Table of Contents
- User's Manual
- Precautions
- CHAPTER1 Interactive pen
- CHAPTER2 Installing the Interactive white board tool
- CHAPTER3 Connecting the projector to a computer
- CHAPTER4 Interactive white board tool pop-up menu
- CHAPTER5 Configuration settings
- CHAPTER6 Finger touch module (sold separately)
- CHAPTER7 Specifications
- CHAPTER8 Troubleshooting
- Mode d'emploi
- Précautions
- Chapitre 1 Stylet interactif
- Chapitre 2 Installation du Interactive white board tool
- Chapitre 3 Branchement du projecteur sur un ordinateur
- Chapitre 4 Menu contextuel du Interactive white board tool
- Chapitre 5
Réglages de la configuration
- 5.1 Interactive white board tool Configuration (Configuration du Interactive white board tool)
- 5.2 Interactive white board tool Alignment (Alignement du Interactive white board tool) : Alignment View (Affichage de l’alignement)
- 5.3 Interactive white board tool Calibration (Calibrage du Interactive white board tool)
- Chapitre 6 Module tactile (vendu séparément)
- Chapitre 7 Spécifications
- Chapitre 8 Dépannage
- Manual del usuario
- Precauciones
- CAPÍTULO1 Lápiz interactivo
- CAPÍTULO2 Instalación de la Interactive white board tool
- CAPÍTULO3 Conexión del proyector a un ordenador
- CAPÍTULO4 Menú emergente de la Interactive white board tool
- CAPÍTULO5
Ajustes de configuración
- 5.1 Interactive white board tool Configuration (Configuración de la Interactive white board tool)
- 5.2 Interactive white board tool Alignment (Alineamiento de la Interactive white board tool): Alignment View (Vista de alineamiento)
- 5.3 Interactive white board tool Calibration (Calibrado de la Interactive white board tool)
- CAPÍTULO6 Módulo táctil digital (comercializado aparte)
- CAPÍTULO7 Especificaciones
- CAPÍTULO8 Resolución de problemas
- Bedienungsanleitung
- Vorsichtsmaßnahmen
- KAPITEL1 Interaktiver Stift
- KAPITEL2 Installieren des Interactive white board tool
- KAPITEL3 Anschließen des Projektors an einen Computer
- KAPITEL4 Popup-Menü für Interactive white board tool
- KAPITEL5
Konfigurationseinstellungen
- 5.1 Interactive white board tool Configuration (Konfiguration des Interactive white board tool)
- 5.2 Interactive white board tool Alignment (Ausrichtung von Interactive white board tool): Alignment View (Ausrichtungsansicht)
- 5.3 Interactive white board tool Calibration (Kalibrierung von Interactive white board tool)
- KAPITEL6 Fingerberührungsmodul (getrennt erhältlich)
- KAPITEL7 Spezifikationen
- KAPITEL8 Fehlersuche
- Manual do utilizador
- Precauções
- Capítulo 1 Caneta interativa
- Capítulo 2 Instalar a Interactive white board tool
- Capítulo 3 Ligar o projetor a um computador
- Capítulo 4 Menu de contexto da Interactive white board tool
- Capítulo 5
Definições de configuração
- 5.1 Interactive white board tool Configuration (Configuração da Interactive white board tool)
- 5.2 Interactive white board tool Alignment (Alinhamento da Interactive white board tool): Alignment View (Vista do Alinhamento)
- 5.3 Interactive white board tool Calibration (Calibragem da Interactive white board tool)
- Capítulo 6 Módulo de toque com o dedo (vendido separadamente)
- Capítulo 7 Especificações
- Capítulo 8 Resolução de problemas
- 使用说明书
- 使用手冊
- 使用説明書
Canon LV-WX300USTi User Manual
Displayed below is the user manual for LV-WX300USTi by Canon which is a product in the Data Projectors category. This manual has pages.
Related Manuals

User's Manual
Mode d'emploi
Manual del usuario
Bedienungsanleitung
Manual do utilizador
使用说明书
使用手冊
使用説明書
日本語
Español
Deutsch
Português
English
中文繁
中文简体
Français
FOR
CHI
FRA
JPN
SPA
GER
POR
ENG
Interactive white board tool

YT1-7425-000_JP.indb 56 2013/04/22 9:25:23

Interactive white board tool
User's Manual
ENG

Table of Contents
CHAPTER1 Interactive pen .............................................................................................3
CHAPTER2 Installing the Interactive white board tool ...............................................5
CHAPTER3 Connecting the projector to a computer ...................................................8
CHAPTER4 Interactive white board tool pop-up menu ................................................9
CHAPTER5 Conguration settings ..............................................................................10
CHAPTER6 Finger touch module (sold separately) ...................................................15
CHAPTER7 Specications ............................................................................................32
CHAPTER8 Troubleshooting ........................................................................................33

Precautions

CHAPTER1
Interactive pen
1.1 Inserting batteries
1.2 Replace the pen tip of the interactive pen.
1

2
3
1.3 Using the interactive pen
Click:
Double-click:
Right-click:
Drag: n.
Note

CHAPTER2
Installing the Interactive white board tool
Operating environment
Installing the software
Installing the software on a computer running Microsoft Windows
1

2
3
4

5
Uninstalling the software from a computer running Microsoft Windows
1
2
3
Installing the software on a Mac running OS X
1
2
3
4
5
Uninstalling the software from a Mac running OS X
1
2
3

CHAPTER3
Connecting the projector to a computer
Note

CHAPTER4
Interactive white board tool pop-up menu

CHAPTER5
Conguration settings
5.1 Interactive white board tool Conguration
Model Selection:
Select Language:
Option:
Note
Driver Update:

5.2 Interactive white board tool Alignment: Alignment View

5.3 Interactive white board tool Calibration
Auto calibration

Manual calibration


CHAPTER6
Finger touch module (sold separately)
6.1 Accessories

Note
1
2

3
Front view

Rear view
Right side
Dimensions

6.2 Screen board atness
6.3 System conguration
Note

Note
Mounting the module using adhesive tape

Note
Mounting the module using screws
Note
Connecting to a projector (recommended)

Note
Connecting to a computer
Caution
Connecting to a 5 V USB adapter
Caution

6.4 Laser curtain characteristics

Laser curtain roll, pitch, and level adjustment
Pitch adjustment

Roll adjustment
Level adjustment

6.5 Installing the laser curtain

Note


1
2

3
4

5
Note

32
CHAPTER7
Specications
Finger touch module
Power consumption Max. 180 mA
USB type (power) Mini USB B type
Power supply Supplied via USB connector or 5 V adapter
Wavelength 850 nm
Angle Max. 180°
Roll control range Max. 4°
Pitch control range Max. 3.5°
Safety classication Class 1
Dimensions 170 mm × 71 mm × 39 mm
Weight 172 g (with cover)
General functionality
Multi pen support Up to 4 touch points (pen or nger)
Calibration Auto/manual, 16 points

CHAPTER8
Troubleshooting
8.1 The Interactive white board tool doesn’t work.
8.2 The interactive pen or dummy pen doesn’t work.
8.3 The cursor does not move.

Copyright Notice
About Trademarks

YT1-7425-000_JP.indb 56 2013/04/22 9:25:23

Interactive white board tool
Mode d'emploi

Table des matières
Chapitre 1 Stylet interactif ............................................................................................3
Chapitre 2 Installation du Interactive white board tool ..............................................5
Chapitre 3 Branchement du projecteur sur un ordinateur.........................................8
Chapitre 4 Menu contextuel du Interactive white board tool .....................................9
Chapitre 5 Réglages de la conguration ...................................................................10
Chapitre 6 Module tactile (vendu séparément) .........................................................15
Chapitre 7 Spécications ............................................................................................32
Chapitre 8 Dépannage .................................................................................................33

Précautions

3
Chapitre 1
Stylet interactif
1.1 Insertion des piles
Insérez deux piles AAA dans le stylet interactif comme illustré ci-dessus.
• Soyez attentif aux points suivants lors de la manipulation des piles.
Ne pas suivre ces recommandations pourrait entraîner un incendie
ou des blessures.
• Ne chauffez pas les piles, ne les placez pas en court-circuit, ne les
démontez pas et ne les brûlez pas.
• N’essayez pas de recharger les piles fournies avec la télécommande.
• Retirez les piles lorsqu’elles sont complètement déchargées ou
lorsque la télécommande n’est pas utilisée pendant une longue
période.
• Remplacez toujours les deux piles en même temps. Utilisez toujours
deux piles du même type en même temps.
• Insérez les piles en respectant les positions des bornes + et -.
• Si du liquide s’écoule des piles et entre en contact avec votre peau,
lavez soigneusement avec de l’eau.
1.2 Changez la pointe du stylet interactif.
1 Tenez fermement la pointe du stylet et tirez dessus.
Avertissement
Attention

2
3
1.3 Utilisation du stylet interactif
Clic :
Double-clic :
Clic droit :
Glissement :
Remarque

Chapitre 2
Installation du Interactive white board tool
Environnement d’exploitation
Installation du logiciel
Installation du logiciel sur un ordinateur fonctionnant sous Microsoft Windows
1

2
3
4

5
Désinstallation du logiciel d’un ordinateur fonctionnant sous Microsoft Windows
1
2
3
Installation du logiciel sur un ordinateur Mac fonctionnant sous OS X
1
2
3
4
5
Désinstallation du logiciel d’un ordinateur Mac fonctionnant sous OS X
1
2
3

Chapitre 3
Branchement du projecteur sur un ordinateur
Remarque

Chapitre 4
Menu contextuel du Interactive white board tool

Chapitre 5
Réglages de la conguration
5.1 Interactive white board tool Conguration
(Conguration du Interactive white board tool)
Model Selection (Sélection du modèle) :
Select Language (Sélectionner la langue) :
Option (Option) :
Remarque
Driver Update (Mise à jour du pilote) :

5.2 Interactive white board tool Alignment (Alignement du
Interactive white board tool) : Alignment View (Afchage
de l’alignement)

5.3 Interactive white board tool Calibration
(Calibrage du Interactive white board tool)
Calibrage automatique

Calibrage manuel


Chapitre 6
Module tactile (vendu séparément)
6.1 Accessoires

Remarque
1
2

3
Vue avant

Vue arrière
Côté droit
Dimensions

6.2 Planéité du tableau écran
6.3 Conguration du système
Remarque

Remarque
Fixation du module avec du ruban adhésif

Remarque
Fixation du module avec des vis
Remarque
Connexion à un projecteur (recommandée)

Remarque
Connexion à un ordinateur
Attention
Connexion à un adaptateur USB 5 V
Attention

6.4 Caractéristiques du rideau laser

Réglage du nivellement horizontal, du nivellement vertical et de la hauteur du rideau
laser
Réglage du nivellement vertical

Réglage du nivellement horizontal
Réglage de la hauteur

6.5 Installation du rideau laser

Remarque


1
2

3
4

5
Remarque

32
Chapitre 7
Spécications
Module tactile
Puissance consommée Max. 180 mA
Type USB (alimentation) Type mini-USB B
Alimentation électrique Alimenté via connecteur USB ou adaptateur 5 V
Longueur d’onde 850 nm
Angle Max. 180°
Plage de commande du nivellement
horizontal
Max. 4°
Plage de commande du nivellement
vertical
Max. 3,5°
Classication de sécurité Classe 1
Dimensions 170 mm × 71 mm × 39 mm
Poids 172 g (couvercle compris)
Fonctionnalités générales
Compatibilité multi-point Jusqu’à 4 points tactiles (stylet ou doigt)
Calibrage Automatique/manuel, 16 points

33
Chapitre 8
Dépannage
8.1 Le Interactive white board tool ne fonctionne pas.
• Les réglages de menu du projecteur ou les réglages de l’ordinateur ne sont pas
corrects.
- Dans les réglages du projecteur, sélectionnez [Table avant] ou [Plafond avant] de
[Inverser image H/V] dans le menu [Installation I] selon l’orientation dans laquelle est
installé le projecteur.
- Dans les réglages de l’ordinateur, sélectionnez [Ultra Short Throw Model] dans [Model
Selection].
• Le projecteur et l’ordinateur ne sont pas correctement connectés.
- Raccordez correctement le projecteur à l’ordinateur au moyen du câble USB
accompagnant le projecteur.
8.2 Le stylet interactif ou le stylet ne fonctionne pas.
• Il y a un obstacle entre le stylet interactif et le projecteur.
- Retirez tout obstacle et ne vous tenez pas devant la caméra interactive lorsque vous
êtes devant l’écran du projecteur.
• Un appareil émettant une lumière infrarouge ou une lumière vive perturbe l’écran du
projecteur ou le projecteur.
- N’utilisez pas de télécommandes ou de microphones utilisant la lumière infrarouge.
• Les piles n’ont pas été insérées correctement dans le stylet interactif.
- Vériez que les piles sont insérées correctement. Si elles sont insérées correctement,
remplacez-les par des neuves.
• Le Interactive white board tool n’a pas été correctement calibré.
- Selon les conditions de positionnement du projecteur, le calibrage automatique peut ne
pas être possible ou la précision médiocre. Dans ce cas, procédez au calibrage manuel.
8.3 Le curseur ne se déplace pas.
• Les données ne sont pas correctement reçues depuis l’écran du projecteur.
- Éteignez les appareils qui utilisent une lumière infrarouge et qui se trouvent à proximité
de l’écran du projecteur ou du projecteur. Vous pouvez également essayer de déplacer
le projecteur.
• Le projecteur est trop près de l’écran du projecteur.
- Vériez les emplacements du projecteur et de l’écran du projecteur pour vous assurer
qu’ils sont correctement installés.

34
Mention des droits d’auteur
Veuillez noter que l’agrandissement ou la réduction de la taille d’une image dans un but
commercial ou pour une présentation publique est susceptible de constituer une violation
des droits de copyright protégés par la loi ou des droits de l’auteur de matériel original.
À propos des marques
* Microsoft, Windows, Windows 7, Windows 8.1 et Windows Media Player sont des marques
ou des marques déposées de Microsoft Corporation aux États-Unis et / ou dans d’autres
pays.
• Mac, Mac OS et Macintosh sont des marques de Apple Inc., déposées aux États-Unis et /
ou dans d’autres pays.
• Toutes les autres marques sont la propriété de leurs détenteurs respectifs.

YT1-7425-000_JP.indb 56 2013/04/22 9:25:23

Interactive white board tool
Manual del usuario
SPA

Índice
CAPÍTULO1 Lápiz interactivo ..........................................................................................3
CAPÍTULO2 Instalación de la Interactive white board tool...........................................5
CAPÍTULO3 Conexión del proyector a un ordenador ..................................................8
CAPÍTULO4 Menú emergente de la Interactive white board tool .................................9
CAPÍTULO5 Ajustes de conguración .........................................................................10
CAPÍTULO6 Módulo táctil digital (comercializado aparte) .........................................15
CAPÍTULO7 Especicaciones .......................................................................................32
CAPÍTULO8 Resolución de problemas.........................................................................33

Precauciones

CAPÍTULO1
Lápiz interactivo
1.1 Inserción de baterías
1.2 Recambie el puntero del lápiz interactivo.
1
Advertencia
Atención

2
3
1.3 Uso del lápiz interactivo
Nota

CAPÍTULO2
Instalación de la Interactive white board tool
Entorno operativo
Instalación del software
Instalación del software en un ordenador con Microsoft Windows
1

2
3
4

5
Desinstalación del software desde un ordenador con Microsoft Windows
1
2
3
Instalación del software en un Mac con OS X
1
2
3
4
5
Desinstalación del software desde un Mac con OS X
1
2
3

CAPÍTULO3
Conexión del proyector a un ordenador
Nota

CAPÍTULO4
Menú emergente de la Interactive white board tool

CAPÍTULO5
Ajustes de conguración
5.1 Interactive white board tool Conguration
(Conguración de la Interactive white board tool)
Model Selection (Selección de modelo):
Select Language (Selección de idioma):
Option (Opción):
Nota
Driver Update (Actualización de controladores):

5.2 Interactive white board tool Alignment (Alineamiento
de la Interactive white board tool): Alignment View
(Vista de alineamiento)

5.3 Interactive white board tool Calibration
(Calibrado de la Interactive white board tool)
Calibrado automático

Calibrado manual


15
CAPÍTULO6
Módulo táctil digital (comercializado aparte)
6.1 Accesorios
El módulo táctil digital es un transmisor táctil diseñado para su uso con proyectores
interactivos de Canon. Instale el módulo táctil digital conforme a las instrucciones de este
manual.
a b c d
Módulo táctil digital
Lápices inertes (2):
Con 4 punteros de
repuesto
Cable mini USB Máscaras de
alineamiento (2)
e f g h
Muñequeras (2) Cinta adhesiva
(2 piezas) Llave hexagonal Manual de
instrucciones del
módulo táctil digital:
cha aparte
a. Módulo táctil digital: Unidad principal
b. Lápices interactivos (2): Con 4 baterías de tamaño AAA y 4 punteros
c. Cable mini USB: Para suministrar alimentación al módulo táctil digital
d. Máscaras de alineamiento (2): Para posicionar la cortina láser
e. Muñequeras (2): Correas para los lápices inertes
f. Cinta adhesiva (2 piezas): Para montar el módulo táctil digital
g. Llave hexagonal: Para ajustar la cortina láser
h. Manual de instrucciones del módulo táctil digital: cha aparte

Nota
1
2

3
Vista frontal

Vista posterior
Lado derecho
Dimensiones

6.2 Planitud del tablero de la pantalla
6.3 Conguración del sistema
Nota

Nota
Montaje del módulo con cinta adhesiva

Nota
Montaje del módulo con tornillos
Nota
Conexión a un proyector (recomendado)

Nota
Conexión a un ordenador
Precaución
Conexión a un adaptador USB de 5 V
Precaución

6.4 Características de la cortina láser

Ajuste de la inclinación, la altura y el nivel de la cortina láser
Ajuste de la altura

Ajuste de la inclinación
Ajuste del nivel

6.5 Instalación de la cortina láser

Nota


1
2

3
4

5
Nota

32
CAPÍTULO7
Especicaciones
Módulo táctil digital
Consumo de energía Max. 180 mA
Tipo USB (alimentación) Tipo mini USB B
Alimentación Suministrada a través del conector USB o del
adaptador de 5 V
Longitud de onda 850 nm
Ángulo Máx. 180°
Rango de control de la inclinación Máx. 4°
Rango de control de la altura Máx. 3,5°
Clasicación de seguridad Clase 1
Dimensiones 170 mm × 71 mm × 39 mm
Peso 172 g (con cubierta)
Funcionalidad general
Soporte para varios lápices Hasta 4 puntos táctiles (con el lápiz o con el dedo)
Calibrado Automático/manual, 16 puntos

CAPÍTULO8
Resolución de problemas
8.1 La Interactive white board tool no funciona.
8.2 El lápiz interactivo o el lápiz inerte no funcionan.
8.3 El cursor no se mueve.

Nota acerca del copyright
Acerca de las marcas comerciales

YT1-7425-000_JP.indb 56 2013/04/22 9:25:23

Interactive white board tool
Bedienungsanleitung
GER

Inhaltsverzeichnis
KAPITEL1 Interaktiver Stift ...........................................................................................3
KAPITEL2 Installieren des Interactive white board tool ............................................5
KAPITEL3 Anschließen des Projektors an einen Computer .....................................8
KAPITEL4 Popup-Menü für Interactive white board tool ...........................................9
KAPITEL5 Kongurationseinstellungen....................................................................10
KAPITEL6 Fingerberührungsmodul (getrennt erhältlich) ........................................15
KAPITEL7 Spezikationen ..........................................................................................32
KAPITEL8 Fehlersuche ...............................................................................................33

Vorsichtsmaßnahmen

KAPITEL1
Interaktiver Stift
1.1 Einlegen der Batterien
1.2 Tauschen Sie die Spitze des interaktiven Stifts aus.
1
Warnung
Vorsicht

2
3
1.3 Benutzung des interaktiven Stifts
Klicken:
Doppelklicken
:
Rechtsklicken
:
Ziehen:
Hinweis

KAPITEL2
Installieren des Interactive white board tool
Betriebsumgebung
Windows 7 oder Windows 8.1, OS X 10.10
Installieren der Software
Installieren der Software auf einem Computer mit Microsoft Windows
1

2
3
4

5
Deinstallieren der Software von einem Computer mit Microsoft Windows
1
2
3
Installieren der Software auf einem Mac-Computer mit OS X
1
2
3
4
5
Deinstallieren der Software von einem Mac-Computer mit OS X
1
2
3

KAPITEL3
Anschließen des Projektors an einen Computer
Hinweis

KAPITEL4
Popup-Menü für Interactive white board tool

KAPITEL5
Kongurationseinstellungen
5.1 Interactive white board tool Conguration
(Konguration des Interactive white board tool)
Model Selection (Modellauswahl):
Select Language (Sprache auswählen):
Option (Optionen):
Hinweis
Driver Update (Treiber-Aktualisierung):

5.2 Interactive white board tool Alignment (Ausrichtung
von Interactive white board tool): Alignment View
(Ausrichtungsansicht)

5.3 Interactive white board tool Calibration (Kalibrierung von
Interactive white board tool)
Automatische Kalibrierung

Manuelle Kalibrierung


KAPITEL6
Fingerberührungsmodul (getrennt erhältlich)
6.1 Zubehör

Hinweis
1
2

3
Vorderseite

Rückseite
Rechte Seite
Abmessungen

6.2 Ebenheit der Bildschirmtafel
6.3 Systemkonguration
Hinweis

Hinweis
Montieren des Moduls mit Klebeband

Hinweis
Montieren des Moduls mit Schrauben
Hinweis
Anschließen an einen Projektor (empfohlen)

Hinweis
Anschließen an einen Computer
Vorsicht
Anschluss an einen 5-V-USB-Adapter
Vorsicht

6.4 Eigenschaften des Laservorhangs

Roll-, Neigungs- und Niveaueinstellung des Laservorhangs
Neigungseinstellung

Rolleinstellung
Niveaueinstellung

6.5 Installieren des Laservorhangs

Hinweis


1
2

3
4

5
Hinweis

32
KAPITEL7
Spezikationen
Fingerberührungsmodul
Leistungsaufnahme Max. 180 mA
USB-Typ (Stromversorgung) Mini-USB Typ-B
Stromversorgung Versorgung über USB-Anschluss oder 5-V-Adapter
Wellenlänge 850 nm
Winkel Max. 180°
Rollregelungsbereich Max. 4°
Neigungsregelungsbereich Max. 3,5°
Sicherheitsklassizierung Klasse 1
Abmessungen 170 mm × 71 mm × 39 mm
Gewicht 172 g (mit Abdeckung)
Allgemeine Funktionalität
Multi-Pen-Unterstützung Bis zu 4 Berührungspunkte (Stift oder Finger)
Kalibrierung Automatisch/Manuell, 16 Punkte

KAPITEL8
Fehlersuche
8.1 Das Interactive white board tool funktioniert nicht.
8.2 Der interaktive Stift oder die Stiftattrappe funktioniert nicht.
8.3 Der Cursor bewegt sich nicht.

Copyright-Hinweise
Marken

YT1-7425-000_JP.indb 56 2013/04/22 9:25:23

Interactive white board tool
Manual do utilizador

Índice
Capítulo 1 Caneta interativa .........................................................................................3
Capítulo 2 Instalar a Interactive white board tool ......................................................5
Capítulo 3 Ligar o projetor a um computador.............................................................8
Capítulo 4 Menu de contexto da Interactive white board tool ...................................9
Capítulo 5 Denições de conguração .....................................................................10
Capítulo 6 Módulo de toque com o dedo (vendido separadamente) ......................15
Capítulo 7 Especicações ..........................................................................................32
Capítulo 8 Resolução de problemas ..........................................................................33

Precauções

3
Capítulo 1
Caneta interativa
1.1 Colocar pilhas
Coloque duas pilhas de tamanho AAA na caneta interativa, como mostrado acima.
• Preste atenção aos seguintes pontos no que toca ao manuseamento
da pilha. Caso não o faça poderá resultar em incêndio ou ferimentos.
• Não coloque a pilha no fogo nem a exponha a calor, curto-circuito
nem a desmonte.
• Não tente recarregar a pilha.
• Retirar as baterias quando eles são planas ou quando o controlo
remoto não irá ser utilizado por um longo período de tempo.
• Ao substituir as baterias, substitua os dois ao mesmo tempo. Além
disso, não usar duas baterias de um tipo diferente, ao mesmo tempo.
• Insira a pilha nas posições correctas +/-.
• Se algum líquido verter da pilha e entrar em contacto com a pele,
lave-a muito bem com água.
1.2 Substitua a ponta da caneta interativa.
1 Segure na ponta da caneta com rmeza e retire-a.
AVISO
Proibição
Precaução

2
3
1.3 Utilização da caneta interativa
Clique:
Duplo clique:
Clique com o botão direito:
Arrastar:
Nota

Capítulo 2
Instalar a Interactive white board tool
Ambiente operativo
Instalar o software
Instalar o software num computador com Microsoft Windows
1

2
3
4

5
Desinstalar o software de um computador com Microsoft Windows
1
2
3
Instalar o software num Mac com OS X
1
2
3
4
5
Desinstalar o software de um Mac com OS X
1
2
3

Capítulo 3
Ligar o projetor a um computador
Nota

Capítulo 4
Menu de contexto da Interactive white board tool

Capítulo 5
Denições de conguração
5.1 Interactive white board tool Conguration
(Conguração da Interactive white board tool)
Model Selection (Seleção de Modelo):
Select Language (Selecionar Idioma):
Option (Opção):
Nota
Driver Update (Atualização do Controlador):

5.2 Interactive white board tool Alignment
(Alinhamento da Interactive white board tool):
Alignment View (Vista do Alinhamento)

5.3 Interactive white board tool Calibration
(Calibragem da Interactive white board tool)
Calibragem automática

Calibragem manual


Capítulo 6
Módulo de toque com o dedo (vendido separadamente)
6.1 Acessórios

Nota
1
2

3
Vista frontal

Vista de trás
Lado direito
Dimensões

6.2 Planeza do quadro do ecrã
6.3 Conguração do sistema
Nota

Nota
Montagem do módulo utilizando ta adesiva

Nota
Montagem do módulo utilizando parafusos
Nota
Ligar a um projetor (recomendado)

Nota
Ligar a um computador
Atenção
Ligar a um adaptador USB de 5 V
Atenção

6.4 Características da cortina de laser

Ajuste da rodagem, profundidade e nível da cortina de laser
Ajuste da profundidade

Ajuste da rodagem
Ajuste de nível

6.5 Instalar a cortina de laser

Nota


1
2

3
4

5
Nota

32
Capítulo 7
Especicações
Módulo de toque com o dedo
Consumo de energia Máx. 180 mA
Tipo USB (alimentação) Mini USB tipo B
Fonte de alimentação Fornecida através do conector USB ou adaptador
de 5 V
Comprimento de onda 850 nm
Ângulo Máx. 180°
Variação de controlo da rodagem Máx. 4°
Variação de controlo da
profundidade
Máx. 3,5°
Classicação de segurança Classe 1
Dimensões 170 mm × 71 mm × 39 mm
Peso 172 g (com tampa)
Funcionalidade geral
Suporte multi-caneta Até 4 pontos de toque (caneta ou dedo)
Calibragem Automática/manual, 16 pontos

Capítulo 8
Resolução de problemas
8.1 A Interactive white board tool não funciona.
8.2 A caneta interativa ou caneta de simulação não funciona.
8.3 O cursor não se move.

34
Aviso de direitos de autor
Note que ampliar ou reduzir o tamanho da imagem para ns comerciais ou de apresentação
pública poderá violar os direitos de autor, protegidos por lei, ou do proprietário do material
original.
Sobre marcas comerciais
* Microsoft, Windows, Windows 7, Windows 8.1, Windows Media Player e Aero são
marcas comerciais registadas ou marcas comerciais da Microsoft Corporation nos Estados
Unidos e/ou noutros países.
• Mac, Mac OS e Macintosh são marcas comerciais registadas da Apple Inc. com registo
nos Estados Unidos e/ou noutros países.
• Todas as outras marcas são de propriedade de seus respectivos proprietários.

YT1-7425-000_JP.indb 56 2013/04/22 9:25:23

Interactive white board tool
操作手册
在使用本产品之前, 请务必先仔细阅读本使用说明书。
请务必妥善保管好本书, 以便日后能随时查阅(保留备用)。
请在充分理解内容的基础上, 正确使用。 CHI

1
目录

2
注意事项
本产品是一种使用红外线的交互设备。请勿盖住镜子和摄像头。交互功能使
用红外线(850 nm)进行通讯。使用此功能时请谨记以下要点。
• 确保不要让交互摄像头接收器和屏幕暴露在直射阳光等明亮的光线下。
• 安装投影机时,交互摄像头接收器不适合安放在荧光灯附近。
• 选择投影机的安装位置时,应确保不会受到附近电机或变压器等设备的
电磁干扰。
• 定期清洁交互摄像头的前表面。使用相机店出售的吹气刷或镜头清洁剂
来清洁摄像头的镜头。
• 请勿在交互摄像头接收器的盖子上涂抹涂料或黏贴贴纸。
• 请勿在安放投影机的同一房间内使用其他红外线设备。否则可能导致交
互笔功能失灵。
• 请勿湿手接触本产品。另外,请勿在可能变得潮湿的地点使用本产品。
交互笔不防水。
• 检查确保交互笔的笔尖没有损坏。如果笔尖损坏,交互笔无法正常工作。
• 用交互笔书写时请勿用力过度。应使交互笔轻柔触碰书写表面,就像用
记号笔在普通白板上书写绘画一样。
• 请勿让交互笔跌落。这样可能损坏交互笔的笔尖,从而导致功能失灵。
• 请勿使用梯形失真功能。否则可能会减弱交互功能的效果。
• 请勿选 择投 影灯节电模 式设 置。否则可能 妨碍 Interactive white
board tool 的 [Auto Calibration] 功能,使其无法正常工作。

3
第 1 章
交互笔
1.1 插入电池
如上所示,将两节 AAA 电池插入交互笔。
• 处理电池时请注意以下几点。 否则会导致火灾或人身伤
害。
• 切勿加热,使其短路或分解电池,或将电池丢在火中。
• 切勿给遥控器中的电池充电。
• 当电池没电时或遥控器长时间不用时,请取出电池。
• 更换电池时,确保同时更换两节电池。 同时,不要同时
使用两种不同类型的电池。
• 将电池按正确的 + 和 - 极方向安装。
• 如果电池内部泄漏液体并接触到您的皮肤,务必彻底将
液体洗净。
1.2 取下交互笔的笔尖。
1

4
2
3
1.3 使用交互笔
您可以使用交互笔执行四种操作 :单击、双击、右击和拖动。这四种操作
的具体操作方式如下。
单击 :点触屏幕上的图标或菜单项。
双击 :快速连续地两次点触屏幕上的图标或菜单项。
右击 :点触屏幕上的图标或菜单项并保持不动约 1.5 秒或更长时间。
拖动 :点触屏幕上的对象并拖动。
注意
存放交互笔时请勿使笔尖朝下。请将其侧放或者使笔尖朝上存放。不遵循
这一注意事项可能导致电池电量过早耗尽或发生泄漏。

5
第 2 章
安装 Interactive white board tool
操作环境
项目 描述
操作系统 Windows 7 或 Windows 8.1、OS X 10.10
CPU 奔腾或更高性能处理器
RAM 不低于 512 MB
可用硬盘空间 不低于 100 MB
USB USB 2.0
显卡 分 辨 率 在 XGA(1024×768) 与 WUXGA (1920×
1200) 之间的 16 位或更大显示色彩深度的显卡
安装软件
在运行 Microsoft Windows 操作系统的电脑上安装本软件
下面描述的是在运行 Microsoft Windows 7 的系统上安装本软件的操作步
骤。
1

6
2
可能有必要安装 Windows Media Player。
3
4
启 动 Interactive white board tool 时, 会 显 示 Interactive white
board tool 的 Configuration(配 置 ) 屏 幕。 按 照 屏幕 上 的 说 明 设 置
Interactive white board tool。

7
5
从运行 Microsoft Windows 操作系统的电脑上卸载本软件
1
2
3
在运行 OS X 操作系统的苹果电脑上安装本软件
1
2
3
4
5
从运行 OS X 操作系统的苹果电脑上卸载本软件
1
2
3

8
第 3 章
将投影机连接到电脑
使用附带的 USB 电缆将投影机连接到电脑。将 USB 的迷你接头插入投影
机的 USB 迷你接口,将 USB 标准接头插入电脑的 USB 接口。
注意
1. 本产品包装中提供一根 5 m 长的 USB 电缆。
2. 安装 Interactive white board tool 驱动程序期间,不要将投影机连
接到电脑。

9
第 4 章
Interactive white board tool 弹出菜单
双 击 桌 面 上 的 Interactive white board tool 图 标 , 启 动
Interactive white board tool,系统托盘中会显示 Interactive white
board tool 图 标。 右 键点 击 系统 托 盘 中的 Interactive white board
tool 图标,随即显示弹出菜单。
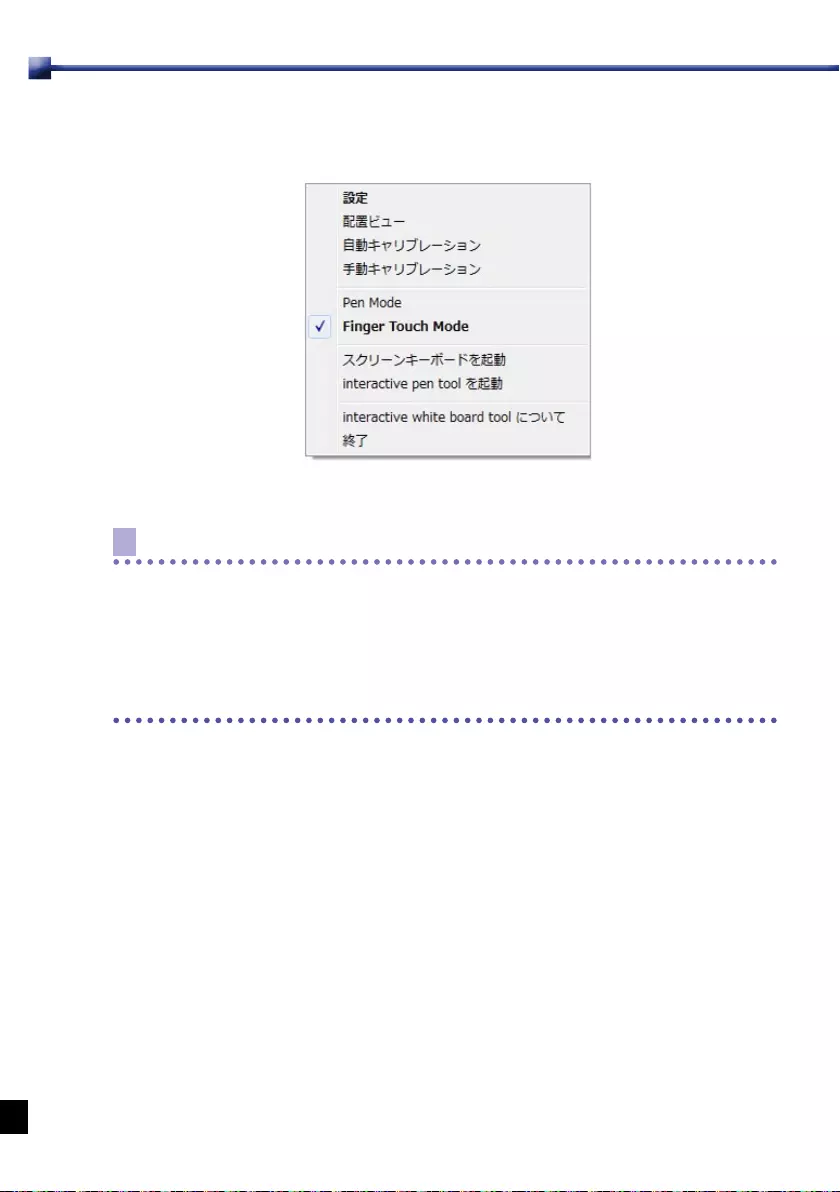
菜单项目 描述
Configuration 如要更改设置,如投影机安装位置或语言,请点击此
菜单项。然后执行“第 5 章 配置设置”中描述的步骤。
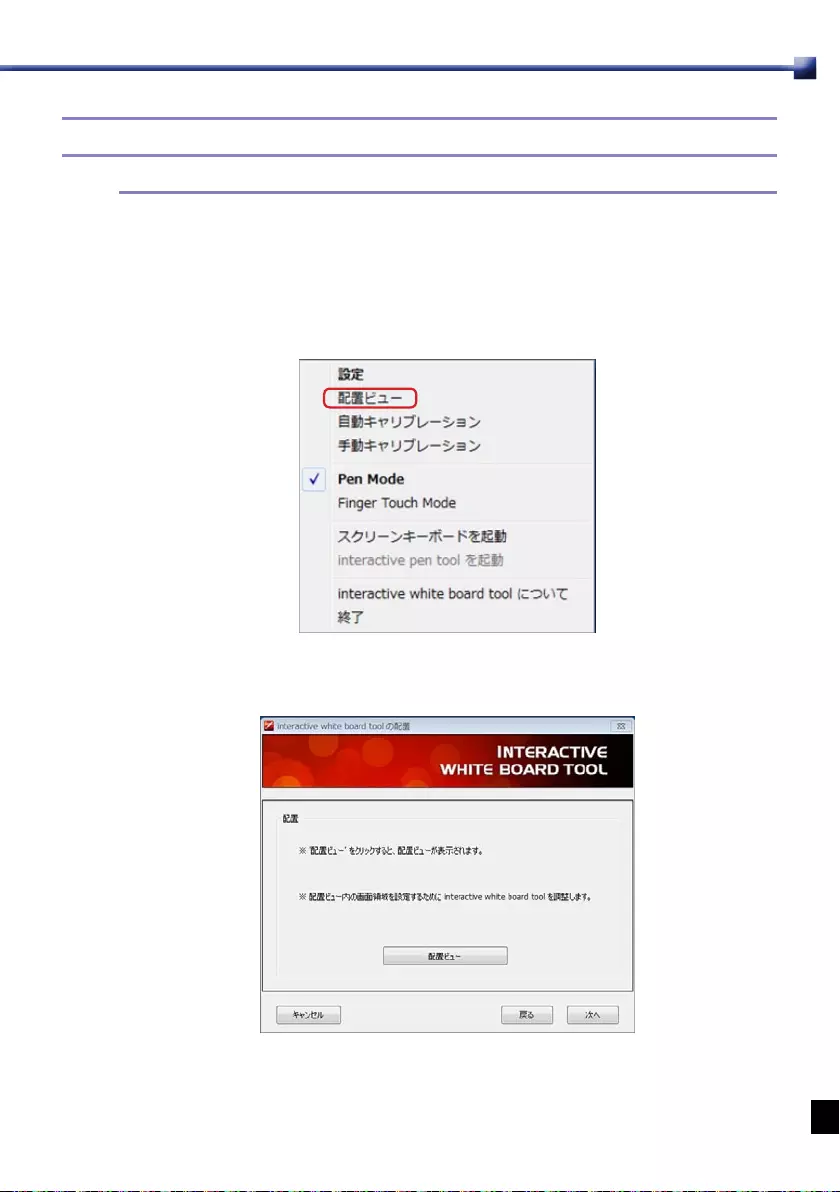
Alignment View
此 菜 单 项 与“5.2 Interactive white board tool
Alignment(交互白板工具对齐):Alignment View(对
齐视图)”中描述的配置功能相同。
Auto Calibration 点击此菜单项可自动执行校准。
Manual
Calibration
如果自动校准失败,则选择此菜单项。
Pen Mode 将投影机与交互笔一起使用时选择此菜单项。
Finger Touch Mode
使用手指触控模块(单独购买)时选择此菜单项。
Virtual Keyboard 需要使用键盘输入时,点击 [Virtual Keyboard] 可
在屏幕上显示键盘。
Run Interactive
pen tool
点击此菜单项可启动 Interactive pen tool。
About
Interactive
white board tool
选择此菜单项可显示 Interactive white board tool
的版本信息。点击此菜单项后会出现一个窗口,其中
会显示版本信息。
Exit 选 择 此 菜 单 项 可 退 出 Interactive white board
tool。

10
第 5 章
配置设置
5.1 Interactive white board tool Configuration(交互白板工
具配置)
要使用 Interactive white board tool,首先需要使用 Interactive white
board tool 的 Configuration(配置)屏幕进行正确设置。设置时请参阅下
面的解释说明。
Model Selection(型号选择):选择 [Ultra Short Throw Model]。
Select Language(选择语言):软件会自动选择与操作系统相同的语言。
要将此设置更改为其他语言,点击 会显示可用语言列表。
更改此设置后,重新启动应用程序时,新的语言设置会生效。
Option(选项):
Program Auto Run(自动运行程序):如要在电脑每次启动后自动运行
Interactive white board tool,请选中此框。
Ceiling Mount Mode(悬吊安装模式):如要将投影机安装在天花板上,请
选中此框。如果投影机安放在桌面上,请不要选中此框。
注意
软件的 OS X 版本没有 [Program Auto Run] 功能。
Driver Update(驱动程序更新):有关详情,请联系购买投影机的经销商。

11
5.2 Interactive white board tool Alignment(交互白板工具对齐):
Alignment View(对齐视图)
Interactive white board tool Alignment :交互式投影机会自动执行对
齐。不过如果对齐功能已关闭,可以使用布局视图功能进行校正。
显示对齐屏幕 :点击 [Alignment View]。

12
5.3 Interactive white board tool Calibration(交互白板工具校准)
Interactive white board tool 有两种校准模式 :自动和手动。
自动校准
点击 [Auto] 可自动运行校准。
根据投影机的安放情况,可能无法执行自动校准,或者校准精度会较差。
此种情况下,请执行手动校准。

13
手动校准
点击 [Manual] 可显示校准窗口。
用交互笔触碰光标 ,随即会显示下一个光标位置。触碰 16 个光标点后,
即完成校准。
要中途退出校准过程,按电脑键盘上的 [ESC] 键。
光标

14
用交互笔触碰光标中心。

15
第 6 章
手指触控模块(单独购买)
6.1 配件
手指触控模块是一种与具备交互功能的佳能投影机搭配使用的触控信号发
射器。请按照本使用说明书中的相关说明安装手指触控模块。
a b c d
手指触控模块 虚拟笔 (2 支):
带 4 个备用笔尖
Mini USB
电缆
对齐遮罩
(2 个)
efgh
腕带
(2 条)
腕带
(2 条) 内六角扳手 手指触控模块说明
书 :单独的页面
a. 手指触控模块 :主机
b. 虚拟笔 (2 支):带 4 个备用笔尖
c. Mini USB 电缆 :为手指触控模块供电
d. 对齐遮罩(2 个):用于确定激光光幕的位置
e. 腕带(2 条):虚拟笔的挂绳
f. 胶带(2 片):用于安装手指触控模块
g. 内六角扳手 :用于调节激光光幕
h. 手指触控模块说明书 :单独的页面

16
6.1.1 取下虚拟笔的笔尖
注意
为获得更好的点触效果,请始终保持笔尖洁净。
1
2

17
3
6.1.2 手指触控模块
正视图
安装孔 螺钉 1
螺钉 2 螺钉 3 盖子
安装孔

18
后视图
右侧
尺寸
胶带粘贴区
手指触控模块头
USB 端口

19
6.2 屏板平坦度
在平坦度偏差不超过 2 mm 的屏板上安装手指触控模块。
6.3 系统配置
6.3.1 带屏幕白板
确保手指触控模块安装位置与触控区域之间留有合适的间隙。
50-100mm
触控区域的中心线
手指触控模块
边框
屏板表面
触控区域
50mm
50mm 50mm
注意
• 在白板框架内部安装手指触控模块。
• 请勿使触控区域内吸附有磁铁等障碍物。

20
6.3.2 安装手指触控模块
注意
• 应由专业技师或您购买投影机的经销商来安装手指触控模块。
• 确保安装手指触控模块后连接 USB 电缆。
• 确保安装手指触控模块时采取措施来消除静电现象。
可使用附带的胶带或螺钉安装手指触控模块。
使用胶带安装模块
如下图所示,将一条附带的胶带粘贴在手指触控模块背后。
胶带
确定手指触控模块的位置,将其粘贴在屏幕上。

21
注意
彻底清洁安装表面,清除任何灰尘或污垢。否则,胶带可能松动,使手指
触控模块掉落下来。如果胶带粘度不够,请使用安装螺钉来固定。
使用螺钉安装模块
• 打开前盖。
• 如下图所示,使用螺钉将模块安装在墙壁上。
注意
使用市面购买的与安装孔相匹配的螺钉。
6.3.3 连接手指触控模块
使用附带的 USB 电缆进行连接。下面列出了可连接的设备。
连接到投影机(推荐)

22
注意
使用配备 A 型 USB 输出接口的交互式投影机。
连接到电脑
小心
下列情况下,从电脑供电可能会不稳定。
• 关闭交流电源(使用电脑蓄电池)。
• 没有空闲的 USB 端口。
连接到 5 V USB 适配器
小心
不使用触控功能时,拔下 USB 适配器的电源。否则可能缩短手指触控模
块的使用寿命。

23
6.4 激光光幕特性
6.4.1 激光光幕角度
手指触控模块生成的激光光幕覆盖 180 度的弧形范围。激光光幕是由激光
光线形成的 2 mm 厚的平面。
激光光幕
手指触控模块
(内部)
6.4.2 激光光幕在屏板上的位置
确保激光光幕与屏板之间留有间隙以不接触到一起,另外激光光幕超出屏
板上方的高度不要过大。
激光光幕
屏板
间隙
高度

24
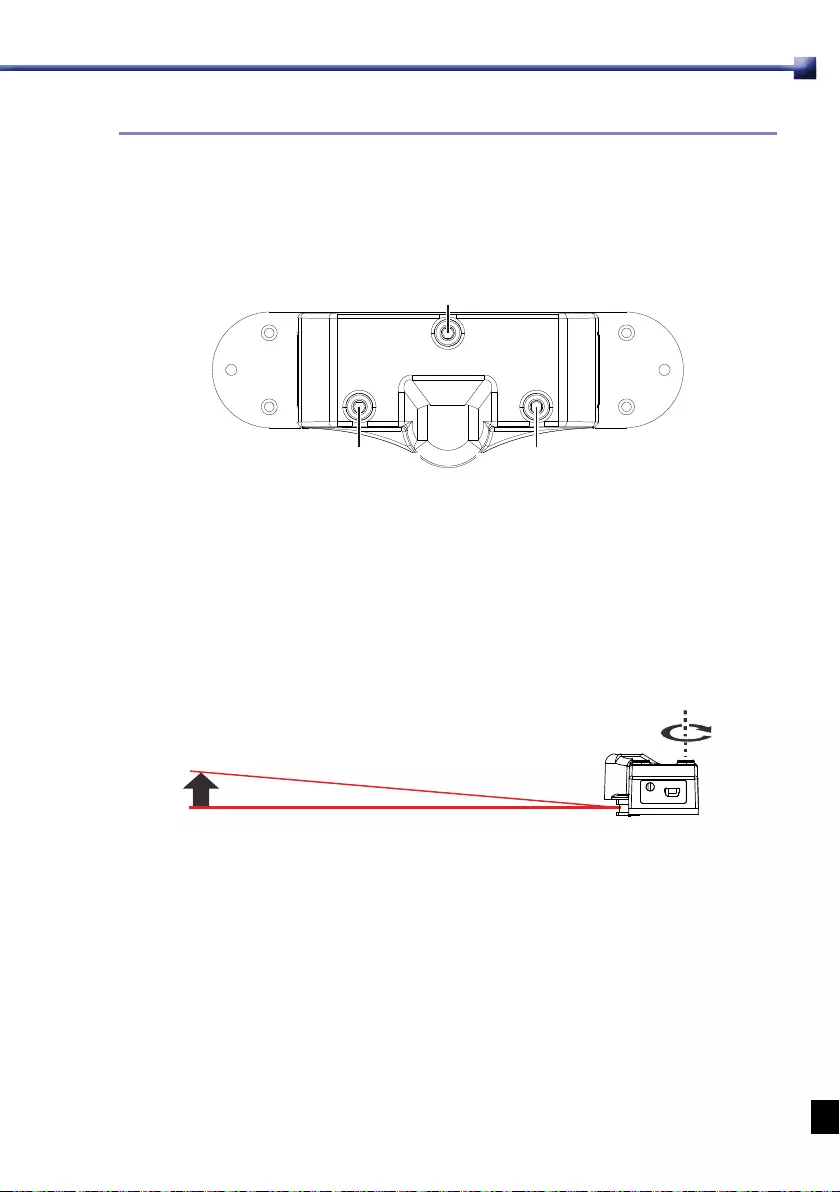
6.4.3 调节激光光幕
激光光幕横摇、纵摇和水平调节
螺钉 1 用于纵摇调节,螺钉 2 和 3 用于横摇调节。
螺钉 1
螺钉 3螺钉 2
纵摇调节
如下图所示,使用附带的内六角扳手顺时针转动螺钉 1,激光光幕将远离
屏板。逆时针转动螺钉 1,激光光幕将靠近屏板。

25
横摇调节
使用附带的内六角扳手逆时针转动螺钉 2,激光光幕左侧将远离屏板。
使用附带的内六角扳手逆时针转动螺钉 3,激光光幕右侧将远离屏板。
水平调节
使用附带的内六角扳手逆时针转动螺钉 2 和 3,激光光幕将相对屏板抬起,
从而增加它们之间的间隙。顺时针转动螺钉 2 和 3 将缩小间隙。

26
6.5 安装激光光幕
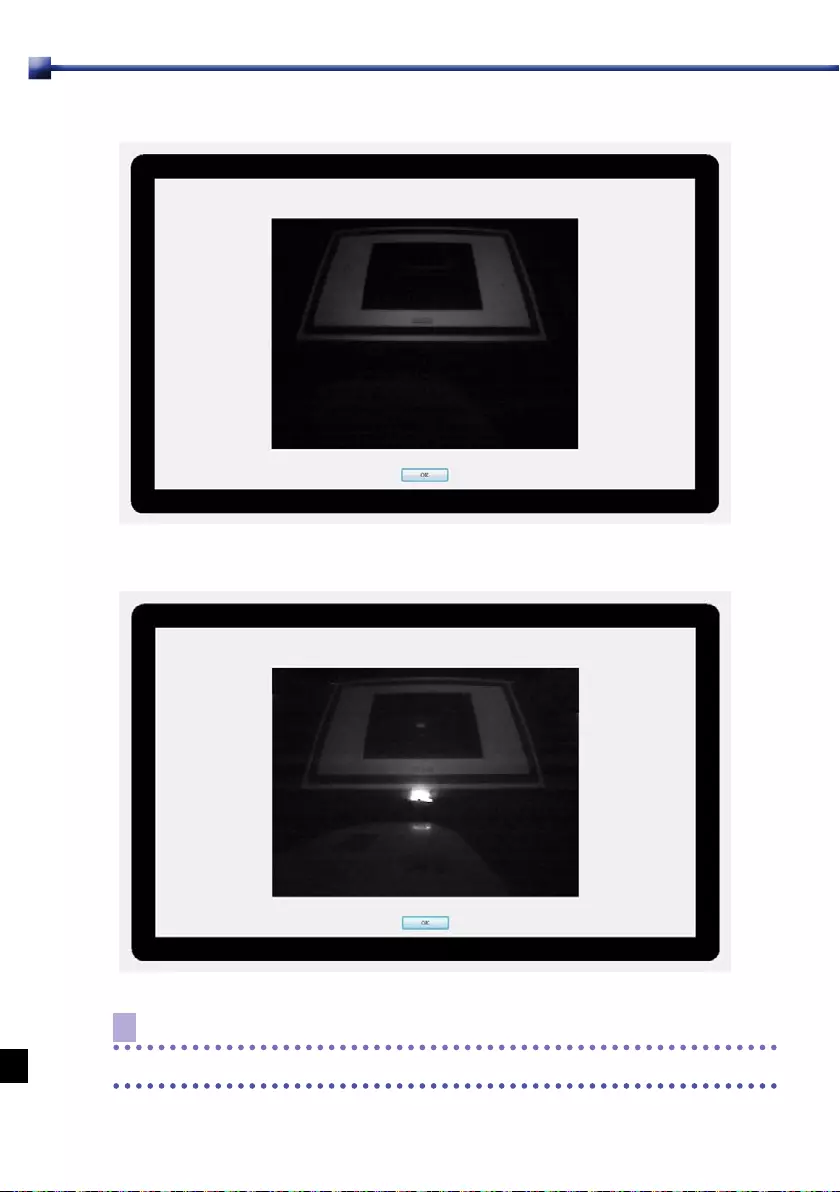
6.5.1 激光光幕对齐视图
使用“Alignment View”功能。
对手指触控模块进行设置前,在 [Pen Mode] 模式下完成自动或手动校准。
或者 :

27
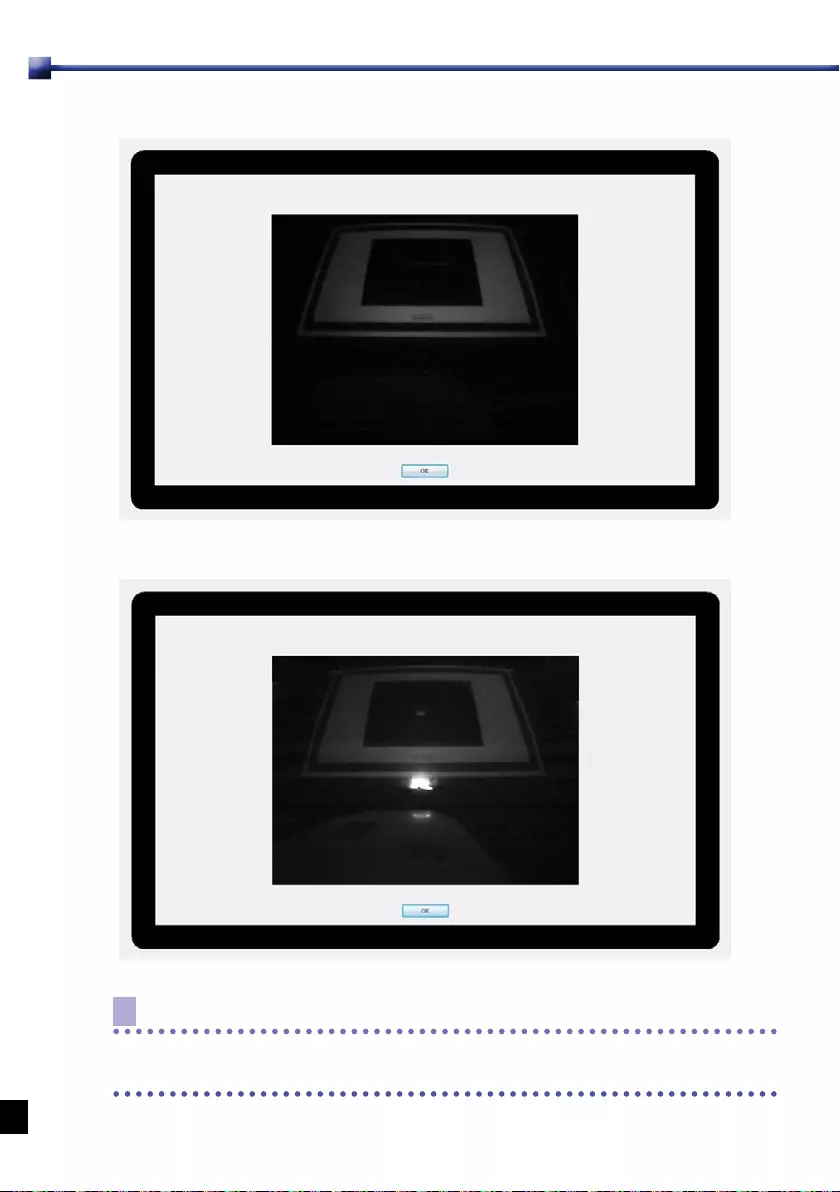
对齐显示画面示例
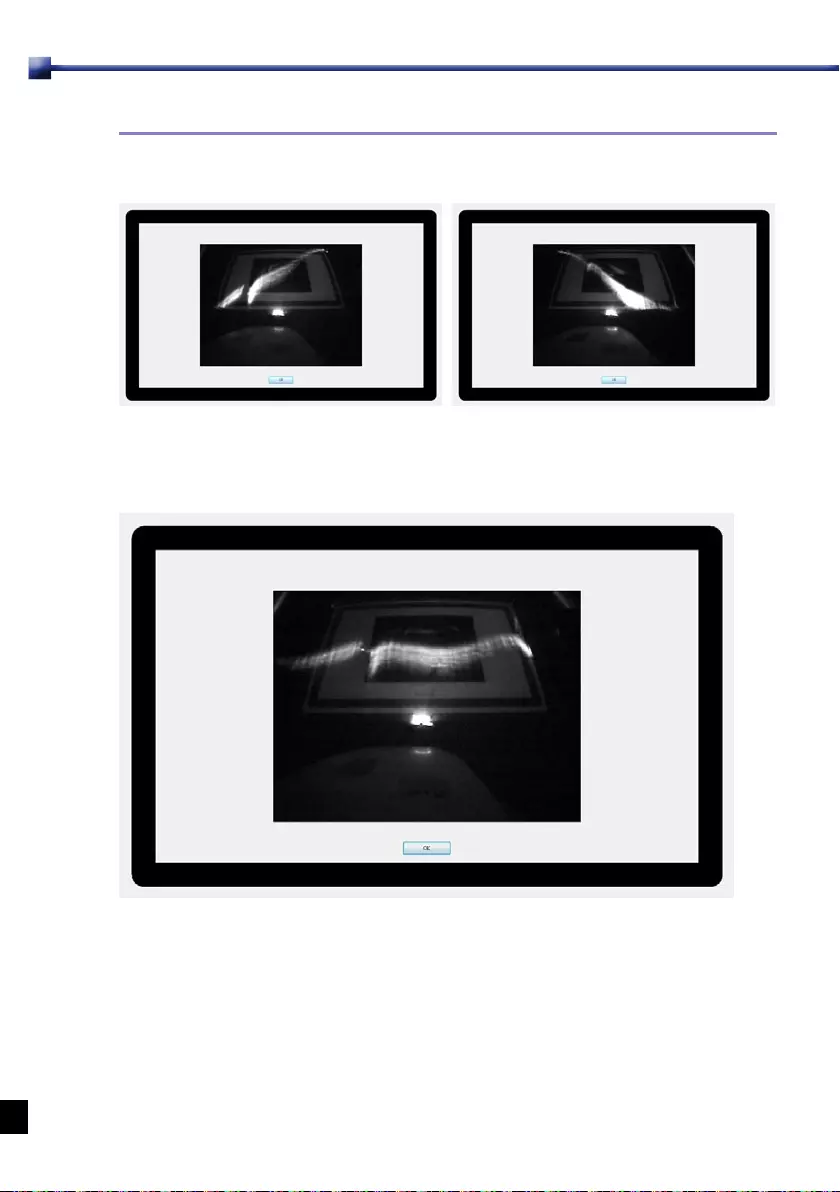
连接 USB 电缆。如下图所示,可以看到激光光线。
注意
切记在悬吊安装模式下使用投影机时,布局视图显示画面的左右和上下会
颠倒。

28
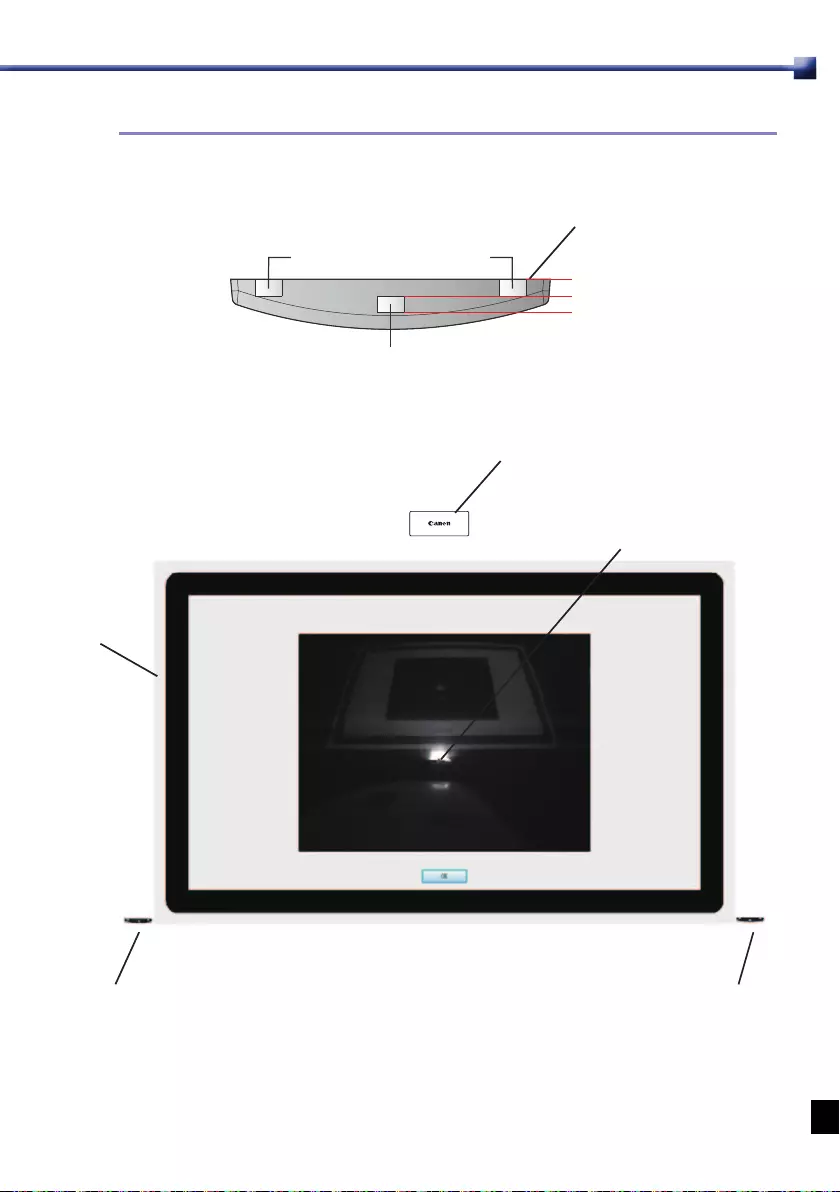
6.5.2 使用对齐遮罩
对齐标记形状(反光点)
提高对齐标记
5mm
5mm
安装表面
降低对齐标记
对齐遮罩安装位置 :
投影机屏幕
手指触控模块
激光光线
对齐遮罩 对齐遮罩
当激光光幕的激光光线碰到对齐标记时会显示反射点。

29
6.5.3 激光光幕对齐步骤
1
2

30
3
4
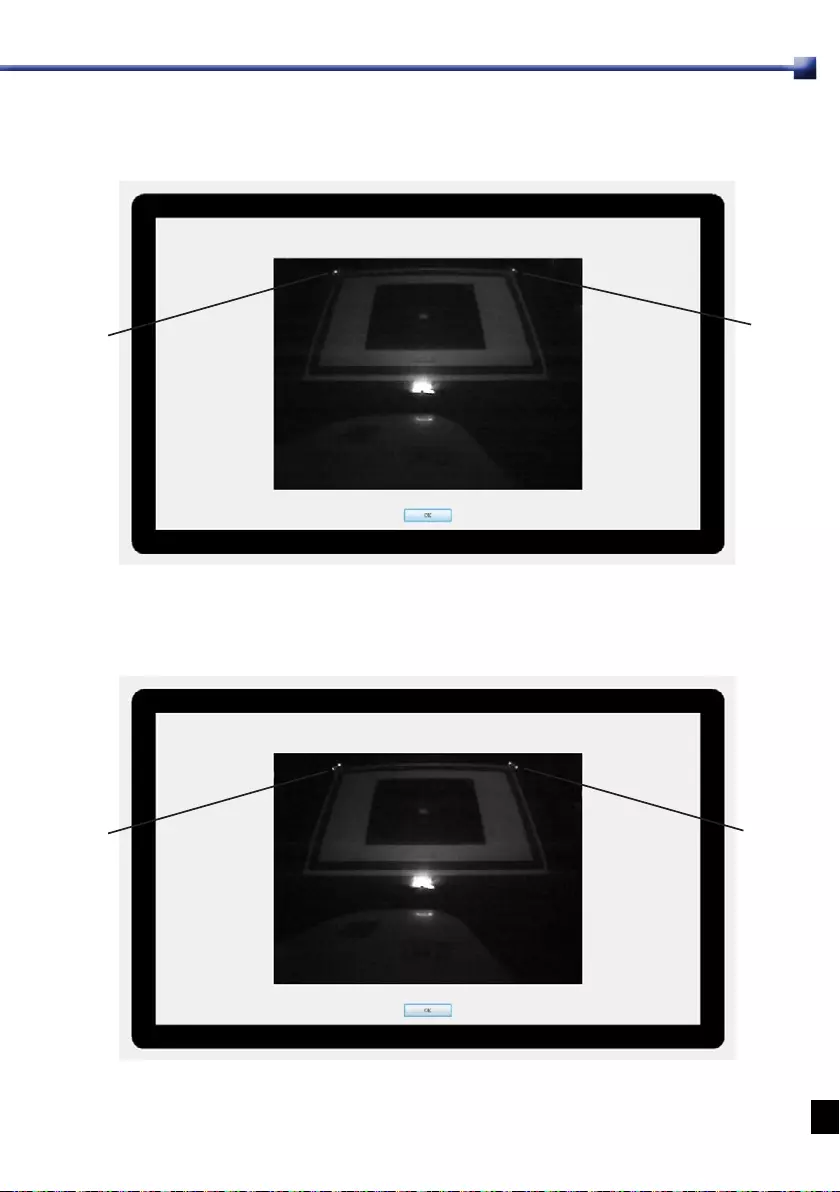
反射点 反射点
反射点 反射点

31
5
注意
• 要书写文字或绘制复杂图形,请使用交互笔。
• 用手指或虚拟笔在远离手指触控模块的区域绘画时,有可能出现无法绘
制到正确位置或无法绘画的情况。如是这样,请代而使用交互笔。
• 如果手指上佩戴了人工指甲、涂有指甲油、缠有绷带或类似物,手指触
控模块可能无法正常工作。如是这样,请代而使用交互笔。

32
第 7 章
规格
手指触控模块
功率消耗 最高 :180 mA
USB 类型(供电) Mini B 型 USB
电源 通过 USB 接头或 5 V 适配器供电
波长 850 nm
角度 最大 180°
横摇控制范围 最大 4°
纵摇控制范围 最大 3.5°
安全等级 1 级
尺寸 170 mm × 71 mm × 39 mm
重量 172 g(含盖)
一般功能
多笔支持 多达 4 个触点(笔 / 手指)
校准 自动 / 手动,16 点

33
第 8 章
故障排除
8.1 Interactive white board tool 不工作。
• 投影机菜单设置或电脑设置不正确。
- 在投影机设置中,按照投影机安装方位,从 [ 设置 I] 菜单下的 [ 水
平 / 垂直图像翻转 ] 中选择 [ 桌上正投 ] 或 [ 吊装正投 ]。
- 在 电 脑 设 置 中, 选 择 [Model Selection] 下 面 的 [Ultra Short
Throw Model]。
• 投影机与电脑连接不正确。
- 使用投影机附带的 USB 电缆将电脑正确连接到投影机。
8.2 交互笔或虚拟笔不工作。
• 交互笔与投影机之间有障碍物。
- 移除障碍物,站在投影机屏幕前时请勿挡在交互摄像头前面。
• 能够发射红外线或亮光的设备会干扰投影机屏幕或投影机。
- 请勿使用采用红外线通讯的遥控器或麦克风。
• 电池没有正确插入交互笔。
- 检查确保电池正确插入。如已正确插入,尝试更换新电池是否奏效。
• 尚未正确校准 Interactive white board tool。
- 根据投影机的安放情况,可能无法执行自动校准,或者校准精度会较差。
这种情况下,请执行手动校准。
8.3 光标不移动。
• 无法正确接收从投影机屏幕传输的数据。
- 关闭投影机屏幕或投影机附近使用红外线的设备。还可以尝试改变投
影机的位置看是否奏效。
• 投影机距离投影机屏幕过近。
- 检查投影机和投影机屏幕位置,确保设置正确。

35
版权声明
请注意,放大或缩小影像用于商业用途或公共展示可能对受法律保护的版
权或原始材料版权所有者造成侵犯。
关于商标
* Microsoft、Windows、Windows 7、Windows 8.1 和 Windows Media
Player 是 Microsoft Corporation 在美国和 / 或其它国家的注册商标
或商标。
• Mac、Mac OS 和 Macintosh 是 Apple Inc. 在美国和 / 或其它国家注
册的商标。
• 所有其他商标均为各自所有者的私有财产。
原产地 : 请参照保修卡、产品包装箱或产品机身上的标示
初版 :
2015.5.1

Interactive white board tool
使用手冊
FOR

1
目錄
注意事項 ................................................................................................... 2
第1章 互動筆 .............................................................................................3
1.1 插入電池 ............................................................................................ 3
1.2 更換互動筆的筆尖。 ............................................................................ 3
1.3 使用互動筆 ......................................................................................... 4
第2章 安裝 Interactive white board tool ............................................... 5
作業環境 ................................................................................................... 5
安裝軟體 ................................................................................................... 5
第3章 將投影機連接到電腦 .......................................................................... 8
第4章 Interactive white board tool 快顯選單 .......................................... 9
第5章 組態設定 ........................................................................................ 10
5.1 Interactive white board tool Configuration
( 互動式電子白板工具的組態 ) ............................................................. 10
5.2 Interactive white board tool Alignment
(Interactive white board tool 對齊 )
:
Alignment View ( 對齊檢視 ) ............................................................ 11
5.3 Interactive white board tool Calibration
(Interactive white board tool 校正 ) ................................................. 12
第6章 指控模組 ( 另售 ) ............................................................................. 15
6.1 零配件 ............................................................................................. 15
6.2 螢幕面板的平坦度 ............................................................................. 19
6.3 系統組態 .......................................................................................... 19
6.4 雷射幕特性 ....................................................................................... 23
6.5 安裝雷射幕 ....................................................................................... 26
第7章 規格 .............................................................................................. 32
第8章 疑難排解 ........................................................................................ 33
8.1 Interactive white board tool 無法使用。 ........................................... 33
8.2 互動筆或觸控筆無法使用。 ................................................................. 33
8.3 游標不會移動。 ................................................................................. 33

2
注意事項
本產品是一種使用紅外線的互動裝置。請勿遮住鏡子與相機。互動功能利用紅外線 (850 nm)
通訊。使用這個功能時,請謹記下列幾點。
安裝場所:
• 確認互動相機接收器與螢幕不會暴露在明亮的光線下,例如直射的陽光。
• 安置投影機時,不要讓互動相機接收器靠近螢光燈。
• 投影機要安置在不會受到附近的馬達、變壓器等的電磁干擾的地方。
• 互動相機的正面要定期清潔。請用可從相機店買到的噴氣刷或鏡頭清潔用品清潔相機鏡頭。
使用:
• 不要在互動相機接收器的蓋子上塗漆或貼上貼紙。
• 不要在放投影機的房間內使用採用紅外線的其他裝置。這樣做可能會使得互動筆故障。
• 不要用濕手觸碰產品。而且不要在可能會變濕的地方使用產品。互動筆並不防水。
• 檢查以確認互動筆的筆尖沒有受損。如果筆尖受損,互動筆將無法正常運作。
• 用互動筆書寫時不要太用力。要像用馬克筆在傳統白板上畫圖時那樣,以筆輕觸書寫表面。
• 不要讓互動筆掉落。這樣可能會損及互動筆的筆尖,而令其故障。
• 不要使用梯形失真功能。這樣做會降低互動功能的效能。
• 不要選擇省電的投影燈模式設定。這樣做可能會使得 Interactive white board tool 的
[Auto Calibration] 功能無法正常運作。

3
第1章
互動筆
1.1 插入電池
如上圖所示,將兩顆 AAA 大小的電池插入互動筆。
• 使用電池的時候,請注意以下幾點。否則可能會造成火災或人員傷害。
• 請勿將電池加熱、短路或拆解,或者將其放入火中。
• 請勿試圖為遙控器中隨附的電池充電。
• 電池沒電或者遙控器長期不使用時,請將電池取出來。
• 更換電池時,要兩顆同時更換。而且不要同時使用不同類型的兩顆電
池。
• 插入電池時,+與-極要朝向正確的方向。
• 如果有任何液體從電池內洩漏出來並接觸到您的皮膚,務必要將液體
徹底洗乾淨。
1.2 更換互動筆的筆尖。
1 抓緊筆尖將其拉下來。

4
2 將新筆尖插入到發出喀噠聲並且可以感覺到已經卡入定位為止。
3 這樣便完成了筆尖的更換程序。
1.3 使用互動筆
您可以用互動筆執行四種動作:按一下、按兩下、按一下右鍵以及拖曳。這四種動作以下列方
式執行。
按一下 : 輕觸螢幕上的圖示或選單項目。
按兩下 : 快速連續輕觸兩下螢幕上的圖示或選單項目。
按一下右鍵 : 輕觸並按住螢幕上的圖示或選單項目 1.5 秒鐘以上。
拖曳 : 輕觸並拖曳螢幕上的一個物件。
附註
存放互動筆時,不要將筆尖朝下。要將其側放或者將筆尖朝上存放。若不遵守這個注意事項,
可能會造成電池電力過早耗盡或者漏電。

5
第2章
安裝 Interactive white board tool
作業環境
項目 說明
作業系統 Windows 7、
Windows 8.1 或 OS X 10.10
CPU Pentium 或者更高
RAM 512 MB 或者更多
可用的硬碟空間 100 MB 或者更多
USB USB 2.0
顯示介面卡 解析度介於 XGA (1024 × 768) 與 WUXGA (1920 ×
1200) 之間,16 位元或者更大的顯示色彩深度
安裝軟體
將軟體安裝在執行 Microsoft Windows 的電腦上
底下描述的程序是將軟體安裝在執行 Microsoft Windows 7 的電腦上。
1 將投影機隨附的 CD 插入電腦的 CD/DVD-ROM 磁碟機中。在 CD/DVD-
ROM 根資料夾中的圖示上按兩下以啟動安裝小幫手。
選擇一種語言並按一下 [OK]。

6
2 安裝精靈出現時,按一下 [Next]。
可能必須安裝 Windows Media Player。
3 按一下 [Install] 以開始安裝程序。
4 安裝程序完成時,會顯示下列對話方塊。按一下 [Finish]。
Interactive white board tool 啟動時,會顯示 Interactive white board tool 組態畫面。
請按照畫面上的指示進行,以設定 Interactive white board tool。

7
5 用投影機隨附的 USB 纜線將電腦連接到投影機。
將軟體從執行 Microsoft Windows 的電腦解除安裝
1 從 [ 開始 ] 功能表選擇 [ 控制台 ]。
2 按一下 [ 解除安裝程式 ]。
3 在 [ 名稱 ] 底下,選擇 [Canon IWB-tool] 並按兩下。
在執行 OS X 的 Mac 上安裝軟體
1 將投影機隨附的 CD-ROM 插入 Mac 的 CD/DVD-ROM 磁碟機中。按兩下
桌面上的 CD-ROM 圖示,然後按兩下 CD/DVD-ROM 根資料夾中的 [IWB-
Tool Setup.pkg]。
2 當 [Welcome to the IWB-Tool Installer] 視窗出現時,按一下 [Continue]。
3 按一下 [Install] 以開始安裝程序。
4 安裝程序完成時,按一下 [Close]。
5 用投影機隨附的 USB 纜線將電腦連接到投影機。
從執行 OS X 的 Mac 上解除安裝軟體
1 打開 [ 應用程式 ] 資料夾。
2 將 [IWB-Tool] 資料夾拖曳到垃圾桶。
3 選擇 [ 清空垃圾桶 ] 將檔案從垃圾桶刪除。

8
第3章
將投影機連接到電腦
用隨附的 USB 纜線將投影機連接到電腦。將 Mini USB 接頭插入投影機的 Mini USB 插座,
並將標準的 USB 接頭插入電腦的 USB 插座。
附註
1.
產品包裝中有一條 5 公尺長的 USB 纜線。
2.
請勿在安裝 Interactive white board tool 驅動程式時將投影機連接到電腦。

9
第4章
Interactive white board tool 快顯選單
當您按兩下桌面上 Interactive white board tool 的圖示 啟 動 Interactive white
board tool 時,Interactive white board tool 圖示會出現在系統匣中。用右鍵按一下系統
匣中的 Interactive white board tool 圖示,以顯示快顯選單。
選單項目 說明
Configuration 如果想要變更諸如投影機安裝位置或語言之類的設定,按一下這個項目。
然後按照
“第 5章 組態設定"
中描述的程序進行。
Alignment View
這個選單項目的組態功能與
“5.2 Interactive white board tool
Alignment (Interactive white board tool 對齊 )
:Alignment View
(對齊檢視 )"中描述的一樣。
Auto
Calibration
按一下這個項目以自動校正。
Manual
Calibration
如果自動校正失敗,請選擇這個項目。
Pen Mode 投影機與互動筆配合使用時,請選擇這個項目。
Finger Touch
Mode
使用指控模組 ( 另售 ) 時,請選擇這個項目。
Virtual
Keyboard
需要鍵盤輸入時,按一下 [Virtual Keyboard] 將鍵盤顯示在螢幕上。
Run Interactive
pen tool
按一下這個項目以啟動 Interactive pen tool。
About
Interactive
white board
tool
選擇這個選單項目以顯示 Interactive white board tool 的版本資訊。
當您按一下這個選單項目時,會出現一個顯示版本資訊的視窗。
Exit 選擇這個選單項目以退出 Interactive white board tool。

10
第5章
組態設定
5.1 Interactive white board tool Configuration
(互動式電子白板工具的組態 )
若要使用
Interactive white board tool
,首先必須要用
Interactive white board tool
Configuration
畫面將其正確地設定。進行設定時,請參考底下的解說。
Model Selection ( 機型選擇 ) : 選擇 [Ultra Short Throw Model]。
Select Language ( 選擇語言 ) : 自動選擇的是與作業系統一樣的語言。若要將設定變更為
別的語言,請按一下 以顯示可用的語言清單。變更這項設定之後,重新啟
動應用程式時,新的語言設定就會生效。
Option ( 選項 ) :
Program Auto Run ( 程式自動執行 )
:如果您要 Interactive white board tool 在電腦啟
動時自動執行,請勾選這個方塊。
Ceiling Mount Mode ( 天花板安裝模式 ) :如果投影機安裝在天花板上,請勾選這個方塊。
如果投影機擺在桌上,請取消勾選這個方塊。
附註
OS X 版的軟體沒有 [Program Auto Run] 功能。
Driver Update ( 驅動程式更新 ) : 詳情請與 Canon 客戶支援中心聯絡。

11
5.2 Interactive white board tool Alignment
(Interactive white board tool 對齊 )
:
Alignment View ( 對齊檢視 )
Interactive white board tool 對齊:互動式投影機會自動執行對齊。如果還是沒有對齊,您
可以用版面檢視功能加以校正。
顯示對齊畫面:按一下 [Alignment View]。

12
5.3 Interactive white board tool Calibration
(Interactive white board tool 校正 )
Interactive white board tool 有兩種校正模式:自動與手動。
自動校正
按一下 [Auto] 讓校正自動執行。
自動校正可能無法進行,或者精確度可能很差,要視投影機安置情況而定。遇到這種情況時,
請執行手動校正。

13
手動校正
按一下 [Manual] 以顯示校正視窗。
當您以互動筆輕觸游標 時,下一個游標位置就會顯示出來。輕觸完 16 個點之後,校正便
完成。
若要在完成之前退出校正,請按電腦鍵盤上的 [ESC] 鍵。
游標

14
以互動筆輕觸游標中央。

15
第6章
指控模組 ( 另售 )
6.1 零配件
指控模組是設計給 Canon 互動投影機使用的一種觸控傳送器。請按照本說明書中的指示設定
指控模組。
a b c d
指控模組 觸控筆 (2 支):
附 4 個備用筆尖 Mini USB 纜線 對齊遮罩 (2 個)
e f g h
腕帶 (2 條)黏著膠帶 (2 片)六角扳手 指控模組使用說明:
印在另一張紙上
a.
指控模組:主機
b. 觸控筆 (2 支):附 4 個備用筆尖
c. Mini USB 纜線:用來為指控模組供電
d.
對齊遮罩 (2 個):用來為雷射幕定位
e.
腕帶 (2 條):供觸控筆使用的帶子
f. 黏著膠帶 (2 片):用來固定指控模組
g.
六角扳手:用來調整雷射幕
h. 指控模組使用說明:印在另一張紙上

16
6.1.1 更換觸控筆的筆尖
附註
若要改善觸控效能,筆尖要隨時保持乾淨。
1 順時針方向轉動筆尖將其取下來。
2 逆時針方向轉動新筆尖將其固定在定位。

17
3 這樣便完成了筆尖的更換程序。
6.1.2 指控模組
正面圖
固定孔 螺絲 1
螺絲 2 螺絲 3 蓋子
固定孔

18
背面圖
右邊
尺寸
膠帶黏貼區
指控模組頭
USB 連接埠

19
6.2 螢幕面板的平坦度
將指控模組安裝在平坦度差異低於 2 mm 的螢幕面板上。
6.3 系統組態
6.3.1 有螢幕的白板
指控模組安裝位置與觸控區之間務必要留下適當的間隙。
50-100 mm
觸控區中線
指控模組
外框
螢幕面板表面
觸控區
50 mm
50 mm 50 mm
附註
• 將指控模組安裝在白板框內。
• 觸控區內不要加上磁鐵之類的障礙物。

20
6.3.2 安裝指控模組
附註
• 指控模組的安裝應該由專業技師或者 Canon 客戶支援中心來進行。
•
務必要在安裝指控模組之後才連接
USB
纜線。
• 安裝指控模組時務必要設法消除靜電。
指控模組可以用隨附的黏著膠帶或者用螺絲安裝。
用黏著膠帶安裝模組
如下圖所示,將一片隨附的黏著膠帶貼在指控模組背面。
黏著膠帶
將指控模組放置於螢幕上並固定上去。

21
附註
請徹底清潔安裝表面以清除任何塵土或污垢。否則黏著膠帶可能會鬆脫,而使得指控模組掉
落。如果黏著膠帶的附著性不夠,請改用安裝螺絲。
用螺絲安裝模組
• 打開前蓋。
• 如下圖所示,用螺絲將模組固定在牆上。
附註
請使用適合固定孔的市售螺絲。
6.3.3 連接指控模組
請用隨附的 USB 纜線進行連接。底下列出的是可以連接的裝置。
連接到投影機 ( 建議 )

22
附註
使用配備有 A 型 USB 輸出插座的互動式投影機。
連接到電腦
注意
在下列情況下,來自電腦的電力可能不穩定。
• 交流電源關閉時 ( 使用的是電腦的電池 )。
• 所有 USB 連接埠都在使用時。
連接到 5 V USB 轉接器時
注意
不使用觸控功能時,要將 USB 轉接器的電源拔掉。否則可能會縮短指控模組的使用壽命。

23
6.4 雷射幕特性
6.4.1 雷射幕角度
指控模組產生的雷射幕涵蓋一個 180 度的弧形。雷射幕是一個由 2 mm 厚的雷射光形成的平
面。
雷射幕
指控模組 ( 內部 )
6.4.2 設定螢幕面板上的雷射幕位置
雷射幕與螢幕之間務必要留下間隙,使得它們不會互相接觸,而且雷射幕不要距離螢幕太遠。
雷射幕
螢幕面板
間隙
高度

24
6.4.3 調整雷射幕
雷射幕的左右、上下與水平調整
螺絲 1 用於上下調整,螺絲 2 與3 用於左右調整。
螺絲 1
螺絲 3
螺絲 2
上下調整
當您用隨附的六角扳手順時針方向轉動螺絲 1 時,雷射幕就會如下圖所示的那樣遠離螢幕面
板。逆時針方向轉動螺絲 1,則會讓雷射幕靠近螢幕面板。

25
左右調整
當您用隨附的六角扳手逆時針方向轉動螺絲 2 時,雷射幕就會遠離螢幕面板左邊。
當您用隨附的六角扳手逆時針方向轉動螺絲 3 時,雷射幕就會遠離螢幕面板右邊。
水平調整
當您用隨附的六角扳手逆時針方向轉動螺絲 2 與螺絲 3 時,雷射幕就會以相對於螢幕面板的
方式升高,增加彼此之間的間隙。順時針方向轉動螺絲 2 與螺絲 3 則會縮小間隙。

26
6.5 安裝雷射幕
6.5.1 雷射幕對齊檢視
使用對齊檢視功能。
進行指控模組的設定之前,要在 [Pen Mode] 中完成自動或手動校正。
另一種方式:
27
對齊顯示範例
連接 USB 纜線。如下圖所示,可以看到雷射光。
附註
請記住,以天花板安裝模式使用投影機時,版面檢視的顯示是左右與上下顛倒的。

28
6.5.2 使用對齊遮罩
對齊標誌的形狀 ( 反射片 )
上方的對齊標誌
5 mm
5 mm
安裝表面
下方的對齊標誌
對齊遮罩安裝位置:
投影機螢幕
指控模組
雷射光
對齊遮罩 對齊遮罩
雷射幕的雷射光觸及對齊標誌時,可以看到一個反射點。

29
6.5.3 雷射幕對齊程序
1 緩緩轉動螺絲 1 直到可以看到如下的反射光為止。
2 轉動螺絲 2 與 3 將反射光的形狀調整成平坦為止。

30
3 首先緩緩轉動螺絲 1 直到可以看到兩個對齊標誌的反射點為止,然後繼續轉動
螺絲 1 直到只能看到一個反射點為止。
4 最後反方向緩緩轉動螺絲 1 直到再度看到兩個對齊標誌反射點為止。這樣便完
成了調整程序。
反射點 反射點
反射點 反射點

31
5 切換至電腦上的 [Finger Touch Mode],以開啟指控功能。
附註
• 若要寫字或繪製複雜的圖形,請使用互動筆。
• 用您的手指或觸控筆在遠離指控模組的位置繪圖時,可能會有定位不准或者無法繪圖的情
形。遇到這種情況時,請改用互動筆。
• 如果您的手指上有人工指甲、指甲油或者繃帶之類的東西,指控模組可能無法正常運作。
遇到這種情況時,請改用互動筆。

32
第7章
規格
指控模組
耗電量 最多 180 mA
USB 類別 ( 電源 ) Mini USB B 型
電源 透過 USB 接頭或 5 V 轉接器供應
波長 850 nm
角度 最多 180°
左右控制範圍 最多 4°
上下控制範圍 最多 3.5°
安全性分類 Class 1
尺寸 170 mm × 71 mm × 39 mm
重量 172 g ( 含蓋子 )
一般功能
支援多支筆 最多 4 個觸控點 ( 筆或手指 )
校正 自動 /手動,16 點

33
第8章
疑難排解
8.1 Interactive white board tool 無法使用。
• 投影機選單設定或電腦設定不正確。
- 在投影機設定中,根據投影機的安裝方向,從 [ 安裝 I] 選單底下的 [ 影像水平 /垂直翻轉 ]
選擇 [ 前桌上投影 ] 或 [ 前天花板投影 ]。
- 在電腦設定中,選擇 [Model Selection] 底下的 [Ultra Short Throw Model]。
• 投影機與電腦沒有正確連接。
- 用投影機隨附的 USB 纜線將投影機正確的連接到電腦。
8.2 互動筆或觸控筆無法使用。
• 互動筆與投影機之間有障礙。
- 移除所有障礙,而且站在投影機螢幕前面時,不要站在互動相機前面。
• 會發出紅外線或明亮光線的裝置會干擾投影機螢幕或投影機。
- 不要使用採用紅外線的遙控器或麥克風。
• 電池沒有正確地插入互動筆中。
- 檢查並確認電池有正確地插入。如果有正確地插入,更換成新的電池試試看。
• Interactive white board tool 沒有經過正確的校正。
- 自動校正可能無法進行,或者精確度可能很差,要視投影機安置情況而定。遇到這種情況
時,請執行手動校正。
8.3 游標不會移動。
• 無法適當地接收來自投影機螢幕的資料。
- 關閉位於投影機螢幕或投影機附近採用紅外線的裝置。您也可以變更投影機的位置試試
看。
• 投影機太靠近投影機螢幕。
- 檢查投影機與投影機螢幕的位置,以確認其設置正確。

34
版權通知
請注意,因為商業用途或者在公開演講時放大或縮小影像,可能會侵犯法定保護的版權或者原
材料所有者的版權。
關於商標
* Microsoft、Windows、Windows 7、Windows 8.1 以及 Windows Media Player 是
Microsoft Corporation 在美國及 / 或其他國家的註冊商標或商標。
• Mac、Mac OS 與Macintosh 是Apple Inc. 在美國及 / 或其他國家的商標。
• 所有其他商標各為其所有者之資產。

YT1-7425-000_JP.indb 56 2013/04/22 9:25:23

Interactive white board tool
使用説明書
JPN

1
目次
第 1 章 インタラクティブペンについて ...................................................................................3
第 2 章 Interactive white board tool のインストール ........................................................ 5
第 3 章
コンピューターにプロジェクターを接続する ...............................................................8
第 4 章 Interactive white board tool プルアップメニュー ..............................................9
第 5 章 構成設定 .......................................................................................................................10
第 6 章 フィンガータッチモジュール(別売品) ...................................................................15
第 7 章 仕様 ...............................................................................................................................32
第 8 章 トラブルシューティング ............................................................................................33

2
使用上のご注意
本製品は赤外線を利用したインタラクティブ方式の機器です。ミラーおよびカメラをふさが
ないでください。インタラクティブ機能は、赤外線(850nm)通信により動作します。こ
の機能を使用するときは、次の点に注意してください。
• インタラクティブカメラレシーバーおよびスクリーンに直射日光等の強い光が当たってい
ないことを確認してください。
• インタラクティブカメラレシーバーが蛍光灯の近くにならないように、プロジェクターを
設置してください。
• インタラクティブカメラの近くにモーターやトランスなどからの電磁妨害を受けないよう
にプロジェクターを設置してください。
• 定期的にインタラクティブカメラの前面を掃除してください。カメラのレンズはカメラ用
に市販されているブロワーブラシやレンズクリーナーを使用してください。
• インタラクティブカメラレシーバーのカバーにペンキを塗ったりステッカーを貼ったりし
ないでください。
• 同じ部屋でプロジェクター以外の赤外線を利用した機器を使用しないでください。インタ
ラクティブペンが誤動作する原因となります。
• 濡れた手で使用しないでください。または濡れる可能性のある場所で使用しないでくださ
い。インタラクティブペンは防水ではありません。
• インタラクティブペンのペン先部分が損傷していないことを確認してください。損傷して
いると、インタラクティブペンは作動しません。
• 書くときにインタラクティブペンを強く押さないでください。マーカーペンでホワイト
ボードに図を書くときのように、そっとタッチしてください。
• インタラクティブペンを落とさないでください。インタラクティブペンのペン先を破損
し故障の原因になります。
• キーストーン機能を使用しないでください。インタラクティブ機能のパフォーマンスが低
下することがあります。
• ランプモードを省電力に設定しないでください。Interactive white board tool の[自
動キャリブレーション]が異常動作を起こす原因となります。

3
第 1 章
インタラクティブペンについて
1.1 電池の入れかた
単 4 型乾電池(2 本)を上図のように入れてください。
• 電池の取り扱いについて以下の点に注意してください。火災やけが
の原因となります。
• 電池を火の中に入れたり、加熱、ショート、分解したりしないでく
ださい。
• 付属の電池は充電しないでください。
• 電池を使いきったときや、長時間使用しないときは電池を取り外し
てください。
• 電池を交換するときは 2本いっしょに交換してください。また、種
類の違う電池をいっしょに使用しないでください。
• +とーの向きを正しく入れてください。
• 万一、液漏れなどで内部の液体が体についたときは、水でよく洗い
流してください。
1.2 インタラクティブペンのペン先を交換する。
1

4
2
3
1.3 インタラクティブペンの使いかた
インタラクティブペンで、クリック、ダブルクリック、右クリック、ドラッグの 4 種類の
操作ができます。それぞれの操作は、以下のように行ないます。
クリック :画面のアイコンかメニューにタッチします。
ダブルクリック :画面のアイコンかメニューに 2 度タッチします。
右クリック :画面のアイコンまたはメニューに 1.5 秒以上タッチします。
ドラッグ :画面のオブジェクトにタッチアンドドラッグします。
Note
インタラクティブペンのペン先を下にして保管しないでください。保管するときは横向き
にするかペン先を上向きにしてください。電池切れとなり、液漏れの原因となります。

5
第 2 章
Interactive white board tool のインストール
動作環境
項目 動作環境
OS Windows7、Windows8.1、OSX10.10
CPU Pentium 以上
RAM 512MB 以上
HDD 100MB 以上
USB USB2.0
ディスプレイ XGA(1024x768) 以上 WUXGA(1920x1200) 以下の解像度、16
ビット以上のディスプレイの色。
インストール
Windows 環境でご使用の場合
本書では Windows7環境でのインストール方法を記載しています。
1

6
2
WindowsMediaPlayerのインストールが必要な場合があります。
3
4
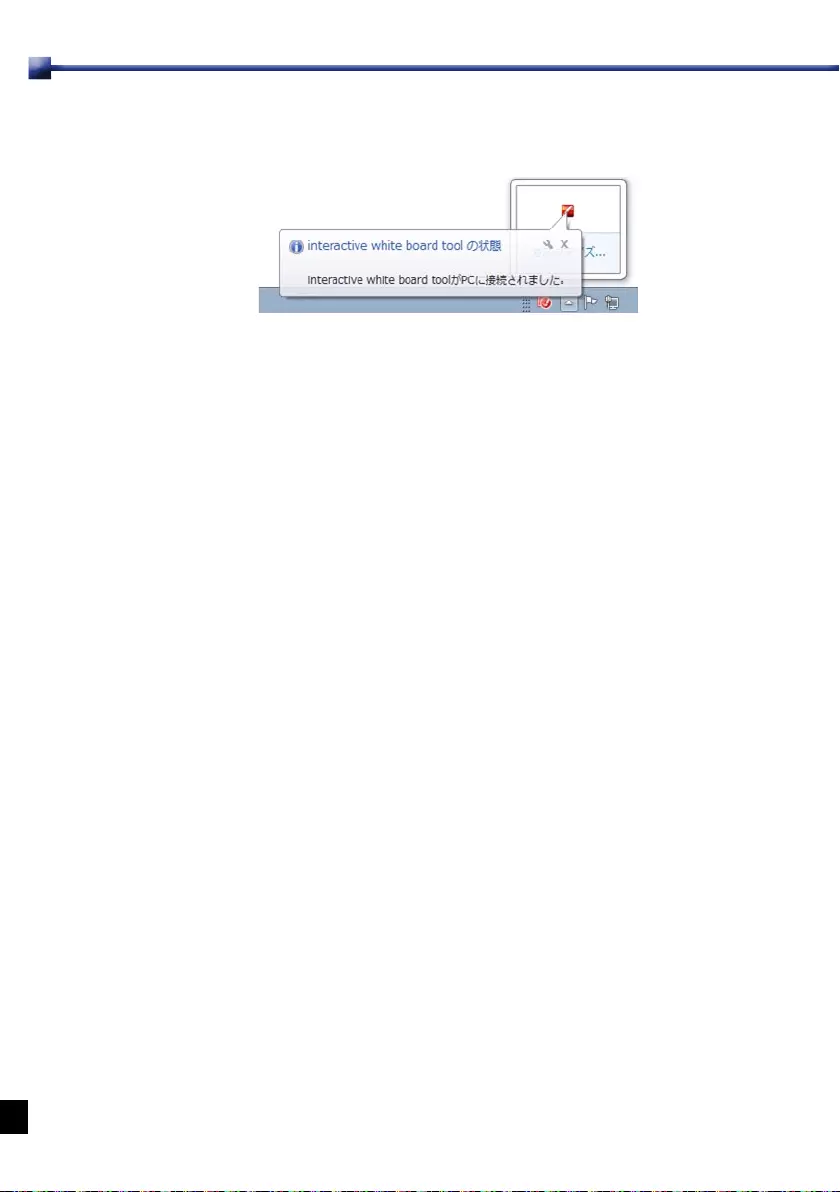
Interactivewhiteboardtool を起動すると、InteractivewhiteboardtoolCongulation
画面が表示されます。画面に従って Interactivewhiteboardtool の設定をしてください。
7
5
Windows 環境でのアンインストール
1
2
3
Machintosh 環境でご使用の場合
1
2
3
4
5
Machintosh 環境でのアンインストール
1
2
3

8
第 3 章
コンピューターにプロジェクターを接続する
付属の USB ケーブルでコンピューターとプロジェクターを接続します。プロジェクターの
ミニ USB 端子にミニ USB コネクタを、コンピューターにもう一方の USB コネクタを差
し込みます。
Note
1.同梱品には、5m の USB ケーブルが付属しています。
2.Interactive white board tool ドライバをインストール中は、コンピューターにプロ
ジェクターを接続しないでください。

9
第 4 章
Interactive white board toolプルアップメニュー
デスク ト ッ プの Interactivewhiteboardtool アイコ ン を ダ ブ ルクリ ッ ク して
Interactivewhiteboardtool を実行すると、Interactivewhiteboardtool アイコンが
システムトレイに表示されます。
システムトレイで Interactivewhiteboardtool アイコンを右クリックすると、ポップアッ
プメニューが表示されます。
メニュー 説明
設定 プロジェクターのマウント位置や言語を変更したい場合にのみ、
このメニューをクリックし、「第 5 章構成設定」手順に従います。
配置ビュー 「5.2Interactivewhiteboardtool の Alignment:配置ビュー」機
能と同じです。
自動キャリブ
レーション
自動でキャリブレーションします。
手動キャリブ
レーション
自動でキャリブレーションできない場合にご使用してください。
PenMode インタラクティブペンと共に使用するときに選びます。
FingerTouch
Mode
フィンガータッチモジュール(別売品)を使用するときに選びます。
スクリーンキー
ボードを起動
キーボード入力が必要な場合、[スクリーンキーボードを起動]をクリッ
クすると、キーボードが画面に表示されます。
Interactivepen
toolを起動
[Interactivepentool]を実行したい場合にクリックします。
Interactive
whiteboard
tool について
このメニューでは、Interactivewhiteboardtool のバージョン情報
を表示します。このメニューをクリックすると、バージョン情報ウィ
ンドウが表示されます。
終了 Interactivewhiteboardtool を終了します。

10
第 5 章
構成設定
5.1 Interactive white board tool の構成
Interactivewhiteboardtool を使用するには、InteractivewhiteboardtoolCongulation
画面で構成を正しく設定する必要があります。以下を参考にして、設定してください。
Model Selection(モデル選択):[超短焦点モデル]を選びます。
Select Language(言語の選択):オペレーティングシステムと同じ言語が自動的に選択
されます。別の言語に変更する場合は、 をクリックすると、言語リスト
が表示されます。変更した言語はアプリケーションの再起動後に反映されます。
Option (オプション):
ProgramAuto Run(プログラムの自動起動):コンピューターの起動時に Interactive
whiteboardtool を実行したい場合にマークします。
CeilingMountMode(天井マウントモード):プロジェクターを天井から吊り下げている
場合にマークします。プロジェクターをテーブルの上に置くとき、この項目をマークしな
いでください。
Note
ProgramAutoRun機能は、Machintosh環境では動作しません。
Driver Update(ドライバ更新):販売店にお問い合わせください。

11
5.2 Interactive white board tool の Alignment:配置ビュー
Interactivewhiteboardtool の Alignment:インタラクティブプロジェクターモデルの
アライメントは自動ですが、ずれている場合は配置ビュー機能を使用してください。
配置画面の表示:[配置ビュー]をクリックします。

12
5.3 Interactive white board tool のキャリブレーション
Interactivewhite board tool には自動キャリブレーションと手動キャリブレーションの
2つの方法があります。
自動キャリブレーション
[自動]をクリックすると、キャリブレーションが自動的に実行されます。
プロジェクターの設置条件などにより、自動キャリブレーションができなかったり、精度が
悪い場合があります。この場合、手動でキャリブレーションを行なってください。

13
手動キャリブレーション
[手動]をクリックすると、キャリブレーション用のウィンドウが表示されます。
インタラクティブペンでカーソルの をタッチすると、次のカーソル位置が表示されま
す。16 のポイントにタッチすると、キャリブレーションが完了します。
キャリブレーションを途中で終了したい場合は、コンピューターの[ESC]キーを押して
ください。
カーソル

14
カーソルの中央をインタラクティブペンでタッチしてください。

15
第 6 章
フィンガータッチモジュール(別売品)
6.1 同梱品
フィンガータッチモジュールは、キヤノンインタラクティブプロジェクタ-用のタッチ送信
機です。
フィンガータッチモジュールは、本使用説明書に従って設置してください。
abcd
フィンガータッチ
モジュール
ダミーペン 2本
(予備のペン先 4個) ミニ USB ケーブル アライメントマスク
(2 個 )
e f g h
リストストラップ
(2 個) 粘着テープ(2 個) 六角レンチ フィンガータッチモ
ジュール使用説明書
(別紙)
a.フィンガータッチモジュール:本体
b.ダミーペン(2本):予備のペン先4個付
c.ミニ USB ケーブル:フィンガータッチモジュールの電力供給用
d.アライメントマスク(2個):レーザーカーテンの位置合わせ用
e.リストストラップ(2 個):ダミーペン用ストラップ
f.粘着テープ(2 個):フィンガータッチモジュール取付用
g.六角レンチ:レーザーカーテン調整用
h.フィンガータッチモジュール使用説明書 :別紙

16
Note
タッチ性能を向上するために、ペン先をきれいに保ってください。
1
2

17
3
前面図
マウント穴 ねじ1
ねじ2 ねじ3 カバー
マウント穴

18
背面図
右面図
寸法
テープ貼り付けエリア
フィンガータッチモジュールヘッド
USBポート

19
6.2 スクリーンボードの平面性について
フィンガータッチモジュールを取り付ける、スクリーンボードは平面度が 2mm 以下のもの
を使用してください。
6.3 システム構成
フィンガータッチモジュールの取り付け位置とタッチエリアとの間に適切な間隔を確保して
ください。
50-100mm
タッチエリアの中心線
フィンガータッチ
モジュール
フレーム(梁)
スクリーンボード面
タッチエリア
50mm
50mm 50mm
Note
• フィンガータッチモジュールはホワイトボードの内側に取り付けてください。
• タッチエリア内にマグネットなどの障害物を貼り付けないでください。
20
Note
• フィンガータッチモジュールの設置工事は必ず専門の技術者または販売店に依頼して
ください。
• USB ケーブルの接続は必ずフィンガータッチモジュールの取り付け後に行なってください。
• フィンガータッチモジュールの設置時は、静電気対策を実施してください。
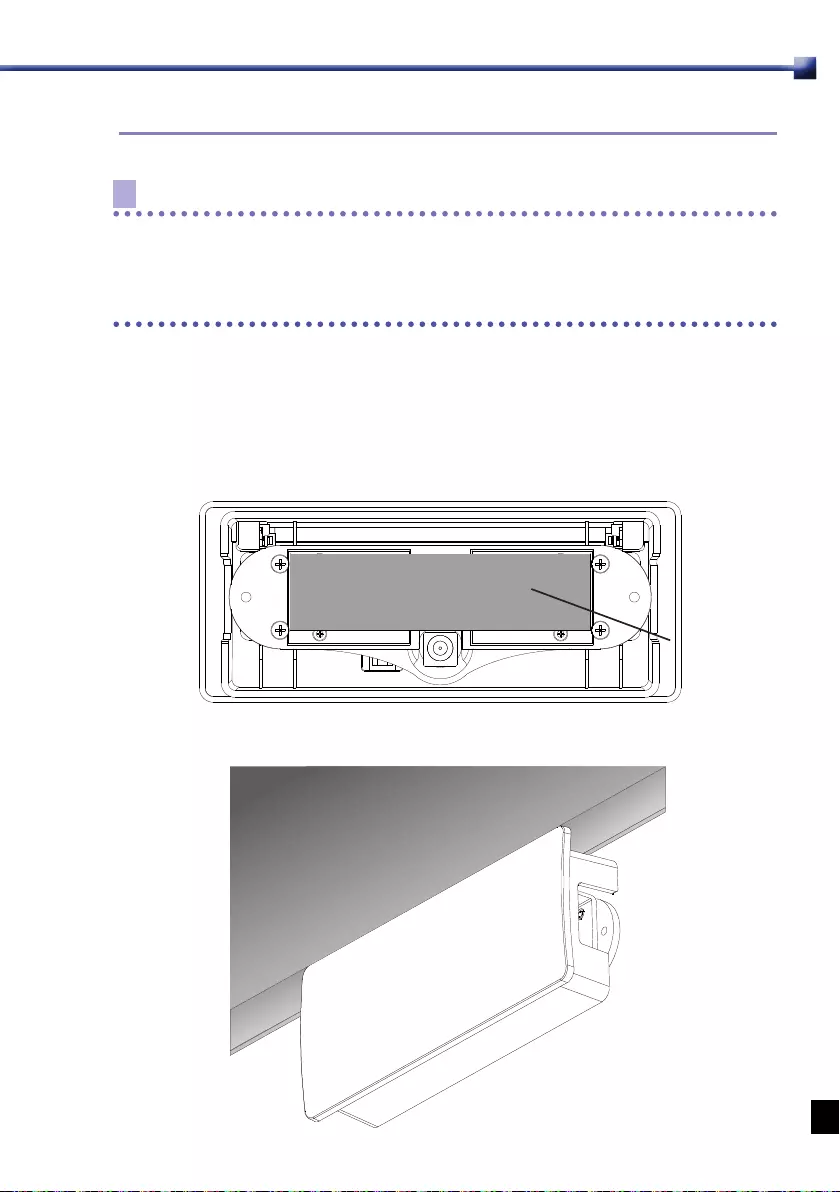
フィンガータッチモジュールの取付けかたには、付属の粘着テープ、またはねじで止める 2
つの方法があります。
粘着テープで取り付ける方法
下図のように、フィンガータッチモジュールの背面に付属の粘着テープを貼り付けます。
粘着テープ
フィンガータッチモジュールの位置を合わせスクリーンに貼り付けます。

21
Note
取り付ける面の汚れを十分に落としてください。粘着シールがはがれフィンガータッチモ
ジュールが落ちることがあります。
粘着テープが付きにくいところには、ねじで取り付けることをお勧めします。
ねじで取り付ける方法
• 前面カバーを開けます。
• 図のようにねじで壁に固定します。
Note
ねじは取り付け部に合った市販のものをご使用ください。
付属の USB ケーブルで接続します。接続できる機器は以下の通りです。
プロジェクターに接続する(推奨)

22
Note
USBタイプ -Aの出力端子のあるインタラクティブプロジェクタ-を使用してください。
コンピューターに接続する
注意事項
コンピューターからの電力は、以下の状態で不安定になることがあります。
• AC電源を切っている(内蔵バッテリーで使用している)。
• すべての USBポートが使用されている
5V USB アダプタに接続する
注意事項
タッチ機能を使用していないときは、USB アダプタの電源を外してください。フィンガー
タッチモジュールの寿命が低減します。
23
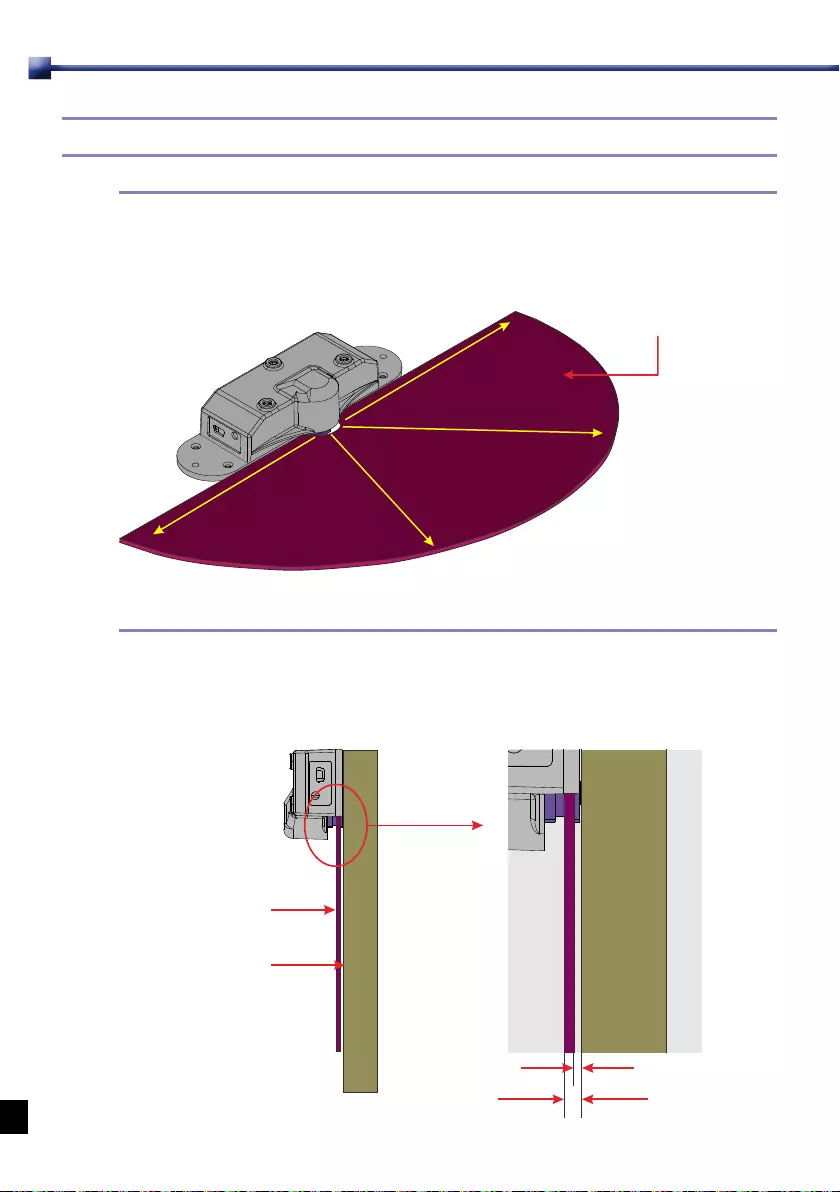
6.4 レーザーカーテンの特性
180 度をカバーし、レーザーカーテンを形成します。
レーザーカーテンは、2mm 厚の平面のレーザーです。
レーザーカーテンはスクリーンと接触しないよう隙間を開け、スクリーンからの高さを十分
低くしてください。
レーザーカーテン
スクリーンボード
隙間
高さ
レーザーカーテン
フィンガータッチ
モジュール(内部)
24
レーザーカーテンのロール / ピッチ / レベルの調整
ねじ 1:ピッチの調整/ ねじ 2、ねじ 3:ロールの調整
ねじ 1
ねじ3ねじ2
ピッチ調整
ねじ 1 を付属の六角レンチで時計回りに回転すると、レーザーカーテンは以下の図のように、
スクリーンボードから離れます。ねじ1を反時計回りに回転すると、レーザーカーテンはス
クリーンボードに近づきます。

25
ロール調整
ねじ 2 を六角レンチで反時計回りに回すと、レーザーカーテンの左側がスクリーンボード
から離れます。
ねじ3を六角レンチで反時計回りに回すと、レーザーカーテンの右側がスクリーンボードか
ら離れます。
レベル調整
ねじ 2 とねじ 3 を六角レンチで反時計回りに回すと、レーザーカーテンがスクリーンボー
ドから上昇し、離れます。時計回りに回すと近づきます。
26
6.5 レーザーカーテンの設置
配置ビュー機能にします。
フィンガータッチモジュールを設定する前に、あらかじめ[PenMode]の自動または手
動キャリブレーションを終了してください。
または、
27
アライメント表示例
USB ケーブルを接続します。下の図のようにレーザーが光ります。
Note
プロジェクターを天井取り付けモードでご使用の場合は、配置ビュー表示の上下左右が反
対となりますのでご注意ください。
28
アライメントマーク(反射体)の形状
上側のアライメントマーク
5mm
5mm
取付け面
下側のアライメントマーク
アライメントマスクの取り付け位置:
投写画面
フィンガータッチモジュール
レーザー光
アライメントマスク アライメントマスク
レーザーカーテンのレーザーがアライメントマークに当たると反射ポイントが現れます。
29
1
2
30
3
4
反射
ポイント
反射
ポイント
反射
ポイント
反射
ポイント
31
5
Note
• 文字や複雑な図形などを描画する場合はインタラクティブペンをご使用してください。
• フィンガータッチモジュールから離れた所で、指やダミーペンで描画の位置がずれてし
まうまたは、描画できない場合があります。その場合はインタラクティブペンをご使用
してください。
• 指に付け爪やマニキュア、メイルアート、包帯などをして操作すると、正しく動作しな
いことがあります。その場合はインタラクティブペンをご使用ください。
32
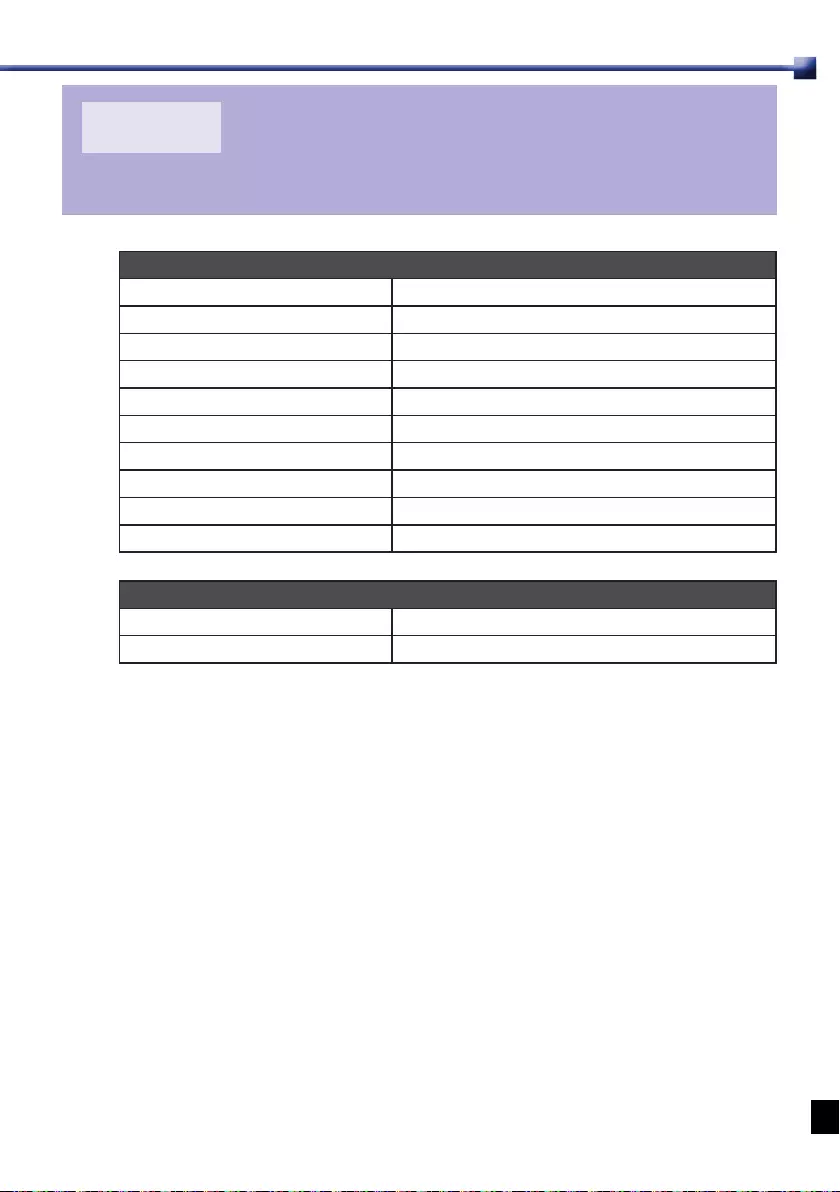
第 7 章
仕様
フィンガータッチモジュール
消費電力 最大 180mA
USB タイプ (パワー) ミニ USB B タイプ
電源 USB コネクタまたは 5V アダプタを介した電力
波長 850nm
角度 最大 : 180°
ロール制御範囲 最大 4°
ピッチ制御範囲 最大 3.5°
安全基準クラス クラス 1
寸法 170mm x 71mm x 39mm
質量 172g ( カバー付き )
一般機能
マルチペンのサポート 最大 4 つのタッチポイント ( ペン / 指 )
キャリブレーション 自動 / 手動 16 ポイント

33
第 8 章
トラブルシューティング
8.1 Interactive white board tool が動作しない
• プロジェクターのメニューとコンピューターが正しく設定されていない。
- プロジェクターの設定-設置状態により、メニューの[設置 I]の[画像反転H/V]
から[机上]または[天吊り]を選んでください。
- コンピューターの設定の[モデル選択]から[超短焦点モデル]を選択してください。
• プロジェクターとコンピューターが正しく接続されていない。
- プロジェクターとコンピューターをプロジェクター本体に同梱されている USB ケーブ
ルで正しく接続してください。
8.2 インタラクティブペンまたはダミーペンが動作しない
• インタラクティブペンとプロジェクターの間に障害物がある。
- 障害物を取り除き、投写画面の前に立つときはインタラクティブカメラの前に立たない
でください。
• 赤外線を出す機器や強い光が、投写画面やプロジェクターに干渉している。
- 赤外線リモコンや赤外線マイクを使用しないでください。
• インタラクティブペンに電池が正しく入っていない。
- 電池が正しく入っているか確認してください。電池が入っている場合は、新しい電池と
交換してください。
• 正しくキャブリレーションされていない。
- プロジェクターの設置条件等により、自動キャリブレーションができなかったり、精度
が悪い場合があります。この場合、手動でキャリブレーションを行ってください。
8.3 カーソルが移動しない
• 投写画面からの情報が、正しく受信されない。
-投写画面またはプロジェクターの近くで赤外線を使っている機器のスイッチをオフにし
てください。または、プロジェクターの位置を移動してください。
• プロジェクターが投写画面に近すぎる。
-プロジェクターと投写画面の位置を確認して正しく設置してください。

34
著作権についてのご注意
本機を営利目的または公衆に視聴させることを目的として、喫茶店、ホテル等において画面
サイズ切り換え機能等を利用して画面の圧縮、引き伸ばし等を行いますと、著作権法で保護
されている著作者の権利を侵害する恐れがありますので、ご注意願います。
商標について
•Microsoft、Windows、Windows7、Windows 8.1、Windows Media Player は、
米国MicrosoftCorporationの米国および、その他の国における登録商標または、商標、
商品名です。
•Mac,MacOS,および Macintoshは米国その他の国で登録された AppleInc.の商標で
す。
• その他の社名、商品名などは、各社の商標または登録商標です。

YT1-7466-000 ©CANONINC.2015
