Table of Contents
- Chapter 1. About this manual
- Chapter 2. Safety information
- Chapter 3. General information
- Chapter 4. General Checkout
- Chapter 5. Using the Setup Utility
- Chapter 6. Symptom-to-FRU Index
- Chapter 7. Locating connectors, controls and components
- Chapter 8. Replacing hardware
- General information
- Replacing the keyboard and mouse
- Removing the computer cover
- Replacing the power supply assemby
- Removing the front bezel
- Replacing an optical drive
- Replacing the M.2 storage drive
- Replacing the 3.5-inch storage drive
- Replacing the 2.5-inch storage drive
- Replacing the front card reader
- Replacing the PCI Express card
- Replacing a memory module
- Replacing the Wi-Fi card
- Replacing the front Wi-Fi antenna
- Replacing the rear Wi-Fi antenna
- Replacing the heat-sink and fan assembly
- Replacing the microprocessor
- Replacing the front fan
- Replacing the rear fan
- Replacing the motherboard
- Chapter 9. FRU lists
- Chapter 10. General information
Lenovo 510 User Manual
Displayed below is the user manual for 510 by Lenovo which is a product in the PCs/Workstations category. This manual has pages.
Related Manuals

ideacentre310/510SeriesHardware
MaintenanceManual
MachineTypes:90G5[310-15ASR/EnergyStar]/90G6
[310-15IAP/EnergyStar]90G7[510-15ABR/EnergyStar]/90G8
[510-15IKL/EnergyStar]


ideacentre310/510Series
HardwareMaintenanceManual
MachineTypes:90G5[310-15ASR/EnergyStar]/90G6
[310-15IAP/EnergyStar]90G7[510-15ABR/EnergyStar]/90G8
[510-15IKL/EnergyStar]

FirstEdition(January2017)21st
©CopyrightLenovo2017.
LIMITEDANDRESTRICTEDRIGHTSNOTICE:IfdataorsoftwarearedeliveredpursuantaGeneralServices
Administration“GSA”contract,use,reproduction,ordisclosureissubjecttorestrictionssetforthinContractNo.
GS-35F-05925

Contents
Chapter1.Aboutthismanual.....1
ImportantSafetyInformation.........1
Chapter2.Safetyinformation.....3
Generalsafety...............3
Electricalsafety..............3
Safetyinspectionguide...........5
Handlingelectrostaticdischarge-sensitive
devices.................5
Groundingrequirements...........6
Safetynotices...............6
Chapter3.Generalinformation....9
Specifications...............9
Chapter4.GeneralCheckout.....11
Chapter5.UsingtheSetupUtility...13
StartingtheLenovoBIOSSetupUtilityprogram.13
Viewingandchangingsettings........13
Usingpasswords..............13
Enablingordisablingadevice........15
Selectingastartupdevice..........16
ExitingtheLenovoBIOSSetupUtilityprogram..17
Chapter6.Symptom-to-FRUIndex..19
Harddiskdrivebooterror..........19
PowerSupplyProblems...........19
POSTerrorcodes.............20
Undeterminedproblems...........20
Chapter7.Locatingconnectors,
controlsandcomponents......21
Chapter8.Replacinghardware....29
Generalinformation.............29
Replacingthekeyboardandmouse......30
Removingthecomputercover........30
Replacingthepowersupplyassemby.....31
Removingthefrontbezel..........32
Replacinganopticaldrive..........33
ReplacingtheM.2storagedrive........34
Replacingthe3.5-inchstoragedrive......35
Replacingthe2.5-inchstoragedrive......37
Replacingthefrontcardreader........38
ReplacingthePCIExpresscard........39
Replacingamemorymodule.........40
ReplacingtheWi-Ficard...........42
ReplacingthefrontWi-Fiantenna.......43
ReplacingtherearWi-Fiantenna.......44
Replacingtheheat-sinkandfanassembly....44
Replacingthemicroprocessor........45
Replacingthefrontfan...........47
Replacingtherearfan............48
Replacingthemotherboard..........49
Chapter9.FRUlists..........51
Chapter10.Generalinformation...69
AdditionalServiceInformation........69
©CopyrightLenovo2017iii

ivideacentre310/510SeriesHardwareMaintenanceManual

Chapter1.Aboutthismanual
ThismanualcontainsserviceandreferenceinformationforLenovoideacentre300seriesdesktopcomputers
listedonthecover.ItisintendedonlyfortrainedservicerswhoarefamiliarwithLenovocomputerproducts.
BeforeservicingaLenovoproduct,besuretoreadtheSafetyInformation.
ThedescriptionoftheTVcardinthismanualisonlyusedforthemachineswhichhavetheTVcard.Itis
invalidforthosemachineswhichdonothaveTVcard.
ImportantSafetyInformation
Besuretoreadallcautionanddangerstatementsinthisbookbeforeperforminganyoftheinstructions.
VeuillezliretouteslesconsignesdetypeDANGERetATTENTIONduprésentdocumentavantd’exécuter
lesinstructions.
LesenSieunbedingtalleHinweisevomT yp“ACHTUNG”oder“VORSICHT”indieserDokumentation,bevor
SieirgendwelcheVorgängedurchführen
LeggereleistruzioniintrodottedaATTENZIONEePERICOLOpresentinelmanualeprimadieseguireuna
qualsiasidelleistruzioni
Certifique-sedelertodasasinstruçõesdecuidadoeperigonestemanualantesdeexecutarqualquer
umadasinstruções
Esimportantequeleatodaslasdeclaracionesdeprecauciónydepeligrodeestemanualantesdeseguir
lasinstrucciones.
©CopyrightLenovo20171

2ideacentre310/510SeriesHardwareMaintenanceManual

Chapter2.Safetyinformation
Thischaptercontainsthesafetyinformationthatyouneedtobefamiliarwithbeforeservicingacomputer.
Generalsafety
Followtheserulestoensuregeneralsafety:
•Observegoodhousekeepingintheareaofthemachinesduringandaftermaintenance.
•Whenliftinganyheavyobject:
1.Ensureyoucanstandsafelywithoutslipping.
2.Distributetheweightoftheobjectequallybetweenyourfeet.
3.Useaslowliftingforce.Nevermovesuddenlyortwistwhenyouattempttolift.
4.Liftbystandingorbypushingupwithyourlegmuscles;thisactionremovesthestrainfromthe
musclesinyourback.
Donotattempttoliftanyobjectsthatweighmorethan16kg(35lb)orobjectsthatyouthinkare
tooheavyforyou.
•Donotperformanyactionthatcauseshazardstothecustomer,orthatmakestheequipmentunsafe.
•Beforeyoustartthemachine,ensurethatotherservicerepresentativesandthecustomer’spersonnelare
notinahazardousposition.
•Placeremovedcoversandotherpartsinasafeplace,awayfromallpersonnel,whileyouareservicing
themachine.
•Keepyourtoolcaseawayfromwalkareassothatotherpeoplewillnottripoverit.
•Donotwearlooseclothingthatcanbetrappedinthemovingpartsofamachine.Ensurethatyoursleeves
arefastenedorrolledupaboveyourelbows.Ifyourhairislong,fastenit.
•Inserttheendsofyournecktieorscarfinsideclothingorfastenitwithanonconductiveclip,approximately
8centimeters(3inches)fromtheend.
•Donotwearjewelry,chains,metal-frameeyeglasses,ormetalfastenersforyourclothing.
Remember:Metalobjectsaregoodelectricalconductors.
•Wearsafetyglasseswhenyouare:hammering,drillingsoldering,cuttingwire,attachingsprings,using
solvents,orworkinginanyotherconditionsthatmightbehazardoustoyoureyes.
•Afterservice,reinstallallsafetyshields,guards,labels,andgroundwires.Replaceanysafetydevice
thatiswornordefective.
•Reinstallallcoverscorrectlybeforereturningthemachinetothecustomer.
Electricalsafety
CAUTION:
Electricalcurrentfrompower,telephone,andcommunicationcablescanbehazardous.Toavoid
personalinjuryorequipmentdamage,disconnecttheattachedpowercords,telecommunication
systems,networks,andmodemsbeforeyouopenthecomputercovers,unlessinstructedotherwise
intheinstallationandconfigurationprocedures.
©CopyrightLenovo20173

Observethefollowingruleswhenworkingonelectricalequipment.
Important:Useonlyapprovedtoolsandtestequipment.Somehandtoolshavehandlescoveredwithasoft
materialthatdoesnotinsulateyouwhenworkingwithliveelectricalcurrents.Manycustomershave,near
theirequipment,rubberfloormatsthatcontainsmallconductivefiberstodecreaseelectrostaticdischarges.
Donotusethistypeofmattoprotectyourselffromelectricalshock.
•Findtheroomemergencypower-off(EPO)switch,disconnectingswitch,orelectricaloutlet.Ifanelectrical
accidentoccurs,youcanthenoperatetheswitchorunplugthepowercordquickly.
•Donotworkaloneunderhazardousconditionsornearequipmentthathashazardousvoltages.
•Disconnectallpowerbefore:
–Performingamechanicalinspection
–Workingnearpowersupplies
–RemovingorinstallingFieldReplaceableUnits(FRUs)
•Beforeyoustarttoworkonthemachine,unplugthepowercord.Ifyoucannotunplugit,askthecustomer
topower-offthewallboxthatsuppliespowertothemachineandtolockthewallboxintheoffposition.
•Ifyouneedtoworkonamachinethathasexposedelectricalcircuits,observethefollowingprecautions:
–Ensurethatanotherperson,familiarwiththepower-offcontrols,isnearyou.
Remember:Anotherpersonmustbetheretoswitchoffthepower,ifnecessary.
–Useonlyonehandwhenworkingwithpowered-onelectricalequipment;keeptheotherhandinyour
pocketorbehindyourback.
Remember:Theremustbeacompletecircuittocauseelectricalshock.Byobservingtheaboverule,
youmaypreventacurrentfrompassingthroughyourbody.
–Whenusingatester,setthecontrolscorrectlyandusetheapprovedprobeleadsandaccessoriesfor
thattester.
–Standonsuitablerubbermats(obtainedlocally,ifnecessary)toinsulateyoufromgroundssuchas
metalfloorstripsandmachineframes.
Observethespecialsafetyprecautionswhenyouworkwithveryhighvoltages;theseinstructionsarein
thesafetysectionsofmaintenanceinformation.Useextremecarewhenmeasuringhighvoltages.
•Regularlyinspectandmaintainyourelectricalhandtoolsforsafeoperationalcondition.
•Donotusewornorbrokentoolsandtesters.
•Neverassumethatpowerhasbeendisconnectedfromacircuit.First,checkthatithasbeenpowered-off.
•Alwayslookcarefullyforpossiblehazardsinyourworkarea.Examplesofthesehazardsaremoistfloors,
nongroundedpowerextensioncables,powersurges,andmissingsafetygrounds.
•Donottouchliveelectricalcircuitswiththereflectivesurfaceofaplasticdentalmirror.Thesurfaceis
conductive;suchtouchingcancausepersonalinjuryandmachinedamage.
•Donotservicethefollowingpartswiththepoweronwhentheyareremovedfromtheirnormaloperating
placesinamachine:
–Powersupplyunits
–Pumps
–Blowersandfans
–Motorgenerators
andsimilarunits.(Thispracticeensurescorrectgroundingoftheunits.)
•Ifanelectricalaccidentoccurs:
–Usecaution;donotbecomeavictimyourself.
–Switchoffpower.
4ideacentre310/510SeriesHardwareMaintenanceManual

–Sendanotherpersontogetmedicalaid.
Safetyinspectionguide
Theintentofthisinspectionguideistoassistyouinidentifyingpotentiallyunsafeconditionsonthese
products.Eachmachine,asitwasdesignedandbuilt,hadrequiredsafetyitemsinstalledtoprotectusers
andservicepersonnelfrominjury.Thisguideaddressesonlythoseitems.However,goodjudgmentshould
beusedtoidentifypotentialsafetyhazardsduetoattachmentoffeaturesoroptionsnotcoveredbythis
inspectionguide.
Ifanyunsafeconditionsarepresent,youmustdeterminehowserioustheapparenthazardcouldbeand
whetheryoucancontinuewithoutfirstcorrectingtheproblem.
Considertheseconditionsandthesafetyhazardstheypresent:
•Electricalhazards,especiallyprimarypower(primaryvoltageontheframecancauseseriousorfatal
electricalshock).
•Explosivehazards,suchasadamagedCRTfaceorbulgingcapacitor
•Mechanicalhazards,suchaslooseormissinghardware
Theguideconsistsofaseriesofstepspresentedinachecklist.Beginthecheckswiththepoweroff,and
thepowercorddisconnected.
Checklist:
1.Checkexteriorcoversfordamage(loose,broken,orsharpedges).
2.Power-offthecomputer.Disconnectthepowercord.
3.Checkthepowercordfor:
a.Athird-wiregroundconnectoringoodcondition.Useametertomeasurethird-wireground
continuityfor0.1ohmorlessbetweentheexternalgroundpinandframeground.
b.Thepowercordshouldbetheappropriatetypeasspecifiedinthepartslistings.
c.Insulationmustnotbefrayedorworn.
4.Removethecover.
5.Checkforanyobviousalterations.Usegoodjudgmentastothesafetyofanyalterations.
6.Checkinsidetheunitforanyobviousunsafeconditions,suchasmetalfilings,contamination,wateror
otherliquids,orsignsoffireorsmokedamage.
7.Checkforworn,frayed,orpinchedcables.
8.Checkthatthepower-supplycoverfasteners(screwsorrivets)havenotbeenremovedortamperedwith.
Handlingelectrostaticdischarge-sensitivedevices
Anycomputerpartcontainingtransistorsorintegratedcircuits(ICs)shouldbeconsideredsensitiveto
electrostaticdischarge(ESD).ESDdamagecanoccurwhenthereisadifferenceinchargebetweenobjects.
ProtectagainstESDdamagebyequalizingthechargesothatthemachine,thepart,theworkmat,andthe
personhandlingthepartareallatthesamecharge.
Notes:
1.Useproduct-specificESDprocedureswhentheyexceedtherequirementsnotedhere.
2.MakesurethattheESDprotectivedevicesyouusehavebeencertified(ISO9000)asfullyeffective.
WhenhandlingESD-sensitiveparts:
•Keepthepartsinprotectivepackagesuntiltheyareinsertedintotheproduct.
Chapter2.Safetyinformation5

•Avoidcontactwithotherpeoplewhilehandlingthepart.
•Wearagroundedwriststrapagainstyourskintoeliminatestaticonyourbody.
•Preventthepartfromtouchingyourclothing.Mostclothingisinsulativeandretainsachargeeven
whenyouarewearingawriststrap.
•Usetheblacksideofagroundedworkmattoprovideastatic-freeworksurface.Thematisespecially
usefulwhenhandlingESD-sensitivedevices.
•Selectagroundingsystem,suchasthoselistedbelow,toprovideprotectionthatmeetsthespecific
servicerequirement.
Note:TheuseofagroundingsystemisdesirablebutnotrequiredtoprotectagainstESDdamage.
–AttachtheESDgroundcliptoanyframeground,groundbraid,orgreen-wireground.
–UseanESDcommongroundorreferencepointwhenworkingonadouble-insulatedor
battery-operatedsystem.Youcanusecoaxorconnector-outsideshellsonthesesystems.
–Usetheroundground-prongoftheacplugonac-operatedcomputers.
Groundingrequirements
Electricalgroundingofthecomputerisrequiredforoperatorsafetyandcorrectsystemfunction.Proper
groundingoftheelectricaloutletcanbeverifiedbyacertifiedelectrician.
Safetynotices
ThecautionanddangersafetynoticesinthissectionareprovidedinthelanguageofEnglish.
DANGER
Electricalcurrentfrompower,telephoneandcommunicationcablesishazardous.
Toavoidashockhazard:
•Donotconnectordisconnectanycablesorperforminstallation,maintenance,orreconfiguration
ofthisproductduringanelectricalstorm.
•Connectallpowercordstoaproperlywiredandgroundedelectricaloutlet.
•Connecttoproperlywiredoutletsanyequipmentthatwillbeattachedtothisproduct.
•Whenpossible,useonehandonlytoconnectordisconnectsignalcables.
•Neverturnonanyequipmentwhenthereisevidenceoffire,water,orstructuraldamage.
•Disconnecttheattachedpowercords,telecommunicationssystems,networks,andmodems
beforeyouopenthedevicecovers,unlessinstructedotherwiseintheinstallationandconfiguration
procedures.
•Connectanddisconnectcablesasdescribedinthefollowingtablewheninstalling,moving,or
openingcoversonthisproductorattacheddevices.
6ideacentre310/510SeriesHardwareMaintenanceManual
ToConnectToDisconnect
1.T urneverythingOFF .
2.First,attachallcablestodevices.
3.Attachsignalcablestoconnectors.
4.Attachpowercordstooutlet.
5.T urndeviceON.
1.T urneverythingOFF .
2.First,removepowercordsfromoutlet.
3.Removesignalcablesfromconnectors.
4.Removeallcablesfromdevices.
CAUTION:
Whenreplacingthelithiumbattery,useonlyPartNumber45C1566oranequivalenttypebattery
recommendedbythemanufacturer.Ifyoursystemhasamodulecontainingalithiumbattery,replace
itonlywiththesamemoduletypemadebythesamemanufacturer.Thebatterycontainslithiumand
canexplodeifnotproperlyused,handled,ordisposedof.
Donot:
•Throworimmerseintowater
•Heattomorethan100°C(212°F)
•Repairordisassemble
Disposeofthebatteryasrequiredbylocalordinancesorregulations.
CAUTION:
Whenlaserproducts(suchasCD-ROMs,DVD-ROMdrives,fiberopticdevices,ortransmitters)are
installed,notethefollowing:
•Donotremovethecovers.Removingthecoversofthelaserproductcouldresultinexposureto
hazardouslaserradiation.Therearenoserviceablepartsinsidethedevice.
•Useofcontrolsoradjustmentsorperformanceofproceduresotherthanthosespecifiedherein
mightresultinhazardousradiationexposure.
DANGER
SomelaserproductscontainanembeddedClass3AorClass3Blaserdiode.Notethefollowing:
Laserradiationwhenopen.Donotstareintothebeam,donotviewdirectlywithoptical
instruments,andavoiddirectexposuretothebeam.
Chapter2.Safetyinformation7
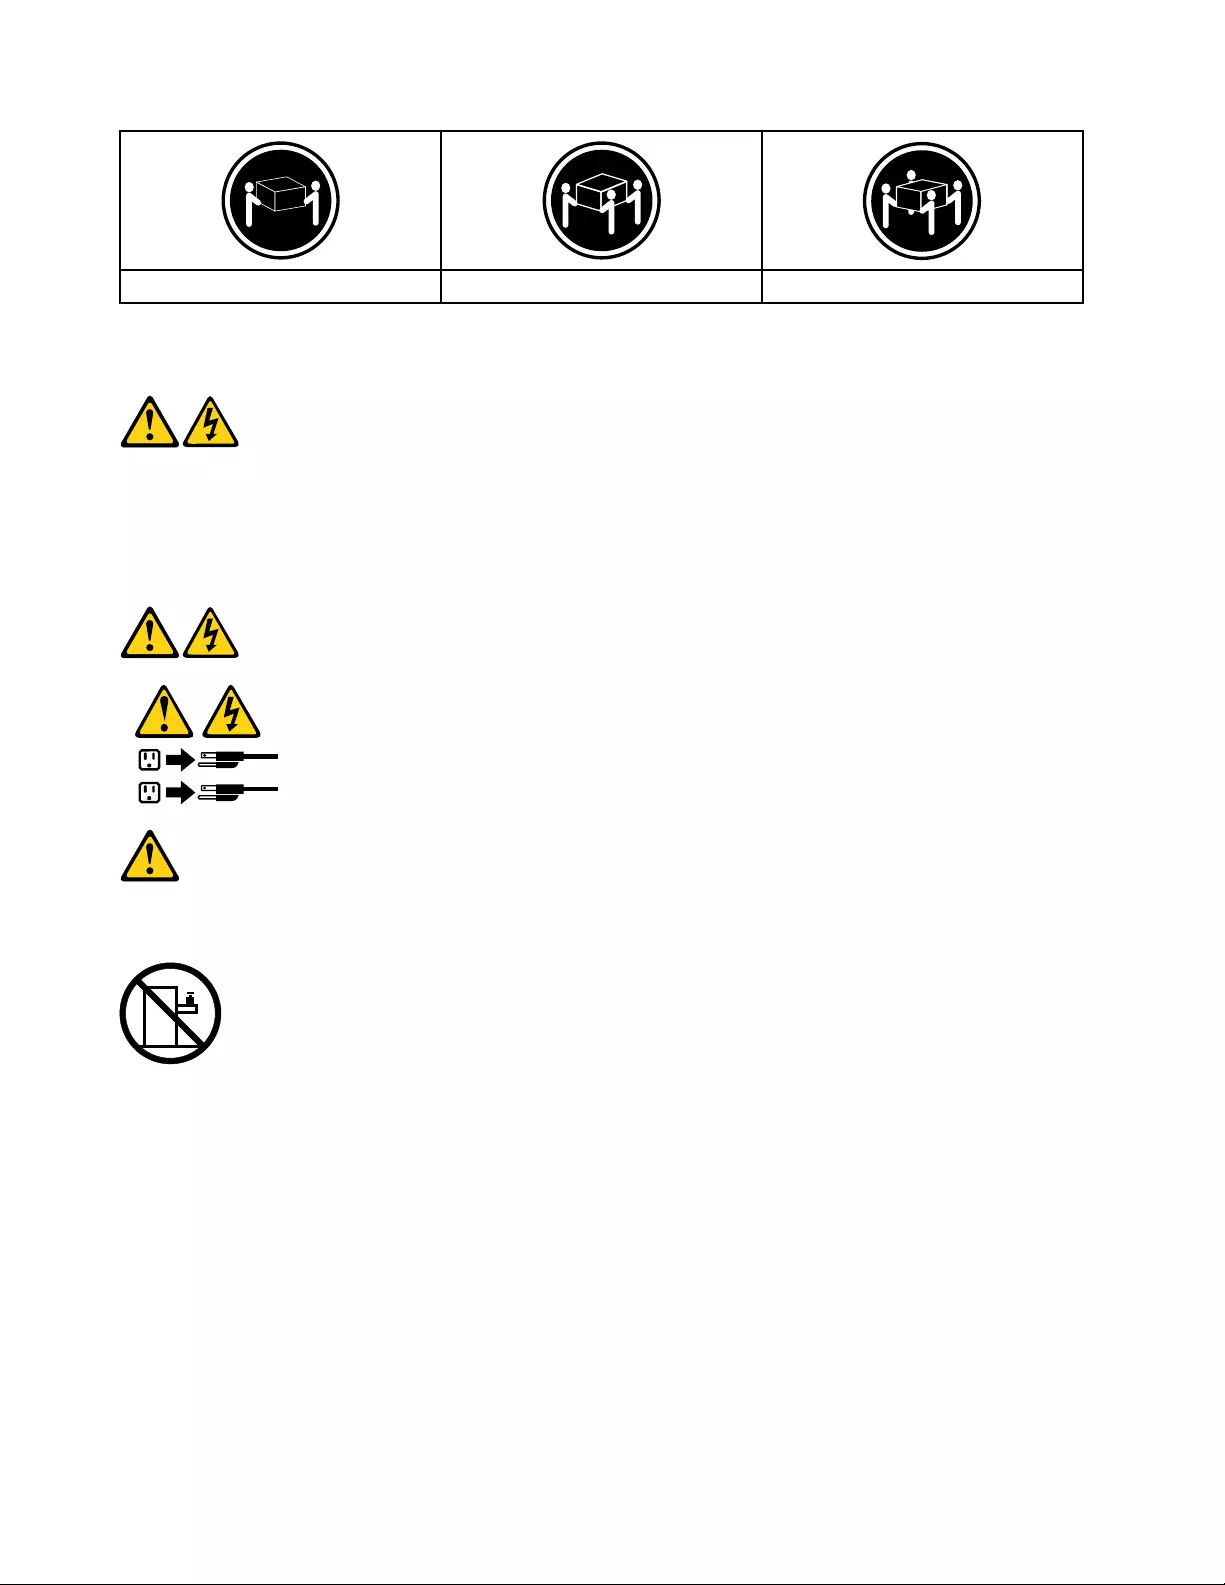
≥18kg(37lbs)≥32kg(70.5lbs)≥55kg(121.2lbs)
CAUTION:
Usesafepracticeswhenlifting.
CAUTION:
Thepowercontrolbuttononthedeviceandthepowerswitchonthepowersupplydonotturnoff
theelectricalcurrentsuppliedtothedevice.Thedevicealsomighthavemorethanonepower
cord.Toremoveallelectricalcurrentfromthedevice,ensurethatallpowercordsaredisconnected
fromthepowersource.
1
2
CAUTION:
Donotplaceanyobjectweighingmorethan82kg(180lbs.)ontopofrack-mounteddevices.
8ideacentre310/510SeriesHardwareMaintenanceManual

Chapter3.Generalinformation
Thischapterprovidesgeneralinformationthatappliestoallmachinetypessupportedbythispublication.
Specifications
Thissectionliststhephysicalspecificationsforyourcomputer.
Thissectionliststhephysicalspecificationsforyourcomputer.
Thissectionliststhephysicalspecifications.
Environment
Airtemperature:
Operating:10°to35°C
Transit:-20°to55°C
Humidity:
Operating:35%to80%
Transit:20%to90%(40°C)
Altitude:86KPato106KPa
Electricalinput:
Inputvoltage:90V-264V(AC)
Inputfrequency:47Hz-63Hz
©CopyrightLenovo20179

10ideacentre310/510SeriesHardwareMaintenanceManual

Chapter4.GeneralCheckout
Attention:Thedrivesinthecomputeryouareservicingmighthavebeenrearrangedorthedrivestartup
sequencechanged.Beextremelycarefulduringwriteoperationssuchascopying,saving,orformatting.
Dataorprogramscanbeoverwrittenifyouselectanincorrectdrive.
Generalerrormessagesappearifaproblemorconflictisfoundbyanapplicationprogram,theoperating
system,orboth.Foranexplanationofthesemessages,refertotheinformationsuppliedwiththatsoftware
package.
Usethefollowingproceduretohelpdeterminethecauseoftheproblem:
1.Power-offthecomputerandallexternaldevices.
2.Checkallcablesandpowercords.
3.Setalldisplaycontrolstothemiddleposition.
4.Power-onallexternaldevices.
5.Power-onthecomputer.
•Lookfordisplayederrorcodes
•Lookforreadableinstructionsoramainmenuonthedisplay.
Ifyoudidnotreceivethecorrectresponse,proceedtostep6.
Ifyoudoreceivethecorrectresponse,proceedtostep7.
6.Lookatthefollowingconditionsandfollowtheinstructions:
•IfthecomputerdisplaysaPOSTerror,goto“POSTerrorcodes” .
•Ifthecomputerhangsandnoerrorisdisplayed,continueatstep7.
7.Iftheteststopsandyoucannotcontinue,replacethelastdevicetested.
©CopyrightLenovo201711

12ideacentre310/510SeriesHardwareMaintenanceManual

Chapter5.UsingtheSetupUtility
TheSetupUtilityprogramisusedtoviewandchangetheconfigurationsettingsofyourcomputer,regardless
ofwhichoperatingsystemyouareusing.However,theoperating-systemsettingsmightoverrideanysimilar
settingsintheSetupUtilityprogram.
StartingtheLenovoBIOSSetupUtilityprogram
TostarttheLenovoBIOSSetupUtilityprogram,dothefollowing:
1.Ifyourcomputerisalreadyonwhenyoustartthisprocedure,shutdowntheoperatingsystemand
turnoffthecomputer.
2.PressandholdtheF1key,andthenturnonthecomputer.WhentheLenovoBIOSSetupUtilityprogram
isdisplayed,releasetheF1key.
Note:IfaPower-OnPasswordoranAdministratorPasswordhasbeenset,theSetupUtilityprogrammenu
isnotdisplayeduntilyoutypeyourpassword.Formoreinformation,see“Usingpasswords.”
Viewingandchangingsettings
SystemconfigurationoptionsarelistedintheLenovoBIOSSetupUtilityprogrammenu.Tovieworchange
settings,see“StartingtheSetupUtilityprogram.”
YoumustusethekeyboardwhenusingtheLenovoBIOSSetupUtilitymenu.Thekeysusedtoperform
varioustasksaredisplayedonthebottomofeachscreen.
Usingpasswords
YoucanusetheLenovoBIOSSetupUtilityprogramtosetpasswordstopreventunauthorizedpersons
fromgainingaccesstoyourcomputeranddata.See“StartingtheSetupUtilityprogram.”Thefollowing
typesofpasswordsareavailable:
•AdministratorPassword
•Power-OnPassword
Youdonothavetosetanypasswordstouseyourcomputer.However,ifyoudecidetosetpasswords,read
thefollowingsections.
Passwordconsiderations
Apasswordcanbeanycombinationoflettersandnumbersupto16character(a-z,and0-9).Forsecurity
reasons,itisagoodideatouseastrongpasswordthatcannotbeeasilycompromised.Wesuggestthat
passwordsshouldfollowtheserules:
•Strongpasswordscontain7-16characters,combinelettersandnumbers.
•Donotuseyournameoryourusername.
•Donotuseacommonwordoracommonname.
•Besignificantlydifferentfromyourpreviouspassword.
Attention:AdministratorandPower-Onpasswordsarenotcasesensitive
©CopyrightLenovo201713

AdministratorPassword
SettinganAdministratorPassworddetersunauthorizedpersonsfromchangingconfigurationsettings.You
mightwanttosetanAdministratorPasswordifyouareresponsibleformaintainingthesettingsofseveral
computers.
AfteryousetanAdministratorPassword,apasswordpromptisdisplayedeverytimeyouaccesstheLenovo
BIOSSetupUtilityprogram.
IfboththeAdministratorandPower-OnPasswordareset,youcantypeeitherpassword.However,youmust
useyourAdministratorPasswordtochangeanyconfigurationsettings.
Setting,changing,ordeletinganAdministratorpassword
TosetanAdministratorPassword,dothefollowing:
Note:Apasswordcanbeanycombinationoflettersandnumbersupto16character(a-z,and0-9).For
moreinformation,see“Passwordconsiderations”onpage13.
1.StarttheLenovoBIOSSetupUtilityprogram(see“StartingtheLenovoBIOSSetupUtilityprogram”on
page13).
2.FromtheSecuritymenu,selectSetAdministratorPasswordandpresstheEnterkey.
3.Thepassworddialogboxwillbedisplayed.Typethepassword,andthenpresstheEnterkey.
4.Re-typethepasswordtoconfirm,andthenpresstheEnterkey.Ifyoutypethepasswordcorrectly,
thepasswordwillbeinstalled.
TochangeanAdministratorPassword,dothefollowing:
1.StarttheLenovoBIOSSetupUtilityprogram(see“StartingtheLenovoBIOSSetupUtilityprogram”on
page13).
2.FromtheSecuritymenu,selectSetAdministratorPasswordandpresstheEnterkey.
3.Thepassworddialogboxwillbedisplayed.Typethecurrentpassword,andthenpressEnterkey.
4.Typethenewpassword,andthenpressEnterkey.Re-typethepasswordtoconfirmthenewpassword,
ifyoutypethenewpasswordcorrectly,thenewpasswordwillbeinstalled.ASetupNoticewilldisplay
thatchangeshavebeensaved.
TodeleteapreviouslysetAdministratorPassword,dothefollowing:
1.FromtheSecuritymenu,selectSetAdministratorPasswordandpresstheEnterkey.
2.Thepassworddialogboxwillbedisplayed.TypethecurrentpasswordandpresstheEnterkey.
3.TodeleteanAdministratorPassword,Enterblankfieldsforeachnewpasswordlineitem.Asetup
noticewilldisplaythatchangeshavebeensaved.
4.ReturntotheLenovoBIOSSetupUtilityprogrammenuandselecttheExitoption.
5.SelectSavechangesandExitfromthemenu.
Power-OnPassword
WhenaPower-OnPasswordisset,youcannotstarttheLenovoBIOSSetupUtilityprogramuntilavalid
passwordistypedfromthekeyboard.
Setting,changing,ordeletingaPower-OnPassword
Note:Apasswordcanbeanycombinationoflettersandnumbersupto16character(a-z,and0-9).
14ideacentre310/510SeriesHardwareMaintenanceManual

TosetaPower-OnPassword,dothefollowing:
1.StarttheLenovoBIOSSetupUtilityprogram(See”StartingtheLenovoBIOSSetupUtilityprogram”on
page13.)
2.FromtheSecuritymenu,selectSetPower-OnPasswordandpresstheEnterkey.
3.Thepassworddialogboxwillbedisplayed.Typethepassword,andpresstheEnterkey.
4.Re-typethepasswordtoconfirm,ifyoutypethepasswordcorrectly,thepasswordwillbeinstalled.
TochangeaPower-OnPassword,dothefollowing:
1.StarttheLenovoBIOSSetupUtilityprogram(See”StartingtheLenovoBIOSSetupUtilityprogram”on
page13.)
2.FromtheSecuritymenu,selectSetPower-OnPasswordandpresstheEnterkey.
3.Thepassworddialogboxwillbedisplayed.Typethecurrentpassword,andthenpresstheEnterkey.
4.Typethenewpassword,andthenpresstheEnterkey.Re-typethepasswordtoconfirmthenew
password,ifyoutypethenewpasswordcorrectly,thenewpasswordwillbeinstalled.Asetupnotice
willdisplaythatchangeshavebeensaved.
TodeleteapreviouslysetPower-OnPassword,dothefollowing:
1.FromtheSecuritymenu,selectSetPower-OnPasswordandpresstheEnterkey.
2.Thepassworddialogboxwillbedisplayed.TypethecurrentpasswordandpresstheEnterkey.
3.TodeletethePower-OnPassword,Enterblankfieldsforeachnewpasswordlineitem.Asetup
noticewilldisplaythatchangeshavebeensaved.
4.ReturntotheLenovoBIOSSetupUtilityprogrammenuandselecttheExitoption.
5.SelectSavechangesandExitfromthemenu.
Enablingordisablingadevice
TheDevicesoptionsisusedtoenableordisableuseraccesstothefollowingdevices:
SerialPortSetupSelectthisoptiontoenableordisableSerialPort(com).
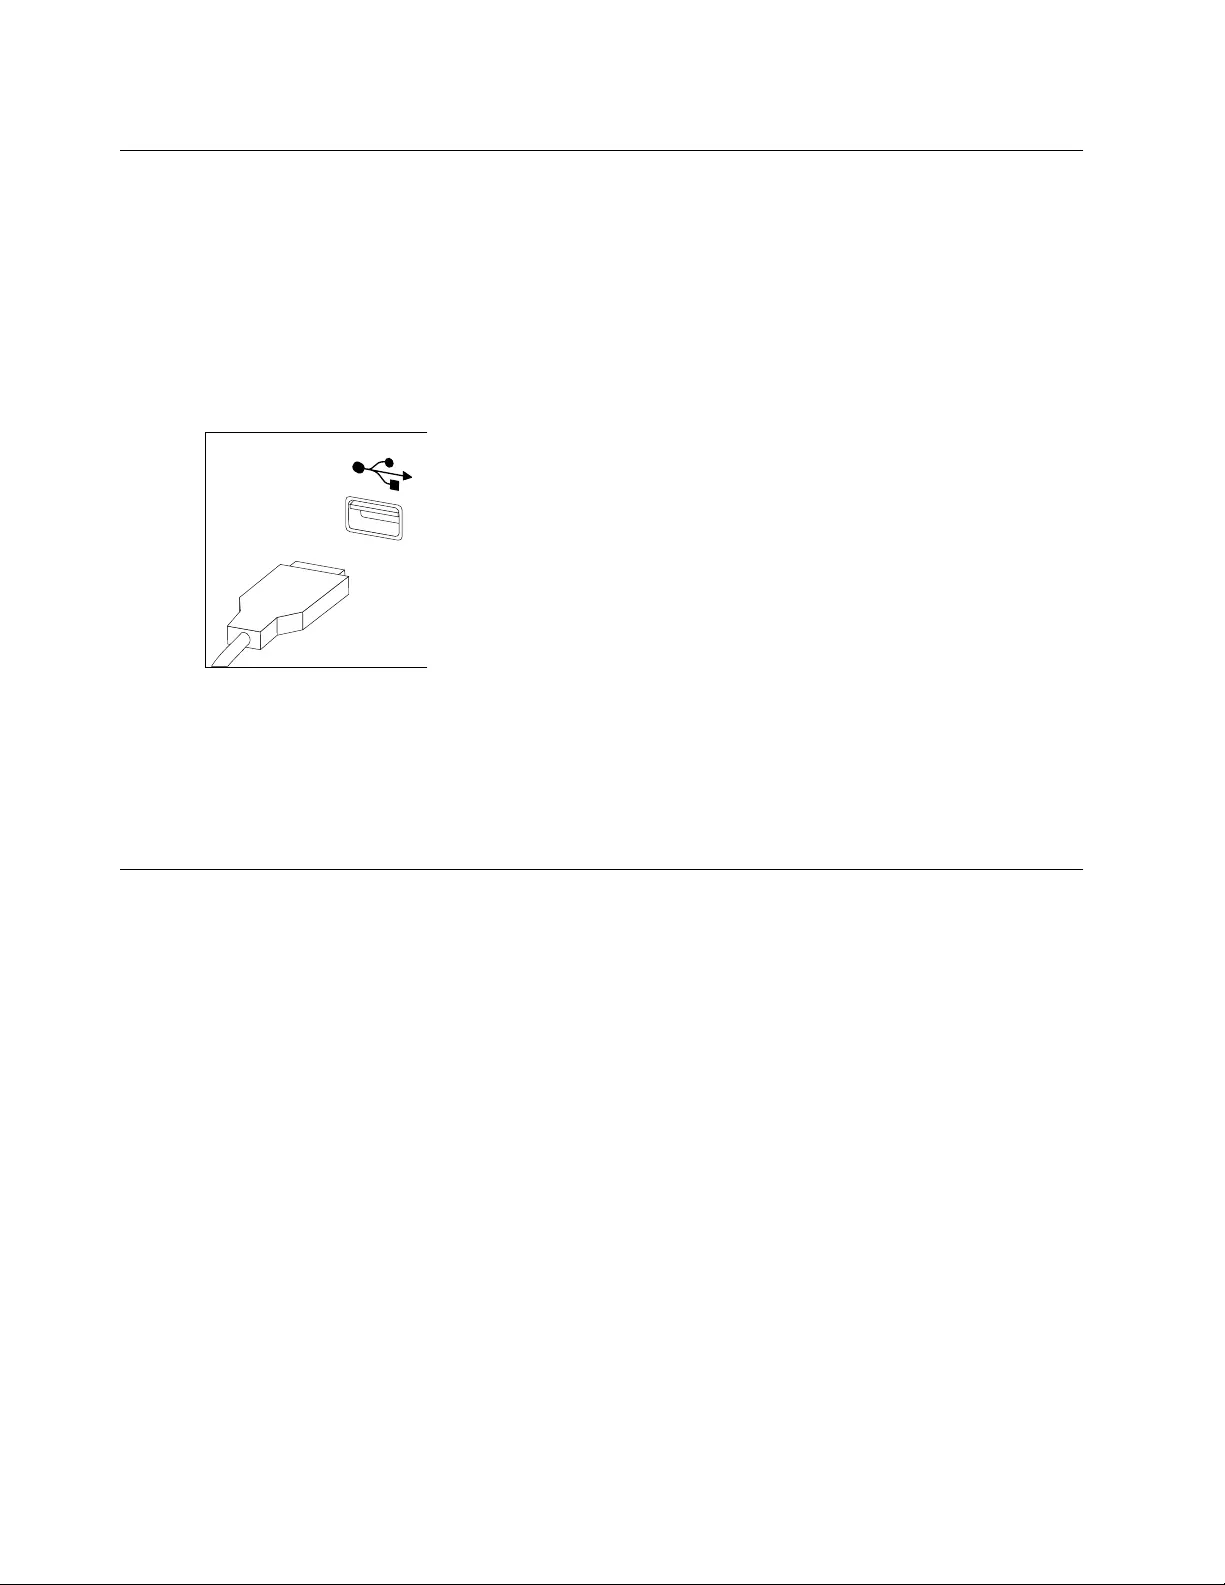
USBFunctionsSelectwhethertoenableordisableUSB(UniversalSerial
Bus)functions.Ifitisdisabled,theUSBkeyboardand/or
USBmousemaybenotabletobeusedwithoutdevice
driversupport.
ATADriveSetupSelectIDE,ACHImodeordisableSATAcontroller.Device
driversupportisrequiredforACHImode.Dependingon
howtheharddiskimagewasinstalled,changingthis
settingmaypreventthesystemfrombooting.
VideoSetupToconfigurevideorelatedfunctions.Thisoptionallows
youtoconfiguresystem'sinitiategraphicadapterfrom
eitherIGD(IntegratedGraphicsDevice)orPEG(PCI
ExpressGraphics).KeepontheIGDenabledbasedon
thesetupoptions.
Chapter5.UsingtheSetupUtility15

OnboardAudioControllerSelectwhethertoenableordisabletheOnboardAudio
Controller,whenfeatureissettoDisabledalldevices
connectedtotheaudioconnectors(e.g.aheadphoneor
amicrophone)aredisabledandcan’tbeused.
OnboardEthernetControllerorLANBootAgentSelectwhethertoenableordisableOnboardEthernet
Controller,orselectwhethertoenableordisableload
onboardPXE(PrebootExecutionEnvironment),or
SMC(SecureManagedClient).Thisfeaturewillallow
thecomputertobootfromaserverimage.
Toenableordisableadevice,dothefollowing:
1.StarttheSetupUtilityprogram(see“StartingtheSetupUtilityprogram”onpage13).
2.FromtheSetupUtilityprogrammenu,selectDevices.
3.Select:
SerialPortSetuppresstheEnterkey,andthenselectSerialPortSetup.
USBSetuppresstheEnterkey,andthenselectUSBFunctions.
ATADeviceSetuppresstheEnterkey.SelectConfigureSATAas,presstheEnterkey,and
thenselectSATAmode.
VideoSetuppresstheEnterkey,andthenselectVideoSetup.
AudioSetuppresstheEnterkey,andthenselectOnboardAudioController.
NetworkSetuppresstheEnterkey,andthenselectOnboardEthernetSupportorLANBoot
Agent.
4.SelectDisabledorEnabledandthenpresstheEnterkey.
5.ReturntotheLenovoBIOSSetupUtilityprogrammenuandselecttheExitoption.
6.SelectSavechangesandExitfromthemenu.
Note:Ifyoudonotwanttosavethesettings,selectDiscardchangesandExitfromthemenu.
Selectingastartupdevice
IfyourcomputerdoesnotbootfromadevicesuchastheCD/DVD-ROMdrivediskorharddiskasexpected,
followoneoftheproceduresbelow.
Selectingatemporarystartupdevice
Usethisproceduretostartupfromanybootdevice.
Note:NotallCDs,DVDsorharddiskdrivesarebootable.
1.Turnoffyourcomputer.
2.PressandholdtheF12key,andthenturnonthecomputer.WhentheStartupDeviceMenuappears,
releasetheF12key.
Note:IftheStartupDeviceMenudoesnotdisplayusingthesesteps,repeatedlypressandreleasethe
F12keyratherthankeepingitpressedwhenturningonthecomputer.
3.Use↑and↓arrowstoselectthedesiredstartupdevicefromtheStartupDeviceMenuandpress
theEnterkeytobegin.
Note:SelectingastartupdevicefromtheStartupDeviceMenudoesnotpermanentlychangethe
startupsequence.
16ideacentre310/510SeriesHardwareMaintenanceManual

Selectingorchangingthestartupdevicesequence
Tovieworpermanentlychangetheconfiguredstartupdevicesequence,dothefollowing:
1.StarttheLenovoBIOSSetupUtilityprogram(see“StartingtheLenovoBIOSSetupUtilityprogram”on
page13).
2.FromtheLenovoBIOSSetupUtilityprogrammainmenu,selecttheStartupoption.
3.PresstheEnterkey,andselectthedevicesforthePrimaryBootSequence.Readtheinformation
displayedontherightsideofthescreen.
4.Use↑and↓arrowstoselectadevice.Usethe<+>or<->keystomoveadeviceupordown.Usethe
<×>keytoexcludethedevicefromorincludethedeviceinthebootsequence.
5.ReturntotheLenovoBIOSSetupUtilityprogrammenuandselecttheExitoption.
6.SelectSavechangesandExitfromthemenu.
Notes:
a.Ifyoudonotwanttosavethesettings,selectDiscardchangesandExitfromthemenu.
b.Ifyouhavechangedthesesettingsandwanttoreturntothedefaultsettings,selectLoadOptimal
Defaultsfromthemenu.
ExitingtheLenovoBIOSSetupUtilityprogram
Afteryoufinishviewingorchangingsettings,presstheEsckeytoreturntotheLenovoBIOSSetupUtility
programmainmenu.YoumighthavetopresstheEsckeyseveraltimes.Dooneofthefollowing:
•Ifyouwanttosavethenewsettings,selectSavechangesandExitfromthemenu.WhentheSave&
resetwindowshows,selecttheYesbutton,andthenpresstheEnterkeytoexittheLenovoBIOS
SetupUtilityprogram.
•Ifyoudonotwanttosavethesettings,selectDiscardchangesandExitfromthemenu.Whenthe
ResetWithoutSavingwindowshows,selecttheYesbutton,andthenpresstheEnterkeytoexitthe
SetupUtilityprogram.
Chapter5.UsingtheSetupUtility17

18ideacentre310/510SeriesHardwareMaintenanceManual
Chapter6.Symptom-to-FRUIndex
TheSymptom-to-FRUindexlistserrorsymptomsandpossiblecauses.Themostlikelycauseislistedfirst.
AlwaysbeginwithChapter4,“GeneralCheckout,”onpage11.Thisindexcanalsobeusedtohelpyou
decidewhichFRUstohaveavailablewhenservicingacomputer.Ifyouareunabletocorrecttheproblem
usingthisindex,goto“Undeterminedproblems”onpage20.
Notes:
•Ifyouhavebothanerrormessageandanincorrectaudioresponse,diagnosetheerrormessagefirst.
•Ifyoucannotrunthediagnostictestsoryougetadiagnosticerrorcodewhenrunningatestbutdid
receiveaPOSTerrormessage,diagnosethePOSTerrormessagefirst.
•Ifyoudidnotreceiveanyerrormessagelookforadescriptionofyourerrorsymptomsinthefirstpartof
thisindex.
Harddiskdrivebooterror
Aharddiskdrivebooterrorcanhavethefollowingcauses.
ErrorFRU/Action
Thestartupdriveisnotincludedinthebootsequence
inconfiguration.
Checktheconfigurationandensurethestartupdriveis
inthebootsequence.
Nooperatingsysteminstalledonthebootdrive.Installanoperatingsystemonthebootdrive.
Thebootsectoronthestartupdriveiscorrupted.Thedrivemustbeformatted.Dothefollowing:
1.Attempttoback-upthedataonthefailingharddisk
drive.
2.Usetheoperatingsystemtoformattheharddisk
drive.
Thedriveisdefective.Replacetheharddiskdrive.
PowerSupplyProblems
Followtheseproceduresifyoususpectthereisapowersupplyproblem.
Check/VerifyFRU/Action
Checkthatthefollowingareproperlyinstalled:
•PowerCord
•On/OffSwitchconnector
•SystemBoardPowerSupplyconnectors
•Microprocessor(s)connection
Reseatconnectors
Checkthepowercord.PowerCord
Checkthepower-onswitch.Power-onSwitch
©CopyrightLenovo201719

POSTerrorcodes
Eachtimeyouturnthecomputeron,itperformsaseriesofteststocheckthatthesystemisoperating
correctlyandthatcertainoptionsareset.ThisseriesoftestsiscalledthePower-OnSelf-Test,orPOST.
POSTdoesthefollowing:
•Checkssomebasicsystem-boardoperations
•Checksthatthememoryisworkingcorrectly
•Startsvideooperations
•Verifiesthatthebootdriveisworking
POSTErrorMessageDescription/Action
KeyboarderrorCannotinitializethekeyboard.Makesurethekeyboard
isproperlyconnectedtothecomputerandthatnokeys
areheldpressedduringPOST.Topurposelyconfigure
thecomputerwithoutakeyboard,selectKeyboardless
operationinStartupoptiontoEnabled.TheBIOSthen
ignoresthemissingkeyboardduringPOST.
RebootandSelectproperBootdeviceorInsertBoot
MediainselectedBootdevice
TheBIOSwasunabletofindasuitablebootdevice.Make
surethebootdriveisproperlyconnectedtothecomputer.
Makesureyouhavebootablemediainthebootdevice.
Undeterminedproblems
1.Power-offthecomputer.
2.Removeordisconnectthefollowingcomponents(ifconnectedorinstalled)oneatatime.
a.Externaldevices(modem,printer,ormouse)
b.Extendedvideomemory
c.ExternalCache
d.ExternalCacheRAM
e.Harddiskdrive
f.Diskdrive
3.Power-onthecomputertore-testthesystem.
4.Repeatsteps1through3untilyoufindthefailingdeviceorcomponent.
Ifalldevicesandcomponentshavebeenremovedandtheproblemcontinues,replacethesystemboard.
20ideacentre310/510SeriesHardwareMaintenanceManual
Chapter7.Locatingconnectors,controlsandcomponents
Thissectionprovidesillustrationstohelplocatethevariousconnectors,controlsandcomponentsofthe
computer.
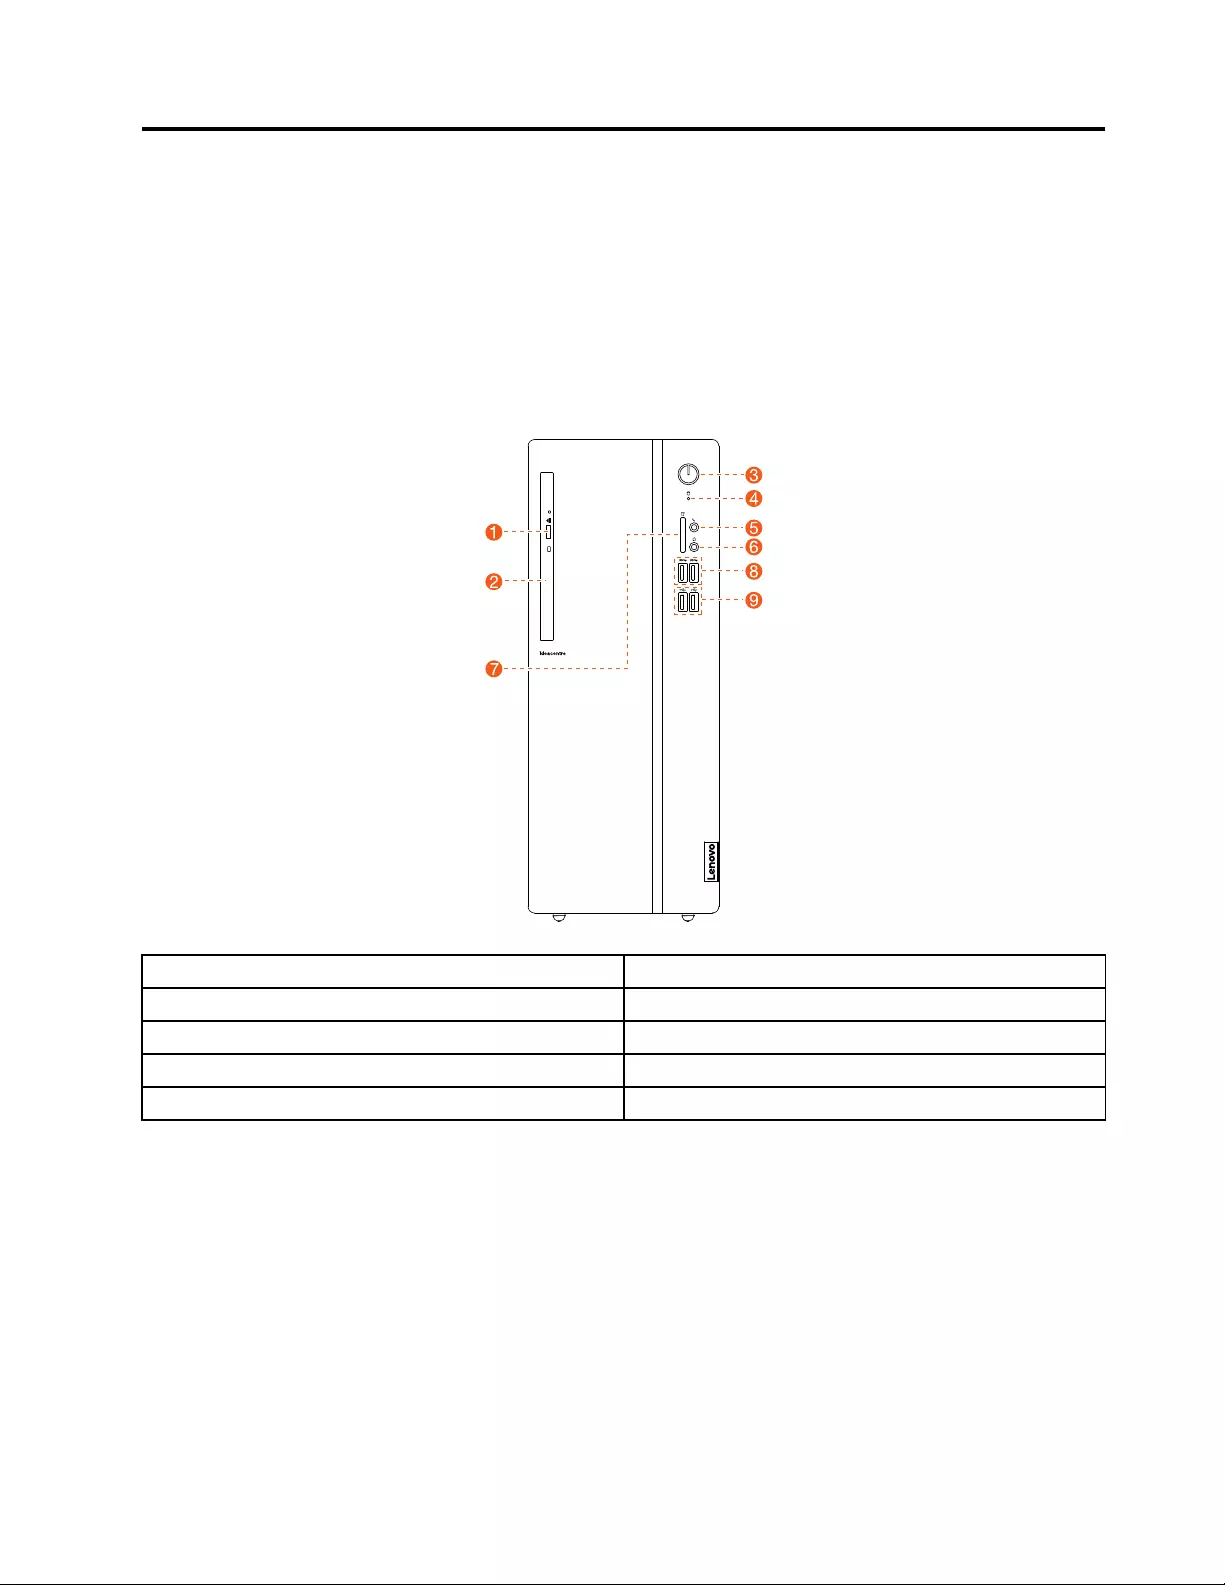
Fontview
Thefollowingillustrationshowsthelocationofcontrolsandcomponentsonthefrontofthecomputer.
Attention:Becarefulnottoblockanyairventsonthecomputer.Blockedairventscancauseoverheating.
1.Opticaldriveejectbutton6.Headphoneconnector
2.OpticalDrive7.Memorycardreader
3.Powerbutton8.USB3.0connectors(2)
4.Storagedriveindicator9.USB3.0connectors(2)orUSB2.0connectors(2)
5.Microphoneconnector
©CopyrightLenovo201721
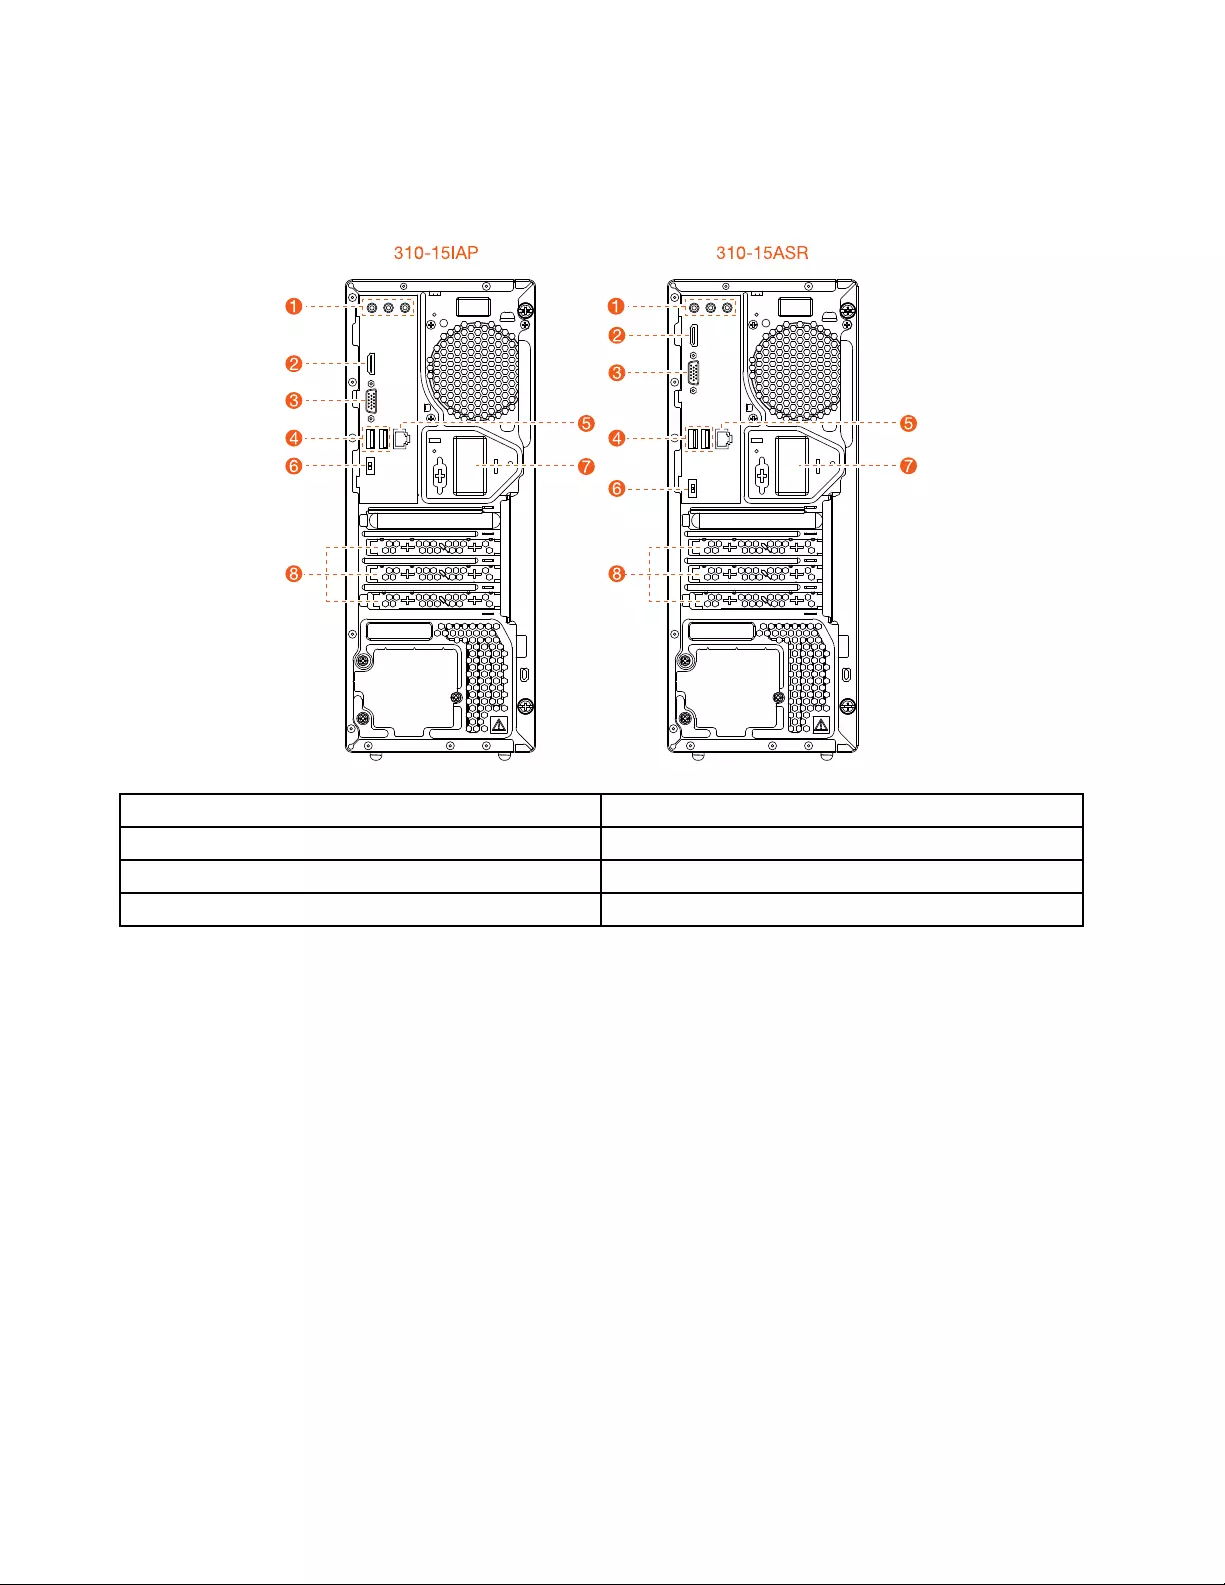
Rearviewofideacentre310series
Thefollowingillustrationsshowthelocationofconnectorsandcomponentsontherearofthe310series
computers.
310-15IAP 310-15ASR
1.Audioconnectors5.Ethernetconnector
2.HDMI-outconnector6.Powerconnector
3.VGA-outconnector7.Wi-Fiantenna
4.USB2.0connectors(2)8.Expansioncardslots
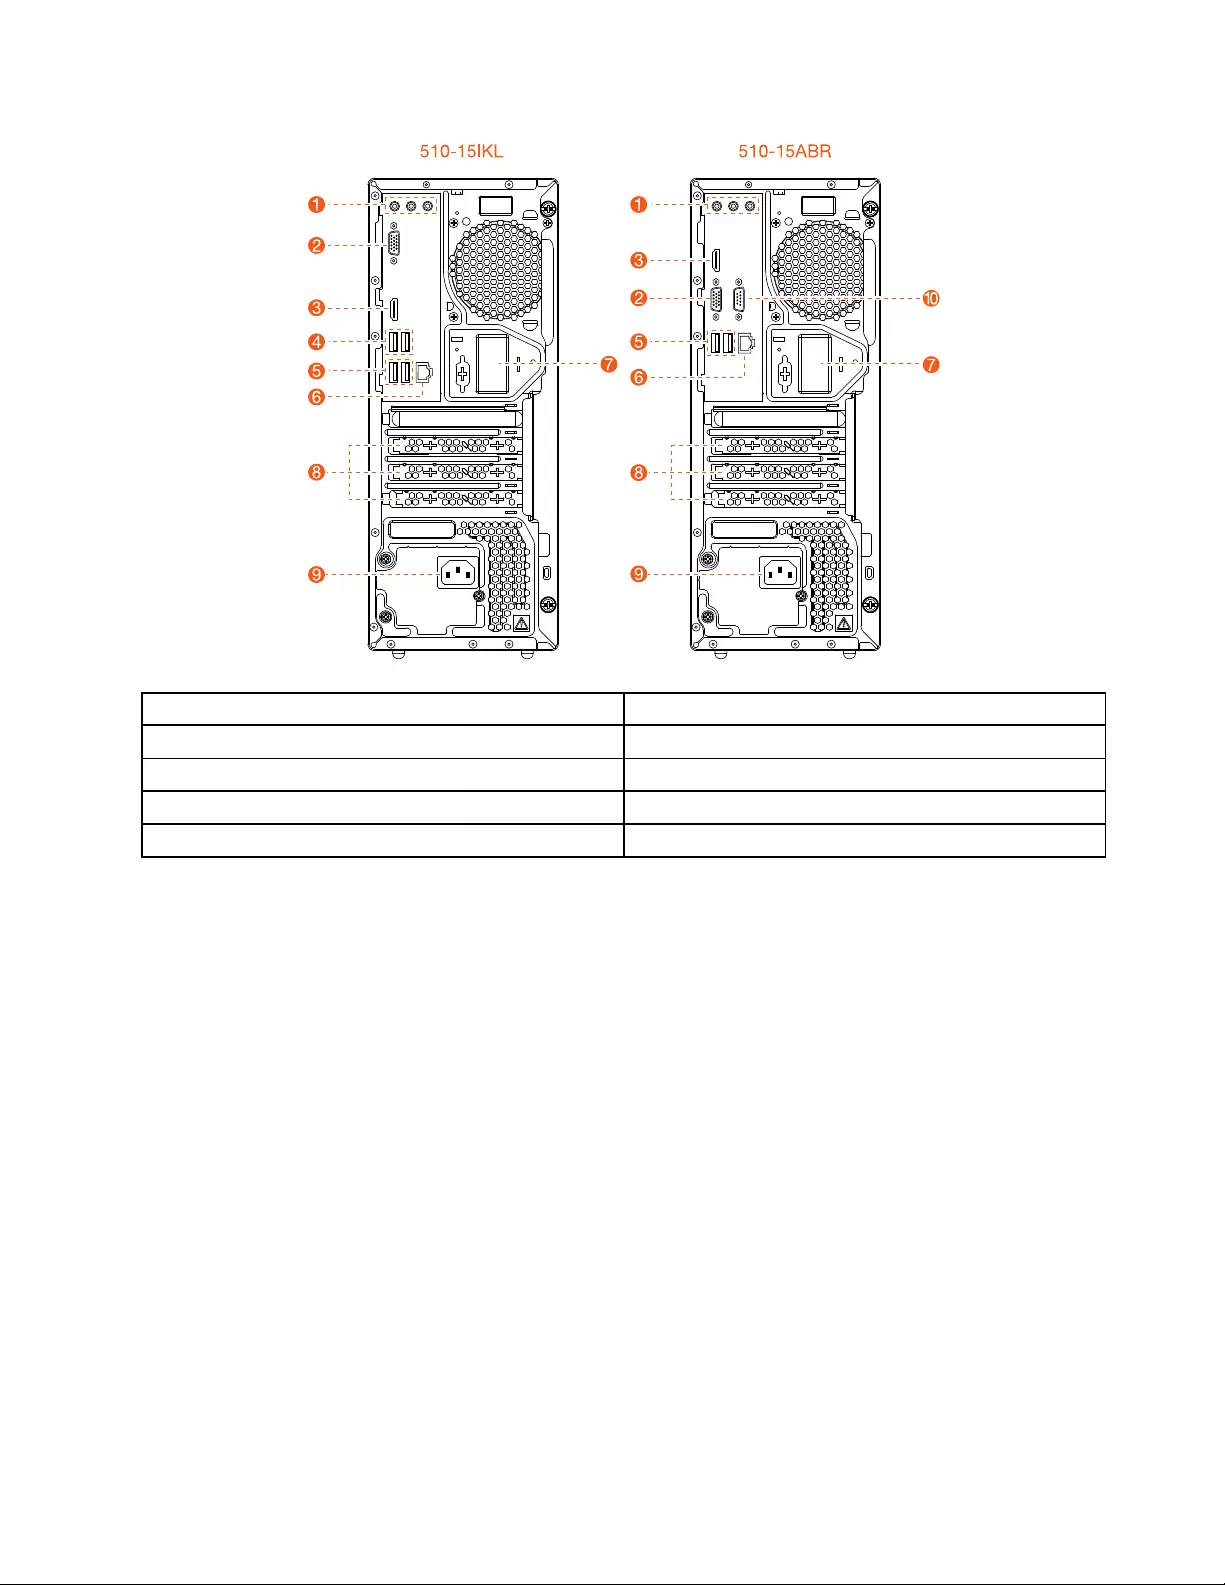
Rearviewofideacentre510series
Thefollowingillustrationsshowsthelocationofconnectorsandcomponentsontherearofthe510series
computers.
22ideacentre310/510SeriesHardwareMaintenanceManual
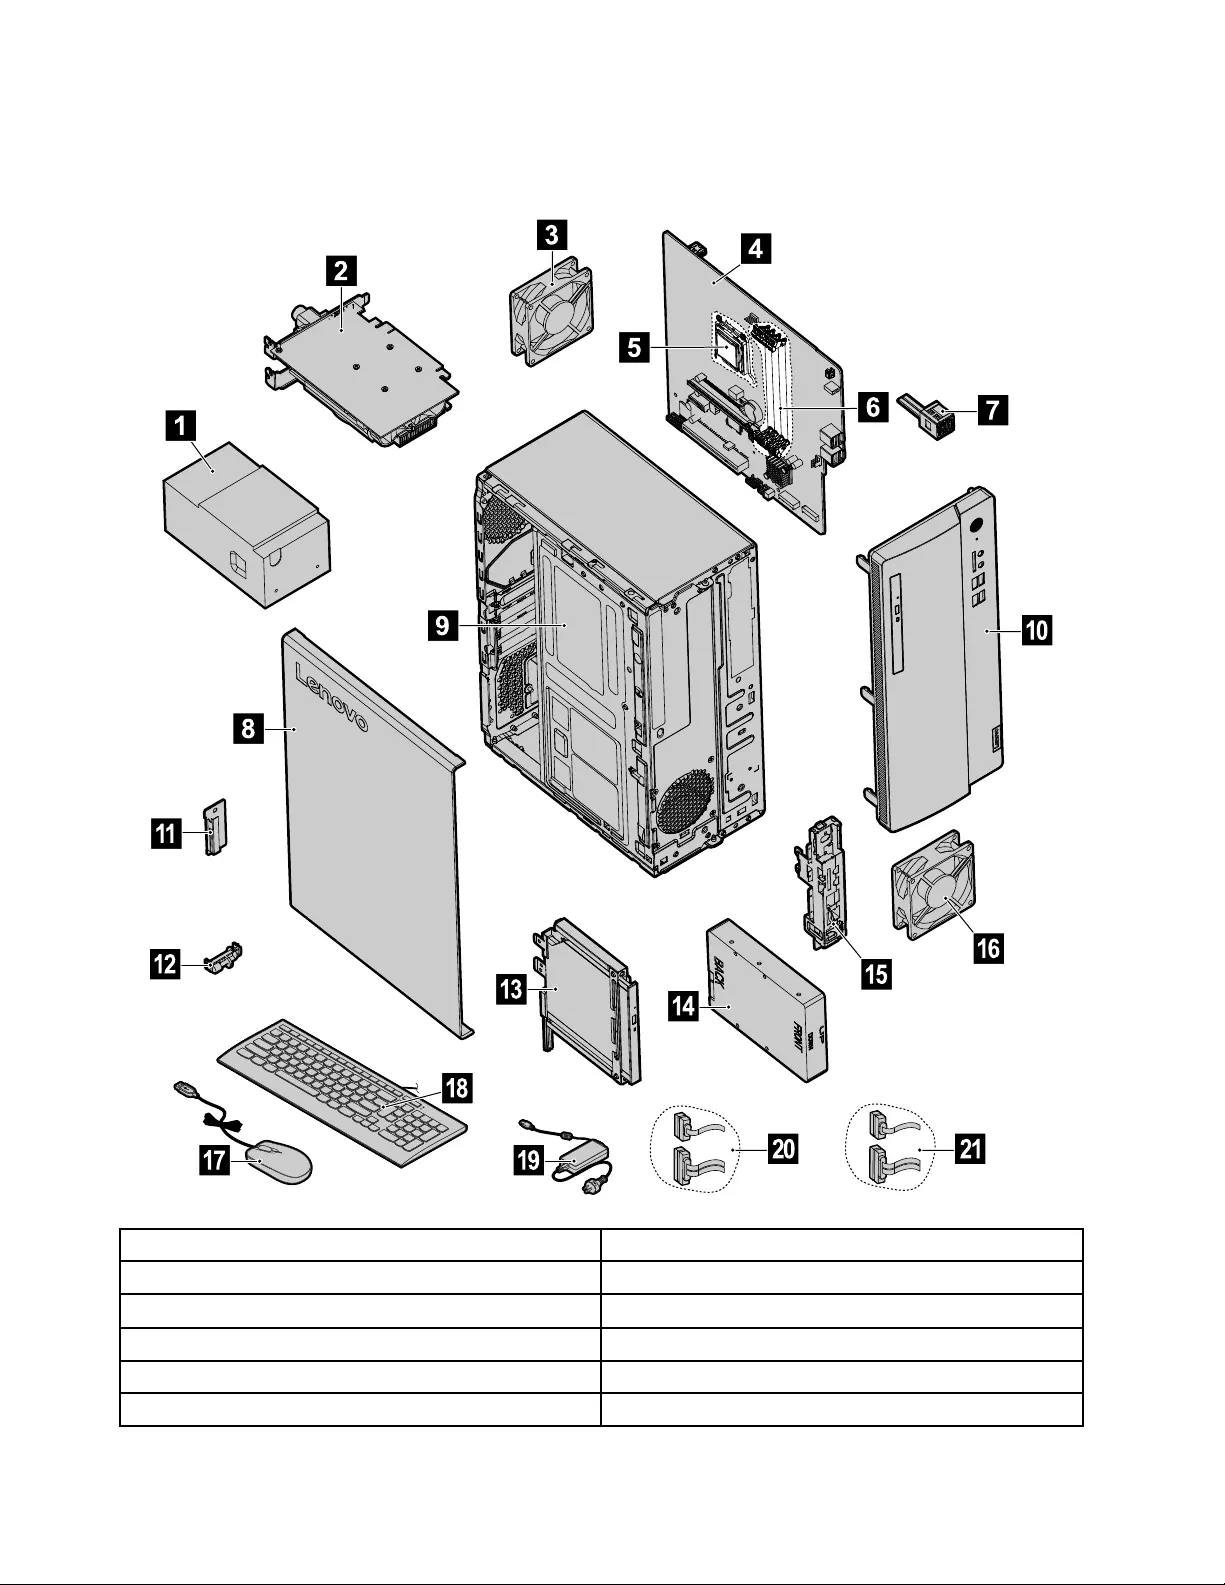
Hardwarecomponents
Thefollowingillustrationshowsthecomponentsthatmakeupyourcomputer.
1
8
4
7
6
9
2
3
12
10
17 19
11
14
15
13
18
16
20 21
5
1.Powersupplyassembly12.Thermalsensor
2.PCIexpressadaptercard13.Opticaldrive
3.Rearsystemfan14.Storagedrive
4.Motherboard15.FrontI/Oassembly(includingthecardreader)
5.Microprocessor16.Frontsystemfan
6.Memorymodule17.Mouse
24ideacentre310/510SeriesHardwareMaintenanceManual

7.Powerbuttonboard18.Keyboard
8.Computercover19.Poweradapter
9.Chassis20.SATAcable(forconnectingthestoragedrive)
10.Frontbezel21.SATAcable(forconnectingtheopticaldrive)
11.FrontWi-Fiantenna
Identifyingpartsonthemotherboard
Themotherboard(sometimescalledtheplanarorsystemboard)isthemaincircuitboardinyourcomputer.
Itprovidesbasiccomputingfunctionsandsupportsavarietyofdevicesthatarefactory-installedorthat
youcaninstalllater.Thefollowingillustrationshowsthelocationofconnectorsandcomponentsonthe
frontofthemotherboard.
Table1.310–15ASR
1
2
3
5
7
8
9 10
11
14
12
13
15
16
17
18192021
6
4
1.Audioconnectors12.Frontpanelconnector
2.HDMI-outconnector13.USB2.0connectors(2)
3.VGA-outconnector14.Storagedrivepowerconnector
4.SATAconnectors(2)15.USB3.0connectors(2)
5.USB2.0andEthernetconnectors16.Headphoneconnector
6.Systemfanconnector17.Microphoneconnector
7.PCIexpressX16adapterslot18.Powerbuttonboardconnector
8.PCIexpressX1adapterslot19.Memoryslots(2)
Chapter7.Locatingconnectors,controlsandcomponents25
9.FrontUSBconnector20.Microprocessorfanconnector
10.M.2Wi-Ficardslot21.Microprocessorsocket
11.Auxiliarypowerconnector
Table2.510–15ABR
1
2
3
4
5
6
7
8 9 10 11 12
13
14
16
17
18
19
2021222324
15
1.Audioconnectors13.Auxiliaryfanconnector
2.HDMI-outconnector14.FrontUSBconnector
3.VGA-outconnector15.Frontpanelconnector
4.USB2.0andEthernetconnectors16.USB2.0connectors(2)
5.PCIexpressX16adapterslot17.USB3.0connectors(2)
6.PCIexpressX1adapterslot18.Headphoneconnector
7.M.2Wi-Ficardslot19.Microphoneconnector
8.SATApowerconnector20.Powerbuttonboardconnector
9.USB3.0connector21.Memoryslots(2)
10.USB3.0connector22.Microprocessorfanconnector
11.M.2storagedriveconnector23.Microprocessorsocket
12.10-pinpowerconnector24.4-pinpowerconnector
26ideacentre310/510SeriesHardwareMaintenanceManual
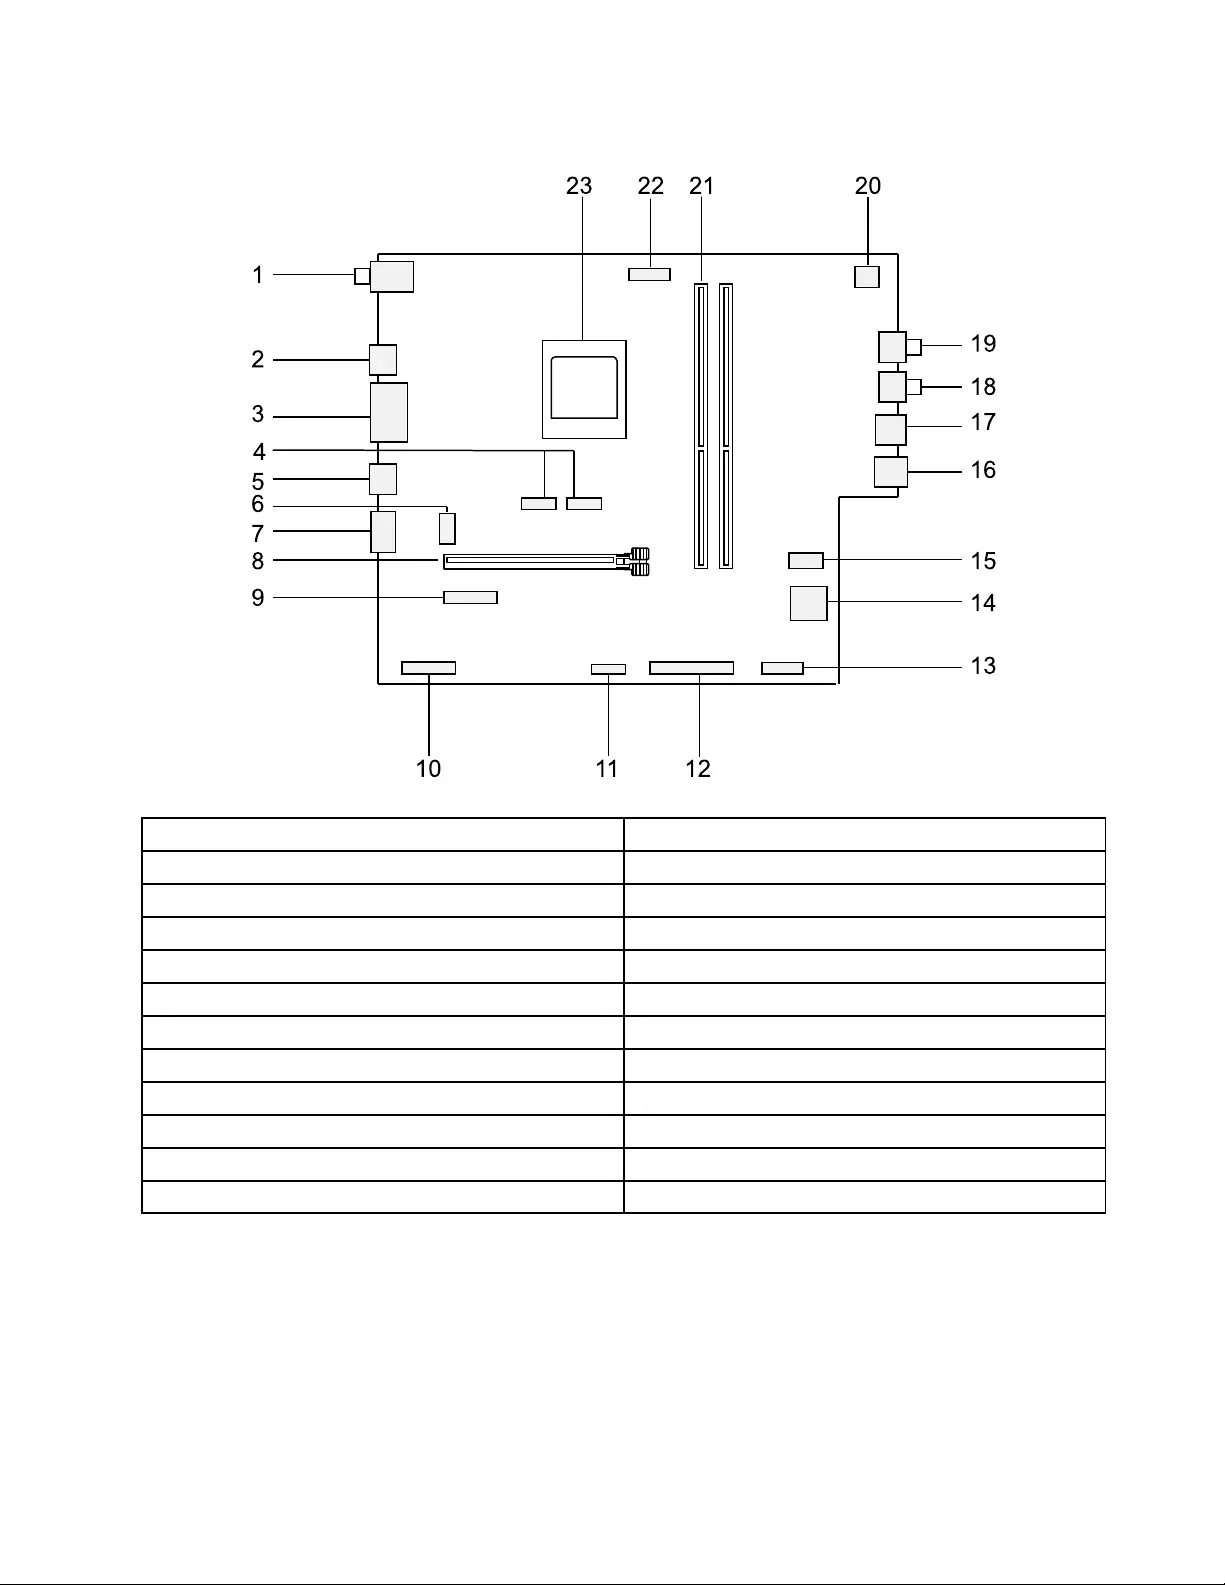
Table3.310–15IAP
1
2
3
5
8
9
11 12
13
14
16
17
18
19
20212223
6
4
15
10
7
1.Audioconnectors13.Frontpanelconnector
2.HDMI-outconnector14.SATApowerconnector
3.VGA-outconnector15.Auxiliaryfanconnector
4.SATAconnectors(2)16.USB2.0connectors(2)
5.USB2.0andEthernetconnectors17.USB3.0connectors(2)
6.Systemfanconnector18.Headphoneconnector
7.Powerconnector19.Microphoneconnector
8.PCIexpressX16adapterslot20.Powerbuttonboardconnector
9.PCIexpressX1adapterslot21.Memoryslots(2)
10.Serialconnector22.Microprocessorfanconnector
11.FrontUSBconnector23.Microprocessorsocket
12.Parallelconnector
Chapter7.Locatingconnectors,controlsandcomponents27
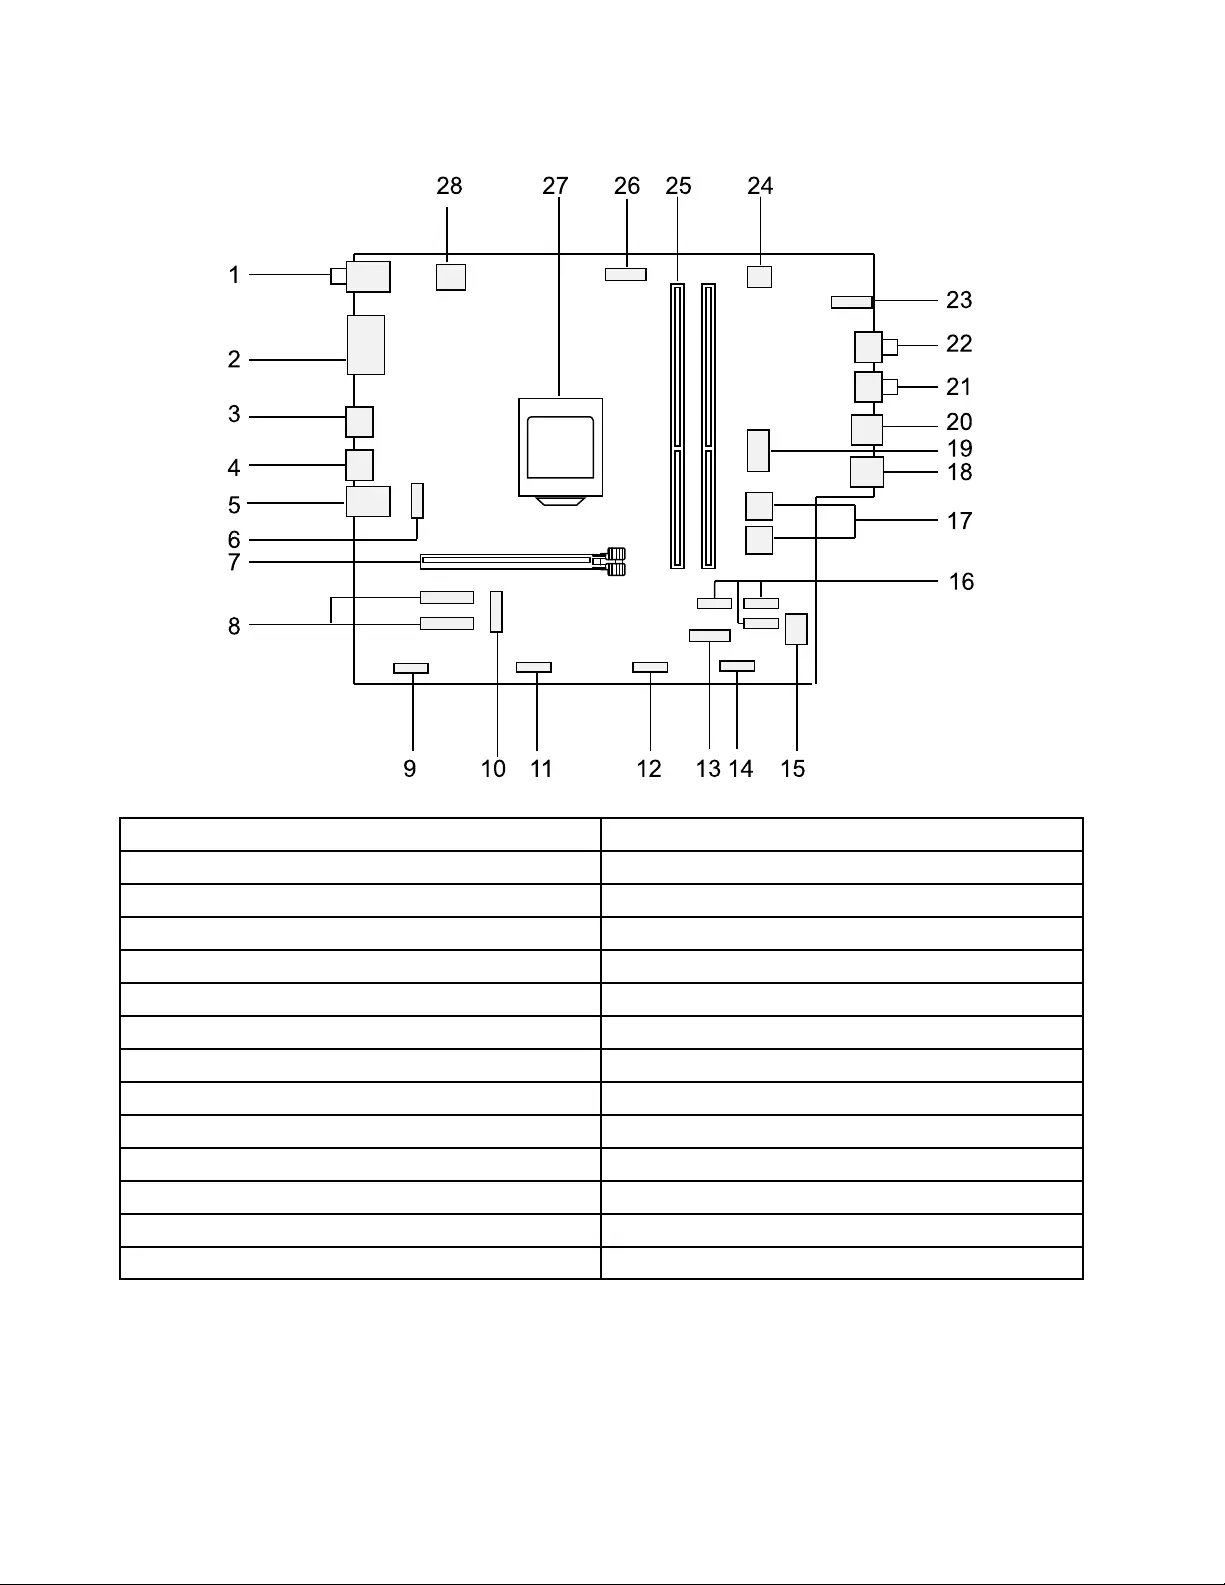
Table4.510–15IKL
1
2
3
4
5
6
8
9 11 12 13 14
19
17
18
20
21
22
23
2425262728
7
1510
16
1.Audioconnectors15.Auxiliaryfanconnector
2.VGA-outandserial(COM1)connectors16.SATAconnectors(3)
3.HDMI-outconnector17.SATApowerconnectors(2)
4.USB3.0connectors(2)18.USB3.0connectors(2)
5.USB2.0andEthernetconnectors19.Auxiliarypowerconnector
6.Systemfanconnector20.USB3.0connectors(2)
7.PCIexpressX16adapterslot21.Headphoneconnector
8.PCIexpressX1adapterslots(2)22.Microphoneconnector
9.Serial(COM2)connector23.Storagedriveindicator
10.M.2Wi-Ficardslot24.Auxiliaryfanconnector2
11.FrontUSBconnector25.Memoryslots(2)
12.Thermalsensorconnector26.Microprocessorfanconnector
13.M.2storagedriveconnector27.Microprocessorsocket
14.Frontpanelconnector28.4-pinpowerconnector
28ideacentre310/510SeriesHardwareMaintenanceManual

Chapter8.Replacinghardware
Attention:Donotremovethecomputercoverorattemptanyrepairbeforereadingthe“Importantsafetyinformation”
intheSafetyandWarrantyGuidethatwasincludedwithyourcomputer.ToobtaincopiesoftheSafetyandWarranty
Guide,gototheSupportWebsiteat:http://consumersupport.lenovo.com.
Note:UseonlypartsprovidedbyLenovo.
Generalinformation
Pre-disassemblyinstructions
Beforeproceedingwiththedisassemblyprocedure,makesurethatyoudothefollowing:
1.Turnoffthepowertothesystemandallperipherals.
2.Unplugallpowerandsignalcablesfromthecomputer.
3.Placethesystemonaflat,stablesurface.
©CopyrightLenovo201729
Replacingthekeyboardandmouse
Toreplacethekeyboardandmouse
Step1.Removeanymedia(disks,CDs,DVDsormemorycards)fromthedrives,shutdowntheoperating
system,andturnoffthecomputerandallattacheddevices.
Step2.Unplugallpowercordsfromelectricaloutlets.
Step3.Disconnectallcablesattachedtothecomputer.Thisincludespowercords,input/output(I/O)
cables,andanyothercablesthatareconnectedtothecomputer.Referto“Leftandrightview”
and“Rearview”forhelpwithlocatingthevariousconnectors.
Note:YourkeyboardwillbeconnectedtoaUSBconnectorononesideorattherearofthe
computer.
Step4.Disconnectthedefectivekeyboardcablefromthecomputerandconnectthenewkeyboardcable
tothesameconnector.
Note:Themousecanbereplacedusingthesamemethod.
Removingthecomputercover
Attention:Turnoffthecomputerandwait3to5minutestoletitcooldownbeforeremovingthecover.
Note:Itmaybehelpfultoplacethecomputerface-downonasoftflatsurfaceforthisprocedure.Lenovo
recommendsthatyouuseablanket,towel,orothersoftclothtoprotectthecomputerscreenfromscratches
orotherdamage.
Toremovethecomputercover:
Step1.Removeanymedia(disks,CDs,DVDs,ormemorycards)fromthedrives,shutdowntheoperating
system,andturnoffthecomputerandallattacheddevices.
Step2.Unplugallpowercordsfromelectricaloutlets.
Step3.Disconnectallcablesattachedtothecomputer.Thisincludespowercords,input/output(I/O)
cables,andanyothercablesthatareconnectedtothecomputer.Referto“Leftandrightview”
and“Rearview”forhelpwithlocatingthevariousconnectors.
30ideacentre310/510SeriesHardwareMaintenanceManual
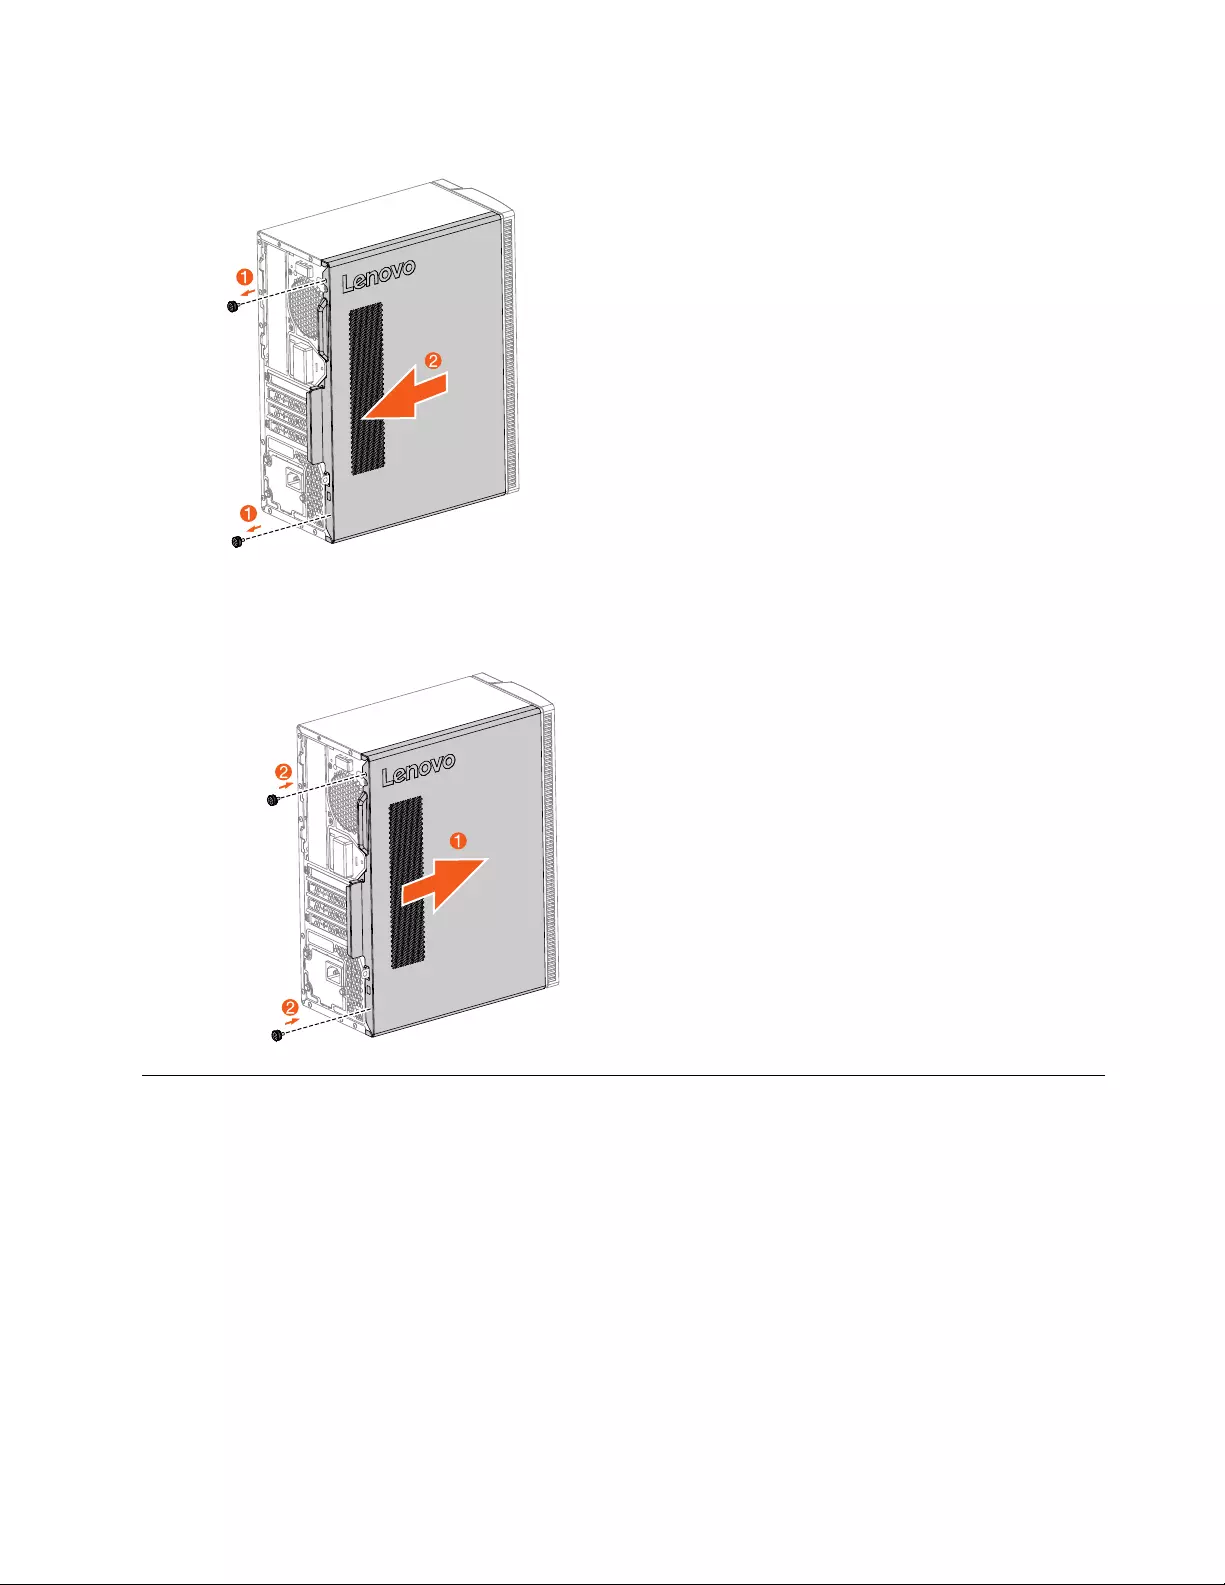
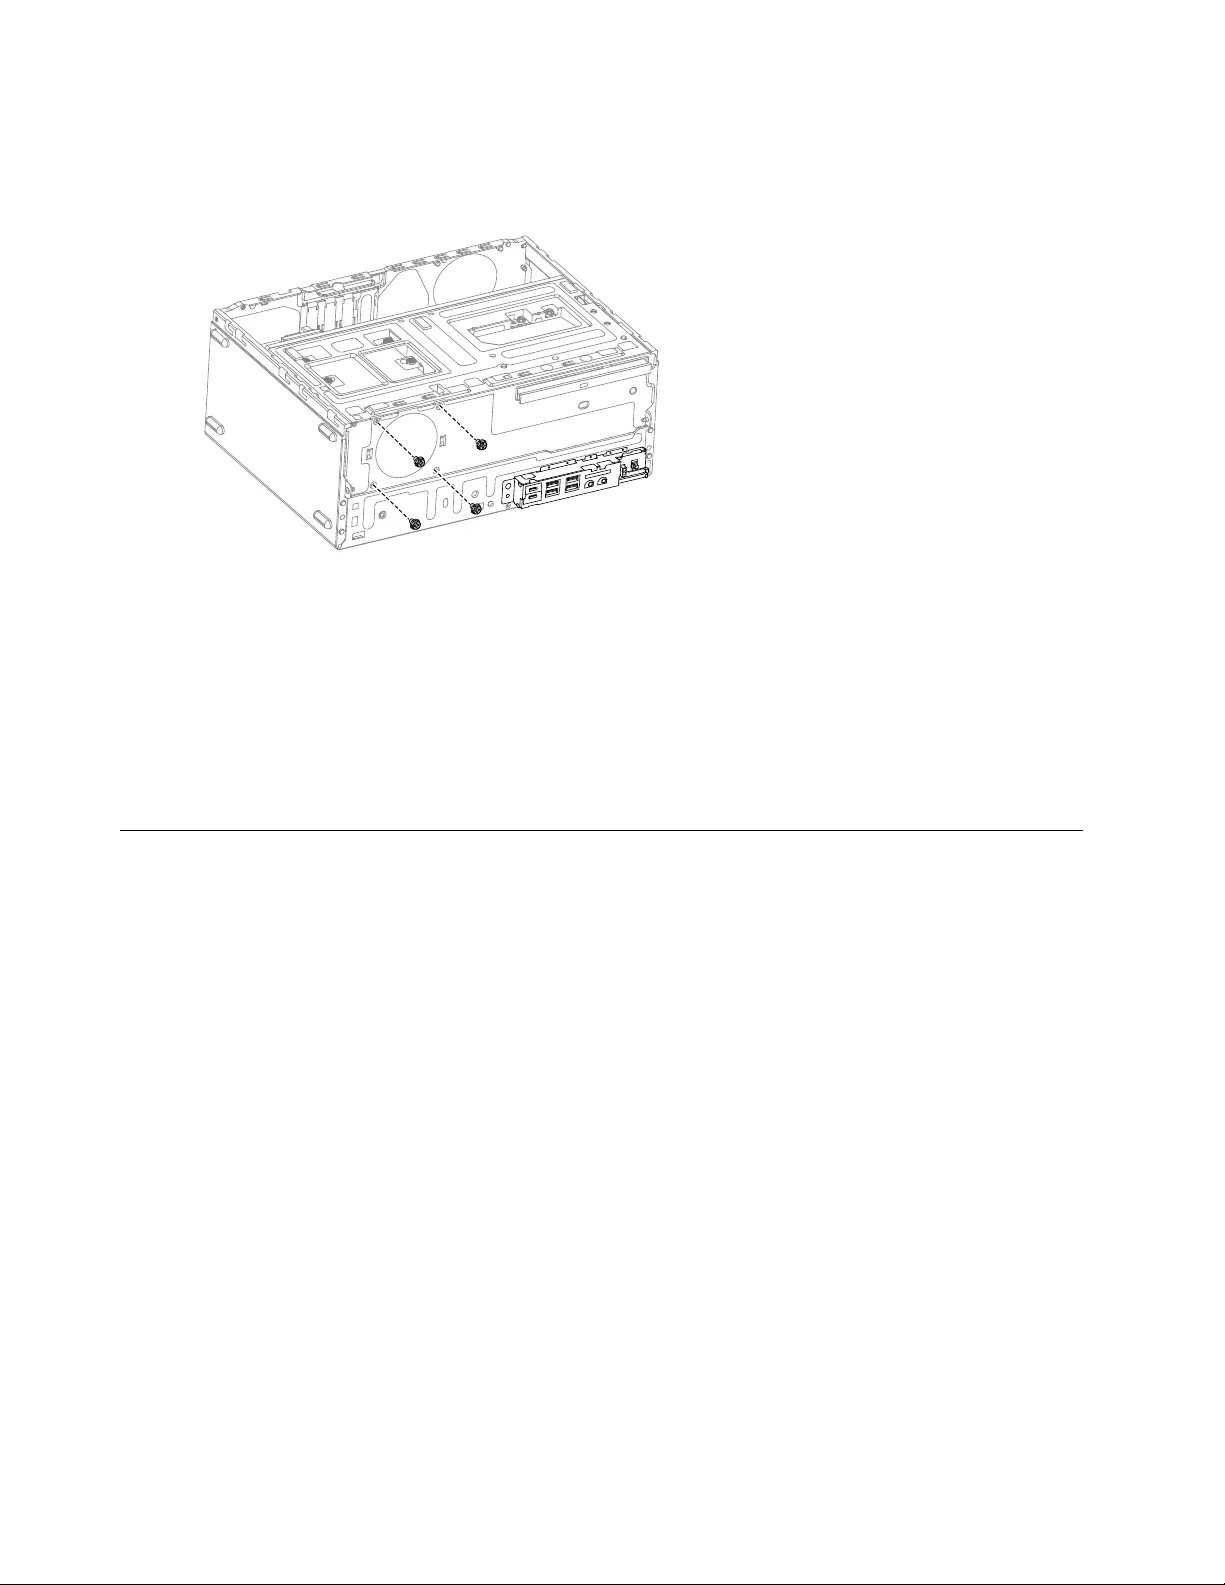
Step4.Removethe2screwsthatsecurethecomputercoverattherearofthechassis.
Step5.Toreinstallthecomputercover:
a.Lineupthecomputercoverwiththechassis,andthenslideitback.
b.Securethecomputercovertothechassiswiththescrews.
Replacingthepowersupplyassemby
Note:Forthisprocedure,ithelpstolaythecomputerflat.
Toreplacethepowersupplyassembly:
Step1.Removeanymediafromthedrives,shutdowntheoperatingsystem,andturnoffthecomputer
andallattacheddevices.
Step2.Unplugallpowercordsfromelectricaloutlets.
Step3.Disconnectallcablesattachedtothecomputer.Thisincludespowercords,input/output(I/O)
cables,andanyothercablesthatareconnectedtothecomputer.RefertoLocatingconnectors,
controlsandcomponentstolocatethevariousconnectors.
Step4.Removethecomputercover.RefertoRemovingthecomputercover.
Chapter8.Replacinghardware31
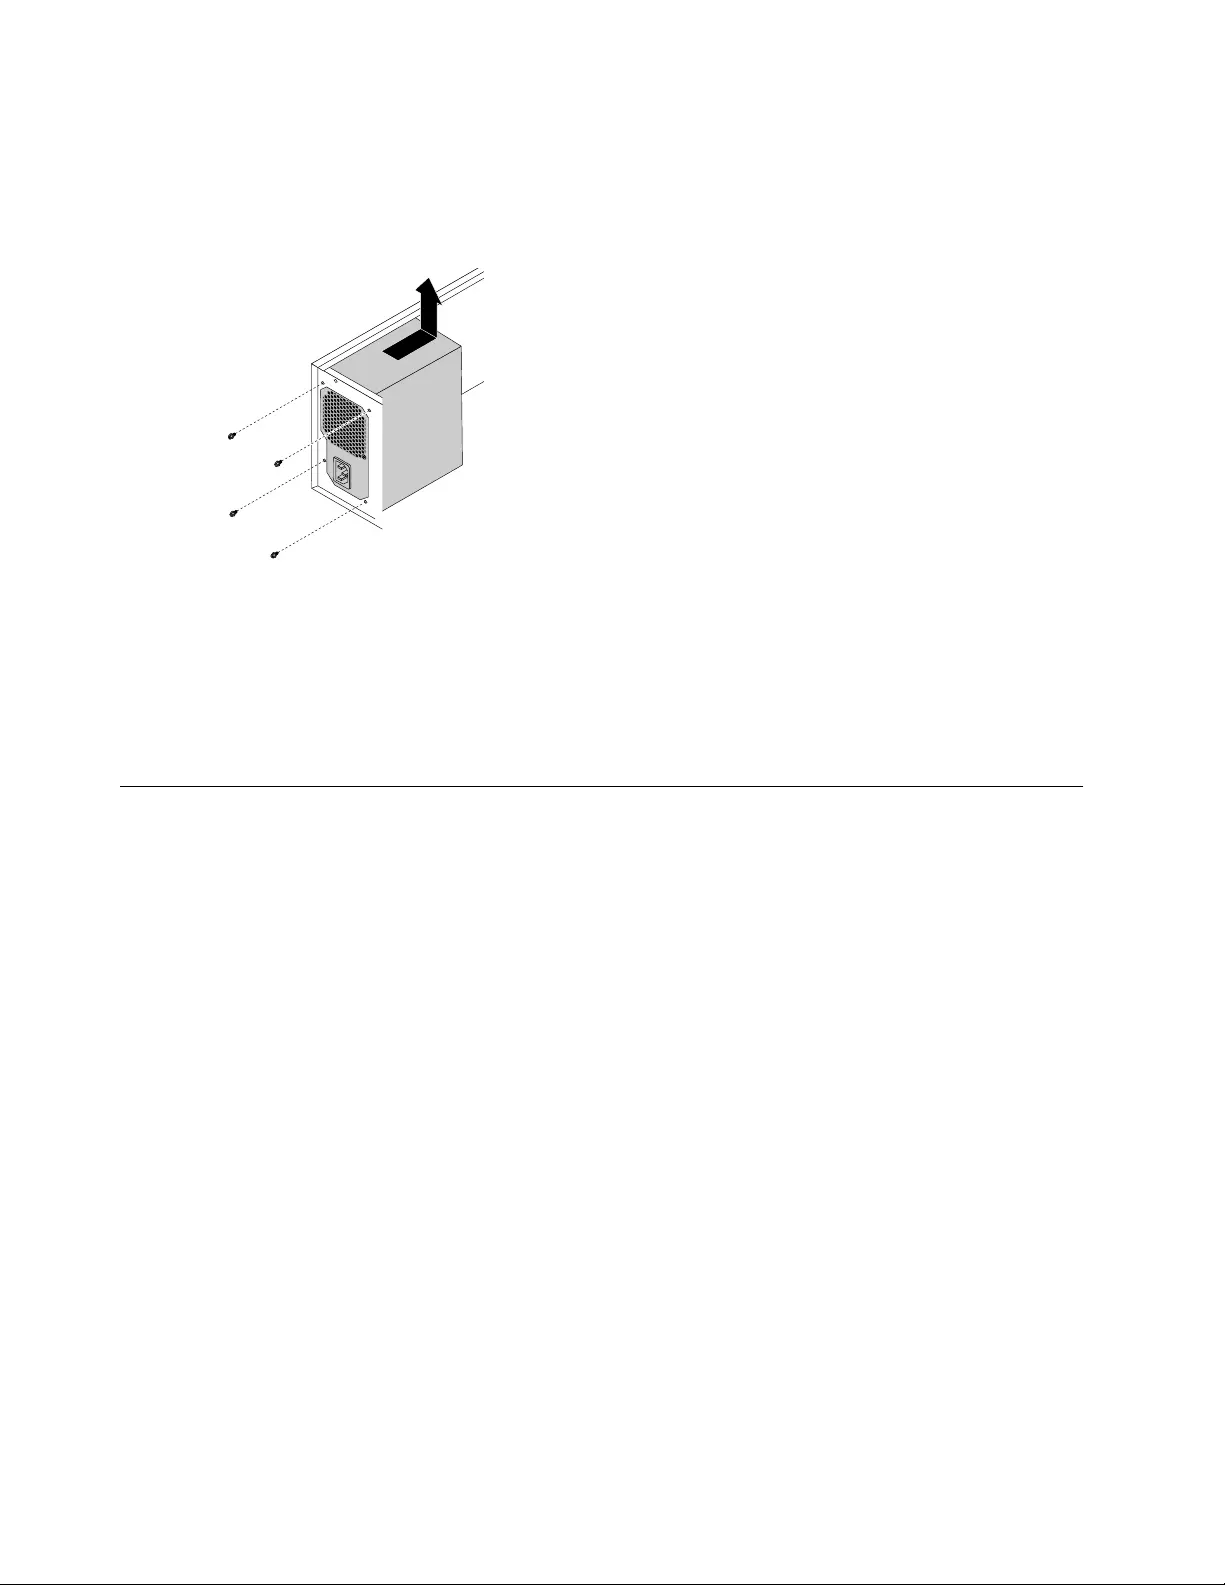
Step5.Laythecomputeronitsside.Then,disconnectthepowersupplyassemblycablesfromthe
motherboard.
Step6.Removethefourscrewsthatsecurethepowersupplyassembly.
Step7.Slidethenliftthepowersupplyassemblyoutofchassis.
Step8.Installthenewpowersupplyassembly:
a.Positionthenewpowersupplyassemblyinthechassissothatthefourscrewholesinthe
powersupplyassemblyalignwiththoseinthechassis.Then,installthefourscrewstosecure
thepowersupplyassembly.
b.Connectthepowersupplyassemblycablestotheconnectorsonthemotherboard.
Step9.Reattachthecomputercover.
Removingthefrontbezel
Attention:Turnoffthecomputerandwait3to5minutestoletitcooldownbeforeremovingthecover.
Note:Itmaybehelpfultoplacethecomputerface-downonasoftflatsurfaceforthisprocedure.Lenovo
recommendsthatyouuseablanket,towel,orothersoftclothtoprotectthecomputerscreenfromscratches
orotherdamage.
Toremovethefrontbezel:
Step1.Removeanymediafromthedrives,shutdowntheoperatingsystem,andturnoffthecomputer
andallattacheddevices.
Step2.Unplugallpowercordsfromelectricaloutlets.
Step3.Disconnectallcablesattachedtothecomputer.Thisincludespowercords,input/output(I/O)
cables,andanyothercablesthatareconnectedtothecomputer.RefertoLocatingconnectors,
controlsandcomponentstolocatethevariousconnectors.
Step4.Removethecomputercover.RefertoRemovingthecomputercover.
32ideacentre310/510SeriesHardwareMaintenanceManual
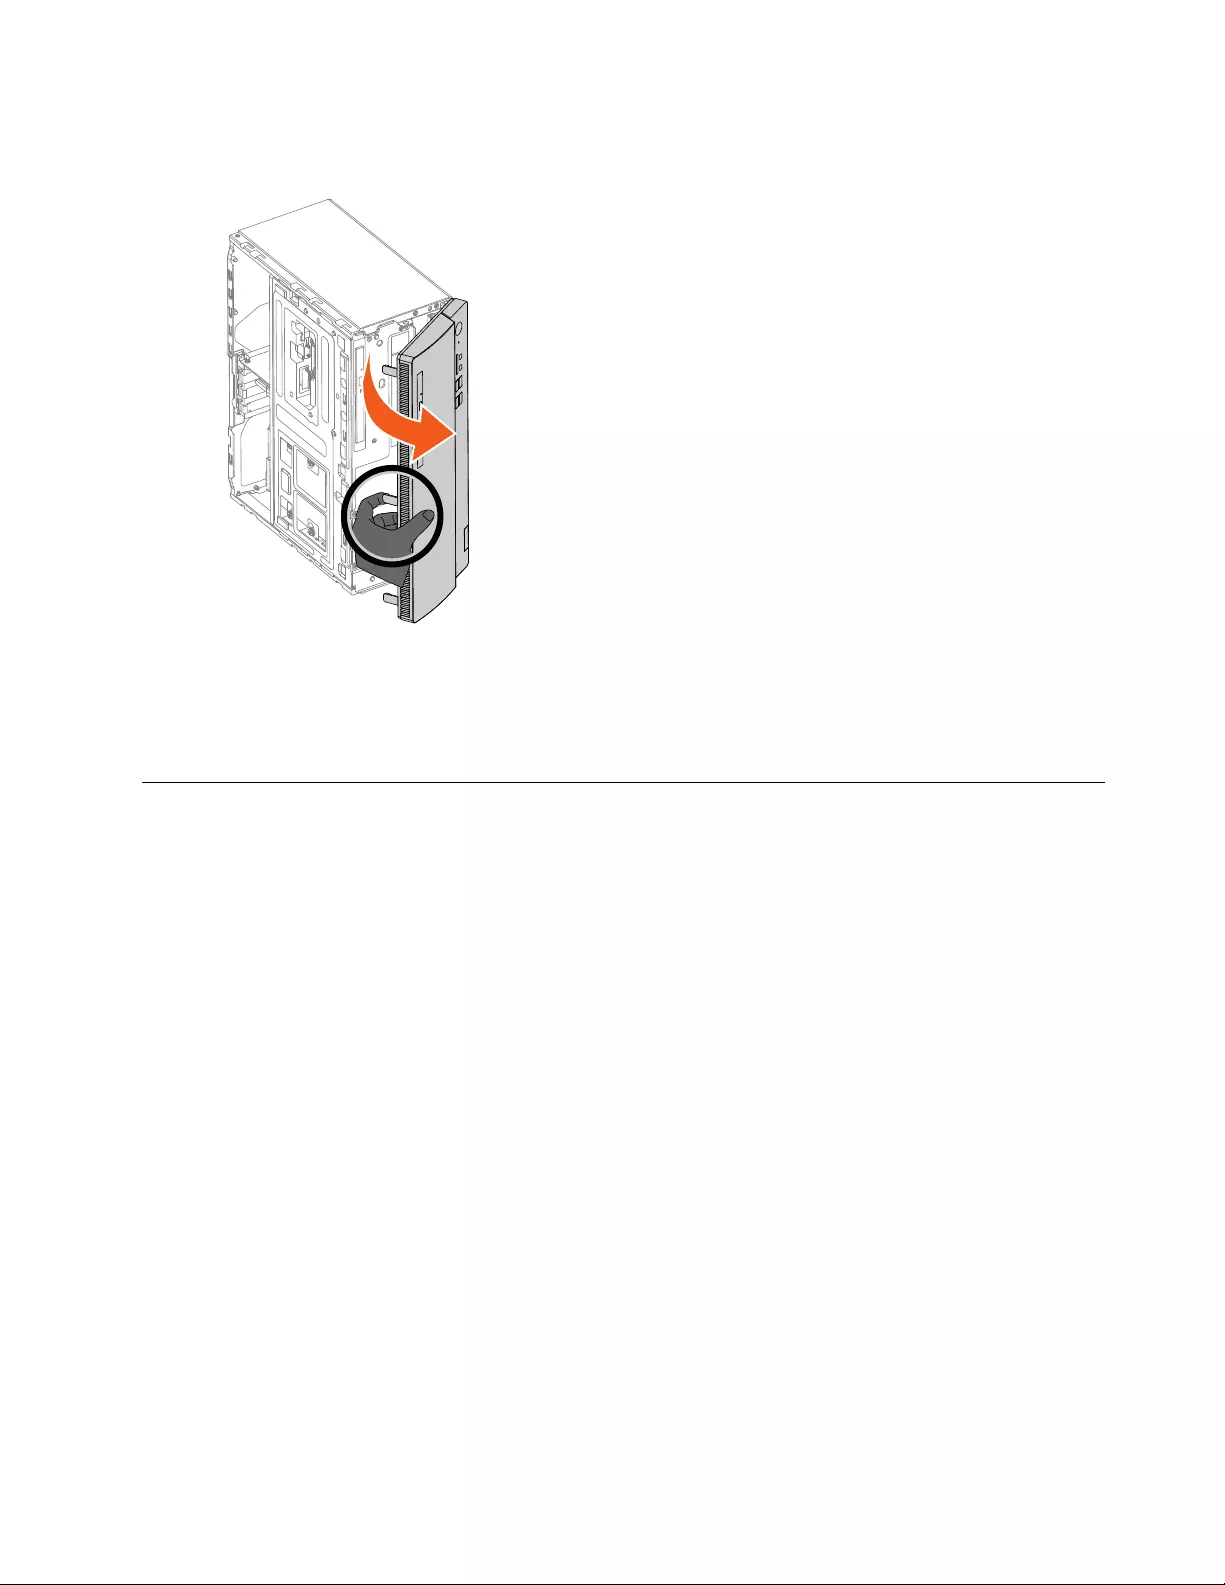
Step5.Releasethethreeplastictabsontheleftsideofthefrontbezel,andthenpivotthefrontbezel
outward.
Step6.Toreattachthebezel:
a.Alignthethreeplastictabsontherightsideofthefrontbezelwiththecorrespondingholesin
thechassis.Then,pivotthefrontbezelinwarduntilitsnapsintoposition.
Step7.Reinstallalltheremovedparts,andthenreconnectthecables.
Replacinganopticaldrive
Note:Forthisprocedure,ithelpstolaythecomputerflat.
Toreplaceanopticaldrive:
Step1.Removeanymediafromthedrives,shutdowntheoperatingsystem,andturnoffthecomputer
andallattacheddevices.
Step2.Unplugallpowercordsfromelectricaloutlets.
Step3.Disconnectallcablesattachedtothecomputer.Thisincludespowercords,input/output(I/O)
cables,andanyothercablesthatareconnectedtothecomputer.RefertoLocatingconnectors,
controlsandcomponentstolocatethevariousconnectors.
Step4.Removethecomputercover.RefertoRemovingthecomputercover.
Step5.Removethefrontbezel.RefertoRemovingthefrontbezel.
Chapter8.Replacinghardware33
Step6.Disconnectthedataandpowercablesfromtherearoftheopticaldrive.
Step7.Removethe2screwsthatsecuretheopticaldiskdrivetothechassis,andthenpushtheoptical
driveout.
Step8.Toinstallthenewopticaldrive:
a.Insertthenewopticaldriveintothechassis.
b.Securethenewopticaldrivetothechassiswithtwoscrews.
c.Connectthedataandpowercablestothenewopticaldrive.
Step9.Reinstallalltheremovedparts.
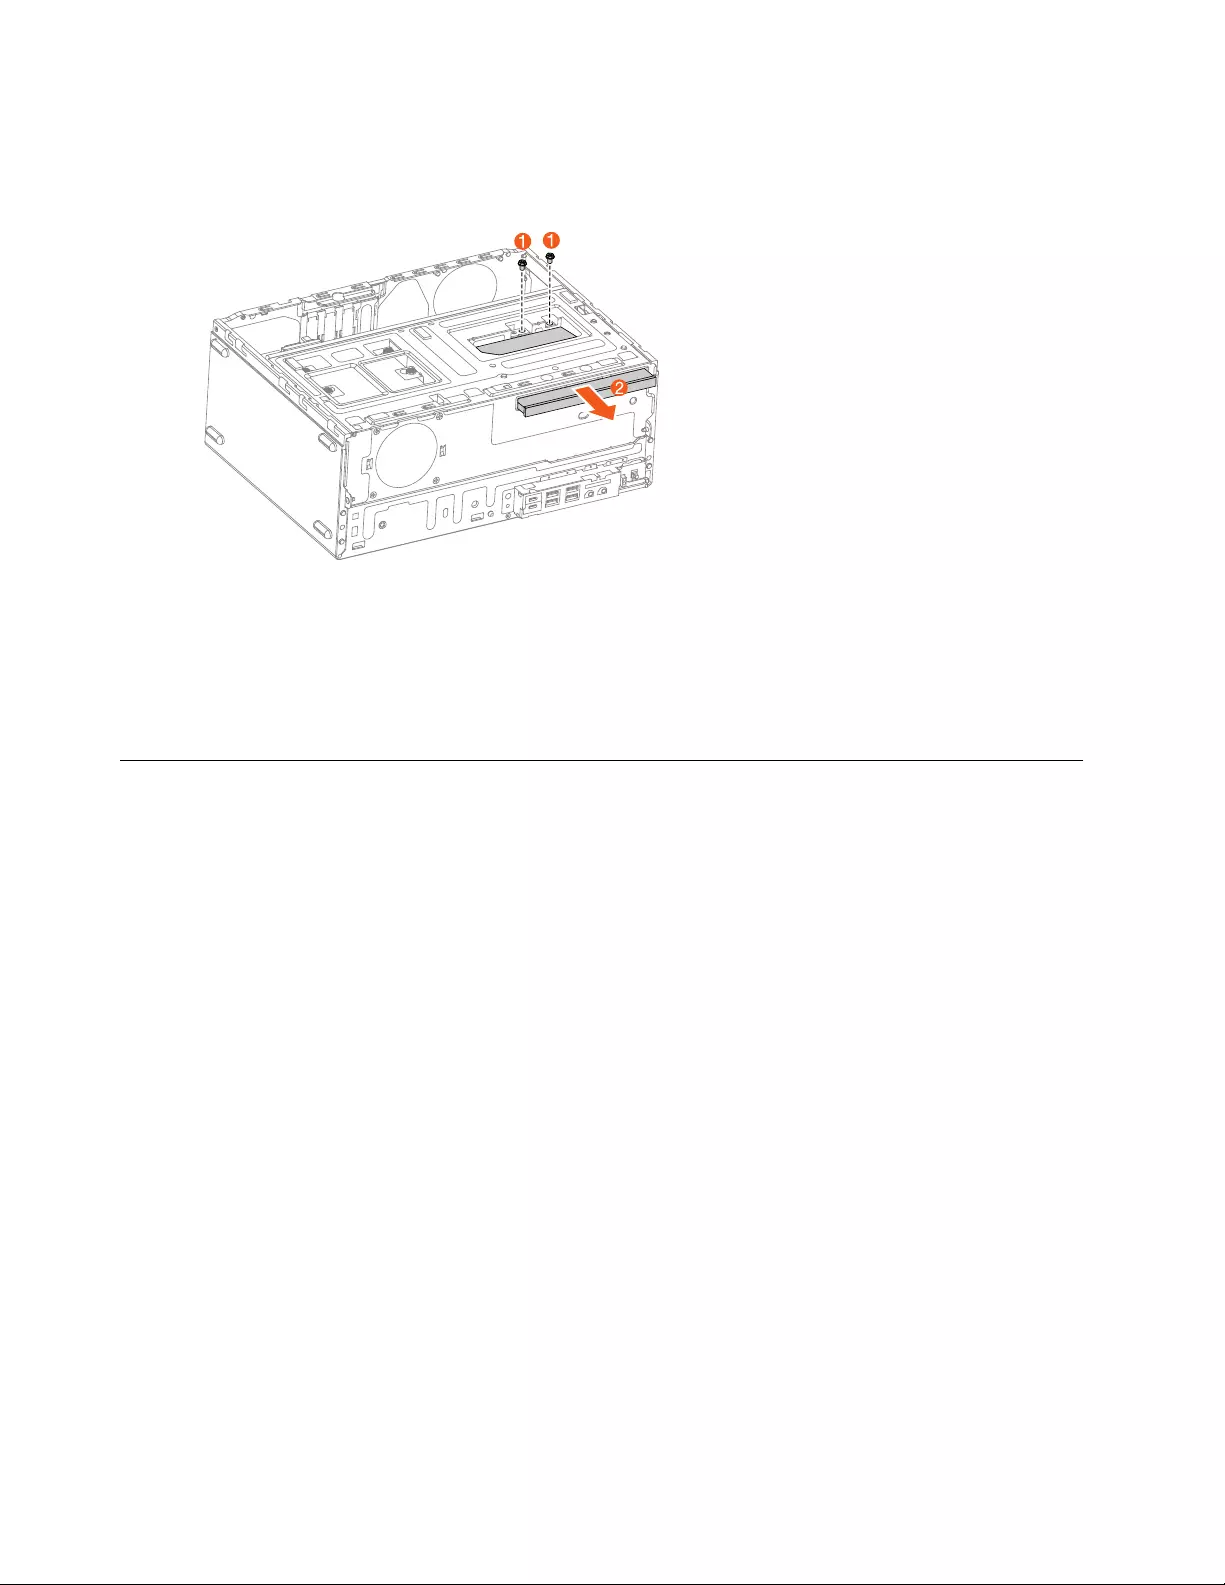
ReplacingtheM.2storagedrive
Note:Forthisprocedure,ithelpstolaythecomputerflat.
ToreplacetheM.2storagedrive:
Step1.Removeanymediafromthedrives,shutdowntheoperatingsystem,andturnoffthecomputer
andallattacheddevices.
Step2.Unplugallpowercordsfromelectricaloutlets.
Step3.Disconnectallcablesattachedtothecomputer.Thisincludespowercords,input/output(I/O)
cables,andanyothercablesthatareconnectedtothecomputer.RefertoLocatingconnectors,
controlsandcomponentstolocatethevariousconnectors.
Step4.Removethecomputercover.RefertoRemovingthecomputercover.
34ideacentre310/510SeriesHardwareMaintenanceManual
Step5.RemovethescrewthatsecurestheM.2storagedrivetothemotherboard.
Step6.PulltheM.2storagedriveout.
Step7.ToinstallthenewM.2storagedrive:
a.InsertthenewM.2storagedriveintotheM.2slot.
b.SecurethenewM.2storagedrivetothemotherboardwithonescrew.
Step8.Reinstallalltheremovedparts,andthenreconnectthecables.
Replacingthe3.5-inchstoragedrive
Note:Forthisprocedure,ithelpstolaythecomputerflat.
Chapter8.Replacinghardware35

Toreplacethe3.5-inchstoragedrive:
Step1.Removeanymediafromthedrives,shutdowntheoperatingsystem,andturnoffthecomputer
andallattacheddevices.
Step2.Unplugallpowercordsfromelectricaloutlets.
Step3.Disconnectallcablesattachedtothecomputer.Thisincludespowercords,input/output(I/O)
cables,andanyothercablesthatareconnectedtothecomputer.RefertoLocatingconnectors,
controlsandcomponentstolocatethevariousconnectors.
Step4.Removethecomputercover.RefertoRemovingthecomputercover.
Step5.Removethefrontbezel.RefertoRemovingthefrontbezel.
Step6.Removethefourscrewsthatsecurethe3.5-inchstoragedrivetotheprimaryorsecondary
drivebay.
Step7.Pivotthedrivebayassemblyupward.2
Step8.Disconnectthedataandpowercablesfromtheprimaryorsecondary3.5-inchstoragedrive.3
Step9.Slidethe3.5-inchstoragedriveoutofthechassis.4
4
4
Step10.Toinstallthenew3.5-inchstoragedrive:
a.Slidethenew3.5-inchstoragedriveintothedrivebay.
36ideacentre310/510SeriesHardwareMaintenanceManual
b.Securethenew3.5-inchstoragedrivetothedrivebaywiththefourscrews.
c.Connectthepoweranddatacablestothe3.5-inchstoragedrive.
d.Pivotingthedrivebayassemblydownward.
Step11.Reinstallalltheremovedparts,andthenreconnectthecables.
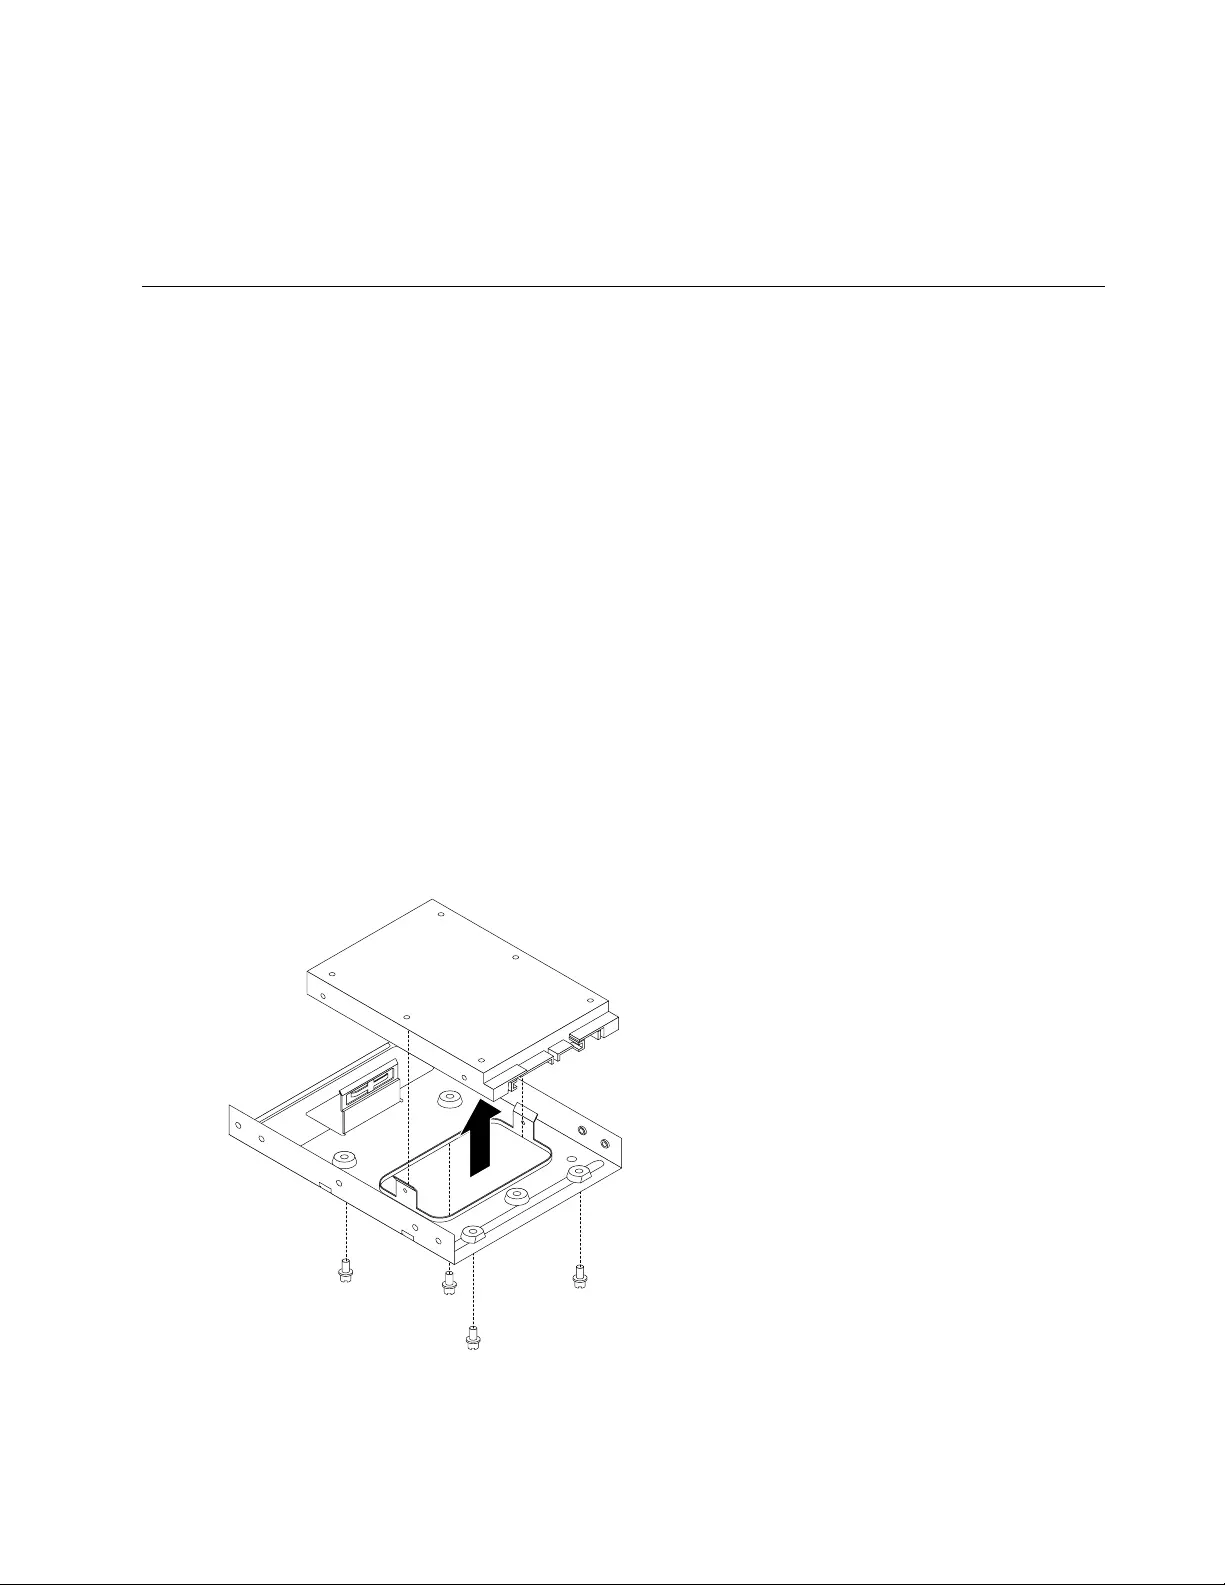
Replacingthe2.5-inchstoragedrive
Note:Forthisprocedure,ithelpstolaythecomputerflat.
Toreplacethe2.5-inchstoragedrive:
Step1.Removeanymediafromthedrives,shutdowntheoperatingsystem,andturnoffthecomputer
andallattacheddevices.
Step2.Unplugallpowercordsfromelectricaloutlets.
Step3.Disconnectallcablesattachedtothecomputer.Thisincludespowercords,input/output(I/O)
cables,andanyothercablesthatareconnectedtothecomputer.RefertoLocatingconnectors,
controlsandcomponentstolocatethevariousconnectors.
Step4.Removethecomputercover.RefertoRemovingthecomputercover.
Step5.Removethefrontbezel.RefertoRemovingthefrontbezel.
Step6.Removethefourscrewsthatsecurethe2.5-inchstoragedriveassemblytodrivebay.
Step7.Pivotingthedrivebayassemblyupward.
Step8.Slidethe2.5-inchstoragedriveassemblyoutofthedrivebay.
Step9.Disconnectthesignalcableandthepowercablefromthe2.5-inchstoragedriveassembly.
Step10.Slidethe2.5-inchstoragedriveassemblyoutofthechassis.
Step11.Removethefourscrewsthatsecurethe2.5-inchstoragedrivetothestorageconverter.Then,
removethe2.5-inchstoragedrivefromtheconverterasshown.
Step12.Toinstallthenew2.5-inchstoragedrive:
a.Securethenew2.5-inchstoragedrivetotheconverterwithfourscrews.
b.Slidethenew2.5-inchstoragedriveassemblyintothestoragedrivebay.
Chapter8.Replacinghardware37
c.Connectthesignalcableandthepowercabletothe2.5-inchstoragedriveassembly.
d.Pivotingthedrivebayassemblydownward.
e.Securethe2.5-inchstoragedriveassemblytothedrivebaywithfourscrews.
Step13.Reinstallalltheremovedparts,andthenreconnectthecables.
Replacingthefrontcardreader
Note:Forthisprocedure,ithelpstolaythecomputerflat.
Toreplacethethefrontcardreader:
Step1.Removeanymediafromthedrives,shutdowntheoperatingsystem,andturnoffthecomputer
andallattacheddevices.
Step2.Unplugallpowercordsfromelectricaloutlets.
Step3.Disconnectallcablesattachedtothecomputer.Thisincludespowercords,input/output(I/O)
cables,andanyothercablesthatareconnectedtothecomputer.RefertoLocatingconnectors,
controlsandcomponentstolocatethevariousconnectors.
Step4.Removethecomputercover.RefertoRemovingthecomputercover.
Step5.Removethefrontbezel.RefertoRemovingthefrontbezel.
Step6.Disconnectthedatacablesfromtheconnectorsonmotherboard.
Step7.RemovethescrewthatsecuresthefrontI/Oassemblytothechassis.
Step8.SlidethefrontI/Oassemblyoutofchassis.
38ideacentre310/510SeriesHardwareMaintenanceManual
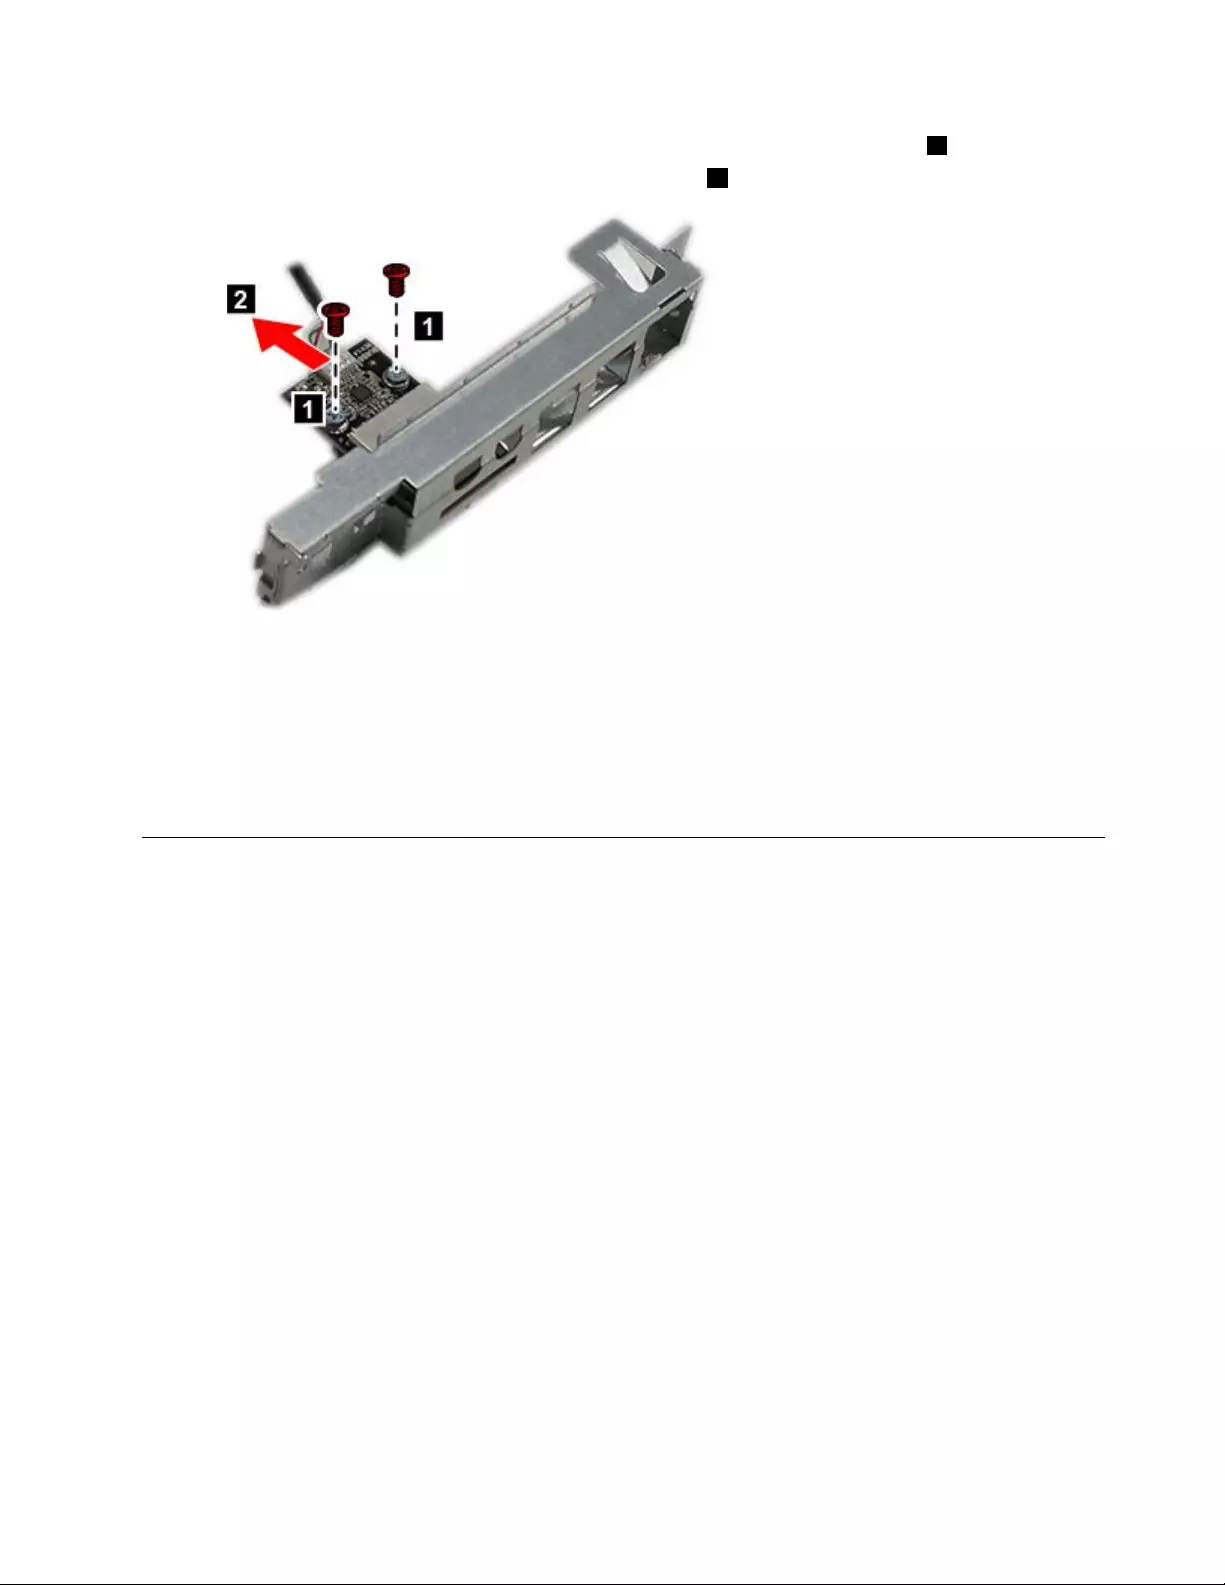
Step9.RemovethetwoscrewsthatsecurethecardreadertothefrontI/Oassembly.1
Step10.RemovethecardreaderfromthefrontI/Oassembly.2
Step11.Installthenewcardreader:
a.Alignthenewcardreaderintoposition,andthensecureittothefrontI/Oassemblywith
twoscrews.
b.SlidethefrontI/Oassemblyintothechassisandsecureitwithonescrew.
c.Connectthedatacablestothemotherboard.
Step12.Reinstallalltheremovedparts,andthenreconnectthecables.
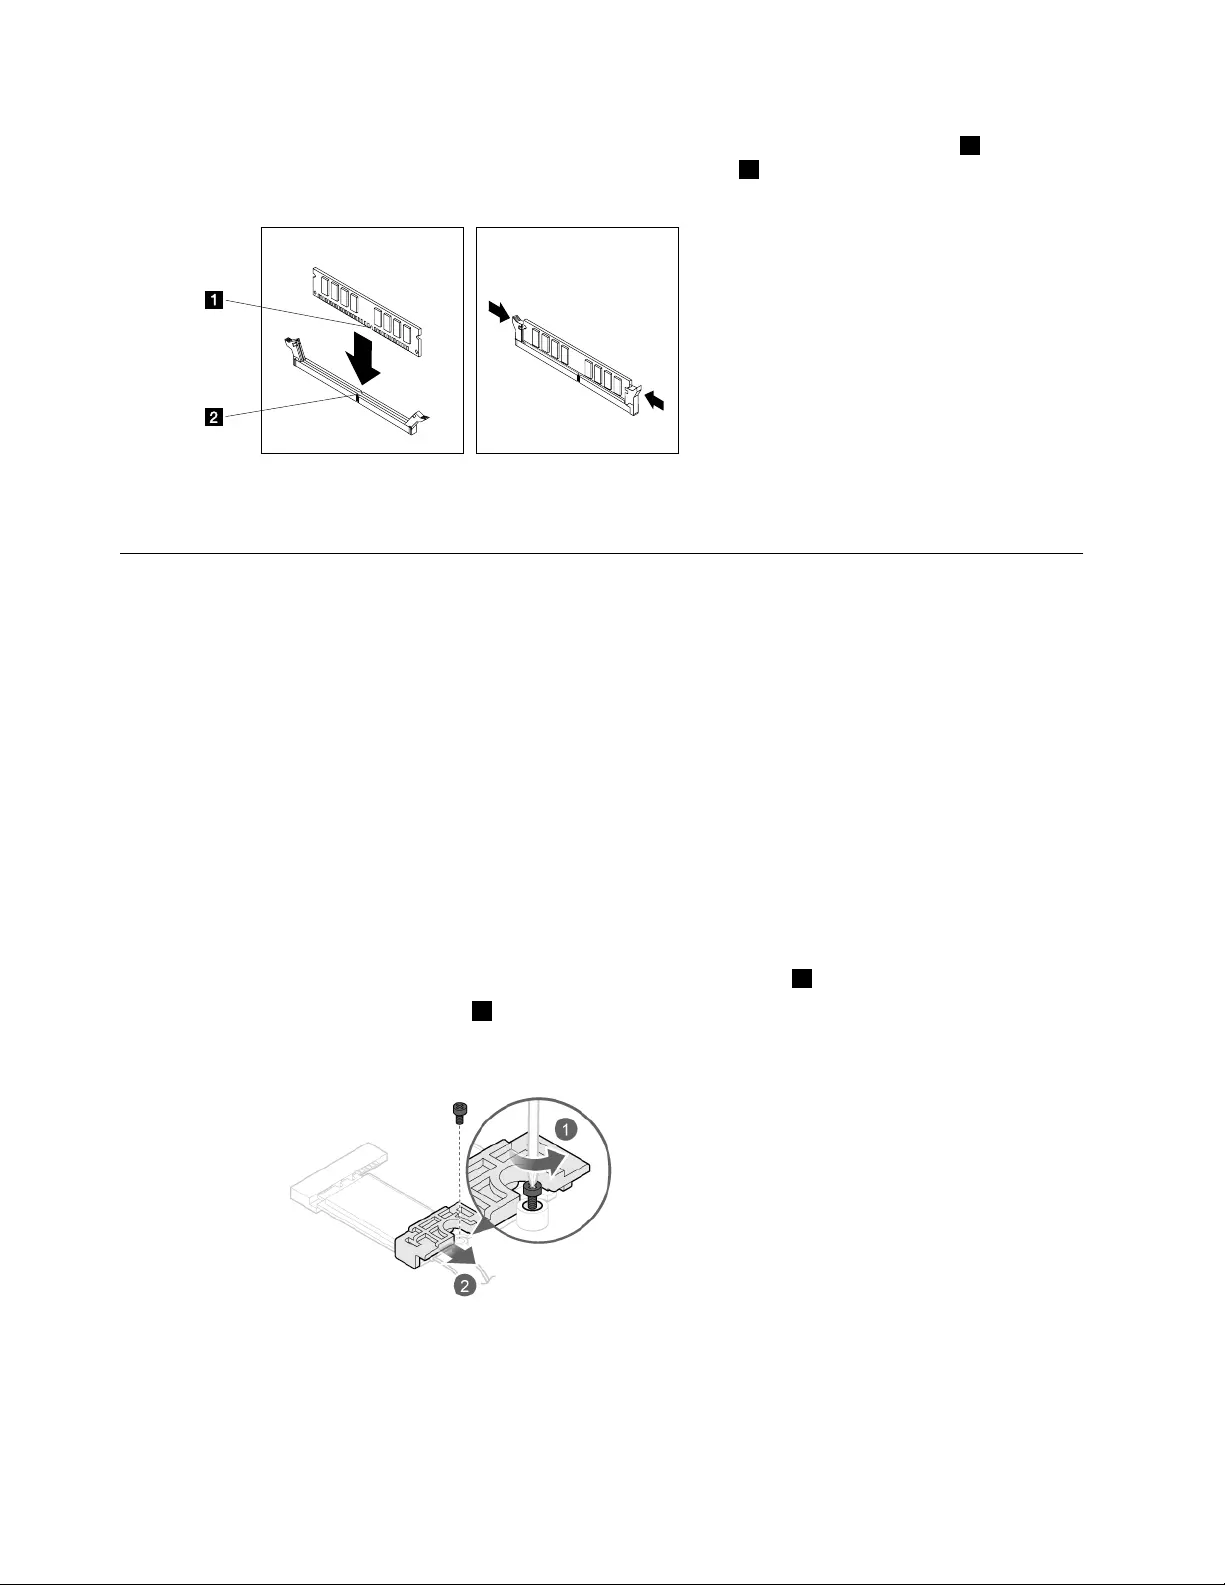
ReplacingthePCIExpresscard
ToreplacethePCIExpresscard:
Step1.Removeanymediafromthedrives,shutdowntheoperatingsystem,andturnoffthecomputer
andallattacheddevices.
Step2.Unplugallpowercordsfromelectricaloutlets.
Step3.Disconnectallcablesattachedtothecomputer.Thisincludespowercords,input/output(I/O)
cables,andanyothercablesthatareconnectedtothecomputer.RefertoLocatingconnectors,
controlsandcomponentstolocatethevariousconnectors.
Step4.Removethecomputercover.RefertoRemovingthecomputercover.
Step5.Removethefrontbezel.RefertoRemovingthefrontbezel.
Chapter8.Replacinghardware39
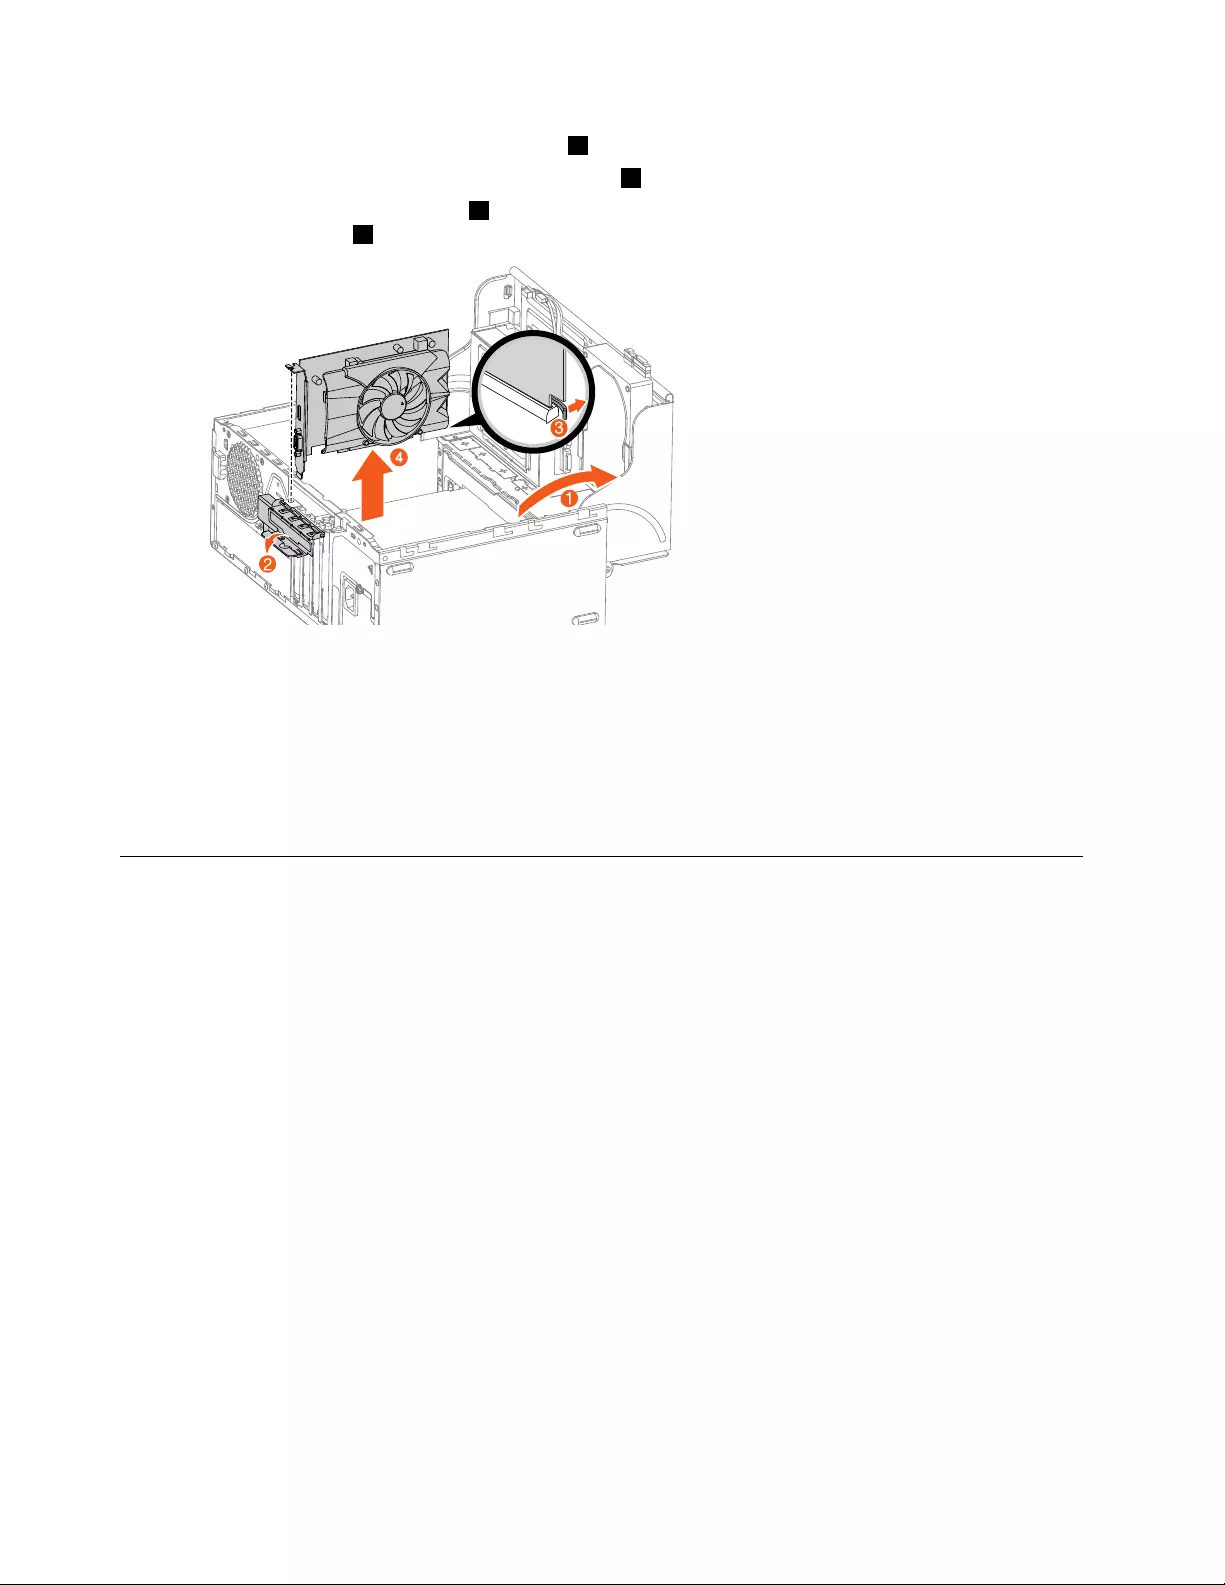
Step6.Pivotingthedrivebayassemblyupward1.
Step7.Pivotthecardlatchoutwardtoopenthelatch2.
Step8.Pressthecardretaininglatch3asshowntodisengagethelatch.Graspthecardandgentlypull
itoutoftheslot4.
4
Step9.ToinstallthenewPCIExpresscard:
a.InsertthenewPCIExpresscardintotheappropriatePCIExpresscardslotonthemotherboard.
b.Pivotthecardretaininglatchtotheclosedposition.
c.Pivotthecardlatchtotheclosedposition.
d.Pivotthedrivebayassemblydownward.
Step10.Reinstallalltheremovedparts,andthenreconnectthecables.
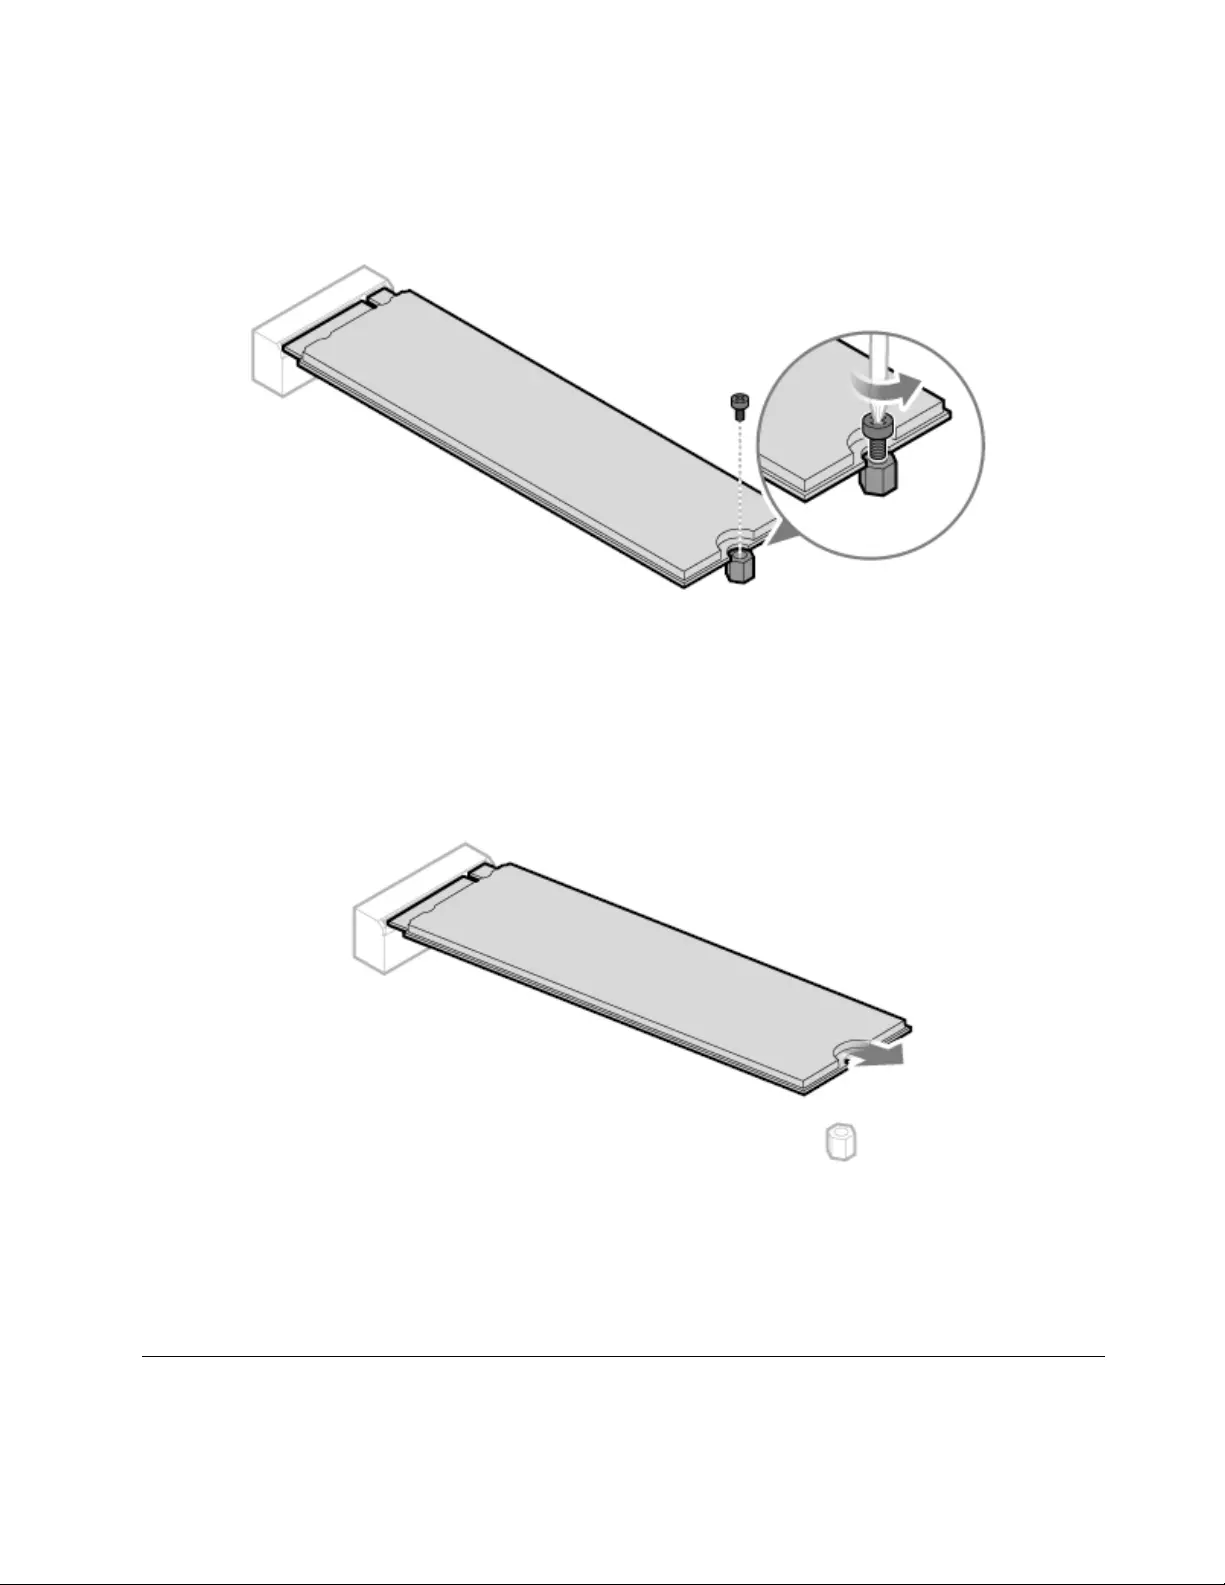
Replacingamemorymodule
Note:Forthisprocedure,ithelpstolaythecomputerflat.
Toreplaceamemorymodule:
Step1.Removeanymediafromthedrives,shutdowntheoperatingsystem,andturnoffthecomputer
andallattacheddevices.
Step2.Unplugallpowercordsfromelectricaloutlets.
Step3.Disconnectallcablesattachedtothecomputer.Thisincludespowercords,input/output(I/O)
cables,andanyothercablesthatareconnectedtothecomputer.RefertoLocatingconnectors,
controlsandcomponentstolocatethevariousconnectors.
Step4.Removethecomputercover.RefertoRemovingthecomputercover.
Step5.Removethefrontbezel.RefertoRemovingthefrontbezel.
Step6.Pivotthedrivebayassemblyupward.
Step7.Locatethememorymoduleconnectors.RefertoLocatingconnectors,controlsandcomponents.
Step8.ToreplaceaSO-DIMMmemorymodule,refertothefollowinginstructions:
40ideacentre310/510SeriesHardwareMaintenanceManual
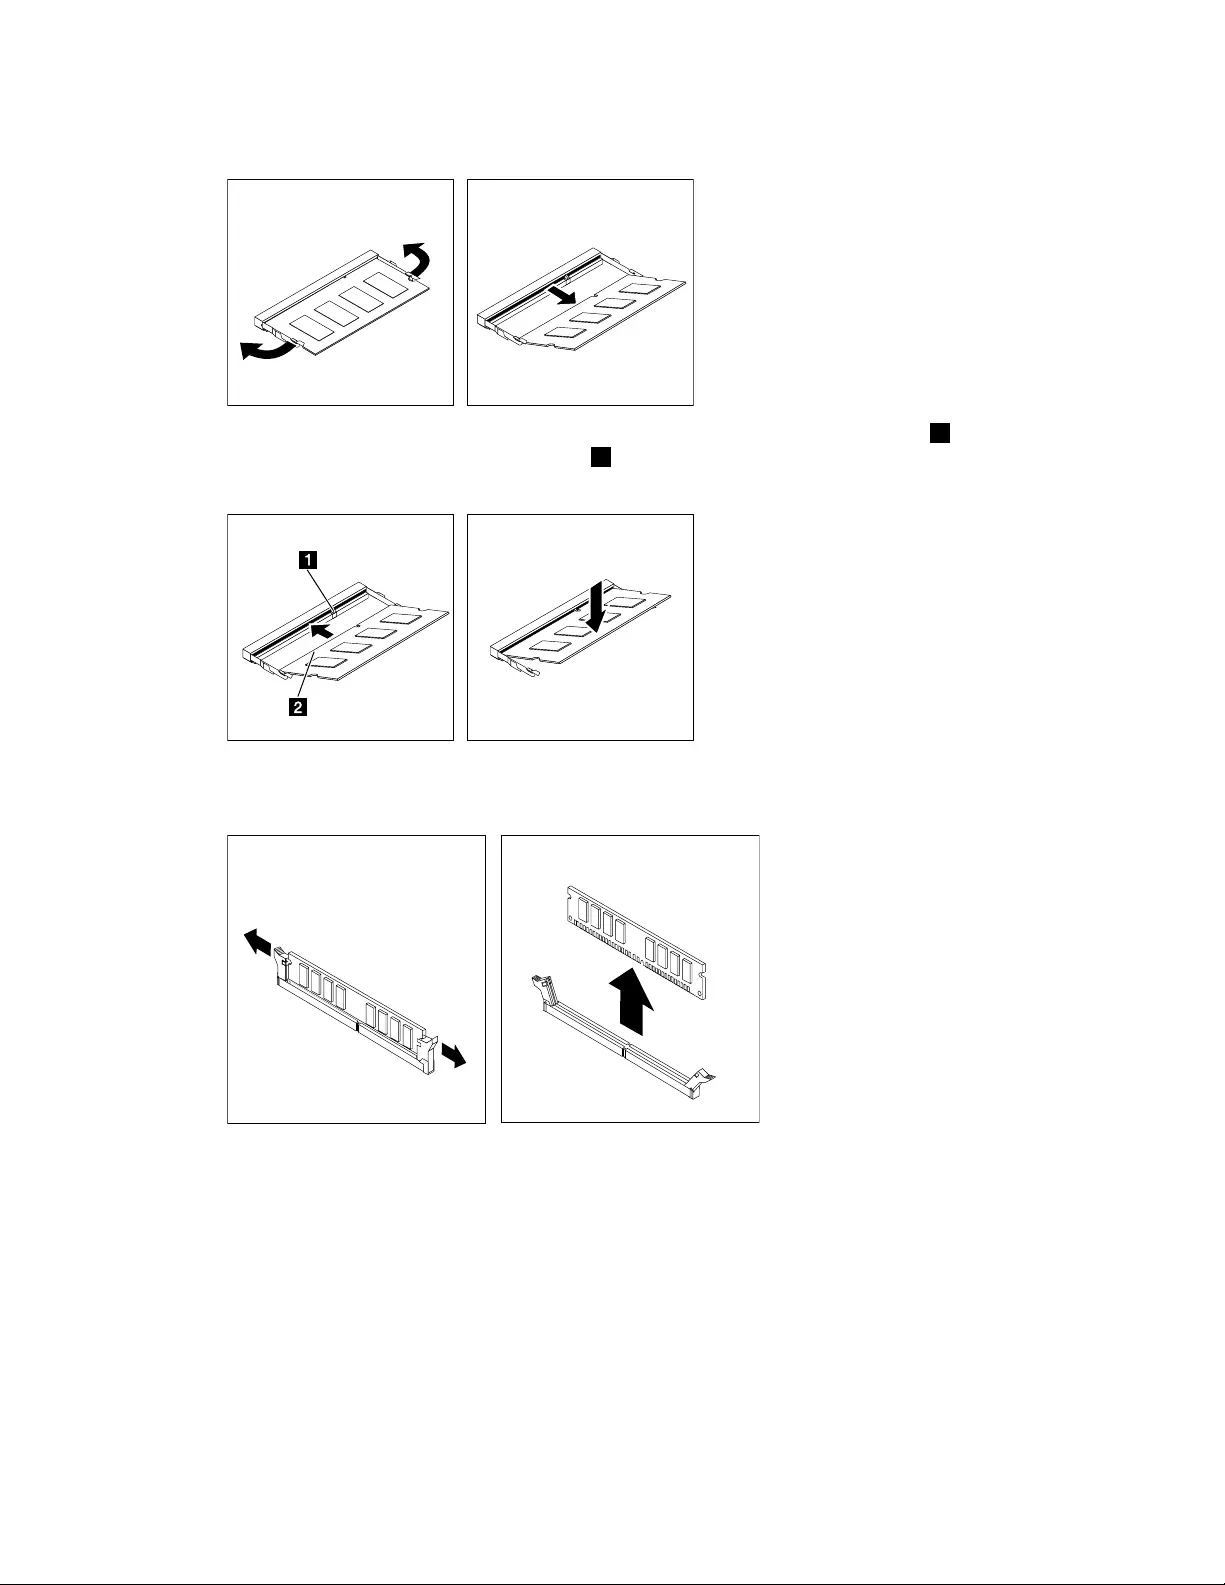
Step9.Removethememorymodulebeingreplacedbyopeningtheretainingclipsasshown.
Step10.Positionthenewmemorymoduleoverthememoryslot.Ensurethatthenotch2onthememory
modulealignscorrectlywiththeslotkey1inthememoryslot.Pressthememorymoduledown
untilsnapsintoposition.
Step11.ToreplaceaUDIMMmemorymodule,refertothefollowinginstructions:
Step12.Removethememorymodulebeingreplacedbyopeningtheretainingclipsasshown.
Chapter8.Replacinghardware41
Step13.Positionthenewmemorymoduleoverthememoryconnector.Makesurethenotch1onthe
memorymoduleiscorrectlyalignedwiththeconnectorkey2onthesystemboard.Pushthe
memorymodulestraightdownintotheconnectoruntiltheretainingclipsclose.
Step14.Pivotthedrivebayassemblydownward.
Step15.Reinstallalltheremovedparts,andthenreconnectthecables.
ReplacingtheWi-Ficard
Note:Forthisprocedure,ithelpstolaythecomputerflat.
ToreplacetheWi-Ficard:
Step1.Removeanymediafromthedrives,shutdowntheoperatingsystem,andturnoffthecomputer
andallattacheddevices.
Step2.Unplugallpowercordsfromelectricaloutlets.
Step3.Disconnectallcablesattachedtothecomputer.Thisincludespowercords,input/output(I/O)
cables,andanyothercablesthatareconnectedtothecomputer.RefertoLocatingconnectors,
controlsandcomponentstolocatethevariousconnectors.
Step4.Removethecomputercover.RefertoRemovingthecomputercover.
Step5.Removethefrontbezel.RefertoRemovingthefrontbezel.
Step6.Pivotthedrivebayassemblyupward.
Step7.RemovethescrewthatsecuretheWi-Ficardtothemotherboard1.
Step8.RemovetheWi-Ficardcover2.
42ideacentre310/510SeriesHardwareMaintenanceManual
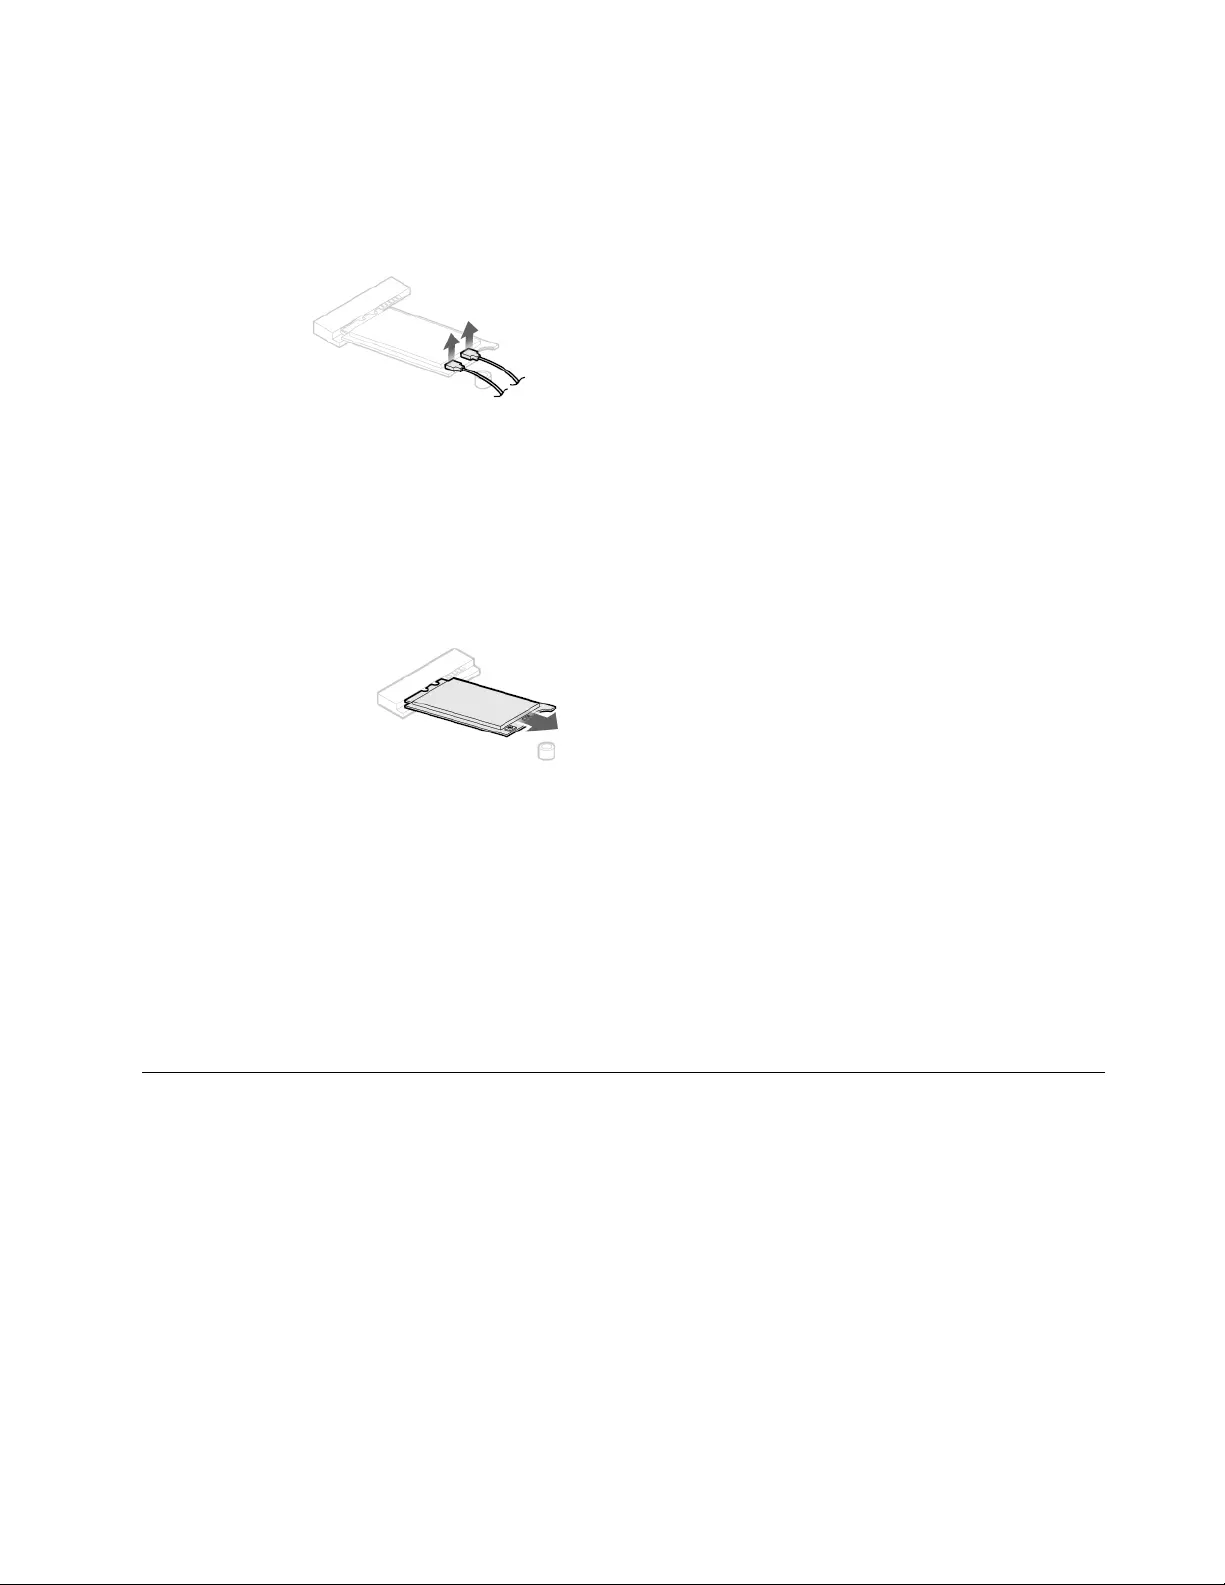
Step9.Disconnectthe2antennacablesfromtheWi-Ficard.
Step10.PulltheWi-Ficardoutfromtheslot.
Step11.InstallthenewWi-Ficard:
a.LineupthenewWi-Ficard,andtheninsertitintothesamecardslot.
b.Connectthe2antennacablestothenewWi-Ficard.
c.SecuretheWi-Ficardtothemotherboardwithonescrew.
Step12.Pivotthedrivebayassemblydownward.
Step13.Reinstallalltheremovedparts,andthenreconnectthecables.
ReplacingthefrontWi-Fiantenna
Note:Forthisprocedure,ithelpstolaythecomputerflat.
ToreplacethefrontWi-Fiantenna:
Step1.Removeanymediafromthedrives,shutdowntheoperatingsystem,andturnoffthecomputer
andallattacheddevices.
Step2.Unplugallpowercordsfromelectricaloutlets.
Step3.Disconnectallcablesattachedtothecomputer.Thisincludespowercords,input/output(I/O)
cables,andanyothercablesthatareconnectedtothecomputer.RefertoLocatingconnectors,
controlsandcomponentstolocatethevariousconnectors.
Step4.Removethecomputercover.RefertoRemovingthecomputercover.
Step5.Removethefrontbezel.RefertoRemovingthefrontbezel.
Chapter8.Replacinghardware43
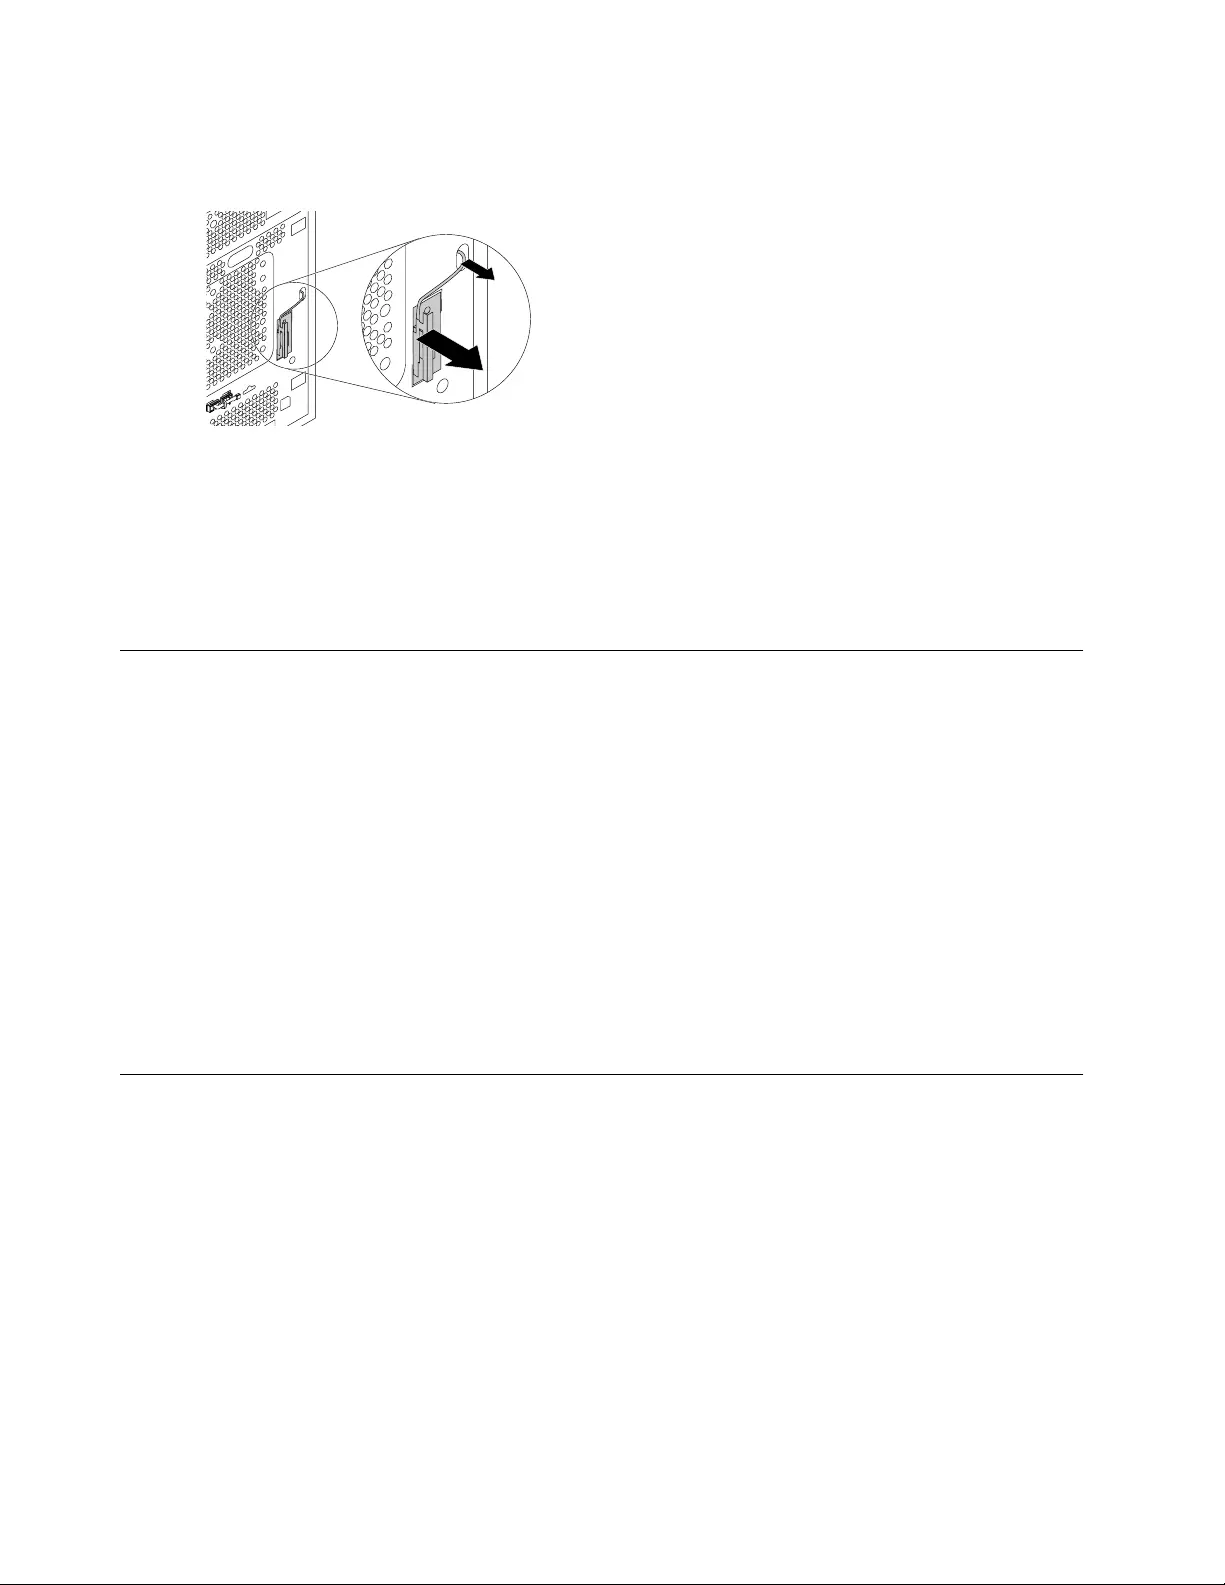
Step6.DisconnectthefrontWi-FiantennacablefromtheWi-Ficard.
Step7.PeeloffthefrontWi-Fiantennafromthefrontpanel,andthenremoveitfromthechassis.
Step8.InstallthenewfrontWi-Fiantenna:
a.PeeloffthereleasepaperontheadhesivesurfaceofthenewWi-Fiantenna.
b.RoutethenewWi-Fiantennacablethroughthecorrespondinghole,andthenstickthenew
Wi-Fiantennatothefrontpanel.
c.ConnectthenewWi-FiantennacabletotheWi-Ficard.
Step9.Reinstallalltheremovedparts,andthenreconnectthecables.
ReplacingtherearWi-Fiantenna
Note:Forthisprocedure,ithelpstolaythecomputerflat.
ToreplacetherearWi-Fiantenna:
Step1.Removeanymediafromthedrives,shutdowntheoperatingsystem,andturnoffthecomputer
andallattacheddevices.
Step2.Unplugallpowercordsfromelectricaloutlets.
Step3.Disconnectallcablesattachedtothecomputer.Thisincludespowercords,input/output(I/O)
cables,andanyothercablesthatareconnectedtothecomputer.RefertoLocatingconnectors,
controlsandcomponentstolocatethevariousconnectors.
Step4.Removethecomputercover.RefertoRemovingthecomputercover.
Step5.ToreplacetherearWi-Fiantenna,usethesamewayasthatofreplacingthefrontWi-Fiantenna.
RefertoReplacingthefrontWi-Fiantenna.
Replacingtheheat-sinkandfanassembly
Note:Forthisprocedure,ithelpstolaythecomputerflat.
Toreplacetheheat-sinkandfanassembly:
Step1.Removeanymediafromthedrives,shutdowntheoperatingsystem,andturnoffthecomputer
andallattacheddevices.
Step2.Unplugallpowercordsfromelectricaloutlets.
Step3.Disconnectallcablesattachedtothecomputer.Thisincludespowercords,input/output(I/O)
cables,andanyothercablesthatareconnectedtothecomputer.RefertoLocatingconnectors,
controlsandcomponentstolocatethevariousconnectors.
Step4.Removethecomputercover.RefertoRemovingthecomputercover.
Step5.Removethefrontbezel.RefertoRemovingthefrontbezel.
44ideacentre310/510SeriesHardwareMaintenanceManual
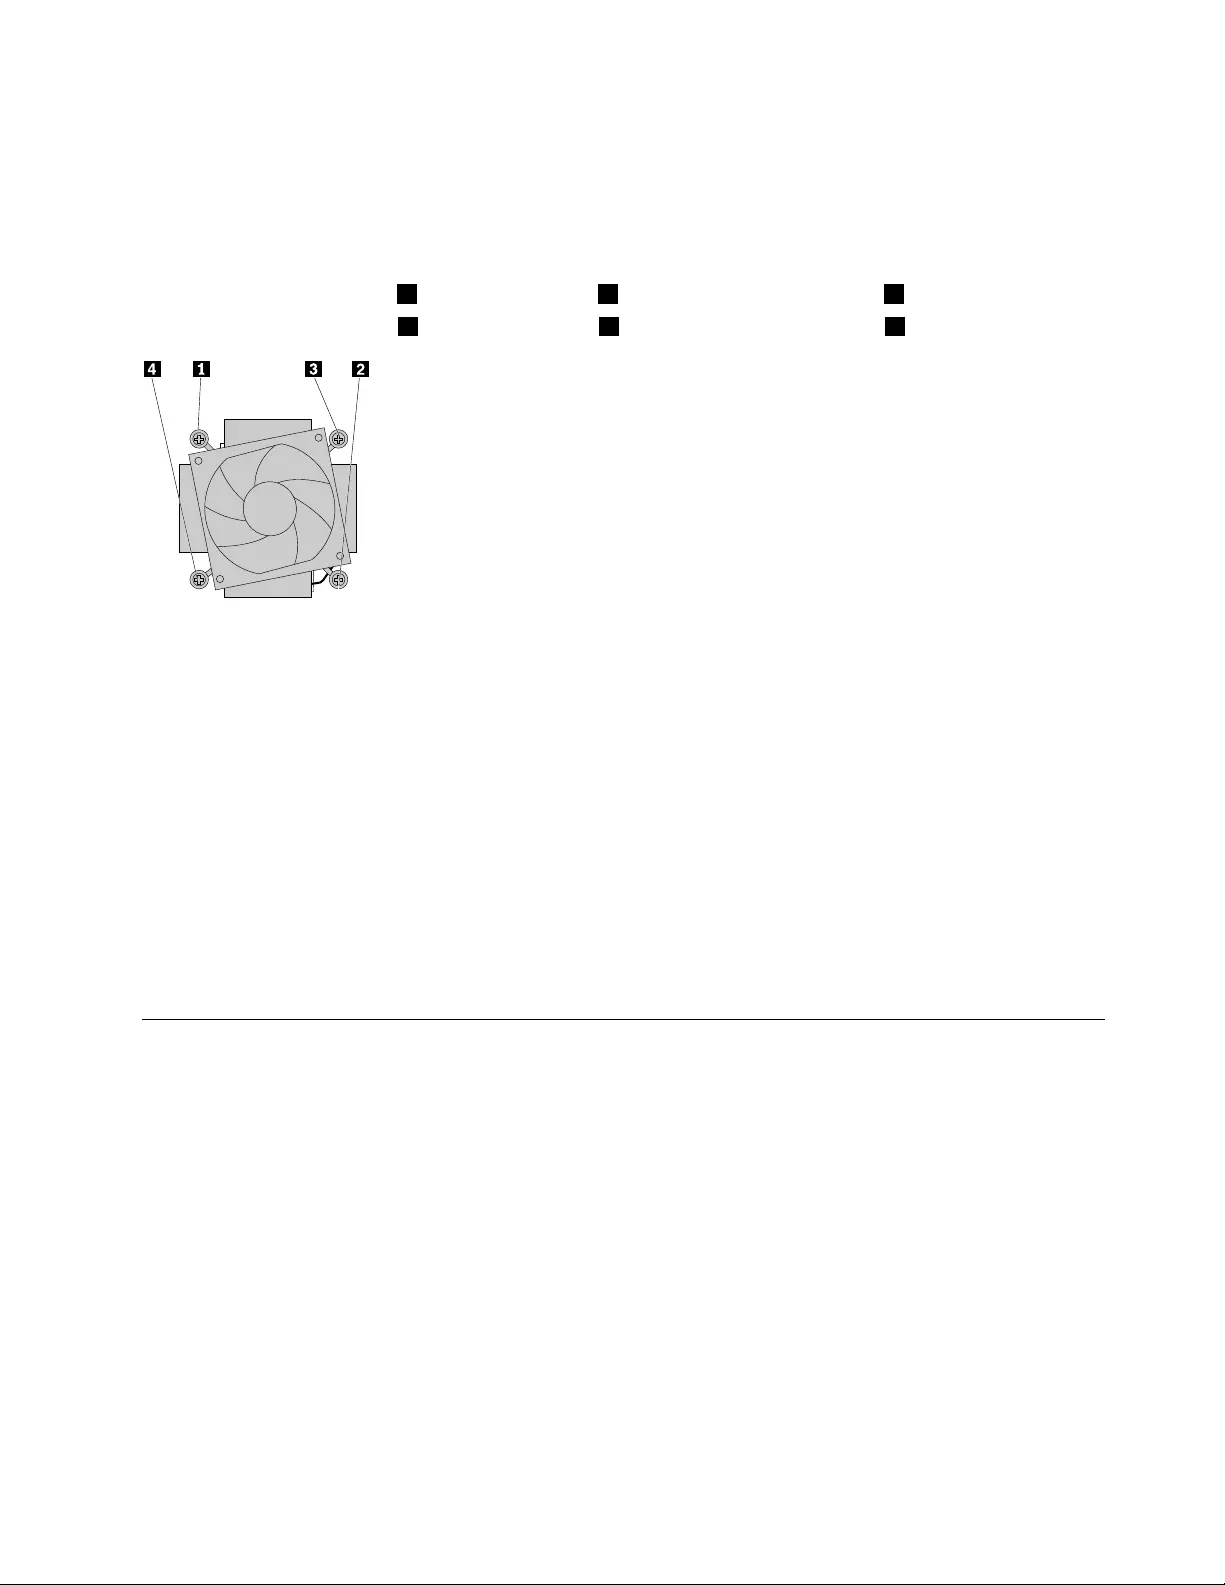
Step6.Pivotthedrivebayassemblyupward.
Step7.Disconnecttheheatsinkandfanassemblycablefromthemicroprocessorfanconnectoron
themotherboard.
Loosenthefourscrewsthatsecuretheheatsinkandfanassemblytothemotherboardinthefollowing
sequence:
•a.Partiallyremovescrew1,fullyremovescrew2,andthenfullyremovescrew1.
•b.Partiallyremovescrew3,fullyremovescrew4,andthenfullyremovescrew3.
Step8.Liftthefailingheatsinkandfanassemblyoffthemotherboard.
Note:Donottouchthethermalgreasewhilehandlingtheheatsinkandfanassembly.
Step9.Toinstallthenewheat-sinkassembly:
a.Positionthenewheatsinkandfanassemblyonthemotherboardsothatthefourscrewsare
alignedwiththeholesinthemotherboard.Ensurethattheheatsinkandfanassemblycable
facestowardthemicroprocessorfanconnectoronthemotherboard.
b.Tightenthefourscrewstosecurethenewheatsinkandfanassembly.
c.Connecttheheatsinkandfanassemblycabletothemicroprocessorfanconnectoronthe
motherboard.
Step10.Pivotthedrivebayassemblydownward.
Step11.Reinstallalltheremovedparts,andthenreconnectthecables.
Replacingthemicroprocessor
Note:Forthisprocedure,ithelpstolaythecomputerflat.
Toreplacethemicroprocessor
Step1.Removeanymediafromthedrives,shutdowntheoperatingsystem,andturnoffthecomputer
andallattacheddevices.
Step2.Unplugallpowercordsfromelectricaloutlets.
Step3.Disconnectallcablesattachedtothecomputer.Thisincludespowercords,input/output(I/O)
cables,andanyothercablesthatareconnectedtothecomputer.RefertoLocatingconnectors,
controlsandcomponentstolocatethevariousconnectors.
Step4.Removethecomputercover.RefertoRemovingthecomputercover.
Step5.Removethefrontbezel.RefertoRemovingthefrontbezel.
Step6.Pivotthedrivebayassemblyupward.
Step7.Removetheheat-sinkandfanassembly.RefertoReplacingtheheat-sinkandfanassembly.
Chapter8.Replacinghardware45
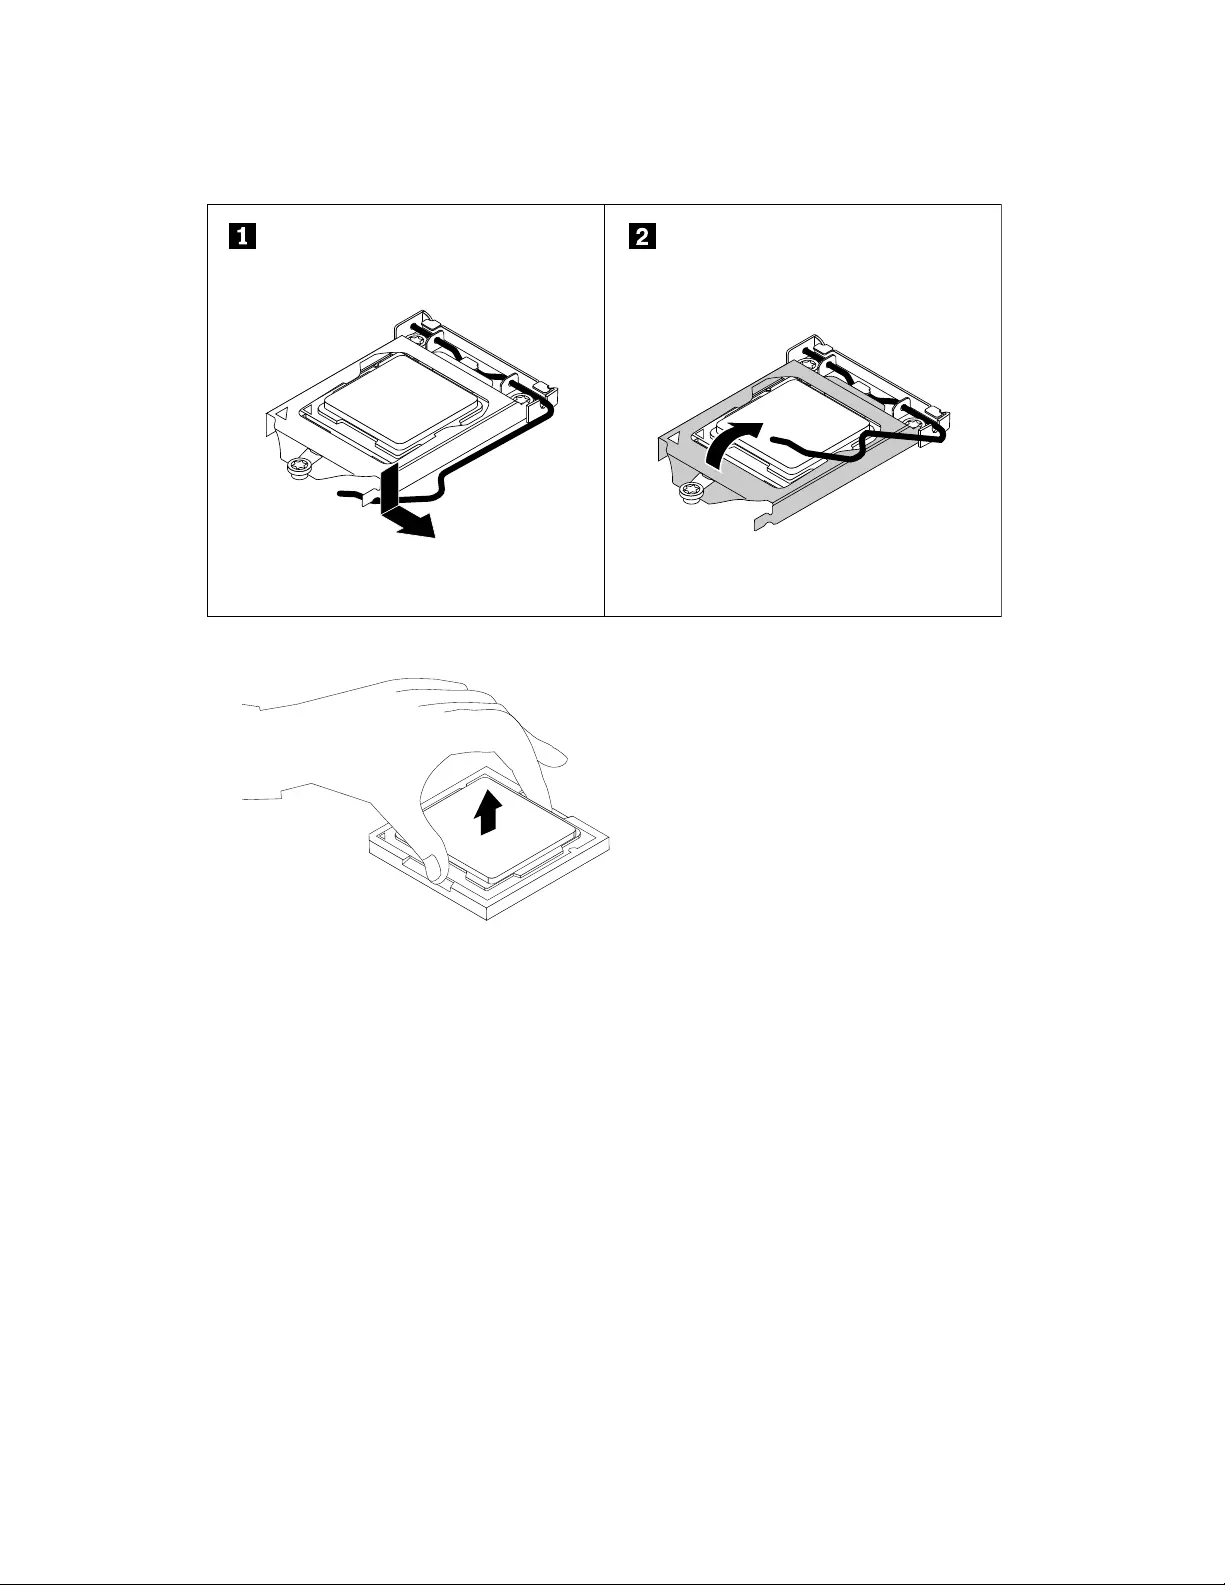
Step8.Pressthesmallhandledownwardtoreleaseitfromtheretainer,andthenopentheretainerto
accessthemicroprocessor.
Step9.Liftthemicroprocessorstraightupandoutofthemicroprocessorsocket.
Note:
a.Yourmicroprocessorandsocketmightlookdifferentfromtheoneillustrated.
b.Touchonlytheedgesofthemicroprocessor.Donottouchthegoldcontactsonthebottom.
c.Donotdropanythingontothemicroprocessorsocketwhileitisexposed.Thesocketpins
mustbekeptascleanaspossible.
Step10.Ensurethatthesmallhandleisintheraisedpositionandthemicroprocessorretainerisfullyopen.
Step11.Removetheprotectivecoverthatprotectsthegoldcontactsofthenewmicroprocessor.
46ideacentre310/510SeriesHardwareMaintenanceManual
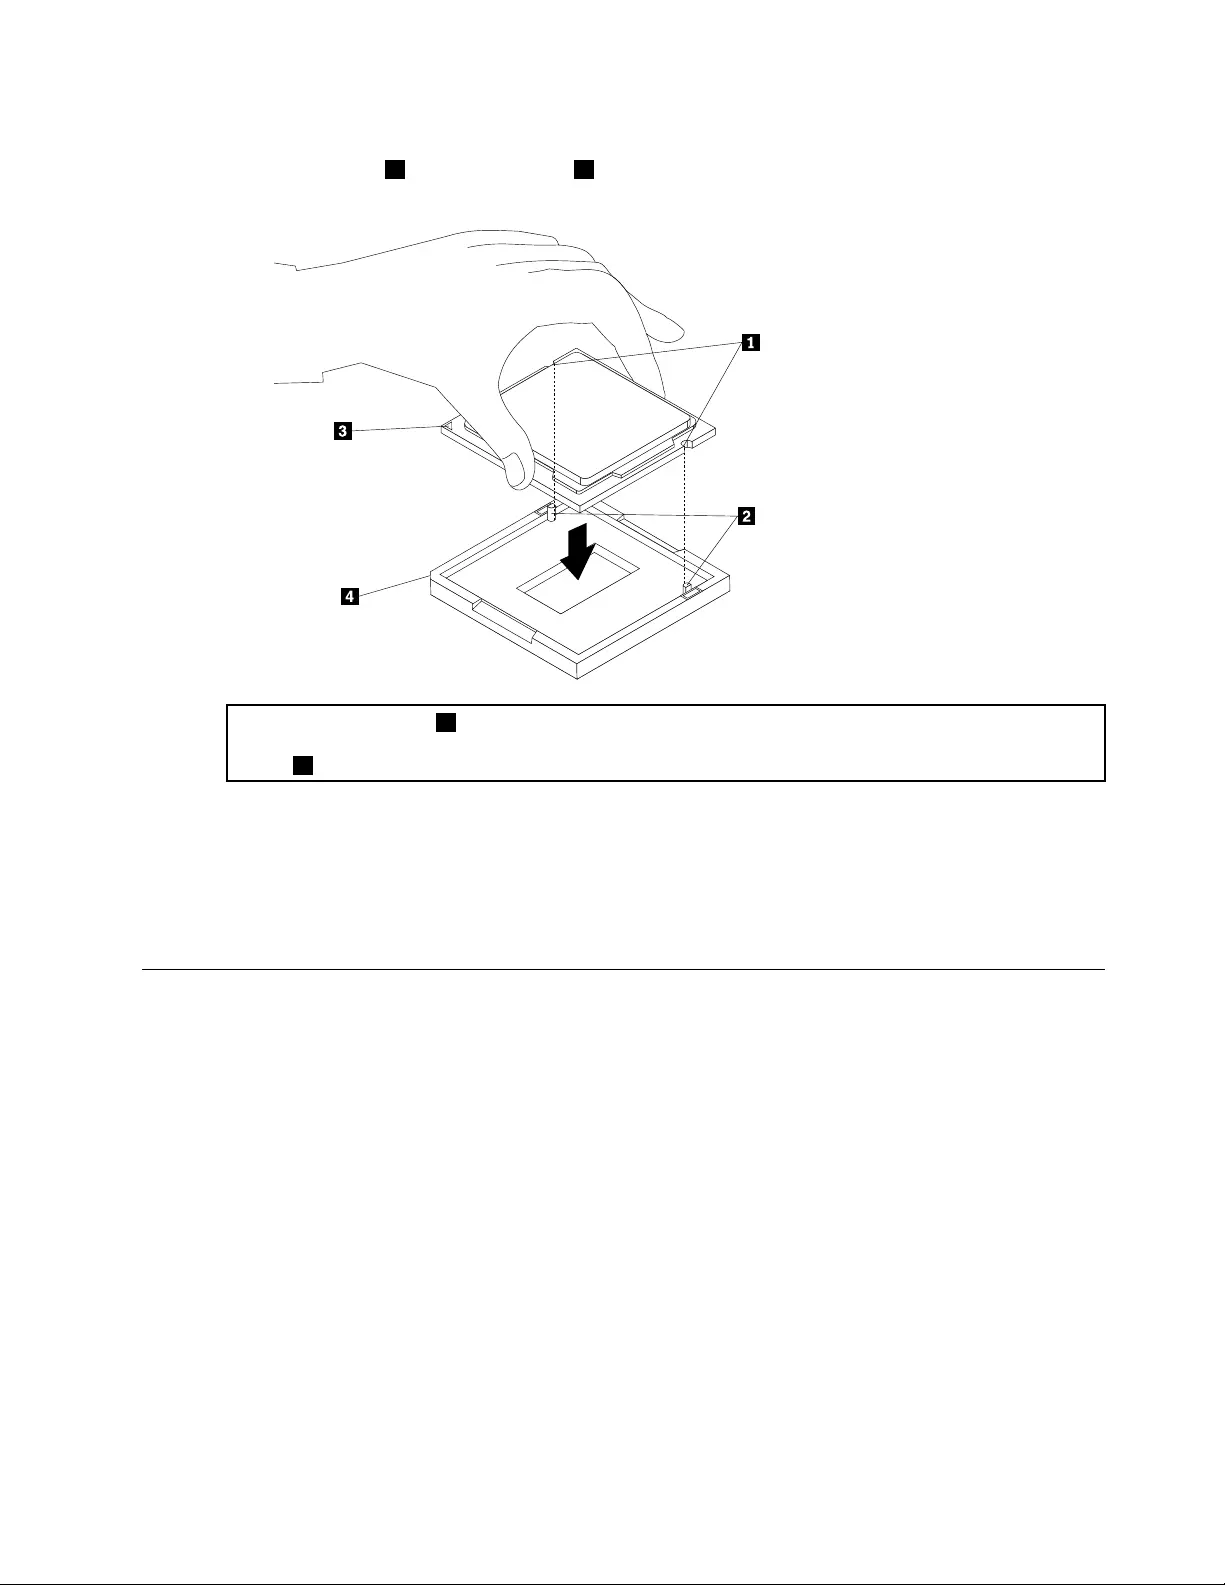
Step12.Notetheorientationofthenewmicroprocessor.Holdthenewmicroprocessorbyitsedgesand
alignthenotches1onitwiththetabs2inthemicroprocessorsocket.Then,carefullylowerthe
newmicroprocessorstraightdownintothemicroprocessorsocket.
Note:Thesmalltriangle3ononecornerofthenewmicroprocessoristhemicroprocessororientation
indicator.Thenewmicroprocessorisinthecorrectorientationwhenthisindicatorpointstothebeveled
corner4ofthemicroprocessorsocket.
Step13.Closethemicroprocessorretainerandlockitintopositionwiththesmallhandletosecurethe
newmicroprocessorinthesocket.
Step14.Reinstalltheheatsinkandfanassembly.
Step15.Pivotthedrivebayassemblydownward.
Step16.Reinstallalltheremovedparts,andthenreconnectthecables.
Replacingthefrontfan
Toreplacethefrontfan:(Selectedmedelsonly)
Step1.Removeanymediafromthedrives,shutdowntheoperatingsystem,andturnoffthecomputer
andallattacheddevices.
Step2.Unplugallpowercordsfromelectricaloutlets.
Step3.Disconnectallcablesattachedtothecomputer.Thisincludespowercords,input/output(I/O)
cables,andanyothercablesthatareconnectedtothecomputer.RefertoLocatingconnectors,
controlsandcomponentstolocatethevariousconnectors.
Step4.Removethecomputercover.RefertoRemovingthecomputercover.
Step5.Removethefrontbezel.RefertoRemovingthefrontbezel.
Step6.Pivotthedrivebayassemblyupward.
Chapter8.Replacinghardware47
Step7.Disconnectthefrontfanpowercablefromthecorrespondingconnectoronthemotherboard.
Step8.Thesystemfanisconnectedtothechassisbyfourrubbermounts.Breakorcuttherubbermounts
andgentlypullthesystemfanoutofthechassis.
Step9.Toinstallthenewsystemfan:
a.Ontheinsideofthefrontpanel,pushthefourrubbermountsonthenewsystemfanthrough
thecorrespondingholesinthechassis.
b.Ontheoutsideofthefrontpanel,pullthetipsoftherubbermountsuntilthesystemfan
issecuredinplace.
c.Connectthefanpowercabletothecorrespondingconnectoronthemotherboard.
d.Pivotthedrivebayassemblydownward.
Step10.Reinstallalltheremovedparts,andthenreconnectthecables.
Replacingtherearfan
Toreplacetherearfan:(Selectedmedelsonly)
Step1.Removeanymediafromthedrives,shutdowntheoperatingsystem,andturnoffthecomputer
andallattacheddevices.
Step2.Unplugallpowercordsfromelectricaloutlets.
Step3.Disconnectallcablesattachedtothecomputer.Thisincludespowercords,input/output(I/O)
cables,andanyothercablesthatareconnectedtothecomputer.RefertoLocatingconnectors,
controlsandcomponentstolocatethevariousconnectors.
Step4.Removethecomputercover.RefertoRemovingthecomputercover.
48ideacentre310/510SeriesHardwareMaintenanceManual
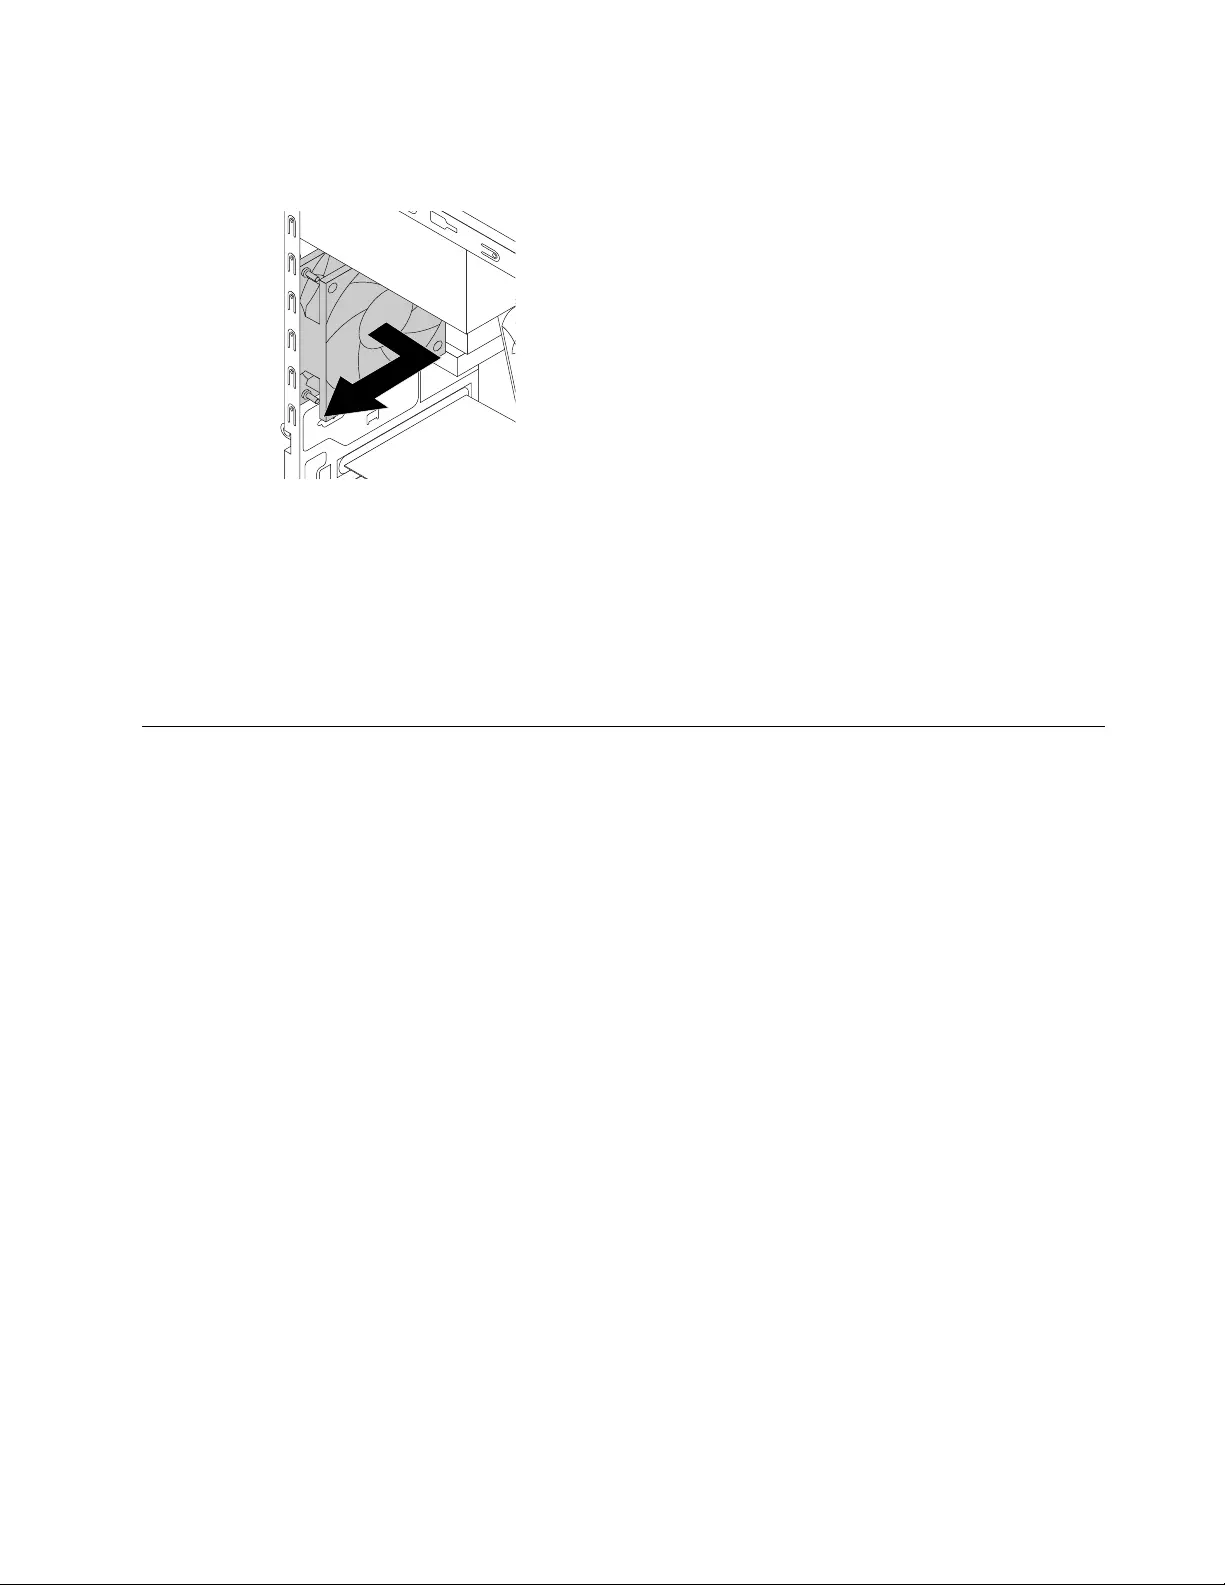
Step5.Disconnecttherearfanpowercablefromthecorrespondingconnectoronthemotherboard.
Step6.Pulltherearfanassemblyoutofthechassis.
Step7.Toinstallthenewrearfan:
a.Ontheinsideoftherearpanel,pushthefourrubbermountsonthenewrearfanthroughthe
correspondingholesinthechassis.
b.Ontheoutsideoftherearpanel,pullthetipsoftherubbermountsuntiltherearfanissecured
inplace.
c.Connectthefanpowercabletothecorrespondingconnectoronthemotherboard.
Step8.Reinstallalltheremovedparts,andthenreconnectthecables.
Replacingthemotherboard
Note:Forthisprocedure,ithelpstolaythecomputerflat.
Toreplacethemotherboard:
Step1.Removeanymediafromthedrives,shutdowntheoperatingsystem,andturnoffthecomputer
andallattacheddevices.
Step2.Unplugallpowercordsfromelectricaloutlets.
Step3.Disconnectallcablesattachedtothecomputer.Thisincludespowercords,input/output(I/O)
cables,andanyothercablesthatareconnectedtothecomputer.RefertoLocatingconnectors,
controlsandcomponentstolocatethevariousconnectors.
Step4.Removethecomputercover.RefertoRemovingthecomputercover.
Step5.Removethefrontbezel.RefertoRemovingthefrontbezel.
Step6.Pivotthedrivebayassemblyupward.
Step7.Removethememorymodule.Referto.
Step8.Removetheheat-sinkassembly.RefertoReplacingtheheat-sinkandfanassembly.
Step9.RemovetheCPU.RefertoReplacingthemicroprocessor.
Step10.RemovethePCIExpresscard.RefertoReplacingthePCIExpresscard.
Step11.RemovetheWi-Ficard.RefertoReplacingtheWi-Ficard.
Step12.Removethefrontfan.RefertoReplacingthefrontfan.
Step13.Removetherearfan.RefertoReplacingtherearfan.
Step14.Disconnecttheallcablesfromtheconnectorsonmotherboard.
Step15.Removethe7screwsthatsecurethemotherboardtothechassis.
Chapter8.Replacinghardware49
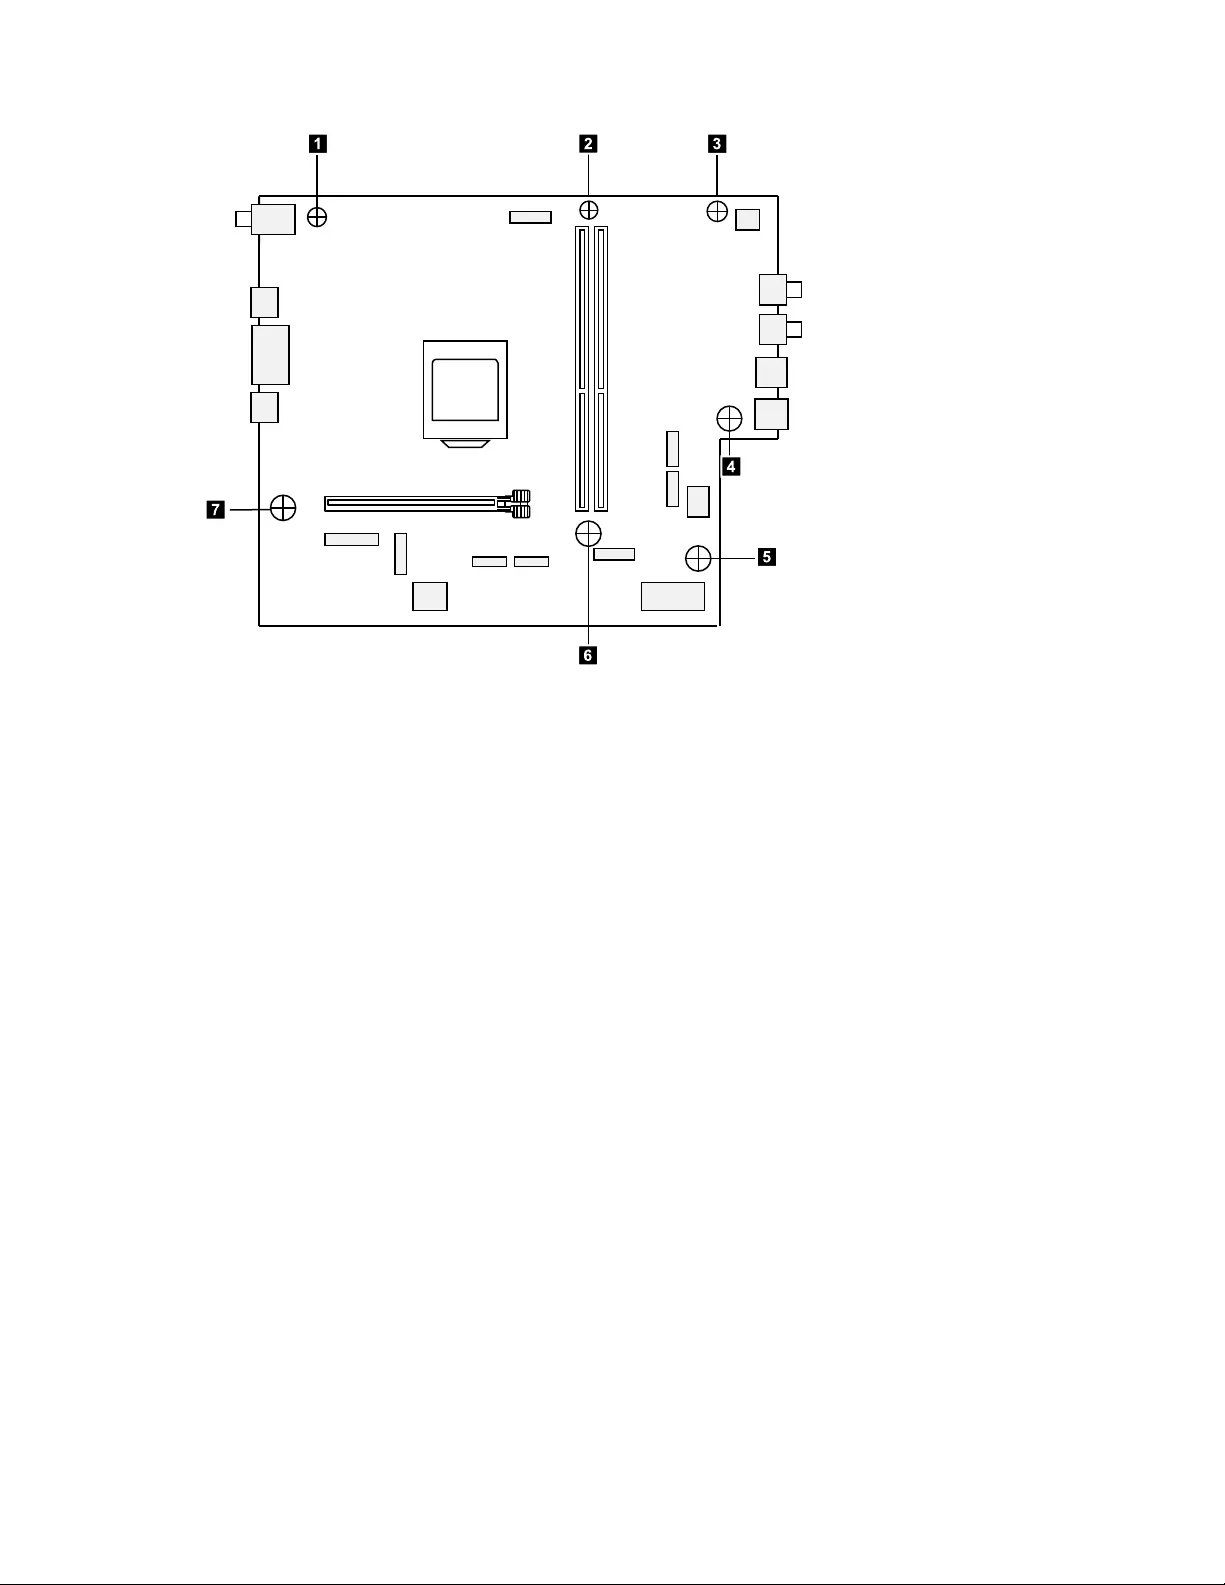
123
4
5
6
7
Step16.Liftupthemotherboardtoremoveit.
Step17.Installthenewmotherboard:
a.Lineuptheholesonthenewmotherboardwithmountingholesonthechassisandsecureit
withsevenscrews.
Step18.Reinstallalltheremovedparts,andthenreconnectthecables.
50ideacentre310/510SeriesHardwareMaintenanceManual

Chapter9.FRUlists
Thischapterliststheinformationonthefieldreplaceableunits(FRUs)forLenovoideacentre310and
510seriescomputers.
Attention:BesuretoreadandunderstandallthesafetyinformationbeforereplacinganyFRUs.
FRUlistofideacentre310–15ASR
FRUP/NDescription
00PC727AC_ADAPTER,120W,100-240Vac,3P
00PC728AC_ADAPTER,150W,100-240Vac,3P
00PC726AC_ADAPTER,90W,100-240Vac,3P
00XJ015Fru,Lx15LStampingFrontANT
00XK158MBMStoneyA9WINDPK
00XK159MBMStoneyA6NODPK
00XK157MBMStoneyA9NODPK
00XK161MBMStoneyE2NODPK
00XK162MBMStoneyE2WINDPK
00XK160MBMStoneyA6WINDPK
00XL218Fru,380mmSATAcable2latch
00XL216Fru400mmSATAcable1latchL_angle
00XL213Fru,SATAPWRcable(300mm+200mm)
00XL146Fru,SATApowercable(300mm_300mm)
04X2750Fru,H5060500M.2Rearantenna
04X2799Fru,370mmSATAcable
00XL217Fru400mmSATApowercable
00PC205NVGeForceGT7302GVGA+HDMIHP
01AJ8397in1Cardreader
00XH950USBCalliopeKBSRBUL
00XH633USBCalliopeKBBKNORDIC
00XH959USBCalliopeKBSRGRE
00XH948USBCalliopeKBSRBELENG
00XH976USBCalliopeKBSRSPA
00XH604USBCalliopeKBBKHBW
00XH605USBCalliopeKBBKHUN
00XH607USBCalliopeKBBKITA
00XH598USBCalliopeKBBKFRA
00XH971USBCalliopeKBSRPOR
00XH967USBCalliopeKBSRKOR
©CopyrightLenovo201751

00XH602USBCalliopeKBBKGRE
00XH601USBCalliopeKBBKGER
00XH627USBCalliopeKBBKSLV
00XH952USBCalliopeKBSRCZE
00XH626USBCalliopeKBBKEUROENG
00XH945USBCalliopeKBSRARA
00XH944USBCalliopeKBSRENG
00XH987USBCalliopeKBSRINDENG
00XH964USBCalliopeKBSRITA
00XH982USBCalliopeKBSRUKE
00XH610USBCalliopeKBBKKOR
00XH973USBCalliopeKBSRRUS
00XH608USBCalliopeKBBKJPN
00XH962USBCalliopeKBSRHUN
00XH949USBCalliopeKBSRBRL
00XH983USBCalliopeKBSREUROENG
00XH621USBCalliopeKBBKSWS
00XH978USBCalliopeKBSRSWS
00XH622USBCalliopeKBBKTHAI
00XH990USBCalliopeKBSRNORDIC
00XH968USBCalliopeKBSRLASPA
00XH958USBCalliopeKBSRGER
00XH630USBCalliopeKBBKINDENG
00XH618USBCalliopeKBBKSLK
00XH625USBCalliopeKBBKUKE
00XH619USBCalliopeKBBKSPA
00XH624USBCalliopeKBBKTUR
00XH611USB,Calliope,KB,BK,LASPA
00XH984USBCalliopeKBSRSLV
00XH594USBCalliopeKBBKTC/ENG
00XH614USBCalliopeKBBKPOR
00XH979USBCalliopeKBSRTHAI
00XH595USBCalliopeKBBKCZE
00XH593USBCalliopeKBBKBUL
00XH591USB,Calliope,KB,BK,BELENG
00XH616USBCalliopeKBBKRUS
00XH981USBCalliopeKBSRTUR
00XH961USBCalliopeKBSRHBW
00XH587USBCalliopeKBBKENG
00XH951USBCalliopeKBSRTC/ENG
52ideacentre310/510SeriesHardwareMaintenanceManual

00XH588USBCalliopeKBBKARA
00XH955USBCalliopeKBSRFRA
00XH635USBCalliopeKBBKCANENG/FRA
00XH992USBCalliopeKBSRCANEN/FR
00XH965USBCalliopeKBSRJPN
00XH975USBCalliopeKBSRSLK
45K0623HDD,1TB,7200,DT3,SATA3,STD
00PC552HDD,2TB,7200,DT3,SATA3,STD
45K0629HDD,500G,7200,DT3,SATA3,STD
00PC550HDD,500G,7200,DT3,SATA3,STD
45K0625HDD,2TB,7200,DT3,SATA3,STD
00PC551HDD,1TB,7200,DT3,SATA3,STD
01EF369A18WCPUCoolerforStoneyRid
00XH853WLKMCalliopeSRTC/ENG
25209181LiteonSK-8861(RU)2.4GKB-Black8
00XH852WLKMCalliopeSRBUL
25209180LiteonSK-8861(US-IN)2.4GKB-Black8
25203464LiteonSM-8861(WW)MouseBlack
00XH880WLKMCalliopeSRSWS
00XH861WLKMCalliopeSRGRE/UK
00XH863WLKMCalliopeSRHBW
25209192LiteonSK-8861(IT)2.4GKB-Black8
25209193LiteonSK-8861(IL)2.4GKB-Black8
00XH895WLKMCalliopeSRNoBATLASPA
25209201LiteonSK-8861(PT)2.4GKB-Black8
25209184LiteonSK-8861(LA)2.4GKB-Black8
00XH875WLKMCalliopeSRRUS
00XH883WLKMCalliopeSRTUR
00XH889WLKMCalliopeSRINDENG
25209182LiteonSK-8861(GB)2.4GKB-Black8
25209183LiteonSK-8861(Nordic)2.4GKB-Black8
00XH867WLKMCalliopeSRJPN
00XH892WLKMCalliopeSRNordic
25209176LiteonSK-8861(US-MY)2.4GKB-Black8
00XH851WLKMCalliopeSRNoBATBRL
00XH866WLKMCalliopeSRITA
25209175LiteonSK-8861(US)2.4GKB-Black8
00XH881WLKMCalliopeSRTHAI
00XH860WLKMCalliopeSRGER
00XH857WLKMCalliopeSRFRA
Chapter9.FRUlists53

25209190LiteonSK-8861(ES)2.4GKB-Black8
25209198LiteonSK-8861(KR)2.4GKB-Black8
25209200LiteonSK-8861(EN-FR)2.4GKB-Black8
25209194LiteonSK-8861(FR)2.4GKB-Black8
25209199LiteonSK-8861(JP)2.4GKB-Black8
25209197LiteonSK-8861(BG)2.4GKB-Black8
25209191LiteonSK-8861(SL)2.4GKB-Black8
25209177LiteonSK-8861(TW)2.4GKB-Black8
00XH878WLKMCalliopeSRSPA
00XH884WLKMCalliopeSRUKE
00XH869WLKMCalliopeSRKOR
25209178LiteonSK-8861(TH)2.4GKB-Black8
25209179LiteonSK-8861(CS-SK)2.4GKB-Black8
00XH877WLKMCalliopeSRSLK
25209186LiteonSK-8861(SA)2.4GKB-Black8
25209185LiteonSK-8861(LA-AR)2.4GKB-Black8
00XH864WLKMCalliopeSRHUN
25209189LiteonSK-8861(TR)2.4GKB-Black8
00PH144USBCalliopeMouseSR-GY
25209188LiteonSK-8861(DE)2.4GKB-Black8
00XH854WLKMCalliopeSRCZE
25209187LiteonSK-8861(CH)2.4GKB-Black8
00XH886WLKMCalliopeSRSLV
00XH873WLKMCalliopeSRPOR
25209203LiteonSK-8861(US-EU)2.4GKB-Black8
25209202LiteonSK-8861(BE-EN)2.4GKB-Black8
00XH885WLKMCalliopeSREuroENG
00XH870WLKMCalliopeSRLASPA
00XH850WLKMCalliopeSRBELENG
25203466LiteonSM-8861Mouse(MY)Black
00XH846PrimaxRFBU712.4GSVGUS
25209196LiteonSK-8861(HU)2.4GKB-Black8
00XH847WLKMCalliopeSRARA
25209195LiteonSK-8861(GR)2.4GKB-Black8
00XH894WLKMCalliopeSRCANENG/FRA
00XL002Fru,JP ,Anti-TR,1M,2P ,NON-LH
00XL052Fru,US/CA,1M,3P ,NON-LH
00XL086Fru,LINECORD,IL,1M,3P ,NON-LH
00XL090Fru,LINECORD,CN,1M,3P ,NON-LH
00XL092Fru,LINECORD,TW,1M,3P ,NON-LH
54ideacentre310/510SeriesHardwareMaintenanceManual

00XL068Fru,LINECORD,DK,1M,3P ,NON-LH
00XL074Fru,LINECORD,IT,1M,3P ,NON-LH
00XL066Fru,LINECORD,DK,1M,3P ,NON-LH
00XL071Fru,LINECORD,CH,1M,3P ,NON-LH
00XL057Fru,LINECORD,AR,1M,3P ,NON-LH
00XL003Fru,JP ,Anti-TR,1M,2P ,NON-LH
00XL079Fru,LINECORD,AU,1M,3P ,NON-LH
00XL060Fru,LINECORD,BR,1M,3P ,NON-LH
00XL058Fru,LINECORD,AR,1M,3P ,NON-LH
00XL062Fru,LINECORD,BR,1M,3P ,NON-LH
00XL096Fru,LINECORD,IN,1M,3P ,NON-LH
00XL084Fru,LINECORD,IL,1M,3P ,NON-LH
00XL070Fru,LINECORD,CH,1M,3P ,NON-LH
00XL064Fru,EU/KR,1M,3P ,NON-LH
00XL097Fru,LINECORD,TH,1M,3P ,NON-LH
00XL065Fru,EU/KR,1M,3P ,NON-LH
00XL091Fru,LINECORD,TW,1M,3P ,NON-LH
00XL063Fru,EU/KR,1M,3P ,NON-LH
00XL059Fru,LINECORD,AR,1M,3P ,NON-LH
00XL072Fru,LINECORD,IT,1M,3P ,NON-LH
00XL061Fru,LINECORD,BR,1M,3P ,NON-LH
00XL069Fru,LINECORD,CH,1M,3P ,NON-LH
00XL093Fru,LINECORD,TW,1M,3P ,NON-LH
00XL081Fru,LINECORD,ZA,1M,3P ,NON-LH
00XL085Fru,LINECORD,IL,1M,3P ,NON-LH
00XL053Fru,US/CA,1M,3P ,NON-LH
00XL082Fru,LINECORD,ZA,1M,3P ,NON-LH
00XL051Fru,US/CA,1M,3P ,NON-LH
00XL077Fru,LINECORD,GB,1M,3P ,NON-LH
00XL073Fru,LINECORD,IT,1M,3P ,NON-LH
00XL075Fru,LINECORD,GB,1M,3P ,NON-LH
00XL067Fru,LINECORD,DK,1M,3P ,NON-LH
00XL078Fru,LINECORD,AU,1M,3P ,NON-LH
00XL083Fru,LINECORD,ZA,1M,3P ,NON-LH
00XL080Fru,LINECORD,AU,1M,3P ,NON-LH
00XL094Fru,LINECORD,IN,1M,3P ,NON-LH
00XL076Fru,LINECORD,GB,1M,3P ,NON-LH
00XL089Fru,LINECORD,CN,1M,3P ,NON-LH
01EF772333ET1,Odd-doorASSY,AVC
01EF774333ET1,Side-Cover,AVC
Chapter9.FRUlists55

01EF8413.5to2.5HDDBrkt,FXN
01EF771333ET1,F-BezelASSY,AVC
00XD328HDMI_COVERKit
01EF961333ET1,FIOBKTASSY,AVC
01EF776333ET1,Accessorybag,AVC,
01EF773333ET1,Base-chassis,AVC
00XD8603.5to2.5HDDBKT,Fox
01EF775333ET2,F-BezelASSY,AVC
01EF777333ET2,Accessorybag,AVC,
00XD436VGArubbercover
01AG8058GBDDR42400UDIMM
01AG8044GBDDR42400UDIMM
00XK718128G,2.5",7mm,SATA3,SAM,STD
00XK734256G,2.5",7mm,SATA3,LIT,OPAL2.0
00XK719256G,2.5",7mm,SATA3,SAM,OPAL2.0
00XK726128G,2.5",7mm,SATA3,SAN,STD
00XK733128G,2.5",7mm,SATA3,LIT,STD
00XK730256G,2.5",7mm,SATA3,SAN,OPAL2.0
01EF801AVC,SLIM-ODD-EMICover
00PH143ChiconyUSBFingerprintMCB_O
00PH131USBCalliopeMouseBlack(Orangewh
45K04949.0mmDVDRambowithoutbezel
01AJ845GT7301GBDDR564Bit
01AJ846BLDGT7301GBDDR564Bit
01AX709Wireless,CMB,LTN,NFA435A
FRUlistofideacentre310–15IAP
FRUP/NDescription
00PC726AC_ADAPTER,90W,100-240Vac,3P
54Y8999AC_ADAPTER,65W,100-240Vac,3P
00XJ015Fru,Lx15LStampingFrontANT
00XK222MBNApollolakeJ4205YTNODPK
00XK225MBNApollolakeJ3455YTWINDP
00XK223MBNApollolakeJ4205YTWINDP
00XK224MBNApollolakeJ3455YTNODPK
00XK226MBNApollolakeJ3355YTNODPK
00XK227MBNApollolakeJ3355YTWINDP
00XL218Fru,380mmSATAcable2latch
00XL216Fru400mmSATAcable1latchL_angle
56ideacentre310/510SeriesHardwareMaintenanceManual

00XL213Fru,SATAPWRcable(300mm+200mm)
00XL146Fru,SATApowercable(300mm_300mm)
04X2750Fru,H5060500M.2Rearantenna
04X2799Fru,370mmSATAcable
00XL217Fru400mmSATApowercable
00PC205NVGeForceGT7302GVGA+HDMIHP
01AJ8397in1Cardreader
01AH633Liteon2.4GBlackSK-8861RU
01AH637Liteon2.4GBlackSK-8861LA-AR
00XH950USBCalliopeKBSRBUL
00XH633USBCalliopeKBBKNORDIC
01AH639Liteon2.4GBlackSK-8861CH
01AH632Liteon2.4GBlackSK-8861US-IN
01AH638Liteon2.4GBlackSK-8861SA
01AH645Liteon2.4GBlackSK-8861IL
00XH959USBCalliopeKBSRGRE
01AH641Liteon2.4GBlackSK-8861TR
00XH948USBCalliopeKBSRBELENG
00XH976USBCalliopeKBSRSPA
01AH642Liteon2.4GBlackSK-8861ES
00XH604USBCalliopeKBBKHBW
01AH643Liteon2.4GBlackSK-8861SL
00XH605USBCalliopeKBBKHUN
01AH644Liteon2.4GBlackSK-8861IT
00XH607USBCalliopeKBBKITA
01AH640Liteon2.4GBlackSK-8861DE
00XH598USBCalliopeKBBKFRA
00XH971USBCalliopeKBSRPOR
00XH967USBCalliopeKBSRKOR
00XH602USBCalliopeKBBKGRE
00XH601USBCalliopeKBBKGER
01AH646Liteon2.4GBlackSK-8861FR
00XH627USBCalliopeKBBKSLV
01AH653Liteon2.4GBlackSK-8861PT
00XH952USBCalliopeKBSRCZE
01AH654Liteon2.4GBlackSK-8861BE-EN
00XH626USBCalliopeKBBKEUROENG
01AH655Liteon2.4GBlackSK-8861US-EU
00XH945USBCalliopeKBSRARA
00XH944USBCalliopeKBSRENG
Chapter9.FRUlists57

00XH987USBCalliopeKBSRINDENG
00XH964USBCalliopeKBSRITA
00XH982USBCalliopeKBSRUKE
00XH610USBCalliopeKBBKKOR
00XH973USBCalliopeKBSRRUS
00XH608USBCalliopeKBBKJPN
01AH650Liteon2.4GBlackSK-8861KR
01AH649Liteon2.4GBlackSK-8861BG
00UW407LiteonSK-88612.4GKB(BR)-BLK
01AH652Liteon2.4GBlackSK-8861EN-FR
01AH651Liteon2.4GBlackSK-8861JP
00XH962USBCalliopeKBSRHUN
00XH949USBCalliopeKBSRBRL
00XH983USBCalliopeKBSREUROENG
00XH621USBCalliopeKBBKSWS
00XH978USBCalliopeKBSRSWS
00XH622USBCalliopeKBBKTHAI
00XH990USBCalliopeKBSRNORDIC
00XH968USBCalliopeKBSRLASPA
00XH958USBCalliopeKBSRGER
00XH630USBCalliopeKBBKINDENG
00XH618USBCalliopeKBBKSLK
01AH647Liteon2.4GBlackSK-8861GR
00XH625USBCalliopeKBBKUKE
00XH619USBCalliopeKBBKSPA
01AH648Liteon2.4GBlackSK-8861HU
00XH624USBCalliopeKBBKTUR
00XH611USB,Calliope,KB,BK,LASPA
00XH984USBCalliopeKBSRSLV
00XH594USBCalliopeKBBKTC/ENG
00XH614USBCalliopeKBBKPOR
00XH979USBCalliopeKBSRTHAI
00XH595USBCalliopeKBBKCZE
00XH593USBCalliopeKBBKBUL
00XH591USB,Calliope,KB,BK,BELENG
00XH616USBCalliopeKBBKRUS
00XH981USBCalliopeKBSRTUR
01AH630Liteon2.4GBlackSK-8861TH
00XH961USBCalliopeKBSRHBW
01AH631Liteon2.4GBlackSK-8861CS-SK
58ideacentre310/510SeriesHardwareMaintenanceManual

00XH587USBCalliopeKBBKENG
00XH951USBCalliopeKBSRTC/ENG
01AH627Liteon2.4GBlackSK-8861US
01AH634Liteon2.4GBlackSK-8861GB
00XH588USBCalliopeKBBKARA
00XH955USBCalliopeKBSRFRA
01AH628Liteon2.4GBlackSK-8861US-MY
00XH635USBCalliopeKBBKCANENG/FRA
01AH635Liteon2.4GBlackSK-8861Nordic
00XH992USBCalliopeKBSRCANEN/FR
01AH629Liteon2.4GBlackSK-8861TW
00XH965USBCalliopeKBSRJPN
00XH975USBCalliopeKBSRSLK
01AH636Liteon2.4GBlackSK-8861LA
45K0623HDD,1TB,7200,DT3,SATA3,STD
00PC552HDD,2TB,7200,DT3,SATA3,STD
45K0629HDD,500G,7200,DT3,SATA3,STD
00PC550HDD,500G,7200,DT3,SATA3,STD
45K0625HDD,2TB,7200,DT3,SATA3,STD
00PC551HDD,1TB,7200,DT3,SATA3,STD
00XD252CPUHeatsink18W
00XH853WLKMCalliopeSRTC/ENG
00XH852WLKMCalliopeSRBUL
00XH880WLKMCalliopeSRSWS
00XH861WLKMCalliopeSRGRE/UK
00XH863WLKMCalliopeSRHBW
00XH895WLKMCalliopeSRNoBATLASPA
00XH875WLKMCalliopeSRRUS
00XH883WLKMCalliopeSRTUR
00XH889WLKMCalliopeSRINDENG
00XH867WLKMCalliopeSRJPN
00XH892WLKMCalliopeSRNordic
00XH851WLKMCalliopeSRNoBATBRL
00XH866WLKMCalliopeSRITA
00XH881WLKMCalliopeSRTHAI
00XH860WLKMCalliopeSRGER
00XH857WLKMCalliopeSRFRA
00XH878WLKMCalliopeSRSPA
00XH884WLKMCalliopeSRUKE
00XH869WLKMCalliopeSRKOR
Chapter9.FRUlists59

00XH877WLKMCalliopeSRSLK
00XH864WLKMCalliopeSRHUN
00PH144USBCalliopeMouseSR-GY
00XH854WLKMCalliopeSRCZE
00XH886WLKMCalliopeSRSLV
00XH873WLKMCalliopeSRPOR
00XH885WLKMCalliopeSREuroENG
00XH870WLKMCalliopeSRLASPA
00XH850WLKMCalliopeSRBELENG
00XH846PrimaxRFBU712.4GSVGUS
00XH847WLKMCalliopeSRARA
00XH894WLKMCalliopeSRCANENG/FRA
00XL002Fru,JP ,Anti-TR,1M,2P ,NON-LH
00XL052Fru,US/CA,1M,3P ,NON-LH
00XL086Fru,LINECORD,IL,1M,3P ,NON-LH
00XL090Fru,LINECORD,CN,1M,3P ,NON-LH
00XL092Fru,LINECORD,TW,1M,3P ,NON-LH
00XL068Fru,LINECORD,DK,1M,3P ,NON-LH
00XL074Fru,LINECORD,IT,1M,3P ,NON-LH
00XL066Fru,LINECORD,DK,1M,3P ,NON-LH
00XL071Fru,LINECORD,CH,1M,3P ,NON-LH
00XL057Fru,LINECORD,AR,1M,3P ,NON-LH
00XL003Fru,JP ,Anti-TR,1M,2P ,NON-LH
00XL079Fru,LINECORD,AU,1M,3P ,NON-LH
00XL060Fru,LINECORD,BR,1M,3P ,NON-LH
00XL058Fru,LINECORD,AR,1M,3P ,NON-LH
00XL062Fru,LINECORD,BR,1M,3P ,NON-LH
00XL096Fru,LINECORD,IN,1M,3P ,NON-LH
00XL084Fru,LINECORD,IL,1M,3P ,NON-LH
00XL070Fru,LINECORD,CH,1M,3P ,NON-LH
00XL064Fru,EU/KR,1M,3P ,NON-LH
00XL097Fru,LINECORD,TH,1M,3P ,NON-LH
00XL065Fru,EU/KR,1M,3P ,NON-LH
00XL091Fru,LINECORD,TW,1M,3P ,NON-LH
00XL063Fru,EU/KR,1M,3P ,NON-LH
00XL059Fru,LINECORD,AR,1M,3P ,NON-LH
00XL072Fru,LINECORD,IT,1M,3P ,NON-LH
00XL061Fru,LINECORD,BR,1M,3P ,NON-LH
00XL069Fru,LINECORD,CH,1M,3P ,NON-LH
00XL093Fru,LINECORD,TW,1M,3P ,NON-LH
60ideacentre310/510SeriesHardwareMaintenanceManual

00XL081Fru,LINECORD,ZA,1M,3P ,NON-LH
00XL085Fru,LINECORD,IL,1M,3P ,NON-LH
00XL053Fru,US/CA,1M,3P ,NON-LH
00XL082Fru,LINECORD,ZA,1M,3P ,NON-LH
00XL051Fru,US/CA,1M,3P ,NON-LH
00XL077Fru,LINECORD,GB,1M,3P ,NON-LH
00XL073Fru,LINECORD,IT,1M,3P ,NON-LH
00XL075Fru,LINECORD,GB,1M,3P ,NON-LH
00XL067Fru,LINECORD,DK,1M,3P ,NON-LH
00XL078Fru,LINECORD,AU,1M,3P ,NON-LH
00XL083Fru,LINECORD,ZA,1M,3P ,NON-LH
00XL080Fru,LINECORD,AU,1M,3P ,NON-LH
00XL094Fru,LINECORD,IN,1M,3P ,NON-LH
00XL076Fru,LINECORD,GB,1M,3P ,NON-LH
00XL089Fru,LINECORD,CN,1M,3P ,NON-LH
01EF772333ET1,Odd-doorASSY,AVC
01EF774333ET1,Side-Cover,AVC
01EF8413.5to2.5HDDBrkt,FXN
01EF771333ET1,F-BezelASSY,AVC
00XD328HDMI_COVERKit
01EF961333ET1,FIOBKTASSY,AVC
01EF776333ET1,Accessorybag,AVC,
01EF773333ET1,Base-chassis,AVC
00XD8603.5to2.5HDDBKT,Fox
01EF775333ET2,F-BezelASSY,AVC
01EF777333ET2,Accessorybag,AVC,
00XD436VGArubbercover
03T7118SODIMM,8G,DDR3L,1600
03T7117SODIMM,4G,DDR3L,1600
00XK734256G,2.5",7mm,SATA3,LIT,OPAL2.0
00XK718128G,2.5",7mm,SATA3,SAM,STD
00XK719256G,2.5",7mm,SATA3,SAM,OPAL2.0
00XK726128G,2.5",7mm,SATA3,SAN,STD
00XK733128G,2.5",7mm,SATA3,LIT,STD
00XK730256G,2.5",7mm,SATA3,SAN,OPAL2.0
01EF801AVC,SLIM-ODD-EMICover
01EF843IntelAPLRearIOShield,AVC
00PH143ChiconyUSBFingerprintMCB_O
01AH700LiteonSM-8861(WW)MouseBlack
01AH701LiteonSM-8861Mouse(MY)Black
Chapter9.FRUlists61
00PH131USBCalliopeMouseBlack(Orangewh
45K04949.0mmDVDRambowithoutbezel
01AJ845GT7301GBDDR564Bit
01AJ846BLDGT7301GBDDR564Bit
00JT497Wireless,CMB,IN,3165ac
FRUlistofideacentre510–15IABR
FRUP/NDescription
00XJ015Fru,Lx15LStampingFrontANT
00XK107V515t,AMD,BristolKoll,NODPK
00XK108V515t,AMD,BristolKoll,WINDPK
00PH717LX2MHDMItoDVI-D-Sdongle
00XL218Fru,380mmSATAcable2latch
00XL216Fru400mmSATAcable1latchL_angle
00XL213Fru,SATAPWRcable(300mm+200mm)
00XL146Fru,SATApowercable(300mm_300mm)
04X2750Fru,H5060500M.2Rearantenna
00XL184Fru,250mmsensorcable
04X2799Fru,370mmSATAcable
00XL217Fru400mmSATApowercable
00PC205NVGeForceGT7302GVGA+HDMIHP
01AJ8397in1Cardreader
01AH633Liteon2.4GBlackSK-8861RU
01AH637Liteon2.4GBlackSK-8861LA-AR
00XH950USBCalliopeKBSRBUL
00XH633USBCalliopeKBBKNORDIC
01AH639Liteon2.4GBlackSK-8861CH
01AH632Liteon2.4GBlackSK-8861US-IN
01AH638Liteon2.4GBlackSK-8861SA
01AH645Liteon2.4GBlackSK-8861IL
00XH959USBCalliopeKBSRGRE
01AH641Liteon2.4GBlackSK-8861TR
00XH948USBCalliopeKBSRBELENG
00XH976USBCalliopeKBSRSPA
01AH642Liteon2.4GBlackSK-8861ES
00XH604USBCalliopeKBBKHBW
01AH643Liteon2.4GBlackSK-8861SL
00XH605USBCalliopeKBBKHUN
01AH644Liteon2.4GBlackSK-8861IT
62ideacentre310/510SeriesHardwareMaintenanceManual

00XH607USBCalliopeKBBKITA
01AH640Liteon2.4GBlackSK-8861DE
00XH598USBCalliopeKBBKFRA
00XH971USBCalliopeKBSRPOR
00XH967USBCalliopeKBSRKOR
00XH602USBCalliopeKBBKGRE
00XH601USBCalliopeKBBKGER
01AH646Liteon2.4GBlackSK-8861FR
00XH627USBCalliopeKBBKSLV
01AH653Liteon2.4GBlackSK-8861PT
00XH952USBCalliopeKBSRCZE
01AH654Liteon2.4GBlackSK-8861BE-EN
00XH626USBCalliopeKBBKEUROENG
01AH655Liteon2.4GBlackSK-8861US-EU
00XH945USBCalliopeKBSRARA
00XH944USBCalliopeKBSRENG
00XH987USBCalliopeKBSRINDENG
00XH964USBCalliopeKBSRITA
00XH982USBCalliopeKBSRUKE
00XH610USBCalliopeKBBKKOR
00XH973USBCalliopeKBSRRUS
00XH608USBCalliopeKBBKJPN
01AH650Liteon2.4GBlackSK-8861KR
01AH649Liteon2.4GBlackSK-8861BG
00UW407LiteonSK-88612.4GKB(BR)-BLK
01AH652Liteon2.4GBlackSK-8861EN-FR
01AH651Liteon2.4GBlackSK-8861JP
00XH962USBCalliopeKBSRHUN
00XH949USBCalliopeKBSRBRL
00XH983USBCalliopeKBSREUROENG
00XH621USBCalliopeKBBKSWS
00XH978USBCalliopeKBSRSWS
00XH622USBCalliopeKBBKTHAI
00XH990USBCalliopeKBSRNORDIC
00XH968USBCalliopeKBSRLASPA
00XH958USBCalliopeKBSRGER
00XH630USBCalliopeKBBKINDENG
00XH618USBCalliopeKBBKSLK
01AH647Liteon2.4GBlackSK-8861GR
00XH625USBCalliopeKBBKUKE
Chapter9.FRUlists63

00XH619USBCalliopeKBBKSPA
01AH648Liteon2.4GBlackSK-8861HU
00XH624USBCalliopeKBBKTUR
00XH611USB,Calliope,KB,BK,LASPA
00XH984USBCalliopeKBSRSLV
00XH594USBCalliopeKBBKTC/ENG
00XH614USBCalliopeKBBKPOR
00XH979USBCalliopeKBSRTHAI
00XH595USBCalliopeKBBKCZE
00XH593USBCalliopeKBBKBUL
00XH591USB,Calliope,KB,BK,BELENG
00XH616USBCalliopeKBBKRUS
00XH981USBCalliopeKBSRTUR
01AH630Liteon2.4GBlackSK-8861TH
00XH961USBCalliopeKBSRHBW
01AH631Liteon2.4GBlackSK-8861CS-SK
00XH587USBCalliopeKBBKENG
00XH951USBCalliopeKBSRTC/ENG
01AH627Liteon2.4GBlackSK-8861US
01AH634Liteon2.4GBlackSK-8861GB
00XH588USBCalliopeKBBKARA
00XH955USBCalliopeKBSRFRA
01AH628Liteon2.4GBlackSK-8861US-MY
00XH635USBCalliopeKBBKCANENG/FRA
01AH635Liteon2.4GBlackSK-8861Nordic
00XH992USBCalliopeKBSRCANEN/FR
01AH629Liteon2.4GBlackSK-8861TW
00XH965USBCalliopeKBSRJPN
00XH975USBCalliopeKBSRSLK
01AH636Liteon2.4GBlackSK-8861LA
01EF483rearSystemfanforTW
01EF548FrontsystemfanforTW
45K0623HDD,1TB,7200,DT3,SATA3,STD
00PC552HDD,2TB,7200,DT3,SATA3,STD
45K0629HDD,500G,7200,DT3,SATA3,STD
00PC550HDD,500G,7200,DT3,SATA3,STD
45K0625HDD,2TB,7200,DT3,SATA3,STD
00PC551HDD,1TB,7200,DT3,SATA3,STD
01EF397AMDAM465WCPUCooler
00XH853WLKMCalliopeSRTC/ENG
64ideacentre310/510SeriesHardwareMaintenanceManual

00XH852WLKMCalliopeSRBUL
00XH880WLKMCalliopeSRSWS
00XH861WLKMCalliopeSRGRE/UK
00XH863WLKMCalliopeSRHBW
00XH895WLKMCalliopeSRNoBATLASPA
00XH875WLKMCalliopeSRRUS
00XH883WLKMCalliopeSRTUR
00XH889WLKMCalliopeSRINDENG
00XH867WLKMCalliopeSRJPN
00XH892WLKMCalliopeSRNordic
00XH851WLKMCalliopeSRNoBATBRL
00XH866WLKMCalliopeSRITA
00XH881WLKMCalliopeSRTHAI
00XH860WLKMCalliopeSRGER
00XH857WLKMCalliopeSRFRA
00XH878WLKMCalliopeSRSPA
00XH884WLKMCalliopeSRUKE
00XH869WLKMCalliopeSRKOR
00XH877WLKMCalliopeSRSLK
00XH864WLKMCalliopeSRHUN
00XH854WLKMCalliopeSRCZE
00XH886WLKMCalliopeSRSLV
00XH873WLKMCalliopeSRPOR
00XH885WLKMCalliopeSREuroENG
00XH870WLKMCalliopeSRLASPA
00XH850WLKMCalliopeSRBELENG
00XH846PrimaxRFBU712.4GSVGUS
00XH847WLKMCalliopeSRARA
00XH894WLKMCalliopeSRCANENG/FRA
00XL041Fru,LINECORD,AU,1.8M,3P ,NON-LH
00XL014Fru,EU/KR,1.8M,3P ,NON-LH
00XL024Fru,LINECORD,GB,1.8M,3P ,NON-LH
00XL018Fru,LINECORD,TW,1.8M,3P ,NON-LH
00XL034Fru,LINECORD,BR,1.8M,3P ,NON-LH
00XL010Fru,LINECORD,CN,1.8M,3P ,NON-LH
00XL037Fru,LINECORD,AR,1.8M,3P ,NON-LH
00XL044Fru,LINECORD,DK,1.8M,3P ,NON-LH
00XL017Fru,LINECORD,TW,1.8M,3P ,NON-LH
00XL033Fru,LINECORD,BR,1.8M,3P ,NON-LH
00XL048Fru,LINECORD,IT,1.8M,3P ,NON-LH
Chapter9.FRUlists65

00XL032Fru,LINECORD,BR,1.8M,3P ,NON-LH
00XL027Fru,LINECORD,IL,1.8M,3P ,NON-LH
00XL000Fru,JP ,Anti- TR,1.8M,3P ,NON-LH
00XL039Fru,LINECORD,ZA,1.8M,3P ,NON-LH
00XL016Fru,EU/KR,1.8M,3P ,NON-LH
00XL031Fru,LINECORD,CH,1.8M,3P ,NON-LH
00XL042Fru,LINECORD,AU,1.8M,3P ,NON-LH
00XL004Fru,US/CA,1.8M,3P ,NON-LH
00XL006Fru,US/CA,1.8M,3P ,NON-LH
00XL038Fru,LINECORD,ZA,1.8M,3P ,NON-LH
00XL020Fru,LINECORD,IN,1.8M,3P ,NON-LH
00XL022Fru,LINECORD,IN,1.8M,3P ,NON-LH
00XL023Fru,LINECORD,GB,1.8M,3P ,NON-LH
00XL050Fru,LINECORD,TH,1.8M,3P ,NON-LH
00XL025Fru,LINECORD,GB,1.8M,3P ,NON-LH
00XL035Fru,LINECORD,AR,1.8M,3P ,NON-LH
00XL019Fru,LINECORD,TW,1.8M,3P ,NON-LH
00XL029Fru,LINECORD,CH,1.8M,3P ,NON-LH
00XL046Fru,LINECORD,DK,1.8M,3P ,NON-LH
00XL036Fru,LINECORD,AR,1.8M,3P ,NON-LH
00XL043Fru,LINECORD,AU,1.8M,3P ,NON-LH
00XL045Fru,LINECORD,DK,1.8M,3P ,NON-LH
00XL001Fru,JP ,Anti- TR,1.8M,3P ,NON-LH
00XL030Fru,LINECORD,CH,1.8M,3P ,NON-LH
00XL040Fru,LINECORD,ZA,1.8M,3P ,NON-LH
00XL005Fru,US/CA,1.8M,3P ,NON-LH
00XL015Fru,EU/KR,1.8M,3P ,NON-LH
00XL049Fru,LINECORD,IT,1.8M,3P ,NON-LH
00XL028Fru,LINECORD,IL,1.8M,3P ,NON-LH
00XL009Fru,LINECORD,CN,1.8M,3P ,NON-LH
00XL026Fru,LINECORD,IL,1.8M,3P ,NON-LH
00XL047Fru,LINECORD,IT,1.8M,3P ,NON-LH
01EF772333ET1,Odd-doorASSY,AVC
01EF774333ET1,Side-Cover,AVC
01EF8413.5to2.5HDDBrkt,FXN
01EF771333ET1,F-BezelASSY,AVC
00XD328HDMI_COVERKit
01EF961333ET1,FIOBKTASSY,AVC
01EF776333ET1,Accessorybag,AVC,
01EF773333ET1,Base-chassis,AVC
66ideacentre310/510SeriesHardwareMaintenanceManual

00XD8603.5to2.5HDDBKT,Fox
01EF775333ET2,F-BezelASSY,AVC
01EF905M.2SSDBrktAssy(213mmMB)
01EF777333ET2,Accessorybag,AVC,
00XD436VGArubbercover
01AG8058GBDDR42400UDIMM
01AG8044GBDDR42400UDIMM
01AG803UDIMM,2GB,DDR4,2400
00XK718128G,2.5",7mm,SATA3,SAM,STD
00UP641256G,M.2,2280,PCIe3x4,TOS,OPAL
00XK726128G,2.5",7mm,SATA3,SAN,STD
00XK733128G,2.5",7mm,SATA3,LIT,STD
00UP448128G,M.2,2280,PCIe3x4,SAMSG,STD
00UP436256G,M.2,2280,PCIe3x4,SAM,OPAL
01AG069AMDA6-95003.5GHz/2C/1M65WAM4
01AG068AMDA8-96003.1GHz/4C/2M65WAM4
01AG067AMDA10-97002M,3.5GHz,4C65WAM4
01AG066AMDA12-98003.8GHz/4C/2M65WAM4
01AG077AMDAthlonX4-9503.5GHz/4C/2M65WAM
01EF801AVC,SLIM-ODD-EMICover
01EF839AMDBRRearIOShield,AVC
00PH143ChiconyUSBFingerprintMCB_O
01AH700LiteonSM-8861(WW)MouseBlack
01AH701LiteonSM-8861Mouse(MY)Black
00PH131USBCalliopeMouseBlack(Orangewh
45K04949.0mmDVDRambowithoutbezel
00PC746100-240Vac,SFF210WPSU
00PC745100-240Vac,SFF180WPSU
01AJ841BLD@RX460@4GD5H+DP+DVIDHP
00PC600AMDR73502GVGA/HDMIHP
01AJ845GT7301GBDDR564Bit
01AJ860RX5502GD5128bDVI+DP+HHP
01AJ846BLDGT7301GBDDR564Bit
01AX709Wireless,CMB,LTN,NFA435A
Chapter9.FRUlists67

68ideacentre310/510SeriesHardwareMaintenanceManual

Chapter10.Generalinformation
Thischapterprovidesgeneralinformationthatappliestoallmachinetypessupportedbythispublication.
AdditionalServiceInformation
Thischapterprovidesadditionalinformationthattheservicerepresentativemightfindhelpful.
Powermanagement
Powermanagementreducesthepowerconsumptionofcertaincomponentsofthecomputersuchasthe
systempowersupply,processor,harddiskdrives,andsomemonitors.
Advancedconfigurationandpowerinterface(ACPI)BIOS
AsthiscomputerhasanACPIBIOSsystem,theoperatingsystemisallowedtocontrolthepower
managementfeaturesofthecomputerandthesettingsforAdvancedPowerManagement(APM)BIOSmode
isignored.NotalloperatingsystemssupportACPIBIOSmode.
AutomaticPower-Onfeatures
TheAutomaticPower-OnfeatureswithinthePowerManagementmenuallowyoutoenableanddisable
featuresthatturnonthecomputerautomatically.
•WakeUponAlarm:Youcanspecifyadateandtimeatwhichthecomputerwillbeturnedonautomatically.
Thiscanbeeitherasingleevent,adailyeventoraweeklyevent.
•WakeUponLAN:ThisfeatureallowsLANadaptercardtowaketheSystem.
©CopyrightLenovo201769