Table of Contents
- Important safety information
- Read this first
- Important information about using your computer
- Conditions that require immediate action
- Service and upgrades
- Power cords and power adapters
- Extension cords and related devices
- Plugs and outlets
- Power supply statement
- External devices
- General battery notice
- Notice for removable rechargeable battery
- Notice for non-rechargeable coin-cell battery
- Heat and product ventilation
- Electrical current safety information
- Liquid crystal display (LCD) notice
- Using headphones or earphones
- Plastic bag notice
- Glass parts notice
- Chapter 1. Product overview
- Chapter 2. Using your computer
- Registering your computer
- Frequently asked questions
- Getting help about the Windows operating system
- Using the multi-touch screen
- Using the special keys
- Using the ThinkPad pointing device
- Power management
- Cabled Ethernet connections
- Wireless connections
- Using the NVIDIA Optimus Graphics feature
- Using audio features
- Using the camera
- Using a media card or a smart card
- Using an external display
- Traveling with your computer
- Chapter 3. Enhancing your computer
- Chapter 4. Accessibility, ergonomic, and maintenance information
- Chapter 5. Security
- Chapter 6. Advanced configuration
- Chapter 7. Troubleshooting computer problems
- General tips for preventing problems
- Diagnosing problems with Lenovo Companion
- Troubleshooting
- Computer stops responding
- Spills on the keyboard
- Error messages
- Beep errors
- Memory module problems
- Ethernet problems
- Wireless-LAN problem
- Wireless-WAN problem
- Bluetooth problem
- ThinkPad pointing device problems
- Keyboard problems
- Computer screen problems
- External monitor problems
- Audio problems
- Fingerprint reader problems
- Battery problems
- ac power adapter problem
- Power problems
- Boot problems
- Sleep and hibernation problems
- Hard disk drive problems
- Solid-state drive problem
- Software problem
- USB problem
- Docking station problem
- Chapter 8. Recovery information
- Chapter 9. Replacing devices
- Chapter 10. Getting support
- Appendix A. Supplemental information about the Ubuntu operating system
- Appendix B. Regulatory information
- Certification-related information
- Wireless-related information
- Export classification notice
- Electronic emission notices
- Federal Communications Commission Declaration of Conformity
- Industry Canada Class B emission compliance statement
- European Union - Compliance to the Electromagnetic Compatibility (EMC) Directive or Radio Equipment Directive
- German Class B compliance statement
- Korea Class B compliance statement
- Japan VCCI Class B compliance statement
- Japan compliance statement for products which connect to the power mains with rated current less than or equal to 20 A per phase
- Japan notice for ac power cord
- Lenovo product service information for Taiwan
- Eurasian compliance mark
- Brazil audio notice
- Appendix C. WEEE and recycling statements
- Appendix D. Restriction of Hazardous Substances (RoHS) Directive
- Appendix E. ENERGY STAR model information
- Appendix F. Notices
- Appendix G. Trademarks
Lenovo T470p User Manual
Displayed below is the user manual for T470p by Lenovo which is a product in the Notebooks category. This manual has pages.
Related Manuals

T470pUserGuide

Note:Beforeusingthisinformationandtheproductitsupports,besuretoreadandunderstandthefollowing:
•Safety,Warranty,andSetupGuide
•“Importantsafetyinformation”onpagev
ThelatestSafety,Warranty,andSetupGuideandtheRegulatoryNoticeareavailableontheLenovoSupport
Websiteat:
http://www.lenovo.com/support
FirstEdition(February2017)
©CopyrightLenovo2017.
LIMITEDANDRESTRICTEDRIGHTSNOTICE:IfdataorsoftwareisdeliveredpursuanttoaGeneralServices
Administration“GSA”contract,use,reproduction,ordisclosureissubjecttorestrictionssetforthinContractNo.
GS-35F-05925.

Contents
Importantsafetyinformation......v
Readthisfirst................v
Importantinformationaboutusingyourcomputer..v
Conditionsthatrequireimmediateaction....vii
Serviceandupgrades............vii
Powercordsandpoweradapters.......viii
Extensioncordsandrelateddevices.......ix
Plugsandoutlets...............ix
Powersupplystatement............ix
Externaldevices...............x
Generalbatterynotice.............x
Noticeforremovablerechargeablebattery.....xi
Noticefornon-rechargeablecoin-cellbattery...xi
Heatandproductventilation..........xi
Electricalcurrentsafetyinformation......xii
Liquidcrystaldisplay(LCD)notice.......xiii
Usingheadphonesorearphones.......xiii
Plasticbagnotice.............xiii
Glasspartsnotice.............xiv
Chapter1.Productoverview......1
Computercontrols,connectors,andindicators...1
Frontview................1
Left-sideview..............2
Right-sideview..............3
Bottomview...............5
Statusindicators.............5
Importantproductinformationlabels.......7
Machinetypeandmodellabel........7
FCCIDandICCertificationnumber.....8
LabelsfortheWindowsoperatingsystems...9
Computerfeatures.............10
Computerspecifications...........11
Operatingenvironment...........11
Lenovoprograms.............12
AccessingLenovoprograms.......12
AnintroductiontoLenovoprograms....12
Chapter2.Usingyourcomputer...15
Registeringyourcomputer..........15
Frequentlyaskedquestions.........15
GettinghelpabouttheWindowsoperating
system..................16
Usingthemulti-touchscreen.........16
Usingthespecialkeys...........18
UsingtheThinkPadpointingdevice......20
ThinkPadpointingdeviceoverview.....20
UsingtheTrackPointpointingdevice....21
Usingthetrackpad...........22
Usingthetrackpadtouchgestures.....23
CustomizingtheThinkPadpointingdevice..23
Replacingthecaponthepointingstick...24
Powermanagement............24
Usingtheacpoweradapter........24
Usingthebattery............25
Managingthebatterypower.......26
Power-savingmodes..........26
CabledEthernetconnections.........26
Wirelessconnections............27
Usingthewireless-LANconnection.....27
Usingthewireless-WANconnection....27
UsingtheBluetoothconnection......28
UsingtheAirplanemode.........28
UsingtheNVIDIAOptimusGraphicsfeature...29
Usingaudiofeatures............29
Usingthecamera.............29
Usingamediacardorasmartcard......30
Usinganexternaldisplay..........31
Travelingwithyourcomputer.........33
Chapter3.Enhancingyour
computer...............35
FindingThinkPadoptions..........35
ThinkPadBasicDock,ThinkPadProDock,and
ThinkPadUltraDock............35
Controls,connectors,andindicators....35
Attachingadockingstationtoyour
computer...............40
Detachingadockingstationfromyour
computer...............40
Guidelinesonconnectingmultipleexternal
displaystothedockingstation......41
Chapter4.Accessibility,ergonomic,
andmaintenanceinformation....43
Accessibilityinformation...........43
Ergonomicinformation...........45
Cleaningandmaintenance..........46
Chapter5.Security..........49
Usingpasswords..............49
Passwordsintroduction.........49
Setting,changing,orremovingapassword.50
Harddisksecurity.............50
Settingthesecuritychip...........51
©CopyrightLenovo2017i

Usingthefingerprintreader..........52
Deletingdatafromyourstoragedrive......54
Usingfirewalls...............54
Protectingdataagainstviruses........55
Chapter6.Advancedconfiguration..57
InstallingtheWindows10operatingsystem...57
Installingdevicedrivers...........58
UsingtheThinkPadSetupprogram......58
ConfiguringThinkPadSetup.......59
Changingthestartupsequence......59
UpdatingtheUEFIBIOS.........60
BIOSmenu..............60
Usingsystemmanagement..........69
Chapter7.Troubleshootingcomputer
problems...............73
Generaltipsforpreventingproblems......73
DiagnosingproblemswithLenovoCompanion..73
Troubleshooting..............74
Computerstopsresponding.......74
Spillsonthekeyboard..........75
Errormessages............75
Beeperrors..............76
Memorymoduleproblems........78
Ethernetproblems...........78
Wireless-LANproblem..........79
Wireless-WANproblem.........79
Bluetoothproblem...........79
ThinkPadpointingdeviceproblems.....80
Keyboardproblems...........80
Computerscreenproblems........80
Externalmonitorproblems........82
Audioproblems............83
Fingerprintreaderproblems........85
Batteryproblems............85
acpoweradapterproblem........85
Powerproblems............86
Bootproblems.............86
Sleepandhibernationproblems......86
Harddiskdriveproblems.........87
Solid-statedriveproblem.........88
Softwareproblem............88
USBproblem.............88
Dockingstationproblem.........88
Chapter8.Recoveryinformation...91
Resettingyourcomputer...........91
Usingadvancedstartupoptions........91
RecoveringyouroperatingsystemifWindows10
failstostart................91
CreatingandusingarecoveryUSBdrive....91
Chapter9.Replacingdevices.....93
Staticelectricityprevention..........93
Replacingtheremovablebattery.......93
ReplacingthemicroSIMcard.........95
Replacingthebasecoverassembly......96
Replacingthecoin-cellbattery........98
Replacingthekeyboard...........100
Replacingtheinternalstoragedrive......107
Replacingthewireless-WANcard.......112
Replacingamemorymodule.........113
Chapter10.Gettingsupport....115
BeforeyoucontactLenovo..........115
Gettinghelpandservice...........115
LenovoSupportWebsite.........116
CallingLenovo.............116
Purchasingadditionalservices........117
AppendixA.Supplemental
informationabouttheUbuntu
operatingsystem..........119
AppendixB.Regulatory
information.............121
Certification-relatedinformation........121
Wireless-relatedinformation.........121
Wirelessinteroperability.........121
Usageenvironmentandyourhealth....121
LocatingtheUltraConnectwireless
antennas...............122
Wireless-radiocomplianceinformation...122
Locatingwirelessregulatorynotices....123
Exportclassificationnotice..........123
Electronicemissionnotices..........123
FederalCommunicationsCommission
DeclarationofConformity........123
IndustryCanadaClassBemissioncompliance
statement...............123
EuropeanUnion-Compliancetothe
ElectromagneticCompatibility(EMC)Directive
orRadioEquipmentDirective.......124
GermanClassBcompliancestatement...124
KoreaClassBcompliancestatement....125
JapanVCCIClassBcompliancestatement..125
Japancompliancestatementforproducts
whichconnecttothepowermainswith
ratedcurrentlessthanorequalto20Aper
phase................125
Japannoticeforacpowercord......125
Lenovoproductserviceinformationfor
Taiwan................125
iiT470pUserGuide

Eurasiancompliancemark..........125
Brazilaudionotice.............125
AppendixC.WEEEandrecycling
statements.............127
Generalrecyclinginformation.........127
ImportantWEEEinformation.........127
Japanrecyclingstatements.........128
RecyclinginformationforBrazil........128
BatteryrecyclinginformationfortheEuropean
Union..................129
BatteryrecyclinginformationforTaiwan.....130
BatteryrecyclinginformationfortheUnitedStates
andCanada................130
RecyclinginformationforChina........130
AppendixD.RestrictionofHazardous
Substances(RoHS)Directive....131
AppendixE.ENERGYSTARmodel
information.............135
AppendixF.Notices.........137
AppendixG.Trademarks......139
©CopyrightLenovo2017iii

ivT470pUserGuide
Importantsafetyinformation
Note:Readtheimportantsafetyinformationfirst.
Readthisfirst
Thisinformationcanhelpyousafelyuseyournotebookcomputer.Followandretainallinformationincluded
withyourcomputer.Theinformationinthisdocumentdoesnotalterthetermsofyourpurchaseagreement
ortheLimitedWarranty.Formoreinformation,see"WarrantyInformation"intheSafety,Warranty,andSetup
Guidethatcomeswithyourcomputer.
Customersafetyisimportant.Ourproductsaredevelopedtobesafeandeffective.However,personal
computersareelectronicdevices.Powercords,poweradapters,andotherfeaturescancreatepotential
safetyrisksthatcanresultinphysicalinjuryorpropertydamage,especiallyifmisused.Toreducethese
risks,followtheinstructionsincludedwithyourproduct,observeallwarningsontheproductandinthe
operatinginstructions,andreviewtheinformationincludedinthisdocumentcarefully.Bycarefullyfollowing
theinformationcontainedinthisdocumentandprovidedwithyourproduct,youcanhelpprotectyourself
fromhazardsandcreateasafercomputerworkenvironment.
Note:Thisinformationincludesreferencestopoweradaptersandbatteries.Inadditiontonotebook
computers,someproducts(suchasspeakersandmonitors)shipwithexternalpoweradapters.Ifyouhave
suchaproduct,thisinformationappliestoyourproduct.Inaddition,computerproductscontainacoin-sized
internalbatterythatprovidespowertothesystemclockevenwhenthecomputerisunplugged,sothe
batterysafetyinformationappliestoallcomputerproducts.
Importantinformationaboutusingyourcomputer
Ensurethatyoufollowtheimportanttipsgivenheretogetthemostuseandenjoymentoutofyourcomputer.
Failuretodosomightleadtodiscomfortorinjury,orcausethecomputertofail.
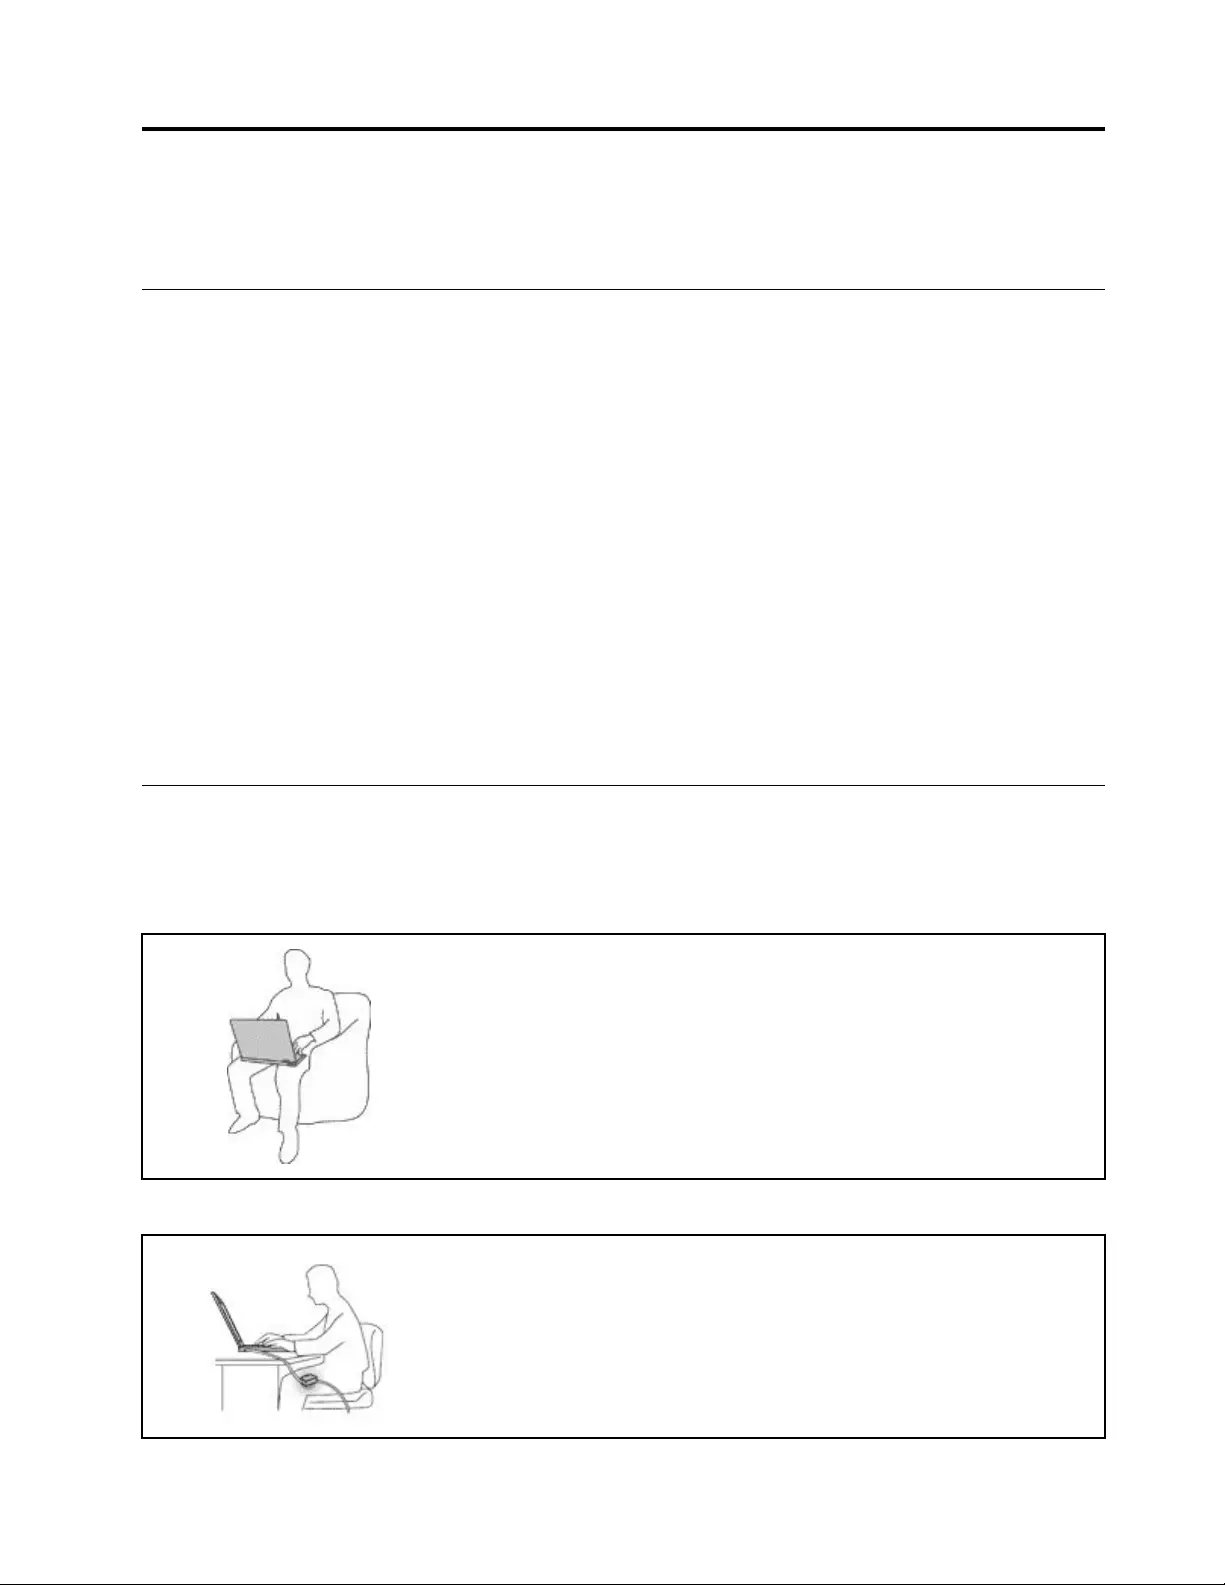
Protectyourselffromtheheatthatyourcomputergenerates.
Whenyourcomputeristurnedonorthebatteryischarging,thebase,thepalm
rest,andsomeotherpartsmaybecomehot.Thetemperaturetheyreach
dependsontheamountofsystemactivityandthelevelofchargeinthebattery.
Extendedcontactwithyourbody,eventhroughclothing,couldcause
discomfortorevenaskinburn.
•Avoidkeepingyourhands,yourlap,oranyotherpartofyourbodyin
contactwithahotsectionofthecomputerforanyextendedtime.
•Periodicallytakehandsfromusingthekeyboardbyliftingyourhandsfrom
thepalmrest.
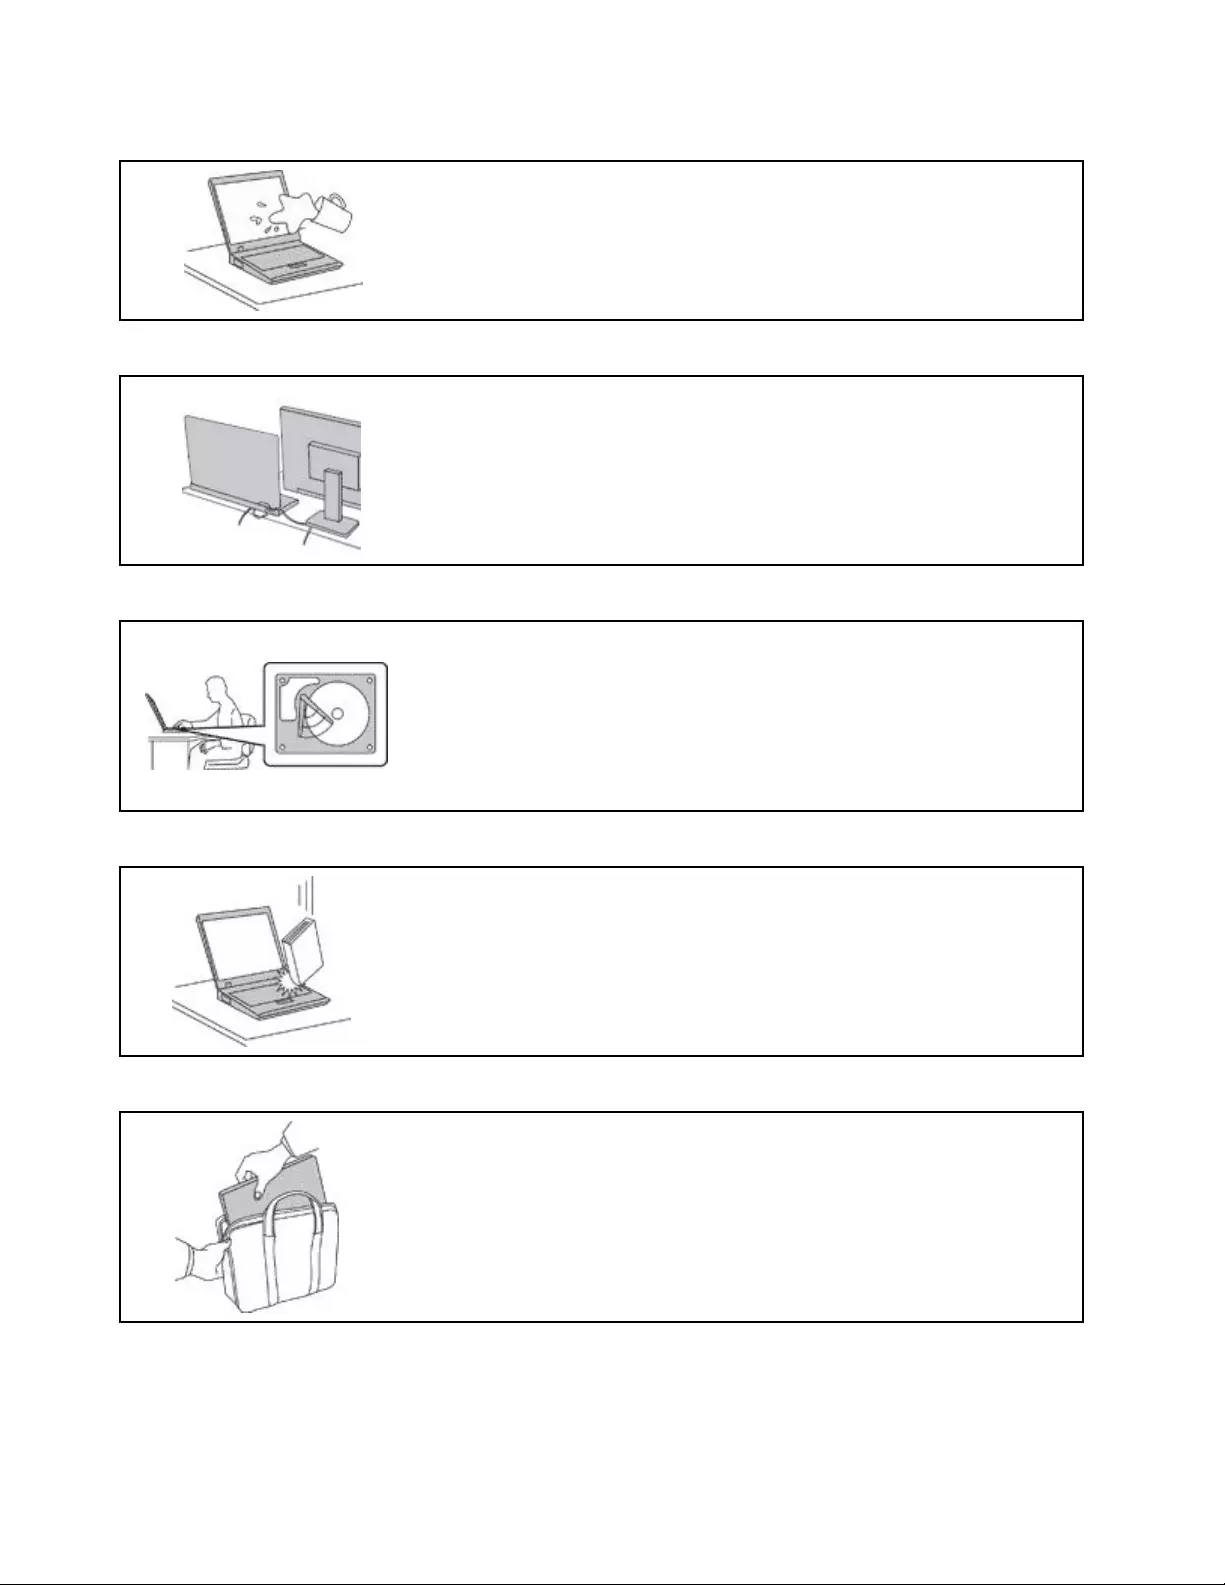
Protectyourselffromtheheatgeneratedbytheacpoweradapter.
Whentheacpoweradapterisconnectedtoanelectricaloutletandyour
computer,itgeneratesheat.
Extendedcontactwithyourbody,eventhroughclothing,maycauseaskin
burn.
•Donotplacetheacpoweradapterincontactwithanypartofyourbody
whileitisinuse.
•Neveruseittowarmyourbody.
©CopyrightLenovo2017v
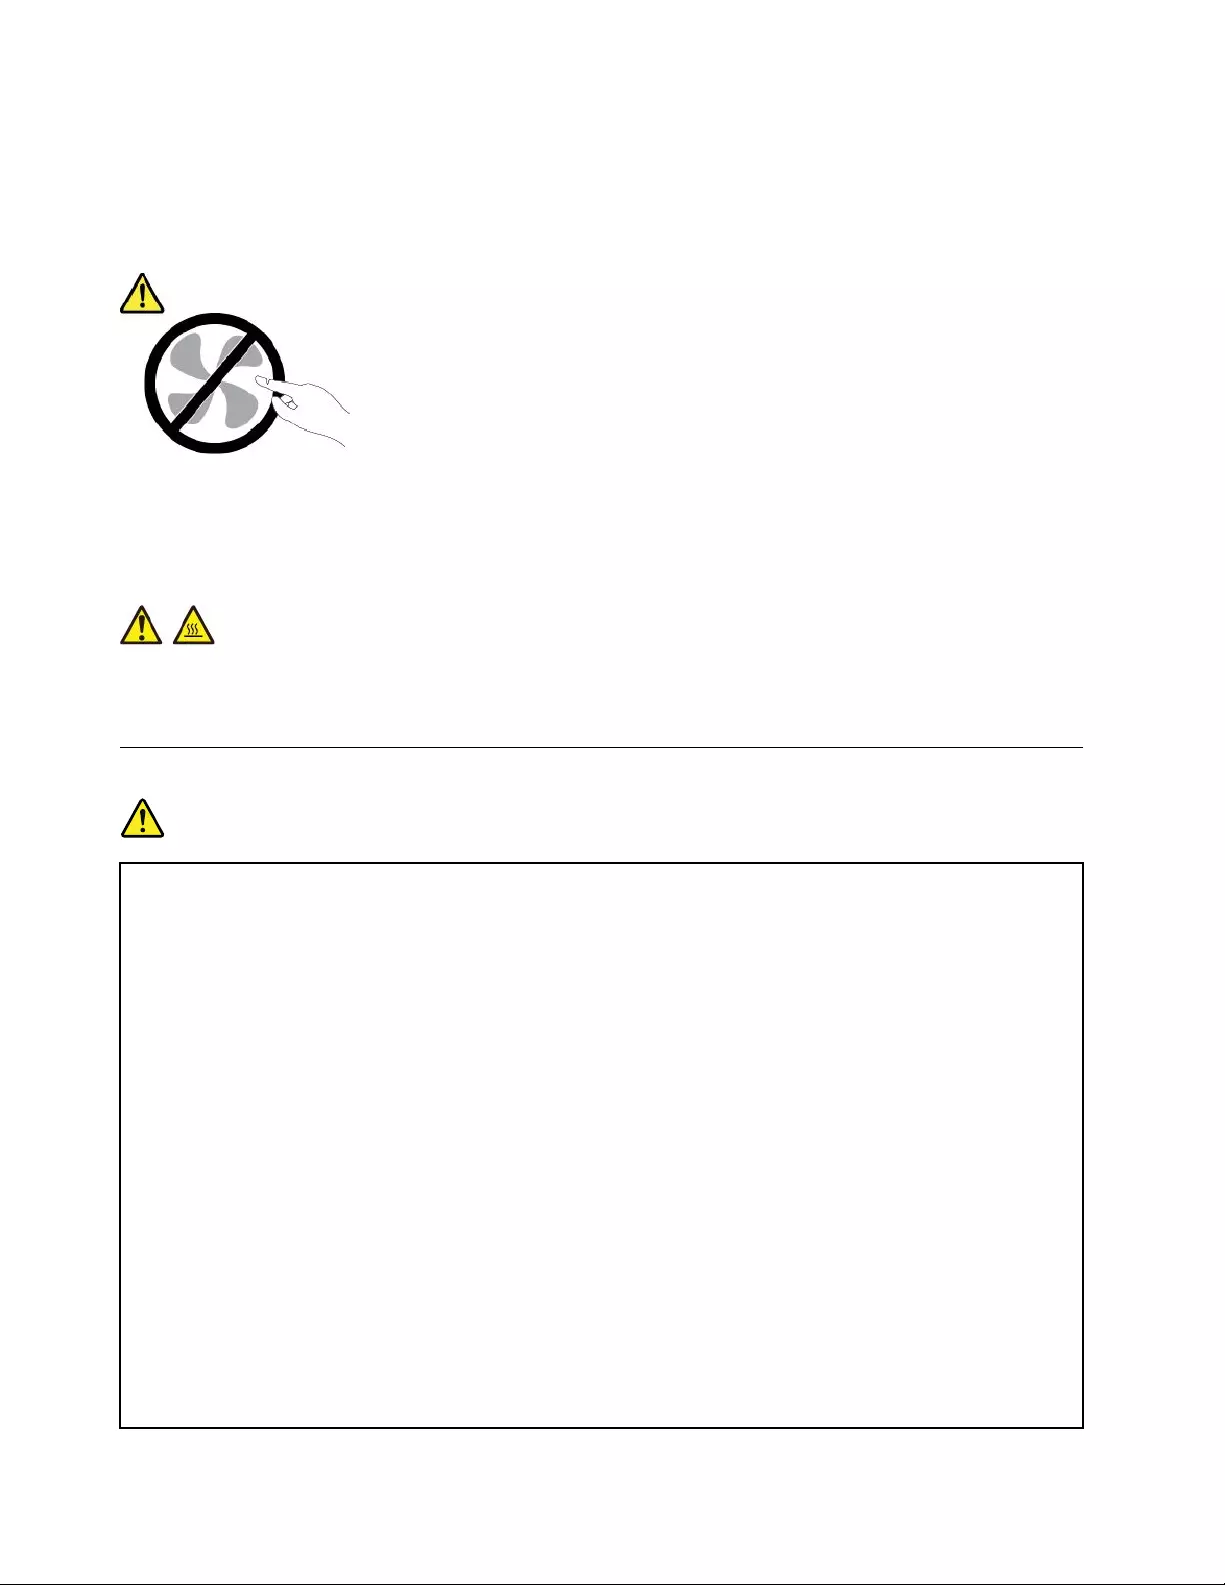
Preventyourcomputerfromgettingwet.
Toavoidspillsandthedangerofelectricalshock,keepliquidsawayfromyour
computer.
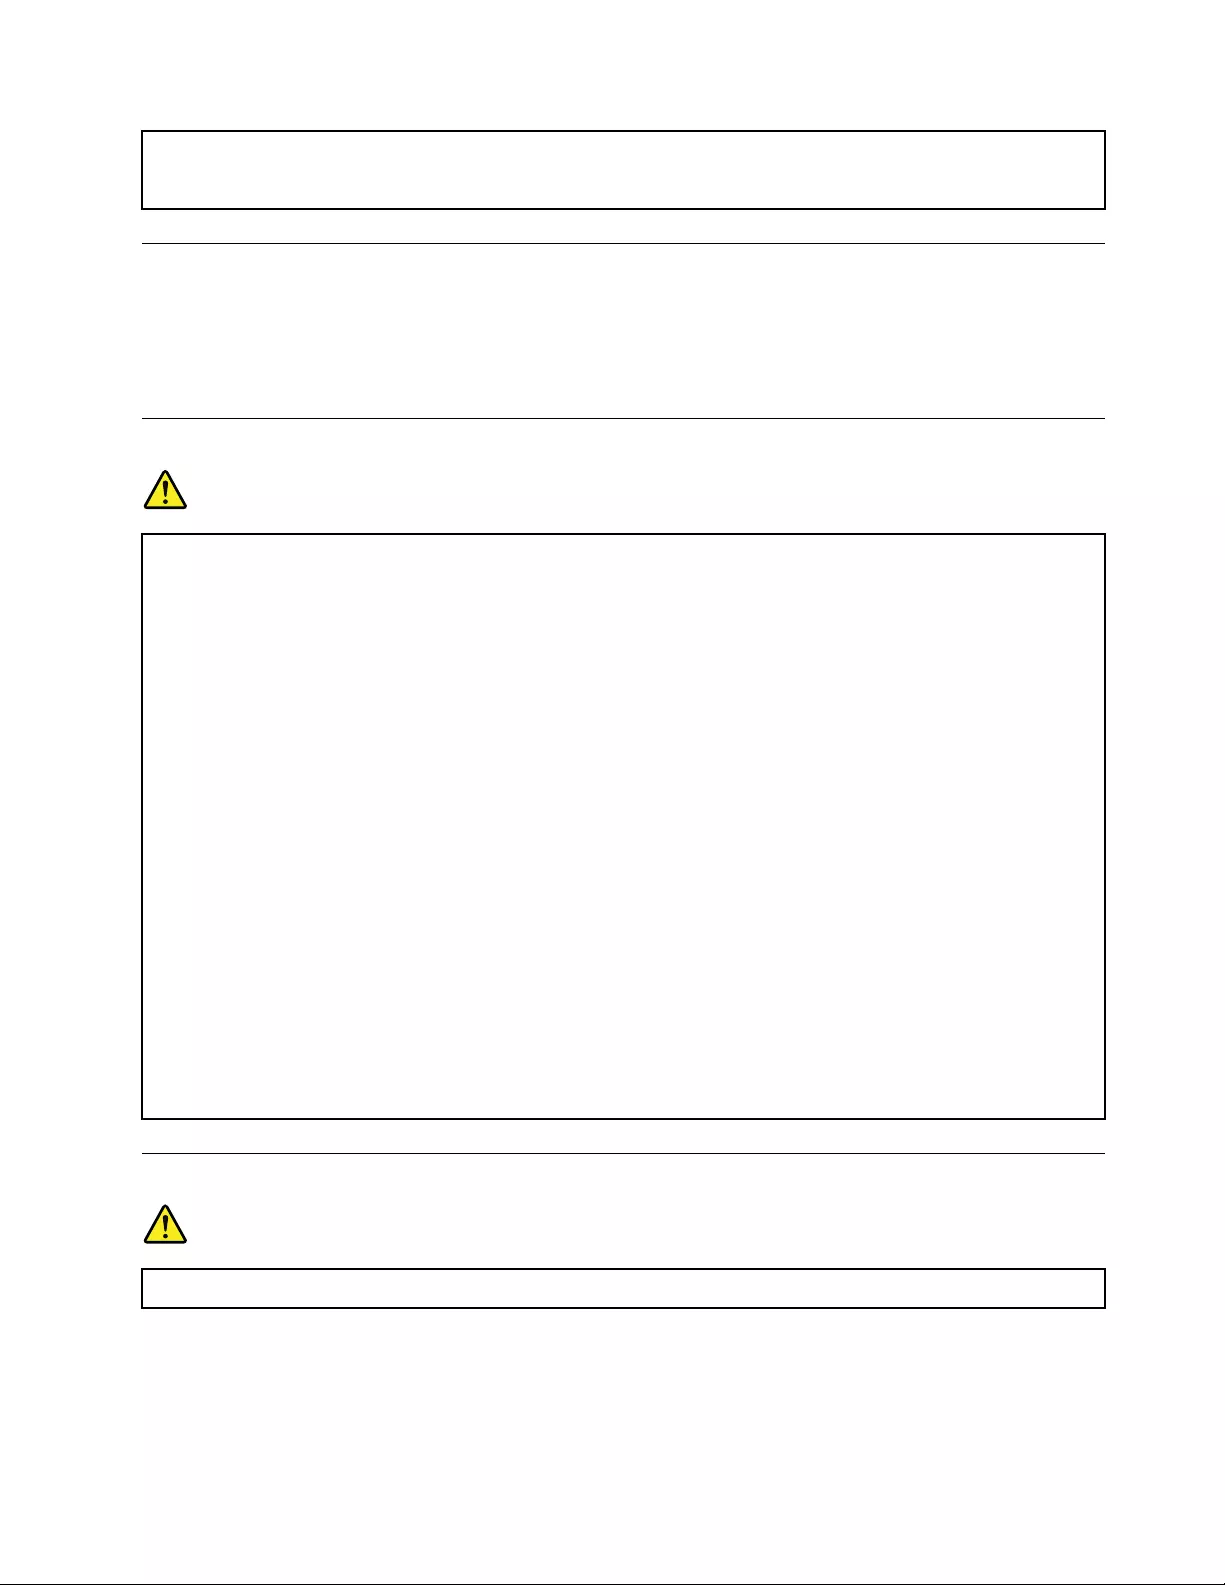
Protectthecablesfrombeingdamaged.
Applyingstrongforcetocablesmaydamageorbreakthem.
Routecommunicationlines,orthecablesofanacpoweradapter,amouse,a
keyboard,aprinter,oranyotherelectronicdevice,sothattheycannotbewalked
on,trippedover,pinchedbyyourcomputerorotherobjects,orinanyway
subjecttotreatmentthatcouldinterferewiththeoperationofyourcomputer.
Protectyourcomputeranddatawhenmovingit.
Beforemovingacomputerequippedwithaharddiskdrive,dooneofthe
following:
•Turnitoff.
•Putitinsleepmode.
•Putitinhibernationmode.
Thishelpstopreventdamagetothecomputer,andpossiblelossofdata.
Handleyourcomputergently.
Donotdrop,bump,scratch,twist,hit,vibrate,push,orplaceheavyobjectson
yourcomputer,display,orexternaldevices.
Carryyourcomputercarefully.
•Useaqualitycarryingcasethatprovidesadequatecushioningandprotection.
•Donotpackyourcomputerinatightlypackedsuitcaseorbag.
•Beforeputtingyourcomputerinacarryingcase,makesurethatitisoff,insleep
mode,orinhibernationmode.Donotputacomputerinacarryingcasewhileit
isturnedon.
viT470pUserGuide

Conditionsthatrequireimmediateaction
Productscanbecomedamagedduetomisuseorneglect.Someproductdamageisseriousenough
thattheproductshouldnotbeusedagainuntilithasbeeninspectedand,ifnecessary,repairedby
anauthorizedservicer.
Aswithanyelectronicdevice,paycloseattentiontotheproductwhenitisturnedon.Onveryrare
occasions,youmightnoticeanodororseeapuffofsmokeorsparksventfromyourproduct.Oryou
mighthearsoundslikepopping,cracking,orhissing.Theseconditionsmightmerelymeanthatan
internalelectroniccomponenthasfailedinasafeandcontrolledmanner.Or,theymightindicate
apotentialsafetyissue.However,donottakerisksorattempttodiagnosethesituationyourself.
ContacttheCustomerSupportCenterforfurtherguidance.ForalistofServiceandSupportphone
numbers,seethefollowingWebsite:
http://www.lenovo.com/support/phone
Frequentlyinspectyourcomputeranditscomponentsfordamageorwearorsignsofdanger.
Ifyouhaveanyquestionabouttheconditionofacomponent,donotusetheproduct.Contact
theCustomerSupportCenterortheproductmanufacturerforinstructionsonhowtoinspectthe
productandhaveitrepaired,ifnecessary.
Intheunlikelyeventthatyounoticeanyofthefollowingconditions,orifyouhaveanysafety
concernswithyourproduct,stopusingtheproductandunplugitfromthepowersourceand
telecommunicationlinesuntilyoucanspeaktotheCustomerSupportCenterforfurtherguidance.
•Powercords,plugs,poweradapters,extensioncords,surgeprotectors,orpowersuppliesthatare
cracked,broken,ordamaged.
•Signsofoverheating,smoke,sparks,orfire.
•Damagetoabattery(suchascracks,dents,orcreases),dischargefromabattery,orabuildupofforeign
substancesonthebattery.
•Acracking,hissing,orpoppingsound,orstrongodorthatcomesfromtheproduct.
•Signsthatliquidhasbeenspilledoranobjecthasfallenontothecomputerproduct,thepowercord,or
poweradapter.
•Thecomputerproduct,powercord,orpoweradapterhasbeenexposedtowater.
•Theproducthasbeendroppedordamagedinanyway.
•Theproductdoesnotoperatenormallywhenyoufollowtheoperatinginstructions.
Note:Ifyounoticetheseconditionswithaproduct(suchasanextensioncord)thatisnotmanufactured
fororbyLenovo®,stopusingthatproductuntilyoucancontacttheproductmanufacturerforfurther
instructions,oruntilyougetasuitablereplacement.
Serviceandupgrades
DonotattempttoserviceaproductyourselfunlessinstructedtodosobytheCustomerSupportCenteror
yourdocumentation.OnlyuseaServiceProviderwhoisapprovedtorepairyourparticularproduct.
Note:Somecomputerpartscanbeupgradedorreplacedbythecustomer.Upgradestypicallyare
referredtoasoptions.ReplacementpartsapprovedforcustomerinstallationarereferredtoasCustomer
ReplaceableUnits,orCRUs.Lenovoprovidesdocumentationwithinstructionswhenitisappropriatefor
customerstoinstalloptionsorreplaceCRUs.Youmustcloselyfollowallinstructionswheninstallingor
replacingparts.TheOffstateofapowerindicatordoesnotnecessarilymeanthatvoltagelevelsinsidea
productarezero.Beforeyouremovethecoversfromaproductequippedwithapowercord,alwaysmake
©CopyrightLenovo2017vii
surethatthepoweristurnedoffandthattheproductisunpluggedfromanypowersource.Ifyouhave
anyquestionsorconcerns,contacttheCustomerSupportCenter.
Althoughtherearenomovingpartsinyourcomputerafterthepowercordhasbeendisconnected,the
followingwarningsarerequiredforyoursafety.
CAUTION:
Hazardousmovingparts.Keepfingersandotherbodypartsaway.
CAUTION:
Beforeyouopenthecomputercover,turnoffthecomputerandwaitseveralminutesuntilthe
computeriscool.
Powercordsandpoweradapters
DANGER
Useonlythepowercordsandpoweradapterssuppliedbytheproductmanufacturer.
Thepowercordsshallbesafetyapproved.ForGermany,itshallbeH03VV-F,3G,0.75mm2,or
better.Forothercountries,thesuitabletypesshallbeusedaccordingly.
Neverwrapapowercordaroundapoweradapterorotherobject.Doingsocanstressthecordin
waysthatcancausethecordtofray,crack,orcrimp.Thiscanpresentasafetyhazard.
Alwaysroutepowercordssothattheywillnotbewalkedon,trippedover,orpinchedbyobjects.
Protectpowercordsandpoweradaptersfromliquids.Forinstance,donotleaveyourpowercord
orpoweradapternearsinks,tubs,toilets,oronfloorsthatarecleanedwithliquidcleansers.
Liquidscancauseashortcircuit,particularlyifthepowercordorpoweradapterhasbeenstressed
bymisuse.Liquidsalsocancausegradualcorrosionofpowercordterminalsand/ortheconnector
terminalsonapoweradapter,whichcaneventuallyresultinoverheating.
Ensurethatallpowercordconnectorsaresecurelyandcompletelypluggedintoreceptacles.
Donotuseanypoweradapterthatshowscorrosionattheacinputpinsorshowssignsof
overheating(suchasdeformedplastic)attheacinputpinsoranywhereonthepoweradapter.
Donotuseanypowercordswheretheelectricalcontactsoneitherendshowsignsofcorrosionor
overheatingorwherethepowercordappearstohavebeendamagedinanyway.
viiiT470pUserGuide
Topreventpossibleoverheating,donotcoverthepoweradapterwithclothingorotherobjects
whenthepoweradapterispluggedintoanelectricaloutlet.
Extensioncordsandrelateddevices
Ensurethatextensioncords,surgeprotectors,uninterruptiblepowersupplies,andpowerstripsthatyouuse
areratedtohandletheelectricalrequirementsoftheproduct.Neveroverloadthesedevices.Ifpowerstrips
areused,theloadshouldnotexceedthepowerstripinputrating.Consultanelectricianformoreinformation
ifyouhavequestionsaboutpowerloads,powerrequirements,andinputratings.
Plugsandoutlets
DANGER
Ifareceptacle(poweroutlet)thatyouintendtousewithyourcomputerequipmentappearstobe
damagedorcorroded,donotusetheoutletuntilitisreplacedbyaqualifiedelectrician.
Donotbendormodifytheplug.Iftheplugisdamaged,contactthemanufacturertoobtain
areplacement.
Donotshareanelectricaloutletwithotherhomeorcommercialappliancesthatdrawlargeamounts
ofelectricity;otherwise,unstablevoltagemightdamageyourcomputer,data,orattacheddevices.
Someproductsareequippedwithathree-prongedplug.Thisplugfitsonlyintoagrounded
electricaloutlet.Thisisasafetyfeature.Donotdefeatthissafetyfeaturebytryingtoinsertitinto
anon-groundedoutlet.Ifyoucannotinserttheplugintotheoutlet,contactanelectricianforan
approvedoutletadapterortoreplacetheoutletwithonethatenablesthissafetyfeature.Never
overloadanelectricaloutlet.Theoverallsystemloadshouldnotexceed80percentofthebranch
circuitrating.Consultanelectricianformoreinformationifyouhavequestionsaboutpowerloads
andbranchcircuitratings.
Besurethatthepoweroutletyouareusingisproperlywired,easilyaccessible,andlocatedclose
totheequipment.Donotfullyextendpowercordsinawaythatwillstressthecords.
Besurethatthepoweroutletprovidesthecorrectvoltageandcurrentfortheproductyouare
installing.
Carefullyconnectanddisconnecttheequipmentfromtheelectricaloutlet.
Powersupplystatement
DANGER
Neverremovethecoveronapowersupplyoranypartthathasthefollowinglabelattached.
©CopyrightLenovo2017ix
Hazardousvoltage,current,andenergylevelsarepresentinsideanycomponentthathasthislabel
attached.Therearenoserviceablepartsinsidethesecomponents.Ifyoususpectaproblemwith
oneoftheseparts,contactaservicetechnician.
Externaldevices
CAUTION:
DonotconnectordisconnectanyexternaldevicecablesotherthanUniversalSerialBus(USB)and
1394cableswhilethecomputerpowerison;otherwise,youmightdamageyourcomputer.Toavoid
possibledamagetoattacheddevices,waitatleastfivesecondsafterthecomputerisshutdownto
disconnectexternaldevices.
Generalbatterynotice
DANGER
BatteriessuppliedbyLenovoforusewithyourproducthavebeentestedforcompatibilityand
shouldonlybereplacedwithapprovedparts.AbatteryotherthantheonespecifiedbyLenovo,ora
disassembledormodifiedbatteryisnotcoveredbythewarranty.
Batteryabuseormishandlingcancauseoverheat,liquidleakage,oranexplosion.Toavoidpossible
injury,dothefollowing:
•Donotopen,dissemble,orserviceanybattery.
•Donotcrushorpuncturethebattery.
•Donotshort-circuitthebattery,orexposeittowaterorotherliquids.
•Keepthebatteryawayfromchildren.
•Keepthebatteryawayfromfire.
Stopusingthebatteryifitisdamaged,orifyounoticeanydischargeorthebuildupofforeign
materialsonthebatteryleads.
Storetherechargeablebatteriesorproductscontainingtherechargeablebatteriesatroom
temperature,chargedtoapproximately30to50%ofcapacity.Werecommendthatthebatteriesbe
chargedaboutonceperyeartopreventoverdischarge.
Donotputthebatteryintrashthatisdisposedofinlandfills.Whendisposingofthebattery,comply
withlocalordinancesorregulations.
xT470pUserGuide

Noticeforremovablerechargeablebattery
DANGER
Onlyrechargethebatterystrictlyaccordingtoinstructionsincludedintheproductdocumentation.
Ifthebatteryisincorrectlyreplaced,thereisdangerofanexplosion.Thebatterycontainsasmall
amountofharmfulsubstance.
Noticefornon-rechargeablecoin-cellbattery
DANGER
Ifthecoin-cellbatteryisincorrectlyreplaced,thereisdangerofanexplosion.Thebatterycontains
asmallamountofharmfulsubstance.
Donotheattomorethan100°C(212°F).
ThefollowingstatementappliestousersinthestateofCalifornia,U.S.A.
CaliforniaPerchlorateInformation:
Productscontainingmanganesedioxidelithiumcoin-cellbatteriesmaycontainperchlorate.
PerchlorateMaterial-specialhandlingmayapply,See
www.dtsc.ca.gov/hazardouswaste/perchlorate
Heatandproductventilation
DANGER
Computers,acpoweradapters,andmanyaccessoriescangenerateheatwhenturnedonandwhen
batteriesarecharging.Notebookcomputerscangenerateasignificantamountofheatduetotheir
compactsize.Alwaysfollowthesebasicprecautions:
•Whenyourcomputeristurnedonorthebatteryischarging,thebase,thepalmrest,andsome
otherpartsmaybecomehot.Avoidkeepingyourhands,yourlap,oranyotherpartofyour
bodyincontactwithahotsectionofthecomputerforanyextendedlengthoftime.Whenyou
usethekeyboard,avoidkeepingyourpalmsonthepalmrestforaprolongedperiodoftime.
Yourcomputergeneratessomeheatduringnormaloperation.Theamountofheatdependson
theamountofsystemactivityandthebatterychargelevel.Extendedcontactwithyourbody,
eventhroughclothing,couldcausediscomfortorevenaskinburn.Periodicallytakebreaks
fromusingthekeyboardbyliftingyourhandsfromthepalmrest;andbecarefulnottouse
thekeyboardforanyextendedlengthoftime.
•Donotoperateyourcomputerorchargethebatterynearflammablematerialsorinexplosive
environments.
•Ventilationslots,fansand/orheatsinksareprovidedwiththeproductforsafety,comfort,and
reliableoperation.Thesefeaturesmightinadvertentlybecomeblockedbyplacingtheproducton
abed,sofa,carpet,orotherflexiblesurface.Neverblock,cover,ordisablethesefeatures.
©CopyrightLenovo2017xi

•Whentheacpoweradapterisconnectedtoanelectricaloutletandyourcomputer,itgenerates
heat.Donotplacetheadapterincontactwithanypartofyourbodywhileusingit.Neverusethe
acpoweradaptertowarmyourbody.Extendedcontactwithyourbody,eventhroughclothing,
maycauseaskinburn.
Foryoursafety,alwaysfollowthesebasicprecautionswithyourcomputer:
•Keepthecoverclosedwheneverthecomputerispluggedin.
•Regularlyinspecttheoutsideofthecomputerfordustaccumulation.
•Removedustfromventsandanyperforationsinthebezel.Morefrequentcleaningsmightbe
requiredforcomputersindustyorhigh-trafficareas.
•Donotrestrictorblockanyventilationopenings.
•Donotoperateyourcomputerinsidefurniture,asthismightincreasetheriskofoverheating.
•Airflowtemperaturesintothecomputershouldnotexceed35°C(95°F).
Electricalcurrentsafetyinformation
DANGER
Electriccurrentfrompower,telephone,andcommunicationcablesishazardous.
Toavoidashockhazard:
•Donotuseyourcomputerduringalightningstorm.
•Donotconnectordisconnectanycablesorperforminstallation,maintenance,orreconfiguration
ofthisproductduringanelectricalstorm.
•Connectallpowercordstoaproperlywiredandgroundedelectricaloutlet.
•Connecttoproperlywiredoutletsanyequipmentthatwillbeattachedtothisproduct.
•Wheneverpossible,useonehandonlytoconnectordisconnectsignalcables.
•Neverturnonanyequipmentwhenthereisevidenceoffire,water,orstructuraldamage.
•Disconnecttheattachedpowercords,battery,andallthecablesbeforeyouopenthedevice
covers,unlessinstructedotherwiseintheinstallationandconfigurationprocedures.
•Donotuseyourcomputeruntilallinternalpartsenclosuresarefastenedintoplace.Neveruse
thecomputerwheninternalpartsandcircuitsareexposed.
DANGER
Connectanddisconnectcablesasdescribedinthefollowingprocedureswheninstalling,moving,
oropeningcoversonthisproductorattacheddevices.
Toconnect:
1.TurneverythingOFF.
2.First,attachallcablestodevices.
3.Attachsignalcablestoconnectors.
4.Attachpowercordstooutlets.
5.TurndevicesON.
Todisconnect:
1.TurneverythingOFF.
2.First,removepowercordsfromoutlets.
3.Removesignalcablesfromconnectors.
4.Removeallcablesfromdevices.
xiiT470pUserGuide
Thepowercordmustbedisconnectedfromthewalloutletorreceptaclebeforeinstallingallother
electricalcablesconnectedtothecomputer.
Thepowercordmaybereconnectedtothewalloutletorreceptacleonlyafterallotherelectrical
cableshavebeenconnectedtothecomputer.
DANGER
Duringelectricalstorms,donotperformanyreplacementanddonotconnectthetelephonecable
toordisconnectitfromthetelephoneoutletonthewall.
Liquidcrystaldisplay(LCD)notice
CAUTION:
Theliquidcrystaldisplay(LCD)ismadeofglass,androughhandlingordroppingthecomputercan
causetheLCDtobreak.IftheLCDbreaksandtheinternalfluidgetsintoyoureyesoronyour
hands,immediatelywashtheaffectedareaswithwaterforatleast15minutes;ifanysymptomsare
presentafterwashing,getmedicalcare.
Note:Forproductswithmercury-containingfluorescentlamps(forexample,non-LED),thefluorescentlamp
intheliquidcrystaldisplay(LCD)containsmercury;disposeofaccordingtolocal,state,orfederallaws.
Usingheadphonesorearphones
CAUTION:
Excessivesoundpressurefromearphonesandheadphonescancausehearingloss.Adjustmentof
theequalizertomaximumincreasestheearphoneandheadphoneoutputvoltageandthesound
pressurelevel.Therefore,toprotectyourhearing,adjusttheequalizertoanappropriatelevel.
Excessiveuseofheadphonesorearphonesforalongperiodoftimeathighvolumecanbedangerousifthe
outputoftheheadphoneorearphoneconnectorsdonotcomplywithspecificationsofEN50332-2.The
headphoneoutputconnectorofyourcomputercomplieswithEN50332-2Subclause7.Thisspecification
limitsthecomputer’smaximumwidebandtrueRMSoutputvoltageto150mV.Tohelpprotectagainst
hearingloss,ensurethattheheadphonesorearphonesyouusealsocomplywithEN50332-2(Clause7
limits)forawidebandcharacteristicvoltageof75mV.UsingheadphonesthatdonotcomplywithEN
50332-2canbedangerousduetoexcessivesoundpressurelevels.
IfyourLenovocomputercamewithheadphonesorearphonesinthepackage,asaset,thecombinationof
theheadphonesorearphonesandthecomputeralreadycomplieswiththespecificationsofEN50332-1.
Ifdifferentheadphonesorearphonesareused,ensurethattheycomplywithEN50332-1(Clause6.5
LimitationValues).UsingheadphonesthatdonotcomplywithEN50332-1canbedangerousdueto
excessivesoundpressurelevels.
Plasticbagnotice
DANGER
Plasticbagscanbedangerous.Keepplasticbagsawayfrombabiesandchildrentoavoiddanger
ofsuffocation.
©CopyrightLenovo2017xiii

Glasspartsnotice
CAUTION:
Somepartsofyourproductmaybemadeofglass.Thisglasscouldbreakiftheproductisdropped
onahardsurfaceorreceivesasubstantialimpact.Ifglassbreaks,donottouchorattempttoremove
it.Stopusingyourproductuntiltheglassisreplacedbytrainedservicepersonnel.
xivT470pUserGuide

Chapter1.Productoverview
Thischapterprovidesbasicinformationtohelpyougetfamiliarwithyourcomputer.
Computercontrols,connectors,andindicators
Thissectionintroduceshardwarefeaturesofthecomputer.
Frontview
1Camera(availableonsomemodels)2Microphones(availableonsomemodels)
3Powerbutton4Fingerprintreader
5TrackPoint®pointingstick6Trackpad
7Media-cardslot8TrackPointbuttons
9Screen(multi-touchavailableonsomemodels)
1Camera(availableonsomemodels)
Thecameraenablesyoutotakepicturesorholdavideoconference.Formoreinformation,see“Using
thecamera”onpage29.
2Microphones(availableonsomemodels)
Themicrophonescapturesoundandvoicewhenusedwithaprogramcapableofhandlingaudio.
3Powerbutton
Youcanpressthepowerbuttontoturnonthecomputerorputthecomputerintosleepmode.
Toturnoffthecomputer,opentheStartmenu,clickPower,andthenclickShutdown.
Ifyourcomputerisunresponsive,youcanturnoffthecomputerbypressingandholdingthepowerbuttonfor
fourormoreseconds.Ifthecomputercannotbeturnedoff,see“Computerstopsresponding”onpage74.
©CopyrightLenovo20171

Youalsocandefinewhatthepowerbuttondoes.Forexample,bypressingthepowerbutton,youcanturn
offthecomputerorputthecomputerintosleeporhibernationmode.Tochangewhatthepowerbutton
does,dothefollowing:
1.GotoControlPanel,andthenchangetheviewofControlPanelfromCategorytoLargeiconsorSmall
icons.
2.ClickPowerOptions➙Choosewhatthepowerbuttonsdo.
3.Followtheinstructionsonthescreen.
4Fingerprintreader
Fingerprintauthenticationprovidessimpleandsecureuseraccessbyassociatingyourfingerprintwitha
password.Formoreinformation,see“Usingthefingerprintreader”onpage52.
ThinkPad®pointingdevice
5TrackPointpointingstick
8TrackPointbuttons
6Trackpad
YourcomputerisequippedwiththeLenovo-uniqueThinkPadpointingdevice.Formoreinformation,see
“ThinkPadpointingdeviceoverview”onpage20.
7Media-cardslot
Youcaninsertaflashmediacardintothemedia-cardslotfordataaccessorstorage.Formoreinformation,
see“Usingamediacardorasmartcard”onpage30.
9Screen(multi-touchavailableonsomemodels)
Themulti-touchscreenenablesyoutouseyourcomputerwithsimpletouchgestures.Formoreinformation,
see“Usingthemulti-touchscreen”onpage16.
Left-sideview
1acpowerconnector2AlwaysOnUSB3.0connector
3Fanlouvers4Audioconnector
5Smart-cardslot(availableonsomemodels)
1acpowerconnector
Connecttheacpoweradaptertotheacpowerconnectortoprovideacpowertothecomputerandcharge
thebattery.
2AlwaysOnUSB3.0connector
Bydefault,theAlwaysOnUSB3.0connectorenablesyoutochargeUSB-compatibledevicesinthe
followingsituations:
•Whenyourcomputerisonorinsleepmode
•Whenyourcomputerisofforinhibernationmode,butconnectedtoacpower
2T470pUserGuide

Attention:WhenyouattachaUSBcabletothisconnector,ensurethattheUSBmarkisfacingupward.
Otherwisetheconnectormightgetdamaged.
Tochargethesedeviceswhenthecomputerisofforinhibernationmode,andthecomputerisnotconnected
toacpower,dothefollowing:
1.StarttheLenovoSettingsprogram.See“AccessingLenovoprograms”onpage12.
2.ClickPOWER.
3.Followtheinstructionsonthescreentomakeyourpreferredsetting.
3Fanlouvers
Thefanlouversandinternalfanenableairtocirculateinthecomputertoensurepropercooling,especially
thecoolingofthemicroprocessor.
Note:Toensureproperairflow,donotplaceanyobstaclesinfrontofthefanlouvers.
4Audioconnector
Youcanconnectheadphonesoraheadsetwitha3.5-mm(0.14-inch),4-poleplugtotheaudioconnectorto
listentothesoundfromthecomputer.
Ifyouareusingaheadsetwithafunctionswitch,donotpressthisswitchwhileusingtheheadset.Ifyou
presstheswitch,theheadsetmicrophoneisdisabled,andtheintegratedmicrophonesonthecomputeris
enabledinstead.
Note:Theaudioconnectordoesnotsupportaconventionalmicrophone.Formoreinformation,see“Using
audiofeatures”onpage29.
5Smart-cardslot(availableonsomemodels)
Youcanusesmartcardsforauthentication,datastorage,andapplicationprocessing.Withinlarge
organizations,youmightalsousesmartcardsforstrongsecurityauthenticationofsinglesign-on(SSO).For
moreinformation,see“Usingamediacardorasmartcard”onpage30.
Right-sideview
1Micro-SIM-cardslot2USB3.0connectors
3Ethernetconnector4MiniDisplayPort®connector
5HDMI™connector6Security-lockslot
1Micro-SIM-cardslot
Ifthecomputersupportswirelesswideareanetwork(WWAN),amicroSubscriberIdentificationModule
(SIM)cardmightberequiredtoestablishconnections.Forinformationaboutreplacingorinstallingthemicro
SIMcard,see“ReplacingthemicroSIMcard”onpage95.
2USB3.0connectors
YoucanusetheUSB3.0connectorstoconnectUSB-compatibledevices,suchasaUSBkeyboard,USB
mouse,USBstoragedevice,orUSBprinter.
Chapter1.Productoverview3

Attention:WhenyouattachaUSBcabletothisconnector,ensurethattheUSBmarkisfacingupward.
Otherwisetheconnectormightgetdamaged.
3Ethernetconnector
TheEthernetconnectorenablesyoutoconnectthecomputertoalocalareanetwork(LAN).
DANGER
Toavoidtheriskofelectricalshock,donotconnectthetelephonecabletotheEthernetconnector.
YoucanonlyconnectanEthernetcabletothisconnector.
TheEthernetconnectorhastwonetworkstatusindicators.Whenthegreenindicatorison,thecomputeris
connectedtoaLAN.Whentheyellowindicatorblinks,dataisbeingtransmitted.
Note:Ifthecomputerisconnectedtoadockingstation,usetheEthernetconnectoronthedockingstation
insteadoftheoneonthecomputer.
4MiniDisplayPortconnector
TheMiniDisplayPortconnectorenablesyoutoconnectyourcomputertoacompatibleprojector,external
monitor,orhigh-definitiontelevision(HDTV).Thiscompactconnectorenablesaplug-and-playsetup
andsupportsadaptersthatcanplugintoDigitalVisualInterface(DVI),videographicsarray(VGA),or
High-DefinitionMultimediaInterface(HDMI™)connectors.TheMiniDisplayPortconnectorsupportsaudio
aswellasvideostreaming.
5HDMIconnector
TheHDMIconnectorisadigitalaudioandvideointerface.Itenablesyoutoconnectyourcomputertoa
compatibledigitalaudiodeviceorvideomonitor,suchasaDVDplayeroranHDTV.
Note:IfyouconnectthecomputertoasupportedThinkPadOneLink+Dock,usetheHDMIconnectoronthe
ThinkPadOneLink+Dock,nottheoneonthecomputer.
6Security-lockslot
Toprotectyourcomputerfromtheft,lockyourcomputertoadesk,table,orotherfixturesthroughasecurity
cablelockthatfitsthissecurity-lockslot.
Note:Youareresponsibleforevaluating,selecting,andimplementingthelockingdeviceandsecurity
feature.Lenovomakesnocomments,judgments,orwarrantiesaboutthefunction,quality,orperformance
ofthelockingdeviceandsecurityfeature.
4T470pUserGuide

Bottomview
1Removablebattery2Dockingstationconnector(availableonsomemodels)
3Keyboarddrainageholes4Speakers
1Removablebattery
Youcanusethecomputerwithbatterypowerwheneveracpowerisunavailable.
2Docking-stationconnector(availableonsomemodels)
Youcanconnectthecomputertoasupporteddockingstationtoextendthecomputercapabilities.
3Keyboarddrainageholes
Ifyouaccidentallyspillwaterordrinkoverthekeyboard,thekeyboarddrainageholescanhelpdrainout
liquidfromyourcomputer.
4Speakers
Yourcomputerisequippedwithapairofstereospeakers.
Statusindicators
Thistopicprovidesinformationaboutlocatingandidentifyingthevariousstatusindicatorsonyourcomputer.
Chapter1.Productoverview5
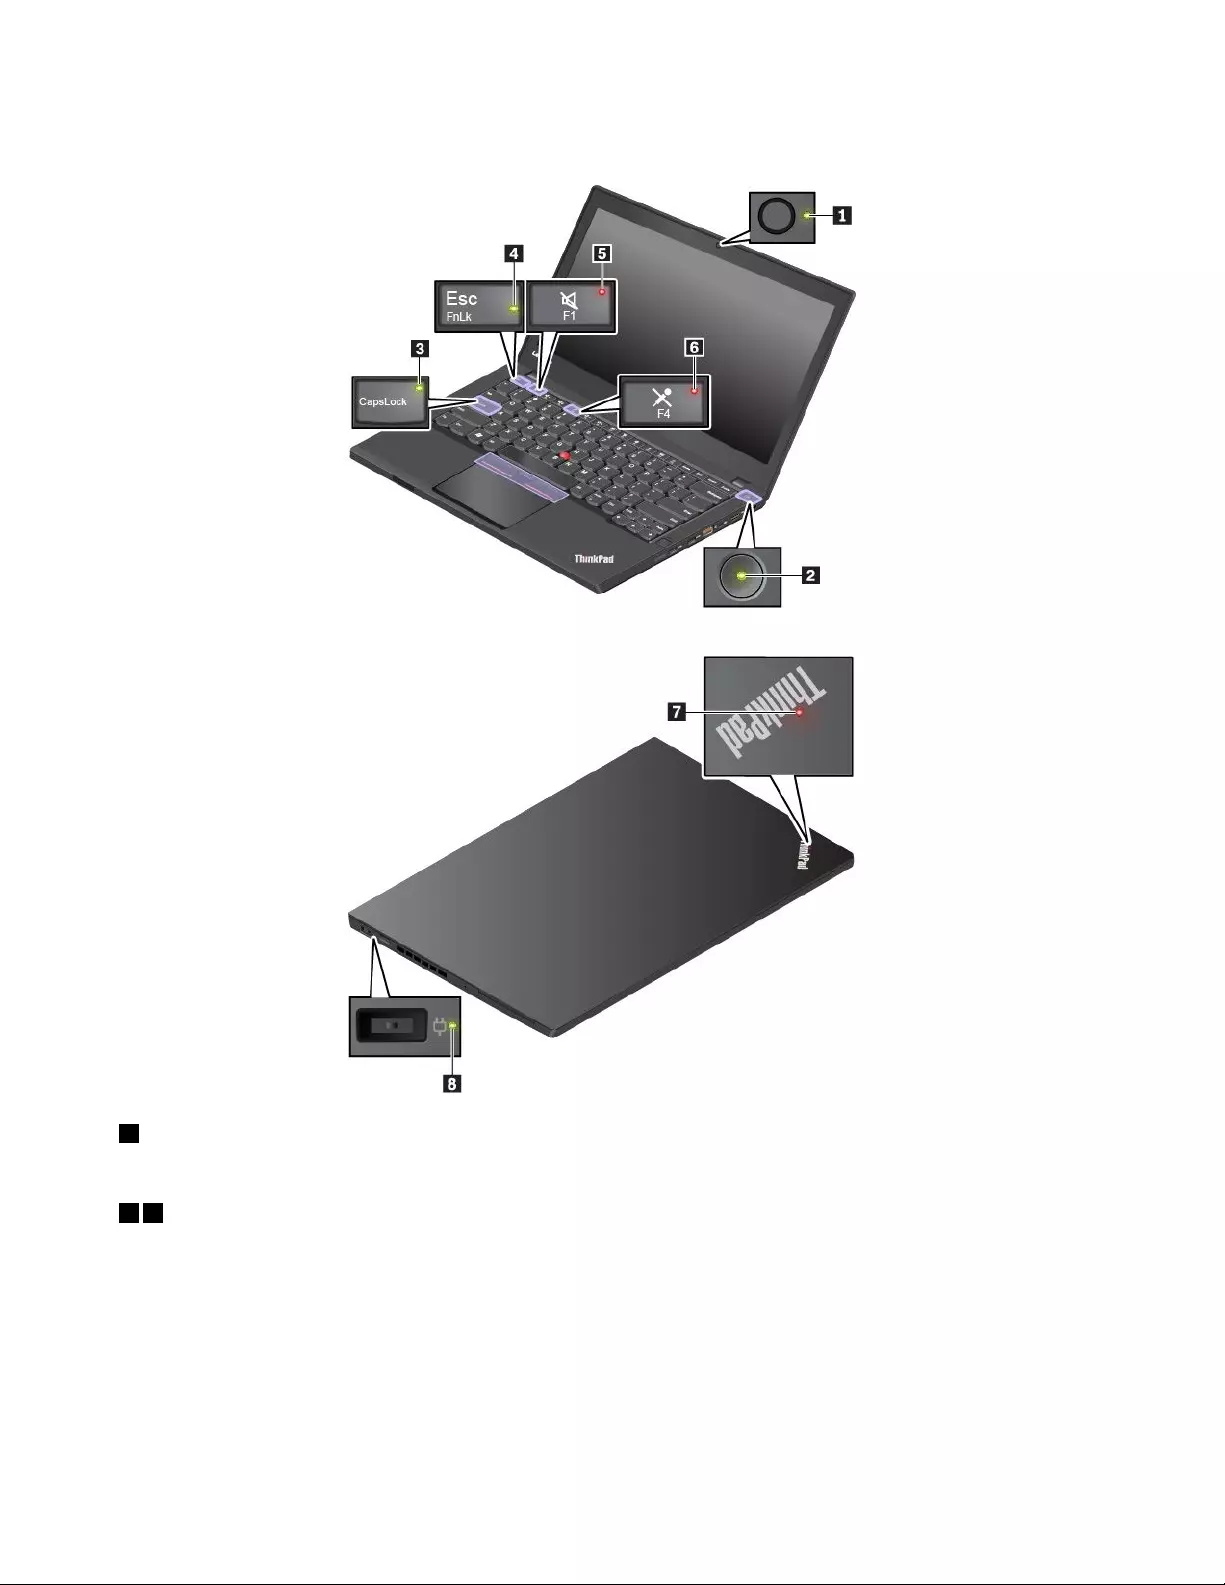
Note:Dependingonthemodel,yourcomputermightlookdifferentfromthefollowingillustrations.
1Camerastatusindicator
Whenthisindicatorison,thecameraisinuse.
27Systemstatusindicators
TheindicatorintheThinkPadlogoonthecomputerlidandtheindicatorinthepowerbuttonshowthe
systemstatusofyourcomputer.
•Blinksforthreetimes:Thecomputerisinitiallyconnectedtopower.
•On:Thecomputerison(innormalmode).
•Off:Thecomputerisofforinhibernationmode.
•Blinksquickly:Thecomputerisenteringsleeporhibernationmode.
•Blinksslowly:Thecomputerisinsleepmode.
6T470pUserGuide

3CapsLockindicator
Whenthisindicatorison,youcantypeuppercaselettersbydirectlypressingtheletterkeys.
4FnLockindicator
ThisindicatorshowsthestatusofFnLockfunction.Formoreinformation,see“Usingthespecialkeys”
onpage18.
5Speaker-muteindicator
Whenthisindicatorison,thespeakersaremuted.
6Microphone-muteindicator
Whenthisindicatorison,themicrophonesaremuted.
8acpowerstatusindicator
Thisindicatorshowstheacpowerandbatterypowerstatusofthecomputer.
•Green:connectedtoacpower(batterypower80%–100%)
•Yellow:connectedtoacpower(batterypower0%–80%)
•Off:notconnectedtoacpower
Importantproductinformationlabels
Thissectionprovidesinformationtohelpyoulocatethefollowinglabels:
•Machinetypeandmodellabel
•FCCIDandICCertificationlabel
•LabelsfortheWindowsoperatingsystems
Machinetypeandmodellabel
WhenyoucontactLenovoforhelp,themachinetypeandmodelinformationhelpsthetechniciansto
identifyyourcomputerandprovidefasterservice.
Chapter1.Productoverview7

Thefollowingillustrationshowswheretofindthelabelthatcontainsthemachinetypeandmodelinformation
ofyourcomputer.
FCCIDandICCertificationnumber
TheFCCandICCertificationinformationisidentifiedbyalabelonthecomputerasshowninthefollowing
illustration.
Note:Dependingonthemodel,yourcomputermightlookdifferentfromthefollowingillustration.
Thecontentofthislabeldiffersdependingonthewirelessmodulesthatcomewithyourcomputer:
•Forapreinstalledwirelessmodule,thislabelidentifiestheactualFCCIDandICcertificationnumberfor
thewirelessmoduleinstalledbyLenovo.
Note:Donotremoveorreplaceapreinstalledwirelessmodulebyyourself.Forreplacement,youmust
contacttheLenovoservicefirst.Lenovoisnotresponsibleforanydamagecausedbyunauthorized
replacement.
8T470pUserGuide

•Forauser-installablewirelessWANmodule,thislabeldirectsyoutoconsultthisuserguidefortheactual
FCCIDandICcertificationnumber.
TheFCCIDandICCertificationnumberlabelisaffixedtothewirelessWANmodule1(availableon
somemodels)installedinthecomputer.
Note:Fortheuser-installablewirelessmodule,ensurethatyouuseonlyaLenovo-authorizedwireless
moduleforthecomputer.Otherwise,anerrormessagewillbedisplayedandthecomputerwillbeep
whenyouturnonthecomputer.
LabelsfortheWindowsoperatingsystems
Windows®10GenuineMicrosoft®label:YourcomputermighthaveaGenuineMicrosoftlabelaffixedtoits
coverdependingonthefollowingfactors:
•Yourgeographiclocation
•Datewhenyourcomputerwasmanufactured
•VersionofWindows10thatispreinstalled
Gotohttps://www.microsoft.com/en-us/howtotell/Hardware.aspxforillustrationsofthevarioustypes
ofGenuineMicrosoftlabels.
•InthePeople’sRepublicofChina,theGenuineMicrosoftlabelisrequiredonallcomputermodels
preinstalledwithanyversionofWindows10.
•Inothercountriesandregions,theGenuineMicrosoftlabelisrequiredonlyoncomputermodelslicensed
forWindows10Pro.
TheabsenceofaGenuineMicrosoftlabeldoesnotindicatethatthepreinstalledWindowsversionisnot
genuine.FordetailsonhowtotellwhetheryourpreinstalledWindowsproductisgenuine,refertothe
informationprovidedbyMicrosoftat:
https://www.microsoft.com/en-us/howtotell/default.aspx
Therearenoexternal,visualindicatorsoftheProductIDorWindowsversionforwhichthecomputeris
licensed.Instead,theProductIDisrecordedinthecomputerfirmware.WheneveraWindows10product
Chapter1.Productoverview9

isinstalled,theinstallationprogramchecksthecomputerfirmwareforavalid,matchingProductIDto
completetheactivation.
Insomecases,anearlierWindowsversionmightbepreinstalledunderthetermsoftheWindows10Pro
licensedowngraderights.
Computerfeatures
Thecomputerfeaturesintroducedinthistopiccovervariousmodels.Somecomputerfeaturesmight
beavailableonlyonspecificmodels.
Microprocessor
Toviewthemicroprocessorinformationofyourcomputer,right-clicktheStartbuttonandthenselect
System.
Memory
•Doubledatarate4(DDR4)smalloutlinedualin-linememorymodule(SODIMM)
Storagedevice
•2.5-inchformfactor,7-mm(0.28-inch)or9.5-mm(0.38-inch)heightharddiskdrive(availableonsome
models)
•2.5-inchformfactor,7-mm(0.28-inch)heightsolid-statedrive(availableonsomemodels)
•2.5-inchformfactor,7-mmheighthybriddrive(availableonsomemodels)
•M.2solid-statedrive(availableonsomemodels)
•Intel®Optane™memory
Display
•Brightnesscontrol
•ColordisplaywithIn-planeSwitching(IPS)technology
•Displaysize:355.6mm(14inches)
•Displayresolution:1920x1080pixelsor2560x1440pixels
•Multi-touchtechnology(availableonsomemodels)
•NVIDIA®discretegraphics
Keyboard
•Six-rowkeyboard(traditionalorbacklight)
•Functionkeys
•ThinkPadpointingdevice(includingtheTrackPointpointingdeviceandtrackpadwithbuttons)
Connectorsandslots
•acpowerconnector
•Audioconnector
•Docking-stationconnector(availableonsomemodels)
•Ethernetconnector
•AlwaysOnUSB3.0connector
•HDMIconnector
•Media-cardslot(4-in-1)
10T470pUserGuide

•Micro-SIM-cardslot(availableonsomemodels)
•MiniDisplayPortconnector
•Smart-cardslot(availableonsomemodels)
•USB3.0connectors
Securityfeatures
•Fingerprintreader
•Security-lockslot
•TrustedPlatformModule(TPM)
Wirelessfeatures
•Bluetooth
•WirelessLAN
•WirelessWAN(availableonsomemodels)
Others
•Camera
•Microphones
Computerspecifications
Size
•Width:339mm(13.35inches)
•Depth:235mm(9.25inches)
•Thickness:24mm(0.95inches)or24.4mm(0.96inches)
Maximumheatoutput(dependingonthemodel)
•90W(307Btu/hr)
Powersource(acpoweradapter)
•Sine-waveinputat50Hzto60Hz
•Inputratingoftheacpoweradapter:100Vto240Vac,50Hzto60Hz
Operatingenvironment
Maximumaltitude(withoutpressurization)
•3048m(10000ft)
Temperature
•Ataltitudesupto2438m(8000ft)
–Operating:5°Cto35°C(41°Fto95°F)
–Storage:5°Cto43°C(41°Fto109°F)
•Ataltitudesabove2438m(8000ft)
–Maximumtemperaturewhenoperatingundertheunpressurizedcondition:31.3°C(88°F)
Chapter1.Productoverview11

Note:Whenyouchargethebattery,itstemperaturemustbeatleast10°C(50°F).
Relativehumidity
•Operating:8%to95%atwet-bulbtemperature23°C(73°F)
•Storage:5%to95%atwet-bulbtemperature27°C(81°F)
Ifpossible,placeyourcomputerinawell-ventilatedanddryareawithoutdirectexposuretosunshine.
Attention:
•Keepelectricalappliancessuchaselectricfans,radio,airconditioners,andmicrowaveovensaway
fromthecomputer.Thestrongmagneticfieldsgeneratedbytheseappliancescandamagethemonitor
anddataontheinternalstoragedrive.
•Donotplaceanybeveragesontopoforbesidethecomputerorotherattacheddevices.Ifliquidisspilled
onorinthecomputeroranattacheddevice,ashortcircuitorotherdamagemightoccur.
•Donoteatorsmokeoveryourkeyboard.Particlesthatfallintoyourkeyboardcancausedamage.
Lenovoprograms
YourcomputercomeswithLenovoprogramstohelpyouworkeasilyandsecurely.
AccessingLenovoprograms
ToaccessLenovoprogramsonyourcomputer,dothefollowing:
1.OpentheStartmenuandlocateaprogrambytheprogramname.
2.Ifyoudonotfindtheprogramintheprogramlist,searchfortheprograminthesearchbox.
AnintroductiontoLenovoprograms
ThistopicprovidesabriefintroductiontoLenovoprograms.Dependingonyourcomputermodel,someof
theprogramsmightnotbeavailable.
Theavailableprogramsaresubjecttochangewithoutnotice.Tolearnmoreabouttheprogramsandother
computingsolutionsofferedbyLenovo,goto:
http://www.lenovo.com/support
ActiveProtectionSystem™Thisprogramprotectsyourinternalstoragedrivewhentheshocksensorinside
yourcomputerdetectsaconditionthatcoulddamagethedrive.Sucha
conditionincludessystemtilt,excessivevibration,orshock.
Theinternalstoragedriveislessvulnerabletodamagewhenitisnotoperating.
Thisisbecausethedrivestopsspinning,andthereadandwriteheadsofthe
drivemightalsobemovedtoareaswithoutdata.
Whendetectingthattheenvironmentisstableagain(minimalchangeinsystem
tilt,vibration,orshock),theshocksensorenablestheinternalstoragedrive.
HotkeyFeaturesIntegrationHotkeyFeaturesIntegrationisautilitypackagethatenablesyoutoselectand
installutilitiesspecificallyforthespecialkeysandbuttonsonyourcomputer.
Thespecialkeysandbuttonsaredesignedtomeetaccessibilityandusability
requirements.Installingrelatedutilitiesenablesfullfunctionalityofthespecial
keysandbuttons.
12T470pUserGuide

LenovoCompanionYourcomputer’sbestfeaturesandcapabilitiesshouldbeeasytoaccessand
understand.WithLenovoCompanion,theyare.
UseLenovoCompaniontodothefollowing:
•Optimizeyourcomputerperformance,monitoryourcomputerhealth,and
manageupdates.
•Accessyouruserguide,checkwarrantystatus,andviewaccessories
customizedforyourcomputer.
•Readhow-toarticles,exploreLenovoforums,andstayup-to-dateon
technologynewswitharticlesandblogsfromtrustedsources.
TheLenovoCompanionprogramisfilledwithexclusiveLenovocontenttohelp
youlearnmoreaboutwhatyoucandowithyourLenovocomputer.
LenovoIDThisprogramenablesyoutocreateandmanageyourLenovoID.WithaLenovo
ID,youcanconnecttoeverythingLenovothroughasingleaccount.Useyour
LenovoIDforquickandsimpleauthenticationandthenenjoythevarious
servicesprovidedbyLenovo.Suchservicesincludeonlineshopping,app
download,personalizeddevicesupport,specialpromotionaloffers,Lenovo
forums,andsoon.
LenovoSettingsThisprogramenhancesyourcomputingexperiencebyprovidingthefollowing
features:
•Turningyourcomputerintoaportablehotspot
•Configuringcameraandaudiosettings
•Optimizingyourpowersettings
•Creatingandmanagingmultiplenetworkprofiles
Chapter1.Productoverview13

14T470pUserGuide

Chapter2.Usingyourcomputer
Thischapterprovidesinformationtohelpyouusethevariousfeaturesprovidedbyyourcomputer.
Registeringyourcomputer
Whenyouregisteryourcomputer,informationisenteredintoadatabase,whichenablesLenovotocontact
youifthereisarecallorothersevereproblem.Inaddition,somelocationsofferextendedprivilegesand
servicestoregisteredusers.
WhenyouregisteryourcomputerwithLenovo,youalsowillreceivethefollowingbenefits:
•QuickerservicewhenyoucallLenovoforhelp
•Automaticnotificationoffreesoftwareandspecialpromotionaloffers
ToregisteryourcomputerwithLenovo,gotohttp://www.lenovo.com/registerandfollowtheinstructionson
thescreen.
Frequentlyaskedquestions
ThistopicprovidesafewtipstohelpyouoptimizetheuseofyourThinkPadnotebookcomputers.
Toensurethebestcomputerperformance,gotothefollowingWebsitetofindinformationsuchasaidsfor
troubleshootingandanswerstofrequentlyaskedquestions:
http://www.lenovo.com/support/faq
CanIgetmyuserguideinanotherlanguage?
Todownloadtheuserguideinanotherlanguage,gotohttp://www.lenovo.com/support.Thenfollowthe
instructionsonthescreen.
Howtoturnoffmycomputer?
OpentheStartmenu,clickPower,andthenclickShutdown.
HowdoIaccessControlPanel?
Right-clicktheStartbutton,andthenclickControlPanel.
HowdoIusebatterypowermoreeffectivelywhenIamonthego?
•Toconservepower,ortosuspendoperationwithoutexitingprogramsorsavingfiles,see“Power-saving
modes”onpage26.
•Toachievethebestbalancebetweenperformanceandpowersaving,createandapplyanappropriate
powerplan.See“Managingthebatterypower”onpage26.
•Ifyourcomputerwillbeturnedoffforanextendedperiodoftime,youcanpreventbatterypowerfrom
drainingbyremovingthebattery.
HowdoIsecurelydisposeofdatastoredontheinternalstoragedrive?
•Study“Security”onpage49tofindouthowyoucanprotectyourcomputerfromtheftandunauthorized
use.
©CopyrightLenovo201715

•Beforeyoudisposeofthedataontheinternalstoragedrive,ensurethatyouread“Deletingdatafrom
yourstoragedrive”onpage54.
HowdoIattachanexternaldisplay?
•Referto“Usinganexternaldisplay”onpage31.
•WiththeExtenddesktopfunction,youcandisplayoutputonboththecomputerdisplayandanexternal
display.
HowdoIattachorreplaceadevice?
Refertotheappropriatetopicin“Replacingdevices”onpage93.
Ihavebeenusingthecomputerforsometimealready,andisgettingslower.WhatshouldIdo?
•Followthe“Generaltipsforpreventingproblems”onpage73.
•Diagnoseproblemsyourselfbyusingthepreinstalleddiagnosticsoftware.See“Diagnosingproblems
withLenovoCompanion”onpage73.
•Checkforrecoverysolutionsin“Recoveryinformation”onpage91.
Printthefollowingtopicsandkeepthemwithyourcomputerincaseyouareunabletoaccessthis
electronicuserguidewhennecessary.
•“InstallingtheWindows10operatingsystem”onpage57
•“Computerstopsresponding”onpage74
•“Powerproblems”onpage86
GettinghelpabouttheWindowsoperatingsystem
TheWindowshelpinformationsystemprovidesyouwithdetailedinformationaboutusingtheWindows
operatingsystemsothatyoucangetthemostofyourcomputer.ToaccesstheWindowshelpinformation
system,opentheStartmenuandclickGetStarted.Additionally,youcanusetheCortana®personal
assistanttosearchforhelp,apps,files,settings,andsoon.
Usingthemulti-touchscreen
Thistopicprovidesinstructionsonhowtousethemulti-touchscreenthatisavailableonsomemodels.
Notes:
•Yourcomputerscreenmightlookdifferentfromthefollowingillustrations.
•Dependingontheprogramyouuse,somegesturesmightnotbeavailable.
Thefollowingtableintroducessomefrequentlyusedgestures.
16T470pUserGuide

Touchgesture(touchmodels
only)
Description
Touch:Tap.
Mouseaction:Click.
Function:Openanapporperformanactiononanopenapp,suchasCopy,
Save,andDelete,dependingontheapp.
Touch:Tapandhold.
Mouseaction:Right-click.
Function:Openamenuwithmultipleoptions.
Touch:Slide.
Mouseaction:Scrollthemousewheel,movethescrollbar,orclickthescroll
arrow.
Function:Scrollthroughitems,suchaslists,pages,andphotos.
Touch:Draganitemtothelocationyouwant.
Mouseaction:Click,hold,anddraganitem.
Function:Moveanobject.
Touch:Movetwofingersclosertogether.
Mouseaction:PresstheCtrlkeywhilescrollingthemousewheelbackward.
Function:Zoomout.
Touch:Movetwofingersfartherapart.
Mouseaction:PresstheCtrlkeywhilescrollingthemousewheelforward.
Function:Zoomin.
Touch:Puttwoormorefingersonanitemandthenrotateyourfingersclockwise
orcounterclockwise.
Mouseaction:Iftheappsupportsrotation,clicktherotationicon.
Function:Rotateanitem.
Touch:Swipeinfromtherightedge.
Mouseaction:ClicktheactioncentericonintheWindowsnotificationarea.
Function:Opentheactioncentertoseeyournotificationsandquickactions.
Chapter2.Usingyourcomputer17

Touchgesture(touchmodels
only)
Description
Touch:Swipeinfromtheleftedge.
Mouseaction:Clickthetask-viewicononthetaskbar.
Function:Viewallyouropenwindowsintaskview.
•Shortswipeforfull-screenedapporwhenyourcomputerisinthetablet
mode
Touch:Swipedownwardsshortlyfromthetopedge.
Mouseaction:Moveyourpointertothetopedgeofthescreen.
Function:Showahiddentitlebar.
•Longswipewhenyourcomputerisinthetabletmode
Touch:Swipeinfromthetopedgetothebottomedge.
Mouseaction:Fromthetopedgeofthescreen,clickandhold,movethe
pointertothebottomofthescreen,andthenrelease.
Function:Closethecurrentapp.
Tipsonusingthemulti-touchscreen
•Themulti-touchscreenisaglasspanelcoveredwithaplasticfilm.Donotapplypressureorplaceany
metallicobjectonthescreen,whichmightdamagethetouchpanelorcauseittomalfunction.
•Donotusefingernails,glovedfingers,orinanimateobjectsforinputonthescreen.
•Regularlycalibratetheaccuracyofthefingerinputtoavoidadiscrepancy.
Tipsoncleaningthemulti-touchscreen
•Turnoffthecomputerbeforecleaningthemulti-touchscreen.
•Useadry,soft,andlint-freeclothorapieceofabsorbentcottontoremovefingerprintsordustfromthe
multi-touchscreen.Donotapplysolventstothecloth.
•Gentlywipethescreenusingatop-downmotion.Donotapplyanypressureonthescreen.
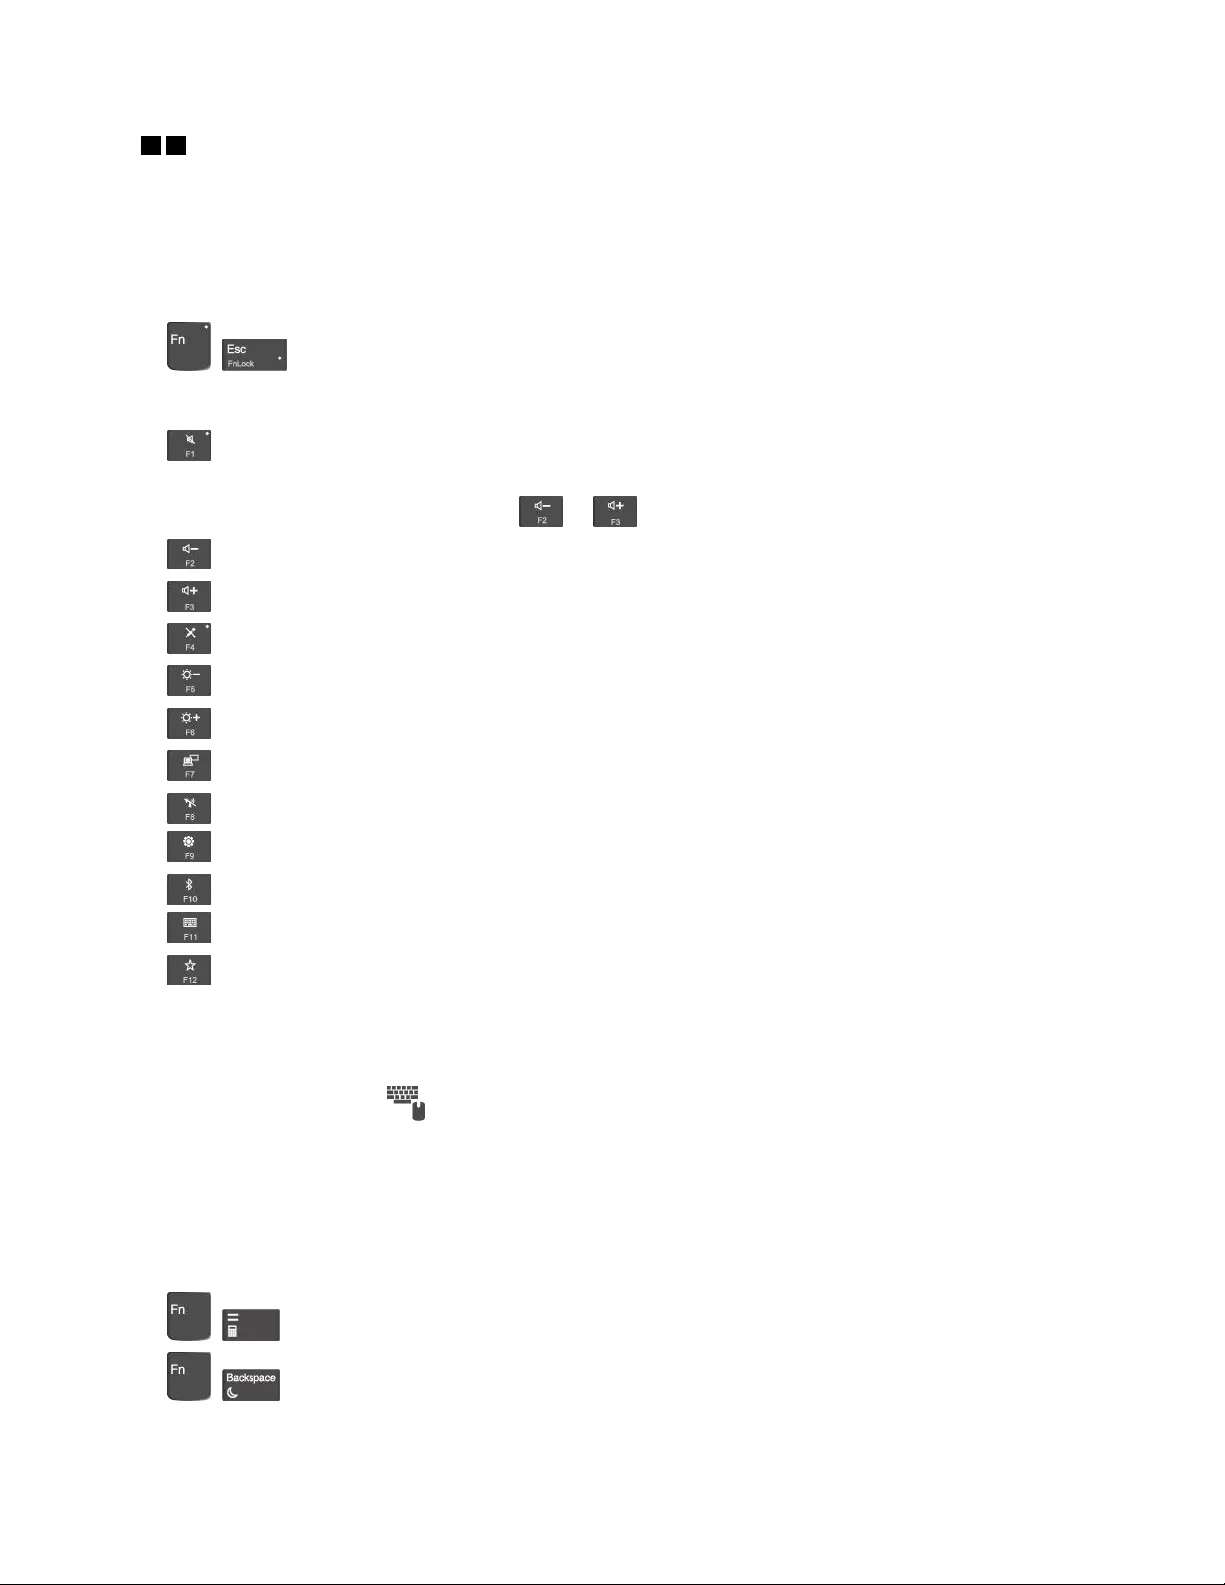
Usingthespecialkeys
Yourcomputerhasseveralspecialkeystohelpyouworkmoreeasilyandeffectively.
1Windowslogokey
PresstheWindowslogokeytoopentheStartmenu.ForinformationaboutusingtheWindowslogokeywith
otherkeys,seethehelpinformationsystemoftheWindowsoperatingsystem.
18T470pUserGuide
23Fnkeyandfunctionkeys
YoucanconfiguretheFnkeyandfunctionkeysintheKeyboardPropertieswindowbydoingthefollowing:
1.GotoControlPanel,andthenchangetheviewofControlPanelfromCategorytoLargeiconsorSmall
icons.
2.ClickKeyboard.IntheKeyboardPropertieswindow,clicktheFnandfunctionkeystab.
3.Selecttheoptionsofyourpreference.
•+SwitchthekeyfunctionbetweenthestandardF1–F12functionandthespecialfunction
printedasanicononeachkey.WhentheFnLockindicatorisoff,youcanusethedefaultfunction.You
canchangethedefaultfunctionintheKeyboardPropertieswindow.
•Muteorunmutethespeakers.
Ifyoumutethesoundandturnoffyourcomputer,thesoundwillremainmutedwhenyouturnonyour
computer.Toturnonthesound,pressor.
•Decreasethespeakervolume.
•Increasethespeakervolume.
•Muteorunmutethemicrophones.
•Darkenthecomputerdisplay.
•Brightenthecomputerdisplay.
•Manageexternaldisplays.
•Enableordisablethebuilt-inwirelessfeatures.
•OpentheSettingswindow.
•Enableordisablethebuilt-inBluetoothfeatures.
•Openakeyboardsettingpage.
•Invokethefunctiondefinedbyyourself.Ifnofunctionisdefined,pressthiskeytoopenthe
Cortanapersonalassistant.
TodefineorchangetheactionfortheF12key,dothefollowing:
1.OpentheLenovoSettingsprogram.See“AccessingLenovoprograms”onpage12.
2.Clicktheinputicon.
3.LocatetheKEYBOARD:USER-DEFINEDKEYsectionandfollowtheinstructionsonthescreento
completethesetting.
OntheInputpage,youcanalsodefinedifferentfunctionsforthekeycombinationswithF12,suchas
Shift+F12,Alt+F12,orCtrl+F12.
Keycombinations
•+:Openthecalculator.
•+:Putyourcomputerintosleepmode.
Chapter2.Usingyourcomputer19

•+:OpentheSnippingToolprogram.
•Fn+Spacebar:Ifyourcomputersupportskeyboardbacklight,pressFn+Spacebartoswitchbetweenthe
differentkeyboardbacklightstatus(off,low,orhigh).
Note:IfyourcomputerisinstalledwiththeLenovoSettings3.0programorlaterversion,therearefour
modesforthekeyboardbacklight:Off,Low,High,andAuto.
•Fn+B:ThiskeycombinationhasthesamefunctionastheBreakkeyonaconventionalexternalkeyboard.
•Fn+K:ThiskeycombinationhasthesamefunctionastheScrLKorScrollLockkeyonaconventional
externalkeyboard.
•Fn+P:ThiskeycombinationhasthesamefunctionasthePausekeyonaconventionalexternalkeyboard.
•Fn+S:ThiskeycombinationhasthesamefunctionastheSysRqkeyonaconventionalexternalkeyboard.
•Fn+4:PressFn+4toputthecomputerintosleepmode.Towakeupthecomputer,pressanykeyor
thepowerbutton.
UsingtheThinkPadpointingdevice
ThissectionprovidesinformationaboutusingtheThinkPadpointingdevice.
ThinkPadpointingdeviceoverview
TheThinkPadpointingdeviceenablesyoutoperformallthefunctionsofatraditionalmouse,suchas
pointing,clicking,andscrolling.WiththeThinkPadpointingdevice,youalsocanperformvarioustouch
gestures,suchasrotatingandzoominginorout.
TheThinkPadpointingdeviceconsistsofthefollowingdevices:
1TrackPointpointingdevice
2Trackpad
Note:Dependingonthemodel,yourTrackPointpointingdeviceandthetrackpadmightlookdifferent
fromtheillustrationinthistopic.
20T470pUserGuide
Bydefault,boththeTrackPointpointingdeviceandthetrackpadareactivewiththetouchgesturesenabled.
Tochangethesettings,see“CustomizingtheThinkPadpointingdevice”onpage23.
UsingtheTrackPointpointingdevice
TheTrackPointpointingdeviceenablesyoutoperformallthefunctionsofatraditionalmouse,suchas
pointing,clicking,andscrolling.
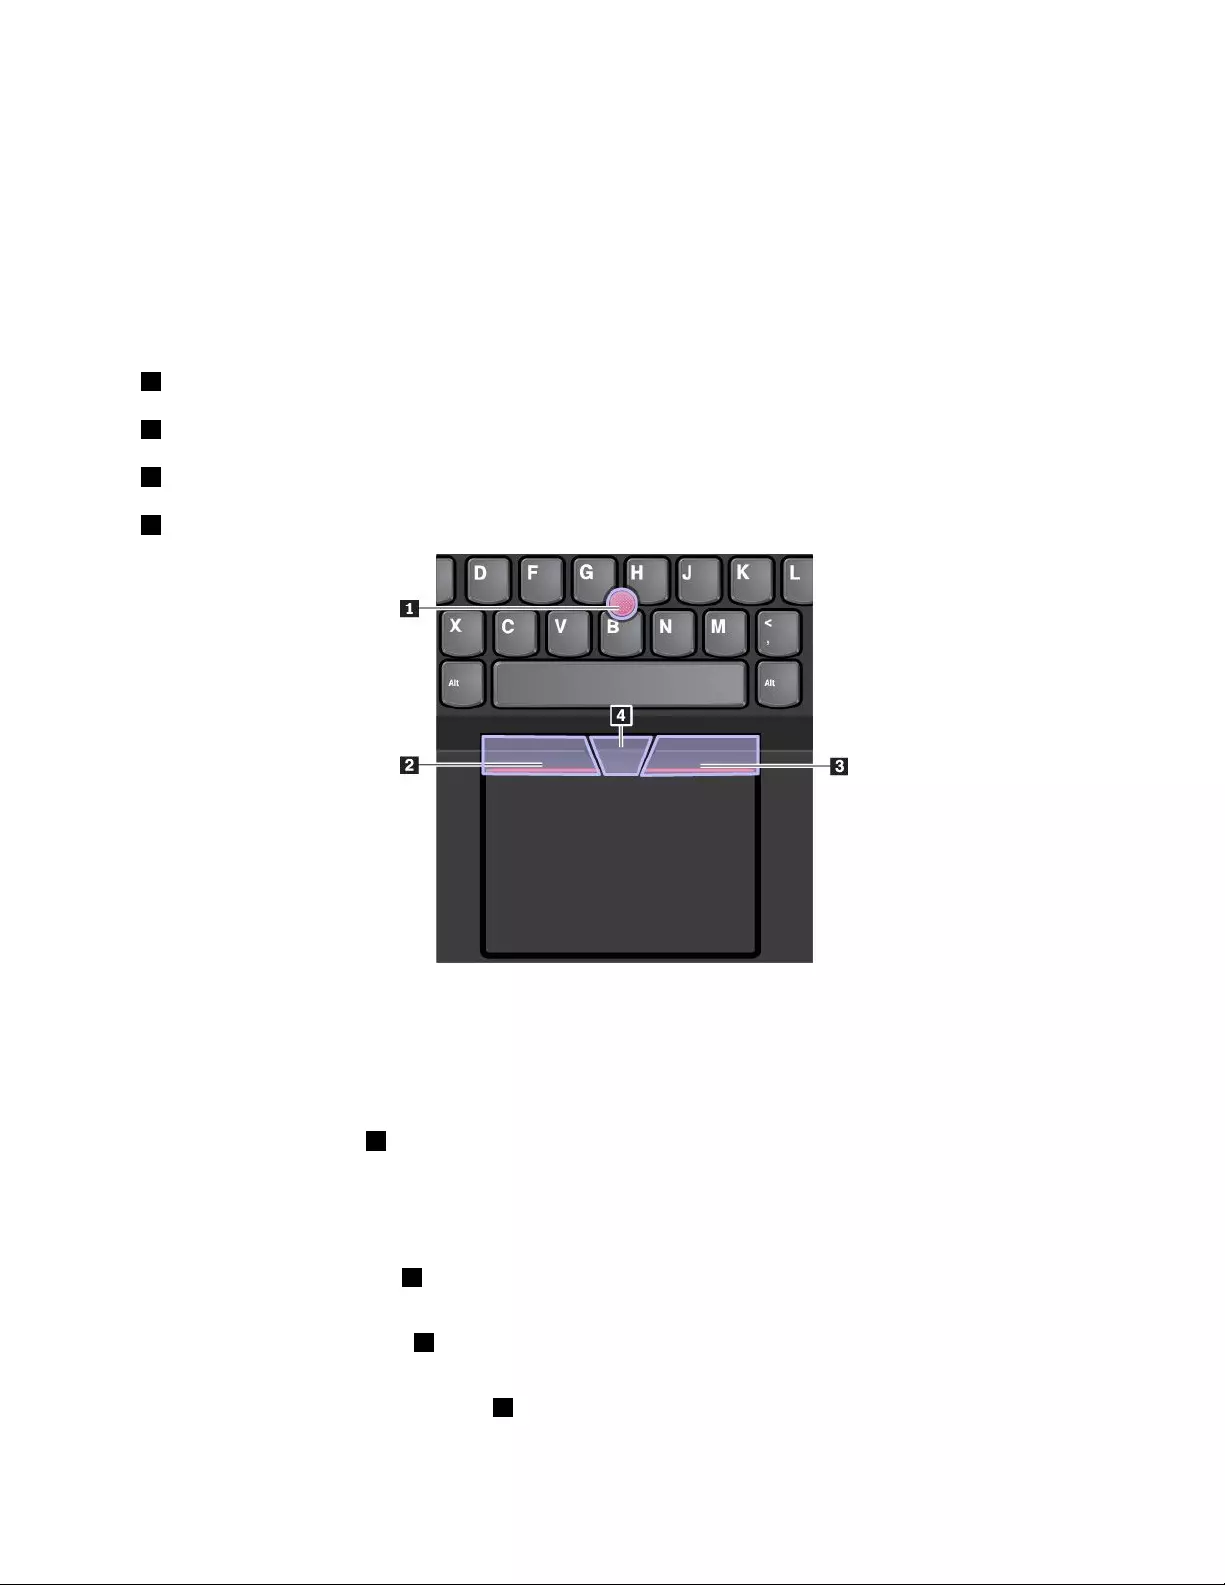
TheTrackPointpointingdeviceconsistsofthefollowingcomponents:
1Pointingstick
2Left-clickbutton(primary-clickbutton)
3Right-clickbutton(secondary-clickbutton)
4Scrollbar
TousetheTrackPointpointingdevice,seethefollowinginstructions:
Note:Placeyourhandsinthetypingpositionanduseyourindexfingerormiddlefingertoapplypressureto
thepointing-sticknonslipcap.Useeitherthumbtopresstheleft-clickbuttonorright-clickbutton.
•Point
Usethepointingstick1tomovethepointeronthescreen.Tousethepointingstick,applypressureto
thepointing-sticknonslipcapinanydirectionparalleltothekeyboard.Thepointermovesaccordingly
butthepointingstickitselfdoesnotmove.Thespeedatwhichthepointermovesdependsonthe
amountofpressureyouapplytothepointingstick.
•Left-click
Presstheleft-clickbutton2toselectoropenanitem.
•Right-click
Presstheright-clickbutton3todisplayashortcutmenu.
•Scroll
Pressandholdthedottedscrollbar4whileapplyingpressuretothepointingstickintheverticalor
horizontaldirection.Thenyoucanscrollthroughthedocument,Website,orapps.
Chapter2.Usingyourcomputer21
Usingthetrackpad
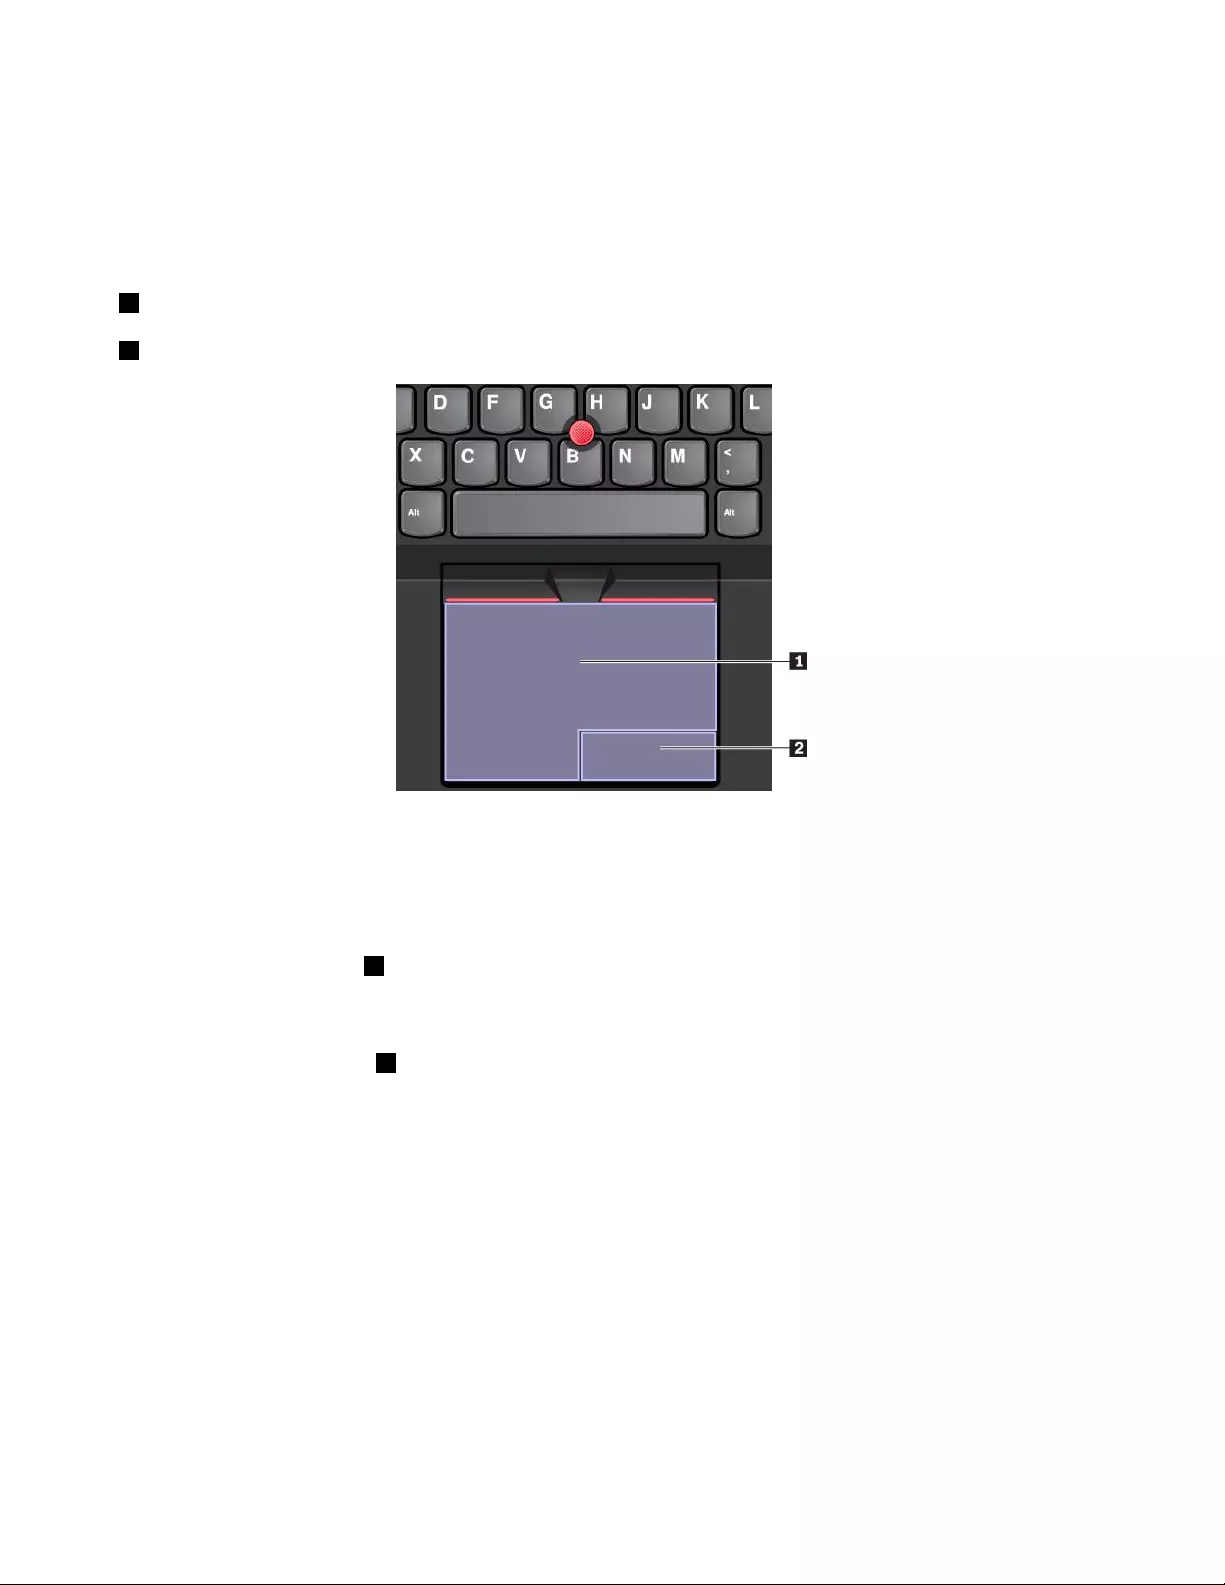
Theentiretrackpadsurfaceissensitivetofingertouchandmovement.Youcanusethetrackpadtoperform
allthepointing,clicking,andscrollingfunctionsofatraditionalmouse.
Thetrackpadcanbedividedintotwozones:
1Left-clickzone(primary-clickzone)
2Right-clickzone(secondary-clickzone)
Tousethetrackpad,seethefollowinginstructions:
•Point
Slideonefingeracrossthesurfaceofthetrackpadtomovethepointeraccordingly.
•Left-click
Presstheleft-clickzone1toselectoropenanitem.
Youalsocantapanywhereonthesurfaceofthetrackpadwithonefingertoperformtheleft-clickaction.
•Right-click
Presstheright-clickzone2todisplayashortcutmenu.
Youalsocantapanywhereonthesurfaceofthetrackpadwithtwofingerstoperformtheright-clickaction.
•Scroll
Puttwofingersonthetrackpadandmovethemintheverticalorhorizontaldirection.Thisactionenables
youtoscrollthroughthedocument,Website,orapps.Ensurethatyoupositionyourtwofingersslightly
apartfromeachother.
Withthetrackpad,youalsocanperformavarietyoftouchgestures.Forinformationaboutusingthetouch
gestures,see“Usingthetrackpadtouchgestures”onpage23.
Ifthetrackpadsurfaceisstainedwithoil,turnoffthecomputerfirst.Thengentlywipethetrackpadsurface
withasoftandlint-freeclothmoistenedwithlukewarmwaterorcomputercleaner.
22T470pUserGuide

Usingthetrackpadtouchgestures
Theentiretrackpadsurfaceissensitivetofingertouchandmovement.Youcanusethetrackpadtoperform
thesamepointandclickactionsasyouwoulduseatraditionalmouse.Youalsocanusethetrackpadto
performvarioustouchgestures.
Thefollowingsectionintroducessomefrequentlyusedtouchgesturessuchastapping,dragging,and
scrolling.Formoregestures,seethehelpinformationsystemoftheThinkPadpointingdevice.
Notes:
•Whenusingtwoormorefingers,ensurethatyoupositionyourfingersslightlyapart.
•SomegesturesarenotavailableifthelastactionwasdonefromtheTrackPointpointingdevice.
•Somegesturesareonlyavailablewhenyouareusingcertainapps.
•Dependingonthemodel,thetrackpadonyourcomputermightlookdifferentfromtheillustrationsin
thistopic.
Tap
Tapanywhereonthetrackpad
withonefingertoselectoropen
anitem.
Two-fingertap
Tapanywhereonthetrackpadwith
twofingerstodisplayashortcut
menu.
Two-fingerscroll
Puttwofingersonthetrackpad
andmovethemintheverticalor
horizontaldirection.Thisaction
enablesyoutoscrollthroughthe
document,Website,orapps.
Two-fingerzoomout
Puttwofingersonthetrackpadand
movethemclosertogethertozoom
out.
Two-fingerzoomin
Puttwofingersonthetrackpad
andmovethemfartherapartto
zoomin.
Swipethreefingersup
Putthreefingersonthetrackpad
andmovethemuptoopenthetask
viewtoseeallyouropenwindows.
Swipethreefingersdown
Putthreefingersonthetrackpad
andmovethemdowntoshow
thedesktop.
CustomizingtheThinkPadpointingdevice
YoucancustomizetheThinkPadpointingdevicesoyoucanuseitmorecomfortablyandefficiently.For
example,youcanchoosetoenabletheTrackPointpointingdevice,thetrackpad,orboth.Youalsocan
disableorenablethetouchgestures.
TocustomizetheThinkPadpointingdevice,dothefollowing:
1.GotoControlPanel.
2.ViewControlPanelbyLargeiconsorSmallicons.ClickMouse.TheMousePropertieswindowis
displayed.
3.IntheMousePropertieswindow,followtheinstructionsonthescreentocompletethecustomization.
Chapter2.Usingyourcomputer23

Replacingthecaponthepointingstick
Thecap1ontheendofthepointingstickisremovable.Afteryouusethecapforaperiodoftime,you
mightconsiderreplacingthecapwithanewone.
Notes:
•Ensurethatyouuseacapwithgroovesaasshowninthefollowingillustration.
•Dependingonthemodel,yourkeyboardmightlookdifferentfromtheillustrationinthistopic.
Powermanagement
Thissectionprovidesinformationabouthowtouseacpowerandbatterypowertoachievethebestbalance
betweenperformanceandpowermanagement.
Usingtheacpoweradapter
Thepowertorunyourcomputercancomeeitherfromthebatteryorfromacpower.Whileyouuseac
power,thebatterychargesautomatically.
Yourcomputercomeswithanacpoweradapterandapowercord.
•acpoweradapter:Convertsacpowerfornotebookcomputeruse.
•Powercord:Connectstheacoutletandtheacpoweradapter.
Connectingtheacpoweradapter
Toconnectthecomputertoacpower,ensurethatyoufollowthestepsinorder:
Attention:Usinganimproperpowercordmightseverelydamageyourcomputer.
1.Connectthepowercordtotheacpoweradapter.
2.Connecttheacpoweradaptertothepowerconnectorofthecomputer.
3.Connectthepowercordtoanelectricaloutlet.
Tipsonusingtheacpoweradapter
•Whentheacpoweradapterisnotinuse,disconnectitfromtheelectricaloutlet.
•Donotbindthepowercordtightlyaroundtheacpoweradaptertransformerpackwhenitisconnectedto
thetransformer.
24T470pUserGuide

Usingthebattery
Whenyouuseyourcomputerawayfromelectricaloutlets,youdependonbatterypowertokeepyour
computerrunning.Differentcomputercomponentsconsumepoweratdifferentrates.Themoreyouusethe
power-intensivecomponents,thefasteryouconsumebatterypower.
SpendmoretimeunpluggedwithThinkPadbatteries.Mobilityhasrevolutionizedbusinessbyenablingyou
totakeyourworkwhereveryougo.WithThinkPadbatteries,youareabletoworklongerwithoutbeingtied
toanelectricaloutlet.
Checkingthebatterystatus
Moveyourpointertothebattery-statusiconintheWindowsnotificationareatocheckthebatterystatus.
Thebattery-statusicondisplaysthepercentageofbatterypowerremainingandhowlongyoucanuse
yourcomputerbeforeyoumustchargethebattery.
Therateatwhichyouusebatterypowerdetermineshowlongyoucanusethebatteryofyourcomputer
betweencharges.Becauseeverycomputeruserhasindividualhabitsandneeds,itisdifficulttopredicthow
longabatterychargelasts.Therearetwomainfactors:
•Howmuchenergyisstoredinthebatterywhenyoubegintowork
•Thewayyouuseyourcomputer,forexample:
–Howoftenyouaccessthestoragedrive
–Howbrightyoumakethecomputerdisplay
–Howoftenyouusethewirelessfeature
Chargingthebattery
Whenyoufindthattheremainingbatterypowerislow,chargeyourbatteryorreplacethebatterywitha
chargedbattery.
Ifanacoutletisconvenient,connectthecomputertoacpower.Thebatteryisfullychargedinabout
fourtoeighthours.Theactualchargingtimedependsonthebatterysize,thephysicalenvironment,and
whetheryouareusingthecomputer.Youcancheckthebatterychargingstatusatanytimethroughthe
battery-statusiconintheWindowsnotificationarea.
Note:Tomaximizethelifeofthebattery,thecomputerdoesnotstartrechargingthebatteryiftheremaining
powerisgreaterthan95%.
Tipsonchargingthebattery
•Beforeyouchargethebattery,ensurethatthebatterytemperatureislowerthan10°C(50°F).
•Chargethebatteryinanyofthefollowingconditions:
–Anewbatteryisinstalled.
–Thepercentageofpowerremainingislow.
–Thebatteryhasnotbeenusedforalongtime.
Maximizingthebatterylife
Tomaximizethelifeofthebattery,dothefollowing:
•Usethebatteryuntilthechargeisdepleted.
•Rechargethebatterycompletelybeforeusingit.Youcanseewhetherthebatteryisfullychargedfromthe
battery-statusiconintheWindowsnotificationarea.
•Alwaysusepowermanagementfeaturessuchaspower-savingmodes.
Chapter2.Usingyourcomputer25

Managingthebatterypower
Toachievethebestbalancebetweenperformanceandpowersaving,adjustyourpowerplansettings.
Toadjustpowerplansettings,dothefollowing:
1.GotoControlPanel,andthenchangetheviewofControlPanelfromCategorytoLargeiconsorSmall
icons.
2.ClickPowerOptions.
3.Followtheinstructionsonthescreen.
Formoreinformation,seetheWindowshelpinformationsystem.
Power-savingmodes
Thereareseveralmodesthatyoucanuseatanytimetoconservepower.Thissectionintroduceseach
modeandgivestipsontheeffectiveuseofbatterypower.
•Sleepmode
Insleepmode,yourworkissavedtomemory,andthenthestoragedriveandthecomputerdisplayare
turnedoff.Whenyourcomputerwakesup,yourworkisrestoredwithinseconds.
Toputyourcomputerintosleepmode,opentheStartmenu,clickPower,andthenclickSleep.
•Hibernationmode
Byusingthismode,youcanturnoffyourcomputercompletelywithoutsavingfilesorexitingany
programsthatarerunning.Whenthecomputerentershibernationmode,allopenprograms,folders,and
filesaresavedtothestoragedrive,andthenthecomputerturnsoff.
Toputthecomputerintohibernationmode,definewhatthepowerbuttondoesfirst,andthenpressthe
powerbuttontoputthecomputerintohibernationmode.
Ifyouputyourcomputerintohibernationmodewiththewake-upfunctiondisabled,thecomputerdoes
notconsumeanypower.Thewake-upfunctionisdisabledbydefault.Ifyouputyourcomputerinto
hibernationmodewiththewake-upfunctionenabled,thecomputerconsumesasmallamountofpower.
Toenablethewake-upfunction,dothefollowing:
1.OpenControlPanel,viewControlPanelbyCategory,andthenclickSystemandSecurity.
2.ClickAdministrativeT ools.
3.Double-clickTaskScheduler.Ifyouarepromptedforanadministratorpasswordorconfirmation,
typethepasswordorprovideconfirmation.
4.Fromtheleftpane,selectthetaskfolderforwhichyouwanttoenablethewake-upfunction.The
scheduledtasksaredisplayed.
5.Clickascheduledtask,andthenclicktheConditionstab.
6.UnderPower,selectWakethecomputertorunthistask.
•Wirelessoff
Whenyouarenotusingthewirelessfeatures,suchasBluetoothorwirelessLAN,turnthemofftohelp
conservepower.
CabledEthernetconnections
WithanEthernetcable,youcanconnectyourcomputertoalocalnetworkthroughtheEthernetconnector
onyourcomputer.
TheEthernetconnectorhastwonetworkstatusindicators.Whenthegreenindicatorison,thecomputeris
connectedtoaLAN.Whentheyellowindicatorblinks,dataisbeingtransmitted.
26T470pUserGuide

Note:Ifthecomputerisconnectedtoasupporteddockingstationorasupporteddock,usetheEthernet
connectoronthedockingstationorthedockinsteadoftheoneonthecomputer.
DANGER
YourcomputerhasanEthernetconnector.T oavoidtheriskofelectricalshock,donotconnect
thetelephonecabletotheEthernetconnector.
Wirelessconnections
Wirelessconnectionisthetransferofdatawithouttheuseofcablesbutbymeansofradiowavesonly.
Usingthewireless-LANconnection
Awirelesslocalareanetwork(LAN)coversarelativelysmallgeographicarea,suchasanofficebuildingora
house.Devicesbasedonthe802.11standardscanconnecttothistypeofnetwork.
Yourcomputercomeswithabuilt-inwirelessnetworkcardtohelpyouestablishwirelessconnectionsand
monitortheconnectionstatus.
Toestablishawireless-LANconnection,dothefollowing:
1.Turnonthewirelessfeature.See“Usingthespecialkeys”onpage18.
2.Clickthewireless-network-connection-statusiconintheWindowsnotificationarea.Alistofavailable
wirelessnetworksisdisplayed.
3.Double-clickanetworktoconnecttoit.Providerequiredinformationifneeded.
Thecomputerautomaticallyconnectstoanavailableandrememberedwirelessnetworkwhenthelocation
changes.Iftheavailablewirelessnetworkissecured,providethepasswordasrequired.Formore
information,seetheWindowshelpinformationsystem.
Tipsonusingthewireless-LANfeature
Toachievethebestconnection,usethefollowingguidelines:
•Placeyourcomputersothatthereareasfewobstaclesaspossiblebetweenthewireless-LANaccess
pointandthecomputer.
•Openyourcomputercovertoanangleofslightlymorethan90degrees.
Checkingthewireless-LANconnectionstatus
Youcancheckthewireless-LANconnectionstatusthroughthewireless-network-connection-statusiconin
theWindowsnotificationarea.Themorebarsencompassed,thebetterthesignalis.
Usingthewireless-WANconnection
Wirelesswideareanetwork(WAN),whichusescellularnetworksfordatatransmission,enablesyou
toestablishwirelessconnectionsoverremotepublicorprivatenetworks.Theseconnectionscanbe
maintainedoveralargegeographicalareabyuseofmultipleantennasitesorsatellitesystemsmaintained
bywirelessserviceproviders.
SomeThinkPadnotebookcomputerscomewithawireless-WANcardinstalled,whichprovidessome
wireless-WANtechnologies,suchas1xEV-DO,HSPA,3G,GPRS,orLTE.Byusingthewireless-WAN
card,youcanestablishwireless-WANconnections.
Note:Thewireless-WANserviceisprovidedbyauthorizedserviceprovidersinsomecountriesorregions.
Chapter2.Usingyourcomputer27

Tipsforusingthewireless-WANfeature
Toachievethebestconnection,usethefollowingguidelines:
•Keepyourcomputerawayfromyourbody.
•Placeyourcomputeronaflatsurfaceandopenyourcomputerdisplaytoanangleofslightlymore
than90degrees.
•Placeyourcomputerawayfromconcreteorbrickwallsthatmightdampencellularsignals.
•Bestreceptionisavailablenearwindowsandotherlocationswherecellularphonereceptionisthe
strongest.
Checkingthewireless-WANconnectionstatus
Youcancheckthewireless-WANconnectionstatusthroughthewireless-network-connection-statusiconin
theWindowsnotificationarea.Themorebarsencompassed,thebetterthesignalis.
UsingtheBluetoothconnection
Bluetoothcanconnectdevicesthatarewithinashortdistancefromoneanother.Bluetoothiscommonly
usedinthefollowingscenarios:
•Connectingperipheraldevicestoacomputer
•Transferringdatabetweenhand-helddevicesandapersonalcomputer
•Remotelycontrollingandcommunicatingwithdevicessuchasmobilephones
Dependingonthemodel,yourcomputermightsupporttheBluetoothfeature.Totransferdatathrough
theBluetoothfeature,dothefollowing:
Note:Itisnotrecommendedtousethewirelessfeature(the802.11standards)ofyourcomputer
simultaneouslywithaBluetoothoption.Thedatatransmissionspeedcanbedelayedandtheperformance
ofthewirelessfeaturecanbedegraded.
1.Dooneofthefollowing:
•PresstheBluetooth-controlkeyandturnontheBluetoothfeature.
•OpentheStartmenu,andthenclickSettings➙Network&Internet➙Airplanemode.The
Bluetoothfeatureisenabled.
2.Right-clickthedatathatyouwanttosend.
3.SelectSendTo➙BluetoothDevices.
4.SelectaBluetoothdevice,andthenfollowtheinstructionsonthescreen.
Formoreinformation,seetheWindowshelpinformationsystemandthehelpinformationsystemofthe
Bluetoothdevice.
UsingtheAirplanemode
TheAirplanemodeissupportedontheWindows10operatingsystem.IftheAirplanemodeisenabled,all
wirelessfeaturesaredisabled.
ToenableordisabletheAirplanemode,dothefollowing:
1.OpentheStartmenu.
2.ClickSettings➙Network&Internet➙Airplanemode.
3.SlidethecontrolforAirplanemodetoturnitonoroff.
28T470pUserGuide

UsingtheNVIDIAOptimusGraphicsfeature
SomeThinkPadnotebookcomputerssupportNVIDIAOptimusGraphics.
Therunningprogramandpowerplansettingsthatyouuseonyourcomputerhavespecificgraphicsquality
demand.Toachievethebestbalancebetweenthecomputerperformanceandalongbatterylife,theNVIDIA
OptimusGraphicsfeatureautomaticallyswitchesbetweenHighPerformanceGraphicsandEnergySaving
Graphics.Youdonothavetorestartyourcomputer,closeprograms,orintervenemanually.
Usingaudiofeatures
Yourcomputerisequippedwiththefollowingitems:
•Audioconnector,3.5mm(0.14inches)indiameter
•Microphones
•Speakers
Yourcomputeralsohasanaudiochipthatenablesyoutoenjoyvariousmultimediaaudiofeatures,such
asthefollowing:
•CompliantwithHighDefinitionAudio
•PlaybackofMIDIandMP3files
•RecordingandplaybackofPCMandWAVfiles
•Recordingfromvarioussoundsources,suchasaheadsetattached
Thefollowinglistprovidesinformationaboutsupportedfunctionsoftheaudiodevicesattachedtothe
connectorsonyourcomputerorthedockingstation.
•Headsetwitha3.5-mm(0.14-inch),4-poleplug:Headphoneandmicrophonefunctions
•Conventionalheadphone:Headphonefunction
Note:Theconventionalmicrophoneisnotsupported.
Usingthecamera
Ifyourcomputerhasacamera,youcanusethecameratopreviewyourvideoimageandtakeasnapshot
ofyourcurrentimage.
Tostartthecamera,opentheStartmenuandclickCamera.
Whenthecameraisstarted,theindicatoristurnedoningreen,indicatingthatthecameraisinuse.
Youalsocanusetheintegratedcamerawithotherprogramsthatprovidefeaturessuchasphotographing,
videocapturing,andvideoconferencing.Tousetheintegratedcamerawithotherprograms,openoneofthe
programsandstartthephotographing,videocapturing,orvideoconferencingfunction.Then,thecamera
startsautomaticallyandthegreencamerastatusindicatorturnson.Formoreinformationaboutusingthe
camerawithaprogram,seethehelpinformationsystemoftheprogram.
Configuringcamerasettings
Youcanconfigurethecamerasettingstomeetyourneeds,suchasadjustingthequalityofthevideooutput.
Toconfigurethecamerasettings,dooneofthefollowing:
Chapter2.Usingyourcomputer29

•OpentheCameraapp,andclickthesettingsiconintheupper-rightcorner.Followtheinstructionsonthe
screentoconfigurethecamerasettingsasdesired.
•OpentheStartmenuandthenclickLenovoSettings➙Camera.Followtheinstructionsonthescreento
configurethecamerasettings.
Usingamediacardorasmartcard
Yourcomputerhasamedia-cardslot.Dependingonthemodel,yourcomputermightalsohavea
smart-cardslot.
Supportedmediacardtypes
Themedia-cardreaderonyourcomputeronlysupportsthefollowingmediacards:
Note:Yourcomputerdoesnotsupportthecontentprotectionforrecordablemedia(CPRM)feature
fortheSDcard.
•MultiMediaCard(MMC)
•SecureDigital(SD)card
•SecureDigitaleXtended-Capacity(SDXC)card
•SecureDigitalHigh-Capacity(SDHC)card
Supportedsmartcardtype
Youcanusesmartcardsforauthentication,datastorage,andapplicationprocessing.Withinlarge
organizations,youmightalsousesmartcardsforstrongsecurityauthenticationofsinglesign-on(SSO).The
smart-cardreaderonyourcomputeronlysupportsthesmartcardofthefollowingspecifications:
•Length:85.60mm(3.37inches)
•Width:53.98mm(2.13inches)
•Thickness:0.76mm(0.03inches)
Attention:Smartcardswithslitsarenotsupported.Donotinsertsuchasmartcardintothesmart-card
readerofyourcomputer.Otherwisethereadermightgetdamaged.
Installingamediacardorasmartcard
Attention:Beforeyoustartinstallingacard,touchametaltableoragroundedmetalobject.Thisaction
reducesanystaticelectricityfromyourbody.Staticelectricitycoulddamagethecard.
Toinstallthecard,dothefollowing:
1.Locatetheappropriatetypeofslotforyourcard.
30T470pUserGuide

2.Ensurethatthecardiscorrectlyoriented:
•Forthemediacard:Themetalcontactsarefacingdownandpointingtowardthecardslot.
•Forthesmartcard:Themetalcontactsarefacingupwardandpointingtowardthecardslot.
3.Pressthecardfirmlyintothecardslot.
Iftheplug-and-playfeatureisnotenabledfortheinstalledmediacardorsmartcard,dothefollowing
toenablethefeature:
1.GotoControlPanel.
2.ViewControlPanelbyCategory.ClickHardwareandSound.
3.ClickDeviceManager.Ifyouarepromptedforanadministratorpasswordorconfirmation,typethe
passwordorprovideconfirmation.
4.FromtheActionmenu,selectAddlegacyhardware.TheAddHardwareWizardstarts.
5.Followtheinstructionsonthescreen.
Removingamediacardorasmartcard
Attention:
•Beforeremovingacard,stopthecardfirst.Otherwise,dataonthecardmightgetcorruptedorlost.
•Whiletransferringdatatoorfromamediacardorasmartcard,donotputyourcomputerintosleepor
hibernationmodebeforethedatatransferiscompleted;otherwise,yourdatamightgetdamaged.
•Donotremoveacardwhilethecomputerisinsleepmodeorhibernationmode.Otherwise,thesystem
mightnotrespondwhenyoutrytoresumeoperation.
Toremoveacard,dothefollowing:
1.ClickthetriangulariconintheWindowsnotificationareatoshowhiddenicons.Then,right-clickthe
SafelyRemoveHardwareandEjectMediaicon.
2.SelectthecorrespondingitemtoejectthecardfromtheWindowsoperatingsystem.
3.Pressthecardtoejectitfromyourcomputer.
4.Removethecardandstoreitsafelyforfutureuse.
Note:IfyoudonotremovethecardfromyourcomputerafteryouejectthecardfromtheWindows
operatingsystem,thecardcannolongerbeaccessed.Toaccessthecard,youmustremoveitfirst,
andtheninsertitagain.
Usinganexternaldisplay
Thissectionprovidesinstructionsonhowtoconnectanexternaldisplay,choosedisplaymodes,and
changedisplaysettings.
Youcanuseanexternaldisplaysuchasaprojectororamonitortogivepresentationsortoexpandyour
workspace.
Yourcomputersupportsthefollowingvideoresolution,iftheexternaldisplayalsosupportsthatresolution.
•Upto4096x2304pixels/60Hz,withanexternaldisplayconnectedtotheMiniDisplayPortconnector
•Upto4096x2160pixels/24Hz,or3840x2160pixels/30Hzwithanexternaldisplayconnected
totheHDMIconnector
Formoreinformationabouttheexternaldisplay,seethemanualsthatcomewithit.
Chapter2.Usingyourcomputer31

Connectinganexternaldisplay
Youcanuseeitherawireddisplayorawirelessdisplay.Thewireddisplaycanbeconnectedtoavideo
connectorsuchastheHDMIconnectorandMiniDisplayPortconnectorbyacable.Thewirelessdisplaycan
beaddedthroughtheMiracast®function.
•Connectingawireddisplay
Note:Whenyouconnectanexternalmonitor,avideointerfacecablewithaferritecoreisrequired.
1.Connecttheexternaldisplaytoanappropriatevideoconnectoronyourcomputer,suchasthe
HDMIconnectororMiniDisplayPortconnector.
2.Connecttheexternaldisplaytoanelectricaloutlet.
3.Turnontheexternaldisplay.
Ifyourcomputercannotdetecttheexternaldisplay,right-clickonthedesktop,andthenclickScreen
resolution/Displaysettings➙Detect.
•Connectingawirelessdisplay
Note:Touseawirelessdisplay,ensurethatbothyourcomputerandtheexternaldisplaysupportthe
Miracastfeature.
Dooneofthefollowing:
–OpentheStartmenu,andthenclickSettings➙Devices➙Connecteddevices➙Addadevice.
–ClicktheactioncentericonintheWindowsnotificationarea.ClickConnect.Selectthewireless
displayandfollowtheinstructionsonthescreen.
Formoreinformation,seetheWindowshelpinformationsystem.
Choosingadisplaymode
Youcandisplayyourdesktopandappsonthecomputerdisplay,theexternaldisplay,orboth.Tochoose
howtodisplaythevideooutput,pressthedisplay-modeswitchingkeyandthenselectadisplay
modeyouprefer.
Therearefourdisplaymodes:
•Disconnect:Displaysthevideooutputonlyonyourcomputerscreen.
Note:Dependingonthesituation,youmightseeDisconnect,PCscreenonly,Computeronly,or
Disconnectprojector.
•Duplicate:Displaysthesamevideooutputonbothyourcomputerscreenandanexternaldisplay.
•Extend:Extendsthevideooutputfromyourcomputerdisplaytoanexternaldisplay.Youcandragand
moveitemsbetweenthetwodisplays.
•Projectoronly:Showsthevideooutputonlyonanexternaldisplay.
Note:Dependingonthesituation,youmightseeProjectoronlyorSecondscreenonly.
IfyoushowprogramsusingDirectDraworDirect3D®infull-screenmode,onlythemaindisplayshows
thevideooutput.
Changingdisplaysettings
Youcanchangethesettingsforboththecomputerdisplayandtheexternaldisplay.Forexample,you
candefinewhichoneisthemaindisplayandwhichoneisthesecondarydisplay.Youalsocanchange
theresolutionandorientation.
Tochangedisplaysettings,dothefollowing:
32T470pUserGuide

1.Right-clickonthedesktopandselectDisplaysettings.
2.Selectthedisplaythatyouwanttoconfigure.
3.Changedisplaysettingsasyouwant.
Note:Ifyousetahigherresolutionforthecomputerdisplaythantheexternaldisplay,onlypartofthescreen
canbeshownontheexternaldisplay.
Travelingwithyourcomputer
Thistopicprovidesinformationtohelpyouworkwithyourcomputerwhenyouaretraveling.
Usethefollowingtraveltipstotravelmoreconfidentlyandefficientlywithyourcomputer.
•Whenyourcomputergoesthroughthex-raymachinesatairportsecuritystations,itisimportanttokeep
youreyesonthecomputeratalltimestopreventtheft.
•Considerbringinganelectricaladapterforuseonanairplaneorautomobile.
•Ifyoucarryanacpoweradapter,detachtheaccordfromittoavoiddamagingthecord.
Traveltipsonairplanes
Ifyoucarryyourcomputerontoanairplane,observethefollowingtips:
•Becarefulabouttheseatinfrontofyouonairplanes.Angleyourcomputerdisplaysothatitdoesnotget
caughtwhenthepersoninfrontofyouleansback.
•Whentakingoff,remembertoturnoffyourcomputerorputitintohibernationmode.
•Ifyouintendtouseyourcomputerorwirelessservices(suchasInternetandBluetooth),checkwiththe
airlineforrestrictionsandavailabilityofservicesbeforeboardingtheairplane.Iftherearerestrictionson
theuseofcomputerswithwirelessfeaturesontheairplane,youmustabidebythoserestrictions.
TheAirplanemodeissupportedontheWindows10operatingsystem.IntheAirplanemode,allwireless
featuresaredisabled.
ToenabletheAirplanemode,dothefollowing:
1.OpentheStartmenu,andthenclickSettings➙Network&Internet➙Airplanemode.
2.SlidetheAirplanemodecontroltoturniton.
Travelaccessories
Ifyouaretravelingtoanothercountryorregion,youmightwanttoconsideranappropriateacpoweradapter
forthecountryorregiontowhichyouaretraveling.
Topurchasetravelaccessories,goto:
http://www.lenovo.com/accessories
Chapter2.Usingyourcomputer33

34T470pUserGuide

Chapter3.Enhancingyourcomputer
Thischapterprovidesinstructionsonhowtousehardwaredevicestoexpandyourcomputercapabilities.
FindingThinkPadoptions
Ifyouwanttoexpandthecapabilitiesofyourcomputer,Lenovohasanumberofhardwareaccessories
andupgradestomeetyourneeds.Optionsincludememorymodules,storagedevices,networkcards,port
replicatorsordockingstations,batteries,poweradapters,keyboards,mice,andmore.
ToshopatLenovo,goto:
http://www.lenovo.com/essentials
ThinkPadBasicDock,ThinkPadProDock,andThinkPadUltraDock
ThissectionintroduceshowtousetheThinkPadBasicDock,ThinkPadProDock,andThinkPadUltraDock.
Controls,connectors,andindicators
ThinkPadBasicDock
1Powerbutton:Pressthepowerbuttontoturnonorturnoffthecomputer.
2Ejectbutton:Presstheejectbuttontoejectthecomputerfromthedockingstation.
3Adjuster:Usetheadjusterasaguidetoalignthecomputerwiththedockingstation.
4Dockingstationconnector:Connectthedockingstationtothecomputer.
©CopyrightLenovo201735

1AlwaysOnUSB2.0connector:ConnectUSB-compatibledevicesorchargesomemobiledigitaldevices
andsmartphones.
2USB2.0connectors
3USB3.0connector
ConnectUSB-compatibledevices,suchasaUSBkeyboard,aUSBmouse,aUSBstoragedevice,ora
USBprinter.
4Ethernetconnector:ConnectthedockingstationtoanEthernetLAN.
Note:Whenyourcomputerisattachedtothedockingstation,alwaysusetheEthernetconnectororthe
externalmonitorconnectoronthedockingstation.Donotusetheonesonthecomputer.
5acpowerconnector:Connecttheacpoweradapter.
6VGAconnector:ConnectthecomputertoaVGA-compatiblevideodevice,suchasaVGAmonitor.
ThinkPadProDock
1Powerbutton:Pressthepowerbuttontoturnonorturnoffthecomputer.
2Keylockindicator:Thisindicatorturnsonwhenthesystemlockisinthelockedposition.
36T470pUserGuide

3Dockingstatusindicator:Thisindicatorturnsonwhenthecomputerisattachedtothedocking
stationproperly.
4Ejectbutton:Presstheejectbuttontoejectthecomputerfromthedockingstation.
5Adjuster:Usetheadjusterasaguidetoalignthecomputerwiththedockingstation.
6Dockingstationconnector:Connectthedockingstationtothecomputer.
7Systemlock:Usethesystemlocktolockorunlocktheejectbutton.
•Whenthesystemlockisinthelockedposition,theejectbuttonislocked,andyoucannotattachor
detachyourcomputer.
•Whenthesystemlockisintheunlockedposition,theejectbuttonisunlocked,andyoucanattachor
detachyourcomputer.
1AlwaysOnUSB2.0connector:ConnectUSB-compatibledevicesorchargesomemobiledigitaldevices
andsmartphones.
2USB2.0connectors
3USB3.0connectors
ConnectUSB-compatibledevices,suchasaUSBkeyboard,aUSBmouse,aUSBstoragedevice,ora
USBprinter.
4Ethernetconnector:ConnectthedockingstationtoanEthernetLAN.
Note:Whenyourcomputerisattachedtothedockingstation,alwaysusetheEthernetconnectororthe
externalmonitorconnectoronthedockingstation.Donotusetheonesonthecomputer.
5acpowerconnector:Connecttheacpoweradapter.
6DisplayPort®connector:Connectahigh-performancemonitor,adirect-drivemonitor,orotherdevices
thatuseaDisplayPortconnector.
7DVIconnector:ConnectamonitorthatsupportsDigitalVisualInterface(DVI)connection.
Note:TheDVIconnectorprovidesadigitalinterfaceonly.Thisconnectorcanonlybeusedwithacomputer
thatsupportsDVIconnection.
Chapter3.Enhancingyourcomputer37

ToconnectaDVImonitor,dothefollowing:
1.Turnoffthecomputer.
2.ConnecttheDVImonitortotheDVIconnector.Thenconnectthemonitortoanelectricaloutlet.
3.TurnontheDVImonitorandthenthecomputer.
8VGAconnector:ConnectthecomputertoaVGA-compatiblevideodevice,suchasaVGAmonitor.
9Audioconnector:Connectheadphonesoraheadsetwitha3.5-mm(0.14-inch),4-poleplug.
10Security-lockslot:Toprotectyourdockingstationfromtheft,lockyourdockingstationtoadesk,table,
orothernon-permanentfixture.Useasecuritycablelockthatfitsthissecurity-lockslot.
ThinkPadUltraDock
1Powerbutton:Pressthepowerbuttontoturnonorturnoffthecomputer.
2Keylockindicator:Thisindicatorturnsonwhenthesystemlockkeyisinthelockedposition.
3Dockingstatusindicator:Thisindicatorturnsonwhenthecomputerisattachedtothedocking
stationproperly.
4Ejectbutton:Presstheejectbuttontoreleasethecomputerfromthedockingstation.
5Slidingadjuster:Usetheslidingadjusterasaguidetoalignthedockingstationconnectoronyour
computerwhenyouattachthedockingstation.
6Dockingstationconnector:Connectthedockingstationtothecomputer.
7Systemlock:Usethesystemlocktolockorunlocktheejectbutton.
•Whenthesystemlockisinthelockedposition,theejectbuttonislocked,andyoucannotattachor
detachyourcomputer.
•Whenthesystemlockisintheunlockedposition,theejectbuttonisunlocked,andyoucanattachor
detachyourcomputer.
38T470pUserGuide
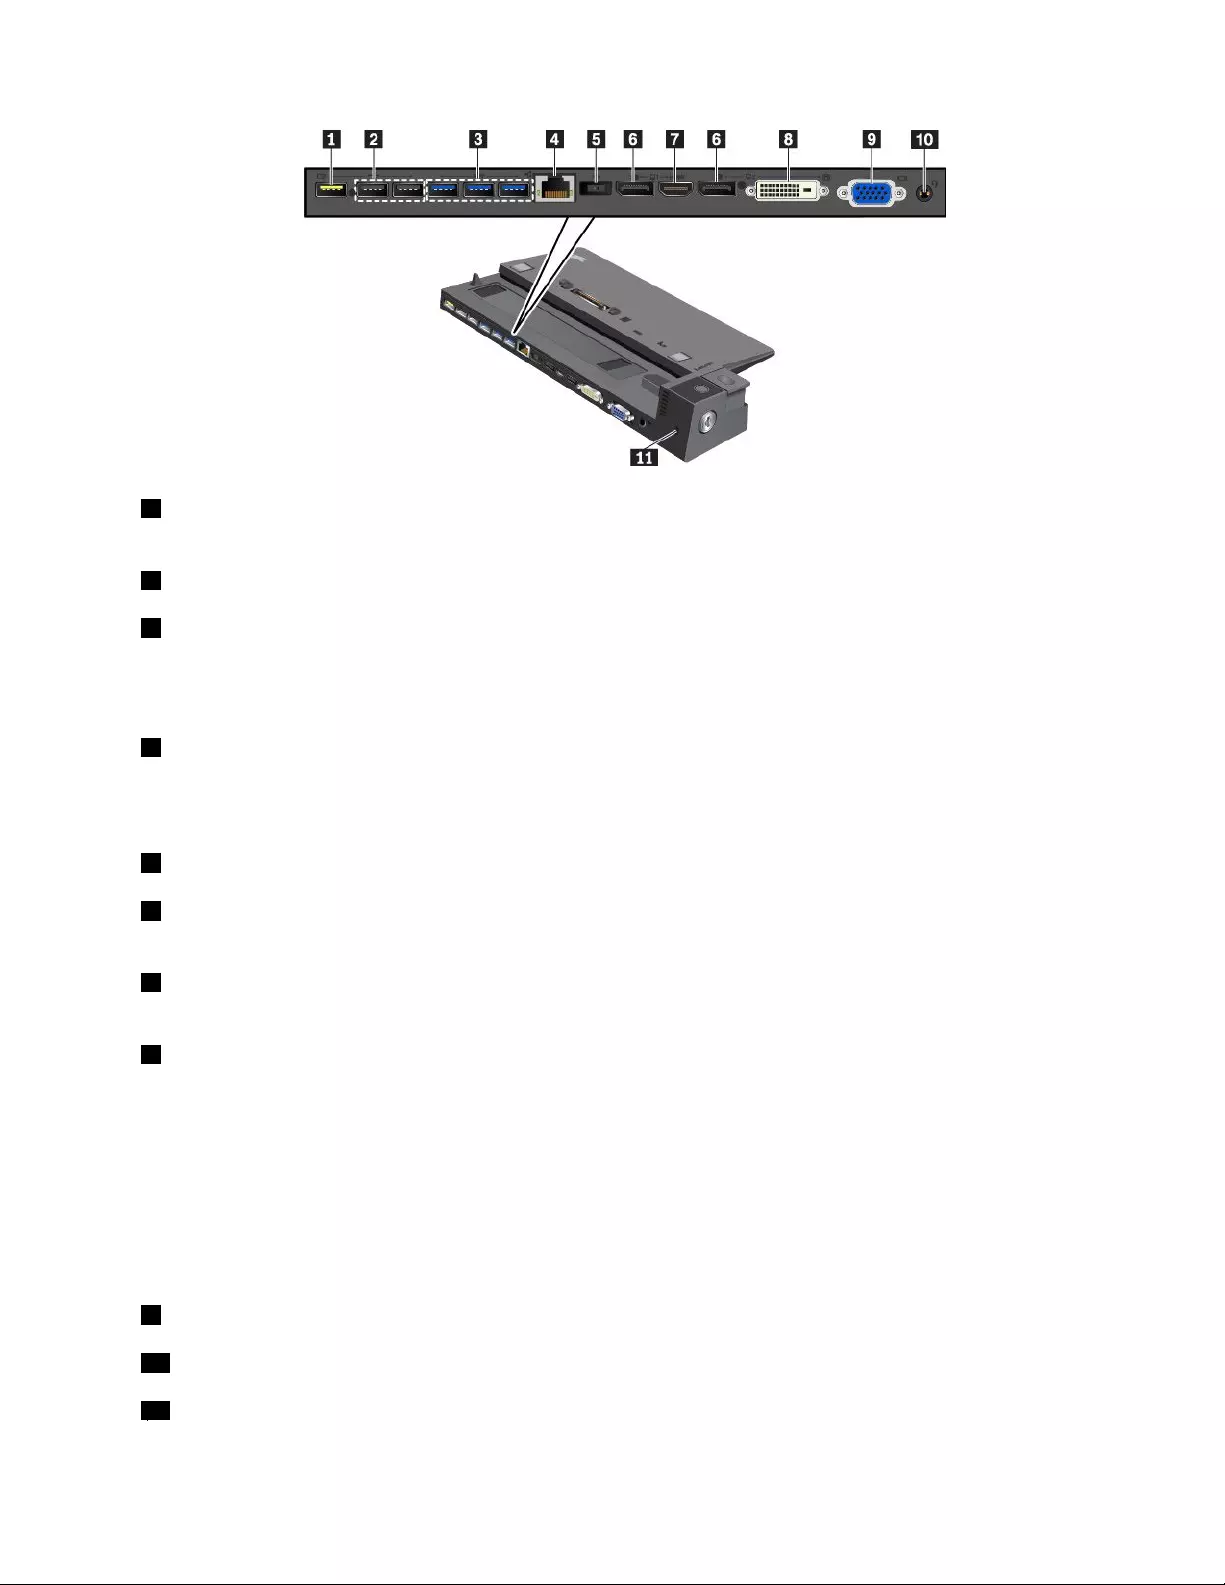
1AlwaysOnUSB2.0connector:ConnectUSB-compatibledevicesorchargesomemobiledigitaldevices
andsmartphones.
2USB2.0connectors
3USB3.0connectors
ConnectUSB-compatibledevices,suchasaUSBkeyboard,aUSBmouse,aUSBstoragedevice,ora
USBprinter.
4Ethernetconnector:ConnectthedockingstationtoanEthernetLAN.
Note:Whenyourcomputerisattachedtothedockingstation,alwaysusetheEthernetconnectororthe
externalmonitorconnectoronthedockingstation.Donotusetheonesonthecomputer.
5acpowerconnector:Connecttheacpoweradapter.
6DisplayPortconnectors:Connectahigh-performancemonitor,adirect-drivemonitor,orotherdevices
thatuseaDisplayPortconnector.
7HDMIconnector:Connectacompatibledigitalaudiodeviceorvideomonitor,suchasaDVDplayer
oranHDTV.
8DVIconnector:ConnectamonitorthatsupportsDigitalVisualInterface(DVI)connection.
Note:TheDVIconnectorprovidesadigitalinterfaceonly.Thisconnectorcanonlybeusedwithacomputer
thatsupportsDVIconnection.
ToconnectaDVImonitor,dothefollowing:
1.Turnoffthecomputer.
2.ConnecttheDVImonitortotheDVIconnector.Thenconnectthemonitortoanelectricaloutlet.
3.TurnontheDVImonitorandthenthecomputer.
9VGAconnector:ConnectthecomputertoaVGA-compatiblevideodevice,suchasaVGAmonitor.
10Audioconnector:Connectheadphonesoraheadsetwitha3.5-mm(0.14-inch),4-poleplug.
11Security-lockslot:Toprotectyourdockingstationfromtheft,lockyourdockingstationtoadesk,table,
orothernon-permanentfixture.Useasecuritycablelockthatfitsthissecurity-lockslot.
Chapter3.Enhancingyourcomputer39
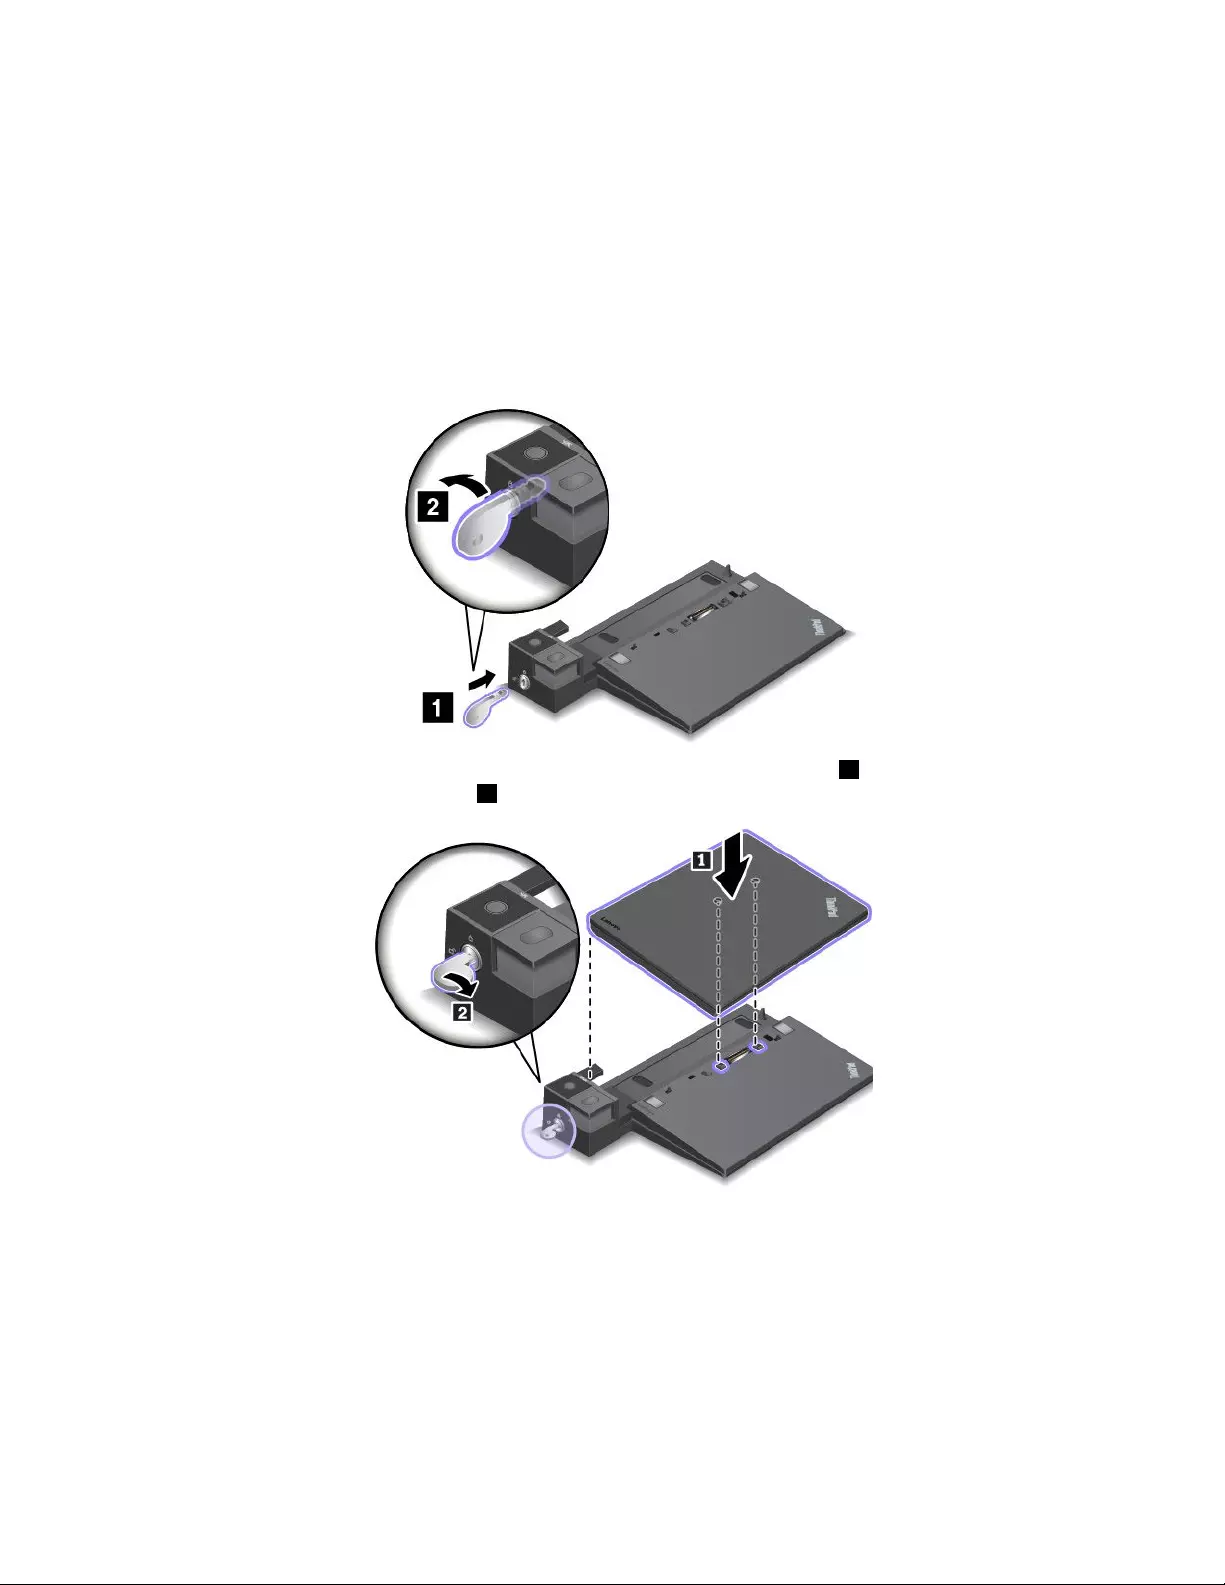
Attachingadockingstationtoyourcomputer
Attention:Whenthecomputerisattachedtoadockingstation,donotpickuptheassemblybytakinghold
ofthecomputeronly.Alwaysholdthewholeassembly.Otherwisethedockingstationmightdropdown.
Toattachthedockingstationtoyourcomputer,dothefollowing:
Note:TheThinkPadBasicDockdoesnothavethesystemlock.
1.Disconnectallcablesanddevicesfromthecomputer.Ensurethatyouturnthesystemlockkeytothe
unlockedposition(horizontal).
2.Attachyourcomputertothedockingstationasshownuntilyouhearaclick1.Turnthesystemlock
keytothelockedposition(vertical)2.
3.Checkthedockingstatusindicator.Iftheindicatorisoff,yourcomputerisnotattachedtothedocking
stationsuccessfully.Tosolvetheproblem,detachandreattachthecomputer.Iftheproblempersists,
detachandreattachtheacpoweradapterofthedockingstation.
Note:Ifyouattachthecomputertothedockingstation,butdonotconnectthedockingstationtoac
power,yourcomputerconsumesbatterypower.
Detachingadockingstationfromyourcomputer
Attention:Whenthecomputerisattachedtoadockingstation,donotpickuptheassemblybytakinghold
ofthecomputeronly.Alwaysholdthewholeassembly.Otherwisethedockingstationmightdropdown.
40T470pUserGuide

Todetachthedockingstationfromyourcomputer,dothefollowing:
Note:TheThinkPadBasicDockdoesnothavethesystemlock.
1.Disconnectallcablesanddevicesfromthecomputerandthedockingstation.
2.Turnthesystemlockkeytotheunlockedposition(horizontal).
3.Presstheejectbuttontoejectthecomputer1,andthengraspbothsidesofthecomputertoremoveit
2.
Guidelinesonconnectingmultipleexternaldisplaystothedocking
station
YoucanconnectmultipleexternaldisplaystoasupportedThinkPaddockingstation.Toensurethat
themultipledisplaysworkcorrectly,observethefollowingguidelinesandconnectthedisplaystothe
appropriateconnectors.
•Donotusetheconnectorsasshowninthefollowingillustrationsatthesametimeforconnectingmultiple
displays.Otherwise,oneofthedisplaysasshownwillnotwork.
Chapter3.Enhancingyourcomputer41
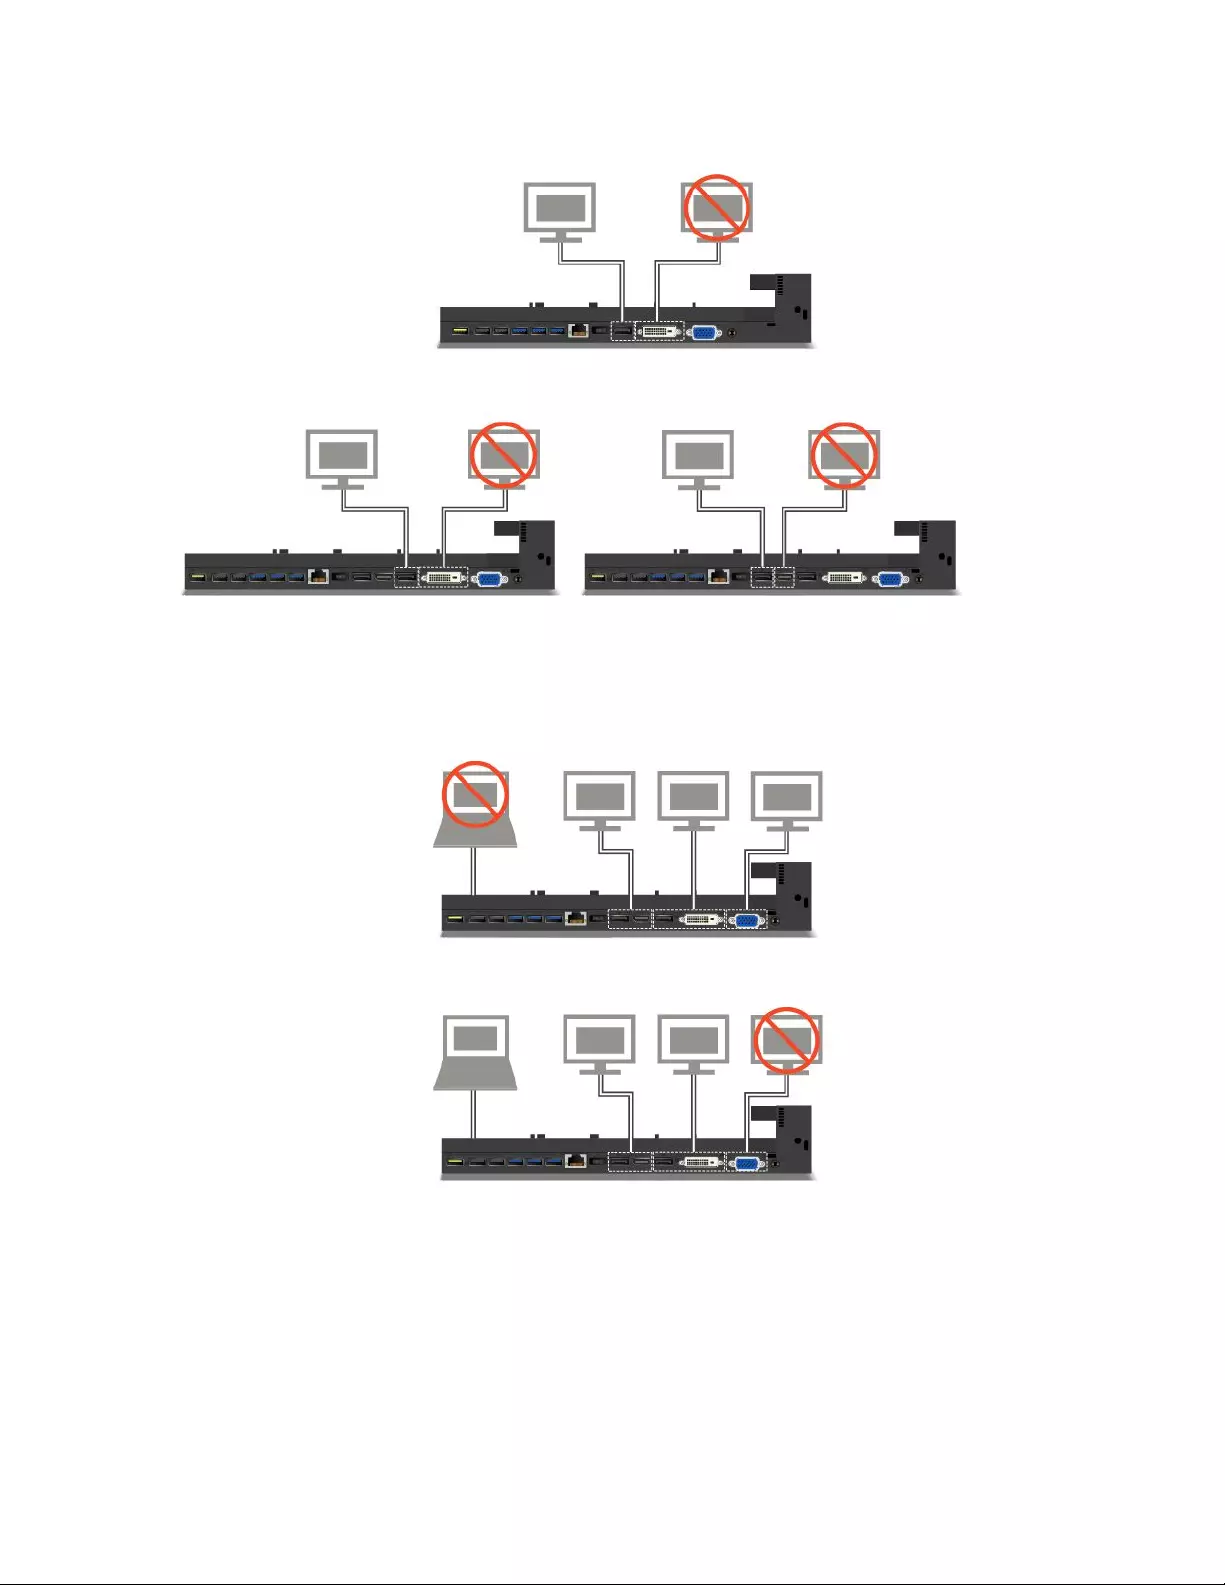
–ThinkPadProDock
–ThinkPadUltraDock
•FortheThinkPadUltraDock,amaximumofthreedisplays(includingyourcomputerdisplay)canworkat
thesametime.Asaresult,ifyouconnectthreeexternaldisplaystotheThinkPadUltraDock,thedisplay
connectedtotheVGAconnectorwillnotworkwhenyourcomputerdisplayison.
–Whenthecomputerdisplayisoff:
–Whenthecomputerdisplayison:
42T470pUserGuide

Chapter4.Accessibility,ergonomic,andmaintenance
information
Thischapterprovidesinformationaboutaccessibility,ergonomic,andcleaningandmaintenance.
Accessibilityinformation
Lenovoiscommittedtoprovidinguserswhohavehearing,vision,andmobilitylimitationswithgreater
accesstoinformationandtechnology.Thissectionprovidesinformationaboutthewaystheseuserscanget
themostoutoftheircomputerexperience.Youalsocangetthemostup-to-dateaccessibilityinformation
fromthefollowingWebsite:
https://www.lenovo.com/accessibility
Keyboardshortcuts
Thefollowingtablecontainskeyboardshortcutsthatcanhelpmakeyourcomputereasiertouse.
Note:Dependingonyourkeyboard,someofthefollowingkeyboardshortcutsmightnotbeavailable.
KeyboardshortcutFunction
Windowslogokey+UOpenEaseofAccessCenter
RightShiftforeightsecondsTurnonorturnoffFilterKeys
ShiftfivetimesTurnonorturnoffStickyKeys
NumLockforfivesecondsTurnonorturnoffToggleKeys
LeftAlt+LeftShift+NumLockTurnonorturnoffMouseKeys
LeftAlt+LeftShift+PrtScn(orPrtSc)TurnonorturnoffHighContrast
Formoreinformation,gotohttp://windows.microsoft.com/,andthensearchusinganyofthefollowing
keywords:keyboardshortcuts,keycombinations,shortcutkeys.
EaseofAccessCenter
EaseofAccessCenterontheWindowsoperatingsystemenablesyoutoconfigureyourcomputersto
suittheirphysicalandcognitiveneeds.
ToaccessEaseofAccessCenter,dothefollowing:
1.GotoControlPanel,andensurethatyouviewControlPanelusingCategory.
2.ClickEaseofAccess➙EaseofAccessCenter.
3.Choosetheappropriatetoolbyfollowingtheinstructionsonthescreen.
EaseofAccessCentermainlyincludesthefollowingtools:
•Magnifier
Magnifierisausefulutilitythatenlargestheentirescreenorpartofthescreensothatyoucansee
theitemsbetter.
•Narrator
Narratorisascreenreaderthatreadswhatisdisplayedonthescreenaloudanddescribeseventssuchas
errormessages.
©CopyrightLenovo201743

•On-ScreenKeyboard
Ifyouprefertotypeorenterdataintoyourcomputerusingamouse,joystick,orotherpointingdevice
insteadofaphysicalkeyboard,youcanuseOn-ScreenKeyboard.On-ScreenKeyboarddisplaysavisual
keyboardwithallthestandardkeys.Youcanselectkeysusingthemouseoranotherpointingdevice,or
youcantaptoselectthekeysifyourcomputersupportsmulti-touchscreen.
•HighContrast
HighContrastisafeaturethatheightensthecolorcontrastofsometextandimagesonyourscreen.Asa
result,thoseitemsaremoredistinctandeasiertoidentify.
•Personalizedkeyboard
Adjustkeyboardsettingstomakeyourkeyboardeasiertouse.Forexample,youcanuseyourkeyboard
tocontrolthepointerandmakethekeyboardeasiertotypecertainkeycombinations.
•Personalizedmouse
Adjustmousesettingstomakeyourmouseeasiertouse.Forexample,youcanchangethepointer
appearanceandmakeyourmouseeasiertomanagewindows.
SpeechRecognition
SpeechRecognitionenablesyoutocontrolyourcomputerbyvoice.
Usingonlyyourvoice,youcanstartprograms,openmenus,clickobjectsonthescreen,dictatetextinto
documents,andwriteandsende-mails.Everythingyoudowiththekeyboardandmousecanbedonewith
onlyyourvoice.
TouseSpeechRecognition,dothefollowing:
1.GotoControlPanel,andensurethatyouviewControlPanelbyCategory.
2.ClickEaseofAccess➙SpeechRecognition.
3.Followtheinstructionsonthescreen.
Screen-readertechnologies
Screen-readertechnologiesareprimarilyfocusedonsoftwareprograminterfaces,helpsystems,andvarious
onlinedocuments.Foradditionalinformationaboutscreenreaders,seethefollowing:
•UsingPDFswithscreenreaders:
https://www.adobe.com/accessibility.html?promoid=DJGVE
•UsingtheJAWSscreenreader:
http://www.freedomscientific.com/jaws-hq.asp
•UsingtheNVDAscreenreader:
https://www.nvaccess.org/
Screenresolution
Youcanmakethetextandimagesonyourscreeneasiertoreadbyadjustingthescreenresolutionofyour
computer.
Toadjustthescreenresolution,dothefollowing:
1.Right-clickanemptyareaofthedesktopandselectScreenresolution.
2.Followtheinstructionsonthescreen.
Note:Settingaresolutiontoolowmightpreventsomeitemsfromfittingonthescreen.
44T470pUserGuide

Customizableitemsize
Youcanmaketheitemsonyourscreeneasiertoreadbychangingtheitemsize.
•Tochangetheitemsizetemporarily,usetheMagnifiertoolinEaseofAccessCenter.
•Tochangetheitemsizepermanently,dothefollowing:
–Changethesizeofalltheitemsonyourscreen.
1.GotoControlPanel,andensurethatyouviewControlPanelbyCategory.
2.ClickAppearanceandPersonalization➙Display.
3.Changetheitemsizebyfollowingtheinstructionsonthescreen.
4.ClickApply.Thischangewilltakeeffectthenexttimeyoulogintotheoperatingsystem.
–ChangethesizeoftheitemsonaWebpage.
PressandholdCtrl,andthenpresstheplus-signkey(+)toenlargeortheminus-signkey(–)to
reducethetextsize.
–Changethesizeoftheitemsonthedesktoporawindow.
Note:Thisfunctionmightnotworkonsomewindows.
Ifyourmousehasawheel,pressandholdCtrl,andthenscrollthewheeltochangetheitemsize.
Industry-standardconnectors
Yourcomputerprovidesindustry-standardconnectorsthatenableyoutoconnectassistivedevices.
Documentationinaccessibleformats
Lenovoprovideselectronicdocumentationinaccessibleformats,suchasproperlytaggedPDFfilesor
HyperTextMarkupLanguage(HTML)files.Lenovoelectronicdocumentationisdevelopedtoensure
thatvisuallyimpaireduserscanreadthedocumentationthroughascreenreader.Eachimageinthe
documentationalsoincludesadequatealternativetextsothatvisuallyimpaireduserscanunderstandthe
imagewhentheyuseascreenreader.
Ergonomicinformation
Goodergonomicpracticeisimportanttogetthemostfromyourpersonalcomputerandtoavoiddiscomfort.
Arrangeyourworkplaceandtheequipmentyouusetosuityourindividualneedsandthekindofwork
thatyouperform.Inaddition,usehealthyworkhabitstomaximizeyourperformanceandcomfortwhen
usingyourcomputer.
Workinginthevirtualofficemightmeanadaptingtofrequentchangesinyourenvironment.Adaptingto
thesurroundinglightsources,activeseating,andtheplacementofyourcomputerhardware,canhelpyou
improveyourperformanceandachievegreatercomfort.
Thisexampleshowssomeoneinaconventionalsetting.Evenwhennotinsuchasetting,youcanfollow
manyofthesetips.Developgoodhabits,andtheywillserveyouwell.
Chapter4.Accessibility,ergonomic,andmaintenanceinformation45

Generalposture:Makeminormodificationsinyourworkingposturetodetertheonsetofdiscomfort
causedbylongperiodsofworkinginthesameposition.Frequentshortbreaksfromyourworkalsohelp
topreventminordiscomfortassociatedwithyourworkingposture.
Display:Positionthedisplaytomaintainacomfortableviewingdistanceof510mmto760mm(20inchesto
30inches).Avoidglareorreflectionsonthedisplayfromoverheadlightingoroutsidesourcesoflight.Keep
thedisplayscreencleanandsetthebrightnesstolevelsthatenableyoutoseethescreenclearly.Pressthe
brightnesscontrolkeystoadjustdisplaybrightness.
Headposition:Keepyourheadandneckinacomfortableandneutral(vertical,orupright)position.
Chair:Useachairthatgivesyougoodbacksupportandseatheightadjustment.Usechairadjustmentsto
bestsuityourcomfortposture.
Armandhandposition:Ifavailable,usechairarmrestsoranareaonyourworkingsurfacetoprovide
weightsupportforyourarms.Keepyourforearms,wrists,andhandsinarelaxedandneutral(horizontal)
position.Typewithasofttouchwithoutpoundingthekeys.
Legposition:Keepyourthighsparalleltothefloorandyourfeetflatonthefloororonafootrest.
Whatifyouaretraveling?
Itmightnotbepossibletoobservethebestergonomicpracticeswhenyouareusingyourcomputer
whileonthemoveorinacasualsetting.Regardlessofthesetting,trytoobserveasmanyofthetipsas
possible.Sittingproperlyandusingadequatelighting,forexample,helpsyoumaintaindesirablelevels
ofcomfortandperformance.Ifyourworkareaisnotinanofficesetting,ensuretotakespecialnoteof
employingactivesittingandtakingworkbreaks.ManyThinkPadproductsolutionsareavailabletohelp
youmodifyandexpandyourcomputertobestsuityourneeds.Youcanfindsomeoftheseoptionsat
http://www.lenovo.com/essentials.Exploreyouroptionsfordockingsolutionsandexternalproductsthat
providetheadjustabilityandfeaturesthatyouwant.
Questionsaboutvision?
ThevisualdisplayscreensofThinkPadnotebookcomputersaredesignedtomeetthehigheststandards.
Thesevisualdisplayscreensprovideyouwithclear,crispimagesandlarge,brightdisplaysthatareeasyto
see,yeteasyontheeyes.Anyconcentratedandsustainedvisualactivitycanbetiring.Ifyouhavequestions
oneyefatigueorvisualdiscomfort,consultavision-carespecialistforadvice.
Cleaningandmaintenance
Withappropriatecareandmaintenanceyourcomputerwillserveyoureliably.Thefollowingtopicsoffer
informationtohelpyoukeepyourcomputerintopworkingorder.
Basicmaintenancetips
Herearesomebasicpointsaboutkeepingyourcomputerfunctioningproperly:
•Storepackingmaterialssafelyoutofthereachofchildrentopreventtheriskofsuffocationfromplastic
bags.
•Keepyourcomputerawayfrommagnets,activatedcellularphones,electricalappliances,orspeakers
(morethan13cmor5inches).
•Avoidsubjectingyourcomputertoextremetemperatures(below5°C/41°Forabove35°C/95°F).
•Avoidplacinganyobjects(includingpaper)betweenthedisplayandthekeyboardorthepalmrest.
•Yourcomputerdisplayisdesignedtobeopenedandusedatanangleslightlygreaterthan90degrees.
Donotopenthedisplaybeyond180degrees.Otherwise,thecomputerhingemightgetdamaged.
46T470pUserGuide

•Donotturnyourcomputeroverwhentheacpoweradapterispluggedin,otherwise,itcouldbreak
theadapterplug.
•Beforemovingyourcomputer,besuretoremoveanymedia,turnoffattacheddevices,anddisconnect
cordsandcables.
•Whenpickingupyouropencomputer,holditbythebottom.Donotpickuporholdyourcomputerby
thedisplay.
•OnlyanauthorizedThinkPadrepairtechnicianshoulddisassembleandrepairyourcomputer.
•Donotmodifyortapethelatchestokeepthedisplayopenorclosed.
•Avoiddirectlyexposingyourcomputerandperipheralstotheairfromanappliancethatcanproduce
negativeions.Whereverpossible,groundyourcomputertofacilitatesafeelectrostaticdischarge.
Cleaningyourcomputer
Itisagoodpracticetocleanyourcomputerperiodicallytoprotectthesurfacesandensuretrouble-free
operation.
Cleaningthecomputercover:Wipeitwithalint-freeclothdampenedinmildsoapandwater.Avoid
applyingliquidsdirectlytothecover.
Cleaningthekeyboard:Wipethekeysonebyonewithalint-freeclothdampenedinmildsoapandwater.
Ifyouwipeseveralkeysatatime,theclothmighthookontoanadjacentkeyandpossiblydamageit.Avoid
sprayingcleanerdirectlyontothekeyboard.Toremoveanycrumbsordustfrombeneaththekeys,youcan
useacamerablowerwithabrushorusecoolairfromahairdryer.
Cleaningthecomputerscreen:Scratches,oil,dust,chemicals,andultravioletlightcanaffectthe
performanceofyourcomputerscreen.Useadry,softlint-freeclothtowipethescreengently.Ifyouseea
scratchlikemarkonyourscreen,itmightbeastain.Wipeordustthestaingentlywithasoft,drycloth.Ifthe
stainremains,moistenasoft,lint-freeclothwithwateroreyeglasscleaner,butdonotapplyliquidsdirectly
toyourcomputerscreen.Ensurethatthecomputerscreenisdrybeforeclosingit.
Chapter4.Accessibility,ergonomic,andmaintenanceinformation47

48T470pUserGuide

Chapter5.Security
Thischapterprovidesinformationabouthowtoprotectyourcomputerfromunauthorizeduse.
Usingpasswords
Youcanhelppreventyourcomputerfromunauthorizedusebyusingpasswords.Afteryousetapassword,a
promptisdisplayedonthescreeneachtimeyouturnonthecomputer.Enteryourpasswordattheprompt.
Youcannotusethecomputerunlessyoutypethecorrectpassword.
Ifyouhavesetapower-onpassword,asupervisorpassword,oraharddiskpassword,itunlocks
automaticallywhenthecomputerresumesfromsleepmode.
Note:IfaWindowspasswordhasbeenset,youarepromptedtoenteritwhenthecomputerresumes
fromsleepmode.
Passwordsintroduction
Power-onpassword
Youcansetapower-onpasswordtohelpprotectyourcomputeragainstunauthorizedaccess.
Ifyousetapower-onpassword,thepasswordpromptisdisplayedonthescreenwheneveryouturnonthe
computer.Youmustenterthecorrectpasswordtostartusingthecomputer.
Whenthisiconisdisplayed,typeapower-onpasswordorasupervisorpassword.
Supervisorpassword
ThesupervisorpasswordprotectsthesysteminformationstoredintheThinkPadSetupprogram.Ifyouhave
setasupervisorpassword,noonecanchangetheconfigurationofthecomputerwithoutthepassword.It
providesthefollowingsecurityfeatures:
•Ifonlyasupervisorpasswordisset,apasswordpromptisdisplayedwhenyoutrytostarttheThinkPad
Setupprogram.UnauthorizeduserscannotaccesstheThinkPadSetupprogramwithoutthepassword.
•Thesystemadministratorcanusethesupervisorpasswordtoaccessacomputereveniftheuserofthat
computerhassetapower-onpassword.Thesupervisorpasswordoverridesthepower-onpassword.
•ThesystemadministratorcansetthesamesupervisorpasswordonmanyThinkPadnotebookcomputers
tomakeadministrationeasier.
Harddiskpasswords
Settingaharddiskpasswordpreventsunauthorizedaccesstothedataontheharddiskdrive.When
aharddiskpasswordisset,youarepromptedtotypeavalidpasswordeachtimeyoutrytoaccessthe
harddiskdrive.
Thefollowingtwotypesofharddiskpasswordscanhelpprotecttheinformationstoredonthestoragedrive:
•Userharddiskpassword
Ifauserharddiskpasswordhasbeenset,butnomasterharddiskpasswordhasbeen,theusermust
entertheuserharddiskpasswordtoaccessfilesandapplicationsonthestoragedrive.
•Masterharddiskpassword
©CopyrightLenovo201749

Themasterharddiskpasswordalsorequiresauserharddiskpassword.Themasterharddiskpassword
issetandusedbyasystemadministrator.Itenablestheadministratortoaccessanystoragedrivein
asystemlikeamasterkey.Theadministratorsetsthemasterpassword;thenassignauserpassword
foreachcomputerinthenetwork.Theusercanthenchangetheuserpasswordasdesired,butthe
administratorstillcangetaccessbyusingthemasterpassword.
Whenamasterharddiskpasswordisset,onlytheadministratorcanremovetheuserharddiskpassword.
Whenthisiconisdisplayed,typeauserharddiskpassword.Totypeamasterharddiskpassword,
pressF1.Whentheiconchangesto,typethemasterharddiskpassword.Toreturntotheicon
,pressF1again.
Tipsonusingtheharddiskpasswords:
•Youcansettheminimumlengthofaharddiskpassword.
•Ifyousetaharddiskpasswordofoversevencharacters,thestoragedrivecanbeusedonlywitha
computerthatcanrecognizeaharddiskpasswordofoversevencharacters.Ifyoutheninstallthe
storagedriveinacomputerthatcannotrecognizeaharddiskpasswordthatcontainsmorethanseven
characters,youcannotaccessthedrive.
•Recordyourpasswordandstoreitinasafeplace.Ifyouforgettheuserharddiskpassword,orbothuser
andmasterharddiskpasswords,Lenovocannotresetyourpasswordsorrecoverdatafromthestorage
drive.YoumusttakeyourcomputertoaLenovoreselleroramarketingrepresentativetohavethestorage
drivereplaced.Proofofpurchaseisrequired,andafeewillbechargedforpartsandservice.
Notes:TheeDrivestoragedrivesorTrustedComputingGroup(TCG)Opal-compliantstoragedrivesprovide
self-encryptioncapabilitiestosecureyourdata.
•IfaTCGOpal-compliantstoragedriveandaTCGOpalmanagementsoftwareprogramareinstalled,and
theTCGOpalmanagementsoftwareprogramisactivated,theharddiskpasswordisnotavailable.
•IfaneDrivestoragedriveisinstalledinyourcomputer,andyourcomputerispreinstalledwiththe
Windows10operatingsystem,theharddiskpasswordisnotavailable.
Setting,changing,orremovingapassword
Beforeyoustart,printtheseinstructions.
Toset,change,orremoveapassword,dothefollowing:
1.Restartthecomputer.Whenthelogoscreenisdisplayed,pressF1tostarttheThinkPadSetupprogram.
2.SelectSecurity➙Passwordbyusingthedirectionalkeys.
3.Dependingonthepasswordtype,selectPower-onPassword,SupervisorPassword,orHarddiskx
Password.
4.Followtheinstructionsonthescreentoset,change,orremoveapassword.
Youmightwanttorecordyourpasswordandstoreitinasafeplace.Otherwise,ifyouforgetthepassword,
youhavetotakeyourcomputertoaLenovoreselleroramarketingrepresentativetohavethepassword
canceled.
Harddisksecurity
Toprotectthecomputerfromunauthorizedsecurityattacks,refertothefollowingtipstoenhancesecurity:
50T470pUserGuide

•Setapower-onpasswordaswellasaharddiskpassword.Forsecurity,alongerpasswordis
recommended.
•TheharddiskdrivebuiltintoyourcomputercanbeprotectedbyUEFIBIOS.Toprovidereliablesecurity,
usethesecuritychipandasecurityprogramwiththeTrustedPlatformModule(TPM)management
feature.See“Settingthesecuritychip”onpage51.
•IfaDiskEncryptionstoragedriveisinstalledinyourcomputer,ensuretoprotectthecontentsofyour
computerfromunauthorizedaccessbyuseofdriveencryptionsoftware,suchasMicrosoftWindows
BitLocker®DriveEncryption.
•Beforeyoudisposeof,sell,orhandoveryourcomputer,deletethedatastoredonit.Formoreinformation,
see“Deletingdatafromyourstoragedrive”onpage54.
UsingWindowsBitLockerDriveEncryption
Tohelpprotectyourcomputeragainstunauthorizedaccess,usethedriveencryptionsoftware,suchas
WindowsBitLockerDriveEncryption.
WindowsBitLockerDriveEncryption(referredtoasBitLocker)isanintegralsecurityfeatureofsomeeditions
oftheWindowsoperatingsystem.Itcanhelpyouprotecttheoperatingsystemanddatastoredonyour
computer,evenifyourcomputerislostorstolen.BitLockercanencryptalluserandsystemfiles,including
theswapandhibernationfiles.
BitLockerusestheTPMtoprovideenhancedprotectionforyourdataandtoensureearlybootcomponent
integrity.AcompatibleTPMisdefinedasaV2.0TPM.
TochecktheBitLockerstatus,gotoControlPanel,viewControlPanelbyCategory,andclickSystemand
Security➙BitLockerDriveEncryption.
Formoreinformation,seethehelpsystemoftheWindowsoperatingsystem,orsearchfor“Microsoft
WindowsBitLockerDriveEncryptionStep-by-StepGuide”ontheMicrosoftWebsite.
DiskEncryptionharddiskdriveandEncryptionsolid-statedrive
SomemodelscontaintheDiskEncryptionharddiskdrive,Encryptionsolid-statedrive,orEncryptionhybrid
drive.Thisencryptiontechnologyhelpstoprotectyourcomputeragainstsecurityattacksonmedia,NAND
flash,ordevicecontrollersbyuseofahardwareencryptionchip.Fortheefficientuseoftheencryption
feature,setaharddiskpasswordfortheinternalstoragedrive.
Settingthesecuritychip
Strictsecurityrequirementsareimposedonnetworkclientcomputersthattransferconfidentialinformation
electronically.Dependingontheoptionsyouordered,yourcomputermighthaveanembeddedsecuritychip
(acryptographicmicroprocessor).Withthesecuritychip,youcandothefollowing:
•Protectyourdataandsystem
•Strengthenaccesscontrols
•Securecommunications
Beforeyoustart,printtheseinstructions.
TosetanitemontheSecurityChipsubmenu,dothefollowing:
1.Restartthecomputer.Whenthelogoscreenisdisplayed,pressF1tostarttheThinkPadSetupprogram.
2.SelectSecurity➙SecurityChipbyusingthedirectionalkeys.
3.PressEnter.TheSecurityChipsubmenuopens.
Chapter5.Security51
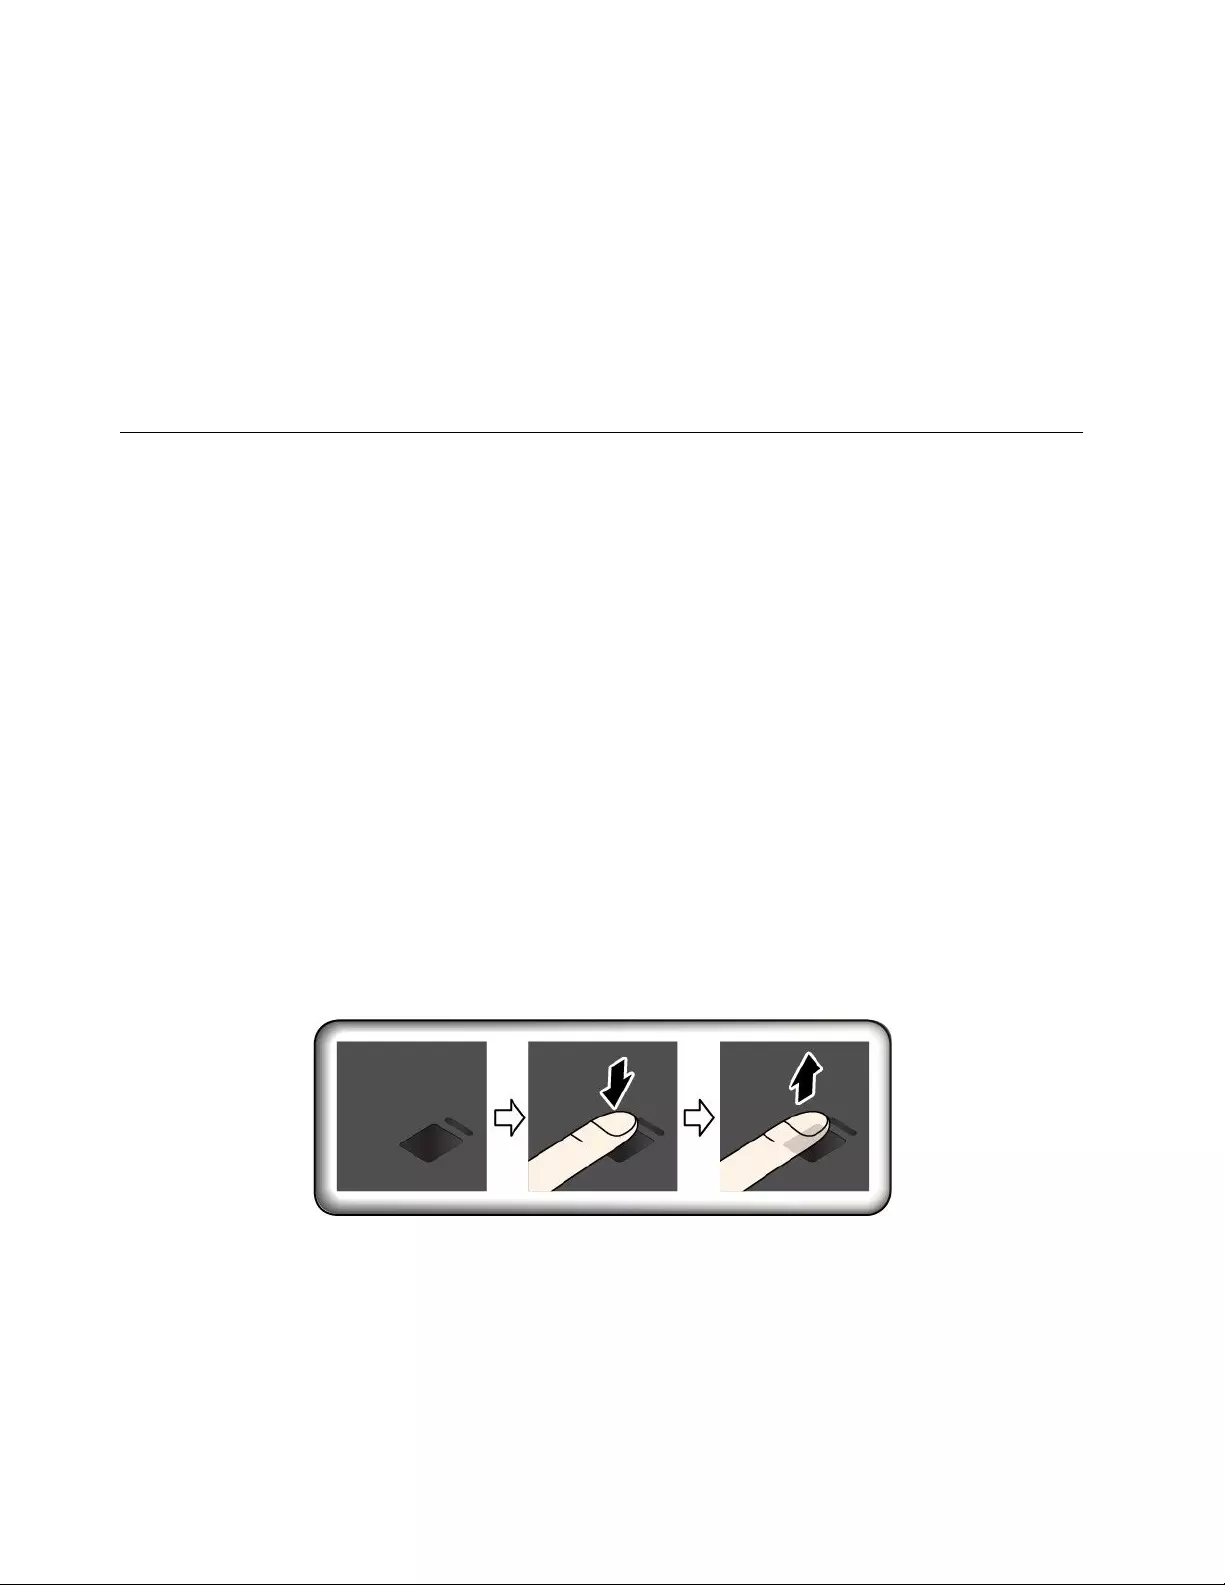
4.Movetoanitemyouwanttosetbyusingthedirectionalkeys.Whentheitemishighlighted,pressEnter.
5.Setotheritemsthatyouwanttoset.
6.PressF10.ASetupConfirmationwindowisdisplayed.SelectYestosavetheconfigurationchanges
andexit.
Notes:
•EnsurethatthesupervisorpasswordhasbeensetinThinkPadSetup.Otherwiseanyonecanchangethe
settingsforthesecuritychip.
•Whenyouclearthesecuritychip,turnoffyourcomputerandthenturnitonagainafteryousetthe
securitychiptoActive.Otherwise,theClearSecurityChipoptionisnotdisplayed.
Usingthefingerprintreader
Dependingonthemodel,yourcomputermighthaveafingerprintreader.Fingerprintauthenticationcan
replaceyourpasswords,suchastheWindowspassword,power-onpassword,andharddiskpassword.In
thisway,youcanlogintoyourcomputersimplyandsecurely.
Youcansetthefingerprintreaderinthefingerprintprogramifavailable.Youalsocanchangethesettings
intheThinkPadSetupprogram.TochangethesettingsintheThinkPadSetupprogram,see“Usingthe
ThinkPadSetupprogram”onpage59.
Enrollingyourfingerprints
Toenablefingerprintauthentication,enrollyourfingerprintsfirst.Duringtheenrollment,thefingerprintsare
associatedwiththeWindowspasswordautomatically.Itisrecommendedthatyouenrollmorethanone
fingerprintincaseofanyinjuriestoyourfingers.
Toenrollyourfingerprints,dothefollowing:
1.OpentheStartmenuandthenclickSettings➙Accounts➙Sign-inoptions.
2.Followtheinstructionsonthescreentofinishtheenrollment.
Scanningyourfinger
Toscanyourfinger,tapthefingerprintreaderwiththetopjointofyourfingerandholdyourfingertherefor
oneortwosecondswithalittlepressure.Thenliftthefingertocompleteonescan.
52T470pUserGuide

Fingerprintreaderindicator
•1Off:Thefingerprintreaderisnotreadyfortapping.
•2Solidgreen:Thefingerprintreaderisreadyfortapping.
•3Amber,blinking:Thefingerprintcannotbeauthenticated.
Associatingyourfingerprintswithyourpower-onpasswordandharddiskpassword
Toassociateyourfingerprintswithyourpower-onpasswordandharddiskpassword,manuallycreatea
connectionbydoingthefollowing:
1.Turnoffandthenturnonthecomputer.
2.Whenprompted,scanyourfingeronthefingerprintreader.
3.Enteryourpower-onpassword,harddiskpassword,orbothasrequired.Theconnectioniscreated.
Whenyoustartthecomputeragain,youcanuseyourfingerprintstologintothecomputerwithnoneedto
enteryourWindowspassword,power-onpassword,andharddiskpassword.
Attention:Ifyoualwaysuseyourfingerprinttologintothecomputer,youmightforgetyourpasswords.
Writedownyourpasswords,andkeeptheminasafeplace.Ifyouforgetyourpower-onpassword,
youmusttakeyourcomputertoaLenovo-authorizedserviceroramarketingrepresentativetohavethe
passwordcanceled.Ifyouforgetyourharddiskpassword,Lenovocannotresetyourpasswordorrecover
datafromthestoragedrive.YoumusttakeyourcomputertoaLenovo-authorizedserviceroramarketing
representativetohavethestoragedrivereplaced.Proofofpurchaseisrequired,andafeewillbecharged
forpartsandservice.
Maintainingthefingerprintreader
Thefollowingactionscoulddamagethefingerprintreaderorcauseitnottoworkcorrectly:
•Scratchingthesurfaceofthereaderwithahard,pointedobject
•Scrapingthesurfaceofthereaderwithyourfingernailoranythinghard
•Usingortouchingthereaderwithadirtyfinger
Ifyounoticeanyofthefollowingconditions,gentlycleanthesurfaceofthereaderwithadry,soft,lint-free
cloth:
•Thesurfaceofthereaderisdirtyorstained.
•Thesurfaceofthereaderiswet.
•Thereaderoftenfailstoenrollorauthenticateyourfingerprint.
Chapter5.Security53

Ifyourfingerhasanyofthefollowingconditions,youmightnotbeabletoregisterorauthenticateit:
•Yourfingeriswrinkled.
•Yourfingerisrough,dry,orinjured.
•Yourfingerisstainedwithdirt,mud,oroil.
•Thesurfaceofyourfingerisdifferentfromtheonewhenyouenrolledyourfingerprint.
•Yourfingeriswet.
•Yourfingerthatyouarecurrentlyusinghasnotbeenenrolledbefore.
Toimprovethesituation,trythefollowing:
•Cleanorwipeyourhandstoremoveanyexcessdirtormoisturefromthefingers.
•Enrollanduseadifferentfingerforauthentication.
Deletingdatafromyourstoragedrive
Someofthedatastoredonthestoragedrivemightbesensitive.Handingyourcomputerovertosomeone
elsewithoutdeletingtheinstalledsoftware,suchasoperatingsystemsandprograms,mightevenviolate
thelicenseagreements.Besuretodeletedatastoredonthestoragedrivebeforeyoudisposeof,sell,
orhandoveryourcomputer.
Youcanusethefollowingmethodstodeletedatafromthestoragedrive:
•MovethedatatotheRecycleBin,andthenemptytheRecycleBin.
•Formatyourstoragedrive,usingthesoftwaretoinitializeit.
•UsetherecoveryprogramprovidedbyLenovotobringthestoragedrivebacktothefactorydefault
settings.
Theseoperations,however,onlychangethefilelocationofthedata;theydonotdeletethedataitself.The
dataisstillthere,eventhoughitseemstobelost.Thus,itissometimespossibletoreadthedatabyuseof
specialsoftwarefordatarecovery.Thereisariskthatpeopleofbadfaithmightreadandmisusethecritical
dataonstoragedrivesforunexpectedpurposes.
Topreventleakageofdata,itisimportantthatyoudeleteallthedatafromtheharddiskdrivewhenyou
disposeof,sell,orhandoveryourcomputer.Youcandestroythedataphysicallybysmashingtheharddisk
drivewithahammer,ormagneticallybymeansofstrongmagneticpower,thusmakingthedataunreadable.
Butitisrecommendedthatyouusethesoftware(payware)orservice(payservice)developedforthat
purpose.Theprocessmighttakeseveralhours.
Fordisposingofdataonthesolid-statedrive,LenovoprovidestheDriveEraseUtilityforResettingthe
CryptographicKeyandErasingtheSolidStateDrivetool.
SomecomputersmightsupportaDiskEncryptionharddiskdriveorEncryptionsolid-statedriveandhave
suchadriveinstalled.Youcanlogicallydisposeofallthedataonthedriveinashorttimebyerasingthe
cryptographickey.Thedataencryptedwiththeoldkeyisnotphysicallyerasedbutremainsonthedrive;
however,itcannotbedecryptedwithouttheoldkey.ThisfeatureisalsoavailablewiththeDriveEraseUtility
forResettingtheCryptographicKeyandErasingtheSolidStateDrivetool.
Usingfirewalls
Ifyoursystemispreinstalledwithafirewallprogram,itprotectsagainstcomputerInternetsecuritythreats,
unauthorizedaccess,intrusions,andInternetattacks.Italsoprotectsyourprivacy.
54T470pUserGuide

Formoreinformationabouthowtousethefirewallprogram,seethehelpsystemthatcomeswiththe
program.
Protectingdataagainstviruses
Lenovoprovidesafullversionofantivirussoftwareonyourcomputerwithafree30-daysubscription.After
30days,youmustrenewthelicensetocontinuereceivingtheantivirussoftwareupdates.
Formoreinformationaboutyourantivirussoftware,seethehelpsystemofyourantivirussoftware.
Chapter5.Security55

56T470pUserGuide

Chapter6.Advancedconfiguration
Thischapterprovidesinformationtohelpyoufurtherconfigurethecomputer:
InstallingtheWindows10operatingsystem
Insomesituations,youmightneedtoinstallanewoperatingsystem.Thistopicprovidesinstructions
onhowtoinstallaWindows10operatingsystem.
Beforeyoustart,printtheseinstructions.
Attention:Theprocessofinstallinganewoperatingsystemdeletesallthedataonyourinternalstorage
drive,includingthedatathatwerestoredinahiddenfolder.
ToinstalltheWindows10operatingsystem,dothefollowing:
1.EnsurethatyousetthesecuritychiptoTPM2.0.Formoreinformation,see“Settingthesecurity
chip”onpage51.
2.Connectthedrivethatcontainstheoperatingsysteminstallationprogramtothecomputer.
3.StarttheThinkPadSetupprogram.See“UsingtheThinkPadSetupprogram”onpage59.
4.SelectStartup➙BoottodisplaytheBootPriorityOrdersubmenu.
5.Selectthedrivethatcontainstheoperatingsysteminstallationprogram,forexample,USBHDD.
ThenpressEsc.
6.SelectRestartandensurethatOSOptimizedDefaultsisenabled.ThenpressF10tosavethesettings
andexittheThinkPadSetupprogram.
7.Followtheon-screeninstructionstoinstallthedevicedriversandnecessaryprograms.See“Installing
devicedrivers”onpage58.
8.Afterinstallingthedevicedrivers,applyWindowsUpdatetogetthelatestmodules,forexamplethe
securitypatches.
9.Dependingonyourpreference,installLenovoprograms.ForinformationaboutLenovoprograms,
see“Lenovoprograms”onpage12.
Note:Afterinstallingtheoperatingsystem,donotchangetheinitialUEFI/LegacyBootsettinginthe
ThinkPadSetupprogram.Otherwise,theoperatingsystemwillnotstartcorrectly.
WhenyouinstalltheWindows10operatingsystem,youmightneedoneofthefollowingcountryorregion
codes:
CountryorregionCodeCountryorregionCode
ChinaSCNetherlandsNL
DenmarkDKNorwayNO
FinlandFISpainSP
FranceFRSwedenSV
GermanyGRTaiwanandHongKongTC
ItalyITUnitedStatesUS
JapanJP
©CopyrightLenovo201757

Installingdevicedrivers
Devicedriversareprogramsthatcontaininstructionsfortheoperatingsystemabouthowtooperateor
“drive”acertainpieceofhardware.Eachhardwarecomponentonyourcomputerhasitsownspecific
driver.Ifyouaddacomponent,theoperatingsystemmustbeinstructedonhowtooperatethatpieceof
hardware.Afteryouinstallthedriver,theoperatingsystemcanrecognizethehardwarecomponentand
understandhowtouseit.
Note:Becausedriversareprograms,likeanyotherfileonyourcomputer,theyaresusceptibletocorruption
andmightnotperformproperlyifcorruptionoccurs.
Itisnotalwaysnecessarytodownloadthelatestdrivers.However,youshoulddownloadthelatestdriverfor
acomponentwhenyounoticepoorperformancefromthatcomponentorwhenyouaddedacomponent.
Thisactionmighteliminatethedriverasthepotentialcauseofaproblem.
GettingthelatestdriversfromtheWebsite
YoucandownloadandinstallupdateddevicedriversfromtheLenovoSupportWebsitebydoingthe
following:
1.Gotohttp://www.lenovo.com/support.
2.Selecttheentryforyourcomputerandthenfollowtheinstructionsonthescreentodownloadand
installnecessarysoftware.
GettingthelatestdriversusingLenovoCompanion
ThesystemupdatefunctionofLenovoCompanionhelpsyoukeepthesoftwareonyourcomputer
up-to-date.UpdatepackagesarestoredonLenovoserversandcanbedownloadedfromtheLenovo
SupportWebsite.Updatepackagescancontainapplications,devicedrivers,UEFIBIOSflashes,orsoftware
updates.WhenLenovoCompanionconnectstotheLenovoSupportWebsite,theprogramautomatically
recognizesthefollowinginformationanddetermineswhatupdatesareavailableforyourcomputer:
•Machinetypeandmodelofyourcomputer
•Installedoperatingsystem
•Languageoftheoperatingsystem
LenovoCompanionthendisplaysalistofupdatepackagesandcategorizeseachupdateascritical,
recommended,oroptionaltohelpyouunderstandtheimportance.Youhavecompletecontrolofwhich
updatestodownloadandinstall.Afteryouselecttheupdatepackagesyouwant,LenovoCompanion
automaticallydownloadsandinstallstheupdates.
LenovoCompanionispreinstalledonyourcomputerandisreadytorun.Theonlyprerequisiteisanactive
Internetconnection.Youcanstarttheprogrammanually,oryoucanusetheschedulefeaturetoenable
theprogramtosearchforupdatesautomaticallyatspecifiedintervals.Youalsocanpredefinescheduled
updatestosearchbythecriticalseveritylevelsothelistyouchoosefromcontainsonlythoseupdate
typesthatyouneed.
FormoreinformationabouthowtouseLenovoCompanion,seethehelpsystemoftheprogram.
UsingtheThinkPadSetupprogram
TheThinkPadSetupprogramenablesyoutoselectthepreferredsettingsforyourcomputerthrough
configuringtheBIOS.
58T470pUserGuide

ConfiguringThinkPadSetup
TheThinkPadSetupprogrammenulistsvariousitemsaboutsystemconfiguration.
Attention:Thedefaultconfigurationsarealreadyoptimizedforyou.Improperchangeoftheconfigurations
mightcauseunexpectedresults.
ToconfigureThinkPadSetup,dothefollowing:
1.Restartthecomputer.Whenthelogoscreenisdisplayed,pressF1.TheThinkPadSetupprogramstarts.
Note:Ifyouarerequiredtoenterthesupervisorpassword,enterthecorrectpassword.Youalsocan
pressEntertoskipthepasswordpromptandstarttheThinkPadSetupprogram.Ifyoudonotenterthe
password,youcannotchangetheconfigurationsthatareprotectedbythesupervisorpassword.
2.Usethearrowkeystoselectatab;orusethearrowkeystolocateanitemandpressEntertoselect
it.Thenthesupportedsubmenuisdisplayed.
3.Defaultvaluesareinboldface.Setthevalueofanitembydoingoneofthefollowing:
•PressF6tochangetoahighervalue.
•PressF5tochangetoalowervalue.
4.PresstheEsckeytoexitthesubmenuandreturntotheparentmenu.Thenusethesamemethod
mentionedabovetochangeotherconfigurations.
5.Whenyoucompletetheconfiguration,pressF10tosaveandexit.YoualsocanselecttheRestarttabin
theThinkPadSetupmenu,andrestartyourcomputerwithoneoftheprovidedoptions.
YoucanpressF9torestoretothedefaultsettings.
Changingthestartupsequence
Insomecases,youmighthavetochangethestartupsequencesothatthecomputerstartsfromadesired
devicewhenpoweredon.Readthistopictolearnhowtochangethecomputerstartupsequence.
Attention:
•Afteryouchangethestartupsequence,ensurethatyouselectthecorrectdeviceduringacopy,asave,or
aformatoperation.Ifyouselectthewrongdevice,thedataonthatdevicemightbeerasedoroverwritten.
•IfyouareusingtheWindowsBitLockerDriveEncryptionfeatureandyourcomputerhasaTrusted
PlatformModule,donotchangethestartupsequence.BitLockerDriveEncryptionlocksthecomputer
whenitdetectsthechangeofstartupsequence.
Tochangethestartupsequence,dothefollowing:
1.AccesstheThinkPadSetupprogramandselectStartup➙Boot.ThenpressEnter.Thedefaultdevice
orderlistisdisplayed.
2.Setthestartupsequenceasyoudesired.
3.PressF10tosavethechangesandrestartthesystem.
Youalsocanchangethestartupsequencetemporarilybydoingthefollowing:
1.Turnoffthecomputer.
2.Turnonthecomputer.Whenthelogoscreenisdisplayed,presstheF12key.
3.Selectthedevicethatyouwantthecomputertostartfrom.ThenpressEnter.
Note:TheBootmenuwillbedisplayedifthecomputercannotstartfromanydevicesortheoperating
systemcannotbefound.
Chapter6.Advancedconfiguration59

UpdatingtheUEFIBIOS
TheUEFIBIOSisthefirstprogramthatthecomputerrunswhenthecomputeristurnedon.TheUEFIBIOS
initializesthehardwarecomponents,andloadstheoperatingsystemandotherprograms.
Whenyouinstallanewprogram,devicedriver,orhardwarecomponent,youmightbeinformedtoupdate
theUEFIBIOS.YoucanupdatetheUEFIBIOSbystartingyourcomputerfromaflashupdatediscoraflash
updateprogramrunningintheWindowsenvironment.
Therequirementsforflashupdateareasfollows:
•ThecomputermustbestartedoverLAN.
•ThecomputermustbeengagedinthePrebooteXecutionEnvironment(PXE).
•Anetwork-managementprogrammustbeinstalledonthecomputerofthenetworkadministrator.
ForinstructionsonhowtoupdatetheUEFIBIOS,gotohttp://www.lenovo.com/support.
BIOSmenu
ThistopicintroducesthefollowingBIOSmenusofyourcomputer:
•Mainmenu
•Configmenu
•Date/Timemenu
•Securitymenu
•Startupmenu
•Restartmenu
Note:Dependingonthemodelandoperatingsystem,themenuitemsandthedefaultvaluemightchange
withoutnotice.
Mainmenu
WhenyouentertheThinkPadSetupprogram,youfirstseetheMainmenuasfollows:
Note:TheBIOSmenuitemsmightchangewithoutnotice.Dependingonthemodel,thedefaultvalue
mightvary.
•UEFIBIOSVersion
•UEFIBIOSDate
•EmbeddedControllerVersion
•MEFirmwareVersion
•MachineTypeModel
•System-unitserialnumber
•Systemboardserialnumber
•AssetTag
•CPUType
•CPUSpeed
•InstalledMemory
•UUID
•MACAddress(InternalLAN)
60T470pUserGuide

•Preinstalledoperatingsystemlicense
•UEFISecureBoot
•OA3ID
•OA2
Configmenu
Note:TheBIOSmenuitemsmightchangewithoutnotice.Dependingonthemodel,thedefaultvalue
mightvary.
Network
•WakeOnLAN
Values:Disabled,AConly,ACandBattery
Description:Thenetworkadministratorcanturnonacomputerfromamanagementconsolebyusing
theWakeonLANfeature.IfyouselectACOnly,theWakeonLANfeatureisenabledonlywhentheac
poweradapterisattached.IfyouselectACandBattery,theWakeonLANfeatureisenabledwithany
powersources.
Notes:
–ThemagicpackettypeWakeonLANrequiresthattheacpowerisattached.
–TheWakeonLANfeaturedoesnotworkwhentheharddiskpasswordisset.
•EthernetLANOptionROM
Values:Disabled,Enabled
Description:TheEthernetLANOptionROMenablesthestartupfromanintegratednetworkdevice.This
menuisdisplayedonlyinLegacyOnlybootmodeorBothbootmodewithLegacyfirst.
•UEFIIPv4NetworkStack
Values:Disabled,Enabled
Description:EnableordisableInternetProtocolVersion4(IPv4)networkstackforUEFIenvironment.This
menuisdisplayedonlyinUEFIOnlybootmodeorBothbootmodewithUEFIfirst.
•UEFIIPv6NetworkStack
Values:Disabled,Enabled
Description:EnableordisableInternetProtocolVersion6(IPv6)networkstackforUEFIenvironment.This
menuisdisplayedonlyinUEFIOnlybootmodeorBothbootmodewithUEFIfirst.
•UEFIPXEBootPriority
Values:IPv6First,IPv4First
Description:SelectnetworkstackpriorityforUEFIPXEboot.ThismenuisdisplayedonlyinUEFIOnly
bootmodeorBothbootmodewithUEFIfirst,whenIPv6andIPv4stacksarebothenabled.
•WirelessAutoConnection
Values:Disabled,Enabled
Description:EnableordisabletheWirelessAutoConnectionfeature.
•MACaddressPassThru
Values:Disabled,Enabled
Description:TheMACaddressfortheLENOVOUSBDockwillbechangedtotheInternalMACaddress.
SelectDisabled,theMACaddressfortheLENOVOUSBDockwillremaintheoriginalMACaddress.
SelectEnabled,theMACaddressfortheLENOVOUSBDockwillbechangedtotheInternalMAC
address.
Chapter6.Advancedconfiguration61

USB
•USBUEFIBIOSSupport
Values:Disabled,Enabled
Description:EnableordisablethebootsupportforUSBstoragedevices.
•AlwaysOnUSB
Values:Disabled,Enabled
Description:SelectEnabledtochargedevicesthroughtheAlwaysOnUSBconnectorsevenwhenthe
computeristurnedoff,insleepmode,orinhibernationmode.
Note:USB-wake-upfunctionisnotsupportedonAlwaysOnUSBconnectors.
•ChargeinBatteryMode
Values:Disabled,Enabled
Description:ItissupportedonlywhenAlwaysOnUSBisEnabled.SelectEnabledtochargedevices
throughtheAlwaysOnUSBconnectorsevenwhenthesystemisinhibernationmode,orispower-off
andinbatteryoperation.
Keyboard/Mouse
•TrackPoint
Values:Disabled,Enabled
Description:Enableordisablethebuilt-inTrackPointpointingdevice.
Note:Ifyouwanttouseanexternalmouse,selectDisabled.
•Trackpad
Values:Disabled,Enabled
Description:Enableordisablethebuilt-intrackpad.
Note:Ifyouwanttouseanexternalmouse,selectDisabled.
•FnandCtrlKeyswap
Values:Disabled,Enabled
Description:IfyouselectEnabled,theFnkeyworksastheCtrlkeyandtheCtrlkeyworksastheFnkey.
•FnStickykey
Values:Disabled,Enabled
Description:IfyouselectEnabled,youcanpresstheFnkey(insteadofpressandhold)tokeepit
inapressedcondition.Thenpressthefunctionkeyyouwant.Theactionisequivalenttopressing
thefunctionkeysimultaneouslywiththeFnkey.
•F1–F12asprimaryfunction
Values:Disabled,Enabled
Description:IfyouselectEnabled,pressingthefunctionkeysdirectlyinputsF1–F12.Ifyouselect
Disabled,pressingthefunctionkeysdirectlyinitiatesthespecialfunctionprintedasanicononeach
key.Totemporarilyswitchtheabovetwofunctions,pressFn+Esc.
Display
•BootDisplayDevice
Values:ThinkPadLCD,DisplayPort,HDMI,Displayondock
62T470pUserGuide

Description:Selectthedisplaydevicethatyouwanttoactivateatboottime.Thisselectioniseffectivefor
boottime,passwordprompt,andThinkPadSetup.DisplayPortcorrespondstotheMiniDisplayPort
onyourcomputer.HDMIcorrespondstotheHDMIconnectoronyourcomputer.Displayondock
correspondstothevideoconnectors(suchastheDisplayPort,DVI,orVGAconnectors)onadocking
station.Bootscreenisclonedtoalldisplaysondock.
•TotalGraphicsMemory
Values:256MB,512MB
Description:AllocatethetotalmemorywhichIntelinternalgraphicsshares.
Note:Ifyouselect512MB,themaximumusablememorymightbereducedonthe32–bitoperating
system.
•BootTimeExtension
Values:Disabled,1second,2seconds,3seconds,5seconds,10seconds
Description:Duringthebootprocess,thecomputermightnotdetecttheexternalmonitorsthatneed
moretimetogetready.Selecthowlongyouwanttoextendthebootprocess.
Power
•Intel(R)SpeedSteptechnology
Values:Disabled,Enabled
Description:SelectthemodeofIntelSpeedSteptechnologyatruntime.
•AdaptiveThermalManagement
Values:MaximizePerformance,Balanced
Description:Selectathermalmanagementschemetouse.Theschemeaffectsfansound,temperature,
andperformance.
•CPUPowerManagement
Values:Disabled,Enabled
Description:Enableordisablethepower-savingfeaturethatstopsthemicroprocessorclockautomatically
whentherearenosystemactivities.Normally,itisnotnecessarytochangethesetting.
•PowerOnwithACAttach
Values:Disabled,Enabled
Description:Enableordisableafeaturethatturnsonthecomputerwhentheacpoweradapterisattached.
BeepandAlarm
•PasswordBeep
Values:Disabled,Enabled
Description:Enableordisableabeepwhenthecomputeriswaitingforapower-on,harddisk,or
supervisorpassword.Differentbeepsremindyouthatthepasswordyouenteredisrightorwrong.
•KeyboardBeep
Values:Enabled,Disabled
Description:Enableordisableabeepwhenunmanageablekeycombinationsarepressed.
IntelAMT
•Intel(R)AMTControl
Values:Disabled,Enabled,PermanentlyDisabled
Chapter6.Advancedconfiguration63

Description:IfyouselectEnabled,IntelAMT(ActiveManagementTechnology)isconfiguredand
additionalsetupitemsareprovidedinMEBx(ManagementEngineBIOSExtension)Setup.Ifyouselect
PermanentlyDisabled,youcanneverenableitagain.Becautiouswhenyoumaketheselection.
Note:YoucanentertheMEBxSetupmenubypressingCtrl+PintheStartupInterruptMenuwindow.To
displaytheStartupInterruptMenuwindow,pressEnterduringthepower-onself-test(POST).
•USBKeyProvisioning
Values:Disabled,Enabled
Description:EnableordisableUSBKeyProvisioning.
•CIRATimeout
Values:0–255
Description:SetthetimeoutoptionfortheCIRAconnectiontobeestablished.Selectablevaluesare
from0to255.Ifyouselect0,use60secondsasthedefaulttimeoutvalue.Ifyouselect255,thewaiting
timeforestablishingaconnectionisunlimited.
Note:Thedefaultvalueis60seconds.
•ConsoleType
Values:PCANSI,VT100+,PC-ANSI,VT-UTF8
Description:SelecttheconsoletypeforAMT.ThisconsoletypemustmatchtheIntelAMTremoteconsole.
Date/Timemenu
Note:TheBIOSmenuitemsmightchangewithoutnotice.Dependingonthemodel,thedefaultvalue
mightvary.
•SystemDate
Descriptions:Setorchangethedateofthesystem.
•SystemTime
Descriptions:Setorchangethetimeofthesystem.
Securitymenu
Note:TheBIOSmenuitemsmightchangewithoutnotice.Dependingonthemodel,thedefaultvalue
mightvary.
Password
•SupervisorPassword
Values:Disabled,Enabled
Descriptions:Setasupervisorpasswordtopreventunauthorizedusersfromchangingthestartup
sequence,network-relatedsettings,andsystemdateandtime.Formoreinformation,see“Passwords
introduction”onpage49.
•LockUEFIBIOSSettings
Values:Disabled,Enabled
Descriptions:EnablethisoptiontopreventunauthorizedusersfromchanginganysettingsinThinkPad
Setup.Tousethisfunction,asupervisorpasswordisrequired.
•PasswordatUnattendedBoot
Values:Disabled,Enabled
Descriptions:Whenthisoptionisenabled,apasswordpromptisdisplayedwhenthecomputeristurned
onbyanunattendedeventsuchasaWakeonLANattempt.Topreventunauthorizedaccess,settheuser
authenticationontheoperatingsystem.
64T470pUserGuide

•PasswordatRestart
Values:Disabled,Enabled
Descriptions:Whenthisoptionisenabled,apasswordpromptisdisplayedwhenyourestartthe
computer.Topreventunauthorizedaccess,settheuserauthenticationontheoperatingsystem.
•PasswordatBootDeviceList
Values:Disabled,Enabled
Descriptions:Ifyouenablethisoption,thesupervisorpasswordisrequiredwhenyoutrytoenterthe
BootmenubyrepeatedlypressingF12.Tousethisfunction,asupervisorpasswordmustbeset.
•PasswordCountExceededError
Values:Disabled,Enabled
Descriptions:EnablethisoptiontodisplaythePOST0199errormessagewhenyouenterawrong
supervisorpasswordmorethanthreetimes.
•SetMinimumLength
Values:Disabled,xcharacters(4≤x≤12)
Descriptions:Specifyaminimumlengthforpower-onpasswordsandharddiskpasswords.Ifasupervisor
passwordisset,youcannotchangetheminimumlengthuntilyouloginasasupervisor.
•Power-OnPassword
Values:Disabled,Enabled
Descriptions:Setapower-onpasswordtoprotectthecomputerfromunauthorizedaccess.Formore
information,see“Passwordsintroduction”onpage49.
•HardDiskxPassword
Values:Disabled,Enabled
Descriptions:Setaharddiskpasswordtopreventunauthorizedusersfromaccessingdataontheinternal
storagedrive.Formoreinformation,see“Passwordsintroduction”onpage49.
Fingerprint
•PredesktopAuthentication
Values:Disabled,Enabled
Descriptions:Enableordisablefingerprintauthenticationbeforetheoperatingsystemisloaded.
•ReaderPriority
Values:External➙Internal,InternalOnly
Descriptions:Ifyourcomputerhasaninternalfingerprintreaderandanattachedexternalfingerprint
reader,usethisoptiontospecifythefingerprintreaderpriority.
•SecurityMode
Values:Normal,High
Descriptions:Ifthefingerprintisnotauthenticated,youcanenterapasswordinstead.Ifyouhave
selectedNormal,entereitherthepower-onpasswordorthesupervisorpassword;ifyouhaveselected
High,supervisorpasswordmustbeentered.
•PasswordAuthentication
Values:Disabled,Enabled
Descriptions:Enablethisoptiontousepasswordauthenticationwhenfingerprintsarenotavailable.This
itemisdisplayedifSecurityModeissettoHigh.
•ResetFingerprintData
Value:Enter
Chapter6.Advancedconfiguration65

Descriptions:Usethisoptiontoeraseallfingerprintdatastoredinthefingerprintreaderandresetthe
settingstothefactorydefaultstate.Asaresult,anypower-onsecurityfeaturespreviouslyenabledwillnot
workuntiltheyarere-enabledinthefingerprintsoftware.
SecurityChip
•SecurityChipType
Values:TPM2.0
•SecurityChip
Values:Enabled,Disabled
Descriptions:Enableordisablethesecuritychip.
•ClearSecurityChip
Descriptions:Usethisoptiontocleartheencryptionkey.
•Intel(R)TXTFeature:
Values:Disabled,Enabled
Descriptions:EnableordisabletheIntelTrustedExecutionTechnology.
•PhysicalPresenceforClear
Values:Disabled,Enabled
Descriptions:Ifthisoptionisenabled,aconfirmationmessageisdisplayedwhenyouclearthesecurity
chip.
UEFIBIOSUpdateOption
•FlashBIOSUpdatingbyEnd-Users
Values:Disabled,Enabled
Descriptions:Whenthisoptionisenabled,alluserscanupdatetheUEFIBIOS.Ifyoudisablethisoption,
onlythepersonwhoknowsthesupervisorpasswordcanupdatetheUEFIBIOS.
•SecureRollBackPrevention
Values:Disabled,Enabled
Descriptions:Whenthisoptionisdisabled,youcanflashtheUEFIBIOStoearlierversion.
MemoryProtection
•ExecutionPrevention
Values:Disabled,Enabled
Descriptions:Somecomputervirusesandwormscausememorybufferstooverflow.Byenablingthis
option,youcanprotectyourcomputeragainstattacksfromsuchvirusesandworms.Iftheoptionis
enabledbutyoufindthataprogramdoesnotrunproperly,disablethisoptionfirstandthenresetthe
settings.
Virtualization
•IntelVirtualizationTechnology
Values:Disabled,Enabled
Descriptions:Ifthisoptionisenabled,aVirtualMachineMonitor(VMM)canutilizetheadditionalhardware
capabilitiesprovidedbyIntelVirtualizationTechnology.
•IntelVT-dFeature
Values:Disabled,Enabled
66T470pUserGuide

Descriptions:IntelVT-dstandsforIntelVirtualizationTechnologyforDirectedI/O.Whenenabled,aVMM
canutilizetheplatforminfrastructureforI/Ovirtualization.
I/OPortAccess
Descriptions:Usethissubmenutoenableordisablethefollowinghardwarefeatures:
•EthernetLAN
•WirelessLAN
•WirelessWAN
•Bluetooth
•USBPort
•MemoryCardSlot
•SmartCardSlot
•IntegratedCamera
•Microphone
•FingerprintReader
InternalDeviceAccess
•BottomCoverTamperDetection
Values:Disabled,Enabled
Descriptions:Whenthisoptionisenabled,supervisorpasswordisrequiredwhenabottomcovertamper
isdetected.Thisoptionisnotfunctionaluntilasupervisorpasswordisset.
•InternalStorageTamperDetection
Values:Disabled,Enabled
Descriptions:Whenthisoptionisenabled,removinganyinternalstoragedevicewhenyourcomputerisin
sleepmodewillbedetected.Ifyouremovetheinternalstoragedevicewhilethecomputerisinsleep
mode,thecomputerwillshutdownwhenyouwakeitup,andanyunsaveddatawillbelost.
Anti-Theft
•ComputraceModuleActivation
Values:Disabled,Enabled,PermanentlyDisabled
Descriptions:EnabletheUEFIBIOSinterfacetoactivatethecomputracemodule.Computraceisan
optionalmonitoringservicefromAbsoluteSoftware.IfyouselectPermanentlyDisabled,youcannot
enablethissettingagain.
SecureBoot
•SecureBoot
Values:Disabled,Enabled
Descriptions:Enablethisoptiontopreventunauthorizedoperatingsystemsfromloadingwhenyou
turnonthecomputer.
•PlatformMode
Values:SetupMode,UserMode
Descriptions:Specifythesystemoperatingmode.
•SecureBootMode
Values:StandardMode,CustomMode
Descriptions:SpecifytheSecureBootmode.
Chapter6.Advancedconfiguration67

•ResettoSetupMode
Descriptions:UsethisoptiontoclearthecurrentplatformkeyandresetPlatformModetoSetupMode.
•RestoreFactoryKeys
Descriptions:UsethisoptiontorestoreallkeysandcertificatesinSecureBootdatabasestothe
factorydefaults.
•ClearAllSecureBootKeys
Descriptions:UsethisoptiontoclearallkeysandcertificatesinSecureBootdatabasesandinstall
yourownkeysandcertificates.
Intel(R)SGX
•Intel(R)SGXControl
Values:Disabled,Enabled,SoftwareControlled
Descriptions:EnableordisabletheIntelSoftwareGuardExtensions(SGX)function.Ifyouselect
SoftwareControlled,SGXwillbecontrolledbytheoperatingsystem.
•ChangeOwnerEPOCH
Value:Enter
Descriptions:ChangeOwnerEPOCHtoarandomvalue.UsethisoptiontoclearSGXuserdata.
DeviceGuard
•DeviceGuard
Values:Disabled,Enabled
Descriptions:ThisoptionisusedtosupportMicrosoftDeviceGuard.
Whenthisoptionisenabled,IntelVirtualizationTechnology,IntelVT-dFeature,SecureBoot,andOS
OptimizedDefaultsareautomaticallyenabled.Intel(R)TXTFeatureisautomaticallydisabled.Bootorder
isnotselectable.TocompletetheconfigurationofDeviceGuard,youhavetosetasupervisorpassword.
Whenthisoptionisdisabled,thesetupoptionsareconfigurableandyoucanchooseanybootoptions
tostartthecomputer.
Startupmenu
Note:TheBIOSmenuitemsmightchangewithoutnotice.Dependingonthemodel,thedefaultvalue
mightvary.
•Boot
Descriptions:Definethestartupsequence.
•NetworkBoot
Descriptions:SelectthebootdevicewhenthesystemwakesfromLAN.IfWakeOnLANisenabled,the
networkadministratorcanturnonallofthecomputersinaLANremotelythroughnetworkmanagement
software.
•UEFI/LegacyBoot
Values:Both,UEFIOnly,LegacyOnly
Descriptions:Definethesystembootcapability.
•BootMode
Values:Quick,Diagnostics
Descriptions:DefinewhichscreenisdisplayedduringthePOST,thelogoscreenorthetextmessage
screen.
•OptionKeyDisplay
68T470pUserGuide

Values:Disabled,Enabled
Descriptions:Ifyoudisablethisoption,the“Tointerruptnormalstartup,pressEnter.”messagewillnotbe
displayedduringthePOST.
•BootDeviceListF12Option
Values:Disabled,Enabled
Descriptions:Ifyouenablethisoption,youcanopentheBootMenuwindowbycontinuouslypressing
F12whenthecomputerispoweredon.
•BootOrderLock
Values:Disabled,Enabled
Descriptions:Enablethisoptiontolockthebootdevicepriorityorder.
Restartmenu
Note:TheBIOSmenuitemsmightchangewithoutnotice.Dependingonthemodel,thedefaultvalue
mightvary.
•ExitSavingChanges
Descriptions:Savethechangesandrestartthecomputer.
•ExitDiscardingChanges
Descriptions:Discardthechangesandrestartthecomputer.
•LoadSetupDefaults
Descriptions:Restoretothefactorydefaultsettings.
•DiscardChanges
Descriptions:Discardthechanges.
•SaveChanges
Descriptions:Savethechanges.
Usingsystemmanagement
Thistopicisprimarilyintendedforthenetworkadministrators.
Yourcomputerisdesignedformanageability,sothatyoucanredirectmoreresourcestobettermeet
yourbusinessobjectives.
Thismanageability,knownastotalcostofownership(TCO),enablesyoutoremotelyoperateclient
computersinthesamewayasyouoperateyourowncomputer,suchasturningonaclientcomputer,
formattingastoragedrive,andinstallingaprogram.
Oncethecomputerisconfiguredandoperational,youcanmanageitbyusingthesoftwareandthe
manageabilityfeaturesthatarealreadyintegratedintotheclientcomputerandthenetwork.
DesktopManagementInterface
TheUEFIBIOSofyourcomputersupportsaninterfacecalledSystemManagementBIOS(SMBIOS)
ReferenceSpecification,version2.8orlater.SMBIOSprovidesinformationaboutthehardwarecomponents
ofyourcomputer.ItistheresponsibilityoftheUEFIBIOStoprovideinformationaboutitselfandthedevices
onthesystemboard.ThisspecificationdocumentsthestandardsforgettingaccesstothisBIOSinformation.
Chapter6.Advancedconfiguration69

PrebooteXecutionEnvironment
ThePrebooteXecutionEnvironment(PXE)technologymakesthecomputermoremanageablebyenabling
thecomputertostartfromaserver.YourcomputersupportsthepersonalcomputerfunctionsthatPXE
requires.Forexample,withtheappropriateLANcard,yourcomputercanbestartedfromthePXEserver.
Note:TheRemoteInitialProgramLoad(RIPLorRPL)functioncannotbeusedwithyourcomputer.
WakeonLAN
ThenetworkadministratorcanturnonacomputerfromamanagementconsolebyusingtheWakeon
LANfeature.
WhentheWakeonLANfeatureisenabled,manyoperations,suchasdatatransfer,softwareupdates,and
flashupdatesoftheUEFIBIOS,canbedoneremotelywithoutremoteattendance.Theupdatingprocess
canperformafternormalworkinghoursandonweekends,sothattheusersarenotinterruptedduringwork,
andtheLANtrafficiskepttoaminimum.Itsavestimeandincreasesproductivity.
IfthecomputeristurnedonthroughWakeonLAN,thecomputerstartsfollowtheNetworkBootsequence.
AssetIDEEPROM
TheAssetIDEEPROMcontainsinformationaboutthecomputerconfigurationandtheserialnumbersof
thekeycomponents.Italsoincludesanumberofblankfieldswhereyoucanrecordinformationabout
theendusersinyournetwork.
Toenableanetworkadministratortoremotelycontrolyourcomputer,setthefollowingsystem-management
featuresintheThinkPadSetupprogram:
•WakeonLAN
•NetworkBootsequence
Note:Ifasupervisorpasswordhasbeenset,youarerequiredtoenterthesupervisorpasswordwhen
youstarttheThinkPadSetupprogram.
EnablingordisablingtheWakeonLANfeature
WhentheWakeonLANfeatureisenabledandthecomputerisconnectedtoaLAN,thenetworkadministrator
canstartthecomputerremotelyfromamanagementconsole,usingaremotenetwork-managementprogram.
ToenableordisabletheWakeonLANfeature,dothefollowing:
1.Restartthecomputer.Whenthelogoscreenisdisplayed,pressF1tostarttheThinkPadSetupprogram.
2.SelectConfig➙Network.TheNetworksubmenuisdisplayed.
3.SelectacorrespondingoptionfortheWakeonLANfeature.
4.PressF10tosavethesettingsandexit.
DefiningaNetworkBootsequence
WhenthecomputerwakesonLAN,thecomputerbootsfromthedeviceasspecifiedontheNetworkBoot
menu,andthenfollowthebootorderlistontheBootmenu.
TodefineaNetworkBootsequence,dothefollowing:
1.Restartthecomputer.Whenthelogoscreenisdisplayed,pressF1tostarttheThinkPadSetupprogram.
2.SelectStartup➙NetworkBoot.Thebootdevicelistisdisplayed.
3.Selectabootdevicetomakeitasthetopbootpriority.
4.PressF10tosavethesettingsandexit.
70T470pUserGuide


72T470pUserGuide

Chapter7.Troubleshootingcomputerproblems
Thischapterprovidesinformationaboutwhattodoifyouexperienceaproblemwithyourcomputer.
Generaltipsforpreventingproblems
Thistopicprovidesthefollowingtipstohelpyoupreventcomputingproblems:
•Emptyyourrecyclebinonaregularbasis.
•Usediskdefragmenttoolregularlyonyourstoragedrivetoimprovedataseekandreadtimes.
•Tofreeupdiskspace,uninstallunusedprograms.Youalsomightwanttolookforprogramduplicationor
overlappingversions.
•CleanoutyourInbox,Sent,andTrashfoldersfromyoure-mailclientprogram.
•Backupyourdataatleastonceaweek.Ifcriticaldataispresent,itisagoodideatobackupthedata
daily.Lenovohasmanybackupoptionsavailableforyourcomputer.
•Schedulesystemrestoreoperationstotakeasystemsnapshotperiodically.Forinformationaboutsystem
restore,see“Recoveryinformation”onpage91.
•Gotohttp://www.lenovo.com/supporttodownloadandinstallupdatesforthedevicedriversandUEFI
BIOSwhenneeded.
•Keepuptodatefordevicedriversonothernon-Lenovohardware.Beforeupdatingdevicedrivers,read
thedevicedriverinformationreleasenotesforcompatibilityorknownissues.
•Keepalogbook.Entriesmightincludemajorhardwareorsoftwarechanges,driverupdates,minorissues
youhaveexperienced,andhowyouresolvedtheminorissues.
•Ifyoueverneedtorunarecoveryonyourcomputertoreturnthepreinstalledcontentsontothemachine,
thefollowingtipsmighthelpalongtheway:
1.Removeallexternaldevicessuchastheprinterandkeyboard.
2.Ensurethatyourbatteryischargedandyourcomputerhastheacpowerconnected.
3.AccessThinkPadSetupandloadthedefaultsettings.
4.Restartthecomputerandstarttherecoveryoperation.
5.Ifyourcomputerusesdiscsastherecoverymedia,donotremovethediscfromthedriveuntil
promptedtodoso.
DiagnosingproblemswithLenovoCompanion
Manycomputerproblemscanbesolvedwithoutoutsideassistance.Ifyouexperienceaproblemwithyour
computer,thefirstplacetostartisthetroubleshootinginformationinyourcomputerdocumentation.Ifyou
suspectasoftwareproblem,seethedocumentation,includingreadmefilesandhelpinformationsystems,
thatcomewiththeoperatingsystemorprogram.
ThinkPadnotebookcomputerscomewithasetofdiagnosticprogramsthatyoucanusetohelpyou
identifyhardwareproblems.LenovoCompanionispreinstalledonyourcomputerandalsoisavailable
fordownloadat:
https://shop.lenovo.com/us/en/accessories/software/apps/lenovo-apps/companion/
Note:IfyouareunabletoisolateandrepairtheproblemyourselfafterrunningLenovoCompanion,save
andprintthelogfilescreatedbytheprogram.YouneedthelogfileswhenyouspeaktoaLenovotechnical
supportrepresentative.
©CopyrightLenovo201773

LenovoCompanionsupportsthehardwarescanfunction.Itcombinesdiagnostictests,systeminformation
collection,securitystatus,andsupportinformation,alongwithhintsandtipsforoptimalsystem
performance.TorunLenovoCompanion,see“AccessingLenovoprograms”onpage12.
Thetroubleshootinginformationorthediagnosticprogramsmighttellyouthatyouneedadditionalor
updateddevicedriversorothersoftware.Youcangetthelatesttechnicalinformationanddownloaddevice
driversandupdatesfromtheLenovoSupportWebsiteat:
http://www.lenovo.com/support
Foradditionalinformation,seethehelpsystemoftheprogram.
Troubleshooting
Ifyourcomputerhasanerror,ittypicallydisplaysamessageoranerrorcode,ormakesabeepwhenyou
turniton.Whenyouexperienceaproblem,seethecorrespondingsymptomandsolutioninthistopic
totrytosolvetheproblembyyourself.
Computerstopsresponding
Printtheseinstructionsnowandkeepthemwithyourcomputerforreferencelater.
Problem:Mycomputerisunresponsive(IcannotusetheThinkPadpointingdeviceorthekeyboard).
Solution:Dothefollowing:
1.Pressandholdthepowerbuttonuntilthecomputerturnsoff.Ifyoucannotturnoffthecomputerby
pressingthepowerbutton,removetheacpoweradapterandtheremovablebattery.Afterthecomputer
isturnedoff,reconnecttheacpoweradapterandreinstalltheremovablebattery,andthenrestartthe
computerbypressingthepowerbutton.Ifthecomputerdoesnotturnon,continuewithstep2.
2.Whilethecomputeristurnedoff,removeallpowersourcesfromthecomputer(removablebatteryand
theacpoweradapter).Plugintheacpoweradapterwhilekeepingtheremovablebatteryoutofthe
computer.Ifthecomputerdoesnotturnbackon,continuewithstep3.
Note:WhenthecomputerstartsupandenterstheWindowsenvironment,usethepropershutdown
proceduretoturnoffthecomputer.Whenthecomputerisoff,reattachtheremovablebatteryand
restartthecomputer.Ifthecomputerdoesnotstartwiththeremovablebatteryreattached,removethe
removablebatteryandagainstartwithstep2.Ifthecomputerstartswithacpowerbutdoesnotstart
whentheremovablebatteryisattached,calltheCustomerSupportCenterforsupport.
3.Whilethecomputerisoff,removeallsourcesofpower(removablebatteryandtheacpoweradapter).
Removeallexternaldevicesthatareattachedtoyourcomputer(keyboard,mouse,printer,scanner,and
soon).Repeatstep2.Ifstep2isunsuccessful,continuewithstep4.
Note:Thefollowingstepsinvolveremovingstaticsensitivecomponentsfromyourcomputer.Makesure
thatyouareproperlygroundedandremoveallsourcesofpowerattachedtothecomputer.Ifyouare
uncomfortableorunsureaboutremovingcomponents,calltheCustomerSupportCenterforassistance.
4.Whilethecomputerisoff,removeallsourcesofpowerandexternalhardware.Removeanynon-original
memorymoduleaddedtoyourcomputer.Afterremovingtheextramemorymoduleandreinstallingthe
originalmemorymodule,repeatstep2.Ifthecomputerstilldoesnotturnon,consulttheusermanual
forothercustomer-replaceablecomponentsthatareattachedtoyourcomputer.
Ifthecomputerstilldoesnotstartup,calltheCustomerSupportCenterandaCustomerSupportSpecialist
willassistyou.
74T470pUserGuide

Spillsonthekeyboard
Problem:Ispillsomethingonthecomputer.
Solution:Becausemostliquidsconductelectricity,liquidspilledonthekeyboardcouldcreatenumerous
shortcircuitsanddamageyourcomputer.Tosolvetheproblem,dothefollowing:
1.Ensurethatnoliquidcreatesashortcircuitbetweenyouandtheacpoweradapter(ifinuse).
2.Carefullyunplugtheacpoweradapterimmediately.
3.Turnoffthecomputerimmediately.Ifthecomputerdoesnotturnoff,removetheremovablebattery.The
morequicklyyoustopthecurrentfrompassingthroughthecomputerthemorelikelyyouwillreduce
damagefromshortcircuits.
Attention:Althoughyoumightlosesomedataorworkbyturningoffthecomputerimmediately,leaving
thecomputeronmightmakeyourcomputerunusable.
4.Waituntilyouarecertainthatalltheliquidisdrybeforeturningonyourcomputer.
Errormessages
•Message:0177:BadSVPdata,stopPOSTtask.
Solution:ChecksumofthesupervisorpasswordintheEEPROMisnotcorrect.Thesystemboard
shouldbereplaced.Havethecomputerserviced.
•Message:0183:BadCRCofSecuritySettingsinEFIVariable.EnterThinkPadSetup.
Solution:ChecksumoftheSecuritysettingsintheEFIVariableisnotcorrect.EnterThinkPadSetup
tochecksecuritysettings,pressF10,andthenpressEntertorestartthesystem.Ifyoustillhavea
problem,havethecomputerserviced.
•Message:0187:EAIAdataaccesserror
Solution:TheaccesstoEEPROMisfailed.Havethecomputerserviced.
•Message:0188:InvalidRFIDSerializationInformationArea
Solution:TheEEPROMchecksumisnotcorrect(block#0and1).Thesystemboardshouldbereplaced,
andtheboxserialnumbermustbereinstalled.Havethecomputerserviced.
•Message:0189:InvalidRFIDconfigurationinformationarea
Solution:TheEEPROMchecksumisnotcorrect(block#4and5).Thesystemboardshouldbereplaced,
andtheuniversallyuniqueidentifier(UUID)mustbereinstalled.Havethecomputerserviced.
•Message:0190:Criticallow-batteryerror
Solution:Thecomputerturnedoffbecausethebatterypowerislow.Connecttheacpoweradapterto
thecomputerandchargethebatteries.
•Message:0191:SystemSecurity-Invalidremotechangerequested
Solution:Thesystemconfigurationchangehasfailed.Confirmtheoperationandtryagain.Toclearthe
error,enterThinkPadSetup.
•Message:0199:SystemSecurity-Securitypasswordretrycountexceeded.
Solution:Thismessageisdisplayedifyouenterawrongsupervisorpasswordmorethanthreetimes.
Confirmthesupervisorpasswordandtryagain.Tocleartheerror,enterThinkPadSetup.
•Message:0270:RealTimeClockError.
Solution:SystemRealTimeClockisnotfunctional.Havethecomputerserviced.
•Message:0271:CheckDateandTimesettings.
Solution:Thedateorthetimeisnotsetinthecomputer.EnterThinkPadSetupandsetthedateandtime.
•Message:1802:Unauthorizednetworkcardispluggedin-Poweroffandremovethenetworkcard.
Chapter7.Troubleshootingcomputerproblems75

Solution:Thewirelessnetworkcardisnotsupportedonthiscomputer.Removeit.
•Message:1820:Morethanoneexternalfingerprintreadersareattached.
Solution:Turnoffandremoveallbutthereaderthatyousetupwithinyourmainoperatingsystem.
•Message:2100:DetectionerroronHDD0(MainHDD)
Solution:Theharddiskdriveisnotworking.Havetheharddiskdriveserviced.
•Message:2103:DetectionerroronSSD1(M.2)
Solution:TheM.2solid-statedriveisnotworking.HavetheM.2solid-statedriveserviced.
•Message:2110:ReaderroronHDD0(MainHDD)
Solution:Theharddiskdriveisnotworking.Havetheharddiskdriveserviced.
•Message:2113:ReaderroronSSD1(M.2)
Solution:TheM.2solid-statedriveisnotworking.HavetheM.2solid-statedriveserviced.
•Message:2200:MachineTypeandSerialNumberareinvalid.
Solution:MachineTypeandSerialNumberareinvalid.Havethecomputerserviced.
•Message:2201:MachineUUIDisinvalid.
Solution:MachineUUIDisinvalid.Havethecomputerserviced.
•Message:Fanerror
Solution:Coolingfanhasfailed.Shutdownthecomputerimmediatelyandhavethecomputerserviced.
•Message:Thermalsensingerror
Solution:Thethermalsensorhasaproblem.Shutdownthecomputerimmediatelyandhavethe
computerserviced.
•Message:Error:Thenon-volatilesystemUEFIvariablestorageisnearlyfull.
Note:Thiserrorindicatesthattheoperatingsystemorprogramscannotcreate,modify,ordeletedatain
thenon-volatilesystemUEFIvariablestorageduetoinsufficientstoragespaceafterPOST.
Thenon-volatilesystemUEFIvariablestorageisusedbytheUEFIBIOSandbytheoperatingsystem
orprograms.Thiserroroccurswhentheoperatingsystemorprogramsstorelargeamountsofdata
inthevariablestorage.AlldataneededforPOST,suchasBIOSsetupsettings,chipset,orplatform
configurationdata,arestoredinaseparateUEFIvariablestorage.
Solution:PressF1aftertheerrormessageisdisplayedtoenterThinkPadSetup.Adialogaskstheuser
forconfirmationtocleanupthestorage.Iftheuserselects“Yes”,alldatathatwerecreatedbythe
operatingsystemorprogramswillbedeletedexceptglobalvariablesdefinedbytheUnifiedExtensible
FirmwareInterfaceSpecification.Iftheuserselects“No”,alldatawillbekept,buttheoperatingsystemor
programswillnotbeabletocreate,modify,ordeletedatainthestorage.
Ifthiserrorhappensataservicecenter,Lenovoauthorizedservicepersonnelwillcleanupthenon-volatile
systemUEFIvariablestorageusingtheprecedingsolution.
Beeperrors
LenovoSmartBeeptechnologyenablesyoutodecodebeeperrorswithyoursmartphonewhenablack
screenoccurswithbeepsfromyourcomputer.TodecodethebeeperrorwithLenovoSmartBeep
technology,dothefollowing:
1.Gotohttp://www.support.lenovo.com/smartbeeporscanthefollowingQRCode.
76T470pUserGuide

2.Downloadtheproperdiagnosticappandinstallitonyoursmartphone.
3.Runthediagnosticappandplacethesmartphonenearthecomputer.
4.PresstheFnkeyonyourcomputertoemitthebeepagain.Thediagnosticappdecodesthebeeperror
andshowspossiblesolutionsonthesmartphone.
Thefollowingsectiondescribessomebeeperrorsandthecorrespondingsolutions.
Note:DonotattempttoserviceaproductyourselfunlessinstructedtodosobytheCustomerSupport
Centerorproductdocumentation.OnlyuseaLenovo-authorizedserviceprovidertorepairyourproduct.
ErrorcodesSolutions
0001:Reseterror(platformresetnotde-asserted)1.Removeallpowerresources(theacpoweradapter,
removablebattery,andcoin-cellbattery).Ifyour
computerhasabuilt-inbattery,resetthecomputer
byinsertingastraightenedpaperclipintothe
emergency-resethole.Waitforoneminute.Then
reconnectallpowerresources.
2.Replacethesystemboard(serviceprovideronly).
0002:InternalbuserrorReplacethesystemboard(serviceprovideronly).
0281:GeneralembeddedcontrollererrorReplacethesystemboard(serviceprovideronly).
0282:Memorymoduleerror1.Reinstallorreplacethememorymodule.
2.Replacethesystemboard(serviceprovideronly).
0283:PCIresourceerror1.RemovePCIedevices(theM.2card,PCIecard,
andsoon)(serviceprovideronly).
2.Replacethesystemboard(serviceprovideronly).
0284:TCG-compliantfunctionality-relatederror(mightbe
theBIOScodevalidationfailure)
Replacethesystemboard(serviceprovideronly).
0285:TCG-compliantfunctionality-relatederror(mightbe
theTPMinitializationfailure)
Replacethesystemboard(serviceprovideronly).
0286:IntegratedgraphicserrorReplacethesystemboard(serviceprovideronly).
0287:Discretegraphicserror1.Reinstallorreplacethediscretegraphicscard
(serviceprovideronly).
2.Replacethesystemboard(serviceprovideronly).
0288:Computerdisplayerror1.Reconnectthedisplaycableonboththesystem
boardsideandthecomputerdisplayside(service
provideronly).
2.Replacethesystemboard(serviceprovideronly).
Chapter7.Troubleshootingcomputerproblems77

Memorymoduleproblems
Printtheseinstructionsnowandkeepthemwithyourcomputerforreferencelater.
Problem:Mymemorymoduleisnotoperatingproperly.
Solution:Checkthefollowingitems:
1.Verifythatthememorymoduleisinstalledandseatedcorrectlyinyourcomputer.
Removealladdedmemorymodulestotestthecomputerwithonlythefactory-installedmemory
modules,andthenreinstallthememorymoduleoneatatimetoensureaproperconnection.
2.Checkforerrormessagesduringstartup.
Followtheappropriatecorrectiveactionsforpower-onself-test(POST)errormessages.
3.VerifythatthelatestUEFIBIOSforyourmodelhasbeeninstalled.
4.Verifythepropermemoryconfigurationandcompatibilityincludingthemaximummemorysizeandthe
memoryspeed.
5.Rundiagnosticprograms.See“DiagnosingproblemswithLenovoCompanion”onpage73.
Ethernetproblems
•Problem:Mycomputercannotconnecttothenetwork.
Solution:
Ensurethat:
–Thecableisinstalledcorrectly.
ThenetworkcablemustbesecurelyconnectedbothtotheEthernetconnectorofyourcomputerand
totheRJ45connectorofthehub.Themaximumallowabledistancefromthecomputertohubis100
m(328ft).Ifthecableisconnectedandthedistanceiswithintheacceptablelimitsbuttheproblem
persists,tryadifferentcable.
–Youareusingthecorrectdevicedriver.Toinstallthecorrectdriver,dothefollowing:
1.GotoControlPanel,andensurethatyouviewControlPanelbyCategory.
2.ClickHardwareandSound➙DeviceManager.Ifyouarepromptedforanadministrator
passwordorconfirmation,typethepasswordorprovideconfirmation.
3.Double-clickNetworkadapterstoviewallnetworkadapters.Ifanexclamationmark!is
displayednexttotheadaptername,youmightnotbeusingthecorrectdriverorthedrivermight
havebeendisabled.
4.Right-clickthehighlightedadapter,clickUpdateDriverSoftware,andthenfollowtheinstructions
onthescreentoupdatethedriver.
–Theswitchportandtheadapterhavethesameduplexsetting.
Ifyouconfiguredtheadapterforfullduplex,ensurethattheswitchportalsoisconfiguredforfullduplex.
Settingawrongduplexmodecandegradeperformance,causedataloss,orresultinlostconnections.
–Youhaveinstalledallnetworkingsoftwarethatisnecessaryforyournetworkenvironment.
CheckwithyourLANadministratorforthenecessarynetworkingsoftware.
•Problem:Theadapterstopsworkingfornoapparentreason.
Solution:Thenetworkdriverfilesmightbecorruptormissing.
•Problem:MycomputerisaGigabitEthernetmodelandIuseaspeedof1000Mbps,theconnectionfails
orerrorsoccur.
Solution:
78T470pUserGuide

–UseCategory5wiringandensurethatthenetworkcableissecurelyconnected.
–Connecttoa1000BASE-Thub/switch(not1000BASE-X).
•Problem:TheWakeonLANfeatureisnotworking.
Solution:EnsurethatWakeonLANisenabledinThinkPadSetup.Ifitis,checkwithyourLAN
administratorforthenecessarysettings.
•Problem:MycomputerisaGigabitEthernetmodel,butitcannotconnecttothenetworkat1000Mbps.
Instead,itconnectsat100Mbps.
Solution:
–TryanotherEthernetcable.
–Ensurethatthelinkpartnerissettoauto-negotiate.
–Ensurethattheswitchis802.3ab-compliant(gigabitovercopper).
Wireless-LANproblem
Problem:Icannotconnecttothenetworkusingthebuilt-inwirelessnetworkcard.
Solution:
Ensurethat:
•TheAirplanemodeisoff.
•Yourwireless-LANdriveristhelatestversion.
•Yourcomputeriswithintherangeofawirelessaccesspoint.
•Thewirelessradioisenabled.
Wireless-WANproblem
Problem:AmessageisdisplayedindicatingthatanunauthorizedWANcardisinstalled.
Solution:TheWANcardisnotsupportedonthiscomputer.RemovetheWANcard.Formoreinformation,
see“Replacingthewireless-WANcard”onpage112.
Note:Somemodelsdonothaveawireless-WANcard.
Bluetoothproblem
Note:CheckyourconnectionanytimeandensurethatnootherBluetooth-enableddeviceissearchingfor
thedevicetowhichyouwanttoconnect.SimultaneoussearchingisnotallowedintheBluetoothconnection.
Problem:SounddoesnotcomefromtheBluetoothheadset/headphonesbutcomesfromthelocalspeaker
eventhoughtheBluetoothheadset/headphonesisconnectedusingaHeadsetprofileorAVprofile.
Solution:Dothefollowing:
1.Exittheprogramthatusesthesounddevice(forexample,WindowsMediaPlayer).
2.GotoControlPanel,andensurethatyouviewControlPanelbyCategory.
3.ClickHardwareandSound➙Sound➙Playback.
4.IfyouareusingaHeadsetprofile,selectBluetoothHands-freeAudioandclicktheSetDefaultbutton.
IfyouareusinganAVprofile,selectStereoAudioandclicktheSetDefaultbutton.
5.ClickOKtoclosetheSoundwindow.
Chapter7.Troubleshootingcomputerproblems79

ThinkPadpointingdeviceproblems
•Problem:Thepointerdriftswhenthecomputeristurnedonorafteritresumesnormaloperation.
Solution:ThepointermightdriftwhenyouarenotusingtheTrackPointpointingdeviceduringnormal
operation.ThisisanormalcharacteristicoftheTrackPointpointingdeviceandisnotadefect.Pointer
driftingmightoccurforseveralsecondsunderthefollowingconditions:
–Whenthecomputeristurnedon
–Whenthecomputerresumesnormaloperation
–WhentheTrackPointpointingdeviceiskeptpressedforalongtime
–Whenthetemperaturechanges
•Problem:TheTrackPointpointingdeviceortrackpaddoesnotwork.
Solution:EnsurethattheTrackPointpointingdeviceortrackpadisenabledintheMouseProperties
window.Formoreinformation,see“CustomizingtheThinkPadpointingdevice”onpage23.
Keyboardproblems
•Problem:Allorsomekeysonthekeyboarddonotwork.
Solution:Ifanexternalnumerickeypadisconnected:
1.Turnoffthecomputer.
2.Removetheexternalnumerickeypad.
3.Turnonthecomputerandtryusingthekeyboardagain.
Ifthekeyboardproblemisresolved,carefullyreconnecttheexternalnumerickeypad.
Iftheproblempersists,ensurethatthecorrectdevicedriverisinstalledbydoingthefollowing:
1.GotoControlPanel,andthenchangetheviewofControlPanelfromCategorytoLargeiconsor
Smallicons.
2.ClickKeyboard.
3.SelecttheHardwaretab.IntheDevicePropertiespane,makesurethatyouseethismessage:
DeviceStatus:Thisdeviceisworkingproperly.
Ifkeysonthekeyboardstilldonotwork,havethecomputerserviced.
•Problem:Allorsomekeysontheexternalnumerickeypaddonotwork.
Solution:Ensurethattheexternalnumerickeypadiscorrectlyconnectedtothecomputer.
Computerscreenproblems
•Problem:MyscreenkeepsblankingwhenIdonotwantitto.
Solution:Dothefollowing:
1.GotoControlPanel,andensurethatyouviewControlPanelbyCategory.
2.ClickHardwareandSound➙PowerOptions.
3.Showtheadditionalplans,andthenselectHighperformance.
•Problem:WhenIturnonthecomputer,nothingisdisplayedonthescreenandthecomputerdoesnot
beepwhilestartingup.
Note:Ifyouarenotsurewhetheryouheardanybeeps,turnoffthecomputerbypressingandholdingthe
powerbuttonforfoursecondsormore.Thenturnonthecomputerandlistenagain.
Solution:Ensurethat:
–Thebatteryisinstalledcorrectly.
80T470pUserGuide

–Theacpoweradapterisconnectedtothecomputerandthepowercordispluggedintoaworking
electricaloutlet.
–Thecomputeristurnedon.(Pressthepowerbuttonagainforconfirmation.)
–Thebrightnesslevelofthescreenisappropriatelyset.
Ifapower-onpasswordisset,pressanykeytodisplaythepromptforthepower-onpasswordand
thentypethecorrectpasswordandpressEnter.
Iftheseitemsarecorrectlyset,andthescreenremainsblank,havethecomputerserviced.
•Problem:WhenIturnonthecomputer,onlyawhitecursorisdisplayedonablankscreen.
Solution:Ifyouhavemodifiedapartitiononyourharddiskdrivebyusingpartitionsoftware,information
aboutthatpartition,orthemasterbootrecordmighthavebeendestroyed.
Dothefollowingtotrytosolvetheproblem:
1.Turnoffthecomputer,andthenturnitonagain.
2.Ifyoustillseeonlythecursoronthescreen,dothefollowing:
–Ifyouhaveusedpartitionsoftware,examinethepartitionontheharddiskdrivebyusingthe
software,andrecoverthepartitionifrequired.
–Usetherecoverysolutionstorestorethesystemtothefactorydefaultstate.Formoreinformation,
see“Recoveryinformation”onpage91.
Iftheproblempersists,havethecomputerserviced.
•Problem:Thescreengoesblankwhilethecomputerison.
Solution:Yourscreensaverorpowermanagementmighthavebeenenabled.Dooneofthefollowing:
–TouchtheTrackPointpointingdeviceorthetrackpad,orpressakeytoexitthescreensaver.
–Pressthepowerbuttontoresumethecomputerfromsleeporhibernationmode.
•Problem:Thescreenisblank.
Solution:Dothefollowing:
1.Pressthedisplay-modeswitchingkeytobringuptheimage.
2.Ifyouareusingtheacpoweradapter,orusingthebatteryandthebatterygaugeshowsthatthe
batteryisnotdepleted,pressthebrightness-upkeytomakethescreenbrighter.
3.Ifyourcomputerisinsleepmode,pressFntoresumethecomputerfromsleepmode.
4.Iftheproblempersists,followthesolutionforthefollowingproblem.
•Problem:Thescreenisunreadableordistorted.
Solution:Ensurethat:
–Thedisplaydevicedriverisinstalledcorrectly.
–Thescreenresolutionandcolorqualityarecorrectlyset.
–Themonitortypeiscorrect.
Tocheckthesesettings,dothefollowing:
1.Right-clickonthedesktop,andclickDisplaysettings➙Advanceddisplaysettings.
Note:Ifyourcomputercannotdetecttheexternalmonitor,clickDetectintheDisplaywindow.
2.SelecttheexternalmonitorandsetResolution.
3.ClickDisplayadapterproperties.
4.ClicktheMonitortab.Checkthemonitorinformationtomakesurethatthemonitortypeiscorrect.If
itis,clickOKtoclosethewindow;otherwiseproceedwiththefollowingsteps.
Chapter7.Troubleshootingcomputerproblems81

5.Ifmorethantwomonitortypesaredisplayed,selectGenericPnPMonitororGenericNon-PnP
Monitor.
6.ClickProperties.Ifyouarepromptedforanadministratorpasswordorconfirmation,typethe
passwordorprovideconfirmation.
7.ClicktheDrivertab.
8.ClickUpdateDriver.
9.ClickBrowsemycomputerfordriversoftware,andthenclickLetmepickfromalistofdevice
driversonmycomputer.
10.CleartheShowcompatiblehardwarecheckbox.
11.Selectthecorrectmanufacturerandmodelfortheexternalmonitor.Ifyoucannotfindyourmonitor
onthelist,stoptheinstallationofthisdriverandusethedrivershippedwithyourmonitor.
12.Afterupdatingthedriver,clickClose.
•Problem:Incorrectcharactersaredisplayedonthescreen.
Solution:Ensurethatyouinstalltheoperatingsystemandprogramcorrectly.Iftheproblempersists,
havethecomputerserviced.
•Problem:ItrytoturnoffmycomputerbutthescreenstaysonandIcannotcompletelyturnoffmy
computer.
Solution:Pressandholdthepowerbuttonforfoursecondsormoretoturnoffthecomputer.
•Problem:Missing,discolored,orbrightdotsappearonthescreeneverytimeIturnonmycomputer.
Solution:ThisisanintrinsiccharacteristicoftheTFTtechnology.Yourcomputerdisplaycontains
multiplethin-filmtransistors(TFTs).Onlyaverysmallnumberofmissing,discolored,orbrightdots
onthescreenmightexistallthetime.
Externalmonitorproblems
•Problem:Theexternalmonitorisblank.
Solution:Tobringuptheimage,pressthedisplay-modeswitchingkeyandselectthemonitoryou
want.Iftheproblempersists,dothefollowing:
1.Connecttheexternalmonitortoanothercomputertoensurethatitworks.
2.Reconnecttheexternalmonitortoyourcomputer.
3.Seethemanualshippedwiththeexternalmonitortochecktheresolutionsandrefreshratesthat
aresupported.
–Iftheexternalmonitorsupportsthesameresolutionasthecomputerdisplayorahigherresolution,
viewoutputontheexternalmonitororonboththeexternalmonitorandthecomputerdisplay.
–Iftheexternalmonitorsupportsalowerresolutionthanthecomputerdisplay,viewoutputonthe
externalmonitoronly.(Ifyouviewoutputonboththecomputerdisplayandtheexternalmonitor,
theexternalmonitorscreenwillbeblankordistorted.)
•Problem:Icannotsetahigherresolutionthanthepresentoneonmyexternalmonitor.
Solution:Ensurethatthemonitorinformationiscorrect.Ifnecessary,updatethemonitordriver.
•Problem:Thescreenisunreadableordistorted.
Solution:Ensurethat:
–Themonitorinformationiscorrectandtheappropriatemonitortypeisselected.Ifnecessary,update
themonitordriver.
–Ensurethatanappropriaterefreshrateisselectedbydoingthefollowing:
82T470pUserGuide

1.Connecttheexternalmonitortothemonitorconnector,andthenconnectthemonitortoan
electricaloutlet.
2.Turnontheexternalmonitorandthecomputer.
3.Right-clickonthedesktop,andclickDisplaysettings➙Advanceddisplaysettings.
Note:Ifyourcomputercannotdetecttheexternalmonitor,clickDetectintheDisplaywindow.
4.Clicktheiconfortheappropriatemonitor(Monitor-2iconisfortheexternalmonitor).
5.ClickDisplayadapterproperties.
6.ClicktheMonitortab.
7.Selectthecorrectscreenrefreshrate.
•Problem:Wrongcharactersaredisplayedonthescreen.
Solution:Ensurethatyoufollowthecorrectprocedurewheninstallingtheoperatingsystemand
program.Iftheyareinstalledandconfiguredcorrectly,buttheproblemstillpersists,havetheexternal
monitorserviced.
•Problem:TheExtenddesktopfunctiondoesnotwork.
Solution:EnabletheExtenddesktopfunction.See“Usinganexternaldisplay”onpage31.
•Problem:IamusingtheExtenddesktopfunction,butIcannotsetahigherresolutionorhigherrefresh
rateonthesecondarydisplay.
Solution:Changetheresolutionandthecolordepthtolowersettingsfortheprimarydisplay.See
“Usinganexternaldisplay”onpage31.
•Problem:Displayswitchingdoesnotwork.
Solution:IfyouusetheExtenddesktopfunction,disableit,andchangethedisplayoutputlocation.If
aDVDmovieoravideoclipisplaying,stoptheplayback,closetheprogram,andthenchangethe
displayoutputlocation.
•Problem:Thescreenpositionontheexternalmonitorisincorrectwhenthatmonitorissetforahigh
resolution.
Solution:Sometimes,whenyouuseahighresolutionsuchas1600x1200pixels,theimageisshiftedto
theleftorrightonthescreen.Tocorrectthis,firstensurethatyourexternalmonitorsupportsthedisplay
mode(theresolutionandtherefreshrate)thatyouhaveset.Ifitdoesnot,setadisplaymodethatthe
monitorsupports.Ifitdoessupportthedisplaymodeyouhaveset,gotothesetupmenuforthemonitor
itselfandadjustthesettingsthere.Usuallytheexternalmonitorhasbuttonsforaccesstothesetupmenu.
Formoreinformation,seethedocumentationthatcomeswiththemonitor.
Audioproblems
•Problem:WaveorMIDIsounddoesnotplayproperly.
Solution:Ensurethatthebuilt-inaudiodeviceisconfiguredcorrectly.
1.GotoControlPanel,andensurethatyouviewControlPanelbyCategory.
2.ClickHardwareandSound.
3.ClickDeviceManager.Ifyouarepromptedforanadministratorpasswordorconfirmation,typethe
passwordorprovideconfirmation.
4.Double-clickSound,videoandgamecontrollers.
5.EnsurethatthedevicefollowingSound,videoandgamecontrollersisenabledandconfigured
correctly.
•Problem:Recordingsmadebyusingthemicrophoneinputarenotloudenough.
Solution:EnsurethattheMicrophoneBoostfunctionisturnedonandsetbydoingthefollowing:
Chapter7.Troubleshootingcomputerproblems83

1.GotoControlPanel,andensurethatyouviewControlPanelbyCategory.
2.ClickHardwareandSound.
3.ClickSound.
4.ClicktheRecordingtabintheSoundwindow.
5.SelectMicrophone,andclickthePropertiesbutton.
6.ClicktheLevelstab,andmovetheMicrophoneBoostsliderupwards.
7.ClickOK.
Note:Formoreinformationaboutcontrollingvolume,seeyourWindowsonlinehelp.
•Problem:Icannotmovethevolumesliderorbalanceslider.
Solution:Theslidermightbegrayedout.Thismeansthatitspositionisfixedbythehardwareand
cannotbechanged.
•Problem:Thevolumeslidersdonotstayinplacewhensomeaudioprogramsareused.
Solution:Itisnormalforthesliderstochangepositionwhencertainsoundprogramsareused.The
programsareawareofthesettingsintheVolumeMixerwindowandareenabledtochangethesettings
themselves.AnexampleistheWindowsMediaPlayerprogram.Usuallytheprogramhasslidersavailable
tocontrolthesoundfromwithintheprogram.
•Problem:Thebalanceslidercannotcompletelymuteonechannel.
Solution:Thecontrolisdesignedtocompensateforminordifferencesinbalanceanddoesnot
completelymuteeitherchannel.
•Problem:ThereisnovolumecontrolforMIDIsoundintheVolumeMixerwindow.
Solution:Usethehardwarevolumecontrol.Thisisbecausethebuilt-insynthesizersoftwaredoes
notsupportthecontrol.
•Problem:ThesoundcannotbeturnedoffevenifIsettheMastervolumecontrolatminimum.
Solution:YoustillcanhearsomesoundeventhoughyouhavesettheMastervolumecontrolatminimum.
Toturnoffthesoundcompletely,gototheMastervolumecontrolandselectMutespeakers.
•Problem:WhenIconnectheadphonestomycomputerwhileplayingsound,aspeakerdoesnot
producesound.
Solution:Whentheheadphonesareattached,thestreamingisautomaticallyredirectedtoit.Ifyouwant
tolistentosoundfromthespeakersagain,ensurethatyousetthosespeakersasthedefaultdevice.For
moreinformation,seethehelpinformationsystemforRealtekHDAudioManager.
•Problem:Sounddoesnotcomefromaheadphoneoraspeaker,orthecomputercannotrecordsounds.
Solution:Toswitchfromonedevicetoanother(forexample,fromaspeakertoaheadphone,orfrom
anexternalmicrophonetoabuilt-inmicrophone),dothefollowing:
1.GotoControlPanel,andensurethatyouviewControlPanelbyCategory.
2.ClickHardwareandSound.
3.ClicktheSmartAudioicon.
4.EnsurethatthecomputerisinMULTI-STREAMmodeintheDeviceadvancedsettingswindow.
5.IntheVolumeMixerwindow,selectthedeviceyouwant,forexample,speakers.
6.Playanysoundthroughamusicprogram(forexample,WindowsMediaPlayer).Ensurethatsound
comesfromthespeakersnow.
7.Then,ifyouwouldliketoswitchtoaheadphone,closethemusicprogram.
8.GototheVolumeMixerwindow.Thenselectanotherdevice(forexample,theheadphone).
84T470pUserGuide

9.Playanysoundthroughthemusicprogram.Ensurethatsoundcomesfromtheheadphoneattached
directlytothesystem.Formoreinformation,seethehelpinformationsystemoftheSmartAudio
program.
Note:TheVolumeMixerwindowofSmartAudiodisplaysallaudiodevicesdetectedinthesystem,
suchasspeakersforaplaybackdevice,orabuilt-inmicrophoneforarecordingdevice.Acheck
markbesidetheaudiodeviceshowsthatthedevicehasbeenselected.
Fingerprintreaderproblems
•Problem:Thesurfaceofthereaderisdirty,stained,orwet.
Solution:Gentlycleanthesurfaceofthereaderwithadry,soft,lint-freecloth.
•Problem:Thereaderoftenfailstoenrollorauthenticateyourfingerprint.
Solution:Ifthesurfaceofthereaderisdirty,stained,orwet,gentlycleanthesurfaceofthereader
withadry,soft,lint-freecloth.
Fortipsonhowtomaintainthefingerprintreader,see“Usingthefingerprintreader”onpage52.
Batteryproblems
•Problem:Thebatterycannotbefullychargedinthestandardchargetimewhenthecomputerispowered
off.
Solution:Thebatterymightbeover-discharged.Dothefollowing:
1.Turnoffthecomputer.
2.Ensurethattheover-dischargedbatteryisinthecomputer.
3.Connecttheacpoweradaptertothecomputerandletitcharge.
Ifaquickchargerisavailable,useittochargetheover-dischargedbattery.
Ifthebatterycannotbefullychargedin24hours,useanewbattery.
•Problem:Thecomputershutsdownbeforethebatterystatusiconshowsthatthebatteryisempty.
Solution:Dischargeandrechargethebattery.
•Problem:Thecomputeroperatesafterthebatterystatusiconshowsthatthebatteryisempty.
Solution:Dischargeandrechargethebattery.
•Problem:Theoperatingtimeforafullychargedbatteryisshort.
Solution:Dischargeandrechargethebattery.Ifyourbatteryoperatingtimeisstillshort,useanewbattery.
•Problem:Thecomputerdoesnotoperatewithafullychargedbattery.
Solution:Thesurgeprotectorinthebatterymightbeactive.Turnoffthecomputerforoneminutetoreset
theprotector;thenturnonthecomputeragain.
•Problem:Thebatterycannotgetcharged.
Solution:Youcannotchargethebatterywhenitistoohot.Ifthebatteryfeelshot,removeitfromthe
computerandwaitforawhiletoletitcooltoroomtemperature.Afteritcools,reinstallitandrechargethe
battery.Ifitstillcannotbecharged,haveitserviced.
acpoweradapterproblem
Problem:Theacpoweradapterisconnectedtothecomputerandtheworkingelectricaloutlet,butthe
poweradapter(powerplug)iconisnotdisplayedintheWindowsnotificationarea.Theacpowerindicator
alsodoesnotlightup.
Solution:Dothefollowing:
Chapter7.Troubleshootingcomputerproblems85

1.Ensurethattheconnectionoftheacpoweradapteriscorrect.Forinstructionsonhowtoconnectthe
acpoweradapter,see“Usingtheacpoweradapter”onpage24.
2.Iftheconnectionoftheacpoweradapteriscorrect,turnoffthecomputer,andthendisconnecttheac
poweradapterandremovetheremovablebattery.
3.Reinstallthebatteryandreconnecttheacpoweradapter,andthenturnonthecomputer.
4.IfthepoweradaptericonstillisnotdisplayedintheWindowsnotificationarea,havetheacpower
adapterandyourcomputerserviced.
Powerproblems
Printtheseinstructionsnowandkeepthemwithyourcomputerforreferencelater.
•Problem:Mycomputerisgettingnopoweratall.
Solution:Checkthefollowingitems:
1.Verifythepowerbutton.Thepowerbuttonisilluminatedwheneverthecomputerison.
2.Checkallpowerconnections.Removeanypowerstripsandsurgeprotectorstoconnecttheac
poweradapterdirectlytotheacpoweroutlet.
3.Inspecttheacpoweradapter.Checkforanyphysicaldamage,andensurethatthepowercableis
firmlyattachedtotheadapterbrickandthecomputer.
4.Verifythattheacpowersourceisworkingbyattachinganotherdevicetotheoutlet.
•Problem:Mycomputerdoesnotrunonbatterypower.
Solution:Checkthefollowingitems:
1.Removeandreinstalltheremovablebatterytoensurethatitisproperlyconnected.
2.Ifthebatteryrunsoutofpower,attachtheacpoweradaptertorechargethebattery.
3.Ifthebatteryischargedbutthecomputerdoesnotrun,replacethebatterywithanewone.
•Problem:Thesystemdoesnotrespond,andIcannotturnoffthecomputer.
Solution:Turnoffthecomputerbypressingandholdingthepowerbuttonforfoursecondsormore.Ifthe
computerstilldoesnotrespond,removetheacpoweradapterandthebattery.
Bootproblems
Printtheseinstructionsnowandkeepthemwithyourcomputerforreferencelater.
•Problem:Ireceiveanerrormessagebeforetheoperatingsystemloads.
Solution:Followtheappropriatecorrectiveactionsforpower-onself-test(POST)errormessages.
•Problem:Ireceiveanerrormessagewhiletheoperatingsystemisloadingthedesktopconfiguration
afterthePOSTiscompleted.
Solution:FindsolutionsbysearchingfortheerrormessageatthefollowingWebsites:
–http://www.lenovo.com/support
–https://support.microsoft.com/
Sleepandhibernationproblems
•Problem:Thecomputerenterssleepmodeunexpectedly.
Solution:Ifthemicroprocessoroverheats,thecomputerautomaticallyenterssleepmodetoallowthe
computertocoolandtoprotectthemicroprocessorandotherinternalcomponents.Checkthesettings
forsleepmode.
86T470pUserGuide

•Problem:Thecomputerenterssleepmodeimmediatelyafterthepower-onself-test.
Solution:Ensurethat:
–Thebatteryischarged.
–Theoperatingtemperatureiswithintheacceptablerange.See“Operatingenvironment”onpage11.
Iftheproblempersists,havethecomputerserviced.
•Problem:Acriticallow-batteryerroroccurs,andthecomputerimmediatelyturnsoff.
Solution:Thebatterypowerisgettinglow.Plugtheacpoweradapterintoanelectricaloutletandthen
intothecomputer.Alternatively,replacethebatterywithachargedone.
•Problem:ThecomputerdisplayremainsblankafteryoupressFntoresumefromsleepmode.
Solution:Checkwhetheranexternalmonitorwasdisconnectedorturnedoffwhilethecomputerwasin
sleepmode.Ifyoudisconnectedorturnedofftheexternalmonitor,connectitorturnitonbeforeresuming
thecomputerfromsleepmode.Whenresumingthecomputerfromsleepmodewithoutattachingthe
externalmonitororturningiton,andthecomputerdisplayremainsblank,pressthedisplay-mode
switchingkeytobringupthecomputerdisplay.
•Problem:Thecomputerdoesnotresumefromsleepmode,orthesystemstatusindicatorblinksslowly
andthecomputerdoesnotwork.
Solution:Ifthesystemdoesnotresumefromsleepmode,itmighthaveenteredsleeporhibernation
modeautomaticallybecausethebatteryisdepleted.Checkthesystemstatusindicator.
–Ifthesystemstatusindicatorblinksslowly,yourcomputerisinsleepmode.Connecttheacpower
adaptertothecomputer;thenpressFn.
–Ifthesystemstatusindicatorisoff,yourcomputerhasnopowerorisinhibernationmode.Connect
theacpoweradaptertothecomputer;thenpressthepowerbuttontoresumeoperation.
Ifthesystemstilldoesnotresumefromsleepmode,yoursystemmightstoprespondingandyoumight
notbeabletoturnoffthecomputer.Inthiscase,youmustresetthecomputer.Ifyouhavenotsavedyour
data,itmightbelost.Toresetthecomputer,pressandholdthepowerbuttonforfoursecondsormore.If
thesystemstilldoesnotrespond,removetheacpoweradapterandthebattery.
•Problem:Yourcomputerdoesnotentersleeporhibernationmode.
Solution:Checkwhetheranyoptionhasbeenselectedtodisableyourcomputerfromenteringsleep
orhibernationmode.
Ifyourcomputertriestoentersleepmodebuttherequestisrejected,thedeviceattachedtotheUSB
connectormighthavebeendisabled.Ifthisoccurs,doahot-unplug-and-plugoperationfortheUSB
device.
•Problem:Thebatterydischargesslightlywhilethecomputerisinhibernationmode.
Solution:Ifthewakeupfunctionisenabled,thecomputerconsumesasmallamountofpower.Thisisnot
adefect.Formoreinformation,see“Power-savingmodes”onpage26.
Harddiskdriveproblems
•Problem:Theharddiskdrivemakesarattlingnoiseintermittently.
Solution:Therattlingnoisemightbeheard:
–Whentheharddiskdrivebeginsorfinishesgettingaccesstodata
–Whenyoucarrytheharddiskdrive
–Whenyoucarryyourcomputer
Thisisanormalcharacteristicofaharddiskdriveandisnotadefect.
•Problem:Theharddiskdrivedoesnotwork.
Chapter7.Troubleshootingcomputerproblems87

Solution:OntheStartupmenuofThinkPadSetup,ensurethattheharddiskdriveisontheBootpriority
orderlist.IfitisontheExcludedfrombootorderlist,itisdisabled.Selecttheentryforitonthelist
andpressShift+1tomoveitbacktotheBootpriorityorderlist.
•Problem:AfterIhavesetaharddiskpassword,Imovetheharddiskdrivetoanothercomputerbut
cannotunlocktheharddiskpasswordonthenewcomputer.
Solution:Yourcomputersupportsanenhancedpasswordalgorithm.Computersolderthanyoursmight
notsupportsuchasecurityfunction.
Solid-statedriveproblem
Problem:WhenyoucompressfilesorfoldersbyuseofthedatacompressionfunctionintheWindows
operatingsystem,andthendecompressthem,theprocessofwritingtoorreadingfromthefilesorfoldersis
slow.
Solution:ApplythediskdefragmentationtoolintheWindowsoperatingsystemforfasteraccesstothedata.
Softwareproblem
Problem:Aprogramdoesnotrunproperly.
Solution:Ensurethattheproblemisnotbeingcausedbytheprogram.
Checkthatyourcomputerhastheminimumrequiredmemorytoruntheprogram.Seethemanualssupplied
withtheprogram.
Checkthefollowing:
•Theprogramisdesignedtooperatewithyouroperatingsystem.
•Otherprogramsrunproperlyonyourcomputer.
•Thenecessarydevicedriversareinstalled.
•Theprogramworkswhenitisrunonsomeothercomputer.
Ifanerrormessageisdisplayedwhileyouareusingtheprogram,seethemanualsorhelpsystemsupplied
withtheprogram.
Iftheprogramstilldoesnotrunproperly,contactyourplaceofpurchaseoraservicerepresentativeforhelp.
USBproblem
Problem:AdeviceconnectedtotheUSBconnectordoesnotwork.
Solution:EnsurethattheUSBportisenabledintheThinkPadSetup.OpentheDeviceManagerwindow.
EnsurethattheUSBdevicesetupiscorrect,andthattheassignmentofcomputerresourceandthe
installationofthedevicedriverarecorrect.ToopentheDeviceManagerwindow,gotoControlPaneland
ensurethatyouviewControlPanelbyCategory,andclickHardwareandSound➙DeviceManager.Ifyou
arepromptedforanadministratorpasswordorconfirmation,typethepasswordorprovideconfirmation.
Referto“DiagnosingproblemswithLenovoCompanion”onpage73andrunadiagnostictestofthe
USBconnector.
Dockingstationproblem
Problem:Thecomputerdoesnotstartwhenyoutrytoturniton,anddoesnotrespondwhenyoutryto
resumeoperation.
88T470pUserGuide


90T470pUserGuide

Chapter8.Recoveryinformation
ThischapterprovidesinformationabouttheWindowsrecoverysolutionsontheWindows10operating
system.
Resettingyourcomputer
Ifyourcomputerdoesnotperformwell,youmightconsiderresettingyourcomputer.Intheresettingprocess,
youcanchoosetokeepyourfilesorremovethem,andthenreinstalltheWindowsoperatingsystem.
Toresetyourcomputer,dothefollowing:
Note:Theitemsinthegraphicaluserinterface(GUI)mightchangewithoutnotice.
1.OpentheStartmenu,andthenclickSettings➙Update&security➙Recovery.
2.IntheResetthisPCsection,clickGetstarted.
3.Followtheinstructionsonthescreentoresetyourcomputer.
Usingadvancedstartupoptions
Theadvancedstartupoptionsenableyoutodothefollowing:
•Changethefirmwaresettingsofthecomputer
•ChangethestartupsettingsoftheWindowsoperatingsystem
•Startthecomputerfromanexternaldevice
•RestoretheWindowsoperatingsystemfromasystemimage
Touseadvancedstartupoptions,dothefollowing:
Note:Theitemsinthegraphicaluserinterface(GUI)mightchangewithoutnotice.
1.OpentheStartmenu,andthenclickSettings➙Update&security➙Recovery.
2.IntheAdvancedstartupsection,clickRestartnow➙Troubleshoot➙Advancedoptions.
3.Selectastartupoptionyouwant,andthenfollowtheinstructionsonthescreen.
RecoveringyouroperatingsystemifWindows10failstostart
TheWindowsrecoveryenvironmentonyourcomputeroperatesindependentlyfromtheWindows10
operatingsystem.ItenablesyoutorecoverorrepairtheoperatingsystemeveniftheWindows10operating
systemfailstostart.
Aftertwoconsecutivefailedbootattempts,theWindowsrecoveryenvironmentstartsautomatically.Then
youcanchooserepairandrecoveryoptionsbyfollowingtheon-screeninstructions.
Note:Ensurethatyourcomputerisconnectedtoacpowerduringtherecoveryprocess.
CreatingandusingarecoveryUSBdrive
YoucancreatearecoveryUSBdriveasabackupfortheWindowsrecoveryprograms.Withtherecovery
USBdrive,youcantroubleshootandfixtheproblemsevenifthepreinstalledWindowsrecoveryprograms
aredamaged.
©CopyrightLenovo201791

ItisrecommendedthatyoucreatearecoveryUSBdriveasearlyaspossible.Ifyoudidnotcreatearecovery
USBdriveasaprecautionarymeasure,youcancontactLenovoCustomerSupportCenterandpurchase
onefromLenovo.ForalistoftheLenovoSupportphonenumbersforyourcountryorregion,goto:
http://www.lenovo.com/support/phone
CreatingarecoveryUSBdrive
TocreatearecoveryUSBdrive,youneedaUSBdrivewithatleast16GBofstoragecapacity.Theactual
USBcapacitythatisrequireddependsonthesizeoftherecoveryimage.
Attention:ThecreationprocesswilldeleteanythingstoredontheUSBdrive.Toavoiddataloss,makea
backupcopyofallthedatathatyouwanttokeep.
TocreatearecoveryUSBdrive,dothefollowing:
Note:Ensurethatyourcomputerisconnectedtoacpowerduringthefollowingprocess.
1.ConnectaproperUSBdrive(atleast16GBofstorage)tothecomputer.
2.Typerecoveryinthesearchboxonthetaskbar.ThenclickCreatearecoverydrive.
3.ClickYesintheUserAccountControlwindowtoallowtheRecoveryMediaCreatorprogramtostart.
4.IntheRecoveryDrivewindow,followtheinstructionsonthescreentocreatearecoveryUSBdrive.
UsingtherecoveryUSBdrive
Ifyoucannotstartyourcomputer,refertothecorrespondinginformationinthetopic“Troubleshooting”on
page74totrytosolvetheproblembyyourself.Ifyoustillcannotstartyourcomputer,usetherecovery
USBdrivetorecoveryourcomputer.
TousearecoveryUSBdrive,dothefollowing:
Note:Ensurethatyourcomputerisconnectedtoacpowerduringthefollowingprocess.
1.ConnecttherecoveryUSBdrivetothecomputer.
2.Turnonorrestartthecomputer.BeforetheWindowsoperatingsystemstarts,repeatedlypressF12.The
BootMenuwindowopens.
3.SelecttherecoveryUSBdriveasthebootdevice.
4.Selectapreferredkeyboardlayout.
5.ClickTroubleshoottodisplayoptionalrecoverysolutions.
6.Selectacorrespondingrecoverysolutionaccordingtoyoursituation.Thenfollowtheinstructionson
thescreentocompletetheprocess.
92T470pUserGuide

Chapter9.Replacingdevices
Thischapterprovidesinstructionsonhowtoinstallorreplacehardwareforyourcomputer.
Staticelectricityprevention
Staticelectricity,althoughharmlesstoyou,canseriouslydamagecomputercomponentsandoptions.
Improperhandlingofstatic-sensitivepartscancausedamagetothepart.Whenyouunpackanoptionora
CustomerReplaceableUnit(CRU),donotopenthestatic-protectivepackageuntiltheinstructionsdirect
youtoinstallthepart.
WhenyouhandleoptionsorCRUs,orperformanyworkinsidethecomputer,takethefollowingprecautions
toavoidstatic-electricitydamage:
•Limityourmovement.Movementcancausestaticelectricitytobuilduparoundyou.
•Alwayshandlecomponentscarefully.Handleadapters,memorymodules,andothercircuitboardsbythe
edges.Nevertouchexposedcircuitry.
•Preventothersfromtouchingthecomponents.
•Beforeyouinstallastatic-sensitiveoptionorCRU,doeitherofthefollowingtoreducestaticelectricityin
thepackageandyourbody:
–Touchthestatic-protectivepackagethatcontainstheparttoametalexpansion-slotcoverforat
leasttwoseconds.
–Touchthestatic-protectivepackagethatcontainstheparttootherunpaintedmetalsurfaceonthe
computerforatleasttwoseconds.
•Whenpossible,removethestatic-sensitivepartfromthestatic-protectivepackageandinstallthepart
withoutsettingitdown.Whenthisisnotpossible,placethestatic-protectivepackageonasmooth,
levelsurfaceandplacethepartonthepackage.
•Donotplacethepartonthecomputercoverorothermetalsurface.
Replacingtheremovablebattery
Beforeyoustart,read“Importantsafetyinformation”onpagevandprintthefollowinginstructions.
ThissystemsupportsonlybatteriesspeciallydesignedforthisspecificsystemandmanufacturedbyLenovo
oranauthorizedbuilder.Thesystemdoesnotsupportunauthorizedbatteriesorbatteriesdesignedforother
systems.Ifanunauthorizedbatteryorabatterydesignedforanothersystemisinstalled,thesystemdoes
notchargeandthefollowingmessageisdisplayed:
"Thebatteryinstalledisnotsupportedbythissystemandwillnotcharge.Replacethebatterywiththe
correctLenovobatteryforthissystem."
Attention:Lenovohasnoresponsibilityfortheperformanceorsafetyofunauthorizedbatteries,and
providesnowarrantiesforfailuresordamagearisingoutoftheiruse.
©CopyrightLenovo201793
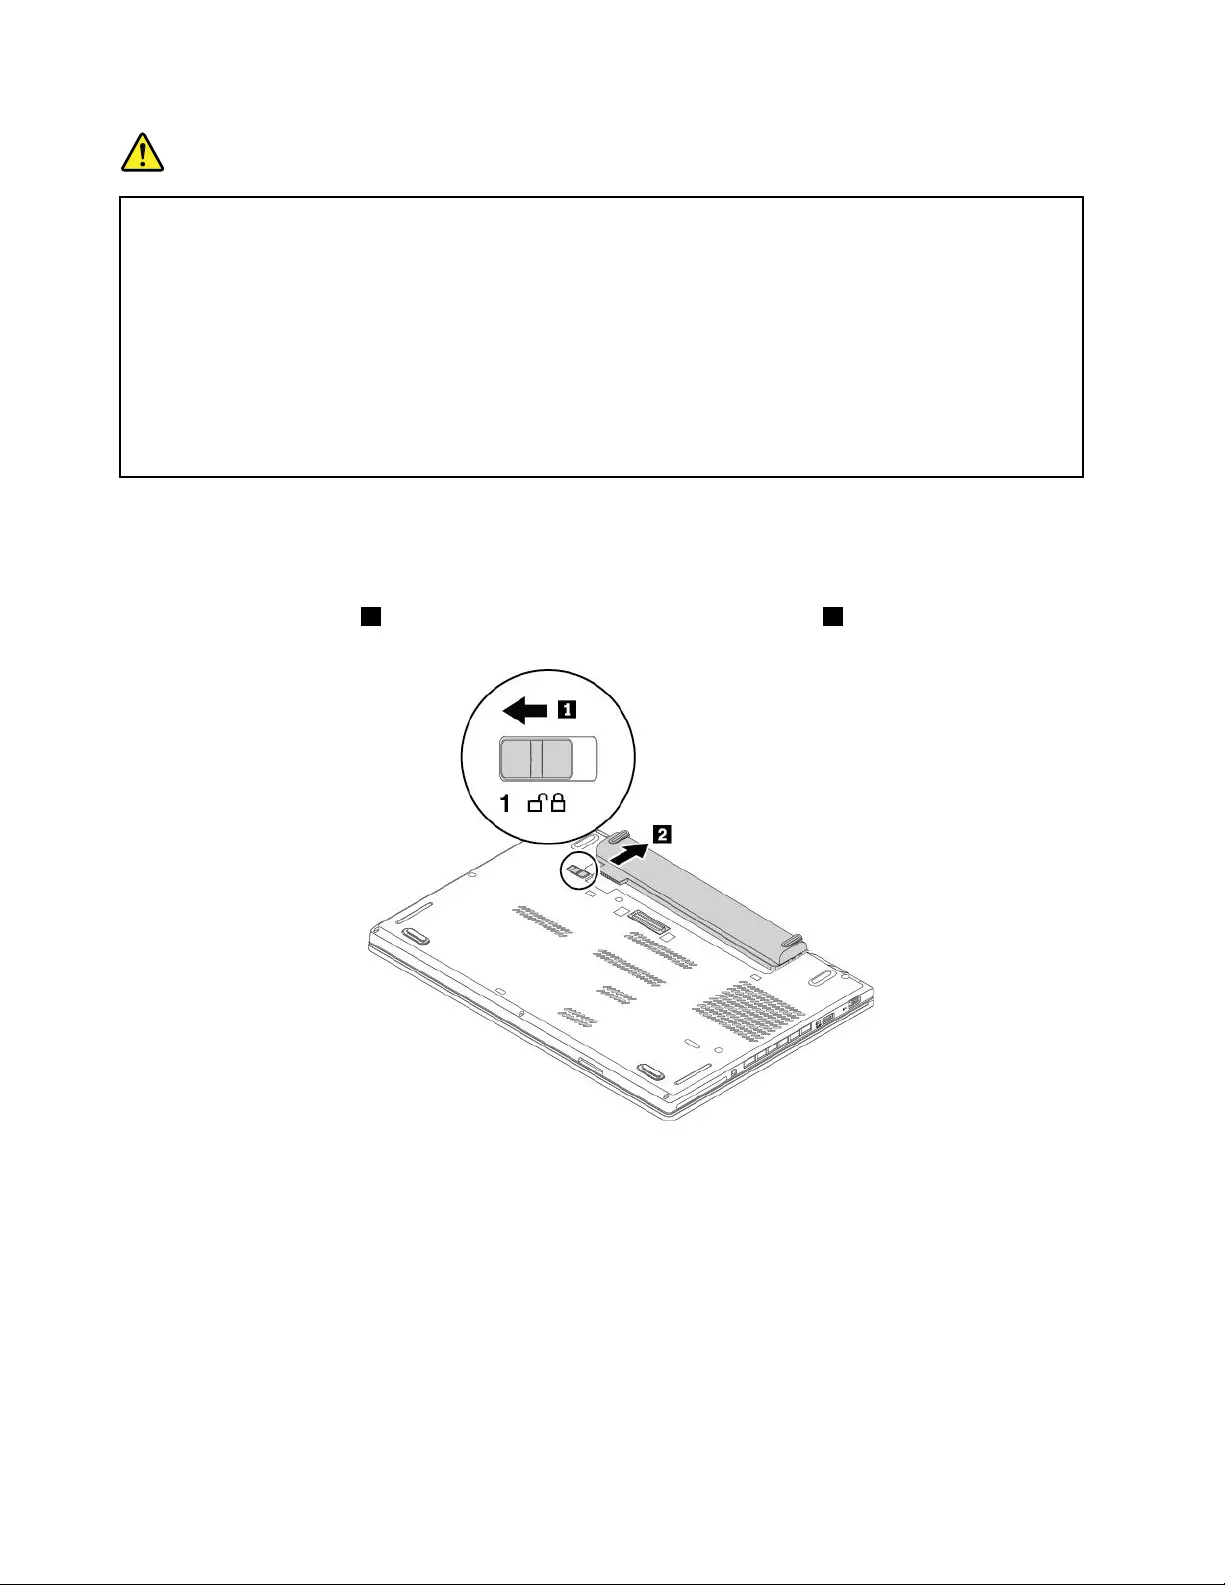
DANGER
Iftherechargeablebatteryisincorrectlyreplaced,thereisdangerofanexplosion.Thebattery
containsasmallamountofharmfulsubstances.Toavoidpossibleinjury:
•ReplaceonlywithabatteryofthetyperecommendedbyLenovo.
•Keepthebatteryawayfromfire.
•Donotexposeittoexcessiveheat.
•Donotexposeittowaterorrain.
•Donotshort-circuitit.
•Donotdrop,crush,puncture,orsubjecttostrongforces.Batteryabuseormishandlingcan
causethebatterytooverheat,whichcancausegassesorflameto"vent"fromthebattery.
Toreplacetheremovablebattery,dothefollowing:
1.Turnoffthecomputeranddisconnectitfromacpowerandallcable.
2.Closethecomputerdisplayandturnthecomputerover.
3.Slidethebatterylatch1totheunlockedposition,anddetachthebattery2fromthebasecover
ontheleft.
94T470pUserGuide

4.Slidetheotherbatterylatch1totheunlockedposition,anddetachthebattery2fromthebase
coverontheright.
5.Removethebattery.
6.Insertanewbatteryuntilitclicksintoplace.Ensurethatthebatterylatchesareinthelockedpositions.
7.Turnthecomputerover.Connecttheacpoweradapterandallcablestothecomputer.
ReplacingthemicroSIMcard
Beforeyoustart,read“Importantsafetyinformation”onpagevandprintthefollowinginstructions.
Chapter9.Replacingdevices95

MicroSIMcardisasmallplasticcardwithanIntegratedCircuit(IC)chipmountedononesideofthecard.
IfyourcomputersupportswirelessWAN,yourcomputermightrequireamicroSIMcardtoestablishwireless
WANconnections.Dependingonthemodel,youmightneedtopurchaseamicroSIMcardoramicroSIM
cardmightalreadybeinstalledinyourcomputer.Insomecountriesorregions,amicroSIMcardispartof
theshippingcontentsthatcomewithyourcomputer.
Attention:WheninstallingorremovingthemicroSIMcard,donottouchthemicroSIMcardmetal
connectors.
ToreplacethemicroSIMcard,dothefollowing:
1.Turnoffthecomputeranddisconnectitfromacpowerandallcable.
2.Locatethemicro-SIM-cardtrayattherightsideofthecomputeranddothefollowing:
a.Insertastraightenedpaperclipintotheholeinthemicro-SIM-cardtray1.Thetrayejects.Then,
slidethetrayoutofthecomputer.
b.GentlytakethemicroSIMcardoutofthetray2.
c.InstallanewmicroSIMcardintothemicro-SIM-cardtray.Notetheorientationofthenewcardand
ensurethatitisseatedcorrectly3.
d.Insertthetrayintothecomputer4.
3.Connecttheacpoweradapterandallcablestothecomputer.
Replacingthebasecoverassembly
Beforeyoustart,read“Importantsafetyinformation”onpagevandprintthefollowinginstructions.
Note:Dependingonthemodel,yourcomputermightlookslightlydifferentfromtheillustrationsinthistopic.
Toreplacethebasecoverassembly,dothefollowing:
1.Turnoffthecomputeranddisconnectitfromacpowerandallcable.
96T470pUserGuide

2.Closethecomputerdisplayandturnthecomputerover.
3.Removetheremovablebattery.See“Replacingtheremovablebattery”onpage93.
4.Removetherubbercaps.
5.RemovethemicroSIMcardtray.See“ReplacingthemicroSIMcard”onpage95.
6.Loosenthescrewsthatsecurethebasecoverassembly1.Then,pryupthelatches2andremove
thebasecoverassembly3.
Chapter9.Replacingdevices97

7.Installthenewbasecoverassembly1,andthentightenthescrews2.
8.Reinstalltherubbercaps.
9.ReinstallthemicroSIMcardtrayandtheremovablebattery.
10.Turnthecomputerover.Connecttheacpoweradapterandallcablestothecomputer.
Replacingthecoin-cellbattery
Beforeyoustart,read“Importantsafetyinformation”onpagevandprintthefollowinginstructions.
98T470pUserGuide

DANGER
Ifthecoin-cellbatteryisincorrectlyreplaced,thereisdangerofanexplosion.Thecoin-cellbattery
containsasmallamountofharmfulsubstances.Toavoidpossibleinjury:
•ReplaceonlywithabatteryofthetyperecommendedbyLenovo.
•Keepthebatteryawayfromfire.
•Donotexposeittoexcessiveheat.
•Donotexposeittowaterorrain.
•Donotshort-circuitit.
•Donotdrop,crush,puncturethebattery,ormakeitsubjecttostrongforces.Batteryabuseor
mishandlingcancausethebatterytooverheat,whichcancausegassesorflameto"vent"
fromthebatteryorcoin-cellbattery.
Toreplacethecoin-cellbattery,dothefollowing:
1.Turnoffthecomputeranddisconnectitfromacpowerandallcable.
2.Closethecomputerdisplayandturnthecomputerover.
3.Removetheremovablebattery.See“Replacingtheremovablebattery”onpage93.
4.Removethebasecoverassembly.See“Replacingthebasecoverassembly”onpage96.
5.Detachtheconnector1andremovethecoin-cellbattery2.
Chapter9.Replacingdevices99
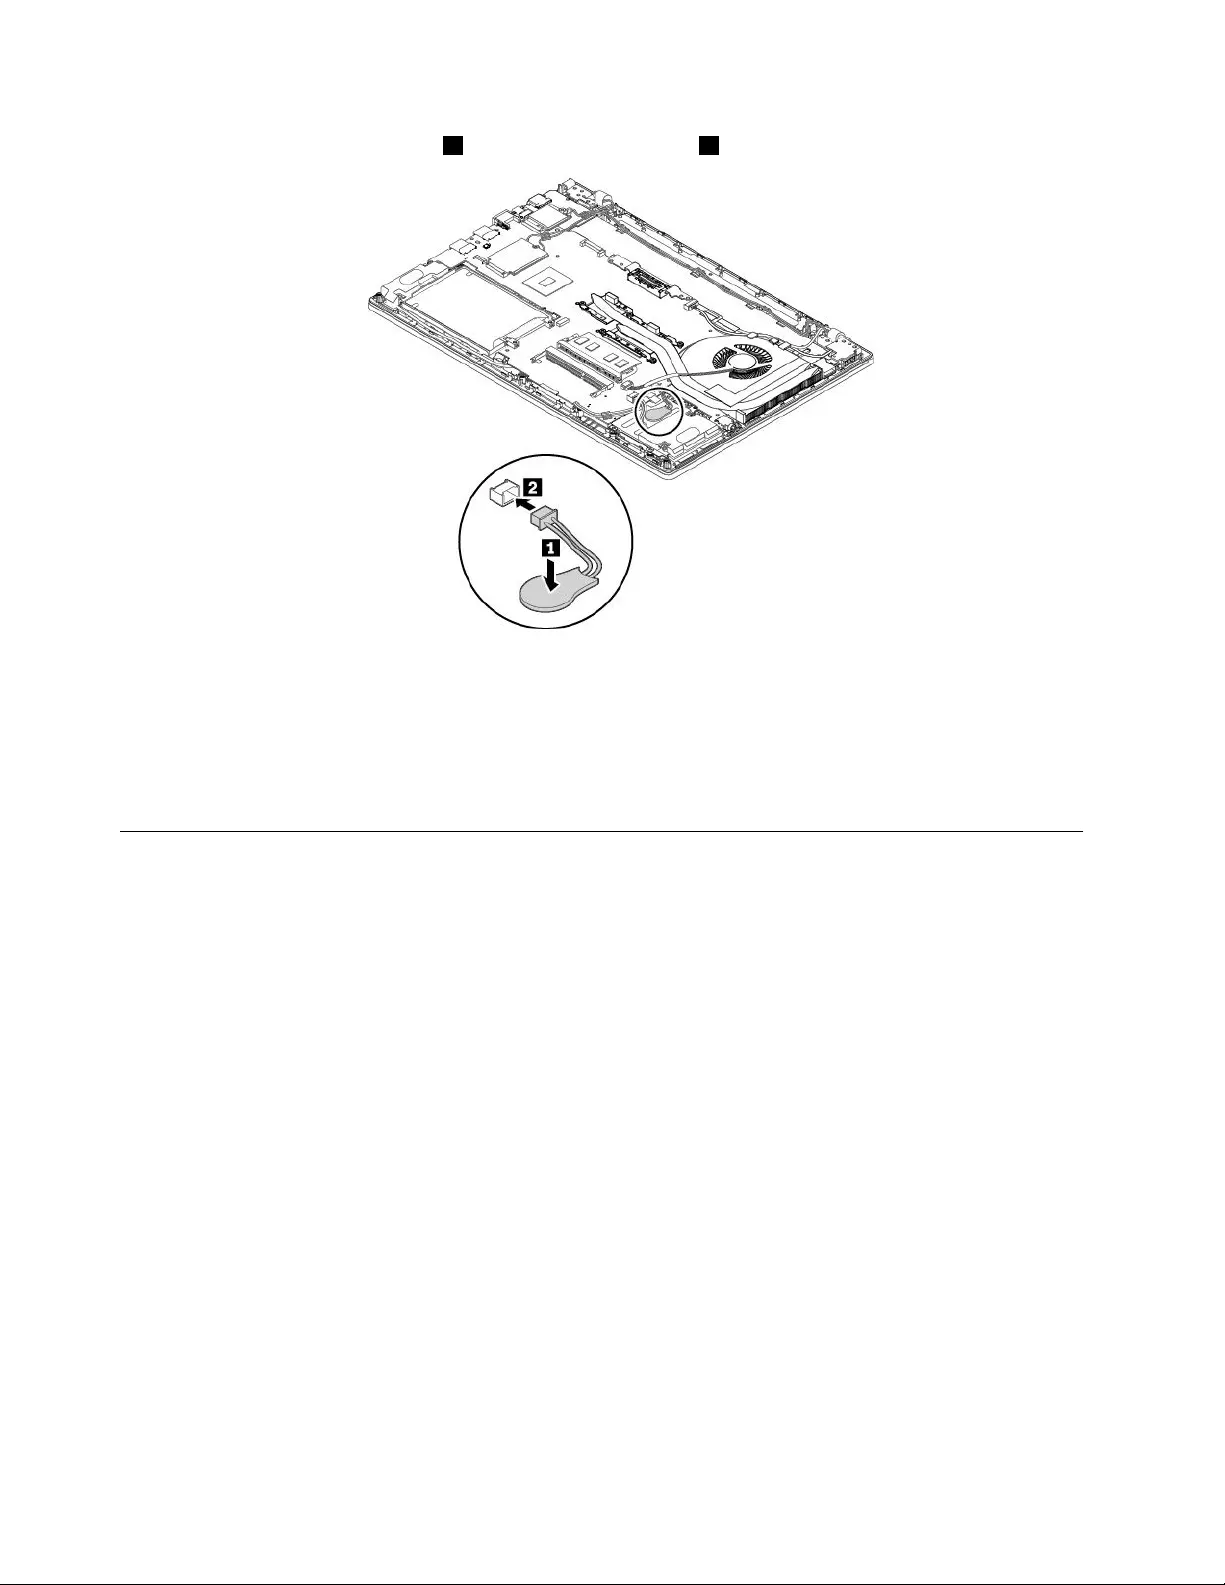
6.Installthenewcoin-cellbattery1andattachtheconnector2.
7.Reinstallthebasecoverassembly.
8.Reinstalltheremovablebattery.
9.Turnthecomputerover.Connecttheacpoweradapterandallcablestothecomputer.
Afteryoureplacethecoin-cellbattery,resetthesystemdateandtimeintheThinkPadSetupprogram.See
“Date/Timemenu”onpage64.
Replacingthekeyboard
Beforeyoustart,read“Importantsafetyinformation”onpagevandprintthefollowinginstructions.
Note:Youmightbeinstructedtoslidethekeyboardframeforwardorbackwardinsomeofthefollowing
steps.Inthiscase,ensurethatyoudonotpressorholdthekeyswhileslidingthekeyboardframe.
Otherwise,thekeyboardframecannotbemoved.
Toremovethekeyboard,dothefollowing:
1.Turnoffthecomputeranddisconnectitfromacpowerandallcable.
2.Closethecomputerdisplayandturnthecomputerover.
3.Removetheremovablebattery.See“Replacingtheremovablebattery”onpage93.
100T470pUserGuide


6.Torevealthescrewheadsbeneaththekeyboardframe,usetheflatendofthemulti-tooltoslidethe
keyboardforwardby2.5mm(0.1inches).
7.Usethecrossendofthemulti-tooltoloosenthescrews.
102T470pUserGuide
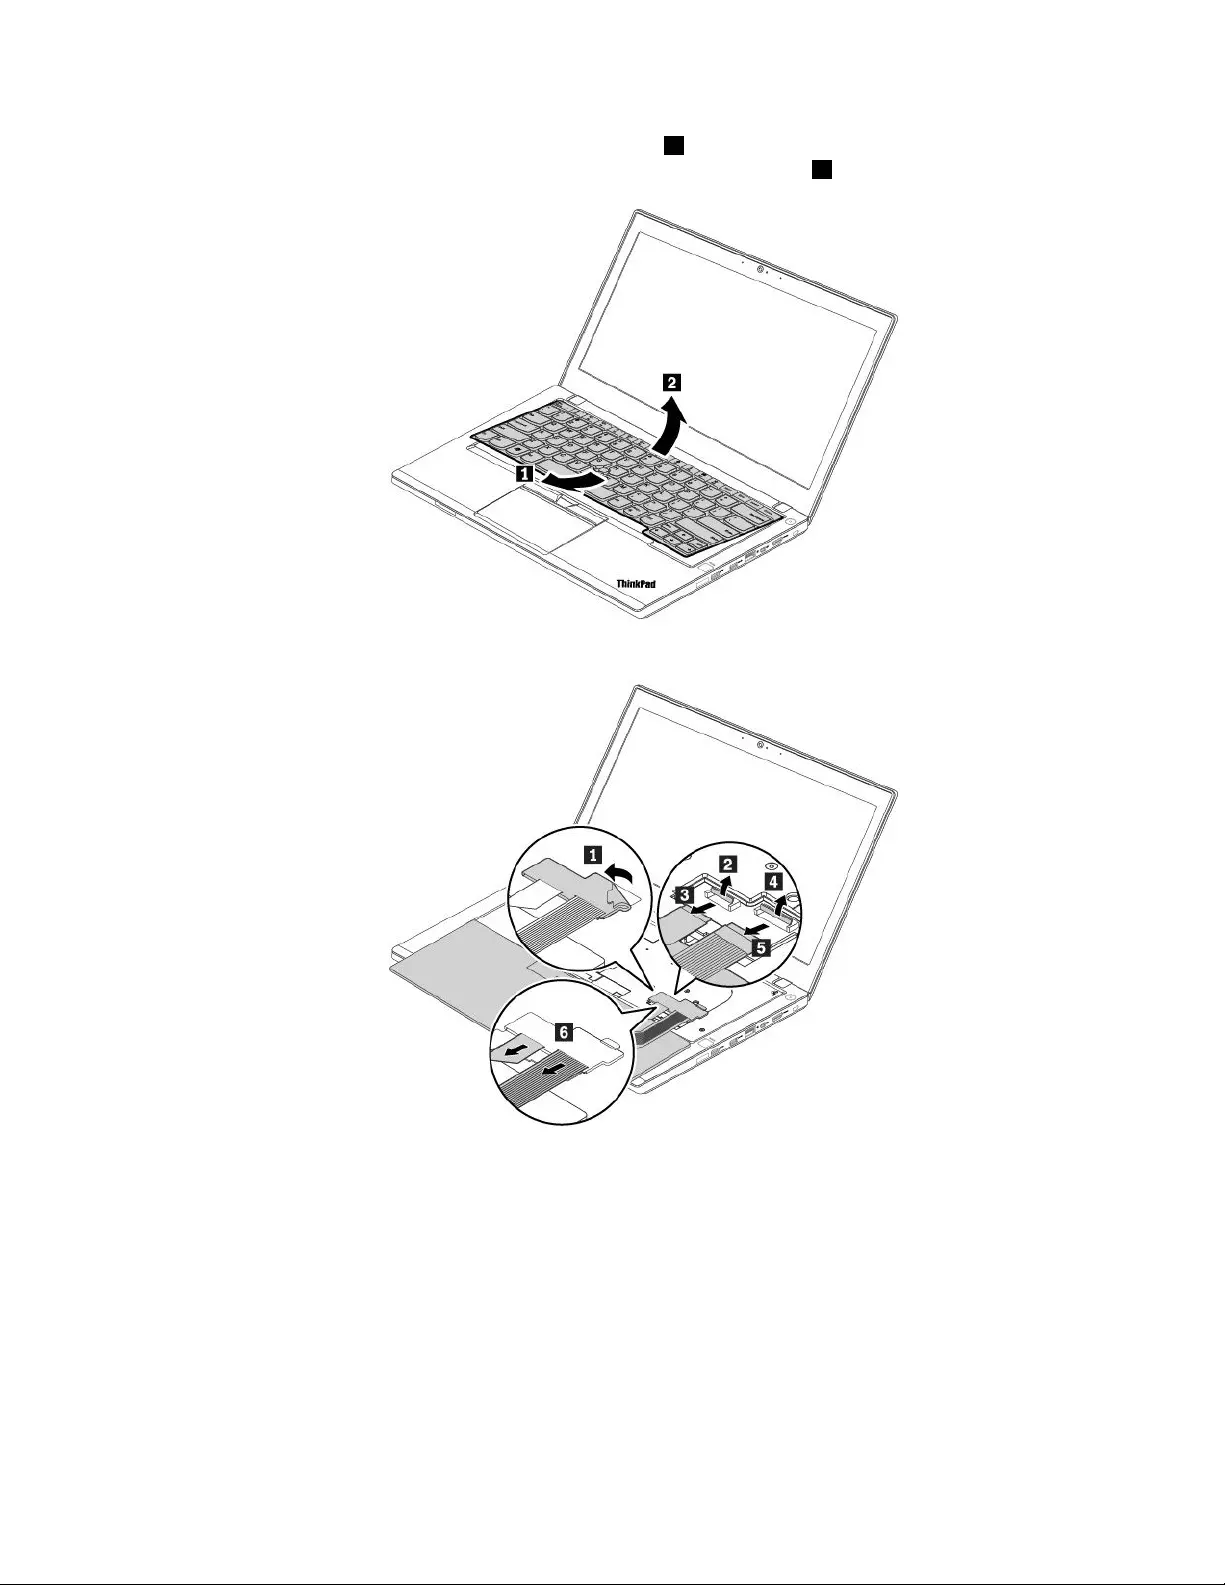
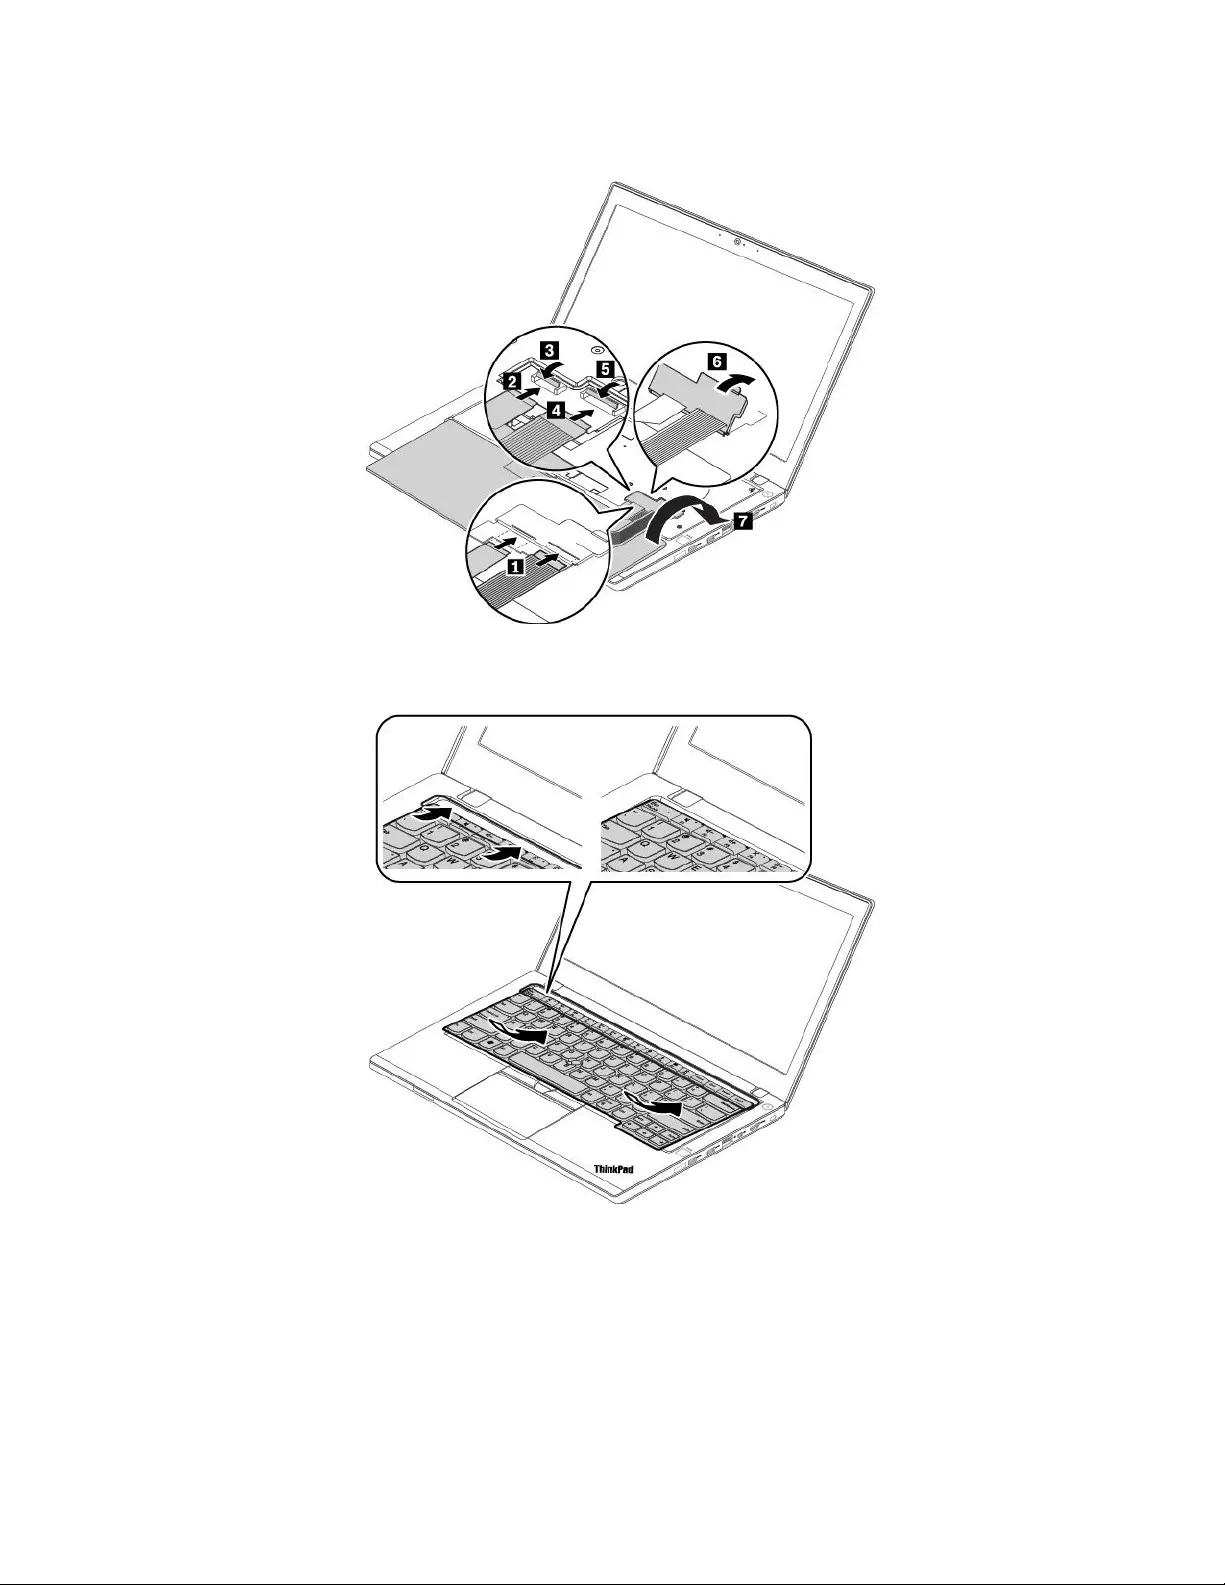
1.Attachtheconnectors,andthenturnthekeyboardover.
2.Insertthekeyboardintothekeyboardbezelasshown.Ensurethatthefrontedgeofthekeyboard(the
edgethatisclosetothedisplay)isundertheframeofthekeyboardbezel.
104T470pUserGuide


5.Slidethekeyboardframebackwardby2.5mm(0.1inches)withtheflatendofthekeyboardmulti-tool.
Ensurethatyouhidethelatchesofthekeyboardframeunderthekeyboardbezel.
6.Inserttheflatendofthekeyboardmulti-toolintothesidesofthekeyboardasshowntopushthe
keyboardframebackward.Ensurethatthereisnogapbetweenthekeyboardframeandkeyboardbezel.
7.Reinstalltherubbercaps.
106T470pUserGuide

8.Reinstalltheremovablebattery.
9.Turnthecomputerover.Connecttheacpoweradapterandallcables.
Replacingtheinternalstoragedrive
Beforeyoustart,read“Importantsafetyinformation”onpagevandprintthefollowinginstructions.
Attention:Theinternalstoragedrive(suchasharddiskdrive,solid-statedrive,orhybriddrive)issensitive.
Inappropriatehandlingmightcausedamageandpermanentlossofdata.
Whenhandlingtheinternalstoragedrive,observethefollowingguidelines:
•Replacetheinternalstoragedriveonlyforupgradeorrepair.Theinternalstoragedriveisnotdesigned
forfrequentchangesorreplacement.
•Beforereplacingtheinternalstoragedrive,makeabackupcopyofallthedatathatyouwanttokeep.
•Donottouchthecontactedgeoftheinternalstoragedrive.Otherwisetheinternalstoragedrivemightget
damaged.
•Donotapplypressuretotheinternalstoragedrive.
•Donotmaketheinternalstoragedrivesubjecttophysicalshocksorvibration.Puttheinternalstorage
driveonasoftmaterial,suchascloth,toabsorbphysicalshocks.
2.5-inchharddiskdrive
Toreplacethe2.5-inchharddiskdrive,dothefollowing:
1.Turnoffthecomputeranddisconnectitfromacpowerandallcable.
2.Closethecomputerdisplayandturnthecomputerover.
3.Removetheremovablebattery.See“Replacingtheremovablebattery”onpage93.
4.Removethebasecoverassembly.See“Replacingthebasecoverassembly”onpage96.
5.Removethescrewthatsecurestheharddiskdrive1.Then,removetheharddiskdrive2.
Chapter9.Replacingdevices107
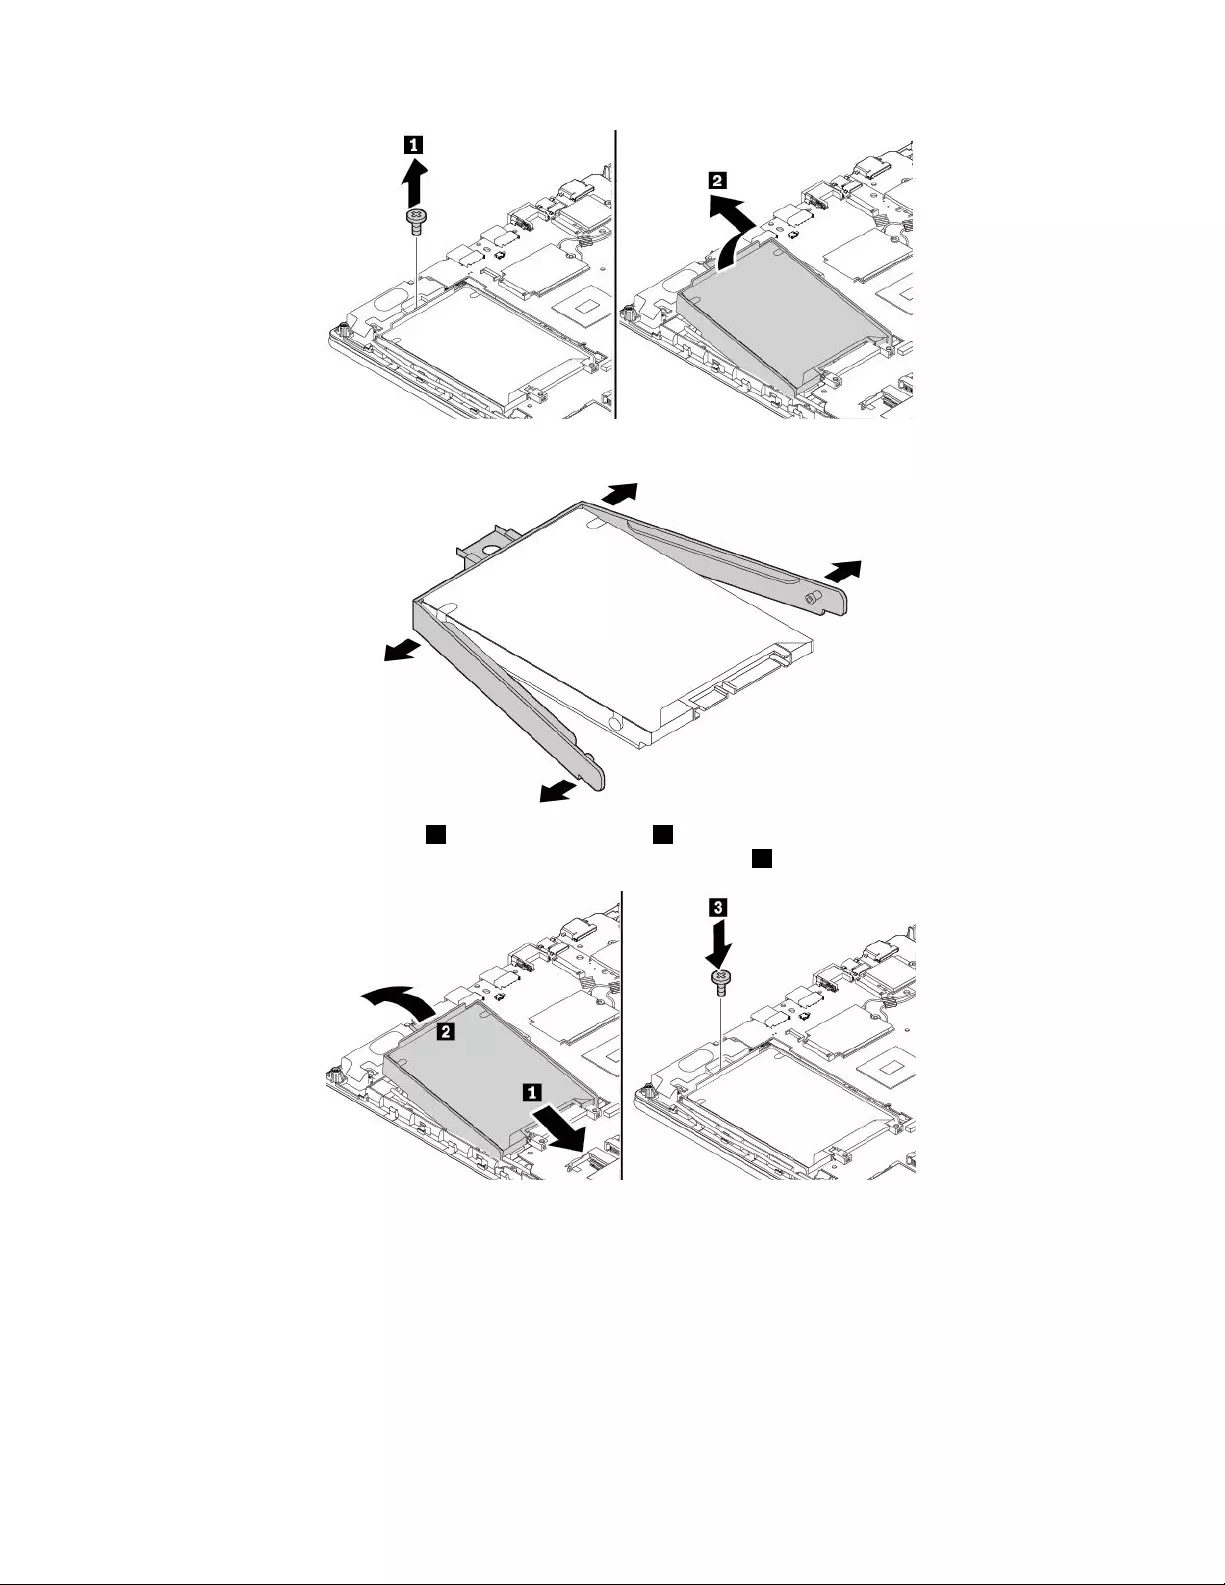
6.Detachthebracketfromtheharddiskdrive,andattachthebrackettothenewharddiskdrive.
7.Insertthenewharddiskdrive1andpivotitdownward2.Ensurethatthenewharddiskdriveisseated
inplace.Then,installthescrewtosecurethenewharddiskdrive3.
8.Reinstallthebasecoverassembly.
9.Reinstalltheremovablebattery.
10.Turnthecomputerover.Connecttheacpoweradapterandallcables.
M.2solid-statedriveinthehard-disk-drivebay
ToreplacetheM.2solid-statedriveinstalledinthehard-disk-drivebay,dothefollowing:
1.Turnoffthecomputeranddisconnectitfromacpowerandallcable.
2.Closethecomputerdisplayandturnthecomputerover.
3.Removetheremovablebattery.See“Replacingtheremovablebattery”onpage93.
108T470pUserGuide
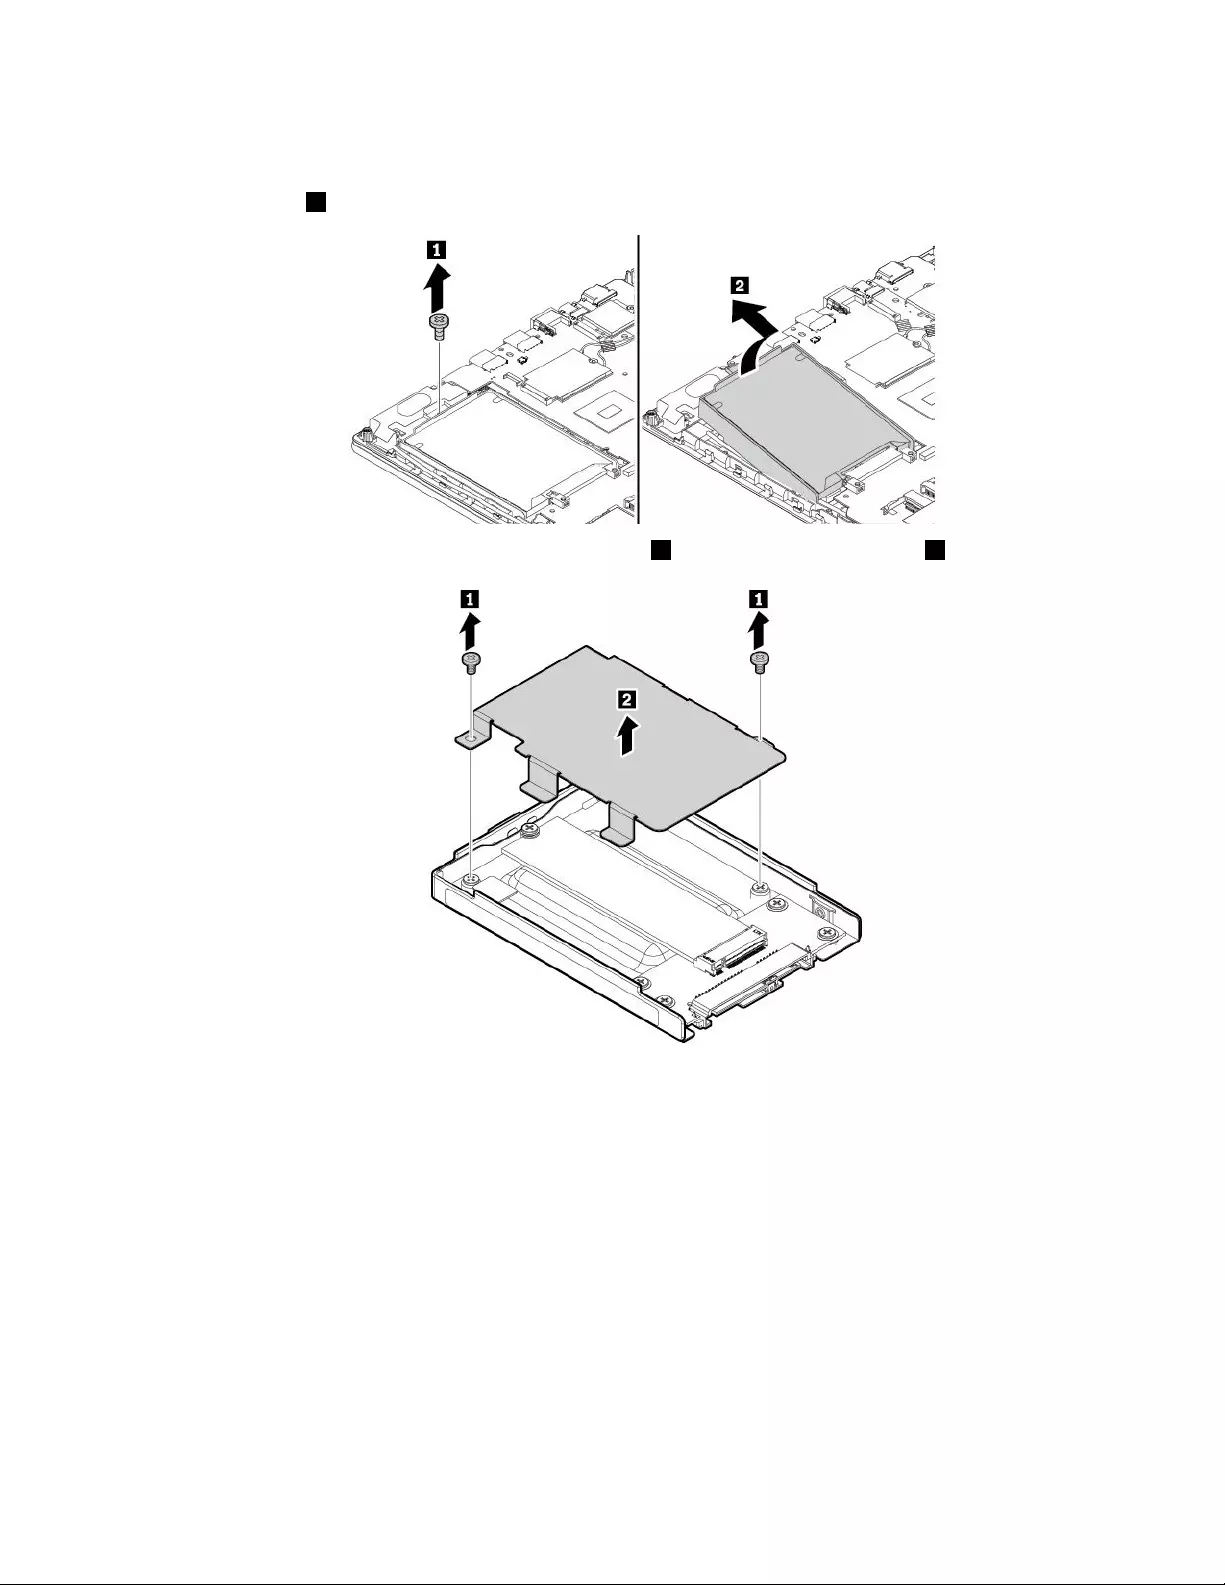

7.RemovethescrewthatsecurestheM.2solid-statedrive.Thedriveisreleasedfromthesecured
positionandpivotsupward.
8.RemovetheM.2solid-statedriveoutoftheslot.
9.AlignthecontactedgeofthenewM.2solid-statedrivewiththekeyintheslot1.Thencarefullyinsert
thenewdriveintotheslotatanangleofabout20degrees.Pivotthenewdrivedownward2.
110T470pUserGuide
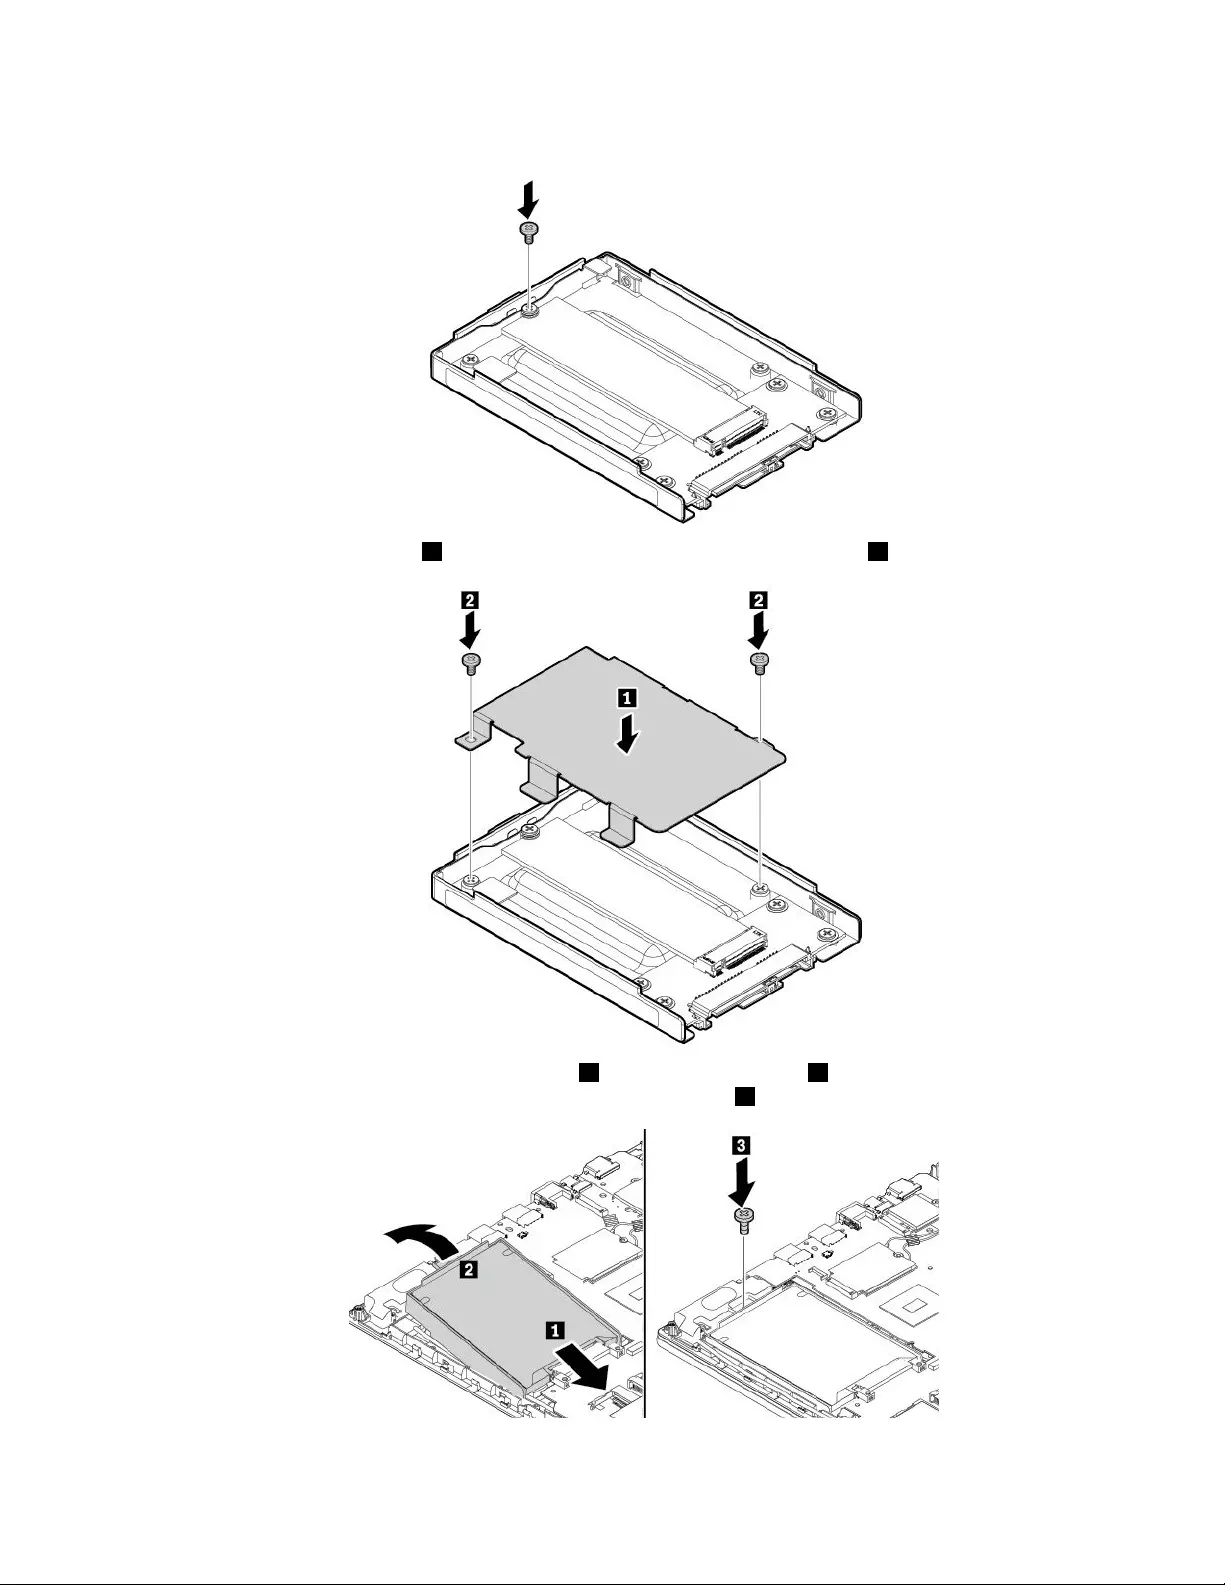
10.InstallthescrewtosecuretheM.2solid-statedriveinplace.
11.Installtheprotectivecover1andtheninstallthescrewstosecurethecover2.
12.InsertthenewM.2solid-state-driveadapter1andpivotitdownward2.Ensurethattheadapteris
seatedinplace.Then,installthescrewtosecuretheadapter3.
13.Reinstallthebasecoverassembly.
Chapter9.Replacingdevices111

14.Reinstalltheremovablebattery.
15.Turnthecomputerover.Connecttheacpoweradapterandallcables.
Replacingthewireless-WANcard
Thefollowinginformationonlyappliestocomputermodelswithuser-installablemodules.
Beforeyoustart,read“Importantsafetyinformation”onpagevandprintthefollowinginstructions.
Toreplacethewireless-WANcard,dothefollowing:
1.Turnoffthecomputeranddisconnectitfromacpowerandallcable.
2.Closethecomputerdisplayandturnthecomputerover.
3.Removetheremovablebattery.See“Replacingtheremovablebattery”onpage93.
4.Removethebasecoverassembly.See“Replacingthebasecoverassembly”onpage96.
5.Toremovethewireless-WANcard,dothefollowing:
a.AfilmmightcoverthewirelessWANcard.ToaccessthewirelessWANcard,openthefilmfirst1.
b.Ifatoolisprovidedwiththenewwireless-WANcardtohelpyoudisconnectcables,usethetool
todisconnectthecablesfromthewireless-WANcard2.Ifnosuchatoolisprovided,holdthe
cableconnectorwithyourfingersandgentlydisconnecteachcablefromthewireless-WANcard.
Thenremovethescrew3.Thecardpopsup.
c.Carefullyremovethewireless-WANcardoutoftheslot4.
112T470pUserGuide

6.Toinstallanewwireless-WANcard,dothefollowing:
a.Alignthecontactedgeofthenewwireless-WANcardwiththekeyintheslot.Thencarefullyinsert
thecardintotheslotatanangleofabout20degrees.Pivotthecarddownward1.
b.Installthescrewtosecurethewireless-WANcardinplace2.Connectthecablestothecard.
Ensurethatyouattachtheredcabletothemainconnectorandthebluecabletotheauxiliary
connectoronthecard3.
7.Reinstallthebasecoverassembly.
8.Reinstalltheremovablebattery.
9.Turnthecomputerover.Connecttheacpoweradapterandallcablestothecomputer.
Replacingamemorymodule
Beforeyoustart,read“Importantsafetyinformation”onpagevandprintthefollowinginstructions.
Increasingmemorycapacityisaneffectivewaytomakeprogramsrunfaster.Youcanincreasememory
capacitybyreplacingoraddingamemorymodule.
Note:Theoperatingspeedofthememorymodulehasdependencyonthesystemconfiguration.Insome
conditions,thememorymoduleinyourcomputermightnotbeabletooperateatthemaximumspeed.
Attention:Donottouchthecontactedgeofthememorymodule.Otherwisethememorymodulemightget
damaged.
Toreplaceamemorymodule,dothefollowing:
1.Turnoffthecomputeranddisconnectitfromacpowerandallcable.
2.Closethecomputerdisplayandturnthecomputerover.
3.Removetheremovablebattery.See“Replacingtheremovablebattery”onpage93.
4.Removethebasecoverassembly.See“Replacingthebasecoverassembly”onpage96.
Chapter9.Replacingdevices113
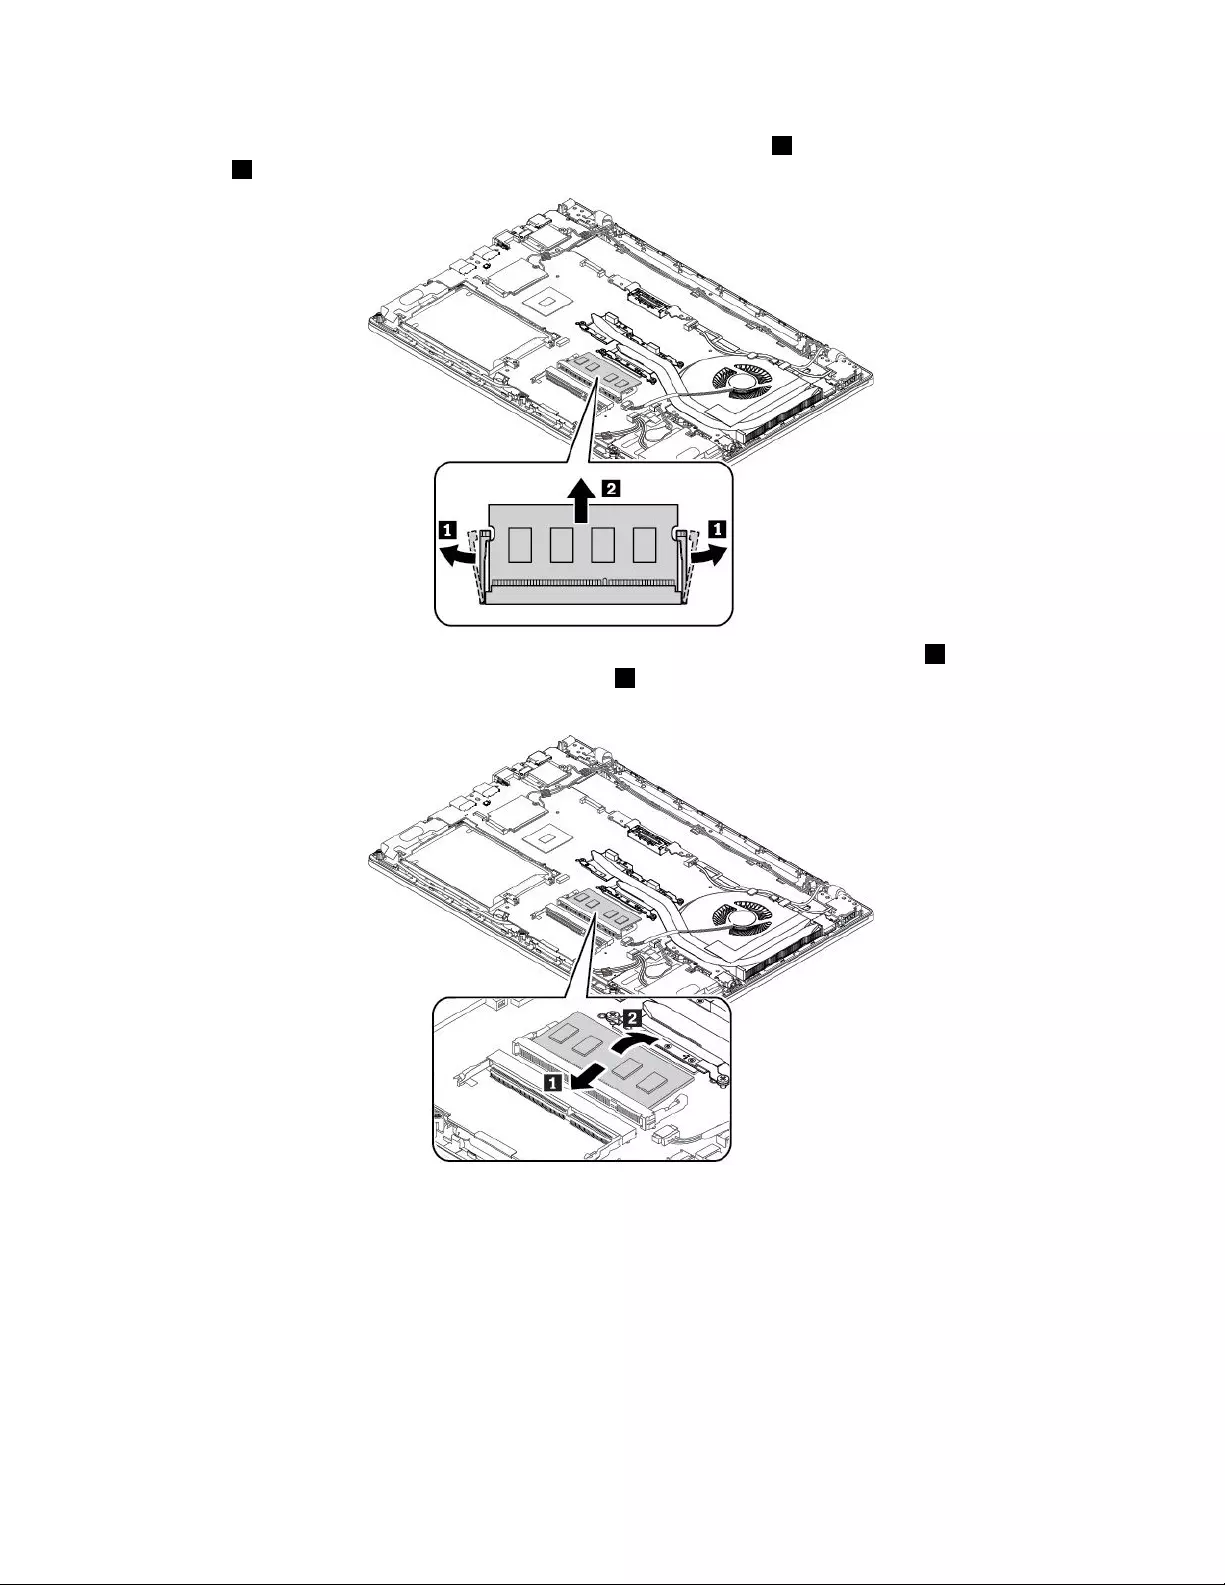
5.Openthelatchesonbothsidesofthememoryslotatthesametime1,andthenremovethememory
module2.
6.Insertthenewmemorymoduleintothememoryslotatanangleofabout20degrees1.Pivotthe
memorymoduledownwarduntilitsnapsintoplace2.Ensurethatthememorymoduleisfirmlyinstalled
inthememoryslotandcannotbemovedeasily.
7.Reinstallthebasecoverassembly.
8.Reinstalltheremovablebattery.
9.Turnthecomputerover.Connecttheacpoweradapterandallcablestothecomputer.
114T470pUserGuide

Chapter10.Gettingsupport
ThischapterprovidesinformationaboutgettinghelpandsupportfromLenovo.
BeforeyoucontactLenovo
Often,youcansolveyourcomputerproblemsbyreferringtotheinformationintheexplanationsoferror
codes,runningdiagnosticprograms,orbyconsultingtheLenovoSupportWebsite.
Registeringyourcomputer
RegisteryourcomputerwithLenovo.Formoreinformation,see“Registeringyourcomputer”onpage15.
Downloadingsystemupdates
Downloadingupdatedsoftwaremightresolveproblemsyouexperiencewithyourcomputer.
Todownloadupdatedsoftware,gotothefollowingWebsiteandfollowtheinstructionsonthescreen:
http://www.lenovo.com/support
Recordinginformation
BeforeyoutalktoaLenovorepresentative,recordthefollowingimportantinformationaboutyourcomputer.
Recordingproblemsymptomsanddetails
Collecttheanswerstothefollowingquestionsbeforeyoucallforhelp.Then,youareabletogethelp
asquicklyaspossible.
•Whatistheproblem?Isitcontinuousorintermittent?
•Isthereanerrormessage?Whatistheerrorcode,ifany?
•Whatoperatingsystemareyouusing?Whichversion?
•Whichsoftwareapplicationswererunningatthetimeoftheproblem?
•Cantheproblembereproduced?Ifso,how?
Recordingsysteminformation
Theserialnumberlabelisonthebottomofyourcomputer.Recordthemachinetypeandtheserialnumber.
•WhatisthenameofyourLenovoproduct?
•Whatisthemachinetype?
•Whatistheserialnumber?
Gettinghelpandservice
Ifyouneedhelp,service,technicalassistance,ormoreinformationaboutLenovoproducts,youwillfinda
widevarietyofsourcesavailablefromLenovotoassistyou.
Informationaboutyourcomputerandpreinstalledsoftware,ifany,isavailableinthedocumentationthat
comeswithyourcomputerorontheLenovoSupportWebsiteathttp://www.lenovo.com/support.The
documentationincludesprintedbooks,onlinebooks,readmefiles,andhelpfiles.
©CopyrightLenovo2017115

MicrosoftServicePacksarethelatestsoftwaresourceforWindowsproductupdates.Theyareavailable
throughWebdownload(connectionchargesmightapply)orthroughdiscs.Formorespecificinformation
andlinks,gotohttps://www.microsoft.com.Lenovoofferstechnicalassistancewithinstallationof,or
questionsrelatedto,ServicePacksforyourLenovo-preinstalledMicrosoftWindowsproduct.Formore
information,contacttheCustomerSupportCenter.
LenovoSupportWebsite
TechnicalsupportinformationisavailableontheLenovoSupportWebsiteathttp://www.lenovo.com/support.
ThisWebsiteisupdatedwiththelatestsupportinformationsuchasthefollowing:
•Driversandsoftware
•Diagnosticsolutions
•Productandservicewarranty
•Productandpartsdetails
•Userguidesandmanuals
•Knowledgebaseandfrequentlyaskedquestions
CallingLenovo
Ifyouhavetriedtocorrecttheproblemyourselfandstillneedhelp,duringthewarrantyperiod,youcan
gethelpandinformationbytelephonethroughtheCustomerSupportCenter.Thefollowingservicesare
availableduringthewarrantyperiod:
•Problemdetermination-Trainedpersonnelareavailabletoassistyouwithdeterminingifyouhavea
hardwareproblemanddecidingwhatactionisnecessarytofixtheproblem.
•Lenovohardwarerepair-IftheproblemisdeterminedtobecausedbyLenovohardwareunderwarranty,
trainedservicepersonnelareavailabletoprovidetheapplicablelevelofservice.
•Engineeringchangemanagement-Occasionally,theremightbechangesthatarerequiredafteraproduct
hasbeensold.Lenovooryourreseller,ifauthorizedbyLenovo,willmakeselectedEngineeringChanges
(ECs)thatapplytoyourhardwareavailable.
Thefollowingitemsarenotcovered:
•ReplacementoruseofpartsnotmanufacturedfororbyLenovoornonwarrantedparts
•Identificationofsoftwareproblemsources
•ConfigurationofUEFIBIOSaspartofaninstallationorupgrade
•Changes,modifications,orupgradestodevicedrivers
•Installationandmaintenanceofnetworkoperatingsystems(NOS)
•Installationandmaintenanceofprograms
ForthetermsandconditionsoftheLenovoLimitedWarrantythatapplytoyourLenovohardwareproduct,
see“Warrantyinformation”intheSafety,Warranty,andSetupGuidethatcomeswithyourcomputer.
Ifpossible,benearyourcomputerwhenyoumakeyourcall.Ensurethatyouhavedownloadedthemost
currentdriversandsystemupdates,rundiagnostics,andrecordedinformationbeforeyoucall.Whencalling
fortechnicalassistance,havethefollowinginformationavailable:
•Machinetypeandmodel
•Serialnumbersofyourcomputer,monitor,andothercomponents,oryourproofofpurchase
•Descriptionoftheproblem
•Exactwordingofanyerrormessages
•Hardwareandsoftwareconfigurationinformationforyoursystem
116T470pUserGuide

Telephonenumbers
ForalistoftheLenovoSupportphonenumbersforyourcountryorregion,goto
http://www.lenovo.com/support/phoneorrefertotheSafety,Warranty,andSetupGuidethatcomeswith
yourcomputer.
Note:Phonenumbersaresubjecttochangewithoutnotice.Thelatestphonenumbersareavailableat
http://www.lenovo.com/support/phone.Ifthenumberforyourcountryorregionisnotprovided,contact
yourLenovoresellerorLenovomarketingrepresentative.
Purchasingadditionalservices
Duringandafterthewarrantyperiod,youcanpurchaseadditionalservices.Serviceavailabilityandservice
namemightvarybycountryorregion.
Formoreinformationabouttheseservices,gotohttp://www.lenovo.com/essentials.
Chapter10.Gettingsupport117

118T470pUserGuide

AppendixA.SupplementalinformationabouttheUbuntu
operatingsystem
Inlimitedcountriesorregions,Lenovoofferscustomersanoptiontoordercomputerswiththepreinstalled
Ubuntu®operatingsystem.
IftheUbuntuoperatingsystemisavailableonyourcomputer,readthefollowinginformationbeforeyouuse
thecomputer.IgnoreanyinformationrelatedtoWindows-basedprograms,utilities,andLenovopreinstalled
applicationsinthisdocumentation.
AccessingtheLenovoLimitedWarranty
ThisproductiscoveredbythetermsoftheLenovoLimitedWarranty(LLW),versionL505-0010-0208/2011.
YoucanviewtheLLWinanumberoflanguagesfromthefollowingWebsite.ReadtheLenovoLimited
Warrantyat:
http://www.lenovo.com/warranty/llw_02
TheLLWalsoispreinstalledonthecomputer.ToaccesstheLLW,gotothefollowingdirectory:
/usr/share/doc/lenovo-doc
IfyoucannotviewtheLLWeitherfromtheWebsiteorfromyourcomputer,contactyourlocalLenovooffice
orresellertoobtainaprintedversionoftheLLW.
AccessingtheUbuntuhelpsystem
TheUbuntuhelpsystemprovidesinformationabouthowtousetheUbuntuoperatingsystem.Toaccessthe
helpsystemfromtheUnity,moveyourpointertotheLaunchbar,andthenclicktheHelpicon.Ifyoucannot
findtheHelpiconfromtheLaunchbar,clicktheSearchicon,andtypeHelptosearchit.
TolearnmoreabouttheUbuntuoperatingsystem,goto:
http://www.ubuntu.com
Gettingsupportinformation
Ifyouneedhelp,service,technicalassistance,ormoreinformationabouttheUbuntuoperatingsystemor
otherapplications,contacttheprovideroftheUbuntuoperatingsystemortheprovideroftheapplication.
Ifyouneedtheserviceandsupportforhardwarecomponentsshippedwithyourcomputer,contact
Lenovo.FormoreinformationabouthowtocontactLenovo,refertotheUserGuideandSafety,Warranty,
andSetupGuide.
ToaccessthelatestUserGuideandSafety,Warranty,andSetupGuide,goto:
http://www.lenovo.com/support
©CopyrightLenovo2017119

120T470pUserGuide

AppendixB.Regulatoryinformation
ThischapterprovidesregulatoryandcomplianceinformationaboutLenovoproducts.
Certification-relatedinformation
Productname:ThinkPadT470p
ComplianceID:TP00077B
Machinetypes:20J6and20J7
Thelatestcomplianceinformationisavailableat:
http://www.lenovo.com/compliance
Wireless-relatedinformation
Thistopicprovideswireless-relatedinformationaboutLenovoproducts.
Wirelessinteroperability
Wireless-LANcardisdesignedtobeinteroperablewithanywireless-LANproductthatisbasedonDirect
SequenceSpreadSpectrum(DSSS),ComplementaryCodeKeying(CCK),and/orOrthogonalFrequency
DivisionMultiplexing(OFDM)radiotechnology,andiscompliantto:
•The802.11b/gStandard,802.11a/b/g,802.11n,or802.11aconwireless-LANs,asdefinedandapproved
bytheInstituteofElectricalandElectronicsEngineers.
•TheWirelessFidelity(Wi-Fi®)certificationasdefinedbytheWi-FiAlliance®.
YourBluetoothcardiscompliantwithBluetoothSpecification4.1asdefinedbytheBluetoothSpecial
InterestGroupSIG.ItsupportsWindows10in-boxBluetoothprofiles.
Usageenvironmentandyourhealth
Thiscomputercontainsintegratedwirelesscardsthatoperatewithintheguidelinesidentifiedbyradio
frequency(RF)safetystandardsandrecommendations;therefore,Lenovobelievesthisproductissafefor
usebyconsumers.Thesestandardsandrecommendationsreflecttheconsensusoftheworldwidescientific
community,andresultfromdeliberationsofpanelsandcommitteesofscientists,whocontinuallyreviewand
interprettheextensiveresearchliterature.
Insomesituationsorenvironments,theuseofwirelessdevicesmightberestrictedbytheproprietorofa
buildingorresponsiblerepresentativesofanorganization.Forexample,thesesituationsandareasmight
includethefollowing:
•Onboardofairplanes,inhospitalsornearpetrolstations,blastingareas(withelectro-explosivedevices),
medicalimplantsorbody-wornelectronicmedicaldevices,suchaspacemakers.
•Inanyotherenvironmentwheretheriskofinterferencetootherdevicesorservicesisperceivedor
identifiedasharmful.
©CopyrightLenovo2017121
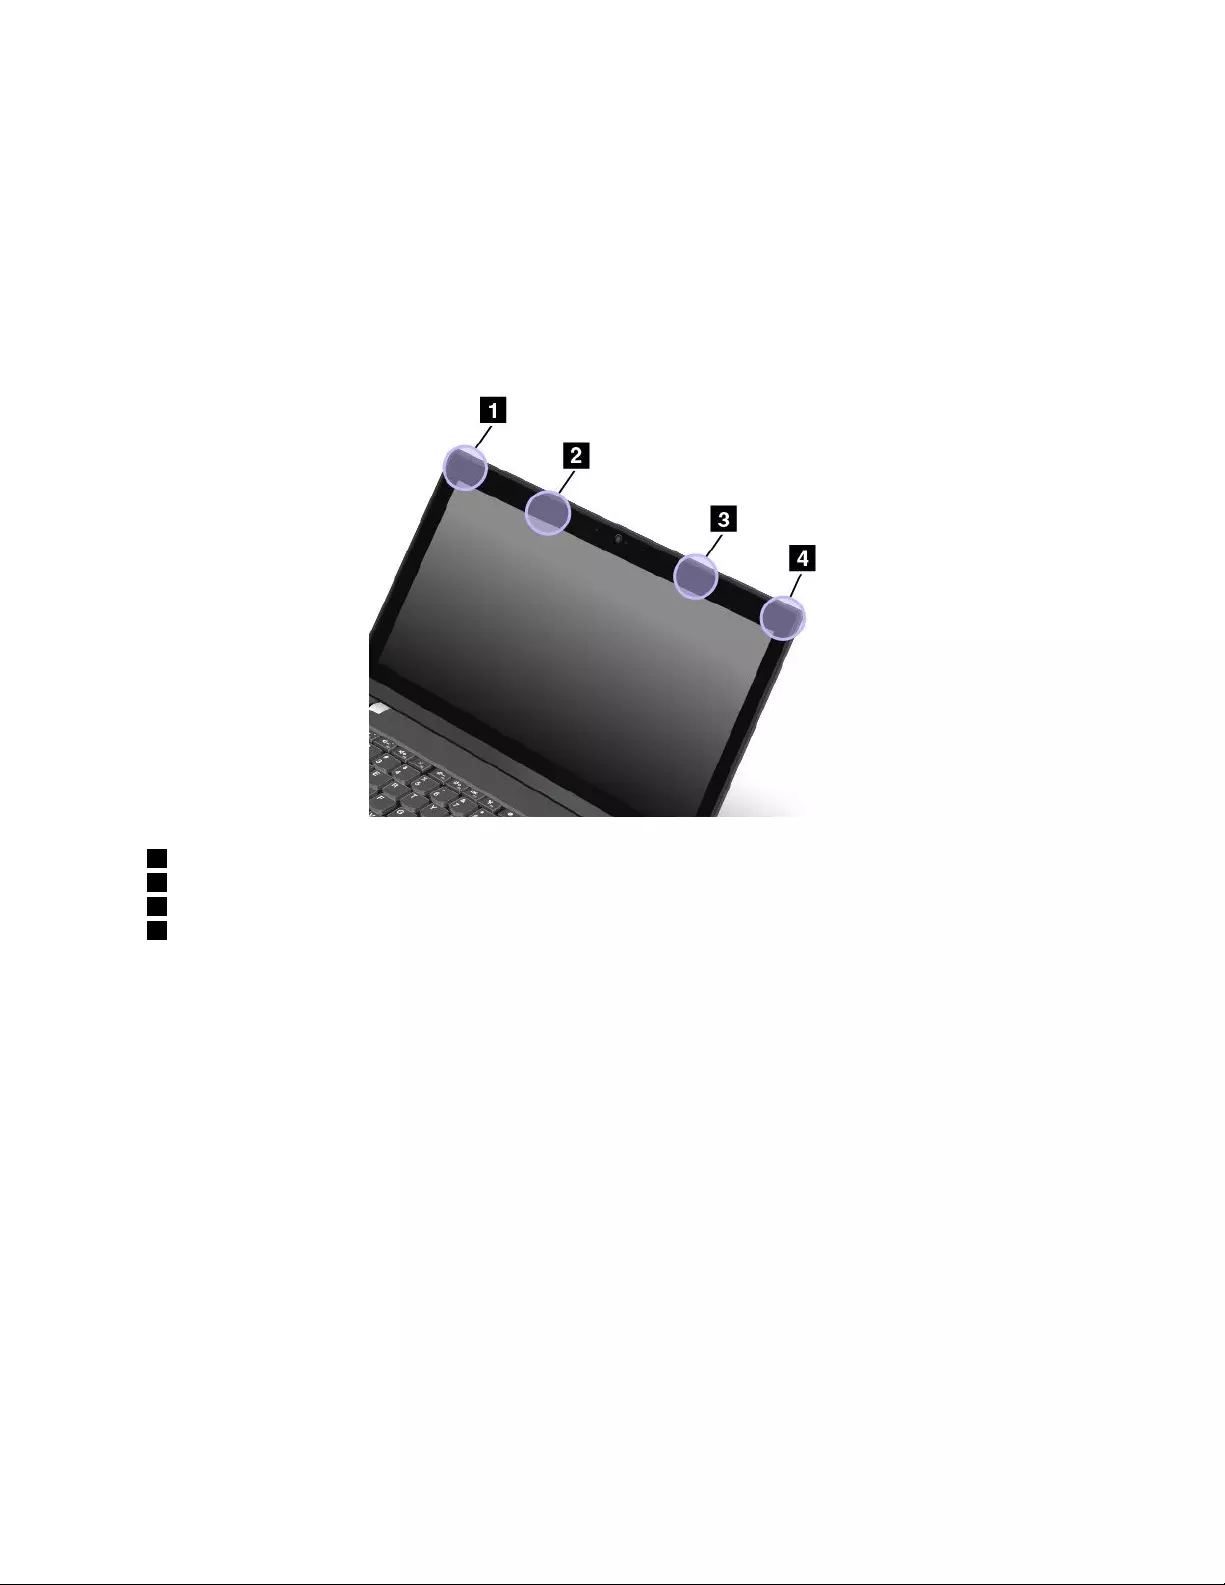
Ifyouareuncertainofthepolicythatappliestotheuseofwirelessdevicesinaspecificarea(suchasan
airportorhospital),youareencouragedtoaskforauthorizationtouseawirelessdevicepriortoturning
onthecomputer.
LocatingtheUltraConnectwirelessantennas
ThinkPadnotebookcomputersfeatureanintegratedUltraConnect™wirelessantennasystembuiltintothe
displayforoptimalreception,enablingwirelesscommunicationwhereveryouare.
Thefollowingillustrationshowstheantennaslocationsofyourcomputer:
1Wireless-LANantenna(auxiliary)
2Wireless-WANantenna(auxiliary)
3Wireless-WANantenna(main)
4Wireless-LANantenna(main)
Wireless-radiocomplianceinformation
Computermodelsequippedwithwirelesscommunicationscomplywiththeradiofrequencyandsafety
standardsofanycountryorregioninwhichithasbeenapprovedforwirelessuse.
Brazilwireless-radiocomplianceinformation
Esteequipamentooperaemcarátersecundário,istoé,nãotemdireitoaproteçãocontrainterferência
prejudicial,mesmodeestaçõesdomesmotipo,enãopodecausarinterferênciaasistemasoperandoem
caráterprimário.
Thisequipmentisasecondarytypedevice,thatis,itisnotprotectedagainstharmfulinterference,even
iftheinterferenceiscausedbyadeviceofthesametype,anditalsocannotcauseanyinterferenceto
primarytypedevices.
Mexicowireless-radiocomplianceinformation
Advertencia:EnMexicolaoperacióndeesteequipoestásujetaalassiguientesdoscondiciones:(1)es
posiblequeesteequipoodispositivonocauseinterferenciaperjudicialy(2)esteequipoodispositivodebe
aceptarcualquierinterferencia,incluyendolaquepuedacausarsuoperaciónnodeseada.
122T470pUserGuide

Locatingwirelessregulatorynotices
Formoreinformationaboutthewirelessregulatorynotices,refertotheRegulatoryNoticeshippedwithyour
computer.
IfyourcomputerisshippedwithouttheRegulatoryNotice,youcanfinditontheWebsiteat:
http://www.lenovo.com/support
Exportclassificationnotice
ThisproductissubjecttotheUnitedStatesExportAdministrationRegulations(EAR)andhasanExport
ClassificationControlNumber(ECCN)of5A992.c.Itcanbere-exportedexcepttoanyoftheembargoed
countriesintheEARE1countrylist.
Electronicemissionnotices
FederalCommunicationsCommissionDeclarationofConformity
ThefollowinginformationreferstoThinkPadT470p,machinetypes:20J6and20J7.
ThisequipmenthasbeentestedandfoundtocomplywiththelimitsforaClassBdigitaldevice,pursuant
toPart15oftheFCCRules.Theselimitsaredesignedtoprovidereasonableprotectionagainstharmful
interferenceinaresidentialinstallation.Thisequipmentgenerates,uses,andcanradiateradiofrequency
energyand,ifnotinstalledandusedinaccordancewiththeinstructions,maycauseharmfulinterference
toradiocommunications.However,thereisnoguaranteethatinterferencewillnotoccurinaparticular
installation.Ifthisequipmentdoescauseharmfulinterferencetoradioortelevisionreception,whichcanbe
determinedbyturningtheequipmentoffandon,theuserisencouragedtotrytocorrecttheinterferenceby
oneormoreofthefollowingmeasures:
•Reorientorrelocatethereceivingantenna.
•Increasetheseparationbetweentheequipmentandreceiver.
•Connecttheequipmentintoanoutletonacircuitdifferentfromthattowhichthereceiverisconnected.
•Consultanauthorizeddealerorservicerepresentativeforhelp.
Lenovoisnotresponsibleforanyradioortelevisioninterferencecausedbyusingotherthanspecifiedor
recommendedcablesandconnectorsorbyunauthorizedchangesormodificationstothisequipment.
Unauthorizedchangesormodificationscouldvoidtheuser'sauthoritytooperatetheequipment.
ThisdevicecomplieswithPart15oftheFCCRules.Operationissubjecttothefollowingtwoconditions:(1)
thisdevicemaynotcauseharmfulinterference,and(2)thisdevicemustacceptanyinterferencereceived,
includinginterferencethatmaycauseundesiredoperation.
ResponsibleParty:
Lenovo(UnitedStates)Incorporated
1009ThinkPlace-BuildingOne
Morrisville,NC27560
PhoneNumber:919-294-5900
IndustryCanadaClassBemissioncompliancestatement
CANICES-3(B)/NMB-3(B)
AppendixB.Regulatoryinformation123

EuropeanUnion-CompliancetotheElectromagneticCompatibility
(EMC)DirectiveorRadioEquipmentDirective
Modelswithoutaradiodevice:ThisproductisinconformitywiththeprotectionrequirementsofEU
CouncilDirective2004/108/EC(until19April,2016)andCouncilDirective2014/30/EU(from20April,2016)
ontheapproximationofthelawsoftheMemberStatesrelatingtoelectromagneticcompatibility.
Modelswitharadiodevice:Thisproductisinconformitywithalltherequirementsandessentialnorms
thatapplytoEUCouncilR&TTEDirective1999/5/EContheapproximationofthelawsoftheMember
Statesrelatingtoradioequipment.
Lenovocannotacceptresponsibilityforanyfailuretosatisfytheprotectionrequirementsresultingfrom
anon-recommendedmodificationoftheproduct,includingtheinstallationofoptioncardsfromother
manufacturers.ThisproducthasbeentestedandfoundtocomplywiththelimitsforClassBequipment
accordingtoEuropeanStandardsharmonizedintheDirectivesincompliance.ThelimitsforClassB
equipmentwerederivedfortypicalresidentialenvironmentstoprovidereasonableprotectionagainst
interferencewithlicensedcommunicationdevices.
Lenovo,Einsteinova21,85101Bratislava,Slovakia
GermanClassBcompliancestatement
DeutschsprachigerEUHinweis:
HinweisfürGerätederKlasseBEU-RichtliniezurElektromagnetischenVerträglichkeit
DiesesProduktentsprichtdenSchutzanforderungenderEU-Richtlinie2014/30/EU(früher2004/108/EC)zur
AngleichungderRechtsvorschriftenüberdieelektromagnetischeVerträglichkeitindenEU-Mitgliedsstaaten
undhältdieGrenzwertederKlasseBderNormgemäßRichtlinie.
Umdiesessicherzustellen,sinddieGerätewieindenHandbüchernbeschriebenzuinstallierenundzu
betreiben.DesWeiterendürfenauchnurvonderLenovoempfohleneKabelangeschlossenwerden.
LenovoübernimmtkeineVerantwortungfürdieEinhaltungderSchutzanforderungen,wenndasProdukt
ohneZustimmungderLenovoverändertbzw.wennErweiterungskomponentenvonFremdherstellernohne
EmpfehlungderLenovogesteckt/eingebautwerden.
Deutschland:
EinhaltungdesGesetzesüberdieelektromagnetischeVerträglichkeitvonBetriebsmitteln
DiesesProduktentsprichtdem„GesetzüberdieelektromagnetischeVerträglichkeitvonBetriebsmitteln“
EMVG(früher„GesetzüberdieelektromagnetischeVerträglichkeitvonGeräten“).DiesistdieUmsetzungder
EMVEU-Richtlinie2014/30/EU(früher2004/108/EWG)inderBundesrepublikDeutschland.
ZulassungsbescheinigunglautdemDeutschenGesetzüberdieelektromagnetischeVerträglichkeit
vonBetriebsmitteln,EMVGvom20.Juli2007(früherGesetzüberdieelektromagnetische
VerträglichkeitvonGeräten),bzw.derEMVEURichtlinie2014/30/EU(früher2004/108/EC),für
GerätederKlasseB.
DiesesGerätistberechtigt,inÜbereinstimmungmitdemDeutschenEMVGdasEG-Konformitätszeichen
-CE-zuführen.VerantwortlichfürdieKonformitätserklärungnachParagraf5desEMVGistdieLenovo
(Deutschland)GmbH,Meitnerstr.9,D-70563Stuttgart.
124T470pUserGuide
InformationeninHinsichtEMVGParagraf4Abs.(1)4:
DasGeräterfülltdieSchutzanforderungennachEN55024undEN55022KlasseB.
KoreaClassBcompliancestatement
JapanVCCIClassBcompliancestatement
Japancompliancestatementforproductswhichconnecttothepower
mainswithratedcurrentlessthanorequalto20Aperphase
Japannoticeforacpowercord
Theacpowercordshippedwithyourproductcanbeusedonlyforthisspecificproduct.Donotusetheac
powercordforotherdevices.
LenovoproductserviceinformationforTaiwan
Eurasiancompliancemark
Brazilaudionotice
Ouvirsonscommaisde85decibéisporlongosperíodospodeprovocardanosaosistemaauditivo.
AppendixB.Regulatoryinformation125

126T470pUserGuide
AppendixC.WEEEandrecyclingstatements
ThischapterprovidesenvironmentalinformationaboutLenovoproducts.
Generalrecyclinginformation
Lenovoencouragesownersofinformationtechnology(IT)equipmenttoresponsiblyrecycletheirequipment
whenitisnolongerneeded.Lenovooffersavarietyofprogramsandservicestoassistequipmentownersin
recyclingtheirITproducts.ForinformationaboutrecyclingLenovoproducts,goto:
http://www.lenovo.com/recycling
Thelatestenvironmentalinformationaboutourproductsisavailableat:
http://www.lenovo.com/ecodeclaration
ImportantWEEEinformation
TheWEEEmarkingonLenovoproductsappliestocountrieswithWEEEande-wasteregulations(for
example,theEuropeanWEEEDirective,IndiaE-WasteManagement&HandlingRules).Appliancesare
labeledinaccordancewithlocalregulationsconcerningwasteelectricalandelectronicequipment(WEEE).
Theseregulationsdeterminetheframeworkforthereturnandrecyclingofusedappliancesasapplicable
withineachgeography.Thislabelisappliedtovariousproductstoindicatethattheproductisnottobe
thrownaway,butratherputintheestablishedcollectionsystemsforreclaimingtheseendoflifeproducts.
Usersofelectricalandelectronicequipment(EEE)withtheWEEEmarkingmustnotdisposeofendoflife
EEEasunsortedmunicipalwaste,butusethecollectionframeworkavailabletothemforthereturn,recycle,
andrecoveryofWEEEandtominimizeanypotentialeffectsofEEEontheenvironmentandhumanhealth
duetothepresenceofhazardoussubstances.Lenovoelectricalandelectronicequipment(EEE)maycontain
partsandcomponents,whichatend-of-lifemightqualifyashazardouswaste.
EEEandwasteelectricalandelectronicequipment(WEEE)canbedeliveredfreeofchargetotheplaceof
saleoranydistributorthatsellselectricalandelectronicequipmentofthesamenatureandfunctionas
theusedEEEorWEEE.
ForadditionalWEEEinformation,goto:
http://www.lenovo.com/recycling
WEEEinformationforHungary
Lenovo,asaproducer,bearsthecostincurredinconnectionwiththefulfillmentofLenovo’sobligations
underHungaryLawNo.197/2014(VIII.1.)subsections(1)-(5)ofsection12.
©CopyrightLenovo2017127

Japanrecyclingstatements
CollectingandrecyclingadisusedLenovocomputerormonitor
IfyouareacompanyemployeeandneedtodisposeofaLenovocomputerormonitorthatistheproperty
ofthecompany,youmustdosoinaccordancewiththeLawforPromotionofEffectiveUtilizationof
Resources.Computersandmonitorsarecategorizedasindustrialwasteandshouldbeproperlydisposed
ofbyanindustrialwastedisposalcontractorcertifiedbyalocalgovernment.InaccordancewiththeLaw
forPromotionofEffectiveUtilizationofResources,LenovoJapanprovides,throughitsPCCollectingand
RecyclingServices,forthecollecting,reuse,andrecyclingofdisusedcomputersandmonitors.Fordetails,
visittheLenovoWebsiteat:
http://www.lenovo.com/recycling/japan
PursuanttotheLawforPromotionofEffectiveUtilizationofResources,thecollectingandrecyclingof
home-usedcomputersandmonitorsbythemanufacturerwasbegunonOctober1,2003.Thisserviceis
providedfreeofchargeforhome-usedcomputerssoldafterOctober1,2003.Fordetails,goto:
http://www.lenovo.com/recycling/japan
DisposingofLenovocomputercomponents
SomeLenovocomputerproductssoldinJapanmayhavecomponentsthatcontainheavymetalsorother
environmentalsensitivesubstances.Toproperlydisposeofdisusedcomponents,suchasaprintedcircuit
boardordrive,usethemethodsdescribedaboveforcollectingandrecyclingadisusedcomputerormonitor.
DisposingofdisusedlithiumbatteriesfromLenovocomputers
Abutton-shapedlithiumbatteryisinstalledinsideyourLenovocomputertoprovidepowertothecomputer
clockwhilethecomputerisoffordisconnectedfromthemainpowersource.Ifyouneedtoreplaceitwitha
newone,contactyourplaceofpurchaseorcontactLenovoforservice.Ifyouneedtodisposeofadisused
lithiumbattery,insulateitwithvinyltape,contactyourplaceofpurchaseoranindustrial-waste-disposal
operator,andfollowtheirinstructions.
Disposalofalithiumbatterymustcomplywithlocalordinancesandregulations.
DisposingofadisusedbatteryfromLenovonotebookcomputers
YourLenovonotebookcomputerhasalithiumionbatteryoranickelmetalhydridebattery.Ifyouare
acompanyemployeewhousesaLenovonotebookcomputerandneedtodisposeofabattery,contact
theproperpersoninLenovosales,service,ormarketing,andfollowthatperson'sinstructions.Youalso
canrefertotheinstructionsat:
https://www.lenovo.com/jp/ja/environment/recycle/battery/
IfyouuseaLenovonotebookcomputerathomeandneedtodisposeofabattery,youmustcomplywith
localordinancesandregulations.Youalsocanrefertotheinstructionsat:
https://www.lenovo.com/jp/ja/environment/recycle/battery/
RecyclinginformationforBrazil
DeclaraçõesdeReciclagemnoBrasil
DescartedeumProdutoLenovoForadeUso
128T470pUserGuide
Equipamentoselétricoseeletrônicosnãodevemserdescartadosemlixocomum,masenviadosàpontosde
coleta,autorizadospelofabricantedoprodutoparaquesejamencaminhadoseprocessadosporempresas
especializadasnomanuseioderesíduosindustriais,devidamentecertificadaspelosorgãosambientais,de
acordocomalegislaçãolocal.
ALenovopossuiumcanalespecíficoparaauxiliá-lonodescartedessesprodutos.Casovocêpossua
umprodutoLenovoemsituaçãodedescarte,ligueparaonossoSACouencaminheume-mailpara:
reciclar@lenovo.com,informandoomodelo,númerodesérieecidade,afimdeenviarmosasinstruções
paraocorretodescartedoseuprodutoLenovo.
BatteryrecyclinginformationfortheEuropeanUnion
Notice:ThismarkappliesonlytocountrieswithintheEuropeanUnion(EU).
BatteriesorpackagingforbatteriesarelabeledinaccordancewithEuropeanDirective2006/66/EC
concerningbatteriesandaccumulatorsandwastebatteriesandaccumulators.TheDirectivedeterminesthe
frameworkforthereturnandrecyclingofusedbatteriesandaccumulatorsasapplicablethroughoutthe
EuropeanUnion.Thislabelisappliedtovariousbatteriestoindicatethatthebatteryisnottobethrown
away,butratherreclaimeduponendoflifeperthisDirective.
InaccordancewiththeEuropeanDirective2006/66/EC,batteriesandaccumulatorsarelabeledtoindicate
thattheyaretobecollectedseparatelyandrecycledatendoflife.Thelabelonthebatterymayalso
includeachemicalsymbolforthemetalconcernedinthebattery(Pbforlead,Hgformercury,andCdfor
cadmium).Usersofbatteriesandaccumulatorsmustnotdisposeofbatteriesandaccumulatorsasunsorted
municipalwaste,butusethecollectionframeworkavailabletocustomersforthereturn,recycling,and
treatmentofbatteriesandaccumulators.Customerparticipationisimportanttominimizeanypotential
effectsofbatteriesandaccumulatorsontheenvironmentandhumanhealthduetothepotentialpresenceof
hazardoussubstances.
Beforeplacingelectricalandelectronicequipment(EEE)inthewastecollectionstreamorinwastecollection
facilities,theenduserofequipmentcontainingbatteriesand/oraccumulatorsmustremovethosebatteries
andaccumulatorsforseparatecollection.
DisposingoflithiumbatteriesandbatterypacksfromLenovoproducts
Acoin-celltypelithiumbatterymightbeinstalledinsideyourLenovoproduct.Youcanfinddetailsaboutthe
batteryintheproductdocumentation.Ifthebatteryneedstobereplaced,contactyourplaceofpurchaseor
contactLenovoforservice.Ifyouneedtodisposeofalithiumbattery,insulateitwithvinyltape,contact
yourplaceofpurchaseorawaste-disposaloperator,andfollowtheirinstructions.
DisposingofbatterypacksfromLenovoproducts
YourLenovodevicemightcontainalithium-ionbatterypackoranickelmetalhydridebatterypack.Youcan
finddetailsonthebatterypackintheproductdocumentation.Ifyouneedtodisposeofabatterypack,
insulateitwithvinyltape,contactLenovosales,service,oryourplaceofpurchase,orawaste-disposal
AppendixC.WEEEandrecyclingstatements129

operator,andfollowtheirinstructions.Youalsocanrefertotheinstructionsprovidedintheuserguide
foryourproduct.
Forpropercollectionandtreatment,goto:
http://www.lenovo.com/lenovo/environment
BatteryrecyclinginformationforTaiwan
BatteryrecyclinginformationfortheUnitedStatesandCanada
RecyclinginformationforChina
130T470pUserGuide

AppendixD.RestrictionofHazardousSubstances(RoHS)
Directive
ThelatestenvironmentalinformationaboutLenovoproductsisavailableat:
http://www.lenovo.com/ecodeclaration
EuropeanUnionRoHS
ThisLenovoproduct,withincludedparts(cables,cords,andsoon)meetstherequirementsofDirective
2011/65/EUontherestrictionoftheuseofcertainhazardoussubstancesinelectricalandelectronic
equipment("RoHSrecast"or"RoHS2").
FormoreinformationaboutLenovoworldwidecomplianceonRoHS,goto:
https://www.lenovo.com/social_responsibility/us/en/RoHS_Communication.pdf
TurkishRoHS
TheLenovoproductmeetstherequirementsoftheRepublicofTurkeyDirectiveontheRestrictionoftheUse
ofCertainHazardousSubstancesinWasteElectricalandElectronicEquipment(WEEE).
UkraineRoHS
IndiaRoHS
RoHScompliantasperE-Waste(Management&Handling)Rules.
©CopyrightLenovo2017131
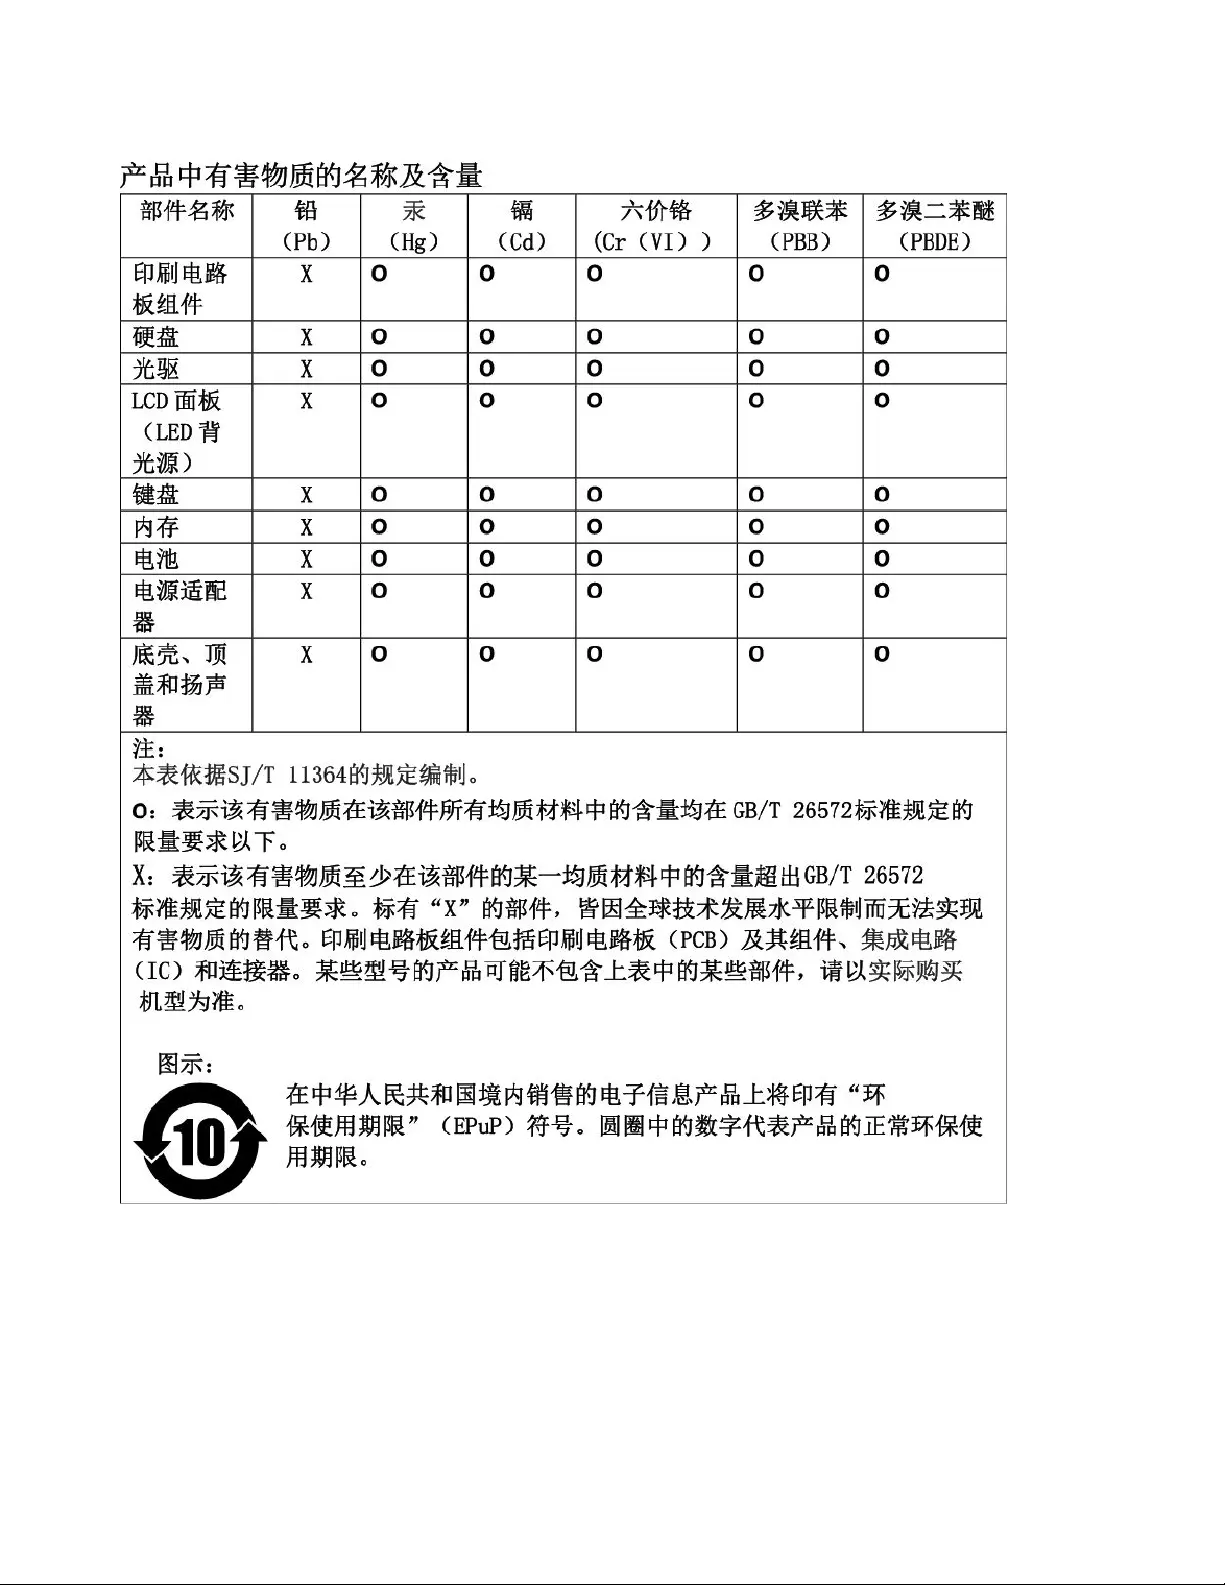
ChinaRoHS
132T470pUserGuide


134T470pUserGuide

AppendixE.ENERGYSTARmodelinformation
ENERGYSTAR®isajointprogramoftheU.S.EnvironmentalProtectionAgencyandtheU.S.Department
ofEnergyaimedatsavingmoneyandprotectingtheenvironmentthroughenergyefficientproductsand
practices.
LenovoisproudtoofferourcustomersproductswiththeENERGYSTARqualifieddesignation.Youmight
findanENERGYSTARmarkaffixedonthecomputerordisplayedonthepowersettingsinterface.Lenovo
computersofthefollowingmachinetypes,ifcarryanENERGYSTARmark,havebeendesignedandtested
toconformtotheENERGYSTARprogramrequirementsforcomputers.
20J6and20J7
ByusingENERGYSTARqualifiedproductsandtakingadvantageofthepower-managementfeatures
ofthecomputer,youcanhelpreducetheconsumptionofelectricity.Reducedelectricalconsumption
cancontributetopotentialfinancialsavings,acleanerenvironment,andthereductionofgreenhousegas
emissions.
FormoreinformationaboutENERGYSTAR,goto:
https://www.energystar.gov
Lenovoencouragesyoutomakeefficientuseofenergyanintegralpartofyourday-to-dayoperations.To
helpinthisendeavor,Lenovohaspresetthefollowingpower-managementfeaturestotakeeffectwhenthe
computerhasbeeninactiveforaspecifiedlengthoftime:
Powerplan:Default(whenpluggedintoacpower)
•Turnoffthedisplay:After10minutes
•Putthecomputertosleep:After30minutes
Toawakenthecomputerfromsleepmode,presstheFnkeyonyourkeyboard.Formoreinformationabout
thesesettings,seetheWindowshelpinformationonthecomputer.
TheWakeonLANfunctionisenabledwhenyourLenovocomputerisshippedfromthefactory,andthe
settingremainsvalidevenwhenthecomputerisinsleepmode.IfyoudonotneedtohaveWakeonLAN
enabledwhilethecomputerisinsleepmode,youcanreducethepowerconsumptionandprolongthetime
insleepmode,bydisablingthesettingofWakeonLANforsleepmode.
TodisablethesettingofWakeonLANforsleepmode,dothefollowing:
1.GotoControlPanelandclickHardwareandSound➙DeviceManager.
2.IntheDeviceManagerwindow,expandNetworkadapters.
3.Right-clickyournetworkadapterdevice,andclickProperties.
4.ClickthePowerManagementtab.
©CopyrightLenovo2017135

5.CleartheAllowthisdevicetowakethecomputercheckbox.
6.ClickOK.
136T470pUserGuide

AppendixF.Notices
Lenovomaynotoffertheproducts,services,orfeaturesdiscussedinthisdocumentinallcountries.Consult
yourlocalLenovorepresentativeforinformationontheproductsandservicescurrentlyavailableinyour
area.AnyreferencetoaLenovoproduct,program,orserviceisnotintendedtostateorimplythatonlythat
Lenovoproduct,program,orservicemaybeused.Anyfunctionallyequivalentproduct,program,orservice
thatdoesnotinfringeanyLenovointellectualpropertyrightmaybeusedinstead.However,itistheuser's
responsibilitytoevaluateandverifytheoperationofanyotherproduct,program,orservice.
Lenovomayhavepatentsorpendingpatentprogramscoveringsubjectmatterdescribedinthisdocument.
Thefurnishingofthisdocumentdoesnotgiveyouanylicensetothesepatents.Youcansendlicense
inquiries,inwriting,to:
Lenovo(UnitedStates),Inc.
1009ThinkPlace-BuildingOne
Morrisville,NC27560
U.S.A.
Attention:LenovoDirectorofLicensing
LENOVOPROVIDESTHISPUBLICATION"ASIS"WITHOUTWARRANTYOFANYKIND,EITHEREXPRESS
ORIMPLIED,INCLUDING,BUTNOTLIMITEDTO,THEIMPLIEDWARRANTIESOFNON-INFRINGEMENT,
MERCHANTABILITYORFITNESSFORAPARTICULARPURPOSE.Somejurisdictionsdonotallow
disclaimerofexpressorimpliedwarrantiesincertaintransactions,therefore,thisstatementmaynotapply
toyou.
Thisinformationcouldincludetechnicalinaccuraciesortypographicalerrors.Changesareperiodically
madetotheinformationherein;thesechangeswillbeincorporatedinneweditionsofthepublication.
Lenovomaymakeimprovementsand/orchangesintheproduct(s)and/ortheapplication(s)describedinthis
publicationatanytimewithoutnotice.
Theproductsdescribedinthisdocumentarenotintendedforuseinimplantationorotherlifesupport
applicationswheremalfunctionmayresultininjuryordeathtopersons.Theinformationcontainedinthis
documentdoesnotaffectorchangeLenovoproductspecificationsorwarranties.Nothinginthisdocument
shalloperateasanexpressorimpliedlicenseorindemnityundertheintellectualpropertyrightsofLenovo
orthirdparties.Allinformationcontainedinthisdocumentwasobtainedinspecificenvironmentsandis
presentedasanillustration.Theresultobtainedinotheroperatingenvironmentsmayvary.
Lenovomayuseordistributeanyoftheinformationyousupplyinanywayitbelievesappropriatewithout
incurringanyobligationtoyou.
Anyreferencesinthispublicationtonon-LenovoWebsitesareprovidedforconvenienceonlyanddonotin
anymannerserveasanendorsementofthoseWebsites.ThematerialsatthoseWebsitesarenotpartof
thematerialsforthisLenovoproduct,anduseofthoseWebsitesisatyourownrisk.
Anyperformancedatacontainedhereinwasdeterminedinacontrolledenvironment.Therefore,theresult
obtainedinotheroperatingenvironmentsmayvarysignificantly.Somemeasurementsmayhavebeen
madeondevelopment-levelsystemsandthereisnoguaranteethatthesemeasurementswillbethesame
ongenerallyavailablesystems.Furthermore,somemeasurementsmayhavebeenestimatedthrough
extrapolation.Actualresultsmayvary.Usersofthisdocumentshouldverifytheapplicabledatafortheir
specificenvironment.
©CopyrightLenovo2017137

ThisdocumentiscopyrightedbyLenovoandisnotcoveredbyanyopensourcelicense,includingany
Linuxagreement(s)whichmayaccompanysoftwareincludedwiththisproduct.Lenovomayupdatethis
documentatanytimewithoutnotice.
Toobtainthemostup-to-datedocumentationforyourcomputer,goto:
http://www.lenovo.com/support
138T470pUserGuide

AppendixG.Trademarks
ThefollowingtermsaretrademarksofLenovointheUnitedStates,othercountries,orboth:
AccessConnections
ActiveProtectionSystem
Lenovo
Lenovologo
ThinkPad
ThinkPadlogo
TrackPoint
UltraConnect
Intel,IntelSpeedStep,Optane,andThunderboltaretrademarksofIntelCorporationoritssubsidiariesinthe
U.S.and/orothercountries.
Microsoft,Windows,Direct3D,BitLocker,andCortanaaretrademarksoftheMicrosoftgroupofcompanies.
MiniDisplayPort(mDP)andDisplayPortaretrademarksoftheVideoElectronicsStandardsAssociation.
UbuntuisaregisteredtrademarkofCanonicalLtd.
ThetermsHDMIandHDMIHigh-DefinitionMultimediaInterfacearetrademarksorregisteredtrademarksof
HDMILicensingLLCintheUnitedStatesandothercountries.
Wi-FiAllianceandMiracastareregisteredtrademarksofWi-FiAlliance.
NVIDIAisaregisteredtrademarkofNVIDIACorporation.
Othercompany,product,andservicenamesmaybetrademarksorservicemarksofothers.
©CopyrightLenovo2017139

140T470pUserGuide