Table of Contents
- ITALIANO
- Indicazioni per un uso sicuro ed efficiente
- 01
- 02
- Funzioni di base
- Componenti e accessori del prodotto
- Panoramica delle parti
- Accensione o spegnimento
- Installazione della scheda SIM
- Inserimento della scheda di memoria
- Rimozione della scheda di memoria
- Batteria
- Touchscreen
- Sfondo
- Blocco schermo
- Riconoscimento delle impronte digitali
- Funzione Multitasking
- Crittografia della scheda di memoria
- Acquisizione di screenshot
- Registrazione schermata
- Immissione di testo
- Condivisione di contenuti
- Non disturbare
- AOD (always-on display)
- Funzioni di base
- 03
- 04
- 05
- Appendice
- Impostazioni della lingua
- LG Bridge
- Aggiornamento software del telefono
- Guida antifurto
- Informazioni avviso software Open Source
- Informazioni sulle normative (Numero ID normativa, etichetta digitale ecc.)
- Marchi di fabbrica
- Dichiarazione sulla sicurezza del laser
- DICHIARAZIONE DI CONFORMITÀ
- Contattare l’ufficio relativo alla conformità del prodotto
- Wi-Fi (WLAN)
- Ulteriori informazioni
- FAQ
- Appendice
- ΕΛΛΗΝΙΚΑ
- Οδηγίες για ασφαλή και αποτελεσματική χρήση
- 01
- 02
- Βασικές λειτουργίες
- Εξαρτήματα και αξεσουάρ του προϊόντος
- Επισκόπηση στοιχείων
- Ενεργοποίηση ή απενεργοποίηση
- Τοποθέτηση της κάρτας SIM
- Τοποθέτηση της κάρτας μνήμης
- Αφαίρεση της κάρτας μνήμης
- Μπαταρία
- Οθόνη αφής
- Αρχική οθόνη
- Κλείδωμα οθόνης
- Αναγνώριση δακτυλικών αποτυπωμάτων
- Λειτουργία πολυδιεργασίας
- Κρυπτογράφηση κάρτας μνήμης
- Λήψη στιγμιότυπων
- Εγγραφή οθόνης
- Εισαγωγή κειμένου
- Κοινή χρήση περιεχομένου
- Μην ενοχλείτε
- AOD (Always-on Display)
- Βασικές λειτουργίες
- 03
- 04
- 05
- Παράρτημα
- Ρυθμίσεις γλώσσας
- LG Bridge
- Ενημέρωση λογισμικού τηλεφώνου
- Οδηγός κατά της κλοπής
- Πληροφορίες σημείωσης για το λογισμικό ανοικτού κώδικα
- Πληροφορίες σχετικά με τους κανονισμούς (Αριθμός αναγνωριστικού κανονισμού, ηλεκτρονικές ετικέτες κ.λπ.)
- Εμπορικά σήματα
- Δήλωση ασφάλειας λέιζερ
- ΔΗΛΩΣΗ ΣΥΜΜΟΡΦΩΣΗΣ
- Διεύθυνση ενημέρωσης για θέματα συμμόρφωσης ως προς τη χρήση του προϊόντος
- Wi-Fi (WLAN)
- Περισσότερες πληροφορίες
- Συχνές ερωτήσεις
- Παράρτημα
- ENGLISH
- Guidelines for safe and efficient use
- 01
- 02
- Basic Functions
- Product components and accessories
- Parts overview
- Turning the power on or off
- Installing the SIM card
- Inserting the memory card
- Removing the memory card
- Battery
- Touch screen
- Home screen
- Screen lock
- Fingerprint Recognition
- Multi-tasking feature
- Memory card encryption
- Taking screenshots
- Screen recording
- Entering text
- Content sharing
- Do not disturb
- AOD (always-on display)
- Basic Functions
- 03
- 04
- 05
LG Wing User Manual
Displayed below is the user manual for Wing by LG which is a product in the Smartphones category. This manual has pages.
Related Manuals

1
Info sulla guida per l’utente
Grazie per aver scelto questo prodotto LG. Per garantire un uso sicuro e corretto
del dispositivo, si prega di leggere con attenzione la guida per l’utente prima di
utilizzarlo per la prima volta.
• Utilizzare sempre accessori LG originali. Gli elementi forniti in dotazione sono
progettati esclusivamente per questo dispositivo e potrebbero non essere
compatibili con altri dispositivi.
• Le descrizioni si basano sulle impostazioni predefinite del dispositivo.
• Le app predefinite presenti sul dispositivo sono soggette ad aggiornamenti e il
supporto per tali applicazioni può essere sospeso senza preavviso. Per eventuali
domande relative alle app preinstallate sul dispositivo, contattare un Centro di
assistenza LG. Per le app installate dall’utente, contattare il provider del servizio
di riferimento.
• La modifica del sistema operativo del dispositivo o l’installazione di software
provenienti da fonti non ufficiali potrebbe danneggiare il dispositivo e causare
il danneggiamento o la perdita di dati. Tali azioni costituiscono una violazione
dell’accordo di licenza LG e annullano la garanzia.
• Alcuni contenuti e illustrazioni potrebbero differire dal dispositivo acquistato
a seconda dell’area, del provider del servizio, della versione del software o del
sistema operativo e sono soggetti a modifiche senza preavviso.
• I software, l’audio, gli sfondi, le immagini e gli altri elementi multimediali forniti
con questo dispositivo sono concessi in licenza per uso limitato. L’estrazione e
l’utilizzo di questi materiali per scopi commerciali o altri scopi potrebbe costituire
una violazione delle leggi sul copyright. La piena responsabilità per l’utilizzo
illegale degli elementi multimediali spetta agli utenti.
• I servizi relativi ai dati, come ad esempio messaggistica, caricamento e
download, sincronizzazione automatica o servizi di posizionamento, potrebbero
comportare costi aggiuntivi. Per evitare costi aggiuntivi, selezionare un piano
dati adeguato alle proprie esigenze. Per ulteriori informazioni, rivolgersi al
proprio gestore di telefonia mobile.
• La presente guida per l’utente è redatta nelle principali lingue per ogni paese. A
seconda della lingua di redazione, i contenuti potrebbero in parte variare.
ITALIANO

2Info sulla guida per l’utente
Notifiche informative
ATTENZIONE: situazioni che potrebbero provocare lesioni all’utente e a terze parti.
ATTENZIONE: situazioni che potrebbero provocare lesioni lievi o danni al
dispositivo.
NOTA: avvisi o informazioni aggiuntive.

3
Indice dei contenuti
01
Funzioni personalizzate
16 Funzioni con lo schermo aperto
26 Funzioni della fotocamera
33 Funzioni di registrazione audio
35 Assistente Google
02
Funzioni di base
38 Componenti e accessori del prodotto
39 Panoramica delle parti
42 Accensione o spegnimento
43 Installazione della scheda SIM
46 Inserimento della scheda di memoria
47 Rimozione della scheda di memoria
47 Batteria
51 Touchscreen
54 Sfondo
65 Blocco schermo
68 Riconoscimento delle impronte
digitali
73 Funzione Multitasking
78 Crittografia della scheda di memoria
79 Acquisizione di screenshot
79 Registrazione schermata
80 Immissione di testo
84 Condivisione di contenuti
85 Non disturbare
86 AOD (always-on display)
6 Indicazioni per un uso sicuro ed efficiente

4Indice dei contenuti
03
App utili
88 Installazione e disinstallazione di app
90 Scorciatoie applicazioni
91 Telefono
95 Messaggi
96 Fotocamera
114 Galleria
116 Rubrica
118 QuickMemo+
121 Orologio
122 Musica
124 Calcolatrice
124 ThinQ
125 LG Health
126 Registratore Audio HD
127 Launcher Del Gioco
127 Smart Doctor
128 LG Mobile Switch
128 Cestino app
129 SmartWorld
129 RemoteCall Service
130 Messaggio CB
130 App di Google
04
Impostazioni
134 Impostazioni
134 Rete & internet
141 Dispositivi connessi
145 Suono
146 Notifiche
146 Display
148 Sfondo & Tema
148 Blocco schermo & sicurezza
149 Privacy
150 Posizione
151 Estensioni
156 Applicazioni
156 Batteria
157 Archiviazione
157 Account
157 Benessere digitale e Controllo
genitori
158 Google
158 Sistema
162 Accesso facilitato

5Indice dei contenuti
05
Appendice
165 Impostazioni della lingua
165 LG Bridge
166 Aggiornamento software del
telefono
168 Guida antifurto
169 Informazioni avviso software Open
Source
169 Informazioni sulle normative
(Numero ID normativa, etichetta
digitale ecc.)
170 Marchi di fabbrica
171 Dichiarazione sulla sicurezza del
laser
171 DICHIARAZIONE DI CONFORMITÀ
172 Contattare l’ufficio relativo alla
conformità del prodotto
172 Wi-Fi (WLAN)
173 Ulteriori informazioni
177 FAQ

6
Indicazioni per un uso sicuro ed
efficiente
Leggere le semplici indicazioni riportate di seguito. Il mancato rispetto di tali indicazioni può
rivelarsi pericoloso o illegale.
Nel caso si verifichino errori, il software integrato nel dispositivo crea un registro degli errori.
Questo strumento raccoglie solo i dati specifici dell’errore come l’intensità del segnale, la “cell ID
position” quando la chiamata viene interrotta e le applicazioni caricate. Il registro viene utilizzato
solo per determinare la causa dell’errore. Questi registri sono crittografati e possono essere
aperti solo nei centri di riparazione LG autorizzati, nel caso sia necessario restituire il dispositivo
per la riparazione.
Esposizione all’energia elettromagnetica a
radiofrequenze (RF)
Informazioni sull’esposizione alle onde radio e sulla SAR (SpecificAbsorption Rate)
Questo dispositivo è stato progettato in conformità ai requisiti di sicurezza vigenti per
l’esposizione alle onde radio. Tali requisiti si basano su precise indicazioni scientifiche che
definiscono, tra l’altro, i margini di sicurezza necessari per salvaguardare tutte le persone,
indipendentemente dall’età e dalle condizioni di salute.
• Le indicazioni sull’esposizione alle onde radio fanno riferimento a un’unità di misura detta
SAR, acronimo per Specific Absorption Rate. Le prove relative ai valori SAR sono state
condotte mediante metodi standardizzati con il dispositivo in stato di trasmissione al
massimo livello di alimentazione certificato, con qualsiasi banda di frequenza.
• Anche se si possono riscontrare differenze tra i livelli SAR nei vari modelli di dispositivi
portatili LG, questi sono comunque stati progettati con un’attenzione particolare alle
normative vigenti sull’esposizione alle onde radio.
• La commissione internazionale ICNIRP (International Commission on Non-Ionizing
Radiation Protection) raccomanda un limite SAR pari a 2W/kg in media per dieci grammi
di tessuto.
• Il valore SAR più elevato registrato per questo modello per l’uso vicino all’orecchio è pari a
0,357 W/kg (10 g) e pari a 1,304 W/kg (10 g) a contatto con il corpo.

7Indicazioni per un uso sicuro ed efficiente
• Questo dispositivo è conforme alle direttive sull’esposizione alle radiofrequenze quando
utilizzato nella normale posizione d’uso vicino all’orecchio o posizionato a una distanza di
almeno 5mm dal corpo. Se una custodia, una clip per cintura o un altro sostegno vengono
posizionati a stretto contatto con il corpo, tali accessori non devono contenere metallo ed è
importante mantenere il dispositivo a una distanza di almeno 5mm dal corpo. Il dispositivo
richiede una connessione ottimale alla rete per poter trasmettere file di dati o messaggi.
In alcuni casi, la trasmissione di file di dati o messaggi potrebbe essere ritardata fino a che
tale connessione diventi disponibile. Le istruzioni relative alla separazione del dispositivo dal
corpo devono essere rispettate fino alla fine della trasmissione.
Informazioni fornite dalla FCC in merito
all’esposizione alle frequenze radio
Nell’agosto del 1996, la Federal Communications Commission (Commissione federale per
le comunicazioni, FCC) degli Stati Uniti, attraverso l’azione in Report and Order FCC 96-326,
ha adottato uno standard di sicurezza aggiornato relativo all’esposizione umana all’energia
elettromagnetica delle frequenze radio emessa dai trasmettitori con normativa FCC. Tali linee
guida sono coerenti con gli standard di sicurezza in precedenza determinati da standard sia
internazionali sia statunitensi. La progettazione del presente dispositivo è conforme alle linee
guida FCC e a tali standard internazionali.
Parte 15.19
Questo apparecchio è conforme alla parte 15 delle norme FCC. Il funzionamento è soggetto
alle due condizioni riportate di seguito:
(1) Il dispositivo non deve generare interferenze dannose.
(2) Il dispositivo deve accettare eventuali interferenze ricevute, incluse quelle che potrebbero
comportare errori di funzionamento.
Parte 15.21
Modifiche non espressamente approvate dal produttore potrebbero annullare l’autorità
dell’utente all’utilizzo dell’attrezzatura.

8Indicazioni per un uso sicuro ed efficiente
Funzionamento del dispositivo indosso all’utente
Il presente dispositivo è stato testato per le tipiche funzioni in cui lo si indossa, mantenendo
la parte posteriore del dispositivo a 1 cm (0,39 pollici) di distanza da corpo dell’utente. Per
rispettare i requisiti FCC relativi all’esposizione alle frequenze radio, è necessario mantenere
una distanza di separazione minima tra il corpo dell’utente e la parte posteriore del dispositivo
di 1 cm (0,39 pollici). Potrebbe non essere possibile utilizzare fermagli da cintura, custodie
e accessori simili contenenti componenti in metallo. Gli accessori da indossare che non
mantengono una distanza di separazione di 1 cm (0,39 pollici) tra il corpo dell’utente e la parte
posteriore del dispositivo e che non sono stati testati per le tipiche funzioni in cui si indossa il
dispositivo potrebbero non rispettare i limiti FCC relativi all’esposizione alle frequenze radio e
devono dunque essere evitati.
Parte 15.105
Questa apparecchiatura è stata testata e rispetta i limiti di un dispositivo digitale di Classe B,
ai sensi della parte 15 delle norme FCC. Questi limiti sono stabiliti per fornire una protezione
adatta dalle interferenze dannose in un’installazione residenziale. Questo apparecchio genera,
utilizza e può irradiare energia in radiofrequenza; inoltre, se non viene installato e utilizzato
secondo le istruzioni, può causare interferenze dannose alle comunicazioni radio. Tuttavia, non
esiste alcuna garanzia che queste interferenze non si verifichino in una particolare installazione.
Se la presente apparecchiatura causa interferenze dannose o ricezione di canali televisivi,
determinabili accendendo e spegnendo il dispositivo, si consiglia vivamente di tentare di
correggere l’interferenza attuando una o più delle seguenti misure:
• Orientare o posizionare di nuovo l’antenna di ricezione.
• Aumentare lo spazio che intercorre tra l’apparecchio e il ricevitore.
• Collegare l’apparecchio a una presa su un circuito differente rispetto a quello a cui è
collegato il ricevitore.
• Per assistenza, consultare il rivenditore o un tecnico radio/TV esperto.

9Indicazioni per un uso sicuro ed efficiente
Manutenzione e cura del prodotto
• Utilizzare solo gli accessori forniti autorizzati da LG. Qualsiasi danno o guasto causato da
accessori di terze parti non è coperto dalla garanzia LG.
• Alcuni contenuti e illustrazioni possono differire dal dispositivo senza preavviso.
• Non smontare l’apparecchio. Se è necessaria una riparazione, rivolgersi presso un centro
assistenza autorizzato LG.
• La garanzia copre, a discrezione di LG, la sostituzione di parti o schede nuove o riconvertite,
funzionalmente equivalenti.
• Tenere lontano da apparecchiature elettriche quali TV, radio e PC.
• Tenere lontano da fonti di calore quali termosifoni o fornelli.
• Non far cadere l’apparecchio.
• Non sottoporre l’apparecchio a scosse, urti o vibrazioni.
• Spegnere il dispositivo nelle aree in cui è specificamente richiesto. Ad esempio, non
utilizzarlo all’interno di ospedali, in quanto potrebbe interferire con il funzionamento di
apparecchiature mediche sensibili.
• Non afferrare il dispositivo con le mani bagnate mentre è in carica. Ciò potrebbe provocare
scosse elettriche o danneggiare seriamente il prodotto.
• Non ricaricare il telefono vicino a materiali infiammabili che potrebbero provocare incendi a
causa del calore sviluppato dal dispositivo.
• Usare un panno asciutto per la pulizia esterna del cellulare (non usare solventi come
benzene, acquaragia o alcol).
• Non caricare il dispositivo quando si trova su superfici morbide.
• Il dispositivo dovrebbe essere caricato in un’area ben ventilata.
• Non esporre l’apparecchio a fumo o polvere.
• Tenere lontano il dispositivo da carte di credito o supporti magnetici per evitarne la
smagnetizzazione.
• Non toccare lo schermo con oggetti appuntiti per evitare di danneggiare il dispositivo.
• Non esporre il dispositivo a umidità o a contatto con liquidi.
• Usare gli accessori con attenzione e delicatezza. Non toccare l’antenna se non strettamente
necessario.
• In caso di vetro rotto o scheggiato, non utilizzare il dispositivo, non toccare il vetro, né
tentare di rimuoverlo o ripararlo. I danni al display in vetro dovuti ad abuso o utilizzo non
corretto non sono coperti dalla garanzia.

10Indicazioni per un uso sicuro ed efficiente
• Il dispositivo è un dispositivo elettronico che genera calore durante il normale
funzionamento. Il contatto diretto e prolungato con la pelle e l’assenza di un’adeguata
ventilazione possono provocare disagi e piccole bruciature. Pertanto, è necessario
maneggiare con cura il dispositivo durante o subito dopo l’utilizzo.
• Se il dispositivo si bagna, scollegarlo immediatamente e farlo asciugare completamente.
Non tentare di accelerare il processo di asciugatura con una fonte di calore esterna, ad
esempio un forno, un forno a microonde o un asciugacapelli.
• Il liquido presente nel dispositivo bagnato potrebbe modificare il colore dell’etichetta del
prodotto presente all’interno. I danni al dispositivo derivanti dall’esposizione ai liquidi non
sono coperti da garanzia.
• Un dispositivo mobile ha bisogno di una corretta circolazione dell’aria per disperdere il
calore. Il contatto diretto con la pelle ed un’insufficiente circolazione d’aria sul dispositivo
potrebbe causare un surriscaldamento. Il dispositivo deve trovarsi ad almeno 1,0 cm dal
corpo dell’utente.
• Evitare che la polvere di sostanze estranee entri nel caricatore / porta del cavo USB. Può
generare calore o fuoco.
• Evitare di esporre il dispositivo a basse pressioni dell’aria ad alta quota.
• Non esporre il dispositivo a pressioni dell’aria estremamente basse. Altrimenti ciò può
causare l’esplosione della batteria o perdite di liquido o gas infiammabile.
• Evitare che il prodotto venga a contatto con liquidi. Non utilizzare o caricare il prodotto se
è bagnato. Se il prodotto si bagna, l’indicatore dei danni causati dai liquidi cambia colore.
Tenere presente che ciò limiterà la possibilità di ricevere eventuali servizi di riparazione
gratuiti previsti dalla garanzia.
Funzionamento efficiente del dispositivo
Dispositivi elettronici
Tutti i dispositivi possono subire interferenze che influiscono sulle prestazioni.
• Non utilizzare il dispositivo in prossimità di apparecchiature mediche senza autorizzazione.
Consultare un medico per determinare se l'uso del dispositivo possa interferire con il
funzionamento dell'apparecchio medico.
• I produttori di pacemaker raccomandano una distanza minima di 15cm da altri dispositivi e
pacemaker per evitare possibili interferenze con quest’ultimo.
• Il dispositivo potrebbe produrre una luce forte o lampeggiante.
• Il dispositivo potrebbe interferire con alcuni tipi di apparecchi acustici.
• Il telefono potrebbe interferire con apparecchi televisivi, radio, computer, ecc.
• Utilizzare il dispositivo a una temperatura compresa tra 0ºC e 35ºC, se possibile.
L’esposizione del dispositivo a temperature estremamente alte o basse può causare danni,
malfunzionamenti o perfino esplosioni.

11Indicazioni per un uso sicuro ed efficiente
Sicurezza in automobile
Verificare le leggi e le normative che riguardano l’utilizzo dei dispositivi quando si guida.
• Non utilizzare il dispositivo in modalità manuale durante la guida.
• Prestare la massima attenzione alla guida.
• Se le condizioni di guida lo richiedono, accostare e parcheggiare prima di telefonare o
rispondere a una chiamata.
• L’energia RF può influire sul sistema elettronico del veicolo, ad esempio sullo stereo o sulle
apparecchiature di sicurezza.
• Se il veicolo è dotato di airbag, non collocarvi accanto oggetti come apparecchi wireless
portatili o installati per evitare lesioni gravi causate dall’errato funzionamento dell’air bag.
• Durante l’ascolto della musica tramite il cellulare, assicurarsi che il volume sia
ragionevolmente basso da consentire il rilevamento dei rumori circostanti. Ciò è
particolarmente importante in prossimità di strade.
Come evitare danni all’udito
Per evitare eventuali danni all’udito, non ascoltare audio ad alto volume per
lunghi periodi.
L’udito potrebbe danneggiarsi se viene esposto a volumi eccessivi e prolungati nel tempo. Si
consiglia pertanto di non accendere o spegnere il telefono indossando gli auricolari e di tenere il
volume di ascolto delle conversazioni e della musica a un livello ragionevole.
• Quando si utilizzano gli auricolari, abbassare il volume se non si riesce a sentire le persone
nelle vicinanze o se il volume è tale da essere udito dalla persona accanto.
• L’utilizzo di auricolari e cuffie a volume troppo elevato può causare la perdita
dell’udito.

12Indicazioni per un uso sicuro ed efficiente
Parti in vetro
Alcune parti del dispositivo sono in vetro. Se il dispositivo cade su una superficie rigida o subisce
un forte impatto, il vetro può rompersi. Se ciò accade, non toccare o tentare di rimuovere il
vetro. Non utilizzare il dispositivo finché il vetro non viene sostituito da un centro di assistenza
autorizzato.
Aree a rischio di esplosione
Non utilizzare il dispositivo in aree dove sono in atto operazioni di detonazione. Rispettare le
restrizioni e osservare tutte le norme o i regolamenti al riguardo.
Atmosfere potenzialmente esplosive
• Non utilizzare il dispositivo in prossimità di stazioni di servizio.
• Non utilizzare l’apparecchio in prossimità di combustibili o prodotti chimici.
• Non trasportare né conservare sostanze esplosive, liquidi o gas infiammabili all’interno
dell’autovettura in cui si trovano il dispositivo o i relativi accessori.
A bordo di aeromobili
L’uso di dispositivi portatili può causare delle interferenze al velivolo.
• Spegnere il dispositivo prima di imbarcarsi su qualsiasi aeromobile.
• Utilizzarlo a terra (prima o dopo il decollo) solo con il permesso dell’equipaggio.
Bambini
Conservare il dispositivo in un posto sicuro, lontano dalla portata dei bambini. L’apparecchio
è composto da parti smontabili di piccole dimensioni che, se ingerite, possono provocare
soffocamento.
Chiamate di emergenza
Le chiamate di emergenza potrebbero non essere disponibili su tutte le reti cellulari. Pertanto,
si consiglia di non affidarsi solo al dispositivo per eventuali chiamate di emergenza. Contattare
il fornitore di servizi locale per conoscere la disponibilità dei servizi di emergenza nel proprio
paese.

13Indicazioni per un uso sicuro ed efficiente
Manutenzione e informazioni sulle batterie
• Non è necessario scaricare completamente la batteria prima di ricaricarla. A differenza
di altri sistemi a batteria, questo cellulare non presenta un effetto memoria in grado di
compromettere le prestazioni della batteria.
• Utilizzare solo batterie e caricabatterie LG, in quanto sono progettati per consentire una
maggiore durata della batteria.
• Non smontare né cortocircuitare la batteria.
• Tenere puliti i contatti metallici della batteria.
• Sostituire la batteria quando le prestazioni non sono più accettabili. La batteria può essere
ricaricata centinaia di volte prima che sia necessario sostituirla.
• Se la batteria è rimasta inutilizzata per un lungo periodo, ricaricarla per ottimizzarne le
prestazioni.
• Non esporre il caricabatterie alla luce solare diretta e non utilizzarlo in ambienti
particolarmente umidi, ad esempio nel bagno.
• Evitare di lasciare il dispositivo in luoghi con temperature eccessivamente basse o elevate
per non comprometterne le prestazioni.
• L’uso di un tipo di batteria errato può comportare il rischio di esplosioni. Attenersi alle
istruzioni per lo smaltimento delle batterie usate.
• Quando il dispositivo è completamente carico, scollegare sempre il caricabatterie dalla presa
di corrente per evitare consumi energetici non necessari.
• La durata della batteria effettiva varia a seconda di configurazione di rete, impostazioni del
prodotto, uso, batteria e condizioni ambientali.
• Assicurarsi che la batteria non venga a contatto con oggetti affilati come ad esempio,
forbici, denti o unghie di animali. Ciò potrebbe causare incendi.
• Consumo energetico (modalità standby di rete): 0,4 W

14Indicazioni per un uso sicuro ed efficiente
Protezione delle informazioni personali
• Assicurarsi di proteggere le informazioni personali per evitare la perdita e l’uso improprio
delle informazioni sensibili.
• Eseguire sempre il backup dei dati importanti durante l’utilizzo del dispositivo. LG non è
responsabile di eventuali perdite di dati.
• Assicurarsi di eseguire il backup di tutti i dati e di ripristinare il dispositivo durante lo
smaltimento del dispositivo per impedire l’uso improprio delle informazioni sensibili.
• Leggere attentamente la schermata delle autorizzazioni durante il download delle
applicazioni.
• Utilizzare con cautela le applicazioni che hanno accesso a più funzioni o a informazioni
personali.
• Controllare regolarmente gli account personali. In caso di uso improprio, chiedere al provider
del servizio di eliminare o modificare le informazioni del proprio account.
• In caso di perdita o furto del dispositivo, modificare la password dell’account per proteggere
le informazioni personali.
• Non utilizzare applicazioni provenienti da fonti sconosciute.
Avviso sulla sostituzione della batteria
• Una batteria agli ioni di litio è un componente pericoloso che può causare lesioni
gravi.
• La sostituzione della batteria da parte di personale non qualificato può causare
danni al dispositivo.
• Non sostituire la batteria autonomamente. La batteria potrebbe essere
danneggiata, surriscaldarsi e provocare lesioni. La batteria deve essere sostituita
da personale qualificato. La batteria deve essere riciclata o smaltita separatamente
rispetto ai rifiuti domestici.
• Nel caso in cui il prodotto contenga una batteria incorporata nel prodotto che
non può essere facilmente rimossa dall’utente finale, LG raccomanda che la
batteria venga rimossa solo da professionisti qualificati, sia per la sostituzione sia
per il riciclaggio al termine della vita del prodotto. Per evitare danni al prodotto,
e per la propria sicurezza, gli utenti non devono tentare di rimuovere la batteria,
ma contattare il Servizio clienti di LG o altri fornitori di servizi indipendenti per
ottenere consiglio.
• La rimozione della batteria comporta lo smantellamento della custodia del
prodotto, la disconnessione di cavi/contatti elettrici, e l’attenta estrazione della
cella batteria utilizzando strumenti specifici. In caso di bisogno di istruzioni per
professionisti qualificati su come rimuovere la batteria in modo sicuro, si prega di
visitare
http://www.lge.com/global/sustainability/environment/take-back-recycling
.

Funzioni
personalizzate
01

Funzioni personalizzate 16
Funzioni con lo schermo aperto
Modalità schermo aperto
È possibile ruotare il display principale come illustrato in figura per usare due
schermi.
Rotazione verso l’alto
Usare il pollice destro per spostare leggermente in senso orario la parte inferiore
dello schermo principale.
Schermo principale
Schermo secondario
• Non applicare forza eccessiva, in quanto lo schermo principale si apre in modo
semiautomatico.
• Fare attenzione a non pizzicarsi il pollice quando si tira verso il basso lo schermo
principale.

Funzioni personalizzate 17
Home schermo aperto
Home schermo aperto è la prima schermata che appare dopo aver ruotato lo
schermo principale. In questa modalità è possibile usare le home page dello
schermo principale e dello schermo secondario separatamente oppure insieme in
vari modi.
Home schermo
aperto dello
schermo principale
Home schermo
aperto dello schermo
secondario
Schermo principale
La schermata home dello schermo principale appare come illustrato sotto.
Icone delle app
Scegliere e aprire un’app trascinando l’icona dell'app a sinistra e a destra. Alcune app
dello schermo principale possono essere utilizzate sia sullo schermo principale che
quello secondario.

Funzioni personalizzate 18
Configurazione della schermata home
Toccare e tenere premuto uno spazio vuoto dello schermo principale, quindi
configurare la schermata home come desiderato.
Eliminazione delle
icone delle app
Configurazione di
sfondo e temi Cestino app
Configurazione di
Home schermo
aperto
Uso delle icone delle app
Toccare e tenere premuta l’icona di un’app. È possibile eliminare l’app dalla
schermata home o usare immediatamente varie funzioni dell’app.

Funzioni personalizzate 19
Schermo secondario
La schermata home dello schermo secondario appare come illustrato sotto. Lo
schermo secondario può essere utilizzato in vari modi.
Icone di accesso rapido Barra di navigazione
Impostazione rapida dello schermo secondario.
È possibile trascinare verso il basso la parte superiore dello schermo secondario per
aprire la finestra di impostazione rapida.
• È possibile toccare per aggiungere o eliminare un’icona nella finestra di
impostazione rapida o per cambiarne la posizione.
• Toccare e tenere premuta un'icona nella finestra di impostazione rapida per
aprire la schermata di configurazione.

Funzioni personalizzate 20
LG Touch Pad
Uso di LG Touch Pad
• Toccare per aprire LG Touch Pad.
Uso con un mouse
Uso di LG Touch Pad
• Una volta attivato LG Touch Pad nello schermo secondario, sullo schermo
principale appare un cursore del mouse come quelli dei PC, da spostare per
scegliere liberamente le icone..

Funzioni personalizzate 21
Uso della Presa Stabile
• È possibile toccare per attivare la Presa Stabile.
Disattiva Presa stabile
• Quando è selezionato Presa Stabile, lo schermo secondario è bloccato.
• Per sbloccarlo, toccare sulla scritta semi-trasparente "Disattiva Presa Stabile"
come mostrato nella figura soprastante

Funzioni personalizzate 22
Multitasking in Modalità Schermo aperto
L’uso del multitasking ruotando lo schermo principale consente di usare un’app su
entrambi gli schermi o di usare contemporaneamente due app, una per schermo.
• Questa funzione potrebbe non essere supportata da alcune app.
Ingrandimento dei video
1 Toccare sullo schermo principale.
2 Scegliere un video da riprodurre e toccare Riproduci video.
3 Toccare sullo schermo secondario.
• Sullo schermo secondario appare la schermata di controllo del video.
Controlla il video
sullo schermo
secondario
Apre il controllo del
video.

Funzioni personalizzate 23
Espansione dell’app YouTube
1 Toccare sullo schermo principale.
2 Scegliere il contenuto di YouTube da riprodurre e riprodurlo.
3 Toccare sullo schermo secondario.
• Sullo schermo secondario appare la schermata di controllo dei contenuti
multimediali.
Disattiva il controllo dei
contenuti multimediali sullo
schermo secondario

Funzioni personalizzate 24
Uso di Multi App
Una volta selezionate le app con il widget Multi App sullo schermo secondario, è
possibile usare contemporaneamente le due app selezionate ogni volta che si tocca
il widget. Impostare le app usate di frequente come Multi App.
1 Toccare e tenere premuto uno spazio vuoto nello schermo secondario.
Imposta Multi App
2 Toccare Impostazioni Multi App .
3 Scorrere verso il basso l’elenco delle app e selezionare due app da usare come
Multi App.
Visualizza l’anteprima
Multi App Seleziona due app

Funzioni personalizzate 25
4 Toccare Applica.
5 Nella schermata principale dello schermo secondario viene creata l’icona Multi
App.
Usa l’icona Multi App
• Per eliminare l’icona Multi App, toccare e tenere premuta l’icona sullo schermo
secondario, toccare Rimuovi da Casa, quindi toccare Rimuovi.

Funzioni personalizzate 26
Funzioni della fotocamera
Uso della fotocamera con lo Modalità schermo
aperto
Quando lo schermo dello smartphone è aperto, è possibile usare delle funzioni
specifiche per la registrazione video sfruttando la Fotocamera Gimbal.
Modalità Gimbal
È possibile utilizzare la fotocamera come se fosse inserita in un gimbal. Registrare i
video in modalità Gimbal per usufruire delle opzioni di stabilizzazione avanzate.
1 Ruotare lo schermo principale.
• Se l'app fotocamera è già aperta, quando si apre lo schermo la modalità
Gimbal si attiva automaticamente.
2 Toccare sullo schermo principale.
3 Selezionare Modalità Gimbal scorrendo le modalità della fotocamera.
4 Toccare per avviare la registrazione in modalità Gimbal.
Effetti sonori
Modalità Follow
Impostazioni del flash
Ripristina impostazioni
Modalità Blocco
Modalità First Person View
Elenco modalità foto
Barra di navigazione
Modalità Pan Follow
Impostazioni Risoluzione
Joystick
• Per scattare una foto mentre si registra un video, toccare .
• Per mettere in pausa la registrazione del video, toccare . Per riprendere la
registrazione del video, toccare .
5 Toccare per terminare la registrazione.

Funzioni personalizzate 27
Modalità FPV (First
Person View)
Consente spostamenti laterali, verticali e variazioni di
inclinazione dell'inquadratura. Questa modalità simula i
movimenti che puoi fare con la tua testa ed è consigliata per le
riprese in cui vuoi seguire l'azione in maniera dinamica.
Modalità Pan Follow
Consente solo gli spostamenti laterali dell'inquadratura. Questa
modalità ti aiuta a tenere fissa la linea dell'orizzonte facilitando
le riprese panoramiche.
Modalità Follow
Consente spostamenti laterali e verticali dell'inquadratura, ma
inibisce le variazioni di inclinazione. Questa modalità tiene fissa
la linea dell'orizzonte e simula i movimenti che puoi fare con i
tuoi occhi.
Consigliata per riprendere grandi spazi, come edifici o eventi
sportivi.
Joystick
È possibile spostare il joystick in qualsiasi direzione si desideri, in
modo da orientare l'inquadratura senza spostare lo smartphone
e allo stesso tempo riducendo al minimo la sfocatura.
Modalità Blocco Toccare e tenere premuto per bloccare l'inquadratura.
Effetti sonori
• Base: È possibile registrare l'audio in stereofonia per le riprese
standard.
• Registrazione ASMR: Incrementa la sensibilità dei microfoni
per registrare anche i suoni più flebili.
• Bokeh vocale: Attenua i rumori ambientali per focalizzarsi sulla
voce del soggetto.

Funzioni personalizzate 28
Ripresa di video in Slow Motion
È possibile realizzare video divertenti rallentando la velocità di registrazione.
1 Ruotare lo schermo principale.
2 Toccare sullo schermo principale.
3 Selezionare Slow Motion scorrendo le modalità della fotocamera.
4 Toccare o per scegliere la durata dell’effetto slow motion.
Sceglie la durata
Imposta le opzioni della
fotocamera Imposta le opzioni del
flash
• Parte al rallentatore: Consente di applicare l’effetto slow motion a una sezione
specifica del video.
- Toccare nel momento in cui si desidera che venga applicato l’effetto slow
motion. Con una breve pressione, l’effetto slow motion viene applicato per 0,5
secondi. Con una pressione prolungata, l’effetto slow motion viene applicato
fino a quando non si rilascia il dito.
• Tutto in Slow Motion: Consente di applicare l’effetto slow motion all’intero
video.

Funzioni personalizzate 29
Registrazione TimeLapse
È possibile registrare video Timelapse ottimizzati per la situazione.
I video possono essere registrati con velocità ottimale e movimento costante
analizzando vari ambienti di ripresa. La velocità di Timelapse può essere regolata
automaticamente in base al soggetto e all'ambiente di ripresa.
È possibile anche selezionare manualmente la velocità di Timelapse.
1 Ruotare lo schermo principale.
2 Toccare sullo schermo principale.
3 Selezionare TimeLapse scorrendo le modalità della fotocamera.
• Scegliere l’ingrandimento dello schermo per la scena da registrare sullo
schermo secondario.
Sceglie l’ingrandimento
dello schermo
Sceglie la velocità di
TimeLapse
• Scegliere la velocità di Timelapse sullo schermo secondario.
• Selezionando Auto, viene impostata automaticamente la velocità adatta per lo
schermo da registrare.

Funzioni personalizzate 30
4 Toccare per registrare un video.
• Durante la registrazione, è possibile cambiare lo zoom e la velocità di
Timelapse.
• Toccando la velocità desiderata, la velocità di Timelapse viene regolata
durante la registrazione.
• Per mettere in pausa la registrazione del video, toccare . Per riprendere la
registrazione del video, toccare .
• Mentre registri un video, puoi stringere o allargare due dita per ingrandire o
rimpicciolire.
• Mentre registri un video, puoi toccare l'area desiderata per regolare la
luminosità.
5 Toccare per arrestare la registrazione.
• Il video registrato viene salvato nella Galleria.
• Durante la registrazione Timelapse, l’audio non viene registrato.
• È possibile toccare per registrare video Timelapse notturni.

Funzioni personalizzate 31
Ripresa di una registrazione video doppia
È possibile utilizzare contemporaneamente le fotocamere anteriore e posteriore
per registrare un video. È possibile salvare i video di ciascuna fotocamera come un
unico file oppure come due file distinti.
1 Ruotare lo schermo principale.
2 Toccare sullo schermo principale.
3 Selezionare Dual recording scorrendo le modalità della fotocamera.
• La fotocamera pop up frontale si solleva automaticamente.
4 Toccare per registrare un video con doppia registrazione.
Dividi vista
Schermata di registrazione frontale
PIP
Schermata di registrazione posteriore
• È possibile toccare e tenere premuto lo schermo principale e trascinare per
cambiare la posizione delle schermate della fotocamera frontale e di quella
posteriore.
• Per mettere in pausa la registrazione del video, toccare . Per riprendere la
registrazione del video, toccare .
5 Toccare per terminare la registrazione.
• Se si sceglie di salvare separatamente, i video della fotocamera frontale e di quella
posteriore vengono salvati come file distinti.
• Se si sceglie di salvare come illustrato , i video della fotocamera frontale e di quella
posteriore vengono salvati in uno schermo.
• Quando si avvia la modalità Doppia registrazione, la fotocamera pop up frontale
si solleva. Non premere o tirare la stessa con forza eccessiva, perché si potrebbe
rompere.

Funzioni personalizzate 32
Ripresa di PIP (Picture in Picture)
• Toccando nella schermata di controllo dello schermo secondario, la
schermata di registrazione passa alla ripresa di una PIP (Picture in Picture).
• Toccando , è possibile scambiare le posizioni delle schermate della
fotocamera frontale e di quella posteriore.
• È possibile toccare e tenere premuta la schermata PIP e trascinarla a uno dei
quattro angoli desiderato.
Riprende una PIP

Funzioni personalizzate 33
Funzioni di registrazione audio
Registrazione video con opzioni di registrazione
audio particolari
È possibile registrare un video con tre diverse opzioni di registrazione vocale, a
seconda della situazione.
1 Toccare e selezionare Video scorrendo le modalità della fotocamera.
2 Toccare e selezionare Base, Modalità ASMR o Bokeh vocale scorrendo le
opzioni audio.
Opzioni audio
Base
È possibile registrare un video con un stabile suono stereo.
Modalità ASMR
È possibile registrare un video ASMR con i due sensibili microfoni integrati nel
dispositivo.

Funzioni personalizzate 34
Bokeh vocale
È possibile enfatizzare la voce del soggetto riducendo il rumore ambientale.
• Per ridurre il rumore ambientale, trascinare il dispositivo di scorrimento verso
.
Registrazione di suoni ASMR
Questa funzione consente di registrare l'audio in modo chiaro e preciso
amplificando il suono rilevato dai microfoni.
1 Toccare LG Registratore Audio HD e toccare ASMR.
2 Toccare per registrare l’audio.
• Per mettere in pausa la registrazione, toccare . Per continuare la
registrazione, toccare .
3 Toccare per terminare la registrazione dell’audio.
LG 3D Sound Engine
La funzione LG 3D Sound Engine consente di sentire un suono stereoscopico e
ottimizzato. Durante la riproduzione di musica o video, è possibile ascoltare un
suono stereoscopico e avvolgente come se fosse dal vivo.
1 Trascinare verso il basso il pannello notifiche.
2 Toccare per attivare o disattivare la funzione LG 3D Sound Engine.
Oppure toccare Impostazioni Suono Qualità del suono ed effetti LG
3D Sound Engine e toccare per attivare la funzione.
• Se si connette al prodotto un dispositivo audio esterno come cuffie o un
altoparlante, appare un pop-up che richiede di attivare la funzione LG 3D Sound
Engine.

Funzioni personalizzate 35
Assistente Google
Panoramica Assistente Google
Il tuo dispositivo dispone di Assistente Google incorporato. Trova le risposte e fai
cose mentre sei in giro.
• Per utilizzare questa funzione, stabilire prima la connessione alla rete.
Avvio di Assistente Google
1 Scorrere diagonalmente da un angolo inferiore dello schermo.
2 Toccare GET STARTED.
3 Seguire le istruzioni visualizzate sullo schermo.
• Il dispositivo salva i dati della voce dell’utente per il riconoscimento.
4 Impostare se utilizzare o meno la funzione di riconoscimento vocale.
• Quando questa funzionalità è attivata, è possibile eseguire Assistente
Google pronunciando “OK Google” nella schermata Home.
5 Toccare Fine.
Accesso vocale
1 Quando la schermata Home è spenta o bloccata, pronuncia “OK Google” o
“Hey Google.”.
2 Quando appare la schermata di Assistente Google, pronuncia un comando o
poni una domanda.

Funzioni personalizzate 36
Accesso dalla schermata Home
1 Scorrere diagonalmente da un angolo inferiore dello schermo.
2 Pronuncia un comando o una domanda quando sulla parte inferiore dello
schermo appare .
• In un ambiente in cui la connessione Wi-Fi o dei dati mobili è scarsa, la funzione
Assistente Google potrebbe essere limitata e la precisione del riconoscimento
vocale potrebbe essere ridotta.
• Se la pronuncia è ambigua, il microfono è coperto, un lettore multimediale è
in riproduzione o l'ambiente circostante è rumoroso, il grado di precisione del
riconoscimento vocale potrebbe essere ridotto. Quando si utilizza il prodotto
mediante i comandi vocali, pronunciare le parole con precisione in un ambiente
silenzioso per una migliore precisione del riconoscimento vocale.

Funzioni di base
02

Funzioni di base 38
Componenti e accessori del prodotto
I seguenti articoli sono forniti in dotazione con il dispositivo.
• Dispositivo
• Cavo USB
• Spillo di espulsione
• Caricabatteria
• Guida introduttiva
• Custodia per telefono
• Gli elementi descritti sopra possono essere facoltativi.
• Gli elementi forniti in dotazione con il dispositivo ed eventuali accessori disponibili
possono variare a seconda dell'area e del provider del servizio.
• Utilizzare sempre accessori LG Electronics originali. L'utilizzo di accessori di altri
produttori può influire sulle prestazioni di chiamata del dispositivo o causare
malfunzionamenti. Il servizio di riparazione LG potrebbe non coprire simili
situazioni.
• Alcune delle componenti del dispositivo sono fatte di vetro temperato. Se si lascia
cadere il dispositivo su una superficie dura o lo si espone a un urto violento, il vetro
temperato potrebbe danneggiarsi. In questi casi, interrompere immediatamente
l’uso del dispositivo e contattare un Centro di assistenza clienti LG.
• In mancanza di uno di questi elementi di base, contattare il rivenditore presso cui è
stato acquistato il dispositivo.
• Per acquistare altri elementi aggiuntivi, contattare un Centro di assistenza clienti LG.
• Alcuni elementi contenuti nella confezione del prodotto sono soggetti a modifica
senza preavviso.
• L'aspetto e le specifiche del dispositivo sono soggetti a modifica senza preavviso ai
fini del miglioramento del prodotto.
• Le specifiche del dispositivo possono variare a seconda dell'area o del provider del
servizio.
• Rimuovere la pellicola protettiva dal sensore di impronte digitali prima di utilizzare
la funzione di riconoscimento delle impronte digitali.

Funzioni di base 39
Panoramica delle parti
Touchscreen
Tasto accensione/blocco
Tasti volume (+/-)
Altoparlante auricolare
Fotocamera pop up
Sensore di prossimità/
luminosità ambientale
Porta per caricabatteria/
cavo USB
Sensore per impronte digitali
Obiettivi fotocamera
posteriore
Microfono
Flash
Altoparlante Microfono
Alloggiamento scheda
Nano-SIM/Scheda di
memoria
NFC
Area dell'antenna per la
ricarica wireless

Funzioni di base 40
Non tentare di rimuovere da sé il coperchio posteriore.
• Fare ciò potrebbe danneggiare gravemente la batteria e il dispositivo, e ciò
potrebbe causare surriscaldamento, incendi o infortuni. Il coperchio posteriore e
la batteria del dispositivo non devono essere rimossi o sostituiti da personale non
qualificato.
• Il telefono è un dispositivo elettronico che genera calore durante il suo normale
funzionamento. Il contatto diretto ed estremamente prolungato con la pelle
in assenza di un’adeguata ventilazione può provocare disagi e piccole ustioni.
Pertanto, maneggiare con cura il telefono durante o subito dopo l’utilizzo.
• Tasti volume
- Consentono di regolare il volume delle suonerie, delle chiamate o delle
notifiche.
- Durante l’utilizzo della Fotocamera, premere delicatamente un tasto volume
per scattare una foto. Per scattare foto in maniera continua, tenere premuto
il tasto volume.
- Quando lo schermo è spento o bloccato, premere il tasto volume giù due
volte per avviare l’app Fotocamera. Premere due volte il tasto volume su per
avviare Capture+.
• Tasto accensione/blocco
- Premere brevemente il tasto se si desidera accendere o spegnere lo schermo.
- Tenere premuto il tasto se si desidera selezionare un’opzione di alimentazione.
• Sensore per impronte digitali
- È possibile utilizzare il sensore di impronte digitali in basso al centro
dello schermo per utilizzare la funzione di riconoscimento delle impronte
digitali. Per i dettagli, vedere, consultare la sezione
Informazioni generali sul
riconoscimento delle impronte digitali
.

Funzioni di base 41
• Alcune funzioni potrebbero essere limitate a seconda della regione e delle
specifiche del prodotto dei diversi fornitori di servizi di telecomunicazione.
• Nella parte posteriore del prodotto sono integrati il chip NFC e le antenne di
ricarica wireless integrate. Fare attenzione a non danneggiare o coprire il chip NFC
o le antenne di ricarica wireless.
• Non poggiare oggetti pesanti né sedersi sul dispositivo. In caso contrario, il
touchscreen potrebbe danneggiarsi.
• La pellicola o accessori di protezione dello schermo potrebbero interferire con il
sensore di prossimità.
• Se il dispositivo è bagnato o viene utilizzato in un luogo umido, il touchscreen o i
pulsanti a sfioramento potrebbero non funzionare correttamente.
Nel prodotto sono integrati due microfoni. Fare attenzione a non coprire i microfoni.
Mentre si parla al telefono, non coprire il microfono con le mani o le dita.
Non utilizzare custodie per telefono non originali, né coprire il microfono con
accessori, nastro adesivo ecc.
Quando si utilizza il prodotto, tenerlo correttamente, come mostrato nell'immagine.
Non coprite il microfono.Microfono
Non coprite il microfono.Microfono

Funzioni di base 42
Accensione o spegnimento
Accensione
Quando il prodotto è spento, tenere premuto il tasto di accensione/blocco.
• Quando si accende il dispositivo per la prima volta, viene avviata la configurazione
iniziale. La durata del primo avvio dello smartphone potrebbe essere più lunga di
quella abituale.
Spegnimento
Tenere premuto il tasto di accensione/blocco, quindi selezionare Spegni.
Riavvio del dispositivo
Se il dispositivo non funziona oppure non risponde ai comandi, riavviarlo seguendo
le istruzioni sottostanti.
1 Tenere premuti contemporaneamente il tasto di accensione/blocco e il tasto
volume giù fino a quando il dispositivo non si spegne.
2 Quando viene riavviato il dispositivo, rilasciare il tasto.
Opzioni di alimentazione
Tenere premuto il tasto di accensione/blocco, quindi selezionare un’opzione.
• Spegni: Spegnere il dispositivo.
• Spegni e riavvia: consente di riavviare il dispositivo.

Funzioni di base 43
Installazione della scheda SIM
Inserire la scheda SIM (Subscriber Identity Module, modulo d'identità dell'abbonato)
fornita dal provider del servizio per iniziare a utilizzare il dispositivo.
• Utilizzare lo spillo di espulsione con cautela, poiché è dotato di un’estremità
appuntita.
1 Inserire la graffetta nel foro dell’alloggiamento della scheda e premere la
graffetta, quindi estrarre l’alloggiamento della scheda dal prodotto.
2 Allineare le schede Nano-SIM sull’alloggiamento delle schede e premere la
scheda nella direzione della freccia come illustrato nella figura.
Scheda Nano-SIM 2
Scheda Nano-SIM 1
• Il vassoio della scheda SIM 2 serve anche come vassoio della scheda di memoria.
Tuttavia, non è possibile posizionare contemporaneamente sia la scheda SIM sia la
scheda di memoria (opzionale).

Funzioni di base 44
3 Inserire l'alloggiamento della scheda nel telefono come illustrato nella figura.

Funzioni di base 45
• Questo dispositivo supporta solamente le schede Nano SIM.
Nano Micro Standard
• Affinché non si verifichino problemi di prestazioni, si consiglia di utilizzare il
dispositivo con il tipo corretto di scheda SIM. Utilizzare sempre una scheda SIM
realizzata in fabbrica, fornita dall'operatore.
• Non perdere la scheda SIM. LG non è responsabile di eventuali danni e altri
problemi causati dalla perdita o dal trasferimento di una scheda SIM.
• Fare attenzione a non danneggiare la scheda SIM durante le operazioni di
inserimento e rimozione.
• Quando si inserisce la carta SIM o la scheda di memoria, è necessario collocarla
correttamente nel foro di alloggiamento della scheda.
• Quando inserisci di nuovo il foro di alloggiamento della scheda nel dispositivo, è
necessario inserirlo orizzontalmente seguendo la direzione della freccia, come
mostrato in figura. Assicurati che la scheda collocata sul foro di alloggiamento
della scheda non si sposti dalla posizione corretta.
• Inserire la scheda SIM sull’alloggiamento con i contatti color oro rivolti verso il
basso.
• Assicurati di inserire la carta SIM nel dispositivo seguendo le istruzioni nel manuale
utenti.
• Se inserisci o rimuovi l'alloggiamento dal dispositivo, assicurati che non vi entrino
acqua o altri liquidi. Se un alloggiamento o una scheda bagnati vengono inseriti nel
dispositivo, questo potrebbe danneggiarsi.
• La scheda di memoria è un elemento opzionale.
• Operazioni frequenti di cancellazione e scrittura dei dati possono ridurre la durata
della scheda di memoria.
• Alcune schede di memoria potrebbero risultare non completamente compatibili
con il dispositivo. L’utilizzo di una scheda incompatibile potrebbe causare il
danneggiamento del dispositivo o della scheda di memoria, oppure la corruzione
dei dati salvati al suo interno.

Funzioni di base 46
Inserimento della scheda di memoria
Inserire la scheda di memoria nel dispositivo.
A seconda del produttore e del tipo di scheda di memoria, alcune schede di
memoria potrebbero non essere compatibili con il dispositivo.
1 Inserire lo spillo di espulsione nel foro dell’alloggiamento della scheda.
2 Estrarre l’alloggiamento della scheda.
3 Posizionare la scheda di memoria sull’alloggiamento con i contatti color oro
rivolti verso il basso.
Scheda di memoria
(Opzionale, venduta separatamente)
Scheda SIM
4 Inserire nuovamente l’alloggiamento nello slot.
• Alcune schede di memoria potrebbero risultare non completamente compatibili
con il dispositivo. L’utilizzo di una scheda incompatibile potrebbe causare il
danneggiamento del dispositivo o della scheda di memoria, oppure la corruzione
dei dati salvati al suo interno.
• Operazioni frequenti di cancellazione e scrittura dei dati possono ridurre la durata
della scheda di memoria.

Funzioni di base 47
Rimozione della scheda di memoria
Per ragioni di sicurezza, disattivare la scheda di memoria prima di rimuoverla.
1 Nella schermata Home, toccare Impostazioni Archiviazione .
2 Inserire lo spillo di espulsione nel foro dell’alloggiamento della scheda ed
estrarlo dal dispositivo.
3 Rimuovere la scheda di memoria.
4 Inserire nuovamente l’alloggiamento nello slot.
• Non rimuovere la scheda di memoria mentre il dispositivo sta trasferendo o
accedendo a informazioni. In caso contrario, potrebbe verificarsi la perdita o la
corruzione dei dati, oppure il danneggiamento della scheda di memoria o del
dispositivo. LG non è responsabile di eventuali perdite causate dall’abuso o dall’uso
errato delle schede di memoria, compresa la perdita di dati.
Batteria
Carica della batteria
Prima di utilizzare il dispositivo, caricare completamente la batteria.
Caricare il dispositivo con il cavo USB tipo C.
Terminale del cavo di ricarica

Funzioni di base 48
• Non utilizzare o caricare il prodotto in presenza di umidità sulla porta di ricarica,
su terminali esposti, sul cavo di ricarica, sull’adattatore di ricarica ecc. Il prodotto
potrebbe non funzionare correttamente o rompersi o danneggiarsi, e sussiste
il rischio di lesioni causate da scosse elettriche, incendio, surriscaldamento,
esplosione ecc. Se si nota la presenza di umidità in tali aree, interrompere
immediatamente l'utilizzo o la ricarica del prodotto e rimuovere completamente
l'umidità.
• Non staccare il coperchio della batteria.
Questo prodotto utilizza una batteria non rimovibile. Non rimuovere o sostituire
il coperchio della batteria o la batteria. Se si rimuove o sostituisce il coperchio
della batteria o la batteria, il prodotto potrebbe venire danneggiato, e potrebbe
surriscaldarsi o esplodere.
• Usare solo il cavo USB e l’adattatore di ricarica forniti con il prodotto come
componenti di base.
• Il dispositivo è dotato di una batteria ricaricabile interna. Per motivi di sicurezza,
non rimuovere la batteria incorporata.
• L'utilizzo del dispositivo durante il caricamento potrebbe causare scosse elettriche.
Per utilizzare il dispositivo, interrompere il caricamento.
• Rimuovere il caricabatteria dalla presa di alimentazione una volta completato il
caricamento del dispositivo. In questo modo si evita un inutile consumo di corrente.
• Un adattatore di ricarica che supporta la ricarica rapida è incluso nel prodotto. La
funzione di ricarica rapida potrebbe non funzionare se si utilizza un adattatore di
ricarica rapida diverso da quello originale fornito in dotazione con il prodotto.
• Per caricare la batteria, è anche possibile collegare un cavo USB tra il dispositivo
e un computer desktop o portatile. Questo metodo può richiedere più tempo
rispetto al collegamento dell’adattatore a una presa a parete.
• Non caricare la batteria con un hub USB non in grado di mantenere la tensione
nominale. Il caricamento potrebbe non riuscire o arrestarsi inavvertitamente.
• Quando ci si reca presso un centro di assistenza per un problema della batteria,
portare con sé il prodotto e il caricabatterie. Poiché la batteria è un materiale di
consumo, la durata della batteria potrebbe ridursi con il passare del tempo.

Funzioni di base 49
Precauzioni per l’utilizzo del dispositivo
• Assicurarsi di utilizzare il cavo USB fornito in dotazione, non utilizzare cavi USB
o caricabatterie di terze parti con il dispositivo. La garanzia limitata LG non copre
l’uso di accessori di terze parti.
• Il mancato rispetto delle istruzioni contenute in questa guida e l’utilizzo non
corretto potrebbero portare al danneggiamento del dispositivo.
Ricarica wireless
Questo dispositivo supporta una funzione di ricarica wireless. Carica il dispositivo
con un caricabatteria wireless certificato Qi (opzionale, venduto separatamente).
Caricare la batteria con un caricabatteria wireless
1 Colloca il tuo dispositivo al centro del caricabatteria wireless, allineandolo con
l'antenna per la ricarica wireless sul retro del dispositivo.
• Per controllare l'area dell'antenna per la ricarica wireless, vedere
Panoramica
delle parti
.
2 Quando la batteria è stata ricaricata, rimuovere il dispositivo dal caricabatteria.
• Quando si ricarica la batteria con il caricabatteria wireless, evitare di porre materiali
magnetici, metallici o conduttori tra il dispositivo e il caricabatteria. Infatti, questi
materiali possono disturbare la ricarica e far surriscaldare il caricabatteria. In
questo caso, il dispositivo, il caricabatteria o la carta SIM/scheda di memoria
possono essere danneggiati.

Funzioni di base 50
• Se la temperatura della batteria supera un certo livello quando il dispositivo è in
carica, sarà necessario interrompere la ricarica.
• Se materiali magnetici, metallici o conduttori dovessero trovarsi vicino al retro del
dispositivo, oppure fosse inserita una custodia protettiva, il dispositivo potrebbe
non essere caricato adeguatamente.
• Se si ricarica la batteria con il caricabatteria wireless in aree in cui il segnale di
rete è debole, le prestazioni di rete del tuo dispositivo potrebbero essere ridotte
ulteriormente.
• Carica il dispositivo con un caricabatteria wireless certificato Qi (opzionale, venduto
separatamente). Dato che la garanzia limitata LG non copre l’uso di accessori di
terze parti, contattare il produttore delle stesse.
• Questo prodotto supporta la ricarica wireless. Per ricaricare il prodotto utilizzare
un caricabatterie wireless certificato Qi (venduto separatamente). Alcuni
caricabatterie wireless con cavo a spirale potrebbero non supportare la ricarica
wireless. I caricabatterie che supportano il profilo EPP (Extended Power Profile)
consento la ricarica wireless ad alta velocità.
• LG Electronics declina ogni responsabilità per problemi riguardanti accessori di
altre marche. Per tali problemi, contattare il produttore dell’accessorio.
Utilizzo efficiente della batteria
La durata della batteria può diminuire se sul dispositivo sono in esecuzione diverse
app e funzioni contemporaneamente e in maniera continuativa.
Annullare le operazioni in background per aumentare la durata della batteria.
Per ridurre al minimo il consumo della batteria, seguire questi Consigli:
• Disattivare la funzione Bluetooth® o rete Wi-Fi quando non le si utilizza.
• Impostare lo spegnimento dello schermo su un lasso di tempo il più breve
possibile.
• Ridurre al minimo la luminosità dello schermo.
• Impostare un blocco schermo quando il dispositivo non è in uso.
• Controllare il livello della batteria quando si utilizza una qualsiasi delle app
scaricate.

Funzioni di base 51
Touchscreen
È possibile imparare a conoscere le modalità di controllo del dispositivo mediante
l’utilizzo di gesti touch sul touchscreen.
Toccare
Toccare leggermente con la punta del dito per selezionare o eseguire un’app o
un’opzione.
Tenere premuto
Toccare e tenere premuto per diversi secondi per visualizzare un menu con le
opzioni disponibili.

Funzioni di base 52
Toccare due volte
Toccare rapidamente due volte per eseguire lo zoom avanti o indietro su una pagina
Web o su una mappa.
Trascinamento
Toccare e tenere premuto un elemento, ad esempio un'app o un widget, quindi
spostare il dito in un'altra posizione con un movimento controllato. È possibile
utilizzare questo gesto per spostare un elemento.
Trascinare
Toccare lo schermo e muovere velocemente il dito senza fermarsi. È possibile
utilizzare questo gesto per scorrere un elenco, una pagina Web, delle foto, delle
schermate e altro ancora.

Funzioni di base 53
Avvicinare e allontanare le dita
Avvicinare due dita per eseguire lo zoom indietro, ad esempio su una foto o una
mappa. Per eseguire lo zoom avanti, allontanare le dita.
• Non esporre il touchscreen a eccessivi urti fisici. Il sensore touch potrebbe
danneggiarsi.
• Se il dispositivo viene utilizzato vicino a materiale magnetico, metallico o
conduttore, potrebbe verificarsi un guasto del touchscreen.
• Se si utilizza il dispositivo sotto luci intense come la luce solare diretta, lo schermo
potrebbe non essere visibile a seconda della posizione. Utilizzare il dispositivo
in una posizione ombreggiata o con una luce ambiente non troppo intensa, ma
sufficientemente luminosa da consentire la lettura.
• Non premere lo schermo applicando una forza eccessiva.
• Toccare delicatamente l'opzione desiderata con la punta del dito.
• Il controllo touch potrebbe non funzionare correttamente se si tocca lo schermo
indossando un guanto o con la punta dell'unghia.
• Il controllo touch potrebbe non funzionare correttamente se lo schermo è umido
o bagnato.
• Il touchscreen potrebbe non funzionare correttamente se sul dispositivo è
applicata una pellicola o un accessorio di protezione dello schermo acquistati da un
negozio di terze parti.
• La visualizzazione di un’immagine statica per lunghi periodi di tempo potrebbe
causare il fenomeno delle immagini residue o di ritenzione delle immagini.
Spegnere lo schermo o evitare di visualizzare la stessa immagine per un lungo
periodo quando il dispositivo non è in uso.

Funzioni di base 54
Sfondo
Informazioni generali sulla schermata Home
La schermata Home è il punto di partenza per accedere a diverse funzioni e app
sul dispositivo. Scorrere verso l’alto dal bordo inferiore di qualsiasi schermata per
andare direttamente alla schermata Home.
Sulla schermata Home è possibile gestire tutte le app e i widget. Scorrere sulla
schermata verso sinistra o destra per visualizzare in un colpo d’occhio tutte le app
installate.
Layout della schermata Home
È possibile visualizzare tutte le app e organizzare i widget e le cartelle sulla
schermata Home.
Area di accesso rapido
Barra di navigazione
Cartella
Barra di stato
Widget meteo
Icona della pagina
Widget di ricerca di Google
• La schermata Home può variare a seconda della politica del produttore, delle
impostazioni dell'utente, della versione del software o del provider del servizio.

Funzioni di base 55
• Barra di stato: consente di visualizzare le icone di stato, l’orario e il livello della
batteria.
• Widget meteo: consente di visualizzare le informazioni meteorologiche e
l'orario di una zona specifica.
• Widget di ricerca di Google: digita o parla per aprire Google Search.
• Cartella: È possibile creare cartelle per classificare le app in base ai criteri
desiderati.
• Icona della pagina: consente di visualizzare il numero totale di aree della
schermata Home. È possibile toccare l’icona della pagina desiderata per
accedere alla pagina selezionata. L’icona corrispondente all’area corrente verrà
evidenziata.
• Area di accesso rapido: è possibile fissare le app principali nella parte inferiore
dello schermo in modo che siano accessibili da qualsiasi area della schermata
Home.
• Barra di navigazione: consente di andare alla schermata precedente o alla
schermata Home durante l’uso dell’app, e controllare l’elenco delle app usate di
recente.
Uso della barra di navigazione
Questa è la guida alle gesture per il controllo della barra di navigazione.
• Per andare alla schermata Home, scorrere verso l'alto dal bordo inferiore dello
schermo.
• Per tornare alla schermata precedente, scorrere verso l'interno dal bordo sinistro
o destro dello schermo.
• Per andare alla schermata Panoramica, scorrere verso l'alto e tenere premuto
dal bordo inferiore dello schermo.
• Per passare rapidamente tra le app, scorrere verso destra sul bordo inferiore
dello schermo per andare alle app utilizzate in precedenza.
• Gesti è l’impostazione predefinita per la barra di navigazione. Per cambiarla a Solo
pulsanti / / , nella schermata Home toccare Impostazioni Display
Barra di navigazione, quindi selezionare Solo pulsanti.

Funzioni di base 56
Icone di stato
Quando è presente una notifica relativa a un messaggio non letto, un evento del
calendario o una sveglia, nella barra di stato viene visualizzata l’icona di notifica
corrispondente. Verificare lo stato del dispositivo visualizzando le icone di notifica
presenti nella barra di stato.
Nessun segnale
Trasmissione di dati tramite la rete in corso
Sveglia impostata
Modalità vibrazione attiva
Bluetooth attivo
Collegato a un computer tramite USB
Livello batteria
Modalità Aereo attiva
Chiamate senza risposta
Wi-Fi attivo
Modalità silenziosa attiva
GPS attivo
Hotspot attivo
Nessuna scheda SIM
La modalità NFC è attiva
• Alcune di queste icone potrebbero apparire in modo diverso o non apparire
affatto a seconda dello stato del dispositivo. Fare riferimento alle icone in base
all'ambiente e alla zona effettivi in cui si utilizza il dispositivo nonché al provider
del servizio.
• Le icone visualizzate possono variare a seconda dell'area o dei provider dei servizi.

Funzioni di base 57
Pannello notifiche
È possibile aprire il pannello notifiche trascinando la barra di stato verso il basso
sulla schermata principale.
• È possibile trascinare verso il basso la finestra di avviso o toccare l'icona della
freccia per aprire l'elenco delle icone di impostazione rapida.
• È possibile toccare per aggiungere, eliminare o disporre le icone nella finestra
di avviso.
• Tenendo premuta l’icona, viene visualizzata la schermata delle impostazioni
relative alla funzione in questione.
• È possibile utilizzare il pannello notifiche anche durante il blocco schermo. Trascina
il pannello notifiche quando lo schermo è bloccato per accedere rapidamente alle
funzioni desiderate.

Funzioni di base 58
Cambio di orientamento dello schermo
È possibile impostare il cambio automatico di orientamento dello schermo in base
all’orientamento fisico del dispositivo.
Nel pannello notifiche, toccare Rotazione nell’elenco delle icone di accesso rapido.
È possibile anche toccare Impostazioni Display e attivare Rotazione automatica
nella schermata Home.
Modifica della schermata Home
Nella schermata Home, toccare e tenere premuto uno spazio vuoto, quindi avviare
l'azione desiderata da sotto.
• Per ridisporre le aree della schermata Home, toccare e tenere premuta un'area e
trascinarla in un'altra posizione.
• Per aggiungere un widget alla schermata Home, toccare e tenere premuta
un'area vuota della schermata Home, quindi selezionare Widget.
• Per modificare sfondi, temi, icone e AOD, toccare e tenere premuta un'area
vuota della schermata Home, quindi selezionare Sfondo & Tema.
È inoltre possibile toccare Impostazioni Sfondo & Tema nella schermata
Home, quindi selezionare sfondi, temi icone e AOD da applicare al dispositivo.
• Per modificare la griglia, toccare e tenere premuta un'area vuota della
schermata Home, quindi selezionare Griglia. Toccare la griglia desiderata, quindi
toccare Applica.

Funzioni di base 59
• Per configurare le impostazioni della schermata Home, toccare e tenere
premuta un'area vuota della schermata Home, quindi selezionare Imposta
schermata home. Per i dettagli, vedere, consultare la sezione
Imposta
schermata home
.
• Per visualizzare o reinstallare le app disinstallate, toccare e tenere premuta
un'area vuota della schermata Home, quindi selezionare Cestino app. Per i
dettagli, vedere, consultare la sezione
Cestino app
.
• Per cambiare la schermata predefinita, toccare e tenere premuta un'area vuota
della schermata Home, spostarsi sulla schermata desiderata, toccare , quindi
toccare nuovamente la schermata.
Schermata predefinita

Funzioni di base 60
Visualizzazione del tema di sfondo
Nella schermata Home è possibile visualizzare solo l'immagine di sfondo
nascondendo app e widget.
Allontanare due dita sulla schermata Home.
• Per tornare alla schermata originale con la visualizzazione di app e widget,
avvicinare le dita sulla schermata Home o trascinare verso l’alto dal bordo
inferiore dello schermo.
Spostamento di app sulla schermata Home
Nella schermata Home, toccare e tenere premuta un'app, quindi trascinarla in
un'altra posizione.
• Per inserire le app utilizzate più spesso nella parte inferiore della schermata
Home, toccare e tenere premuta un'app, quindi trascinarla nell’area di accesso
rapido nella parte inferiore.
• Per rimuovere un'icona dall’area di accesso rapido, trascinarla nella schermata
Home.

Funzioni di base 61
Utilizzo delle cartelle dalla schermata Home
Creazione di cartelle
Nella schermata Home, toccare e tenere premuta un'app, quindi trascinarla su
un'altra app.
• Viene creata una nuova cartella e le app vengono aggiunte al suo interno.
Modifica di cartelle
Nella schermata Home, toccare una cartella ed eseguire una delle seguenti azioni.
• Per modificare il nome della cartella, toccare il nome della cartella.
• Per modificare il colore, toccare il cerchio in alto a destra.
• Per aggiungere app, toccare e tenere premuta una app, quindi trascinarla sopra
la cartella e rilasciarla.
• Per rimuovere un'app dalla cartella, toccare e tenere premuta l'app, quindi
trascinarla all'esterno della cartella. Se l'app rimossa è l'unica esistente nella
cartella, viene rimossa automaticamente anche la cartella.
• È possibile anche aggiungere o rimuovere le app dopo aver toccato .
• Quando si utilizza un tema scaricato, non è possibile modificare il colore della
cartella.

Funzioni di base 62
Imposta schermata home
È possibile personalizzare le impostazioni della schermata Home.
1 Nella schermata Home, toccare Impostazioni Display Sfondo.
2 Personalizzare le seguenti impostazioni:
• Seleziona Launcher: consente di selezionare una modalità per la schermata
Home.
• Effetto scorrimento schermo: consente di selezionare un effetto da
applicare quando si passa a un'altra area della schermata Home.
• Aspetto delle icone: consente di scegliere se si desidera che le icone
abbiano gli angoli squadrati o arrotondati.
• Feed Google: consente di visualizzare alla sinistra della schermata Home
principale.
• Ordina le app per: Impostare la modalità di ordinamento delle app sulla
schermata Home.
• Nascondi applicazioni: consente di selezionare le app da nascondere nella
schermata Home.
• Scorrimento continuo: attivare per consentire lo scorrimento continuo della
schermata Home (ritorno alla prima schermata dopo l'ultima schermata).
• Scorri verso il basso su Sfondo: consente di cercare app o contenuti, o
visualizzare le notifiche scorrendo verso il basso sulla schermata Home.
• Scorri verso l'alto su Sfondo: consente di cercare app o contenuti
scorrendo verso l’alto sulla schermata Home.
• Sfondo Lock: consente di impedire che le app o i widget siano spostati o
rimossi.

Funzioni di base 63
Personalizzazione di Home schermo aperto
Home schermo aperto è la prima schermata che appare dopo aver ruotato lo
schermo principale verso l’alto. È possibile utilizzare le schermate Home dello
schermo principale e dello schermo secondario in vari modi.
Schermo
principale
Barra di
navigazione
Orologio e
meteo
Scorciatoie
applicazioni
Icone di accesso rapido
Schermo secondario
Barra di navigazione
• Orologio e meteo: Consente di controllare l’ora e a situazione meteo corrente.
• Scorciatoie applicazioni: Consente di avviare rapidamente le app nell’elenco.
• Barra di navigazione: È possibile usare i gesti per andare alla schermata
Home, alla schermata precedente, alla schermata Panoramica o per passare
rapidamente tra le app.
• Icone di accesso rapido: Consente di usare le app che si desidera avviare
direttamente.

Funzioni di base 64
Configurazione della schermata Home schermo
aperto
È possibile cambiare le impostazioni relative alla schermata Home quando lo
schermo principale è aperto.
1 Nella schermata Home, toccare Impostazioni Display Home schermo
aperto.
2 Scegliere la funzione desiderata per impostare una configurazione.
• Scorri verso il basso su Sfondo: consente di selezionare cosa si desidera
visualizzare scorrendo verso il basso la schermata Home principale in
modalità Swivel.
• Scorciatoia multi-app: consente di scegliere di eseguire due app
contemporaneamente sullo schermo principale e sullo schermo secondario.
• Scorri verso il basso su Sfondo: consente di selezionare cosa si desidera
visualizzare scorrendo verso il basso lo schermo secondario in modalità
Swivel.
• Effetto scorrimento schermo: consente di scegliere l’effetto visivo
desiderato quando si fa ruotare il telefono.
• Icone del cassetto delle app: consente di visualizzare l’icona del cassetto
delle app sullo schermo secondario.
• Sfondo Lock: consente di impedire che le app o i widget siano spostati o
rimossi.
• Guida: consente di visualizzare la guida per Swivel Home.

Funzioni di base 65
Blocco schermo
Informazioni generali sul blocco schermo
Lo schermo del dispositivo si spegne e si blocca se si preme il tasto di accensione/
blocco. Il blocco avviene anche quando il dispositivo viene lasciato inattivo per un
determinato periodo di tempo.
Se si preme il tasto di accensione/blocco senza l'impostazione di un blocco schermo,
viene immediatamente visualizzata la schermata Home.
Per maggiore sicurezza e per impedire l'accesso indesiderato al dispositivo,
impostare un blocco schermo.
• Il blocco schermo impedisce inutili input tocco sullo schermo del dispositivo
e riduce il consumo della batteria. È altamente consigliabile attivare il blocco
schermo mentre non si usa il dispositivo.
Impostazione di un blocco schermo
Per la configurazione delle impostazioni del blocco schermo sono disponibili varie
opzioni.
1 Nella schermata Home, toccare Impostazioni Blocco schermo & sicurezza
Seleziona il blocco dello schermo e quindi selezionare il metodo preferito.
2 Personalizzare le seguenti impostazioni:
• Nessuno: consente di disattivare la funzione di blocco schermo.
• Trascina: consente di scorrere con un dito sullo schermo per sbloccarlo.
• Sequenza: consente di disegnare una sequenza per sbloccare lo schermo.
• PIN: consente di immettere una password numerica per sbloccare lo
schermo.
• Password: consente di immettere una password alfanumerica per sbloccare
lo schermo.
• Impronte digitali: consente di sbloccare lo schermo utilizzando le impronte
digitali.

Funzioni di base 66
Personalizza Blocco schermo
Puoi personalizzare il blocco schermo.
1 Nella schermata Home, toccare Impostazioni Blocco schermo & sicurezza
Personalizza Blocco schermo.
2 Seleziona una funzione che vuoi impostare.
• Orologio: consente di impostare il punto in cui posizionare l'orologio sul
blocco schermo.
• Collegamenti: Consente di scegliere le app da eseguire sul blocco schermo.
Questa impostazione appare solo quando uno schermo di blocco viene
impostato.
• Animazione meteo: Consente di visualizzare le animazioni meteo relative
alla posizione attuale sulla schermata di blocco.
• Informazioni di contatto per telefono perso: Consente di impostare il
testo da visualizzare sulla schermata di blocco per identificare il proprietario
del telefono.
Impostazioni di Blocco con sicurezza
Puoi impostare blocchi schermo sicuri.
1 Nella schermata Home, toccare Impostazioni Blocco schermo & sicurezza
Impostazioni di Blocco con sicurezza.
2 Seleziona una funzione che vuoi impostare.
• Rendi visibile la sequenza (visualizzato solo quando come blocco schermo
è impostata una sequenza): attivare questa opzione per rendere visibile la
sequenza.
• Blocco timer: Consente di impostare l'intervallo di tempo prima che
lo schermo si blocchi automaticamente dopo lo spegnimento della
retroilluminazione (time out a causa di inattività).
• Blocco istantaneo con tasto accensione: Attivare questa opzione
per bloccare istantaneamente lo schermo quando si preme il tasto di
accensione/blocco. Questa impostazione supera le impostaszioni del timer
del blocco di sicurezza.
• Mostra blocco (visualizzato solo quando è impostato un blocco schermo):
Attivare questa opzione per visualizzare l’icona di blocco tenendo premuto
il pulsante di accensione/blocco. Toccare l’icona di blocco per disattivare il
smart lock, lo sblocco biometrico e le notifiche sulla schermata di blocco.

Funzioni di base 67
• Smart Lock: Consente di impostare dispositivi, luoghi, voce e/o rilevamento
su corpo affidabili che permettono al tuo telefono di restare sbloccato.
• Le opzioni di menu disponibili possono variare a seconda del metodo di blocco
schermo selezionato.
Toc Toc
È possibile accendere o spegnere lo schermo toccandolo due volte.
• Questa opzione è disponibile solo sulla schermata Home fornita da LG. Potrebbe
non funzionare correttamente su un launcher personalizzato o sulla schermata
Home installata dall'utente.
• Quando si tocca lo schermo, utilizzare la punta di un dito. Non utilizzare un'unghia.
• Per utilizzare la funzione Toc Toc, assicurarsi che il sensore di prossimità/luminosità
non sia ostruito da un adesivo o da un'altra sostanza estranea.
Accendi lo schermo
Toccare due volte il centro dello schermo.
• Se si tocca la parte superiore o inferiore dello schermo, la velocità di
riconoscimento potrebbe essere più bassa.
Spegni lo schermo
Toccare due volte uno spazio vuoto nella schermata Home e nella schermata di
blocco.
In alternativa, toccare due volte uno spazio vuoto sulla barra di stato.
Disattivazione di Toc Toc
Se non si desidera utilizzare la funzione Toc Toc, impostare come segue:
Nella schermata Home, toccare Impostazioni Estensioni Toc Toc e trascinare
per disattivare la funzione.

Funzioni di base 68
Riconoscimento delle impronte
digitali
Informazioni generali sul riconoscimento delle
impronte digitali
Prima di utilizzare la funzione di riconoscimento delle impronte digitali, è necessario
registrare la propria impronta sul dispositivo.
La funzione di riconoscimento delle impronte digitali può essere impiegata nei casi
seguenti:
• Per sbloccare lo schermo.
• Per visualizzare i contenuti bloccati in Galleria o QuickMemo+
• Per confermare un acquisto effettuando l’accesso a un’app o identificandosi
tramite l’impronta digitale.
• L’impronta può essere utilizzata dal dispositivo per il riconoscimento dell’utente.
Impronte digitali molto simili appartenenti a utenti diversi potrebbero essere
riconosciute dal sensore di impronte come la stessa impronta. Per una maggiore
sicurezza, impostare il blocco schermo con una Sequenza, un PIN o una Password.
• Se il dispositivo non riesce a individuare le impronte digitali o se si dimentica il
valore specificato per la registrazione, recarsi presso il più vicino Centro di servizio
clienti LG con il dispositivo e la scheda di identificazione.

Funzioni di base 69
Precauzioni per il riconoscimento delle impronte digitali
L’accuratezza del riconoscimento delle impronte digitali potrebbe diminuire a causa
di diverse regioni. Per massimizzarla, eseguire le seguenti verifiche prima dell’utilizzo
del dispositivo.
• In basso al centro dello schermo del prodotto, è presente un sensore integrato
che riconosce le impronte digitali. Fare attenzione a non graffiare o danneggiare
il sensore di impronte digitali con oggetti metallici come monete o chiavi.
• Se si sostituisce la pellicola di protezione sul prodotto con una pellicola
polarizzata che diffonde la luce o con una pellicola troppo spessa, questa può
ridurre la capacità di riconoscimento delle impronte digitali.
• In presenza di sostanze estranee (sudore, creme, acqua, sporco, grasso ecc.) sul
sensore di impronte digitali o sul dito da applicare sul sensore, il riconoscimento
delle impronte digitali potrebbe non funzionare correttamente. Pulire il sensore
e il dito e rimuovere tutta l'umidità prima di posizionare il dito sul sensore.
• Se la superficie del dito è ruvida a causa di una cicatrice o di un’immersione
prolungata in acqua, il sensore potrebbe non essere in grado di riconoscere
l'impronta digitale. In tal caso, registrare un’altra impronta digitale.
• Se si piega il dito o si usa solamente la punta del dito, il riconoscimento
dell’impronta potrebbe non avere esito positivo. Assicurati che il tuo dito copra
l’intera superficie del sensore per impronte digitali.
• Eseguire la scansione di un solo dito per ciascuna registrazione. La scansione
di più di un dito potrebbe compromettere la registrazione e il riconoscimento
dell’impronta.
• Il dispositivo potrebbe generare elettricità statica se l’aria circostante è secca. Se
l’aria circostante è secca, evitare la scansione delle impronte digitali o toccare un
oggetto metallico, quale ad esempio una moneta o una chiave, prima di eseguire
la scansione delle impronte al fine di eliminare l’elettricità statica.

Funzioni di base 70
Registrazione delle impronte digitali
È possibile registrare e salvare la propria impronta digitale sul dispositivo per
utilizzare l’identificazione tramite impronta digitale.
1 Nella schermata Home, toccare Impostazioni Blocco schermo & sicurezza
Impronte digitali.
• Questa funzione è disponibile solo se è impostato il blocco schermo.
- Bloccare il dispositivo con una sequenza, un PIN o una password.
• Se non è stato impostato il blocco schermo, attivarlo seguendo le istruzioni
visualizzate sullo schermo. Per i dettagli, vedere, consultare la sezione
Impostazione di un blocco schermo
.
2 Controllare la posizione del sensore di impronte digitali in basso al centro dello
schermo e posare leggermente il dito sul sensore.
• Assicurarsi che il dito copra completamente il sensore di impronte digitali.
3 Seguire le istruzioni visualizzate sullo schermo.
• Posare il dito sul sensore e tenerlo in posizione fino a quando non si avverte
una vibrazione.
• Muovere lo stesso dito sul sensore, di poco alla volta, fino al completamento
della registrazione dell’impronta digitale.
4 Una volta completata la registrazione dell’impronta, toccare OK.
• Toccare Aggiungi altro per registrare un’altra impronta digitale. Se si registra
solo un’impronta digitale e il dito corrispondente non è in condizioni ottimali,
il riconoscimento dell'impronta potrebbe non funzionare correttamente.
Come misura preventiva, registrare più impronte digitali.

Funzioni di base 71
Gestione delle impronte digitali
È possibile modificare o eliminare le impronte digitali registrate.
1 Nella schermata Home, toccare Impostazioni Blocco schermo & sicurezza
Impronte digitali.
2 Sbloccare in base al metodo di blocco specificato.
3 Dall’elenco delle impronte digitali, toccare un’impronta digitale per rinominarla.
Per eliminarla, toccare .
Visualizzazione dell’icona dell’impronta digitale
quando lo schermo è spento
È possibile impostare la visualizzazione della posizione del sensore di impronte
digitali sullo schermo quando lo schermo è spento.
1 Nella schermata Home, toccare Impostazioni Blocco schermo & sicurezza
Impronte digitali.
2 Sbloccare in base al metodo di blocco specificato.
3 Toccare Tocca per mostrare l'icona quando lo schermo è spento per abilitare
l’opzione.
Effetto icona
È possibile scegliere l’effetto che appare quando si tocca l’icona dell’impronta
digitale.
1 Nella schermata Home, toccare Impostazioni Blocco schermo & sicurezza
Impronte digitali.
2 Sbloccare in base al metodo di blocco specificato.
3 Toccare Effetto icona e selezionare l’effetto desiderato.

Funzioni di base 72
Sblocco dello schermo con un’impronta digitale
È possibile sbloccare lo schermo o visualizzare i contenuti bloccati utilizzando la
propria impronta digitale.
1 Nella schermata Home, toccare Impostazioni Blocco schermo & sicurezza
Impronte digitali.
2 Sbloccare in base al metodo di blocco specificato.
3 Nella schermata delle impostazioni dell’impronta digitale, attivare la funzione
desiderata:
• Blocco schermo: consente di sbloccare lo schermo con un’impronta digitale.
• Blocco del contenuto: consente di accedere con l’impronta digitale ai
contenuti che sono stati bloccati In Galleria e QuickMemo+.
Toc Toc
È possibile accendere o spegnere lo schermo toccandolo due volte.
Nella schermata Home, toccare Impostazioni Estensioni Toc Toc per abilitare
l’opzione.
• Questa opzione è disponibile solo sulla schermata Home fornita da LG. Potrebbe
non funzionare correttamente su un launcher personalizzato o sulla schermata
Home installata dall'utente.
• Quando si tocca lo schermo, utilizzare la punta di un dito. Non utilizzare un'unghia.
• Per utilizzare la funzione Toc Toc, assicurarsi che il sensore di prossimità/luminosità
non sia ostruito da un adesivo o da un'altra sostanza estranea.
Accendi lo schermo
Toccare due volte il centro dello schermo.
• Se si tocca la parte superiore o inferiore dello schermo, la velocità di
riconoscimento potrebbe essere più bassa.
Spegni lo schermo
Toccare due volte uno spazio vuoto nella schermata Home e nella schermata di
blocco.
In alternativa, toccare due volte uno spazio vuoto sulla barra di stato.

Funzioni di base 73
Funzione Multitasking
Schermata Utilizzi recenti
Scorrere verso l’alto la barra di navigazione e tenerla premuta per visualizzare la
cronologia di utilizzo recente.
Finestra pop-up
È possibile aprire più app sullo schermo e passare facilmente da una all'altra in
qualsiasi momento.
1 Scorrere verso l'alto e tenere premuto dal lato inferiore dello schermo.
2 Toccare l’icona dell’app nella parte superiore sinistra della schermata dell’app e
selezionare Finestra pop-up.
• Se si tocca l’icona dell’app, appaiono le opzioni Informazioni applicazione,
Multi Window, Finestra pop-up e Appunta app.
3 L’app appare sullo schermo nella forma di una finestra pop-up.
• Questa funzione potrebbe non essere disponibile per alcune app o schermate.

Funzioni di base 74
Utilizzo della finestre popup
• : Riduce a icona la finestra pop-up. La finestra pop-up viene ridotta a icona
mobile dell'app e può essere spostata dove desiderato sullo schermo.
• : Espande l’app a schermo intero.
• : Chiude l’app.
• Per spostare la finestra pop-up: Trascinare la parte superiore della finestra
pop-up.
• Per regolare le dimensioni della finestra pop-up: Trascinare il bordo sinistro,
destro o inferiore della finestra pop-up.
• È possibile aprire fino a 5 app usando le finestre popup.
• Per selezionare un'app tra quelle aperte, toccare la relativa finestra pop-up. La
finestra pop-up selezionata viene portata in primo piano.
• Le finestre popup non possono essere spostate nell’area della barra di stato o della
barra di navigazione.

Funzioni di base 75
Uso della cartella delle app per le finestre popup
Toccando sulla finestra pop-up, la finestra popup viene ridotta a icona dell’app.
È possibile trascinare l’icona dell’app in qualsiasi punto trascinandola.
Se due o più finestre popup sono ridotte a icona, viene creata la cartella delle app
per contenere le icone delle app.
• L’icona dell’app utilizzata più di recente viene usata come icona della cartella delle
app. Toccando l’icona, tutte le icone delle finestre popup ridotte a icona appaiono
nella cartella delle app.

Funzioni di base 76
Cartella delle app delle
finestre popup
• Se si tocca a lungo la cartella delle app delle finestre popup e si trascina la cartella
della app in Rimuovi, la cartella delle app viene rimossa.
• Per rimuovere una delle app dalla cartella delle app, aprire la cartella delle app e
trascinare l'icona dell'app fuori dalla cartella delle app.

Funzioni di base 77
Multi Window
Quando si usa la navigazione a gesti (per impostazione
predefinita)
1 Scorrere verso l'alto e tenere premuto dal lato inferiore dello schermo.
• Vengono visualizzate le app utilizzate di recente.
• Se si tocca l’icona dell’app, appaiono le opzioni Informazioni applicazione,
Multi Window, Finestra pop-up e Appunta app.
2 Toccare l’icona dell’app nella parte superiore sinistra dell’app da visualizzare nella
finestra multipla e selezionare Multi Window.
• Le app selezionate vengono visualizzate nella parte superiore dello schermo.
3 Toccare l’altra app da visualizzare nella finestra multipla.
• Le applicazioni selezionate vengono visualizzate nella parte inferiore dello
schermo.
Quando si usa la navigazione sono con i pulsanti
1 Toccare nella barra di navigazione.
• Vengono visualizzate le app utilizzate di recente.
• Se si tocca l’icona dell’app, appaiono le opzioni Informazioni applicazione,
Multi Window, Finestra pop-up e Appunta app.
2 Toccare l’icona dell’app nella parte superiore sinistra dell’app da visualizzare nella
finestra multipla e selezionare .
• Le app selezionate vengono visualizzate nella parte superiore dello schermo.
3 Toccare l’altra app da visualizzare nella finestra multipla.
• Per regolare le dimensioni dello schermo diviso, trascinare la barra al centro dello
schermo.
• Per disattivare la funzione di finestra multipla, trascinare la barra al centro verso
l’alto o verso il basso fino all’estremità dello schermo.
• La funzione Multi Window non è supportata da alcune app LG o da alcune app
scaricate dal Play Store.

Funzioni di base 78
Crittografia della scheda di memoria
È possibile crittografare e proteggere i dati salvati sulla scheda di memoria.
L'accesso ai dati crittografati sulla scheda di memoria non sarà possibile da un altro
dispositivo.
1 Nella schermata Home, toccare Impostazioni Blocco schermo & sicurezza
Crittografia e credenziali Cripta la Scheda SD.
2 Leggere le informazioni generali sulla crittografia della scheda di memoria
visualizzate sullo schermo, quindi toccare Continua per continuare.
3 Selezionare un'opzione e toccare Crittografia.
• Crittografia del nuovo file: consente di crittografare solo i dati salvati sulla
scheda di memoria dopo la crittografia.
• Crittografia completa: consente di crittografare tutti i dati attualmente
salvati sulla scheda di memoria.
• Escludi file multimediali: consente di crittografare tutti i file ad eccezione di
quelli multimediali come musica, foto e video.
• Una volta avviata la crittografia di una scheda di memoria, alcune funzioni non
sono disponibili.
• Se il dispositivo si spegne mentre la crittografia è in corso, il processo di crittografia
non riuscirà e alcuni dati potrebbero danneggiarsi. Occorre perciò assicurarsi che il
livello della batteria sia sufficiente prima di avviare la crittografia.
• L'accesso ai file crittografati è possibile solo dal dispositivo in cui i file sono stati
crittografati.
• La scheda di memoria crittografata non può essere utilizzata su un altro
dispositivo LG. Per utilizzare la scheda di memoria crittografata su un altro
dispositivo mobile, formattare la scheda.
• È possibile attivare la crittografia della scheda di memoria anche se nel dispositivo
non è installata alcuna scheda di memoria. Qualsiasi scheda di memoria installata
dopo la crittografia verrà automaticamente crittografata.

Funzioni di base 79
Acquisizione di screenshot
È possibile acquisire screenshot della schermata che si sta visualizzando.
Tramite un collegamento rapido
Tenere premuti contemporaneamente il tasto di accensione/blocco e il Tasto
volume giù per almeno due secondi.
• Gli screenshot possono essere visualizzati nella cartella Screenshots nella
Galleria.
Tramite screenshot
Nella schermata di cui si desidera acquisire uno screenshot, trascinare verso il basso
la barra di stato, quindi toccare .
• Per i dettagli, vedere, consultare la sezione
Scrittura di note su uno screenshot
.
Registrazione schermata
È possibile registrare la schermata.
1 Trascinare verso il basso la barra di stato per aprire l’elenco delle icone di
accesso rapido.
2 (Se necessario, scorrere a sinistra sull'area delle icone di accesso rapido.)
Sfiorare .
3 Leggere la dichiarazione di non responsabilità e toccare Inizio. La registrazione
inizia in 3 secondi.
Tempo di registrazione della schermata
Seleziona la fotocamera pop up frontale Arresta la registrazione
Seleziona la registrazione vocale
• Quando si tocca , la fotocamera pop up si solleva ed è inclusa anche la
visualizzazione dalla fotocamera frontale.

Funzioni di base 80
4 Per arrestare la registrazione, toccare . Il video registrato viene salvato nella
Galleria.
• La violazione dei diritti di altre persone, quali il diritto di ritratto o di proprietà
intellettuale, o la diffamazione della reputazione di altre persone utilizzando le
funzioni fornite per il servizio di registrazione dello schermo, possono comportare
responsabilità civili, penali o amministrative in conformità con le leggi vigenti. LG
Electronics declina ogni responsabilità legale per le azioni degli utenti.
Immissione di testo
Utilizzo della barra degli strumenti Smart
È possibile usare vari metodi di immissione da tastiera da un’unica posizione. È
possibile selezionare il metodo di immissione desiderato dalla parte superiore della
tastiera.
1 Selezionare il metodo di immissione da tastiera desiderato dalla barra degli
strumenti Smart.
2 Toccare e selezionare il metodo di immissione da visualizzare nella barra
degli strumenti Smart, oppure riorganizzarli.
Barra degli
strumenti Smart
• I metodi di immissione supportati possono variare a seconda del dispositivo.
• È possibile attivare o disattivare la barra degli strumenti Smart dalle impostazioni
della tastiera.

Funzioni di base 81
• : Aggiungere emoji.
• : Toccare per aggiungere emoticon animate o creare le proprie emoji
usando una foto o la fotocamera.
• : Consente di usare la tastiera GIF di Tenor. Toccare Accetta per usare
questa funzione.
• : Aprire Draw Chat.
• : Immettere testo tramite voce
• : Accedere alle impostazioni della tastiera.
• : Aprire Appunti.
• : Inserire il testo mediante scrittura manuale. È necessario scaricare i dati
della lingua di immissione per la scrittura manuale. Toccare Download per
scaricare i dati della lingua di immissione per la scrittura manuale.
• : Attivare a tastiera fluttuante quando si usa la funzione Multi Window. È
possibile anche spostare la testiera nella posizione desiderata.
• : Toccare per usare la modalità di utilizzo con una mano
• : Toccare per regolare le dimensioni della tastiera.
• : Toccare per regolare la trasparenza della tastiera.

Funzioni di base 82
Utilizzo della tastiera Smart
È possibile utilizzare la tastiera Smart per immettere e modificare testo.
Con la tastiera Smart il testo viene visualizzato mentre lo si digita, senza dover
passare dalla schermata a una tastiera tradizionale e viceversa. In questo modo è
possibile trovare e correggere con facilità gli eventuali errori durante la digitazione.
Spostamento del cursore
Con la tastiera Smart è possibile spostare il cursore esattamente nella posizione
desiderata. Quando si digita un testo, toccare e tenere premuta la barra spaziatrice,
quindi trascinarla verso sinistra o destra.
• Questa opzione è disponibile solo sulla tastiera QWERTY.

Funzioni di base 83
Suggerimento di parole
La tastiera Smart analizza automaticamente abitudini di utilizzo dell'utente per
suggerire le parole utilizzate più spesso durante la digitazione. Quanto più si utilizza
il dispositivo, tanto più precisi saranno i Consigli.
Immettere un testo, quindi toccare una parola suggerita o trascinare delicatamente
verso l'alto il lato sinistro o destro della tastiera.
• La parola selezionata viene inserita automaticamente. Non è necessario digitare
manualmente ogni lettera della parola.
Copia e incolla
È possibile tagliare o copiare del testo da un’app, quindi incollarlo nella stessa app. È
anche possibile eseguire altre app e incollare il testo al loro interno.
1 Toccare e tenere premuta l'area attorno al testo che si desidera copiare o
tagliare.
2 Trascinare / per specificare l'area da copiare o tagliare.
3 Selezionare Taglia o Copia.
• Il testo tagliato o copiato viene aggiunto automaticamente agli Appunti.
4 Toccare e tenere premuta la finestra di inserimento del testo, quindi selezionare
Incolla.
• In assenza di un elemento copiato o tagliato, l'opzione Incolla non verrà
visualizzata.

Funzioni di base 84
Condivisione di contenuti
Riproduzione di contenuti da un altro dispositivo
È possibile riprodurre foto, video o canzoni salvate sul proprio dispositivo da una TV.
1 Connettere la TV e il dispositivo alla stessa rete Wi-Fi.
2 Mentre si visualizzano gli elementi dell'app Galleria o Musica, toccare o
Riproduci su un altro dispositivo.
Oppure, nella schermata Home toccare Impostazioni Dispositivi connessi
Condivisione schermo e quindi toccare per attivare la funzione.
3 Selezionare la TV a cui si desidera connettersi.
• Per l'utilizzo con Chromecast, è consigliabile che i servizi di Google Play siano
aggiornati.
Visualizzazione di contenuti da dispositivi vicini
È possibile visualizzare contenuti da diversi dispositivi, come ad esempio un
computer, un dispositivo NAS o un dispositivo mobile, utilizzando le app Galleria o
Musica.
Connessione dei dispositivi
Connettere sia il proprio dispositivo che un altro dispositivo in grado di supportare
la funzione DLNA alla stessa rete wireless.
• Assicurarsi che la Condivisione file (DLNA) sia attiva sia nel dispositivo mittente
che nel dispositivo connesso.
Ricerca di dispositivi vicini
È possibile visualizzare un elenco di dispositivi DLNA connessi alla stessa rete
selezionando il menu Dispositivi nelle vicinanze in ciascuna app.
Si possono utilizzare i contenuti di dispositivi vicini come se li si stesse utilizzando
sul proprio dispositivo.

Funzioni di base 85
Invio o ricezione di file
È possibile condividere file tra il proprio dispositivo e un altro dispositivo LG oppure
un tablet.
Invio di file
Dalla Galleria o altre app, toccare Condividi o , quindi selezionare un
dispositivo dall’elenco di condivisione file.
Ricezione di file
Trascinare verso il basso la barra di stato e toccare Condivisione File.
Se il proprio dispositivo non supporta la funzione di condivisione file, nella
schermata Home toccare Impostazioni Dispositivi connessi Condivisione File
SmartShare Beam .
• È possibile condividere file con determinati dispositivi che supportano DLNA.
Non disturbare
È possibile limitare o disattivare l’audio delle notifiche per evitare di essere disturbati
per un determinato periodo di tempo.
Nella schermata Home, toccare Impostazioni Suono Non disturbare.
• Toccare Modo e selezionare la modalità desiderata:
- Solo priorità: consente di ricevere le notifiche sonore o con vibrazione per le
app selezionate. Anche se è attiva la modalità Solo priorità, le sveglie suonano
comunque.
- Silenzio totale: consente di disabilitare sia l’audio che la vibrazione.
• Seleziona le priorità: rricevi allarmi e le notifiche per le app selezionate.
- Chiamate da: imposta una serie di notifiche quando ricevi una chiamata.
• Chiamate ripetute: la seconda chiamata dalla stessa persona entro 15 minuti non
viene resa silenziosa.

Funzioni di base 86
- Messaggi da: imposta una serie di notifiche quando ricevi un messaggio.
• Utilizza modalità Non disturbare: Attiva la funzionalità Non disturbare.
• Sonno: imposta il programma in base al quale attivare la funzionalità Non
disturbare.
• Guida: Visualizzare la guida per Non disturbare.
AOD (always-on display)
È possibile visualizzare la data, l’ora o la firma, anche se lo schermo principale è
spento.
Scorrere il lato inferiore della schermata di AOD (always-on display) per attivare
diverse funzioni, tra cui Camera, Capture+, Wi-Fi, impostazioni audio, Bluetooth,
Flash, Musica e molto altro.
1 Nella schermata Home, toccare Impostazioni Display AOD (always-on
display).
2 Seleziona l'immagine che vuoi visualizzare e tocca Salva.
• Tocca l'immagine desiderata tra Orologio digitale, Orologio analogico,
Doppio orologio e Firma o Immagine.
• Toccare Mostra display e selezionare Tocca per mostrare per 10 secondi
o Mostra sempre.
• Toccare Strumenti rapidi e lettore musicale per scorrere sulle icone di
stato di Strumenti rapidi e lettore musicale.
• Per aumentare la luminosità della funzione AOD (always-on display), toccare
Display più luminoso.
• Per visualizzare la guida di Always-on display toccare Guida.
• La batteria potrebbe scaricarsi più velocemente quando si utilizza AOD (always-on
display). Spegnere questa funzione per risparmiare la batteria.
• Per disattivare la funzione Always-on display, nella schermata Home toccare
Impostazioni Display AOD (always-on display), e quindi toccare .

App utili
03

App utili 88
Installazione e disinstallazione di app
Installazione di app
È possibile accedere a uno store di app per cercare e scaricare delle app.
• Si può utilizzare SmartWorld, Play Store o lo store di app fornito dal proprio
gestore del servizio.
• Alcuni store di app potrebbero richiedere la creazione di un account e la
registrazione.
• Alcune app potrebbero essere a pagamento.
• Se si utilizzano dati mobili, potrebbe esserne addebitato il costo a seconda del
proprio piano tariffario.
• SmartWorld potrebbe non essere supportato a seconda dell'area o del provider
del servizio.
Disinstallazione di app
Disinstallare le app inutilizzate dal dispositivo.
Disinstallazione con il gesto di tocco e pressione lunga
Tenere premuta un’area vuota della schermata, e quindi premere dell’app da
eliminare.
Disinstallazione tramite il menu delle impostazioni
Nella schermata Home, toccare Impostazioni Applicazioni Informazioni
applicazione, selezionare un’app e quindi toccare Disinstalla.
• Alcune app non possono essere disinstallate dagli utenti.
Disinstallazione di app dallo store di app
Per disinstallare un'app, accedere allo store di app da cui è stata scaricata e
disinstallarla.

App utili 89
Installazione e disinstallazione di app durante il
setup
Quando si accende il dispositivo per la prima volta, è possibile scaricare le app
consigliate.
È possibile saltare alla fase successiva senza l'installazione.
Cestino app
È possibile visualizzare le app disinstallate. È inoltre possibile reinstallare le app che
sono state disinstallate nelle ultime 24 ore.
1 Nella schermata Home, toccare LG Cestino app.
Si può inoltre toccare e tenere premuta un’area vuota della schermata Home,
quindi toccare Cestino app.
2 Attivare la funzione desiderata:
• Ripristina: consente di reinstallare l’app selezionata.
• : consente di rimuovere definitivamente dal dispositivo le app disinstallate.
• Le app disinstallate vengono rimosse automaticamente dal dispositivo 24 ore
dopo la disinstallazione. Se si desidera reinstallare le app disinstallate, è necessario
scaricarle nuovamente dallo store di app.
• Questa funzione è attiva solamente sulla schermata Home. Se si disinstallano delle
app mentre si utilizza la schermata EasyHome o un altro launcher, queste vengono
immediatamente e definitivamente rimosse dal dispositivo.

App utili 90
Scorciatoie applicazioni
Nella schermata Home, toccare e tenere premuta l'icona di una app come Chiama,
Invia messaggio, Camera, Galleria e Impostazioni per mostrare un menu di accesso
rapido. Utilizza le app in maniera più semplice grazie alle scorciatoie per app.
• Toccare per impostare i widget per l'app.
• Toccare per visualizzare le informazioni sull’app.
• Questa funzione è disponibile solo in alcune app.

App utili 91
Telefono
Chiamata vocale
Per eseguire una chiamata vocale, utilizzare uno dei metodi disponibili, ad esempio
immettere manualmente un numero di telefono e selezionarlo dall'elenco dei
contatti o dall'elenco delle chiamate recenti.
Esecuzione di una chiamata dal tastierino numerico
1 Nella schermata Home, toccare Componi.
2 Eseguire la chiamata utilizzando un metodo a scelta:
• Immettere un numero di telefono e toccare .
• Toccare e tenere premuto un numero di composizione veloce.
• Cercare un contatto toccando la lettera iniziale del relativo nome nell'elenco
dei contatti, quindi toccare .
• Per immettere "+" quando si esegue una chiamata internazionale, toccare e tenere
premuto il numero 0.
• Per i dettagli, vedere
Aggiunta di contatti
per ottenere ulteriori informazioni su
come aggiungere numeri di telefono all'elenco di selezione rapida.
Esecuzione di chiamate dalla Rubrica
1 Nella schermata Home, toccare Rubrica.
2 Dopo aver selezionato il numero da chiamare dall’elenco dei contatti nella
rubrica, toccare .

App utili 92
Risposta a una chiamata
Per rispondere a una chiamata, trascinare sulla schermata della chiamata in
arrivo.
• Se è collegato un auricolare stereo, è possibile eseguire le chiamate utilizzando il
pulsante di chiamata/fine sull'auricolare.
• Per terminare una chiamata senza spegnere lo schermo, nella schermata Home
toccare Impostazioni Rete & internet Impostazioni chiamate Rispondi
e termina chiamate e quindi attivare Termina le chiamate con il tasto di
accensione.
• Nella schermata Home, toccare Impostazioni Rete & internet Impostazioni
chiamate Rispondi e termina chiamate Termina le chiamate con il tasto
di accensione, è possibile terminare le chiamate premendo il tasto di accensione/
blocco mentre è attiva la schermata della chiamata in corso.
Rifiuto di una chiamata
Per rifiutare una chiamata in arrivo, trascinare attraverso la schermata della
chiamata in arrivo.
• Per inviare un messaggio di rifiuto, trascinare l'opzione del messaggio di rifiuto
per la schermata.
• Per aggiungere o modificare un messaggio di rifiuto, nella schermata Home
toccare Impostazioni Rete & internet Impostazioni chiamate Blocco
chiamate & Rifiuta con messaggio.
• Quando è in arrivo una chiamata, premere il tasto volume su, volume giù o il
tasto di accensione/blocco per disattivare l’audio della suoneria o la vibrazione,
oppure per mettere in attesa la chiamata.
Verifica di una chiamata in arrivo durante l’utilizzo
di un’app
Quando si riceve una chiamata mentre si sta utilizzando un’app, è possibile
visualizzare una notifica pop-up nella parte superiore della schermata. Si può
accettare la chiamata, rifiutarla o inviare un messaggio dalla schermata pop-up.
• Nella schermata Home, toccare Impostazioni Rete & internet Impostazioni
chiamate Altre impostazioni Pop-up di chiamata in arrivo e quindi
selezionare il modo in cui si desidera visualizzare la chiamata in arrivo quando si
usa un'app.

App utili 93
Visualizzazione delle chiamate perse
In caso di una chiamata persa, nella barra di stato nella parte superiore dello
schermo viene visualizzato .
Per visualizzare i dettagli della chiamata persa, trascinare la barra di stato verso il
basso. È inoltre possibile toccare Chiamate nella schermata Home.
Funzioni disponibili nel corso di una chiamata
Nel corso di una chiamata è possibile accedere a varie funzioni toccando i pulsanti
visualizzati sullo schermo:
• Rubrica: consente di visualizzare l'elenco di contatti durante una chiamata.
• Attesa: mette in attesa la chiamata corrente.
• Tastiera: consente di mostrare o nascondere la testiera del telefono.
• Vivavoce: consente di attivare la funzione vivavoce.
• Muto: consente di silenziare la propria voce in modo che non possa essere udita
dall'interlocutore.
• Bluetooth: consente di passare la chiamata a un dispositivo Bluetooth associato
e connesso.
• : consente di terminare una chiamata.
• : consente di accedere a opzioni di chiamata aggiuntive.
• Le voci delle impostazioni disponibili possono variare a seconda dell'area e del
provider del servizio.

App utili 94
Esecuzione di una chiamata a tre vie
È possibile eseguire una chiamata a un altro contatto nel corso di una chiamata.
1 Durante una chiamata, toccare Aggiungi.
2 Immettere un numero di telefono e toccare .
• Le due chiamate vengono visualizzate contemporaneamente sullo schermo
e la prima chiamata viene messa in attesa.
3 Per avviare una conferenza telefonica, toccare Unisci.
• Può essere addebitato il costo di ogni chiamata. Rivolgersi al proprio provider del
servizio per ulteriori informazioni.
Visualizzazione dei record delle chiamate
Per visualizzare i record delle chiamate recenti, nella schermata Home toccare
Chiamate. È quindi possibile utilizzare le seguenti funzioni:
• Per visualizzare i record dettagliati delle chiamate, selezionare un contatto. Per
eseguire una chiamata a un contatto selezionato, toccare .
• Per eliminare i record delle chiamate, toccare Elimina.
• La durata visualizzata delle chiamate potrebbe essere diversa da quella addebitata.
Rivolgersi al proprio provider del servizio per ulteriori informazioni.
• La cronologia delle telefonate non può essere recuperata una volta cancellata.
• Stringi due dita o allargale per regolare la dimensione del carattere per i registri
delle chiamate o i contatti.
Configurazione delle opzioni di chiamata
È possibile configurare diverse opzioni di chiamata.
1 Nella schermata Home, toccare Componi o Chiamate.
2 Toccare Impostazioni chiamate e quindi configurare le opzioni in base alle
proprie preferenze.

App utili 95
Messaggi
Invio di un messaggio
È possibile creare e inviare messaggi ai propri contatti utilizzando l’app di
messaggistica.
• L'invio di messaggi all'estero potrebbe essere soggetto a ulteriori costi. Rivolgersi al
proprio provider del servizio per ulteriori informazioni.
1 Nella schermata Home, toccare .
2 Sfiorare .
3 Specificare un destinatario e creare un messaggio.
• Per usare le opzioni multimediali, tocca .
• Per accedere alle voci di menu opzionali, toccare .
4 Toccare per inviare il messaggio.
Lettura di un messaggio
È possibile visualizzare i messaggi scambiati organizzati per singolo contatto.
1 Nella schermata Home, toccare .
2 Selezionare un contatto dall'elenco dei messaggi.
• Nell'elenco dei messaggi o nella finestra di chat, è possibile regolare le dimensioni
dei caratteri posizionando due dita sullo schermo e allontanando o avvicinando
le dita.

App utili 96
Configurazione delle impostazioni dei messaggi
È possibile modificare le impostazioni dei messaggi in base alle proprie preferenze.
1 Nella schermata Home, toccare .
2 Toccare Impostazioni dall'elenco dei messaggi.
• È possibile specificare le impostazioni per la finestra di avviso, il blocco delle
chiamate, l'avviso di emergenza, i messaggi multimediali ecc.
Fotocamera
Avvio della fotocamera
È possibile scattare una foto o registrare un video per conservare tutti i momenti
memorabili.
Nella schermata Home, toccare .
• Prima di scattare una foto o registrare un video, pulire l'obiettivo della fotocamera
con un panno morbido.
• Prestare attenzione a non macchiare l’obiettivo della fotocamera con le dita o altre
sostanze.
• Le immagini incluse nella presente guida potrebbero essere diverse da quelle
effettive del dispositivo.
• Le foto e i video possono essere visualizzati o modificati dalla Galleria. Per i
dettagli, vedere, consultare la sezione
Informazioni generali sulla Galleria
.
• Non utilizzare il prodotto per scopi che potrebbero violare la privacy o i diritti di
altre persone.

App utili 97
Scatto di una foto
È possibile scattare foto con la fotocamera del prodotto.
1 Toccare e mettere a fuoco il soggetto.
• È possibile toccare il soggetto da mettere a fuoco.
• È possibile allontanare o avvicinare due dita per ingrandire o ridurre.
2 Sfiorare per scattare una foto.
• È inoltre possibile premere il tasto volume su o volume giù per scattare una
foto.
• È possibile scattare una foto durante la registrazione di un video premendo
sullo schermo.
• Le informazioni visualizzate nella schermata di ripresa possono variare a
seconda della fotocamera selezionata (anteriore o posteriore) e alla modalità
fotocamera.
• La fotocamera si disattiva automaticamente se non la si usa per un po’ di
tempo dopo aver aperto l’app Fotocamera.
Seleziona tra zoom 1.0x con
angolo standard/zoom 2.0x
con angolo standard/zoom
0.5x grandangolare
Apre Google Lens
Consente alla funzione AI di
applicare automaticamente
l’effetto migliore per la scena
Imposta le proporzioni dello
schermo
Imposta le opzioni della
fotocamera
Apre la Galleria
Consente di passare dalla
fotocamera anteriore a quella
posteriore e viceversa
Consente di scattare foto
Cambia le impostazioni del
timer
Cambia le impostazioni della
fotocamera
Applica gli effetti filtro

App utili 98
• È possibile aprire l’app della fotocamera premendo brevemente due volte il tasto
di accensione. Nella schermata Home, toccare Impostazioni Estensioni
Collegamenti e quindi toccare Apri Fotocamera per attivarla.
• Quando lo schermo è spento o bloccato, avviare la fotocamera premendo due volte
il tasto volume giù. Nella schermata Home, toccare Impostazioni Estensioni
Collegamenti e quindi toccare Apri Fotocamera per attivarla.
Personalizzazione delle opzioni della fotocamera
È possibile personalizzare varie opzioni in base alle proprie preferenze.
Toccare sulla schermata.
• Le opzioni disponibili potrebbero variare a seconda della fotocamera selezionata
(anteriore o posteriore) e alla modalità fotocamera selezionata.
Ottimizzatore
automatico della
scena
Riconoscendo la scena che viene registrata, applica automaticamente
l'impostazione della risoluzione ottimale.
Composizione Riconoscendo la figura umana quando si scatta una foto a una
persona, consiglia la composizione ottimale.
Consigli
Informa l'utente quando gli occhi del soggetto erano chiusi o
l'immagine è sfocata, per consentire di ottenere una fotografia
ottimale.
Dimensioni foto Consente di scegliere le dimensioni e le proporzioni della foto.
HDR
Consente di ottenere foto dai colori vividi ed effetti compensati
anche quando le foto sono scattate contro luce. Queste funzioni sono
disponibili grazie alla tecnologia High Dynamic Range (HDR) integrata
nella fotocamera.
Correzione della
distorsione dello
scatto ultra
grandangolare
Corregge la distorsione dello schermo quando si scattano foto ultra
grandangolari.
Salva in HEIF
Risparmia spazio di archiviazione comprimendo il file immagine in
formato HEIF. Altri dispositivi potrebbero non supportare i file video
in formato HEIF.
Foto dal vivo Registra l'azione prima e dopo aver scattato una foto.

App utili 99
Tracking focus
Consente alla fotocamera di mantenere la messa a fuoco sul
soggetto che si tocca sullo schermo, anche se il soggetto è in
movimento. (Disponibile quando è in funzione la fotocamera
Standard.)
Griglia
Consente di visualizzare le griglie di guida in modo da poter scattare
foto o registrare video in base alle linee di riferimento orizzontali e
verticali.
Scatto al Cheese Consente di scattare una foto pronunciando ‘Cheese’, ‘Smile’,
‘Whiskey’, ‘Kimchi’ o ‘LG’.
Aggiungi Filigrana Consente di visualizzare una filigrana sulle foto.
Tag posizione Consente di salvare l’immagine completa di dati sulla posizione GPS.
Archiviazione
Consente di selezionare se si desidera archiviare le immagini e i video
nell’Archivio interno o nella Scheda SD. (Disponibile quando la scheda
di memoria è inserita.)
Guida Fornisce una guida per ciascun menu della fotocamera.
Opzioni aggiuntive della fotocamera anteriore
Correzione della
distorsione del
selfie
Corregge le parti distorte del viso
Salva come
capovolta Salva le immagini come capovolte dopo aver scattato dei selfie.
Scatto di selfie Scatta un selfie selezionando le sue opzioni tra Scatto tramite gesto
della mano e Scatto automatico.
• È possibile applicare l’effetto make-up quando si scatta un selfie con la fotocamera
anteriore.
• Scatto tramite gesto della mano viene effettuato mediante il riconoscimento
della forma di una mano e Scatto automatico viene effettuato mediante il
riconoscimento di un viso.

App utili 100
Selezione della modalità
È possibile selezionare comodamente tra le modalità visualizzate sullo schermo, che
sono selezionate per adattarsi all'ambiente di ripresa.
Toccare e scorrere le modalità della fotocamera verso sinistra o destra, oppure
scorrere lo schermo a sinistra o a destra per selezionare una modalità della
fotocamera.
Modalità della
fotocamera
Uso delle modalità della fotocamera
Registrazione di video TimeLapse
È possibile registrare video Timelapse ottimizzati per la situazione.
I video possono essere registrati con velocità ottimale e movimento costante
analizzando vari ambienti di ripresa. La velocità di Timelapse può essere regolata
automaticamente in base al soggetto e all'ambiente di ripresa.
È possibile anche selezionare manualmente la velocità di Timelapse.
1 Toccare e selezionare TimeLapse scorrendo le modalità della fotocamera.

App utili 101
Selezionare lo zoom
Consente di registrare video
Passa alla fotocamera
anteriore/posteriore
Modalità foto corrente
Anteprima
Seleziona la velocità di
Timelapse
Imposta/annulla l’impostazione
del flash
Timelapse notturno
Imposta le opzioni della
fotocamera
Imposta la risoluzione dello
schermo
Attiva/disattiva Steady Cam
2 Toccare per registrare un video.
• Durante la registrazione, è possibile cambiare lo zoom e la velocità di
Timelapse.
• Toccando la velocità desiderata, la velocità di Timelapse viene regolata
durante la registrazione.
• Per mettere in pausa la registrazione del video, toccare . Per riprendere la
registrazione del video, toccare .
• Mentre registri un video, puoi stringere o allargare due dita per ingrandire o
rimpicciolire.
• Mentre registri un video, puoi toccare l'area desiderata per regolare la
luminosità.
3 Toccare per arrestare la registrazione.
• Il video registrato viene salvato nella Galleria.
• Durante la registrazione Timelapse, l’audio non viene registrato.

App utili 102
Registrazione di un video
1 Toccare e selezionare Video scorrendo le modalità della fotocamera.
2 Toccare per registrare un video.
Selezionare lo zoom
Consente di registrare video
Passa alla fotocamera
anteriore/posteriore
Imposta il flash
Applica l’effetto filtro
Imposta la fotocamera
Imposta la risoluzione dello
schermo
Attiva/disattiva Steady Cam
Anteprima
Toccare per cambiare le
opzioni audio tra Base,
Modalità ASMR e Bokeh
vocale.
• Per scattare una foto mentre si registra un video, toccare .
• Per mettere in pausa la registrazione del video, toccare . Per riprendere la
registrazione del video, toccare .
• Mentre registri un video, puoi stringere o allargare due dita per ingrandire o
rimpicciolire.
• Mentre registri un video, puoi toccare l'area desiderata per regolare la
luminosità.
3 Toccare per terminare la registrazione del video.

App utili 103
Scatto di ritratti
È possibile scattare foto o video in cui il soggetto risalta ed è più distinto sfocando
lo sfondo.
1 Toccare e selezionare Ritratto scorrendo le modalità della fotocamera.
• Selezionare un effetto desiderato scorrendo le opzioni di effetto disponibili
per Ritratto.
2 Toccare per scattare una foto, oppure toccare e tenere premuto per
registrare un video.
• Per mettere in pausa la registrazione del video, toccare . Per riprendere la
registrazione del video, toccare .
Imposta il timer
Imposta il valore di apertura
Imposta la fotocamera
Imposta le proporzioni dello
schermo
Seleziona un effetto
3 Toccare per terminare la registrazione del video.
• Quando appare il messaggio “Ritratto è disponibile”, iniziare a scattare una foto.
• La funzione Ritratto potrebbe non essere disponibile se la fotocamera non è in
grado di riconoscere il soggetto-
• Durante lo scatto di foto, mantenere una distanza di 1,3 ~ 5 piedi dal soggetto.
• Questa funzionalità non è disponibile se l'ambiente è buio.

App utili 104
Uso di un adesivo
È possibile aggiungere vari adesivi nelle foto o nei video. È disponibile anche l’effetto
dinamico spostando gli Adesivi AR 3D.
1 Toccare e selezionare Sticker scorrendo le modalità della fotocamera.
2 Toccare per scattare una foto, oppure toccare e tenere premuto per
registrare un video.
• Per mettere in pausa la registrazione del video, toccare . Per riprendere la
registrazione del video, toccare .
3 Toccare per terminare la registrazione.
Adesivi AR 3D
La fotocamera di profondità sul lato posteriore del dispositivo consente di creare
realistici Effetto AR 3D riconoscendo i contorni del viso in modo più dettagliato.
1 Toccare e selezionare Sticker scorrendo le modalità della fotocamera.
2 Toccare .
3 Scorrere l’elenco di adesivi verso sinistra o verso destra per selezionare l’adesivo
AR da usare.
• Il viso riconosciuto dalla fotocamera viene scansionato in 3D.

App utili 105
4 Toccare per scattare una foto, oppure toccare e tenere premuto per
registrare un video.
• La foto viene ripresa con Adesivi AR 3D applicato.
• La funzione di scansione 3D della Z-camera è disponibile solo per la ripresa di primi
piani ravvicinati.
Uso di altre modalità della fotocamera
Toccare e selezionare Altro scorrendo le modalità della fotocamera.
Vista notturna
È possibile scattare foto notturne vivide e nitide. Vista notturna si attiva
automaticamente quando si scattano foto in condizioni di luminosità ridotta.
È possibile anche riprendere scene notturne nitide utilizzando la funzione Vista
notturna manualmente.
1 Toccare e selezionare Altro scorrendo le modalità della fotocamera.
2 Sfiorare .
3 Sfiorare per scattare una foto.
• Per regolare la luminosità della foto, spostare a sinistra o a destra.
Regola la luminosità

App utili 106
• Rimanere fermi, in modo che la fotocamera non scuota mentre si scatta una foto.
Panoramica
È possibile creare una foto panoramica spostando la fotocamera nella direzione da
fotografare e unire gli scatti continui di una vista ampia.
1 Toccare e selezionare Altro scorrendo le modalità della fotocamera.
2 Sfiorare .
3 Toccare , quindi spostare lentamente la fotocamera in una sola direzione.
4 Toccare per interrompere l’acquisizione della panoramica.
Imposta la fotocamera
• Quando si sposta la fotocamera in una direzione, assicurarsi che l’inquadratura
ripresa non sia fuori dalla linea guida.

App utili 107
Fotocamera manuale
È possibile creare foto dal tocco professionale grazie a varie funzioni avanzate.
1 Toccare e selezionare Altro scorrendo le modalità della fotocamera.
2 Toccare .
3 Personalizzare le seguenti impostazioni della fotocamera.
• Se si seleziona Auto, le opzioni vengono regolate automaticamente in base
al soggetto e all’ambiente di ripresa.
• Se è selezionata l’opzione Focus peaking, l’area di messa a fuoco viene
evidenziata con un colore. Questa funzione è disponibile solo nella modalità
Messa a fuoco manuale (MF).
Regola il
bilanciamento del
bianco
Resetta le
impostazioni
Regola la messa
a fuoco
Regola la
luminosità
Regola la velocità
ISO
Visualizza le varie
opzioni di Graphy
Regolare il la
velocità
dell’otturatore
Imposta il timer
Imposta il flash
Imposta la fotocamera
Imposta le proporzioni dello
schermo
Applica l’effetto filtro
4 Toccare per scattare la foto.

App utili 108
• Se si tocca e si seleziona un effetto Graphy, appare un elenco delle foto
consigliate con varie impostazioni.
• La selezione degli effetti Graphy consente di scattare utilizzando il bilanciamento
del bianco, la velocità dell'otturatore e i valori di impostazione ISO applicati alla foto
consigliata.
• La funzione Graphy è disponibile solo nella modalità Fotocamera manuale.
• È possibile vedere una varietà di foto consigliate scaricando l'app Graphy da
Google Play Store.
• A seconda del proprio piano tariffario, potrebbe essere addebitato il costo dei dati
utilizzati per il download.
• Toccare e quindi Foto con Graphy per disattivare questa funzione.
Video manuale
È possibile registrare un video personalizzando manualmente diverse opzioni. Si
possono regolare i valori del bilanciamento del bianco, della messa a fuoco, della
luminosità, dell'ISO, della velocità dell'otturatore e altri ancora.
1 Toccare e selezionare Altro scorrendo le modalità della fotocamera.
2 Toccare .
Regola il
bilanciamento del
bianco
Resetta le
impostazioni
Regola la messa a
fuoco
Regola la
luminosità
Regola la velocità
ISO
Regola il
bilanciamento
dell'audio
Regolare il la
velocità
dell’otturatore
Imposta il flash
Applica l’effetto filtro
Imposta la fotocamera
Imposta la risoluzione dello
schermo

App utili 109
3 Regolare manualmente le impostazioni della fotocamera come necessario.
4 Toccare per registrare un video.
Slow Motion
È possibile creare un video divertente cambiando la velocità di movimento dei
soggetti del video.
1 Toccare e selezionare Altro scorrendo le modalità della fotocamera.
2 Sfiorare .
3 Personalizzare le seguenti impostazioni della fotocamera.
4 Toccare o per selezionare la durata dell’effetto slow motion.
• Parte al rallentatore: Consente di applicare l’effetto slow motion a una
sezione specifica del video.
- Toccare nel momento in cui si desidera che venga applicato l’effetto
slow motion. Con una breve pressione, l’effetto slow motion viene
applicato per 0,5 secondi. Con una pressione prolungata, l’effetto slow
motion viene applicato fino a quando non si rilascia il dito.
• Tutte le Slow Motion: Consente di applicare l’effetto slow motion all’intero
video.
5 Toccare per avviare la registrazione.
• Per mettere in pausa la registrazione del video, toccare . Per riprendere la
registrazione del video, toccare .
6 Per terminare la ripresa, toccare .

App utili 110
YouTube Live
È possibile registrare un video e caricarlo direttamente su YouTube.
Per utilizzare questa funzione, è necessario soddisfare i requisiti di idoneità. Per i
requisiti, contattare YouTube.
1 Nella schermata Home, toccare .
2 Selezionare Altro scorrendo le modalità della fotocamera, quindi toccare .
• YouTube Live è disponibile solo quando il proprio dispositivo è connesso a Internet.
Se si utilizzano dati mobili, potrebbe esserne addebitato il costo a seconda del
proprio piano tariffario.
Utili funzioni della fotocamera
Scatto di foto con la funzione AI
Quando si scatta una foto, la funzione AI riconosce il soggetto e applica l'effetto
ottimale alla foto.
• Toccare per disattivare la funzione AI.

App utili 111
Blocco Esposizione automatica/Messa a fuoco automatica
È possibile fissare il livello attuale di esposizione e mettere a fuoco la posizione
toccando e tenendo premuto lo schermo. Per disattivare la funzione, toccare
un’area vuota sulla schermata.
Blocco Esposizione
automatica/
Messa a fuoco
automatica
• Questa funzione è disponibile solo in alcune modalità specifiche.
Zoom avanti o indietro
È possibile allontanare o avvicinare due dita per ingrandire o ridurre quando si
scattano foto o si registrano video.
• La funzione di zoom avanti/indietro non è disponibile in modalità selfie
(fotocamera anteriore).
• Questa funzione non è supportata in diverse modalità.

App utili 112
Utilizzo di Burst Shot
È possibile scattare foto consecutive e visualizzarle come immagini in movimento
nella Galleria.
1 Toccare e selezionare Foto.
2 Toccare e scorrere a sinistra o a destra.
• Vengono scattate più foto consecutive (fino a 100 foto) mentre si tiene
premuto .
Scatto tramite gesto della mano
È possibile scattare selfie tramite gesti.
Mostrare il palmo della mano alla fotocamera anteriore e quindi stringere il pugno.
È inoltre possibile stringere il pugno e poi aprirlo verso la fotocamera anteriore.
• Dopo tre secondi la foto viene scattata.
• Per utilizzare questa funzione, passare alla modalità fotocamera anteriore, quindi
toccare Scatto di selfie Scatto tramite gesto della mano.
• Assicurarsi che il palmo e il pugno siano all'interno della linea di riferimento in
modo che la fotocamera possa rilevarli.
• Questa funzione potrebbe non essere disponibile mentre sono in uso alcune altre
funzioni della fotocamera.

App utili 113
Scatto automatico
È possibile utilizzare la funzione di rilevamento del volto per scattare selfie in
maniera semplice e comoda. Si può impostare il dispositivo in maniera tale che,
quando l’utente guarda verso lo schermo, la fotocamera anteriore rilevi il volto e
scatti automaticamente un selfie.
• Quando la fotocamera anteriore rileva il volto, viene visualizzata la cornice guida
di colore bianco. Se il soggetto all’interno della cornice guida smette di muoversi,
la cornice guida diventa blu, quindi la fotocamera scatta una foto.
• Toccare Scatto di selfie Scatto automatico per attivare la funzione
Scatto automatico.
Scatto intervallato
È possibile scattare selfie a intervalli regolari.
Mentre è in uso la fotocamera anteriore, mostrare il palmo della mano alla
fotocamera, quindi stringere rapidamente il pugno per due volte.
• Vengono scattate quattro foto a intervalli regolari dopo un timer di ritardo di tre
secondi.
Salva come capovolta
Prima di scattare una foto con la fotocamera anteriore, toccare Salva come
capovolta. L’immagine viene capovolta in senso orizzontale.
• Durante l’utilizzo della fotocamera anteriore, è possibile modificare le modalità di
scatto dei selfie nelle opzioni della fotocamera. Per i dettagli, vedere, consultare la
sezione
Personalizzazione delle opzioni della fotocamera
.

App utili 114
Galleria
Informazioni generali sulla Galleria
È possibile visualizzare e gestire le foto e i video salvati sul dispositivo.
Visualizzazione delle foto
È possibile visualizzare le foto salvate nel prodotto.
1 Toccare e selezionare la cartella desiderata.
2 Toccare la foto desiderata.
• La cartella Galleria contiene Foto, Album, Ricordi, e Play.
Consente di eliminare le
immagini
Galleria anteprime
Consente di condividere le
immagini
Consente di aggiungere a o
rimuovere dai preferiti.
Consente di modificare le
immagini
Consente di accedere a opzioni
aggiuntive.
Consente di tornare alla
schermata precedente.
Apre Google Lens.
• Toccando leggermente lo schermo, appare il menu Dettagli. Toccando nuovamente
lo schermo, il menu scompare.

App utili 115
Riproduzione di un video
È possibile riprodurre i video salvati nel prodotto.
Consente di accedere a
opzioni aggiuntive.
Consente di tornare alla
schermata precedente.
Consente di eliminare le
immagini
Galleria anteprime
Consente di condividere le
immagini
Consente di aggiungere a o
rimuovere dai preferiti.
Consente di riprodurre o
sospendere la riproduzione
del video.
Consente di modificare le
immagini
• Per regolare il volume dell'audio, trascinare in alto o in basso il lato destro della
schermata del video.
• Per regolare la luminosità dello schermo, trascinare verso l’alto o verso il basso il
lato sinistro della schermata.
• Trascinando lo schermo a sinistra nella schermata di riproduzione video è possibile
riavvolgere (REW) e trascinando a destra è possibile avanzare rapidamente (FF).

App utili 116
Rubrica
Informazioni generali sui contatti
È possibile salvare e gestire i contatti.
Nella schermata Home, toccare LG Rubrica.
Aggiunta di contatti
Aggiunta di nuovi contatti
1 Nella schermata dell'elenco dei contatti, toccare .
• Appare un pop-up che consente di selezionare la posizione di salvataggio del
contatto. Selezionare la posizione desiderata.
2 Immettere i dettagli del contatto e toccare Salva.
Importazione di contatti
È possibile importare contatti da un altro dispositivo di archiviazione.
1 Nella schermata dell'elenco dei contatti, toccare Gestisci contatti
Importa.
2 Selezionare le posizioni di origine e di destinazione del contatto che si desidera
importare, quindi toccare OK.
3 Selezionare i contatti e toccare Importa.
Aggiunta di contatti all'elenco di composizione veloce
1 Nella schermata dell'elenco dei contatti, toccare Selezione rapida.
2 Toccare Aggiungi contatto da un numero di composizione veloce.
3 Selezionare un contatto.
• Mentre si aggiunge un nuovo contatto, toccare per aggiungere un numero di
chiamata rapida.

App utili 117
Ricerca di contatti
È possibile ricercare contatti utilizzando una delle seguenti opzioni:
• Toccare la barra di ricerca nella parte superiore della schermata Rubrica e
inserire il contatto o il numero di telefono che si desidera cercare.
• Scorrere l'elenco dei contatti verso l’alto o verso il basso.
• Dall'indice della schermata dell'elenco dei contatti, toccare la lettera iniziale di
un contatto
.
• Premendo la barra di ricerca nella parte superiore della schermata Rubrica e
inserendo un contatto o un numero di telefono, vengono visualizzati i risultati della
ricerca integrati dalla cronologia delle chiamate e dall'elenco dei contatti salvati
nel prodotto.
Elenco dei contatti
Modifica di contatti
1 Nella schermata dell'elenco dei contatti, selezionare un contatto.
2 Nella schermata dell'elenco dei contatti, toccare e modificare i dettagli.
3 Toccare Salva per salvare le modifiche.
Eliminazione di contatti
È possibile eliminare contatti utilizzando una delle seguenti opzioni:
• Nella schermata dell’elenco dei contatti, toccare e tenere premuto un contatto
che si desidera eliminare, quindi toccare .
• Toccare Elimina nella schermata dell’elenco dei contatti.
• I contatti cancellati non possono essere recuperati.

App utili 118
Aggiunta ai preferiti
È possibile registrare i contatti utilizzati più spesso come preferiti.
1 Nella schermata dell'elenco dei contatti, selezionare un contatto.
2 Nella schermata dei dettagli dei contatti, toccare .
Creazione di gruppi
1 Nell’elenco dei gruppi di contatti, toccare Gruppi, quindi toccare .
2 Immettere il nome del nuovo gruppo.
3 Toccare Aggiungi iscritti, selezionare i contatti, quindi toccare Aggiungi.
4 Toccare Salva per salvare il nuovo gruppo.
QuickMemo+
Informazioni generali su QuickMemo+
È possibile generare note creative utilizzando una varietà di opzioni su questa
funzione avanzata del blocco note, come ad esempio la gestione immagini e gli
screenshot, che non sono supportati dal blocco note tradizionale.
Creazione di una nota
1 Nella schermata Home, toccare LG QuickMemo+.
2 Toccare per creare una nota.
• : consente di salvare una nota.
• : Annullare le modifiche precedenti.
• : Applicare di nuovo le modifiche annullate di recente.
• : consente di immettere una nota utilizzando la tastiera.
• : consente di salvare i tipi di penna preferiti.
• : consente di scrivere delle note a mano.
• : consente di cancellare le note scritte a mano.

App utili 119
• : consente di passare al font calligrafico quando si scrive a mano.
• : Consente di accedere a opzioni aggiuntive.
3 Toccare per salvare la nota.
Scrittura di note su uno screenshot
1 Mentre si visualizza la schermata che si desidera acquisire, trascinare la barra di
stato verso il basso, quindi toccare .
• La schermata viene acquisita e visualizzata come miniatura nella parte
inferiore destra dello schermo.
2 Per scrivere note sullo schermo, toccare .
3 Scrivere note usando gli strumenti.
• : consente di ingrandire o ridurre, oppure regolare l’area da acquisire.
• : consente di scrivere delle note a mano.
• : consente di cancellare le note scritte a mano.
• : Annullare le modifiche precedenti.
• : Applicare di nuovo le modifiche annullate di recente.
• : consente di ritagliare lo schermo come desiderato.
4 Toccare e salvare le note.
• Le note salvate possono essere visualizzate in Galleria.

App utili 120
Funzioni aggiuntive dopo aver acquisito uno screenshot
Toccare per registrare lo schermo.
Toccare per acquisire l'intero
schermo utilizzando la funzione
di scatto di scorrimento.
Toccare per eliminare lo
screenshot acquisito.
Toccare per scrivere note sulla
schermata acquisita.
Toccare per condividere lo
screenshot acquisito.
• Puoi scattare una foto dell'intero schermo, utilizzando la funzione di scatto di
scorrimento.
• Durante l’uso di un’app come Messaging e Chrome, trascinare verso il basso il
pannello notifiche e quindi toccare . Toccare quindi per acquisire l’intera
schermata visualizzata come unico file.
• Questa funzione è disponibile solo in alcune app che supportano la funzione scatto
di scorrimento.
• Stringi due dita o allargale per regolare il layout del promemoria.

App utili 121
Orologio
Sveglia
È possibile impostare una sveglia in modo che si attivi a un orario specificato.
1 Nella schermata Home, toccare LG Orologio Sveglia.
2 Toccare per aggiungere una nuova sveglia.
3 Configurare le impostazioni della sveglia e toccare Salva.
• Se si seleziona una sveglia impostata in precedenza, è possibile modificarla.
• Per eliminare una sveglia, toccare Elimina nella parte superiore dello schermo.
In alternativa, toccare e tenere premuta la sveglia.
Fusi orari
È possibile visualizzare l'ora attuale delle città di tutto il mondo.
1 Nella schermata Home, toccare LG Orologio Fusi orari.
2 Toccare e aggiungere una città.
Timer
È possibile impostare il timer in modo da attivare un segnale acustico dopo un
periodo di tempo specificato.
1 Nella schermata Home, toccare LG Orologio Timer.
2 Impostare il tempo e toccare Inizio.
• Per sospendere il timer, toccare Pausa. Per riprendere il timer, toccare
Riprendi.
3 Toccare Stop per arrestare la sveglia del timer.

App utili 122
Cronometro
È possibile utilizzare il cronometro per registrare un tempo.
1 Nella schermata Home, toccare LG Orologio Cronometro.
2 Toccare Inizio per avviare il cronometro.
• Per registrare un tempo, toccare Giro.
3 Toccare Pausa per sospendere il cronometro.
• Per riprendere il cronometro, toccare Riprendi.
• Per cancellare tutte le registrazioni e avviare di nuovo il cronometro, toccare
Reset.
Musica
È possibile riprodurre e gestire canzoni o album musicali.
1 Nella schermata Home, toccare LG Musica.
2 Selezionare una categoria.
3 Selezionare un file musicale.

App utili 123
Consente di riprodurre in ordine
casuale. Consente di selezionare una
modalità di ripetizione.
Toccare per riprodurre il file
successivo/Toccare e tenere
premuto per avanzare
velocemente.
Toccare per riprodurre il file
corrente dall’inizio/Toccare due
volte per riprodurre il file
precedente/Toccare e tenere
premuto per riavvolgere.
Consente di aggiungere a o
rimuovere dai preferiti.
Consente di regolare il volume
dell’audio.
Consente di impostare effetti
sonori.
Accendi/spegni Flash Light.
Consente di tornare alla
schermata precedente.
Consente di riprodurre o
sospendere la riproduzione.
Consente di accedere a opzioni
aggiuntive.
Andare all’elenco In
riproduzione ora.
• Alcuni formati file potrebbero non essere supportati a seconda del software
installato.
• I file di dimensioni superiori al limite massimo potrebbero generare un errore.
• I file musicali potrebbero essere protetti dai titolari di copyright internazionali o da
leggi sul copyright. Prima di copiare un file musicale, potrebbe essere necessario
ottenerne l'autorizzazione legale. Per scaricare o copiare un file musicale, verificare
prima le leggi sul copyright del relativo paese.
• Questo modello supporta la riproduzione audio Hi-Fi. I file audio Hi-Fi presentano
l'icona Hi-Fi.
• Se si imposta la torcia, la torcia lampeggia a tempo con la musica riprodotta.

App utili 124
Calcolatrice
È possibile utilizzare due tipi di calcolatrici: la calcolatrice semplice e la calcolatrice
scientifica.
1 Nella schermata Home, toccare Google Calcolatrice.
2 Utilizzare il tastierino numerico per eseguire un calcolo.
• Per calcolare dall’inizio, toccare e tenere premuto .
ThinQ
È possibile collegare facilmente il prodotto a dispositivi IoT per monitorarli e
utilizzarli comodamente.
Nella schermata Home, toccare LG ThinQ.
• Lavatrice, asciugatrice, styler, lavastoviglie, forno e robot aspirapolvere possono
essere registrati solo quando il prodotto è in modalità standby.
• Cercare il marchio ThinQ sul prodotto per vedere se può essere collegato all'app
ThinQ.
• Toccare per vedere le varie funzioni dell’app ThinQ.

App utili 125
LG Health
È possibile gestire il proprio stato di salute e mantenere buone abitudini di fitness
monitorando l’esercizio fisico svolto.
Informazioni preliminari su LG Health
È possibile configurare LG Health al primo avvio dell’app o dopo averla ripristinata.
1 Nella schermata Home, toccare LG LG Health.
2 Seguire le istruzioni visualizzate sullo schermo per completare la
configurazione.
Utilizzo di LG Health
È possibile visualizzare le informazioni principali su LG Health e gestire la quantità di
esercizio fisico e le informazioni relative alla salute.
1 Nella schermata Home, toccare LG LG Health.
2 Sono disponibili le seguenti opzioni.
• : consente di visualizzare il registro del proprio esercizio fisico nel giorno
che si desidera monitorare.
• : consente di iniziare a monitorare una sessione di esercizio fisico. Il
percorso e la quantità di esercizio fisico svolto vengono registrati per
ciascuna tipologia di esercizio.
• : consente di impostare gli obiettivi giornalieri di esercizio fisico, compresi i
passi e le calorie, oppure di configurare diverse impostazioni di LG Health.
• Le informazioni relative alla salute fornite da LG Health sono studiate per la
comodità dell’utente e non possono essere utilizzate a scopo di prevenzione,
trattamento e diagnosi di malattie né per altri scopi medici.
• LG Health potrebbe variare o potrebbe non essere disponibile a seconda del paese
e del provider del servizio. Le funzioni di LG Health disponibili e le app che possono
essere abbinate a LG Health possono variare a seconda del paese. Le variazioni
sono dovute alle diverse leggi e normative vigenti.

App utili 126
Registratore Audio HD
Il Registratore Audio HD ti consentirà di configurare manualmente le impostazioni
audio in modo tale da poter registrare audio in base all'ambiente in cui ti trovi.
Modalità di registrazione
È possibile registrare un file audio ad alta definizione selezionando e configurando
la modalità audio desiderata, adatta all’ambiente di registrazione.
Nella schermata Home, toccare LG Registratore Audio HD .
Normale
È possibile registrare audio senza impostazioni aggiuntive.
ASMR
È possibile registrare suono ASMR.
Concerto
È possibile registrare audio durante un concerto o altri eventi musicali.
Personalizzato
È possibile configurare manualmente le impostazioni desiderate per registrare
l’audio.
Modalità Studio
La modalità Studio consente di riprodurre un file audio o musicale e registrare
contemporaneamente la propria voce, creare un accordo registrando più volte
la propria voce, nonché registrare i propri commenti sul file audio originale del
presentatore o del parlante.
1 Nella schermata Home, toccare LG Registratore Audio HD
Personalizzato.
2 Sfiorare .
3 Selezionare un file audio da utilizzare come musica di sottofondo.
4 Toccare per registrare la voce.
5 Toccare per salvare il file registrato.

App utili 127
• La musica di sottofondo può essere riprodotta solo attraverso gli auricolari.
Assicurarsi di collegare gli auricolari prima di utilizzare questa funzione.
• Per modificare altre impostazioni, toccare Impostazioni, quindi personalizzare
il tipo di file, la profondità in bit, la frequenza di campionamento e altre
impostazioni.
• Quando si seleziona la modalità Concerto o Personalizzato con gli auricolari
connessi, appare . Toccare , quindi selezionare il microfono da utilizzare.
• È possibile monitorare la qualità del suono mediante l’altoparlante auricolare
collegato durante una registrazione audio. Durante una registrazione audio in
modalità Studio, il monitoraggio del suono non è supportato. È possibile sentire
solamente la musica di sottofondo.
Launcher Del Gioco
È possibile impostare se utilizzare il launcher del gioco, dove è possibile visualizzare
l'elenco dei giochi installati nel prodotto e selezionare le impostazioni di gioco quali
la disattivazione dell’audio multimediale, la limitazione degli avvisi ecc.
1 Nella schermata Home, toccare Launcher Del Gioco.
2 Selezionare l’opzione desiderata.
Smart Doctor
È possibile utilizzare Smart Doctor per eseguire una diagnosi dello stato del
dispositivo e ottimizzarlo.
Nella schermata Home, toccare LG Smart Doctor.

App utili 128
LG Mobile Switch
È possibile trasferire dati con facilità da un dispositivo usato a un dispositivo nuovo
mediante LG Mobile Switch.
1 Nella schermata Home, toccare LG LG Mobile Switch.
È possibile anche toccare Impostazioni Sistema Backup LG Mobile
Switch.
• Se l'app non è installata nel prodotto, scaricare e installare l'app LG Mobile
Switch dal Google Play Store.
2 Seguire le istruzioni visualizzate sullo schermo per selezionare il metodo
desiderato per il trasferimento.
• I dati in un account Google non saranno sottoposti a Backup. Quando si
sincronizza l'account Google, le app di Google, i contatti di Google, il calendario di
Google, i dati delle app di promemoria di Google e le app scaricate dal Play Store
vengono archiviati automaticamente sull'app Drive.
• Caricare completamente la batteria prima del trasferimento di dati per evitare lo
spegnimento involontario durante il processo.
Cestino app
È possibile vedere l’elenco delle app disinstallate sulla schermata Home. Le app
eliminate nelle ultime 24 ore possono essere recuperate.
Nella schermata Home, toccare LG Cestino app.
Per maggiori informazioni, vedere
Cestino app
.

App utili 129
SmartWorld
È possibile scaricare vari giochi, contenuti audio, app e tipi di carattere forniti da LG
Electronics. Si può inoltre personalizzare il dispositivo in base alle proprie preferenze
utilizzando temi per la schermata Home e tipi di carattere.
• Se si utilizzano dati mobili, potrebbe esserne addebitato il costo a seconda del
proprio piano tariffario.
• Questa funzione potrebbe non essere supportata a seconda dell'area o del
provider del servizio.
1 Nella schermata Home, toccare SmartWorld.
2 Toccare Account LG, quindi effettuare l'accesso.
3 Selezionare e scaricare i contenuti desiderati.
RemoteCall Service
Il dispositivo può essere sottoposto a diagnostica in modalità remota per risolverne
i problemi. Innanzitutto, eseguire una chiamata telefonica a un Centro di assistenza
clienti LG come segue:
• Per servirsi di questa funzione, è prima necessario accettarne l'utilizzo.
• Se si utilizzano dati mobili, potrebbe esserne addebitato il costo a seconda del
proprio piano tariffario.
1 Nella schermata Home, toccare LG RemoteCall Service.
2 Collegare una chiamata al centro di assistenza clienti LG.
3 Al collegamento della chiamata, seguire le istruzioni dell'addetto al servizio per
immettere un numero di accesso a sei cifre.
• Il dispositivo viene connesso in modalità remota e viene avviato il servizio di
assistenza remota.

App utili 130
Messaggio CB
È possibile visualizzare trasmissioni di testo in tempo reale su situazioni di
emergenza, come tifoni, inondazioni e terremoti.
Nella schermata Home, toccare Messaggio CB.
App di Google
È possibile utilizzare app di Google impostando un account Google. Quando si
utilizza un'app di Google per la prima volta, viene visualizzata automaticamente
la finestra di registrazione dell'account Google. Se non si dispone di un account
Google, crearne uno dal dispositivo. Per i dettagli su come utilizzare un'app, vedere
la Guida contenuta nell'app.
• Alcune app potrebbero non funzionare a seconda dell'area o del provider del
servizio.
Calendario
L'app Calendario consente di tenere traccia del proprio programma di eventi (che è
stato creato), organizzato per Giorno, 3 giorni, Settimana o Mese.
Chrome
Un browser web veloce, semplice e sicuro, costruito per la rete moderna.
Documenti
Docs è uno strumento collaborativo di elaborazione di testi che aumenta la
produttività. Usa Docs per creare, modificare e lavorare insieme in tempo reale.
Drive
Drive è un'app di condivisione e immagazzinaggio di file che facilita l'individuazione,
la condivisone e la collaborazione su progetti di lavoro ovunque e in ogni istante.

App utili 131
Duo
Crea video chiamate semplici e di alta qualità verso i tuoi amici e famigliari su
telefoni Android e iPhones.
Gmail
Gmail è un'app facile da usare che tiene al sicuro i tuoi messaggi, rende più smart la
tua casella di posta e ti aiuta a restare organizzato.
Google
L'app Google ti tiene aggiornato sulle cose che ti interessano. Trova risposte rapide,
esplora i tuoi interessi e ricevi un feed di storie e aggiornamenti su argomenti
importanti per te.
Maps
Stai andando da qualche parte? Vai con Maps, l'app con GPS in tempo reale sulla
quale puoi fare affidamento per navigazione, traffico, transito e dettagli su milioni di
luoghi, come recensioni ed eventi popolari.
Foto
La casa di tutte le tue foto e video, organizzata automaticamente per condividere e
salvare le cose più importanti.
Play Film
Consente di utilizzare il proprio account Google per noleggiare o acquistare film. È
possibile acquistare contenuti e riprodurli ovunque.
YT Music
Un nuovo servizio di streaming musicale da YouTube.
Fogli
Sheets è un foglio di lavoro collaborativo che aumenta la produttività. Usa Sheets
per importare, organizzare e analizzare informazioni in tempo reale.

App utili 132
Presentazioni
Google Slides è uno strumento per presentazioni in tempo reale che aumenta la
produttività. Usa Slides per organizzare informazioni, presentare risultati e prendere
decisioni insieme in tempo reale.
YouTube
Guarda i tuoi canali preferiti, ascolta la musica che ami e carica video da condividere
con le persone intorno a te.
Assistente
Il tuo dispositivo dispone di Assistente Google incorporato. Trovale risposte e fai
cose mentre sei in giro.
• Assistente Google non è disponibile in tutte le lingue o paesi.
Files
È possibile visualizzare e gestire file salvati sul dispositivo.

Impostazioni
04

Impostazioni 134
Impostazioni
È possibile personalizzare le impostazioni del dispositivo in base alle proprie
preferenze.
Nella schermata Home, toccare Impostazioni.
• Inserendo una parola chiave nella finestra di ricerca nella parte superiore dello
schermo, è possibile trovare comodamente gli elementi da impostare.
Rete & internet
Dual SIM
È possibile configurare le impostazioni dual SIM.
1 Nella schermata delle impostazioni, toccare Rete & internet Dual SIM.
2 Personalizzare le seguenti funzioni:
• Scheda SIM 1: modificare il nome e l'icona della scheda SIM 1.
• Scheda SIM 2: modificare il nome e l'icona della scheda SIM 2.
• Colore del tema della scheda SIM: modificare i temi del colore per le
schede SIM.
• Modalità Risparmio: attivare o disattivare la modalità risparmio: In modalità
Risparmio, se si effettua una chiamata a un contatto al quale è assegnata
una specifica SIM, tale SIM viene utilizzata per la chiamata anche se l'altra
SIM è attiva, ad esempio in caso di utilizzo dei dati mobili.
• Dati mobili: selezionare una scheda SIM da utilizzare per il servizio dati
cellulare. È possibile anche disattivare questa funzione.
• Roaming dati: selezionare questa opzione per attivare il dispositivo affinché
utilizzi i dati mobili durante il roaming al di fuori dell'area della propria rete
domestica.
• Dati mobili durante le chiamate: Accedere ai dati mobili usando la scheda
SIM dati non predefinita temporaneamente durante una chiamata HD con la
stessa scheda.

Impostazioni 135
Wi-Fi
È possibile connettersi a dispositivi vicini tramite una rete Wi-Fi.
Connessione a una rete Wi-Fi
1 Nella schermata delle impostazioni, toccare Rete & internet Wi-Fi.
2 Toccare per attivarlo.
• Vengono visualizzate automaticamente le reti Wi-Fi disponibili.
3 Selezionare una rete.
• Potrebbe essere necessario immettere la password Wi-Fi della rete.
• Questo processo viene ignorato in caso di reti a cui è già stato effettuato
l'accesso in precedenza. Se non si desidera eseguire automaticamente la
connessione a una determinata rete Wi-Fi, toccare la rete, quindi toccare
Elimina.
Impostazioni della rete Wi-Fi
Nella schermata delle impostazioni, toccare Rete & internet Wi-Fi.
• Passa a rete dati: se la funzione connessione dati mobile è attiva e il dispositivo
non è in grado di connettersi a Internet tramite la connessione Wi-Fi, il
dispositivo si connette a Internet tramite la connessione dati mobile.
• Questa funzione dipende dal provider del servizio.
• : consente di personalizzare le impostazioni della rete Wi-Fi.

Impostazioni 136
Wi-Fi Direct
È possibile connettere il dispositivo ad altri dispositivi che supportano la funzione
Wi-Fi Direct per condividere direttamente i dati con essi. Non è necessario disporre
di un punto di accesso. Utilizzando la funzione Wi-Fi Direct, è possibile connettere
più di due dispositivi.
1 Nella schermata delle impostazioni, toccare Rete & Internet Wi-Fi
Avanzate Wi-Fi Wi-Fi Direct.
• Vengono automaticamente visualizzati i dispositivi vicini che supportano la
funzione Wi-Fi Direct.
2 Selezionare un dispositivo.
• La connessione avviene quando il dispositivo accetta la richiesta di
connessione.
• La batteria potrebbe scaricarsi più rapidamente quando si utilizza il Wi-Fi Direct.
Dati mobili
È possibile attivare o disattivare i dati mobili. È inoltre possibile gestirne l'utilizzo.
Attivazione dei dati mobili
1 Nella schermata delle impostazioni, toccare Rete & internet Dati mobili.
2 Toccare per attivarlo.
Personalizzazione delle impostazioni dei dati mobili
1 Nella schermata delle impostazioni, toccare Rete & internet Dati mobili.
2 Personalizzare le seguenti impostazioni:
• Dati mobili: consente di utilizzare le connessioni dati su reti mobili.
• Limita l'utilizzo dei dati mobili: consente di impostare un limite di utilizzo
dei dati mobili in modo da bloccarli al raggiungimento della soglia.
• : consente di personalizzare le impostazioni dei dati mobili.
• Il volume di utilizzo dei dati misurato in base al prodotto e il volume calcolato
dal proprio gestore di telefonia mobile potrebbero essere diversi.

Impostazioni 137
Impostazioni chiamate
È possibile personalizzare le impostazioni di chiamata, ad esempio le opzioni per le
chiamate vocali e per quelle internazionali.
• Alcune funzioni potrebbero non essere supportate a seconda dell'area o del
provider del servizio.
1 Nella schermata delle impostazioni, toccare Rete & internet Impostazioni
chiamate.
2 Personalizzare le impostazioni.
Tethering
Tethering USB
È possibile connettere il dispositivo a un altro dispositivo tramite USB e condividere
i dati mobili.
1 Connettere il dispositivo e gli altri dispositivi tramite il cavo USB.
2 Nella schermata delle impostazioni, toccare Rete & Internet Tethering
Tethering USB e quindi toccare per attivarlo.
• Questa opzione utilizza i dati mobili e potrebbe comportare costi di utilizzo dei
dati, a seconda del piano tariffario. Rivolgersi al proprio provider del servizio per
ulteriori informazioni.
• Quando si esegue la connessione a un computer, scaricare il driver USB da
www.lg.com
e installarlo sul computer.
• Non è possibile inviare o ricevere file tra il dispositivo e un computer quando il
tethering USB è attivo. Disattivare il tethering USB per inviare o ricevere file.
• I sistemi operativi che supportano il tethering sono Windows XP o versione
superiore, o Linux.

Impostazioni 138
Hotspot Wi-Fi
È possibile impostare il dispositivo in modo da farlo funzionare come un router
wireless affinché altri dispositivi possano connettersi a Internet utilizzando i suoi
dati mobili.
1 Nella schermata delle impostazioni, toccare Rete & internet Tethering
Hotspot Wi-Fi e toccare per attivare la funzione.
2 Toccare Imposta hotspot Wi-Fi e immettere il Nome Wi-Fi (SSID) e la
password.
3 Attivare il Wi-Fi sull'altro dispositivo e selezionare il nome della rete del
dispositivo nell'elenco delle connessioni Wi-Fi.
4 Immettere la password di rete.
• Questa opzione utilizza i dati mobili e potrebbe comportare costi di utilizzo dei
dati, a seconda del piano tariffario. Rivolgersi al proprio provider del servizio per
ulteriori informazioni.
• Ulteriori informazioni sono disponibili su questo sito Web:
http://www.android.com/tether#wifi
Timer per lo spegnimento automatico dell'hotspot Wi-Fi
Se l'hotspot Wi-Fi non viene utilizzato per un determinato periodo di tempo,
viene disconnesso in automatico. Puoi impostare il periodo di tempo per la
disconnessione automatica.
Tethering Bluetooth
Un altro dispositivo connesso tramite Bluetooth può connettersi a Internet
utilizzando i dati mobili del proprio dispositivo.
1 Nella schermata delle impostazioni, toccare Rete & internet Tethering
Tethering Bluetooth e quindi toccare per attivarlo.
2 Attivare il Bluetooth su entrambi i dispositivi e associarli.

Impostazioni 139
• Questa opzione utilizza i dati mobili e potrebbe comportare costi di utilizzo dei
dati, a seconda del piano tariffario. Rivolgersi al proprio provider del servizio per
ulteriori informazioni.
• Ulteriori informazioni sono disponibili su questo sito Web:
http://www.android.com/tether#Bluetooth_tethering
Guida
È possibile visualizzare la guida sull’utilizzo del tethering e degli hotspot.
Nella schermata delle impostazioni, toccare Rete & internet Tethering Guida.
Modalità aereo
È possibile disattivare le funzioni di chiamata e dei dati mobili. Quando questa
modalità è attiva, restano disponibili le funzioni che non implicano il trasferimento di
dati, ad esempio i giochi e la riproduzione di brani musicali.
1 Nella schermata delle impostazioni, toccare Rete & internet Modalità aereo.
2 Toccare nella schermata di conferma.
Reti mobili
È possibile personalizzare le impostazioni delle reti mobili.
1 Nella schermata delle impostazioni, toccare Rete & internet Reti mobili.
2 Personalizzare le seguenti impostazioni:
• Modalità rete: consente di selezionare un tipo di rete.
• Nomi punti di accesso: consente di visualizzare o cambiare il punto di
accesso per l'utilizzo dei servizi di dati mobili. Per cambiare il punto di
accesso, selezionarne uno fra quelli disponibili nel relativo elenco.
• Operatori di rete: consente di cercare gli operatori di rete e di connettersi
automaticamente a una rete.

Impostazioni 140
VPN
È possibile connettersi a una rete virtuale sicura, ad esempio a una Intranet. È
inoltre possibile gestire la rete privata virtuale connessa.
Aggiunta di una rete VPN
1 Nella schermata delle impostazioni, toccare Rete & internet VPN.
2 Sfiorare .
3 Immettere i dettagli della rete VPN e toccare Salva.
Configurazione delle impostazioni della rete VPN
1 Toccare una rete VPN nell'elenco VPNS.
2 Immettere i dettagli relativi all'account utente della rete VPN e toccare
Connetti.
• Per salvare i dettagli dell'account, selezionare la casella di controllo Salva le
informazioni sull'account.
DNS privato
È possibile configurare le opzioni del DNS (Domain Name System) privato.
1 Nella schermata delle impostazioni, toccare Rete & internet DNS privato.
2 Selezionare l’opzione desiderata e toccare Salva.

Impostazioni 141
Dispositivi connessi
Bluetooth
È possibile connettere il dispositivo a dispositivi vicini che supportano la funzione
Bluetooth per scambiare direttamente i dati con essi. Connettere il dispositivo a un
auricolare Bluetooth e a una tastiera. In questo modo sarà più semplice controllare
il dispositivo.
Associazione a un altro dispositivo
1 Nella schermata delle impostazioni, toccare Dispositivi connessi Bluetooth.
2 Toccare per attivarlo.
• Vengono automaticamente visualizzati i dispositivi disponibili.
• Per aggiornare l'elenco dei dispositivi, toccare .
• Nell’elenco sono visualizzati solamente i dispositivi impostati come visibili.
3 Selezionare un dispositivo dall'elenco.
4 Seguire le istruzioni visualizzate sullo schermo per effettuare l'autenticazione.
• Questo passaggio viene saltato per i dispositivi cui è stato effettuato l’accesso in
precedenza.
Invio di dati tramite Bluetooth
1 Selezionare un file.
• È possibile inviare file multimediali o contatti.
2 Toccare Bluetooth.
3 Selezionare un dispositivo di destinazione per il file.
• Il file viene inviato non appena viene accettato dal dispositivo di destinazione.
• I processi di condivisione di file potrebbero differire, a seconda del file.

Impostazioni 142
Condivisione schermo
È possibile riprodurre la schermata e l’audio del dispositivo su un altro dispositivo,
come ad esempio una TV, in grado di supportare la funzione Miracast.
1 Nella schermata delle impostazioni, toccare Dispositivi connessi
Condivisione schermo.
2 Toccare per attivarlo.
3 Selezionare un dispositivo dall'elenco dei dispositivi vicini.
• Se il dispositivo desiderato non è visualizzato, toccare Ricerca per aggiornare
l'elenco.
• Una volta effettuata la connessione al dispositivo, sul relativo schermo viene
visualizzata la schermata del dispositivo.
• La Condivisione schermo si spegne automaticamente se non vi è alcun dispositivo
compatibile per la condivisione nelle vicinanze.
NFC
È possibile utilizzare il dispositivo come tessera dei trasporti o carta di credito. È
inoltre possibile condividere dati con l’altro dispositivo.
1 Nella schermata delle impostazioni, toccare Dispositivi connessi NFC.
2 Toccare per attivarlo.
• Mettere a contatto il proprio dispositivo con l’altro dispositivo che supporta
NFC per consentire la condivisione di dati.
• L'antenna NFC potrebbe essere situata in una posizione diversa a seconda del tipo
di dispositivo. Per i dettagli relativi all’area dell’antenna NFC, vedere
Panoramica
delle parti
.

Impostazioni 143
Pannello di condivisione
È possibile condividere i contenuti delle app Galleria, Musica e File Manager con i
dispositivi nelle vicinanze. Inoltre, è possibile condividere contenuti con delle persone
specifiche nelle app che utilizzano Google Condivisione diretta.
1 Nella schermata delle impostazioni, toccare Dispositivi connessi Pannello di
condivisione.
2 Toccare per disattivare ciascuna opzione.
• Dispositivi nelle vicinanze: È possibile visualizzare i dispositivi vicini con cui
è possibile condividere i contenuti delle app Galleria, Musica e File Manager.
• Condivisione diretta: da un’app che supporta Google Condivisione diretta,
è possibile visualizzare un’icona che consente di condividere contenuti con
persone specifiche.
Condivisione File
È possibile inviare e ricevere file scambiandoli tra il dispositivo e altri dispositivi o
tablet LG.
1 Nella schermata delle impostazioni, toccare Dispositivi connessi
Condivisione File.
2 Personalizzare le seguenti impostazioni:
• WING: consente di modificare il nome del dispositivo.
• Salva in: consente di impostare la cartella di destinazione in cui salvare i file
inviati da altri dispositivi.
• Condivisione File: consente la ricezione di file inviati da altri dispositivi.
• SmartShare Beam: consente di condividere file con altri dispositivi tramite
SmartShare Beam.
• Guida: consente di visualizzare la guida alla condivisione dei file.

Impostazioni 144
Server multimediale
È possibile condividere contenuti multimediali presenti sul dispositivo con dispositivi
vicini che supportano la funzione DLNA.
1 Nella schermata delle impostazioni, toccare Dispositivi connessi Server
multimediale.
2 Personalizzare le seguenti impostazioni:
• Condivisione di contenuti: consente di condividere contenuti presenti sul
dispositivo con dispositivi vicini.
• WING: consente di impostare il nome del dispositivo.
• A seconda del prodotto dell'utente, i nomi dei menu potrebbero apparire in modo
diverso.
• Contenuti da condividere: consente di selezionare il tipo di contenuti
multimediali da condividere con altri dispositivi.
• Dispositivi consentiti: consente di visualizzare un elenco dei dispositivi a cui
è consentito accedere ai contenuti presenti sul dispositivo.
• Dispositivi non autorizzati: consente di visualizzare un elenco dei dispositivi
a cui non è consentito accedere ai contenuti presenti sul dispositivo.
Stampa
È possibile connettere il dispositivo a una stampante Bluetooth e stampare foto o
documenti salvati sul dispositivo.
Nella schermata delle impostazioni, toccare Dispositivi connessi Stampa.
• Toccare Servizio di stampa predefinito per cercare le stampanti a cui è
possibile connettersi. Oppure, toccare Aggiungi stampante per aggiungere
manualmente una stampante.
• Toccare Nuovo servizio per scaricare l’app della stampante desiderata.
• Questa funzione è disponibile sono quando è attiva la funzione di rete mobile o
Bluetooth.
• Per scaricare l’app della stampante in Nuovo servizio, è necessario prima
accedere al proprio account Google.

Impostazioni 145
Suono
È possibile personalizzare le impostazioni relative a suono, vibrazione e notifiche.
Nella schermata delle impostazioni, toccare Suono e personalizzare le seguenti
impostazioni:
• Profilo audio: consente di passare alla modalità audio Suono, Vibrazione o
Silenzioso.
• Volume: consente di regolare il volume dell’audio di diversi elementi.
• Suonerie: consente di selezionare una suoneria per le chiamate in arrivo. È
possibile aggiungere o eliminare suonerie.
• Suono di notifica: consente di selezionare una suoneria per le notifiche. È
possibile impostare un brano musicale salvato sul dispositivo come suoneria di
notifica.
• Suoni di sistema: consente di selezionare l’attivazione o disattivazione di
ciascun suono di sistema.
• Suoneria con vibrazione: consente di impostare sul dispositivo la vibrazione e la
riproduzione di una suoneria in contemporanea.
• Suoneria contatto: consente di creare una suoneria per una chiamata in arrivo
da un determinato contatto.
• Allerta flash per le chiamate in arrivo: imposta il lampeggiamento secondo la
suoneria LG.
• Non disturbare: consente di impostare il tempo, l'intervallo e il tipo di app per
cui ricevere messaggi di notifica. È possibile ricevere messaggi di notifica solo in
particolari giorni della settimana.
• Qualità del suono ed effetti: usare la funzione per impostare la qualità e gli
effetti audio quando si riproduce una canzone o video.
- Volume: consente di regolare il volume dell’audio di diversi elementi.
- Normalizza volume: Usare la funzione per normalizzare i volumi di sorgenti
audio differenti.
- Equalizzatore: Usare la funzione per regolare le impostazioni
dell'equalizzatore.
- LG 3D Sound Engine: Usare la funzione per riprodurre musica o video in un
audio tridimensionale, immersivo e vivido quando cuffie, altoparlanti, o altri
dispositivi audio esterni sono connessi. Per i dettagli, vedere, consultare la
sezione
LG 3D Sound Engine
.

Impostazioni 146
• Sottotitoli dal vivo: consente di impostare il dispositivo in modo che rilevi la
voce nel contenuto multimediale e generi automaticamente i sottotitoli.
• Potenza vibrazione: consente di regolare l'intensità della vibrazione.
• Tipo vibrazione: consente di selezionare il tipo di vibrazione per le chiamate in
arrivo.
• Vibrazione al tocco: consente di impostare la vibrazione del dispositivo quando
si toccano determinati elementi sullo schermo.
Notifiche
È possibile controllare l’elenco delle app installate e configurare le impostazioni per
le notifiche.
1 Nella schermata delle impostazioni, toccare Notifiche.
2 Personalizzare le impostazioni come desiderato.
Display
È possibile personalizzare impostazioni dettagliate per ogni tipo di schermata.
Nella schermata delle impostazioni, toccare Display e personalizzare le seguenti
impostazioni:
•Sfondo: consente di personalizzare le impostazioni per la schermata Home. Per
i dettagli, vedere, consultare la sezione
Imposta schermata home
.
•Home Schermo aperto: consente di personalizzare le impostazioni della
modalità Swivel Home.
•Barra di navigazione: consente di configurare la barra di navigazione. Per
maggiori dettagli, vedere
Uso della barra di navigazione
.
•AOD (always-on display): consente di visualizzare sempre informazioni come
data, ora e notifiche, anche quando lo schermo è spento. Per maggiori dettagli,
vedere
AOD (always-on display)
.
•Schermo secondario: consente di impostare la luminosità o il colore dello
schermo secondario.
•Vista comfort: consente di ridurre la quantità di luce blu sullo schermo del
dispositivo per limitare l'affaticamento degli occhi.

Impostazioni 147
• Modalità notte: di notte è possibile applicare un tema dello schermo oscurato
per evitare l'abbagliamento.
• Colore dello schermo: Regola colore e temperatura del colore per lo schermo
desiderato.
• Toccare per ripristinare le impostazioni.
• Amplificatore Video: Durante la riproduzione di un video in modalità schermo
intero, è possibile modificare le impostazioni per una visualizzazione a Colore
dello più luminosa e dinamica.
• Carattere: modificare dimensione, grassetto, o facciata.
• Colori menu e app LG: consente di cambiare il colore di accento per
impostazioni, menu, finestre di notifica ecc.
• Dimensioni display: consente di impostare gli elementi presenti sullo schermo
su dimensioni facilmente visibili per l’utente. Alcuni elementi potrebbero
cambiare posizione.
• Schermo intero App: consente di selezionare le app da aprire a schermo intero.
• Luminosità: utilizzare la barra di scorrimento per modificare la luminosità dello
schermo.
• Automatico: consente di impostare la regolazione automatica della luminosità
dello schermo in base all’intensità luminosa dell’ambiente.
• Extra luminosità: consente di regolare la luminosità a un livello superiore a
quello massimo.
• Timeout schermo: consente di disattivare automaticamente lo schermo
quando il dispositivo viene lasciato inattivo per un determinato periodo di
tempo.
• Rotazione automatica: consente di ruotare automaticamente lo schermo a
seconda dell’orientamento del dispositivo.
• Screen saver: consente di visualizzare uno screen saver quando il dispositivo è
collegato al supporto o al caricabatteria. Selezionare un tipo di screen saver da
visualizzare.
• Schermo a una mano: ridurre le dimensioni dello schermo in modo da poter
utilizzare il dispositivo con una sola mano.

Impostazioni 148
Sfondo & Tema
È possibile selezionare lo sfondo, il tema dello schermo, lo stile delle icone o AOD
(always-on display) per il dispositivo.
1 Nella schermata delle impostazioni, toccare Sfondo & Tema.
2 Toccare Sfondo, Tema, Icona o AOD per personalizzare le impostazioni.
Blocco schermo & sicurezza
È possibile personalizzare le impostazioni della schermata di blocco e della
sicurezza.
1 Nella schermata delle impostazioni, toccare Blocco schermo & sicurezza.
2 Personalizzare le impostazioni.
• Google Play Protect: scansiona giornalmente il dispositivo per scoprire app
potenzialmente nocivi.
• Trova il mio dispositivo: tracciare a distanza la posizione del dispositivo.
Puoi anche proteggere i tuoi dati in modo sicuro se hai smarrito il tuo
dispositivo.
• Aggiornamento sicurezza: controlla gli aggiornamenti software e configura
le impostazioni di installazione automatiche.
• Seleziona il blocco dello schermo: seleziona il metodo di blocco schermo
desiderato. Per i dettagli, vedere, consultare la sezione
Impostazione di un
blocco schermo
.
• Personalizza Blocco schermo: modifica le informazioni visualizzate sullo
schermo bloccato.
• Impostazioni di Blocco con sicurezza: modifica le impostsazioni di blocco
sicuro.
• Impronte digitali: consente di usare l’impronta digitale per sbloccare
lo schermo o il contenuto. Per i dettagli, vedere, consultare la sezione
Informazioni generali sul riconoscimento delle impronte digitali
.
• Blocco del contenuto: consente di impostare un tipo di blocco (password o
sequenza) per i propri file della Galleria.
• Crittografia e credenziali: configura le impostazioni per la cifratura e le
credenziali della scheda SD.

Impostazioni 149
- Cripta la Scheda SD: consente di crittografare la scheda di memoria per
impedire l’utilizzo su un altro dispositivo. Per i dettagli, vedere, consultare
la sezione
Crittografia della scheda di memoria
.
- Protezione delle credenziali: consente di visualizzare il tipo di memoria
su cui sarà salvato il certificato di sicurezza.
- Credenziali di fiducia: visualizza i certificati CA root e i certificati CA
installati dall'utente del tuo sistema.
- Credenziali dell'utente: visualizza e modifica le informazioni dei
certificati sicuri conservati sul tuo dispositivo.
- Installa dalla memoria: installare un certificato sicuro da un archivio.
- Cancella archivio: cancella i certificati sicuri installati da utente e le
credenziali relative.
• Amministratori dispositivo: consente privilegi per limitare il controllo o
l’utilizzo del dispositivo a determinate app.
• Trust agents: consente di visualizzare e utilizzare agenti attendibili installati
sul dispositivo.
• Puntina schermo: consente di fissare la schermata dell’app in modo che sia
possibile utilizzare soltanto l’app attiva al momento.
• Accesso all'utilizzo: consente di visualizzare i dettagli sull’utilizzo delle app
sul dispositivo.
Privacy
È possibile trovare e regolare tutte le impostazioni sulla privacy.
1 Nella schermata delle impostazioni, toccare Privacy.
2 Personalizzare le impostazioni.
• Gestione autorizzazioni: Consente di controllare e cambiare le
autorizzazioni concesse alle app.
• Blocco schermo: Consente di impostare le notifiche da visualizzare sul
blocco schermo.
• Rendi visibili le password: attivare questa opzione per visualizzare
rapidamente ciascun carattere della password mentre si digita per vedere
cosa si sta immettendo.
• Servizi di personalizzazione del dispositivo: consentono di ottenere
suggerimenti in base agli utenti, alle app e ai contenuti interattivi.

Impostazioni 150
• Compilazione automatica Google: azionare questa opzione per inserire le
informazioni salvate nel proprio account come password, indirizzo, o numero
di carta di credito con un singolo tocco. È possibile anche disattivare questa
opzione, usare la funzione Google Autocomplete, oppure aggiungere un
nuovo account di servizio.
• Cronologia delle posizioni Google: Consente di abilitare o disabilitare
la Cronologia delle posizioni. Quando è abilitata, Google periodicamente
memorizza e utilizza i dati sulla posizione più recenti del telefono in
connessione con l’account Google.
Nella schermata Cronologia delle posizioni, toccare per visualizzare e/o
gestire i dati sulla posizione.
• Gestione attività: Seleziona attività e informazioni che si desidera vengano
salvate da Google.
• Annunci: Consente di controllare l’ID pubblicità e impostare le pubblicità
personalizzate.
• Utilizzo e diagnostica: Abilitare questa opzione per migliorare l'esperienza
Android inviando automaticamente a Google dati diagnostici e sull’utilizzo
del dispositivo e delle app.
Posizione
È possibile controllare come vengono condivise le informazioni sulla propria
posizione e configurare l'autorizzazione per accedere alle informazioni sulla propria
posizione.
Nella schermata delle impostazioni, toccare Posizione e impostare la funzione
desiderata..

Impostazioni 151
Estensioni
Smart Doctor
È possibile utilizzare Smart Doctor per eseguire una diagnosi dello stato del
dispositivo e ottimizzarlo.
Nella schermata delle impostazioni, toccare Estensioni Smart Doctor.
Context Awareness
È possibile modificare automaticamente le impostazioni del dispositivo in base alla
sequenza di utilizzo e alla posizione.
1 Nella schermata delle impostazioni, toccare Estensioni Context Awareness.
2 Attivare gli elementi per i quali si desidera modificare automaticamente le
impostazioni.
• AUTOMATIZZATO: È possibile impostare il dispositivo in modo che modifichi
automaticamente il profilo audio, le opzioni Bluetooth e Wi-Fi in diversi
ambienti, ad esempio A casa, Fuori casa, Al lavoro e Non al lavoro. È possibile
anche impostare che un’app si apra quando vengono collegati gli auricolari o
quando viene connesso un dispositivo Bluetooth.
• Per poter usare questa funzione, le posizioni di casa e lavoro devono essere
presenti in I miei luoghi. Nella schermata delle impostazioni, toccare Posizione I
miei luoghi per impostare le posizioni.
Servizio personalizzato
È possibile ottenere risultati intelligenti utilizzando la ricerca integrata.
1 Nella schermata delle impostazioni, toccare Estensioni Servizio
personalizzato.
2 Toccare per attivarlo.

Impostazioni 152
Visualizzazione estesa con schermo aperto
In Modalità Swivel, le app possono essere estese a entrambi gli schermi.
1 Nella schermata delle impostazioni, toccare Estensioni Visualizzazione
estesa con schermo aperto.
2 Toccare per attivarlo.
• ESTESO PER IMPOSTAZIONE PREDEFINITA: consente di vedere un’app in
vista estesa quando si apre l’app nello schermo principale.
Gaming
È possibile configurare le impostazioni di gioco per gli strumenti, la grafica e il
risparmio energetico.
1 Nella schermata delle impostazioni, toccare Estensioni Gaming.
2 Personalizzare le seguenti impostazioni:
• Launcher Del Gioco: Toccare per usare la funzione Launcher Del Gioco.
• Strumenti di gioco: È possibile eseguire la funzione durante il gioco
toccando l'icona degli strumenti di gioco tra i pulsanti a sfioramento anteriori.
• Grafica di gioco: Regola la grafica di gioco.
• Se si modifica la risoluzione video di alcuni giochi, le funzioni di visualizzazione dello
schermo potrebbero non funzionare correttamente.
• Questa funzione potrebbe non essere disponibile per alcune app di gioco.
• Tempo di pausa: Riduce la luminosità dello schermo e le prestazioni, ogni
volta che si abbandona il gioco per più di 5 minuti.

Impostazioni 153
Registrazione schermata
È possibile configurare le impostazioni della registrazione dello schermo.
1 Nella schermata delle impostazioni, toccare Estensioni Registrazione
schermata.
2 Personalizzare le seguenti impostazioni:
• Includi te stesso nel video da: Selezionare una delle seguenti opzioni.
- Immagine: Include l’immagine del profilo nel video durante la
registrazione. Una volta effettuata questa selezione, toccare e
selezionare un’immagine del profilo. Regolare quindi le dimensioni
dell’immagine usando la barra di scorrimento.
- Fotocamera anteriore: Include sé stessi registrati con la fotocamera
anteriore durante la registrazione dello schermo.
- Mai: Non viene incluso niente.
• Sorgente Audio: Scegliere l’sorgente audio tra Mic e Contenuto.
• Risoluzione video: Selezionare la risoluzione per la registrazione dello
schermo.
Dual App
È possibile installare app di messaggistica duplicate nel prodotto e utilizzare due
account contemporaneamente.
1 Nella schermata delle impostazioni, toccare Estensioni Dual App.
2 Dopo aver letto la dichiarazione di non responsabilità, toccare Conferma.
3 Nell'elenco delle app disponibili, toccare Installa per installare una copia dell’app
desiderata e seguire le istruzioni visualizzate sullo schermo.
• Sullo schermo viene visualizzato l’elenco delle app duplicate disponibili.
Durante l’installazione, sulla schermata Home vengono generate le icone
delle app.

Impostazioni 154
Suggerimento applicazione
Consente di accedere rapidamente alle app di cui si ha bisogno al momento nella
schermata Panoramica
Nella schermata delle impostazioni, toccare Estensioni Suggerimento
applicazione.
Penna
È possibile configurare le opzioni per l’uso di una penna attiva (opzionale, in
vendita separatamente). Questo dispositivo supporta Active Pen AES2.0 (Active
Electrostatic).
1 Nella schermata delle impostazioni, toccare Estensioni Penna.
2 Personalizzare le seguenti impostazioni:
• Tasto Penna Collegamenti: consente di configurare le scorciatoie per tutti i
pulsanti della penna attiva.
• Scorciatoie applicazioni: Selezionare quale app (fino a cinque) visualizzare
come collegamento quando la penna è rimossa dal dispositivo.
• Anteprima promemoria: Attivare per visualizzare i promemoria recenti in
Pen Pop.
• Suono scrittura: Attivare per applicare effetti sonori alla modalità disegno.
• Mostra puntatore: Attivare per visualizzare un puntatore della penna nei
punti in cui si passa con la penna.
• Gesti ignora barra di navigazioneta: Blocca l’immissione di gesti per la
barra di navigazione, e risulta utile quando si disegna o si scrive sul bordo
dello schermo con una Active Pen.

Impostazioni 155
Collegamenti
È possibile utilizzare pulsanti quali accensione/blocco, volume e Assistente Google
per eseguire direttamente determinate app o funzioni.
1 Nella schermata delle impostazioni, toccare Estensioni Collegamenti.
2 Personalizzare le seguenti impostazioni.
• Apri Fotocamera: premere il tasto di accensione due volte per avviare la
Fotocamera.
• Apri Promemoria a schermo spento: quando lo schermo è bloccato o
spento, premere due volte il tasto volume su (+) per aprire promemoria off
screen.
• Apri Fotocamera: quando lo schermo è bloccato o spento, premere due
volte il tasto volume giù (-) per avviare Fotocamera.
• Assistente Google non supporta alcune lingue.
Toc Toc
Eseguire un doppio tocco sullo schermo per spegnerlo o accenderlo.
Per i dettagli, vedere, consultare la sezione
Toc Toc
.
Aumenta la sensibilità al tocco
È possibile aumentare la sensibilità al tocco del touchscreen. Si consiglia di attivare
questa funzione quando si usa una protezione per lo schermo.
Nella schermata delle impostazioni, toccare Estensioni Aumenta la sensibilità
al tocco

Impostazioni 156
Applicazioni
È possibile controllare l’elenco delle app installate e configurare le impostazioni per
notifiche, autorizzazioni delle app e altro ancora.
1 Nella schermata delle impostazioni, toccare Applicazioni.
2 Personalizzare le impostazioni.
Batteria
È possibile visualizzare le informazioni sulla batteria corrente o attivare la modalità
risparmio energetico.
1 Nella schermata delle impostazioni, toccare Batteria.
2 Personalizzare le seguenti impostazioni:
• Utilizzo della batteria: consente di visualizzare i dettagli sull’utilizzo della
batteria.
• Ricarica ottimizzata: regola automaticamente la velocità di carica in base a
come si carica, per ridurre il calore e prolungare la durata della batteria.
• Batteria adattiva: consente di risparmiare la batteria impedendo
l’esecuzione in background delle app.
• Limitazione sfondo: abilitare questa opzione per limitare le app in
background e risparmiare la batteria durante l’uso del dispositivo. Le app
con limitazioni per il risparmio energetico potrebbero non funzionare
correttamente o potrebbero non inviare notifiche.
• Risparmio energetico: consente di ridurre il consumo della batteria
riducendo alcune impostazioni del dispositivo, come la luminosità del display,
la velocità e l’intensità della vibrazione.
• Eccezioni del risparmio energetico: seleziona le app che vengono
utilizzare senza alcuna restrizione in modalità di risparmio energetico o di
ottimizzazione della batteria.

Impostazioni 157
Archiviazione
È possibile visualizzare e gestire la memoria interna sul dispositivo o lo spazio di
archiviazione della scheda di memoria.
1 Nella schermata delle impostazioni, toccare Archiviazione.
2 Personalizzare le seguenti impostazioni:
• Archivio interno: consente di visualizzare lo spazio di archiviazione totale
e lo spazio libero nella memoria interna del dispositivo. Visualizza un elenco
delle app in uso e la capacità di archiviazione di ciascuna app.
• Scheda SD: consente di visualizzare lo spazio di archiviazione totale e lo
spazio libero nella scheda di memoria. Questa opzione compare soltanto
quando viene inserita una scheda di memoria. Per disattivare la scheda di
memoria, toccare .
Account
È possibile aggiungere utenti con i quali condividere e registrare un account cloud.
1 Nella schermata delle impostazioni, toccare Account.
2 Personalizzare le impostazioni.
Benessere digitale e Controllo
genitori
È possibile visualizzare il tempo di utilizzo del prodotto e impostare il timer per
ciascuna app. È possibile inoltre gestire il tempo di utilizzo del telefono cellulare
utilizzando le modalità Bedtime e Focus.
Nella schermata delle impostazioni, selezionare Benessere digitale e Controllo
genitori e impostare la funzione desiderata.

Impostazioni 158
Google
È possibile utilizzare le impostazioni di Google per gestire le proprie app e le
impostazioni dell'account di Google.
Nella schermata delle impostazioni, toccare Google.
Sistema
Centro aggiornamenti
Puoi controllare e installare la versione più recente dell'app o del software fornito
a LG.
1 Nella schermata delle impostazioni, toccare Sistema Centro aggiornamenti.
2 Personalizzare le seguenti impostazioni:
• Aggiornamento applicazione: controlla se è disponibile un aggiornamento.
Se disponibile, puoi installare l'aggiornamento.
• Aggiornamento software: controlla se è disponibile un aggiornamento
software. Se disponibile, puoi installare l'aggiornamento.
Lingua e tastiera
È possibile personalizzare le impostazioni di lingua e tastiera del dispositivo.
1 Nella schermata delle impostazioni, toccare Sistema Lingua e tastiera.
2 Personalizzare le seguenti impostazioni:
• Lingua: consente di selezionare una lingua da applicare al dispositivo.
• Gestisci tastiere: è possibile modificare le impostazioni di base della tastiera
del prodotto, impostare gli ambienti di utilizzo per la tastiera LG o altre
tastiere installate e impostare la funzione di riconoscimento vocale per i
comandi con Google Voice. È possibile inoltre impostare se visualizzare il
pulsante della tastiera nell'area dei pulsanti a sfioramento della schermata
Home, in modo da poter passare rapidamente a un'altra tastiera.

Impostazioni 159
• Tastiera fisica: selezionare per usare la tastiera fisica, o controllare i tasti dei
collegamenti da tastiera.
• Servizio Compilazione automatica: azionare questa opzione per inserire le
informazioni salvate nel proprio account come password, indirizzo, o numero
di carta di credito con un singolo tocco. Puoi anche disattivare questa
opzione, usare Google Autocomplete, o aggiungere un nuovo account di
servizio.
• Lettura text-to-speech: consente di configurare le impostazioni dell’output
sintesi vocale.
• Velocità del puntatore: consente di regolare la velocità del puntatore di un
mouse o trackpad.
• Inverti i pulsanti del mouse: consente di invertire il pulsante destro del
mouse in modo che esegua le principali azioni di manipolazione diretta.
Data e ora
È possibile personalizzare le impostazioni di data e ora del dispositivo.
1 Nella schermata delle impostazioni, toccare Sistema Data e ora.
2 Personalizzare le impostazioni.
Memoria
Consente di visualizzare la quantità media di utilizzo della memoria in un
determinato periodo di tempo e la memoria occupata da un’app.
1 Nella schermata delle impostazioni, toccare Sistema Memoria.
2 Toccare per impostare una fascia oraria per il recupero dei dati.

Impostazioni 160
Backup
È possibile eseguire il backup dei dati salvati sul dispositivo su un altro dispositivo o
account.
1 Nella schermata delle impostazioni, toccare Sistema Backup.
2 Personalizzare le seguenti impostazioni:
• LG Mobile Switch: consente di trasferire i dati da un vecchio dispositivo LG a
quello nuovo. Per i dettagli, vedere, consultare la sezione
LG Mobile Switch
.
• Backup e ripristino: consente di eseguire il backup dei dati del dispositivo o
ripristinare i dati di un backup nel dispositivo.
• Il ripristino del dispositivo potrebbe eliminare i file di backup salvati nell’archivio.
Assicurarsi di copiare e salvare i file di backup importanti nel proprio PC.
• Google Backup: modifica le impostazioni di backup di Google. È possibile
anche controllare l'account di backup attualmente usato, o aggiungere un
nuovo account di backup.
Riavvio & Ripristino
È possibile ripristinare il dispositivo, includendo le impostazioni di rete e app.
1 Nella schermata delle impostazioni, toccare Sistema Riavvio & Ripristino.
2 Personalizzare le seguenti impostazioni:
• Riavvio automatico: riavvia e ottimizza automaticamente il telefono all'ora
impostata. Toccare per attivare la funzione. Il dispositivo si riavvia
automaticamente all'ora impostata e si ottimizza. Seleziona la data e l'ora
del riavvio.

Impostazioni 161
• Puoi impostare il dispositivo affinché si riavvii una volta la settimana. Il dispositivo
si riavvia automaticamente entro un'ora dall'ora impostata.
• Una volta che il dispositivo si riavvia, le notifiche e i badge sono cancellati. Salvare i
dati importanti prima dell'ora preimpostata.
• La funzionalità di riavvio automatico non è attivata nelle seguenti situazioni.
Quando lo schermo è acceso, quando il dispositivo è in uso, quando il livello della
batteria è il 30% o meno, o quando la scheda USIM è bloccata.
- A seconda del fornitore del servizio di telecomunicazione, la funzione di riavvio
automatico potrebbe non essere disponibile.
• Ripristino delle impostazioni della rete: consente di ripristinare Wi-Fi,
Bluetooth e altre impostazioni di rete.
• Ripristina preferenze applicazione: ripristina le impostazioni dio un'app. I
dati salvati nell'app non saranno cancellati.
• Reset impostazioni: consente di ripristinare tutte le impostazioni
predefinite di sistema.
• Ripristino dati di fabbrica: consente di ripristinare tutte le impostazioni del
dispositivo ed eliminare i dati.
• Il ripristino e il riavvio del dispositivo elimina tutti i dati presenti sullo stesso. Inserire
nuovamente il nome del dispositivo, l’account Google e altre informazioni iniziali.
• Dopo l’inizializzazione dei dati, i dati non possono più essere recuperati.
Info sul telefono
È possibile visualizzare informazioni sul dispositivo, come nome, stato, dettagli
software e informazioni legali.
Nella schermata delle impostazioni, toccare Sistema Info sul telefono e
visualizzare le informazioni.
Normative & Sicurezza
È possibile visualizzare i certificati normativi e le relative informazioni sul proprio
dispositivo.
Nella schermata delle impostazioni, toccare Sistema Normative & Sicurezza.

Impostazioni 162
Accesso facilitato
È possibile gestire i plugin di accessibilità installati sul dispositivo.
1 Nella schermata delle impostazioni, toccare Accesso facilitato.
2 Personalizzare le seguenti impostazioni:
• Visione TalkBack: consente di impostare il dispositivo in modo da
notificare lo stato dello schermo o le azioni tramite voce.
• Visione Notifiche vocali: impostare sul dispositivo la lettura delle
informazioni del chiamante tramite voce.
• Visione Carattere: modificare dimensione, grassetto, o facciata.
• Visione Dimensioni display: consente di impostare gli elementi presenti
sullo schermo su dimensioni facilmente visibili per l’utente. Alcuni elementi
potrebbero cambiare posizione.
• Visione Zoom touch: consente di eseguire lo zoom avanti o indietro
toccando lo schermo tre volte.
• Visione Zoom della finestra: consente di eseguire lo zoom avanti o
indietro all’interno di una finestra e invertire il colore.
• Visione Puntatore del mouse grande: consente di ingrandire il puntatore
del mouse.
• Visione Schermo ad alto contrasto: consente di modificare il colore di
sfondo in nero per uno schermo ad alto contrasto.
• Visione Inversione del colore dello schermo: consente di aumentare il
contrasto del colore del display per le persone ipovedenti.
• Visione Regolazione del colore dello schermo: consente di regolare il
colore del display.
• Visione Monocromatico: consente di far passare lo schermo alla modalità
scala di grigi.
• Visione Termina le chiamate con il tasto di accensione: consente di
terminare una chiamata premendo il tasto di accensione/blocco.
• Udito Sottotitoli dal vivo: consente di impostare il dispositivo in modo
che rilevi la voce nel contenuto multimediale e generi automaticamente i
sottotitoli.
• Udito Preferenze di didascalia: consente di attivare il servizio dei
sottotitoli durante la riproduzione di video per non udenti.

Impostazioni 163
• Udito Flash allarme: consente di impostare il dispositivo in modo da
notificare all’utente le chiamate in arrivo, i messaggi e le sveglie con una luce
lampeggiante.
• Udito Disattiva tutti i suoni: consente di disattivare tutti i suoni e
abbassare il volume sul ricevitore.
• Udito Canale audio: consente di selezionare il tipo di audio.
• Udito Bilanciamento del suono: consente di regolare il bilanciamento
dell’uscita audio. Consente di utilizzare la barra di scorrimento per modificare
il bilanciamento.
• Movimento & cognizione Touch assistant: consente di attivare il pannello
touch per facilitare l’utilizzo di pulsanti e gesti.
• Movimento & cognizione Input tattile: consente di immettere il testo
toccando e tenendo premuto lo schermo, o di modificarlo semplicemente
toccando lo schermo.
• Movimento & cognizione Tastiera fisica: consente di personalizzare le
impostazioni della tastiera.
• Movimento & cognizione Click automatico del mouse: consente di
cliccare il puntatore del mouse automaticamente in caso di assenza di
movimento.
• Movimento & cognizione Tocca e tieni premuto per le chiamate:
consente di rispondere o rifiutare le chiamate toccando e tenendo premuto il
pulsante di chiamata, invece di trascinarlo.
• Movimento & cognizione Timeout schermo: consente di disattivare
automaticamente lo schermo quando il dispositivo viene lasciato inattivo per
un determinato periodo di tempo.
• Movimento & cognizione Aree di controllo tattile: consente di limitare
l'area touch in modo che soltanto una determinata porzione dello schermo
possa essere controllata dall’inserimento touch.
• Collegamento alle funzioni di accessibilità: consente di accedere
rapidamente a una funzione utilizzata di frequente toccando tre volte.
• Rotazione automatica: consente di cambiare automaticamente
l’orientamento dello schermo a seconda della posizione fisica del dispositivo.
• Seleziona per ascoltare: consente di toccare gli elementi e ricevere una
risposta vocale.
• Switch Access: consente di creare combinazioni di tasti per controllare il
dispositivo.

Appendice
05

Appendice 165
Impostazioni della lingua
È possibile selezionare una lingua da utilizzare sul dispositivo.
• Nella schermata Home, toccare Impostazioni Sistema Lingua e tastiera
Lingua Aggiungi lingua, quindi selezionare una lingua.
- Toccare e tenere premuta quindi trascinarla in cima all’elenco delle lingue
per impostarla come lingua predefinita.
LG Bridge
Informazioni generali su LG Bridge
È possibile eseguire il backup dei contatti, delle foto e di altri elementi sul computer
o aggiornare il software del dispositivo.
• Per i dettagli, vedere la guida di LG Bridge.
• Le funzioni supportate possono variare a seconda del dispositivo.
• Il driver USB LG è un programma necessario per connettere lo smartphone LG con
il computer e viene installato quando si installa LG Bridge.
Funzioni di LG Bridge
• Consente di eseguire il backup dei dati dal dispositivo a un computer o
ripristinare i dati da un computer al dispositivo tramite un collegamento con
cavo USB.
• Consente di aggiornare il software del dispositivo da un computer tramite un
collegamento con cavo USB.

Appendice 166
Installazione di LG Bridge su un computer
1 Andare sul sito
www.lg.com
dal proprio computer.
2 Selezionare la regione.
3 Fare clic su Supporto Software e firmware.
4 Immettere il nome del dispositivo.
OPPURE
Selezionare Categoria prodotto.
5 Andare a Sync PC LG Bridge per scaricare il file di installazione.
• Andare su Dettagli per visualizzare i requisiti minimi per l’installazione di LG
Bridge.
Aggiornamento software del telefono
Aggiornamento software del telefono LG Mobile da
Internet
Per ulteriori informazioni sull’utilizzo di questa funzione, visitare
http://www.lg.com/common/index.jsp
, selezionare il paese e la lingua.
Questa funzione consente di aggiornare facilmente il firmware del telefono a
una versione più recente da Internet senza la necessità di visitare un centro
di assistenza. Questa funzione sarà disponibile solo se e quando LG mette a
disposizione una nuova versione del firmware per il dispositivo.
Poiché l’aggiornamento del firmware del telefono cellulare richiede la massima
attenzione da parte dell’utente per tutta la durata del processo di aggiornamento,
assicurarsi di controllare tutte le istruzioni e le note visualizzate a ogni passaggio
prima di procedere. Si prega di notare che la rimozione del cavo USB durante
l’aggiornamento può danneggiare gravemente il telefono cellulare.
• LG si riserva il diritto di rendere disponibili aggiornamenti del firmware
esclusivamente per modelli selezionati a propria discrezione e non garantisce la
disponibilità della versione più recente del firmware per tutti i modelli di cellulari.

Appendice 167
Aggiornamento software del telefono LG Mobile
tramite Over-the-Air (OTA)
Questa funzione consente di aggiornare facilmente il software del telefono a una
nuova versione tramite OTA, senza collegamento di un cavo USB. Questa funzione
sarà disponibile solo se e quando LG mette a disposizione una nuova versione del
firmware per il dispositivo.
Per eseguire l’aggiornamento del software del telefono,
Impostazioni Sistema Centro aggiornamenti Aggiornamento software
Controlla aggiornamenti.
• I dati personali dell’utente presenti sulla memoria interna del telefono, ivi comprese
le informazioni relative all’account Google e qualsiasi altro account, i dati e le
impostazioni di sistema/applicazioni, le app scaricate e la licenza DRM potrebbero
andare perduti nel processo di aggiornamento del software del telefono. Pertanto,
LG consiglia di eseguire il backup dei dati personali prima di aggiornare il software
del telefono. LG non si assume alcuna responsabilità per eventuali perdite di dati
personali.
• Questa funzione dipende dall’area e dal provider del servizio.

Appendice 168
Guida antifurto
Configurare il dispositivo per impedire ad altre persone di utilizzarlo se è stato
ripristinato alle impostazioni di fabbrica senza permesso. Ad esempio, in caso
di smarrimento, furto o cancellazione dei dati del dispositivo, solo qualcuno in
possesso delle informazioni sull’account Google o delle informazioni sul blocco
schermo può utilizzare il dispositivo.
Per assicurarsi che il dispositivo sia protetto è sufficiente:
• Impostare un blocco schermo: Se il dispositivo viene smarrito o rubato, ma
si dispone di un blocco schermo, il dispositivo non può essere cancellato
utilizzando il menu Impostazioni a meno che lo schermo non venga sbloccato.
• Aggiungere il proprio account Google sul dispositivo: Se il dispositivo viene
cancellato, ma è presente un account Google su di esso, il dispositivo non
può terminare il processo di configurazione fino a quando le informazioni
dell’account Google non vengono nuovamente inserite.
Dopo aver protetto il dispositivo, è necessario sbloccare lo schermo o immettere la
password dell’account Google, se è necessario effettuare un ripristino di fabbrica.
Questo fa sì che il ripristino venga effettuato da una persona di fiducia.
• Non dimenticare l’account Google e la password aggiunti al dispositivo prima
di eseguire un ripristino di fabbrica. Se non è possibile fornire le informazioni
sull’account durante il processo di configurazione, non sarà possibile utilizzare il
dispositivo dopo aver eseguito il ripristino di fabbrica.

Appendice 169
Informazioni avviso software Open
Source
Per ottenere il codice sorgente contenuto in questo prodotto secondo quanto
consentito dalle licenze GPL, LGPL, MPL e altre licenze Open Source, visitare
http://opensource.lge.com
.
In aggiunta al codice sorgente, sono disponibili per il download tutti i termini di
licenza, le esclusioni di responsabilità e le relative note di copyright.
LG Electronics fornirà anche il codice open source su CD-ROM su richiesta tramite
e-mail all’indirizzo
opensource@lge.com
addebitando il costo delle spese di
distribuzione (ad esempio il costo di supporti, spedizione e gestione).
L’offerta è valida per un periodo di tre anni a partire dalla nostra ultima spedizione
di questo prodotto. L’offerta è valida per gli utenti che avranno ricevuto queste
informazioni.
Informazioni sulle normative
(Numero ID normativa, etichetta
digitale ecc.)
Per informazioni sulle normative, andare in Impostazioni Sistema Normative
& Sicurezza.

Appendice 170
Marchi di fabbrica
• Copyright ©2020 LG Electronics Inc. Tutti i diritti riservati. LG e il logo LG sono
marchi registrati del Gruppo LG e delle sue entità correlate.
• Google, Google Maps, Gmail, YouTube, Google Duo, Google Play, Android, Chrome,
Google Photos, Google Play Protect, Google Calendar, Google Docs, Google Drive,
Google Sheets e altri marchi e logo correlati sono marchi di Google LLC.
• Bluetooth
®
è un marchio registrato di Bluetooth SIG, Inc. nel mondo.
• Wi-Fi
®
e il logo Wi-Fi sono marchi registrati di Wi-Fi Alliance.
• Tutti gli altri marchi sono di proprietà dei rispettivi titolari.

Appendice 171
Dichiarazione sulla sicurezza del laser
Attenzione!
Questo prodotto utilizza un sistema laser. Per garantirne un utilizzo corretto,
leggere attentamente il presente manuale dell’utente e conservarlo come
riferimento per il futuro. Se l’unità richiede manutenzione, contattare un centro di
assistenza autorizzato.
L’utilizzo di controlli e regolazioni o l’esecuzione di procedure diverse da quelle
specificate può provocare l’esposizione a radiazioni pericolose.
Per evitare l’esposizione diretta al fascio laser, non tentare di aprire l’involucro o
entrare in contatto diretto con il laser.
DICHIARAZIONE DI CONFORMITÀ
Con il presente documento, LG Electronics dichiara che il prodotto
LM-F100EMW è conforme ai requisiti essenziali e alle altre disposizioni della
Direttiva 2014/53/EU.
Una copia della Dichiarazione di conformità è disponibile all’indirizzo
http://www.lg.com/global/declaration

Appendice 172
Contattare l’ufficio relativo alla
conformità del prodotto
LG Electronics European Shared Service Center B.V.
Krijgsman 1, 1186 DM Amstelveen, The Netherlands
Wi-Fi (WLAN)
La banda 5150 - 5350 MHz è limitata esclusivamente all’utilizzo domestico.
AT BE BG CH CY CZ DE DK EE EL ES FI FR
HR HU IE IS IT LI LT LU LV MT NL NO PL
PT RO SE SI SK UK AL ME RS MK TR BA XK
Italia
Il servizio 5G dipende dalla copertura del servizio e dalla compatibilità con l'operatore.
Verifica la compatibilità con il tuo operatore sul sito
www.lg.com/it

Appendice 173
Ulteriori informazioni
Parti in vetro temperato
Le parti in vetro temperato di questo dispositivo non sono permanenti e possono
usurarsi col passare del tempo.
• Se si lascia cadere il dispositivo su una superficie dura o lo si espone a un urto
violento, il vetro temperato potrebbe danneggiarsi.
In questi casi, interrompere immediatamente l’uso del dispositivo e contattare
un Centro di assistenza clienti LG.
• Sul mercato sono disponibili apposite custodie per proteggere il dispositivo da
eventuali danni.
Tenere presente che tali custodie protettive non sono coperte dal servizio di
garanzia fornito da LG Electronics e non ne viene garantita la sicurezza.
Proporzioni
Alcune app scaricate potrebbero non supportare alcune proporzioni.
In tal caso, selezionare le proporzioni dello schermo più adatte all’app o consultare il
provider dell’app per ulteriori informazioni.
CUSTOMER CARE
199600044
Per conoscere gli orari di apertura e i relativi costi ti invitiamo a visitare il sito di LG
Italia
www.lg.com/it

Appendice 174
Guida al trasferimento dati
• Per i dati trasferibili tra dispositivi LG e tra un dispositivo LG e un dispositivo di
parti terze, vedere lo schema seguente.
Tipo Dettagli dell’elemento
Dispositivo
LG
→
Dispositivo
LG
Dispositivo
Android di
parti terze
→
Dispositivo
LG
Dispositivo
iOS
→
Dispositivo
LG
Dati
personali
Contatti, messaggi, registri
chiamate, calendario,
registrazioni audio
OOO
Promemoria OXO
Sveglie O X X
Dati
multimediali
Foto, video, canzoni,
documenti OOO
Impostazioni
di schermo
Impostazioni della schermata
home (cartelle e widget) O X X
Impostazioni della schermata
di blocco (impostazioni di
blocco schermo escluse)
O X X
Applicazioni
App scaricate O O
-
Dati personali contenuti nelle
app scaricate O X
Altri
Certificato pubblico O O X
Impostazioni (Wi-Fi,
Bluetooth, chiamate, suoni
e notifiche, accessibilità,
batteria)
O X X
• Alcune dati potrebbero non essere trasmessi a seconda della versione del
software, della versione delle app, del sistema operativo, e delle politiche del
produttore del dispositivo o del gestore del servizio.

Appendice 175
Bande di frequenza supportate Potenza in uscita trasmettitore
GSM 900 33.7 dBm
GSM 1800 30.7 dBm
W B1 24.2 dBm
W B8 25.2 dBm
LTE B1 25.2 dBm
LTE B3 23.7 dBm
LTE B7 23.7 dBm
LTE B8 25.2 dBm
LTE B20 25.2 dBm
LTE B28 25.2 dBm
LTE B38 25.2 dBm
LTE B40 25.2 dBm
5G Sub6 n1 25.2 dBm
5G Sub6 n3 25.2 dBm
5G Sub6 n7 25.2 dBm
5G Sub6 n28 25.2 dBm
5G Sub6 n78 22.7 dBm
BT 2.4GHz 12 dBm
WLAN 2.4GHz 19 dBm
WLAN 5GHz 20 dBm
NFC - 23 dBuA/m
Le informazioni sull’adattatore da viaggio si possono trovare su
http://www.lg.com/global/support/cedoc/cedoc

Appendice 176
Smaltimento delle apparecchiature obsolete
1. Tutte le apparecchiature elettriche ed elettroniche, contrassegnate da
questo simbolo (“bidone della spazzatura barrato da una croce”), devono
essere raccolte e smaltite separatamente rispetto agli altri rifiuti urbani
misti mediante impianti di raccolta specifici installati da enti pubblici o dalle
autorità locali. Si ricorda che gli utenti finali domestici possono consegnare
gratuitamente le apparecchiature elettriche ed elettroniche a fine vita presso
il punto vendita all’atto dell’acquisto di una nuova apparecchiatura equivalente.
Gli utenti finali domestici possono inoltre consegnare gratuitamente
apparecchiature elettriche ed elettroniche di piccolissime dimensioni (non
eccedenti i 25 cm) a fine vita direttamente presso un punto vendita a ciò
abilitato, senza obbligo di acquistare una apparecchiatura nuova di tipo
equivalente. Si prega di informarsi previamente presso il punto vendita
prescelto circa tale ultima modalità di conferimento dell’apparecchiatura a fine
vita.
2. Il corretto smaltimento dell'unità obsoleta contribuisce a prevenire possibili
conseguenze negative sulla salute degli individui e sull'ambiente. Una gestione
responsabile del fine vita delle apparecchiature elettriche ed elettroniche
da parte degli utenti contribuisce al riutilizzo, al riciclaggio ed al recupero
sostenibile dei prodotti obsoleti e dei relativi materiali.
3. Per informazioni più dettagliate sullo smaltimento delle apparecchiature
obsolete, contattare l'ufficio del comune di residenza, il servizio di
smaltimento rifiuti o il punto vendita in cui è stato acquistato il prodotto.
(
www.lg.com/global/recycling
)
Smaltimento delle batterie/accumulatori
1. Questo simbolo potrebbe essere associato ai simboli chimici del mercurio (Hg),
cadmio (Cd) o piombo (Pb) se la batteria contiene più di 0,0005% di mercurio,
0,002% di cadmio o 0,004% di piombo.
2. Tutte le batterie e gli accumulatori devono essere smaltiti separatamente
rispetto alla raccolta differenziata municipale, mediante impianti di raccolta
specifici designati dal governo o dalle autorità locali.
3. Il corretto smaltimento di batterie e accumulatori obsoleti contribuisce a
prevenire possibili conseguenze negative sull’ambiente, sulla salute degli
individui e su tutte le altre specie viventi.
4. Per informazioni più dettagliate sullo smaltimento di batterie e accumulatori
obsoleti, contattare l’ufficio del comune di residenza, il servizio di smaltimento
rifiuti o il negozio in cui è stato acquistato il prodotto.

Appendice 177
FAQ
In questo capitolo sono descritti alcuni problemi che potrebbero verificarsi durante
l’uso del dispositivo. Alcuni problemi richiedono una chiamata al provider del
servizio, ma la maggior parte è facilmente risolvibile in autonomia.
Errore scheda SIM
Assicurarsi che la scheda SIM sia inserita correttamente.
Nessuna connessione alla rete o connessione di rete interrotta
Il segnale è debole. Spostarsi verso una finestra o in uno spazio aperto.
Sei al di fuori dell’area coperta dal fornitore di rete. Spostati e controlla la rete.
Le chiamate non sono disponibili
Nuova rete non autorizzata.
Assicurati di non avere impostato il blocco chiamate dal numero che effettua la
chiamata.
Assicurati di non avere impostato il blocco chiamate dal numero che stai
chiamando.
Non è possibile accendere il dispositivo
Quando la batteria è completamente scarica, il tuo dispositivo non si accende.
Ricaricare completamente la batteria prima di accendere il dispositivo.
Errore di caricamento
Assicurarsi che il dispositivo sia in carica a una temperatura normale.
Controllare il caricabatteria e il suo collegamento al dispositivo.
Utilizzare solo gli accessori forniti autorizzati da LG.
La batteria si scarica più rapidamente rispetto a quando è
stata acquistata
Esponendo il dispositivo o la batteria a temperatura molto alte o molto basse, la
durata della batteria potrebbe ridursi.
Il consumo della batteria aumenta quando si usano certe app o funzionalità, come
GPS, giochi o internet.
La batteria è usurabile e la sua durata si riduce nel corso del tempo.

Appendice 178
Messaggi d’errore vengono visualizzati quando si avvia la
fotocamera.
Ricaricare la batteria.
Liberare memoria trasferendo i file a un computer o cancellando i file dal proprio
dispositivo.
consente di riavviare il dispositivo.
Se i problemi con l’app della fotocamera persistono dopo avere tentato con questi
suggerimenti, contattare il centro di assistenza LG Electronics.
La qualità delle foto è bassa.
La qualità delle foto potrebbe variare, a seconda dell’ambiente e delle tecniche
fotografiche usate.
Quando si realizzano foto e video, la qualità angolare standard è migliora rispetto al
grandangolo.
Realizzando foto in posti bui, di notte o interni, potrebbero essere presenti disturbi
o le immagini potrebbero essere sfocate.
In caso di problemi, azzerare le opzioni.
Lo schermo tattile risponde lentamente o in modo non
corretto
Collegando una protezione per lo schermo o accessori opzionali allo schermo tattile,
potrebbe non funzionare correttamente.
Indossando guanti, se le mani non sono pulite quando si tocca lo schermo tattile o
si sfiora lo schermo usando oggetti affilati o le punte delle dita, lo schermo tattile
potrebbe non funzionare.
Lo schermo tattile potrebbe non funzionare correttamente in condizioni di umidità
o quando è esposto all’acqua.
Riavviare l’apparecchio per annullare eventuali bug del software.
Se lo schermo tattile è graffiato o danneggiato, visitare un centro di assistenza LG
Electronics.

Appendice 179
Chiude la chiamata o si blocca
Riavviare il dispositivo.
• Se il dispositivo si chiude la chiamata o si blocca, potrebbe essere necessario
chiudere le applicazioni o spegnere del tutto il dispositivo e riaccenderlo.
Eseguire un riavvio
• È possibile utilizzare un ripristino superficiale del dispositivo se lo schermo
si blocca oppure se i pulsanti, lo schermo a sfioramento o il dispositivo non
rispondono più in modo corretto.
• Per eseguire un ripristino superficiale del dispositivo, tenere premuti i tasti
Volume giù e Power fino a quando il dispositivo non si riavvia.
Azzerare il dispositivo
• Se i metodi illustrati sopra non risolvono il problema, eseguire un ripristino dati
di fabbrica.
• Nella schermata delle impostazioni, toccare Sistema Riavvio & Ripristino
Ripristino dati di fabbrica.
- Questo metodo consente di ripristinare tutte le impostazioni del dispositivo
ed eliminare i dati. Prima di eseguire il ripristino dei dati di fabbrica, effettuare
copie di backup di tutti i dati importanti salvati nel dispositivo.
- Se il dispositivo è associato a un account Google, effettuare l’accesso allo
stesso account Google dopo il ripristino.

Appendice 180
L’apparecchio Bluetooth non è localizzato
Assicurarsi che la funzionalità wireless Bluetooth sia attivata sul dispositivo.
Assicurarsi che la funzionalità wireless Bluetooth sia attivata sul dispositivo a cui
vuoi connetterti.
Assicurarsi che il dispositivo e altri dispositivi Bluetooth siano nell’area massima del
Bluetooth (10 m)
Se i suggerimenti indicati non ti hanno aiutato a risolvere il problema, contatta un
centro di assistenza LG Electronics.
Quando colleghi il tuo apparecchio a un computer, non viene
stabilita una connessione.
Assicurarsi che il cavo USB che stai usando sia compatibile con il tuo apparecchio.
Assicurarsi che sul proprio computer siano installati e aggiornati i driver nella
versione corretta.
Un’applicazione scaricata sta causando molti errori.
L’applicazione presenta dei problemi.
Rimuovere e reinstallare l’applicazione.

1
Πληροφορίες σχετικά με αυτό το
εγχειρίδιο χρήσης
Σας ευχαριστούμε που επιλέξατε αυτό το προϊόν LG. Για την ασφαλή και σωστή
χρήση της συσκευής, παρακαλείστε να διαβάσετε προσεκτικά αυτό το εγχειρίδιο
πριν χρησιμοποιήσετε τη συσκευή για πρώτη φορά.
• Να χρησιμοποιείτε πάντοτε γνήσια αξεσουάρ LG. Τα παρεχόμενα εξαρτήματα
προορίζονται αποκλειστικά για χρήση με αυτήν την συσκευή και ενδέχεται να
μην είναι συμβατά με άλλες συσκευές.
• Οι περιγραφές βασίζονται στις προεπιλεγμένες ρυθμίσεις της συσκευής.
• Οι προεγκατεστημένες εφαρμογές στη συσκευή υπόκεινται σε ενημερώσεις,
και η παροχή υποστήριξης για αυτές τις εφαρμογές ενδέχεται να διακοπεί
χωρίς προειδοποίηση. Εάν έχετε ερωτήσεις σχετικά με μια εφαρμογή που
παρέχεται με τη συσκευή, επικοινωνήστε με ένα Κέντρο επισκευών της LG.
Σχετικά με εφαρμογές που έχουν εγκατασταθεί από τον χρήστη, μπορείτε να
επικοινωνήσετε με τον αρμόδιο πάροχο υπηρεσιών.
• Η τροποποίηση του λειτουργικού συστήματος της συσκευής ή η εγκατάσταση
λογισμικού από ανεπίσημες πηγές μπορεί να προκαλέσει βλάβη στη συσκευή
και να οδηγήσει σε καταστροφή ή απώλεια δεδομένων. Τέτοιου είδους
ενέργειες αποτελούν παραβίαση της άδειας χρήσης της LG και έχουν ως
αποτέλεσμα την ακύρωση της εγγύησής σας.
• Κάποιο περιεχόμενο και εικόνες μπορεί να διαφέρουν σε σχέση με τη
συσκευή σας, ανάλογα με την περιοχή, τον πάροχο υπηρεσιών, την έκδοση
του λογισμικού ή την έκδοση του λειτουργικού συστήματος, και μπορεί να
αλλάξουν χωρίς προειδοποίηση.
• Το λογισμικό, οι ήχοι, οι ταπετσαρίες, οι εικόνες και άλλα μέσα που παρέχονται
μαζί με τη συσκευή σας συνοδεύονται από άδεια για περιορισμένη χρήση.
Τυχόν εξαγωγή και χρήση αυτών των υλικών για εμπορικούς ή άλλους σκοπούς
ενδέχεται να συνιστά παραβίαση των νόμων περί πνευματικών δικαιωμάτων.
Ως τελικός χρήστης, έχετε την πλήρη ευθύνη για τυχόvν παράνομη χρήση των
μέσων αυτών.
• Ενδέχεται να υπάρχουν πρόσθετες χρεώσεις για υπηρεσίες δεδομένων, όπως
για τις υπηρεσίες ανταλλαγής μηνυμάτων, τη φόρτωση ή τη λήψη δεδομένων,
τον αυτόματο συγχρονισμό και τις υπηρεσίες τοποθεσίας. Για να μην
επιβαρύνεστε με πρόσθετες χρεώσεις, επιλέξτε ένα πρόγραμμα δεδομένων
που να καλύπτει τις ανάγκες σας. Επικοινωνήστε με τον πάροχο υπηρεσιών σας
για περισσότερες λεπτομέρειες.
ΕΛΛΗΝΙΚΑ

2
Πληροφορίες σχετικά με αυτό το εγχειρίδιο χρήσης
• Το παρόν εγχειρίδιο χρήσης έχει συνταχθεί στις βασικές γλώσσες για κάθε
χώρα. Ανάλογα με τη γλώσσα που χρησιμοποιείται, το περιεχόμενο ενδέχεται
να διαφοροποιείται.
Συμβουλευτικές ανακοινώσεις
ΠΡΟΕΙΔΟΠΟΙΗΣΗ: Καταστάσεις που μπορεί να προκαλέσουν τραυματισμό
του χρήστη και τρίτων.
ΠΡΟΣΟΧΗ: Καταστάσεις που μπορεί να προκαλέσουν ελαφρύ τραυματισμό
ή ζημιά στη συσκευή.
ΣΗΜΕΙΩΣΗ: Ανακοινώσεις ή πρόσθετες πληροφορίες.

3
Πίνακας περιεχομένων
01
Ειδικές λειτουργίες
16 Χαρακτηριστικά περιστροφής
26 Χαρακτηριστικά κάμερας
33 Λειτουργίες εγγραφής ήχου
35 Google Assistant
02
Βασικές λειτουργίες
38 Εξαρτήματα και αξεσουάρ του
προϊόντος
39 Επισκόπηση στοιχείων
42 Ενεργοποίηση ή απενεργοποίηση
43 Τοποθέτηση της κάρτας SIM
46 Τοποθέτηση της κάρτας μνήμης
47 Αφαίρεση της κάρτας μνήμης
47 Μπαταρία
51 Οθόνη αφής
54 Αρχική οθόνη
65 Κλείδωμα οθόνης
68 Αναγνώριση δακτυλικών
αποτυπωμάτων
73 Λειτουργία πολυδιεργασίας
78 Κρυπτογράφηση κάρτας μνήμης
79 Λήψη στιγμιότυπων
79 Εγγραφή οθόνης
80 Εισαγωγή κειμένου
84 Κοινή χρήση περιεχομένου
85 Μην ενοχλείτε
86 AOD (Always-on Display)
6 Οδηγίες για ασφαλή και αποτελεσματική χρήση

4
Πίνακας περιεχομένων
03
Χρήσιμες εφαρμογές
88 Εγκατάσταση και απεγκατάσταση
εφαρμογών
90 Συντομεύσεις εφαρμογών
91 Τηλέφωνο
95 Μηνύματα
96 Κάμερα
114 Άλμπουμ
116 Επαφές
118 QuickMemo+
121 Ρολόι
122 Μουσική
124 Αριθμομηχανή
124 ThinQ
125 LG Health
126 Εγγραφή ήχου HD
127 Πρόγραμμα Εκκίν. Παιχνιδ.
127 Smart Doctor
128 LG Mobile Switch
128 Σκουπίδια εφαρμογ.
129 SmartWorld
129 RemoteCall Service
130 Εκπομπή κυψέλης
130 Εφαρμογές Google
04
Ρυθμίσεις
134 Ρυθμίσεις
134 Δίκτυο & Internet
141 Συνδεδεμένες συσκευές
145 Ήχος
146 Ειδοποιήσεις
146 Προβολή
148 Φόντο & Θέμα
148 Κλείδωμα οθόνης & ασφάλεια
149 Απόρρητο
150 Τοποθεσία
151 Επεκτάσεις
156 Εφαρμογές
156 Μπαταρία
157 Αποθηκευτικός χώρος
157 Λογαριασμοί
157 Digital Wellbeing και γονικοί
έλεγχοι
158 Google
158 Σύστημα
161 Προσβασιμότητα

5
Πίνακας περιεχομένων
05
Παράρτημα
165 Ρυθμίσεις γλώσσας
165 LG Bridge
166 Ενημέρωση λογισμικού
τηλεφώνου
168 Οδηγός κατά της κλοπής
169 Πληροφορίες σημείωσης για το
λογισμικό ανοικτού κώδικα
169 Πληροφορίες σχετικά με
τους κανονισμούς
(Αριθμός
αναγνωριστικού κανονισμού,
ηλεκτρονικές ετικέτες κ.λπ.)
170 Εμπορικά σήματα
171 Δήλωση ασφάλειας λέιζερ
171 ΔΗΛΩΣΗ ΣΥΜΜΟΡΦΩΣΗΣ
172 Διεύθυνση ενημέρωσης για
θέματα συμμόρφωσης ως προς τη
χρήση του προϊόντος
172 Wi-Fi (WLAN)
173 Περισσότερες πληροφορίες
177 Συχνές ερωτήσεις

6
Οδηγίες για ασφαλή και αποτελεσματική
χρήση
Διαβάστε τις παρακάτω απλές οδηγίες. Η μη τήρηση αυτών των οδηγιών μπορεί να
αποβεί επικίνδυνη ή παράνομη.
Σε περίπτωση σφάλματος, η συσκευή σας διαθέτει ένα εργαλείο λογισμικού που θα
δημιουργήσει ένα αρχείο καταγραφής σφάλματος. Το εργαλείο συλλέγει δεδομένα
ειδικά για το συγκεκριμένο σφάλμα όπως τα εξής: ισχύς σήματος, cell ID position
σε περίπτωση απρόσμενης απόρριψης κλήσης και εφαρμογές που υπάρχουν στη
συσκευή. Το αρχείο καταγραφής χρησιμοποιείται αποκλειστικά για τον προσδιορισμό
της αιτίας του σφάλματος. Αυτά τα αρχεία καταγραφής είναι κρυπτογραφημένα και η
πρόσβαση σε αυτά είναι εφικτή μόνο από εξουσιοδοτημένα κέντρα επισκευής της LG,
σε περίπτωση που χρειαστεί να επιστρέψετε τη συσκευή σας για επισκευή.
Έκθεση σε ενέργεια ραδιοσυχνοτήτων
Πληροφορίες σχετικά με την έκθεση σε ραδιοκύματα και το συντελεστή ειδικής
απορρόφησης (ΣΕΑ).
Αυτή η συσκευή έχει σχεδιαστεί ώστε να συμμορφώνεται με τις ισχύουσες απαιτήσεις
ασφαλείας για την έκθεση σε ραδιοκύματα. Οι απαιτήσεις αυτές βασίζονται σε
επιστημονικές οδηγίες που περιλαμβάνουν περιθώρια ασφαλείας για την προστασία
όλων των ατόμων, ανεξάρτητα από την ηλικία ή την κατάσταση της υγείας τους.
• Στις οδηγίες σχετικά με την έκθεση σε ραδιοκύματα χρησιμοποιείται μια μονάδα
μέτρησης η οποία είναι γνωστή ως συντελεστής ειδικής απορρόφησης ή ΣΕΑ. Οι
έλεγχοι για το ΣΕΑ διεξάγονται με τυποποιημένες μεθόδους, με τη συσκευή να
εκπέμπει στο μέγιστο πιστοποιημένο επίπεδο ισχύος σε όλες τις ζώνες συχνοτήτων
που χρησιμοποιεί.
• Αν και μπορεί να υπάρχουν διαφορές μεταξύ των επιπέδων του ΣΕΑ για
διάφορα μοντέλα συσκευών της LG, όλα τα μοντέλα έχουν σχεδιαστεί ώστε να
ανταποκρίνονται στις σχετικές οδηγίες για την έκθεση σε ραδιοκύματα.
• Το όριο του ΣΕΑ που συνιστάται από τη Διεθνή Επιτροπή Προστασίας από τη Μη
Ιονίζουσα Ακτινοβολία (ICNIRP), είναι 2W/kg με βάση τον υπολογισμό της μέσης
τιμής για 10 γραμμάρια σωματικού ιστού.
• Η υψηλότερη τιμή του ΣΕΑ για αυτό το μοντέλο, όπως έχει ελεγχθεί για χρήση στο
αυτί, είναι 0,357 W/kg (10g) και για χρήση στο σώμα είναι 1,304 W/kg (10g).

7
Οδηγίες για ασφαλή και αποτελεσματική χρήση
• Αυτή η συσκευή πληροί τις προϋποθέσεις για την έκθεση σε ραδιοσυχνότητες
είτε όταν χρησιμοποιείται στην κανονική θέση χρήσης δίπλα στο αυτί είτε όταν
βρίσκεται σε απόσταση τουλάχιστον 5mm από το σώμα. Όταν χρησιμοποιείται
θήκη μεταφοράς, κλιπ ζώνης ή θήκη για χρήση στο σώμα, δεν πρέπει να
περιλαμβάνει μεταλλικά στοιχεία και πρέπει να συγκρατεί το προϊόν σε απόσταση
τουλάχιστον 5mm από το σώμα σας. Για τη μετάδοση αρχείων δεδομένων ή
μηνυμάτων, η συσκευή απαιτεί την ύπαρξη ποιοτικής σύνδεσης στο δίκτυο. Σε
ορισμένες περιπτώσεις, η μετάδοση αρχείων δεδομένων ή μηνυμάτων μπορεί
να καθυστερήσει έως ότου είναι διαθέσιμη μια τέτοια σύνδεση. Βεβαιωθείτε ότι
τηρούνται οι παραπάνω οδηγίες σχετικά με την απόσταση από το σώμα μέχρι να
ολοκληρωθεί η μετάδοση.
Πληροφορίες σχετικά με την έκθεση σε ραδιοσυχνότητες
από την Ομοσπονδιακή Επιτροπή Επικοινωνιών των ΗΠΑ
Τον Αύγουστο του 1996, η Ομοσπονδιακή Επιτροπή Επικοινωνιών (FCC) των Ηνωμένων
Πολιτειών, με τη δράση της Report and Order FCC 96-326, υιοθέτησε ένα ενημερωμένο
πρότυπο ασφάλειας για την έκθεση του ανθρώπου στην ηλεκτρομαγνητική ενέργεια
ραδιοσυχνοτήτων (RF) που εκπέμπεται από πομπούς οι οποίοι τελούν υπό τον
ρυθμιστικό έλεγχο της FCC. Οι οδηγίες αυτές είναι συνεπείς με τους κανονισμούς
ασφαλείας που είχαν τεθεί στο παρελθόν από τα διεθνή και αμερικανικά πρότυπα. Η
σχεδίαση αυτής της συσκευής συμμορφώνεται με τις οδηγίες της FCC και με αυτά τα
διεθνή πρότυπα.
Δήλωση Part 15.19
Αυτή η συσκευή συμμορφώνεται με το άρθρο 15 των κανονισμών της FCC. Η χρήση
υπόκειται στις ακόλουθες δύο προϋποθέσεις:
(1) Αυτή η συσκευή δεν μπορεί να προκαλέσει επιβλαβείς παρεμβολές και
(2) αυτή η συσκευή πρέπει να αποδέχεται οποιαδήποτε παρεμβολή,
συμπεριλαμβανομένων παρεμβολών που μπορεί να προκαλέσουν ανεπιθύμητη
λειτουργία.
Δήλωση Part 15.21
Τυχόν αλλαγές ή τροποποιήσεις που δεν εγκρίνονται ρητά από τον κατασκευαστή
μπορούν να ακυρώσουν το δικαίωμα χρήσης του εξοπλισμού.

8
Οδηγίες για ασφαλή και αποτελεσματική χρήση
Χρήση στο σώμα
Αυτή η συσκευή έχει ελεγχθεί για τυπική χρήση στο σώμα, με το πίσω μέρος της
σε απόσταση 0,39 ιντσών (1 cm) από το σώμα του χρήστη. Για συμμόρφωση με τις
απαιτήσεις της FCC για την έκθεση σε ραδιοσυχνότητες, πρέπει να διατηρείται ελάχιστη
απόσταση 0,39 ιντσών (1 cm) ανάμεσα στο σώμα του χρήστη και το πίσω μέρος της
συσκευής.
Ενδέχεται να μην μπορούν να χρησιμοποιηθούν κλιπ στήριξης σε ζώνη, θήκες και
παρεμφερή αξεσουάρ που διαθέτουν μεταλλικά εξαρτήματα. Τα αξεσουάρ για χρήση
στο σώμα που δεν μπορούν να διατηρήσουν απόσταση 0,39 ιντσών (1 cm) μεταξύ
του σώματος του χρήστη και του πίσω μέρους της συσκευής και τα οποία δεν έχουν
δοκιμαστεί για τυπικές χρήσεις στο σώμα, ενδέχεται να μην πληρούν τα όρια της FCC για
την έκθεση σε ραδιοσυχνότητες και πρέπει να αποφεύγονται.
Δήλωση Part 15.105
Αυτός ο εξοπλισμός έχει ελεγχθεί και συμμορφώνεται με τα όρια για τις ψηφιακές
συσκευές κατηγορίας B, σύμφωνα με το Part 15 των κανονισμών FCC. Αυτά τα όρια
είναι σχεδιασμένα για να παρέχουν επαρκή προστασία έναντι επιβλαβών παρεμβολών
σε οικιακή εγκατάσταση. Ο εξοπλισμός αυτός παράγει, χρησιμοποιεί και μπορεί να
εκπέμψει ενέργεια ραδιοσυχνοτήτων και, αν δεν εγκατασταθεί και χρησιμοποιηθεί
σύμφωνα με τις οδηγίες, μπορεί να προκαλέσει επιβλαβείς παρεμβολές στις
ραδιοεπικοινωνίες. Ωστόσο, δεν υπάρχει εγγύηση ότι δεν θα υπάρξουν παρεμβολές
σε μια συγκεκριμένη εγκατάσταση. Αν αυτός ο εξοπλισμός προκαλέσει επιβλαβείς
παρεμβολές στην τηλεοπτική λήψη, γεγονός που μπορεί να διαπιστωθεί με την
απενεργοποίηση και ενεργοποίηση του εξοπλισμού, ο χρήστης ενθαρρύνεται να
δοκιμάσει να διορθώσει τις παρεμβολές με ένα ή περισσότερα από τα εξής μέτρα:
• Αλλάξτε τον προσανατολισμό ή τη θέση της κεραίας λήψης.
• Αυξήστε την απόσταση μεταξύ εξοπλισμού και δέκτη.
• Συνδέστε τον εξοπλισμό σε πρίζα που ανήκει σε άλλο κύκλωμα από αυτό με το
οποίο είναι συνδεδεμένος ο δέκτης.
• Συμβουλευτείτε το μεταπωλητή ή έναν έμπειρο τεχνικό ραδιοφώνων/τηλεόρασης
για βοήθεια.
Φροντίδα και συντήρηση του προϊόντος
• Να χρησιμοποιείτε μόνο τα εξαρτήματα που περιλαμβάνονται στη συσκευασία και είναι
εξουσιοδοτημένα από την LG. Η LG δεν παρέχει εγγυήσεις για τυχόν βλάβες ή αποτυχίες
λειτουργίας που οφείλονται σε εξαρτήματα άλλων κατασκευαστών.
• Ορισμένα περιεχόμενα και εικόνες ενδέχεται να διαφέρουν από τη συσκευή σας χωρίς
προειδοποίηση.

9
Οδηγίες για ασφαλή και αποτελεσματική χρήση
• Μην αποσυναρμολογείτε τη μονάδα. Όταν απαιτούνται εργασίες επισκευής, παραδώστε
την σε εξειδικευμένο τεχνικό.
• Κατά τη διακριτική ευχέρεια της LG, οι επισκευές που καλύπτονται από την εγγύηση
ενδέχεται να περιλαμβάνουν την τοποθέτηση ανταλλακτικών μερών ή πινάκων (είτε
καινούριων είτε επισκευασμένων), με την προϋπόθεση ότι η λειτουργικότητά τους είναι
ισοδύναμη με τη λειτουργικότητα των μερών που αντικαταστάθηκαν.
• Κρατάτε τη συσκευή μακριά από ηλεκτρικές συσκευές όπως τηλεοράσεις, ραδιόφωνα και
υπολογιστές.
• Η συσκευή πρέπει να φυλάσσεται μακριά από πηγές θερμότητας, όπως καλοριφέρ ή
ηλεκτρικές κουζίνες.
• Προσέξτε να μην πέσει.
• Η συσκευή δεν πρέπει να υπόκειται σε μηχανικές δονήσεις ή κραδασμούς.
• Απενεργοποιείτε τη συσκευή στις περιοχές όπου απαγορεύεται η χρήση της σύμφωνα με
ειδικούς κανονισμούς. Για παράδειγμα, μην χρησιμοποιείτε τη συσκευή σε νοσοκομεία,
καθώς η χρήση της μπορεί να επηρεάσει ευαίσθητο ιατρικό εξοπλισμό.
• Μην πιάνετε τη συσκευή με βρεγμένα χέρια, όταν φορτίζει. Μπορεί να πάθετε
ηλεκτροπληξία και να προκληθεί σοβαρή βλάβη στη συσκευή.
• Μην φορτίζετε το τηλέφωνο κοντά σε εύφλεκτα υλικά, καθώς ενδέχεται να θερμανθεί και
να δημιουργηθεί κίνδυνος πυρκαγιάς.
• Χρησιμοποιήστε ένα στεγνό πανί για να καθαρίσετε το περίβλημα της συσκευής (μην
χρησιμοποιείτε διαλύτες όπως βενζίνη, διαλυτικό ή οινόπνευμα).
• Μη φορτίζετε τη συσκευή όταν βρίσκεται πάνω σε μαλακά υφάσματα.
• Η συσκευή πρέπει να φορτίζεται σε καλά αεριζόμενο χώρο.
• Μην αφήνετε τη συσκευή σε χώρους με υπερβολικό καπνό ή σκόνη.
• Μην τοποθετείτε τη συσκευή δίπλα σε πιστωτικές κάρτες ή εισιτήρια μέσων μεταφοράς.
Μπορεί να επηρεάσει τις πληροφορίες που περιέχονται στις μαγνητικές ταινίες.
• Μην χτυπάτε την οθόνη με αιχμηρά αντικείμενα, καθώς ενδέχεται να προκαλέσετε βλάβη
στη συσκευή.
• Μην εκθέτετε τη συσκευή σε υγρά ή υγρασία.
• Χρησιμοποιείτε με προσοχή τα αξεσουάρ, όπως π.χ. τα ακουστικά. Μην αγγίζετε άσκοπα
την κεραία.
• Μην χρησιμοποιείτε, μην αγγίζετε και μην προσπαθείτε να αφαιρέσετε ή να
επιδιορθώσετε σπασμένο, κομμένο ή ραγισμένο γυαλί. Η εγγύηση δεν καλύπτει βλάβες
που οφείλονται σε κακή χρήση της γυάλινης οθόνης.
• Η συσκευή είναι ηλεκτρονική και παράγει θερμότητα κατά τη διάρκεια της κανονικής
λειτουργίας. Η παρατεταμένη, άμεση επαφή με το δέρμα σας υπό συνθήκες ανεπαρκούς
εξαερισμού ενδέχεται να επιφέρει δυσφορία ή μικρά εγκαύματα. Συνεπώς, χειριστείτε με
προσοχή τη συσκευή σας κατά τη λειτουργία ή αμέσως μετά.

10
Οδηγίες για ασφαλή και αποτελεσματική χρήση
• Αν βραχεί η συσκευή, αποσυνδέστε την αμέσως και στεγνώστε την καλά. Μην
επιχειρήσετε να επισπεύσετε το στέγνωμα με μια εξωτερική πηγή θερμότητας, όπως είναι
οι φούρνοι, οι φούρνοι μικροκυμάτων ή οι στεγνωτήρες μαλλιών.
• Το υγρό στη βρεγμένη συσκευή αλλάζει το χρώμα της ετικέτας του προϊόντος στο
εσωτερικό της συσκευής. Η εγγύηση δεν καλύπτει βλάβες της συσκευής που οφείλονται
στην έκθεσή της σε υγρά.
• Μια φορητή συσκευή απαιτεί σωστή κυκλοφορία αέρα για τη διάχυση της θερμότητας.
Η άμεση επαφή με το δέρμα και η ανεπαρκής κυκλοφορία του αέρα στη συσκευή μπορεί
να οδηγήσει σε υπερθέρμανσή της. Η συσκευή θα πρέπει να βρίσκεται σε απόσταση
τουλάχιστον 1,0 cm από το σώμα του χρήστη.
• Εμποδίστε την είσοδο σκόνης ή άλλων ξένων ουσιών στη θύρα του φορτιστή/του
καλωδίου USB. Ενδέχεται να προκληθεί υπερθέρμανση ή πυρκαγιά.
• Αποφύγετε την έκθεση της συσκευής σε χαμηλή ατμοσφαιρική πίεση σε υψηλό
μεγάλο υψόμετρο.
• Μην εκθέτετε τη συσκευή σε πολύ χαμηλή ατμοσφαιρική πίεση. Διαφορετικά,
μπορεί να προκληθεί έκρηξη της μπαταρίας ή διαρροή εύφλεκτου υγρού ή αερίου.
• Φροντίστε να μην έρθει το προϊόν σε επαφή με υγρά. Μην χρησιμοποιείτε ή
επαναφορτίζετε το προϊόν αν έχει υποστεί ζημιά. Αν το προϊόν βραχεί, η λυχνία
βλάβης από υγρά θα αλλάξει χρώμα. Λάβετε υπόψη σας ότι σε αυτήν την περίπτωση
δεν θα δικαιούστε τις δωρεάν υπηρεσίες επισκευής που καλύπτονται από την
εγγύηση.
Αποτελεσματική χρήση της συσκευής
Ηλεκτρονικές συσκευές
Όλες οι συσκευές μπορεί να δέχονται παρεμβολές που επηρεάζουν την απόδοσή τους.
• Μην χρησιμοποιείτε τη συσκευή κοντά σε ιατρικό εξοπλισμό χωρίς να έχετε λάβει
σχετική άδεια. Συμβουλευτείτε το γιατρό σας για να διαπιστώσετε αν η λειτουργία
της συσκευής μπορεί να προκαλέσει παρεμβολές στη λειτουργία της ιατρικής σας
συσκευής.
• Οι κατασκευαστές βηματοδοτών συνιστούν ελάχιστη απόσταση 15cm μεταξύ
άλλων συσκευών και του βηματοδότη, για την αποφυγή πιθανών παρεμβολών.
• Αυτή η συσκευή μπορεί να παράγει έντονο φως ή φως που αναβοσβήνει.
• Ορισμένα βοηθήματα ακοής ενδέχεται να υφίστανται παρεμβολές από συσκευές.
• Μικρές παρεμβολές ενδέχεται να επηρεάσουν συσκευές, όπως τηλεοράσεις,
ραδιόφωνα, υπολογιστές κ.λπ.
• Αν είναι δυνατό, χρησιμοποιήστε τη συσκευή σε θερμοκρασίες μεταξύ 0ºC και
35ºC. Η έκθεση της συσκευής σε πολύ χαμηλές ή υψηλές θερμοκρασίες ενδέχεται
να προκαλέσει ζημιά, δυσλειτουργία ή ακόμα και έκρηξη.

11
Οδηγίες για ασφαλή και αποτελεσματική χρήση
Οδική ασφάλεια
Ελέγξτε τους νόμους και τους κανονισμούς για τη χρήση συσκευών όταν οδηγείτε.
• Μην χρησιμοποιείτε ποτέ συσκευή χειρός όταν οδηγείτε.
• Εστιάστε όλη σας την προσοχή στην οδήγηση.
• Σταματήστε στην άκρη του δρόμου και σταθμεύστε το όχημά σας πριν
πραγματοποιήσετε ή απαντήσετε σε μια κλήση, εάν το απαιτούν οι συνθήκες
οδήγησης.
• Η ενέργεια ραδιοσυχνοτήτων ενδέχεται να επηρεάσει ορισμένα ηλεκτρονικά
συστήματα στο όχημά σας, όπως το ραδιόφωνο του αυτοκινήτου και τον εξοπλισμό
ασφαλείας.
• Εάν το όχημά σας είναι εξοπλισμένο με έναν ή περισσότερους αερόσακους,
μην εγκαθιστάτε και μην τοποθετείτε ασύρματο εξοπλισμό σε σημεία όπου θα
εμποδίζεται η λειτουργία του αερόσακου. Ενδέχεται να προκληθεί δυσλειτουργία
του αερόσακου ή σοβαρός τραυματισμός λόγω ακατάλληλης απόδοσης.
• Όταν ακούτε μουσική ενώ βρίσκεστε έξω, βεβαιωθείτε ότι έχετε ρυθμίσει την
ένταση σε ένα λογικό επίπεδο, για να έχετε επίγνωση του τι συμβαίνει γύρω σας.
Αυτό είναι ιδιαίτερα σημαντικό όταν κινείστε κοντά σε δρόμους.
Πρόκληση βλάβης στην ακοή σας
Για να προφυλαχτείτε από πιθανή βλάβη της ακοής σας, αποφύγετε την
ακρόαση σε υψηλά επίπεδα ήχου για μεγάλα χρονικά διαστήματα.
Ενδέχεται να προκληθεί βλάβη στην ακοή σας εάν εκτίθεστε σε δυνατό ήχο για
παρατεταμένο χρονικό διάστημα. Επομένως, σας συνιστούμε να μην ενεργοποιείτε
ή απενεργοποιείτε το τηλέφωνο κοντά στα αυτιά σας. Επίσης, σας συνιστούμε να
ρυθμίζετε την ένταση της μουσικής και του ήχου κλήσης σε ένα λογικό επίπεδο.
• Όταν χρησιμοποιείτε ακουστικά, να μειώνετε την ένταση του ήχου αν δεν ακούτε
όσους μιλούν γύρω σας ή αν το άτομο που κάθεται δίπλα σας μπορεί να ακούσει
αυτό που ακούτε.
• Η υπερβολική ηχητική πίεση από τα ακουστικά μπορεί να προκαλέσει
απώλεια της ακοής.

12
Οδηγίες για ασφαλή και αποτελεσματική χρήση
Γυάλινα εξαρτήματα
Ορισμένα μέρη της συσκευής σας είναι κατασκευασμένα από γυαλί. Το γυαλί μπορεί
να σπάσει αν η συσκευή σας πέσει πάνω σε σκληρή επιφάνεια ή δεχτεί ισχυρούς
κραδασμούς. Εάν σπάσει κάποιο γυάλινο εξάρτημα, μην το αγγίξετε και μην
επιχειρήσετε να το αφαιρέσετε. Σταματήστε να χρησιμοποιείτε τη συσκευή σας μέχρι να
αντικατασταθεί το γυαλί από εξουσιοδοτημένο πάροχο υπηρεσιών.
Πεδία ανατινάξεων
Μην χρησιμοποιείτε τη συσκευή σε περιοχές όπου γίνονται ανατινάξεις. Να ακολουθείτε
τους περιορισμούς και όποιους κανονισμούς ή κανόνες ισχύουν.
Περιβάλλοντα όπου υπάρχει κίνδυνος εκρήξεων
• Μην χρησιμοποιείτε τη συσκευή σε σημεία ανεφοδιασμού καυσίμων.
• Μην χρησιμοποιείτε το τηλέφωνο κοντά σε καύσιμα ή χημικά.
• Μην μεταφέρετε και μην αποθηκεύετε εύφλεκτα αέρια, υγρά ή εκρηκτικά στον ίδιο
χώρο του αυτοκινήτου σας όπου τοποθετείτε τη συσκευή ή τα αξεσουάρ της.
Χρήση σε αεροσκάφος
Οι ασύρματες συσκευές μπορούν να προκαλέσουν παρεμβολές στα συστήματα
αεροσκαφών.
• Πριν επιβιβαστείτε σε αεροσκάφος, απενεργοποιήστε τη συσκευή.
• Όσο το αεροσκάφος βρίσκεται στο έδαφος, μην χρησιμοποιείτε το τηλέφωνο χωρίς
άδεια από το πλήρωμα.
Παιδιά
Φυλάξτε τη συσκευή σε ασφαλές μέρος, μακριά από παιδιά. Περιλαμβάνει εξαρτήματα
μικρού μεγέθους που ενδέχεται να προκαλέσουν κίνδυνο πνιγμού εάν αποσπαστούν
από το τηλέφωνο.
Επείγουσες κλήσεις
Οι επείγουσες κλήσεις ενδέχεται να μην είναι διαθέσιμες σε όλα τα δίκτυα κινητής
τηλεφωνίας. Για το λόγο αυτό, δεν πρέπει να βασίζεστε αποκλειστικά σε αυτή τη
συσκευή για επείγουσες κλήσεις. Επικοινωνήστε με τον τοπικό πάροχο υπηρεσιών για
να ενημερωθείτε σχετικά με αυτό το θέμα.

13
Οδηγίες για ασφαλή και αποτελεσματική χρήση
Πληροφορίες και φροντίδα μπαταριών
• Δεν είναι απαραίτητο να αποφορτιστεί πλήρως η μπαταρία για να την
επαναφορτίσετε. Σε αντίθεση με άλλα συστήματα μπαταριών, δεν εμφανίζεται το
φαινόμενο μνήμης που μπορεί να επηρεάσει την απόδοση της μπαταρίας.
• Χρησιμοποιείτε μόνο μπαταρίες και φορτιστές LG. Οι φορτιστές LG έχουν σχεδιαστεί
με τρόπο τέτοιο, ώστε να μεγιστοποιούν τη διάρκεια ζωής της μπαταρίας.
• Μην αποσυναρμολογείτε και μην βραχυκυκλώνετε την μπαταρία.
• Διατηρείτε καθαρές τις μεταλλικές επαφές της μπαταρίας.
• Αντικαθιστάτε την μπαταρία όταν μειωθεί σημαντικά η απόδοσή της. Η μπαταρία
μπορεί να φορτιστεί εκατοντάδες φορές μέχρι να χρειαστεί αντικατάσταση.
• Εάν η μπαταρία δεν έχει χρησιμοποιηθεί για πολύ καιρό, φορτίστε τη για να
μεγιστοποιήσετε τη διάρκεια χρήσης της.
• Μην αφήνετε εκτεθειμένο το φορτιστή της μπαταρίας απευθείας στην ηλιακή
ακτινοβολία και μην τον χρησιμοποιείτε σε χώρους με πολλή υγρασία, όπως το
μπάνιο.
• Μην αφήνετε την μπαταρία σε θερμούς ή κρύους χώρους, καθώς ενδέχεται να
μειωθεί η απόδοσή της.
• Εάν αντικαταστήσετε τη μπαταρία με λανθασμένο τύπο μπαταρίας, υπάρχει
κίνδυνος έκρηξης. Η απόρριψη των χρησιμοποιημένων μπαταριών πρέπει να γίνεται
σύμφωνα με τις οδηγίες.
• Για να αποφύγετε την άσκοπη κατανάλωση ενέργειας από το φορτιστή, να τον
αποσυνδέετε πάντοτε από την πρίζα μετά την πλήρη φόρτιση της συσκευής.
• Η πραγματική διάρκεια ζωής της μπαταρίας εξαρτάται από τη διαμόρφωση του
δικτύου, τις ρυθμίσεις των προϊόντων, τις συνήθειες χρήσης, την μπαταρία και τις
περιβαλλοντικές συνθήκες.
• Βεβαιωθείτε πως η μπαταρία δεν έρχεται σε επαφή με αιχμηρά αντικείμενα, όπως
δόντια ζώων ή καρφιά. Υπάρχει κίνδυνος ανάφλεξης.
• Κατανάλωση ενέργειας (λειτουργία αναμονής δικτύου): 0,4 W
Ασφάλεια προσωπικών στοιχείων
• Να προστατεύετε πάντα τα προσωπικά σας στοιχεία, ώστε να εμποδίσετε τυχόν
διαρροές δεδομένων ή κατάχρηση ευαίσθητων πληροφοριών.
• Να δημιουργείτε πάντα αντίγραφα ασφαλείας των σημαντικών σας δεδομένων όταν
χρησιμοποιείτε τη συσκευή. Η LG δεν είναι υπεύθυνη για τυχόν απώλειες δεδομένων.
• Πριν πετάξετε τη συσκευή, να δημιουργήσετε αντίγραφα ασφαλείας όλων των
δεδομένων και να κάνετε επαναφορά της συσκευής ώστε να εμποδίσετε τυχόν
κατάχρηση ευαίσθητων πληροφοριών.

14
Οδηγίες για ασφαλή και αποτελεσματική χρήση
• Όταν κατεβάζετε εφαρμογές, να διαβάζετε προσεκτικά την οθόνη των δικαιωμάτων.
• Να είστε προσεκτικοί όταν χρησιμοποιείτε εφαρμογές που έχουν πρόσβαση σε
πολλές λειτουργίες ή στα προσωπικά σας στοιχεία.
• Να ελέγχετε τακτικά τους προσωπικούς σας λογαριασμούς. Αν εντοπίσετε τυχόν
ενδείξεις κατάχρησης των προσωπικών σας στοιχείων, ζητήστε από τον πάροχο της
υπηρεσίας να διαγράψει ή να αλλάξει τα στοιχεία του λογαριασμού σας.
• Αν η συσκευή σας χαθεί ή κλαπεί, αλλάξτε τον κωδικό πρόσβασης του λογαριασμού
σας ώστε να διασφαλίσετε τα προσωπικά σας στοιχεία.
• Μην χρησιμοποιείτε εφαρμογές που προέρχονται από άγνωστες πηγές.
Ειδοποίηση για την αντικατάσταση της μπαταρίας
• Η μπαταρία ιόντων λιθίου είναι επικίνδυνη καθώς μπορεί να προκαλέσει
τραυματισμό.
• Η αντικατάσταση της μπαταρίας από μη καταρτισμένο επαγγελματία μπορεί
να προκαλέσει ζημιά στη συσκευή σας.
• Μην αντικαθιστάτε τη μπαταρία μόνοι σας. Μπορεί να προκληθεί βλάβη στη
μπαταρία που θα οδηγήσει σε υπερθέρμανση και τραυματισμό. Η μπαταρία
πρέπει να αντικατασταθεί από καταρτισμένο επαγγελματία. Η μπαταρία
πρέπει να ανακυκλώνεται ή να απορρίπτεται ξεχωριστά από τα οικιακά
απορρίμματα.
• Στην περίπτωση που το προϊόν διαθέτει ενσωματωμένη μπαταρία που δε
μπορεί να αφαιρεθεί από το χρήστη, η LG σας προτείνει να απευθυνθείτε
σε επαγγελματία για την αφαίρεση της μπαταρίας, εάν πρόκειται να την
αντικαταστήσετε ή να τη στείλετε για ανακύκλωση στο τέλος της ζωής της.
Για την πρόληψη βλάβης στο προϊόν, και για την ασφάλεια του χρήστη,
μην επιχειρήσετε να αφαιρέσετε τη μπαταρία. Απευθυνθείτε στη Γραμμή
Βοήθειας της LG, ή σε άλλο επαγγελματία.
• Η αφαίρεση της μπαταρίας προϋποθέτει αποσυναρμολόγηση
του περιβλήματος του προϊόντος, αποσύνδεση των ηλεκτρικών
καλωδίων/ επαφών, και προσεκτική απομάκρυνση της μπαταρίας
με εξειδικευμένα εργαλεία. Εάν χρειάζεστε τις επαγγελματικές
οδηγίες για την αφαίρεση της μπαταρίας, επισκεφθείτε τη διεύθυνση
http://www.lge.com/global/sustainability/environment/take-back-recycling
.

Ειδικές
λειτουργίες
01

Ειδικές λειτουργίες 16
Χαρακτηριστικά περιστροφής
Λειτουργία Στροφή
Μπορείτε να περιστρέψετε το προϊόν για να χρησιμοποιήσετε δύο οθόνες.
Περιστρέψτε το προϊόν όπως βλέπετε στην εικόνα.
Περιστρέψτε προς τα πάνω
Χρησιμοποιήστε τον δεξιό αντίχειρά σας για να σπρώξετε ελαφρώς προς τα επάνω
το κάτω μέρος της κύριας οθόνης.
Κύρια οθόνη
Οθόνη δευτερεύον
• Μην ασκείτε υπερβολική δύναμη, καθώς η κύρια οθόνη ανοίγει
ημιαυτόματα.
• Προσέξτε να μην κλείσετε τον αντίχειρά σας όταν σπρώχνετε προς τα κάτω
την κύρια οθόνη.

Ειδικές λειτουργίες 17
Στροφή Home
Η αρχική οθόνη της λειτουργίας περιστροφής είναι η πρώτη αρχική οθόνη που
εμφανίζεται αφού περιστρέψετε το προϊόν. Σε αυτήν τη λειτουργία, μπορείτε
να χρησιμοποιήσετε την κύρια οθόνη και τη δεύτερη οθόνη ξεχωριστά ή μαζί,
αξιοποιώντας τις οθόνες με διάφορους τρόπους.
Κύρια οθόνη
λειτουργίας
περιστροφής
Οθόνη δευτερεύον
λειτουργίας
περιστροφής
Κύρια οθόνη
Η αρχική οθόνη της κύριας οθόνης εμφανίζεται όπως βλέπετε στην εικόνα.
Εικονίδια εφαρμογών
Επιλέξτε και ξεκινήστε μια εφαρμογή σύροντας το εικονίδιό της αριστερά και
δεξιά. Κάποιες εφαρμογές στην κύρια οθόνη μπορούν να χρησιμοποιηθούν στην
κύρια και στη δεύτερη οθόνη.

Ειδικές λειτουργίες 18
Διαμόρφωση αρχικής οθόνης
Πατήστε παρατεταμένα σε κενό χώρο στην κύρια οθόνη και διαμορφώστε την
αρχική οθόνη όπως επιθυμείτε.
Διαγραφή
εικονιδίων
εφαρμογών
Διαμόρφωση
φόντου και
θεμάτων
Κάδος
απορριμμάτων
εφαρμογής
Διαμόρφωση
ρυθμίσεων
λειτουργίας
περιστροφής
Χρήση εικονιδίων εφαρμογών
Πατήστε παρατεταμένα ένα εικονίδιο εφαρμογής. Μπορείτε να διαγράψετε
την εφαρμογή από την αρχική οθόνη ή να χρησιμοποιήσετε άμεσα διάφορες
δυνατότητες της εφαρμογής.

Ειδικές λειτουργίες 19
Οθόνη δευτερεύον
Η αρχική οθόνη της Οθόνη δευτερεύον εμφανίζεται όπως βλέπετε στην εικόνα.
Χρησιμοποιείτε τη δεύτερη οθόνη με διάφορους τρόπους.
Εικονίδια γρήγορης
πρόσβασης Γραμμή πλοήγησης
Γρήγορη ρύθμιση Οθόνη δευτερεύον
Μπορείτε να σύρετε το επάνω μέρος της Οθόνη δευτερεύον προς τα κάτω για να
ανοίξετε το παράθυρο γρήγορων ρυθμίσεων.
• Μπορείτε να πατήσετε το για να προσθέσετε ή να διαγράψετε ένα εικονίδιο
στο παράθυρο γρήγορων ρυθμίσεων ή να αλλάξετε τη θέση του.
• Πατήστε παρατεταμένα ένα εικονίδιο στο παράθυρο γρήγορων ρυθμίσεων και
θα εμφανιστεί η οθόνη διαμόρφωσης.

Ειδικές λειτουργίες 20
Πληκτρολόγιο LG
Χρήση Πληκτρολόγιο
LG
• Πατήστε για να ανοίξετε την Πληκτρολόγιο LG.
Χρήση με ποντίκι
Χρήση
επιφάνειας
αφής LG
• Αφού ενεργοποιήσετε την επιφάνεια αφής Πληκτρολόγιο LG οθόνη, στην κύρια
οθόνη εμφανίζεται ένα πλήκτρο ποντικιού όπως σε ένα PC, το οποίο μπορείτε
να μετακινείτε και να επιλέγετε εικονίδια.

Ειδικές λειτουργίες 21
Χρήση κλειδώματος λαβής
• Μπορείτε να πατήσετε το για να ενεργοποιήσετε το Κλείδωμα λαβής.
Απενεργοποίηση
κλειδώματος λαβής
• Η δεύτερη οθόνη κλειδώνει αν έχετε ενεργοποιήσει το Κλείδωμα λαβής.
• Μπορείτε να την ξεκλειδώσετε απενεργοποιώντας το Κλείδωμα λαβής.

Ειδικές λειτουργίες 22
Πολυεργασία στη Λειτουργία Στροφή
Η χρήση πολυεργασίας με την περιστροφή του προϊόντος σάς επιτρέπει να
χρησιμοποιείτε μία εφαρμογή και στις δύο οθόνες ή δύο εφαρμογές, μία σε κάθε
οθόνη, ταυτόχρονα.
• Αυτή η λειτουργία ενδέχεται να μην υποστηρίζεται σε ορισμένες εφαρμογές.
Μεγέθυνση βίντεο
1 Πατήστε στην κύρια οθόνη.
2 Επιλέξτε ένα βίντεο που θέλετε να αναπαραχθεί και πατήστε Αναπαραγωγή
βίντεο.
3 Πατήστε στη δεύτερη οθόνη.
• Στη δεύτερη οθόνη θα εμφανιστεί η οθόνη χειρισμού βίντεο.
Έλεγχος του βίντεο
στη Οθόνη
δευτερεύον
Άνοιγμα του ελεγκτή
βίντεο.

Ειδικές λειτουργίες 23
Επέκταση της εφαρμογής YouTube
1 Πατήστε στην κύρια οθόνη.
2 Επιλέξτε το περιεχόμενο από το YouTube που θέλετε να αναπαράγετε και
αναπαράγετέ το.
3 Πατήστε στη δεύτερη οθόνη.
• Στη δεύτερη οθόνη θα εμφανιστεί η οθόνη Ελεγκτής μέσων.
Απενεργοποίηση του
Ελεγκτή μέσων στη
δεύτερη οθόνη

Ειδικές λειτουργίες 24
Χρήση Multi app
Αφού επιλέξετε εφαρμογές με το γραφικό στοιχείο Multi app στη δεύτερη
οθόνη, μπορείτε να χρησιμοποιείτε τις επιλεγμένες δύο εφαρμογές ταυτόχρονα
κάθε φορά που πατάτε το γραφικό στοιχείο. Ορισμός των εφαρμογών που
χρησιμοποιείτε συχνότερα ως Multi app.
1 Πατήστε παρατεταμένα σε έναν κενό χώρο στη δεύτερη οθόνη.
Ορισμός Multi app
2 Πατήστε Ρυθμίσεις Multi app .
3 Κυλήστε προς τα κάτω τη λίστα εφαρμογών και επιλέξτε δύο εφαρμογές για να
τις χρησιμοποιήσετε ως Πολλαπλές εφαρμογές.
Προβολή
προεπισκόπησης
Πολλαπλών
εφαρμογών
Επιλογή δύο
εφαρμογών

Ειδικές λειτουργίες 25
4 Πατήστε Εφαρμογή.
5 Στην αρχική οθόνη της Οθόνη δευτερεύον θα δημιουργηθεί το εικονίδιο
Πολλαπλές εφαρμογές.
Χρήση του εικονιδίου
Πολλαπλές εφαρμογές
• Για να διαγράψετε το εικονίδιο Πολλαπλές εφαρμογές, πατήστε
παρατεταμένα το εικονίδιο στη δεύτερη οθόνη, πατήστε Κατάργηση από
τη και έπειτα πατήστε Διαγρ.

Ειδικές λειτουργίες 26
Χαρακτηριστικά κάμερας
Χρήση της κάμερας στη Λειτουργία Στροφή
Μπορείτε να χρησιμοποιήσετε τα ειδικά χαρακτηριστικά εγγραφής βίντεο που
παρέχονται όταν το προϊόν βρίσκεται σε λειτουργία περιστροφής.
Λειτουργία σταθεροποίησης
Μπορείτε να χρησιμοποιήσετε την κάμερα σαν να την έχετε εισάγει σε
βάση σταθεροποίησης. Πραγματοποιήστε εγγραφή βίντεο στη λειτουργία
σταθεροποιητή για να ελαχιστοποιήσετε τη δόνηση.
1 Αλλάξτε το προϊόν στη λειτουργία περιστροφής.
• Μπορείτε επίσης να ξεκινήσετε την κάμερα της λειτουργίας περιστροφής
περιστρέφοντας το προϊόν στην εφαρμογή κάμερας.
2 Πατήστε στην κύρια οθόνη.
3 Επιλέξτε Λειτουργία σταθεροποίησης από τις λειτουργίες κάμερας.
4 Πατήστε για να τερματίσετε την εγγραφή στη λειτουργία σταθεροποιητή.
Ηχητικά εφέ
Λειτουργία
παρακολούθησης
Ρυθμίσεις φλας
Ανανέωση
Λειτουργία
κλειδώματος
Λειτουργία FPV
Κατάλογος λειτουργιών
φωτογραφίας
Γραμμή Πλοήγησης
Λειτουργία μετατόπισης
και παρακολούθησης
Ρυθμίσεις Ανάλυση
Χειριστήριο
• Για να τραβήξετε μια φωτογραφία κατά την εγγραφή βίντεο, πατήστε το
κουμπί .
• Για να διακόψετε προσωρινά την εγγραφή βίντεο, πατήστε το κουμπί .
Για να συνεχίσετε την εγγραφή βίντεο, πατήστε το κουμπί .
5 Πατήστε το κουμπί για να τερματίσετε την ηχογράφηση.

Ειδικές λειτουργίες 27
Λειτουργία FPV
(προβολή σε πρώτο
πρόσωπο)
Οι περιστροφές ή οι κινήσεις σας αποτυπώνονται με
φυσικό τρόπο, ώστε να μπορείτε να κάνετε εγγραφή
βίντεο με ρυθμό και δυναμική.
Λειτουργία
μετατόπισης και
παρακολούθησης
Οι περιστροφές πάνω/κάτω και δεξιόστροφα/
αριστερόστροφα σταθεροποιούνται και η γωνία κινείται
αριστερά/δεξιά. Αποδοτική λειτουργία για την καταγραφή
φωτογραφιών ή βίντεο όταν ανεβαίνετε σκαλιά ή κινείστε
μέσα σε ένα αυτοκίνητο, διατηρώντας την οριζόντια θέση.
Λειτουργία
παρακολούθησης
Οι περιστροφές δεξιόστροφα/αριστερόστροφα
σταθεροποιούνται και η γωνία κινείται πάνω/κάτω και
αριστερά/δεξιά.
Αποδοτική λειτουργία για την καταγραφή φωτογραφιών
ή βίντεο της συνολικής εμφάνισης ενός μεγάλου
αντικειμένου, όπως μιας συναυλίας ή ενός κτιρίου.
Χειριστήριο
Μπορείτε να μετακινήσετε το χειριστήριο προς όποια
κατεύθυνση θέλετε, ώστε να μετακινείτε τη γωνία πάνω/
κάτω και αριστερά/δεξιά χωρίς να περιστρέφετε την
κάμερα, ελαχιστοποιώντας το φλουτάρισμα.
Λειτουργία
κλειδώματος Πατήστε παρατεταμένα για να κλειδώσετε τη γωνία.
Ηχητικά εφέ
• Βασικό: Μπορείτε να πραγματοποιήσετε εγγραφή βίντεο
με σταθερό στερεοφωνικό ηχητικό εφέ.
• ASMR εγγραφή: Χρησιμοποιήστε αυτήν τη λειτουργία
για να ενισχύσετε τον ήχο του θέματος στην οθόνη, ώστε
να πραγματοποιήσετε εγγραφή βίντεο με καθαρούς,
διακριτούς ήχους.
• Bokeh φωνής: Χρησιμοποιήστε αυτήν τη λειτουργία για
να πραγματοποιήσετε εγγραφή βίντεο μειώνοντας τους
ήχους του περιβάλλοντος και τονίζοντας τη φωνή του
θέματος.

Ειδικές λειτουργίες 28
Εγγραφή αργής κίνησης
Δημιουργήστε ένα διασκεδαστικό βίντεο ελέγχοντας την ταχύτητα μιας κίνησης.
Μπορείτε να εφαρμόσετε ένα εφέ κίνησης πιο αργής από το κανονικό.
1 Αλλάξτε το προϊόν στη λειτουργία περιστροφής.
2 Πατήστε στην κύρια οθόνη.
3 Επιλέξτε Αργή κίνηση από τις λειτουργίες κάμερας.
4 Πατήστε ή για να επιλέξετε διάρκεια για το εφέ αργής κίνησης.
Επιλογή διάρκειας
Ορισμός επιλογών
κάμερας
Ορισμός επιλογών
φλας
• Τμήμα αργή κίνηση: Σας επιτρέπει να εφαρμόσετε ένα εφέ αργής κίνησης σε
ένα συγκεκριμένο τμήμα του βίντεο.
-Πατήστε όταν θέλετε να εφαρμοστεί το εφέ αργής κίνησης. Με ένα
σύντομο πάτημα, το εφέ αργής κίνησης εφαρμόζεται για 0,5 δευτερόλεπτα.
Με ένα παρατεταμένο πάτημα, το εφέ αργής κίνησης εφαρμόζεται μέχρι να
αφήσετε το δάχτυλό σας.
• Όλες οι Αργή κίνηση: Σας επιτρέπει να εφαρμόσετε ένα εφέ αργής κίνησης σε
ολόκληρο το βίντεο.

Ειδικές λειτουργίες 29
Εγγραφή χρονισμού
Μπορείτε να πραγματοποιήσετε εγγραφή βίντεο χρονισμού που
βελτιστοποιούνται ανάλογα με την κατάσταση.
Τα βίντεο μπορούν να εγγραφούν με βέλτιστη ταχύτητα και σταθερή κίνηση
αναλύοντας διάφορα περιβάλλοντα λήψης. Η ταχύτητα χρονισμού μπορεί να
ρυθμίζεται αυτόματα ανάλογα με τον στόχο και το περιβάλλον λήψης.
Είναι επίσης δυνατή η χειροκίνητη επιλογή της ταχύτητας χρονισμού.
1 Αλλάξτε το προϊόν στη λειτουργία περιστροφής.
2 Πατήστε στην κύρια οθόνη.
3 Επιλέξτε Ενδιάμεσος χρόνος από τις λειτουργίες κάμερας.
• Στη δεύτερη οθόνη, επιλέξτε τη μεγέθυνση οθόνης της σκηνής που θα
καταγραφεί.
Επιλογή μεγέθυνσης
οθόνης
Επιλογή ταχύτητας
χρονισμού
• Στη δεύτερη οθόνη, επιλέξτε την ταχύτητα χρονισμού.
• Εάν επιλέξετε Αυτόματο, θα ρυθμιστεί αυτόματα η ταχύτητα που είναι
κατάλληλη για την οθόνη στην οποία θα γίνει εγγραφή.

Ειδικές λειτουργίες 30
4 Πατήστε για να εγγράψετε ένα βίντεο.
• Μπορείτε να αλλάξετε την μεγέθυνση και την ταχύτητα χρονισμού κατά την
εγγραφή.
• Αν πατήσετε την επιθυμητή ταχύτητα, η ταχύτητα χρονισμού
προσαρμόζεται κατά την εγγραφή.
• Για να διακόψετε προσωρινά την εγγραφή βίντεο, πατήστε το κουμπί .
Για να συνεχίσετε την εγγραφή βίντεο, πατήστε το κουμπί .
• Κατά την εγγραφή ενός βίντεο, μπορείτε να τεντώσετε ή να πιάσετε δύο
δάχτυλα για μεγέθυνση ή σμίκρυνση.
• Κατά την εγγραφή βίντεο, μπορείτε να αγγίξετε την επιθυμητή περιοχή για
να ρυθμίσετε τη φωτεινότητα.
5 Πατήστε το κουμπί για να τερματίσετε την εγγραφή.
• Το καταγεγραμμένο βίντεο θα αποθηκευτεί στο Άλμπουμ.
• Δεν εγγράφεται ήχος κατά την εγγραφή με Χρονισμό.
• Μπορείτε να πατήσετε για να πραγματοποιήσετε εγγραφή βίντεο στη
λειτουργία Νυχτερινός χρονισμός.

Ειδικές λειτουργίες 31
Πραγματοποίηση διπλής εγγραφής βίντεο
Μπορείτε να χρησιμοποιήσετε ταυτόχρονα την εμπρός και την πίσω κάμερα για
να πραγματοποιήσετε εγγραφή βίντεο. Μπορείτε να αποθηκεύσετε τα βίντεο από
κάθε κάμερα ως ένα ή ως δύο ξεχωριστά αρχεία.
1 Αλλάξτε το προϊόν στη λειτουργία περιστροφής.
2 Πατήστε στην κύρια οθόνη.
3 Επιλέξτε Διπλή εγγραφή από τις λειτουργίες κάμερας.
• Η εμπρός pop-up κάμερα αναδύεται αυτόματα.
4 Πατήστε για καταγραφή βίντεο διπλής εγγραφής.
Διαχωρισμένη
προβολή
Εμπρός οθόνη εγγραφής
PIP
Πίσω οθόνη εγγραφής
• Μπορείτε να πατήσετε παρατεταμένα την κύρια οθόνη και να σύρετε για να
αλλάξετε τη θέση των οθονών της εμπρός και της πίσω κάμερας.
• Για να διακόψετε προσωρινά την εγγραφή βίντεο, πατήστε το κουμπί .
Για να συνεχίσετε την εγγραφή βίντεο, πατήστε το κουμπί .
5 Πατήστε για να τερματίσετε την εγγραφή.
• Εάν επιλέξετε ξεχωριστή αποθήκευση, τα βίντεο της εμπρός και της πίσω
κάμερας αποθηκεύονται ως ξεχωριστά αρχεία.
• Εάν επιλέξετε να αποθηκεύσετε ακριβώς αυτό που βλέπετε, τα βίντεο της
εμπρός και της πίσω κάμερας αποθηκεύονται ως μία οθόνη.
• Εάν ενεργοποιήσετε τη λειτουργία διπλής εγγραφής, αναδύεται η
ενσωματωμένη εμπρός pop-up κάμερα. Η κάμερα μπορεί να χαλάσει αν την
τραβήξετε ή την πιέσετε με υπερβολική δύναμη.

Ειδικές λειτουργίες 32
Λήξη PIP (εικόνα μέσα σε εικόνα)
• Εάν πατήσετε το στην οθόνη ελέγχου της Οθόνη δευτερεύον, η οθόνη
εγγραφής αλλάζει για να καταγράψει μια εικόνα μέσα σε εικόνα (PIP).
• Εάν πατήσετε το , μπορείτε να αλλάξετε τις θέσεις οθονών της εμπρός και
της πίσω κάμερας.
• Μπορείτε, αν θέλετε, να πατήσετε παρατεταμένα την οθόνη PIP και να τη
σύρετε σε μία από τις τέσσερεις γωνίες.
Λήψη PIP

Ειδικές λειτουργίες 33
Λειτουργίες εγγραφής ήχου
Εγγραφή βίντεο με εξειδικευμένες επιλογές εγγραφής
ήχου
Μπορείτε να καταγράψετε ένα βίντεο χρησιμοποιώντας τρεις διαφορετικές
επιλογές εγγραφής φωνής ανάλογα με τις απαιτήσεις σας.
1 Πατήστε και επιλέξτε Βίντεο σύροντας τις λειτουργίες της κάμερας.
2 Πατήστε και επιλέξτε Βασικό, ASMR εγγραφή ή Bokeh φωνής αλλάζοντας
επιλογές ήχου.
Επιλογές ήχου
Βασικό
Μπορείτε να καταγράψετε ένα βίντεο με σταθερό στερεοφωνικό ήχο.
ASMR εγγραφή
Με δύο ευαίσθητα μικρόφωνα στη συσκευή, μπορείτε να καταγράψετε ένα βίντεο
ASMR.

Ειδικές λειτουργίες 34
Bokeh φωνής
Μπορείτε να τονίσετε τη φωνή ενός θέματος μειώνοντας το θόρυβο του
περιβάλλοντος.
• Για να μειώσετε το θόρυβο του περιβάλλοντος, μεταφέρετε το ρυθμιστικό στη
θέση .
Εγγραφή ήχων ASMR
Αυτή η λειτουργία σας επιτρέπει να εγγράφετε ήχο καθαρά και με ακρίβεια,
ενισχύοντας τον ήχο από τα μικρόφωνα.
1 Πατήστε LG Εγγραφή ήχου HD και πατήστε ASMR.
2 Πατήστε για να εγγράψετε τον ήχο.
• Για να διακόψετε προσωρινά την εγγραφή, πατήστε το κουμπί . Για να
συνεχίσετε την εγγραφή, πατήστε το κουμπί .
3 Πατήστε το κουμπί για να τερματίσετε την εγγραφή ήχου.
Τρισδιάστατος `Ηχος Μηχανή LG
Η λειτουργία Τρισδιάστατος `Ηχος Μηχανή LG σας επιτρέπει να ακούτε
στερεοσκοπικό και βελτιστοποιημένο ήχο. Κατά την αναπαραγωγή μουσικής ή
βίντεο, μπορείτε να απολαύσετε στερεοσκοπικό και καθηλωτικό ήχο σαν να τον
ακούτε στον χώρο.
1 Σύρετε τον πίνακα ειδοποιήσεων προς τα κάτω.
2 Πατήστε για να ενεργοποιήσετε ή να απενεργοποιήσετε το χαρακτηριστικό
Τρισδιάστατος `Ηχος Μηχανή LG.
Ή πατήστε Ρυθμίσεις Ήχος Ποιότητα ήχου και εφέ Τρισδιάστατος
`Ηχος Μηχανή LG και πατήστε για να την ενεργοποιήσετε.
• Εάν συνδέσετε εξωτερική συσκευή ήχου όπως ακουστικά ή ηχεία στη
συσκευή, εμφανίζεται ένα αναδυόμενο παράθυρο για την ενεργοποίηση της
λειτουργίας Τρισδιάστατος `Ηχος Μηχανή LG.

Ειδικές λειτουργίες 35
Google Assistant
Google Assistant Επισκόπηση
Η συσκευή σας έχει ενσωματωμένη τη δυνατότητα Google Assistant. Βρείτε
απαντήσεις και κάντε τις δουλειές σας εκτός σπιτιού ή γραφείου.
• Για να χρησιμοποιήσετε αυτήν την δυνατότητα, πρέπει πρώτα να συνδεθείτε
στο δίκτυο.
Εκκίνηση του Google Assistant.
1 Σύρετε διαγώνια από την κάτω γωνία της οθόνης.
2 Αγγίξτε το ΞΕΚΙΝΗΣΤΕ.
3 Ακολουθήστε τις οδηγίες που εμφανίζονται στην οθόνη.
• Η συσκευή αποθηκεύει τα φωνητικά σας δεδομένα για αναγνώριση.
4 Επιλέξτε αν θα χρησιμοποιήσετε τη δυνατότητα φωνητικής αναγνώρισης.
• Όταν έχει ενεργοποιηθεί αυτή η λειτουργία, μπορείτε να εκτελέσετε το
Google Assistant λέγοντας “OK Google” στην αρχική οθόνη.
5 Πατήστε Τέλος.
Πρόσβαση με φωνή
1 Όταν η αρχική οθόνη είναι απενεργοποιημένη ή κλειδωμένη, πείτε “OK
Google” ή “Hey Google.”.
2 Όταν εμφανιστεί η οθόνη του Google Assistant, πείτε μια εντολή ή κάντε μια
ερώτηση.

Ειδικές λειτουργίες 36
Πρόσβαση από την αρχική οθόνη
1 Σύρετε διαγώνια από την κάτω γωνία της οθόνης.
2 Πείτε μια εντολή ή ερώτηση όταν δείτε το στο κάτω μέρος της οθόνης.
• Σε ένα περιβάλλον όπου η σύνδεση του ασύρματου δικτύου Wi-Fi ή του
δικτύου κινητής τηλεφωνίας είναι χαμηλής ποιότητας, η λειτουργία Google
Assistant ενδεχομένως να περιορίζεται και ο ρυθμός πιστής αναγνώρισης
ομιλίας να είναι χαμηλότερος.
• Εάν η ομιλία είναι ασαφής, το μικρόφωνο καλύπτεται, λειτουργεί μια
συσκευή αναπαραγωγής μέσων ή ο περιβάλλων ήχος είναι δυνατός, ο
ρυθμός πιστής αναγνώρισης ομιλίας μπορεί να είναι χαμηλότερος. Όταν
χρησιμοποιείτε το προϊόν με φωνητικές εντολές, μιλήστε με καλή προφορά
σε ήσυχο περιβάλλον για μεγαλύτερη ακρίβεια αναγνώρισης ομιλίας.

Βασικές
λειτουργίες
02

Βασικές λειτουργίες 38
Εξαρτήματα και αξεσουάρ του προϊόντος
Τα παρακάτω στοιχεία περιλαμβάνονται στη συσκευή σας.
• Συσκευή
• Καλώδιο USB
• Καρφίτσα εξαγωγής
• Φορτιστής
• Οδηγός γρήγορης εκκίνησης
• Θήκη τηλεφώνου
• Τα στοιχεία που περιγράφονται πιο πάνω μπορεί να είναι προαιρετικά.
• Τα στοιχεία που παρέχονται με τη συσκευή και τυχόν διαθέσιμα αξεσουάρ
μπορεί να διαφέρουν, ανάλογα με την περιοχή και τον πάροχο υπηρεσιών.
• Να χρησιμοποιείτε πάντοτε γνήσια αξεσουάρ LG Electronics. Η χρήση
αξεσουάρ άλλων κατασκευαστών ενδέχεται να επηρεάσει την απόδοση
των κλήσεων στη συσκευή σας ή να προκαλέσει προβλήματα κατά τη
λειτουργία. Η επισκευή ενός τέτοιου προβλήματος ενδέχεται να μην
καλύπτεται από την υπηρεσία επισκευών της LG.
• Μερικά από τα μέρη της συσκευής έχουν κατασκευαστεί από ενισχυμένο
γυαλί. Εάν η συσκευή σας πέσει πάνω σε μια σκληρή επιφάνεια ή
προσκρούσει κάπου με δύναμη, μπορεί να προκληθεί ζημιά στο
σκληρυμένο γυαλί. Σε αυτήν την περίπτωση, διακόψτε αμέσως τη χρήση της
συσκευής και επικοινωνήστε με ένα Κέντρο εξυπηρέτησης πελατών της LG.
• Εάν λείπει οποιοδήποτε από αυτά τα βασικά στοιχεία, επικοινωνήστε με τον
αντιπρόσωπο από τον οποίο αγοράσατε τη συσκευή.
• Για να αγοράσετε πρόσθετα στοιχεία, επικοινωνήστε με ένα Κέντρο
εξυπηρέτησης πελατών της LG.
• Ορισμένα στοιχεία που περιλαμβάνονται στη συσκευασία του προϊόντος
ενδέχεται να αλλάξουν χωρίς προειδοποίηση.
• Η εμφάνιση και οι προδιαγραφές της συσκευής σας ενδέχεται να αλλάξουν
χωρίς προειδοποίηση με στόχο τη βελτίωση του προϊόντος.
• Οι προδιαγραφές της συσκευής ενδέχεται να διαφέρουν, ανάλογα με την
περιοχή ή τον πάροχο υπηρεσιών.
• Αφαιρέστε την προστατευτική μεμβράνη από τον αισθητήρα Δακτυλ.
Αποτυπώματα προτού χρησιμοποιήσετε τη λειτουργία αναγνώρισης
Δακτυλ. Αποτυπώματα.

Βασικές λειτουργίες 39
Επισκόπηση στοιχείων
Οθόνη αφής
Ισχύς/Πλήκτρο κλειδώματος
Πλήκτρα έντασης ήχου (+/-)
Ακουστικό
Αναδυόμενη Κάμερα
Αισθητήρας
εγγύτητας/φωτισμού
περιβάλλοντος
Θύρα φορτιστή/καλωδίου
USB
Αισθητήρας δακτυλικών
αποτυπωμάτων
Φακοί πίσω κάμερας
Μικρόφωνο
Φλας
Ηχείο Μικρόφωνο
Θήκη κάρτας
Nano-SIM/μνήμης
NFC
Περιοχή κεραίας
ασύρματης φόρτισης

Βασικές λειτουργίες 40
ΜΗΝ επιχειρήσετε να αφαιρέσετε μόνοι σας το πίσω κάλυμμα.
• Σε διαφορετική περίπτωση, ενδέχεται να υποστεί σοβαρή ζημιά η μπαταρία
και η συσκευή που μπορεί να οδηγήσει σε υπερθέρμανση, πυρκαγιά
και τραυματισμό. Το πίσω κάλυμμα και η μπαταρία αυτής της συσκευής
δεν πρέπει να αφαιρούνται ή να αντικαθίστανται από μη καταρτισμένο
επαγγελματία.
• Το τηλέφωνό σας είναι μια ηλεκτρονική συσκευή που παράγει θερμότητα
κατά τη διάρκεια της κανονικής λειτουργίας της. Η άμεση επαφή με το
δέρμα για εξαιρετικά μεγάλα χρονικά διαστήματα, ελλείψει επαρκούς
εξαερισμού, μπορεί να οδηγήσει σε δυσφορία ή εγκαύματα πρώτου
βαθμού. Συνεπώς, να χειρίζεστε το τηλέφωνο με προσοχή τόσο κατά τη
χρήση των λειτουργιών του όσο και αμέσως μετά.
• Πλήκτρα έντασης ήχου
-Μπορείτε να προσαρμόσετε την ένταση των ήχων κλήσης, των κλήσεων ή
των ειδοποιήσεων.
-Ενώ χρησιμοποιείτε την κάμερα, πατήστε απαλά κάποιο από τα πλήκτρα
έντασης ήχου για να τραβήξετε μια φωτογραφία. Για συνεχείς λήψεις, αγγίξτε
και κρατήστε το πλήκτρο έντασης ήχου.
-Για να εκκινήσετε την εφαρμογή Κάμερα όταν η οθόνη είναι κλειδωμένη ή
απενεργοποιημένη, πατήστε το πλήκτρο μείωσης της έντασης ήχου δύο
φορές. Για να εκκινήσετε την εφαρμογή Capture+, πατήστε το πλήκτρο
αύξησης της έντασης ήχου δύο φορές.
• Ισχύς/Πλήκτρο κλειδώματος
-Πατήστε σύντομα το πλήκτρο όταν θέλετε να ενεργοποιήσετε ή να
απενεργοποιήσετε την οθόνη.
-Πατήστε το πλήκτρο παρατεταμένα όταν θέλετε να ενεργοποιήσετε μια
επιλογή ελέγχου λειτουργίας.
• Αισθητήρας δακτυλικών αποτυπωμάτων
-Μπορείτε να χρησιμοποιήσετε τον αισθητήρα Δακτυλ. Αποτυπώματα
κάτω και στο κέντρο της οθόνης για να ενεργοποιήσετε τη λειτουργία
αναγνώρισης Δακτυλ. Αποτυπώματα. Για λεπτομέρειες, ανατρέξτε στην
ενότητα
Αναγνώριση Δακτυλ. Αποτυπώματα - Παρουσίαση
.

Βασικές λειτουργίες 41
• Ορισμένες λειτουργίες μπορεί να περιορίζονται, ανάλογα με την περιοχή και
τις προδιαγραφές του προϊόντος από διαφορετικούς πάροχους υπηρεσιών
τηλεπικοινωνιών.
• Στο πίσω μέρος του προϊόντος ενσωματώνονται ένα τσιπ NFC και κεραίες
ασύρματης φόρτισης. Χειρίζεστε προσεκτικά το προϊόν ώστε να μην
καταστρέψετε ή καλύπτετε το τσιπ NFC και τις κεραίες ασύρματης φόρτισης.
• Μην τοποθετείτε βαριά αντικείμενα πάνω στη συσκευή ή μην κάθεστε πάνω
σε αυτήν. Σε αντίθετη περίπτωση, μπορεί να προκληθεί βλάβη στην οθόνη
αφής.
• Η χρήση προστατευτικής μεμβράνης οθόνης ή αξεσουάρ ενδέχεται να
προκαλέσουν παρεμβολές στον αισθητήρα εγγύτητας.
• Εάν η συσκευή σας είναι υγρή ή χρησιμοποιείται σε μέρος με υγρασία, η
οθόνη ή τα κουμπιά αφής ενδέχεται να μην λειτουργούν σωστά.
Στο προϊόν ενσωματώνονται δύο μικρόφωνα. Προσέχετε ώστε να μην καλύπτετε
τα μικρόφωνα. Ενώ μιλάτε στο τηλέφωνο, μην καλύπτετε το μικρόφωνο με την
παλάμη ή τα δάχτυλά σας.
Μην χρησιμοποιείτε θήκη τηλεφώνου που δεν είναι γνήσιο προϊόν και μην
καλύπτετε το μικρόφωνο με αξεσουάρ, ταινία, κ.ά.
Κρατάτε το προϊόν σωστά όταν το χρησιμοποιείτε, όπως υποδεικνύεται στην
εικόνα.
Μην καλύπτετε το μικρόφωνο.Μικρόφωνο
Μην καλύπτετε το μικρόφωνο.Μικρόφωνο

Βασικές λειτουργίες 42
Ενεργοποίηση ή απενεργοποίηση
Ενεργοποίηση
Όταν η συσκευή είναι απενεργοποιημένη, πατήστε παρατεταμένα το πλήκτρο
ενεργοποίησης/κλειδώματος.
• Όταν η συσκευή ενεργοποιείται για πρώτη φορά, πραγματοποιείται η
αρχική διαμόρφωση. Η πρώτη εκκίνηση του smartphone ενδέχεται να
διαρκέσει περισσότερη ώρα από ό,τι συνήθως.
Απενεργοποίηση
Πατήστε παρατεταμένα το πλήκτρο λειτουργίας/κλειδώματος και επιλέξτε
Απενεργοποίηση.
Επανεκκίνηση της συσκευής
Όταν η συσκευή δεν λειτουργεί σωστά ή δεν ανταποκρίνεται, επανεκκινήστε την
ακολουθώντας τις παρακάτω οδηγίες.
1 Πατήστε και κρατήστε πατημένο το πλήκτρο ενεργοποίησης/κλειδώματος
και το πλήκτρο μείωσης της έντασης ήχου ταυτόχρονα μέχρι η συσκευή να
απενεργοποιηθεί.
2 Όταν η συσκευή επανεκκινηθεί, αφήστε τα πλήκτρα.
Επιλογές ελέγχου λειτουργίας
Πατήστε παρατεταμένα το πλήκτρο λειτουργίας/κλειδώματος και επιλέξτε, στη
συνέχεια, ενεργοποιήστε μια επιλογή.
• Απενεργοποίηση: Απενεργοποιεί τη συσκευή.
• Απενεργοποίηση και επανεκκίνηση: Επανεκκινεί τη συσκευή.

Βασικές λειτουργίες 43
Τοποθέτηση της κάρτας SIM
Τοποθετήστε την κάρτα SIM (Subscriber Identity Module) που σας έχει
προμηθεύσει ο πάροχος υπηρεσιών για να ξεκινήσετε να χρησιμοποιείτε τη
συσκευή σας.
• Να είστε προσεκτικοί κατά τον χειρισμό της καρφίτσας εξαγωγής καθώς έχει
αιχμηρή άκρη.
1 Τοποθετήστε την ακίδα στην οπή της θήκης κάρτας και πατήστε την ακίδα,
έπειτα τραβήξτε τη θήκη κάρτας προς τα έξω.
2 Ευθυγραμμίστε τις κάρτες Nano-SIM στη θήκη κάρτας και πατήστε την κάρτα
προς την κατεύθυνση του βέλους όπως φαίνεται στην εικόνα.
Κάρτα Nano-SIM 2
Κάρτα Nano-SIM 1
• Η θήκη κάρτας SIM 2 χρησιμεύει επίσης ως θήκη της κάρτας μνήμης.
Ωστόσο, δεν μπορείτε να τοποθετήσετε ταυτόχρονα την κάρτα SIM και την
κάρτα μνήμης (προαιρετικά).

Βασικές λειτουργίες 44
3 Εισάγετε τη θήκη κάρτας στο τηλέφωνο όπως φαίνεται στην εικόνα.

Βασικές λειτουργίες 45
• Αυτή η συσκευή υποστηρίζει μόνο κάρτες Nano SIM.
Nano Micro Κανονική
• Για απόδοση χωρίς προβλήματα, συνιστάται να χρησιμοποιείτε τη
συσκευή με τον σωστό τύπο της κάρτας SIM. Να χρησιμοποιείτε πάντα την
εργοστασιακής κατασκευής κάρτα SIM που παρέχεται από τον πάροχο.
• Μην χάσετε την κάρτα SIM. Η LG δεν φέρει καμία ευθύνη για βλάβες και
άλλα προβλήματα που προκαλούνται από την απώλεια ή τη μεταβίβαση της
κάρτας SIM.
• Κατά την εισαγωγή ή την αφαίρεση της κάρτας SIM πρέπει να είστε
προσεκτικοί για να μην προκληθεί ζημιά.
• Όταν εισαγάγετε την κάρτα SIM ή την κάρτα μνήμης, τοποθετήστε την
σωστά στη θήκη κάρτας.
• Όταν εισαγάγετε τη θήκη κάρτας ξανά στη συσκευή, τοποθετήστε
την οριζόντια προς την κατεύθυνση του βέλους, όπως απεικονίζεται.
Βεβαιωθείτε ότι η κάρτα που έχει τοποθετηθεί στη θήκη κάρτας δεν έχει
φύγει από τη θέση της.
• Τοποθετήστε την κάρτα SIM με τις χρυσές επαφές στραμμένες προς τα
κάτω.
• Βεβαιωθείτε ότι όταν τοποθετείτε την κάρτα SIM στη συσκευή, ακολουθείτε
τις οδηγίες στο εγχειρίδιο χρήσης.
• Όταν τοποθετείτε ή αφαιρείτε τη θήκη κάρτας από τη συσκευή, πρέπει να
προσέχετε να μην περάσει νερό ή άλλα υγρά μέσα στην υποδοχή κάρτας.
Εάν η θήκη κάρτας ή η κάρτα που θα τοποθετήσετε στη συσκευή είναι υγρή,
τότε ενδέχεται να προκληθεί ζημιά στη συσκευή σας.
• Η κάρτα μνήμης είναι προαιρετική.
• Η συχνή εγγραφή και διαγραφή δεδομένων μπορεί να μειώσει τη διάρκεια
ζωής της κάρτας μνήμης.
• Ορισμένες κάρτες μνήμης μπορεί να μην είναι πλήρως συμβατές με τη
συσκευή. Η χρήση μιας μη συμβατής κάρτας μπορεί προκαλέσει βλάβη της
συσκευής ή της κάρτας μνήμης, ή να καταστρέψει τα δεδομένα που είναι
αποθηκευμένα σε αυτήν.

Βασικές λειτουργίες 46
Τοποθέτηση της κάρτας μνήμης
Τοποθετήστε την κάρτα μνήμης στη συσκευή σας.
Ανάλογα με τον κατασκευαστή και τον τύπο της κάρτας μνήμης, κάποιες κάρτες
μνήμης μπορεί να μην είναι συμβατές με τη συσκευή σας.
1 Τοποθετήστε την καρφίτσα εξαγωγής στην οπή που βρίσκεται στην υποδοχή
της κάρτας.
2 Τραβήξτε προς τα έξω την υποδοχή της κάρτας.
3 Τοποθετήστε την κάρτα μνήμης στην υποδοχή της κάρτας με τις χρυσές
επαφές στραμμένες προς τα κάτω.
Κάρτα μνήμης
(πωλείται ξεχωριστά, προαιρετικά)
Κάρτα SIM
4 Επιστρέψτε την υποδοχή της κάρτας στην αρχική της θέση.
• Ορισμένες κάρτες μνήμης μπορεί να μην είναι πλήρως συμβατές με τη
συσκευή. Η χρήση μιας μη συμβατής κάρτας μπορεί προκαλέσει βλάβη της
συσκευής ή της κάρτας μνήμης, ή να καταστρέψει τα δεδομένα που είναι
αποθηκευμένα σε αυτήν.
• Η συχνή εγγραφή και διαγραφή δεδομένων μπορεί να μειώσει τη διάρκεια
ζωής της κάρτας μνήμης.

Βασικές λειτουργίες 47
Αφαίρεση της κάρτας μνήμης
Για λόγους ασφαλείας, απενεργοποιήστε την κάρτα μνήμης, πριν την αφαιρέσετε.
1 Στην αρχική οθόνη, πατήστε Ρυθμίσεις Αποθηκευτικός χώρος .
2 Τοποθετήστε την καρφίτσα εξαγωγής στην οπή που βρίσκεται στην υποδοχή
της κάρτας και έπειτα τραβήξτε τη θήκη της κάρτας προς τα έξω.
3 Αφαιρέστε την κάρτα μνήμης από τη θήκη κάρτας.
4 Επιστρέψτε την υποδοχή της κάρτας στην αρχική της θέση.
• Μην αφαιρείτε την κάρτα μνήμης, ενώ η συσκευή μεταφέρει ή χρησιμοποιεί
δεδομένα. Μπορεί να προκληθεί απώλεια ή καταστροφή δεδομένων, ή
βλάβη της κάρτας μνήμης ή της συσκευής. Η LG δεν ευθύνεται για απώλειες
που είναι αποτέλεσμα κακής ή ακατάλληλης χρήσης των καρτών μνήμης,
συμπεριλαμβανομένης της απώλειας δεδομένων.
Μπαταρία
Φόρτιση της μπαταρίας
Πριν χρησιμοποιήσετε τη συσκευή, φορτίστε πλήρως την μπαταρία.
Φορτίστε τη συσκευή με το καλώδιο USB τύπου C.
Ακροδέκτης Καλωδίου Φόρτισης

Βασικές λειτουργίες 48
• Εάν υπάρχει υγρασία στην υποδοχή φόρτισης, σε άλλες εκτεθειμένες
υποδοχές, στο καλώδιο φόρτισης, στον προσαρμογέα φόρτισης κ.λπ.,
μην χρησιμοποιείτε ή φορτίζετε το προϊόν. Το προϊόν ενδέχεται να
παρουσιάζει δυσλειτουργία ή να έχει χαλάσει ή φθαρεί και υπάρχει κίνδυνος
τραυματισμού από ηλεκτροπληξία, φωτιά, υπερθέρμανση, έκρηξη, κ.ά. Εάν
παρατηρήσετε υγρασία σε τέτοια σημεία, διακόψτε τη χρήση ή τη φόρτιση
του προϊόντος αμέσως και απομακρύνετε πλήρως την υγρασία.
• Μην αφαιρείτε το κάλυμμα της μπαταρίας.
Αυτό το προϊόν χρησιμοποιεί μη αφαιρούμενη μπαταρία. Μην αφαιρείτε ή
μην αντικαθιστάτε το κάλυμμα μπαταρίας ή την μπαταρία. Εάν αφαιρέσετε
ή αντικαταστήσετε το κάλυμμα μπαταρίας ή την μπαταρία, υπάρχει
πιθανότητα βλάβης, υπερθέρμανσης ή έκρηξης του προϊόντος.
• Χρησιμοποιείτε μόνο το καλώδιο USB και τον προσαρμογέα φόρτισης που
παρέχεται με το προϊόν.
• Η συσκευή σας διαθέτει εσωτερική επαναφορτιζόμενη μπαταρία. Για δική
σας ασφάλεια, μην αφαιρείτε την ενσωματωμένη μπαταρία.
• Σε περίπτωση χρήσης της συσκευής ενώ αυτή φορτίζει, ενδέχεται να
προκληθεί ηλεκτροπληξία. Για να χρησιμοποιήσετε τη συσκευή, σταματήστε
τη φόρτιση.
• Αφαιρέστε τον φορτιστή από την πρίζα αφού ολοκληρωθεί η φόρτιση της
συσκευής. Έτσι αποτρέπεται η άσκοπη κατανάλωση ενέργειας.
• Μαζί με το προϊόν περιλαμβάνεται ένας προσαρμογέας φόρτισης που
υποστηρίζει τη γρήγορη φόρτιση. Η λειτουργία ταχείας φόρτισης μπορεί να
μην λειτουργεί εάν χρησιμοποιηθεί άλλος προσαρμογέας φόρτισης εκτός
του γνήσιου προσαρμογέα που συνόδευε το προϊόν.
• Ένας άλλος τρόπος για να φορτίσετε την μπαταρία είναι να συνδέσετε
ένα καλώδιο USB μεταξύ της συσκευής και ενός επιτραπέζιου ή φορητού
υπολογιστή. Η ενέργεια αυτή μπορεί να είναι περισσότερο χρονοβόρα από
τη φόρτιση της μπαταρίας σε επιτοίχια πρίζα.
• Μη φορτίζετε την μπαταρία χρησιμοποιώντας USB hub που δεν
δύναται να διατηρήσει σταθερή την ονομαστική τάση. Ενδέχεται να μην
πραγματοποιηθεί φόρτιση ή να διακοπεί.
• Όταν επισκέπτεστε το κέντρο επισκευών για κάποιο πρόβλημα στην
μπαταρία, πρέπει να έχετε μαζί σας το προϊόν και τον φορτιστή που
χρησιμοποιείτε. Επειδή η μπαταρία είναι αναλώσιμο προϊόν, η διάρκεια
ζωής της μπορεί να μειώνεται με το πέρασμα του χρόνου.

Βασικές λειτουργίες 49
Προφυλάξεις κατά τη χρήση της συσκευής
• Βεβαιωθείτε ότι χρησιμοποιείτε το παρεχόμενο καλώδιο USB. Μην
χρησιμοποιείτε καλώδια USB ή φορτιστές τρίτων κατασκευαστών με τη
συσκευή σας. Η περιορισμένη εγγύηση της LG δεν καλύπτει τη χρήση
αξεσουάρ τρίτων κατασκευαστών.
• Τυχόν αδυναμία τήρησης των οδηγιών που περιλαμβάνονται στο παρόν
εγχειρίδιο χρήσης και η ακατάλληλη χρήση ενδέχεται να έχουν ως αποτέλεσμα
την πρόκληση βλάβης στη συσκευή.
Ασύρματη φόρτιση
Η συσκευή υποστηρίζει τη δυνατότητα ασύρματης φόρτισης. Φορτίστε τη
συσκευή με έναν εγκεκριμένο ασύρματο φορτιστή Qi (προαιρετικά, πωλείται
ξεχωριστά).
Φόρτιση μπαταρίας με ασύρματο φορτιστή
1 Τοποθετήστε τη συσκευή σας στο κέντρο του ασύρματου φορτιστή, έτσι ώστε
η κεραία ασύρματης φόρτισης στο πίσω μέρος της συσκευής και ο φορτιστής
να είναι ευθυγραμμισμένοι.
• Για να βρείτε την εμβέλεια της κεραίας ασύρματης φόρτισης, ανατρέξτε
στην ενότητα
Επισκόπηση στοιχείων
.
2 Όταν η μπαταρία φορτίσει πλήρως, αφαιρέστε τη συσκευή από τον φορτιστή.
• Όταν φορτίζετε την μπαταρία μέσω ασύρματου φορτιστή, μην τοποθετείτε
μαγνητικά, μεταλλικά ή άλλα αγώγιμα υλικά ανάμεσα στη συσκευή και
τον φορτιστή, Αυτό ενδέχεται να δημιουργεί παρεμβολές στη φόρτιση
της συσκευής και ο φορτιστής μπορεί να υπερθερμανθεί. Σε αυτήν την
περίπτωση ενδέχεται να προκληθεί βλάβη στη συσκευή, τον φορτιστή ή τις
κάρτες SIM/μνήμης.

Βασικές λειτουργίες 50
• Αν η θερμοκρασία της μπαταρίας υπερβεί το καθορισμένο όριο κατά τη
διάρκεια της φόρτισης, η φόρτιση ενδέχεται να σταματήσει.
• Αν στο πίσω μέρος της συσκευής έχουν προσαρτηθεί μαγνητικά, μεταλλικά
ή άλλα αγώγιμα στοιχεία, ή προστατευτική θήκη, τότε η συσκευή ενδέχεται
να μην φορτίζεται κανονικά.
• Εάν φορτίζετε την μπαταρία με ασύρματο φορτιστή σε περιοχές όπου η
ισχύς του σήματος δικτύου είναι χαμηλή, η απόδοση δικτύου στη συσκευή
σας ενδέχεται να μειωθεί περαιτέρω.
• Φορτίστε τη συσκευή με έναν εγκεκριμένο ασύρματο φορτιστή Qi
(προαιρετικά, πωλείται ξεχωριστά). Η περιορισμένη εγγύηση της LG
δεν καλύπτει τη χρήση αξεσουάρ τρίτων κατασκευαστών. Για τυχόν
προβλήματα, επικοινωνήστε με τον εκάστοτε κατασκευαστή.
• Αυτό το προϊόν υποστηρίζει ασύρματη φόρτιση. Φορτίστε το προϊόν
με έναν ασύρματο φορτιστή με πιστοποίηση Qi (πωλείται ξεχωριστά).
Ορισμένοι ενσύρματοι φορτιστές ενδέχεται να μην υποστηρίζουν ασύρματη
φόρτιση. Οι ασύρματοι φορτιστές που υποστηρίζουν EPP (Extended Power
Profile) επιτρέπουν την ασύρματη φόρτιση υψηλής ταχύτητας.
• Η LG Electronics δεν φέρει καμία ευθύνη για προβλήματα που σχετίζονται
με αξεσουάρ άλλων εταιρειών. Για τέτοια θέματα, απευθυνθείτε στον
κατασκευαστή του αντίστοιχου προϊόντος.
Αποτελεσματική χρήση της μπαταρίας
Η διάρκεια ζωής της μπαταρίας μπορεί να μειωθεί εάν στη συσκευή εκτελούνται
πολλές εφαρμογές και λειτουργίες ταυτόχρονα και συνεχώς.
Για να αυξήσετε τη διάρκεια ζωής της μπαταρίας, τερματίστε τις λειτουργίες που
εκτελούνται στο παρασκήνιο.
Για να ελαχιστοποιήσετε την κατανάλωση της ισχύος της μπαταρίας, ακολουθήστε
τις παρακάτω συμβουλές:
• Να απενεργοποιείτε τη δυνατότητα Bluetooth® ή δικτύου Wi-Fi όταν δεν τις
χρησιμοποιείτε.
• Ρυθμίστε το χρονικό όριο της οθόνης στη μικρότερη δυνατή τιμή.
• Ρυθμίστε τη φωτεινότητα της οθόνης στο ελάχιστο.
• Ενεργοποιήστε το κλείδωμα της οθόνης όταν δεν χρησιμοποιείται η συσκευή.
• Ελέγξτε τη στάθμη μπαταρίας ενώ χρησιμοποιείτε εφαρμογές που έχετε
κατεβάσει.

Βασικές λειτουργίες 51
Οθόνη αφής
Μπορείτε να εξοικειωθείτε με τον έλεγχο της συσκευής σας χρησιμοποιώντας τις
κινήσεις που μπορείτε να κάνετε με τα δάκτυλά σας στην οθόνη αφής.
Πάτημα
Πατήστε ελαφρά το δάκτυλό σας για να κάνετε μια επιλογή ή να επιλέξετε και να
εκτελέσετε μια εφαρμογή.
Παρατεταμένο πάτημα
Για να εμφανιστεί το μενού με τις διαθέσιμες επιλογές, η ενέργεια που απαιτείται
είναι το άγγιγμα και το κράτημα για αρκετά δευτερόλεπτα.

Βασικές λειτουργίες 52
Διπλό πάτημα
Πατήστε γρήγορα δύο φορές για να μεγεθύνετε ή να σμικρύνετε μια ιστοσελίδα ή
έναν χάρτη.
Μετακίνηση
Αγγίξτε και κρατήστε ένα στοιχείο, όπως μια εφαρμογή ή ένα widget και, στη
συνέχεια, μετακινήστε το δάχτυλό σας σε άλλο σημείο ακολουθώντας μια
ελεγχόμενη κίνηση. Μπορείτε να χρησιμοποιήσετε αυτήν την κίνηση για να
μετακινήσετε ένα στοιχείο.
Κάθετη κύλιση
Αγγίξτε την οθόνη με το δάχτυλό σας και μετακινήστε το γρήγορα χωρίς καμία
παύση. Μπορείτε να χρησιμοποιήσετε αυτή την κίνηση για να μετακινηθείτε σε μια
λίστα, μια ιστοσελίδα, τις φωτογραφίες, τις οθόνες και άλλα.

Βασικές λειτουργίες 53
Άνοιγμα και κλείσιμο των δακτύλων
Κλείστε τα δύο δάκτυλά σας για να φύγετε από μια εφαρμογή, όπως για
παράδειγμα από μια φωτογραφία ή έναν χάρτη. Για να μεγεθύνετε κάποιο στοιχείο,
ανοίξτε τα δάκτυλά σας.
• Μην εκθέτετε την οθόνη αφής σε υπερβολικά δυνατούς κραδασμούς.
Μπορεί να προκληθεί βλάβη στον αισθητήρα αφής.
• Σε περίπτωση χρήσης της συσκευής κοντά σε μαγνητικό, μεταλλικό ή
αγώγιμο υλικό, η οθόνη αφής ενδέχεται να μην αποκρίνεται.
• Σε περίπτωση χρήσης της συσκευής κάτω από έντονο φωτισμό, όπως το
άμεσο ηλιακό φως, η οθόνη μπορεί να μην είναι ορατή, ανάλογα με τη θέση
σας. Χρησιμοποιείτε τη συσκευή σε μια σκιερή τοποθεσία ή μια τοποθεσία
με μέτριο φωτισμό, σε ένταση που αρκεί για την ανάγνωση ενός βιβλίου.
• Μην πατάτε πάνω στην οθόνη με υπερβολική δύναμη.
• Πατήστε απαλά με το δάκτυλό σας την επιλογή που θέλετε.
• Ο έλεγχος αφής ενδέχεται να μην λειτουργήσει σωστά σε περίπτωση που
φοράτε γάντια ή πατάτε με το άκρο του νυχιού σας.
• Ο έλεγχος αφής ενδέχεται να μην λειτουργήσει σωστά εάν στην οθόνη έχει
σχηματιστεί υγρασία.
• Η οθόνη αφής ενδέχεται να μην λειτουργεί σωστά εάν στη συσκευή έχει
τοποθετηθεί προστατευτική μεμβράνη ή αξεσουάρ που προμηθευτήκατε
από τρίτο κατάστημα.
• Η εμφάνιση μιας στατικής εικόνας για παρατεταμένα χρονικά διαστήματα
μπορεί να οδηγήσει στη δημιουργία μετεικάσματος ή ειδώλου στην οθόνη.
Απενεργοποιήστε την οθόνη ή αποφύγετε την προβολή της ίδιας εικόνας
για μεγάλο διάστημα όταν δεν χρησιμοποιείτε τη συσκευή.

Βασικές λειτουργίες 54
Αρχική οθόνη
Επισκόπηση αρχικής οθόνης
Η αρχική οθόνη είναι το σημείο εκκίνησης για την πρόσβαση σε διάφορες
λειτουργίες και εφαρμογές στη συσκευή σας. Σύρετε το δάκτυλο από το κάτω
μέρος οποιαδήποτε οθόνης για να μεταβείτε απευθείας στην αρχική οθόνη.
Μπορείτε να διαχειριστείτε όλες τις εφαρμογές και τα widget στην αρχική οθόνη.
Σύρετε το δάκτυλό σας στην οθόνη προς τα αριστερά ή προς τα δεξιά για να δείτε
όλες τις εγκατεστημένες εφαρμογές με μια ματιά.
Διάταξη αρχικής οθόνης
Μπορείτε να δείτε όλες τις εφαρμογές και να οργανώσετε τα widget και τους
φακέλους στην αρχική οθόνη.
Περιοχή γρήγορης
πρόσβασης
Γραμμή Πλοήγησης
Φάκελος
Γραμμή κατάστασης
Widget καιρού
Εικονίδιο σελίδας
Γραφικό στοιχείο
Αναζήτησης Google
• Η αρχική οθόνη ενδέχεται να διαφέρει ανάλογα με την πολιτική του
κατασκευαστή, τις ρυθμίσεις χρήστη, την έκδοση του λογισμικού ή τον
πάροχο υπηρεσιών.

Βασικές λειτουργίες 55
• Γραμμή κατάστασης: εμφανίζει εικονίδια κατάστασης, την ώρα και τη στάθμη
της μπαταρίας.
• Widget καιρού: εμφάνιση πληροφοριών καιρού και χρόνου για συγκεκριμένη
περιοχή.
• Γραφικό στοιχείο Αναζήτησης Google: Δακτυλογράφησε ή μίλα για να
ανοίξεις την Αναζήτηση Google.
• Φάκελος: Μπορείτε να δημιουργείτε φακέλους για να τοποθετείτε την
εφαρμογή με βάση τα επιθυμητά κριτήρια.
• Εικονίδιο σελίδας: εμφάνιση του συνολικού αριθμού των καμβάδων στην
αρχική οθόνη. Μπορείτε να αγγίξετε το επιθυμητό εικονίδιο σελίδας για να
μεταβείτε στη σελίδα της επιλογής σας. Θα επισημανθεί το εικονίδιο που
εμφανίζει τους καμβάδες εκείνης της στιγμής.
• Περιοχή γρήγορης πρόσβασης: τοποθετήστε βασικές εφαρμογές στο κάτω
μέρος της οθόνης για να είναι δυνατή η πρόσβαση σε αυτές από οποιονδήποτε
καμβά της αρχικής οθόνης.
• Γραμμή Πλοήγησης: Μπορείτε να μεταβείτε στην προηγούμενη οθόνη ή την
αρχική οθόνη ενώ χρησιμοποιείτε την εφαρμογή και να ελέγξετε τη λίστα των
εφαρμογών που χρησιμοποιήσατε πρόσφατα.
Χρήση της Γραμμή Πλοήγησης
Ακολουθεί ο οδηγός χειρονομιών για τον έλεγχο της Γραμμή πλοήγηση.
• Για να μεταβείτε στην Αρχική οθόνη, σύρετε προς τα πάνω από την κάτω γωνία
της οθόνης.
• Για να επιστρέψετε στην προηγούμενη οθόνη, σύρετε προς τα μέσα από την
αριστερή ή την δεξιά άκρη της οθόνης.
• Για να μεταβείτε στην οθόνη Επισκόπησης, σύρετε προς τα πάνω και κρατήστε
από την κάτω πλευρά της οθόνης.
• Για γρήγορη εναλλαγή μεταξύ των εφαρμογών, σύρετε προς τα δεξιά από το
κάτω μέρος της οθόνης για να μεταβείτε στις εφαρμογές που χρησιμοποιήσατε
προηγουμένως.
• Οι Χειρονομίες είναι η προεπιλογή για τη γραμμή πλοήγησης. Για να το
αλλάξετε σε Μόνο κουμπιά / / , στην αρχική οθόνη, πατήστε
Ρυθμίσεις Προβολή Γραμμή Πλοήγησης, στη συνέχεια επιλέξτε Μόνο
κουμπιά.

Βασικές λειτουργίες 56
Εικονίδια κατάστασης
Όταν υπάρχει μια ειδοποίηση για ένα αδιάβαστο μήνυμα, ένα συμβάν
ημερολογίου ή ξυπνητήρι, η γραμμή κατάστασης εμφανίζει το αντίστοιχο
εικονίδιο ειδοποίησης. Ελέγξτε την κατάσταση της συσκευής σας μέσω των
εικονιδίων ειδοποίησης που εμφανίζονται στη γραμμή κατάστασης.
Δεν υπάρχει σήμα
Η μετάδοση δεδομένων πραγματοποιείται μέσω δικτύου
Έχει ρυθμιστεί ξυπνητήρι
Έχει ενεργοποιηθεί η λειτουργία δόνησης
Έχει ενεργοποιηθεί το Bluetooth
Σύνδεση με υπολογιστή μέσω USB
Στάθμη μπαταρίας
Λειτουργία πτήσης ενεργοποιημένη
Αναπάντητες κλήσεις
Έχει συνδεθεί το Wi-Fi
Έχει ενεργοποιηθεί η λειτουργία σίγασης
Έχει ενεργοποιηθεί το GPS
Έχει ενεργοποιηθεί το φορητό σημείο πρόσβασης
Δεν υπάρχει κάρτα SIM
Η λειτουργία NFC είναι ενεργοποιημένη
• Ορισμένα από αυτά τα εικονίδια ενδέχεται να εμφανίζονται διαφορετικά ή
να μην εμφανίζονται καθόλου, ανάλογα με την κατάσταση της συσκευής.
Διαβάστε την περιγραφή των εικονιδίων ανάλογα με το περιβάλλον και την
περιοχή όπου χρησιμοποιείτε τη συσκευή και τον πάροχο υπηρεσιών.
• Τα εικονίδια που εμφανίζονται ενδέχεται να διαφέρουν ανάλογα με την
περιοχή και τον πάροχο υπηρεσιών κινητής τηλεφωνίας.

Βασικές λειτουργίες 57
Πίνακας ειδοποιήσεων
Μπορείτε να ανοίξετε τον πίνακα ειδοποιήσεων σύροντας τη γραμμή κατάστασης
προς τα κάτω στην κύρια οθόνη.
• Μπορείτε να σύρετε προς τα κάτω το παράθυρο ειδοποιήσεων ή να πατήσετε
το εικονίδιο βέλους για να ανοίξετε τη λίστα με τα εικονίδια γρήγορων
ρυθμίσεων.
• Μπορείτε να πατήσετε για να προσθέσετε, διαγράψετε ή τακτοποιήσετε τα
εικονίδια στο παράθυρο ειδοποιήσεων.
• Εάν πατήσετε παρατεταμένα το εικονίδιο, θα εμφανιστεί η οθόνη ρυθμίσεων
για την αντίστοιχη λειτουργία.
• Μπορείτε να χρησιμοποιήσετε τον πίνακα ειδοποιήσεων ακόμα και όταν
η οθόνη είναι κλειδωμένη. Σύρετε τον πίνακα ειδοποιήσεων ενώ η οθόνη
είναι κλειδωμένη, για να αποκτήσετε γρήγορη πρόσβαση στις δυνατότητες
που θέλετε.

Βασικές λειτουργίες 58
Εναλλαγή στον προσανατολισμό της οθόνης
Μπορείτε να ορίσετε να αλλάζει αυτόματα ο προσανατολισμός της οθόνης
ανάλογα με τον φυσικό προσανατολισμό της συσκευής.
Στον πίνακα ειδοποιήσεων, επιλέξτε Περιστροφή από τη λίστα των εικονιδίων
γρήγορης πρόσβασης.
Μπορείτε επίσης να πατήστε Ρυθμίσεις Προβολή και ενεργοποιήστε την
Αυτόματη περιστροφή οθόνης στην αρχική οθόνη.
Επεξεργασία της αρχικής οθόνης
Στην Αρχική οθόνη, αγγίξτε και κρατήστε σε ένα κενό σημείο και, στη συνέχεια,
επιλέξτε την επιθυμητή ενέργεια από τις παρακάτω.
• Για να αλλάξετε τη διάταξη των καμβάδων στην αρχική οθόνη, πατήστε
παρατεταμένα πάνω σε έναν καμβά και σύρετέ τον σε μια άλλη θέση.
• Για να προσθέσετε ένα widget στην Αρχική οθόνη, αγγίξτε ένα κενό σημείο της
Αρχικής οθόνης και κρατήστε το επιλέγοντας Widgets.
• Για να αλλάξετε ταπετσαρίες, θέματα, εικονίδια και AOD, αγγίξτε παρατεταμένα
μια κενή περιοχή της αρχικής οθόνης και, στη συνέχεια, επιλέξτε Φόντο &
Θέμα.
Μπορείτε επίσης να πατήσετε Ρυθμίσεις Φόντο & Θέμα στην αρχική οθόνη
και, στη συνέχεια, να επιλέξετε ταπετσαρίες, θέματα, εικονίδια και AOD που θα
εφαρμόσετε στη συσκευή.
• Για να αλλάξετε το πλέγμα, πατήστε παρατεταμένα σε ένα κενό σημείο της
Αρχικής οθόνης και, στη συνέχεια, επιλέξτε Πλέγμα. Πατήστε το επιθυμητό
πλέγμα, κατόπιν πατήστε Εφαρμογή.

Βασικές λειτουργίες 59
• Για να διαμορφώσετε τις ρυθμίσεις της Αρχικής οθόνης, αγγίξτε ένα κενό
σημείο της Αρχικής οθόνης και κρατήστε το επιλέγοντας στη συνέχεια
Ρυθμίσεις αρχικής οθόνης. Για λεπτομέρειες, ανατρέξτε στην ενότητα
Ρυθμίσεις αρχικής οθόνης
.
• Για να δείτε ή να εγκαταστήσετε ξανά τις μη εγκατεστημένες εφαρμογές,
αγγίξτε ένα κενό σημείο της Αρχικής οθόνης και κρατήστε το επιλέγοντας
Σκουπίδια εφαρμογ. Για λεπτομέρειες, ανατρέξτε στην ενότητα
Σκουπίδια
εφαρμογ.
.
• Για να αλλάξετε την προεπιλεγμένη οθόνη, αγγίξτε και κρατήστε μια κενή
περιοχή της Αρχικής οθόνης, μετακινηθείτε στην επιθυμητή οθόνη, αγγίξτε το
κουμπί , και στη συνέχεια αγγίξτε την οθόνη για άλλη μια φορά.
Προεπιλεγμένη οθόνη

Βασικές λειτουργίες 60
Προβολή του θέματος φόντου
Η προβολή της εικόνας φόντου είναι δυνατή μόνο με την απόκρυψη των
εφαρμογών και των widget στην αρχική οθόνη.
Απλώστε τα δύο δάκτυλά σας στην αρχική οθόνη.
• Για να επιστρέψετε στην αρχική οθόνη με τις εφαρμογές και τα widget, ενώστε
τα δάκτυλά σας ενώ τα ακουμπάτε στην Αρχική οθόνη ή σύρετε προς τα πάνω
από την κάτω άκρη της οθόνης.
Μετακίνηση εφαρμογών στην αρχική οθόνη
Στην αρχική οθόνη, πατήστε παρατεταμένα πάνω σε μια εφαρμογή και σύρετέ την
σε μια άλλη θέση.
• Για να καρφιτσώσετε τις εφαρμογές που χρησιμοποιούνται συχνά στο κάτω
μέρος της αρχικής οθόνης, πατήστε παρατεταμένα πάνω σε μια εφαρμογή, και
σύρετέ την στην περιοχή γρήγορης πρόσβασης στο κάτω μέρος της οθόνης.
• Για να αφαιρέσετε ένα εικονίδιο από την περιοχή γρήγορης πρόσβασης, σύρετε
το εικονίδιο στην αρχική οθόνη.

Βασικές λειτουργίες 61
Χρήση φακέλων από την αρχική οθόνη
Δημιουργία φακέλων
Στην αρχική οθόνη, πατήστε παρατεταμένα πάνω σε μια εφαρμογή και σύρετέ την
πάνω σε μια άλλη εφαρμογή.
• Δημιουργείται ένας νέος φάκελος και οι εφαρμογές προστίθενται στον φάκελο.
Επεξεργασία φακέλων
Στην αρχική οθόνη, αγγίξτε έναν φάκελο και, έπειτα, εκτελέστε μία από τις
ακόλουθες ενέργειες.
• Για να επεξεργαστείτε το όνομα φακέλου, πατήστε στο όνομα φακέλου.
• Για να επεξεργαστείτε το χρώμα, πατήστε στον επάνω δεξί κύκλο.
• Για να προσθέσετε εφαρμογές, αγγίξτε και κρατήστε το εικονίδιο μιας
εφαρμογής, σύρετέ το πάνω από το φάκελο και, στη συνέχεια, αφήστε το.
• Για να αφαιρέσετε μια εφαρμογή από τον φάκελο, πατήστε παρατεταμένα
πάνω στην εφαρμογή και σύρετέ την έξω από τον φάκελο. Εάν η καταργηθείσα
εφαρμογή είναι η μοναδική εφαρμογή στο φάκελο, ο φάκελος θα καταργηθεί
αυτόματα.
• Επίσης, μπορείτε να προσθέσετε ή να αφαιρέσετε εφαρμογές πατώντας .
• Δεν μπορείτε να αλλάξετε το χρώμα του φακέλου όταν χρησιμοποιείτε
κάποιο θέμα που έχετε κατεβάσει.

Βασικές λειτουργίες 62
Ρυθμίσεις αρχικής οθόνης
Μπορείτε να προσαρμόσετε τις ρυθμίσεις της αρχικής οθόνης.
1 Στην αρχική οθόνη, πατήστε Ρυθμίσεις Προβολή Αρχική οθόνη.
2 Προσαρμόστε τις παρακάτω ρυθμίσεις:
• Επιλέξτε Αρχική σελίδα: επιλέξτε μια λειτουργία από την αρχική οθόνη.
• Εφέ οθόνης: επιλέξτε το εφέ που θα εφαρμόζεται κατά την εναλλαγή καμβά
στην αρχική οθόνη.
• Σχήματα εικονιδίων: επιλέξτε εάν θέλετε τα εικονίδια να έχουν
τετραγωνισμένες ή στρογγυλεμένες άκρες.
• Ροή Google: εμφάνιση στα αριστερά της κύριας Αρχικής οθόνης.
• Ταξινόμηση εφαρμογών ανά: δείτε με ποιον τρόπο ταξινομούνται οι
εφαρμογές στην αρχική οθόνη.
• Απόκρυψη εφαρμογών: επιλέξτε τις εφαρμογές που θέλετε να αποκρύψετε
από την αρχική οθόνη.
• Να επιτρέπεται κυκλική επανάληψη Αρχικών οθονών: ενεργοποιήστε
αυτήν την επιλογή για να επιτρέψετε τη συνεχή κύλιση στην αρχική οθόνη
(επιστρέψτε μέσω βρόχου στην πρώτη οθόνη μετά την τελευταία οθόνη).
• Σύρετε προς τα κάτω στο Αρχική οθόνη: Ενεργοποιήστε την αναζήτηση
εφαρμογών ή περιεχομένου ή προβάλλετε ειδοποιήσεις σέρνοντας προς τα
κάτω στην αρχική οθόνη.
• Σύρετε προς τα επάνω στο Αρχική οθόνη: Ενεργοποιήστε την αναζήτηση
εφαρμογών ή περιεχομένου σύροντας προς τα επάνω στην αρχική οθόνη.
• Κλείδωμα Αρχική οθόνη: Ενεργοποιήστε το για να μην γίνεται αναδιάταξη
ή απομάκρυνση εφαρμογών και widget.

Βασικές λειτουργίες 63
Προσαρμογή Στροφή Home
Η αρχική οθόνη της λειτουργίας περιστροφής είναι η πρώτη οθόνη που
εμφανίζεται αφού περιστρέψετε το προϊόν. Μπορείτε να χρησιμοποιήσετε τις
αρχικές οθόνες της κύριας οθόνης και της Οθόνη δευτερεύον με διάφορους
τρόπους.
Κύρια οθόνη
Γραμμή
Πλοήγησης
Ρολόι και
καιρός
Συντομεύσεις
εφαρμογών
Εικονίδια γρήγορης
πρόσβασης
Δεύτερη οθόνη
Γραμμή Πλοήγησης
• Ρολόι και καιρός: Μπορείτε να δείτε την τρέχουσα ώρα και πληροφορίες για
τον καιρό.
• Συντομεύσεις εφαρμογών: Μπορείτε να ξεκινήσετε γρήγορα της εφαρμογές
της λίστας.
• Γραμμή Πλοήγησης: Μπορείτε να χρησιμοποιήσετε χειρονομίες για να
μεταβείτε στην αρχική οθόνη, στην προηγούμενη οθόνη, στην οθόνη
προεπισκόπησης ή για γρήγορη εναλλαγή μεταξύ των εφαρμογών.
• Περιοχή γρήγορης πρόσβασης: Μπορείτε να χρησιμοποιήσετε τις εφαρμογές
που θέλετε για να ξεκινήσετε αμέσως.

Βασικές λειτουργίες 64
Διαμόρφωση της Στροφή Home
Μπορείτε να αλλάξετε τις ρυθμίσεις που αφορούν την αρχική οθόνη της
λειτουργίας περιστροφής.
1 Στην αρχική οθόνη, πατήστε Ρυθμίσεις Προβολή Στροφή Home.
2 Επιλέξτε την επιθυμητή λειτουργία για να καθορίσετε τις ρυθμίσεις της.
• Σύρετε προς τα κάτω στο Αρχική οθόνη: Επιλέξτε τι θέλετε να εμφανίζεται
όταν σύρετε προς τα κάτω στην κύρια αρχική οθόνη στη λειτουργία
περιστροφής.
• Multi App Shortcut: Μπορείτε να επιλέξετε να εκτελούνται δύο εφαρμογές
ταυτόχρονα στην κύρια οθόνη και στη δεύτερη οθόνη.
• Σύρετε προς τα κάτω στο Αρχική οθόνη: Επιλέξτε τι θέλετε να
εμφανίζεται όταν σύρετε προς τα κάτω στη δεύτερη οθόνη στη λειτουργία
περιστροφής.
• Εφέ οθόνης: Επιλέξτε ένα επιθυμητό οπτικό εφέ όταν περιστρέφετε το
τηλέφωνο.
• Εικονίδια συρταριού εφαρμογών: Ενεργοποιήστε την εμφάνιση του
εικονιδίου συρταριού εφαρμογών στη δεύτερη οθόνη.
• Κλείδωμα Αρχική οθόνη: Ενεργοποιήστε το για να μην γίνεται αναδιάταξη
ή απομάκρυνση εφαρμογών και widget.
• Βοήθεια: Προβολή της βοήθειας για τη λειτουργία περιστροφής.
Βασικές λειτουργίες 65
Κλείδωμα οθόνης
Παρουσίαση κλειδώματος οθόνης
Η οθόνη της συσκευής σας απενεργοποιείται και κλειδώνει αυτόματα αν πατήσετε
το πλήκτρο λειτουργίας/κλειδώματος. Το ίδιο συμβαίνει επίσης και όταν η συσκευή
παραμείνει σε αδράνεια για ένα καθορισμένο χρονικό διάστημα.
Εάν πατήσετε το πλήκτρο ενεργοποίησης/κλειδώματος χωρίς να έχει
ενεργοποιηθεί το κλείδωμα οθόνης, θα εμφανιστεί αυτόματα η αρχική οθόνη.
Για να εξασφαλίσετε την ασφάλεια της συσκευής και να αποτρέψετε ανεπιθύμητη
πρόσβαση σε αυτή, ενεργοποιήστε το κλείδωμα οθόνης.
• Το κλείδωμα οθόνης αποτρέπει την περιττή εισαγωγή εντολών αφής στη
συσκευή και μειώνει την κατανάλωση ισχύος της μπαταρίας. Συνιστάται
να ενεργοποιήσετε το κλείδωμα της οθόνης όταν δεν χρησιμοποιείτε τη
συσκευή.
Ρύθμιση κλειδώματος οθόνης
Διατίθενται αρκετές επιλογές για τη διαμόρφωση των ρυθμίσεων κλειδώματος της
οθόνης.
1 Στην αρχική οθόνη, πατήστε Ρυθμίσεις Κλείδωμα οθόνης & ασφάλεια
Διαλέξτε κλείδωμα οθόνης και, στη συνέχεια, επιλέξτε τη μέθοδο που
προτιμάτε.
2 Προσαρμόστε τις παρακάτω ρυθμίσεις:
• Κανένα: απενεργοποίηση λειτουργίας κλειδώματος οθόνης.
• Σύρετε: σαρώστε στην οθόνη για να ξεκλειδώσετε την οθόνη.
• Μοτίβο: σχεδιάστε ένα μοτίβο για να ξεκλειδώνετε την οθόνη.
• Κωδικός κλειδώματος: εισαγάγετε έναν αριθμητικό κωδικό πρόσβασης για
να ξεκλειδώσετε την οθόνη.
• Κωδικός πρόσβασης: εισαγάγετε έναν αλφαριθμητικό κωδικό πρόσβασης
για να ξεκλειδώσετε την οθόνη.
• Δακτυλ Αποτυπώματα: ξεκλειδώστε την οθόνη χρησιμοποιώντας το
δακτυλικό σας αποτύπωμα.

Βασικές λειτουργίες 66
Παραμετροποίηση κλειδώματος οθόνης κλειδώματος
Μπορείτε να προσαρμόσετε την οθόνη κλειδώματος.
1 Στην αρχική οθόνη, πατήστε Ρυθμίσεις Κλείδωμα οθόνης & ασφάλεια
Παραμετροποίηση κλειδώματος οθόνης.
2 Επιλέξτε μια λειτουργία που θέλετε να ρυθμίσετε.
• Ρολόι: Σας επιτρέπει να ορίσετε το μέγεθος του ρολογιού στην οθόνη
κλειδώματος.
• Συντομεύσεις: Σας επιτρέπει να επιλέξετε την εφαρμογή που θα εκτελεστεί
στην οθόνη κλειδώματος σας. Αυτή η ρύθμιση είναι ορατή μόνο όταν έχει
οριστεί το κλείδωμα οθόνης.
• Κινούμενη εικόνα καιρού: Ενεργοποιήστε αυτήν την επιλογή για να
εμφανίσετε κινούμενα σχέδια καιρού για την τρέχουσα θέση στην οθόνη
κλειδώματος.
• Στοιχεία επαφής στην περίπτωση απώλειας του τηλεφώνου: Σας δίνει
τη δυνατότητα να ορίσετε κείμενο στην οθόνη κλειδώματος για να
προσδιορίσετε τον κάτοχο του τηλεφώνου.
Ρυθμίσεις ασφαλούς κλειδώματος
Μπορείτε να ορίσετε ασφαλείς ρυθμίσεις κλειδώματος.
1 Στην αρχική οθόνη, πατήστε Ρυθμίσεις Κλείδωμα οθόνης & ασφαλείας
ασφάλεια Ρυθμίσεις ασφαλούς κλειδώματος.
2 Επιλέξτε μια λειτουργία που θέλετε να ρυθμίσετε.
• Να φαίνονται τα μοτίβα (εμφανίζεται μόνο όταν το Μοτίβο έχει οριστεί ως
κλείδωμα οθόνης): Ενεργοποιήστε για να κάνετε το μοτίβο ορατό.
• Χρονοδιακόπτης κλειδώματος: Σας επιτρέπει να ρυθμίζετε το χρονικό
διάστημα πριν το αυτόματο κλείδωμα της οθόνης αφού κλείσετε τον
οπίσθιο φωτισμό (χρονικό όριο λόγω αδράνειας).
• Το κουμπί τροφοδοσίας κλειδώνει στιγμιαία: Ενεργοποιήστε αυτή την
επιλογή για να κλειδώσετε αμέσως την οθόνη όταν πιέσετε το κουμπί
ενεργοποίησης / κλειδώματος. Αυτή η ρύθμιση υπερισχύει της ρύθμισης
χρονοδιακόπτη κλειδώματος ασφαλείας.
• Εμφάνιση επιλογής κλειδώματος (εμφανίζεται μόνο όταν έχει οριστεί
κλείδωμα οθόνης): Ενεργοποιήστε αυτήν την επιλογή για να εμφανίζεται
το εικονίδιο κλειδώματος όταν κρατάτε πατημένο το πλήκτρο Ισχύος/
κλειδώματος. Πατήστε το εικονίδιο κλειδώματος για να απενεργοποιήσετε
το έξυπνο κλείδωμα, το βιομετρικό ξεκλείδωμα και τις ειδοποιήσεις στην
οθόνη κλειδώματος.

Βασικές λειτουργίες 67
• Smart Lock: Σας δίνει τη δυνατότητα να ορίσετε αξιόπιστη συσκευή,
τοποθεσία, φωνή και / ή ανίχνευση στο σώμα που θα επιτρέψει στο
τηλέφωνό σας να παραμένει ξεκλειδωμένο.
• Οι διαθέσιμες επιλογές μενού ενδέχεται να διαφέρουν ανάλογα με την
επιλεγμένη μέθοδο οθόνης κλειδώματος.
Ενεργοποίηση οθόνης
Μπορείτε να ενεργοποιήσετε ή να απενεργοποιήσετε την οθόνη με διπλό πάτημα
πάνω της.
• Αυτή η επιλογή είναι διαθέσιμη μόνο στην αρχική οθόνη της LG. Δεν
λειτουργεί σωστά σε κάποια ειδική εφαρμογή εκκίνησης ή στην αρχική
οθόνη που έχει εγκατασταθεί από τον χρήστη.
• Για να πατήσετε την οθόνη αφής, χρησιμοποιήστε το δάκτυλό σας. Μην
χρησιμοποιείτε το νύχι σας.
• Για να χρησιμοποιήσετε τη λειτουργία Ενεργοποίηση οθόνης, βεβαιωθείτε
ότι ο αισθητήρας εγγύτητας/φωτισμού δεν εμποδίζεται από κάποιο
αυτοκόλλητο ή άλλη ξένη ουσία.
Ενεργοποίηση οθόνης
Πατήστε με το δάκτυλό σας δύο φορές στη μέση της οθόνης.
• Εάν πατήσετε στο επάνω ή στο κάτω μέρος της οθόνης, ο βαθμός αναγνώρισης
της κίνησης ενδέχεται να μην είναι επαρκής.
Απενεργοποίηση οθόνης
Αγγίξτε με το δάκτυλό σας δύο φορές πάνω σε ένα κενό σημείο στην Αρχική
οθόνη και στην Κλειδωμένη οθόνη.
Εναλλακτικά, πατήστε δύο φορές σε έναν κενό χώρο στη γραμμή κατάστασης.
Απενεργοποίηση Ενεργοποίηση οθόνης
Εάν δεν θέλετε να χρησιμοποιείτε τη λειτουργία Ενεργοποίηση οθόνης, κάντε τα
εξής:
Στην αρχική οθόνη, πατήστε Ρυθμίσεις Επεκτάσεις Ενεργοποίηση οθόνης και
σύρετε για να απενεργοποιήσετε τη λειτουργία.

Βασικές λειτουργίες 68
Αναγνώριση δακτυλικών αποτυπωμάτων
Αναγνώριση Δακτυλ. Αποτυπώματα - Παρουσίαση
Προτού χρησιμοποιήσετε τη λειτουργία αναγνώρισης Δακτυλ. Αποτυπώματος,
πρέπει να καταχωρίσετε τα δακτυλικά σας αποτυπώματα στη συσκευή.
Μπορείτε να χρησιμοποιήσετε τη λειτουργία αναγνώρισης Δακτυλ.
Αποτυπώματος στις ακόλουθες περιπτώσεις:
• Για ξεκλείδωμα της οθόνης.
• Για να δείτε τα κλειδωμένα περιεχόμενα στη λειτουργία Άλμπουμ ή στην
εφαρμογή QuickMemo+.
• Για επιβεβαίωση μιας αγοράς μέσω της σύνδεσης σε μια εφαρμογή ή
ταυτοποίησης με το δακτυλικό σας αποτύπωμα.
• Η συσκευή μπορεί να χρησιμοποιεί το δακτυλικό σας αποτύπωμα για
λόγους ταυτοποίησης. Ο αισθητήρας Δακτυλ. Αποτυπώματος μπορεί να
μην ξεχωρίζει δακτυλικά αποτυπώματα που ανήκουν σε διαφορετικούς
χρήστες αλλά έχουν πολλές ομοιότητες, και να τα αναγνωρίζει ως το ίδιο
αποτύπωμα. Για πρόσθετη ασφάλεια, ρυθμίστε το κλείδωμα της οθόνης με
ένα μοτίβο, κωδικό PIN ή κωδικό πρόσβασης.
• Αν η συσκευή δεν αναγνωρίζει τα δαχτυλικά σας αποτυπώματα ή αν
ξεχάσετε την καθορισμένη τιμή για την καταχώριση, επικοινωνήστε με
το Εξουσιοδοτημένο κέντρο εξυπηρέτησης πελατών της LG έχοντας τη
συσκευή και την ταυτότητά σας.

Βασικές λειτουργίες 69
Προφυλάξεις για την αναγνώριση Δακτυλ. Αποτυπώματος
Η ακρίβεια αναγνώρισης δακτυλικού αποτυπώματος μπορεί να μειωθεί για
διάφορους λόγους. Για να μεγιστοποιηθεί η ακρίβεια της αναγνώρισης, ελέγξτε τα
ακόλουθα πριν χρησιμοποιήσετε τη συσκευή.
• Κάτω και στο κέντρο της οθόνης του προϊόντος, υπάρχει ένας ενσωματωμένος
αισθητήρας που αναγνωρίζει δακτυλικά αποτυπώματα. Προσέχετε ώστε
να μην γρατζουνίσετε ή προκαλέσετε φθορά στον αισθητήρα Δακτυλ.
Αποτυπώματα με μεταλλικά αντικείμενα όπως κέρματα ή κλειδιά.
• Εάν αντικαταστήσετε την προστατευτική μεμβράνη που υπάρχει στο προϊόν με
μια πολωμένη μεμβράνη που διαχέει το φως ή μια μεμβράνη μεγάλου πάχους,
ενδεχομένως να μειωθεί ο ρυθμός αναγνώρισης δακτυλικών αποτυπωμάτων.
• Εάν υπάρχουν ξένες ουσίες (ιδρώτας, λοσιόν, νερό, σκόνη, λίπη, κ.ά.) στον
αισθητήρα Δακτυλ. Αποτυπώματα ή στο δάχτυλο που θα τοποθετηθεί στον
αισθητήρα, η αναγνώριση Δακτυλ. Αποτυπώματα ενδέχεται να μην λειτουργεί
σωστά. Σκουπίστε τον αισθητήρα και το δάχτυλο και αφαιρέστε κάθε ίχνος
υγρασίας πριν τοποθετήσετε το δάχτυλο στον αισθητήρα.
• Εάν η επιφάνεια του δαχτύλου είναι σκληρή επειδή έχει ουλές ή έχει ζαρώσει
από το νερό, ο αισθητήρας ενδέχεται να μην μπορεί να αναγνωρίσει το
δακτυλικό αποτύπωμα. Σε τέτοια περίπτωση, καταχωρίστε το δακτυλικό
αποτύπωμα άλλου δαχτύλου.
• Εάν λυγίζετε το δάκτυλό σας ή χρησιμοποιείτε μόνο την άκρη του δακτύλου
σας, το δακτυλικό αποτύπωμά σας ενδέχεται να μην αναγνωριστεί. Βεβαιωθείτε
ότι το δάκτυλό σας καλύπτει ολόκληρη την επιφάνεια του αισθητήρα Δακτυλ.
Αποτυπώματα.
• Σαρώστε μόνο ένα δάκτυλο για κάθε καταχώριση. Η σάρωση περισσότερων
δακτύλων μπορεί να έχει επιπτώσεις στη διαδικασία καταχώρισης και
εγγραφής.
• Η συσκευή ενδέχεται να δημιουργεί στατικό ηλεκτρισμό σε περίπτωση που
λειτουργεί σε περιβάλλον με ξηρό αέρα. Εάν ο περιβάλλων αέρας είναι ξηρός,
αποφύγετε τη σάρωση του δακτυλικού σας αποτυπώματος ή αγγίξτε ένα
μεταλλικό αντικείμενο, όπως ένα νόμισμα ή ένα κλειδί, πριν τη σάρωση του
δακτυλικού αποτυπώματος για να εξουδετερώσετε τον στατικό ηλεκτρισμό.

Βασικές λειτουργίες 70
Καταχώριση Δακτυλ. Αποτυπώματα
Μπορείτε να καταχωρίσετε και να αποθηκεύσετε το δακτυλικό σας αποτύπωμα
στη συσκευή για να το χρησιμοποιείτε με την αναγνώριση Δακτυλ. Αποτυπώματα.
1 Στην αρχική οθόνη, πατήστε Ρυθμίσεις Κλείδωμα οθόνης & ασφάλεια
Δακτυλ. Αποτυπώματα.
• Αυτή η λειτουργία είναι διαθέσιμη μόνο εφόσον είναι ενεργοποιημένη η
λειτουργία κλειδώματος οθόνης.
-Κλειδώστε τη συσκευή με ένα μοτίβο, ένα PIN ή έναν κωδικό πρόσβασης.
• Αν δεν έχει οριστεί κλείδωμα οθόνης, ακολουθήστε τις οδηγίες στην οθόνη
για το ενεργοποιήσετε. Για λεπτομέρειες, ανατρέξτε στην ενότητα
Ρύθμιση
κλειδώματος οθόνης
.
2 Εντοπίστε τη θέση του αισθητήρα Δακτυλ. Αποτυπώματος κάτω και στο
κέντρο της οθόνης και ακουμπήστε ελαφρώς το δάχτυλο στον αισθητήρα.
• Το δάχτυλο πρέπει να καλύπτει πλήρως τον αισθητήρα Δακτυλ.
Αποτυπώματος.
3 Ακολουθήστε τις οδηγίες που εμφανίζονται στην οθόνη.
• Ακουμπήστε το δάχτυλό σας στον αισθητήρα και κρατήστε το μέχρι να
αισθανθείτε μια δόνηση.
• Μετακινήστε ελαφρώς το ίδιο δάχτυλο στον αισθητήρα μέχρι να
ολοκληρωθεί η καταχώριση του δακτυλικού αποτυπώματος.
4 Όταν η καταχώριση του δακτυλικού αποτυπώματος ολοκληρωθεί, πατήστε
OK.

Βασικές λειτουργίες 71
• Πατήστε Προσθηκη επιπλ. για να καταχωρίσετε άλλο δακτυλικό
αποτύπωμα. Εάν έχετε καταχωρίσει μόνο ένα δακτυλικό αποτύπωμα και
το αντίστοιχο δάκτυλο δεν είναι σε κατάλληλη κατάσταση για σάρωση,
η αναγνώριση ενδέχεται να μη λειτουργήσει σωστά. Προληπτικά,
καταχωρίστε πολλά δακτυλικά αποτυπώματα.
Διαχείριση Δακτυλ. Αποτυπώματος
Μπορείτε να επεξεργαστείτε ή να διαγράψετε καταχωρισμένα δακτυλικά
αποτυπώματα.
1 Στην αρχική οθόνη, πατήστε Ρυθμίσεις Κλείδωμα οθόνης & ασφάλεια
Δακτυλ. Αποτυπώματα.
2 Ξεκλειδώστε σύμφωνα με την καθορισμένη μέθοδο κλειδώματος.
3 Από τη λίστα των Δακτυλ. Αποτυπώματα, πατήστε πάνω σε ένα δακτυλικό
αποτύπωμα για να το μετονομάσετε. Για να το διαγράψετε, πατήστε το κουμπί
.
Εμφάνιση του εικονιδίου δακτυλικού αποτυπώματος όταν
η οθόνη είναι σβηστή
Μπορείτε να ρυθμίσετε πώς θα εμφανίζεται η θέση του αισθητήρα δακτυλικού
αποτυπώματος στην οθόνη όταν η οθόνη είναι σβηστή.
1 Στην αρχική οθόνη, πατήστε Ρυθμίσεις Κλείδωμα οθόνης & ασφάλεια
Δακτυλ. Αποτυπώματα.
2 Ξεκλειδώστε σύμφωνα με την καθορισμένη μέθοδο κλειδώματος.
3 Για να ενεργοποιήσετε αυτήν την επιλογή, πατήστε τη ρύθμιση Πατήστε για
να εμφανίζεται εικονίδιο όταν η οθόνη είναι σβηστή.
Εφέ εικονιδίου
Μπορείτε να επιλέξετε ένα εφέ που εμφανίζεται κάθε φορά που πατιέται το
εικονίδιο δακτυλικών αποτυπωμάτων.
1 Στην αρχική οθόνη, πατήστε Ρυθμίσεις Κλείδωμα οθόνης & ασφάλεια
Δακτυλ. Αποτυπώματα.
2 Ξεκλειδώστε σύμφωνα με την καθορισμένη μέθοδο κλειδώματος.
3 Πατήστε Εφέ εικονιδίου και επιλέξτε το επιθυμητό εφέ.

Βασικές λειτουργίες 72
Ξεκλείδωμα της οθόνης με χρήση δακτυλικού
αποτυπώματος
Μπορείτε να ξεκλειδώσετε την οθόνη ή να δείτε το κλειδωμένο περιεχόμενο
χρησιμοποιώντας το δακτυλικό σας αποτύπωμα.
1 Στην αρχική οθόνη, πατήστε Ρυθμίσεις Κλείδωμα οθόνης & ασφάλεια
Δακτυλ. Αποτυπώματα.
2 Ξεκλειδώστε σύμφωνα με την καθορισμένη μέθοδο κλειδώματος.
3 Στην οθόνη ρυθμίσεων Δακτυλ. Αποτυπώματα, ενεργοποιήστε την επιθυμητή
λειτουργία:
• Κλείδωμα οθόνης: για να ξεκλειδώνετε την οθόνη με χρήση δακτυλικού
αποτυπώματος.
• Κλείδωμα περιεχομένου: Προσπελάστε περιεχόμενο που έχετε κλειδώσει
στο Άλμπουμ και το QuickMemo+ με το δακτυλικό σας αποτύπωμα.
Ενεργοποίηση οθόνης
Μπορείτε να ενεργοποιήσετε ή να απενεργοποιήσετε την οθόνη με διπλό πάτημα
πάνω της.
Στην αρχική οθόνη, πατήστε Ρυθμίσεις Επεκτάσεις Ενεργοποίηση οθόνης για
να ενεργοποιήσετε την επιλογή.
• Αυτή η επιλογή είναι διαθέσιμη μόνο στην αρχική οθόνη της LG. Δεν
λειτουργεί σωστά σε κάποια ειδική εφαρμογή εκκίνησης ή στην αρχική
οθόνη που έχει εγκατασταθεί από τον χρήστη.
• Για να πατήσετε την οθόνη αφής, χρησιμοποιήστε το δάκτυλό σας. Μην
χρησιμοποιείτε το νύχι σας.
• Για να χρησιμοποιήσετε τη λειτουργία Ενεργοποίηση οθόνης, βεβαιωθείτε
ότι ο αισθητήρας εγγύτητας/φωτισμού δεν εμποδίζεται από κάποιο
αυτοκόλλητο ή άλλη ξένη ουσία.
Ενεργοποίηση οθόνης
Πατήστε με το δάκτυλό σας δύο φορές στη μέση της οθόνης.
• Εάν πατήσετε στο επάνω ή στο κάτω μέρος της οθόνης, ο βαθμός αναγνώρισης
της κίνησης ενδέχεται να μην είναι επαρκής.

Βασικές λειτουργίες 73
Απενεργοποίηση οθόνης
Αγγίξτε με το δάκτυλό σας δύο φορές πάνω σε ένα κενό σημείο στην Αρχική
οθόνη και στην Κλειδωμένη οθόνη.
Εναλλακτικά, πατήστε δύο φορές σε έναν κενό χώρο στη γραμμή κατάστασης.
Λειτουργία πολυδιεργασίας
Οθόνη πρόσφατων χρήσεων
Σύρετε τη γραμμή πλοήγησης προς τα πάνω και κρατήστε την για να δείτε το
πρόσφατο ιστορικό χρήσης.
Αναδυόμενο παράθυρο
Μπορείτε να ανοίξετε πολλές εφαρμογές στην οθόνη και να εναλλάσσεστε εύκολα
ανάμεσά τους σε κάθε στιγμή.
1 Σύρετε προς τα πάνω και κρατήστε από το κάτω μέρος της οθόνης.
2 Πατήστε το εικονίδιο της εφαρμογής στην επάνω αριστερή γωνία της οθόνης
της εφαρμογής και επιλέξτε Αναδυόμενο παράθυρο.
• Αν πατήσετε το εικονίδιο της εφαρμογής, εμφανίζονται οι επιλογές
Πληροφορίες εφαρμογής, Πολλαπλά παράθυρα, Αναδυόμενο παράθυρο
και Καρφίτσ. εφαρ.
3 Η εφαρμογή εμφανίζεται με τη μορφή αναδυόμενου παραθύρου στην οθόνη.

Βασικές λειτουργίες 74
• Αυτή η δυνατότητα ενδέχεται να μην είναι διαθέσιμη σε ορισμένες
εφαρμογές ή οθόνες.
Χρήση του αναδυόμενου παραθύρου
• : Ελαχιστοποιεί το αναδυόμενο παράθυρο. Το αναδυόμενο παράθυρο
ελαχιστοποιείται στο αιωρούμενο εικονίδιο εφαρμογής στην οθόνη, το οποίο
μπορεί να μετακινηθεί οπουδήποτε θέλετε.
• : Επεκτείνει την εφαρμογή σε πλήρη οθόνη.
• : Κλείνει την εφαρμογή.
• Για να μετακινήσετε το αναδυόμενο παράθυρο: Σύρετε το επάνω μέρος του
αναδυόμενου παραθύρου.
• Για να ρυθμίσετε το μέγεθος του αναδυόμενου παραθύρου: Σύρετε την
αριστερή, τη δεξιά ή την κάτω πλευρά του αναδυόμενου παραθύρου.
• Μπορείτε να ανοίξετε έως 5 εφαρμογές χρησιμοποιώντας τα αναδυόμενα
παράθυρα.
• Για να επιλέξετε μια εφαρμογή από τις ανοιχτές εφαρμογές, πατήστε σε
ένα από τα αναδυόμενα παράθυρα. Το επιλεγμένο αναδυόμενο παράθυρο
έρχεται στο προσκήνιο.
• Τα αναδυόμενα παράθυρα δεν μπορούν να μετακινηθούν στη γραμμή
κατάστασης ή στην περιοχή της Γραμμή πλοήγηση.

Βασικές λειτουργίες 75
Χρήση του φακέλου εφαρμογών για αναδυόμενα παράθυρα
Αν πατήσετε στο αναδυόμενο παράθυρο, το αναδυόμενο παράθυρο
ελαχιστοποιείται στο εικονίδιο της εφαρμογής.
Μπορείτε να μετακινήσετε το εικονίδιο εφαρμογής οπουδήποτε θέλετε, σύροντάς
το.
Εάν ελαχιστοποιηθούν δύο ή περισσότερα αναδυόμενα παράθυρα, δημιουργείται
ο φάκελος εφαρμογών για να περιέχει τα εικονίδια εφαρμογών.
• Το εικονίδιο της εφαρμογής που χρησιμοποιήθηκε πρόσφατα
χρησιμοποιείται ως το εικονίδιο του φακέλου εφαρμογών. Εάν πατήσετε στο
εικονίδιο, όλα τα εικονίδια για τα ελαχιστοποιημένα αναδυόμενα παράθυρα
εμφανίζονται στο φάκελο εφαρμογών.

Βασικές λειτουργίες 76
Φάκελος εφαρμογών
αναδυόμενων
παραθύρων
• Εάν πατήσετε παρατεταμένα τον φάκελο εφαρμογών για αναδυόμενα
παράθυρα και σύρετε τον φάκελο εφαρμογών στην επιλογή Κατάργηση, ο
φάκελος εφαρμογών θα διαγραφεί.
• Για να διαγράψετε μια από τις εφαρμογές από το φάκελο εφαρμογών,
ανοίξτε τον φάκελο εφαρμογών και σύρετε το εικονίδιο της εφαρμογής
εκτός του φακέλου εφαρμογών.

Βασικές λειτουργίες 77
Πολλαπλά παράθυρα
Όταν χρησιμοποιείτε πλοήγηση με χειρονομίες (από
προεπιλογή)
1 Σύρετε προς τα πάνω και κρατήστε από το κάτω μέρος της οθόνης.
• Εμφανίζονται οι πρόσφατα χρησιμοποιημένες εφαρμογές.
• Αν πατήσετε το εικονίδιο της εφαρμογής, εμφανίζονται οι επιλογές
Πληροφορίες εφαρμογής, Πολλαπλά παράθυρα, Αναδυόμενο παράθυρο
και Καρφίτσ. εφαρ.
2 Πατήστε το εικονίδιο της εφαρμογής στην επάνω αριστερή γωνία της
εφαρμογής προς προβολή σε πολλαπλά παράθυρα και επιλέξτε Πολλαπλά
παράθυρα.
• Η επιλεγμένη εφαρμογή θα εμφανιστεί στο πάνω μισό της οθόνης.
3 Πατήστε στην άλλη εφαρμογή που θέλετε να εμφανίζεται στα πολλαπλά
παράθυρα.
• Η επιλεγμένη εφαρμογή θα εμφανιστεί στο κάτω μισό της οθόνης.
Όταν χρησιμοποιείτε πλοήγηση με Μόνο κουμπιά
1 Πατήστε στην γραμμή πλοήγησης.
• Εμφανίζονται οι πρόσφατα χρησιμοποιημένες εφαρμογές.
• Αν πατήσετε το εικονίδιο της εφαρμογής, εμφανίζονται οι επιλογές
Πληροφορίες εφαρμογής, Πολλαπλά παράθυρα, Αναδυόμενο παράθυρο
και Καρφίτσ. εφαρ.
2 Πατήστε το εικονίδιο της εφαρμογής στην επάνω αριστερή γωνία της
εφαρμογής προς προβολή σε πολλαπλά παράθυρα και επιλέξτε .
• Η επιλεγμένη εφαρμογή θα εμφανιστεί στο πάνω μισό της οθόνης.
3 Πατήστε στην άλλη εφαρμογή που θέλετε να εμφανίζεται στα πολλαπλά
παράθυρα.
• Για να προσαρμόσετε το μέγεθος των τμημάτων στη διαχωρισμένη οθόνη,
σύρετε τη γραμμή στο κέντρο της οθόνης.
• Για να απενεργοποιήσετε τη λειτουργία πολλαπλών παραθύρων, σύρετε την
κεντρική γραμμή προς τα πάνω ή κάτω ως το τέλος της οθόνης.
• Η δυνατότητα πολλαπλών παραθύρων δεν υποστηρίζεται από ορισμένες
εφαρμογές LG ή από εφαρμογές που κατεβάζετε από το Play Store.

Βασικές λειτουργίες 78
Κρυπτογράφηση κάρτας μνήμης
Μπορείτε να κρυπτογραφήσετε και να προστατεύσετε τα δεδομένα που
αποθηκεύονται στην κάρτα μνήμης. Δεν είναι δυνατή η πρόσβαση από άλλη
συσκευή στα κρυπτογραφημένα δεδομένα στην κάρτα μνήμης.
1 Στην αρχική οθόνη, πατήστε Ρυθμίσεις Κλείδωμα οθόνης & ασφάλεια
Κρυπτογράφηση & διαπιστευτήρια Κρυπτογράφηση κάρτας SD.
2 Διαβάστε την παρουσίαση για την κρυπτογράφηση της κάρτας μνήμης που
εμφανίζεται στην οθόνη και πατήστε Συνέχεια για να συνεχίσετε.
3 Ενεργοποιήστε μια επιλογή και αγγίξτε Κρυπτογράφηση:
• Κρυπτογράφηση νέου αρχείου: για να κρυπτογραφήσετε μόνο
τα δεδομένα που αποθηκεύτηκαν στην κάρτα μνήμης μετά την
κρυπτογράφηση.
• Πλήρης κρυπτογράφηση: για να κρυπτογραφήσετε όλα τα δεδομένα που
είναι αποθηκευμένα στην κάρτα μνήμης τη δεδομένη στιγμή.
• Εξαίρεση αρχείων πολυμέσων: για να κρυπτογραφήσετε όλα τα αρχεία,
εκτός από αρχεία πολυμέσων, όπως αρχεία μουσικής, φωτογραφιών και
βίντεο.
• Μόλις ξεκινήσει η κρυπτογράφηση της κάρτας μνήμης, ορισμένες
λειτουργίες καθίστανται μη διαθέσιμες.
• Εάν η συσκευή απενεργοποιηθεί ενώ η κρυπτογράφηση βρίσκεται
σε εξέλιξη, η διαδικασία κρυπτογράφησης θα αποτύχει και ενδέχεται
να καταστραφούν ορισμένα δεδομένα. Για αυτό, πριν ξεκινήσετε την
κρυπτογράφηση, ελέγξτε κατά πόσον η στάθμη της μπαταρίας είναι
επαρκής.
• Τα κρυπτογραφημένα αρχεία είναι προσβάσιμα μόνο από τη συσκευή στην
οποία έγινε η κρυπτογράφησή τους.
• Η κρυπτογραφημένη κάρτα μνήμης δεν μπορεί να χρησιμοποιηθεί σε
άλλη συσκευή LG. Για να χρησιμοποιήσετε την κρυπτογραφημένη κάρτα
μνήμης σε κάποια άλλη συσκευή κινητού τηλεφώνου, πρέπει να εκτελέσετε
μορφοποίηση της κάρτας.
• Μπορείτε να ενεργοποιήσετε την κρυπτογράφηση της κάρτας μνήμης
ακόμα κι όταν δεν υπάρχει κάρτα μνήμης στη συσκευή. Κάθε κάρτα μνήμης
που θα τοποθετηθεί μετά την κρυπτογράφηση θα κρυπτογραφείται
αυτόματα.

Βασικές λειτουργίες 79
Λήψη στιγμιότυπων
Μπορείτε να δημιουργήσετε στιγμιότυπα της οθόνης που βλέπετε.
Μέσω συντόμευσης
Πατήστε παρατεταμένα το πλήκτρο ενεργοποίησης/κλειδώματος και το πλήκτρο
μείωσης της έντασης ήχου ταυτόχρονα για τουλάχιστον δύο δευτερόλεπτα.
• Μπορείτε να δείτε τα στιγμιότυπα οθόνης που έχετε τραβήξει στον φάκελο
Screenshots στο μενού Άλμπουμ.
Μέσω Στιγμιοτύπου οθόνης
Ενώ βρίσκεστε στην οθόνη το στιγμιότυπο της οποίας θέλετε να τραβήξετε,
σύρετε τη γραμμή κατάστασης προς τα κάτω και πατήστε .
• Για λεπτομέρειες, ανατρέξτε στην ενότητα
Δημιουργία σημειώσεων σε ένα
στιγμιότυπο οθόνης
.
Εγγραφή οθόνης
Μπορείτε να πραγματοποιήσετε εγγραφή της οθόνης.
1 Μεταφέρετε τη γραμμή κατάστασης προς τα κάτω για να ανοίξετε τη λίστα
εικονιδίων γρήγορης πρόσβασης.
2 (Εάν χρειαστεί, περάσετε το δάκτυλο αριστερά επάνω από την περιοχή των
εικονιδίων γρήγορης πρόσβασης.) Πατήστε το κουμπί .
3 Διαβάστε τη δήλωση αποποίησης ευθύνης και πατήστε Έναρξη. Η καταγραφή
θα ξεκινήσει σε 3 δευτερόλεπτα.
Ώρα εγγραφής οθόνης
Επιλογή εμπρός pop-up κάμερας Διακοπή εγγραφής
00:00:05
Επιλογή εγγραφής φωνής
• Όταν πατάτε το , η εμπρός pop-up κάμερα αναδύεται και στην
καταγραφή περιλαμβάνεται η εγγραφή από την εμπρός κάμερα.

Βασικές λειτουργίες 80
4 Για να διακόψετε προσωρινά την εγγραφή, πατήστε . Το καταγεγραμμένο
βίντεο θα αποθηκευτεί στο Άλμπουμ.
• Εάν παραβιάσετε τα δικαιώματα άλλου ατόμου, όπως το δικαίωμα
Πορτραίτου ή το δικαίωμα πνευματικής ιδιοκτησίας ή διαβάλλετε τη φήμη
άλλου ατόμου χρησιμοποιώντας τις λειτουργίες που παρέχονται για την
υπηρεσία καταγραφής οθόνης, ενδέχεται να υποστείτε αστική ή ποινική
δίωξη ή διοικητικό πρόστιμο σύμφωνα με τους ισχύοντες νόμους. Η LG
Electronics δεν φέρει καμία ευθύνη για τις ενέργειες των χρηστών.
Εισαγωγή κειμένου
Χρήση της γραμμής εργαλείων Smart
Μπορείτε να χρησιμοποιήσετε διάφορες μεθόδους εισαγωγής πληκτρολογίου σε
ένα μέρος. Μπορείτε να επιλέξετε την επιθυμητή μέθοδο εισαγωγής από το επάνω
μέρος του πληκτρολογίου.
1 Επιλέξτε τημέθοδο εισαγωγής πληκτρολογίου που θέλετε από τη γραμμή
εργαλείων Smart.
2 Πατήστε και επιλέξτε τη μέθοδο εισαγωγής που θέλετε να εμφανίζεται
στην γραμμή εργαλείων Smart ή αλλάξτε τη διάταξη των μεθόδων εισαγωγής.
Γραμμή
εργαλείων
Smart
• Ορισμένες υποστηριζόμενες μέθοδοι εισαγωγής ενδέχεται να διαφέρουν
ανάλογα με τη συσκευή σας.
• Μπορείτε να ενεργοποιήσετε ή να απενεργοποιήσετε τη λειτουργία
γραμμής εργαλείων Smart από τις ρυθμίσεις πληκτρολογίου.

Βασικές λειτουργίες 81
• : Προσθήκη emojis.
• : Πατήστε για να προσθέσετε κινούμενο emoticon ή για να
δημιουργήσετε τα δικά σας emoji χρησιμοποιώντας την κάμερα.
• : Μπορείτε να χρησιμοποιήσετε το πληκτρολόγιο εικόνων GIF της Tenor.
Πατήστε Αποδέχομαι για να χρησιμοποιήσετε αυτήν τη δυνατότητα.
• : Άνοιγμα συνομιλίας Draw.
• : Εισαγωγή κειμένου με τη χρήση φωνής.
• : Πρόσβαση στις ρυθμίσεις πληκτρολογίου.
• : Άνοιγμα του Clip Tray.
• : Εισαγάγετε κείμενο με γράφοντας με το χέρι. Απαιτείται η λήψη των
δεδομένων γλώσσας εισαγωγής για γραφή με το χέρι. Πατήστε Λήψη για
να προχωρήσετε στη λήψη των δεδομένων γλώσσας εισαγωγής για γραφή
με το χέρι.
• : Ενεργοποίηση του αιωρούμενου πληκτρολογίου όταν χρησιμοποιείτε
τη λειτουργία πολλαπλών παραθύρων. Μπορείτε επίσης να μετακινήσετε το
πληκτρολόγιο στην επιθυμητή θέση.
• : Πατήστε για να χρησιμοποιήσετε τη λειτουργία χειρισμού με το ένα
χέρι.
• : Πατήστε για να αλλάξετε το μέγεθος του πληκτρολογίου.
• : Πατήστε για να προσαρμόσετε τη διαφάνεια του πληκτρολογίου.

Βασικές λειτουργίες 82
Μέσω του Λειτουργία Smart Keyboard
Μπορείτε να χρησιμοποιήσετε το πληκτρολόγιο Smart για να εισαγάγετε και να
επεξεργαστείτε κείμενο.
Με το πληκτρολόγιο Smart, μπορείτε να βλέπετε το κείμενο καθώς πληκτρολογείτε
χωρίς να χρειάζεται να εναλλάσσεστε ανάμεσα στην οθόνη και το συμβατικό
πληκτρολόγιο. Με αυτόν τον τρόπο, μπορείτε εύκολα να εντοπίσετε και να
διορθώσετε λάθη ενώ πληκτρολογείτε.
Μετακίνηση του δρομέα
Με το πληκτρολόγιο Smart, μπορείτε να μετακινείτε τον δρομέα ακριβώς στη
θέση που θέλετε. Όταν πληκτρολογείτε κείμενο, αγγίξτε και κρατήστε το πλήκτρο
διαστήματος και στη συνέχεια σύρετε δεξιά ή αριστερά.
• Αυτή η επιλογή διατίθεται μόνο για το πληκτρολόγιο QWERTY.

Βασικές λειτουργίες 83
Προτάσεις λέξεων
Το πληκτρολόγιο Smart αναλύει αυτόματα τα μοτίβα χρήσης σας για να σας
προτείνει καθώς πληκτρολογείτε λέξεις που χρησιμοποιείτε συχνά. Όσο
περισσότερο χρησιμοποιείτε τη συσκευή σας, τόσο πιο ακριβείς είναι οι
προτεινόμενες λέξεις.
Πληκτρολογήστε κείμενο και πατήστε πάνω σε μια προτεινόμενη λέξη ή σύρετε
απαλά την αριστερή ή τη δεξιά πλευρά του πληκτρολογίου προς τα πάνω.
• Εισαγάγεται αυτόματα η λέξη που επιλέγετε. Δεν χρειάζεται να
πληκτρολογήσετε εσείς κάθε γράμμα αυτής της λέξης.
Αντιγραφή και επικόλληση
Μπορείτε να αποκόψετε ή να αντιγράψετε κείμενο από μια εφαρμογή και, στη
συνέχεια, να επικολλήσετε το κείμενο στην ίδια εφαρμογή. Ή, μπορείτε να ανοίξετε
άλλες εφαρμογές και να επικολλήσετε το κείμενο σε αυτές.
1 Πατήστε παρατεταμένα σε ένα σημείο κοντά στο κείμενο που θέλετε για
αντιγραφή ή αποκοπή.
2 Σύρετε τα όρια / για να οριοθετήσετε την περιοχή που προορίζεται για
αντιγραφή ή αποκοπή.
3 Επιλέξτε είτε Αποκοπή είτε Αντιγραφή.
• Το κείμενο που έχει επιλεγεί για αντιγραφή ή αποκοπή προστίθεται
αυτόματα στο Clip Tray.
4 Πατήστε παρατεταμένα το παράθυρο εισαγωγής κειμένου, και επιλέξτε
Επικόλληση.
• Εάν δεν υπάρχει στοιχείο που έχει επιλεγεί για αντιγραφή ή αποκοπή, η
επιλογή Επικόλληση δεν θα εμφανίζεται.

Βασικές λειτουργίες 84
Κοινή χρήση περιεχομένου
Αναπαραγωγή περιεχομένου από άλλη συσκευή
Μπορείτε να πραγματοποιήσετε αναπαραγωγή φωτογραφιών, βίντεο ή μουσικής
που έχουν αποθηκευτεί στη συσκευή από μια τηλεόραση.
1 Συνδέστε την τηλεόραση και τη συσκευή στο ίδιο δίκτυο Wi-Fi.
2 Ενώ γίνεται προβολή περιεχομένου από την εφαρμογή Άλμπουμ ή Μουσική
πατήστε το κουμπί ή Αναπαραγωγή σε άλλη συσκευή.
Ή, στην αρχική οθόνη, πατήστε Ρυθμίσεις Συνδεδεμένες συσκευές
Κοινή χρήση οθόνης και μετά πατήστε για να την ενεργοποιήσετε.
3 Επιλέξτε την τηλεόραση στην οποία θέλετε να συνδεθείτε.
• Για χρήση με συσκευή Chromecast, οι υπηρεσίες Google Play πρέπει να είναι
ενημερωμένες.
Προβολή περιεχομένου από κοντινές συσκευές
Μπορείτε να δείτε περιεχόμενο από διάφορες συσκευές, π.χ. υπολογιστή, συσκευή
NAS ή φορητή συσκευή, χρησιμοποιώντας τις εφαρμογές Άλμπουμ ή Μουσική.
Σύνδεση των συσκευών
Συνδέστε τη συσκευή σας και μια άλλη συσκευή που υποστηρίζει την υπηρεσία
DLNA στο ίδιο ασύρματο δίκτυο.
• Βεβαιωθείτε ότι η λειτουργία κοινής χρήσης αρχείων (DLNA) είναι
ενεργοποιημένη και στη δική σας συσκευή και στη συνδεδεμένη συσκευή.
Αναζήτηση κοντινών συσκευών
Μπορείτε να δείτε μια λίστα με τις συσκευές DLNA που είναι συνδεδεμένες στο
ίδιο δίκτυο επιλέγοντας το μενού Κοντινές συσκευές σε κάθε εφαρμογή.
Χρησιμοποιήστε το περιεχόμενο από τις κοντινές συσκευές όπως θα το
χρησιμοποιούσατε εάν βρισκόταν στη δική σας συσκευή.

Βασικές λειτουργίες 85
Αποστολή ή λήψη αρχείων
Μπορείτε να κάνετε κοινή χρήση αρχείων μεταξύ της συσκευής σας και άλλης
συσκευής LG ή ενός tablet.
Αποστολή αρχείων
Από το Άλμπουμ ή από άλλη εφαρμογή, πατήστε Κοινή χρήση ή και
επιλέξτε μια συσκευή από τη λίστα κοινής χρήσης αρχείου.
Λήψη αρχείων
Σύρετε τη γραμμή κατάστασης προς τα κάτω και πατήστε το κουμπί Κοινή Χρήση
Αρχείου.
Εάν η συσκευή σας δεν υποστηρίζει την κοινή χρήση αρχείων, στην αρχική
οθόνη, πατήστε Ρυθμίσεις Συνδεδεμένες συσκευές Κοινή Χρήση Αρχείου
SmartShare Beam .
• Μπορείτε να μοιράζεστε αρχεία με συγκεκριμένες συσκευές που
υποστηρίζουν DLNA.
Μην ενοχλείτε
Μπορείτε να περιορίσετε ή να απενεργοποιήσετε τις ειδοποιήσεις για να μην σας
ενοχλούν για ένα συγκεκριμένο χρονικό διάστημα.
Στην αρχική οθόνη, πατήστε Ρυθμίσεις Ήχος Μην ενοχλείτε.
• Λειτουργία και επιλέξτε τη λειτουργία που θέλετε:
-Μόνο προτεραιότητα: πραγματοποιείται λήψη ειδοποιήσεων με ήχο ή
δόνηση για τις επιλεγμένες εφαρμογές. Ακόμη κι όταν είναι ενεργοποιημένη
η επιλογή Μόνο προτεραιότητα, εξακολουθούν να ηχούν ειδοποιήσεις.
-Συνολικά αθόρυβο: απενεργοποιεί και τον ήχο και τη δόνηση.
• Επιλογή προτεραιοτήτων: Λάβετε ειδοποιήσεις και τις ειδοποιήσεις για τις
επιλεγμένες εφαρμογές.
-Κλήσεις από: Ρυθμίστε μια σειρά ειδοποιήσεων κατά τη λήψη κλήσεων.
• Επαναλαμβανόμενη κλήση: Μέσα σε 15 λεπτά, η δεύτερη κλήση από τον
ίδιο καλούντα δεν είναι σιωπηρή.

Βασικές λειτουργίες 86
-Μηνύματα από: Ρυθμίστε μια σειρά ειδοποιήσεων κατά τη λήψη μηνυμάτων.
• Χρήση Μην ενοχλείτε: Ενεργοποιήστε τη λειτουργία Μην ενοχλείτε.
• Υπνος: Ορίστε το πρόγραμμα για το οποίο θέλετε να ενεργοποιήσετε τη
λειτουργία Μην ενοχλείτε.
• Βοήθεια: Προβολή της βοήθειας για τη λειτουργία Μην ενοχλείτε.
AOD (Always-on Display)
Μπορείτε να δείτε την ημερομηνία, την ώρα ή την υπογραφή όταν η κεντρική
οθόνη είναι σβηστή.
Σύρετε το κάτω μέρος της οθόνης Always-on Display για να ενεργοποιήσετε
λειτουργίες όπως η κάμερα, το Capture+, το Wi-Fi, οι ρυθμίσεις ήχου, το Bluetooth,
το φλας, η μουσική και άλλα.
1 Στην αρχική οθόνη, πατήστε Ρυθμίσεις Προβολή AOD (Always-on
Display).
2 Επιλέξτε την εικόνα που θέλετε να εμφανίζεται και πατήστε Αποθήκευση.
• Πατήστε την επιθυμητή εικόνα μεταξύ των επιλογών Ψηφιακό ρολόι,
Αναλογικό ρολόι, Διπλό ρολόι, Υπογραφή ή Εικόνα.
• Πατήστε Εμφάνιση και επιλέξτε Πατήστε για να εμφανιστεί για 10
δευτερόλεπτα ή Να εμφανίζεται πάντα.
• Πατήστε ΓρήγοραΕργαλεία & πρόγραμμα αναπαραγωγής μουσικής για
να πατήσετε τα εικονίδια κατάστασης για τα εργαλεία γρήγορης εκτύπωσης
και το πρόγραμμα αναπαραγωγής μουσικής.
• Για να ενισχύσετε τη φωτεινότητα για τη δυνατότητα Always-on Display,
επιλέξτε Πιο φωτεινή οθόνη.
• Για να προβάλετε τη βοήθεια για την δυνατότητα Always-on Display,
πατήστε Βοήθεια.
• Η μπαταρία ενδέχεται να εξαντληθεί γρηγορότερα εάν χρησιμοποιείτε τη
λειτουργία Always-on Display. Απενεργοποιήστε αυτήν τη δυνατότητα για
να εξοικονομήσετε διάρκεια ζωής της μπαταρίας.
• Για να απενεργοποιήσετε τη δυνατότητα Always-on Display, στην αρχική
οθόνη, πατήστε Ρυθμίσεις Προβολή AOD (Always-on Display) και, στη
συνέχεια, πατήστε .

Χρήσιμες
εφαρμογές
03

Χρήσιμες εφαρμογές 88
Εγκατάσταση και απεγκατάσταση
εφαρμογών
Εγκατάσταση εφαρμογών
Μπείτε σε ένα κατάστημα εφαρμογών για να αναζητήσετε και να κατεβάσετε
εφαρμογές.
• Μπορείτε να χρησιμοποιήσετε το SmartWorld, το Play Store ή το κατάστημα
εφαρμογών του παρόχου υπηρεσιών.
• Για ορισμένα καταστήματα εφαρμογών ενδέχεται να απαιτείται η
δημιουργία λογαριασμού και η σύνδεση σε αυτόν.
• Για ορισμένες εφαρμογές ενδέχεται να υπάρχει χρέωση.
• Εάν χρησιμοποιείτε δεδομένα κινητής τηλεφωνίας, μπορεί να επιβαρυνθείτε
με χρεώσεις για τη χρήση δεδομένων, ανάλογα με το πρόγραμμα χρεώσεων
που έχετε επιλέξει.
• Η λειτουργία SmartWorld ενδέχεται να μην υποστηρίζεται ανάλογα με την
περιοχή ή τον πάροχο υπηρεσιών.
Κατάργηση εγκατάστασης εφαρμογών
Καταργήστε από τη συσκευή σας την εγκατάσταση εφαρμογών που δεν
χρησιμοποιούνται πλέον.
Απεγκατάσταση με παρατεταμένο πάτημα
Πατήστε παρατεταμένα σε μια κενή περιοχή στην οθόνη και στη συνέχεια πατήστε
το της εφαρμογής που θέλετε να διαγράψετε.
Απεγκατάσταση με χρήση του μενού ρυθμίσεων
Στην αρχική οθόνη, πατήστε Ρυθμίσεις Εφαρμογές Πληροφορίες εφαρμογής,
επιλέξτε μια εφαρμογή και πατήστε Κατάργηση εγκατάστασης.
• Δεν είναι δυνατή η κατάργηση ορισμένων εφαρμογών από τους χρήστες.

Χρήσιμες εφαρμογές 89
Κατάργηση εγκατάστασης εφαρμογών από το κατάστημα
εφαρμογών
Για να καταργήσετε την εγκατάσταση μιας εφαρμογής, μπείτε στο κατάστημα
εφαρμογών από το οποίο κατεβάσατε την εφαρμογή και καταργήστε την
εγκατάστασή της.
Εγκατάσταση και κατάργηση εγκατάστασης εφαρμογών
κατά τη ρύθμιση
Όταν ενεργοποιείτε τη συσκευή για πρώτη φορά, μπορείτε να κατεβάσετε τις
προτεινόμενες εφαρμογές.
Μπορείτε να παρακάμψετε αυτό το βήμα και να προχωρήσετε στο επόμενο χωρίς
να έχετε ολοκληρώσει την εγκατάσταση.
Σκουπίδια εφαρμογ.
Μπορείτε να δείτε τις εφαρμογές που έχουν απεγκατασταθεί. Επίσης, μπορείτε να
επανεγκαταστήσετε τις εφαρμογές που έχουν απεγκατασταθεί τις τελευταίες 24
ώρες.
1 Στην οθόνη αρχική, πατήστε LG Σκουπίδια εφαρμογ..
Μπορείτε ακόμα να αγγίξετε μια κενή περιοχή στην αρχική οθόνη και να την
κρατήσετε αγγίζοντας το κουμπί Σκουπίδια εφαρμογ.
2 Ενεργοποίηση επιθυμητής λειτουργίας:
• Επαναφορά: επανεγκατάσταση επιλεγμένης εφαρμογής.
• : καταργήστε μόνιμα τις απεγκατεστημένες εφαρμογές από τη συσκευή.
• Οι απεγκατεστημένες εφαρμογές καταργούνται αυτόματα από τη συσκευή
24 ώρες μετά την απεγκατάστασή τους. Εάν θέλετε να εγκαταστήσετε ξανά
τις απεγκατεστημένες εφαρμογές, θα πρέπει να τις κατεβάσετε ξανά από το
κατάστημα εφαρμογών.
• Αυτή η λειτουργία είναι ενεργοποιημένη μόνο στην προεπιλεγμένη αρχική
οθόνη. Εάν απεγκαθιστάτε εφαρμογές κατά τη χρήση της οθόνης EasyHome
ή άλλου προγράμματος εκκίνησης, αυτές καταργούνται από τη συσκευή
αμέσως και μόνιμα.

Χρήσιμες εφαρμογές 90
Συντομεύσεις εφαρμογών
Στην αρχική οθόνη, αγγίξτε και κρατήστε πατημένο ένα εικονίδιο εφαρμογής,
όπως τα εικονίδια Κλήση, Μήνυμα, Κάμερα, Άλμπουμ, Ρυθμίσεις, για να εμφανιστεί
το αντίστοιχο μενού γρήγορης πρόσβασης. Κάντε πιο εύκολη τη χρήση
εφαρμογών αξιοποιώντας τις συντομεύσεις εφαρμογών.
• Πατήστε για να ρυθμίσετε τα widget για την εφαρμογή.
• Πατήστε για να δείτε τις πληροφορίες της εφαρμογής.
• Αυτή η δυνατότητα είναι διαθέσιμη μόνο για συγκεκριμένες εφαρμογές.

Χρήσιμες εφαρμογές 91
Τηλέφωνο
Φωνητική κλήση
Πραγματοποιήσετε τηλεφωνική κλήση χρησιμοποιώντας κάποια από τις
διαθέσιμες μεθόδους, όπως την πληκτρολόγηση του αριθμού τηλεφώνου με το
χέρι, και επιλέγοντας μια επαφή από τη λίστα επαφών ή τη λίστα πρόσφατων
κλήσεων.
Πραγματοποίηση κλήσης από το πληκτρολόγιο
1 Στην αρχική οθόνη, πατήστε Κλήση.
2 Πραγματοποιήστε μια κλήση χρησιμοποιώντας τη μέθοδο της επιλογής σας:
• Πληκτρολογήστε έναν αριθμό τηλεφώνου και πατήστε το κουμπί .
• Αγγίξτε και κρατήστε έναν αριθμό ταχείας κλήσης.
• Αναζητήστε μια επαφή πατώντας το αρχικό γράμμα του ονόματος της
επαφής στη λίστα επαφών, και πατήστε το κουμπί .
• Για να εισαγάγετε το σύμβολο «+» όταν πραγματοποιείτε διεθνείς κλήσεις,
πατήστε παρατεταμένα τον αριθμό 0.
• Βλ.
Προσθήκη επαφών
για λεπτομέρειες σχετικά με τον τρόπο προσθήκης
αριθμών τηλεφώνου στη λίστα με τις ταχείες κλήσεις.
Πραγματοποίηση κλήσεων από επαφές
1 Στην αρχική οθόνη, πατήστε Επαφές.
2 Αφού επιλέξετε τον αριθμό που θέλετε να καλέσετε από τη λίστα επαφών,
πατήστε .

Χρήσιμες εφαρμογές 92
Απάντηση σε κλήση
Για να απαντήσετε σε μια κλήση, σύρετε το κουμπί στην οθόνη εισερχόμενης
κλήσης.
• Όταν είναι συνδεδεμένα τα στερεοφωνικά ακουστικά, μπορείτε να
πραγματοποιείτε κλήσεις χρησιμοποιώντας το κουμπί κλήσης/τερματισμού
στα ακουστικά.
• Για να τερματίσετε μια κλήση χωρίς να κλείσετε την οθόνη, πατήστε διαδοχικά
Ρυθμίσεις Δίκτυο & internet Ρυθμίσεις κλήσεων Απάντηση και
τερματισμός κλήσεων και, στη συνέχεια, ενεργοποιήστε τη δυνατότητα
Τερματισμός κλήσης με το πλήκτρο τροφοδοσίας.
• Στην αρχική οθόνη, πατήστε Ρυθμίσεις Δίκτυο & internet Ρυθμίσεις
κλήσεων Απάντηση και τερματισμός κλήσεων Τερματισμός
κλήσης με το πλήκτρο τροφοδοσίας και θα μπορείτε να τερματίσετε
μια κλήση πατώντας το πλήκτρο κλειδώματος/ενεργοποίησης όσο είναι
ενεργοποιημένη η οθόνη κλήσης σε εξέλιξη.
Απόρριψη κλήσης
Για να απορρίψετε μια εισερχόμενη κλήση, σύρετε το κουμπί στην οθόνη
εισερχόμενης κλήσης.
• Για να στείλετε ένα μήνυμα απόρριψης, σύρετε την επιλογή μηνύματος
απόρριψης σε όλη την οθόνη.
• Για προσθήκη ή επεξεργασία μηνύματος απόρριψης, στην αρχική οθόνη
πατήστε Ρυθμίσεις Δίκτυο & internet Ρυθμίσεις κλήσεων Φραγή
κλήσης και απόρριψη με μήνυμα.
• Κατά την εισερχόμενη κλήση, πατήστε το πλήκτρο αύξησης της έντασης
ήχου, το πλήκτρο μείωσης της έντασης ήχου ή το πλήκτρο ενεργοποίησης/
κλειδώματος για σίγαση του ήχου κλήσης ή της δόνησης ή για θέση της κλήσης
σε αναμονή.
Έλεγχος εισερχόμενης κλήσης ενώ η εφαρμογή βρίσκεται
σε λειτουργία
Όταν έχετε μια εισερχόμενη κλήση ενώ χρησιμοποιείτε μια εφαρμογή, θα
εμφανιστεί μια αναδυόμενη ειδοποίηση στο επάνω μέρος της οθόνης. Μπορείτε
να δεχτείτε την κλήση, να την απορρίψετε ή να στείλετε μήνυμα από την
αναδυόμενη οθόνη.

Χρήσιμες εφαρμογές 93
• Στην αρχική οθόνη, πατήστε Ρυθμίσεις Δίκτυο & internet Ρυθμίσεις
κλήσεων Πρόσθετες ρυθμίσεις Πλαίσιο ανάδυσης εισερχόμενης
κλήσης και επιλέξτε τον τρόπο που θέλετε να εμφανίζεται η εισερχόμενη
κλήση όταν χρησιμοποιείτε μια εφαρμογή.
Προβολή αναπάντητων κλήσεων
Εάν υπάρχει αναπάντητη κλήση, η γραμμή κατάστασης στο επάνω μέρος της
οθόνης εμφανίζει την ένδειξη .
Για να δείτε στοιχεία για τις αναπάντητες κλήσεις, σύρετε τη γραμμή κατάστασης
προς τα κάτω. Μπορείτε επίσης να πατήσετε Αρχεία καταγρ. κλήσ. στην
αρχική οθόνη.
Προσβάσιμες λειτουργίες κατά τη διάρκεια κλήσης
Κατά τη διάρκεια μιας κλήσης, μπορείτε να έχετε πρόσβαση σε πλήθος
λειτουργιών πατώντας τα κουμπιά που εμφανίζονται στην οθόνη:
• Επαφές: δείτε τη λίστα επαφών κατά τη διάρκεια μιας κλήσης.
• Αναμονή: Βάζει την τρέχουσα κλήση σε αναμονή.
• Πληκτρ: για να εμφανίσετε ή να κρύψετε το πληκτρολόγιο κλήσης.
• Ηχείο: για να ενεργοποιήσετε τη λειτουργία ηχείων.
• Σίγαση: για να πραγματοποιήσετε σίγαση στο μικρόφωνό σας έτσι ώστε η
φωνή σας να μην ακούγεται στον συνομιλητή σας.
• Bluetooth: προωθήστε την κλήση σε μια συζευγμένη και συνδεδεμένη
συσκευή Bluetooth.
• : για να τερματίσετε την κλήση.
• : πρόσβαση σε πρόσθετες επιλογές κλήσης.
• Τα διαθέσιμα στοιχεία ρυθμίσεων ενδέχεται να διαφέρουν ανάλογα με την
περιοχή ή τον πάροχο υπηρεσιών.
Χρήσιμες εφαρμογές 94
Πραγματοποίηση τριμερούς κλήσης
Μπορείτε να πραγματοποιήσετε κλήση σε άλλη επαφή κατά τη διάρκεια μιας
κλήσης που βρίσκεται σε εξέλιξη.
1 Κατά τη διάρκεια μιας κλήσης, πατήστε το κουμπί Προσθήκη κλήσης.
2 Πληκτρολογήστε έναν αριθμό τηλεφώνου και πατήστε το κουμπί .
• Οι δύο κλήσεις εμφανίζονται στην οθόνη ταυτόχρονα και η πρώτη κλήση
μπαίνει σε αναμονή.
3 Για να ξεκινήσετε μια κλήση συνδιάσκεψης, αγγίξτε Συγχώνευση.
• Για κάθε κλήση ενδέχεται να ισχύει χρέωση. Για περισσότερες πληροφορίες,
συμβουλευτείτε τον πάροχο υπηρεσιών.
Προβολή αρχείων κλήσεων
Για την προβολή των αρχείων πρόσφατων κλήσεων, στην αρχική οθόνη πατήστε
Αρχεία καταγρ. κλήσ.. Έπειτα, μπορείτε να χρησιμοποιήσετε τις παρακάτω
λειτουργίες:
• Για να δείτε λεπτομερές ιστορικό κλήσεων, επιλέξτε μια επαφή. Για να
πραγματοποιήσετε μια κλήση προς την επιλεγμένη επαφή, πατήστε το κουμπί
.
• Για να διαγράψετε αρχεία κλήσεων, πατήστε Διαγραφή.
• Η διάρκεια κλήσης που εμφανίζεται ενδέχεται να διαφέρει από τη διάρκεια
για την οποία χρεώνεστε. Για περισσότερες πληροφορίες, συμβουλευτείτε
τον πάροχο υπηρεσιών.
• Δεν είναι δυνατή η αποκατάσταση του διαγραμμένου ιστορικού κλήσεων.
• Για να προσαρμόσετε το μέγεθος γραμματοσειράς των ημερολογίων
κλήσεων ή των επαφών, πιέστε με δύο δάχτυλα ή απλώστε τα δάχτυλά σας.
Διαμόρφωση των επιλογών κλήσης
Μπορείτε να ρυθμίσετε τις διάφορες επιλογές κλήσης.
1 Στην αρχική οθόνη, πατήστε Κλήση ή Αρχεία καταγρ. κλήσ..
2 Πατήστε το κουμπί Ρυθμίσεις κλήσεων και, έπειτα, διαμορφώστε τις
επιλογές σύμφωνα με τις προτιμήσεις σας.

Χρήσιμες εφαρμογές 95
Μηνύματα
Αποστολή μηνύματος
Μπορείτε να δημιουργήσετε και να στείλετε μηνύματα στις επαφές σας
χρησιμοποιώντας την εφαρμογή «Μηνύματα».
• Για την αποστολή μηνυμάτων στο εξωτερικό ενδέχεται να ισχύουν επιπλέον
χρεώσεις. Για περισσότερες πληροφορίες, συμβουλευτείτε τον πάροχο
υπηρεσιών.
1 Στην αρχική οθόνη, πατήστε .
2 Πατήστε το κουμπί .
3 Ορίστε παραλήπτη και δημιουργήστε ένα μήνυμα.
• Για να χρησιμοποιήσετε τις επιλογές πολυμέσων, πατήστε .
• Για να αποκτήσετε πρόσβαση σε προαιρετικά στοιχεία μενού, πατήστε το
κουμπί .
4 Επιλέξτε το (Αποστολή) για να στείλετε το μήνυμα.
Ανάγνωση μηνύματος
Μπορείτε να δείτε τα μηνύματα που έχετε ανταλλάξει ανά επαφή.
1 Στην αρχική οθόνη, πατήστε .
2 Επιλέξτε μια επαφή από τη λίστα μηνυμάτων.
• Όταν βρίσκεστε στη λίστα μηνυμάτων ή σε ένα παράθυρο συνομιλίας,
μπορείτε να ρυθμίσετε το μέγεθος της γραμματοσειράς αν βάλετε δύο
δάχτυλα στην οθόνη και τα απομακρύνετε ή πλησιάσετε μεταξύ τους.

Χρήσιμες εφαρμογές 96
Διαμόρφωση των ρυθμίσεων μηνυμάτων
Μπορείτε να αλλάξετε τις ρυθμίσεις ανταλλαγής μηνυμάτων έτσι ώστε να
ανταποκρίνονται στις προτιμήσεις.
1 Στην αρχική οθόνη, πατήστε .
2 Πατήστε το κουμπί Ρυθμίσεις από τη λίστα μηνυμάτων.
• Μπορείτε να επιλέξετε ρυθμίσεις για το παράθυρο ειδοποιήσεων, τον
αποκλεισμό κλήσεων, την ειδοποίηση καταστροφής, τα μηνύματα
πολυμέσων, κ.λπ.
Κάμερα
Εκκίνηση της κάμερας
Μπορείτε να τραβήξετε φωτογραφία ή να εγγράψετε βίντεο για να απαθανατίσετε
όλες τις αξέχαστες στιγμές σας.
Στην αρχική οθόνη, πατήστε .
• Πριν από τη λήψη μιας φωτογραφίας ή την εγγραφή ενός βίντεο, σκουπίστε
τον φακό της κάμερας με ένα απαλό πανί.
• Προσέξτε να μην λεκιάσετε τον φακό της κάμερας με τα δάχτυλά σας ή άλλη
ξένη ουσία.
• Οι εικόνες που περιλαμβάνονται σε αυτό το εγχειρίδιο χρήσης μπορεί να
διαφέρουν από την πραγματική συσκευή.
• Μπορείτε να προβάλλετε και να επεξεργαστείτε τις φωτογραφίες και τα
βίντεο μέσω του Άλμπουμ. Για λεπτομέρειες, ανατρέξτε στην ενότητα
Επισκόπηση εφαρμογής Άλμπουμ
.
• Μην χρησιμοποιείτε αυτό το προϊόν για σκοπούς που ενδεχομένως
παραβιάζουν το ιδιωτικό απόρρητο ή τα δικαιώματα άλλων.

Χρήσιμες εφαρμογές 97
Λήψη φωτογραφίας
Μπορείτε να τραβήξετε φωτογραφίες με την κάμερα στο προϊόν.
1 Πατήστε και εστιάστε στο θέμα σας.
• Μπορείτε να αγγίξετε την οθόνη στο θέμα για να εστιάσετε σε αυτό.
• Μπορείτε να ανοίξετε ή να ενώσετε δύο δάχτυλα για μεγέθυνση ή
σμίκρυνση.
2 Πατήστε για να βγάλετε μια φωτογραφία.
• Μπορείτε επίσης να πατήσετε το πλήκτρο αύξησης της έντασης ήχου ή το
πλήκτρο μείωσης της έντασης ήχου για να τραβήξετε μια φωτογραφία.
• Μπορείτε να τραβήξετε μια φωτογραφία ενώ γράφετε βίντεο πατώντας το
στην οθόνη.
• Οι επιλογές που εμφανίζονται στην οθόνη λήψης ενδέχεται να διαφέρουν
ανάλογα με την επιλεγμένη κάμερα (μπροστινή ή πίσω) και τη λειτουργία
κάμερας.
• Η κάμερα θα απενεργοποιηθεί αυτόματα αν δεν την χρησιμοποιήσετε για
λίγο μετά την εκτέλεση της εφαρμογής Κάμερα.
Επιλογή μεταξύ τυπικής
γωνίας x1.0 ζουμ/τυπικής
γωνίας x2.0 ζουμ/ευρείας
γωνίας x0.5 ζουμ
Άνοιγμα του Google Lens
Ενεργοποίηση
δυνατότητας ΑΙ για
αυτόματη εφαρμογή
βέλτιστου εφέ για τη
σκηνή
Ορισμός αναλογιών
οθόνης
Ορισμός επιλογών
κάμερας
Άνοιγμα συλλογής
Εναλλαγή μεταξύ
μπροστινής και πίσω
κάμερας
Λήψη φωτογραφιών
Αλλαγή ρυθμίσεων
χρονομέτρου
Αλλαγή ρυθμίσεων φλας
Εφαρμογή εφέ φίλτρου
Χρήσιμες εφαρμογές 98
• Μπορείτε να εκτελέσετε την εφαρμογή κάμερας πατώντας γρήγορα δύο
φορές το πλήκτρο τροφοδοσίας. Στην αρχική οθόνη πατήστε Ρυθμίσεις
Επεκτάσεις Συντομεύσεις και, στη συνέχεια, πατήστε Άνοιγμα
Φωτογραφικής Μηχανής για να την ενεργοποιήσετε.
• Όταν η οθόνη είναι απενεργοποιημένη ή κλειδωμένη, μπορείτε να
εκκινήσετε την κάμερα πατώντας δύο φορές το πλήκτρο μείωσης
της έντασης. Στην αρχική οθόνη, πατήστεΡυθμίσεις Επεκτάσεις
Συντομεύσεις και, στη συνέχεια, πατήστε Άνοιγμα Φωτογραφικής
Μηχανής για να την ενεργοποιήσετε.
Προσαρμογή των επιλογών της κάμερας
Μπορείτε να προσαρμόσετε πλήθος επιλογών κάμερας ανάλογα με τις
προτιμήσεις σας.
Αγγίξτε το κουμπί στην οθόνη.
• Οι διαθέσιμες επιλογές διαφέρουν ανάλογα με την επιλεγμένη (μπροστινή ή
πίσω) κάμερα και την επιλεγμένη λειτουργία κάμερας.
Αυτόματη
βελτίωση σκηνής
Αναγνωρίζοντας τη σκηνή της οποίας γίνεται εγγραφή,
εφαρμόζει τη βέλτιστη ρύθμιση ανάλυσης αυτόματα.
Σύνθεση Με Τεχν.
Νοημ.
Αναγνωρίζοντας την ανθρώπινη φιγούρα κατά τη λήψη
Πορτραίτου, συνιστά τη βέλτιστη σύνθεση.
Συμβουλές Ειδοποιεί τον χρήστη όταν τα μάτια του θέματος είναι κλειστά
ή όταν η εικόνα είναι θολή για βέλτιστη φωτογράφιση.
Μέγεθος
φωτογραφίας
Σας επιτρέπει να επιλέξετε το μέγεθος της φωτογραφίας και
την αναλογία διαστάσεων.
HDR
Τραβά φωτογραφίες με ζωηρά χρώματα και δημιουργεί εφέ
αντιστάθμισης ακόμα κι όταν οι φωτογραφίες τραβιούνται
με κόντρα φως. Αυτές οι λειτουργίες παρέχονται από την
τεχνολογία υψηλού δυναμικού εύρους (HDR) με την οποία
είναι εξοπλισμένη η κάμερα.
Διόρθωση
παραμόρφωσης
εξαιρετικά
ευρυγώνιας λήψης
Διορθώνει την παραμόρφωση οθόνης κατά τη λήψη
φωτογραφιών υπερ ευρείας γωνίας.

Χρήσιμες εφαρμογές 99
Αποθήκευση ως
HEIF
Εξοικονομεί αποθηκευτικό χώρο συμπιέζοντας το αρχείο
εικόνας σε μορφή HEIF. Άλλες συσκευές ενδέχεται να μην
υποστηρίζουν αρχεία εικόνας σε μορφή HEIF.
Ζωντανή
φωτογραφία
Καταγράψτε τη δράση πριν και μετά τη λήψη μιας
φωτογραφίας.
Tracking focus
Ορίζει ότι η κάμερα θα παραμένει εστιασμένη στο
αντικείμενο που αγγίζετε στην οθόνη, ακόμη κι αν αυτό
κινείται. (Διατίθεται όταν χρησιμοποιείται η κάμερα με τον
τυπικό φακό.)
Πλέγμα
Εμφανίστε στην οθόνη καθοδηγητικά πλέγματα για λήψη
φωτογραφιών ή εγγραφή βίντεο βάσει των οριζόντιων και
κατακόρυφων γραμμών αναφοράς.
Εφαρμογή 'Cheese' Σας δίνει τη δυνατότητα να τραβήξετε μια φωτογραφία
λέγοντας ‘Cheese’, ‘Smile’, ‘Whiskey’, ‘Kimchi’ ή ‘LG’.
Προσθήκη
Υδατογραφήματος Εμφανίζει ένα υδατογράφημα στις φωτογραφίες
Τοποθεσία ετικέτας Αποθηκεύει την εικόνα εισάγοντας τα δεδομένα τοποθεσίας
GPS.
Αποθήκευση
Επιλέξτε εάν θέλετε να αποθηκεύετε τις φωτογραφίες και
τα βίντεο στον Εσωτερ. αποθ. χώρος ή στην Κάρτα SD.
(Διατίθεται όταν έχει τοποθετηθεί κάρτα μνήμης).
Βοήθεια Παρέχει Βοήθεια για κάθε μενού της κάμερας.
Πρόσθετες επιλογές στην μπροστινή κάμερα
Διόρθωση
παραμόρφωσης
Selfie
Διορθώνει τα παραμορφωμένα μέρη του προσώπου.
Αποθήκευση
αναστροφής
Αποθηκεύει τις εικόνες ως ανεστραμμένες κατά την λήψη
μιας selfie.
Selfie Τραβήξτε μια selfie επιλέγοντας είτε Λήψη με χειρονομία
χεριού είτε Αυτόματη λήψη.
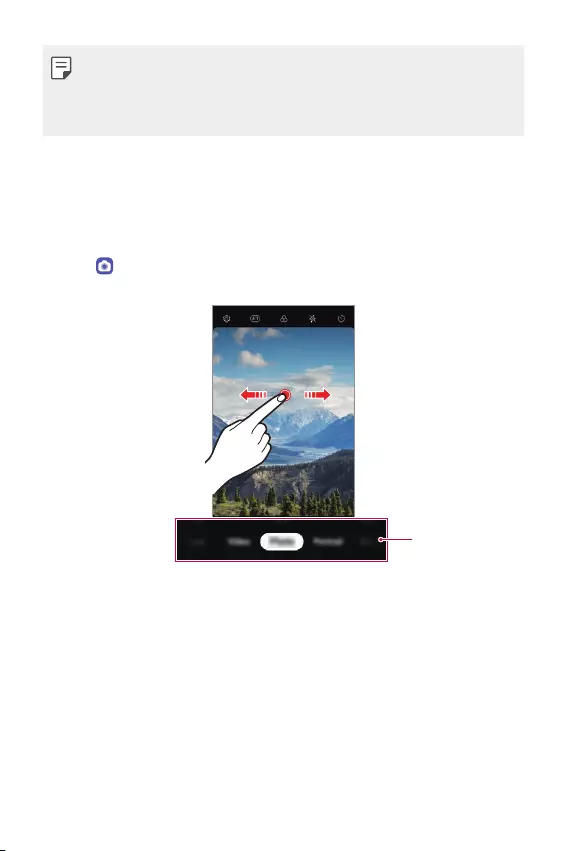
Χρήσιμες εφαρμογές 100
• Μπορείτε να εφαρμόσετε το εφέ μακιγιάζ όταν τραβάτε μια selfie
χρησιμοποιώντας τη μπροστινή κάμερα.
• Η Λήψη με χειρονομία χεριού εκτελείται με αναγνώριση του σχήματος ενός
χεριού και η Αυτόματη λήψη γίνεται με αναγνώριση ενός προσώπου.
Επιλογή λειτουργίας
Μπορείτε να επιλέγετε εύκολα τη λειτουργία που θέλετε από τις λειτουργίες που
εμφανίζονται στην οθόνη, οι οποίες επιλέγονται σύμφωνα με το περιβάλλον
λήψης.
Πατήστε και σύρετε τις λειτουργίες της κάμερας αριστερά ή δεξιά ή σύρετε την
οθόνη αριστερά ή δεξιά για να επιλέξετε μια λειτουργία κάμερας.
Λειτουργίες
κάμερας
Χρήση λειτουργιών κάμερας
Εγγραφή βίντεο με χρονισμό
Μπορείτε να πραγματοποιήσετε εγγραφή βίντεο χρονισμού που
βελτιστοποιούνται ανάλογα με την κατάσταση.
Τα βίντεο μπορούν να εγγραφούν με βέλτιστη ταχύτητα και σταθερή κίνηση
αναλύοντας διάφορα περιβάλλοντα λήψης. Η ταχύτητα χρονισμού μπορεί να
ρυθμίζεται αυτόματα ανάλογα με τον στόχο και το περιβάλλον λήψης.
Είναι επίσης δυνατή η χειροκίνητη επιλογή της ταχύτητας χρονισμού.
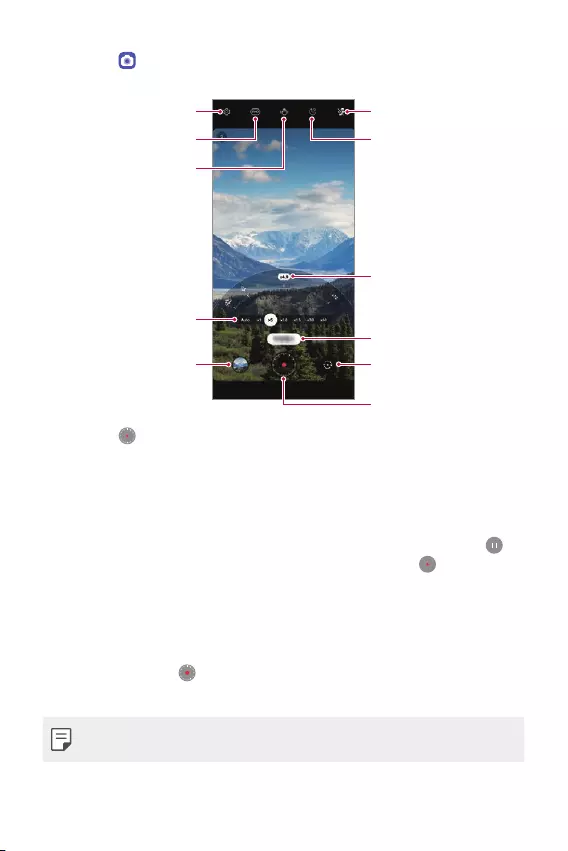
Χρήσιμες εφαρμογές 101
1 Πατήστε και επιλέξτε Ενδιάμεσος χρόνος σύροντας τις λειτουργίες της
κάμερας.
Επιλογή μεγέθυνσης
Εγγραφή βίντεο
Εναλλαγή εμπρός/πίσω
κάμερας
Τρέχουσα λειτουργία
φωτογραφίας
Προεπισκόπηση
Επιλογή της ταχύτητας
χρονισμού
Επιλογή/Ακύρωση
ρύθμισης φλας
Νυχτερινός χρονισμός
Ορισμός επιλογών
κάμερας
Ορισμός ανάλυσης οθόνης
Ενεργοποίηση /
Απενεργοποίηση σταθερής
κάμερας
2 Πατήστε για να εγγράψετε ένα βίντεο.
• Μπορείτε να αλλάξετε την μεγέθυνση και την ταχύτητα χρονισμού κατά την
εγγραφή.
• Αν πατήσετε την επιθυμητή ταχύτητα, η ταχύτητα χρονισμού
προσαρμόζεται κατά την εγγραφή.
• Για να διακόψετε προσωρινά την εγγραφή βίντεο, πατήστε το κουμπί .
Για να συνεχίσετε την εγγραφή βίντεο, πατήστε το κουμπί .
• Κατά την εγγραφή ενός βίντεο, μπορείτε να τεντώσετε ή να πιάσετε δύο
δάχτυλα για μεγέθυνση ή σμίκρυνση.
• Κατά την εγγραφή βίντεο, μπορείτε να αγγίξετε την επιθυμητή περιοχή για
να ρυθμίσετε τη φωτεινότητα.
3 Πατήστε το κουμπί για να τερματίσετε την εγγραφή.
• Το καταγεγραμμένο βίντεο θα αποθηκευτεί στο Άλμπουμ.
• Δεν εγγράφεται ήχος κατά την εγγραφή με Χρονισμό.
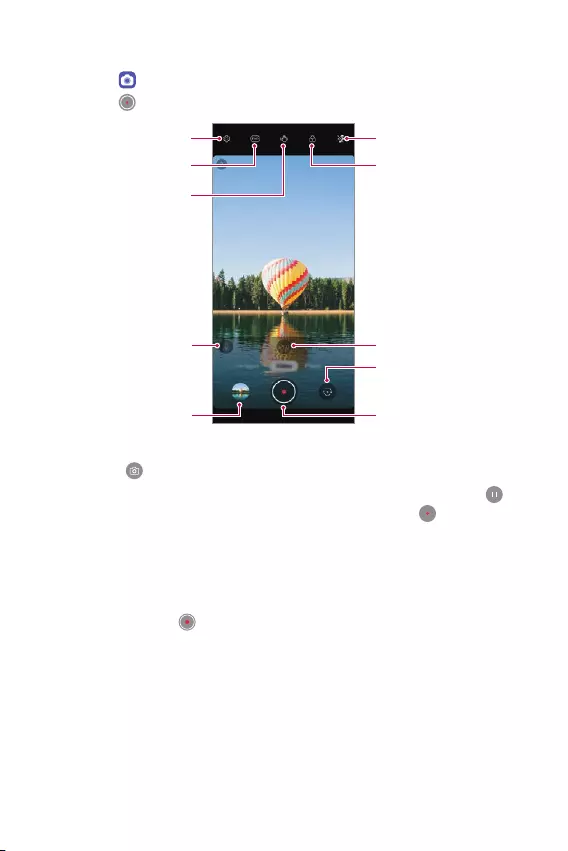
Χρήσιμες εφαρμογές 102
Εγγραφή βίντεο
1 Πατήστε και επιλέξτε Βίντεο σύροντας τις λειτουργίες της κάμερας.
2 Πατήστε για να εγγράψετε ένα βίντεο.
Επιλογή μεγέθυνσης
Εγγραφή βίντεο
Εναλλαγή εμπρός/πίσω
κάμερας
Επιλογή ρύθμισης φλας
Εφαρμογή εφέ φίλτρου
Ρύθμιση κάμερας
Ορισμός ανάλυσης
οθόνης
Ενεργοποίηση /
Απενεργοποίηση
σταθερής κάμερας
Προεπισκόπηση
Πατήστε για να αλλάξετε
τις επιλογές ήχου ανάμεσα
σε Βασική, ASMR
εγγραφή και Bokeh
φωνής.
• Για να τραβήξετε μια φωτογραφία κατά την εγγραφή βίντεο, πατήστε το
κουμπί .
• Για να διακόψετε προσωρινά την εγγραφή βίντεο, πατήστε το κουμπί .
Για να συνεχίσετε την εγγραφή βίντεο, πατήστε το κουμπί .
• Κατά την εγγραφή ενός βίντεο, μπορείτε να τεντώσετε ή να πιάσετε δύο
δάχτυλα για μεγέθυνση ή σμίκρυνση.
• Κατά την εγγραφή βίντεο, μπορείτε να αγγίξετε την επιθυμητή περιοχή για
να ρυθμίσετε τη φωτεινότητα.
3 Πατήστε το κουμπί για να τερματίσετε την εγγραφή βίντεο.
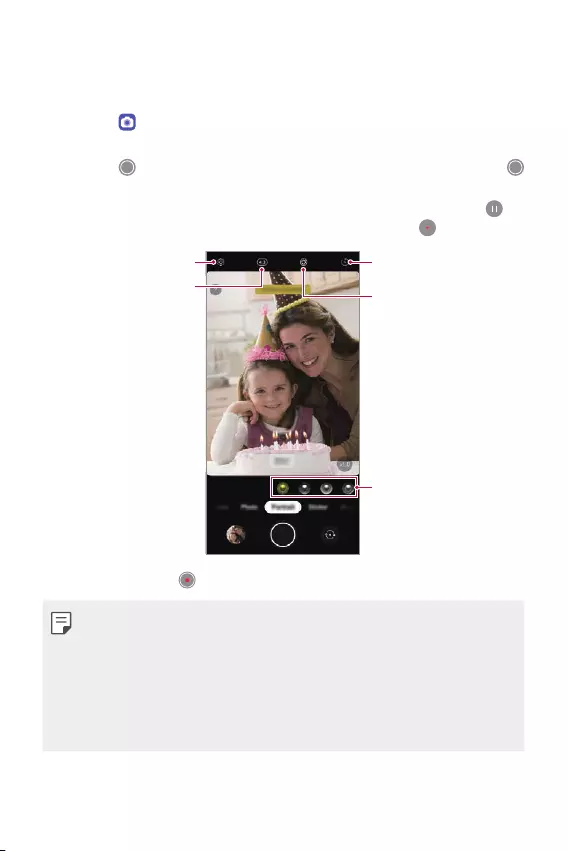
Χρήσιμες εφαρμογές 103
Λήψη Πορτραίτο
Μπορείτε να τραβήξετε φωτογραφίες ή βίντεο που κάνουν το θέμα περισσότερο
διακριτό και εξέχον με θόλωση του φόντου.
1 Πατήστε και επιλέξτε Πορτραίτο σύροντας τις λειτουργίες της κάμερας.
• Επιλέξτε το επιθυμητό εφέ σύροντας τις επιλογές εφέ για Πορτραίτο.
2 Πατήστε για να τραβήξετε μια φωτογραφία ή πατήστε παρατεταμένα το
για να εγγράψετε ένα βίντεο.
• Για να διακόψετε προσωρινά την εγγραφή βίντεο, πατήστε το κουμπί .
Για να συνεχίσετε την εγγραφή βίντεο, πατήστε το κουμπί .
Επιλογή ρύθμισης
χρονομέτρου
Ορισμός τιμής
διαφράγματος
Ρύθμιση κάμερας
Ορισμός αναλογιών
οθόνης
Επιλογή εφέ
3 Πατήστε το κουμπί για να τερματίσετε την εγγραφή βίντεο.
• Όταν δείτε το μήνυμα «Η λειτουργία πορτραίτου είναι διαθέσιμη.»,
ξεκινήστε τη λήψη φωτογραφίας.
• Η λειτουργία Πορτραίτο ενδέχεται να μη λειτουργήσει εάν η κάμερα δεν
μπορεί να αναγνωρίσει το θέμα.
• Κατά τη λήψη φωτογραφίας, διατηρείτε μια απόσταση 0,5 με 1,5 μέτρο από
το θέμα σας.
• Αυτή η λειτουργία δεν είναι διαθέσιμη σε πολύ σκοτεινό περιβάλλον.

Χρήσιμες εφαρμογές 104
Χρήση Αυτοκόλλητο
Μπορείτε να προσθέσετε διάφορα αυτοκόλλητα σε φωτογραφίες ή βίντεο.
Μπορείτε επίσης να απολαύσετε ένα δυναμικό εφέ μέσω της κίνησης
αυτοκόλλητων AR 3D.
1 Πατήστε και επιλέξτε Αυτοκόλλητο σύροντας τις λειτουργίες της κάμερας.
2 Πατήστε για να τραβήξετε μια φωτογραφία ή πατήστε παρατεταμένα το
για να εγγράψετε ένα βίντεο.
• Για να διακόψετε προσωρινά την εγγραφή βίντεο, πατήστε το κουμπί .
Για να συνεχίσετε την εγγραφή βίντεο, πατήστε το κουμπί .
3 Πατήστε το κουμπί για να τερματίσετε την ηχογράφηση.
Αυτοκόλλητο AR 3D
Η κάμερα βάθους στο πίσω μέρος της συσκευής σάς επιτρέπει να δημιουργείτε
ρεαλιστικά AR Εφέ 3D αναγνωρίζοντας περιγράμματα προσώπου με
περισσότερες λεπτομέρειες.
1 Πατήστε και επιλέξτε Αυτοκόλλητο σύροντας τις λειτουργίες της κάμερας.
2 Πατήστε .
3 Σύρετε τη λίστα με τα αυτοκόλλητα αριστερά ή δεξιά για να επιλέξετε ένα
αυτοκόλλητο AR που θα χρησιμοποιηθεί.
• Το πρόσωπο που ανιχνεύεται από την κάμερα σαρώνεται σε 3Δ.
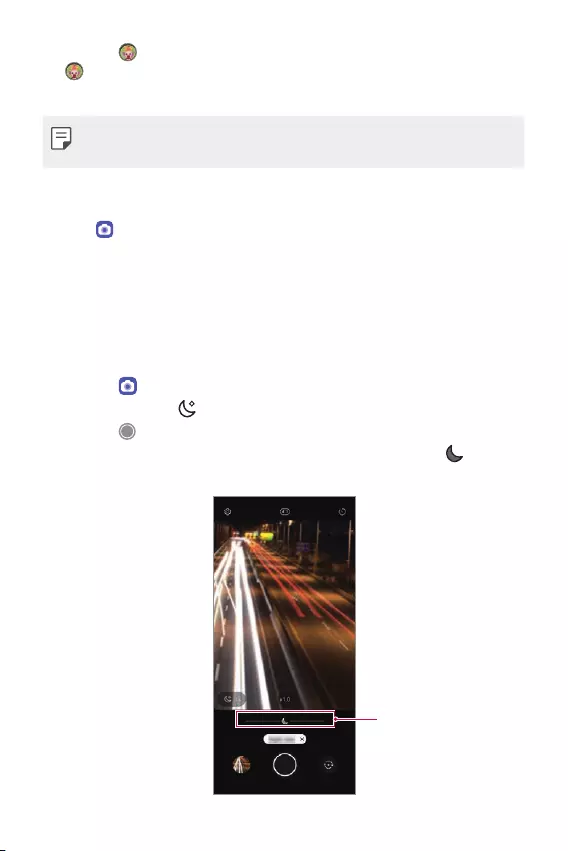
Χρήσιμες εφαρμογές 105
4 Πατήστε για να τραβήξετε μια φωτογραφία ή πατήστε παρατεταμένα το
για να εγγράψετε ένα βίντεο.
• Η φωτογραφία λαμβάνεται με την εφαρμογή του Αυτοκόλλητο AR 3D.
• Η λειτουργία 3Δ σάρωσης της Z-κάμερας είναι διαθέσιμη μόνο για κοντινές
λήψεις Πορτραίτου.
Χρήση πρόσθετων λειτουργιών κάμερας
Πατήστε και επιλέξτε Περισσότερα σύροντας τις λειτουργίες της κάμερας.
Νυχτερινή θέα
Μπορείτε να βγάζετε ζωντανές και καθαρές νυχτερινές φωτογραφίες. Η Νυχτερινή
θέα θα εκτελεστεί αυτόματα όταν βγάλετε μια φωτογραφία σε συνθήκες χαμηλού
φωτισμού.
Μπορείτε επίσης να βγάλετε καθαρές νυχτερινές σκηνές χρησιμοποιώντας μη
αυτόματα τη λειτουργία Νυχτερινή θέα.
1 Πατήστε και επιλέξτε Περισσότερα σύροντας τις λειτουργίες της κάμερας.
2 Πατήστε το κουμπί .
3 Πατήστε για να βγάλετε μια φωτογραφία.
• Για να ρυθμίσετε τη φωτεινότητα της φωτογραφίας, σύρετε το προς τα
αριστερά ή τα δεξιά.
Προσαρμογή
φωτεινότητας
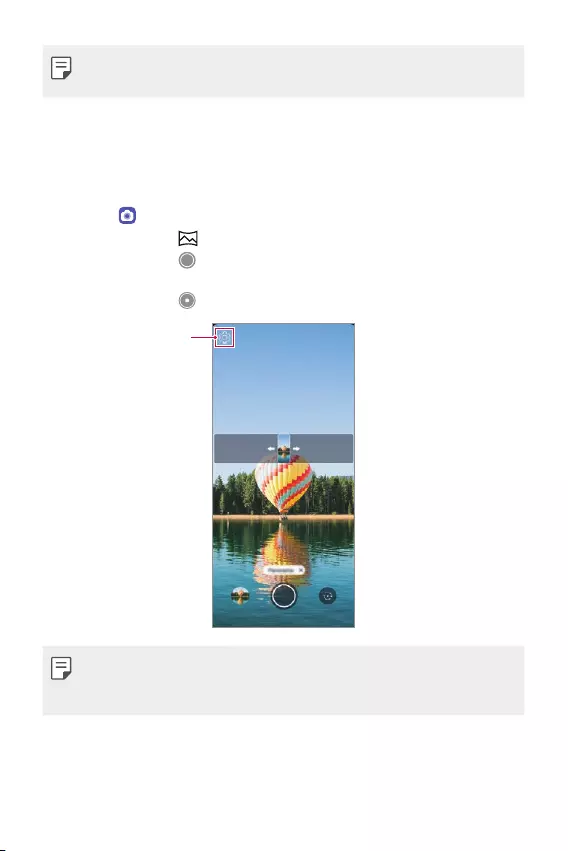
Χρήσιμες εφαρμογές 106
• Κρατήστε σταθερά, ώστε η κάμερα να μην κινείται κατά τη λήψη
φωτογραφίας.
Πανόραμα
Μπορείτε να δημιουργήσετε μια πανοραμική φωτογραφία μετακινώντας την
κάμερα προς μία κατεύθυνση για λήψη φωτογραφιών και συρραφή των συνεχών
λήψεων μιας ευρυγώνιας προβολής.
1 Πατήστε και επιλέξτε Περισσότερα σύροντας τις λειτουργίες της κάμερας.
2 Πατήστε το κουμπί .
3 Πατήστε το κουμπί και, έπειτα, μετακινήστε την κάμερα προς μία
κατεύθυνση.
4 Πατήστε το κουμπί για να διακόψετε την πανοραμική λήψη.
Ρύθμιση κάμερας
• Όταν μετακινείτε την κάμερα προς μία κατεύθυνση, βεβαιωθείτε ότι η
οθόνη στην οποία κάνετε την λήψη δεν βρίσκεται εκτός της γραμμής
καθοδήγησης.

Χρήσιμες εφαρμογές 107
Χειροκίνητη Κάμερα
Μπορείτε να δημιουργήσετε φωτογραφίες επαγγελματικής ποιότητας
χρησιμοποιώντας πλήθος προηγμένων λειτουργιών.
1 Πατήστε και επιλέξτε Περισσότερα σύροντας τις λειτουργίες της κάμερας.
2 Πατήστε .
3 Προσαρμόστε τις παρακάτω ρυθμίσεις της κάμερας.
• Αν επιλέξετε Auto, οι επιλογές προσαρμόζονται αυτομάτως ανάλογα με τον
στόχο λήψης και το περιβάλλον.
• Εάν επιλέξετε Κορύφωση εστίασης, η περιοχή εστίασης επισημαίνεται
με χρώμα. Αυτή η δυνατότητα είναι διαθέσιμη μόνο στη λειτουργία
Χειροκίνητη Εστίαση (Manual Focus - MF).
Προσαρμογή
ισορροπίας
λευκού
Επαναφορά
των ρυθμίσεων
Προσαρμογή
εστίασης
Προσαρμογή
φωτεινότητας
Προσαρμογή
ταχύτητας ISO
Εμφανίζει
διάφορες
επιλογές
Graphy
Προσαρμογή
ταχύτητας
κλείστρου
Επιλογή ρύθμισης
χρονομέτρου
Επιλογή ρύθμισης φλας
Ρύθμιση κάμερας
Ορισμός αναλογιών
οθόνης
Εφαρμογή εφέ φίλτρου
4 Πατήστε το κουμπί για να τραβήξετε μια φωτογραφία.
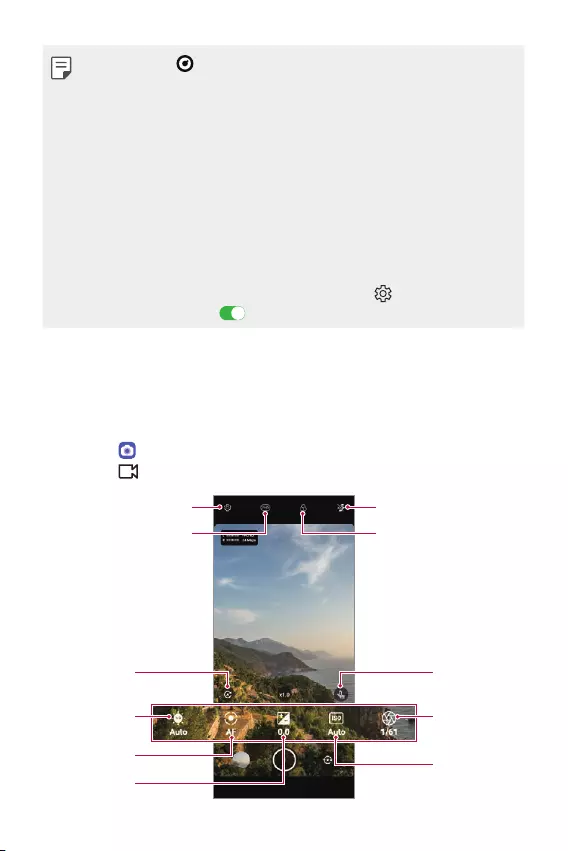
Χρήσιμες εφαρμογές 108
• Εάν πατήσετε και επιλέξετε ένα εφέ Graphy, θα εμφανιστεί μια λίστα με
συνιστώμενες φωτογραφίες με διάφορες ρυθμίσεις.
• Επιλέγοντας τα εφέ Graphy, μπορείτε να λάβετε φωτογραφίες
χρησιμοποιώντας την ισορροπία λευκού, την ταχύτητα κλείστρου και τις
τιμές ρυθμίσεων ISO που εφαρμόζονται στην προτεινόμενη φωτογραφία.
• Η δυνατότητα Graphy είναι διαθέσιμη μόνο σε Χειροκίνητη λειτουργία
κάμερας.
• Μπορείτε να δείτε διάφορες προτεινόμενες φωτογραφίες αν λάβετε την
εφαρμογή Graphy από το Google Play Store.
• Εάν χρησιμοποιείτε δεδομένα κινητής τηλεφωνίας, μπορεί να επιβαρυνθείτε
με χρεώσεις για τη χρήση δεδομένων, ανάλογα με το πρόγραμμα χρεώσεων
που έχετε επιλέξει.
• Για να απενεργοποιήσετε τη δυνατότητα, πατήστε και έπειτα πατήστε
Graphy φωτογραφία .
Χειροκίνητο Βίντεο
Μπορείτε να εγγράψετε ένα βίντεο προσαρμόζοντας χειροκίνητα διάφορες
επιλογές. Προσαρμόστε την ισορροπία λευκού, την εστίαση, τη φωτεινότητα, την
τιμή ISO, την ταχύτητα του κλείστρου και πολλά άλλα.
1 Πατήστε και επιλέξτε Περισσότερα σύροντας τις λειτουργίες της κάμερας.
2 Πατήστε .
Προσαρμογή
ισορροπίας
λευκού
Επαναφορά
των ρυθμίσεων
Προσαρμογή
εστίασης
Προσαρμογή
φωτεινότητας
Προσαρμογή
ταχύτητας ISO
Προσαρμογή
ισορροπίας
ήχου
Προσαρμογή
ταχύτητας
κλείστρου
Επιλογή ρύθμισης φλας
Εφαρμογή εφέ φίλτρου
Ρύθμιση κάμερας
Ορισμός ανάλυσης
οθόνης

Χρήσιμες εφαρμογές 109
3 Προσαρμόστε χειροκίνητα τις ρυθμίσεις της κάμερας αν χρειάζεται.
4 Πατήστε για να εγγράψετε ένα βίντεο.
Αργή κίνηση
Μπορείτε να δημιουργήσετε ένα διασκεδαστικό βίντεο αλλάζοντας τις ταχύτητες
κίνησης των θεμάτων που συμμετέχουν στο βίντεο.
1 Πατήστε και επιλέξτε Περισσότερα σύροντας τις λειτουργίες της κάμερας.
2 Πατήστε το κουμπί .
3 Προσαρμόστε τις παρακάτω ρυθμίσεις της κάμερας.
4 Πατήστε ή για να επιλέξετε διάρκεια για το εφέ αργής κίνησης.
• Τμήμα αργή κίνηση: Σας επιτρέπει να εφαρμόσετε ένα εφέ αργής κίνησης
σε ένα συγκεκριμένο τμήμα του βίντεο.
-Πατήστε όταν θέλετε να εφαρμοστεί το εφέ αργής κίνησης. Με
ένα σύντομο πάτημα, το εφέ αργής κίνησης εφαρμόζεται για 0,5
δευτερόλεπτα. Με ένα παρατεταμένο πάτημα, το εφέ αργής κίνησης
εφαρμόζεται μέχρι να αφήσετε το δάχτυλό σας.
• Όλες οι Αργή κίνηση: Σας επιτρέπει να εφαρμόσετε ένα εφέ αργής κίνησης
σε ολόκληρο το βίντεο.
5 Πατήστε για να ξεκινήσετε την εγγραφή.
• Για να διακόψετε προσωρινά την εγγραφή βίντεο, πατήστε το κουμπί .
Για να συνεχίσετε την εγγραφή βίντεο, πατήστε το κουμπί .
6 Εάν θέλετε να ολοκληρώσετε τη λήψη, πατήστε .

Χρήσιμες εφαρμογές 110
YouTube Live
Μπορείτε να καταγράψετε ένα βίντεο και να το αποστείλετε απευθείας στο
YouTube.
Για να χρησιμοποιήσετε αυτή την δυνατότητα, πρέπει να πληρείτε τις
προϋποθέσεις επιλεξιμότητας. Επικοινωνήστε με το YouTube για τις προϋποθέσεις.
1 Στην αρχική οθόνη, πατήστε .
2 Επιλέξτε Περισσότερα αλλάζοντας λειτουργίες της κάμερας και πατήστε .
• To YouTube Live είναι διαθέσιμο μόνο όταν η συσκευή σας είναι
συνδεδεμένη στο διαδίκτυο. Εάν χρησιμοποιείτε δεδομένα κινητής
τηλεφωνίας, μπορεί να επιβαρυνθείτε με χρεώσεις για τη χρήση δεδομένων,
ανάλογα με το πρόγραμμα χρεώσεων που έχετε επιλέξει.
Χρήσιμα χαρακτηριστικά κάμερας
Λήψη φωτογραφίας με τη λειτουργία AI
Κατά τη λήψη μιας φωτογραφίας, η λειτουργία AI αναγνωρίζει ένα θέμα και
χρησιμοποιεί το καταλληλότερο εφέ στη φωτογραφία.
• Πατήστε για να απενεργοποιήσετε τη λειτουργία AI.
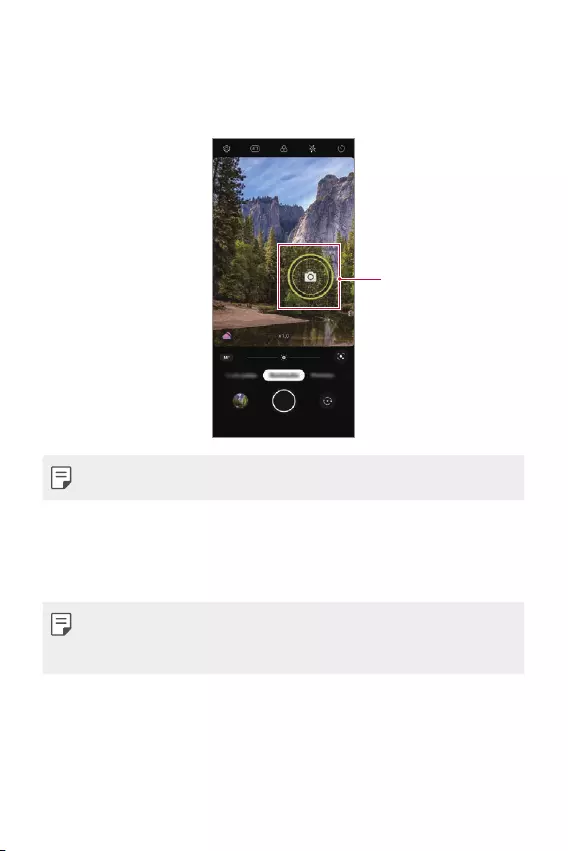
Χρήσιμες εφαρμογές 111
Κλείδωμα αυτόματης έκθεσης/αυτόματης εστίασης
Μπορείτε να προσαρμόσετε το τρέχον επίπεδο έκθεσης και τη θέση εστίασης
πατώντας παρατεταμένα πάνω στην οθόνη. Για να απενεργοποιήσετε τη
λειτουργία, αγγίξτε μια κενή περιοχή της οθόνης.
Κλείδωμα αυτόματης
έκθεσης/αυτόματης
εστίασης
• Αυτή η δυνατότητα είναι διαθέσιμη μόνο σε συγκεκριμένες λειτουργίες.
Μεγέθυνση ή σμίκρυνση
Μπορείτε να ανοίξετε ή να ενώσετε δύο δάχτυλα για μεγέθυνση ή σμίκρυνση όταν
λαμβάνετε φωτογραφίες ή βίντεο.
• Η λειτουργία μεγέθυνσης/σμίκρυνσης δεν είναι διαθέσιμη στη λειτουργία
selfie (μπροστινή κάμερα).
• Αυτή η λειτουργία δεν υποστηρίζεται σε αρκετές καταστάσεις λειτουργίας.
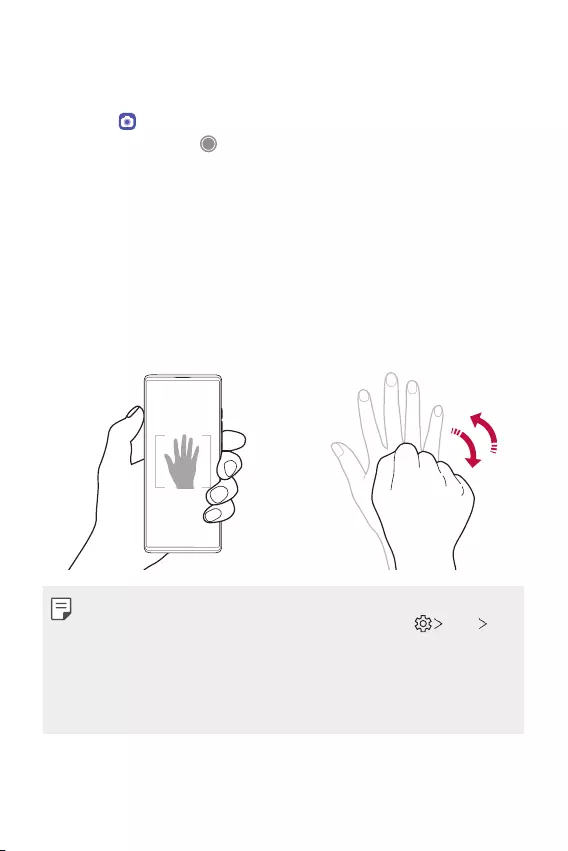
Χρήσιμες εφαρμογές 112
Χρήση της λειτουργίας Πολλαπλή λήψη
Μπορείτε να τραβήξετε συνεχόμενες φωτογραφίες και να τις δείτε ως κινούμενες
εικόνες στο Άλμπουμ.
1 Πατήστε και επιλέξτε Φωτογραφία.
2 Πατήστε και σύρετε το προς τα αριστερά ή προς τα δεξιά.
• Ενώ κρατάτε πατημένο το κουμπί λαμβάνονται πολλές, συνεχόμενες
φωτογραφίες (έως 100 φωτογραφίες).
Λήψη με χειρονομία χεριού
Μπορείτε να τραβήξετε selfie δίνοντας εντολές με απλές κινήσεις των χεριών σας.
Ανοίξτε την παλάμη σας στραμμένη προς την μπροστινή κάμερα και, έπειτα,
κλείστε τα δάκτυλά σας σε γροθιά.
Μπορείτε ακόμη να κλείσετε τα δάχτυλά σας σε γροθιά και να τα ανοίξετε προς τη
μπροστινή κάμερα.
• Σε τρία δευτερόλεπτα πραγματοποιείται λήψη φωτογραφίας.
• Για να χρησιμοποιήσετε αυτήν τη λειτουργία, μεταβείτε στη λειτουργία
μπροστινής κάμερας και, στη συνέχεια, αγγίξτε διαδοχικά Selfie
Λήψη με χειρονομία χεριού.
• Βεβαιωθείτε ότι η παλάμη σας και η γροθιά σας βρίσκονται εντός της
γραμμής αναφοράς για να μπορεί η κάμερα να τις αναγνωρίσει.
• Αυτή η λειτουργία ενδέχεται να μην είναι διαθέσιμη όταν χρησιμοποιείτε
ορισμένες από τις λειτουργίες της κάμερας.
Χρήσιμες εφαρμογές 113
Αυτόματη λήψη
Μπορείτε να χρησιμοποιήσετε τη λειτουργία ανίχνευσης προσώπου για να
τραβήξετε selfie γρήγορα κι εύκολα. Μπορείτε να ρυθμίσετε τη συσκευή έτσι
ώστε, όταν κοιτάτε την οθόνη, η μπροστινή κάμερα ανιχνεύει το πρόσωπό σας και
τραβάει αυτόματα μια selfie.
• Μόλις η μπροστινή κάμερα ανιχνεύσει το πρόσωπό σας, εμφανίζεται ένα
λευκό πλαίσιο-οδηγός. Εάν το θέμα εντός του πλαισίου-οδηγού σταματήσει
να κινείται, το χρώμα του πλαισίου-οδηγού γίνεται κίτρινο, και τότε η κάμερα
τραβάει φωτογραφία.
• Αγγίξτε διαδοχικά Selfie Αυτόματη λήψη για να ενεργοποιήσετε τη
λειτουργία «Αυτόματη λήψη».
Μεσοδιάστημα λήψης
Μπορείτε να τραβήξετε selfie με χρονική απόσταση μεταξύ τους.
Ενώ χρησιμοποιείτε την μπροστινή κάμερα, ανοίξτε την παλάμη σας στην κάμερα
και, έπειτα, κλείστε τα δάκτυλά σας γρήγορα σε γροθιά επαναλαμβάνοντας την
ίδια κίνηση δύο φορές.
• Θα ληφθούν τέσσερις φωτογραφίες διαδοχικά μετά από καθυστέρηση τριών
δευτερολέπτων για καθεμία.
Αποθήκευση αναστροφής
Πριν τραβήξετε μια φωτογραφία με την μπροστινή κάμερα, αγγίξτε το κουμπί
Αποθήκευση αναστροφής. Η εικόνα αναστρέφεται σε οριζόντιο άξονα.
• Κατά τη χρήση της μπροστινής κάμερας, μπορείτε να αλλάξετε τον τρόπο
λήψης των selfie στις επιλογές κάμερας. Για λεπτομέρειες, ανατρέξτε στην
ενότητα
Προσαρμογή των επιλογών της κάμερας
.
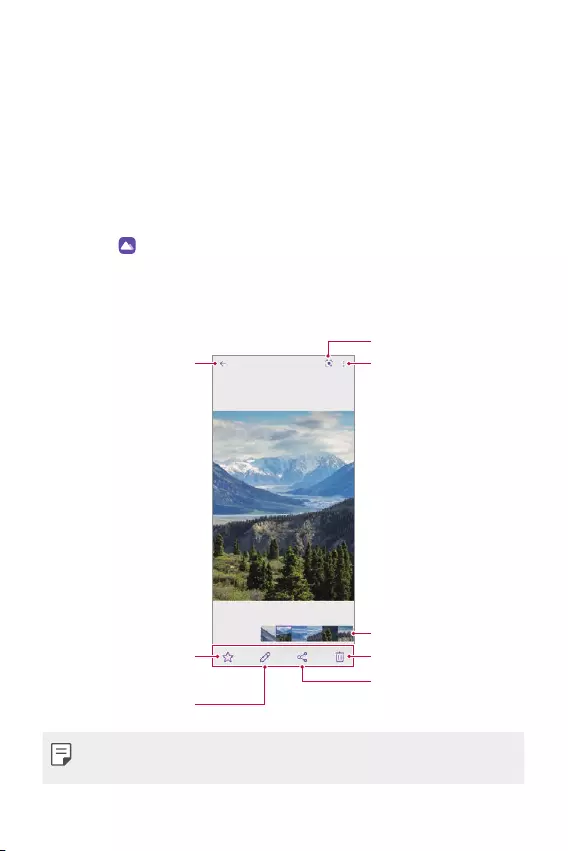
Χρήσιμες εφαρμογές 114
Άλμπουμ
Επισκόπηση εφαρμογής Άλμπουμ
Για τις φωτογραφίες και τα βίντεο που έχουν αποθηκευτεί στη συσκευή σας
παρέχονται δυνατότητες προβολής και διαχείρισής τους.
Προβολή φωτογραφιών
Μπορείτε να δείτε τις φωτογραφίες που έχουν αποθηκευτεί στο προϊόν.
1 Πατήστε και επιλέξτε τον επιθυμητό φάκελο.
2 Πατήστε στην επιθυμητή φωτογραφία.
• Ο φάκελος Άλμπουμ περιέχει τα Φωτογραφία, Άλμπουμ, Εφέ Αναμνήσεις
και Αναπαρ.
Διαγραφή εικόνων
Προεπισκόπηση
άλμπουμ
Κοινή χρήση εικόνων
Προσθήκη ή κατάργηση
από τα αγαπημένα.
Επεξεργασία εικόνων
Πρόσβαση σε άλλες
επιλογές.
Επιστροφή στην
προηγούμενη οθόνη.
Άνοιγμα Φακοί Google.
• Το μενού λεπτομερειών εμφανίζεται όταν αγγίζετε ελαφρώς την οθόνη. Αν
αγγίξετε την οθόνη ακόμα μία φορά, το μενού θα εξαφανιστεί.
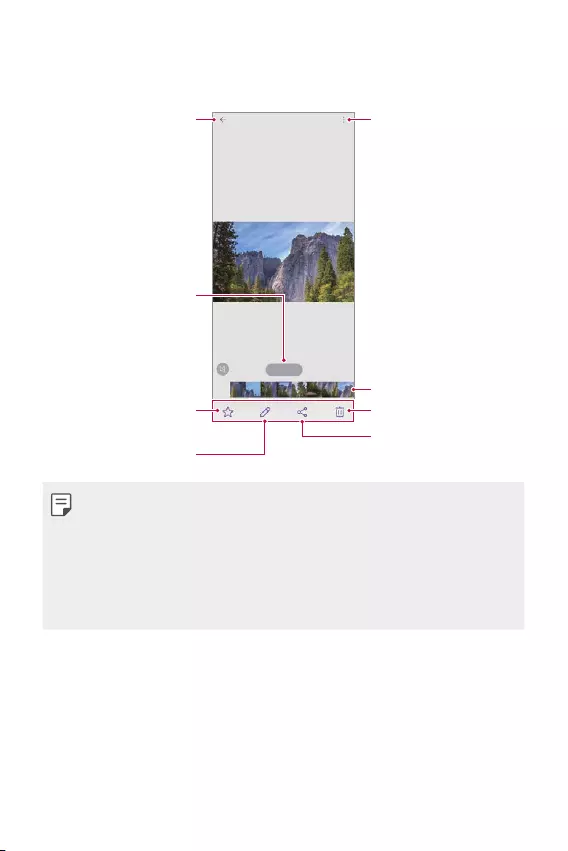
Χρήσιμες εφαρμογές 115
Αναπαραγωγή βίντεο
Μπορείτε να δείτε τα βίντεο που έχουν αποθηκευτεί στο προϊόν.
Πρόσβαση σε άλλες
επιλογές.
Επιστροφή στην
προηγούμενη οθόνη.
Διαγραφή εικόνων
Προεπισκόπηση άλμπουμ
Κοινή χρήση εικόνων
Προσθήκη ή κατάργηση
από τα αγαπημένα.
Παύση ή αναπαραγωγή
βίντεο.
Επεξεργασία εικόνων
• Για να ρυθμίσετε την ένταση του ήχου, τραβήξτε τη δεξιά πλευρά στην
οθόνη ενός βίντεο προς τα κάτω ή προς τα πάνω.
• Για να ρυθμίσετε τη φωτεινότητα της οθόνης, σύρετε την αριστερή πλευρά
στην οθόνη προς τα επάνω ή προς τα κάτω.
• Αν σύρετε την οθόνη προς τα αριστερά στην οθόνη αναπαραγωγής βίντεο,
το βίντεο κινείται προς τα πίσω (REW) και αν σύρετε προς τα δεξιά, μπορείτε
να κινήσετε το βίντεο προς τα εμπρός και γρήγορα (FF).
Χρήσιμες εφαρμογές 116
Επαφές
Επαφές - Παρουσίαση
Μπορείτε να αποθηκεύσετε και να διαχειριστείτε τις επαφές.
Στην αρχική οθόνη, πατήστε LG Επαφές.
Προσθήκη επαφών
Προσθήκη νέων επαφών
1 Στην οθόνη της λίστας επαφών, πατήστε το κουμπί .
• Θα εμφανιστεί ένα αναδυόμενο παράθυρο για να επιλέξετε τη θέση
αποθήκευσης για να την κοινοποιήσετε. Επιλέξτε τη θέση που θέλετε.
2 Εισαγάγετε τα στοιχεία επικοινωνίας και πατήστε Αποθήκευση.
Εισαγωγή επαφών
Μπορείτε να εισαγάγετε επαφές από μια άλλη συσκευή αποθήκευσης.
1 Στην οθόνη της λίστας επαφών, αγγίξτε διαδοχικά Διαχείριση επαφών
Εισαγωγή.
2 Επιλέξτε τις τοποθεσίες προέλευσης και προορισμού για την επαφή που
προορίζεται για εισαγωγή και πατήστε OK.
3 Επιλέξτε τις επαφές και αγγίξτε Εισαγωγή.
Προσθήκη επαφών στη λίστα ταχείας κλήσης
1 Στην οθόνη της λίστας επαφών, πατήστε το κουμπί Ταχεία κλήση.
2 Αγγίξτε Προσθήκη επαφής από έναν αριθμό ταχείας κλήσης.
3 Επιλέξτε μια επαφή.
• Όταν προσθέτετε μια καινούργια επαφή, πατήστε για να προσθέσετε
έναν αριθμό ταχείας κλήσης.
Χρήσιμες εφαρμογές 117
Αναζήτηση επαφών
Μπορείτε να πραγματοποιήσετε αναζήτηση επαφών χρησιμοποιώντας μία από τις
παρακάτω επιλογές:
• Πατήστε τη γραμμή αναζήτησης στο επάνω μέρος της οθόνης Επαφών και
εισάγετε την επαφή ή τον αριθμό τηλεφώνου για τα οποία θέλετε να κάνετε
αναζήτηση.
• Πραγματοποιήστε κύλιση της λίστας επαφών προς τα πάνω ή προς τα κάτω.
• Από το ευρετήριο στην οθόνη της λίστας επαφών, πατήστε το αρχικό γράμμα
για μια επαφή
.
• Εάν πατήσετε στη γραμμή αναζήτησης στο επάνω μέρος της οθόνης
Επαφών και εισάγετε μια επαφή ή έναν αριθμό τηλεφώνου, θα εμφανιστούν
τα αποτελέσματα αναζήτησης από το ιστορικό κλήσεων και τη λίστα
επαφών που είναι αποθηκευμένη στη συσκευή.
Λίστα επαφών
Επεξεργασία επαφών
1 Στην οθόνη της λίστας επαφών, επιλέξτε μια επαφή.
2 Στην οθόνη των στοιχείων μιας επαφής, πατήστε το κουμπί και
επεξεργαστείτε τα στοιχεία.
3 Πατήστε Αποθήκευση για να αποθηκεύσετε τις αλλαγές.
Διαγραφή επαφών
Μπορείτε να διαγράψετε επαφές χρησιμοποιώντας μία από τις παρακάτω
επιλογές:
• Στην οθόνη της λίστας επαφών, αγγίξτε και κρατήστε την επαφή που θέλετε να
διαγράψετε και, στη συνέχεια, αγγίξτε .
• Αγγίξτε διαδοχικά Διαγραφή που βρίσκεται στην οθόνη λίστας επαφών.
• Οι απομακρυσμένες επαφές ενδέχεται να μην αποκατασταθούν.
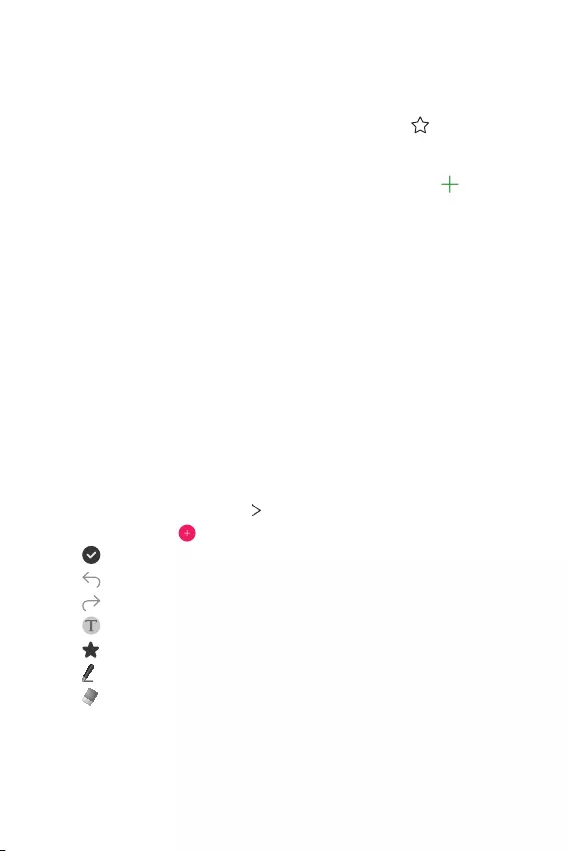
Χρήσιμες εφαρμογές 118
Προσθήκη αγαπημένων
Μπορείτε να καταχωρίσετε τις επαφές που χρησιμοποιείτε συχνά ως αγαπημένες.
1 Στην οθόνη της λίστας επαφών, επιλέξτε μια επαφή.
2 Στην οθόνη των στοιχείων μιας επαφής, πατήστε το κουμπί .
Δημιουργία Ομάδας
1 Στη λίστα ομάδων επαφών, πατήστε Ομάδες και έπειτα πατήστε .
2 Πληκτρολογήστε ένα νέο όνομα για την ομάδα.
3 Πατήστε Προσθήκη μελών, επιλέξτε επαφές και πατήστε Προσθήκη.
4 Πατήστε Αποθήκευση για να αποθηκεύσετε τη νέα ομάδα.
QuickMemo+
Παρουσίαση της εφαρμογής QuickMemo+
Μπορείτε να φτιάξετε δημιουργικές σημειώσεις χρησιμοποιώντας την γκάμα
επιλογών που διαθέτει αυτή η προηγμένη δυνατότητα του σημειωματάριου, όπως
η διαχείριση εικόνων και στιγμιότυπων. Οι επιλογές αυτές δεν υποστηρίζονται από
το συμβατικό σημειωματάριο.
Δημιουργία σημείωσης
1 Στην αρχική οθόνη, πατήστε LG QuickMemo+.
2 Πατήστε το κουμπί για να δημιουργήσετε μια σημείωση.
• : αποθήκευση σημείωσης.
• : Αναίρεση της προηγούμενης ενέργειας επεξεργασίας.
• : Επανάληψη των πιο πρόσφατων ενεργειών διαγραφής.
• : εισαγωγή σημείωσης χρησιμοποιώντας το πληκτρολόγιο.
• : Αποθηκεύστε τους αγαπημένους σας τύπους στυλό.
• : δημιουργία χειρόγραφων σημειώσεων.
• : διαγραφή χειρόγραφων σημειώσεων.

Χρήσιμες εφαρμογές 119
• : Αλλάξτε σε γραμματοσειρά καλλιγραφίας καθώς γράφετε με το χέρι.
• : Πρόσβαση σε άλλες επιλογές.
3 Πατήστε το κουμπί για να αποθηκεύσετε τη σημείωση.
Δημιουργία σημειώσεων σε ένα στιγμιότυπο οθόνης
1 Κατά την προβολή της οθόνης που θέλετε να αποτυπώσετε, σύρετε τη γραμμή
κατάστασης προς τα κάτω και, στη συνέχεια, αγγίξτε το κουμπί .
• Η οθόνη αποτυπώνεται και εμφανίζεται ως μικρογραφία στο δεξιό κάτω
μέρος της οθόνης.
2 Για να γράψετε σημειώσεις στην οθόνη, πατήστε .
3 Γράψτε σημειώσεις χρησιμοποιώντας τα εργαλεία.
• : Κάνετε μεγέθυνση ή σμίκρυνση ή προσαρμόστε την περιοχή λήψης.
• : δημιουργία χειρόγραφων σημειώσεων.
• : διαγραφή χειρόγραφων σημειώσεων.
• : Αναίρεση της προηγούμενης ενέργειας επεξεργασίας.
• : Επανάληψη των πιο πρόσφατων ενεργειών διαγραφής.
• : Περικόψτε την οθόνη σύμφωνα με τις απαιτήσεις σας.
4 Πατήστε και αποθηκεύστε τις σημειώσεις.
• Μπορείτε να δείτε τις σημειώσεις που αποθηκεύσατε στο Άλμπουμ.
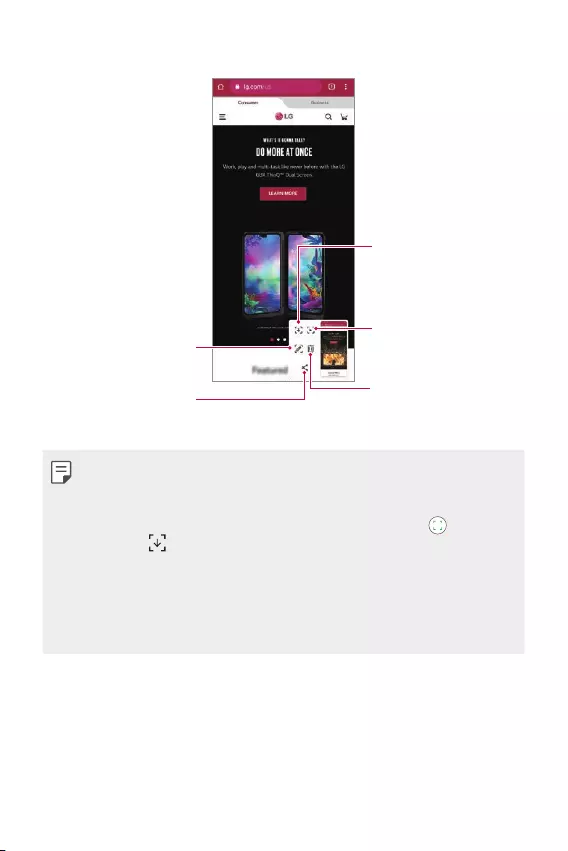
Χρήσιμες εφαρμογές 120
Πρόσθετα χαρακτηριστικά μετά τη λήψη στιγμιότυπου οθόνης
Πατήστε για να
καταγράψετε την οθόνη.
Πατήστε για να
αποτυπώσετε ολόκληρη
την οθόνη
χρησιμοποιώντας τη
δυνατότητα κύλισης.
Πατήστε για να διαγράψετε
το αποτυπωμένο
στιγμιότυπο οθόνης.
Πατήστε για να γράψετε
σημειώσεις στο
αποτυπωμένο στιγμιότυπο
οθόνης.
Πατήστε για να μοιραστείτε
το αποτυπωμένο
στιγμιότυπο οθόνης.
• Μπορείτε να αποτυπώσετε ολόκληρη την οθόνη χρησιμοποιώντας τη
δυνατότητα κύλισης.
• Κατά τη χρήση μιας εφαρμογής, όπως οι Messaging και Chrome, σύρετε
το πλαίσιο ειδοποιήσεων προς τα κάτω και κατόπιν πατήστε . Έπειτα,
πατήστε για να αποτυπώσετε ολόκληρη την οθόνη που βλέπετε εκείνη
τη στιγμή ως ένα μόνο αρχείο.
• Αυτή η δυνατότητα είναι διαθέσιμη μόνο για ορισμένες εφαρμογές που
υποστηρίζουν τη δυνατότητα κύλισης.
• Πιάστε δύο δάχτυλα ή απλώστε τα δάχτυλά σας για να αλλάξετε τη διάταξη
των σημείων.
Χρήσιμες εφαρμογές 121
Ρολόι
Αφύπνιση
Μπορείτε να ορίσετε να χτυπήσει το ξυπνητήρι μια καθορισμένη ώρα.
1 Στην αρχική οθόνη, πατήστε LG Ρολόι Αφύπνιση.
2 Πατήστε το κουμπί για να προσθέσετε ένα καινούργιο ξυπνητήρι.
3 Διαμορφώστε τις ρυθμίσεις αφύπνισης και πατήστε Αποθήκευση.
• Εάν επιλέξετε μια καταχώριση αφύπνισης που είχε ρυθμιστεί στο παρελθόν,
μπορείτε να επεξεργαστείτε τα στοιχεία της.
• Για να διαγράψετε μια επιλογή αφύπνισης, πατήστε το κουμπί
Διαγραφή. στο επάνω μέρος της οθόνης. Εναλλακτικά, πατήστε
παρατεταμένα την αφύπνιση.
Παγκόσμιο ρολόι
Μπορείτε να δείτε την τρέχουσα ώρα στις πόλεις σε όλο τον κόσμο.
1 Στην αρχική οθόνη, πατήστε LG Ρολόι Παγκόσμιο ρολόι.
2 Πατήστε το κουμπί και προσθέστε μια πόλη.
Αντίστρ. Χρονόμ.
Μπορείτε να ορίσετε να χτυπήσει το ξυπνητήρι μετά από ένα καθορισμένο
χρονικό διάστημα.
1 Στην αρχική οθόνη, πατήστε LG Ρολόι Αντιστρ. Χρονόμ.
2 Ρυθμίστε την ώρα και πατήστε Έναρξη.
• Για αναστολή του χρονοδιακόπτη, πατήστε Παύση. Για συνέχιση του
χρονοδιακόπτη, πατήστε Συνέχεια.
3 Πατήστε Διακοπή για να διακόψετε τον χρονοδιακόπτη.

Χρήσιμες εφαρμογές 122
Χρονόμετρο
Μπορείτε να χρησιμοποιήσετε το χρονόμετρο για να μετρήσετε τον χρόνο για
έναν γύρο.
1 Στην αρχική οθόνη, πατήστε LG Ρολόι Χρονόμετρο.
2 Πατήστε το κουμπί Έναρξη για να ξεκινήσει το χρονόμετρο.
• Για να μετρήσετε τον χρόνο για έναν γύρο, πατήστε Lap.
3 Πατήστε Παύση για να αναστείλετε το χρονόμετρο.
• Για να συνεχίσει το χρονόμετρο, πατήστε Συνέχεια.
• Για να διαγράψετε όλες τις εγγραφές και να ξεκινήσετε το χρονόμετρο από
την αρχή, αγγίξτε Επαναφορά.
Μουσική
Μπορείτε να ακούσετε και να διαχειριστείτε τραγούδια ή μουσικά άλμπουμ.
1 Στην αρχική οθόνη, πατήστε LG Μουσική.
2 Επιλέξτε μια κατηγορία.
3 Επιλέξτε ένα αρχείο μουσικής.
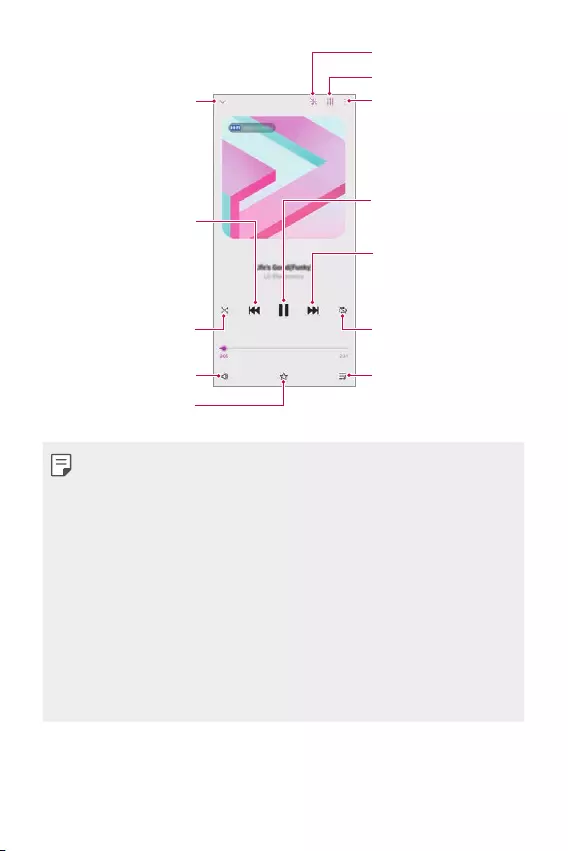
Χρήσιμες εφαρμογές 123
Αναπαραγωγή σε τυχαία
σειρά.
Επιλογή λειτουργίας
επανάληψης.
Πατήστε για αναπαραγωγή
του επόμενου αρχείου /
Πατήστε παρατεταμένα για
γρήγορη προώθηση.
Πατήστε για αναπαραγωγή
από την αρχή του
τρέχοντος αρχείου /
Πατήστε δύο φορές για
αναπαραγωγή του
προηγούμενου αρχείου /
Πατήστε παρατεταμένα για
επιστροφή στην αρχή.
Προσθήκη ή διαγραφή από
τα αγαπημένα.
Προσαρμογή της έντασης
ήχου.
Ρύθμιση ηχητικών εφέ.
Άνοιξε/Κλείσε το Φως
Φλας.
Επιστροφή στην
προηγούμενη οθόνη.
Παύση ή αναπαραγωγή.
Πρόσβαση σε άλλες
επιλογές.
Μετάβαση στη λίστα
Αναπαραγωγής σε εξέλιξη.
• Ορισμένες μορφές αρχείων ενδέχεται να μην υποστηρίζονται ανάλογα με το
εγκατεστημένο λογισμικό.
• Αρχεία που υπερβαίνουν το επιτρεπόμενο όριο μεγέθους ενδέχεται να
προκαλέσουν σφάλματα.
• Τα αρχεία μουσικής ενδέχεται να προστατεύονται από διεθνείς κατόχους
πνευματικών δικαιωμάτων ή τους νόμους περί πνευματικών δικαιωμάτων.
Για να αντιγράψετε κάποιο αρχείο μουσικής, μπορεί να χρειαστεί να λάβετε
νόμιμη άδεια. Για να πραγματοποιήσετε λήψη ή αντιγραφή ενός αρχείου
μουσικής, ελέγξτε πρώτα τη νομοθεσία περί πνευματικών δικαιωμάτων στη
χώρα όπου βρίσκεστε.
• Αυτό το μοντέλο υποστηρίζει αναπαραγωγή ήχου Hi-Fi. Τα αρχεία ήχου Hi-Fi
εμφανίζονται με το εικονίδιο Hi-Fi.
• Εάν ενεργοποιήσετε το φλας, θα αναβοσβήνει σύμφωνα με τη μουσική που
αναπαράγεται.
Χρήσιμες εφαρμογές 124
Αριθμομηχανή
Μπορείτε να χρησιμοποιήσετε δύο τύπους υπολογιστών: το απλό κομπιουτεράκι
και τη μηχανική αριθμομηχανή.
1 Στην αρχική οθόνη, πατήστε Google Αριθμομηχανή.
2 Χρησιμοποιήστε το πληκτρολόγιο για να κάνετε έναν υπολογισμό.
• Εάν θέλετε να γίνει νέος υπολογισμός, πατήστε παρατεταμένα το .
ThinQ
Μπορείτε να συνδέσετε εύκολα το προϊόν με συσκευές IoT για να τις
παρακολουθείτε και να τις χρησιμοποιείτε με άνεση.
Στην αρχική οθόνη, πατήστε LG ThinQ.
• Μπορείτε να καταχωρίσετε πλυντήριο ρούχων, στεγνωτήριο, σύστημα
φροντίδας ενδυμάτων styler, πλυντήριο πιάτων, φούρνο και σκούπα ρομπότ
όταν το προϊόν βρίσκεται σε κατάσταση αναμονής.
• Αναζητήστε το σήμα ThinQ στο προϊόν για να καταλάβετε αν μπορεί να
συνδεθεί με την εφαρμογή ThinQ.
• Πατήστε για να μάθετε περισσότερα για διάφορες λειτουργίες της
εφαρμογής ThinQ.

Χρήσιμες εφαρμογές 125
LG Health
Μπορείτε να διαχειριστείτε θέματα που αφορούν την υγεία σας και να υιοθετήσετε
καλές συνήθειες σωματικής άσκησης παρακολουθώντας τις ασκήσεις που
εκτελείτε.
Εισαγωγή στη χρήση της εφαρμογής LG Health
Μπορείτε να προσαρμόσετε τις ρυθμίσεις της εφαρμογής LG Health όταν εκκινείτε
την εφαρμογή για πρώτη φορά μετά την επαναφορά της.
1 Στην αρχική οθόνη, πατήστε LG LG Health.
2 Ακολουθήστε τις οδηγίες που εμφανίζονται στην οθόνη για να ολοκληρώσετε
τη διαμόρφωση.
Χρήση της εφαρμογής LG Health
Στην εφαρμογή LG Health μπορείτε να δείτε βασικές πληροφορίες και να
διαχειριστείτε το εύρος των πληροφοριών υγείας και φυσικής άσκησης.
1 Στην αρχική οθόνη, πατήστε LG LG Health.
2 Διατίθενται οι παρακάτω επιλογές.
• : δείτε το αρχείο καταγραφής των σωματικών ασκήσεών σας τη
συγκεκριμένη ημέρα που θέλετε να ελέγξετε.
• : ξεκινήστε να παρακολουθείτε μια άσκηση. Καταγράφεται η διαδρομή
και η ένταση της σωματικής άσκησης για κάθε τύπο άσκησης που εκτελείτε.
• : ορίστε τους ημερήσιους στόχους σωματικής άσκησης, τις θερμίδες που
θέλετε να καταναλώνετε και τα βήματα ή ορίστε διάφορες ρυθμίσεις στην
εφαρμογή LG Health.
• Οι πληροφορίες σε θέματα υγείας που παρέχονται από την εφαρμογή
LG Health προορίζονται για την ευκολία του χρήστη και δεν πρέπει
να χρησιμοποιηθούν για την πρόληψη, τη θεραπεία και τη διάγνωση
ασθενειών ή άλλων προβλημάτων ιατρικής φύσης.
• Η εφαρμογή LG Health ενδέχεται να διαφέρει ή να μην είναι διαθέσιμη,
ανάλογα με τη χώρα και τον πάροχο υπηρεσιών. Οι λειτουργίες που
διατίθενται για την εφαρμογή LG Health, καθώς και άλλες εφαρμογές
που μπορούν να προστεθούν στην εφαρμογή LG Health, ενδέχεται να
διαφέρουν ανάλογα με τη χώρα. Αυτό οφείλεται στους διαφορετικούς
νόμους και κανονισμούς που ισχύουν.

Χρήσιμες εφαρμογές 126
Εγγραφή ήχου HD
Με την Εγγραφή ήχου HD μπορείτε να διαμορφώνετε χειροκίνητα τις ρυθμίσεις
ήχου, έτσι ώστε η εγγραφή του ήχου να προσαρμόζεται κάθε φορά στο
περιβάλλον σας.
Λειτουργίες εγγραφής
Μπορείτε να εγγράφετε ένα αρχείο ήχου υψηλής ανάλυσης επιλέγοντας
και διαμορφώνοντας τη λειτουργία ήχου που θέλετε, ώστε να ταιριάζει στο
περιβάλλον εγγραφής.
Στην αρχική οθόνη, πατήστε LG Εγγραφή ήχου HD .
Κανονικό
Μπορείτε να εγγράψετε ήχο χωρίς να ορίσετε επιπλέον ρυθμίσεις.
ASMR
Μπορείτε να καταγράψετε ήχο ASMR.
Συναυλία
Μπορείτε να εγγράψετε ήχο σε μια συναυλία ή άλλη μουσική εκδήλωση.
Προσαρμοσμένο
Μπορείτε να διαμορφώσετε τις επιθυμητές ρυθμίσεις για την εγγραφή ήχου.
Λειτουργία Στούντιο
Με τη λειτουργία Στούντιο, μπορείτε να παίξετε ένα αρχείο ήχου ή μουσικής
και ταυτόχρονα να ηχογραφείτε τη φωνή σας, να δημιουργήσετε μια συγχορδία
ηχογραφώντας τη φωνή σας πολλές φορές, και να ηχογραφήσετε τα σχόλιά σας
πάνω από το αρχικό αρχείο ήχου του παρουσιαστή ή του ομιλητή.
1 Στην αρχική οθόνη, πατήστε LG Εγγραφή ήχου HD
Προσαρμοσμένο.
2 Πατήστε το κουμπί .
3 Επιλέξτε ένα αρχείο ήχου που θα χρησιμοποιήσετε ως μουσική φόντου.
4 Αγγίξτε το κουμπί για εγγραφή ήχου.
5 Αγγίξτε το κουμπί για αποθήκευση του ηχογραφημένου αρχείου.
Χρήσιμες εφαρμογές 127
• Η αναπαραγωγή μουσικής φόντου είναι δυνατή μόνο μέσω ακουστικών.
Βεβαιωθείτε ότι έχετε συνδέσει τα ακουστικά προτού χρησιμοποιήσετε
αυτήν τη λειτουργία.
• Για να αλλάξετε τις πρόσθετες ρυθμίσεις, αγγίξτε Ρυθμίσεις, και
στη συνέχεια προσαρμόστε τον τύπο αρχείου, το βάθος bit, το ρυθμό
δειγματοληψίας και άλλες ρυθμίσεις.
• Όταν επιλέγετε τη λειτουργία Concert ή Προσαρμοσμένη όταν έχετε
συνδέσει ακουστικά, εμφανίζεται το . Αγγίξτε το κουμπί και στη
συνέχεια επιλέξτε το μικρόφωνο που θέλετε να χρησιμοποιήσετε.
• Μπορείτε να ελέγχετε την ποιότητα του ήχου με το συνδεδεμένο ακουστικό
ενώ εγγράφετε τον ήχο. Κατά την εγγραφή ήχου σε λειτουργία Στούντιο,
η λειτουργία παρακολούθησης ήχου δεν υποστηρίζεται. Μπορείτε να
ακούσετε μόνο τη μουσική φόντου.
Πρόγραμμα Εκκίν. Παιχνιδ.
Μπορείτε να επιλέξετε αν θα χρησιμοποιείται το Πρόγραμμα Εκκίν. Παιχνιδ. όπου
μπορείτε να δείτε τη λίστα με τα παιχνίδια που έχουν εγκατασταθεί στο προϊόν
και να επιλέγετε ρυθμίσεις για τα παιχνίδια, όπως απενεργοποίηση του ήχου των
πολυμέσων, περιορισμό ειδοποιήσεων, κ.λπ.
1 Στην αρχική οθόνη, πατήστε Πρόγραμμα Εκκίν. Παιχνιδ..
2 Επιλέξτε την επιλογή που θέλετε.
Smart Doctor
Μπορείτε να χρησιμοποιήσετε το Smart Doctor για να διαγνώσετε την κατάσταση
της συσκευής και να τη βελτιστοποιήσετε.
Στην οθόνη αρχική, πατήστε LG Smart Doctor.
Χρήσιμες εφαρμογές 128
LG Mobile Switch
Μέσω του LG Mobile Switch μεταφέρετε εύκολα δεδομένα από μια μεταχειρισμένη
συσκευή σε μια νέα συσκευή.
1 Στην αρχική οθόνη, πατήστε LG LG Mobile Switch.
Μπορείτε επίσης να πατήσετε Ρυθμίσεις Σύστημα Αντίγραφο ασφαλείας
LG Mobile Switch.
• Εάν η εφαρμογή δεν έχει εγκατασταθεί στο προϊόν, λάβετε και
εγκαταστήστε την εφαρμογή LG Mobile Switch από το Google Play Store.
2 Ακολουθήστε τις οδηγίες της οθόνης για να επιλέξετε την επιθυμητή μέθοδο
μεταφοράς.
• Δεν θα δημιουργηθούν αντίγραφα ασφαλείας για τα δεδομένα σε έναν
λογαριασμό Google. Όταν συγχρονίζεις τον λογαριασμό σου στο Google, οι
εφαρμογές Google, οι επαφές Google, το Ημερολόγιο Google, τα δεδομένα
της εφαρμογής σημειωμάτων Google και οι εφαρμογές που κατεβαίνουν
από το Play Store αποθηκεύονται στην εφαρμογή Drive αυτόματα.
• Φορτίστε πλήρως την μπαταρία πριν από τη μεταφορά των δεδομένων για
να αποφευχθεί η άσκοπη απενεργοποίηση της συσκευής κατά τη διάρκεια
της διαδικασίας.
Σκουπίδια εφαρμογ.
Μπορείτε να δείτε μια λίστα με διαγραμμένες εφαρμογές στην αρχική οθόνη.
Μπορείτε να ανακτήσετε μια εφαρμογή που διαγράφηκε τις τελευταίες 24 ώρες.
Στην οθόνη αρχική, πατήστε LG Σκουπίδια εφαρμογ..
Για περισσότερες λεπτομέρειες, ανατρέξτε στο
Σκουπίδια εφαρμογ.
.
Χρήσιμες εφαρμογές 129
SmartWorld
Μπορείτε να κατεβάσετε μια μεγάλη γκάμα παιχνιδιών, ηχητικού περιεχομένου,
εφαρμογών και γραμματοσειρών που παρέχονται από την LG Electronics.
Προσαρμόστε τη συσκευή ανάλογα με τις προτιμήσεις σας χρησιμοποιώντας τα
θέματα της αρχικής οθόνης.
• Εάν χρησιμοποιείτε δεδομένα κινητής τηλεφωνίας, μπορεί να επιβαρυνθείτε
με χρεώσεις για τη χρήση δεδομένων, ανάλογα με το πρόγραμμα χρεώσεων
που έχετε επιλέξει.
• Αυτή η λειτουργία μπορεί να μην υποστηρίζεται, ανάλογα με την περιοχή ή
τον πάροχο υπηρεσιών.
1 Στην αρχική οθόνη, πατήστε Smartworld.
2 Πατήστε Λογαριασμοί LG και συνδεθείτε.
3 Επιλέξτε και πραγματοποιήστε λήψη των στοιχείων περιεχομένου της
αρεσκείας σας.
RemoteCall Service
Μπορεί να γίνει απομακρυσμένη διάγνωση της συσκευής σας για την επίλυση
των προβλημάτων. Αρχικά, καλέστε το Κέντρο εξυπηρέτησης πελατών της LG
ακολουθώντας τα παρακάτω βήματα:
• Για να χρησιμοποιήσετε αυτήν τη λειτουργία, πρέπει πρώτα να
συμφωνήσετε με τους όρους χρήσης της λειτουργίας.
• Εάν χρησιμοποιείτε δεδομένα κινητής τηλεφωνίας, μπορεί να επιβαρυνθείτε
με χρεώσεις για τη χρήση δεδομένων, ανάλογα με το πρόγραμμα χρεώσεων
που έχετε επιλέξει.
1 Στην αρχική οθόνη, πατήστε LG RemoteCall Service.
2 Πραγματοποιήστε κλήση προς το Κέντρο εξυπηρέτησης πελατών της LG.
3 Όταν απαντηθεί η κλήση, ακολουθήστε τις οδηγίες του συνεργάτη επισκευών
για να εισαγάγετε έναν εξαψήφιο αριθμό.
• Εκτελείται απομακρυσμένη σύνδεση στη συσκευή σας και ξεκινάει η
απομακρυσμένη υποστήριξη.
Χρήσιμες εφαρμογές 130
Εκπομπή κυψέλης
Μπορείτε να δείτε τις εκπομπές κειμένου σε πραγματικό χρόνο σε καταστάσεις
έκτακτης ανάγκης, όπως τυφώνες, πλημμύρες και σεισμούς.
Στην αρχική οθόνη, πατήστε Εκπομπή κυψέλης.
Εφαρμογές Google
Μπορείτε να χρησιμοποιήσετε εφαρμογές Google ορίζοντας ένα λογαριασμό
Google. Όταν χρησιμοποιείτε μια εφαρμογή Google για πρώτη φορά, εμφανίζεται
ένα παράθυρο καταχώρισης λογαριασμού Google. Εάν δεν έχετε λογαριασμό
Google, δημιουργήστε έναν από τη συσκευή σας. Για λεπτομέρειες σχετικά με τη
χρήση μιας εφαρμογής, συμβουλευτείτε τη Βοήθεια στην ίδια την εφαρμογή.
• Ορισμένες εφαρμογές ενδέχεται να μην λειτουργούν, ανάλογα με την
περιοχή ή τον πάροχο υπηρεσιών.
Ημερολόγιο
Η εφαρμογή Ημερολόγιο σας επιτρέπει να παρακολουθείτε το πρόγραμμα
συμβάντων σας (που εσείς δημιουργήσατε), οργανωμένο ανά Ημέρα, ανά 3
Ημέρες, Εβδομάδα ή Μήνα.
Chrome
Ένας γρήγορος, απλός, κι ασφαλής περιηγητής, φτιαγμένος για τον σύγχρονο ιστό.
Έγγραφα
Το Docs είναι ένα συλλογικό εργαλείο επεξεργασίας κειμένου που ενισχύει
την παραγωγικότητα. Χρησιμοποιήστε το Docs για να δημιουργήσετε, να
επεξεργαστείτε και να συνεργαστείτε σε πραγματικό χρόνο.
Google Drive
Το Drive είναι χώρος αποθήκευσης αρχείων και κοινής εφαρμογής που σε
διευκολύνει να βρεις, να μοιραστείς και συνεργαστείς σε projects δουλειάς από
παντού, άμεσα.

Χρήσιμες εφαρμογές 131
Duo
Κάνε απλές, υψηλής ποιότητας βιντεοκλήσεις στους φίλους σου και στην
οικογένεια με τα τηλέφωνα Android και iPhones.
Gmail
Το Gmail είναι μια εύκολη στη χρήση εφαρμογή email που διατηρεί τα μηνύματά
σας ασφαλή, κάνει το γραμματοκιβώτιό σας εξυπνότερο και σας βοηθάει να είστε
οργανωμένοι.
Google
Η εφαρμογή Google σε κρατάει ενήμερο για τα πράγματα που σε ενδιαφέρουν.
Βρείτε γρήγορες απαντήσεις, εξερευνήστε τα ενδιαφέροντά σας, και μάθετε
ιστορίες και πάρτε ενημερώσεις για θέματα που σας ενδιαφέρουν.
Χάρτες
Πάτε κάπου; Πηγαίνετε με τους Χάρτες, η εφαρμογή στην οποία μπορείτε
να βασιστείτε για πλοήγηση σε πραγματικό χρόνο, για την κυκλοφορία, τη
συγκοινωνία, και για λεπτομέρειες για εκατομμύρια μέρη, όπως κριτικές και
δημοφιλείς ώρες.
Φωτογραφίες
Το σπίτι για όλες τις φωτογραφίες και τα βίντεό σας, αυτόματα οργανωμένα έτσι
ώστε να μπορείτε να μοιράζεστε και να αποθηκεύετε ό,τι έχει σημασία.
Ταινίες Play
Χρησιμοποιήστε τον λογαριασμό σας Google για ενοικίαση ή αγορά ταινιών.
Μπορείτε να αγοράσετε περιεχόμενο για αναπαραγωγή παντού.
YT Music
Μια νέα υπηρεσία streaming μουσικής από το YouTube.
Υπολογιστικά φύλλα
Το Sheets είναι ένα συλλογικό εργαλείο επεξεργασίας υπολογιστικών φύλλων
που ενισχύει την παραγωγικότητα. Χρησιμοποιήστε το Sheets για να εισάγετε, να
οργανώσετε και να αναλύσετε πληροφορίες μαζί σε πραγματικό χρόνο.
Χρήσιμες εφαρμογές 132
Παρουσιάσεις
Το Google Slides είναι ένα συλλογικό εργαλείο δημιουργίας παρουσίασης που
ενισχύει την παραγωγικότητα. Χρησιμοποιήστε το Slides για να οργανώσετε
πληροφορίες, να παρουσιάσετε αποτελέσματα, και να παίρνετε αποφάσεις μαζί σε
πραγματικό χρόνο.
YouTube
Παρακολούθησε τα αγαπημένα σου κανάλια, άκουσε τη μουσική που αγαπάς, και
ανέβασε βίντεο για να μοιραστείς με ανθρώπους από όλο τον κόσμο.
Βοηθός
Η συσκευή σας έχει τον Βοηθό Google ενσωματωμένο. Βρείτε απαντήσεις και κάνε
πράγματα στην πορεία.
• Ο Βοηθός Google δεν είναι διαθέσιμος σε συγκεκριμένες γλώσσες και
χώρες.
Files
Μπορείτε να προβάλετε και να διαχειριστείτε τα αρχεία που έχουν αποθηκευτεί
στη συσκευή σας.

Ρυθμίσεις
04

Ρυθμίσεις 134
Ρυθμίσεις
Μπορείτε να προσαρμόσετε τις ρυθμίσεις της συσκευής σύμφωνα με τις
προτιμήσεις σας.
Στην αρχική οθόνη, πατήστε Ρυθμίσεις.
• Εάν εισάγετε λέξη κλειδί στο παράθυρο αναζήτησης στο επάνω μέρος
της οθόνης, μπορείτε να εκτελέσετε πιο εύκολα τα στοιχεία που πρέπει να
ρυθμιστούν.
Δίκτυο & Internet
Διπλή κάρτα SIM
Μπορείτε να διαμορφώσετε τις ρυθμίσεις διπλής κάρτας SIM.
1 Στην οθόνη Ρυθμίσεις, πατήστε Δίκτυο & Internet Διπλή κάρτα SIM.
2 Μπορείτε να προσαρμόσετε τις παρακάτω λειτουργίες:
• Κάρτα SIM 1: Μπορείτε να αλλάξετε το όνομα και το εικονίδιο της κάρτας
SIM 1.
• Κάρτα SIM 2: Μπορείτε να αλλάξετε το όνομα και το εικονίδιο της κάρτας
SIM 2.
• Χρώμα θέματος κάρτας SIM: Αλλάξτε τα χρωματικά θέματα για τις κάρτες
SIM.
• Λειτουργία εξοικονόμησης: Ενεργοποιήστε ή απενεργοποιήστε τη
λειτουργία εξοικονόμησης. Στη λειτουργία εξοικονόμησης, αν καλέσετε
μια επαφή στην οποία έχει αντιστοιχιστεί μια συγκεκριμένη κάρτα SIM,
θα χρησιμοποιηθεί αυτή η SIM για την κλήση ακόμα κι αν είναι ενεργή η
άλλη SIM εκείνη τη στιγμή (επειδή π.χ. χρησιμοποιεί τα δεδομένα κινητής
τηλεφωνίας).
• Δεδομένα κινητής τηλεφωνίας: Μπορείτε να επιλέξετε την κάρτα SIM
που θα χρησιμοποιείτε για την υπηρεσία δεδομένων κινητής τηλεφωνίας.
Μπορείτε επίσης να απενεργοποιήσετε αυτήν τη λειτουργία.
• Περιαγωγή δεδομένων: Ορίστε αυτήν την επιλογή για να επιτρέπετε στη
συσκευή σας να χρησιμοποιεί τα δεδομένα κινητής τηλεφωνίας όταν
βρίσκεστε σε περιαγωγή εκτός του κανονικού σας δικτύου.
Ρυθμίσεις 135
• Δεδομένα κινητής τηλεφωνίας κατά τη διάρκεια της κλήσης: Αποκτήσετε
προσωρινά πρόσβαση σε δεδομένα κινητής τηλεφωνίας χρησιμοποιώντας
μια μη προεπιλεγμένη κάρτα SIM δεδομένων κατά τη διάρκεια μιας
φωνητικής κλήσης HD με την ίδια κάρτα.
Wi-Fi
Μπορείτε να συνδεθείτε με κοντινές συσκευές μέσω δικτύου Wi-Fi.
Σύνδεση σε δίκτυο Wi-Fi
1 Στην οθόνη ρυθμίσεων, πατήστε Δίκτυο & Internet Wi-Fi.
2 Πατήστε το κουμπί για ενεργοποίηση.
• Τα διαθέσιμα δίκτυα Wi-Fi εμφανίζονται αυτόματα.
3 Επιλέξτε ένα δίκτυο.
• Μπορεί να χρειαστεί να εισαγάγετε τον κωδικό πρόσβασης του δικτύου
Wi-Fi.
• Η συσκευή παραλείπει αυτήν τη διαδικασία για δίκτυα WI-FI στα οποία
είχε συνδεθεί στο παρελθόν. Αν δεν θέλεις να συνδεθείς αυτόματα με ένα
ορισμένο δίκτυο Wi-Fi, πάτα το δίκτυο και μετά πάτα Παράβλεψη.
Ρυθμίσεις δικτύου Wi-Fi
Στην οθόνη ρυθμίσεων, πατήστε Δίκτυο & Internet Wi-Fi.
• Μετάβαση σε δίκτυο κινητής τηλεφωνίας: εάν η λειτουργία της σύνδεσης
δεδομένων κινητής τηλεφωνίας είναι ενεργοποιημένη, αλλά η συσκευή
δεν μπορεί να συνδεθεί στο Internet μέσω της σύνδεσης Wi-Fi, η συσκευή
συνδέεται αυτόματα στο Internet μέσω της σύνδεσης δεδομένων κινητής
τηλεφωνίας.
• Αυτή η δυνατότητα εξαρτάται από τον πάροχο υπηρεσιών.
• : Προσαρμόστε τις ρυθμίσεις του δικτύου Wi-Fi.
Ρυθμίσεις 136
Wi-Fi Direct
Μπορείτε να συνδέσετε τη συσκευή σας σε άλλες συσκευές που υποστηρίζουν
Wi-Fi Direct για απευθείας κοινή χρήση δεδομένων με αυτές. Δεν είναι απαραίτητη
η χρήση σημείου πρόσβασης. Μπορείτε να συνδεθείτε με περισσότερες από δύο
συσκευές χρησιμοποιώντας Wi-Fi Direct.
1 Στην οθόνη ρυθμίσεων, πατήστε Δίκτυο & Internet Wi-Fi Wi-Fi για
προχωρημένους Wi-Fi Direct.
• Οι κοντινές συσκευές που υποστηρίζουν Wi-Fi Direct εμφανίζονται
αυτόματα.
2 Επιλέξτε μια συσκευή.
• Σύνδεση πραγματοποιείται όταν η συσκευή αποδεχτεί το αίτημα σύνδεσης.
• Η μπαταρία ενδέχεται να εξαντληθεί γρηγορότερα όταν χρησιμοποιείται
Wi-Fi Direct.
Δεδομένα κινητής τηλεφωνίας
Μπορείτε να ενεργοποιείτε και να απενεργοποιείτε τα δεδομένα κινητής
τηλεφωνίας. Μπορείτε επίσης να διαχειριστείτε τη χρήση δεδομένων κινητής
τηλεφωνίας.
Ενεργοποίηση δεδομένων κινητής τηλεφωνίας
1 Στην οθόνη ρυθμίσεων, πατήστε Δίκτυο & Internet Δεδομένα κινητής
τηλεφωνίας.
2 Πατήστε το κουμπί για ενεργοποίηση.
Προσαρμογή των ρυθμίσεων δεδομένων κινητής τηλεφωνίας
1 Στην οθόνη ρυθμίσεων, πατήστε Δίκτυο & Internet Δεδομένα κινητής
τηλεφωνίας.
2 Προσαρμόστε τις παρακάτω ρυθμίσεις:
• Δεδομένα κινητής τηλεφωνίας: ρύθμιση για χρήση συνδέσεων δεδομένων
σε κινητά δίκτυα.
• Περιορισμός χρήσης μετάδοσης δεδομένων: θέστε ένα όριο για τη χρήση
δεδομένων κινητής τηλεφωνίας. Σε περίπτωση που φτάσετε αυτό το όριο,
δεν θα επιτρέπεται πλέον η χρήση δεδομένων κινητής τηλεφωνίας.
• : προσαρμογή των ρυθμίσεων δεδομένων κινητής τηλεφωνίας.
Ρυθμίσεις 137
• Ο όγκος χρήσης δεδομένων υπολογίζεται με βάση το προϊόν και ο όγκος
που υπολογίζει ο πάροχός σας ενδέχεται να διαφέρει.
Ρυθμίσεις κλήσεων
Μπορείτε να προσαρμόσετε τις ρυθμίσεις κλήσεων, όπως για τις φωνητικές
κλήσεις και τις επιλογές διεθνών κλήσεων.
• Ορισμένες λειτουργίες ενδέχεται να μην υποστηρίζονται, ανάλογα με την
περιοχή ή τον πάροχο υπηρεσιών.
1 Στην οθόνη ρυθμίσεων, πατήστε Δίκτυο & Internet Ρυθμίσεις κλήσεων.
2 Προσαρμόστε τις ρυθμίσεις.
Tethering
Σύνδεση μέσω κινητής συσκευής με USB
Μπορείτε να συνδέσετε τη συσκευή σε άλλη συσκευή μέσω USB για κοινή χρήση
δεδομένων κινητής τηλεφωνίας.
1 Συνδέστε τη συσκευή σας με άλλες συσκευές μέσω καλωδίου USB.
2 Στην οθόνη ρυθμίσεων, πατήστε Δίκτυο & Internet Tethering Σύνδεση
μέσω κινητής συσκευής με USB και στη συνέχεια πατήστε το κουμπί για
ενεργοποίηση.
• Για αυτήν την επιλογή χρησιμοποιούνται δεδομένα κινητής τηλεφωνίας
και μπορεί να επιβαρυνθείτε με χρεώσεις για τη χρήση δεδομένων,
ανάλογα με το πρόγραμμα χρεώσεων που έχετε επιλέξει. Για περισσότερες
πληροφορίες, συμβουλευτείτε τον πάροχο υπηρεσιών.
• Για σύνδεση σε υπολογιστή, κατεβάστε το πρόγραμμα οδήγησης USB από
την τοποθεσία
www.lg.com
και εγκαταστήστε το στον υπολογιστή.
• Δεν είναι δυνατή η αποστολή ή η λήψη αρχείων μεταξύ της συσκευής
σας και ενός υπολογιστή όταν είναι ενεργοποιημένη η σύνδεση USB.
Απενεργοποιήστε τη σύνδεση USB για την αποστολή ή λήψη αρχείων.
• Τα λειτουργικά συστήματα που υποστηρίζουν αυτόν τον τύπο σύνδεσης
είναι τα Windows XP ή μεταγενέστερη έκδοση, ή το Linux.
Ρυθμίσεις 138
Φορητό σημείο πρόσβασης Wi-Fi
Μπορείτε να ορίσετε τη συσκευή ως ασύρματο δρομολογητή, έτσι ώστε οι άλλες
συσκευές να μπορούν να συνδεθούν στο Internet χρησιμοποιώντας τα δεδομένα
κινητής τηλεφωνίας της συσκευής σας.
1 Στην οθόνη ρυθμίσεων, πατήστε Δίκτυο & Internet Tethering Φορητό
σημείο πρόσβασης Wi-Fi και έπειτα πατήστε για ενεργοποίηση.
2 Αγγίξτε Ρύθμιση φορητού σημείου πρόσβασης Wi-Fi και καταχωρίστε το
αναγνωριστικό και τον κωδικό πρόσβασης του Όνομα Wi-Fi (SSID).
3 Ενεργοποιήστε το Wi-Fi στην άλλη συσκευή και επιλέξτε το όνομα του δικτύου
της συσκευής στη λίστα Wi-Fi.
4 Πληκτρολογήστε τον κωδικό πρόσβασης δικτύου.
• Για αυτήν την επιλογή χρησιμοποιούνται δεδομένα κινητής τηλεφωνίας
και μπορεί να επιβαρυνθείτε με χρεώσεις για τη χρήση δεδομένων,
ανάλογα με το πρόγραμμα χρεώσεων που έχετε επιλέξει. Για περισσότερες
πληροφορίες, συμβουλευτείτε τον πάροχο υπηρεσιών.
• Μπορείτε να βρείτε περισσότερες πληροφορίες σε αυτόν τον ιστότοπο:
http://www.android.com/tether#wifi
Χρονοδιακόπτης απενεργοποίησης φορητού σημείου πρόσβασης Wi-Fi
Όταν το σημείο πρόσβασης Wi-Fi δεν έχει χρησιμοποιηθεί για ορισμένη περίοδο,
απενεργοποιείται αυτόματα. Μπορείτε να ορίσετε την ώρα που θέλετε να
εκτελεστεί αυτόματη αποσύνδεση.
Bluetooth tethering
Μια συνδεδεμένη με Bluetooth συσκευή μπορεί να συνδεθεί στο Internet
χρησιμοποιώντας τα δεδομένα κινητής τηλεφωνίας της συσκευής σας.
1 Στην οθόνη ρυθμίσεων, πατήστε Δίκτυο & Internet Tethering Bluetooth
tethering και στη συνέχεια πατήστε το κουμπί για ενεργοποίηση.
2 Ενεργοποιήστε το Bluetooth και στις δύο συσκευές, και πραγματοποιήστε
ζεύξη.
Ρυθμίσεις 139
• Για αυτήν την επιλογή χρησιμοποιούνται δεδομένα κινητής τηλεφωνίας
και μπορεί να επιβαρυνθείτε με χρεώσεις για τη χρήση δεδομένων,
ανάλογα με το πρόγραμμα χρεώσεων που έχετε επιλέξει. Για περισσότερες
πληροφορίες, συμβουλευτείτε τον πάροχο υπηρεσιών.
• Μπορείτε να βρείτε περισσότερες πληροφορίες σε αυτόν τον ιστότοπο:
http://www.android.com/tether#Bluetooth_tethering
Βοήθεια
Μπορείτε να προβάλετε τη βοήθεια σχετικά με τη χρήση συνδέσεων και hotspot.
Στην οθόνη ρυθμίσεων, πατήστε Δίκτυο & Internet Tethering Βοήθεια.
Λειτουργία πτήσης
Μπορείτε να απενεργοποιήσετε τις λειτουργίες κλήσης και δεδομένων κινητής
τηλεφωνίας. Όταν αυτή η λειτουργία είναι ενεργοποιημένη, οι λειτουργίες που
δεν απαιτούν τη χρήση δεδομένων, όπως παιχνίδια και αναπαραγωγή μουσικής,
παραμένουν διαθέσιμες.
1 Στην οθόνη ρυθμίσεων, πατήστε Δίκτυο & Internet Λειτουργία πτήσης.
2 Πατήστε στην οθόνη επιβεβαίωσης.
Δίκτυα κινητής τηλεφωνίας
Μπορείτε να προσαρμόσετε τις ρυθμίσεις δικτύων κινητής τηλεφωνίας.
1 Στην οθόνη ρυθμίσεων, πατήστε Δίκτυο & Internet Δίκτυα κινητής
τηλεφωνίας.
2 Προσαρμόστε τις παρακάτω ρυθμίσεις:
• Λειτουργία δικτύου: Επιλέξτε τύπο δικτύου.
• Ονόματα σημείου πρόσβασης: Για εμφάνιση ή αλλαγή του σημείου
πρόσβασης για τη χρήση υπηρεσιών δεδομένων κινητής τηλεφωνίας. Για
να αλλάξετε το σημείο πρόσβασης, επιλέξτε ένα στοιχείο από τη λίστα
σημείων πρόσβασης.
• Εταιρείες δικτύου: Για αναζήτηση παρόχων δικτύου και αυτόματη σύνδεση
σε κάποιο δίκτυο.

Ρυθμίσεις 140
VPN
Μπορείτε να συνδεθείτε σε ένα ασφαλές εικονικό δίκτυο, π.χ. σε ένα εσωτερικό
εταιρικό δίκτυο. Μπορείτε επίσης να διαχειριστείτε τα συνδεδεμένα εικονικά
ιδιωτικά δίκτυα.
Προσθήκη VPN
1 Στην οθόνη ρυθμίσεων, πατήστε Δίκτυο & Internet VPN.
2 Πατήστε το κουμπί .
3 Εισαγάγετε τα στοιχεία της σύνδεσης VPN και πατήστε Αποθήκευση.
Διαμόρφωση των ρυθμίσεων VPN
1 Στη λίστα VPNS, επιλέξτε ένα VPN.
2 Εισαγάγετε τα στοιχεία λογαριασμού χρήστη VPN και πατήστε Σύνδεση.
• Για να αποθηκεύσετε τα στοιχεία του λογαριασμού, επιλέξτε το πλαίσιο
ελέγχου Αποθήκευση στοιχείων λογαριασμού.
Ιδιωτικό DNS
Μπορείτε να διαμορφώσετε τις επιλογές Ιδιωτικού DNS (Domain Name System).
1 Στην οθόνη ρυθμίσεων, πατήστε Δίκτυο & Internet Ιδιωτικό DNS.
2 Κάντε την επιλογή που θέλετε και πατήστε Αποθήκευση.
Ρυθμίσεις 141
Συνδεδεμένες συσκευές
Bluetooth
Μπορείτε να συνδέσετε τη συσκευή σας σε κοντινές συσκευές που υποστηρίζουν
Bluetooth για ανταλλαγή δεδομένων με αυτές. Συνδέστε τη συσκευή σας σε ένα
ακουστικό και ένα πληκτρολόγιο με δυνατότητα Bluetooth. Έτσι ο έλεγχος της
συσκευής θα είναι ευκολότερος.
Σύζευξη με άλλη συσκευή
1 Στην οθόνη ρυθμίσεων, πατήστε Συνδεδεμένες συσκευές Bluetooth.
2 Πατήστε το κουμπί για ενεργοποίηση.
• Οι διαθέσιμες συσκευές εμφανίζονται αυτόματα.
• Για να ανανεώσετε τη λίστα συσκευών, πατήστε .
• Μόνο οι συσκευές που έχουν οριστεί ως ορατές εμφανίζονται στη λίστα.
3 Επιλέξτε μια συσκευή από τη λίστα.
4 Ακολουθήστε τις οδηγίες που εμφανίζονται στην οθόνη για να
πραγματοποιήσετε έλεγχο ταυτότητας.
• Αυτό το βήμα παραλείπεται για συσκευές στις οποίες έχει υπάρξει
πρόσβαση στο παρελθόν.
Αποστολή δεδομένων μέσω Bluetooth
1 Επιλέξτε ένα αρχείο.
• Μπορείτε να στείλετε αρχεία πολυμέσων ή στοιχεία επαφών.
2 Πατήστε Bluetooth.
3 Επιλέξτε μια συσκευή προορισμού για το αρχείο.
• Το αρχείο αποστέλλεται μόλις γίνει αποδεκτό από τη συσκευή προορισμού.
• Οι διαδικασίες κοινής χρήσης αρχείων ενδέχεται να διαφέρουν ανάλογα με
το αρχείο.
Ρυθμίσεις 142
Κοινή χρήση οθόνης
Μπορείτε να αναπαραγάγετε την οθόνη και τον ήχο της συσκευής σε μια
διαφορετική συσκευή, όπως μια τηλεόραση, που υποστηρίζει τη λειτουργία
Miracast.
1 Στην οθόνη ρυθμίσεων, πατήστε Συνδεδεμένες συσκευές Κοινή χρήση
οθόνης.
2 Πατήστε το κουμπί για ενεργοποίηση.
3 Επιλέξτε μια συσκευή από τη λίστα των κοντινών συσκευών.
• Εάν η συσκευή που θέλετε δεν εμφανίζεται, πατήστε Αναζήτηση για να
ανανεώσετε τη λίστα.
• Αφού επιτευχθεί σύνδεση, στη συσκευή θα εμφανιστεί η οθόνη του
τηλεφώνου σας.
• Η εφαρμογή κοινής χρήσης οθόνης απενεργοποιείται αυτόματα εάν δεν
υπάρχει κοντά συσκευή συμβατή με τη δυνατότητα κοινής χρήσης.
NFC
Μπορείτε να χρησιμοποιήσετε τη συσκευή ως μια κάρτα για τα μέσα μαζικής
μεταφοράς ή ως πιστωτική κάρτα. Επίσης, μπορείτε να κοινοποιήσετε δεδομένα
σε άλλες συσκευές.
1 Στην οθόνη ρυθμίσεων, πατήστε Συνδεδεμένες συσκευές NFC.
2 Πατήστε το κουμπί για ενεργοποίηση.
• Αγγίξτε τη συσκευή σας με άλλη συσκευή που υποστηρίζει NFC για
ανταλλαγή δεδομένων.
• Η κεραία NFC μπορεί να βρίσκεται σε διαφορετικό σημείο ανάλογα με τον
τύπο συσκευής. Για λεπτομέρειες σχετικά με την περιοχή της κεραίας NFC,
ανατρέξτε στην ενότητα
Επισκόπηση στοιχείων
.

Ρυθμίσεις 143
Πίνακας κοινοποιήσεων
Μπορείτε να κοινοποιήσετε περιεχόμενο από το Άλμπουμ, τη Μουσική και τη
Διαχείριση αρχείων σας σε κοντινές συσκευές. Μπορείτε επίσης να κοινοποιήσετε
το περιεχόμενο σε συγκεκριμένα άτομα σε εφαρμογές που υποστηρίζουν τη
δυνατότητα άμεσης κοινοποίησης της Google (Google Direct Share).
1 Στην οθόνη ρυθμίσεων, πατήστε Συνδεδεμένες συσκευές Πίνακας
κοινοποιήσεων.
2 Απενεργοποιήστε κάθε επιλογή χρησιμοποιώντας το ρυθμιστικό .
• Κοντινές συσκευές: Μπορείτε να εμφανίσετε τις κοντινές συσκευές με τις
οποίες μπορείτε να μοιραστείτε περιεχόμενο από τις εφαρμογές Άλμπουμ,
Μουσική και Διαχείριση αρχείων,
• Απευθείας κοινή χρήση: Από μια εφαρμογή που υποστηρίζει τη
δυνατότητα άμεσης κοινοποίηση της Google (Google Direct Share),
μπορείτε να εμφανίσετε ένα εικονίδιο που σας επιτρέπει να μοιράζεστε
περιεχόμενο με συγκεκριμένους ανθρώπους.
Κοινή Χρήση Αρχείου
Μπορείτε να στείλετε ή να λάβετε αρχεία ανάμεσα στη συσκευή σας και σε άλλη
συσκευή ή tablet της LG.
1 Στην οθόνη ρυθμίσεων, πατήστε Συνδεδεμένες συσκευές Κοινή Χρήση
Αρχείου.
2 Προσαρμόστε τις παρακάτω ρυθμίσεις:
• WING: για να αλλάξετε το όνομα της συσκευής.
• Αποθήκευση σε: ορίστε τον φάκελο προορισμού για την αποθήκευση των
αρχείων που αποστέλλονται από άλλες συσκευές.
• Κοινή Χρήση Αρχείου: για να επιτρέψετε τη λήψη αρχείων που
αποστέλλονται από άλλες συσκευές.
• SmartShare Beam: για να μοιραστείτε αρχεία με άλλες συσκευές μέσω του
SmartShare Beam.
• Βοήθεια: μπορείτε να δείτε τη βοήθεια για την κοινοποίηση αρχείων.
Ρυθμίσεις 144
Διακομιστής πολυμέσων
Μπορείτε να μοιραστείτε περιεχόμενο πολυμέσων στη συσκευή σας με κοντινές
συσκευές που υποστηρίζουν DLNA.
1 Στην οθόνη ρυθμίσεων, πατήστε Συνδεδεμένες συσκευές Διακομιστής
πολυμέσων.
2 Προσαρμόστε τις παρακάτω ρυθμίσεις:
• Κοινή χρήση περιεχομένου: μοιραστείτε περιεχόμενο που βρίσκεται στη
συσκευή σας με άλλες κοντινές συσκευές.
• WING: ορίστε το όνομα της συσκευής σας
• Ανάλογα με το προϊόν του χρήστη, τα ονόματα των μενού ενδέχεται να
διαφέρουν.
• Το περιεχόμενό μου σε κοινή χρήση: επιλέξτε τον τύπο του περιεχομένου
πολυμέσων που θα μοιράζεστε με άλλες συσκευές.
• Εξουσιοδοτημένες συσκευές: δείτε μια λίστα με τις συσκευές που
επιτρέπεται να έχουν πρόσβαση στο περιεχόμενο της συσκευής σας.
• Μη-εγκεκριμένες συσκευές: δείτε μια λίστα με τις συσκευές που δεν
επιτρέπεται να έχουν πρόσβαση στο περιεχόμενο της συσκευής σας.
Εκτύπωση
Μπορείτε να συνδέσετε τη συσκευή σας σε έναν εκτυπωτή Bluetooth και να
εκτυπώσετε τις φωτογραφίες ή τα έγγραφα που έχουν αποθηκευτεί στη συσκευή.
Στην οθόνη ρυθμίσεων, πατήστε Συνδεδεμένες συσκευές Εκτύπωση.
• Πατήστε Προεπιλεγμένη υπηρεσία εκτύπωσης για να γίνει αναζήτηση
εκτυπωτών με τους οποίους μπορείτε να συνδεθείτε. Ή πατήστε
Προσθήκη εκτυπωτών για να προσθέσετε χειροκίνητα έναν εκτυπωτή.
• Πατήστε Προσθήκη υπηρεσίας για να λάβετε την εφαρμογή του εκτυπωτή
που θέλετε.
• Αυτή η δυνατότητα είναι διαθέσιμη μόνο όταν το δίκτυα κινητής
τηλεφωνίας ή η λειτουργία Bluetooth είναι ενεργοποιημένη.
• Για να λάβετε την εφαρμογή εκτυπωτή στο Προσθήκη υπηρεσίας, θα
πρέπει πρώτα να συνδεθείτε στον λογαριασμό σας Google.

Ρυθμίσεις 145
Ήχος
Μπορείτε να προσαρμόσετε τις ρυθμίσεις ήχου, δόνησης και ειδοποιήσεων.
Στην οθόνη ρυθμίσεων, πατήστε Ήχος και προσαρμόστε τις παρακάτω ρυθμίσεις:
• Ηχητικά προφίλ: αλλάξτε τη λειτουργία ήχου σε ‘Ηχος, Μόνο δόνηση, ή
Σίγαση.
• Ένταση: ρύθμιση της έντασης ήχου για τα διάφορα στοιχεία.
• Ήχος κλήσης: Επιλέξτε έναν ήχο κλήσης για εισερχόμενες κλήσεις. Προσθέστε
ή διαγράψτε ήχους κλήσης.
• Ήχος ειδοποιήσεων: Επιλέξτε έναν ήχο ειδοποίησης. Ορίστε ένα μουσικό
κομμάτι που έχει αποθηκευτεί στη συσκευή ως ήχο ειδοποίησης.
• Ήχοι συστήματος: Επιλέξτε κάθε ήχο συστήματος για να τον ενεργοποιήσετε ή
απενεργοποιήσετε.
• Ήχος κλήσης με δόνηση: Ρυθμίστε τη συσκευή για δόνηση και αναπαραγωγή
ήχου κλήσης ταυτόχρονα.
• Ringtone ID: δημιουργεί έναν ήχο κλήσης για μια εισερχόμενη κλήση από μια
συγκεκριμένη επαφή.
• Το φλας ανάβει όταν υπάρχει εισερχόμενη κλήση: Ρυθμίστε να αναβοσβήνει
το φλας σύμφωνα με τον ήχο κλήσης της LG.
• Μην ενοχλείτε: Ορίστε την ώρα, τη διάρκεια και τον τύπο εφαρμογής για τα
οποία θα λαμβάνετε μηνύματα ειδοποίησης. Μπορείτε να λαμβάνετε μηνύματα
ειδοποιήσεων μόνο σε συγκεκριμένες ημέρες της εβδομάδας.
• Ποιότητα ήχου και εφέ: Χρησιμοποιήστε τη λειτουργία για να ρυθμίσετε την
ποιότητα ήχου και τα εφέ κατά την αναπαραγωγή ενός τραγουδιού ή βίντεο.
-Ένταση: ρύθμιση της έντασης ήχου για τα διάφορα στοιχεία.
-Κανονικοποίηση έντασης: Χρησιμοποιήστε τη λειτουργία για να
ομαλοποιήσετε την ποσότητα διαφορετικών πηγών ήχου.
-Ισοσταθμιστής: Χρησιμοποιήστε τη λειτουργία για να προσαρμόσετε τις
ρυθμίσεις ισοσταθμιστή.
-Τρισδιάστατος `Ηχος Μηχανή LG: Χρησιμοποίησε την λειτουργία για να
παίξεις μουσική ή βίντεο σε τρισδιάστατο, εμβυθιστικό και ζωντανό ήχο
όταν ακουστικά, ηχείο ή άλλες εξωτερικές συσκευές ήχου είναι συνδεδεμένα.
Για λεπτομέρειες, ανατρέξτε στην ενότητα
Τρισδιάστατος `Ηχος Μηχανή LG
.
• Ζωντανοί υπότιτλοι: Ρυθμίστε τη συσκευή ώστε να αναγνωρίζει τη φωνή στα
πολυμέσα και να δημιουργεί αυτόματα υπότιτλους.

Ρυθμίσεις 146
• Ένταση δόνησης: προσαρμόστε την ένταση της δόνησης.
• Τύπος δόνησης: μπορείτε να επιλέξετε τον τύπο δόνησης που θα
ενεργοποιείται κατά τη λήψη κλήσεων.
• Δόνηση κατά το πάτημα: ορίστε τη συσκευή να δονείται όταν αγγίζετε
ορισμένα στοιχεία στην οθόνη.
Ειδοποιήσεις
Μπορείτε να δείτε μια λίστα εγκαταστημένων εφαρμογών και να διαμορφώσετε
τις ρυθμίσεις για ειδοποιήσεις.
1 Στην οθόνη ρυθμίσεων, πατήστε Ειδοποιήσεις.
2 Αλλάξτε τις ρυθμίσεις σύμφωνα με τις απαιτήσεις σας.
Προβολή
Μπορείτε να προσαρμόσετε λεπτομερείς ρυθμίσεις για κάθε τύπο οθόνης.
Στην οθόνη ρυθμίσεων, πατήστε Προβολή και προσαρμόστε τις παρακάτω
ρυθμίσεις:
• Αρχική οθόνη: προσαρμόστε τις ρυθμίσεις για την αρχική οθόνη. Για
λεπτομέρειες, ανατρέξτε στην ενότητα
Ρυθμίσεις αρχικής οθόνης
.
• Στροφή Home: προσαρμόστε τις ρυθμίσεις για την αρχική οθόνη της
λειτουργίας περιστροφής.
• Γραμμή Πλοήγησης: Διαμορφώστε τη Γραμμή Πλοήγησης. Για λεπτομέρειες
βλέπε
Χρήση της Γραμμή Πλοήγησης
• AOD (always-on display): να εμφανίζονται πάντα πληροφορίες όπως
η ημερομηνία, η ώρα και οι ειδοποιήσεις, ακόμα και όταν η οθόνη είναι
απενεργοποιημένη. Για λεπτομέρειες βλέπε
AOD (Always-on Display)
• Οθόνη δευτερεύον: Ορίστε τη φωτεινότητα ή το χρώμα οθόνης της Οθόνη
δευτερεύον.
• Άνετη προβολή: ρυθμίστε τη συσκευή έτσι ώστε να μειώσετε την ποσότητα
του μπλε φωτός στην οθόνη και να περιορίσετε την καταπόνηση των ματιών.
• Νυχτερινή λήψη: Μπορείτε να εφαρμόσετε ένα αχνό θέμα οθόνης για να
αποφύγετε την έντονη λάμψη της οθόνης κατά τη διάρκεια της νύχτας.

Ρυθμίσεις 147
• Χρώμα οθόνης: Ρυθμίστε το χρώμα, τη θερμοκρασία χρώματος για την
επιθυμητή οθόνη.
• Πατήστε για να επαναφέρετε τις ρυθμίσεις.
• Ενισχυτής Βίντεο: Κατά την αναπαραγωγή ενός βίντεο σε λειτουργία πλήρους
οθόνης, μπορείτε να αλλάξετε τις ρυθμίσεις ώστε τα χρώματα να προβάλλονται
πιο φωτεινά και δυναμικά.
• Γραμματοσειρά: Αλλάξτε το μέγεθος της γραμματοσειράς, την ένταση της
γραφής ή τη γραμματοσειρά.
• Χρωματικός τόνος: Αλλάξτε τον χρωματικό τόνο για τις ρυθμίσεις, τα μενού, τα
παράθυρα ειδοποιήσεων, κ.λπ.
• Μέγεθος οθόνης: Ορίστε το μέγεθος των στοιχείων στην οθόνη όπως σας
βολεύει. Κάποια στοιχεία ενδέχεται να αλλάξουν θέση.
• Πλήρης οθόνη εφαρμογές : Επιλέξτε εφαρμογές που θα ανοίγουν σε πλήρης
οθόνη.
• Φωτεινότητα: Χρησιμοποιήστε τη γραμμή κύλισης για να αλλάξετε τη
φωτεινότητα της οθόνης της συσκευής.
• Αυτόματο: ρυθμίστε τη συσκευή έτσι ώστε η φωτεινότητα της οθόνης να
ρυθμίζεται αυτόματα σύμφωνα με την ένταση φωτός του περιβάλλοντος.
• Επιπλέον φωτεινότητα: Επιτρέπει στην οθόνη να είναι πιο φωτεινή από τη
μέγιστη ρύθμιση φωτεινότητας.
• Λήξη χρονικού ορίου οθόνης: Απενεργοποιείται αυτόματα η συσκευή όταν
παραμένει σε αδράνεια για ένα καθορισμένο χρονικό διάστημα.
• Αυτόματη περιστροφή οθόνης: Περιστρέφεται αυτόματα η οθόνη ανάλογα με
τον προσανατολισμό της συσκευής.
• Προφύλαξη Οθόνης: Εμφανίζεται προφύλαξη οθόνης όταν η συσκευή έχει
συνδεθεί στη βάση ή τον φορτιστή. Επιλέξτε τον τύπο προφύλαξης οθόνης
που θέλετε να εμφανίζεται.
• Οθόνη με το ένα χέρι: Μικρύνετε το μέγεθος της οθόνης, έτσι ώστε να
μπορείτε να χρησιμοποιείτε τη συσκευή με το ένα χέρι.

Ρυθμίσεις 148
Φόντο & Θέμα
Μπορείτε να επιλέξετε φόντο, θέμα οθόνης, στυλ εικονιδίων ή AOD (Always-on
Display) για τη συσκευή σας.
1 Στην οθόνη ρυθμίσεων, πατήστε Φόντο & Θέμα.
2 Πατήστε Φόντο, Θέμα, Εικονίδιο ή AOD για να αλλάξετε τις ρυθμίσεις.
Κλείδωμα οθόνης & ασφάλεια
Μπορείτε να προσαρμόσετε τις ρυθμίσεις της οθόνης κλειδώματος και της
ασφάλειας.
1 Στην οθόνη ρυθμίσεων, πατήστε Κλείδωμα οθόνης & ασφάλεια.
2 Προσαρμόστε τις ρυθμίσεις.
• Google Play Protect: Σαρώστε τη συσκευή σας καθημερινά για πιθανώς
βλαβερές εφαρμογές.
• Εύρεση συσκευής : Παρακολουθήστε την τοποθεσία της συσκευής
απομακρυσμένα. Μπορείτε επίσης να προστατέψετε με ασφάλεια τα
δεδομένα σας εάν χάσατε τη συσκευή σας.
• Ενημέρωση ασφάλειας: Έλεγχος για ενημέρωση λογισμικού και
διαμόρφωση ρυθμίσεων αυτόματης εγκατάστασης.
• Διαλέξτε κλείδωμα οθόνης: Επιλέξτε τη μέθοδο κλειδώματος οθόνης που
θέλετε. Για λεπτομέρειες, ανατρέξτε στην ενότητα
Ρύθμιση κλειδώματος
οθόνης
.
• Παραμετροποίηση κλειδώματος οθόνης κλειδώματος: Αλλαγή των
πληροφοριών που εμφανίζονται στην κλειδωμένη οθόνη.
• Ρυθμίσεις ασφαλούς κλειδώματος: Αλλάξτε τις ρυθμίσεις κλειδώματος
ασφαλείας.
• Δακτυλ Αποτυπώματα: χρησιμοποιήστε το δακτυλικό σας αποτύπωμα για
να ξεκλειδώσετε την οθόνη ή το περιεχόμενο. Για λεπτομέρειες, ανατρέξτε
στην ενότητα
Αναγνώριση Δακτυλ. Αποτυπώματα - Παρουσίαση
.
• Κλείδωμα περιεχομένου: Σας επιτρέπει να ορίσετε τύπο κλειδώματος
(κωδικό πρόσβασης ή μοτίβο) για τα αρχεία σας Συλλογής.
• Κρυπτογράφηση & διαπιστευτήρια: Διαμορφώστε τις ρυθμίσεις για την
κρυπτογράφηση και τα διαπιστευτήρια της κάρτας SD.
-Κρυπτογράφηση κάρτας SD: κρυπτογραφήστε την κάρτα μνήμης για να
αποτρέψετε τη χρήση της σε άλλη συσκευή. Για λεπτομέρειες, ανατρέξτε
στην ενότητα
Κρυπτογράφηση κάρτας μνήμης
.

Ρυθμίσεις 149
-Προστασία διαπιστευτηρίου: προβολή τύπου του χώρου αποθήκευσης
όπου θα αποθηκευτεί το πιστοποιητικό ασφαλείας.
-Αξιόπιστα διαπιστευτήρια: Προβολή των ριζικών πιστοποιητικών CA
του συστήματός σας και των πιστοποιητικών CA που έχουν εγκατασταθεί
από το χρήστη.
-Διαπιστευτήρια χρήστη: Προβολή και αλλαγή των ασφαλών
πληροφοριών πιστοποιητικού που είναι αποθηκευμένες στη συσκευή
σας.
-Εγκατάσταση από τον αποθηκευτικό χώρο: Εγκατάσταση ενός
ασφαλούς πιστοποιητικού από μια μονάδα αποθήκευσης.
-Εκκαθάριση διαπιστευτηρίων: Διαγραφή ασφαλών πιστοποιητικών που
έχει εγκαταστήσει ο χρήστη και των σχετικών διαπιστευτηρίων.
• Διαχειριστές συσκευών: εκχωρήστε δικαιώματα για να περιορίσετε τον
έλεγχο ή τη χρήση της συσκευής σε συγκεκριμένες εφαρμογές.
• Trust agents: Εμφανίστε και χρησιμοποιήστε τα trust agent που έχουν
εγκατασταθεί στη συσκευή.
• Καρφίτσα οθόνης: Ρυθμίστε την οθόνη εφαρμογών έτσι ώστε να είναι
δυνατή μόνο η χρήση της εφαρμογής που είναι ενεργή την εκάστοτε
στιγμή.
• Πρόσβαση χρήσης: δείτε λεπτομέρειες σχετικά με τη χρήση εφαρμογών
στη συσκευή.
Απόρρητο
Μπορείτε να βρείτε και να αλλάξετε όλες τις ρυθμίσεις απορρήτου σας.
1 Στην οθόνη ρυθμίσεων, πατήστε Απόρρητο.
2 Προσαρμόστε τις ρυθμίσεις.
• διαχειριστής Άδεια: Σας επιτρέπει να δείτε και να αλλάξετε τα δικαιώματα
που έχετε δώσει στις εφαρμογές.
• Κλείδωμα οθόνης: Σας επιτρέπει να ορίσετε τις ειδοποιήσεις που θα
εμφανίζονται στην οθόνη κλειδώματος.
• Να φαίνονται οι κωδικοί πρόσβασης: Ενεργοποιήστε αυτήν την επιλογή
για να εμφανίζεται για σύντομο διάστημα κάθε χαρακτήρας του κωδικού
πρόσβασης καθώς τον πληκτρολογείτε ώστε να βλέπετε τι εισάγετε.
• Υπηρεσίες εξατομίκευσης συσκευής: Σας επιτρέπει να λάβετε μια πρόταση
με βάση τους χρήστες, τις εφαρμογές και το διαδραστικό περιεχόμενο.

Ρυθμίσεις 150
• Αυτ. Συμπλήρωση από την Google : Ενεργοποιήστε αυτήν την επιλογή
για να γίνεται εισαγωγή των πληροφοριών που είναι αποθηκευμένες
στο λογαριασμό σας, όπως κωδικό πρόσβασης, διεύθυνση ή
αριθμού πιστωτικής κάρτας με ένα μόνο πάτημα. Μπορείτε επίσης να
απενεργοποιήσετε αυτήν την επιλογή, να χρησιμοποιήσετε τη λειτουργία
Αυτόματης συμπλήρωσης της Google ή να προσθέσετε ένα νέο
λογαριασμό υπηρεσίας.
• Ιστορικό τοποθεσίας Google: Σας επιτρέπει να ενεργοποιήσετε ή να
απενεργοποιήσετε το Ιστορικό τοποθεσιών. Όταν έχει ενεργοποιηθεί, η
Google αποθηκεύει περιοδικά και χρησιμοποιεί τα πιο πρόσφατα δεδομένα
τοποθεσίας του τηλεφώνου σας σε συνδυασμό με το λογαριασμό σας
Google.
Στην οθόνη Ιστορικό τοποθεσιών, πατήστε για να δείτε και/ή να
διαχειριστείτε τα δεδομένα τοποθεσιών σας.
• Στοιχεία ελέγχου δραστηριότητας: Επιλέξτε τις δραστηριότητες και τις
πληροφορίες που θέλετε να αποθηκεύει η Google.
• Διαφημίσεις: Σας επιτρέπει να δείτε το αναγνωριστικό διαφημίσεων και να
ορίσετε εξατομικευμένες διαφημίσεις.
• Χρήση και διαγνωστικά: Ενεργοποιήστε αυτήν την επιλογή για να
συντελέσετε στη βελτίωση της εμπειρίας του Android μέσω της αυτόματης
αποστολής διαγνωστικών δεδομένων, δεδομένων συσκευής και χρήσης
εφαρμογών στη Google.
Τοποθεσία
Μπορείτε να ελέγξετε τον τρόπο που κοινοποιούνται οι πληροφορίες τοποθεσίας
σας και να ρυθμίσετε τα δικαιώματα πρόσβασης στις πληροφορίες τοποθεσίας
σας.
Στην οθόνη ρυθμίσεων, πατήστε Τοποθεσία και ρυθμίστε τη λειτουργία που
θέλετε.
Ρυθμίσεις 151
Επεκτάσεις
Smart Doctor
Μπορείτε να χρησιμοποιήσετε το Smart Doctor για να διαγνώσετε την κατάσταση
της συσκευής και να τη βελτιστοποιήσετε.
Στην οθόνη ρυθμίσεων, πατήστε Επεκτάσεις Smart Doctor.
Context Awareness
Μπορείτε να αλλάζετε αυτόματα τις ρυθμίσεις της συσκευής σας ανάλογα με το
μοτίβο χρήσης και την τοποθεσία.
1 Στην οθόνη ρυθμίσεων, πατήστε Επεκτάσεις Context Awareness.
2 Ενεργοποιήστε τα στοιχεία για τα οποία θέλετε οι ρυθμίσεις να αλλάζουν
αυτόματα.
• ΑΥΤΟΜΑΤΑ: Μπορείτε να ρυθμίσετε τη συσκευή έτσι ώστε να αλλάζουν
αυτόματα οι επιλογές προφίλ ήχου, Bluetooth και Wi-Fi σε διαφορετικά
περιβάλλοντα, όπως Οικία, Εκτός οικίας, Εργασία, Εκτός εργασίας. Μπορείτε
επίσης να ρυθμίσετε να ανοίγει μια εφαρμογή όταν συνδεθούν ακουστικά ή
μια συσκευή Bluetooth.
• Για να χρησιμοποιήσετε αυτήν τη δυνατότητα, πρέπει να έχετε ορίσει στη
ρύθμιση Τα μέρη μου την τοποθεσία της οικίας ή της εργασίας σας. Στην
οθόνη ρυθμίσεων, πατήστε Τοποθεσία Τα μέρη μου για να ρυθμίσετε τις
τοποθεσίες.
Εξατομικευμένη υπηρεσία
Μπορείτε να λάβετε έξυπνα αποτελέσματα όταν χρησιμοποιείτε την
ενσωματωμένη αναζήτηση.
1 Στην οθόνη ρυθμίσεων, πατήστε Επεκτάσεις Εξατομικευμένη υπηρεσία.
2 Πατήστε το κουμπί για ενεργοποίηση.
Ρυθμίσεις 152
Διευρυμένη προβολή στη λειτουργία Λειτουργία Στροφή
Οι εφαρμογές μπορούν να επεκταθούν και στις δύο οθόνες στη λειτουργία
περιστροφής.
1 Στην οθόνη ρυθμίσεων, πατήστε Επεκτάσεις Διευρυμένη προβολή στη
λειτουργία Λειτουργία Στροφή.
2 Πατήστε το κουμπί για ενεργοποίηση.
• ΕΠΕΚΤΑΣΗ ΑΠΟ ΠΡΟΕΠΙΛΟΓΗ: Μπορείτε να δείτε μια εφαρμογή σε
Εκτεταμένη προβολή όταν ανοίγετε την εφαρμογή στην κύρια οθόνη.
Παιχνίδι
Μπορείτε να διαμορφώσετε τις ρυθμίσεις για εργαλεία και γραφικά παιχνιδιών,
καθώς και για τη δυνατότητα εξοικονόμησης μπαταρίας.
1 Στην οθόνη ρυθμίσεων, πατήστε Επεκτάσεις Παιχνίδι.
2 Προσαρμόστε τις παρακάτω ρυθμίσεις:
• Πρόγραμμα Εκκίν. Παιχνιδ.: Πατήστε για να χρησιμοποιήσετε το
Πρόγραμμα Εκκίν. Παιχνιδ..
• Εργαλεία παιχνιδιού: Μπορείτε να εκτελέσετε τη λειτουργία όταν παίζετε
παιχνίδια πατώντας τα εργαλεία παιχνιδιού από τα κουμπιά αφής της
αρχικής οθόνης
• Γραφικά παιχνιδιού: Ρυθμίστε τα γραφικά του παιχνιδιού.
• Εάν αλλάξετε την ανάλυση σε ορισμένα παιχνίδια, η δυνατότητα προβολής
οθόνης ενδέχεται να μην λειτουργεί σωστά.
• Αυτή η λειτουργία ενδέχεται να μην είναι διαθέσιμη σε εφαρμογές
παιχνιδιών.
• Διάλειμμα: Μειώστε τη φωτεινότητα της οθόνης και την απόδοση κάθε
φορά που διακόπτετε το παιχνίδι για περισσότερο από 5 λεπτά.

Ρυθμίσεις 153
Εγγραφή οθόνης
Μπορείτε να διαμορφώσετε τις ρυθμίσεις για Εγγραφή οθόνης.
1 Στην οθόνη ρυθμίσεων, πατήστε Επεκτάσεις Εγγραφή οθόνης.
2 Προσαρμόστε τις παρακάτω ρυθμίσεις:
• Συμπεριλάβετε τον εαυτό σας στο βίντεο: Κάντε μία από τις παρακάτω
επιλογές.
-Εικόνα: Περιλαμβάνει την εικόνα προφίλ σας στο βίντεο κατά την
καταγραφή. Αφότου κάνετε αυτήν την επιλογή, πατήστε και επιλέξτε
μια εικόνα προφίλ. Στη συνέχεια, ρυθμίστε το μέγεθος της εικόνας
χρησιμοποιώντας το ρυθμιστικό.
-Μπροστινή κάμερα: Συμπεριλαμβάνει καταγραφή του εαυτού σας
χρησιμοποιώντας την μπροστινή κάμερα, κατά την καταγραφή της
οθόνης.
-Ποτέ: Δεν περιλαμβάνεται τίποτα.
• Πηγή ήχου: Επιλέξτε την πηγή ήχου μεταξύ Μικροφώνου και Περιεχόμενα.
• Ανάλυση βίντεο: Επιλέξτε την ανάλυση για την Εγγραφή οθόνης.
Διπλή Εφαρμογή
Μπορείτε να εγκαταστήσετε δύο φορές μια εφαρμογή ανταλλαγής μηνυμάτων
στο προϊόν και να χρησιμοποιείτε δύο λογαριασμούς ταυτόχρονα.
1 Στην οθόνη ρυθμίσεων, πατήστε Επεκτάσεις Διπλή Εφαρμογή.
2 Μετά την ανάγνωση της δήλωσης αποποίησης, πατήστε Επιβεβαίωση.
3 Στη λίστα διαθέσιμων εφαρμογών, πατήστε Εγκατάσταση για να
εγκαταστήσετε ένα αντίγραφο της εφαρμογής και ακολουθήστε τις οδηγίες
που εμφανίζονται στην οθόνη.
• Στην οθόνη εμφανίζεται η λίστα των διαθέσιμων διπλών εφαρμογών. Κατά
τη διάρκεια της εγκατάστασης, στην αρχική οθόνη προστίθενται εικονίδια
των εφαρμογών.

Ρυθμίσεις 154
Πρόταση εφαρμογής
Μπορείτε να προσπελάσετε γρήγορα εφαρμογές που μπορεί να χρειάζεστε εκείνη
τη στιγμή στην οθόνη Επισκόπηση.
Στην οθόνη ρυθμίσεων, πατήστε Επεκτάσεις Πρόταση εφαρμογής.
Στυλό
Μπορείτε να ρυθμίσετε τις επιλογές για τη χρήση ενός Ενεργού στυλό (πωλείται
ξεχωριστά προαιρετικά). Σημειώστε ότι αυτή η συσκευή υποστηρίζει το Ενεργό
στυλό AES2.0 (Active ElectroStatic - Ενεργό Ηλεκτροστατικό).
1 Στην οθόνη ρυθμίσεων, πατήστε Επεκτάσεις Στυλό.
2 Προσαρμόστε τις παρακάτω ρυθμίσεις:
• Κλειδί Στυλό Συντομεύσεις: Ρυθμίστε τις συντομεύσεις για κάθε κουμπί στο
Ενεργό στυλό σας.
• Συντομεύσεις Εφαρμογών: Επιλέξτε ποιες εφαρμογές (έως και πέντε)
θα εμφανίζονται ως συντομεύσεις όταν η γραφίδα διαγράφεται από τη
συσκευή.
• Προεπισκόπηση σημείωσης: Ενεργοποιήστε για την προβολή των
πρόσφατων σημειωμάτων στο άγγιγμα του Στυλό.
• Ήχος σχεδίασης: Ενεργοποιήστε για να εφαρμόσετε ηχητικά εφέ στη
λειτουργία σχεδίασης.
• Προβολή δείκτης: Ενεργοποιήστε για να δείτε ένα δείκτη στυλό πάνω από
το σημείο όπου αιωρείται το στυλό.
• Απόρριψη γραμμή πλοήγησης χειρονομίες: Αποκλεισμός εισαγωγής
από τις χειρονομίες στη γραμμή πλοήγησης, που είναι χρήσιμος κατά το
σχεδιασμό ή το γράψιμο στο άκρο της οθόνης με ένα Ενεργό στυλό.
Ρυθμίσεις 155
Συντομεύσεις
Μπορείτε να χρησιμοποιείτε κουμπιά όπως το κουμπί ενεργοποίησης /
κλειδώματος, το κουμπί έντασης ήχου και το Google Assistant για άμεση εκτέλεση
συγκεκριμένων εφαρμογών ή λειτουργιών.
1 Στην οθόνη ρυθμίσεων, πατήστε Επεκτάσεις Συντομεύσεις.
2 Προσαρμόστε τις παρακάτω ρυθμίσεις.
• Άνοιγμα Φωτογραφικής Μηχανής: Πατήστε δύο φορές το πλήκτρο
ενεργοποίησης για να ανοίξετε την κάμερα.
• Άνοιγμα Σημείωση σβηστής οθόνης: Πατήστε δύο φορές το πλήκτρο
αύξησης της έντασης ήχου για να ανοίξετε τη λειτουργία Σημείωσης
οθόνης, όταν η οθόνη είναι κλειδωμένη ή απενεργοποιημένη.
• Άνοιγμα Φωτογραφικής Μηχανής: Πατήστε το πλήκτρο Μείωσης έντασης
δύο φορές για να ανοίξετε τη λειτουργία Κάμερα όταν το κλειδί είναι
κλειδωμένο ή απενεργοποιημένο.
• Το Google Assistant δεν υποστηρίζει όλες τις γλώσσες.
Ενεργοποίηση οθόνης
Κάντε διπλό πάτημα στην οθόνη για να ενεργοποιήσετε ή να απενεργοποιήσετε
την οθόνη.
Για λεπτομέρειες, ανατρέξτε στην ενότητα
Ενεργοποίηση οθόνης
.
Αύξηση ευαισθησίας αφής
Μπορείτε να κάνετε την οθόνη αφής πιο ευαίσθητη στο άγγιγμά σας. Προτείνεται
να ενεργοποιείτε το χαρακτηριστικό αυτό όταν χρησιμοποιείτε προστατευτικό
οθόνης.
Στην οθόνη ρυθμίσεων, πατήστε Επεκτάσεις Αύξηση ευαισθησίας αφής.

Ρυθμίσεις 156
Εφαρμογές
Μπορείτε να δείτε μια λίστα εγκαταστημένων εφαρμογών και να διαμορφώσετε
τις ρυθμίσεις για ειδοποιήσεις, δικαιωμάτων εφαρμογών και άλλα.
1 Στην οθόνη ρυθμίσεων, πατήστε Εφαρμογές.
2 Προσαρμόστε τις ρυθμίσεις.
Μπαταρία
Μπορείτε να δείτε τις τρέχουσες πληροφορίες για την μπαταρία ή να
ενεργοποιήσετε τη λειτουργία εξοικονόμησης ενέργειας.
1 Στην οθόνη ρυθμίσεων, πατήστε Μπαταρία.
2 Προσαρμόστε τις παρακάτω ρυθμίσεις:
• Χρήση μπαταρίας: δείτε λεπτομέρειες για τη χρήση της μπαταρίας.
• Βελτιστοποιημένη φόρτιση: Προσαρμόστε την ταχύτητα φόρτισης
σύμφωνα με τον τρόπο φόρτισης για να μειωθεί η θερμότητα και να
παραταθεί ο χρόνος ζωής της μπαταρίας.
• Ρυθμιζόμενη μπαταρία: Επιτρέπει εξοικονόμηση ενέργειας διακόπτοντας
τη λειτουργία εφαρμογών στο παρασκήνιο.
• Περιορισμοί φόντου: Ενεργοποιήστε αυτήν την επιλογή για να περιορίσετε
την εκτέλεση εφαρμογών στο παρασκήνιο για εξοικονόμηση ενέργειας
κατά τη χρήση της συσκευής. Οι εφαρμογές που περιορίζονται για λόγους
εξοικονόμησης ενέργειας ενδέχεται να μην λειτουργούν σωστά ή να μην
σας στέλνουν ειδοποιήσεις.
• Εξοικονόμηση ενέργειας: Μειώστε την κατανάλωση ισχύος της μπαταρίας
επιλέγοντας χαμηλότερη τιμή σε ορισμένες ρυθμίσεις της συσκευής, όπως
τη φωτεινότητα της οθόνης, την ταχύτητα του λειτουργικού συστήματος
και την ένταση της δόνησης.
• Εξαιρέσεις εξοικονόμησης ενέργειας: Επιλέξτε τις εφαρμογές που
θέλετε να χρησιμοποιείτε χωρίς κανέναν λειτουργικό περιορισμό παρά τη
λειτουργία εξοικονόμησης ισχύος ή βελτιστοποίησης μπαταρίας.

Ρυθμίσεις 157
Αποθηκευτικός χώρος
Μπορείτε να προβάλετε και να διαχειριστείτε τον εσωτερικό χώρο αποθήκευσης
στη συσκευή ή τον αποθηκευτικό χώρο στην κάρτα μνήμης.
1 Στην οθόνη ρυθμίσεων, πατήστε Αποθηκευτικός χώρος.
2 Προσαρμόστε τις παρακάτω ρυθμίσεις:
• Εσωτερικός αποθηκευτικός χώρος: Δείτε τον συνολικό χώρο
αποθήκευσης και τον ελεύθερο χώρο στον εσωτερικό χώρο αποθήκευσης
της συσκευής. Δείτε μια λίστα με τις εφαρμογές που χρησιμοποιούνται και
τον χώρο αποθήκευσης που καταναλώνει η καθεμία.
• Κάρτα SD: Δείτε τον συνολικό χώρο αποθήκευσης και τον ελεύθερο
χώρο στην κάρτα μνήμης. Αυτή η επιλογή εμφανίζεται μόνο όταν έχει
τοποθετηθεί κάρτα μνήμης. Για να απενεργοποιήσετε την κάρτα μνήμης,
πατήστε .
Λογαριασμοί
Μπορείτε να προσθέσετε χρήστες με τους οποίους θα χρησιμοποιείτε από κοινού
τη συσκευή και να δημιουργήσετε ένα λογαριασμό στο cloud.
1 Στην οθόνη ρυθμίσεων, πατήστε Λογαριασμοί.
2 Προσαρμόστε τις ρυθμίσεις.
Digital Wellbeing και γονικοί έλεγχοι
Μπορείτε να δείτε τον χρόνο χρήσης του προϊόντος και να ρυθμίσετε το
χρονόμετρο για κάθε εφαρμογή. Μπορείτε επίσης να διαχειριστείτε τον χρόνο
χρήσης του κινητού τηλεφώνου χρησιμοποιώντας τις λειτουργίες Ύπνου και
Εστίασης.
Επιλέξτε Digital Wellbeing και γονικοί έλεγχοι στην οθόνη ρυθμίσεων και
ρυθμίστε τη λειτουργία που θέλετε.

Ρυθμίσεις 158
Google
Μπορείτε να χρησιμοποιήσετε τις ρυθμίσεις του Google για να διαχειριστείτε τις
εφαρμογές Google και τις ρυθμίσεις του λογαριασμού.
Στην οθόνη ρυθμίσεων, πατήστε Google.
Σύστημα
Κέντρο ενημέρωσης
Μπορείτε να προβάλετε και να εγκαταστήσετε την τελευταία έκδοση της
εφαρμογής ή του λογισμικού που παρέχει η LG.
1 Στην οθόνη ρυθμίσεων, πατήστε Σύστημα Κέντρο ενημέρωσης.
2 Προσαρμόστε τις παρακάτω ρυθμίσεις:
• Ενημέρωση εφαρμογής: Έλεγχος εάν υπάρχει διαθέσιμη ενημέρωση
εφαρμογής. Εάν υπάρχει, μπορείτε να εγκαταστήσετε την ενημερωμένη
έκδοση.
• Ενημέρωση Λογισμικού: Έλεγχος εάν υπάρχει διαθέσιμη ενημέρωση
λογισμικού. Εάν υπάρχει, μπορείτε να εγκαταστήσετε την ενημερωμένη
έκδοση.
Γλώσσα & πληκτρολόγιο
Μπορείτε να προσαρμόσετε τις ρυθμίσεις γλώσσας και πληκτρολογίου για τη
συσκευή σας.
1 Στην οθόνη ρυθμίσεων, πατήστε Σύστημα Γλώσσα & πληκτρολόγιο.
2 Προσαρμόστε τις παρακάτω ρυθμίσεις:
• Γλώσσα: Επιλέξτε γλώσσα για τη συσκευή.
• Διαχείριση πληκτρολογίων: Μπορείτε να αλλάξετε τη ρύθμιση για το
βασικό πληκτρολόγιο του προϊόντος, να ρυθμίσετε τα περιβάλλοντα
χρήσης για το πληκτρολόγιο LG ή άλλα εγκατεστημένα πληκτρολόγια και να
ρυθμίσετε τη λειτουργία αναγνώρισης ομιλίας για είσοδο με την εφαρμογή
Google Voice. Μπορείτε επίσης να επιλέξετε αν το κουμπί πληκτρολογίου
θα εμφανίζεται στην περιοχή των κουμπιών αφής στην αρχική οθόνη, ώστε
να μπορείτε να μεταβείτε γρήγορα σε άλλο πληκτρολόγιο.
• Πραγματικό πληκτρολόγιο: Επιλέξτε για να χρησιμοποιήσετε το κανονικό
πληκτρολόγιο ή για να προβάλλετε τις συντομεύσεις πληκτρολογίου.

Ρυθμίσεις 159
• Υπηρεσία Αυτόματη συμπλήρωση: Ενεργοποιήστε αυτήν την επιλογή
για να γίνεται εισαγωγή των πληροφοριών που είναι αποθηκευμένες
στο λογαριασμό σας, όπως κωδικό πρόσβασης, διεύθυνση ή
αριθμού πιστωτικής κάρτας με ένα μόνο πάτημα. Μπορείτε επίσης να
απενεργοποιήσετε αυτήν την επιλογή, να χρησιμοποιήσετε την Αυτόματη
συμπλήρωση της Google ή να προσθέσετε ένα νέο λογαριασμό υπηρεσίας.
• Μετατροπή κειμένου σε φωνή: Διαμορφώστε τις ρυθμίσεις για μετατροπή
κειμένου σε ομιλία.
• Tαχύτητα του δείκτη: Ρυθμίστε την ταχύτητα του δείκτη του ποντικιού ή
του trackpad.
• Αντιστροφή πλήκτρων στο ποντίκι: αντιστρέψτε το δεξί κουμπί του
ποντικιού για να εκτελεί βασικές ενέργειες άμεσου χειρισμού.
Ημερομηνία & ώρα
Μπορείτε να προσαρμόσετε τις ρυθμίσεις ημερομηνίας και ώρας για τη συσκευή
σας.
1 Στην οθόνη ρυθμίσεων, πατήστε Σύστημα Ημερομηνία & ώρα.
2 Προσαρμόστε τις ρυθμίσεις.
Μνήμη
Μπορείτε να δείτε έναν μέσο όρο για την κατανάλωση μνήμης για ένα
συγκεκριμένο χρονικό διάστημα, καθώς και την ποσότητα μνήμης που
καταναλώνει μια εφαρμογή.
1 Στην οθόνη ρυθμίσεων, πατήστε Σύστημα Μνήμη.
2 Πατήστε το κουμπί για να ορίσετε μια χρονοθυρίδα για ανάκτηση
δεδομένων.
Αντίγραφο ασφαλείας
Μπορείτε να δημιουργήσετε αντίγραφα ασφαλείας για δεδομένα που είναι
αποθηκευμένα στη συσκευή σας σε μια άλλη συσκευή ή λογαριασμό.
1 Στην οθόνη ρυθμίσεων, πατήστε Σύστημα Αντίγραφο ασφαλείας.
2 Προσαρμόστε τις παρακάτω ρυθμίσεις:
• LG Mobile Switch: Σας επιτρέπει να μεταφέρετε δεδομένα από μια παλιά
συσκευή LG σε μια νέα συσκευή LG. Για λεπτομέρειες, ανατρέξτε στην
ενότητα
LG Mobile Switch
.
Ρυθμίσεις 160
• Δημιουργία αντιγράφων ασφαλείας και επαναφορά: δημιουργήστε
αντίγραφα ασφαλείας των δεδομένων της συσκευής ή επαναφέρετε
δεδομένα στη συσκευή σας από κάποιο αντίγραφο ασφαλείας.
• Με την επαναφορά της συσκευής ενδέχεται να διαγραφούν αρχεία
αντιγράφων ασφαλείας που έχουν αποθηκευτεί στον χώρο αποθήκευσης.
Βεβαιωθείτε ότι έχετε αντιγράψει και αποθηκεύσει στον υπολογιστή σας τα
αντίγραφα ασφαλείας των σημαντικών αρχείων σας.
• Αντίγραφο ασφ. Google: Αλλαγή των ρυθμίσεων αντιγράφου ασφαλείας
του Google drive. Μπορείτε επίσης να προβάλλετε τον λογαριασμό
δημιουργίας αντιγράφων ασφαλείας που χρησιμοποιείται ή να προσθέσετε
έναν νέο λογαριασμό δημιουργίας αντιγράφων ασφαλείας.
Επανεκκίνηση & Επαναφορά
Μπορείτε να κάνετε επαναφορά της συσκευής περιλαμβανομένων των ρυθμίσεων
δικτύου και εφαρμογών.
1 Στην οθόνη ρυθμίσεων, πατήστε Σύστημα Επανεκκίνηση & Επαναφορά.
2 Προσαρμόστε τις παρακάτω ρυθμίσεις:
• Αυτόματη επανεκκίνηση: Αυτόματη επανεκκίνηση και προσαρμογή
του τηλεφώνου σε καθορισμένο χρόνο. Πατήστε το κουμπί για να
ενεργοποιήσετε αυτή τη λειτουργία. Η συσκευή επανεκκινείται αυτόματα
σε καθορισμένο χρόνο και βελτιστοποιείται αυτόματα. Επιλέξτε την
ημερομηνία και την ώρα για το βιογραφικό σημείωμα.
• Μπορείτε να ρυθμίσετε τη συσκευή να ξεκινά ξανά μία φορά την εβδομάδα. Η
συσκευή επανεκκινείται αυτόματα σε μία ώρα από την προκαθορισμένη ώρα.
• Μετά την επανεκκίνηση της συσκευής, οι ειδοποιήσεις και τα εμβλήματα
καταργούνται. Αποθηκεύστε σημαντικά δεδομένα πριν από την
προκαθορισμένη ώρα.
• Η λειτουργία αυτόματης επανεκκίνησης δεν είναι ενεργή στις ακόλουθες
περιπτώσεις: Όταν η οθόνη είναι ενεργοποιημένη, όταν η συσκευή είναι σε
χρήση, όταν η στάθμη της μπαταρίας είναι 30% ή λιγότερο ή όταν η κάρτα USIM
είναι κλειδωμένη.
-Ανάλογα με τον πάροχο υπηρεσιών τηλεπικοινωνιών, η λειτουργία αυτόματης
επανεκκίνησης ενδέχεται να μην είναι διαθέσιμη.
Ρυθμίσεις 161
• Επαναφορά των ρυθμίσεων δικτύου: επαναφέρει τις ρυθμίσεις Wi-Fi,
Bluetooth και άλλες ρυθμίσεις δικτύου.
• Μηδενισμός προτιμήσεων εφαρμογής: Επαναφορά των ρυθμίσεων για μια
εφαρμογή. Δεν θα διαγραφούν τα δεδομένα που είναι αποθηκευμένα στην
εφαρμογή.
• Επαναφορά ρυθμίσεων: Επαναφέρετε όλες τις ρυθμίσεις συστήματος στις
προεπιλογές.
• Επαναφορά εργοστασιακών δεδομένων: επαναφέρει όλες τις ρυθμίσεις
για τη συσκευή και διαγράφει τα δεδομένα.
• Η επανεκκίνηση και η επαναφορά της συσκευής σου διαγράφει όλες
τα δεδομένα πάνω σ' αυτήν. Βάλτε το όνομα της συσκευής σας, τον
λογαριασμό Google και άλλες αρχικές πληροφορίες ξανά.
• Μετά την αρχικοποίηση των δεδομένων, δεν είναι δυνατή η επαναφορά
τους.
Σχετικά με το τηλέφωνο
Μπορείτε να δείτε πληροφορίες σχετικά με τη συσκευή σας, όπως το όνομά της,
την κατάσταση, τα στοιχεία για το λογισμικό και νομικές πληροφορίες.
Στην οθόνη ρυθμίσεων, πατήστε Σύστημα Σχετικά με το τηλέφωνο και δείτε τις
πληροφορίες που σας ενδιαφέρουν.
Ρυθμιστικό πλαίσιο & Ασφάλεια
Μπορείτε να δείτε τις ρυθμιστικές ετικέτες τις σχετικές πληροφορίες στη συσκευή
σας.
Στην οθόνη ρυθμίσεων, πατήστε Σύστημα Ρυθμιστικό πλαίσιο & Ασφάλεια.
Προσβασιμότητα
Μπορείτε να διαχειριστείτε τις προσθήκες προσβασιμότητας που έχουν
εγκατασταθεί στη συσκευή σας.
1 Στην οθόνη ρυθμίσεων, πατήστε Προσβασιμότητα.
2 Προσαρμόστε τις παρακάτω ρυθμίσεις:
• Όραση TalkBack: Ρυθμίστε τη συσκευή να σας ειδοποιεί μέσω φωνής για
την κατάσταση της οθόνης ή για ενέργειες.
Ρυθμίσεις 162
• Όραση Φωνητικές ειδοποιήσεις: Ρυθμίστε τη συσκευή να διαβάζει τα
στοιχεία εισερχόμενης κλήσης μέσω φωνής.
• Όραση Γραμματοσειρά: Αλλάξτε το μέγεθος της γραμματοσειράς, την
ένταση της γραφής ή τη γραμματοσειρά.
• Όραση Μέγεθος οθόνης: Ορίστε το μέγεθος των στοιχείων στην οθόνη
όπως σας βολεύει. Κάποια στοιχεία ενδέχεται να αλλάξουν θέση.
• Όραση Μεγέθυνση αφής: για μεγέθυνση ή σμίκρυνση πατώντας στην
οθόνη τρεις φορές.
• Όραση Μεγέθυνση παραθύρου: πραγματοποιήστε μεγέθυνση ή
σμίκρυνση εντός του παραθύρου και αντιστρέψτε το χρώμα.
• Όραση Μεγάλος δείκτης ποντικιού: μεγεθύνετε τον δείκτη του
ποντικιού.
• Όραση Οθόνη υψηλής αντίθεσης: σκουρύνετε το χρώμα φόντου για
οθόνη υψηλής αντίθεσης.
• Όραση Αντιστροφή χρωμάτων οθόνης: Αυξήστε την αντίθεση
χρωμάτων της οθόνης για άτομα με περιορισμένη όραση.
• Όραση Ρύθμιση χρωμάτων οθόνης: Προσαρμόστε το χρώμα της
οθόνης.
• Όραση Μονόχρωμη: αλλάξτε τη λειτουργία της οθόνης σε κλίμακα του
γκρι.
• Όραση Τερματισμός κλήσης με το πλήκτρο τροφοδοσίας: τερματίστε
μια κλήση με το πάτημα του πλήκτρου ενεργοποίησης/κλειδώματος.
• Ακοή Ζωντανοί υπότιτλοι: Ρυθμίστε τη συσκευή ώστε να αναγνωρίζει τη
φωνή στα πολυμέσα και να δημιουργεί αυτόματα υπότιτλους.
• Ακοή Προτιμήσεις λεζάντας: Ενεργοποιήστε την υπηρεσία υποτίτλων
κατά την αναπαραγωγή βίντεο για άτομα με προβλήματα ακοής.
• Ακοή Ειδοποιήσεις φλας: ρυθμίστε τη συσκευή να σας ενημερώνει με
φως που αναβοσβήνει για εισερχόμενες κλήσεις, μηνύματα και αφυπνίσεις.
• Ακοή Απομόνωση όλων των ήχων: απομόνωση όλων των ήχων και
χαμηλότερη στάθμη έντασης ήχου στον δέκτη.
• Ακοή Κανάλι ήχου: επιλέξτε τον τύπο ήχου.
• Ακοή Ισορροπία ήχου: προσαρμόστε την ισορροπία εξόδου ήχου.
Χρησιμοποιήστε τη γραμμή κύλισης για να αλλάξετε την ισορροπία.
• Κινητικότητα και γνώση Touch assistant: ενεργοποιήστε τον πίνακα
αφής για ευκολότερη χρήση των κουμπιών και των κινήσεων.
Ρυθμίσεις 163
• Κινητικότητα και γνώση Εισαγωγή αφής: καταχωρήστε κείμενο
πατώντας παρατεταμένα την οθόνη ή τροποποιήστε το πατώντας απλά την
οθόνη.
• Κινητικότητα και γνώση Πραγματικό πληκτρολόγιο: προσαρμόστε τις
ρυθμίσεις του πληκτρολογίου.
• Κινητικότητα και γνώση Αυτόματο κλικ ποντικού: δημιουργήστε
αυτόματα κλικ του δείκτη του ποντικιού σε περίπτωση απουσίας κίνησης.
• Κινητικότητα και γνώση Αγγίξτε παρατεταμένα για να κάνετε κλήση:
απαντήστε ή απορρίψτε κλήσεις πατώντας παρατεταμένα το κουμπί
κλήσης, και όχι με σάρωσή του.
• Κινητικότητα και γνώση Λήξη χρονικού ορίου οθόνης: να
απενεργοποιείται αυτόματα η συσκευή όταν παραμένει σε αδράνεια για ένα
καθορισμένο χρονικό διάστημα.
• Κινητικότητα και γνώση Περιοχή ελέγχου αφής: περιορίστε την περιοχή
αφής έτσι ώστε ο έλεγχος αφής να είναι δυνατός μόνο σε ένα συγκεκριμένο
τμήμα της οθόνης.
• Συντόμευση λειτουργιών προσβασιμότητας: για γρήγορη πρόσβαση σε
λειτουργίες που χρησιμοποιείτε συχνά πατώντας τρεις φορές το κουμπί .
• Αυτόματη περιστροφή οθόνης: αλλάζει αυτόματα ο προσανατολισμός της
οθόνης ανάλογα με τον προσανατολισμό της συσκευής.
• Επιλέξτε για εκφώνηση: Σας επιτρέπει να πατάτε ορισμένα στοιχεία για να
λαμβάνετε προφορική ανατροφοδότηση.
• Πρόσβαση με διακόπτη: Δημιουργήστε συνδυασμούς πλήκτρων για να
ελέγχετε τη συσκευή σας.

Παράρτημα
05
Παράρτημα 165
Ρυθμίσεις γλώσσας
Επιλέξτε γλώσσα για τη συσκευή.
• Στην αρχική οθόνη, πατήστε Ρυθμίσεις Σύστημα Γλώσσα & πληκτρολόγιο
Γλώσσα Προσθήκη γλώσσας και επιλέξτε μια γλώσσα.
-Αγγίξτε και κρατήστε το κουμπί και σύρετέ το στο επάνω μέρος της
λίστας γλωσσών για να το ορίσετε ως τη γλώσσα προεπιλογής.
LG Bridge
LG Bridge - Παρουσίαση
Μπορείτε να δημιουργήσετε αντίγραφα ασφαλείας των επαφών, των
φωτογραφιών και άλλων στοιχείων στον υπολογιστή ή να ενημερώσετε το
λογισμικό της συσκευής.
• Για περισσότερες πληροφορίες βοήθειας, ανατρέξτε στην ενότητα LG
Bridge.
• Οι υποστηριζόμενες λειτουργίες ενδέχεται να διαφέρουν ανάλογα με τη
συσκευή.
• Το πρόγραμμα οδήγησης USB LG είναι απαραίτητο για να συνδέσετε το
smartphone LG με τον υπολογιστή και εγκαθίσταται κατά την εγκατάσταση
του LG Bridge.
Λειτουργίες της εφαρμογής LG Bridge
• Δημιουργήστε αντίγραφα ασφαλείας των δεδομένων από τη συσκευή σε έναν
υπολογιστή ή επαναφέρετε τα δεδομένα από έναν υπολογιστή στη συσκευή
μέσω σύνδεσης καλωδίου USB.
• Ενημέρωση λογισμικού της συσκευής από έναν υπολογιστή μέσω σύνδεσης
καλωδίου USB.

Παράρτημα 166
Εγκατάσταση εφαρμογής LG Bridge σε υπολογιστή
1 Μεταβείτε στη διεύθυνση
www.lg.com
από τον υπολογιστή σας.
2 Επιλέξτε την περιοχή σας.
3 Πατήστε Υποστήριξη Λογισμικό και υλικολογισμικό.
4 Πληκτρολογήστε το όνομα της συσκευής σας.
Ή
Επιλέξτε την κατηγορία προϊόντος.
5 Για να κατεβάσετε το αρχείο ρύθμισης, επιλέξτε Συγχρονισμός PC LG Bridge.
• Επιλέξτε Λεπτομέρειες για να δείτε τις ελάχιστες απαιτήσεις για την
εγκατάσταση της εφαρμογής LG Bridge.
Ενημέρωση λογισμικού τηλεφώνου
Ενημέρωση λογισμικού κινητού τηλεφώνου LG από το
Internet
Για περισσότερες πληροφορίες σχετικά με τη χρήση αυτής της λειτουργίας,
επισκεφθείτε τη διεύθυνση
http://www.lg.com/common/index.jsp
και επιλέξτε τη
χώρα και τη γλώσσα σας.
Με αυτήν τη λειτουργία μπορείτε εύκολα να ενημερώνετε μέσω Internet το
υλικολογισμικό στο τηλέφωνό σας σε μια πιο πρόσφατη έκδοση χωρίς να
χρειάζεται να επισκεφθείτε κάποιο κέντρο επισκευών. Αυτή η λειτουργία
θα είναι διαθέσιμη εάν και όταν η LG διαθέσει στην αγορά νεότερη έκδοση
υλικολογισμικού για τη συσκευή σας.
Επειδή η ενημέρωση του υλικολογισμικού του τηλεφώνου προϋποθέτει
την εστιασμένη προσοχή του χρήστη καθόλη τη διάρκεια της διαδικασίας
ενημέρωσης, βεβαιωθείτε ότι διαβάζετε προσεχτικά όλες τις οδηγίες και τις
σημειώσεις που εμφανίζονται σε κάθε βήμα πριν προχωρήσετε στην εκτέλεσή
του. Λάβετε υπόψη ότι εάν αφαιρέσετε το καλώδιο USB κατά τη διάρκεια της
διαδικασίας αναβάθμισης, ενδέχεται να προκληθούν σοβαρά προβλήματα στο
τηλέφωνό σας.
• Η LG επιφυλάσσεται του δικαιώματος να διαθέτει, κατά τη διακριτική
της ευχέρεια, τις ενημερώσεις του υλικολογισμικού μόνο για επιλεγμένα
μοντέλα και δεν εγγυάται τη διαθεσιμότητα της νεότερης έκδοσης
υλικολογισμικού για όλα τα μοντέλα τηλεφώνων.

Παράρτημα 167
Ενημέρωση λογισμικού κινητού τηλεφώνου LG μέσω
Over-the-Air (OTA)
Αυτή η λειτουργία σάς επιτρέπει να ενημερώνετε εύκολα το λογισμικό του
τηλεφώνου σας σε μια πιο πρόσφατη έκδοση μέσω OTA, χωρίς σύνδεση καλωδίου
USB. Αυτή η λειτουργία θα είναι διαθέσιμη εάν και όταν η LG διαθέσει στην αγορά
νεότερη έκδοση υλικολογισμικού για τη συσκευή σας.
Για να εκτελέσετε ενημέρωση του λογισμικού του τηλεφώνου, ακολουθήστε την
εξής διαδρομή:
Ρυθμίσεις Σύστημα Κέντρο ενημέρωσης Ενημέρωση λογισμικού
Έλεγχος ενημέρωσης λογισμικού.
• Κατά τη διαδικασία ενημέρωσης του λογισμικού του τηλεφώνου σας
ενδέχεται να χαθούν τα προσωπικά σας δεδομένα από τον εσωτερικό
χώρο αποθήκευσης του τηλεφώνου, όπως για παράδειγμα, οι πληροφορίες
σχετικά με τον προσωπικό σας λογαριασμό Google και άλλους
λογαριασμούς, τα δεδομένα και οι ρυθμίσεις του συστήματος και των
εφαρμογών σας, οι αποθηκευμένες εφαρμογές από το Internet και η άδεια
χρήσης DRM. Επομένως, η LG σάς συνιστά να δημιουργείτε αντίγραφα
ασφαλείας των προσωπικών σας δεδομένων πριν από την ενημέρωση του
λογισμικού του τηλεφώνου σας. Η LG δεν φέρει ευθύνη για ενδεχόμενη
απώλεια προσωπικών δεδομένων.
• Αυτή η λειτουργία εξαρτάται από την περιοχή ή τον πάροχο υπηρεσιών.

Παράρτημα 168
Οδηγός κατά της κλοπής
Ρυθμίστε τη συσκευή σας να μην επιτρέπει τη χρήση από άλλα άτομα εάν έχει
πραγματοποιηθεί επαναφορά εργοστασιακών ρυθμίσεων χωρίς την άδειά σας. Για
παράδειγμα, εάν η συσκευή σας χαθεί ή κλαπεί, ή εάν διαγραφούν τα δεδομένα
της, μόνο κάποιος με λογαριασμό Google ή πληροφορίες για το κλείδωμα της
οθόνης θα μπορεί να χρησιμοποιήσει τη συσκευή.
Το μόνο που χρειάζεται να κάνετε για να βεβαιωθείτε ότι η συσκευή σας είναι
προστατευμένη είναι τα εξής:
• Να ορίσετε κλείδωμα οθόνης: εάν η συσκευή σας χαθεί ή κλαπεί, αλλά έχετε
ορίσει κλείδωμα οθόνης, δεν είναι δυνατή η διαγραφή των δεδομένων
που βρίσκονται στη συσκευή μέσω του μενού ρυθμίσεων παρά μόνο εάν
ξεκλειδωθεί η οθόνη.
• Να προσθέστε τον λογαριασμό σας στο Google στη συσκευή σας: εάν τα
δεδομένα της συσκευής σας διαγραφούν αλλά έχετε ορίσει λογαριασμό
Google, η συσκευή δεν μπορεί να ολοκληρώσει τη διαδικασία ρύθμισης μέχρι
να εισαχθούν ξανά τα στοιχεία του λογαριασμού σας στο Google.
Αφού πάρετε τα απαραίτητα μέτρα για την προστασία της συσκευής σας, εάν
χρειαστεί να πραγματοποιήσετε επαναφορά της στις εργοστασιακές ρυθμίσεις, θα
πρέπει να ξεκλειδώσετε την οθόνη σας ή να εισαγάγετε τον κωδικό πρόσβασης
για τον λογαριασμό σας στο Google. Με αυτόν τον τρόπο διασφαλίζεται ότι η
επαναφορά μπορεί να εκτελεστεί μόνο από κάποιον που εμπιστεύεστε.
• Πριν εκτελέσετε επαναφορά των εργοστασιακών ρυθμίσεων, βεβαιωθείτε
ότι θυμάστε τον λογαριασμό σας στο Google και τον κωδικό πρόσβασης
που έχετε προσθέσει στη συσκευή σας. Εάν δεν μπορείτε να παρέχετε αυτά
τα στοιχεία λογαριασμού κατά τη διαδικασία ρύθμισης, δεν θα μπορείτε
να χρησιμοποιήσετε τη συσκευή καθόλου μετά από την εκτέλεση της
επαναφοράς εργοστασιακών ρυθμίσεων.

Παράρτημα 169
Πληροφορίες σημείωσης για το
λογισμικό ανοικτού κώδικα
Για τη λήψη του πηγαίου κώδικα που διέπεται από τις άδειες χρήσης GPL, LGPL,
MPL και άλλες άδειες χρήσης ανοιχτού κώδικα, ο οποίος περιλαμβάνεται στο
προϊόν, επισκεφτείτε τη διεύθυνση
http://opensource.lge.com
.
Εκτός από τον πηγαίο κώδικα, διατίθενται προς λήψη όλοι οι αναφερόμενοι όροι αδειών
χρήσης, οι αποποιήσεις εγγυήσεων και οι σημειώσεις πνευματικών δικαιωμάτων.
Η LG Electronics θα σας παρέχει επίσης τον κώδικα ανοιχτής πηγής σε μορφή CD-
ROM έναντι χρέωσης που θα καλύπτει τα έξοδα της διανομής (όπως το κόστος των
πολυμέσων, της αποστολής και της διαχείρισης), κατόπιν αιτήματος μέσω email
στη διεύθυνση
opensource@lge.com
.
Η προσφορά ισχύει για περίοδο τριών ετών από την τελευταία μας αποστολή
αυτού του προϊόντος. Η προσφορά ισχύει για όλους τους παραλήπτες αυτής της
πληροφορίας.
Πληροφορίες σχετικά με τους
κανονισμούς
(Αριθμός αναγνωριστικού
κανονισμού, ηλεκτρονικές ετικέτες κ.λπ.)
Για λεπτομέρειες σχετικά με τους κανονισμούς, επιλέξτε διαδοχικά Ρυθμίσεις
Σύστημα Ρυθμιστικό πλαίσιο & Ασφάλεια.

Παράρτημα 170
Εμπορικά σήματα
• Πνευματικά δικαιώματα ©2020 LG Electronics Inc. Όλα τα δικαιώματα
προστατεύονται. Η επωνυμία LG και το λογότυπο LG είναι σήματα κατατεθέντα
του Ομίλου LG και των σχετικών οντοτήτων του.
• Τα Google, Google Maps, Gmail, YouTube, Google Duo, Google Play, Android,
Chrome, Φωτογραφίες Google, Google Play Protect, Ημερολόγιο Google,
Google Docs, Google Drive, Google Sheets κι άλλα σχετικά σήματα και
λογότυπα είναι εμπορικά σήματα της Google LLC.
• Το Bluetooth
®
αποτελεί σήμα κατατεθέν της Bluetooth SIG, Inc. παγκοσμίως.
• Η επωνυμία Wi-Fi
®
και το λογότυπο Wi-Fi είναι σήματα κατατεθέντα της Wi-Fi
Electronics.
• Όλα τα υπόλοιπα εμπορικά σήματα και πνευματικά δικαιώματα αποτελούν
ιδιοκτησία των αντίστοιχων κατόχων τους.
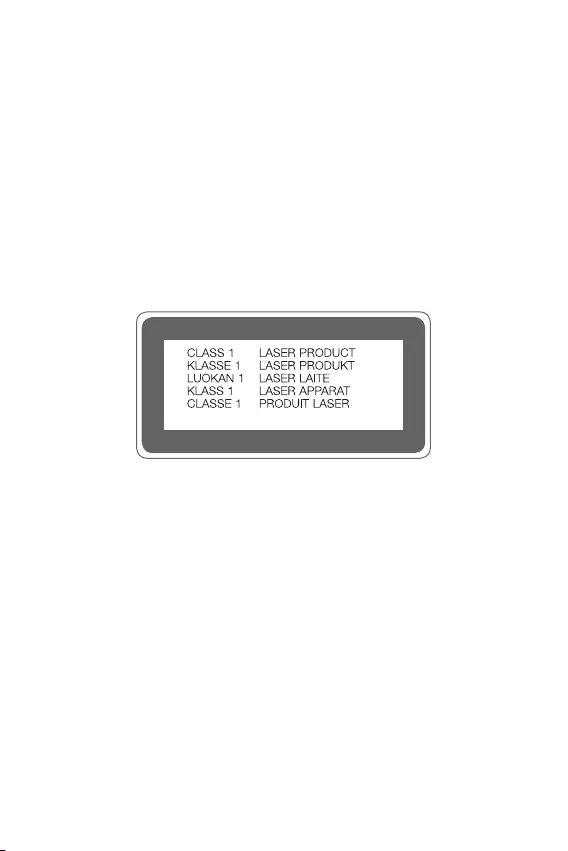
Παράρτημα 171
Δήλωση ασφάλειας λέιζερ
Προσοχή!
Αυτό το προϊόν χρησιμοποιεί σύστημα λέιζερ. Για να βεβαιωθείτε πως
χρησιμοποιείτε κατάλληλα αυτό το προϊόν, διαβάστε προσεκτικά το εγχειρίδιο
χρήστη και φυλάξτε το για μελλοντική αναφορά. Σε περίπτωση που η μονάδα
χρειαστεί συντήρηση, επικοινωνήστε με εξουσιοδοτημένο κέντρο επισκευών.
Η χρήση στοιχείων ελέγχου, ρυθμίσεων ή η εκτέλεση διαδικασιών που δεν
περιγράφονται στο παρόν ενδέχεται να επιφέρουν επικίνδυνη έκθεση σε
ραδιενέργεια.
Για να αποφύγετε την άμεση έκθεση στην ακτίνα λέιζερ, μην προσπαθήσετε να
ανοίξετε το περίβλημα ή να έχετε άμεση επαφή με το λέιζερ.
ΔΗΛΩΣΗ ΣΥΜΜΟΡΦΩΣΗΣ
Με το παρόν, η LG Electronics δηλώνει ότι το προϊόν LM-F100EMW
συμμορφώνεται με τις βασικές απαιτήσεις και με τις υπόλοιπες σχετικές διατάξεις
της Οδηγίας 2014/53/EU.
Ένα αντίγραφο της Δήλωσης Συμμόρφωσης διατίθεται στη διεύθυνση
http://www.lg.com/global/declaration
Παράρτημα 172
Διεύθυνση ενημέρωσης για θέματα
συμμόρφωσης ως προς τη χρήση του
προϊόντος
LG Electronics European Shared Service Center B.V.
Krijgsman 1, 1186 DM Amstelveen, The Netherlands
Wi-Fi (WLAN)
Η συχνότητα 5150 – 5350 MHz προορίζεται αποκλειστικά για χρήση σε
εσωτερικούς χώρους.
AT BE BG CH CY CZ DE DK EE EL ES FI FR
HR HU IE IS IT LI LT LU LV MT NL NO PL
PT RO SE SI SK UK AL ME RS MK TR BA XK
Ελλάδα
Η δυνατότητα 5G εξαρτάται από την πραγματική διαθεσιμότητα και συμβατότητα
του δικτύου 5G με το προϊόν. Ελέγξτε την κατάσταση συμβατότητας στο
www.lg.com/it

Παράρτημα 173
Περισσότερες πληροφορίες
Εξαρτήματα από σκληρυμένο γυαλί
Τα εξαρτήματα αυτής της συσκευής από σκληρυμένο γυαλί δεν έχουν διάρκεια εφ’
όρου ζωής, συνεπώς, ενδέχεται να φθαρούν με την πάροδο του χρόνου.
• Εάν η συσκευή σας πέσει πάνω σε μια σκληρή επιφάνεια ή προσκρούσει κάπου
με δύναμη, μπορεί να προκληθεί ζημιά στο σκληρυμένο γυαλί.
Σε αυτήν την περίπτωση, διακόψτε αμέσως τη χρήση της συσκευής και
επικοινωνήστε με ένα Κέντρο εξυπηρέτησης πελατών της LG.
• Στην αγορά κυκλοφορούν προστατευτικές θήκες που μπορείτε να
προμηθευτείτε για να προστατεύσετε τη συσκευή σας από τη ζημιά.
Λάβετε υπόψη ότι αυτές οι προστατευτικές θήκες δεν καλύπτονται από την
εγγύηση της LG Electronics και δεν εγγυώνται την ασφάλεια.
Λόγος διαστάσεων
Ενδέχεται κάποιες ληφθείσες εφαρμογές να μην υποστηρίζουν το συγκεκριμένο
λόγο διαστάσεων.
Σε αυτήν την περίπτωση, επιλέξτε τις βέλτιστες αναλογίες οθόνης για την
εφαρμογή ή αποταθείτε στον πάροχο της εφαρμογής για περισσότερες
πληροφορίες.
Για περισσότερες πληροφορίες
τηλεφωνήστε στο: 801 11 200 900
ή από κινητό στο: 210 4800564
Παράρτημα 174
Οδηγός για μεταφορά δεδομένων
• Για δεδομένα που μπορούν να μεταφερθούν μεταξύ συσκευών LG ή μεταξύ
μιας συσκευής LG και μιας συσκευής τρίτου κατασκευαστή, συμβουλευτείτε
τον παρακάτω πίνακα.
Τύπος Λεπτομέρειες στοιχείου
Συσκευή LG
→
Συσκευή LG
Συσκευή τρίτου
κατασκευαστή
με λειτουργικό
Android
→
Συσκευή LG
Συσκευή
iOS
→
Συσκευή LG
Προσωπικά
δεδομένα
Επαφές, μηνύματα, αρχεία
κλήσεων, ημερολόγιο,
φωνητικές εγγραφές
○○○
Σημειωματάριο
○
X
○
Ξυπνητήρια
○
X X
Δεδομένα
πολυμέσων
Φωτογραφίες, βίντεο,
τραγούδια, έγγραφα
○○○
Ρυθμίσεις
οθόνης
Ρυθμίσεις αρχικής οθόνης
(φάκελοι και widget)
○
X X
Ρυθμίσεις κλειδώματος
της οθόνης (εξαιρούνται
οι ρυθμίσεις κλειδώματος
οθόνης)
○
X X
Εφαρμογές
Ληφθείσες εφαρμογές
○ ○
-
Προσωπικά δεδομένα για
τη ληφθείσα εφαρμογή
○
X
Άλλα
Δημόσιο πιστοποιητικό
○ ○
X
Ρυθμίσεις (Wi-Fi,
Bluetooth, κλήσεις,
ήχο και ειδοποιήσεις,
προσβασιμότητα,
μπαταρία)
○
X X
Παράρτημα 175
• Ενδέχεται να μην είναι εφικτή η μεταφορά ορισμένων δεδομένων ανάλογα
με την έκδοση λογισμικού και εφαρμογής, το λειτουργικό σύστημα, τον
κατασκευαστή ή την πολιτική του παρόχου υπηρεσιών.
Υποστηριζόμενες ζώνες συχνοτήτων Ισχύς εξόδου πομπού
GSM 900 33.7 dBm
GSM 1800 30.7 dBm
W B1 24.2 dBm
W B8 25.2 dBm
LTE B1 25.2 dBm
LTE B3 23.7 dBm
LTE B7 23.7 dBm
LTE B8 25.2 dBm
LTE B20 25.2 dBm
LTE B28 25.2 dBm
LTE B38 25.2 dBm
LTE B40 25.2 dBm
5G Sub6 n1 25.2 dBm
5G Sub6 n3 25.2 dBm
5G Sub6 n7 25.2 dBm
5G Sub6 n28 25.2 dBm
5G Sub6 n78 22.7 dBm
BT 2.4GHz 12 dBm
WLAN 2.4GHz 19 dBm
WLAN 5GHz 20 dBm
NFC - 23 dBuA/m
Μπορείτε να βρείτε πληροφορίες για το φορτιστή ταξιδίου στη διεύθυνση
http://www.lg.com/global/support/cedoc/cedoc

Παράρτημα 176
Απόρριψη της παλιάς σας συσκευής
1. Αυτό το διαγραμμένο σύμβολο του τροχοφόρου κάδου υποδεικνύει ότι
τα απόβλητα ηλεκτρικών και ηλεκτρονικών προϊόντων (ΑΗΗΕ) πρέπει να
απορρίπτονται χωριστά από τα γενικά οικιακά απορρίμματα.
2. Τα παλιά ηλεκτρικά προϊόντα μπορεί να περιέχουν επικίνδυνες
ουσίες και ως εκ τούτου η σωστή απόρριψη της παλιάς σας συσκευής
αποτρέπει ενδεχόμενες αρνητικές συνέπειες για το περιβάλλον
και την ανθρώπινη υγεία. Η παλιά σας συσκευή μπορεί να περιέχει
επαναχρησιμοποιήσιμα ανταλλακτικά που θα μπορούσαν να
χρησιμοποιηθούν για την επισκευή άλλων προϊόντων, καθώς και άλλα
υλικά αξίας που μπορούν να ανακυκλωθούν για εξοικονόμηση των
περιορισμένων φυσικών πόρων.
3. Μπορείτε να πάτε τη συσκευή σας, είτε στο κατάστημα από το
οποίο αγοράσατε το προϊόν, ή να επικοινωνήσετε το τοπικό γραφείο
απορριμμάτων για λεπτομέρειες σχετικά με το πλησιέστερο εγκεκριμένο
σημείο συλλογής ΑΗΗΕ (Απόβλητα Ηλεκτρικών και Ηλεκτρονικών
Συσκευών). Για τις πιο πρόσφατες πληροφορίες για τη χώρα σας
επισκεφθείτε τη διεύθυνση
www.lg.com/global/recycling
Απόρριψη των χρησιμοποιημένων μπαταριών/
συσσωρευτών
1. Το σύμβολο αυτό μπορεί να συνδυάζεται με τα χημικά σύμβολα για
τον υδράργυρο (Hg), το κάδμιο (Cd) ή το μόλυβδο (Pb), αν η μπαταρία
περιέχει ποσότητες μεγαλύτερες από 0,0005% υδράργυρο, 0,002%
κάδμιο ή 0,004% μόλυβδο.
2. Η απόρριψη όλων των μπαταριών/συσσωρευτών πρέπει να
γίνεται χωριστά από τα γενικά οικιακά απορρίμματα, μέσω ειδικών
εγκαταστάσεων συλλογής απορριμμάτων που έχουν καθοριστεί από την
κυβέρνηση ή από τις τοπικές αρχές.
3. Η σωστή απόρριψη των παλιών μπαταριών/συσσωρευτών αποτρέπει
ενδεχόμενες αρνητικές συνέπειες για το περιβάλλον, καθώς και για την
υγεία των ζώων και των ανθρώπων.
4. Για πιο αναλυτικές πληροφορίες σχετικά με την απόρριψη των παλιών
μπαταριών/συσσωρευτών, επικοινωνήστε με το τοπικό γραφείο, την
αρμόδια υπηρεσία διάθεσης οικιακών απορριμμάτων ή το κατάστημα
από το οποίο αγοράσατε το προϊόν.

Παράρτημα 177
Συχνές ερωτήσεις
Στο κεφάλαιο αυτό αναφέρονται ορισμένα προβλήματα που ενδέχεται να
αντιμετωπίσετε κατά τη χρήση της συσκευής σας. Για ορισμένα προβλήματα θα
χρειαστεί να επικοινωνήσετε με τον πάροχο υπηρεσιών σας, αλλά τα περισσότερα
μπορείτε να τα διορθώσετε και μόνοι σας.
Σφάλμα κάρτας SIM
Βεβαιωθείτε ότι η κάρτα SIM είναι σωστά τοποθετημένη.
Δεν υπάρχει σύνδεση δικτύου ή υπάρχει απώλεια δικτύου
Χαμηλό σήμα. Μετακινηθείτε κοντά σε παράθυρο ή σε ανοιχτό χώρο.
Είστε εκτός της περιοχής κάλυψης δικτύου του πάροχου. Αλλάξτε θέση και ελέγξτε
το δίκτυο.
Δεν είναι διαθέσιμες οι κλήσεις
Το νέο δίκτυο δεν είναι εξουσιοδοτημένο.
Σιγουρευτείτε πως δεν έχετε ορίσει φραγή κλήσεων για τον εισερχόμενο αριθμό.
Σιγουρευτείτε πως δεν έχετε ορίσει φραγή κλήσεων για τον αριθμό που καλείτε.
Δεν είναι δυνατή η ενεργοποίηση της συσκευής
Όταν η μπαταρία έχει αποφορτίσει πλήρως, δεν θα είναι δυνατή η ενεργοποίηση
της συσκευής σας.
Φορτίστε πλήρως τη μπαταρία πριν να ενεργοποιήσετε τη συσκευή.

Παράρτημα 178
Σφάλμα φόρτισης
Βεβαιωθείτε ότι η συσκευή φορτίζεται σε κανονική θερμοκρασία.
Ελέγξτε τον φορτιστή και τη σύνδεσή του στη συσκευή.
Να χρησιμοποιείτε μόνο τα εξαρτήματα που περιλαμβάνονται στη συσκευασία και
είναι εξουσιοδοτημένα από την LG.
Η μπαταρία τελειώνει πιο γρήγορα σε σχέση με όταν αγόρασα
αρχικά τη συσκευή
Όταν εκτίθεται η συσκευή ή η μπαταρία σε πολύ υψηλές ή χαμηλές θερμοκρασίες,
ενδέχεται να μειωθεί η διάρκεια ζωής της μπαταρίας.
Η κατανάλωση μπαταρίας θα αυξηθεί όταν χρησιμοποιείτε ορισμένες
χαρακτηριστικά ή εφαρμογές, όπως το GPS, παιχνίδια ή το Internet.
Η μπαταρία είναι αναλώσιμο και η ζωή της μπαταρίας θα μειώνεται με την πάροδο
του χρόνου.
Εμφανίζονται μηνύματα σφάλματος κατά την εκκίνηση της
κάμερας
Φορτίστε την μπαταρία.
Απελευθερώστε μνήμη μεταφέροντας αρχεία σε έναν υπολογιστή ή διαγράφοντας
αρχεία από τη συσκευή σας.
επανεκκινεί τη συσκευή.
Εάν εξακολουθείτε να αντιμετωπίζετε πρόβλημα με την εφαρμογή της κάμερας
αφότου ακολουθήσετε αυτές τις συμβουλές, επικοινωνήστε με ένα Κέντρο Σέρβις
της LG Electronics.

Παράρτημα 179
Η ποιότητα της φωτογραφίας είναι κακή
Η ποιότητα των φωτογραφιών σας ενδέχεται να ποικίλει, ανάλογα με τον
περιβάλλοντα χώρο και την τεχνική φωτογράφησης που χρησιμοποιείτε.
Όταν βγάζετε φωτογραφίες και βίντεο, η ποιότητα από σταθερή γωνία είναι
καλύτερη σε σχέση με την αντίστοιχη από ευρεία γωνία.
Εάν βγάζετε φωτογραφίες σε σκοτεινά μέρη, το βράδυ ή σε εσωτερικό χώρο,
ενδέχεται να υπάρχει θόρυβος στις φωτογραφίες ή να είναι θολές.
Εάν αντιμετωπίζετε προβλήματα, κάντε επαναφορά των επιλογών.
Η οθόνη αφής ανταποκρίνεται αργά ή λανθασμένα
Εάν τοποθετήσετε προστατευτικό οθόνης ή προαιρετικά εξαρτήματα στην οθόνη
αφής, αυτή ενδέχεται να μην λειτουργεί σωστά.
Εάν φοράτε γάντια, εάν τα χέρια σας δεν είναι καθαρά όταν αγγίζετε την οθόνη
αφής ή εάν αγγίξετε την οθόνη με αιχμηρά αντικείμενα ή με τα ακροδάκτυλά σας,
αυτή ενδέχεται να μην λειτουργήσει σωστά.
Η οθόνη αφής ενδέχεται να μην λειτουργήσει σωστά σε συνθήκες υψηλής
υγρασίας ή όταν εκτεθεί σε νερό.
Επανεκκινήστε τη συσκευή σας για να διορθωθούν τυχόν προσωρινά προβλήματα
λογισμικού.
Εάν η οθόνη αφής έχει γρατσουνιστεί ή υποστεί ζημιά, επισκεφτείτε ένα Κέντρο
Σέρβις της LG Electronics.
Καθυστερεί ή κολλάει
Επανεκκινήστε τη συσκευή
• Αν η συσκευή σας κολλάει ή καθυστερεί, μπορεί να χρειαστεί να κλείσετε
κάποιες εφαρμογές ή να απενεργοποιήσετε τη συσκευή και να την
ενεργοποιήσετε ξανά.
Εκκινήστε τη συσκευή
• Η επαναφορά μπορεί να χρησιμοποιηθεί αν η οθόνη παγώσει, ή αν τα κουμπιά,
η οθόνη αφής ή η συσκευή δεν ανταποκρίνονται πια.
• Για να επαναφέρετε τη συσκευή σας, πατήστε ταυτόχρονα τα πλήκτρα μείωσης
έντασης ήχου και λειτουργίας μέχρι η συσκευή να επανεκκινηθεί.

Παράρτημα 180
Επαναφορά της συσκευής
• Εάν η χρήση των παραπάνω μεθόδων δεν αποκαταστήσει το πρόβλημα,
εκτελέστε επαναφορά εργοστασιακών δεδομένων.
• Στην οθόνη ρυθμίσεων, αγγίξτε διαδοχικά Σύστημα Επανεκκίνηση &
Επαναφορά Επαναφορά εργοστασιακών δεδομένων.
-Επαναφέρει όλες τις ρυθμίσεις για τη συσκευή και διαγράφει τα δεδομένα.
Πριν προχωρήσετε στην επαναφορά εργοστασιακών δεδομένων, θυμηθείτε
να δημιουργήσετε αντίγραφο ασφαλείας για όλα τα σημαντικά δεδομένα
που έχετε αποθηκευμένα στη συσκευή.
-Αν καταχώρησες έναν λογαριασμό Google στη συσκευή, πρέπει να κάνει
είσοδο με τον ίδιο λογαριασμό Google μετά την επαναφορά της συσκευής.
Δεν βρέθηκε συσκευή Bluetooth
Σιγουρευτείτε πως η λειτουργία Bluetooth έχει ενεργοποιηθεί στη συσκευή σας.
Σιγουρευτείτε πως η λειτουργία Bluetooth έχει ενεργοποιηθεί στη συσκευή με την
οποία θέλετε να συνδεθείτε.
Βεβαιωθείτε ότι η συσκευή σας και η άλλη συσκευή Bluetooth είναι εντός της
μέγιστης εμβέλειας Bluetooth (10 m).
Εάν οι παραπάνω συμβουλές δεν λύσουν το πρόβλημά σας, επικοινωνήστε με ένα
Κέντρο Σέρβις της LG Electronics.
Δεν πραγματοποιείται σύνδεση όταν συνδέετε τη συσκευή σε
έναν υπολογιστή
Σιγουρευτείτε πως το καλώδιο USB που χρησιμοποιείτε είναι συμβατό με τη
συσκευή σας.
Σιγουρευτείτε πως είναι εγκαταστημένο και έχει ενημερωθεί το κατάλληλο
πρόγραμμα οδήγησης συσκευής στον υπολογιστή σας.
Η εφαρμογή που λήφθηκε προκαλεί πολλά σφάλματα
Η εφαρμογή παρουσιάζει προβλήματα.
Αφαιρέστε και εγκαταστήστε ξανά την εφαρμογή.

1
About this user guide
Thank you for choosing this LG product. Please carefully read this user
guide before using the device for the first time to ensure safe and proper
use.
• Always use genuine LG accessories. The supplied items are designed
only for this device and may not be compatible with other devices.
• Descriptions are based on the device default settings.
• Default apps on the device are subject to updates, and support for
these apps may be withdrawn without prior notice. If you have any
questions about an app provided with the device, please contact an
LG Service Centre. For user-installed apps, please contact the relevant
service provider.
• Modifying the device’s operating system or installing software from
unofficial sources may damage the device and lead to data corruption
or data loss. Such actions will violate your LG licence agreement and
void your warranty.
• Some content and illustrations may differ from your device, depending
on the area, service provider, software version, or OS version, and are
subject to change without prior notice.
• Software, audio, wallpaper, images, and other media supplied with
your device are licenced for limited use. If you extract and use these
materials for commercial or other purposes, you may be infringing
copyright laws. As a user, you are fully responsible for the illegal use of
media.
• Additional charges may incur for data services, such as messaging,
uploading, downloading, auto-syncing and location services. To avoid
additional charges, select a data plan suitable to your needs. Contact
your service provider to obtain additional details.
• This user guide is written in major languages for each country.
Depending on the language used, content may partly differ.
ENGLISH

2About this user guide
Instructional notices
WARNING: Situations that could cause injury to the user and third
parties.
CAUTION: Situations that may cause minor injury or damage to the
device.
NOTE: Notices or additional information.

3
Table of contents
01
Custom-designed
Features
16 Swivel features
26 Camera features
33 Audio recording features
35 Google Assistant
02
Basic Functions
38 Product components and
accessories
39 Parts overview
42 Turning the power on or off
43 Installing the SIM card
46 Inserting the memory card
47 Removing the memory card
47 Battery
51 Touch screen
54 Home screen
65 Screen lock
68 Fingerprint Recognition
73 Multi-tasking feature
78 Memory card encryption
79 Taking screenshots
79 Screen recording
80 Entering text
84 Content sharing
85 Do not disturb
86 AOD (always-on display)
6 Guidelines for safe and efficient use

4Table of contents
03
Useful Apps
88 Installing and uninstalling apps
90 App Shortcuts
91 Phone
95 Messages
96 Camera
114 Gallery
116 Contacts
118 QuickMemo+
121 Clock
122 Music
124 Calculator
124 ThinQ
125 LG Health
126 HD Audio Recorder
127 Game Launcher
127 Smart Doctor
128 LG Mobile Switch
128 App trash
129 SmartWorld
129 RemoteCall Service
130 Cell Broadcast
130 Google apps
04
Settings
134 Settings
134 Network & internet
141 Connected devices
145 Sound
146 Notifications
146 Display
148 Wallpaper & theme
148 Lock screen & security
149 Privacy
150 Location
151 Extensions
156 Apps
156 Battery
157 Storage
157 Accounts
157 Digital Wellbeing & parental
controls
158 Google
158 System
162 Accessibility

5Table of contents
05
Appendix
165 Language Settings
165 LG Bridge
166 Phone software update
168 Anti-Theft Guide
169 Open Source Software Notice
Information
169 Regulatory information
(Regulation ID number, E-labeling,
etc.)
170 Trademarks
171 Laser safety statement
171 DECLARATION OF
CONFORMITY
172 Contact office for compliance of
this product
172 Wi-Fi (WLAN)
173 More information
177 FAQ

6
Guidelines for safe and efficient use
Please read these simple guidelines. Not following these guidelines may be
dangerous or illegal.
Should a fault occur, a software tool is built into your device that will gather a
fault log. This tool gathers only data specific to the fault, such as signal strength,
cell ID position in sudden call drop and applications loaded. The log is used only to
help determine the cause of the fault. These logs are encrypted and can only be
accessed by an authorised LG Repair centre should you need to return your device
for repair.
Exposure to radio frequency energy
Radio wave exposure and Specific Absorption Rate (SAR) information.
This device has been designed to comply with applicable safety requirements for
exposure to radio waves. These requirements are based on scientific guidelines that
include safety margins designed to assure the safety of all persons, regardless of
age and health.
• The radio wave exposure guidelines employ a unit of measurement known
as the Specific Absorption Rate, or SAR. Tests for SAR are conducted using
standardised methods with the device transmitting at its highest certified
power level in all used frequency bands.
• While there may be differences between the SAR levels of various LG device
models, they are all designed to meet the relevant guidelines for exposure to
radio waves.
• The SAR limit recommended by the International Commission on Non-Ionizing
RadiationProtection(ICNIRP)is2W/kgaveragedover10goftissue.
• The highest SAR value for this model tested for use at the ear is 0.357 W/kg
(10g)andwhenwornonthebodyis1.304W/kg(10g).
• This device meets RF exposure guidelines when used either in the normal use
position against the ear or when positioned at least 5 mm away from the body.
When a carry case, belt clip or holder is used for body-worn operation, it should
not contain metal and should position the product at least 5 mm away from
your body. In order to transmit data files or messages, this device requires a
quality connection to the network. In some cases, transmission of data files
or messages may be delayed until such a connection is available. Ensure the
above separation distance instructions are followed until the transmission is
completed.

7Guidelines for safe and efficient use
Information about the RF exposure from FCC
In August 1996, the Federal Communications Commission (FCC) of the United
States, with its action in Report and Order FCC 96-326, adopted an updated safety
standard for human exposure to radio frequency (RF) electromagnetic energy
emitted by FCC regulated transmitters. Those guidelines are consistent with the
safety standard previously set by both international and U.S. standards. The design
of this device complies with FCC guidelines and these international standards.
Part 15.19 statement
This device complies with part 15 of the FCC Rules. Operation is subject to the
following two conditions:
(1) This device may not cause harmful interference, and
(2) this device must accept any interference received, including interference that
may cause undesired operation.
Part 15.21 Statement
Changes or modifications not expressly approved by the manufacturer could void
the user’s authority to operate the equipment.

8Guidelines for safe and efficient use
Body-worn Operation
This device was tested for typical bodyworn operations with the back of the device
kept 0.39 inches (1cm) between the user’s body and the back of the device. To
comply with FCC RF exposure requirements, a minimum separation distance of
0.39 inches (1cm) must be maintained between the user’s body and the back of
the device.
Any beltclips, holsters, and similar accessories containing metallic components
may not be used. Body-worn accessories that cannot maintain 0.39 inches (1cm)
separation distance between the user’s body and the back of the device, and have
not been tested for typical body-worn operations may not comply with FCC RF
exposure limits and should be avoided.
Part 15.105 Statement
This equipment has been tested and found to comply with the limits for a class
B digital device, pursuant to Part 15 of the FCC Rules. These limits are designed
to provide reasonable protection against harmful interference in a residential
installation. This equipment generates uses and can radiate radio frequency energy
and, if not installed and used in accordance with the instructions, may cause
harmful interference to radio communications. However, there is no guarantee that
interference will not occur in a particular installation. If this equipment does cause
harmful interference or television reception, which can be determined by turning
the equipment off and on, the user is encouraged to try to correct the interference
by one or more of the following measures:
• Reorient or relocate the receiving antenna.
• Increase the separation between the equipment and receiver.
• Connect the equipment into an outlet on a circuit different from that to which
the receiver is connected.
• Consult the dealer or an experienced radio/TV technician for help.
Product care and maintenance
• Use only in-box accessories which are authorised by LG. LG does not guarantee
any damage or failure which is caused by third party accessories.
• Some contents and illustrations may differ from your device without prior
notice.
• Do not disassemble this unit. Take it to a qualified service technician when repair
work is required.

9Guidelines for safe and efficient use
• Repairs under warranty, at LG’s discretion, may include replacement parts
or boards that are either new or reconditioned, provided that they have
functionality equal to that of the parts being replaced.
• Keep away from electrical appliances such as TVs, radios and personal
computers.
• The unit should be kept away from heat sources such as radiators or cookers.
• Do not drop.
• Do not subject this unit to mechanical vibration or shock.
• Switch off the device in any area where you are required to by special
regulations. For example, do not use your device in hospitals as it may affect
sensitive medical equipment.
• Do not handle the device with wet hands while it is being charged. It may cause
an electric shock and can seriously damage your device.
• Do not charge a handset near flammable material as the handset can become
hot and create a fire hazard.
• Use a dry cloth to clean the exterior of the unit (do not use solvents such as
benzene, thinner or alcohol).
• Do not charge the device when it is on soft furnishings.
• The device should be charged in a well ventilated area.
• Do not subject this unit to excessive smoke or dust.
• Do not keep the device next to credit cards or transport tickets; it can affect the
information on the magnetic strips.
• Do not tap the screen with a sharp object as it may damage the device.
• Do not expose the device to liquid or moisture.
• Use accessories like earphones cautiously. Do not touch the antenna
unnecessarily.
• Do not use, touch or attempt to remove or fix broken, chipped or cracked glass.
Damage to the glass display due to abuse or misuse is not covered under the
warranty.
• Your device is an electronic device that generates heat during normal operation.
Extremely prolonged, direct skin contact in the absence of adequate ventilation
may result in discomfort or minor burns. Therefore, use care when handling your
device during or immediately after operation.

10Guidelines for safe and efficient use
• If your device gets wet, immediately unplug it to dry off completely. Do not
attempt to accelerate the drying process with an external heating source, such
as an oven, microwave or hair dryer.
• The liquid in your wet device, changes the colour of the product label inside your
device. Damage to your device as a result of exposure to liquid is not covered
under your warranty.
• A mobile device requires proper air circulation in order to dissipate heat. Direct
skin contact and inadequate circulation of air flow to the device may cause the
device to overheat. The device must be at least 1.0cm from between the user’s
body.
• Prevent dust of any other foreign substances from getting into the Charger/
USB cable port. It may cause heat or fire.
• Avoid exposing the device to low air pressure at high altitude.
• Do not expose the device to extremely low air pressure. Otherwise, it can cause
explosion of the battery or leakage of flammable liquid or gas.
• Please ensure that the product does not get in contact with liquid. Do not
use or recharge the product if it is wet. Once the product becomes wet, the
liquid damage indicator changes color. Please note that this will limit you from
receiving any free-of-charge repair services provided under warranty.
Efficient device operation
Electronics devices
All devices may receive interference, which could affect performance.
• Do not use your device near medical equipment without requesting permission.
Please consult your doctor to determine if operation of your device may
interfere with the operation of your medical device.
• Pacemaker manufacturers recommend that you leave at least 15 cm of space
between other devices and a pacemaker to avoid potential interference with the
pacemaker.
• This device may produce a bright or flashing light.
• Some hearing aids might be disturbed by devices.
• Minor interference may affect TVs, radios, PCs etc.
• Useyourdeviceintemperaturesbetween0ºCand35ºC,ifpossible.Exposing
your device to extremely low or high temperatures may result in damage,
malfunction, or even explosion.

11Guidelines for safe and efficient use
Road safety
Check the laws and regulations on the use of devices in the area when you drive.
• Do not use a hand-held device while driving.
• Give full attention to driving.
• Pull off the road and park before making or answering a call if driving conditions
so require.
• RF energy may affect some electronic systems in your vehicle such as car
stereos and safety equipment.
• When your vehicle is equipped with an air bag, do not obstruct with installed
or portable wireless equipment. It can cause the air bag to fail or cause serious
injury due to improper performance.
• If you are listening to music whilst out and about, please ensure that the volume
is at a reasonable level so that you are aware of your surroundings. This is of
particular importance when near roads.
Avoid damage to your hearing
To prevent possible hearing damage, do not listen at high volume
levels for long periods.
Damage to your hearing can occur if you are exposed to loud sound for long
periods of time. We therefore recommend that you do not turn on or off the
handset close to your ear. We also recommend that music and call volumes are set
to a reasonable level.
• When using headphones, turn the volume down if you cannot hear the people
speaking near you, or if the person sitting next to you can hear what you are
listening to.
• Excessive sound pressure from earphones and headphones can cause
hearing loss.

12Guidelines for safe and efficient use
Glass Parts
Some parts of your device are made of glass. This glass could break if your device is
dropped on a hard surface or receives a substantial impact. If the glass breaks, do
not touch or attempt to remove it. Stop using your device until the glass is replaced
by an authorised service provider.
Blasting area
Do not use the device where blasting is in progress. Observe restrictions and follow
any regulations or rules.
Potentially explosive atmospheres
• Do not use your device at a refueling point.
• Do not use near fuel or chemicals.
• Do not transport or store flammable gas, liquid or explosives in the same
compartment of your vehicle as your device or accessories.
In aircraft
Wireless devices can cause interference in aircraft.
• Turn your device off before boarding any aircraft.
• Do not use it on the ground without permission from the crew.
Children
Keep the device in a safe place out of the reach of small children. It includes small
parts which may cause a choking hazard if detached.
Emergency calls
Emergency calls may not be available on all mobile networks. Therefore you should
never depend solely on your device for emergency calls. Check with your local
service provider.

13Guidelines for safe and efficient use
Battery information and care
• You do not need to completely discharge the battery before recharging. Unlike
other battery systems, there is no memory effect that could compromise the
battery’s performance.
• Use only LG batteries and chargers. LG chargers are designed to maximise the
battery life.
• Do not disassemble or short-circuit the battery.
• Keep the metal contacts of the battery clean.
• Replace the battery when it no longer provides acceptable performance. The
battery pack may be recharged hundreds of times before it needs replacing.
• Recharge the battery if it has not been used for a long time to maximise
usability.
• Do not expose the battery charger to direct sunlight or use it in high humidity,
such as in the bathroom.
• Do not leave the battery in hot or cold places, as this may deteriorate battery
performance.
• Risk of explosion if battery is replaced by an incorrect type. Dispose of used
batteries according to the instructions.
• Always unplug the charger from the wall socket after the device is fully charged
to save unnecessary power consumption of the charger.
• Actual battery life will depend on network configuration, product settings,
usage patterns, battery and environmental conditions.
• Make sure that no sharp-edged items such as animal’s teeth or claws, come
into contact with the battery. This could cause a fire.
• PowerConsumption(NetworkedStandbyMode):0.4W
Securing personal information
• Make sure to protect your personal information to prevent data leakage or
misuse of sensitive information.
• Always back up important data while using the device. LG is not responsible for
any data loss.
• Make sure to back up all data and reset the device when disposing of the device
to prevent any misuse of sensitive information.

14Guidelines for safe and efficient use
• Read the permission screen carefully while downloading applications.
• Be cautious using the applications that have access to multiple functions or to
your personal information.
• Check your personal accounts regularly. If you find any sign of misuse of your
personal information, ask your service provider to delete or change your account
information.
• If your device is lost or stolen, change the password of your account to secure
your personal information.
• Do not use applications from unknown sources.
Notice for Battery replacement
• Li-Ion Battery is a hazardous component which can cause injury.
• Battery replacement by a non-qualified professional can cause damage
to your device.
• Do not replace the battery by yourself. The battery can be damaged,
which can cause overheat and injury. The battery must be replaced by
a qualified professional. The battery should be recycled or disposed
separately from household waste.
• In case this product contains a battery incorporated within the product
which cannot be readily removed by end-users, LG recommends that
only qualified professionals remove the battery, either for replacement
or for recycling at the end of this product’s working life. To prevent
damage to the product, and for their own safety, users should not
attempt to remove the battery and should contact LG Service Helpline,
or other independent service providers for advice.
• Removal of the battery will involve dismantling of the product case,
disconnection of the electrical cables/contacts, and careful extraction of
the battery cell using specialized tools. If you need the instructions for
qualified professionals on how to remove the battery safely, please visit
http://www.lge.com/global/sustainability/environment/take-back-recycling
.

Custom-designed
Features
01
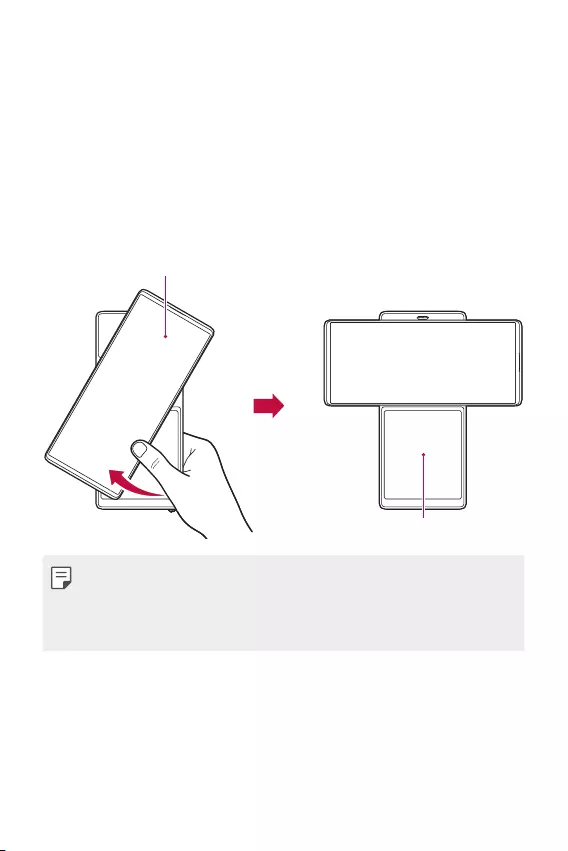
Custom-designed Features 16
Swivel features
Swivel Mode
You can swivel the product to use two screens. Swivel the product as
shown below.
Swivel-up
Use your right thumb to slightly push up the bottom of the main screen.
Main Screen
Second Screen
• Do not apply excessive force as the main screen opens semi-
automatically.
• Be careful not to get your thumb jammed while pulling down the main
screen.
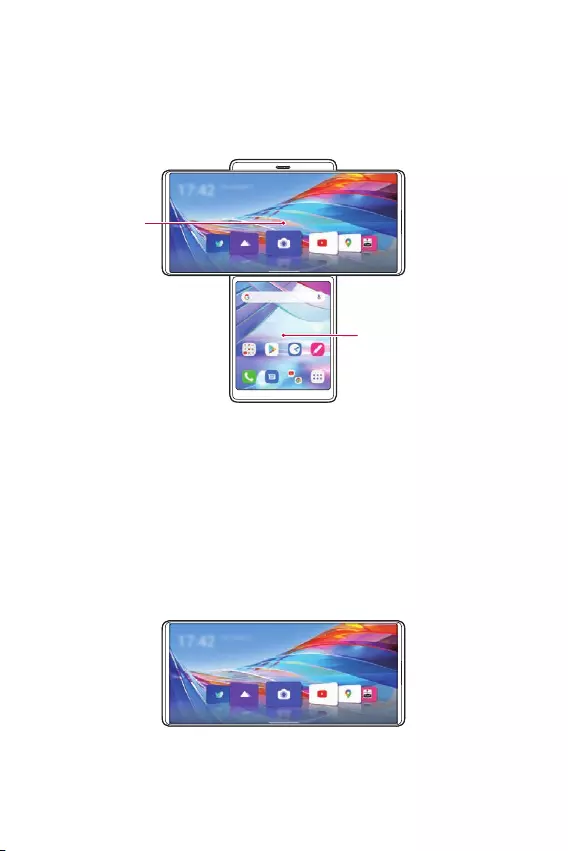
Custom-designed Features 17
Swivel Home
Swivel Home is the first screen that appears after swivelling the product.
In this mode, you can use the main screen and second screen homes
separately or together to utilize in various ways.
Main screen
Swivel Home
Second screen
Swivel Home
Main screen
The home screen of the main screen appears as below.
App icons
Choose and start an app by dragging an app icon left and right. Some
apps on the main screen can be used on both the main screen and second
screen.
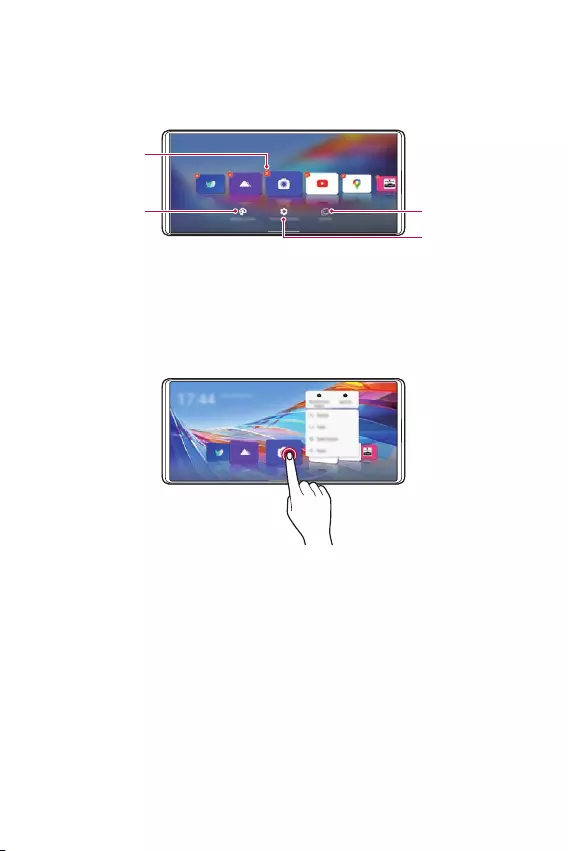
Custom-designed Features 18
Configuring home screen
Touch and hold an empty space on the main screen, then configure the
home screen as desired.
Deleting app
icons
Configuring
wallpaper and
themes
App trash can
Configuring
Swivel Home
Using app icons
Touch and hold an app icon. You can delete the app from the home screen
or use various app features immediately.
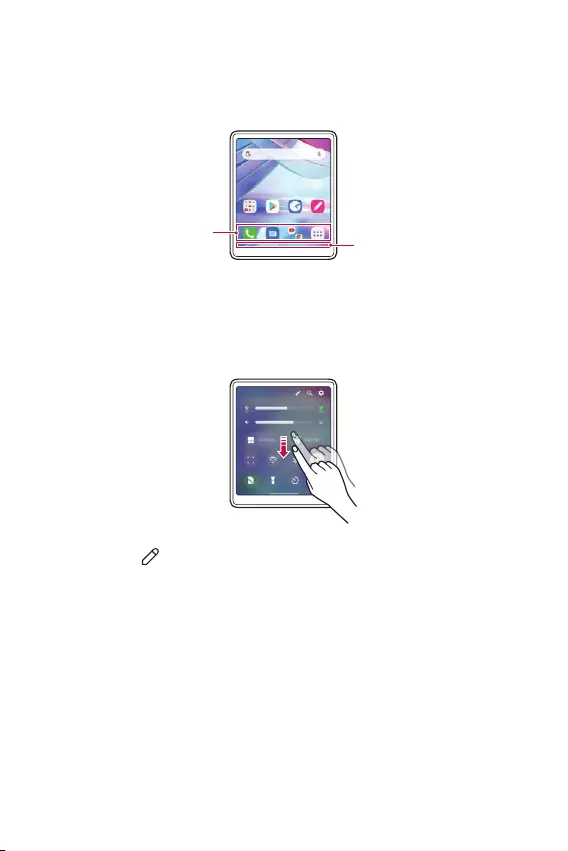
Custom-designed Features 19
Second screen
The home screen of the second screen appears as below. Use the second
screen in various ways.
Quick access icons Navigation bar
Second screen quick setting
You can drag the upper part of the second screen downward to open the
quick setting window.
• You can tap to add or delete an icon on the quick setting window or
change the location.
• Touch and hold an icon on the quick setting window and the
configuration screen will appear.
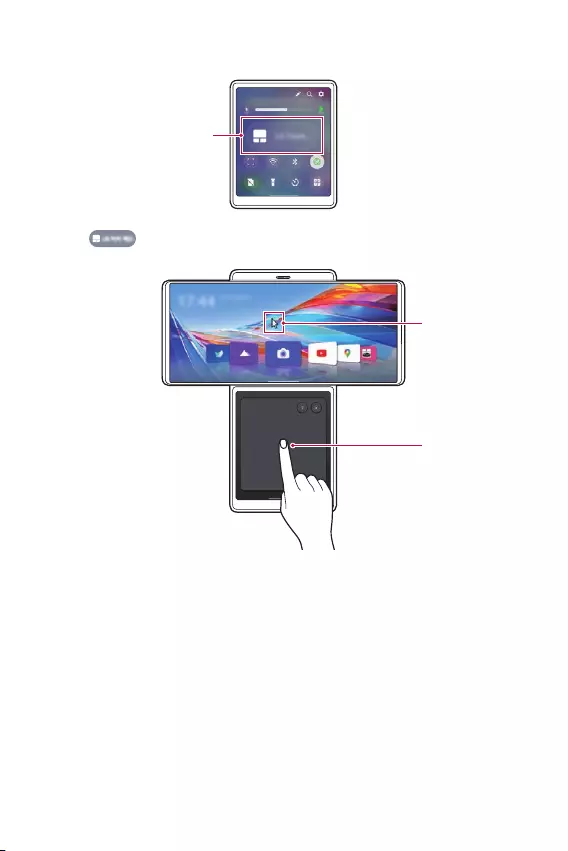
Custom-designed Features 20
LG Touch Pad
Use LG Touch Pad
• Tap to open LG Touch Pad.
Use with a
mouse
Use LG Touch Pad
• Once LG Touch Pad is activated in the second screen, a mouse key
appears on the main screen as in PC to move it and choose an icon
freely.

Custom-designed Features 21
Using Grip Lock
• You can touch to start Grip Lock.
Turn off Grip Lock
• The second screen is locked when Grip Lock is selected.
• You can unlock it by turning off Grip Lock.
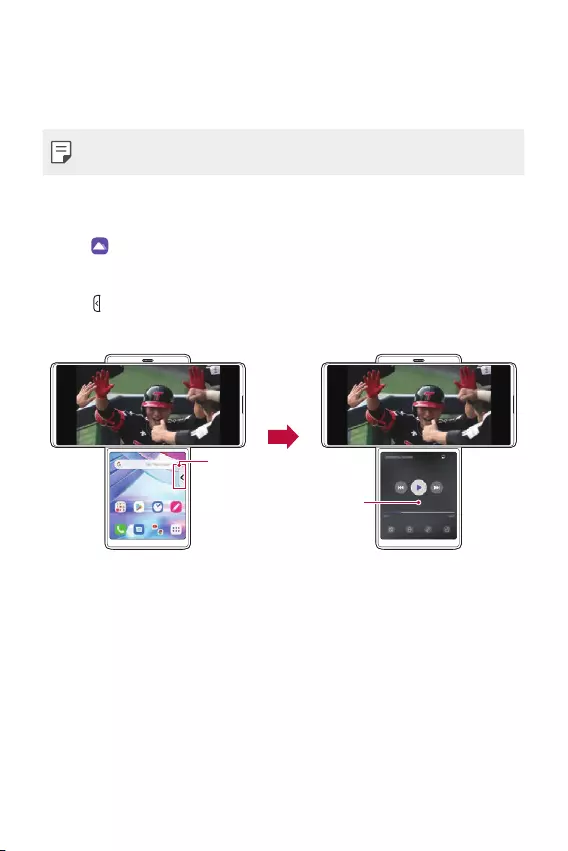
Custom-designed Features 22
Multitasking in the Swivel Mode
Using multitasking by swivelling the product allows you to use one app on
both screens or use two apps on each screen simultaneously.
• This feature may not be supported in some apps.
Enlarging videos
1 Tap on the main screen.
2 Choose a video you want to play and tap Play video.
3 Tap on the second screen.
• The video controller screen appears on the second screen.
Control the
video on second
screen
Open the video
controller.
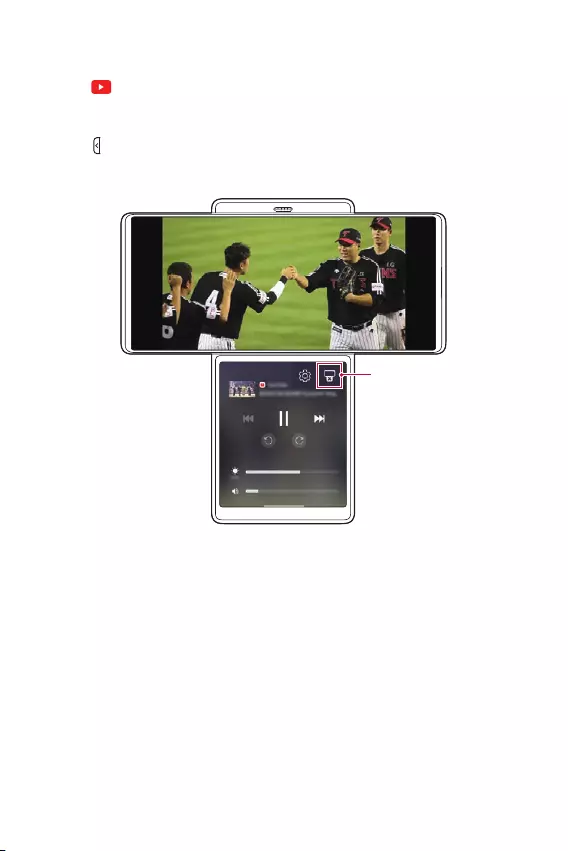
Custom-designed Features 23
Expanding YouTube app
1 Tap on the main screen.
2 Choose the YouTube content you want to play and play it.
3 Tap on the second screen.
• The Media Controller screen appears on the second screen.
Turn off the Media
Controller on the second
screen
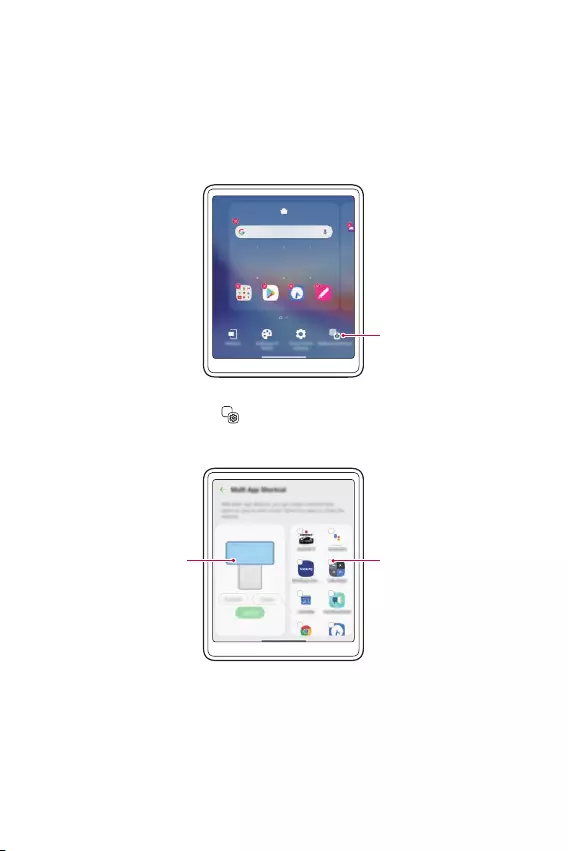
Custom-designed Features 24
Using Multi App
Once you select apps with the Multi App widget on the second screen,
you can use the selected two apps simultaneously every time you tap the
widget. Set the frequently-used apps as Multi App.
1 Touch and hold an empty space on the second screen.
Set Multi App
2 Tap Multi app settings .
3 Scroll down the app list and select two apps to use as Multi App.
View Multi App
preview Select two apps
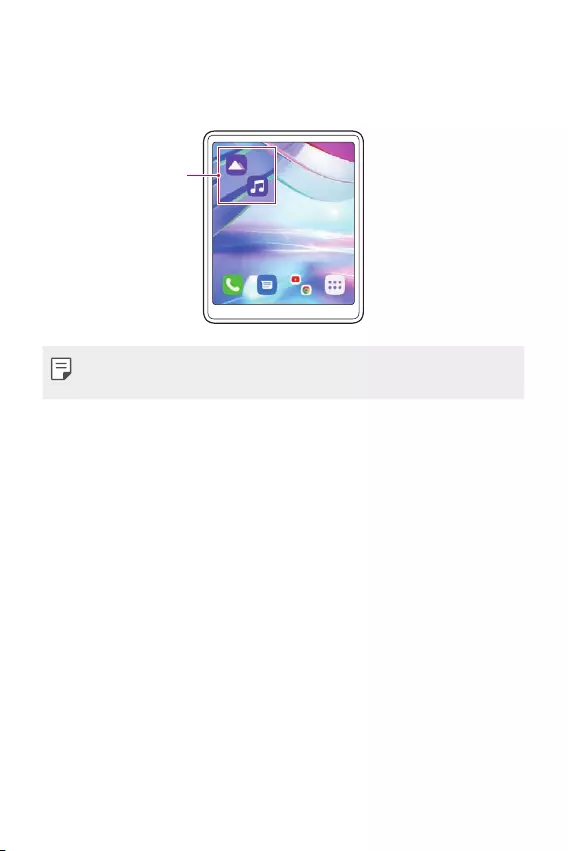
Custom-designed Features 25
4 Tap Apply.
5 The Multi App icon is created on the home screen of the second
screen.
Use the Multi App icon
• To delete the Multi App icon, touch and hold the icon on the second
screen, tap Remove from Home, then tap Remove.
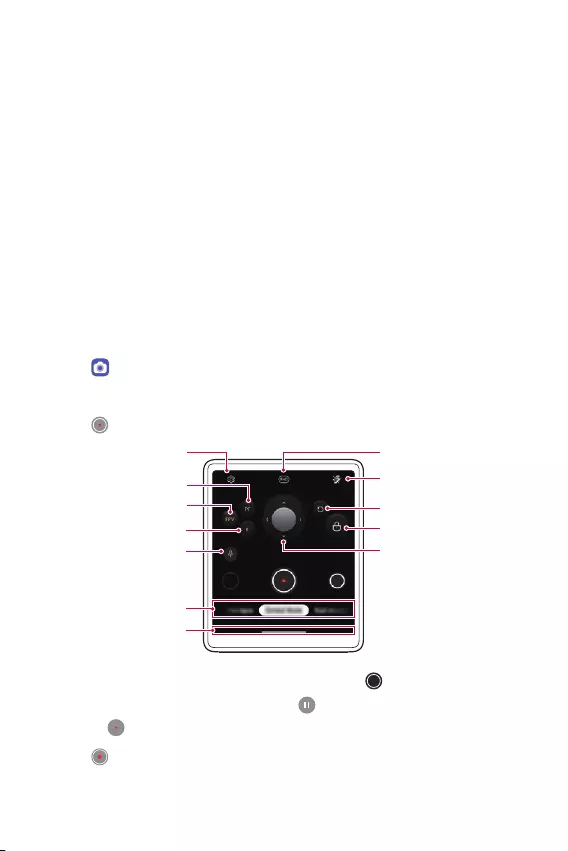
Custom-designed Features 26
Camera features
Using the camera in the Swivel Mode
You can use the features specialised for the video recording when the
product is in the Swivel Mode.
Gimbal Mode
You can use the camera as if it is inserted in a gimbal. Record a video in the
Gimbal mode to minimise shaking.
1 Change the product to the Swivel Mode.
• You can also start the Swivel Mode camera by swivelling the
product in the camera app.
2 Tap on the main screen.
3 Select Gimbal Mode by swiping camera modes.
4 Tap to start recording in the Gimbal mode.
Sound effects
Follow mode
Flash settings
Refresh
Lock mode
FPV mode
Photo mode list
Navigation bar
Pan Follow mode
Settings Resolution
Joystick
• To take a photo while recording a video, tap .
• To pause the video recording, tap . To resume the video recording,
tap .
5 Tap to end recording.

Custom-designed Features 27
FPV (First Person
View) mode
Your rotations or movements are naturally reflected
so that you can record a video rhythmically and
dynamically.
Pan Follow mode
The up/down and clockwise/anticlockwise rotations are
fixed and the angle moves left/right. It is efficient for
capturing photos or videos when walking up the stairs
or moving in a car while maintaining level.
Follow mode
The clockwise/anticlockwise rotations are fixed and the
angle moves up/down and left/right.
It is efficient for capturing photos or videos of an overall
appearance of a large subject such as a concert or a
building.
Joystick
You can move the joystick in any direction you want,
so that you can move the angle up/down and left/
right without rotating the camera while minimising
blurriness.
Lock mode Touch and hold to lock the angle.
Sound effects
•Basic: You can record a video with a stable stereo
sound effect.
•ASMR Recording: Use it to amplify the sound of the
subject in the screen to record a video with clear, small
sounds.
•Voice Bokeh: Use it to record a video with reduced
surrounding sounds and emphasized voice of a
subject.
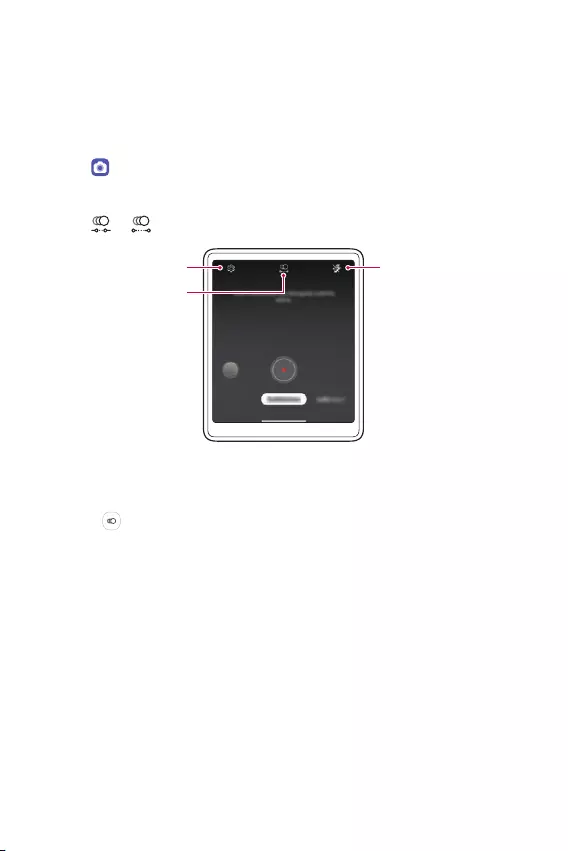
Custom-designed Features 28
Taking Slo-mo
Make a fun video by controlling a movement speed. You can apply a
motion effect slower than normal.
1 Change the product to the Swivel Mode.
2 Tap on the main screen.
3 Select Slo-mo by swiping camera modes.
4 Tap or to choose a duration for the slow motion effect.
Choose duration
Set camera options Set flash options
• Part Slo-mo: Allows you to apply a slow motion effect to a specific
section of the video.
- Tap at the moment where you want the slow motion effect to be
applied. With a short-press, slow motion effect will be applied for 0.5
second. With a long-press, slow motion effect will be applied until
you release your finger.
• All Slo-mo: Allows you to apply a slow motion effect to the entire
video.
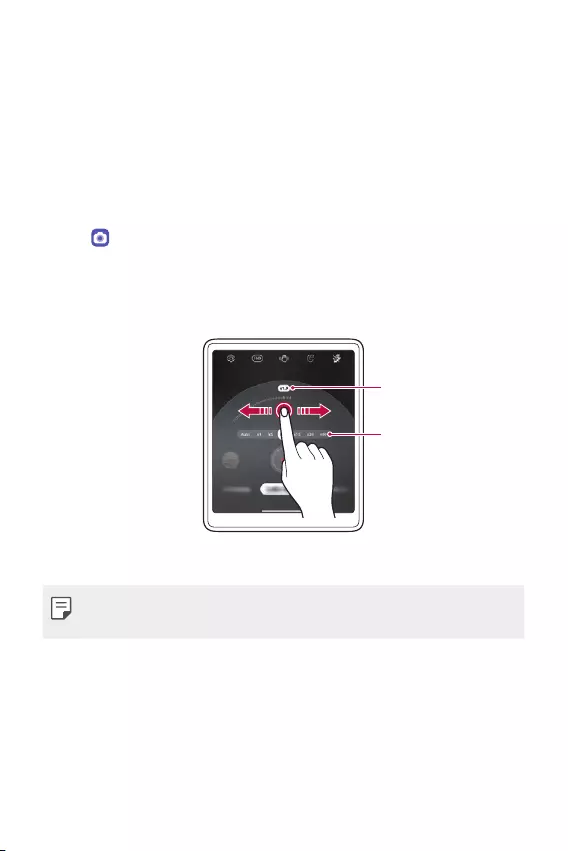
Custom-designed Features 29
Time-lapse recording
You can record Time-lapse videos optimised for the situation.
Videos can be recorded with optimal speed and steady motion by
analysing various shooting environments. The time-lapse speed can be
automatically adjusted according to the shooting target and environment.
You can also select the time-lapse speed manually.
1 Change the product to the Swivel Mode.
2 Tap on the main screen.
3 Select Time-lapse by swiping camera modes.
• Choose the screen magnification of the scene to be recorded on the
second screen.
Choose screen
magnification
Choose time-lapse
speed
• Choose the Time-lapse speed on the second screen.
• If you select Auto, it automatically sets the speed suitable for the screen
to be recorded.
Custom-designed Features 30
4 Tap to record a video.
• You can change a zoom and time-lapse speed while recording.
• If you tap the desired speed, the time-lapse speed is adjusted while
recording.
• To pause the video recording, tap . To resume the video recording,
tap .
• While recording a video, you may spread or pinch two fingers to
zoom in or out.
• While recording a video, you may tap the desired area to adjust the
brightness.
5 Tap to stop recording.
• The recorded video will be saved in Gallery.
• Audio is not recorded during Time-lapse recording.
• You can tap to record a Night Time-lapse video.
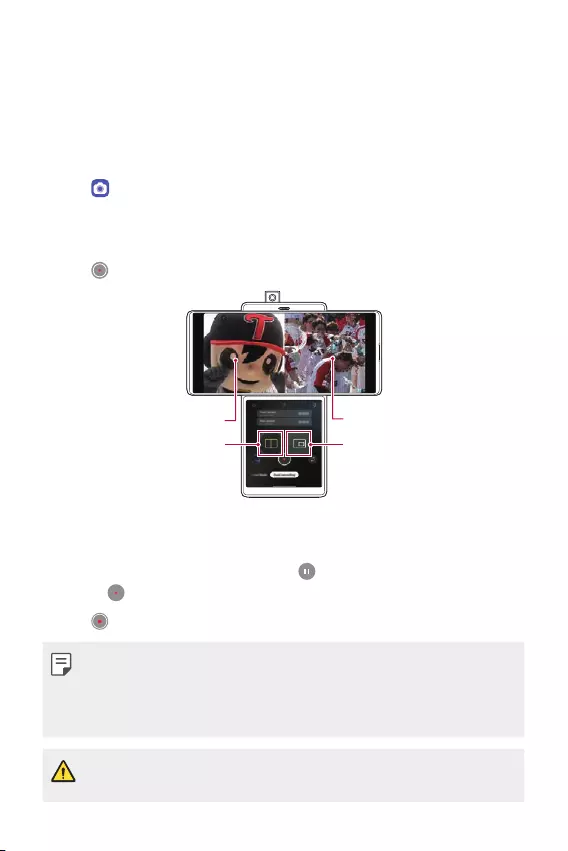
Custom-designed Features 31
Taking a Dual recording video
You can use front and rear cameras simultaneously to record a video. You
can save the videos from each camera either as one file or two separate
files.
1 Change the product to the Swivel Mode.
2 Tap on the main screen.
3 Select Dual recording by swiping camera modes.
• The Front pop-up camera automatically pops up.
4 Tap to record a dual-recording video.
Split view
Front recording screen
PIP
Rear recording screen
• You can touch and hold the main screen and drag to switch the
locations of the front and rear camera screens.
• To pause the video recording, tap . To resume the video recording,
tap .
5 Tap to end the recording.
• If you choose to save separately, the videos of the front and rear
cameras are saved as separate files.
• If you choose to save as shown, the videos of front and rear cameras are
saved in one screen.
• If you start Dual-recording mode, a built-in Front pop-up camera comes
out. Do not push or pull it with excessive force, or it may be broken.
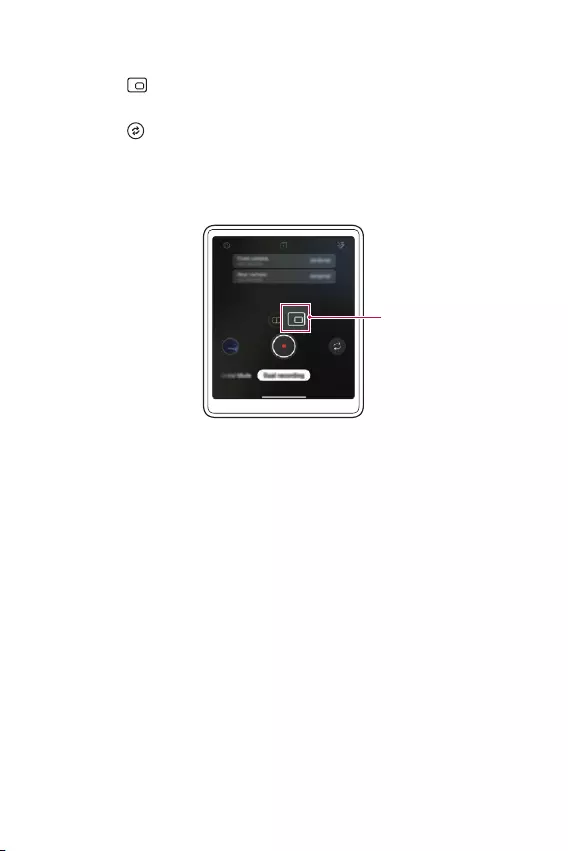
Custom-designed Features 32
Taking PIP (Picture in Picture)
• If you tap in the control screen of the second screen, the recording
screen is switched to take a PIP (Picture in Picture).
• If you tap , you can switch the screen locations of front and rear
cameras.
• You can touch and hold the PIP screen and drag it to one of the four
corners as desired.
Take PIP

Custom-designed Features 33
Audio recording features
Video recording with specialised audio
recording options
You can record a video using three different voice recording options to suit
your purpose.
1 Tap and select Video by swiping camera modes.
2 Tap and select Basic, ASMR Recording, or Voice Bokeh by swiping
audio options.
Audio options
Basic
You can record a video with stable stereo sound.
ASMR Recording
With two sensitive microphones in the device, you can record an ASMR
video.
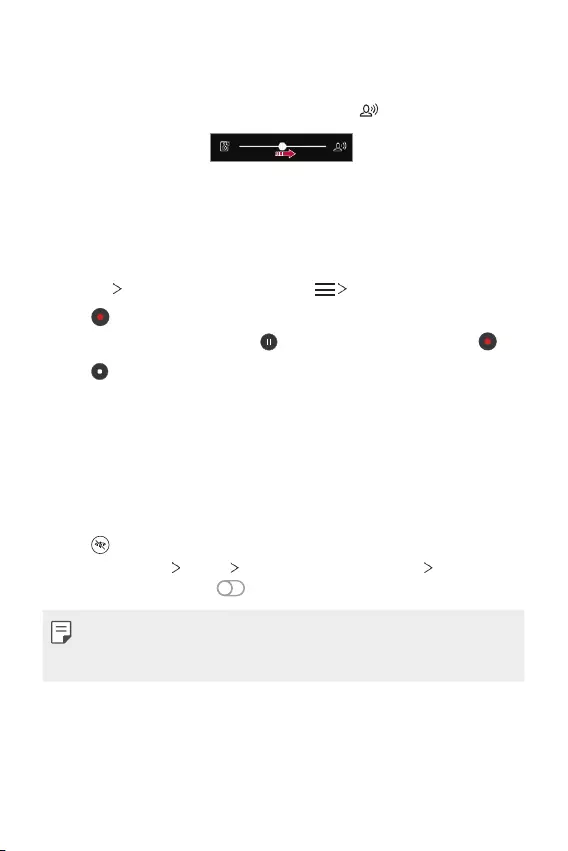
Custom-designed Features 34
Voice Bokeh
You can emphasize the voice of a subject by reducing ambient noise.
• To reduce ambient noise, drag the slide bar to .
Recording ASMR sounds
This feature allows you to record the audio clearly and precisely by
amplifying the sound from the microphones.
1 Tap LG HD Audio Recorder and tap ASMR.
2 Tap to record the audio.
• To pause the recording, tap . To continue the recording, tap .
3 Tap to end the audio recording.
LG 3D Sound Engine
LG 3D Sound Engine feature allows you to hear stereoscopic and
optimised sound. When playing music or video, you can enjoy stereoscopic
and immersive sound as if you were listening in the field.
1 Drag the notifications panel downwards.
2 Tap to turn on or off the LG 3D Sound Engine feature.
Or tap Settings Sound Sound quality and effects LG 3D
Sound Engine and tap to activate it.
• If you connect an external audio device such as an earphone or speaker
to the product, a pop-up appears to turn on the LG 3D Sound Engine
feature.

Custom-designed Features 35
Google Assistant
Google Assistant overview
Your device has the built-in Google Assistant feature. Find answers and
get things done while on-the-go.
• To use this feature, first connect to the network.
Launching Google Assistant
1 Swipe diagonally from a bottom edge corner of the screen.
2 Tap GET STARTED.
3 Follow the on-screen instructions.
• The device saves your voice data for recognition.
4 Set whether to use the the speech recognition feature.
• When this feature is activated, you can run Google Assistant by
saying “OK Google” on the Home screen.
5 Tap Finish.
Accessing by Voice
1 When the home screen is turned off or locked, say “OK Google” or
“Hey Google”.
2 When the Google Assistant screen appears, say a command or ask a
question.

Custom-designed Features 36
Accessing from Home Screen
1 Swipe diagonally from a bottom edge corner of the screen.
2 Say a command or question when you see on the bottom of the
screen.
• In an environment where Wi-Fi or mobile data connection is poor, the
Google Assistant function may be restricted and the speech recognition
accuracy rate may be lowered.
• If the speech is ambiguous, the microphone is covered, a media player is
playing, or the surrounding is loud, the speech recognition accuracy rate
may be lowered. When you are using the product via voice commands,
say with accurate pronunciation in a quite environment for better
speech recognition accuracy.

Basic Functions
02

Basic Functions 38
Product components and
accessories
The following items are included with your device.
• Device
• USB cable
• Ejection pin
• Charger
• Quick Start Guide
• Phone Case
• The items described above may be optional.
• The items supplied with the device and any available accessories may
vary depending on the area and service provider.
• Always use genuine LG Electronics accessories. Using accessories made
by other manufacturers may affect your device's call performance or
cause malfunctions. This may not be covered by LG's repair service.
• Some of the device parts are made of tempered glass. If you drop your
device on a hard surface or subject it to severe impact, the tempered
glass may be damaged. If this happens, stop using your device
immediately and contact an LG Customer Service Centre.
• If any of these basic items are missing, contact the dealer from which
you purchased your device.
• To purchase additional items, contact an LG Customer Service Centre.
• Some items in the product box are subject to change without notice.
• The appearance and specifications of your device are subject to change
without prior notice for product improvement.
• Device specifications may vary depending on the area or service provider.
• Remove the protective film from the Fingerprint sensor before using the
fingerprint recognition feature.
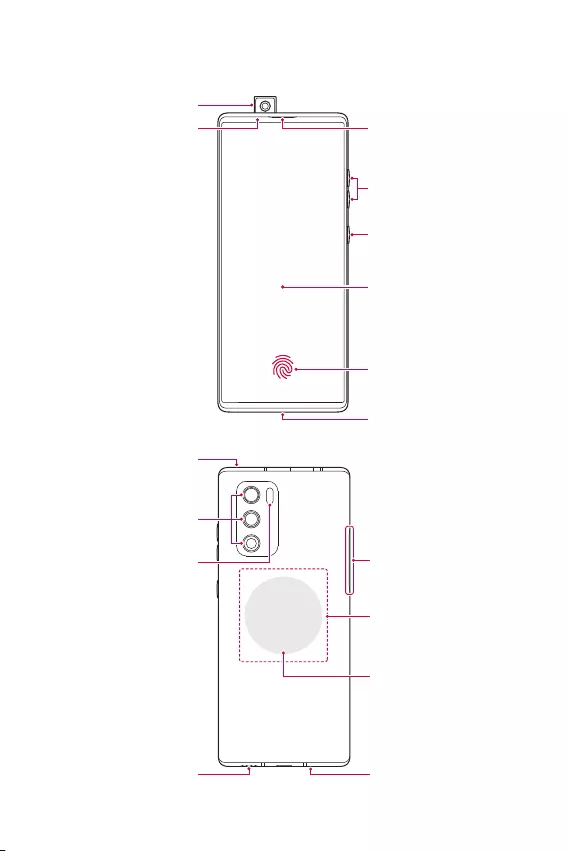
Basic Functions 39
Parts overview
Touch screen
Power/Lock key
Volume keys (+/-)
Earpiece
Pop up camera
Proximity/Ambient
light sensor
Charger/USB cable port
Fingerprint sensor
Rear camera lenses
Microphone
Flash
Speaker Microphone
Nano-SIM/
Memory card tray
NFC
Wireless charging
antenna area

Basic Functions 40
Do NOT attempt to remove the back cover by yourself.
• Doing so may severely damage the battery and device, which could
cause overheating, fire, and injury. This device’s back cover and battery
are not to be removed or replaced by a non-qualified professional.
• Your phone is an electronic device that generates heat during normal
operation. Extremely prolonged, direct skin contact in the absence of
adequate ventilation may result in discomfort or minor burns. Therefore,
use care when handling your phone during or immediately after
operation.
• Volume keys
- Adjust the volume for ringtones, calls or notifications.
- While using the Camera, gently press a Volume key to take a photo.
To take continuous photos, press and hold the Volume key.
- Press the Volume Down key twice to launch the Camera app when
the screen is locked or turned off. Press the Volume Up key twice to
launch Capture+.
• Power/Lock key
- Briefly press the key when you want to turn the screen on or off.
- Press and hold the key when you want to select a power control
option.
• Fingerprint sensor
- You can use the fingerprint sensor at the bottom centre of the
screen to use the fingerprint recognition function. See
Fingerprint
recognition overview
for details.
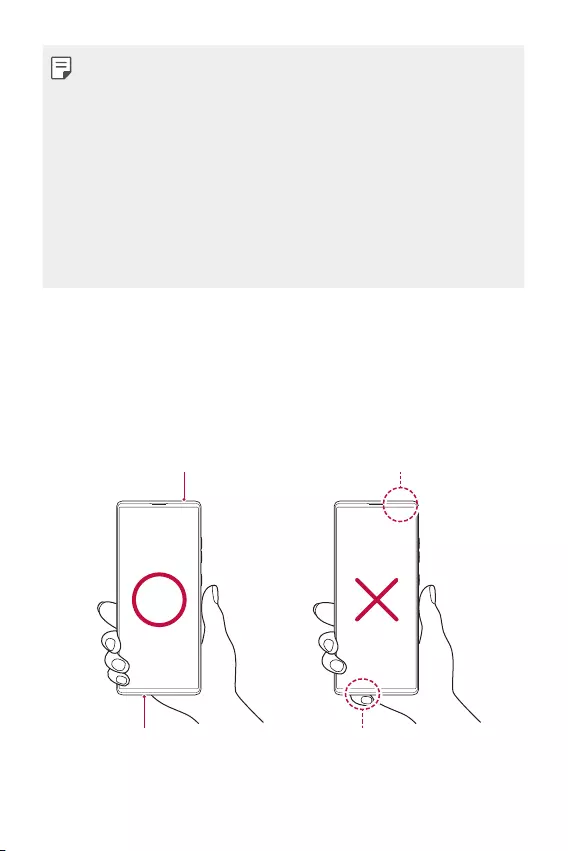
Basic Functions 41
• Some functions may be restricted depending on the region and product
specifications of different telecommunications providers.
• There are NFC chip and wireless charging antennas built into the rear
part of the product. Be careful not to damage or cover the NFC chip or
wireless charging antennas.
• Do not put heavy objects on the device or sit on it. Failure to do so may
damage the touch screen.
• Screen-protective film or accessories may interfere with the proximity
sensor.
• If your device is wet or is being used in a humid place, the touch screen
or keys may not function properly.
There are two microphones built into this product. Be careful not to cover
the microphones. While you are talking on the phone, do not cover the
microphone with your hand or fingers.
Do not use a phone case that is not a genuine product or cover the
microphone with accessories, tape, etc.
Hold the product correctly as shown in the image when you are using it.
Do not cover the microphone.Microphone
Do not cover the microphone.Microphone

Basic Functions 42
Turning the power on or off
Turning the power on
When the power is turned off, press and hold the Power/Lock key.
• When the device is turned on for the first time, initial configuration
takes place. The first booting time for the smart phone may be longer
than usual.
Turning the power off
Press and hold the Power/Lock key, then select Power off.
Restarting the device
When the device is not working properly or does not respond, restart it by
following the instructions below.
1 Press and hold the Power/Lock key and the Volume Down key at the
same time until the power is turned off.
2 When the device is restarted, release the key.
Power control options
Press and hold the Power/Lock key, then select an option.
• Power off: Turn the device off.
• Power off and restart: Restart the device.
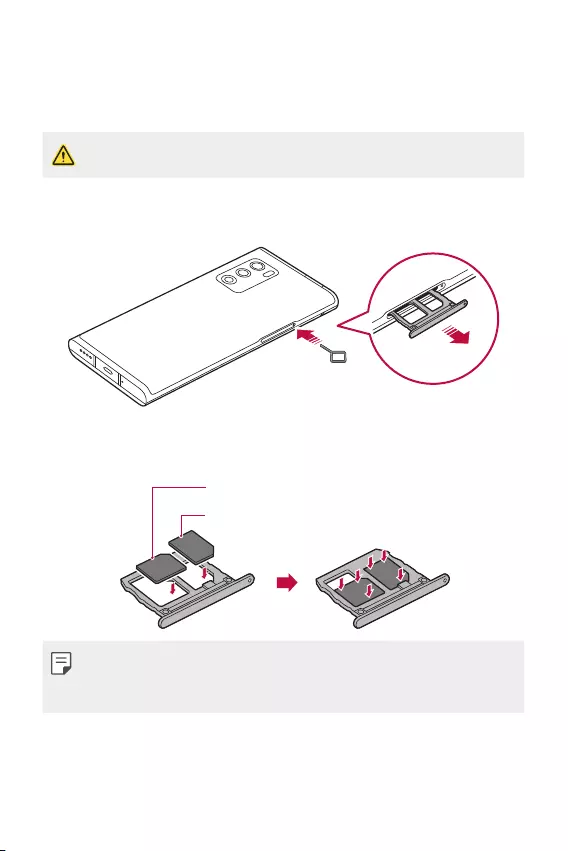
Basic Functions 43
Installing the SIM card
Insert the SIM (Subscriber Identity Module) card provided by your service
provider to start using your device.
• Be careful with the ejection pin since it has a sharp edge.
1 Insert the pin into the hole of the card tray and press the pin, and then
pull the card tray out of the product.
2 Align the Nano-SIM cards on the card tray and press the card in the
direction of the arrow as shown in the figure.
Nano-SIM card 2
Nano-SIM card 1
• The SIM card tray 2 also serves as the memory card tray. However, you
cannot put both the SIM card and the memory card (optional) at the
same time.
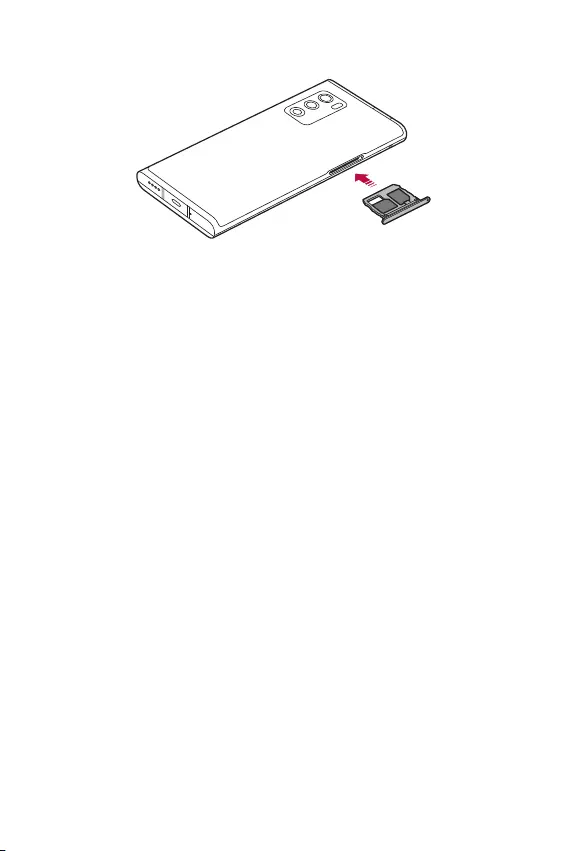
Basic Functions 44
3 Insert the card tray into the phone as shown in the figure.
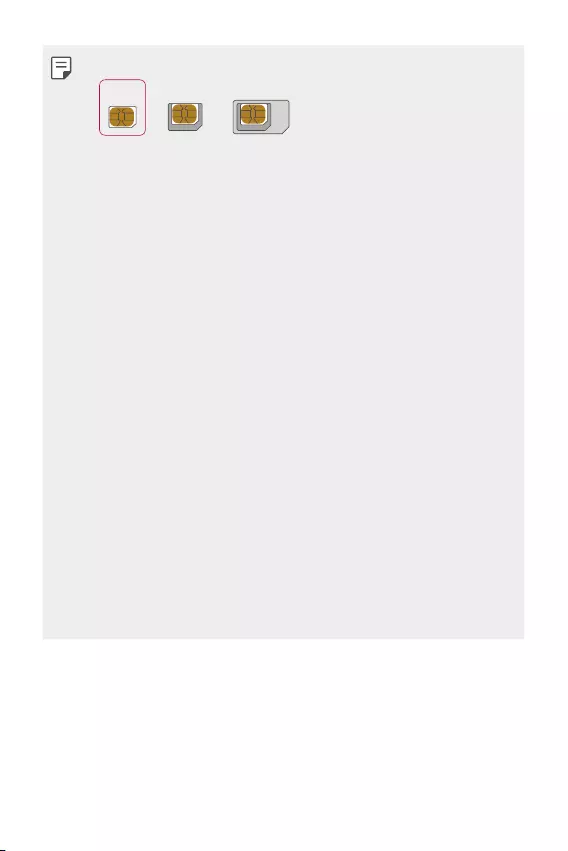
Basic Functions 45
• This device supports only Nano SIM cards.
Nano Micro Standard
• For problem-free performance, it is recommended that you use the
device with the correct type of SIM card. Always use a factory-made
SIM card supplied by the operator.
• Do not lose your SIM card. LG is not responsible for damage and other
issues caused by loss or transfer of a SIM card.
• Be careful not to damage the SIM card when you insert or remove it.
• When you insert the SIM card or memory card, place it on the card tray
correctly.
• When you insert the card tray back into the device, insert it horizontally
in the direction of arrow as shown in the figure. Make sure that the card
placed on the card tray does not move out of its position.
• Insert the SIM card with the gold-coloured contacts facing downwards.
• Be sure to insert the SIM card into the device by following the
instructions in the user manual.
• If you insert or remove the card tray from the device, be careful not to
let water or other liquids enter into the card tray. If a wet card tray or
card is inserted into the device, your device may get damaged.
• Memory card is an optional item.
• Frequent writing and erasing of data may shorten the memory card
lifespan.
• Some memory cards may not be fully compatible with the device. If you
use an incompatible card, it may damage the device or the memory card,
or corrupt the data stored in it.
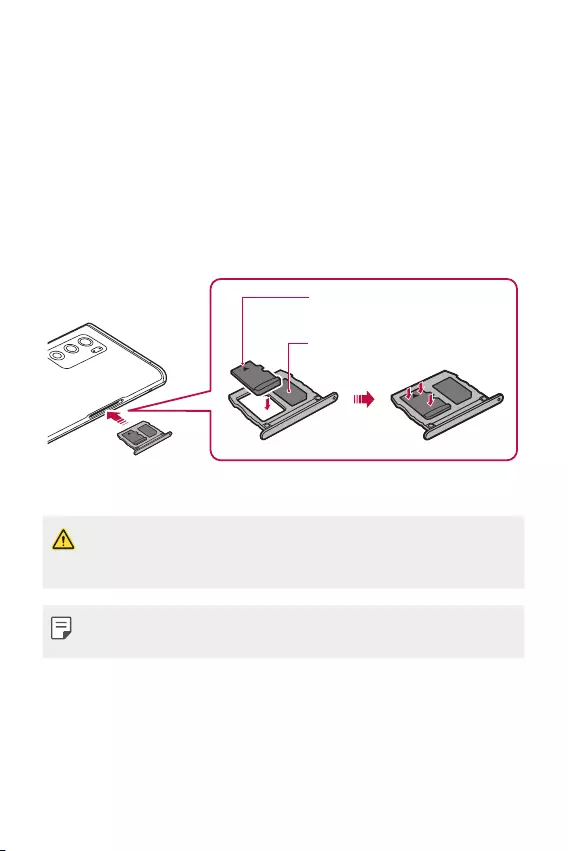
Basic Functions 46
Inserting the memory card
Insert the memory card into your device.
Depending on the memory card manufacturer and type, some memory
card may not be compatible with your device.
1 Insert the ejection pin into the hole on the card tray.
2 Pull out the card tray.
3 Put the memory card on the card tray with the gold-coloured contacts
facing downwards.
Memory card
(optional-sold separately)
SIM card
4 Insert the card tray back into the slot.
• Some memory cards may not be fully compatible with the device. If you
use an incompatible card, it may damage the device or the memory card,
or corrupt the data stored in it.
• Frequent writing and erasing of data may shorten the memory card
lifespan.
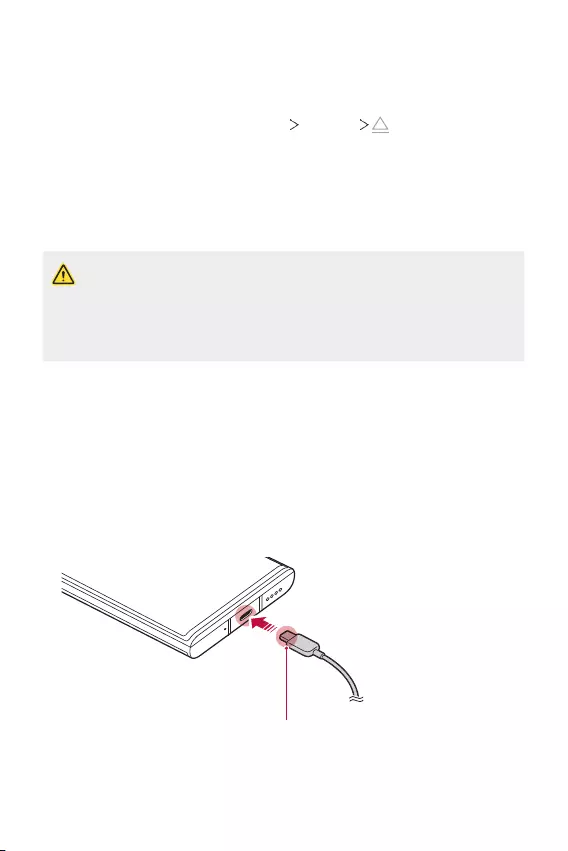
Basic Functions 47
Removing the memory card
Unmount the memory card before removing it for safety.
1 On the home screen, tap Settings Storage .
2 Insert the ejection pin into the hole in the card tray and then pull out
the card tray from the device.
3 Remove the memory card from the card tray.
4 Insert the card tray back into the slot.
• Do not remove the memory card while the device is transferring or
accessing information. This may cause data to be lost or corrupted, or
may damage the memory card or the device. LG is not responsible for
losses that result from the abuse or improper use of memory cards,
including the loss of data.
Battery
Charging the battery
Before using the device, fully charge the battery.
Charge the device with the USB Type-C cable.
Charging cable terminal

Basic Functions 48
• If there is moisture on the charging port, exposed terminals, charging
cable, charging adapter, etc., do not use or charge the product. The
product may malfunction or get broken or damaged, and there is risk
of injury caused by electric shock, fire, overheating, explosion, etc. If
you find moisture on such areas, stop using or charging the product
immediately and completely remove the moisture.
• Do not separate the battery cover.
This product uses a non-removable battery. Do not remove or replace
the battery cover or the battery. If you remove or replace the battery
cover or the battery, the product may be damaged, overheated or
explode.
• Only use the USB cable and charging adapter provided with the product
as basic components.
• Your device has an internal rechargeable battery. For your safety, do not
remove the embedded battery.
• Using the device when it is charging may cause electric shock. To use the
device, stop charging it.
• Remove the charger from the power socket after the device is fully
charged. This prevents unnecessary power consumption.
• A charging adapter that supports fast charging is included with the
product. The fast charging feature may not work if a fast charging
adapter other than the genuine adapter provided with the product is
used.
• Another way to charge the battery is by connecting a USB cable
between the device and a desktop or laptop computer. This may take
longer than plugging the adapter to a wall outlet.
• Do not charge the battery by using a USB hub that is unable to maintain
the rated voltage. Charging may fail or unintentionally stop.
• When you are visiting the Service Centre with a battery issue, bring the
product and the charger with you Since the battery is a consumable, the
battery life may be shortened as times goes by.
Basic Functions 49
Precautions when using the device
• Make sure to use the USB cable provided; do not use third party USB
cables or chargers with your device. The LG limited warranty does not
cover the use of third party accessories.
• Failure to follow the instructions in this guide and improper use may
damage the device.
Wireless charging
This device supports wireless charging feature. Charge the device with a
Qi certified wireless charger (optional, sold separately).
Charging the battery with a wireless charger
1 Place your device on the centre of the wireless charger aligned with
the wireless charging antenna on the back of the device.
• To check the wireless charging antenna area, see
Parts overview
.
2 When the battery is fully charged, remove the device from the charger.
• When you charge the battery with a wireless charger, do not put a
magnetic, metallic or conductive materials between the device and the
charger. This may disturb charging of the device and the charger may
become heated. In this case, the device, charger or SIM/Memory cards
may be damaged.

Basic Functions 50
• If the battery temperature exceeds a certain level while charging the
device, charging may be stopped.
• If magnetic, metallic or conductive materials are attached on the back
of the device or a protective case is inserted, the device may not charge
properly.
• If you charge the battery with a wireless charger in areas where the
network signal strength is weak, the network performance of your
device may be further degraded.
• Charge the device with a Qi certified wireless charger (optional, sold
separately). Because the LG limited warranty does not cover the use of
third party accessories, contact the third party manufacturer.
• This product supports wireless charging. Use a Qi certified wireless
charger (sold separately) to charge the product. Some coiled wireless
chargers may not support wireless charging. Wireless chargers that
support EPP (Extended Power Profile) allow high-speed wireless
charging.
• LG Electronics is not responsible for any issues concerning accessories
of other brands. For such issues, contact the manufacturer of the
accessory product.
Using the battery efficiently
Battery lifespan may decrease if you keep many apps and functions
running simultaneously and continuously.
Cancel background operations to increase battery life.
To minimise battery consumption, follow these tips:
• Turn off the Bluetooth® or Wi-Fi network function when not using
them.
• Set the screen timeout to as short a time as possible.
• Minimise the screen brightness.
• Set a screen lock when the device is not used.
• Check the battery level while using any downloaded apps.
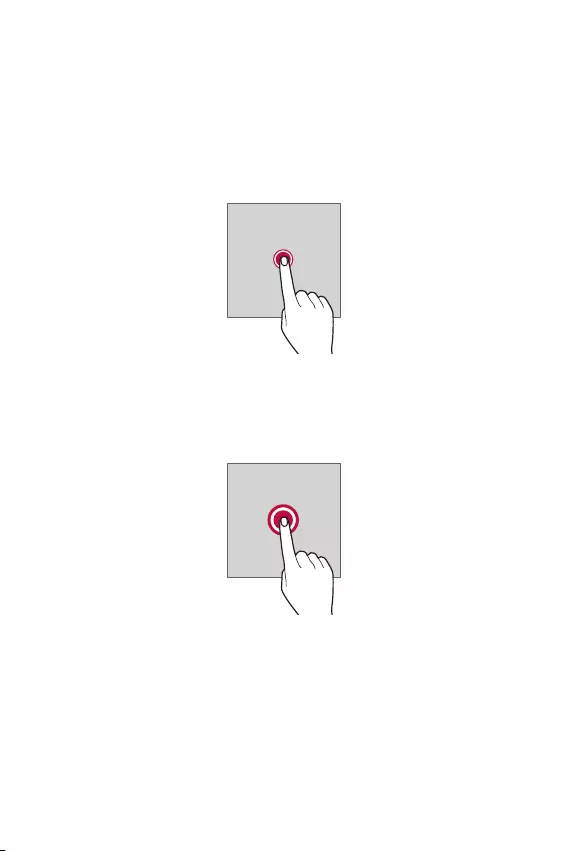
Basic Functions 51
Touch screen
You can familiarise yourself with how to control your device by using
touch screen gestures.
Tapping
Lightly tap with your fingertip to select or run an app or option.
Touching and holding
Touch and hold for several seconds to display a menu with available
options.
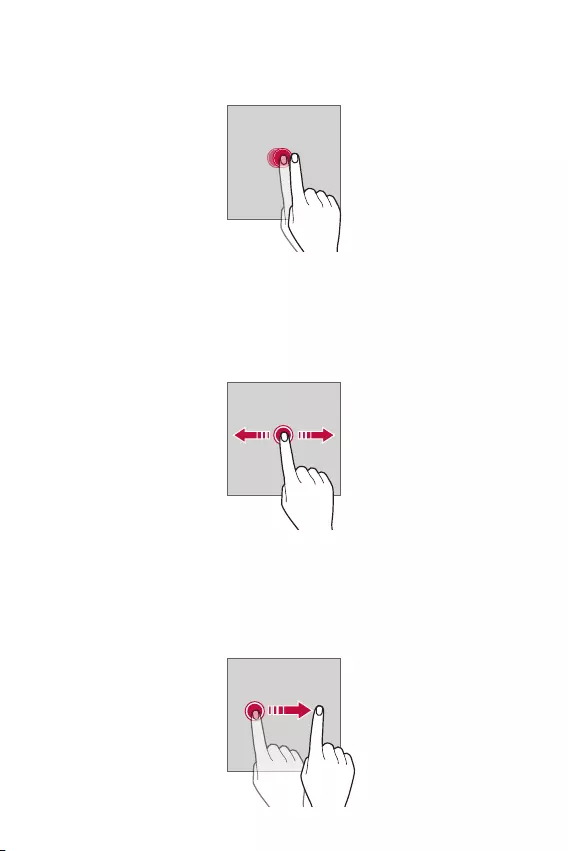
Basic Functions 52
Double-tapping
Tap twice quickly to zoom in or out on a web page or map.
Dragging
Touch and hold an item, such as an app or widget, then move your finger
to another location in a controlled motion. You can use this gesture to
move an item.
Swiping
Touch the screen with your finger and move it quickly without pausing.
You can use this gesture to scroll through a list, a web page, photos,
screens, and more.
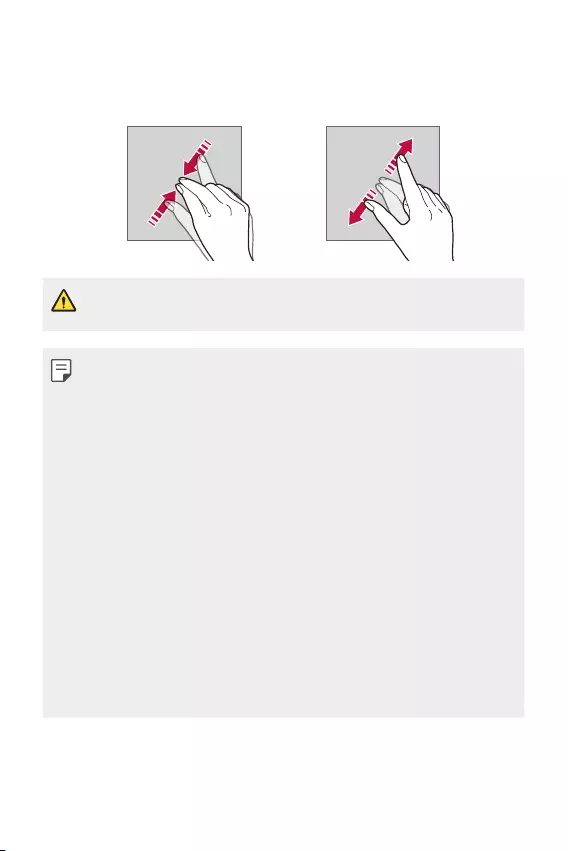
Basic Functions 53
Pinching and spreading
Pinch two fingers to zoom out such as on a photo or map. To zoom in,
spread your fingers apart.
• Do not expose the touch screen to excessive physical shock. You might
damage the touch sensor.
• A touch screen failure may occur if you use the device near a magnetic,
metallic or conductive material.
• If you use the device under bright lights, such as direct sunlight, the
screen may not be visible, depending on your position. Use the device
in a shady location or a location with an ambient light that is not too
bright and bright enough to read books.
• Do not press the screen with excessive force.
• Gently tap with your fingertip on the option you want.
• Touch control may not work properly if you tap while wearing a glove or
by using the tip of your fingernail.
• Touch control may not work properly if the screen is moist or wet.
• The touch screen may not function properly if a screen-protective film
or accessory purchased from a third party store is attached to the
device.
• Displaying a static image for extended periods of time may result in
after-images or screen burn-in. Turn off the screen or avoid displaying
the same image for a long time when you do not use the device.
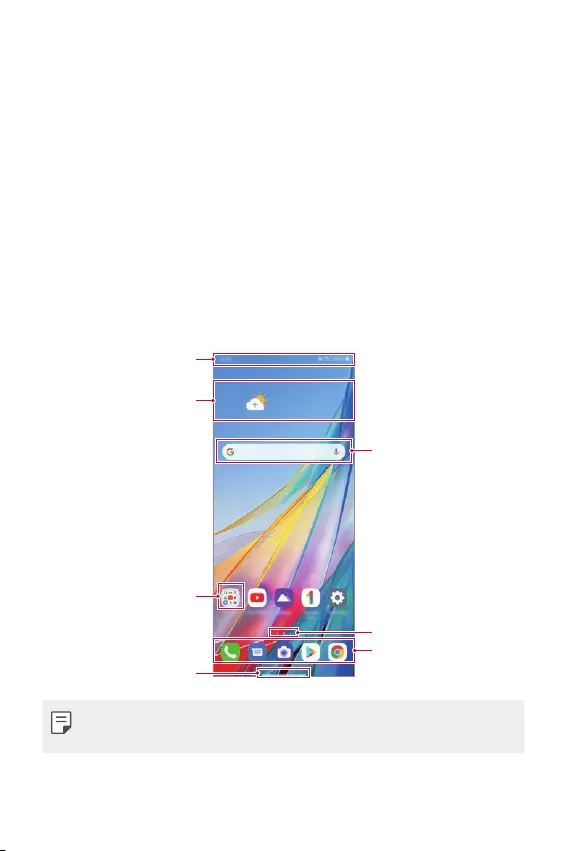
Basic Functions 54
Home screen
Home screen overview
The Home screen is the starting point for accessing various functions and
apps on your device. Swipe up from the bottom edge of any screen to
directly go to the Home screen.
You can manage all apps and widgets on the Home screen. Swipe the
screen left or right to view all installed apps at a glance.
Home screen layout
You can view all apps and organise widgets and folders on the Home
screen.
Quick access area
Navigation bar
Folder
Status bar
Weather widget
Page icon
Google Search widget
• The Home screen may differ depending on the manufacturer policy, user
settings, software version or service provider.

Basic Functions 55
• Status bar: View status icons, the time and the battery level.
• Weather widget: View the information of weather and time for a
specific area.
• Google Search widget: Type or speak to pull open Google Search.
• Folder: You can create folders to classify the app based on desired
criteria.
• Page icon: Display the total number of Home screen canvases. You
can tap the desired page icon to go to the page you selected. The icon
reflecting the current canvas will be highlighted.
• Quick access area: Fix main apps at the bottom of the screen so that
they can be accessed from any Home screen canvas.
• Navigation bar: You can go to the previous screen or home screen
while using the app, and check the list of apps you used recently.
Using Navigation bar
Here is the gestures guide to control the Navigation bar.
• To go to Home screen, swipe up from the bottom edge of the screen.
• To go back to the previous screen, swipe in from the left or right edge
of the screen.
• To go to Overview screen, swipe up and hold from the bottom edge of
the screen.
• To quickly switch between apps, swipe right at the bottom edge of the
screen to go to previously used apps.
• Gestures is the default for the Navigation bar. To change it to Buttons
only / / , on the home screen, tap Settings Display
Navigation bar, then select Buttons only.
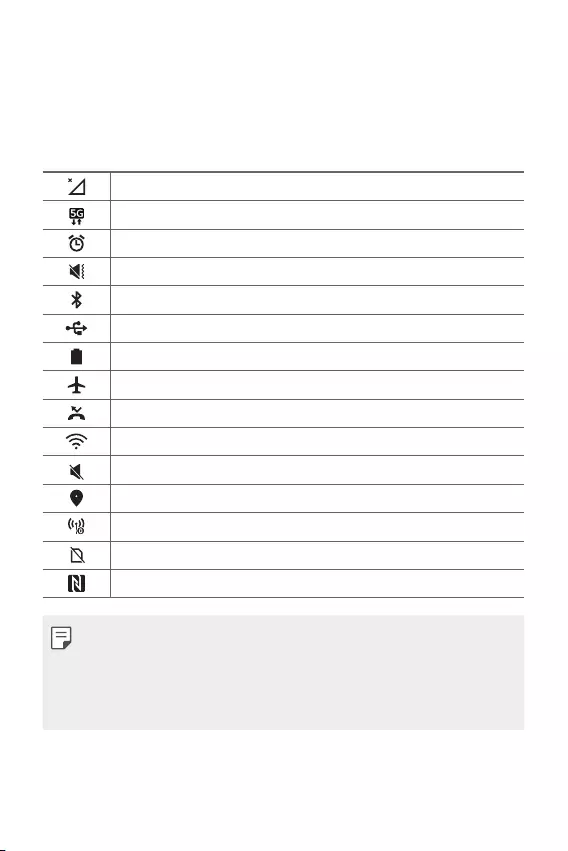
Basic Functions 56
Status icons
When there is a notification for an unread message, calendar event or
alarm, the status bar displays the corresponding notification icon. Check
your device’s status by viewing notification icons displayed on the status
bar.
No signal
Data is being transmitted over the network
Alarm is set
Vibrate mode is on
Bluetooth is on
Connected to a computer via USB
Battery level
Airplane mode is on
Missed calls
Wi-Fi is connected
Mute mode is on
GPS is on
Hotspot is on
No SIM card
The NFC mode is on
• Some of these icons may appear differently or may not appear at all,
depending on the device's status. Refer to the icons according to the
actual environment and area in which you are using the device and your
service provider.
• Displayed icons may vary, depending on the area or service provider.
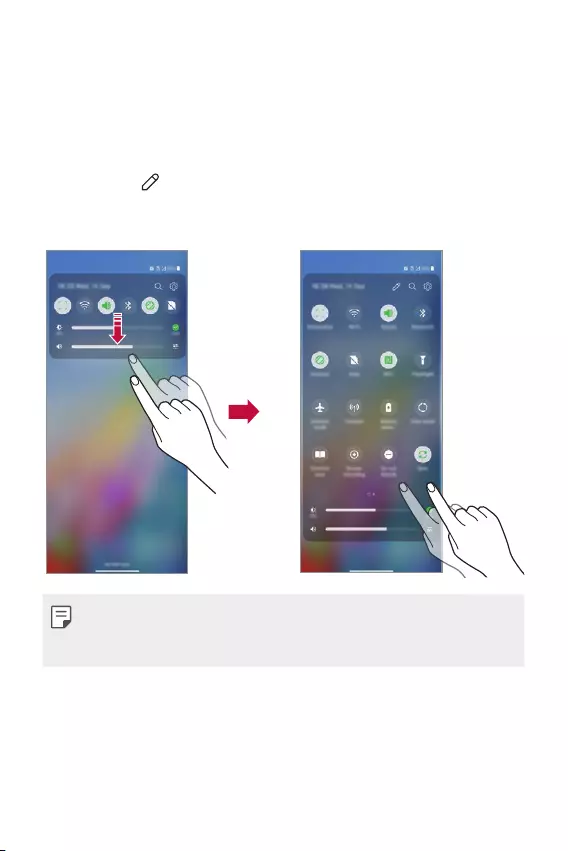
Basic Functions 57
Notifications panel
You can open the notifications panel by dragging the status bar
downward on the main screen.
• You can drag down the notice window or tap the arrow icon to open
the list of quick setting icons.
• You can tap to add, delete or arrange icons in the notice window.
• If you touch and hold the icon, the settings screen for the
corresponding function appears.
• You can use the notifications panel even on the lock screen. Drag the
notifications panel while the screen is locked to quickly access the
desired features.

Basic Functions 58
Switching the screen orientation
You can set the screen orientation to automatically switch according to
the device’s physical orientation.
On the notification panel, tap Rotation from the quick access icon list.
You can also tap Settings Display and activate Auto-rotate screen on
the home screen.
Editing the Home screen
On the Home screen, touch and hold on an empty space, then select the
desired action from below.
• To rearrange the Home screen canvases, touch and hold on a canvas,
then drag it to another location.
• To add a widget to the Home screen, touch and hold on a blank area of
the Home screen, then select Widgets.
• To change wallpapers, themes, icons, and AOD, touch and hold on a
blank area of the Home screen, then select Wallpaper & theme.
You can also tap Settings Wallpaper & theme on the home screen,
then select wallpapers, themes, icons, and AOD, to apply to the device.
• To change the grid, touch and hold on a blank area of the Home screen,
then select Grid. Tap the desired grid, then tap Apply.
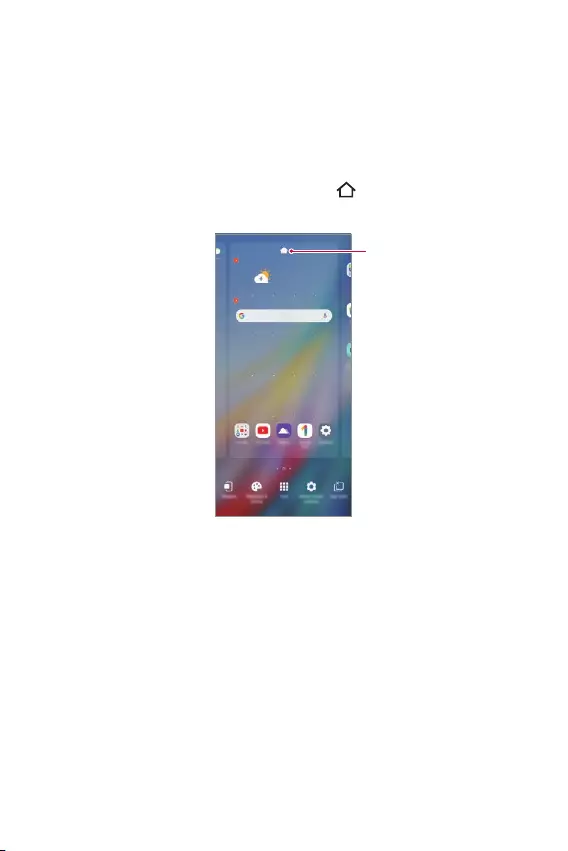
Basic Functions 59
• To configure the Home screen settings, touch and hold on a blank area
of the Home screen, then select Home screen settings. See
Home
screen settings
for details.
• To view or reinstall the uninstalled apps, touch and hold on a blank area
of the Home screen, then select App trash. See
App trash
for details.
• To change the default screen, touch and hold on a blank area of the
Home screen, move to desired screen, tap , then tap the screen once
more.
Default screen
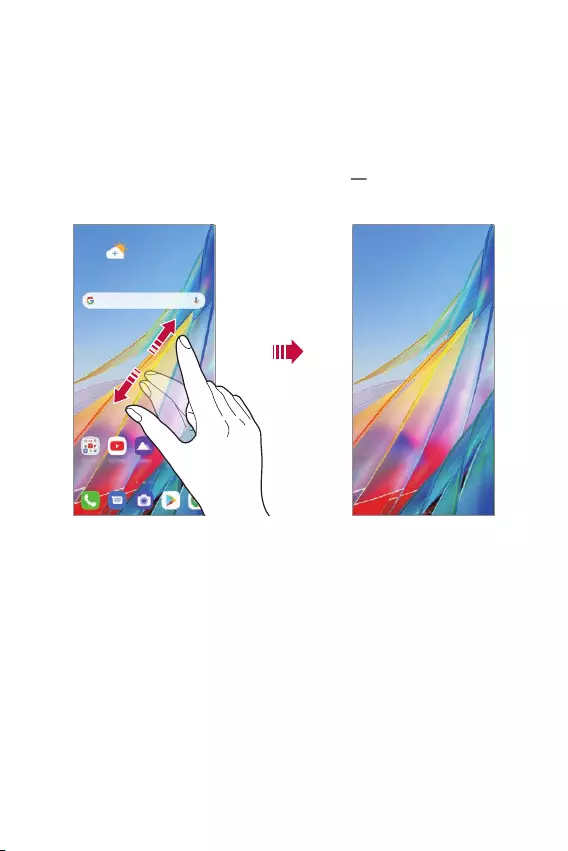
Basic Functions 60
Viewing the background theme
You can view only the background image by hiding the apps and widgets
on the Home screen.
Spread two fingers apart on the Home screen.
• To return to the original screen, which displays apps and widgets, pinch
your fingers on the Home screen or drag up from the bottom edge
of the screen.
Moving apps on the Home screen
On the Home screen, touch and hold an app, then drag it to another
location.
• To keep frequently used apps at the bottom of the Home screen, touch
and hold an app, then drag it to the quick access area at the bottom.
• To remove an icon from the quick access area, drag the icon to the
Home screen.
Basic Functions 61
Using folders from the Home screen
Creating folders
On the Home screen, touch and hold an app, then drag it over another
app.
• A new folder is created and the apps are added to the folder.
Editing folders
On the Home screen, tap a folder and do one of the following actions.
• To edit the folder name tap the folder name.
• To edit the colour, tap the right upper circle.
• To add apps, touch and hold an app, then drag it over the folder and
release it.
• To remove an app from the folder, touch and hold the app and drag it to
outside the folder. If the removed app is the only one app that existed
in the folder, the folder is removed automatically.
• You can also add or remove apps after tapping .
• You cannot change the folder colour while using downloaded theme.

Basic Functions 62
Home screen settings
You can customise the Home screen settings.
1 On the home screen, tap Settings Display Basic Home.
2 Customise the following settings:
• Select Home: Select a Home screen mode.
• Screen swipe effect: Select an effect to apply when the Home
screen canvas switches.
• Icon shape: Choose if you want icons to have square or rounded
corners.
• Google feed: Show to the left of the main Home screen.
• Sort apps by: Set how apps are sorted on the Home screen.
• Hide apps: Select which apps you want to hide from the Home
screen.
• Loop Home screen: Enable to allow continuous Home screen
scrolling (loop back to first screen after the last screen).
• Swipe down on the Home screen: Enable to search apps or
contents, or view notifications by swiping down on the home
screen.
• Swipe up on the Home screen: Enable to search apps or contents,
by swiping up on the home screen.
• Home screen lock: Enable to prevent apps and widgets from being
rearranged or removed.
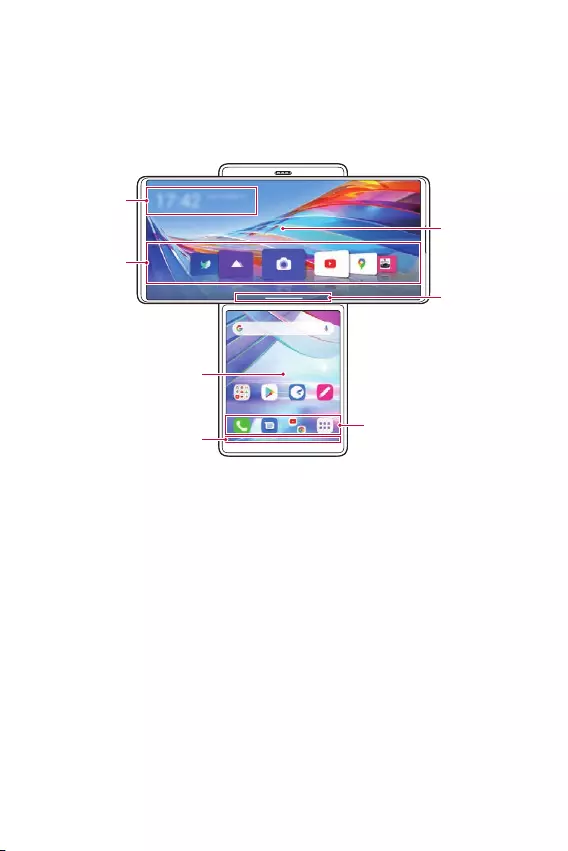
Basic Functions 63
Customise the Swivel Home
The Swivel Home is the first start screen that appears after swivelling up
the product. Use the Home screens of the main screen and the second
screen in various ways.
Main Screen
Navigation bar
Clock and
weather
App
shortcuts
Quick-access icons
Second Screen
Navigation bar
• Clock and weather: You can check the current time and weather.
• App shortcuts: You can quick start the apps on the list.
• Navigation bar: You can use some gestures to go to the Home screen,
previous screen, Overview screen, or quickly switch between apps.
• Quick access area: You can use the apps you want to start directly.

Basic Functions 64
Configuring the Swivel Home Screen
You can change the settings related to the Home screen of the Swivel
Mode.
1 On the home screen, tap Settings Display Swivel Home.
2 Choose the desired function to set a configuration.
• Swipe down on the Home screen: Select what you want to view
when swiping down the main home screen in the Swivel Mode.
• Multi App Shortcut: You can choose to run two apps
simultaneously on the main screen and on the second screen.
• Swipe down on the Home screen: Select what you want to view
when swiping down the second screen in the Swivel Mode.
• Screen swipe effect: Choose a desired visual effect when you
swivel the phone.
• App drawer icon: Enable the App drawer icon visible on the
second screen.
• Home screen lock: Enable to prevent apps and widgets from being
rearranged or removed.
• Help: View the help for Swivel Home.
Basic Functions 65
Screen lock
Screen lock overview
Your device’s screen turns off and locks itself if you press the Power/Lock
key. This also happens after the device is left idle for a specified period of
time.
If you press the Power/Lock key when a screen lock is not set, the Home
screen appears immediately.
To ensure security and prevent unwanted access to your device, set a
screen lock.
• A screen lock prevents unnecessary touch input on the device screen
and reduces battery consumption. We recommend that you activate the
screen lock while not using the device.
Setting a screen lock
There are several options available for configuring the screen lock settings.
1 On the home screen, tap Settings Lock screen & security Select
screen lock and then select the method you prefer.
2 Customise the following settings:
• None: Deactivate the screen lock function.
• Swipe: Swipe on the screen to unlock the screen.
• Pattern: Draw a pattern to unlock the screen.
• PIN: Enter a numeric password to unlock the screen.
• Password: Enter an alphanumeric password to unlock the screen.
• Fingerprints: Unlock the screen by using your fingerprint.

Basic Functions 66
Customise Lock screen
You can customise lock screen.
1 On the home screen, tap Settings Lock screen & security
Customize Lock screen.
2 Select a function you want to set.
• Clock: Allow you to set clock size on the Lock screen.
• Shortcuts: Allow you to choose apps to run on your Lock screen.
This setting appears only when a screen lock is set.
• Weather animation: Enable this option to display weather
animations for the current location on the Lock screen.
• Contact info for lost phone: Allow you to set text to be displayed
on the Lock screen to identify the phone’s owner.
Secure lock settings
You can set secure lock settings.
1 On the home screen, tap Settings Lock screen & security Secure
lock settings.
2 Select a function you want to set.
• Make pattern visible (shown only when Pattern is set as a screen
lock): Turn on to make pattern visible.
• Lock timer: Allow you to set the amount of time before the screen
automatically locks after the backlight turns off (time-out due to
inactivity).
• Power key instantly locks: Enable this option to instantly lock the
screen when the Power/Lock key is pressed. This setting overrides
the Security Lock timer setting.
• Show lockdown option (shown only when a screen lock is set):
Enable this option to display the Lockdown icon when you press
and hold the Power/Lock button. Tap the Lockdown icon to turn
off Smart Lock, biometric unlocking, and notifications on the lock
screen.

Basic Functions 67
• Smart Lock: Allow you to set trusted devices, places, voice, and/or
on-body detection that will allow your phone to remain unlocked.
• Available menu options may vary depending on the lock screen method
selected.
KnockON
You can turn the screen on or off by double-tapping the screen.
• This option is available only on the Home screen provided by LG. It may
not function properly on a custom launcher or on the Home screen
installed by the user.
• When tapping the screen, use your fingertip. Do not use a fingernail.
• To use the KnockON feature, make sure that the proximity/light sensor
is not blocked by a sticker or any other foreign substance.
Turning the screen on
Double-tap the middle of the screen.
• Tapping the top or bottom of the screen may decrease the recognition
rate.
Turning the screen off
Double-tap on an empty space on the Home screen and Lock screen.
You can also double-tap an empty space on the status bar.
Disable KnockON
If you don’t want to use the KnockON function, set as follows:
On the home screen, tap Settings Extensions KnockON and drag it
to disable the function.

Basic Functions 68
Fingerprint Recognition
Fingerprint recognition overview
You must register your fingerprint on your device first before using the
fingerprint recognition function.
You can use the fingerprint recognition function in the following cases:
• To unlock the screen.
• To view locked contents in Gallery or QuickMemo+.
• Confirm a purchase by signing in to an app or identifying yourself with
your fingerprint.
• Your fingerprint can be used by the device for user identification. Very
similar fingerprints from different users may be recognised by the
fingerprint sensor as the same fingerprint. For added security, set the
screen lock using a pattern, PIN or Password.
• If the device cannot detect your fingerprint, or you forget the value
specified for registration, contact the LG Authorised Service Centre with
your device and ID card.

Basic Functions 69
Precautions for fingerprint recognition
Fingerprint recognition accuracy may decrease due to a number of
reasons. To maximise the recognition accuracy, check the following before
using the device.
• At the bottom centre of the product’s screen, there is a built-in sensor
that recognises fingerprints. Be careful not to scratch or damage the
fingerprint sensor with metal objects such as coins or keys.
• If you replace the protective film on the product with a polarized film
that diffuses the light or a film that is too thick, it may decrease the
fingerprint recognition rate.
• If there are foreign substances (sweat, lotion, water, dirt, grease, etc.)
on the fingerprint sensor or on the finger to be put on the sensor,
fingerprint recognition may not work properly. Wipe the sensor and the
finger clean and remove all moisture before putting the finger on the
sensor.
• If the finger’s surface is rough due to it being scarred or pruney from
water, the sensor may not be able to recognise the fingerprint. In such
a case, register another finger’s fingerprint.
• If you bend your finger or use the fingertip only, your fingerprint may
not be recognised. Make sure that your finger covers the entire surface
of the fingerprint sensor.
• Scan only one finger for each registration. Scanning more than one
finger may affect fingerprint registration and recognition.
• The device may generate static electricity if the surrounding air is dry.
If the surrounding air is dry, avoid scanning fingerprints, or touch a
metallic object such as a coin or a key before scanning fingerprints to
remove static electricity.
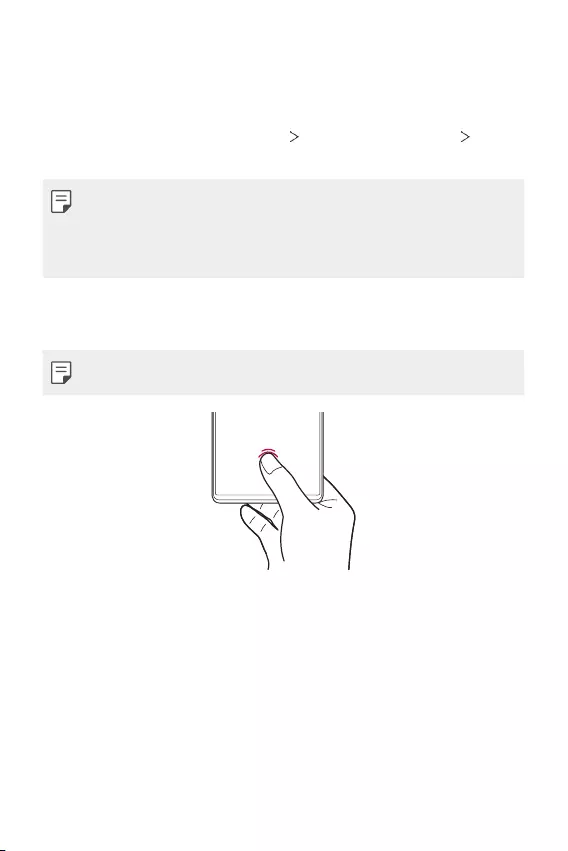
Basic Functions 70
Registering fingerprints
You can register and save your fingerprint on the device to use fingerprint
identification.
1 On the home screen, tap Settings Lock screen & security
Fingerprints.
• This feature is available only when the screen lock is set.
- Lock the device with a pattern, PIN or password.
• If the screen lock is not set, enable it by following the on-screen
instructions. See
Setting a screen lock
for details.
2 Check the location of the fingerprint sensor at the bottom centre of
the screen, and lightly place your finger on the sensor.
• Make sure that the finger fully covers the fingerprint sensor.
3 Follow the on-screen instructions.
• Place your finger on the sensor and hold it until you feel a vibration.
• Move the same finger around on the sensor a little by little until the
fingerprint registration is complete.
4 When the fingerprint registration is done, tap OK.
• Tap Add more to register another fingerprint. If you register only
one fingerprint and the corresponding finger is not in a good
condition, the fingerprint recognition may not work well. As a
preventative measure, register multiple fingerprints.

Basic Functions 71
Managing fingerprints
You can edit or delete registered fingerprints.
1 On the home screen, tap Settings Lock screen & security
Fingerprints.
2 Unlock according to the specified lock method.
3 From the fingerprint list, tap a fingerprint to rename it. To delete it, tap
.
Displaying the fingerprint icon when the
screen is off
You can set to display the fingerprint sensor location on the screen when
the screen is off.
1 On the home screen, tap Settings Lock screen & security
Fingerprints.
2 Unlock according to the specified lock method.
3 Tap Tap to show icon when screen is off to enable the option.
Icon effect
You can choose an effect that appears when the fingerprint icon is
touched.
1 On the home screen, tap Settings Lock screen & security
Fingerprints.
2 Unlock according to the specified lock method.
3 Tap Icon effect and select a desired effect.

Basic Functions 72
Unlocking the screen with a fingerprint
You can unlock the screen or view locked content by using your
fingerprint.
1 On the home screen, tap Settings Lock screen & security
Fingerprints.
2 Unlock according to the specified lock method.
3 On the fingerprint settings screen, activate the desired function:
• Screen lock: Unlock the screen with a fingerprint.
• Content lock: Access contents you have locked in Gallery and
QuickMemo+ with a fingerprint.
KnockON
You can turn the screen on or off by double-tapping the screen.
On the home screen, tap Settings Extensions KnockON to enable
the option.
• This option is available only on the Home screen provided by LG. It may
not function properly on a custom launcher or on the Home screen
installed by the user.
• When tapping the screen, use your fingertip. Do not use a fingernail.
• To use the KnockON feature, make sure that the proximity/light sensor
is not blocked by a sticker or any other foreign substance.
Turning the screen on
Double-tap the middle of the screen.
• Tapping the top or bottom of the screen may decrease the recognition
rate.
Turning the screen off
Double-tap on an empty space on the Home screen and Lock screen.
You can also double-tap an empty space on the status bar.
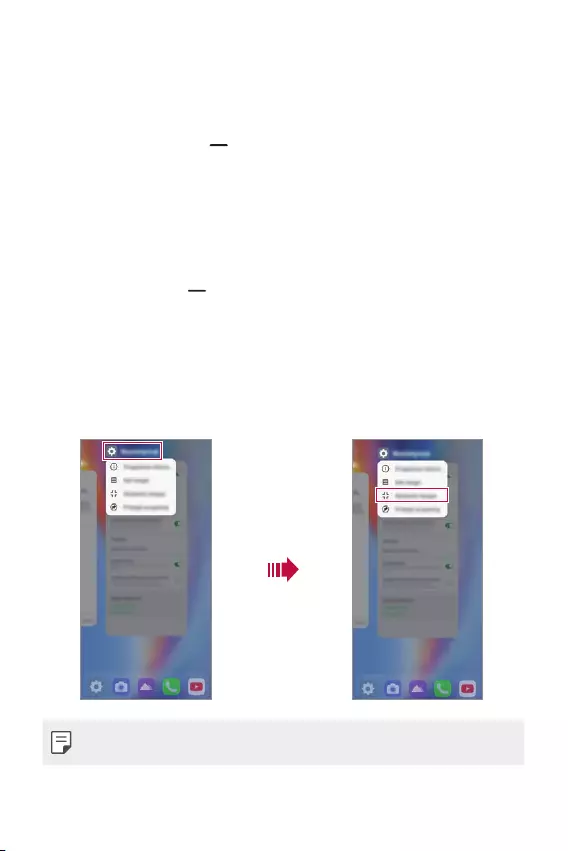
Basic Functions 73
Multi-tasking feature
Recent Uses Screen
Swipe the Navigation bar upward and hold to view the recent use
history.
Pop-up window
You can open multiple apps on the screen and easily switch between
them at any time.
1 Swipe up and hold from the bottom of the screen.
2 Tap the app icon on the top left of the app screen and select Pop-up
window.
• If you tap the app icon, the App info, Multi window, Pop-up
window and Pin app options appear.
3 The app appears in the form of a pop-up window on the screen.
• This feature may not be available in some apps or screens.
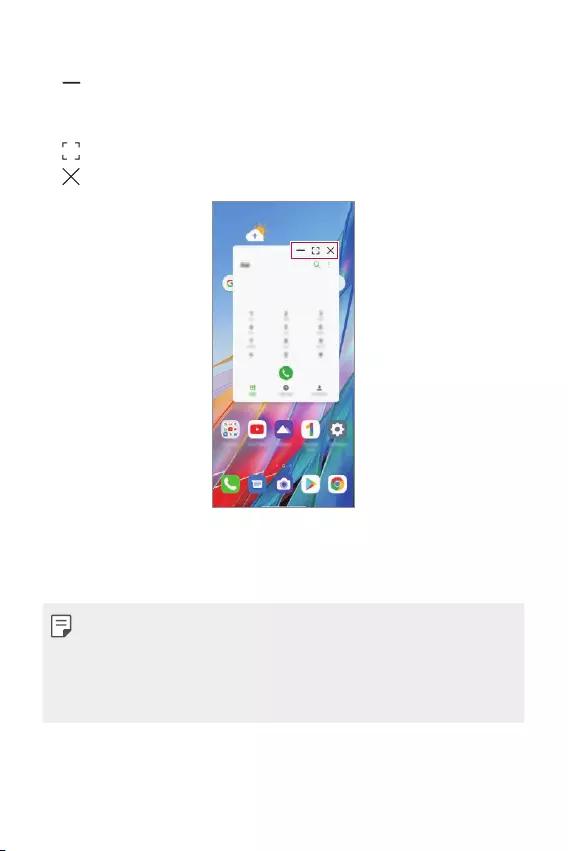
Basic Functions 74
Using the pop-up window
• : Minimises the pop-up window. The pop-up window is minimised
into the app icon floating on the screen, which can be moved anywhere
you want.
• : Expands the app to full screen.
• : Closes the app.
• To move the pop-up window: Drag the top of the pop-up window.
• To adjust the size of the pop-up window: Drag the left, right or
bottom edge of the pop-up window.
• You can open up to 5 apps using the pop-up windows.
• To select an app from the opened apps, tap one of the pop-up windows.
The selected pop-up window comes to the front.
• Pop-up windows cannot be moved to the status bar or navigation bar
area.
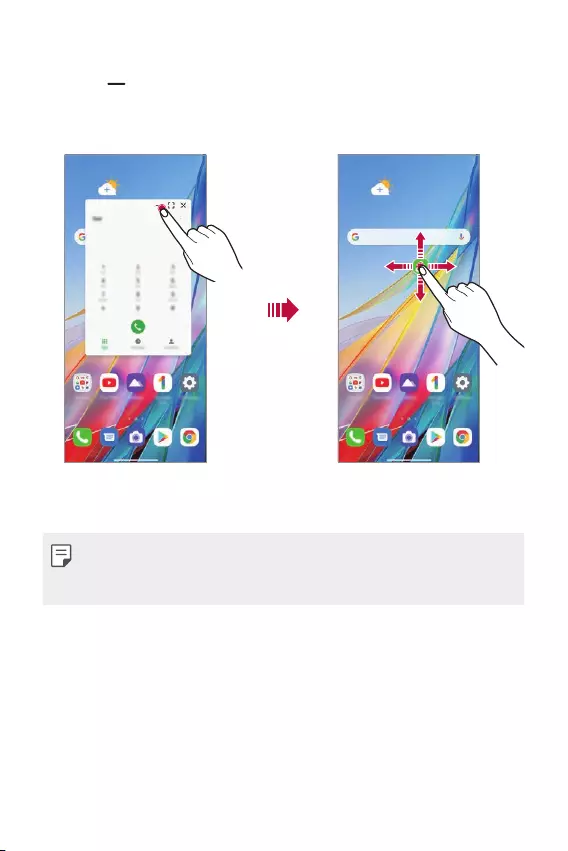
Basic Functions 75
Using the app folder for pop-up windows
If you tap on the pop-up window, the pop-up window is minimised into
the app icon.
You can move the app icon anywhere you want by dragging it.
If two or more pop-up windows are minimised, the app folder is created to
contain the app icons.
• The recently-used app icon is used as the app folder icon. If you tab the
icon, all the icons for the minimised pop-up windows appear in the app
folder.
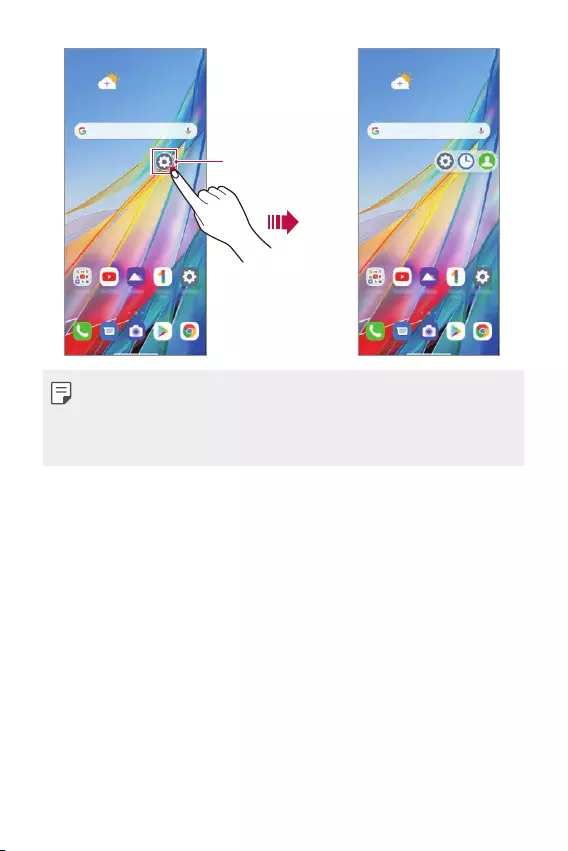
Basic Functions 76
Pop-up windows
apps folder
• If you touch and hold the app folder for pop-up windows and drag the
app folder into Remove, the app folder will be removed.
• To remove one of the apps from the app folder, open the app folder and
drag the app icon out of the app folder.

Basic Functions 77
Multi window
When using Gestures navigation (by default)
1 Swipe up and hold from the bottom of the screen.
• Recently-used apps appear.
• If you tap the app icon, the App info, Multi window, Pop-up
window and Pin app options appear.
2 Tap the app icon on the top left of the app to be displayed in the
multiwindow and select Multi window.
• The selected app appears at the top half of the screen.
3 Tap the other app to be displayed in the multi window.
• The selected app appears at the bottom half of the screen.
When using Buttons only navigation
1 Tap on the navigation bar.
• Recently-used apps appear.
• If you tap the app icon, the App info, Multi window, Pop-up
window and Pin app options appear.
2 Tap the app icon on the top left of the app to be displayed in the
multiwindow and select .
• The selected app appears at the top half of the screen.
3 Tap the other app to be displayed in the multi window.
• To adjust the size of the split screen, drag the bar on the centre of the
screen.
• To deactivate the multi window feature, drag the centre bar up or down
to the end of the screen.
• The multi window feature is not supported in some LG apps or apps
downloaded from Play Store.

Basic Functions 78
Memory card encryption
You can encrypt and protect data saved on the memory card. The
encrypted data in the memory card cannot be accessed from another
device.
1 On the home screen, tap Settings Lock screen & security
Encryption & credentials Encrypt SD card.
2 Read the on-screen overview of memory card encryption and then tap
Continue to continue.
3 Select an option and tap Encrypt now.
• New data encryption: Encrypt only data that is saved on the
memory card after encryption.
• Full encryption: Encrypt all the data currently saved on the memory
card.
• Exclude media files: Encrypt all files, except for media files such as
music, photos and videos.
• Once memory card encryption starts, some functions are not available.
• If the device is turned off while encryption is underway, the encryption
process will fail, and some data may be damaged. Therefore, be sure to
check if the battery level is sufficient before starting encryption.
• Encrypted files are accessible only from the device where the files were
encrypted.
• The encrypted memory card cannot be used on another LG device. To
use the encrypted memory card on another mobile device, format the
card.
• You can activate memory card encryption even when no memory card
is installed into the device. Any memory card that is installed after
encryption will automatically be encrypted.
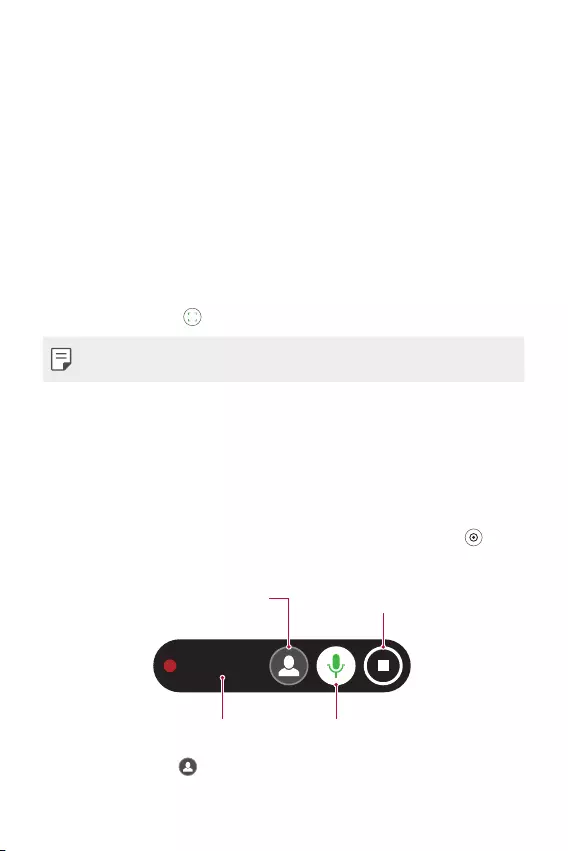
Basic Functions 79
Taking screenshots
You can take screenshots of the current screen you are viewing.
Via a shortcut
Press and hold the Power/Lock key and the Volume Down key at the
same time for at least two seconds.
• Screenshots can be viewed from the Screenshots folder in the
Gallery.
Via Screenshot
On the screen where you want to take a screenshot, drag the status bar
downwards, then tap .
• See
Writing notes on a screenshot
for details.
Screen recording
You can record the screen.
1 Drag the status bar downward to open the Quick access icons list.
2 (If necessary, swipe left over the Quick access icons area.) Tap .
3 Read the disclaimer and tap Start. It will start recording in 3 seconds.
Screen recording time
Select front pop-up camera Stop recording
00:00:05
Select voice recording
• When you tap , the front pop-up camera comes up and the
display using the front camera is also included.
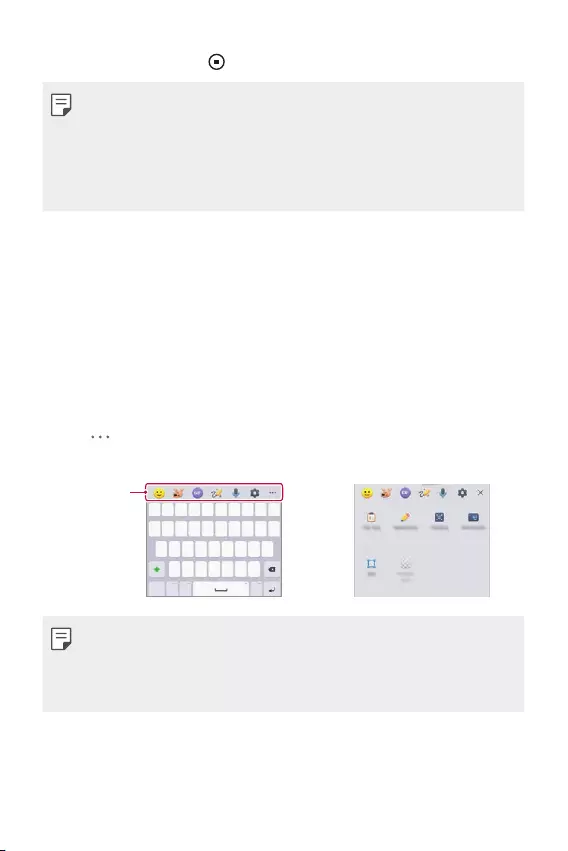
Basic Functions 80
4 To stop recording, tap . The recorded video will be saved in Gallery.
• If you violate another person’s rights such as portrait right or intellectual
property right or defame another person’s reputation by using the
functions provided for the screen recording service, you may be held
liable to civil, criminal or administrative charges in accordance with the
relevant laws. LG Electronics is not legally responsible in any way for the
acts of users.
Entering text
Using the Smart toolbar
You can use various keyboard input methods in one place. You can select
the desired input method from the top of the keyboard.
1 Select the desired keyboard input method from the Smart toolbar.
2 Tap and select the input method you want to show on the Smart
toolbar, or reorganise them.
Smart toolbar
• Some supporting input methods may differ depending on the device
you have.
• You can turn on or off the Smart toolbar feature from the keyboard
settings.

Basic Functions 81
• : Add emojis.
• : Tap to add animated emoticons or make your own emoji by
using a photo or camera.
• : You can use Tenor’s GIF keyboard. Tap Accept to use this
feature.
• : Open Draw chat.
• : Enter text by using voice.
• : Access keyboard settings.
• : Open the clip tray.
• : Enter text by handwriting. It is required to download the input
language data for handwriting. Tap Download to download the
input language data for handwriting.
• : Activate floating keyboard when you use the Multi-window
feature. You can also move the keyboard to the desired location.
• : Tap to use one-handed operation mode.
• : Tap to adjust the size of the keyboard.
• : Tap to adjust the transparency of the keyboard.
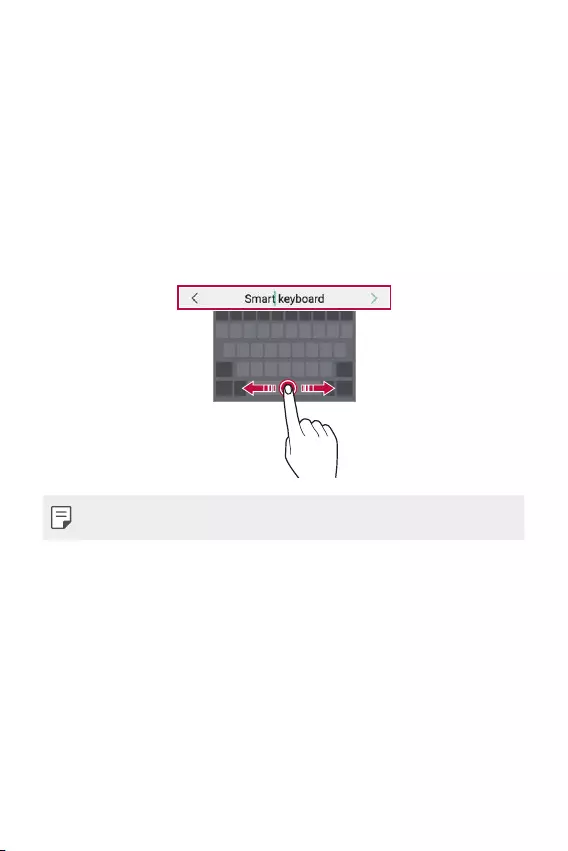
Basic Functions 82
Using the Smart keyboard
You can use the Smart keyboard to enter and edit text.
With the Smart keyboard, you can view text as you type without
bothering to alternate between the screen and a conventional keyboard.
This allows you to easily find and correct errors when typing.
Moving the cursor
With the Smart keyboard, you can move the cursor to the exact position
you want. When typing text, touch and hold on the space bar and then
drag left or right.
• This option is available only on the QWERTY keyboard.
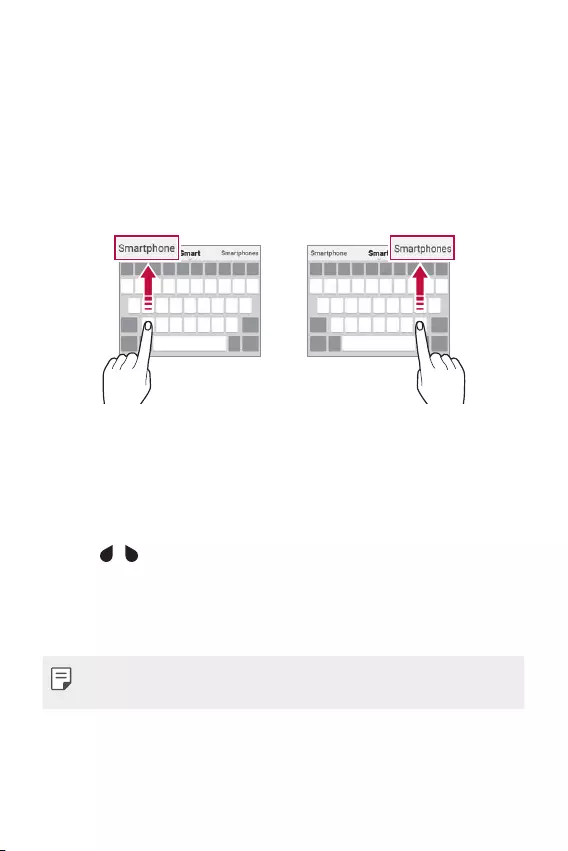
Basic Functions 83
Suggesting words
Smart keyboard automatically analyses your usage patterns to suggest
frequently used words as you type. The longer you use your device, the
more precise the suggestions are.
Enter text, then tap a suggested word or gently drag the left or right side
of the keyboard upwards.
• The selected word is automatically entered. You do not need to
manually type every letter of the word.
Copy and Paste
You can cut or copy text from an app, and then paste the text into the
same app. Or, you can run other apps and paste the text into them.
1 Touch and hold around the text you want to copy or cut.
2 Drag / to specify the area to copy or cut.
3 Select either Cut or Copy.
• Cut or copied text is automatically added to the clip tray.
4 Touch and hold the text input window, then select Paste.
• If there is no item that has been copied or cut, the Paste option will not
appear.
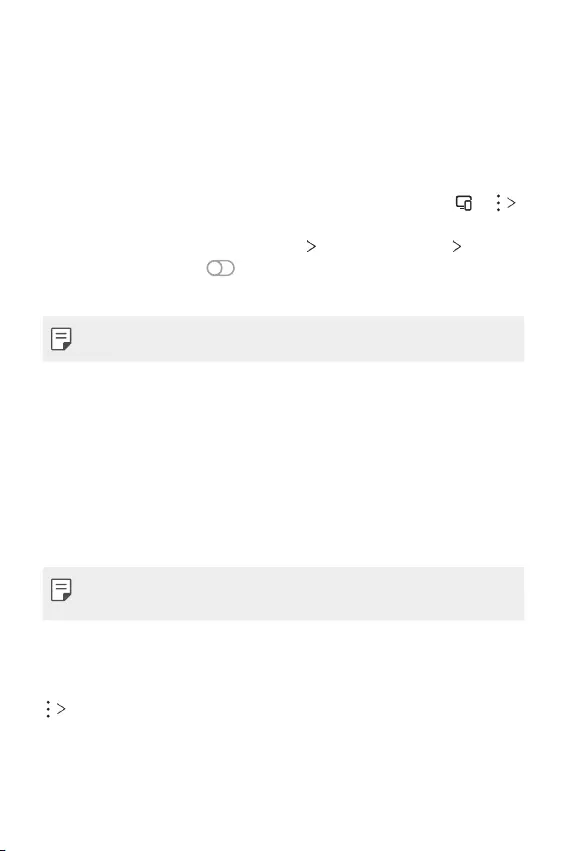
Basic Functions 84
Content sharing
Playing content from another device
You can play photos, videos or songs saved on your device from a TV.
1 Connect the TV and your device to the same Wi-Fi network.
2 While viewing the items from the Gallery or Music app, tap or
Play on other device.
Or on the home screen, tap Settings Connected devices Screen
sharing and then tap to activate it.
3 Select the TV you want to connect to.
• For use with Chromecast, Google Play services should be up to date.
Viewing content from nearby devices
You can view content from various devices, such as a computer, NAS or
mobile device, by using the Gallery or Music apps.
Connecting the devices
Connect both your device and another device that support DLNA function
to the same wireless network.
• Make sure that File sharing (DLNA) is activated on both the device and
the connected device.
Searching for nearby devices
You can view a list of DLNA devices on the same network by selecting the
Nearby devices menu in each app.
Use content from nearby devices as if you were using it on your device.
Basic Functions 85
Sending or receiving files
You can share files between your device and another LG device, or a tablet.
Sending files
From the Gallery or other apps, tap Share or , then select a device
on the file sharing list.
Receiving files
Drag the status bar downward and then tap File sharing.
If your device does not support the file sharing feature, on the home
screen, tap Settings Connected devices File sharing SmartShare
Beam .
• You can share files with certain devices that support DLNA.
Do not disturb
You can limit or mute notifications to avoid disturbances for a specific
period of time.
On the home screen, tap Settings Sound Do not disturb.
• Mode and select the mode you want:
- Priority only: Receive sound or vibrate notifications for the selected
apps. Even when Priority only is turned on, alarms still sound.
- Total silence: Disable both the sound and vibration.
• Select priorities: Receive alarms and the notifications for the selected
apps.
- Calls from: Set up a range of notifications when receiving a call.
• Repeated calls: Second call from the same caller within 15 min is not
silenced.
Basic Functions 86
- Messages from: Set up a range of notifications when receiving a
message.
• Use Do not disturb: Turn on the Do not disturb feature.
• Sleeping: Set the schedule for which you want to turn on the Do not
disturb feature.
• Help: View the help for Do not disturb.
AOD (always-on display)
You can view the date, time or signature when the main screen is turned
off.
Swipe the bottom of the Always-on display screen to activate features
including Camera, Capture+, Wi-Fi, sound settings, Bluetooth, Flash, Music
and more.
1 On the home screen, tap Settings Display AOD (always-on
display).
2 Select the image you want to display and tap Save.
• Tap the desired image among Digital clock, Analog clock, Dual
clock, Signature or Image.
• Tap Show display and select Tap to show for 10 seconds or
Always show.
• Tap Quick tools & music player to swipe over the status icons for
Quick tools and the music player.
• To enhance brightness for the Always-on display feature, tap
Brighter display.
• To view the help for Always-on display, tap Help.
• The battery may drain faster when you use Always-on display. Turn this
feature off to save battery power.
• To deactivate Always-on display feature, on the home screen, tap
Settings Display AOD (always-on display), and then tap .

Useful Apps
03
Useful Apps 88
Installing and uninstalling apps
Installing apps
Access an app store to search and download apps.
• You can use SmartWorld, Play Store or the app store provided by your
service provider.
• Some app stores may require you to create an account and sign in.
• Some apps may charge fees.
• If you use mobile data, you may be charged for data usage, depending
on your pricing plan.
• SmartWorld may not be supported depending on the area or service
provider.
Uninstalling apps
Uninstall apps that you no longer use from your device.
Uninstalling with the touch and hold gesture
Press and hold any empty area on the screen, and then press of the
app you want to delete.
Uninstalling by using the settings menu
On the home screen, tap Settings Apps App info, select an app, then
tap Uninstall.
• Some apps cannot be uninstalled by users.
Uninstalling apps from the app store
To uninstall an app, access the app store from which you download the
app and uninstall it.
Useful Apps 89
Installing and uninstalling apps during the
setup
When you turn on the device for the first time, you can download
recommended apps.
You can skip to the next step without installation.
App trash
You can view the uninstalled apps. You can also reinstall apps which were
uninstalled within 24 hours from now.
1 On the home screen, tap LG App trash.
You can also touch and hold an empty area of the Home screen, then
tap App trash.
2 Activate the desired function:
• Restore: Reinstall the selected app.
• : Remove the uninstalled apps permanently from the device.
• Uninstalled apps are automatically removed from the device 24 hours
after they were uninstalled. If you want to reinstall the uninstalled apps,
you must download them again from the app store.
• This feature is activated on the default Home screen only. If you
uninstall apps while using the EasyHome screen or other launcher, they
are immediately and permanently removed from the device.
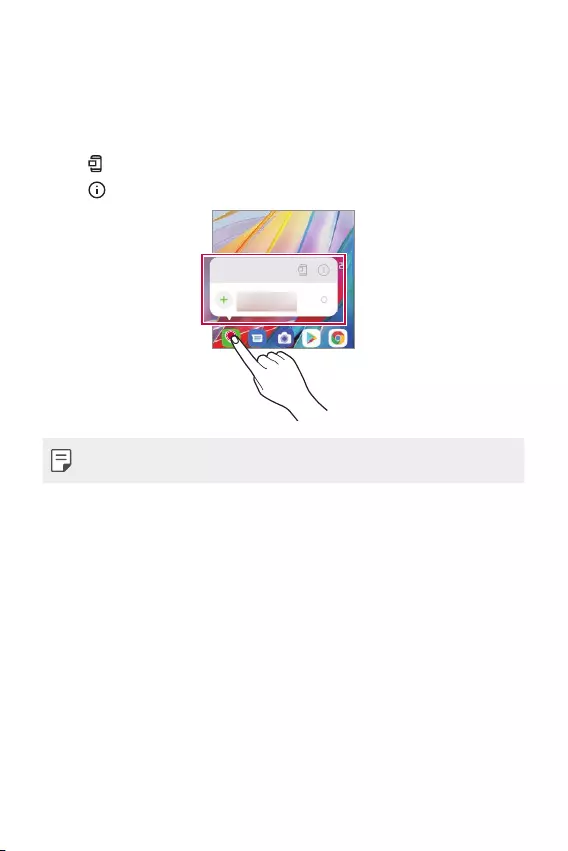
Useful Apps 90
App Shortcuts
On the Home screen, touch and hold an app icon such as Call, Message,
Camera, Gallery and Settings to display a quick access menu. Use apps
more easily through App Shortcuts.
• Tap to set the widgets for the app.
• Tap to check the app information.
• This feature is available only on some apps.
Useful Apps 91
Phone
Voice call
Make a phone call by using one of the available methods, such as manually
entering a phone number and making a call from the contact list or the
list of recent calls.
Making a call from the keypad
1 On the home screen, tap Dial.
2 Make a call by using a method of your choice:
• Enter a phone number and tap .
• Touch and hold a speed dial number.
• Search for a contact by tapping the initial letter of a contact name
in the contact list, and then tap .
• To enter "+" when making an international call, touch and hold number
0.
• See
Adding contacts
for details on how to add phone numbers to the
speed dial list.
Making Calls from Contacts
1 On the home screen, tap Contacts.
2 After selecting the number you want to call from the list of contacts,
tap .
Useful Apps 92
Answering a call
To answer a call, drag on the incoming call screen.
• When the stereo headset is connected, you can make calls by using the
call/end button on the headset.
• To end a call without turning off the screen, on the home screen, tap
Settings Network & internet Call Answer and end calls and
then activate End call with the Power key.
• On the home screen, tap Settings Network & internet Call
Answer and end calls End call with the Power key, you can end a
call by pressing the Lock/Power key while the call-in-process screen is
turned on.
Rejecting a call
To reject an incoming call, drag across the incoming call screen.
• To send a rejection message, drag the rejection message option
across the screen.
• To add or edit a rejection message, On the home screen, tap Settings
Network & internet Call Call blocking & Decline with message.
• When a call is coming in, press the Volume Up, Volume Down or Power/
Lock key to mute ringtone or vibration, or to hold the call.
Checking an incoming call while using an app
When a call comes in while using an app, a pop-up notification can be
displayed at the top of the screen. You can receive the call, reject the call,
or send message from the pop-up screen.
• On the home screen, tap Settings Network & internet Call
Additional settings Incoming voice call pop-up and then select the
desired way you would like to display the incoming call while using an
app.
Useful Apps 93
Viewing missed calls
If there is a missed call, the status bar at the top of the screen displays .
To view missed call details, drag the status bar downwards. You can also
tap Call logs on the home screen.
Functions accessible during a call
During a call, you can access a variety of functions by tapping the
on-screen buttons:
• Contacts: View the contact list during a call.
• Hold: Place the current call on hold.
• Dialpad: Display or hide the dial pad.
• Speaker: Turn on the speakerphone function.
• Mute: Mute your voice so that your voice cannot be heard by the other
party.
• Bluetooth: Switch the call to a Bluetooth device that is paired and
connected.
• : End a call.
• : Access additional call options.
• Available settings items may vary depending on the area or service
provider.
Useful Apps 94
Making a three-way calling
You can make a call to another contact during a call.
1 During a call, tap Add call.
2 Enter a phone number and tap .
• The two calls are displayed on the screen at the same time, and the
first call is put on hold.
3 To start a conference call, tap Merge calls.
• You may be charged a fee for each call. Consult with your service
provider for more information.
Viewing call records
To view recent call records, on the home screen, tap Call logs. Then,
you can use the following functions:
• To view detailed call records, select a contact. To make a call to the
selected contact, tap .
• To delete call records, tap Delete.
• The displayed call duration may differ from the call charge. Consult with
your service provider for more information.
• The deleted call history can not be restored.
• Pinch two fingers or spread your fingers apart to adjust the font size of
call logs or contacts.
Configuring call options
You can configure various call options.
1 On the home screen, tap Dial or Call logs.
2 Tap Call settings and then configure the options to suit your
preferences.
Useful Apps 95
Messages
Sending a message
You can create and send messages to your contacts using the Messaging
app.
• Sending messages abroad may incur additional charges. Consult with
your service provider for more information.
1 On the home screen, tap .
2 Tap .
3 Specify a recipient and create a message.
• To use multimedia options, tap .
• To access optional menu items, tap .
4 Tap to send the message.
Reading a message
You can view exchanged messages organised by contact.
1 On the home screen, tap .
2 Select a contact from the message list.
• While on the message list or chat window, you can adjust the font size
by placing two fingers on the screen and either widening or narrowing
the fingers.
Useful Apps 96
Configuring messaging settings
You can change messaging settings to suit your preferences.
1 On the home screen, tap .
2 Tap Settings from the message list.
• You can designate settings for the notice window, blocking calls, disaster
alert, multimedia messages, etc.
Camera
Starting the camera
You can take a photo or record a video to cherish all of your memorable
moments.
On the home screen, tap .
• Before taking a photo or recording a video, wipe the camera lens with a
soft cloth.
• Be careful not to stain the camera lens with your fingers or other
foreign substance.
• Images included in this user guide may be different from the actual
device.
• Photos and videos can be viewed or edited from the Gallery. See
Gallery
overview
for details.
• Refrain from using the product for a purpose that may violate someone
else’s privacy or rights.

Useful Apps 97
Taking a photo
You can take photos with the camera in the product.
1 Tap and focus on the subject.
• You can touch the subject to focus on.
• You may spread or pinch two fingers to zoom in or out.
2 Tap to take a photo.
• You can also press the Volume Down or Volume Up key to take a
photo.
• You can take a photo while recording a video by pressing on the
screen.
• The options displayed on the shooting screen may differ depending
on the selected camera (front or rear) and camera mode.
• The camera will turn off automatically if you do not use it for a while
after running the Camera app.
Select from standard
angle x1.0 zoom/
standard angle x2.0
zoom/wide angle x0.5
zoom
Open Google Lens
Enable AI feature to
automatically apply best
effect for the scene
Set screen ratio
Set camera options
Open Gallery
Switch between front and
rear cameras
Take photos
Change timer settings
Change flash settings
Apply filter effects
Useful Apps 98
• You can run the camera app by short-pressing the power key twice. On
the home screen, tap Settings Extensions Shortcuts and then tap
Open Camera to activate it.
• When the screen is turned off or locked, start the camera by pressing
the Volume Down key twice. On the home screen, tap Settings
Extensions Shortcuts and then tap Open Camera to activate it.
Customising the camera options
You can customise a variety of camera options to suit your preferences.
Tap on the screen.
• Available options vary depending on the selected camera (front or rear
camera) and the selected camera mode.
Auto scene
optimizer
By recognising the scene that is being recorded, applies the
optimal resolution setting automatically.
Composition By recognising the human figure when taking a portrait,
recommends the optimal composition.
Tips Notifies the user when the subject’s eyes were closed or the
picture is blurry for optimal photography.
Photo size Allows you to choose the photo size and aspect ratio.
HDR
Obtain photos in vivid colours and get compensated effects
even when they are taken against the light. These functions
are provided by the high dynamic range (HDR) technology
equipped in the camera.
Ultra wide
shot distortion
correction
Corrects the screen distortion when taking ultra wideangle
photos.
Save as HEIF
Saves storage space by compressing the image file in HEIF
format. Other devices may not support image files in HEIF
format.
Live photo Record the action before and after you take a photo.
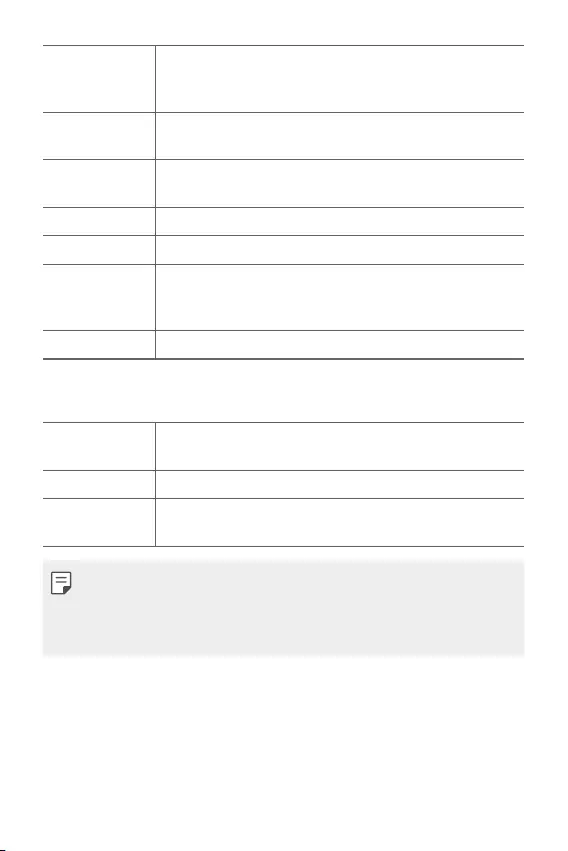
Useful Apps 99
Tracking focus
Enables the camera to remain focused on the subject you
touch on the screen, even if the subject is moving. (Available
when the Standard camera is in use.)
Grid Display guide grids so that you can take photos or record
videos based on the horizontal and vertical reference lines.
Cheese shutter Allows you to take a photo by saying ‘Cheese’, ‘Smile’,
‘Whiskey’, ‘Kimchi’, or ‘LG’.
Add watermark Displays a watermark on the photos
Tag locations Save the image with GPS location data.
Storage
Select if you want to store the pictures and videos in the
Internal storage or SD card. (Available when a memory card
is inserted.)
Help Provide Help for each camera menu.
Additional options on the front camera
Selfie distortion
correction Corrects distorted parts of the face.
Save as flipped Saves as flipped images when taking a selfie.
Selfie shot Take a selfie by selecting its option between Gesture shot
and Auto shot.
• You can apply the make-up effect when taking a selfie using the front
camera.
• Gesture shot is taken by recognising the shape of a hand and Auto
shot is taken by recognising a face.
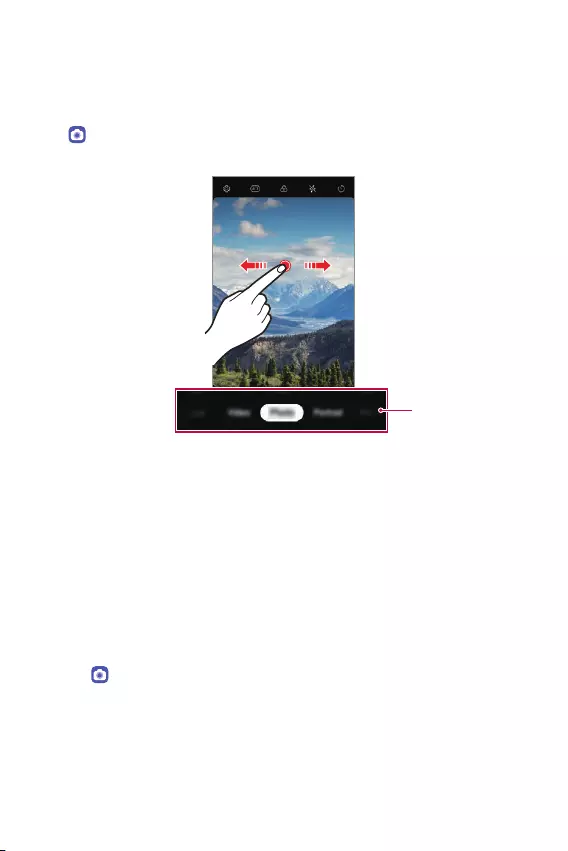
Useful Apps 100
Mode Selection
You can conveniently select from the modes displayed on the screen
which are selected to suit the shooting environment.
Tap and swipe the camera modes left or right, or swipe the screen left
or right to select a camera mode.
Camera modes
Using camera modes
Record Time-lapse videos
You can record Time-lapse videos optimised for the situation.
Videos can be recorded with optimal speed and steady motion by
analysing various shooting environments. The time-lapse speed can be
automatically adjusted according to the shooting target and environment.
You can also select the time-lapse speed manually.
1 Tap and select Time-lapse by swiping camera modes.
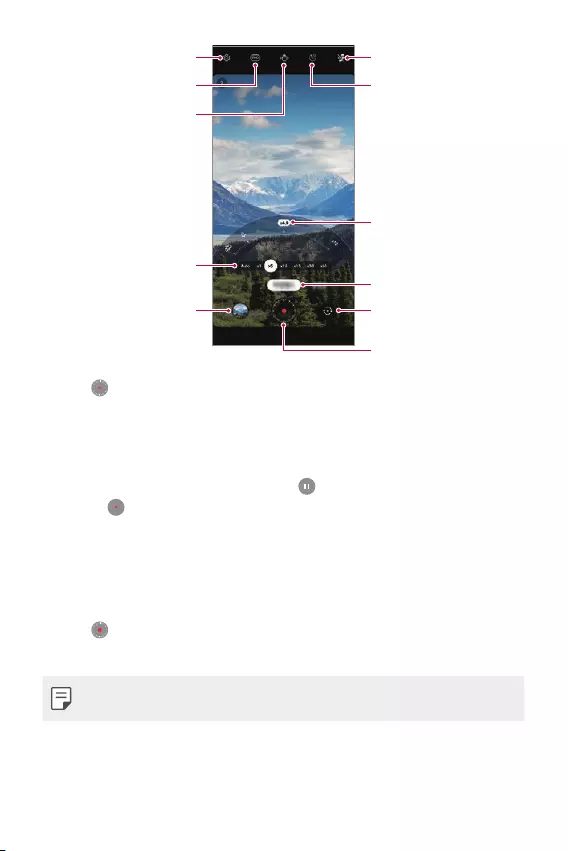
Useful Apps 101
Select zoom
Record videos
Switch to front-facing/
rear-facing camera
Current photo mode
Preview
Select the time-lapse
speed
Set/Cancel flash setting
Night Time-lapse
Set camera options
Set screen resolution
Turn On/Off steady cam
2 Tap to record a video.
• You can change a zoom and time-lapse speed while recording.
• If you tap the desired speed, the time-lapse speed is adjusted while
recording.
• To pause the video recording, tap . To resume the video recording,
tap .
• While recording a video, you may spread or pinch two fingers to
zoom in or out.
• While recording a video, you may tap the desired area to adjust the
brightness.
3 Tap to stop recording.
• The recorded video will be saved in Gallery.
• Audio is not recorded during Time-lapse recording.
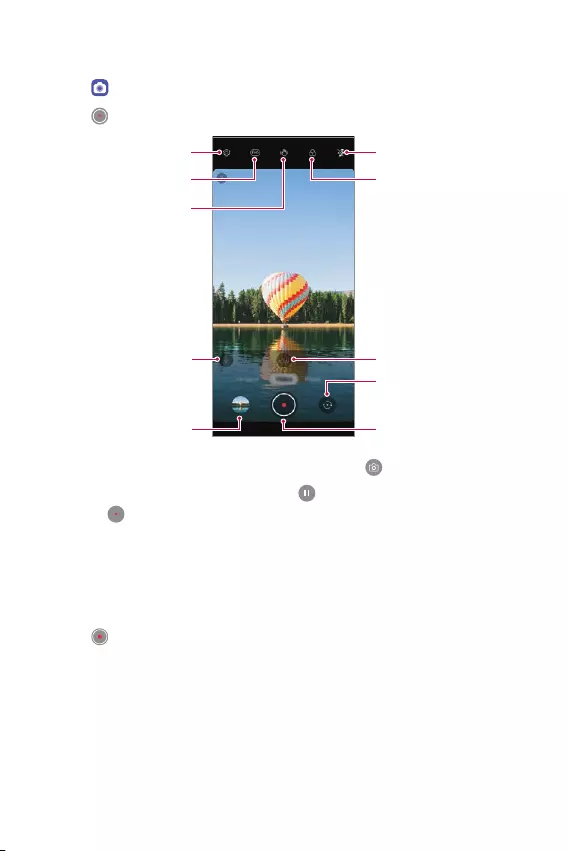
Useful Apps 102
Recording a video
1 Tap and select Video by swiping camera modes.
2 Tap to record a video.
Select zoom
Record videos
Switch to front-facing/
rear-facing camera
Set flash setting
Apply filter effect
Set camera
Set screen resolution
Turn On/Off steady cam
Preview
Tap to change the audio
options from Basic, ASMR
Recording, and Voice
Bokeh.
• To take a photo while recording a video, tap .
• To pause the video recording, tap . To resume the video recording,
tap .
• While recording a video, you may spread or pinch two fingers to
zoom in or out.
• While recording a video, you may tap the desired area to adjust the
brightness.
3 Tap to end the video recording.
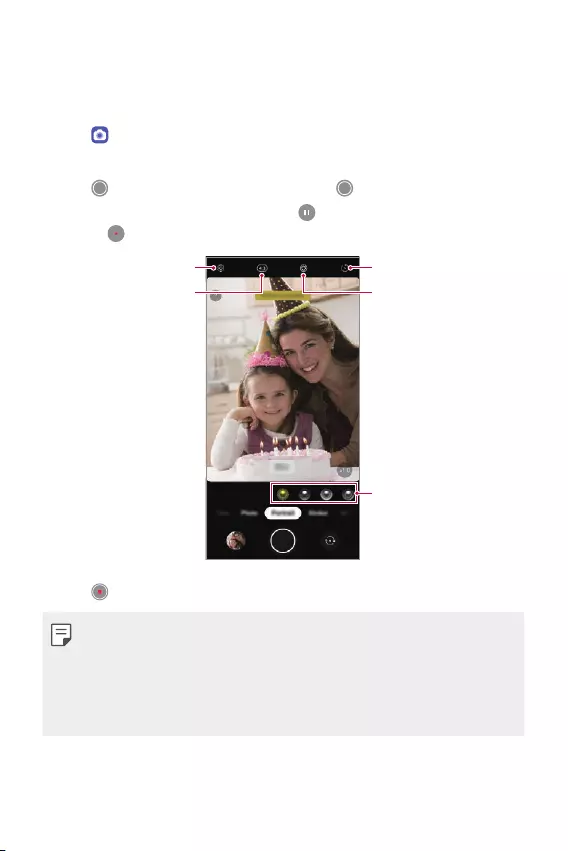
Useful Apps 103
Taking portraits
You can take photos or videos that make the subject more distinct and
stand out by blurring the background.
1 Tap and select Portrait by swiping camera modes.
• Select a desired effect by swiping effect options for portrait.
2 Tap to take a photo, or touch and hold to record a video.
• To pause the video recording, tap . To resume the video recording,
tap .
Set timer setting
Set aperture value
Set camera
Set screen ratio
Select an effect
3 Tap to end the video recording.
• When you see the message “Portrait is available”, start taking a photo.
• The Portrait feature may not work if the camera cannot recognise the
subject.
• While taking a photo, keep the distance to your subject to 1.3 ~ 5 feet.
• This feature is not available if the surroundings are too dark.

Useful Apps 104
Using a sticker
You can add various stickers in photos or videos. Also, enjoy a dynamic
effect through moving 3D AR stickers.
1 Tap and select Sticker by swiping camera modes.
2 Tap to take a photo, or touch and hold to record a video.
• To pause the video recording, tap . To resume the video recording,
tap .
3 Tap to end recording.
3D AR Sticker
Depth camera on the back of the device allows you to create realistic 3D
AR Effect by recognizing facial contours in greater detail.
1 Tap and select Sticker by swiping camera modes.
2 Tap .
3 Swipe the sticker list left or right to select an AR sticker to use.
• The face detected by the camera is scanned in 3D.
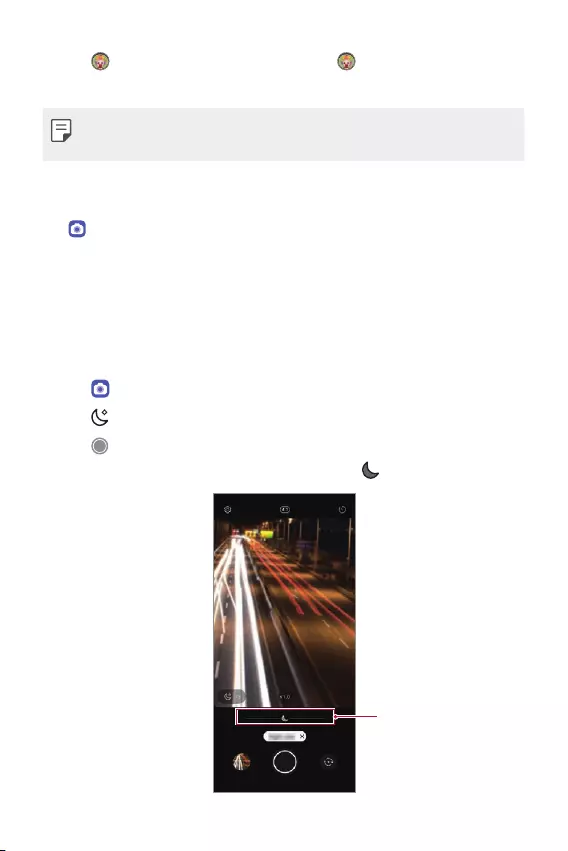
Useful Apps 105
4 Tap to take a photo, or touch and hold to record a video.
• The photo is taken with 3D AR Sticker applied.
• The 3D scanning feature of Z-camera is available only for close-up
portrait shooting.
Using additional camera modes
Tap and select More by swiping camera modes.
Night view
You can take vivid and clear night photos. Night view will run
automatically when you take a photo in a low light conditions.
You can also take clear night scenes by using the Night view feature
manually.
1 Tap and select More by swiping camera modes.
2 Tap .
3 Tap to take a photo.
• To adjust the brightness of the photo, slide left or right.
Adjust brightness
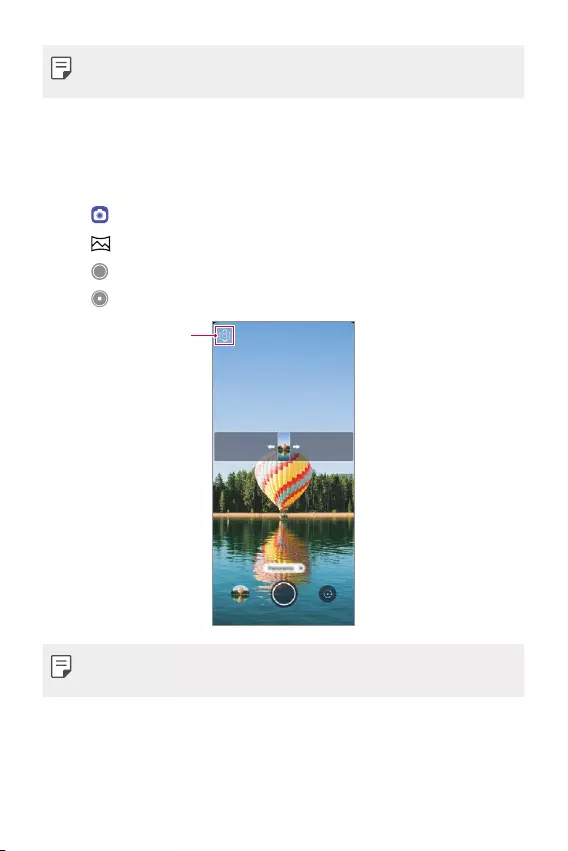
Useful Apps 106
• Hold steady and firm so that the camera does not shake while taking
a photo.
Panorama
You can create a panoramic photo by moving the camera in one direction
to photograph and stitch continuous shots of a wide view.
1 Tap and select More by swiping camera modes.
2 Tap .
3 Tap and then slowly move the camera in one direction.
4 Tap to stop capturing the panoramic.
Set camera
• When moving the camera in one direction, make sure that the screen
you shoot is not out of the guide line.

Useful Apps 107
Manual Camera
You can create photos featuring professional touch by using a variety of
advanced features.
1 Tap and select More by swiping camera modes.
2 Tap .
3 Customize the following camera settings.
• If you select Auto, the options are automatically adjusted according
to the shooting target and environment.
• If the Focus peaking option is selected, the focused area is
highlighted in color. This feature is available only in Manual Focus
(MF) mode.
Adjust white
balance
Reset the
settings
Adjust focus
Adjust
brightness
Adjust ISO
speed
Displays
various Graphy
options
Adjust shutter
speed
Set timer setting
Set flash setting
Set camera
Set screen ratio
Apply filter effect
4 Tap to take the photo.
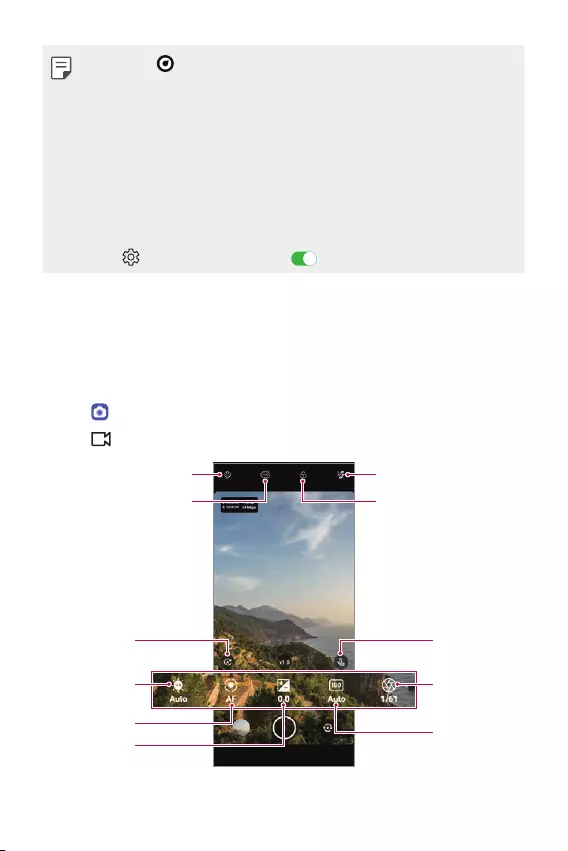
Useful Apps 108
• If you tap and select a Graphy effect, a list of recommended photos
with various settings will appear.
• Selecting the Graphy effects allows you to shoot using the white
balance, shutter speed, and ISO setting values applied to the
recommended photo.
• The Graphy feature is available only in Manual Camera mode.
• You can see a variety of recommended photos if you download the
Graphy app from Google Play Store.
• You may be charged for data usage, depending on your pricing plan.
• Tap , then tap Graphy photos to deactivate this feature.
Manual Video
You can record a video by manually customizing various options. Adjust
values for the white balance, focus, brightness, ISO, shutter speed and
more.
1 Tap and select More by swiping camera modes.
2 Tap .
Adjust white
balance
Reset the
settings
Adjust focus
Adjust
brightness
Adjust ISO
speed
Adjust audio
balance
Adjust shutter
speed
Set flash setting
Apply filter effect
Set camera
Set screen resolution
Useful Apps 109
3 Manually adjust the camera settings, as necessary.
4 Tap to record a video.
Slo-mo
You can create an entertaining video by changing the moving speeds of
subjects in your video.
1 Tap and select More by swiping camera modes.
2 Tap .
3 Customize the following camera settings.
4 Tap or to select a duration of the slow motion effect.
• Part Slo-mo: Allows you to apply a slow motion effect to a specific
section of the video.
- Tap at the moment where you want the slow motion effect to
be applied. With a short-press, slow motion effect will be applied
for 0.5 second. With a long-press, slow motion effect will be
applied until you release your finger.
• All Slo-mo: Allows you to apply a slow motion effect to the entire
video.
5 Tap to start recording.
• To pause the video recording, tap . To resume the video recording,
tap .
6 If you want to finish shooting, tap .

Useful Apps 110
YouTube Live
You can record a video and directly upload to YouTube.
To use this feature, you must meet the eligibility requirements. Contact
YouTube for the requirements.
1 On the home screen, tap .
2 Select More by swiping camera modes, then tap .
• YouTube Live is available only when your device is connected to the
Internet. If you use mobile data, you may be charged for data usage,
depending on your pricing plan.
Useful camera features
Taking a photo with the AI feature
When taking a photo, the AI feature recognises a subject and applies the
optimum effect to the photo.
• Tap to deactivate the AI feature.
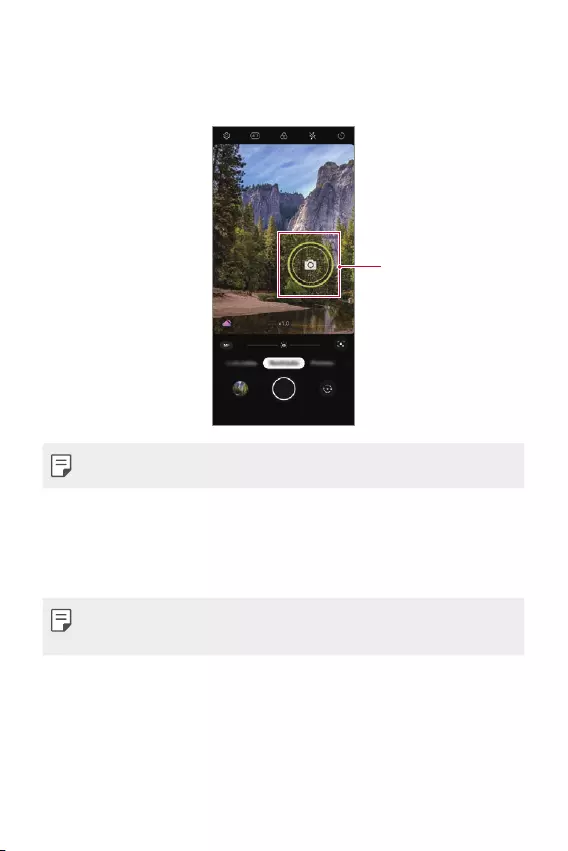
Useful Apps 111
Auto-Exposure/Auto-Focus lock
You can fix the current exposure level and focus position by touching and
holding the screen. To turn off the feature, tap a blank area on the screen.
Auto-Exposure/
Auto-Focus lock
• This feature is available only in specific modes.
Zoom in or out
You may spread or pinch two fingers to zoom in or out when you take
photos or videos.
• Zoom in/out function is not available in the selfie mode (front camera).
• This function is not supported in a number of modes.
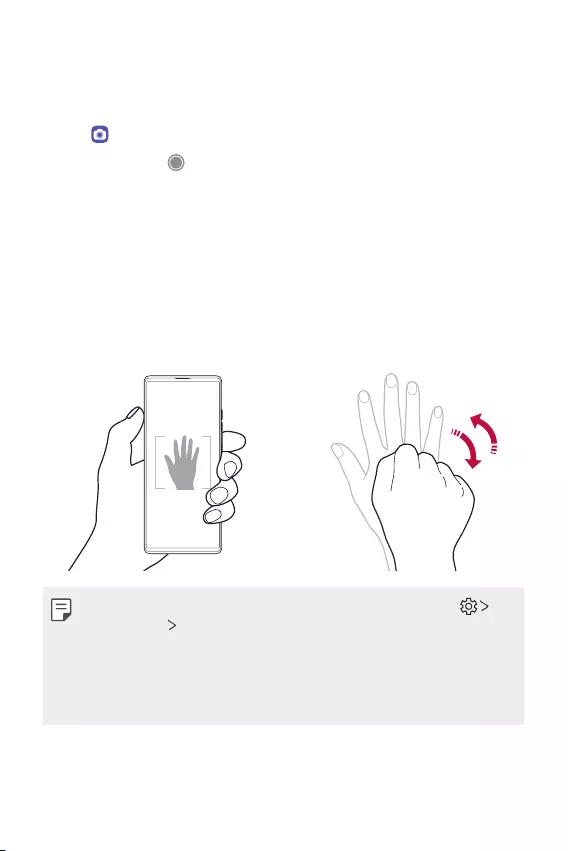
Useful Apps 112
Using the Burst Shot
You can take consecutive photos and view them as moving pictures in the
Gallery.
1 Tap and select Photo.
2 Touch and slide to the left or right.
• Multiple, consecutive photos (up to 100 photos) are taken while
you are holding down.
Gesture shot
You can take selfies by using gestures.
Show your palm to the front camera and then clench your fist.
You can also clench your fist and then open it towards the front camera.
• In three seconds, a photo is taken.
• To use this feature, switch to the front camera mode, then tap
Selfie shot Gesture shot.
• Make sure that your palm and fist are within the reference line so that
the camera can detect them.
• This feature may not be available while using some of the camera
features.
Useful Apps 113
Auto shot
You can use the face detection feature to take selfies easily and
conveniently. You can set the device so that, when you look at the screen,
the front camera detects your face and takes a selfie automatically.
• The white coloured guide frame appears when the front camera
detects your face. If the subject within the guide frame stops moving,
the guide frame colour turns yellow, then the camera takes a photo.
• Tap Selfie shot Auto shot to enable the Auto shot feature.
Interval shot
You can take selfies at an interval.
While using the front camera, you can show your palm to the camera,
then clench your fist twice quickly.
• Four photos are taken at regular intervals after a timer delay of three
seconds.
Save as flipped
Before taking a photo with the front camera, tap Save as flipped.
The image is flipped horizontally.
• When using the front camera, you can change how selfies are taken in
the camera options. See
Customising the camera options
for details.
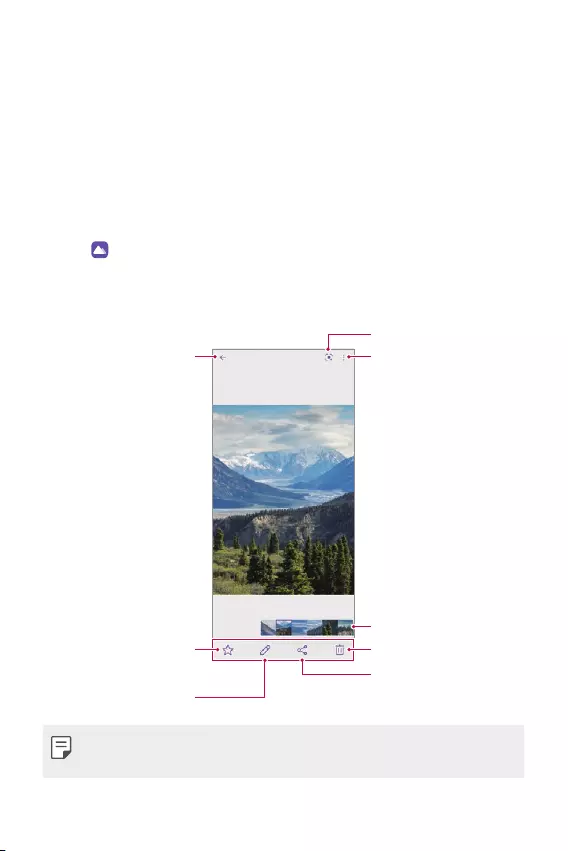
Useful Apps 114
Gallery
Gallery overview
You can view and manage photos and videos saved on your device.
Viewing photos
You can view the photos saved to the product.
1 Tap and select a desired folder.
2 Tap a desired photo.
• The Gallery folder contains Photos, Albums, Memories, and Play.
Delete images
Preview gallery
Share images
Add to or remove from
your favourites.
Edit images
Access additional options.
Back to the previous
screen.
Open Google Lens.
• Details menu appears when the screen is lightly touched. Touching the
screen once again makes the menu disappear.
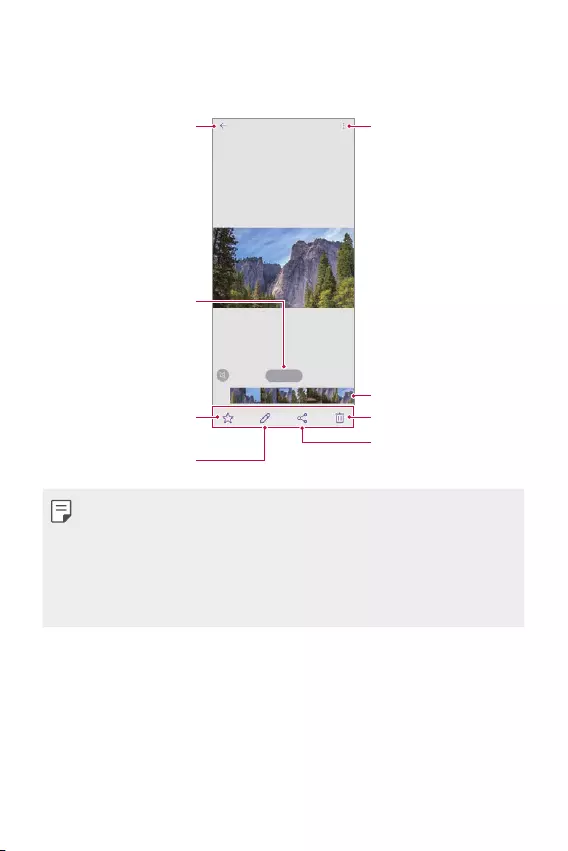
Useful Apps 115
Playing a video
You can view the videos saved to the product.
Access additional
options.
Back to the previous
screen.
Delete images
Preview gallery
Share images
Add to or remove from
your favourites.
Pause or play the video.
Edit images
• To adjust the sound volume, drag the right side of the video screen up
or down.
• To adjust the screen brightness, drag the left side of the screen up or
down.
• Dragging the screen to the left on the video play screen allows you to
rewind (REW) and dragging to the right allows you to fast forward (FF).
Useful Apps 116
Contacts
Contacts overview
You can save and manage contacts.
On the home screen, tap LG Contacts.
Adding contacts
Adding new contacts
1 On the contact list screen, tap .
• A pop-up appears for selecting the saving location for contact.
Select the location you want.
2 Enter contact details and tap Save.
Importing contacts
You can import contacts from another storage device.
1 On the contact list screen, tap Manage contacts Import.
2 Select the source and target locations of the contact you want to
import, and then tap OK.
3 Select the contacts and tap Import.
Adding contacts to the speed dial list
1 On the contact list screen, tap Speed dial.
2 Tap Add contact from a speed dial number.
3 Select a contact.
• While adding a new contact, tap to add a speed dial number.
Useful Apps 117
Searching for contacts
You can search for contacts by using one of the following options:
• Tap the search bar at the top of the Contacts screen and enter the
desired contact or phone number you want to search for.
• Scroll the contact list up or down.
• From the index of the contact list screen, tap the initial letter of a
contact
.
• Pressing the search bar at the top of the Contacts screen and entering
a contact or phone number brings up the integrated search results from
the call history and contacts list saved onto the product.
Contacts list
Editing contacts
1 On the contact list screen, select a contact.
2 On the contact detail screen, tap and edit details.
3 Tap Save to save changes.
Deleting contacts
You can delete contacts by using one of the following options:
• On the contact list screen, touch and hold a contact you want to
delete, then tap .
• Tap Delete on the contact list screen.
• Deleted contacts may not be restored.

Useful Apps 118
Adding favourites
You can register frequently used contacts as favourites.
1 On the contact list screen, select a contact.
2 On the contact detail screen, tap .
Creating groups
1 On the contacts group list, tap Groups, then tap .
2 Enter a new group name.
3 Tap Add members, select contacts, then tap Add.
4 Tap Save to save the new group.
QuickMemo+
QuickMemo+ overview
You can make creative notes by using a variety of options on this
advanced notepad feature, such as image management and screenshots,
which are not supported by the conventional notepad.
Creating a note
1 On the home screen, tap LG QuickMemo+.
2 Tap to create a note.
• : Save a note.
• : Undo the previous edit.
• : Redo the recently deleted edits.
• : Enter a note by using the keypad.
• : Save your favorite pen types.
• : Write notes by hand.
• : Erase handwritten notes.
Useful Apps 119
• : Change into the calligraphy font as you write by hand.
• : Access additional options.
3 Tap to save the note.
Writing notes on a screenshot
1 While viewing the screen you want to capture, drag the status bar
downwards and then tap .
• The screen is captured and displayed as a thumbnail on the right
bottom of the screen.
2 To write notes on the screen, tap .
3 Write notes using the tools.
• : Zoom in or out, or adjust the area to capture.
• : Write notes by hand.
• : Erase handwritten notes.
• : Undo the previous edit.
• : Redo the recently deleted edits.
• : Crop the screen as you desire.
4 Tap and save the notes.
• Saved notes can be viewed in Gallery.
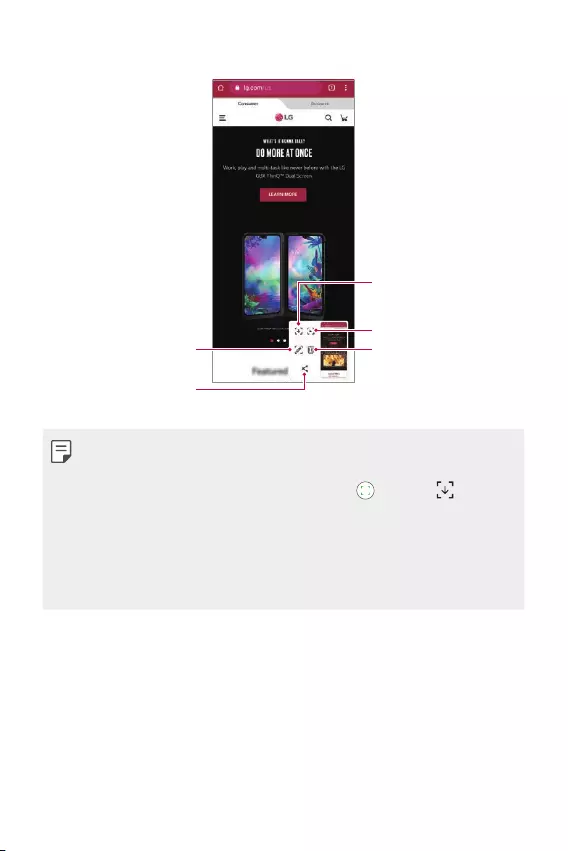
Useful Apps 120
Additional features after capturing a screenshot
Tap to record the screen.
Tap to capture entire
screen by using the scroll
capture feature.
Tap to delete the captured
screen shot.
Tap to write notes on the
captured screen.
Tap to share the captured
screen shot.
• You can capture the entire screen by using the scroll capture feature.
• While using an app such as Messaging and Chrome, drag the
notifications panel downwards and then tap . Then, tap to
capture the entire screen you are currently viewing as a single file.
• This feature is available only on some apps that support the scroll
capture feature.
• Pinch two fingers or spread your fingers apart to change the memo
layout.
Useful Apps 121
Clock
Alarm
You can set an alarm to trigger it at a specified time.
1 On the home screen, tap LG Clock Alarm.
2 Tap to add a new alarm.
3 Configure the alarm settings and tap Save.
• If you select a previously set alarm, you can edit the alarm.
• To delete an alarm, tap Delete at the top of the screen. You can also
touch and hold the alarm.
World clock
You can view the current time in cities around the world.
1 On the home screen, tap LG Clock World clock.
2 Tap and add a city.
Timer
You can set the timer to trigger an alarm after a specified period of time.
1 On the home screen, tap LG Clock Timer.
2 Set the time and tap Start.
• To suspend the timer, tap Pause. To resume the timer, tap Resume.
3 Tap Stop to stop the timer alarm.

Useful Apps 122
Stopwatch
You can use the stopwatch to record a lap time.
1 On the home screen, tap LG Clock Stopwatch.
2 Tap Start to initiate the stopwatch.
• To record a lap time, tap Lap.
3 Tap Pause to suspend the stopwatch.
• To resume the stopwatch, tap Resume.
• To clear all the records and restart the stopwatch, tap Reset.
Music
You can play and manage songs or music albums.
1 On the home screen, tap LG Music.
2 Select a category.
3 Select a music file.
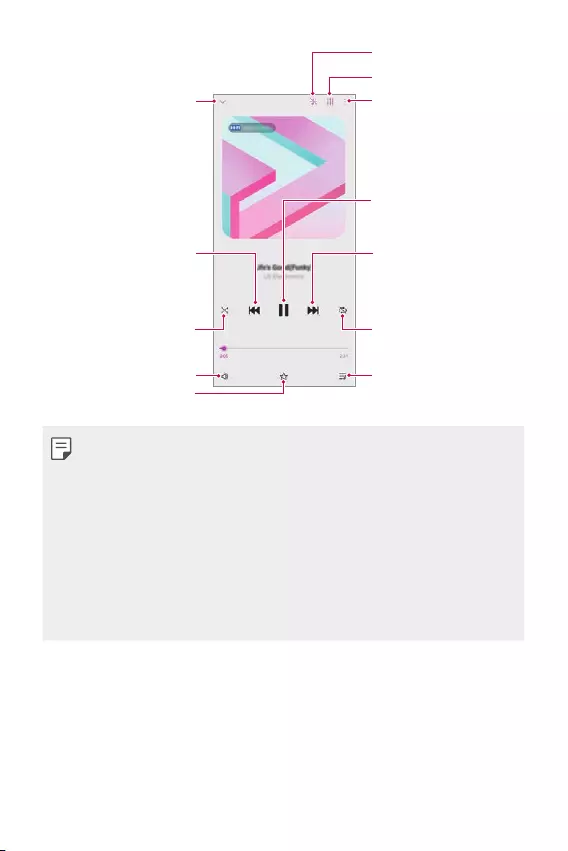
Useful Apps 123
Play in random order. Select a repeat mode.
Tap to play the next file/
Touch and hold to fast
forward.
Tap to play from the
beginning of the current
file/Double-tap to play the
previous file/Touch and
hold to rewind.
Add to or delete from your
favourites.
Adjust the sound volume.
Set sound effects.
Turn on/off Flash Light.
Back to the previous
screen.
Pause or play.
Access additional options.
Go to Now playing list.
• Some file formats may not be supported, depending on the installed
software.
• Files that exceed the size limit may cause an error.
• Music files may be protected by international copyright owners or
copyright laws. You may have to obtain legal permission before copying
a music file. To download or copy a music file, first check the copyright
law for the relevant country.
• This model supports Hi-Fi audio playback. Hi-Fi audio files display the
Hi-Fi icon.
• If you set the flashlight, flashlight blinks to fit the music being played.
Useful Apps 124
Calculator
You can use two types of calculators: the simple calculator and the
scientific calculator.
1 On the home screen, tap Google Calculator.
2 Use the keypad to make a calculation.
• If you want to calculate from the beginning, tap and hold .
ThinQ
You can easily connect the product with IoT appliances to monitor and
conveniently use the appliances.
On the home screen, tap LG ThinQ.
• Washing machine, dryer, styler, dishwasher, oven, and robot cleaner can
only be registered when the product is in the standby mode.
• Look for the ThinQ mark on the product to see if it can be connected to
ThinQ app.
• Tap to check various function of the ThinQ app.
Useful Apps 125
LG Health
You can manage your health and maintain good exercise habits by
keeping track of the exercises you do.
Getting started with LG Health
You can configure LG Health when launching the app for the first time or
after resetting it.
1 On the home screen, tap LG LG Health.
2 Follow the on-screen instructions to complete configuration.
Using LG Health
You can view main information on LG Health and manage the amount of
physical exercise and health information.
1 On the home screen, tap LG LG Health.
2 The following options are available.
• : View your exercise log on the day you want to check.
• : Begin tracking an exercise. The route and amount of your
physical exercise are recorded for each exercise type.
• : Set your daily exercise goals including calories and steps, or set
various LG Health settings.
• Health-related information provided by LG Health is designed for user
convenience and cannot be used for purposes of disease prevention,
treatment, diagnosis or other medical issues.
• LG Health may vary or may not be available, depending on the country
and service provider. LG Health functions that are available and apps
that can be added to LG Health may vary, depending on the country. This
is due to differing laws and regulations.
Useful Apps 126
HD Audio Recorder
The HD Audio Recorder allows you to configure the audio settings
manually so that you can record audio based on your environment.
Recording modes
You can record a high definition audio file by selecting and configuring the
desired audio mode to suit the recording environment.
On the home screen, tap LG HD Audio Recorder .
Normal
You can record audio without extra settings.
ASMR
You can record ASMR sound.
Concert
You can record audio in a concert or other music event.
Custom
You can manually configure the desired settings to record audio.
Studio Mode
With Studio mode, you can play an audio file or music and record your
voice at the same time, create a chord by recording your voice multiple
times, and record your comments over the presenter’s or speaker’s original
audio file.
1 On the home screen, tap LG HD Audio Recorder Custom.
2 Tap .
3 Select an audio file to use as background music.
4 Tap to record voice.
5 Tap to save the recorded file.

Useful Apps 127
• Background music can only be played through earphones. Make sure to
plug in earphones before using this feature.
• To change additional settings, tap Settings, then customise the file
type, bit depth, sampling rate and other settings.
• When you select the Concert or Custom mode with earphones
connected, appears. Tap and then select the microphone to use.
• You can monitor the the sound quality with the connected earpiece
while recording audio. While recording audio in Studio mode, sound
monitoring is not supported. You can hear only the background music.
Game Launcher
You can set whether to use the game launcher where you can view the
list of games installed on the product and select game settings such as
muting media volume, limiting alerts, etc.
1 On the home screen, tap Game Launcher.
2 Select the desired option.
Smart Doctor
You can use Smart Doctor to diagnose the device’s condition and optimise
it.
On the home screen, tap LG Smart Doctor.
Useful Apps 128
LG Mobile Switch
Easily transfer data from a used device to a new device via LG Mobile
Switch.
1 On the home screen, tap LG LG Mobile Switch.
You can also tap Settings System Backup LG Mobile Switch.
• If the app is not installed on the product, download and install the
LG Mobile Switch app from the Google Play Store.
2 Follow the on-screen instructions to select a desired method for
transfer.
• Data in a Google Account will not be backed up. When you synchronise
your Google Account, Google apps, Google contacts, Google Calendar,
Google memo app data and apps downloaded from the Play Store are
stored on the Drive app automatically.
• Fully charge the battery before transferring data to avoid unintentional
powering off during the process.
App trash
You can see the list of apps deleted on the home screen. The app that was
deleted within the last 24 hours can be recovered.
On the home screen, tap LG App trash.
For more details, refer to
App trash
.
Useful Apps 129
SmartWorld
You can download a variety of games, audio content, apps and fonts
provided by LG Electronics. Customise your device to suit your preferences
by using Home themes and fonts.
• If you use mobile data, you may be charged for data usage depending
on your pricing plan.
• This feature may not be supported depending on the area or service
provider.
1 On the home screen, tap SmartWorld.
2 Tap LG Account, then sign in.
3 Select and download the desired content items.
RemoteCall Service
Your device can be remotely diagnosed for resolving issues. First, make a
phone call to an LG Customer Service Centre as follows:
• To use this function, first you must agree to usage of the function.
• If you use mobile data, you may be charged for data usage depending
on your pricing plan.
1 On the home screen, tap LG RemoteCall Service.
2 Connect a call to an LG Customer Service Centre.
3 After the call connects, follow the service associate’s instructions to
enter a six-digit access number.
• Your device is remotely connected and the remote support service
starts.
Useful Apps 130
Cell Broadcast
You can view real-time text broadcasts on emergency situations, such as
typhoons, floods and earthquakes.
On the home screen, tap Cell Broadcast.
Google apps
You can use Google apps by setting a Google Account. The Google
Account registration window appears automatically when you use a
Google app for the first time. If you do not have a Google Account, create
one from your device. For details on how to use an app, see the Help in
the app.
• Some apps may not work depending on the area or service provider.
Calendar
The Calendar app allows you to track your schedule of events (that you
created), organised by Day, 3-day, Week or Month.
Chrome
A fast, simple, and secure web browser, built for the modern web.
Docs
Docs is a collaborative, word-processing tool that powers productivity. Use
Docs to create, edit and work together in real-time.
Drive
Drive is a file storage and sharing app that makes it easy to find, share and
collaborate on work projects from anywhere, instantly.

Useful Apps 131
Duo
Make simple, high quality video calls to your friends and family on Android
phones and iPhones.
Gmail
Gmail is an easy to use mail app that keeps your messages safe, makes
your inbox smarter, and helps you stay organised.
Google
The Google app keeps you in the know about the things you care about.
Find quick answers, explore your interests, and get a feed of stories and
updates on topics that matter to you.
Maps
Going somewhere? Go with Maps, the app you can rely on for real-time
GPS navigation, traffic, transit, and details about millions of places, such as
reviews and popular times.
Photos
Home for all your photos and videos, automatically organised so you can
share and save what matters.
Play Movies & TV
Use your Google Account to rent or purchase movies. Purchase content
and play it anywhere.
YT Music
A new music streaming service from YouTube.
Sheets
Sheets is a collaborative spreadsheet processing tool that powers
productivity. Use Sheets to import, organise and analyse information
together in real-time.

Useful Apps 132
Slides
Google Slides is a collaborative presentation creation tool that powers
productivity. Use Slides to organise information, present results, and make
decisions together in real-time.
YouTube
Watch your favourite channels, listen to music you love, and upload videos
to share with people around the world.
Assistant
Your device has the Google Assistant built-in. Find answers and get things
done while on-the-go.
• The Google Assistant is not available in certain languages and countries.
Files
You can view and manage files saved on your device.

Settings
04

Settings 134
Settings
You can customise the device settings in accordance with your
preferences.
On the home screen, tap Settings.
• If you enter a keyword on the search window at the top of the screen,
you can conveniently run the items that need to be set.
Network & internet
Dual SIM card
You can configure Dual SIM settings.
1 On the settings screen, tap Network & internet Dual SIM card.
2 Customise the following functions:
• SIM card 1: Change the name and icon of the SIM card 1.
• SIM card 2: Change the name and icon of the SIM card 2.
• SIM card colour theme: Change the colour themes for the SIM
cards.
• Cost save mode: Activate or deactivate the cost save mode. In the
cost save mode, if you make a call to a contact to which a specific
SIM is assigned, this SIM is used for the call even if the other SIM is
active, for example, it is using mobile data.
• Mobile data: Select a SIM card you want to use for mobile data
service. You can also turn off this function.
• Data roaming: Select this option to enable the device to use mobile
data when you are roaming outside your home network area.
• Mobile data during calls: Access mobile data using the nondefault
data SIM card temporarily during an HD voice call with the same
card.
Settings 135
Wi-Fi
You can connect to nearby devices over a Wi-Fi network.
Connecting to a Wi-Fi network
1 On the settings screen, tap Network & internet Wi-Fi.
2 Tap to activate it.
• Available Wi-Fi networks appear automatically.
3 Select a network.
• You may need to enter the network’s Wi-Fi password.
• The device skips this process for previously accessed Wi-Fi
networks. If you do not want to automatically connect to a certain
Wi-Fi network, tap the network and then tap Forget.
Wi-Fi network settings
On the settings screen, tap Network & internet Wi-Fi.
• Switch to mobile data: If the mobile data connection function is
activated but the device cannot connect to the Internet via Wi-Fi
connection, the device automatically connects to the Internet via the
mobile data connection.
• This feature depends on the service provider.
• : Customise Wi-Fi network settings.
Settings 136
Wi-Fi Direct
You can connect your device to other devices that support Wi-Fi Direct to
share data directly with them. You do not need an access point. You can
connect with more than two devices by using Wi-Fi Direct.
1 On the settings screen, tap Network & internet Wi-Fi
Advanced Wi-Fi Wi-Fi Direct.
• Nearby devices that support Wi-Fi Direct automatically appear.
2 Select a device.
• Connection occurs when the device accepts the connection request.
• The battery may drain faster when using Wi-Fi Direct.
Mobile data
You can turn mobile data on and off. You can also manage mobile data
usage.
Turning on mobile data
1 On the settings screen, tap Network & internet Mobile data.
2 Tap to activate it.
Customising mobile data settings
1 On the settings screen, tap Network & internet Mobile data.
2 Customise the following settings:
• Mobile data: Set to use data connections on mobile networks.
• Limit mobile data usage: Set a limit for mobile data usage to block
mobile data if the limit is reached.
• : Customise mobile data settings.
• Data usage volume is measured based on the product, and the
volume calculated by your mobile provider may be different.
Settings 137
Call
You can customise call settings, such as voice call and international call
options.
• Some features may not be supported depending on the area or service
provider.
1 On the settings screen, tap Network & internet Call.
2 Customise the settings.
Tethering
USB tethering
You can connect the device to another device via USB and share mobile
data.
1 Connect your device and other devices via USB cable.
2 On the settings screen, tap Network & internet Tethering USB
tethering and then tap to activate it.
• This option uses mobile data and may incur data usage fees, depending
on your pricing plan. Consult with your service provider for more
information.
• When connecting to a computer, download the USB driver from
www.lg.com
and install it on the computer.
• You cannot send or receive files between your device and a computer
while USB tethering is turned on. Turn off USB tethering to send or
receive files.
• Operating systems that support tethering are Window XP or higher, or
Linux.
Settings 138
Wi-Fi hotspot
You can set the device as a wireless router so that other devices can
connect to the Internet by using your device’s mobile data.
1 On the settings screen, tap Network & internet Tethering Wi-Fi
hotspot and then tap to activate it.
2 Tap Set up Wi-Fi hotspot, and enter the Wi-Fi name (SSID) and
password.
3 Turn on Wi-Fi on the other device, and select the name of the device
network on the Wi-Fi list.
4 Enter the network password.
• This option uses mobile data and may incur data usage fees, depending
on your pricing plan. Consult with your service provider for more
information.
• More information is available at this web site:
http://www.android.com/tether#wifi
Wi-Fi hotspot turn off timer
When the Wi-Fi hotspot has not been used for a specific period of time,
it is automatically disconnected. You can set the time for automatic
disconnection.
Bluetooth tethering
A Bluetooth-connected device can connect to the Internet by using your
device’s mobile data.
1 On the settings screen, tap Network & internet Tethering
Bluetooth tethering and then tap to activate it.
2 Turn on Bluetooth on both devices and pair them.
Settings 139
• This option uses mobile data and may incur data usage fees, depending
on your pricing plan. Consult with your service provider for more
information.
• More information is available at this web site:
http://www.android.com/tether#Bluetooth_tethering
Help
You can view help on using tethering and hotspots.
On the settings screen, tap Network & internet Tethering Help.
Airplane mode
You can turn off the call and mobile data functions. When this mode is
on, functions that do not involve data, such as games and music playback,
remain available.
1 On the settings screen, tap Network & internet Airplane mode.
2 Tap in the confirmation screen.
Mobile networks
You can customise the mobile networks settings.
1 On the settings screen, tap Network & internet Mobile networks.
2 Customise the following settings:
• Network mode: Select a network type.
• Access Point Names: View or change the access point for using
mobile data services. To change the access point, select a choice
from the access point list.
• Network operators: Search for network operators and connect
automatically to a network.

Settings 140
VPN
You can connect to a safe virtual network, such as an intranet. You can
also manage connected virtual private networks.
Adding VPN
1 On the settings screen, tap Network & internet VPN.
2 Tap .
3 Enter VPN details and tap Save.
Configuring VPN settings
1 Tap a VPN from the VPNS list.
2 Enter the VPN user account details and tap Connect.
• To save the account details, select the Save account information
checkbox.
Private DNS
You can configure the Private DNS (Domain Name System) options.
1 On the settings screen, tap Network & internet Private DNS.
2 Select the desired option and tap Save.
Settings 141
Connected devices
Bluetooth
You can connect your device to nearby devices that support Bluetooth to
exchange data with them. Connect your device to a Bluetooth headset
and a keyboard. This makes it easier to control the device.
Pairing with another device
1 On the settings screen, tap Connected devices Bluetooth.
2 Tap to activate it.
• Available devices appear automatically.
• To refresh the device list, tap .
• Only devices set as visible are displayed on the list.
3 Select a device from the list.
4 Follow the on-screen instructions to perform authentication.
• This step is skipped for previously accessed devices.
Sending data via Bluetooth
1 Select a file.
• You can send multimedia files or contacts.
2 Tap Bluetooth.
3 Select a target device for the file.
• The file is sent as soon as the target device accepts it.
• File sharing processes may differ, depending on the file.
Settings 142
Screen sharing
You can play the screen and sound of the device on a different device,
such as a TV, that supports the Miracast function.
1 On the settings screen, tap Connected devices Screen sharing.
2 Tap to activate it.
3 Select a device from the list of nearby devices.
• If the desired device does not appear, tap Search to refresh the list.
• After connecting to the device, the device displays the screen of
your device.
• Screen sharing turns off automatically if there is no sharing-compatible
device in the vicinity.
NFC
You can use the device as a transportation card or credit card. You can also
share data with the other device.
1 On the settings screen, tap Connected devices NFC.
2 Tap to activate it.
• Touch your device with other device that supports NFC to allow
sharing data.
• NFC antenna may be located differently depending on the device type.
See
Parts overview
for details about the NFC antenna area.

Settings 143
Sharing panel
You can share contents from Gallery, Music and File Manager with nearby
devices. Also you can share the content with specific people in apps that
work with Google Direct Share.
1 On the settings screen, tap Connected devices Sharing panel.
2 Tap to deactivate each option.
• Nearby devices: You can display the nearby devices to which you
can share contents on the Gallery, Music, and File Manager apps.
• Direct share: From an app which supports Google Direct Share, you
can display an icon which allows you to share contents to specific
people.
File sharing
You can send and receive files between your device and other LG devices
or tablets.
1 On the settings screen, tap Connected devices File sharing.
2 Customise the following settings:
• WING: Change the device name.
• Save to: Set the destination folder to save files sent from other
devices in.
• File sharing: Permit receipt of files sent from other devices.
• SmartShare Beam: Share files with other devices via SmartShare
Beam.
• Help: You can view help on sharing files.
Settings 144
Media server
You can share media content on your device with nearby devices that
support DLNA.
1 On the settings screen, tap Connected devices Media server.
2 Customise the following settings:
• Content sharing: Share content on your device with nearby devices.
• WING: Set your device’s name.
• Depending on the user’s product, the menu names may appear
differently.
• Content to share: Select the type of media content to share with
other devices.
• Allowed devices: View a list of devices permitted to access content
on your device.
• Not-allowed devices: View a list of devices not permitted to access
content on your device.
Printing
You can connect your device to a Bluetooth printer and print photos or
documents saved on the device.
On the settings screen, tap Connected devices Printing.
• Tap Default Print Service to search for printers you can connect to. Or,
tap Add printer to manually add a printer.
• Tap Add service to download the printer app you want.
• This is available only when the mobile network or the Bluetooth
function is turned on.
• To down the printer app in Add service, first log on to your Google
account.

Settings 145
Sound
You can customise sound, vibrate and notification settings.
On the settings screen, tap Sound and customise the following settings:
• Sound profile: Change the sound mode to Sound, Vibrate only, or
Silent.
• Volume: Adjust the sound volume for various items.
• Ringtone: Select a ringtone for incoming calls. Add or delete ringtones.
• Notification sound: Select a notification ringtone. Set music saved on
the device as a notification ringtone.
• System sounds: Select each system sound to turn on or off.
• Ring with vibration: Set the device to vibrate and play a ringtone
simultaneously.
• Ringtone ID: Create a ringtone for an incoming call from a particular
contact.
• Flash alert for incoming call: Set the flash to blink according to LG
ringtone.
• Do not disturb: Set the time, range and app type to receive
notification messages. Receive notification messages only on particular
days of the week.
• Sound quality and effects: Use the function to set the sound quality
and effects while playing a song or video.
- Volume: Adjust the sound volume for various items.
- Normalize volume: Use the function to normalise the volumes of
different sound sources.
- Equalizer: Use the function to adjust the equaliser settings.
- LG 3D Sound Engine: Use the function to play music or video in
three-dimensional, immersive and vivid sound when earphones,
speaker or other external audio devices are connected. See
LG 3D
Sound Engine
for details.
• Live Caption: Set the device to detect the voice in the media and
automatically generate subtitles.

Settings 146
• Vibration strength: Adjust the vibration intensity.
• Vibration type: You can select the type of vibration when receiving
calls.
• Vibrate on tap: Set the device to vibrate when you tap certain items
on the screen.
Notifications
You can check a list of installed apps, and configure the settings for
notifications.
1 On the settings screen, tap Notifications.
2 Customise the settings as desired.
Display
You can customise detailed settings for each screen type.
On the settings screen, tap Display and customise the following settings:
• Basic Home: Customise settings for the Home screen. See
Home
screen settings
for details.
• Swivel Home: Customise settings for the Swivel Home mode.
• Navigation bar: Configure the Navigation bar. For details, see
Using
Navigation bar
.
• AOD (always-on display): Always display information, such as the
date, time and notifications, even when the screen is turned off. For
details, see
AOD (always-on display)
.
• Second Screen: Set the brightness or screen colour of the second
screen.
• Comfort view: Set the device to reduce amount of blue light on screen
to reduce eye strain.
• Night mode: You can apply a dimmed screen theme to avoid glare on
the screen at night time.

Settings 147
• Screen colour: Adjust the colour, colour temperature for the desired
screen.
• Tap to reset the settings.
• Video Enhancer: When playing back a video in full screen mode, you
can change the settings for brighter and more dynamic colour display.
• Font: Change the font size, bold text or type.
• Accent colour: Change the accent colour for settings, menus,
notification windows, etc.
• Display size: Set the items on the screen to a size easy for you to see.
Some items may change position.
• Full screen apps: Select apps to open in full screen.
• Brightness: Use the slide bar to change the device’s screen brightness.
• Auto: Set the device so that the screen brightness is automatically
adjusted in accordance with the ambient light intensity.
• Extra brightness: Allows the display to be brighter than the maximum
brightness.
• Screen timeout: Automatically turn off the screen when the device is
left idle for a specified period of time.
• Auto-rotate screen: Automatically rotate the screen according to the
device’s orientation.
• Screen saver: Display a screen saver when the device is connected to
the holder or charger. Select a screen saver type to display.
• One-handed screen: Make the screen size smaller to conveniently use
the device with one hand.

Settings 148
Wallpaper & theme
You can select wallpaper, screen theme, icon style or AOD (Always-on
Display) for your device.
1 On the settings screen, tap Wallpaper & theme.
2 Tap Wallpaper, Theme, Icon, or AOD to customise the settings.
Lock screen & security
You can customise lock screen and security settings.
1 On the settings screen, tap Lock screen & security.
2 Customise the settings.
• Google Play Protect: Scan your device daily for potentially harmful
apps.
• Find My Device: Remotely track the device location. You can also
protect your data securely if you lost your device.
• Security update: Check for software update and configure
automatic installation settings.
• Select screen lock: Select the desired screen lock method. See
Setting a screen lock
for details.
• Customise Lock screen: Change the information displayed on the
locked screen.
• Secure lock settings: Change the secure lock settings.
• Fingerprints: Use your fingerprint to unlock the screen or content.
See
Fingerprint recognition overview
for details.
• Content lock: Allow you to set a lock type (password or pattern)
for your Gallery files.
• Encryption & credentials: Configure the settings for SD card
encryption and credentials.
- Encrypt SD card: Encrypt the memory card to prevent use on
another device. See
Memory card encryption
for details.

Settings 149
- Credential protection: View the type of the storage where the
security certificate will be saved.
- Trusted credentials: View your system’s root CA certificates and
user-installed CA certificates.
- User credentials: View and change secure certificate information
stored on your device.
- Install from storage: Install a secure certificate from a storage.
- Clear credentials: Delete user-installed secure certificates and
related credentials.
• Phone administrators: Allow privileges to restrict the control or
use of the device to particular apps.
• Trust agents: View and use trust agents installed on the device.
• Screen pin: Fix the app screen so that only the currently active app
can be used.
• Usage access: View details on usage of apps on the device.
Privacy
You can find and adjust all your privacy settings.
1 On the settings screen, tap Privacy.
2 Customise the settings.
• Permission manager: Allows you to check and change the
permissions granted to the apps.
• Lock screen: Allows you to set notifications to show on the lock
screen.
• Make passwords visible: Enable this option to briefly show each
character of the password as you type it so you can see what you’ve
entered.
• Device Personalisation Services: Allows you to get a suggestion
based on users, apps, and interactive content.

Settings 150
• Auto-fill service from Google: Enable this option to enter your
information saved in your account such as password, address,
or credit card number with a single tap. You can also disable this
option, use the Google Autocomplete feature, or add a new service
account.
• Google Location History: Allows you to enable or disable Location
History. When enabled, Google periodically stores and uses your
phone’s most recent location data in connection with your Google
Account.
From the Location History screen, tap to view and/or manage
your location data.
• Activity controls: Select activities and information which you want
Google to save.
• Ads: Allows you to check the advertising ID and set the personalised
ads.
• Usage and diagnostics: Enable this option to help improve the
Android experience by automatically sending diagnostic, device, and
app usage data to Google.
Location
You can check how your location information is shared and configure the
permission to access your location information.
On the settings screen, tap Location and set the desired function.
Settings 151
Extensions
Smart Doctor
You can use Smart Doctor to diagnose the device’s condition and optimise
it.
On the settings screen, tap Extensions Smart Doctor.
Context Awareness
You can automatically change your device settings according to the usage
pattern and location.
1 On the settings screen, tap Extensions Context Awareness.
2 Activate items you want to automatically change settings for.
• AUTOMATED: You can set the device to change the sound
profile, Bluetooth and Wi-Fi options automatically in different
environments, such as At home, Away from home, At work, and Off
work. You can also set an app to open when earphones are plugged
in or a Bluetooth device is connected.
• To use this feature, home or work location must be preset in My places.
On the settings screen, tap Location My places to set the locations.
Personalised service
You can get intelligent results when using the integrated search.
1 On the settings screen, tap Extensions Personalised service.
2 Tap to activate it.
Settings 152
Extended view on Swivel Mode
Apps can be extended across both screens in Swivel Mode.
1 On the settings screen, tap Extensions Extended view on Swivel
Mode.
2 Tap to activate it.
• EXTENDED BY DEFAULT: You can see an app in Extended view
when opening the app on the Main screen.
Gaming
You can configure settings for game tools, graphics and battery saving
feature.
1 On the settings screen, tap Extensions Gaming.
2 Customise the following settings:
• Game Launcher: Tap to use the game launcher.
• Game tools: You can run the function while playing games by
touching the game tools icon among the home touch buttons.
• Game graphics: Adjust the game graphics.
• When you change the resolutions on some games, the screen display
feature may not work properly.
• This function may not be available in certain game apps.
• Break time: Reduce the screen brightness and performance
whenever you leave the game running for more than 5 minutes.

Settings 153
Screen recording
You can configure the settings for screen recording.
1 On the settings screen, tap Extensions Screen recording.
2 Customise the following settings:
• Include yourself in video by: Select one from the following options.
- Image: Includes your profile image in video when recording. After
selecting this, tap and select a profile image. Then, adjust the
size of the image using the slide bar.
- Front camera: Includes yourself recorded using the front camera
while recording the screen.
- Never: Nothing is included.
• Audio source: Choose the audio source between Mic and
Contents.
• Video resolution: Select the resolution for screen recording.
Dual App
You can install duplicate messenger apps on the product and use two
accounts at the same time.
1 On the settings screen, tap Extensions Dual App.
2 After reading the disclaimer, tap Confirm.
3 In the list of available apps, tap Install to install a copy of a desired app
and follow the on-screen instructions.
• On the screen, the list of available dual apps is shown. During
installation, app icons are generated on the home screen.

Settings 154
App suggestion
You can quickly access apps that you may need at the moment on the
Overview screen.
On the settings screen, tap Extensions App suggestion.
Pen
You can configure options for using an Active pen (optional-sold
separately). Please note that this device supports the Active Pen AES2.0
(Active Electrostatic).
1 On the settings screen, tap Extensions Pen.
2 Customise the following settings:
• Pen key shortcuts: Configure the shortcuts on each button on
your Active pen.
• Pen Pop shortcut: Select which apps (up to five) to display as a
shortcut when the pen is removed from the device.
• Memo preview: Turn on to display recent memos in Pen pop.
• Drawing sound: Turn on to apply sound effects in drawing mode.
• Show pointer: Turn on to see a pen pointer over where the pen
hovers.
• Ignore navigation bar gestures: Block navigation bar gestures
from being input, which is useful when drawing or writing on the
edge of the screen with an Active pen.
Settings 155
Shortcuts
You can use buttons such as the Lock/Power, Volume, and Google
Assistant to run certain apps or functions right away.
1 On the settings screen, tap Extensions Shortcuts.
2 Customise the following settings.
• Open Camera: Press Power key twice to open Camera.
• Open Screen-off memo: Press Volume Up key twice to open
Screen-off memo when the screen is locked or off.
• Open Camera: Press Volume Down key twice to open Camera
when the screen is locked or off.
• Google Assistant does not support certain languages.
KnockON
Double-tap the screen to turn the screen on or off.
See
KnockON
for details.
Increase touch sensitivity
You can set the touch screen more sensitive to your touch. Recommended
to turn this feature on when using a screen protector.
On the settings screen, tap Extensions Increase touch sensitivity.

Settings 156
Apps
You can check a list of installed apps, and configure the settings for
notifications, app permissions, and more.
1 On the settings screen, tap Apps.
2 Customise the settings.
Battery
You can view the current battery information or turn on power-saving
mode.
1 On the settings screen, tap Battery.
2 Customise the following settings:
• Battery usage: View the battery usage details.
• Optimised charging: Automatically adjust charging speed according
to how you charge to reduce heat and extend lifespan of battery.
• Adaptive battery: Allow you to save the battery by stopping apps
running in the background.
• Background restrictions: Enable this option to restrict background
apps to save the battery while using the device. Restricted apps
for power saving may not work properly or may not send you
notifications.
• Battery saver: Reduce battery consumption by cutting down some
device settings, such as the display brightness, speed and vibration
intensity.
• Power saving exclusions: Select apps to use without any
functional limitation while in power saving or battery optimisation
mode.

Settings 157
Storage
You can view and manage internal storage on the device or storage space
of the memory card.
1 On the settings screen, tap Storage.
2 Customise the following settings:
• Internal storage: View the total storage space and free space in the
device’s internal storage. View a list of apps in use and the storage
capacity for each app.
• SD card: View the total storage space and free space in the
memory card. This option appears only when a memory card is
inserted. To unmount the memory card, tap .
Accounts
You can add users to share your device and register a cloud account.
1 On the settings screen, tap Accounts.
2 Customise the settings.
Digital Wellbeing & parental
controls
You can view the product use time and set the timer for each app. Also,
you can manage the mobile phone use time by using the Bedtime Mode
and Focus Mode.
Select Digital Wellbeing & parental controls on the settings screen and
set the desired function.

Settings 158
Google
You can use Google settings to manage your Google apps and account
settings.
On the settings screen, tap Google.
System
Update centre
You can check and install the latest version of the app or software
provided by LG.
1 On the settings screen, tap System Update centre.
2 Customise the following settings:
• App Updates: Check if an app update is available. If available, you
can install the update.
• Software Update: Check if a software update is available. If
available, you can install the update.
Language & keyboard
You can customise language and keyboard settings for your device.
1 On the settings screen, tap System Language & keyboard.
2 Customise the following settings:
• Language: Select a language to apply for the device.
• Manage keyboards: You can change the product’s basic keyboard
setting, set the use environments for LG Keyboard or other installed
keyboards, and set the speech recognition function for Google Voice
input. Also, you can set whether to display the keyboard button in
the touch button area on the home screen so that you can quickly
switch to another keyboard.

Settings 159
• Physical keyboard: Select to use the physical keyboard, or check
keyboard shortcut keys.
• Autofill service: Enable this option to enter your information saved
in your account such as password, address, or credit card number
with a single tap. You can also disable this option, use Google
Autocomplete, or add a new service account.
• Text-to-speech output: Configure the settings for text-to-speech
output.
• Pointer speed: Adjust the pointer speed of a mouse or trackpad.
• Reverse mouse buttons: Reverse the right mouse button to
perform primary direct-manipulation actions.
Date & time
You can customise date and time settings for your device.
1 On the settings screen, tap System Date & time.
2 Customise the settings.
Memory
You can view the average amount of memory usage over a certain period
of time and the memory occupied by an app.
1 On the settings screen, tap System Memory.
2 Tap to set a time slot to retrieve data.
Settings 160
Backup
You can back up data saved on your device to another device or account.
1 On the settings screen, tap System Backup.
2 Customise the following settings:
• LG Mobile Switch: Allow you to transfer data from an old LG device
to your new LG device. See
LG Mobile Switch
for details.
• Backup & restore: Back up your device data or restore data to your
device from a backup.
• Resetting your device may delete backup files saved in storage. Make
sure to copy and store the important backup files to your PC.
• Google backup: Change Google drive backup settings. You can
also check the backup account currently used, or add a new backup
account.
Restart & reset
You can reset the device including network and app settings.
1 On the settings screen, tap System Restart & reset.
2 Customise the following settings:
• Auto-restart: Automatically restart and optimise the phone at a
set time. Tap to activate this feature. The device automatically
restarts at a set time and optimise itself. Select a date and time for
restart.
Settings 161
• You can set the device to restart itself once a week. The device
automatically restarts in an hour from the preset time.
• Once the device restarts, notifications and badges are erased. Save
important data before the preset time.
• The Auto-restart feature is not activated in the following situations:
When the screen is turned on, when the device is in use, when the
battery level is 30% or less, or when the USIM card is locked.
- Depending on the telecommunication provider, the auto-restart
function may or may not be available.
• Network settings reset: Reset Wi-Fi, Bluetooth and other network
settings.
• Reset app preferences: Reset the settings for an app. The data
saved in the app will not be deleted.
• Reset settings: Reset all system settings back to default.
• Factory data reset: Reset all settings for the device and delete
data.
• Restarting and resetting your device deletes all data on it. Enter your
device name, Google Account and other initial information again.
• After data initialisation, the data cannot be restored.
About phone
You can view information about your device, such as the name, status,
software details and legal information.
On the settings screen, tap System About phone and view information.
Regulatory & safety
You can view regulatory marks and related information on your device.
On the settings screen, tap System Regulatory & safety.
Settings 162
Accessibility
You can manage accessibility plug-ins installed on your device.
1 On the settings screen, tap Accessibility.
2 Customise the following settings:
• Vision TalkBack: Set the device to notify screen status or actions
via voice.
• Vision Voice notifications: Set the device to read the caller
information via voice.
• Vision Font: Change the font size, bold text or type.
• Vision Display size: Set the items on the screen to a size easy for
you to see. Some items may change position.
• Vision Touch zoom: Zoom in or out by tapping the screen three
times.
• Vision Window zoom: Zoom in or out within a window and invert
the colour.
• Vision Large mouse pointer: Magnify the mouse pointer.
• Vision High contrast screen: Turn the background colour into
black for a high contrast screen.
• Vision Screen colour inversion: Increase the display colour
contrast for people with low vision.
• Vision Screen colour adjustment: Adjust the display colour.
• Vision Monochrome: Switch the screen to grayscale mode.
• Vision End call with the Power key: End a call by pressing the
Power/Lock key.
• Hearing Live Caption: Set the device to detect the voice from the
media and automatically generate subtitles.
• Hearing Caption preferences: Turn on the subtitle service when
playing videos for the hearing impaired.
• Hearing Flash alerts: Set the device to notify you with a blinking
light for incoming calls, messages and alarms.
Settings 163
• Hearing Mute all sounds: Mute all sounds and lower volume on
the receiver.
• Hearing Audio channel: Select the audio type.
• Hearing Sound balance: Adjust the audio output balance. Use the
slide bar to change the balance.
• Motor & cognition Touch assistant: Turn on the touch board to
make buttons and gestures easier to use.
• Motor & cognition Touch input: Enter text by touching and
holding the screen or modify it by simply touching the screen.
• Motor & cognition Physical keyboard: Customise the keyboard
settings.
• Motor & cognition Auto mouse click: Automatically click the
mouse pointer in case of no movement.
• Motor & cognition Touch and hold for calls: Answer or decline
calls by touching and holding the call button instead of dragging it.
• Motor & cognition Screen timeout: Turn off the screen
automatically when the device is left idle for a specified period of
time.
• Motor & cognition Touch control areas: Limit the touch area
so that only a particular portion of the screen can be controlled by
touch input.
• Accessibility features shortcut: Quickly access a frequently used
function by tapping three times.
• Auto-rotate screen: Automatically change the screen orientation
according to the physical position of the device.
• Select to Speak: Allow you to tap items to hear spoken feedback.
• Switch Access: Create key combinations to control your device.

Appendix
05
Appendix 165
Language Settings
Select a language to use on your device.
• On the home screen, tap Settings System Language & keyboard
Language Add language, and select a language.
- Touch and hold and drag it to the top of the language list to set it
as a default language.
LG Bridge
LG Bridge overview
You can back up contacts, photos and more to the computer or update
the device software.
• See LG Bridge help for details.
• The supported features may vary depending on the device.
• LG USB driver is a necessary program to connect your LG smartphone
with the computer and is installed when you install LG Bridge.
LG Bridge functions
• Back up data from the device to a computer or restore data from a
computer to the device via USB cable connection.
• Update the device software from a computer via USB cable connection.

Appendix 166
Installing LG Bridge on a computer
1 Go to
www.lg.com
from your computer.
2 Select your region.
3 Click Support Software & Firmware.
4 Enter the name of your device.
OR
Select by the Product Category.
5 Go to PC Sync LG Bridge to download the setup file.
• Go to Details to view the minimum requirements for installing
LG Bridge.
Phone software update
LG Mobile phone software update from the
Internet
For more information about using this function, please visit
http://www.lg.com/common/index.jsp
, select your country and language.
This feature allows you to conveniently update the firmware on your
phone to a newer version from the Internet without needing to visit a
service centre. This feature will only be available if and when LG makes a
newer firmware version available for your device.
Because the mobile phone firmware update requires the user’s full
attention for the duration of the update process, please make sure
you check all instructions and notes that appear at each step before
proceeding. Please note that removing the USB cable during the upgrade
may seriously damage your mobile phone.
• LG reserves the right to make firmware updates available only for
selected models at its own discretion and does not guarantee the
availability of the newer version of the firmware for all handset models.
Appendix 167
LG Mobile Phone software update via Over-
the-Air (OTA)
This feature allows you to conveniently update your phone’s software to
a newer version via OTA, without connecting a USB cable. This feature will
only be available if and when LG makes a newer firmware version available
for your device.
To perform the phone software update,
Settings System Update centre Software Update Check now
for update.
• Your personal data from internal phone storage—including information
about your Google Account and any other accounts, your system/
application data and settings, any downloaded applications and your
DRM licence—might be lost in the process of updating your phone’s
software. Therefore, LG recommends that you backup your personal
data before updating your phone’s software. LG does not take
responsibility for any loss of personal data.
• This feature depends on the area or service provider.
Appendix 168
Anti-Theft Guide
Set up your device to prevent other people from using it if it's been reset
to factory settings without your permission. For example, if your device is
lost, stolen, or wiped, only someone with your Google Account or screen
lock information can use the device.
All you need to make sure your device is protected is:
• Set a screen lock: If your device is lost or stolen but you have a screen
lock set, the device can't be erased using the Settings menu unless
your screen is unlocked.
• Add your Google Account on your device: If your device is wiped but
you have your Google Account on it, the device can't finish the setup
process until your Google Account information is entered again.
After your device is protected, you'll need to either unlock your screen or
enter your Google Account password if you need to do a factory reset.
This ensures that you or someone you trust is doing the reset.
• Do not forget your Google Account and password you had added to
your device prior to performing a factory reset. If you can't provide the
account information during the setup process, you won't be able to use
the device at all after performing the factory reset.

Appendix 169
Open Source Software Notice
Information
To obtain the source code under GPL, LGPL, MPL, and other open
source licenses, that is contained in this product, please visit
http://opensource.lge.com
.
In addition to the source code, all referred license terms, warranty
disclaimers and copyright notices are available for download.
LG Electronics will also provide open source code to you on CD-ROM
for a charge covering the cost of performing such distribution (such
as the cost of media, shipping, and handling) upon email request to
opensource@lge.com
.
This offer is valid for a period of three years after our last shipment of this
product. This offer is valid to anyone in receipt of this information.
Regulatory information
(Regulation ID number, E-labeling, etc.)
For regulatory details, go to Settings System Regulatory & safety.

Appendix 170
Trademarks
• Copyright ©2020 LG Electronics Inc. All rights reserved. LG and the
LG logo are registered trademarks of LG Group and its related entities.
• Google, Google Maps, Gmail, YouTube, Google Duo, Google Play,
Android, Chrome, Google Photos, Google Play Protect, Google Calendar,
Google Docs, Google Drive, Google Sheets and other related marks and
logos are trademarks of Google LLC.
• Bluetooth
®
is a registered trademark of Bluetooth SIG, Inc. worldwide.
• Wi-Fi
®
and the Wi-Fi logo are registered trademarks of the Wi-Fi
Alliance.
• All other trademarks and copyrights are the property of their
respective owners.
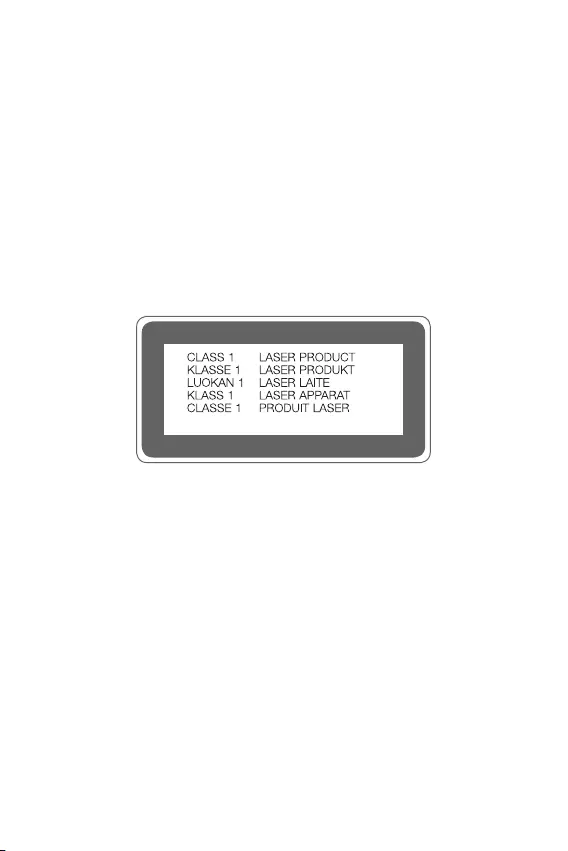
Appendix 171
Laser safety statement
Caution!
This product employs a Laser system. To ensure proper use of this
product, please read this owner’s manual carefully and retain for future
reference. Should the unit require maintenance, contact an authorised
service centre.
Use of controls, adjustments, or the performance of procedures other
than those specified herein may result in hazardous radiation exposure.
To prevent direct exposure to laser beam, do not try to open the enclosure
or make direct contact with the laser.
DECLARATION OF CONFORMITY
Hereby, LG Electronics declares that this LM-F100EMW product is in
compliance with the essential requirements and other relevant provisions
of Directive 2014/53/EU.
A copy of the Declaration of Conformity can be found at
http://www.lg.com/global/declaration
Appendix 172
Contact office for compliance of
this product
LG Electronics European Shared Service Center B.V.
Krijgsman 1, 1186 DM Amstelveen, The Netherlands
Wi-Fi (WLAN)
The use of the 5150 – 5350 MHz band is restricted to indoor use only.
AT BE BG CH CY CZ DE DK EE EL ES FI FR
HR HU IE IS IT LI LT LU LV MT NL NO PL
PT RO SE SI SK UK AL ME RS MK TR BA XK
Italy
5G capability depends on the actual 5G network availability and compatibility
with the product. Please check the compatibility status on
www.lg.com/it

Appendix 173
More information
Tempered glass parts
Tempered glass parts of this device are not permanent and they may wear
out over time.
• If you drop your device on a hard surface or subject it to severe impact,
the tempered glass may be damaged.
If this happens, stop using your device immediately and contact an LG
Customer Service Centre.
• You can purchase protective cases to protect your device from damage
on the market.
Note that these protective cases are not covered under the warranty
service provided by LG Electronics and safety is not guaranteed.
Aspect ratio
Some downloaded apps may not support specific aspect ratio.
In this case, select the most optimal screen ratio for the app or consult
the app provider for more information.
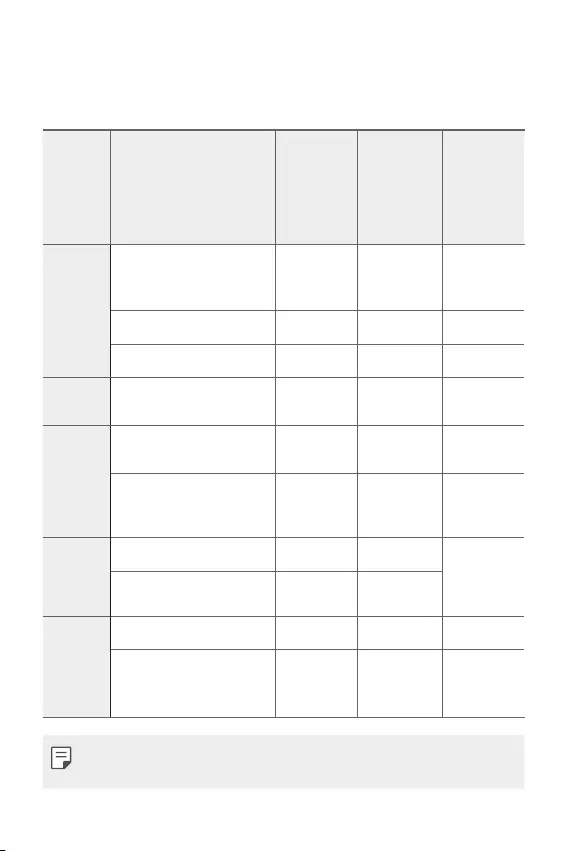
Appendix 174
Guide to data transfers
• For the data that can be exchange between LG devices or between the
LG device and a third party device, see the following table.
Type Item details
LG device
→
LG device
Third party
Android
device
→
LG device
iOS device
→
LG device
Personal
data
Contacts, messages,
dial logs, calendar, voice
recordings
○○○
Memos
○
X
○
Alarms
○
X X
Media
data
Photos, videos, songs,
documents
○○○
Screen
settings
Home screen settings
(folders and widgets)
○
X X
Lock screen settings
(screen lock settings
excluded)
○
X X
Apps
Downloaded apps
○ ○
-
Personal data of the
downloaded app
○
X
Others
Public certificate
○ ○
X
Settings (Wi-Fi, Bluetooth,
Calls, sound & notification,
accessibility, battery)
○
X X
• Some data may not be transmitted depending on the software version,
app version, operating system, manufacturer or service provider’s policy.
Appendix 175
Supported Frequency Bands Transmitter Output power
GSM 900 33.7 dBm
GSM 1800 30.7 dBm
W B1 24.2 dBm
W B8 25.2 dBm
LTE B1 25.2 dBm
LTE B3 23.7 dBm
LTE B7 23.7 dBm
LTE B8 25.2 dBm
LTE B20 25.2 dBm
LTE B28 25.2 dBm
LTE B38 25.2 dBm
LTE B40 25.2 dBm
5G Sub6 n1 25.2 dBm
5G Sub6 n3 25.2 dBm
5G Sub6 n7 25.2 dBm
5G Sub6 n28 25.2 dBm
5G Sub6 n78 22.7 dBm
BT 2.4GHz 12 dBm
WLAN 2.4GHz 19 dBm
WLAN 5GHz 20 dBm
NFC - 23 dBuA/m
Travel Adapter Information can be found at
http://www.lg.com/global/support/cedoc/cedoc

Appendix 176
Disposal of your old appliance
1. This crossed-out wheeled bin symbol indicates that waste electrical
and electronic products (WEEE) should be disposed of separately
from the municipal waste stream.
2. Old electrical products can contain hazardous substances so correct
disposal of your old appliance will help prevent potential negative
consequences for the environment and human health. Your old
appliance may contain reusable parts that could be used to repair
other products, and other valuable materials that can be recycled to
conserve limited resources.
3. You can take your appliance either to the shop where you purchased
the product, or contact your local government waste office for
details of your nearest authorised WEEE collection point. For
the most up to date information for your country please see
www.lg.com/global/recycling
Disposal of waste batteries/accumulators
1. This symbol may be combined with chemical symbols for mercury
(Hg), cadmium (Cd) or lead (Pb) if the battery contains more than
0.0005% of mercury, 0.002% of cadmium or 0.004% of lead.
2. All batteries/accumulators should be disposed separately from the
municipal waste stream via designated collection facilities appointed
by the government or the local authorities.
3. The correct disposal of your old batteries/accumulators will help
to prevent potential negative consequences for the environment,
animal and human health.
4. For more detailed information about disposal of your old batteries/
accumulators, please contact your city office, waste disposal service
or the shop where you purchased the product.

Appendix 177
FAQ
This chapter lists some problems you might encounter when using your
device. Some problems require you to call your service provider, but most
are easy to fix yourself.
SIM card error
Make sure the SIM card is correctly inserted.
No network connection or dropped network
Signal is weak. Move to a window or an open area.
You are outside the carrier network area. Move and check the network.
Calls are not available
New network not authorised.
Make sure you have not set call barring for the incoming number.
Make sure you have not set call barring for the number you are dialling.
Device cannot be turned on
When the battery is completely discharged, your device will not turn on.
Fully charge the battery before turning on the device.
Charging error
Make sure device is charging at a normal temperature.
Check the charger and its connection to the device.
Use only in-box accessories which are authorised by LG.
The battery depletes faster than when first purchased
When you expose the device or the battery to very cold or hot
temperatures, the battery life may be reduced.
Battery consumption will increase when you use certain features or apps,
such as GPS, games or the Internet.
The battery is consumable and the battery life will get shorter over time.

Appendix 178
Error messages appear when launching the camera
Charge the battery.
Free some memory by transferring files to a computer or deleting files
from your device.
Restart the device.
If you are still having trouble with the camera app after trying these tips,
contact a LG Electronics Service Centre.
The photo quality is poor
The quality of your photos may vary, depending on the surroundings and
the photography techniques you use.
If you take photos and videos, standard angle quality is better than wide-
angle.
If you take photos in dark areas, at night or indoors, image noise may
occur or images may be out of focus.
If you have any problems, reset the options.
The touch screen responds slowly or incorrectly
If you attach a screen protector or optional accessories to the touch
screen, the touch screen may not function properly.
If you are wearing gloves, if your hands are not clean while touching the
touch screen or if you tap the screen with sharp objects or your fingertips,
the touch screen may malfunction.
The touch screen may malfunction in humid conditions or when exposed
to water.
Restart your device to clear any temporary software bugs.
If the touch screen is scratched or damaged, visit a LG Electronics Service
Centre.

Appendix 179
Hangs or freezes
Restart the device
• If your device freezes or hangs, you may need to close apps or turn the
device off and then on again.
Perform a boot-up
• A soft reset may be used to reset the device if the screen freezes, or
the buttons, touch screen or device are no longer responding.
• To perform a soft reset of your device, simply press and hold the
Volume Down and Power keys until the device restarts.
Reset the device
• If the methods above do not solve your problem, perform a factory
data reset.
• On the settings screen, tap System Restart & reset Factory data
reset.
- This method resets all settings for the device and deletes data.
Before performing the factory data reset, remember to make back-
up copies of all important data stored in the device.
- If you registered a Google Account to the device, you must sign in to
the same Google Account after resetting the device.

Appendix 180
Bluetooth device is not located
Make sure the Bluetooth wireless feature is activated on your device.
Make sure the Bluetooth wireless feature is activated on the device you
wish to connect to.
Make sure your device and the other Bluetooth device are within the
maximum Bluetooth range (10 m).
If the tips above do not solve your problem, contact a LG Electronics
Service Centre.
A connection is not established when you connect the
device to a computer
Make sure the USB cable you are using is compatible with your device.
Make sure you have the proper driver installed and updated on your
computer.
Downloaded application causes a lot of errors
Application has problems.
Remove and reinstall the application.

