Table of Contents
- Safety Information
- Specifications
- Package contents
- Rear I/O Panel
- Overview of Components
- CPU Socket
- DIMM Slots
- PCI_E1~3: PCIe Expansion Slots
- M2_1~6: M.2 Slots (Key M)
- SATA5~8 & SATAA~B: SATA 6Gb/s Connectors
- JAUD1: Front Audio Connector
- CPU_PWR1~2, ATX_PWR1: Power Connectors
- JFP1, JFP2: Front Panel Connectors
- W_FLOW1: Water Flow Meter Connector
- JSLOW1: Slow Mode Booting Jumper
- JLN1~2: Low Temperature Booting Jumper
- T_SEN1~2: Thermal Sensor Connectors
- V-Check Points Lite
- JDASH1 : Tuning Controller connector
- JUSB1~2: USB 3.2 Gen 2x2 Type-C Connectors
- JUSB3~4: USB 3.2 Gen 1 Connectors
- JUSB5~6: USB 2.0 Connectors
- JTPM1: TPM Module Connector
- CPU_FAN1, PUMP_FAN1, SYS_FAN1~8: Fan Connectors
- JCI1: Chassis Intrusion Connector
- POWER1, RESET1: Power Button, Reset Button
- JBAT1: Clear CMOS (Reset BIOS) Jumper
- BIOS_SW1: Multi-BIOS Switch
- JRGB1: RGB LED connector
- JRAINBOW1~2: Addressable RGB (ARGB) LED connectors
- JCORSAIR1: CORSAIR Connector
- M-VISION Dashboard
- M_SW1: M-VISION switch
- M-VISION Dashboard Status Table
- Onboard LEDs
- Installing OS, Drivers & MSI Center
- UEFI BIOS
- 安全に関する注意事項
- 仕様
- パッケージの内容
- リアI/Oパネル
- コンポーネントの概要
- CPUソケット
- DIMMスロット
- PCI_E1~3: PCIe拡張スロット
- M2_1~6: M.2スロット (Key M)
- SATA5~8 & SATAA~B: SATA 6Gb/sコネクター
- JAUD1: フロントオーディオコネクター
- CPU_PWR1~2, ATX_PWR1: 電源コネクター
- JFP1, JFP2: フロントパネルコネクター
- W_FLOW1: 水流量計コネクター
- JSLOW1: スローモード起動ジャンパ
- JLN1~2: 低温度起動ジャンパ
- T_SEN1~2: 熱センサーコネクター
- V-Checkポイント
- JDASH1 : チューニングコントローラーコネクター
- JUSB1~2: USB 3.2 Gen 2x2 Type-Cコネクター
- JUSB3~4: USB 3.2 Gen 1コネクター
- JUSB5~6: USB 2.0コネクター
- JTPM1: TPMモジュールコネクター
- CPU_FAN1, PUMP_FAN1, SYS_FAN1~8: ファンコネクター
- JCI1: ケース開放スイッチコネクター
- POWER1, RESET1: 電源ボタン、リセットボタン
- JBAT1: クリアCMOS (BIOSリセット) ジャンパ
- BIOS_SW1: マルチBIOSスイッチ
- JRGB1: RGB LEDコネクター
- JRAINBOW1~2: 追加のRGB (ARGB) LEDコネクター
- JCORSAIR1: CORSAIRコネクター
- M-VISION Dashboard
- M_SW1: M-VISIONスイッチ
- M-VISION Dashboard状態表
- オンボードLED
- OS、ドライバーおよびMSI Centerのインストール
- UEFI BIOS
- 안전 지침
- 사양
- 제품 내용물
- 후면 I/O 패널
- 구성품 개요
- CPU 소켓
- DIMM 슬롯
- PCI_E1~3: PCIe 확장 슬롯
- M2_1~6: M.2 슬롯 (Key M)
- SATA5~8 & SATAA~B: SATA 6Gb/s 커넥터
- JAUD1: 전면 오디오 커넥터
- 전원 커넥터
- JFP1, JFP2: 전면 패널 커넥터
- W_FLOW1: 워터플로우 미터 커넥터
- JSLOW1: 슬로우 모드 부팅 점퍼
- JLN1~2: 저온 부팅 점퍼
- T_SEN1~2: 열 센서 커넥터
- V-체크 포인트 라이트
- JDASH1 : 튜닝 컨트롤러 커넥터
- JUSB1~2: USB 3.2 Gen 2x2 Type-C 커넥터
- JUSB3~4: USB 3.2 Gen 1 커넥터
- JUSB5~6: USB 2.0 커넥터
- JTPM1: TPM 모듈 커넥터
- CPU_FAN1, PUMP_FAN1, SYS_FAN1~8: 팬 커넥터
- JCI1: 섀시 침입 커넥터
- POWER1, RESET1: 전원 버튼, 리셋 버튼
- JBAT1: CMOS (Reset BIOS) 클리어 점퍼
- BIOS_SW1: 멀티-BIOS 스위치
- JRGB1: RGB LED 커넥터
- JRAINBOW1~2: 주소 지정 가능한 RGB (ARGB) LED 커넥터
- JCORSAIR1: CORSAIR 커넥터
- M-VISION 대쉬보드
- M_SW1: M-VISION 스위치
- M-VISION 대쉬보드 상태표
- 온보드 LEDs
- OS, 드라이버 & MSI 센터 설치하기
- UEFI BIOS
- 安全說明
- 規格
- 包裝內容
- 背板 I/O
- 元件總覽
- CPU 腳座
- 記憶體插槽
- PCI_E1~3: PCIe 擴充插槽
- M2_1~6: M.2 插槽 (M 鍵)
- SATA5~8 & SATAA~B: SATA 6Gb/s 插孔
- JAUD1: 前置音效插孔
- CPU_PWR1~2, ATX_PWR1: 電源接頭
- JFP1, JFP2: 系統面板接頭
- W_FLOW1: 水流量表接頭
- JSLOW1: 慢速模式啟動跳線
- JLN1~2: 低溫模式啟動跳線
- T_SEN1~2: 溫度感測器接頭
- V-Check Points Lite (電壓檢測點標準版)
- JDASH1: 調試控制器接頭
- JUSB1~2: USB 3.2 Gen 2x2 Type-C 接頭
- JUSB3~4: USB 3.2 Gen 1 接頭
- JUSB5~6: USB 2.0 接頭
- JTPM1: TPM 模組接頭
- CPU_FAN1、PUMP_FAN1、SYS_FAN1~8: 風扇電源接頭
- JCI1: 機殼開啟接頭
- POWER1, RESET1: 電源按鈕、重新開機按鈕
- JBAT1: 清除 CMOS (重置 BIOS) 功能跳線
- BIOS_SW1: 多重 BIOS 切換開關
- JRGB1: RGB LED 接頭
- JRAINBOW1~2: 可定址 RGB (ARGB) LED 接頭
- JCORSAIR1: CORSAIR 接頭
- M-VISION Dashboard
- M_SW1: M-VISION 開關
- M-VISION Dashboard 狀態表
- 內建 LED 指示燈
- 安裝作業系統、驅動程式和 MSI Center
- UEFI BIOS
- 安全信息
- 规格
- 包装内容
- 后置 I/O 面板
- 组件概述
- CPU 底座
- DIMM 插槽
- PCI_E1~3: PCIe 扩展插槽
- M2_1~6: M.2 接口 (M 键)
- SATA5~8 & SATAA~B: SATA 6Gb/s 接口
- JAUD1: 前置音频接口
- CPU_PWR1~2, ATX_PWR1: 电源接口
- JFP1, JFP2: 前置面板接口
- W_FLOW1: 水流计接口
- JSLOW1: 低速模式启动跳线
- JLN1~2: 低温启动跳线
- T_SEN1~2: 热敏传感器接口
- 电压检测点经典版
- JDASH1 : 调试控制器接口
- JUSB1~2: USB 3.2 Gen 2x2 Type-C 接口
- JUSB3~4: USB 3.2 Gen 1 接口
- JUSB5~6: USB 2.0 接口
- JTPM1: TPM 模组接口
- CPU_FAN1, PUMP_FAN1, SYS_FAN1~8: 风扇接口
- JCI1: 机箱入侵检测接口
- POWER1, RESET1: 电源按钮,重启按钮
- JBAT1: 清除 CMOS (重启 BIOS) 跳线
- BIOS_SW1: 多重 BIOS 开关
- JRGB1: RGB LED 接口
- JRAINBOW1~2: 寻址 RGB (ARGB) LED 接口
- JCORSAIR1: CORSAIR 接口
- M-VISION 动态面板
- M_SW1: M-VISION 开关
- M-VISION 动态面板状态表
- 板载 LED 灯
- 安装操作系统,驱动程序和 MSI Center
- UEFI BIOS
MSI MEG Z690 GODLIKE User Manual
Displayed below is the user manual for MEG Z690 GODLIKE by MSI which is a product in the Motherboards category. This manual has pages.
Related Manuals

I
MEG Z690 GODLIKE
Motherboard
User Guide

III
Quick Start
Thank you for purchasing the MSI® motherboard. This Quick Start section provides
demonstration diagrams about how to install your computer. Some of the installations
also provide video demonstrations. Please link to the URL to watch it with the web
browser on your phone or tablet. You may have even link to the URL by scanning the
QR code.

V
DIMMA2 DIMMA2
DIMMB2
DIMMA1
DIMMA2
DIMMB1
DIMMB2
https://youtu.be/XiNmkDNZcZk
Youtube
https://v.youku.com/v_show/id_
XNTE5NTg0NDM4NA==.html

VI
HDD LED
RESET SW
JFP1
HDD LED HDD LED -
HDD LED +
POWER LED -
POWER LED +
POWER LED
1
2 10
9
+
+
+- --
-
+
Power LED
HDD LED Reset Switch
Reserved
Power Switch
JFP1
1 HDD LED + 2 Power LED +
3 HDD LED - 4 Power LED -
5 Reset Switch 6 Power Switch
7 Reset Switch 8 Power Switch
9 Reserved 10 No Pin
RESET SW
POWER SW
POWER LED+
POWER LED-
HDD LED
http://youtu.be/DPELIdVNZUI
Youtube
http://v.youku.com/v_show/id_XNjcyMTczMzM2.html

VII
https://youtu.be/wWI6Qt51Wnc
https://v.youku.com/v_show/id_
XNDUwMDUyNTkwOA==.html
Youtube
1
Torque:
3 kgf·cm*
*3 kgf·cm
= 0.3 N·m
= 2.6 lbf·in
2
Important
Before installing the motherboard into the case, please refer to the M.2 section in this
manual to remove the M.2 SHIELD FROZR heatsinks first.

XI
x3
x2

XII

XIII
4
3
12

XIV

1
Contents
Contents
Safety Information ................................................................................................. 3
Avoid collision notification ...................................................................................... 4
Specifications ......................................................................................................... 5
.................................................................... 13
Package contents ................................................................................................ 14
Rear I/O Panel ..................................................................................................... 15
LAN Port LED Status Table .................................................................................. 15
.................................................................................... 15
......................................................................................... 16
Installing Antennas ............................................................................................... 18
................................................ 19
Overview of Components .................................................................................... 20
........................................................................................................... 21
DIMM Slots ............................................................................................................ 22
.......................................................................... 23
................................................................................... 24
................................................... 32
............................................................................ 32
................................................... 33
................................................................... 34
............................................................ 34
JSLOW1: Slow Mode Booting Jumper .................................................................. 35
....................................................... 35
............................................................. 36
.............................................................................................. 36
................................................................ 37
.................................................. 39
.................................................................. 39
............................................................................. 40
........................................................................... 40
.................................. 41
....................................................................... 42
POWER1, RESET1: Power Button, Reset Button ................................................. 42
........................................................... 43
BIOS_SW1: Multi-BIOS Switch ............................................................................. 43
JRGB1: RGB LED connector ................................................................................. 44
English

2Contents
................................ 45
........................................................................ 46
M-VISION Dashboard ............................................................................................ 47
M_SW1: M-VISION switch..................................................................................... 47
M-VISION Dashboard Status Table ...................................................................... 50
Onboard LEDs ...................................................................................................... 51
EZ Debug LED ....................................................................................................... 51
JPWRLED1: LED power input ............................................................................... 51
................................................................................... 51
................................................................................................... 52
.............................................................................. 52
Boot Phases .......................................................................................................... 52
......................................................................................... 52
............................................................................................. 52
Installing OS, Drivers & MSI Center .................................................................... 58
Installing Windows 10 / Windows 11 .................................................................... 58
Installing Drivers .................................................................................................. 58
............................................................................................................ 58
UEFI BIOS ............................................................................................................. 59
BIOS Setup ............................................................................................................ 60
Entering BIOS Setup ............................................................................................. 60
BIOS User Guide ................................................................................................... 60
Resetting BIOS ...................................................................................................... 61
Updating BIOS ....................................................................................................... 61

3
Safety Information
Safety Information
The components included in this package are prone to damage from electrostatic
computer assembly.
Ensure that all components are securely connected. Loose connections may cause
the computer to not recognize a component or fail to start.
Hold the motherboard by the edges to avoid touching sensitive components.
handling the motherboard to prevent electrostatic damage. If an ESD wrist strap is
not available, discharge yourself of static electricity by touching another metal object
before handling the motherboard.
Store the motherboard in an electrostatic shielding container or on an anti-static
pad whenever the motherboard is not installed.
Before turning on the computer, ensure that there are no loose screws or metal
components on the motherboard or anywhere within the computer case.
Do not boot the computer before installation is completed. This could cause
permanent damage to the components as well as injury to the user.
If you need help during any installation step, please consult a certified computer
technician.
Always turn off the power supply and unplug the power cord from the power outlet
before installing or removing any computer component.
Keep this user guide for future reference.
Keep this motherboard away from humidity.
Make sure that your electrical outlet provides the same voltage as is indicated on
the PSU, before connecting the PSU to the electrical outlet.
Place the power cord such a way that people can not step on it. Do not place
anything over the power cord.
All cautions and warnings on the motherboard should be noted.
If any of the following situations arises, get the motherboard checked by service
personnel:
Liquid has penetrated into the computer.
The motherboard has been exposed to moisture.
The motherboard does not work well or you can not get it work according to user
guide.
The motherboard has been dropped and damaged.
The motherboard has obvious sign of breakage.
the motherboard.

4Contents
Avoid collision notification
Protective paint is printed around each screw hole to prevent parts from being
scratched.

5
Specifications
Specifications
CPU
Processor socket LGA1700
* Please go to www.msi.com to get the newest support status as new processors
are released.
Chipset
Memory
4x DDR5 memory slots, supporting up to 128GB*
Max. overclocking frequency:
* Please go to www.msi.com for more information on compatible memory.
Expansion Slot
Multi-GPU

6Specifications
Thunderbolt 4
Support up to 40 Gbps transfer rate with Thunderbolt
devices
Support up to 20 Gbps transfer rate with USB4 devices
Support up to 10Gbps transfer rate with USB 3.2
devices
Support up to 5V/3A , 15W power charging
Each port can daisy-chain up to three Thunderbolt 4
devices or five Thunderbolt 3 devices
DisplayPort of the discrete graphics card to the Mini
USB
4x USB 3.2 Gen 2 10Gbps ports on the back panel
Hub-GL3590
4x USB 3.2 Gen 2 10Gbps ports on the back panel
Asmedia 1074
4x USB 3.2 Gen 1 5Gbps ports through internal USB
connectors
Hub-GL850G
4x USB 2.0 ports through internal USB connectors

7
Specifications
Storage
6x SATA 6Gb/s ports
Supports 2260/ 2280/ 22110 storage devices
Supports 2260/ 2280 storage devices
Supports 2260/ 2280/ 22110 storage devices
Supports SATA 6Gb/s
Supports 2280/ 22110 storage devices****
Supports SATA 6Gb/s
Supports 2260/ 2280/ 22110 storage devices****
Supports 2260/ 2280 storage devices
M2_2, M2_4, M2_5 and M2_6 support Intel Optane
Memory.
Supports Intel® Smart Response Technology for Intel
* SATA7 will be unavailable when installing M.2 SATA SSD in the M2_5 slot.

8Specifications
RAID
Supports RAID 0, RAID 1, RAID 5 and RAID 10 for SATA
storage devices*
Supports RAID 0, RAID 1, RAID 5 and RAID 10 for M.2
NVMe storage devices
LAN
1x Intel® I225-V 2.5Gbps LAN controller
Audio
Supports S/PDIF output
Wireless LAN &
Bluetooth®
Intel® WiFi 6E
slot
up to 2.4Gbps
Supports 802.11a/ b/ g/ n/ ac/ ax
Supports Bluetooth® 5.2**
* Wi-Fi 6E 6GHz may depend on every country’s regulations and will be ready in
Windows 10 build 21H1 and Windows 11.
** Bluetooth 5.2 will be ready in Windows 10 build 21H1 and Windows 11.
Back Panel
Connectors
1x Flash BIOS button
8x USB 3.2 Gen 2 10Gbps Type-A ports
2x Wi-Fi Antenna connectors
1x Optical S/PDIF Out connector

9
Specifications
Internal Connectors
1x 24-pin ATX main power connector
2x 8-pin ATX 12V power connectors
6x SATA 6Gb/s connectors
1x 4-pin water-pump fan connector
8x 4-pin system fan connectors
1x Water Flow meter connector
1x Front panel audio connector
2x System panel connectors
2x 2-pin Thermal Sensors connectors
1xTPM module connector
Jumper
1x Slow mode jumper
2x Low Temperature Booting jumpers
LED Features
4x EZ Debug LED
1x 4-pin RGB LED connector
2x 3-pin RAINBOW LED connectors
Internal Buttons 1x Power button
1x Reset button
Switches
1x Multi-BIOS switch
1x M-VISION switch

10 Specifications
I/O Controller
Hardware Monitor
Form Factor E-ATX Form Factor
BIOS Features
Dual BIOS
2x 256 Mb flash
UEFI AMI BIOS
Multi-language
Software
Drivers
Intel Extreme Tuning Utility
Nahimic

11
Specifications
MSI Center
Features
MSI Sound Tune
Gaming Mode
Smart Priority
Game Highlights
LAN Manager
Mystic Light
Ambient Devices
User Scenario
Live Update
Hardware Monitoring
Speed Up
Smart Image Finder
Special Features
Audio
Audio Boost 5 HD
Nahimic 3
Sound Tune
Network
10G Super LAN
2.5G LAN
LAN Manager
Intel WiFi
All Aluminum Design
Wavy Fin Design
Extended Heatsink Design

12 Specifications
Special Features
M.2 Shield Frozr
7W/mK MOSFET thermal pad
LED
Mystic Light
Ambient Devices Support
EZ DEBUG LED
Performance
Memory Boost
Memory Force
Game Boost
Thunderbolt 4
USB 4.0
Lightning USB 20G
USB 3.2 Gen 2 10G

13
Specifications
Special Features
Protection
Pre-installed I/O Shielding
Metal Backplate
Experience
M-VISION Dashboard
Smart Button
System Saver
Flash BIOS Button
EZ Dubug LED
Duet Display
App Player
Tile
JCORSAIR1 Connector Specification
Supporting CORSAIR RGB Products Maximum connection
Lighting Node PRO LED Strip
20*
* 20% brightness is recommended when the number of
LED strips exceeds 8.
HD120 RGB Fan 6
SP120 RGB Fan 6
LL120 RGB Fan 6

14 Package contents
Package contents
Please check the contents of your motherboard package. It should contain:
Motherboard MEG Z690 GODLIKE
Documentation Quick installation guide 1
DIY Stands Set Quick Guide 1
Application 1
Cables
SATA 6Gb/s cables 3
LED JRGB Y cable 1
1
LED JRAINBOW cable 2
1
1
Thermistor cable 2
DP to Mini-DP cable 2
Accessories
Wi-Fi antenna 1
1
2
DIY Stands Set 1
MEG sticker 1
SATA cable stickers 1
Full armor kit 1
Product registration card 1
Gifts
Wiping cloth 1
Small screwdriver set 1
Small brush 1
Important
If any of the above items are damaged or missing, please contact your retailer.

15
Rear I/O Panel
Rear I/O Panel
Clear CMOS button
button for about 5-10 seconds to reset BIOS to default values.
Flash BIOS Port/ Button - Please refer to page 62 for Updating BIOS with Flash
BIOS Button.
LAN Port LED Status Table
Audio Ports Configuration
Audio Ports Channel
2468
Rear Speaker Out
Line-In/ Side Speaker Out
Line-Out/ Front Speaker Out
Mic In
Blank
Thunderbolt 4
Mini DisplayPort
USB 3.2 Gen 2
10Gbps Type-A
2.5 Gbps LAN 10 Gbps LAN
Audio Ports
Optical
S/PDIF-Out
button
Wi-Fi Antenna
connectors
Flash BIOS
Button
Flash BIOS Port
M-VISION Dashboard Port
Link/ Activity LED
Status Description
Off No link
Linked
Blinking Data activity
Speed LED
Status 2.5 Gbps LAN 10 Gbps LAN
Off 10 Mbps
Green 100 Mbps/ 1
Gbps
100 Mbps / 1
Gbps / 2.5 Gbps
2.5 Gbps 10 Gbps

16 Rear I/O Panel
Realtek Audio Console
better sound experience.
Device Selection - allows you to select a audio output source to change the related
options. The check sign indicates the devices as default.
Application Enhancement - the array of options will provide you a complete
guidance of anticipated sound effect for both output and input device.
Main Volume - controls the volume or balance the right/left side of the speakers
that you plugged in front or rear panel by adjust the bar.
Jack Status - depicts all render and capture devices currently connected with your
computer.
Connector Settings - configures the connection settings.
Auto popup dialog
When you plug into a device at an audio jack, a dialogue window will pop up asking you
which device is current connected.
Each jack corresponds to its default setting as shown on the next page.
Important
The pictures above for reference only and may vary from the product you purchased.
Jack Status
Device
Selection
Main Volume
Application Enhancement

17
Rear I/O Panel
Audio jacks to headphone and microphone diagram
Audio jacks to stereo speakers diagram
Audio jacks to 7.1-channel speakers diagram
AUDIO INPUT
AUDIO INPUT
Rear Front
Side Center/
Subwoofer

18 Rear I/O Panel
Installing Antennas
1.
2. Screw two antenna cables tight to the WiFi antenna connectors as shown.
1
2
3. Place the antenna as high as possible.

19
Rear I/O Panel
Connecting Thunderbolt Devices via Daisy-chain
terminal.
Daisy-chain allows you to connect multiple thunderbolt devices to a single thunderbolt
port on the back panel.
You can also daisy chain monitor by connecting graphics card to the Mini DisplayPort
Input port on the back panel.
If you want to connect USB devices, please place them at the end of the chain.

20 Overview of Components
Overview of Components
RESET1
JRAINBOW1 JFP2
JFP1
JLN1
JLN2
JRGB1
JUSB1
M2_6
JUSB4
JUSB2
JUSB3
JBAT1
JSLOW1
SYS_FAN1
SYS_FAN3
PUMP_FAN1
M2_4
M2_3
M2_2
M2_5
M2_1
JAUD1
JDASH1
W_FLOW1
JUSB6
SYS_FAN4
SYS_FAN5
M_SW1
JRAINBOW2
POWER1
JTPM1
LED_SW1
BIOS_SW1
JPWRLED1
SYS_FAN6
SYS_FAN7
SYS_FAN8
ATX_PWR1
SYS_FAN2
T_SEN1/ T_SEN2
DIMMB1
DIMMB2
DIMMA1
DIMMA2
JUSB5

21
Overview of Components
Important
Always unplug the power cord from the power outlet before installing or removing
is necessary to prevent overheating and maintain system stability.
your system.
enhance heat dissipation.
the socket with the plastic cap.
documentation in the heatsink/ cooler package for more details about installation.
This motherboard is designed to support overclocking. Before attempting to
overclock, please make sure that all other system components can tolerate
overclocking. Any attempt to operate beyond product specifications is not
recommended. MSI® does not guarantee the damages or risks caused by inadequate
operation beyond product specifications.
CPU Socket
Introduction to the LGA1700 CPU
four notches and a golden triangle to
motherboard placement. The golden
triangle is the Pin 1 indicator.
Distance from the center of the
CPU to the nearest DIMM slot.
50.8 mm

22 Overview of Components
DIMM Slots
DIMMA1 DIMMB1
Channel A Channel B
DIMMA2 DIMMB2
Memory module installation recommendation
Important
Always insert memory modules in the DIMMA2 slot first.
To ensure system stability for Dual channel mode, memory modules must be of the
same type, number and density.
Some memory modules may operate at a lower frequency than the marked value
when overclocking due to the memory frequency operates dependent on its Serial
DRAM Frequency to set the memory
frequency if you want to operate the memory at the marked or at a higher frequency.
It is recommended to use a more efficient memory cooling system for full DIMMs
installation or overclocking.
and devices when overclocking.
Please refer www.msi.com for more information on compatible memory.
DIMMB2 DIMMB2
DIMMB1
DIMMA2 DIMMA2 DIMMA2
DIMMA1

23
Overview of Components
PCI_E1~3: PCIe Expansion Slots
PCI_E1
PCI_E2
PCI_E3
Important
If you install a large and heavy graphics card, you need to use a tool such as MSI
Gaming Series Graphics Card Bolster to support its weight to prevent deformation of
the slot.
the PCI_E1 slot is recommended.
When adding or removing expansion cards, always turn off the power supply and
unplug the power supply power cable from the power outlet. Read the expansion
card’s documentation to check for any necessary additional hardware or software
changes.
Slot Available device
M2_4 SATA
PCI_E3
Bandwidth share table for PCI_E3 & M2_4 slots
Important

24 Overview of Components
M2_1~6: M.2 Slots (Key M)
M2_1
M2_2
M2_3
M2_6
M2_5M2_4
Important
UEFI ROM.
M2_2, M2_4, M2_5 and M2_6 support Intel
Optane Memory.
Important
M2_1 & M2_3 slot Installation
1. Loosen the screws of M2_1 SHIELD FROZR heatsink and remove the heatsink.
2.
3. Loosen the screws of M2_3 SHIELD FROZR heatsink and remove the heatsink.
4. Remove the protective films from the heatsink thermal pads.
2
2
2
3
3
4
4
4
2
1
1
M2_1 chipset
M2_3

25
Overview of Components
5. Remove the protective films from the M.2 thermal pads on the M.2 plate.
5
6. Remove or exchange the screws according to your SSD length. Skip this step, if
you install 2280 SSD.
6
6
22110 SSD 2260 SSD
7. Insert your M.2 SSD into the M.2 slot at a 30-degree angle.
8.
30º30º
30º30º
77
8
8
22110 SSD
2280 SSD
2260 SSD

26 Overview of Components
9. Put the M2_3 SHIELD FROZR heatsink back in place and secure it.
10. Put the chipset heatsink back in place and secure it.
11. Put the M2_1 SHIELD FROZR heatsink back in place and secure it.
10
10
10
9
9
10
11
11
M2_1 chipset
M2_3
M2_2 & M2_6 slot Installation
1.
2. Loosen the screws of M2_2 SHIELD FROZR heatsink and remove the heatsink.
3. Loosen the screws of M2_6 SHIELD FROZR heatsink and remove the heatsink.
4. Remove the protective films from the heatsink thermal pads.
1
1
2
3
3
4 4
4
2
1
1
M2_2
chipset
M2_6

27
Overview of Components
5. Remove the protective films from the M.2 thermal pads on the M.2 plate.
5
6. If you install 2260 SSD, remove the screw from the M.2 plate and then install
6
2260 SSD
7. Insert your M.2 SSD into the M.2 slot at a 30-degree angle.
8.
30º30º
30º30º
2280 SSD
2260 SSD
877
8

28 Overview of Components
9. Put the M2_6 SHIELD FROZR heatsink back in place and secure it.
10. Put the M2_2 SHIELD FROZR heatsink back in place and secure it.
11. Put the chipset heatsink back in place and secure it.
11
11
10
9
9
10
11
11
M2_2
chipset
M2_6
M2_4 & M2_5 slot installation
1.
2.
3. Remove the protective films from the heatsink thermal pads.
1
1
2
3
3
2
1
1
M2_4
chipset
M2_5

29
Overview of Components
4. Remove the protective films from the M.2 thermal pads on the M.2 plate.
4
5. If there is a screw installed on the M.2 plate, remove it first; otherwise, please
skip this step.
6. Secure the supplied M.2 standoff according to your M.2 SSD length.
5
6
Standoff

30 Overview of Components
7. Insert your M.2 SSD into the M.2 slot at a 30-degree angle.
8. Secure the M.2 SSD in place with the supplied M.2 8.5H screw.
30º30º
8
8.5H screw
7
9.
10. Put the chipset heatsink back in place and secure it.
10
10
9
9
10
10
M2_4
chipset
M2_5

31
Overview of Components
Ways to install M2_4 & M2_5
22110 SSD
2280 SSD
2280 SSD
22110 SSD
2280 SSD
2280 SSD

32 Overview of Components
SATA5~8 & SATAA~B: SATA 6Gb/s Connectors
These connectors are SATA 6Gb/s interface ports. Each connector can connect to one
SATA device.
SATAA
SATA5
SATA7
SATAB
SATA6
SATA8
Important
Please do not fold the SATA cable at a 90-degree angle. Data loss may result during
transmission otherwise.
SATA cables have identical plugs on either sides of the cable. However, it is
recommended that the flat connector be connected to the motherboard for space
saving purposes.
SATA7 will be unavailable when installing M.2 SATA SSD in the M2_5 slot.
JAUD1: Front Audio Connector
This connector allows you to connect audio jacks on the front panel.
1
2 10
9
1 2 Ground
3 4
5 Head Phone R 6
7 SENSE_SEND 8 No Pin
9 Head Phone L 10 Head Phone Detection

33
Overview of Components
24
13 1
12
ATX_PWR1
1 +3.3V 13 +3.3V
2 +3.3V 14 -12V
3 Ground 15 Ground
4 +5V 16 PS-ON#
5 Ground 17 Ground
6 +5V 18 Ground
7 Ground 19 Ground
8 PWR OK 20 Res
9 5VSB 21 +5V
10 +12V 22 +5V
11 +12V 23 +5V
12 +3.3V 24 Ground
5
4 1
8
1 Ground 5 +12V
2 Ground 6 +12V
3 Ground 7 +12V
4 Ground 8 +12V
Important
Make sure that all the power cables are securely connected to a proper ATX power
supply to ensure stable operation of the motherboard.
CPU_PWR1~2, ATX_PWR1: Power Connectors
These connectors allow you to connect an ATX power supply.

34 Overview of Components
JFP1, JFP2: Front Panel Connectors
These connectors connect to the switches and LEDs on the front panel.
1
2 10
9
+
+
+- --
-
+
Power LED
HDD LED Reset Switch
Reserved
Power Switch
JFP1
1 HDD LED + 2 Power LED +
3 HDD LED - 4 Power LED -
5 Reset Switch 6 Power Switch
7 Reset Switch 8 Power Switch
9 Reserved 10 No Pin
1
JFP2
+
+-
-
Speaker
Buzzer
1 Speaker - 2 Buzzer +
3 Buzzer - 4 Speaker +
W_FLOW1: Water Flow Meter Connector
This connector allows you to connect a flow meter to monitor the flow rate of your
liquid cooling system.
1
1 Ground 3 WFLOW IN
2

35
Overview of Components
JSLOW1: Slow Mode Booting Jumper
This jumper is used for LN2 cooling solution, that provides the extreme overclocking
conditions, to boot at a stable processor frequency and to prevent the system from
crashing.
JLN1~2: Low Temperature Booting Jumper
This jumper is used for liquid nitrogen cooling system to boot at an extreme low
temperature. Try to set it Enabled to increase the boot success rate.
Important
Users will try extreme low temperature overclocking at their own risks. The
Please don’t set to Enabled when power-off or the system will be un-bootable.
Enabled
Normal
Normal
Enabled

36 Overview of Components
V-Check Points Lite
These voltage checkpoints are used to measure the current system voltages. A
Please refer to the manual of your multimeter for more information.
GND
T_SEN1~2: Thermal Sensor Connectors
These connectors allow you to connect the thermistor cable and use it to monitor the
temperature of the detection point.
Thermistor cable
GND
Sense

37
Overview of Components
JDASH1 : Tuning Controller connector
1
2 14
13
1 No Pin 2
3 4
5 6 Ground
7 PSIN#_R 8 FP_RST#_R
9 10
11 BLK+ 12 BLK-
13 14
1
88
Tuning Controller
JDASH1
Power
Reset
Tuning Controller Module (Optional)
Tuning controller is a multiple functions module that helps you to monitor, control
and overclock the motherboard more easily. Please follow the instructions below to
understand the function of each button on the module.
Debug Code LED
for details.
OC button- / + -
BIOS > OC > Direct OC Button
Reset - this button allows you to reset the computer.
Power - this button allows you to power on and off the computer.
OC Fail Save - press and hold the button and start the system simultaneously to
OC Retry
up successfully.
Clear CMOS - power off the computer and than long press this button for 5-10
seconds to reset BIOS with defaults.
Connecting the JDASH1 and Tuning Controller module

38 Overview of Components
Tuning Controller module magnet
Tuning controller module has build in some magnets on both sides that will be
convenient for you to stick it to the chassis. However, we provide extra four magnets
for sticking inside the back cover of module. Please follow the instructions below to
stick the magnets.
1. Loosen the screws of the back cover.
2. Open and turn the back cover over.
3. Remove the sticker from the magnet.
4. Stick four magnets to the designated four locations.
5. Reinstall the back cover in correct direction.
Please note that wrong mounting direction of the back cover will affect the circuit of
the module and may damage the module.
1
1 1
1
2
3
4
5
5
5
5
Designated locations

39
Overview of Components
JUSB1~2: USB 3.2 Gen 2x2 Type-C Connectors
the front panel. The connector possesses a foolproof design. When you connect the
cable, be sure to connect it with the corresponding orientation.
JUSB3~4: USB 3.2 Gen 1 Connectors
These connectors allow you to connect USB 3.2 Gen 1 5Gbps ports on the front panel.
Important
Note that the Power and Ground pins must be connected correctly to avoid possible
damage.
1
10 11
20
1 Power 11 USB2.0+
2 USB3_RX_DN 12 USB2.0-
3 USB3_RX_DP 13 Ground
4 Ground 14
5 15
6 16 Ground
7 Ground 17 USB3_RX_DP
8 USB2.0- 18 USB3_RX_DN
9 USB2.0+ 19 Power
10 Ground 20 No Pin
JUSB1/ 2
the front panel

40 Overview of Components
JUSB5~6: USB 2.0 Connectors
These connectors allow you to connect USB 2.0 ports on the front panel.
1
2 10
9
1 2
3 USB0- 4 USB1-
5 USB0+ 6 USB1+
7 Ground 8 Ground
9 No Pin 10
Important
damage.
In order to recharge your iPad,iPhone and iPod through USB ports, please install
1
2 12
11
1 SPI Power 2
3
4
5 Reserved 6
7 Ground 8 SPI Reset
9 Reserved 10 No Pin
11 Reserved 12 Interrupt Request
JTPM1: TPM Module Connector
platform manual for more details and usages.

41
Overview of Components
CPU_FAN1, PUMP_FAN1, SYS_FAN1~8: Fan Connectors
PWM Mode fan connectors provide constant 12V output and adjust fan speed with
manually.
Switching fan mode and adjusting fan speed
BIOS >
HARDWARE MONITOR.
Important
Pin definition of fan connectors
Connector Default
fan mode Max.
current Max.
power
Auto mode 2A 24W
PUMP_FAN1 PWM mode 3A 36W
Auto mode 2A 12W
1 PWM Mode pin definition
1 Ground 2 +12V
3 Sense 4
1 DC Mode pin definition
1 Ground 2
3 Sense 4
PUMP_FAN1
Select PWM mode or DC mode
There are gradient points of the fan speed that allow you to adjust

42 Overview of Components
JCI1: Chassis Intrusion Connector
This connector allows you to connect the chassis intrusion switch cable.
Normal
Trigger the chassis
intrusion event
Using chassis intrusion detector
1. JCI1 connector to the chassis intrusion switch/ sensor on the chassis.
2.
3. Go to BIOS > SETTINGS > Security > Chassis Intrusion Configuration.
4. Set Chassis Intrusion to Enabled.
5. Press F10 to save and exit and then press the Enter key to select Yes.
6. Once the chassis cover is opened again, a warning message will be displayed on
screen when the computer is turned on.
Resetting the chassis intrusion warning
1. Go to BIOS > SETTINGS > Security > Chassis Intrusion Configuration.
2. Set Chassis Intrusion to Reset.
3. Press F10 to save and exit and then press the Enter key to select Yes.
POWER1, RESET1: Power Button, Reset Button
The Power / Reset button allows you to power on / reset the computer.
Power buttonReset button

43
Overview of Components
JBAT1: Clear CMOS (Reset BIOS) Jumper
the motherboard to save system configuration data. If you want to clear the system
Resetting BIOS to default values
1. Power off the computer and unplug the power cord.
2. Use a jumper cap to short JBAT1 for about 5-10 seconds.
3. Remove the jumper cap from JBAT1.
4. Plug the power cord and Power on the computer.
BIOS_SW1: Multi-BIOS Switch
This motherboard has two built-in BIOS ROMs. If one is crashed, you can shift to the
other for booting by sliding the switch. And the multi BIOS LED indicates which BIOS
ROM is in operation.
Keep Data
Reset BIOS
BIOS B BIOS A
Multi-BIOS LED
Multi-BIOS LED
White : BIOS A
Red : BIOS B
BIOS_SW1
Important
Do not use the Multi-BIOS switch when system is booting up.
BIOS_SW1

44 Overview of Components
Important
The JRGB connector supports up to 2 meters continuous 5050 RGB LED strips
Always turn off the power supply and unplug the power cord from the power outlet
before installing or removing the RGB LED strip.
Please use MSI’s software to control the extended LED strip.
JRGB1: RGB LED connector
The JRGB connector allows you to connect the 5050 RGB LED strips 12V.
1
GRB
JRGB
connector
JRGB extension
cable 5050 RGB LED strips 12V
1
1 +12V 2 G
3 R 4 B
RGB LED Strip Connection
1
1
GRB
JRGB connector
System Fan connector
RGB LED Fan Connection
RGB LED Fan

45
Overview of Components
1
1
1
D
+5V
CAUTION
Do not connect the wrong type of LED strips. The JRGB connector and the JRAINBOW
connector provide different voltages, and connecting the 5V LED strip to the JRGB
connector will result in damage to the LED strip.
Important
The JRAINBOW connector supports up to 75 LEDs WS2812B Individually
LEDs.
Always turn off the power supply and unplug the power cord from the power outlet
before installing or removing the RGB LED strip.
Please use MSI’s software to control the extended LED strip.
JRAINBOW1~2: Addressable RGB (ARGB) LED connectors
The JRAINBOW connectors allow you to connect the WS2812B Individually
JRAINBOW
connector
JRAINBOW connector
System Fan connector
JRAINBOW LED
extension cable WS2812B Individually
strips 5V
Addressable RGB (ARGB) LED Strip Connection
Addressable RGB (ARGB) LED Fan Connection
Addressable RGB
1
JRAINBOW1 1
JRAINBOW2
1 +5V 2 Data
3 No Pin 4 Ground

46 Overview of Components
JCORSAIR1: CORSAIR Connector
LED strips and fans with MSI's software.
1
1 +5V 2 Data
3 Ground
CORSAIR RGB Fan Connection
Important
Fans must start at 1 and continue in series. 1 > 2 > 3 > 4 > 5 > 6. Any fan not
connected in series will break communication and the RGB LED lighting function will
not work.
Quantity of RGB LED Fans or RGB LED Lighting PRO strips supported may differ
between models. Please refer to the motherboard specification.
time.
SYS_FAN
SYS_FAN
SYS_FAN SYS_FAN
SYS_FAN
SYS_FAN
1
2
34
5
6
SATA power
CORSAIR Lighting Node PRO Connection

47
Overview of Components
M-VISION Dashboard
system by touching the M-VISION Dashboard. You can use MSI’s software to configure
and customize the M-VISION Dashboard Advanced mode and even upload a .gif/ .bmp/
.webp/ .jpg or .mp4 animation file.
M-VISION Dashboard
Connecting the M-VISION Dashboard
You can also remove the M-VISION Dashboard from the motherboard and it still can
be activated. Please follow the steps below to connect M-VISION Dashboard to the
motherboard.
1. Remove the M-VISION Dashboard from the motherboard.
2. Use the supplied M-VISION cable to connect the M-VISION Dashboard and
3.
1
2
2
M-VISION Dashboard Port
M-VISION cable
10 Gb LAN
M_SW1: M-VISION switch
for USB device
M-VISION mode:
for M-VISION Dashboard
3

48 Overview of Components
M-VISION Dashboard Basic mode
Humidity display
Temperature display
Debug Code LED
Tuning Controller
Tuning controller helps you to monitor, control and overclock the motherboard more
easily.
CPU CLK - / + -
ratio. Please go to BIOS > OC > Direct OC Button
Ratio to be overclocked.
Safe Boot - long touch this icon and start the system simultaneously to boot in Safe
OC Retry
successfully.
Clear CMOS - power off the computer and than long touch this icon to reset BIOS
with defaults.
Shut Down - touch this icon to power off the computer.
Reset - touch this icon to reset the computer.

49
Overview of Components
Countdown Timer
Touch this icon to enter the countdown time screen, it allows you to set the time for
the countdown timer.
Temperature display & Humidity display
Show the ambient temperature and humidity.
M-VISION Dashboard Advanced mode
Before using the M-VISION Dashboard Advanced mode, please make sure you have
M-VISION dashboard and even upload the pictures or animation files. The M-VISION
dashboard can be used to display the system information and status. You can also
use it to turn on the system’s APPs, browser, and calculator by touching the shortcut
icons.
Important
For information on configuration and customization M-VISION Dashboard, please refer

50 Overview of Components
System Status M-VISION Dashboard
Power On
detected or fail
S4/S5
to Disk/
Flash BIOS
System Status M-VISION Dashboard
Hardware
Monitor page
page
Live weather
User profile 800*480px.gif/
bmp/ jpg/ png/
mp4
M-VISION Dashboard Status Table

51
Onboard LEDs
EZ Debug LED
These LEDs indicate the debug status of the motherboard.
Onboard LEDs
BOOT - indicates the booting device is not
detected or fail.
DDR - indicates DRAM is not detected or fail.
CPU
VGA - indicates GPU is not detected or fail.
JPWRLED1: LED power input
This connector is used by retailers to demonstrate onboard LED lights.
JPWRLED1 - LED power input
LED_SW1: EZ LED Control
This switch is used to switch on/ off all the LEDs of motherboard.
LED_SW1
LED_OFF LED_ON

52 Onboard LEDs
Hexadecimal Character Table
Hexadecimal 0 1 2 3 4 5 6 7 8 9 A B D E F
LED display 0123456789ABCDEF
Boot Phases
Security (SEC) – initial low-level initialization
Pre-EFI Initialization (PEI) – memory initialization
Driver Execution Environment (DXE) – main hardware initialization
Boot Device Selection (BDS)
Debug Code LED
Debug Code LED Table
SEC Progress Codes
01
02 AP initialization before microcode loading
03 System Agent initialization before microcode loading
04
06 Microcode loading
07 AP initialization after microcode loading
08 System Agent initialization after microcode loading
09
0B
SEC Error Codes
0C - 0D
0E Microcode not found

53
Onboard LEDs
0F Microcode not loaded
PEI Progress Codes
10
11
12 - 14
15 Pre-memory System Agent initialization is started
16 - 18
19
1A - 1C
2B
2C Memory initialization. Memory presence detection
2D Memory initialization. Programming memory timing information
2E
2F
31 Memory Installed
32
33
34
35
36
initialization
37 Post-Memory System Agent initialization is started
38 - 3A
3B
3C - 3E
4F DXE IPL is started
PEI Error Codes
50 Memory initialization error. Invalid memory type or incompatible memory
speed
51 Memory initialization error. SPD reading has failed
52 Memory initialization error. Invalid memory size or memory modules do
not match
53 Memory initialization error. No usable memory detected
54 Unspecified memory initialization error
55 Memory not installed
56
57

54 Onboard LEDs
58
59
5A
5B Reset PPI is not available
5C - 5F Reserved for future AMI error codes
DXE Progress Codes
60
61 NVRAM initialization
62
63
64 - 67
68
69 System Agent DXE initialization is started
6A System Agent DXE SMM initialization is started
6B - 6F
70
71
72
73 - 77
78
79
7A - 7F Reserved for future AMI DXE codes
90
91 Driver connecting is started
92
93
94
95
96
97
98
99 Super IO Initialization
9A USB initialization is started
9B USB Reset
9C USB Detect
9D USB Enable

55
Onboard LEDs
9E -9F Reserved for future AMI codes
A0 IDE initialization is started
A1 IDE Reset
A2 IDE Detect
A3 IDE Enable
A4
A5
A6
A7
A8 Setup Verifying Password
A9 Start of Setup
AB Setup Input Wait
AD Ready To Boot event
AE Legacy Boot event
AF Exit Boot Services event
B0 Runtime Set Virtual Address MAP Begin
B1 Runtime Set Virtual Address MAP End
B2 Legacy Option ROM Initialization
B3 System Reset
B4 USB hot plug
B5
B6
B7
B8 - BF Reserved for future AMI codes
DXE Error Codes
D0
D1 System Agent initialization error
D2
D3 Some of the Architectural Protocols are not available
D4
D5 No Space for Legacy Option ROM
D6
D7
D8 Invalid password
D9

56 Onboard LEDs
DA
DB Flash update is failed
DC Reset protocol is not available
S3 Resume Progress Codes
E0
E1 S3 Boot Script execution
E2 Video repost
E3 OS S3 wake vector call
E4 - E7 Reserved for future AMI progress codes
S3 Resume Error Codes
E8 S3 Resume Failed
E9 S3 Resume PPI not Found
EA S3 Resume Boot Script Error
EB S3 OS Wake Error
EC - EF Reserved for future AMI error codes
Recovery Progress Codes
F0
F1
F2 Recovery process started
F3 Recovery firmware image is found
F4 Recovery firmware image is loaded
F5 - F7 Reserved for future AMI progress codes
Recovery Error Codes
F8 Recovery PPI is not available
F9 Recovery capsule is not found
FA Invalid recovery capsule
FB - FF Reserved for future AMI error codes
ACPI States Codes
01 System is entering S1 sleep state
02 System is entering S2 sleep state
03 System is entering S3 sleep state
04 System is entering S4 sleep state
05 System is entering S5 sleep state

57
Onboard LEDs
10 System is waking up from the S1 sleep state
20 System is waking up from the S2 sleep state
30 System is waking up from the S3 sleep state
40 System is waking up from the S4 sleep state
AC
mode.
AA
mode.
CPU core /CPU socket / System / MOS / PCH Temperature
00 - 99
Temperature after the system has fully booted into the OS.
Important

58 Installing OS, Drivers & MSI Center
Installing OS, Drivers & MSI Center
Please download and update the latest utilities and drivers at www.msi.com
Installing Windows 10 / Windows 11
1. Power on the computer.
2. Insert the Windows 10 / Windows 11 installation disc/USB into your computer.
3. Press the Restart button on the computer case.
4. Press F11
Menu.
5. Select the Windows 10 / Windows 11 installation disc/USB from the Boot Menu.
6. Press any key if screen shows Press any key to boot from CD or DVD... message.
If not, please skip this step.
7. Follow the instructions on the screen to install Windows 10 / Windows 11.
Installing Drivers
1. Start up your computer in Windows 10 / Windows 11.
2. Insert MSI® USB Drive into the USB port.
3. Select to choose what happens with this disc pop-up notification, then
select Run DVDSetup.exe to open the installer. If you turn off the AutoPlay feature
DVDSetup.exe
from the root path of the MSI USB Drive.
4. The installer will find and list all necessary drivers in the Drivers/Software tab.
5. Install button in the lower-right corner of the window.
6. The drivers installation will then be in progress, after it has finished it will prompt
you to restart.
7. OK button to finish.
8. Restart your computer.
MSI Center
use content creation softwares. It also allows you to control and synchronize LED
modes, monitor system performance, and adjust fan speed.
MSI Center User Guide
refer to
or scan the QR code to access.
Important
Functions may vary depending on the product you have.

59
UEFI BIOS
UEFI BIOS
architecture. UEFI has many new functions and advantages that traditional BIOS
cannot achieve, and it will completely replace BIOS in the future. The MSI UEFI
BIOS uses UEFI as the default boot mode to take full advantage of the new chipset’s
capabilities.
Important
The term BIOS in this user guide refers to UEFI BIOS unless otherwise noted.
UEFI advantages
Fast booting - UEFI can directly boot the operating system and save the BIOS self-
Supports for hard drive partitions larger than 2 TB.
Supports unlimited number of partitions.
Supports full capabilities of new devices - new devices may not provide backward
compatibility.
Supports secure startup - UEFI can check the validity of the operating system to
ensure that no malware tampers with the startup process.
Incompatible UEFI cases
32-bit Windows operating system - this motherboard supports only Windows 10/
Windows 11 64-bit operating system.
Older graphics card - the system will detect your graphics card. When display a
warning message There is no GOP (Graphics Output protocol) support detected in
this graphics card.
Important
We recommend that you to replace with a GOP/UEFI compatible graphics card or
How to check the BIOS mode?
1. Power on your computer.
2. Press Delete key, when the Press DEL key to enter Setup Menu, F11 to enter
Boot Menu message appears on the screen during the boot process.
3. After entering the BIOS, you can check the BIOS Mode at the top of the screen.
BIOS Mode: UEFI

60 UEFI BIOS
BIOS Setup
The default settings offer the optimal performance for system stability in normal
conditions. You should always keep the default settings to avoid possible system
damage or failure booting unless you are familiar with BIOS.
Important
BIOS items are continuously update for better system performance. Therefore, the
description may be slightly different from the latest BIOS and should be for reference
only. You could also refer to the HELP information panel for BIOS item description.
The BIOS screens, options and settings will vary depending on your system.
Entering BIOS Setup
Press Delete key, when the Press DEL key to enter Setup Menu, F11 to enter Boot
Menu message appears on the screen during the boot process.
Function key
F1: General Help list
F2: Add/ Remove a favorite item
F3: Enter Favorites menu
F4
F5: Enter Memory-Z menu
F6: Load optimized defaults
F7: Switch between Advanced mode and EZ mode
F8: Load Overclocking Profile
F9: Save Overclocking Profile
F10
F12
Ctrl+F: Enter Search page
* When you press F10, a confirmation window appears and it provides the modification
information. Select between Yes or No to confirm your choice.
BIOS User Guide
If you’d like to know more instructions on setting up the BIOS, please
refer to
http://download.msi.com/manual/mb/Intel600BIOS.pdf
or scan the QR code to access.

61
UEFI BIOS
Resetting BIOS
You might need to restore the default BIOS setting to solve certain problems. There
are several ways to reset BIOS:
Go to BIOS and press F6 to load optimized defaults.
Short the Clear CMOS jumper on the motherboard.
Important
Clear
CMOS jumper section for resetting BIOS.
Updating BIOS
Updating BIOS with M-FLASH
Before updating:
Please download the latest BIOS file that matches your motherboard model from MSI
website. And then save the BIOS file into the USB flash drive.
Updating BIOS:
1. Switch to the target BIOS ROM by Multi-BIOS switch. Please skip this step if your
motherboard doesn't has this switch.
2. Insert the USB flash drive that contains the update file into the USB port.
3. Please refer the following methods to enter flash mode.
Reboot and press Ctrl + F5 key during POST and click on Yes to reboot the
system.
Reboot and press DelM-FLASH button
and click on Yes to reboot the system.
4. Select a BIOS file to perform the BIOS update process.
5. When prompted click on Yes to start recovering BIOS.
6. After the flashing process is 100% completed, the system will reboot
automatically.

62 UEFI BIOS
Updating the BIOS with MSI Center
Before updating:
Make sure the LAN driver is already installed and the internet connection is set
properly.
Please close all other application software before updating the BIOS.
To update BIOS:
1. Support page.
2. Select Live Update and click on Advance button.
3. Select the BIOS file and click on Install button.
4. The installation reminder will appear, then click the Install button on it.
5. The system will automatically restart to update BIOS.
6. After the flashing process is 100% completed, the system will restart
automatically.
Updating BIOS with Flash BIOS Button
1. Please download the latest BIOS file that matches your motherboard model from
the MSI® website.
2. Rename the BIOS file to MSI.ROM, and save it to the root of the USB storage
device.
3. CPU_PWR1 and ATX_PWR1
4. Plug the USB storage device that contains the MSI.ROM file into the Flash BIOS
Port on the rear I/O panel.
5. Press the Flash BIOS Button to flash BIOS, and the LED starts flashing.
6. The LED will be turned off when the process is completed.

1
........................................................................................... 3
............................................................................................ 4
........................................................................................................................ 5
............................................................................... 13
................................................................................................. 14
....................................................................................................... 15
........................................................................................... 15
......................................................................................... 15
................................................................................ 16
............................................................................................... 18
................................................... 19
.......................................................................................... 20
........................................................................................................... 21
........................................................................................................ 22
................................................................................. 23
................................................................................ 24
..................................................... 32
................................................................... 32
......................................................... 33
................................................................. 34
........................................................................... 34
..................................................................... 35
................................................................................ 35
......................................................................... 36
.................................................................................................... 36
................................................. 37
..................................................... 39
..................................................................... 39
............................................................................... 40
........................................................................ 40
................................. 41
..................................................................... 42
..................................................... 42
........................................................ 43
............................................................................ 43
................................................................................. 44

2
............................................ 45
......................................................................... 46
M-VISION Dashboard ............................................................................................ 47
................................................................................... 47
................................................................................ 50
..................................................................................................... 51
EZ Debug LED ....................................................................................................... 51
.................................................................................... 51
............................................................................ 51
................................................................................................ 52
.................................................................................................... 52
........................................................................................................ 52
..................................................................................... 52
...................................................................................................... 52
................................................. 58
............................................................. 58
....................................................................................... 58
............................................................................................................ 58
UEFI BIOS ............................................................................................................. 59
........................................................................................................... 60
................................................................................. 60
........................................................................................... 60
...................................................................................................... 61
........................................................................................ 61

3

4

5
CPU

6
Thunderbolt 4
USB
Hub-GL3590
Asmedia 1074
Hub-GL850G

7

8
RAID
LAN
HPA
Bluetooth®
Intel® WiFi 6E

9
EZ Debug LED x4

10
Dual BIOS
UEFI AMI BIOS
Intel Extreme Tuning Utility
Nahimic

11
MSI Sound Tune
Gaming Mode
Smart Priority
Game Highlights
LAN Manager
Mystic Light
Ambient Devices
User Scenario
Live Update
Hardware Monitoring
Speed Up
Smart Image Finder
Audio Boost 5 HD
Nahimic 3
Sound Tune
10G Super LAN
2.5G LAN
LAN Manager
Intel WiFi

12
M.2 Shield Frozr
LED
Mystic Light
EZ DEBUG LED
Memory Boost
Memory Force
Game Boost
Thunderbolt 4
USB 4.0
Lightning USB 20G
USB 3.2 Gen 2 10G

13
M-VISION Dashboard
System Saver
EZ Debug LED
Duet Display
App Player
Tile
20*
6
6
6

14
MEG Z690 GODLIKE
1
1
1
3
1
1
2
1
1
2
2
1
1
2
1
1
1
1
1
1
1
1

15
2468
Thunderbolt 4
USB 3.2 Gen 2
10Gbps Type-A
2.5 Gbps LAN 10 Gbps LAN
Flash
Flash
Off
2.5 Gbps LAN 10 Gbps LAN
Off 10 Mbps
100 Mbps/ 1
Gbps
100 Mbps / 1
Gbps / 2.5 Gbps
2.5 Gbps 10 Gbps

16

17
AUDIO INPUT
AUDIO INPUT
Rear Front
Side Center/
Subwoofer

18
1.
2.
1
2
3.

19

20
RESET1
JRAINBOW1 JFP2
JFP1
JLN1
JLN2
JRGB1
JUSB1
M2_6
JUSB4
JUSB2
JUSB3
JBAT1
JSLOW1
SYS_FAN1
SYS_FAN3
PUMP_FAN1
M2_4
M2_3
M2_2
M2_5
M2_1
JAUD1
JDASH1
W_FLOW1
JUSB6
SYS_FAN4
SYS_FAN5
M_SW1
JRAINBOW2
POWER1
JTPM1
LED_SW1
BIOS_SW1
JPWRLED1
SYS_FAN6
SYS_FAN7
SYS_FAN8
ATX_PWR1
SYS_FAN2
T_SEN1/ T_SEN2
DIMMB1
DIMMB2
DIMMA1
DIMMA2
JUSB5

21
4
50.8 mm

22
DIMMA1 DIMMB1
DIMMA2 DIMMB2
DIMMA2
DRAM Frequency
DIMMB2 DIMMB2
DIMMB1
DIMMA2 DIMMA2 DIMMA2
DIMMA1

23
PCI_E1
PCI_E2
PCI_E3
MSI Gaming Series Graphics Card Bolster
PCI_E1
M2_4 SATA
PCI_E3

24
M2_1
M2_2
M2_3
M2_6
M2_5M2_4
1.
2.
3.
4.
2
2
2
3
3
4
4
4
2
1
1
M2_1
M2_3

25
5.
5
6.
6
6
22110 SSD 2260 SSD
7.
8.
30º30º
30º30º
77
8
8
22110 SSD
2280 SSD
2260 SSD

26
9.
10.
11.
10
10
10
9
9
10
11
11
M2_1
M2_3
1.
2.
3.
4.
1
1
2
3
3
4 4
4
2
1
1
M2_2
M2_6

27
5.
5
6.
6
2260 SSD
7.
8.
30º30º
30º30º
2280 SSD
2260 SSD
877
8

28
9.
10.
11.
11
11
10
9
9
10
11
11
M2_2
M2_6
1.
2.
3.
1
1
2
3
3
2
1
1
M2_4
M2_5

29
4.
4
5.
6.
5
6

30
7.
8.
30º30º
8
7
9.
10.
10
10
9
9
10
10
M2_4
M2_5

31
22110 SSD
2280 SSD
2280 SSD
22110 SSD
2280 SSD
2280 SSD

32
SATAA
SATA5
SATA7
SATAB
SATA6
SATA8
1
2 10
9
1 2 Ground
3 4
5 Head Phone R 6
7 SENSE_SEND 8 No Pin
9 Head Phone L 10 Head Phone Detection

33
24
13 1
12
ATX_PWR1
1 +3.3V 13 +3.3V
2 +3.3V 14 -12V
3 Ground 15 Ground
4 +5V 16 PS-ON#
5 Ground 17 Ground
6 +5V 18 Ground
7 Ground 19 Ground
8 PWR OK 20 Res
9 5VSB 21 +5V
10 +12V 22 +5V
11 +12V 23 +5V
12 +3.3V 24 Ground
5
4 1
8
1 Ground 5 +12V
2 Ground 6 +12V
3 Ground 7 +12V
4 Ground 8 +12V

34
JFP1,
1
2 10
9
+
+
+- --
-
+
Power LED
HDD LED Reset Switch
Reserved
Power Switch
JFP1
1 HDD LED + 2 Power LED +
3 HDD LED - 4 Power LED -
5 Reset Switch 6 Power Switch
7 Reset Switch 8 Power Switch
9 Reserved 10 No Pin
1
JFP2
+
+-
-
Speaker
Buzzer
1 Speaker - 2 Buzzer +
3 Buzzer - 4 Speaker +
1
1 Ground 3 WFLOW IN
2

35
Enabled

36
GND
GND

37
1
2 14
13
1 No Pin 2
3 4
5 6 Ground
7 PSIN#_R 8 FP_RST#_R
9 10
11 BLK+ 12 BLK-
13 14
1
88
JDASH1
BIOS > OC > Direct OC Button
OC Fail Save
OC Retry

38
1.
2.
3.
4.
5.
1
1 1
1
2
3
4
5
5
5
5

39
1
10 11
20
1 Power 11 USB2.0+
2 USB3_RX_DN 12 USB2.0-
3 USB3_RX_DP 13 Ground
4 Ground 14
5 15
6 16 Ground
7 Ground 17 USB3_RX_DP
8 USB2.0- 18 USB3_RX_DN
9 USB2.0+ 19 Power
10 Ground 20 No Pin
JUSB1/ 2

40
1
2 10
9
1 2
3 USB0- 4 USB1-
5 USB0+ 6 USB1+
7 Ground 8 Ground
9 No Pin 10
1
2 12
11
1 SPI Power 2
3
4
5 Reserved 6
7 Ground 8 SPI Reset
9 Reserved 10 No Pin
11 Reserved 12 Interrupt Request

41
BIOS > HARDWARE MONITOR
2A 24W
PUMP_FAN1 3A 36W
2A 12W
1
1 Ground 2 +12V
3 Sense 4
1
1 Ground 2
3 Sense 4
PUMP_FAN1
PWM/DC

42
1. JCI1
2.
3. BIOS > SETTINGS > Security > Chassis Intrusion Configuration
4. Chassis IntrusionEnabled
5. F10Enter
Yes
6.
1. BIOS > SETTINGS > Security > Chassis Intrusion Configuration
2. Chassis IntrusionReset
3. F10Enter
Yes

43
1.
2. JBAT1
3. JBAT1
4.
BIOS B BIOS A
: BIOS A
: BIOS B
BIOS_SW1
BIOS_SW1

44
1
GRB
1
1 +12V 2 G
3 R 4 B
1
1
GRB

45
1
1
1
D
+5V
1
JRAINBOW1 1
JRAINBOW2
1 +5V 2 Data
3 No Pin 4 Ground

46
1
1 +5V 2 Data
3 Ground
SYS_FAN
SYS_FAN
SYS_FAN SYS_FAN
SYS_FAN
SYS_FAN
1
2
34
5
6

47
M-VISION Dashboard
M-VISION Dashboard
1.
2.
3.
1
2
2
10 Gb LAN
3

48
CPU CLK - / +
BIOS > OC > Direct OC Button
OC Retry

49

50
M-VISION Dashboard
M-VISION Dashboard
800*480px.gif/
bmp/ jpg/ png/
mp4

51
EZ Debug LED
BOOT
DDR
CPU
VGA
LED_SW1
LED_OFF LED_ON

52
0123456789ABD E F
0123456789ABCDEF
Security (SEC)
Pre-EFI Initialization (PEI)
Driver Execution Environment (DXE)
Boot Device Selection (BDS)
01
02
03
04
06
07
08
09
0B
0C - 0D
0E
0F

53
10
11
12 - 14
15
16 - 18
19
1A - 1C
2B
2C
2D
2E
2F
31
32
33
34
35
36
37
38 - 3A
3B
3C - 3E
4F
50
51
52
53
54
55
56
57
58
59
5A

54
5B
5C - 5F
60
61
62
63
64 - 67
68
69
6A
6B - 6F
70
71
72
73 - 77
78
79
7A - 7F
90
91
92
93
94
95
96
97
98
99
9A
9B
9C
9D
9E -9F
A0
A1

55
A2
A3
A4
A5
A6
A7
A8
A9
AB
AD
AE
AF
B0
B1
B2
B3
B4
B5
B6
B7
B8 - BF
D0
D1
D2
D3
D4
D5
D6
D7
D8
D9
DA
DB
DC

56
E0
E1
E2
E3
E4 - E7
E8
E9
EA
EB
EC - EF
F0
F1
F2
F3
F4
F5 - F7
F8
F9
FA
FB - FF
01
02
03
04
05
10
20
30

57
40
AC
AA
00 - 99

58
1.
2.
3. Restart
4. F11
5.
6. Press any key to boot from CD or DVD...
7.
1.
2.
3.
Run DVDSetup.exe
DVDSetup.exe
4.
5. Install
6.
7. OK
8.
MSI Center

59
UEFI BIOS
UEFI BIOS
1.
2. Press DEL key to enter Setup Menu, F11 to enter Boot Menu
Delete
3.
BIOS Mode: UEFI

60 UEFI BIOS
HELP
Press DEL key to enter Setup Menu, F11 to enter Boot Menu
Delete
F1
F2
F3
F4
F5
F6
F7
F8
F9
F10
F12
Ctrl+F
http://download.msi.com/manual/mb/Intel600BIOSjp.pdf

61
UEFI BIOS
F6
1.
2.
3.
Ctrl + F5 Yes
DeleteM-FLASH
Yes
4.
5. Yes
6.

62 UEFI BIOS
1. Support
2. Live Update Advanced
3. Install
4.
5.
6.
1.
2.
3. CPU_PWR1ATX_PWR1
4.
5. Flash BIOS
6.

1
.......................................................................................................3
.......................................................................................................... 4
..............................................................................................................5
......................................................................................... 13
..................................................................................................14
...............................................................................................15
........................................................................................ 15
............................................................................................. 15
............................................................................................... 16
...................................................................................................... 18
...................................................................... 19
..................................................................................................20
............................................................................................................... 21
............................................................................................................. 22
..................................................................................... 23
..................................................................................... 24
........................................................... 32
.................................................................................... 32
............................................................................................................ 33
................................................................................ 34
....................................................................... 34
............................................................................. 35
......................................................................................... 35
..................................................................................... 36
.............................................................................................. 36
.............................................................................. 37
........................................................... 39
........................................................................... 39
..................................................................................... 40
....................................................................................... 40
............................................. 41
........................................................................................... 42
................................................................ 42
............................................................... 43
.............................................................................. 43
....................................................................................... 44

2
.................................. 45
............................................................................... 46
................................................................................................ 47
..................................................................................... 47
..................................................................................... 50
................................................................................................51
....................................................................................................... 51
................................................................................... 51
..................................................................................... 51
..................................................................................................... 52
............................................................................................................ 52
............................................................................................................ 52
................................................................................................ 52
....................................................................................................... 52
....................................................................................................... 57
............................................................................................................... 57
................................................................58
....................................................................... 58
.................................................................................................. 58
................................................................................................................ 58
UEFI BIOS ..................................................................................................59
.............................................................................................. 60
............................................................................................................... 60
................................................................................................ 60
............................................................................................................... 61
........................................................................................................ 61

3

4

5
CPU

6
USB
Hub-GL3590
Asmedia 1074
Hub-GL850G

7

8
RAID
LAN
®
.

9

10
2x 256 Mb flash
UEFI AMI BIOS

11
10G Super LAN
2.5G LAN

12
LED
USB 4.0
USB 3.2 Gen 2 10G

13
App Player
6
6
6

14
MEG Z690 GODLIKE
1
1
1
3
1
1
2
1
1
2
2
1
1
2
1
1
1
1
1
1
1
1

15
2468
USB 3.2 Gen 2
10Gbps Type-A
2.5 Gbps LAN 10 Gbps LAN
2.5 Gbps LAN
10 Gbps LAN
10 Mbps
100 Mbps/
1 Gbps
100 Mbps / 1
Gbps / 2.5 Gbps
2.5 Gbps 10 Gbps

16

17
AUDIO INPUT
AUDIO INPUT
Rear Front
Side Center/
Subwoofer

18
1.
2.
1
2
3.

19

20
RESET1
JRAINBOW1 JFP2
JFP1
JLN1
JLN2
JRGB1
JUSB1
M2_6
JUSB4
JUSB2
JUSB3
JBAT1
JSLOW1
SYS_FAN1
SYS_FAN3
PUMP_FAN1
M2_4
M2_3
M2_2
M2_5
M2_1
JAUD1
JDASH1
W_FLOW1
JUSB6
SYS_FAN4
SYS_FAN5
M_SW1
JRAINBOW2
POWER1
JTPM1
LED_SW1
BIOS_SW1
JPWRLED1
SYS_FAN6
SYS_FAN7
SYS_FAN8
ATX_PWR1
SYS_FAN2
T_SEN1/ T_SEN2
DIMMB1
DIMMB2
DIMMA1
DIMMA2
JUSB5

21
50.8 mm

22
DIMMA1 DIMMB1
DIMMA2 DIMMB2
DRAM Frequency
DIMMB2 DIMMB2
DIMMB1
DIMMA2

23
PCI_E1
PCI_E2
PCI_E3
PCI_E1
M2_4 SATA
PCI_E3

24
M2_1
M2_2
M2_3
M2_6
M2_5M2_4
1.
2.
3.
4.
2
2
2
3
3
4
4
4
2
1
1
M2_1
M2_3

25
5.
5
6.
6
6
22110 SSD 2260 SSD
7.
8.
30º30º
30º30º
77
8
8
22110 SSD
2280 SSD
2260 SSD

26
9.
10.
11.
10
10
10
9
9
10
11
11
M2_1
M2_3
1.
2.
3.
4.
1
1
2
3
3
4 4
4
2
1
1
M2_2
M2_6

27
5.
5
6.
6
2260 SSD
7.
8.
30º30º
30º30º
2280 SSD
2260 SSD
877
8

28
9.
10.
11.
11
11
10
9
9
10
11
11
M2_2
M2_6
1.
2.
3.
1
1
2
3
3
2
1
1
M2_4
M2_5

29
4.
4
5.
6.
5
6

30
7.
8.
30º30º
8
7
9.
10.
10
10
9
9
10
10
M2_4
M2_5

31
22110 SSD
2280 SSD
2280 SSD
22110 SSD
2280 SSD
2280 SSD

32
SATAA
SATA5
SATA7
SATAB
SATA6
SATA8
1
2 10
9
1 2 Ground
3 4
5 Head Phone R 6
7 SENSE_SEND 8 No Pin
9 Head Phone L 10 Head Phone Detection

33
24
13 1
12
ATX_PWR1
1 +3.3V 13 +3.3V
2 +3.3V 14 -12V
3 Ground 15 Ground
4 +5V 16 PS-ON#
5 Ground 17 Ground
6 +5V 18 Ground
7 Ground 19 Ground
8 PWR OK 20 Res
9 5VSB 21 +5V
10 +12V 22 +5V
11 +12V 23 +5V
12 +3.3V 24 Ground
5
4 1
8
1 Ground 5 +12V
2 Ground 6 +12V
3 Ground 7 +12V
4 Ground 8 +12V

34
1
2 10
9
+
+
+- --
-
+
HDD LED
Reserved
JFP1
1 HDD LED + 2 Power LED +
3 HDD LED - 4 Power LED -
5 Reset Switch 6 Power Switch
7 Reset Switch 8 Power Switch
9 Reserved 10 No Pin
1
JFP2
+
+-
-
Speaker
Buzzer
1 Speaker - 2 Buzzer +
3 Buzzer - 4 Speaker +
1
1 Ground 3 WFLOW IN
2

35

36
GND
GND
Sense

37
1
2 14
13
1 No Pin 2
3 4
5 6 Ground
7 PSIN#_R 8 FP_RST#_R
9 10
11 BLK+ 12 BLK-
13 14
1
88
JDASH1
OC Fail Save

38
1.
2.
3.
4.
5.
1
1 1
1
2
3
4
5
5
5
5

39
1
10 11
20
1 Power 11 USB2.0+
2 USB3_RX_DN 12 USB2.0-
3 USB3_RX_DP 13 Ground
4 Ground 14
5 15
6 16 Ground
7 Ground 17 USB3_RX_DP
8 USB2.0- 18 USB3_RX_DN
9 USB2.0+ 19 Power
10 Ground 20 No Pin
JUSB1/ 2

40
1
2 10
9
1 2
3 USB0- 4 USB1-
5 USB0+ 6 USB1+
7 Ground 8 Ground
9 No Pin 10
1
2 12
11
1 SPI Power 2
3
4
5 Reserved 6
7 Ground 8 SPI Reset
9 Reserved 10 No Pin
11 Reserved 12 Interrupt Request

41
2A 24W
PUMP_FAN1 3A 36W
2A 12W
1
1 Ground 2 +12V
3 Sense 4
1
1 Ground 2
3 Sense 4
PUMP_FAN1
PWMDC

42
1. JCI1
2.
3. BIOS > SETTINGS > Security > Chassis Intrusion Configuration
4.
5. F10EnterYes
6.
1. BIOS > SETTINGS > Security > Chassis Intrusion Configuration
2.
3. F10 EnterYes

43
1.
2.
3.
4.
BIOS B BIOS A
: BIOS A
: BIOS B
BIOS_SW1
BIOS_SW1

44
1
GRB
1
1 +12V 2 G
3 R 4 B
1
1
GRB

45
1
1
1
D
+5V
JRAINBOW
JRAINBOW LED
1
JRAINBOW1 1
JRAINBOW2
1 +5V 2 Data
3 No Pin 4 Ground

46
1
1 +5V 2 Data
3 Ground
SYS_FAN
SYS_FAN
SYS_FAN SYS_FAN
SYS_FAN
SYS_FAN
1
2
34
5
6

47
1.
2.
3.
1
2
2
10 Gb LAN
3

48
CPU CLK - / +

49

50
800*480px.gif/
bmp/ jpg/ png/
mp4

51
BOOT
DDR
CPU
VGA
LED_SW1

52
0123456789ABD E F
0123456789ABCDEF
Pre-EFI Initialization (PEI)
Driver Execution Environment (DXE)
Boot Device Selection (BDS)
01
02
03
04
06
07
08
09
0B
SEC Error Codes
0C - 0D
0E

53
0F
10
11
12 - 14
15
16 - 18
19
1A - 1C
2B
2C
2D
2E
2F
31
32
33
34
35
36
37
38 - 3A
3B
3C - 3E
4F
50
51
52
53
54
55
56
57
58

54
59
5A
5B
5C - 5F
60
61
62
63
64 - 67
68
69
6A
6B - 6F
70
71
72
73 - 77
78
79
7A - 7F
90
91
92
93
94
95
96
97
98
99
9A
9B

55
9C
9D
9E -9F
A0
A1
A2
A3
A4
A5
A6
A7
A8
A9
AB
AD
AE
AF
B0
B1
B2
B3
B4
B5
B6
B7
B8 -
BF
D0
D1
D2
D3
D4

56
D5
D6
D7
D8
D9
DA
DB
DC
E0
E1
E2
E3
E4 - E7
E8
E9
EA
EB
EC - EF
F0
F1
F2
F3
F4
F5 - F7
F8
F9
FA
FB - FF

57
01
02
03
04
05
10
20
30
40
AC
AA
CPU
00 - 99

58
1.
2.
3. Restart
4. F11
5.
6. Press any key to boot from CD or DVD...
7.
1.
2.
3. Select to choose what happens with this disc Run
DVDSetup.exe
DVDSetup.exe
4. Drivers/Software
5. Install
6.
7. OK
8.

59
UEFI BIOS
UEFI BIOS
1.
2. DEL
Delete
3.
UEFI

60 UEFI BIOS
Delete
F1
F2
F3
F4
F5
F6
F7
F8
F9:
F10
F12
Ctrl+F
http://download.msi.com/manual/mb/Intel600BIOSkr.pdf

61
UEFI BIOS
1.
2.
3.
Ctrl + F5Yes
DelM-FLASH
4.
5. Yes
6.

62 UEFI BIOS
1. Support
2. Live UpdateAdvance
3.
4.
5.
6.
1.
2.
3.
4.
5.
6.

1
................................................................................................................. 3
................................................................................................... 4
........................................................................................................................ 5
............................................................................................ 13
............................................................................................................... 14
................................................................................................................ 15
.................................................................................... 15
.................................................................................................... 15
.............................................................................................. 16
................................................................................................................ 18
.................................................... 19
............................................................................................................... 20
............................................................................................................... 21
............................................................................................................ 22
..................................................................................... 23
...................................................................................... 24
.............................................................. 32
........................................................................................... 32
.................................................................. 33
.................................................................................... 34
..................................................................................... 34
................................................................................. 35
.................................................................................. 35
................................................................................. 36
............................................................. 36
..................................................................................... 37
.............................................................. 39
.............................................................................. 39
........................................................................................ 40
.......................................................................................... 40
...................................... 41
............................................................................................... 42
........................................................ 42
............................................................ 43
........................................................................... 43
.......................................................................................... 44

2
.................................................... 45
.................................................................................. 46
M-VISION Dashboard ............................................................................................ 47
........................................................................................ 47
................................................................................ 50
.................................................................................................. 51
................................................................................................... 51
................................................................................... 51
............................................................................. 51
........................................................................................................ 52
.................................................................................................... 52
................................................................................................................ 52
................................................................................................... 52
............................................................................................................ 52
............................................................... 58
............................................................................. 58
........................................................................................................ 58
............................................................................................................ 58
UEFI BIOS ............................................................................................................. 59
.............................................................................................................. 60
...................................................................................................... 60
................................................................................................... 60
.............................................................................................................. 61
.............................................................................................................. 61

3

4

5
裝置

6
Thunderbolt 4
Hub-GL3590
Asmedia 1074
Hub-GL850G

7

8
RAID
10*
RAID 10
Bluetooth®
Intel® WiFi 6E

9

10
E-ATX
UEFI AMI BIOS
Intel Extreme Tuning Utility
Nahimic

11
MSI Sound Tune
Gaming Mode
Smart Priority
Game Highlights
Mystic Light
Ambient Devices
User Scenario
Live Update
Speed Up
Smart Image Finder
Audio Boost 5HD
Nahimic 3
Sound Tune
Intel WiFi
Wavy Fin Design

12
M.2 Shield Frozr
Mystic Light
Ambient Devices Support
Memory Boost
Memory Force
Thunderbolt 4
USB 4.0
Lightning USB 20G
USB 3.2 Gen 2 10G

13
M-VISION Dashboard
System Saver
Duet Display
App player
Tile
20*
6
6
6

14
MEG Z690 GODLIKE
1
1
1
3
1
1
2
1
1
2
2
1
1
2
1
1
1
1
1
1
1
1

15
2468
Thunderbolt 4
USB 3.2 Gen 2
10Gbps Type-A
2.5 Gbps
10 Gbps
M-VISION Dashboard
10 Mbps
100 Mbps/
1 Gbps
100 Mbps / 1
Gbps / 2.5 Gbps
黃 2.5 Gbps 10 Gbps

16

17
AUDIO INPUT
AUDIO INPUT
Rear Front
Side Center/
Subwoofer

18
1.
2.
1
2
3.

19

20
RESET1
JRAINBOW1 JFP2
JFP1
JLN1
JLN2
JRGB1
JUSB1
M2_6
JUSB4
JUSB2
JUSB3
JBAT1
JSLOW1
SYS_FAN1
SYS_FAN3
PUMP_FAN1
M2_4
M2_3
M2_2
M2_5
M2_1
JAUD1
JDASH1
W_FLOW1
JUSB6
SYS_FAN4
SYS_FAN5
M_SW1
JRAINBOW2
POWER1
JTPM1
LED_SW1
BIOS_SW1
JPWRLED1
SYS_FAN6
SYS_FAN7
SYS_FAN8
ATX_PWR1
SYS_FAN2
T_SEN1/ T_SEN2
DIMMB1
DIMMB2
DIMMA1
DIMMA2
JUSB5

21
50.8 mm

22
DIMMA1 DIMMB1
DIMMA2 DIMMB2
DIMMA2
DRAM Frequency
DIMMB2 DIMMB2
DIMMB1
DIMMA2 DIMMA2 DIMMA2
DIMMA1

23
PCI_E1
PCI_E2
PCI_E3
MSI Gaming Series
PCI_E1
M2_4 SATA
PCI_E3

24
M2_1
M2_2
M2_3
M2_6
M2_5M2_4
1.
2.
3.
4.
2
2
2
3
3
4
4
4
2
1
1
M2_1
M2_3

25
5.
5
6.
6
6
22110 SSD 2260 SSD
7.
8.
30º30º
30º30º
77
8
8
22110 SSD
2280 SSD
2260 SSD

26
9.
10.
11.
10
10
10
9
9
10
11
11
M2_1
M2_3
1.
2.
3.
4.
1
1
2
3
3
4 4
4
2
1
1
M2_2
M2_6

27
5.
5
6.
6
2260 SSD
7.
8.
30º30º
30º30º
2280 SSD
2260 SSD
877
8

28
9.
10.
11.
11
11
10
9
9
10
11
11
M2_2
M2_6
1.
2.
3.
1
1
2
3
3
2
1
1
M2_4
M2_5

29
4.
4
5.
6.
5
6

30
7.
8.
30º30º
8
7
9.
10.
10
10
9
9
10
10
M2_4
M2_5

31
22110 SSD
2280 SSD
2280 SSD
22110 SSD
2280 SSD
2280 SSD

32
SATAA
SATA5
SATA7
SATAB
SATA6
SATA8
1
2 10
9
1 2 Ground
3 4
5 Head Phone R 6
7 SENSE_SEND 8 No Pin
9 Head Phone L 10 Head Phone Detection

33
24
13 1
12
ATX_PWR1
1 +3.3V 13 +3.3V
2 +3.3V 14 -12V
3 Ground 15 Ground
4 +5V 16 PS-ON#
5 Ground 17 Ground
6 +5V 18 Ground
7 Ground 19 Ground
8 PWR OK 20 Res
9 5VSB 21 +5V
10 +12V 22 +5V
11 +12V 23 +5V
12 +3.3V 24 Ground
5
4 1
8
1 Ground 5 +12V
2 Ground 6 +12V
3 Ground 7 +12V
4 Ground 8 +12V

34
1
2 10
9
+
+
+- --
-
+
Power LED
HDD LED Reset Switch
Reserved
Power Switch
JFP1
1 HDD LED + 2 Power LED +
3 HDD LED - 4 Power LED -
5 Reset Switch 6 Power Switch
7 Reset Switch 8 Power Switch
9 Reserved 10 No Pin
1
JFP2
+
+-
-
Speaker
Buzzer
1 Speaker - 2 Buzzer +
3 Buzzer - 4 Speaker +
1
1 Ground 3 WFLOW IN
2

35

36
GND
GND
Sense

37
1
2 14
13
1 No Pin 2
3 4
5 6 Ground
7 PSIN#_R 8 FP_RST#_R
9 10
11 BLK+ 12 BLK-
13 14
1
88
JDASH1
- BIOS > OC >
Direct OC Button

38
1.
2.
3.
4.
5.
1
1 1
1
2
3
4
5
5
5
5

39
1
10 11
20
1 Power 11 USB2.0+
2 USB3_RX_DN 12 USB2.0-
3 USB3_RX_DP 13 Ground
4 Ground 14
5 15
6 16 Ground
7 Ground 17 USB3_RX_DP
8 USB2.0- 18 USB3_RX_DN
9 USB2.0+ 19 Power
10 Ground 20 No Pin
JUSB1/ 2

40
1
2 10
9
1 2
3 USB0- 4 USB1-
5 USB0+ 6 USB1+
7 Ground 8 Ground
9 No Pin 10
1
2 12
11
1 SPI Power 2
3
Master In Slave Out
4
Master Out Slave In
5 Reserved 6
7 Ground 8 SPI Reset
9 Reserved 10 No Pin
11 Reserved 12 Interrupt Request

41
BIOS > HARDWARE MONITOR
2A 24W
PUMP_FAN1 3A 36W
2A 12W
1
1 Ground 2 +12V
3 Sense 4
1
1 Ground 2
3 Sense 4
PUMP_FAN1
PWMDC

42
1. JCI1
2.
3. BIOS > SETTINGS > Security > Chassis Intrusion Configuration
4. Chassis IntrusionEnabled
5. F10Enter
6.
1. BIOS > SETTINGS > Security > Chassis Intrusion Configuration.
2. Chassis IntrusionReset
3. F10 EnterYes

43
1.
2. JBAT1
3. JBAT1
4.
BIOS B BIOS A
: BIOS A
: BIOS B
BIOS_SW1
BIOS_SW1

44
1
GRB
1
1 +12V 2 G
3 R 4 B
1
1
GRB

45
1
1
1
D
+5V
1
JRAINBOW1 1
JRAINBOW2
1 +5V 2 Data
3 No Pin 4 Ground
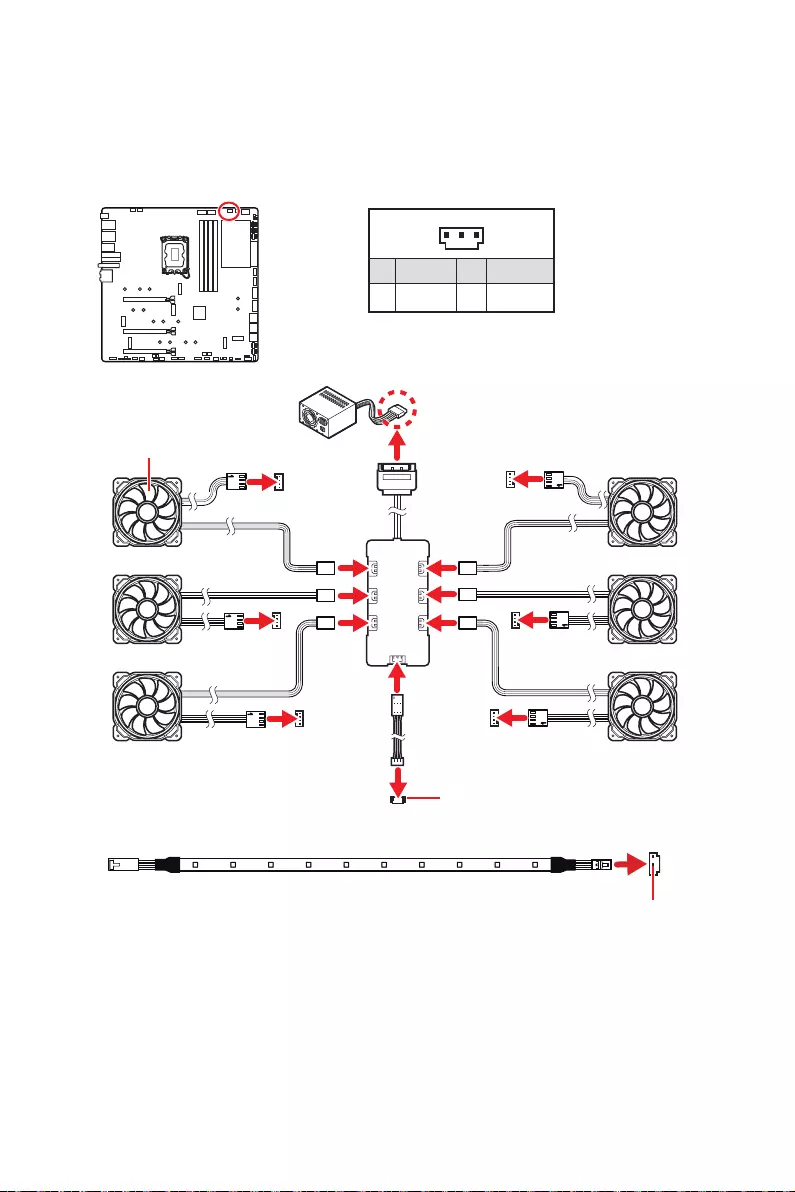
46
1
1 +5V 2 Data
3 Ground
SYS_FAN
SYS_FAN
SYS_FAN SYS_FAN
SYS_FAN
SYS_FAN
1
2
34
5
6

47
M-VISION Dashboard
M-VISION Dashboard
1.
2.
3.
1
2
2
3

48
CPU CLK - / + - BIOS > OC >
Direct OC Button

49

50
M-VISION Dashboard
M-VISION Dashboard
800*480px.gif/
bmp/ jpg/ png/
mp4

51
BOOT
DDR
CPU
VGA
LED_SW1
LED_OFF LED_ON

52
0123456789ABD E F
0123456789ABCDEF
Security (SEC)
Pre-EFI Initialization (PEI)
Driver Execution Environment (DXE)
Boot Device Selection (BDS)
01
02
03
04
06
07
08
09
0B
0C - 0D
0E
0F

53
10
11
12 - 14
15
16 - 18
19
1A - 1C
2B
2C
2D
2E
2F
31
32
33
34
35
36
37
38 - 3A
3B
3C - 3E
4F
50
51
52
53
54
55
56
57
58
59
5A
5B
5C - 5F

54
60
61
62
63
64 - 67
68
69
6A
6B - 6F
70
71
72
73 - 77
78
79
7A - 7F
90
91
92
93
94
95
96
97
98
99
9A
9B USB Reset
9C
9D
9E -9F
A0
A1 IDE Reset
A2
A3
A4

55
A5
A6
A7
A8
A9
AB
AD
AE
AF
B0
B1
B2
B3
B4
B5
B6
B7
B8 - BF
D0
D1
D2
D3
D4
D5
D6
D7
D8
D9
DA
DB
DC

56
E0
E1
E2
E3
E4 - E7
E8
E9
EA
EB
EC - EF
F0
F1
F2
F3
F4
F5 - F7
F8
F9
FA
FB - FF

57
01
02
03
04
05
10
20
30
40
AC
AA
00 - 99

58
1.
2.
3.
4. F11
5.
6. Press any key to boot from CD or DVD...
7.
1.
2.
3. DVDSetup.exe
DVDSetup.exe
4.
5.
6.
7.
8.
MSI Center

59
UEFI BIOS
UEFI BIOS
There is no GOP (Graphics
Output protocol) support detected in this graphics card.
1.
2.
Delete
3.
BIOS Mode: UEFI

60 UEFI BIOS
HELP
Delete
F1
F2
F3
F4
F5
F6
F7
F8
F9
F10
F12
Ctrl+F
http://download.msi.com/manual/mb/Intel600BIOStc.pdf

61
UEFI BIOS
F6
1. ,
2.
3.
Ctrl + F5
DelM-FLASH
4.
5. Yes
6.

62 UEFI BIOS
1. Support
2. Live UpdateAdvance
3. Install
4.
5.
6.
1.
2.
3. CPU_PWR1ATX_PWR1
4.
5. Flash BIOS
6.

1
................................................................................................................. 3
................................................................................................... 4
........................................................................................................................ 5
............................................................................................ 13
............................................................................................................... 14
........................................................................................................ 15
........................................................................................... 15
........................................................................................................ 15
.............................................................................................. 16
................................................................................................................ 18
............................................................. 19
............................................................................................................... 20
............................................................................................................... 21
............................................................................................................ 22
..................................................................................... 23
...................................................................................... 24
.............................................................. 32
........................................................................................... 32
.................................................................. 33
.................................................................................... 34
......................................................................................... 34
................................................................................. 35
.......................................................................................... 35
................................................................................. 36
................................................................................................. 36
.................................................................................... 37
.............................................................. 39
.............................................................................. 39
........................................................................................ 40
.......................................................................................... 40
............................................. 41
........................................................................................ 42
............................................................... 42
.................................................................... 43
.................................................................................. 43
.......................................................................................... 44

2
........................................................ 45
.................................................................................. 46
............................................................................................... 47
........................................................................................ 47
.................................................................................... 50
.......................................................................................................... 51
................................................................................................... 51
................................................................................... 51
................................................................................. 51
................................................................................................... 52
.................................................................................................... 52
................................................................................................................ 52
............................................................................................... 52
........................................................................................................ 52
............................................................... 58
............................................................................ 58
................................................................................................................ 58
............................................................................................................ 58
UEFI BIOS ............................................................................................................. 59
.............................................................................................................. 60
...................................................................................................... 60
....................................................................................................... 60
.............................................................................................................. 61
.............................................................................................................. 61

3

4

5
CPU

6
Thunderbolt 4
USB
Hub-GL3590
Asmedia 1074
Hub-GL850G

7

8
RAID
10*
LAN
®
Intel® WiFi 6E

9

10
UEFI AMI BIOS

11
Live Update
10G Super LAN
2.5G LAN
Intel WiFi

12
Memory Force
Thunderbolt 4
USB 4.0
USB 3.2 Gen 2 10G

13
Tile
20*
6
6
6

14
MEG Z690 GODLIKE
1
1
1
3
1
1
2
1
1
2
2
1
1
2
1
1
1
1
1
1
1
1

15
2468
Thunderbolt 4
USB 3.2 Gen 2
10Gbps Type-A
2.5 Gbps LAN 10 Gbps LAN
2.5 Gbps LAN 10 Gbps LAN
Mbps
100 Mbps/ 1
Gbps
/ 1 Gbps / 2.5 Gbps
Gbps
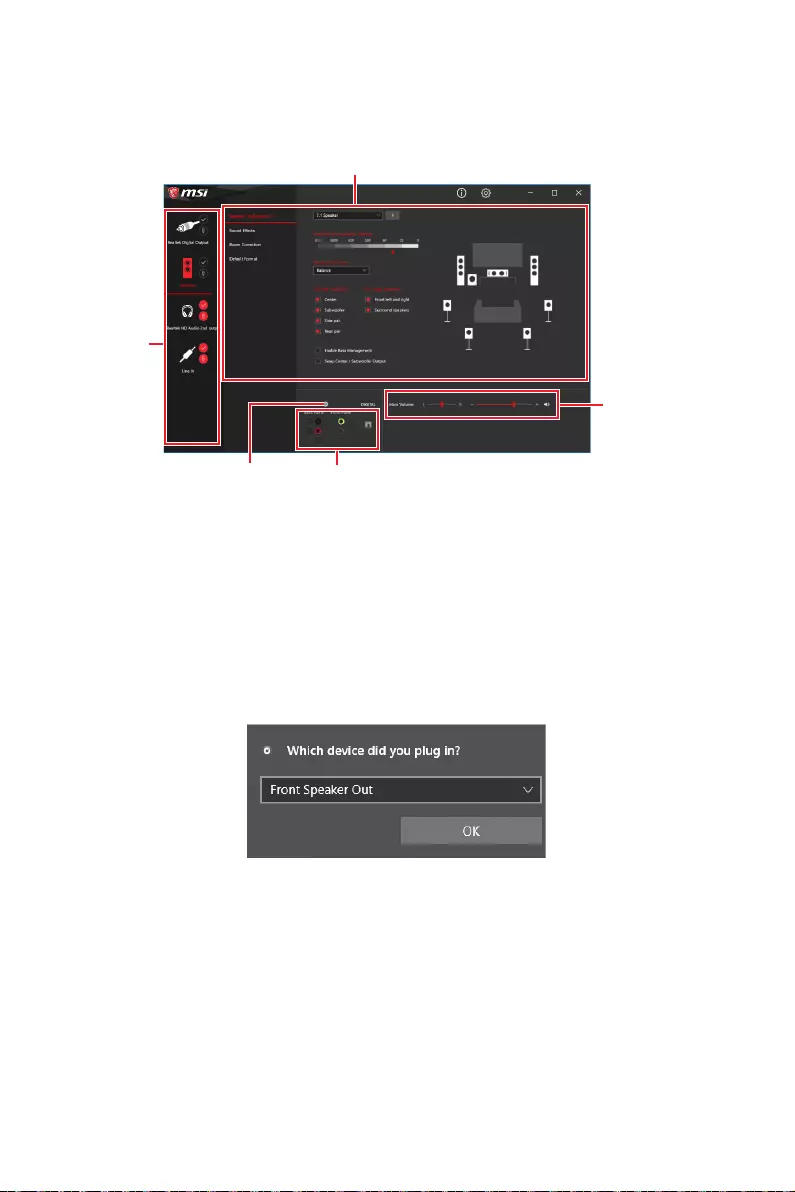
16
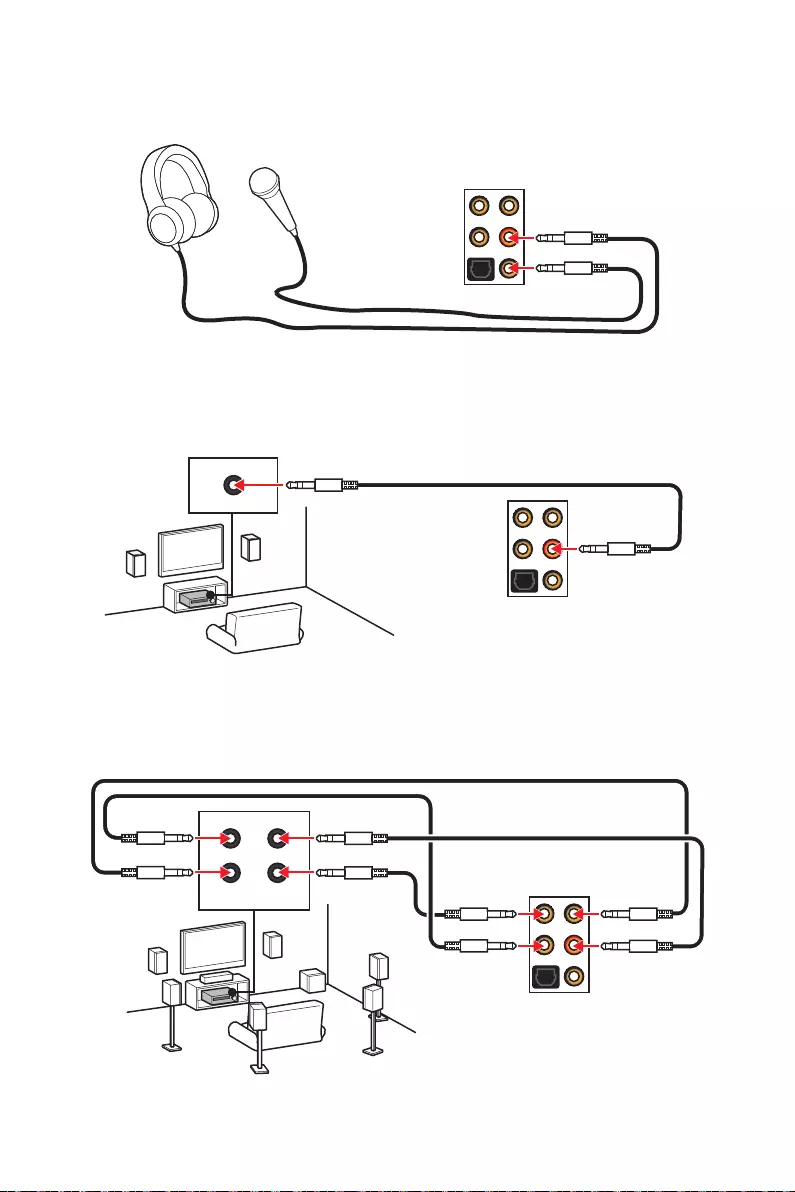
17
AUDIO INPUT
AUDIO INPUT
Rear Front
Side Center/
Subwoofer

18
1.
2.
1
2
3.
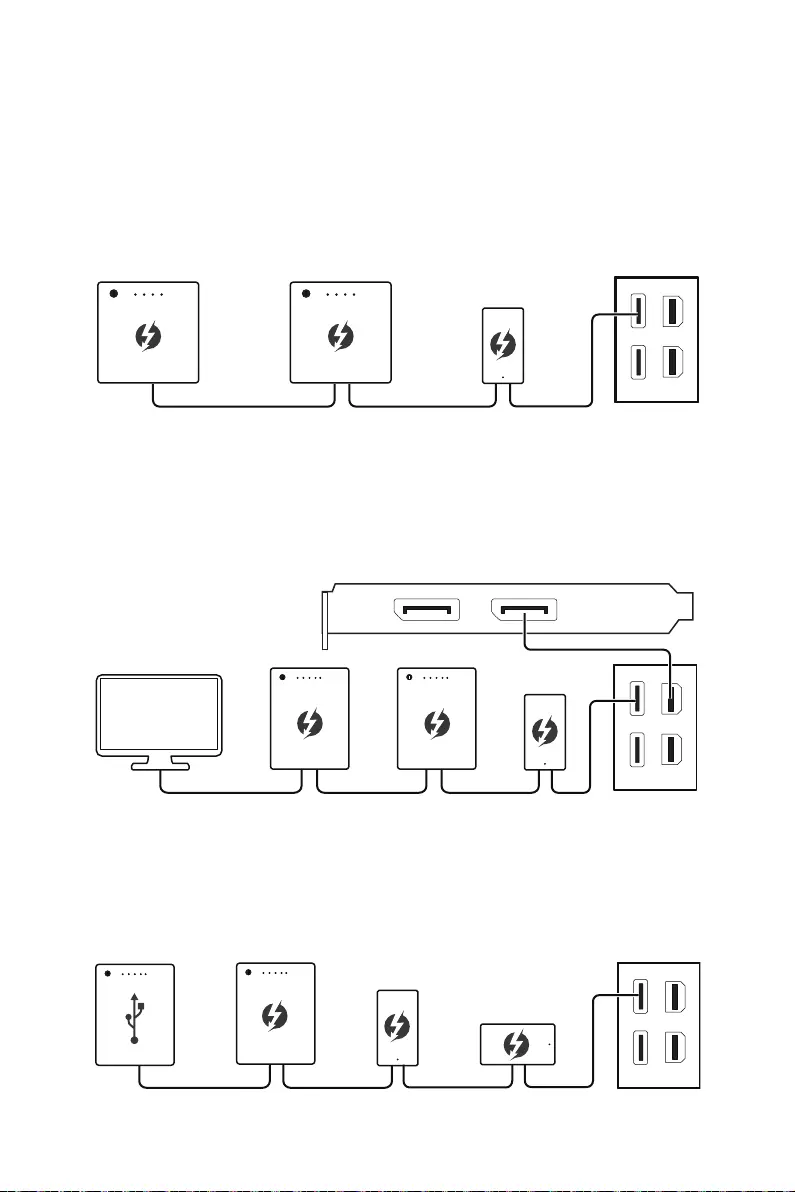
19
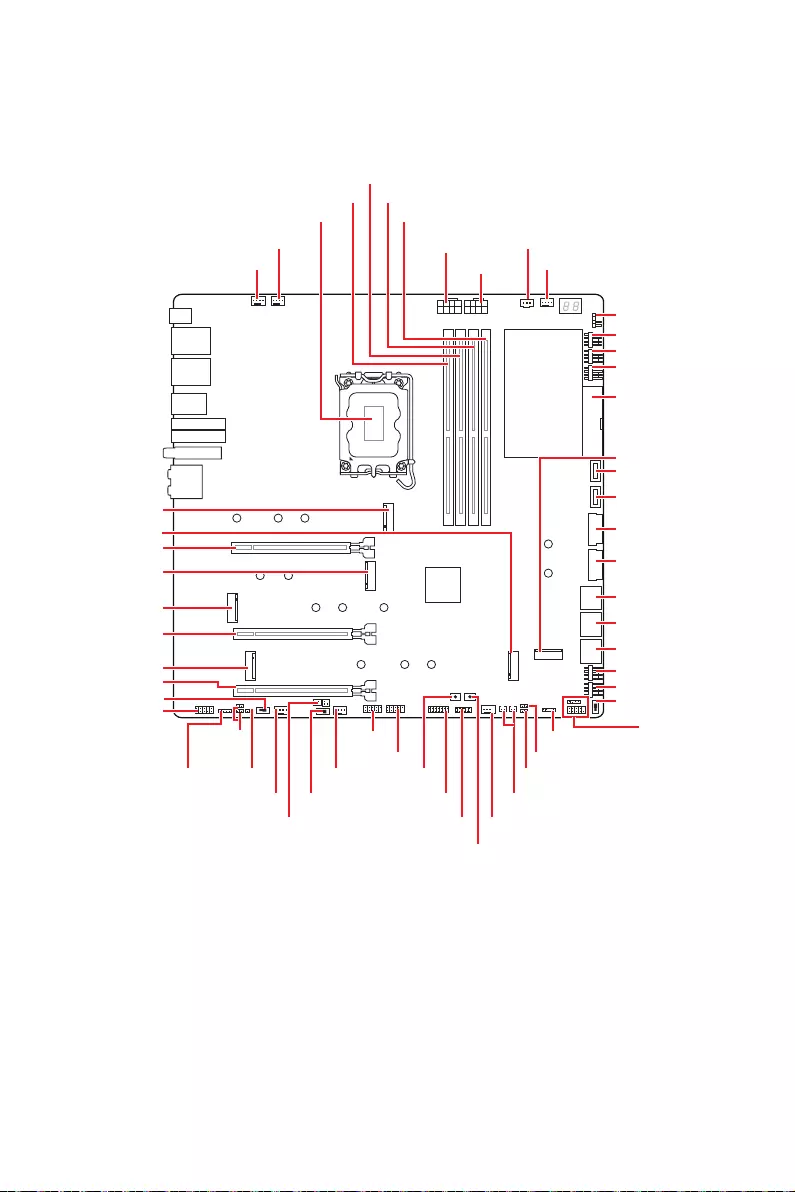
20
RESET1
JRAINBOW1 JFP2
JFP1
JLN1
JLN2
JRGB1
JUSB1
M2_6
JUSB4
JUSB2
JUSB3
JBAT1
JSLOW1
SYS_FAN1
SYS_FAN3
PUMP_FAN1
M2_4
M2_3
M2_2
M2_5
M2_1
JAUD1
JDASH1
W_FLOW1
JUSB6
SYS_FAN4
SYS_FAN5
M_SW1
JRAINBOW2
POWER1
JTPM1
LED_SW1
BIOS_SW1
JPWRLED1
SYS_FAN6
SYS_FAN7
SYS_FAN8
ATX_PWR1
SYS_FAN2
T_SEN1/ T_SEN2
DIMMB1
DIMMB2
DIMMA1
DIMMA2
JUSB5
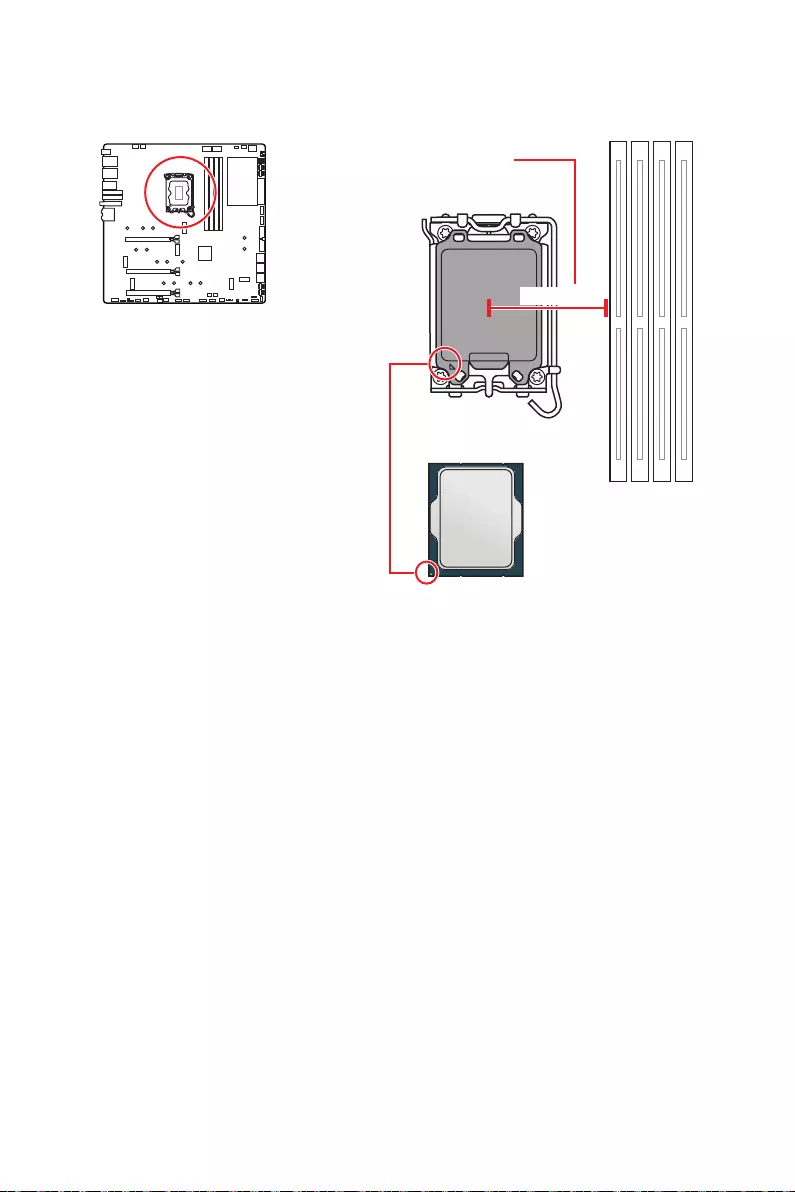
21
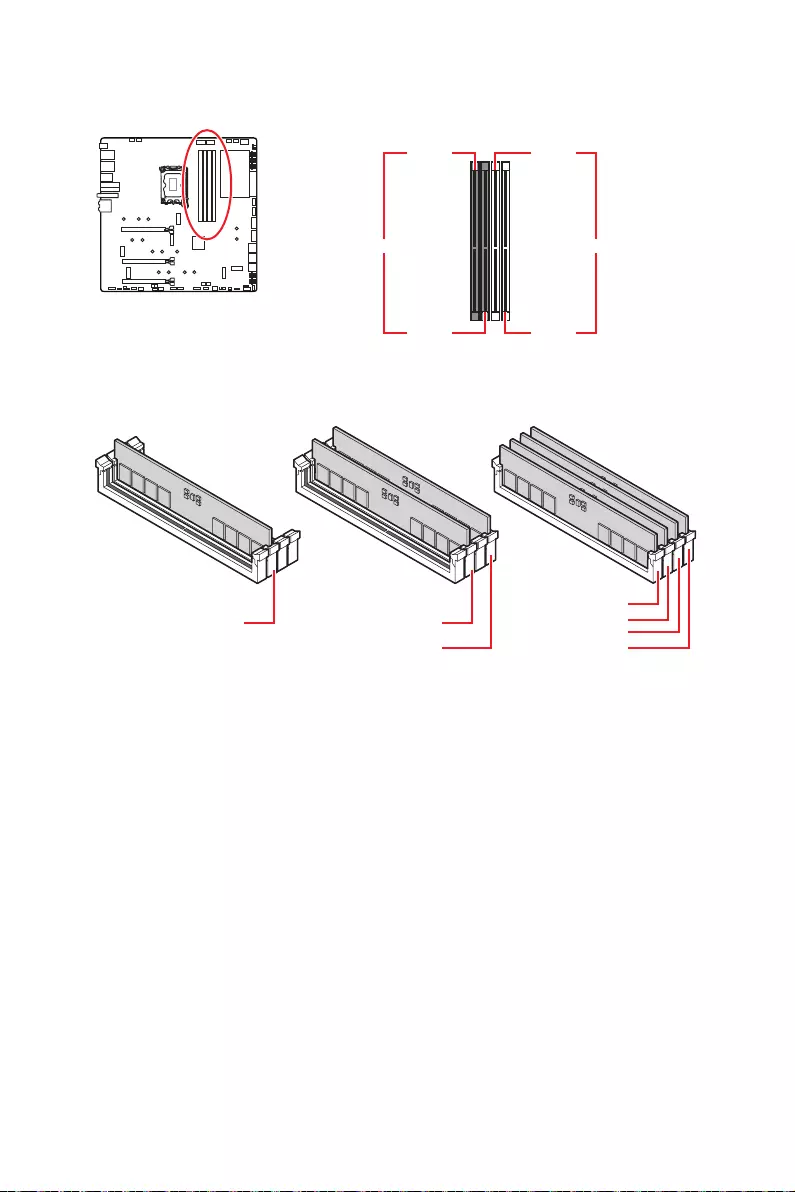
22
DIMMA1 DIMMB1
DIMMA2 DIMMB2
DIMMA2
DRAM Frequency
DIMMB2 DIMMB2
DIMMB1
DIMMA2 DIMMA2 DIMMA2
DIMMA1
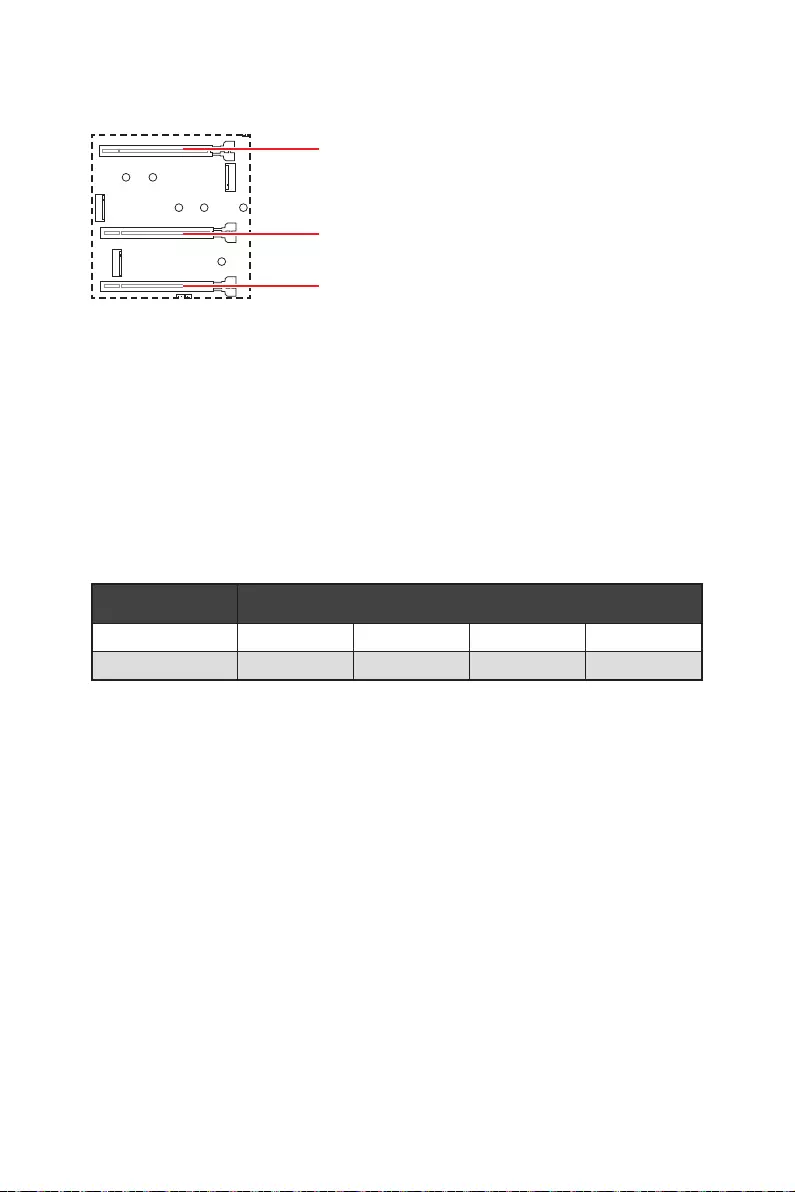
23
PCI_E1
PCI_E2
PCI_E3
PCI_E1
M2_4 SATA
PCI_E3
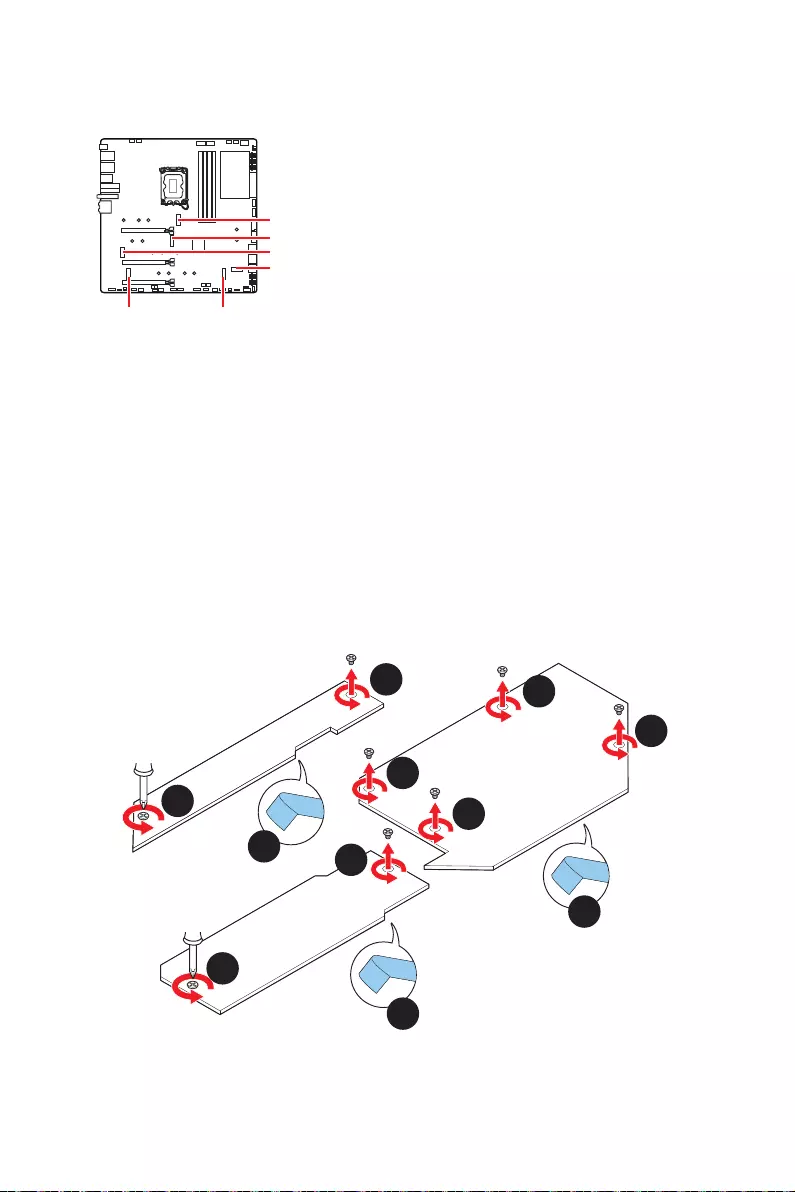
24
M2_1
M2_2
M2_3
M2_6
M2_5M2_4
1.
2.
3.
4.
2
2
2
3
3
4
4
4
2
1
1
M2_1
M2_3
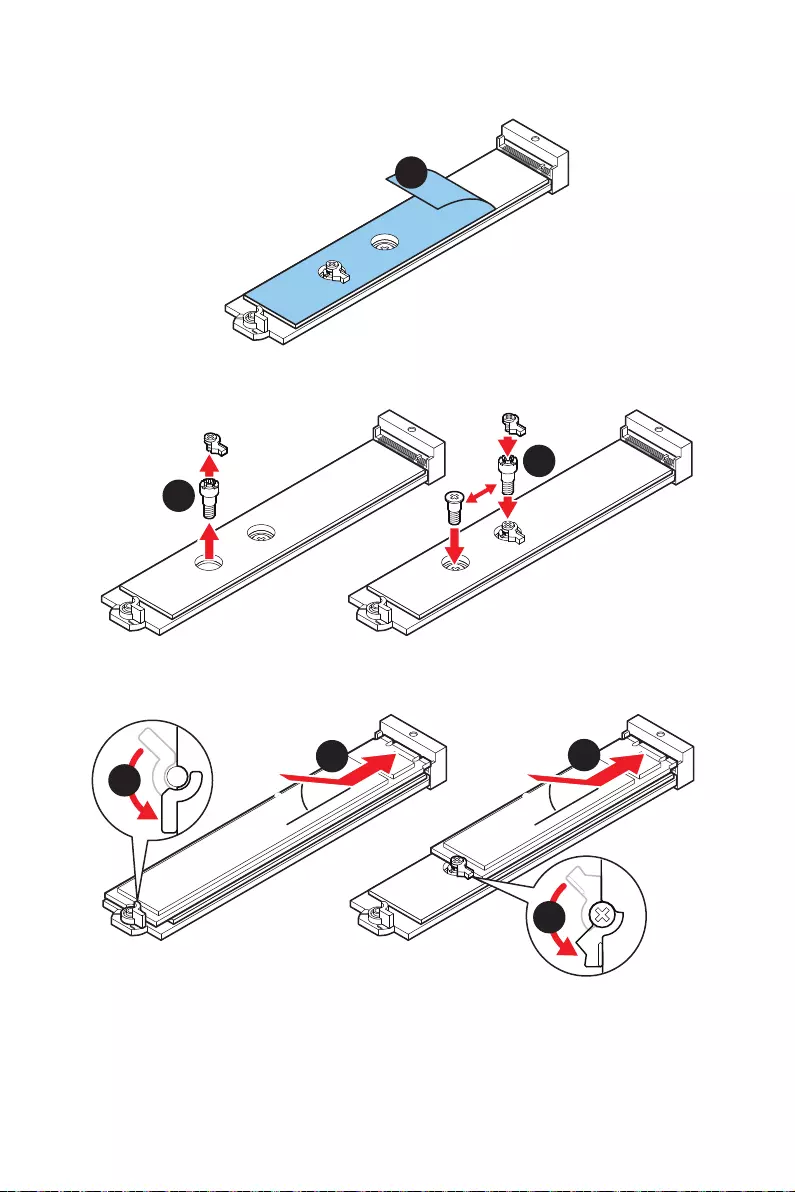
25
5.
5
6.
6
6
7.
8.
30º30º
30º30º
77
8
8
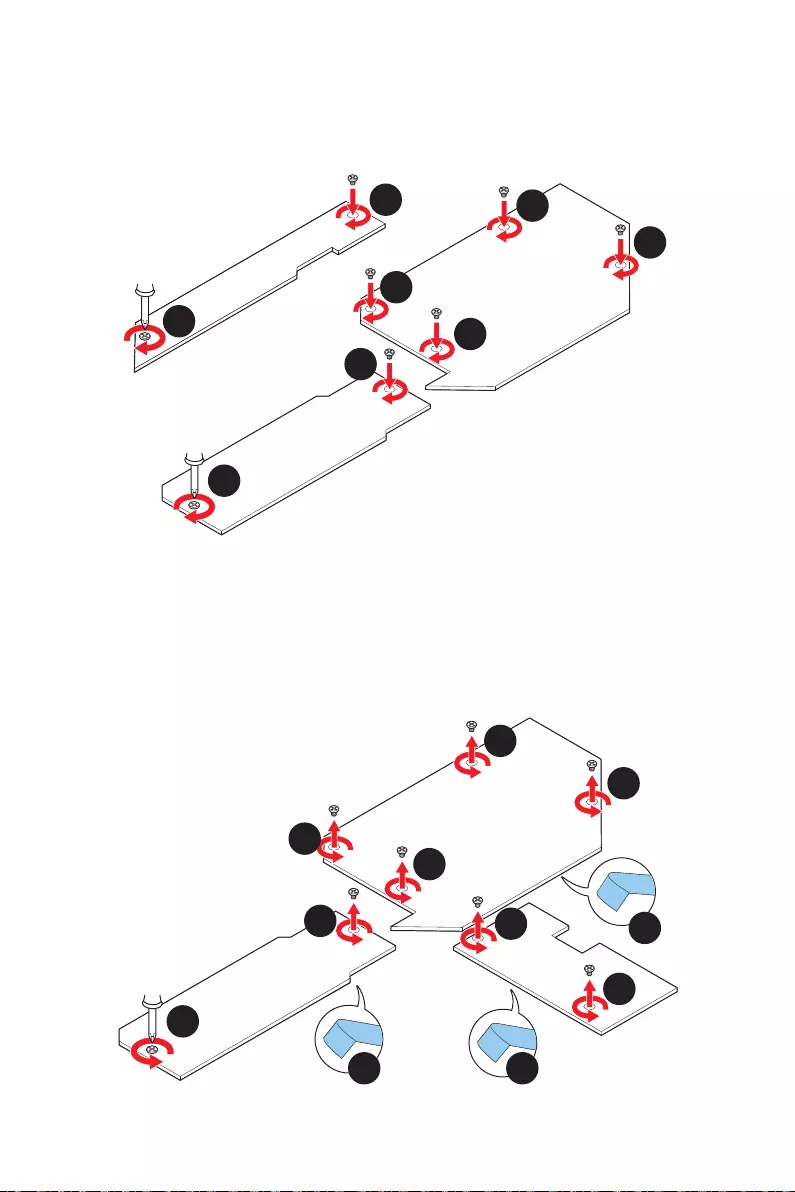
26
9.
10.
11.
10
10
10
9
9
10
11
11
M2_1
M2_3
1.
2.
3.
4.
1
1
2
3
3
4 4
4
2
1
1
M2_2
M2_6
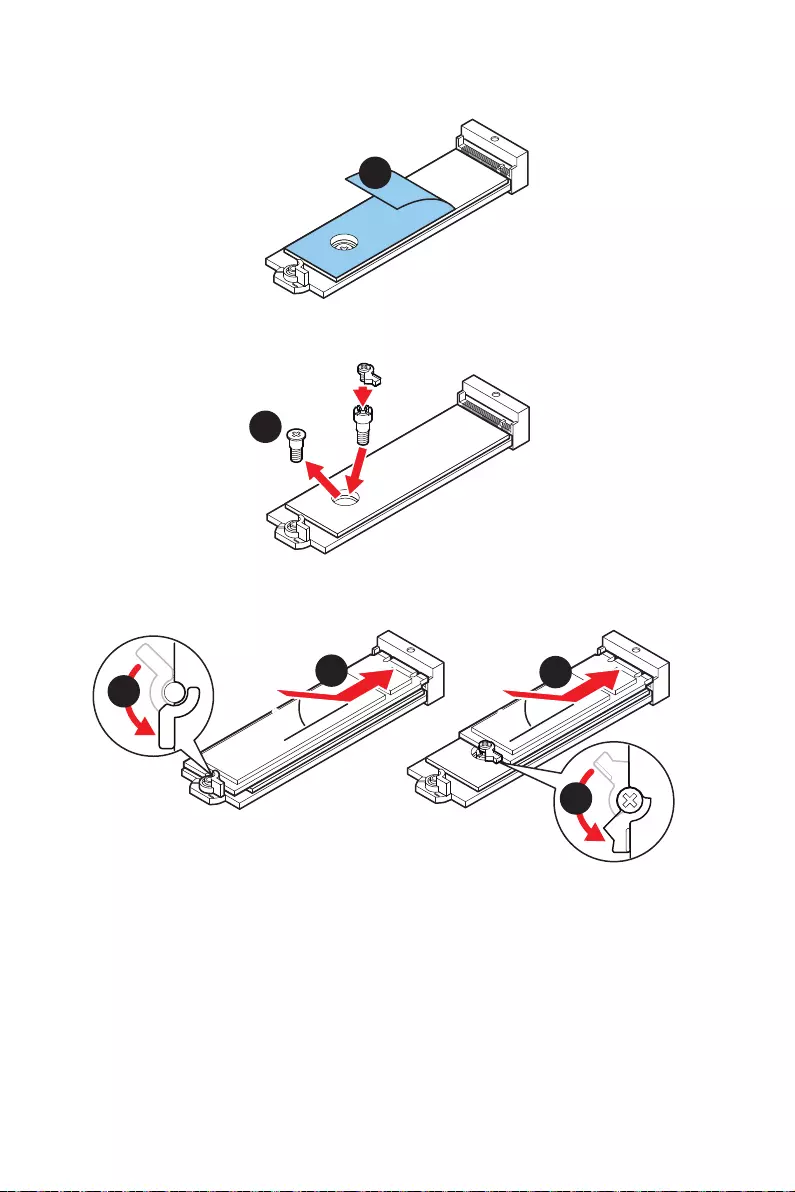
27
5.
5
6.
6
7.
8.
30º30º
30º30º
877
8
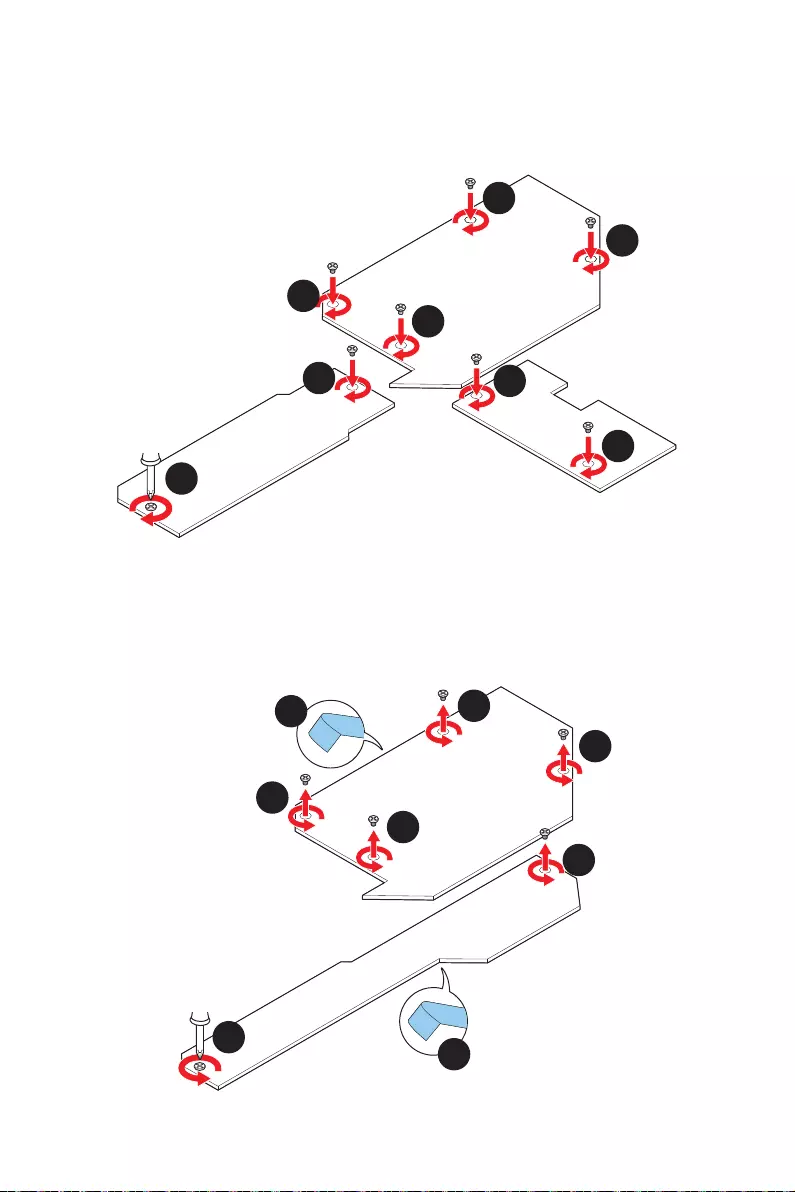
28
9.
10.
11.
11
11
10
9
9
10
11
11
M2_2
M2_6
1.
2.
3.
1
1
2
3
3
2
1
1
M2_4
M2_5

29
4.
4
5.
6.
5
6
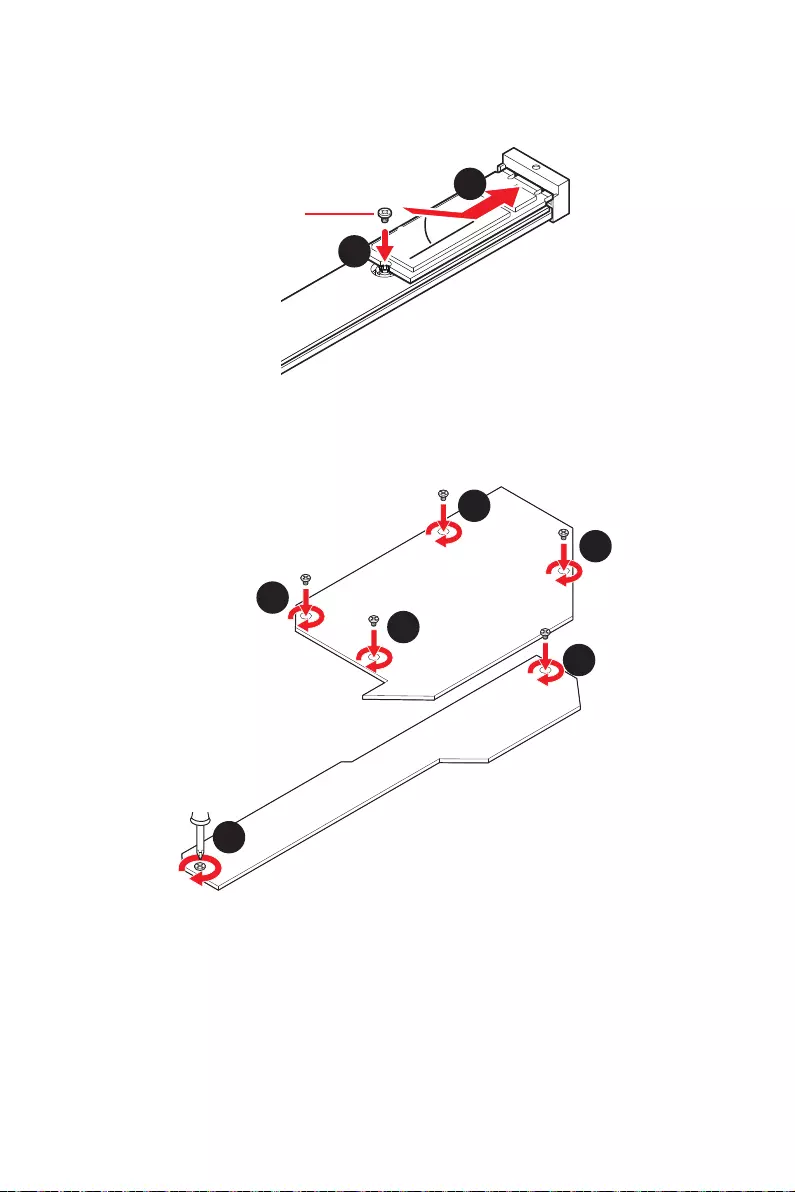
30
7.
8.
30º30º
8
7
9.
10.
10
10
9
9
10
10
M2_4
M2_5
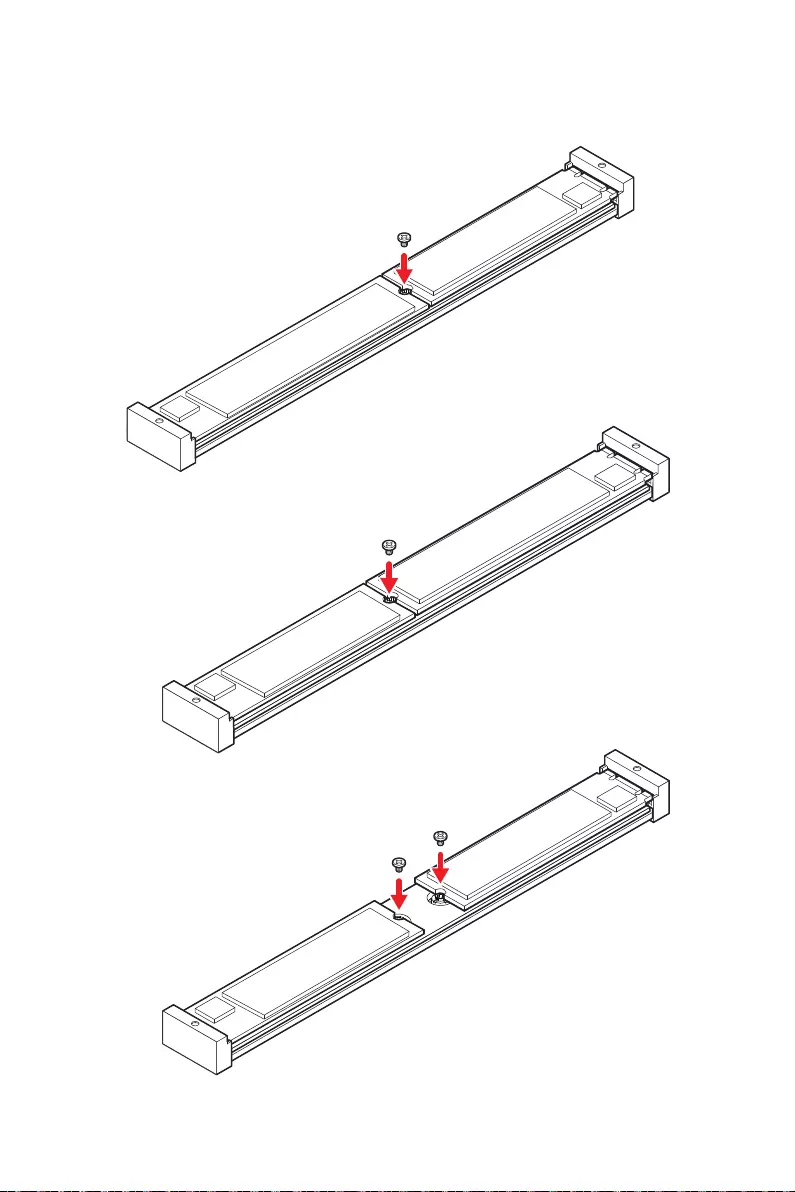
31
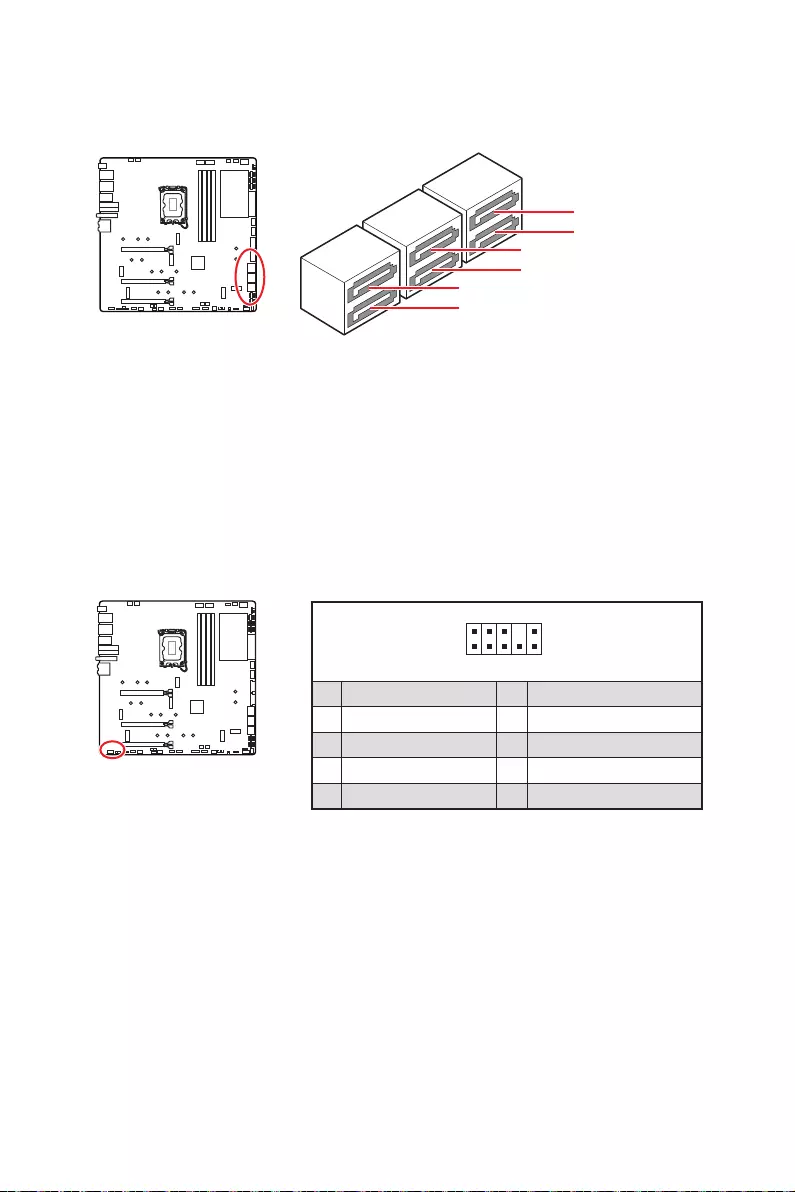
32
SATAA
SATA5
SATA7
SATAB
SATA6
SATA8
1
2 10
9
1 2 Ground
3 4
5 Head Phone R 6
7 SENSE_SEND 8 No Pin
9 Head Phone L 10 Head Phone Detection
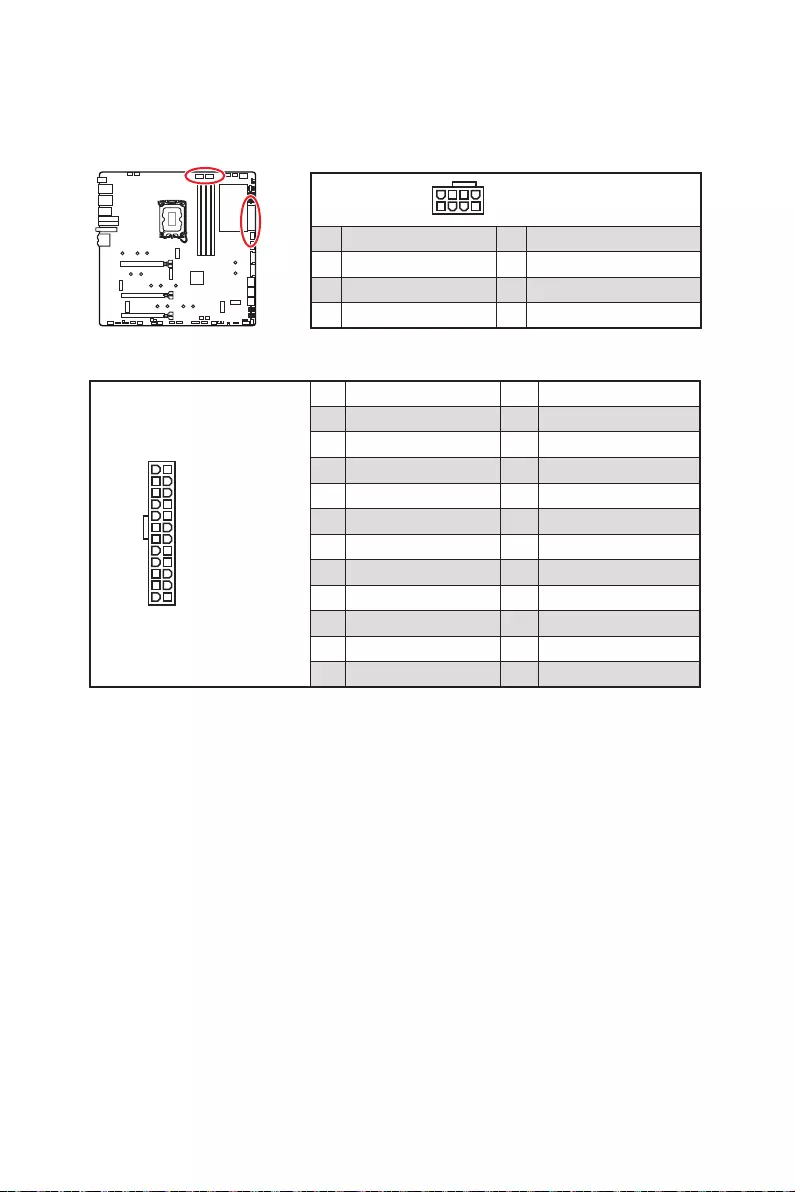
33
24
13 1
12
ATX_PWR1
1 +3.3V 13 +3.3V
2 +3.3V 14 -12V
3 Ground 15 Ground
4 +5V 16 PS-ON#
5 Ground 17 Ground
6 +5V 18 Ground
7 Ground 19 Ground
8 PWR OK 20 Res
9 5VSB 21 +5V
10 +12V 22 +5V
11 +12V 23 +5V
12 +3.3V 24 Ground
5
4 1
8
1 Ground 5 +12V
2 Ground 6 +12V
3 Ground 7 +12V
4 Ground 8 +12V
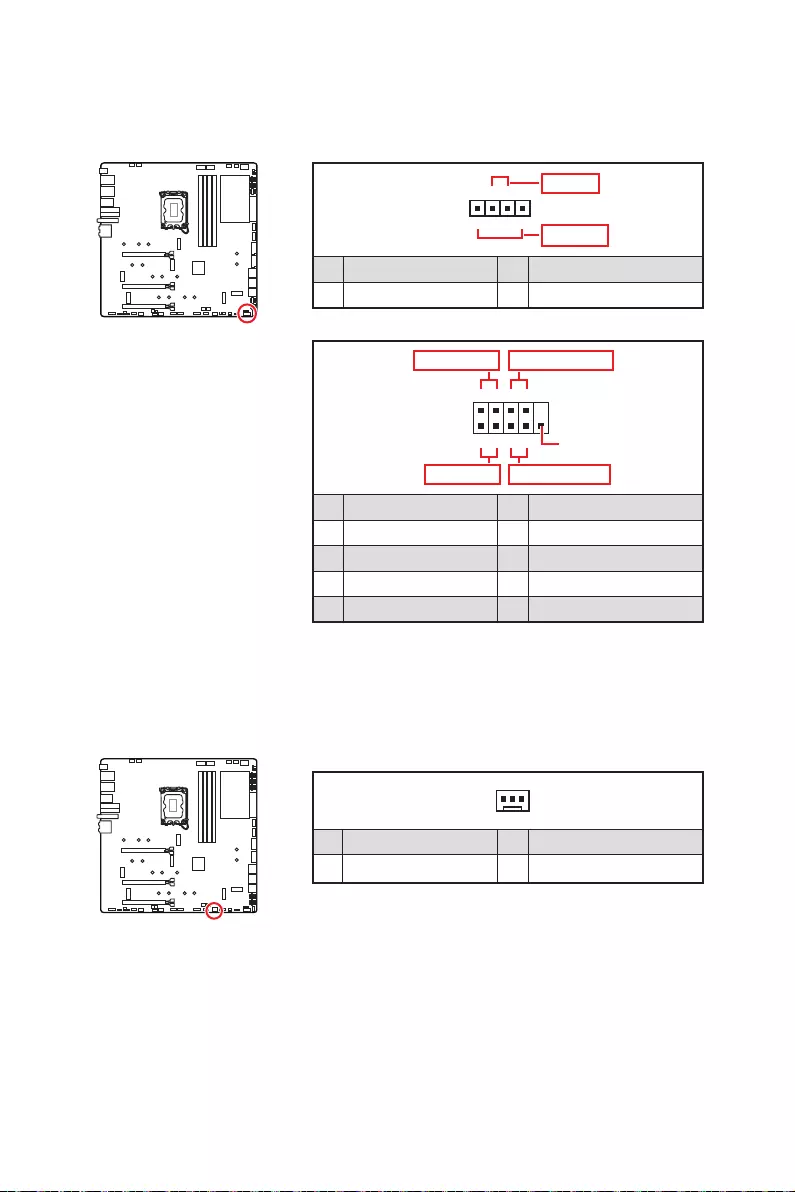
34
1
2 10
9
+
+
+- --
-
+
Power LED
HDD LED Reset Switch
Reserved
Power Switch
JFP1
1 HDD LED + 2 Power LED +
3 HDD LED - 4 Power LED -
5 Reset Switch 6 Power Switch
7 Reset Switch 8 Power Switch
9 Reserved 10 No Pin
1
JFP2
+
+-
-
Speaker
Buzzer
1 Speaker - 2 Buzzer +
3 Buzzer - 4 Speaker +
1
1 Ground 3 WFLOW IN
2
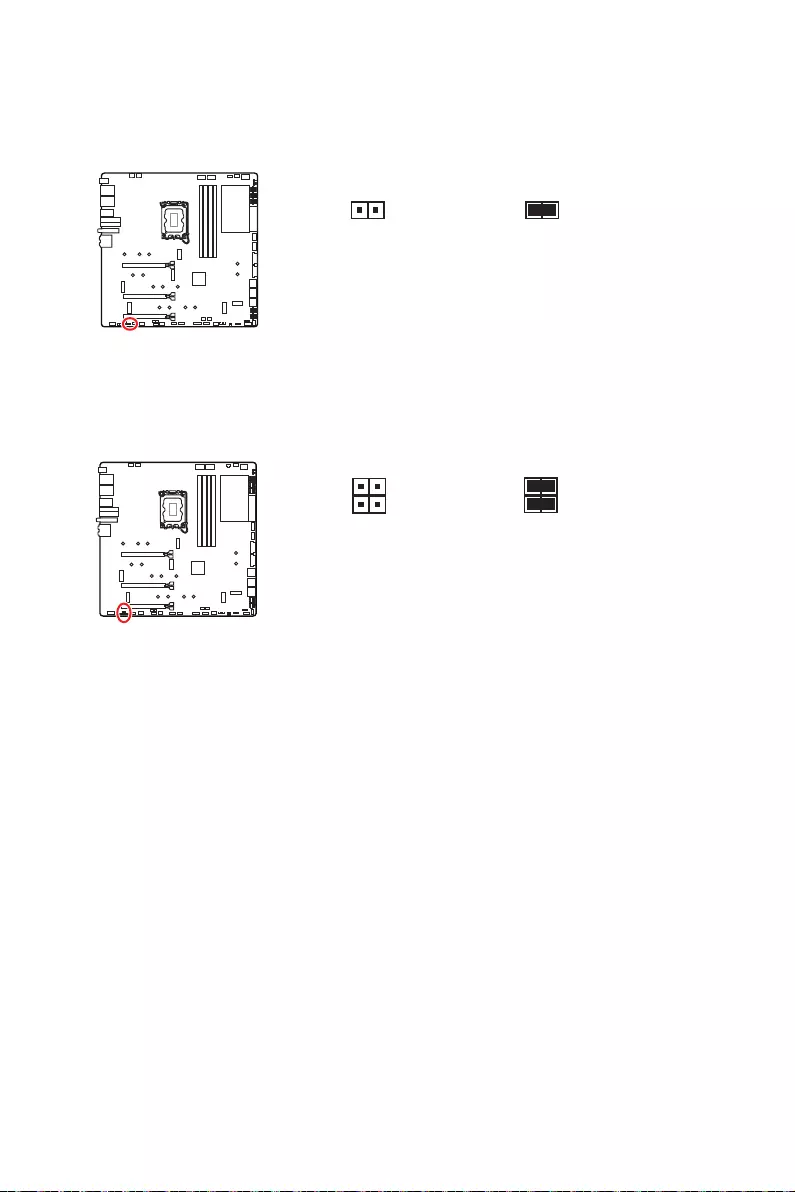
35
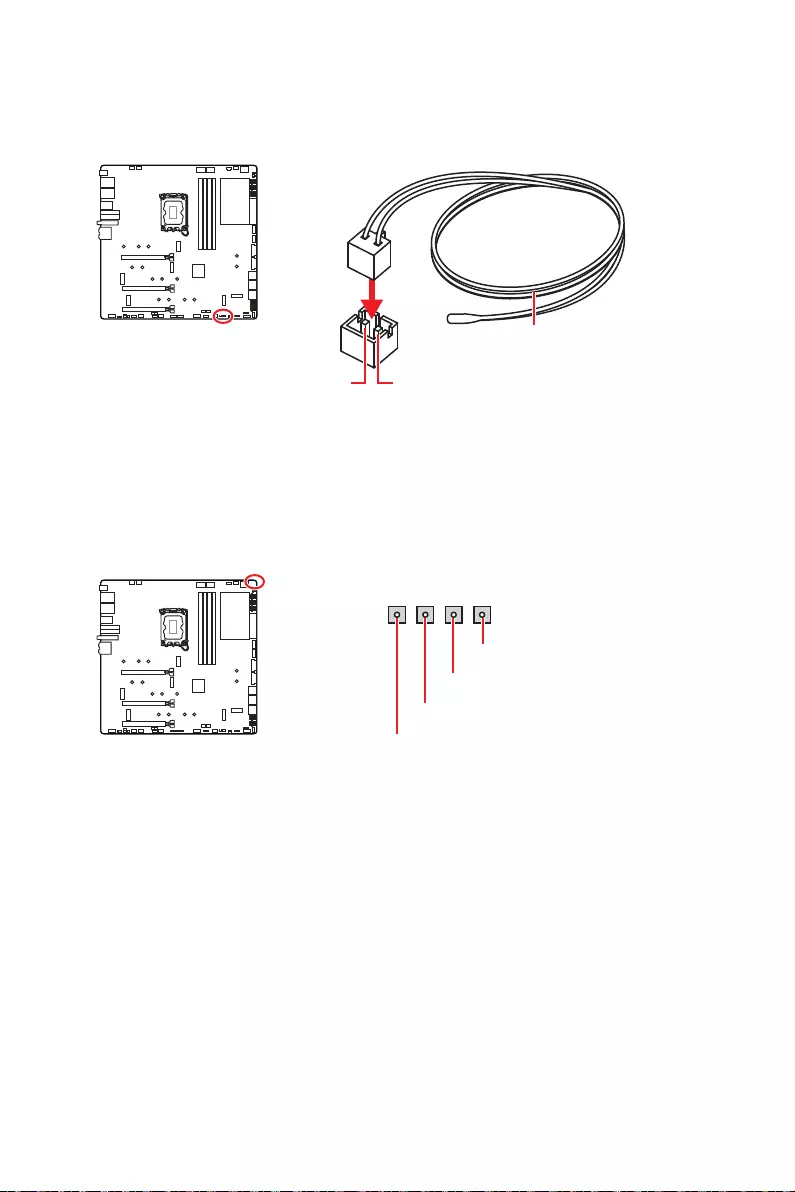
36
GND
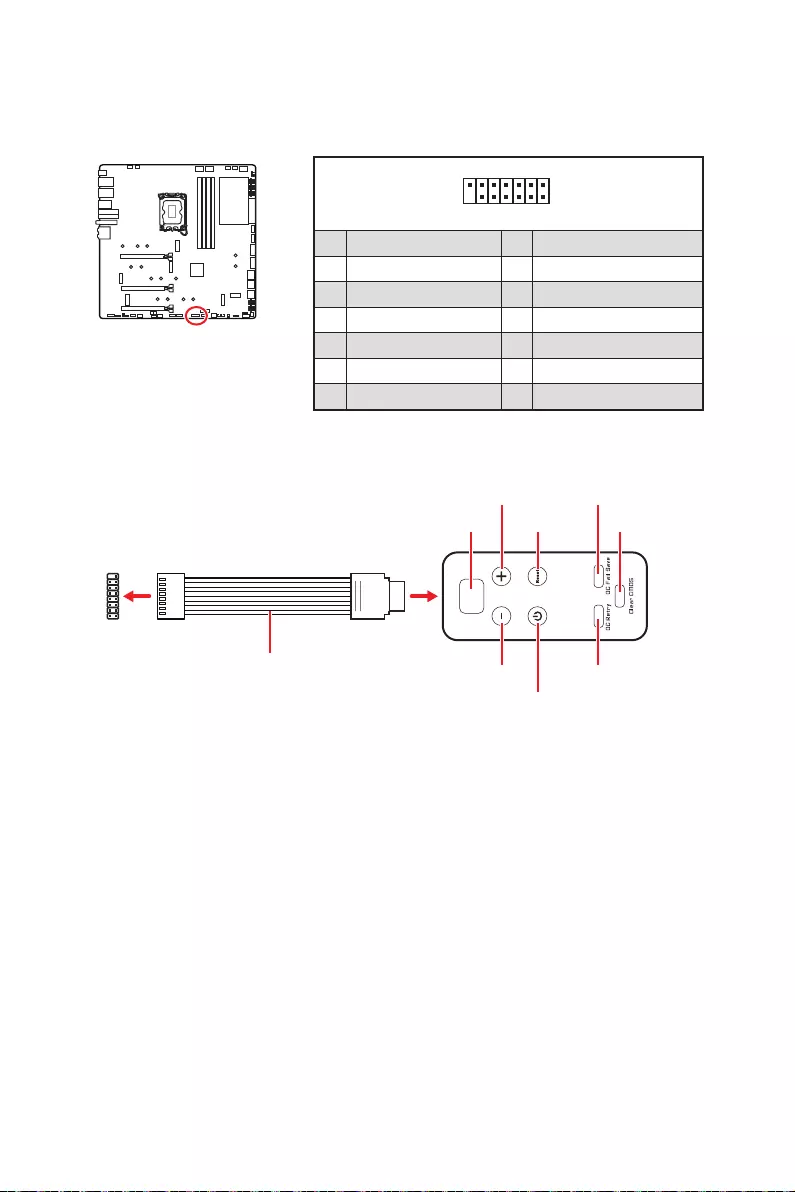
37
1
2 14
13
1 No Pin 2
3 4
5 6 Ground
7 PSIN#_R 8 FP_RST#_R
9 10
11 BLK+ 12 BLK-
13 14
1
88
JDASH1
- BIOS > OC >
Direct OC Button
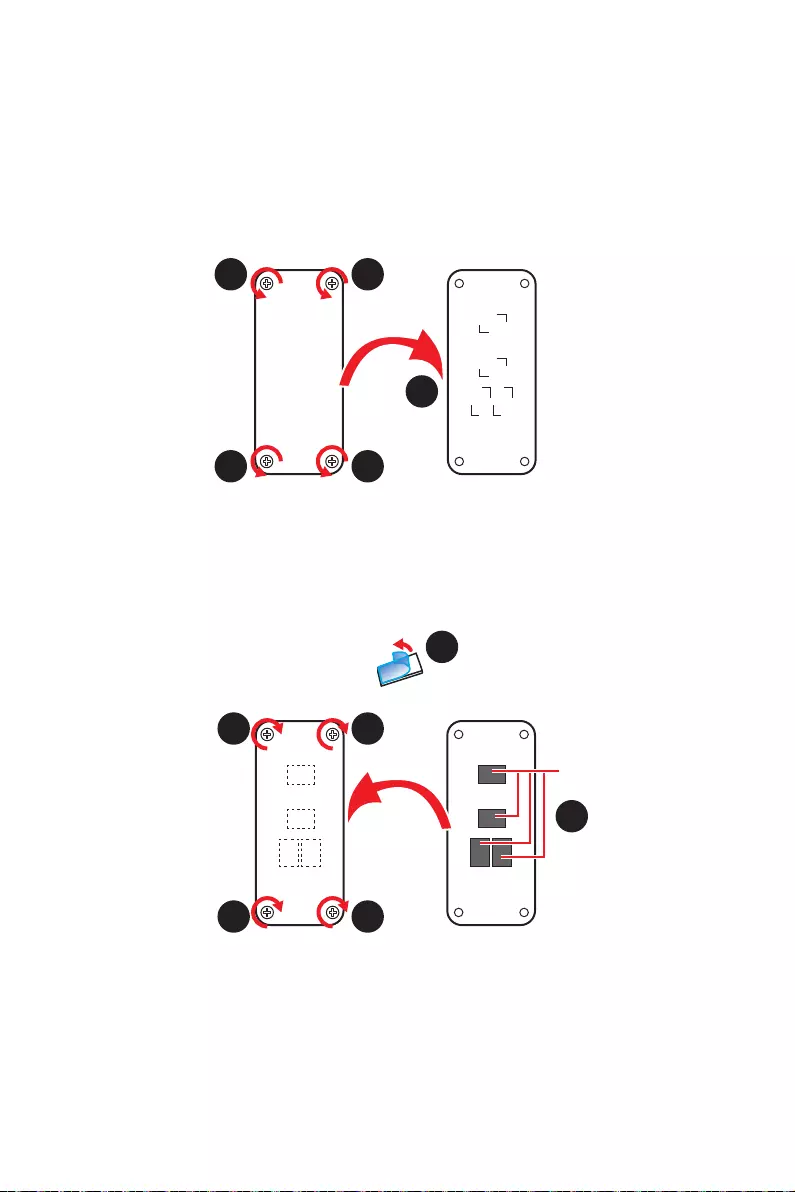
38
1.
2.
3.
4.
5.
1
1 1
1
2
3
4
5
5
5
5
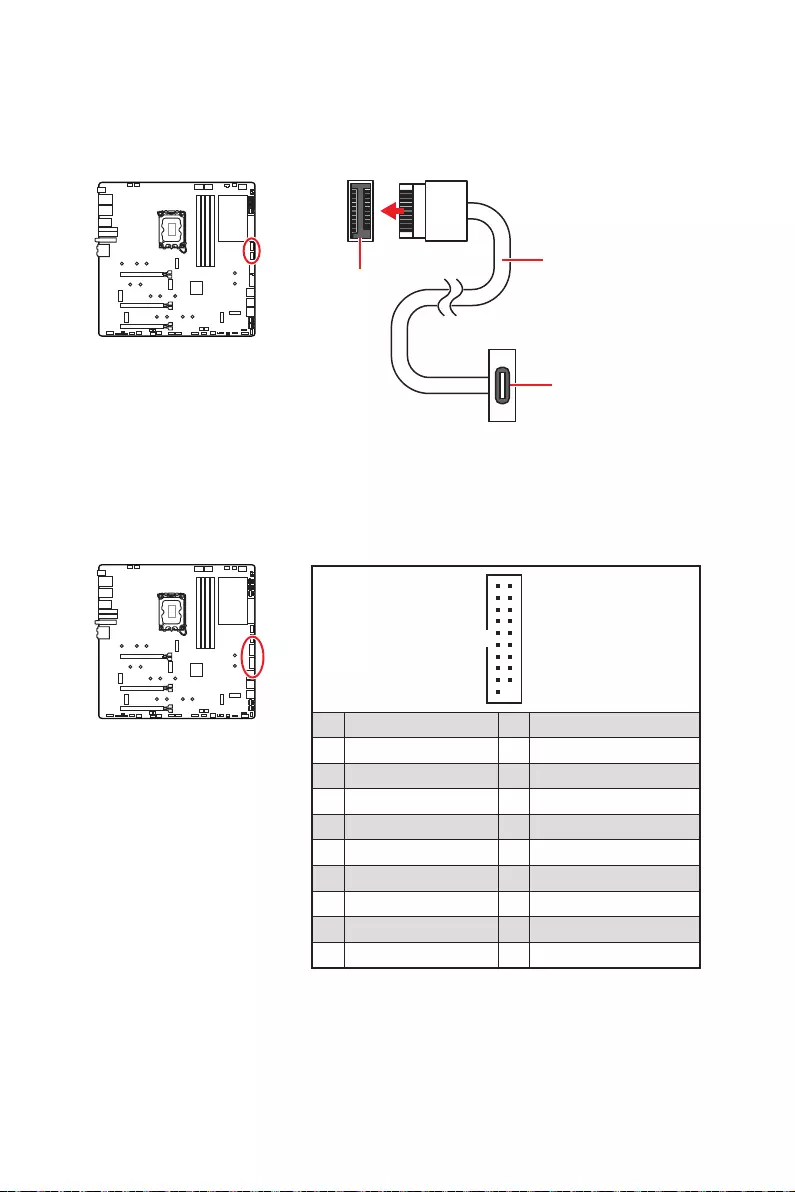
39
1
10 11
20
1 Power 11 USB2.0+
2 USB3_RX_DN 12 USB2.0-
3 USB3_RX_DP 13 Ground
4 Ground 14
5 15
6 16 Ground
7 Ground 17 USB3_RX_DP
8 USB2.0- 18 USB3_RX_DN
9 USB2.0+ 19 Power
10 Ground 20 No Pin
JUSB1/ 2
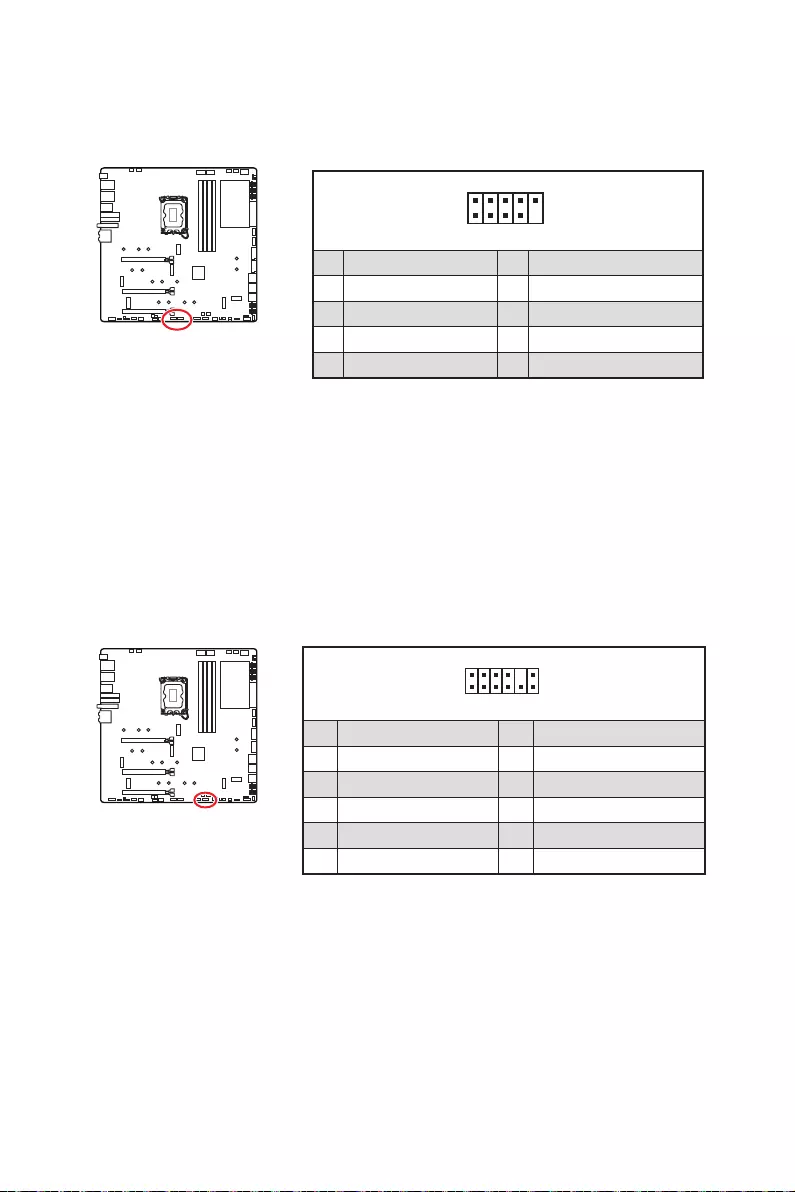
40
1
2 10
9
1 2
3 USB0- 4 USB1-
5 USB0+ 6 USB1+
7 Ground 8 Ground
9 No Pin 10
1
2 12
11
1 SPI Power 2
3
4
5 Reserved 6
7 Ground 8 SPI Reset
9 Reserved 10 No Pin
11 Reserved 12 Interrupt Request
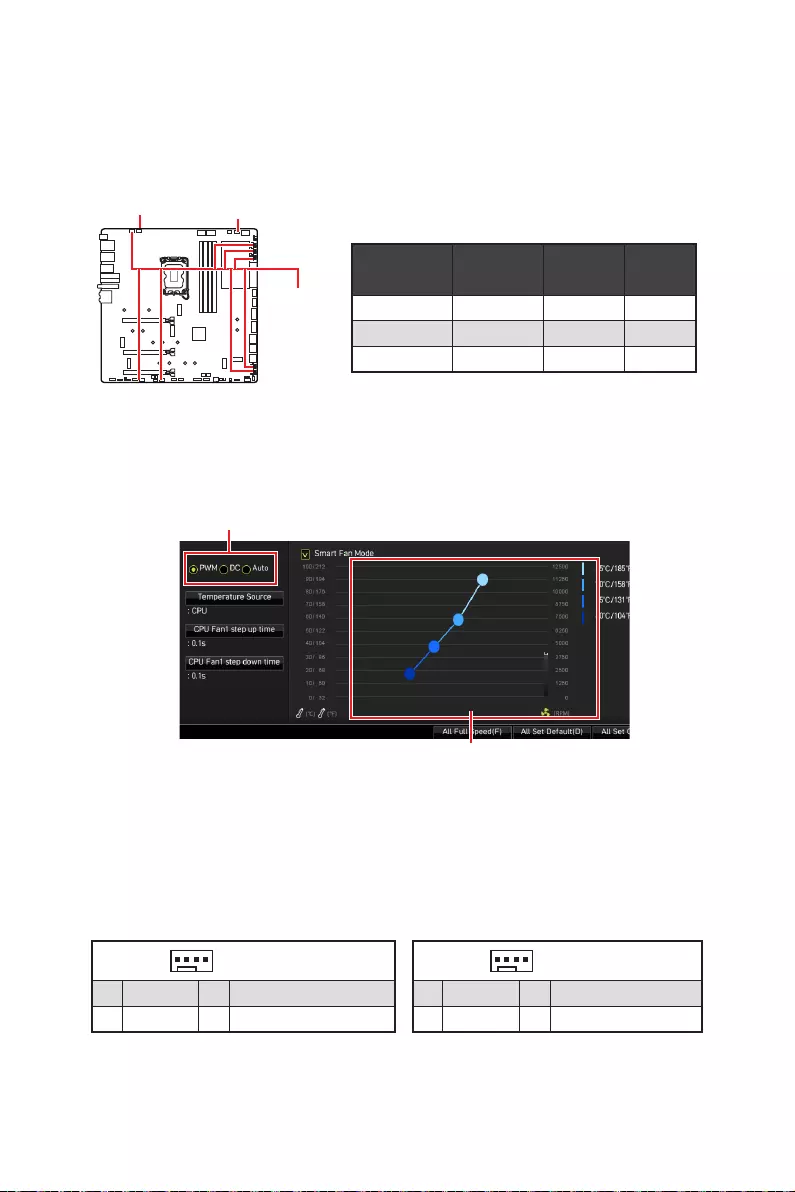
41
BIOS > HARDWARE MONITOR
2A 24W
PUMP_FAN1 3A 36W
2A 12W
1
1 Ground 2 +12V
3 Sense 4
1
1 Ground 2
3 Sense 4
PUMP_FAN1
PWM DC
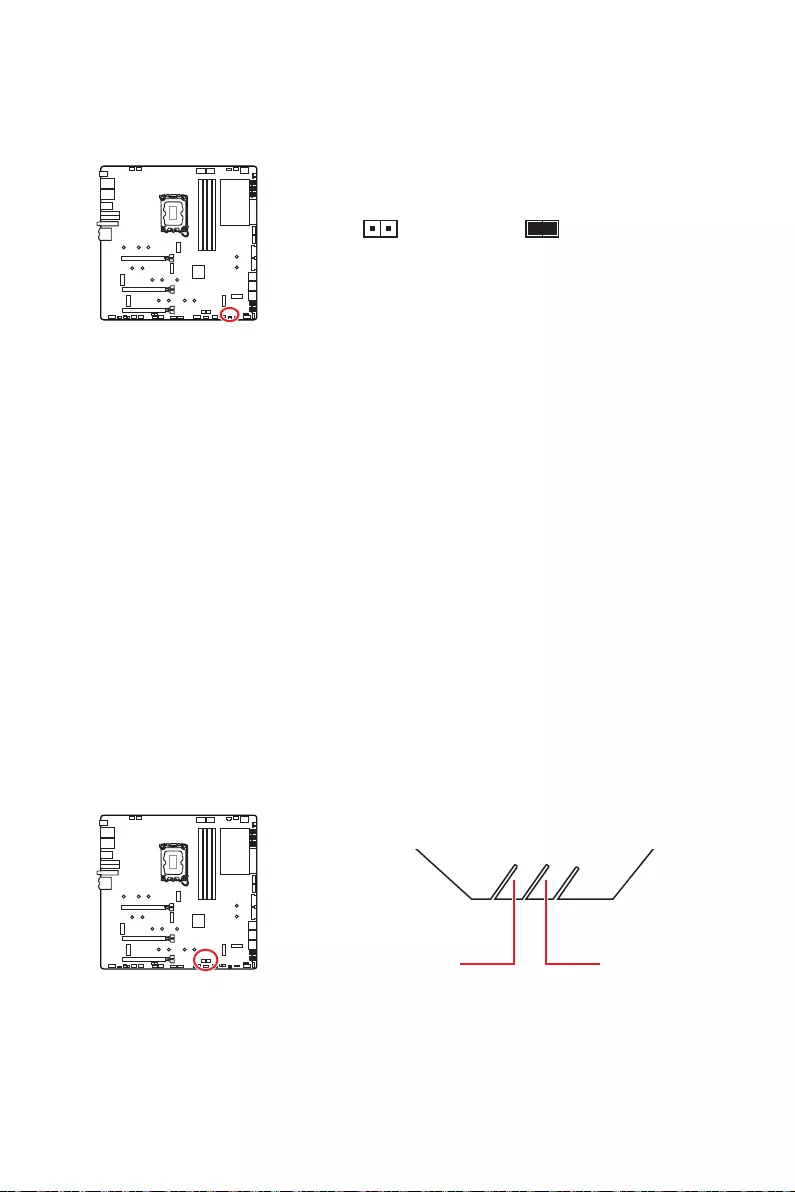
42
1. JCI1
2.
3. BIOS > SETTINGS > Security > Chassis Intrusion Configuration
4. Chassis IntrusionEnabled
5. F10EnterYes
6.
1. BIOS > SETTINGS > Security > Chassis Intrusion Configuration
2. Chassis IntrusionReset
3. F10EnterYes
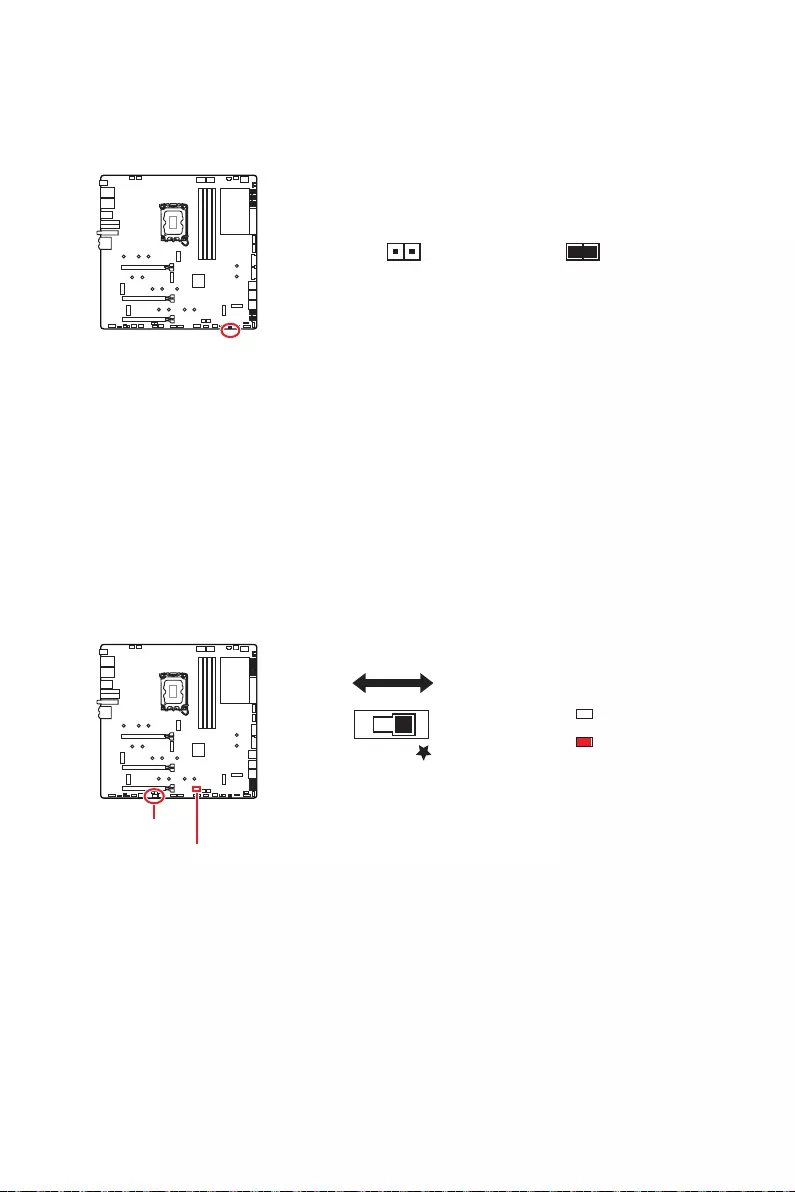
43
1.
2. JBAT1
3. JBAT1
4.
BIOS B BIOS A
BIOS_SW1
BIOS_SW1
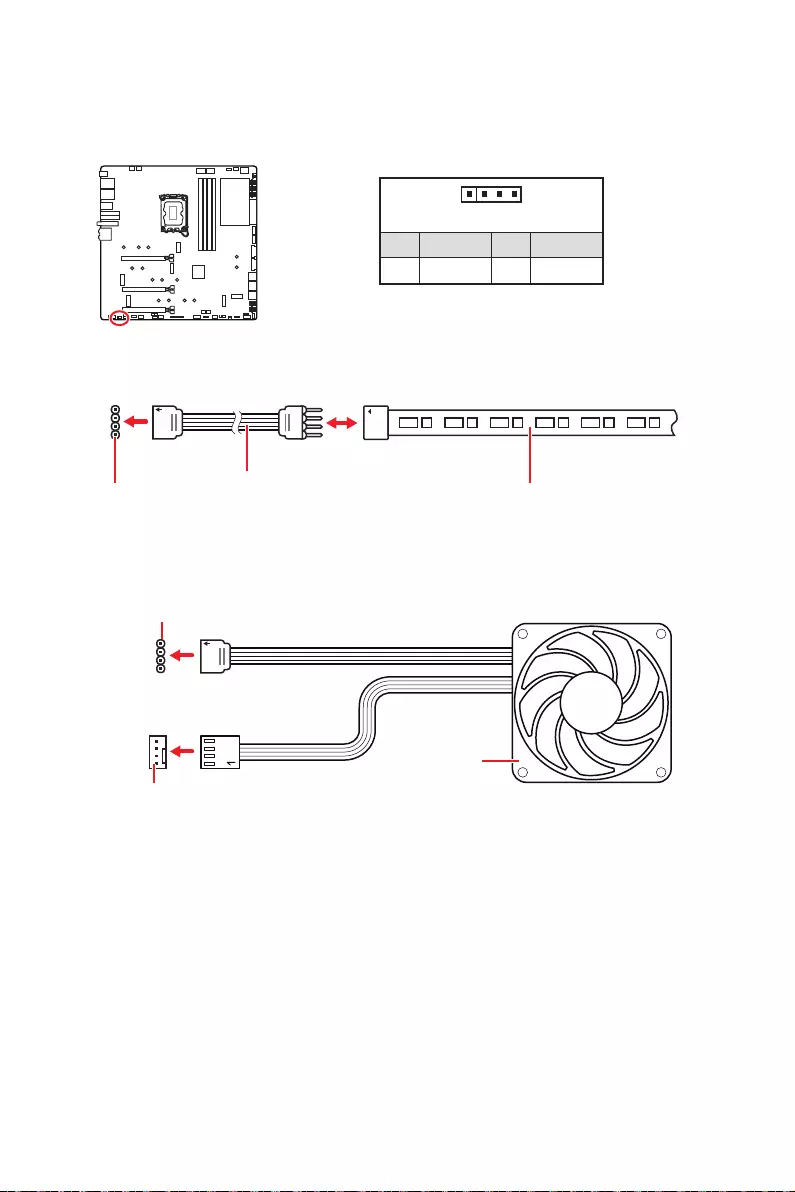
44
1
GRB
1
1 +12V 2 G
3 R 4 B
1
1
GRB
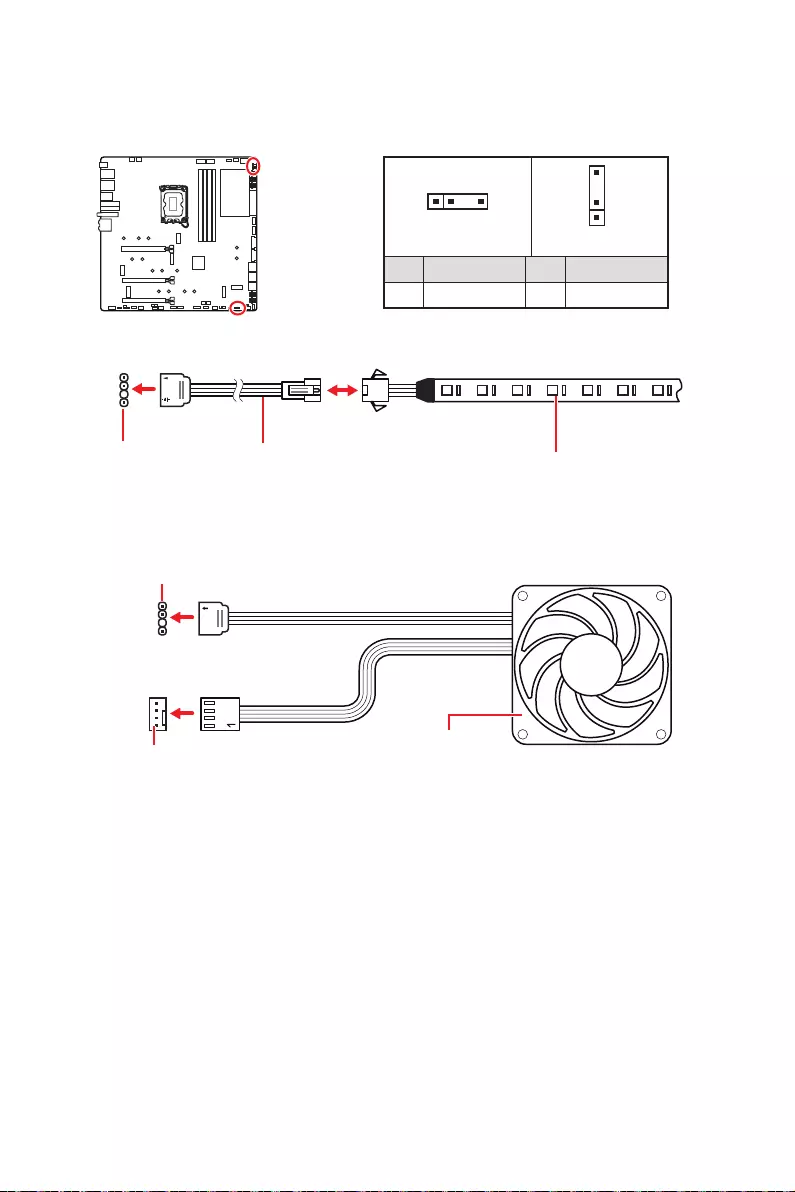
45
1
1
1
D
+5V
JRAINBOW
JRAINBOW LED
1
JRAINBOW1 1
JRAINBOW2
1 +5V 2 Data
3 No Pin 4 Ground
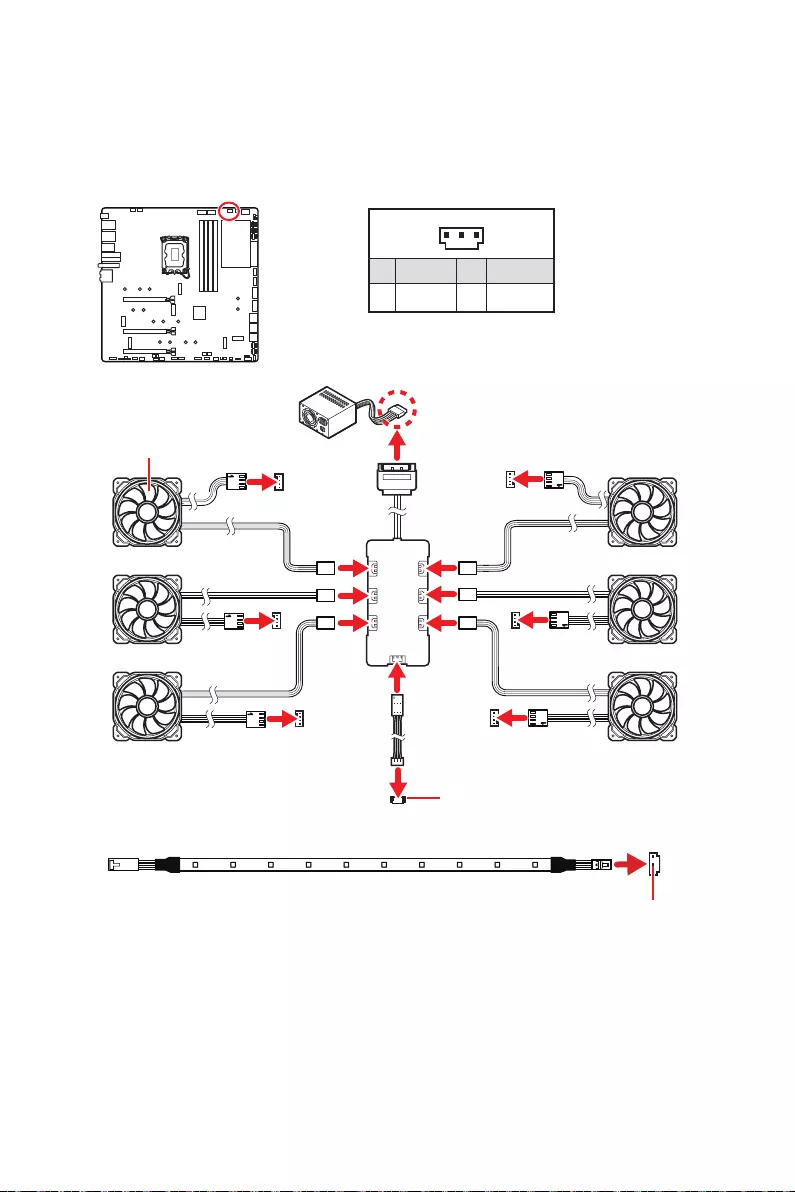
46
1
1 +5V 2 Data
3 Ground
SYS_FAN
SYS_FAN
SYS_FAN SYS_FAN
SYS_FAN
SYS_FAN
1
2
34
5
6
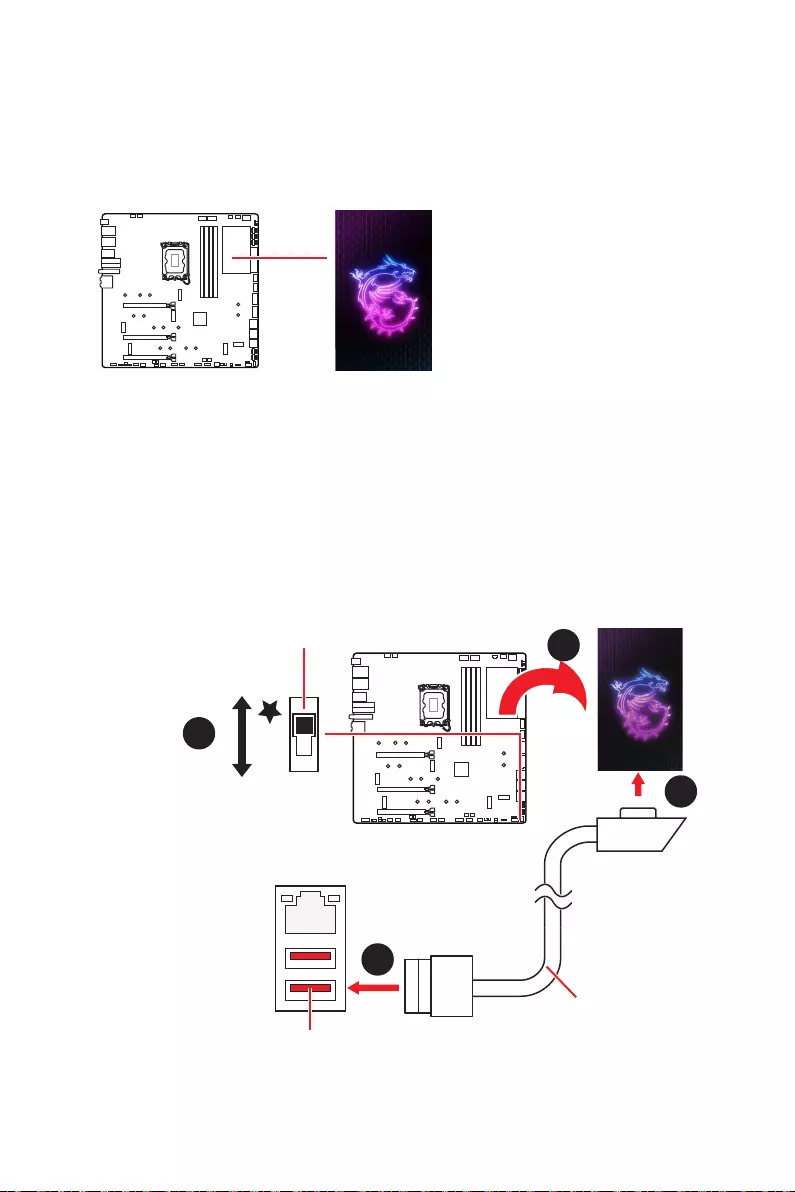
47
1.
2.
3.
1
2
2
10 Gb LAN
3
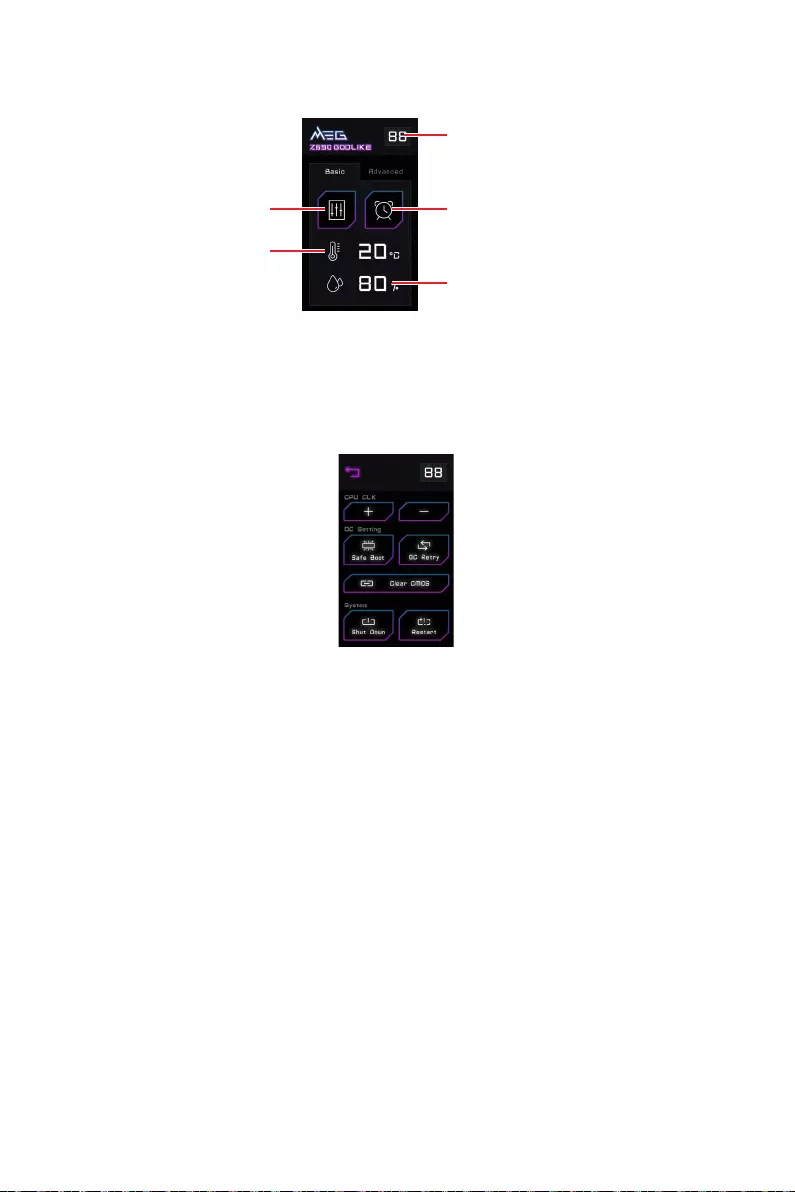
48
CPU CLK - / + - BIOS > OC >
Direct OC Button
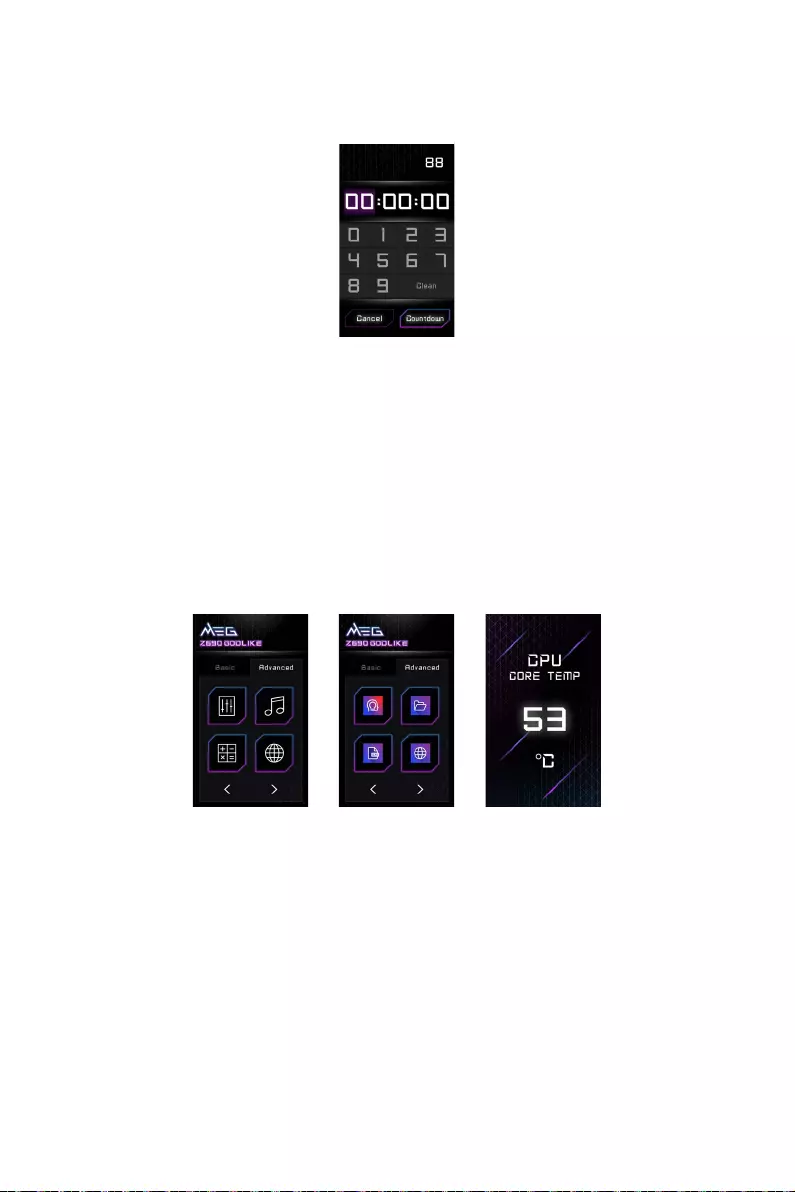
49
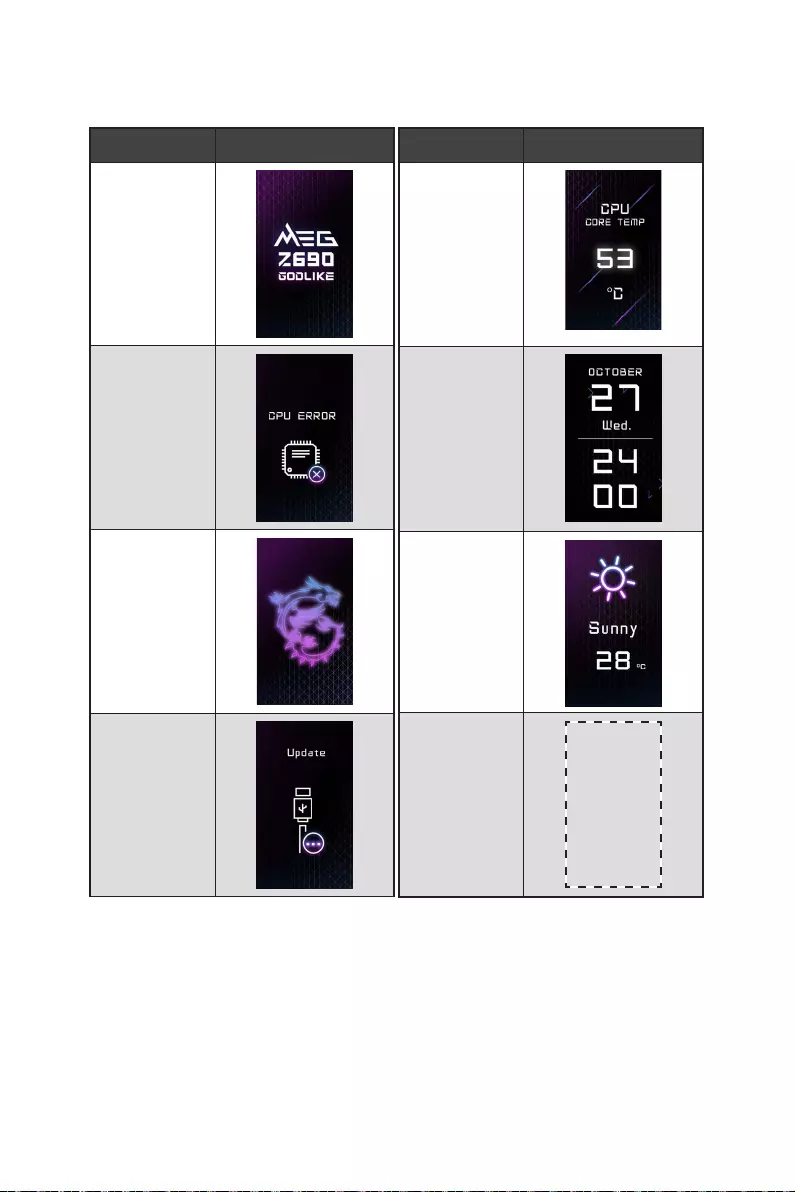
50
800*480px.gif/
bmp/ jpg/ png/
mp4
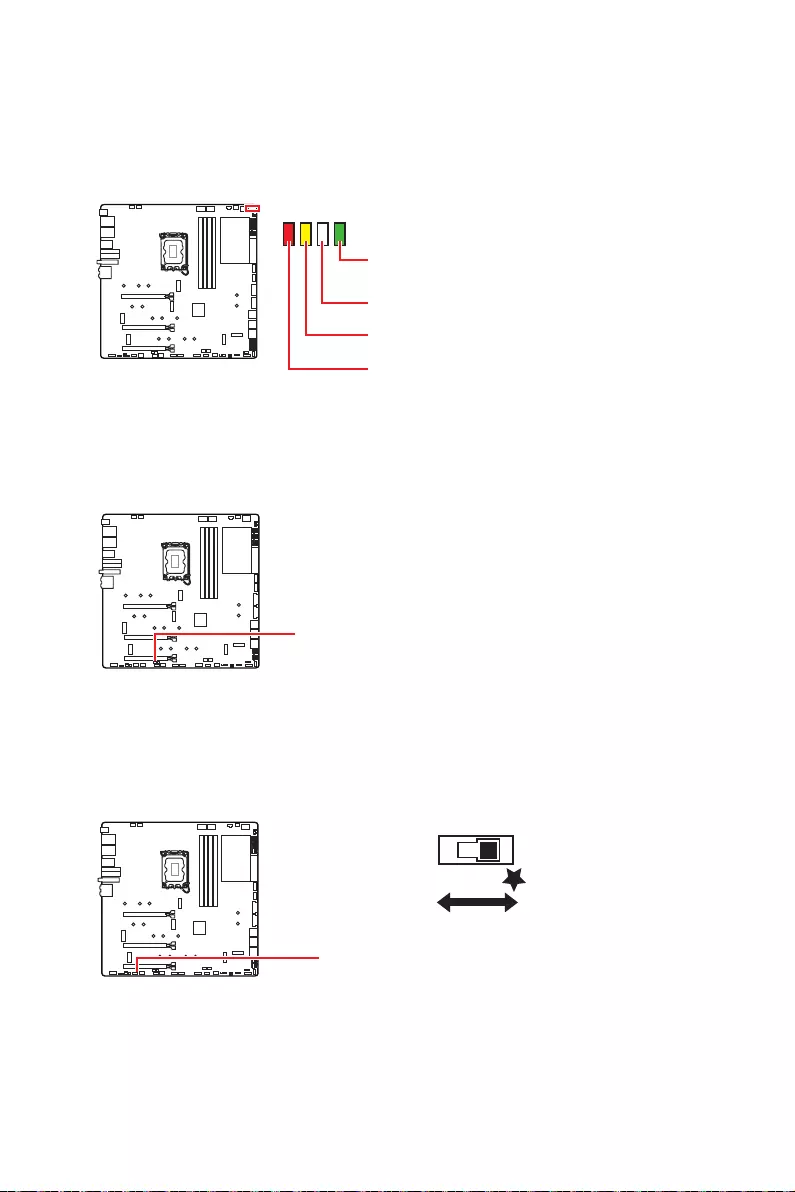
51
BOOT
DDR
CPU
VGA
LED_SW1
LED_OFF LED_ON
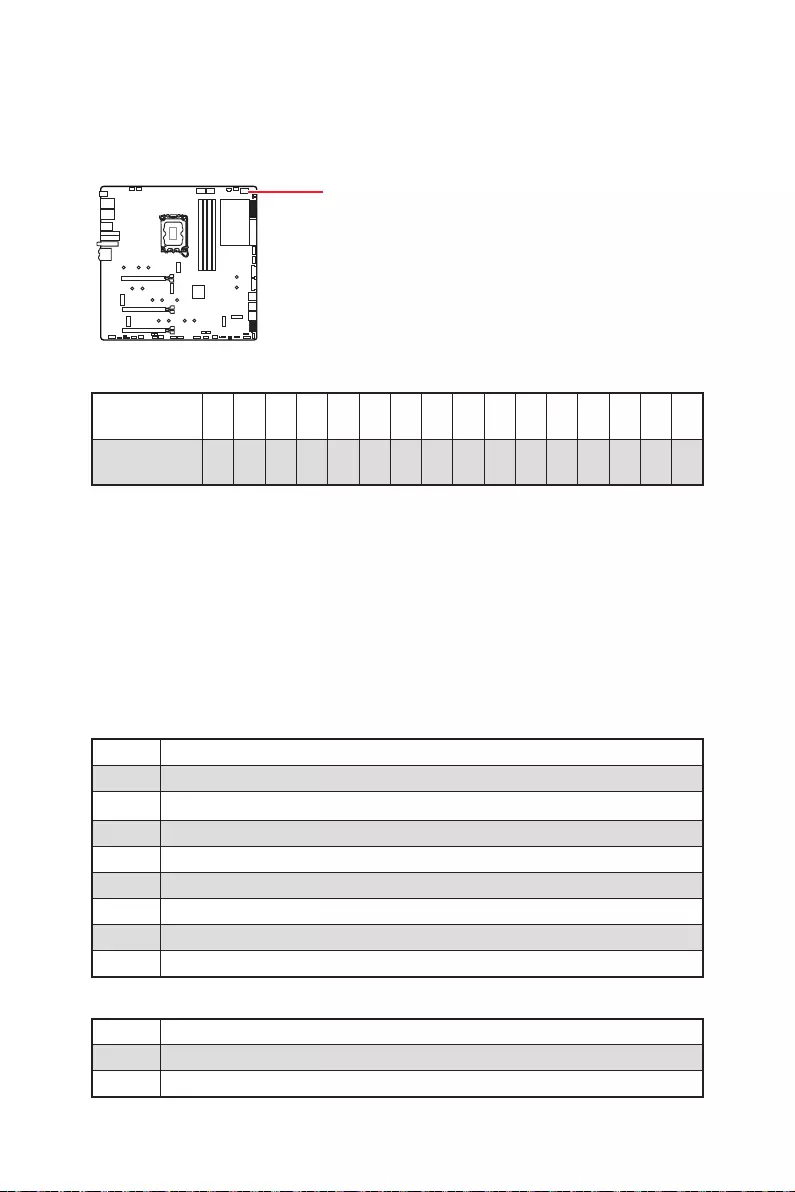
52
0123456789ABD E F
0123456789ABCDEF
01
02
03
04
06
07
08
09
0B
0C - 0D
0E
0F
53
10
11
12 - 14
15
16 - 18
19
1A - 1C
2B
2C
2D
2E
2F
31
32
33
34
35
36
37
38 - 3A
3B
3C - 3E
4F
50
51
52
53
54
55
56
57
58
59
5A
54
5B
5C - 5F
60
61
62
63
64 - 67
68
69
6A
6B - 6F
70
71
72
73 - 77
78
79
7A - 7F
90
91
92
93
94
95
96
97
98
99
9A
9B
9C
9D
9E -9F
A0
A1

55
A2
A3
A4
A5
A6
A7
A8
A9
AB
AD
AE
AF
B0
B1
B2
B3
B4
B5
B6
B7
B8 - BF
D0
D1
D2
D3
D4
D5
D6
D7
D8
D9
DA
DB
DC

56
E0
E1
E2
E3
E4 - E7
E8
E9
EA
EB
EC - EF
F0
F1
F2
F3
F4
F5 - F7
F8
F9
FA
FB - FF
01
02
03
04
05
10
20
30

57
40
AC
AA
00 - 99

58
1.
2.
3. Restart
4. F11
5.
6. Press any key to boot from CD or DVD...
7.
1.
2.
3. Select to choose what happens with this disc Run
DVDSetup.exe
DVDSetup.exe
4. Drivers/Software
5. Install
6.
7. OK
8.
MSI Center

59
UEFI BIOS
UEFI BIOS
There is no GOP (Graphics
Output protocol) support detected in this graphics card
1.
2. Press DEL key to enter Setup Menu, F11 to enter
Boot MenuDelete
3. BIOS
UEFI

60 UEFI BIOS
Press DEL key to enter Setup Menu, F11 to enter Boot
MenuDelete
F1
F2
F3
F4
F5
F6
F7
F8
F9
F10
F12
Ctrl+F
http://download.msi.com/manual/mb/Intel600BIOSsc.pdf

61
UEFI BIOS
F6
1.
2.
3.
Ctrl + F5Yes
DelM-FLASHYes
4.
5. Yes
6.

62 UEFI BIOS
1. Support
2. Live UpdateAdvanced
3. Install
4.
5.
6.
1.
2.
3. CPU_PWR1 ATX_PWR1
4.
5.
6.

i
Regulatory Notices
Regulatory Notices
FCC-B Radio Frequency Interference Statement
This equipment has been tested and found to comply with the limits
limits are designed to provide reasonable protection against harmful
interference in a residential installation. This equipment generates,
uses and radiates radio frequency energy, and, if not installed and
used in accordance with the instructions, may cause harmful interference to radio
communications. However, there is no guarantee that interference will not occur in a
particular installation. If this equipment does cause harmful interference to radio or
television reception, which can be determined by turning the equipment off and on, the
user is encouraged to try to correct the interference by one or more of the following
measures:
Reorient or relocate the receiving antenna.
Increase the separation between the equipment and receiver.
receiver is connected.
NOTE
The changes or modifications not expressly approved by the party responsible for
compliance could void the user’s authority to operate the equipment.
with the emission limits.
FCC Conditions
following two conditions:
This device may not cause harmful interference.
This device must accept any interference received, including interference that may
cause undesired operation.
MSI Computer Corp.
www.msi.com

ii Regulatory Notices
CE Conformity
following EU Directives as may be applicable:
RED 2014/53/EU
Low Voltage Directive 2014/35/EU
RoHS Directive 2011/65/EU
Standards.
The point of contact for regulatory matters is MSI, MSI-NL Eindhoven 5706 5692 ER
Son.
Products with Radio Functionality (EMF)
This product incorporates a radio transmitting and receiving device. For computers
in normal use, a separation distance of 20 cm ensures that radio frequency exposure
levels comply with EU requirements. Products designed to be operated at closer
proximities, such as tablet computers, comply with applicable EU requirements in
typical operating positions. Products can be operated without maintaining a separation
distance unless otherwise indicated in instructions specific to the product.
Restrictions for Products with Radio Functionality
CAUTION
band is restricted for indoor use only in all European Union member
application outdoors might lead to interference issues with existing radio
services.
Radio frequency bands and maximum power levels
Features: Wi-Fi 6E, BT
Frequency Range:
Max Power Level: 2.4 GHz: 20dBm; 5 GHz: 23dBm; 6 GHz: 23dBm

iii
Regulatory Notices
Wireless Radio Use
This device is restricted to indoor use when operating in the 2.4GHz, 5GHz, 6GHz
frequency band.
Compliance Statement of Innovation, Science and
Economic Development Canada (ISED)
This device complies with with Innovation, Science and Economic Development
interference, including interference that may cause undesired operation of the device.
Operation in the band 5150-5250 MHz is only for indoor use to reduce the potential for
harmful interference to co-channel mobile satellite systems.
Australia and New Zealand notice
This equipment incorporates a radio transmitting and receiving device. In normal use,
a separation distance of 20 cm ensures that radio frequency exposure levels comply
with the Australian and New Zealand Standards.
R-R-MSI-10-7D26

iv Regulatory Notices
Battery Information
European Union:
Batteries, battery packs, and accumulators should not be disposed of as
unsorted household waste. Please use the public collection system to
return, recycle, or treat them in compliance with the local regulations.
Taiwan:
For better environmental protection, waste batteries should be collected
separately for recycling or special disposal.
California, USA:
The button cell battery may contain perchlorate material and requires
For further information please visit:
http://www.dtsc.ca.gov/hazardouswaste/perchlorate/
CAUTION: There is a risk of explosion, if battery is incorrectly replaced. Replace only
with the same or equivalent type recommended by the manufacturer.
Chemical Substances Information
https://csr.msi.com/global/index
Environmental Policy
The product has been designed to enable proper reuse of parts and
recycling and should not be thrown away at its end of life.
Users should contact the local authorized point of collection for recycling
and disposing of their end-of-life products.
Visit the MSI website and locate a nearby distributor for further recycling
information.
Users may also reach us at gpcontdev@msi.com for information regarding proper
Disposal, Take-back, Recycling, and Disassembly of MSI products.
WEEE (Waste Electrical and Electronic Equipment)
Statement
ENGLISH
To protect the global environment and as an environmentalist, MSI must
remind you that...

v
Regulatory Notices
discarded as municipal wastes anymore, and manufacturers of covered electronic
equipment will be obligated to take back such products at the end of their useful life.
MSI will comply with the product take back requirements at the end of life of MSI-
branded products that are sold into the EU. You can return these products to local
collection points.
DEUTSCH
Hinweis von MSI zur Erhaltung und Schutz unserer Umwelt
Gemäß der Richtlinie 2002/96/EG über Elektro- und Elektronik-Altgeräte dürfen
Elektro- und Elektronik-Altgeräte nicht mehr als kommunale Abfälle entsorgt
werden. MSI hat europaweit verschiedene Sammel- und Recyclingunternehmen
beauftragt, die in die Europäische Union in Verkehr gebrachten Produkte, am Ende
seines Lebenszyklus zurückzunehmen. Bitte entsorgen Sie dieses Produkt zum
gegebenen Zeitpunkt ausschliesslich an einer lokalen Altgerätesammelstelle in Ihrer
Nähe.
FRANÇAIS
les points de collecte.
ESPAÑOL
MSI como empresa comprometida con la protección del medio ambiente, recomienda:
equipos electrónicos, con fecha de rigor desde el 13 de agosto de 2005, los productos
los contenedores habituales de su municipio, los fabricantes de equipos electrónicos,
están obligados a hacerse cargo de dichos productos al termino de su período de vida.

vi Regulatory Notices
la Unión Europea al final de su periodo de vida. Usted debe depositar estos productos
en el punto limpio establecido por el ayuntamiento de su localidad o entregar a una
empresa autorizada para la recogida de estos residuos.
NEDERLANDS
niet meer beschouwd worden als vervuiling. Fabrikanten van dit soort producten
worden verplicht om producten retour te nemen aan het eind van hun levenscyclus.
MSI zal overeenkomstig de richtlijn handelen voor de producten die de merknaam MSI
dragen en verkocht zijn in de EU. Deze goederen kunnen geretourneerd worden op
lokale inzamelingspunten.
SRPSKI
kojima je istekao vek trajanja, koji imaju MSI oznaku i koji su prodati u EU. Ove
POLSKI
wyznaczonych punktach zbiorczych.
TÜRKÇE

vii
Regulatory Notices
MAGYAR
ITALIANO
appartenenti alla categoria dei Materiali Elettrici ed Elettronici non possono più
essere eliminati come rifiuti municipali: i produttori di detti materiali saranno obbligati
ritirando tutti i prodotti marchiati MSI che sono stati venduti all’interno dell’Unione
Europea alla fine del loro ciclo di vita. È possibile portare i prodotti nel più vicino punto
di raccolta
India RoHS
and prohibits use of lead, mercury, hexavalent chromium, polybrominated biphenyls
or polybrominated diphenyl ethers in concentrations exceeding 0.1 weight % and 0.01
weight % for cadmium, except for the exemptions set in Schedule 2 of the Rule.

viii Regulatory Notices

ix
Regulatory Notices
Copyright and Trademarks Notice
other marks and names mentioned may be trademarks of their respective owners. No
warranty as to accuracy or completeness is expressed or implied. MSI reserves the
right to make changes to this document without prior notice.
Technical Support
If a problem arises with your system and no solution can be obtained from the user
guide, please contact your place of purchase or local distributor. Alternatively, please
try the following help resources for further guidance.
Visit the MSI website for technical guide, BIOS updates, driver updates, and other
information: http://www.msi.com
Register your product at: http://register.msi.com
Revision History
Version 1.0, 2021/12, First release.
Version 1.1, 2022/02, update list.


