Samsung UE32T4002AK User Manual
Displayed below is the user manual for UE32T4002AK by Samsung which is a product in the TVs category. This manual has pages.
Related Manuals

USER MANUAL
Thank you for purchasing this Samsung product.
To receive more complete service, please register your product at www.samsung.com
Model Serial No.
4 SERIES

2
English
Before Reading This User Manual
This TV comes with this user manual.
Before reading this user manual, review the following:
User Manual Read this provided user manual to see information
about product safety, installation, accessories,
initial configuration, and product specifications.
On the website (www.samsung.com), you can download the user manual and see its contents on your PC
or mobile device.

3
English
English
Warning! Important Safety Instructions
Please read the Safety Instructions before using your TV.
Refer to the table below for an explanation of symbols which may be on your Samsung product.
CAUTION Class II product: This symbol indicates
that a safety connection to electrical earth
(ground) is not required. If this symbol
is not present on a product with a mains
lead, the product MUST have a reliable
connection to protective earth (ground).
RISK OF ELECTRIC SHOCK. DO NOT OPEN.
CAUTION: TO REDUCE THE RISK OF
ELECTRIC SHOCK, DO NOT REMOVE
COVER (OR BACK). THERE ARE NO USER
SERVICEABLE PARTS INSIDE. REFER ALL
SERVICING TO QUALIFIED PERSONNEL.
AC voltage: Rated voltage marked with
this symbol is AC voltage.
This symbol indicates that high
voltage is present inside. It is
dangerous to make any kind of
contact with any internal part
of this product.
DC voltage: Rated voltage marked with
this symbol is DC voltage.
This symbol indicates that this
product has included important
literature concerning operation
and maintenance.
Caution. Consult instructions for use: This
symbol instructs the user to consult the
user manual for further safety related
information.
•The slots and openings in the cabinet and in the back or bottom are provided for necessary
ventilation. To ensure reliable operation of this apparatus and to protect it from overheating, these
slots and openings must never be blocked or covered.
–Do not place this apparatus in a confined space, such as a bookcase or built-in cabinet, unless
proper ventilation is provided.
–Do not place this apparatus near or over a radiator or heat register, or where it is exposed to
direct sunlight.
–Do not place vessels (vases etc.) containing water on this apparatus, as this can result in a fire
or electric shock.
•Do not expose this apparatus to rain or place it near water (near a bathtub, washbowl, kitchen sink,
or laundry tub, in a wet basement, or near a swimming pool, etc.). If this apparatus accidentally gets
wet, unplug it and contact an authorised dealer immediately.
•This apparatus uses batteries. In your community, there might be environmental regulations that
require you to dispose of these batteries properly. Please contact your local authorities for disposal
or recycling information.
•Do not overload wall outlets, extension cords, or adaptors beyond their capacity, since this can
result in fire or electric shock.
•Power-supply cords should be placed so that they are not likely to be walked on or pinched by items
placed upon or against them. Pay particular attention to cords at the plug end, at wall outlets, and
at the point where they exit from the appliance.

4
English
•To protect this apparatus from a lightning storm, or when left unattended and unused for long periods
of time, unplug it from the wall outlet and disconnect the antenna or cable system. This will prevent
damage to the set due to lightning and power line surges.
•Before connecting the AC power cord to the DC adaptor outlet, make sure that the voltage designation
of the DC adaptor corresponds to the local electrical supply.
•Never insert anything metallic into the open parts of this apparatus. This may cause a danger of
electric shock.
•To avoid electric shock, never touch the inside of this apparatus. Only a qualified technician should
open this apparatus.
•Be sure to plug in the power cord until it is firmly seated. When unplugging the power cord from a wall
outlet, always pull on the power cord’s plug. Never unplug it by pulling on the power cord. Do not touch
the power cord with wet hands.
•If this apparatus does not operate normally - in particular, if there are any unusual sounds or smells
coming from it - unplug it immediately and contact an authorised dealer or Samsung service centre.
•Be sure to pull the power plug out of the outlet if the TV is to remain unused or if you are to leave the
house for an extended period of time (especially when children, elderly, or disabled people will be left
alone in the house).
–Accumulated dust can cause an electric shock, an electric leakage, or a fire by causing the power
cord to generate sparks and heat or by causing the insulation to deteriorate.
•Be sure to contact an authorised Samsung service centre for information if you intend to install your TV
in a location with heavy dust, high or low temperatures, high humidity, chemical substances, or where
it will operate 24 hours a day such as in an airport, a train station, etc. Failure to do so may lead to
serious damage to your TV.
•Use only a properly grounded plug and wall outlet.
–An improper ground may cause electric shock or equipment damage. (Class l Equipment only.)
•To turn off this apparatus completely, disconnect it from the wall outlet. To ensure you can unplug this
apparatus quickly if necessary, make sure that the wall outlet and power plug are readily accessible.
•Store the accessories (batteries, etc.) in a location safely out of the reach of children.
•Do not drop or strike the product. If the product is damaged, disconnect the power cord and contact a
Samsung service centre.
•To clean this apparatus, unplug the power cord from the wall outlet and wipe the product with a
soft, dry cloth. Do not use any chemicals such as wax, benzene, alcohol, thinners, insecticide, aerial
fresheners, lubricants, or detergents. These chemicals can damage the appearance of the TV or erase
the printing on the product.
•Do not expose this apparatus to dripping or splashing.
•Do not dispose of batteries in a fire.
•Do not short-circuit, disassemble, or overheat the batteries.
•CAUTION: There is danger of an explosion if you replace the batteries used in the remote with the
wrong type of battery. Replace only with the same or equivalent type.

5
English
English
* Figures and illustrations in this User Manual are provided for reference only and may differ from
the actual product appearance. Product design and specifications may change without notice.
CIS languages (Russian, Ukrainian, Kazakhs) are not available for this product, since this is
manufactured for customers in EU region.
WARNING
To prevent injury, this apparatus must be securely attached to the floor/wall in accordance with the
installation instructions.

6
English
Contents
Before Reading This User Manual ..................................................................... 2
Warning! Important Safety Instructions .......................................................... 3
01 What's in the Box?
02 TV Installation
Mounting the TV on a wall .................................................................................. 9
Providing proper ventilation for your TV......................................................... 10
Safety Precaution: Securing the TV to the wall to prevent falling ..............11
03 The Remote Control
About the Buttons on the Remote Control .....................................................13
Installing batteries into the remote control (Battery size: AAA) ................14
04 Running the Initial Setup
Using the TV Controller ......................................................................................16
05 Changing the Input Source
Source ...................................................................................................................16
How to use Edit Name ........................................................................................16
06 Connecting the “CI or CI+ Card” via COMMON INTERFACE slot
Using the “CI or CI+ Card” ................................................................................... 17

7
English
English
07 Main menu
Viewing the Menus ........................................................................................18
08 Troubleshooting and Maintenance
Troubleshooting .............................................................................................22
Teletext Feature .............................................................................................26
The teletext pages are organised according to six categories ................ 27
Anti-theft Kensington Lock ..........................................................................27
Setting / Changing the TV’s password ........................................................ 27
Caring for the TV ........................................................................................... 28
09 Specifications and Other Information
Specifications .................................................................................................29
Environmental Considerations ....................................................................29
Decreasing power consumption ..................................................................29
License............................................................................................................ 30

8
English
01 What's in the Box?
Make sure the following items are included with your TV. If any items are missing, contact your dealer.
•Remote Control & Batteries (AAA x 2)
•User Manual
•Warranty Card / Regulatory Guide (Not
available in some locations)
•TV Power Cable
•The items’ colours and shapes may vary depending on the models.
•Cables not included can be purchased separately.
•Check for any accessories hidden behind or in the packing materials when opening the box.
An administration fee may be charged in the following situations:
(a) An engineer is called out at your request, but it is found that the product has no defect (i.e., where
the user manual has not been read).
(b) You bring the unit to the Samsung service centre, but it is found that the product has no defect
(i.e., where the user manual has not been read).
You will be informed of the administration fee amount before a technician visits.
Warning: Screens can be damaged from direct pressure
when handled incorrectly. We recommend lifting the TV
at the edges, as shown. Do Not Touch
This Screen!

9
English
English
02 TV Installation
Mounting the TV on a wall
If you mount this TV on a wall, follow the instructions exactly as set out by the
manufacturer. Unless it is correctly mounted, the TV may slide or fall and cause serious
injury to a child or adult and serious damage to the TV.
•You can mount the TV on the wall using a wall mount kit (sold separately).
•Refer to the installation manual included with the Samsung wall mount kit.
TV
Wall mount
Bracket
C
•Samsung Electronics is not responsible for any damage to the product or injury to yourself or others
if you choose to install the wall mount on your own.
•You can install your wall mount on a solid wall perpendicular to the floor. Before attaching the wall
mount to surfaces other than plaster board, contact your nearest dealer for additional information.
If you install the TV on a ceiling or slanted wall, it may fall and result in severe personal injury.
•Standard dimensions for wall mount kits are shown in the table.
•If you are installing a third-party wall mount, note that the length of the screws you can use to
attach the TV to the wall mount is shown in column C in the table.
•When installing a wall mount kit, we recommend you fasten all four VESA screws.
•If you want to install a wall mount kit that attaches to the wall using two top screws only, be sure
to use a Samsung wall mount kit that supports this type of installation. (You may not be able to
purchase this type of wall mount kit, depending on the geographical region.)
TV size in
inches
VESA Screw hole specs
(A * B) in millimetres C (mm) Standard Screw Quantity
32 100 x 100 6.0-8.0 M4 4
Do not install your wall mount kit while your TV is turned on. This may result in personal
injury from electric shock.

10
English
•Do not use screws that are longer than the standard dimension or do not comply with the VESA
standard screw specifications. Screws that are too long may cause damage to the inside of the TV set.
•For wall mounts that do not comply with the VESA standard screw specifications, the length of the
screws may differ depending on the wall mount specifications.
•Do not fasten the screws too firmly. This may damage the product or cause the product to fall, leading
to personal injury. Samsung is not liable for these kinds of accidents.
•Samsung is not liable for product damage or personal injury when a non-VESA or non-specified wall
mount is used or when the consumer fails to follow the product installation instructions.
•Do not mount the TV at more than a 15 degree tilt.
•Always have two people mount the TV onto a wall.
Providing proper ventilation for your TV
When you install your TV, maintain a distance of at least 10 cm between the TV and other objects (walls,
cabinet sides, etc.) to ensure proper ventilation. Failing to maintain proper ventilation may result in a fire
or a problem with the product caused by an increase in its internal temperature.
When you install your TV with a stand or a wall mount, we strongly recommend you use parts provided by
Samsung Electronics only. Using parts provided by another manufacturer may cause difficulties with the
product or result in injury caused by the product falling.
Installation with a stand Installation with a wall mount
10 cm 10 cm
10 cm
10 cm10 cm
10 cm
10 cm

11
English
English
Safety Precaution: Securing the TV to the wall to prevent falling
Caution: Pulling, pushing, or climbing on the TV may cause the TV to fall.
In particular ensure your children do not hang on or destabilise the TV. This
action may cause the TV to tip over, causing serious injuries or death. Follow
all safety precautions provided in the Safety Flyer included with your TV. For
added stability and safety, you can purchase and install the anti-fall device as
described on the next page.
WARNING: Never place a television set in an unstable location. The television set may
fall, causing serious personal injury or death. Many injuries, particularly to children, can
be avoided by taking simple precautions such as
•Always use cabinets or stands or mounting methods recommended by the
manufacturer of the television set.
•Always use furniture that can safely support the television set.
•Always ensure the television set is not overhanging the edge of the supporting
furniture.
•Always educate children about the dangers of climbing on furniture to reach the
television set or its controls.
•Always route cords and cables connected to your television so they cannot be
tripped over pulled or grabbed.
•Never place a television set in an unstable location.
•Never place the television set on tall furniture (for example, cupboards or
bookcases) without anchoring both the furniture and the television set to a
suitable support.
•Never place the television set on cloth or other materials that may be located
between the television set and supporting furniture.
•Never place items that might tempt children to climb, such as toys and remote
controls, on the top of the television or furniture on which the television is
placed.
If the existing television set is going to be retained and relocated, the same
considerations as above should be applied.

12
English
Preventing the TV from falling
1. Using the appropriate screws, firmly fasten a set of brackets
to the wall. Confirm that the screws are firmly attached to the
wall.
–You may need additional material such as wall anchors
depending on the type of wall.
2. Using the appropriately sized screws, firmly fasten a set of
brackets to the TV.
–For the screw specifications, refer to the standard screw
part in the table under “Mounting the TV on a wall”.
3. Connect the brackets fixed to the TV and the brackets fixed
to the wall with a durable, heavy-duty string, and then tie the
string tightly.
–Install the TV near the wall so that it does not fall
backwards.
–Connect the string so that the brackets fixed to the wall
are at the same height as or lower than the brackets
fixed to the TV.
•The product colour and shape
may vary depending on the
model.
03 The Remote Control
About the Buttons on the Remote Control
•This remote control has Braille points on the Power, Channel, Volume, and Enter buttons and
can be used by visually impaired persons.
•The images, buttons, and functions of the remote control may differ depending on the model.
Turns the TV on and off.
Alternately selects Teletext mode,
Full > Double > Mix > Off.
Turns the sound on/off.
Adjusts the volume.
Displays the main on-screen menu.
Views the Media Play.
Quickly select frequently used
functions.
(Enter)
Selects or runs a focused item.
Returns to the previous menu.
E-MANUAL
No function.
PIC SIZE
Changes the picture size.
AD/SUBT.
Audio Description selection. (Not
available in some locations) / Displays
digital subtitles.
Display and selects available video
sources.
Gives direct access to channels.
Returns to the previous channel.
Changes the current channel.
Launches the Channel List.
Displays the Guide screen.
Displays information about the current
programme or content.
Moves the cursor, selects the on-screen
menu items, and changes the values
seen on the TV’s menu.
Exits the menu.
Use these buttons according to the
directions on the TV screen.
Use these buttons with specific features.
Use these buttons according to the
directions on the TV screen.

13
English
English
03 The Remote Control
About the Buttons on the Remote Control
•This remote control has Braille points on the Power, Channel, Volume, and Enter buttons and
can be used by visually impaired persons.
•The images, buttons, and functions of the remote control may differ depending on the model.
Turns the TV on and off.
Alternately selects Teletext mode,
Full > Double > Mix > Off.
Turns the sound on/off.
Adjusts the volume.
Displays the main on-screen menu.
Views the Media Play.
Quickly select frequently used
functions.
(Enter)
Selects or runs a focused item.
Returns to the previous menu.
E-MANUAL
No function.
PIC SIZE
Changes the picture size.
AD/SUBT.
Audio Description selection. (Not
available in some locations) / Displays
digital subtitles.
Display and selects available video
sources.
Gives direct access to channels.
Returns to the previous channel.
Changes the current channel.
Launches the Channel List.
Displays the Guide screen.
Displays information about the current
programme or content.
Moves the cursor, selects the on-screen
menu items, and changes the values
seen on the TV’s menu.
Exits the menu.
Use these buttons according to the
directions on the TV screen.
Use these buttons with specific features.
Use these buttons according to the
directions on the TV screen.

14
English
Installing batteries into the remote control (Battery size: AAA)
Match the polarities of the batteries to the symbols on the battery compartment.
2
3
1
•The colour and shape of the remote may vary depending on the model.
•Use the remote control within 7 m of the TV.
•Bright lights may affect the performance of the remote control. Avoid using the remote control
near special fluorescent lights or neon signs.
•Alkaline batteries are recommended for longer battery life.
1. Gently pull on the battery cover’s notch and then remove the cover completely once it comes
loose.
2. Insert 2 AAA alkaline batteries, making sure to align the positive and negative polarities correctly.
3. Place the battery cover on the remote control and insert the cover into the remote control.
4. Slide the battery cover in the order shown above so that the cover is completely attached to the
remote control.
CAUTION
–Risk of explosion if the battery is replaced by an incorrect type.
–Replacement of a BATTERY with an incorrect type that can defeat a SAFEGUARD (for example, in the
case of some lithium BATTERY types).
–Disposal of a BATTERY into fire or a hot oven, or mechanically crushing or cutting of a BATTERY, that
can result in an EXPLOSION.
–Leaving a BATTERY in an extremely high temperature surrounding environment that can result in an
EXPLOSION or the leakage of flammable liquid or gas.
–A BATTERY subjected to extremely low air pressure that may result in an EXPLOSION or the leakage of
flammable liquid or gas.

15
English
English
04 Running the Initial Setup
When you turn on your TV for the first time, it immediately starts the Initial Setup. The Initial Setup
allows you to configure the basic settings for the TV to operate, such as broadcast reception, channel
search, at one time.
•Before starting the Initial Setup, be sure to connect external devices first.
You can also start the Initial Setup using the TV’s menu (MENU > System > Setup).
Follow the instructions displayed on the Initial Setup screen and configure the TV’s basic settings to
suit your viewing environment.
(The Initial Setup process may be differently displayed from your country.)
Language
Select your language, then press OK
Français
Español
Ελληνικά
Eesti keel
English
Country
Select your country, then press OK
Luxembourg
Italy
Greece
Hungary
France
1. Select your language 2. Select your country
PIN code
You must enter a 4 digit PIN code. Use this PIN code to unlock 18+ rated programmes in
the fuure.
Enter the code: (Do not use 0000)
Enter the code again:
Use Mode
Set the TV for home use or for in store promotion (shop).
Store Demo
Home Use
3. Set the PIN code 4. Select Use Mode
Setup TV
Select Start and press OK to install the TV.
You have completed the initial TV setup.
Now you can start the TV installation.
StartBack
TV installation
To install the Antenna/Cable channels, press OK.
Done
lnstall Antenna/Cable Channels
5. Start to install the TV 6. Start to scan channels
Finish
To start using your TV, select Finish and press OK.
Finish
7. Finish

16
English
Using the TV Controller
You can turn on the TV with the TV Controller button at the bottom of the TV, and then use the Control
menu.
The Control menu appears when the TV Controller button is pressed while the TV is On. For more
information about its usage, refer to the figure below.
Control menu
: Power off
: Channel Up
: Channel Down
: Volume Up
: Volume Down
: Source
TV Controller button / Remote control
sensor
Press: Move
Press & Hold: Select
The TV Controller button is located on
the bottom of the TV.
Power LED
- Power on mode: No led light
- Standby mode: Red
05 Changing the Input Source
Source
Use to select TV or other external input sources such as DVD / Blu-ray players / cable box / STB satellite
receiver connected to the TV.
1. Press the SOURCE button on your remote.
2. Select a desired external input source.
How to use Edit Name
In the Source, press the Green button, and then you can set an external input sources name you want.

17
English
English
06 Connecting the “CI or CI+ Card” via COMMON
INTERFACE slot
•Depending on the country and model.
•Turn the TV off to connect or disconnect a “CI or CI+ Card”.
•The TV Viewing Card (“CI or CI+ Card”) may not supported depending on the model.
Connect the “CI or CI+ Card” to the COMMON INTERFACE slot as shown in the image below.
•The image may differ depending on the model.
Using the “CI or CI+ Card”
To watch paid channels, the “CI or CI+ CARD” must be inserted.
•Samsung TV follow up CI+ 1.3 standard. When TV product display the pop-up message, it may
happen due to CI+ 1.3 Version inconsistency. If you have a problem, please contact Samsung Call
Centre.
–Your Samsung TV conforms to the CI+ 1.3 standards.
–Where a CI+ Common Interface module is incompatible with TV product then please remove
the module and contact the CI+ operator for assistance.
–If you don’t insert the “CI or CI+ CARD”, some channels will display the pop-up message.
•The pairing information containing a telephone number, the “CI or CI+ CARD” ID, the Host ID, and
other information will be displayed in about 2~3 minutes. If an error message is displayed, please
contact your service provider.
–You must obtain a “CI or CI+ CARD” from a local cable service provider.
–When removing the “CI or CI+ CARD”, carefully pull it out with your hands since dropping the “CI or
CI+ CARD” may cause damage to it.
–Insert the “CI or CI+ CARD” in the direction marked on the card.
–The location of the COMMON INTERFACE slot may be different depending on the model.
–“CI or CI+ CARD” is not supported in some countries and regions. Check with your authorised dealer.
–If you have any problems, please contact a service provider.
–Insert the “CI or CI+ CARD” that supports the current aerial settings. If not, the screen may not look
normal.

18
English
07 Main menu
Viewing the Menus
With the power on, press the MENU button. The main menu appears on the screen.
Its left side has five icons: Picture, Sound, Broadcasting, System, and Support.
Picture
Eco settings
Picture Size
Advanced
50
3
100
Shadow detail
Sharpness
Contrast
80
55
Standard
Brightness
Colour
Picture Mode
Support
System
Broadcasting
Sound
Picture
Item Description
Picture
Picture Mode
Select your preferred picture type.
•Dynamic: Suitable for a bright room.
•Standard: Suitable for a normal environment.
•Movie: Suitable for watching movies in a dark room.
Colour Adjust the colour saturation according to your personal preference.
Brightness Adjust the video backlight intensity.
Contrast Adjust the level of contrast for best picture experience.
Sharpness Adjust picture sharpness.
Shadow detail Adjust the entire brightness of the video signals.
Advanced
Adjust the detailed setting for the screen including colour and contrast.
•Computer: Set to have the ideal picture settings for using your TV as a
computer monitor. (Only available when the HDMI source is selected)
•Colour enhancement: Set the level of enhancement for colour intensity
and details in bright colours.
•Colour Tone: Set the colour tone manually.
•Custom Colour Tone: Set the overall colour tone manually. (Only available
when the Custom is selected in Colour Tone)
•Motion Lighting: Reduce power consumption by brightness control
adapted motion.
•Dynamic Contrast: Adjust the level at which the TV automatically
enhances the details in the dark, middle and light areas of the picture.
•Gamma: Adjust the primary colour intensity. This is an expert user setting.
•Digital Clean View: Reduce unwanted picture noise.
•MPEG Noise Filter: Reduce MPEG noise to improve picture quality.

19
English
English
Item Description
Picture
Picture Size
Set the various picture options such as picture size and aspect
ratio.
–The available items may differ depending on the selected mode.
–Depending on the input source, the picture size options may
vary.
•Picture format: Select the picture format that fills the screen.
•Screen edges: Set to slightly enlarge the picture to hide
distorted edges.
•Picture shift: Shift the picture position with the cursor keys.
–It is available when the HDMI source is selected. For ATV /
DTV, it depends on the Picture Size and signal (SD / HD).
Eco settings
Eco settings bundles settings that help save energy.
•Energy saving: Set energy saving level.
•Screen off: Set screen off to save energy consumption.
•Switch off timer: Set TV switch off timer. Press to adjust the
value. The value 0 (Off) deactivates the automatic switch off.
Sound
Sound Mode
Select your favourite sound mode.
•User: Adjust the sounds manually to suit your preferred sound
quality.
•Standard: Select the normal sound mode.
•Cinema: Provide the best sound for movies.
•Music: Provide the best sound for watching music videos, etc.
•Game: Provide the best sound for playing games, etc.
•Speech: Provide the best sound for watching news, drama, etc.
Bass Adjust low tones in the sound.
Treble Adjust high tones in the sound.
Surround mode Select surround sound settings.
Clear Sound Select to improve the sound for speech. Ideal for news
programme.
Advanced
Adjust the advanced sound settings individually.
•Auto volume levelling: This function allows you to reduce the
disparity of a voice signal (which is one of the signals received
during a digital TV broadcast) to a desired level.
•Delta volume: Adjust the delta value for TV speaker volume.
(Only available when the ATV or HDMI source is selected)
•Audio out: Set the TV to play the sound on TV or on the
connected audio system.
•Digital out format: You can select the Digital Audio output
format. The available Digital Audio output format may differ
depending on the input source.

20
English
Item Description
Sound Advanced
•Digital out levelling: Level out the volume from device
which is connected to DIGITAL AUDIO OUT(OPTICAL).
•Digital out delay: Adjust the delay time of the sound
output from DIGITAL AUDIO OUT(OPTICAL) terminal.
•Digital out offset: Set an audio offset If you cannot
set a sound delay on the Home Theatre System. (Only
available when Digital out delay set to On)
Broadcasting
Search for channels Start updating the current channels or redo a complete
installation channels.
Automatic channel update Automatically search for the receivable channels.
Channel update message When new channels are found, a message is shown at TV
start up.
Digital: Reception test
Manually install digital channels. If the reception is poor,
check and reposition your antenna.
Select Search to check the signal quality.
Analogue: Manual
installation
Manually install analogue channels.
•System: Select the country and the TV system.
•Search Channel: Enter a frequency to find a channel.
•Fine tune: Fine tune a channel.
•Store current channel / Store as new channel: Store a
found channel on the current channel number or as a
new channel number.
Common interface
If prepaid premium content is available from a CAM, you
can set the provider settings with this option.
(Only available when you insert CAM card)
System
Use Mode
Select the Use Mode suitable for your place.
•Home Use: It is the default setting.
•Store Demo: It is for retail environments only. If
you select Store Demo, Picture Mode will change to
Dynamic every 10 minutes.
Shop setup
•Feature logos: Select On / Off to show the e-sticker.
(Only available when the Store Demo is selected in Use
Mode)
Factory settings It will reset all the personal settings.
The channel installation remains unchanged.
Setup Reinstall and redo the TV installation completely.
CAM Operator profile This enables the user to allow the CI+CAM operator profile
which is for easy channel installation and updating.
CAM Profile Name Show the current using CAM profile name.
(Only available when you insert CAM card)

21
English
English
Item Description
System
Time
•Clock Mode: Set the Date and Time to automatic,
manual or country dependent time adjustment.
•Time Zone: Set your local time zone.
–This is only for Spain and Portugal. (Only available
when the Country dependent is selected in Clock
Mode)
•Daylight saving: Set the daylight saving option. (Only
available when the Country dependent is selected in
Clock Mode)
•Sleep timer: Set the TV to switch to Standby
automatically after a preset time.
Languages Select the language for the TV menus or the preferred
languages for audio, subtitles and Text/Teletext.
Universal access Activate special function for aid visually-impaired and
hearing-impaired people.
Hearing impaired Some digital TV programmes broadcast special audio
and subtitle for the hard of hearing or deaf people.
Audio description Set On to activate special audio commentary describing
what is happening on screen.
Parental rating
Prevent unauthorised users, such as children, from
watching unsuitable programme with a user-defined
4-digit PIN code.(Depending on the broadcaster)
Set code / Change code
You can set / change the PIN number.
–You must enter the 4 digit PIN code when running the
initial setup. If not, it will need to Set code first.
Support
Current software info View the current software version and information.
Local updates For dealers and expert users.
Look for OAD updates Search for an Over-the-air software update.
(It depends on your country.)
View software update
history Display the list of software update history.
OSS View the open source license.
Contact Samsung You can find information regarding our call centres, and
product information and software version.
Self Diagnosis Test the TV picture, sound and signal.

22
English
08 Troubleshooting and Maintenance
Troubleshooting
If the TV seems to have a problem, first try this list of possible problems and solutions. If none of these
troubleshooting tips apply, visit “www.samsung.com”, then click on Support, or call Samsung customer
service centre.
Picture Quality
•First of all, please perform the Picture Test and confirm that your TV is properly displaying test
image. (go to MENU - Support - Self Diagnosis - Picture Test) If the test image is properly
displayed, the poor picture may caused by the source or signal.
The TV image does not look as good as it did in the store.
•If you have an analogue cable box or satellite box, upgrade to a digital cable box or satellite box.
Use HDMI cables to deliver HD (high definition) picture quality.
•Cable/Satellite subscribers: Try digital stations from the channel line up.
•Aerial connection: Try HD stations after performing Search for channels.
•Many HD channels are up scaled from SD (Standard Definition) contents.
•Adjust the cable box or satellite box video output resolution to 1080i or 720p.
•Make sure you are watching the TV at the minimum recommended distance based on the size and
definition of the signal.
The picture is distorted: macro block, small block, dots, pixelisation error.
•Compression of video contents may cause picture distortion especially in fast moving pictures
such as sports and action movies.
•Low signal level or bad quality can cause picture distortion. This is not a TV issue.
•Mobile phones used close to the TV (cca up to 1m) may cause noise in picture on analogue and
digital TV.
There is poor colour or brightness.
•Adjust the Picture options in the TV menu. (go to Picture Mode / Colour / Brightness / Contrast /
Sharpness / Shadow detail)
•Adjust Energy saving option in the TV menu. (go to MENU - Picture - Eco settings - Energy
saving)
•Try resetting the picture to view the default picture settings. (go to MENU - Picture - Picture
Mode, then press Reset to Defaults)
There is a dotted line on the edge of the screen.
•If the picture size is set to Auto fill, change it to 16:9 Overscan.
•Change the cable box or satellite box resolution.
When changing channels, the picture freezes or is distorted or delayed.
•If connected with a cable box or satellite box, please try to reset the cable box or satellite box.
Reconnect the AC power cord and wait until the cable box or satellite box reboots. It may take up
to 20 minutes.

23
English
English
•Set the output resolution of the cable box or satellite box to 1080i or 720p.
Sound Quality
•First of all, please perform the Sound Test to confirm that your TV audio is properly operating.
(go to MENU - Support - Self Diagnosis - Sound Test)
•If the audio is ok, the sound problem may be caused by the source or signal.
There is no sound or the sound is too low at maximum volume.
•Please check the volume of the device (cable box or satellite box, DVD, Blu-ray etc) connected
to your TV.
The picture is good but there is no sound.
•Set the Audio out option to TV speakers in the sound menu. (go to MENU - Sound -
Advanced - Audio out)
•If you are using an external device, check the device’s audio output option (ex. you may need
to change your cable box’s or satellite box’s audio option to HDMI when you have a HDMI
connected to your TV).
•If you are using a DVI to HDMI cable, a separate audio cable is required.
•Reboot the connected device by reconnecting the device’s power cable.
The speakers are making an inappropriate noise.
•For aerial or cable connections, check the signal strength. Low signal level may cause sound
distortion. (go to MENU - Support - Self Diagnosis - Signal Information)
No Picture, No Video
The TV will not turn on.
•Make sure the AC power cord is securely plugged in to the wall outlet and the TV.
•Make sure the wall outlet is working.
•Try pressing the POWER ( ) button at the bottom of the TV to make sure the problem is not
the remote. If the TV turns on, refer to “The remote control does not work”.
The TV turns off automatically.
•Ensure the Sleep Timer is set to Off in the Time menu. (go to MENU - System - Time - Sleep
timer)
•If your PC is connected to the TV, check your PC power settings.
•Make sure the AC power cord is plugged in securely to the wall outlet and the TV.
•Switch off timer turns off the TV if there has been no user input in 240 minutes (default). You
can set the time to up to 240 minutes in increments of 30 minutes. (go to MENU - Picture -
Eco settings - Switch off timer)
There is no picture/video.
•Check cable connections (remove and reconnect all cables connected to the TV and external
devices).
•Set your external device’s (cable box or satellite box, DVD, Blu-ray etc) video outputs to match
the connections to the TV input. For example, if an external device’s output is HDMI, it should
be connected to an HDMI input on the TV.

24
English
•Make sure your connected devices are powered on.
•Be sure to select the TV’s correct source by pressing the SOURCE button on the remote control.
•Reboot the connected device by reconnecting the device’s power cable.
Aerial (Air/Cable) Connection (Cable: depending on the country)
The TV is not receiving all channels.
•Make sure the Aerial cable is connected securely.
•Please try Setup (Initial setup) to add available channels to the channel list. Go to MENU -
System - Setup (Initial setup) and wait for all available channels to be stored.
•Verify the Aerial is positioned correctly.
•Try to start a channel update manually (go to MENU - Broadcasting - Search for channels -
Update channels) or re-install channels. (go to MENU - Broadcasting - Search for channels -
Re-install channels)
The picture is distorted: macro block, small block, dots, pixelisation error.
•Compression of video contents may cause picture distortion, especially on fast moving pictures
such as sports and action movies.
•A low signal can cause picture distortion. This is not a TV issue.
Others
The picture will not display in full screen.
•HD channels will have black bars on either side of the screen when displaying up scaled SD (4:3)
contents.
•Black bars on the top and bottom will appear during movies that have aspect ratios different from your
TV.
•Adjust the picture size options on your external device or TV to full screen.
The remote control does not work.
•Replace the remote control batteries with the poles (+/–) in the right direction.
•Clean the sensor’s transmission window on the remote.
•Try pointing the remote directly at the TV from 1.5 ~ 1.8 m away.
The cable box or satellite box remote control doesn’t turn the TV on or off, or adjust the volume.
•Programme the cable box or satellite box remote control to operate the TV. Refer to the cable box or
satellite box user manual for the SAMSUNG TV code.
There is a plastic smell from the TV.
•This smell is normal and will dissipate over time.
The TV Signal Information is unavailable in the Self Diagnosis Test menu.
•This function is only available with digital channels from an Aerial / RF / Coax connection.
TV is tilted to the right or left side.
•Remove the stand base from the TV and reassemble it.
There are difficulties assembling the stand base.
•Make sure the TV is placed on a flat surface. If you can not remove the screws from the TV, please use a

25
English
English
magnetised screw driver.
The CI+ does not work.
•Your Samsung TV conforms to the CI+ 1.3 standards.
•Where a CI+ Common Interface module is incompatible with TV product then please remove the
module and contact the CI+ operator for assistance.
Picture mode will change to Dynamic every 10 minutes.
•If the TV is in the Store Demo mode, it will reset the Picture Mode to Dynamic every 10 minutes.
If you want to change the settings from Store Demo mode to Home Use mode, press the SOURCE
button to select TV mode, and go to MENU - System - Use Mode.
You have intermittent loss of audio or video.
•Check the cable connections and reconnect them.
•Loss of audio or video can be caused by using overly rigid or thick cables. Make sure the cables are
flexible enough for long term use. If mounting the TV to the wall, we recommend using cables with
90 degree connectors.
You see small particles when you look closely at the edge of the frame of the TV.
•This is part of the product’s design and is not a defect.
There are recurrent picture/sound issues.
•Check and change the signal/source.
A reaction may occur between the rubber cushion pads on the base stand and the top finish of some
furniture.
•To prevent this, use felt pads on any surface of the TV that comes in direct contact with furniture.
You can keep your TV in optimum operating condition by upgrading to the latest firmware (www.
samsung.com → Support) by USB.
1. Insert a USB drive containing the firmware upgrade file into the TV.
2. Go to MENU - Support – Local updates and select the firmware file.
3. Select Start to start the software update.
4. Select Restart to restart TV.
–Please be careful not to disconnect the power or remove the USB drive until upgrades are
complete.
–The TV will be turned off and on automatically after completing the firmware upgrade.
–Please remember to unplug USB after firmware upgrade.
–USB format should be FAT32.
This TFT LED panel uses a panel consisting of sub pixels which require sophisticated technology to
produce.
However, there may be a few bright or dark pixels on the screen. These pixels will have no impact on
the performance of the product.
Some functions and pictures shown in this manual are available on specific models only.

26
English
Teletext Feature
•To enter the Teletext feature, press the TTX/MIX button on the remote control.
•To exit from the Teletext feature, press the TTX/MIX button on the remote control until live TV
appears.
•This function is available only in the channel that supports the teletext service.
•This function may not be supported depending on the model or geographical area.
The index page of the Teletext service gives you information on how to use the service. For Teletext
information to be displayed correctly, channel reception must be stable. Otherwise, information may be
missing or some pages may not be displayed.
•You can change Teletext pages by pressing the numeric buttons on the remote control.
List/Flof: No function
Full TTX / Double TTX / Mix / Off: The teletext mode
is
activated in the channel that is being watched. Each time
you press the button, the teletext mode changes in
the order of Full TTX → Double TTX → Mix → Off.
Sub Page: Displays the available sub-page.
Store: No function
Index: Displays the index (contents) page at any time
while you are viewing Teletext.
Size: Displays the teletext on the upper half of the
screen in double-size. To move the text to the lower half of
the screen, press it again. For normal display, press it once
again.
Hold: Holds the display at the current page, in the
case that there are several secondary pages that follow
automatically. To undo, press it again.
Page Up: Displays the next Teletext page.
Page Down: Displays the previous Teletext page.
Reveal/Conceal: Displays or hides the hidden text
(answers to quiz games, for example). To display the normal
screen, press it again.
Cancel: Shrinks the Teletext display to overlap with the
current broadcast.
Colour buttons (red, green, yellow, blue): If the FASTEXT
system is used by the broadcasting company, the different
topics on a Teletext page are colour-coded and can be
selected by pressing the coloured buttons. Press the colour
corresponding to the topic of your choice. A new colour
coded page is displayed. Items can be selected in the
same way. To display the previous or next page, press the
corresponding coloured button.

27
English
English
The teletext pages are organised according to six categories
Part Contents
A Selected page number.
B Broadcasting channel identity.
C Current page number or search indications.
DDate and time.
E Text.
F Status information. FASTEXT information.
Anti-theft Kensington Lock
The Kensington Lock is not supplied by Samsung. It is a device used to physically fix the system
when using it in a public place. The appearance and locking method may differ from the illustration
depending on the manufacturer. Refer to the manual provided with the Kensington Lock for
additional information on proper use.
•Please find a “ ” icon on the rear of the TV. A Kensington slot is beside the “ ” icon.
•The position and colour may differ depending on the model.
<Optional>
To lock the product, follow these steps:
1. Wrap the Kensington lock cable around a large, stationary object such as desk or chair.
2. Slide the end of the cable with the lock attached through the looped end of the Kensington
lock cable.
3. Insert the locking device into the Kensington slot on the product.
4. Lock the lock.
–These are general instructions. For exact instructions, see the User manual supplied with the
locking device.
–The locking device has to be purchased separately.
Setting / Changing the TV’s password
MENU - System - Set code / Change code
1. Run Change code and then enter the current password in the password field. The default password
is “9999“.
2. Enter a new password and then enter it again to confirm it. The password change is complete.

28
English
Caring for the TV
•If a sticker was attached to the TV screen, some debris can
remain after you remove the sticker. Please clean the debris
off before watching TV.
•The exterior and screen of the TV can get scratched during
cleaning. Be sure to wipe the exterior and screen carefully
using a soft cloth to prevent scratches.
•Do not spray water or any liquid directly onto the TV. Any
liquid that goes into the product may cause a failure, fire, or
electric shock.
•To clean the screen, turn off the TV, then gently wipe away
smudges and fingerprints on the panel with a micro-fiber
cloth. Clean the body or panel of the TV with a micro-fiber
cloth dampened with a small amount of water. After that,
remove the moisture with a dry cloth. While cleaning, do
not apply strong force to the surface of the panel because
it can damage the panel. Never use flammable liquids
(benzene, thinner, etc.) or a cleaning agent. For stubborn
smudges, spray a small amount of screen cleaner on a
micro-fiber cloth, and then use the cloth to wipe away the
smudges.

29
English
English
09 Specifications and Other Information
Specifications
Model Name UE32T4005AK / UE32T4000AK / UE32T4000AW / UE32T4002AK
Display Resolution 1366 x 768
Screen Size
Measured Diagonally
31.5 inches
80 cm
Sound (Output) 5 W + 5 W
Dimensions (W x H x D)
Body
With stand
719.2 x 434.7 x 88.6 mm
719.2 x 464.4 x 166.0 mm
Weight
Without Stand
With Stand
4.1 kg
4.2 kg
Environmental Considerations
Operating Temperature
Operating Humidity
Storage Temperature
Storage Humidity
10°C to 40°C (50°F to 104°F)
10% to 80%, non-condensing
-20°C to 45°C (-4°F to 113°F)
5% to 95%, non-condensing
•The design and specifications are subject to change without prior notice.
•For information about the power supply, and more information about power consumption,
refer to the label-rating attached to the product.
•Typical power consumption is measured according to IEC 62087.
•You can see the label-rating attached to the back of the TV. (For some models, you can see the
label-rating inside the cover terminal.)
Decreasing power consumption
When you shut the TV off, it enters Standby mode. In Standby mode, it continues to draw a small
amount of power. To decrease power consumption, unplug the power cord when you don’t intend to
use the TV for a long time.

30
English
License
The terms HDMI and HDMI High-Definition Multimedia
Interface, and the HDMI Logo are trademarks or registered
trademarks of HDMI Licensing LLC in the United States and
other countries.
Dolby, Dolby Audio, and the double-D symbol are trademarks
of Dolby Laboratories. Manufactured under license from Dolby
Laboratories. Confidential unpublished works. Copyright ©
1992-2020 Dolby Laboratories. All rights reserved.
Recommendation - EU Only
Hereby, Samsung Electronics, declares that this equipment is in compliance with the essential
requirements and other relevant provisions of Directives 2014/53/EU (RED), 2009/125/EC (Eco Design)
and 2011/65/EU (RoHS).
The full text of the EU declaration of conformity is available at the following internet address: http://
www.samsung.com go to Support and enter the model name.
This equipment may be operated in all EU countries.

31
English
English
Correct Disposal of This Product (Waste Electrical & Electronic Equipment)
(Applicable in countries with separate collection systems)
This marking on the product, accessories or literature indicates that the product and
its electronic accessories (e.g. charger, headset, USB cable) should not be disposed of
with other household waste at the end of their working life. To prevent possible harm
to the environment or human health from uncontrolled waste disposal, please separate
these items from other types of waste and recycle them responsibly to promote the
sustainable reuse of material resources.
Household users should contact either the retailer where they purchased this product,
or their local government office, for details of where and how they can take these items
for environmentally safe recycling.
Business users should contact their supplier and check the terms and conditions of the
purchase contract. This product and its electronic accessories should not be mixed with
other commercial wastes for disposal.
Correct disposal of the batteries in this product
(Applicable in countries with separate collection systems)
This marking on battery, manual or packaging indicates that the batteries in this
product should not be disposed of with other household waste at the end of their
working life. Where marked, the chemical symbols Hg, Cd or Pb indicate that the battery
contains mercury, cadmium or lead above the reference levels in EC Directive 2006/66.
If batteries are not properly disposed of, these substances can cause harm to human
health or the environment.
To protect natural resources and to promote material reuse, please separate batteries
from other types of waste and recycle them through your local, free battery return
system.
For information on Samsung’s environmental commitments and product-specific regulatory
obligations, e.g. REACH, WEEE, Batteries, visit www.samsung.com/uk/aboutsamsung/sustainability/
environment/our-commitment/data/
WARNING - TO PREVENT THE SPREAD OF FIRE, KEEP CANDLES OR OTHER ITEMS WITH
OPEN FLAMES AWAY FROM THIS PRODUCT AT ALL TIMES.

32
English
Supported Media File
Internal Subtitle
File Extension Container Subtitle Codec Remark
mpg, mpeg, vob MPG, MPEG DVD Subtitle
ts, tp TS DVB Subtitle
mp4 MP4 DVD Subtitle
UTF-8 Plain Text
mkv MKV
ASS
SSA
UTF-8 Plain Text
VobSub
DVD Subtitle
avi AVI(1.0, 2.0),
DMF0,1,2
XSUB
XSUB+
External Subtitle
File Extension Subtitle Parser Remark
.srt SubRip
.ssa/ .ass SubStation Alpha
.smi SAMI
.sub SubViewer
MicroDVD
DVDSubtitleSystem
SubIdx (VobSub)
SubViewer 1.0 & 2.0 Only
.txt TMPlayer
Supported Video Formats
Video
Codec Resolution Bit Rate Profile Container
MPEG1/2 1080P@30fps 40Mbps MP@HL
MPEG program stream (.VOB, .MPG, .MPEG)
MPEG transport stream (.ts, .tp)
MP4 (.mp4, .mov)
AVI (.avi)
MKV (.mkv)
ASF (wmv)
MPEG4 1080P@30fps 40Mbps
. Simple Profile
. Advanced Simple
Profile@Level 5
. GMC is not supported
MPEG program stream (.MPG, .MPEG)
MP4 (.mp4, .mov)
AVI (.avi)
MKV (.mkv)
ASF (wmv)
Sorenson
H.263 1080P@30fps 40Mbps AVI (.avi)
SWF(.swf)
H.263 1080P@30fps 40Mbps
MP4 (.mp4, .mov)
AVI (.avi)
MKV (.mkv)

33
English
English
Video
Codec Resolution Bit Rate Profile Container
H.264 1080P@60fps 50Mbps
. Main Profile
. High Profile @ Level
4.1 bit rate up to
50Mbps
MP4 (.mp4, .mov)
MPEG transport stream (.ts, .tp)
ASF (.asf)
WMV (.wmv)
AVI (.avi)
MKV (.mkv)
AVS 1080P@30fps 40Mbps Jizhun profile @ Level
6.0 MPEG transport stream (.ts, .tp)
WMV3 1080P@30fps 40Mbps
ASF (wmv)
AVI (.avi)
MKV (.mkv)
WMV (.wmv)
VC1 1080P@30fps 40Mbps
. Advanced Profile @
Level 3
. Simple Profile
. Main Profile
MPEG program stream (.MPG, .MPEG)
MPEG transport stream (.ts, .tp)
WMV (.wmv)
AVI (.avi)
MKV (.mkv)
Motion
JPEG 640x480@30fps 10Mbps
AVI (.avi)
MP4 (.mp4, .mov)
MKV (.mkv)
HEVC/H.265 1080P@60fps,
High tier 50Mbps Main / Main10 profile
@Level4.1
MP4 (.mp4, .mov)
MPEG transport stream (.ts, .tp)
MKV (.mkv)
Supported Photo Formats
Image Photo Resolution (width x height) Remark
JPEG Base-line 15360 x 8640 (1920x8 x 1080x8) The limitation of max resolution depends on DRAM size
Progressive 1024x768 The limitation of max resolution depends on DRAM size
PNG non-interlace 9600x6400 The limitation of max resolution depends on DRAM size
interlace 1200x800 The limitation of max resolution depends on DRAM size
BMP 9600x6400 The limitation of max resolution depends on DRAM size
MPO Base-line 15360x8640 (1920x8 x 1080x8) The limitation of max resolution depends on DRAM size
Progressive 1024x768 The limitation of max resolution depends on DRAM size
GIF 6400x4800 (800x8 x 600x8) The limitation of max resolution depends on DRAM size
1. Resolution is a kind of reference design, instead of hardware limitation. Because it is bounded
by DRAM size and performance
2. The larger resolution, the bigger DRAM size
3. The larger resolution, the less performance, since it requires longer time to show a picture
4. JPEG use hardware decoder. The max resolution of Jpeg hardware decoder is 16360x16360
5. BMP decoder is a software decoder. The limitation of max resolution depends on DRAM size
6. PNG decoder is a software decoder. The limitation of max resolution depends on DRAM size
7. GIF decoder is a software decoder. The limitation of max resolution depends on the DRAM size

34
English
Supported Audio Formats
Audio Codec Sample rate Channel Bit Rate Container Remark
MPEG1/2 Layer1 16KHz ~ 48KHz Up to 2 32Kbps ~ 448Kbps
Movie:
AVI (.avi)
ASF (wmv)
Matroska (.mkv)
MPEG transport stream
(.ts, .tp)
MPEG program stream
(.MPG, .MPEG)
Music:
WAV (.wav)
MP3 (.mp3)
MPEG1/2 Layer2 16KHz ~ 48KHz Up to 2 8Kbps ~ 384Kbps
Movie:
AVI (.avi)
ASF (.wmv)
Matroska (.mkv)
MPEG transport stream
(.ts, .tp)
MPEG program stream
(.MPG, .MPEG)
Music:
WAV (.wav)
MP3 (.mp3)
MPEG1/2 Layer3 16KHz ~ 48KHz Up to 2 8Kbps ~ 320Kbps
Movie:
AVI (.avi)
ASF (.wmv)
Matroska (.mkv)
MP4 (.mp4, .mov)
MPEG transport stream
(.ts, .tp)
MPEG program stream
(.MPG, .MPEG)
SWF (.swf)
Music:
WAV (.wav)
MP3 (.mp3)
MP4 (.m4a)
AC3 32KHz, 44.1KHz,
48KHz Up to 5.1 32Kbps ~ 640Kbps
Movie:
AVI (.avi)
Matroska (.mkv)
MP4 (.mp4, .mov)
MPEG transport stream
(.ts, .tp)
MPEG program stream
(.MPG, .MPEG)
Music:
AC3 (.ac3)
MP4 (.m4a)

35
English
English
Audio Codec Sample rate Channel Bit Rate Container Remark
EAC3 32KHz, 44.1KHz,
48KHz Up to 5.1 32Kbps ~ 6Mbps
Movie:
MP4 (.mp4, .mov)
MPEG transport stream
(.ts, .tp)
MPEG program stream
(.MPG, .MPEG)
Music:
EAC3 (.ec3)
MP4 (.m4a)
AAC-LC, HEAAC 8KHz ~ 48KHz Up to 5.1
AAC-LC:
12kbps ~ 576kbps
V1:
6kbps ~ 288kbps
V2:
3kbps ~ 144kbps
Movie:
AVI (.avi)
Matroska (.mkv)
MP4 (.mp4, .mov)
MPEG transport stream
(.ts, .tp)
MPEG program stream
(.MPG, .MPEG)
Music:
AAC (.aac)
MP4 (.m4a)
WMA 8KHz ~ 48KHz Up to 2 128bps ~ 320Kbps
Movie:
ASF (.wmv)
AVI (.avi)
Matroska (.mkv, .mka)
Music:
ASF (.wma)
WMA 7,
WMA 8,
WMA 9
Standard
WMA 10 Pro M0 48KHz Up to 2 < 192kbps
Movie:
ASF (.wmv)
AVI (.avi)
Matroska (.mkv)
Music:
ASF (.wma)
No LBR
mode
WMA 10 Pro M1 48KHz Up to 5.1 < 384kbps
Movie:
ASF (.wmv)
AVI (.avi)
Matroska (.mkv)
Music:
ASF (.wma)
WMA 10 Pro M2 96KHz Up to 5.1 < 768kbps
Movie:
ASF (.wmv)
AVI (.avi)
Matroska (.mkv)
Music:
ASF (.wma)
VORBIS Up to 48KHz Up to 2
Movie:
Matroska (.mkv)
WebM (.webm)
MP4 (.mp4, .mov)
Music:
MP4 (.m4a)
Supports
stereo
decoding
only

36
English
Audio Codec Sample rate Channel Bit Rate Container Remark
DTS Up to 48KHz Up to 5.1 < 1.5Mbps
Movie:
MPEG transport stream
(.ts, .tp)
MPEG program stream
(.MPG, .MPEG)
Matroska (.mkv)
LPCM 8KHz ~ 48KHz Up to 5.1 64Kbps ~ 1.5Mbps
Movie:
AVI (.avi)
Matroska (.mkv)
MP4 (.mp4, .mov)
MPEG transport stream
(.ts, .tp)
MPEG program stream
(.MPG, .MPEG)
Music:
WAV (.wav)
MP4 (.m4a)
IMA-ADPCM
MS-ADPCM 8KHz ~ 48KHz Up to 2 32Kbps ~ 384Kbps
Movie:
AVI (.avi)
Matroska (.mkv)
MP4 (.m4a, .mov)
Music:
WAV (.wav)
MP4 (.m4a)
G711 A/mu-law 8KHz Up to 2 64Kbps
Movie:
AVI (.avi)
Matroska (.mkv)
MP4 (.m4a, .mov)
Music:
WAV (.wav)
MP4 (.m4a)
Other Restrictions
•Video content will not play, or not play correctly, if there is an error in the content or the container.
•Sound or video may not work if the contents have a standard bit rate/frame rate above the compatible
Frame/sec listed in the table.
•If the Index Table is in error, the Seek (Jump) function is not supported.
•Some USB/digital camera devices may not be compatible with the player.
•The menu can be displayed late if the video is over 10Mbps(bit rate).
•HEVC codec is only available in MKV/MP4/TS containers.

37
English
English
Full available resolution
Optimal resolution: 1366 x 768@60Hz.
See specification page for full available resolution.
HDMI Input (DTV)
Resolution Horizontal Frequency
(KHz)
Vertical Frequency
(Hz)
640*480p 31.47 59.94
31.50 60.00
720(1440)*480i 15.73 59.94
15.75 60.00
720*480p 31.47 59.94
31.50 60.00
720(1440)*576i 15.63 50.00
720*576p 31.25 50.00
1280*720p
44.96 59.94
45.00 60.00
37.50 50.00
1920*1080i
33.72 59.94
33.75 60.00
28.13 50.00
1920*1080p
67.43 59.94
67.50 60.00
56.25 50.00
26.97 23.976
27.00 24.00
33.72 29.97
33.75 30.00
HDMI Input (PC)
Resolution Horizontal Frequency
(KHz)
Vertical Frequency
(Hz)
720*400 31.469 70.08
640*480 31.469 59.94
800*600 37.879 60.31
1024*768 48.363 60.00
1280*720 45.00 60.00
1360*768 47.712 60.015
1366*768 47.712 59.79

2
Magyar
A TV-készülék tartozéka ez a felhasználói kézikönyv.
Használati
útmutató
Olvassa el a mellékelt felhasználói kézikönyvet
megtekintéséhez.

3
Magyar
Magyar
váltakozó feszültség.
található alkatrészekhez.
Veszélyes.
egyenfeszültség.
vonatkoznak.
hogy el kell olvasni a felhasználói kézikönyv
•
–
–
–
okozhat.
•
•
•
•

4
Magyar
•
túlfeszültség miatt.
•
•
•
•
•
márkaszervizéhez.
•
–
•
•
–
•
•
•
•
•
•
•
•

5
Magyar
Magyar
* A jelen Használati útmutatóban szereplő ábrák és rajzok kizárólag referenciául szolgálnak, és
eltérhetnek a termék tényleges megjelenésétől. A termék kialakítása és jellemzői előzetes értesítés
nélkül megváltozhatnak.
A FÁK országaiban beszélt nyelvek (orosz, ukrán és kazah) ehhez a termékhez nem érhetők el, mivel a
termék az EU területén élő fogyasztók számára készül.

6
Magyar
2
3
9
10
11
13
14
16
16
16
17

7
Magyar
Magyar
18
22
26
27
27
27
28
29
29
29
30

8
Magyar
•
•Használati útmutató
•
•
•
•
•

9
Magyar
Magyar
készülék is komolyan megsérülhet.
•
•
TV-készülék
A fali konzol
tartóeleme
C
•
•
személyi sérüléseket okozhat.
•
•
hosszát.
•
•
32 100 x 100 6,0-8,0 M4 4

10
Magyar
•
•
•
•
•
•

11
Magyar
Magyar
•
•
TV-készüléket.
•
•felmászni
•
•
•
•
•
és máshová helyezi.

12
Magyar
–
használata is szükséges lehet.
készülékre a tartóelemeket.
–
3.
–
–
•

13
Magyar
Magyar
•
•
kiválasztása.
> > > Ki.
A megtekintése.
gyors kiválasztása.
futtatása.
kiválasztása.
A
A

14
Magyar
2
3
1
•
•
•
•
3.
–
–
–
–
–

15
Magyar
Magyar
•
Nyelv
A nyelv kiválasztását követően nyomja meg az OK gombot
Français
Español
Ελληνικά
Eesti keel
English
Ország
Válassza ki az országát, majd nyomja meg az OK gombot
Luxemburg
Olaszország
Görögország
Magyarország
Franciaország
Ország kiválasztása
PIN-kód
Adjon meg egy 4 számjegyű PIN-kódot, amellyel a jövőben a 18+ besorolású
programokat feloldhatja.
Kód beírása:(Ne használja a 0000 kódot.)
Adja meg ismét a kódot:
Használati mód
A TV beállítása otthoni használatra vagy üzletben történő kihelyezésre (bolt).
Üzlet demó
Otthon
3.
TV beállítása
Válassza ki a Kezdés lehetőséget, majd nyomja meg az OK
gombot a TV-készülék installálásához.
Befejezte a TV-készülék kezdeti beállítását.
Most már elkezdheti a TV hangolását.
Kezdés
Vissza
TV hangolása
Az antenna/kábel csatornák beállításához nyomja meg az OK gombot.
Kész
Antenna/kábel csatornák telepítése
6.
Befejezés
A TV használatának megkezdéséhez válassza a Befejezés lehetőséget, majd nyomja le az
OK-t.
Befejezés

16
Magyar
A TV-készüléket az alsó részén található
válik a menü.
A
A
részén található.

17
Magyar
Magyar
•
•
•
támogatott.
•
•
–
–
–
•
–
–
–
–
–
–
–

18
Magyar
és .
Kép
Eco beállítások
Képméret
Javított
50
3
100
Részletárnyékolás
Képélesség
Kontraszt
80
55
Normál
Fényesség
Szín
Kép üzemmód
Támogatás
Rendszer
Közvetítés
Hang
Kép
•
•
•
•
•
•
•
•
•
•
•
•

19
Magyar
Magyar
–
lehetnek.
–
lehetnek.
•
•
•
–
energiatakarékosságot.
•
•
elkerülésére.
•
•
•
•
•
•
•
•
•
•
•

20
Magyar
•
•
•
Be
•
•
kereséséhez.
•
•
•
•
Ha az
•Ki
van
kiválasztva a

21
Magyar
Magyar
• és az
•
–
kiválasztva az
•
van kiválasztva az
•
feliratokat sugároznak a hallássérült vagy süket
Be
–
OSS

22
Magyar
•
•
•
•
•
•
értékre.
•
•
•
•
•
• -
•
a
• értékre.
•
•

23
Magyar
Magyar
•
értékre.
•
-
•
•
•
-
•
•
•
•
•
TV-készülékhez.
•
•
•Ki
•
•
•A
•
•

24
Magyar
•
•
•
•
•
•
•
•
•
•
•
•
•
•
•
•
•
•
•
•

25
Magyar
Magyar
•
•
•Ha a TV-készülék
elemre.
•
•
•
•
•
3. Válassza a
Válassza az
–
–
–
–

26
Magyar
•
•
•
•
támogatott.
•
Ki
Ki.
ismételt megnyomásával térhet vissza.
vissza.

27
Magyar
Magyar
A
C
F
• ” ikon mellett
található.
•
asztalhoz vagy székhez.
3.
–
–A zárszerkezetet külön kell megvásárolni.
Futtassa a

28
Magyar
•
•
•
vagy áramütést okozhat.
•

29
Magyar
Magyar
Átlósan mérve
Állvánnyal
Tömeg
Állvány nélkül
Állvánnyal
•
•
•
•

30
Magyar
fenntartva.

31
Magyar
Magyar

32
Magyar
mkv
avi
.srt
.smi
.txt TMPlayer
MP@HL
. A GMC nem
támogatott

33
Magyar
Magyar
. Main Profile
Level 3
. Main Profile
High tier
nem váltott
soros
váltott soros
MPO
GIF
3.
6.

34
Magyar
AC3

35
Magyar
Magyar
Csak a
sztereó

36
Magyar
LPCM
•
•
•
•
•
•

37
Magyar
Magyar

2
Polski

3
Polski
Polski
PRZESTROGA
•
–
–
–
•

4
Polski
•
•
•
•
•
•
•
•
•
•
–
•
•
–
•

5
Polski
Polski
•
•
•
•
•
•
•PRZESTROGA

6
Polski
2
3
9
10
11
13
14
16
16
16
17

7
Polski
Polski
18
22
26
27
27
27
28
29
29
29
30

8
Polski
•
•
•
•
•
•
•

9
Polski
Polski
•
•
•
•
•
•
•
•
32 100 x 100 6,0–8,0 M4 4

10
Polski
•
•
•
•
•
•

11
Polski
Polski
•
•
•
•
•
•
•
•
•

12
Polski
–
–
–
–
•
•
•
> > >

13
Polski
Polski
•
•
> > >

14
Polski
2
3
1
•
•
•
•
PRZESTROGA
–
–
–
–
–

15
Polski
Polski
•
Język
Wybierz swój język i naciśnij OK.
Français
Español
Ελληνικά
Eesti keel
English
Kraj
Wybierz kraj, a następnie naciśnij OK.
Luksemburg
Włochy
Grecja
Węgry
Francja
Kod PIN
Musisz wprowadzić czterocyfrowy kod PIN. Za pomocą tego kodu możesz w przyszłości
odblokowywać programy dla dorosłych.
Wprowadź kod: (Nie używaj kodu 0000.)
Wprowadź kod ponownie:
Tryb korzystania
Skonfiguruj telewizor do użytku domowego lub na potrzeby promocji sklepowych
(Sklep).
Tryb sklepowy
Tryb domowy
Skonfiguruj TV
Wybierz opcję Start i naciśnij przycisk OK, aby zainstalować
telewizor.
Zakończono konfigurację wstępną telewizora.
Teraz można rozpocząć instalację telewizora.
StartWstecz
Instalacja TV
Aby zainstalować kanały telewizji naziemnej/kablowej, naciśnij przycisk OK.
Gotowe
Instaluj kanały antenowe/kablowe
Zakończ
Aby rozpocząć korzystanie z telewizora, wybierz opcję Zakończ i naciśnij przycisk OK.
Zakończ

16
Polski

17
Polski
Polski
•
•
•
•
•
–
–
–
•
–
–
–
–
–
–
–

18
Polski
i
Obraz
Ustawienia ekologiczne
Rozmiar obrazu
Zaawansowane
50
3
100
Szczegóły cieni
Ostrość
Kontrast
80
55
Standardowy
Jasność
Kolor
Tryb obrazu
Wsparcie
System
Audycje
Dźwięk
Obraz
•
•
•
•
•
•
•
•
•
•
•
•

19
Polski
Polski
–
–
•
•
•
–
•
•
•
•
•
•
•
•
•
•
•
•
•

20
Polski
•
•
•
•
•
•
•
•
•
•

21
Polski
Polski
• i
•
–
•
•
–
OSS

22
Polski
•
•
•
•
•
•
•
•
•
•
•
•
•
•
•
•

23
Polski
Polski
•
•
•
•
•
•
•
•
•
•
•
•
•
•
•
•
•
•

24
Polski
•
•
•
•
•
•
•
•
•
•
•
•
•
•
•
•
•
•
•
•

25
Polski
Polski
•
•
•
•
•
•
•
•
–
–
–
–
–

26
Polski
•
•
•
•
•

27
Polski
Polski
D
E
•
•
–
–

28
Polski
•
•
•
•

29
Polski
Polski
•
•
•
•

30
Polski

31
Polski
Polski

32
Polski

33
Polski
Polski
Ro

34
Polski

35
Polski
Polski

36
Polski
•
•
•
•
•
•

37
Polski
Polski

2

3
Ελληνικά
Ελληνικά
•
–
–
–
•
•
•
•

4
•
•
•
•
•
•
•
–
•
•
–
•
•
•
•
•
•
•
•

5
Ελληνικά
Ελληνικά
* Οι εικόνες που υπάρχουν σε αυτό το εγχειρίδιο χρήσης παρέχονται μόνο για αναφορά και
ενδέχεται να διαφέρουν από την πραγματική εμφάνιση του προϊόντος. Η σχεδίαση και οι
προδιαγραφές του προϊόντος ενδέχεται να αλλάξουν χωρίς προειδοποίηση.
Οι γλώσσες των χωρών της ομοσπονδίας CIS (Ρωσικά, Ουκρανικά, Καζακικά) δεν είναι διαθέσιμες
για αυτό το προϊόν, επειδή κατασκευάζεται για πελάτες στις χώρες της Ε.Ε.

6
2
3
9
10
11
13
14
16
16
16
17

7
Ελληνικά
Ελληνικά
18
22
26
27
27
27
28
29
29
29
30

8
•
•
•
•
•
•
•

9
Ελληνικά
Ελληνικά
•
•
C
•
•
•
•
•
•
32 100 x 100 6,0-8,0 M4 4

10
•
•
•
•
•
•

11
Ελληνικά
Ελληνικά
•
•
•
•
•
•
•
•
•

12
–
–
–
–
•
•
•

13
Ελληνικά
Ελληνικά
•
•

14
2
3
1
•
•
•
•
–
–
–
–
–

15
Ελληνικά
Ελληνικά
•
Γλώσσα
Επιλέξτε τη γλώσσα σας και, στη συνέχεια, πατήστε OK
Français
Español
Ελληνικά
Eesti keel
English
Χώρα
Επιλέξτε τη χώρα σας και στη nσυνέχεια πατήστε ΟΚ
Λουξεμβούργο
Ιταλία
Ελλάδα
Ουγγαρία
Γαλλία
Κωδικός PIN
Πρέπει να εισαγάγετε έναν τετραψήφιο κωδικό ΡΙΝ, για να ξεκλειδώνετε προγράμματα
για ενηλίκους στο μέλλον.
Εισαγωγή κωδικού: (Μην χρησιμοποιήσετε το 0000.)
Εισαγάγετε εκ νέου τον κωδικό:
Χρήση κατάστασης
Ρυθμίστε την τηλεόραση για χρήση σε σπίτι ή για προώθηση σε εμπορικό κατάστημα.
Επίδειξη καταστ.
Οικιακή χρήση
Ρύθμιση τηλεόρασης
Επιλέξτε "Έναρξη" και πατήστε OK για να εγκαταστήσετε την
τηλεόραση.
Έχετε ολοκληρώσει την αρχική ρύθμιση της τηλεόρασης.
Τώρα μπορείτε να ξεκινήσετε την εγκατάσταση της τηλεόρασης.
Έναρξη
Πίσω
Εγκατάσταση τηλεόρασης
Για να εγκαταστήσετε τα κανάλια μέσω κεραίας/τα καλωδιακά κανάλ
ια, πατήστε "OK".
Πραγμ
Εγκατάσταση καναλιών μέσω
κεραίας/καλωδιακών καναλιών
Τέλος
Για να αρχίσετε να χρησιμοποιείτε την τηλεόραση, επιλέξτε Τέλος και πατήστε OK.
Τέλος

16

17
Ελληνικά
Ελληνικά
•
•
•
•
•
–
–
–
•
–
–
–
–
–
–
–

18
Εικόνα
Ρυθμίσεις Eco
Μέγεθος εικόνας
Για προχ/νους
50
3
100
Λεπτομέρεια σκίασης
Ευκρίνεια
Αντίθεση
80
55
Τυπικό
Φωτεινότητα
Χρώμα
Λειτ. εικόνας
ΥΠΟΣΤΗΡΙΞΗ
Σύστημα
Εκπομπές
Ήχος
Εικόνα
•
•
•
•
•
•
•
•
•
•
•
•

19
Ελληνικά
Ελληνικά
–
–
•
•
•
–
•
•
•
•
•
•
•
•
•
•
•
•
•

20
•
•
•
•
•
•
•
•
•
•

21
Ελληνικά
Ελληνικά
•
•
–
•
•
–

22
•
•
•
•
•
•
•
•
•
•
•
•
•
•
•
•

23
Ελληνικά
Ελληνικά
•
•
•
•
•
•
•
•
•
•
•
•
•
•
•
•
•
•

24
•
•
•
•
•
•
•
•
•
•
•
•
•
•
•
•
•
•
•
•

25
Ελληνικά
Ελληνικά
•
•
•
•
•
•
•
•
–
–
–
–

26
•
•
•
•
•

27
Ελληνικά
Ελληνικά
C
•
•
–
–

28
•
•
•
•

29
Ελληνικά
Ελληνικά
•
•
•
•

30

31
Ελληνικά
Ελληνικά

32

33
Ελληνικά
Ελληνικά

34

35
Ελληνικά
Ελληνικά

36
•
•
•
•
•
•

37
Ελληνικά
Ελληνικά

2

3
Български
•
–
–
–
•
•
•

4
•
•
•
•
•
•
•
•
–
•
•
–
•
•
•
•

5
Български
•
•
•
•

6
2
3
9
10
11
13
14
16
16
16
17

7
Български
18
22
26
27
27
27
28
29
29
29
30

8
•
•
•
•
•
•
•

9
Български
•
•
C
•
•
•
•
•
•
32 100 x 100 6,0 – 8,0 M4 4

10
•
•
•
•
•
•

11
Български
•
•
•
•
•
•
•
•
•

12
–
–
–
–
•
•
•

13
Български
•
•

14
2
3
1
•
•
•
•
–
–
–
–
–

15
Български
•
Език
Изберете Вашия език, след което натиснете OK.
Français
Español
Ελληνικά
Eesti keel
English
Държава
Изберете страна, след което натиснете OK.
Люксембург
Италия
Гърция
Унгария
Франция
PIN код
Трябва да въведете 4-цифрен PIN код. Впоследствие, използвайте този PIN код за
отключване на програмите с възрастово ограничение 18+.
Въведете кода: (Не използвайте 0000.)
Въведете кода отново:
Използване режим
Настройка на телевизора за домашна употреба или за употреба в магазин.
Демо магазин
За дома
Настройка на ТВ
Изберете "Старт" и натиснете ОК, за да инсталирате ТВ.
Приключихте първоначалната настройка на ТВ.
Сега може да започнете инсталиране на ТВ.
Старт
Назад
Инсталиране на ТВ
За да инсталирате антенни/кабелни канали, натиснете OK.
Готово
Инсталиране на антенни/кабелни канали
Край
За да започнете да използвате телевизора, изберете Готово и натиснете OK.
Край

16

17
Български
•
•
•
•
•
–
–
–
•
–
–
–
–
–
–
–

18
Картина
Еко настройки
Размер картина
Разширена
50
3
100
Детайли в сянката
Острота
Контраст
80
55
Стандартен
Яркост
Цвят
Режим картина
Поддръжка
Система
Излъчване
Звук
Картина
•
•
•
•
•
•
•
•
•
•
•
•

19
Български
–
–
•
•
•
–
•
•
•
•
•
•
•
•
•
•
•
•
•

20
•
•
•
•
•
•
•
•
•
•

21
Български
•
•
–
•
•
–

22
•
•
•
•
•
•
•
•
•
•
•
•
•
•
•
•
•

23
Български
•
•
•
•
•
•
•
•
•
•
•
•
•
•
•
•
•
•
•
•

24
•
•
•
•
•
•
•
•
•
•
•
•
•
•
•
•
•
•
•

25
Български
•
•
•
•
•
•
–
–
–
–

26
•
•
•
•
•

27
Български
A
C
D
.
•
•
–
–

28
•
•
•
•

29
Български
•
•
•
•

30

31
Български

32

33
Български
1. Разделителната способност е вид референтен дизайн, а не толкова хардуерно ограничение. Защото е ограничена от
размера и производителността на DRAM
2. Колкото по-голяма е разделителната способност, толкова по-голям е размерът на DRAM
3. Колкото по-голяма е разделителната способност, толкова по-малка е производителността, тъй като изисква по-
дълго време за извеждане на картина
4. JPEG използва хардуерен декодер. Максималната разделителна способност на хардуерния декодер на JPEG е
16360 x 16360
5. BMP декодерът е софтуерен декодер. Ограничението на максималната разделителна способност зависи от размера
на DRAM
6. PNG декодерът е софтуерен декодер. Ограничението на максималната разделителна способност зависи от размера
на DRAM
7. GIF декодерът е софтуерен декодер. Ограничението на максималната разделителна способност зависи от размера
на DRAM

34
AC3

35
Български

36
•
•
•
•
•
•

37
Български

2
Hrvatski

3
Hrvatski
Hrvatski
OPREZ
POSTOJI RIZIK OD STRUJNOG UDARA.
NEMOJTE OTVARATI.
•
–
–
–
•
•
•
•

4
Hrvatski
•
•
•
•
•
•
•
–
•
•
–
•
•
•
•
•
•
•
•OPREZ

5
Hrvatski
Hrvatski
UPOZORENJE

6
Hrvatski
................................................... 2
............................................................... 3
............................................................................ 9
................................ 10
........................................................................................................11
........................................13
.................14
.......................................................................16
......................................................................................................................16
.....................................................................................16
...............................................................................17

7
Hrvatski
Hrvatski
...............................................................................18
.....................................................................................22
.......................................................................................26
.............27
.................................................................27
.....................................................27
.......................................................................................... 28
...................................................................................................29
..........................................................................................29
......................................................................29
.......................................................................... 30

8
Hrvatski
•
•
•
•
•
•
•
Upozorenje

9
Hrvatski
Hrvatski
•
•
•
•
•
•
•
•
32 100 x 100 6,0–8,0 M4 4

10
Hrvatski
•
•
•
•
•
•

11
Hrvatski
Hrvatski
Oprez
•
•
•
•
•
•
•
•
•

12
Hrvatski
–
–
–
–
•
•
•
> >
>
E-MANUAL
Odabir
Pokretanje
Prikaz zaslona

13
Hrvatski
Hrvatski
•
•
> >
>
E-MANUAL
Odabir
Pokretanje
Prikaz zaslona

14
Hrvatski
2
3
1
•
•
•
•
OPREZ
–
–
–
–
–

15
Hrvatski
Hrvatski
•
Jezik
Odaberite svoj jezik, a zatim pritisnite OK
Français
Español
Ελληνικά
Eesti keel
English
Zemlja
Odaberite svoju državu, a zatim pritisnite OK
Luksemburg
Italija
Grčka
Mađarska
Francuska
Odaberite svoj jezik
PIN kod
Morate unijeti 4-znamenkasti PIN kod. Taj PIN kod koristite kako biste ubuduće
otključavali programe s oznakom 18+.
Unesite kod: (Nemojte koristiti 0000)
Ponovno unesite kod:
Način korištenja
Postavite televizor za uporabu kod kuće ili za promociju u trgovini.
Demo u trgovini
Kućna upotreba
Postavljanje PIN koda
Postavljanje televizora
Odaberite Pokreni i pritisnite OK kako biste instalirali televizor.
Dovršili ste početno postavljanje televizora.
Sada možete započeti instalaciju televizora.
PokreniPrethodna
TV instalacija
Za instalaciju antenskih/kabelskih kanala pritisnite OK.
Gotovo
Instaliraj antenske/kabelske kanale
Dovrši
Ako želite početi koristiti svoj televizor, odaberite Završi i pritisnite OK.
Završi

16
Hrvatski

17
Hrvatski
Hrvatski
•
•
•
•
•
–
–
–
•
–
–
–
–
–
–
–

18
Hrvatski
MENU
i
Slika
Ekološke postavke
Veličina slike
Napredno
50
3
100
Detalj sjene
Oštrina
Kontrast
80
55
Standardno
Svjetlina
Boja
Način prik. Slike
Podrška
Sustav
Emitiranje
Zvuk
Slika
•
•
•
•
•
•Kontr. Boje
•
odabrali Kontr. Boje
•
•
•
•
•

19
Hrvatski
Hrvatski
–
–
•
•
•
–
•
•
•
• kvaliteti
•
•Kino
•
•Igre
•
•
•
•
•

20
Hrvatski
•
•
•
Odaberite
•
•
•
•
Odaberite
•
•
•
kao

21
Hrvatski
Hrvatski
• i
•
–
samo ako ste odabrali
•
•
Odaberite
–
OSS

22
Hrvatski
•
MENU
•
•
•
•
•
•
•
•
•
•
•MENU
•MENU
•
•
•

23
Hrvatski
Hrvatski
•
•
MENU
•
•
•MENU
•
•
•
•
MENU
•
•
•POWER
•Provjerite je li
MENU
•
•
•
MENU
•
•

24
Hrvatski
•
•
•
•
•Pokrenite
Odaberite MENU
•
•MENU
MENU
•
•
•
•
•
•
•
•
•
•
•
•
•

25
Hrvatski
Hrvatski
•
•
•
MENU
•
•
•
•
•
Odaberite MENU
Odaberite
Odaberite
–
–
–
–

26
Hrvatski
•
•
•
•
•

27
Hrvatski
Hrvatski
Dio
•
•
–
–
MENU
Pokrenite

28
Hrvatski
•
•
•
•

29
Hrvatski
Hrvatski
Naziv modela
•
•
•
•

30
Hrvatski

31
Hrvatski
Hrvatski

32
Hrvatski
mkv
avi

33
Hrvatski
Hrvatski
Osnovno
bez
Osnovno

34
Hrvatski

35
Hrvatski
Hrvatski
samo stereo
dekodiranje

36
Hrvatski
•
•
•
•
•
•

37
Hrvatski
Hrvatski

2

3
Čeština
•
–
–
–
•
•
•
•

4
•
•
•
•
•
•
•
–
•
•
–
•
•
•
•
•
•
•
•

5
Čeština

6
Obsah
2
3
9
10
11
13
14
16
16
16
17

7
Čeština
18
22
26
27
27
27
28
29
29
29
30

8
•
•
•
•
•
•
•

9
Čeština
•
•
•
•
•
•
•
•
32 100×100 6,0až8,0 M4 4

10
•
•
•
•
•
•

11
Čeština
•
•
•
•
•
•
•
•
•

12
–
–
–
–
•
•
•

13
Čeština
•
•

14
2
3
1
•
•
•
•
–
–
–
–
–

15
Čeština
•
Jazyk
Vyberte váš jazyk astiskněte OK.
Français
Español
Ελληνικά
Eesti keel
English
Země
Vyberte zemi a poté stiskněte tlačítko OK.
Lucembursko
Itálie
Řecko
Maďarsko
Francie
Kód PIN
Je třeba zadat 4ciferný kód PIN. Pomocí kódu PIN budete později odemykat programy
pro dospělé.
Zadejte kód: (Nepoužívejte 0000)
Zadejte kód znovu:
Režim použití
Nastavení televizoru pro domácí použití nebo pro předvádění vprodejně.
Prodejna
Domácnost
Nastavení televizoru
Vyberte možnost Spustit a stiskněte tlačítko OK pro instalaci
televizoru.
Dokončili jste počáteční nastavení televizoru.
Nyní můžete spustit instalaci televizoru.
Spustit
Zpět
Instalace televizoru
Chcete-li nainstalovat anténní/kabelové kanály, stiskněte tlačítko OK.
Hotovo
Instalovat anténní/kabelové kanály
Dokončení
Chcete-li začít používat televizor, vyberte možnost Dokončit astiskněte tlačítko OK.
Dokončení

16

17
Čeština
•
•
•
•
•
–
–
–
•
–
–
–
–
–
–
–

18
Obraz
Nastavení Eco
Velikost obrazu
Více možností
50
3
100
Detail stínu
Ostrost
Kontrast
80
55
Standardní
Jas
Barva
Režim obrazu
Podpora
Systém
Vysílání
Zvuk
Obraz
•
•
•
•
•
•
•
•
•
•
•
•

19
Čeština
–
–
•
•
•
–
•
•
•
•
•
•
•
•
•
•
•
•
•

20
•
•
•
•
•
•
•
•
•
•

21
Čeština
•
•
–
•
•
–

22
•
•
•
•
•
•
•
•
•
•
•
•
•
•
•
•

23
Čeština
•
•
•
•
•
•
•
•
•
•
•
•
•
•
•
•
•
•

24
•
•
•
•
•
•
•
•
•
•
•
•
•
•
•
•
•
•
•
•

25
Čeština
•
•
•
•
•
•
•
•
–
–
–
–

26
•
•
•
•
•

27
Čeština
D
•
•
–
–

28
•
•
•
•

29
Čeština
•
•
•
•

30

31
Čeština

32

33
Čeština

34

35
Čeština

36
•
•
•
•
•
•

37
Čeština

2

3
Slovenčina
UPOZORNENIE
•
–
–
–
•
•
•
•

4
•
•
•
•
•
•
•
–
•
•
–
•
•
•
•
•
•
•
•UPOZORNENIE

5
Slovenčina
* Obrázky a ilustrácie v tejto používateľskej príručke sú len orientačné a nemusia zodpovedať
skutočnému vzhľadu produktu. Dizajn a technické údaje produktu sa môžu zmeniť bez
predchádzajúceho upozornenia.
Jazyky SNŠ (ruština, ukrajinčina, kazaština) nie sú pri tomto produkte k dispozícii, pretože bol
vyrobený pre zákazníkov v regióne EÚ.
VAROVANIE

6
2
3
9
10
11
13
14
16
16
16
COMMON INTERFACE
17

7
Slovenčina
18
22
26
27
27
27
28
29
29
29
30

8
•
•
•
•
•
•
•

9
Slovenčina
•
•
•
•
•
•
•
•
32 100 x 100 6,0-8,0 M4 4
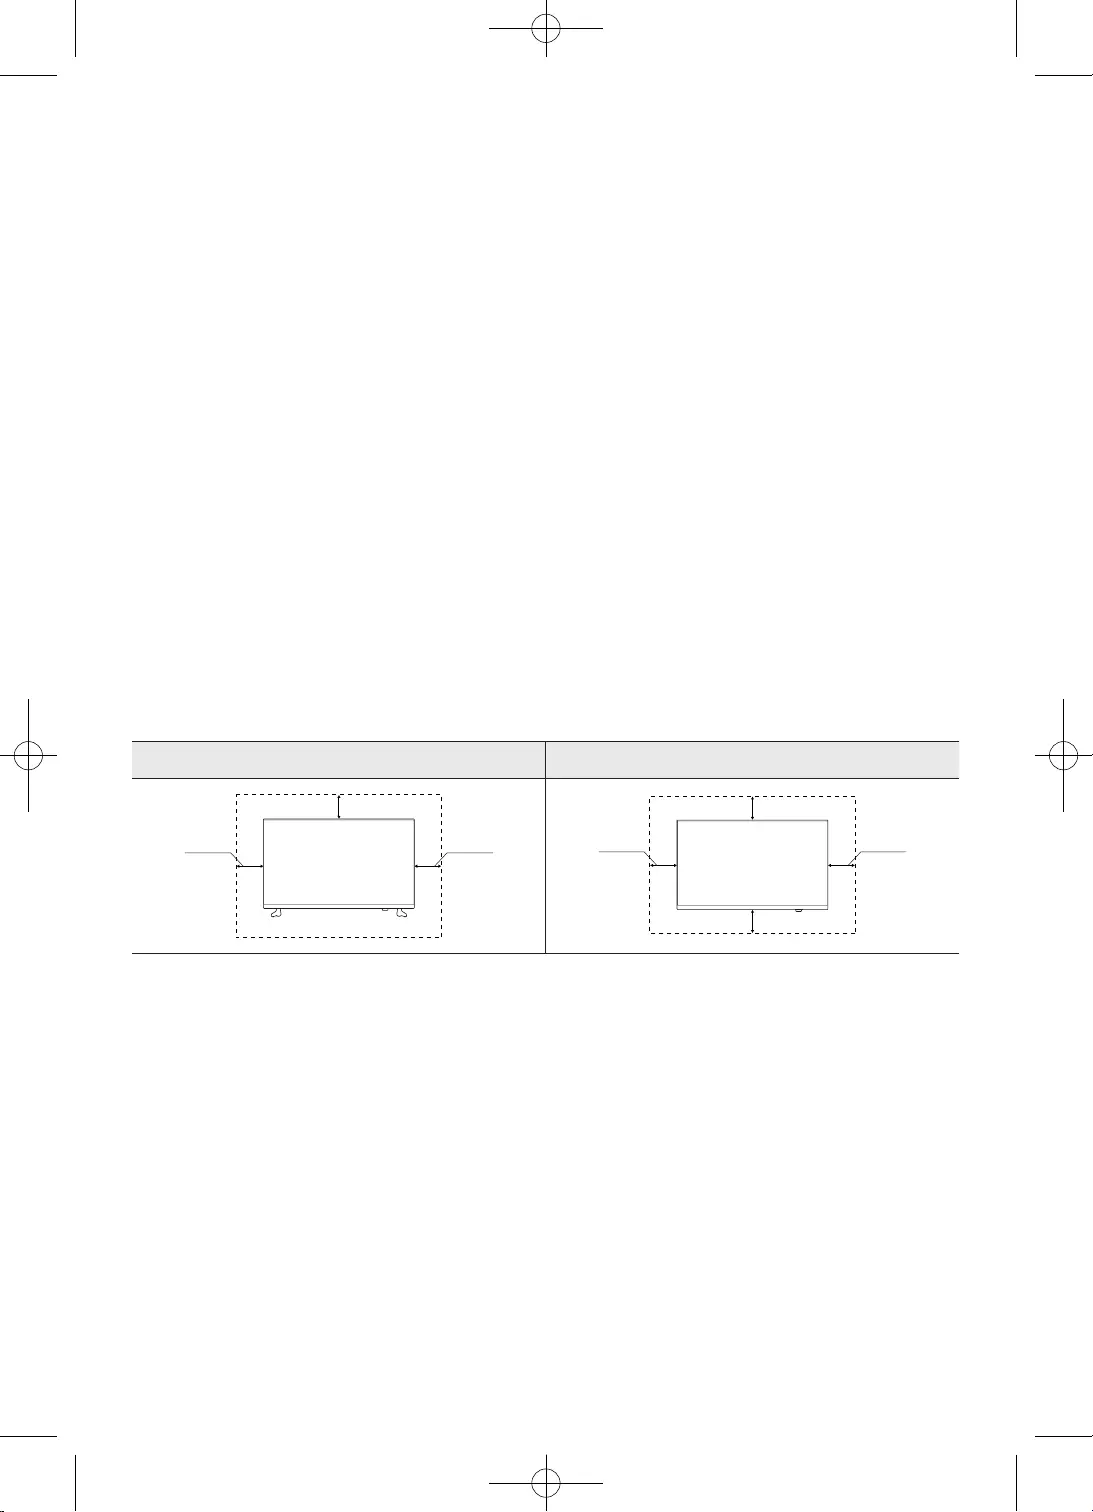
10
•
•
•
•
•
•

11
Slovenčina
•
•
•
•
•
•
•
•
•

12
–
–
–
–
•
•
•
E-MANUAL
PIC SIZE

13
Slovenčina
•
•
E-MANUAL
PIC SIZE

14
2
3
1
•
•
•
•
UPOZORNENIE
–
–
–
–
–

15
Slovenčina
•
Jazyk
Vyberte jazyk, potom stlačte tlačidlo OK.
Français
Español
Ελληνικά
Eesti keel
English
Krajina
Vyberte krajinu\na stlačte tlačidlo OK.
Luxembursko
Taliansko
Grécko
Maďarsko
Francúzsko
Kód PIN
Musíte zadať 4-číselný kód PIN. Používajte tento kód PIN v budúcnosti na odomknutie
programov s prístupnosťou 18+.
Zadajte kód: (Nepoužívajte 0000)
Znova zadajte kód:
Režim použitia
Nastavte televízor na používanie v domácnosti alebo predajni (obchode).
Ukážka vobchode
Domáce použitie
Nastavenie televízora
Na inštaláciu televízora vyberte možnosť Spustiť astlačte
tlačidlo OK.
Dokončili ste počiatočné nastavenie televízora.
Teraz môžete začať sinštaláciou televízora.
Spustiť
Späť
Inštalácia televízora
Ak chcete nainštalovať kanály antény/káblovej tv, stlačte tlačidlo OK.
Hotovo
Nainštalovať kanály antény/káblovej tv
Dokončiť
Ak chcete začať používať televízor, vyberte možnosť Dokončiť a stlačte tlačidlo OK.
Dokončiť

16

17
Slovenčina
•
•
•
•
•
–
–
–
•
–
–
–
–
–
–
–

18
MENU
Obraz
Eko nastavenia
Veľkosť obrazu
Rozšírené
50
3
100
Detaily tieňov
Ostrosť
Kontrast
80
55
Štandardný
Jas
Farba
Režim obrazu
Podpora
Systém
Vysielanie
Zvuk
Obraz
•
•
•
•
•
•
•
•
•
•
•
•

19
Slovenčina
–
–
•
•
•
–
•
•
•
•
•
•
•
•
•
•
•
•
•

20
•
•
•
•
•
•
•
•
•
•
CAM
CAM

21
Slovenčina
•
•
–
•
•
–
OSS

22
•
MENU
•
•
•
•
•
•
•
•
•
•
•MENU
•
MENU
•
•
•
23
Slovenčina
•
•
MENU
•
•
•
MENU
•
•
•
•
MENU
•
•
•POWER
•
MENU
•
•
•
MENU
•
•

24
•
•SOURCE
•
•
•
MENU
•
•MENU
MENU
•
•
•
•
•
•
•
•
•
•
•
•
•

25
Slovenčina
•
•
•
SOURCEMENU
•
•
•
•
•
MENU
–
–
–
–
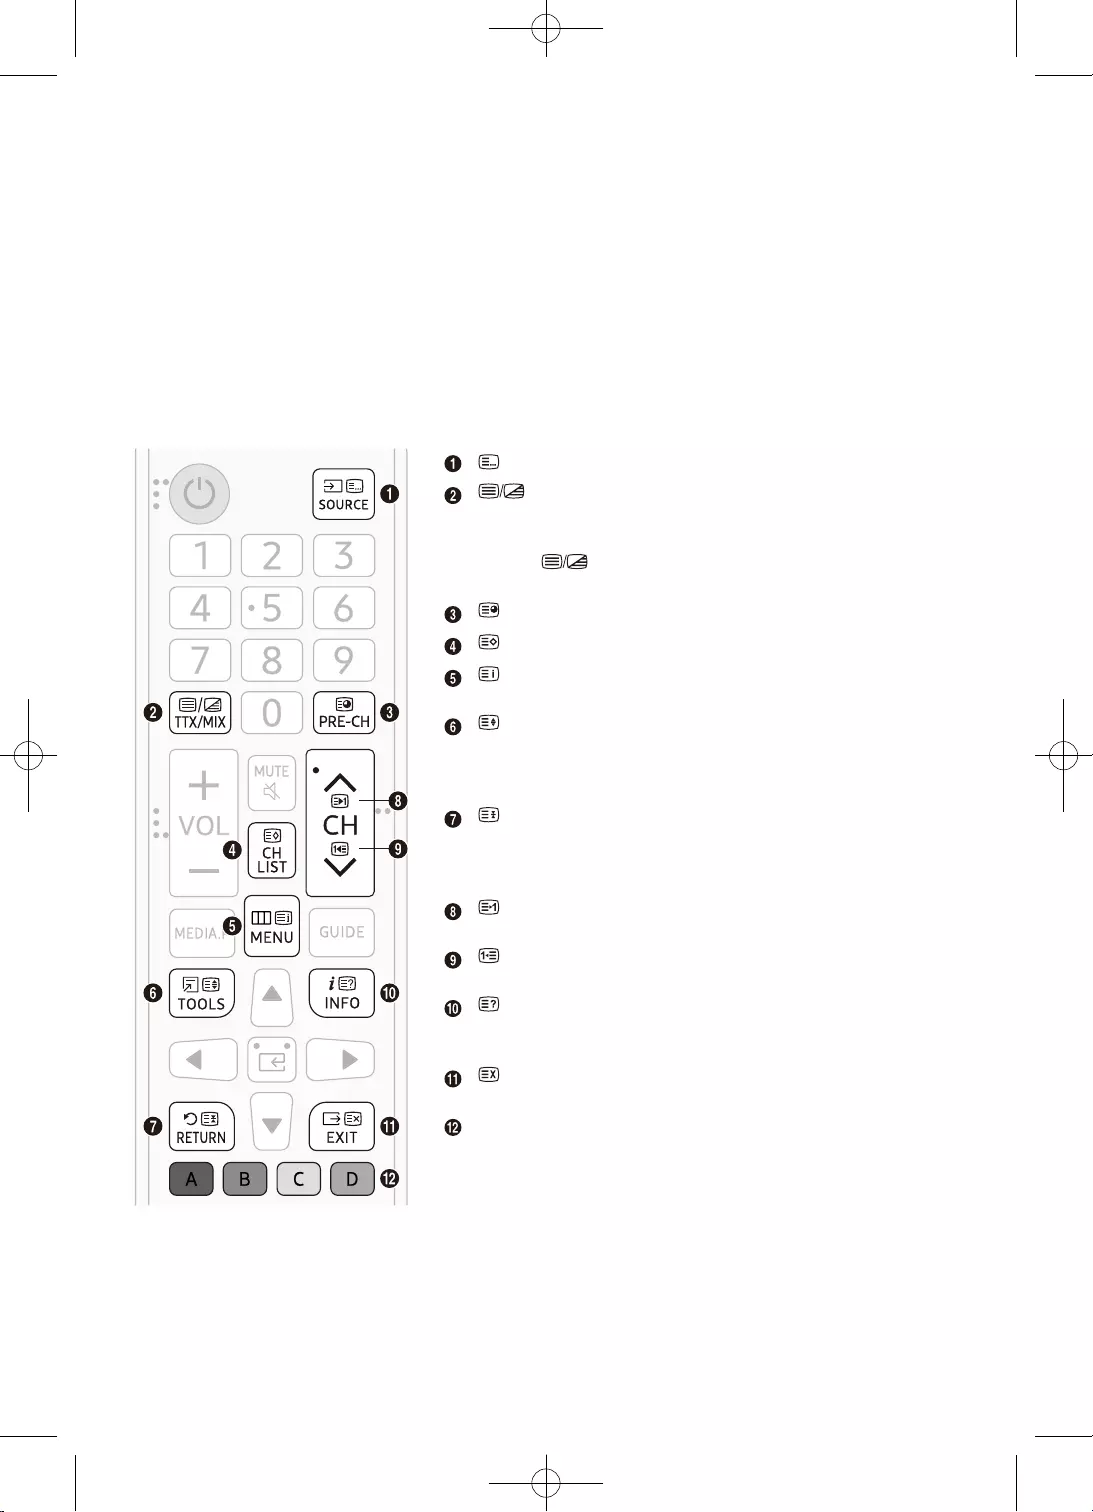
26
•
•
•
•
•
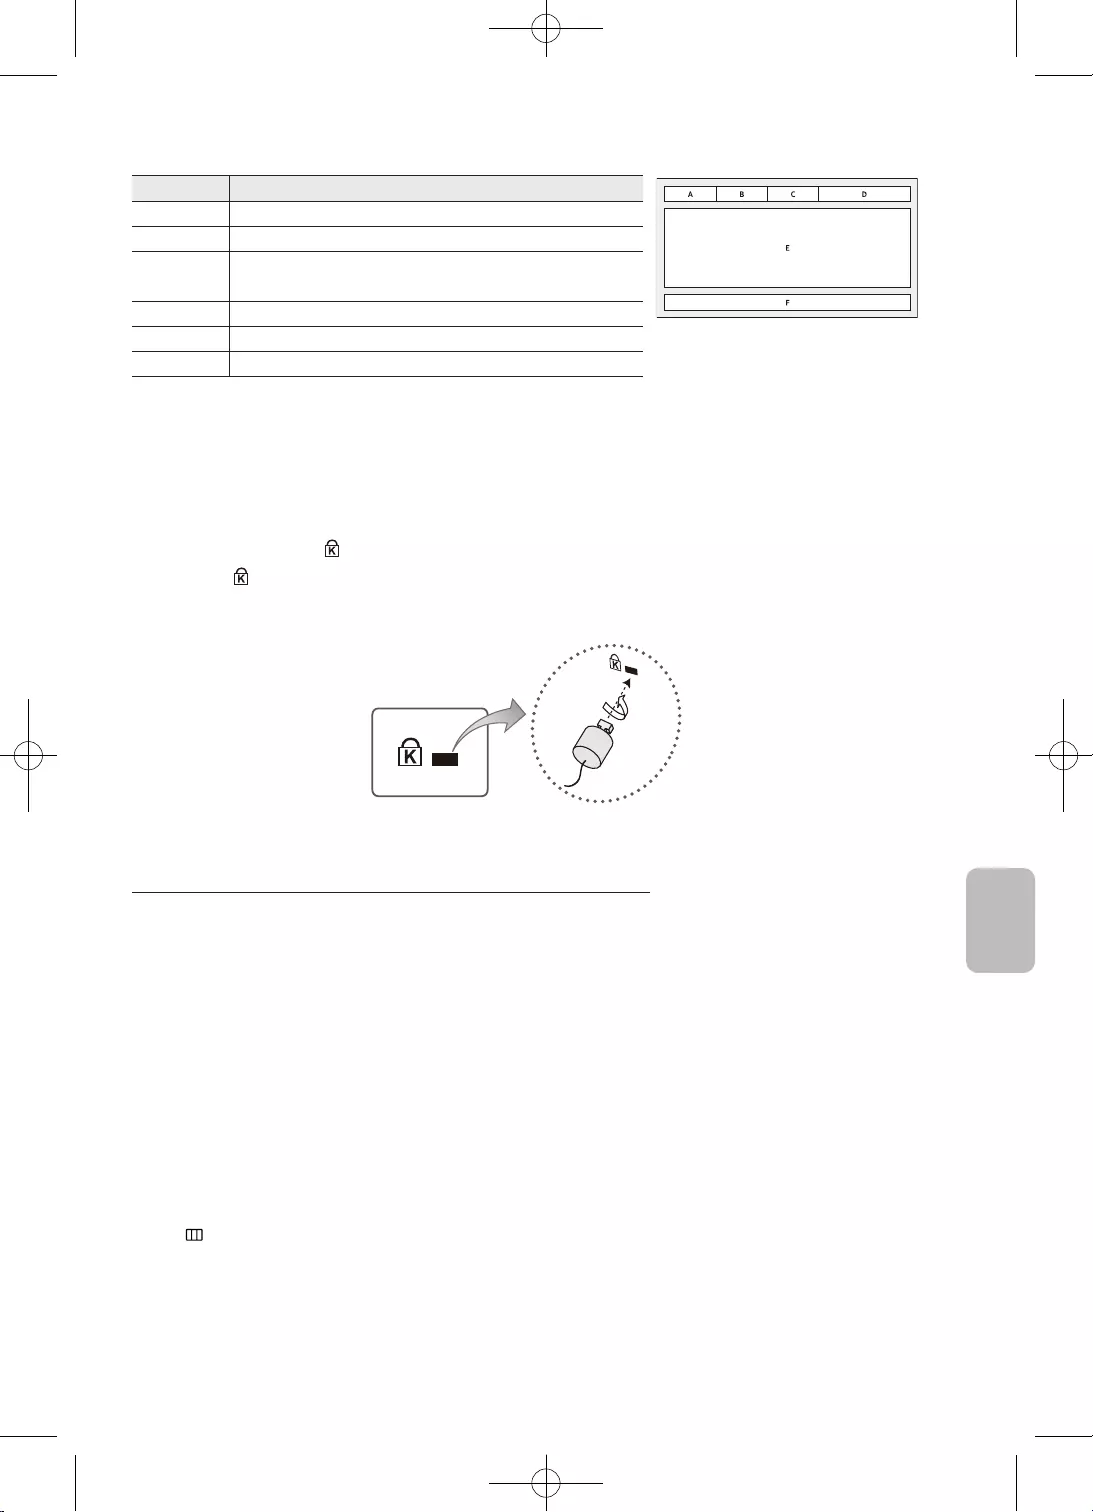
27
Slovenčina
•
•
–
–
MENU

28
•
•
•
•
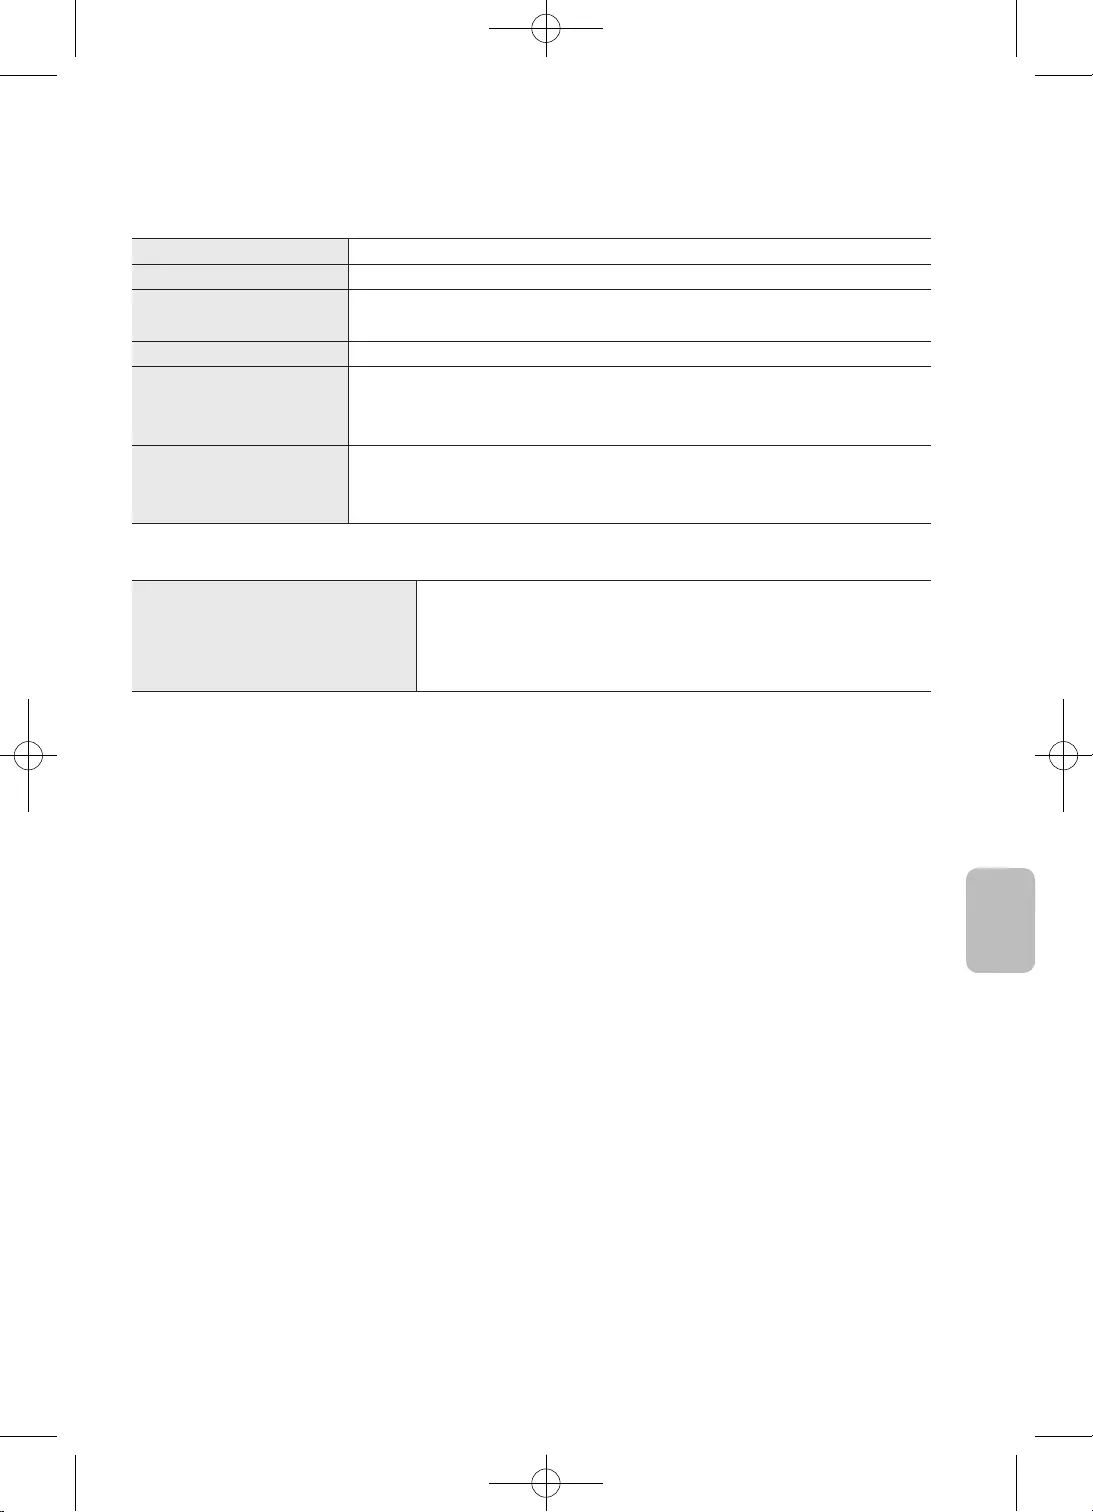
29
Slovenčina
•
•
•
•

30
31
Slovenčina
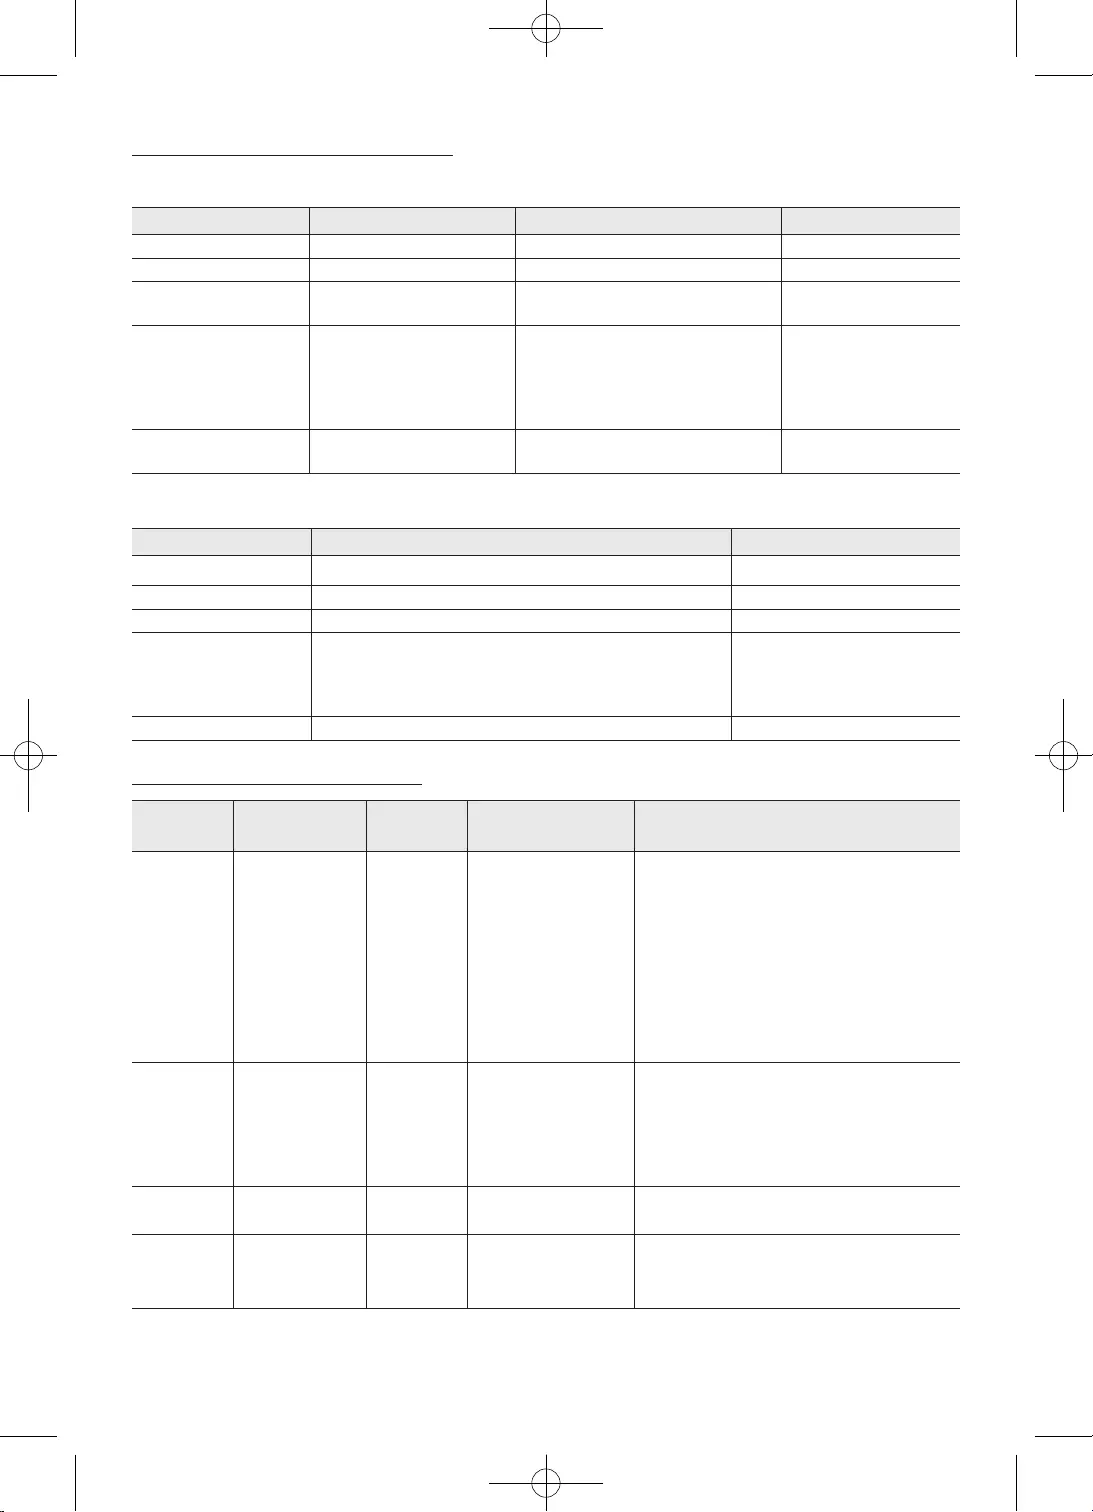
32
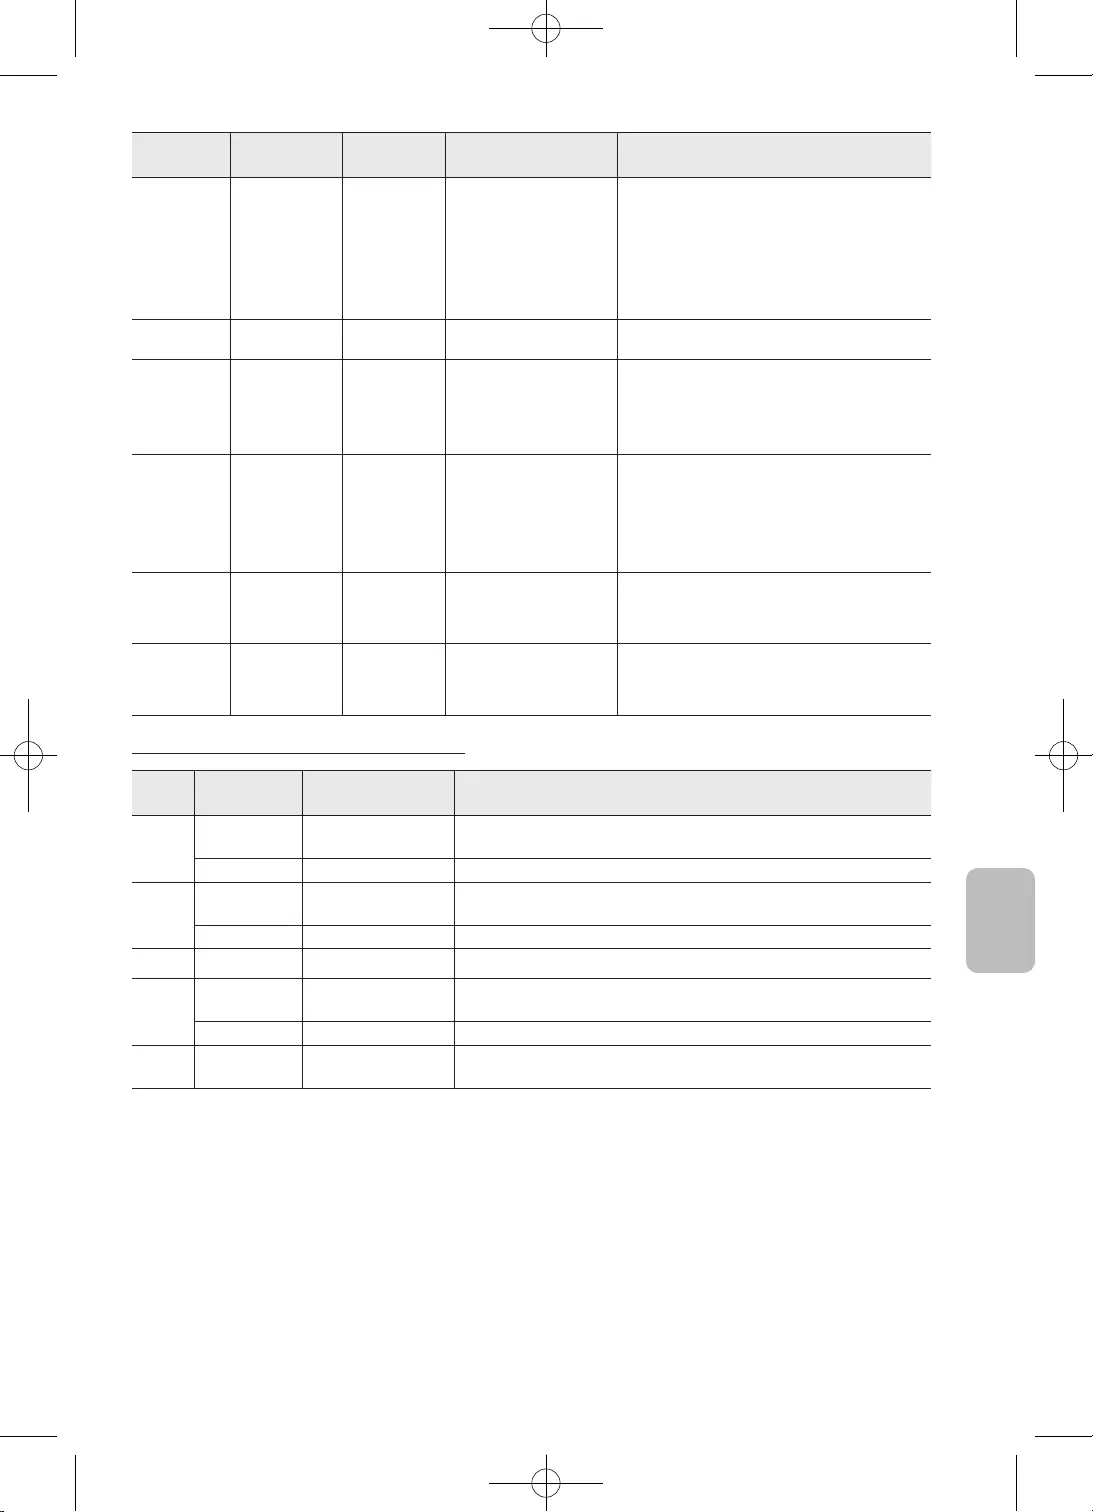
33
Slovenčina
34
35
Slovenčina
36
•
•
•
•
•
•
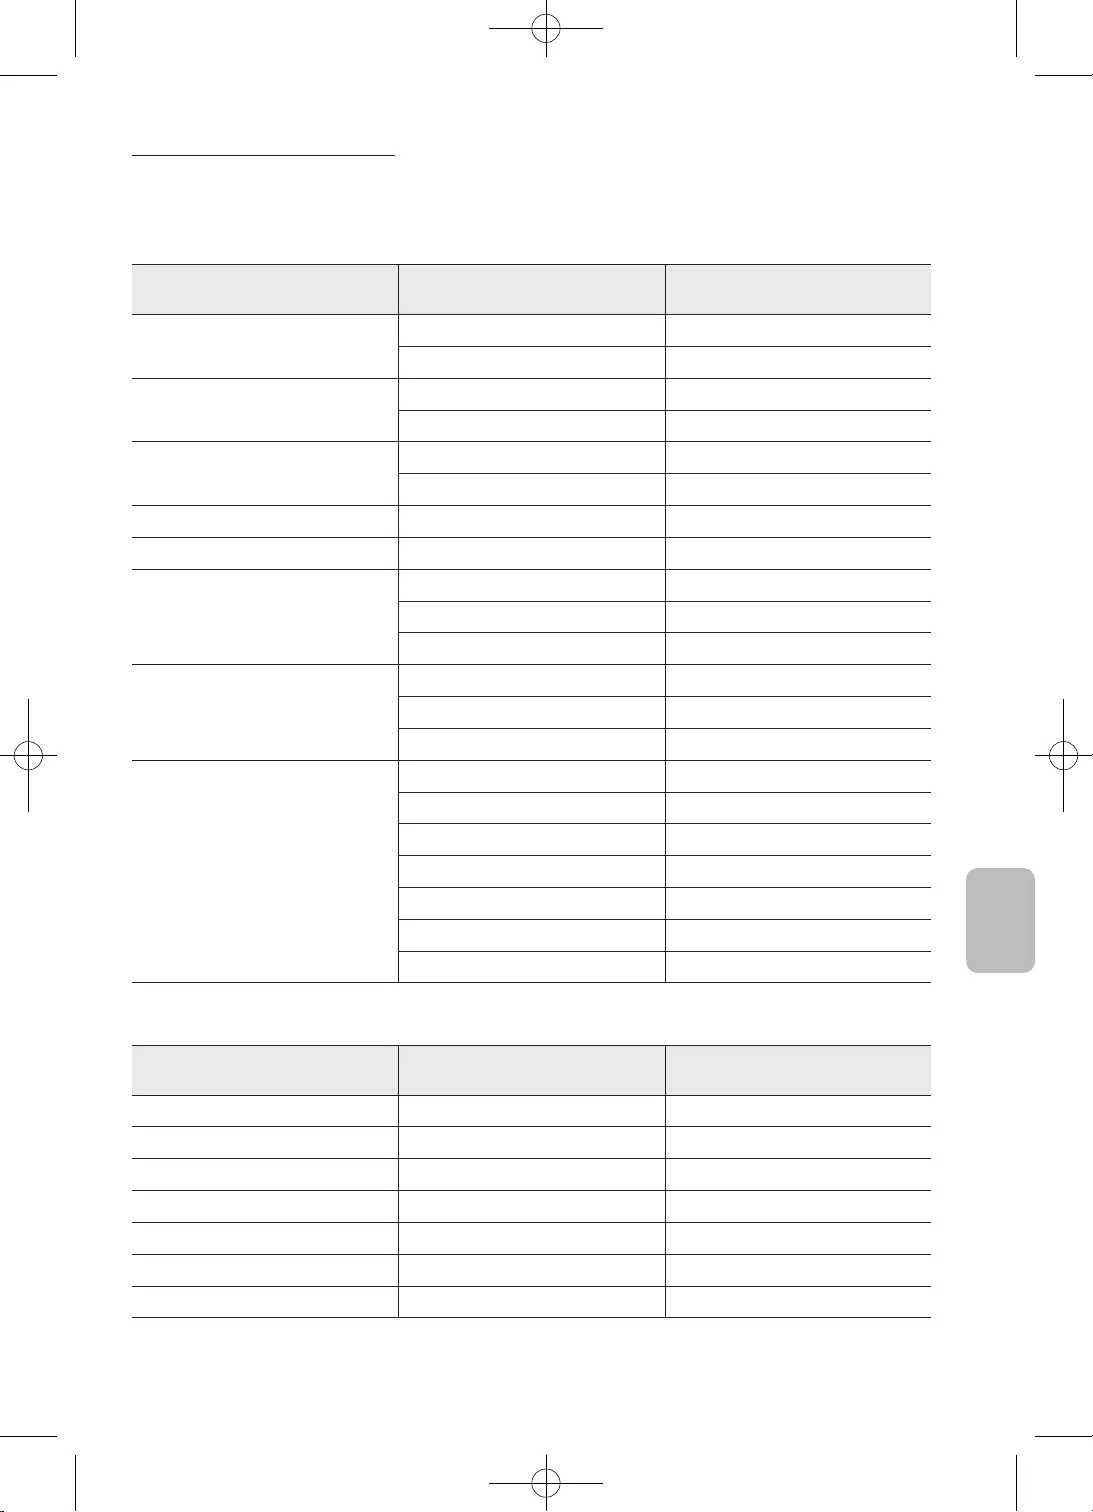
37
Slovenčina
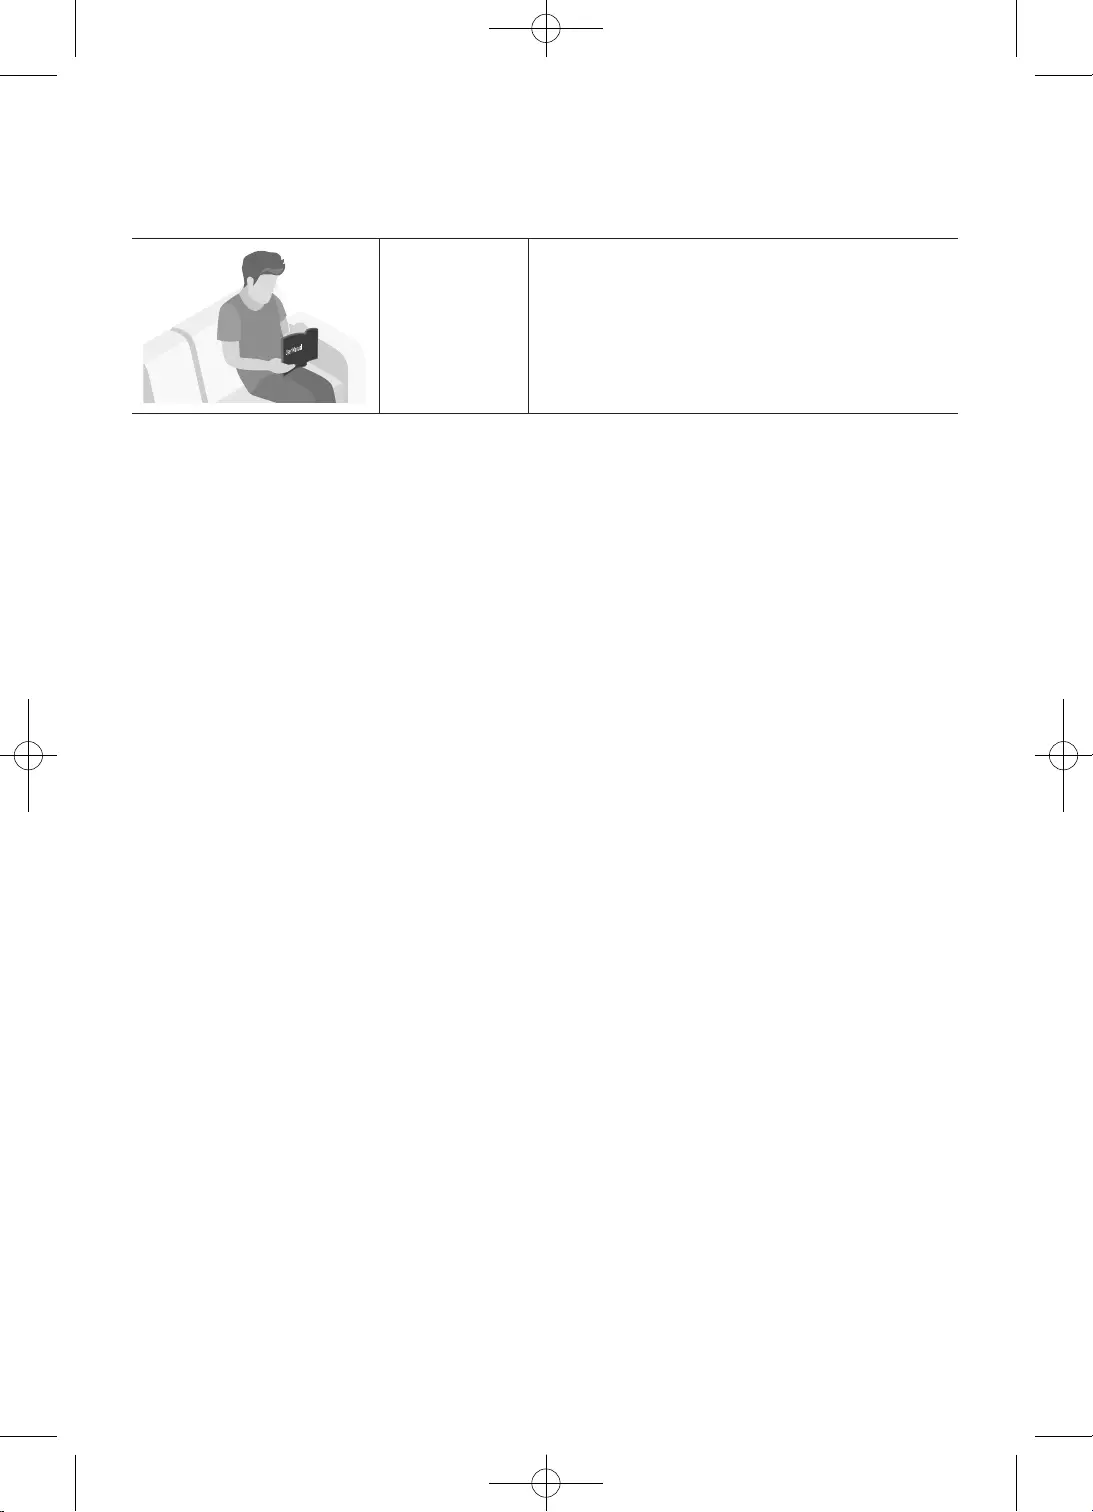
2
Înainte de citirea acestui manual de utilizare
Televizorul este livrat cu acest manual de utilizare.
Manual de
utilizare

3
Română
tensiunea din interior este
cu acest simbol este tensiune de CC.
•
–
–
–
sau electrocutare.
•
•
•
•

4
•
vârfurilor de tensiune.
•
•
de electrocutare.
•
•
•
•
–
•
televizorului dvs.
•
–
•
•
•
•
•
•
•
•

5
Română
* Imaginile şi ilustraţiile din acest manual de utilizare sunt furnizate doar în scop orientativ şi
pot diferi de aspectul real al produsului. Designul şi specificaţiile produsului se pot schimba fără
notificare prealabilă.
Limbile CIS (rusă, ucraineană, kazahă) nu sunt disponibile pentru acest produs, deoarece este fabricat
pentru clienţii din regiunea UE.
AVERTISMENT

6
Cuprins
Înainte de citirea acestui manual de utilizare ������������������������������������������������� 2
��������������������������������������� 3
���������������������������������������������������������������� 9
��������������������������������� 10
���������������������������������������������������������������������������������������������������11
������������������������������������������������������������������������13
���������14
���������������������������������������������������������������������������������������16
���������������������������������������������������������������������������������������������������������������������16
����������������������������������������������������16
���������������������������������������������������������������������17

7
Română
���������������������������������������������������������������������������������18
���������������������������������������������������������������������������������������������������������22
�����������������������������������������������������������������������������������������26
����������������������������27
���������������������������������������������������27
�������������������������������������������������27
���������������������������������������������������������������������������� 28
������������������������������������������������������������������������������������������������������29
�������������������������������������������������������������������������29
��������������������������������������������������������������29
������������������������������������������������������������������������������������������������������������ 30
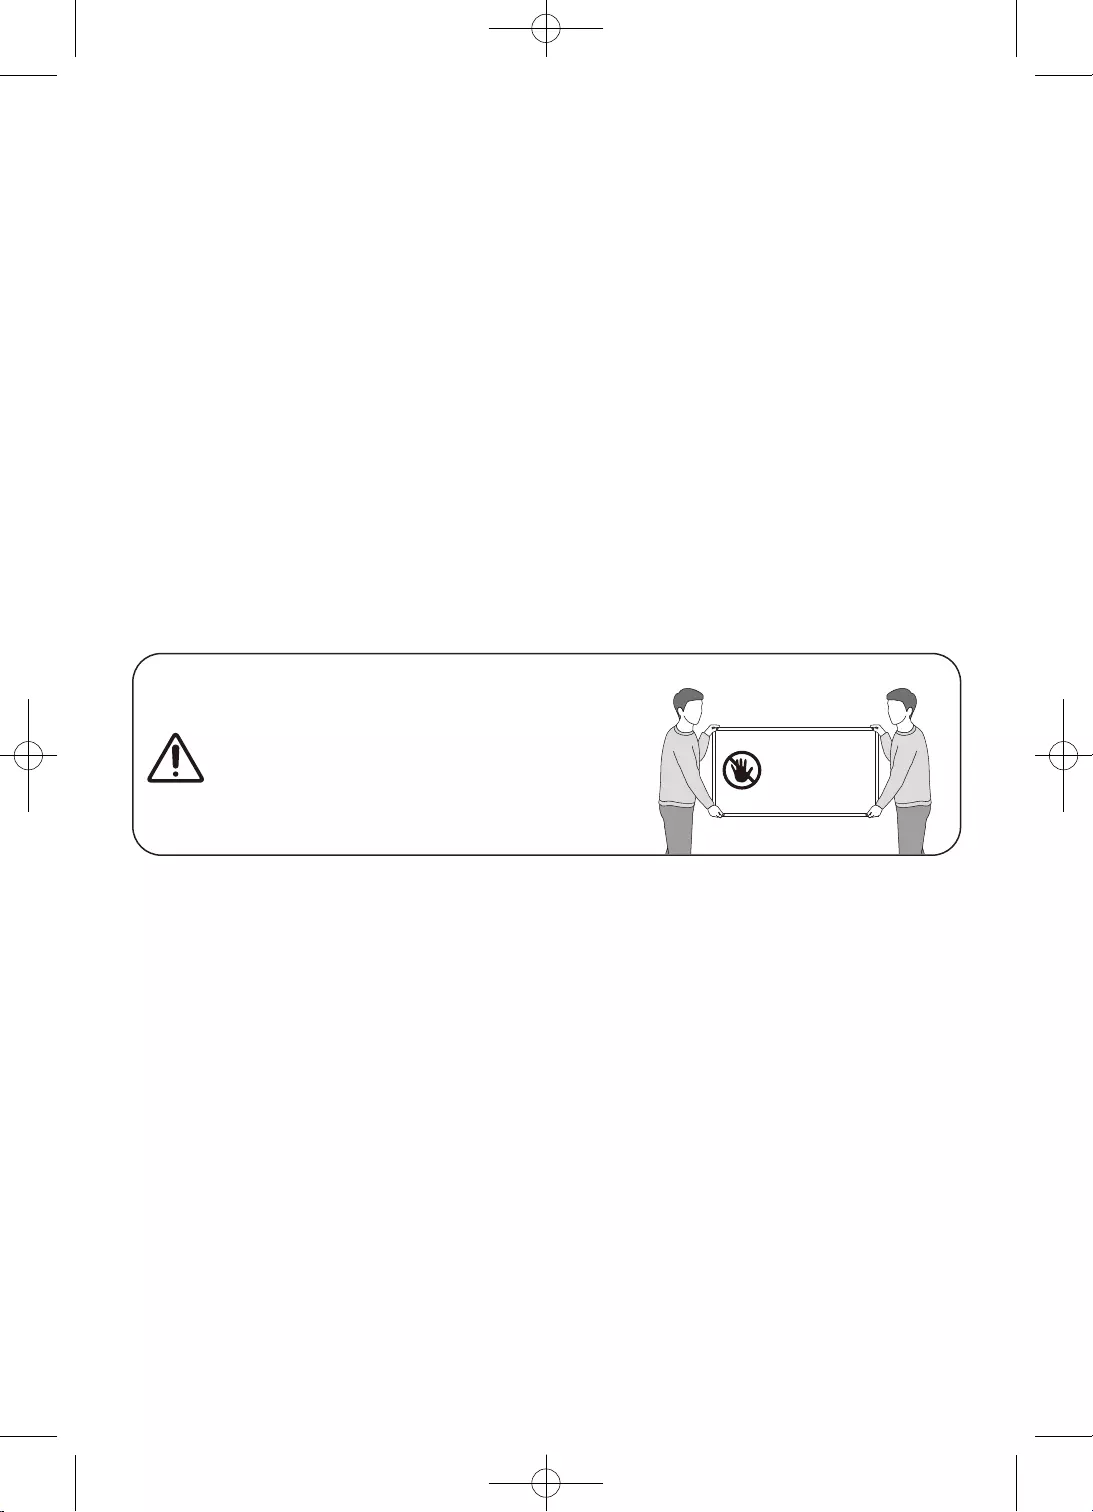
8
•
•Manual de utilizare
•
•Cablu alimentare TV
•
•
•
Avertisment
acest ecran!
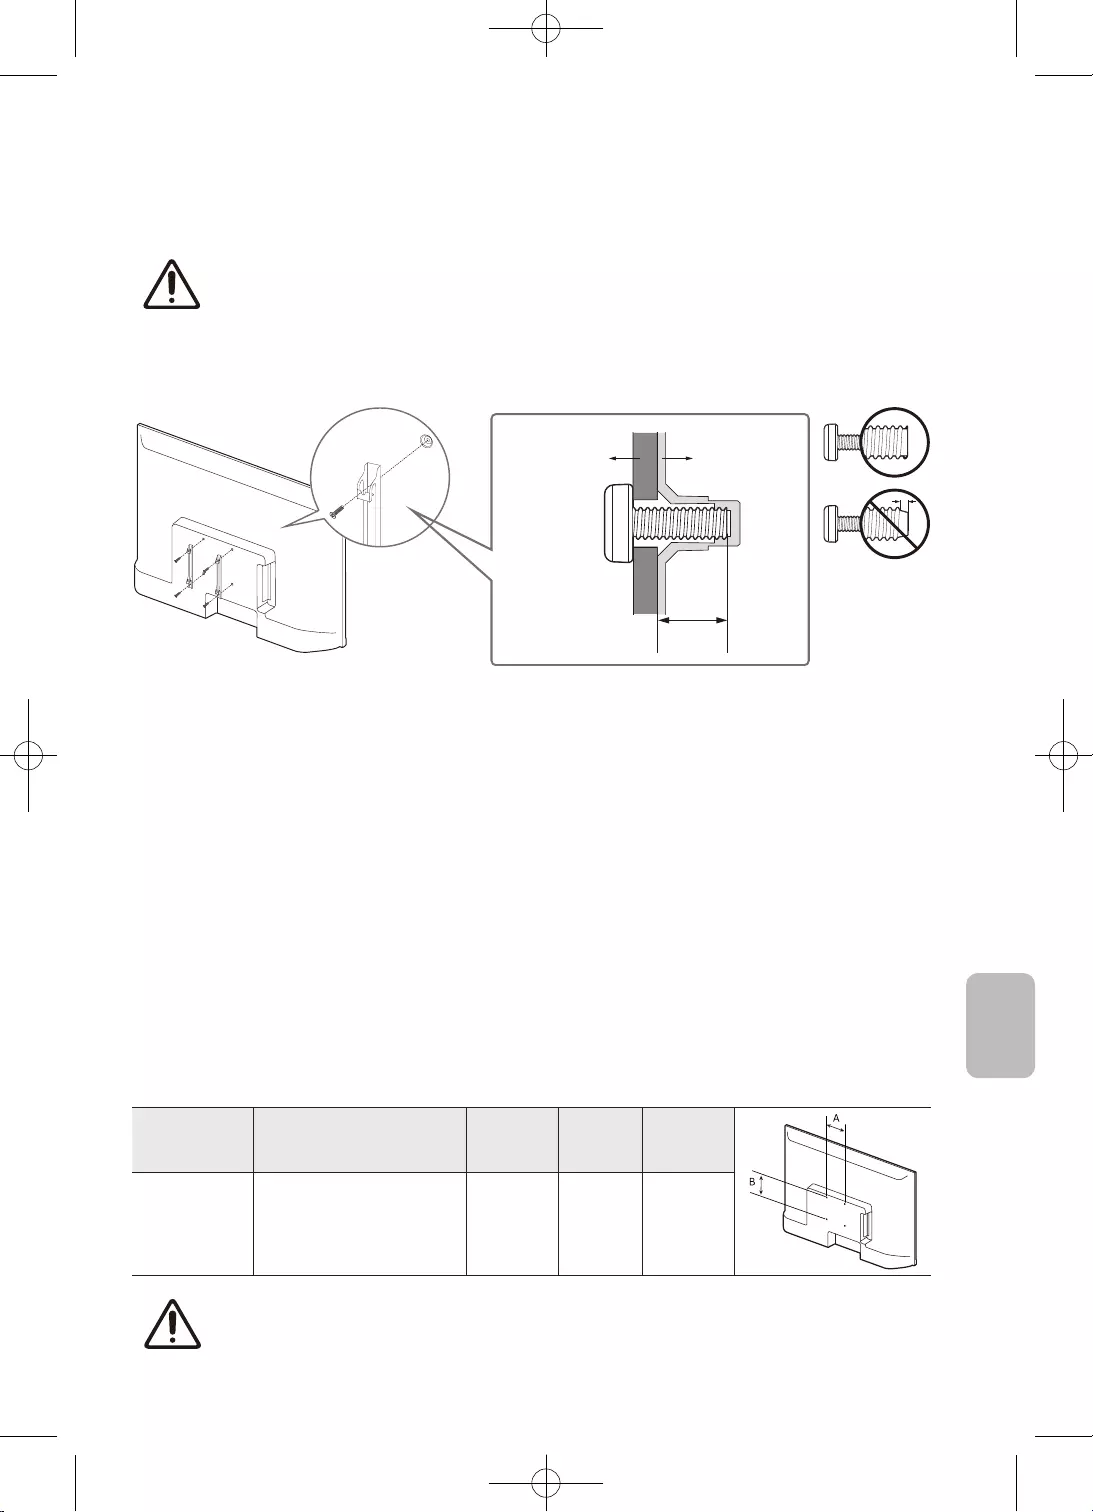
9
Română
•
•
TV
C
•
•
•
•
•
•
standard Cantitate
32 100 x 100 6,0-8,0 M4 4
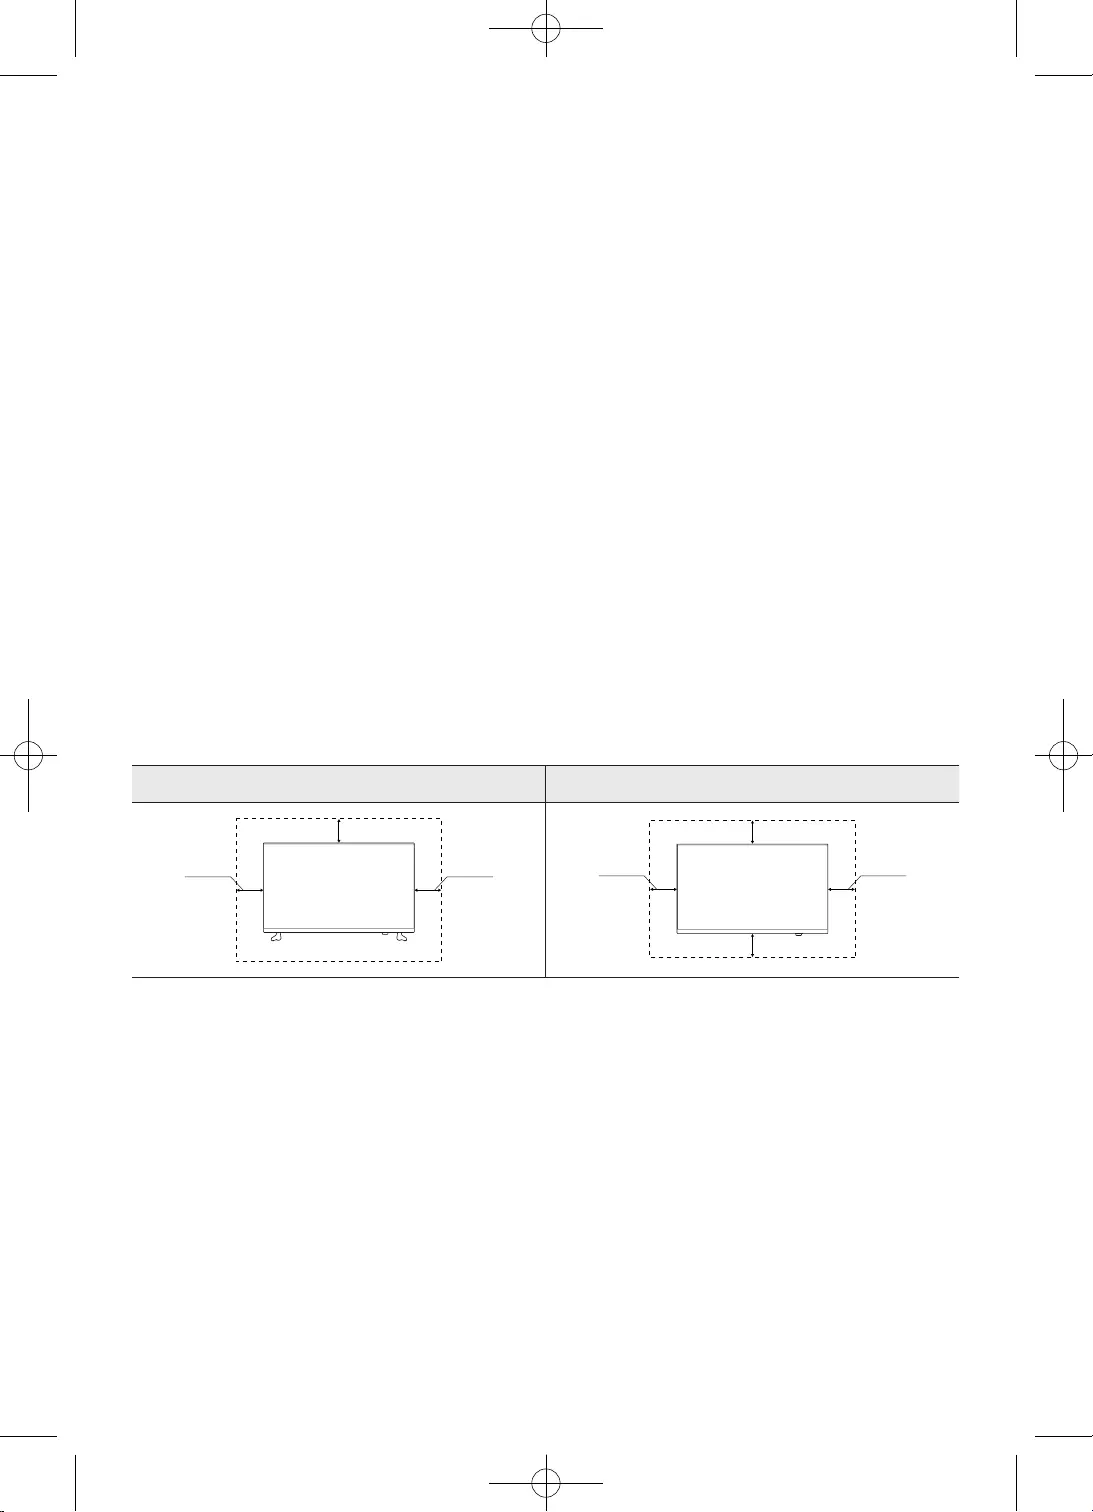
10
•
•
•
accidente.
•
•
•
Instalarea cu un stativ
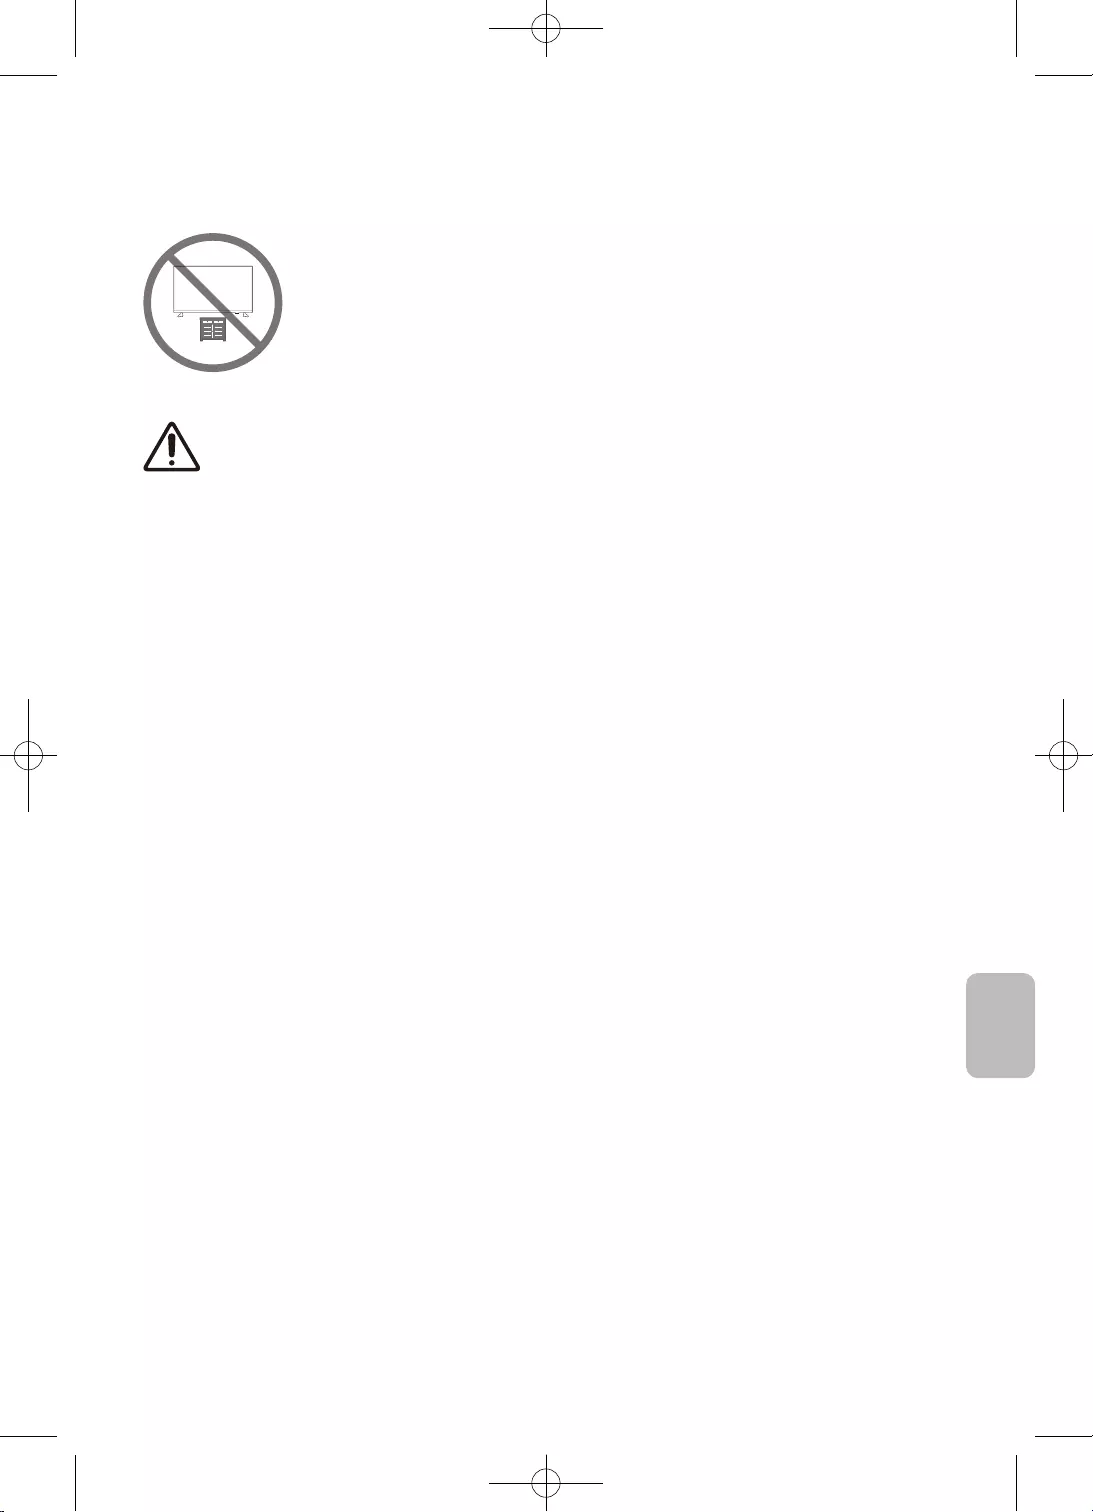
11
Română
•
•
•
•
•
•
•
•
•
acesta.
cele de mai sus.
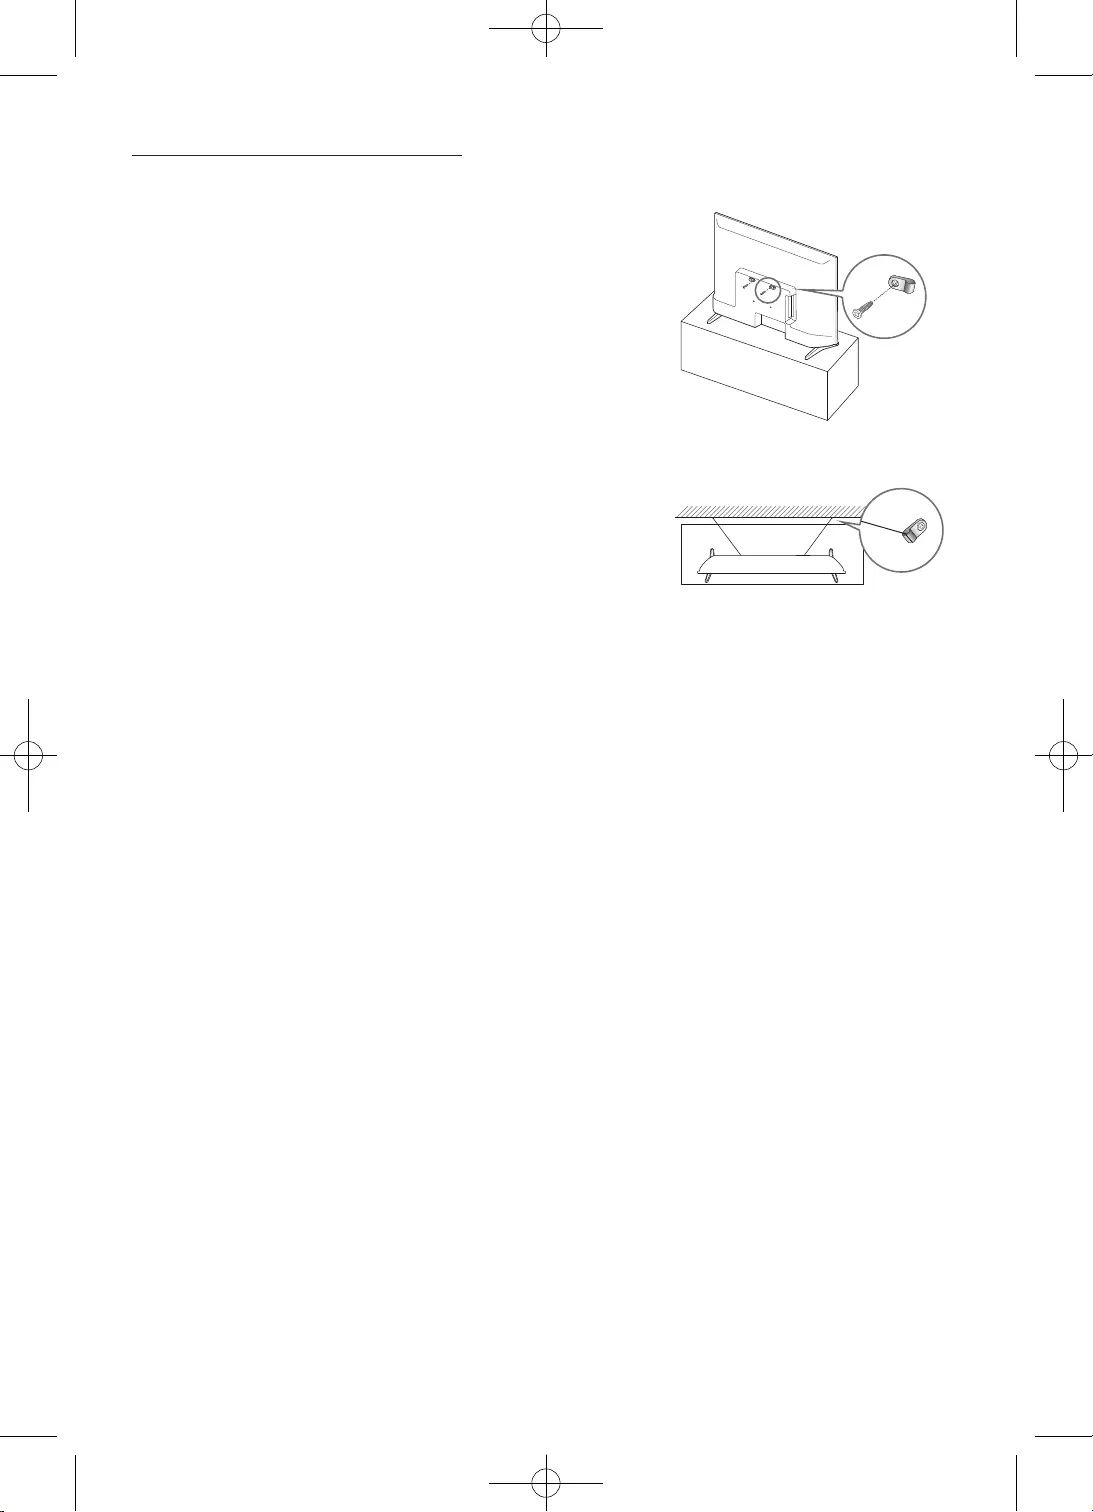
12
–
televizor.
–
3.
–
–
•
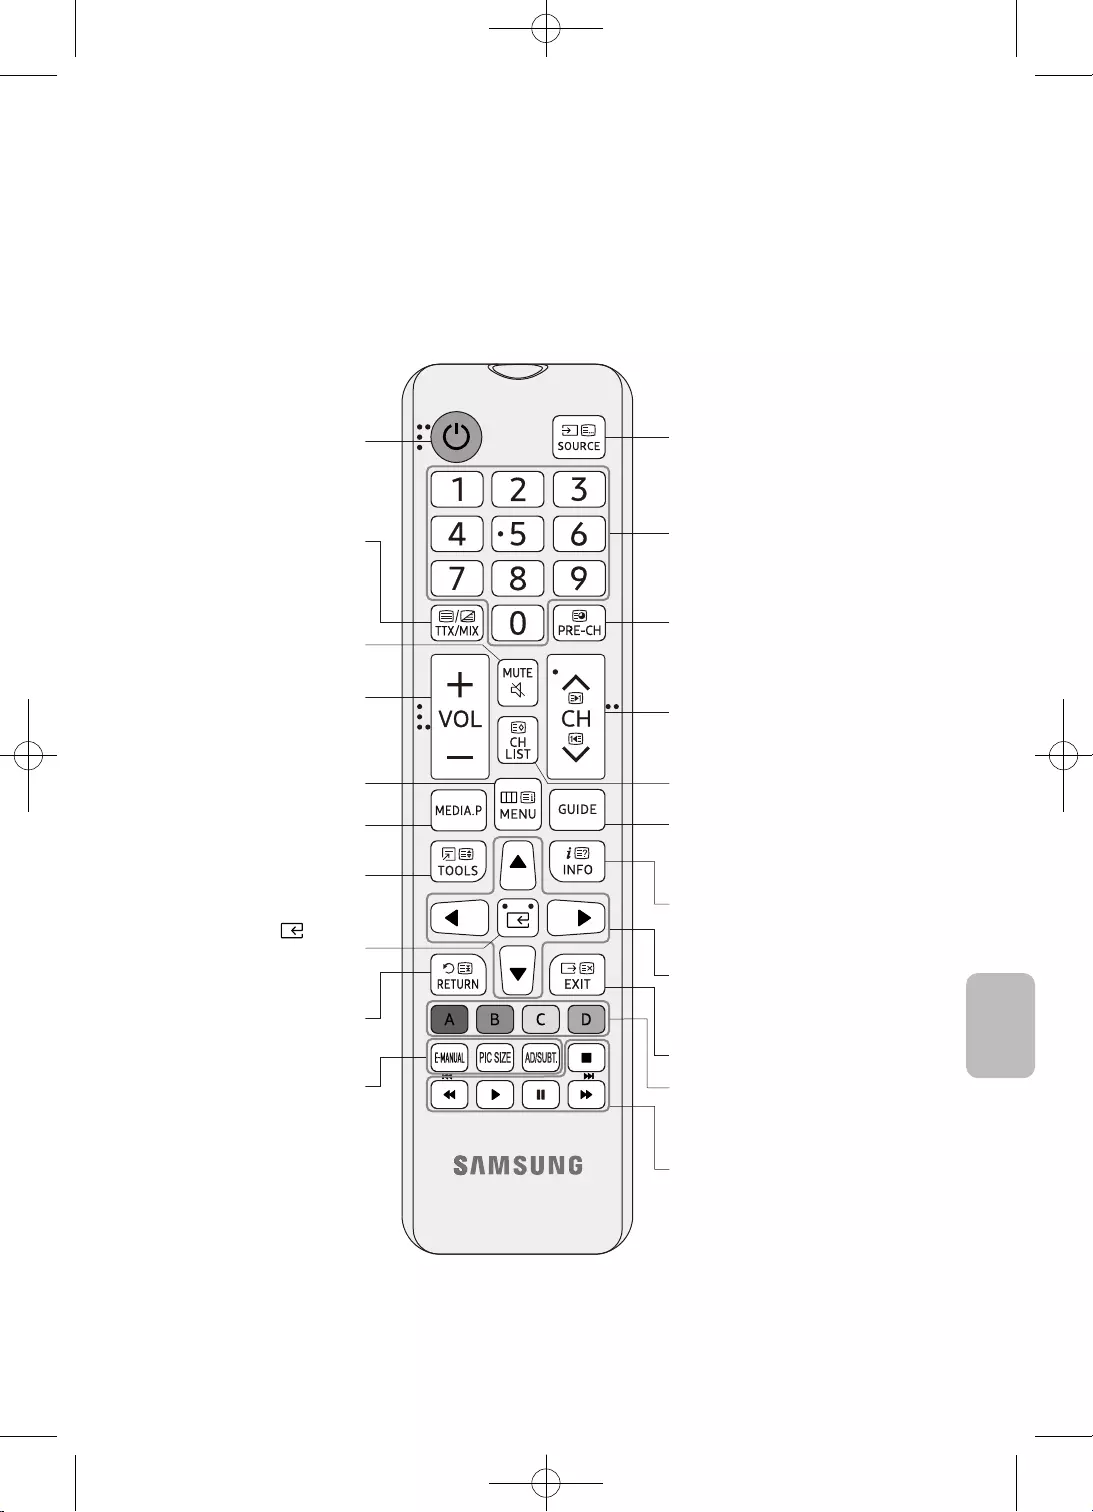
13
Română
•
•
> >
> .
Media Play.
frecvent.
elementul focalizat.
Revine la meniul anterior.
E-MANUAL
PIC SIZE
.
Revine la canalul anterior.
.
Ghid.
televizorului.
Iese din meniu.
televizorului.
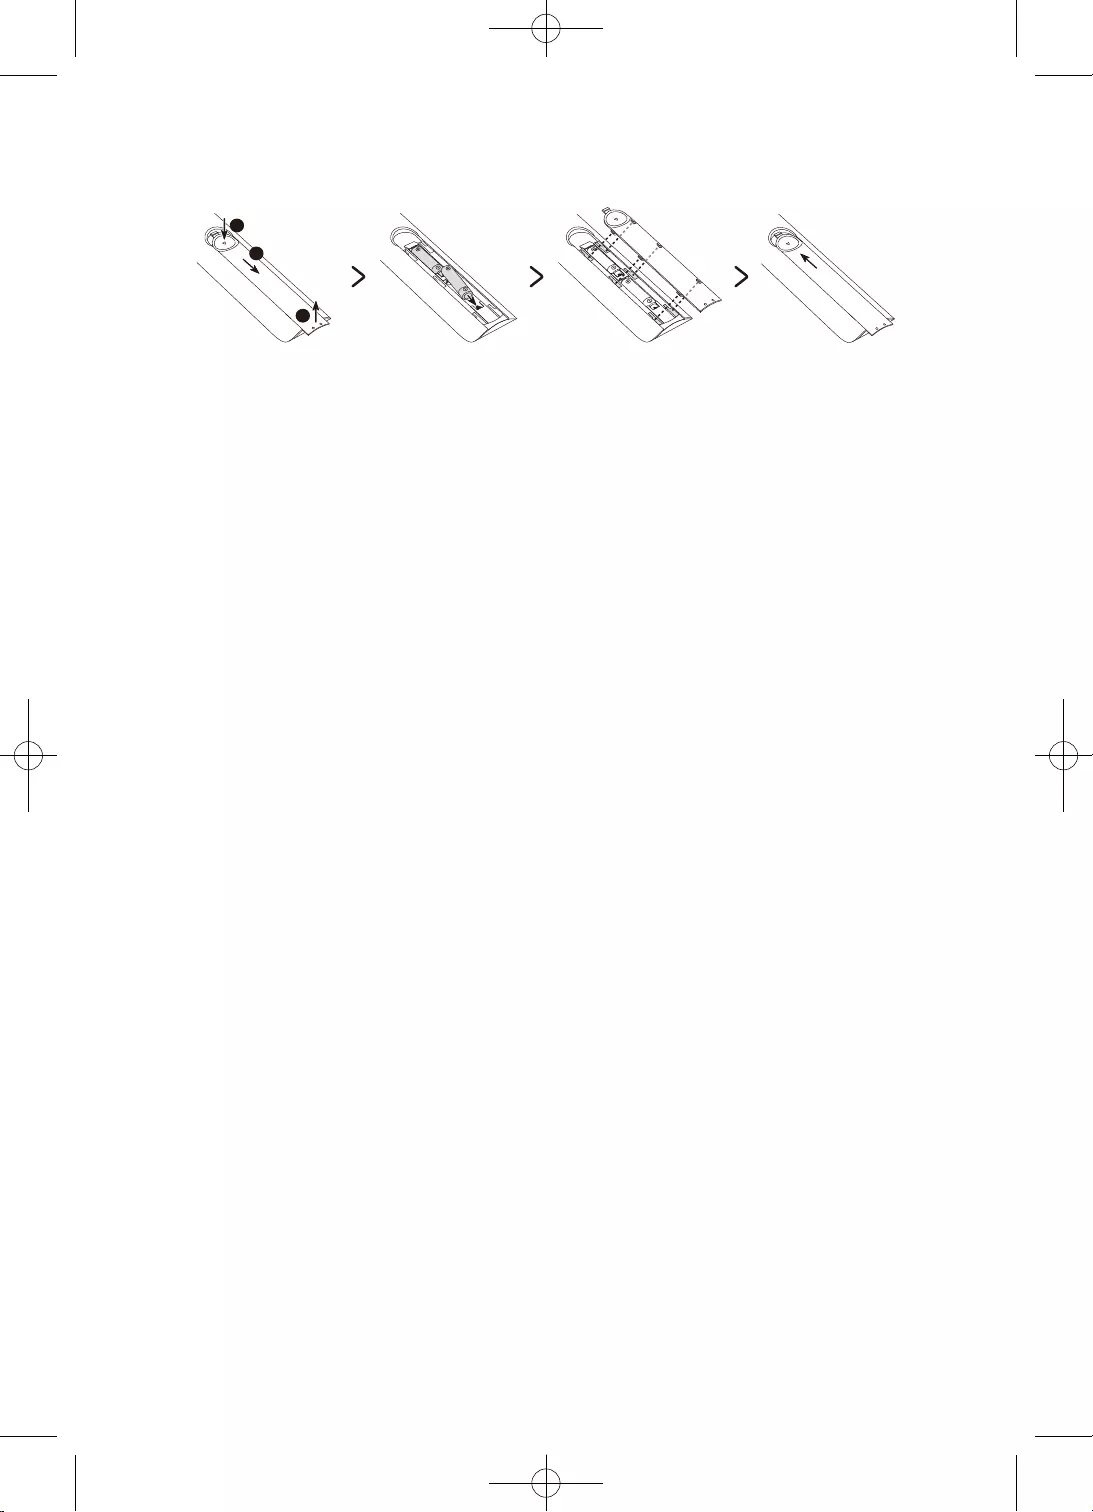
14
2
3
1
•
•
•
•
3.
4.
–
–
–
–
–
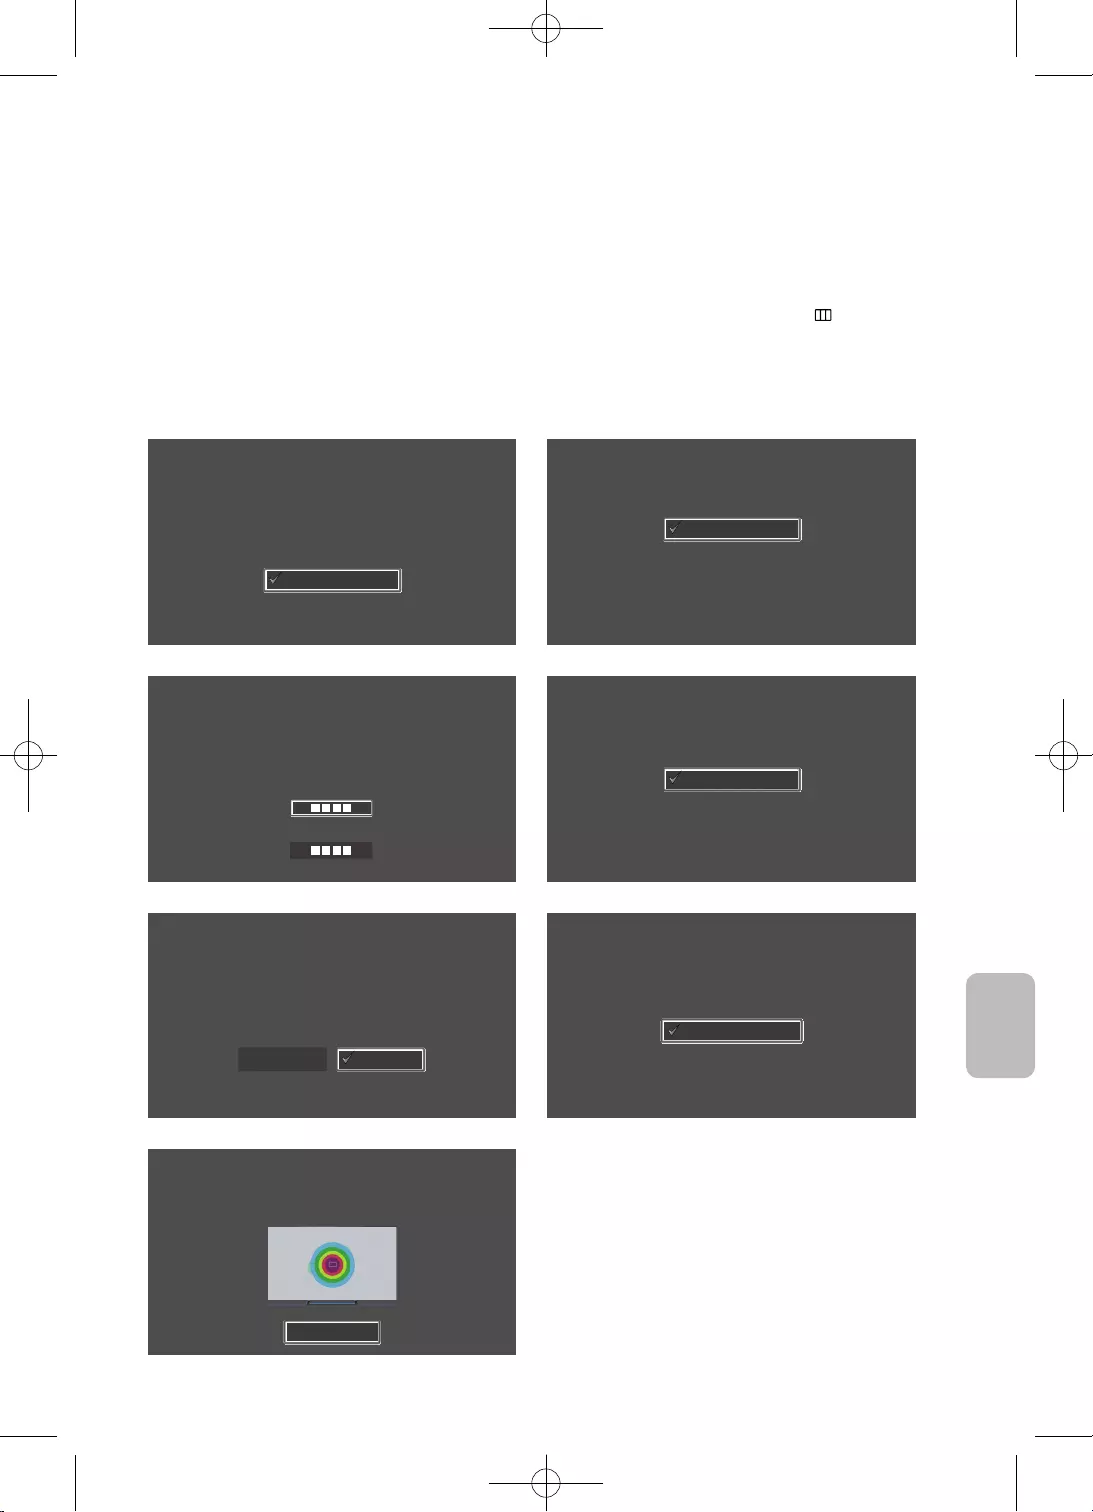
15
Română
•
> Sistem >
Limbă
Selectaţi limba, apoi apăsaţi OK
Français
Español
Ελληνικά
Eesti keel
English
Ţară
Selectaţi ţara, apoi apăsaţi OK
Luxemburg
Italia
Grecia
Ungaria
Franţa
Cod PIN
Trebuie să introduceţi un cod PIN de 4 cifre. Utilizaţi acest cod PIN pentru a debloca în
viitor programele cotate cu 18+.
Introduceţi codul: (Nu utilizaţi codul 0000.)
Introduceţi codul din nou:
Mod uz
Setaţi televizorul pentru utilizare acasă sau pentru promovare în magazine.
Demo magazin
Uz casnic
3. 4.
Configurare TV
Selectaţi Pornire şi apăsaţi OK pentru a instala televizorul.
Aţi finalizat configurarea iniţială a televizorului.
Acum puteţi începe instalarea TV.
Pornire
Înapoi
Instalare TV
Pentru a instala canale prin antenă/cablu, apăsaţi OK.
OK
Instalare canale antenă/cablu
6.
Terminare
Pentru a începe să utilizaţi televizorul, selectaţi Terminare şi apăsaţi OK.
Terminare
Terminare
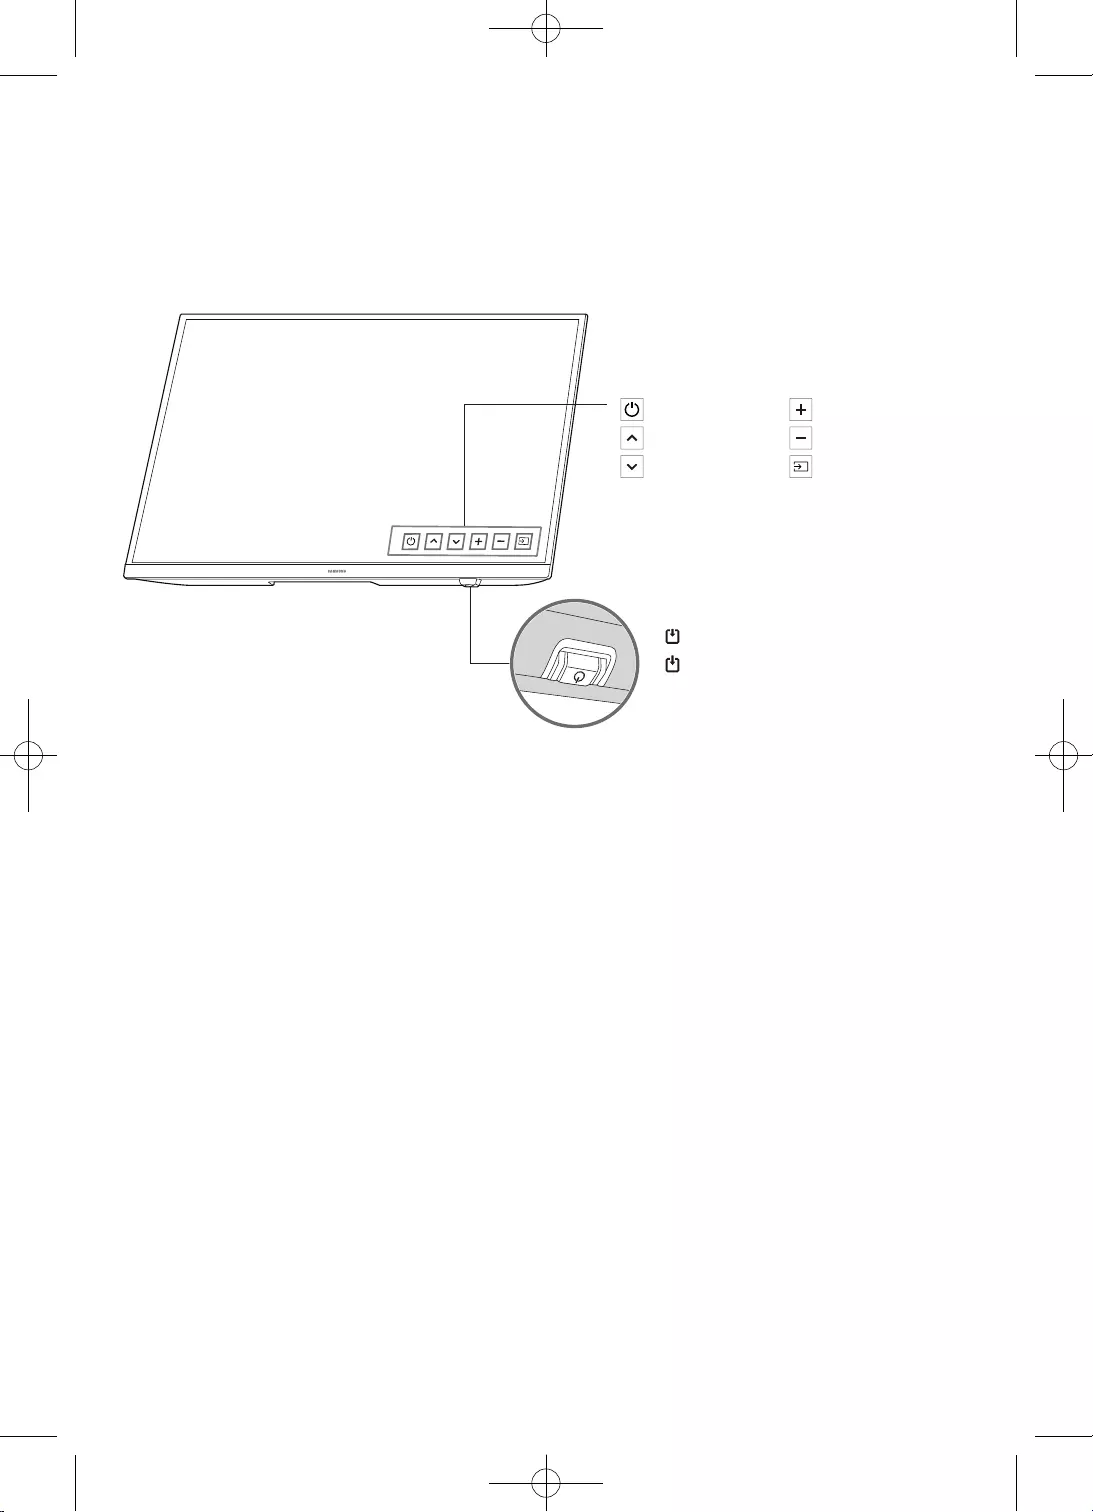
16
.
LED de alimentare
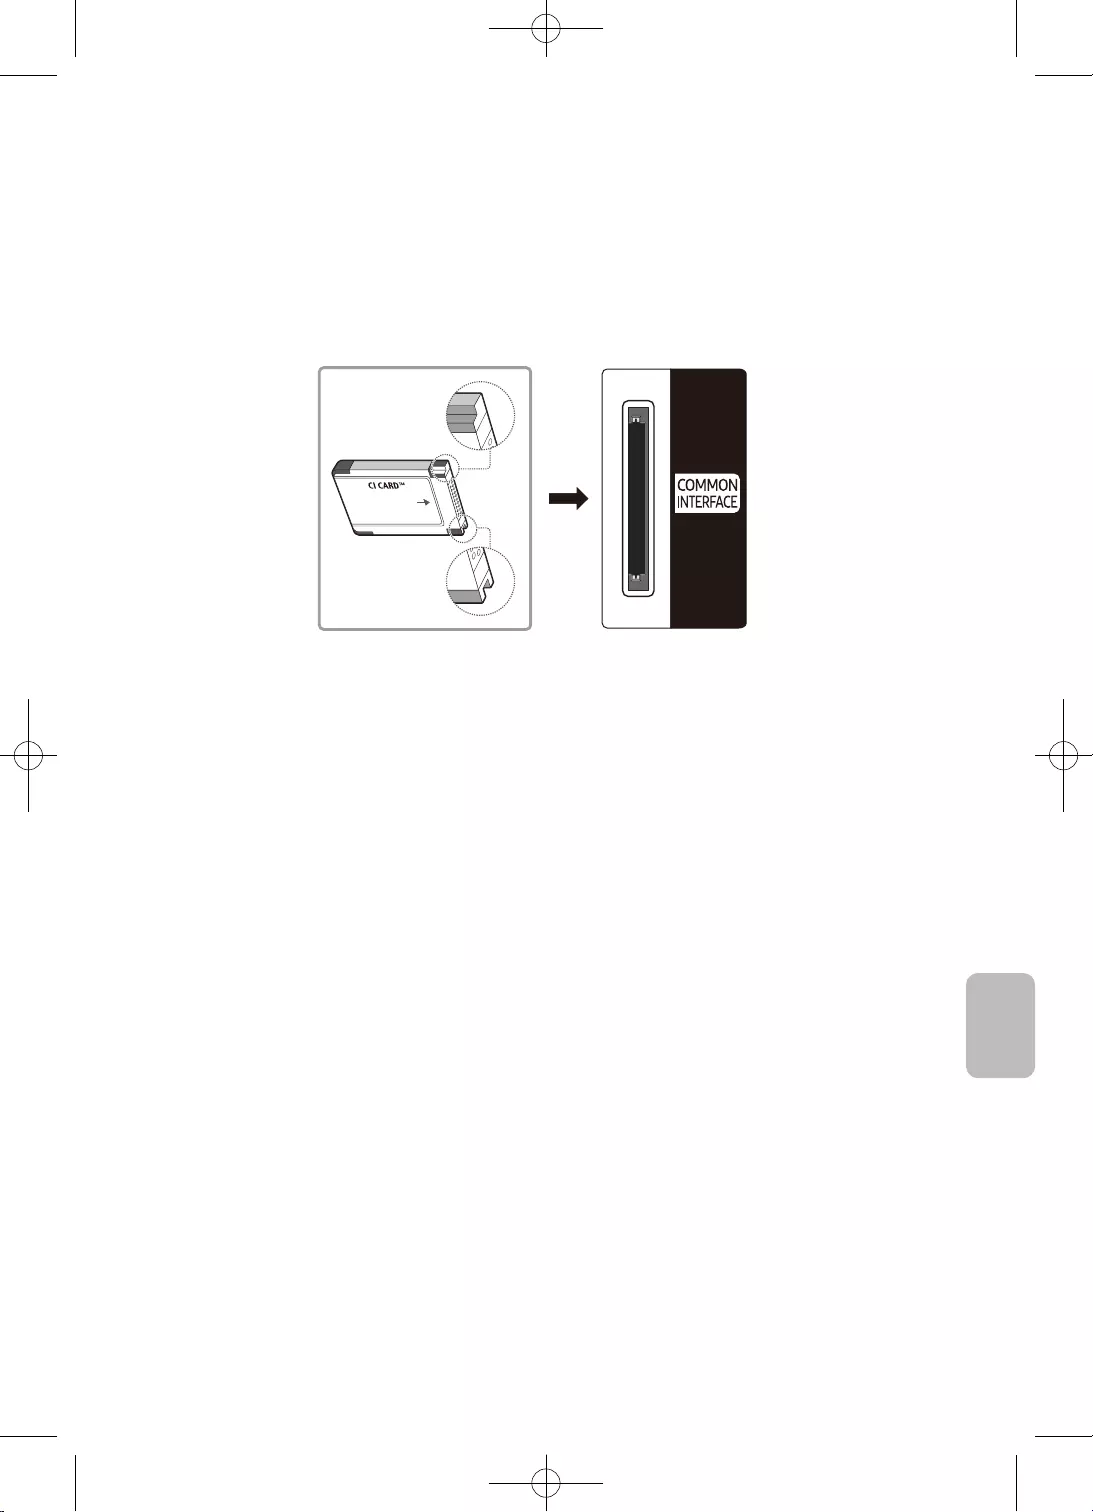
17
Română
•
•
•
•
•
–
–
–
•
–
–
deteriora.
–
–
–
–
–
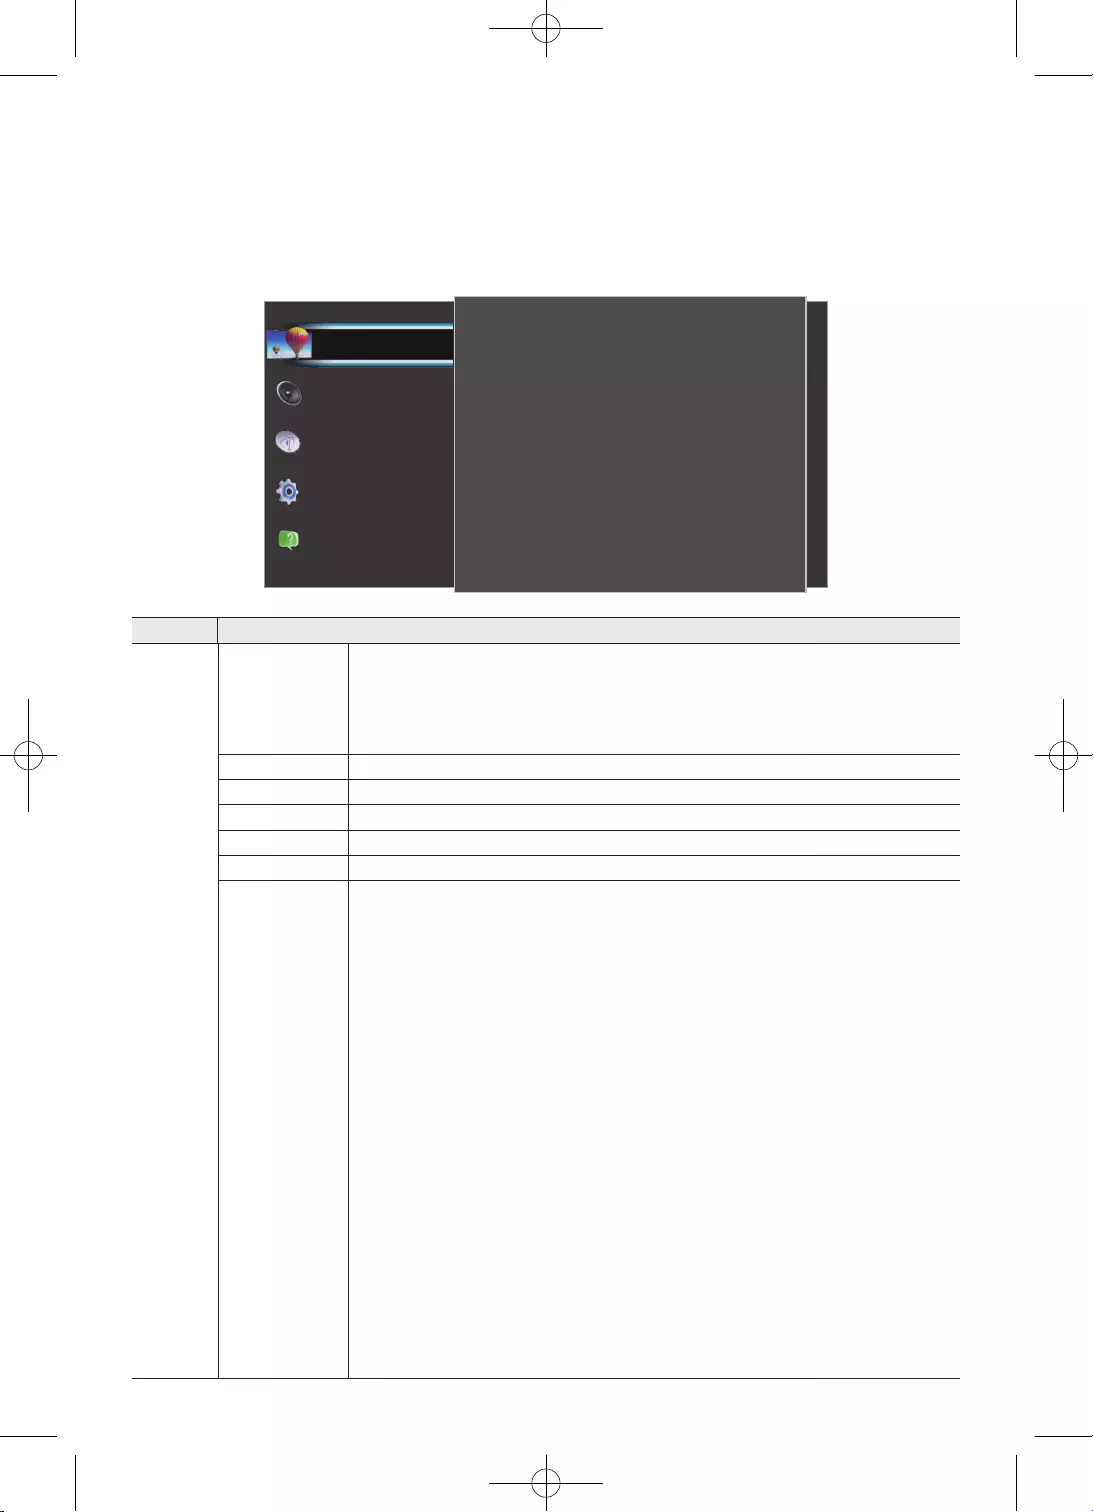
18
MENU
, Sunet, Transmitere, Sistem.
Imagine
Setări ecologice
Dimens. Imagine
Setări avansate
50
3
100
Detalii umbră
Claritate
Contrast
80
55
Standard
Luminozitate
Culoare
Mod imagine
Asistenţă
Sistem
Transmitere
Sunet
Imagine
Element Descriere
•
•Standard
•
Claritate
avansate
•
•
•
•
este setat la
•
•
•Gamma
•
•
19
Română
Element Descriere
Dimens�
–
–
•
ecranul.
•
•
–
•
•Dezactivare ecran
•
Sunet
•
a sunetului.
•Standard
•Cinema
•
muzicale etc.
•
•
avansate
•
la nivelul dorit.
•
•
•
20
Element Descriere
Sunet
•
•
•
Transmitere
Mesaj actualizare canal
•Sistem
•
canal.
•
•
nou de canal.
Sistem
•Uz casnic
•
,
•
atunci când este setat la
21
Română
Element Descriere
Sistem
Ora
•
•
–
când este setat la
•
este
setat la
•
Acces universal
–
.
curent
aceasta.
OSS
software.
22
•
MENU - - -
•
•
•.
•
•
•
•
•
•
•
/
•MENU - -
-
•MENU -
-
•.
•
•
23
Română
•
Calitatea sunetului
•Test sunet
MENU - - - Test sunet
•
•
televizor.
• la MENU - Sunet -
-
•
•
•
•
MENU - -
-
•
televizor.
•
•POWER (
•
MENU - Sistem - Ora -
•
•
televizor.
•
MENU - - -
•
•
24
•
•SOURCE
•
•
•
MENU - Sistem -
•
•MENU - Transmitere -
canale - Actualizare canaleMENU - Transmitere -
canale - Reinstalare canale
•
•
Altele
•
•
•
•
•
•
•
•
•
•
•
25
Română
•
•
•, acesta va reseta la la
la Uz casnic
butonul SOURCEMENU - Sistem - .
•
•
•
•
•
MENU - –
3.
4.
–
–
–
–
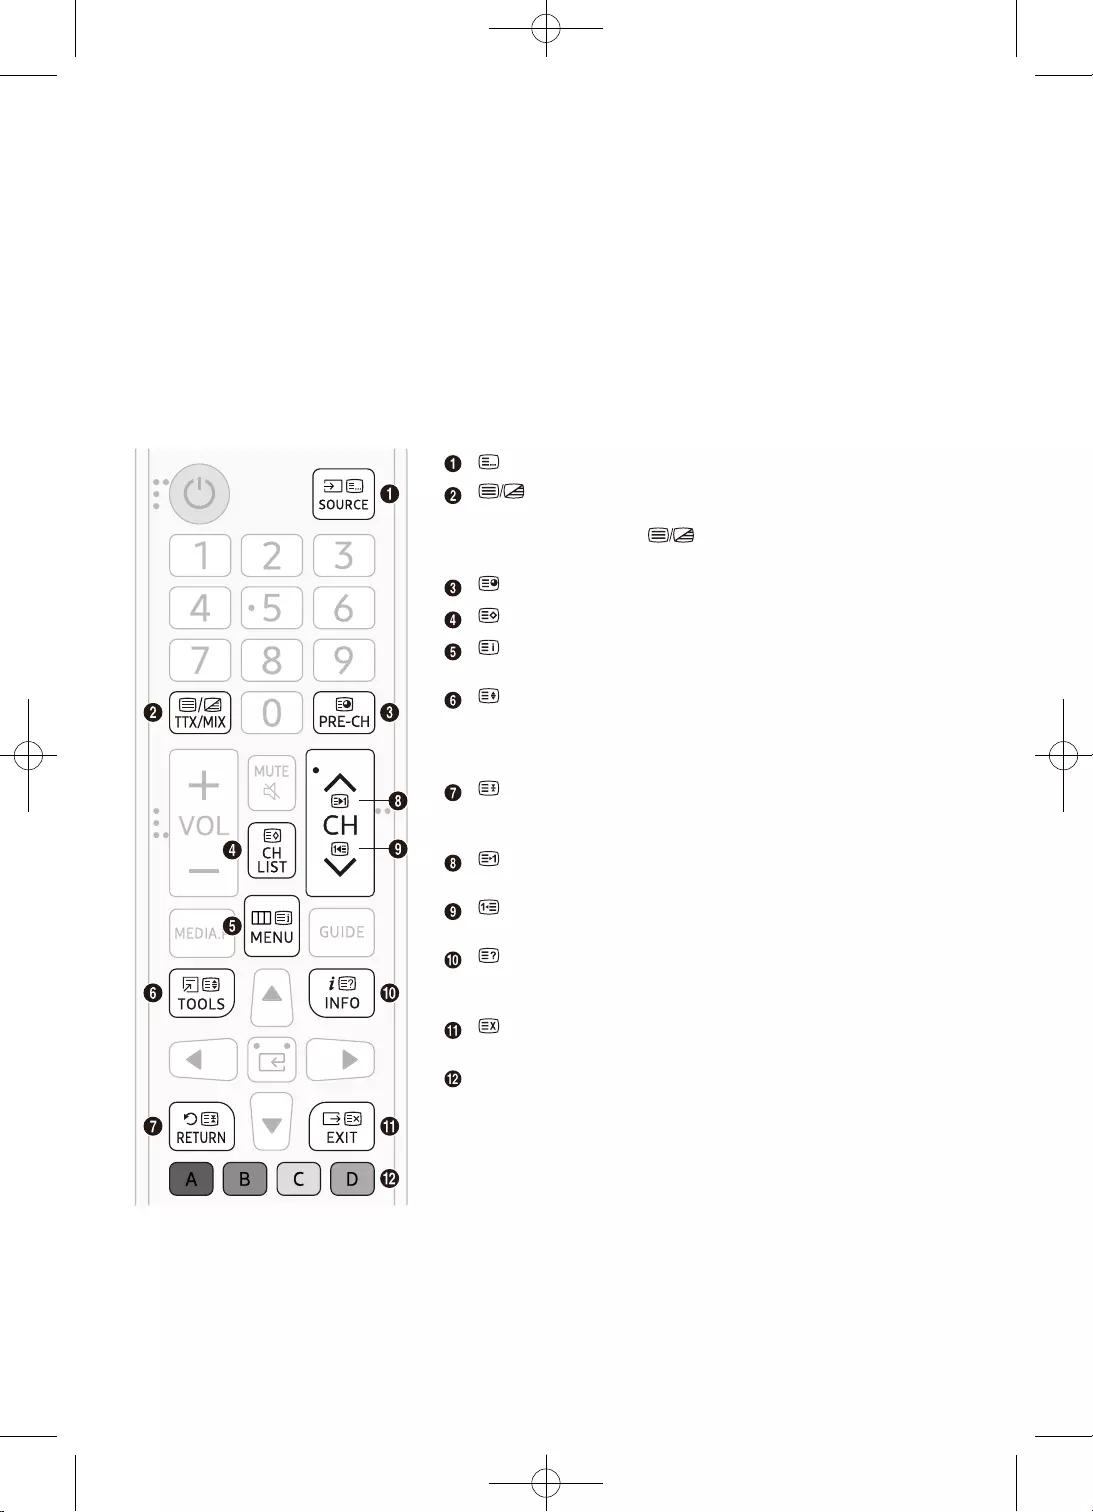
26
•
•
•
•
•
ordinea .
.
Dimensiune
.
.
Anulare
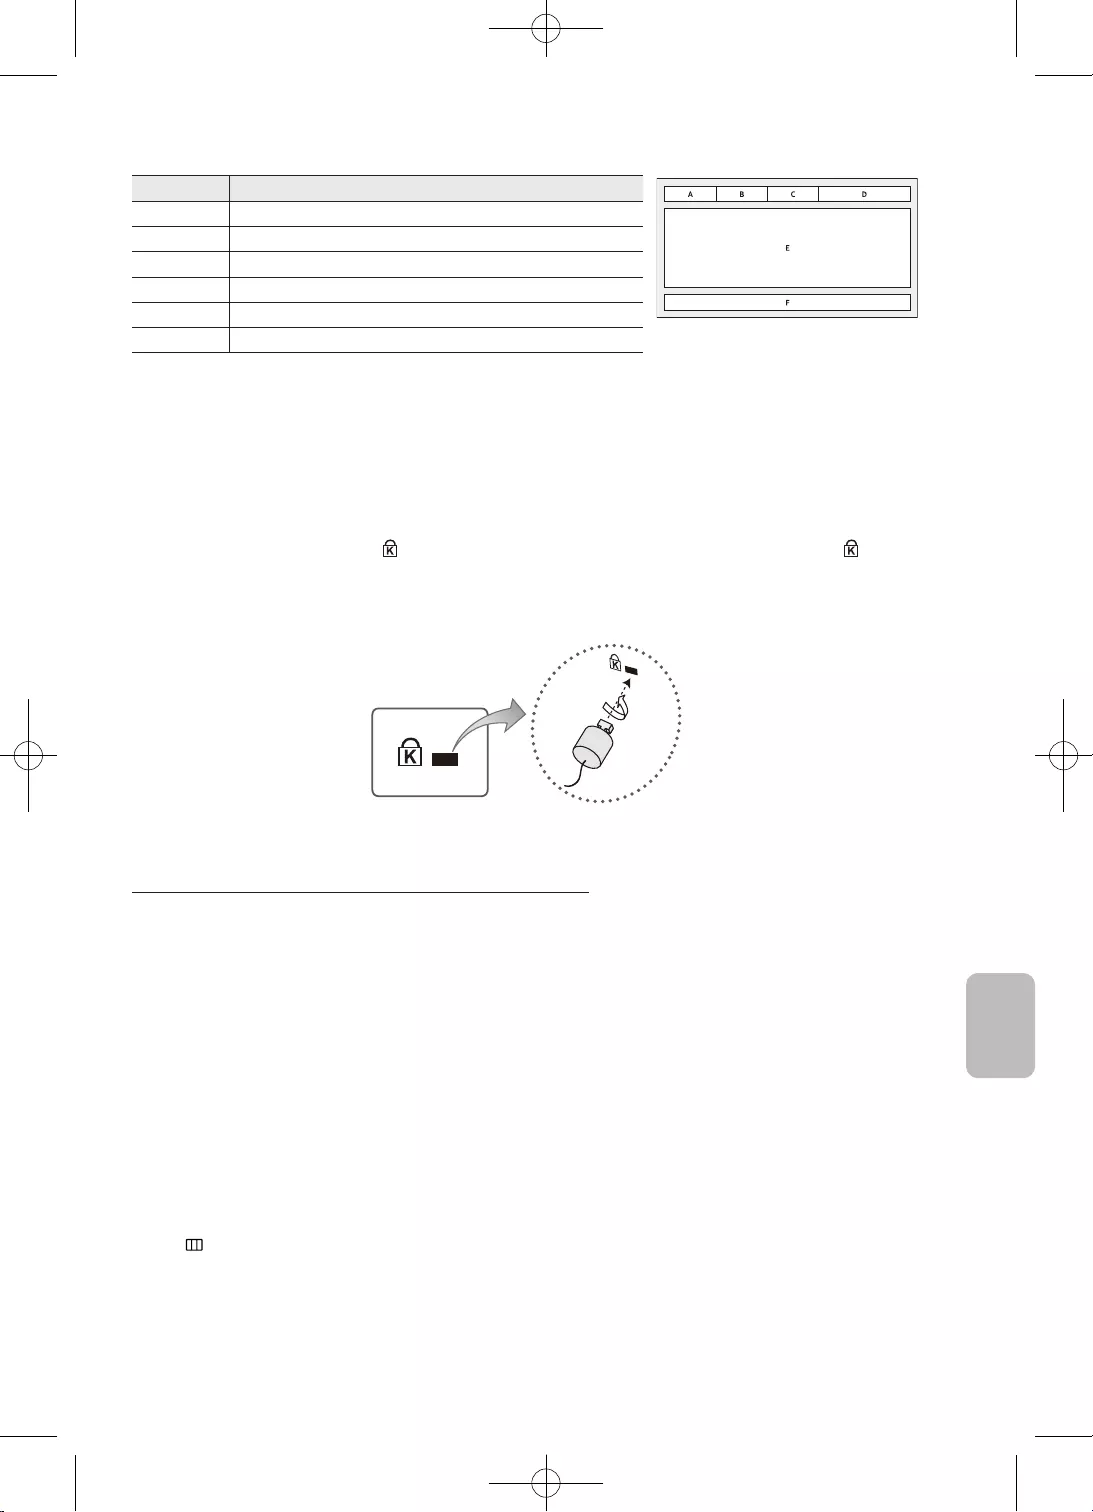
27
Română
Parte
Identitatea canalului de emisie.
C
•
•
3.
4.
–
–
MENU - Sistem -
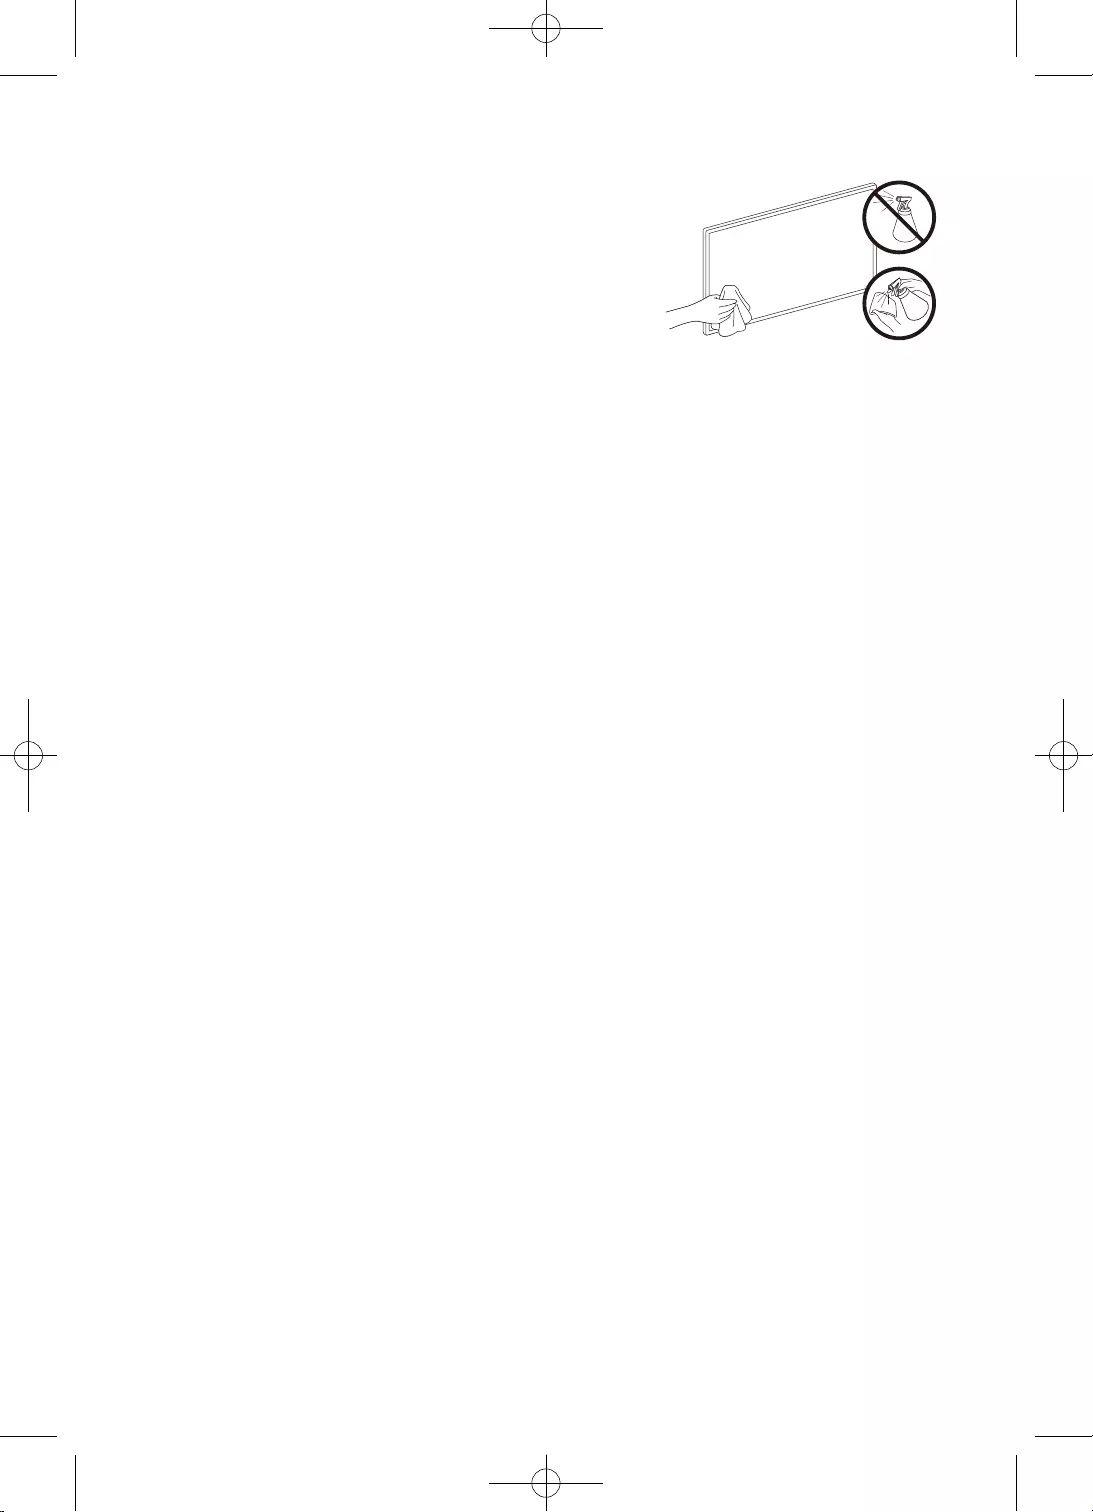
28
•
•
•
•
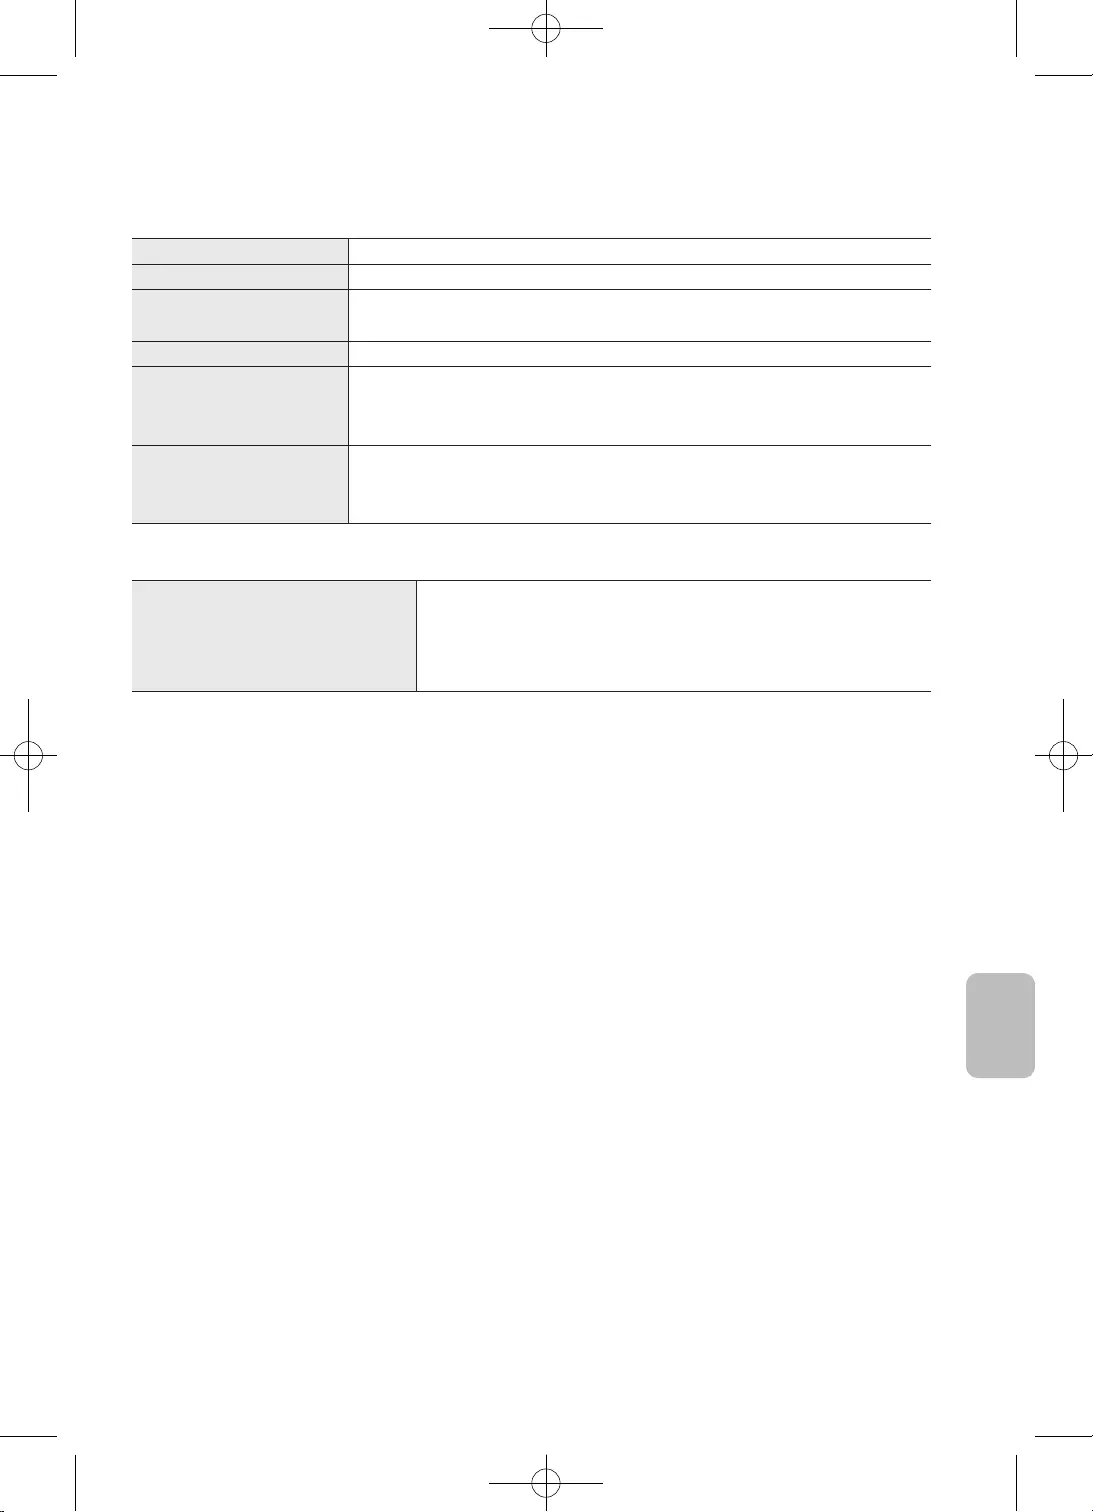
29
Română
Cu stativ
Cu stativ
•
•
•
•
30
31
Română
materiale.
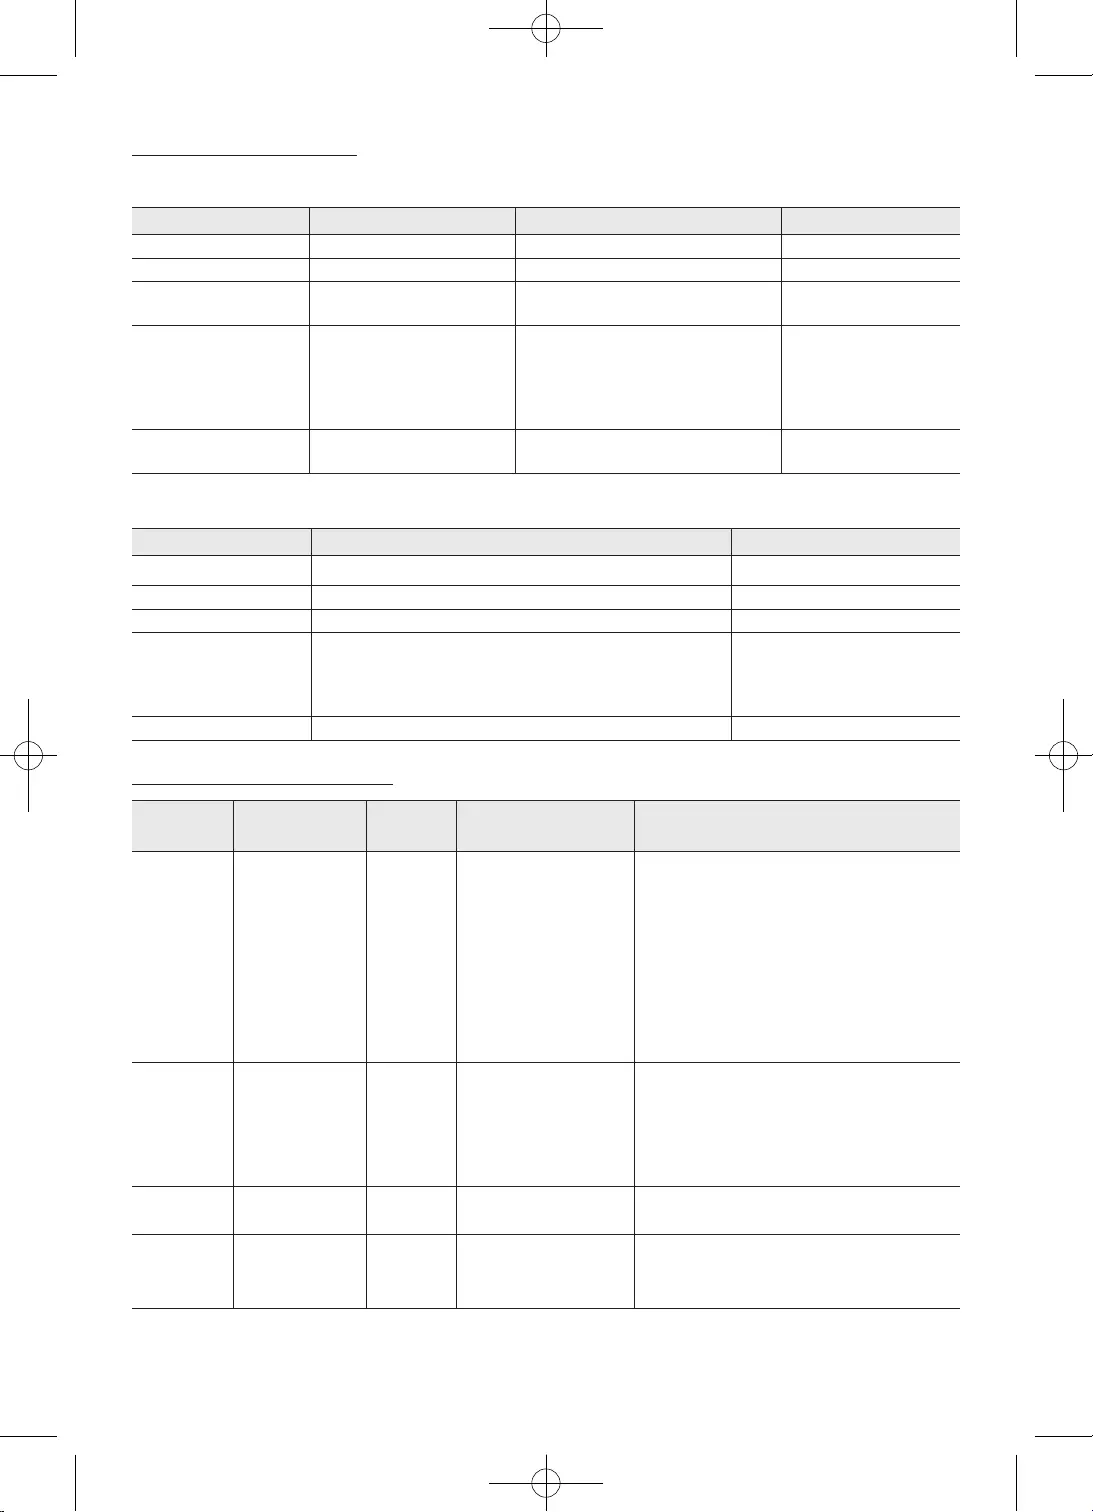
32
TS
MP4
VobSub
avi
.srt
.smi
.sub SubViewer
Sorenson
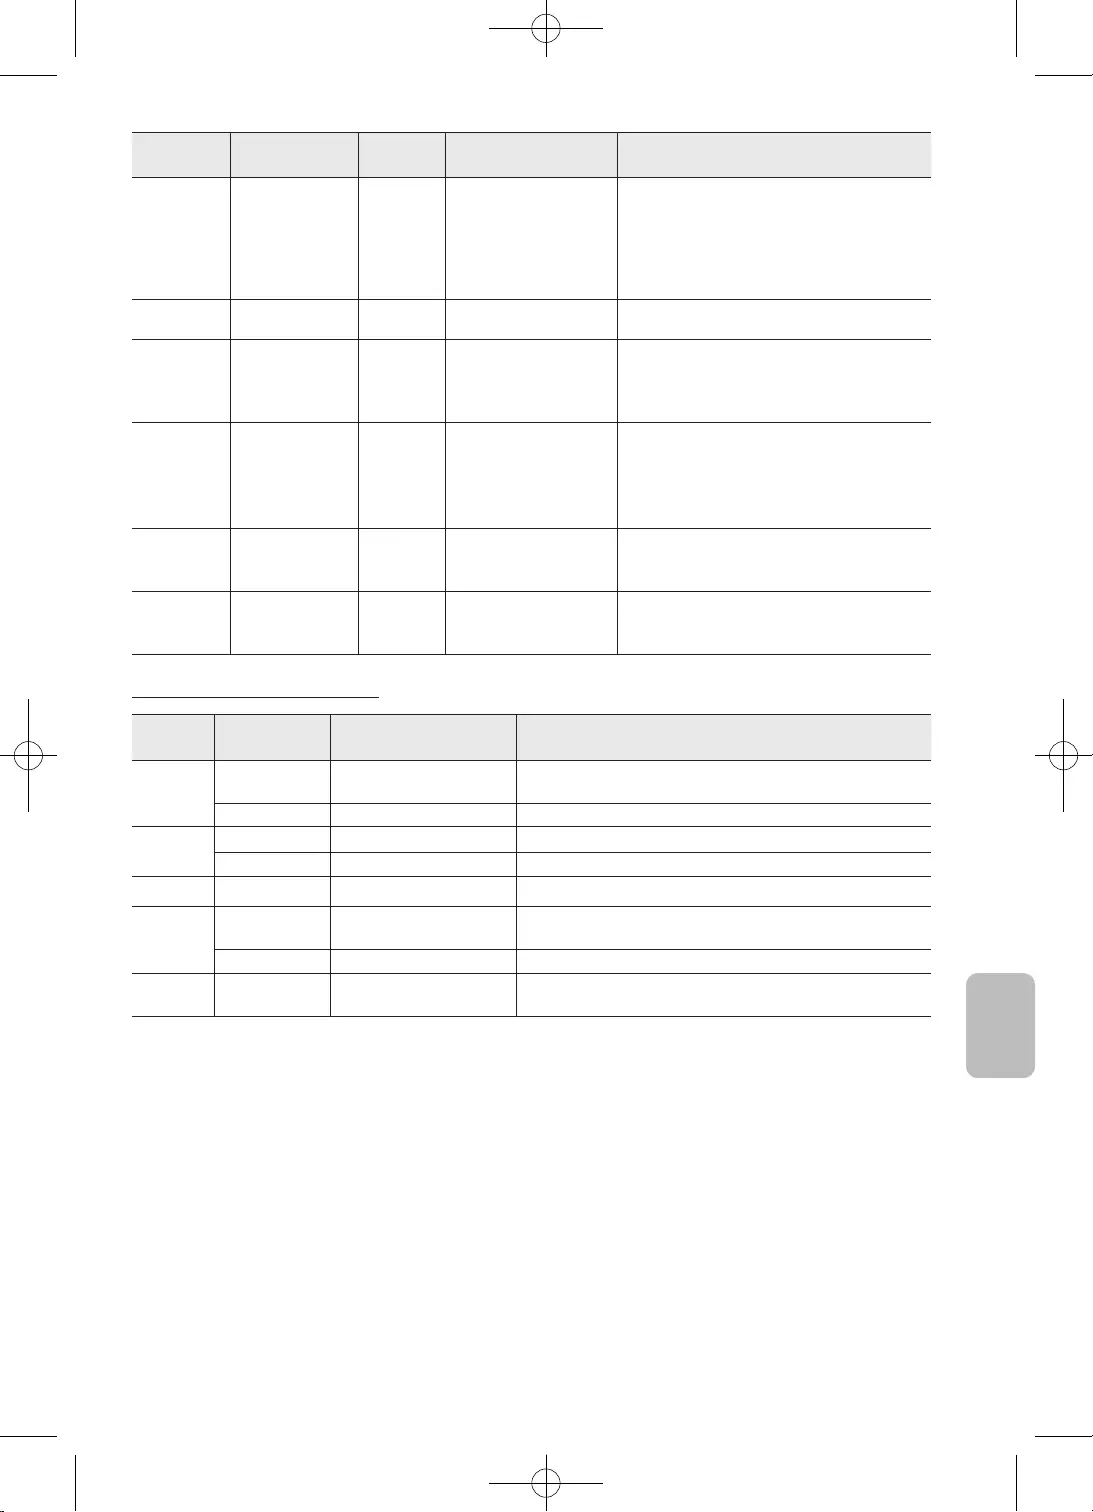
33
Română
. Profil ridicat la
. Profil avansat la
nivelul 3
Motion
nivel ridicat
3.
4.
6.
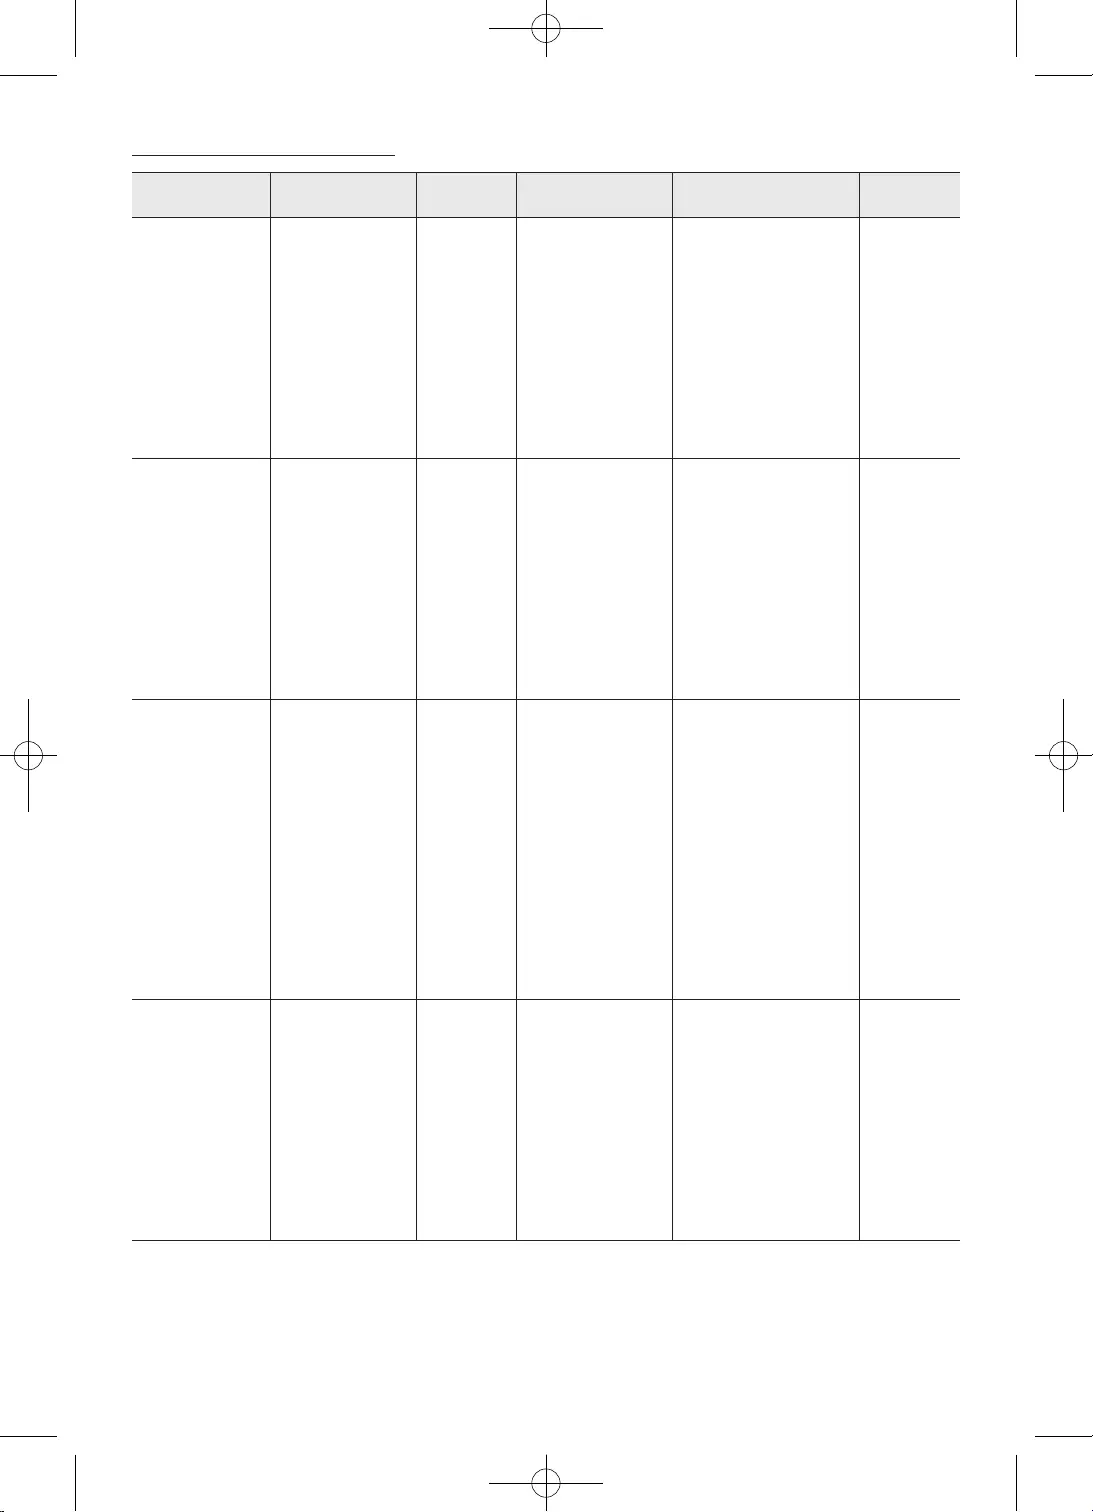
34
Canal
35
Română
Canal
Standard
numai
decodare
stereo
36
Canal
•
container.
•
•
•
•
•
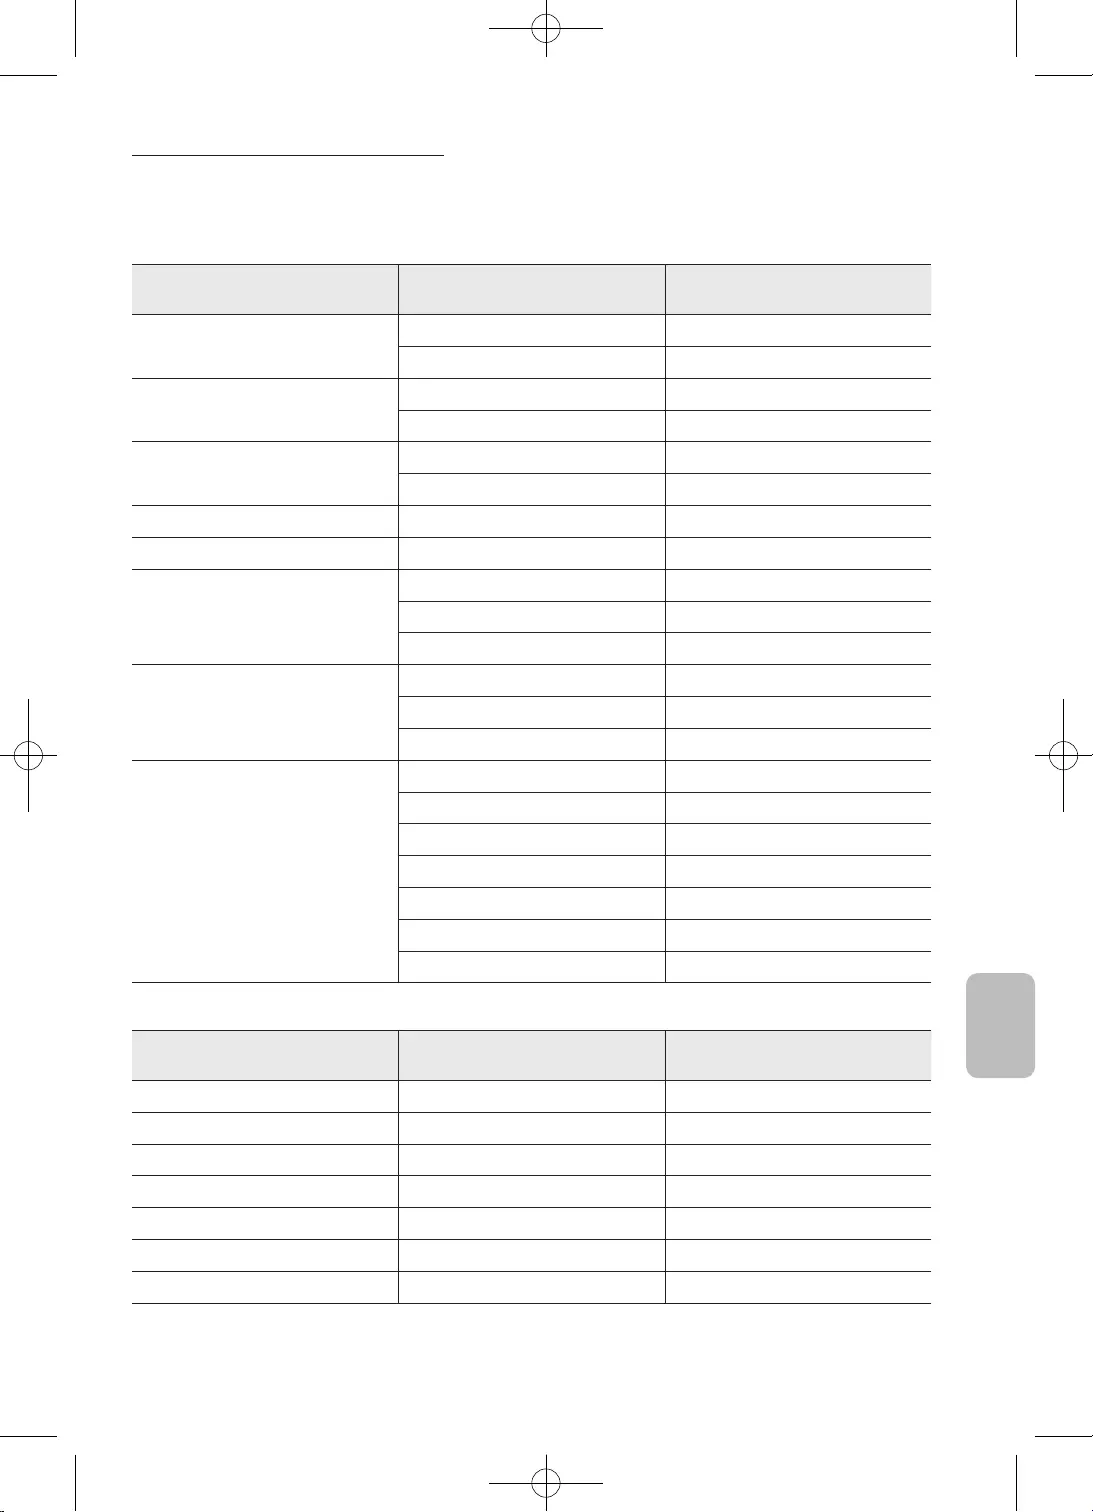
37
Română


© 2020 Samsung Electronics Co., Ltd. All rights reserved.
Contact SAMSUNG WORLD WIDE
If you have any questions or comments relating to Samsung products, please contact the Samsung service centre.
Country Samsung Service Centre Web Site
AUSTRIA 0800 72 67 864 (0800-SAMSUNG) www.samsung.com/at/support
BELGIUM 02-201-24-18 www.samsung.com/be/support (Dutch)
www.samsung.com/be_fr/support (French)
BOSNIA 055 233 999 www.samsung.com/support
ALBANIA 045 620 202 www.samsung.com/al/support
BULGARIA *3000 Цена на един градски разговор
0800 111 31 Безплатен за всички оператори www.samsung.com/bg/support
CROATIA 072 726 786 www.samsung.com/hr/support
CZECH 800 - SAMSUNG (800-726786) www.samsung.com/cz/support
Samsung Electronics Czech and Slovak, s.r.o. V Parku 2323/14, 148 00 - Praha 4
DENMARK 707 019 70 www.samsung.com/dk/support
FINLAND 030-6227 515 www.samsung.com/fi/support
FRANCE 01 48 63 00 00 www.samsung.com/fr/support
GERMANY 06196 77 555 77 www.samsung.com/de/support
CYPRUS 8009 4000 only from landline, toll free
www.samsung.com/gr/support
GREECE 80111-SAMSUNG (80111 726 7864) only from land line
(+30) 210 6897691 from mobile and land line
HUNGARY 0680SAMSUNG (0680-726-7864) www.samsung.com/hu/support
ITALIA 800-SAMSUNG (800.7267864) www.samsung.com/it/support
LUXEMBURG 261 03 710 www.samsung.com/be_fr/support
MONTENEGRO 020 405 888 www.samsung.com/support
SLOVENIA 080 697 267 (brezplačna številka) www.samsung.com/si/support
NETHERLANDS 088 90 90 100 www.samsung.com/nl/support
NORWAY 21629099 www.samsung.com/no/support
POLAND 801-172-678* lub +48 22 607-93-33*
* (opłata według taryfy operatora) www.samsung.com/pl/support
PORTUGAL 808 207 267 www.samsung.com/pt/support
ROMANIA
*8000 (apel in retea)
08008-726-78-64 (08008-SAMSUNG) Apel GRATUIT
Atenţie: Dacă efectuaţi apelul din reţeaua Digi (RCS/RDS),
vă rugăm să ne contactaţi formând numărul Telverde fără
ultimele două cifre, astfel: 0800872678.
www.samsung.com/ro/support
SERBIA 011 321 6899 www.samsung.com/rs/support
SLOVAKIA 0800 - SAMSUNG (0800-726 786) www.samsung.com/sk/support
SPAIN 91 175 00 15 www.samsung.com/es/support
SWEDEN 0771 726 786 www.samsung.com/se/support
SWITZERLAND 0800 726 786 (0800-SAMSUNG) www.samsung.com/ch/support (German)
www.samsung.com/ch_fr/support (French)
UK 0330 SAMSUNG (7267864) www.samsung.com/uk/support
IRELAND (EIRE) 0818 717100 www.samsung.com/ie/support
LITHUANIA 8-800-77777 www.samsung.com/lt/support
LATVIA 8000-7267 www.samsung.com/lv/support
ESTONIA 800-7267 www.samsung.com/ee/support
TURKEY 444 77 11 www.samsung.com/tr/support