Table of Contents
- Digital Photo Professional
- Introduction
- Downloading Images
- Viewing Images
- Organizing and Sorting Images
- Editing Images
- RAW Images
- Editing JPEG and TIFF Images
- Tool Palettes
- Editing with the Basic Adjustment Tool Palette
- Editing with the Tone Adjustment Tool Palette
- Editing with the Color Adjustment Tool Palette
- Editing with the Detailed Adjustment Tool Palette
- Editing with the Trimming/Angle Adjustment Tool Palette
- Editing with the Lens Correction Tool Palette
- Editing with the Partial Adjustment Tool Palette
- Editing with the Dust Delete/Copy Stamp Tool Palette
- Setting Work Color Space
- Using the Soft-Proof Colors Function
- Specifying the Size when Opening RAW Images
- Displaying and Saving RAW Images
- Saving Editing Results
- Re-Editing an Image
- Utilizing Adjustment Contents (Recipe)
- Adjusting by Comparing Multiple Images
- Editing Efficiently
- Compositing Images
- Creating HDR (High Dynamic Range) Images
- Using the Dual Pixel RAW Optimizer
- Using Depth Compositing
- Using the RAW Burst Image Tool
- Transferring a RAW Image to Photoshop
- Customizing the Main Window Toolbar
- Using Cloud Processing
- Printing Images
- Processing Large Numbers of RAW Images
- Remote Shooting
- Playing Back Movies and Saving Still Photos
- Working with RAW Movies
- Using HDR PQ Mode
- Specifying Preferences
- Reference
Canon R6 User Manual
Displayed below is the user manual for R6 by Canon which is a product in the Digital Cameras category. This manual has pages.
Related Manuals
3
Sorting
Images
1
2
4
5
Downloading
Images
Viewing
Images
Printing
Images
Editing
Images
6
Processing
Large Numbers
of RAW Images
7
Remote
Shooting
10
HDR PQ
Mode
8
Playing Back
Movies and Saving
Still Photos
11
Specifying
Preferences
9
Handling
RAW Movies
RAW Image Processing, Viewing and Editing Software
Digital Photo Professional
Ver. 4.14
Instruction Manual
lContent of this Instruction Manual
lDPP stands for Digital Photo Professional.
l indicates the selection procedure of the menu.
lSquare brackets are used to indicate items such
as menu names, button names and window
names that appear on the computer screen.
lText inside < > indicates a key on the keyboard.
lp.** indicates a reference page.
Click to move to the relevant page.
l indicates the function for advanced
users who are experienced in handling image
processing software.
l : Marks helpful information when a problem
arises.
Advanced
© CANON INC. 2021 CEL-SY3RA210
l : Marks tips for using the software skillfully.
l : Marks information that should be read
before use.
l : Marks additional information you may find
helpful.
lSwitching Between Pages
lClick on arrows on the bottom right of the screen.
: next page
: previous page
: return to a page you had previously
displayed
lClick on the chapter headings on the right side
of the screen to switch to the contents page of
that chapter. Also, click the item you want to
read about on the table of contents to move to
the relevant page.
ENGLISH
2
3
Sorting
Images
1
2
4
5
Downloading
Images
Viewing
Images
Printing
Images
Editing
Images
6
Processing
Large Numbers
of RAW Images
7
Remote
Shooting
10
HDR PQ
Mode
8
Playing Back
Movies and Saving
Still Photos
11
Specifying
Preferences
9
Handling
RAW Movies
Introduction
Main Features of DPP
Following are the main tasks you can perform with images you have
downloaded to your computer.
* indicates processing that can be performed with JPEG or
TIFF images as well as RAW images.
lView and organize images
lPlay back movies and save still photos
lAdjust an image
lVarious image adjustments while maintaining the original image
lFreely apply a Picture Style
lView your image before and after adjustment in the same window
lTrim and adjust the angle of an image
(trimming)
lResize an image
lCorrection of lens aberration
lDigital Lens Optimizer
lAutomatic/manual dust erasure processing
lConvert from a RAW image to a JPEG or
TIFF image and save
lProcess large numbers of RAW images in batches
lTransfer the image to image editing software
lPrint an image
lLink with EOS Utility for remote shooting
JPEG/TIFF
JPEG/TIFF
JPEG/TIFF
JPEG/TIFF
JPEG/TIFF
JPEG/TIFF
JPEG/TIFF
JPEG/TIFF
JPEG/TIFF
lColor management compatibility
lCMYK simulation for commercial printing
In DPP Ver. 4.8.20 or later, clicking [Check for updates] in the
[Digital Photo Professional 4] menu allows you to check for update
files on the server and download any update files that are available.
To use this function, an environment with Internet access
(subscription to a provider and an in-place line connection) is
required. Internet Service Provider (ISP) connection fees or access
point connection fees may apply.
3
3
Sorting
Images
1
2
4
5
Downloading
Images
Viewing
Images
Printing
Images
Editing
Images
6
Processing
Large Numbers
of RAW Images
7
Remote
Shooting
10
HDR PQ
Mode
8
Playing Back
Movies and Saving
Still Photos
11
Specifying
Preferences
9
Handling
RAW Movies
System Requirements
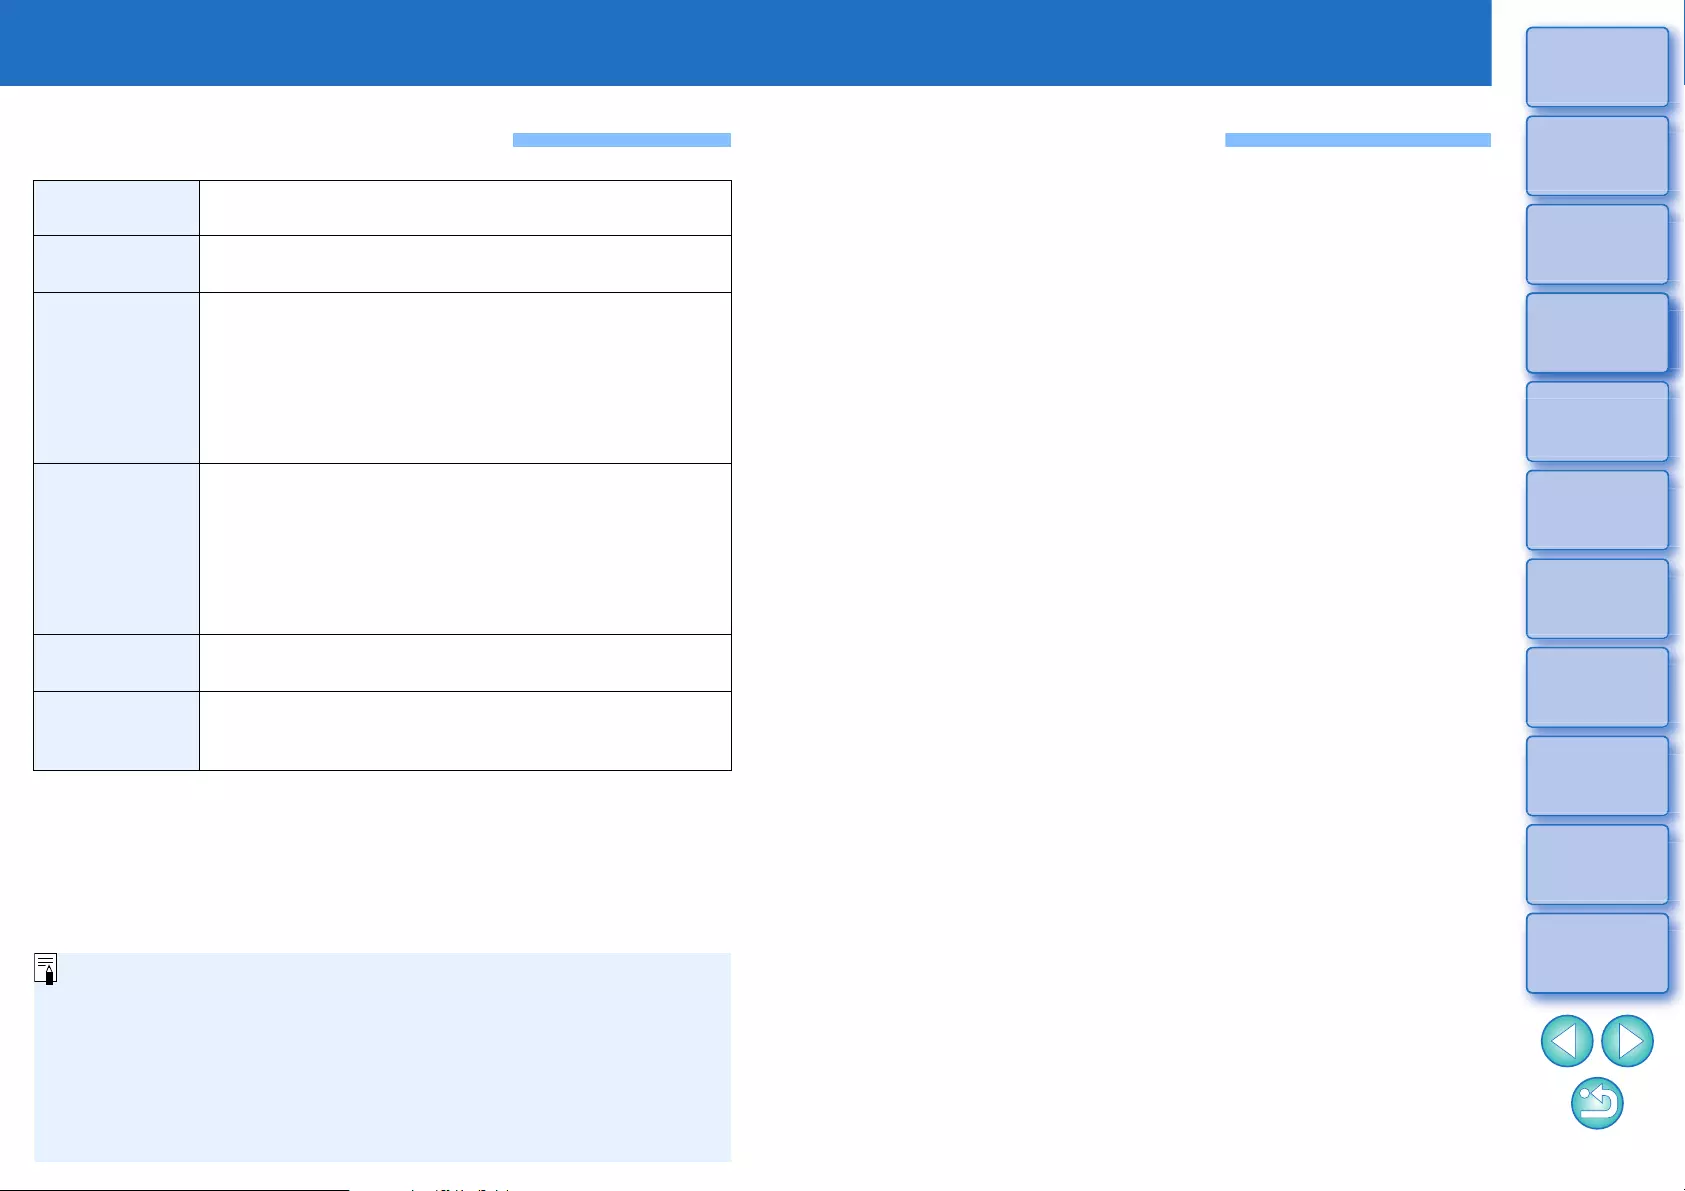
OS (operating
system) macOS 10.13 to 10.15, 11 (Intel-based Mac)
Model PC with one of the above OS preinstalled
(Upgraded machines not supported)
CPU
Images shot with EOS-1D X Mark III, EOS R5,
EOS R6:
Intel Core i series (recommended Intel Core i7 or
later)
Images shot with other cameras:
Core 2 Duo 2.0 GHz or faster (recommended Core i
series or later)
RAM
(memory)
Images shot with EOS-1D X Mark III, EOS R5,
EOS R6:
4.0 GB or more of RAM (8.0 GB or more
recommended)
Images shot with other cameras:
2.0 GB or more of RAM (4.0 GB or more
recommended)
Hard disk
drive
Installation: Min. 300 MB of available space
Operation: Min. 600 MB of available space
Display
Resolution: XGA (1024 x 768) or more (1600 x 1200
or more recommended)
Colors: 16-bit color (65536 colors) or more
lFor information on system requirements for HDR PQ mode
(including supported images), see “System Requirements for
HDR PQ Mode” (p.165).
lFor details on system requirements for the RAW movie tool, see
“Working with RAW Movies” (p.154).
lFor images supported by depth compositing, see “Using Depth
Compositing” “Supported Images” (p.117).
Supported Cameras
EOS-1D X Mark III, EOS-1D X Mark II, EOS-1D X, EOS-1D C,
EOS-1D Mark IV, EOS-1Ds Mark III, EOS-1D Mark III, EOS-1D Mark II N,
EOS-1Ds Mark II, EOS-1D Mark II, EOS-1D, EOS-1Ds, EOS 5DS/
EOS 5DS R, EOS 5D Mark IV, EOS 5D Mark III, EOS 5D Mark II,
EOS 5D, EOS 6D Mark II, EOS 6D, EOS 7D Mark II, EOS 7D,
EOS 90D, EOS 80D, EOS 70D, EOS 60D/EOS 60Da, EOS 50D,
EOS 40D, EOS 30D, EOS 20D/EOS 20Da, EOS 10D, EOS D2000,
EOS D30, EOS D60, EOS 77D, EOS 760D, EOS 850D, EOS 800D,
EOS 750D, EOS 700D, EOS 250D, EOS 200D, EOS 100D, EOS 2000D,
EOS 1300D, EOS 1200D, EOS 650D, EOS 600D, EOS 550D, EOS 500D,
EOS 450D, EOS 1000D, EOS 1100D, EOS 400D, EOS 350D,
EOS 4000D, EOS 300D, EOS R5, EOS R6, EOS R, EOS Ra, EOS RP,
EOS M6 Mark II, EOS M6, EOS M5, EOS M3, EOS M2, EOS M,
EOS M10, EOS M200, EOS M100, EOS M50 Mark II, EOS M50,
PowerShot G3 X*1, PowerShot G1 X Mark II*1, PowerShot G7 X*1,
PowerShot G9 X*1, PowerShot SX60 HS*1, PowerShot G5 X*1,
PowerShot G7 X Mark II*1, PowerShot G16*1, PowerShot S120*1,
PowerShot G1 X*1, PowerShot G15*1, PowerShot S110*1, PowerShot
S100*1,
PowerShot G9 X Mark II
*1
, PowerShot G1 X Mark III
*1
,
PowerShot G9
*1*2
,
PowerShot G10*1*2, PowerShot G11*1*2, PowerShot
G12*1*2, PowerShot S90*1*2, PowerShot S95*1*2, PowerShot SX1
IS*1*2, PowerShot SX50 HS*1*2, PowerShot SX70 HS*1*2, PowerShot
G5 X Mark II*1, and PowerShot G7 X Mark III*1
*1 For RAW images, functions that are not in the camera (such as the
Auto Lighting Optimizer) and functions such as the Digital Lens
Optimizer cannot be used. However, Picture Styles, even if not in the
camera, can be used with the exception of some functionality.
*2 The following functions are unavailable.
- Basic Adjustment tool palette:
White balance [Fine-tune]
A portion of [Gamma adjustment]
Automatic gradation and luminance adjustment
Midpoint adjustment
Input white points range expansion
- Dust Delete/Copy Stamp tool palette
- Compositing tool
- HDR tool
4
3
Sorting
Images
1
2
4
5
Downloading
Images
Viewing
Images
Printing
Images
Editing
Images
6
Processing
Large Numbers
of RAW Images
7
Remote
Shooting
10
HDR PQ
Mode
8
Playing Back
Movies and Saving
Still Photos
11
Specifying
Preferences
9
Handling
RAW Movies
Supported Images
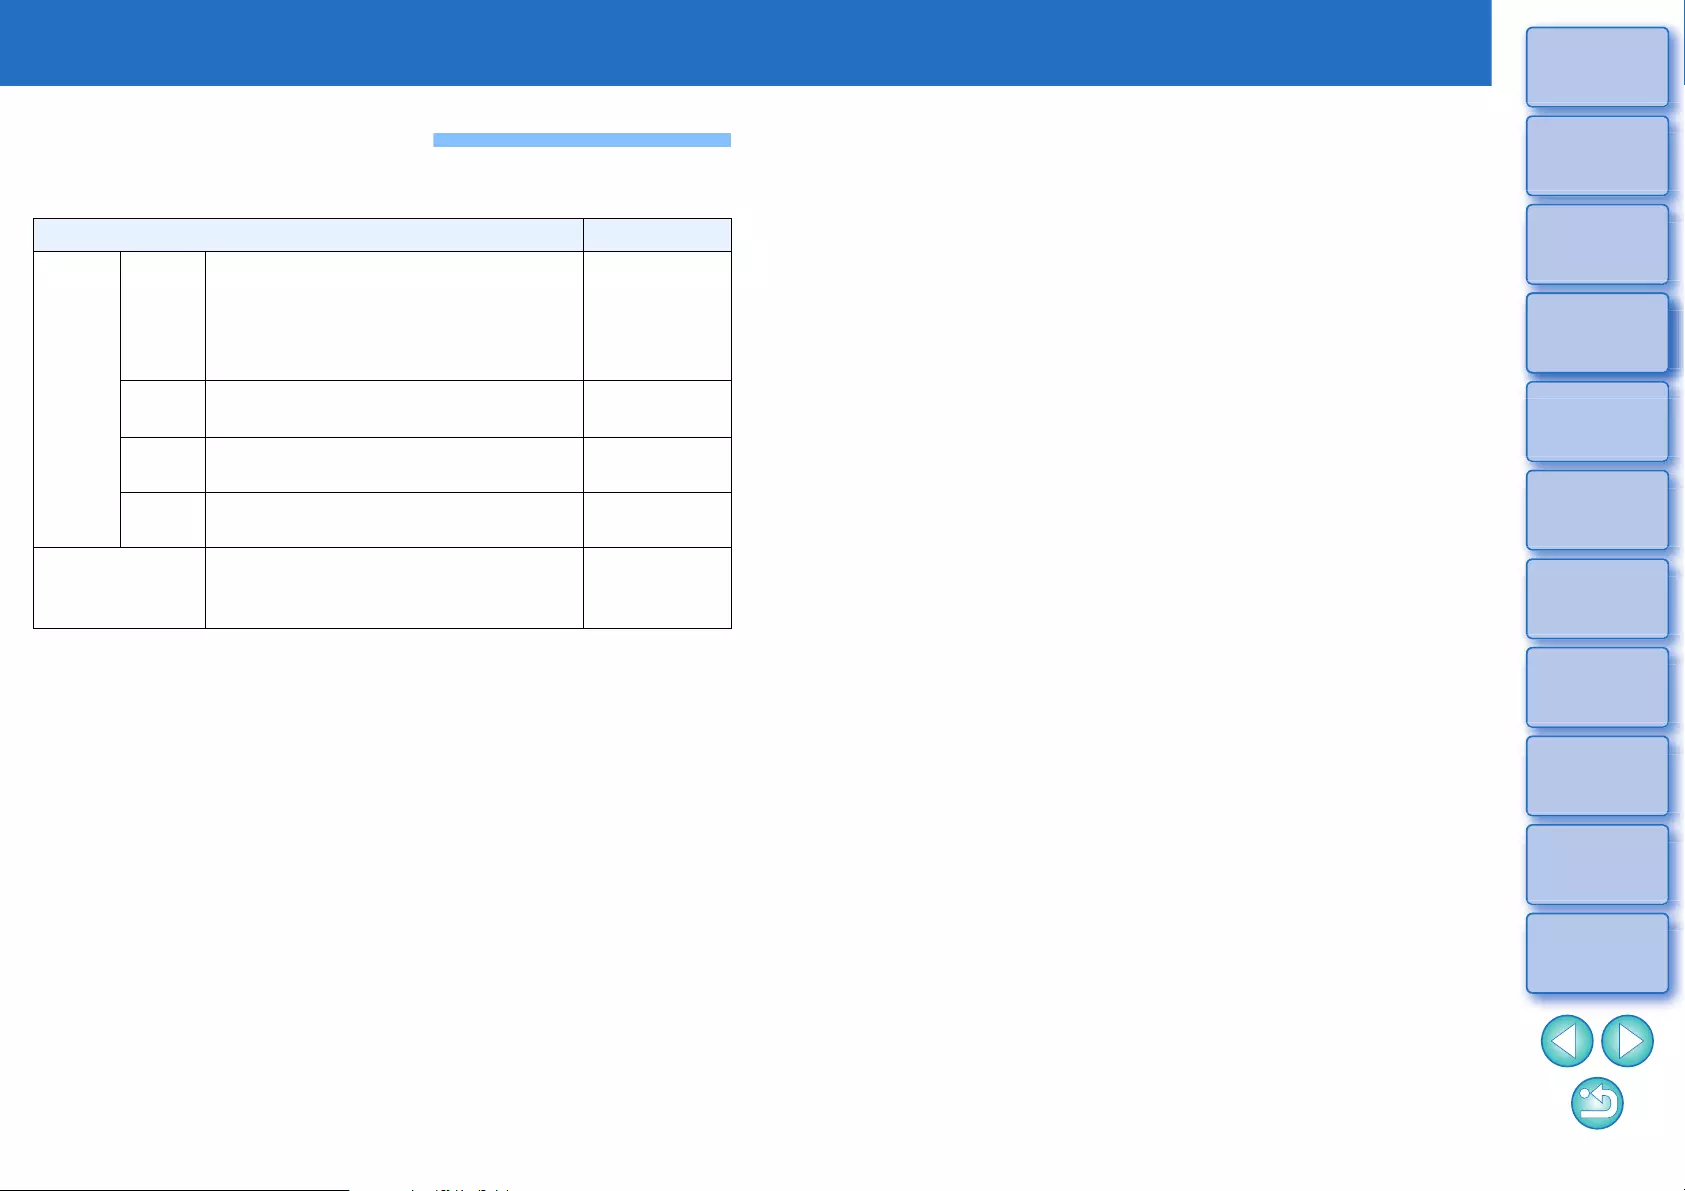
Image data
*Compatible with RAW images shot with EOS D2000 that have been
converted to RAW images using the CR2 Converter and have the
“.CR2” extension.
Image type Extension
Still
photos
RAW
images
Images in the Canon RAW format
shot on supported cameras*
.CR3
.CR2
.TIF
.CRW
.CIP
JPEG
images
Exif 2.2, 2.21 or 2.3-compatible JPEG
images .JPG/.JPEG
TIFF
images Exif-compatible TIFF images .TIF/.TIFF
HEIF
images
Images shot on supported cameras,
or HEIF images developed in DPP .HIF/.HEIC
Movies Movies shot with supported cameras
.MOV
.MP4
.CRM
5
3
Sorting
Images
1
2
4
5
Downloading
Images
Viewing
Images
Printing
Images
Editing
Images
6
Processing
Large Numbers
of RAW Images
7
Remote
Shooting
10
HDR PQ
Mode
8
Playing Back
Movies and Saving
Still Photos
11
Specifying
Preferences
9
Handling
RAW Movies
Contents
Introduction ................................................................ 2
Main Features of DPP .................................................. 2
System Requirements .................................................. 3
Supported Cameras...................................................... 3
Supported Images ........................................................ 4
1 Downloading Images .............................................. 9
Starting up DPP ......................................................... 10
Downloading Images to Your Computer.................... 11
Downloading Images Using the Software “EOS
Utility”..................................................................... 11
Downloading Images Using Your Card Reader..... 11
2 Viewing Images .................................................... 12
Viewing Images in the Main Window (Thumbnail
Layout)....................................................................... 13
Changing the Thumbnail Display........................... 14
Enlarging and Viewing an Image in the Preview
Window ...................................................................... 18
Enlarging and Viewing a Specific Area.................. 19
Checking the Image in Detail ....................... 20
Displaying the Main Window (Multi-layout)............ 20
Checking an Image Using the Preview Control
Panel...................................................................... 21
Checking an Image in Multi-Function Preview....... 25
Checking an Image in Second Windows ............... 26
Opening and Closing Window Panels (Panes).......... 27
Changing the Display Method and Order of
Palettes...................................................................... 28
Changing the Display Method (Dock/Float) of
Palettes.................................................................. 28
Rearranging Palettes ............................................. 28
Quitting DPP .............................................................. 29
Advanced
3 Organizing and Sorting Images ........................... 30
Efficiently Checking/Sorting Images ........................... 31
Sorting Images ....................................................... 33
Sorting Images in the Main Window ....................... 34
Arranging Images in the Main Window................... 36
Displaying a RAW Image and JPEG Image as a
Single Image........................................................... 37
Checking Image Information................................... 38
Organizing Images ..................................................... 39
Deleting an Unwanted Image ................................. 39
Moving Images ....................................................... 39
Moving Images in Folders ...................................... 40
Registering Frequent-Use Folders (Bookmark
Registration) ........................................................... 40
4 Editing Images ..................................................... 41
RAW Images .............................................................. 44
RAW Images .......................................................... 44
RAW Development ................................................. 44
When RAW Development is to be Done ................ 44
Advantages of a RAW Image ................................. 44
Editing JPEG and TIFF Images.................................. 45
Tool Palettes............................................................... 46
Editing with the Basic Adjustment Tool
Palette ........................................................................ 48
Adjusting Brightness............................................... 48
Changing the Picture Style ..................................... 49
Using a Picture Style File.......................... 51
Adjusting Color Tone by Changing White
Balance................................................................... 51
Adjusting Color Tone Using Click White
Balance................................................................... 52
Adjusting White Balance with Color
Temperature ........................................................... 53
JPEG/TIFF
Advanced
Advanced
6
3
Sorting
Images
1
2
4
5
Downloading
Images
Viewing
Images
Printing
Images
Editing
Images
6
Processing
Large Numbers
of RAW Images
7
Remote
Shooting
10
HDR PQ
Mode
8
Playing Back
Movies and Saving
Still Photos
11
Specifying
Preferences
9
Handling
RAW Movies
Tuning White Balance .............................. 53
Adjusting Contrast ................................................. 54
Adjusting Brightness of Shadows/
Highlights ............................................................... 54
Changing Color Tone and Color Saturation........... 55
Adjusting Dynamic Range........................ 56
Adjusting Gradation and Luminance
Automatically ......................................................... 57
Using the Auto Lighting Optimizer ......................... 58
Adjust Face Lighting .............................................. 59
Adjusting Image Sharpness................................... 59
Adjusting Clarity..................................................... 61
Editing with the Tone Adjustment Tool
Palette........................................................................ 62
Adjusting Brightness and Contrast ........................ 62
Adjusting Color Tone Using Click White
Balance.................................................................. 63
Adjusting Tone Curve............................... 64
Adjusting Dynamic Range........................ 66
Using the Auto Lighting Optimizer ......................... 66
Editing with the Color Adjustment Tool
Palette........................................................................ 67
Editing with the Color Adjustment Tool
Palette.................................................................... 67
Editing with the Detailed Adjustment Tool
Palette........................................................................ 69
Reducing Noise ..................................................... 69
Adjusting Image Sharpness................................... 70
Reducing Color Moiré in an Image ........................ 70
Editing with the Trimming/Angle
Adjustment Tool Palette............................................. 71
Editing with the Lens Correction Tool Palette............ 74
Correcting Lens Aberration.................................... 74
Making Corrections................................................ 75
Advanced
Advanced
Advanced
JPEG/TIFF
Advanced
Advanced
JPEG/TIFF
Advanced
JPEG/TIFF
JPEG/TIFF
Shooting Distance Information Slider ..................... 77
Correcting Multiple Images at a Time..................... 78
Digital Lens Optimizer ............................................ 78
Using the Digital Lens Optimizer ............................ 79
Adjusting Image Sharpness.................................... 81
Editing with the Partial Adjustment
Tool Palette ................................................................ 82
Making Partial Adjustments to Images
([Brightness], [Contrast], [Hue], [Saturation]).......... 82
Making Partial Adjustments to Images ([Reduce
color moiré])............................................................ 84
Adjustment Groups................................................. 85
Editing with the Dust Delete/Copy Stamp
Tool Palette ................................................................ 86
Performing Automatic Dust Erasure Processing .... 86
Automatic Dust Erasure Processing in the Main
Window................................................................... 87
Manually Erasing Dust (Repair Function)............... 88
Erasing Unwanted Parts of an Image (Copy
Stamp Function) ..................................................... 90
Setting Work Color Space .......................................... 91
Using the Soft-Proof Colors Function ......................... 92
Specifying the Size when Opening RAW Images....... 93
Displaying and Saving RAW Images.......................... 94
Saving Editing Results............................... 95
Saving Editing Contents to an Image ..................... 95
Saving as a separate image ................................... 95
Re-Editing an Image.................................. 97
Utilizing Adjustment Contents (Recipe) ..... 98
Copying a Recipe and Applying to Another
Image...................................................................... 99
Saving a Recipe as a File....................................... 99
Loading and Applying Recipes ............................. 100
JPEG/TIFF Advanced
JPEG/TIFF
JPEG/TIFF
JPEG/TIFF
JPEG/TIFF
7
3
Sorting
Images
1
2
4
5
Downloading
Images
Viewing
Images
Printing
Images
Editing
Images
6
Processing
Large Numbers
of RAW Images
7
Remote
Shooting
10
HDR PQ
Mode
8
Playing Back
Movies and Saving
Still Photos
11
Specifying
Preferences
9
Handling
RAW Movies
Adjusting by Comparing Multiple
Images..................................................................... 101
Editing Efficiently .................................... 102
Editing in the Edit Image Window ........................ 102
Changing the Thumbnail Display Position to
Horizontal............................................................. 103
Gathering and Editing Images in the Collection
Window ................................................................ 104
Compositing Images ............................... 106
Compositing Methods .......................................... 109
Creating HDR (High Dynamic Range)
Images..................................................................... 110
Using the Dual Pixel RAW Optimizer ......... 113
Microadjustment of the Position of Maximum
Sharpness and Resolution Using the Depth
Information Contained within the Dual Pixel RAW
File .......................................................................... 113
Reposition the Viewpoint or Foreground
Bokeh for a More Pleasing Result ....................... 114
Reduces the Appearance of Ghosting in
Images ................................................................. 115
Using Depth Compositing.......... 117
Supported Images ............................................... 117
Using the Depth Compositing Tool ...................... 117
Using the Depth Compositing Editing Tool .......... 119
Using the RAW Burst Image Tool .............. 122
Starting Up the RAW Burst Image Tool ............... 122
Changing the Representative Image in a Roll ..... 124
Saving One Image in a Roll ................................. 124
Extracting and Saving Any Range in a Roll ......... 125
Transferring a RAW Image to
Photoshop................................................................ 126
Customizing the Main Window Toolbar...... 127
JPEG/TIFF
JPEG/TIFF
JPEG/TIFF
JPEG/TIFF
Advanced
JPEG/TIFF Advanced
Advanced
Advanced
Advanced
Using Cloud Processing.............................. 128
Supported Images ................................................ 128
Requirements for Using this Function .................. 128
Enabling Cloud Processing .................................. 128
Cloud Processing and CIP Image Editing ............ 129
Using Noise Reduction (Cloud) ............................ 130
5 Printing Images .................................................. 131
Printing an Image ..................................................... 132
Printing with Shooting Information............................ 133
Printing a Thumbnail List (Contact Sheet Printing)... 134
Plug-in printing.......................................................... 135
6 Processing Large Numbers of RAW Images ..... 136
Batch Apply White Balance to Images (Personal
White Balance) ......................................................... 137
Registering Personal White Balance .................... 137
Applying Personal White Balance ........................ 138
Batch Save as JPEG or TIFF Images (Batch
Processing)............................................................... 139
Batch Transfer Images to Image Editing
Software ................................................................... 141
Batch Change the File Name of Images................... 142
Changing the File Name of Images in the Order
in the Main Window .............................................. 142
7 Remote Shooting ............................................... 143
Remote Shooting...................................................... 144
Registering Click White Balance in the Camera... 147
8 Playing Back Movies and Saving Still Photos.... 149
Playing Back Movies and Saving Still Photos .......... 150
9 Working with RAW Movies................................. 153
Working with RAW Movies ....................................... 154
Supported Cameras ............................................. 154
Advanced
8
3
Sorting
Images
1
2
4
5
Downloading
Images
Viewing
Images
Printing
Images
Editing
Images
6
Processing
Large Numbers
of RAW Images
7
Remote
Shooting
10
HDR PQ
Mode
8
Playing Back
Movies and Saving
Still Photos
11
Specifying
Preferences
9
Handling
RAW Movies
Changing the Image Displayed for a RAW
Movie ................................................................... 154
Grabbing and Saving a Displayed RAW Movie
Image................................................................... 155
Saving Several Still Photos from a RAW Movie........
155
Starting Up the RAW Movie Tool......................... 157
Playing Back RAW Movies .................................. 159
Saving any Range of a RAW Movie as Still
Photos.................................................................. 160
Grabbing and Saving any Range from a RAW
Movie ................................................................... 161
Editing a RAW Movie........................................... 161
10 Using HDR PQ Mode ....................................... 164
HDR PQ Mode......................................................... 165
System Requirements for HDR PQ Mode ............... 165
Displaying Images in HDR PQ Mode....................... 166
Cautions when Using HDR PQ Mode...................... 167
Saving Images Displayed in HDR PQ Mode in
JPEG/TIFF Format .................................................. 169
Working with Files Saved in HEVC Format ............. 170
11 Specifying Preferences .................................... 171
Specifying Preferences............................................ 172
General Settings .................................................. 172
Image processing ................................................ 173
Color Management .............................................. 175
View Settings ....................................................... 176
Properties Display Settings.................................. 177
Survey.................................................................. 178
Reference............................................................... 179
Troubleshooting ....................................................... 180
Deleting the Software (Uninstalling) ........................ 181
Image Frame Information in the Main Window and
Edit Image Window.................................................. 182
Glossary ................................................................... 183
Index......................................................................... 185
About This Instruction Manual .............................. 189
Trademarks .......................................................... 189
* Sections with and in “4 Editing Images”
support not only RAW image editing but also JPEG/TIFF image
editing.
: All the functions explained in the section support
JPEG/TIFF image editing.
: Certain functions explained in the section support
JPEG/TIFF image editing.
JPEG/TIFF JPEG/TIFF
JPEG/TIFF
JPEG/TIFF
1
9
3
Sorting
Images
1
2
4
5
Downloading
Images
Viewing
Images
Printing
Images
Editing
Images
6
Processing
Large Numbers
of RAW Images
7
Remote
Shooting
10
HDR PQ
Mode
8
Playing Back
Movies and Saving
Still Photos
11
Specifying
Preferences
9
Handling
RAW Movies
Downloading Images
Starting up DPP....................................................... 10
Downloading Images to Your Computer.................. 11
Downloading Images Using the Software “EOS Utility”.......
11
Downloading Images Using Your Card Reader.......... 11
10
3
Sorting
Images
1
2
4
5
Downloading
Images
Viewing
Images
Printing
Images
Editing
Images
6
Processing
Large Numbers
of RAW Images
7
Remote
Shooting
10
HDR PQ
Mode
8
Playing Back
Movies and Saving
Still Photos
11
Specifying
Preferences
9
Handling
RAW Movies
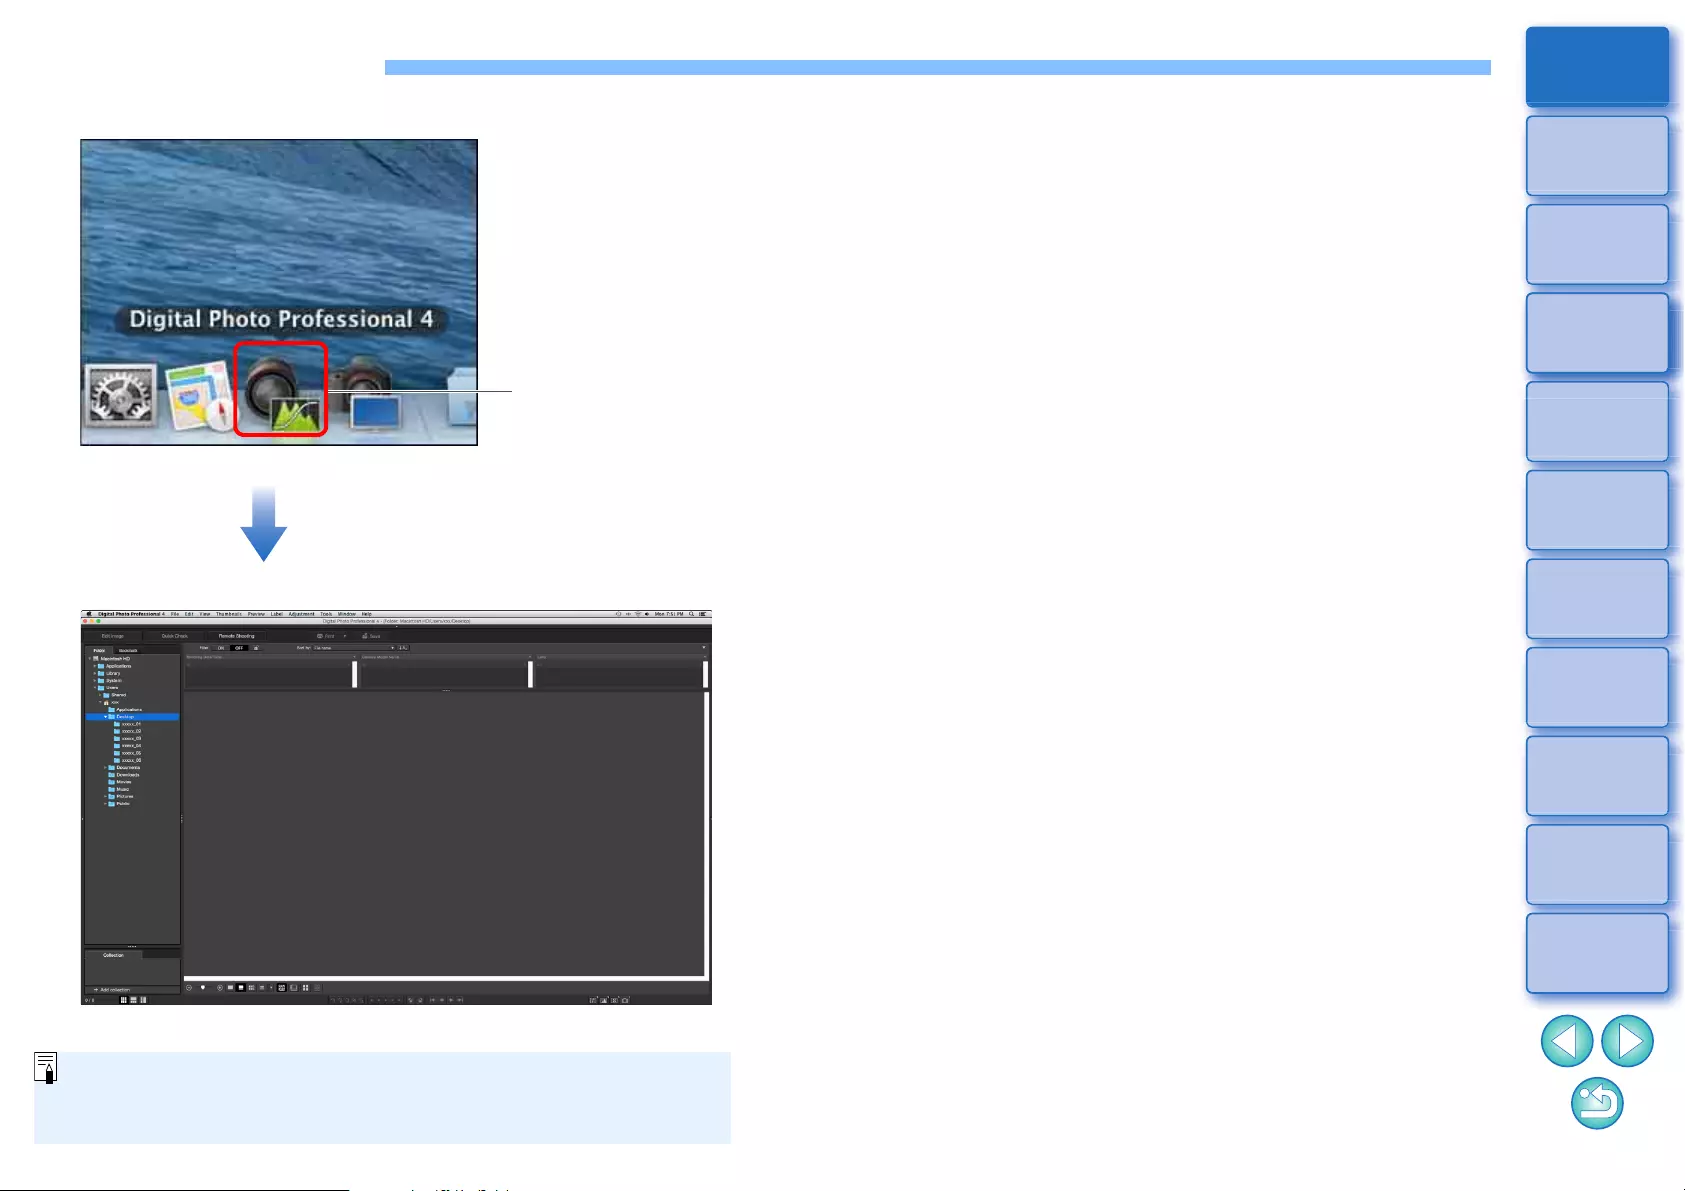
Starting up DPP
Double-click the Dock icon.
ÜDPP starts up and the main window (thumbnail layout) appears.
If you drop a DPP-supported image file onto the icon on the Dock,
you can start up DPP and display the folder where the image file is
saved.
Double-click
Main window (thumbnail layout)
11
3
Sorting
Images
1
2
4
5
Downloading
Images
Viewing
Images
Printing
Images
Editing
Images
6
Processing
Large Numbers
of RAW Images
7
Remote
Shooting
10
HDR PQ
Mode
8
Playing Back
Movies and Saving
Still Photos
11
Specifying
Preferences
9
Handling
RAW Movies
Downloading Images to Your Computer
Download the images saved on the memory card inserted in the
camera.
You can download images with “EOS Utility”, communication software
for the camera.
For detailed instructions on downloading images, refer to the “EOS
Utility Instruction Manual” (PDF electronic manual).
Downloading Images Using the Software “EOS Utility”
You can also download images to the computer using a third-party card
reader.
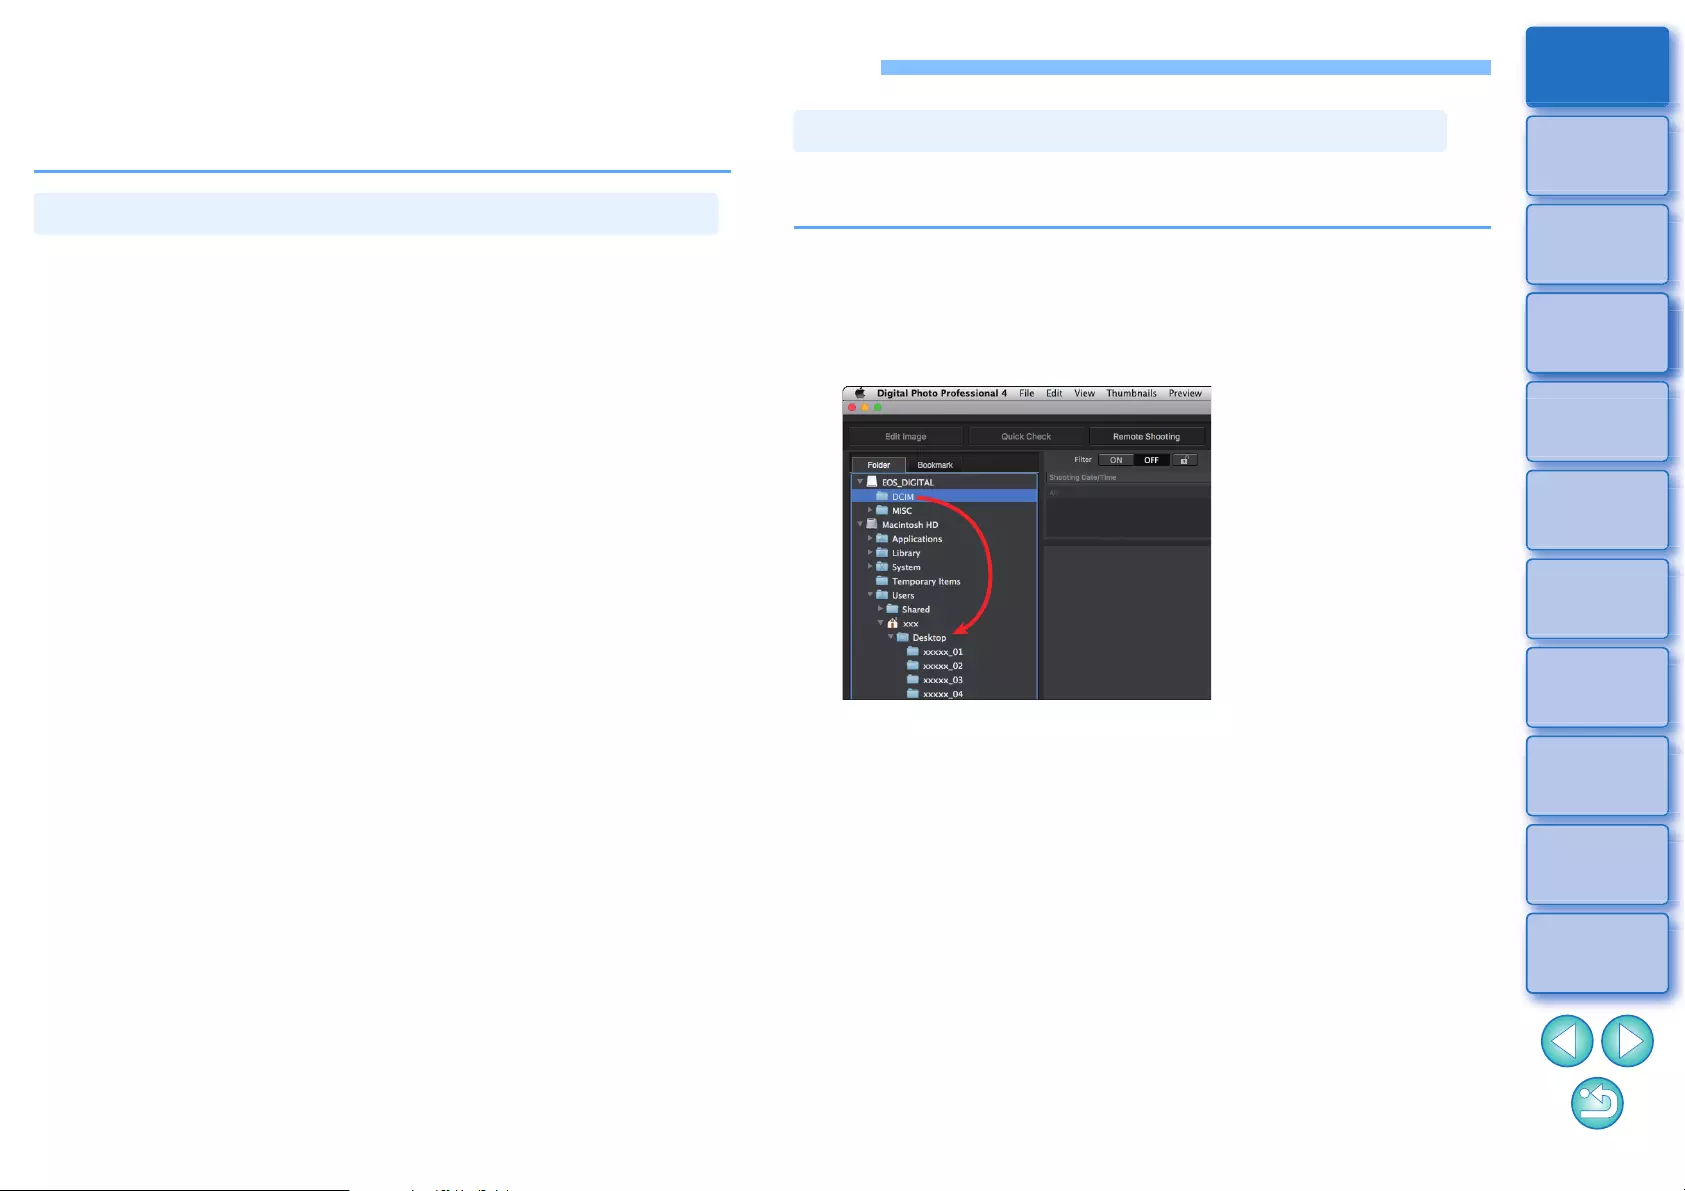
1Load the memory card into the card reader.
lStart up DPP beforehand.
2Open a removable disk icon in the folder area and
drag the [DCIM] folder to the [Desktop].
ÜThe [DCIM] folder is copied to your computer.
lAll images are saved in folder units inside the [DCIM] folder.
lCopying images to your computer will take some time when there
is a large number of images saved on the memory card.
Downloading Images Using Your Card Reader
2
12
3
Sorting
Images
1
2
4
5
Downloading
Images
Viewing
Images
Printing
Images
Editing
Images
6
Processing
Large Numbers
of RAW Images
7
Remote
Shooting
10
HDR PQ
Mode
8
Playing Back
Movies and Saving
Still Photos
11
Specifying
Preferences
9
Handling
RAW Movies
Viewing Images
Viewing Images in the Main Window (Thumbnail Layout) ..
13
Changing the Thumbnail Display................................ 14
Using the Thumbnails Control Panel ........ 15
Using the Thumbnail Display Filter/Sort
Function.................................................................. 16
Displaying the Histogram Palette.............. 17
Enlarging and Viewing an Image in the Preview Window ............
18
Enlarging and Viewing a Specific Area....................... 19
Displaying the Navigator Palette ............... 19
Checking the Image in Detail ...................... 20
Displaying the Main Window (Multi-layout)................. 20
Checking an Image Using the Preview Control Panel.........
21
Changing the Magnification .................................... 21
Comparing with a Pinned (Fixed) Image ................ 21
Displaying Multiple Images at the Same Time ....... 22
Displaying Grid Lines.............................................. 22
Displaying AF Points .............................................. 22
Displaying Areas Beyond the Set Range with
Warning Indicators (Highlight/Shadow Warning).... 23
Comparing Pre- and Post-Editing Images (Single-
Image Display)........................................................ 23
Comparing Pre- and Post-Editing Images (before/
after comparison) Arrange vertically/horizontally
(two-screen display) / Split vertically/horizontally
(split-image display)................................................ 24
Displaying Image Properties................................... 24
Checking an Image in Multi-Function Preview ........... 25
Checking an Image in Second Windows .................... 26
Opening and Closing Window Panels (Panes)........ 27
Changing the Display Method and Order of Palettes .......
28
Changing the Display Method (Dock/Float) of Palettes.......
28
Rearranging Palettes.................................................. 28
Quitting DPP............................................................ 29
Advanced
Advanced
Advanced
Advanced
Advanced
13
3
Sorting
Images
1
2
4
5
Downloading
Images
Viewing
Images
Printing
Images
Editing
Images
6
Processing
Large Numbers
of RAW Images
7
Remote
Shooting
10
HDR PQ
Mode
8
Playing Back
Movies and Saving
Still Photos
11
Specifying
Preferences
9
Handling
RAW Movies
Viewing Images in the Main Window (Thumbnail Layout)
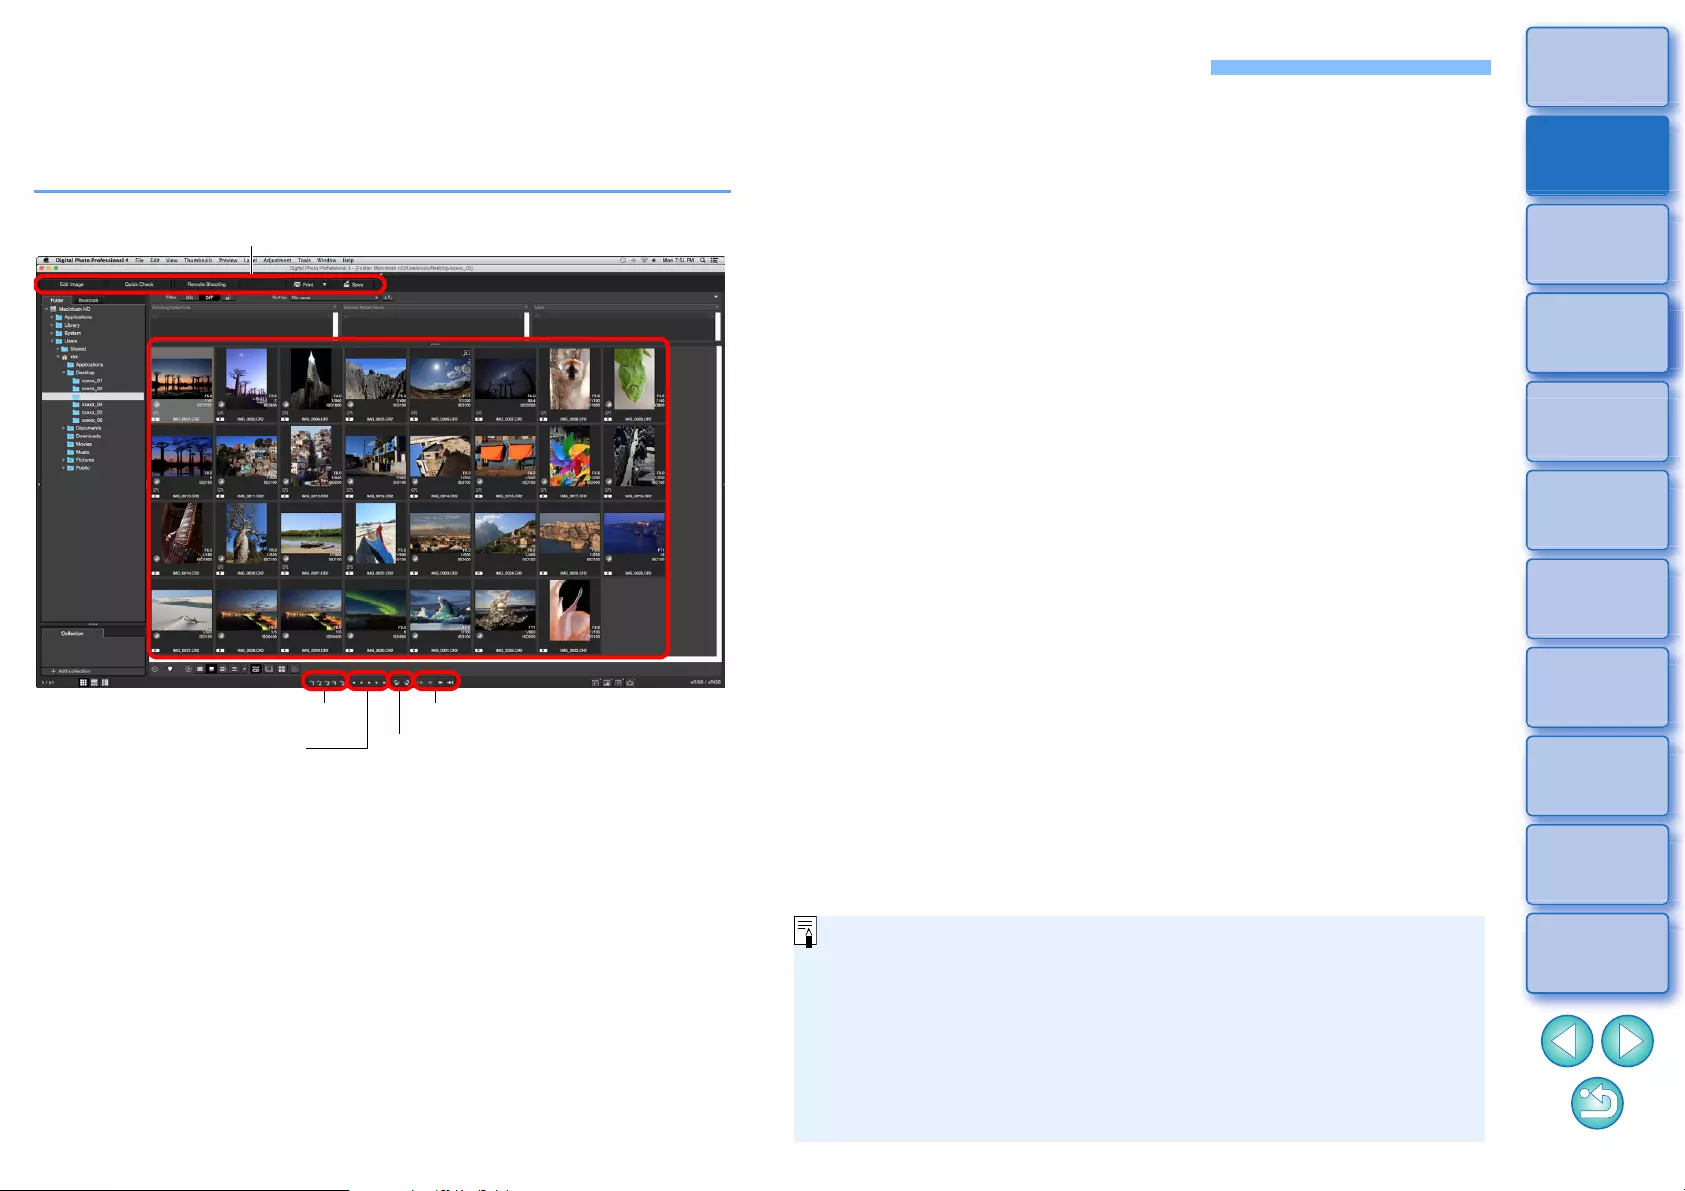
Images downloaded to your computer are displayed as a thumbnails list
in the main window (thumbnail layout). You can double-click an image to
open the preview window (p.18) and display the image at large size.
lFor information on icons displayed on the frame of a thumbnail,
see “Image Frame Information in the Main Window and Edit
Image Window” (p.182).
Main window
Ratings (p.33, p.34) Rotate image
Forward/Reverse
Check marks (p.33, p.34)
Toolbar
lFor information on movie files, see “Playing Back Movies and
Saving Still Photos” (p.150).
lWhen aspect ratio information is attached to an image shot with
any supported camera other than the EOS 5D Mark II, the image
is displayed as a cropped image (p.71).
lIn the main window, in addition to this view (thumbnail layout),
you can select multi-layout. Multi-layout allows you to check the
image in detail (p.20).
14
3
Sorting
Images
1
2
4
5
Downloading
Images
Viewing
Images
Printing
Images
Editing
Images
6
Processing
Large Numbers
of RAW Images
7
Remote
Shooting
10
HDR PQ
Mode
8
Playing Back
Movies and Saving
Still Photos
11
Specifying
Preferences
9
Handling
RAW Movies
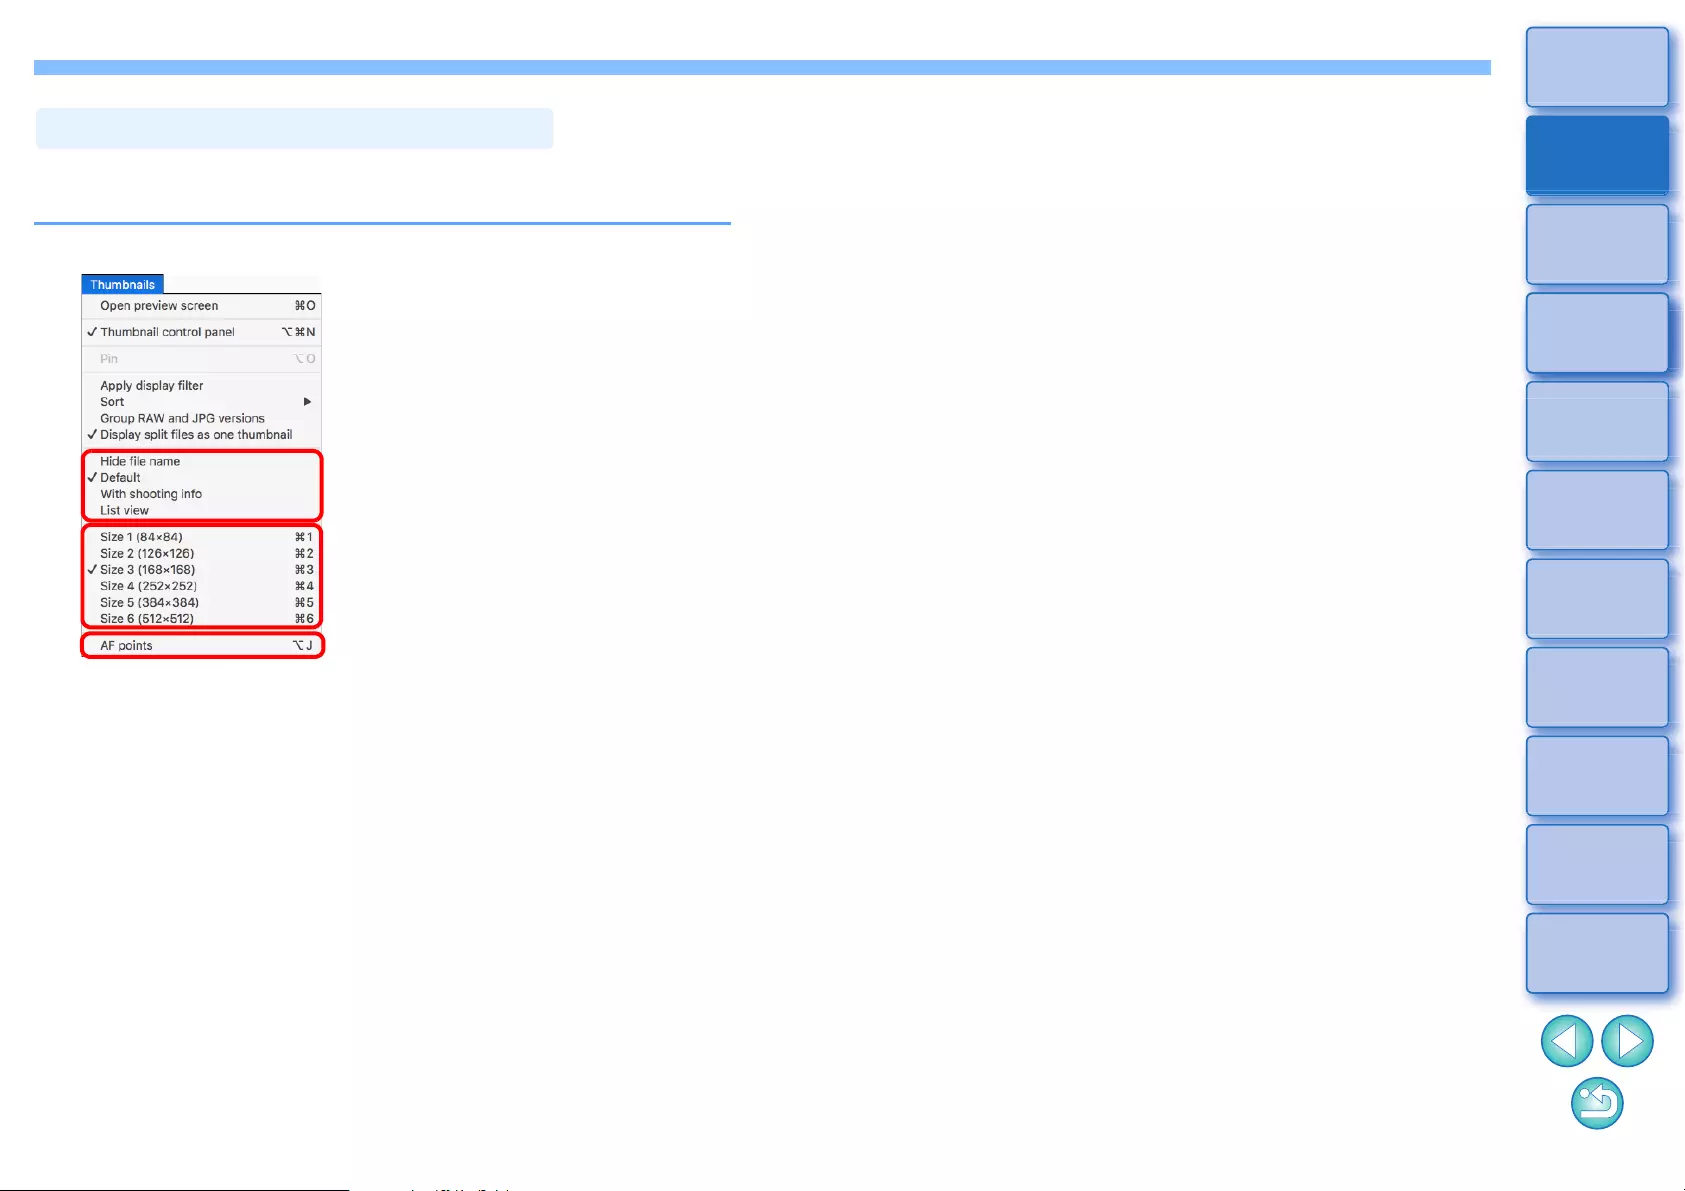
You can change the size of the thumbnail images displayed in the main
window and select the information displayed for thumbnails.
Select the [Thumbnails] menu desired item.
ÜThe display changes to the selected item.
Changing the Thumbnail Display
15
3
Sorting
Images
1
2
4
5
Downloading
Images
Viewing
Images
Printing
Images
Editing
Images
6
Processing
Large Numbers
of RAW Images
7
Remote
Shooting
10
HDR PQ
Mode
8
Playing Back
Movies and Saving
Still Photos
11
Specifying
Preferences
9
Handling
RAW Movies
Using the Thumbnails Control Panel
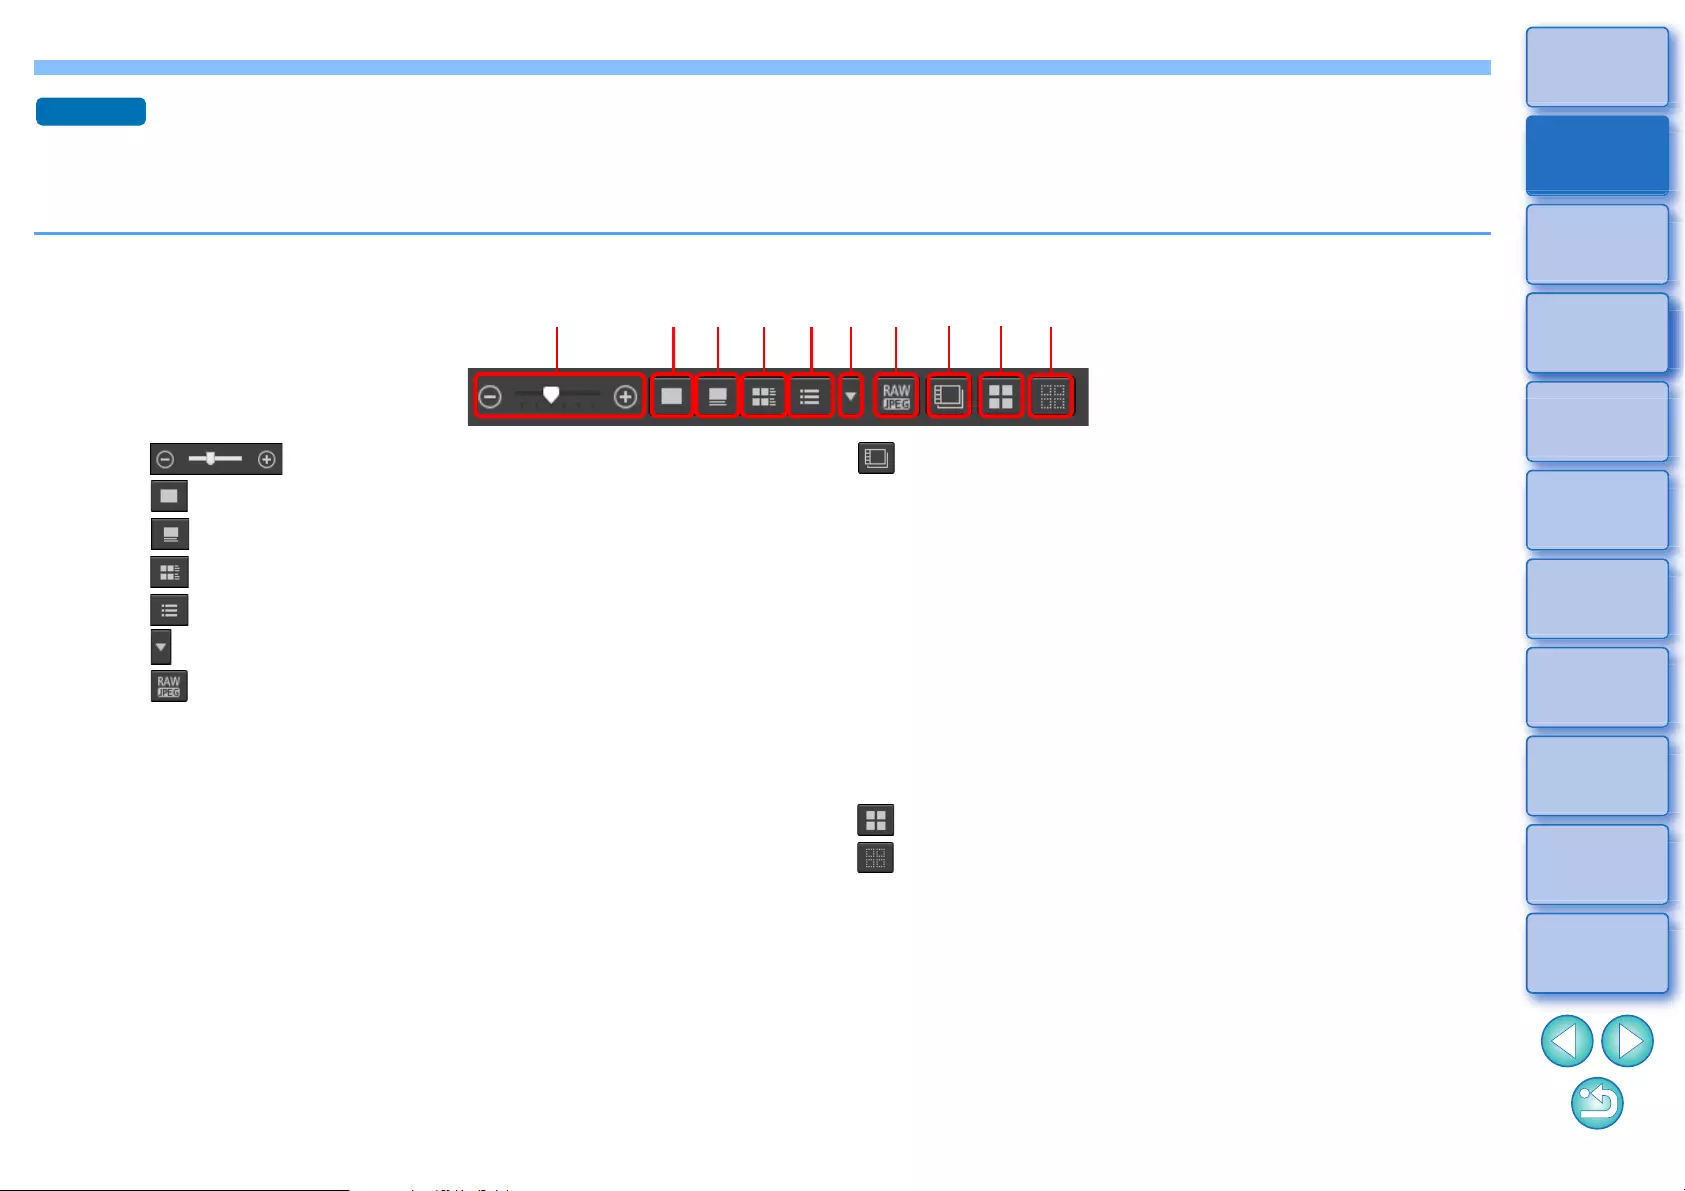
The thumbnails control panel integrates various settings for viewing thumbnails.
By using this panel, you can view and specify the settings for thumbnails efficiently.
Thumbnails control panel functions
Advanced
(1) Change the size of thumbnails
(2) Display thumbnails without file names
(3) Display standard thumbnails
(4) Display thumbnails with information
(5) Display thumbnails in list
(6) Specify properties display settings (p.177)
(7) Display a RAW image and JPEG image as a single image
Display a RAW image and JPEG image that were shot together
as a single image. When this setting is specified, viewing and
editing of images are as follows.
• Image displayed: Only the RAW image is displayed in all
windows.
• Edited image: The content which has been edited with any of
DPP’s functions (the tool palette etc.) will be applied to the
RAW image only. However, if you have used the following
functions, the adjustments will be applied to both the RAW
image and the JPEG image.
Deleting an image (p.39)
Moving or copying an image (p.39)
Checkmarking (p.33 to p.34)
Rating (p.33 to p.34)
Rotating an image (p.13)
(8) Display or play back split movie files as single movies
When you play back split movie files in DPP, this setting plays
back all the movie files in a continuous sequence from the
beginning.
• This is set to ON by default.
• Only the thumbnail for the first movie file is displayed.
• This setting will be kept and applied the next time DPP is
started up.
• When the following functions are used, they apply to all the
remaining split movie files, not just the first movie file:
[Copy], [Cut], [Delete], [Add to collection], [Rename Tool]
• When the Filter/Sort function (p.16) is used with thumbnails,
the function is only applied to the first movie file.
(9) Select all thumbnails
(10) Cancel all thumbnail selections
lThe thumbnails control panel is displayed in the main window by
default. If it is not displayed, such as when screen settings have
been changed, you can display it by selecting [Thumbnail control
panel] in the [Thumbnails] menu.
lIn multi-layout (vertical thumbnails, p.20), only the thumbnail view
setting (Default thumbnail display) is possible.
(1) (2) (3) (4) (7) (8) (9)(6)
(5) (10)
16
3
Sorting
Images
1
2
4
5
Downloading
Images
Viewing
Images
Printing
Images
Editing
Images
6
Processing
Large Numbers
of RAW Images
7
Remote
Shooting
10
HDR PQ
Mode
8
Playing Back
Movies and Saving
Still Photos
11
Specifying
Preferences
9
Handling
RAW Movies
Using the Thumbnail Display Filter/Sort
Function
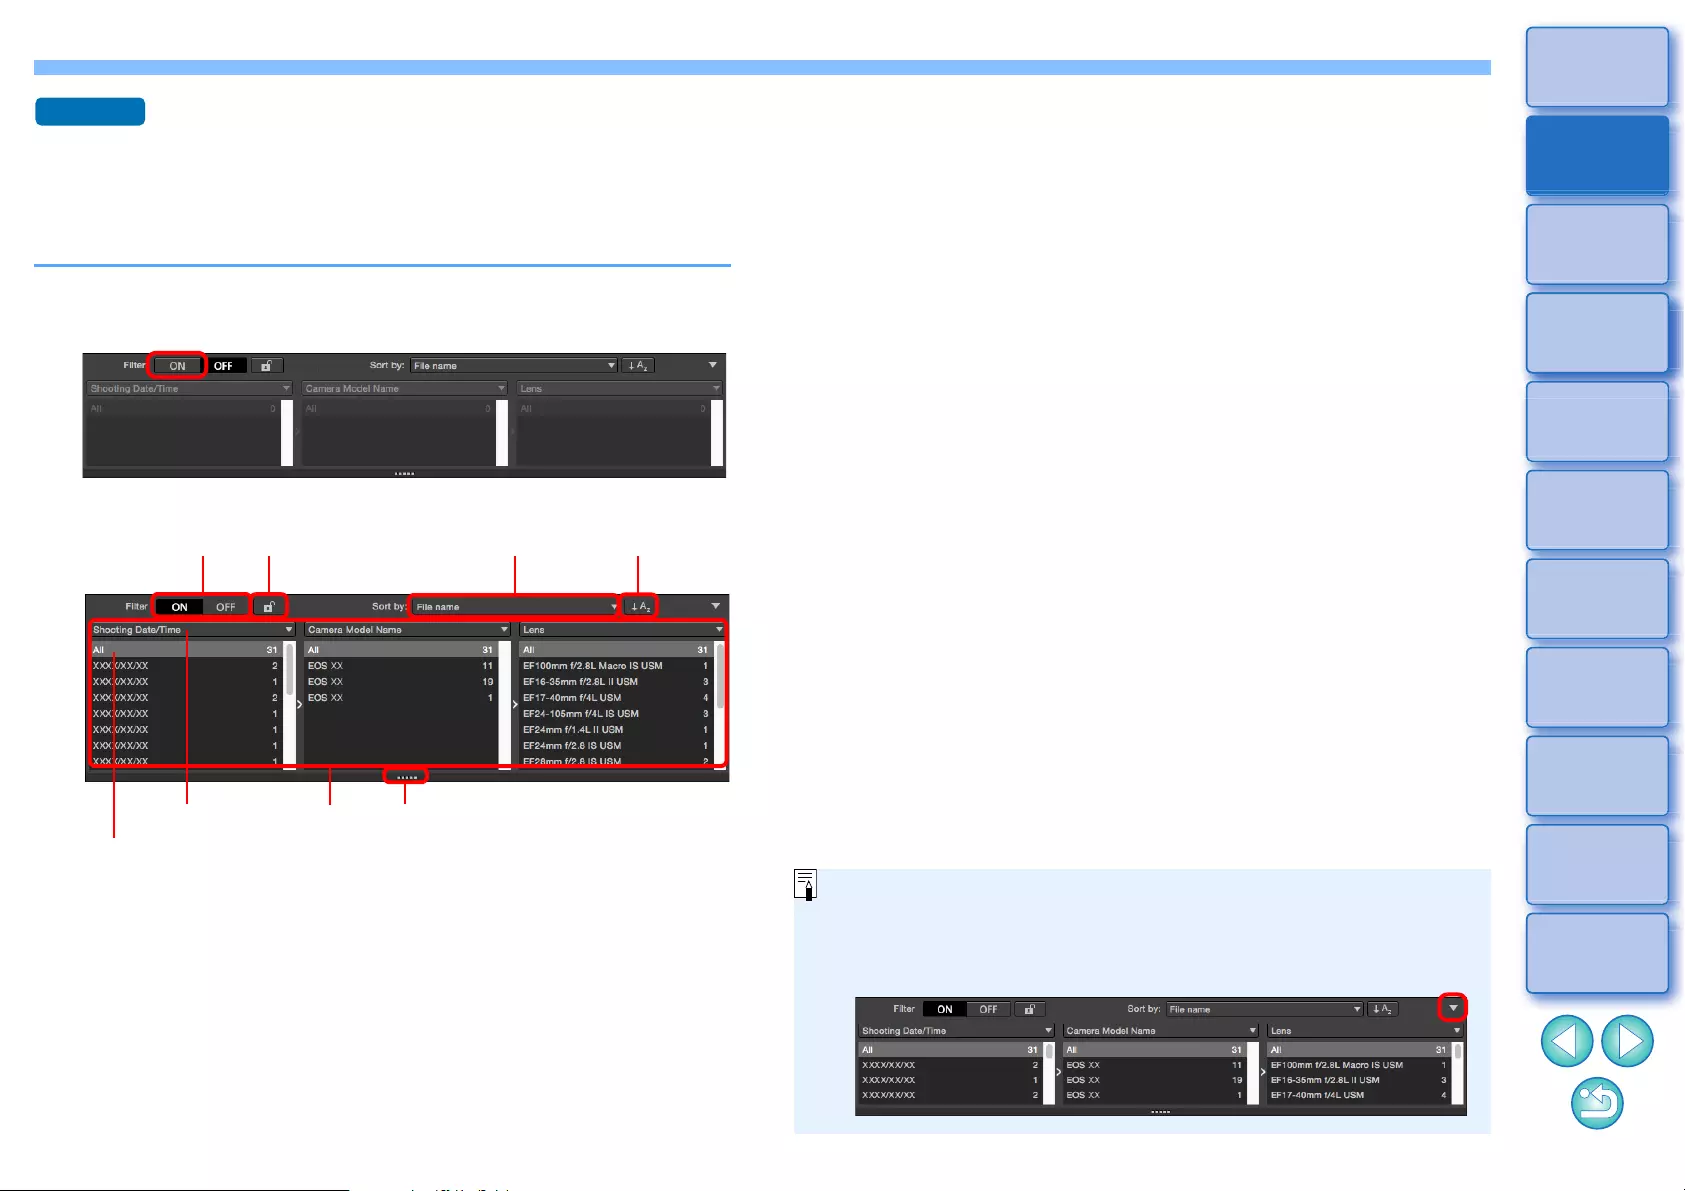
This function allows you to display only thumbnails that match the
selected filtering option or to specify an option for sorting thumbnails.
(1) Thumbnail display filter ON/OFF
By setting to [ON], only thumbnails matching the filtering option set
with (2) the filtering options menu are displayed.
1Set the [Filter] button on the [Filter/Sort pane] in the
main window to [ON].
2Specify settings.
lYou can drag the bottom edge of the [Filter/Sort pane] to adjust
the display area of the filter menu lists upward or downward.
Advanced
(1) (5) (3) (4)
(2) Drag to adjust display area of filter
menu lists upward or downward
Filter menu
Filter menu list
(2) Filtering options menu
Select a filtering option for the thumbnail display filter.
• After selecting a filtering item in the list box that appears by clicking
[] at the right on the filter menu, options appear in the filter menu
list. Select an option.
• You can select multiple options in the filter menu list.
(Hold down the <shift> key and click with the mouse for
consecutive selection. Hold down the <command> key and click
with the mouse to select individually.)
• The filter menus/filter menu lists are prioritized from left to right.
You can specify filtering options from left to right to narrow down
filtering.
(3) Sorting options
Select an option for sorting thumbnails. If files were added, a “*” is
temporarily displayed after the option name. [Custom] is displayed if
you sorted thumbnails in a chosen way.
(4) Sort order selection
Select the order (ascending/descending) for sorting thumbnails.
(5) Filter lock button
When the filter lock button is clicked, filter settings will be kept and
applied when you switch to a different folder or the next time DPP is
started up. When the filter lock button is not clicked, filter settings
automatically change to [OFF] when you switch to a different folder
or the next time DPP is started up.
lIn addition to thumbnail display, this function can also be used in
multi-layout.
lYou can open/close the panel by clicking the [] button at the
upper right of the [Filter/Sort pane].
17
3
Sorting
Images
1
2
4
5
Downloading
Images
Viewing
Images
Printing
Images
Editing
Images
6
Processing
Large Numbers
of RAW Images
7
Remote
Shooting
10
HDR PQ
Mode
8
Playing Back
Movies and Saving
Still Photos
11
Specifying
Preferences
9
Handling
RAW Movies
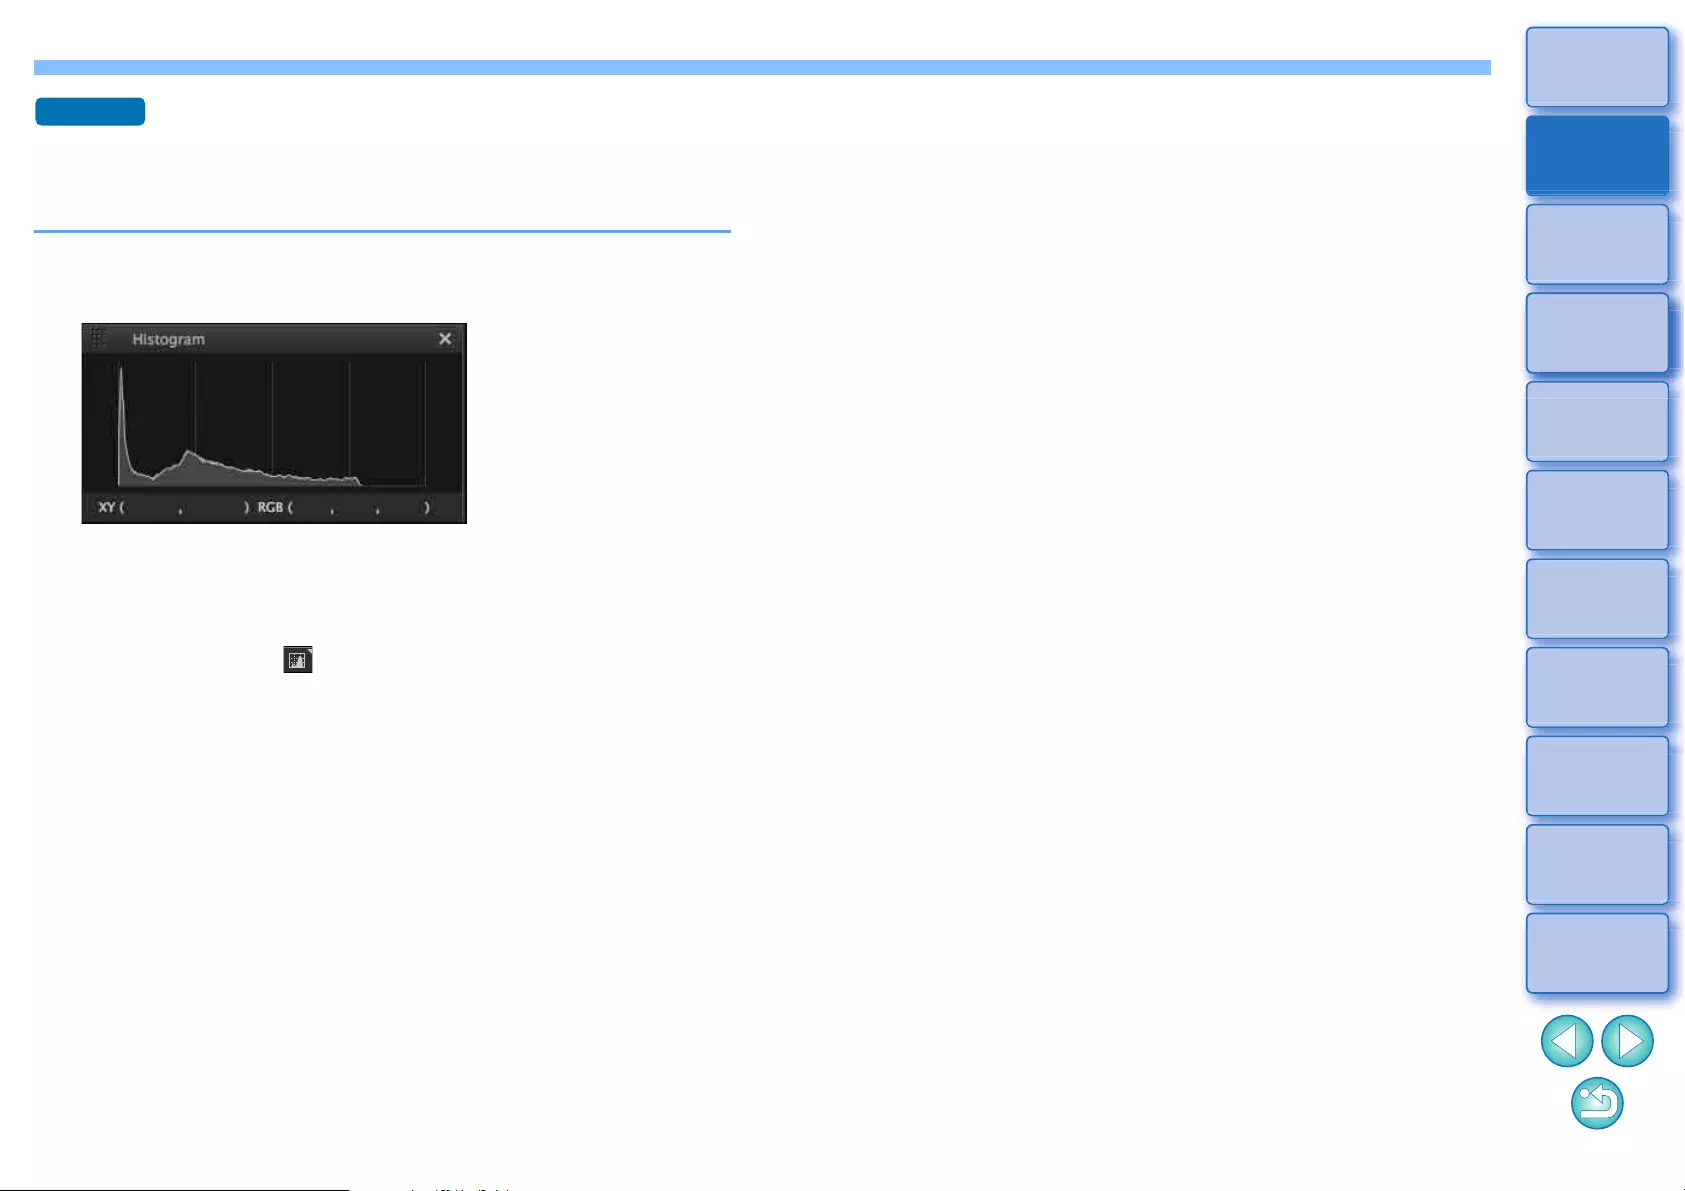
Displaying the Histogram Palette
The histogram palette shows a histogram of the selected image. You
can quickly check a histogram without opening a tool palette.
Select the [View] menu [Histogram palette].
ÜThe histogram palette appears.
lYou can select any of the following four histograms from the
menu that appears when you right-click with the mouse.
[Brightness only], [RGB separately], [YRGB separately], [RGB
together]
lYou can click the [ ] button at the bottom right of the main
window to show/hide the [Histogram] palette.
Advanced
18
3
Sorting
Images
1
2
4
5
Downloading
Images
Viewing
Images
Printing
Images
Editing
Images
6
Processing
Large Numbers
of RAW Images
7
Remote
Shooting
10
HDR PQ
Mode
8
Playing Back
Movies and Saving
Still Photos
11
Specifying
Preferences
9
Handling
RAW Movies
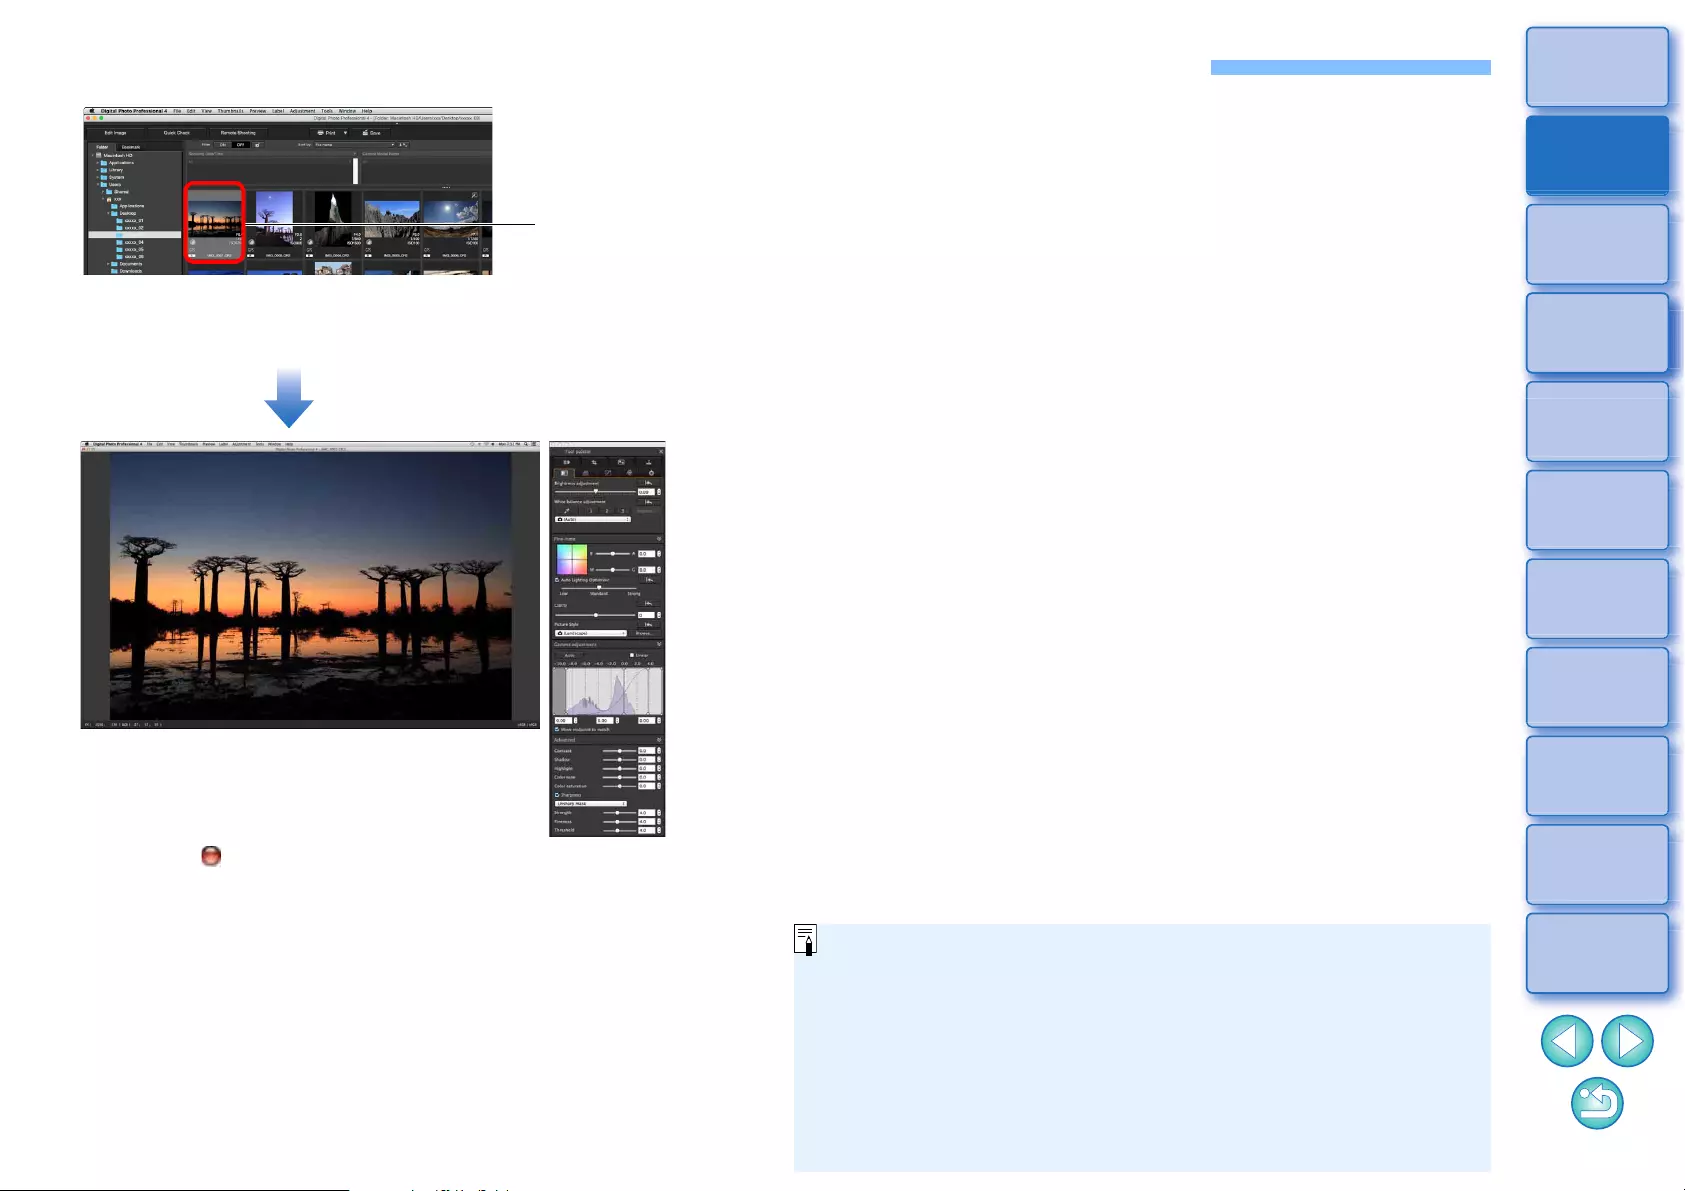
Enlarging and Viewing an Image in the Preview Window
ÜThe preview window appears.
lUp to 36 windows can be displayed at the same time for the
preview window.
lClick the [ ] in the Upper left of the preview window to close the
preview window.
Double-click
Preview window Tool palette
By selecting the [Preview] menu [AF points] in the preview
window, you can display the AF points selected in the camera at
the time of shooting. However, AF points are not displayed for
images whose image size has been changed and then been
converted and saved (p.95), images for which you selected an
effect other than [Shot settings] as correction of fisheye lens
distortion aberration, or images which have had settings specified
during RAW processing on the camera for distortion correction or
chromatic aberration correction.
19
3
Sorting
Images
1
2
4
5
Downloading
Images
Viewing
Images
Printing
Images
Editing
Images
6
Processing
Large Numbers
of RAW Images
7
Remote
Shooting
10
HDR PQ
Mode
8
Playing Back
Movies and Saving
Still Photos
11
Specifying
Preferences
9
Handling
RAW Movies
Click the area you want to enlarge.
ÜThe area you clicked is enlarged to 100% (actual pixel size).
lClick again to revert to the full view.
lTo change the display area drag on the image.
Enlarging and Viewing a Specific Area
Click
Select any enlargement ratio from the [Preview] menu.
To display an image in an enlargement ratio other than 100%
While in the preview window, you can select the [Preview] menu
[Preview control panel] to use various preview functions. For details,
see “Checking an Image Using the Preview Control Panel” (p.21).
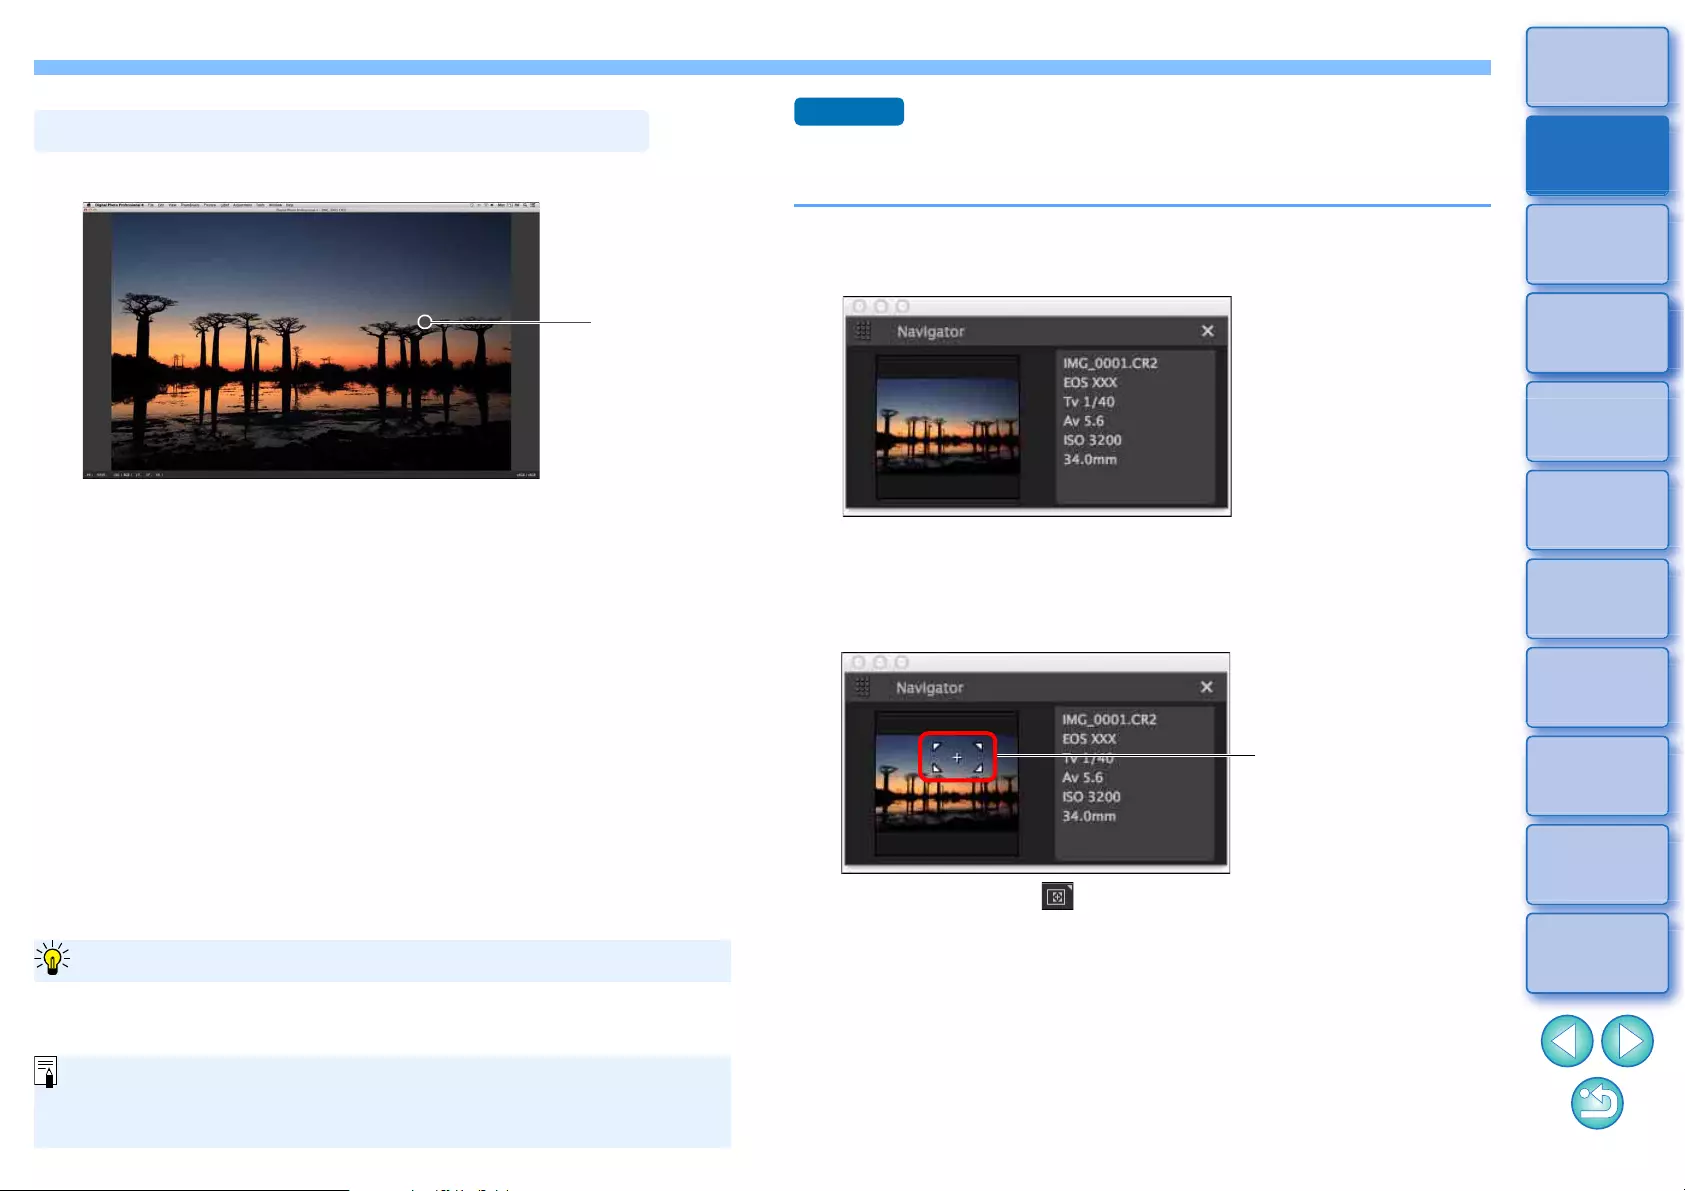
Displaying the Navigator Palette
The navigator palette shows the enlargement area of a selected image.
Select the [View] menu [Navigator palette].
ÜThe navigator palette appears.
lWhen an image is enlarged in the preview or other window, the
enlargement display area is indicated in the navigator palette.
The area to be enlarged can be changed by dragging the
enlargement display area on the image.
lYou can click the [ ] button at the bottom right of the main
window to show/hide the [Navigator] palette.
Advanced
Change the
enlargement display
area by dragging
20
3
Sorting
Images
1
2
4
5
Downloading
Images
Viewing
Images
Printing
Images
Editing
Images
6
Processing
Large Numbers
of RAW Images
7
Remote
Shooting
10
HDR PQ
Mode
8
Playing Back
Movies and Saving
Still Photos
11
Specifying
Preferences
9
Handling
RAW Movies
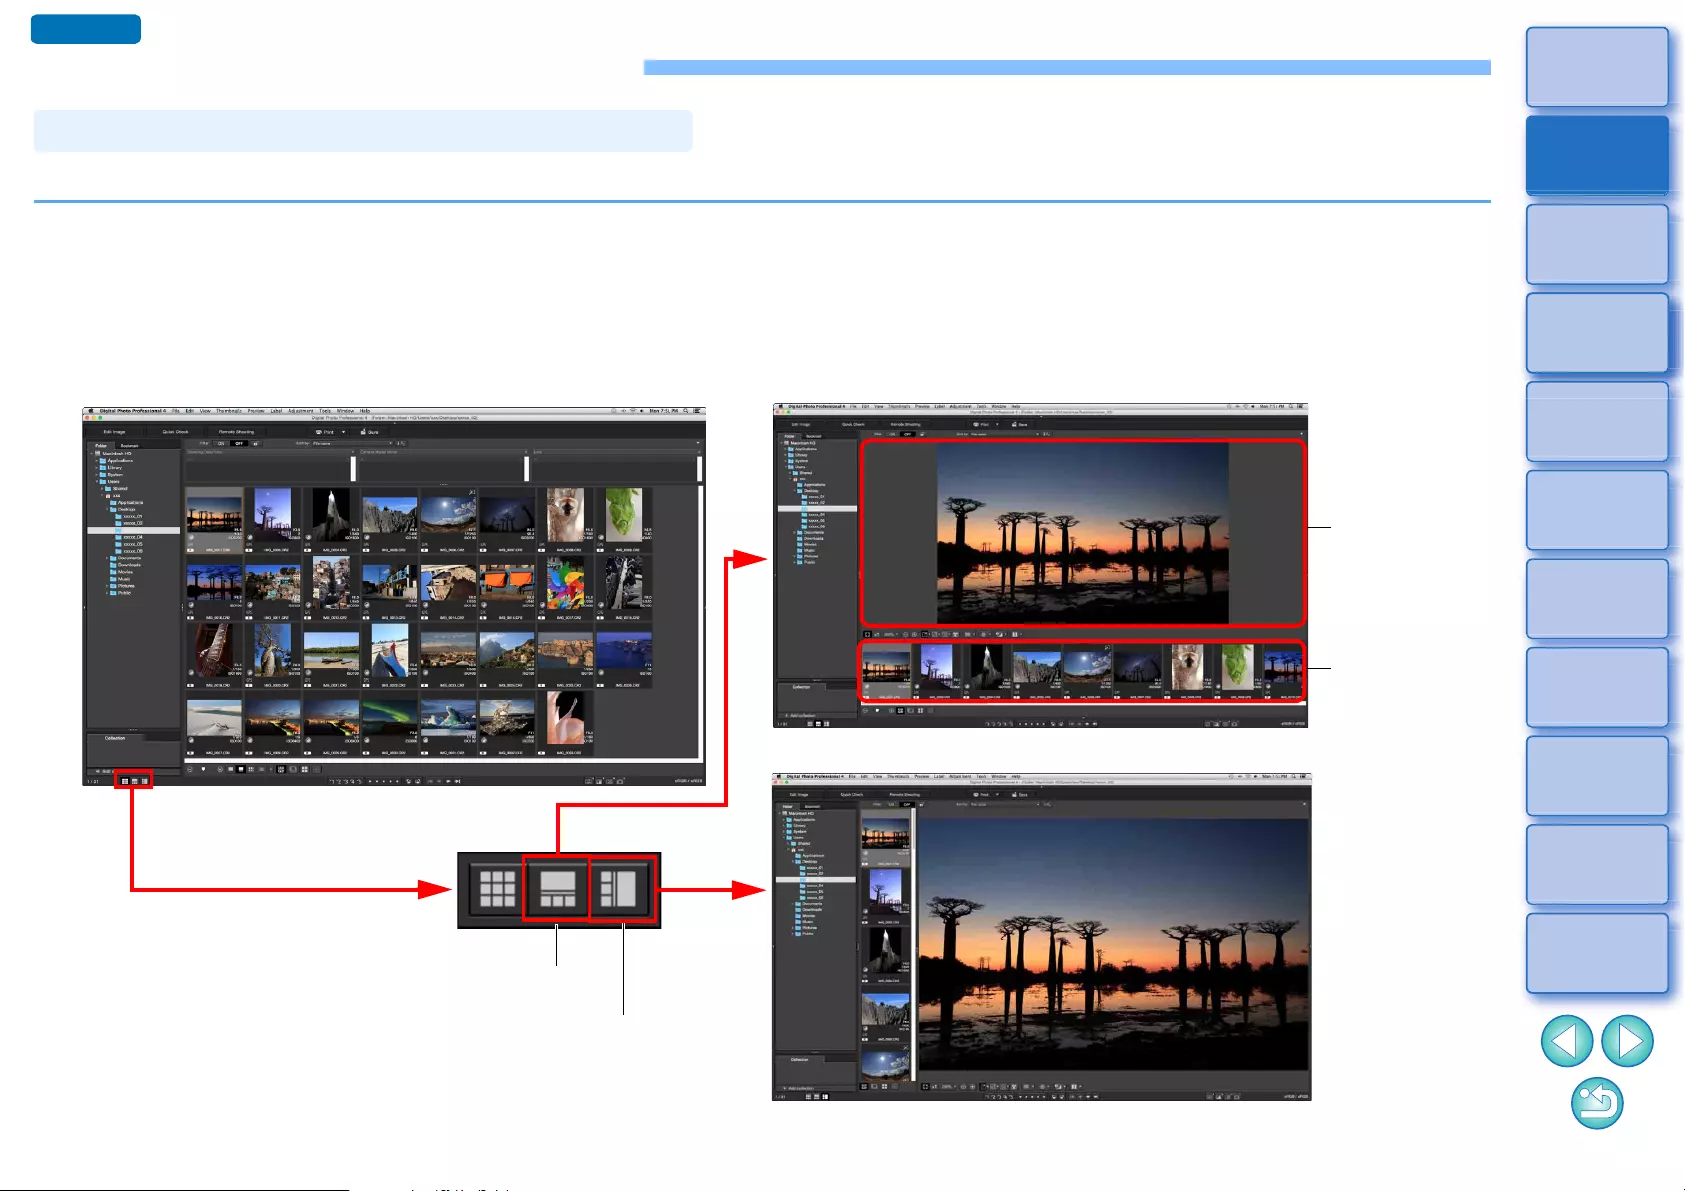
Checking the Image in Detail
By switching the main window to “multi-layout”, you can use the preview control panel to check the image in detail.
Click a change layout button at the bottom of the main window (thumbnail layout).
ÜThe main window (multi-layout) appears.
lIn the main window (multi-layout), you can select from two layouts, with horizontal thumbnails or vertical thumbnails.
lClick the area you want to enlarge in the image displayed in the preview display area to display the image at actual pixel size (100%). Click the
image again to revert to full display.
Displaying the Main Window (Multi-layout)
Preview
display area
Thumbnail
display area
Multi-layout (vertical thumbnails)
Multi-layout (horizontal thumbnails)
Layout change button
Main Window (thumbnail layout)
Vertical thumbnails
Horizontal thumbnails
Advanced
21
3
Sorting
Images
1
2
4
5
Downloading
Images
Viewing
Images
Printing
Images
Editing
Images
6
Processing
Large Numbers
of RAW Images
7
Remote
Shooting
10
HDR PQ
Mode
8
Playing Back
Movies and Saving
Still Photos
11
Specifying
Preferences
9
Handling
RAW Movies
With Preview control panel, you can check the image in detail.
You can use this panel in the main window (multi-layout) and edit image
window. If the preview control panel is not displayed, you can display it
by selecting [Preview control panel] from the [Preview] menu. By
default, the [] button and [ ] button are selected. When you select a
movie, the displayed content changes. For information on the display
when movies are selected, see “Playing Back Movies and Saving Still
Photos” (p.150).
Changing the Magnification
Checking an Image Using the Preview Control Panel
Display the image at actual pixel size (100%).
Click the [ ] button to display the image at the set
magnification displayed. If the [ ] button is used to
enlarge/reduce the image, the magnification set for this
button also changes accordingly*.
*Excluding actual pixel size (100%)
Enlarge/reduce the image.
Revert the zoomed image back to fit-to-window view.
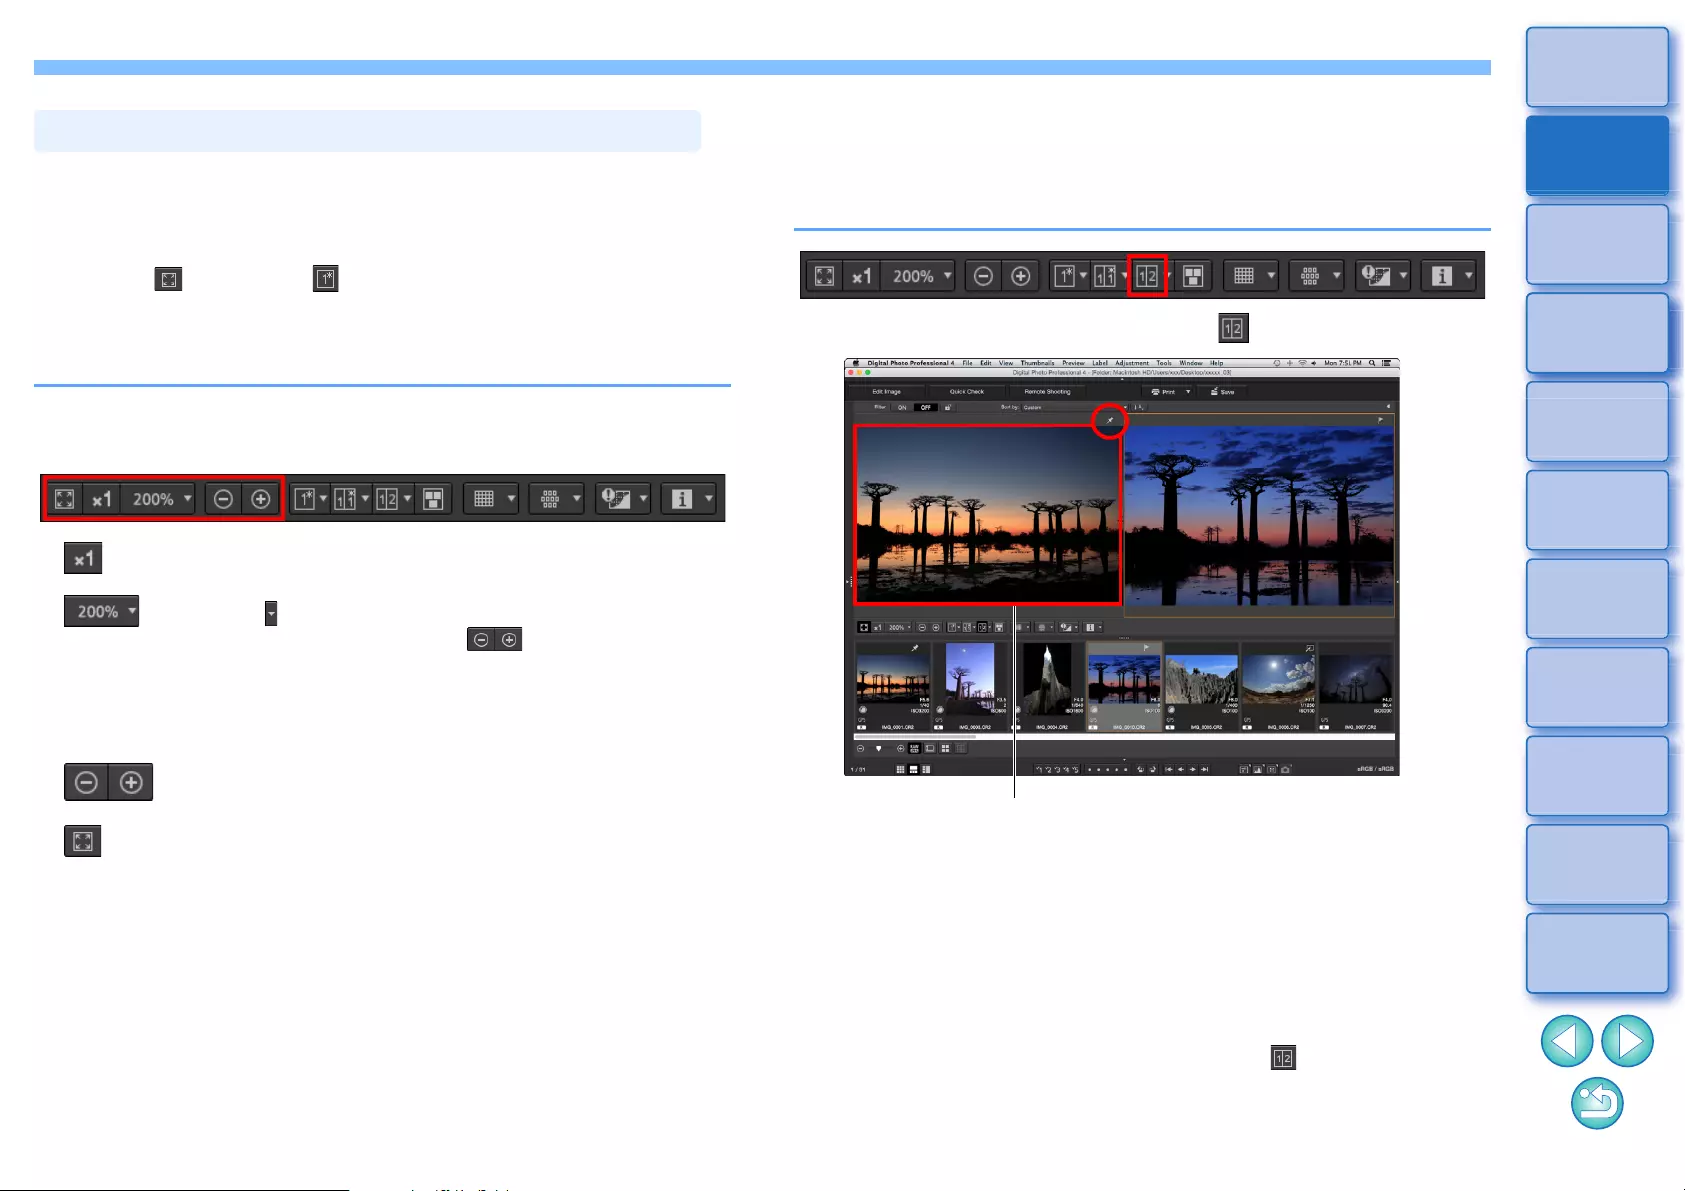
Comparing with a Pinned (Fixed) Image
You can split the window into two sections, and compare the images on
the left and right by “pinning” an image in the left section then scrolling
images in the right section. It improves efficiency of image selection.
Select an image and click the [ ] button.
ÜThe window divides into left and right, and the selected image is
pinned.
ÜWhen you pin an image and perform scrolling, the image on the
left (pinned image) remains and only the image on the right is
scrolled, which is convenient for image selection.
lTo pin another image, select the image, then select [Pin] from the
menu that appears when you right-click with the mouse.
lAfter pinning an image, you can click the [ ] button to switch
between top-bottom and left-right split screens.
Pinned (fixed) image
22
3
Sorting
Images
1
2
4
5
Downloading
Images
Viewing
Images
Printing
Images
Editing
Images
6
Processing
Large Numbers
of RAW Images
7
Remote
Shooting
10
HDR PQ
Mode
8
Playing Back
Movies and Saving
Still Photos
11
Specifying
Preferences
9
Handling
RAW Movies
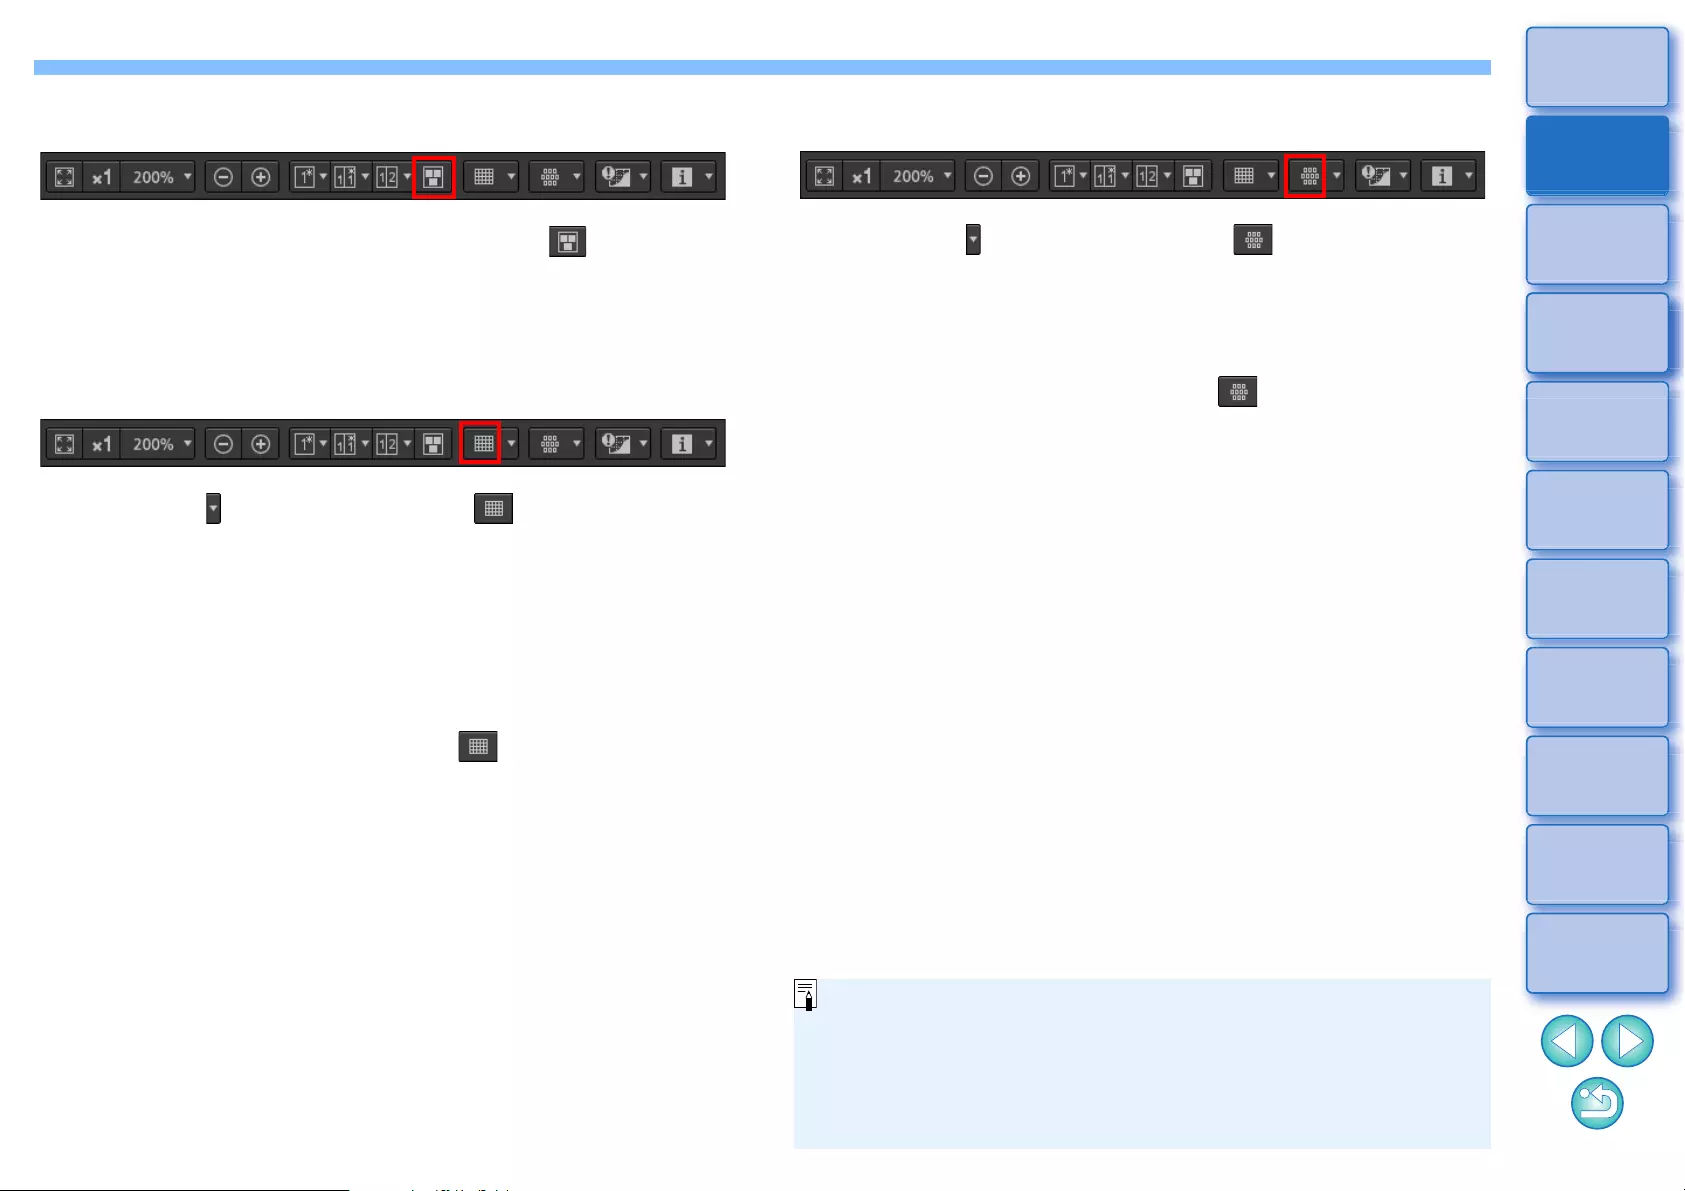
Displaying Multiple Images at the Same Time
Displaying Grid Lines
Select multiple images, and click the [ ] button.
ÜThe selected image is displayed.
lYou can display up to 8 images.
1Click the [ ] button beside the [ ] button, and set
the spacing between grid lines on the menu that
appears.
lTo set the spacing, enter values (8 to 256, in pixels), or move the
slider.
lAfter specifying settings, click the [Close] button and close the
window.
2Select an image and click the [ ] button.
ÜThe image with grid lines is displayed.
Displaying AF Points
1Click the [ ] button beside the [ ] button, and
select the item to display on the image on the menu
that appears.
lSelect [Show only AF points in focus] or [Show all AF points].
2Select an image and click the [ ] button.
ÜAn image with the AF points selected in step 1 is displayed.
AF points are not displayed for images whose image size has been
changed and then been converted and saved (p.95), images for
which you selected an effect other than [Shot settings] as correction
of fisheye lens distortion aberration, or images which have had
settings specified during RAW processing on the camera for
distortion correction or chromatic aberration correction.
23
3
Sorting
Images
1
2
4
5
Downloading
Images
Viewing
Images
Printing
Images
Editing
Images
6
Processing
Large Numbers
of RAW Images
7
Remote
Shooting
10
HDR PQ
Mode
8
Playing Back
Movies and Saving
Still Photos
11
Specifying
Preferences
9
Handling
RAW Movies
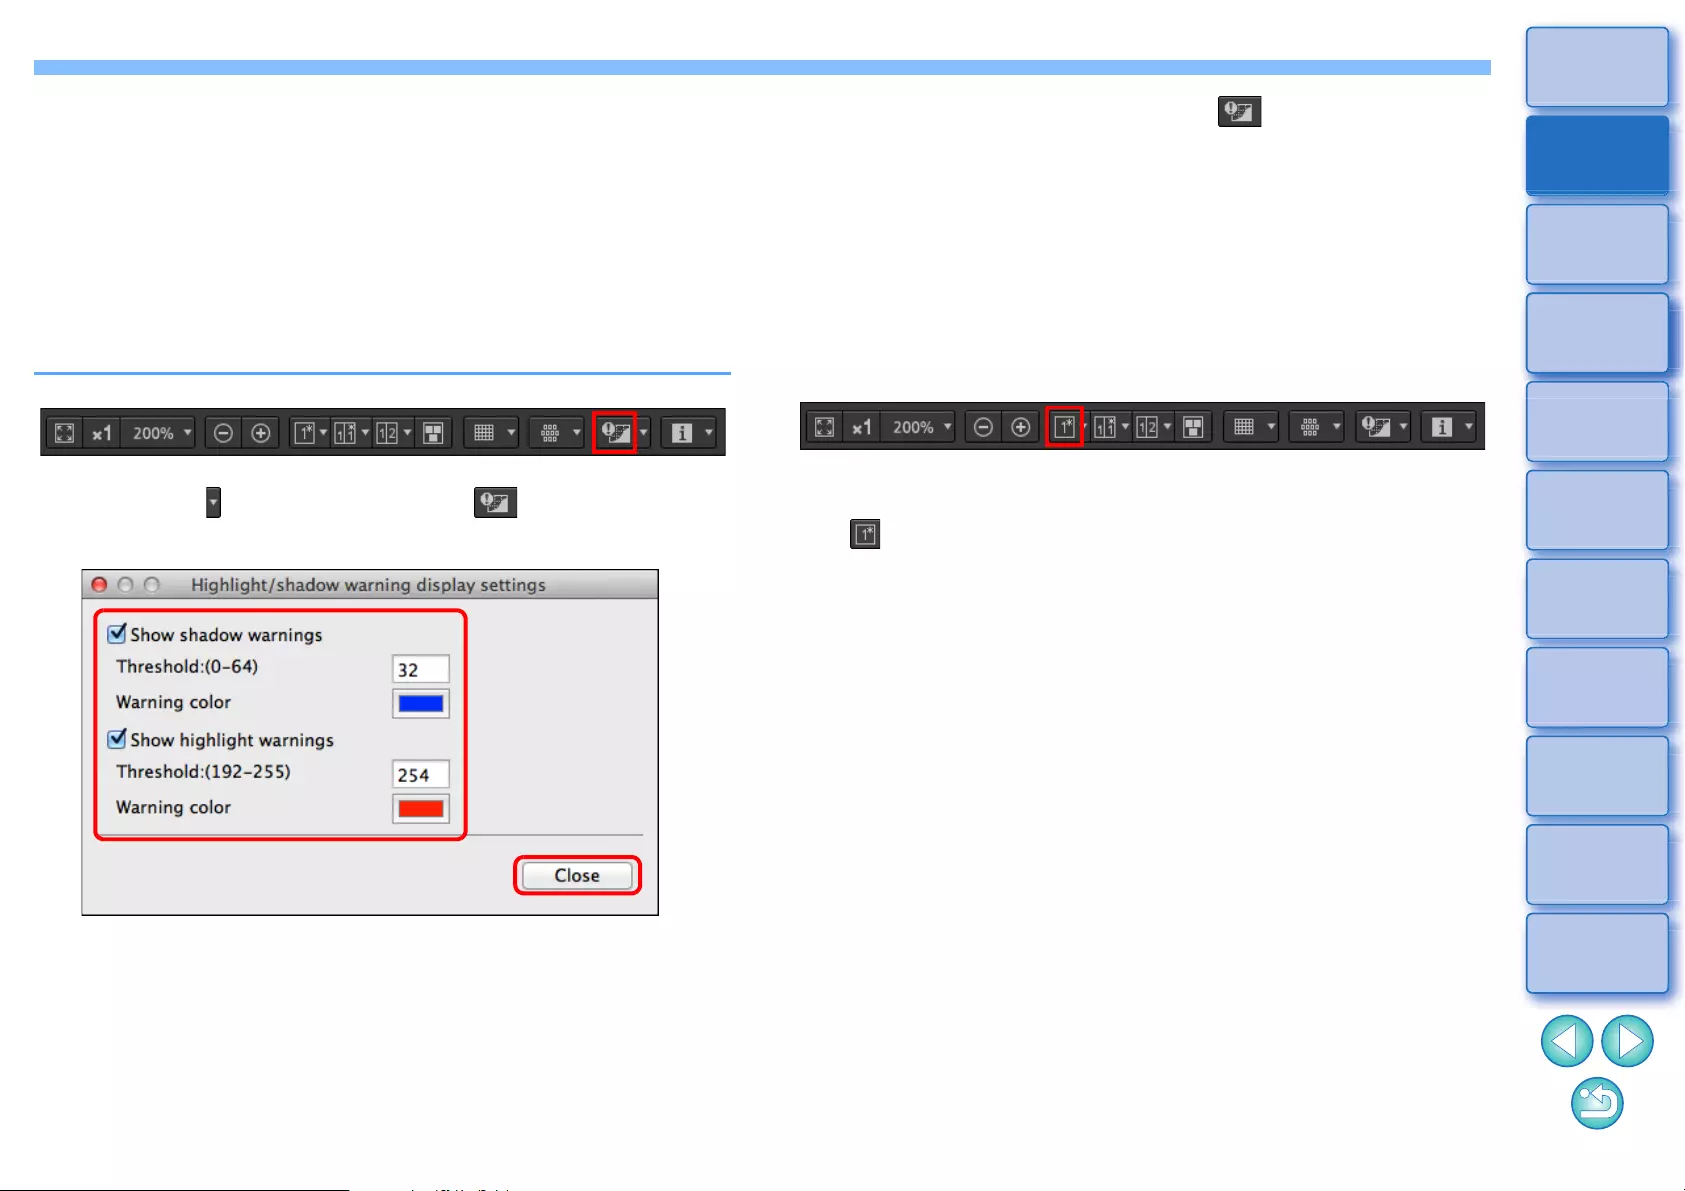
Displaying Areas Beyond the Set Range with
Warning Indicators (Highlight/Shadow
Warning)
You can set up warning indicators for both highlighted and shadowed
parts, which is effective for checking the clipped highlights and shadows
and preventing excessive adjustment of an image. Where the area on
the image has exceeded the set range, you can display the highlighted
part in red and the shadowed part in blue.
1Click the [ ] button beside the [ ] button, and
specify settings on the menu that appears.
lCheckmark the [Show highlight warnings] and [Show shadow
warnings] checkboxes and enter the warning values.
You can also select different warning colors from the dialog that
appears when you click the [Warning color] box.
lAfter specifying settings, click the [Close] button and close the
window.
Comparing Pre- and Post-Editing Images
(Single-Image Display)
2Select an image and click the [ ] button.
ÜOn the opened image, if there is an area that exceeds the value
entered in step 1, the highlighted part of that area is displayed in
red and the shadowed part is displayed in blue. If you selected
different warning colors, the parts are displayed in the specified
colors.
Select an image that is being edited and click the
[ ] button.
lBy clicking the button, the display switches between the image
before editing and the current image (being edited).
24
3
Sorting
Images
1
2
4
5
Downloading
Images
Viewing
Images
Printing
Images
Editing
Images
6
Processing
Large Numbers
of RAW Images
7
Remote
Shooting
10
HDR PQ
Mode
8
Playing Back
Movies and Saving
Still Photos
11
Specifying
Preferences
9
Handling
RAW Movies
Comparing Pre- and Post-Editing Images
(before/after comparison) Arrange vertically/
horizontally (two-screen display) / Split
vertically/horizontally (split-image display)
You can display before and after versions of an adjusted image in the
same window and check the adjustment results.
This function allows you to adjust an image while comparing the original
image and image being edited.
1Select an image that is being edited and click the
[ ] button.
ÜThe image is displayed in two-screen display (Arrange vertically).
lThe image before editing is on the left, and the currently edited is
on the right.
2Change the image display.
lThe display switches in the following order by clicking the [ ]
button.
Arrange vertically (two-screen: left/right) Arrange horizontally
(two-screen: top/bottom) Split vertically (split-image: left/right)
Split horizontally (split-image: top/bottom)
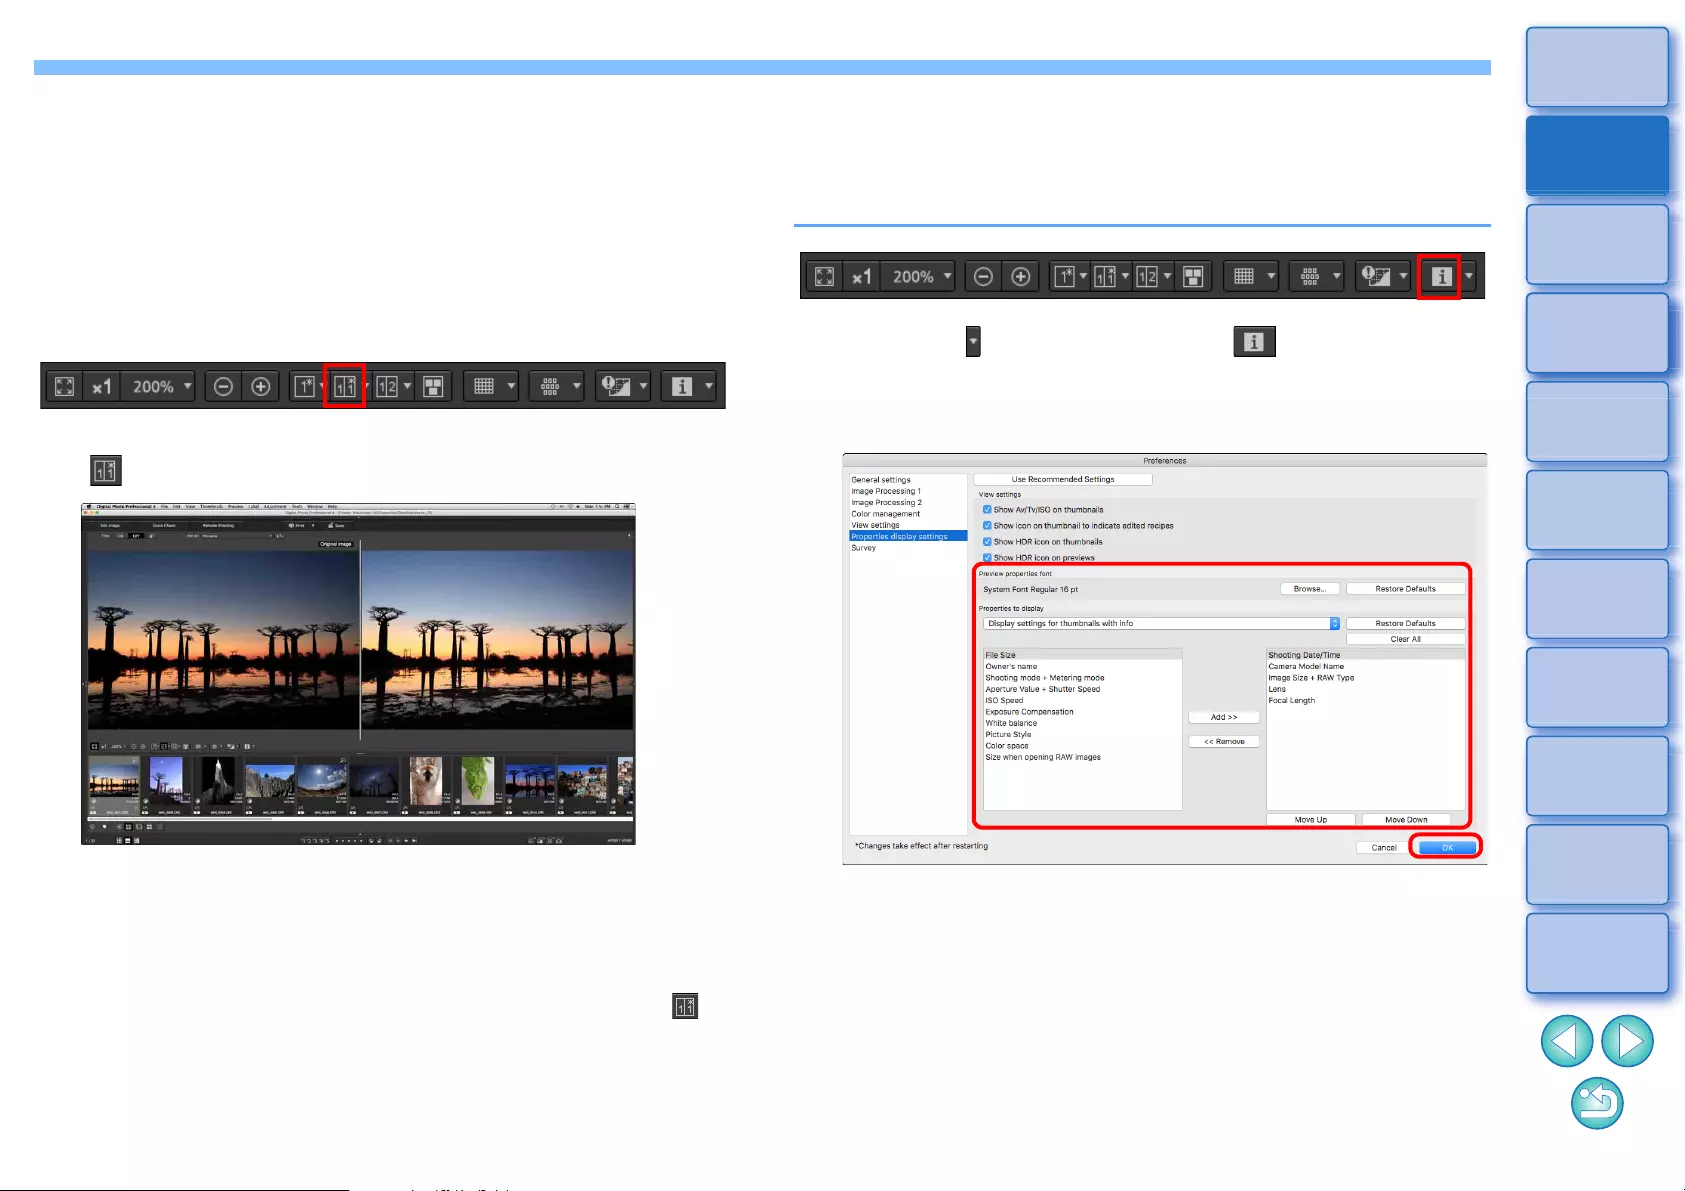
Displaying Image Properties
Display the shooting and recipe information for an image in the screen.
You can select items to be displayed.
1Click the [ ] button beside the [ ] button.
ÜThe [Properties display settings] window appears.
2Specify display settings.
25
3
Sorting
Images
1
2
4
5
Downloading
Images
Viewing
Images
Printing
Images
Editing
Images
6
Processing
Large Numbers
of RAW Images
7
Remote
Shooting
10
HDR PQ
Mode
8
Playing Back
Movies and Saving
Still Photos
11
Specifying
Preferences
9
Handling
RAW Movies
1Select [Display settings for preview properties] from the
[Properties to display] pulldown menu.
2Specify display items with the [Add >>] button and [<< Remove]
button. Items that can be selected appear in the list box at left,
and actually displayed items appear in the list box at right. You
can also change the display order with the [Move Up] button and
[Move Down] button.
After specifying settings, click the [OK] button.
lWith the [Preview properties font] option, you can specify the font
used for information displayed in the preview window.
3Select an image and click the [ ] button.
ÜThe image and properties selected in step 2 are displayed in the
screen.
lIf the recipe contents of an image being edited are displayed in
before/after comparison (two-screen display/split-image display),
edited items are displayed in red.
All the property items may not be displayed depending on the
combination of window, preview window, or the size of thumbnails.
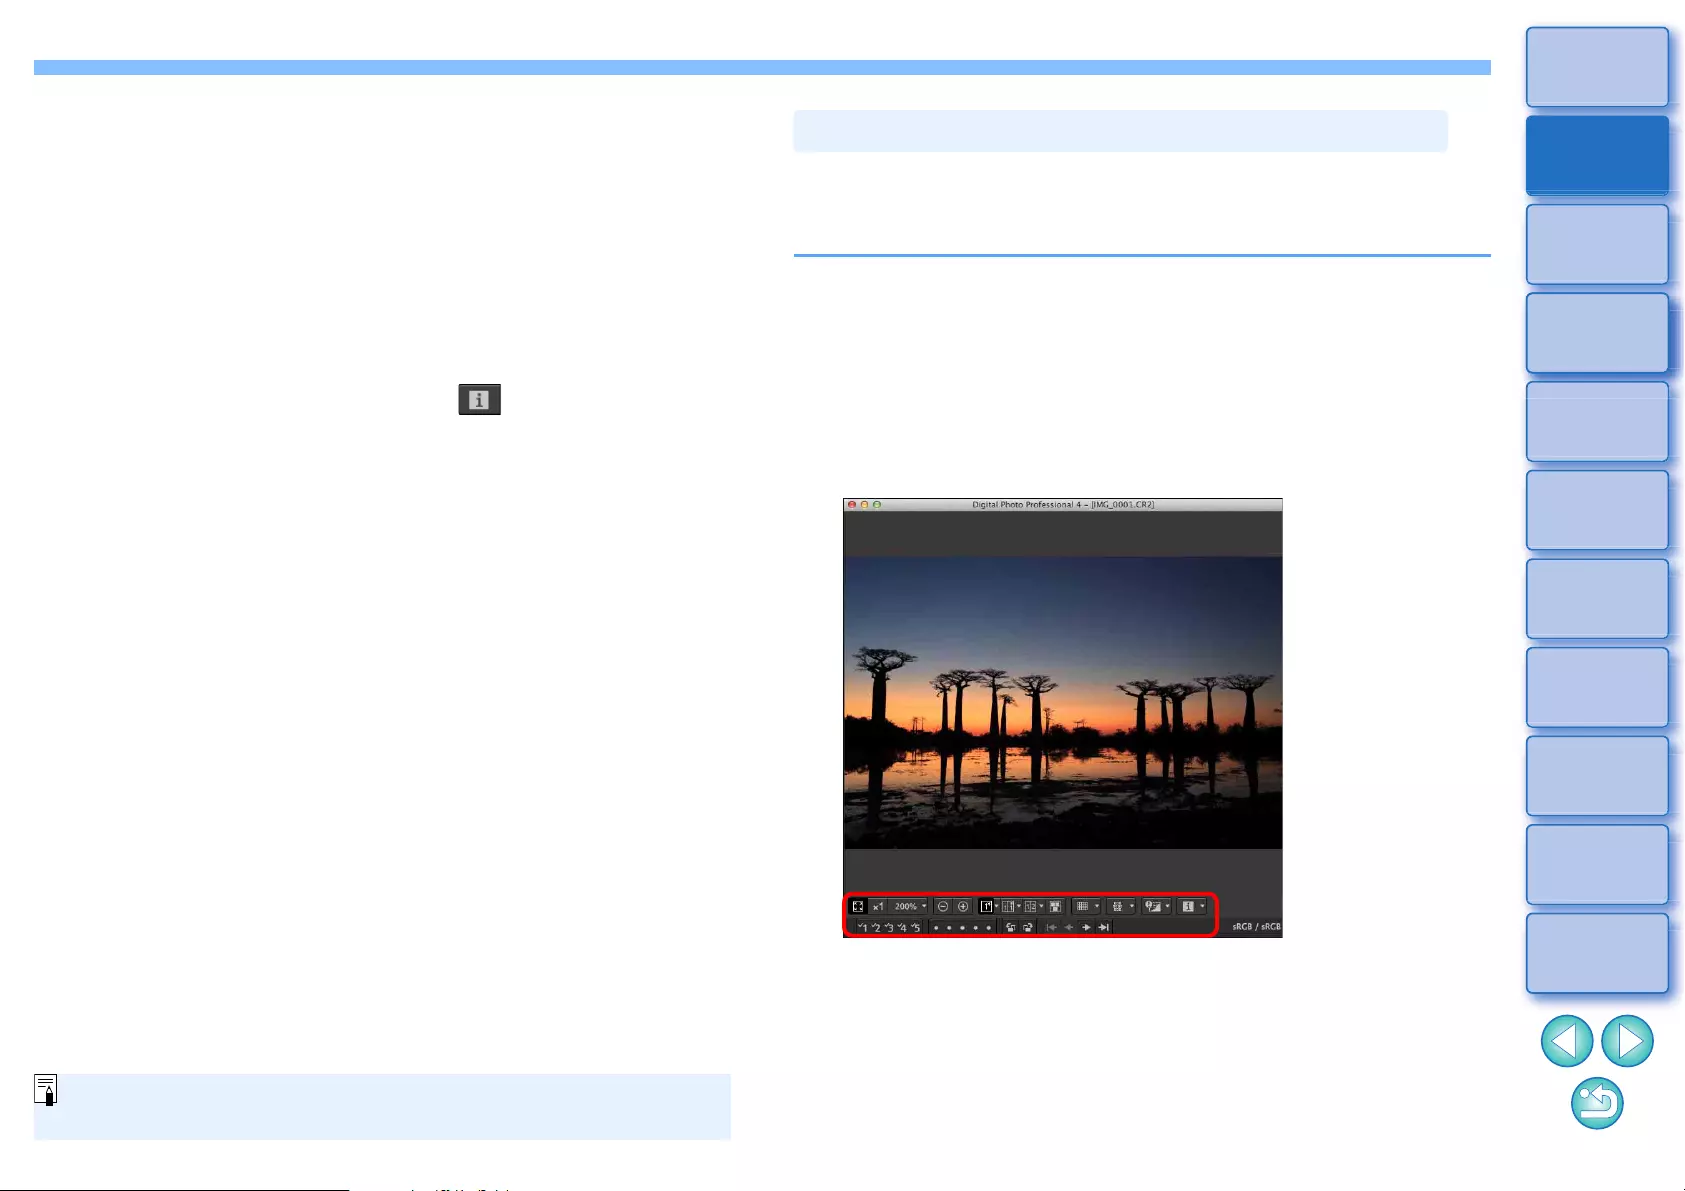
The preview window shows the coordinates of the mouse cursor and the
work color space. By switching to multi-function preview, you can also
check image details in the same way as the main window (multi-layout).
1Select the [Tools] menu [Preview screen display
settings], and then [Multi-function preview] from the
dialog that appears.
2Open the preview window (p.18).
ÜA multi-function preview with various functions at the bottom of
the screen is displayed.
lFor how to use the displayed functions, see “Viewing an Image in
the Main Window (Thumbnail Layout)” (p.13) and “Checking an
Image Using the Preview Control Panel” (p.21 to p.25).
Checking an Image in Multi-Function Preview
26
3
Sorting
Images
1
2
4
5
Downloading
Images
Viewing
Images
Printing
Images
Editing
Images
6
Processing
Large Numbers
of RAW Images
7
Remote
Shooting
10
HDR PQ
Mode
8
Playing Back
Movies and Saving
Still Photos
11
Specifying
Preferences
9
Handling
RAW Movies
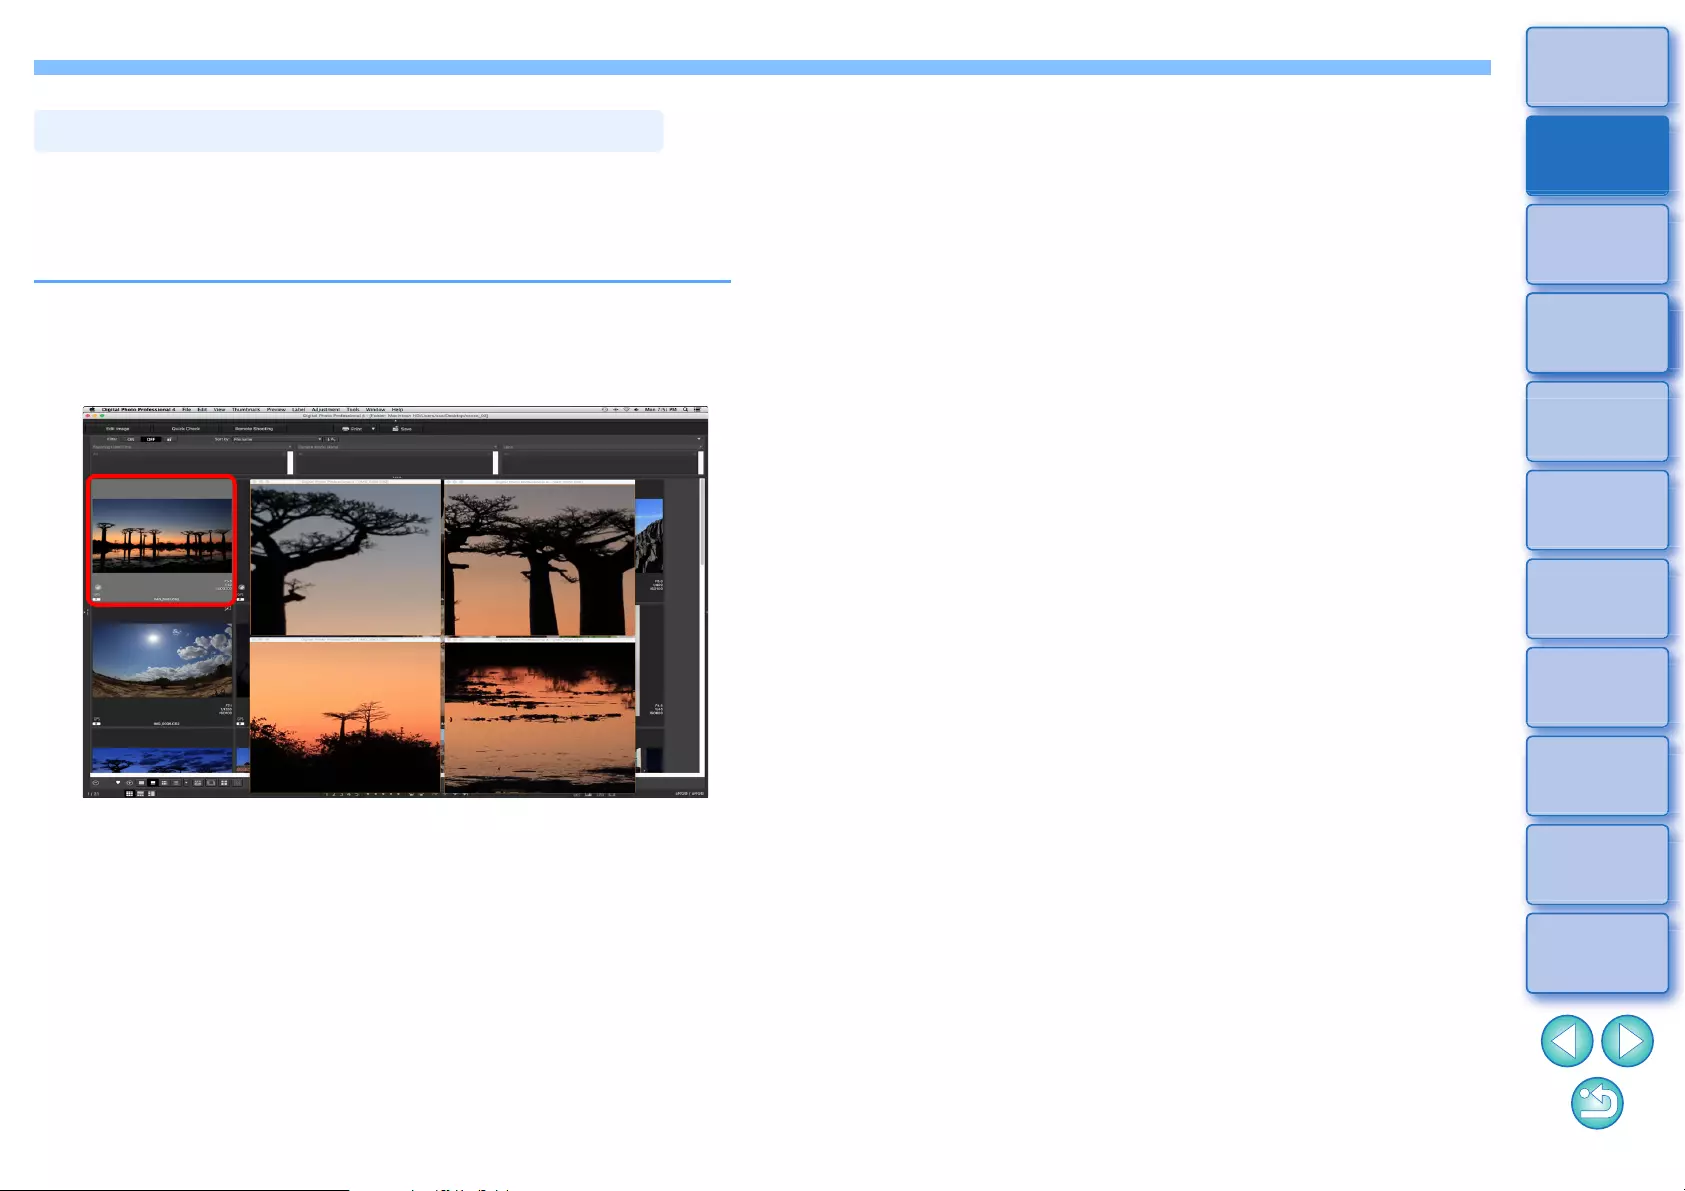
Second windows are preview windows that you can open additionally
for thumbnails and image previews. You can display up to 4 second
windows for an single image to check the focus in all parts of the image,
etc.
Select an image, and then select [Show second
screen] from the menu that appears when you right-
click with the mouse.
ÜA second window is displayed.
lTo display an additional second window, repeat the operation.
lYou can change the size of second windows as desired.
lClick the displayed image to switch between actual pixel size
(100% view) and fit-to-window view.
lWhen you magnify an image in the second window, the right-
clicked position on the image will be the center for the
magnification.
Checking an Image in Second Windows
27
3
Sorting
Images
1
2
4
5
Downloading
Images
Viewing
Images
Printing
Images
Editing
Images
6
Processing
Large Numbers
of RAW Images
7
Remote
Shooting
10
HDR PQ
Mode
8
Playing Back
Movies and Saving
Still Photos
11
Specifying
Preferences
9
Handling
RAW Movies
Opening and Closing Window Panels (Panes)
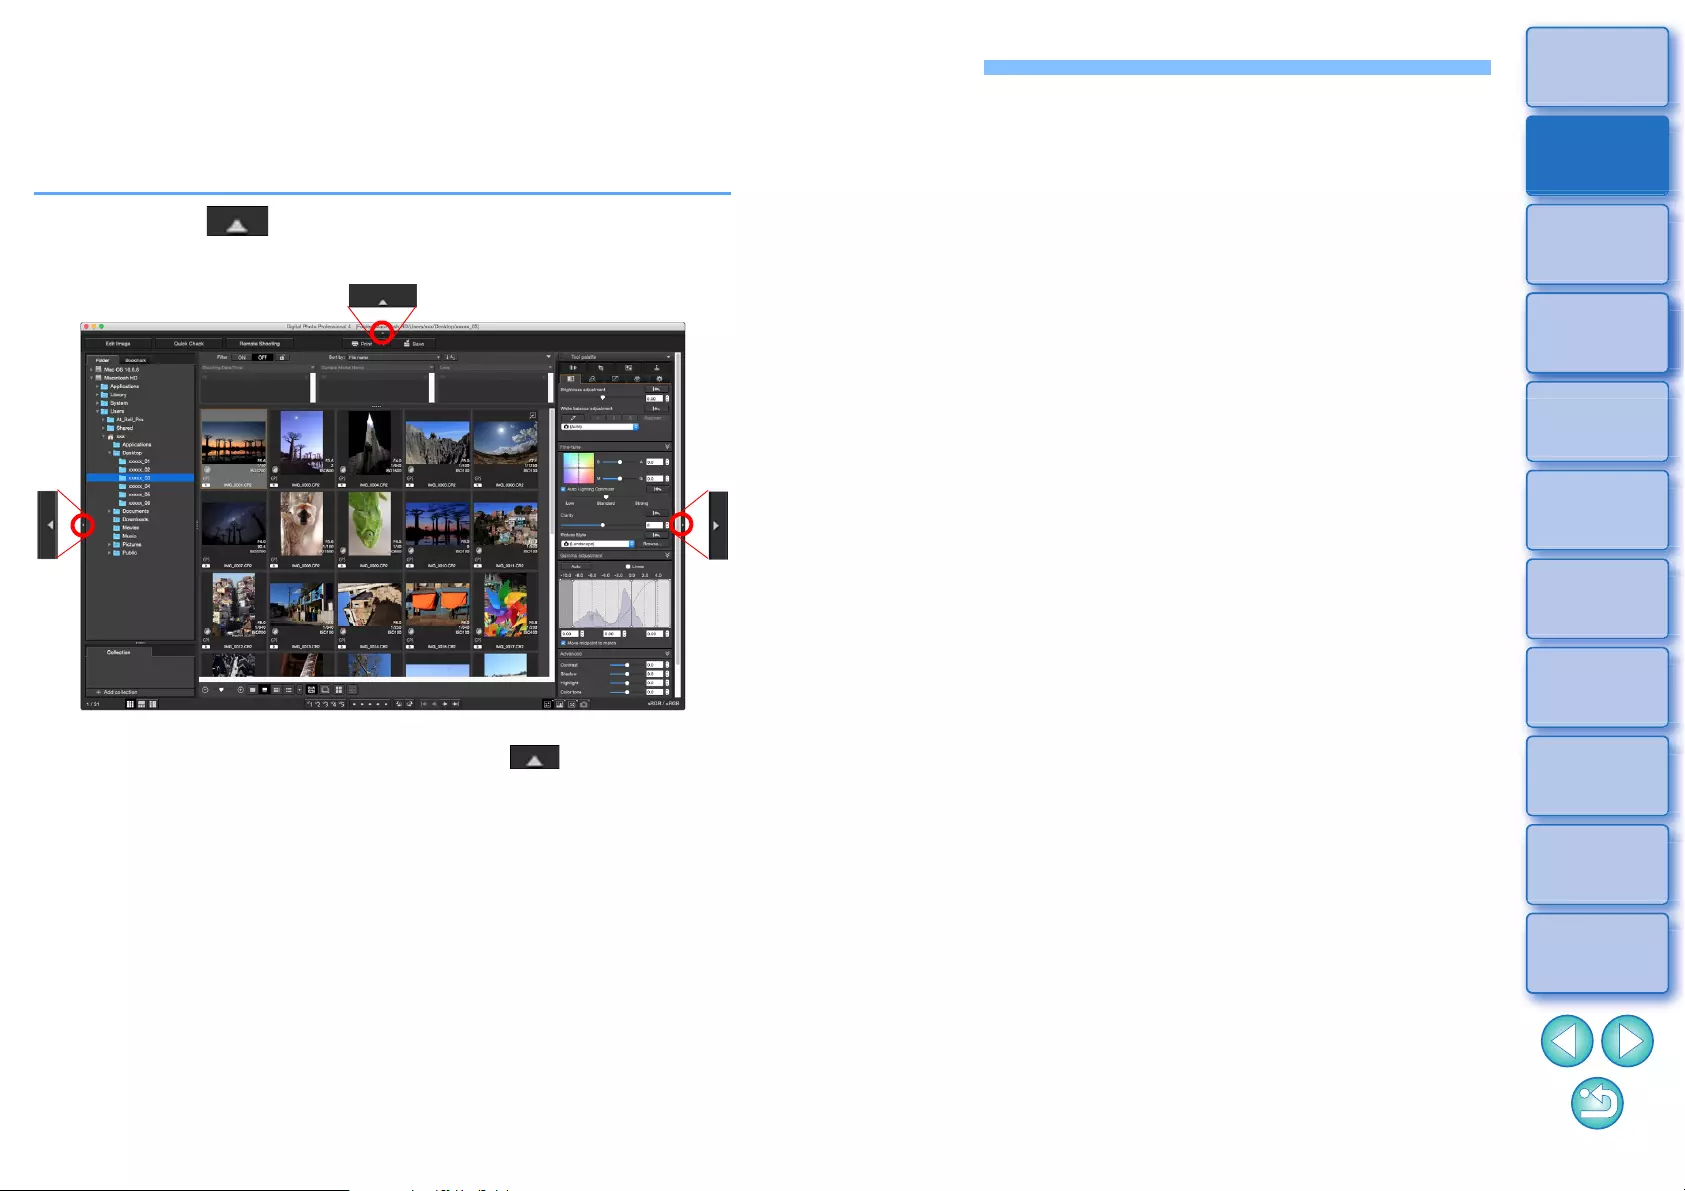
Panels (panes) at the top, bottom, left, and right of each window can be
closed to suit the tasks being performed.
You can use DPP in an optimal layout.
Click the [ ] for a panel to open or close.
lWhen a panel is closed, you can point to [ ] with the mouse
to temporarily open the panel.
Example: main window (thumbnail layout)
28
3
Sorting
Images
1
2
4
5
Downloading
Images
Viewing
Images
Printing
Images
Editing
Images
6
Processing
Large Numbers
of RAW Images
7
Remote
Shooting
10
HDR PQ
Mode
8
Playing Back
Movies and Saving
Still Photos
11
Specifying
Preferences
9
Handling
RAW Movies
Changing the Display Method and Order of Palettes
For any palette (tool palette, navigator palette, histogram palette, quick
check palette, and camera control palette), you can change how the
palette is displayed (docked/floating), or the display order of multiple
docked palettes.
When multiple palettes are docked, you can rearrange their order from
top to bottom.
Right-click on the palette’s title bar (where its name
is shown) and click [Dock/float] in the dialog that
appears.
ÜA docked palette is then displayed floating, and a floating palette
is then displayed docked.
lTo revert to the original display method, repeat the same
operation again.
Right-click on the palette’s title bar (where its name
is shown) and click [Move one up] or [Move one
down] in the dialog that appears.
ÜThe order of the palettes is changed.
Changing the Display Method (Dock/Float) of Palettes
Rearranging Palettes
29
3
Sorting
Images
1
2
4
5
Downloading
Images
Viewing
Images
Printing
Images
Editing
Images
6
Processing
Large Numbers
of RAW Images
7
Remote
Shooting
10
HDR PQ
Mode
8
Playing Back
Movies and Saving
Still Photos
11
Specifying
Preferences
9
Handling
RAW Movies
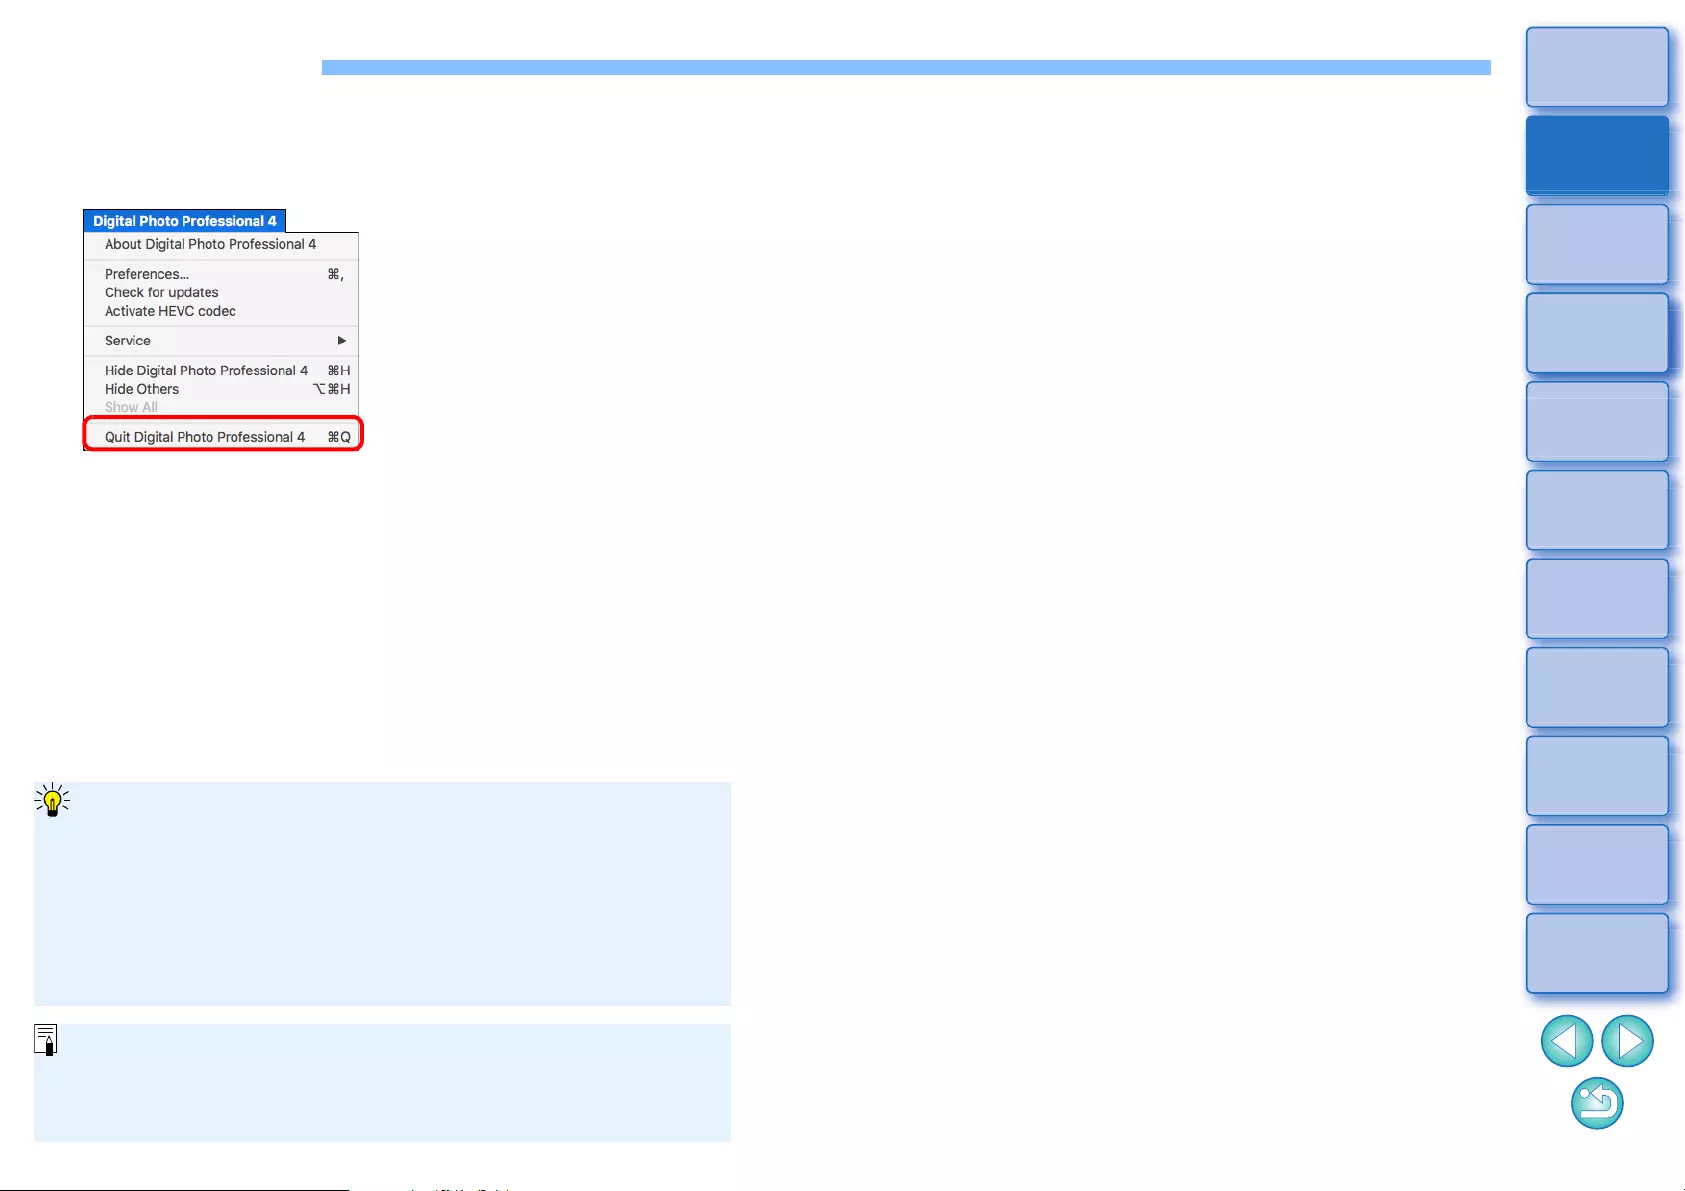
Quitting DPP
In the main window, select the [Digital Photo
Professional 4] menu [Quit Digital Photo
Professional 4].
ÜDPP quits.
Digital Photo Professional Survey Program
Canon requests that information related to your Canon product be
sent to Canon (in case of using your Canon product in China, to
the legally approved research company) through the Internet.
Canon uses such information for development and marketing of
products that better meet customer needs.
Even after agreeing, you can change the send settings anytime in
the [Survey] tab sheet (p.178) in [Preferences].
A confirmation dialog box for saving the images appears when you
try to quit DPP without saving the adjusted image. Click the [Yes to
all] button to save the adjustment contents (recipe) to all the images
adjusted.
3
30
3
Sorting
Images
1
2
4
5
Downloading
Images
Viewing
Images
Printing
Images
Editing
Images
6
Processing
Large Numbers
of RAW Images
7
Remote
Shooting
10
HDR PQ
Mode
8
Playing Back
Movies and Saving
Still Photos
11
Specifying
Preferences
9
Handling
RAW Movies
Organizing and Sorting Images
Efficiently Checking/Sorting Images ........................ 31
Sorting Images ........................................................... 33
Attaching Check Marks........................................... 33
Setting Ratings ....................................................... 33
Sorting Images in the Main Window ........................... 34
Attaching Check Marks in the Main Window .......... 34
Setting Ratings in the Main Window....................... 34
Arranging Images in the Main Window....................... 36
Arranging by Type .................................................. 36
Arranging Freely ..................................................... 36
Displaying a RAW Image and JPEG Image as a
Single Image............................................................... 37
Checking Image Information....................................... 38
Organizing Images .................................................. 39
Deleting an Unwanted Image ..................................... 39
Moving Images ........................................................... 39
Moving Images in Folders .......................................... 40
Registering Frequent-Use Folders (Bookmark
Registration) ............................................................... 40
Deleting Bookmarks ............................................... 40
31
3
Sorting
Images
1
2
4
5
Downloading
Images
Viewing
Images
Printing
Images
Editing
Images
6
Processing
Large Numbers
of RAW Images
7
Remote
Shooting
10
HDR PQ
Mode
8
Playing Back
Movies and Saving
Still Photos
11
Specifying
Preferences
9
Handling
RAW Movies
Efficiently Checking/Sorting Images
You can enlarge images displayed as thumbnails in the main window
and efficiently check each image. You can sort images into groups.
Note that this function does not apply to movie files.
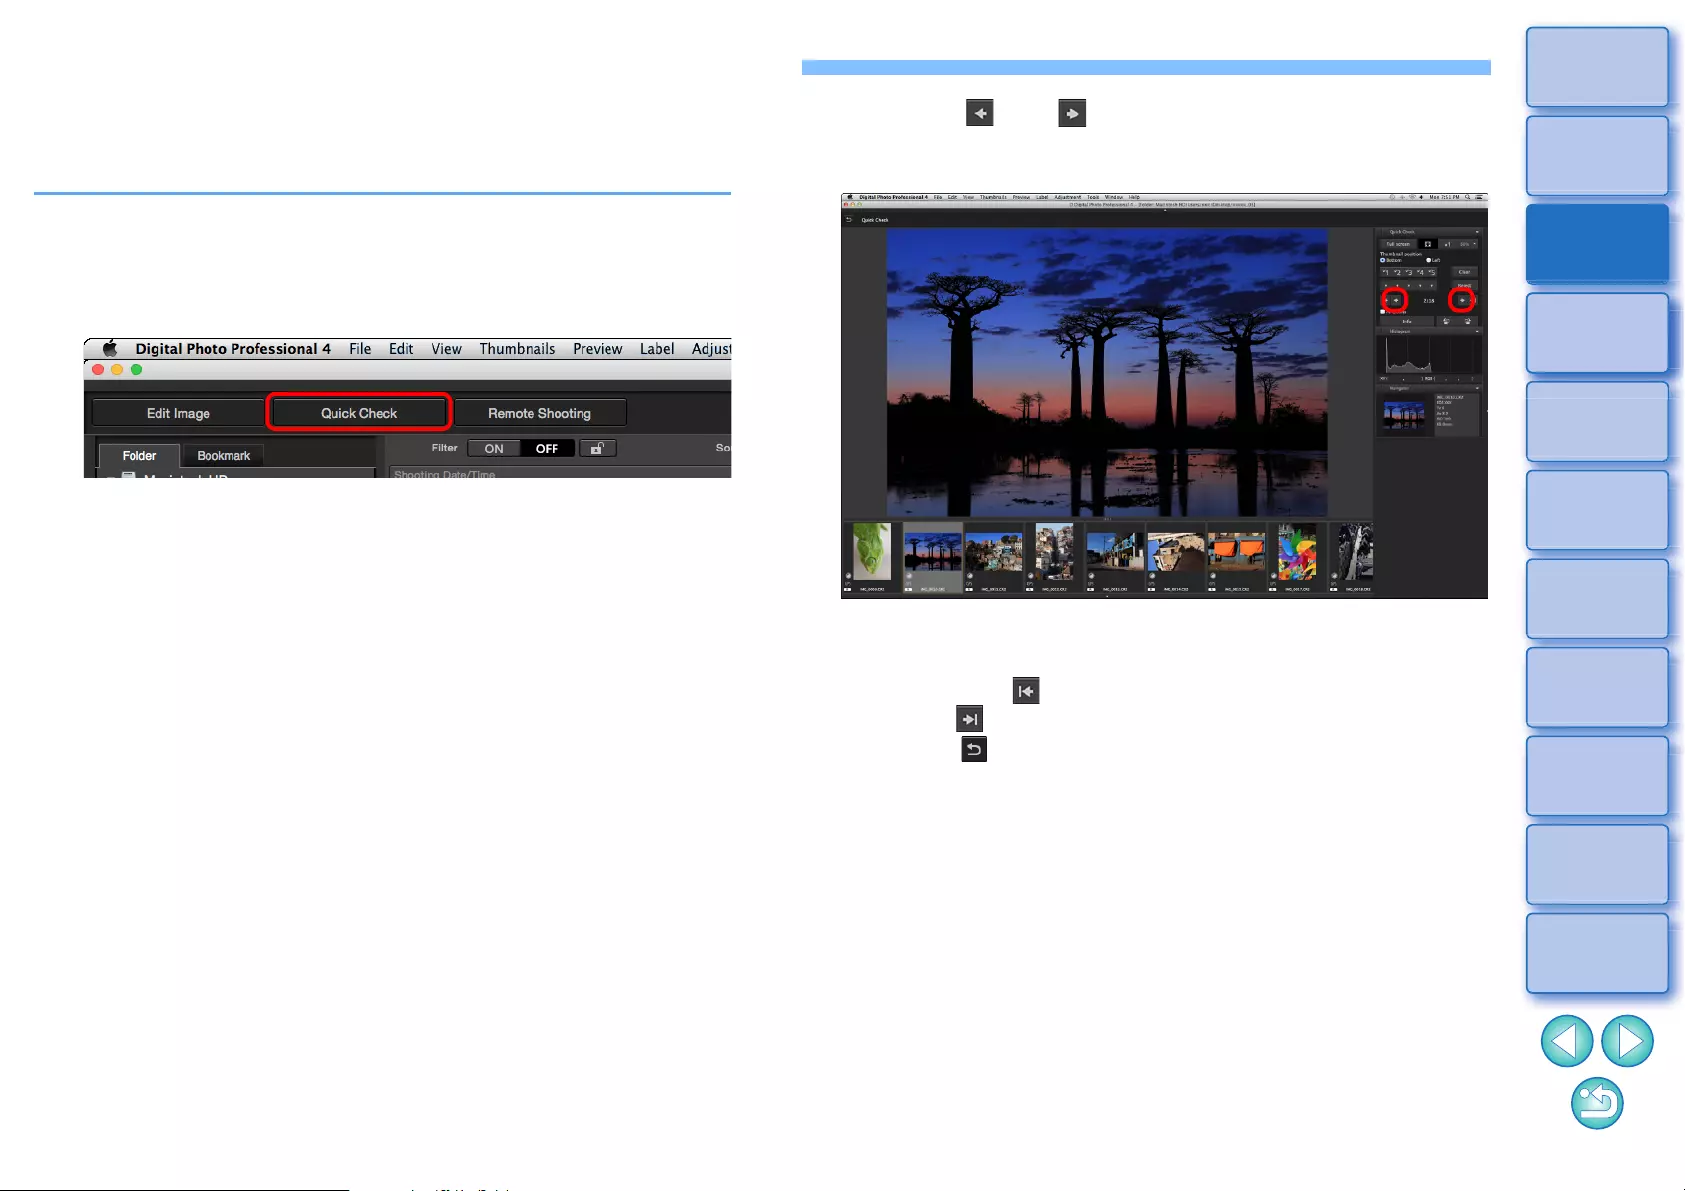
1Select multiple images to check in the main window.
2Display the quick check window.
lClick the [Quick check] button.
ÜThe quick check window appears.
3Click the [ ] or [ ] button to switch between
images to be checked.
lAll the images displayed in the main window can be checked in
the quick check window.
lIf you click the [ ] button, the first image is displayed, and if you
click the [ ] button, the last image is displayed.
lClick the [ ] button to return to the main window.
Quick check window
32
3
Sorting
Images
1
2
4
5
Downloading
Images
Viewing
Images
Printing
Images
Editing
Images
6
Processing
Large Numbers
of RAW Images
7
Remote
Shooting
10
HDR PQ
Mode
8
Playing Back
Movies and Saving
Still Photos
11
Specifying
Preferences
9
Handling
RAW Movies
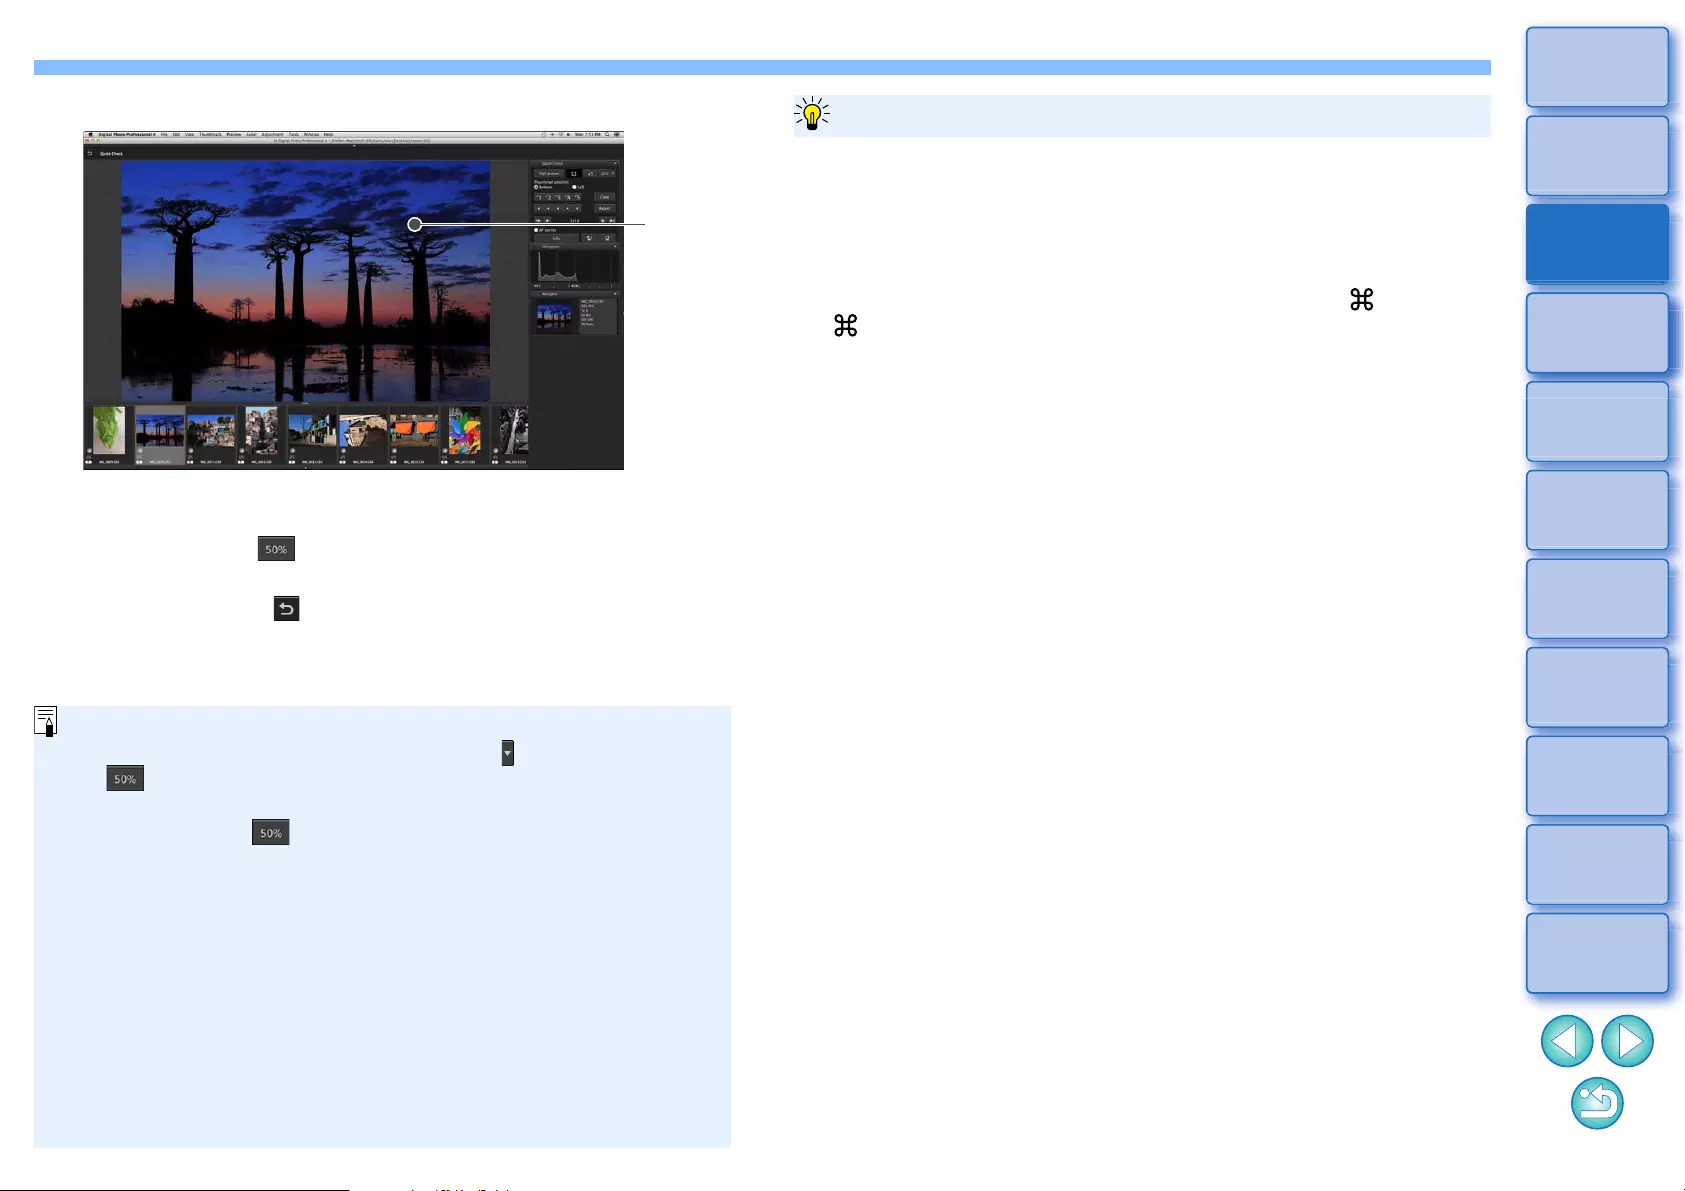
4Click the area you want to enlarge.
ÜThe area you clicked is displayed at 100% (actual pixel size).
lTo change the display position, drag on the image.
lIf you click the [ ] button, you can display the image at 50%.
lClick again to revert to the full view.
lTo quit, click the [ ] button.
Click
lIn addition to 100% and 50%, you can display images at 12.5%,
25%, 200%, 300%, and 400%. Click the [ ] button beside the
[ ] button on the screen, and select a magnification from the
menu that appears.
ÜIf you click the [ ] button (the selected magnification appears
on the button), the image appears at the selected magnification.
However, after the quick check window is closed, the image
returns to its original 50% view.
lWhen [AF Point] is checkmarked, you can display the AF points
selected in the camera at the time of shooting. However, AF
points are not displayed for images which have had their image
size changed and then been converted and saved (p.95), which
have had settings specified during RAW processing on the
camera for distortion correction and chromatic aberration
correction, which are composited, or which are created as HDR
(High Dynamic Range) images.
lTo check only selected images
You can use the quick check window to check only selected images
by selecting the desired images from those displayed in the main
window and then performing step 1.
lSwitching between images using the keyboard
You can also switch between images by pressing the < > + <> or
< > + <> keys.
lOperations using the menu
Each operation can also be performed with the menu which appears
by clicking on the image while holding down the <control> key.
Convenient functions of the quick check window
33
3
Sorting
Images
1
2
4
5
Downloading
Images
Viewing
Images
Printing
Images
Editing
Images
6
Processing
Large Numbers
of RAW Images
7
Remote
Shooting
10
HDR PQ
Mode
8
Playing Back
Movies and Saving
Still Photos
11
Specifying
Preferences
9
Handling
RAW Movies
You can sort images by attaching check marks or setting ratings
(indicated with [ ] marks) for each subject or theme.
Attaching Check Marks
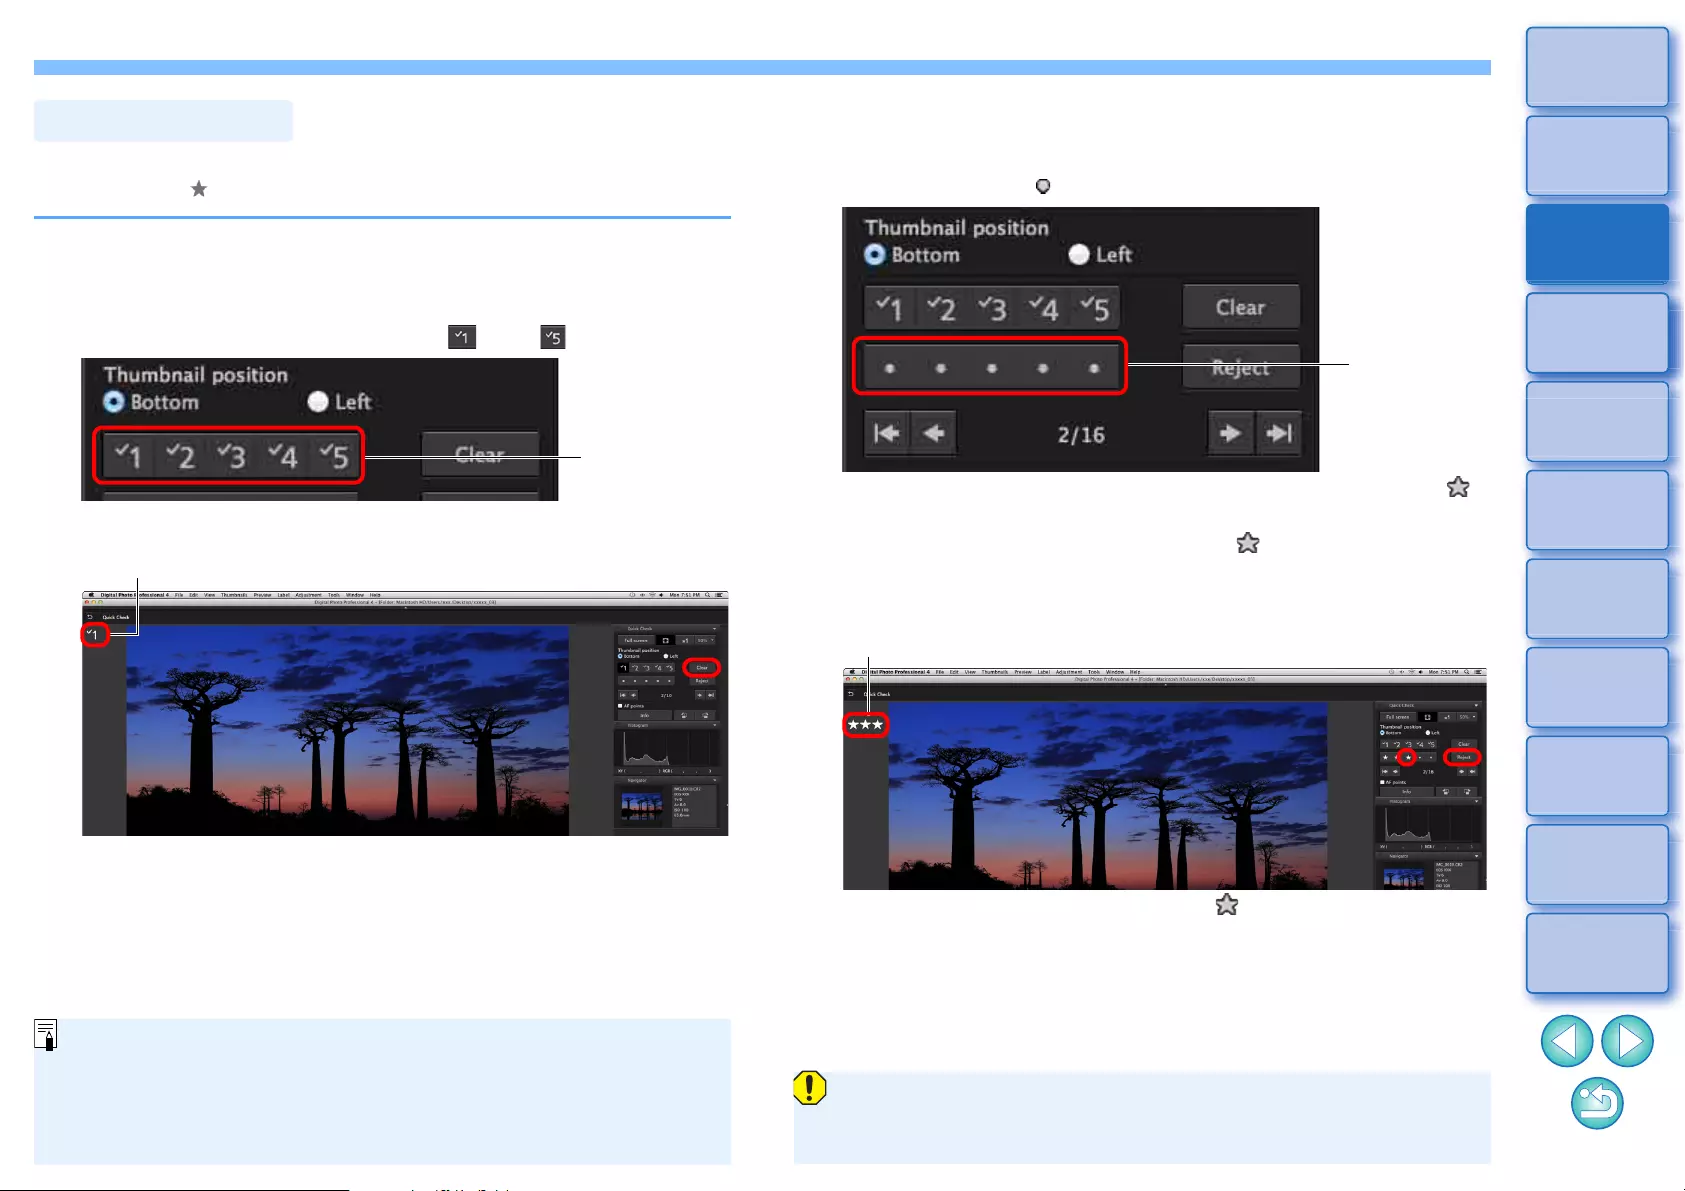
Display the image you want to attach a check mark
to, and then click any one of [ ] to [ ].
ÜThe selected check mark appears in the upper left of the window.
lClick the [Clear] button to remove the check mark.
Sorting Images
Click
Check mark
lThe values of check marks attached to images in versions before
DPP 4 are not maintained.
lYou can also attach check marks from the menu that appears by
clicking on an image in the main window while holding down the
<control> key.
Setting Ratings
Display the image you want to rate, and then click
any one of the [ ].
ÜThe rating is set and an icon corresponding to the selected [ ]
appears in the upper left of the window.
(Window shown with a rating of three [ ])
lTo set [Reject], click the [Reject] button. Click the [Reject] button
again to cancel.
lTo cancel the rating, click the same [ ] as when the setting was
made on the right of the window.
Click
Rating icon
As the file structure of the image data is changed when a rating is
set to an image, it may not be possible to check the image
information in third-party software.
34
3
Sorting
Images
1
2
4
5
Downloading
Images
Viewing
Images
Printing
Images
Editing
Images
6
Processing
Large Numbers
of RAW Images
7
Remote
Shooting
10
HDR PQ
Mode
8
Playing Back
Movies and Saving
Still Photos
11
Specifying
Preferences
9
Handling
RAW Movies
You can also sort images in the main window by attaching check marks
or setting ratings (indicated with [ ] marks) for each subject or theme.
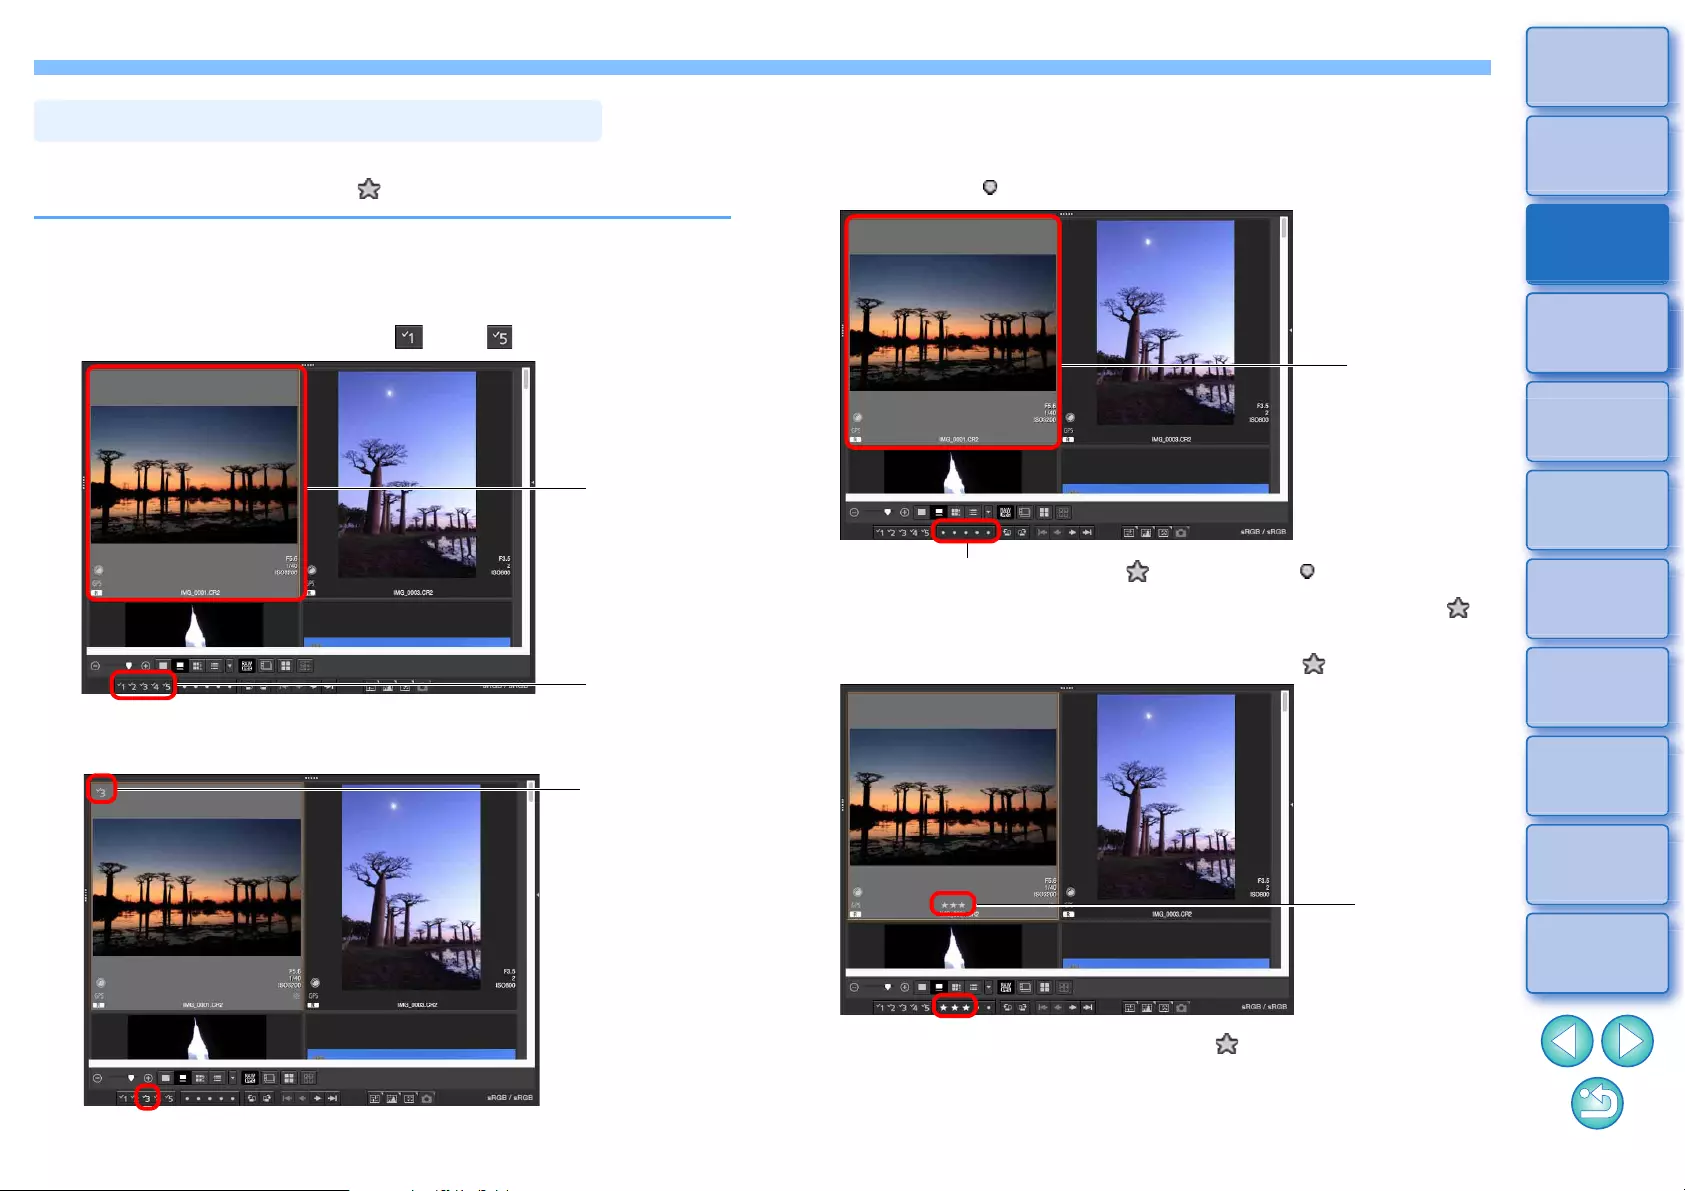
Attaching Check Marks in the Main Window
Select the images you want to attach a check mark
to, and then click any of [ ] to [ ].
ÜThe selected check mark appears in the upper left of the image
frame.
lClick the check mark again to remove the check marks.
Sorting Images in the Main Window
Click
Select
Check mark
Setting Ratings in the Main Window
Select the images you want to rate, and then click
any of the [ ].
ÜThe rating is set and an icon corresponding to the selected [ ]
appears in the image frame.
(Sample window shown with a rating of three [ ] as an example)
lTo cancel the rating, click the same [ ] as when the setting was
made.
lSet [Reject] with the [Label] menu or the quick check window
(p.31).
Select
Click (changes to [ ] after clicking [ ])
Rating icon
35
3
Sorting
Images
1
2
4
5
Downloading
Images
Viewing
Images
Printing
Images
Editing
Images
6
Processing
Large Numbers
of RAW Images
7
Remote
Shooting
10
HDR PQ
Mode
8
Playing Back
Movies and Saving
Still Photos
11
Specifying
Preferences
9
Handling
RAW Movies
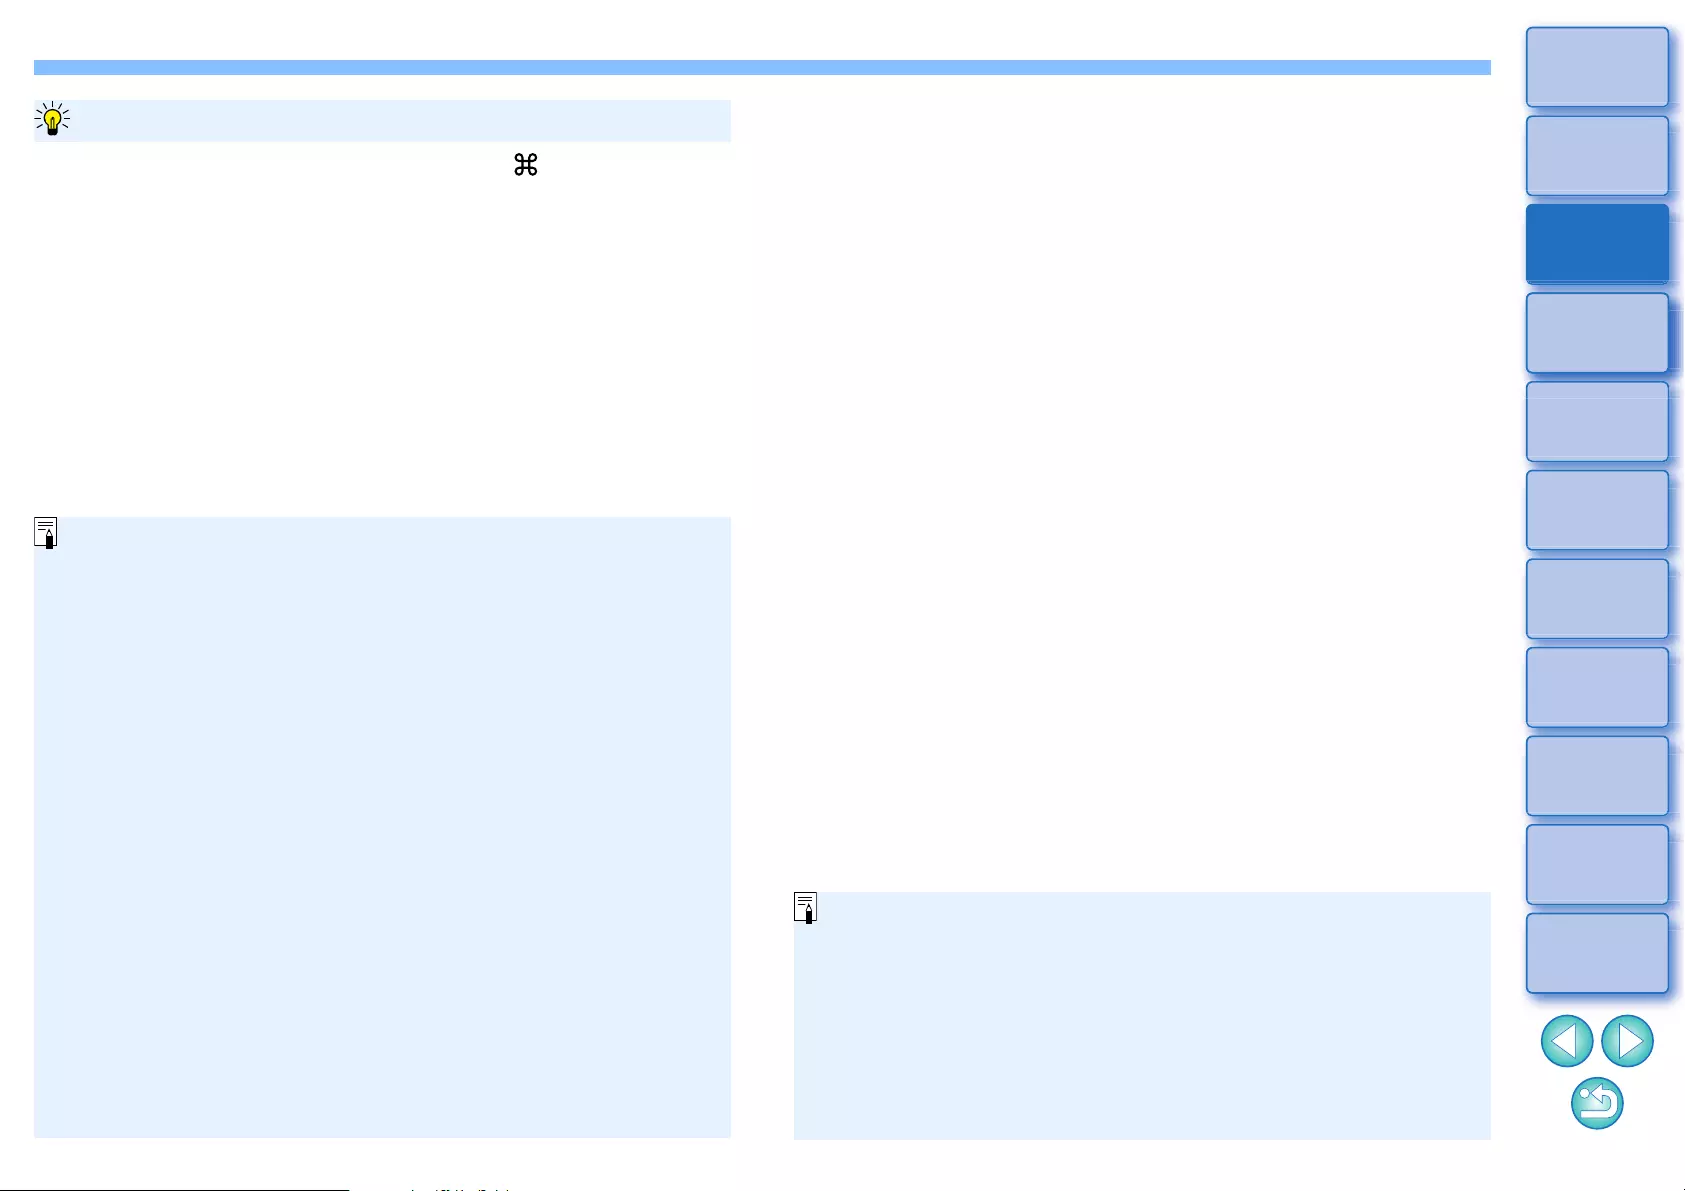
Click on desired images while holding down the < > key. To select
multiple consecutive images, click on the first image, and then click on
the last image while holding down the <shift> key.
To select multiple images in the main window
lThe [Label] menu can also be used to attach check marks and set
ratings.
lYou can display and change the rating settings set in DPP with
other EOS software and with any supported EOS camera (for the
EOS 7D, version 2.0.0 or later firmware) except the EOS-1D
Mark IV, EOS-1Ds Mark III, EOS-1D Mark III, EOS-1D Mark II N,
EOS-1Ds Mark II, EOS-1D Mark II, EOS-1D, EOS-1Ds, EOS 5D
Mark II, EOS 5D, EOS 50D, EOS 40D, EOS 30D, EOS 20D/
EOS 20Da, EOS 10D, EOS D2000, EOS D30, EOS D60,
EOS 550D, EOS 500D, EOS 450D, EOS 1000D, EOS 400D,
EOS 350D, and EOS 300D.
• EOS Utility version 2.9 or later:
Ratings set in DPP are displayed. However, [Reject] is not
displayed and you cannot change rating settings.
• With any supported camera (for the EOS 7D, version 2.0.0 or later
firmware) except the EOS-1D Mark IV, EOS-1Ds Mark III,
EOS-1D Mark III, EOS-1D Mark II N, EOS-1Ds Mark II, EOS-1D
Mark II, EOS-1D, EOS-1Ds, EOS 5D Mark II, EOS 5D, EOS 50D,
EOS 40D, EOS 30D, EOS 20D/EOS 20Da, EOS 10D,
EOS D2000, EOS D30, EOS D60, EOS 550D, EOS 500D,
EOS 450D, EOS 1000D, EOS 400D, EOS 350D, and EOS 300D:
Ratings set in DPP are displayed in the playback screen. You can
also change rating settings. However, you cannot display or
change settings for [Reject].
lReversely, you can also display and change in DPP the rating
settings set for images on any supported EOS camera (for the
EOS 7D, version 2.0.0 or later firmware) except the EOS-1D
Mark IV, EOS-1Ds Mark III, EOS-1D Mark III, EOS-1D Mark II N,
EOS-1Ds Mark II, EOS-1D Mark II, EOS-1D, EOS-1Ds, EOS 5D
Mark II, EOS 5D, EOS 50D, EOS 40D, EOS 30D, EOS 20D/
EOS 20Da, EOS 10D, EOS D2000, EOS D30, EOS D60,
EOS 550D, EOS 500D, EOS 450D, EOS 1000D, EOS 400D,
EOS 350D, and EOS 300D.
36
3
Sorting
Images
1
2
4
5
Downloading
Images
Viewing
Images
Printing
Images
Editing
Images
6
Processing
Large Numbers
of RAW Images
7
Remote
Shooting
10
HDR PQ
Mode
8
Playing Back
Movies and Saving
Still Photos
11
Specifying
Preferences
9
Handling
RAW Movies
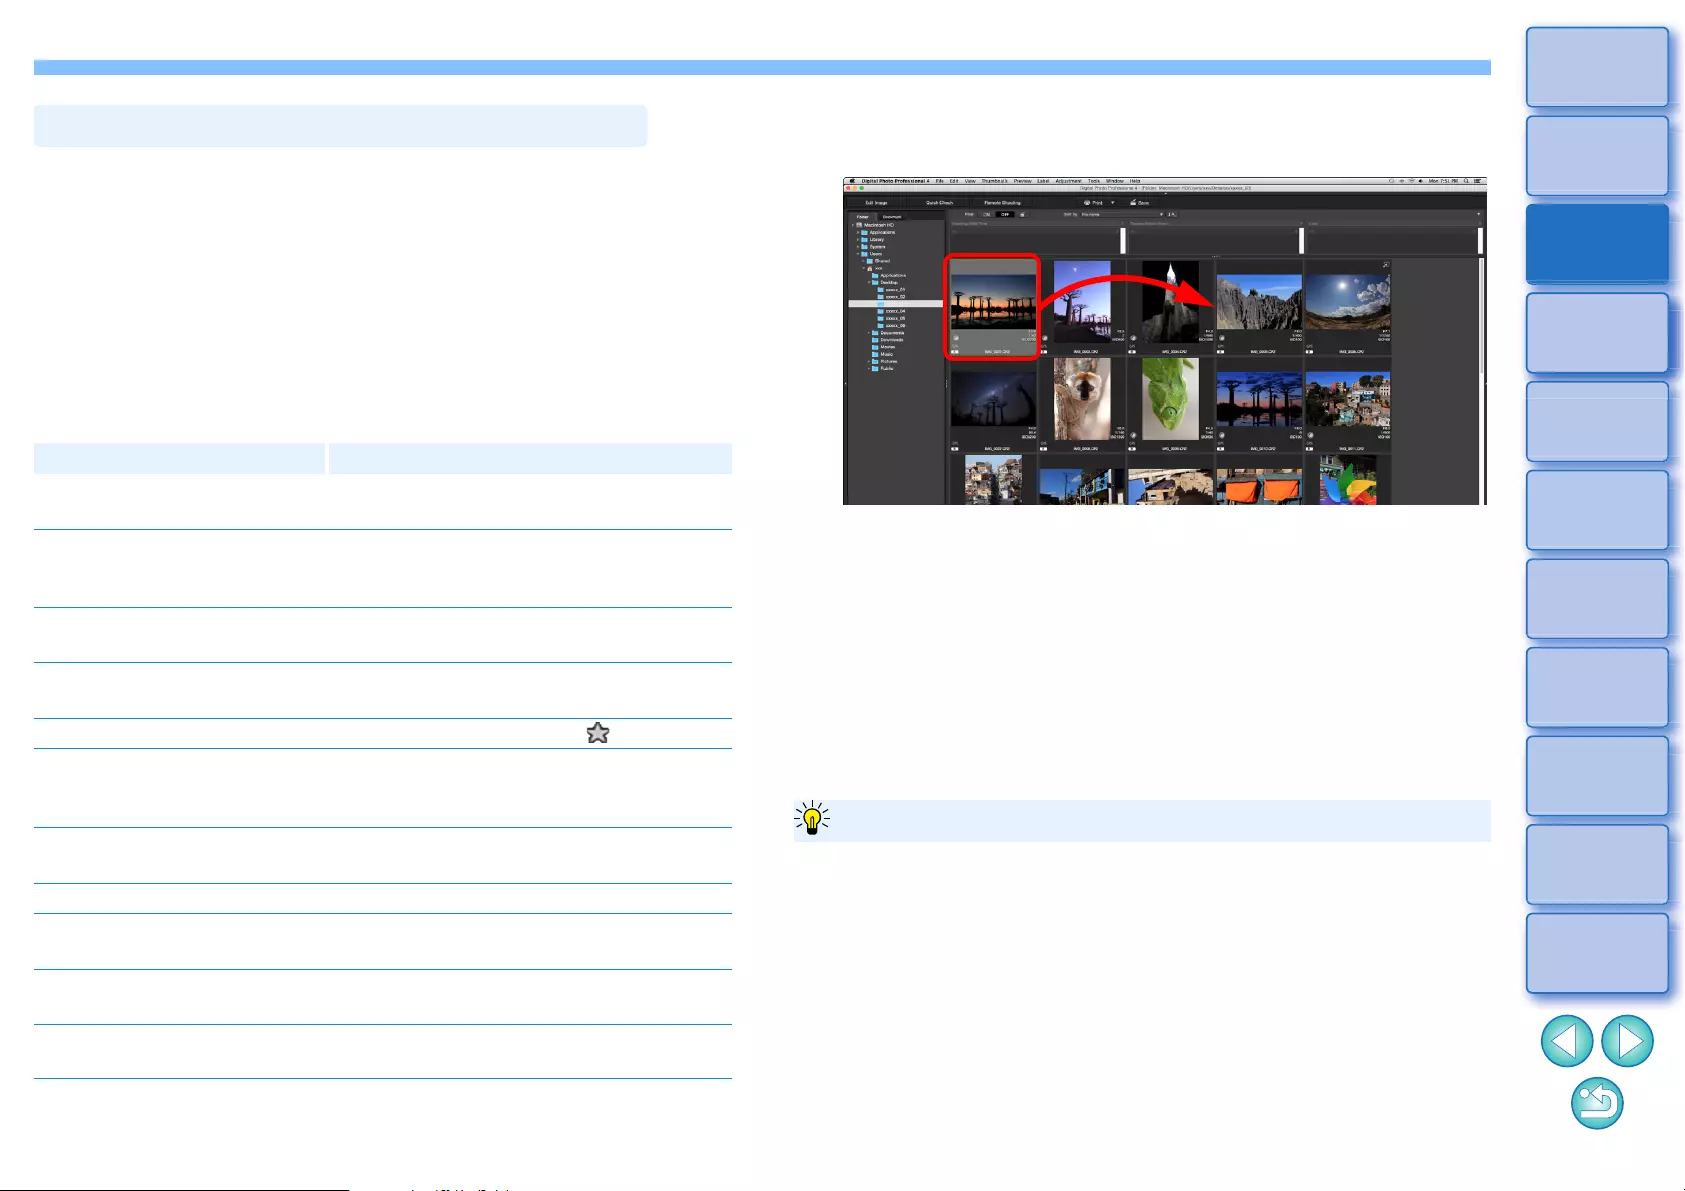
You can arrange images in the order of the types of check marks you
have attached to images, or in the order of date and time at which the
images were shot. You can also freely arrange images by moving them
individually.
Arranging by Type
* You can also arrange images by [Image Size], [RAW Type], and
[Recipe editing status].
* Descending order sorts all items in the reverse of ascending order.
Select the [Thumbnails] menu [Sort] desired item.
ÜThe images are arranged in the order according to the selected
item.
Main sort items Description
File name: ascending order Images are sorted by file name in
alphanumeric order (0 to 9 A to Z).
Extension: ascending order Images are sorted in the following order:
RAW images JPEG images TIFF
images MOV movies MP4 movies.
Shooting Date/Time:
ascending order
Images are sorted by shooting date and
time from the earliest.
Check mark: ascending order Images with check marks take priority
and are sorted in number order.
Rating: ascending order Sorted in order of fewest [ ].
Camera model Name:
ascending order
Sorted in order of least digit used in the
camera model name. (Ex.: EOS-1D X
EOS 6D)
Lens: ascending order Sorted in order of shooting lens with
shortest focal length.
ISO speed: ascending order Sorted in order of lowest speed.
Shutter speed: ascending
order
Sorted in order of fastest shutter speed.
Aperture value: ascending
order
Sorted in order of lowest aperture value.
Focal length: ascending
order
Sorted in order of shooting lens with
shortest set focal length.
Arranging Images in the Main Window
Arranging Freely
Drag and drop the image to the desired location.
ÜThe image moves to the desired location.
lYou can also select multiple images (p.35) and move them.
lThe order of rearranged images is temporarily registered as
[Custom] in the [Filter/Sort pane] and maintained until you quit
DPP or select another folder in the folder area.
lSelect the [Thumbnails] menu [Sort] [File name] and [Ascending]
to revert to the order before the images were rearranged.
You can maintain the order of rearranged images even if you quit DPP
or select another folder in the folder area.
lMaintain order without changing image file names
You can use the [View Settings] tab sheet in [Preferences] to maintain
the order of images without changing the image file names (p.176).
lMaintain order and change image file names
You can use the rename function to maintain the order of images and
change the image file names all at once in the order they were
rearranged (p.142).
Maintaining the order of rearranged images
37
3
Sorting
Images
1
2
4
5
Downloading
Images
Viewing
Images
Printing
Images
Editing
Images
6
Processing
Large Numbers
of RAW Images
7
Remote
Shooting
10
HDR PQ
Mode
8
Playing Back
Movies and Saving
Still Photos
11
Specifying
Preferences
9
Handling
RAW Movies
You can display and handle a RAW image and JPEG image shot
simultaneously as a single image. In particular, you can halve the
number of images displayed in the main window and you can streamline
the checking of a large number of images shot simultaneously.
Images that can be displayed as a single image are images shot with a
camera that shoots RAW images with the extension “.CR2”, “.CR3”, and
JPEG images simultaneously. Images that have been simultaneously
shot with a camera that shoots RAW images with the extension “.CRW”
or “.TIF” cannot be displayed as a single image.
lImage displayed
The RAW image is displayed in all windows.
lEdited image
The content which has been adjusted with any of DPP’s functions (the
tool palette etc.) will be applied to the RAW image only.
However, if you have used the following functions, the adjustments
will be applied to both the RAW image and the JPEG image.
• Deleting an image (p.39)
• Moving or copying an image (p.39)
• Checkmarking (p.33, p.34)
• Rating (p.33, p.34)
• Rotating an image (p.13)
Select the [Thumbnails] menu [Group RAW and
JPG versions].
ÜThe main window display updates and the simultaneously shot
RAW image and JPEG image are displayed as a single image
with the [ ] mark (p.182).
RAW images with the extension “.CR2” or “.CR3” can be
displayed as a single image
When a single image is displayed
Displaying a RAW Image and JPEG Image as a Single Image
lImages added to the [Collection] window
When you add a RAW image and JPEG image displayed as a single
image to the [Collection] window, the single image is marked with the
[ ] mark. However, because the RAW and JPEG images are
actually added individually, the number of images shown on the
[Collection] tab sheet increases by 2.
If you cancel selection of [Group RAW and JPG versions], the RAW
image and JPEG image are displayed as separate images.
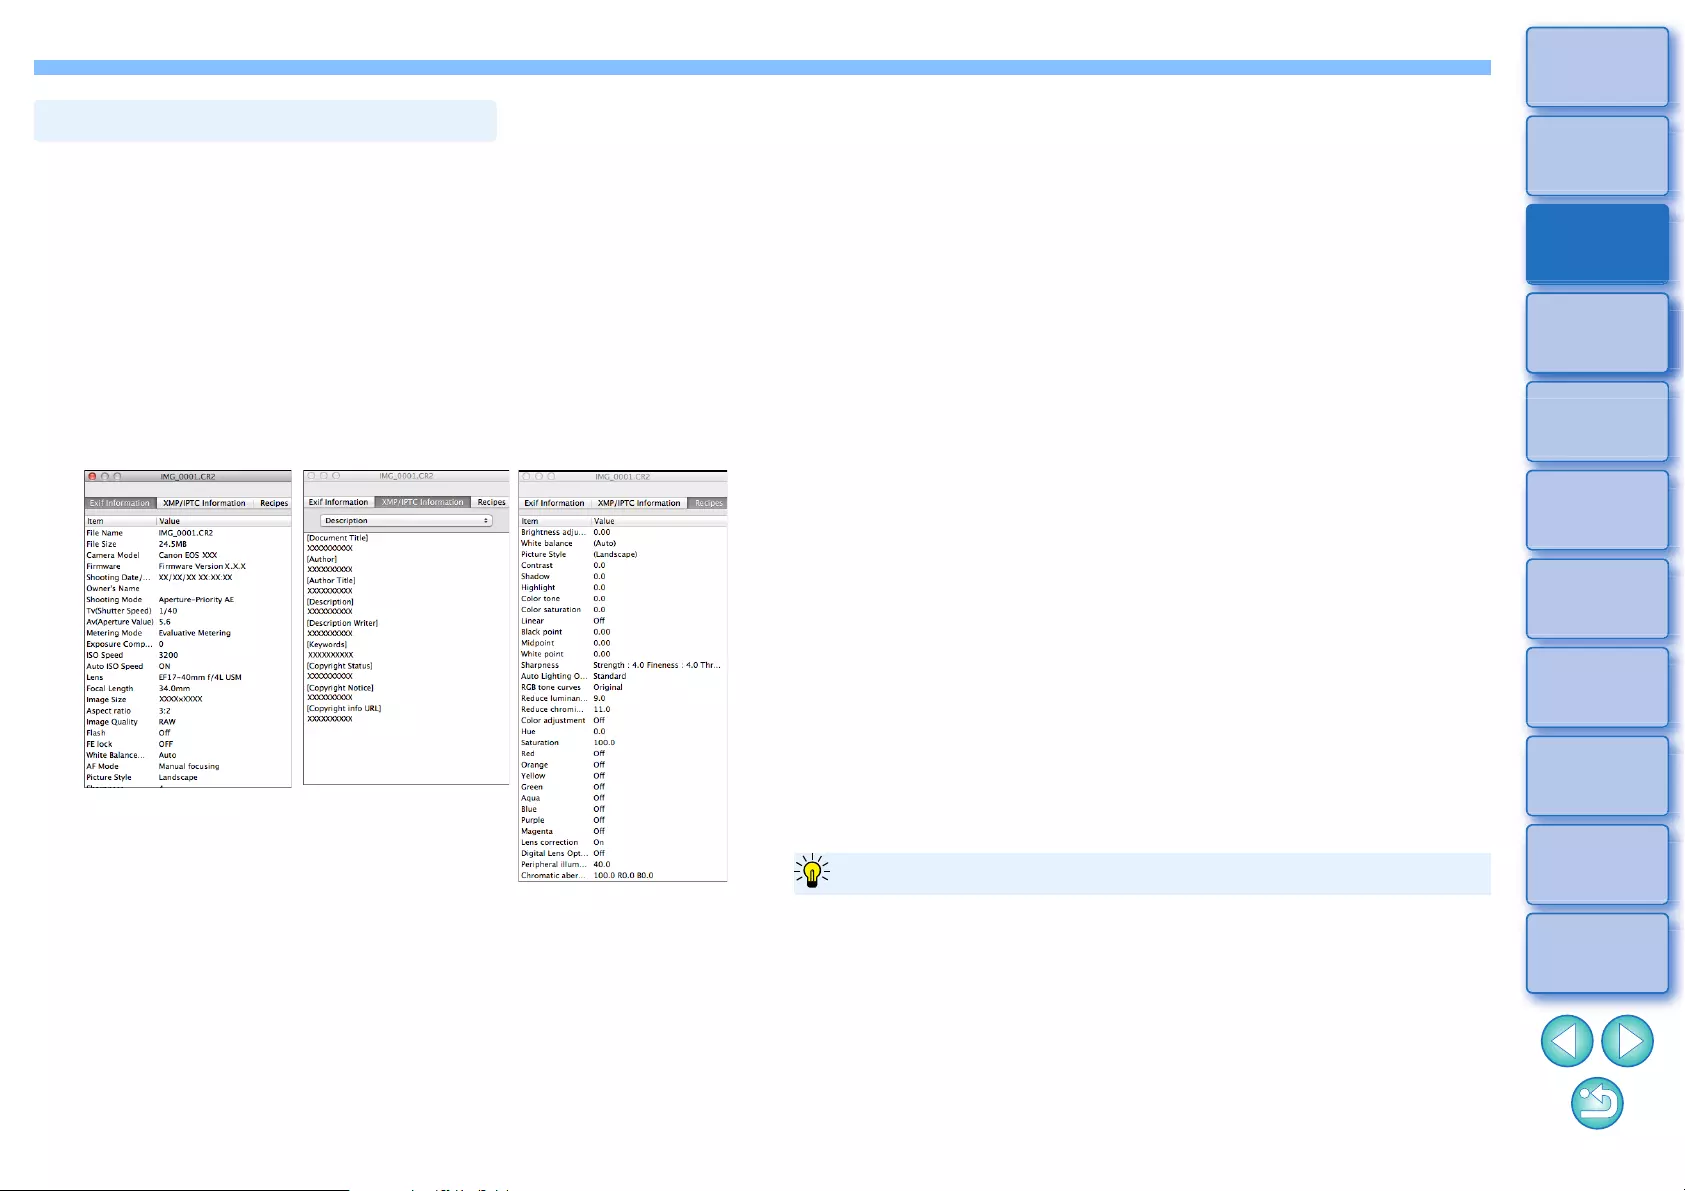
38
3
Sorting
Images
1
2
4
5
Downloading
Images
Viewing
Images
Printing
Images
Editing
Images
6
Processing
Large Numbers
of RAW Images
7
Remote
Shooting
10
HDR PQ
Mode
8
Playing Back
Movies and Saving
Still Photos
11
Specifying
Preferences
9
Handling
RAW Movies
1Select the image for which you want to check the
image information.
2Select the [View] menu [Info].
ÜThe image information window appears.
3Select a tab sheet and check information.
Checking Image Information
[Exif Information]
tab sheet
[XMP/IPTC Information]
tab sheet [Recipes]
tab sheet
Image information window
lShooting information is displayed in the [Exif Information] tab
sheet, while IPTC* information appended to the image after
shooting is displayed in the [XMP/IPTC Information] tab sheet.
IPTC* information provides additional comments on images,
such as captions, credits and the shooting location. The
information is sorted into 5 different categories and can be
viewed by selecting [Description], [IPTC Contact], [IPTC Image],
[IPTC Content] or [IPTC Status] from the list box in the [XMP/
IPTC Information] tab sheet.
* International Press Telecommunications Council (IPTC)
lThe contents of the [Exif Information] tab sheet will vary
depending on the camera model.
lRecipe contents applied to an image are displayed in the
[Recipes] tab sheet.
lSwitching displays
If a different image is selected in the main window when the image
information window is displayed, the image information for that image
will be displayed.
lDifference with the thumbnail with shooting information
Detailed shooting information for each image is displayed in the
image information window. However, if you want to only check the
main shooting information, you can check it for each image in
[Thumbnails] menu [With shooting info] (p.14).
Convenient uses in the main window
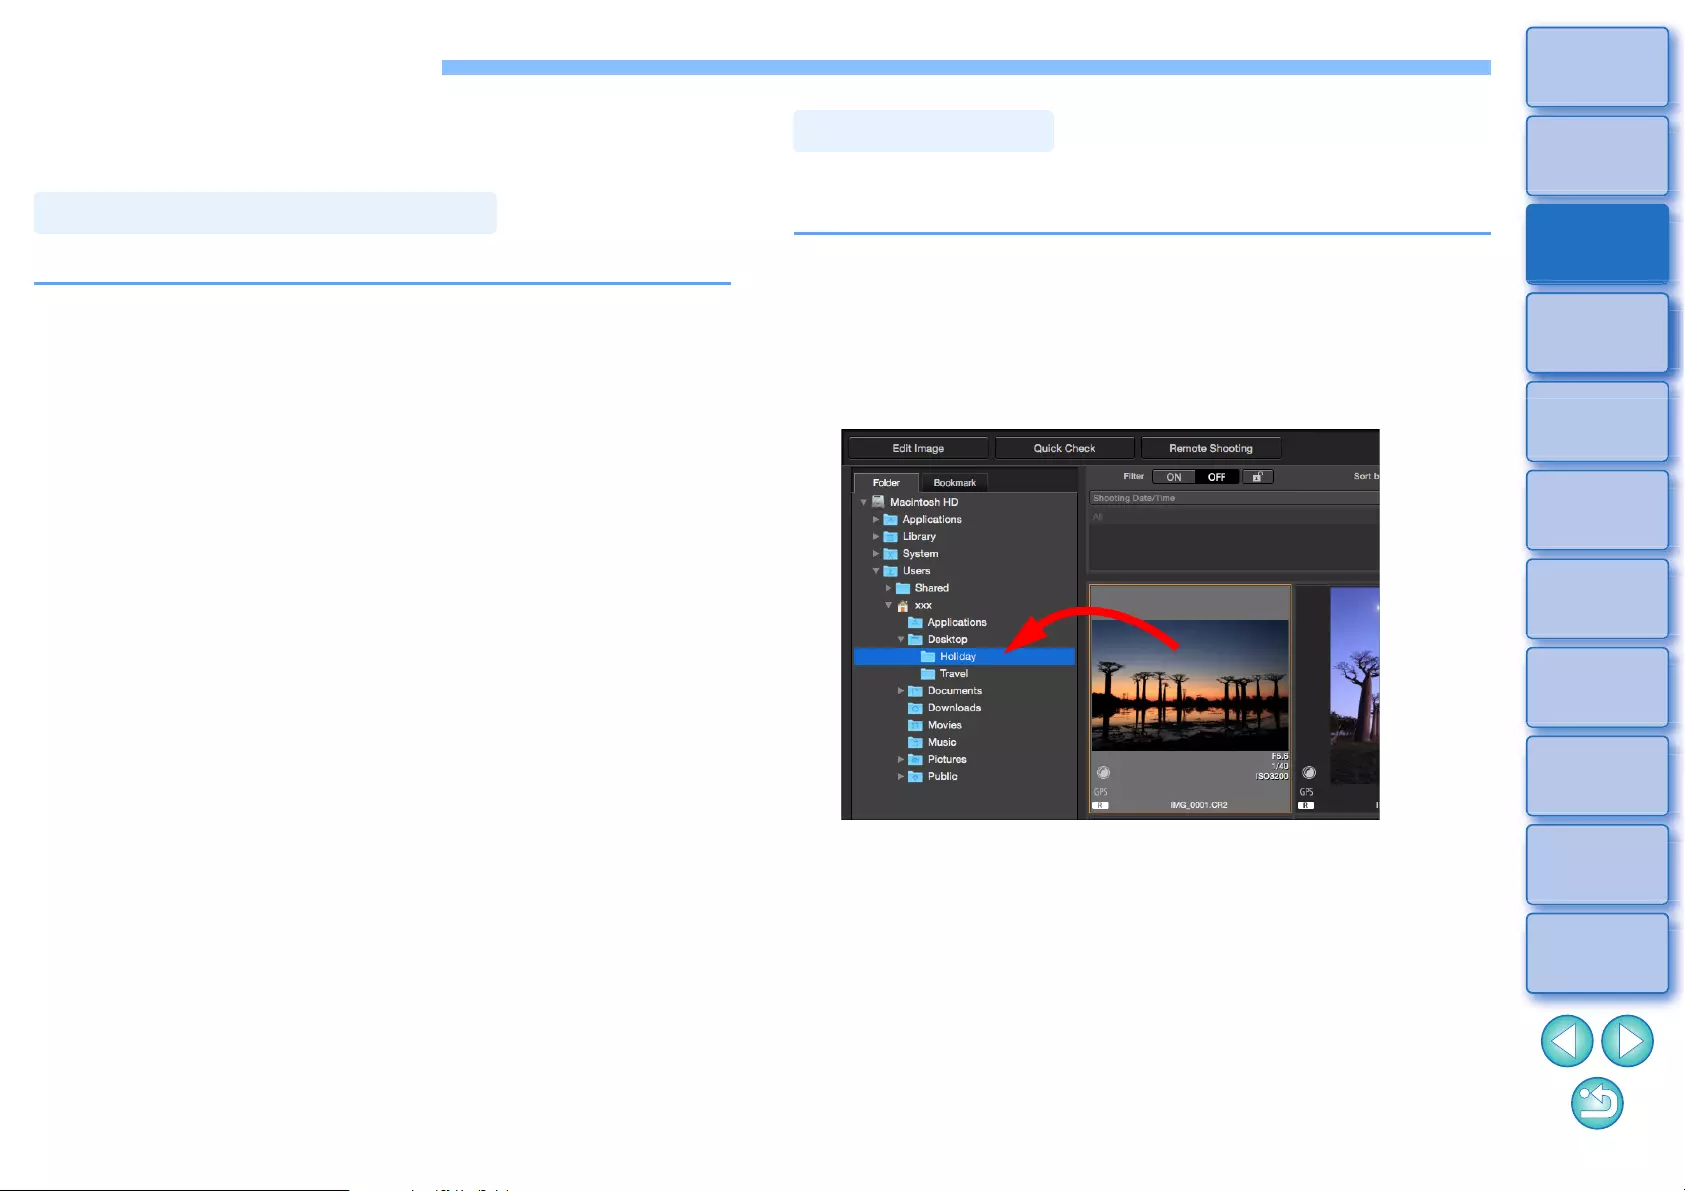
39
3
Sorting
Images
1
2
4
5
Downloading
Images
Viewing
Images
Printing
Images
Editing
Images
6
Processing
Large Numbers
of RAW Images
7
Remote
Shooting
10
HDR PQ
Mode
8
Playing Back
Movies and Saving
Still Photos
11
Specifying
Preferences
9
Handling
RAW Movies
Organizing Images
This section explains how to delete unwanted images, move or copy
images, etc., to organize your images.
Be aware that you cannot recover deleted images.
1Select an unwanted image in the main window.
2Select the [File] menu [Move to Trash].
ÜThe image is moved to the [Trash] and is deleted from DPP.
lThe images are deleted completely from your computer by
selecting the [Finder] menu [Empty Trash] on the desktop.
Deleting an Unwanted Image
You can move or copy images to a separate folder and sort by shooting
date or themes.
Drag the image to be moved or copied.
lTo move: Drag the image and release when the image is in the
destination folder.
lTo copy: Drag the image while holding down the <Option> key
and release when the image is in the destination
folder.
ÜThe images are moved or copied to the destination folder.
Moving Images
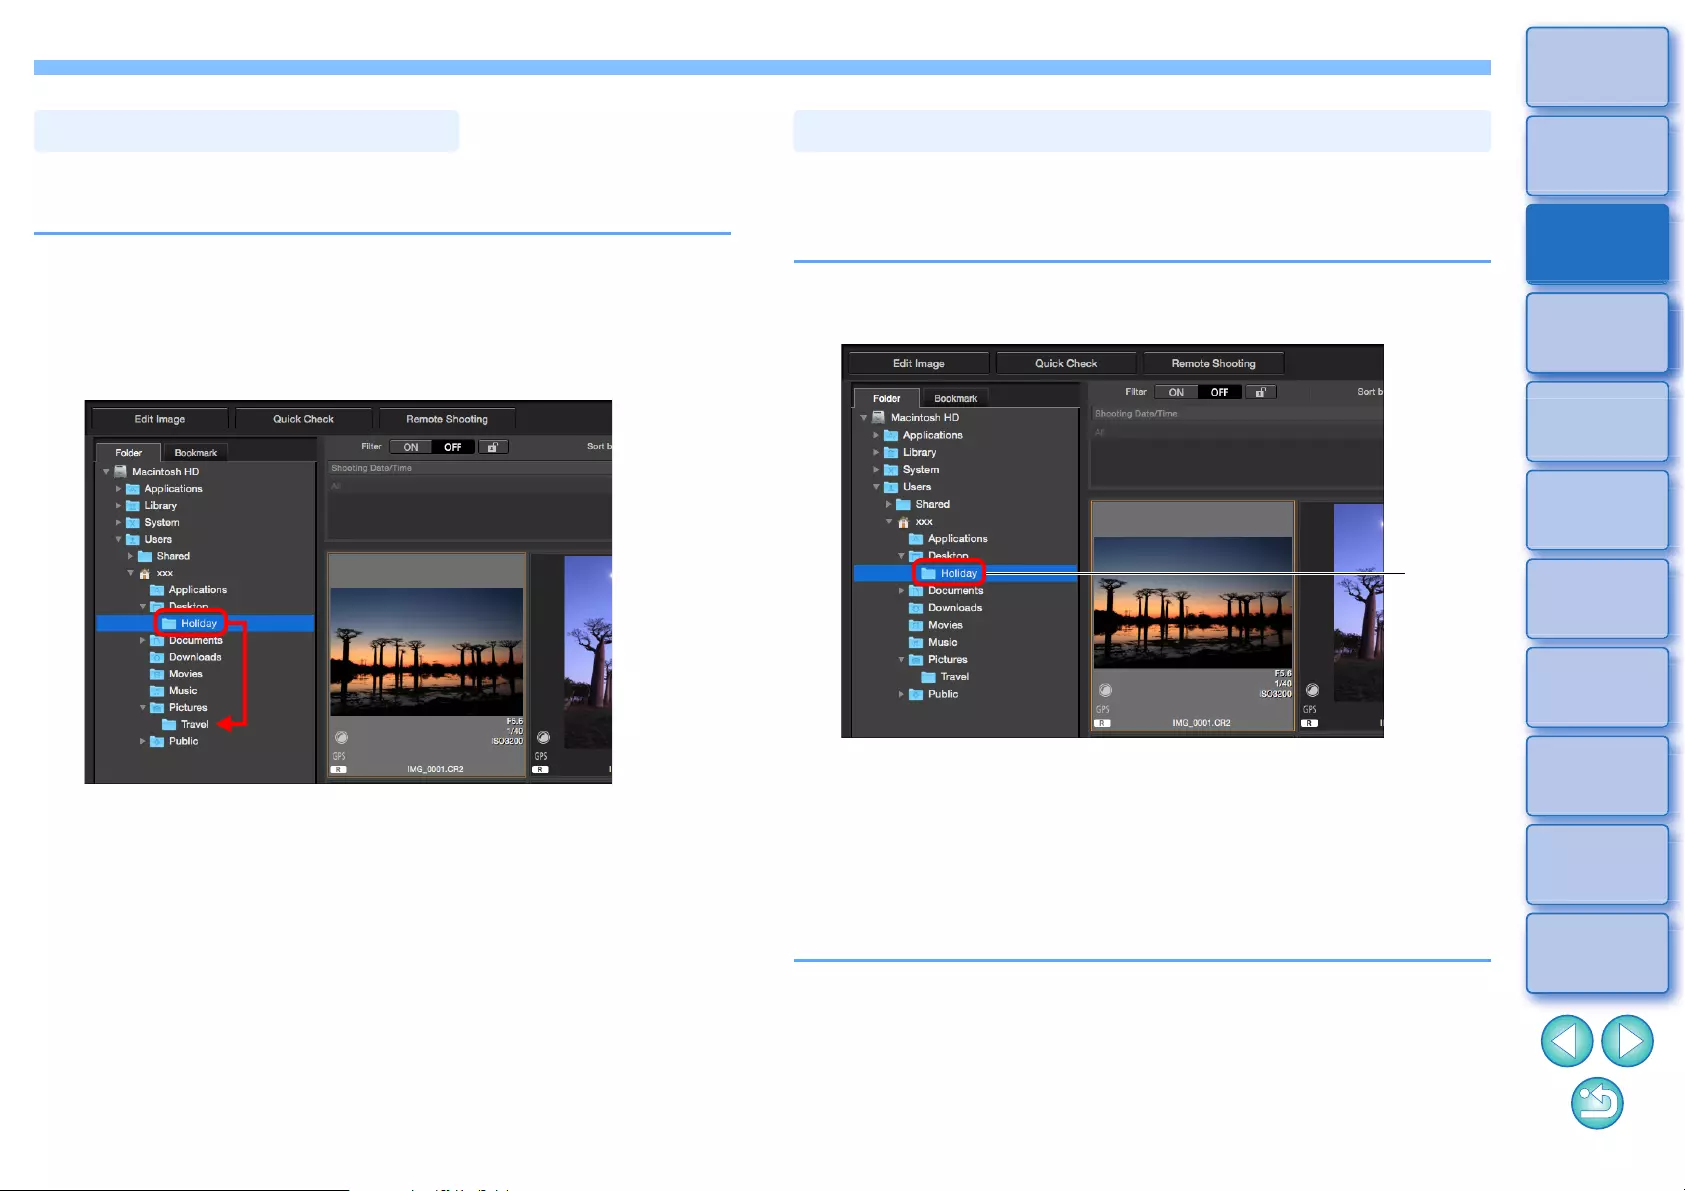
40
3
Sorting
Images
1
2
4
5
Downloading
Images
Viewing
Images
Printing
Images
Editing
Images
6
Processing
Large Numbers
of RAW Images
7
Remote
Shooting
10
HDR PQ
Mode
8
Playing Back
Movies and Saving
Still Photos
11
Specifying
Preferences
9
Handling
RAW Movies
You can move or copy folders that contain images, and sort the images
by folders.
Drag the folder to be moved or copied.
lTo move: Drag the folder and release when the folder is in the
destination folder.
lTo copy: Drag the folder while holding down the <Option> key
and release when the folder is in the destination folder.
ÜThe folders are moved or copied to the destination folder.
Moving Images in Folders
You can register frequently used folders in bookmarks.
Registered folders are displayed in the [Bookmark] tab sheet in the main
window.
Deleting Bookmarks
You can delete a folder registered in [Bookmark].
1Select the folder for which a bookmark is to be
registered.
2Select the [File] menu [Bookmark].
ÜThe folder selected in step 1 is registered in the [Bookmark] tab
sheet in the main window.
Select the [File] menu [Remove bookmark].
ÜThe selected folder is deleted from bookmarks.
Registering Frequent-Use Folders (Bookmark Registration)
Select
4
41
3
Sorting
Images
1
2
4
5
Downloading
Images
Viewing
Images
Printing
Images
Editing
Images
6
Processing
Large Numbers
of RAW Images
7
Remote
Shooting
10
HDR PQ
Mode
8
Playing Back
Movies and Saving
Still Photos
11
Specifying
Preferences
9
Handling
RAW Movies
Editing Images
RAW Images ............................................................ 44
RAW Images.............................................................. 44
RAW Development .................................................... 44
When RAW Development is to be Done.................... 44
Advantages of a RAW Image .................................... 44
Editing JPEG and TIFF Images ............................... 45
Tool Palettes ............................................................ 46
Editing with the Basic Adjustment Tool
Palette ...................................................................... 48
Adjusting Brightness .................................................. 48
Changing the Picture Style ........................................ 49
Using a Picture Style File ............................. 51
Adjusting Color Tone by Changing White Balance.... 51
Adjusting Color Tone Using Click White Balance ...... 52
Adjusting White Balance with Color
Temperature .............................................................. 53
Tuning White Balance .................................. 53
Adjusting Contrast ..................................................... 54
Adjusting Brightness of Shadows/
Highlights ................................................................... 54
Changing Color Tone and Color Saturation............... 55
Adjusting Monochrome .......................................... 55
Adjusting Dynamic Range............................ 56
Adjusting Gradation and Luminance Automatically ... 57
Using the Auto Lighting Optimizer ............................. 58
Adjust Face Lighting .................................................. 59
Adjusting Image Sharpness....................................... 59
Detailed Setting of Image Sharpness .................... 60
Adjusting Clarity......................................................... 61
JPEG/TIFF
Advanced
Advanced
Advanced
Advanced
Advanced
Editing with the Tone Adjustment Tool
Palette ..................................................................... 62
Adjusting Brightness and Contrast ............................. 62
Adjusting Color Tone Using Click White Balance....... 63
Adjusting Tone Curve ................................... 64
Example of a Tone Curve Operation ...................... 65
Adjusting Dynamic Range............................. 66
Using the Auto Lighting Optimizer.............................. 66
Editing with the Color Adjustment Tool
Palette ..................................................................... 67
Editing with the Color Adjustment Tool
Palette ........................................................................ 67
Adjusting a Specific Color Gamut........................... 67
Adjusting Hue and Saturation for an Entire
Image...................................................................... 68
Adjusting in Monochrome ....................................... 68
Editing with the Detailed Adjustment Tool
Palette ..................................................................... 69
Reducing Noise .......................................................... 69
Adjusting Image Sharpness........................................ 70
Reducing Color Moiré in an Image ............................. 70
Editing with the Trimming/Angle
Adjustment Tool Palette .......................................... 71
Editing with the Lens Correction Tool Palette.......... 74
Correcting Lens Aberration......................................... 74
Making Corrections..................................................... 75
Effects of Distortion Correction for Fisheye
Lenses .................................................................... 76
Shooting Distance Information Slider ......................... 77
JPEG/TIFF
Advanced
Advanced
JPEG/TIFF
Advanced
JPEG/TIFF
JPEG/TIFF
42
3
Sorting
Images
1
2
4
5
Downloading
Images
Viewing
Images
Printing
Images
Editing
Images
6
Processing
Large Numbers
of RAW Images
7
Remote
Shooting
10
HDR PQ
Mode
8
Playing Back
Movies and Saving
Still Photos
11
Specifying
Preferences
9
Handling
RAW Movies
Correcting Multiple Images at a Time ........................ 78
Digital Lens Optimizer................................................ 78
Using the Digital Lens Optimizer ............................... 79
Adjusting Image Sharpness....................................... 81
Editing with the Partial Adjustment
Tool Palette ................................................................... 82
Making Partial Adjustments to Images ([Brightness],
[Contrast], [Hue], [Saturation]) ................................... 82
Making Partial Adjustments to Images ([Reduce
color moiré])............................................................... 84
Adjustment Groups .................................................... 85
Editing with the Dust Delete/Copy Stamp
Tool Palette .............................................................. 86
Performing Automatic Dust Erasure Processing ....... 86
Automatic Dust Erasure Processing in the Main
Window ...................................................................... 87
Manually Erasing Dust (Repair Function) .................. 88
Erasing Unwanted Parts of an Image (Copy Stamp
Function).................................................................... 90
Setting Work Color Space........................................ 91
Using the Soft-Proof Colors Function....................... 92
Specifying the Size when Opening RAW Images .... 93
Displaying and Saving RAW Images ....................... 94
Saving Editing Results.............................. 95
Saving Editing Contents to an Image ........................ 95
Saving as a separate image ...................................... 95
Re-Editing an Image................................. 97
Utilizing Adjustment Contents (Recipe) .... 98
JPEG/TIFF Advanced
JPEG/TIFF
JPEG/TIFF
JPEG/TIFF
JPEG/TIFF
Copying a Recipe and Applying to Another Image..... 99
Saving a Recipe as a File........................................... 99
Loading and Applying Recipes ................................. 100
Adjusting by Comparing Multiple
Images................................................................... 101
Editing Efficiently ................................... 102
Editing in the Edit Image Window............................. 102
Changing the Thumbnail Display Position to
Horizontal ................................................................. 103
Gathering and Editing Images in the Collection
Window..................................................................... 104
Compositing Images .............................. 106
Compositing Methods............................................... 109
Creating HDR (High Dynamic Range)
Images................................................................... 110
Using the Dual Pixel RAW Optimizer........ 113
Microadjustment of the Position of Maximum
Sharpness and Resolution Using the Depth
Information Contained within the Dual Pixel RAW
File............................................................................ 113
Reposition the Viewpoint or Foreground Bokeh
for a More Pleasing Result ....................................... 114
Reduces the Appearance of Ghosting in
Images...................................................................... 115
Using Depth Compositing.......... 117
Supported Images .................................................... 117
Using the Depth Compositing Tool........................... 117
Using the Depth Compositing Editing Tool............... 119
Using the RAW Burst Image Tool ............. 122
JPEG/TIFF
JPEG/TIFF
JPEG/TIFF
JPEG/TIFF
Advanced
JPEG/TIFF
Advanced
Advanced
43
3
Sorting
Images
1
2
4
5
Downloading
Images
Viewing
Images
Printing
Images
Editing
Images
6
Processing
Large Numbers
of RAW Images
7
Remote
Shooting
10
HDR PQ
Mode
8
Playing Back
Movies and Saving
Still Photos
11
Specifying
Preferences
9
Handling
RAW Movies
Starting Up the RAW Burst Image Tool ................... 122
Changing the Representative Image in a Roll ......... 124
Saving One Image in a Roll..................................... 124
Extracting and Saving Any Range in a Roll ............. 125
Transferring a RAW Image to
Photoshop .............................................................. 126
Customizing the Main Window Toolbar ..... 127
Using Cloud Processing ............................ 128
Supported Images ................................................... 128
Requirements for Using this Function...................... 128
Enabling Cloud Processing...................................... 128
Cloud Processing and CIP Image Editing................ 129
Using Noise Reduction (Cloud) ............................... 130
Advanced
Advanced
Advanced
* Sections with and in “4 Editing Images”
support not only RAW image editing but also JPEG/TIFF image
editing.
: All the functions explained in the section support
JPEG/TIFF image editing.
: Certain functions explained in the section support
JPEG/TIFF image editing.
JPEG/TIFF JPEG/TIFF
JPEG/TIFF
JPEG/TIFF
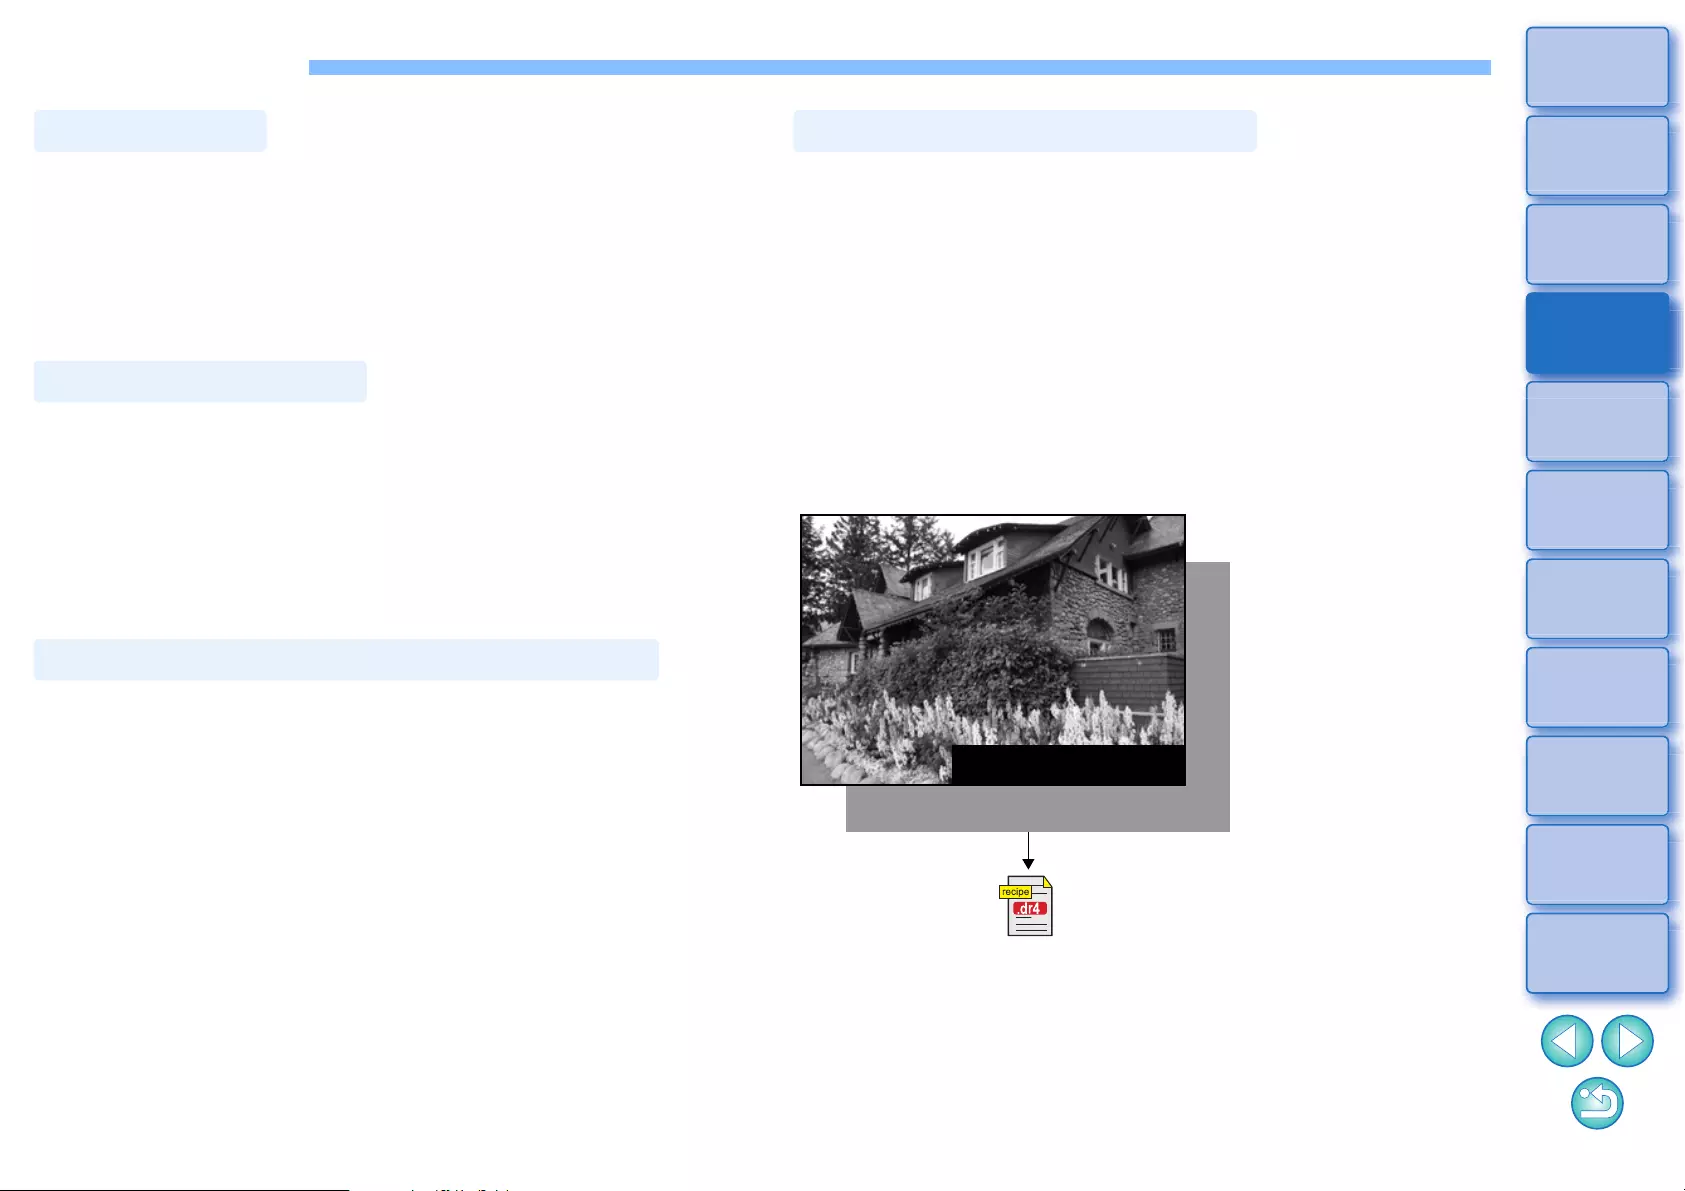
44
3
Sorting
Images
1
2
4
5
Downloading
Images
Viewing
Images
Printing
Images
Editing
Images
6
Processing
Large Numbers
of RAW Images
7
Remote
Shooting
10
HDR PQ
Mode
8
Playing Back
Movies and Saving
Still Photos
11
Specifying
Preferences
9
Handling
RAW Movies
RAW Images
A RAW image is image data that has recorded output data of imaging
sensor. As image processing is not performed inside the camera when a
photo is taken and the photo has been recorded in the special form of
“RAW image data + Image processing conditions information at the time
of shooting”, special software is needed to view or edit the image.
* “RAW” means “in a natural condition” or “not processed or refined”.
If described in terms of film, the concept of a RAW image is a shot
image not yet developed (latent image).
With film, the image appears for the first time when it is developed. In
the same way, for RAW images too, you cannot view them as images on
your computer unless you perform subsequent image signal processing.
Therefore, even though it is digital, this processing is called
“development”.
DPP automatically carries out this “development” processing when
RAW images are displayed in DPP. As a result, RAW images displayed
in DPP are images whose development processing has been
completed.
With DPP, you can view, edit and print RAW images without being
particularly conscious of the development processing.
RAW Images
RAW Development
When RAW Development is to be Done
RAW images are recorded in the format “RAW image data + Image
processing conditions information at the time of shooting”. When you
open a RAW image in DPP, the image is automatically developed and
you can view the image as an image to which image processing
conditions at the time of shooting have been applied.
Even if you perform various adjustments to the image you have opened
(it undergoes automatic development processing each time), only the
image processing conditions (development conditions) change and the
“original image data itself” remains unaffected. Therefore, it is the
perfect data for users who want to get creative with the images after
shooting, as you do not have to worry about image deterioration.
In DPP, the “Image processing conditions information” that can be
adjusted is called a “Recipe” (p.98).
In DPP, all the adjustments (image processing conditions information)
made with the tool palettes can be saved in the image as data called a
“recipe” (p.99), or can be saved, downloaded and applied to other
images as a separate recipe file (extension “.dr4”, p.100). However, a
recipe file with saved RAW image adjustments cannot be applied to
JPEG or TIFF images.
Advantages of a RAW Image
Image processing conditions information
RAW image data
Contents adjusted using the tool
palettes can be handled
individually as a recipe file
(extension “.dr4”) (p.98, p.99).
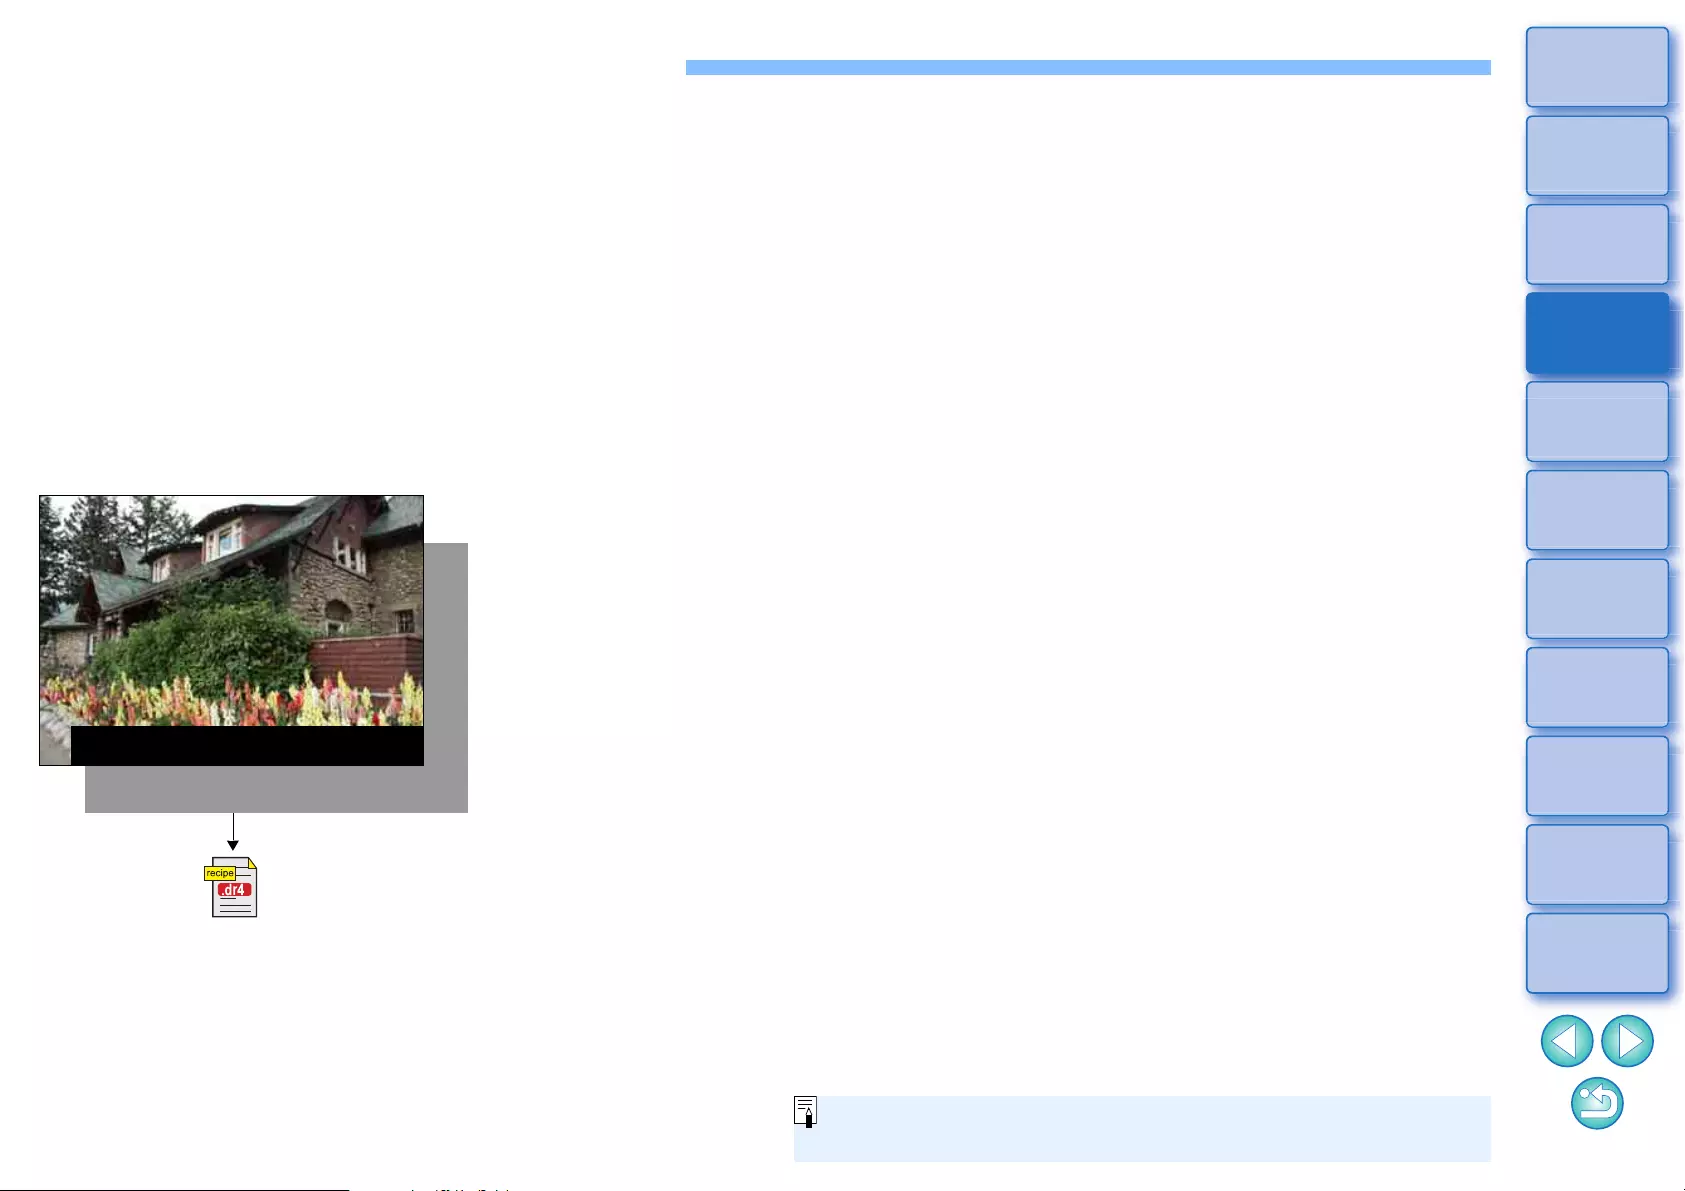
45
3
Sorting
Images
1
2
4
5
Downloading
Images
Viewing
Images
Printing
Images
Editing
Images
6
Processing
Large Numbers
of RAW Images
7
Remote
Shooting
10
HDR PQ
Mode
8
Playing Back
Movies and Saving
Still Photos
11
Specifying
Preferences
9
Handling
RAW Movies
Editing JPEG and TIFF Images
With DPP, you can adjust JPEG and TIFF images in the same way as
RAW images using the tool palettes below.
• Tone Adjustment tool palette
• Color Adjustment tool palette
• Detailed Adjustment tool palette
• Trimming/Angle Adjustment tool palette
• Partial Adjustment tool palette
• Dust Delete/Copy Stamp tool palette
• Settings tool palette
Because adjustments made with these tool palettes (the recipe) only
change the image processing conditions, the “original image data itself”
remains unaffected. Consequently, there is none of the image
deterioration that normally accompanies editing and you can readjust
your image any number of times.
In DPP, all the adjustments (image processing conditions information)
made with the tool palettes can be saved in the image as data called a
“recipe” (p.99), or can be saved, downloaded and applied to other
images as a separate recipe file (extension “.dr4”, p.100). However,
recipe data with saved JPEG or TIFF image adjustments cannot be
applied to RAW images.
Contents adjusted using the tool
palettes can be handled
individually as a recipe file
(extension “.dr4”) (p.98, p.99).
Image processing conditions information
JPEG, TIFF image data
You can also adjust HEIF images in DPP in the same way as JPEG/
TIFF images.
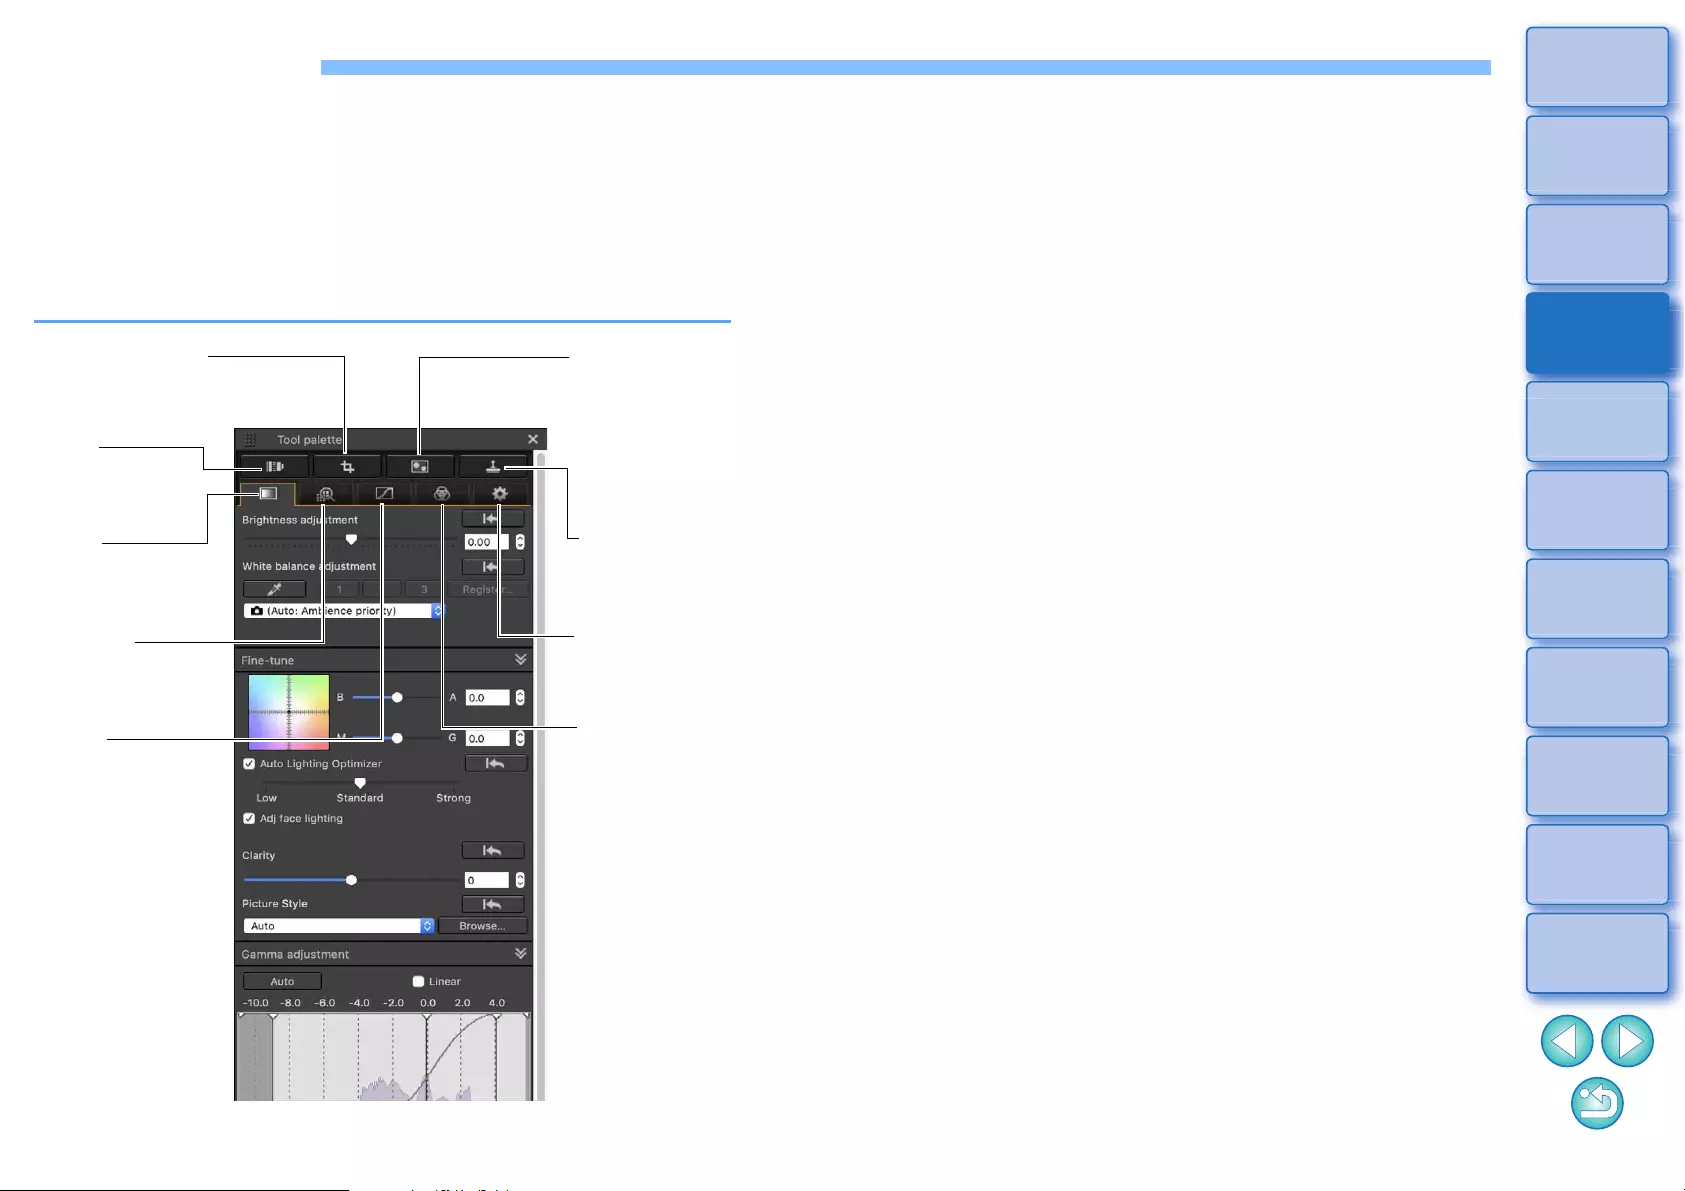
46
3
Sorting
Images
1
2
4
5
Downloading
Images
Viewing
Images
Printing
Images
Editing
Images
6
Processing
Large Numbers
of RAW Images
7
Remote
Shooting
10
HDR PQ
Mode
8
Playing Back
Movies and Saving
Still Photos
11
Specifying
Preferences
9
Handling
RAW Movies
Tool Palettes
With DPP, you can adjust images with the tool palettes by switching
between various tool palette windows according to your editing
requirements. Since adjustments made with the tool palettes only
change the image processing conditions, the “original image data itself”
remains unaffected. As there is no image deterioration that normally
accompanies editing, you can readjust your image any number of times.
The various functions of the tool palettes are explained in more detail
under the respective topics.
Lens
Correction tool
palette
Dust Delete/
Copy Stamp
tool palette
Basic
Adjustment
tool palette
Detailed
Adjustment
tool palette
Color
Adjustment
tool palette
Tone
Adjustment
tool palette
Settings tool
palette
Trimming/Angle
Adjustment tool
palette
Partial
Adjustment tool
palette
lBasic Adjustment tool palette
Makes basic adjustments to a RAW image (p.48).
lTone Adjustment tool palette
Adjusts the tone curve and applies the Auto Lighting Optimizer (p.62).
lColor Adjustment tool palette
Adjusts the hue, saturation and luminance of a specific color space. The
hue and saturation for an entire image can also be adjusted (p.67).
lDetailed Adjustment tool palette
Reduces noise and adjusts the image sharpness (p.69).
lTrimming/Angle Adjustment tool palette
Crops an image and adjusts the image angle (p.71).
lLens Correction tool palette
Corrects lens aberration in the image (p.74) and applies the Digital
Lens Optimizer (p.79).
lPartial Adjustment tool palette
Adjusts the selected area of an image (p.82).
lDust Delete/Copy Stamp tool palette
Erases dust from an image and corrects image by copying sections
of the image (p.86).
lSettings tool palette
Configures settings such as the work color space (p.91).
47
3
Sorting
Images
1
2
4
5
Downloading
Images
Viewing
Images
Printing
Images
Editing
Images
6
Processing
Large Numbers
of RAW Images
7
Remote
Shooting
10
HDR PQ
Mode
8
Playing Back
Movies and Saving
Still Photos
11
Specifying
Preferences
9
Handling
RAW Movies
We recommend that you use the Basic Adjustment tool palette to make
adjustments to RAW images. However, if you find that the Basic
Adjustment tool palette does not offer a sufficient range of adjustments,
or if you want to use specific functions that are only available in the Tone
Adjustment tool palette (p.62), completing initial adjustments with the
Basic Adjustment tool palette and then using the Tone Adjustment tool
palette to make just the minimum of adjustments needed is
recommended.
For noise reduction (p.69) and lens aberration correction (p.75), you
should first complete necessary adjustments in the Basic Adjustment
and Tone Adjustment tool palettes, and then adjust with the Detailed
Adjustment tool palette (p.69) and Lens Correction tool palette (p.74).
lYou can click the [ ] button at the bottom right of the main window
to show/hide [Tool palette].
Using the different tool palettes
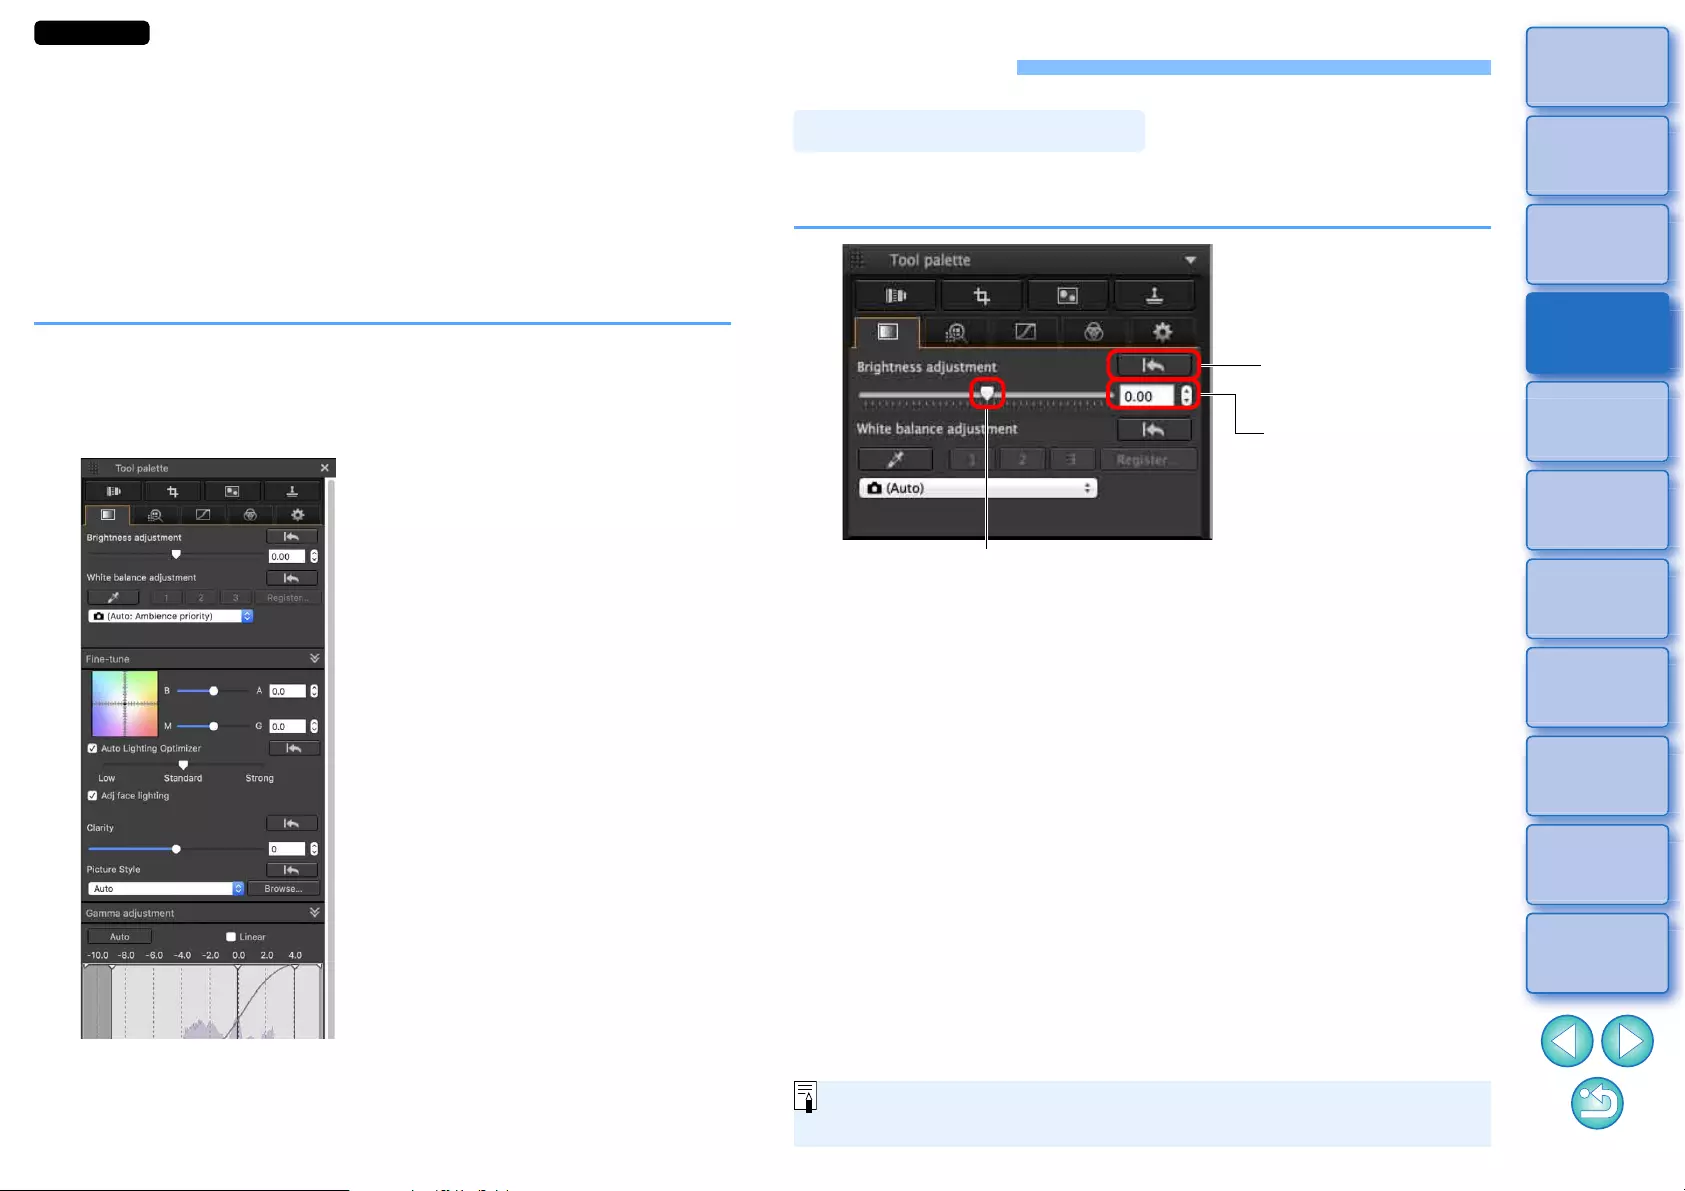
48
3
Sorting
Images
1
2
4
5
Downloading
Images
Viewing
Images
Printing
Images
Editing
Images
6
Processing
Large Numbers
of RAW Images
7
Remote
Shooting
10
HDR PQ
Mode
8
Playing Back
Movies and Saving
Still Photos
11
Specifying
Preferences
9
Handling
RAW Movies
Editing with the Basic Adjustment Tool Palette
The Basic Adjustment tool palette makes basic adjustments to RAW
images. With this tool palette, you can adjust the image brightness, set
Picture Style, adjust the white balance, adjust the contrast, adjust the
color tone and saturation, adjust the dynamic range, apply the Auto
Lighting Optimizer and adjust the image sharpness.
Note that the only adjustments you can make to JPEG/TIFF images are
applying the Auto Lighting Optimizer and adjusting the image
sharpness.
1Select an image in the main window, etc.
2Display the Basic Adjustment tool palette.
The brightness of an image can be adjusted. Move the slider to the right
to make the image brighter and to the left to make the image darker.
Adjusting Brightness
Reverts the image to
the original settings
Enter a numerical
value
Drag the slider left or right
The adjustment range is –3.0 to +3.0 (in 0.01-stop increments when
entering a value).
JPEG/TIFF
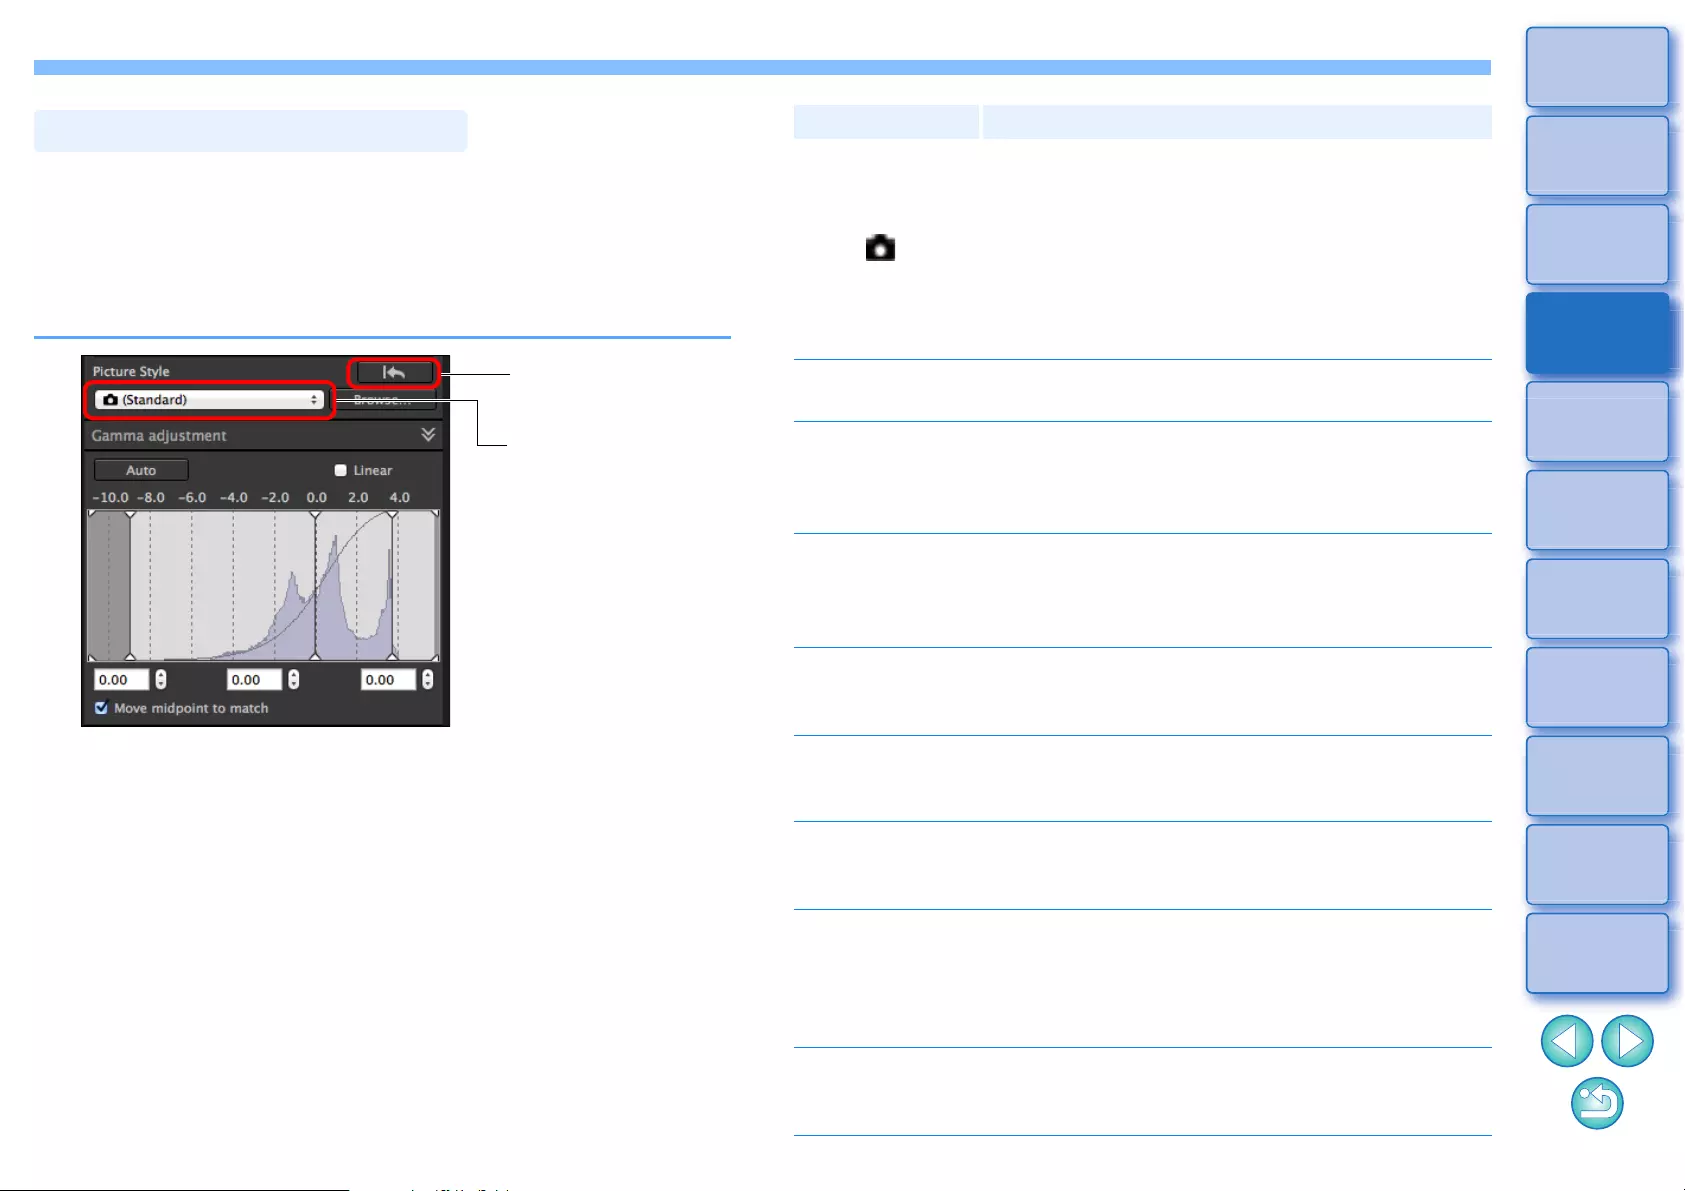
49
3
Sorting
Images
1
2
4
5
Downloading
Images
Viewing
Images
Printing
Images
Editing
Images
6
Processing
Large Numbers
of RAW Images
7
Remote
Shooting
10
HDR PQ
Mode
8
Playing Back
Movies and Saving
Still Photos
11
Specifying
Preferences
9
Handling
RAW Movies
If the image looks different from what you visualized at the time of
shooting, you can get it closer to what you expected by changing the
Picture Style. Even if you have saved the image (p.95) with
[Monochrome] (p.55) selected, you can still change to another Picture
Style at any point by simply selecting a Picture Style other than
[Monochrome].
Changing the Picture Style
Reverts the image to
the original settings
Select
Picture Style Description
( )
The Picture Style set with the camera when the
image was shot.
When a mode in the Creative Zone is selected on the
camera, the Picture Style set is displayed in ( ).
When a mode in the Basic Zone is selected on the
camera, [Shot settings] is displayed in ( ), and image
characteristics that are according to the selected
shooting mode are applied.
Standard The image looks vivid.
Generally, this setting is suitable for most images.
Auto
The color tone will be adjusted to suit the scene.
The colors will look vivid. Especially the colors of
blue skies, greenery, and sunsets will be vivid in a
shot of nature, outdoor, or sunset scenes.
Portrait
For nice skin tones.
Effective for close-ups of women and children. By
changing the [Color tone], you can adjust the skin
tone (p.55).
Landscape
For vivid blues and greens.
Effective for making images of landscapes
impressive.
Fine Detail
Suited for detailed outline and fine texture
description of the subject. The colors will be slightly
vivid.
Neutral
For natural colors and subdued images.
Effective for base images which are to undergo
adjustment.
Faithful
When the subject is photographed under a color
temperature of 5200K, the color is adjusted
colorimetrically to match the subject’s color.
Effective for base images which are to undergo
adjustment.
Monochrome
For black and white images.
You can also adjust with [Filter effect] or [Toning
effect] (p.55).
50
3
Sorting
Images
1
2
4
5
Downloading
Images
Viewing
Images
Printing
Images
Editing
Images
6
Processing
Large Numbers
of RAW Images
7
Remote
Shooting
10
HDR PQ
Mode
8
Playing Back
Movies and Saving
Still Photos
11
Specifying
Preferences
9
Handling
RAW Movies
Picture Style Description
(Picture Style file
registered in the
camera)
Displayed when selecting an image shot with the
Picture Style file registered in the camera.
In the list, the name of the Picture Style file is
displayed in ( ).
[Picture Style file
applied in DPP]
The name of the Picture Style file applied in DPP is
displayed in [ ].
lYou can retain the [Color tone], [Color saturation], [Contrast],
[Unsharp mask] and [Sharpness] settings, even if you change the
Picture Style.
l[Auto] is not applied to images shot with the EOS-1D Mark IV,
EOS-1Ds Mark III, EOS-1D Mark III, EOS-1D Mark II N, EOS-1Ds
Mark II, EOS-1D Mark II, EOS-1D, EOS-1Ds, EOS 5D Mark II,
EOS 5D, EOS 7D, EOS 60D/EOS 60Da, EOS 50D, EOS 40D,
EOS 30D, EOS 20D/EOS 20Da, EOS 10D, EOS D2000,
EOS D30, EOS D60, EOS 550D, EOS 500D, EOS 450D,
EOS 1000D, EOS 1100D, EOS 400D, EOS 350D, EOS 300D,
PowerShot G3 X, PowerShot G1 X Mark II, PowerShot G7 X,
PowerShot G9 X, PowerShot SX60 HS, PowerShot G5 X,
PowerShot G16, PowerShot S120, PowerShot G1 X, PowerShot
G15, PowerShot S110, PowerShot S100, PowerShot G9,
PowerShot G10, PowerShot G11, PowerShot G12, PowerShot
S90, PowerShot S95, PowerShot SX1 IS, PowerShot SX50 HS,
or PowerShot SX70 HS. When changing the Picture Style with
several images selected, although you can select [Auto] if images
shot with any supported camera other than the above are
included, [Auto] will not be applied to the images shot with the
above cameras.
lYou can apply [Fine Detail] to all images shot with supported
camera models except the PowerShot G3 X, PowerShot G1 X
Mark II, PowerShot G7 X, PowerShot G9 X, PowerShot SX60
HS, PowerShot G5 X, PowerShot G16, PowerShot S120,
PowerShot G1 X, PowerShot G15, PowerShot S110, PowerShot
S100, PowerShot G9, PowerShot G10, PowerShot G11,
PowerShot G12, PowerShot S90, PowerShot S95, PowerShot
SX1 IS, and PowerShot SX50 HS.
lYou cannot select [Auto] with multiple-exposure RAW images
created with the camera.
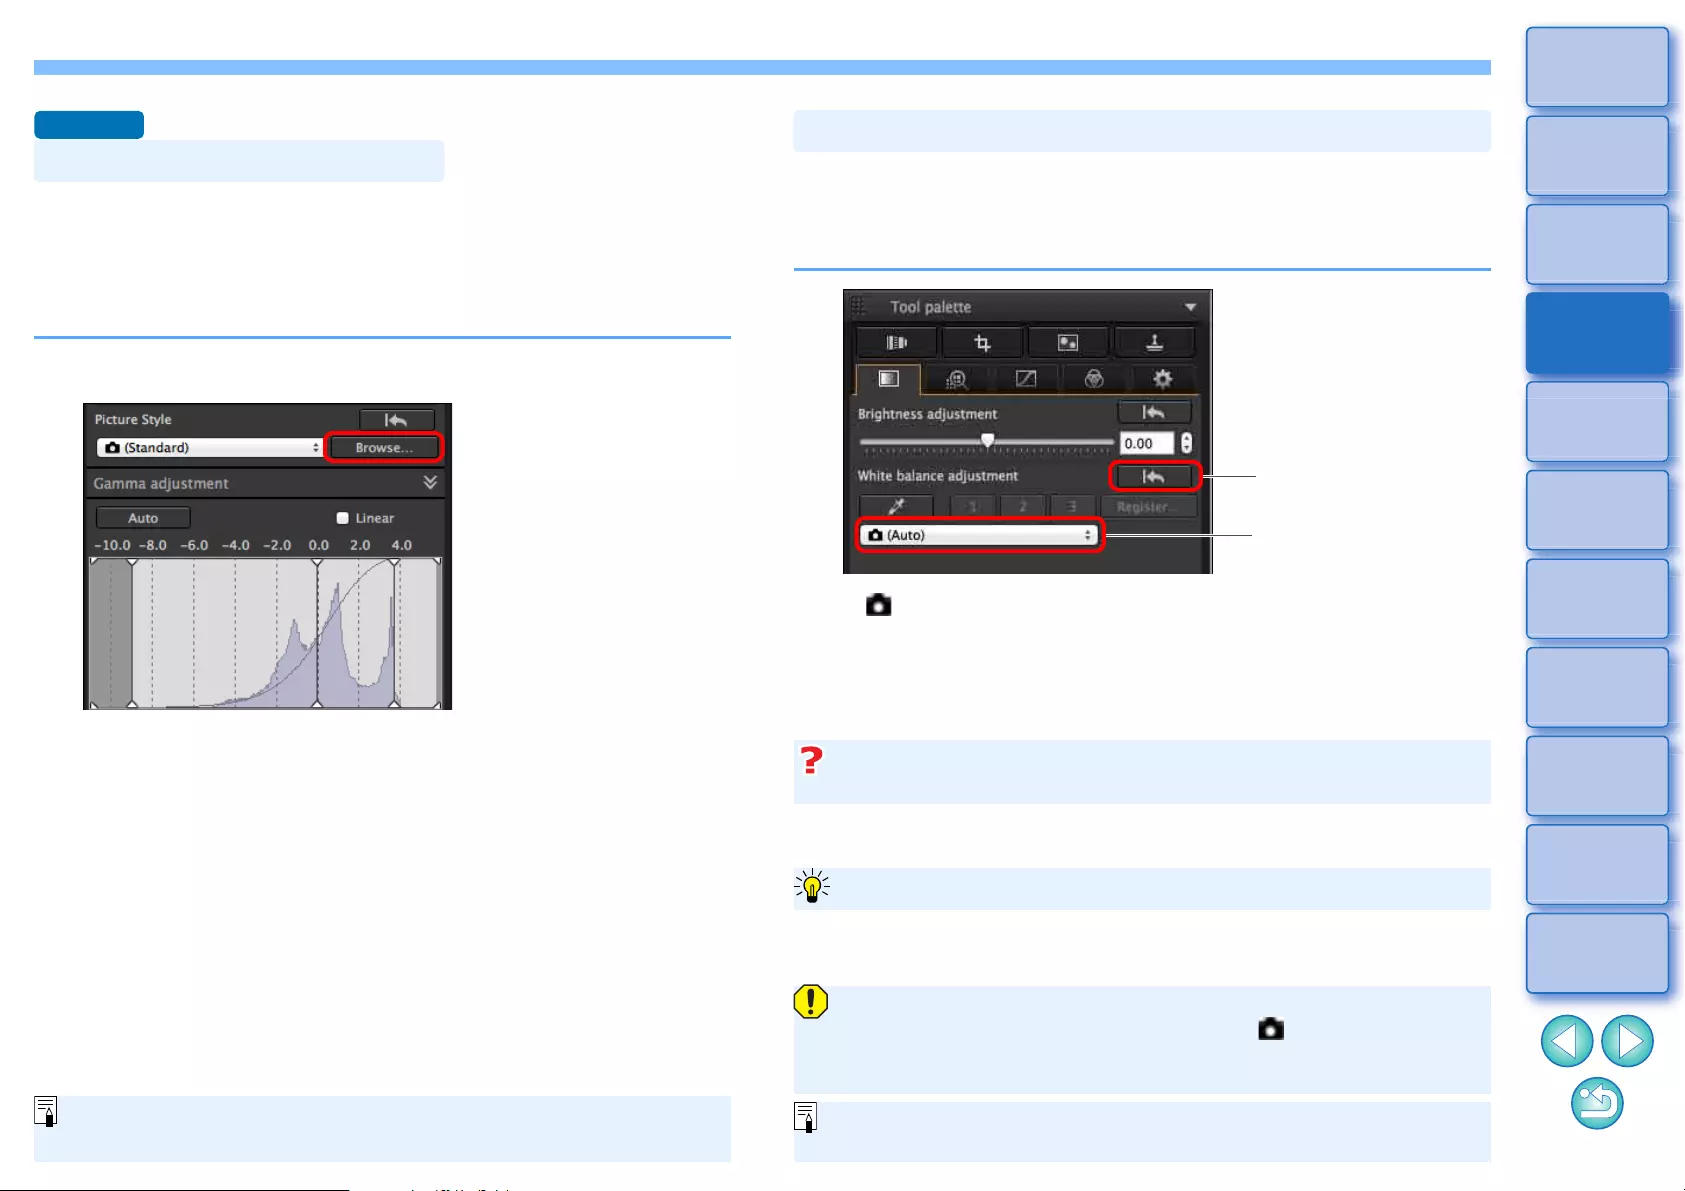
51
3
Sorting
Images
1
2
4
5
Downloading
Images
Viewing
Images
Printing
Images
Editing
Images
6
Processing
Large Numbers
of RAW Images
7
Remote
Shooting
10
HDR PQ
Mode
8
Playing Back
Movies and Saving
Still Photos
11
Specifying
Preferences
9
Handling
RAW Movies
A Picture Style file is a Picture Style extension file.
With DPP, you can apply to RAW images Picture Style files that you
have downloaded from Canon website effective for various scenes or
Picture Style files created with “Picture Style Editor”. When using a
Picture Style file, save it to your computer beforehand.
1Click the [Browse] button in the [Picture Style] panel.
ÜThe [Open] dialog box appears.
2Select a Picture Style file saved on your computer,
and click the [Open] button.
ÜThe Picture Style file you selected is applied to an image.
lTo apply a different Picture Style file, follow the procedure from
step 2 again.
Using a Picture Style File
Advanced
The Picture Style files that you can apply to the camera are files with
the “.PF2” or “.PF3” extension only.
If the color tone of the photographed image does not appear natural,
change the white balance to make it appear natural. You can make the
color tone natural by setting the light source to match the scene at the
time of shooting an image of, for example, pale-colored flowers.
l( )
is the white balance set on the camera when the image was shot.
• When a mode in the Creative Zone is selected on the camera,
the white balance set is displayed in ( ).
• When a mode in the Basic Zone is selected on the camera,
[Shot settings] is displayed in ( ), and image characteristics that
are according to the selected shooting mode are applied.
Adjusting Color Tone by Changing White Balance
Reverts the image to
the original settings
Select
If the color tone of the image does not appear natural after changing the
white balance, adjust the white balance using click white balance (p.52).
To make further fine adjustments to color tone after adjusting the white
balance, you can use [Color tone] (p.55) for tuning towards your expectations.
The color tone does not become more natural even when the
white balance is changed
Tune with color tone
lYou cannot register the adjustment results as personal white
balance (p.137) when you have selected [ ( )] from the list box.
lYou cannot change or adjust white balance with multiple-
exposure RAW images created on the camera.
Refer to your camera’s Instruction Manual for details on each white
balance setting.
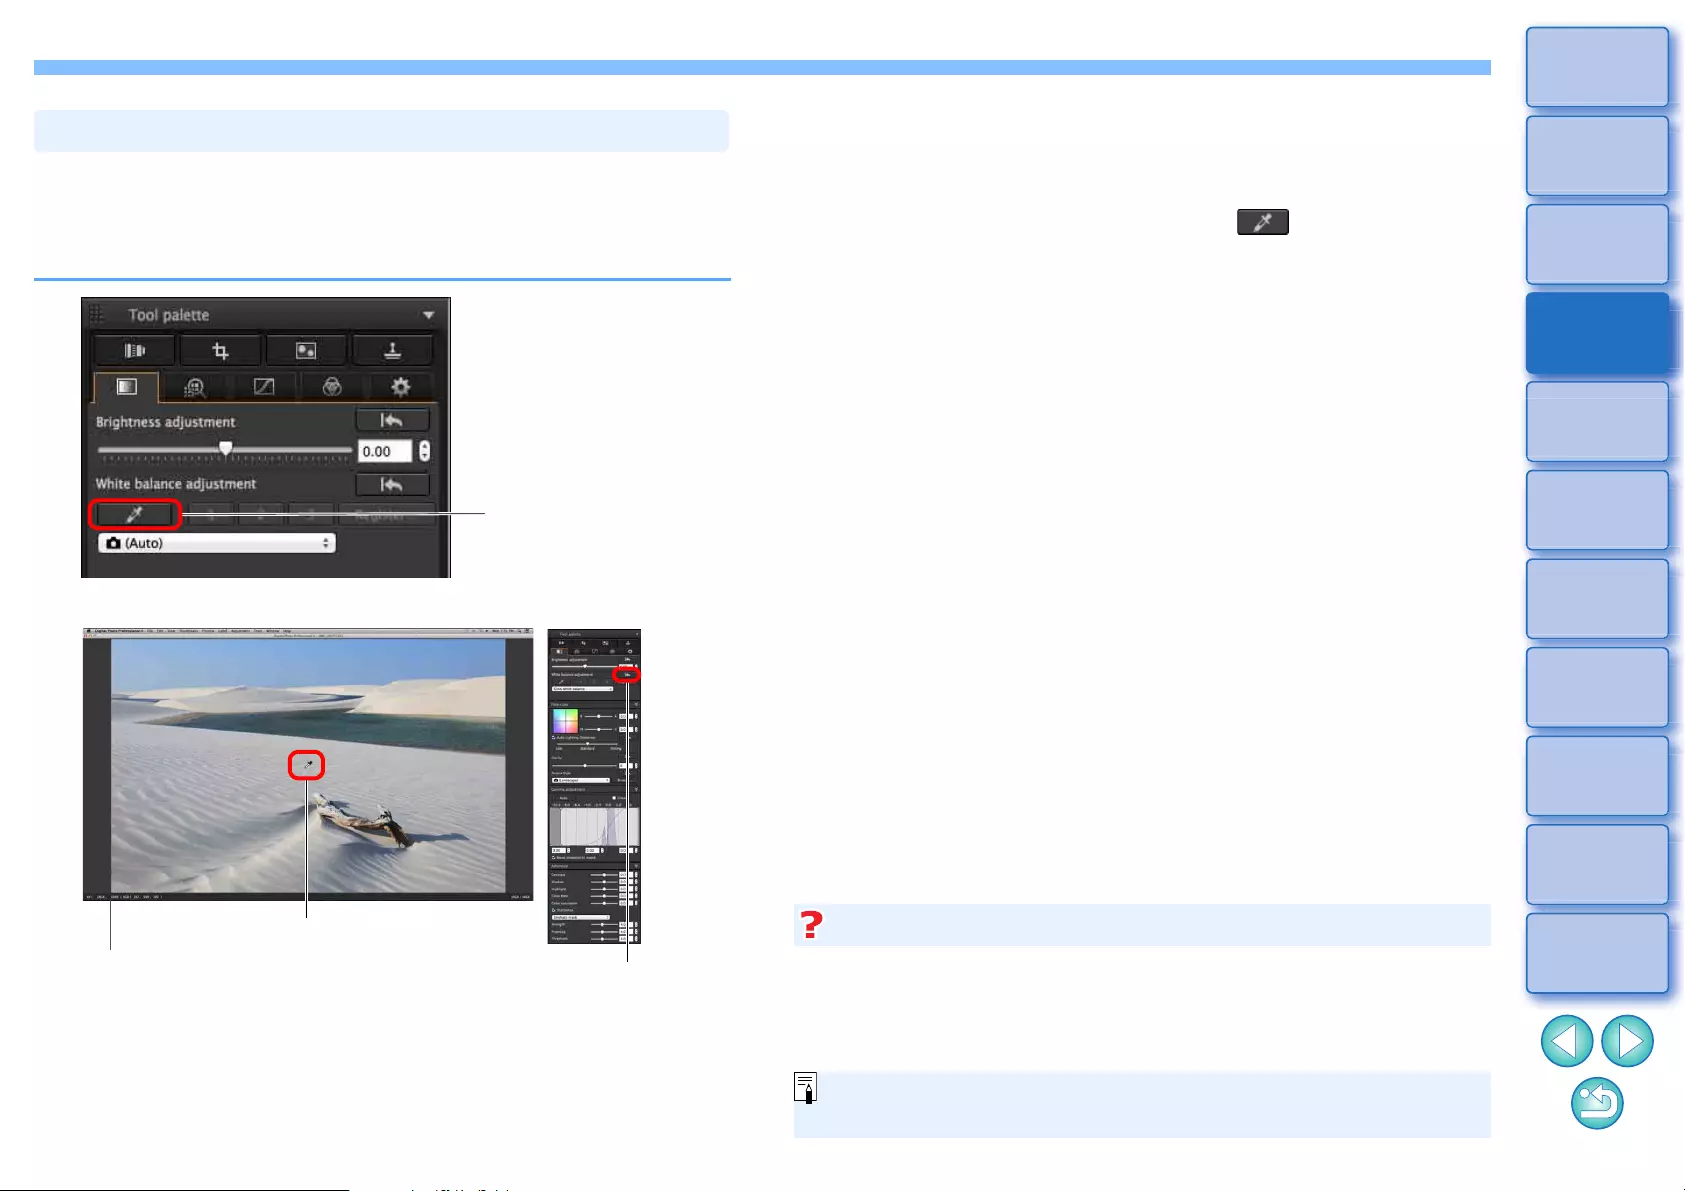
52
3
Sorting
Images
1
2
4
5
Downloading
Images
Viewing
Images
Printing
Images
Editing
Images
6
Processing
Large Numbers
of RAW Images
7
Remote
Shooting
10
HDR PQ
Mode
8
Playing Back
Movies and Saving
Still Photos
11
Specifying
Preferences
9
Handling
RAW Movies
You can adjust white balance using a selected part of an image as the
standard for white to make the image appear natural. Using click white
balance is effective when using it in parts of an image where white color
tone has changed under the influence of a light source.
1
2Click on a point that is to be the standard for white.
Adjusting Color Tone Using Click White Balance
Click
The coordinates of the cursor position and
the RGB values (8-bit conversion)
Click
Reverts the
image to the
original settings
ÜThe color of the image is adjusted with the point you selected as
the standard for white.
lIf you click on another point in the image, the white balance is
adjusted again.
lTo finish click white balance, click the [ ] button again.
When there are no white areas in your image, you can adjust the white
balance by clicking on a grey point of the image in step 2. This has the
same adjustment result as selecting a white area.
When there are no white areas in your image
You cannot change or adjust white balance with multiple-exposure
RAW images created on the camera.
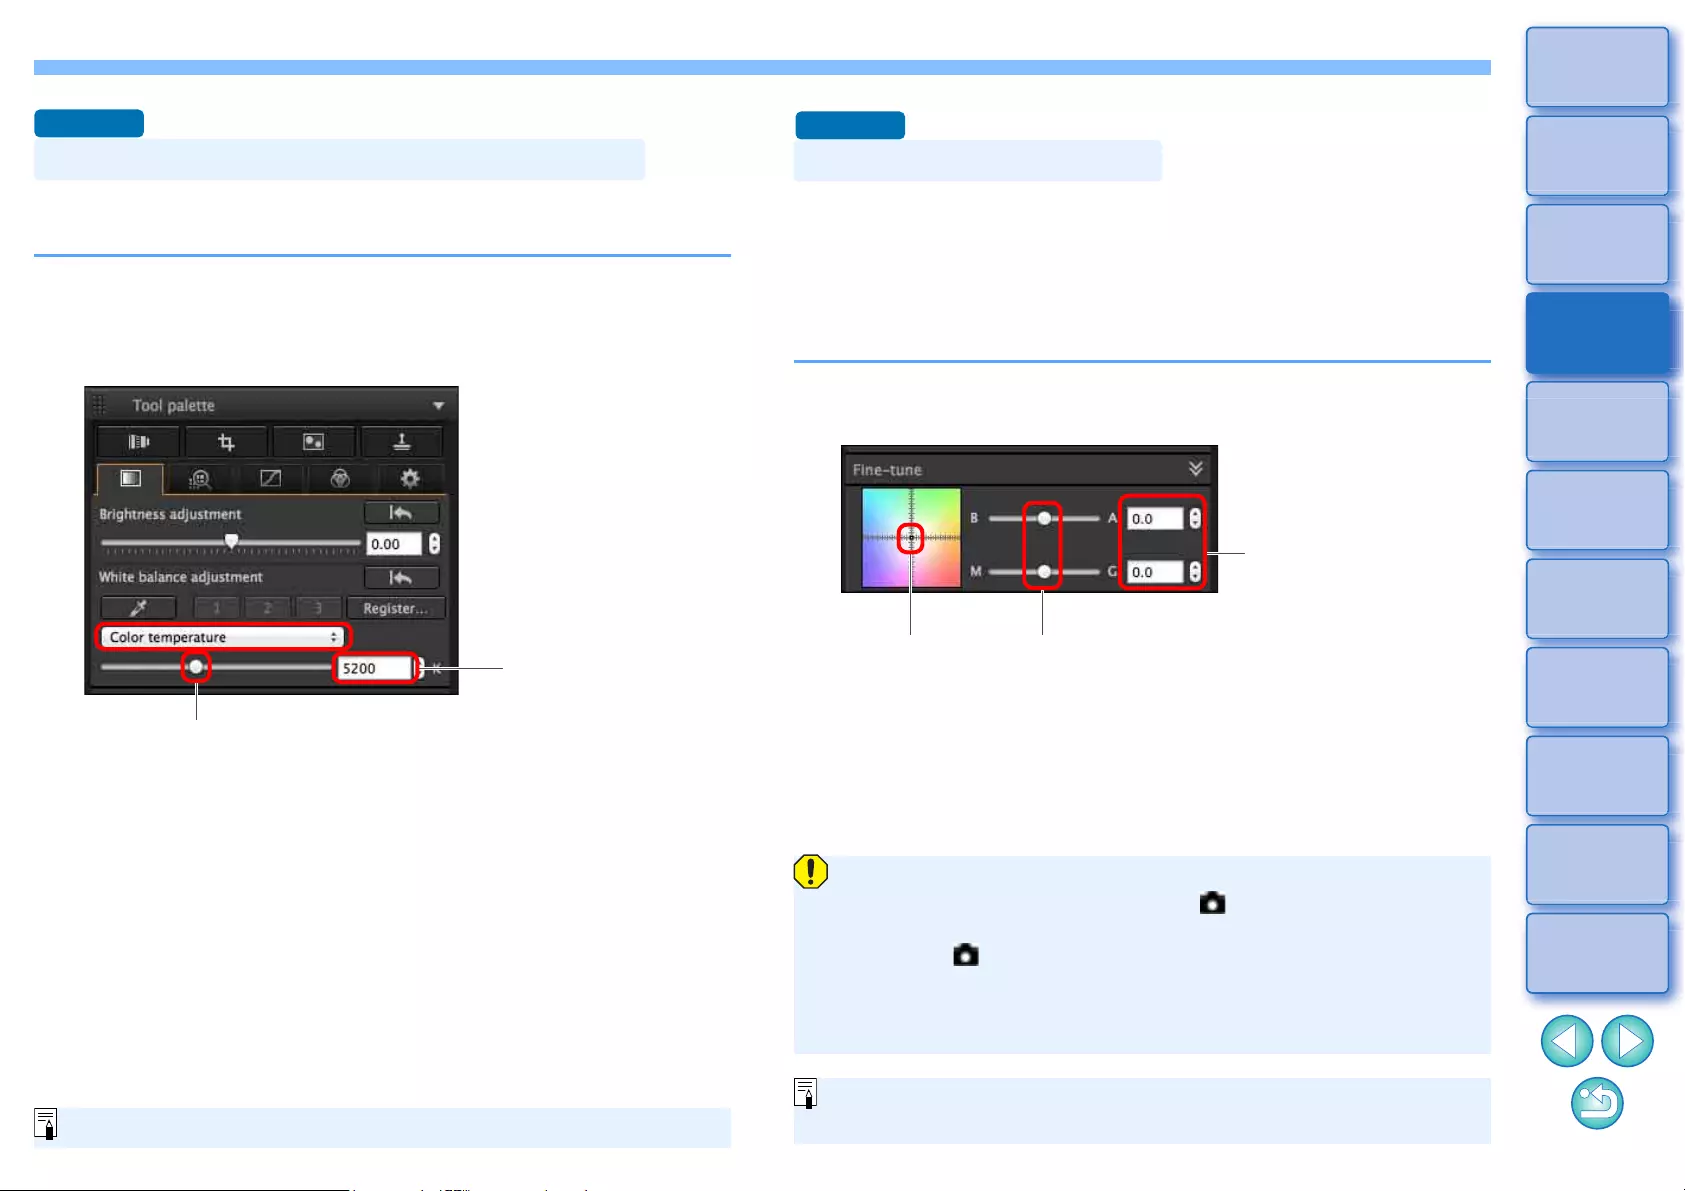
53
3
Sorting
Images
1
2
4
5
Downloading
Images
Viewing
Images
Printing
Images
Editing
Images
6
Processing
Large Numbers
of RAW Images
7
Remote
Shooting
10
HDR PQ
Mode
8
Playing Back
Movies and Saving
Still Photos
11
Specifying
Preferences
9
Handling
RAW Movies
White balance can be adjusted by setting a numerical value for color
temperature.
1Select [Color temperature] from the [White balance
adjustment] list box.
2Set the color temperature.
Adjusting White Balance with Color Temperature
Advanced
Displays the value of
the setting
Drag the slider left or right
The adjustment range is 2000 to 10000K (in 10K increments).
This is a function that makes fine adjustments to the white balance.
Using this function, you can achieve the same effects as third-party
color temperature conversion filters and color correction filters. The
adjustable range is ±10 steps. This function is aimed particularly at high-
end users who are familiar with the roles and effects of color
temperature conversion filters and color correction filters.
Tune the white balance by dragging the point in the
adjustment screen in the [Fine-tune] panel.
lB stands for blue, A for amber, M for magenta and G for green.
The color is adjusted towards the color to which the point moves.
lYou can also fine-tune your adjustment by using the sliders or
entering the adjustment values.
Tuning White Balance
Advanced
Enter the values to set
Drag Drag the sliders left
or right
lTo register the adjustment outcomes as a personal white balance
(p.137), select a setting other than [ ( )] from the [White balance
adjustment] list box before tuning the white balance. If you
selected [ ( )] from the list box and tuned the white balance, you
cannot then register the outcomes as a personal white balance.
lYou cannot change or adjust the white balance in multi-exposure
RAW images generated on the camera.
The adjustable range is 0 to ±10. (in 0.1-stop increments when
entering a value).
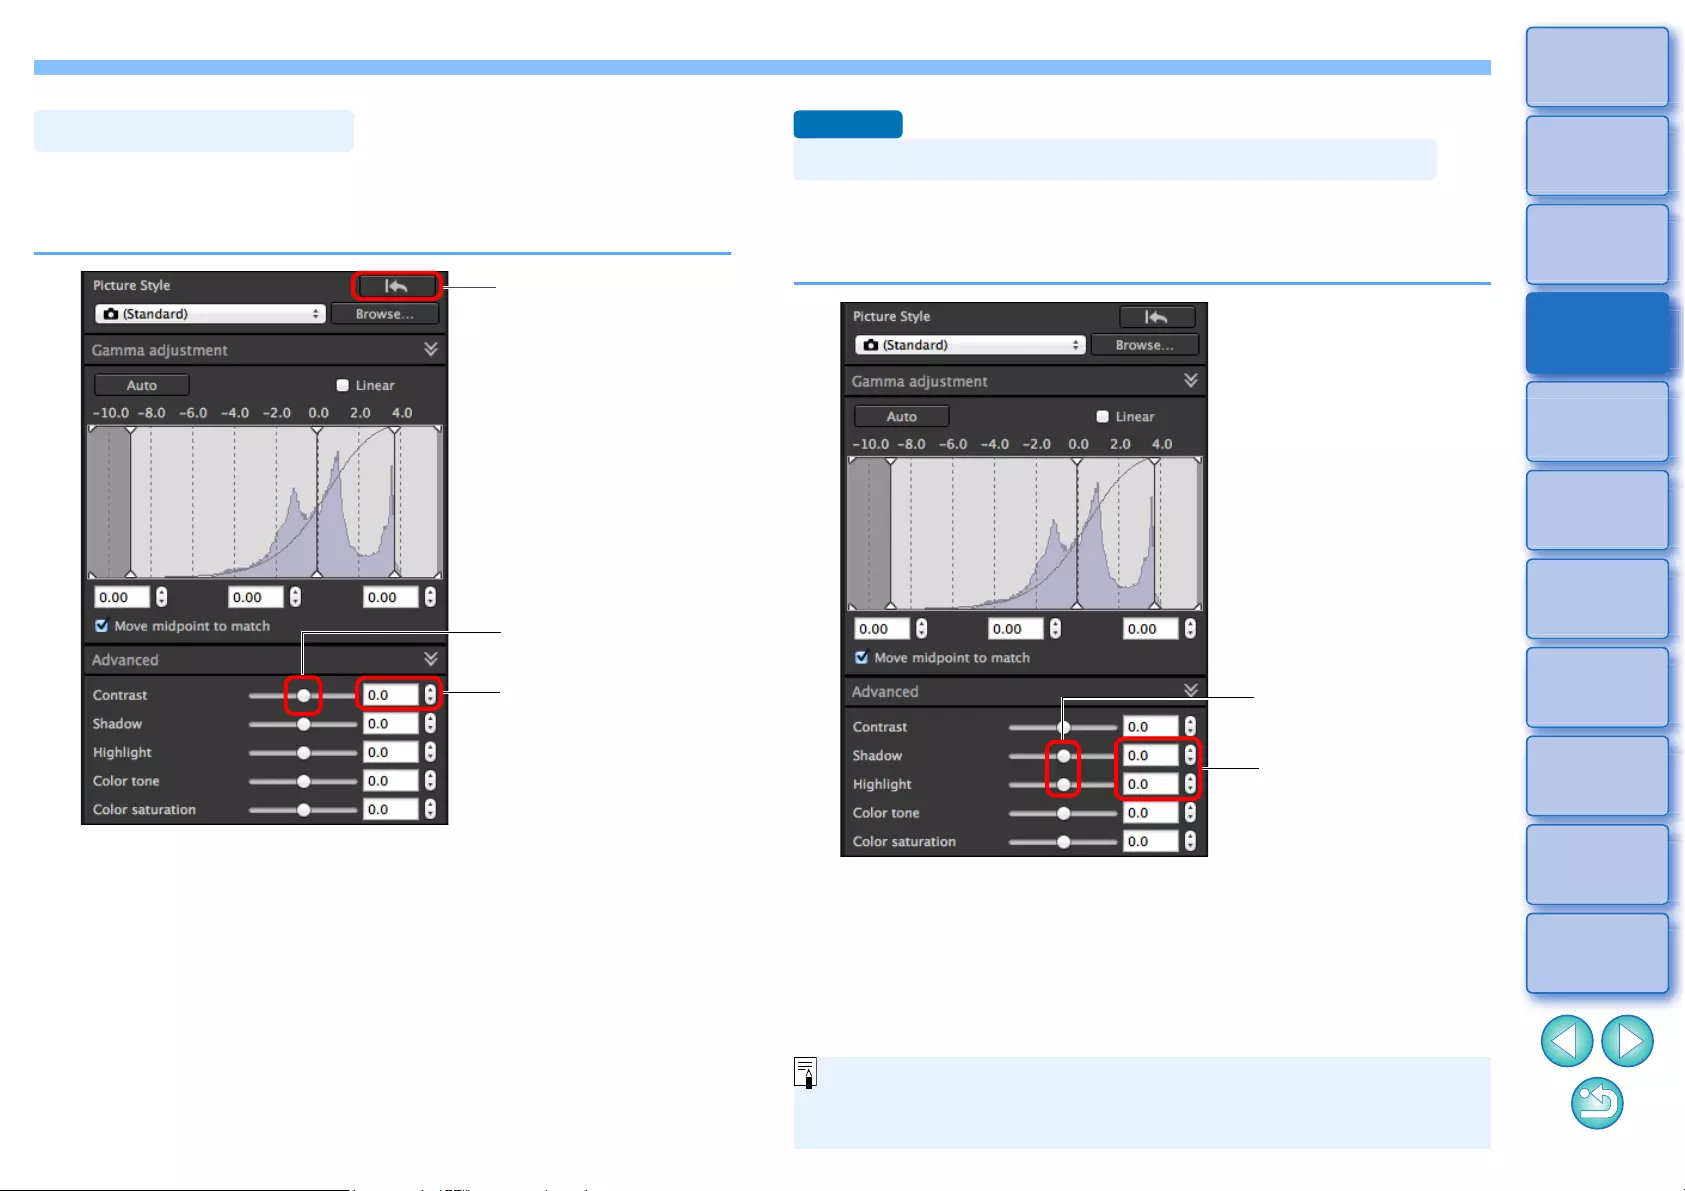
54
3
Sorting
Images
1
2
4
5
Downloading
Images
Viewing
Images
Printing
Images
Editing
Images
6
Processing
Large Numbers
of RAW Images
7
Remote
Shooting
10
HDR PQ
Mode
8
Playing Back
Movies and Saving
Still Photos
11
Specifying
Preferences
9
Handling
RAW Movies
Modulation and degree of contrast can be adjusted. Move the slider to
the right to make contrast stronger and to the left to make contrast
weaker.
Adjusting Contrast
Reverts the image to
the original settings
Drag the slider left or
right (9 steps)
Enter a setting (in 0.1-
stop increments)
You can adjust the brightness of shadows and highlights in an image.
By adjusting only shadows or highlights in an image, you can reduce the
effects of clipping in shadows and highlights.
Adjusting Brightness of Shadows/Highlights
Advanced
Drag the sliders left
or right
Enter a setting (in 0.1-
stop increments)
If you make a major adjustment to the highlights or shadows in an
image, the image may look unnatural. In such a case, reduce the
degree of adjustment.
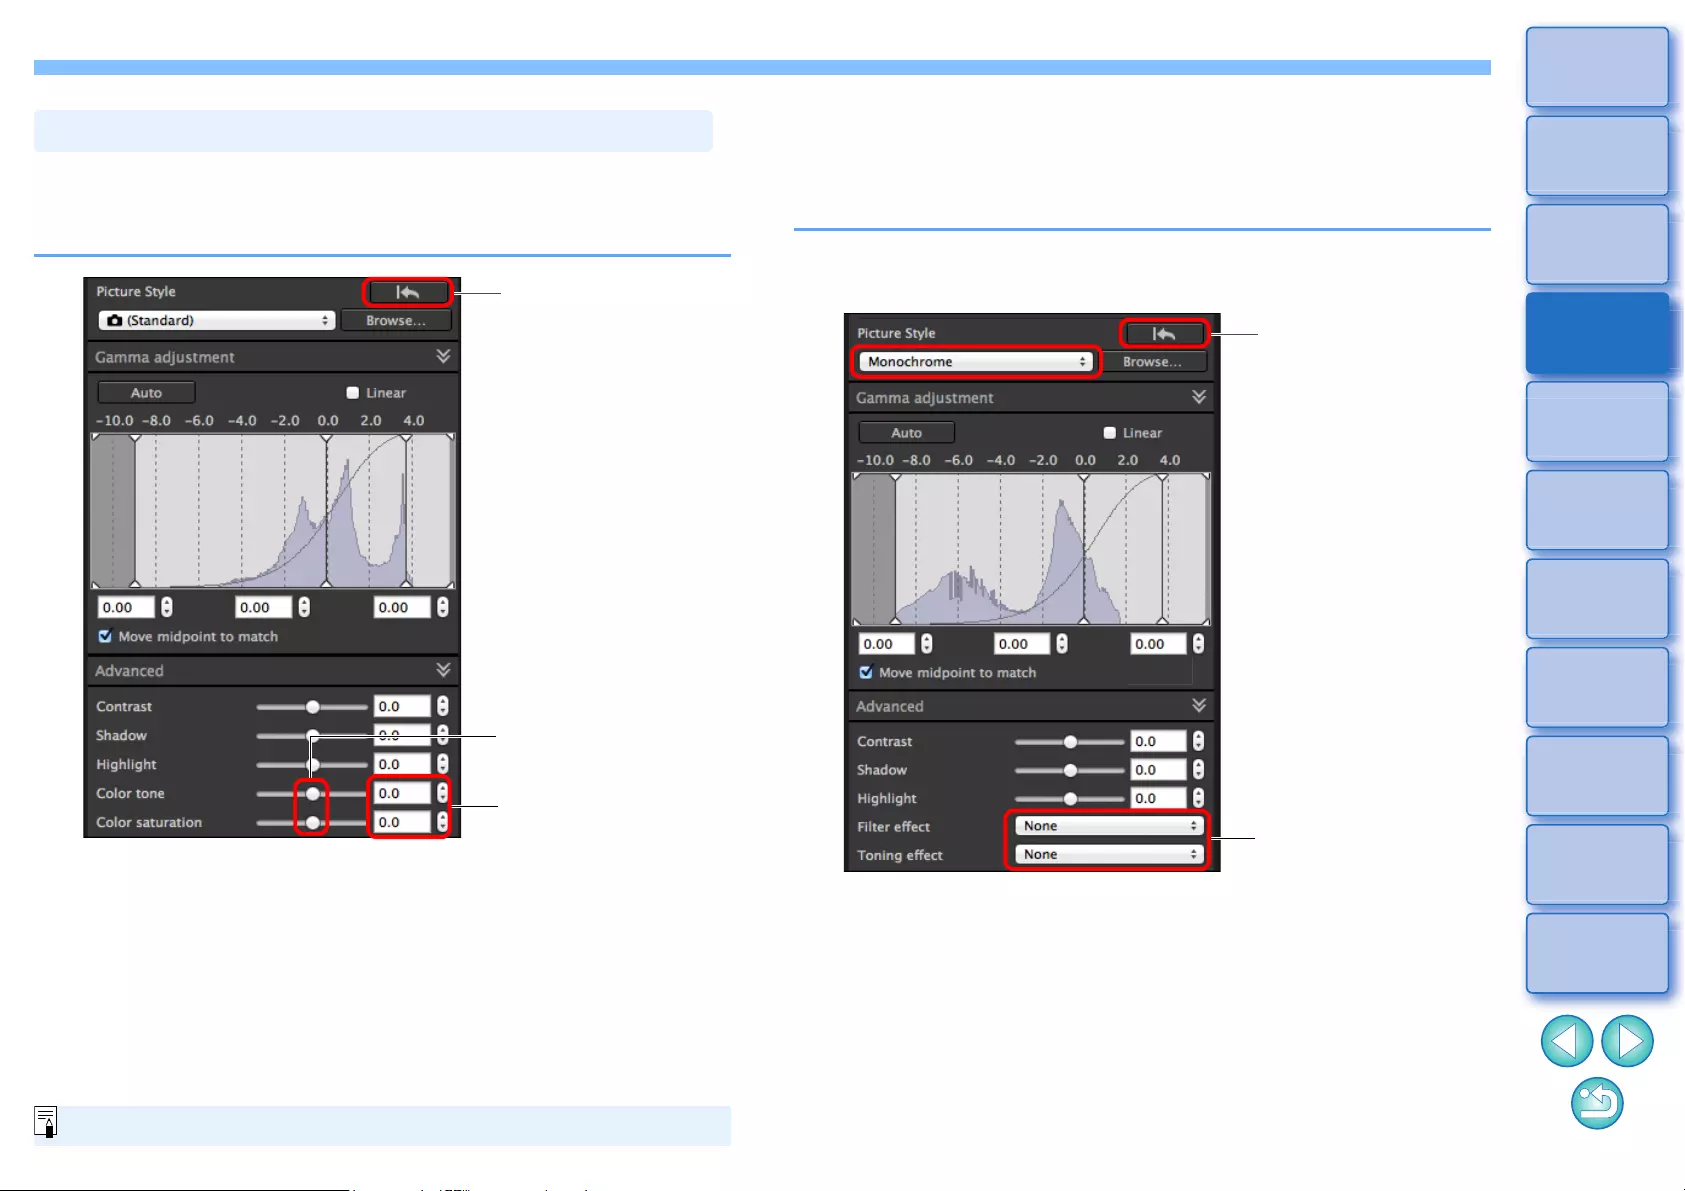
55
3
Sorting
Images
1
2
4
5
Downloading
Images
Viewing
Images
Printing
Images
Editing
Images
6
Processing
Large Numbers
of RAW Images
7
Remote
Shooting
10
HDR PQ
Mode
8
Playing Back
Movies and Saving
Still Photos
11
Specifying
Preferences
9
Handling
RAW Movies
Tone and overall color saturation can be adjusted.
If Picture Style (p.49) is set to [Monochrome], [Color tone] and [Color
saturation] switch to [Filter effect] and [Toning effect] (this page).
lColor tone: Move the slider to the right to make tones
more yellowish, and to the left to make tones
more reddish.
lColor saturation: Adjusts the overall color intensity for the
image. Move the slider to the right for more
intense colors, and to the left for less intense
colors.
Changing Color Tone and Color Saturation
Enter a setting (in 0.1-
stop increments)
Reverts the image to
the original settings
Drag the sliders left or
right
The adjustment range is –4 to +4.
Adjusting Monochrome
When the Picture Style (p.49) is set to [Monochrome], you can create
monochrome photographs with effects similar to filtering, or with a look
of monotone color photograph.
1Select [Monochrome] in the [Picture Style] list box.
2
Reverts the image to
the original settings
Displays the values of
the settings
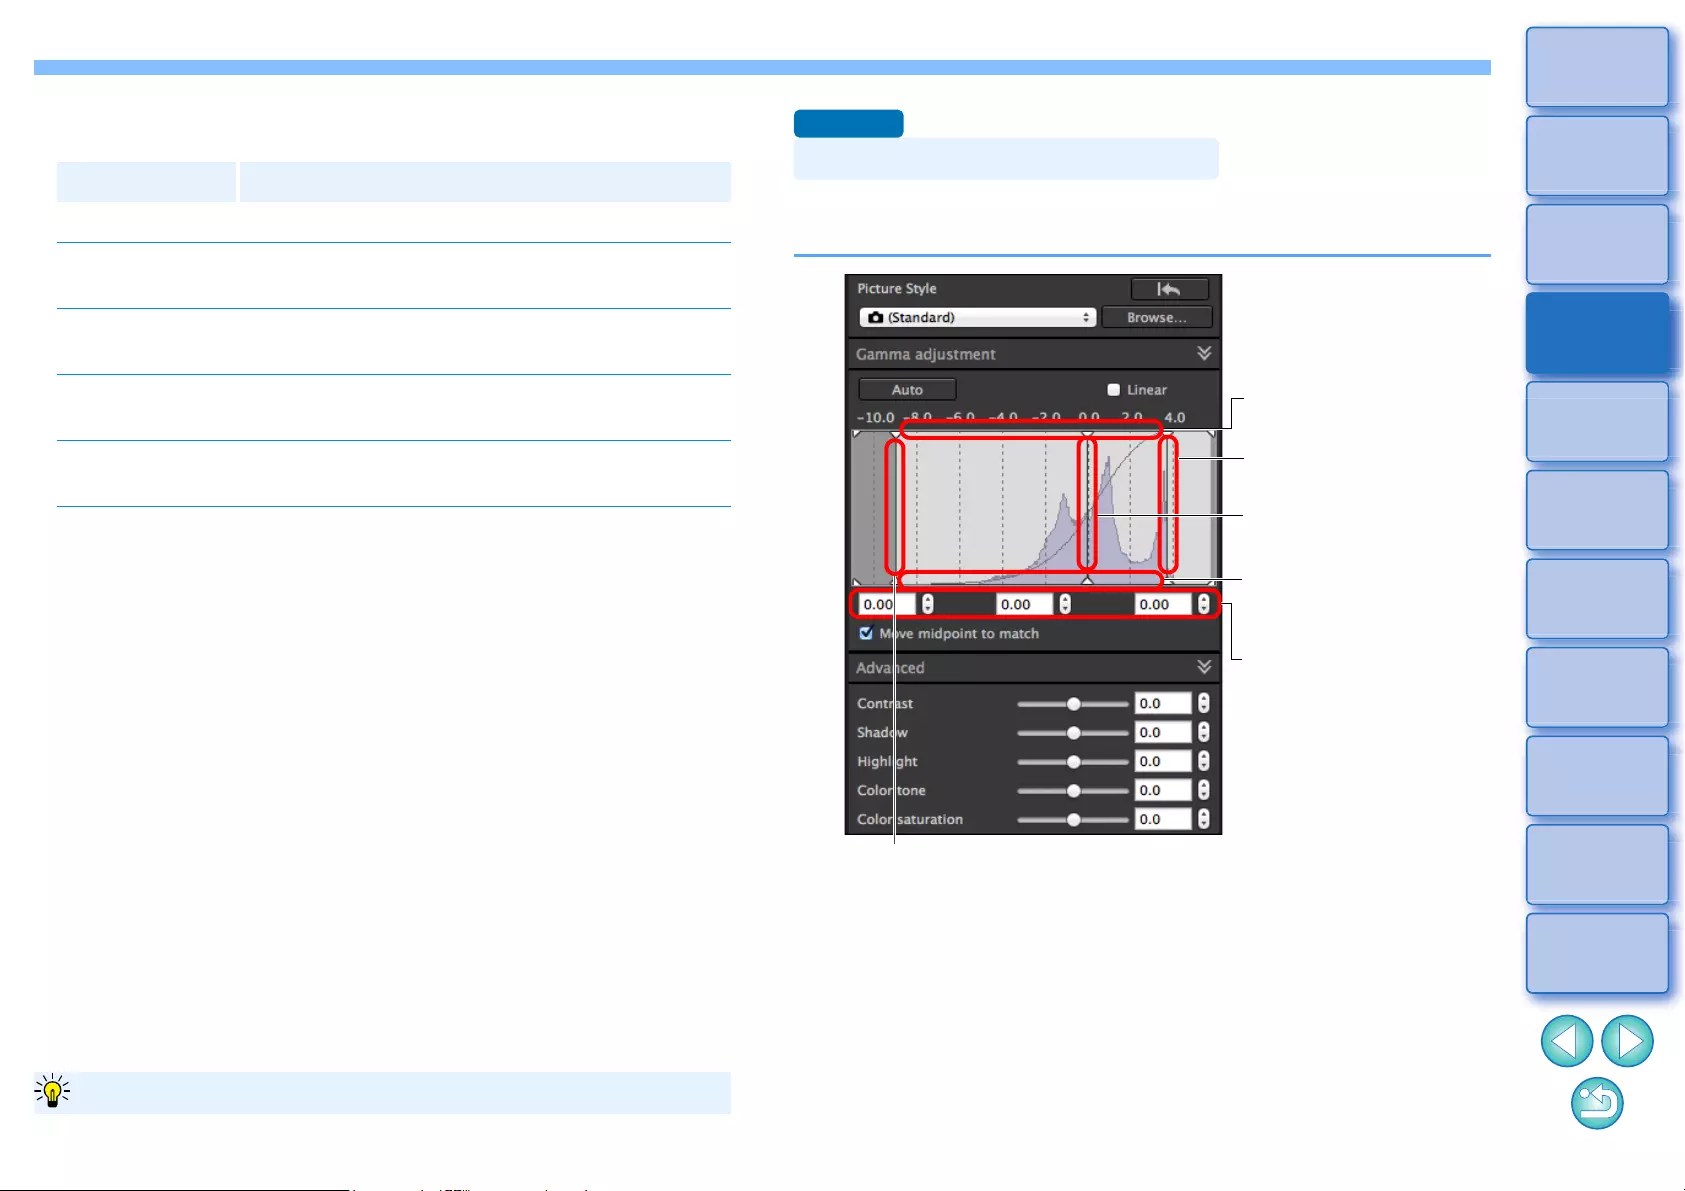
56
3
Sorting
Images
1
2
4
5
Downloading
Images
Viewing
Images
Printing
Images
Editing
Images
6
Processing
Large Numbers
of RAW Images
7
Remote
Shooting
10
HDR PQ
Mode
8
Playing Back
Movies and Saving
Still Photos
11
Specifying
Preferences
9
Handling
RAW Movies
lFilter effect: Creates a monochrome photograph where the white of
clouds and the green of trees are emphasized.
lToning effect: Creates a monochrome photograph to which a single
color has been added.
You can choose from [None], [Sepia], [Blue], [Purple]
and [Green].
Filter Example of effect
None General monochrome image without filter effect.
Yellow Blue sky is reproduced more naturally and white
clouds emerge clearly.
Orange Blue sky becomes somewhat darker. The
brightness of the setting sun increases further.
Red Blue sky becomes quite dark. Autumn leaves
become clear and bright.
Green Human skin tones and lips become softer. The
green leaves of trees become clear and bright.
To emphasize the filter effect, set the [Contrast] slider to the right.
Increase the [Contrast] to emphasize the filter effect
Dynamic range (width of gradation expression) from dark points to bright
points in an image can be adjusted.
lThe horizontal axis shows the input level and the vertical axis
shows the output level.
lCheckmark the [Move midpoint to match] checkbox to link the
mid-point to your adjustments to the input white points and input
black points.
Adjusting Dynamic Range
Advanced
Move to the left or right
Input white points
Move downwards
Output white points
Move upwards
Output black points
Move to the left or right
Mid (medium tone) point
You can also adjust
the dynamic range by
entering values
Move to the left or right
Input black points
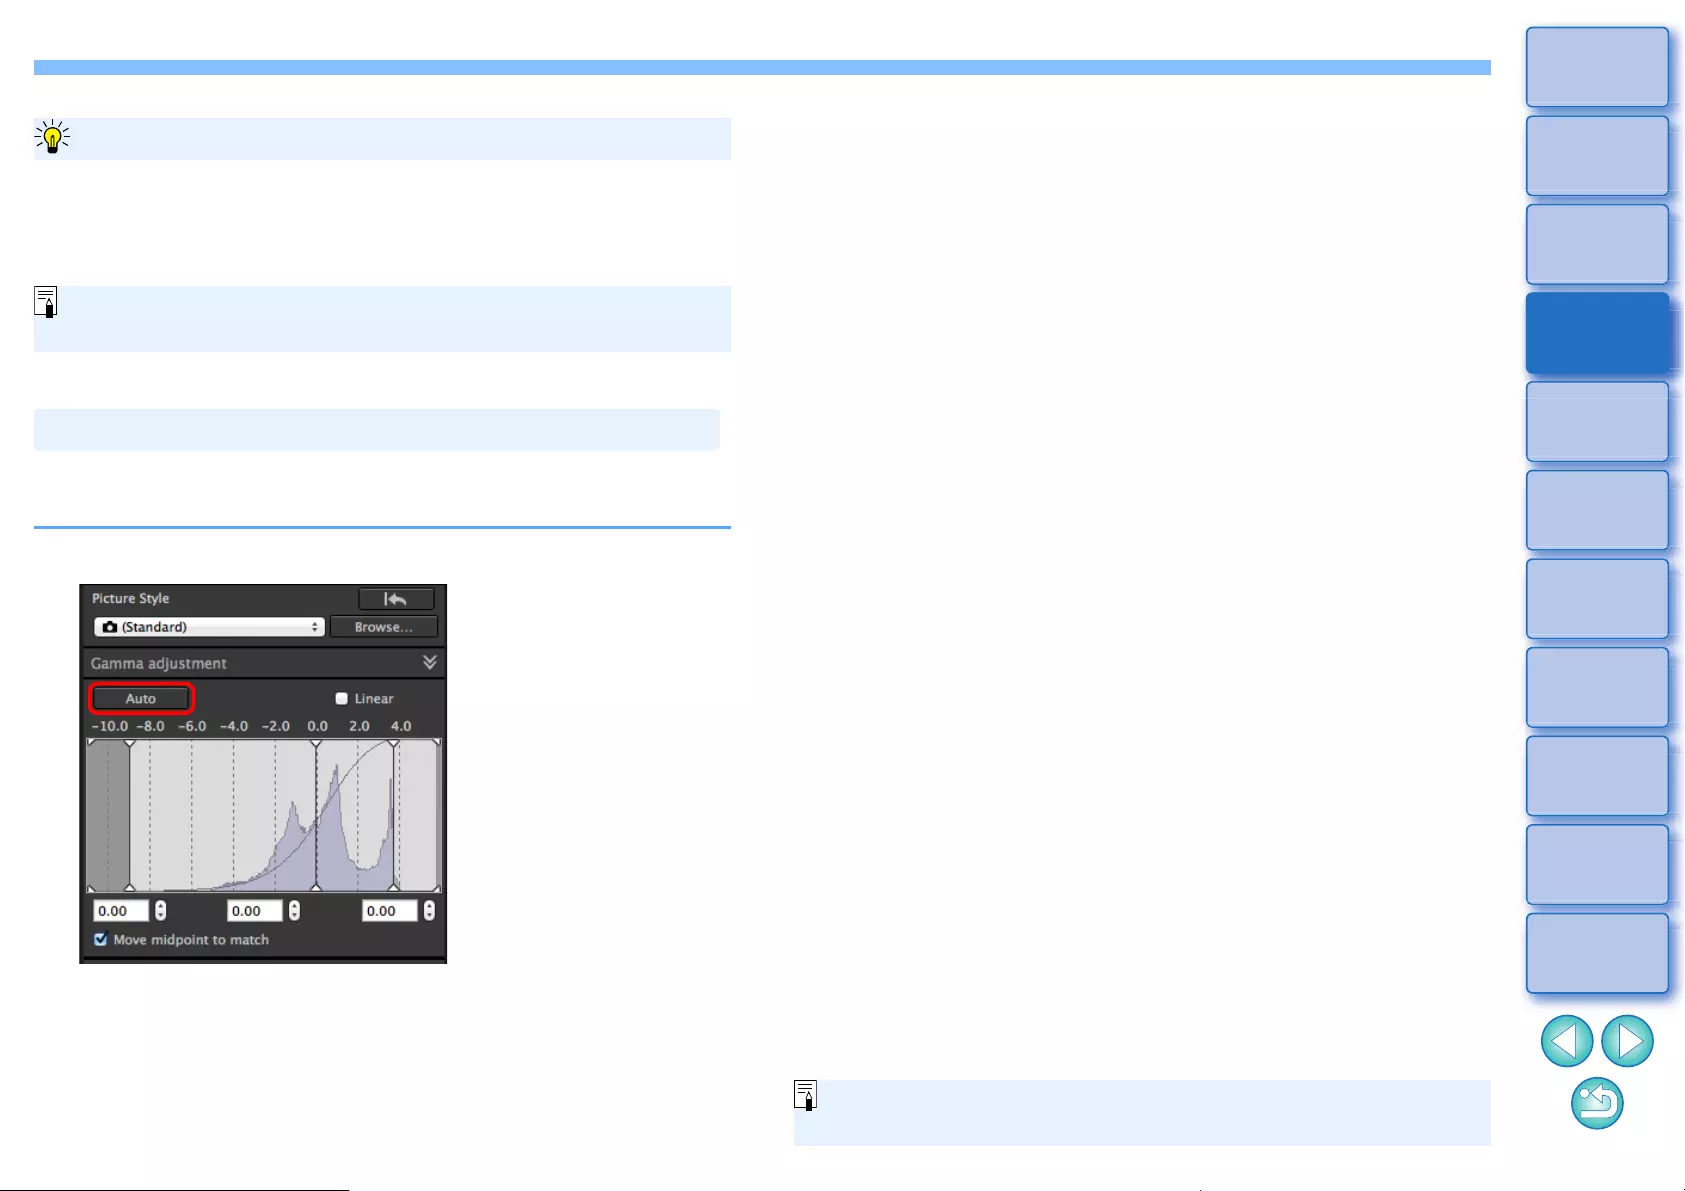
57
3
Sorting
Images
1
2
4
5
Downloading
Images
Viewing
Images
Printing
Images
Editing
Images
6
Processing
Large Numbers
of RAW Images
7
Remote
Shooting
10
HDR PQ
Mode
8
Playing Back
Movies and Saving
Still Photos
11
Specifying
Preferences
9
Handling
RAW Movies
In order to give the image desirable gradations and luminance,
automatic adjustments are applied for an appropriate dynamic range.
Click the [Auto] button.
ÜIn order to give the image desirable gradations and luminance,
the dynamic range is automatically adjusted.
Use [Linear] when you adjust images using image editing software that
has advanced editing functions. Note that when [Linear] is
checkmarked, the image becomes dim.
[Linear] - A function for advanced adjustment
[Contrast], [Highlight], [Shadow], and [Auto Lighting Optimizer]
(p.58) will not function when [Linear] is checkmarked.
Adjusting Gradation and Luminance Automatically
lWhite points, midpoint, and black points in the [Gamma
adjustment] panel as well as [Highlight] and [Shadow] in the
[Advanced] panel are adjusted automatically.
lSettings that are reset and those that are not with this adjustment
are as follows.
l Settings that are reset
・Auto Lighting Optimizer
・[Contrast] in the [Advanced] panel
l Settings that are not reset
・Brightness adjustment
・White balance adjustment
・Linear*
* White points and black points are automatically adjusted.
An image may look unnatural after automatic adjustment. In such a
case, reduce the degree of shadow and highlight adjustment.
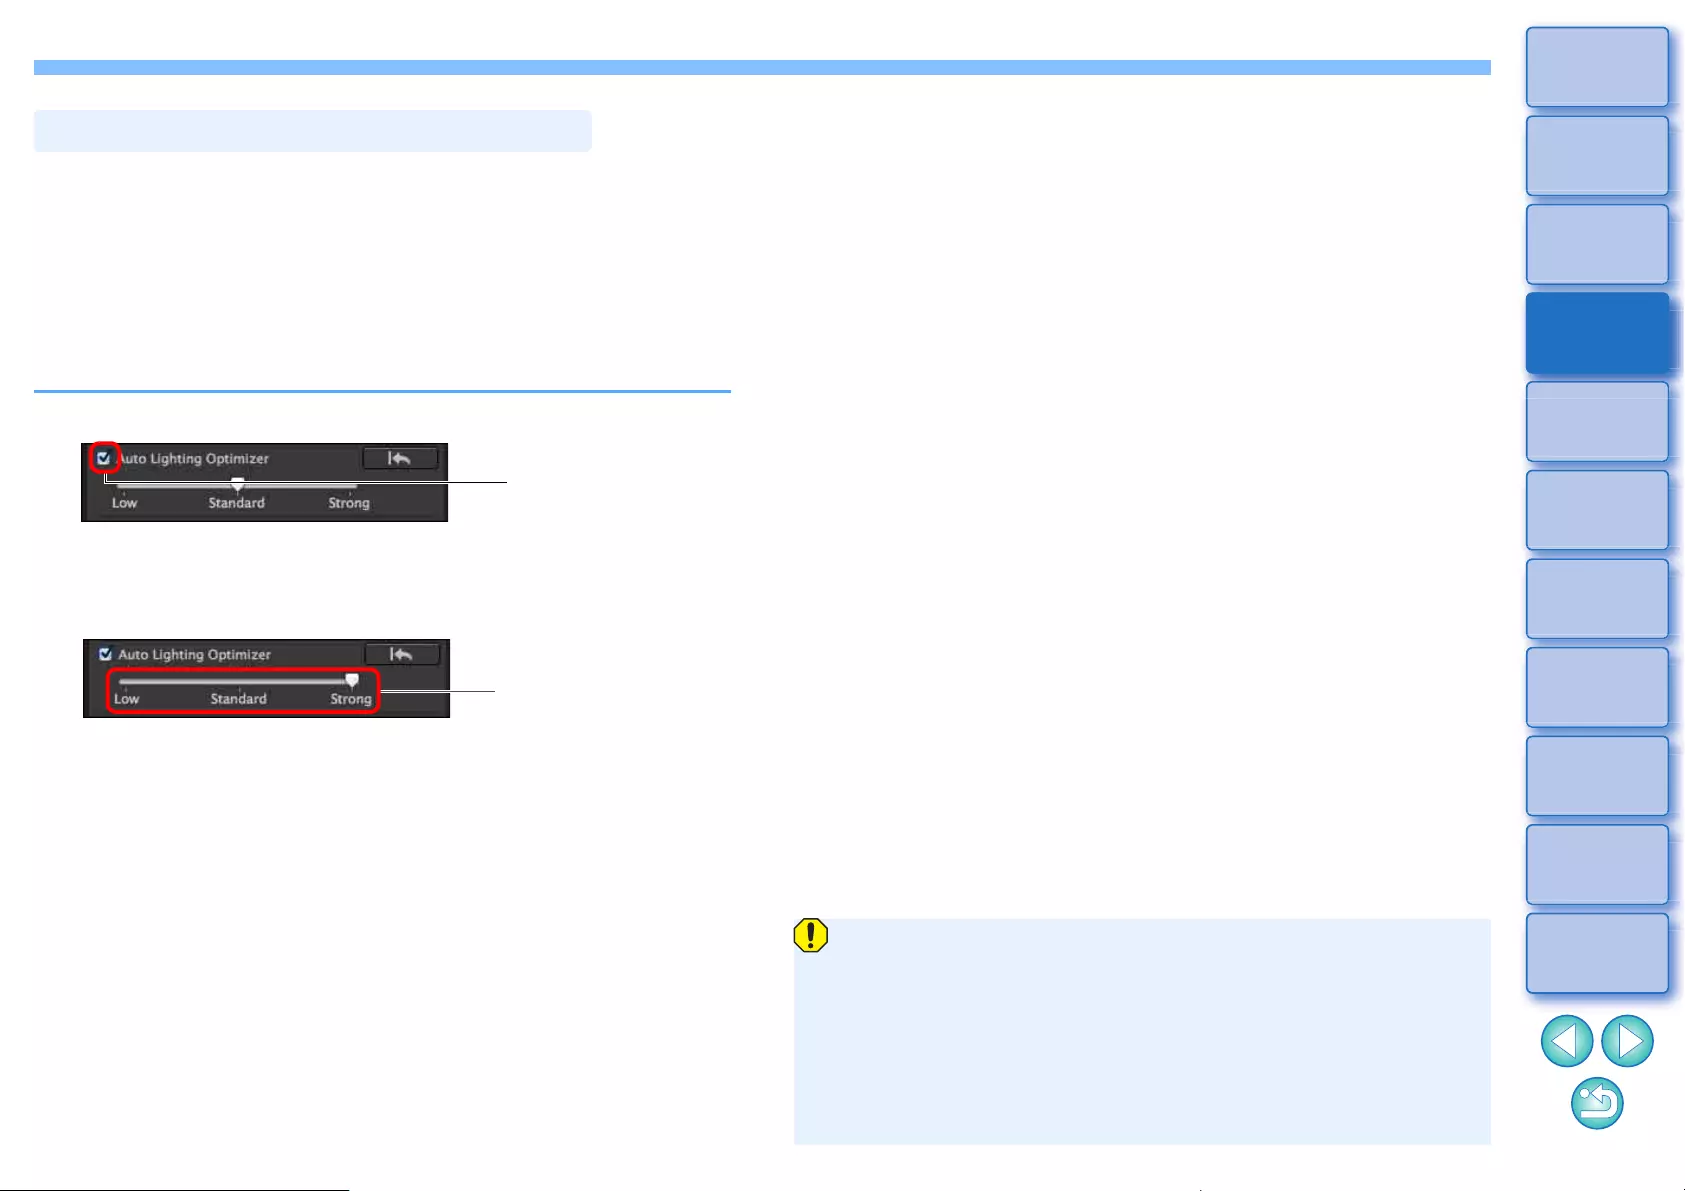
58
3
Sorting
Images
1
2
4
5
Downloading
Images
Viewing
Images
Printing
Images
Editing
Images
6
Processing
Large Numbers
of RAW Images
7
Remote
Shooting
10
HDR PQ
Mode
8
Playing Back
Movies and Saving
Still Photos
11
Specifying
Preferences
9
Handling
RAW Movies
If the shooting result is dark or the contrast is low, you can use the Auto
Lighting Optimizer function to auto-correct the brightness and contrast,
and obtain a more favorable image.
You can also change the setting of the image shot with the camera’s
Auto Lighting Optimizer function.
This function also can be used for JPEG/TIFF images in addition to
RAW images.
* ALO stands for Auto Lighting Optimizer.
1Checkmark the [Auto Lighting Optimizer] checkbox.
lFor the image shot with the camera’s Auto Lighting Optimizer
function, the checkbox is already checked.
2Change the setting according to your preferences.
ÜAuto correction is applied to the image to match the setting.
lFor the image shot with the camera’s Auto Lighting Optimizer
function, the setting at the time of shooting is applied as the
default value.
lTo cancel the Auto Lighting Optimizer, remove the check mark
from the checkbox.
Using the Auto Lighting Optimizer
Checkmark
Select from three
levels: Low/Standard/
Strong
lWhen [Highlight tone priority] is set to [Enable] on any supported
EOS camera other than the EOS-1D Mark IV or EOS 5D Mark II,
the Auto Lighting Optimizer cannot be used for RAW images.
lYou cannot use the Auto Lighting Optimizer with multiple-
exposure RAW images created with the camera.
lWhen you apply Auto Lighting Optimizer to the RAW and JPEG
images shot simultaneously, the correction results of the two
images may differ.
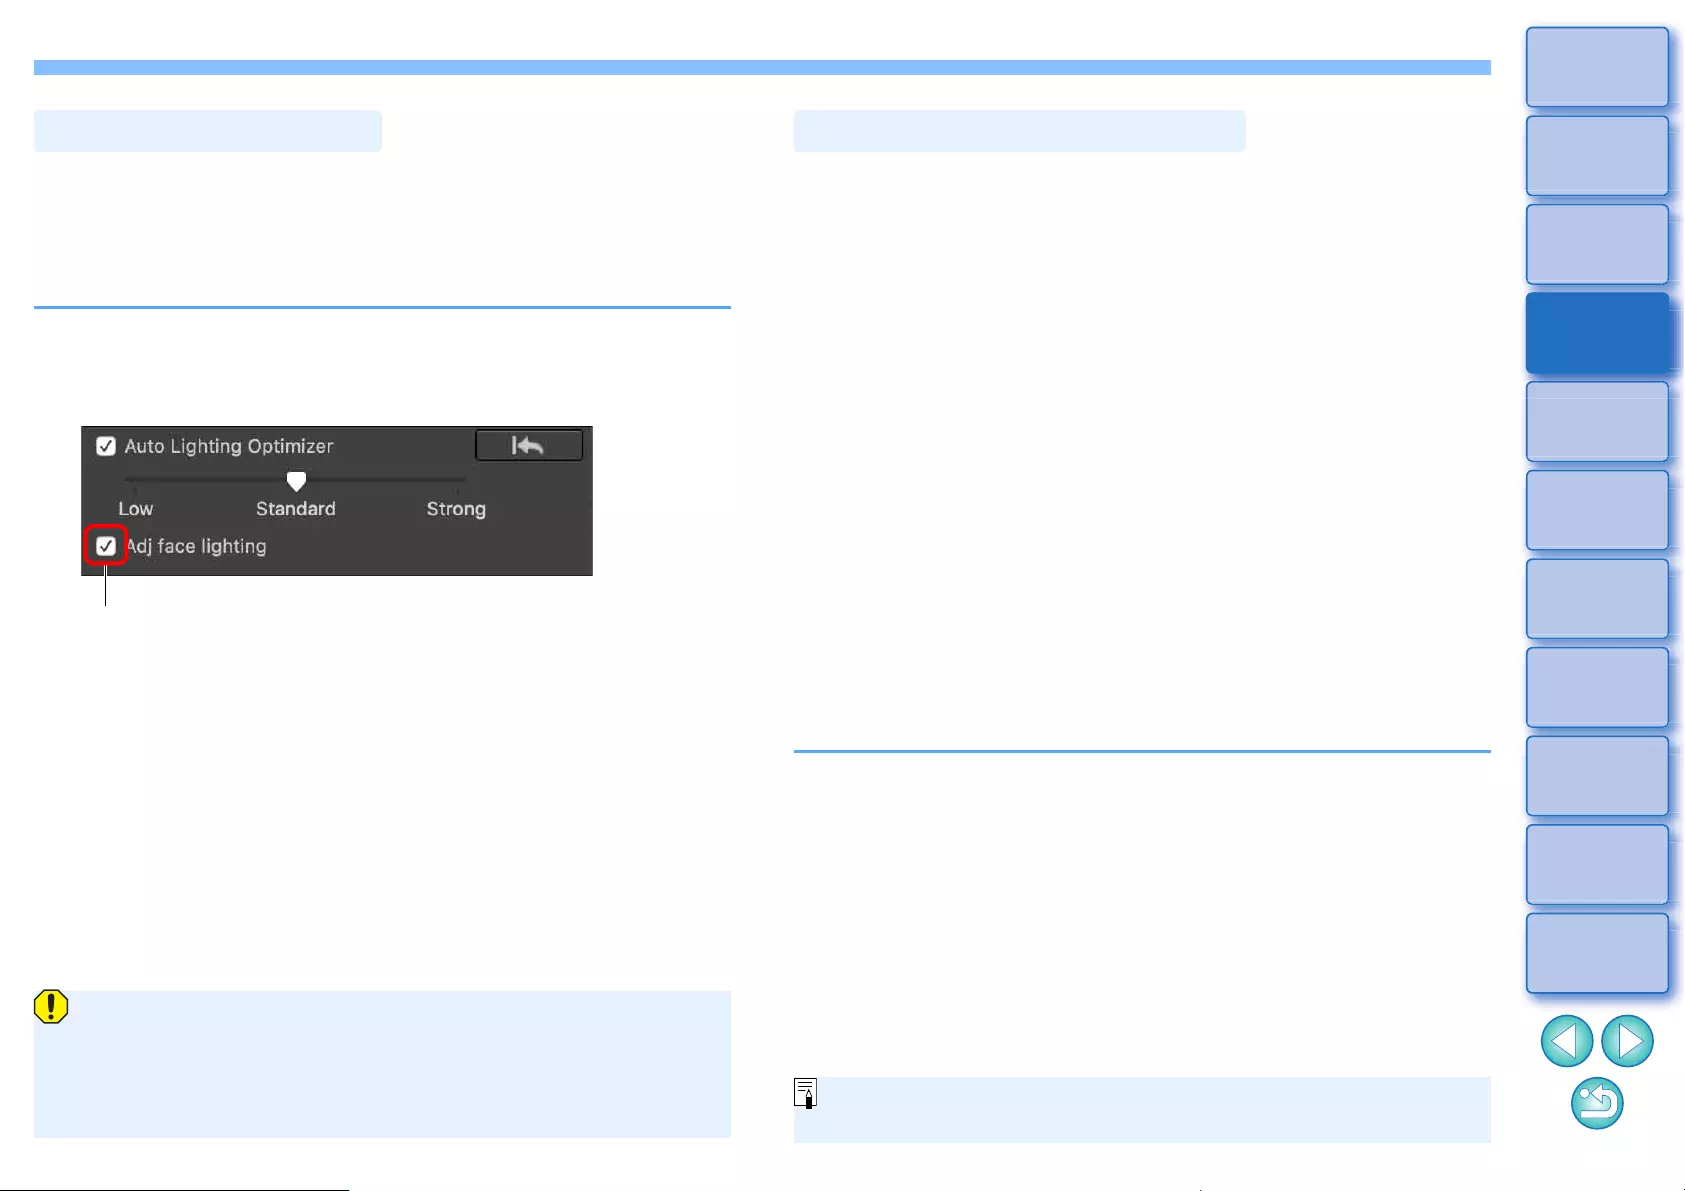
59
3
Sorting
Images
1
2
4
5
Downloading
Images
Viewing
Images
Printing
Images
Editing
Images
6
Processing
Large Numbers
of RAW Images
7
Remote
Shooting
10
HDR PQ
Mode
8
Playing Back
Movies and Saving
Still Photos
11
Specifying
Preferences
9
Handling
RAW Movies
With adjust face lighting, you can automatically optimize facial lighting
and effectively correct a face that is illuminated at an angle or by a flash.
This function can be enabled when the Auto Lighting Optimizer is used.
Use this function with RAW images from images of people shot with an
EOS R5 or EOS R6.
1Select a supported image in the main window, etc.
2Checkmark the [Adj face lighting] checkbox.
ÜThe image is corrected.
Adjust Face Lighting
Checkmark
lYou might not be able to checkmark the Adj face lighting
checkbox for images such as where facial details cannot be
discerned or a face is too dark.
lNoise may increase.
lAdjustment may be less effective at high ISO speeds.
You can make the overall atmosphere of an image sharper or softer.
Adjustment can be made by selecting from two modes, [Sharpness] and
[Unsharp mask].
[Sharpness]: Controls the sharpness of an image by adjusting the
level of emphasis for the outline of the image. The
further to the right the [Sharpness] slider is moved (the
larger the setting value), the more the edges are
emphasized for a sharper image.
[Unsharp mask]: Adjusts the image’s sharpness more finely.
[Strength]: Shows the level of emphasis for the outline of the
image. The further to the right the slider is moved (the
larger the setting value), the more the image’s edges
are emphasized for a sharper image.
[Fineness]: Shows the fineness of the emphasized outline. The
further to the left the slider is moved (the smaller the
setting), the easier it becomes to emphasize fine
details.
[Threshold]: Sets “how much contrast difference there should be
compared to surroundings before emphasizing
edges”.
Adjusting Image Sharpness
[Unsharp mask] cannot be used with images other than RAW
images.
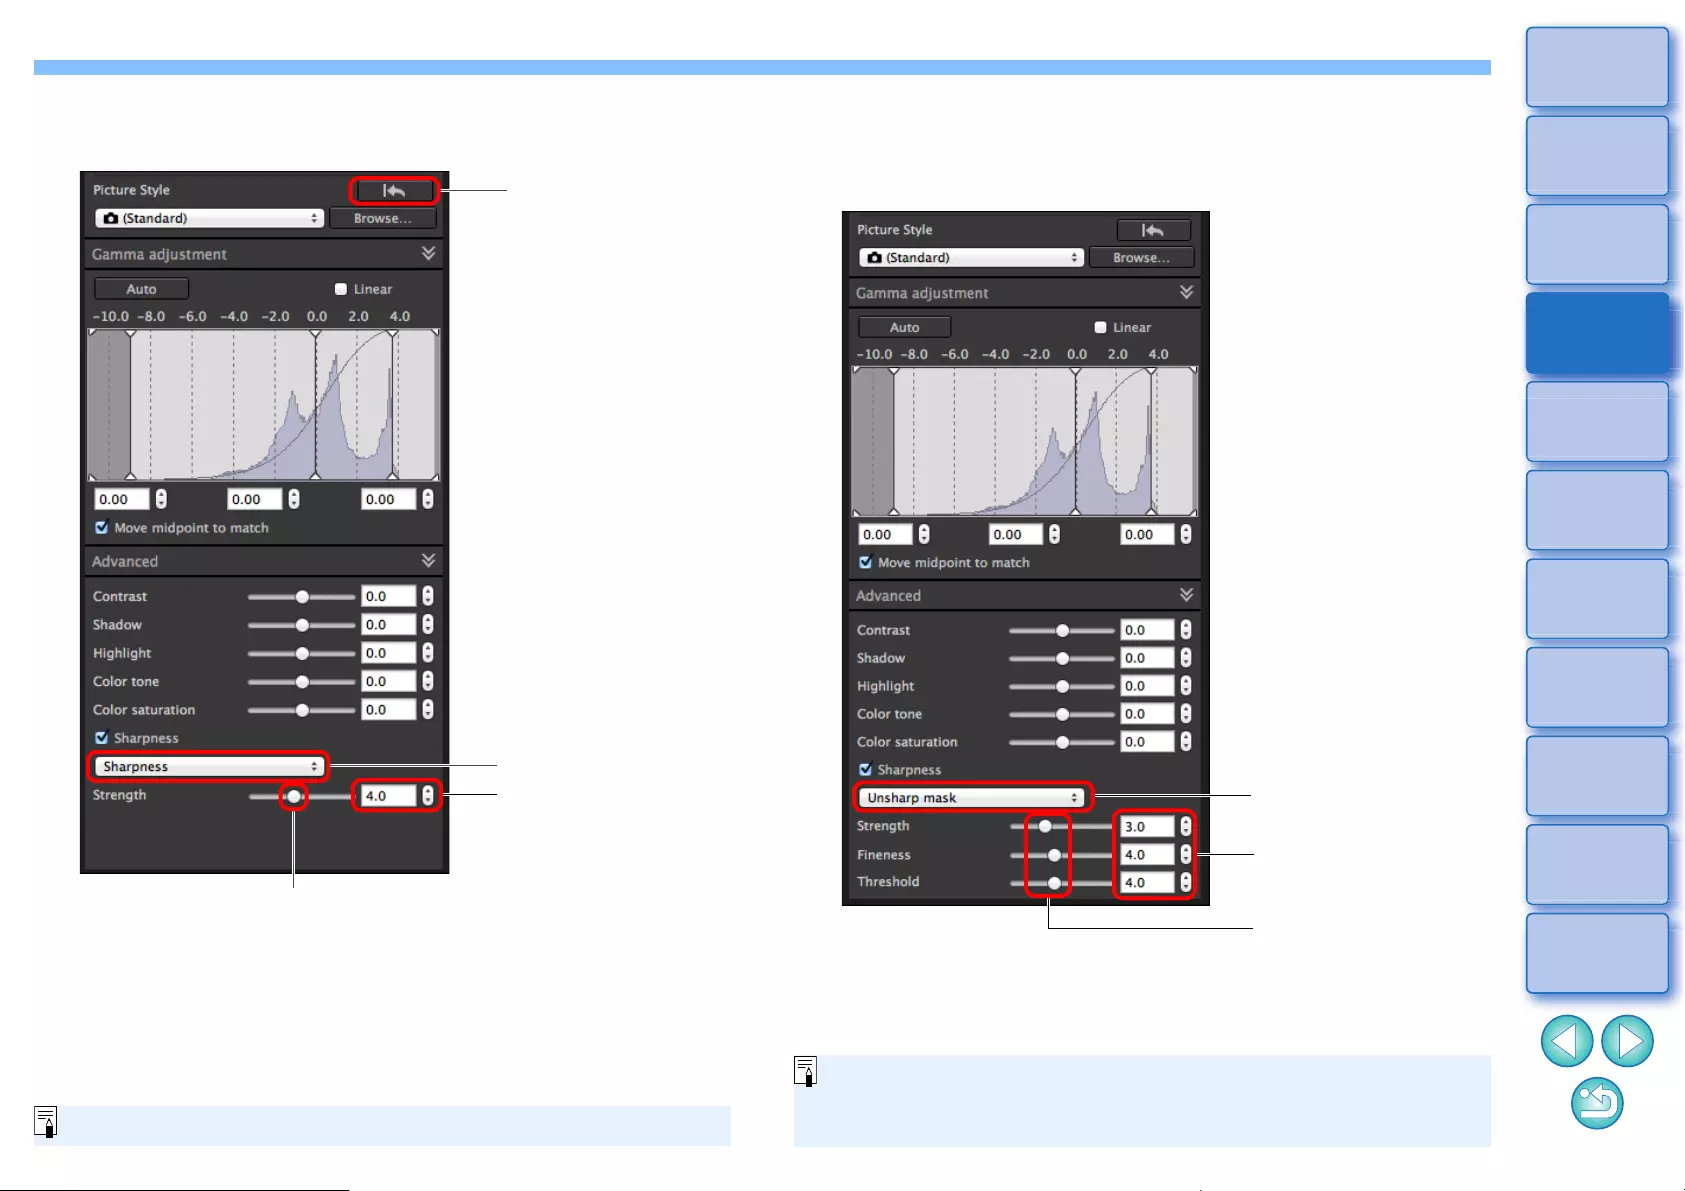
60
3
Sorting
Images
1
2
4
5
Downloading
Images
Viewing
Images
Printing
Images
Editing
Images
6
Processing
Large Numbers
of RAW Images
7
Remote
Shooting
10
HDR PQ
Mode
8
Playing Back
Movies and Saving
Still Photos
11
Specifying
Preferences
9
Handling
RAW Movies
Select [Sharpness] from the list box and adjust the
setting.
Reverts the image to
the original settings
Drag the slider left or right
Enter a setting (in 0.1-
stop increments)
Select [Sharpness]
The adjustment range is 0 to 10.
Detailed Setting of Image Sharpness
Select [Unsharp mask] from the list box and adjust
the setting.
Drag the slider left
or right
Select [Unsharp mask]
Enter a setting (in
0.1-stop increments)
Adjust image sharpness with the window view set to [400%], [200%]
or [100%]. If the view is set to [Fit to window] (full view), you may not
be able to correctly check the adjustment results.
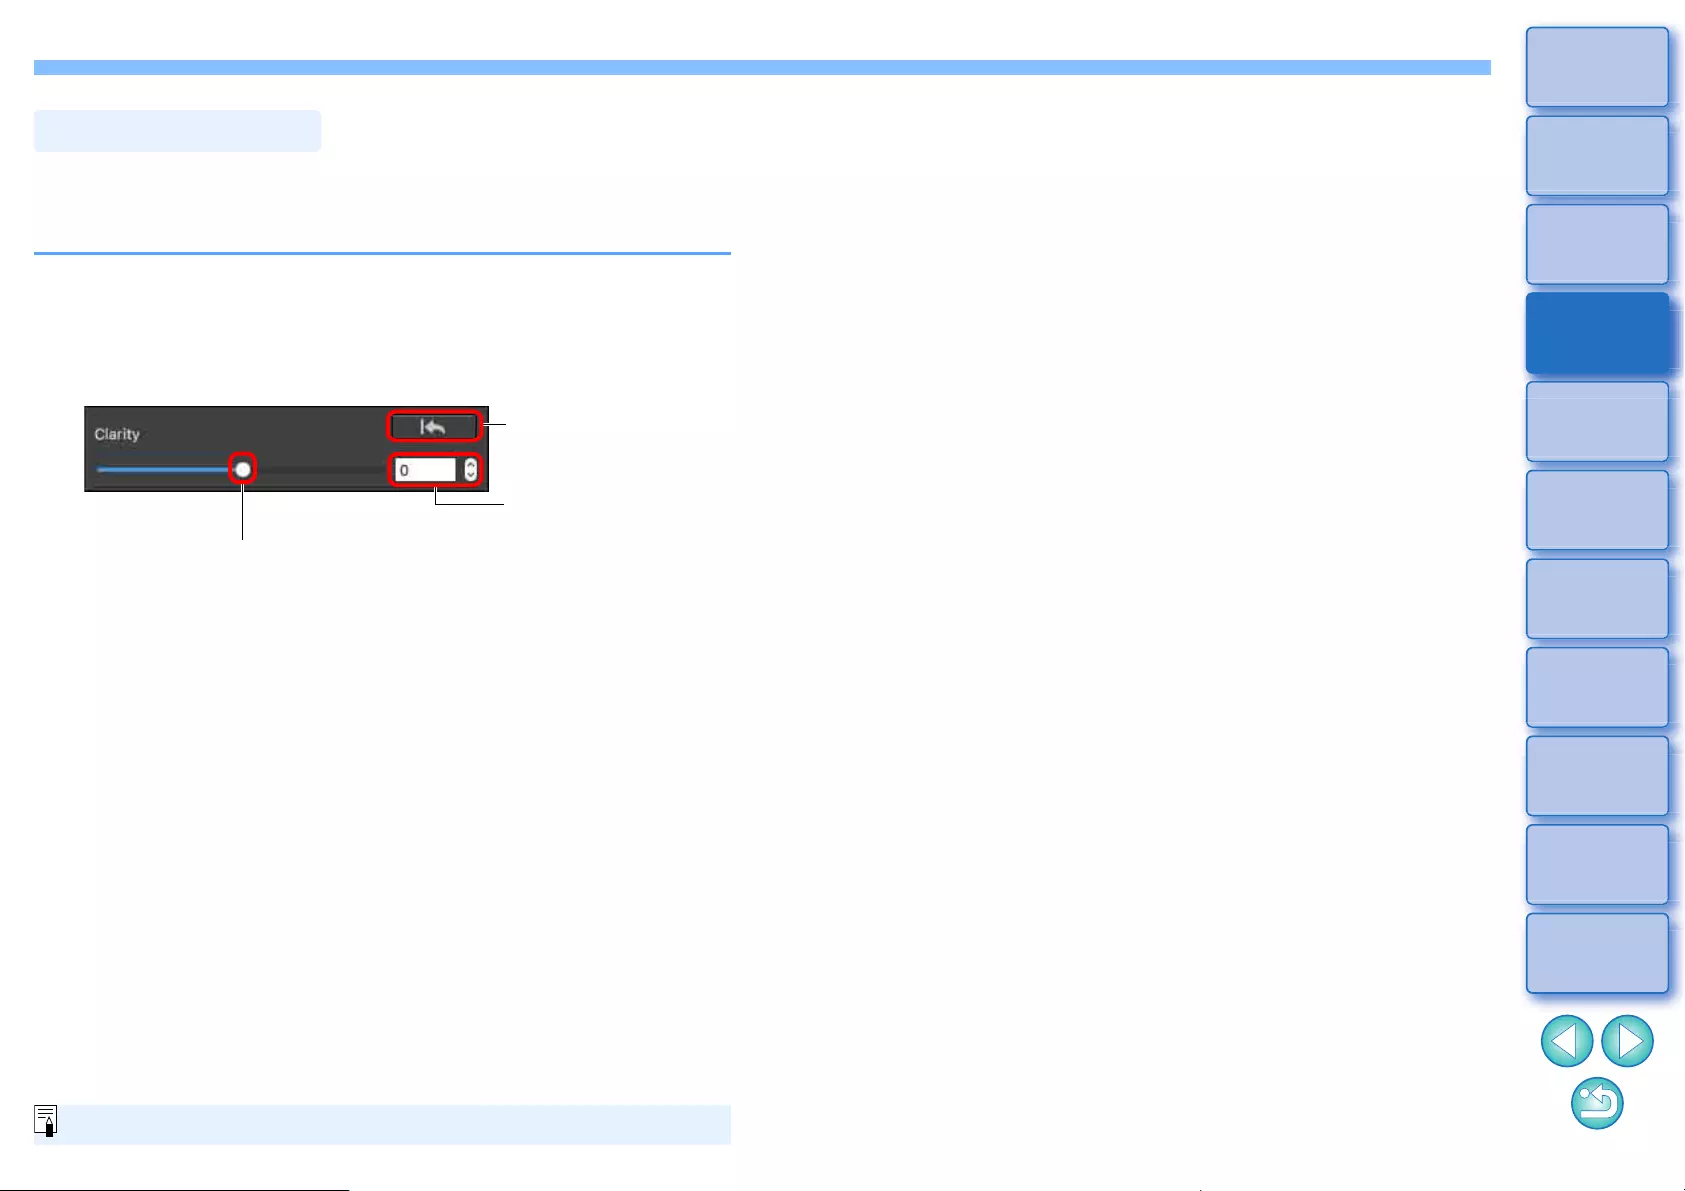
61
3
Sorting
Images
1
2
4
5
Downloading
Images
Viewing
Images
Printing
Images
Editing
Images
6
Processing
Large Numbers
of RAW Images
7
Remote
Shooting
10
HDR PQ
Mode
8
Playing Back
Movies and Saving
Still Photos
11
Specifying
Preferences
9
Handling
RAW Movies
This function allows you to change the contrast at the edges of an
image. It can be used with images shot on a camera model that allows
clarity to be set on the camera.
1Select an image to adjust in the main window, etc.
2Display the Basic Adjustment tool palette and adjust
the image.
lThe further the slider is moved to the right, the more clarity the
image has.
Adjusting Clarity
Reverts the image to
the original settings
Enter a numerical
value
Drag the slider left or right
The adjustment range is -4 to +4.
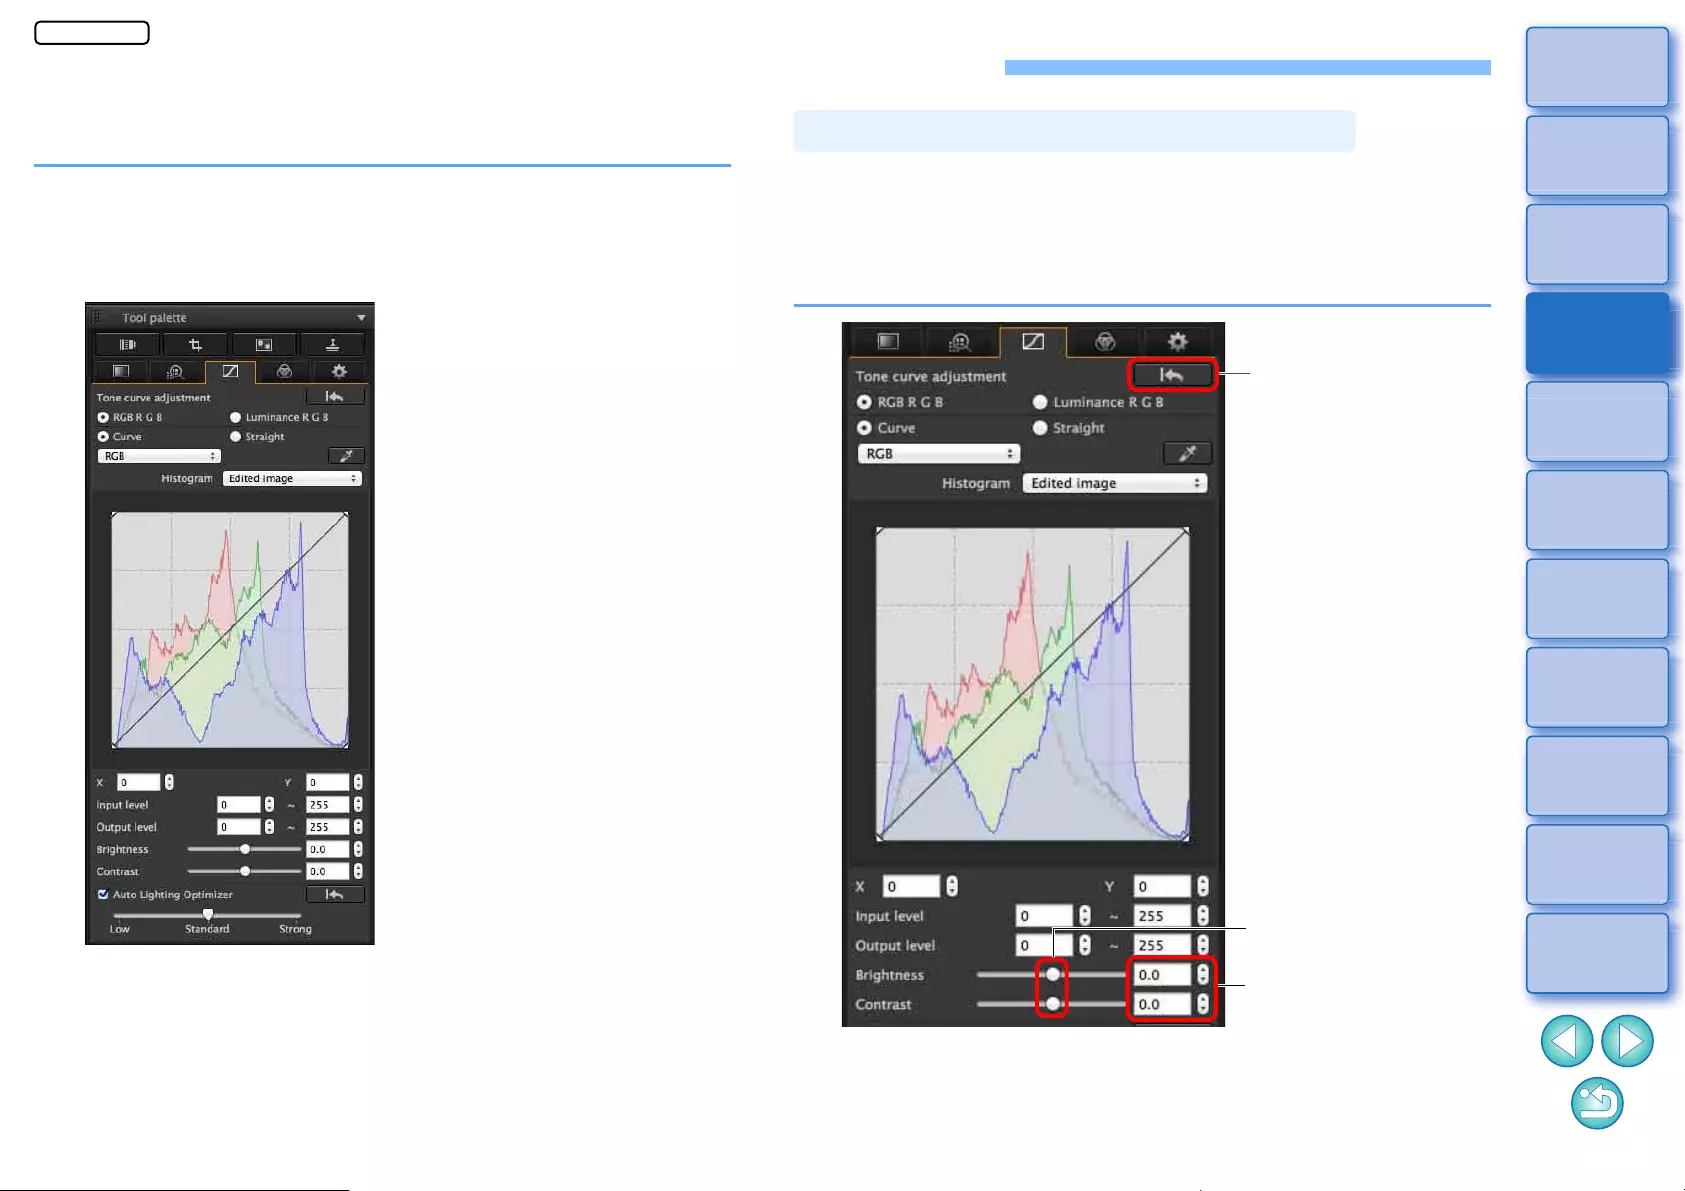
62
3
Sorting
Images
1
2
4
5
Downloading
Images
Viewing
Images
Printing
Images
Editing
Images
6
Processing
Large Numbers
of RAW Images
7
Remote
Shooting
10
HDR PQ
Mode
8
Playing Back
Movies and Saving
Still Photos
11
Specifying
Preferences
9
Handling
RAW Movies
Editing with the Tone Adjustment Tool Palette
With the Tone Adjustment tool palette, you can adjust images with the
same functions as general image editing software.
1Select an image in the main window, etc.
2Display the Tone Adjustment tool palette.
The brightness and contrast of an image can be adjusted. Since the
adjustment range is broader than the same functions in the Basic
Adjustment tool palette, the image color may be saturated, or the image
quality may deteriorate if you adjust too much. Be especially careful
when adjusting.
Adjusting Brightness and Contrast
Drag the sliders left or
right
Enter a setting (in 0.1-
stop increments)
Reverts the image to
the original settings
JPEG/TIFF
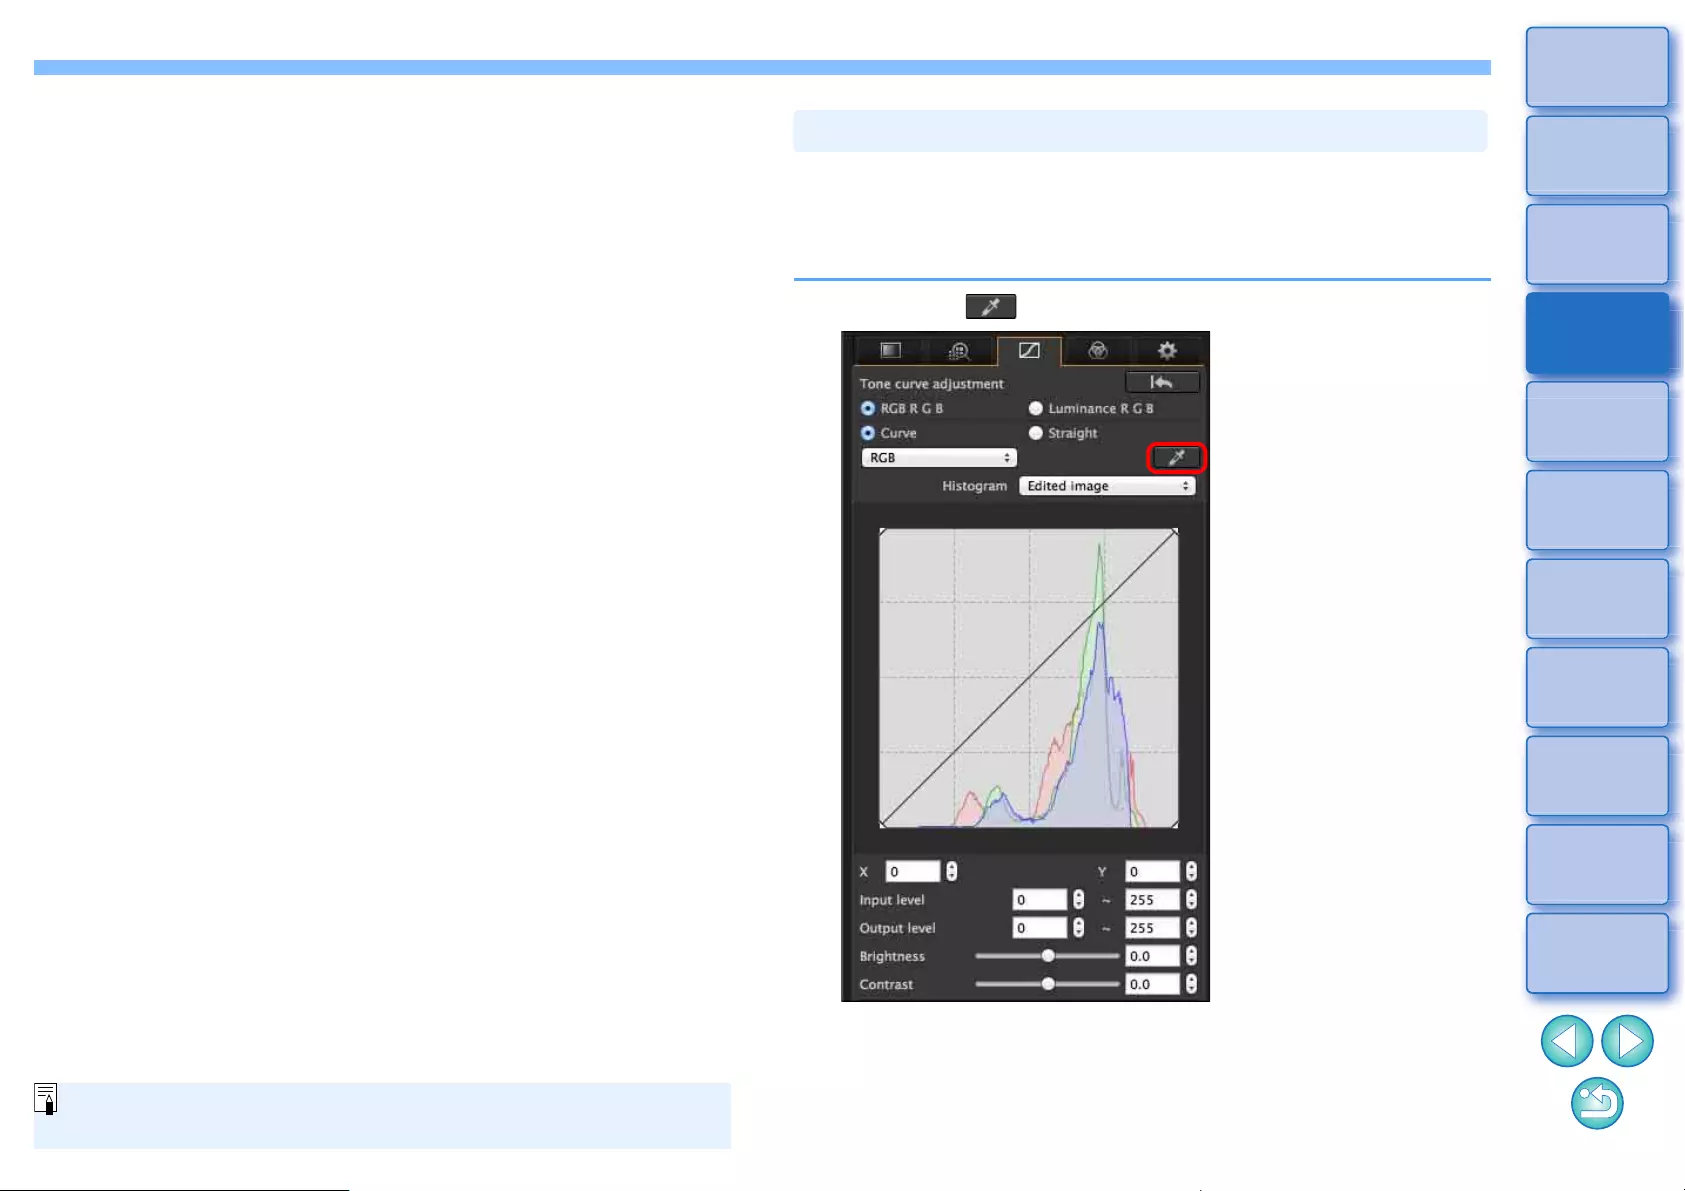
63
3
Sorting
Images
1
2
4
5
Downloading
Images
Viewing
Images
Printing
Images
Editing
Images
6
Processing
Large Numbers
of RAW Images
7
Remote
Shooting
10
HDR PQ
Mode
8
Playing Back
Movies and Saving
Still Photos
11
Specifying
Preferences
9
Handling
RAW Movies
lBrightness: Move the slider to the right to make an image
brighter and to the left to make an image darker.
lContrast: Used to adjust modulation and degree of contrast
of color. Move the slider to the right to make
contrast of an image stronger and to the left to
make contrast weaker.
The adjustment range is –100 to +100 (in 0.1-stop increments when
entering a value).
You can adjust white balance using a selected part of an image as the
standard for white to make the image appear natural. Using click white
balance is effective when using it in parts of an image where white color
tone has changed under the influence of a light source.
1Click the [ ] button.
Adjusting Color Tone Using Click White Balance
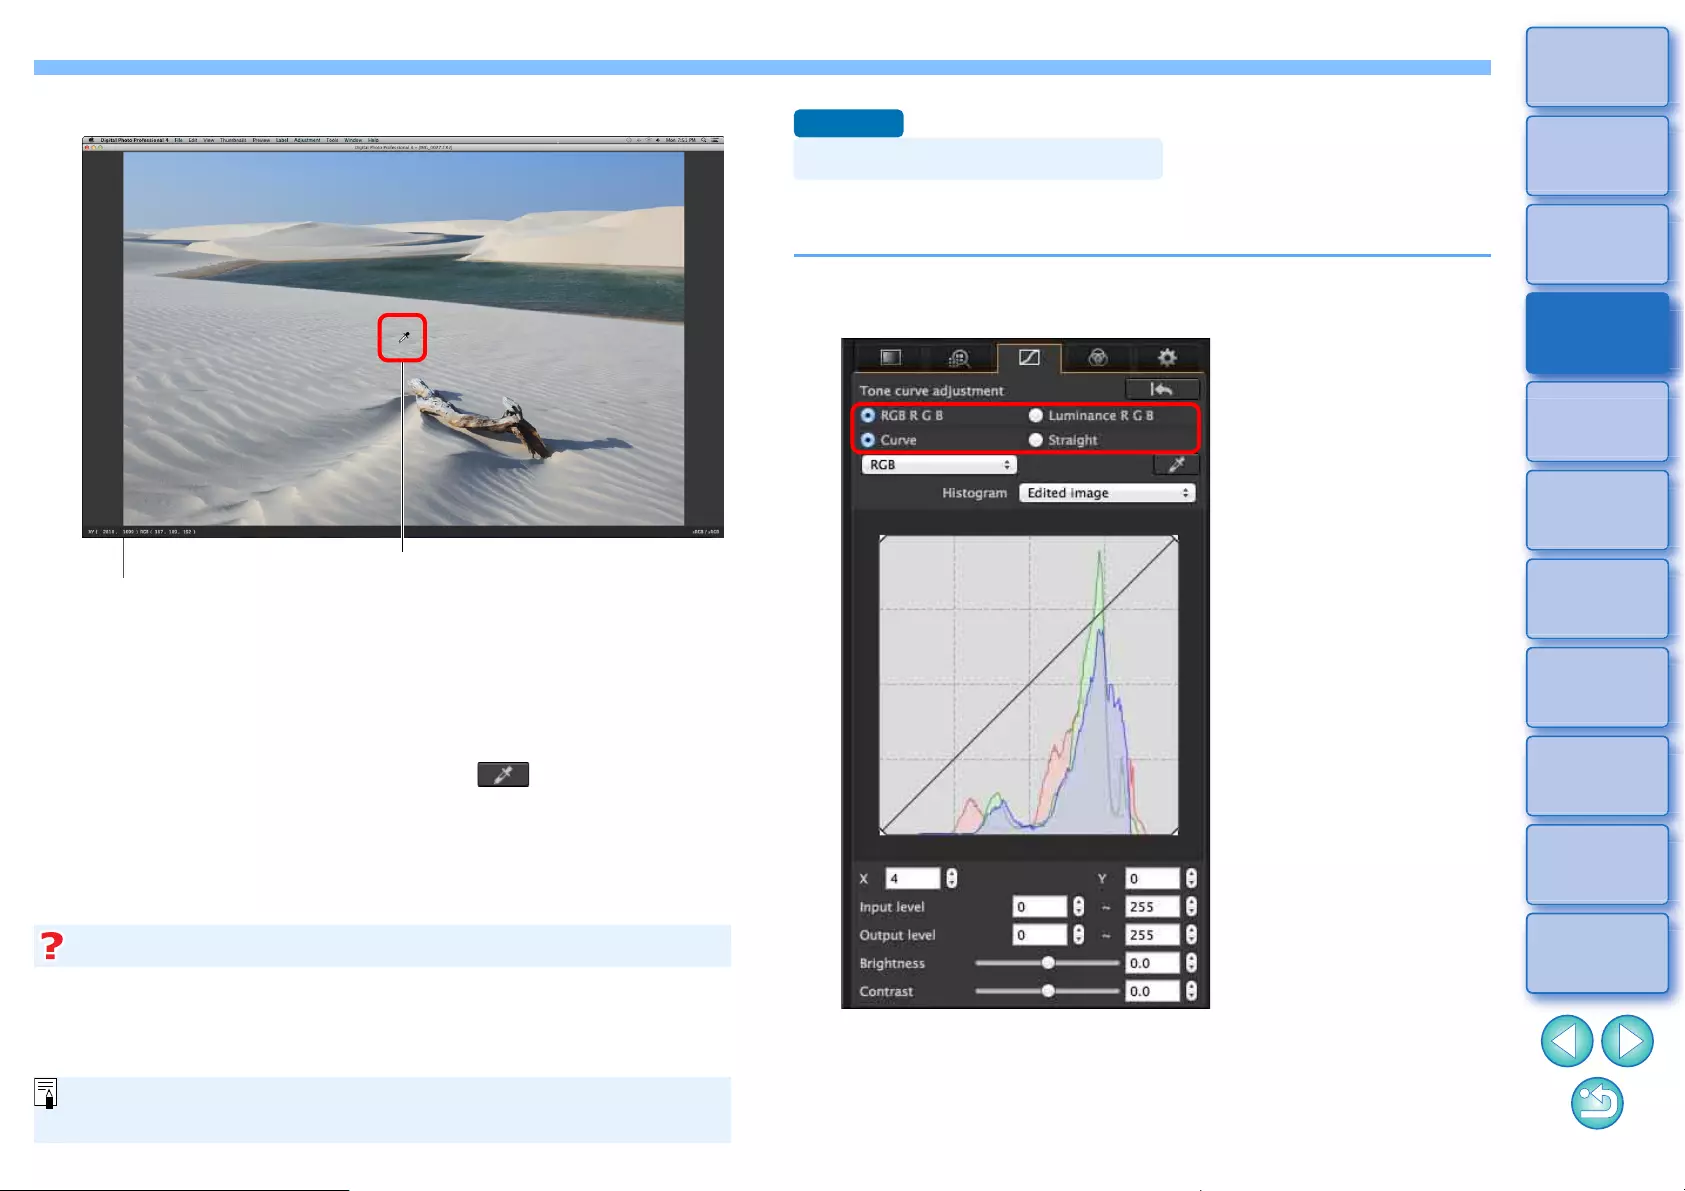
64
3
Sorting
Images
1
2
4
5
Downloading
Images
Viewing
Images
Printing
Images
Editing
Images
6
Processing
Large Numbers
of RAW Images
7
Remote
Shooting
10
HDR PQ
Mode
8
Playing Back
Movies and Saving
Still Photos
11
Specifying
Preferences
9
Handling
RAW Movies
2Click on a point that is to be the standard for white.
ÜThe color of the image is adjusted with the point you selected as
the standard for white.
lIf you click on another point in the image, the white balance is
adjusted again.
lTo finish click white balance, click the [ ] button again.
The coordinates of the cursor position and
the RGB values (8-bit conversion)
Click
When there are no white areas in your image, you can adjust the white
balance by clicking on a grey point of the image in step 2. This has the
same adjustment result as selecting a white area.
When there are no white areas in your image
The histogram display changes according to adjustment. You can
also display the histogram before making any adjustments.
You can adjust the brightness, contrast and color of a specific area by
changing the tone curve (p.183).
1Select the tone curve mode and interpolation
method.
Adjusting Tone Curve
Advanced
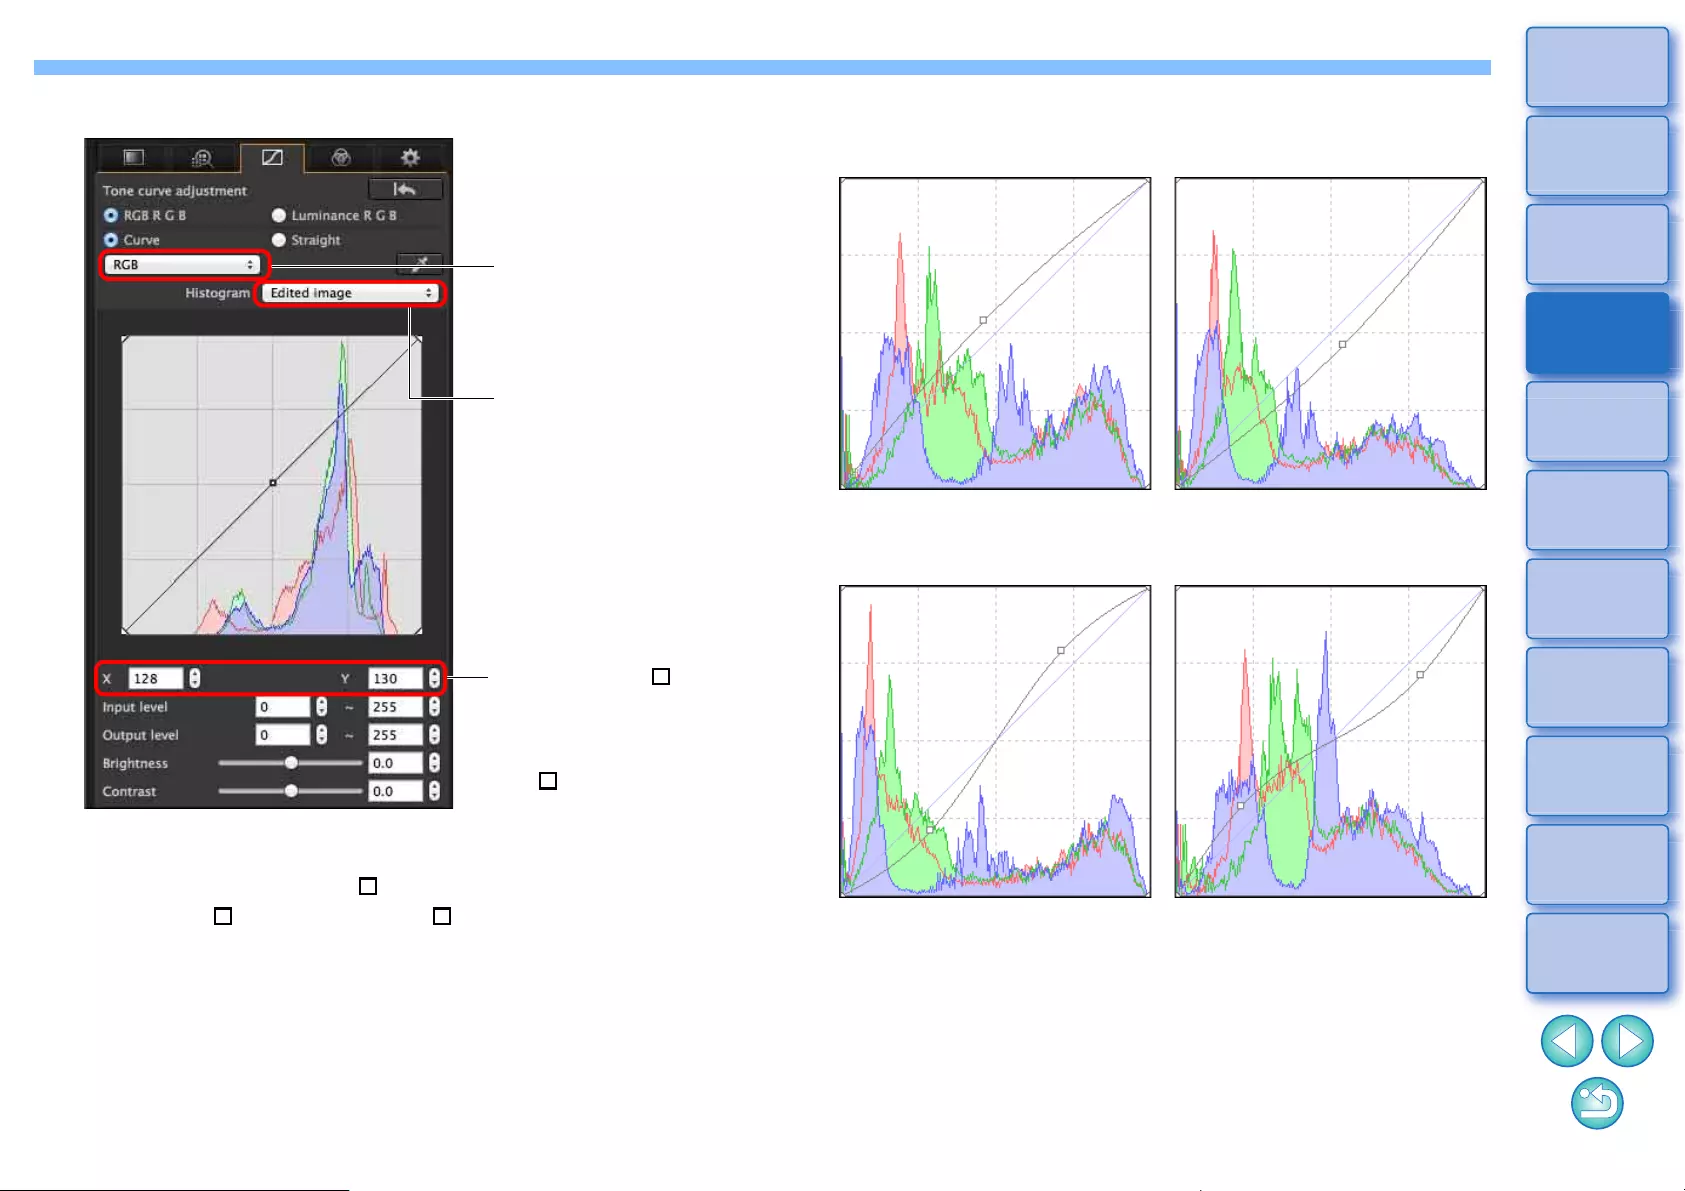
65
3
Sorting
Images
1
2
4
5
Downloading
Images
Viewing
Images
Printing
Images
Editing
Images
6
Processing
Large Numbers
of RAW Images
7
Remote
Shooting
10
HDR PQ
Mode
8
Playing Back
Movies and Saving
Still Photos
11
Specifying
Preferences
9
Handling
RAW Movies
2Make adjustments.
lThe horizontal axis shows the input level and the vertical axis
shows the output level.
lThe maximum number of [ ] is 8.
l
To delete a [ ], double-click on the [ ].
You can display pre-
and post-adjustment
histograms
RGB: Adjusts RGB
in a batch
R, G, B: Adjusts
each channel
Coordinates of [ ]
(when several
coordinates are set,
coordinates of last-
set [ ])
Example of a Tone Curve Operation
Makes medium tones brighter Makes medium tones darker
Makes tones sharper Makes tones softer
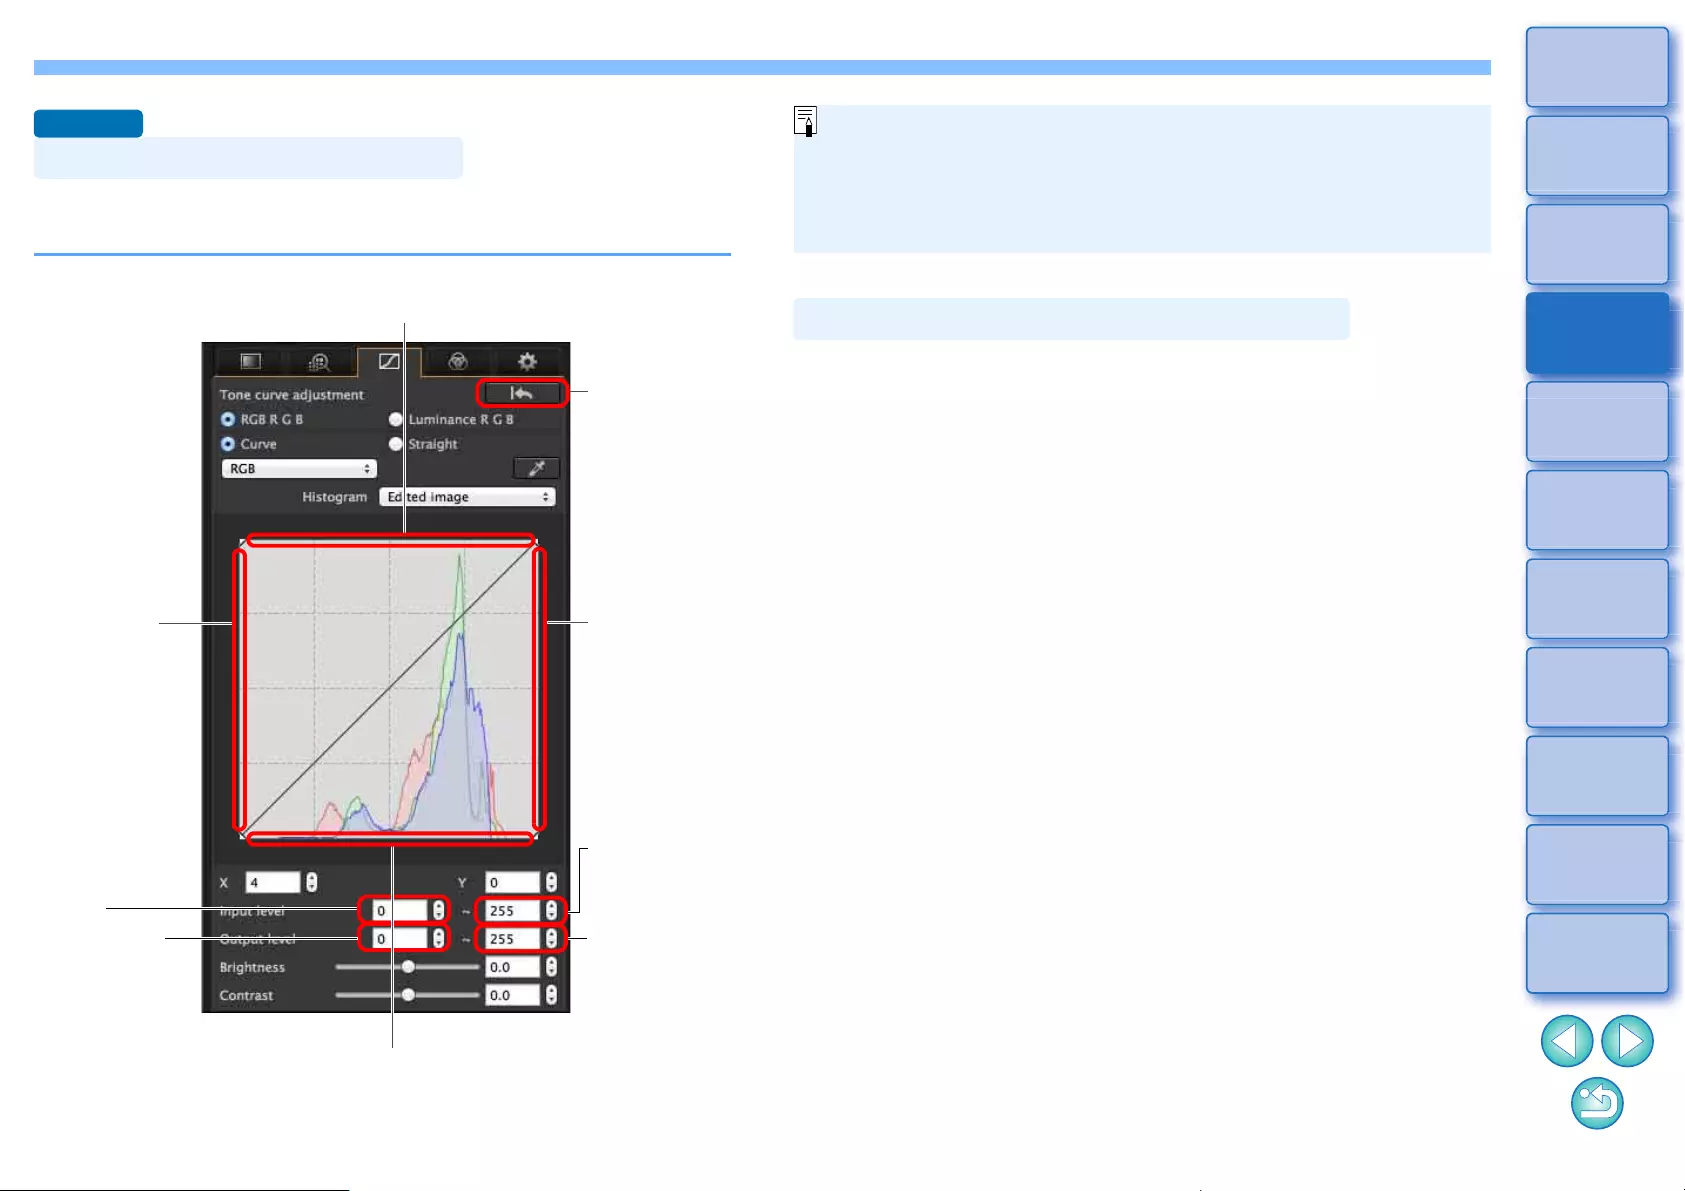
66
3
Sorting
Images
1
2
4
5
Downloading
Images
Viewing
Images
Printing
Images
Editing
Images
6
Processing
Large Numbers
of RAW Images
7
Remote
Shooting
10
HDR PQ
Mode
8
Playing Back
Movies and Saving
Still Photos
11
Specifying
Preferences
9
Handling
RAW Movies
Dynamic range (width of gradation expression) from dark points to bright
points in an image can be adjusted.
lThe horizontal axis shows the input level and the vertical axis shows
the output level.
Adjusting Dynamic Range
Advanced
Move to the
left
Input
white
points
Reverts the
image to the
original
settings
Move to the
right
Input black
points
Output
white point
numerical
value
Move downwards
Output white points
Output black
point numerical
value
Move upwards
Output black points
Input black
point numerical
value
Input
white
point numerical
value
For information on using the Auto Lighting Optimizer, see “Using the
Auto Lighting Optimizer” (p.58) in “Editing with the Basic Adjustment
Tool Palette”.
lThe setting range of black points is 0 to 247 (in 1-stop increments
when entering a value).
lThe setting range of white points is 8 to 255 (in 1-stop increments
when entering a value).
lYou can display pre- and post-editing histograms (p.65).
Using the Auto Lighting Optimizer
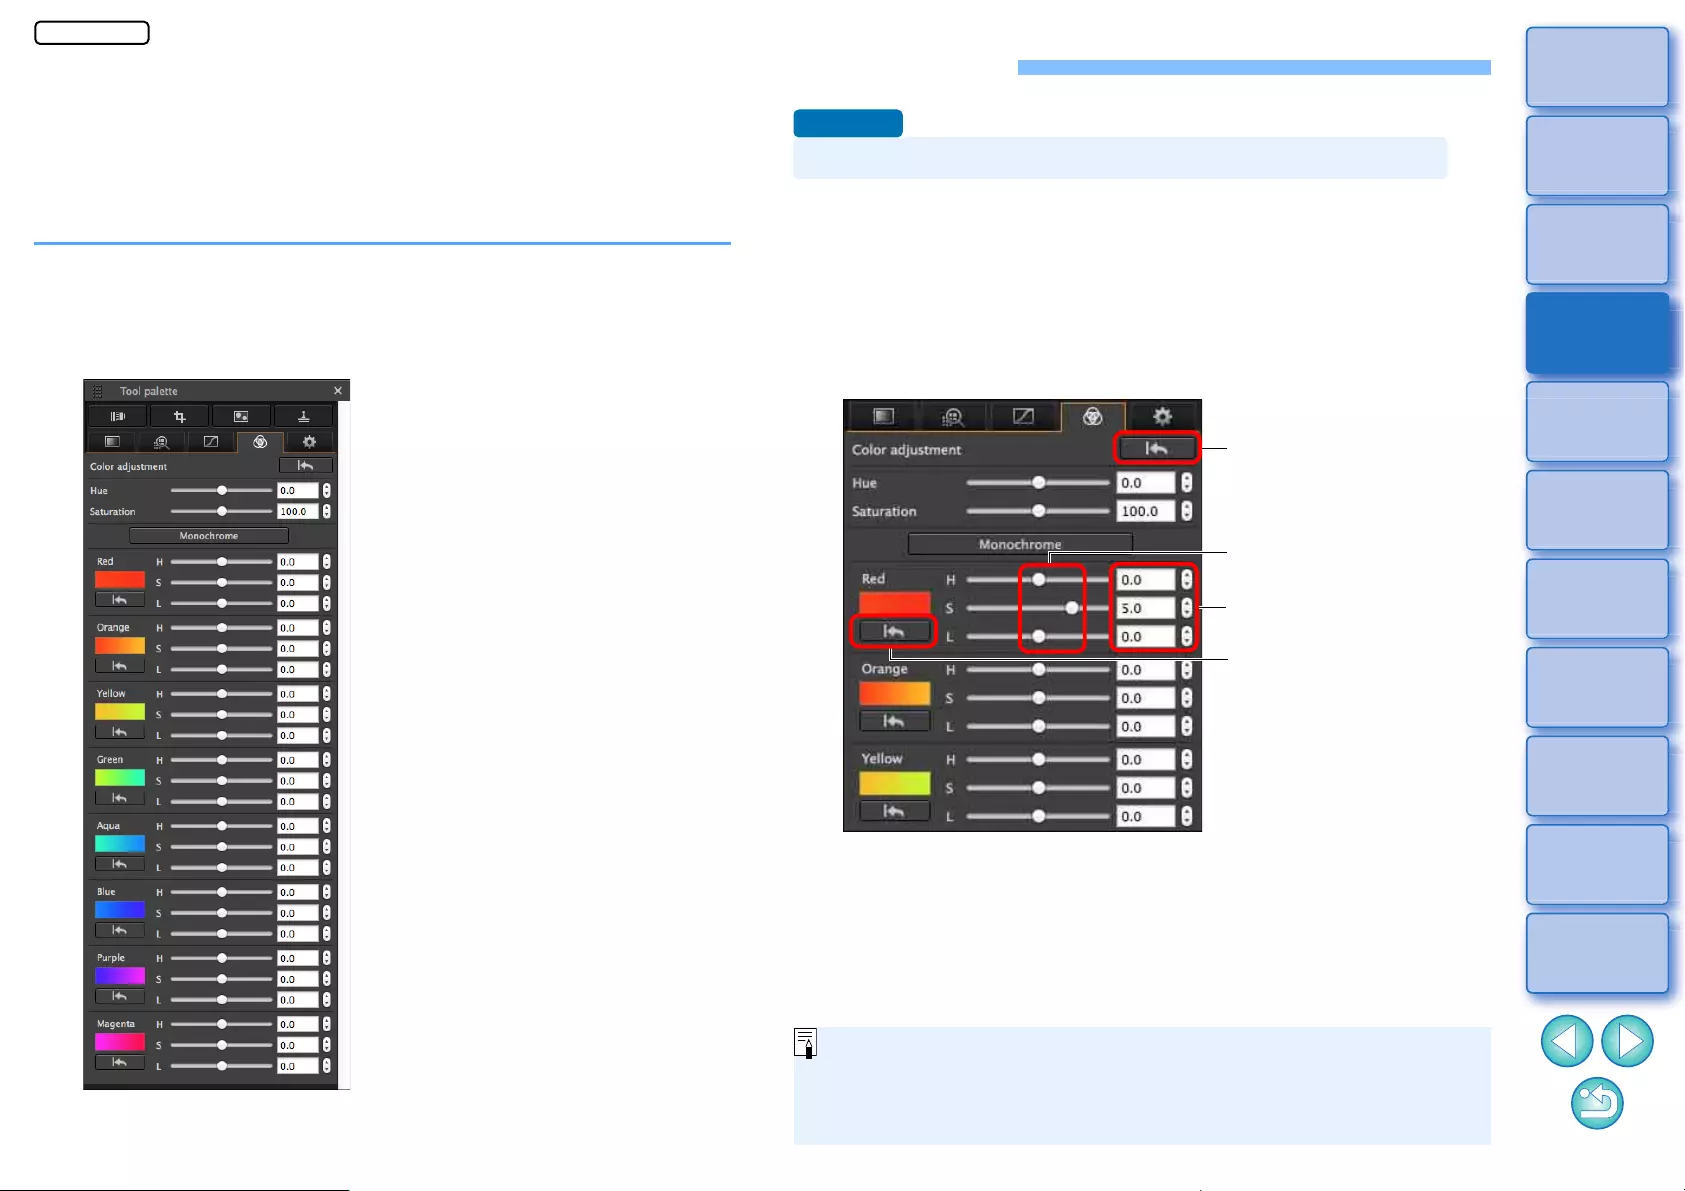
67
3
Sorting
Images
1
2
4
5
Downloading
Images
Viewing
Images
Printing
Images
Editing
Images
6
Processing
Large Numbers
of RAW Images
7
Remote
Shooting
10
HDR PQ
Mode
8
Playing Back
Movies and Saving
Still Photos
11
Specifying
Preferences
9
Handling
RAW Movies
Editing with the Color Adjustment Tool Palette
With the Color Adjustment tool palette, you can adjust the hue,
saturation and luminance in a specific color gamut for 8 color gamuts
(red, orange, yellow, green, aqua, blue, purple and magenta). You can
also adjust the hue and saturation for the entire image and tune
monochrome images.
1Select an image in the main window, etc.
2Display the Color Adjustment tool palette.
Adjusting a Specific Color Gamut
Use the sliders to make adjustments. You can also make adjustments
by directly entering a numeric value.
H: Adjusts the hue.
S: Adjusts the saturation.
L: Adjusts the luminosity.
Editing with the Color Adjustment Tool Palette
Advanced
Revert all adjustments to
the original settings
Drag the sliders left
or right
Enter the values to set
Revert color gamut
adjustments to the
original settings
The adjustment ranges are as follows:
H: –20 to +20
S: –10 to +10
L: –10 to +10
JPEG/TIFF
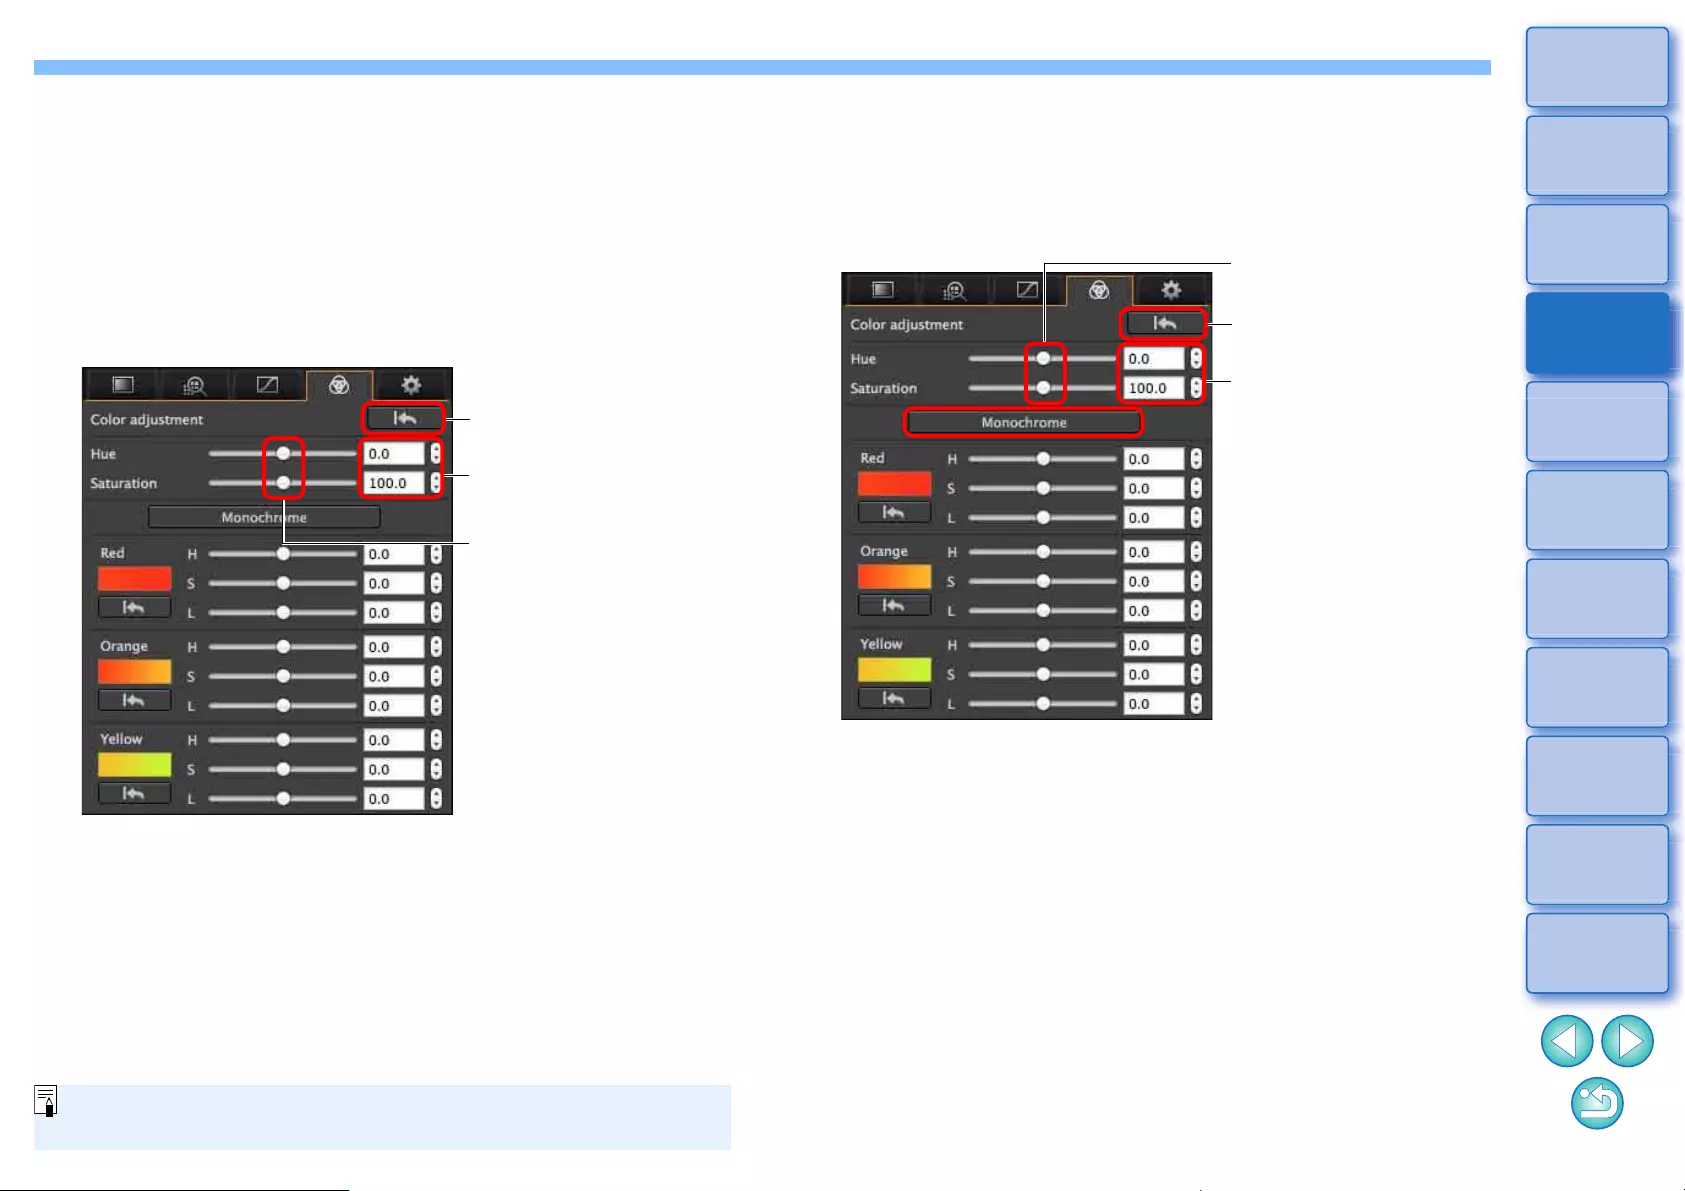
68
3
Sorting
Images
1
2
4
5
Downloading
Images
Viewing
Images
Printing
Images
Editing
Images
6
Processing
Large Numbers
of RAW Images
7
Remote
Shooting
10
HDR PQ
Mode
8
Playing Back
Movies and Saving
Still Photos
11
Specifying
Preferences
9
Handling
RAW Movies
Adjusting Hue and Saturation for an Entire
Image
Use the sliders to make adjustments. You can also make adjustments
by directly entering a numeric value.
lHue: Move the slider to the right to make color tones more
yellowish, and to the left to make color tones more reddish.
lSaturation:Adjusts the overall color intensity for the image. Move the
slider to the right for more intense colors, and to the left for
less intense colors.
Revert all adjustments
to the original settings
Drag the sliders left or
right
Enter the values to set
The adjustment range for hue is –30 to +30; and for saturation is 0
to 200.
Adjusting in Monochrome
Press the [Monochrome] button to set the 8 color gamuts to their least
saturation (-10) and create a monochrome image. After creating it, you
can tune the monochrome image with the H and L sliders for each color
gamut, adjusting the hue and brightness.
Revert all adjustments
to the original settings
Drag the sliders left or
right
Enter the values to set
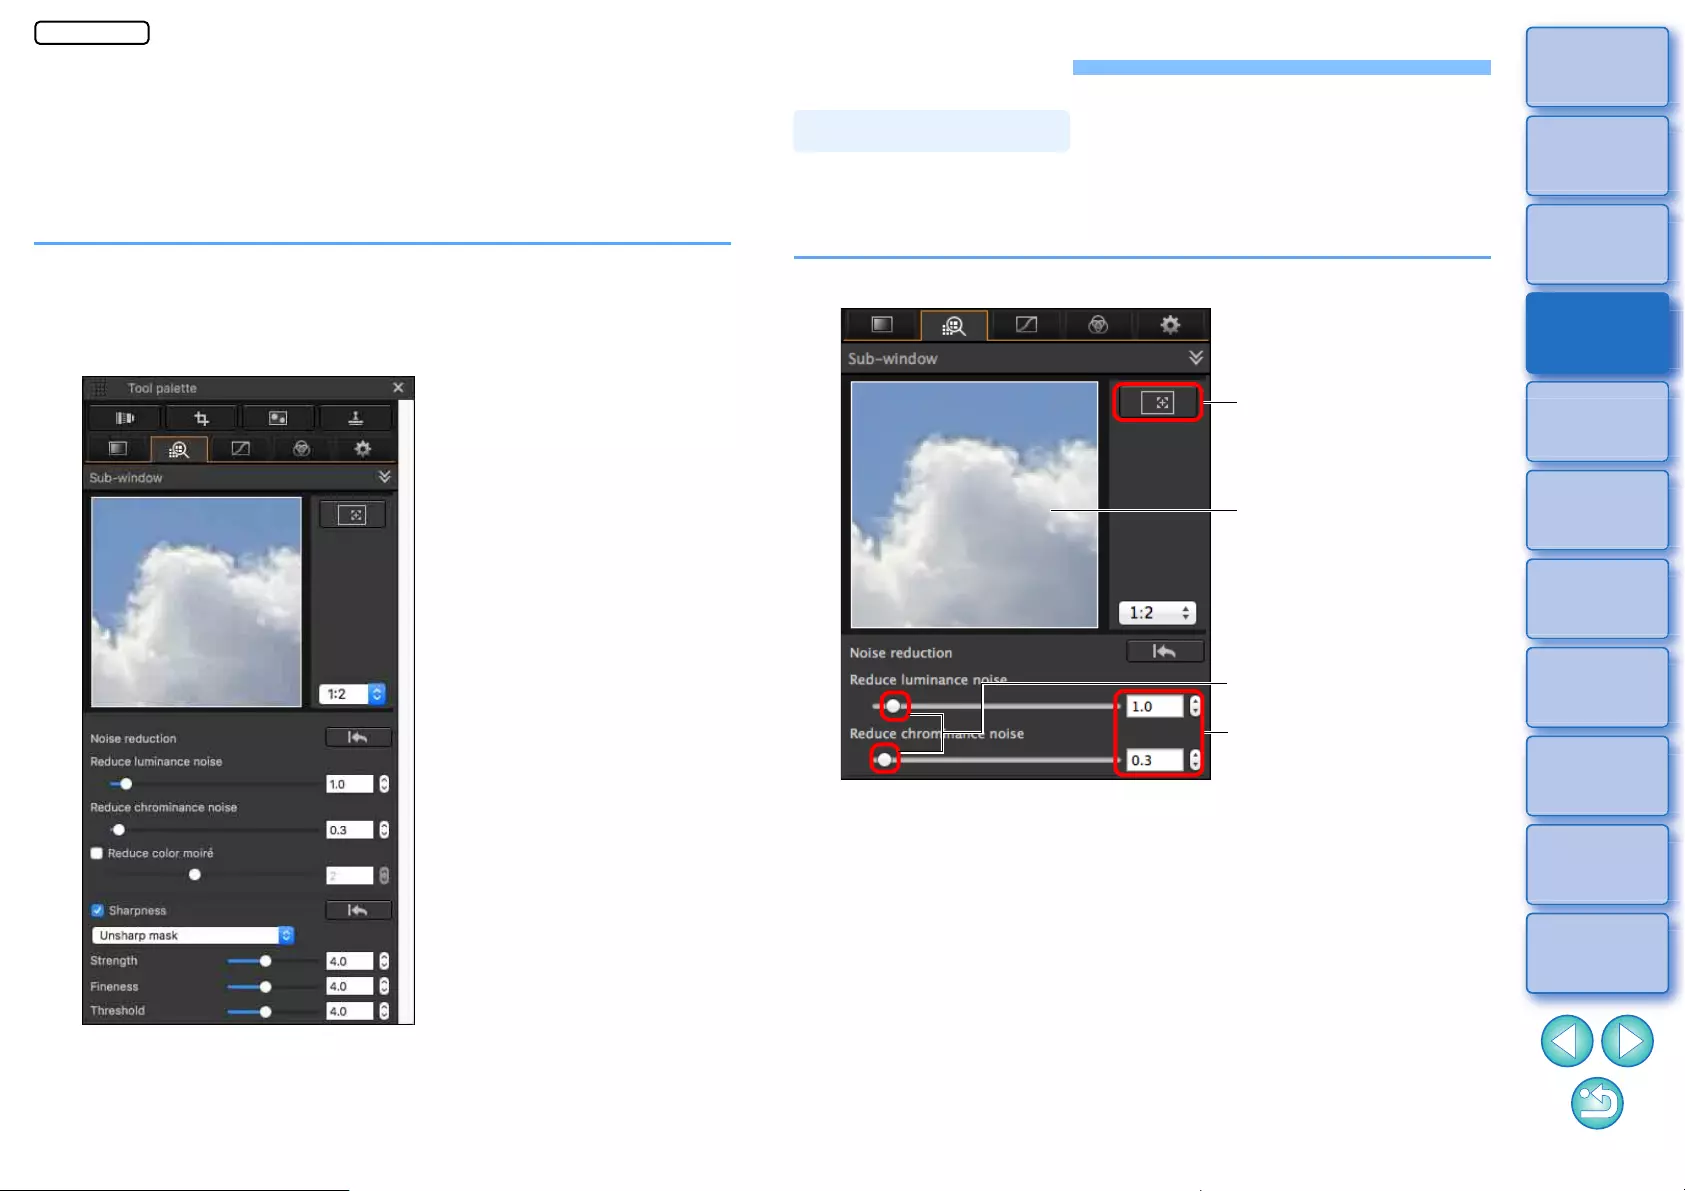
69
3
Sorting
Images
1
2
4
5
Downloading
Images
Viewing
Images
Printing
Images
Editing
Images
6
Processing
Large Numbers
of RAW Images
7
Remote
Shooting
10
HDR PQ
Mode
8
Playing Back
Movies and Saving
Still Photos
11
Specifying
Preferences
9
Handling
RAW Movies
Editing with the Detailed Adjustment Tool Palette
You can use the Detailed Adjustment tool palette to reduce the noise
that occurs in images shot at night or at high ISO settings. This tool
palette can also be used in conjunction with the sharpness adjustment
functions. Note that you can use the functions in this tool palette with
JPEG and TIFF images as well as RAW images.
1Select an image in the main window, etc.
2Display the Detailed Adjustment tool palette.
You can reduce noise that arises in images shot at night or with a high
ISO speed.
* NR stands for Noise Reduction.
Adjust an image.
lYou can set a noise reduction level from within a range of 0 to 20.
The larger the setting, the larger the noise reduction effect.
lThe noise reduction effect can also be checked in the check
window.
Reducing Noise
Enlargement
display
position
Check window
Drag the sliders
Enter a setting (in 0.1-
stop increments)
JPEG/TIFF
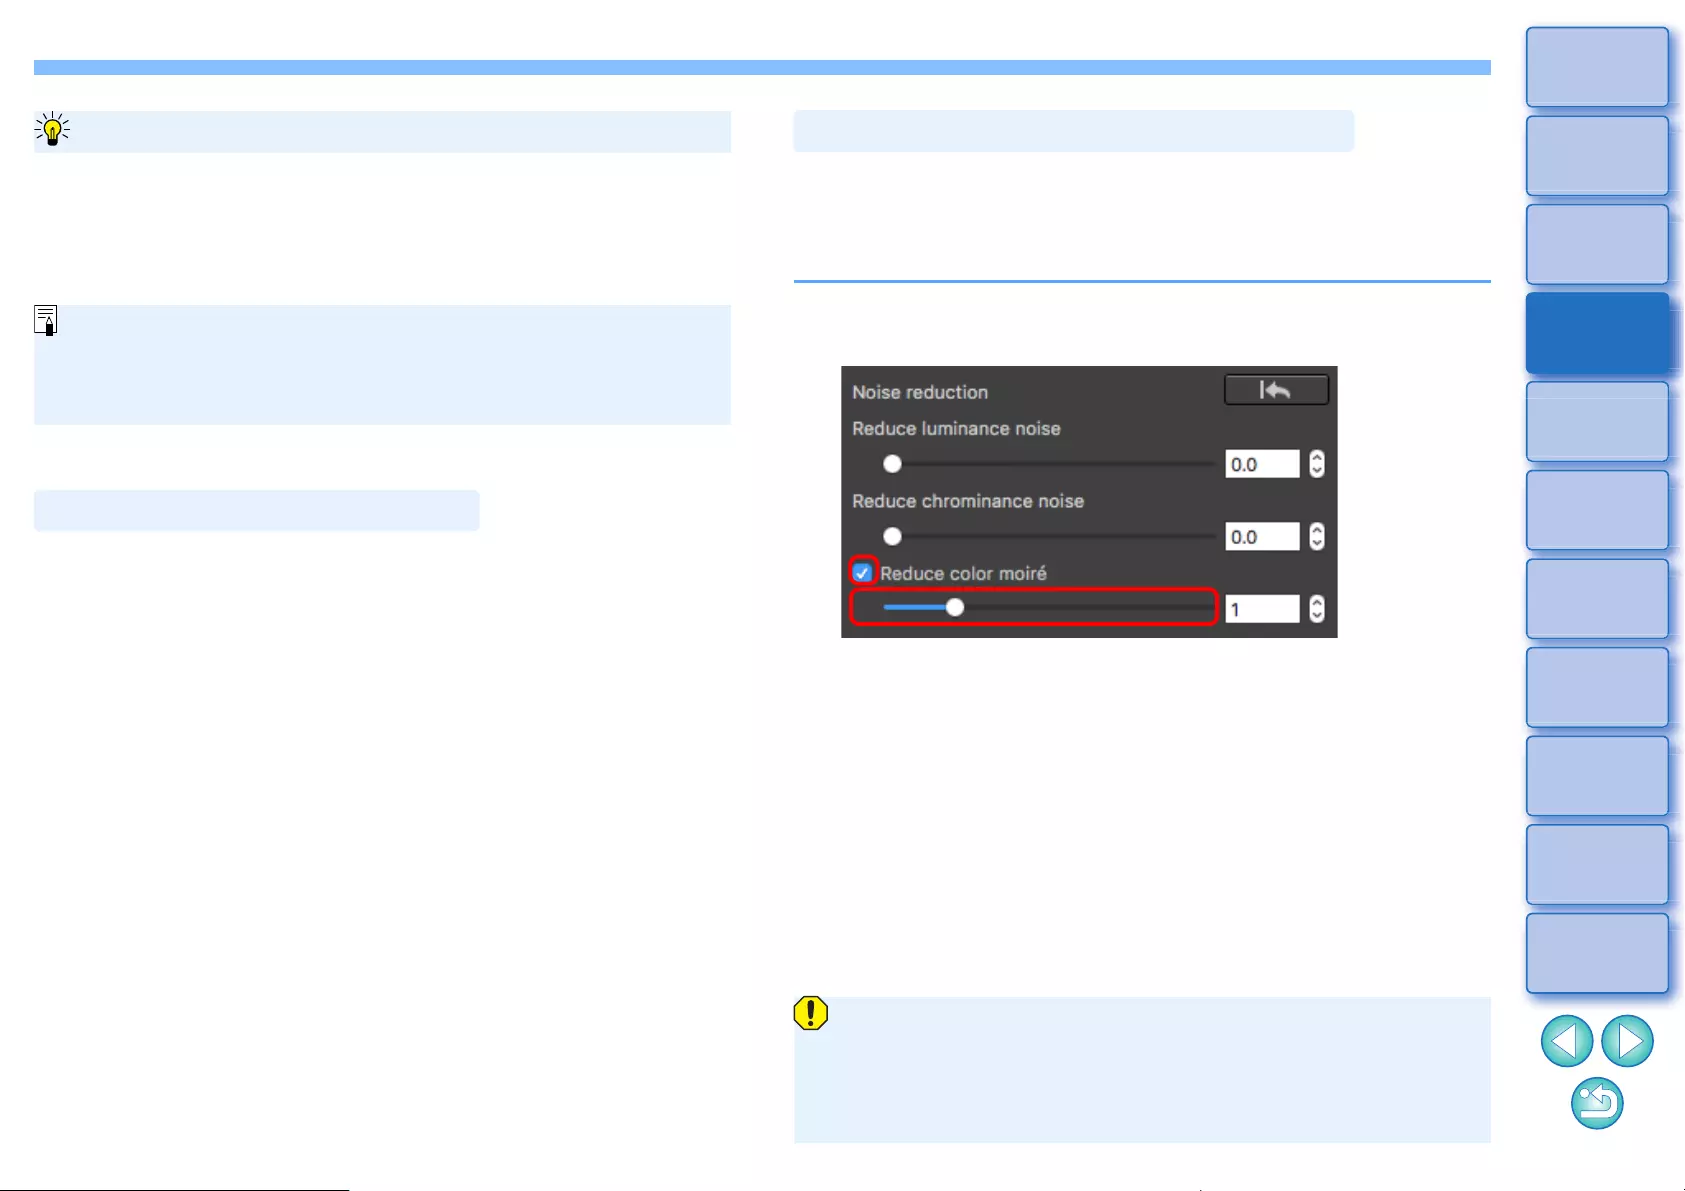
70
3
Sorting
Images
1
2
4
5
Downloading
Images
Viewing
Images
Printing
Images
Editing
Images
6
Processing
Large Numbers
of RAW Images
7
Remote
Shooting
10
HDR PQ
Mode
8
Playing Back
Movies and Saving
Still Photos
11
Specifying
Preferences
9
Handling
RAW Movies
You can also use this palette to adjust the image sharpness. For
information on making adjustments, see “Adjusting Image Sharpness” in
“Editing with the Basic Adjustment Tool Palette” (p.59).
You can set the same noise reduction level for several images by first
selecting multiple images in the main window, and then adjusting the
noise reduction level using the [Reduce luminance noise] and [Reduce
chrominance noise] sliders.
Setting the same noise reduction level for several images
lIf [Reduce luminance noise] is set, resolution may be reduced
along with reduction of noise.
lIf [Reduce chrominance noise] is set, color bleeding may occur
along with reduction of noise.
Adjusting Image Sharpness
You can reduce color moiré* occurring in an image.
*Color moiré: Occurrence of a color appearing that is not originally in an
image. In particular, tends to occur when taking photos of latticed or
similar patterns.
Checkmark the [Reduce color moiré] checkbox and
adjust using the slider.
Reducing Color Moiré in an Image
lDepending on the subject, you may not be able to correct color
moiré completely.
lUsing this function may cause hue to change depending on the
subject. If there is a noticeable change in hue, lower the level of
adjustment.
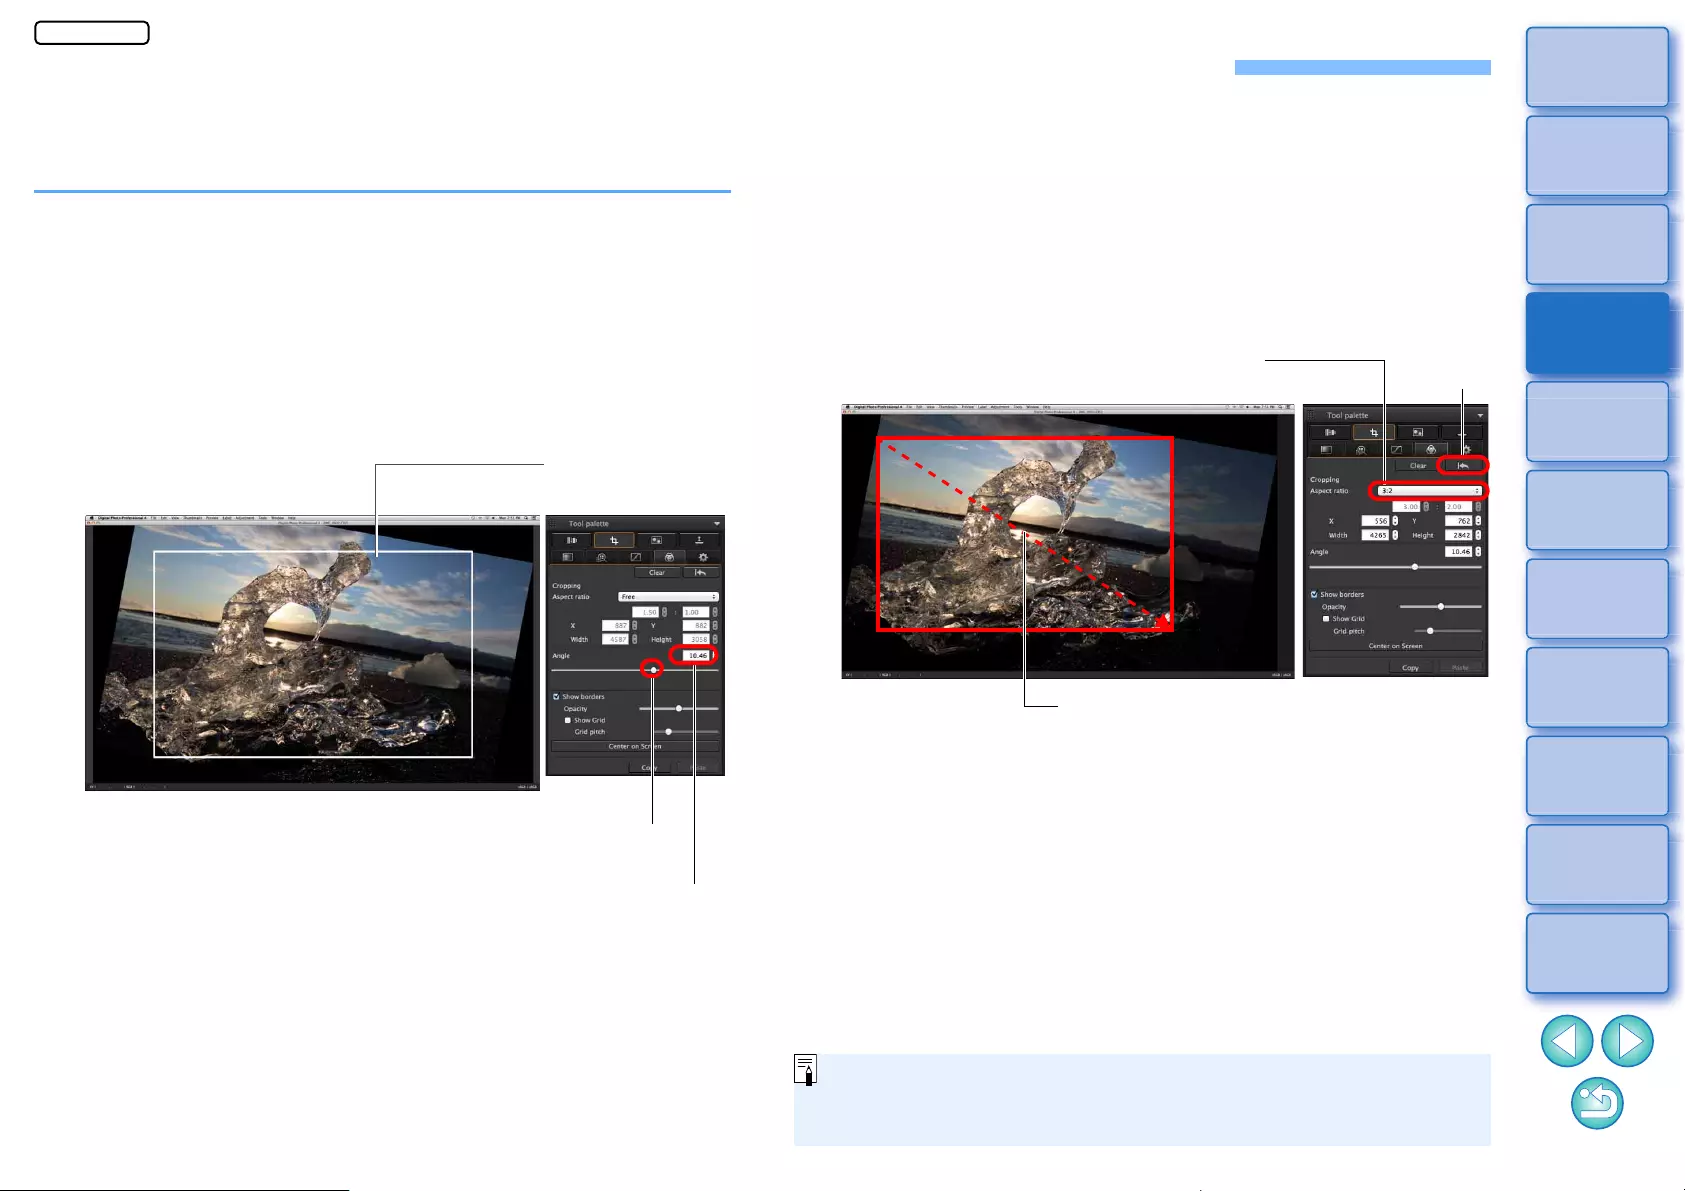
71
3
Sorting
Images
1
2
4
5
Downloading
Images
Viewing
Images
Printing
Images
Editing
Images
6
Processing
Large Numbers
of RAW Images
7
Remote
Shooting
10
HDR PQ
Mode
8
Playing Back
Movies and Saving
Still Photos
11
Specifying
Preferences
9
Handling
RAW Movies
Editing with the Trimming/Angle Adjustment Tool Palette
You can crop only the part of an image you need, or change the
composition of an image where an image shot horizontally becomes
vertical. You can also adjust the angle of an image before cropping.
1Select the image to be cropped.
2Display the Trimming/Angle Adjustment tool palette.
lYou cannot make adjustments with the Trimming/Angle
Adjustment tool palette in a window that only shows thumbnails.
3Adjust the angle of the image as needed.
Trimming/angle adjustment window
Use the mouse (click /) to adjust the angle or directly enter
the adjustment angle (0.01-degree increments; adjustable
range: –45 to +45 degrees)
Drag (0.01-degree increments; adjustment range: –45 to +45
degrees)
Largest possible
trimming range
lIf you click [Center on Screen], you can display the trimming
range in the center of the window.
lWhen correcting lens aberrations, it is recommended to perform
lens aberration correction before adjusting the angle of the
image.
lIf you have only adjusted the angle of the image, the image will
be cropped at the largest possible trimming range.
4Select a ratio and drag the trimming range.
lThe trimming range can be moved by dragging.
lYou can enlarge or reduce the size of the trimming range by
dragging the four corners of the trimming range.
Cancel
Select a trimming ratio
Drag the trimming
range
When aspect ratio information is attached to an image shot with any
supported camera other than the EOS 5D Mark II, the displayed
trimming range is based on the aspect ratio information.
JPEG/TIFF
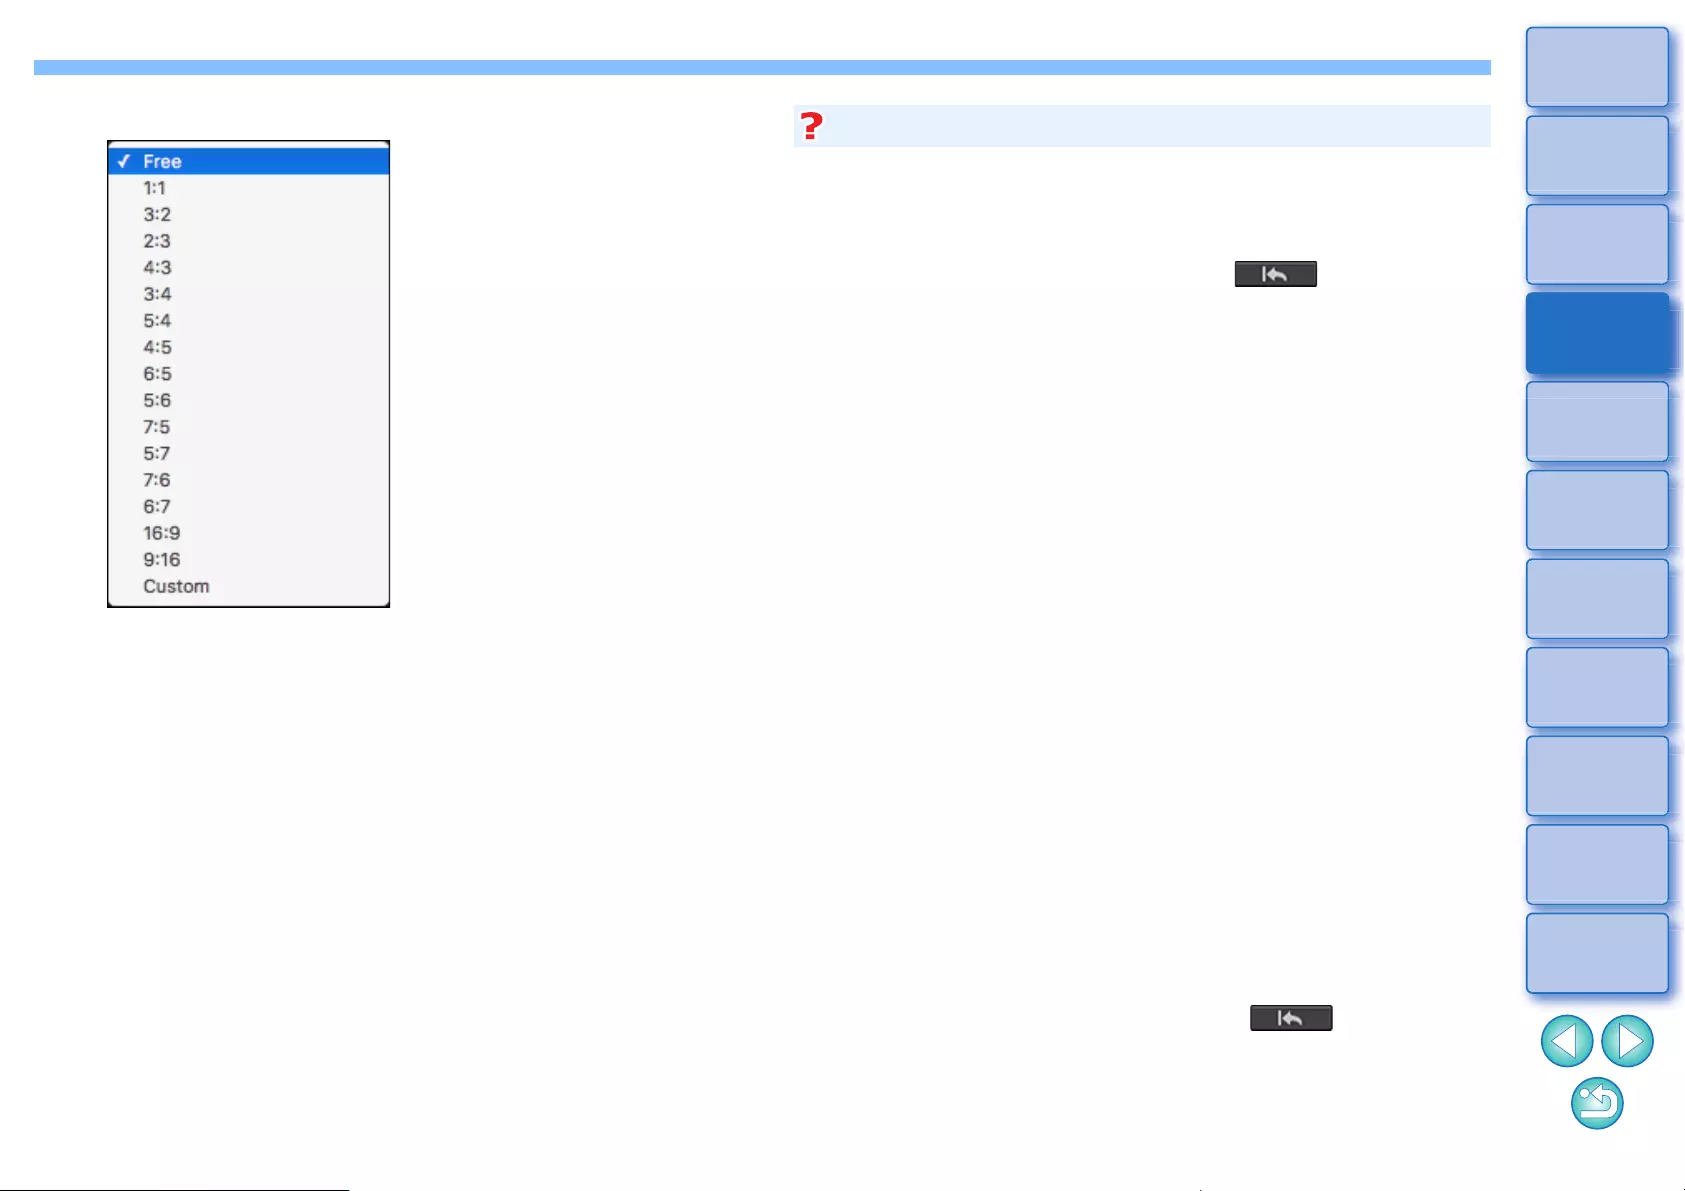
72
3
Sorting
Images
1
2
4
5
Downloading
Images
Viewing
Images
Printing
Images
Editing
Images
6
Processing
Large Numbers
of RAW Images
7
Remote
Shooting
10
HDR PQ
Mode
8
Playing Back
Movies and Saving
Still Photos
11
Specifying
Preferences
9
Handling
RAW Movies
lList of aspect ratios (width : height)
5Return to the main window.
ÜThe trimming range frame is displayed in the cropped image
(p.182).
ÜWhen the cropped image is displayed in a preview window or the
edit image window, it is displayed in its cropped form.
[Free]: You can crop an image to any size, regardless of
the selectable ratio.
[Custom]: You can crop an image at the specified ratio.
lThe trimmed range can be reverted to its original condition at
any time
A cropped image is displayed or printed as a cropped image.
However, since the image is not actually cropped, you can always
revert to the original image by clicking the [ ] button in the
trimming/angle adjustment window or performing the “Re-Editing an
Image” procedure (p.97).
lDisplay of the cropped image in each window
• Main window: The frame showing the trimming range is
displayed on the image (p.182).
• Preview window: The image is displayed in its cropped condition.
• Edit image window: The thumbnail image is the same as the main
window display, and the enlarged image is the
same as the preview window display.
lPrinting a cropped image
You can print as a cropped image by printing it in DPP.
lThe image becomes a cropped image when converted and saved
The cropped RAW image actually becomes a cropped image when
converted to a JPEG or TIFF image and saved (p.95).
lImages that have aspect ratio set will be displayed as cropped
images
When aspect ratio or cropping information is attached to a RAW
image shot with any supported camera other than the EOS 5D Mark
II, the image will be displayed with the set trimming range based on
the information. Since the image is not actually cropped, you can
change the trimming range or revert to its condition before cropping.
However, when a JPEG image is shot either with an aspect ratio set
with a camera that supports aspect ratio information or with the EOS
5DS/EOS 5DS R set to crop shooting, its trimming range cannot be
changed or the image cannot be reverted to its condition before
cropping since the image is actually cropped and saved.*
When reverting to the trimming range that is based on the aspect ratio
information at the time of shooting, click the [ ] button. Also, if
you want to cancel all the trimming range, click the [Clear] button.
Cropped images
73
3
Sorting
Images
1
2
4
5
Downloading
Images
Viewing
Images
Printing
Images
Editing
Images
6
Processing
Large Numbers
of RAW Images
7
Remote
Shooting
10
HDR PQ
Mode
8
Playing Back
Movies and Saving
Still Photos
11
Specifying
Preferences
9
Handling
RAW Movies
*When shooting with EOS 5DS/EOS 5DS R, EOS 5D Mark IV, EOS
5D Mark III, EOS R5/R6/R/Ra/RP (with any setting other than [1.6x
(crop)]), or EOS 7D Mark II and [Add cropping information] is set in
Custom Functions, aspect ratio information is only set and the
image is not actually cropped, even for JPEG images.
lOperate using the menu
Each operation can also be performed with the menu which appears
by clicking on the image while holding down the <control> key.
lApply the trimmed range to another image
You can apply the trimmed range to another image by clicking the
[Copy] button to copy the trimmed range, displaying another image
and then clicking the [Paste] button.
To batch apply a copied trimming range to multiple images, select the
cropped image in the main window together with the images to which
you want to apply the trimming range and then display the Trimming/
Angle Adjustment tool palette. With the cropped image displayed,
click the [Copy] button and then click the [Paste] button. This will
apply the trimming range to all the images selected when the
trimming/angle adjustment window is displayed.
To select multiple images in the main window, click the images while
holding down the < > key. To select multiple consecutive images,
click on the first image, and then click on the last image while holding
down the <shift> key.
For images shot with ISO speed range expansion set, noticeable
noise may make it difficult to view the image in detail in the
trimming/angle adjustment window.
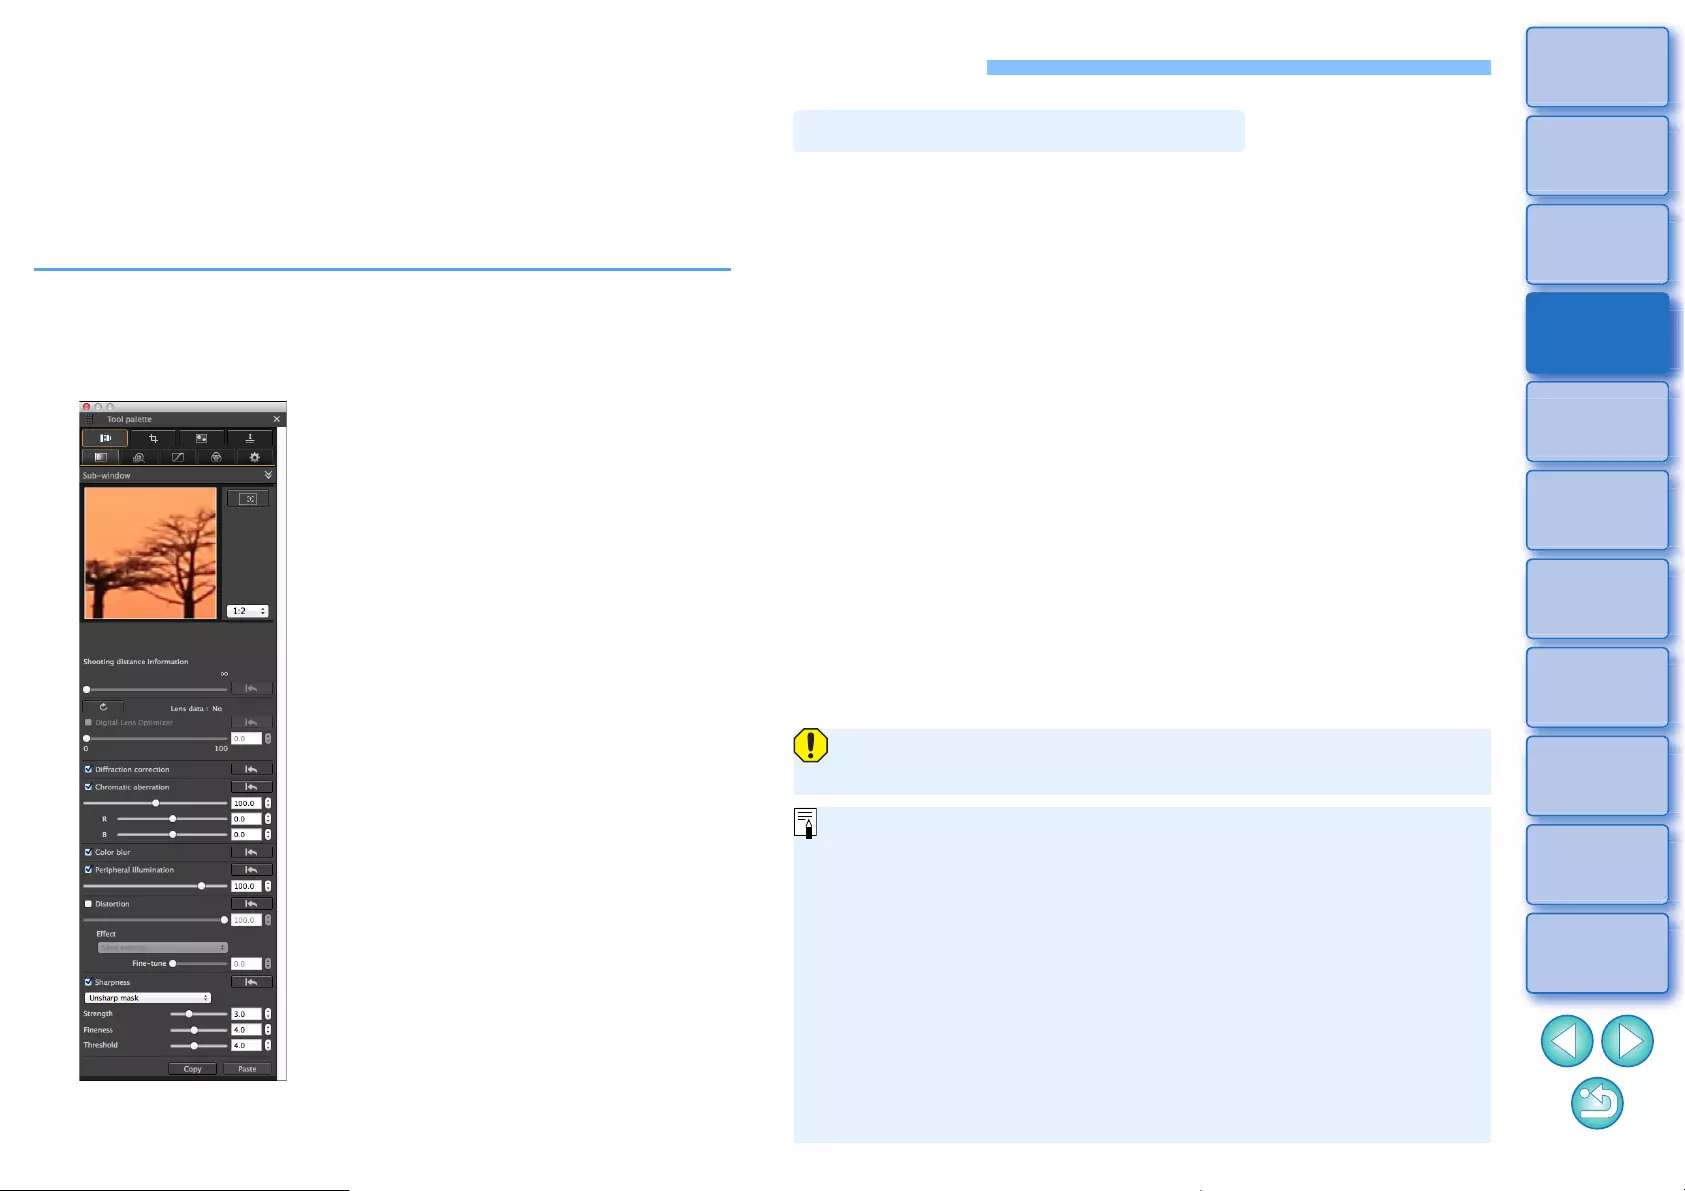
74
3
Sorting
Images
1
2
4
5
Downloading
Images
Viewing
Images
Printing
Images
Editing
Images
6
Processing
Large Numbers
of RAW Images
7
Remote
Shooting
10
HDR PQ
Mode
8
Playing Back
Movies and Saving
Still Photos
11
Specifying
Preferences
9
Handling
RAW Movies
Editing with the Lens Correction Tool Palette
With the Lens Correction tool palette, you can use the lens aberration
correction functions and the Digital Lens Optimizer to correct lens
aberration in your images and to improve their resolution. This tool
palette can also be used in conjunction with the sharpness adjustment
functions. Note that the lens aberration correction functions and the
Digital Lens Optimizer can only be used with RAW images.
1Select an image in the main window, etc.
2Display the Lens Correction tool palette.
You can easily make corrections to drops in peripheral illumination,
distortions in the subject, and color blur which occur by the physical
characteristics of the lens or slightly remaining aberration.
You can only correct aberration in RAW images which have been shot
with compatible lenses. JPEG or TIFF images cannot be corrected.
Note that even though the EOS 20D/EOS 20Da, EOS 10D, EOS D2000,
EOS D30, EOS D60, EOS 350D, and EOS 300D are EOS cameras
supporting the Digital Photo Professional, they are not compatible with
the lens aberration correction function. Also, note that the lens
aberration correction function is compatible with the EOS 5D with the
firmware version 1.1.1 and the EOS 30D with the firmware version
1.0.6.
Correcting Lens Aberration
To use this function, the EOS Lens Registration Tool (version 1.4.20
or later) must be installed.
lLenses compatible with this function are those displayed in the
[Add or Remove lens data] window (p.80).
lYou can also correct RAW images taken with the compatible lens
even when the extender is attached.
lYou can also correct RAW images shot with EF50mm f/2.5
Compact Macro fitted with Life Size Converter EF.
lThe aberration correction function is not available for images shot
with a lens other than those given under “Compatible Lenses”.
They are therefore not displayed and cannot be used.
lThe lens aberration correction function is not available for
multiple-exposure RAW images created on the camera.
lEF cinema lenses (CN-E lenses) are not compatible.
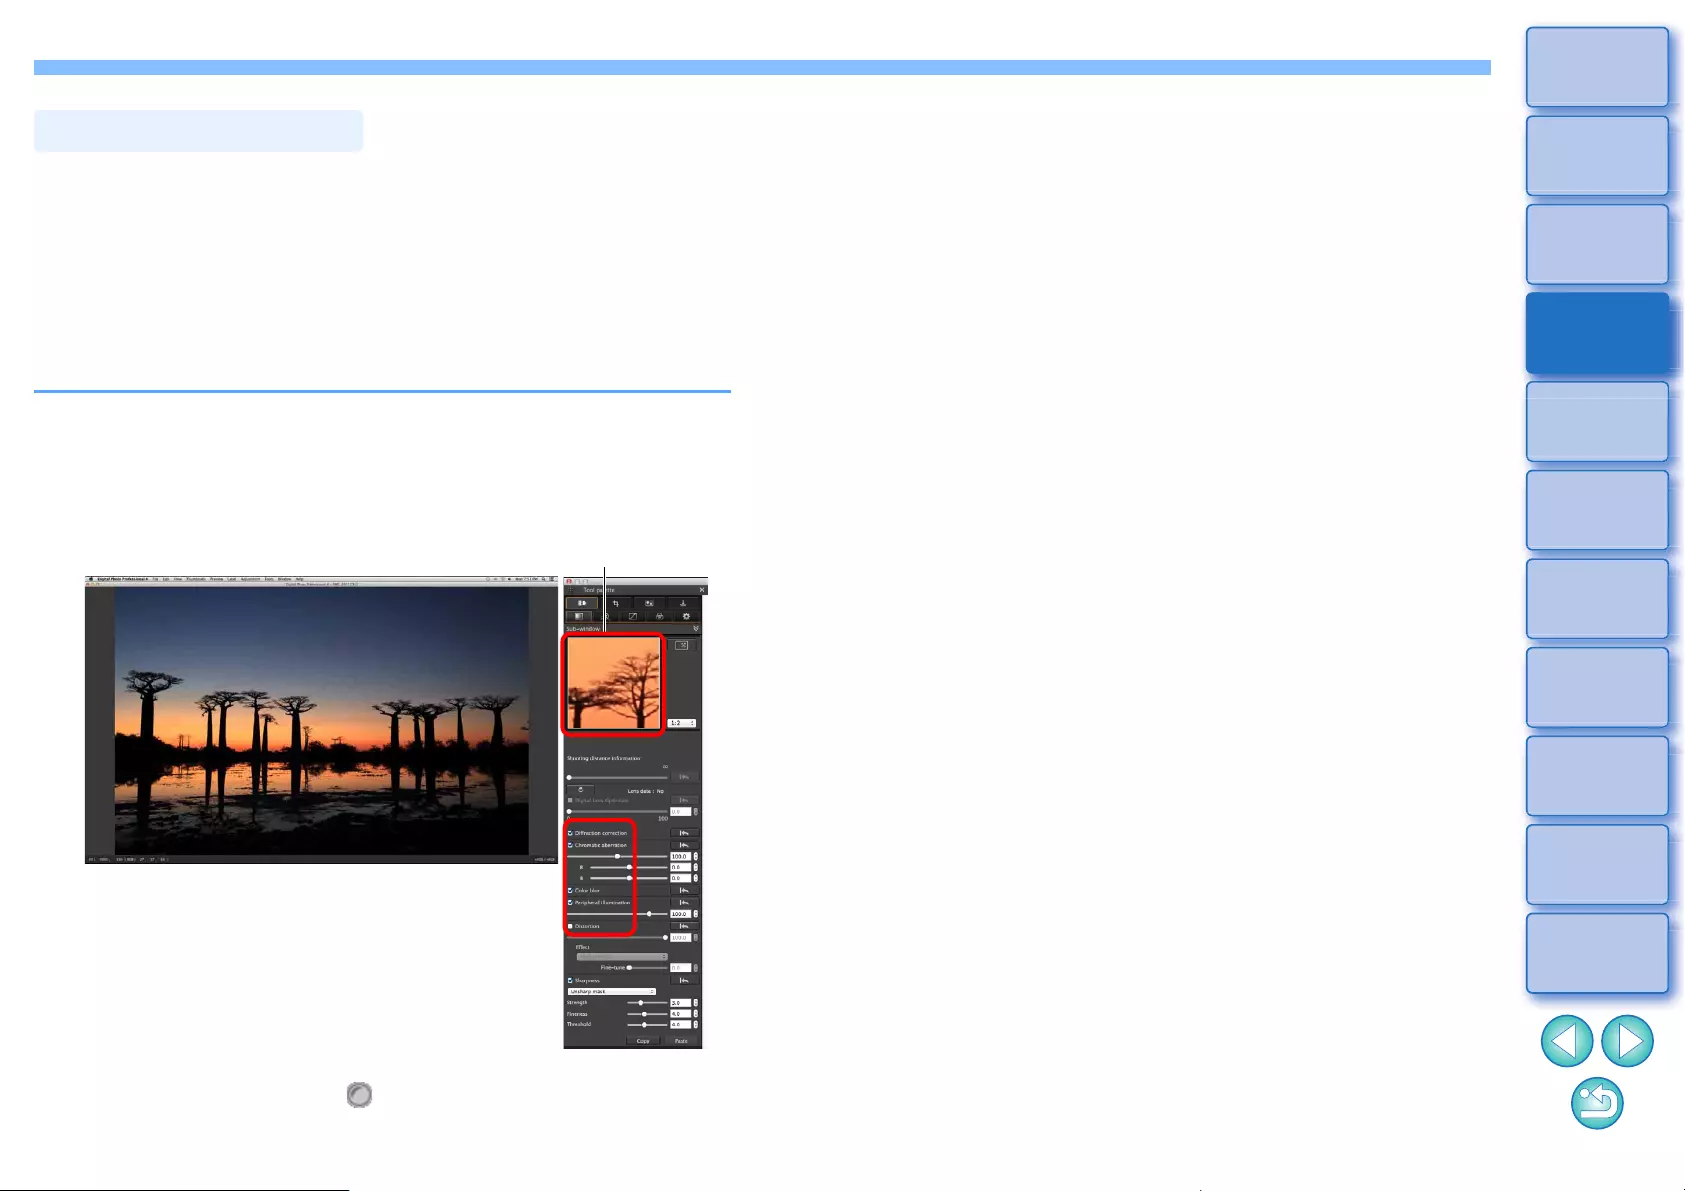
75
3
Sorting
Images
1
2
4
5
Downloading
Images
Viewing
Images
Printing
Images
Editing
Images
6
Processing
Large Numbers
of RAW Images
7
Remote
Shooting
10
HDR PQ
Mode
8
Playing Back
Movies and Saving
Still Photos
11
Specifying
Preferences
9
Handling
RAW Movies
You can make corrections to any of the five aberrations as below, either
one at a time or simultaneously.
lPeripheral illumination
lChromatic aberration (color fringing which occurs in the periphery of
an image)
lColor blur (blue or red color blur which sometimes occurs at the edge
of the highlighted area of an image)
lDistortions l Diffraction
1Select an image in the main window.
2Display the Lens Correction tool palette and
checkmark the items to be corrected.
ÜThe image is corrected and redisplayed.
ÜIn the main window, the [ ] mark is displayed on the image to
indicate that the lens aberration correction is applied (p.182).
Making Corrections
Enlargement display section
lCheck the results of corrections to peripheral illumination or
distortions in the full view.
lCheck the results of corrections to chromatic aberration and color
blur by clicking the area on the image you want to check and
then checking the enlargement display section in the top of the
window. You can choose from 4 display scales between 1:1 and
1:4 for the enlargement display.
lYou can lessen the degree of correction by moving the slider to
the left.
lYou can respectively correct red chromatic aberration with the [R]
slider of the [Chromatic aberration] or blue chromatic aberration
with the [B] slider.
lTo correct distortion aberration of images shot with a fisheye lens
(EF8–15mm f/4L USM Fisheye or EF15mm f/2.8 Fisheye), four
effects can be selected from the [Effect] list box in addition to
[Shot settings] normally used for distortion correction.
The level of an effect can be adjusted with the adjustment slider
located below [Distortion].
For detailed information on each effect, see “Effects of Distortion
Correction for Fisheye Lenses” (p.76).
lFor images shot with EF8–15mm f/4L USM Fisheye, a fine-tune
slider is also displayed when you select [Emphasize Linearity]
from the [Effect] list box.
Adjust the amount of correction for distortion aberration with the
adjustment slider, and then adjust with the fine-tune slider if more
adjustment is required.
lWhen the list box for selecting an extender is displayed, select
the extender attached at the time of shooting from the list box.
l[Diffraction correction] corrects only those images shot with a
camera with a diffraction correction function. By checkmarking
this option, images are corrected according to the camera’s
diffraction correction function. Note that this function cannot be
used at the same time as the Digital Lens Optimizer.
lThe adjustment range of distortion correction is either [0 to +100]
or [–20 to +120], depending on the camera model that was used
for shooting. The adjustment range for images shot with a
fisheye lens mounted is [0 to +100] regardless of the camera
model that was used.
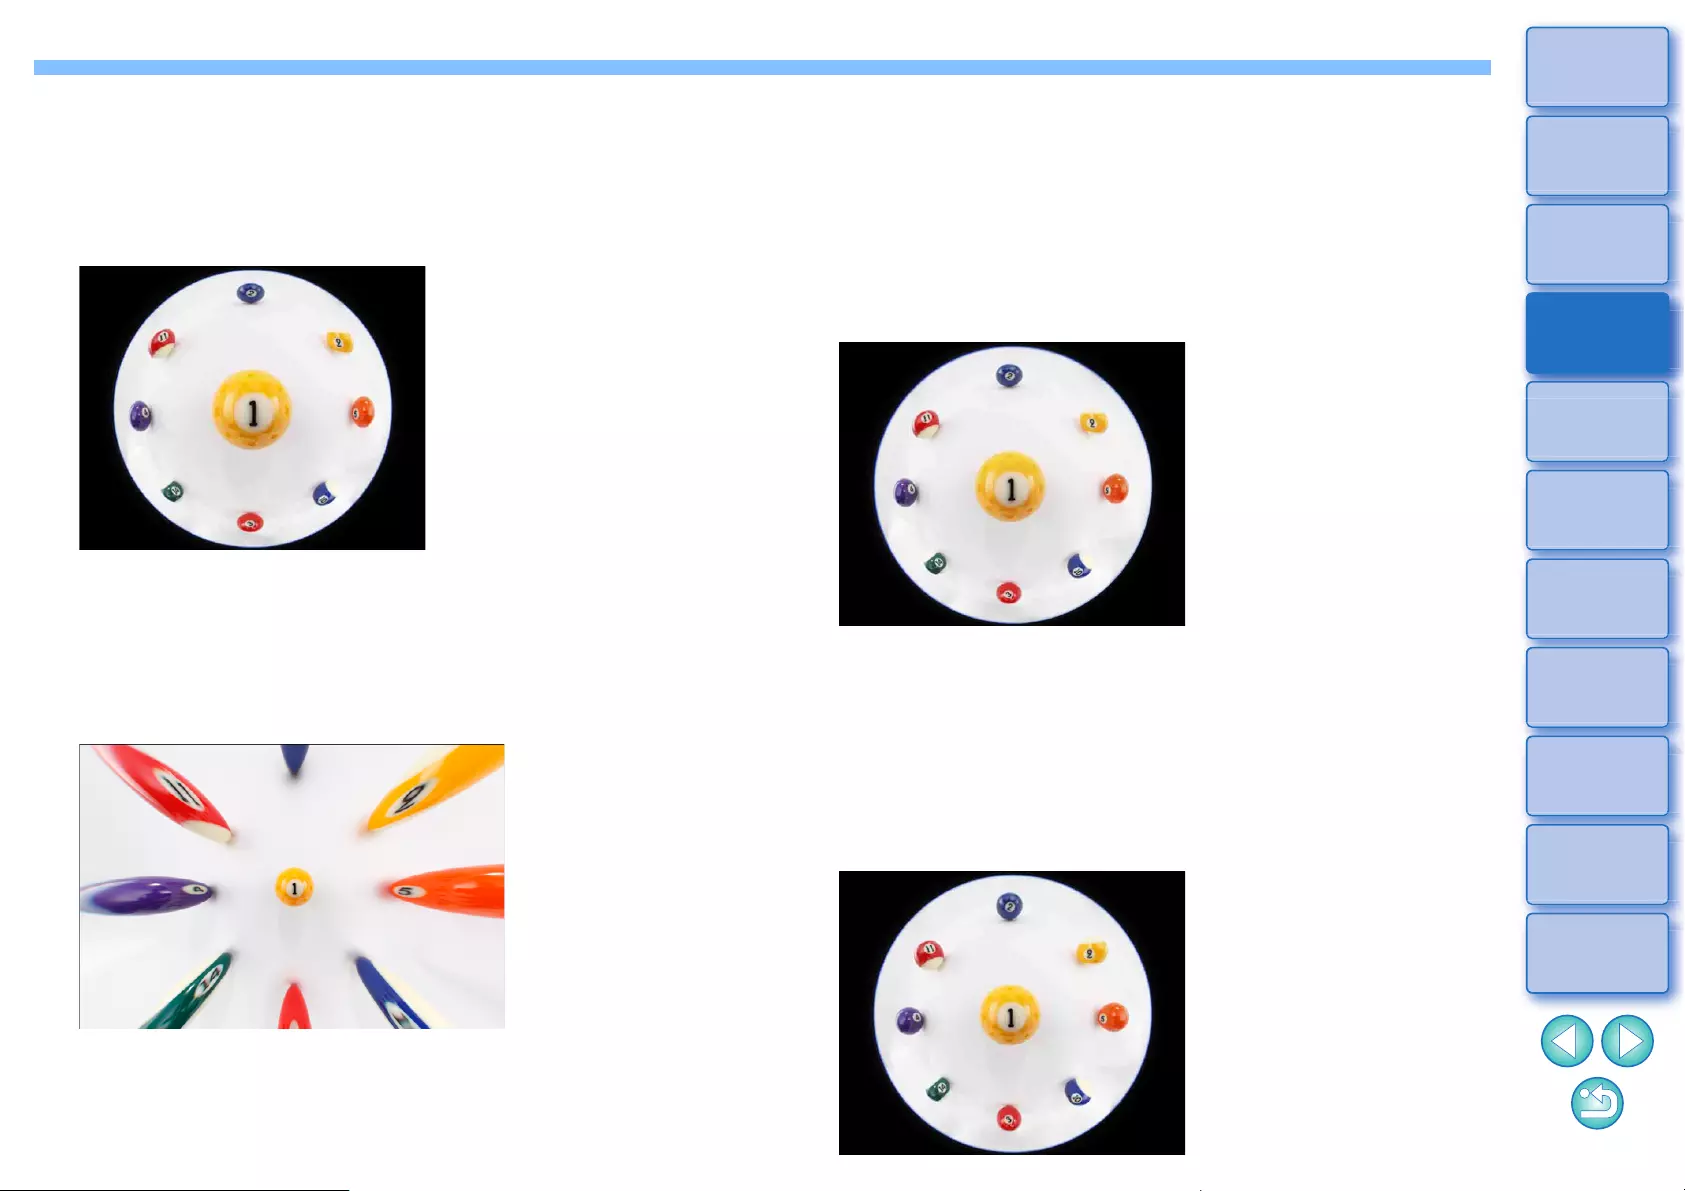
76
3
Sorting
Images
1
2
4
5
Downloading
Images
Viewing
Images
Printing
Images
Editing
Images
6
Processing
Large Numbers
of RAW Images
7
Remote
Shooting
10
HDR PQ
Mode
8
Playing Back
Movies and Saving
Still Photos
11
Specifying
Preferences
9
Handling
RAW Movies
Effects of Distortion Correction for Fisheye
Lenses
lShot settings
By selecting this option, only the aberration corrections will be
performed to correct the optical distortions.
lEmphasize Linearity
This converts the image to a “central projection” style image. This
projection method is employed for general lenses.
Since central projection displays straight lines as straight lines, a
wide-view panoramic image can be obtained by selecting this option.
However, the periphery is stretched, resulting in decreased resolution.
lEmphasize Distance
This converts the image to an “equidistant projection” style image.
This projection method preserves distance relationships.
Equidistant projection displays a distance in the same distance
anywhere from the center to the periphery. In particular, when
shooting a celestial body such as the celestial sphere, same heights
above the horizon(declination) are captured at the same heights. This
method is therefore used in such photography as celestial
photography (star maps, solar path diagrams, etc.).
lEmphasize Periphery
This converts the image to a “stereographic projection” style image.
This projection method emphasizes the periphery.
Stereographic projection allows position relationships on a spherical
surface, such as N, S, E, W on a map, to be displayed correctly. It is
therefore used for world maps and monitoring cameras.
By selecting this option, the periphery is stretched and may result in
decreased resolution.
77
3
Sorting
Images
1
2
4
5
Downloading
Images
Viewing
Images
Printing
Images
Editing
Images
6
Processing
Large Numbers
of RAW Images
7
Remote
Shooting
10
HDR PQ
Mode
8
Playing Back
Movies and Saving
Still Photos
11
Specifying
Preferences
9
Handling
RAW Movies
lEmphasize Center
This converts the image to an “orthographic projection” style image.
With this projection method, the center is more emphasized.
Since an orthogonal projection allows a subject of the same
brightness to be displayed as occupying the same area in the image,
this method has typical uses in photography for celestial luminance
distributions and center-emphasized animal photography. By
selecting this option, the center is stretched and may result in
decreased resolution.
When selecting any of the options, [Emphasize Linearity],
[Emphasize Distance], [Emphasize Periphery], or [Emphasize
Center], it will yield results similar to that of the selected projection
method. However, the conversion does not really apply a change of
projection method in a strict sense.
Accordingly, be aware that they are not suited for scientific or other
such purposes.
lWhen correcting RAW images and if shooting distance information has
been saved to the image, the slider is set automatically according to
this shooting distance information. However, if no shooting distance
information is saved to the image, the slider is set automatically to the
right end at infinity position and a [<!>] appears above the slider.
If the image’s shooting distance is not infinite, you can minutely adjust
the distance by operating the slider while looking at the screen.
lWhen correcting RAW images shot with the cameras in the table
below, it is set automatically to the right end at infinity position. You
can then minutely adjust the distance by operating the slider while
looking at the screen if the shooting distance is not infinite.
lFor RAW images shot with MP-E65mm f/2.8 1-5x Macro Photo or
EF50mm f/2.5 Compact Macro with Life Size Converter EF, the slider
indicator changes to [Magnification factor].
lThe [Shooting distance information] slider is applied to all the
correction items with check marks.
lIf the lens requires no adjustment with the [Shooting distance
information] slider, the slider cannot be used.
EOS-1D Mark II N EOS-1Ds Mark II EOS-1D Mark II
EOS-1D EOS-1Ds EOS 5D
EOS 30D EOS 400D
Shooting Distance Information Slider
78
3
Sorting
Images
1
2
4
5
Downloading
Images
Viewing
Images
Printing
Images
Editing
Images
6
Processing
Large Numbers
of RAW Images
7
Remote
Shooting
10
HDR PQ
Mode
8
Playing Back
Movies and Saving
Still Photos
11
Specifying
Preferences
9
Handling
RAW Movies
You can apply the same corrections to several images by first selecting
multiple images in the main window, and then performing correction
procedures (p.75).
Also, you can apply same corrections by copying the recipe of the
corrected image and pasting it onto the multiple images (p.99).
lSome noise appeared in the periphery of an image after
correcting [Peripheral illumination]
You can reduce the noise by using luminance and/or chromatic noise
reduction of the noise reduction function (p.69). However, if you had
applied high amount of [Peripheral illumination] correction to the
images that have been shot at night or with a high ISO speed, the
noise might not be reduced.
lThe image appears with less resolution after correcting
[Distortion]
You can make the image similar to the one before correction by
applying more sharpness with the sharpness adjusting function
(p.70).
lThe colors of the image became weaker after correcting [Color
blur]
You can make the image similar to the one before correction by
adjusting the color tone (p.55) and/or the color saturation (p.68) to
make the color deeper.
lThe result of [Color blur] correction cannot be detected
[Color blur] correction is effective for correcting blue or red color blur
which occurs at the edge of the highlighted area of an image. If
conditions do not match, correction cannot be made.
Additional information
Correcting Multiple Images at a Time
The periphery of the image may be truncated when [Distortion]
correction is made.
This function enables the resolution of images to be increased by
removing any remaining aberration related to image-forming capability or
any deterioration of resolution resulting from diffraction phenomena.
These optical phenomena cannot be corrected under Lens aberration
correction (p.74). Correction is achieved using the designed value of
each lens. You can correct these optical phenomena in RAW images
which have been shot with compatible lenses. JPEG, TIFF, S-RAW, and
M-RAW images cannot be corrected. To use this function, [Lens data] for
the lens used to shoot images first needs to be downloaded to your
computer. Before using the Digital Lens Optimizer, it is recommended
that you set [Sharpness] or [Strength] for [Unsharp mask] for images to 0.
Note that even though the EOS 20D/EOS 20Da, EOS 10D, EOS D2000,
EOS D30, EOS D60, EOS 350D, and EOS 300D are EOS cameras
supporting the Digital Photo Professional, they are not compatible with
the Digital Lens Optimizer. Also, note that the Digital Lens Optimizer is
compatible with the EOS 5D with the firmware version 1.1.1 and the
EOS 30D with the firmware version 1.0.6.
Digital Lens Optimizer
lTo use this function, the EOS Lens Registration Tool (version
1.4.20 or later) must be installed.
lThe Digital Lens Optimizer is also available for images shot with
an extender attached to a compatible lens.
lYou cannot use the Digital Lens Optimizer with multiple-exposure
RAW images created on the camera.
lEF cinema lenses (CN-E lenses) are not compatible.
l[Diffraction correction] cannot be used at the same time as the
Digital Lens Optimizer.
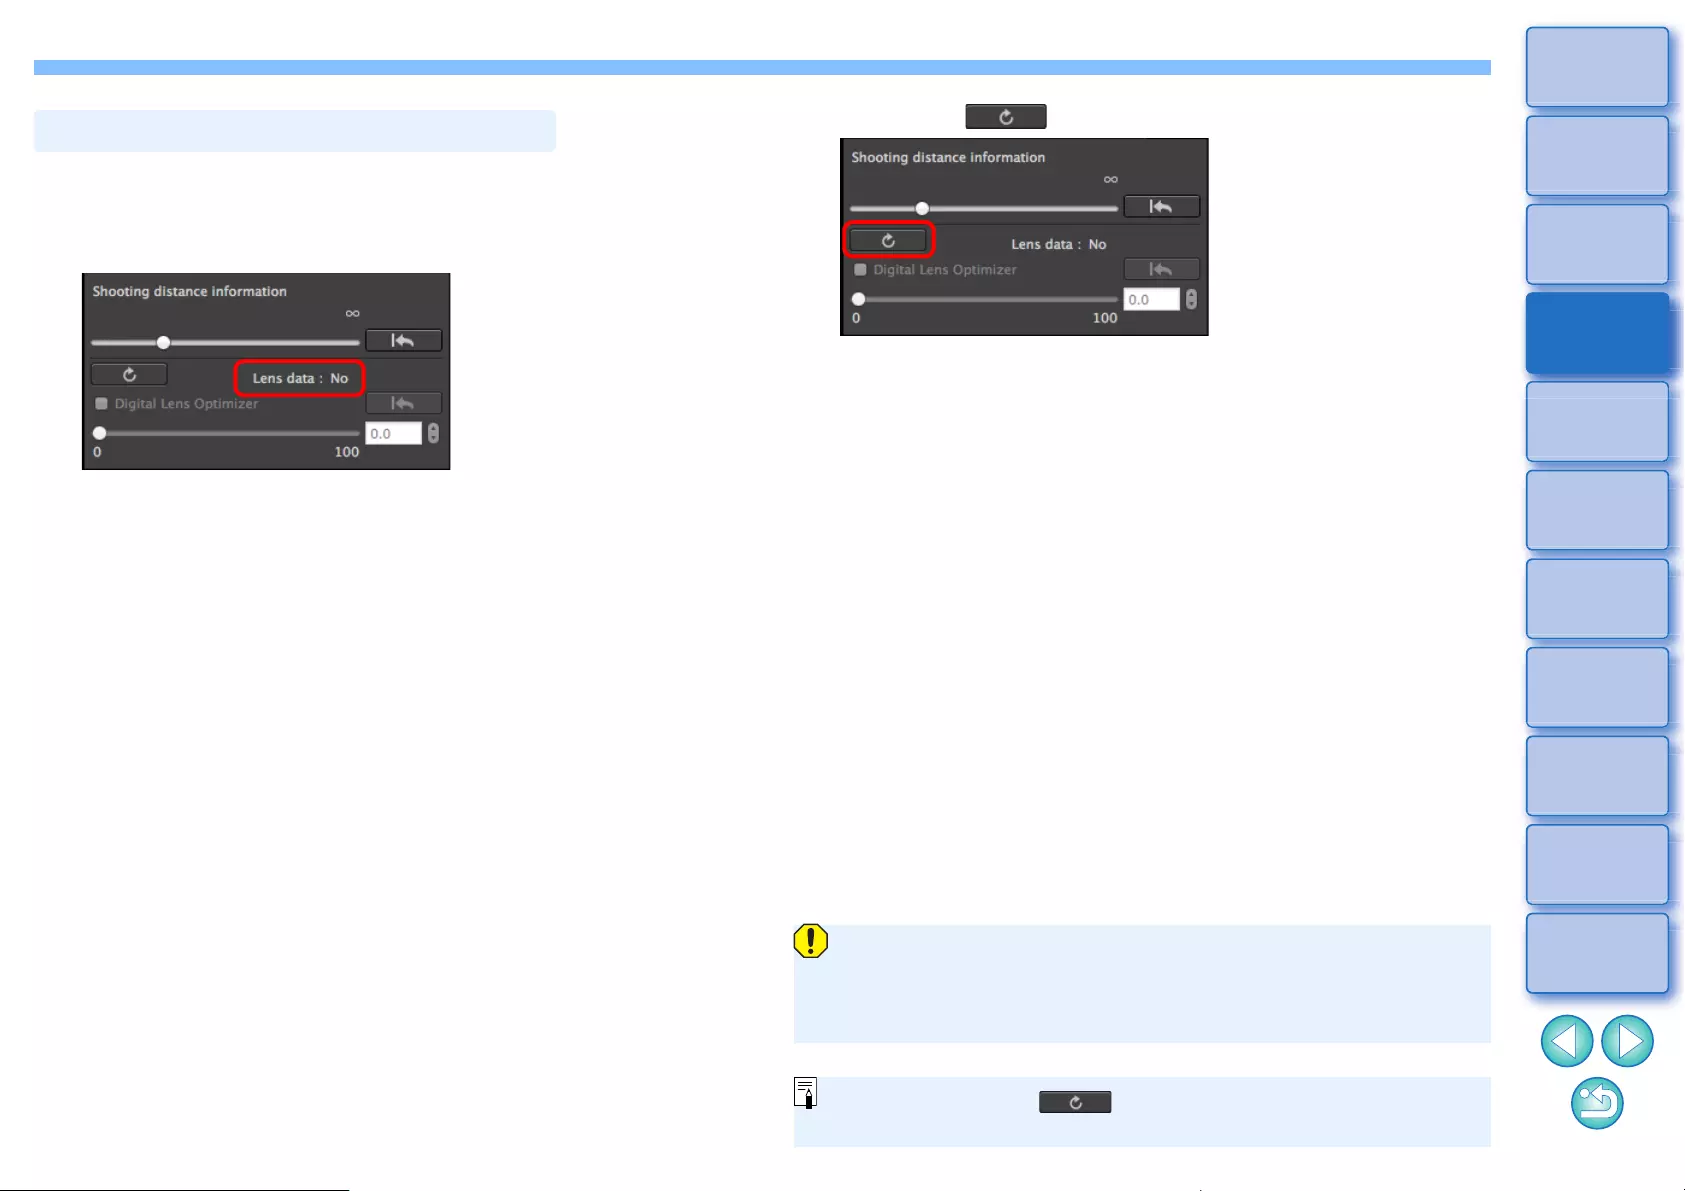
79
3
Sorting
Images
1
2
4
5
Downloading
Images
Viewing
Images
Printing
Images
Editing
Images
6
Processing
Large Numbers
of RAW Images
7
Remote
Shooting
10
HDR PQ
Mode
8
Playing Back
Movies and Saving
Still Photos
11
Specifying
Preferences
9
Handling
RAW Movies
1Check the status of [Lens data] for [Digital Lens
Optimizer].
l[Not Available] is displayed for an image shot with a non-
compatible camera or lens, or for a non-compatible image such
as a JPEG, TIFF, S-RAW, or M-RAW image. The function cannot
be used for these images.
lIf [No] is displayed, proceed to step 2. To use the function, you
need to download the lens data for the lens used when shooting
the image. It is recommended that you check the lens used when
shooting the image beforehand. The lens used can be checked
using the image information and shooting information displays.
lIf [Yes] is displayed, proceed to step 4.
Using the Digital Lens Optimizer
2Click the [ ] button.
ÜThe [Add or Remove lens data] window appears.
To use this function, an environment with Internet access
(subscription to a provider and an in-place line connection) is
required. Internet Service Provider (ISP) connection fees or access
point connection fees may apply.
Before you click the [ ] button in step 2, Lens data [No] may
be displayed instead of [Not Available] for non-compatible images.
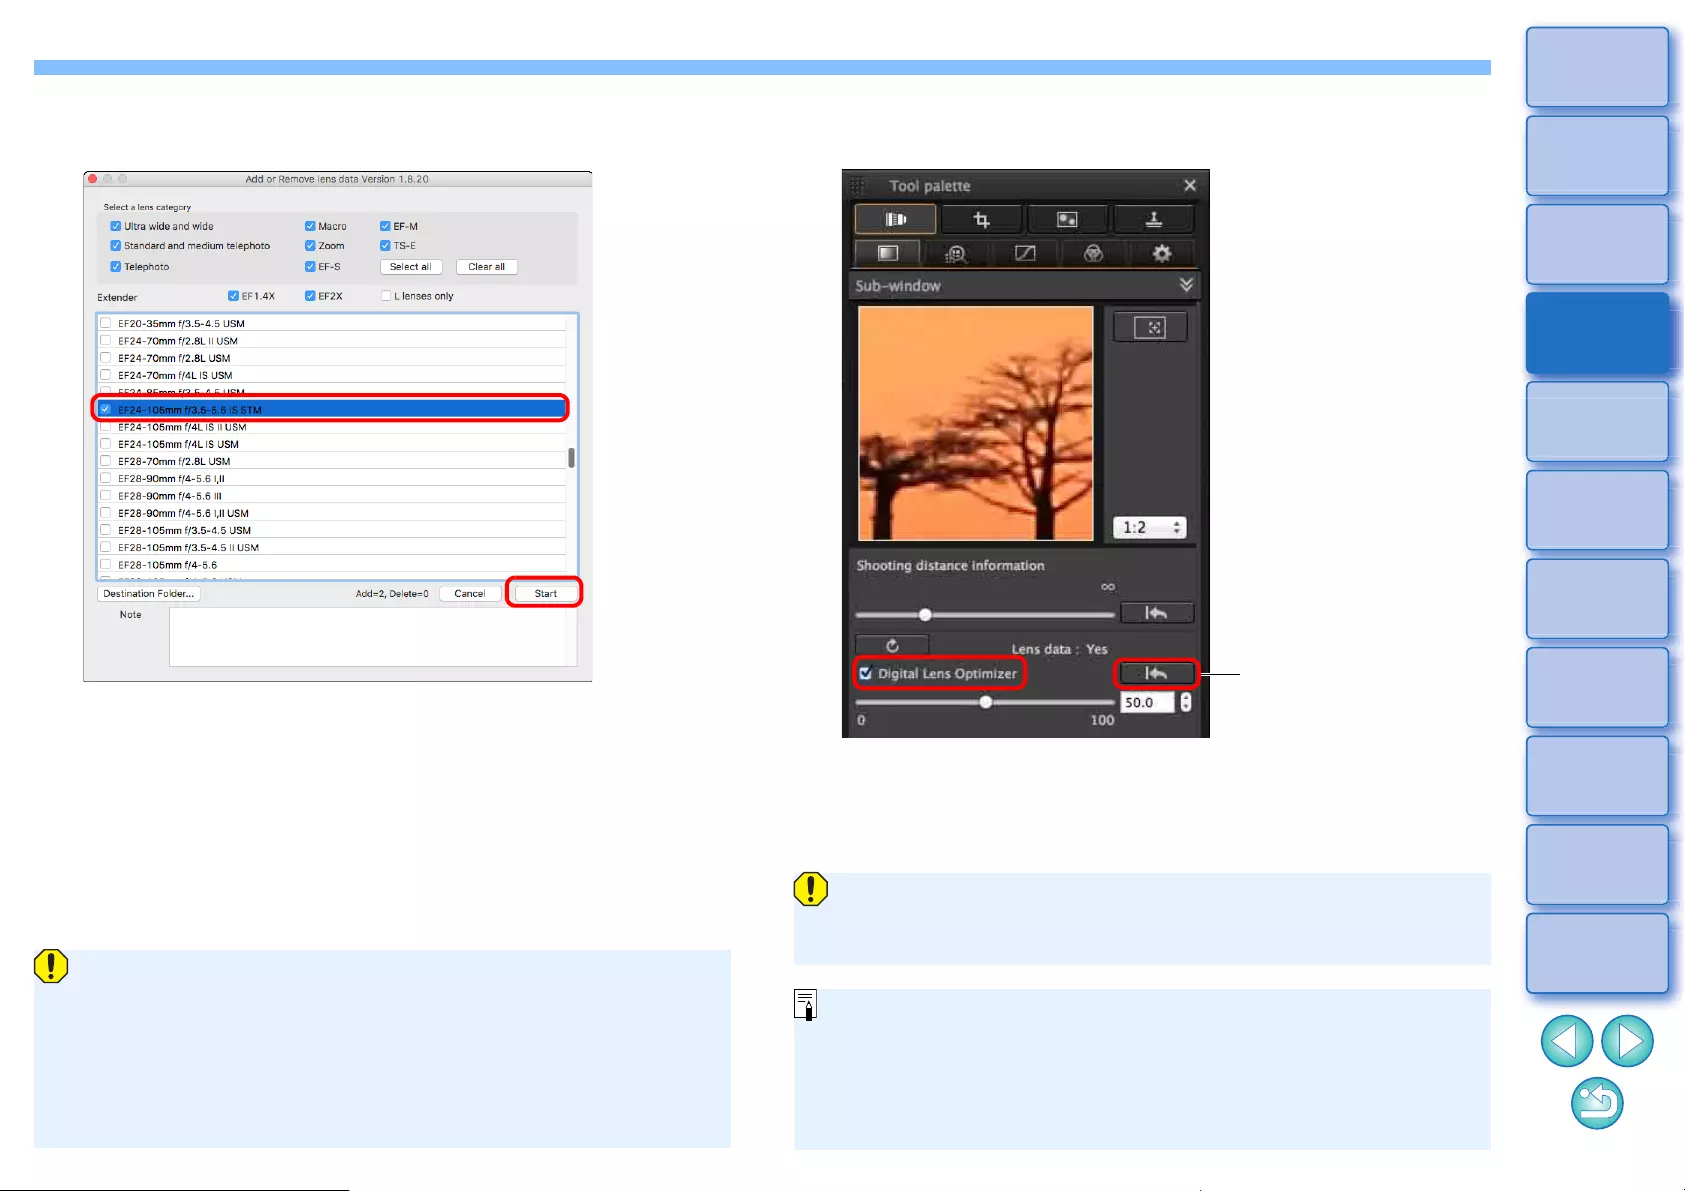
80
3
Sorting
Images
1
2
4
5
Downloading
Images
Viewing
Images
Printing
Images
Editing
Images
6
Processing
Large Numbers
of RAW Images
7
Remote
Shooting
10
HDR PQ
Mode
8
Playing Back
Movies and Saving
Still Photos
11
Specifying
Preferences
9
Handling
RAW Movies
3Checkmark the checkbox for the lens used to shoot
the image, and click the [Start] button.
ÜThe lens data is downloaded to your computer.
ÜWhen the downloading of the lens data ends, the indication for
the lens data changes to [Yes].
lLenses compatible with this function are those displayed in the
[Add or Remove lens data] window.
lIf you remove the check mark from the checkbox for already-
downloaded lens names and click the [Start] button, the lens data
will be deleted from your computer.
lDepending on the type, current state, etc. of software running on
your computer, the download of the lens data may fail. If it occurs,
wait for a while then try downloading the data again.
lIf you want to change the destination where lens data is saved
when there is already downloaded lens data, move the previously
downloaded lens data from the old folder to the new destination
folder manually.
4Checkmark the [Digital Lens Optimizer] checkbox
and adjust the image.
Reverts to its condition
before adjustment
Since the lens data downloaded with DPP version 3.x is not
compatible with DPP version 4.x, the lens data must be downloaded
again.
When applying the Digital Lens Optimizer, the effect of [Sharpness]
or [Unsharp mask] may become excessive. It is recommended that
you set [Sharpness] or [Strength] for [Unsharp mask] for images to 0
before using the Digital Lens Optimizer. Adjust [Sharpness] or
[Unsharp mask] again after applying the Digital Lens Optimizer to
images.
81
3
Sorting
Images
1
2
4
5
Downloading
Images
Viewing
Images
Printing
Images
Editing
Images
6
Processing
Large Numbers
of RAW Images
7
Remote
Shooting
10
HDR PQ
Mode
8
Playing Back
Movies and Saving
Still Photos
11
Specifying
Preferences
9
Handling
RAW Movies
You can also use this palette to adjust the image sharpness. For
information on making adjustments, see “Adjusting Image Sharpness” in
“Editing with the Basic Adjustment Tool Palette” (p.59).
lUse the slider to adjust the Digital Lens Optimizer effect.
lIf no shooting distance information is saved to the image, the
shooting distance slider is set automatically to the right end at
infinity position and a [<!>] appears above the shooting distance
slider.
lIf the lens requires no adjustment with the [Shooting distance
information] slider, the slider cannot be used.
lImages cannot be corrected for [Chromatic aberration] in the lens
aberration correction tool pallet if the Digital Lens Optimizer has
been applied.
ÜIn the main window, the [ ] mark is displayed on the image to
indicate that the Digital Lens Optimizer is applied (p.182).
Adjusting Image Sharpness
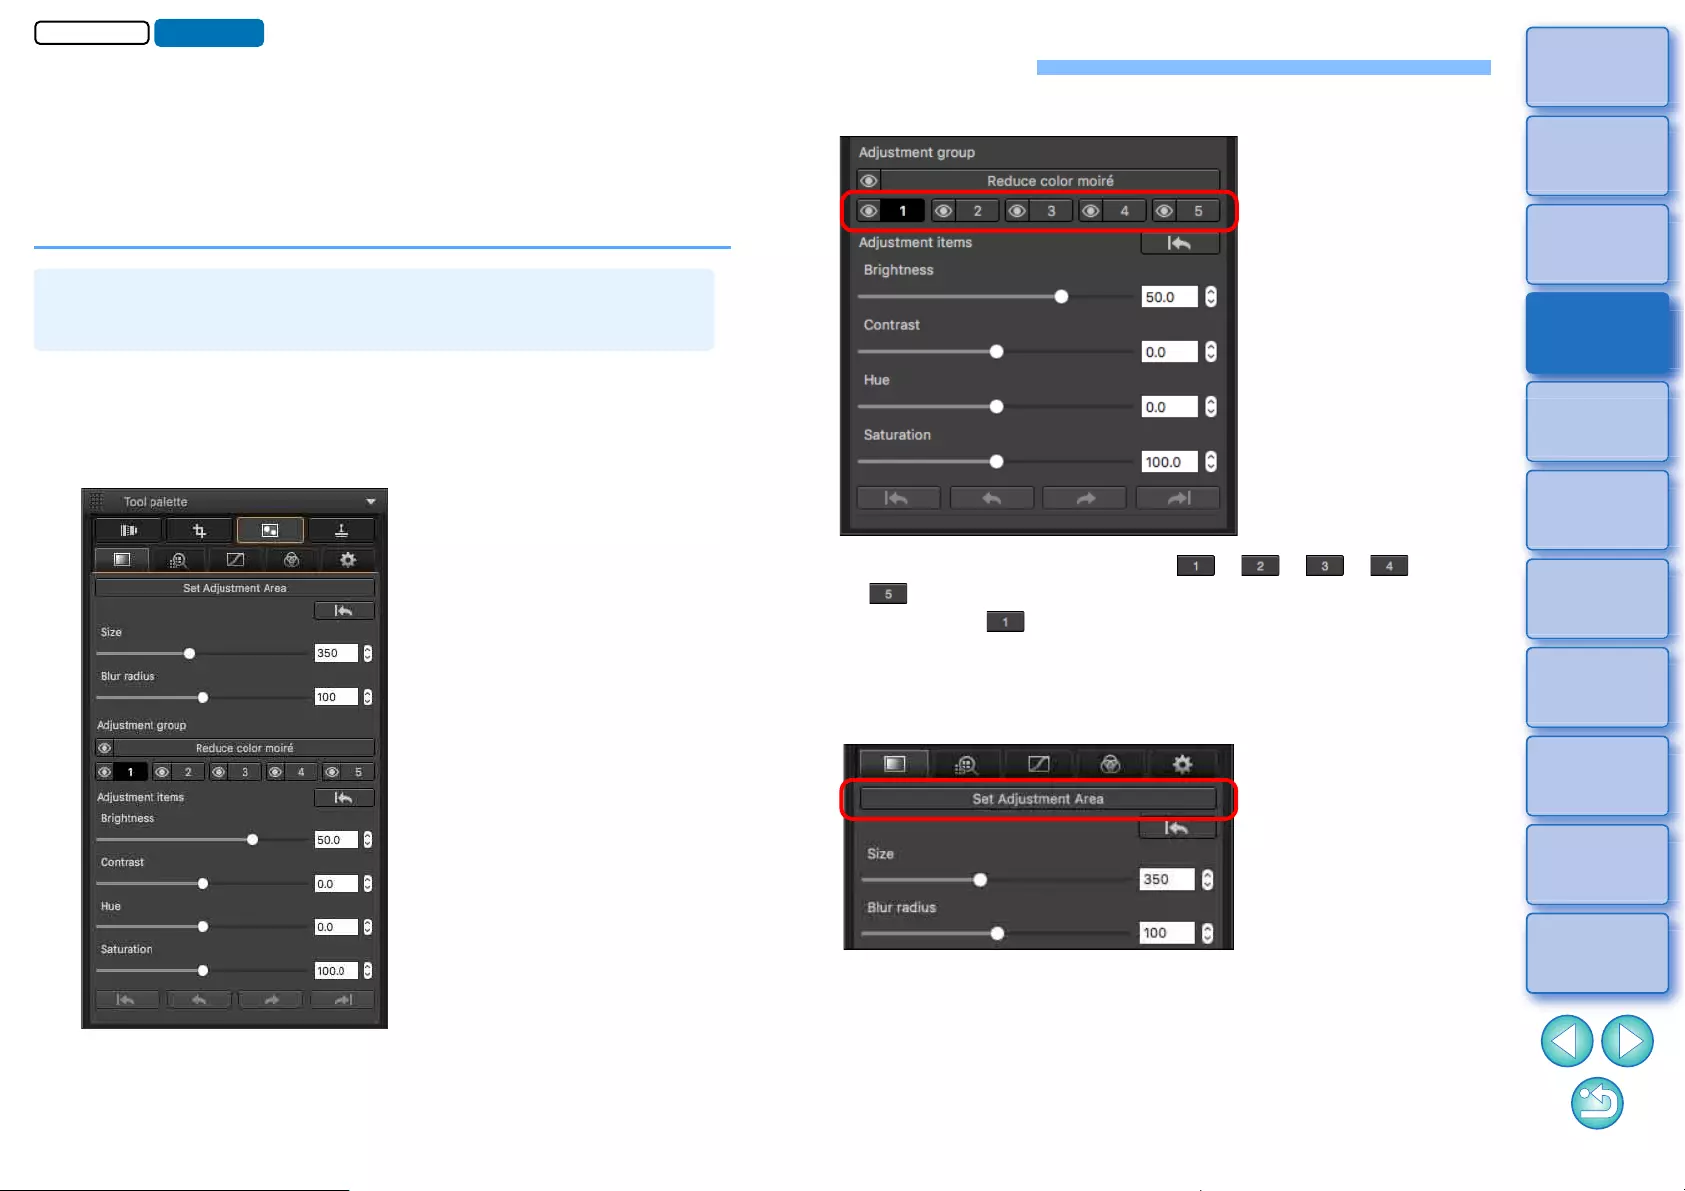
82
3
Sorting
Images
1
2
4
5
Downloading
Images
Viewing
Images
Printing
Images
Editing
Images
6
Processing
Large Numbers
of RAW Images
7
Remote
Shooting
10
HDR PQ
Mode
8
Playing Back
Movies and Saving
Still Photos
11
Specifying
Preferences
9
Handling
RAW Movies
Editing with the Partial Adjustment Tool Palette
The Partial Adjustment tool palette adjusts the selected area of an
image.
With this tool palette, you can adjust brightness, contrast, hue, and
saturation, and reduce color moiré.
Supported image formats are CR2, CR3, TIFF, and JPG.
1Select an image in the main window, etc.
2Display the Partial Adjustment tool palette.
Making Partial Adjustments to Images
([Brightness], [Contrast], [Hue], [Saturation])
3Select [Adjustment group].
lSelect [Adjustment group] from [ ], [ ], [ ], [ ], and
[].
(By default, [ ] is selected.)
For information on adjustment groups, see “Adjustment Groups”
(p.85).
4Click the [Set Adjustment Area] button.
ÜA circular cursor appears in the window.
JPEG/TIFF
Advanced
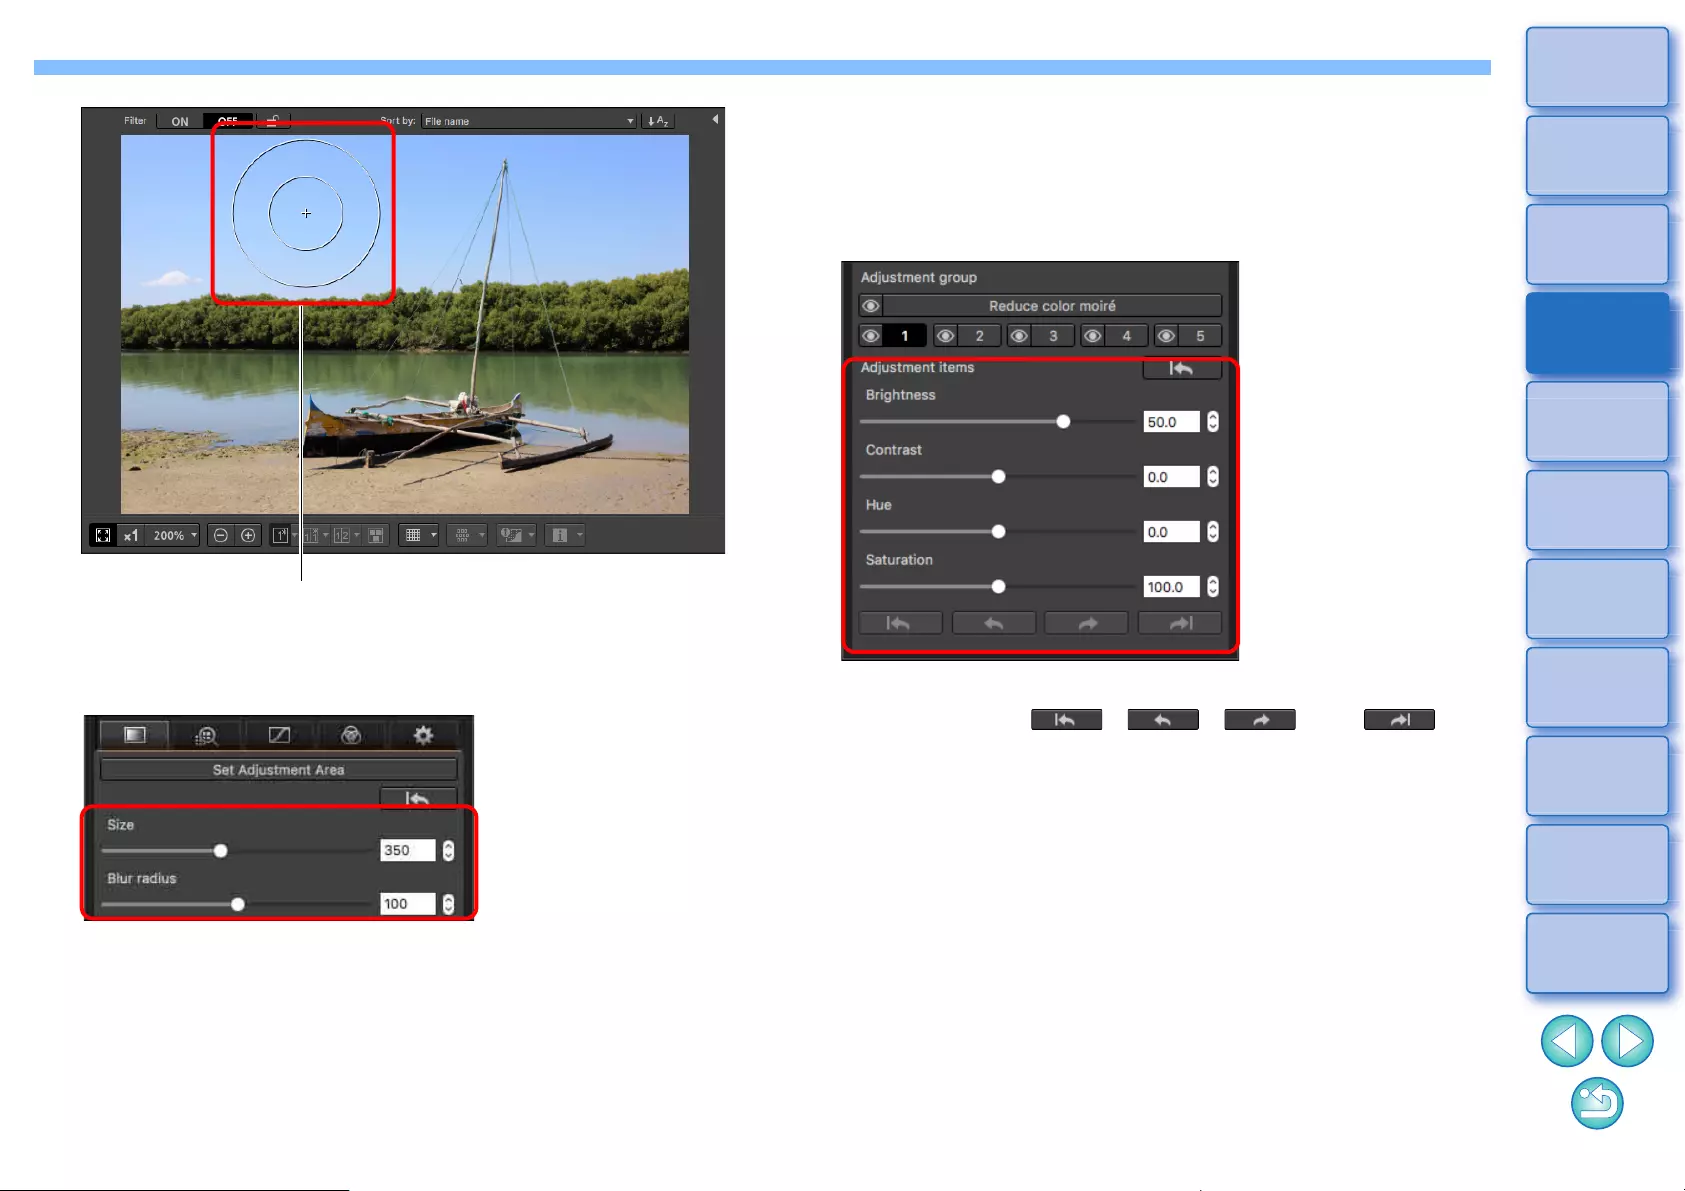
83
3
Sorting
Images
1
2
4
5
Downloading
Images
Viewing
Images
Printing
Images
Editing
Images
6
Processing
Large Numbers
of RAW Images
7
Remote
Shooting
10
HDR PQ
Mode
8
Playing Back
Movies and Saving
Still Photos
11
Specifying
Preferences
9
Handling
RAW Movies
5Drag the sliders to adjust [Size] and [Blur radius] for
the circular cursor.
l[Blur radius] adjusts blurring at the border of the selected area.
Circular cursor
6Click or drag the circular cursor on the image to
select the area of adjustment in the image.
7Use the sliders to adjust [Adjustment items] as
necessary.
ÜAdjustments are applied to the area selected in step 6.
lYou can use the [ ], [ ], [ ], and [ ]
buttons below [Adjustment items] to return and check positions
selected with the circular cursor. Available buttons, from the left,
are [Undo All], [Undo], [Redo], and [Redo All].
84
3
Sorting
Images
1
2
4
5
Downloading
Images
Viewing
Images
Printing
Images
Editing
Images
6
Processing
Large Numbers
of RAW Images
7
Remote
Shooting
10
HDR PQ
Mode
8
Playing Back
Movies and Saving
Still Photos
11
Specifying
Preferences
9
Handling
RAW Movies
lChanges edited with this function are not displayed in the
following images.
• Thumbnail images
• Navigator images
• Images in the HDR [Select images] window (see p.110, step 3)
• Images in the [Contact sheet] window for printing a thumbnail
list (see p.134, step 3)
However, edited changes are applied when four images or
fewer (JPEG/TIFF images) are selected.
lChanges edited with this function are not applied in the DPP
histogram display.
This function partially reduces color moiré in images.
Before making adjustments, see “Reducing Color Moiré in an Image”
(p.70) for information on reducing color moiré.
1Select an image in the main window, etc.
2Display the Partial Adjustment tool palette.
3Click the [Reduce color moiré] button in [Adjustment
group].
ÜA dialog box for [Reduce color moiré] appears.
4Click the [Set Adjustment Area] button, and use the
[Size] and [Blur radius] sliders for the circular cursor
to make adjustments.
5Click or drag the circular cursor on the image to
select the area of adjustment in the image.
6Use the [Reduce color moiré] slider in [Adjustment
items] to specify the setting.
ÜAdjustments are applied to the area selected in step 5.
lYou can use the [ ], [ ], [ ], and [ ]
buttons below [Adjustment items] to return and check positions
selected with the circular cursor. Available buttons, from the left,
are [Undo All], [Undo], [Redo], and [Redo All].
Making Partial Adjustments to Images
([Reduce color moiré])
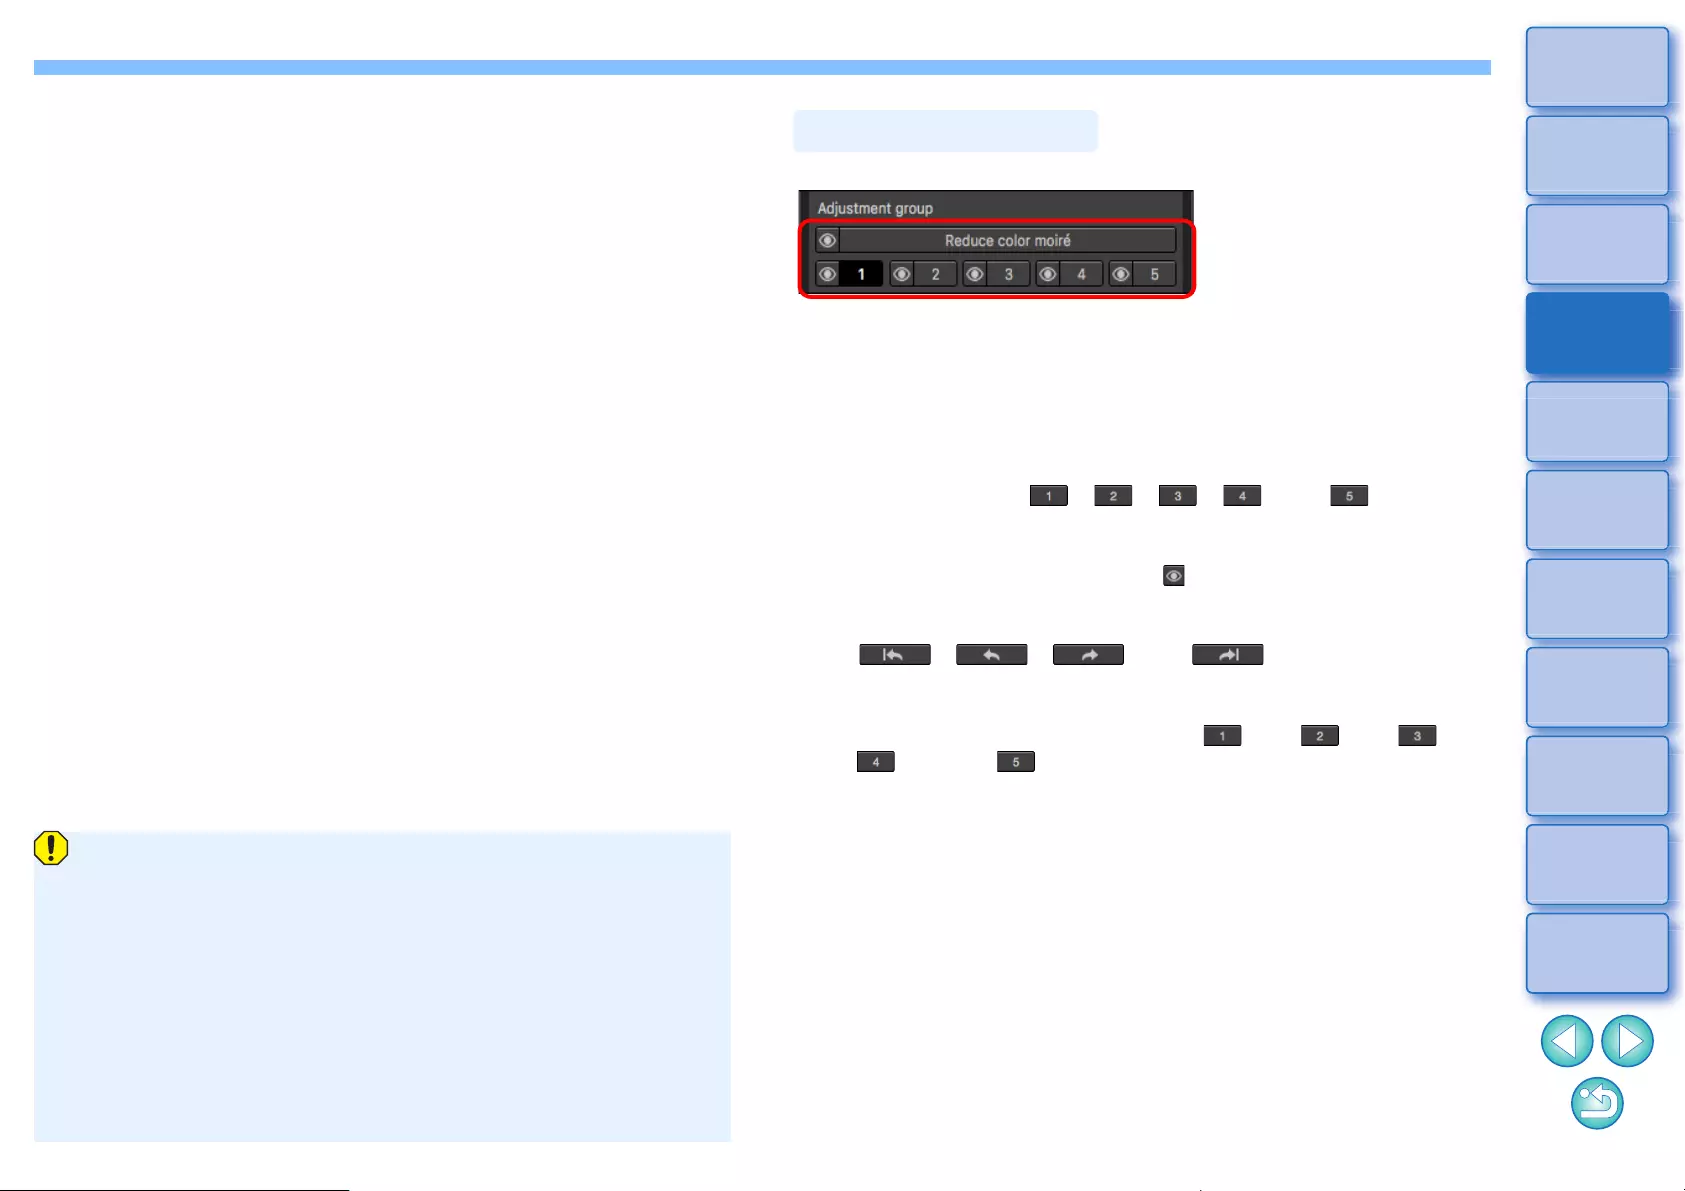
85
3
Sorting
Images
1
2
4
5
Downloading
Images
Viewing
Images
Printing
Images
Editing
Images
6
Processing
Large Numbers
of RAW Images
7
Remote
Shooting
10
HDR PQ
Mode
8
Playing Back
Movies and Saving
Still Photos
11
Specifying
Preferences
9
Handling
RAW Movies
lChanges edited with this function are not displayed in the
following images.
• Thumbnail images
• Navigator images
• Images in the HDR [Select images] window (see p.110, step 3)
• Images in the [Contact sheet] window for printing a thumbnail
list (see p.134, step 3)
However, edited changes are applied when four images or
fewer (JPEG/TIFF images) are selected.
lChanges edited with this function are not applied in the DPP
histogram display.
lThe Partial Adjustment tool palette comprises 5 adjustment groups
that allow adjustments to be made with [Brightness], [Contrast], [Hue],
and [Saturation] options, and 1 adjustment group that allows
adjustments to be made with the [Reduce color moiré] option.
• A different adjustment area can be selected for each adjustment
group.
• Adjustment groups [ ], [ ], [ ], [ ], and [ ] allow
different values to be specified even for a same adjustment option.
lBy default, adjustments from all adjustment groups are applied to an
image. However, you can click the [ ] button and select to apply or
not apply adjustments from each adjustment group.
lPositions selected with the circular cursor, that can be checked using
the [ ], [ ], [ ], and [ ] buttons below
[Adjustment items], can be checked per each group.
lThe order of adjustment groups in which adjustments are applied to
images is (1) [Reduce color moiré], (2) [ ], (3) [ ], (4) [ ],
(5) [ ], and (6) [ ].
Adjustment Groups
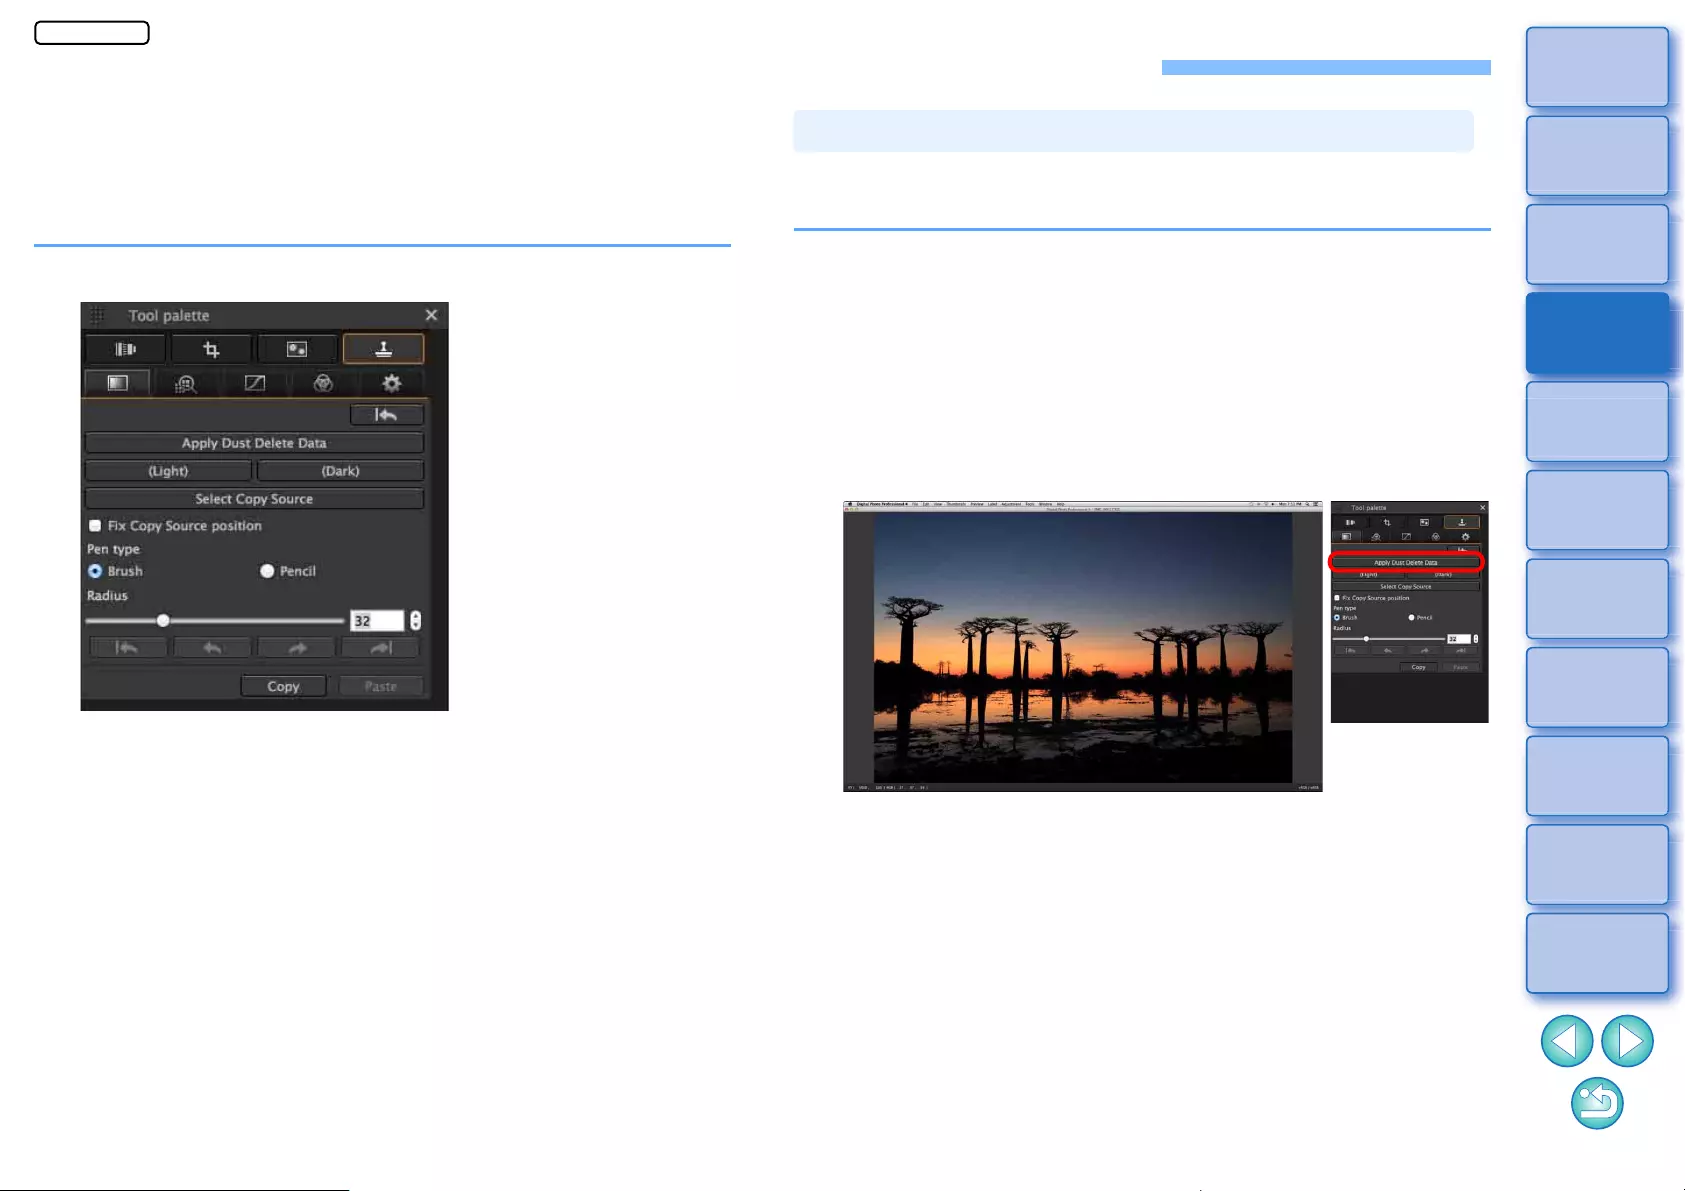
86
3
Sorting
Images
1
2
4
5
Downloading
Images
Viewing
Images
Printing
Images
Editing
Images
6
Processing
Large Numbers
of RAW Images
7
Remote
Shooting
10
HDR PQ
Mode
8
Playing Back
Movies and Saving
Still Photos
11
Specifying
Preferences
9
Handling
RAW Movies
Editing with the Dust Delete/Copy Stamp Tool Palette
You can use this tool palette to erase dust and other marks in a shot
image and to correct an image by copying part of the image and pasting
it onto an unnecessary part of the image.
Note that you can use the functions in this tool palette with JPEG and
TIFF images as well as RAW images.
Dust Delete/Copy Stamp Tool Palette
The Dust Delete Data that is appended to images can be used to
automatically erase dust spots.
1Select an image with dust delete data attached in the
main window, etc.
2Display the Dust Delete/Copy Stamp tool palette.
lYou cannot make adjustments with the Dust Delete/Copy Stamp
tool palette in a window that only shows thumbnails.
3When the image has redrawn itself, click the [Apply
Dust Delete Data] button.
ÜDust spots are erased in a single operation.
4Return to the main window.
Performing Automatic Dust Erasure Processing
JPEG/TIFF
87
3
Sorting
Images
1
2
4
5
Downloading
Images
Viewing
Images
Printing
Images
Editing
Images
6
Processing
Large Numbers
of RAW Images
7
Remote
Shooting
10
HDR PQ
Mode
8
Playing Back
Movies and Saving
Still Photos
11
Specifying
Preferences
9
Handling
RAW Movies
lThe dust-erased image can be reverted to its original condition
at any time
A dust-erased image is displayed or printed as a dust-erased image.
However, since the dust on the image is not actually erased, you can
always revert to the original image by clicking the [ ] button in
the Dust Delete/Copy Stamp tool palette or performing the “Re-Editing
an Image” procedure (p.97).
lPrinting dust-erased images
You can print as a dust-erased image by printing it in DPP.
lTo erase dust spots that cannot be erased with the automatic
dust erasure processing
In automatic dust erasure processing, dust spots are erased based on
information relating to dust saved in the Dust Delete Data. However,
there may be cases where you will not be able to erase dust spots
depending on the type of dust. If this occurs, erase those dust spots
using the repair function (p.88) or the copy stamp function (p.90).
lThe image becomes a dust-erased image when converted and
saved
The dust-erased RAW image actually becomes a dust-erased image
when converted to a JPEG or TIFF image and saved (p.95).
lApplying the dust erasure result to another image
You can apply dust erasure to the same place in another image by
clicking the [Copy] button to copy the dust erasure results and then
displaying the other image to which you want to apply the results and
clicking the [Paste] button.
Additional information
In the main window, you can also automatically erase dust spots in
multiple images appended with Dust Delete Data.
Select multiple images appended with Dust Delete
Data, and then select the [Adjustment] menu
[Apply Dust Delete Data].
ÜDust spots in all the selected images are erased in a single
operation.
Automatic Dust Erasure Processing in the Main Window
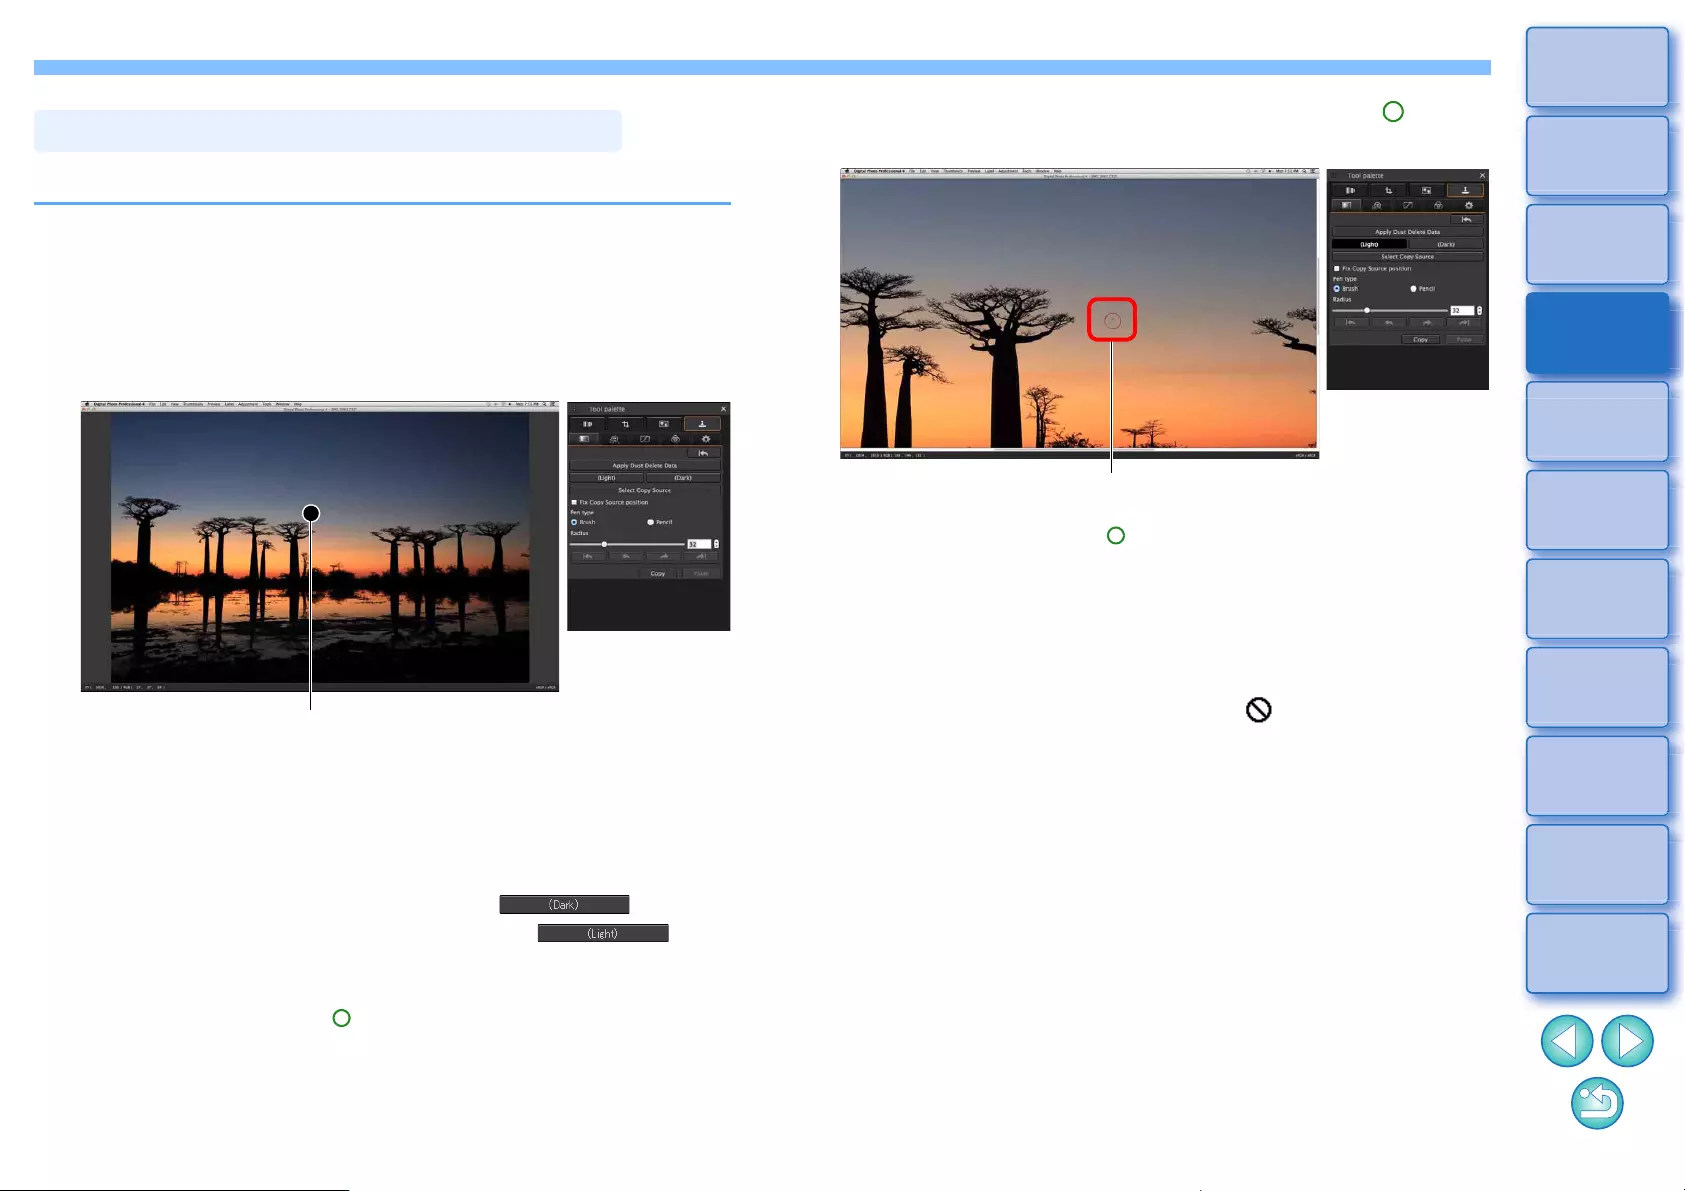
88
3
Sorting
Images
1
2
4
5
Downloading
Images
Viewing
Images
Printing
Images
Editing
Images
6
Processing
Large Numbers
of RAW Images
7
Remote
Shooting
10
HDR PQ
Mode
8
Playing Back
Movies and Saving
Still Photos
11
Specifying
Preferences
9
Handling
RAW Movies
You can erase dust spots in an image by selecting them one by one.
1In the main window, select the image from which you
want to erase dust spots.
2Display the Dust Delete/Copy Stamp tool palette.
3Click the point from where dust is to be erased.
ÜThe display changes to 100% view.
lThe display position can be changed by dragging.
4Click the button that matches the dust spot to be
erased.
lIf the dust spot is dark in color, click the [ ] button,
and if the dust spot is light in color, click the [ ]
button.
lWhen you move the cursor over the image, the dust erasure
range is indicated with [ ].
Manually Erasing Dust (Repair Function)
Click
5Place the dust spot to be erased within the [ ] and
click.
ÜThe dust spot within the [ ] is erased.
lClick on another part of the image to continue erasing dust spots
within the displayed image.
lTo erase dust in another part of the image, click the button clicked
in step 4 again to cancel dust erasure processing and perform the
operation again from step 3.
lWhen the dust spot cannot be erased, [ ] is displayed.
6Return to the main window.
Click
89
3
Sorting
Images
1
2
4
5
Downloading
Images
Viewing
Images
Printing
Images
Editing
Images
6
Processing
Large Numbers
of RAW Images
7
Remote
Shooting
10
HDR PQ
Mode
8
Playing Back
Movies and Saving
Still Photos
11
Specifying
Preferences
9
Handling
RAW Movies
lClick several times when dust spots are not erased completely
Where unwanted dust spots are not erased even after performing
step 5 once, they may be erased completely when you click several
times.
lMainly spots of dust can be erased with the repair function
Spots of dust can be erased with the repair function. You may be
unable to erase lines of dust. In this case, use the copy stamp
function (p.90).
lThe dust-erased image can be reverted to its original condition
at any time
A dust-erased image is displayed or printed as a dust-erased image.
However, since the dust on the image is not actually erased, you can
always revert to the original image by clicking the [ ] button in
the Dust Delete/Copy Stamp tool palette or performing the “Re-Editing
an Image” procedure (p.97).
lPrinting dust-erased images
You can print as a dust-erased image by printing it in DPP.
lThe image becomes a dust-erased image when converted and
saved
The dust-erased RAW image actually becomes a dust-erased image
when converted to a JPEG or TIFF image and saved (p.95).
Additional information
For images shot with ISO speed range expansion set, noticeable
noise may make it difficult to view dust spots in the copy stamp
window, so using this function is not recommended.
90
3
Sorting
Images
1
2
4
5
Downloading
Images
Viewing
Images
Printing
Images
Editing
Images
6
Processing
Large Numbers
of RAW Images
7
Remote
Shooting
10
HDR PQ
Mode
8
Playing Back
Movies and Saving
Still Photos
11
Specifying
Preferences
9
Handling
RAW Movies
You can correct an image by pasting a section copied from another part
of the image to an unwanted part of the image.
1Follow steps 1 to 3 in “Manually Erasing Dust (Repair
Function)” (p.88).
2Specify the section to be copied.
lClick on the section that is to be the copy source after clicking the
[Select Copy Source] button.
lTo change the section that is to be the copy source, perform the
operation above again.
lTo fix the position of the copy source, checkmark [Fix Copy
Source position].
3Correct the image.
lClick or drag on the part of the image you want to modify. [+] in
the window indicates the copy source and [ ] indicates the copy
destination.
ÜThe copied image is pasted in the position to which it was
dragged.
lFor [Pen type], you can select from [Brush] (the pasted image’s
borders simulate a brush) and [Pencil] (the pasted image’s
borders are sharp).
4Return to the main window.
Erasing Unwanted Parts of an Image (Copy Stamp Function)
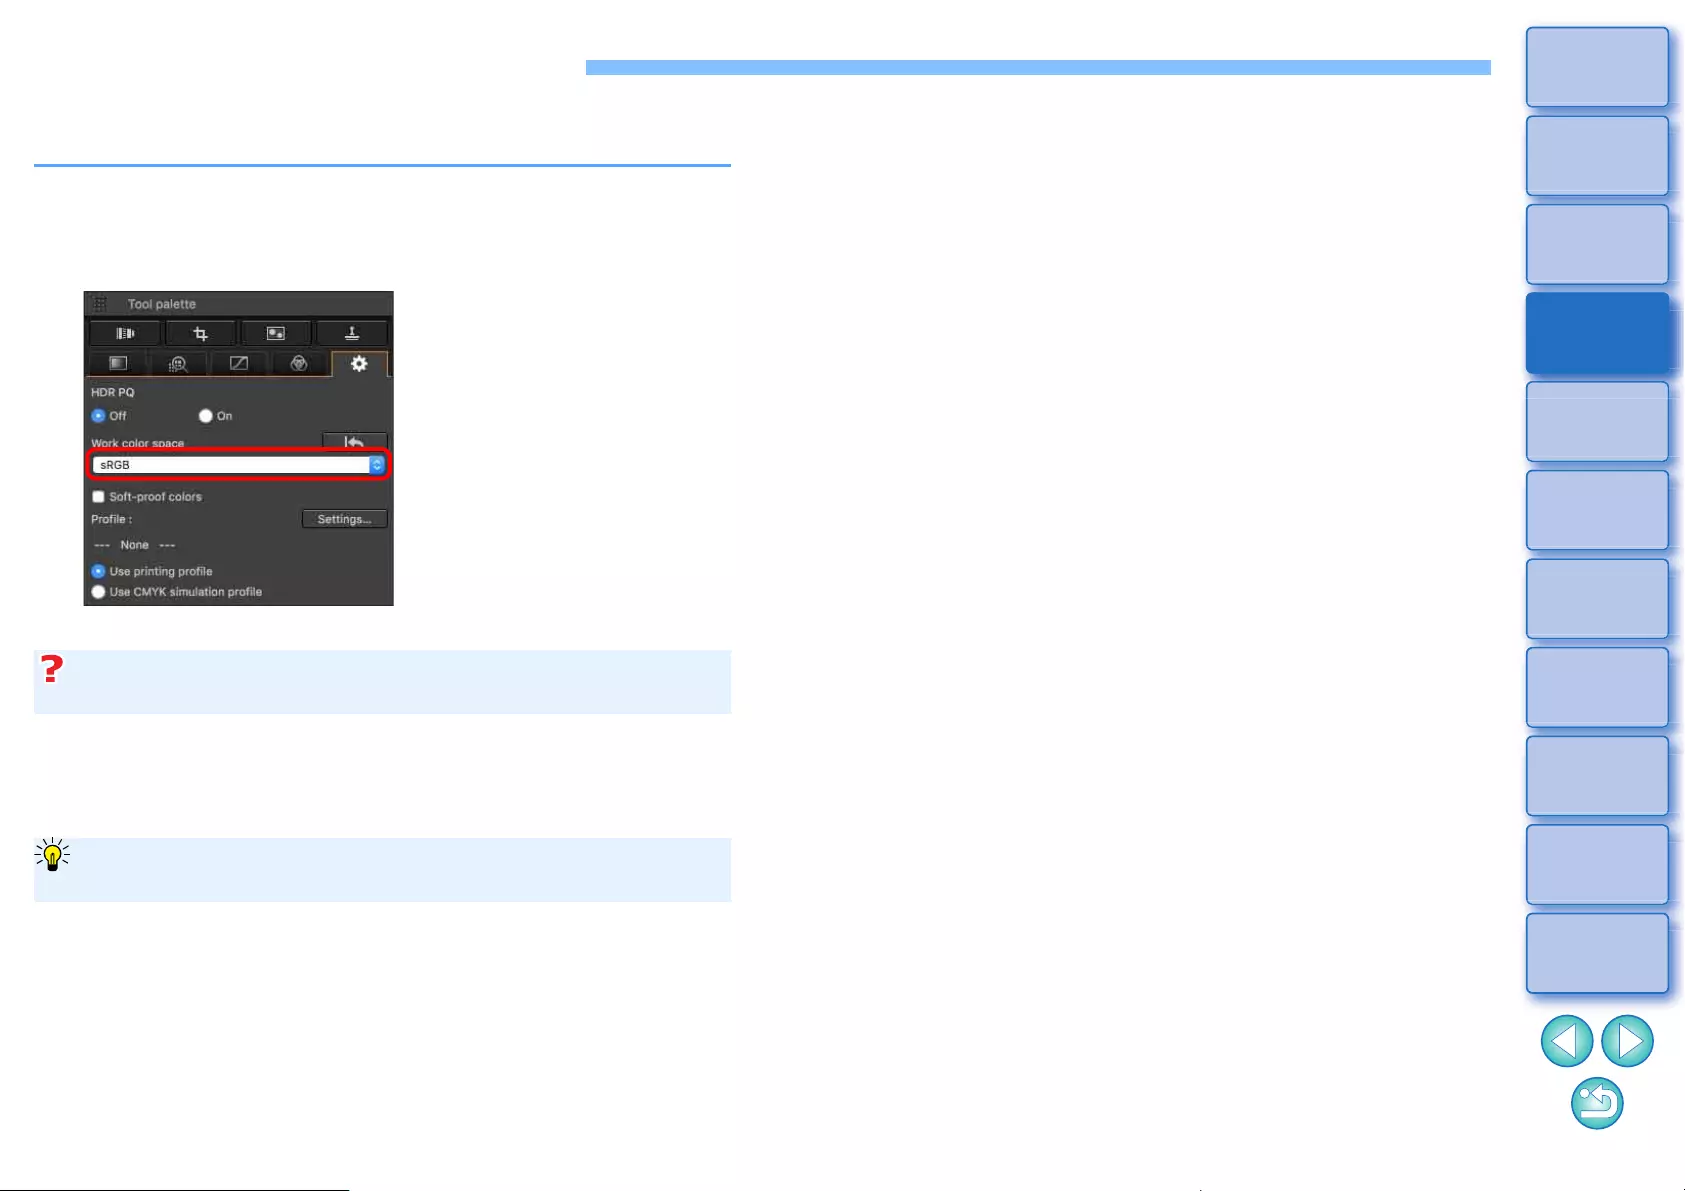
91
3
Sorting
Images
1
2
4
5
Downloading
Images
Viewing
Images
Printing
Images
Editing
Images
6
Processing
Large Numbers
of RAW Images
7
Remote
Shooting
10
HDR PQ
Mode
8
Playing Back
Movies and Saving
Still Photos
11
Specifying
Preferences
9
Handling
RAW Movies
Setting Work Color Space
A different work color space (p.184) from the default settings (p.175) can
be set for each image.
If you set an image with a color space different to the default setting and
then subsequently change the default color space setting (p.175), this
default setting will not be applied and the individually set color space will
remain.
Since only the image processing conditions information changes, the
color space of a RAW image can be changed at any time.
Display the Settings tool palette select the color
space to be set.
Settings tool palette
A color space set individually does not change even when the
default setting is changed
The color space of a RAW image can be changed freely as
many times as required
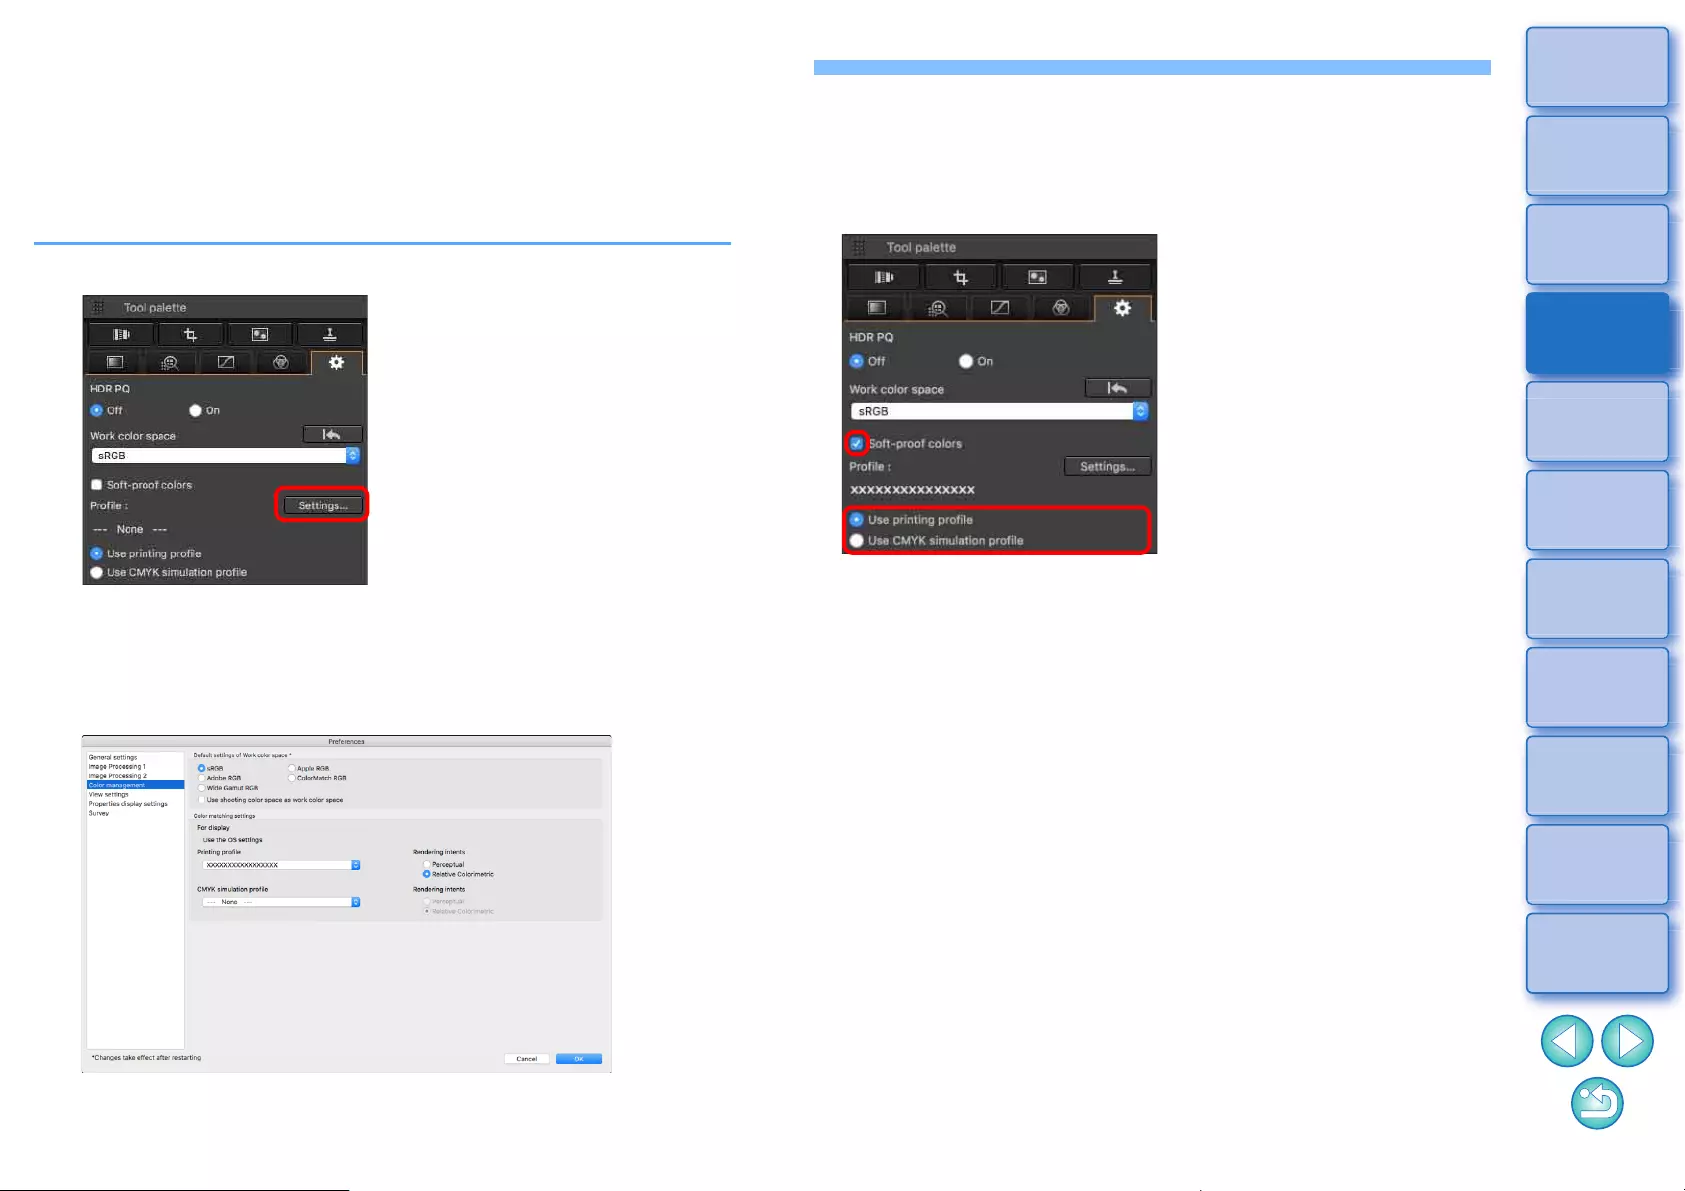
92
3
Sorting
Images
1
2
4
5
Downloading
Images
Viewing
Images
Printing
Images
Editing
Images
6
Processing
Large Numbers
of RAW Images
7
Remote
Shooting
10
HDR PQ
Mode
8
Playing Back
Movies and Saving
Still Photos
11
Specifying
Preferences
9
Handling
RAW Movies
Using the Soft-Proof Colors Function
By using the soft-proof colors function, you can apply a selected printing
profile or CMYK simulation profile to the displayed image. The reliability
of the soft-proof colors function depends on the monitor quality, the
monitor and printer profiles, and surrounding lighting conditions where
you are working.
1Click the [Settings] button.
ÜThe [Color management] tab sheet in [Preferences] appears.
2Select the profile to apply from the [Printing profile]
or [CMYK simulation profile] list box, and click the
[OK] button.
ÜThe [Color management] tab sheet in [Preferences] closes.
3According to the profile selected in step 2, select
either [Use printing profile] or [Use CMYK simulation
profile], and checkmark the [Soft-proof colors]
checkbox.
ÜThe profile selected in step 2 is applied to the displayed image
including its thumbnail.
The profile is not applied to images displayed in the quick check
window.
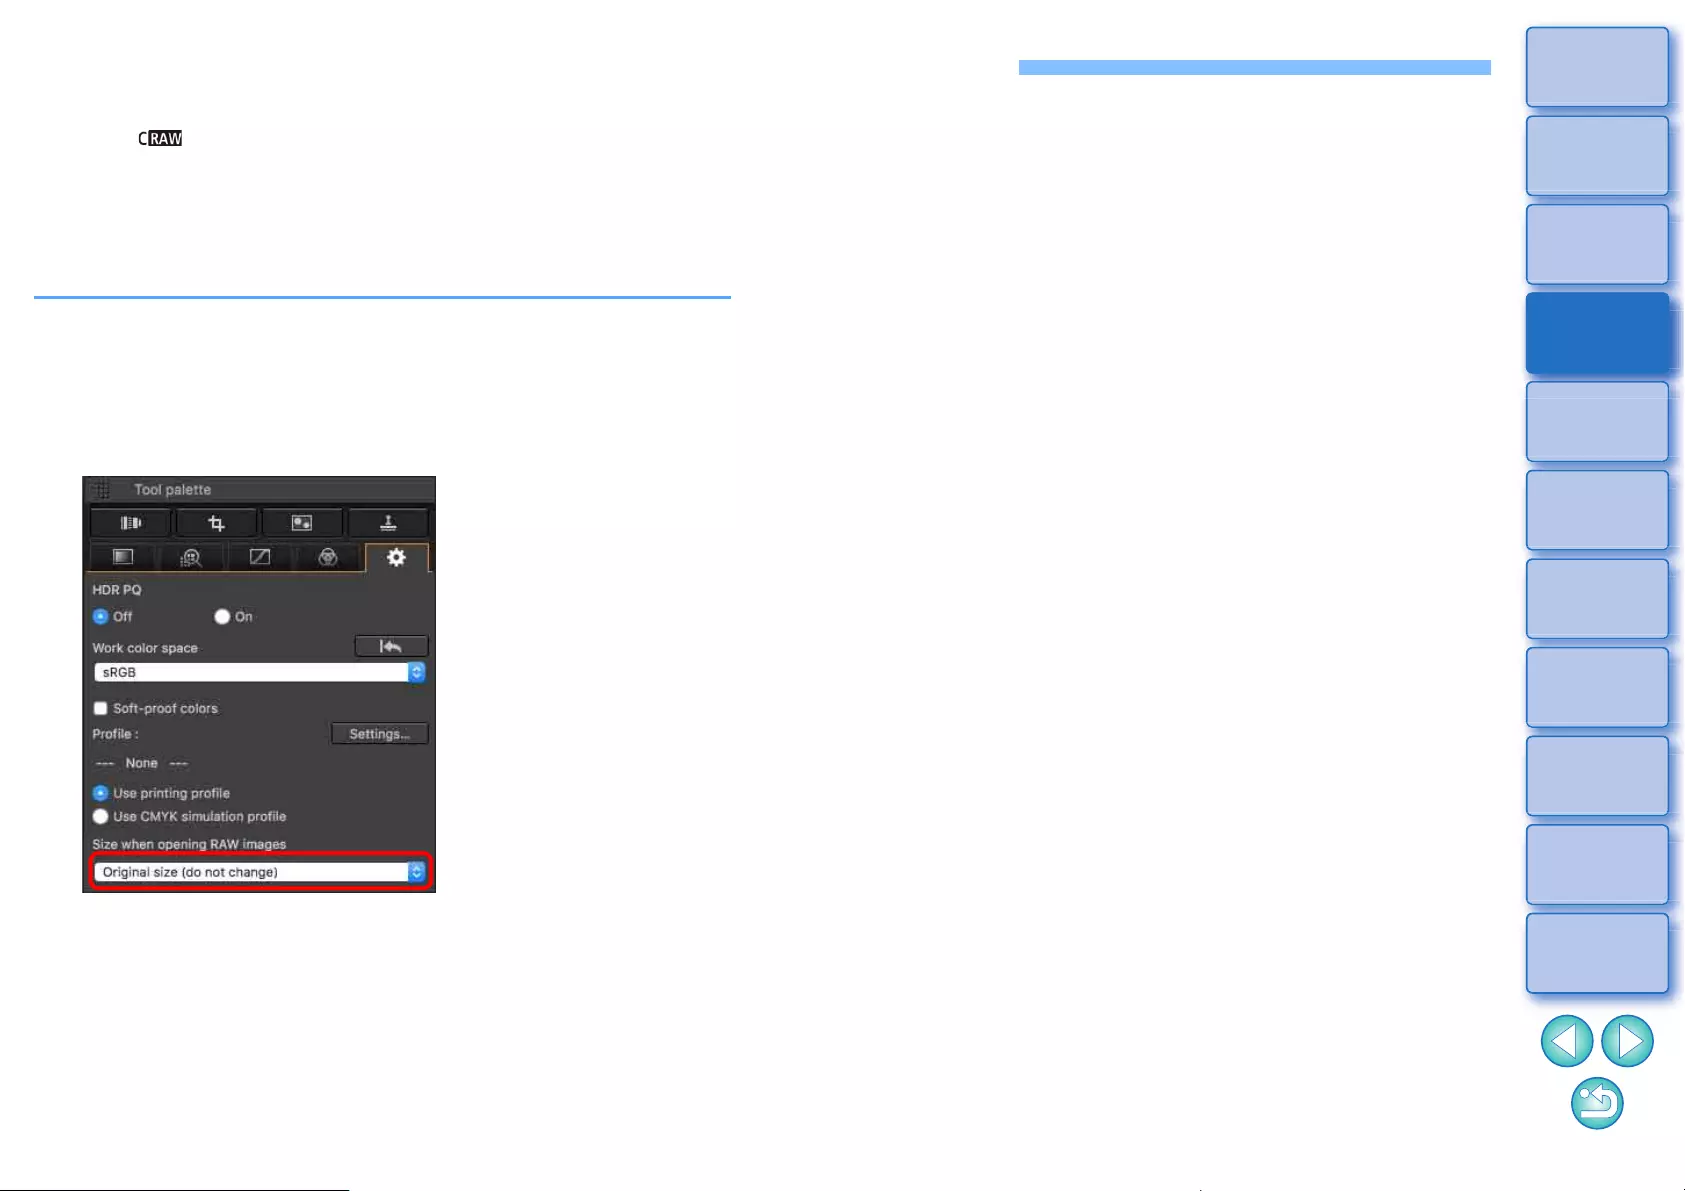
93
3
Sorting
Images
1
2
4
5
Downloading
Images
Viewing
Images
Printing
Images
Editing
Images
6
Processing
Large Numbers
of RAW Images
7
Remote
Shooting
10
HDR PQ
Mode
8
Playing Back
Movies and Saving
Still Photos
11
Specifying
Preferences
9
Handling
RAW Movies
Specifying the Size when Opening RAW Images
This applies only to RAW images with the extension “.CR3” that were
shot with [ ] selected on the camera.
This function specifies the image size when a RAW image is selected
and opened in DPP. When the selected RAW image is converted and
saved as a JPEG or TIFF image, it is also saved at the same size. This
function is not available for images shot with the Dual Pixel RAW
function set on the camera.
Select the RAW image display the Settings tool
palette select the size when opening RAW images
in DPP.
Settings tool palette
ÜThe image size when opening RAW images in DPP is set.
lThe default setting shows the size set in [Default size when
opening RAW images] in the [Image Processing 2] tab sheet in
[Preferences].
lThe settings are saved as recipes for each image.
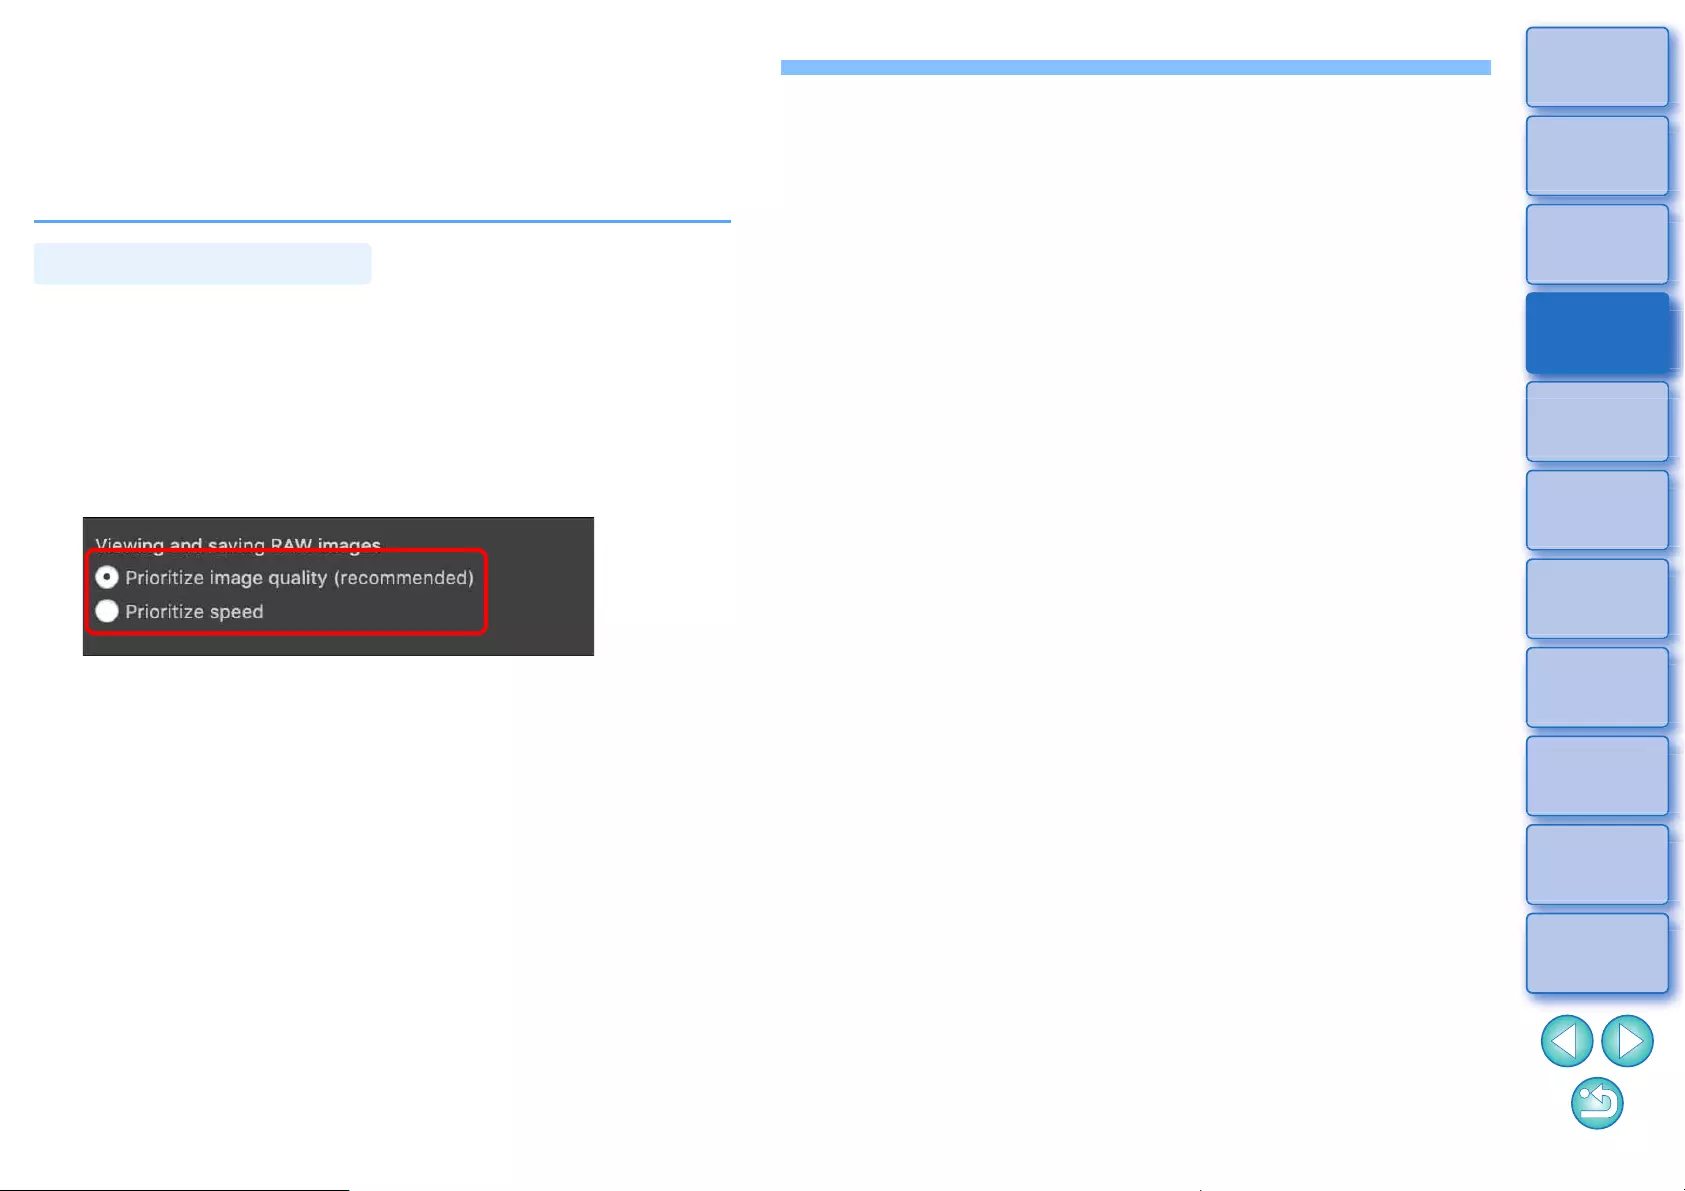
94
3
Sorting
Images
1
2
4
5
Downloading
Images
Viewing
Images
Printing
Images
Editing
Images
6
Processing
Large Numbers
of RAW Images
7
Remote
Shooting
10
HDR PQ
Mode
8
Playing Back
Movies and Saving
Still Photos
11
Specifying
Preferences
9
Handling
RAW Movies
Displaying and Saving RAW Images
Specify settings for displaying and saving RAW images.
This function allows you to select a [Prioritize speed] mode in addition to
the usual [Prioritize image quality (recommended)] mode.
Only RAW images shot with a supported camera are supported.
EOS-1D X Mark III, EOS R5, EOS R6
1Select a supported image in the main window, etc.
2Display the Settings tool palette.
3Select the option.
ÜAfter selecting an option, the RAW image is displayed based on
the setting.
The image quality of a converted and saved image is based on
the setting of the selected option.
l[Prioritize image quality (recommended)]: an image is displayed
and saved in normal DPP quality.
l[Prioritize speed]: sets a shorter time for displaying and saving
RAW images than [Prioritize image quality (recommended)].
However, some images may be displayed/saved with a
noticeable level of noise.
l[Prioritize speed] does not allow “Specifying the Size when
Opening RAW Images” (p.93) to be used.
Supported Cameras
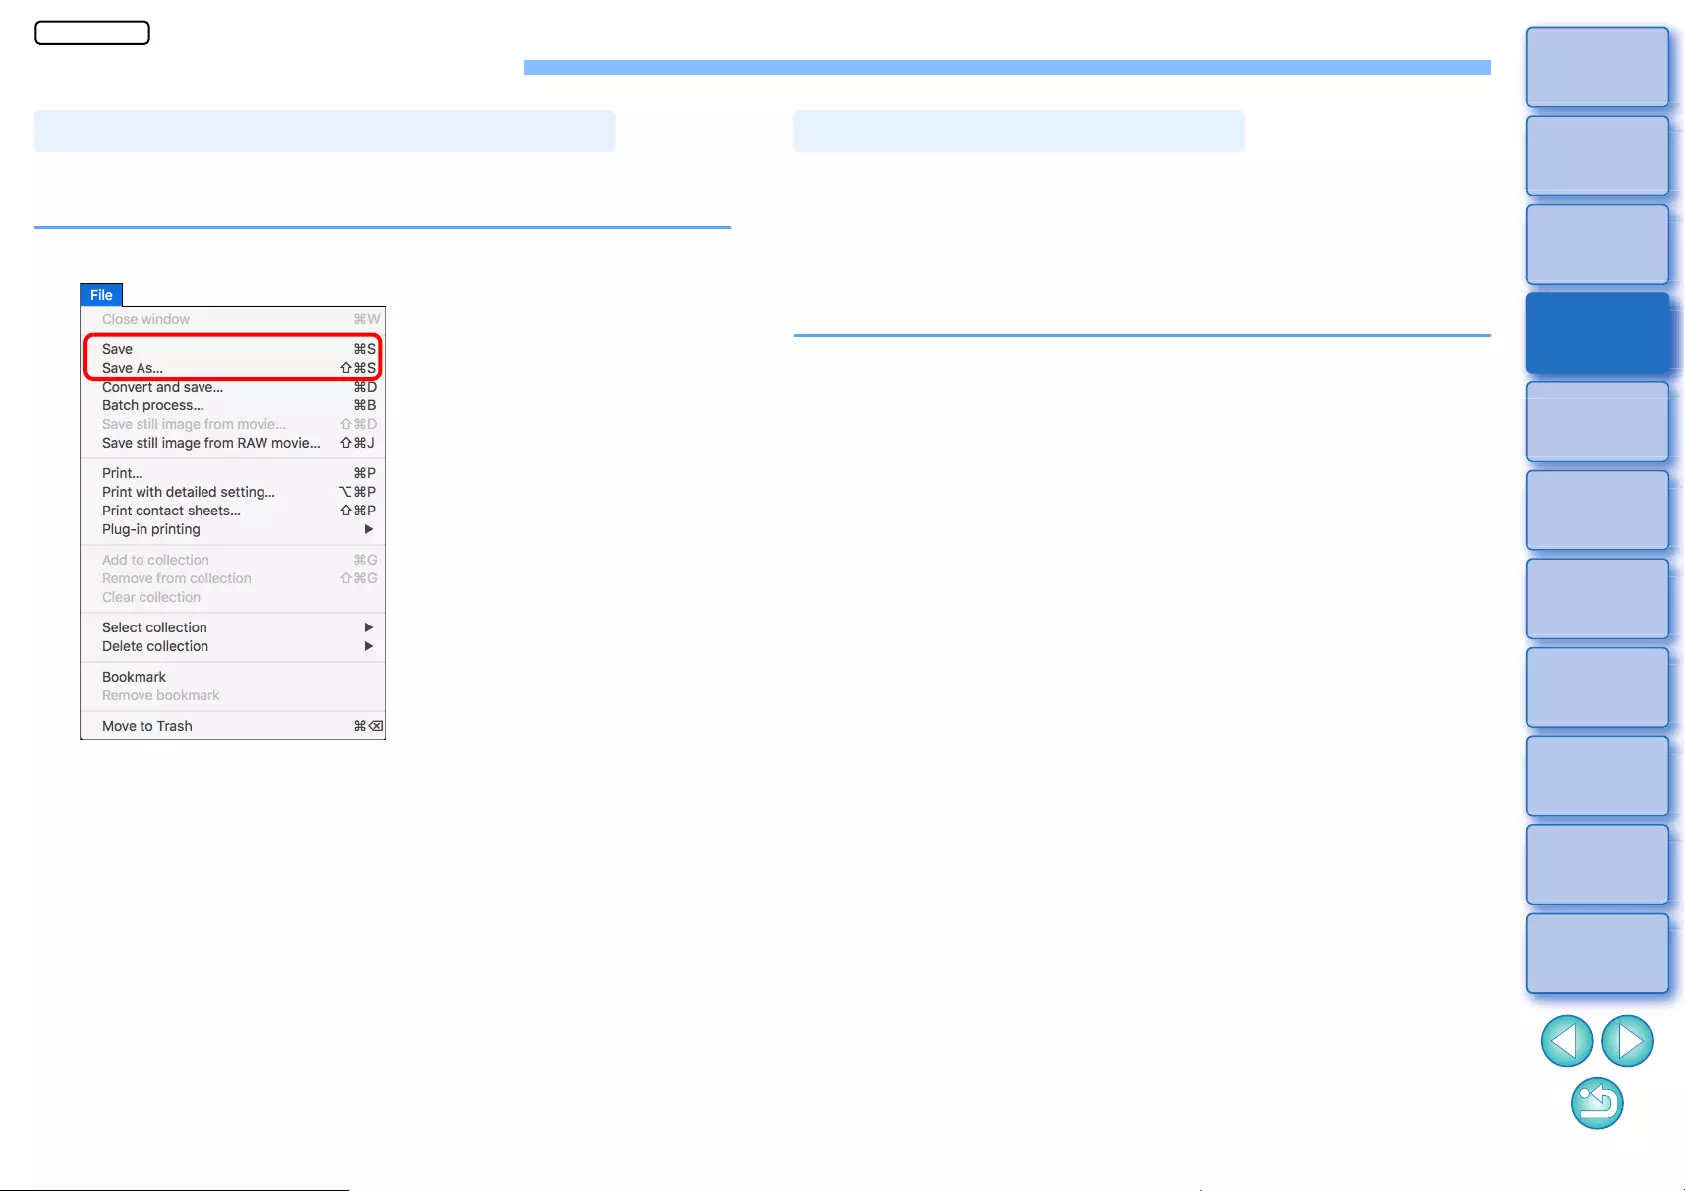
95
3
Sorting
Images
1
2
4
5
Downloading
Images
Viewing
Images
Printing
Images
Editing
Images
6
Processing
Large Numbers
of RAW Images
7
Remote
Shooting
10
HDR PQ
Mode
8
Playing Back
Movies and Saving
Still Photos
11
Specifying
Preferences
9
Handling
RAW Movies
Saving Editing Results
All the contents adjusted with the tool palette (recipe) can be saved to
the image or saved as a separate image.
Select the [File] menu desired item.
ÜYour adjustments are saved to the image.
Saving Editing Contents to an Image
To view, edit and print a RAW image with software other than DPP,
convert to a more versatile JPEG or TIFF image and save.
If a JPEG or TIFF image is saved as described below, the image can be
saved as a separate image with the adjustments (recipe) applied to it.
The image is saved as a separate image, so the original image remains
unaffected.
1Select the image to be converted.
2Select the [File] menu [Convert and save].
ÜThe [Convert and save] window appears.
Saving as a separate image
JPEG/TIFF
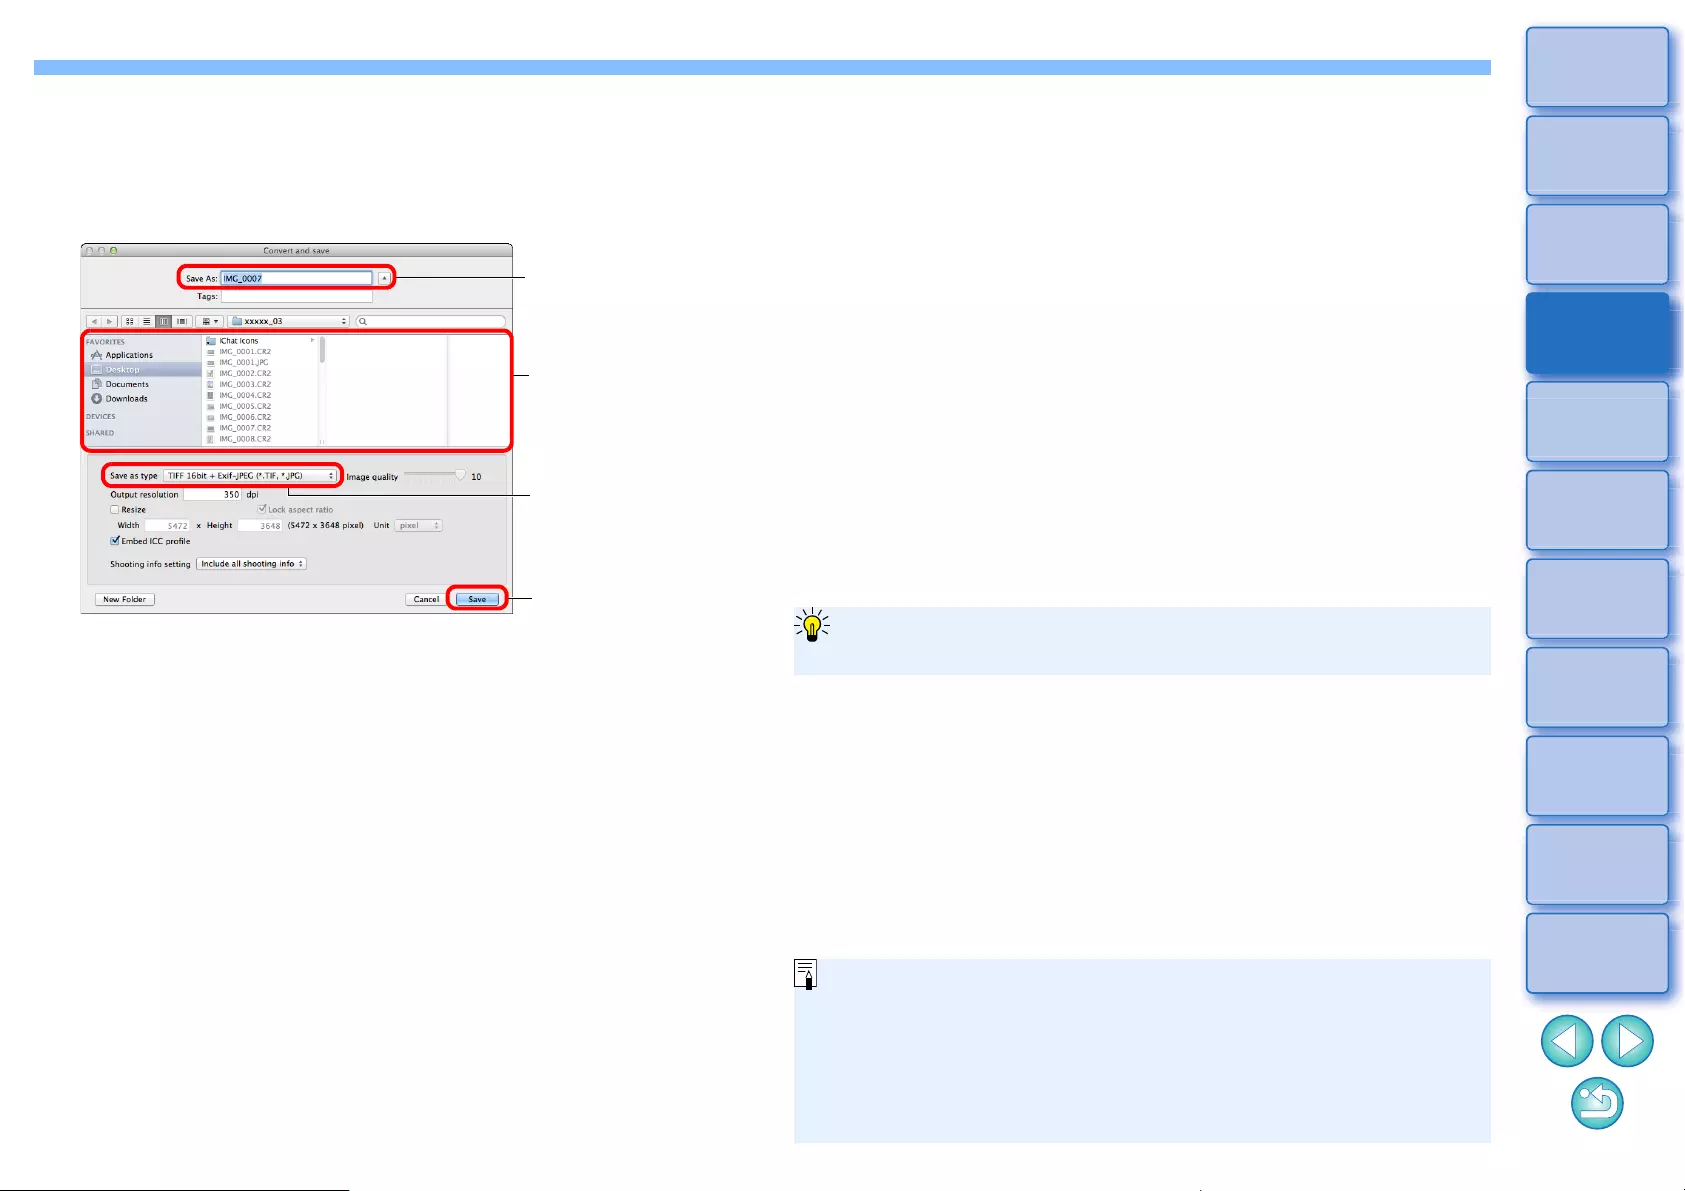
96
3
Sorting
Images
1
2
4
5
Downloading
Images
Viewing
Images
Printing
Images
Editing
Images
6
Processing
Large Numbers
of RAW Images
7
Remote
Shooting
10
HDR PQ
Mode
8
Playing Back
Movies and Saving
Still Photos
11
Specifying
Preferences
9
Handling
RAW Movies
3Specify the necessary settings, and then click the
[Save] button.
lBy default, the image is converted and saved to a JPEG image
with the highest image quality, without changing the image size.
Change the settings according to your requirements.
ÜThe RAW image is converted to a JPEG or TIFF image which is
then saved as a new image in the specified save destination.
Click and save
Select the save
destination
Select an image
type
Enter a file name
DPP’s RAW image development processing technology is continually
being improved upon so that you can perform the latest image
processing more appropriately.
Meaning that, between two different versions of DPP, processing results
may differ very slightly even if with the same RAW image data, or the
results of significant editing of RAW image data with an attached recipe
may be different.
When you want to save the developing or editing results of the version
you are currently using as it is, saving the image as a separate file (p.95)
is recommended.
To save the developing/editing results for the version you are
currently using
lBy saving as a separate JPEG or TIFF image as explained
above, some image deterioration that accompanies editing/saving
occurs as when editing with general image editing software.
lBy saving as explained above, a trimmed image (p.71) or dust-
erased image (p.86 to p.90) actually becomes a trimmed image
or dust-erased image.
lYou can batch convert and save multiple images (p.139).
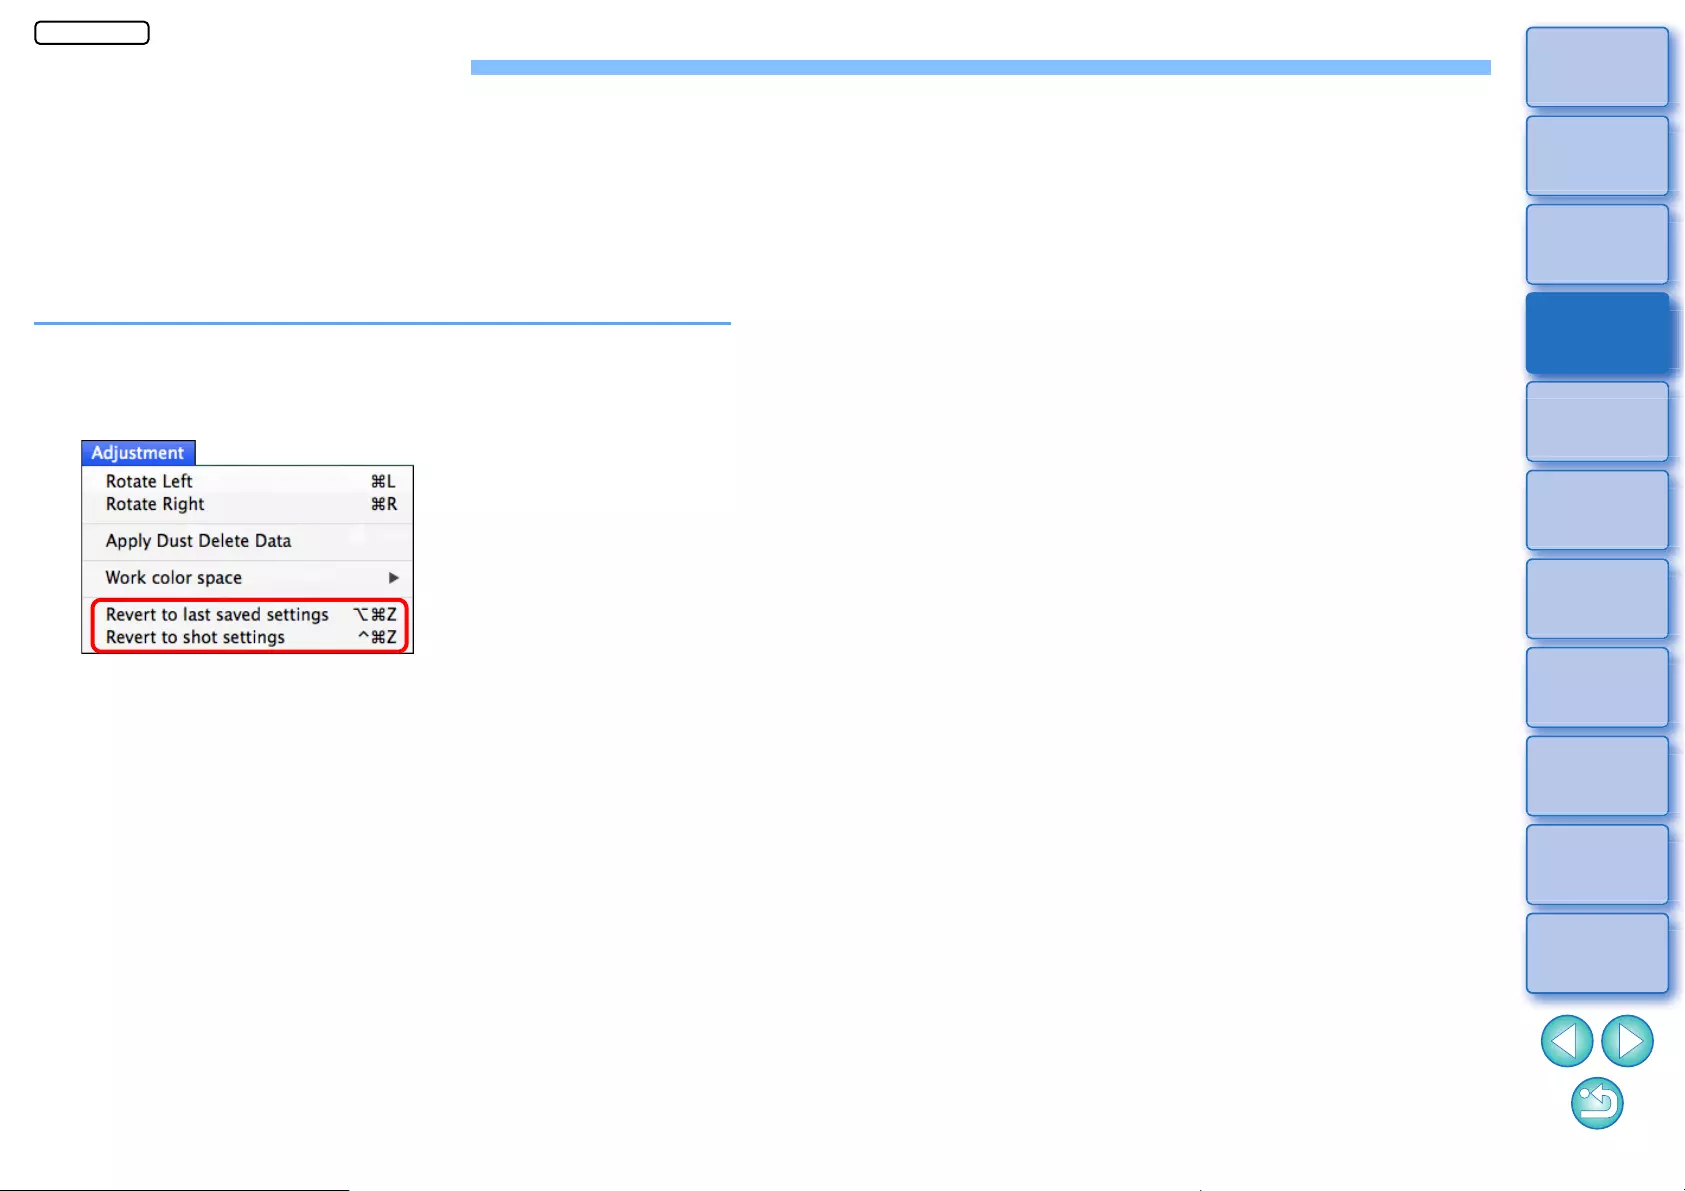
97
3
Sorting
Images
1
2
4
5
Downloading
Images
Viewing
Images
Printing
Images
Editing
Images
6
Processing
Large Numbers
of RAW Images
7
Remote
Shooting
10
HDR PQ
Mode
8
Playing Back
Movies and Saving
Still Photos
11
Specifying
Preferences
9
Handling
RAW Movies
Re-Editing an Image
Only the image processing conditions are changed in images adjusted
with the tool palette (p.45 to p.91), so the “original image data itself”
remains unaffected. (The trimming range or dust-erasure information of
a cropped image (p.71) or dust-erased image (p.86 to p.90) is simply
saved to the image.)
For this reason, you can undo any adjustments saved (p.95) to the
image, trimming range and dust-erasure information, and revert to the
condition when last saved, or when the image was shot.
1Select the image that is to be re-edited.
2Select the [Adjustment] menu desired item.
ÜThe image reverts to the conditions of the selected item.
JPEG/TIFF
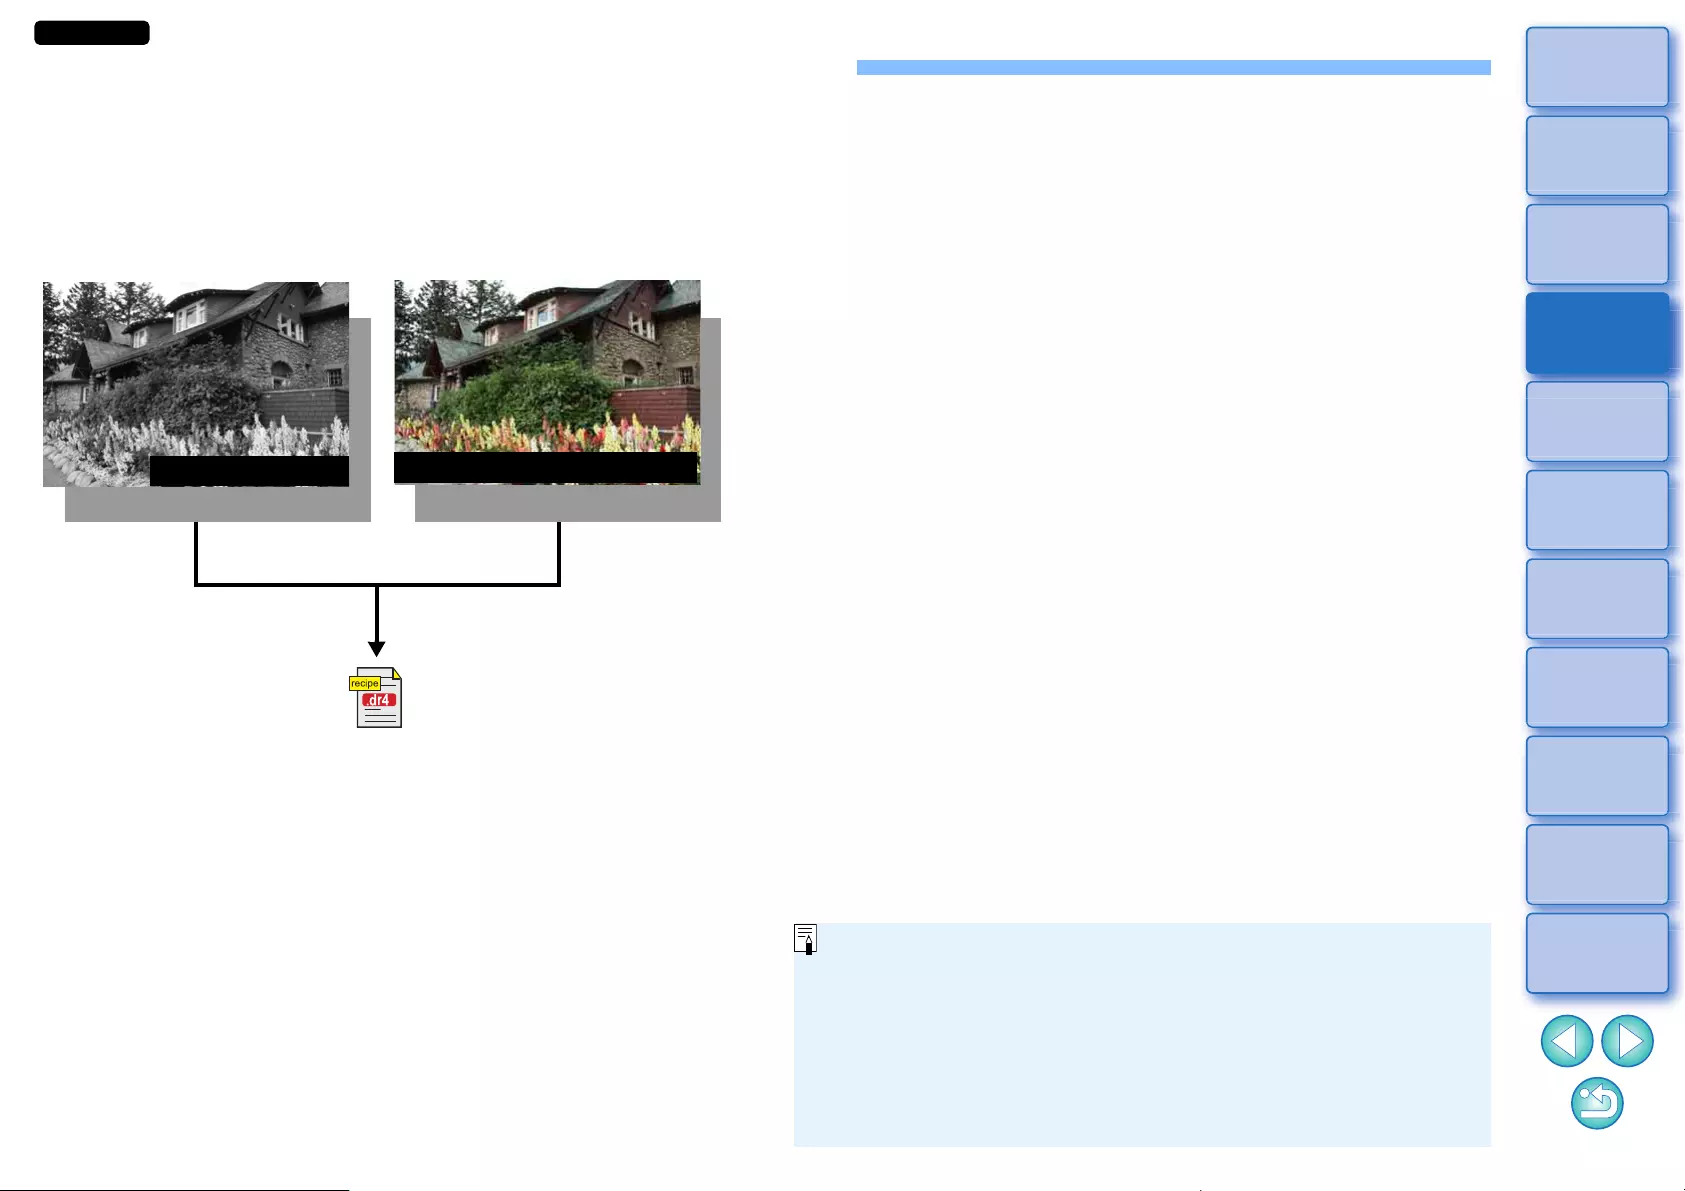
98
3
Sorting
Images
1
2
4
5
Downloading
Images
Viewing
Images
Printing
Images
Editing
Images
6
Processing
Large Numbers
of RAW Images
7
Remote
Shooting
10
HDR PQ
Mode
8
Playing Back
Movies and Saving
Still Photos
11
Specifying
Preferences
9
Handling
RAW Movies
Utilizing Adjustment Contents (Recipe)
All the adjustment contents (recipe) made using the tool palette can be
saved as an individual recipe file (extension “.dr4”) and loaded and
applied to another image.
You can edit images efficiently by selecting and adjusting one image
from images shot with the same shooting environment and batch
applying the adjustment results to a large number of images.
Contents adjusted using the tool
palette can be handled
individually as a recipe file
(extension “.dr4”).
RAW image data
Image processing conditions information Image processing conditions information
JPEG, TIFF image data
lA recipe file with contents that can only be adjusted in RAW
images are not reflected even if it is applied to a JPEG or TIFF
image.
lRecipes are not compatible between DPP version 4.x and DPP
version 1.x to 3.x. Images with DPP version 1.x to 3.x recipe files
attached are displayed with the shot settings in DPP version 4.x.
Conversely, images with DPP version 4.x recipe files attached are
displayed with the shot settings in DPP version 1.x to 3.x.
JPEG/TIFF

99
3
Sorting
Images
1
2
4
5
Downloading
Images
Viewing
Images
Printing
Images
Editing
Images
6
Processing
Large Numbers
of RAW Images
7
Remote
Shooting
10
HDR PQ
Mode
8
Playing Back
Movies and Saving
Still Photos
11
Specifying
Preferences
9
Handling
RAW Movies
You can copy a recipe of an edited image and then apply it to another
image.
1Select the image with the recipe you want to copy.
2To copy all items of a recipe, select the [Edit] menu
[Copy recipe]. To copy only selected items of a
recipe, select the [Edit] menu [Copy selected
recipe].
ÜThe recipe is copied.
lTo select recipe items, select the [Edit] menu [Select and copy
recipe settings] and select items in the window that appears.
After specifying settings, click the [OK] button and close the
window.
3Select the image to which the recipe is to be applied
and then select the [Edit] menu [Paste recipe].
ÜThe recipe is applied to the image.
Copying a Recipe and Applying to Another Image
You cannot copy or apply RAW movie recipes.
When a recipe for an image is copied and applied to an image in a
different orientation, the image orientation also changes. To prevent
the orientation of the image from changing, select the [Edit] menu
[Select and copy recipe settings] and remove the check mark from
the [Rotate left / Rotate right: 0°] checkbox in the window that
appears.
1Select an edited image, and then select the [Edit]
menu [Save recipe in file].
ÜThe [Save recipe in file] dialog box appears.
lTo save all of a recipe, select the [Save all recipes] option in the
window displayed.
lTo select and save recipe settings, select the [Save selected
recipes] option in the window displayed and then click the
[Specify Recipe Details] button. In the window displayed,
checkmark the recipe settings to be saved and then click the
[OK] button.
2Select the destination folder, enter a file name, and
then click the [Save] button.
Saving a Recipe as a File
100
3
Sorting
Images
1
2
4
5
Downloading
Images
Viewing
Images
Printing
Images
Editing
Images
6
Processing
Large Numbers
of RAW Images
7
Remote
Shooting
10
HDR PQ
Mode
8
Playing Back
Movies and Saving
Still Photos
11
Specifying
Preferences
9
Handling
RAW Movies
1Select the image to which a recipe is to be applied,
and then select the [Edit] menu [Read and paste
recipe from file].
ÜThe [Open] dialog box appears.
2Select a recipe and click the [Open] button.
ÜThe recipe is applied to the image.
Loading and Applying Recipes
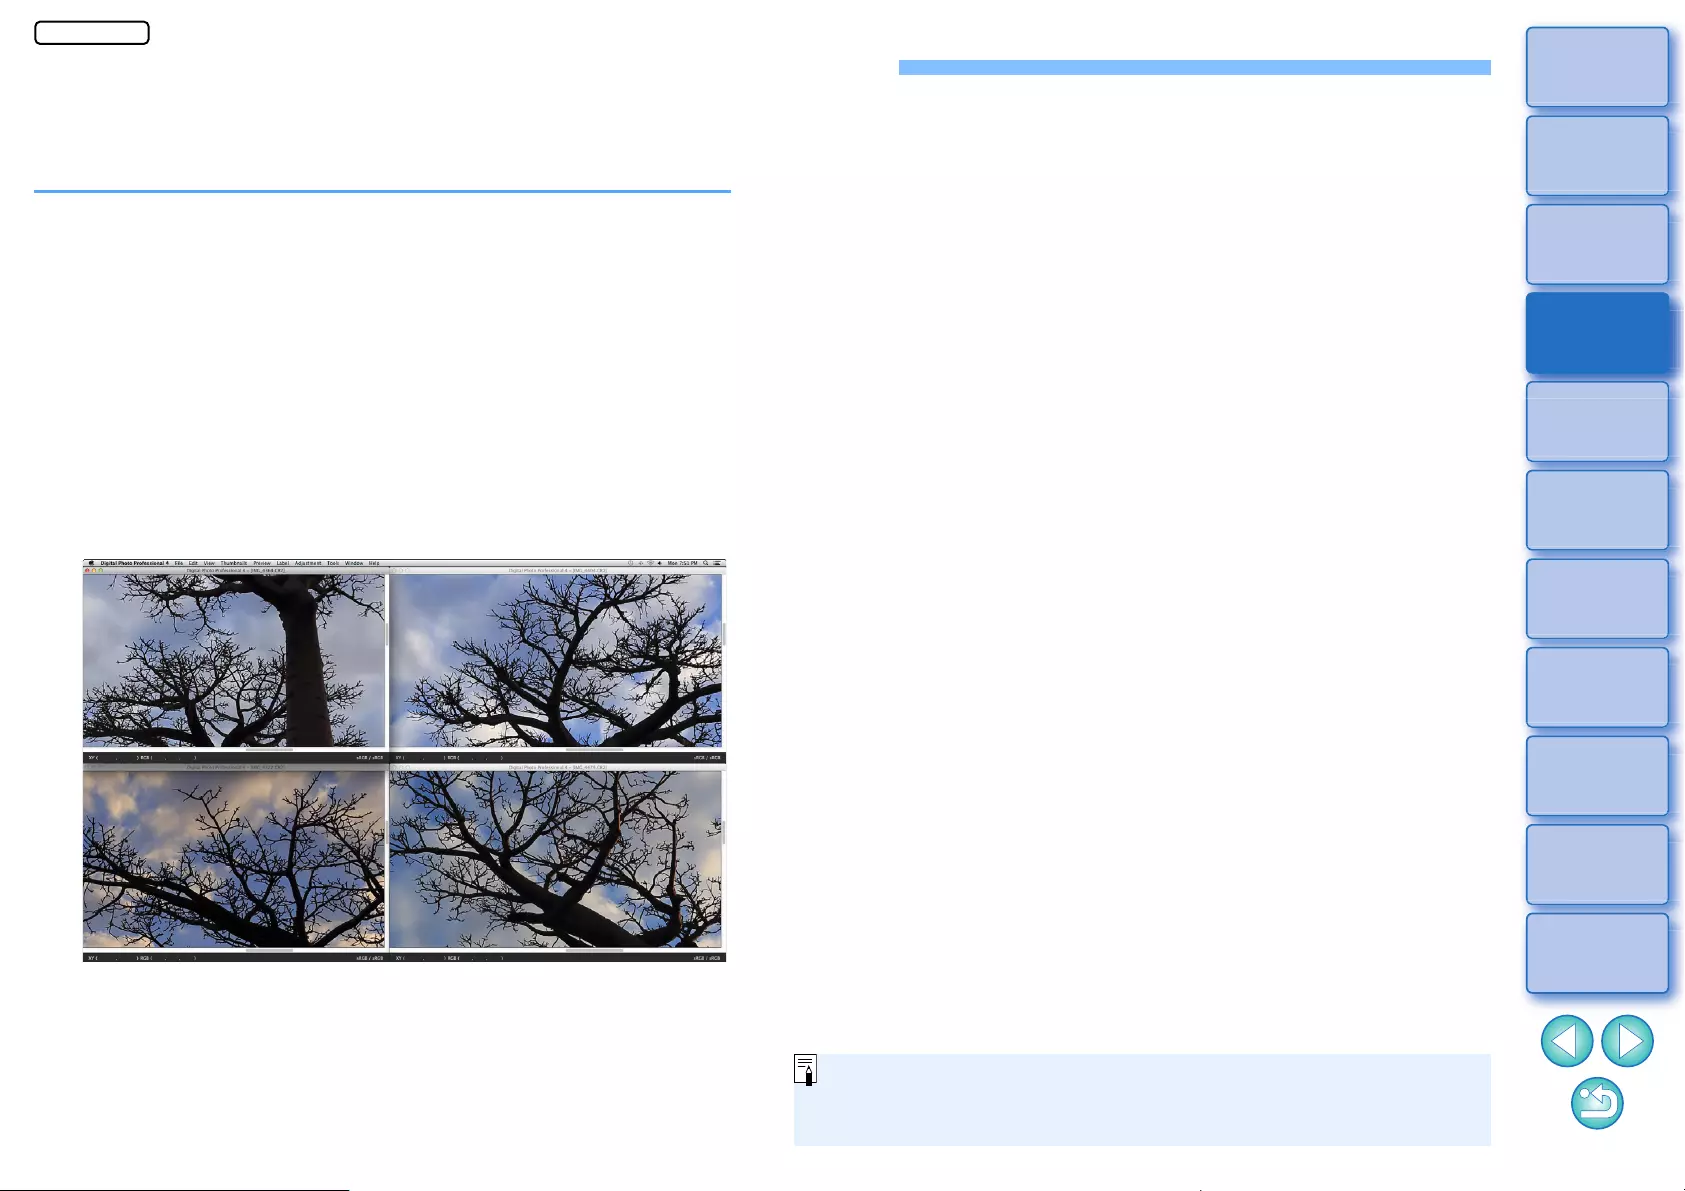
101
3
Sorting
Images
1
2
4
5
Downloading
Images
Viewing
Images
Printing
Images
Editing
Images
6
Processing
Large Numbers
of RAW Images
7
Remote
Shooting
10
HDR PQ
Mode
8
Playing Back
Movies and Saving
Still Photos
11
Specifying
Preferences
9
Handling
RAW Movies
Adjusting by Comparing Multiple Images
You can synchronize the areas in different images to be displayed
among multiple preview windows, and adjust images while comparing
them.
1In the preview window, display the multiple images
to be compared.
2Align the images.
lSelect the [Window] menu [Arrange horizontally] or [Arrange
vertically].
ÜThe preview windows are aligned.
3Select the [Preview] menu [Sync preview position]
and [Sync preview display size].
4Enlarge the image.
lEnlarge and display any of the preview windows.
ÜOther preview windows will also be displayed in the same
position/enlargement ratio.
5Move the area to be displayed.
ÜIf you move the enlargement display area in one of the preview
windows, the enlargement display area will also change in all
other preview windows.
lTo cancel synchronization, select the [Preview] menu [Sync
preview position] and [Sync preview display size] again.
Synchronization only applies to the enlargement display position
and the enlargement ratio. Adjustments to the images are not
synchronized.
JPEG/TIFF
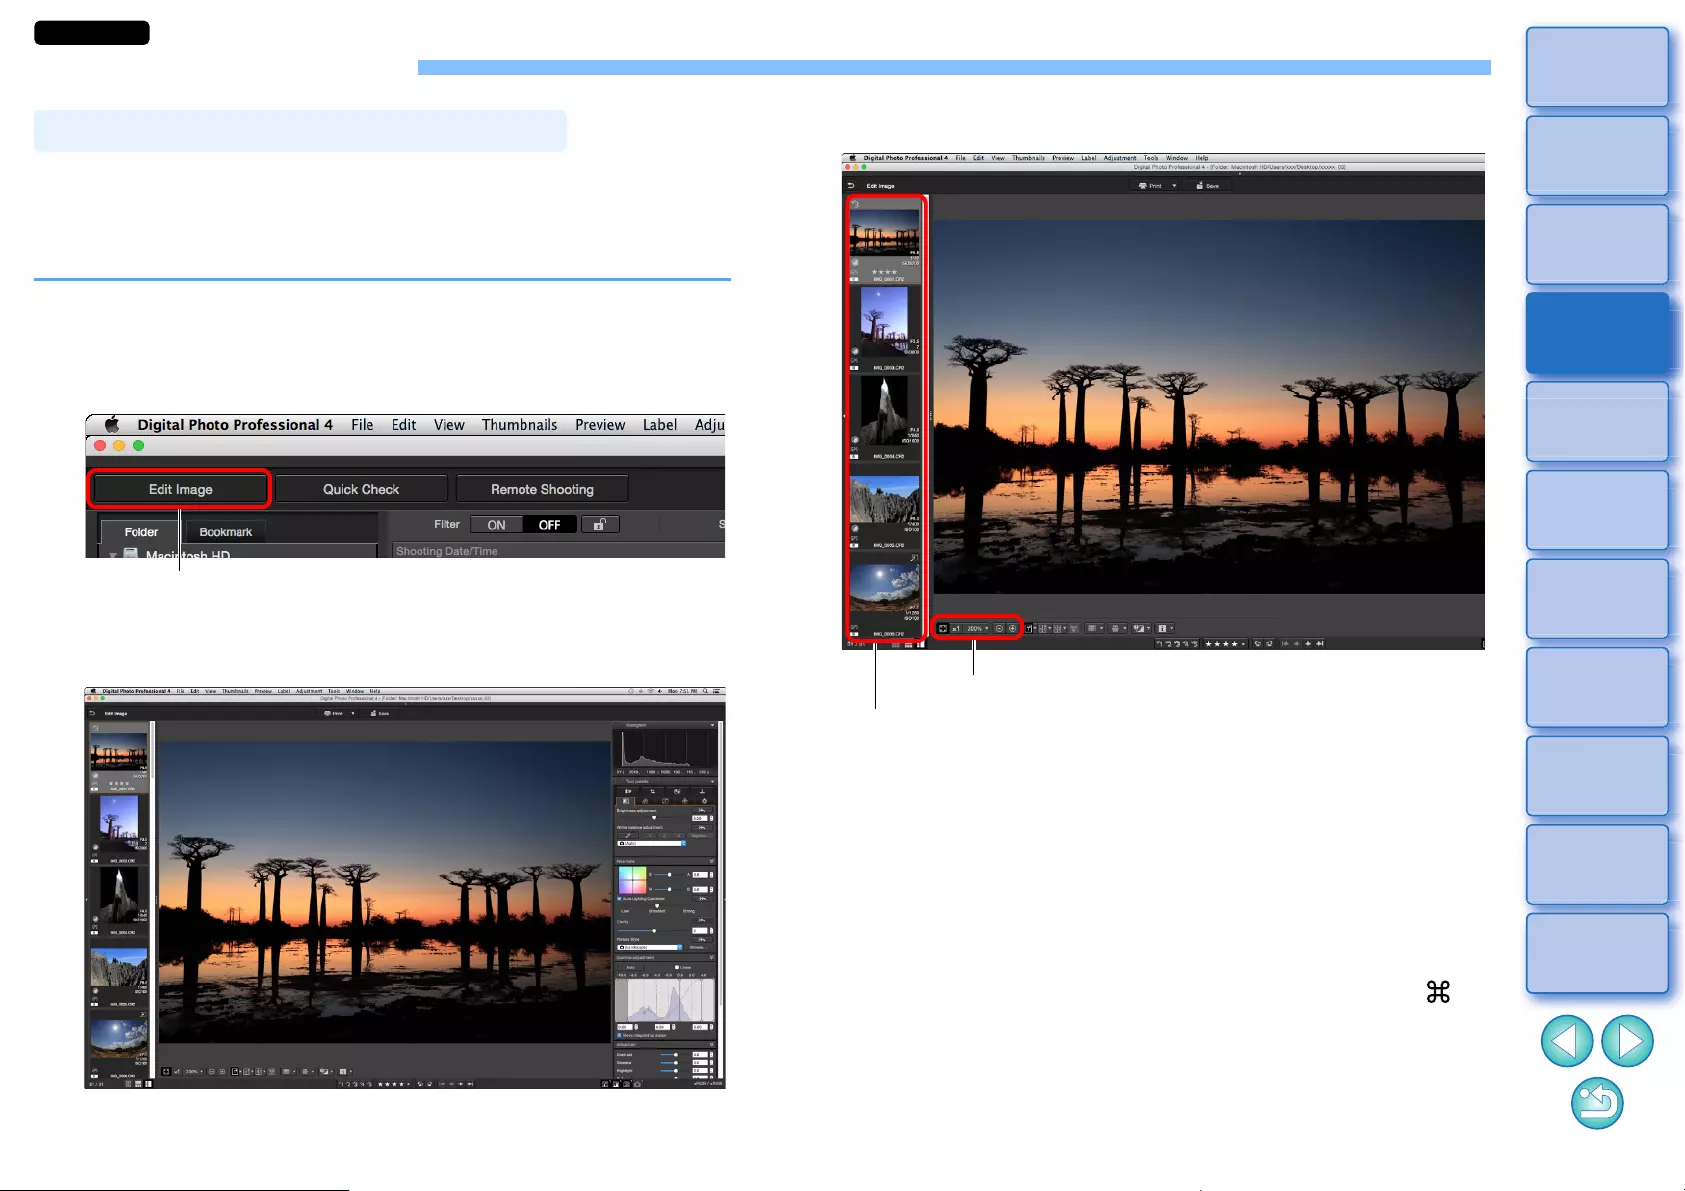
102
3
Sorting
Images
1
2
4
5
Downloading
Images
Viewing
Images
Printing
Images
Editing
Images
6
Processing
Large Numbers
of RAW Images
7
Remote
Shooting
10
HDR PQ
Mode
8
Playing Back
Movies and Saving
Still Photos
11
Specifying
Preferences
9
Handling
RAW Movies
Editing Efficiently
The thumbnail display and the preview window are combined, and
images can be edited efficiently while quickly switching between images
to be edited. Select the images to be edited beforehand in the main
window.
1In the main window, select the images you want to
edit.
2Switch to the edit image window.
ÜThe main window switches to the edit image window.
Editing in the Edit Image Window
Click
Edit image window
3Edit the image.
lFor information on icons displayed on the frame of a thumbnail,
see “Image Frame Information in the Main Window and Edit
Image Window” (p.182).
lThe tool palettes, navigator palette, and histogram palette are
displayed and you can edit the image.
lTo revert to the condition before the last operation performed on
the tool palette, select [Undo] in the [Edit] menu or press < > +
<Z> keys.
Change the display magnification
Select the image to be edited
The selected image is displayed as an enlargement in the
middle of the window
JPEG/TIFF
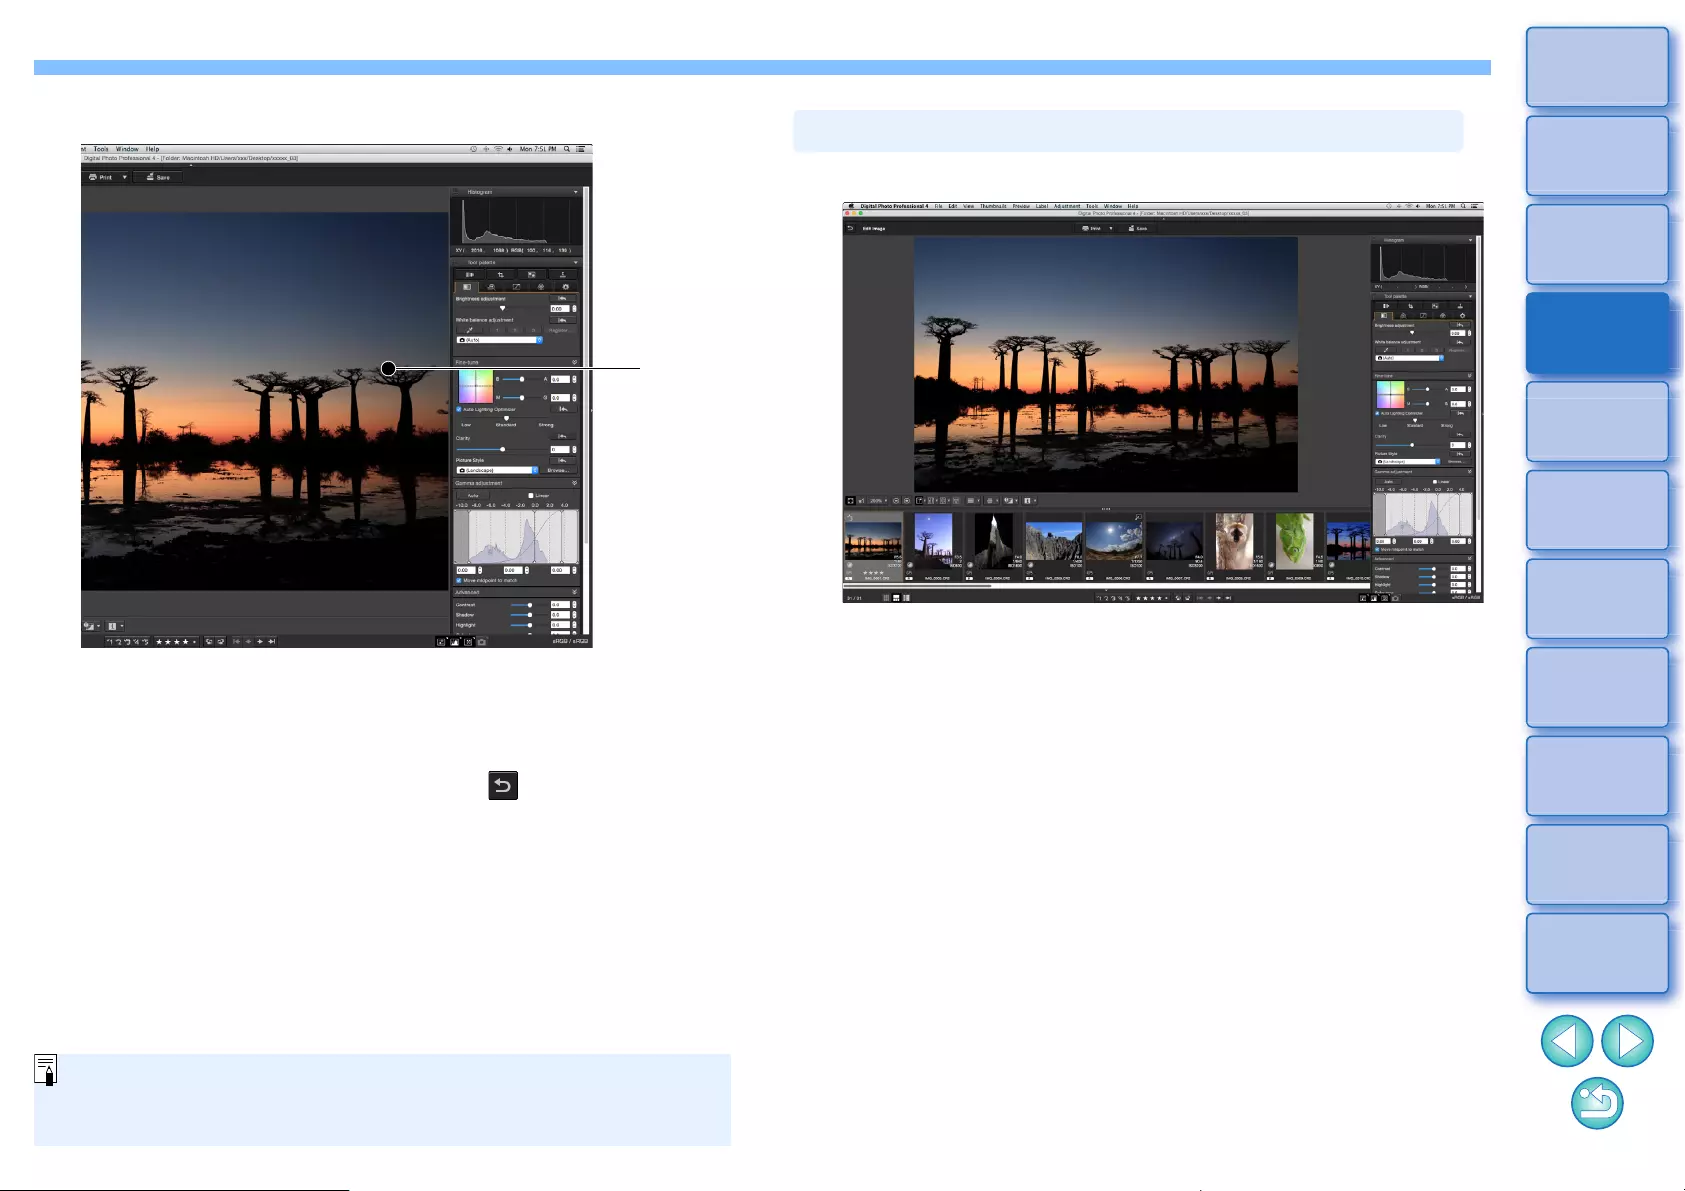
103
3
Sorting
Images
1
2
4
5
Downloading
Images
Viewing
Images
Printing
Images
Editing
Images
6
Processing
Large Numbers
of RAW Images
7
Remote
Shooting
10
HDR PQ
Mode
8
Playing Back
Movies and Saving
Still Photos
11
Specifying
Preferences
9
Handling
RAW Movies
4Click the area you want to enlarge.
ÜThe area you clicked is enlarged to 100% (actual pixel size).
lTo change the display area, drag on the image or drag the
enlargement display area (p.19) of the navigator palette.
lClick again to revert to the full view ([Fit to window]).
lTo return to the main window, click the [ ] button on the
toolbar.
Click
With the edit image window, you can only select images from a
folder. To gather images from several folders for editing, see
“Gathering and Editing Images in the Collection Window” (p.104).
Select the [View] menu [Horizontal Thumbnails].
lIf you select [Vertical Thumbnails], the thumbnail display reverts
to the vertical position.
Changing the Thumbnail Display Position to Horizontal
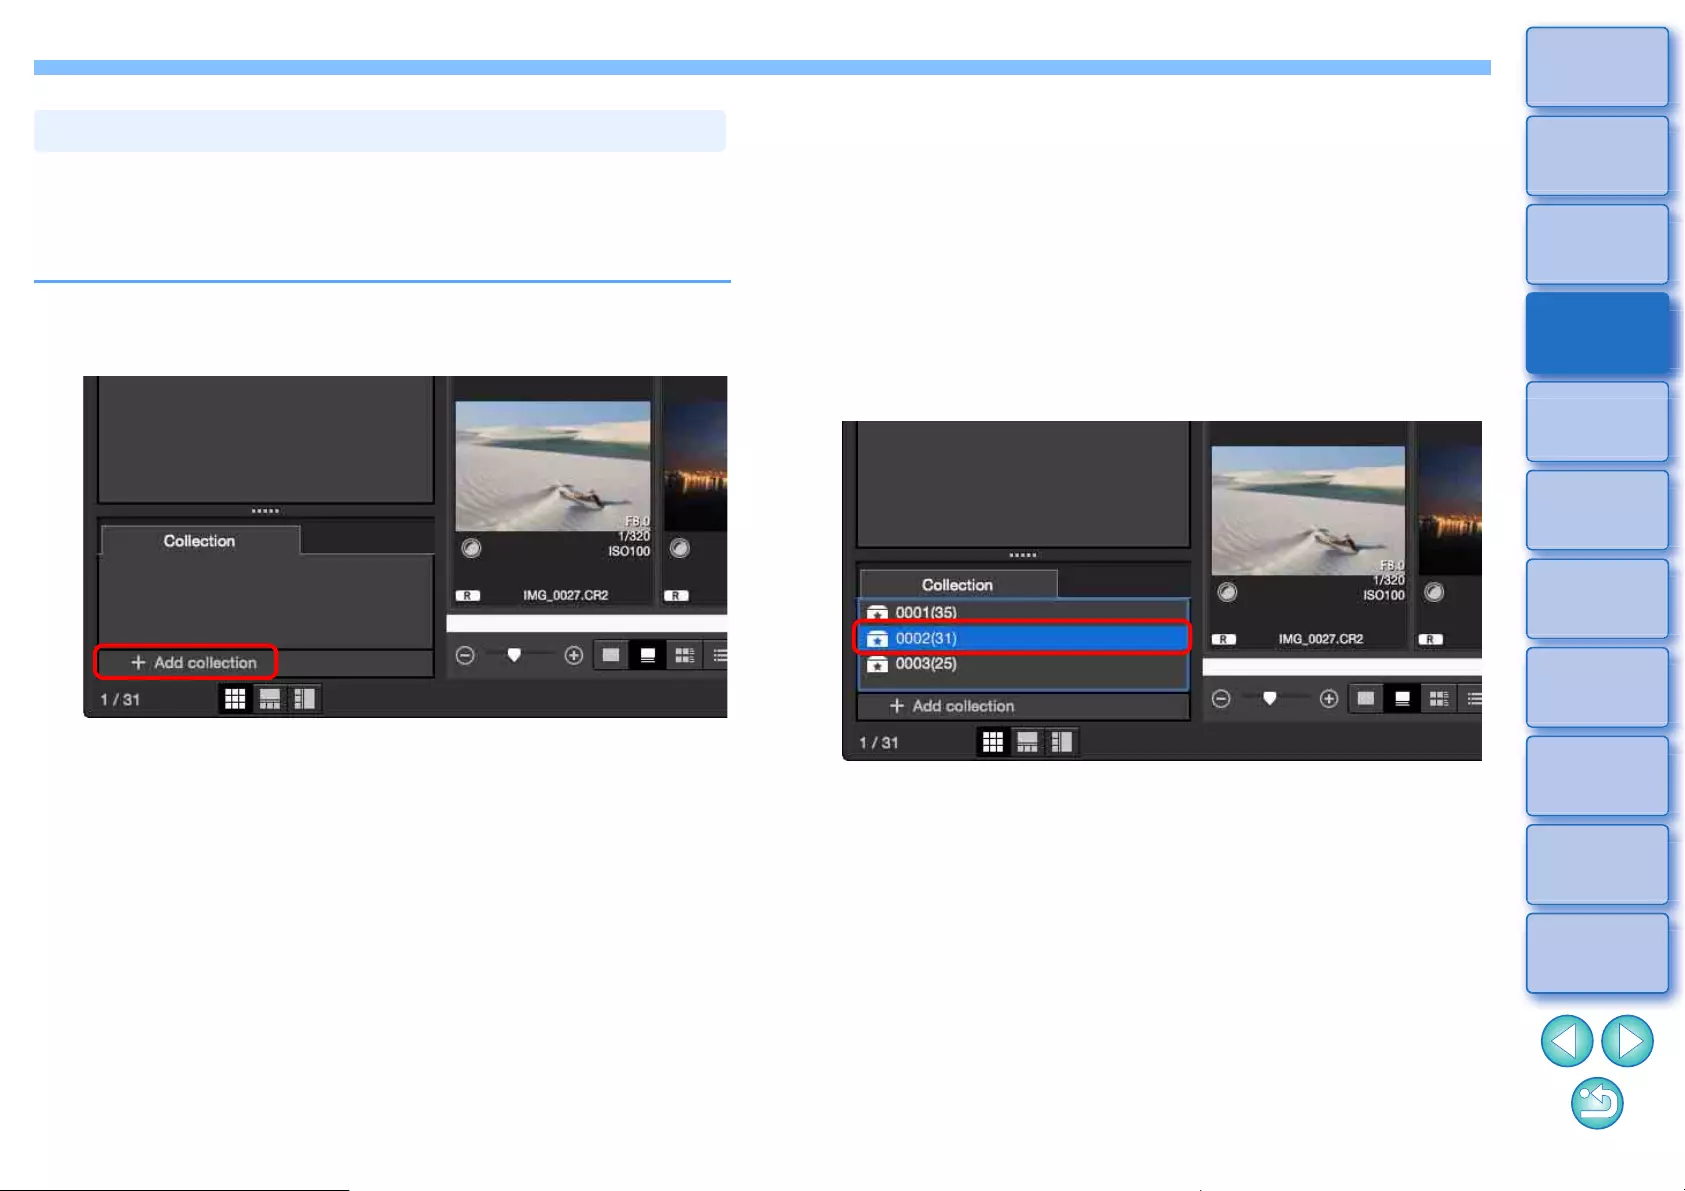
104
3
Sorting
Images
1
2
4
5
Downloading
Images
Viewing
Images
Printing
Images
Editing
Images
6
Processing
Large Numbers
of RAW Images
7
Remote
Shooting
10
HDR PQ
Mode
8
Playing Back
Movies and Saving
Still Photos
11
Specifying
Preferences
9
Handling
RAW Movies
You can gather selected images together in Collection folders for
viewing, comparison and editing.
You can gather images from several folders as well as from a single
folder, allowing you to work with them efficiently.
1Click [+ Add collection] in the [Collection] area in the
main window.
ÜA new collection folder is created in the [Collection] area.
lEnter a name for the collection folder.
lTo create additional collection folders, repeat the operation. Up to
20 folders can be created.
2Select the [File] Menu [Select collection], and
select a collection folder to gather images from the
collection folder names displayed.
Gathering and Editing Images in the Collection Window
3Select images or image folders in the main window.
Select the [File] menu [Add to collection].
ÜThe images are added to the selected collection folder, and the
number of selected images in the collection folder is displayed.
When an image set to single-image display (p.23) is added, the
number of images is indicated as two images.
lYou can also add images to a collection folder by selecting
images and folders and then selecting [Add to collection] from
the menu that appears when you holding down the <control> key.
4Select a collection folder in the [Collection] area.
ÜImages in the selected folder are displayed.
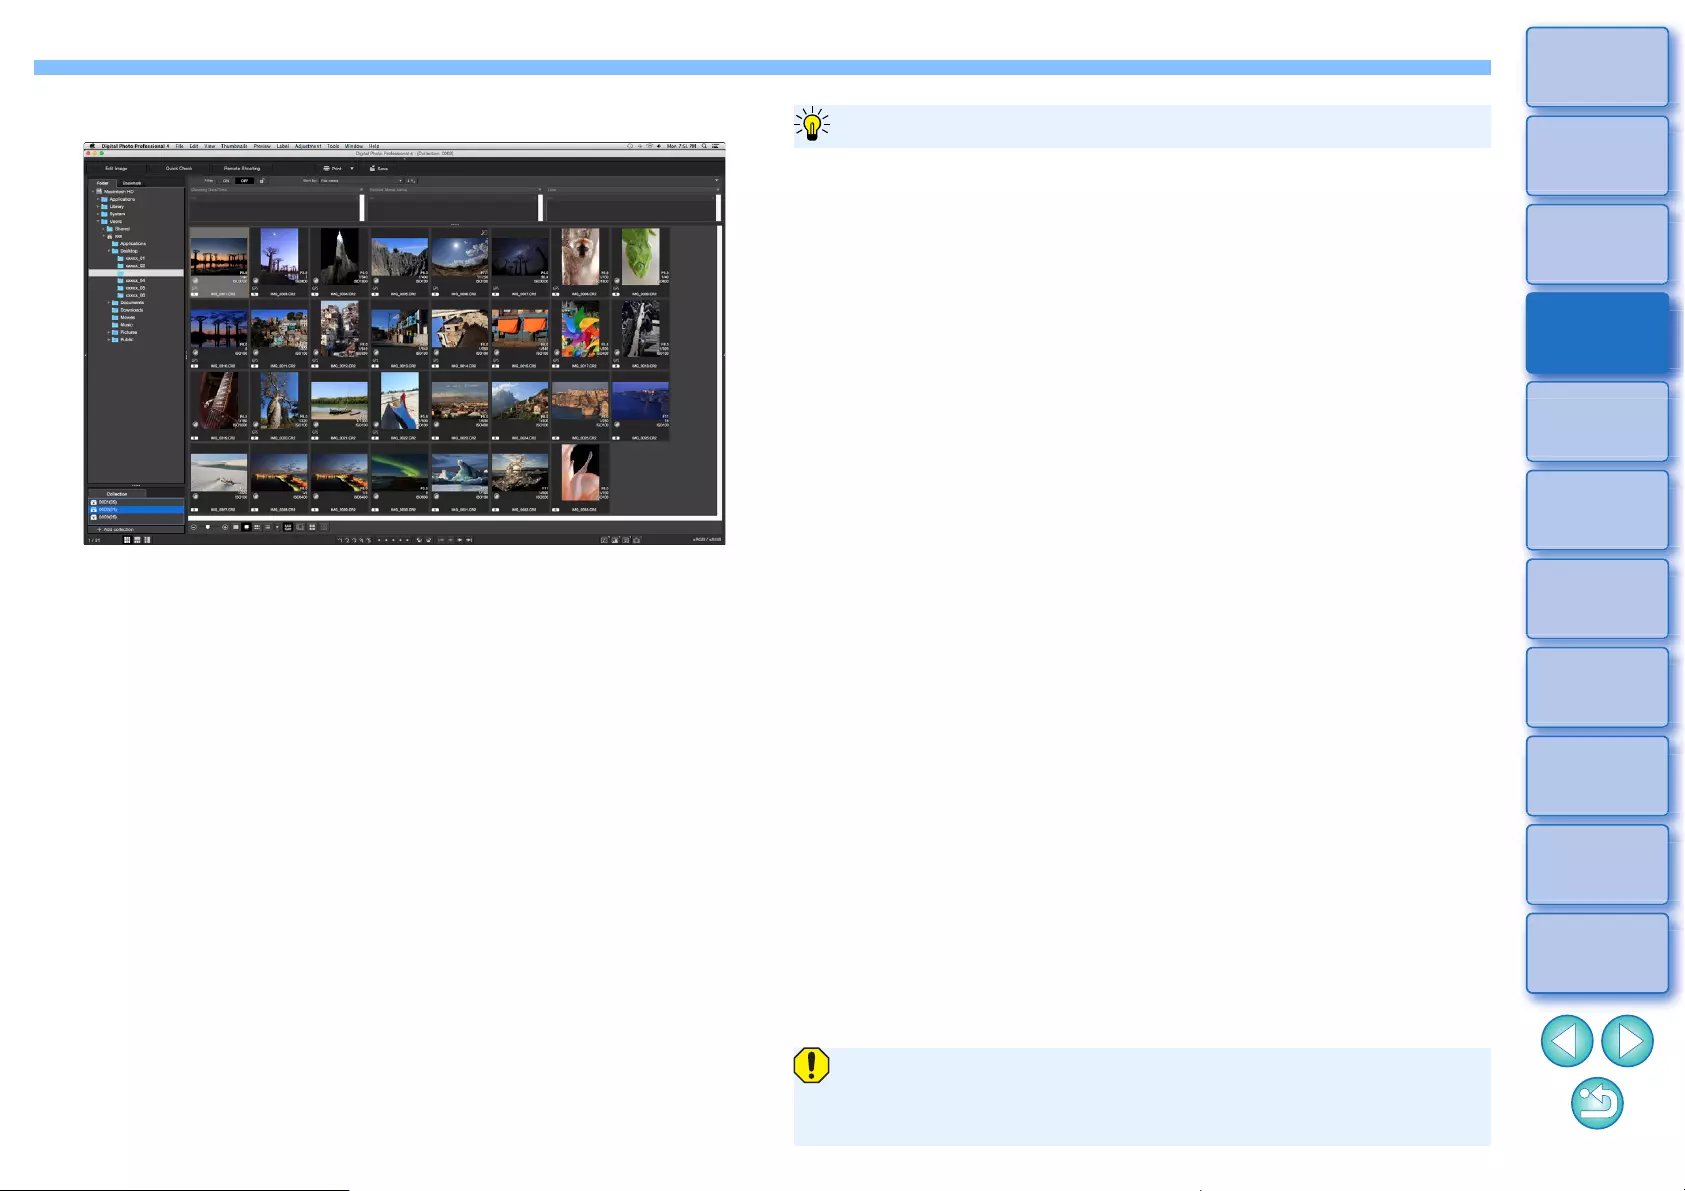
105
3
Sorting
Images
1
2
4
5
Downloading
Images
Viewing
Images
Printing
Images
Editing
Images
6
Processing
Large Numbers
of RAW Images
7
Remote
Shooting
10
HDR PQ
Mode
8
Playing Back
Movies and Saving
Still Photos
11
Specifying
Preferences
9
Handling
RAW Movies
5Check the displayed images.
6Edit the images.
lEdit the displayed images.
ÜDisplayed images are retained in the collection folders even after
quitting DPP.
lRemoving selected images
Select images in a collection folder, select images, and select
[Remove from collection] in the [File] menu. (You can also remove
images from a collection folder by selecting the images, holding down
the <control> key, and selecting [Remove from collection] from the
menu that appears.) Note that even if you remove an image from a
collection folder, the original image remains unaffected.
lRemoving all images
Select [Clear collection] in the [File] menu. Note that even if you
remove all images from a collection folder, the original images remain
unaffected.
lDeleting a collection folder
Select a collection folder in the collection area, then select [Delete
collection] from the menu that appears while holding down the
<control> key. Note that if you delete a collection folder, the original
images remain unaffected.
To remove images from collection folders
Modifications to the image are applied to the original image
Modifications made to images in a collection folder are all applied to
the original image.
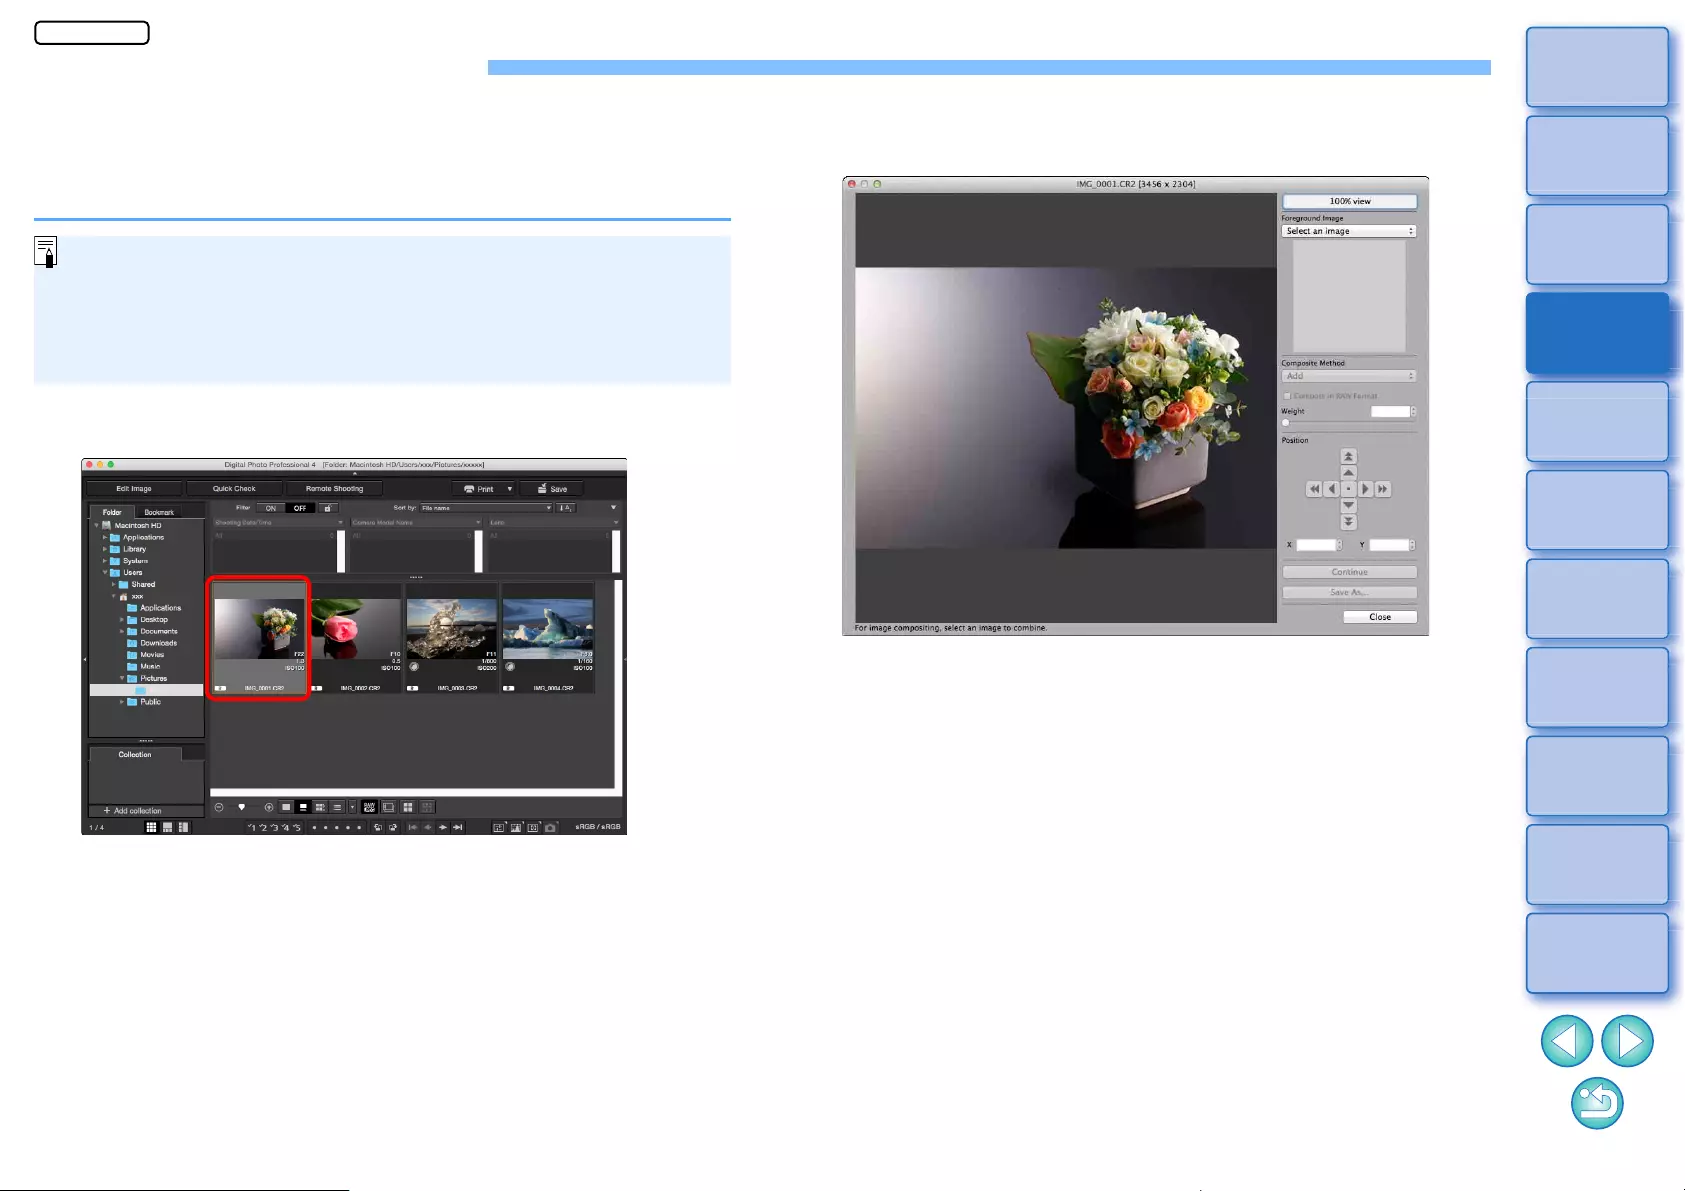
106
3
Sorting
Images
1
2
4
5
Downloading
Images
Viewing
Images
Printing
Images
Editing
Images
6
Processing
Large Numbers
of RAW Images
7
Remote
Shooting
10
HDR PQ
Mode
8
Playing Back
Movies and Saving
Still Photos
11
Specifying
Preferences
9
Handling
RAW Movies
Compositing Images
You can combine two images into a single image. You can further
combine images by adding another image to the composited image.
Since the composited image is saved as a separate image, the original
images remain as they are.
lThis function can be used with all image types (p.4) supported by
DPP.
lThe color space of a composited image will be the color space of
the background image.
lImage information is not appended to a composited image.
1Select a background image in the main window.
lYou can also select a background image from the edit image
window or [Collection] window.
2Select the [Tools] menu [Start Compositing tool].
ÜThe compositing tool window appears.
JPEG/TIFF
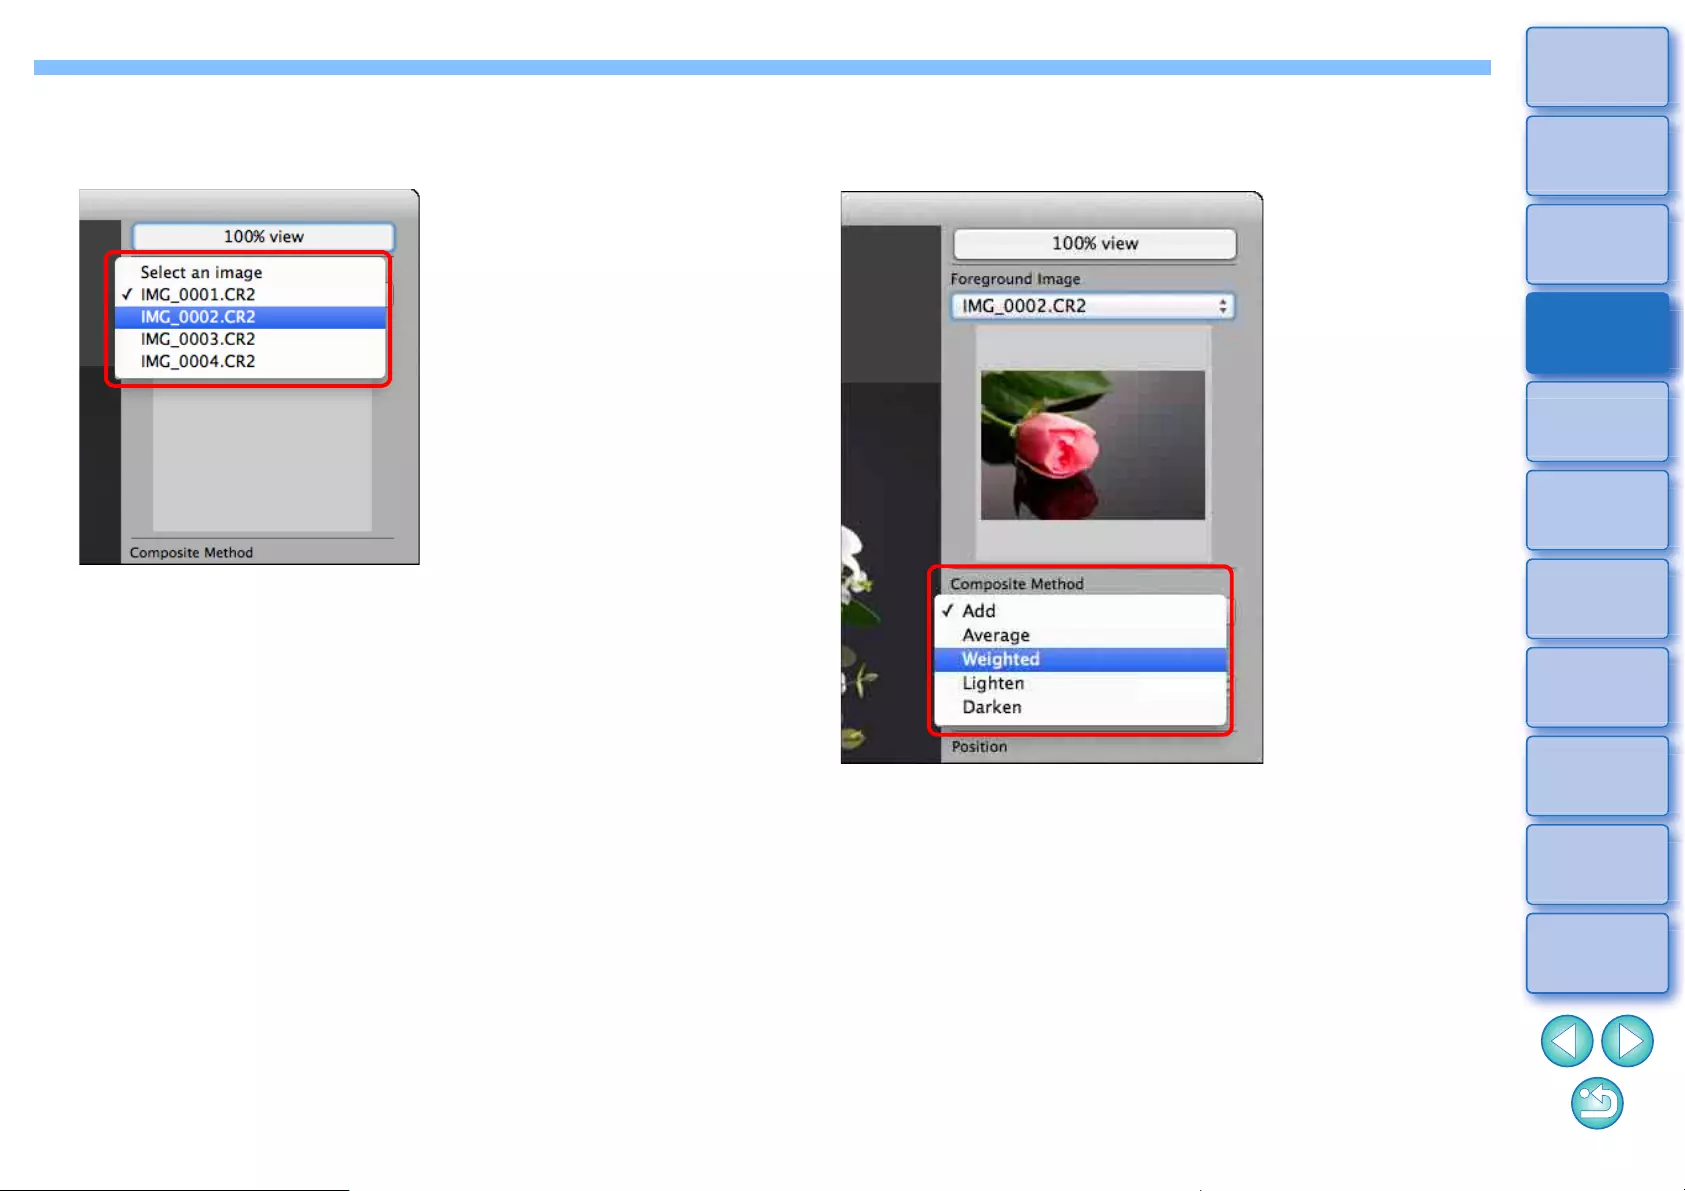
107
3
Sorting
Images
1
2
4
5
Downloading
Images
Viewing
Images
Printing
Images
Editing
Images
6
Processing
Large Numbers
of RAW Images
7
Remote
Shooting
10
HDR PQ
Mode
8
Playing Back
Movies and Saving
Still Photos
11
Specifying
Preferences
9
Handling
RAW Movies
3Select the image to combine.
lSelect the image to combine from the [Foreground Image] list
box.
ÜThe selected image is displayed in the [Foreground Image]
thumbnail display.
ÜA preview of the combined background image and [Foreground
Image] is displayed in the composite preview.
lThe following images can be combined.
• When a background image is selected in the main window:
images in same folder as background image
• When a background image is selected in the [Collection]
window: images in the [Collection] window
• When a background image is selected in the edit image
window: images displayed in the thumbnail display area
lYou can also combine images of different sizes.
4Select a compositing method.
lSelect a compositing method from the [Composite Method] list
box.
ÜThe compositing method selected in the composite preview is
applied.
lThe compositing method can be selected from five types: Add,
Average, Weighted, Lighten, and Darken. For details on each
compositing method, see “Compositing Methods” (p.109).
lIf you select [Weighted], you can set the proportion of the image
to be combined. Use the [Weight] slider at the bottom of the
[Composite Method] list box or directly enter a value to set the
proportion.
lBy clicking the [100% view] button, the image is displayed at
100% magnification (actual pixel size).
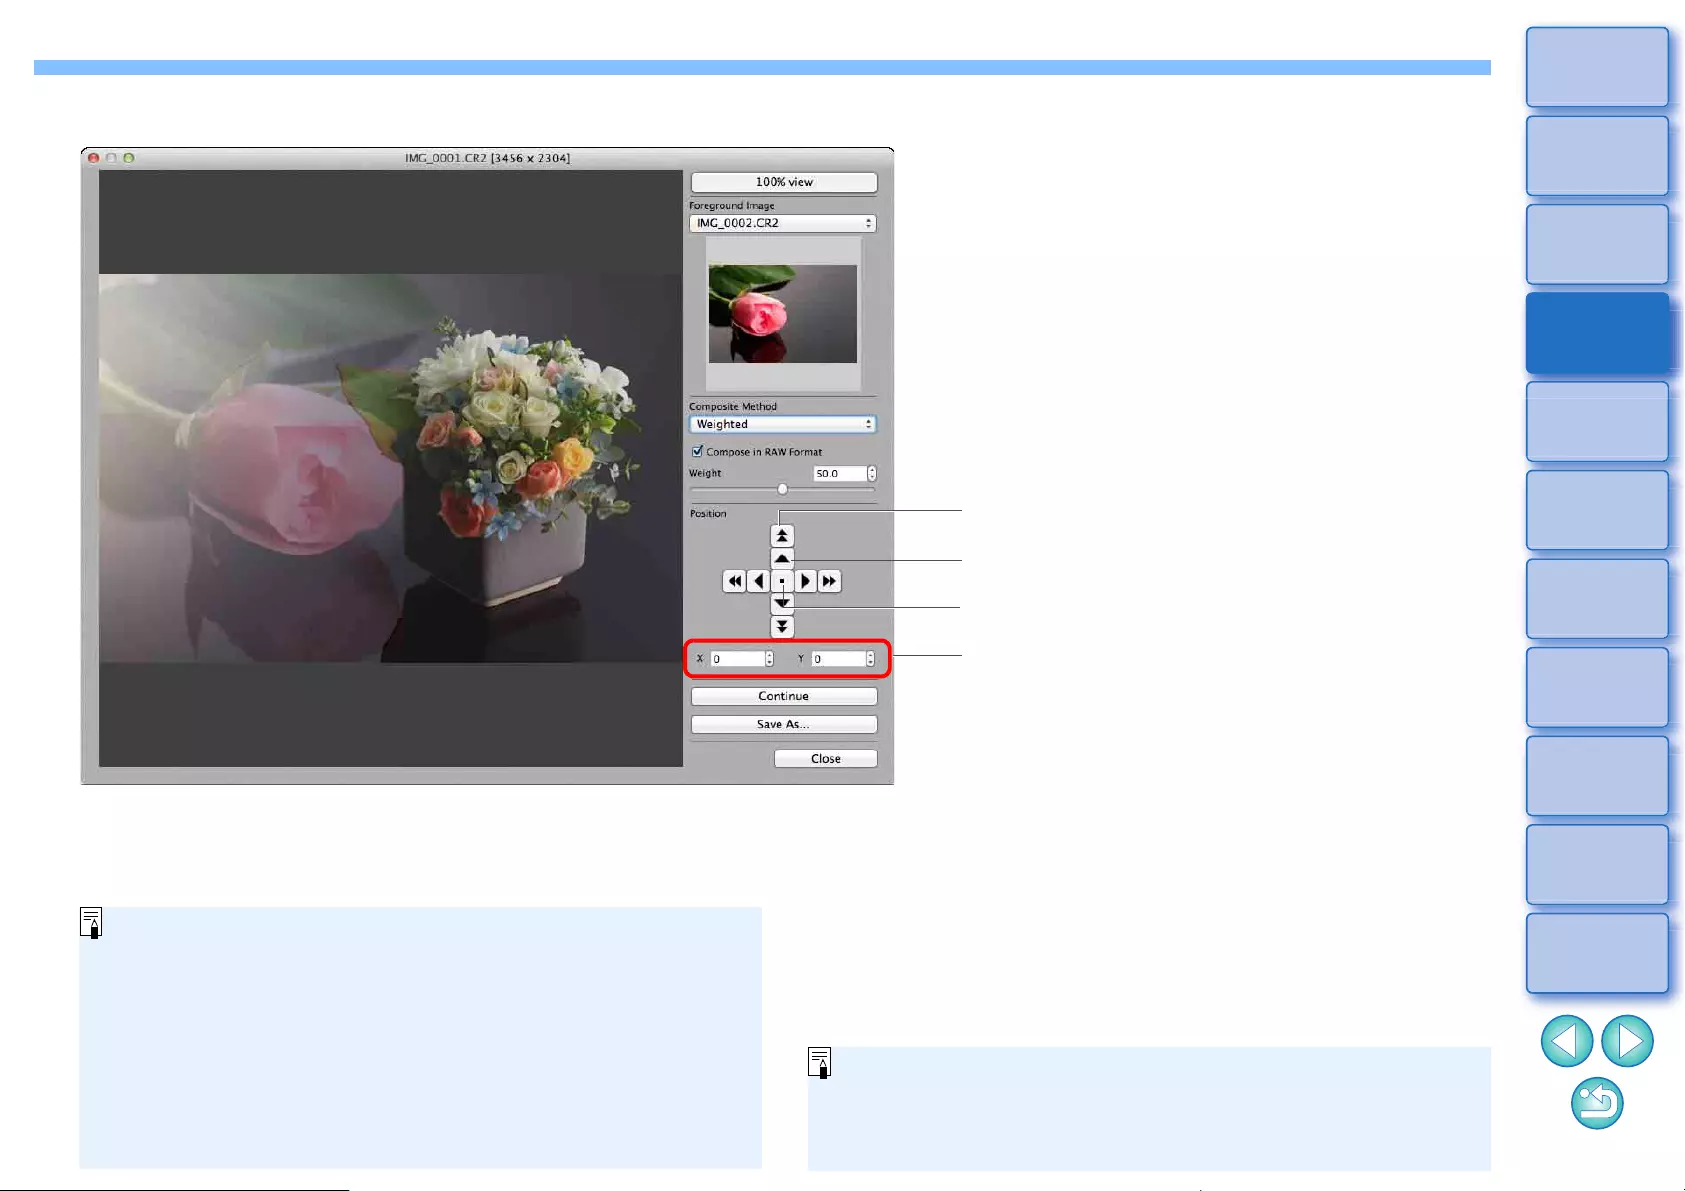
108
3
Sorting
Images
1
2
4
5
Downloading
Images
Viewing
Images
Printing
Images
Editing
Images
6
Processing
Large Numbers
of RAW Images
7
Remote
Shooting
10
HDR PQ
Mode
8
Playing Back
Movies and Saving
Still Photos
11
Specifying
Preferences
9
Handling
RAW Movies
5Position the images.
You can also directly enter the position
coordinates of the [Foreground Image]
to align it.
Shift large amount (50 pixels)
Shift small amount (1 pixel)
Align image centers
lBy default, the background image and the [Foreground Image] are
displayed with their centers aligned.
l[Compose in RAW Format]
Checkmark the [Compose in RAW Format] checkbox as necessary.
lYou can set [Compose in RAW Format] under the following
conditions.
Both the background image and [Foreground Image] are RAW
images, and all the following conditions are met.
• The cameras used to shoot were of the same model
• The ISO speed setting at the time of shooting was the same
• The highlight tone priority setting at the time of shooting was
the same
• The image sizes (original size) are the same
lThe following functions are not available for images composited
with [Compose in RAW Format].
• Auto Lighting Optimizer (p.58)
• Picture Style Auto (automatically set to Standard) (p.49)
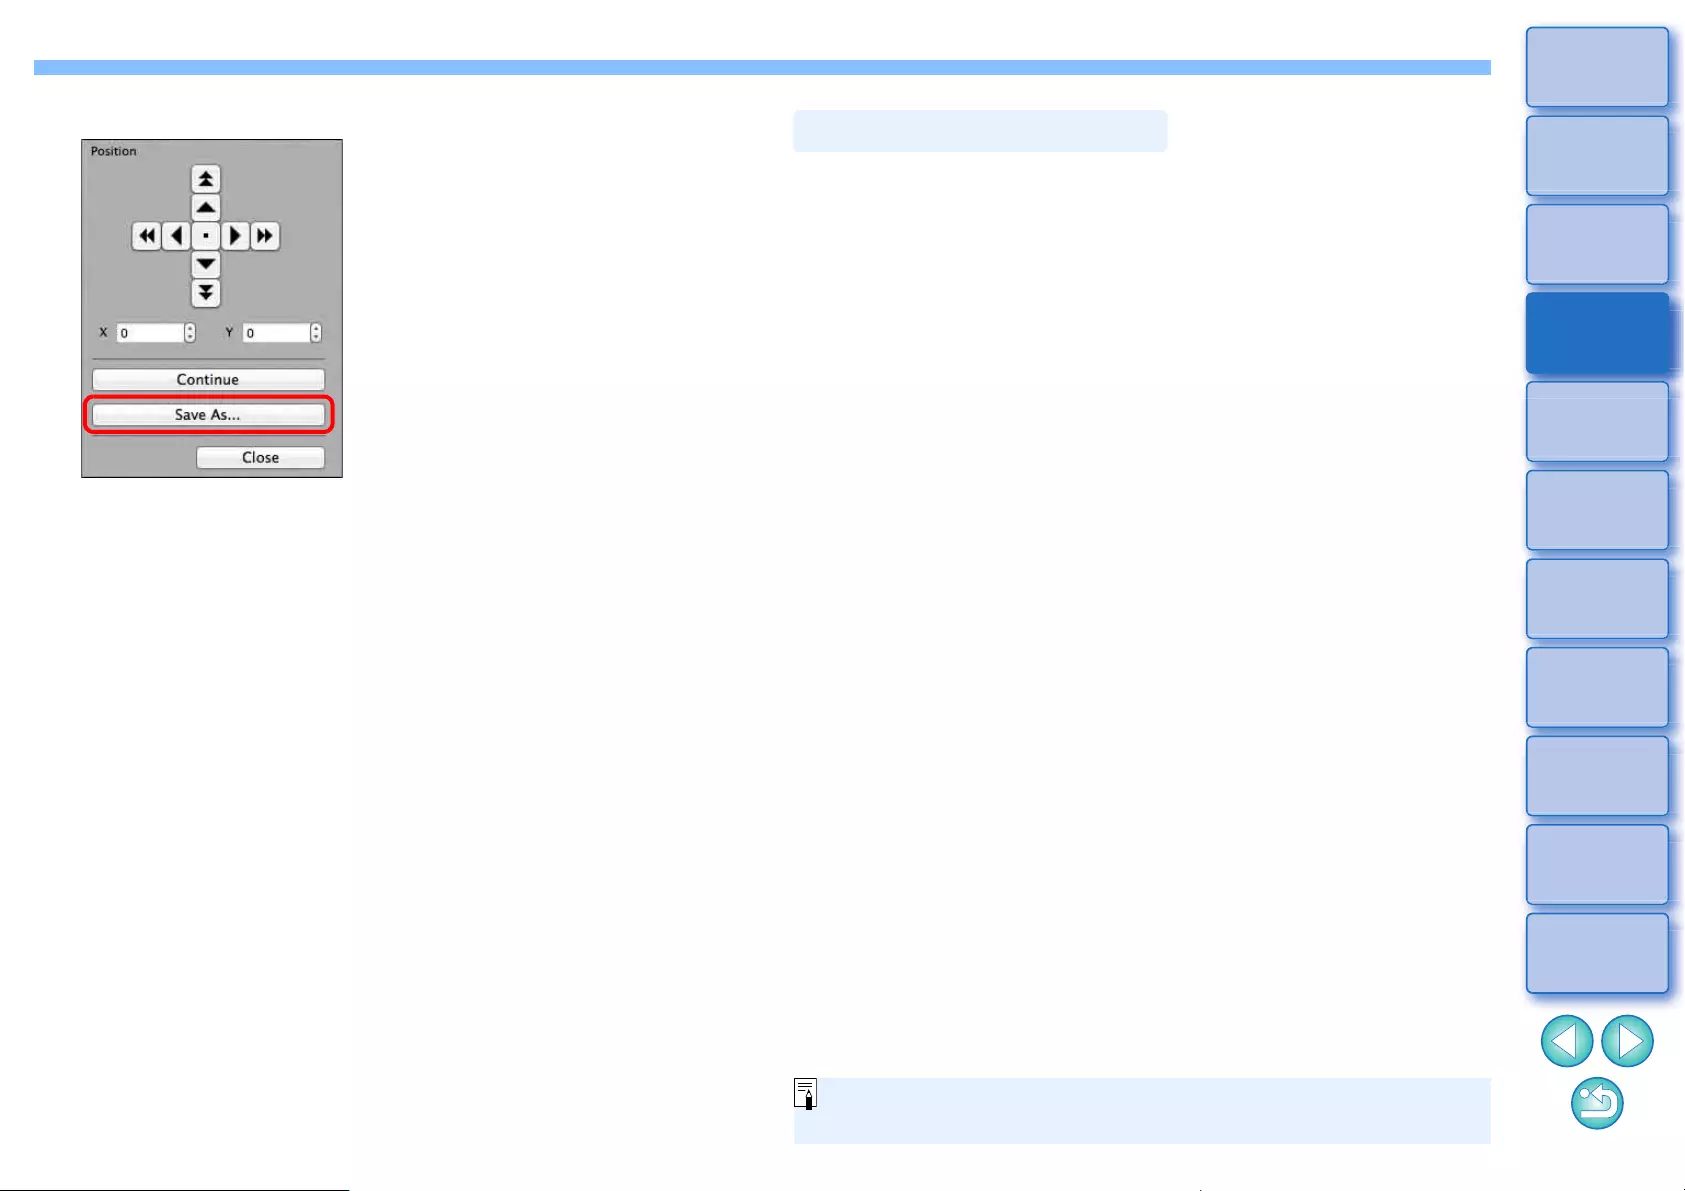
109
3
Sorting
Images
1
2
4
5
Downloading
Images
Viewing
Images
Printing
Images
Editing
Images
6
Processing
Large Numbers
of RAW Images
7
Remote
Shooting
10
HDR PQ
Mode
8
Playing Back
Movies and Saving
Still Photos
11
Specifying
Preferences
9
Handling
RAW Movies
6Click the [Save As] button.
lSpecify the required settings in the window that appears and then
click the [Save] button.
lBy clicking the [Continue] button, images are combined to create
a new background image, and you can continue by combining
another image.
lTo finish, click the [Close] button.
lAdd
The background image and [Foreground Image] are added and
images are combined.
lAverage
The background image and the [Foreground Image] are combined in
proportions of 50% each.
If you want to change the proportion of the [Foreground Image], select
[Weighted].
lWeighted
Set the proportion of the [Foreground Image] and then combine the
background image and [Foreground Image].
lLighten
The background image and the [Foreground Image] are compared,
with only brighter portions of the [Foreground Image] being combined.
lDarken
The background image and the [Foreground Image] are compared,
with only darker portions of the [Foreground Image] being combined.
Compositing Methods
You can display this function as a function button in the main
window’s toolbar (p.127).
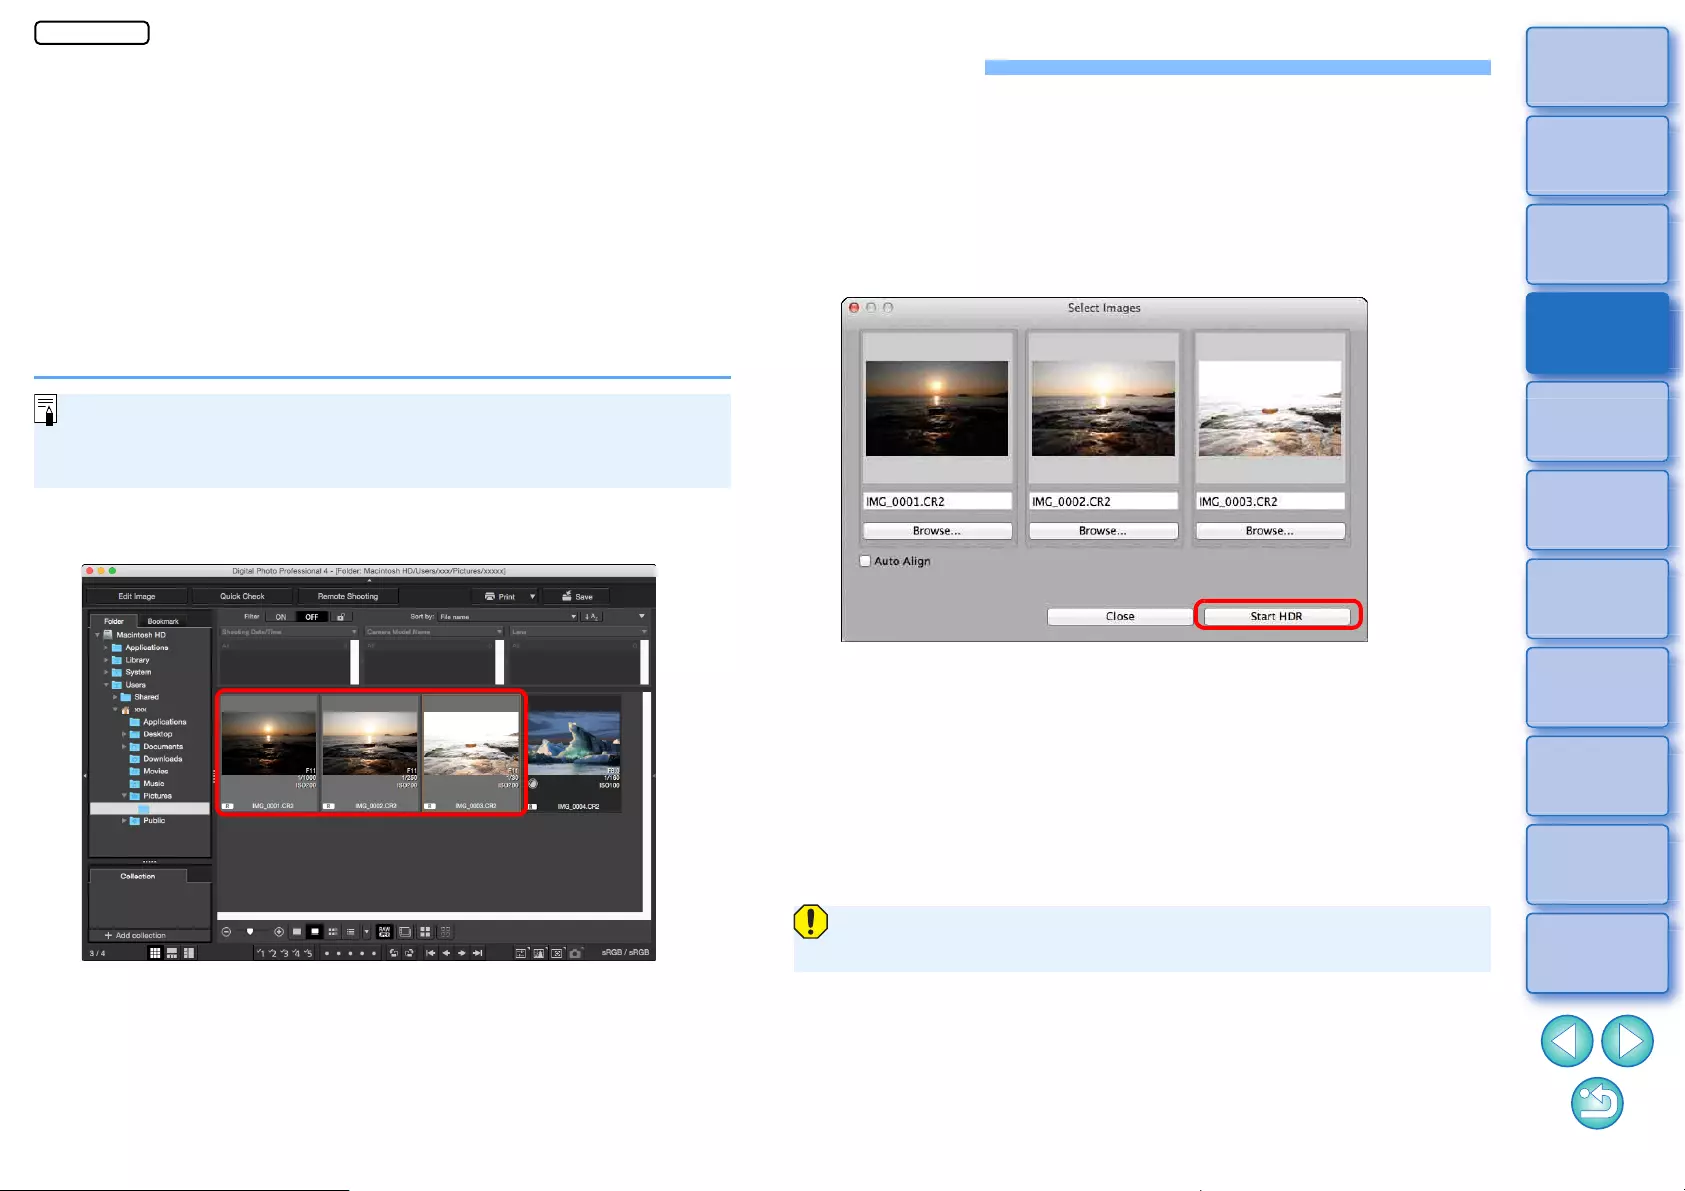
110
3
Sorting
Images
1
2
4
5
Downloading
Images
Viewing
Images
Printing
Images
Editing
Images
6
Processing
Large Numbers
of RAW Images
7
Remote
Shooting
10
HDR PQ
Mode
8
Playing Back
Movies and Saving
Still Photos
11
Specifying
Preferences
9
Handling
RAW Movies
Creating HDR (High Dynamic Range) Images
You can create images with a wide dynamic range where clipping in
highlights and shadows has been reduced, and images that appear like
paintings. This is suited for scenes such as still-lifes and landscapes.
This function is most effective when using three images with different
exposures for the same scene (negative exposure, standard exposure,
positive exposure) to create an HDR image. However, you can also
create an HDR image from two images, or even only one.
Since an HDR image is saved as a separate image, the original images
remain as they are.
* HDR stands for High Dynamic Range.
lThis function can be used with all image types (p.4) supported by
DPP except HEIF images.
lImage information is not appended to an HDR image.
1Select an image in the main window.
2Select the [Tools] menu [Start HDR tool].
ÜThe [Select Images] window appears.
lYou can also display the [Select Images] window from the edit
window and edit image window.
3Specify the required settings, then click the [Start
HDR] button.
lTo change the selected image or add another image, click the
[Browse] button, and in the [Open] dialog box that appears,
select the image file and click the [Open] button.
lIf you select two images of the same size, you can checkmark
the [Auto Align] checkbox for auto image alignment. However,
auto image alignment may not work properly with repetitive
patterns (lattice, stripes, etc.) or flat, single-tone images.
ÜBy clicking the [Start HDR] button, the [Adjust Image] window
appears.
After using auto image alignment, the periphery of the images is
partially deleted.
JPEG/TIFF
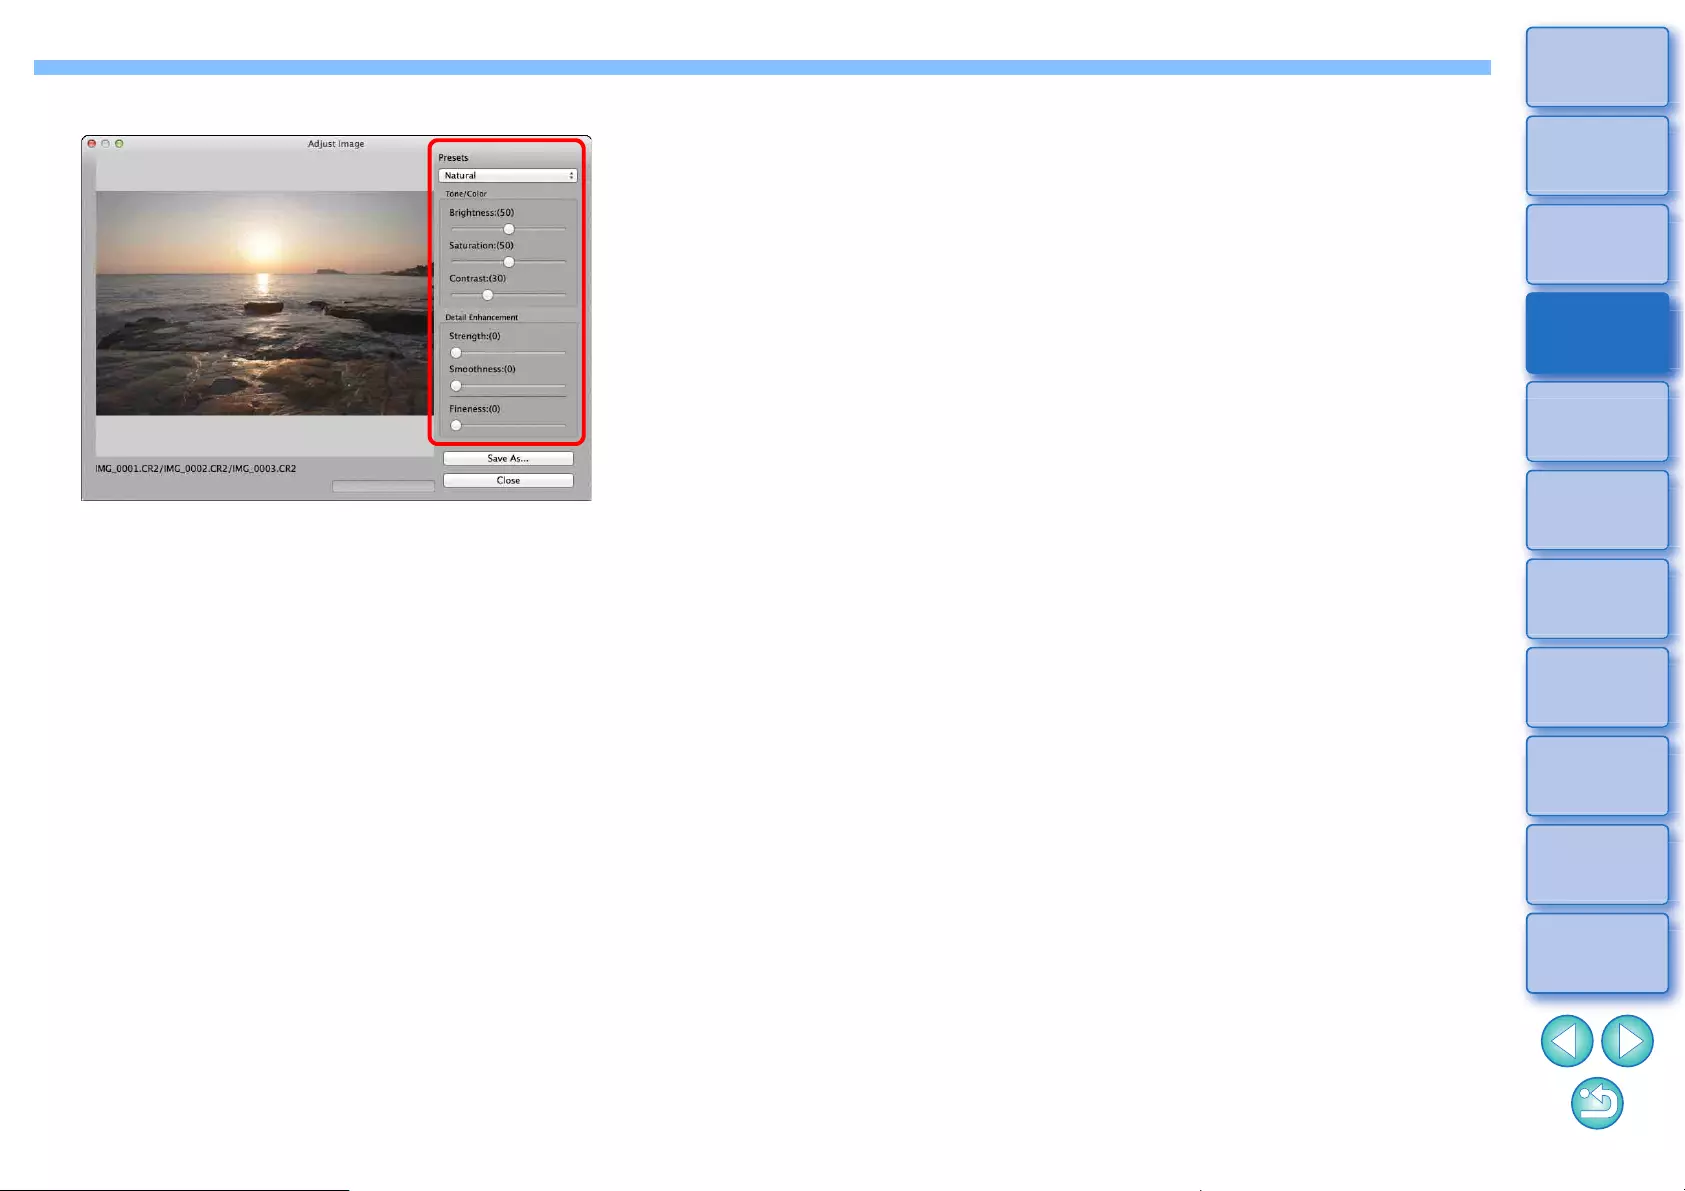
111
3
Sorting
Images
1
2
4
5
Downloading
Images
Viewing
Images
Printing
Images
Editing
Images
6
Processing
Large Numbers
of RAW Images
7
Remote
Shooting
10
HDR PQ
Mode
8
Playing Back
Movies and Saving
Still Photos
11
Specifying
Preferences
9
Handling
RAW Movies
4Make required selections to adjust the image.
lSliders in [Adjust Image] window
[Tone/Color]
[Brightness]: Adjusts the overall brightness of the image. Move
the slider to the right to brighten the image, and to
the left to darken the image.
[Saturation]: Adjusts the overall color saturation of the image.
Move the slider to the right to make the color
deeper, and to the left to make the color weaker.
[Contrast]: Adjusts the overall contrast of the image. Move
the slider to the right to make contrast stronger
and to the left to make contrast weaker.
[Detail Enhancement]
[Strength]: Adjusts the overall contrast and contrast of
details together. Move the slider to the right for a
stronger effect.
[Smoothness]:Adjusts the overall smoothness of the image.
Move the slider to the right for a smooth and
natural impression.
[Fineness]: Adjusts the clearness of details. Move the slider
to the right for a sharper outline.
l[Presets] and finishing effects
With [Presets], you can select from the five preset finishing
effects below from a pulldown menu ([Natural] is selected by
default), instead of operating the sliders individually. By selecting
a finishing effect, each slider moves according to the setting. You
can also operate and adjust the sliders after selecting an effect.
[Natural]: In high-contrast scenes, rendering in areas
where highlights or shadows are usually clipped
is corrected, for a finish with reduced highlight
and shadow clipping.
[Art standard]: Gives a finish with painting-like tonality for an
impressive image.
[Art vivid]: For a more vivid look than with [Art standard].
[Art bold]: For a more vivid look than with [Art standard],
that makes the subject pop out.
[Art embossed]: Tones down vividness more than [Art standard],
for an old-fashioned feel.
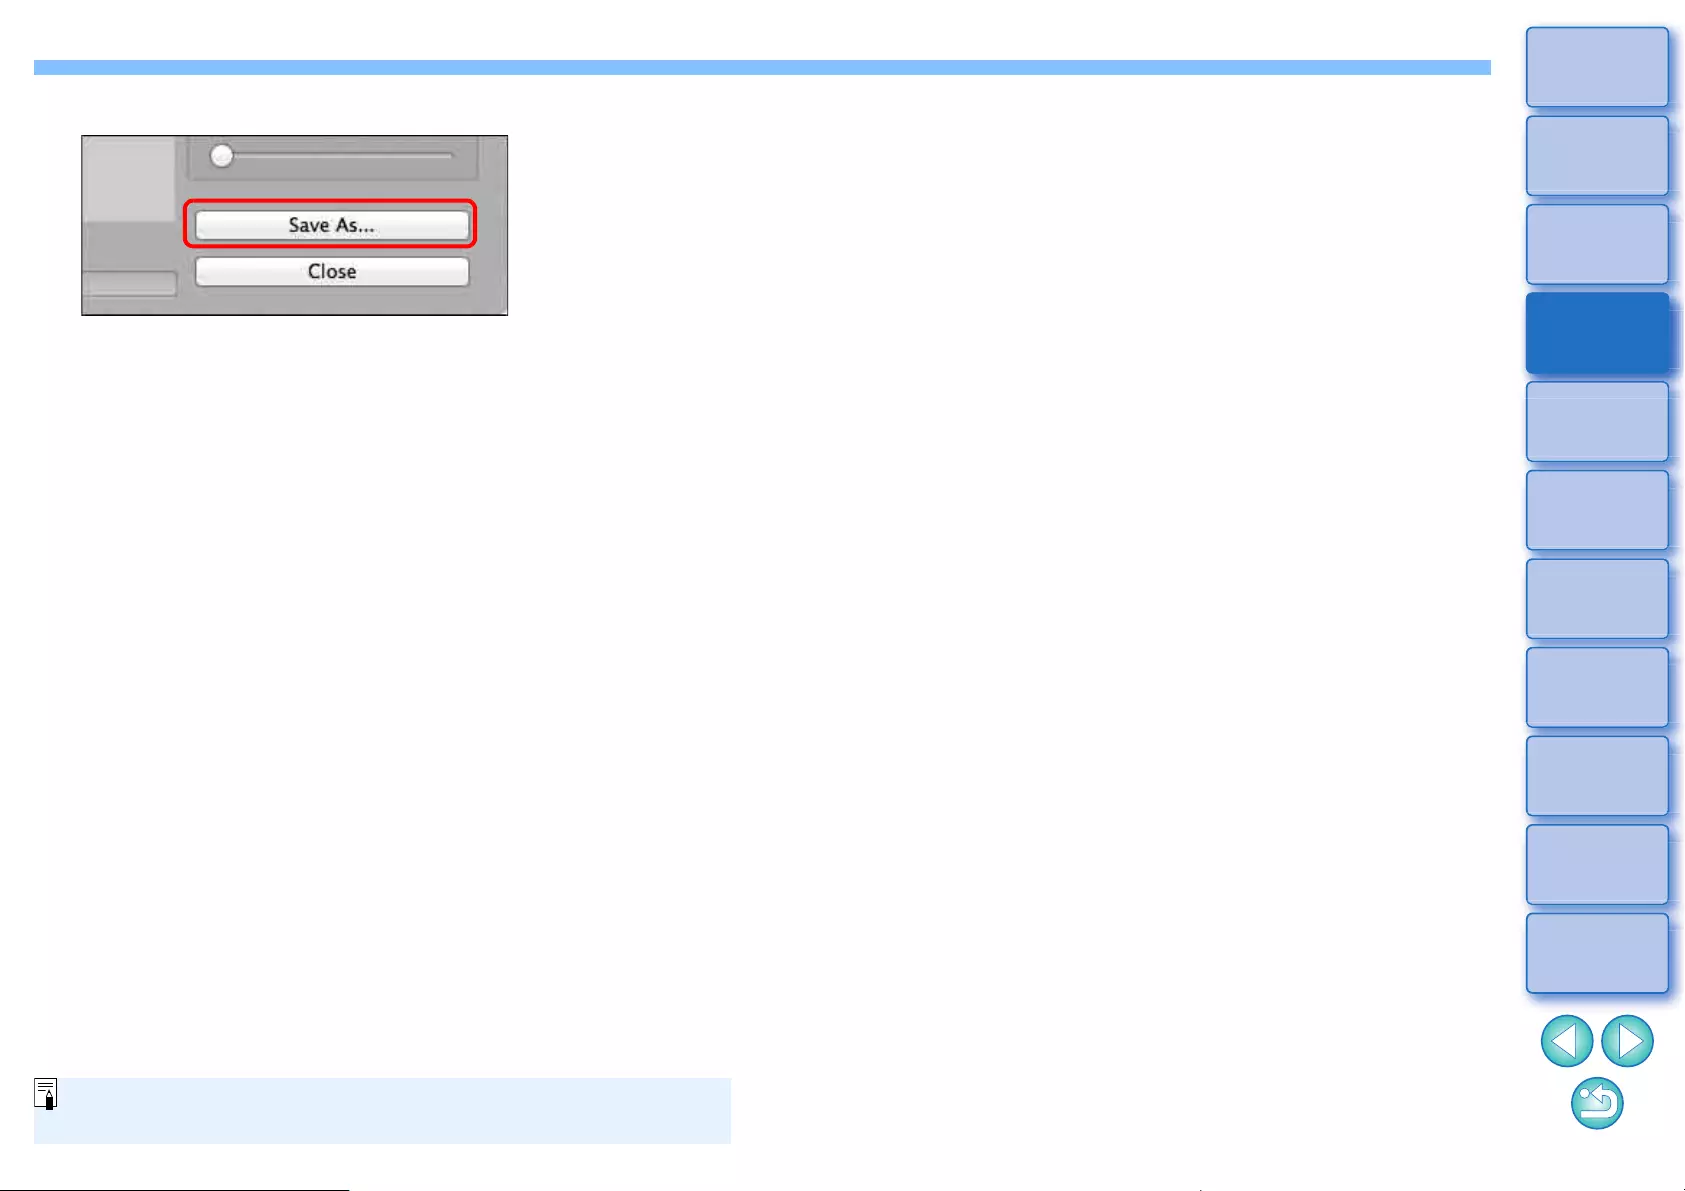
112
3
Sorting
Images
1
2
4
5
Downloading
Images
Viewing
Images
Printing
Images
Editing
Images
6
Processing
Large Numbers
of RAW Images
7
Remote
Shooting
10
HDR PQ
Mode
8
Playing Back
Movies and Saving
Still Photos
11
Specifying
Preferences
9
Handling
RAW Movies
5Click the [Save As] button.
ÜSpecify the required settings in the window that appears by
clicking the [Save As] button and click the [Save] button.
You can display this function as a function button in the main
window’s toolbar (p.127).
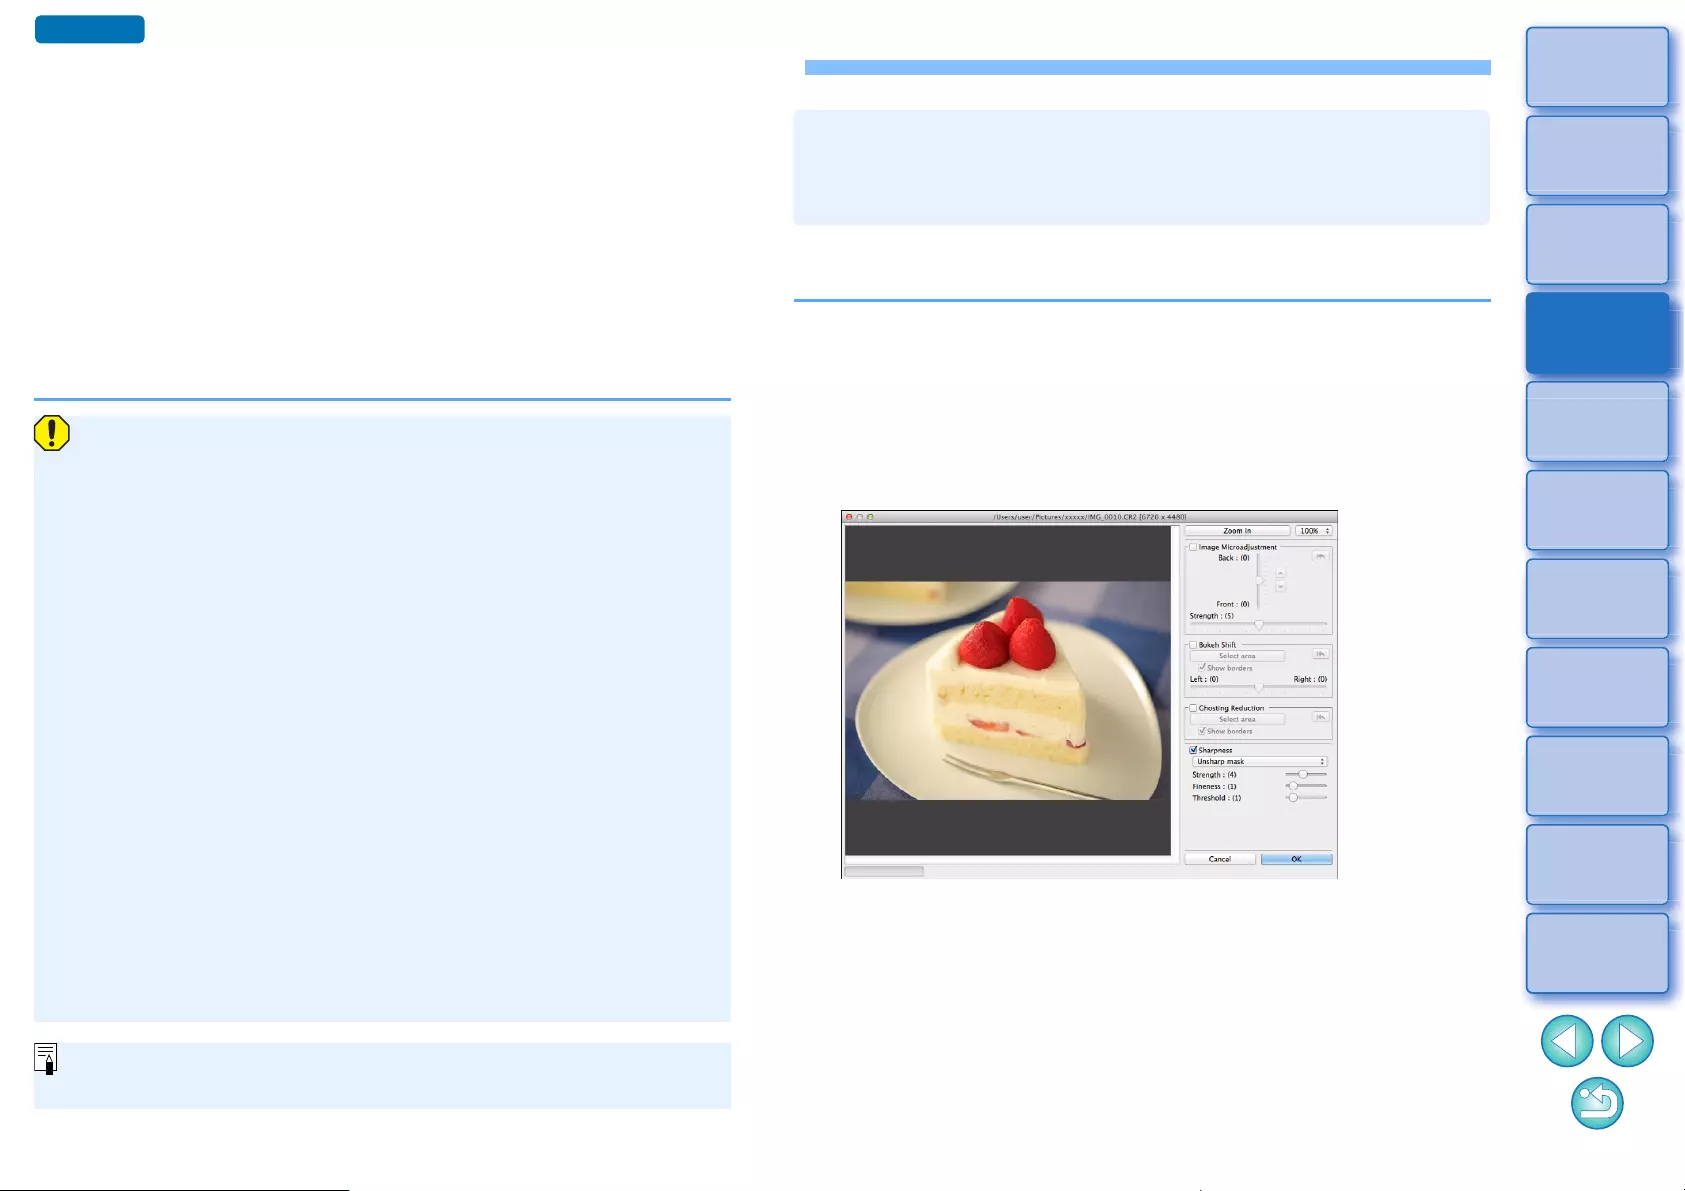
113
3
Sorting
Images
1
2
4
5
Downloading
Images
Viewing
Images
Printing
Images
Editing
Images
6
Processing
Large Numbers
of RAW Images
7
Remote
Shooting
10
HDR PQ
Mode
8
Playing Back
Movies and Saving
Still Photos
11
Specifying
Preferences
9
Handling
RAW Movies
Using the Dual Pixel RAW Optimizer
By setting the Dual Pixel RAW function on the camera compatible with
the function before shooting RAW images, images are recorded as
“special RAW images (Dual Pixel RAW images)” with dual pixel
information appended from the imaging sensor. This is called Dual Pixel
RAW shooting. Using this function, the [Dual Pixel RAW Optimizer], with
Dual Pixel RAW images, you can make use of the Dual Pixel data
recorded with the Dual Pixel RAW image for microadjustment of the
position of maximum sharpness and resolution using the depth
information contained within the file, repositioning the viewpoint or
foreground bokeh for a more pleasing result, and reducing the
appearance of ghosting in images.
Cautions for Dual Pixel RAW shooting
Note the following when shooting in Dual Pixel RAW.
lCommon to all functions
• Effects are most easily gained when the lens aperture value is
f/5.6 or lower.
• Effects may be different between shooting in vertical orientation
and horizontal orientation.
• It is recommended that the ISO speed be ISO 1600 or lower.
lOnly for “Microadjustment of the position of maximum sharpness
and resolution using the depth information contained within the
Dual Pixel RAW file”
• It is recommended that the lens focal length be at least 50 mm.
• It is recommended that this function be used when the camera
is at a distance from the subject.*
* Use the following as a guide to subject distances according to
focal length.
When the lens focal length is 50 mm, the subject distance
should be approx. 1 m - 10 m / 3.3 ft. - 32.8 ft.
When the lens focal length is 100 mm, the subject distance
should be approx. 2 m - 20 m / 6.6 ft. - 65.6 ft.
When the lens focal length is 200 mm, the subject distance
should be approx. 4 m - 40 m / 13.1 ft. - 131.2 ft.
You can display this function as a function button in the main
window’s toolbar (p.127).
Microadjust the position of maximum sharpness and resolution, using the
depth information contained within the Dual Pixel RAW images.
1In the main window or edit image window, select the
Dual Pixel RAW image you want to adjust, and then
select [Start Dual Pixel RAW Optimizer] from the
[Tools] menu.
ÜThe Dual Pixel RAW Optimizer window appears.
2Checkmark the [Image Microadjustment] checkbox.
Microadjustment of the Position of Maximum
Sharpness and Resolution Using the Depth
Information Contained within the Dual Pixel RAW File
Advanced
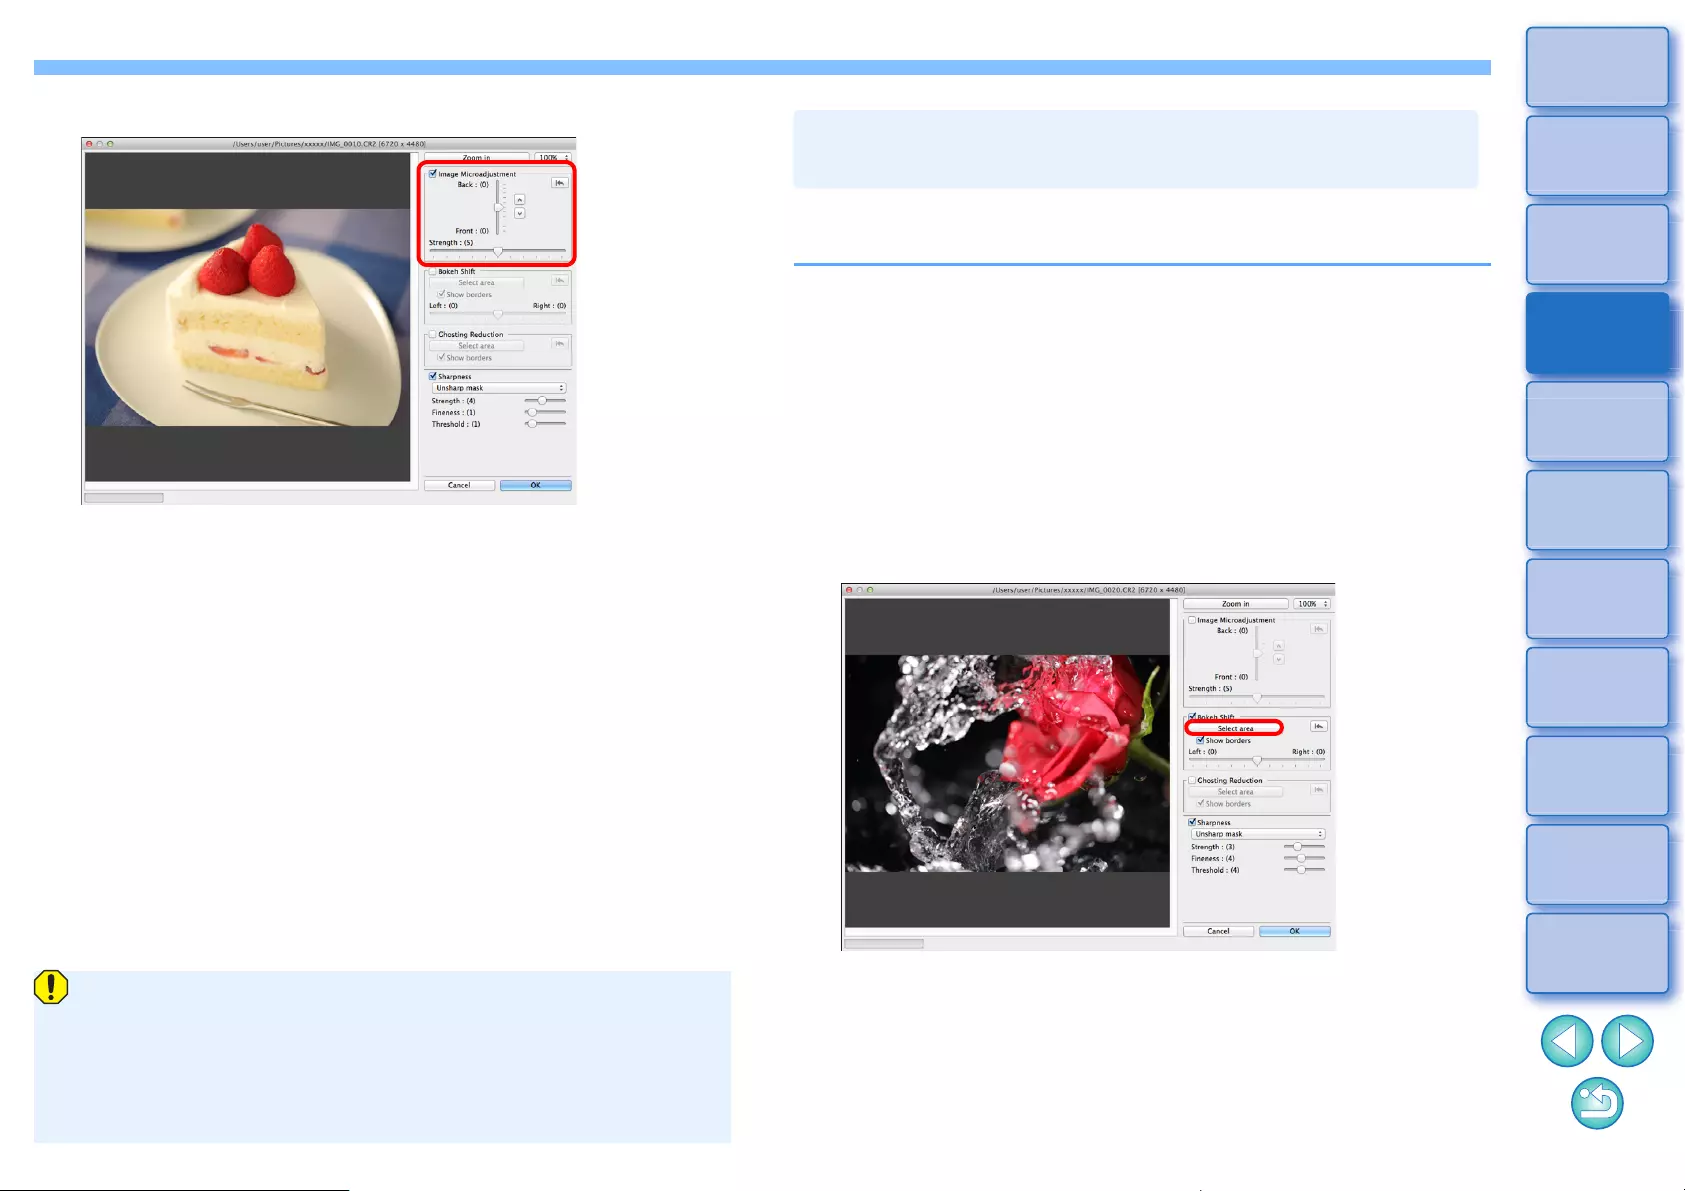
114
3
Sorting
Images
1
2
4
5
Downloading
Images
Viewing
Images
Printing
Images
Editing
Images
6
Processing
Large Numbers
of RAW Images
7
Remote
Shooting
10
HDR PQ
Mode
8
Playing Back
Movies and Saving
Still Photos
11
Specifying
Preferences
9
Handling
RAW Movies
3Adjust the image.
lUse the slider to adjust the resolution based on depth information
and the level of resolution.
4Click the [OK] button.
ÜAdjustment results are applied to the image.
For information on saving adjustment results to images, see
“Saving Editing Results” (p.95).
lIf the subject’s outline or any bokeh look unnatural, or there is an
increase in noise or noticeable changes in hue or brightness,
lower the level of adjustment.
lThis function cannot be used at the same time as “Reposition the
viewpoint or foreground bokeh for a more pleasing result” or
“Reduces the appearance of ghosting in images”.
Reposition the viewpoint or foreground bokeh for a more pleasing result,
using the dual pixel information recorded in Dual Pixel RAW images.
1In the main window or edit image window, select the
Dual Pixel RAW image you want to adjust, and then
select [Start Dual Pixel RAW Optimizer] from the
[Tools] menu.
ÜThe Dual Pixel RAW Optimizer window appears.
2Checkmark the [Bokeh Shift] checkbox.
3Specify the area to adjust.
lClick the [Select area] button and drag on the image to specify
the area to be adjusted, and right-click with the mouse to fix the
area.
You can also remove the check mark from the [Show borders]
checkbox to hide the border.
Reposition the Viewpoint or Foreground
Bokeh for a More Pleasing Result
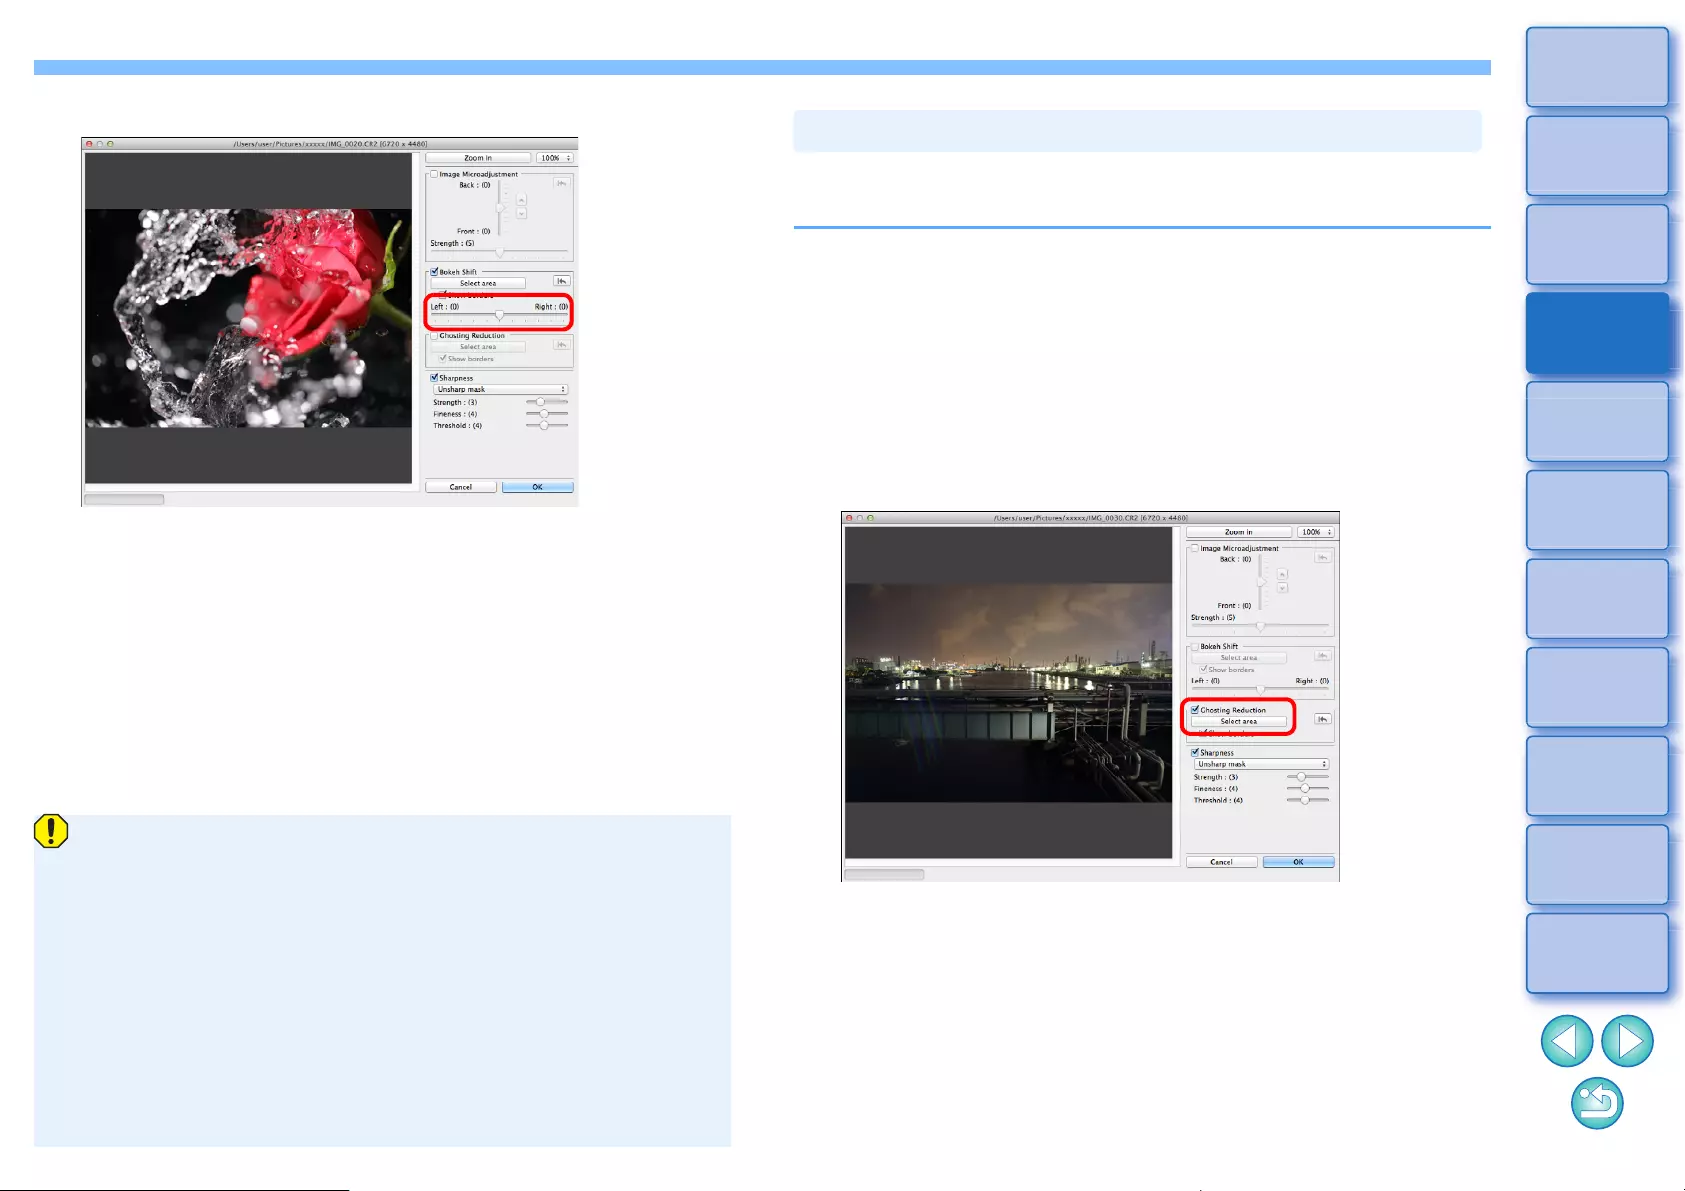
115
3
Sorting
Images
1
2
4
5
Downloading
Images
Viewing
Images
Printing
Images
Editing
Images
6
Processing
Large Numbers
of RAW Images
7
Remote
Shooting
10
HDR PQ
Mode
8
Playing Back
Movies and Saving
Still Photos
11
Specifying
Preferences
9
Handling
RAW Movies
4Adjust the image.
lUse the slider to adjust the viewpoint.
5Click the [OK] button.
ÜAdjustment results are applied to the image.
For information on saving adjustment results to images, see
“Saving Editing Results” (p.95).
lIf the subject’s outline or any bokeh look unnatural, or there is an
increase in noise or noticeable changes in hue or brightness,
lower the level of adjustment.
lResolution may expand in the depth direction according to the
level of adjustment.
lIf the border of the selected area in the image appears unnatural,
lower the level of adjustment.
lThis function cannot be used at the same time as
“Microadjustment of the position of maximum sharpness and
resolution using the depth information contained within the Dual
Pixel RAW file” or “Reduces the appearance of ghosting in
images”.
Reduce the appearance of ghosting in images, using the dual pixel
information in Dual Pixel RAW images.
1In the main window or edit image window, select the
Dual Pixel RAW image you want to adjust, and then
select [Start Dual Pixel RAW Optimizer] from the
[Tools] menu.
ÜThe Dual Pixel RAW Optimizer window appears.
2Checkmark the [Ghosting Reduction] checkbox, and
specify the area.
lClick the [Select area] button and drag on the image to specify
the area to be adjusted, and right-click with the mouse to fix the
area.
You can also remove the check mark from the [Show borders]
checkbox to hide the border.
ÜAny ghosting and flare in the specified area is reduced.
Reduces the Appearance of Ghosting in Images

116
3
Sorting
Images
1
2
4
5
Downloading
Images
Viewing
Images
Printing
Images
Editing
Images
6
Processing
Large Numbers
of RAW Images
7
Remote
Shooting
10
HDR PQ
Mode
8
Playing Back
Movies and Saving
Still Photos
11
Specifying
Preferences
9
Handling
RAW Movies
3Click the [OK] button.
ÜAdjustment results are applied to the image.
For information on saving adjustment results to images, see
“Saving Editing Results” (p.95).
lThere may be cases where the subject's outline and any bokeh
look unnatural, or where an increase in noise or noticeable
changes in hue or brightness occur.
lThere may be cases where the border of the selected area in the
image looks unnatural.
lThis function cannot be used at the same time as
"Microadjustment of the position of maximum sharpness and
resolution using the depth information contained within the Dual
Pixel RAW file" or "Reposition the viewpoint or foreground bokeh
for a more pleasing result".
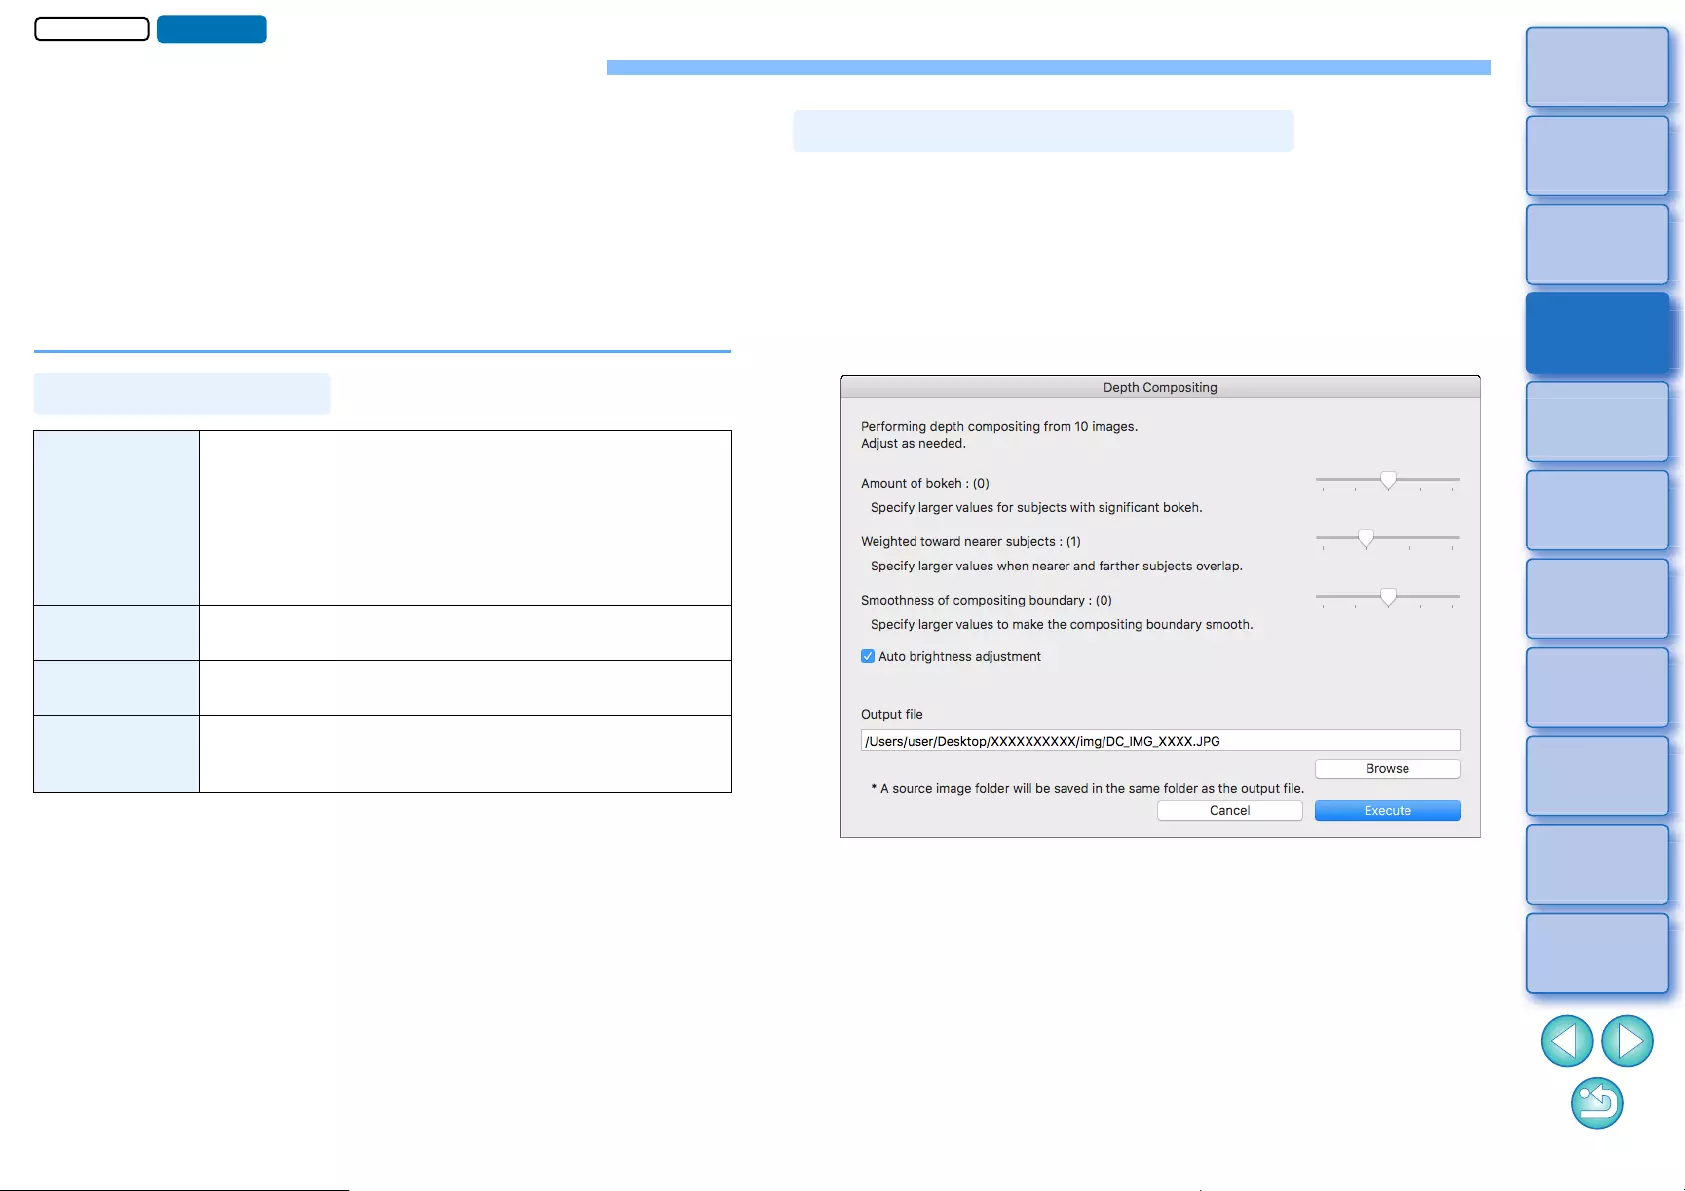
117
3
Sorting
Images
1
2
4
5
Downloading
Images
Viewing
Images
Printing
Images
Editing
Images
6
Processing
Large Numbers
of RAW Images
7
Remote
Shooting
10
HDR PQ
Mode
8
Playing Back
Movies and Saving
Still Photos
11
Specifying
Preferences
9
Handling
RAW Movies
Using Depth Compositing
Depth compositing generates a single image from several images that is
in focus over a wide area. This function combines images with the Depth
Compositing tool, and outputs the combined result as a depth composite
image. It is then possible to also correct the output image using the
Depth Compositing Editing tool.
This function can also be used with images shot without using focus
bracketing on the camera.
See “Cautions when shooting images for depth compositing” (p.118)
and “Cautions for using depth compositing” (p.119).
*1 TIFF images converted and saved in DPP
lEven if the above conditions are met, the following images are not
supported by depth compositing.
• RAW images created by multiple-exposure shooting
• Images without shooting information
• Images saved as HDR PQ mode display images
• Images of 1600 x 1600 pixels or less, or 9999 x 6666 pixels or more
Cameras
• JPEG, TIFF images*1:
All cameras compatible with DPP
• RAW images:
EOS 5D Mark IV, EOS R5, EOS R6, EOS R, EOS
Ra, EOS RP, EOS 90D, EOS M6 Mark II,
PowerShot G5 X Mark II, PowerShot G7 X Mark III
Lenses RF, EF, and EF-S lens groups (excluding TS-E lenses
and fisheye lenses)
Supported
formats CR2, CR3, JPG, TIFF*1
Shooting
conditions
The camera, lens, shutter speed, aperture value,
focal length, image format, and image size must be
the same.
Supported Images
1Select multiple images in the main window, etc.
lFor images shot using focus bracketing on the camera, you can
perform depth compositing even if you select only one image.
2Select the [Tools] menu [Depth Compositing]
[Start depth compositing tool].
ÜThe Depth Compositing tool window appears.
Using the Depth Compositing Tool
JPEG/TIFF
Advanced
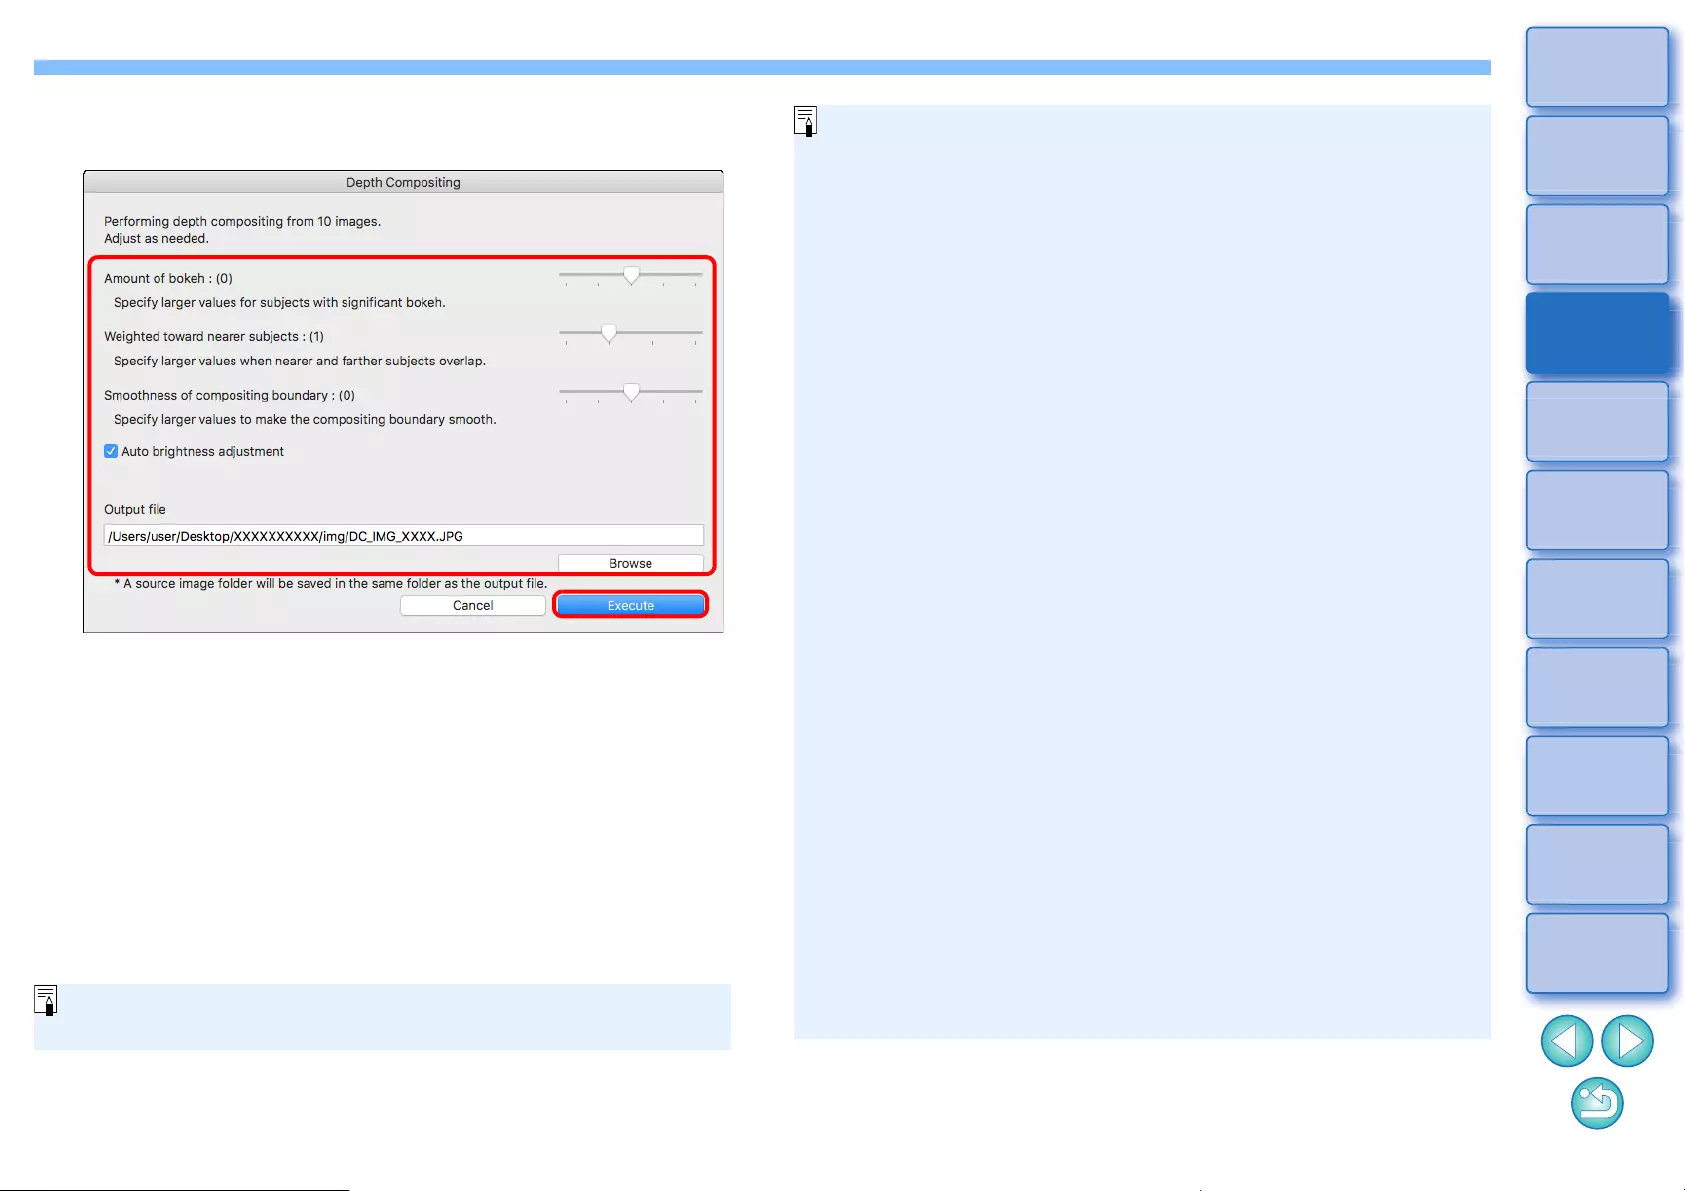
118
3
Sorting
Images
1
2
4
5
Downloading
Images
Viewing
Images
Printing
Images
Editing
Images
6
Processing
Large Numbers
of RAW Images
7
Remote
Shooting
10
HDR PQ
Mode
8
Playing Back
Movies and Saving
Still Photos
11
Specifying
Preferences
9
Handling
RAW Movies
3Adjust and set items as necessary, and then click the
[Execute] button.
ÜImages are combined and a depth composite image is output.
lA source image folder (folder name: DPP_DC_...) is output in the
same folder as the depth composite image.
The source image folder is used to correct the depth composite
image with the [Depth Compositing Editing Tool].
lTo change the output destination or format of a depth composite
image, click the [Browse] button to make the settings in the
window that appears.
l[Auto brightness adjustment] suppresses any change in
brightness between images used for depth compositing with
automatic correction when brightnesses are slightly different.
You can display this function as a function button in the main
window’s toolbar (p.127).
Cautions when shooting images for depth
compositing
lAfter performing depth compositing, the combined result may
have a narrower angle of view than when images were shot.
When shooting with focus bracketing, shooting with a wider angle
of view is recommended. After depth compositing, you can crop
the image if necessary.
lFor best results, set the aperture value in a range of f/5.6–11
before shooting.
lBe sure to use a tripod and lock the camera firmly in place before
shooting.
lRepeating patterns such as lattice patterns and stripe patterns, or
images where the entire screen is flat and lacking contrast may
not be combinable.
lWhen shooting multiple images, start by focusing on the image
nearest to you and work progressively farther away.
lWhen shooting multiple images, images where the focus differs
largely may result in a combined image with uneven focus or that
may not be combinable.
lDepth compositing assumes that images of still subjects are
being combined. Images shot of moving subjects may not be
combinable.
lIf multiple subjects are in the screen, images may not be
combinable depending on how subjects are arranged, for
example, subjects spaced far apart.
lThe lenses below are recommended.
RF35mm F1.8 MACRO IS STM, RF50mm F1.2 L USM, RF28-
70mm F2 L USM, RF24-105mm F4 L IS USM
EF16-35mm f/4L IS USM, EF24-70mm f/4L IS USM, EF100mm
f/2.8L MACRO IS USM, EF180mm f/3.5L MACRO USM
EF-S35mm f/2.8 MACRO IS STM, EF-S60mm f/2.8 MACRO
USM, EF-S18-135mm f/3.5-5.6 IS USM
EF-M28mm f/3.5 MACRO IS STM, EF-M15-45mm f/3.5-6.3 IS
STM, EF-M18-150mm f/3.5-6.3 IS STM
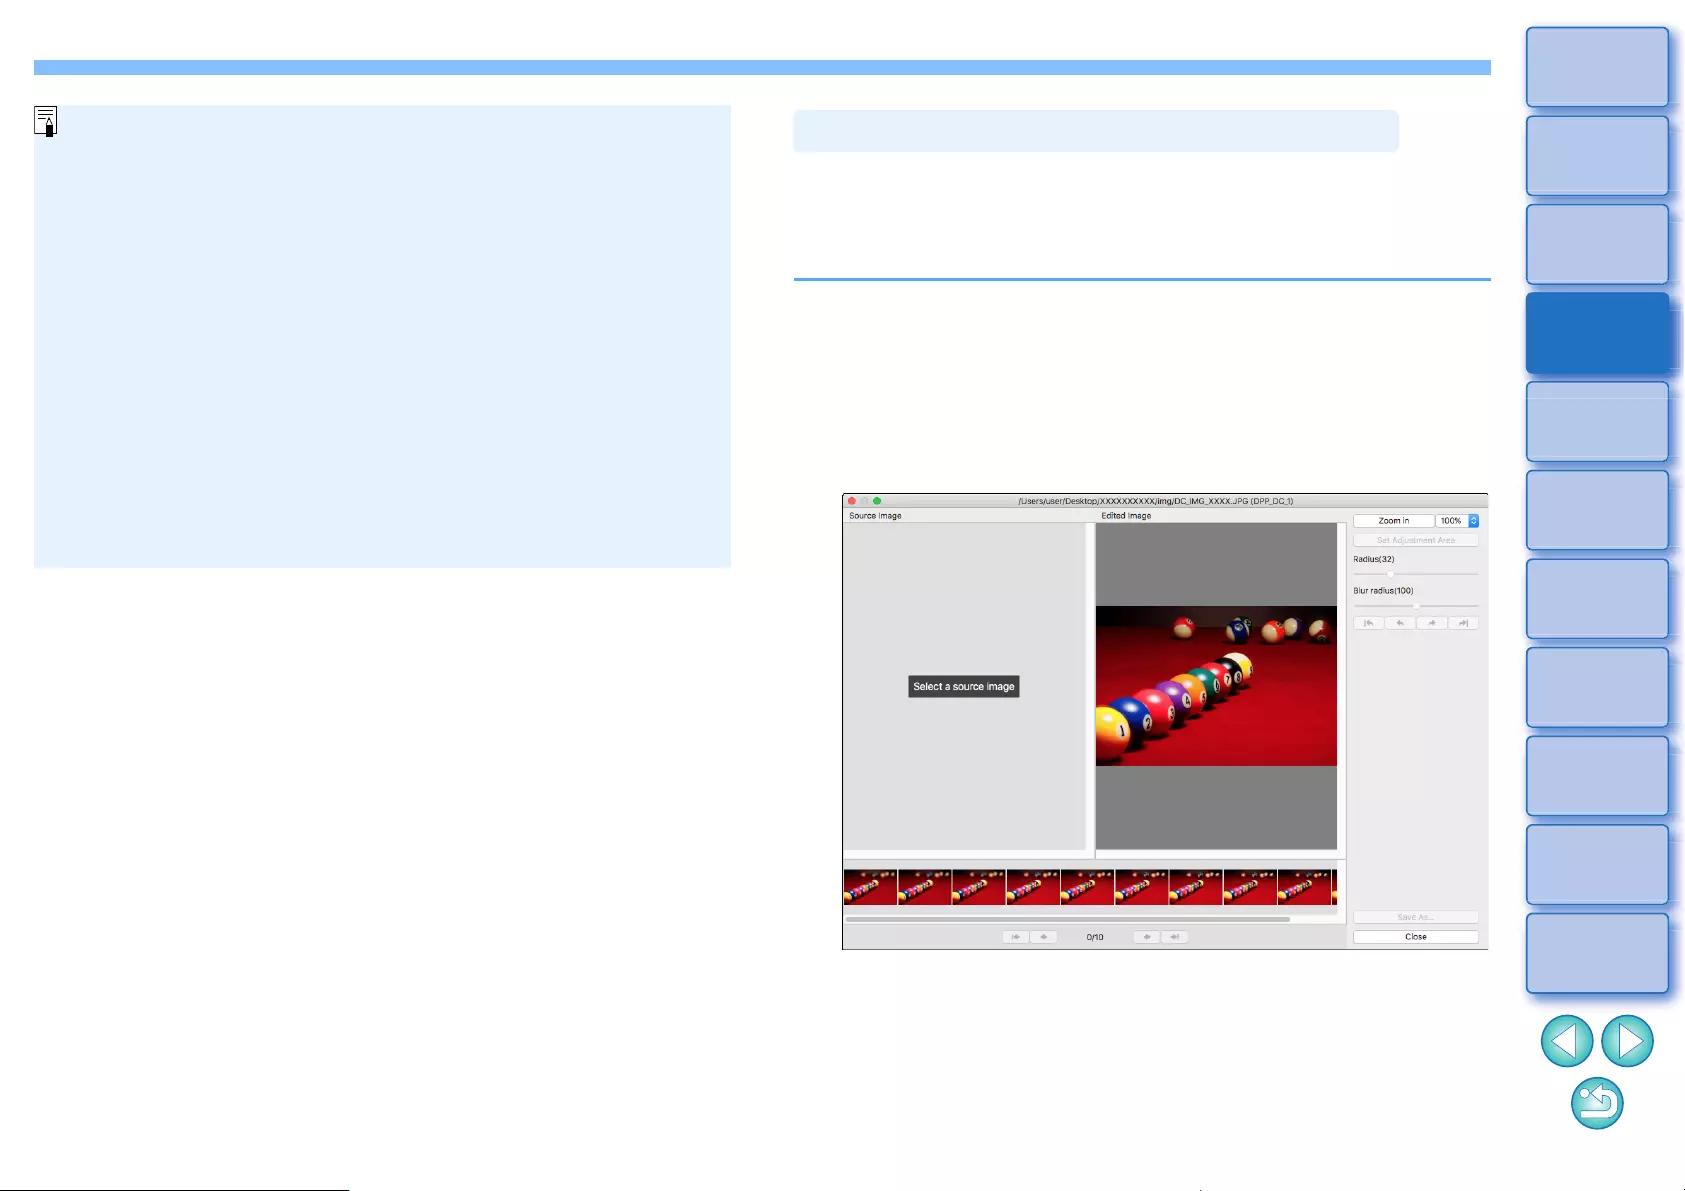
119
3
Sorting
Images
1
2
4
5
Downloading
Images
Viewing
Images
Printing
Images
Editing
Images
6
Processing
Large Numbers
of RAW Images
7
Remote
Shooting
10
HDR PQ
Mode
8
Playing Back
Movies and Saving
Still Photos
11
Specifying
Preferences
9
Handling
RAW Movies
Cautions for using depth compositing
lWhen the Depth Compositing tool is started up, the content of
recipes that are attached to images in focus is reflected in the
depth composite image (excluding the following items).
•Stamp
• Dust delete data
• Reducing color moiré (Partial Adjustment tool palette)
• Angle adjustment (Trimming/Angle Adjustment tool palette)
• Size setting when opening selected RAW image in DPP (p.93)
• Color adjustment for a specific color gamut (including
[Monochrome])
• Dual Pixel RAW Optimizer
• Auto Lighting Optimizer
• Shadows/highlights
lThe Depth Compositing tool does not start up if an image in focus
is not supported.
If intended results were not obtained with the Depth Compositing tool,
this function copies the portion of the image to be corrected from a
source image to the depth composite image (in this tool, the [Edited
Image]).
1Select the depth composite image in the main
window, etc.
2Select the [Tools] menu [Depth Compositing]
[Start depth compositing editing tool].
ÜThe Depth Compositing Editing tool window appears.
lA thumbnail of the source image is automatically displayed at the
bottom of the screen. However, thumbnails of source images are
not automatically displayed if the name of the depth composite
image or the source image folder is changed or the save location
is moved. Select the source image folder that was output at the
same time the depth composite image was output.
Using the Depth Compositing Editing Tool
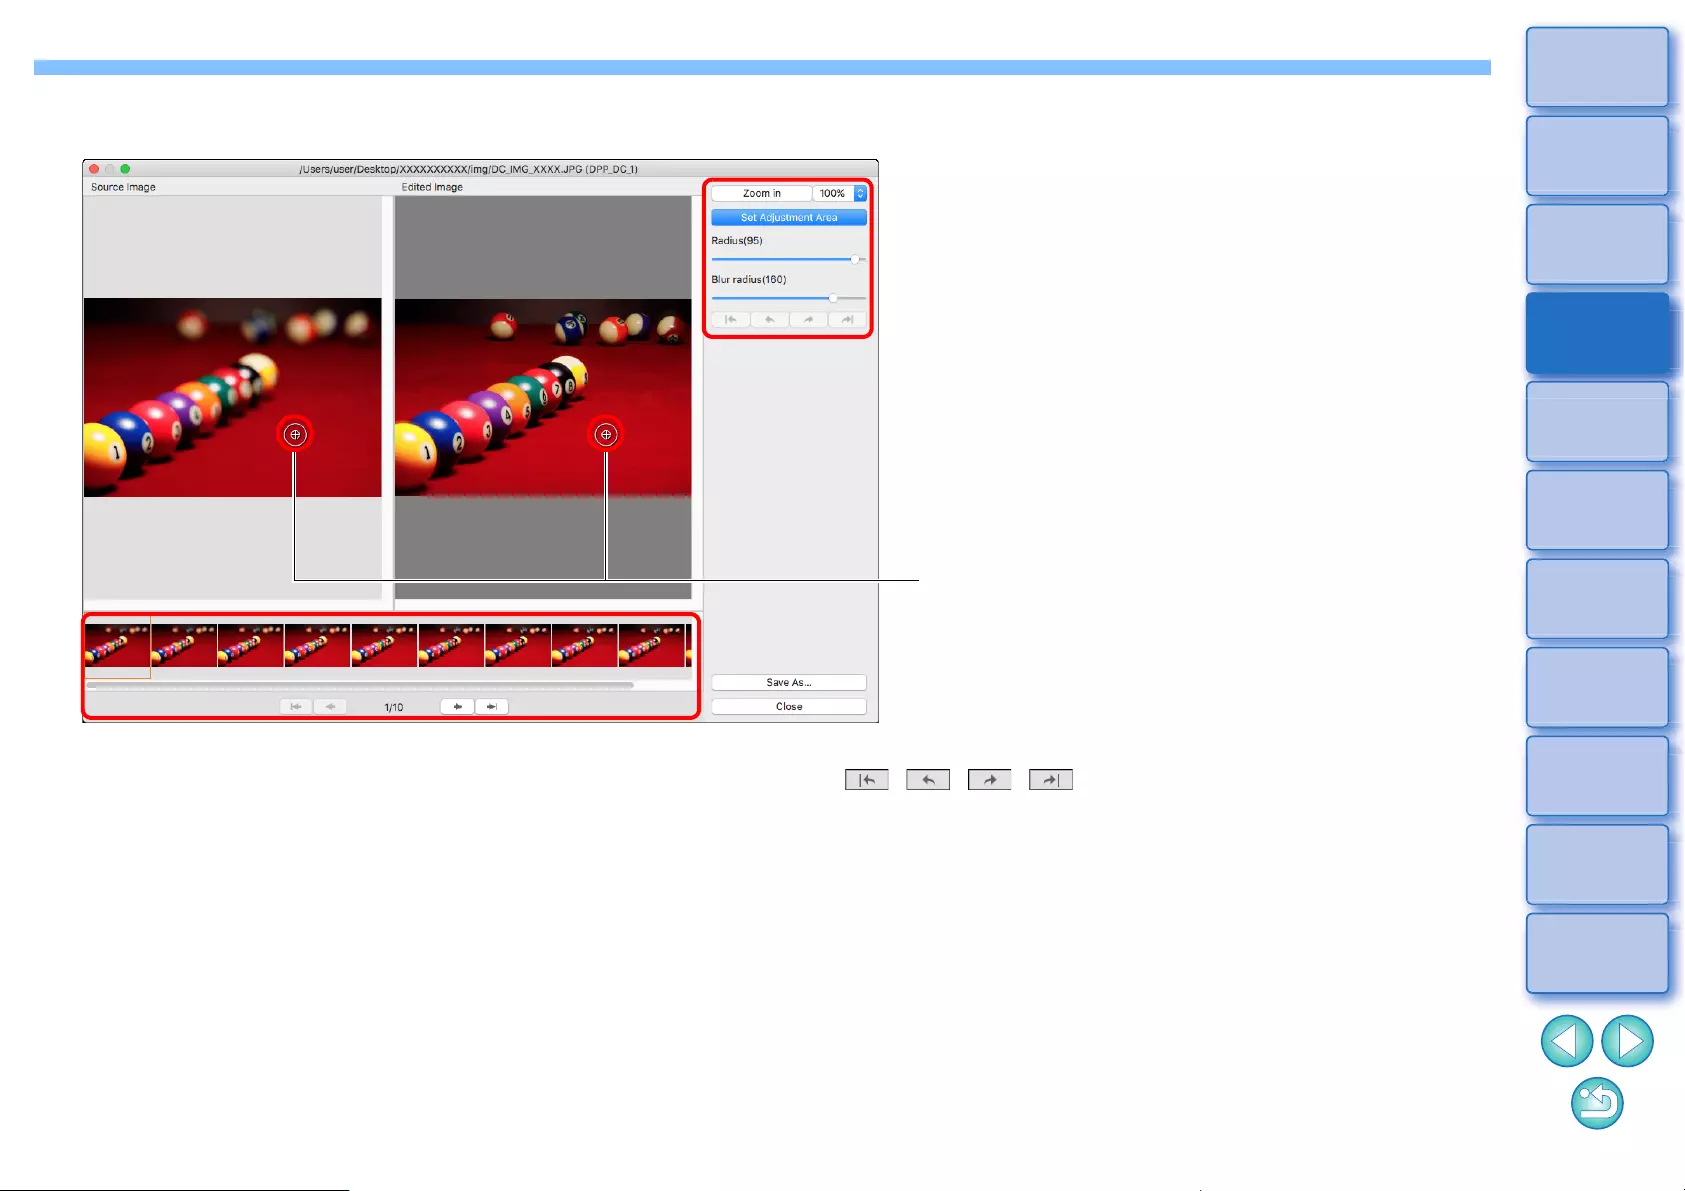
120
3
Sorting
Images
1
2
4
5
Downloading
Images
Viewing
Images
Printing
Images
Editing
Images
6
Processing
Large Numbers
of RAW Images
7
Remote
Shooting
10
HDR PQ
Mode
8
Playing Back
Movies and Saving
Still Photos
11
Specifying
Preferences
9
Handling
RAW Movies
3Select a source image and modify it as necessary.
Circular cursor
lSelect a source image from the thumbnails of source images
displayed at the bottom of the screen.
lIf the [Source Image] and [Edited Image] are shots of different
areas, a black frame may be displayed around the [Source Image].
lClicking the [Set Adjustment Area] button displays a circular cursor.
Click or drag the portion of the [Edited Image] that you want to
correct with the circular cursor, and the same portion of the [Source
Image] is copied.
lUse [Radius] to set the size of the adjustment area, and use [Blur
radius] to set blurring at the border of the adjustment area.
lYou can return through the corrections you made with the
[ ][ ][ ][ ] buttons. Available buttons, from the left,
are [Undo All], [Undo], [Redo], and [Redo All]. However, if you
changed to another source image, you cannot return through
corrections you made using the source image before the change.
lA recipe attached to a depth composite image is not applied in the
[Edited Image] in this function.
Also, depth composite image recipes are not attached to image
files saved with this function.
121
3
Sorting
Images
1
2
4
5
Downloading
Images
Viewing
Images
Printing
Images
Editing
Images
6
Processing
Large Numbers
of RAW Images
7
Remote
Shooting
10
HDR PQ
Mode
8
Playing Back
Movies and Saving
Still Photos
11
Specifying
Preferences
9
Handling
RAW Movies
4Save the image.
lClick the [Save As] button to select and save required settings.
lTo exit, click the [Close] button.
You can display this function as a function button in the main
window’s toolbar (p.127).
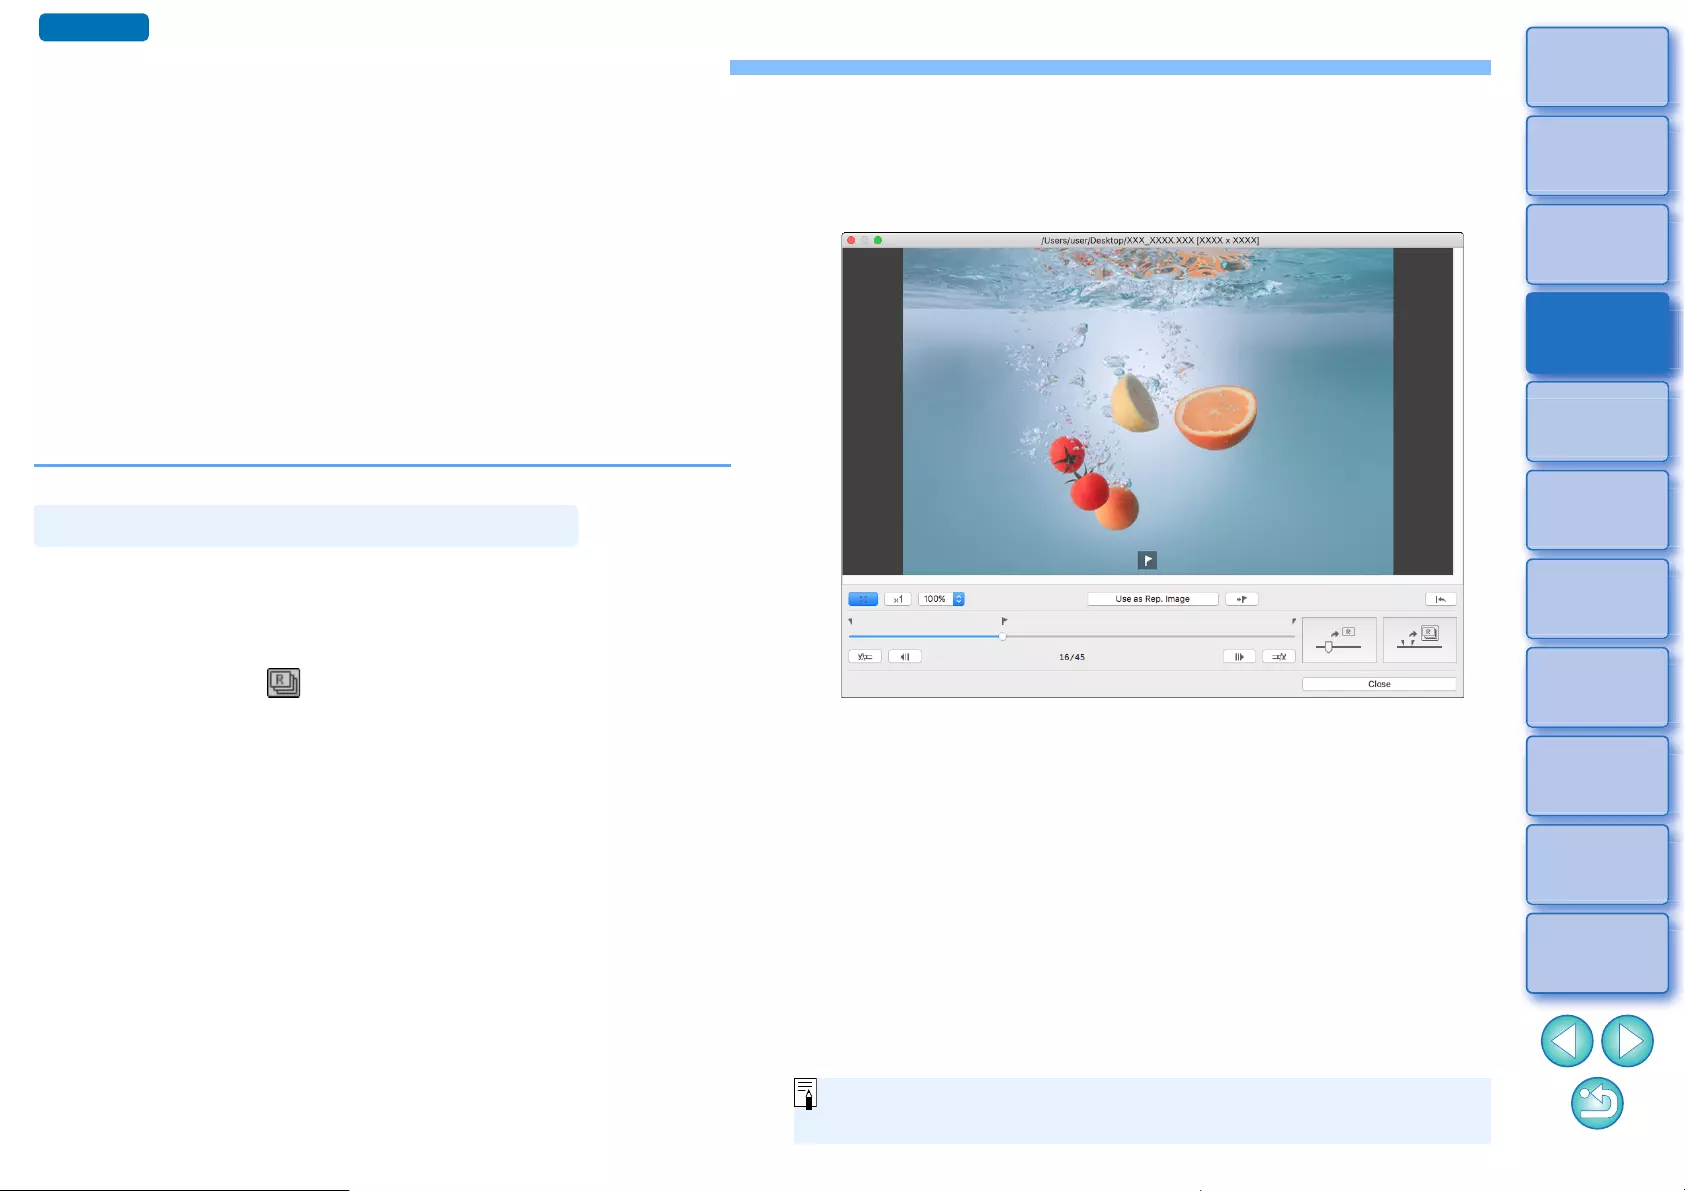
122
3
Sorting
Images
1
2
4
5
Downloading
Images
Viewing
Images
Printing
Images
Editing
Images
6
Processing
Large Numbers
of RAW Images
7
Remote
Shooting
10
HDR PQ
Mode
8
Playing Back
Movies and Saving
Still Photos
11
Specifying
Preferences
9
Handling
RAW Movies
Using the RAW Burst Image Tool
This function can be used with rolls (continuous-shot image files)
captured in RAW burst mode on Canon digital cameras.
A roll is edited, saved, printed, etc. as a single RAW image in DPP,
however, a “representative image”* is selected automatically for this
purpose.
For detailed information on RAW burst mode, refer to the Instruction
Manual included with a RAW burst mode-capable camera.
You can use this tool to do the following:
• Change the representative image in a roll
• Save one image in a roll
• Extract and save any range in a roll
*Representative image: the image displayed in thumbnails, etc.
representing all the images in a roll
1Select a roll in the main window, etc.
lOnly rolls shot with RAW burst mode on a Canon digital camera
are supported.
(Thumbnail icon: )
Starting Up the RAW Burst Image Tool
2Select the [Tools] menu [Start RAW Burst Image
tool].
ÜThe RAW Burst Image Tool window is displayed.
lTo exit, click the [Close] button.
You can display this function as a function button in the main
window's toolbar (p.127).
Advanced
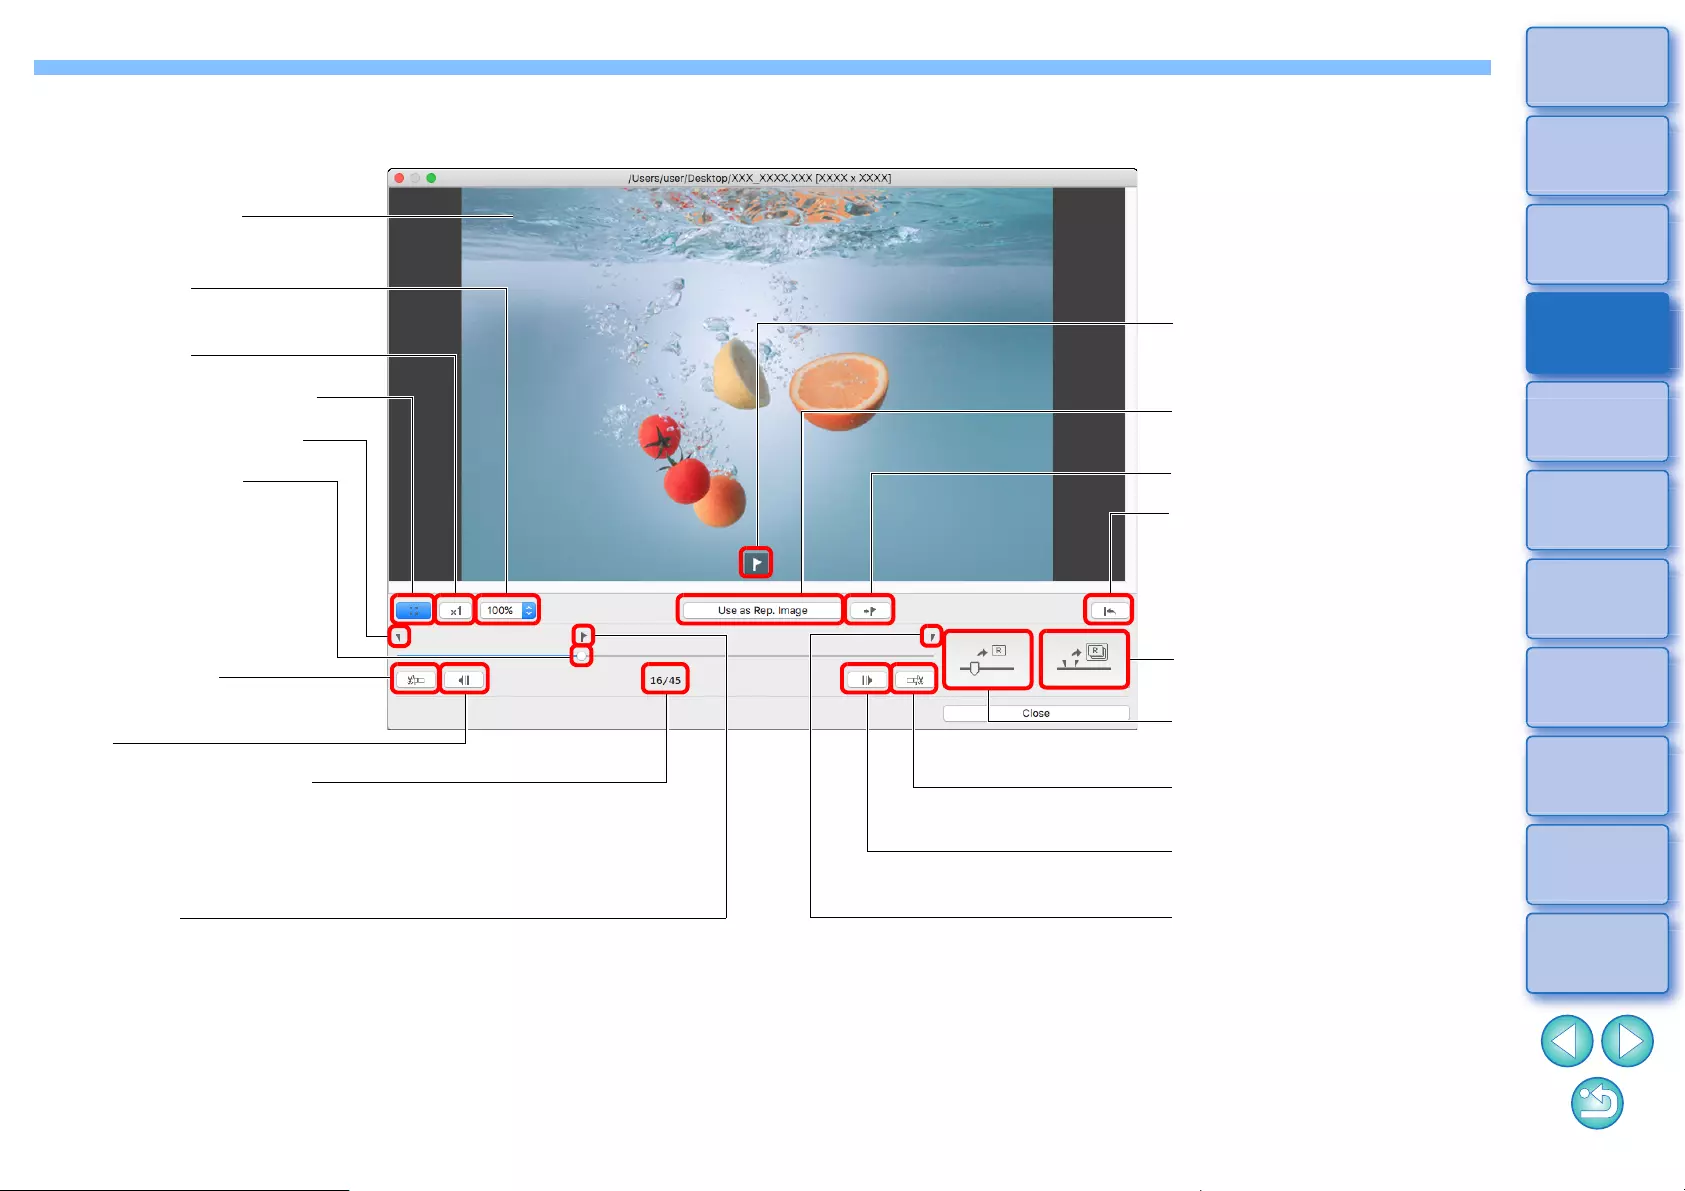
123
3
Sorting
Images
1
2
4
5
Downloading
Images
Viewing
Images
Printing
Images
Editing
Images
6
Processing
Large Numbers
of RAW Images
7
Remote
Shooting
10
HDR PQ
Mode
8
Playing Back
Movies and Saving
Still Photos
11
Specifying
Preferences
9
Handling
RAW Movies
RAW Burst Image Tool window functions
Image display area
Set image display
magnification
Display image at no
magnification
Display image fit to window
Lead image marker (p.125)
Slider (p.124, p.125)
Set lead image in roll after
extracting (p.125)
Move to image before (p.124,
p.125)
Number of displayed image
Number of displayed image/
number of all images in roll are
displayed
Position of representative
image in roll
Representative image mark
Displayed when representative
image displayed
Set displayed image as
representative image (p.124)
Move to representative image
Revert to image when captured
Discard all editing done with this
tool and revert to image when
captured
Extract and save any range in a
roll (p.125)
Save one image in a roll (p.124)
Set last image in a roll after
extracting (p.125)
Move to image behind (p.124,
p.125)
Last image marker (p.125)
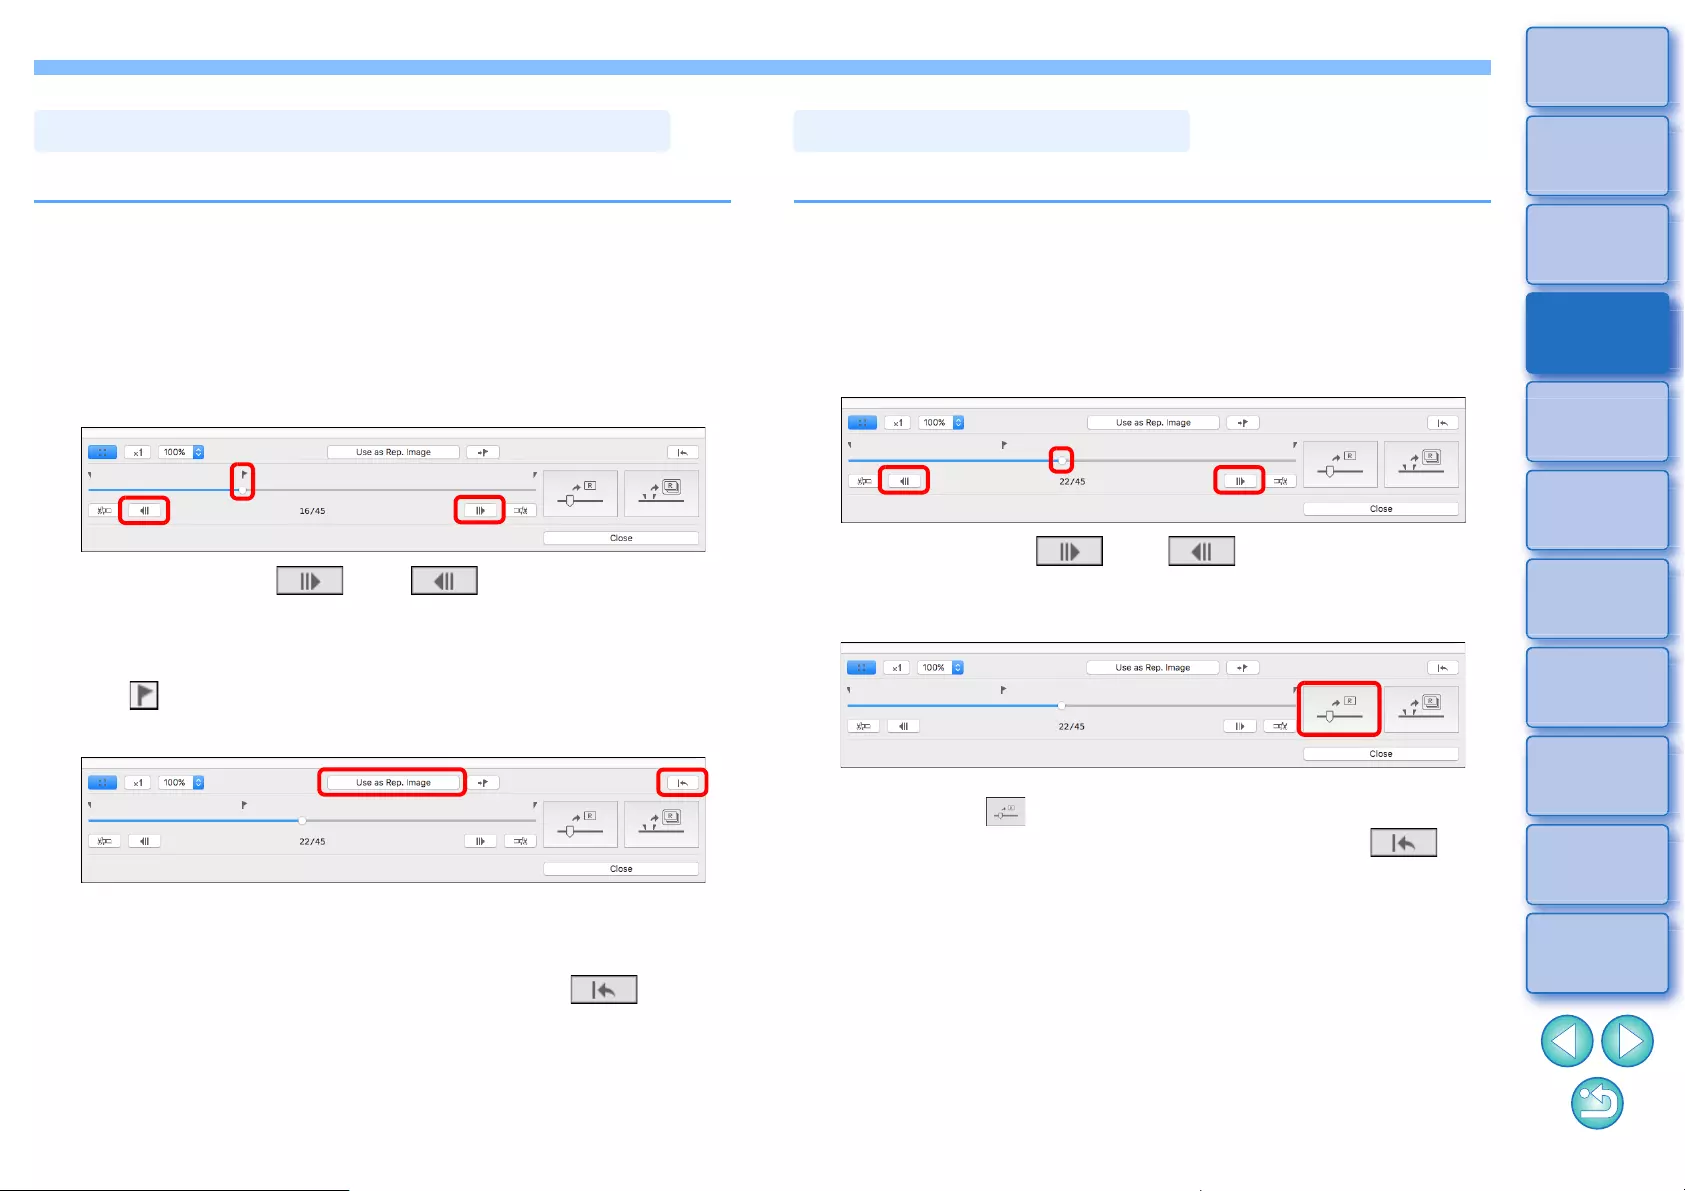
124
3
Sorting
Images
1
2
4
5
Downloading
Images
Viewing
Images
Printing
Images
Editing
Images
6
Processing
Large Numbers
of RAW Images
7
Remote
Shooting
10
HDR PQ
Mode
8
Playing Back
Movies and Saving
Still Photos
11
Specifying
Preferences
9
Handling
RAW Movies
You can change the representative image to any image in a roll.
1Display the RAW Burst Image Tool window.
lPerform steps 1 to 2 of “Starting Up the RAW Burst Image Tool”
(p.122).
ÜThe RAW Burst Image Tool window is displayed.
2Display the image you want to be the representative
image.
lUse the slider or [ ] and [ ] buttons to display the
image you want to set as the representative image in the image
display area.
lThe position of the current representative image is indicated with
a [ ] mark above the slider.
3Change the representative image.
lClick the [Use as Rep. Image] button.
ÜThe representative image changes to the currently displayed
image.
lTo revert to the image when captured, click the [ ] button.
lTo exit, click the [Close] button.
Changing the Representative Image in a Roll
You can extract any one image in a roll and save it.
1Display the RAW Burst Image Tool window.
lPerform steps 1 to 2 of “Starting Up the RAW Burst Image Tool”
(p.122).
ÜThe RAW Burst Image Tool window is displayed.
2Display the image you want to save.
lUse the slider or [ ] and [ ] buttons to display the
image you want to save in the image display area.
3Save the image.
lSpecify the necessary settings in the window that appears by
clicking the [ ] button and save the image.
lTo revert settings to those when captured, click the [ ]
button.
lTo exit, click the [Close] button.
Saving One Image in a Roll
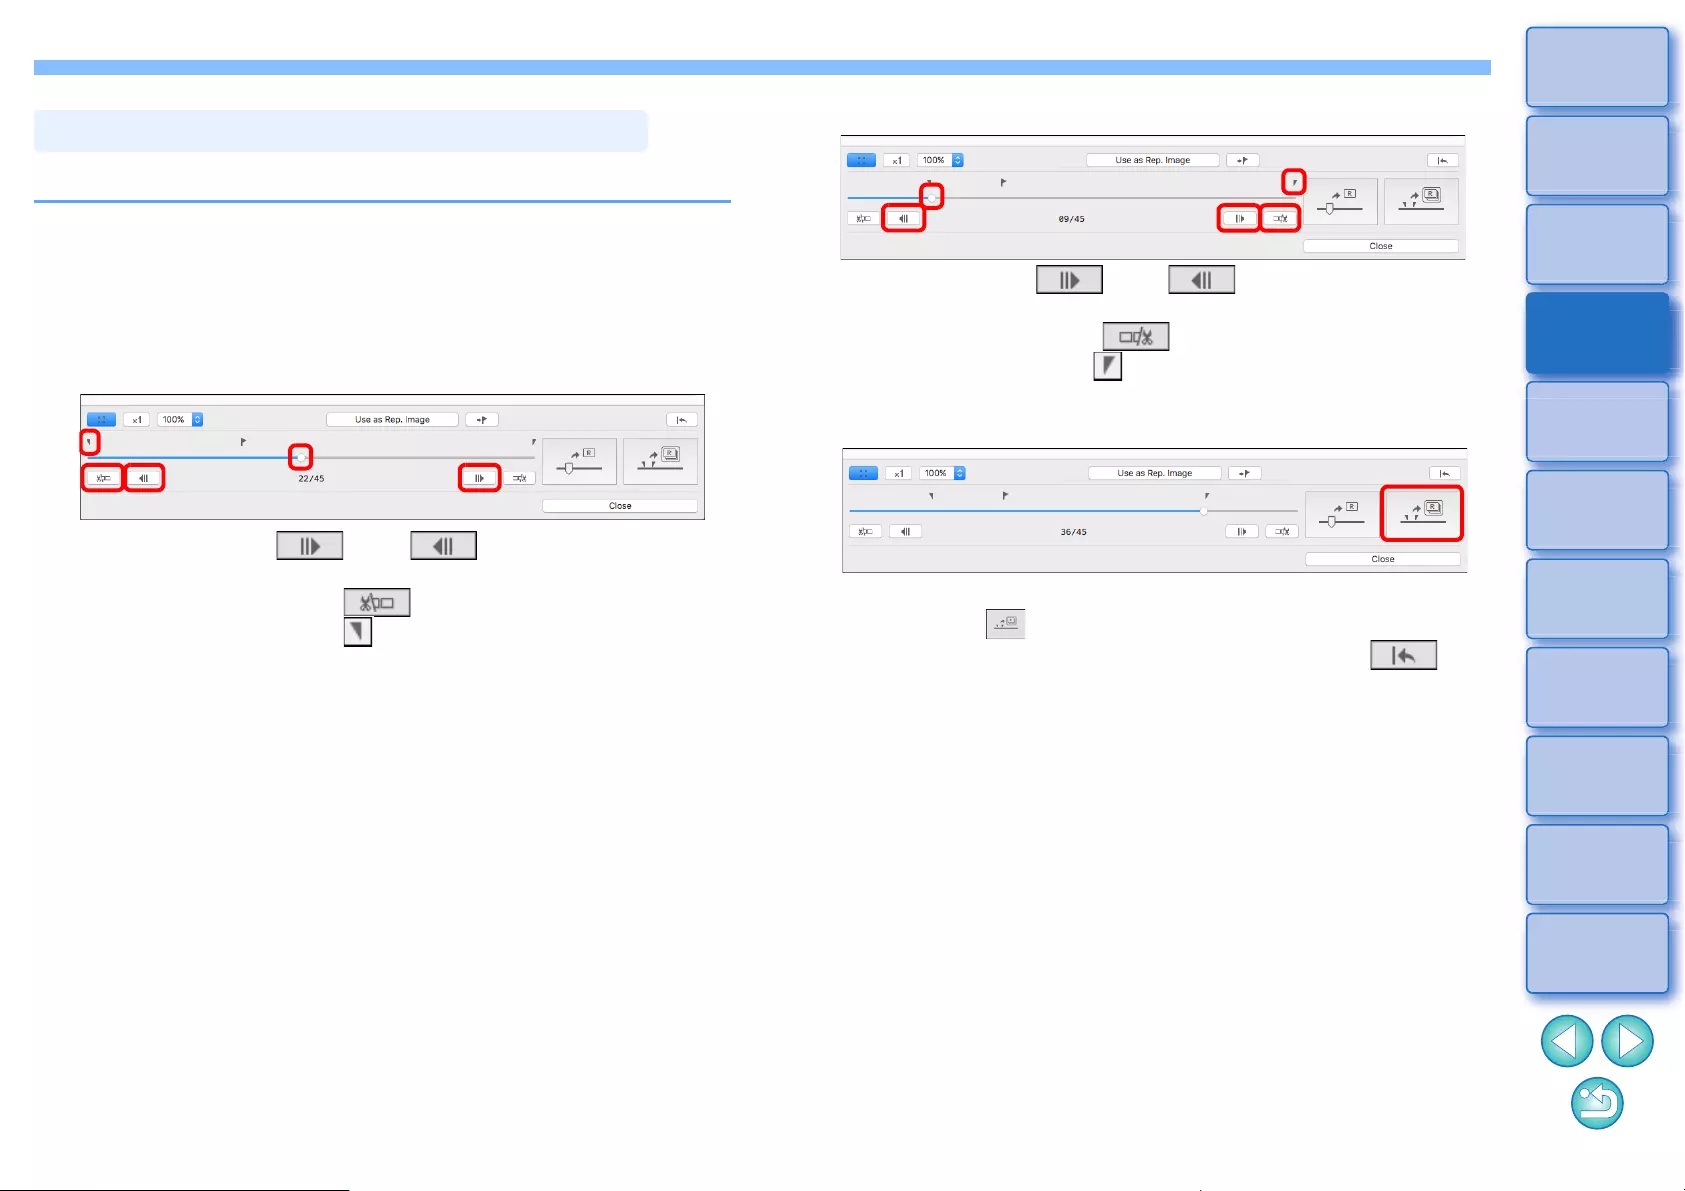
125
3
Sorting
Images
1
2
4
5
Downloading
Images
Viewing
Images
Printing
Images
Editing
Images
6
Processing
Large Numbers
of RAW Images
7
Remote
Shooting
10
HDR PQ
Mode
8
Playing Back
Movies and Saving
Still Photos
11
Specifying
Preferences
9
Handling
RAW Movies
You can extract any range in a roll and save it as a separate roll.
1Display the RAW Burst Image Tool window.
lPerform steps 1 to 2 of “Starting Up the RAW Burst Image Tool”
(p.122).
ÜThe RAW Burst Image Tool window is displayed.
2Set the lead image.
lUse the slider or [ ] and [ ] buttons to display the
image you want to set as the lead image in the image display
area, and then click the [ ] button.
ÜThe lead image marker ( ) moves, and the lead image in the
roll is set.
Extracting and Saving Any Range in a Roll
3Set the last image.
lUse the slider or [ ] and [ ] buttons to display the
image you want to set as the last image in the image display
area, and then click the [ ] button.
ÜThe last image marker ( ) moves, and the last image in the roll
is set.
4Save the roll.
lSpecify the necessary settings in the window that appears by
clicking the [ ] button and save the roll.
lTo revert settings to those when captured, click the [ ]
button.
lTo exit, click the [Close] button.
126
3
Sorting
Images
1
2
4
5
Downloading
Images
Viewing
Images
Printing
Images
Editing
Images
6
Processing
Large Numbers
of RAW Images
7
Remote
Shooting
10
HDR PQ
Mode
8
Playing Back
Movies and Saving
Still Photos
11
Specifying
Preferences
9
Handling
RAW Movies
lEditing performed with this function is not supported with these
functions: “Copying a Recipe and Applying to Another Image”
(p.99), “Saving a Recipe as a File” (p.99), and “Loading and
Applying Recipes” (p.100).
lEditing performed with this function cannot be reverted to the
states in [Revert to shot settings] or [Revert to last saved settings]
in the [Adjustment] tab in the menu even if they are selected.
However, you can press this function's [ ] button to revert
the image to the captured image.
lEven after changing the representative image in a roll with this
function, shooting information for the roll displayed in the main
window, etc. is information for the representative image at the
time of shooting.
lAdjustments (recipe) made to a roll in the main window, etc. are
not applied in the window for this function (except for 90° image
rotation).
Transferring a RAW Image to Photoshop
A RAW image can be converted to a TIFF image (16bit) and transferred
to Adobe Photoshop.
Only one image can be transferred at a time. To send multiple images at
a time, see p.141.
Select the [Tools] menu [Transfer to Photoshop].
ÜPhotoshop starts up and the transferred image is displayed.
A single image can be transferred at a time
lCompatible versions of Photoshop are 7.0 or later.
lTransferred images are automatically converted to TIFF images
(16bit) to which an ICC profile (p.183) is added. The ICC profile
contains information about [Preferences] (p.175) or work color
space (p.91) set for each image as described and the appropriate
color information is relayed to Photoshop.
lWhen you quit Photoshop, only the original RAW image remains,
and the transferred image will disappear. Saving the transferred
image as a separate image in Photoshop is recommended.
Advanced
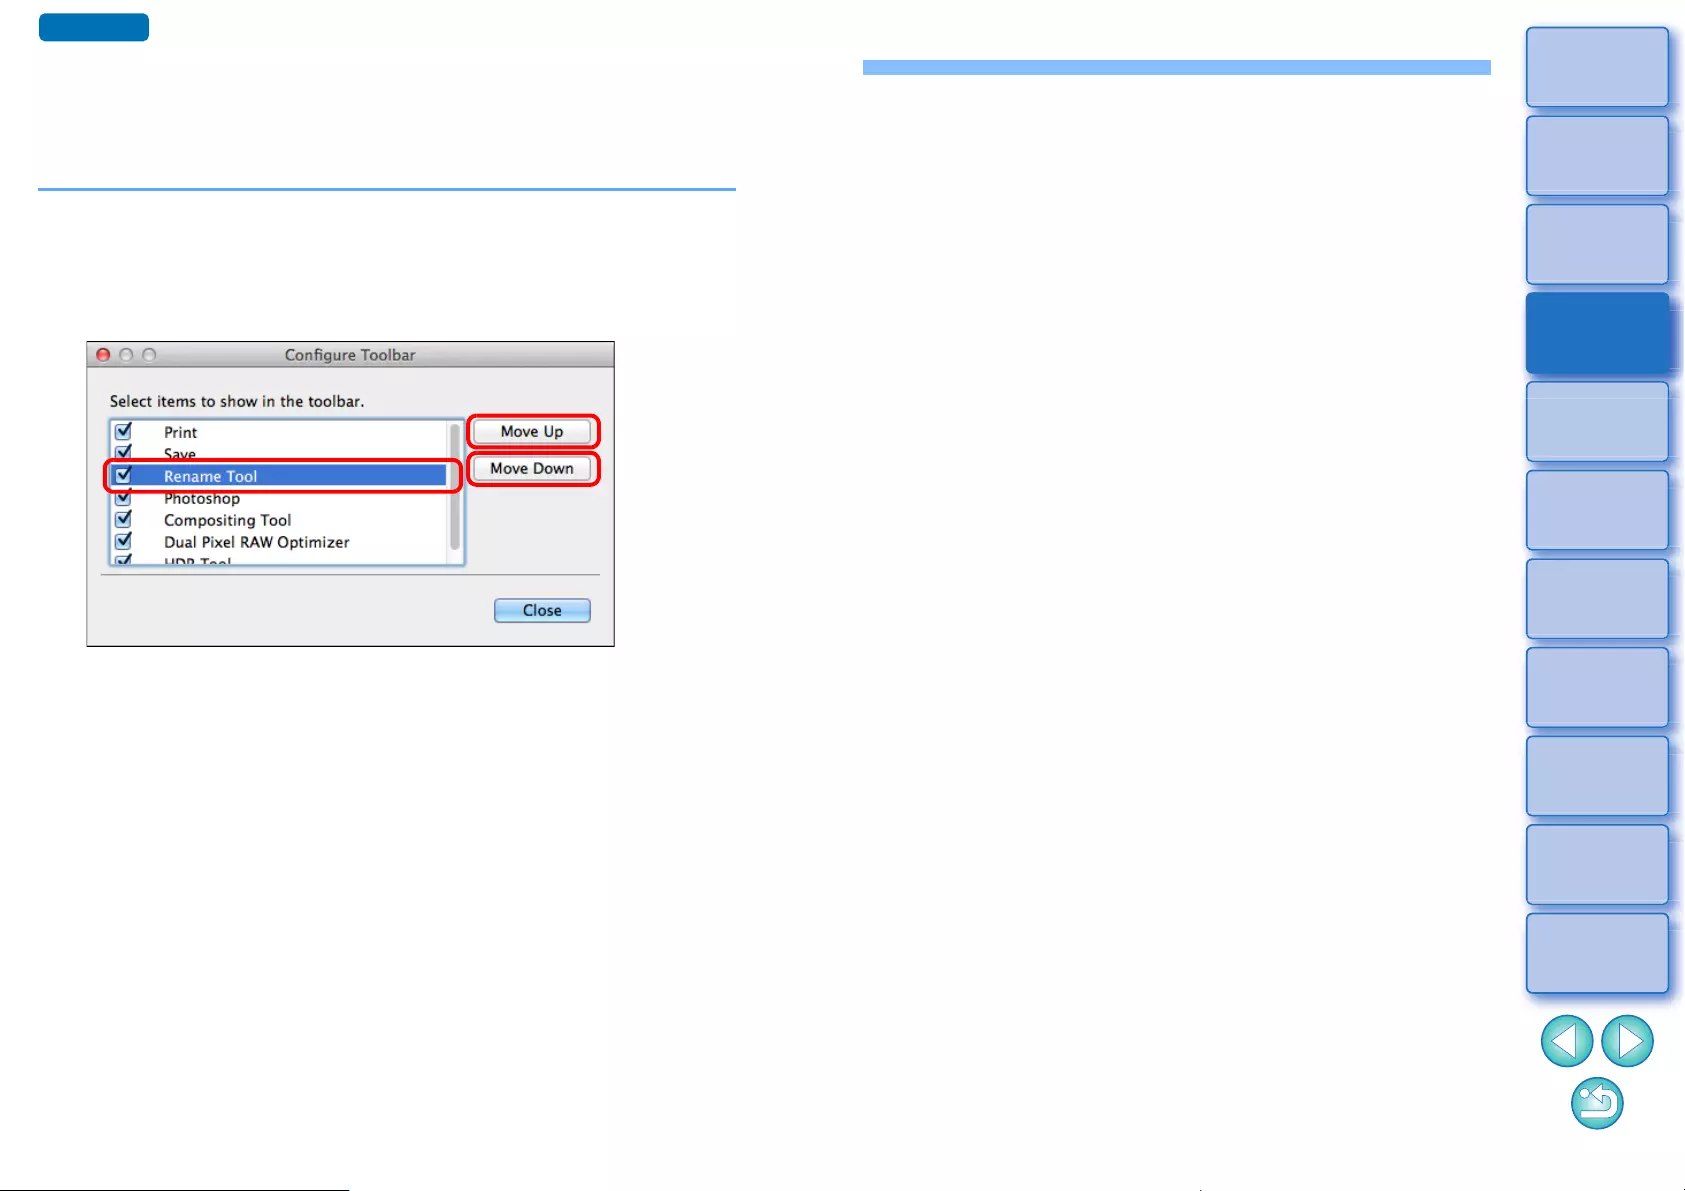
127
3
Sorting
Images
1
2
4
5
Downloading
Images
Viewing
Images
Printing
Images
Editing
Images
6
Processing
Large Numbers
of RAW Images
7
Remote
Shooting
10
HDR PQ
Mode
8
Playing Back
Movies and Saving
Still Photos
11
Specifying
Preferences
9
Handling
RAW Movies
Customizing the Main Window Toolbar
You can display buttons for frequently-used functions in the main
window’s toolbar.
You can also change how the buttons are laid out.
1Select the [Tools] menu [Customize toolbar].
ÜThe [Configure Toolbar] window appears.
2Select functions to display in the toolbar.
lTo rearrange buttons, select the function you want to change,
and then click the [Move Up] or [Move Down] button.
lAfter specifying settings, click the [Close] button and close the
window.
ÜThe settings are applied to the main window’s toolbar.
Advanced
128
3
Sorting
Images
1
2
4
5
Downloading
Images
Viewing
Images
Printing
Images
Editing
Images
6
Processing
Large Numbers
of RAW Images
7
Remote
Shooting
10
HDR PQ
Mode
8
Playing Back
Movies and Saving
Still Photos
11
Specifying
Preferences
9
Handling
RAW Movies
Using Cloud Processing
It has become possible starting with DPP version 4.12.10 to use the
network service “Canon Cloud Imaging” to process supported images
with higher-performance noise reduction.
This processing is called “Cloud Processing”.
This section explains how to use this function. This function cannot be
used if you select China as your region when installing DPP.
ISO 3200 or higher RAW images shot using an EOS-1DX Mark III
OS: macOS 10.14 / 10.15 / 11 (Intel-based Mac)
Supported Images
Requirements for Using this Function
To use cloud processing, you must first enable it.
How to enable cloud processing is described below.
1In the main window, etc., select [Enable cloud
processing] in the [Cloud] menu.
2Check the contents in the dialog box that appears,
and click the [Agree] button to agree and start using
the function.
3In the dialog that appears, drag [DPP Cloud Connect]
to the Applications folder.
4Restart DPP.
Ü [Cloud Box] appears in [Collection] in the main window.
5In the main window, etc., select and run [Log in] in
the [Cloud] menu.
ÜCloud processing is enabled.
Enabling Cloud Processing
Advanced
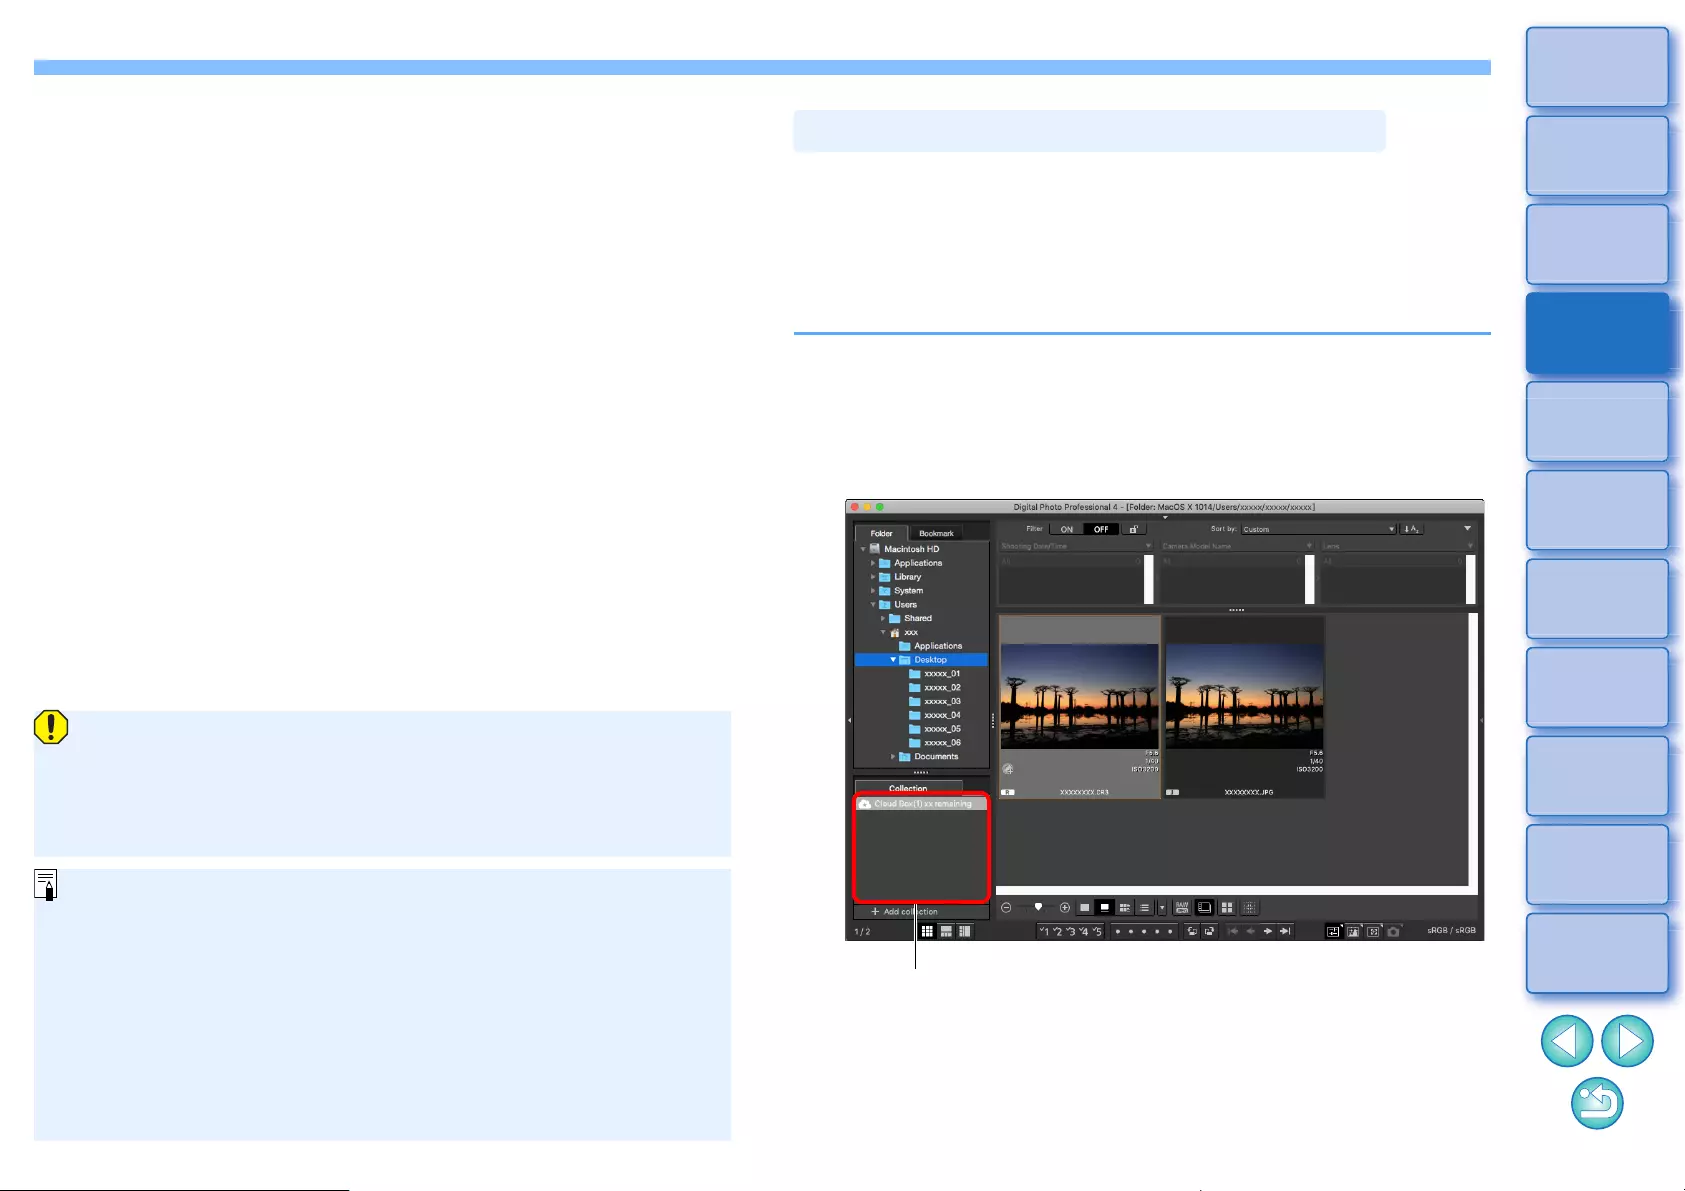
129
3
Sorting
Images
1
2
4
5
Downloading
Images
Viewing
Images
Printing
Images
Editing
Images
6
Processing
Large Numbers
of RAW Images
7
Remote
Shooting
10
HDR PQ
Mode
8
Playing Back
Movies and Saving
Still Photos
11
Specifying
Preferences
9
Handling
RAW Movies
lTo use this function, an environment with Internet access
(subscription to a provider and an in-place line connection) is
required.
lInternet Service Provider (ISP) connection fees or access point
connection fees may apply.
Disabling cloud processing
You can disable cloud processing with the following procedure.
1In the main window, etc., select [Disable cloud processing] in the
[Cloud] menu.
2Move [DPP Cloud Connect] in the dialog that appears to the
Trash.
3Empty the Trash.
4Start up DPP again.
ÜCloud processing is disabled.
By using cloud processing, a “CIP image” is generated from the original
RAW image. The “CIP image” is an image that has been processed with
higher-performance noise reduction by using the network service
“Canon Cloud Imaging”.
The procedure for cloud processing and editing CIP images is described
here.
1Enable cloud processing (p.128).
2In the main window, drag the image you want to use
cloud processing to [Cloud Box] in [Collection].
Cloud Processing and CIP Image Editing
Cloud Box
Special folder for working with images generated after cloud
processing.
The number of remaining that can be processed currently is
displayed.
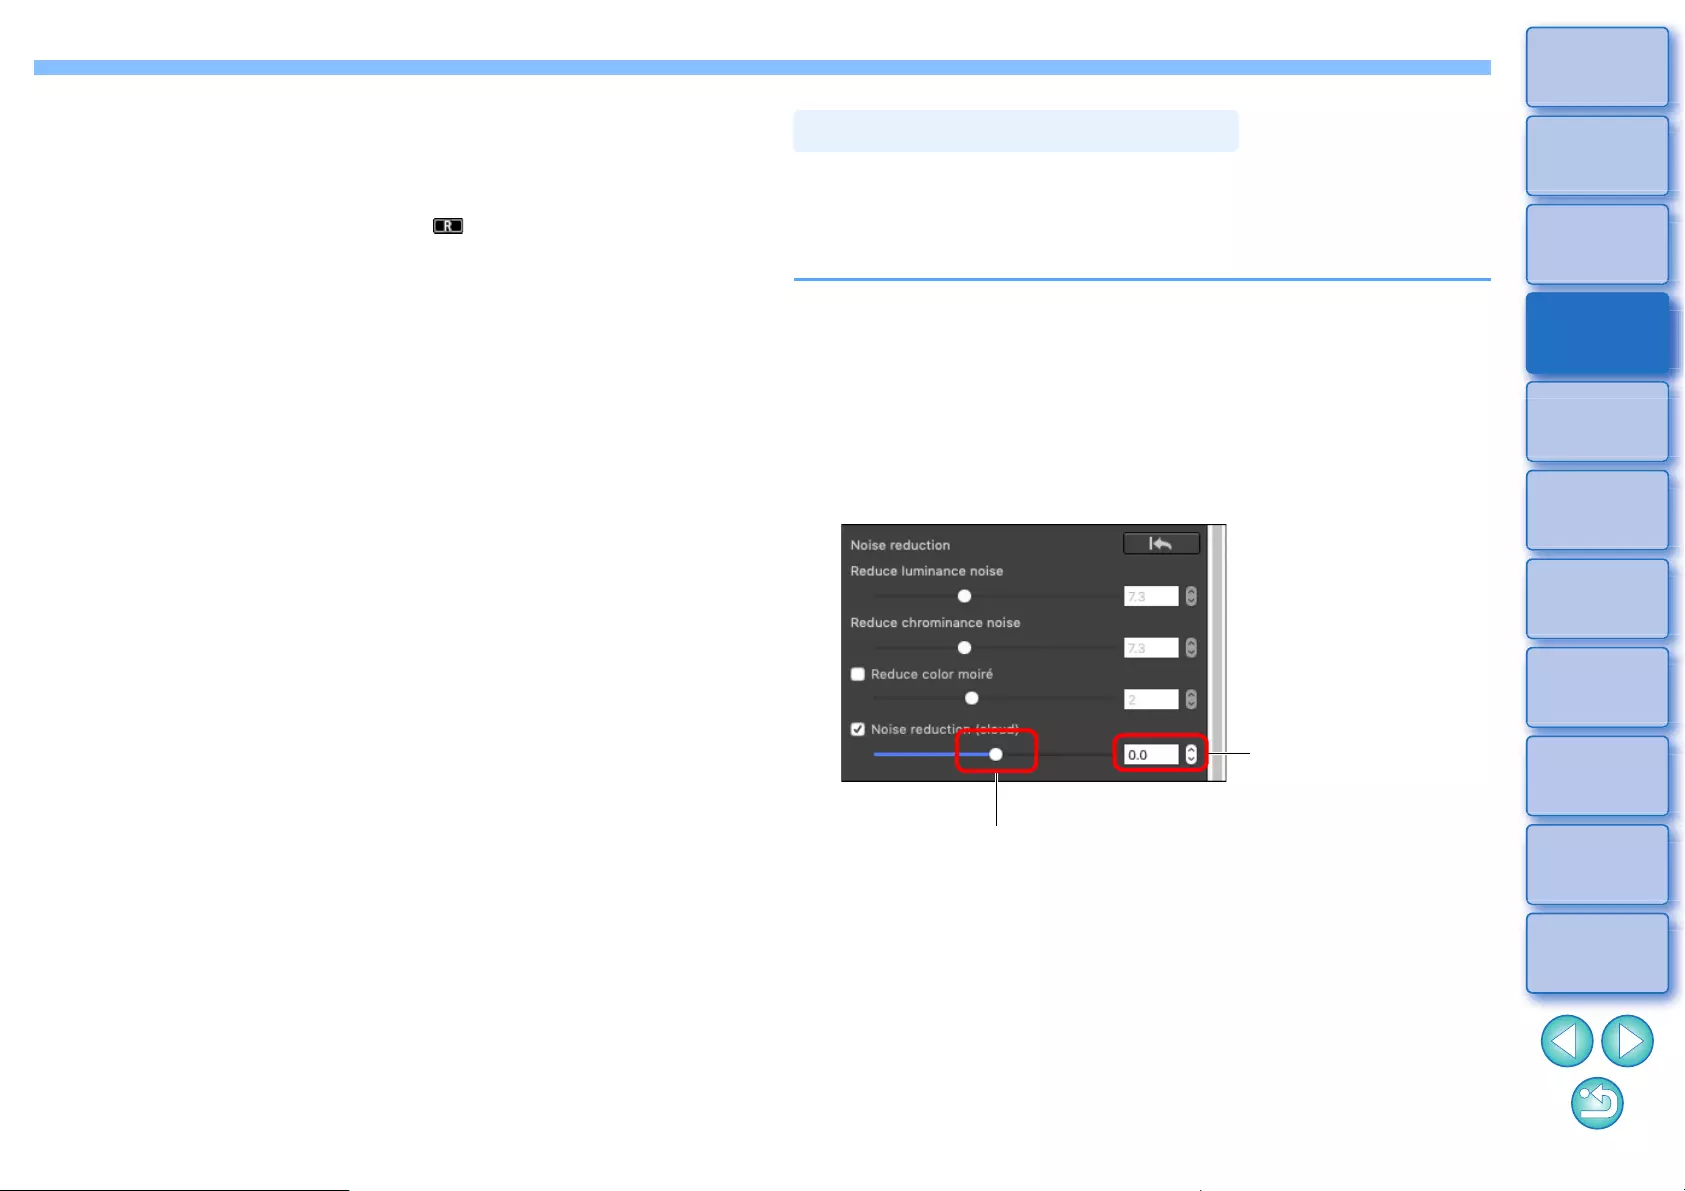
130
3
Sorting
Images
1
2
4
5
Downloading
Images
Viewing
Images
Printing
Images
Editing
Images
6
Processing
Large Numbers
of RAW Images
7
Remote
Shooting
10
HDR PQ
Mode
8
Playing Back
Movies and Saving
Still Photos
11
Specifying
Preferences
9
Handling
RAW Movies
ÜCloud processing is carried out. As a result of cloud processing,
a CIP image is generated from the RAW image and saved in
[Cloud Box]. The original RAW image is not affected by cloud
processing.
lCIP images are displayed with a [ ] icon in the thumbnail
image.
lYou can also select an image you want to use cloud processing
and select the [Cloud] menu [Process in cloud] to use cloud
processing.
lTo stop the process during cloud processing, select [Cancel]
from the menu that appears by right-clicking with the mouse. An
image for which cloud processing was stopped is displayed with
a [!] icon in the image’s thumbnail image in [Cloud Box], but you
can continue cloud processing again.
lIf cloud processing fails, an image is displayed with a [!] icon in
the thumbnail image in [Cloud Box]. Continue cloud processing
again.
lYou cannot edit [Digital Lens Optimizer], [Diffraction correction],
or [Chromatic aberration] settings for CIP images. It is
recommeded that you complete this editing before using cloud
processing.
lYou cannot carry out [Cropping], [Stamp], or [Partial adjustments]
during cloud processing.
lCIP images cannot be handled with software other than DPP.
3Open [Cloud Box], select the CIP image you want to
edit, and edit.
lCIP images can be edited in the same way as normal RAW
images.
However, you cannot edit [Digital Lens Optimizer], [Diffraction
correction], [Chromatic aberration], [Compose in RAW Format] in
the compositing tool, or [Size when opening RAW images]
settings.
[Noise reduction (cloud)] in the Detailed Adjustment tool palette is a
noise reduction function that can be used only with CIP images
generated after cloud processing. How to use this function is described
here.
1Open [Cloud Box] in the main window (p.129), and
select an image.
2Open the Detailed Adjustment tool palette (p.69).
3Checkmark the [Noise reduction (cloud)] checkbox,
and make adjustments.
lYou can set a noise reduction level from within a range of -4.0 to
4.0.
The larger the setting, the larger the noise reduction effect.
lThe noise reduction effect can also be checked in the check
window.
Using Noise Reduction (Cloud)
Drag the slider left or right
Enter a setting (in 0.1-
stop increments)
5
131
3
Sorting
Images
1
2
4
5
Downloading
Images
Viewing
Images
Printing
Images
Editing
Images
6
Processing
Large Numbers
of RAW Images
7
Remote
Shooting
10
HDR PQ
Mode
8
Playing Back
Movies and Saving
Still Photos
11
Specifying
Preferences
9
Handling
RAW Movies
Printing Images
Printing an Image .................................................. 132
Printing with Shooting Information......................... 133
Printing a Thumbnail List (Contact Sheet
Printing) ................................................................. 134
Plug-in printing....................................................... 135
132
3
Sorting
Images
1
2
4
5
Downloading
Images
Viewing
Images
Printing
Images
Editing
Images
6
Processing
Large Numbers
of RAW Images
7
Remote
Shooting
10
HDR PQ
Mode
8
Playing Back
Movies and Saving
Still Photos
11
Specifying
Preferences
9
Handling
RAW Movies
Printing an Image
You can print images with a printer. As an example, the procedure to
print one image on one sheet of paper is described here.
1Select the image to be printed.
2Select the [File] menu [Print].
ÜThe printer’s print settings dialog box appears.
3Print.
lSpecify the optimum settings for printing photographs in the
printer’s print settings dialog box and click the [print] button.
ÜPrinting begins.
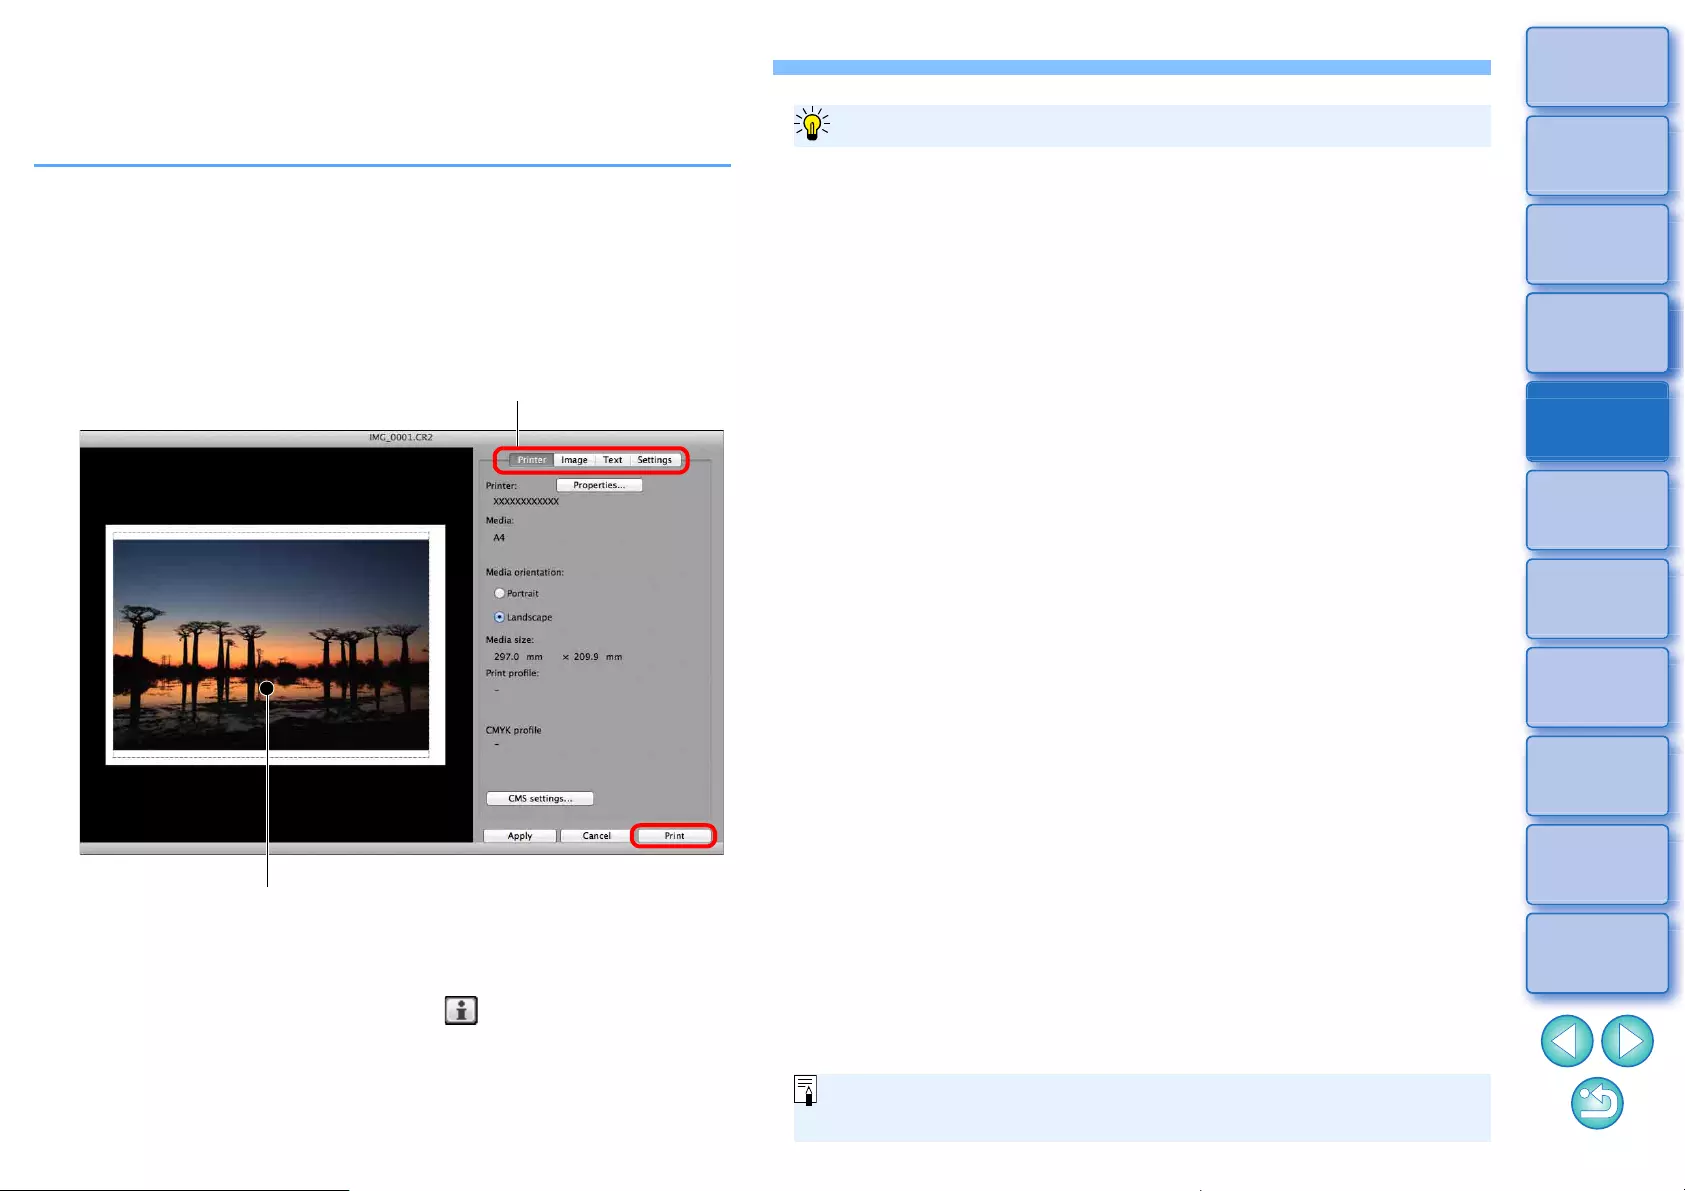
133
3
Sorting
Images
1
2
4
5
Downloading
Images
Viewing
Images
Printing
Images
Editing
Images
6
Processing
Large Numbers
of RAW Images
7
Remote
Shooting
10
HDR PQ
Mode
8
Playing Back
Movies and Saving
Still Photos
11
Specifying
Preferences
9
Handling
RAW Movies
Printing with Shooting Information
You can freely layout one image on one sheet of paper and print
together with titles and shooting information, etc.
1Select one image to be printed.
2Select the [File] menu [Print with detailed setting].
3Specify the required settings for printing, and then
click the [Print] button.
lThe image can be moved by dragging.
lDrag the four corners of the image to change the size.
lFor the shooting information, click [ ] on the [Text] tab sheet
and select the necessary items in the window that appears.
Print preview
Switches the settings tab sheet
The settings of each tab sheet in step 3 are memorized when printing or
the [Apply] button is clicked. The settings can be applied to another
image when printing.
Memorized settings are options in [Printer], [Media], [Media orientation],
[Registration marks], [Header], [Footer], and [Image Information], and
settings in the [Settings] tab sheet.
To maintain the settings
lYou can set printer profiles (p.175).
lIf CMYK simulation is set, the image is printed in the set colors.
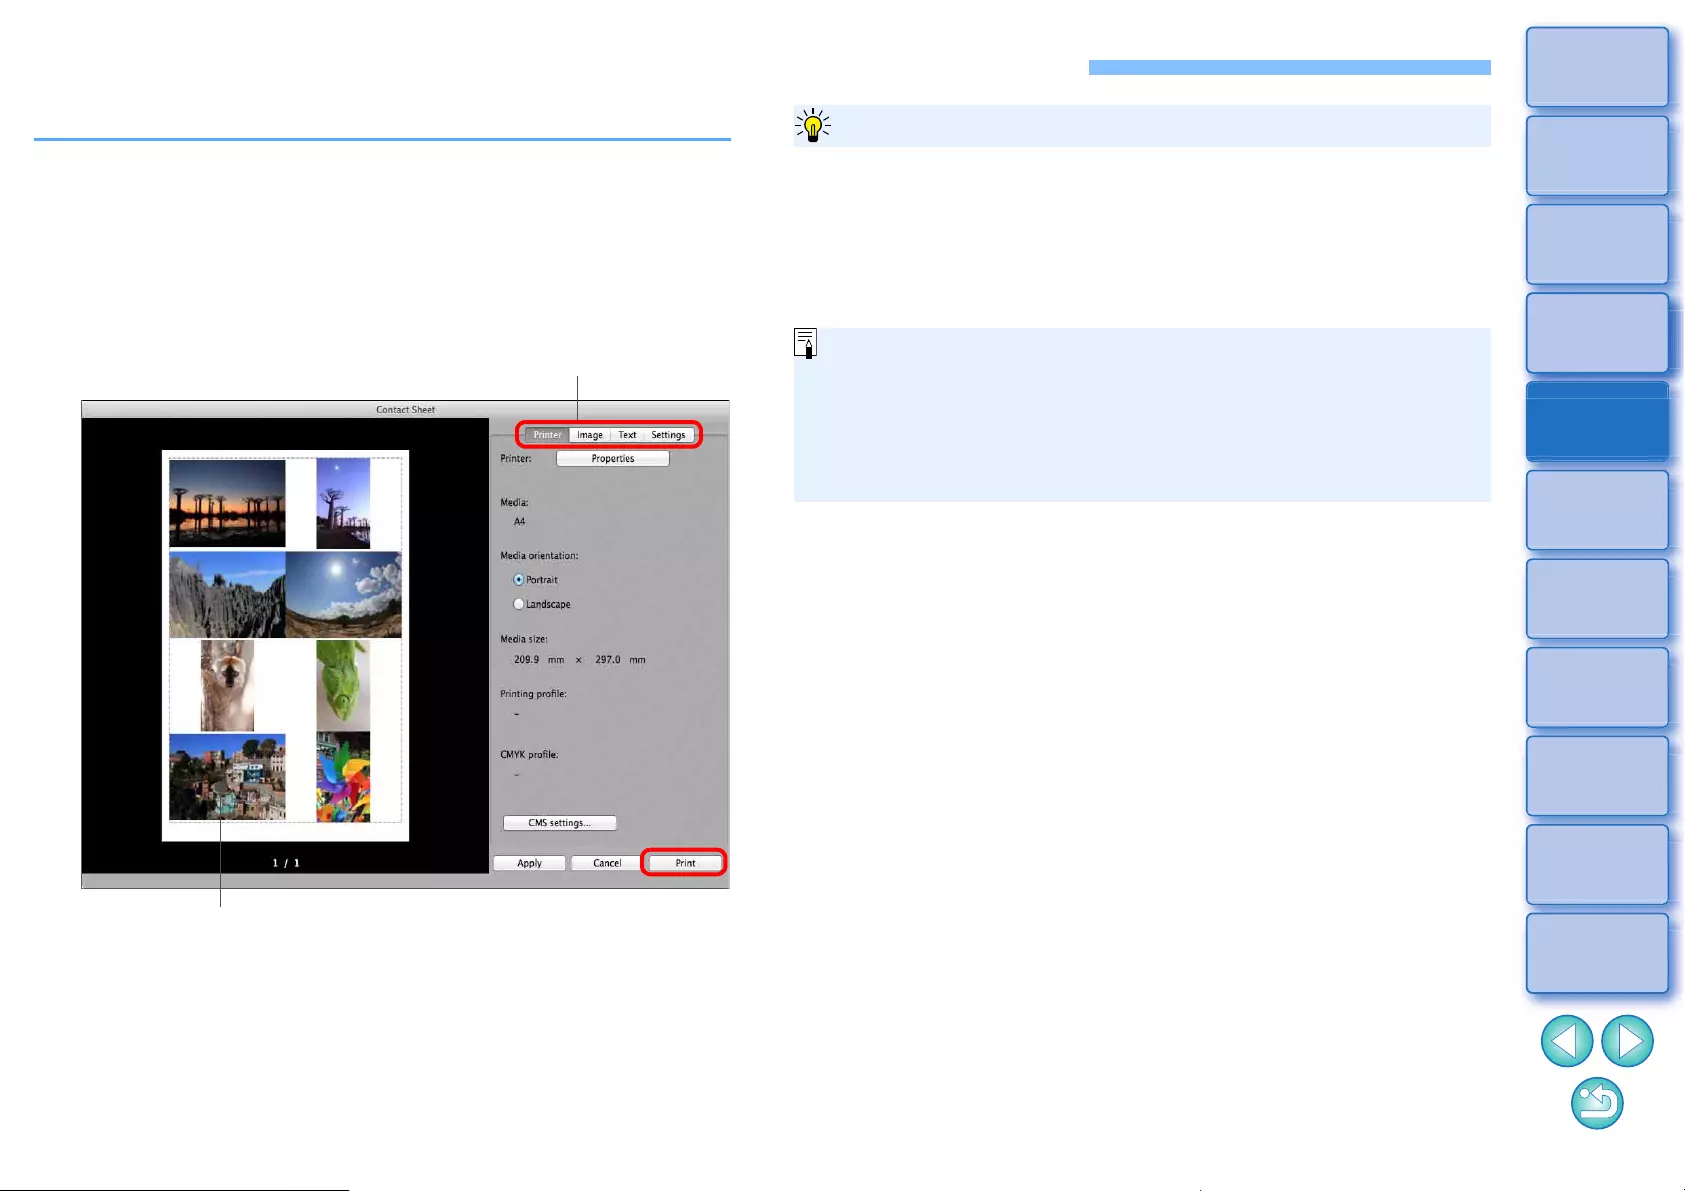
134
3
Sorting
Images
1
2
4
5
Downloading
Images
Viewing
Images
Printing
Images
Editing
Images
6
Processing
Large Numbers
of RAW Images
7
Remote
Shooting
10
HDR PQ
Mode
8
Playing Back
Movies and Saving
Still Photos
11
Specifying
Preferences
9
Handling
RAW Movies
Printing a Thumbnail List (Contact Sheet Printing)
You can print rows of multiple images on one sheet of paper.
1Select images to be printed in a thumbnail list.
2Select the [File] menu [Print contact sheets].
3Specify the required settings for printing, and then
click the [Print] button.
Print preview
Switches the settings tab sheet
The settings of each tab sheet in step 3 are memorized when printing or
the [Apply] button is clicked. The settings can also be applied to another
image when printing.
Memorized settings are [Printer], [Media], and [Media orientation], and
settings in the [Image] and [Settings] tab sheets.
To maintain the settings
lYou can set printer profiles (p.175).
lIf CMYK simulation has been set, the image is printed in the set
colors (p.175).
lBy using this function in the edit image window, all images in the
window (not only the selected ones) are printed in a thumbnail
list.
135
3
Sorting
Images
1
2
4
5
Downloading
Images
Viewing
Images
Printing
Images
Editing
Images
6
Processing
Large Numbers
of RAW Images
7
Remote
Shooting
10
HDR PQ
Mode
8
Playing Back
Movies and Saving
Still Photos
11
Specifying
Preferences
9
Handling
RAW Movies
Plug-in printing
1Select the [File] menu [Plug-in printing] Plug-In
for the printer you use.
ÜThe Plug-In starts up.
2Specify the required settings for printing
photographs and then print.
6
136
3
Sorting
Images
1
2
4
5
Downloading
Images
Viewing
Images
Printing
Images
Editing
Images
6
Processing
Large Numbers
of RAW Images
7
Remote
Shooting
10
HDR PQ
Mode
8
Playing Back
Movies and Saving
Still Photos
11
Specifying
Preferences
9
Handling
RAW Movies
Processing Large Numbers of RAW Images
Batch Apply White Balance to Images (Personal
White Balance) ...................................................... 137
Registering Personal White Balance ........................ 137
Applying Personal White Balance ............................ 138
Batch Save as JPEG or TIFF Images (Batch
Processing)............................................................ 139
Batch Transfer Images to Image Editing Software .........
141
Batch Change the File Name of Images................ 142
Changing the File Name of Images in the Order in
the Main Window ...................................................... 142
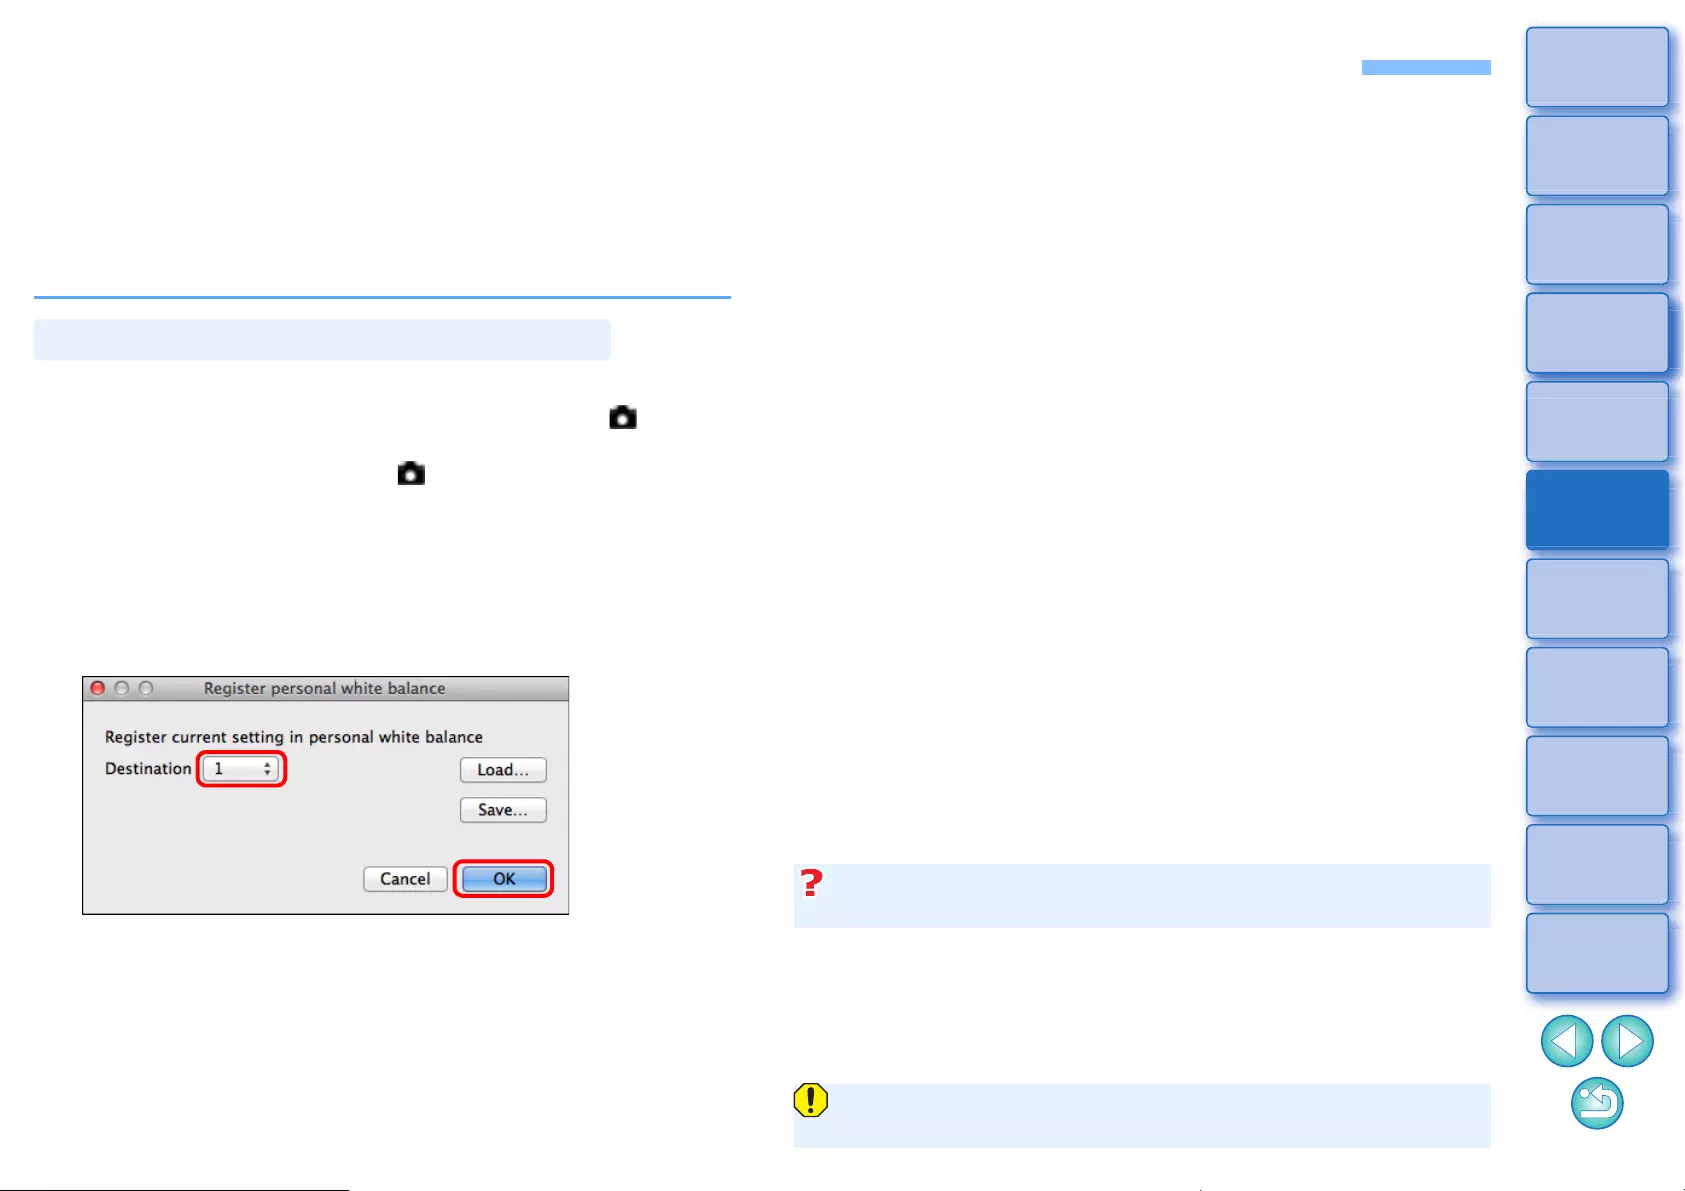
137
3
Sorting
Images
1
2
4
5
Downloading
Images
Viewing
Images
Printing
Images
Editing
Images
6
Processing
Large Numbers
of RAW Images
7
Remote
Shooting
10
HDR PQ
Mode
8
Playing Back
Movies and Saving
Still Photos
11
Specifying
Preferences
9
Handling
RAW Movies
Batch Apply White Balance to Images (Personal White Balance)
The white balance adjustments made to a RAW image shot in a specific
shooting environment can be registered as personal white balance. You
can then perform efficient white balance adjustment by applying this
personal white balance to a large number of RAW images shot in the
same shooting environment.
Personal white balance data for versions before DPP 4 cannot be
applied.
1Adjust the white balance (p.52, p.53).
lTo adjust white balance, select a setting other than [ ( )] from
the [White balance adjustment] list box (p.51). Registering the
adjustments is not possible if [ ( )] is selected.
2In the Basic adjustment tool palette, click the
[Register] button.
ÜThe [Register personal white balance] dialog box appears.
3Select the button number to be registered from the
list and click the [OK] button.
Registering Personal White Balance
1In step 3, click the [Save] button to write as a file.
2Copy the file to another computer.
3In DPP on another computer, display the window of step 3.
4Click the [Load] button and in the window that appears, select the
copied file.
To use the registered personal white balance on another
computer
You cannot change or adjust white balance with multiple-exposure
RAW images created on the camera.
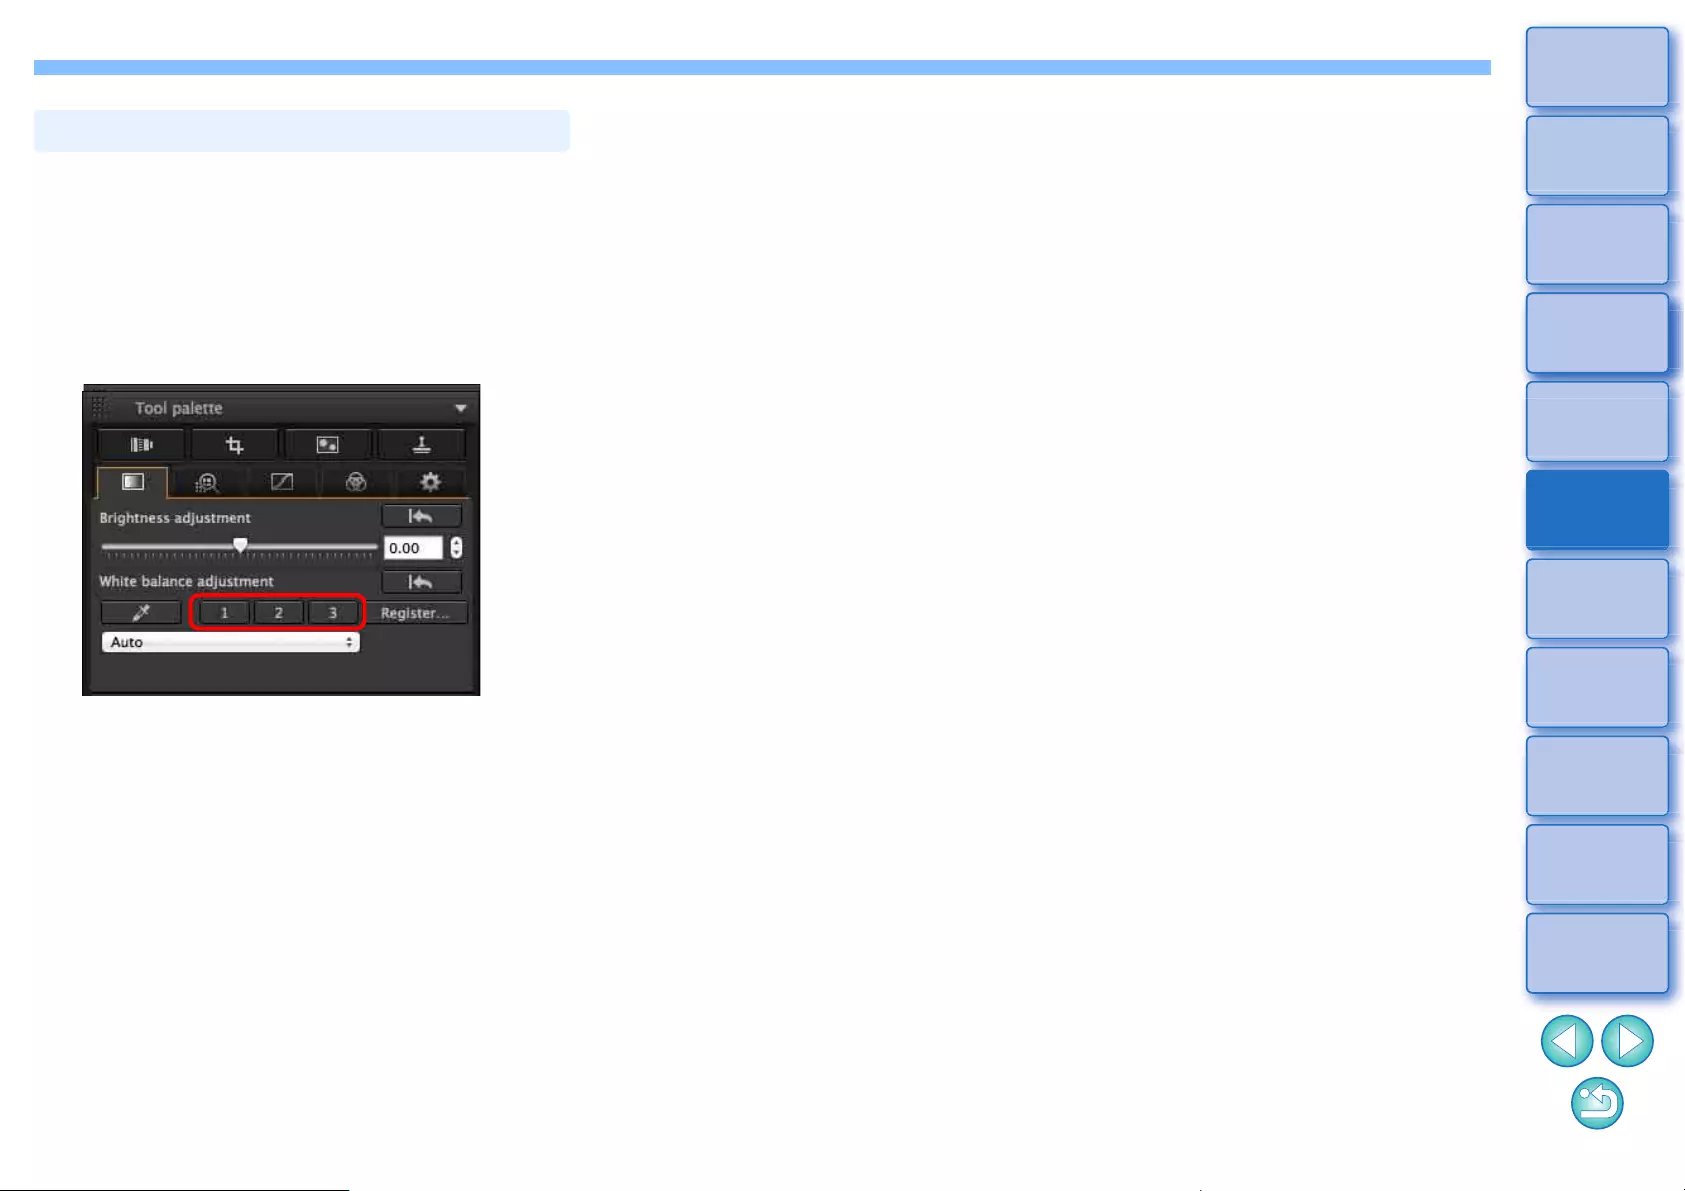
138
3
Sorting
Images
1
2
4
5
Downloading
Images
Viewing
Images
Printing
Images
Editing
Images
6
Processing
Large Numbers
of RAW Images
7
Remote
Shooting
10
HDR PQ
Mode
8
Playing Back
Movies and Saving
Still Photos
11
Specifying
Preferences
9
Handling
RAW Movies
1In the main window, select the image to which a
personal white balance is to be applied.
2Select the [View] menu [Tool palette].
ÜThe tool palette appears.
3Click the personal white balance number button that
is to be applied.
ÜPersonal white balance is applied to all the selected images.
Applying Personal White Balance
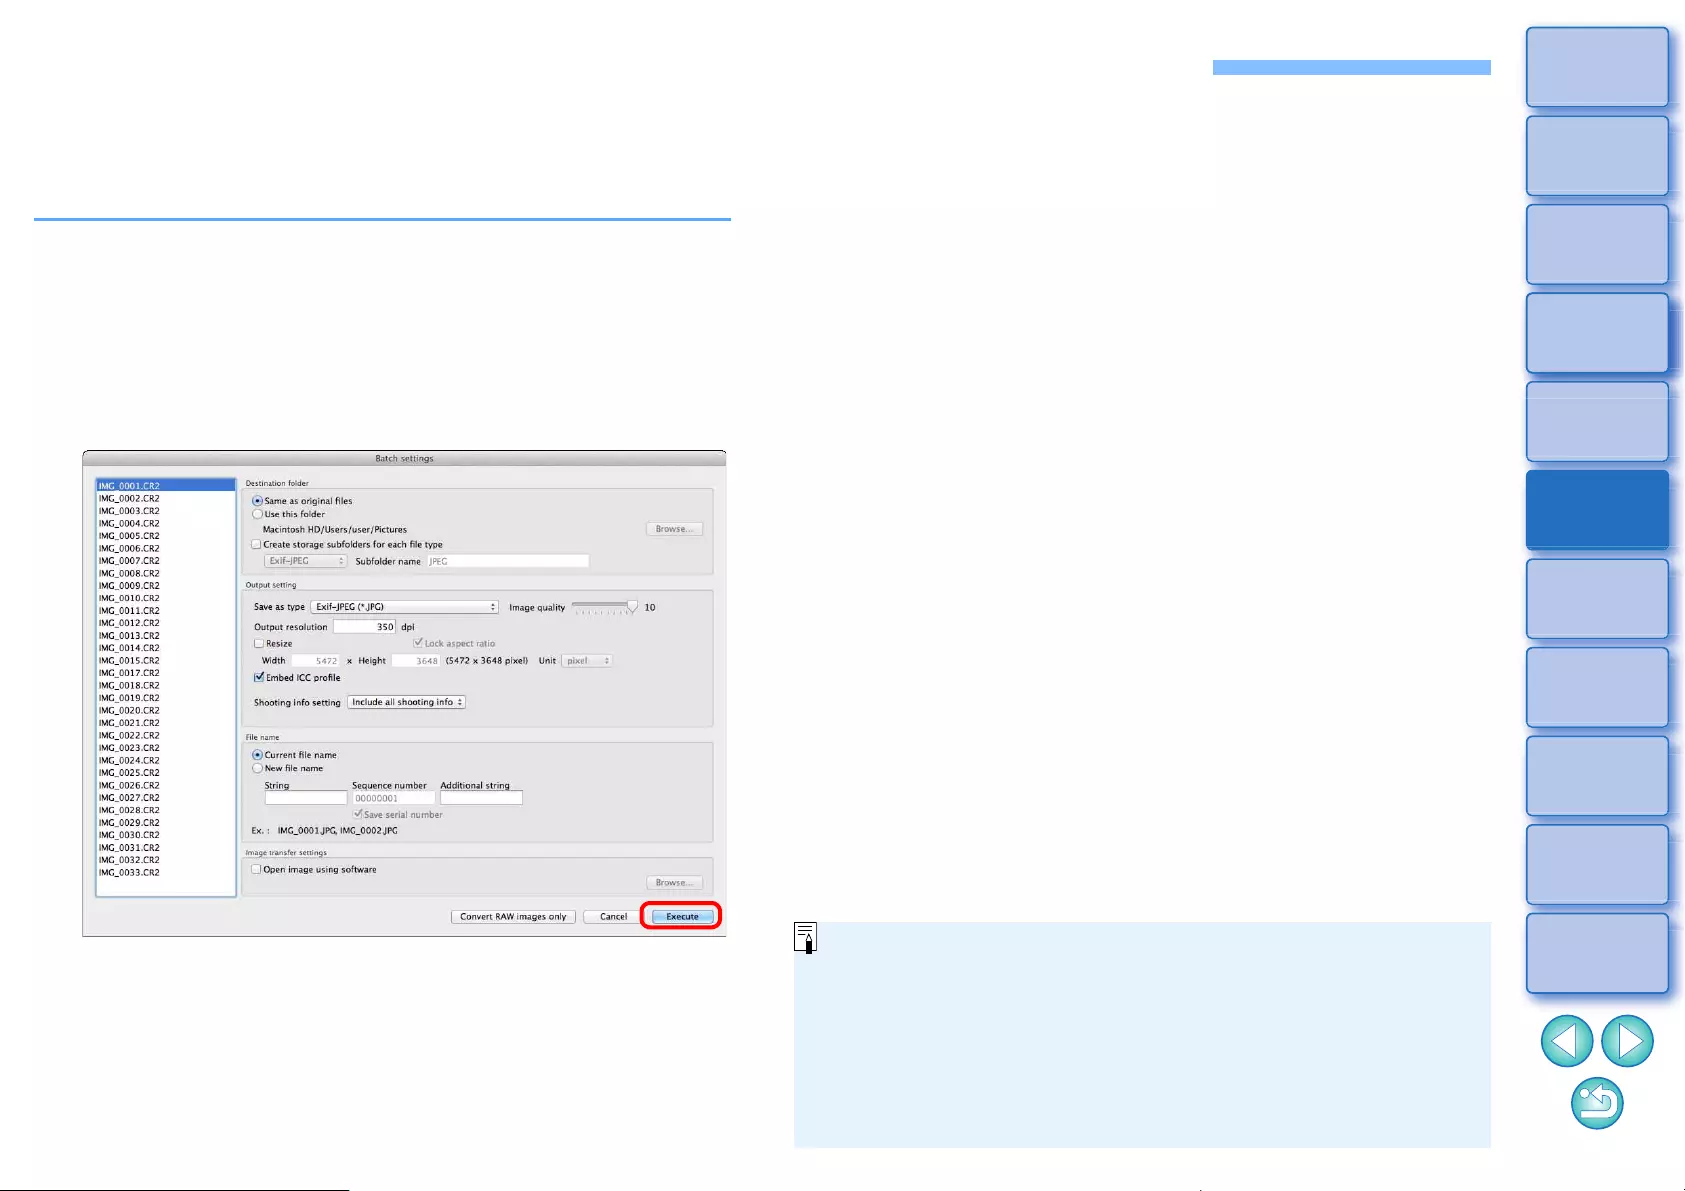
139
3
Sorting
Images
1
2
4
5
Downloading
Images
Viewing
Images
Printing
Images
Editing
Images
6
Processing
Large Numbers
of RAW Images
7
Remote
Shooting
10
HDR PQ
Mode
8
Playing Back
Movies and Saving
Still Photos
11
Specifying
Preferences
9
Handling
RAW Movies
Batch Save as JPEG or TIFF Images (Batch Processing)
You can batch convert and save edited RAW images to highly versatile
JPEG or TIFF images.
The images are saved as separate images, so the RAW images remain
unaffected.
1In the main window, select multiple images to be
converted.
2Select the [File] menu [Batch process].
ÜThe [Batch settings] window appears.
3Specify the required settings, and then click the
[Execute] button.
ÜThe batch processing dialog box appears and saving begins.
ÜWhen all the images are saved, the [Exit] button appears in the
batch processing dialog box.
4In the processing dialog box, click the [Exit] button.
lIf you have selected [New file name] in [File name], [Sequence
number] has to be set.
lBy saving as explained above, a trimmed image (p.71) or dust-
erased image (p.86 to p.90) actually becomes a trimmed image
or dust-erased image.
lYou can also use this function in the edit image window. However,
all images in the window (not only the selected ones) are
converted and saved.
140
3
Sorting
Images
1
2
4
5
Downloading
Images
Viewing
Images
Printing
Images
Editing
Images
6
Processing
Large Numbers
of RAW Images
7
Remote
Shooting
10
HDR PQ
Mode
8
Playing Back
Movies and Saving
Still Photos
11
Specifying
Preferences
9
Handling
RAW Movies
In the [Batch settings] window, you cannot perform [Save] or [Save As]
(p.95) to edited RAW images.
DPP’s RAW image development processing technology is continually
being improved upon so that you can perform the latest image
processing more appropriately.
Meaning that, between two different versions of DPP, processing results
may differ very slightly even if with the same RAW image data, or the
results of significant editing of RAW image data with an attached recipe
may be different.
When you want to save the developing or editing results of the version
you are currently using as it is, converting and saving images as JPEG
or TIFF images is recommended.
lWhile saving is being performed, you can continue working in
another window
Since the saving function operates independently in the background,
you can continue with an operation in another window such as the
main window or the preview window during the saving process.
lTo convert all images and save, do not select an image in the
main window
If you do not perform step 1 and perform step 2 with no image
selected in the main window, all the images displayed in the main
window will be converted and saved.
Saving images with recipe is not possible
To save the developing/editing results for the version you are
currently using
Skillful batch saving
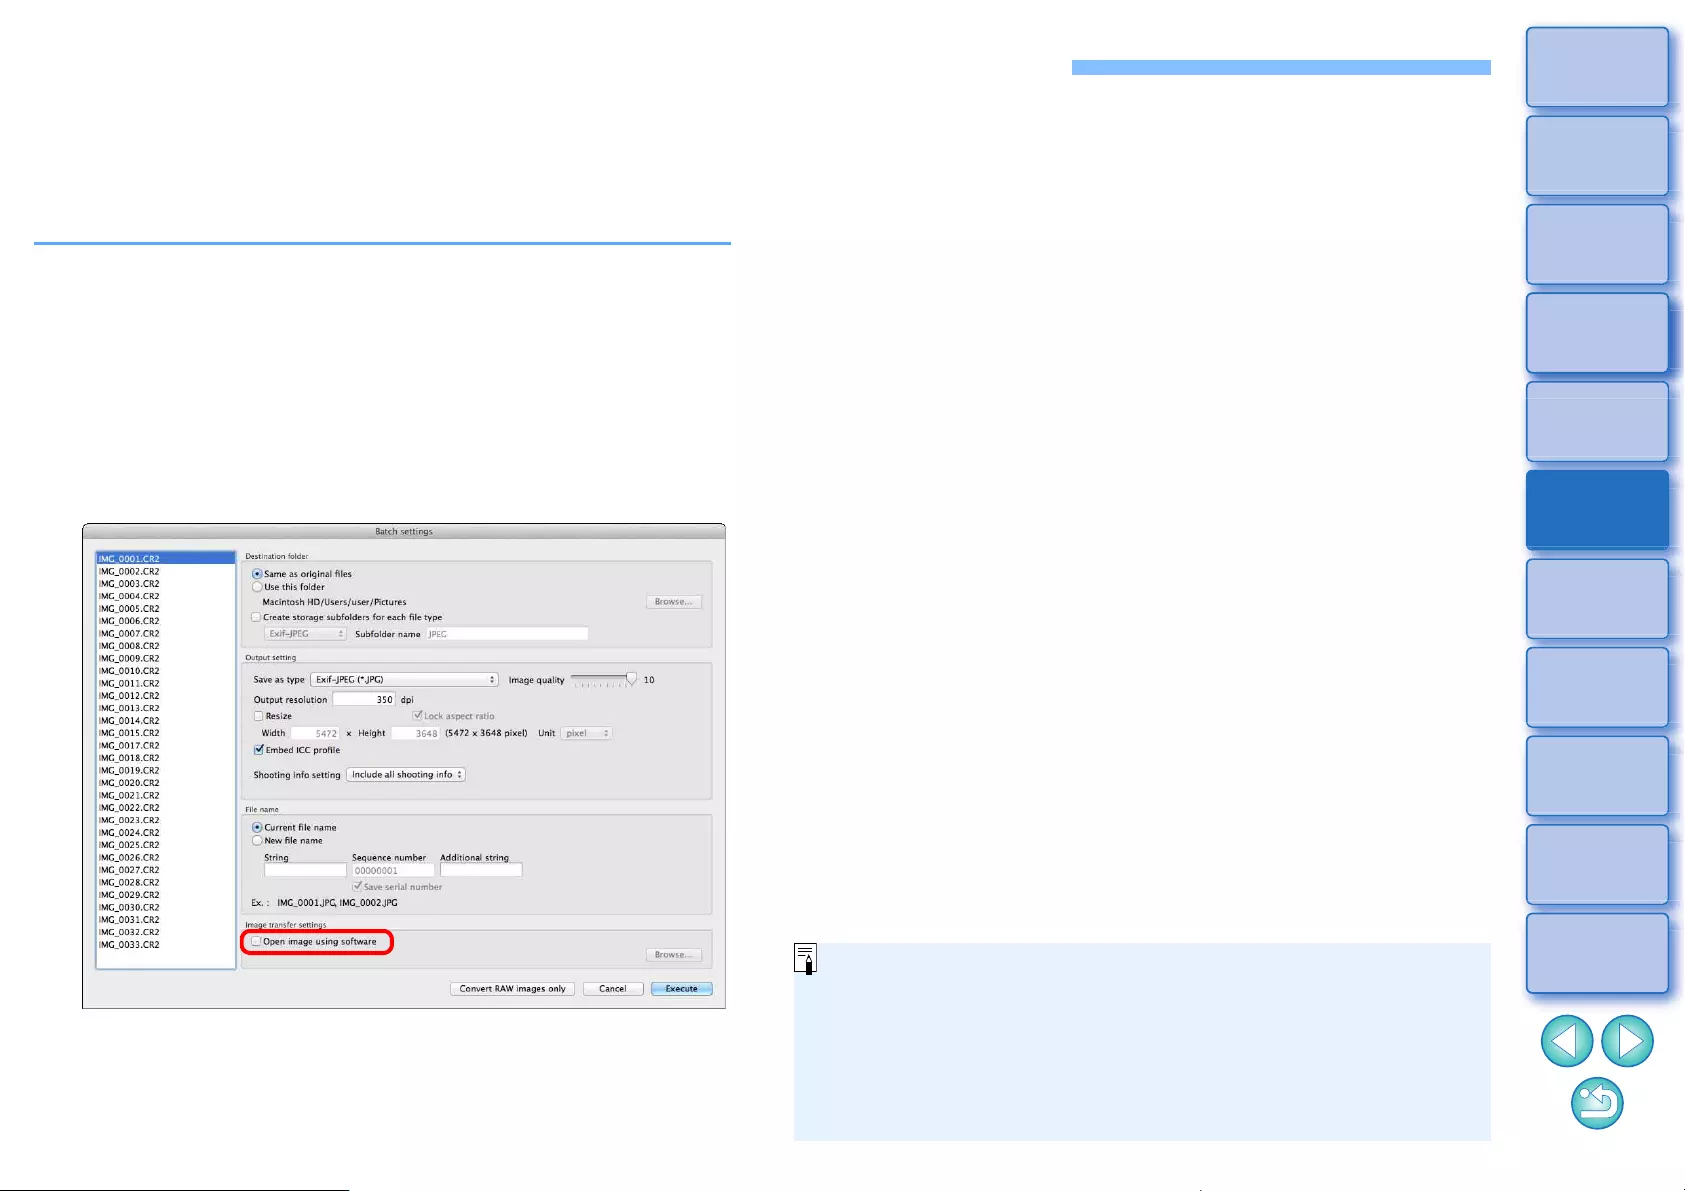
141
3
Sorting
Images
1
2
4
5
Downloading
Images
Viewing
Images
Printing
Images
Editing
Images
6
Processing
Large Numbers
of RAW Images
7
Remote
Shooting
10
HDR PQ
Mode
8
Playing Back
Movies and Saving
Still Photos
11
Specifying
Preferences
9
Handling
RAW Movies
Batch Transfer Images to Image Editing Software
You can transfer multiple images to image editing software. Unlike
“Transferring a RAW Image to Photoshop” (p.126), you transfer images
that have first been converted and saved as a separate image, so the
transferred image will not be deleted after quitting the destination
software. The software used here as an example is Adobe Photoshop.
1In the main window, select multiple images to be
transferred.
2
Select the [File] menu
[Batch process].
ÜThe [Batch settings] window appears.
3Perform settings required for transferring (e.g. file
format).
4Checkmark [Open image using software].
ÜThe [Open] dialog box appears.
5Select Photoshop.
lIn the [Open] dialog box, select a Photoshop file or an alias and
click the [Open] button.
ÜThe [Open] dialog box closes and [Image transfer settings] in the
[Batch settings] window is set to Photoshop.
6Click the [Execute] button.
ÜThe processing dialog box appears and batch transfer begins.
ÜWhen the first image has been transferred, Photoshop starts up
and transferred images are displayed in transferred order.
lTo reset the transfer destination to another software, click the
[Browse] button in [Image transfer settings], and in the [Open]
dialog that appears, select the software and click the [Open]
button.
lYou can also use this function in the edit image window. However,
all images in the window (not only the selected ones) are
transferred.
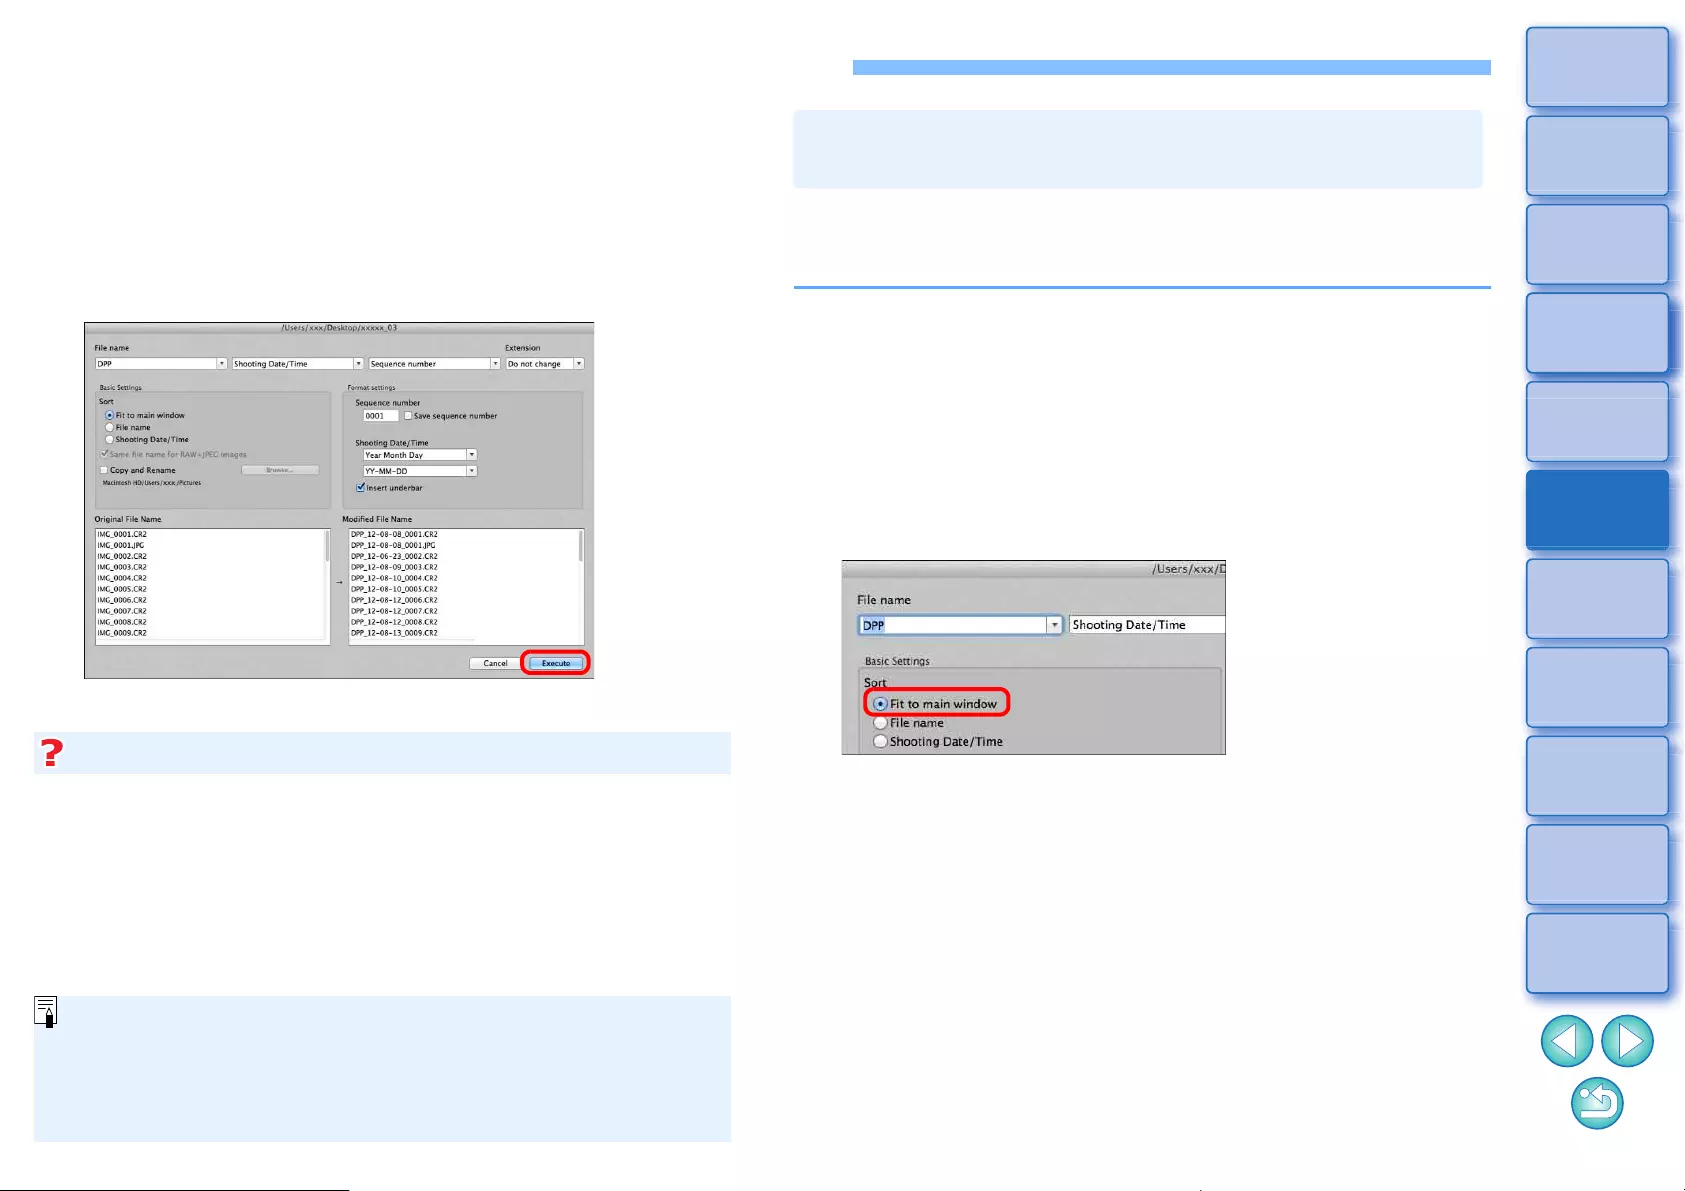
142
3
Sorting
Images
1
2
4
5
Downloading
Images
Viewing
Images
Printing
Images
Editing
Images
6
Processing
Large Numbers
of RAW Images
7
Remote
Shooting
10
HDR PQ
Mode
8
Playing Back
Movies and Saving
Still Photos
11
Specifying
Preferences
9
Handling
RAW Movies
Batch Change the File Name of Images
If a file name in red text appears in [Modified File Name], the file name is
duplicated. Changes cannot be made if even one file name is
duplicated. Change the settings so that duplication does not occur.
1In the main window, select multiple images of which
the file names are to be changed.
2Select the [Tools] menu [Start Rename tool].
ÜThe rename window appears.
3Specify the required settings and click the [Execute]
button.
ÜProcessing begins and the file names are changed.
Changes cannot be made when the file name is duplicated
lYou can change the file name of only one image in the main
window by selecting the thumbnail, right-clicking with the mouse,
and selecting [Rename] from the menu that appears.
lYou cannot start up the rename tool from the [Collection] window
(p.104). You also cannot change the file name of one image.
When you change the order of the images in the main window, you can
change in one operation the names of the files for the images, in the
order they were rearranged.
1Change the order of the images in the main window
(p.36).
2In the main window, select multiple images of which
the file names are to be changed.
3Select the [Tools] menu [Start Rename tool].
4Select [Fit to main window].
5Specify the required settings.
lTo copy an image, checkmark [Copy and Rename].
6Click the [Execute] button.
ÜThe file names are changed and the order in the main window is
maintained.
Changing the File Name of Images in the
Order in the Main Window
7
143
3
Sorting
Images
1
2
4
5
Downloading
Images
Viewing
Images
Printing
Images
Editing
Images
6
Processing
Large Numbers
of RAW Images
7
Remote
Shooting
10
HDR PQ
Mode
8
Playing Back
Movies and Saving
Still Photos
11
Specifying
Preferences
9
Handling
RAW Movies
Remote Shooting
Remote Shooting................................................... 144
Registering Click White Balance in the Camera....... 147
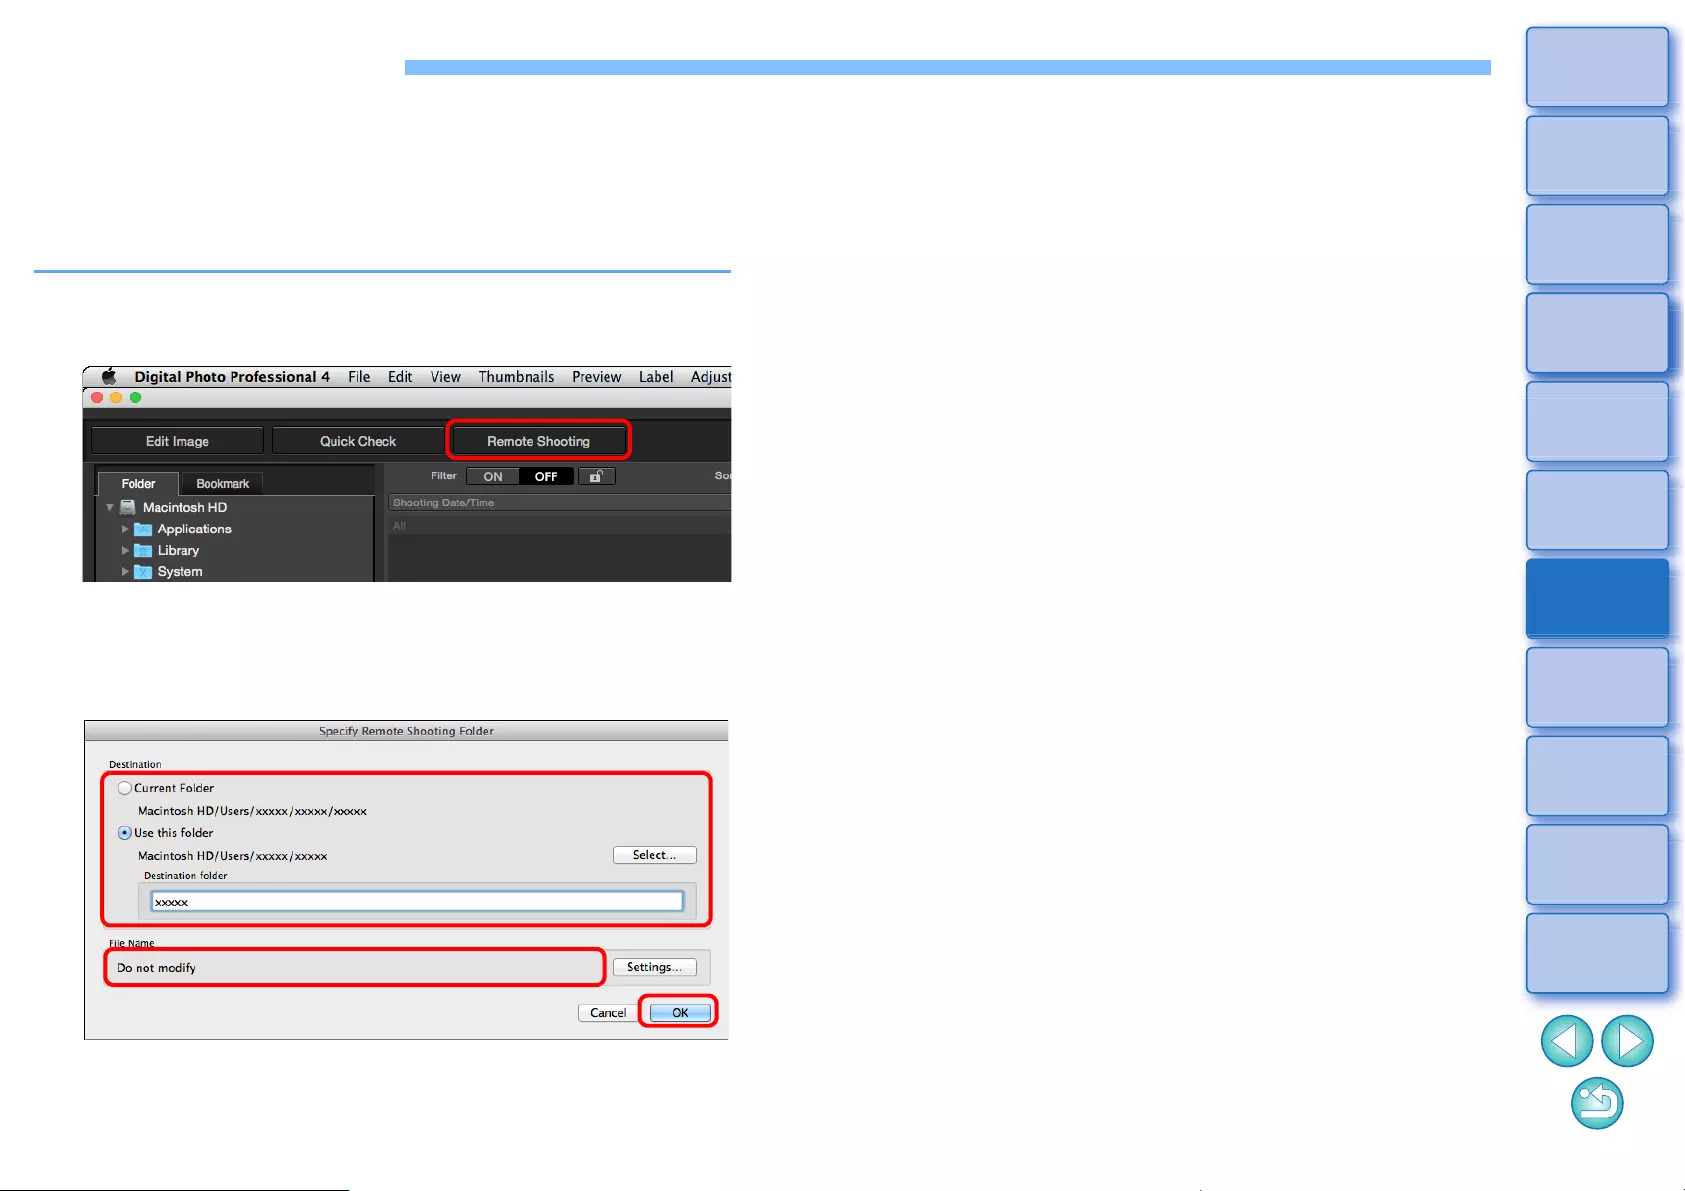
144
3
Sorting
Images
1
2
4
5
Downloading
Images
Viewing
Images
Printing
Images
Editing
Images
6
Processing
Large Numbers
of RAW Images
7
Remote
Shooting
10
HDR PQ
Mode
8
Playing Back
Movies and Saving
Still Photos
11
Specifying
Preferences
9
Handling
RAW Movies
Remote Shooting
You can perform remote shooting by using “EOS Utility” which enables
communication with a camera in combination.
For remote shooting, “EOS Utility Ver. 3.x” must be installed on your
computer. For information on cameras compatible with “EOS Utility Ver.
3.x”, refer to “EOS Utility Ver. 3.x Instruction Manual” (electronic manual
in PDF format).
1Click the [Remote Shooting] button on the toolbar in
the main window.
ÜRemote shooting setting window appears.
2Set the [Destination] in the Specify Remote Shooting
Folder window.
lTo save to the currently selected folder, select [Current Folder].
lTo create a new folder for saving images, select [Use this folder],
click the [Select] button, then select the destination and enter a
name for [Destination folder].
lAfter specifying settings, click the [OK] button.
ÜThe remote shooting window appears.
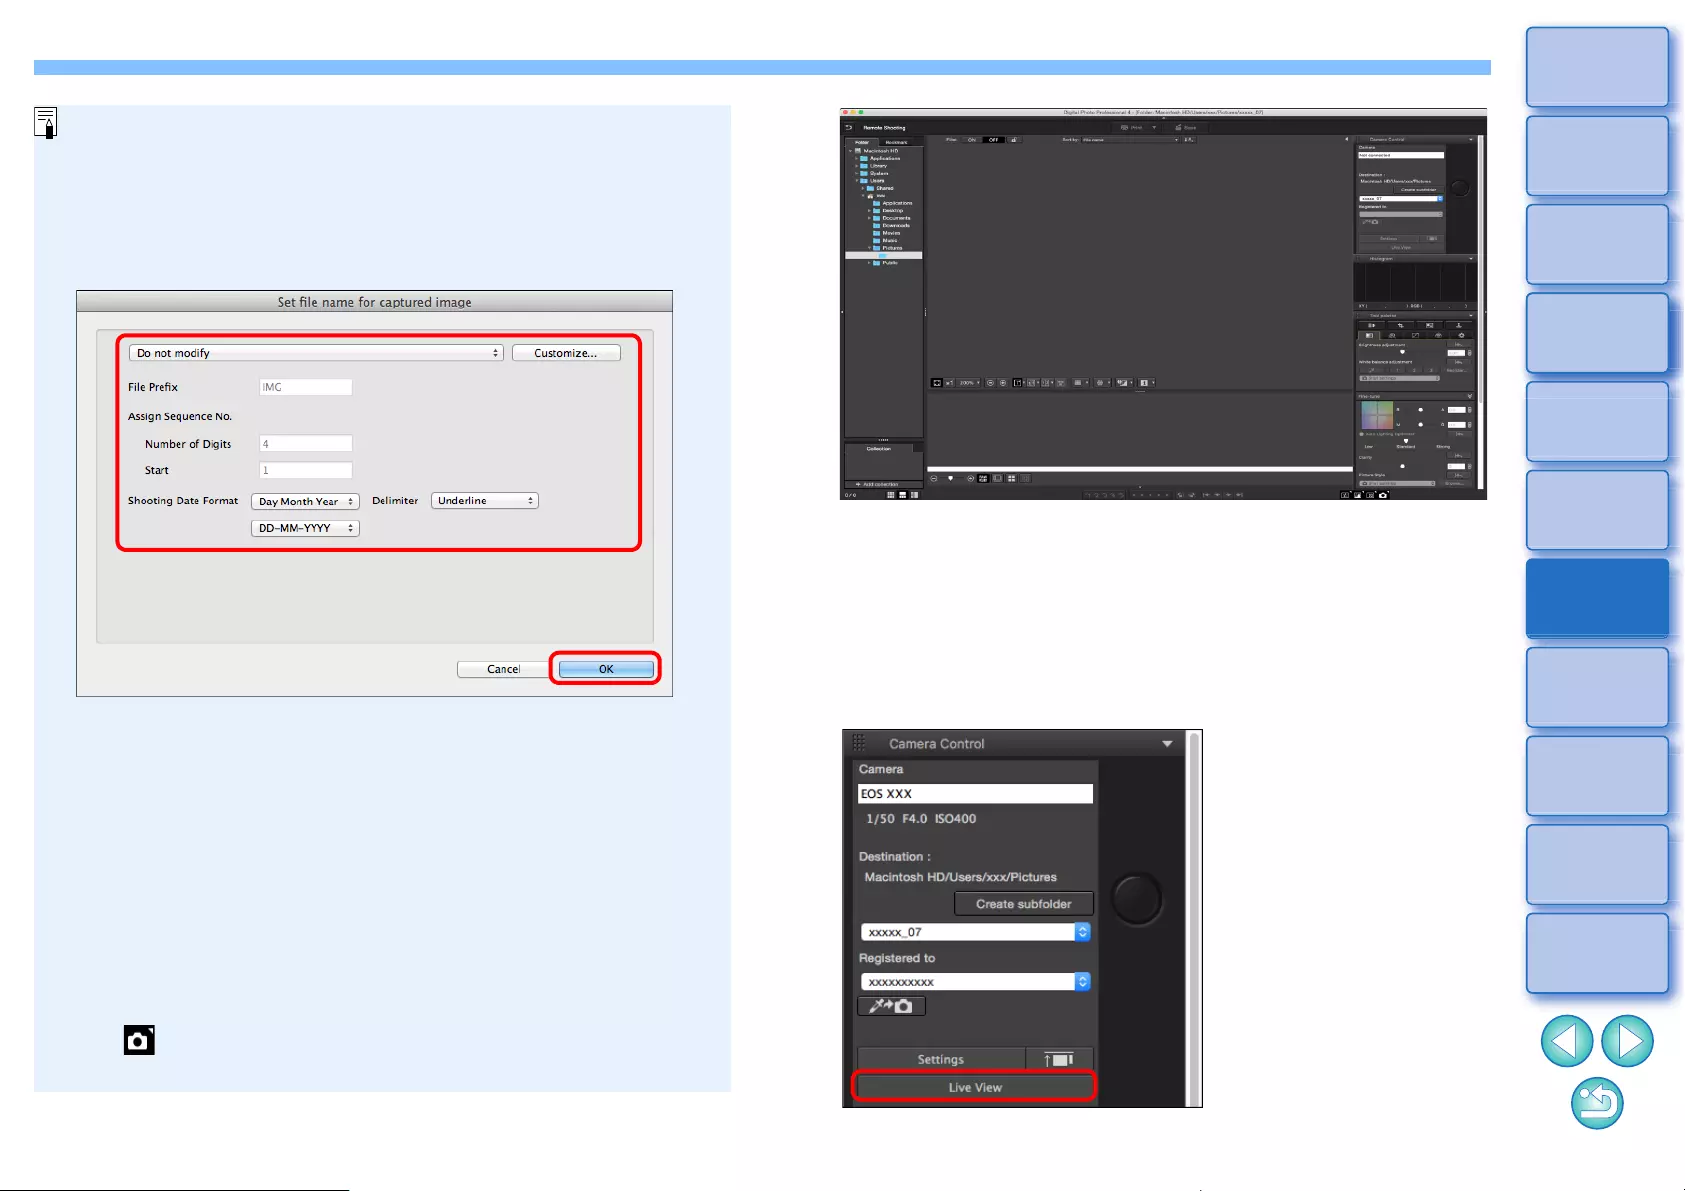
145
3
Sorting
Images
1
2
4
5
Downloading
Images
Viewing
Images
Printing
Images
Editing
Images
6
Processing
Large Numbers
of RAW Images
7
Remote
Shooting
10
HDR PQ
Mode
8
Playing Back
Movies and Saving
Still Photos
11
Specifying
Preferences
9
Handling
RAW Movies
You can change the [File Name] for Specify Remote Shooting
Folder window.
(If [Do not modify] is selected, images are saved with the file names
set on the camera.)
1Click the [Settings] button to display the Set file name for captured
image window.
2Select a naming rule for image file names from the list box.
You can click the [Customize] button and customize naming rules
for file names.
lYou can individually set prefix characters, number of digits for
serial numbers, and the start number for file names.
lIf you are using the shooting date in file names, you can specify
the date format (order and style for year-month-date) and
dividing characters on the Set file name for captured image
window.
3After specifying settings, click the [OK] button.
ÜThe Set file name for captured image window closes.
lAfter clicking the [Remote Shooting] button, you can click the
[ ] button at the bottom right of the main window to show/
hide the [Camera Control] palette.
lYou can perform shooting while checking the image by switching
the window to multi-layout.
3Connect a camera and a computer, and turn on the
camera’s power.
4 Click the [Live View] button.
ÜLive View window of “EOS Utility” appears.
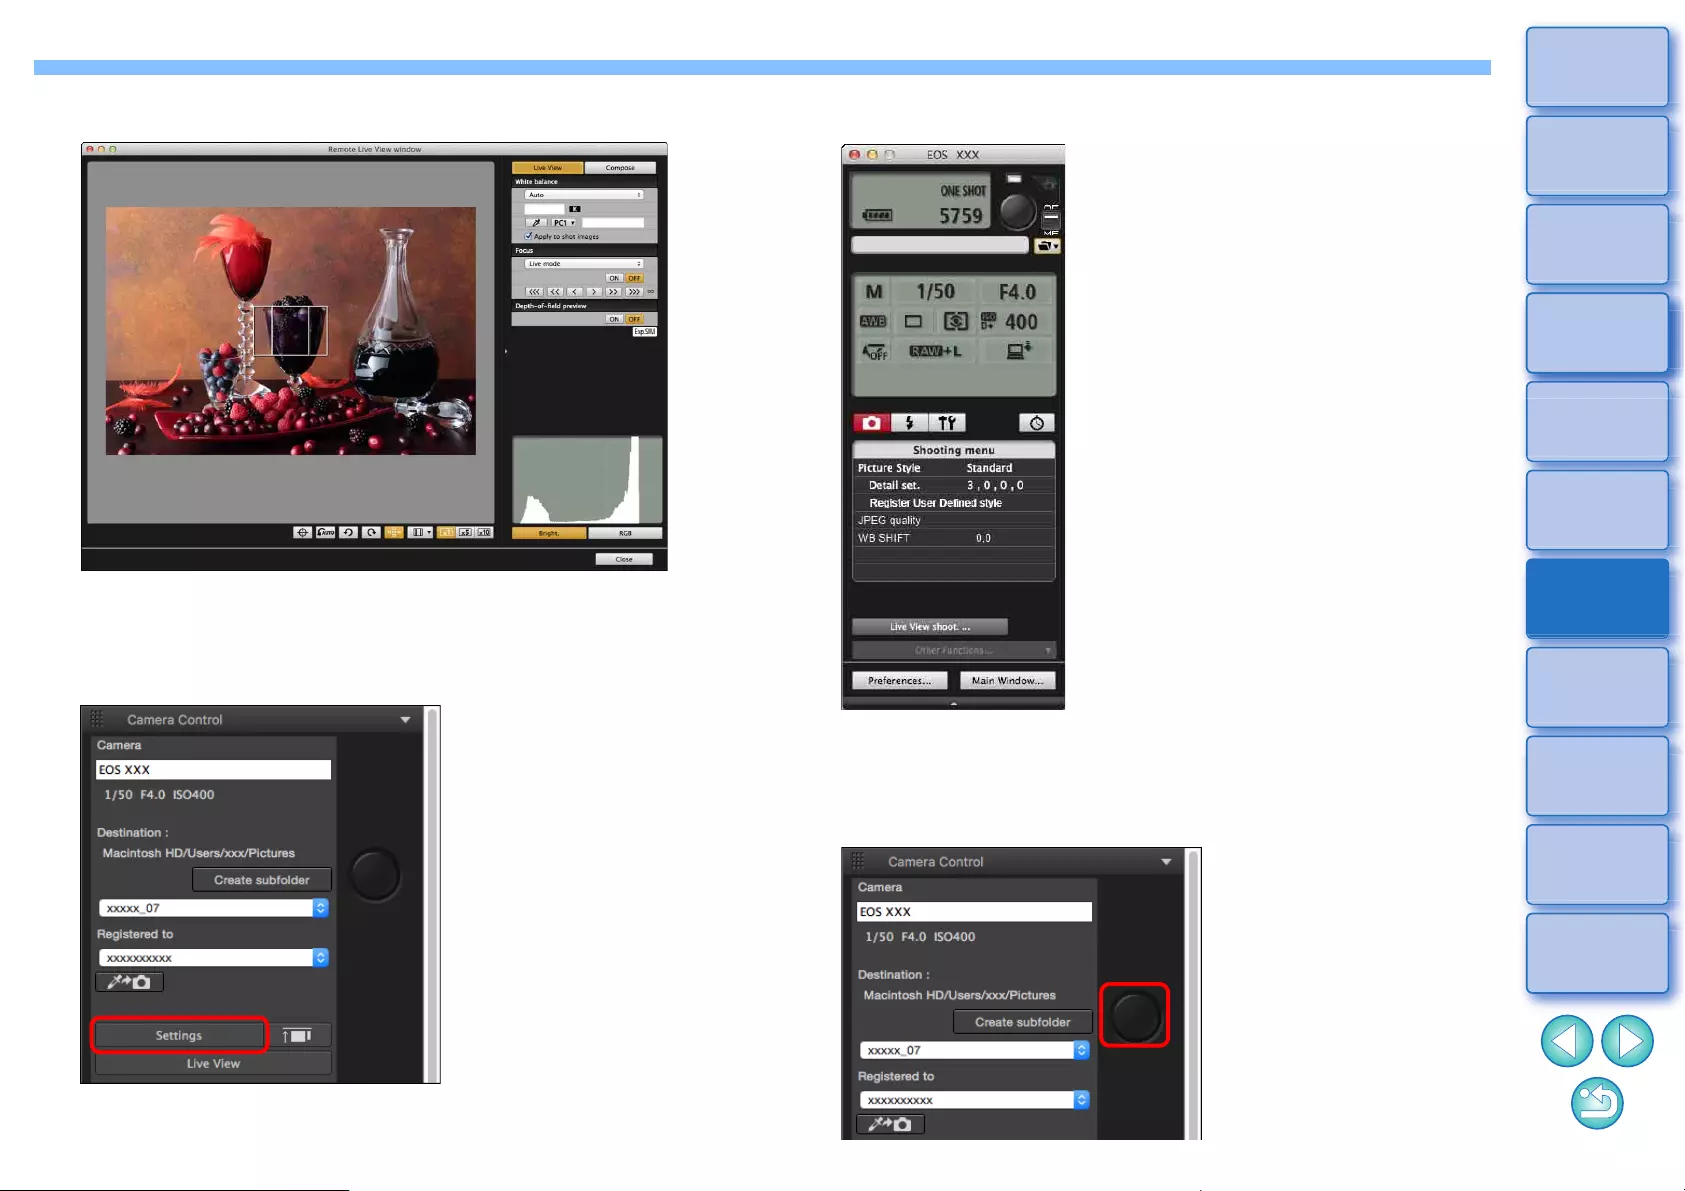
146
3
Sorting
Images
1
2
4
5
Downloading
Images
Viewing
Images
Printing
Images
Editing
Images
6
Processing
Large Numbers
of RAW Images
7
Remote
Shooting
10
HDR PQ
Mode
8
Playing Back
Movies and Saving
Still Photos
11
Specifying
Preferences
9
Handling
RAW Movies
5Specify the required settings.
lFor detailed instructions on setting procedures, refer to “EOS
Utility Instruction Manual” (PDF electronic manual).
6Click the [Settings] button.
ÜThe capture window of “EOS Utility” appears.
7Specify the required settings.
lFor detailed instructions on setting procedures, refer to “EOS
Utility Instruction Manual” (PDF electronic manual).
8Take the picture.
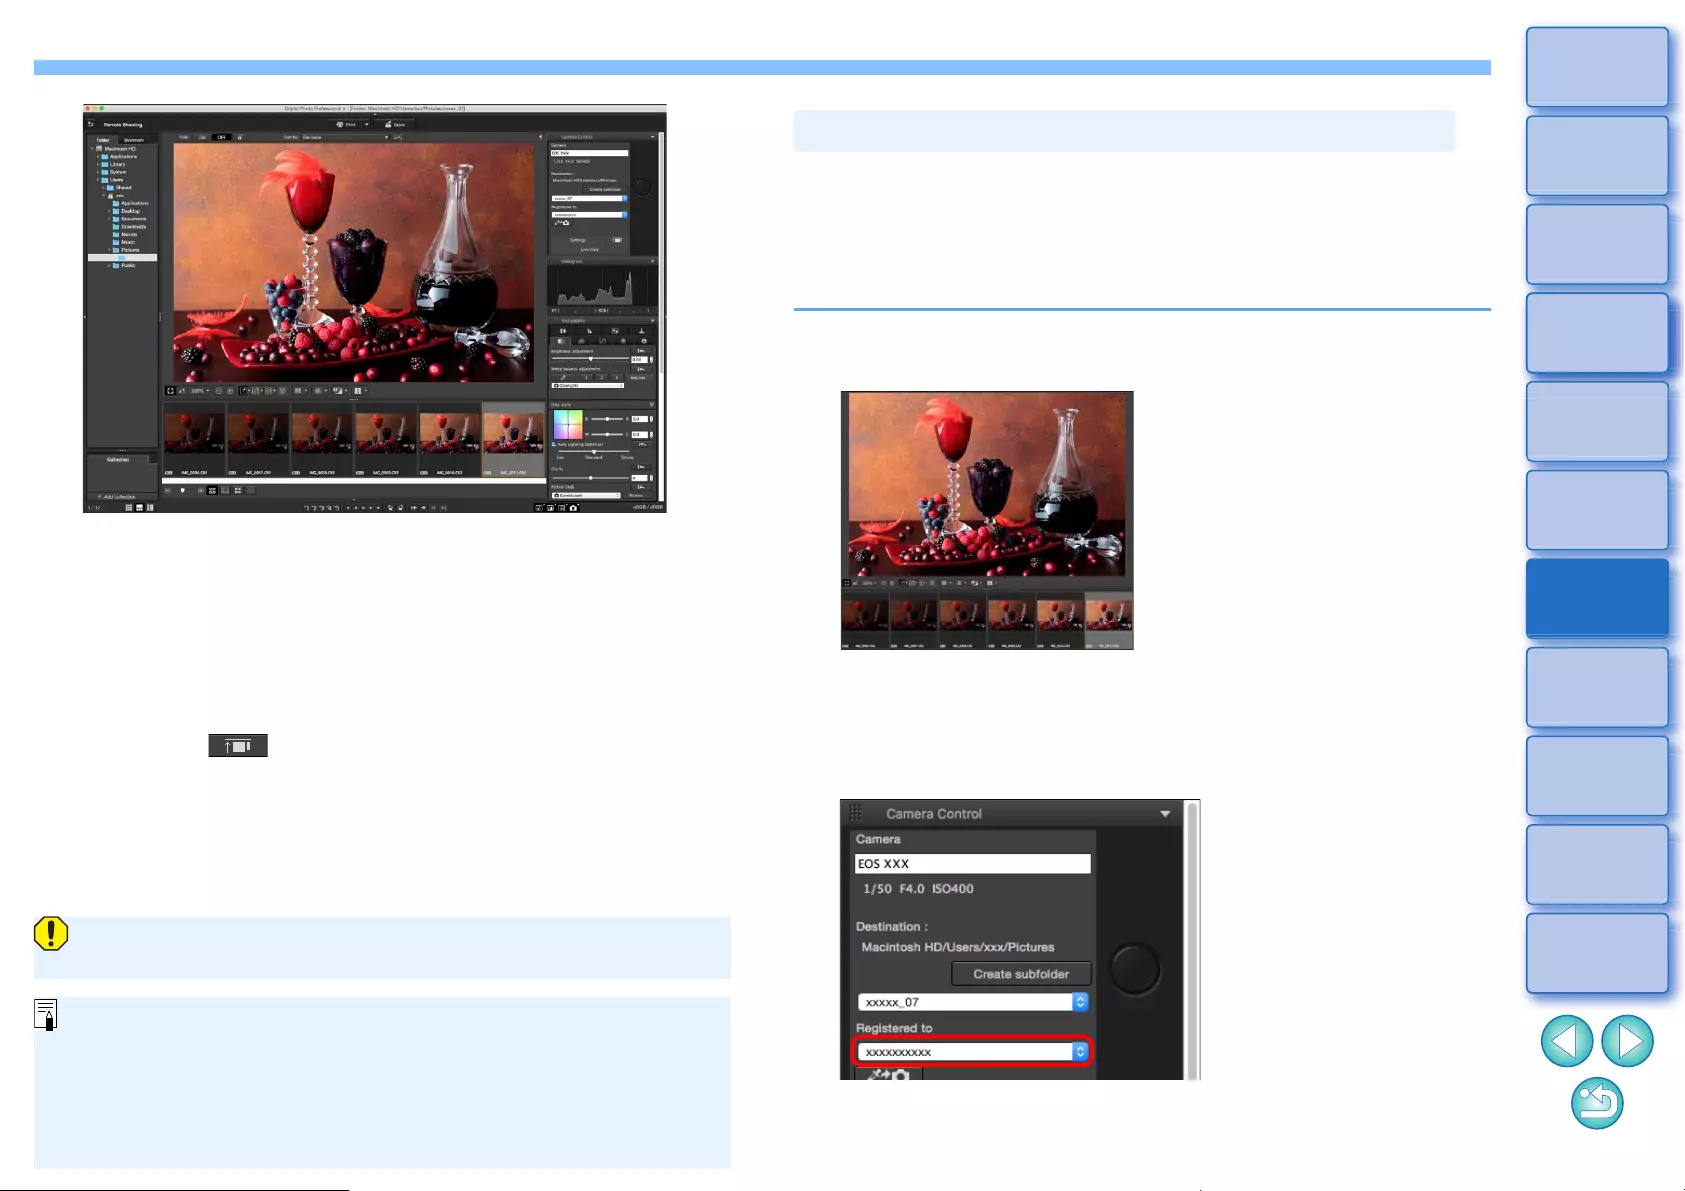
147
3
Sorting
Images
1
2
4
5
Downloading
Images
Viewing
Images
Printing
Images
Editing
Images
6
Processing
Large Numbers
of RAW Images
7
Remote
Shooting
10
HDR PQ
Mode
8
Playing Back
Movies and Saving
Still Photos
11
Specifying
Preferences
9
Handling
RAW Movies
ÜThe shot image is displayed.
lThe shot image will be saved in the folder created in step 2.
lThe images in the folder mentioned above will be displayed in
the thumbnail display area.
You can also create a sub-folder in the folder mentioned above to
save images. To create a sub-folder, click the [Create subfolder]
button on the remote shooting window, enter [Folder name] on
the screen appeared, then click the [OK] button.
lPress the [ ] button to display DPP and EOS Utility
windows uniformly in line.
• Supported with EOS Utility version 3.8 and later.
• If you are using multiple monitors, DPP’s main window and
EOS Utility’s remote window can only be lined up uniformly
when on the same monitor.
Do not quit “EOS Utility” when remote shooting is being set or
performed.
lIn the cases below, perform shooting with EOS Utility.
• You want to autofocus with EOS Utility’s shoot button
• You want to perform continuous shooting
lYou can perform shooting while comparing the shot image with a
pinned image by pinning an image (p.21). This is convenient for
image selection.
During remote shooting, you can register click white balance to the
connected camera. To use this function, EOS Utility version 3.4.20 or
later must be installed on your computer.
This function is not available on EOS M series cameras other than the
EOS M50 Mark II, EOS M50, or PowerShot cameras.
1Display the shot image to be used as the standard
for white balance.
lThis function supports only RAW images with a “.CR2” or “.CR3”
extension.
2Select the destination where to register click white
balance.
lSelect the destination where to register white balance from the
[Registered to] list box. Options in the list box depend on the
camera model.
Registering Click White Balance in the Camera
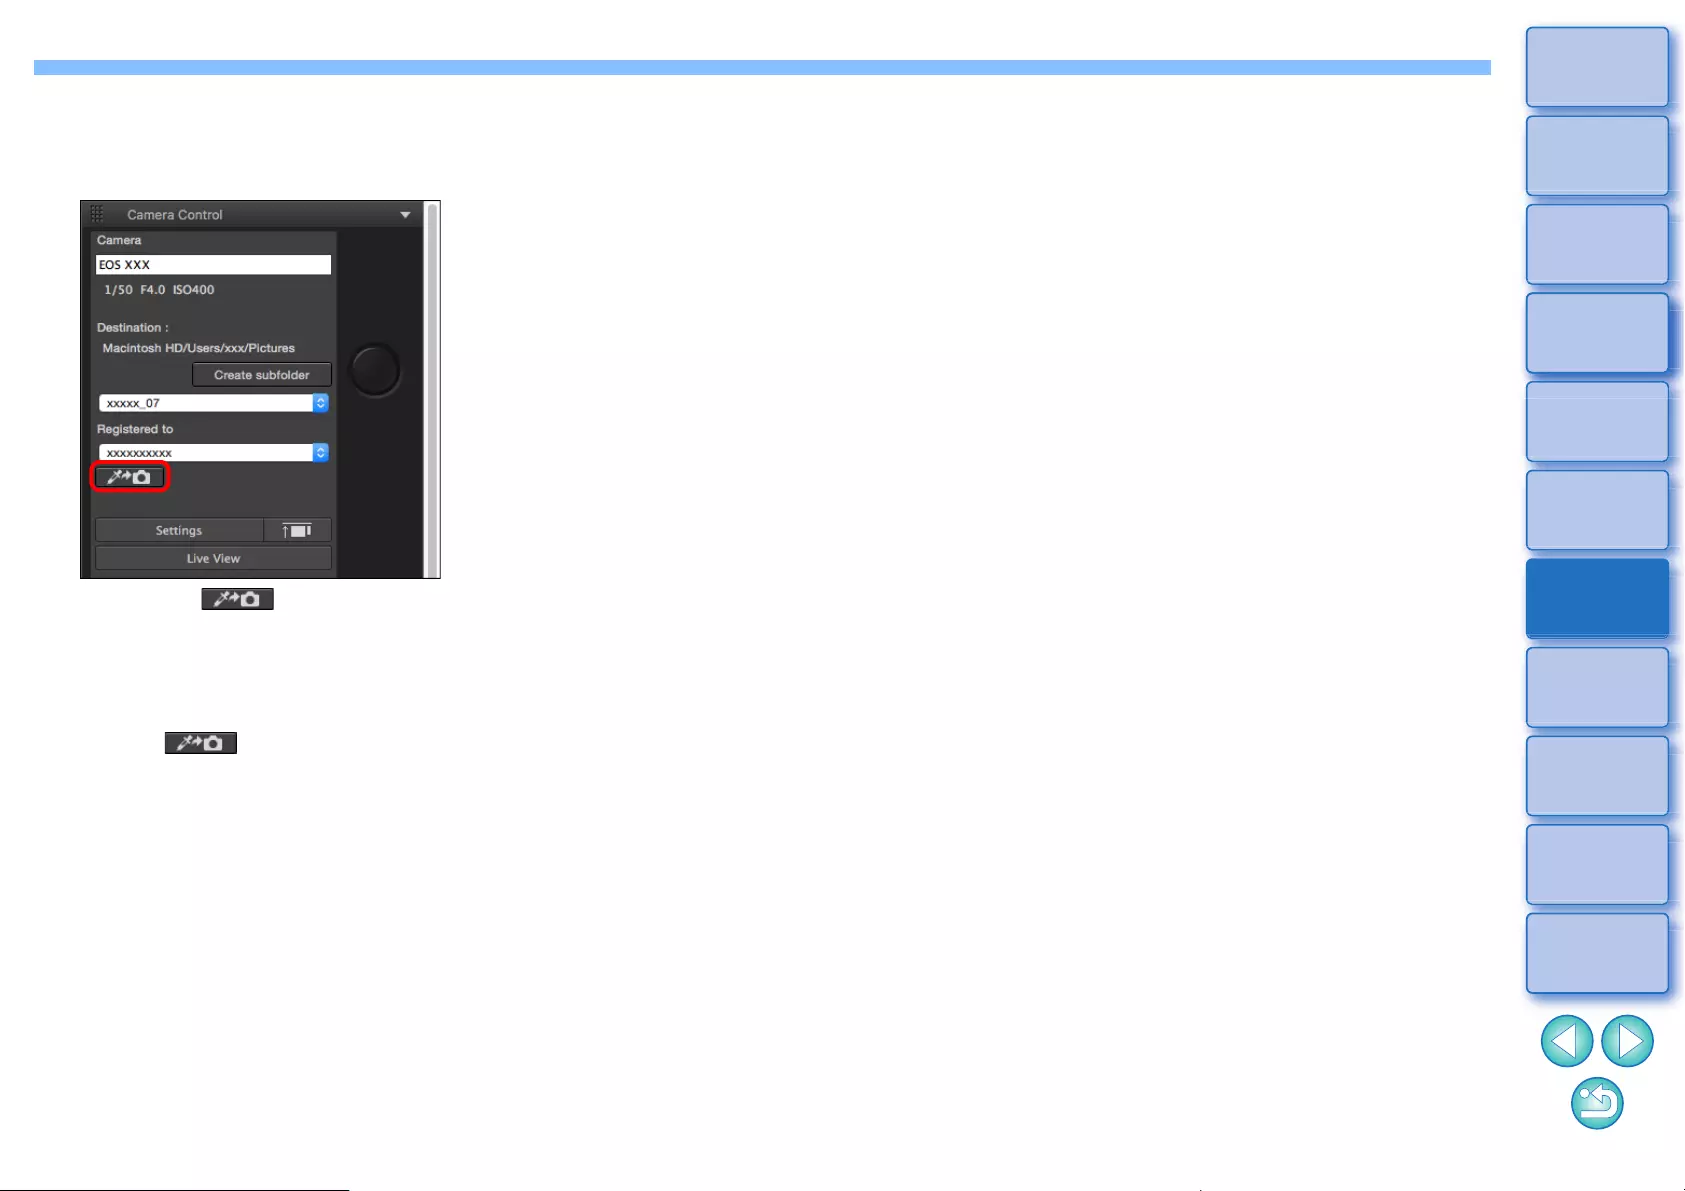
148
3
Sorting
Images
1
2
4
5
Downloading
Images
Viewing
Images
Printing
Images
Editing
Images
6
Processing
Large Numbers
of RAW Images
7
Remote
Shooting
10
HDR PQ
Mode
8
Playing Back
Movies and Saving
Still Photos
11
Specifying
Preferences
9
Handling
RAW Movies
3Select a point that is to be the standard for white
balance in the shot image, and register the white
balance in the camera.
lClick the [ ] button, and in the displayed image in step 1,
click on a point that is to be the standard for white balance with
the mouse.
ÜThe white balance is registered to the destination selected in
step 2, and applied to displayed images.
lClick [ ] again to exit the function.
8
149
3
Sorting
Images
1
2
4
5
Downloading
Images
Viewing
Images
Printing
Images
Editing
Images
6
Processing
Large Numbers
of RAW Images
7
Remote
Shooting
10
HDR PQ
Mode
8
Playing Back
Movies and Saving
Still Photos
11
Specifying
Preferences
9
Handling
RAW Movies
Playing Back Movies and Saving Still Photos
Playing Back Movies and Saving Still Photos ....... 150
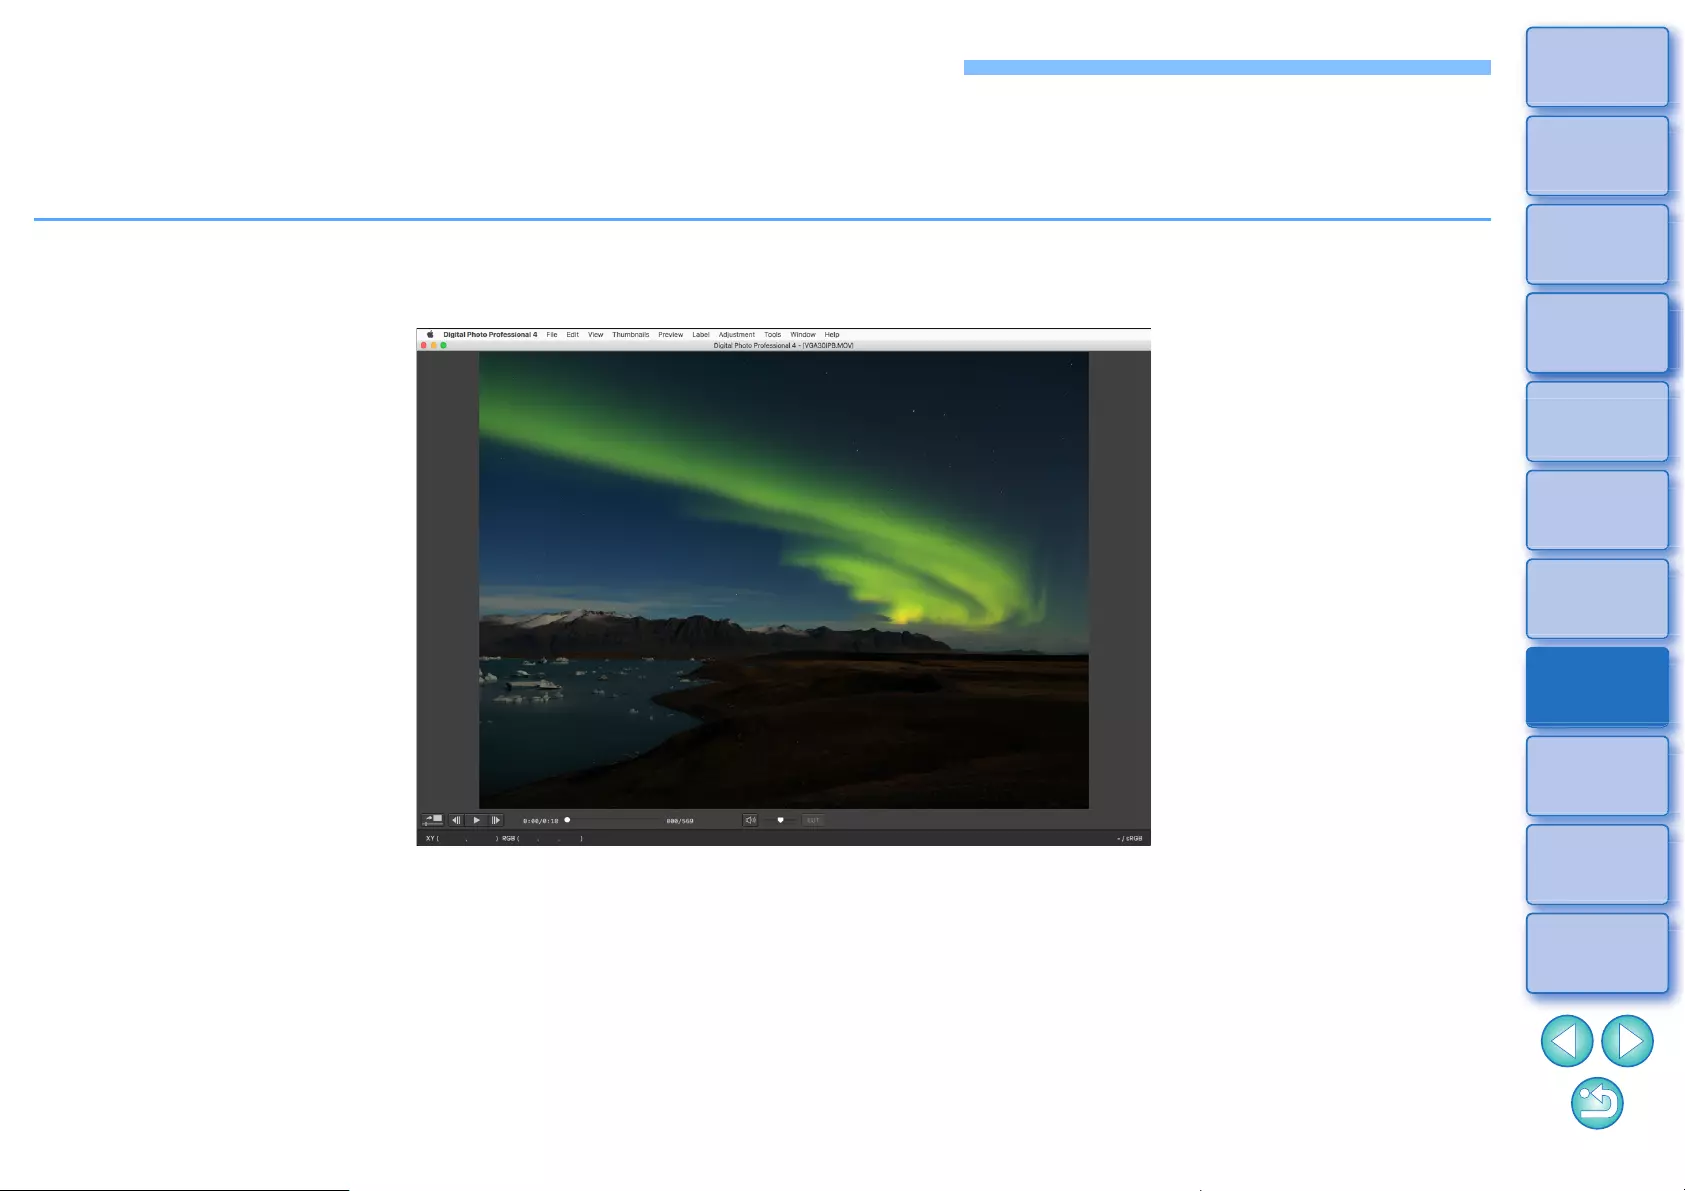
150
3
Sorting
Images
1
2
4
5
Downloading
Images
Viewing
Images
Printing
Images
Editing
Images
6
Processing
Large Numbers
of RAW Images
7
Remote
Shooting
10
HDR PQ
Mode
8
Playing Back
Movies and Saving
Still Photos
11
Specifying
Preferences
9
Handling
RAW Movies
Playing Back Movies and Saving Still Photos
You can use DPP to play back MOV or MP4 movies shot using a supported camera and save still photos from the movies as JPEG or TIFF images. To
use this function, [Play with Digital Photo Professional 4] must be selected in [Movie file playback] in the [General Settings] tab sheet in [Preferences].
Note that you cannot edit MOV or MP4 movies in DPP. For details on playing back RAW movies and saving still photos, see “Working with RAW
Movies” (p.154).
1Double-click the movie thumbnail in the main window (thumbnail layout).
ÜThe preview window appears.
lIf the preview control panel does not appear, select the [Preview] menu [Preview control panel].
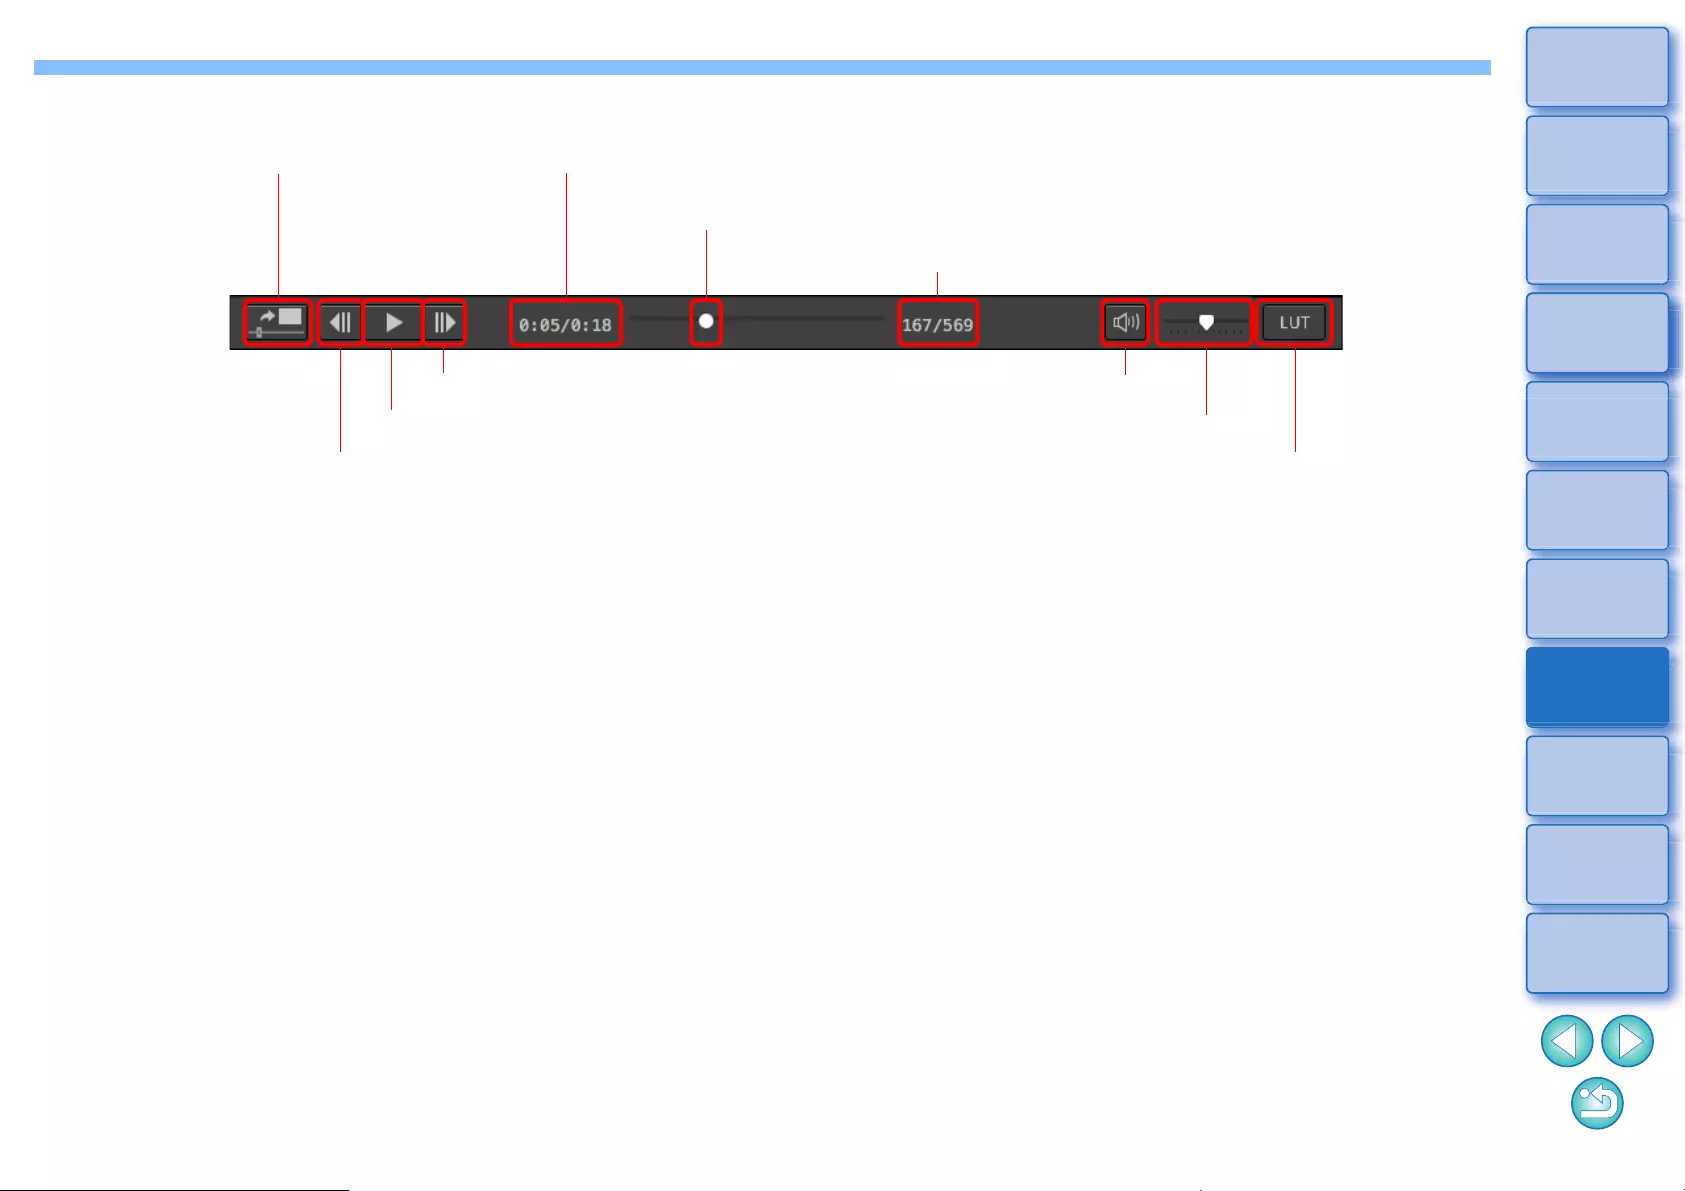
151
3
Sorting
Images
1
2
4
5
Downloading
Images
Viewing
Images
Printing
Images
Editing
Images
6
Processing
Large Numbers
of RAW Images
7
Remote
Shooting
10
HDR PQ
Mode
8
Playing Back
Movies and Saving
Still Photos
11
Specifying
Preferences
9
Handling
RAW Movies
2Use the preview control panel for each operation.
lIf the preview control panel does not appear, select the [Preview] menu [Preview control panel].
(10) Save as still photo (4) Show playback time
(5) Frame position slider
(6) Frame no./Total frames
(9) Viewing LUT on/off
(2) Next frame
(1) Play/pause
(3) Previous frame
(8) Volume slider
(7) Mute/unmute
(1) Play/pause
Play and pause the selected movie.
(2) Next frame
Move forward one frame. When movie playback is paused,
this allows you to advance the movie one frame at a time.
(3) Previous frame
Move back one frame. When movie playback is paused,
this allows you to rewind the movie one frame at a time.
(4) Show playback time
Shows the playback time.
(5) Frame position slider
By dragging the slider left or right, you can move the
playback position while a movie is playing or paused.
(6) Frame no./Total frames
Shows the current frame number in the movie being
played back or shown and the total number of frames.
(7) Mute/unmute
Turns audio output on or off.
(8) Volume slider
Drag the slider left or right to adjust the volume for the
movie being played back.
(9) Viewing LUT on/off
Enables or disables Viewing LUT for movies shot with
Canon Log specified.
This setting can also be changed during movie playback.
(10) Save as still photo
Allows you to capture a still photo of the movie frame
currently being displayed.
When you click the button, the [Convert and save] window
(p.96) appears. Specify the necessary settings, and then
click the [Save] button to save the image.
Note that you cannot save a still photo while the movie is
playing back. Pause the movie and then save the still
photo.
152
3
Sorting
Images
1
2
4
5
Downloading
Images
Viewing
Images
Printing
Images
Editing
Images
6
Processing
Large Numbers
of RAW Images
7
Remote
Shooting
10
HDR PQ
Mode
8
Playing Back
Movies and Saving
Still Photos
11
Specifying
Preferences
9
Handling
RAW Movies
lMP4 movies shot with Canon Log are converted to sRGB color
space before being displayed and saved.
lA movie is displayed in SDR based on the [HDR assist display
(movies)] (p.176) setting in [Preferences].
Only HEIF format can be selected for saving still photos (p.170).
lOn some supported cameras, shooting a movie generates a
“.THM” file that is saved together with the movie file.The “.THM”
file has the same image number as the movie file and records the
shooting information. In DPP, the movie file and “.THM” file must
be stored in the same folder when the movie is played back.
lYou can also play back movies in the following windows:
• Main window (multi-layout)
• Edit image window
• Remote shooting window (multi-layout)
• Multi-function preview window
lIn Preferences, you can change the movie playback application
to that used by your computer’s OS or to EOS MOVIE Utility.
(p.172)
For information on EOS MOVIE Utility, refer to the EOS MOVIE
Utility Instruction Manual.
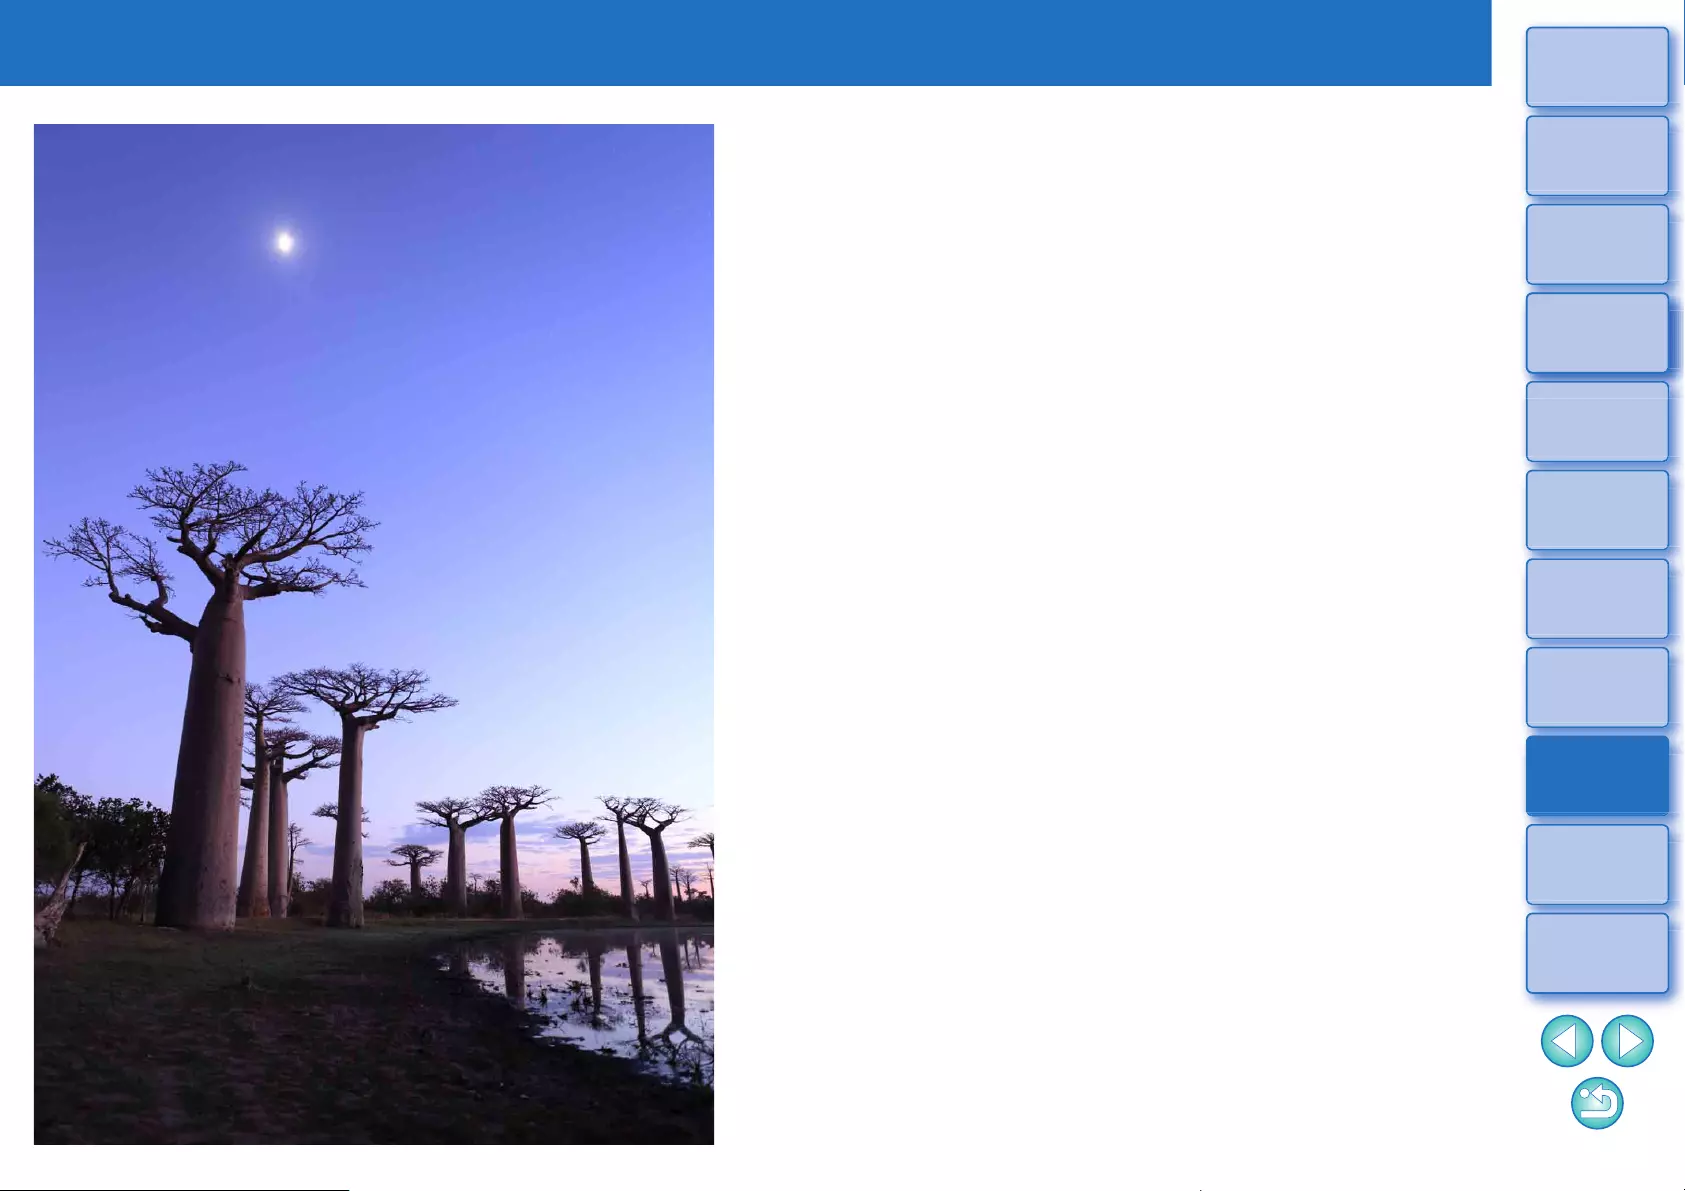
9
153
3
Sorting
Images
1
2
4
5
Downloading
Images
Viewing
Images
Printing
Images
Editing
Images
6
Processing
Large Numbers
of RAW Images
7
Remote
Shooting
10
HDR PQ
Mode
8
Playing Back
Movies and Saving
Still Photos
11
Specifying
Preferences
9
Handling
RAW Movies
Working with RAW Movies
Working with RAW Movies .................................... 154
Supported Cameras ................................................. 154
Changing the Image Displayed for a RAW Movie .... 154
Grabbing and Saving a Displayed RAW Movie
Image........................................................................ 155
Saving Several Still Photos from a RAW Movie ....... 155
Starting Up the RAW Movie Tool.............................. 157
Playing Back RAW Movies....................................... 159
Saving any Range of a RAW Movie as Still
Photos ...................................................................... 160
Grabbing and Saving any Range from a RAW
Movie ........................................................................ 161
Editing a RAW Movie................................................ 161
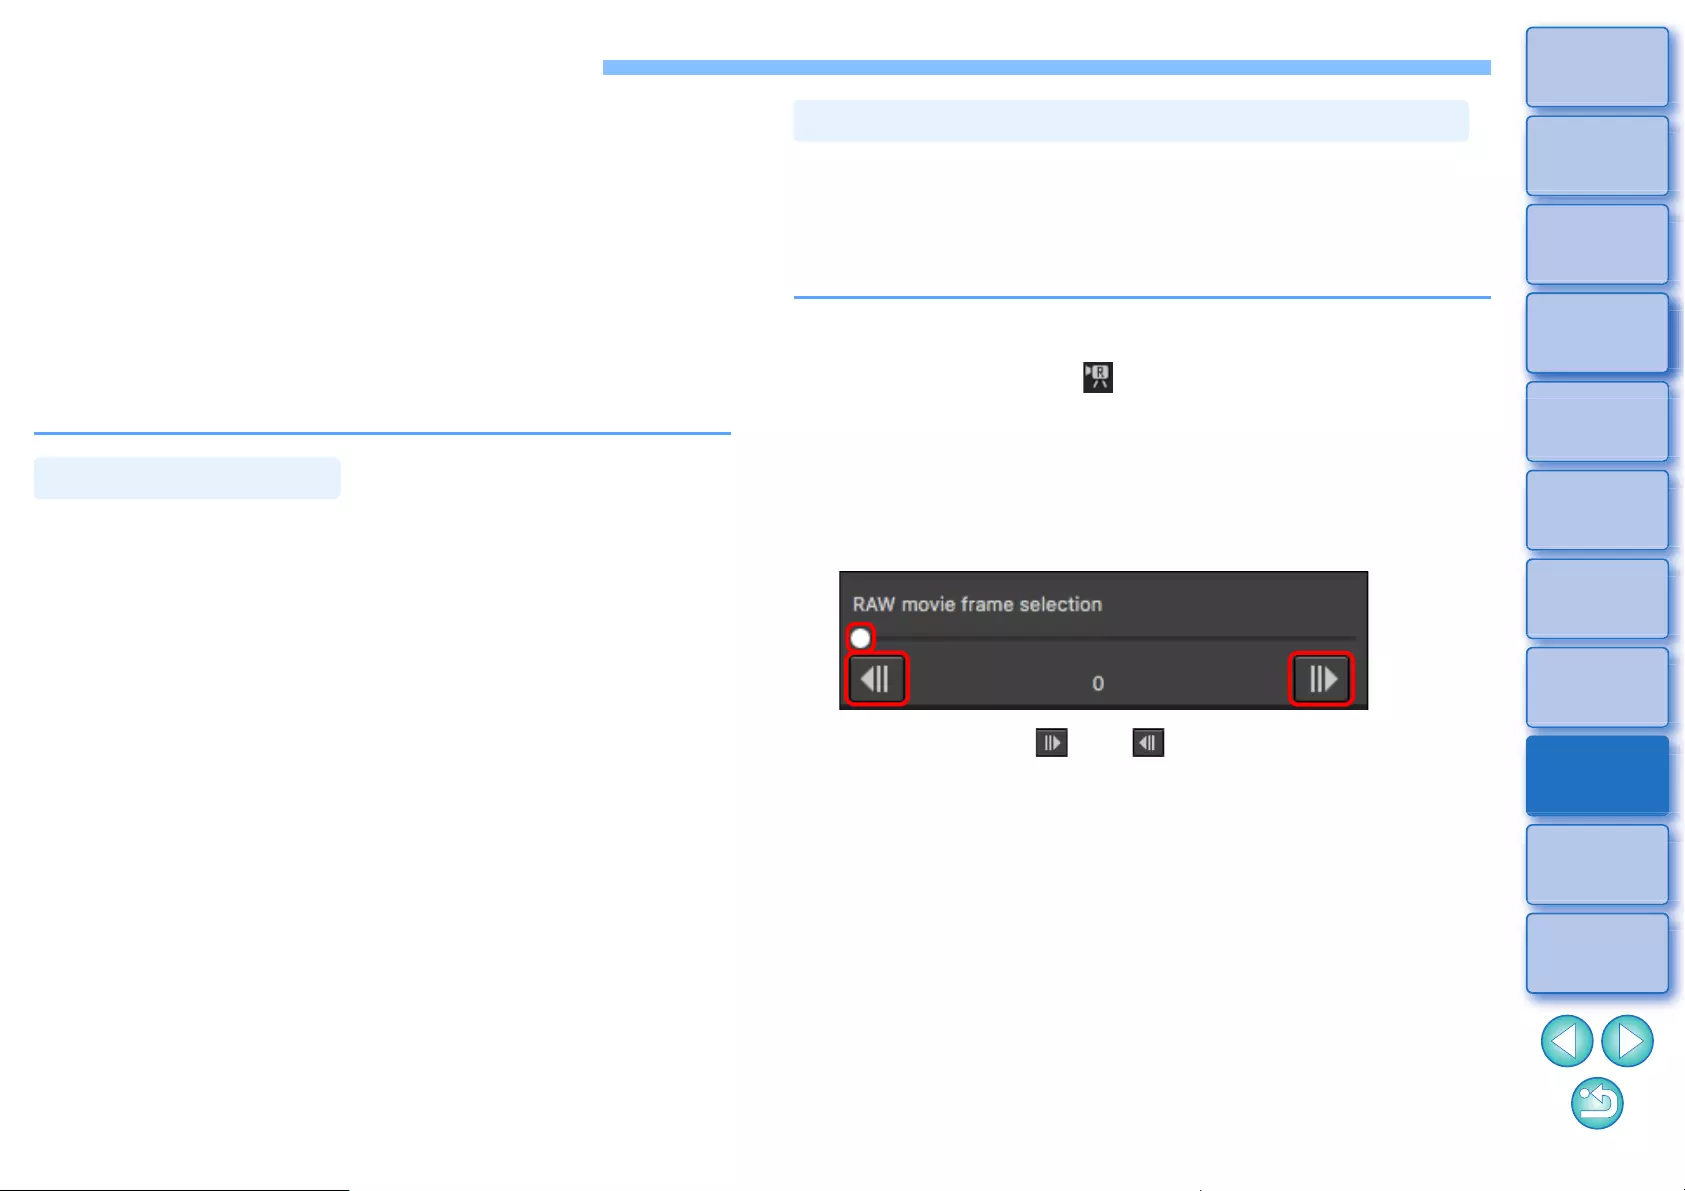
154
3
Sorting
Images
1
2
4
5
Downloading
Images
Viewing
Images
Printing
Images
Editing
Images
6
Processing
Large Numbers
of RAW Images
7
Remote
Shooting
10
HDR PQ
Mode
8
Playing Back
Movies and Saving
Still Photos
11
Specifying
Preferences
9
Handling
RAW Movies
Working with RAW Movies
Users can work with the RAW movie (extension: .CRM) format in DPP
version 4.12.0. RAW movies can be handled as either movies or still
photos in DPP.
As a movie, they can be played back and edited using the RAW movie
tool.
As a still photo, they can be handled as a RAW image file in the same
way as CR2/CR3. However, RAW movies shot with a camera having
Canon Log set ON are developed with Canon Log OFF.
DPP supports RAW movies shot only with a supported camera. RAW
movies shot with a camera having Canon Log 3 set ON are not
supported.
This section explains how to work with RAW movies.
EOS-1D X Mark III, EOS R5
Supported Cameras
You can change the image displayed for a RAW movie file to any frame
within the file.
While you can edit, save, print, etc. a RAW movie file as a single RAW
image in DPP, the displayed image is automatically selected for doing
this.
1Select a RAW movie file in the main window, etc.
lThe thumbnail icon is [ ].
2Display the Settings tool palette.
3Select the frame you want to set as the display image
in [RAW movie frame selection].
lUse the slider or [ ] and [ ] buttons to select the frame you
want to set as the display image, and the display image changes.
Changing the Image Displayed for a RAW Movie
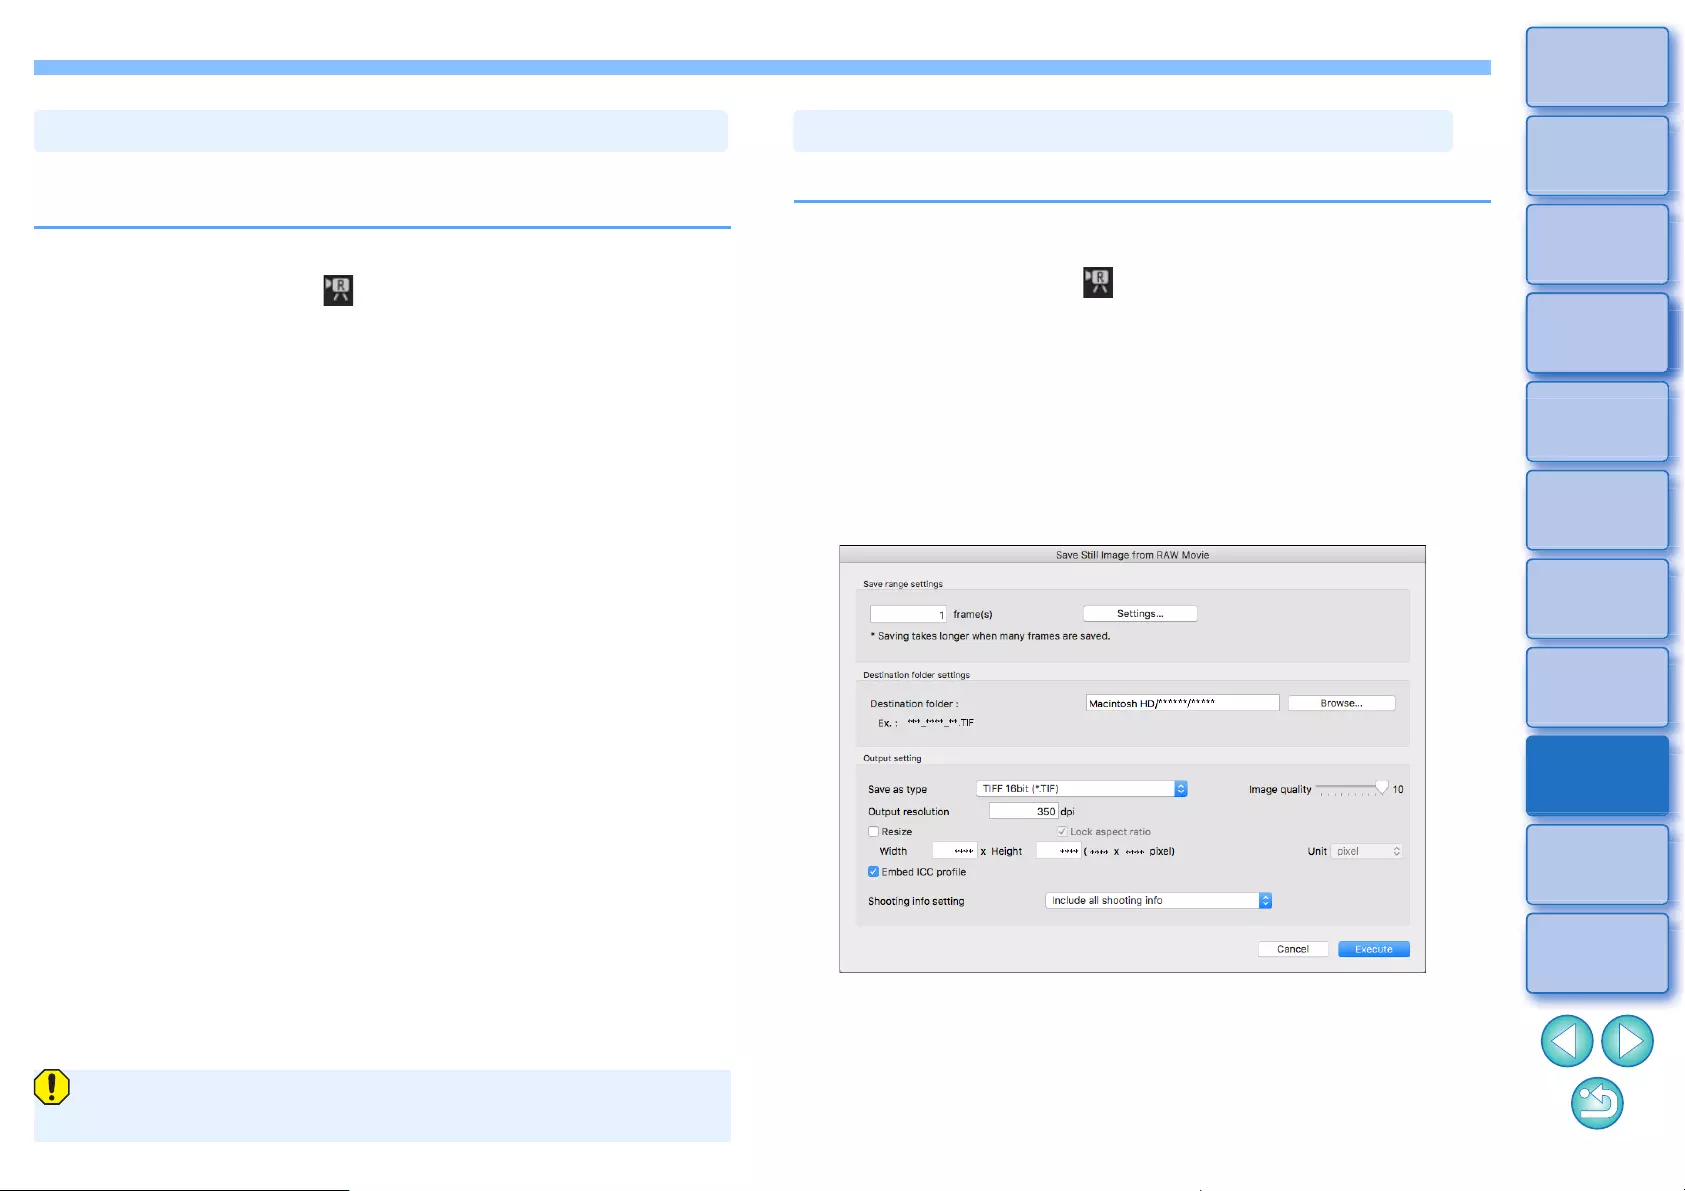
155
3
Sorting
Images
1
2
4
5
Downloading
Images
Viewing
Images
Printing
Images
Editing
Images
6
Processing
Large Numbers
of RAW Images
7
Remote
Shooting
10
HDR PQ
Mode
8
Playing Back
Movies and Saving
Still Photos
11
Specifying
Preferences
9
Handling
RAW Movies
You can grab and save the frame of the displayed RAW movie file
image.
1Select a RAW movie file in the main window, etc.
ÜThe thumbnail icon is [ ].
lTo change the displayed image, follow the steps in “Changing the
Image Displayed for a RAW Movie” (p.154).
2Select the [File] menu [Grab current frame from
RAW movie and save], and click [OK] in the dialog
that appears.
3In the dialog that appears, set items as necessary
and click the [Save] button.
ÜThe frame is saved based on specified settings.
lSavable format is only CRM.
Grabbing and Saving a Displayed RAW Movie Image
Any image editing made to the original movie file is not carried over
to the new saved file.
You can save several still photos from a RAW movie file.
1Select a RAW movie file in the main window, etc.
lThe thumbnail icon is [ ].
2Select the [File] menu [Save still image from RAW
movie].
ÜThe [Save Still Image from RAW Movie] dialog box appears.
3Set items as necessary
[Save Still Image from RAW Movie] dialog box
l[Save range settings]: Set the range of frames to save. By
default, only the single display image frame (selected frame) is
set. Set the range in the [Save Settings] dialog box that appears
by clicking the [Settings] button.
Saving Several Still Photos from a RAW Movie
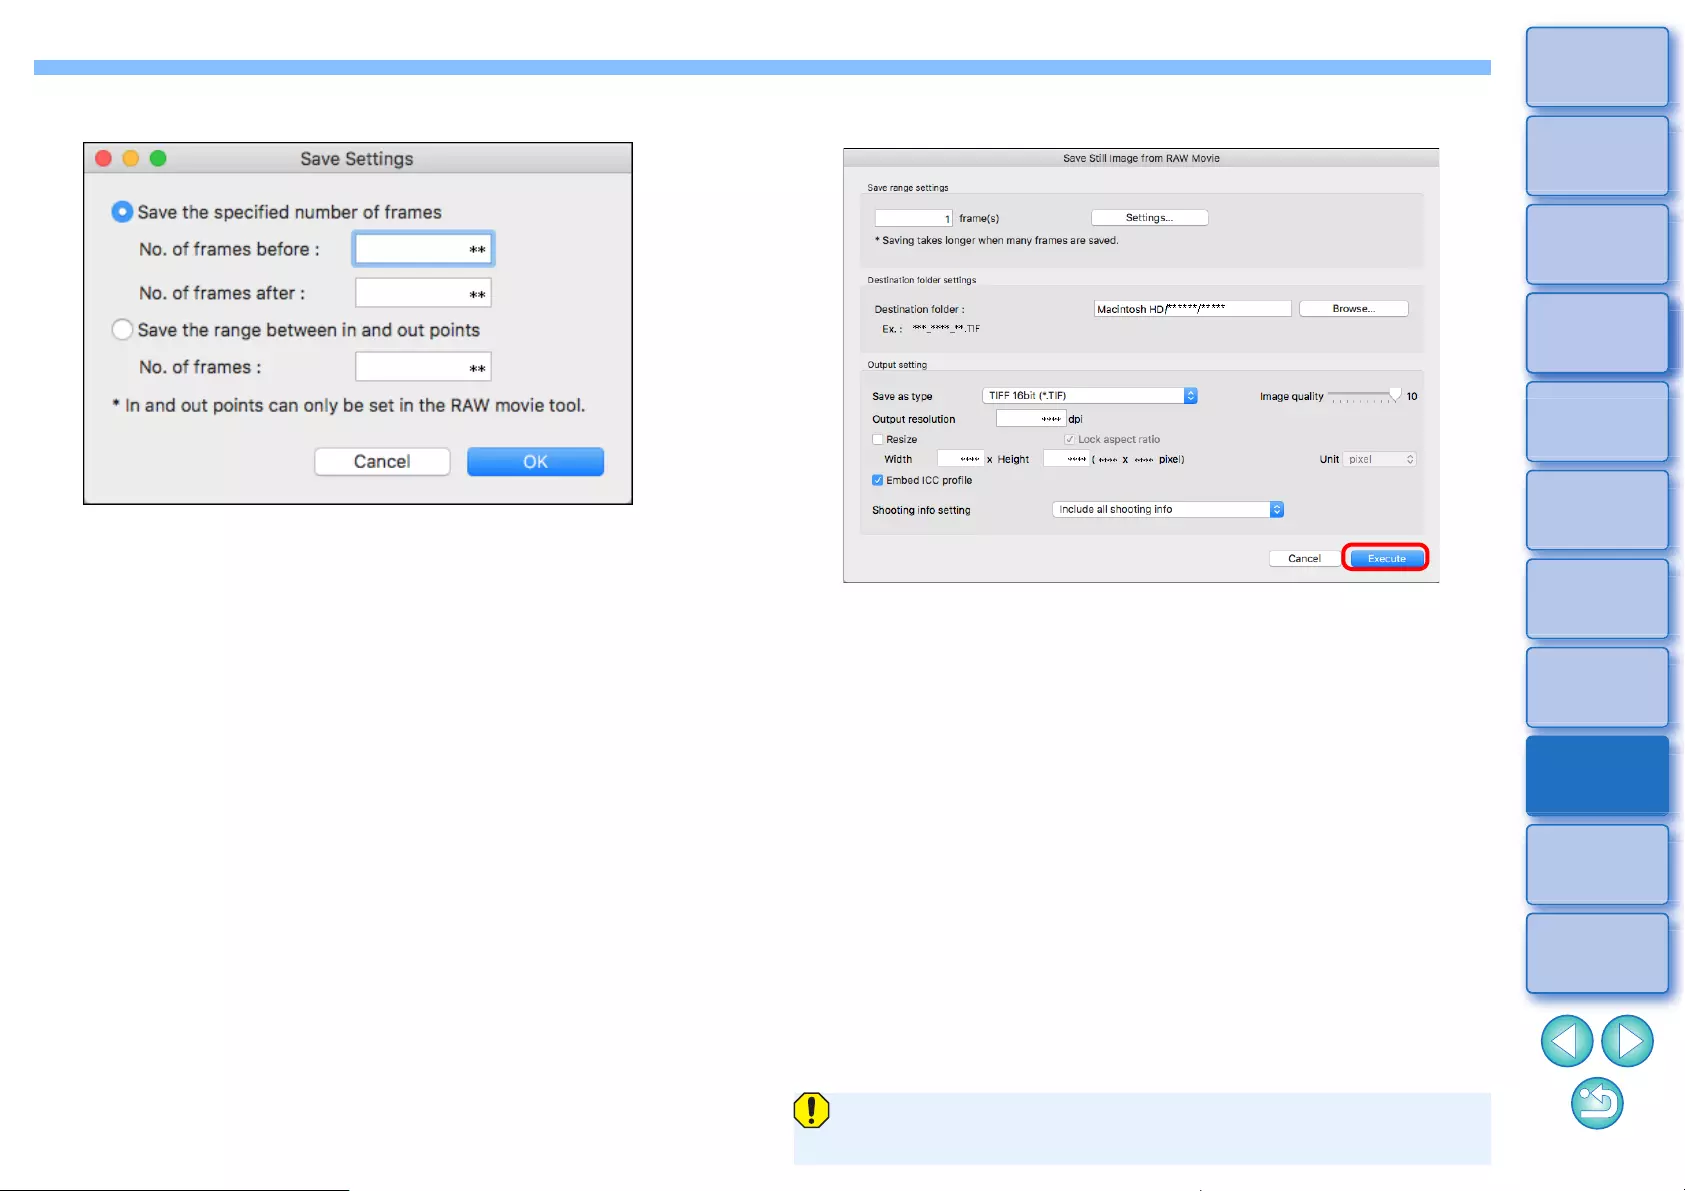
156
3
Sorting
Images
1
2
4
5
Downloading
Images
Viewing
Images
Printing
Images
Editing
Images
6
Processing
Large Numbers
of RAW Images
7
Remote
Shooting
10
HDR PQ
Mode
8
Playing Back
Movies and Saving
Still Photos
11
Specifying
Preferences
9
Handling
RAW Movies
[Save Settings] dialog box
• [Save the specified number of frames]: Specify the number of
frames and save.
[No. of frames before] specifies the number of frames before
the display image (selected frame) to save.
[No. of frames after] specifies the number of frames after the
display image (selected frame) to save.
Up to 10 frames can be saved with each of [No. of frames
before] and [No. of frames after].
• [Save the range between in and out points]: All frames in the
range selected in the RAW movie tool are saved as still
photos.
• After specifying settings, click the [OK] button.
ÜThe [Save Settings] dialog box closes.
l[Destination folder settings]: Specify the destination folder where
still photos are saved.
l[Output setting]: Specify settings for outputting still photos.
4Save the still photos.
lClick the [Execute] button to create a folder in the destination
folder with the name of the movie file. Still photos are saved
according to the settings specified in step 3.
Depending on your system requirements or the number of frames
being saved, it may take a long time to save.
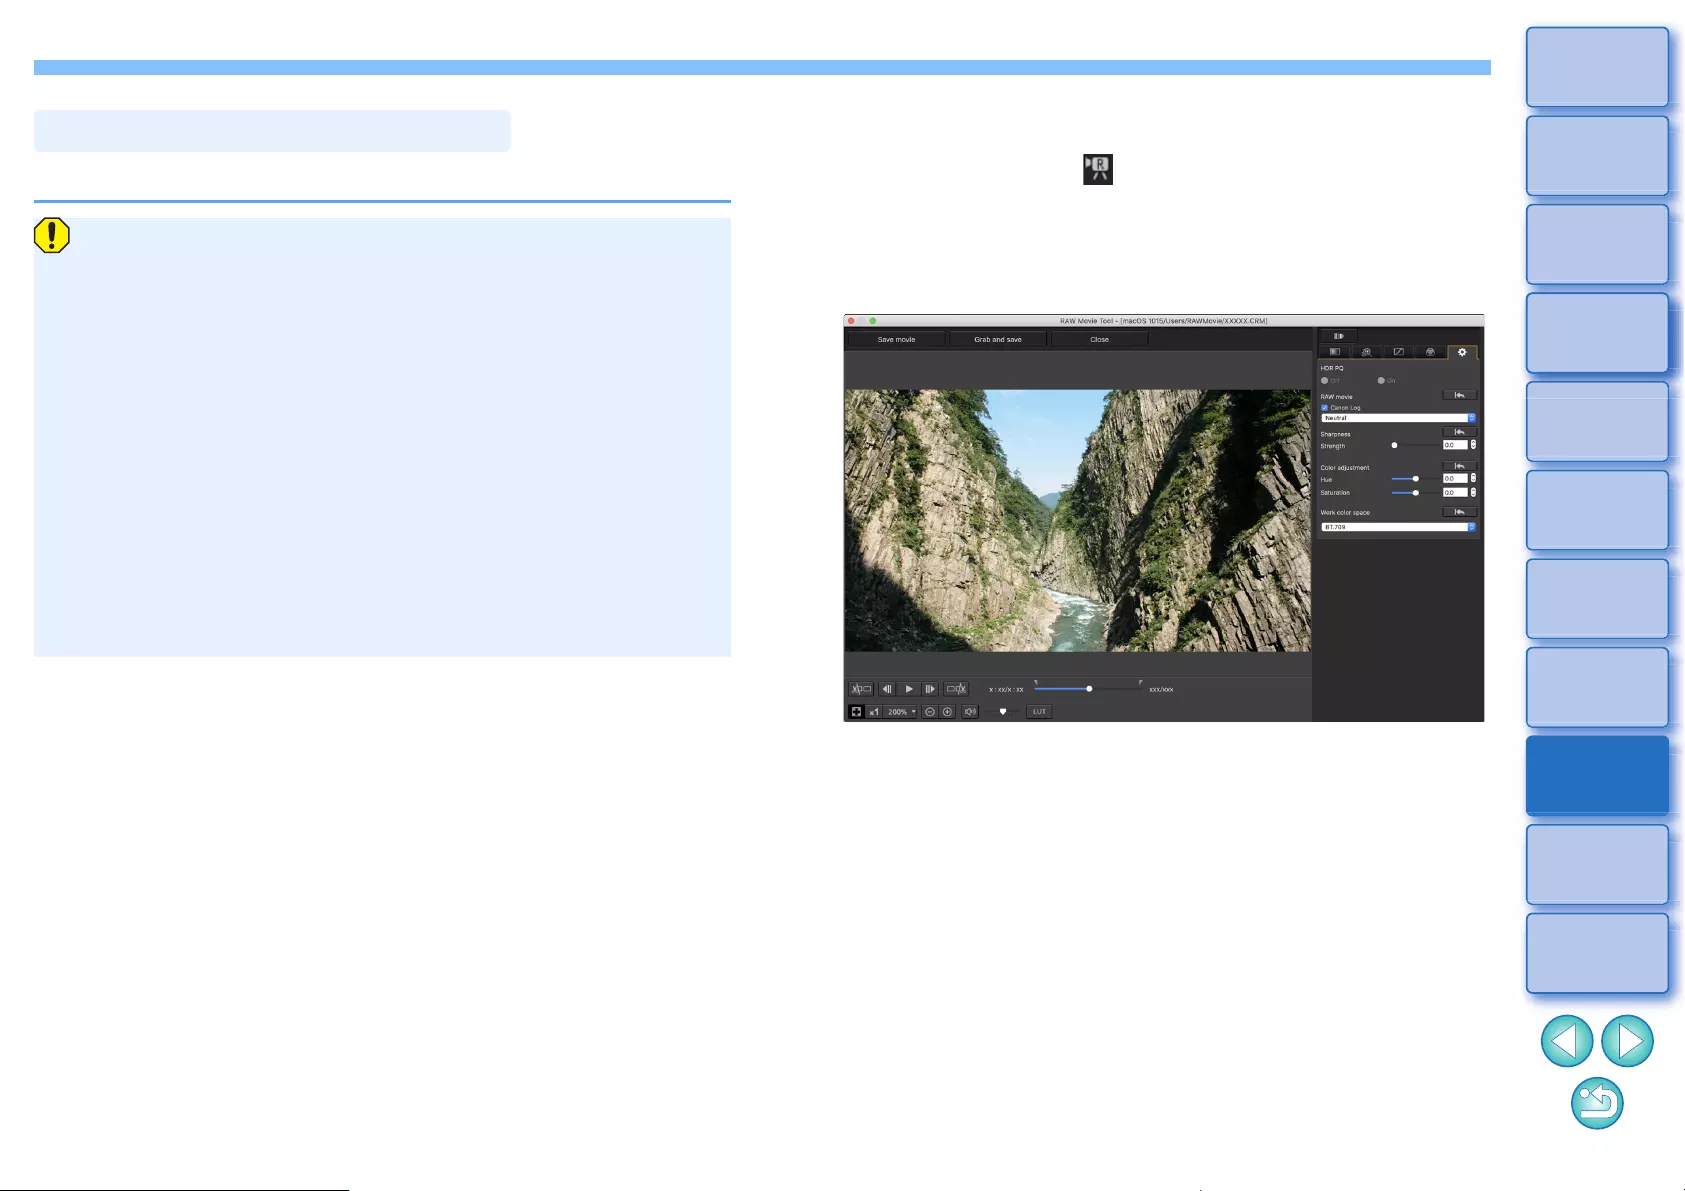
157
3
Sorting
Images
1
2
4
5
Downloading
Images
Viewing
Images
Printing
Images
Editing
Images
6
Processing
Large Numbers
of RAW Images
7
Remote
Shooting
10
HDR PQ
Mode
8
Playing Back
Movies and Saving
Still Photos
11
Specifying
Preferences
9
Handling
RAW Movies
The RAW movie tool allows you to play back and edit RAW movie files.
lThe environment below is recommended for running the RAW
movie tool. The minimum environment also below is necessary
for running the RAW movie tool.
Recommended environment
• CPU: iMac Pro 2.5 GHz 14-core Intel Xeon W processor (max.
4.3 GHz using Turbo Boost)
• GPU: Radeon Pro Vega 64 (16 GB HBM2 memory)
• RAM: 32 GB or more
• Storage: SSD readable 400 MB/s or faster
Minimum environment
• CPU: Intel Core i series or later
• GPU: Environment with AMD GPU
• VRAM: 4 GB or more (8K movies: 8 GB or more)
* The RAW movie tool cannot run in a non-AMD GPU
environment (example: NVIDIA GPU, Intel GPU).
lInstall the latest-version GPU driver.
Starting Up the RAW Movie Tool
1Select a RAW movie file in the main window, etc.
ÜThe thumbnail icon is [ ].
2Select the [Tools] menu [Start RAW Movie Tool].
ÜThe RAW Movie tool window appears.
lTo quit, click the [Close] button.
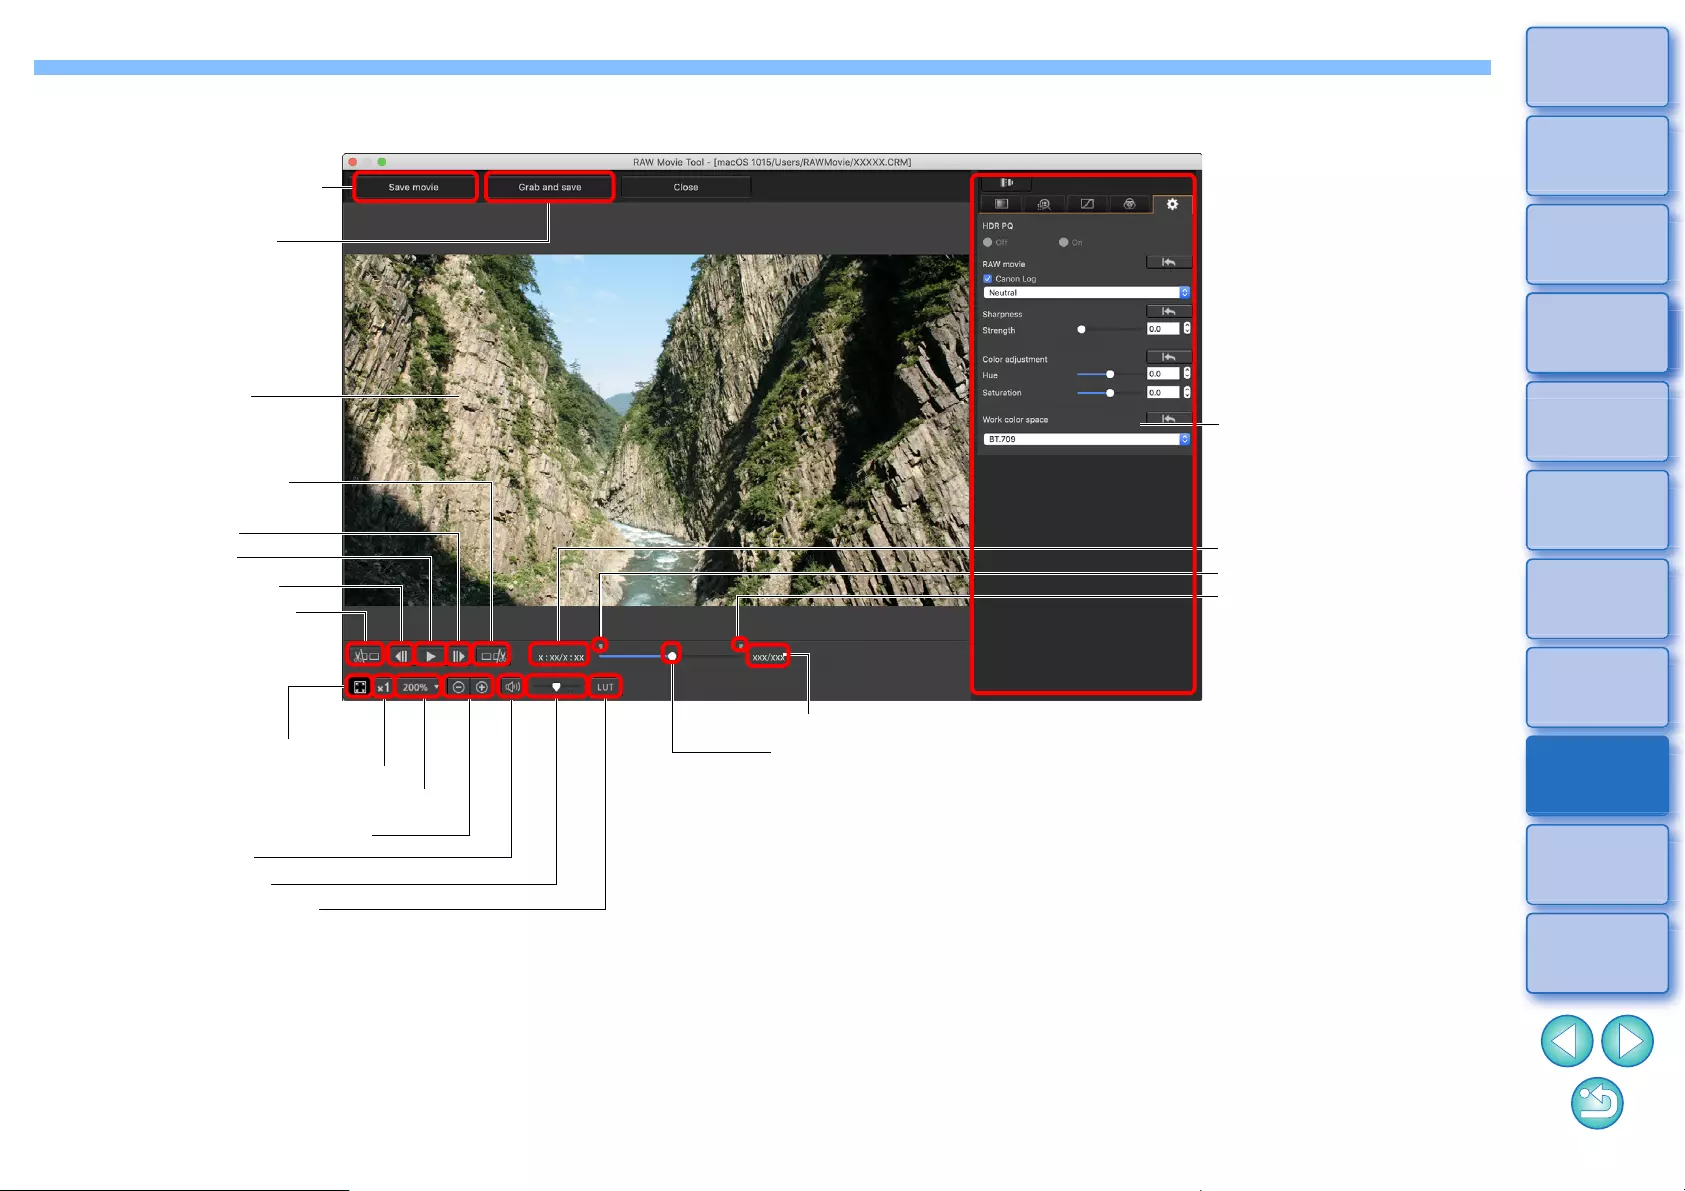
158
3
Sorting
Images
1
2
4
5
Downloading
Images
Viewing
Images
Printing
Images
Editing
Images
6
Processing
Large Numbers
of RAW Images
7
Remote
Shooting
10
HDR PQ
Mode
8
Playing Back
Movies and Saving
Still Photos
11
Specifying
Preferences
9
Handling
RAW Movies
List of RAW Movie Tool Window Functions
[Save movie] button (p.161)
Frame display area Tool palettes (for RAW
movies) (p.161)
Frame no./Total frames (p.159)
Frame position slider (p.159)
Show playback time
In point marker (p.160)
Out point marker (p.160)
Set last frame for saving
(p.160)
Next frame (p.159)
Play/pause (p.159)
Previous frame (p.159)
Set start frame for saving
(p.160)
Display frame fit to window (p.21)
Display frame at no magnification
(p.21)
Set the frame display magnification (p.21)
Reduce/enlarge the frame (p.21)
Mute/unmute (p.159)
Volume slider (p.159)
Viewing LUT on/off (p.161)
[Grab and save] button
(p.161)
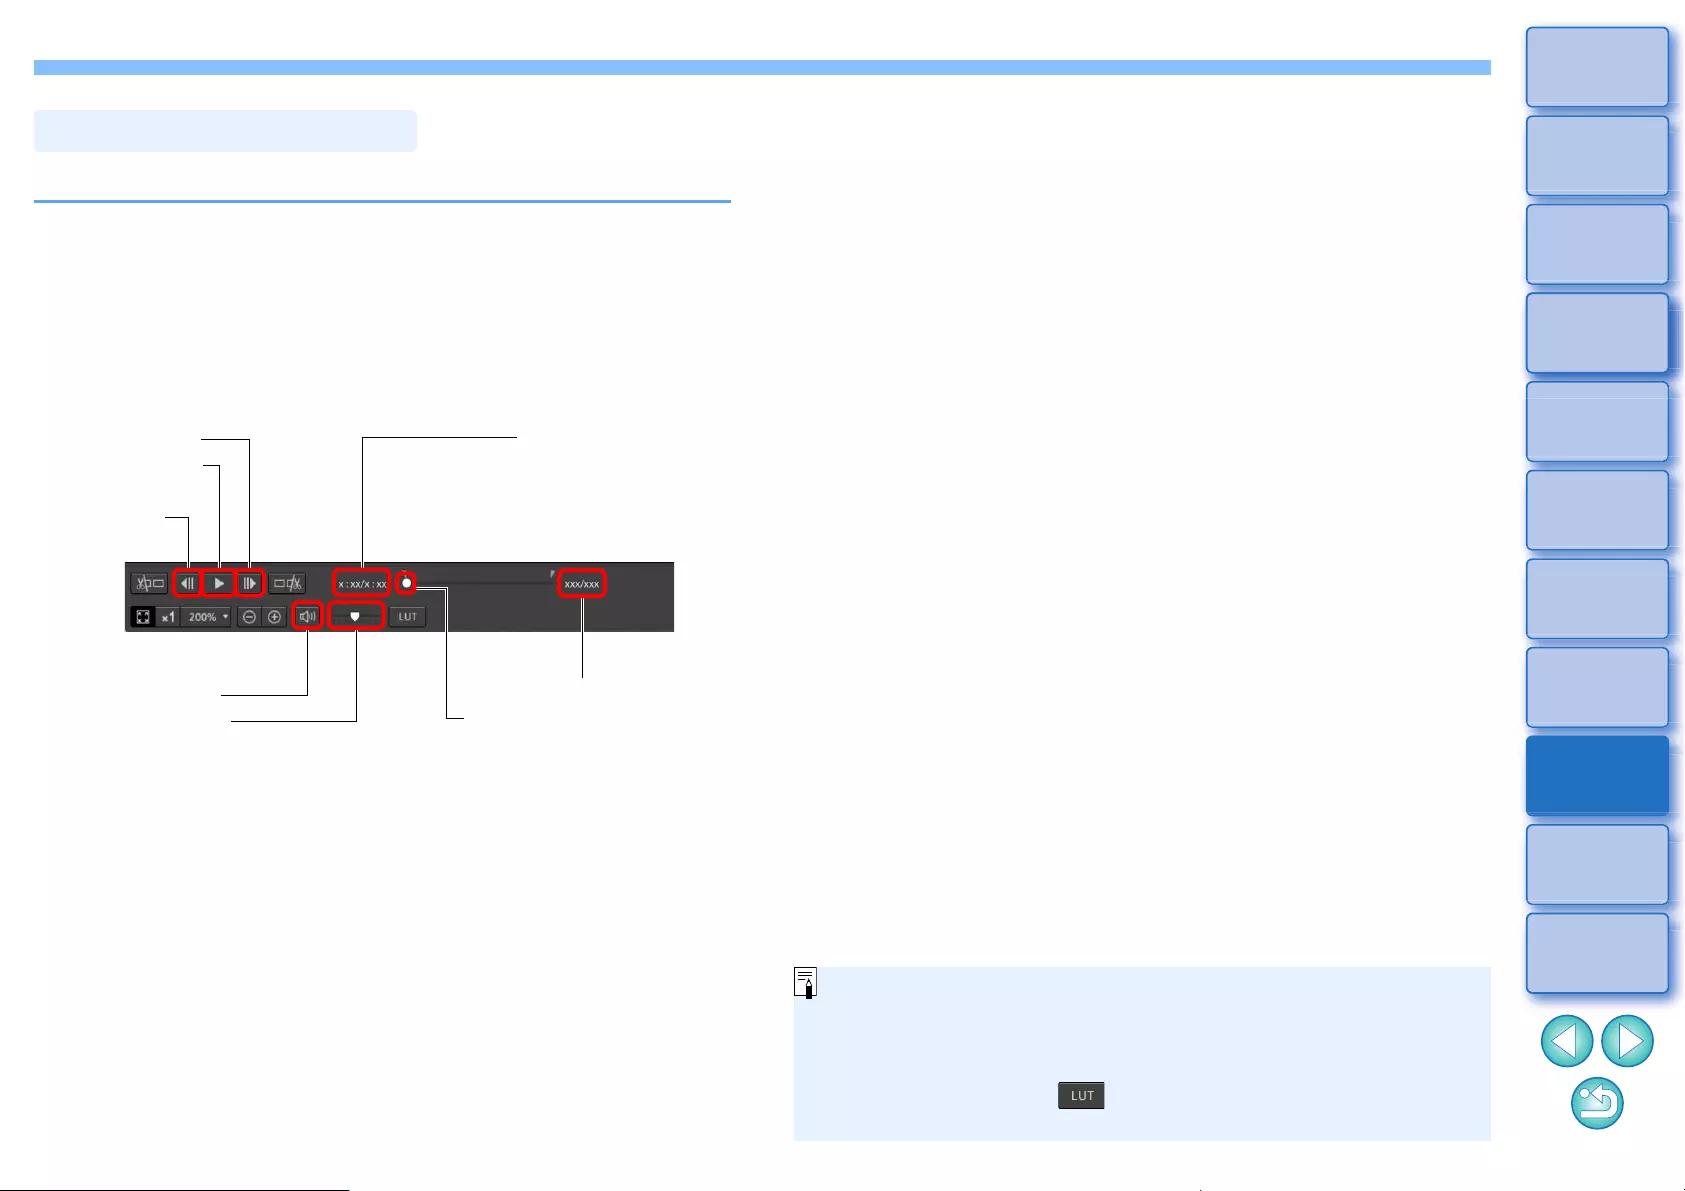
159
3
Sorting
Images
1
2
4
5
Downloading
Images
Viewing
Images
Printing
Images
Editing
Images
6
Processing
Large Numbers
of RAW Images
7
Remote
Shooting
10
HDR PQ
Mode
8
Playing Back
Movies and Saving
Still Photos
11
Specifying
Preferences
9
Handling
RAW Movies
You can play back RAW movie files with the RAW movie tool.
1Select a RAW movie file in the main window, etc., and
start up the RAW movie tool.
lStart up the RAW movie tool according to the procedure at
“Starting Up the RAW Movie Tool” (p.157).
2Control movie playback.
Playing Back RAW Movies
Next frame
Play/pause
Previous
frame
Show playback time
Mute/unmute
Volume slider
Frame no./Total frames
Frame position slider
lPlay/pause: Play and pause the selected movie.
lNext frame: Move forward one frame. When movie playback is
paused, this allows you to advance the movie one frame at a
time.
lPrevious frame: Move back one frame. When movie playback is
paused, this allows you to rewind the movie one frame at a time.
lShow playback time: Shows the playback time.
lFrame position slider: By dragging the slider left or right, you can
move the playback position while a movie is playing or paused.
lFrame no./Total frames: Shows the current frame number in the
movie being played back or shown and the total number of
frames.
lMovies shot with Canon Log (color space: BT.2020) are played
back in BT.709 color space.
lYou cannot edit with the tool palettes (for RAW movies) in the
RAW movie tool while a RAW movie is playing back.
lYou cannot use the [ ] button for applying a Viewing LUT
while a RAW movie is playing back.
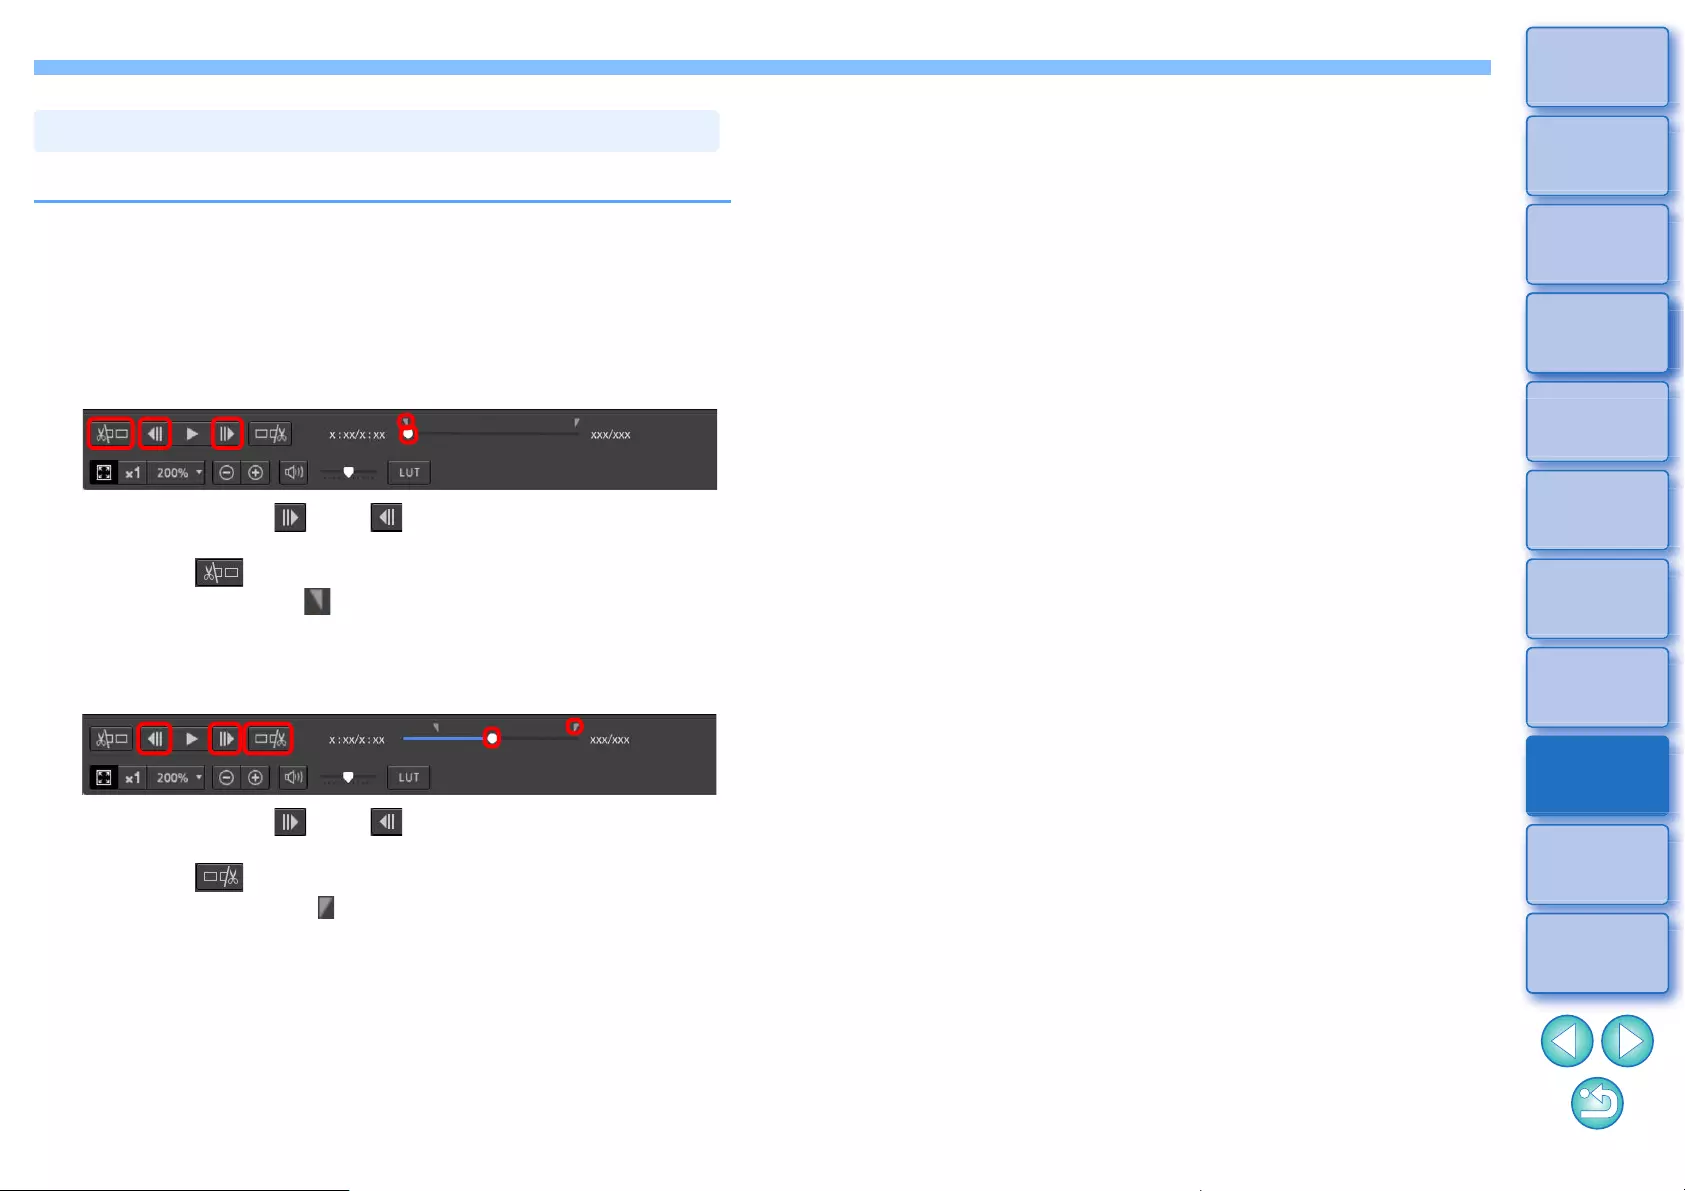
160
3
Sorting
Images
1
2
4
5
Downloading
Images
Viewing
Images
Printing
Images
Editing
Images
6
Processing
Large Numbers
of RAW Images
7
Remote
Shooting
10
HDR PQ
Mode
8
Playing Back
Movies and Saving
Still Photos
11
Specifying
Preferences
9
Handling
RAW Movies
You can save any range of a RAW movie file as still photos.
1Select a RAW movie file in the main window, etc., and
start up the RAW movie tool.
lStart up the RAW Movie tool according to the procedure at
“Starting Up the RAW Movie Tool” (p.157).
2Set the lead frame.
lUse the slider or [ ] and [ ] buttons to display the frame you
want to set as the lead frame in the frame display area, and then
click the [ ] button.
ÜThe in point marker ( ) moves, and the lead frame in the movie
is set.
3Set the last frame.
lUse the slider or [ ] and [ ] buttons to display the frame you
want to set as the last frame in the frame display area, and then
click the [ ] button.
ÜThe out point marker ( ) moves, and the last frame in the movie
is set.
Saving any Range of a RAW Movie as Still Photos
4Save the range.
lSpecify the necessary settings in the window that appears by
clicking the [Save movie] button and save the range.
lThe range is saved to the folder created in the destination folder
with the name of the movie file.
lFiles are saved as a still photo (JPG/TIFF/DPX*) + an audio file
(WAV file) and numbered sequentially.
Note the following for [Save as type] that can be selected.
• When [HDR PQ] for the RAW movie is set to [On] : Only DPX*
is selectable.
• When Canon Log (color space: BT.2020)is set for the RAW
movie : Only DPX* is selectable.
• When Canon Log (color space: BT.709)is set for the RAW
movie: Only 16-bit TIFF format is selectable.
When selecting DPX, you cannot specify settings for [Image
quality], [Output resolution], [Embed ICC profile], or [Shooting
info setting].
For the files saved in DPX format cannot be viewed in DPP.
*DPX: Digital Picture Exchange
lIf the movie was shot without audio on the camera, no audio file
(WAV file) is output.
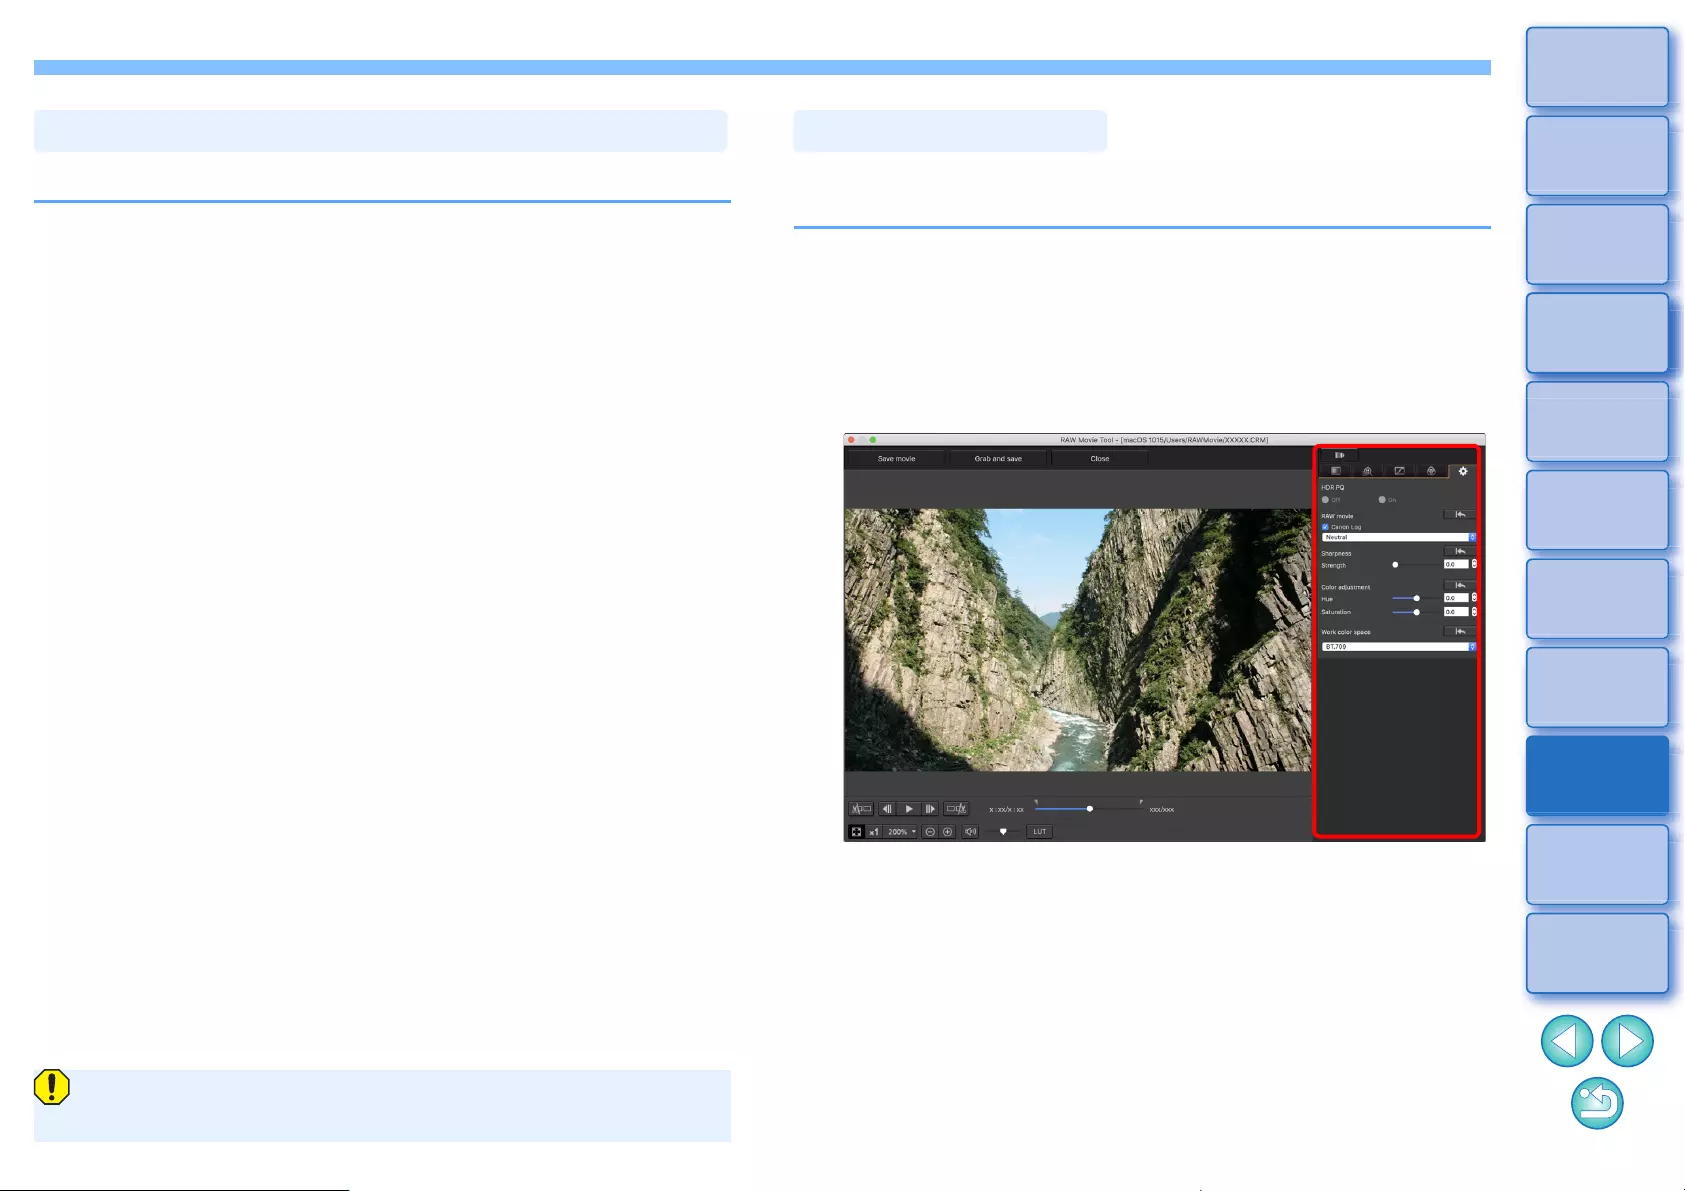
161
3
Sorting
Images
1
2
4
5
Downloading
Images
Viewing
Images
Printing
Images
Editing
Images
6
Processing
Large Numbers
of RAW Images
7
Remote
Shooting
10
HDR PQ
Mode
8
Playing Back
Movies and Saving
Still Photos
11
Specifying
Preferences
9
Handling
RAW Movies
You can grab and save any range from a RAW movie file.
1Set any range of a movie file following steps 1 to 3 of
“Saving any Range of a RAW Movie as Still Photos”
(p.160).
2Click the [Grab and save] button.
3In the dialog that appears, make required settings
and click the [Save] button.
ÜThe range is saved based on specified settings.
lSavable format is only CRM.
Grabbing and Saving any Range from a RAW Movie
Any image editing made to the original movie file is not carried over
to the new saved file.
You can edit RAW movie files with the tool palettes (for RAW movies) in
the RAW movie tool.
1Select a RAW movie file in the main window, etc., and
start up the RAW movie tool.
lStart up the RAW Movie tool according to the procedure at
“Starting Up the RAW Movie Tool” (p.157).
2Edit.
lUse the tool palettes (for RAW movies) to edit.
Editing a RAW Movie
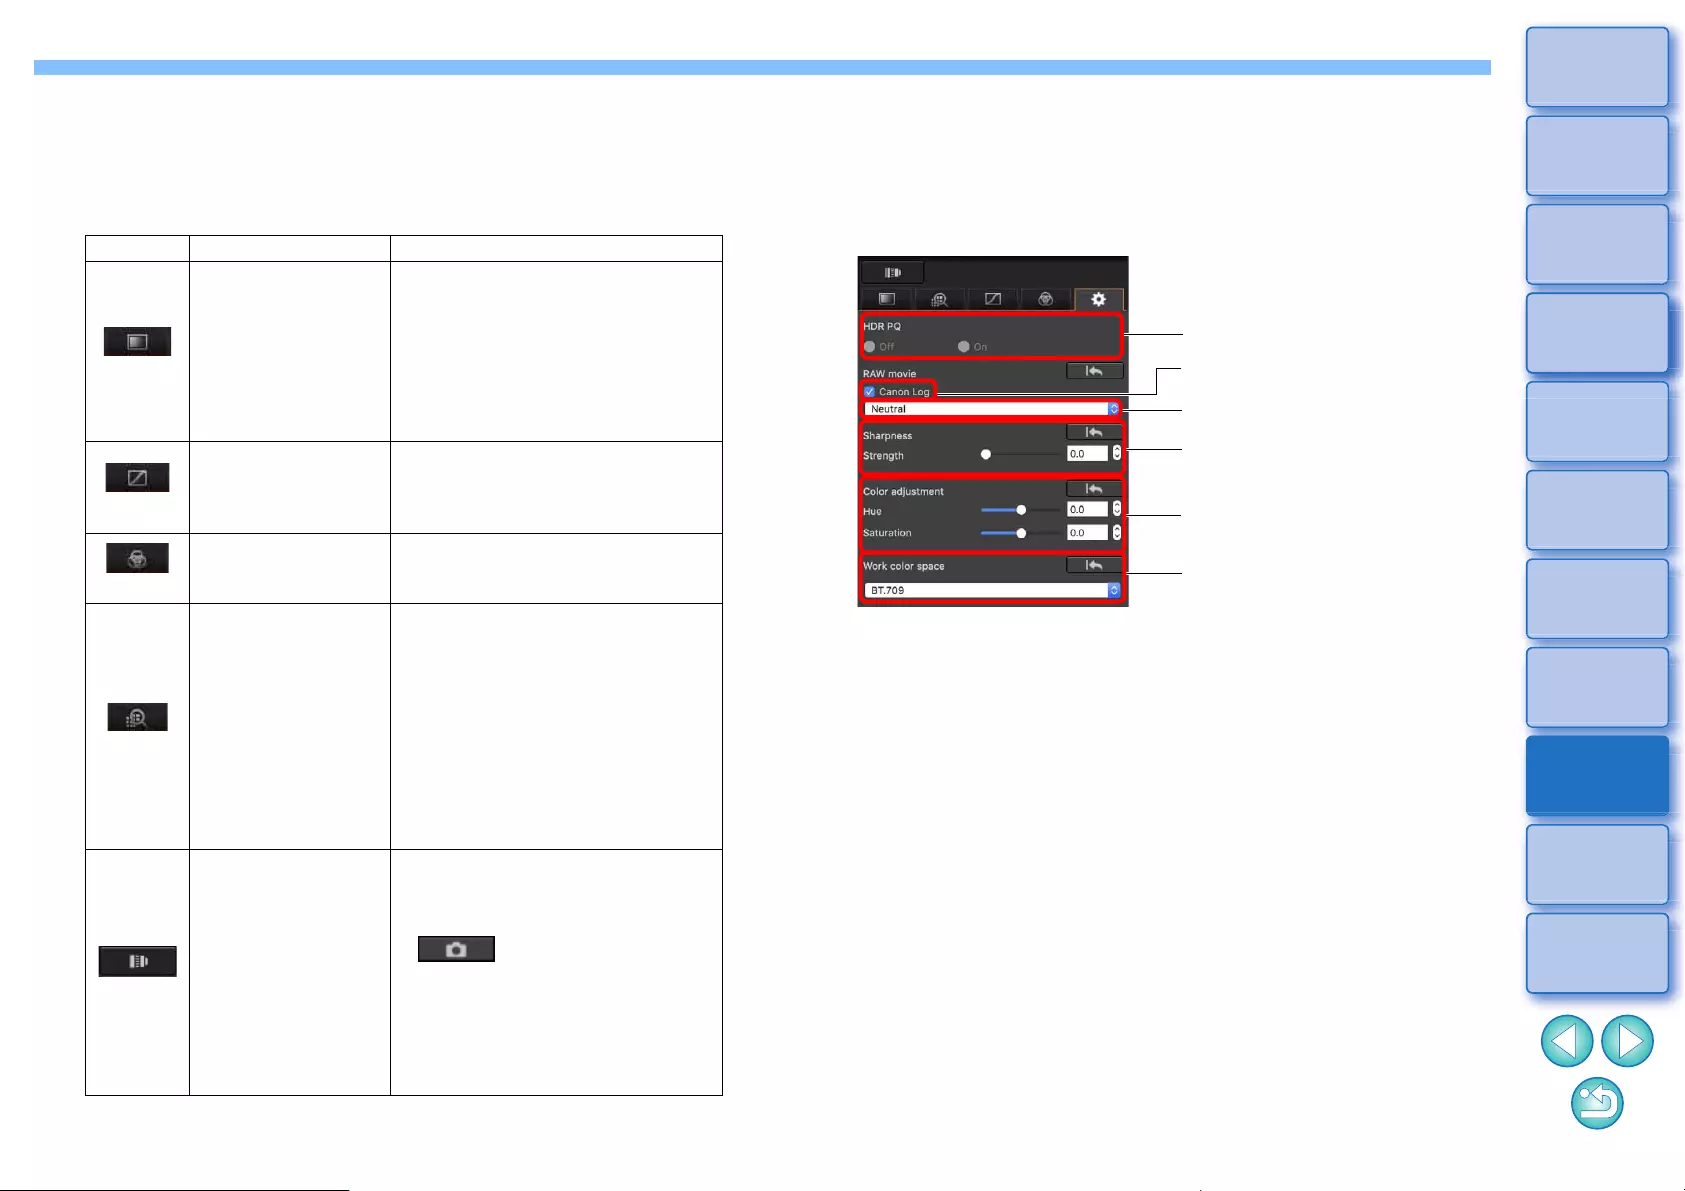
162
3
Sorting
Images
1
2
4
5
Downloading
Images
Viewing
Images
Printing
Images
Editing
Images
6
Processing
Large Numbers
of RAW Images
7
Remote
Shooting
10
HDR PQ
Mode
8
Playing Back
Movies and Saving
Still Photos
11
Specifying
Preferences
9
Handling
RAW Movies
lThe tool palettes (for RAW movies) other than the Settings tool
palette have the same basic functions as the original tool palettes
(p.46). See instructions for each original tool palette.
See the table below for differences in operation.
Icon Tool palette name Description
Basic Adjustment tool
palette
(for RAW movies)
Differences from the Basic Adjustment
tool palette (p.48) are as follows:
• [Linear], [Clarity], [Adj face lighting] not
settable
• Automatic adjustment of gradation and
luminance not possible
• Only [Unsharp mask] settable for
[Sharpness]
Tone Adjustment tool
palette
(for RAW movies)
Differences from the Tone Adjustment
tool palette (p.62) are as follows:
• If [HDR PQ] is set to [On], click white
balance is not available
Color Adjustment tool
palette
(for RAW movies)
Same editing possible as with the Color
Adjustment tool palette (p.67)
Detailed Adjustment tool
palette
(for RAW movies)
Differences from the Detailed
Adjustment tool palette (p.69) are as
follows:
• [Reduce luminance noise] and
[Reduce chrominance noise] can be
adjusted using the slider only when
the [Noise reduction] checkbox is
checked (adjustment range: -10 to 10)
• [Reduce color moiré] not settable
• Only [Unsharp mask] settable for
[Sharpness]
Lens Correction tool
palette
(for RAW movies)
Differences from the Lens Correction
tool palette (p.74) are as follows:
• [Chromatic aberration] and [Peripheral
illumination] correction: click the
[ ] button to apply shot
settings.
• [Distortion]: correction possible only
for images shot with an RF lens.
• [Digital Lens Optimizer] not settable
• [Diffraction correction] and [Color blur]
correction not possible
lThe following tool palettes are unavailable for RAW movies:
Trimming/Angle Adjustment tool palette, Dust Delete/Copy
Stamp tool palette, Partial Adjustment tool palette, Settings tool
palette.
lEditing using the Settings tool palette
• You can set HDR PQ. When set to [On], the movie is
converted and displayed in the RAW movie tool in SDR based
on the [HDR assist display (movies)] setting in [Preferences]
(p.176).
• Canon Log checkbox: If checked, you can perform color matrix
selection, sharpness setting, and color adjustment with this
tool palette. Only for movies shot on a supported camera
having RAW movie shooting and Canon Log set ON.
• Color matrix selection: Select from EOS Original and Neutral
color matrices.
• Sharpness setting: Set the sharpness.
• Color adjustment: Set the hue and saturation.
Canon Log checkbox
Color matrix selection
Sharpness setting
Color adjustment
Work color space
HDR PQ setting
163
3
Sorting
Images
1
2
4
5
Downloading
Images
Viewing
Images
Printing
Images
Editing
Images
6
Processing
Large Numbers
of RAW Images
7
Remote
Shooting
10
HDR PQ
Mode
8
Playing Back
Movies and Saving
Still Photos
11
Specifying
Preferences
9
Handling
RAW Movies
• Work color space: When the Canon Log checkbox is
checkmarked, you can select either of BT.709 and BT.2020
work color spaces. Note that in DPP, movies cannot be
displayed in BT.2020 even if BT.2020 is set.
• Viewing LUT: Click the [ ] button in the RAW movie tool to
apply a look-up table (LUT). This allows you to check the
movie with an image close to normal display.
3Save the movie.
lSpecify the necessary settings in the window that appears by
clicking the [Save movie] button and save the movie.
lFiles are saved as a still photo (JPG/TIFF/DPX*) + an audio file
(WAV file) and numbered sequentially.
Note the following for [Save as type] that can be selected.
• When [HDR PQ] for the RAW movie is set to [On] : Only DPX*
is selectable.
• When Canon Log (color space: BT.2020) is set for the RAW
movie : Only DPX* is selectable.
• When Canon Log (color space: BT.709) is set for the RAW
movie: Only 16-bit TIFF format is selectable.
When selecting DPX, you cannot specify settings for [Image
quality], [Output resolution], [Embed ICC profile], or [Shooting
info setting].
For the files saved in DPX format cannot be viewed in DPP.
*DPX: Digital Picture Exchange
lIf the movie was shot without audio on the camera, no audio file
(WAV file) is output.
lTo quit, click the [Close] button.
lEditing performed with this function cannot be reverted to the
states in [Revert to shot settings] or [Revert to last saved settings]
in the [Adjustment] tab in the menu even if they are selected.
lIf [HDR PQ] for a RAW movie is set to [On], the movie is
converted and displayed in SDR. A [ ] is displayed.
10
164
3
Sorting
Images
1
2
4
5
Downloading
Images
Viewing
Images
Printing
Images
Editing
Images
6
Processing
Large Numbers
of RAW Images
7
Remote
Shooting
10
HDR PQ
Mode
8
Playing Back
Movies and Saving
Still Photos
11
Specifying
Preferences
9
Handling
RAW Movies
Using HDR PQ Mode
HDR PQ Mode....................................................... 165
System Requirements for HDR PQ Mode ............. 165
Displaying Images in HDR PQ Mode .................... 166
Cautions when Using HDR PQ Mode.................... 167
Saving Images Displayed in HDR PQ Mode in
JPEG/TIFF Format ................................................ 169
Working with Files Saved in HEVC Format ........... 170
165
3
Sorting
Images
1
2
4
5
Downloading
Images
Viewing
Images
Printing
Images
Editing
Images
6
Processing
Large Numbers
of RAW Images
7
Remote
Shooting
10
HDR PQ
Mode
8
Playing Back
Movies and Saving
Still Photos
11
Specifying
Preferences
9
Handling
RAW Movies
HDR PQ Mode
HDR stands for High Dynamic Range and refers to technology that
enables expression of “a wider range of brightness” than with the
conventional range. The conventional range of brightness is referred to
as SDR (Standard Dynamic Range) = “standard brightness range” when
compared to HDR.
The “PQ” in this function’s name, HDR PQ, stands for Perceptual
Quantization and refers to the gamma curve of the input signal for
displaying HDR images. It is capable of brightness up to 10,000 cd/m2
and approximates human visual characteristics. HDR PQ mode in the
Mac edition of DPP is displayed in SDR according to the characteristics
of the display so that RAW images shot on a supported camera
approximate as much as possible display in HDR PQ on an HDR display
compliant with the HDR standard. However, the large difference in
regions that can be rendered between HDR PQ and SDR results in a
different impression of colors and gradations.
You can also edit and save images.
In addition, DPP has the function “Creating HDR (High Dynamic Range)
Images” (p.110). However, this function assumes that display is in
conventional SDR, and combines exposure-bracketed images (HDR
compositing) to achieve image expression that uses a wide range of
gradation from shadows to highlights, and is thus different from HDR PQ
mode.
System Requirements for HDR PQ Mode
System Requirements
OS (operating
system) macOS 10.13 to 10.15, 11 (Intel-based Mac)
CPU Core i series 3.4 GHz or higher
RAM
(memory)
4.0 GB or more of RAM (8.0 GB or more
recommended)
Supported
images
RAW and DPRAW images shot, RAW movies shot
with the EOS R5
RAW images shot with the EOS R6
RAW images and RAW movies shot with the EOS-1D
X Mark III
RAW and DPRAW images shot with the EOS R, EOS
Ra or EOS 5D Mark IV
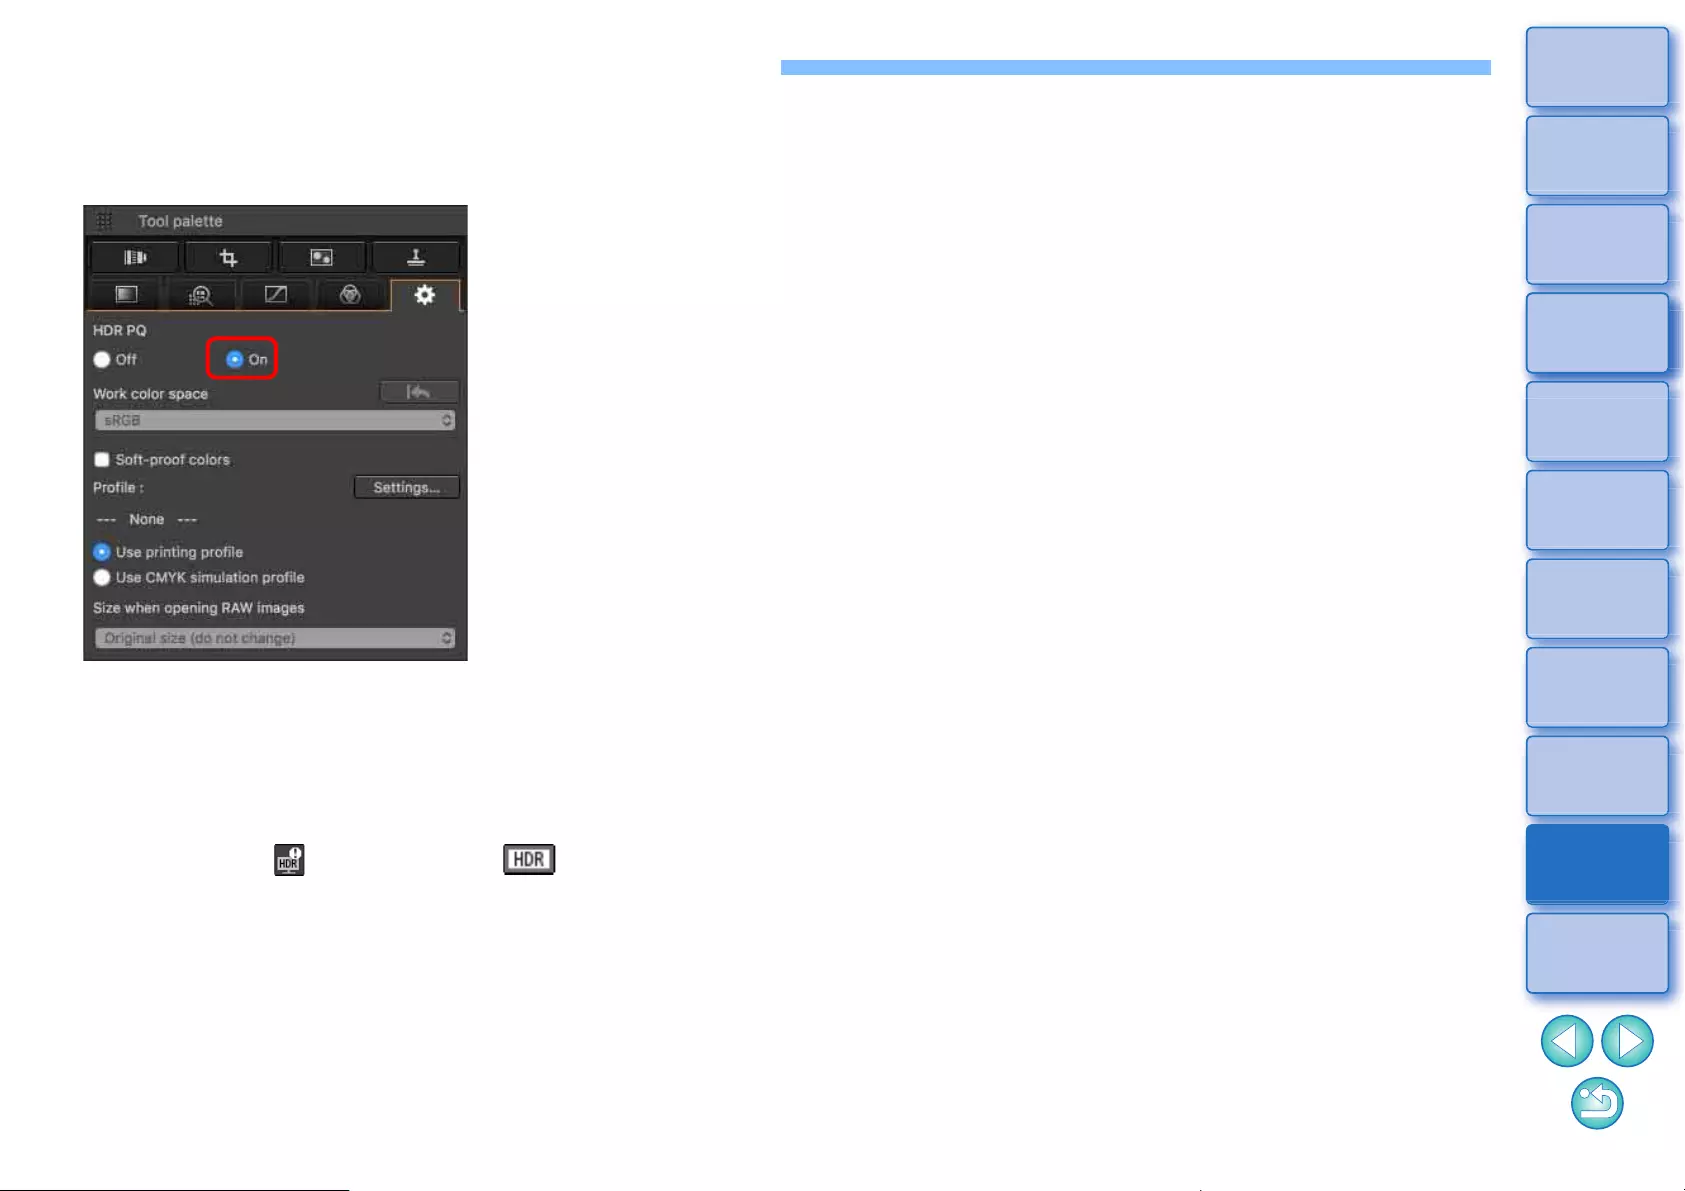
166
3
Sorting
Images
1
2
4
5
Downloading
Images
Viewing
Images
Printing
Images
Editing
Images
6
Processing
Large Numbers
of RAW Images
7
Remote
Shooting
10
HDR PQ
Mode
8
Playing Back
Movies and Saving
Still Photos
11
Specifying
Preferences
9
Handling
RAW Movies
Displaying Images in HDR PQ Mode
Select an image in the main window, etc., and then
open the Settings tool palette and select [On] in
[HDR PQ].
ÜThe image is displayed in HDR PQ mode.
(Images are displayed in SDR according to the characteristics of
the display so that they approximate display in HDR PQ as much
as possible.)
lThe following icons are displayed in the preview window and
thumbnail frames for images displayed in HDR PQ mode.
Preview window: Thumbnail frame:
167
3
Sorting
Images
1
2
4
5
Downloading
Images
Viewing
Images
Printing
Images
Editing
Images
6
Processing
Large Numbers
of RAW Images
7
Remote
Shooting
10
HDR PQ
Mode
8
Playing Back
Movies and Saving
Still Photos
11
Specifying
Preferences
9
Handling
RAW Movies
Cautions when Using HDR PQ Mode
lSince recipes that become attached to images when HDR PQ is set to On and when HDR PQ is set to Off are not compatible, neither can be applied
to the other.
Item Restriction
Display function Highlight/shadow warning (p.23) Not displayable
Basic Adjustment tool palette
Auto Lighting Optimizer (p.58) Unavailable
Changing the Picture Style (p.49)
The following Picture Styles are available
- [Standard], [Portrait], [Landscape], [Fine Detail],
[Neutral], [Faithful], [Monochrome]
Using Picture Style Files (p.51)
Unavailable
Linear (p.57)
Automatic adjustment of gradation and luminance
(p.57)
Detailed Adjustment tool palette Reducing color moiré in images (p.70) Unavailable
Partial Adjustment tool palette Reducing color moiré (p.84) Unavailable
Settings tool palette
Setting the work color space (p.91) Not selectable
Setting the size of RAW images when opening (p.93) Unavailable
Tools
Compositing images (p.106)
Unavailable
Generating HDR (High Dynamic Range) images
(p.110)
168
3
Sorting
Images
1
2
4
5
Downloading
Images
Viewing
Images
Printing
Images
Editing
Images
6
Processing
Large Numbers
of RAW Images
7
Remote
Shooting
10
HDR PQ
Mode
8
Playing Back
Movies and Saving
Still Photos
11
Specifying
Preferences
9
Handling
RAW Movies
Switching between HDR and SDR modes clears the following recipes:
* The recipe is cleared if the Picture Style was set to a style other than [Standard], [Portrait], [Landscape], [Fine Detail], [Neutral], [Faithful] or
[Monochrome].
Basic Adjustment tool palette Auto Lighting Optimizer / linear / Picture Style* / gamma adjustment
Tone Adjustment tool palette Tone curve adjustment (RGB), brightness, contrast
Settings tool palette Work color space, size when opening RAW images
Color Adjustment tool palette Hue and saturation adjustments for the entire image, color adjustments for specific gamuts
Detailed Adjustment tool palette Reducing color moiré
Partial Adjustment tool palette Partial adjustments and reducing color moiré
Dust Delete / Copy Stamp tool
palette
Stamp
Dust delete data
Image quality enhancement in HDR PQ mode has been introduced as of Digital Photo Professional 4.10.40. To keep using previous adjustment
results, select the check box for [HDR PQ image quality settings*] in [Image Processing 2], in [Preferences].

169
3
Sorting
Images
1
2
4
5
Downloading
Images
Viewing
Images
Printing
Images
Editing
Images
6
Processing
Large Numbers
of RAW Images
7
Remote
Shooting
10
HDR PQ
Mode
8
Playing Back
Movies and Saving
Still Photos
11
Specifying
Preferences
9
Handling
RAW Movies
Saving Images Displayed in HDR PQ Mode in JPEG/TIFF Format
You can save the editing results of images displayed in HDR PQ mode
in the same way as SDR images.
lSee “Saving Editing Results” (p.95) for information on how to save
images.
lWhen saving an image displayed in HDR PQ mode as a separate
image (JPEG or TIFF image), it is saved as an SDR image. The
image is processed so that it approximates display in HDR PQ on an
HDR display as much as possible. However, the large difference in
regions that can be rendered between HDR PQ and SDR results in a
different impression of colors and gradations.
lFor information on saving images in HEIF format, see “Saving Images
Displayed in HDR PQ Mode in HEIF Format” (p.170).
When an image displayed in HDR PQ mode is saved as a separate
image (JPEG or TIFF image), the work color spaces of the saved
images are all fixed at sRGB.

170
3
Sorting
Images
1
2
4
5
Downloading
Images
Viewing
Images
Printing
Images
Editing
Images
6
Processing
Large Numbers
of RAW Images
7
Remote
Shooting
10
HDR PQ
Mode
8
Playing Back
Movies and Saving
Still Photos
11
Specifying
Preferences
9
Handling
RAW Movies
Working with Files Saved in HEVC Format
You must first install HEVC Codec (or enable it, depending on the
model) so you can display files saved in HEVC format* or save images
that are displayed in HDR PQ mode in HEIF format (extension: .hif).
HEIF stands for High Efficiency Image File format. Saving in HEIF
format allows you to save images while retaining the wide dynamic
range of HDR PQ.
*HEIF image files, HEVC compressed movie files
lTo work with files saved in HEVC format, HEVC Codec must be
installed (or enabled, depending on the model).
lTo work with files in HEIF format after shot on an EOS R/Ra, or EOS
5D Mark IV, download and install Canon HEVC Codec from the
Canon website. You should also start up DPP again after installing.
lTo work with files in the above format shot on supported cameras, it is
necessary to enable HEVC Codec. Select the images in the main
window, and in the [Help] menu, select [Activate HEVC codec], and
follow the displayed instructions to enable it.
You should also start up DPP again after enabling.
Preparation for Working with Files Saved in
HEVC Format (Display and Saving)
lSee “Saving Editing Results” “Saving as a separate image” (p.95)
for information on saving images. When selecting the image type in
step 3, select [HEIF (*.HIF)] from [Save as type] and then save the
image.
lYou cannot select the image quality or compression rate when saving
in HEIF format.
lYou can [Save], [Save As], [Convert and save], or [Batch process]
HEIF images.
lYou can save a HEIF image as a JPEG or TIFF image. (It is saved as
an SDR image.)
The image is processed so that it approximates display in HDR PQ on
an HDR display as much as possible. However, the large difference in
regions that can be rendered between HDR PQ and SDR results in a
different impression of colors and gradations.
See “Saving Editing Results” (p.95) for information on how to save an
image as a JPEG or TIFF image.
Saving Images Displayed in HDR PQ Mode in
HEIF Format
lWhen a HEIF image is saved as a JPEG or TIFF image, the work
color spaces of the saved images are all fixed at sRGB.
lHEIF files generated with software other than DPP are not
compatible with HEIF files saved in DPP. Only HEIF files saved in
DPP can be loaded into DPP.
lImages saved in HEIF format cannot be printed using Print Studio
Pro software for Canon inkjet printers.
11
171
3
Sorting
Images
1
2
4
5
Downloading
Images
Viewing
Images
Printing
Images
Editing
Images
6
Processing
Large Numbers
of RAW Images
7
Remote
Shooting
10
HDR PQ
Mode
8
Playing Back
Movies and Saving
Still Photos
11
Specifying
Preferences
9
Handling
RAW Movies
Specifying Preferences
Specifying Preferences.......................................... 172
General Settings....................................................... 172
Image processing ..................................................... 173
Color Management................................................... 175
View Settings............................................................ 176
Properties Display Settings ...................................... 177
Survey ...................................................................... 178
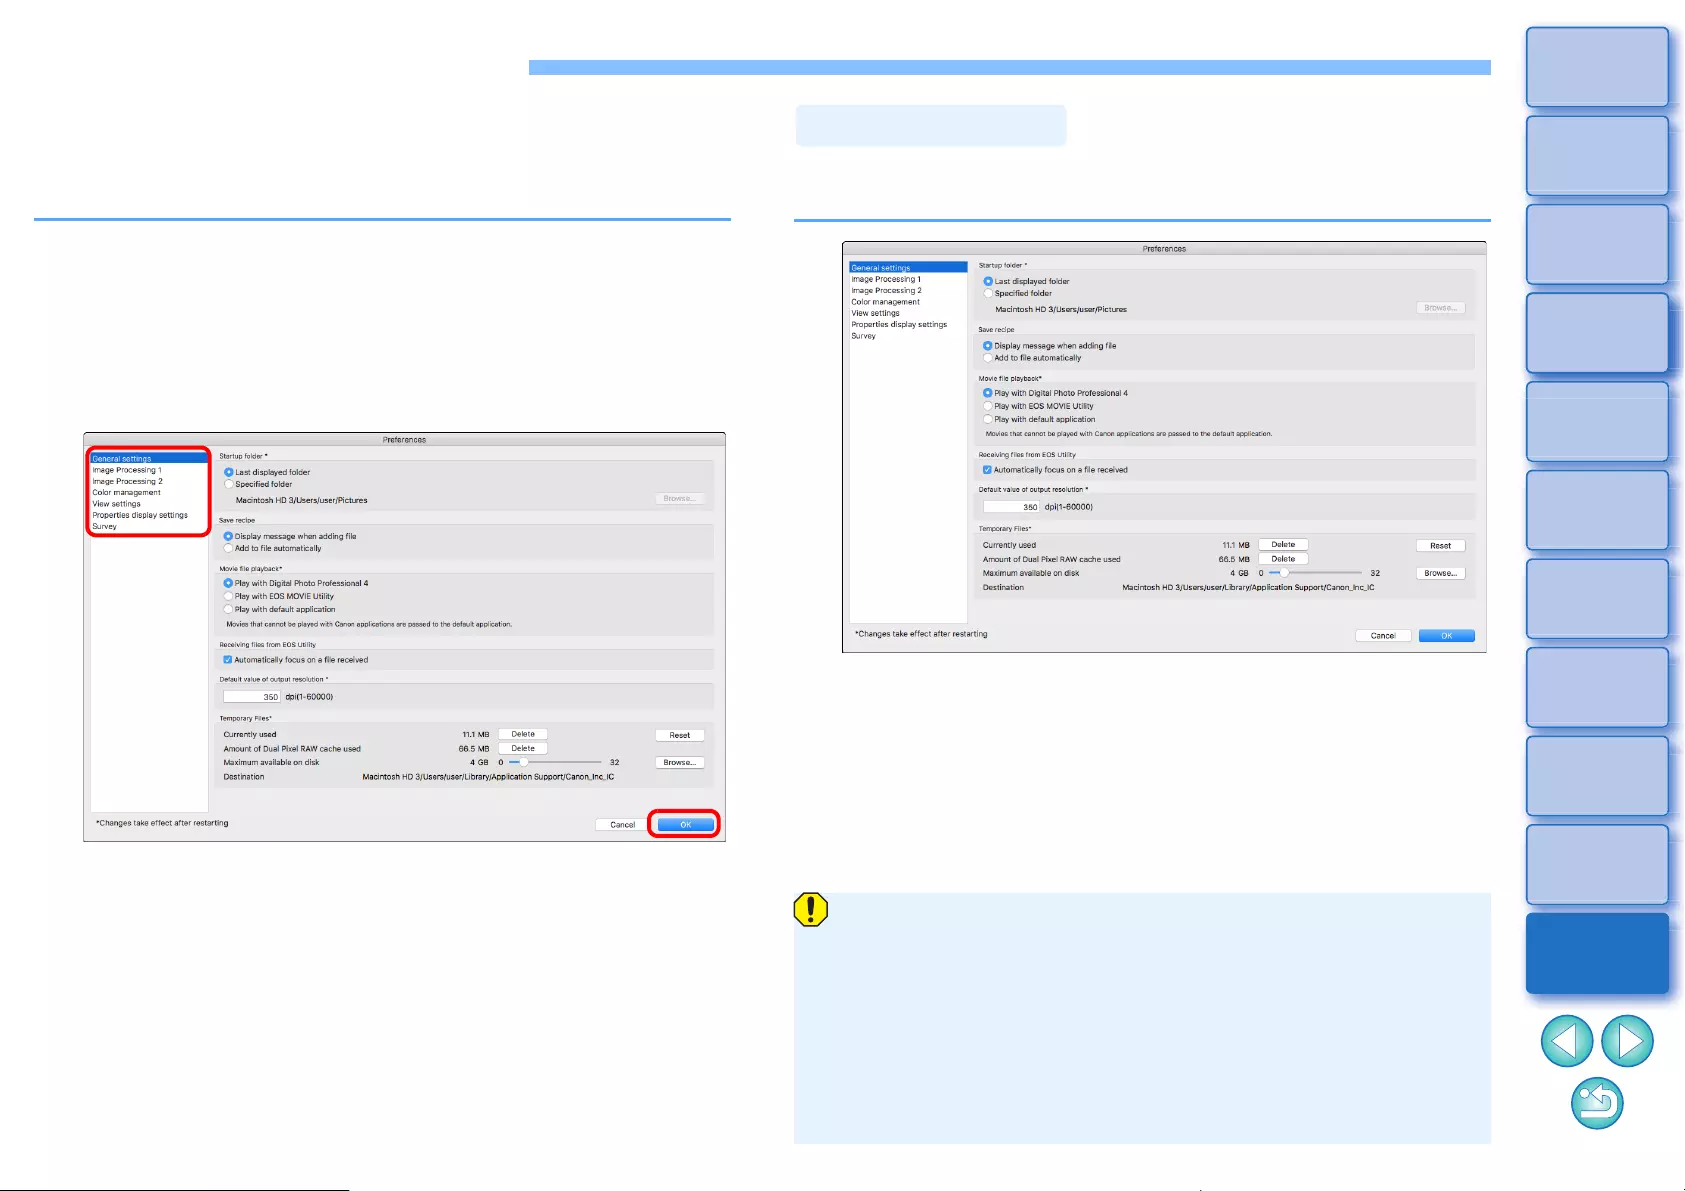
172
3
Sorting
Images
1
2
4
5
Downloading
Images
Viewing
Images
Printing
Images
Editing
Images
6
Processing
Large Numbers
of RAW Images
7
Remote
Shooting
10
HDR PQ
Mode
8
Playing Back
Movies and Saving
Still Photos
11
Specifying
Preferences
9
Handling
RAW Movies
Specifying Preferences
You can change the various functions of DPP in the [Preferences]
window. Check the contents of each window and set.
Refer to the detailed explanations if available, as well as to each
window.
1Select the [Digital Photo Professional 4] menu
[Preferences].
ÜThe [Preferences] window appears.
2Select a tab sheet, specify the settings, and then
click the [OK] button.
You can specify the folder that opens when DPP is started up, saving of
recipes, etc.
lMovie file playback
Choose the application used for playing back movie files. Movies that
cannot be played back in DPP or EOS MOVIE Utility are played back
with the movie playback application specified with the computer’s OS
settings. For information on EOS MOVIE Utility, refer to the EOS MOVIE
Utility Instruction Manual.
General Settings
lIf you have changed the movie playback application to EOS
MOVIE Utility, and playback does not start after starting up EOS
MOVIE Utility, check compatible models with the EOS MOVIE
Utility Instruction Manual.
lIf the movie playback application specified with the computer’s
OS settings is set to EOS MOVIE Utility, MOV and MP4 files shot
with the models that are not compatible with EOS MOVIE Utility
will not be played back. Check the OS settings and change the
movie playback application.
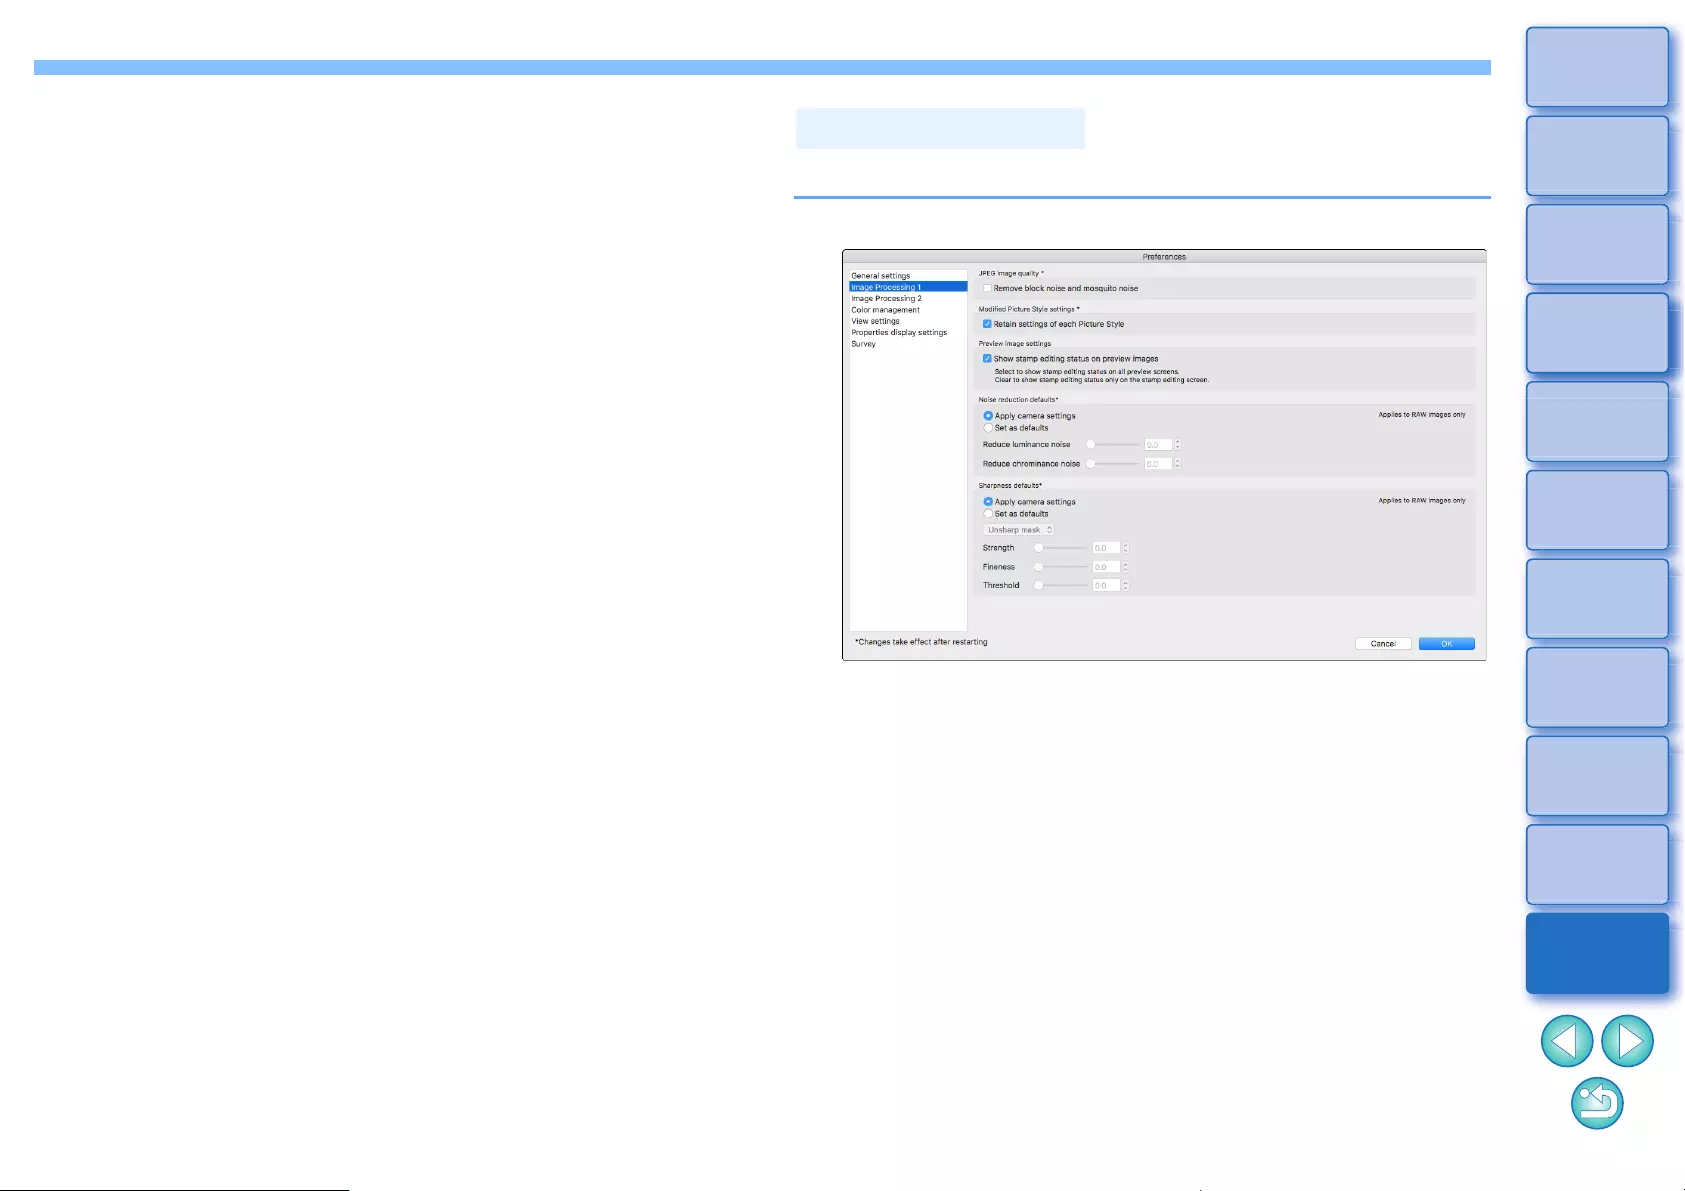
173
3
Sorting
Images
1
2
4
5
Downloading
Images
Viewing
Images
Printing
Images
Editing
Images
6
Processing
Large Numbers
of RAW Images
7
Remote
Shooting
10
HDR PQ
Mode
8
Playing Back
Movies and Saving
Still Photos
11
Specifying
Preferences
9
Handling
RAW Movies
lDefault value of output resolution
When saving JPEG or TIFF images created by converting RAW images
(p.95, p.139), the resolution of the JPEG or TIFF images can be set.
lTemporarily saved files
You can delete temporarily saved files that were created and improve
operation speed, change file save destinations, or set a limit on disk
usage. Any changes you made will be applied when you start up DPP
again.
l[Delete] button: Click the [Delete] button to delete
temporarily saved files.
l[Maximum available on disk]: Set with the slider (setting range: 0 to
32 GB).
Once usage reaches the limit, files
are erased starting with the oldest.
l[Destination]: Click the [Browse] button to change
the save destination in the dialog that
appears.
l[Reset] button: Click the [Reset] button to revert all
changes to the original settings.
You can specify settings for processing images in DPP.
Image Processing 1
lJPEG image quality
[Remove block noise and mosquito noise]
lYou can improve the quality of a JPEG image by reducing the noise
particular to JPEG images.
This setting is also effective when RAW images are converted to
JPEG images and saved (p.95, p.139) and for JPEG images that to
be saved with a different name. The higher the JPEG image’s
compression rate, the better the effect. And when the compression
rate is low, the effect of noise reduction may not be noticeable.
lModified Picture Style settings
If you checkmark the checkbox, setting values for [Color tone], [Color
saturation], [Contrast], [Unsharp mask], [Sharpness], and other options
will be retained for each Picture Style.
Image processing
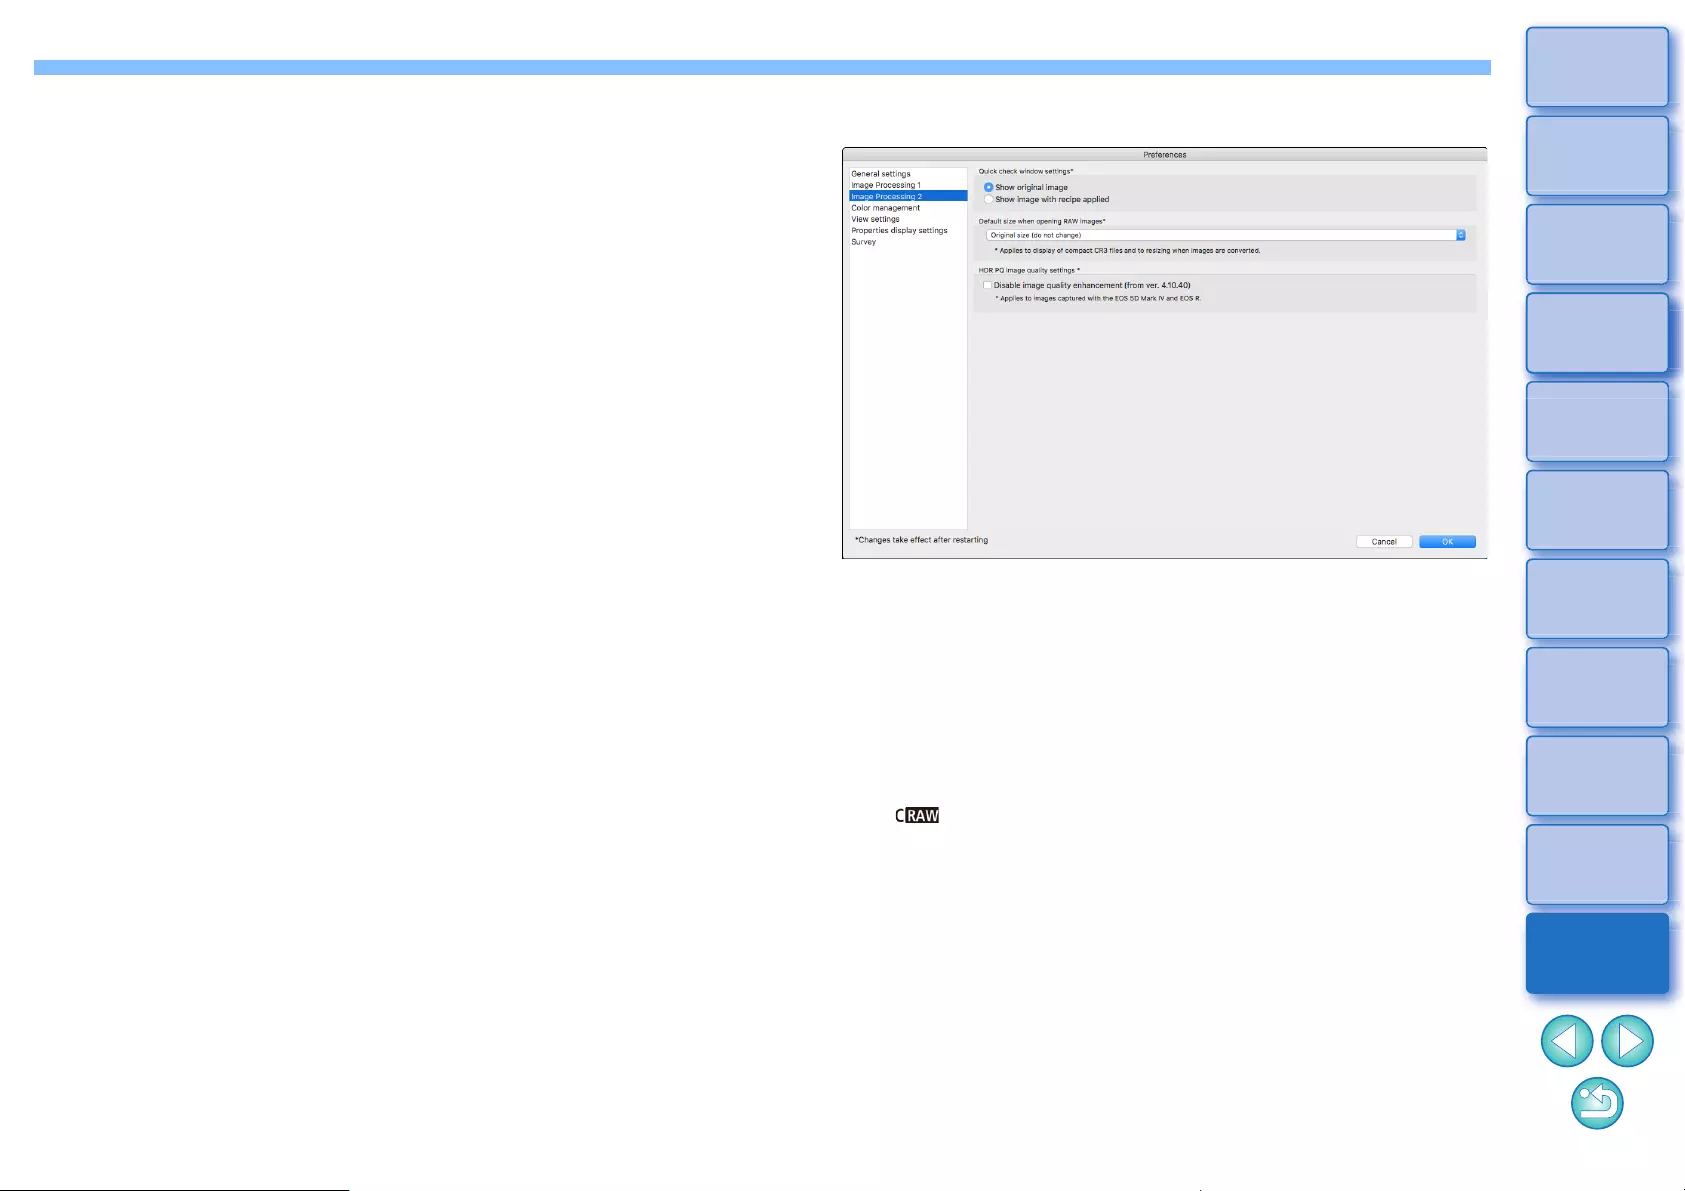
174
3
Sorting
Images
1
2
4
5
Downloading
Images
Viewing
Images
Printing
Images
Editing
Images
6
Processing
Large Numbers
of RAW Images
7
Remote
Shooting
10
HDR PQ
Mode
8
Playing Back
Movies and Saving
Still Photos
11
Specifying
Preferences
9
Handling
RAW Movies
lNoise reduction defaults
You can set a default beforehand for the noise reduction level. Only
RAW images are supported.
lWhen [Apply camera settings] is selected, you can pre-set a noise
reduction level that suits the camera settings beforehand as the
default.
lWhen [Set as defaults] is selected, you can pre-set a preferred
default setting for the noise reduction level beforehand.
For images not having a recipe attached, the default noise reduction
level set here is applied. If you changed settings, they will be applied to
images as the default noise reduction level when you start up DPP
again.
For images with a recipe attached, the noise level recorded in the recipe
remains as it is and the default for noise reduction level set here is not
applied.
lSharpness defaults
You can set a default beforehand for the sharpness. Only RAW images
are supported.
lWhen [Apply camera settings] is selected, you can pre-set a
sharpness that suits the camera settings beforehand as the default.
lWhen [Set as defaults] is selected, you can pre-set preferred
default settings for the sharpness and unsharp mask beforehand.
For images not having a recipe attached, the defaults for sharpness and
unsharp mask set here are applied. If you changed settings, they will be
applied to images as the default sharpness level when you start up DPP
again.
For images with a recipe attached, the sharpness level recorded in the
recipe remains as it is and the defaults for sharpness and unsharp mask
set here are not applied.
Image Processing 2
lQuick check window settings
You can specify image display settings for the quick check window. By
selecting [Show image with recipe applied], images with a recipe
attached are displayed with the recipe applied. Any changes you made
will be applied when you start up DPP again.
lDefault size when opening RAW images
This applies only to RAW images with the extension “.CR3” that were
shot with [ ] selected on the camera.
This specifies the size defaults when RAW images are opened in DPP.
This default size is also set when RAW images are converted and saved
as JPEG or TIFF images.
The settings are applied the next time DPP is started up.
lHDR PQ image quality settings
Image quality enhancement in HDR PQ mode has been introduced as
of Digital Photo Professional 4.10.40. To keep using previous
adjustment results, select the check box for [HDR PQ image quality
settings*].
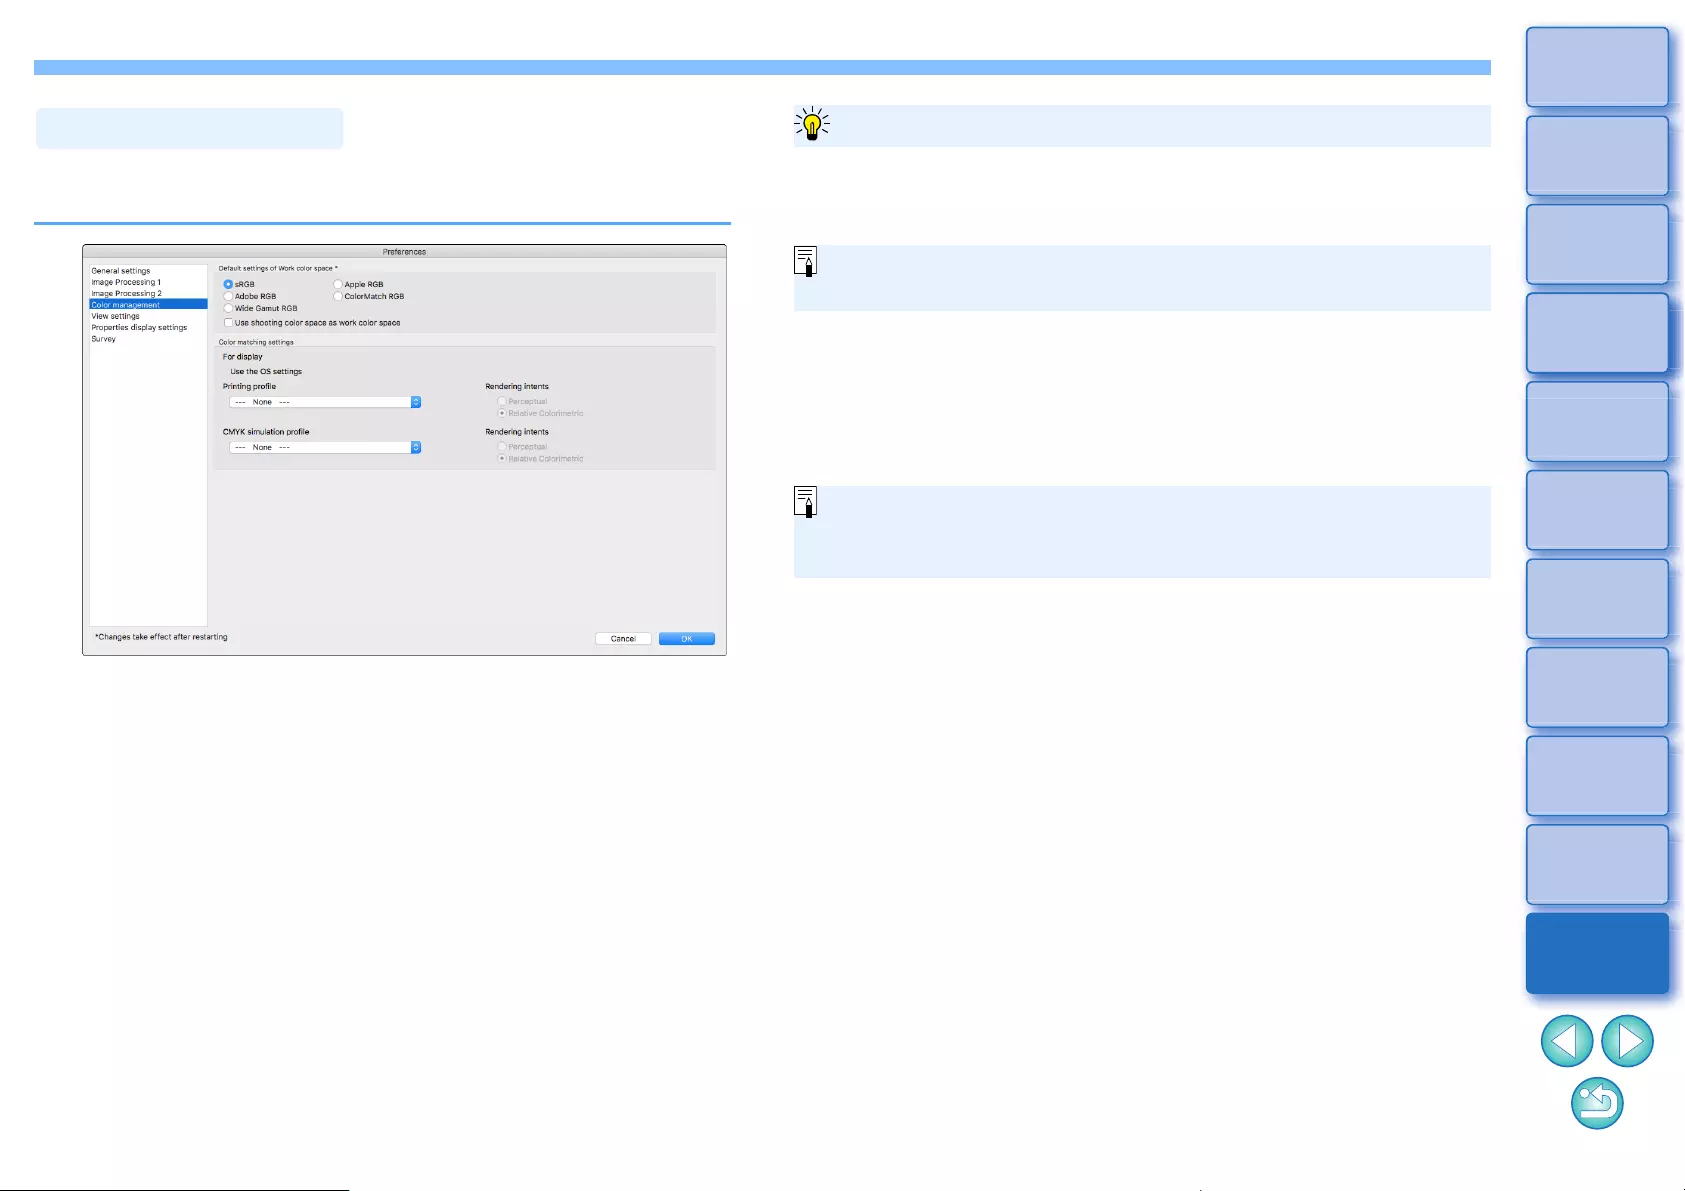
175
3
Sorting
Images
1
2
4
5
Downloading
Images
Viewing
Images
Printing
Images
Editing
Images
6
Processing
Large Numbers
of RAW Images
7
Remote
Shooting
10
HDR PQ
Mode
8
Playing Back
Movies and Saving
Still Photos
11
Specifying
Preferences
9
Handling
RAW Movies
You can specify settings relating to color management, such as settings
for work color space, conditions for color matching, etc.
lDefault settings of Work color space
You can select the color space (p.184) to be applied as a default setting
of RAW images from five types. The color space set will be applied as
the color space when a RAW image is converted and saved (p.95,
p.139) or printed (p.132 to p.135).
lIf you change the color space, and you restart DPP, the set color
space is applied as the default color space.
lYou can check the color space that is set in an image in all windows
except the quick check window.
lIf you checkmark [Use shooting color space as work color space],
the color space specified with the camera when the image was shot
will be set as work color space.
Color Management
lPrinting profile (color setting of the printer)
Where a profile is not attached to the printer you are using to print
images, you can print an image, simulating the colors displayed on
screen by setting the profile in DPP.
When you set a profile for printing in DPP, set the color adjustment
function of the printer driver to off. If it is left on, the image may not
be printed in colors close to those displayed on screen.
Even if the default setting is changed, the new default setting is not
applied to edited (i.e., adjusted using the tool palette, cropped, dust-
erased) images. Change the settings individually.
Changes are not applied to the edited image
You can set a color space that is different from the default settings
for each image (p.91).
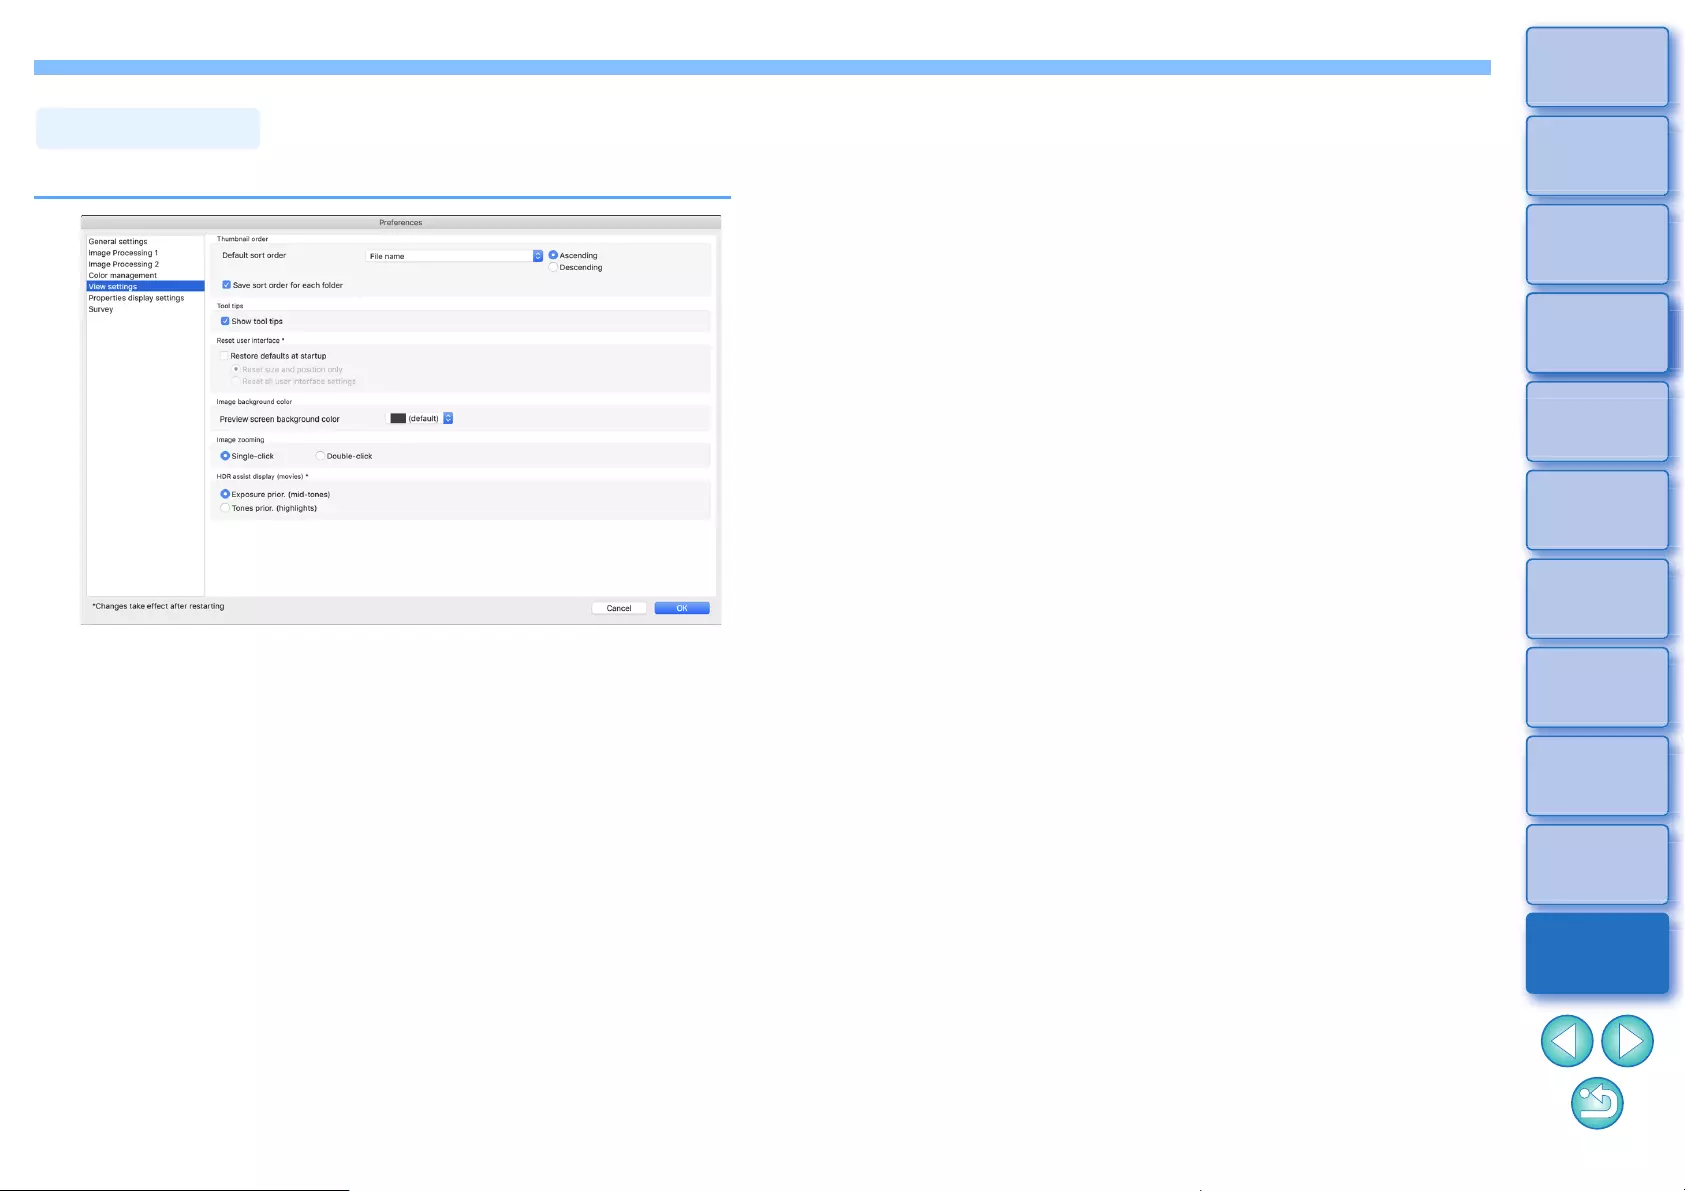
176
3
Sorting
Images
1
2
4
5
Downloading
Images
Viewing
Images
Printing
Images
Editing
Images
6
Processing
Large Numbers
of RAW Images
7
Remote
Shooting
10
HDR PQ
Mode
8
Playing Back
Movies and Saving
Still Photos
11
Specifying
Preferences
9
Handling
RAW Movies
You can set layout for screen display.
lThumbnail order
Specify the default order of images in the main window, and that the
order of rearranged images be maintained. If you checkmark the
checkbox, the order of rearranged images is maintained starting the
next time you select a folder (p.36).
lReset user interface
You can reset user interface settings.
Choose from either of 2 reset states.
By checkmarking the [Restore defaults at startup] checkbox, settings
revert to their original settings for next time you start up DPP. The
checkmark is also removed from the checkbox for the next startup.
View Settings
lHDR assist display (movies)
This function provides an assisted display of CRM and MP4 files that
have [HDR PQ] set to [On] so that they are easier to view in an SDR
environment. The setting will be applied the next time DPP is started up.
However, this function is only effective in the RAW movie tool for CRM
files.
lExposure prior. (mid-tones): maintains brightness where there are
medium tones in dark areas. Used for checking exposure.
lTones prior. (highlights): maintains color reproduction and gradation
as much as is possible. Used for checking gradation in highlights.
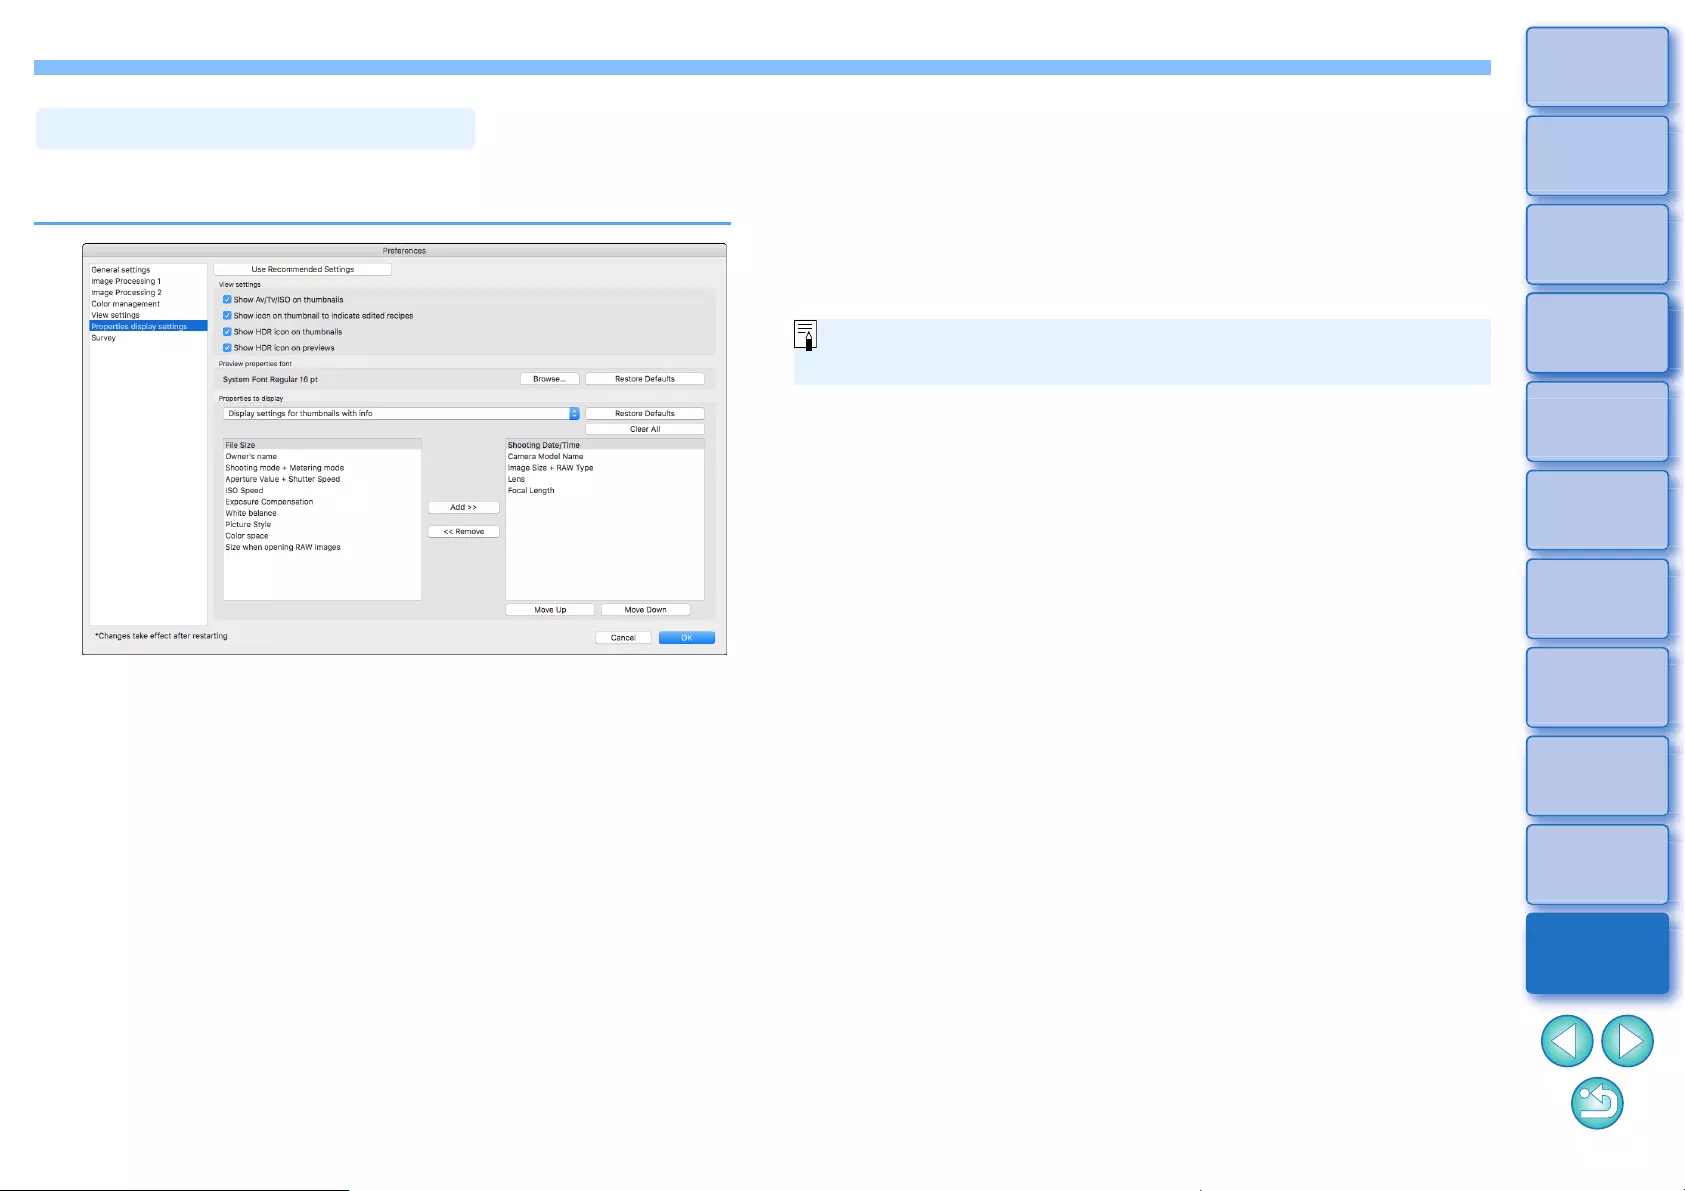
177
3
Sorting
Images
1
2
4
5
Downloading
Images
Viewing
Images
Printing
Images
Editing
Images
6
Processing
Large Numbers
of RAW Images
7
Remote
Shooting
10
HDR PQ
Mode
8
Playing Back
Movies and Saving
Still Photos
11
Specifying
Preferences
9
Handling
RAW Movies
You can specify settings for shooting and recipe information that
appears with thumbnails and in the preview window.
lView settings
You can specify information that appears on thumbnails or previews.
If the [Show Av/Tv/ISO on thumbnails] checkbox is checked, Av/Tv/ISO
information is displayed on thumbnails if thumbnails are set at Size 3 or
larger.
lPreview properties font
You can specify the font used for information displayed in the preview
window.
Properties Display Settings
lProperties to display
You can specify detailed settings for [Display settings for thumbnails
with info], [Display settings for thumbnail list], and [Display settings for
preview properties].
Items that can be selected appear in the list box at left, and actually
displayed items appear in the list box at right. Specify items with the
[Add >>] button and [<< Remove] button. You can also change the
display order with the [Move Up] button and [Move Down] button.
All the property items may not be displayed depending on the
combination of window, preview window, or the size of thumbnails.
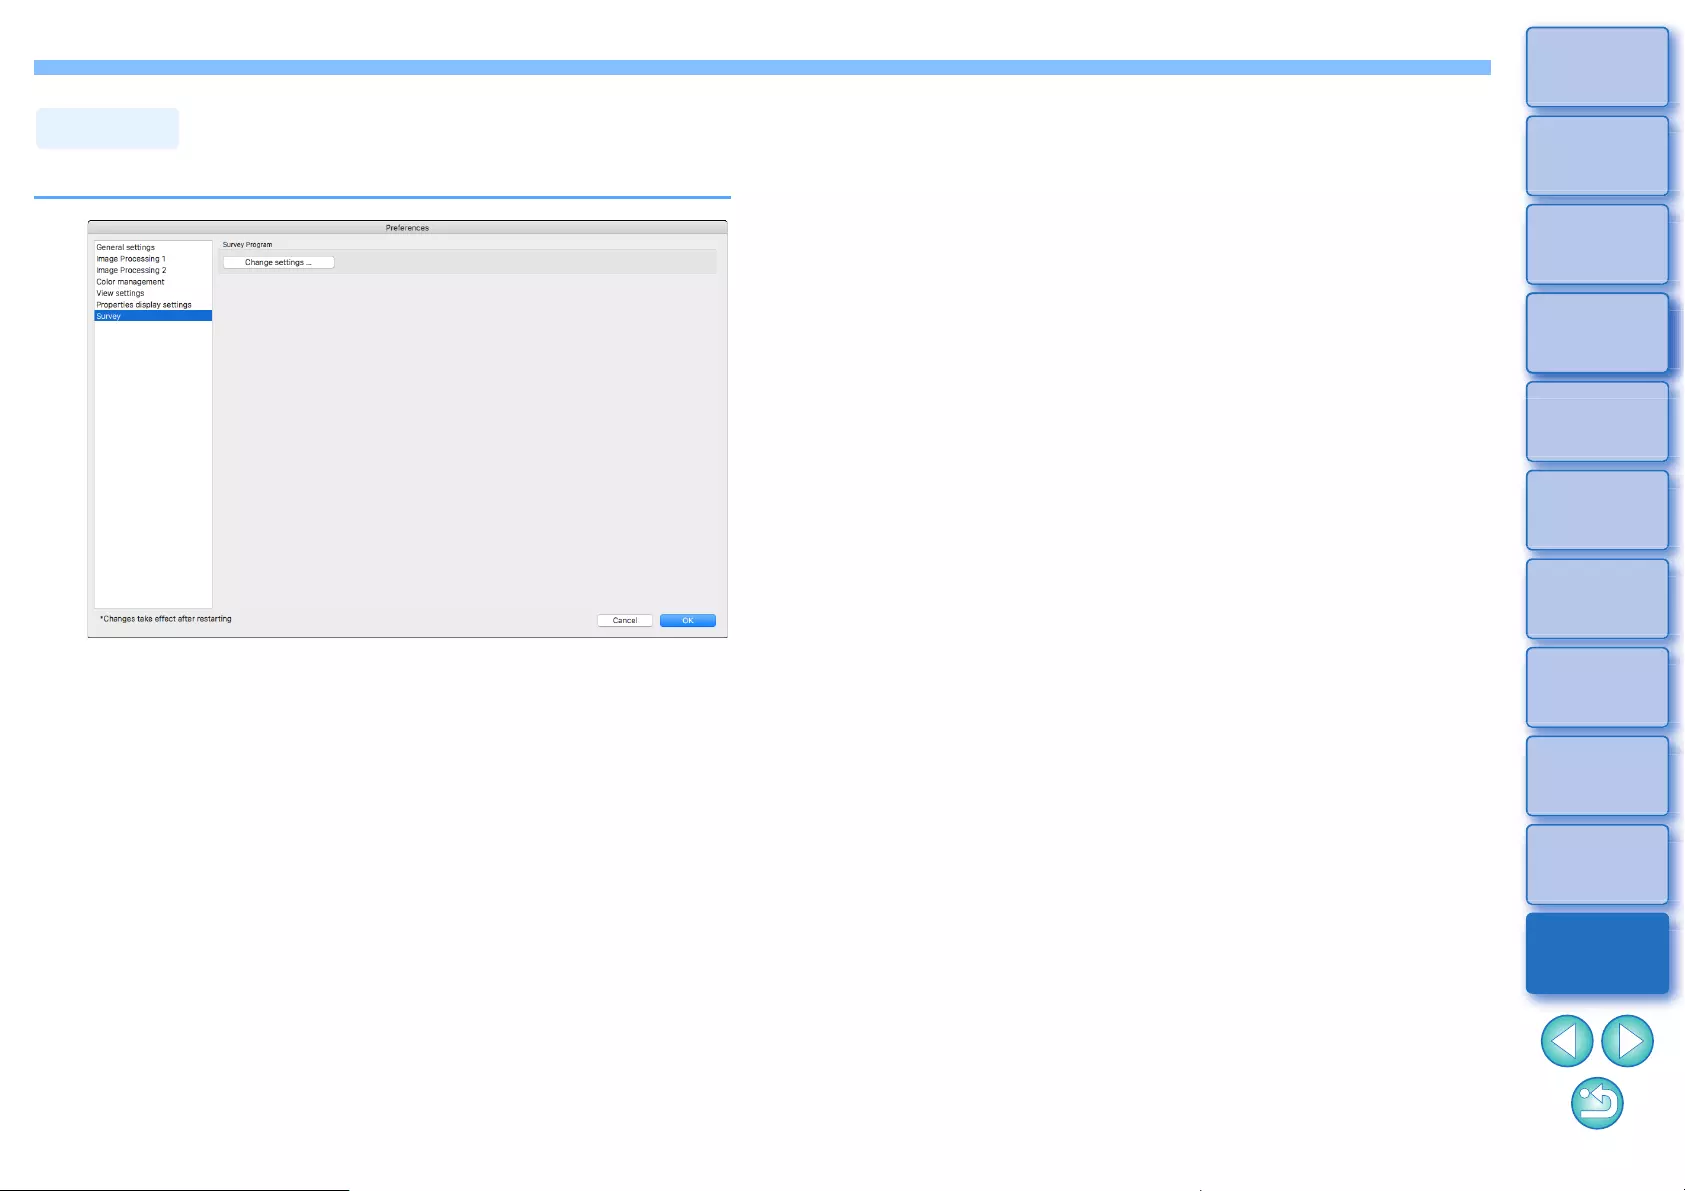
178
3
Sorting
Images
1
2
4
5
Downloading
Images
Viewing
Images
Printing
Images
Editing
Images
6
Processing
Large Numbers
of RAW Images
7
Remote
Shooting
10
HDR PQ
Mode
8
Playing Back
Movies and Saving
Still Photos
11
Specifying
Preferences
9
Handling
RAW Movies
You can change survey send settings.
lClick the [Change settings] button and change settings in the
dialog box that appears.
Survey

179
3
Sorting
Images
1
2
4
5
Downloading
Images
Viewing
Images
Printing
Images
Editing
Images
6
Processing
Large Numbers
of RAW Images
7
Remote
Shooting
10
HDR PQ
Mode
8
Playing Back
Movies and Saving
Still Photos
11
Specifying
Preferences
9
Handling
RAW Movies
Reference
Troubleshooting ..................................................... 180
Deleting the Software (Uninstalling)....................... 181
Image Frame Information in the Main Window
and Edit Image Window ......................................... 182
Glossary ................................................................. 183
Index ...................................................................... 185
About This Instruction Manual ............................. 189
Trademarks.......................................................... 189
180
3
Sorting
Images
1
2
4
5
Downloading
Images
Viewing
Images
Printing
Images
Editing
Images
6
Processing
Large Numbers
of RAW Images
7
Remote
Shooting
10
HDR PQ
Mode
8
Playing Back
Movies and Saving
Still Photos
11
Specifying
Preferences
9
Handling
RAW Movies
Troubleshooting
If DPP is not operating correctly, refer to the subjects below.
lYou cannot install software unless you are logged into an account with
Administrator privileges. Log in again into an account with
Administrator privileges. For how to log in and how to specify
Administrator settings, refer to the User’s Manual for the Macintosh
computer you are using or for OS.
lDPP does not operate correctly on a computer if its system
requirements are not met. Use DPP on a computer with compatible
system requirements (p.3).
lEven if your computer has the RAM capacity (memory) described in
the system requirements (p.3), if other applications are running at the
same time as DPP, you may not have sufficient RAM (memory). Quit
any applications other than DPP.
lDepending on the card reader and computer OS used, SDXC cards
may not be correctly detected. In such a case, connect your camera
and computer with the provided interface cable, and transfer the
images to your computer using EOS Utility.
lImages that are not supported by DPP are not displayed. (Thumbnail
images are displayed as [?].) There are various types of JPEG and
TIFF images, so JPEG images other than Exif 2.2, 2.21 or 2.3
compatible images and TIFF images other than Exif compatible
images may not to be displayed properly (p.4).
Installation can not be completed correctly
DPP does not work
The card reader does not detect the SD card
Images are not displayed properly
lSince recipes are not compatible between RAW images and JPEG or
TIFF images, neither can be applied to the other.
lIf a RAW image which has a color space other than sRGB is
converted and saved as a JPEG or TIFF image (p.91, p.175), the
colors will be subdued when viewed in software that is only
compatible with sRGB color space. In such a case, set the RAW
image’s color space to sRGB, convert and save again as a JPEG or
TIFF image, and then view the image.
lThe Auto Lighting Optimizer (p.58) is a function compatible with
cameras equipped with the Auto Lighting Optimizer.
Adjustments made with the Auto Lighting Optimizer cannot be applied
to RAW images shot with the cameras not compatible with this
function.
lIf the color of the monitor that displays an image is not adjusted
correctly, or if the profile for a printer that is to print image is not set
up, the color of the image displayed on screen and the color of the
printed photograph may differ greatly. If the color of the monitor that
displays images is corrected and the profile for a printer is set up
correctly (p.175), the color of a printed photograph and the color of an
image on screen can be more closely matched. Using a Canon printer
automatically sets up the profiles for the printer, so you only need to
set the color of the monitor to bring the colors closer to each other.
lIf a large number of images are printed in batches, printing may stop
in the middle or the images may not be printed. Reduce the number of
images to print or increase the memory on your computer.
A recipe could not be pasted (applied) to another image
Colors are subdued in the image when viewed with
other software
The colors of the image displayed on screen and
the colors of the printed image do not match
Printing a large number of images in batches
cannot be performed
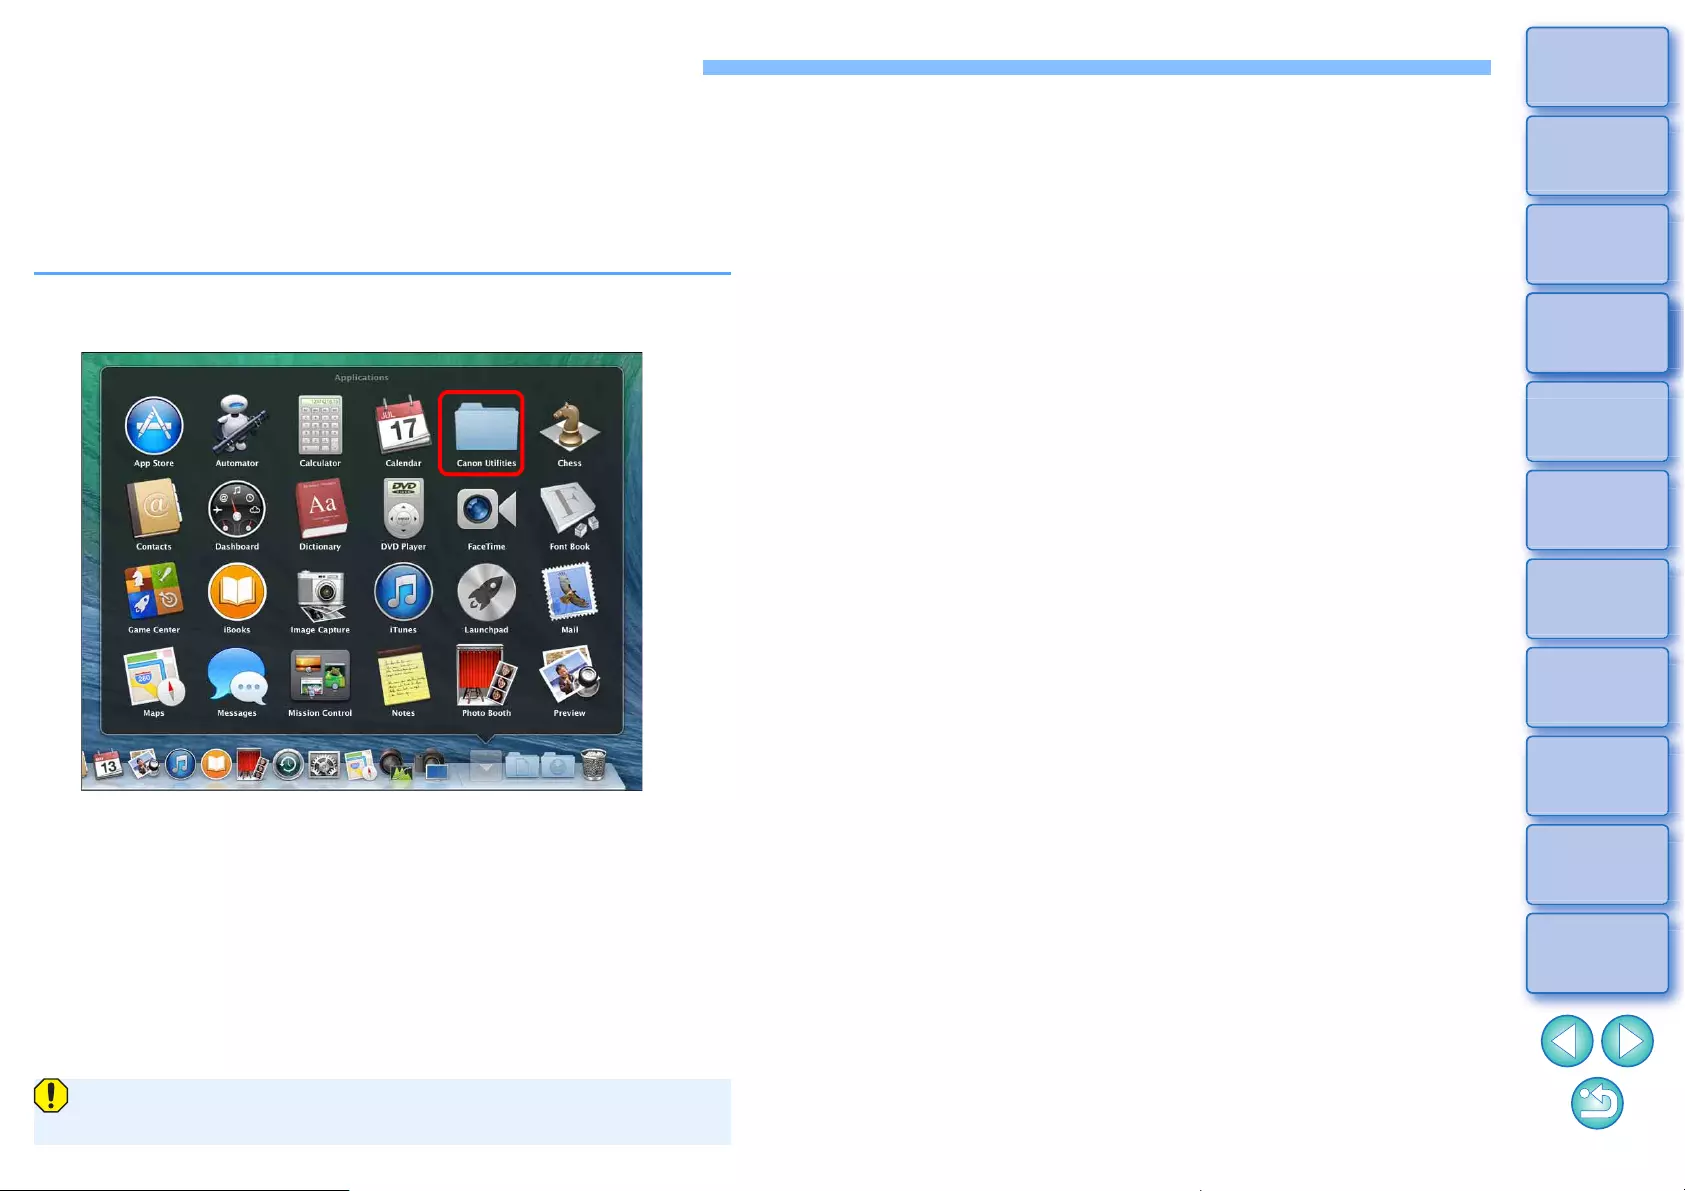
181
3
Sorting
Images
1
2
4
5
Downloading
Images
Viewing
Images
Printing
Images
Editing
Images
6
Processing
Large Numbers
of RAW Images
7
Remote
Shooting
10
HDR PQ
Mode
8
Playing Back
Movies and Saving
Still Photos
11
Specifying
Preferences
9
Handling
RAW Movies
Deleting the Software (Uninstalling)
lQuit any applications before uninstalling the software.
lLog into the account used when installation was performed.
lWhen you have moved the folders and the software to be deleted to
the Trash, select the [Finder] menu [Empty Trash] and empty the
Trash. You cannot reinstall the software until you have emptied the
Trash.
1Display the folder in which the software is saved.
lOpen the [Canon Utilities] folder.
2Drag the folder for the software to be uninstalled to
the Trash.
3Select the [Finder] menu on the desktop [Empty
Trash].
ÜThe software is deleted.
lWhen uninstallation ends, restart your computer.
You cannot retrieve data that you have emptied into the Trash and
deleted, so be particularly careful when deleting data.
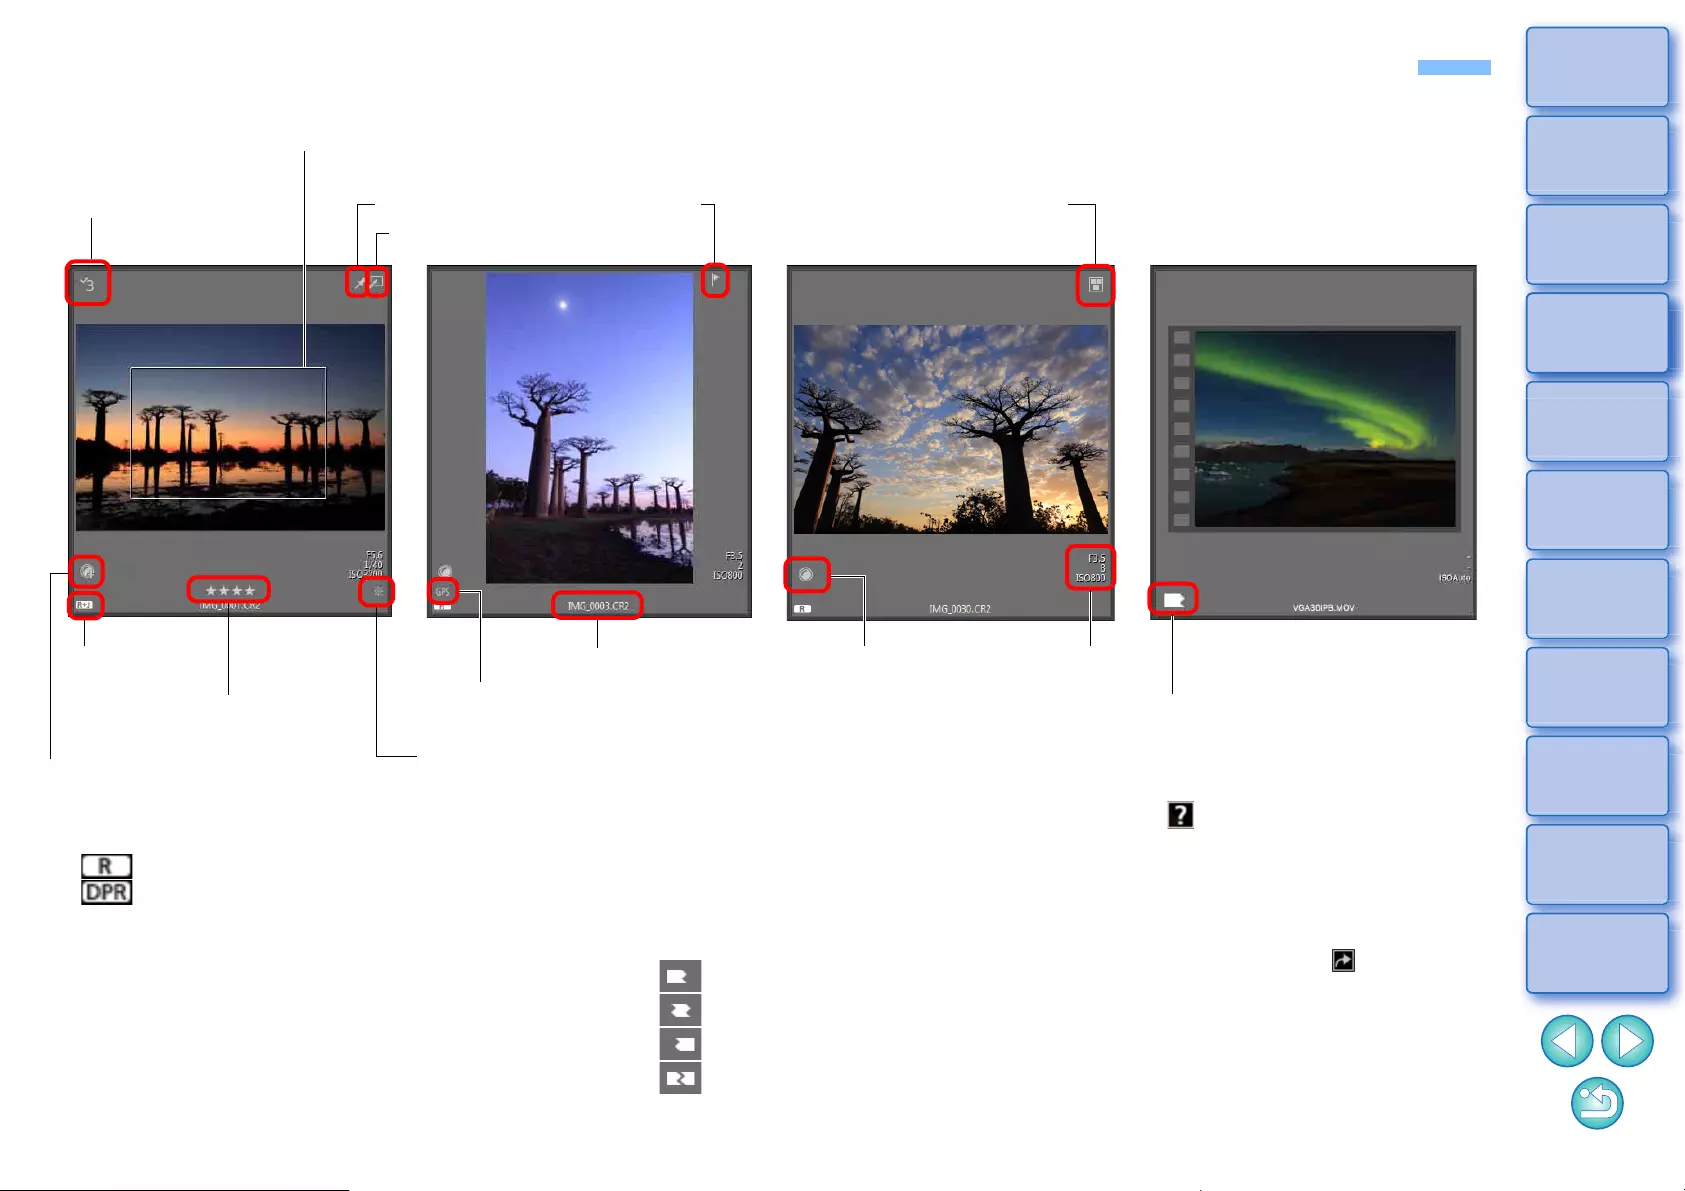
182
3
Sorting
Images
1
2
4
5
Downloading
Images
Viewing
Images
Printing
Images
Editing
Images
6
Processing
Large Numbers
of RAW Images
7
Remote
Shooting
10
HDR PQ
Mode
8
Playing Back
Movies and Saving
Still Photos
11
Specifying
Preferences
9
Handling
RAW Movies
Image Frame Information in the Main Window and Edit Image Window
Recipe mark
Trimming (cropping) range*2 (p.71)
Check mark
(p.33, p.34) Pinned image setting mark (p.21) Multiple image display mark
(p.22)
Image type*1 File name
Rating mark (p.33, p.34) GPS mark*3
Lens aberration
correction mark
(p.75)
Digital Lens Optimizer mark (p.79)
Unsaved editing content mark
*1Displayed on RAW+JPEG images displayed as a single
image (p.15).
[ ] is displayed in RAW images.
[ ] is displayed in Dual Pixel RAW images.
*2When aspect ratio information is attached to an image
shot with any supported camera other than the EOS 5D
Mark II, the image is displayed as a cropped image.
*3Displayed on images shot on a GPS function-
compatible Canon camera.
*4Shows that the movie is split and includes movies
other than that shown in the thumbnail.
The following icons may be displayed:
: No final movie
: No initial or final movie
: No initial movie
: All split movies present
[ ] is displayed in an image
frame when editing is not
possible.
Movies played back using
software other than DPP are
displayed with a [ ] icon in the
thumbnail image.
For information on icons
displayed in HDR PQ mode, see
“Displaying Images in HDR PQ
Mode” (p.166).
Shooting
information
Split movie mark*4
(p.13, p.102)

183
3
Sorting
Images
1
2
4
5
Downloading
Images
Viewing
Images
Printing
Images
Editing
Images
6
Processing
Large Numbers
of RAW Images
7
Remote
Shooting
10
HDR PQ
Mode
8
Playing Back
Movies and Saving
Still Photos
11
Specifying
Preferences
9
Handling
RAW Movies
Glossary
RAW image
EOS camera RAW images are recorded in an uncompressed 14bit or
12bit format.
Because RAW images are special images in an undeveloped status,
you need software with development processing functions such as DPP
in order to view them. The advantage of the undeveloped RAW images
is that you can make a variety of adjustments to RAW images with
almost no deterioration of the image.
* “RAW” meaning “in a natural condition” or “not processed or refined”.
JPEG image
The most ordinary image in non-reversible compressed 8bit format.
The advantage of this is that by saving at a high compression rate, the
file size can be small, even for image data that has a high pixel count.
Because during saving and compression part of the data is thinned out
to make the file size small, every time you edit or save, the image
deteriorates.
With DPP, even if you repeat editing/saving, only the recipe data is
modified, and no overwriting or compression occurs so the original
image data does not deteriorate.
* JPEG is an abbreviation of “Joint Photographic Experts Group”.
TIFF image
Bitmap-format image recorded in a 8bit/16bit uncompressed format.
Because TIFF images are in uncompressed format, they are suitable for
saving an image while maintaining the original high image quality.
* TIFF is an abbreviation of “Tagged Image File Format”.
Recipe
The “Image processing conditions information” for RAW images that can
be edited in DPP is called a “recipe”.
Further, in DPP, you can perform image editing on JPEG and TIFF
images that use “recipes” as with RAW images.
bit number
Binary unit of information volume in the color of an image. The number
shows the number of bits per pixel.
The larger the number of bits, the more the color numbers and the
gradation becomes smoother. A one-bit image is a black-and-white
image.
Color Management System (Color Matching)
Digital cameras that shoot images, monitors that display images, and
printers that print images each have a different way of creating color. For
this reason, there may be a difference between the color of an image
when viewed on a monitor and when printed.
A color management system is a system for managing color in order to
bring these colors closer together. With DPP, you can more closely
match color between different devices using ICC profiles between
different devices.
ICC profiles
ICC profiles are files containing color information such as color
characteristics and color space for various devices, set by the ICC
(International Color Consortium). Most devices such as the monitor we
use to view images or the printer we use to print images can be
managed (color management) using these ICC profiles and the color
between different devices can be more closely matched.
DPP has color management that uses these ICC profiles.
Tone Curve
A tone curve shows values before adjustment (input) as the horizontal
axis on a graph, and the values after adjustment (output) as the vertical
axis. Since the values of before adjustment and after adjustment are the
same before any adjustment is made, the tone curve displays as a
straight line from bottom left to top right, and by changing this tone
curve, you can adjust in detail the image’s brightness, contrast and
color. The more you go right on the horizontal axis, the more the plus
value it becomes, and the higher you go on the vertical axis, the more
the plus value it becomes.
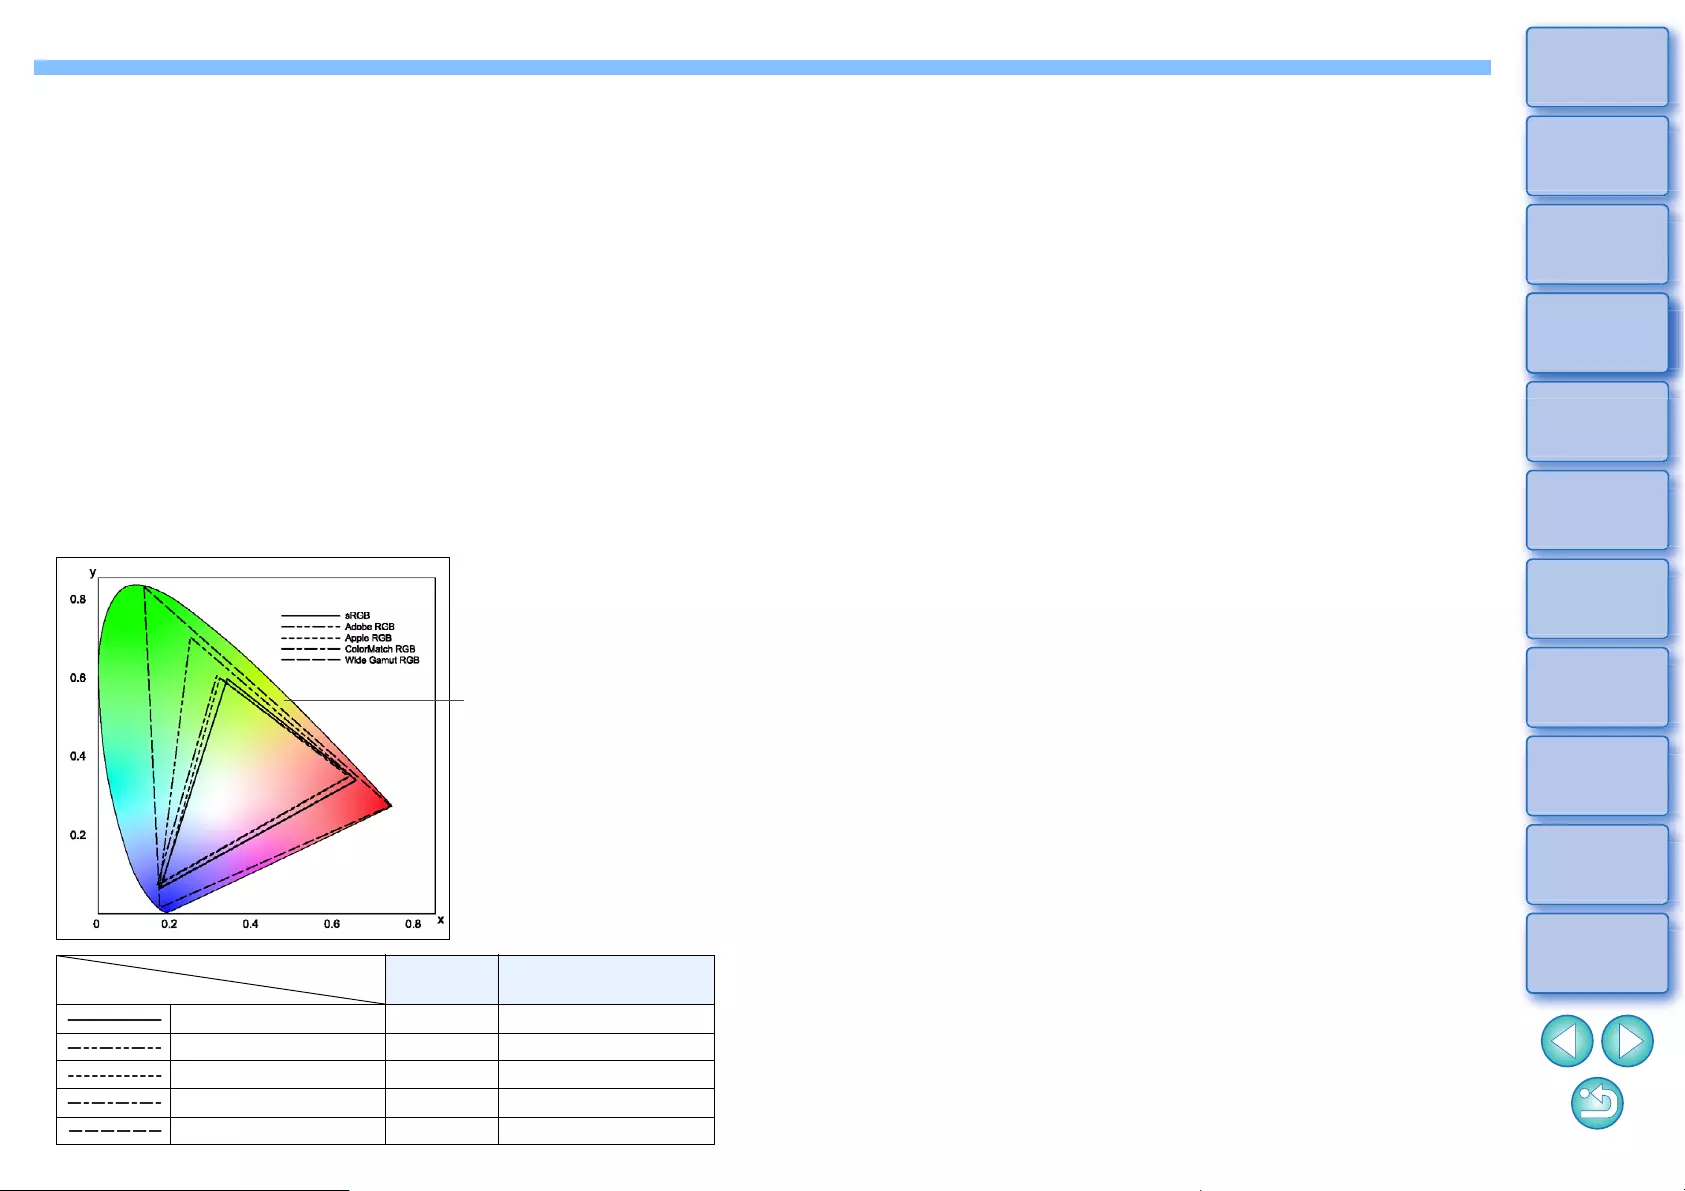
184
3
Sorting
Images
1
2
4
5
Downloading
Images
Viewing
Images
Printing
Images
Editing
Images
6
Processing
Large Numbers
of RAW Images
7
Remote
Shooting
10
HDR PQ
Mode
8
Playing Back
Movies and Saving
Still Photos
11
Specifying
Preferences
9
Handling
RAW Movies
Color space
A color space is the reproducible color range (color gamut
characteristics). DPP supports the following five kinds of color space.
sRGB : Standard color space for Windows. Widely used for
the standard color space of monitors, digital
cameras, and scanners.
Adobe RGB : A wider color space than sRGB. Mainly used for
printing for business purposes.
Apple RGB : Standard color space for Macintosh. A slightly
wider color space than sRGB.
ColorMatch RGB : A slightly wider color space than sRGB. Mainly
used for printing for business purposes.
Wide Gamut RGB : A wider color space than Adobe RGB.
Refer to the color chart below for the color area of each color space.
Color chart of color spaces compatible with DPP
Color range that can be
seen by the human eye
Gamma
value
White point
(color temp.)
sRGB 2.2 6500K(D65)
Adobe RGB 2.2 6500K(D65)
Apple RGB 1.8 6500K(D65)
ColorMatch RGB 1.8 5000K(D50)
Wide Gamut RGB 2.2 5000K(D50)
CMYK simulation profiles
A profile that simulates colors when printing in a CMYK environment
(printing machine, etc.). With DPP, you can simulate color with four
types of profile.
Euro Standard : Profile normally used for book printing in
Europe, suitable for simulation of standard
European printing.
JMPA : Profile normally used for book printing, etc. in
Japan, suitable for simulation of magazine
advertising standard color printing.
U.S.Web Coated : Profile normally used for book printing in
North America, suitable for simulation of
North American standard printing.
JapanColor2001 type3 : Profile becoming a standard in the Japanese
printing industry, suitable for simulation of
JapanColor standard printing.
Rendering intent
Rendering intents are color conversion methods when printing an image.
The conversion method of each rendering intent is shown below.
Perceptual : Before and after conversion, all colors are
converted to maintain the relationship between
colors. Even where colors slightly change, you
can print a natural-looking image which has
maintained color harmony. However,
depending on the image, the saturation may
change overall.
Relative Colorimetric : There will not be much conversion to colors
which are similar before and after conversion,
but colors which are not similar are converted
appropriately. Because there are little changes
to similar colors which comprise most of an
image, you can print a natural-looking image in
which the saturation has not changed greatly.
However, depending on the image, there are
cases where the overall tone of an image
changes somewhat as colors which are not
similar and highlights change.
185
3
Sorting
Images
1
2
4
5
Downloading
Images
Viewing
Images
Printing
Images
Editing
Images
6
Processing
Large Numbers
of RAW Images
7
Remote
Shooting
10
HDR PQ
Mode
8
Playing Back
Movies and Saving
Still Photos
11
Specifying
Preferences
9
Handling
RAW Movies
A
Adjust Face Lighting ........................................................................... 59
Adjust JPEG Images........................................................................... 45
Adjust TIFF Images............................................................................. 45
Adjusting
Adjustment Contents (Recipe) ................................................... 100
Apply Adjustments........................................................................ 99
Automatic Adjustment (Gradation, Luminance)............................ 57
Brightness .............................................................................. 48, 62
Brightness of Highlights................................................................ 54
Brightness of Shadows................................................................. 54
Click White Balance ............................................................... 52, 63
Color Saturation ........................................................................... 55
Color Temperature ....................................................................... 53
Color Tone.................................................................................... 55
Contrast.................................................................................. 54, 62
Copy Adjustments ........................................................................ 99
Dynamic Range...................................................................... 56, 66
Filter Effect ................................................................................... 56
Hue......................................................................................... 67, 68
Monochrome .......................................................................... 55, 68
Personal White Balance ............................................................. 137
Picture Style File .......................................................................... 51
Saturation ............................................................................... 67, 68
Save Adjustments ........................................................................ 99
Sharpness .................................................................................... 59
Tone Curve Adjustment................................................................ 64
Toning Effect .......................................................................... 55, 56
White Balance .............................................................................. 51
Adjusting Brightness ........................................................................... 48
Adjusting Clarity.................................................................................. 61
Adjusting Tone Curve ......................................................................... 64
Adjustment Contents (Recipe).................................................... 98, 183
Adobe RGB....................................................................................... 184
AF Points ............................................................................................ 22
Apple RGB........................................................................................ 184
Arrange Images .................................................................................. 36
Auto Lighting Optimizer....................................................................... 58
Automatic Adjustment (Gradation, Luminance) .................................. 57
Automatic Dust Erasure Processing.................................................... 87
B
Basic Adjustment Tool Palette............................................................. 48
Batch Apply White Balance to Images (Personal White Balance)..... 137
Batch Change the File Name of Images............................................ 142
Batch Convert/Save Images (Batch Process) ................................... 139
Batch Process (Batch Save JPEG and TIFF Images)....................... 139
Batch Process of Multiple Images
Change File Name ...................................................................... 142
Convert/Save (Batch Process).................................................... 139
Personal White Balance.............................................................. 137
Recipe Data .................................................................................. 98
Transfer....................................................................................... 141
Batch Settings Window.............................................................. 139, 141
Batch Transfer Images ...................................................................... 141
Batch Transfer Images to Image Editing Software ............................ 141
Before/After Comparison Display ........................................................ 24
bit Number......................................................................................... 183
Bookmark ............................................................................................ 40
Brightness............................................................................................ 62
C
Change File Name............................................................................. 142
Change the Display ............................................................................. 14
Changing the File Name of Images in the Order in the Main
Window.............................................................................................. 142
Check Mark ........................................................................... 33, 34, 182
Chromatic Aberration Correction ......................................................... 75
Chrominance Noise Reduction............................................................ 69
Click White Balance............................................................... 52, 63, 147
CMYK Simulation .............................................................................. 184
Collection Window ............................................................................. 104
Color Blur Correction ........................................................................... 75
Color Chart ........................................................................................ 184
Color Management (Color Matching) ................................................ 183
Color Space ................................................................................ 184
Index

186
3
Sorting
Images
1
2
4
5
Downloading
Images
Viewing
Images
Printing
Images
Editing
Images
6
Processing
Large Numbers
of RAW Images
7
Remote
Shooting
10
HDR PQ
Mode
8
Playing Back
Movies and Saving
Still Photos
11
Specifying
Preferences
9
Handling
RAW Movies
ICC Profiles ................................................................................ 183
Color Management (Preferences)..................................................... 175
Color saturation................................................................................... 55
Color Setting of the Monitor (Profiles)............................................... 175
Color Setting of the Printer (Profiles) ................................................ 175
Color Space ...................................................................................... 184
Adobe RGB ................................................................................ 184
Apple RGB ................................................................................. 184
Color Space Setting for Each Image ............................................ 91
ColorMatch RGB ........................................................................ 184
sRGB.......................................................................................... 184
Wide Gamut RGB....................................................................... 184
Color Space Setting for Each Image................................................... 91
Color Temperature.............................................................................. 53
Color Tone .......................................................................................... 55
ColorMatch RGB............................................................................... 184
Compositing Images ......................................................................... 106
Contrast ........................................................................................ 54, 62
Convert One Image............................................................................. 95
Convert to JPEG or TIFF Image and Save................................. 95, 139
Copy Stamp (Image Correction) ......................................................... 90
Copying and Pasting (Applying) Recipes............................................ 99
Correct Images (Copy Stamp Function) ............................................. 90
Cropping ............................................................................................. 71
Customize toolbar ............................................................................. 127
D
Default Color Space Setting.............................................................. 175
Delete Images..................................................................................... 39
Deleting
Delete Images .............................................................................. 39
Delete the Software.................................................................... 181
Deleting DPP (Uninstalling) .............................................................. 181
Depth compositing ............................................................................ 117
Detailed Setting Printing (Printing with Shooting Information) .......... 133
Digital Lens Optimizer......................................................................... 78
Digital Lens Optimizer mark.............................................................. 182
Display
Before/After Comparison Display.................................................. 24
Enlarged Display (Preview Window)............................................. 18
Enlarged Display (Quick Check Window) ..................................... 31
Multi-Function Preview.................................................................. 25
Single Image Display .................................................................... 37
Synchronize Preview Window..................................................... 101
Thumbnail Display (Main Window)................................................ 13
Thumbnail Display and Enlarged Display
(Edit Image Window)................................................................... 102
Displaying Image Properties................................................................ 24
Displaying Shooting Information.......................................................... 24
Distortion Correction............................................................................ 75
Downloading an Image to Your Computer .......................................... 11
Downloading Images from a Camera ........................................... 11
Downloading Images from a Card Reader.................................... 11
Downloading Images........................................................................... 11
Downloading Images from a Camera .................................................. 11
Dual Pixel RAW Optimizer................................................................. 113
Dust Delete Data ........................................................................... 86, 87
Dust Delete/Copy Stamp Tool Palette................................................. 86
Dust Erasure Processing
Automatic Dust Erasure Processing ............................................. 86
Dust Delete/Copy Stamp Tool Palette .......................................... 86
Image Correction (Copy Stamp Function) .................................... 90
Manual Dust Erasure (Repair Function) ....................................... 88
Dynamic Range ............................................................................. 56, 66
E
Edit Image Window............................................................................ 102
Editing................................................................................................ 185
Enlarged Display (Preview Window) ................................................... 18
EOS Utility ........................................................................................... 11
F
Filter Effect .......................................................................................... 56
G
General Settings (Preferences) ......................................................... 172
Adjusting

187
3
Sorting
Images
1
2
4
5
Downloading
Images
Viewing
Images
Printing
Images
Editing
Images
6
Processing
Large Numbers
of RAW Images
7
Remote
Shooting
10
HDR PQ
Mode
8
Playing Back
Movies and Saving
Still Photos
11
Specifying
Preferences
9
Handling
RAW Movies
GPS mark ......................................................................................... 182
Grid Lines............................................................................................ 22
H
HDR (High Dynamic Range) Images................................................ 110
HDR PQ Mode .................................................................................. 164
Highlight Area Warning Indicator ........................................................ 23
Histogram Palette ............................................................................... 17
Hue ......................................................................................... 46, 67, 68
I
ICC Profiles....................................................................................... 183
Image Information............................................................................... 38
Image Marks (Image Frame Information) ......................................... 182
Image processing (Preferences)....................................................... 173
Image Quality
Noise Reduction ........................................................................... 69
J
JPEG Image................................................................................ 45, 183
L
Lens Aberration Correction ................................................................. 74
Lens aberration correction mark ....................................................... 182
Linear.................................................................................................. 57
Loading and Pasting (Applying) Recipes.......................................... 100
Luminance Noise Reduction............................................................... 69
M
Main Window ...................................................................................... 13
Main Window (Multi-layout)................................................................. 20
Main Window (Thumbnail Layout) ...................................................... 13
Manual Dust Erasure (Repair Function) ............................................. 88
Monochrome ....................................................................................... 55
Filter Effect ................................................................................... 56
Toning effect................................................................................. 56
Move or Copy Folders......................................................................... 40
Move or Copy Images......................................................................... 39
Movies
Play Back .................................................................................... 150
Save Still Photos......................................................................... 150
Split movie mark ......................................................................... 182
Multi-Function Preview ........................................................................ 25
Multi-layout .......................................................................................... 20
Multiple image display mark .............................................................. 182
N
Navigator Palette ................................................................................. 19
Noise Reduction .................................................................................. 69
O
Organize Images ................................................................................. 39
Organizing Images .............................................................................. 39
Delete Images............................................................................... 39
Move or Copy Folders................................................................... 40
Move or Copy Images................................................................... 39
Register Folders as Bookmarks.................................................... 40
P
Palettes
Display Method of Palettes ........................................................... 28
Rearranging Palettes .................................................................... 28
Perceptual ......................................................................................... 184
Peripheral Illumination Correction ....................................................... 75
Personal White Balance .................................................................... 137
Picture Style ........................................................................................ 49
Picture Style File.................................................................................. 51
Pin ....................................................................................................... 21
Pinned image setting mark ................................................................ 182
Preferences ....................................................................................... 172
Color Management ..................................................................... 175
General Settings ......................................................................... 172
Image processing........................................................................ 173
Properties Display Settings......................................................... 177
Survey......................................................................................... 178
View Settings .............................................................................. 176
Preview Control Panel ......................................................................... 21
Preview Display Area .......................................................................... 20

188
3
Sorting
Images
1
2
4
5
Downloading
Images
Viewing
Images
Printing
Images
Editing
Images
6
Processing
Large Numbers
of RAW Images
7
Remote
Shooting
10
HDR PQ
Mode
8
Playing Back
Movies and Saving
Still Photos
11
Specifying
Preferences
9
Handling
RAW Movies
Preview Window ................................................................................. 18
Printing
Printing a Thumbnail List (Contact Sheet Printing) .................... 134
Printing One Sheet of Paper ...................................................... 132
Printing with Shooting Information (Detailed Setting Printing).... 133
Printing One Sheet of Paper............................................................. 132
Printing with Shooting Information (Detailed Setting Printing) .......... 133
Properties Display Settings (Preferences) ........................................ 177
Q
Quick Check Window.......................................................................... 31
Quitting DPP ....................................................................................... 29
R
Rating............................................................................................ 33, 34
Rating mark....................................................................................... 182
RAW Burst Image Tool ..................................................................... 122
RAW Image................................................................................. 44, 183
RAW Movies ..................................................................................... 153
Changing the Image Displayed for a RAW Movie ...................... 154
Editing a RAW Movie ................................................................. 161
Grabbing and Saving a Displayed RAW Movie Image............... 155
Grabbing and Saving any Range from a RAW Movie ................ 161
Playing Back RAW Movies......................................................... 159
Saving any Range of a RAW Movie as Still Photos ................... 160
Saving Several Still Photos from a RAW Movie ......................... 155
Starting Up the RAW Movie Tool ............................................... 157
Supported Cameras ................................................................... 154
Re-Adjusting an Image ....................................................................... 97
Recipe......................................................................................... 98, 183
Recipe File .......................................................................................... 98
Re-Editing an Image ........................................................................... 97
Registering Folders as Bookmarks..................................................... 40
Remote Shooting ...................................................................... 144, 154
Rename Window............................................................................... 142
Rendering Intent (Matching Method) ................................................ 184
Repair (Manual Dust Erasure) ............................................................ 88
Roll.................................................................................................... 122
Rotate Images ..................................................................................... 13
S
Saturation ................................................................................ 46, 67, 68
Save
Batch Convert/Save Images (Batch Process)............................. 139
Save.............................................................................................. 95
Save As......................................................................................... 95
Save As ............................................................................................... 95
Saving Recipes.................................................................................... 99
Second Windows................................................................................. 26
Select Images........................................................................ 13, 31, 102
Shadow Area Warning Indicator.......................................................... 23
Sharpness ..................................................................................... 59, 81
Shooting Information Display......................................................... 24, 38
Single Image Display........................................................................... 37
Single Image Display of RAW and JPEG Image ................................. 37
Soft-Proof Colors Function .................................................................. 92
Sorting Images
Check marks ........................................................................... 33, 34
Ratings.................................................................................... 33, 34
sRGB ................................................................................................. 184
Starting up DPP................................................................................... 10
Supported Images ................................................................................. 4
Survey (Preferences)......................................................................... 178
Synchronization (Preview Window) ................................................... 101
Synchronize Images .......................................................................... 101
Synchronize Preview Window ........................................................... 101
System Requirements ........................................................................... 3
T
Thumbnail Display (Filter/Sort Function) ............................................. 16
Thumbnail Display (Main Window) ...................................................... 13
Change the Display....................................................................... 14
Thumbnail Display (Multi-layout) ......................................................... 20
Thumbnail Display and Enlarged Display (Edit Image Window) ....... 102
Thumbnail Display Area ...................................................................... 20

189
3
Sorting
Images
1
2
4
5
Downloading
Images
Viewing
Images
Printing
Images
Editing
Images
6
Processing
Large Numbers
of RAW Images
7
Remote
Shooting
10
HDR PQ
Mode
8
Playing Back
Movies and Saving
Still Photos
11
Specifying
Preferences
9
Handling
RAW Movies
Thumbnail Layout ............................................................................... 13
Thumbnails Control Panel................................................................... 15
TIFF Image ................................................................................. 45, 183
Tone Curve ....................................................................................... 183
Toning effect ....................................................................................... 56
Tool Palette......................................................................................... 46
Basic Adjustment Tool Palette ..................................................... 48
Color Adjustment Tool Palette...................................................... 67
Detailed Adjustment Tool Palette ................................................. 69
Dust Delete/Copy Stamp Tool Palette.......................................... 86
Lens Correction Tool Palette........................................................ 74
Partial Adjustment tool palette...................................................... 82
Settings Tool Palette .................................................................... 91
Tone Adjustment Tool Palette ...................................................... 62
Trimming/Angle Adjustment Tool Palette ..................................... 71
Toolbar................................................................................................ 13
Transfer
Batch Transfer Images to Image Editing Software..................... 141
Transfer an Image to Photoshop................................................ 126
Transfer an Image to Photoshop ...................................................... 126
Trimming (cropping) range................................................................ 182
Trimming/Angle Adjustment Tool Palette............................................ 71
Trimming/Angle Adjustment Window .................................................. 71
U
Unsaved editing content mark .......................................................... 182
Unsharp Mask..................................................................................... 60
Using Cloud Processing.................................................................... 128
V
View Settings (Preferences) ............................................................. 176
Viewing Images in the Main Window (Thumbnail Layout) .................. 13
W
White Balance..................................................................................... 51
Click White Balance ............................................................... 52, 63
Color Temperature ....................................................................... 53
Personal White Balance ............................................................. 137
Wide Gamut RGB ............................................................................. 184
Work Color Space ............................................................................... 91
Color Management ..................................................................... 175
About This Instruction Manual
lIt is prohibited to reproduce, in whole or part, the contents of this
Instruction Manual without permission.
lCanon may change without notice the software specifications and
contents of this Instruction Manual.
lThe software screens and displays printed in this Instruction Manual
may differ slightly from the actual software.
lPlease note that irrespective of the above-mentioned, Canon does
not take responsibility for the outcome of the operation of the
software.
Trademarks
lMacintosh and Mac OS are trademarks of Apple Inc., registered in the
U.S. and other countries.
lAdobe and Photoshop are registered trademarks or trademarks of
Adobe Systems Incorporated in the United States and/or other
countries.
lAll other trademarks are the property of their respective owners.