Intellinet High-Power Ceiling Mount Wireless AC1200 Dual-Band Gigabit PoE User Manual
Displayed below is the user manual for High-Power Ceiling Mount Wireless AC1200 Dual-Band Gigabit PoE by Intellinet which is a product in the Wireless Access Points category. This manual has pages.
Related Manuals

HIGH‐POWERCEILINGMOUNTWIRELESSAC1200
DUAL‐BANDGIGABITPOEACCESSPOINT
USERMANUAL
MODEL525688
EW‐
7679WAUserManual
05‐2014/v1.
INT‐525688‐UM‐0415‐01

CONTENTS
I.ProductInformation...............................................................................1
I‐1.PackageContents..........................................................................................................1
I‐2.SystemRequirements....................................................................................................2
I‐3.HardwareOverview.......................................................................................................2
I‐4.Reset..............................................................................................................................3
I‐5.SafetyInformation.........................................................................................................4
II.QuickSetup............................................................................................5
II‐1.InitialSetup....................................................................................................................5
II‐2.BasicSettings.................................................................................................................7
III.HardwareInstallation...........................................................................11
III‐1.ConnectingtheaccesspointtoarouterorPoEswitch...............................................11
III‐2.Mountingtheaccesspointtoaceiling........................................................................12
III‐3.T‐RailMount................................................................................................................15
IV.Browser‐BasedConfigurationInterface................................................17
IV‐1.Information..................................................................................................................19
IV‐1‐1.SystemInformation.....................................................................................................19
IV‐1‐2.WirelessClients............................................................................................................23
IV‐1‐3.WirelessMonitor.........................................................................................................24
IV‐1‐4.Log................................................................................................................................26
IV‐2.NetworkSettings.........................................................................................................28
IV‐2‐1.LAN‐SideIPAddress.....................................................................................................28
IV‐2‐2.LANPort.......................................................................................................................30
IV‐2‐3.VLAN............................................................................................................................31
IV‐3.WirelessSettings..........................................................................................................32
IV‐3‐1.2.4GHz11bgn...............................................................................................................32
IV‐3‐2.5GHz11ac11an...........................................................................................................44
IV‐3‐3.WPS..............................................................................................................................52
IV‐3‐4.RADIUS.........................................................................................................................54
IV‐3‐5.MACFilter....................................................................................................................59
IV‐3‐6.WMM...........................................................................................................................61
IV‐4.Management...............................................................................................................63
IV‐4‐1.Admin...........................................................................................................................63
IV‐4‐2.DateandTime..............................................................................................................66
IV‐4‐3.SyslogServer................................................................................................................68
IV‐4‐4.I’mhere!......................................................................................................................69
IV‐5.Advanced.....................................................................................................................70

IV‐5‐1.LEDSettings.................................................................................................................70
IV‐5‐2.UpdateFirmware.........................................................................................................71
IV‐5‐3.Save/RestoreSettings..................................................................................................72
IV‐5‐4.FactoryDefault............................................................................................................74
IV‐5‐5.Reboot..........................................................................................................................75
V.Appendix..............................................................................................76
V‐1.ConfiguringyourIPaddress.........................................................................................76
V‐1‐1.WindowsXP.................................................................................................................77
V‐1‐2.WindowsVista.............................................................................................................79
V‐1‐3.Windows7...................................................................................................................81
V‐1‐4.Windows8...................................................................................................................85
V‐1‐5.Mac..............................................................................................................................89
V‐1‐6.Glossary........................................................................................................................91
V‐2.HardwareSpecifications..............................................................................................94
V‐3.Enviornmental&Physical............................................................................................94

1
I. ProductInformation
I‐1.PackageContents
1. AccessPoint
2. CeilingMountBracket
3. T‐RailMountingKit&
Screws
4. QuickInstallationGuide
5. PowerAdapter
5
23

2
I‐2.SystemRequirements
‐ Existingcable/DSLmodem&router
‐ ComputerwithWebbrowserforaccesspointconfiguration
I‐3.HardwareOverview
I‐4.LEDStatus
LEDColorLEDStatus Description
Blue
OnTheaccesspointison.
Amber
FlashingError.
Of
f
OffTheaccesspointisoff.
EthernetPortPower Jack(DCIN)

3
I‐4.Reset
Ifyouexperienceproblemswithyouraccesspoint,youcanresetthedevice
backtoitsfactorysettings.Thisresetsallsettingsbacktodefault.
1.
PressandholdtheResetbuttonontheaccesspointforatleast10
seconds,thenreleasethebutton.
Youmayneedtouseapinorsimilarsharpobjecttopushthe
resetbutton.
2.
Waitfortheaccesspointtorestart.Theaccesspointisreadyforsetup
whentheLEDisPurple.

4
I‐5.SafetyInformation
Inordertoensurethesafeoperationofthedeviceanditsusers,readandact
inaccordancewiththefollowingsafetyinstructions.
1.Theaccesspointisdesignedforindooruseonly;donotplacetheaccess
pointoutdoors.
2.Donotplacetheaccesspointinornearhot/humidplaces,suchasakitchen
orbathroom.
3.Donotpullanyconnectedcablewithforce;carefullydisconnectitfromthe
accesspoint.
4.Handletheaccesspointwithcare.Accidentaldamagewillvoidthe
warrantyoftheaccesspoint.
5.Thedevicecontainssmallpartswhichareadangertosmallchildrenunder
3yearsofage.Pleasekeeptheaccesspointoutofreachofchildren.
6.Donotplacetheaccesspointonpaper,clothorotherflammablematerials.
Theaccesspointmaybecomehotduringuse.
7.Therearenouser‐serviceablepartsinsidetheaccesspoint.Ifyou
experienceproblemswiththeaccesspoint,contactyourdealerofpurchase
andaskforhelp.
8.Theaccesspointisanelectricaldeviceandassuch,ifitbecomeswetfor
anyreason,donotattempttotouchitwithoutswitchingthepowersupply
off.Contactanexperiencedelectricaltechnicianforfurtherhelp.
9.Ifyousmellsomethingburningorseesmokecomingfromtheaccesspoint
orpoweradapter,disconnecttheaccesspointandpoweradapter
immediately,asmuchasitissafelypossibletodoso.Callyourdealerof
purchaseforhelp.
5
II. QuickSetup
Youraccesspointcanbeupandrunninginjustafewminutes.Thisquick
installationguidewillhelpyousetupyouraccesspointanddirectyoutothe
initialsettingsscreens.Followtheinstructionsinthechaptersbelow.
II‐1.InitialSetup
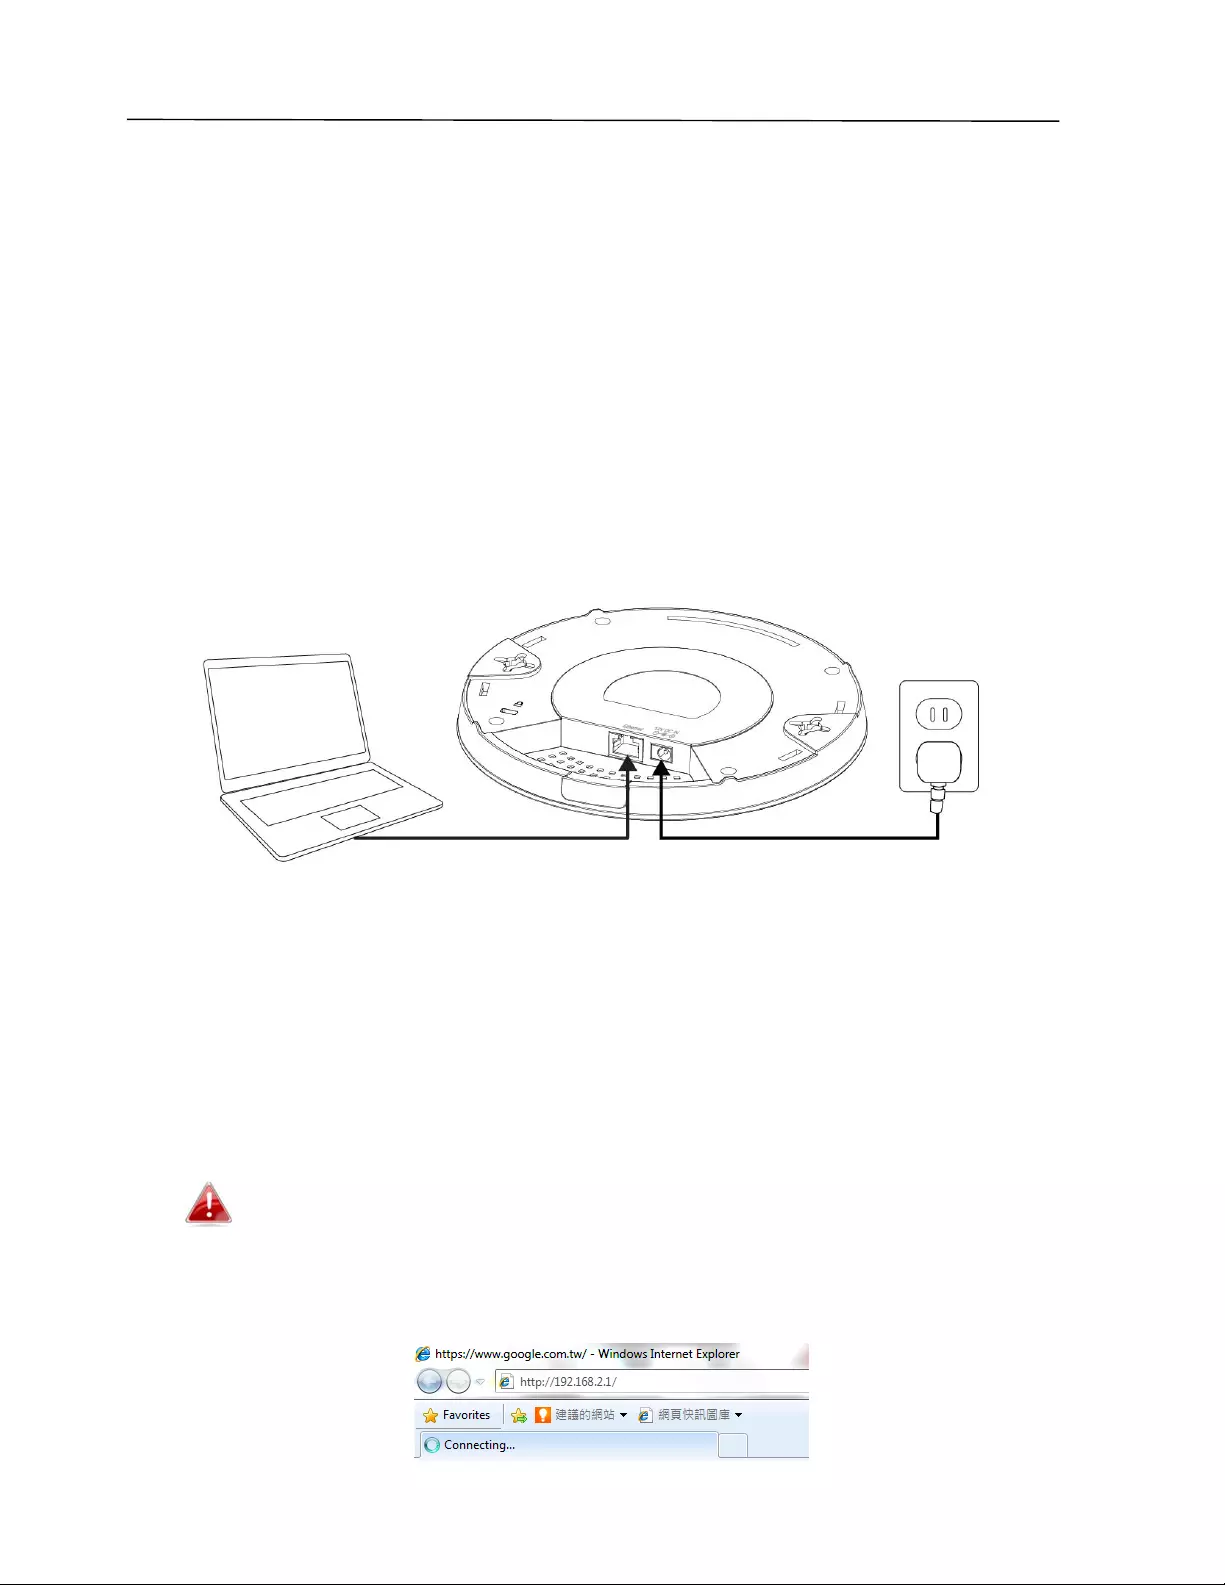
1.
ConnecttheaccesspointtoacomputerviaEthernetcable.
2.
Connectthepoweradaptertotheaccesspoint’s12VDCportandplugthe
poweradapterintoapowersupplyusingtheincludedcable.
3.
Waitamomentfortheaccesspointtostartup.Theaccesspointisready
whentheLEDisPurple.
4.
Setyourcomputer’sIPaddressto192.168.2.xwherexisanumberinthe
range3–100.Ifyouareunsurehowtodothis,refertoSectionII‐2Basic
Settings.
Ensuretherearenootheractivenetworkconnectionsonyour
computer(disconnectWi‐FiconnectionsandEthernetcables).
5.
Entertheaccesspoint’sdefaultIPaddress192.168.2.1intotheURLbarof
aWebbrowser.

6
6.
Youwillbepromptedforausernameandpassword.Enterthedefault
username“admin”andthedefaultpassword“1234.”
7.
YouwillarriveattheSystemInformationscreenshownbelow.
8.
Next,followtheinstructionsbelowinII‐2.BasicSettingstoconfigurethe
accesspoint’sbasicsettings.
Formoreadvancedconfigurations,refertoIV.BrowserBased
ConfigurationInterface.

7
II‐2.BasicSettings
Theinstructionsbelowwillhelpyoutoconfigurethesebasicsettingsofthe
accesspoint:
‐ LANIPAddress
‐ 2.4GHz&5GHzSSID&Security
‐ AdministratorName&Password
‐ Time&Date
Itisrecommendedthatyouconfigurethesesettingsbeforeusing
theaccesspoint.
1.
Tochangetheaccesspoint’sLANIPaddress,goto“NetworkSettings”>
“LAN‐sideIPAddress”andyouwillseethescreenbelow.
2.
EntertheIPaddresssettingsyouwishtouseforyouraccesspoint.You
canuseadynamic(DHCP)orstaticIPaddress,dependingonyournetwork
environment.Click“Apply”tosavethechangesandwaitafewmoments
fortheaccesspointtoreload.
Whenyouchangeyouraccesspoint’sIPaddress,youneedtouse
thenewIPaddresstoaccessthebrowser‐basedconfiguration
interfaceinsteadofthedefaultIP
192.168.2.1.
8
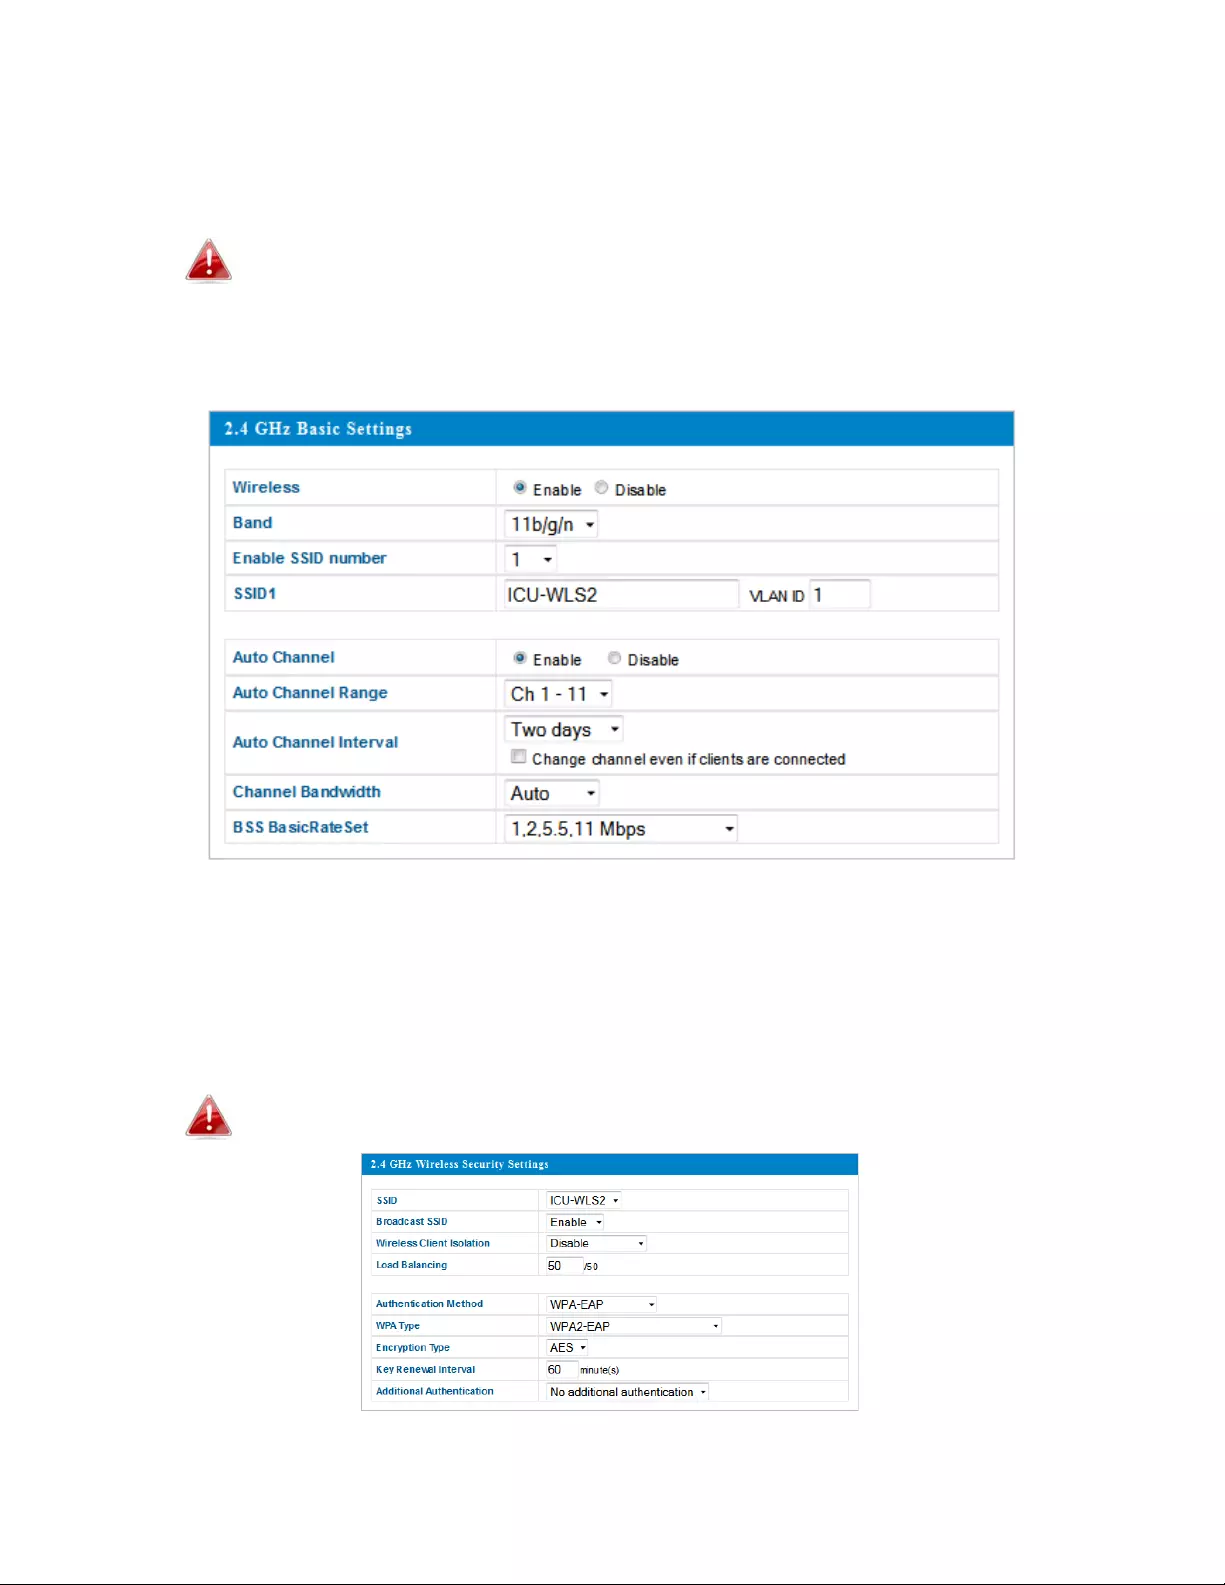
3.
TochangetheSSIDofyouraccesspoint’s2.4GHzwirelessnetwork(s),go
to“WirelessSettings”>“2.4GHz11bgn”>“Basic.”EnterthenewSSIDfor
your2.4GHzwirelessnetworkinthe“SSID1”fieldandclick“Apply.”
Toutilizemultiple2.4GHzSSIDs,openthedrop‐downmenu
labeled“EnableSSIDnumber”andselecthowmanySSIDsyou
require.ThenenteranewSSIDinthecorrespondingnumbered
fieldsbelowandclick“Apply.”
4.
Toconfigurethesecurityofyouraccesspoint’s2.4GHzwireless
network(s),goto“WirelessSetting”>“2.4GHz11bgn”>“Security.”Select
an“AuthenticationMethod”andentera“Pre‐sharedKey”or“Encryption
Key”dependingonyourpreference,thenclick“Apply.”
IfusingmultipleSSIDs,specifywhichSSIDtoconfigureusingthe
“SSID”drop‐downmenu.

9
5. Goto“WirelessSetting”>“5GHz11ac11an”andrepeatsteps3&4for
theaccesspoint’s5GHzwirelessnetwork.
6. Tochangetheadministratornameandpasswordforthebrowser‐based
configurationinterface,goto“Management”>“Admin.”
7. Completethe“AdministratorName”and“AdministratorPassword”fields
andclick“Apply.”
10
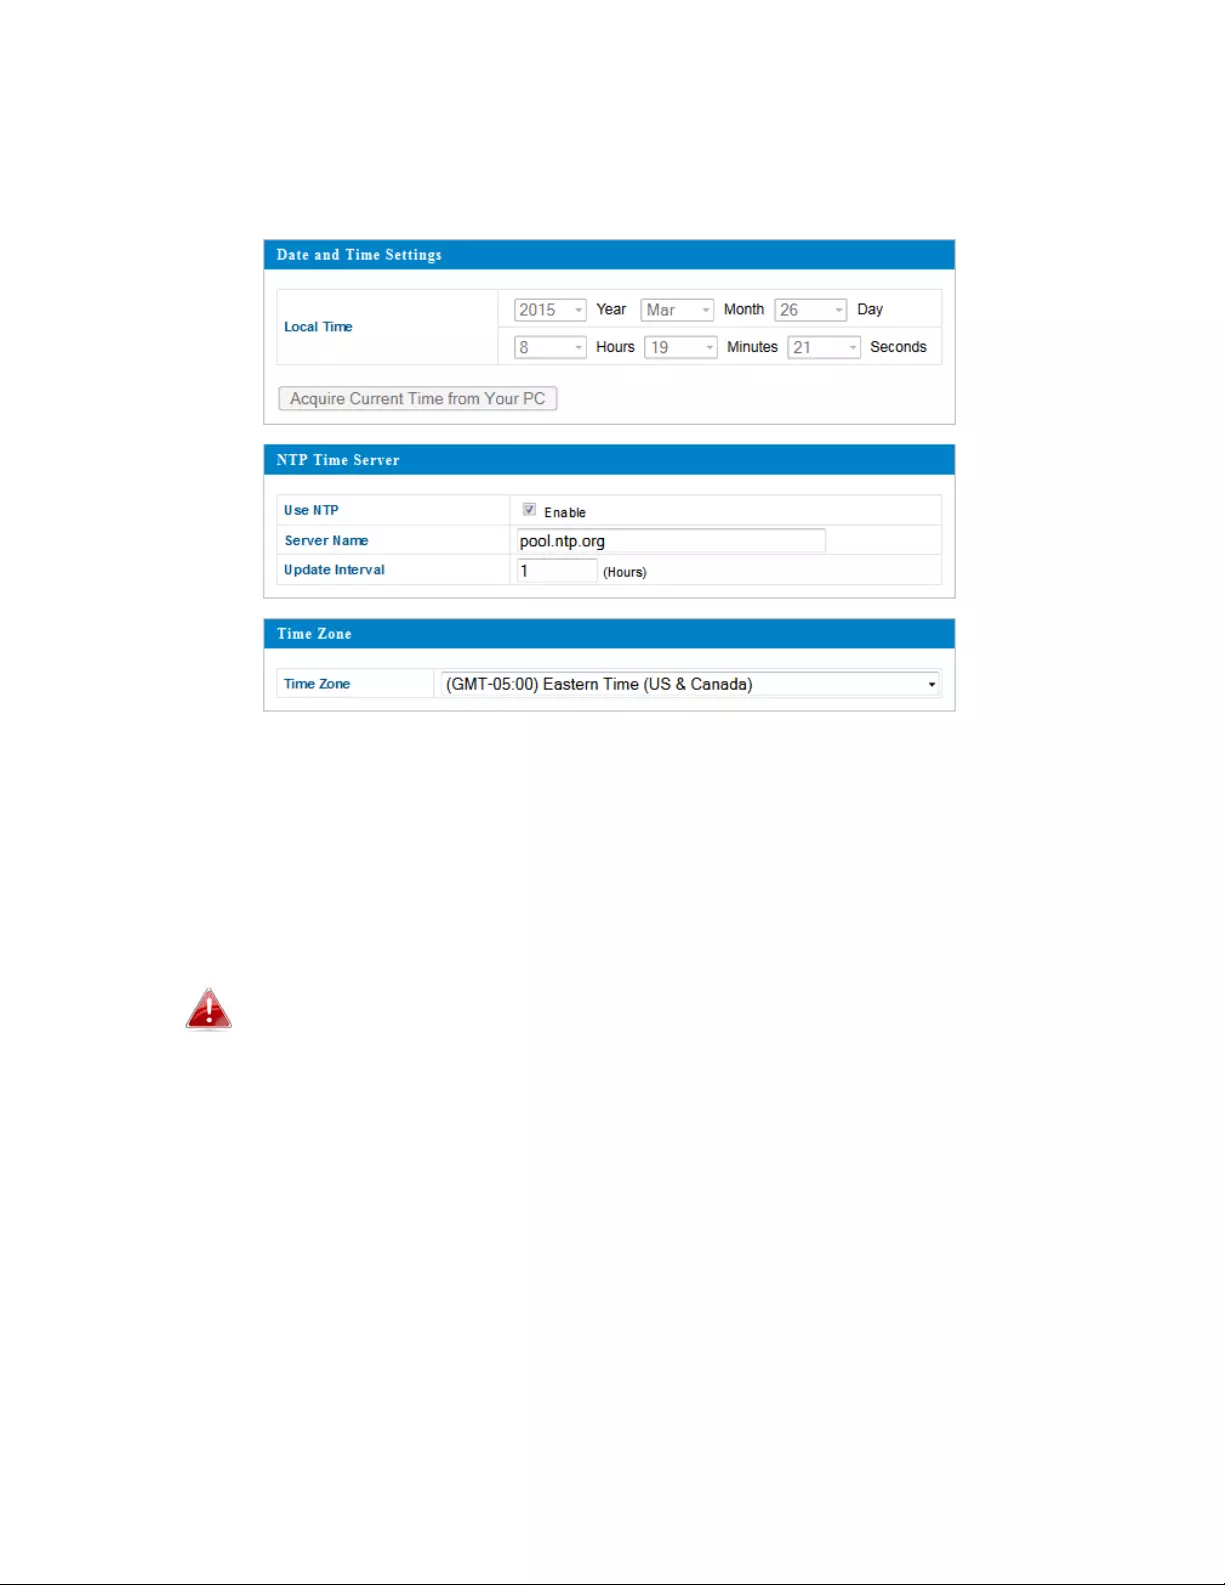
8.
Tosetthecorrecttimeforyouraccesspoint,goto“Management”>
“DateandTime.”
9.
Setthecorrecttimeandtimezoneforyouraccesspointusingthedrop‐
downmenus.TheaccesspointalsosupportsNTP(NetworkTimeProtocol)
soalternativelyyoucanenterthehostnameorIPaddressofatimeserver.
Click“Apply”whenyouarefinished.
Youcanusethe“AcquireCurrentTimefromyourPC”buttonif
youwishtosettheaccesspointtothesametimeasyourPC.
10.
Thebasicsettingsofyouraccesspointarenowconfigured.Referto
III.HardwareInstallationforguidanceonconnectingyouraccesspointtoa
routerorPoEswitch.
11
III. HardwareInstallation
III‐1.ConnectingtheaccesspointtoarouterorPoEswitch
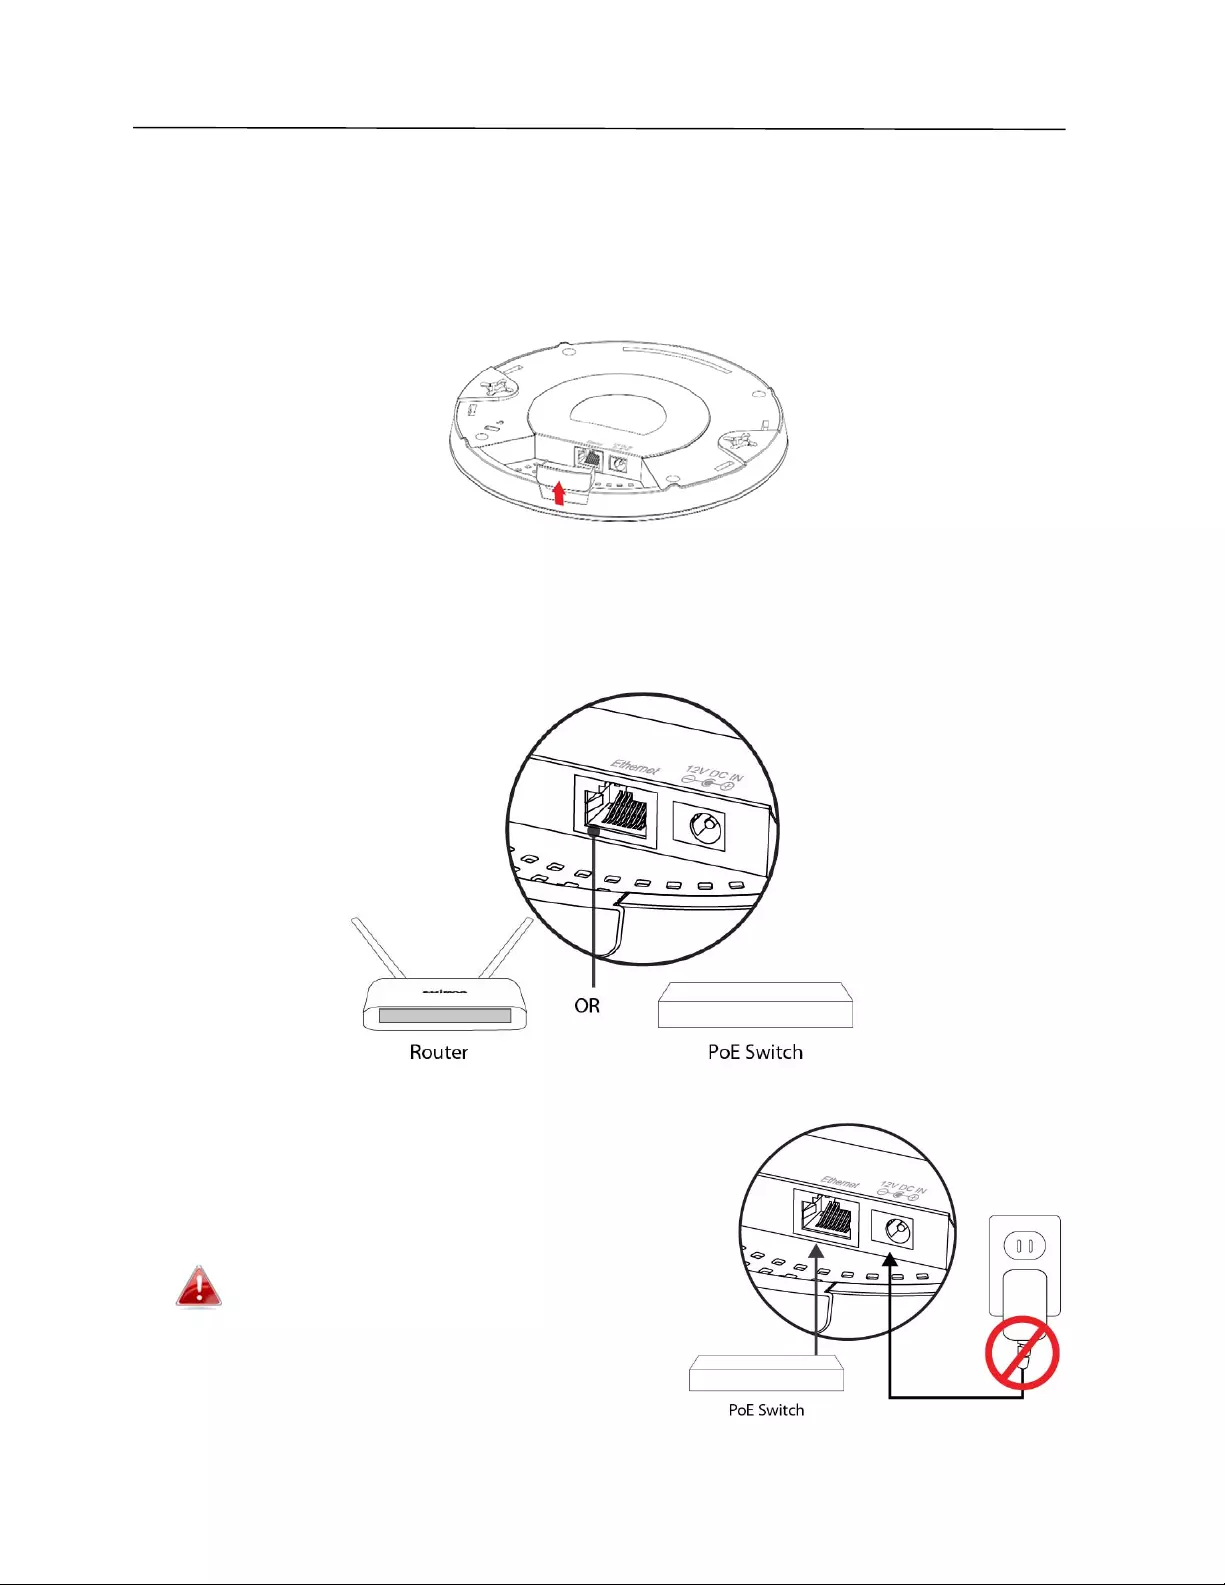
1.
Ifyouneedto,removethecapfromtheundersideoftheaccesspoint.
Thiscreatesextraspaceforyourcablestopassthrough.
2.
ConnectarouterorPoEswitchtotheaccesspoint’sLANportusingan
Ethernetcable.
3.
Ifyouareusingarouter,connectthe
poweradaptertotheaccesspoint’s
12VDCportandplugthepower
adapterintoapowersupply.
Donotusethepoweradapterif
youareusingaPoEswitch.

12
III‐2.Mountingtheaccesspointtoaceiling
Tomounttheaccesspointtoaceiling,followtheinstructionsbelowandrefer
todiagramsA&B.
ForWoodenCeilings(refertodiagramA):
1. Placetheceilingmountbracketinthedesiredpositionandinsertscrewiii
throughholei(x2)andtightentofixthebracketinplace.
2. Whentheceilingbracketisinplace,insetscrewivintoholev(x2)onthe
accesspoint.
3. Fixtheaccesspointtotheceilingbracketbyinsertingtheenclosedscrews
ivintoholesviandtwistingtheaccesspoint.
4. Locktheaccesspointfirmlyinplacebytwistingittoalignscrewsivwith
thegroovesintheceilingmount.
ForOtherCeilings(refertodiagramB):
1. Placetheceilingmountbracketinthedesiredpositionandinsertscrewii
throughholei(x2)andtightentofixthebracketinplace,asshowninA.
2. Insertscrewiiithroughholeiandintoanchoriiandtightentoprovide
additionalstrength.
3. Whentheceilingbracketisinplace,insertscrewivintoholev(x2)onthe
accesspoint.
4. Fixtheaccesspointtotheceilingbracketbyinsertingtheattachedscrews
ivintoholeviandtwistingtheaccesspoint.
5. Locktheaccesspointfirmlyinplacebytwistingittoalignscrewsivwith
thegroovesintheceilingmount.

13
A
i
ii
iii

14
B

15
III‐3.T‐RailMount
TomounttheaccesspointtoaT‐rail,followtheinstructionsbelowandrefer
todiagramC,D&E.
1.
SelectthecorrectsizeT‐railbracketfromthetwosizesincludedinthe
package.
2.
AttachtheT‐railbracketitoholeiiusingscrewiii(x2)asshowninC.
IfyouneedmorespacebetweentheaccesspointandtheT‐rail,
usebracketivbetweenbracketiandholeii(x2),andusethe
longerscrews(x2)includedinthepackage.
3.
CliptheaccesspointontoyourT‐railusingthenowattachedT‐rail
bracket.
C

16
D
E
17
IV. Browser‐BasedConfigurationInterface
Thebrowser‐basedconfigurationinterfaceenablesyoutoconfigurethe
accesspoint’sadvancedfeatures.Thedevicefeaturesarangeofadvanced
functions,suchasMACfiltering,MACRADIUSauthentication,VLAN
configurations,upto32SSIDsandmanymore.Toaccessthebrowser‐based
configurationinterface:
1.
ConnectacomputertoyouraccesspointusinganEthernetcable.
2.
Enteryouraccesspoint’sIPaddressintheURLbarofaWebbrowser.The
accesspoint’sdefaultIPaddressis192.168.2.1.
3.
Youwillbepromptedforausernameandpassword.Thedefault
usernameis“admin”andthedefaultpasswordis“1234,”thoughitwas
recommendedthatyouchangethepasswordduringsetup(seeII‐2.Basic
Settings).
Ifyoucannotrememberyourpassword,resettheaccesspoint
backtoitsfactorydefaultsettings.RefertoI‐5.Reset.
4.
YouwillarriveattheSystemInformationscreenshownbelow.
18
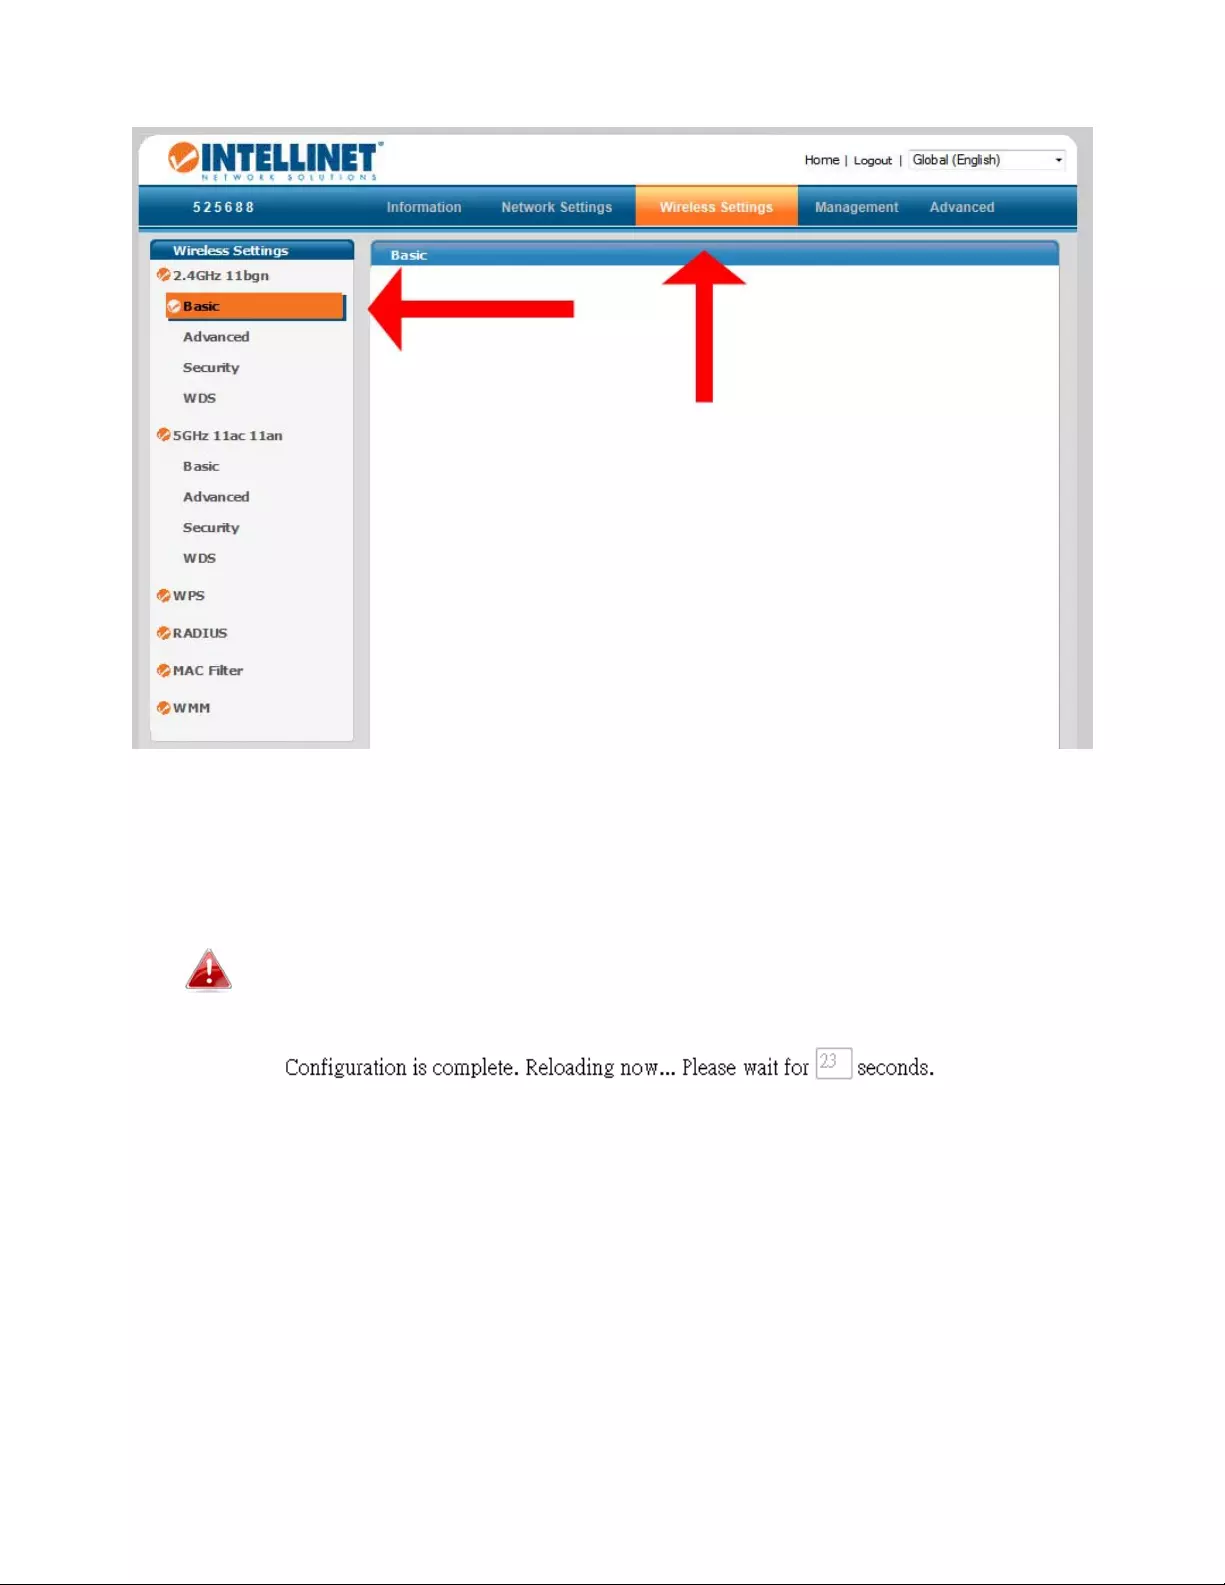
5.
Usethemenuacrossthetopanddowntheleftsidetonavigate.
6.
Click“Apply”tosavechangesandreloadtheaccesspoint,or“Cancel”to
cancelchanges.
Waitafewsecondsfortheaccesspointtoreloadafteryou
“Apply”changes,asshownbelow.
7.
Refertothefollowingchaptersforfulldescriptionsofthebrowser‐based
configurationinterfacefeatures.

19
IV‐1.Information
Screenshotsdisplayedareexamples.Theinformationshownon
yourscreenwillvarydependingonyourconfiguration.
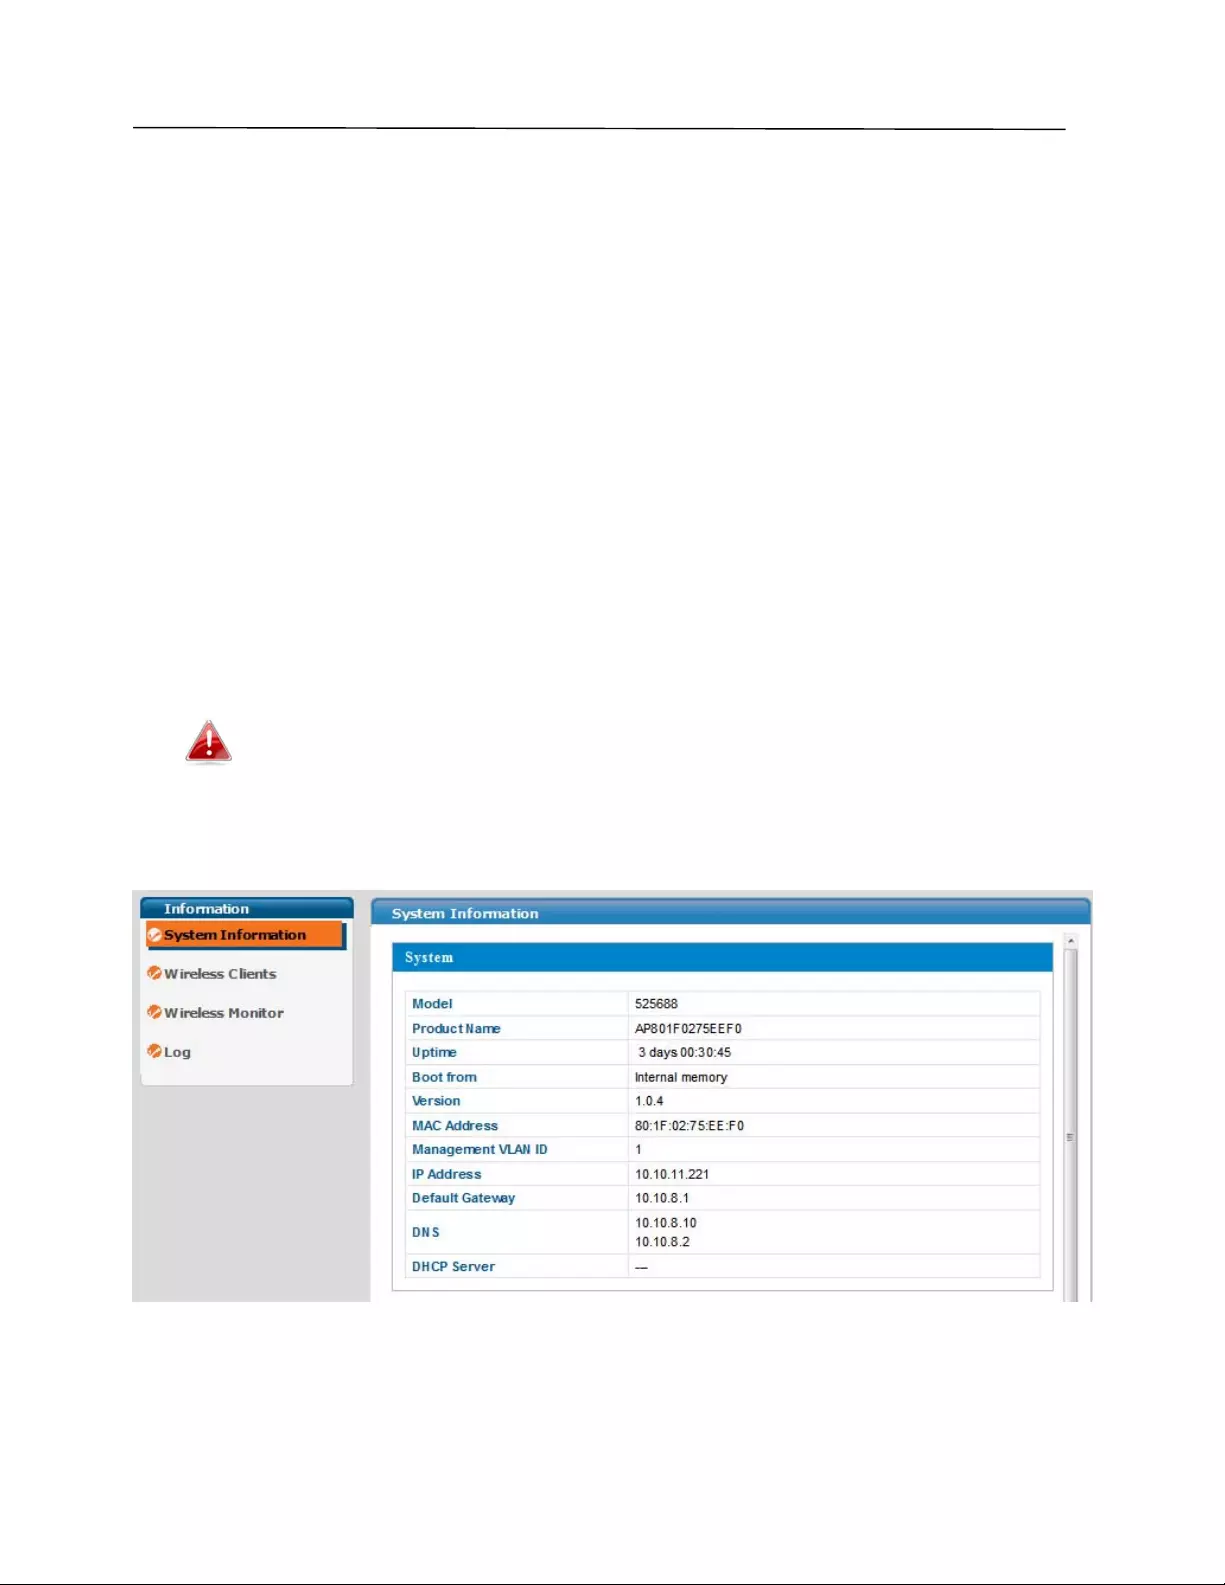
IV‐1‐1.SystemInformation
TheSystemInformationpagedisplaysbasicsysteminformationaboutthe
accesspoint.

20

21
System
ModelDisplaysthemodelnumberoftheaccess
point.
ProductName Displaystheproductnameforreference,
whichconsistsof“AP”plustheMACaddress.
UptimeDisplaysthetotaltimesincethedevicewas
turnedon.
BootFromDisplaysinformationforthebooted
hardware.
VersionDisplays the firmware version.
MACAddressDisplays the accesspoint’sMACaddress.
ManagementVLAN
ID
DisplaysthemanagementVLANID.
IPAddressDisplaystheIPaddressofthisdevice.Click
“Refresh”toupdatethisvalue.
Default
Gateway
DisplaystheIPaddressofthedefault
gateway.
DNSIPaddressofDNS(DomainNameServer).
DHCPServerIPaddressofDHCPServer.
WiredLANPortSettings
WiredLANPortSpecifieswhichLANport.
StatusDisplaysthestatusoftheLANport(connected
ordisconnected).
VLANMode/IDDisplaystheVLANmode(taggedoruntagged)
andVLANIDfortheLANport.SeeIV‐2‐3.
VLAN
Wireless2.4GHz(5GHz)
StatusDisplaysthestatusofthe2.4GHzor5GHz
wireless(enabledordisabled).
MACAddressDisplays the accesspoint’sMACaddress.
ChannelDisplaysthechannelnumberthespecified
wirelessfrequencyisusingforbroadcast.
TransmitPowerDisplaysthewirelessradiotransmitpower
levelasapercentage.

22
Wireless2.4GHz(5GHz)/SSID
SSIDDisplays the SSIDname(s)forthespecified
frequency.
Authentication
Method
Displaystheauthenticationmethodforthe
specifiedSSID.SeeIV‐3.WirelessSettings.
EncryptionTypeDisplays the encryptiontypeforthespecified
SSID.SeeIV‐3.WirelessSettings.
VLANIDDisplaystheVLANIDforthespecifiedSSID.
SeeIV‐2‐3.VLAN.
Additional
Authentication
Displaystheadditionalauthenticationtypefor
thespecifiedSSID.SeeIV‐3.WirelessSettings.
WirelessClient
Isolation
Displayswhetherwirelessclient isolationisin
useforthespecifiedSSID.See IV‐2‐3.VLAN.
Wireless2.4GHz(5GHz)/WDSStatus
MACAddressDisplays the peeraccesspoint’sMACaddress.
EncryptionTypeDisplaystheencryptiontypeforthespecified
WDS.SeeIV‐3‐1‐4.WDS.
VLANMode/IDDisplaystheVLANIDforthespecifiedWDS.
SeeIV‐3‐1‐4.WDS.
RefreshClicktorefreshallinformation.
23
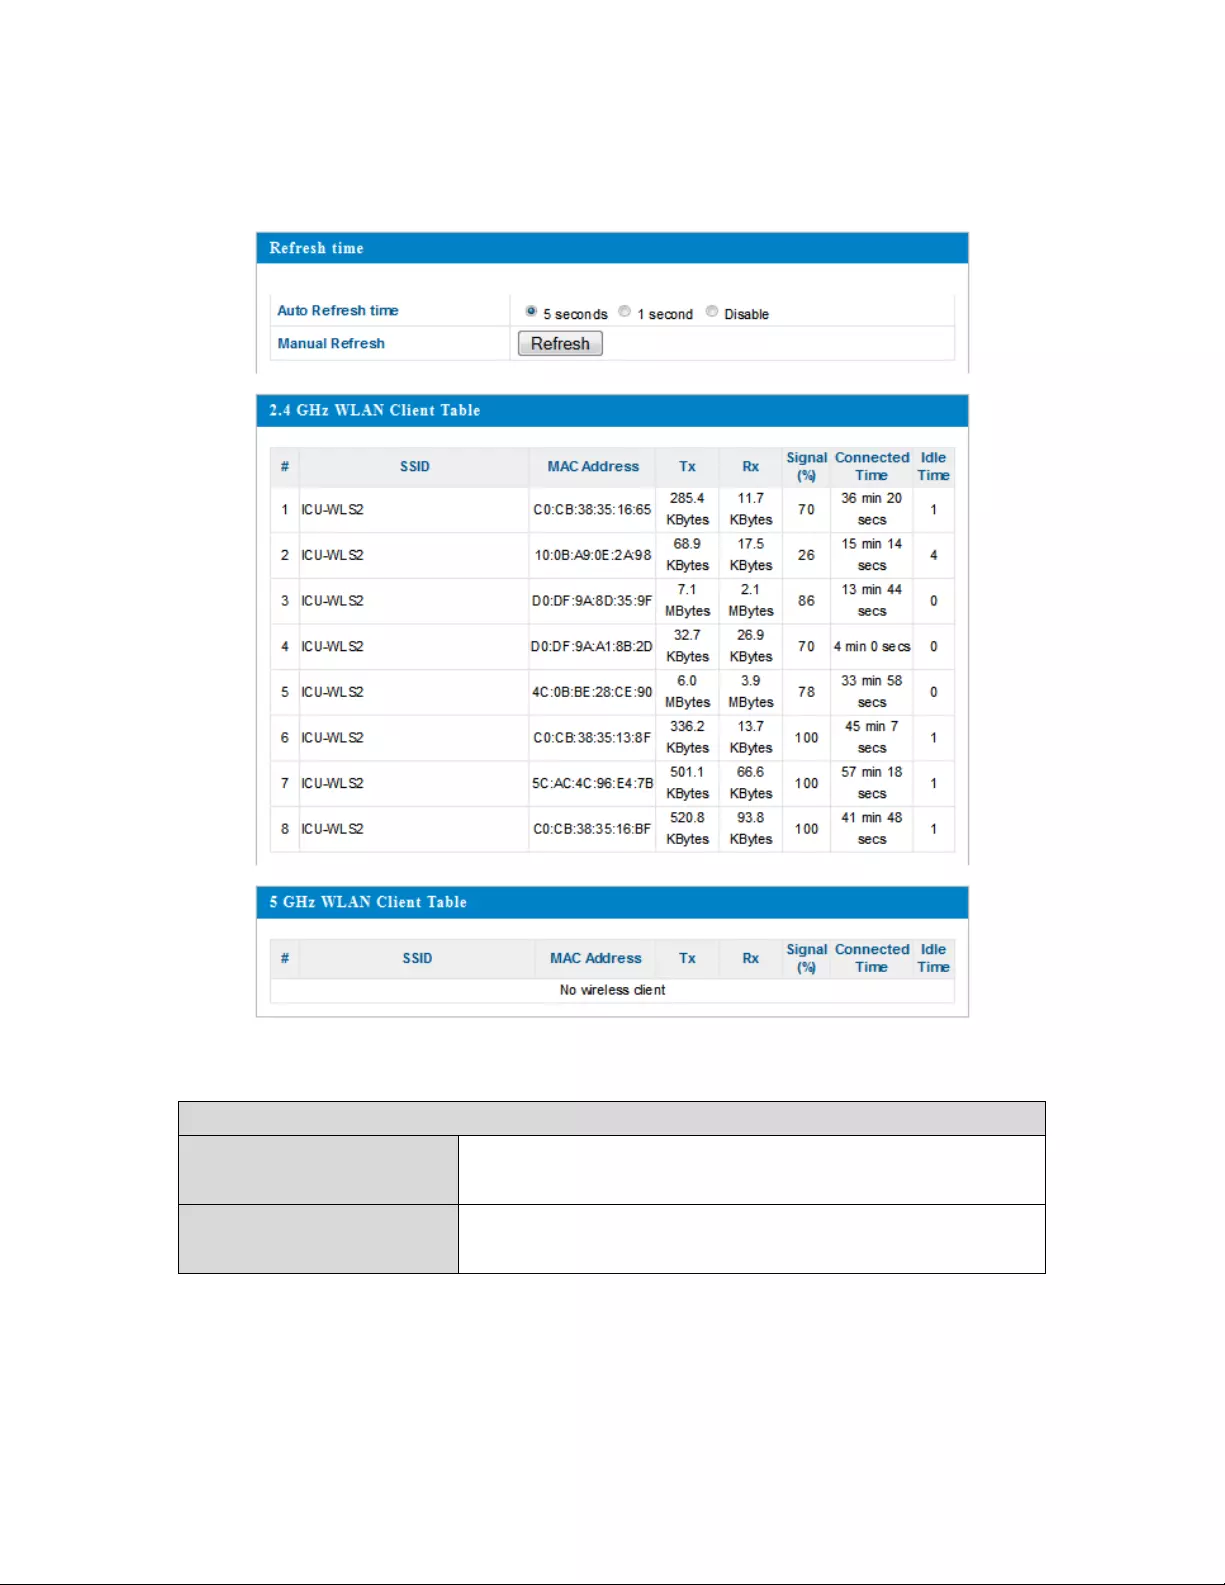
IV‐1‐2.WirelessClients
TheWirelessClientspagedisplaysinformationaboutallwirelessclients
connectedtotheaccesspointonthe2.4GHzor5GHzfrequency.
Refreshtime
AutoRefreshTimeSelectatimeintervalfortheclienttablelistto
automaticallyrefresh.
ManualRefreshClickrefreshtomanuallyrefreshtheclient
table.

24
2.4GHz(5GHz)WLANClientTable
SSIDDisplaystheSSIDwhichtheclientis
connectedto.
MACAddressDisplaystheMACaddressoftheclient.
TxDisplaysthetotaldatapacketstransmittedby
thespecifiedclient.
RxDisplaysthetotaldatapacketsreceivedby
thespecifiedclient.
Signal(%)Displaysthewirelesssignalstrengthforthe
specifiedclient.
ConnectedTimeDisplaysthetotaltimethewirelessclienthas
beenconnectedtotheaccess point.
IdleTimeClientidletimeisthetimeduringwhichthe
clienthasnottransmittedanydatapackets;
i.e.,hasbeen idle.
VendorThevendoroftheclient’swirelessadapteris
displayedhere.
IV‐1‐3.WirelessMonitor
WirelessMonitorisatoolbuiltintotheaccesspointtoscanandmonitorthe
surroundingwirelessenvironment.Selectafrequencyandclick“Scan”to
displayalistofallSSIDswithinrangealongwithrelevantdetailsforeachSSID.

25
WirelessMonitor
SiteSurveySelectwhichfrequency(orboth)toscan,and
click“Scan”tobegin.
ChannelSurvey
Result
Afterascaniscomplete,click“Export”tosave
theresultstolocalstorage.
SiteSurveyResults
ChDisplays the channelnumberusedbythe
specifiedSSID.
SSIDDisplaystheSSIDidentifiedbythescan.
MACAddressDisplays the MACaddressofthewireless
router/accesspointforthespecifiedSSID.
SecurityDisplaystheauthentication/encryptiontype
ofthespecifiedSSID.
Signal(%)Displaysthecurrentsignal strengthofthe
SSID.
TypeDisplaysthe802.11wirelessnetworking
standard(s)ofthespecifiedSSID.
VendorDisplaysthevendorofthewireless
router/accesspointforthespecifiedSSID.
26
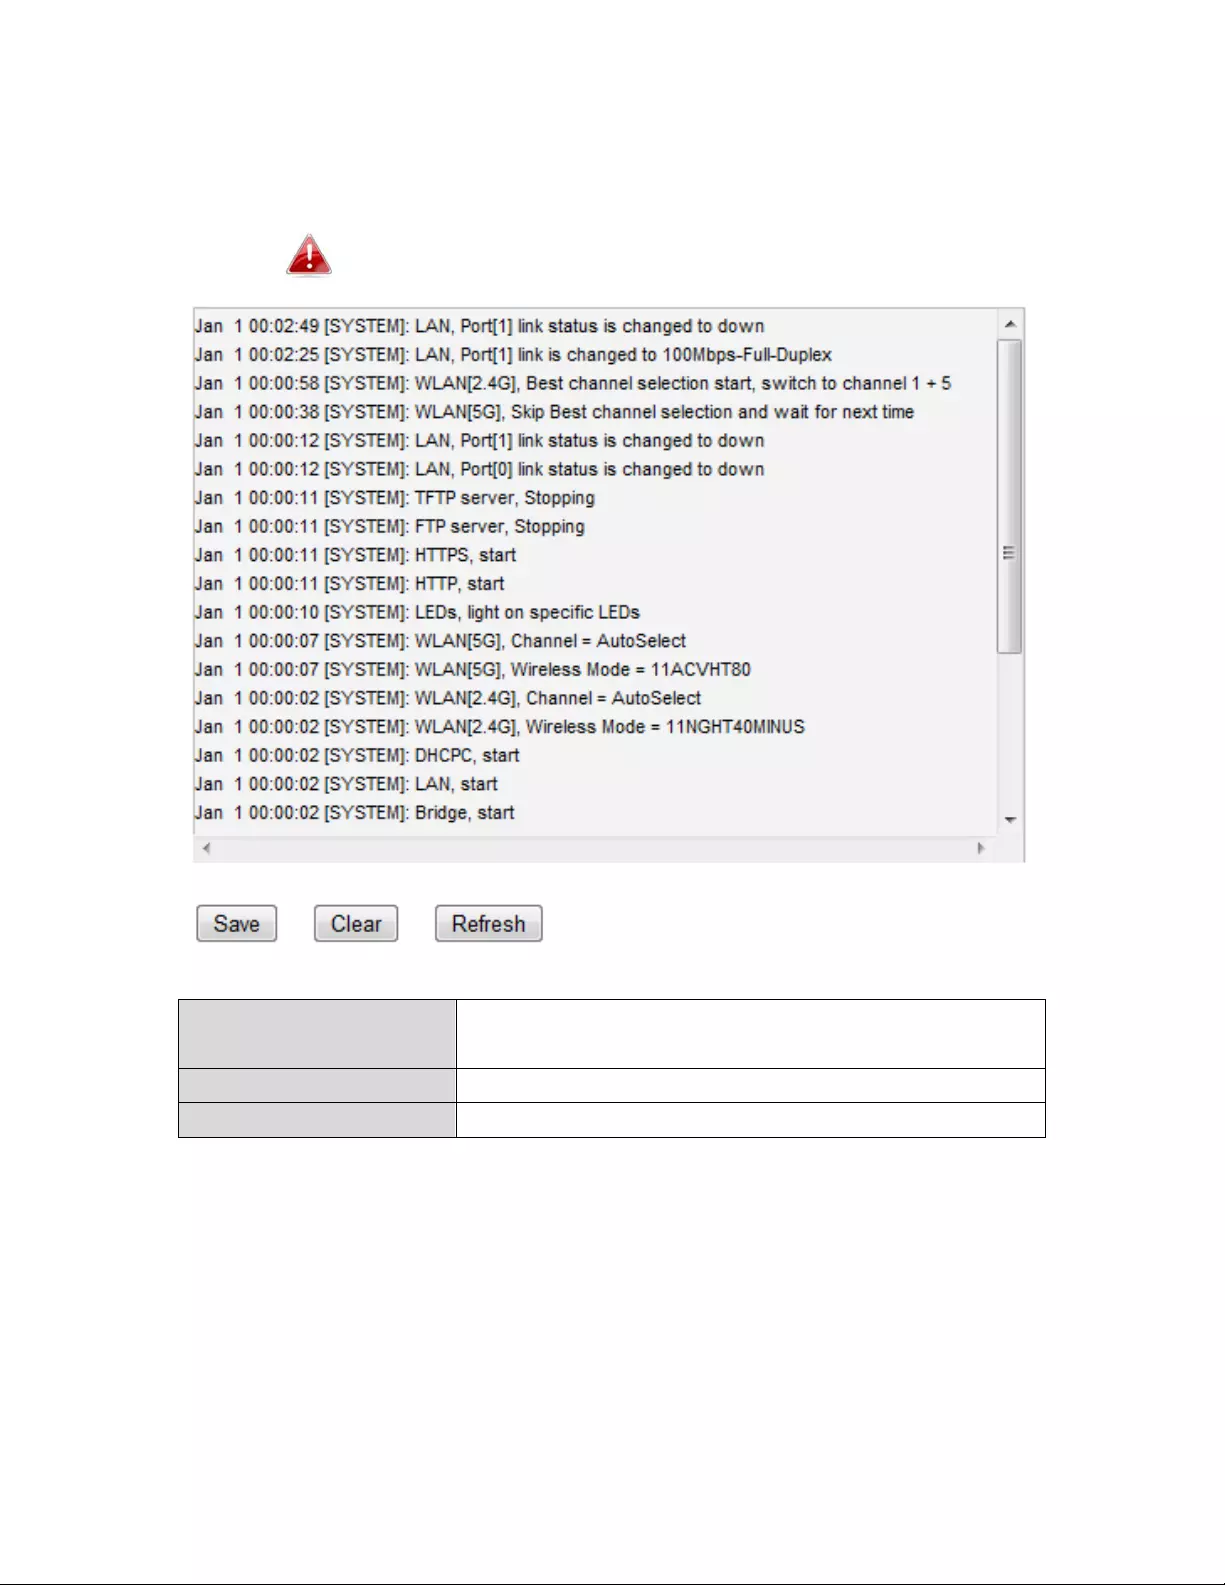
IV‐1‐4.Log
Thesystemlogdisplayssystemoperationinformationsuchasuptimeand
connectionprocesses.Thisinformationisusefulfornetworkadministrators.
Whenthelogisfull,oldentriesareoverwritten.
SaveClicktosavethelogasafileonyourlocal
computer.
ClearClearalllogentries.
RefreshRefreshthecurrentlog.

27
Thefollowinginformation/eventsarerecordedbythelog:
WirelessClient
Connected&disconnected
Keyexchangesuccess&fail
Authentication
Authenticationfailorsuccessful
Association
Successorfail
WPS
M1‐M8messages
WPSsuccess
ChangeSettings
SystemBoot
Displayscurrentmodelname
NTPClient
WiredLink
LANPortlinkstatusandspeedstatus
ProxyARP
ProxyARPmodulestart&stop
Bridge
Bridgestart&stop.
SNMP
SNMPserverstart&stop
HTTP
HTTPstart&stop
HTTPS
HTTPSstart&stop
SSH
SSH‐clientserverstart&stop
Telnet
Telnet‐clientserverstartorstop
WLAN(2.4G)
WLAN(2.4G]channelstatusandcountry/regionstatus
WLAN(5G)
WLAN(5G)channelstatusandcountry/regionstatus
ADT
28
IV‐2.NetworkSettings
Screenshotsdisplayedareexamples.Theinformationshownon
yourscreenwillvarydependingonyourconfiguration.
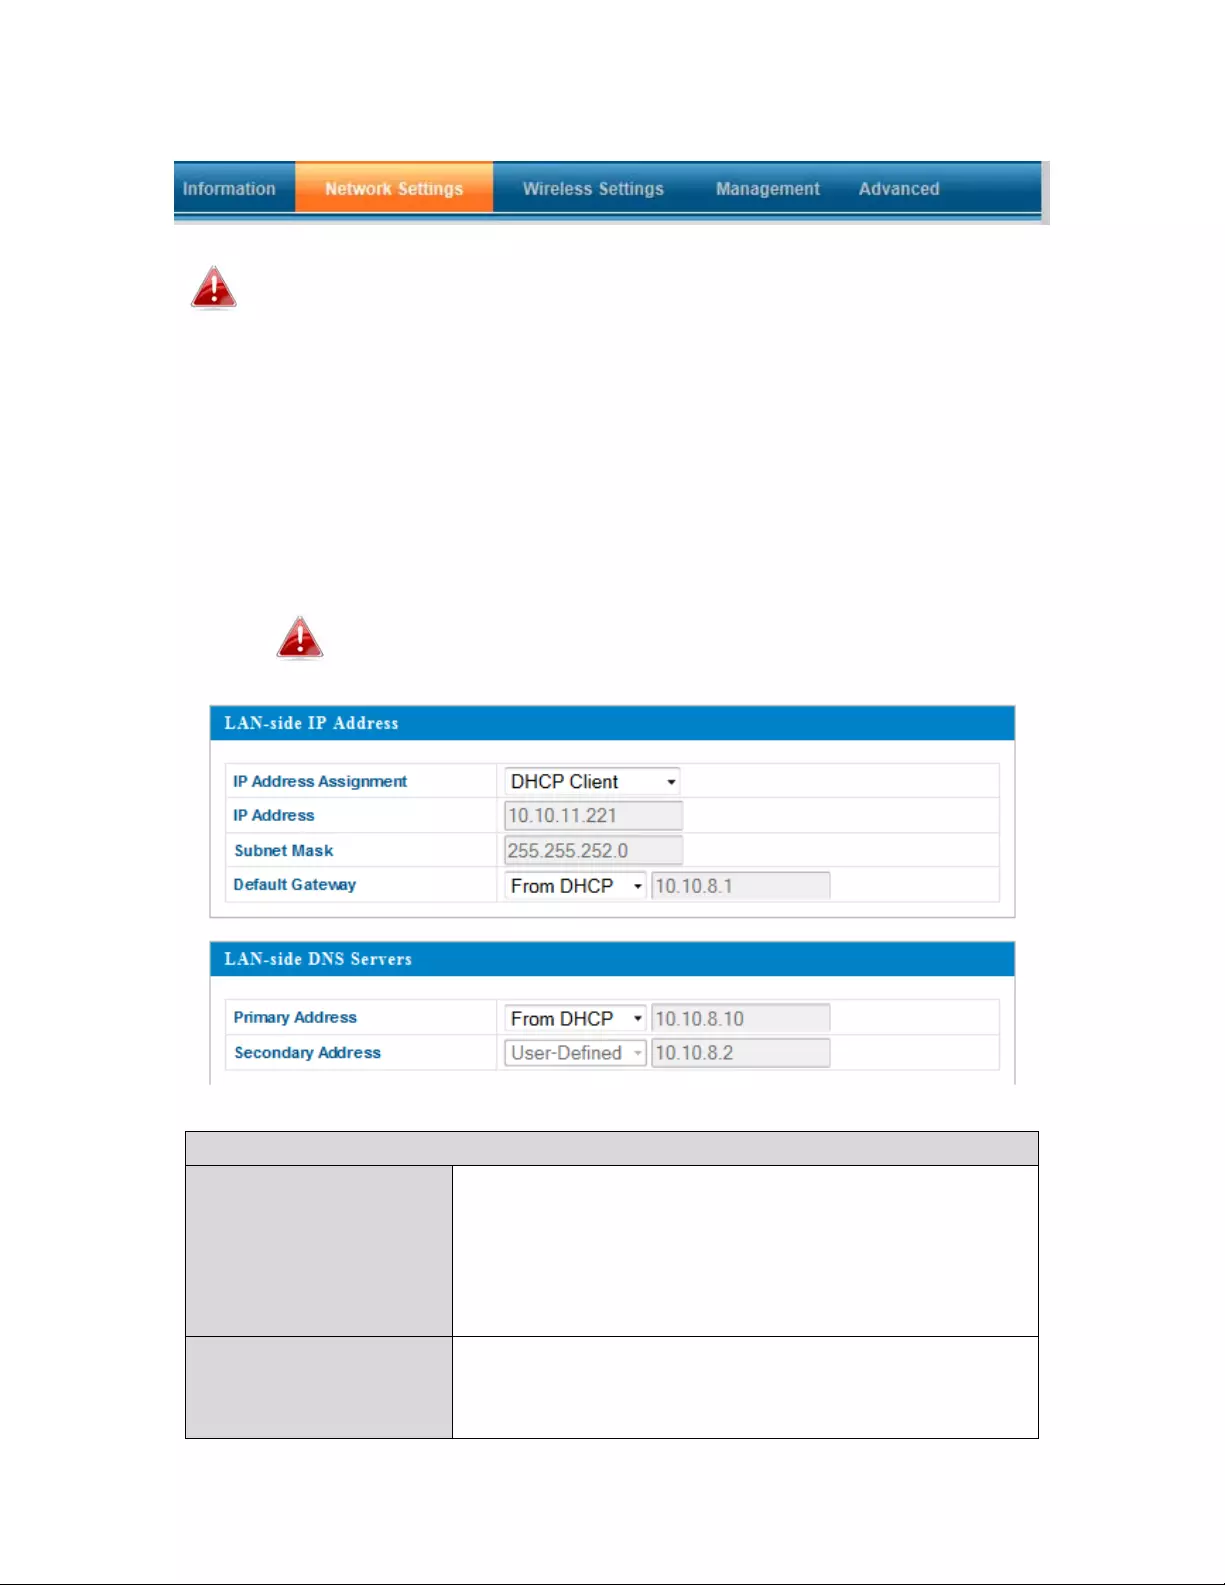
IV‐2‐1.LAN‐SideIPAddress
TheLAN‐sideIPAddresspageallowsyoutoconfigureyouraccesspointon
yourLocalAreaNetwork(LAN).Youcanenabletheaccesspointto
dynamicallyreceiveanIPaddressfromyourrouter’sDHCPserveroryoucan
specifyastaticIPaddressforyouraccesspoint,aswellasconfigureDNS
servers.
Theaccesspoint’sdefaultIPaddressis192.168.2.1.
LAN‐sideIPAddress
IPAddress
Assignment
Select“DHCPClient”foryouraccesspointto
beassignedadynamicIPaddressfromyour
router’sDHCPserver,orselect“StaticIP”to
manuallyspecifyastatic/fixedIPaddressfor
youraccesspoint(below).
IPAddressSpecifytheIPaddresshere.ThisIPaddress
willbeassignedtoyouraccesspointandwill
replacethedefaultIPaddress.

29
SubnetMaskSpecifyasubnetmask.The defaultvalueis
255.255.255.0
DefaultGatewayForDHCPusers,select“FromDHCP”toget a
defaultgatewayfromyourDHCPserveror
“User‐Defined”toenteragatewaymanually.
ForstaticIPusers,thedefaultvalueisblank.
DHCPuserscanselecttogetaDNSservers’IPaddressfromDHCPormanually
enteravalue.ForstaticIPusers,thedefaultvalueisblank.
PrimaryAddressDHCPuserscanselect“FromDHCP”togeta
primaryDNSserver’sIPaddressfromDHCPor
“User‐Defined”tomanuallyenteravalue.For
staticIPusers,thedefaultvalueisblank.
SecondaryAddressUserscanmanuallyenteravaluewhenthe
DNSserver’sprimaryaddressissetto“User‐
Defined.”

30
IV‐2‐2.LANPort
TheLANPortpageallowsyoutoconfigurethesettingsforyouraccesspoint’s
twowiredLAN(Ethernet)ports.
WiredLANPortIdentifiesLANport1.
EnableEnable/disableLANport.
Speed&DuplexSelectaspeed&duplextypeforLANport,or
usethe“Auto”value.LANportscanoperateup
to1000Mbpsandfull‐duplexenables
simultaneousdatapackets transfer/receive.
FlowControlEnable/disableflowcontrol.Flowcontrolcan
pausenewsessionrequestuntilcurrentdata
processingiscomplete,inordertoavoid
deviceoverloadsunderheavytraffic.
802.3azEnable/disable802.3az.802.3azisanEnergy
EfficientEthernetfeaturewhichdisables
unusedinterfacestoreducepowerusage.
31
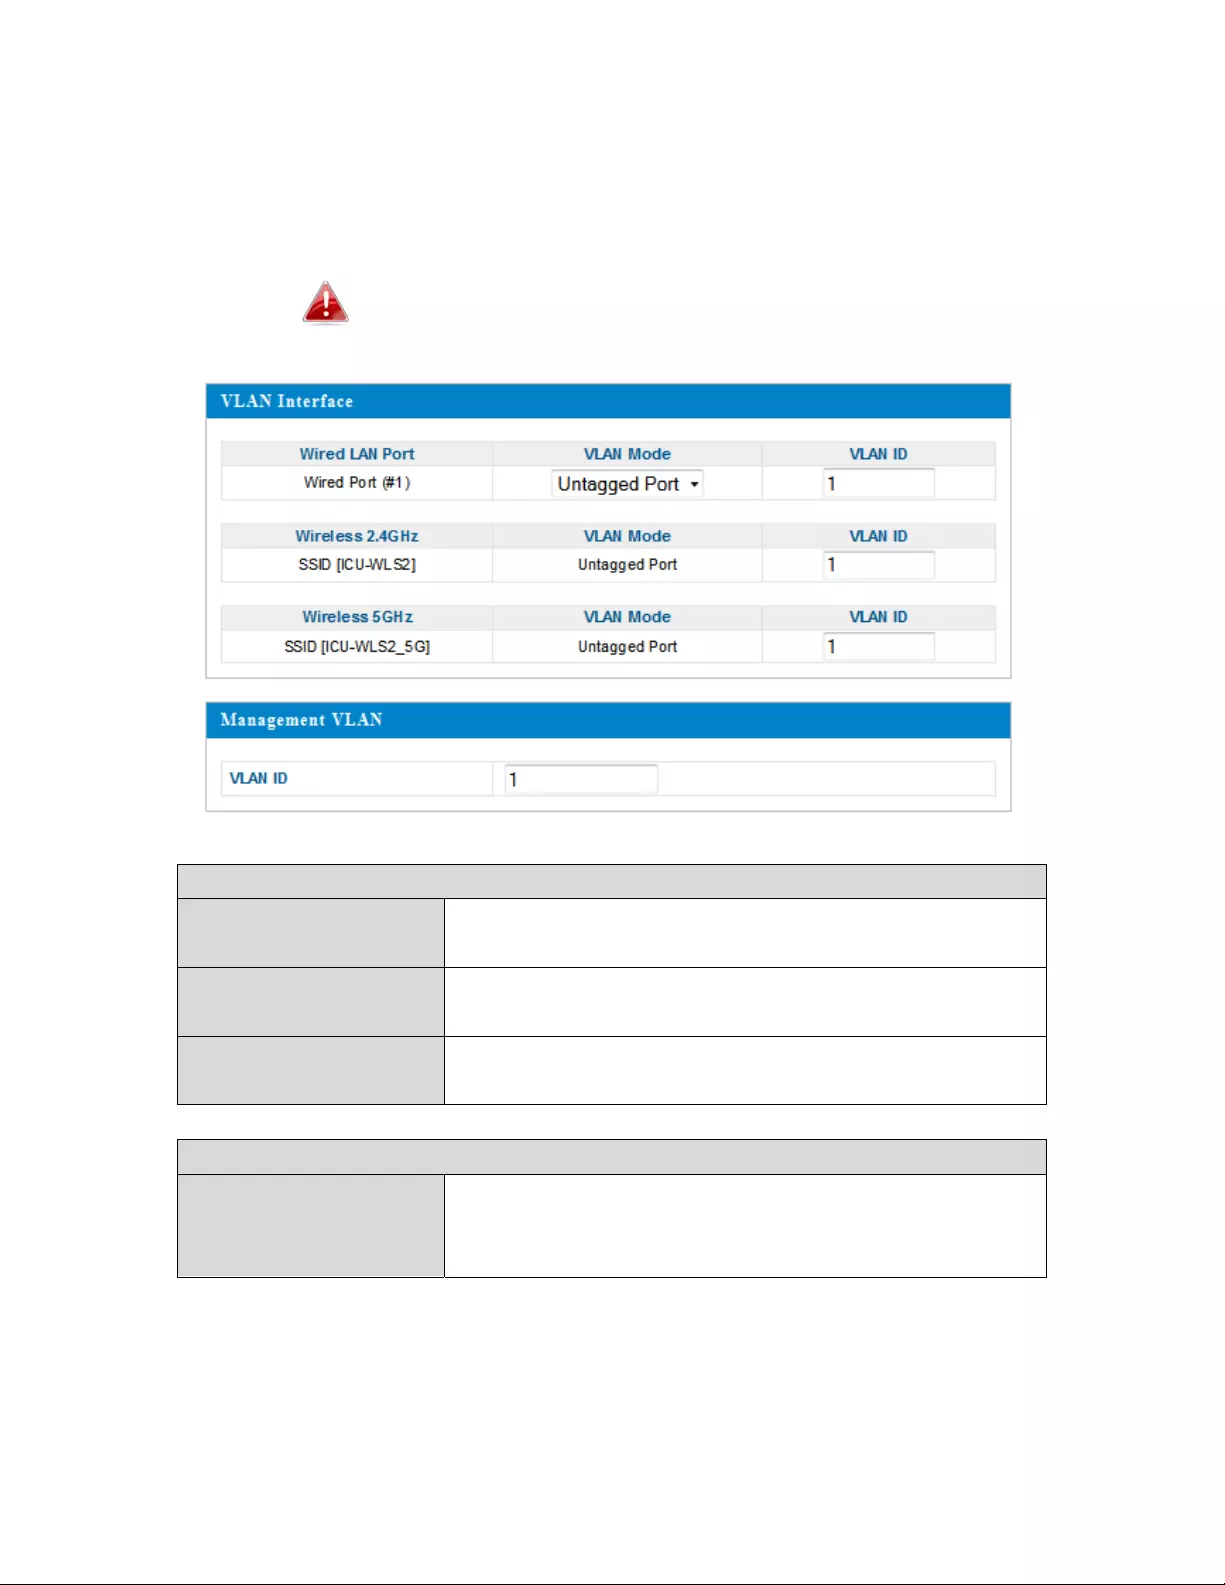
IV‐2‐3.VLAN
TheVLAN(VirtualLocalAreaNetwork)screenenablesyoutoconfigureVLAN
settings.AVLANisalocalareanetworkwhichmapsworkstationsvirtually
insteadofphysicallyandallowsyoutogrouptogetherorisolateusersfrom
eachother.VLANIDs1–4094aresupported.
VLANIDsintherange1–4094aresupported.
VLANInterface
WiredLAN
Port/Wireless
IdentifiesLANport1and wirelessSSIDs
(2.4GHzor5GHz).
VLANModeSelect“TaggedPort”or“UntaggedPort”for a
LAN interface.
VLANIDSetaVLANIDforaspecifiedinterface,if
“Untagged Port”isselected.
ManagementVLAN
VLANIDSpecifytheVLANIDofthemanagementVLAN.
OnlythehostsbelongingtothesameVLANcan
managethedevice.

32
IV‐3.WirelessSettings
Screenshotsdisplayedareexamples.Theinformationshownon
yourscreenwillvarydependingonyourconfiguration.
IV‐3‐1.2.4GHz11bgn
The2.4GHz11bgnmenuallowsyoutoviewandconfigureinformationfor
youraccesspoint’s2.4GHzwirelessnetworkacrossfourcategories:Basic,
Advanced,SecurityandWDS.
TheBasicscreendisplaysbasicsettingsforyouraccesspoint’s2.4GHzWi‐Fi
network(s).

33
WirelessEnableordisabletheaccesspoint’s2.4GHzwireless
radio.Whendisabled,no2.4GHzSSIDswillbeactive.
BandSelectthewirelessstandardusedfortheaccess
point.Combinationsof802.11b,802.11g&802.11n
canbeselected.
EnableSSIDNumberSelecthowmanySSIDstoenableforthe2.4GHz
frequencyfromthedrop‐downmenu.Amaximum
of16canbeenabled.
SSID#EntertheSSIDnameforthespecifiedSSID(upto
16).TheSSIDcanconsistofanycombinationofup
to32alphanumericcharacters.
VLANIDSpecifyaVLANIDforeachSSID.
AutoChannelEnable/disableautochannelselection.Autochannel
selectionwillautomaticallysetthewirelesschannel
fortheaccesspoint’s2.4GHzfrequencybasedon
availabilityandpotentialinterference.When
disabled,selectachannelmanuallyasshowninthe
nexttable.
AutoChannelRangeSelectarangefromwhichtheautochannelsetting
(above) willchooseachannel.
AutoChannelIntervalSpecifyafrequencyforhowoftentheautochannel
settingwillcheck/reassignthewirelesschannel.
Check/uncheckthe“Changechannelevenifclients
areconnected”boxaccordingtoyourpreference.
ChannelBandwidthSetthechannelbandwidth:20MHz(lower
performancebutlessinterference),40MHz(higher
performancebutpotentiallyhigherinterference)or
Auto(automaticallyselectbasedoninterference
level).
BSSBasicRateSetSetaBasicServiceSet(BSS)rate:Thisisaseriesof
ratestocontrolcommunicationframesforwireless
clients.

34
Whenautochannelisdisabled,selectawirelesschannelmanually:
Channel Selectawirelesschannelfrom1
–
11(1‐13).
ChannelBandwidthSetthechannelbandwidth:20MHz(lower
performancebutlessinterference),40MHz
(higherperformancebutpotentiallyhigher
interference)orAuto(automaticallyselect
basedoninterferencelevel).
BSSBasicRateSetSetaBasicServiceSet(BSS)rate:Thisisa
seriesofratestocontrolcommunication
framesforwirelessclients.
Thesesettingsareforexperiencedusersonly.It’srecommendedthatyounot
changeanyofthevaluesonthispageunlessyouarealreadyfamiliarwith
thesefunctions.
Changingthesesettingscanadverselyaffecttheperformanceof
youraccesspoint.

35
ContentionSlotSelect“Short”or“Long.”Thisvalueisusedfor
contentionwindowsinWMM(seeIV‐3‐6.
WMM).
PreambleTypeSetthewirelessradio preambletype.The
preambletypein802.11basedwireless
communicationdefinesthelengthoftheCRC
(CyclicRedundancyCheck)blockfor
communicationbetweentheaccesspointand
roamingwirelessadapters.Thedefaultvalueis
“ShortPreamble.”
GuardIntervalSettheguardinterval. Ashorterintervalcan
improveperformance.
802.11gProtectionEnable/disable802.11gprotection,which
increasesreliabilitybutreducesbandwidth.
(ClientswillsendaRequesttoSend[RTS]to
theaccesspoint,andtheaccesspointwill
broadcastCleartoSend[CTS]beforeapacket
issentfromtheclient.)
802.11nProtectionEnable/disable802.11nprotection,which
increasesreliabilitybutreducesbandwidth.
(ClientswillsendaRequesttoSend[RTS]to
theaccesspoint,andtheaccesspointwill
broadcastCleartoSend[CTS]beforeapacket
issentfromtheclient.)

36
DTIMPeriodSettheDTIM(deliverytrafficindication
message)periodvalueofthewirelessradio.
Thedefaultvalueis1.
RTSThreshold SettheRTSthresholdofthewirelessradio.The
defaultvalueis2347.
Fragment
Threshold
Setthefragmentthresholdofthewireless
radio.Thedefaultvalueis2346.
MulticastRateSetthetransferrateformulticastpacketsor
usethe“Auto”setting.
TxPowerSetthepoweroutputofthewirelessradio.You
maynotrequire100%outputpower.Settinga
lowerpoweroutputcanenhancesecuritysince
potentiallymalicious/unknownusersindistant
areaswillnotbeabletoaccessyoursignal.
BeaconIntervalSetthebeaconintervalofthewirelessradio.
Thedefaultvalueis100.
Stationidle
timeout
Settheintervalforkeepalivemessagesfrom
theaccesspointtoawirelessclienttoverifyif
thestationisstillalive/active.
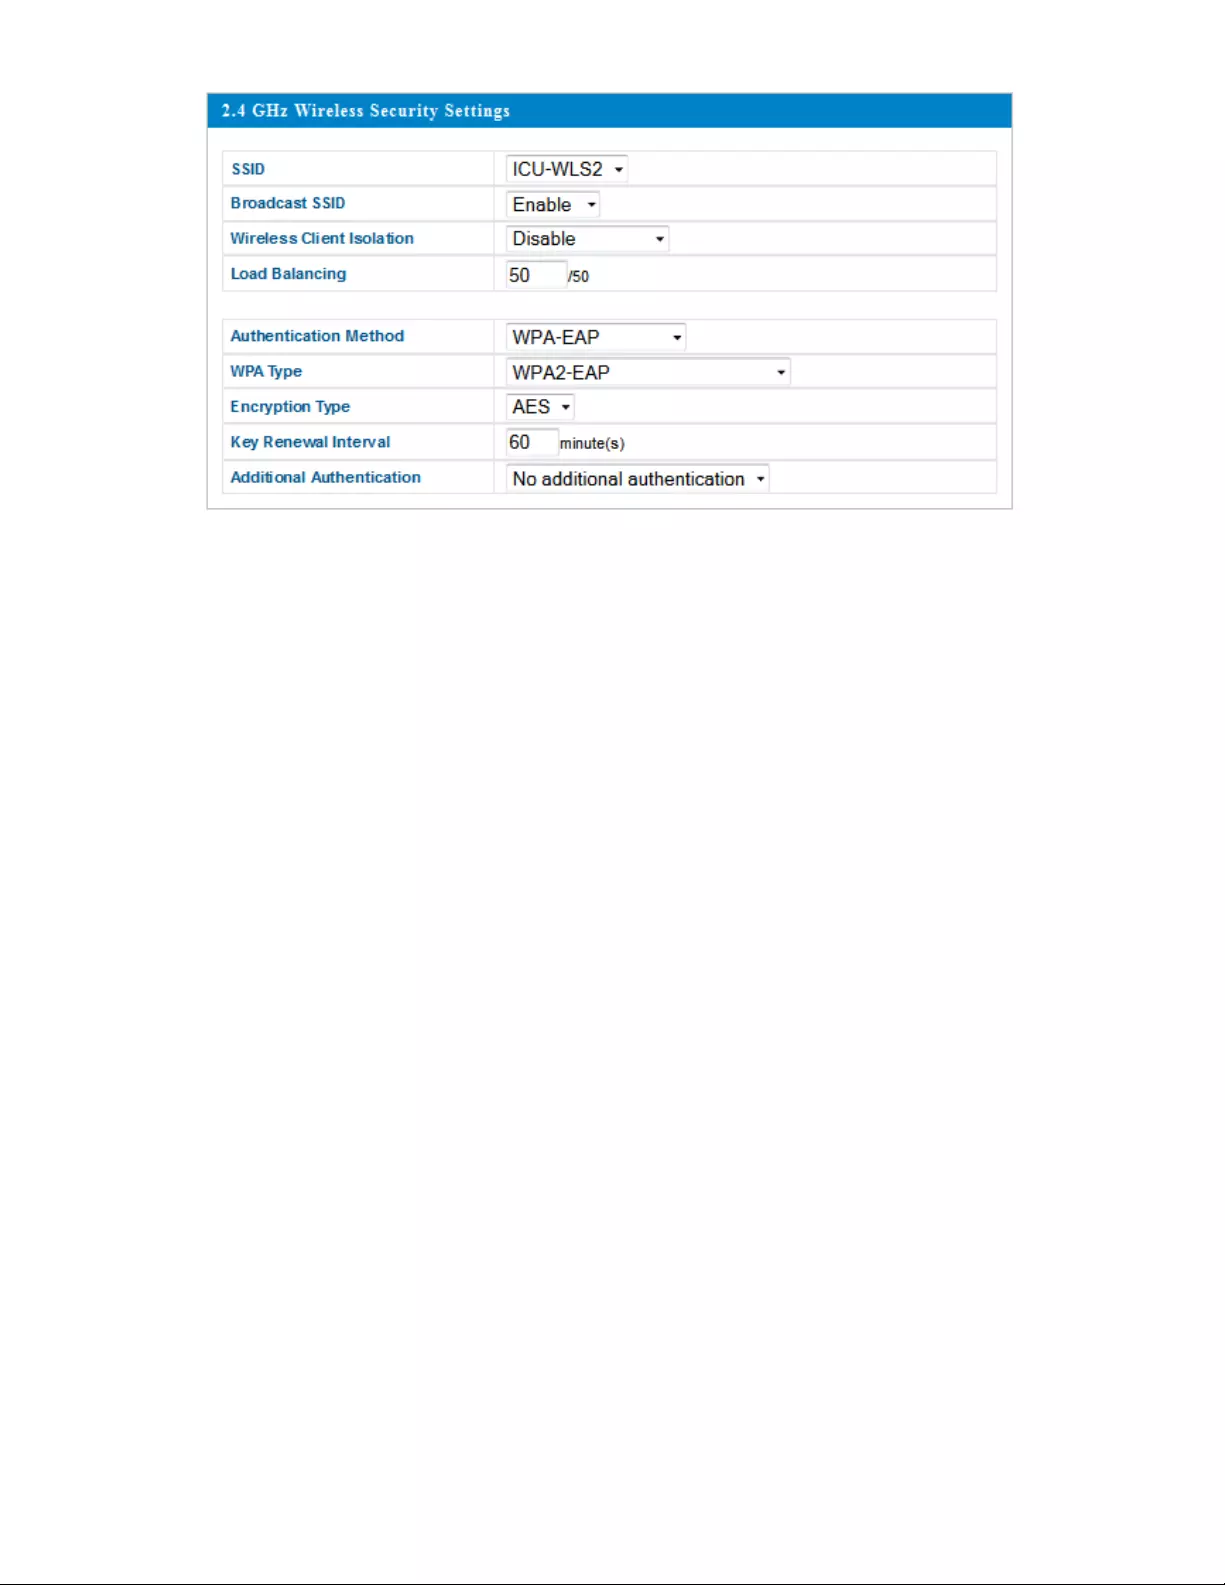
Theaccesspointprovidesvarioussecurityoptions(wirelessdataencryption).
Whendataisencrypted,informationtransmittedwirelesslycannotbereadby
anyonewhodoesnotknowthecorrectencryptionkey.
It’sessentialtoconfigurewirelesssecurityinordertoprevent
unauthorizedaccesstoyournetwork.
Selecthard‐to‐guesspasswordswhichincludecombinationsof
numbers,lettersandsymbols,andchangeyourpassword
regularly.
37

38
SSIDSelectionSelectwhichSSIDtoconfiguresecuritysettings
for.
BroadcastSSIDEnableordisableSSIDbroadcast.When
enabled,theSSIDwillbevisibletoclientsasan
availableWi‐Finetwork.Whendisabled,the
SSIDwillnotbevisibleasanavailableWi‐Fi
networktoclients–clientsmustmanually
entertheSSIDinordertoconnect.Ahidden
(disabled)SSIDistypicallymoresecurethana
visible(enabled)SSID.
WirelessClient
Isolation
Enableordisablewirelessclientisolation.
Wirelessclientisolationpreventsclients
connectedtotheaccesspointfrom
communicatingwitheachotherandimproves
security.Typically,thisfunctionisusefulfor
corporateenvironmentsorpublichotspotsand
canpreventbruteforceattacksonclients’
usernamesandpasswords.
LoadBalancingLoadbalancinglimitsthenumberofwireless
clientsconnectedtoanSSID.Setaload
balancingvalue(maximum50).
Authentication
Method
Selectanauthenticationmethodfromthe
drop‐downmenuandrefertotheinformation
belowthatisappropriateforyourmethod.
Additional
Authentication
Selectanadditionalauthenticationmethod
fromthedrop‐downmenuandrefertothe
informationbelow(IV‐3‐1‐3‐6.)thatis
appropriateforyourmethod.

39
IV‐3‐1‐3‐1.NoAuthentication
Authenticationisdisabledandnopassword/keyisrequiredtoconnecttothe
accesspoint.
Disablingwirelessauthenticationisnotrecommended.When
disabled,anybodywithinrangecanconnecttoyourdevice’sSSID.
IV‐3‐1‐3‐2.WEP
WEP(WiredEquivalentPrivacy)isabasicencryptiontype.Forahigher
levelofsecurity,considerusingWPAencryption.
KeyLengthSelect64‐bitor128‐bit.128‐bitismoresecure
than64‐bitandisrecommended.
KeyTypeChoosefrom“ASCII”(anyalphanumerical
character0‐9,a‐zandA‐Z)or“Hex”(any
charactersfrom0‐9,a‐fandA‐F).
DefaultKeySelectwhichencryptionkey(1
–
4below)isthe
defaultkey.Forsecuritypurposes,youcanset
uptofourkeys(below)andchangewhichis
thedefaultkey.
EncryptionKey1
–
4
Enteryourencryptionkey/passwordaccording
totheformatyouselectedabove.
IV‐3‐1‐3‐3.IEEE802.1x/EAP
KeyLengthSelect64‐bitor128‐bit.128‐bitismoresecure
than64‐bitandisrecommended.

40
IV‐3‐1‐3‐4.WPA‐PSK
WPA‐PSKisasecurewirelessencryptiontypewithstrongdata
protectionanduserauthentication,utilizing128‐bitencryptionkeys.
WPATypeSelectfromWPA/WPA2MixedMode‐PSK,
WPA2orWPAonly.WPA2issaferthanWPA
only,butisnotsupportedbyallwireless
clients.Makesureyourwirelessclientsupports
yourselection.
EncryptionSelect“TKIP/AESMixedMode”or“AES”
encryptiontype.
KeyRenewal
Interval
Specifyafrequencyforkeyrenewalin
minutes.
Pre‐SharedKey
Type
Choosefrom“Passphrase”(8–63
alphanumericcharacters)or“Hex”(upto64
charactersfrom0‐9,a‐fandA‐F).
Pre‐SharedKeyPleaseenter asecuritykey/passwordaccording
totheformatyouselectedabove.
IV‐3‐1‐3‐5.WPA‐EAP
WPATypeSelectfromWPA/WPA2MixedMode‐EAP,
WPA2‐EAPorWPA‐EAP.
EncryptionSelect“TKIP/AESMixedMode”or“AES”
encryptiontype.
KeyRenewal
Interval
Specifyafrequencyforkeyrenewalin
minutes.
WPA‐EAPmustbedisabledtouseMAC‐RADIUSauthentication.

41
IV‐3‐1‐3‐6.AdditionalAuthentication
Additionalwirelessauthenticationmethodscanalsobeused:
MACAddressFilter
Restrictwirelessclients’accessbasedonMACaddressesspecifiedintheMAC
filtertable.
SeeIV‐3‐5.MACFiltertoconfigureMACfiltering.
MACFilter&MAC‐RADIUSAuthentication
Restrictwirelessclients’accessusingbothoftheaboveMACfiltering&
RADIUSauthenticationmethods.
MAC‐RADIUSAuthentication
Restrictwirelessclients’accessbasedonMACaddressviaaRADIUSserver,or
passwordauthenticationviaaRADIUSserver.
SeeIV‐3‐4.RADIUStoconfigureRADIUSservers.
WPSmustbedisabledtouseMAC‐RADIUSauthentication.SeeIV‐
3‐3.forWPSsettings.
MACRADIUS
Password
SelectwhethertouseMACaddressor
passwordauthenticationviaRADIUSserver.If
youselect“Usethefollowingpassword,”enter
thepasswordinthefieldbelow.Thepassword
shouldmatchthe“SharedSecret”usedinIV‐3‐
4.RADIUS.
WirelessDistributionSystem(WDS)canbridge/repeataccesspointstogether
inanextendednetwork.WDSsettingscanbeconfiguredasshownbelow.
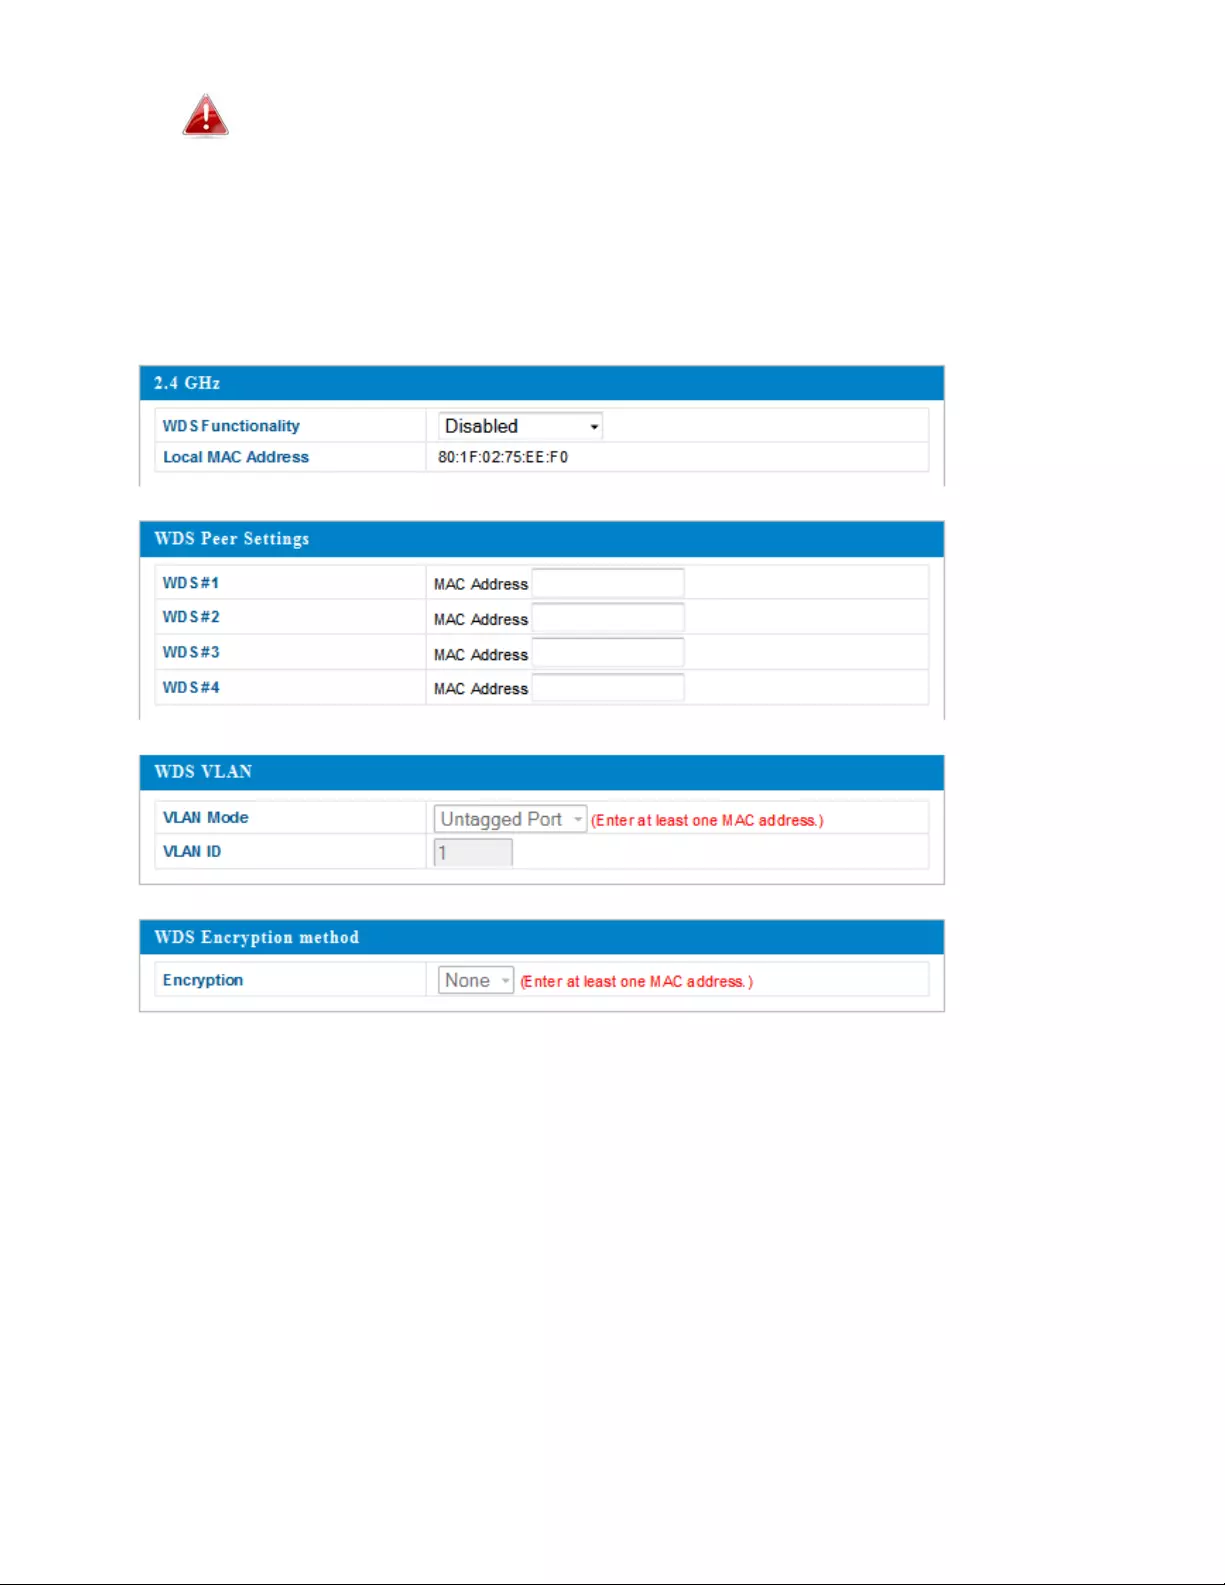
42
WhenusingWDS,configuretheIPaddressofeachaccesspointto
beinthesamesubnetandensurethereisonlyoneactiveDHCP
serveramongconnectedaccesspoints,preferablyontheWAN
side.
WDSmustbeconfiguredoneachaccesspoint,usingcorrectMACaddresses.
Allaccesspointsshouldusethesamewirelesschannelandencryption
method.

43
2.4GHz
WDSFunctionalitySelect“WDSwithAP”touseWDSwithan
accesspointor“DedicatedWDS”touseWDS
andalsoblockcommunicationwithregular
wirelessclients.WhenWDSisused,each
accesspointshouldbeconfiguredwith
correspondingMACaddresses,wireless
channelandwirelessencryptionmethod.
LocalMACAddressDisplaystheMACaddress ofyouraccesspoint.
WDSPeerSettings
WDS#EntertheMACaddressforuptofourother
WDS devicesyouwishtoconnectto.
WDSVLAN
VLANModeSpecifytheWDSVLANmode to“Untagged
Port” or“TaggedPort.”
VLANIDSpecifytheWDSVLANID when“Untagged
Port”isselectedabove.
WDSEncryptionmethod
EncryptionSelectwhethertouse“None”or“AES”
encryptionandenterapre‐sharedkeyforAES
consistingof 8‐63alphanumericcharacters.

44
IV‐3‐2.5GHz11ac11an
The5GHz11ac11anmenuallowsyoutoviewandconfigureinformationfor
youraccesspoint’s5GHzwirelessnetworkacrossfourcategories:Basic,
Advanced,SecurityandWDS.
TheBasicscreendisplaysbasicsettingsforyouraccesspoint’s5GHzWi‐Fi
network(s).
WirelessEnableordisabletheaccesspoint’s5GHz
wirelessradio.Whendisabled,no5GHzSSIDs
willbeactive.
BandSelectthewirelessstandardusedforthe
accesspoint.Combinationsof802.11a,
802.11n&802.11accanbeselected.
EnableSSIDNumberSelecthowmanySSIDstoenableforthe5GHz
frequencyfromthedrop‐downmenu.A
maximumof16canbeenabled.
SSID#EntertheSSIDnameforthespecifiedSSID(up
to16).TheSSIDcanconsistofany
combinationofupto32alphanumeric
characters.
VLANIDSpecifyaVLANIDforeachSSID.
AutoChannelEnable/disableautochannelselection.Auto
channelselectionwillautomaticallysetthe
wirelesschannelfortheaccesspoint’s5GHz
frequencybasedonavailabilityandpotential

45
interference. Whendisabled,selectachannel
manuallyasshowninthenexttable.
AutoChannelRangeSelectarangefromwhichtheautochannel
setting(above)willchooseachannel.
AutoChannel
Interval
Specifyafrequencyforhowoftentheauto
channelsettingwillcheck/reassignthe
wirelesschannel.Check/uncheckthe“Change
channelevenifclientsareconnected”box
accordingtoyourpreference.
ChannelBandwidthSetthechannelbandwidth:20MHz(lower
performancebutlessinterference),Auto
40/20MHzorAuto80/40/20MHz
(automaticallyselectbasedoninterference
level).
BSSBasicRateSetSetaBasicServiceSet(BSS)rate:Thisisa
seriesofratestocontrolcommunication
framesforwirelessclients.

46
Whenautochannelisdisabled,selectawirelesschannelmanually:
Channel Selectawirelesschannel.
ChannelBandwidthSetthechannelbandwidth:20MHz(lower
performancebutlessinterference),Auto
40/20MHzorAuto80/40/20MHz
(automaticallyselectbasedoninterference
level).
BSSBasicRateSetSetaBasicServiceSet(BSS)rate:Thisisa
seriesofratestocontrolcommunication
framesforwirelessclients.
Thesesettingsareforexperiencedusersonly.It’srecommmendedthatyou
notchangeanyofthevaluesonthispageunlessyouarealreadyfamiliarwith
thesefunctions.
Changingthesesettingscanadverselyaffecttheperformanceof
youraccesspoint.

47
GuardIntervalSettheguardinterval. Ashorterintervalcan
improveperformance.
802.11nProtectionEnable/disable802.11nprotection,which
increasesreliabilitybutreducesbandwidth.
(ClientswillsendaRequesttoSend(RTS)to
theaccesspoint,andtheaccesspointwill
broadcastCleartoSend(CTS)beforeapacket
issentfromtheclient.)
DTIMPeriodSettheDTIM(deliverytrafficindication
message)periodvalueofthewirelessradio.
Thedefaultvalueis1.
RTSThreshold SettheRTSthresholdofthewirelessradio.The
defaultvalueis2347.
Fragment
Threshold
Setthefragmentthresholdofthewireless
radio.Thedefaultvalueis2346.
MulticastRateSetthetransferrateformulticastpacketsor
usethe“Auto”setting.
TxPowerSetthepoweroutputofthewirelessradio.You
maynotrequire100%outputpower.Settinga
lowerpoweroutputcanenhancesecuritysince
potentiallymalicious/unknownusersindistant
areaswillnotbeabletoaccessyoursignal.
BeaconIntervalSetthebeaconintervalofthewirelessradio.
Thedefaultvalueis100.
Stationidle
timeout
Settheintervalforkeepalivemessagesfrom
theaccesspointtoawirelessclienttoverifyif
thestationisstillalive/active.

48
Theaccesspointprovidesvarioussecurityoptions(wirelessdataencryption).
Whendataisencrypted,informationtransmittedwirelesslycannotbereadby
anyonewhodoesnotknowthecorrectencryptionkey.
It’sessentialtoconfigurewirelesssecurityinordertoprevent
unauthorizedaccesstoyournetwork.
Selecthard‐to‐guesspasswordswhichincludecombinationsof
numbers,lettersandsymbols,andchangeyourpassword
regularly.
SSIDSelectionSelectwhichSSIDtoconfiguresecuritysettings
for.
BroadcastSSIDEnableordisableSSIDbroadcast.When
enabled,theSSIDwillbevisibletoclientsasan
availableWi‐Finetwork.Whendisabled,the
SSIDwillnotbevisibleasanavailableWi‐Fi
networktoclients–clientsmustmanually
entertheSSIDinordertoconnect.Ahidden
(disabled)SSIDistypicallymoresecurethana
visible(enabled)SSID.

49
WirelessClient
Isolation
Enableordisablewirelessclientisolation.
Wirelessclientisolationpreventsclients
connectedtotheaccesspointfrom
communicatingwitheachotherandimproves
security.Typically,thisfunctionisusefulfor
corporateenvironmentsorpublichotspots
andcanpreventbruteforceattacksonclients’
usernamesandpasswords.
LoadBalancingLoadbalancinglimitsthenumberofwireless
clientsconnectedtoanSSID.Setaload
balancingvalue(maximum50).
Authentication
Method
Selectanauthenticationmethodfromthe
drop‐downmenuandrefertotheinformation
belowthatisappropriateforyourmethod.
Additional
Authentication
Selectanadditionalauthenticationmethod
fromthedrop‐downmenuandrefertothe
informationbelowthatisappropriateforyour
method.
ReferbacktoIV‐3‐1‐3.Securityformoreinformationonauthenticationand
additionalauthenticationtypes.
WirelessDistributionSystem(WDS)canbridge/repeataccesspointstogether
inanextendednetwork.WDSsettingscanbeconfiguredasshownbelow.
WhenusingWDS,configuretheIPaddressofeachaccesspointto
beinthesamesubnetandensurethereisonlyoneactiveDHCP
serveramongconnectedaccesspoints,preferablyontheWAN
side.
WDSmustbeconfiguredoneachaccesspoint,usingcorrectMACaddresses.
Allaccesspointsshouldusethesamewirelesschannelandencryption
method.

50
5GHzWDSMode
WDSFunctionalitySelect“WDSwithAP”touseWDSwithaccess
pointor“DedicatedWDS”touseWDSandalso
blockcommunicationwithregularwireless
clients.WhenWDSisused,eachaccesspoint
shouldbeconfiguredwithcorrespondingMAC
addresses,wirelesschannelandwireless
encryptionmethod.
LocalMACAddressDisplaystheMACaddressofyouraccesspoint.
WDSPeerSettings
WDS#EntertheMACaddressforuptofourother
WDAdevicesyouwishtoconnect.

51
WDSVLAN
VLANModeSpecifytheWDSVLANmode to“Untagged
Port” or“TaggedPort.”
VLANIDSpecifytheWDSVLANID when“Untagged
Port” isselectedabove.
WDSEncryption
EncryptionSelectwhethertouse“None”or“AES”
encryptionandenterapre‐sharedkeyforAES
with8‐63alphanumericcharacters.

52
IV‐3‐3.WPS
Wi‐FiProtectedSetupisasimplewaytoestablishconnectionsbetweenWPS‐
compatibledevices.WPScanbeactivatedoncompatibledevicesbypushinga
WPSbuttononthedeviceorfromwithinthedevice’sfirmware/configuration
interface(knownasPBCor“PushButtonConfiguration”).WhenWPSis
activatedinthecorrectmannerandatthecorrecttimefortwocompatible
devices,theywillautomaticallyconnect.“PINcodeWPS”isavariationofPBC
whichincludestheadditionaluseofaPINcodebetweenthetwodevicesfor
verification.
Refertothemanufacturer’sinstructionsforyourotherWPS
device.

53
WPSCheck/uncheckthisboxtoenable/disableWPS
functionality.WPSmustbedisabledwhen
usingMACRADIUSauthentication(seeIV‐3‐1‐
3‐6&IV‐3‐4).
ProductPINDisplaystheWPSPINcodeofthedevice,used
forPINcodeWPS.Youwillberequiredtoenter
thisPINcodeintoanotherWPSdeviceforPIN
codeWPS.Click“GeneratePIN”togeneratea
newWPSPINcode.
Push‐ButtonWPSClick“Start”toactivateWPSontheaccess
pointforapproximately2minutes.Thishasthe
sameeffectasphysicallypushingtheaccess
point’sWPSbutton.
WPSbyPINEnterthePINcodeofanotherWPSdeviceand
click“Start”toattempttoestablishaWPS
connectionforapproximately2minutes.
WPSStatusWPSsecuritystatusisdisplayedhere.Click
“Release”tocleartheexistingstatus.
54
IV‐3‐4.RADIUS
TheRADIUSsubmenuallowsyoutoconfiguretheaccesspoint’sRADIUS
serversettings,categorizedintothreesubmenus:RADIUSsettings,Internal
ServerandRADIUSaccounts.
ARADIUSserverprovidesuser‐basedauthenticationtoimprovesecurityand
offerwirelessclientcontrol–userscanbeauthenticatedbeforegaining
accesstoanetwork.
Theaccesspointcanutilizebothaprimaryandsecondary(backup)RADIUS
serverforeachofitswirelessfrequencies(2.4GHz&5GHz).ExternalRADIUS
serverscanbeusedortheaccesspoint’sinternalRADIUSservercanbeused.
TouseRADIUSservers,goto“WirelessSettings”
“Security”and
select“MACRADIUSAuthentication”
“Additional
Authentication”andselect“MACRADIUSAuthentication”(seeIV‐
3‐1‐3.&IV‐3‐2‐3).
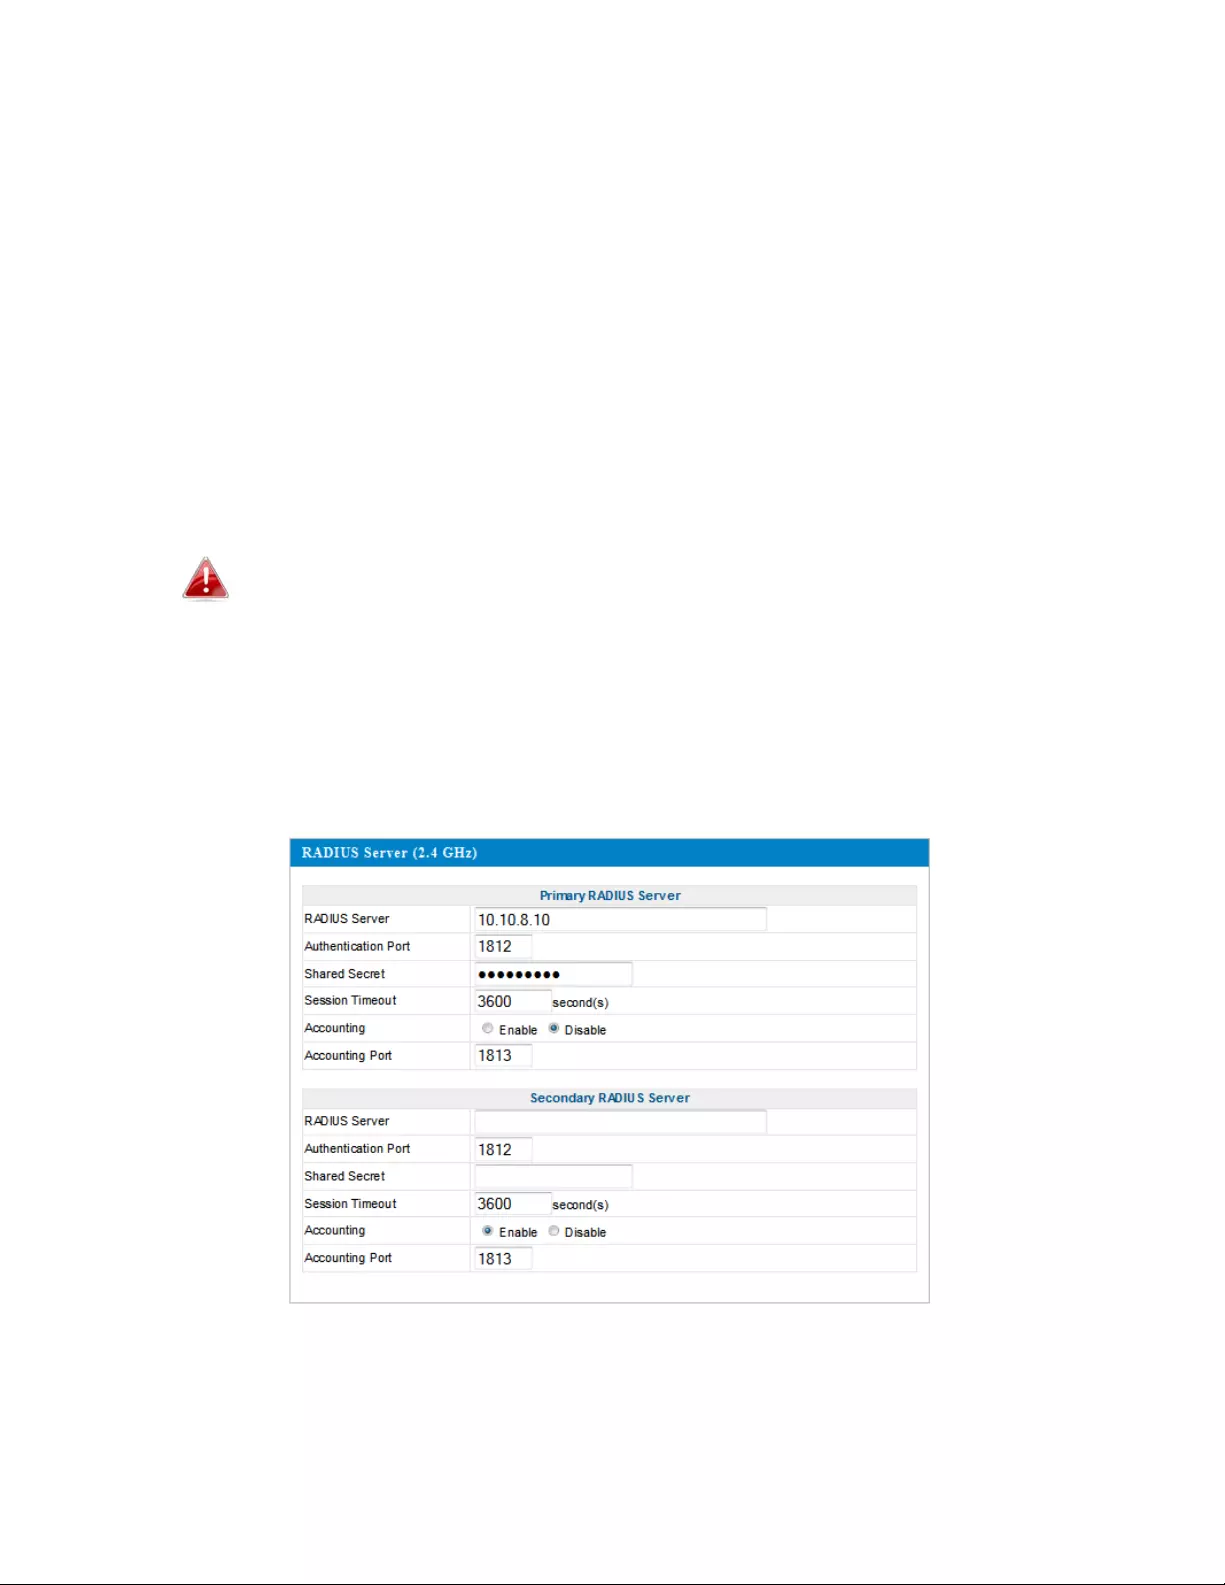
ConfiguretheRADIUSserversettingsfor2.4GHz&5GHz.Eachfrequencycan
useaninternalorexternalRADIUSserver.

55
RADIUSTypeSelect“Internal”tousetheaccesspoint’sbuilt‐
inRADIUSserveror“external”tousean
externalRADIUSserver.
RADIUSServerEntertheRADIUSserverhostIPaddress.
Authentication
Port
SettheUDPportusedintheauthentication
protocoloftheRADIUSserver.Valuemustbe
between1
–
65535.
SharedSecretEnterasharedsecret/passwordbetween1
–
99charactersinlength.Thisshouldmatchthe
“MACRADIUS”passwordusedinIV‐3‐1‐3‐6or
IV‐3‐2‐3.
SessionTimeoutSetadurationofsessiontimeoutinseconds
between0–86400.
AccountingEnableordisableRADIUSaccounting.
AccountingPortWhenaccountingisenabled(above),setthe
UDPportusedintheaccountingprotocolof
theRADIUSserver.Valuemustbebetween1–
65535.

56
Theaccesspointfeaturesabuilt‐inRADIUSserverwhichcanbeconfiguredas
shownbelowusedwhen“Internal”isselectedfor“RADIUSType”inthe
“WirelessSettings”“RADIUS”“RADIUSSettings”menu.
TouseRADIUSservers,goto“WirelessSettings”
“Security”and
select“MACRADIUSAuthentication”
“Additional
Authentication”andselect“MACRADIUSAuthentication”(seeIV‐
3‐1‐3.&IV‐3‐2‐3).
InternalServerCheck/unchecktoenable/disabletheaccess
point’sinternalRADIUSserver.
EAPInternal
Authentication
SelectEAPinternalauthenticationtypefrom
thedropdownmenu.
EAPCertificateFile
Format
DisplaystheEAPcertificatefileformat:
PCK#12(*.pfx/*.p12)
EAPCertificateFileClick“Upload”toopenanewwindowand
selectthelocationofanEAPcertificatefileto
use.Ifnocertificatefileisuploaded,the
internalRADIUSserverwilluseaself‐made
certificate.
SharedSecretEnterasharedsecret/passwordforuse
betweentheinternalRADIUSserverand
RADIUSclient.Thesharedsecretshouldbe1–
99charactersinlength.Thisshouldmatchthe
“MACRADIUS”passwordusedinIV‐3‐1‐3‐6or
IV‐3‐2‐3.

57
SessionTimeoutSetadurationofsessiontimeoutinseconds
between0–86400.
TerminationActionSelectatermination‐actionattribute:
“Reauthentication”sendsaRADIUSrequestto
theaccesspoint,“Not‐Reathentication”sends
adefaulttermination‐actionattributetothe
accesspoint,“Not‐Send”notermination‐
actionattributeissenttotheaccesspoint.
TheinternalRADIUSservercanauthenticateupto256useraccounts.The
RADIUSAccountspageallowsyoutoconfigureandmanageusers.

58
UserNameEntertheusernameshere,separatedby
commas.
AddClick“Add”toaddtheusertotheuser
registrationlist.
ResetCleartextfromtheusernamebox.
SelectChecktheboxtoselectauser.
UserNameDisplaystheusername.
PasswordDisplaysifspecifiedusernamehasapassword
(configured)ornot(notconfigured).
CustomizeClick“Edit”toopenanewfieldtoset/edita
passwordforthespecifiedusername(below).
DeleteSelectedDeleteselecteduserfromtheuserregistration
list.
DeleteAllDeleteallusersfromtheuserregistrationlist.
EditUserRegistrationList
UserNameExistingusernameisdisplayedhereandcanbe
editedaccordingtoyourpreference.
PasswordEnteroreditapasswordforthespecifieduser.

59
IV‐3‐5.MACFilter
MAC(mediaaccesscontrol)filteringisasecurityfeaturethatcanhelpto
preventunauthorizedusersfromconnectingtoyouraccesspoint.
Thisfunctionallowsyoutodefinealistofnetworkdevicespermittedto
connecttotheaccesspoint.DevicesareeachidentifiedbytheiruniqueMAC
address.IfadevicewhichisnotonthelistofpermittedMACaddresses
attemptstoconnecttotheaccesspoint,itwillbedenied.
ToenableMACfiltering,goto“WirelessSettings”
“2.4GHz
11bgn/5GHz11ac11an”
“Security”
“Additional
Authentication”andselect“MACFilter”(seeIV‐3‐1‐3.&IV‐3‐2‐3).
TheMACaddressfilteringtableisdisplayedbelow:

60
AddMACAddressEnteraMACaddressofcomputerornetwork
devicemanually;e.g.,“aa‐bb‐cc‐dd‐ee‐ff”;or
entermultipleMACaddressesseparatedwith
commas;e.g.,“aa‐bb‐cc‐dd‐ee‐ff,aa‐bb‐cc‐dd‐
ee‐gg.”
AddClick“Add”toaddtheMACaddresstothe
MACaddressfilteringtable.
ResetClearallfields.
MACaddressentrieswillbelistedintheMACAddressFilteringTable.Select
anentryusingthe“Select”checkbox.
SelectDeleteselectedorallentriesfromthetable.
MACAddressTheMACaddressislistedhere.
DeleteSelectedDeletetheselectedMACaddressfromthe
list.
DeleteAllDeleteall entriesfromtheMACaddress
filteringtable.
ExportClick“Export”tosaveacopyoftheMAC
filteringtable.Anewwindowwillpopupfor
youtoselectalocationtosavethefile.

61
IV‐3‐6.WMM
Wi‐FiMultimedia(WMM)isaWi‐FiAllianceinteroperabilitycertification
basedontheIEEE802.11estandard,whichprovidesQualityofService(QoS)
featurestoIEEE802.11networks.WMMprioritizestrafficaccordingtofour
categories:background,besteffort,videoandvoice.
ConfiguringWMMconsistsofadjustingparametersonqueuesfordifferent
categoriesofwirelesstraffic.Trafficissenttothefollowingqueues:
BackgroundLow
Priority
Highthroughput,non‐time‐sensitivebulk
data; e.g., FTP
BestEffortMedium
Priority
TraditionalIPdata,medium throughputand
delay.
VideoHigh
Priority
Time‐sensitivevideodatawithminimum
timedelay.
VoiceHigh
Priority
Time‐sensitivedatasuchasVoIPand
streamingmediawithminimumtimedelay.

62
Queuesautomaticallyprovideminimumtransmissiondelaysforvideo,voice,
multimediaandcriticalapplications.Thevaluescanfurtherbeadjusted
manually:
CWMinMinimumContentionWindow(milliseconds):
Thisvalueisinputtotheinitialrandom
backoffwaittimealgorithmforretryofadata
frametransmission.Thebackoffwaittimewill
begeneratedbetween0andthisvalue.Ifthe
frameisnotsent,therandombackoffvalueis
doubleduntilthevaluereachesthenumber
definedbyCWMax(below).TheCWMinvalue
mustbelowerthantheCWMaxvalue.The
contentionwindowschemehelpstoavoid
framecollisionsanddeterminepriorityof
frametransmission.Ashorterwindowhasa
higherprobability(priority)oftransmission.
CWMaxMaximumContentionWindow(milliseconds):
Thisvalueistheupperlimittorandom
backoffvaluedoubling(seeabove).
AIFSNArbitrationInter‐FrameSpace(milliseconds):
Specifiesadditionaltimebetweenwhena
channelgoesidleandtheAP/clientsends
dataframes.TrafficwithalowerAIFSNvalue
hasahigherpriority.
TxOPTransmissionOpportunity(milliseconds):The
maximumintervaloftimeanAP/clientcan
transmit.Thismakeschannelaccessmore
efficientlyprioritized.Avalueof0meansonly
oneframepertransmission.Agreatervalue
effectshigherpriority.
63
IV‐4.Management
Screenshotsdisplayedareexamples.Theinformationshownon
yourscreenwillvarydependingonyourconfiguration.
IV‐4‐1.Admin
Youcanchangethepasswordusedtologintothebrowser‐based
configurationinterfacehere.Itisadvisedyoudosoforsecuritypurposes.
Ifyouchangetheadministratorpassword,makeanoteofthe
newpassword.Intheeventthatyouforgetthispasswordand
areunabletologintothebrowser‐basedconfiguration
interface,seeI‐5.Resetforhowtoresettheaccesspoint.

64
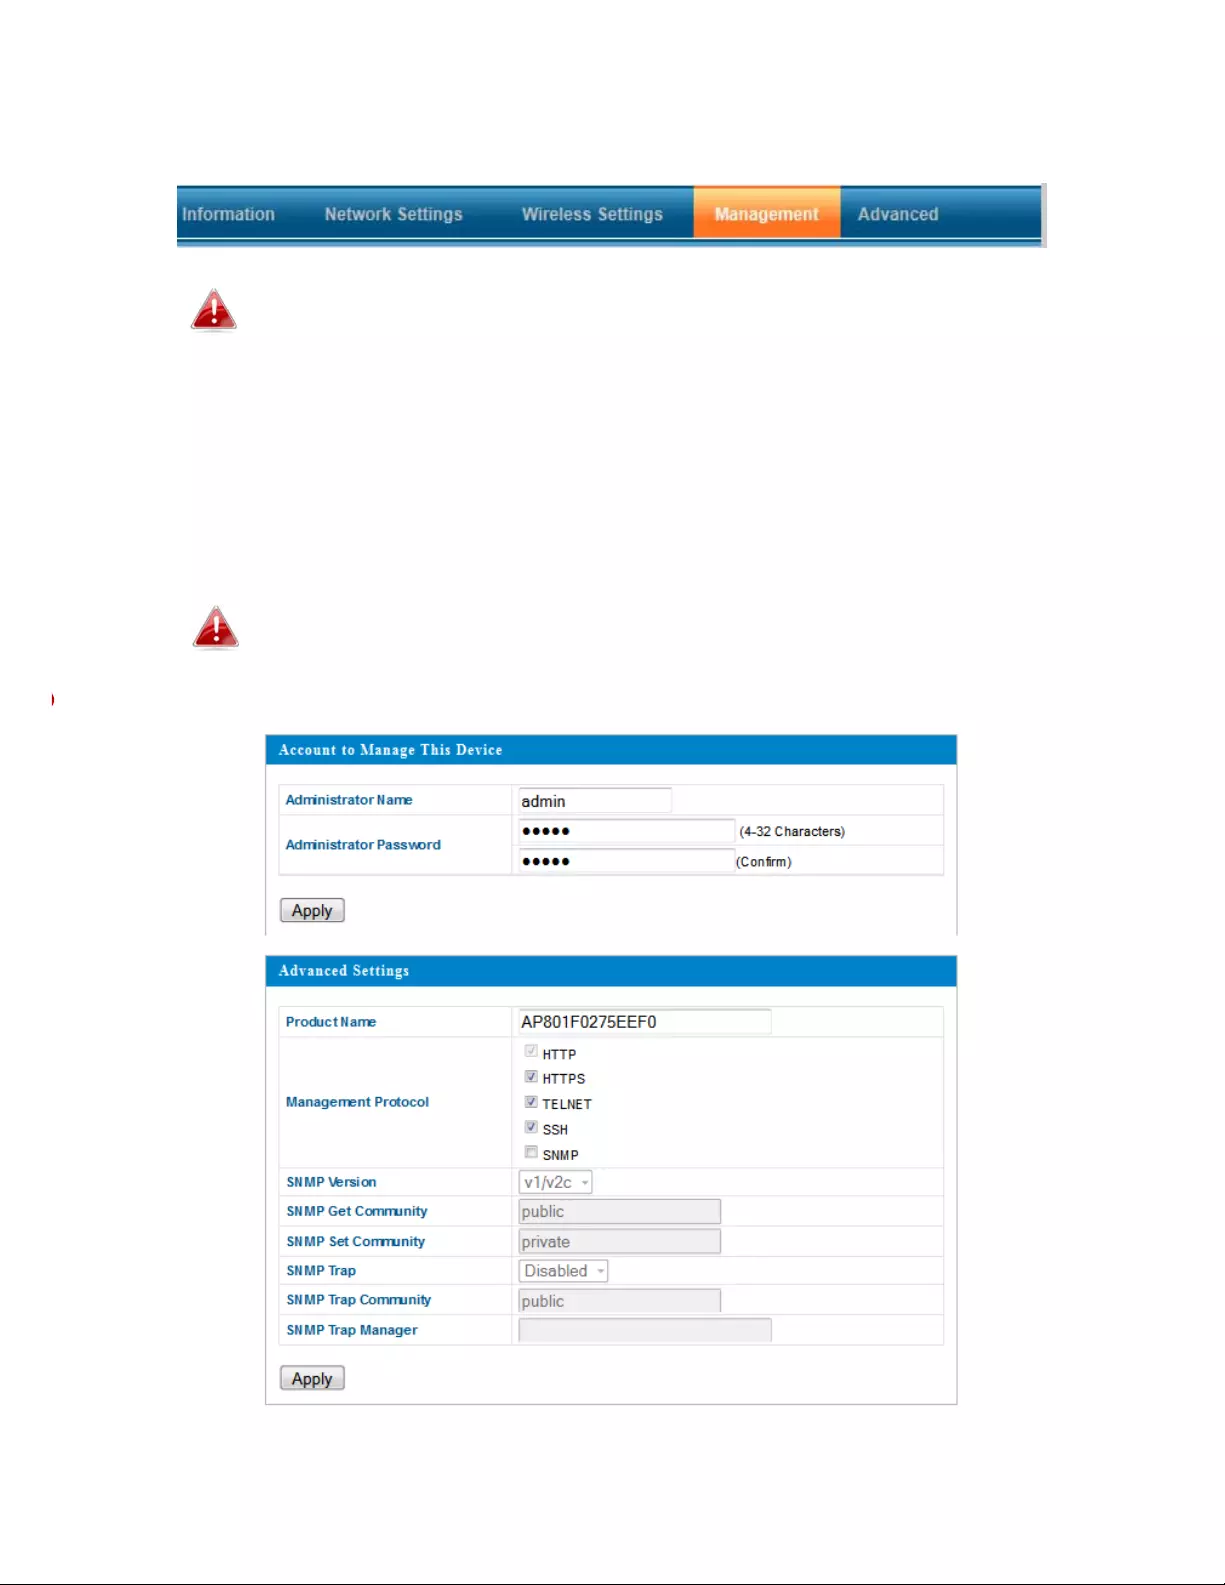
AccounttoManageThisDevice
Administrator
Name
Settheaccesspoint’sadministratorname.
Thisisusedtologintothebrowser‐based
configurationinterfaceandmustbebetween
4‐16alphanumericcharacters(casesensitive).
Administrator
Password
Settheaccesspoint’sadministratorpassword.
Thisisusedtologintothebrowser‐based
configurationinterfaceandmustbebetween
4‐32alphanumericcharacters(casesensitive).
AdvancedSettings
ProductNameEdittheproductnameaccordingtoyour
preferenceconsistingof1‐32alphanumeric
characters.Thisnameisusedforreference
purposes.
Management
Protocol
Check/unchecktheboxestoenable/disable
specifiedmanagementinterfaces(seebelow).
WhenSNMPisenabled,completetheSNMP
fieldsbelow.
SNMPVersionSelectSNMPversionappropriateforyour
SNMPmanager.
SNMPGet
Community
EnteranSNMPGetCommunitynamefor
verificationwiththeSNMPmanagerfor
SNMP‐GETrequests.
SNMPSet
Community
EnteranSNMPSetCommunitynamefor
verificationwiththeSNMPmanagerfor
SNMP‐SETrequests.
SNMPTrapEnableordisableSNMPTraptonotifySNMP
managerofnetworkerrors.
SNMPTrap
Community
Enteran SNMPTrapCommunitynamefor
verificationwiththeSNMPmanagerfor
SNMP‐TRAPrequests.
SNMPTrap
Manager
SpecifytheIPaddressorservername(2‐128
alphanumericcharacters)oftheSNMP
manager.

65
HTTP
InternetbrowserHTTPprotocolmanagementinterface
HTTPS
InternetbrowserHTTPSprotocolmanagementinterface
TELNET
ClientterminalwithTelnetprotocolmanagementinterface
SSH
ClientterminalwithSSHprotocolversion1or2managementinterface
SNMP
SimpleNetworkManagementProtocol.SNMPv1,v2&v3protocolsupported.
SNMPv2canbeusedwithcommunitybased‐authentication.SNMPv3uses
user‐basedsecuritymodel(USM)architecture.
66
IV‐4‐2.DateandTime
Youcanconfigurethetimezonesettingsofyouraccesspointhere.Thedate
andtimeofthedevicecanbeconfiguredmanuallyorcanbesynchronized
withatimeserver.
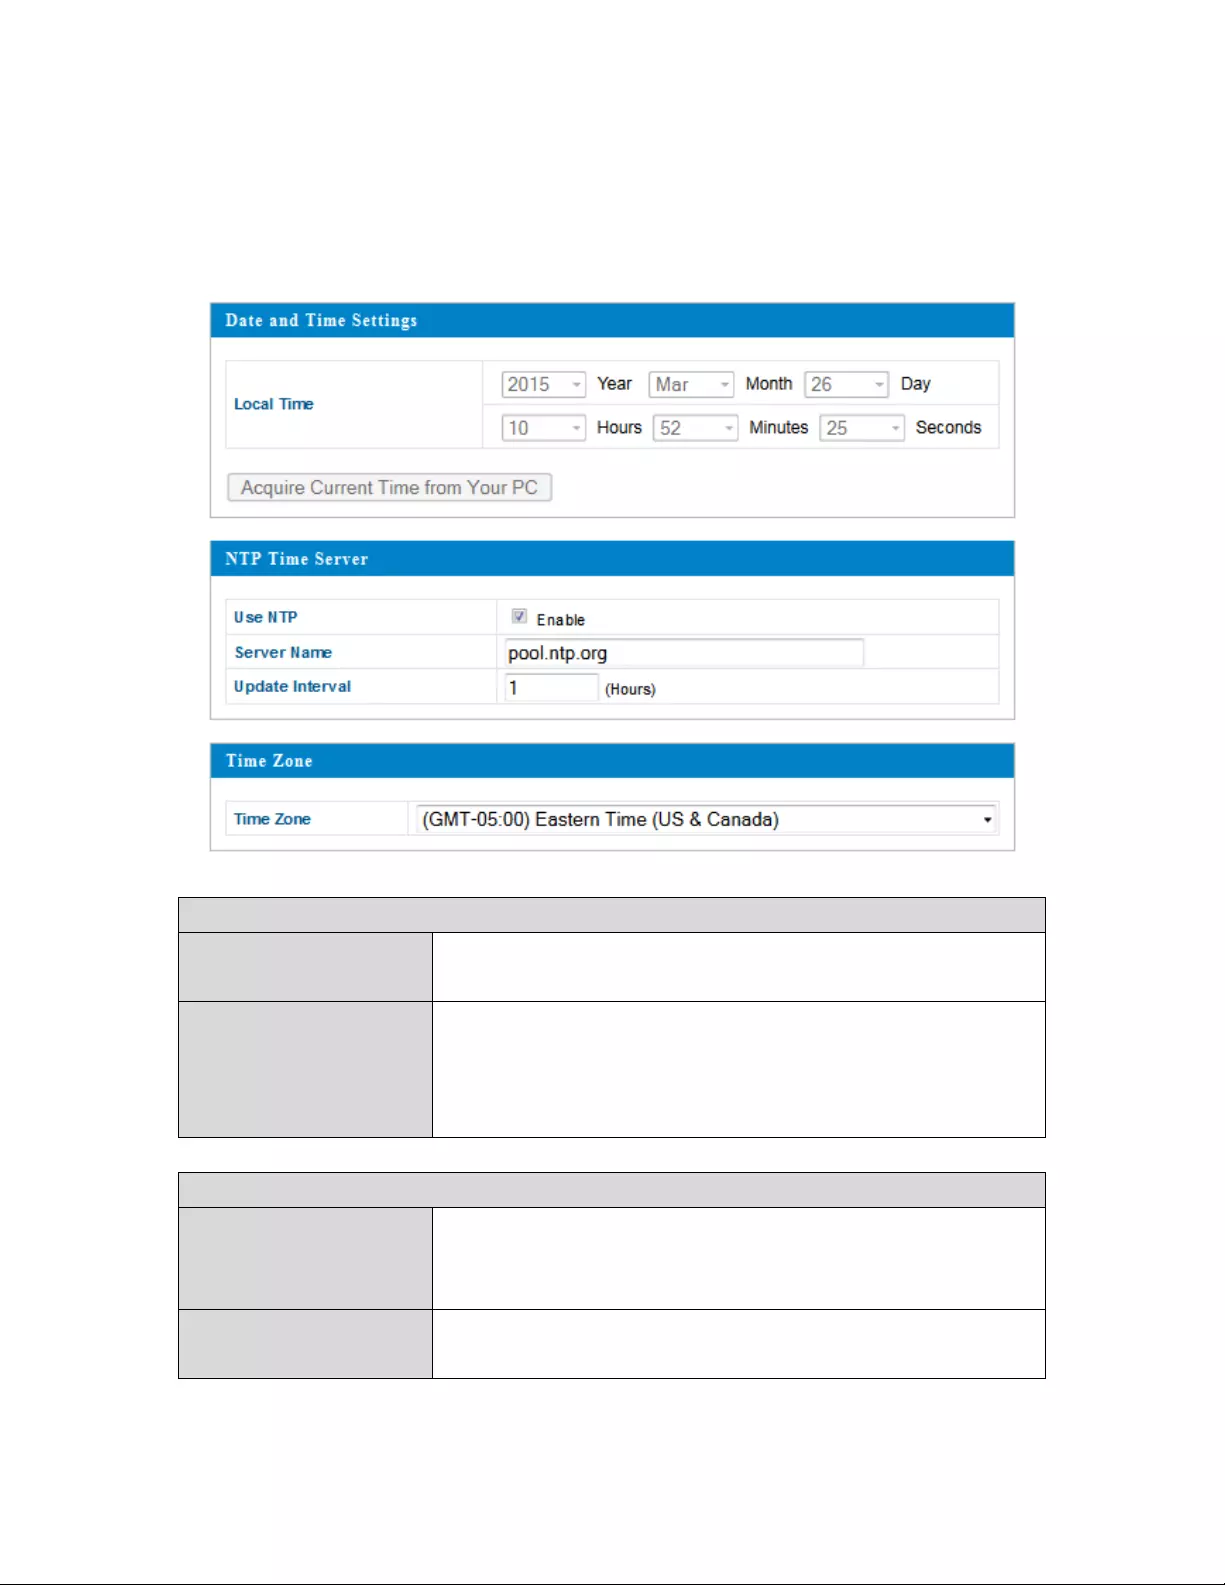
DateandTimeSettings
LocalTimeSettheaccesspoint’sdateandtimemanually
usingthedrop‐downmenus.
AcquireCurrent
TimefromyourPC
Click“AcquireCurrentTimefromYourPC”to
entertherequiredvaluesautomatically
accordingtoyourcomputer’scurrenttimeand
date.
NTPTimeServer
UseNTPTheaccesspointalsosupportsNTP(Network
TimeProtocol)forautomatictimeanddate
setup.
ServerNameEnter thehostnameorIPaddressofthetime
serverifyouwish.

67
UpdateIntervalSpecifyafrequency(inhours)fortheaccess
pointtoupdate/synchronizewiththeNTP
server.
TimeZone
TimeZoneSelect thetimezoneofyourcountry/region.If
yourcountry/regionisnotlisted,selectanother
country/regionwhosetimezoneisthesameas
yours.

68
IV‐4‐3.SyslogServer
Thesystemlogcanbesenttoaserver.
TransferLogsCheck/unchecktheboxtoenable/disablethe
useofasyslogserver,andenterahostname,
domainorIPaddressfortheserver
consistingofupto128alphanumeric
characters.
Theremotelogfunctionusesthe
SyslogProtocol,whichisastandardfor
forwardinglogmessagesinanIP
network.Syslogisaclient/server
protocol.TheSyslogsender(the
NetworkCamera)sendsasmall(less
than1KB)textualmessagetothe
Syslogserver.Thisusermanualshows
oneexampleofaSyslogserver,the
3CDaemonutilityby3ComCorp.

69
IV‐4‐4.I’mhere!
TheIntellinetAC1200AccessPointfeaturesabuilt‐inbuzzerwhichcansound
oncommandusingthe“I’mHere”page.Thisisusefulfornetwork
administratorsandengineersworkingincomplexnetworkenvironmentsto
locatetheaccesspoint.
Thebuzzerisloud!
DurationofSoundSetthedurationforwhichthebuzzerwillsoundwhenthe
“SoundBuzzer”buttonisclicked.
SoundBuzzerActivatethebuzzersoundfortheabovespecifiedduration
oftime.
70
IV‐5.Advanced
Screenshotsdisplayedareexamples.Theinformationshownon
yourscreenwillvarydependingonyourconfiguration.
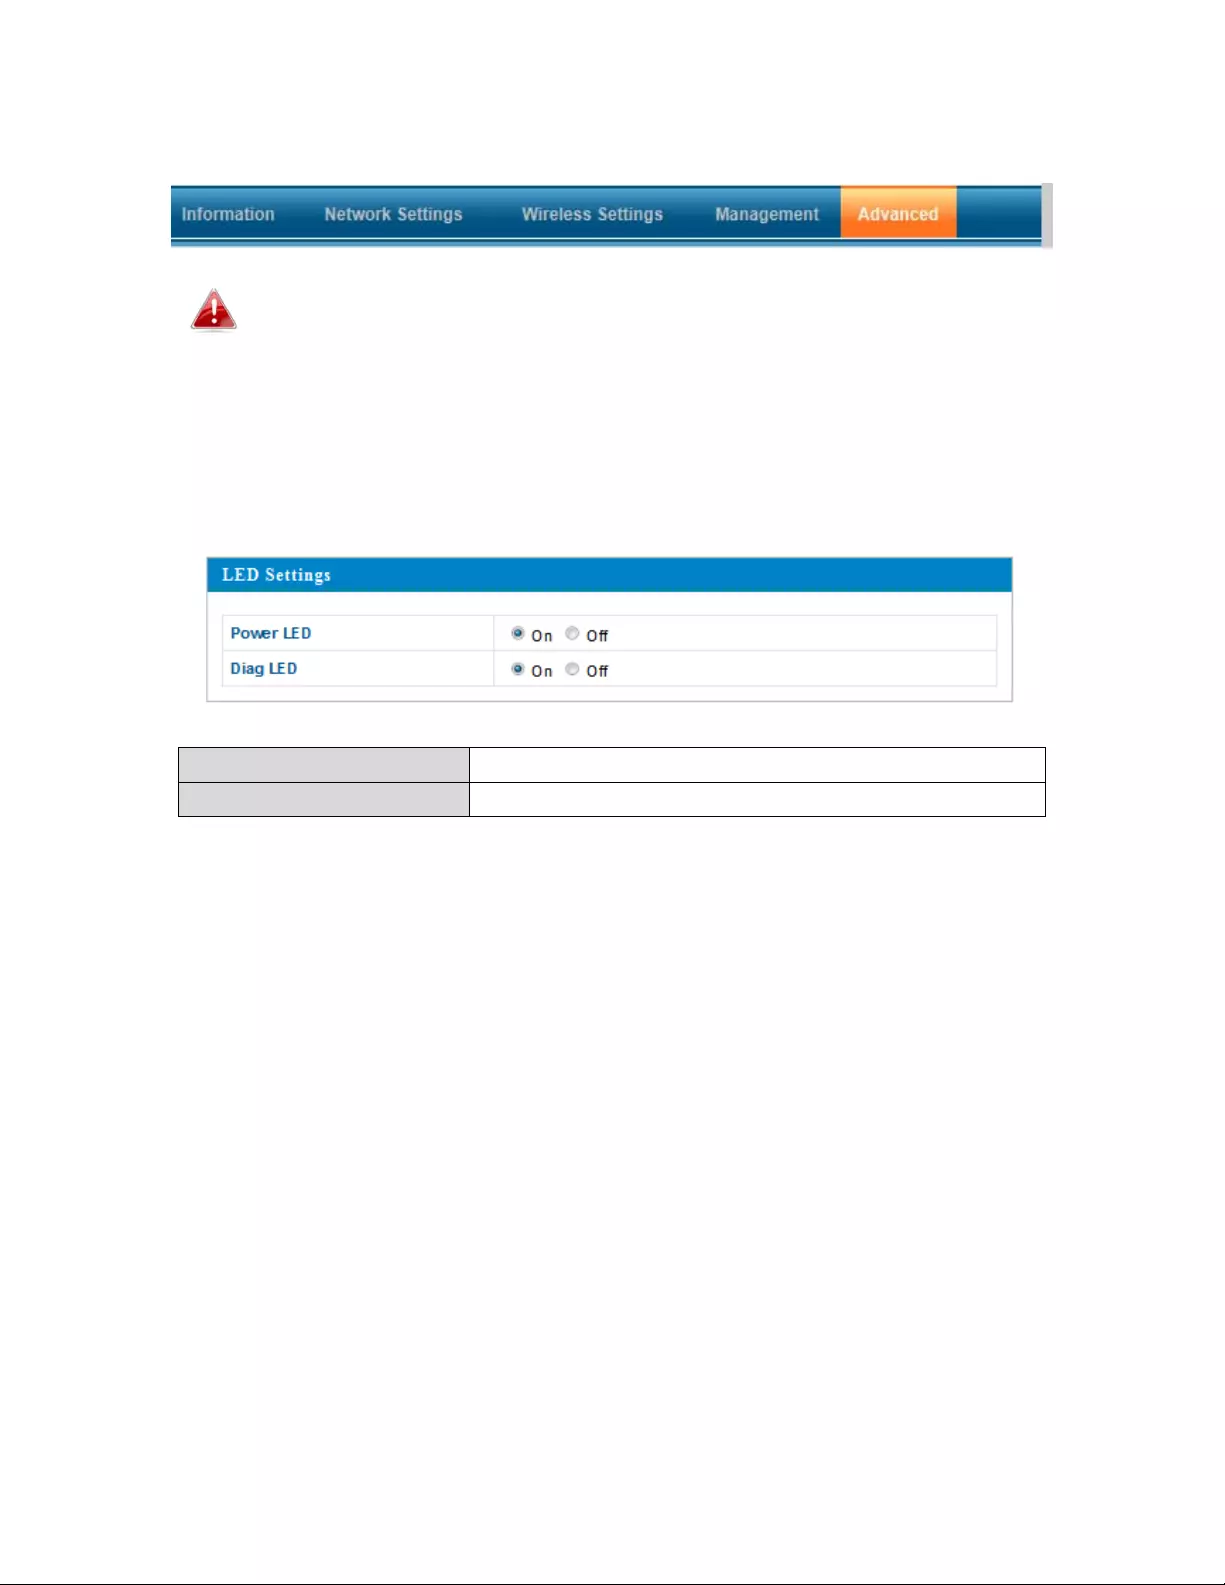
IV‐5‐1.LEDSettings
Theaccesspoint’sLEDscanbemanuallyenabledordisabledaccordingto
yourpreference.
PowerLEDSelectonoroff.
DiagLEDSelectonoroff.

71
IV‐5‐2.UpdateFirmware
TheFirmwarepageallowsyoutoupdatethesystemfirmwaretoamore
recentversion.Updatedfirmwareversionsoftenofferincreasedperformance
andsecurity,aswellasbugfixes.Youcandownloadthelatestfirmwarefrom
thewebsite.
Donotswitchoffordisconnecttheaccesspointduringafirmware
upgrade,asthiscoulddamagethedevice.
UpdateFirmware
From
Select“afileonyourPC”touploadfirmware
fromyourlocalcomputer.
FirmwareUpdateFileClick“Browse”toopen anewwindowto
locateandselectthefirmwarefileinyour
computer.
UpdateClick“Update”touploadthespecified
firmwarefiletoyouraccesspoint.
72
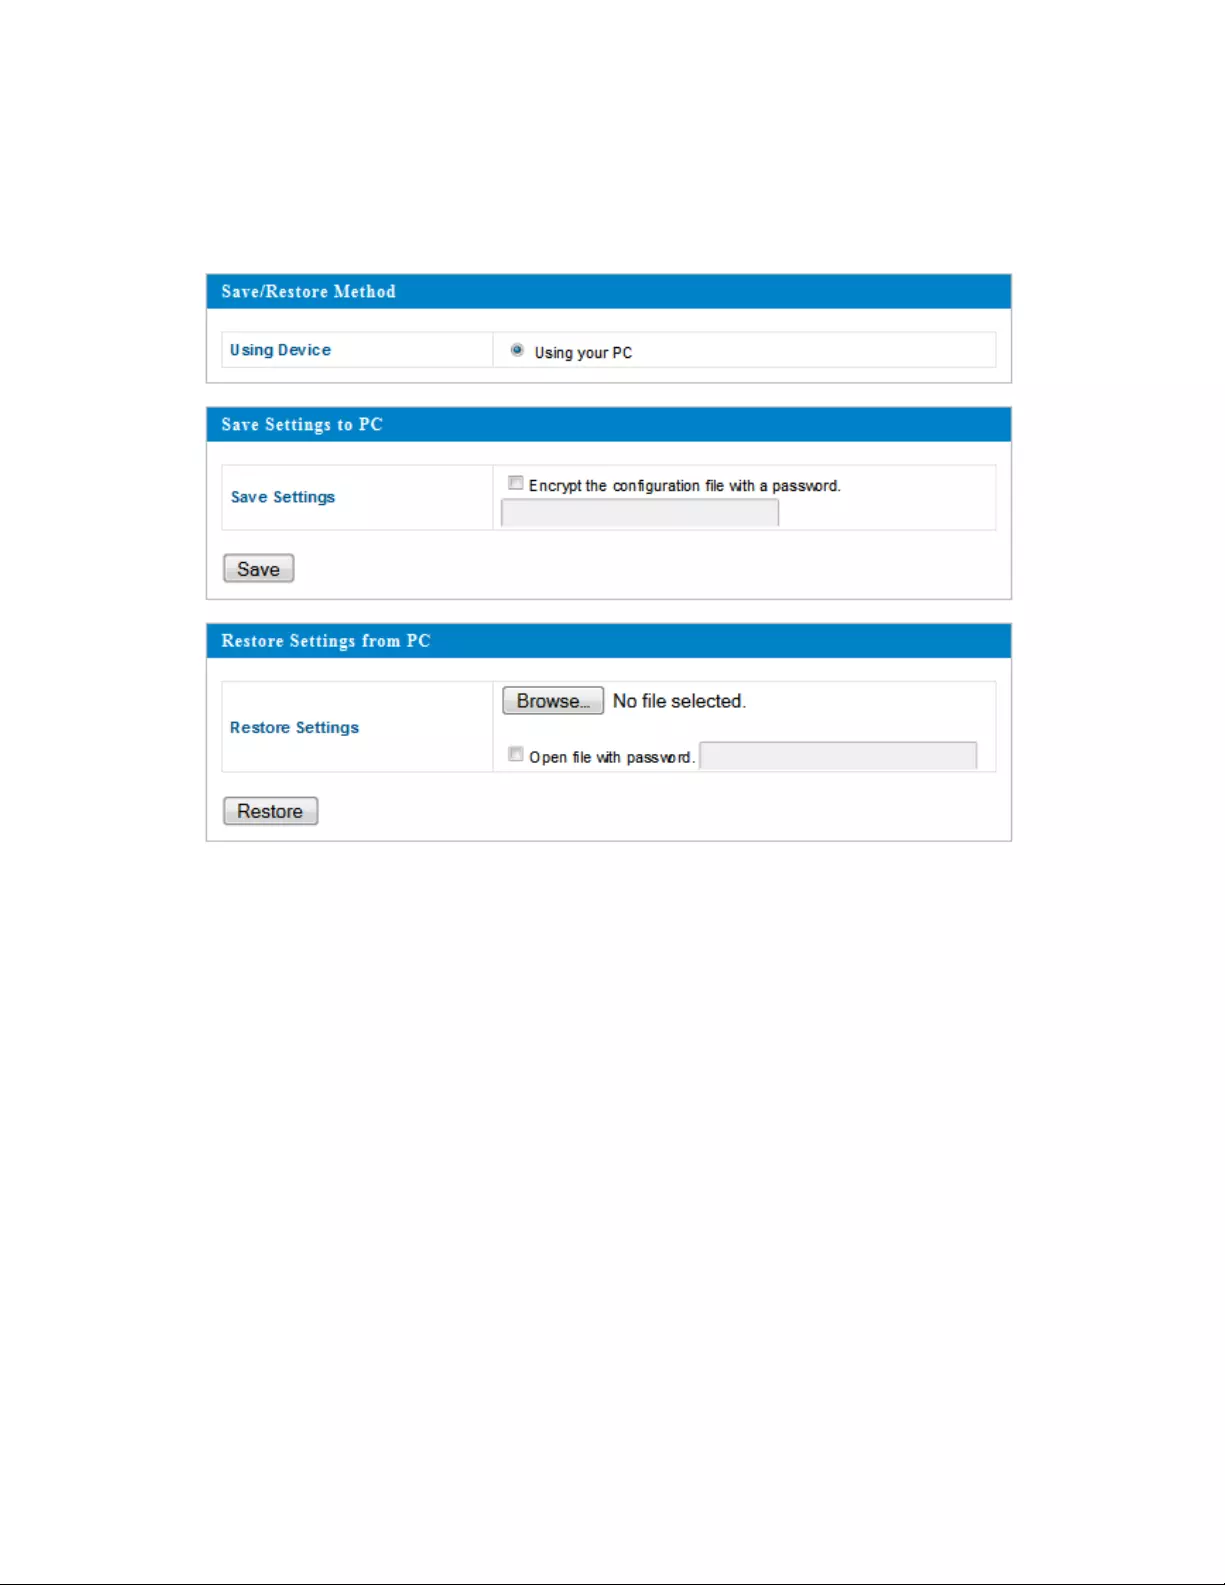
IV‐5‐3.Save/RestoreSettings
Theaccesspoint’sSave/RestoreSettingspageenablesyoutosave/backup
theaccesspoint’scurrentsettingsasafiletoyourlocalcomputer,andrestore
theaccesspointtopreviouslysavedsettings.

73
Save/RestoreSettings
UsingDeviceSelect“UsingyourPC”tosavetheaccess
point’ssettingstoyourlocalcomputer.
SaveSettingstoPC
SaveSettingsClick“Save”tosavesettings.Anewwindow
willopentospecifyalocationtosavethe
settingsfile.Youcanalsocheckthe“Encrypt
theconfigurationfilewithapassword”box
andenterapasswordtoprotectthefilein
thefieldunderneath,ifyouwish.
RestoreSettingsfromPC
RestoreSettingsClickthebrowsebuttontofindapreviously
savedsettingsfileonyourcomputer,then
click“Restore”toreplaceyourcurrent
settings.Ifyoursettingsfileisencryptedwith
apassword,checkthe“Openfilewith
password”boxandenterthepasswordin
thefieldunderneath.

74
IV‐5‐4.FactoryDefault
Iftheaccesspointmalfunctionsorisnotresponding,thenitisrecommended
thatyourebootthedevice(seeIV‐5.5)orresetthedevicebacktoitsfactory
defaultsettings.Youcanresettheaccesspointbacktoitsdefaultsettings
usingthisfeatureifthelocationoftheaccesspointisnotconvenientto
accesstheresetbutton.
FactoryDefaultClick“FactoryDefault” torestoresettingsto
thefactorydefault.Apop‐upwindowwill
appearandaskyoutoconfirm.
Afterresettingtofactorydefaults,waitfortheaccesspointto
resetandrestart.

75
IV‐5‐5.Reboot
Iftheaccesspointmalfunctionsorisnotresponding,thenitisrecommended
thatyourebootthedeviceorresettheaccesspointbacktoitsfactorydefault
settings(seeIV‐5‐4).Youcanreboottheaccesspointremotelyusingthis
feature.
RebootClick“Reboot”torebootthedevice.A
countdownwillindicatetheprogressofthe
reboot.

76
V. Appendix
V‐1.ConfiguringyourIPaddress
TheaccesspointusesthedefaultIPaddress192.168.2.1.Inordertoaccess
thebrowser‐basedconfigurationinterface,youneedtomodifytheIPaddress
ofyourcomputertobeinthesameIPaddresssubnet;e.g.,192.168.2.x(x=3
–254).
TheprocedureformodifyingyourIPaddressvariesacrossdifferentoperating
systems.Followtheguideappropriateforyouroperatingsystem.
Inthefollowingexamples,weusetheIPaddress192.168.2.10thoughyoucan
useanyIPaddressintherange192.168.2.x(x=3–254).

77
V‐1‐1.WindowsXP
1. Clickthe“Start”button(itshouldbelocatedinthelower‐leftcornerof
yourcomputer),thenclick“ControlPanel.”Double‐clickthe“Networkand
InternetConnections”icon,click“NetworkConnections,”thendouble‐click
“LocalAreaConnection.”TheLocalAreaConnectionStatuswindowwill
thenappear.Click“Properties.”
2. Select“UsethefollowingIPaddress,”theninputthefollowingvalues:
IPaddress:192.168.2.10
Subnetmask:255.255.255.0
Click“OK”whenfinished.

78

79
V‐1‐2.WindowsVista
1. Clickthe“Start”button(itshouldbelocatedinthelower‐leftcornerof
yourcomputer),thenclick“ControlPanel.”Click“ViewNetworkStatusand
Tasks,”thenclick“ManageNetworkConnections.”Right‐click“LocalArea
Network,”thenselect“Properties.”TheLocalAreaConnectionProperties
windowwillthenappear.Select“InternetProtocolVersion4(TCP/IPv4),”
andthenclick“Properties.”
2. Select“UsethefollowingIPaddress,”theninputthefollowingvalues:
IPaddress:192.168.2.10
Subnetmask:255.255.255.0
Click“OK”whenfinished.

80
81
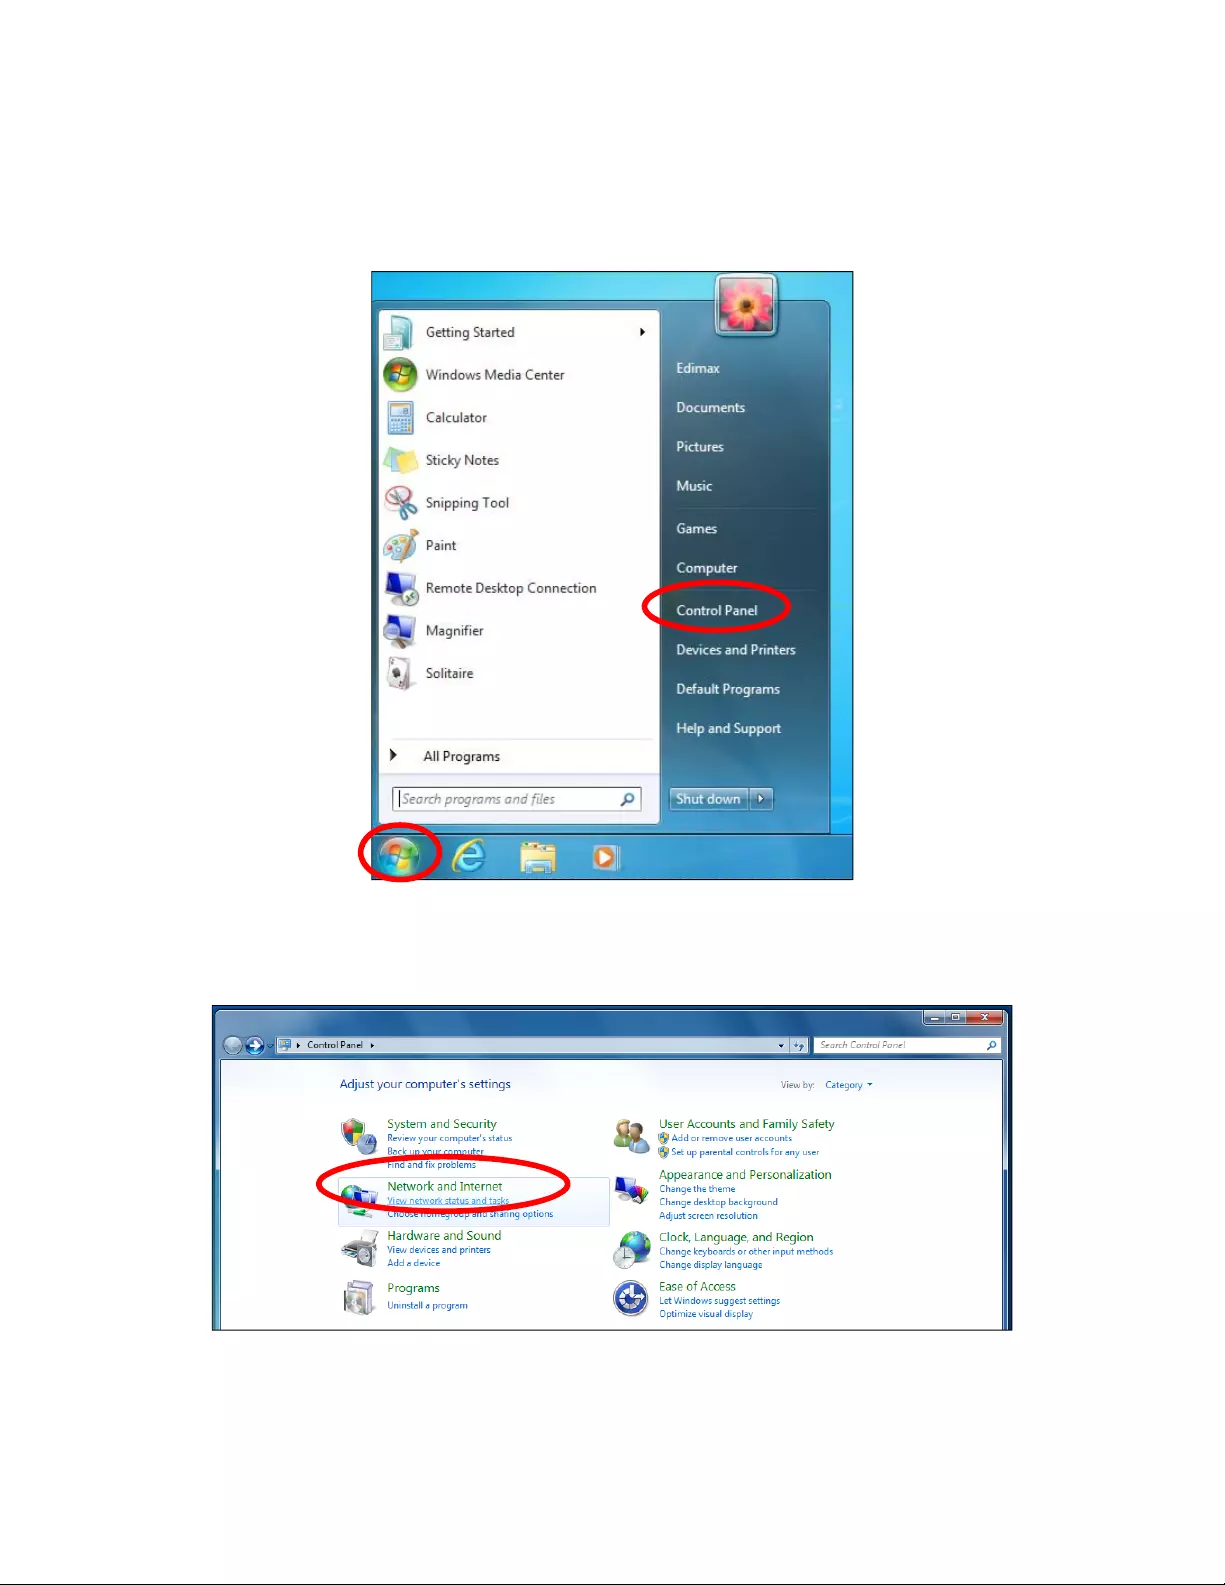
V‐1‐3.Windows7
1. Clickthe“Start”button(itshouldbelocatedinthelower‐leftcornerof
yourcomputer),thenclick“ControlPanel.”
2. Under“NetworkandInternet,”click“Viewnetworkstatusandtasks.”

82
3. Click“LocalAreaConnection.”
4. Click“Properties.”

83
5. Select“InternetProtocolVersion4(TCP/IPv4),”thenclick“Properties.”
6. Select“UsethefollowingIPaddress,”theninputthefollowingvalues:
IPaddress:192.168.2.10
Subnetmask:255.255.255.0
Click“OK”whenfinished.

84
85
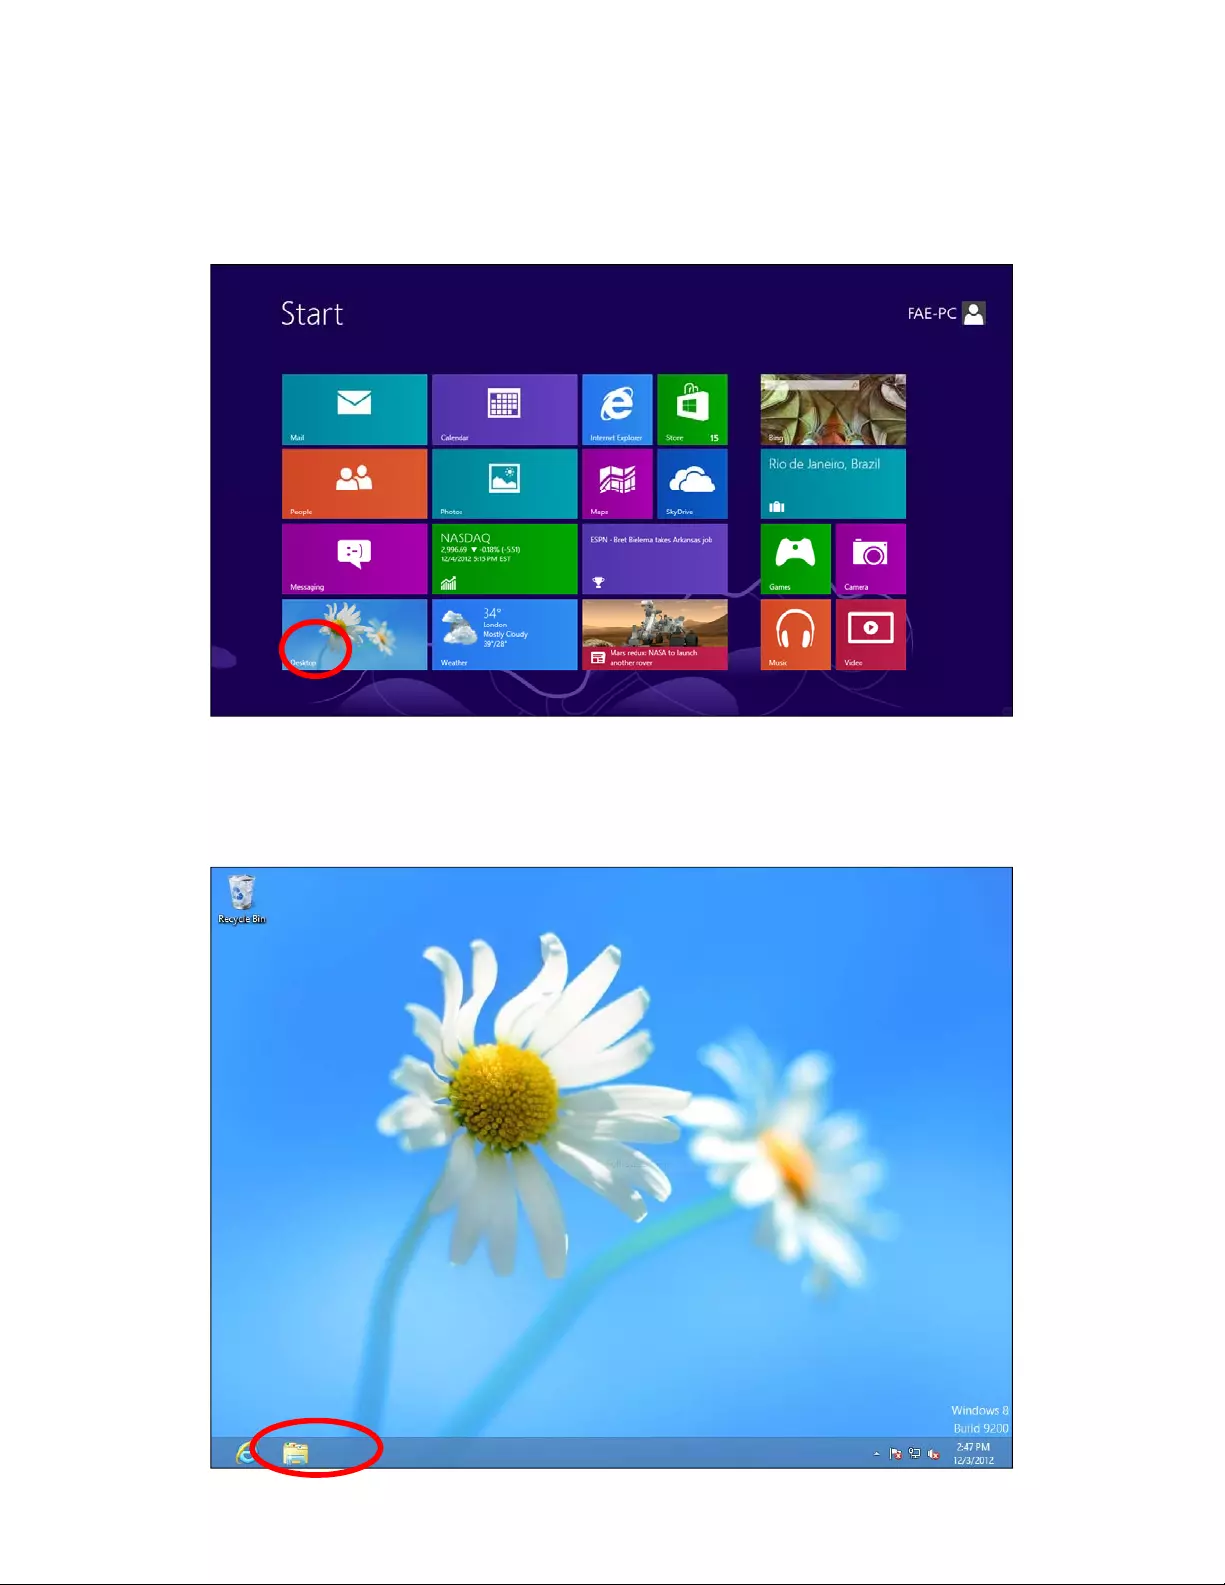
V‐1‐4.Windows8
1. FromtheWindows8Startscreen,youneedtoswitchtodesktopmode.
Moveyourcursertothebottomleftofthescreenandclick.
2. Indesktopmode,clicktheFileExplorericoninthebottomleftofthe
screen,asshownbelow.

86
3. Right‐click“Network,”thenselect“Properties.”
4. Inthewindowthatopens,select“Changeadaptersettings”fromtheleft
side.

87
5. Chooseyourconnectionandright‐click,thenselect“Properties.”

88
6. Select“InternetProtocolVersion4(TCP/IPv4),”thenclick“Properties.”
7. Select“UsethefollowingIPaddress,”theninputthefollowingvalues:
IPaddress:192.168.2.10
Subnetmask:255.255.255.0
Click“OK”whenfinished.

89
V‐1‐5.Mac
1. HaveyourMacintoshcomputeroperateasusual,andclick“System
Preferences.”
2. InSystemPreferences,click“Network.”
3. Click“Ethernet”intheleftpanel.
4. Openthedrop‐downmenulabeled“ConfigureIPv4”andselect
“Manually.”

90
5. EntertheIPaddress192.168.2.10andsubnetmask255.255.255.0.Click
“Apply”tosavethechanges.

91
V‐1‐6.Glossary
AccessPoint:Anaccesspointisanintelligentnetworkdevicethatforwards
packetsbetweendifferentnetworksbasedonnetworklayeraddress
information,suchasIPaddresses.
DefaultGateway(Accesspoint):Everynon‐accesspointIPdeviceneedsto
configureadefaultgateway’sIPaddress.WhenthedevicesendsoutanIP
packet,ifthedestinationisnotonthesamenetwork,thedevicehastosend
thepackettoitsdefaultgateway,whichwillthensenditouttowardthe
destination.
DHCP:DynamicHostConfigurationProtocol.Thisprotocolautomaticallygives
everycomputeronyourhomenetworkanIPaddress.
DNSServerIPAddress:DNSstandsforDomainNameSystem,whichallows
Internetserverstohaveadomainname(suchaswww.Broadbandaccess
point.com)andoneormoreIPaddresses(suchas192.34.45.8).ADNSserver
keepsadatabaseofInternetserversandtheirrespectivedomainnamesand
IPaddresses,sothatwhenadomainnameisrequested(asintyping
"Broadbandaccesspoint.com"intoyourInternetbrowser),theuserissentto
theproperIPaddress.TheDNSserverIPaddressusedbythecomputerson
yourhomenetworkisthelocationoftheDNSserveryourISPhasassignedto
you.
DSLModem:DSLstandsforDigitalSubscriberLine.ADSLmodemusesyour
existingphonelinestotransmitdataathighspeeds.
Ethernet:Astandardforcomputernetworks.Ethernetnetworksare
connectedbyspecialcablesandhubs,andmovedataaroundatupto10/100
millionbitspersecond(Mbps).
IPAddressandNetwork(Subnet)Mask:IPstandsforInternetProtocol.AnIP
addressconsistsofaseriesoffournumbersseparatedbyperiodsthat
identifiesasingle,uniqueInternetcomputerhostinanIPnetwork.Example:
192.168.2.1.Itconsistsof2portions:theIPnetworkaddressandthehost
identifier.
TheIPaddressisa32‐bitbinarypattern,whichcanberepresentedasfour
cascadeddecimalnumbersseparatedby“.”:aaa.aaa.aaa.aaa,whereeach
“aaa”canbeanythingfrom000to255,orasfourcascadedbinarynumbers

92
separatedby“.”:bbbbbbbb.bbbbbbbb.bbbbbbbb.bbbbbbbb,whereeach“b”
caneitherbe0or1.
Anetworkmaskisalsoa32‐bitbinarypattern,andconsistsofconsecutive
leading1’sfollowedbyconsecutivetrailing0’s,suchas
11111111.11111111.11111111.00000000.Thereforesometimesanetwork
maskcanalsobedescribedsimplyas“x”numberofleading1’s.
Whenbotharerepresentedsidebysideintheirbinaryforms,allbitsintheIP
addressthatcorrespondto1’sinthenetworkmaskbecomepartoftheIP
networkaddress,andtheremainingbitscorrespondtothehostID.
Forexample,iftheIPaddressforadeviceis,initsbinaryform,
11011001.10110000.10010000.00000111,andifitsnetworkmaskis
11111111.11111111.11110000.00000000,itmeansthedevice’snetwork
addressis11011001.10110000.10010000.00000000anditshostIDis
00000000.00000000.00000000.00000111.Thisisaconvenientandefficient
methodforaccesspointstorouteIPpacketstotheirdestination.
ISPGatewayAddress:(seeISPfordefinition).TheISPGatewayAddressisan
IPaddressfortheInternetaccesspointlocatedattheISP'soffice.
ISP:InternetServiceProvider.AnISPisabusinessthatprovidesconnectivity
totheInternetforindividualsandbusinessesororganizations.
LAN:LocalAreaNetwork.ALANisagroupofcomputersanddevices
connectedtogetherinarelativelysmallarea(suchasahouseoranoffice).
YourhomenetworkisconsideredaLAN.
MACAddress:MACstandsforMediaAccessControl.AMACaddressisthe
hardwareaddressofadeviceconnectedtoanetwork.TheMACaddressisa
uniqueidentifierforadevicewithanEthernetinterface.Itiscomposedoftwo
parts:3bytesofdatacorrespondingtotheManufacturerID(uniqueforeach
manufacturer)plus3bytesoftenusedastheproduct’sserialnumber.
NAT:NetworkAddressTranslation.Thisprocessallowsallofthecomputers
onyourhomenetworktouseoneIPaddress.Usingthebroadbandaccess
point’sNATcapability,youcanaccesstheInternetfromanycomputeron
yourhomenetworkwithouthavingtopurchasemoreIPaddressesfromyour
ISP.

93
Port:Networkclients(LANPC)usesportnumberstodistinguishonenetwork
application/protocolfromanother.Belowisalistofcommonapplicationsand
protocol/portnumbers:
ApplicationProtocolPortNumber
TelnetTCP23
FTPTCP21
SMTPTCP25
POP3TCP110
H.323TCP1720
SNMPUCP161
SNMPTrapUDP162
HTTPTCP80
PPTPTCP1723
PCAnywhereTCP5631
PCAnywhereUDP5632
SubnetMask:Asubnetmask,whichmaybeapartoftheTCP/IPinformation
providedbyyourISP,isasetoffournumbers(e.g.,255.255.255.0)configured
likeanIPaddress.ItisusedtocreateIPaddressnumbersusedonlywithina
particularnetwork(asopposedtovalidIPaddressnumbersrecognizedbythe
Internet,whichmustbeassignedbyInterNIC).
TCP/IP,UDP:TransmissionControlProtocol/InternetProtocol(TCP/IP)and
UnreliableDatagramProtocol(UDP).TCP/IPisthestandardprotocolfordata
transmissionovertheInternet.BothTCPandUDParetransportlayer
protocol.TCPperformspropererrordetectionanderrorrecovery,andthusis
reliable.UDP,ontheotherhand,isnotreliable.TheybothrunontopoftheIP
(InternetProtocol),anetworklayerprotocol.
WAN:WideAreaNetwork.Anetworkthatconnectscomputerslocatedin
geographicallyseparateareas(e.g.,differentbuildings,cities,countries).The
Internetisawideareanetwork.
Web‐basedManagementGraphicalUserInterface(GUI):Manydevices
supportagraphicaluserinterfacethatisbasedontheWebbrowser.This
meanstheusercanusethefamiliarNetscapeorMicrosoftInternetExplorer
tocontrol/configureormonitorthedevicebeingmanaged.

94
V‐2.HardwareSpecifications
MCU/RF MediaTekMT7620A(2.4GHz)+QCA9882(5GHz)
PHY/SwitchQualcommAtherosAR8035
Memory DDR264MB
Flash 8MB
Physical
Interface
‐LAN:10/100/1000GigabitEthernetwithPoEsupport802.3af(PDIn)
‐ResetButton
‐DCPowerJack
Power
Requirement
PoweroverEthernet,IEEE802.3af
DC:12V/1A
AntennaInternalPIFAAntenna(3dBi2.4GHzx2,4dBi5GHzx2)
OthersInternalBuzzer(Findme)
V‐3.Enviornmental&Physical
Temperature
Range
Operation:0to40℃(32℉to104℉)
Storage:‐20to60℃(‐4℉to140℉)
Humidity 90%orless–Operating,90%orless‐Storage
CertificationsFCC,CE
Dimensions 176(D)x30(H)mm
Weight 306g

95
COPYRIGHT
Copyright©2015ICIntracom.Allrightsreserved.Nopartofthispublicationmaybereproduced,
transmitted,transcribed,storedinaretrievalsystem,ortranslatedintoanylanguageorcomputer
language,inanyformorbyanymeans,electronic,mechanical,magnetic,optical,chemical,manualor
otherwise,withoutthepriorwrittenpermissionofthiscompany
Thiscompanymakesnorepresentationsorwarranties,eitherexpressedorimplied,withrespecttothe
contentshereofandspecificallydisclaimsanywarranties,merchantabilityorfitnessforanyparticular
purpose.Anysoftwaredescribedinthismanualissoldorlicensed"asis".Shouldtheprogramsprove
defectivefollowingtheirpurchase,thebuyer(andnotthiscompany,itsdistributor,oritsdealer)
assumestheentirecostofallnecessaryservicing,repair,andanyincidentalorconsequentialdamages
resultingfromanydefectinthesoftware.Further,thiscompanyreservestherighttorevisethis
publicationandtomakechangesfromtimetotimeinthecontentsthereofwithoutobligationtonotify
anypersonofsuchrevisionorchanges.

96
FederalCommunicationCommissionInterferenceStatement
ThisequipmenthasbeentestedandfoundtocomplywiththelimitsforaClassBdigitaldevice,pursuanttoPart
15ofFCCRules.Theselimitsaredesignedtoprovidereasonableprotectionagainstharmfulinterferenceina
residentialinstallation.Thisequipmentgenerates,uses,andcanradiateradiofrequencyenergyand,ifnot
installedandusedinaccordancewiththeinstructions,maycauseharmfulinterferencetoradiocommunications.
However,thereisnoguaranteethatinterferencewillnotoccurinaparticularinstallation.Ifthisequipmentdoes
causeharmfulinterferencetoradioortelevisionreception,whichcanbedeterminedbyturningtheequipment
offandon,theuserisencouragedtotrytocorrecttheinterferencebyoneormoreofthefollowingmeasures:
1.Reorientorrelocatethereceivingantenna.
2.Increasetheseparationbetweentheequipmentandreceiver.
3.Connecttheequipmentintoanoutletonacircuitdifferentfromthattowhichthereceiverisconnected.
4.Consultthedealeroranexperiencedradiotechnicianforhelp.
FCCCaution
Thisdeviceanditsantennamustnotbeco‐locatedoroperatinginconjunctionwithanyotherantennaor
transmitter.ThisdevicecomplieswithPart15oftheFCCRules.Operationissubjecttothefollowingtwo
conditions:(1)thisdevicemaynotcauseharmfulinterference,and(2)thisdevicemustacceptanyinterference
received,includinginterferencethatmaycauseundesiredoperation.Anychangesormodificationsnotexpressly
approvedbythepartyresponsibleforcompliancecouldvoidtheauthoritytooperateequipment.
FCCRadiationExposureStatement:
ThisequipmentcomplieswithFCCradiationexposurelimitssetforthforanuncontrolledenvironment.This
equipmentshouldbeinstalledandoperatedwithminimumdistance20cmbetweentheradiator&yourbody.
R&TTEComplianceStatement
ThisequipmentcomplieswithalltherequirementsofDirective1999/5/ECoftheEuropeanParliamentandthe
CouncilofMarch9,1999,onradioequipmentandtelecommunicationterminalequipmentandthemutual
recognitionoftheirconformity(R&TTE);andofitssupersedingDirective2014/53/EU.
Safety
Thisequipmentisdesignedwiththeutmostcareforthesafetyofthosewhoinstallanduseit.However,special
attentionmustbepaidtothedangersofelectricshockandstaticelectricitywhenworkingwithelectrical
equipment.Allguidelinesofthisandofthecomputermanufacturemustthereforebeallowedatalltimesto
ensurethesafeuseoftheequipment.
EUCountriesIntendedforUse
TheETSIversionofthisdeviceisintendedforhomeandofficeuseinAustria,Belgium,Bulgaria,Cyprus,Czech,
Denmark,Estonia,Finland,France,Germany,Greece,Hungary,Ireland,Italy,Latvia,Lithuania,Luxembourg,
Malta,Netherlands,Poland,Portugal,Romania,Slovakia,Slovenia,Spain,Sweden,Turkey,andUnitedKingdom.
TheETSIversionofthisdeviceisalsoauthorizedforuseinEFTAmemberstates:Iceland,Liechtenstein,Norway,
andSwitzerland.
EUCountriesNotIntendedforUse
None

97
intellinetnetworkcom
©ICIntracom.Allrightsreserved.
IntellinetisatrademarkofICIntracom,registeredintheU.S.andothercountries.