Table of Contents
Philips DS9830W/12 User Manual
Displayed below is the user manual for DS9830W/12 by Philips which is a product in the Loudspeakers category. This manual has pages.
Related Manuals

www.philips.com/support
DS9830W
User manual
Always there to help you
Register your product and get support at
Question?
Contact
Philips
Question?
Contact
Philips


1EN
Contents
1 Important 2
Safety 2
Notice 3
2 Your Entertainment System 5
Introduction 5
What's in the box 5
What else you need 5
Overview of the wireless
SoundSphere speakers 6
Overview of the remote control 7
3 Prepare 8
Connect 8
Prepare the remote control 9
4 Connect to your home Wi-Fi
network for AirPlay 10
Method 1: Use Wi-Fi network login
sharing 10
Method 2: Connect to a WPS router 11
Method 3: Connect to a non-WPS
Wi-Fi router 12
5 Play 18
Stream audio from your iTunes music
library to DS9830W 18
Control play 20
Use advanced sound settings 21
Play from an external device 21
6 Charge your iPod/iPhone/iPad
through USB socket 22
7 Updatermware 23
Option 1: Update through Philips
SoundStudio (recommended) 23
Option 2: Update through a USB
mass storage device or PC/Mac 23
8 Product information 25
Specications 25
9 Troubleshooting© 26

2EN
1 Important
Safety
Information for Europe:
Toreducetheriskofreorelectricshock,do
not expose the product to rain or moisture and
donotplaceanyobjectslledwithliquids,such
asvases,ontheproduct.
a Read these instructions.
b Keep these instructions.
c Heed all warnings.
d Follow all instructions.
e Do not use this product near water.
f Clean only with dry cloth.
g Do not block any ventilation openings.
Install in accordance with the
manufacturer's instructions.
h Do not remove the casing of this product.
i Only use this product indoors. Do
not expose the product to dripping /
splashing water, rain or high humidity.
j Keep this product away from direct
sunlight,nakedamesorheat.
k Do not install near any heat sources
such as radiators, heat registers, stoves,
or other electrical equipment (including
ampliers).
l Do not place any other electrical
equipment on the product.
m Do not place any sources of danger
on the product (e.g. objects containing
liquids,burningcandles).
n This product may include batteries. Please
refer to safety and disposal instructions
for batteries in this user manual.
o Where the mains plug or an appliance
coupler is used as the disconnect device,
the disconnect device shall remain readily
operable.
Warning
•Neverremovethecasingofthisapparatus.
•Neverlubricateanypartofthisapparatus.
•Never place this apparatus on other electrical
equipment.
•Keepthisapparatusawayfromdirectsunlight,naked
amesorheat.
•Ensure that you always have easy access to the power
cord,plugoradaptortodisconnectthisapparatusfrom
thepower.
Risk of overheating! Never install this apparatus
inaconnedspace.Alwaysleaveaspaceof
at least four inches around this apparatus for
ventilation.Ensurecurtainsorotherobjects
never cover the ventilation slots on this
apparatus.
Mains fuse
This information applies only to products with a
UKmainsplug.
Thisproductisttedwithanapprovedmolded
plug.Ifyoureplacethefuse,useonewith:
• theratingsshownontheplug,
• aBS1362approval,and
• theASTAapprovalmark.
Contact your dealer if you are not sure about
whattypeoffusetouse.
Caution: To conform with the EMC directive
(2004/108/EC),donotdetachtheplugfrom
thepowercord.

3EN
Notice
Hereby,WOOXInnovationsdeclaresthatthis
product is in compliance with the essential
requirementsandotherrelevantprovisions
ofDirective1999/5/EC.Youcanndthe
Declaration of Conformity on www.philips.com/
support.
Anychangesormodicationsmadetothis
device that are not expressly approved by
WOOXInnovationsmayvoidtheuser’s
authoritytooperatetheequipment.
PhilipsandthePhilips’ShieldEmblemare
registeredtrademarksofKoninklijkePhilipsN.V.
andareusedbyWOOXInnovationsLimited
underlicensefromKoninklijkePhilipsN.V.”
Specicationsaresubjecttochangewithout
notice.WOOXreservestherighttochange
products at any time without being obliged to
adjustearliersuppliesaccordingly.
Yourproductisdesignedandmanufactured
withhighqualitymaterialsandcomponents,
whichcanberecycledandreused.
This symbol on a product means that the
product is covered by European Directive
2012/19/EU.
This symbol means that the product contains
batteries covered by European Directive
2013/56/EU which cannot be disposed of with
normalhouseholdwaste.
Inform yourself about the local separate
collection system for electrical and electronic
productsandbatteries.Followlocalrulesand
never dispose of the product and batteries
withnormalhouseholdwaste.Correctdisposal
of old products and batteries helps prevent
negativeconsequencesfortheenvironmentand
humanhealth.
Removing the disposable batteries
Toremovethedisposablebatteries,seebattery
installationsection.
Information about the use of batteries:
Caution
•Riskofleakage:Onlyusethespeciedtypeofbatteries.
Donotmixnewandusedbatteries.Donotmix
differentbrandsofbatteries.Observecorrectpolarity.
Remove batteries from products that are not in use for
alongerperiodoftime.Storebatteriesinadryplace.
•Risk of injury: Wear gloves when handling leaking
batteries.Keepbatteriesoutofreachofchildrenand
pets.
•Riskofexplosion:Donotshortcircuitbatteries.Do
notexposebatteriestoexcessiveheat.Donotthrow
batteriesintothere.Donotdamageordisassemble
batteries.Donotrechargenon-rechargeablebatteries.
4EN
Environmental information
Allunnecessarypackaginghasbeenomitted.
We have tried to make the packaging easy to
separateintothreematerials:cardboard(box),
polystyrene foam (buffer) and polyethylene
(bags,protectivefoamsheet.)
Yoursystemconsistsofmaterialswhichcan
be recycled and reused if disassembled by
aspecializedcompany.Pleaseobservethe
local regulations regarding the disposal of
packagingmaterials,exhaustedbatteriesandold
equipment.
“MadeforiPod,”“MadeforiPhone,”and“Made
foriPad”meanthatanelectronicaccessory
hasbeendesignedtoconnectspecicallyto
iPod,iPhone,oriPad,respectively,andhas
beencertiedbythedevelopertomeet
Appleperformancestandards.Appleisnot
responsible for the operation of this device
or its compliance with safety and regulatory
standards.Pleasenotethattheuseofthis
accessorywithiPod,iPhone,oriPadmayaffect
wirelessperformance.
AirPlay,iPod,andiPhonearetrademarksof
AppleInc.,registeredintheU.S.andother
countries.iPadisatrademarkofAppleInc.
Class II equipment symbol:
CLASSIIapparatuswithdoubleinsulation,and
noprotectiveearthprovided.
Note
•The type plate is located on the bottom of the
apparatus.

5EN
2 Your
Entertainment
System
Congratulationsonyourpurchase,and
welcometoPhilips!Tofullybenetfromthe
supportthatPhilipsoffers,registeryourproduct
atwww.philips.com/welcome.
IfyoucontactPhilips,youwillbeaskedforthe
modelandserialnumberofthisapparatus.The
model number and serial number are on the
bottomoftheapparatus.Writethenumbers
here:
ModelNo.__________________________
SerialNo.___________________________
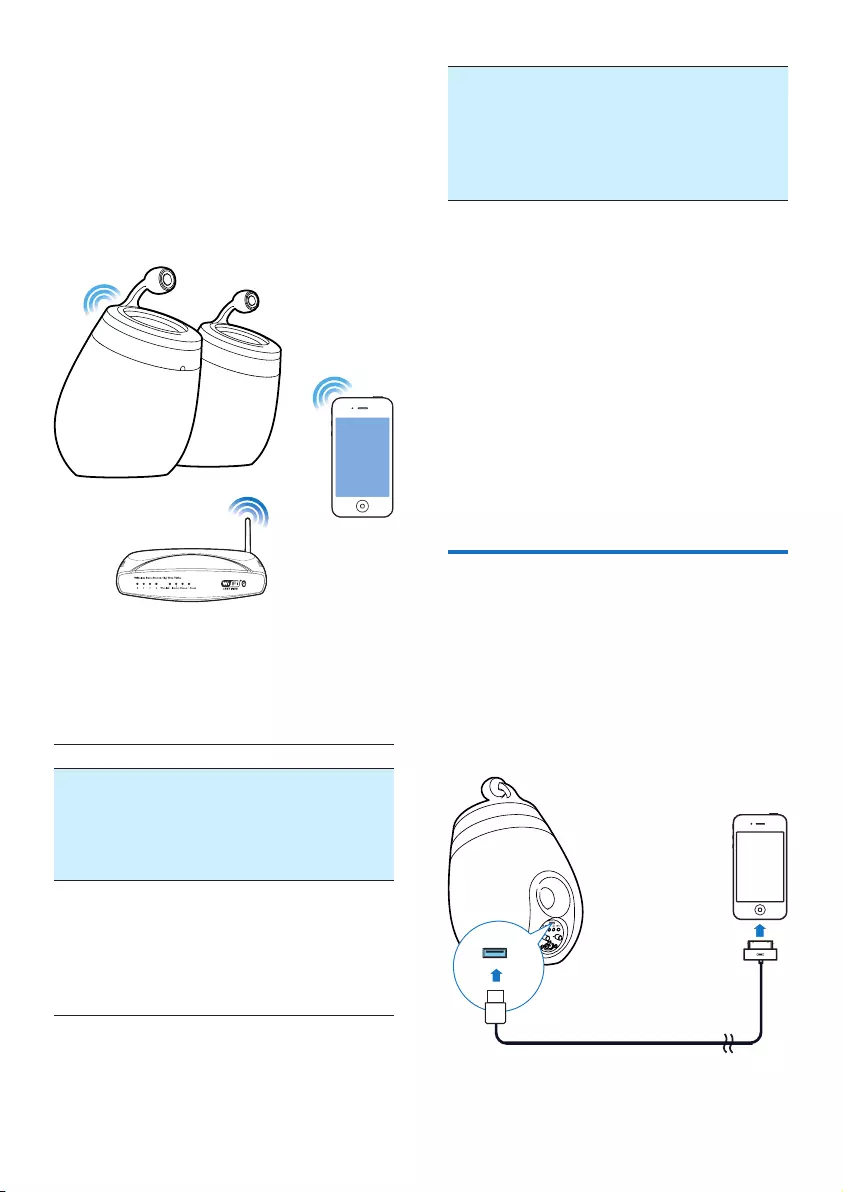
Introduction
Apple AirPlay technology enables you to play
youriTunesmusiclibrary,hostedonaMac,PC,
iPhone,iPodtouch,oriPadonanyAirPlay-
enableddevice(forexample,yourDS9830W)
connectedtotheWi-Finetwork.
WithanAirPlay-enableddevice(forexample,
yourDS9830W),youcan:
• stream audio from your iTunes music library
to any room in your house
• choose which AirPlay-enabled devices you
want to play music on (if you have more
than one such devices in your house)
• stream audio to multiple AirPlay-enabled
devices at the same time (from the iTunes
music library on your PC/Mac only)
Tip
•Pleasevisitwww.philips.com/welcomeforinformation
aboutmorePhilipsAirPlay-enableddevices.
WithDS9830W,youcanalso:
• play music from other audio devices
through the MP3-LINKsocket.
• charge your iPod/iPhone/iPad through the
USBsocket.
What's in the box
Check and identify the contents of your
package:
• Main unit (2 x wireless SoundSphere
speakers,withabuilt-inWi-Fimodule)
• 1 x speaker connection cable
• 1 x AC power cord (for the main unit)
• 1 x remote control (for the main unit)
• 1x3.5mmaudiocablecable
• Printing materials
What else you need
TostreamaudiowirelesslybyAirPlay,youneed:
• A Wi-Ficertiedrouter
• AhostforyouriTunesmusiclibrary,
for example,aniPodtouch/iPhone/iPad
installedwithiOS4.3.3(orlater)oraWi-Fi
enabledPC/MacinstalledwithiTunes10.2.2
(or later)
YourDS9830Wshouldbeconnectedtothe
same local network as your iTunes host device
throughtheWi-Firouter.
List of compatible iTunes host devices
for AirPlay
IntermsofAirPlay,DS9830Wiscompatible
with:
• a Wi-Fi enabled PC/Mac installed with
iTunes10.2.2(orlater);and
• the following iPod/iPhone/iPad models
installed with the latest iOS version:
Made for
• iPhone 5
• iPhone 4S
• iPhone 4
• iPhone 3GS
6EN
• iPad (4th generation)
• iPad mini
• iPad (3rd generation)
• iPad 2
• iPad
• iPod touch (5th generation)
• iPod touch (4th generation)
• iPod touch (3rd generation)
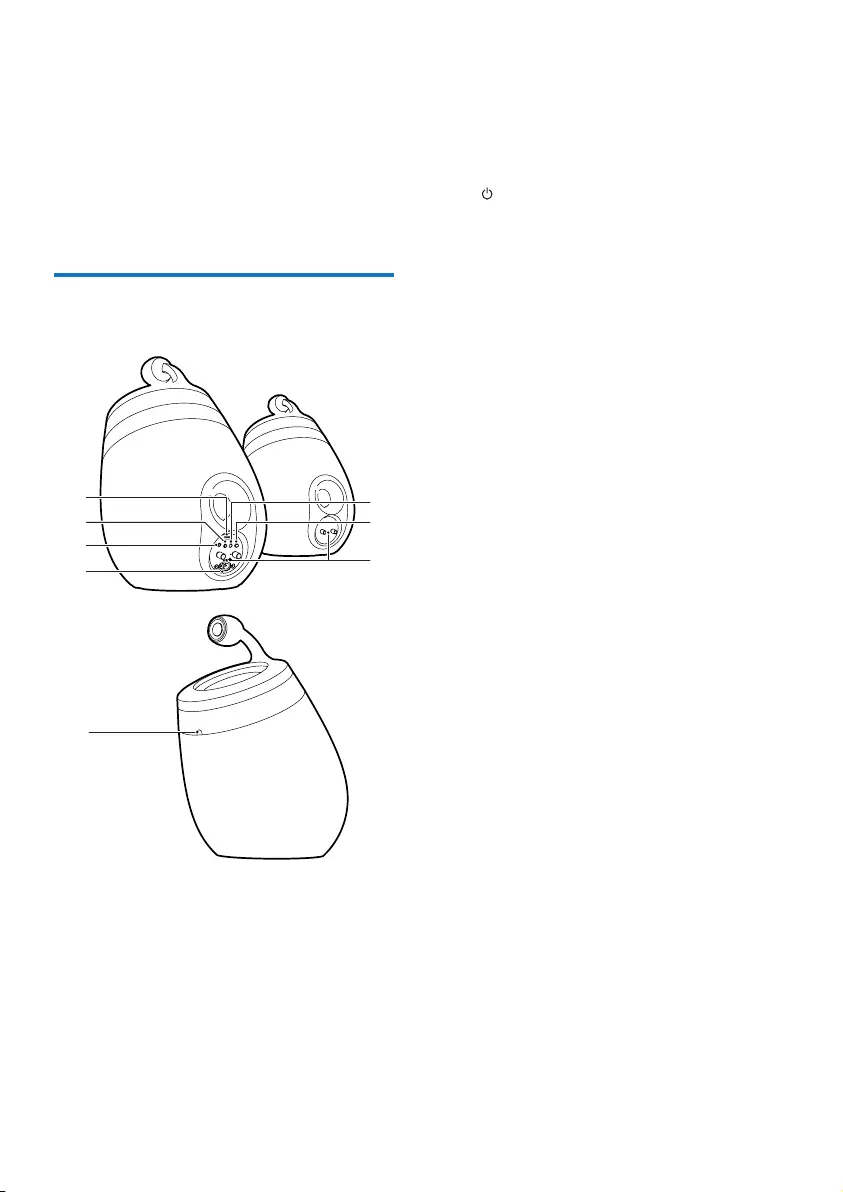
Overview of the wireless
SoundSphere speakers
a USBsocket(notsupportingmusicplay)
• Connect an iOS device (upgraded to
iOS5.0orlater)throughanApple
USB cable (not supplied) for Wi-Fi
NetworkLoginSharing (see 'Method
1: Use Wi-Fi network login sharing' on
page 10).
a
b
ce
d
f
g
h
• Connect an iOS device through an
Apple USB cable (not supplied) for
charging.
• Connect a USB mass storage device
forrmwareupgrade.
b
• Turntheuniton/off.
• (Pressandhold)resettheunit.
c MP3-LINK
• Connect an external audio player
throughthesuppliedMP3linkcable.
d ~ AC IN
• Connectthepowercord.
e Speakerconnectors(+/-)
• Connect the two speakers through the
suppliedspeakercable.
f WI-FI SETUP
• ConnecttheunittoaWi-Finetwork.
g WI-FI STATUS LED indicator
• Showthecurrentstatusoftheunit.
h IR sensor
• Detect signals from the remote
control.Pointtheremotecontrol
directlyatthesensor.
7EN
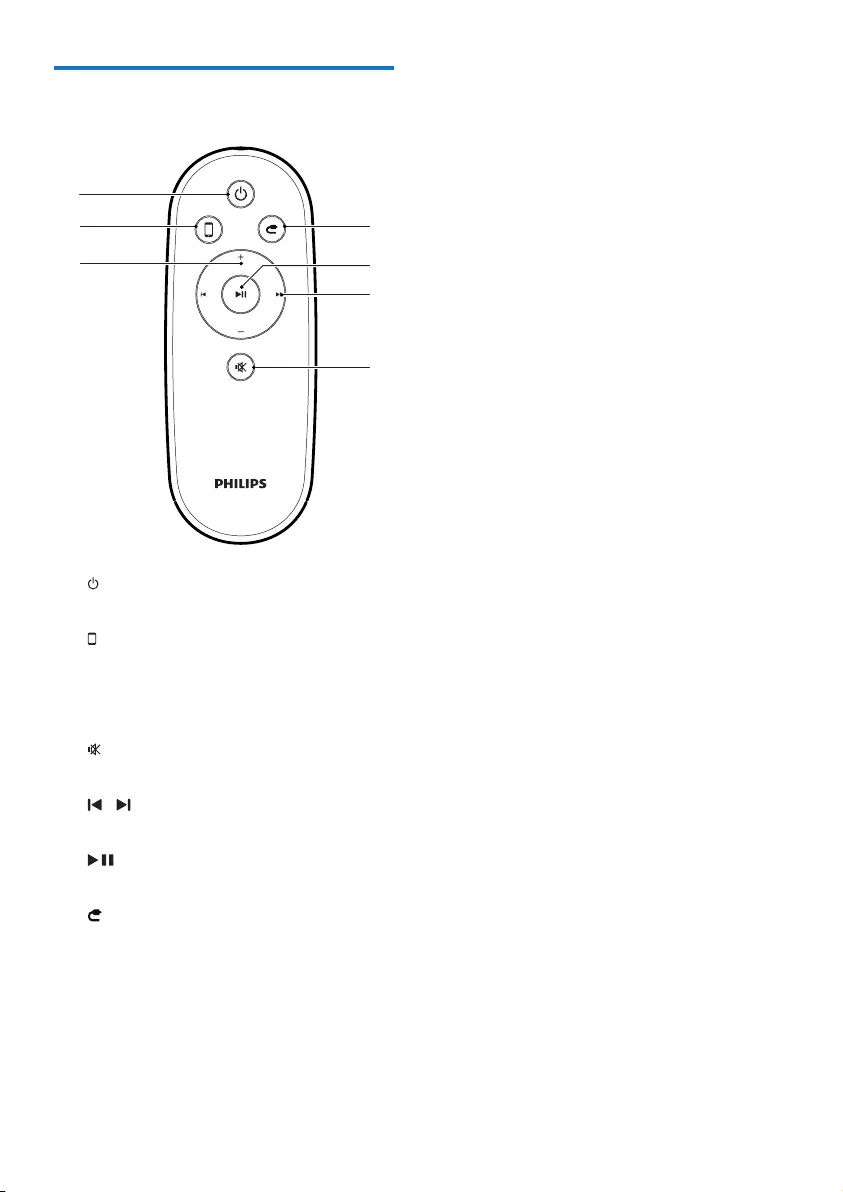
Overview of the remote
control
a
• Turntheuniton/off.
b
• SelecttheAirPlaydeviceaudiosource.
c +/-
• Adjustvolume.
d
• Muteorrestorevolume.
e /
• Skiptotheprevious/nexttrack.
f
• Startorpauseplay.
g
• SelecttheMP3linkaudiosource.
g
f
b
a
e
d
c
8EN
3 Prepare
Always follow the instructions in this chapter in
sequence.
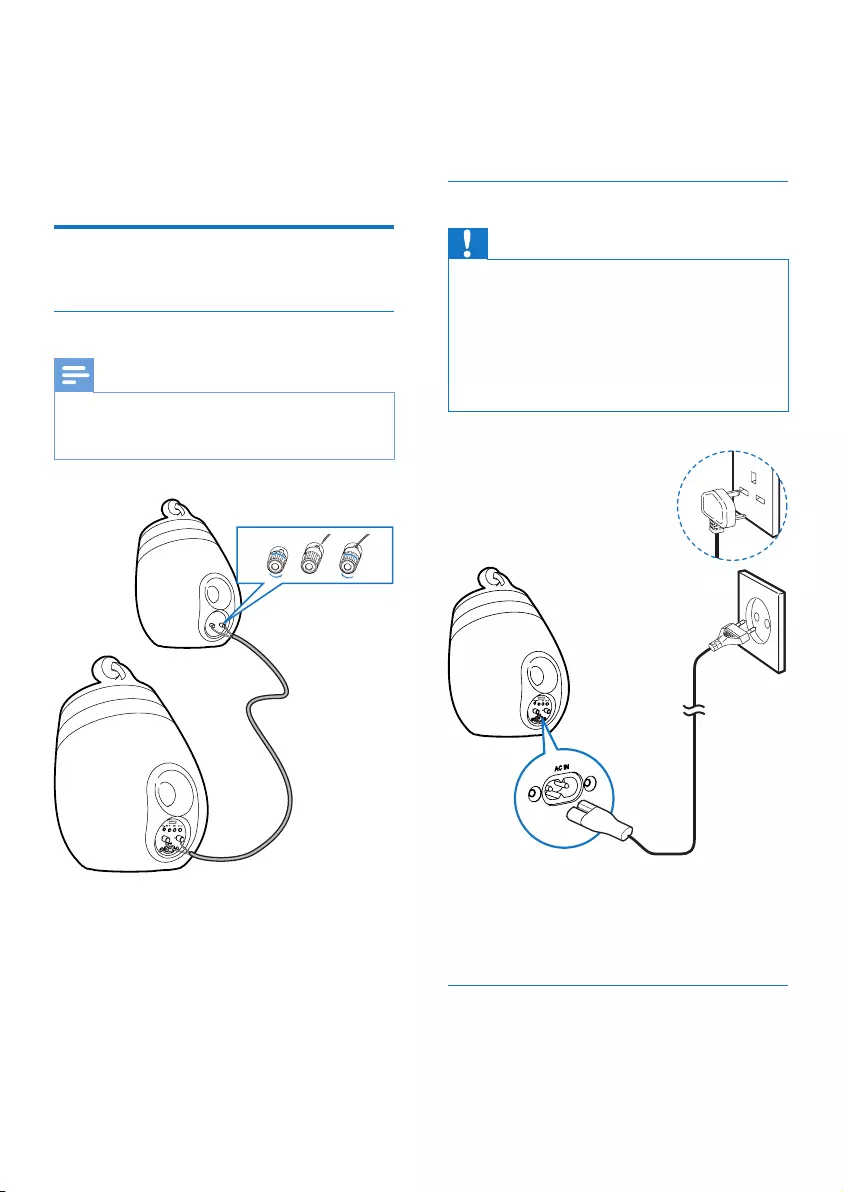
Connect
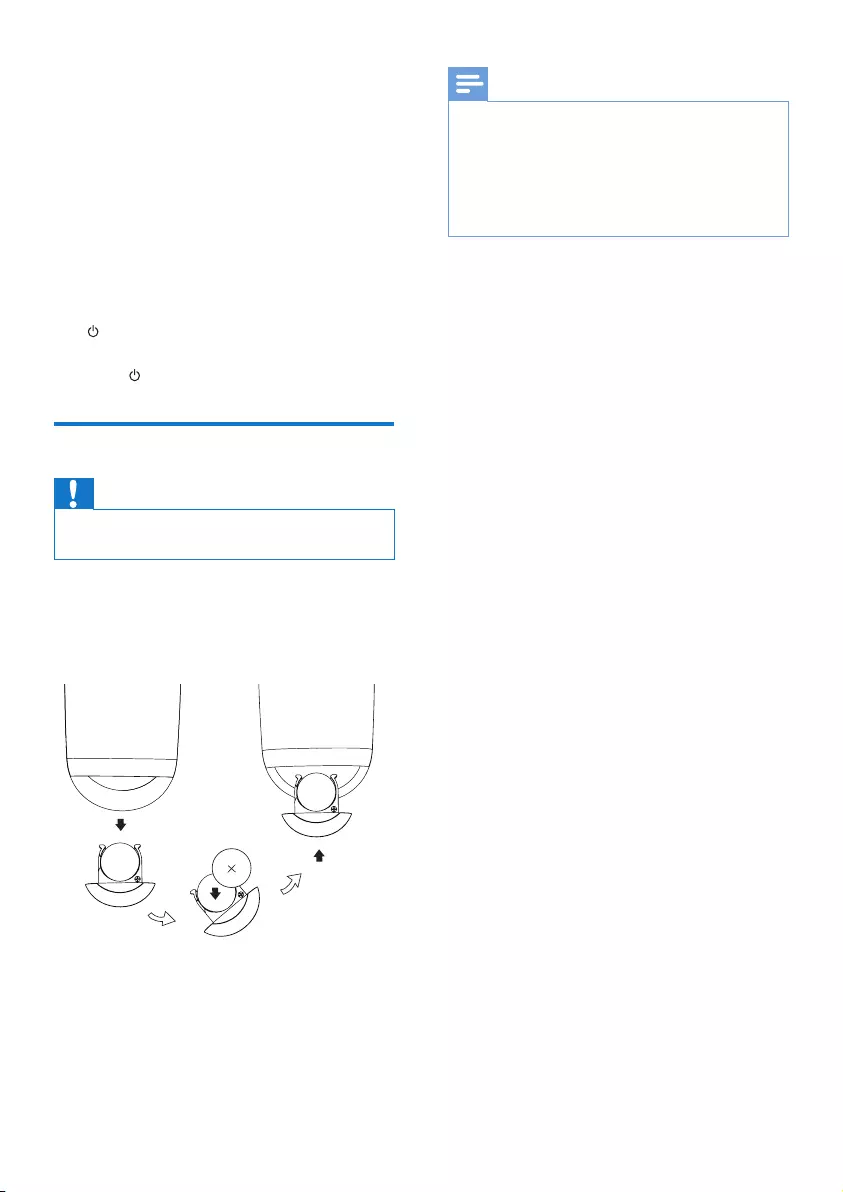
Connect speaker cables
Note
•Insert the stripped portion of each speaker wire into
thesocketcompletely.
•Foroptimalsound,usethesuppliedspeakersonly.
1 Unscrewthespeakerconnectors.
2 Insert fully the end of a speaker cable with
redmarkintotheleftred(+)connector.
3 Screw the left red (+) connector to secure
thecable.
4 Insert fully the end of a speaker cable
without red mark into the left black (-)
connector.
2
13
5 Screw the left black (-) connector to
securethecable.
6 Repeat steps 2-5 to insert the other
speakercableintotherightconnectors.
Connect power
Caution
•Risk of product damage! Make sure that the power
supply voltage matches the voltage printed on the
bottomoftheunit.
•Riskofelectricshock!WhenyouunplugtheACcord,
alwayspulltheplugfromthesocket.Neverpullthe
cord.
•BeforeyouconnecttheACcord,makesurethatyou
havecompletedalltheotherconnections.
• Connect the AC power cord to
• the ~ AC IN socket on the back of the
mainspeaker.
• thewallpowersocket.
Turn DS9830W on
Afterproperpowerconnection,theunit
switchesonautomatically.
• Waitforsuccessfulboot-upoftheunit.
9EN
» Theboot-uptakesabout25seconds.
» Duringboot-up,theindicatoronthe
backofthemainspeakerblinksyellow.
» Afterboot-up,forrst-timesetup,the
WI-FI STATUS indicator turns solid
yellow,andtheunitisreadyforWi-Fi
setup.IfaWi-Ficonnectionhasbeen
setuppreviously,theWI-FI STATUS
indicator blinks green slowly to search
forthesetupWi-Finetwork.
• Toswitchtheunittostandbymode,press
.
• Toswitchtheunitonfromstandbymode,
press again.
Prepare the remote control
Caution
•Riskofexplosion!Keepbatteriesawayfromheat,
sunshineorre.Neverdiscardbatteriesinre.
Forrst-timeuse:
• Remove the protective tab to activate the
remotecontrolbattery.
To replace the remote control battery:
1 Openthebatterycompartment.
2 Insert one CR2032 battery with correct
polarity(+/-)asindicated.
3 Closethebatterycompartment.
Note
•Before you press any function button on the remote
control,rstselectthecorrectsourcewiththeremote
controlinsteadofthemainunit.
•If you are not going to use the remote control for a
longtime,removethebattery.
•Point the remote control directly at the IR sensor on
thefrontofthemainspeakerforbetterreception.
10 EN
4 Connect to
your home Wi-
Fi network for
AirPlay
To connect DS9830W to your existing home
Wi-Finetwork,youneedtoapplyyourhome
Wi-FisettingstoDS9830W.
Choose your best setup method based on the
preconditionslistedbelow.
Precondition Setup method
YouhaveaniPod
touch/iPhone/iPad
upgradedtoiOS5.0
orlater.
Choose method
1 (recommended)
(see 'Method 1: Use
Wi-Fi network login
sharing' on page 10).
YourWi-Firouteris
enabled with WPS
(Wi-Fi Protected
Setup) and supports
PBC (Push Button
Connection).
Choose method
2 (see 'Method 2:
Connect to a WPS
router' on page 11).
YouhaveaWi-Fi
enabled device with
anInternetbrowser,
such as an iPod touch/
iPhone/iPad or a Wi-Fi
enabledPC/Mac.
Choose method
3 (see 'Method 3:
Connect to a non-
WPS Wi-Fi router'
on page 12).
Before connection of DS9830W to you home
Wi-Finetwork,makesurethat:
a your Wi-Fi router is powered on and
working properly.
b DS9830W has been powered on and
booted up successfully (see 'Turn
DS9830W on' on page 8).
Onceconnectedsuccessfully,DS9830Wwill
rememberyourhomeWi-Fisettings.Then
you can enjoy AirPlay whenever DS9830W is
powered on and connected to your home Wi-
Finetworkautomatically.
Method 1: Use Wi-Fi network
login sharing
1 Connect your iPod touch/iPhone/iPad to
yourhomeWi-Finetwork.
2 Connect your iPod/iPhone/iPad to the
main speaker through an Apple USB cable
(notsupplied).
11EN
3 Press WI-FI SETUP on the back of the
mainspeaker.
» Thefollowingdialogboxisdisplayed.
4 Tap ALLOW (allow) to share your Wi-Fi
settingswithDS9830W.
» Afterawhile,theWI-FI STATUS
indicator on the back of the main
speakerturnssolidgreen,andtheunit
beeps.
» DS9830W is connected to your
existing home Wi-Fi network
successfully.
Method 2: Connect to a WPS
router
Note
•BeforeyoupressanybuttononDS9830W,make sure
that DS9830W has been booted up successfully (see
'Turn DS9830W on' on page 8).
1 Press the WPS button on your home Wi-Fi
router.
2 Shortlyafterstep1,pressWI-FI SETUP on
thebackofthemainspeaker.
» The WI-FI STATUS indicator blinks
yellow,greenandredalternately.
» Within2minutes,theWI-FI STATUS
indicatorturnssolidgreen,andtheunit
beeps.
» DS9830W is connected to your home
Wi-Finetworksuccessfully.
WPS

12 EN
Tip
•ForsomeWi-Firouters,youmayneedtoholdthe
WPS button for Wi-Fi connection or enable the WPS
PBCfunctionfromtheroutercongurationpages.See
theusermanualsofthespecicroutersfordetails.
•If the WI-FI STATUS indicator on DS9830W stays
yellow,itmeansthattheWi-Ficonnectionhasfailed.
Pleasewaitfor2minutesandtryagain.Iftheproblem
remains,try to set up the Wi-Fi connection manually
(see 'Method 3: Connect to a non-WPS Wi-Fi router'
on page 12).
•IftheWi-Ficonnectionfailsagain,restartDS9830W,
andthentryagain.
Method 3: Connect to a non-
WPS Wi-Fi router
Note
•Youcanalsofollowtheproceduresbelowtoconnect
DS9830WtoaWPSroutermanually.
To connect DS9830W to a Wi-Fi router
manually,youneedaccesstoDS9830W's
built-incongurationwebpageforchangeof
itsinternalWi-Fisettings.Todoso,youneeda
Wi-Fi enabled device with an Internet browser
fortemporaryWi-FiconnectiontoDS9830W.
WIFI
SETUP
The Wi-Fi enabled device can be an iPod touch/
iPhone/iPadoraWi-FienabledPC/Mac.
Followthesequencebelowforconnectionof
DS9830Wtoanon-WPSWi-Firouter.
1 Collect settings of your home Wi-Fi router
and write down on paper for use during
DS9830W Wi-Fi setup (see 'Collect
settings of your home Wi-Fi router' on
page 12).
2 Make sure that DS9830W is in Assisted
Wi-FiSetupmode.Ifnot,switch
DS9830W to Assisted Wi-Fi Setup mode
(see 'Switch DS9830W to Assisted Wi-Fi
Setup mode' on page 13).
» A new Wi-Fi network created by
DS9830Wwillappear,withthe
network name (SSID) of Philips_Install
XXXXXX.
3 Connect your Wi-Fi enabled device to the
newly created Wi-Fi network temporarily
(see 'Connect your Wi-Fi enabled device
to the newly created Wi-Fi network' on
page 13).
4 Open the built-in web page of DS9830W
with the Internet Browser of your Wi-Fi
enabled device (see 'Open the built-in web
page of DS9830W' on page 15).
5 ConguretheinternalWi-Fisettingsof
DS9830W based on the settings you
wrote on paper at step 1(see'Congure
the internal Wi-Fi settings of DS9830W'
on page 15).
6 Restore your Wi-Fi enabled device back
to your existing home Wi-Fi settings (see
'Restore your Wi-Fi enabled device back
to your existing home Wi-Fi setting' on
page 16).
Collect settings of your home Wi-Fi
router
Note
•Always consult the user manual of your home Wi-Fi
routerfordetailedinstructions.
13EN
1 Connect your Wi-Fi enabled device to
yourexistinghomeWi-Finetwork.
2 LaunchtheInternetbrowser(forexample,
Apple Safari or Microsoft Internet
Explorer)onyourWi-Fienableddevice.
3 Openthecongurationpageofyour
homeWi-Firouter.
4 Find the Wi-Fi settings tab and write down
the following information on paper:
A Network name (SSID)
B Wi-Fisecuritymode(usuallyWEP,
WPA or WPA2 if enabled)
C Wi-Fi password (if Wi-Fi security is
enabled)
D DHCP mode (enabled or disabled)
E Static IP address settings (if DHCP
mode is disabled)
Switch DS9830W to Assisted Wi-Fi
Setup mode
• After successful boot-up (see 'Turn
DS9830W on' on page 8),pressandhold
WI-FI SETUP on the back of the main
speaker.
» The WI-FI STATUS indicator blinks
greenandyellowalternately.
» A new Wi-Fi network of DS9830W
itselfiscreated,withthenetworkname
(SSID) of Philips_Install XXXXXX.
» It takes about 45 seconds for successful
creationofthisnewWi-Finetwork.
Note
•AfteryounishmanualWi-FisettingforDS9830W,this
newWi-Finetworkdisappears.
•IfyoufailtoenterAssistedWi-FiSetupmode,power
offDS9830Wandpoweronit,thentryagainafter
successfulboot-up.
•Make sure that there are no other Philips AirPlay-
enabled devices in Assisted Wi-Fi Setup mode at the
sametime.MultiplenewWi-Finetworkscreatedthis
waymayinterferewitheachother.
Connect your Wi-Fi enabled device to
the newly created Wi-Fi network
The new Wi-Fi network created by DS9830W
onlyallowsaccessofoneWi-Fienableddevice.
To avoid interference from any other Wi-Fi
devices,youarerecommendedtotemporarily
disable the Wi-Fi function on your other Wi-Fi
devices.
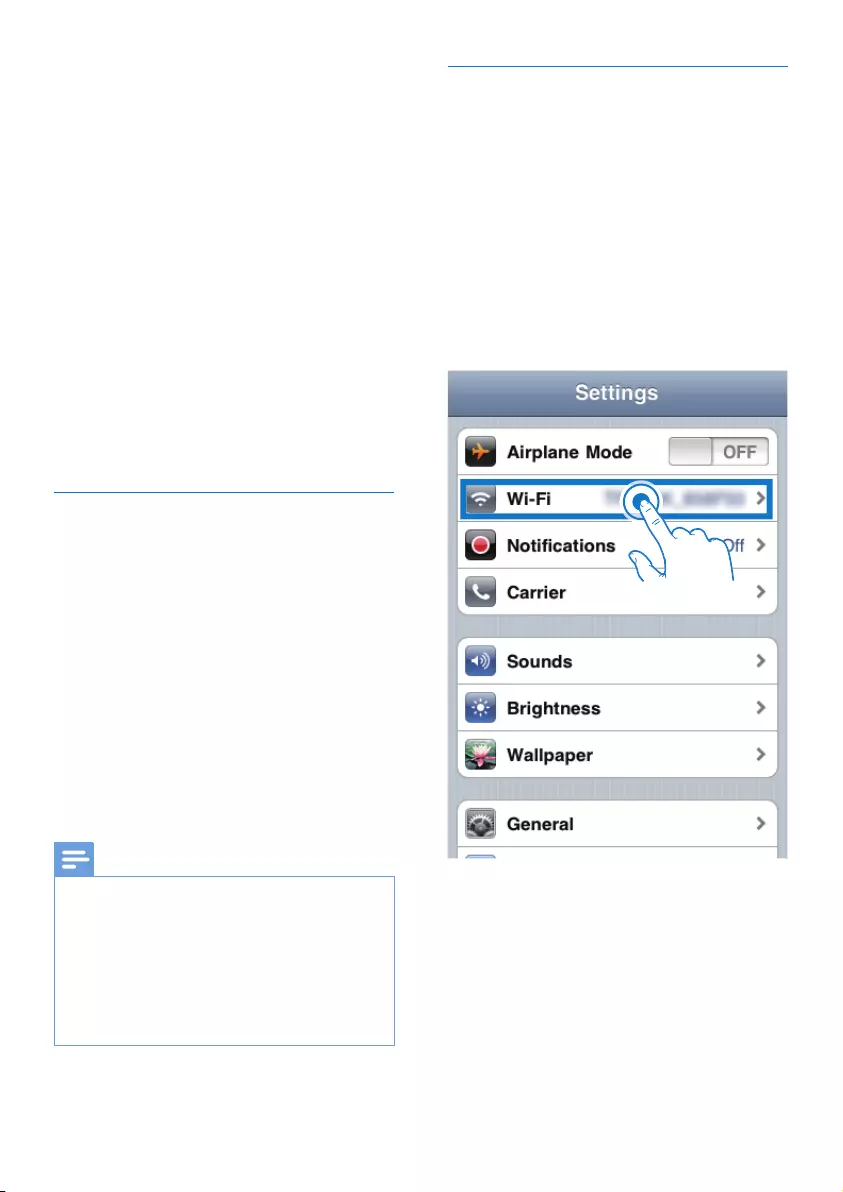
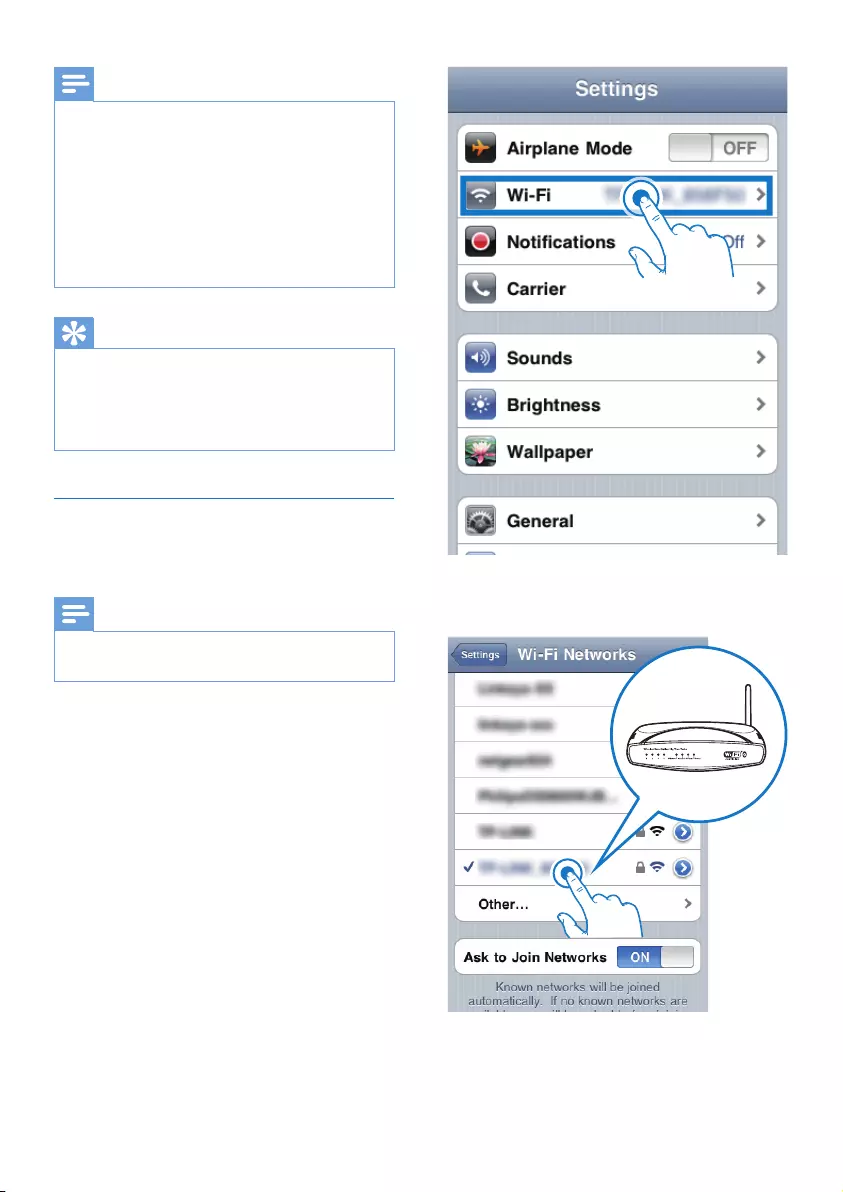
Option 1: Use your iPod touch/iPhone/iPad
1 Select Settings -> Wi-Fi on your iPod
touch/iPhone/iPad.
2 Select Philips_Install XXXXXX from the
listofavailablenetworks.
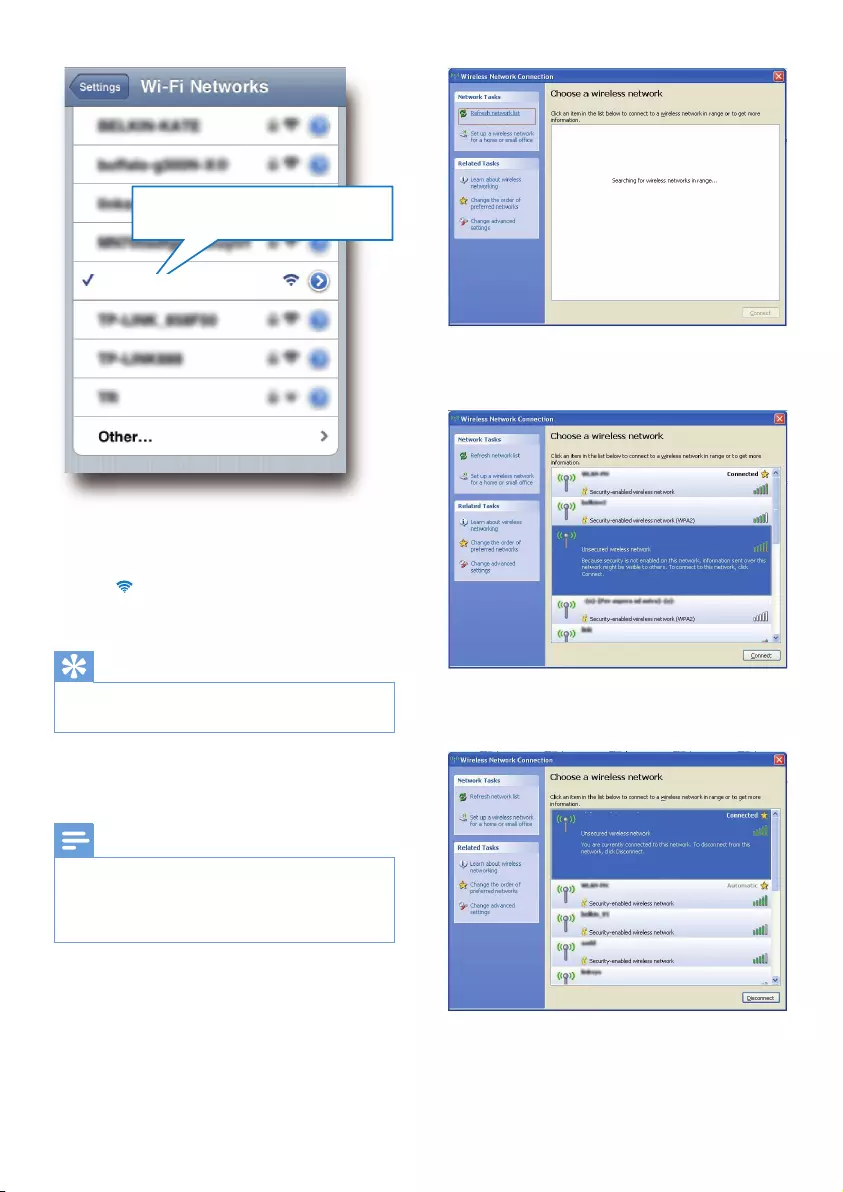
14 EN
3 Wait until successful Wi-Fi connection on
youriPodtouch/iPhone/iPad.
» is displayed at the upper left corner
ofyouriPodtouch/iPhone/iPad.
Tip
•If Philips_Install XXXXXX isnotinthelist,trytoscan
theavailableWi-Finetworksagain.
Option 2: Use your Wi-Fi enabled PC/Mac
Note
•See the user manual of your PC/Mac for how to
connectyourPC/MactoaWi-Finetwork.
•DuringWi-Finetworkconnection,donotconnectany
networkcabletoyourPC/Mac.
1 Open the Wi-Fi setup tool or control
panelonyourPC/Mac.
2 ScantheavailableWi-Finetworks.
Philips_Install XXXXXX
Philips_Install XXXXXX
3 Select Philips_Install XXXXXX from the
listofavailablenetworks.
4 Wait until successful Wi-Fi connection on
yourPC/Mac.
Philips_Install XXXXXX
Philips_Install XXXXXX
15EN
Tip
•If Philips_Install XXXXXX isnotinthelist,trytoscan
theavailableWi-Finetworksagain.
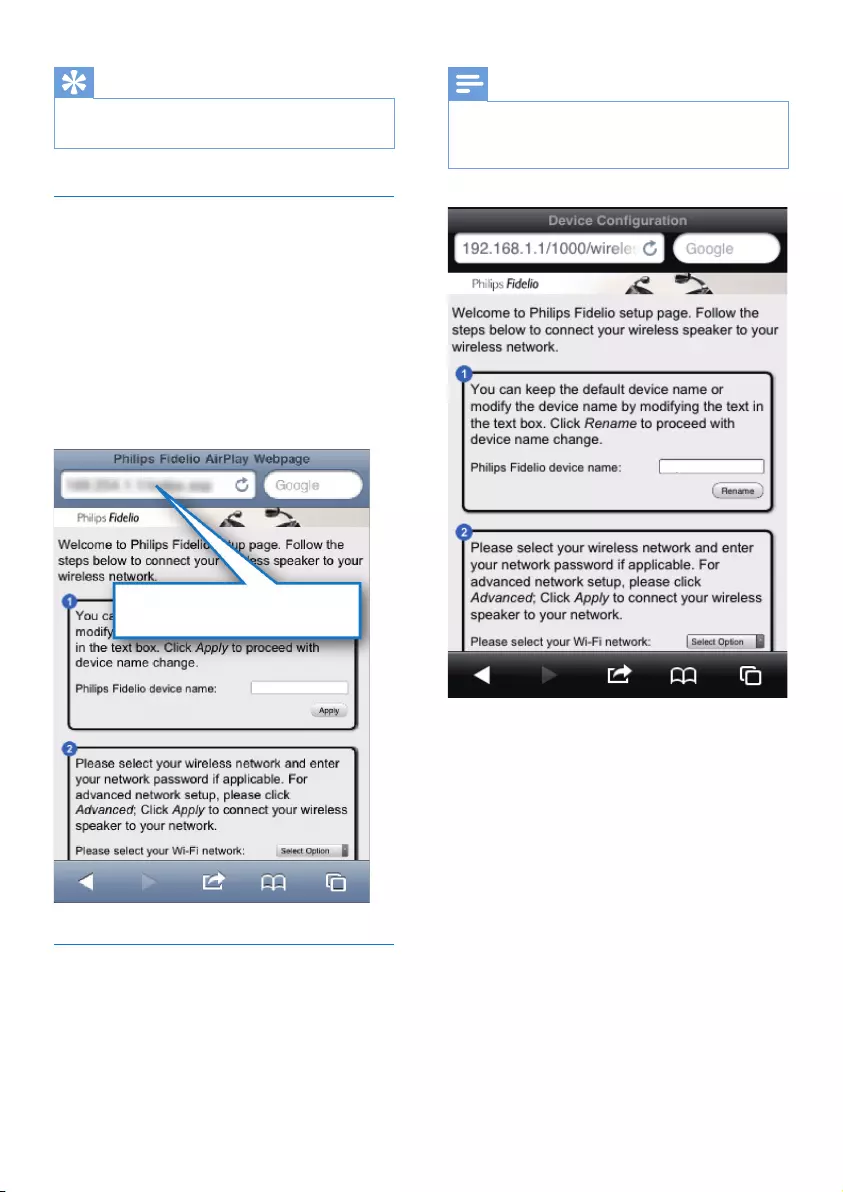
Open the built-in web page of
DS9830W
1 LaunchAppleSafari browser or any other
Internet browser on your Wi-Fi enabled
device.
2 Type in 192.168.1.1 at the browser
addressbarandconrm.
» TheDS9830Wcongurationweb
pageisdisplayed.
ConguretheinternalWi-Fisettings
of DS9830W
OntheDS9830Wcongurationwebpage,
youcanconguretheinternalWi-Fisettings
of DS9830W for connection of DS9830W to
yourexistinghomeWi-Finetwork.
192.168.1.1
Philips SoundSphere XXXXXX
Note
•Makesurethatthesettingsonthecongurationweb
page match your home Wi-Fi network settings that you
wroteonpaper.
• Follow the on-screen instructions to
congureandconrmtheinternalWi-Fi
settingsofDS9830W.
» Afterawhile,theWI-FI STATUS
indicator on the back of DS9830W
stopsblinkingandturnssolidgreen,
andtheunitbeeps.
» DS9830W is connected to your
existing home Wi-Fi network
successfully.
Philips SoundSphere XXXXXX
16 EN
Note
•If the WI-FI STATUSindicator on DS9830W does not
staygreensteadily,itmeansthattheWi-Ficonnection
hasfailed.PleasepoweroffbothyourWi-Firouter
and DS9830W and then power on them again to see
whether DS9830W can be connected to your home
Wi-Finetwork.Iftheproblemremains,trytheabove
proceduresagain.
•Afteryounishtheabovecongurationorpower-off
andpower-onofDS9830W,thenewWi-Finetwork
createdbyDS9830Wwilldisappear.
Tip
•Ifyoulike,youcanchangethenameofyourDS9830W
in Philips Fidelio Device Name on the DS9830W
congurationwebpage.Thisishelpfulwhenyouhave
multiple Philips AirPlay-enabled devices in your house
andyouneedtodistinguishbetweenthem.
Restore your Wi-Fi enabled device
back to your existing home Wi-Fi
setting
Note
•Make sure that the settings at steps 2 to 3 below match
yourhomeWi-Finetworksettingsyouwroteonpaper.
1 Select Settings -> Wi-Fi on your iPod
touch/iPhone/iPad.
• Or open the list of available Wi-Fi
networksonyourPC/Mac.
2 Select your network name (SSID) from the
listofavailablewirelessnetworks.
3 Enterthenetworkkeyifrequired.
17EN
4 Wait until successful Wi-Fi connection to
yourhomeWi-Finetwork.
Optional: Change the internal Wi-
Fi settings or rename your device
through Safari
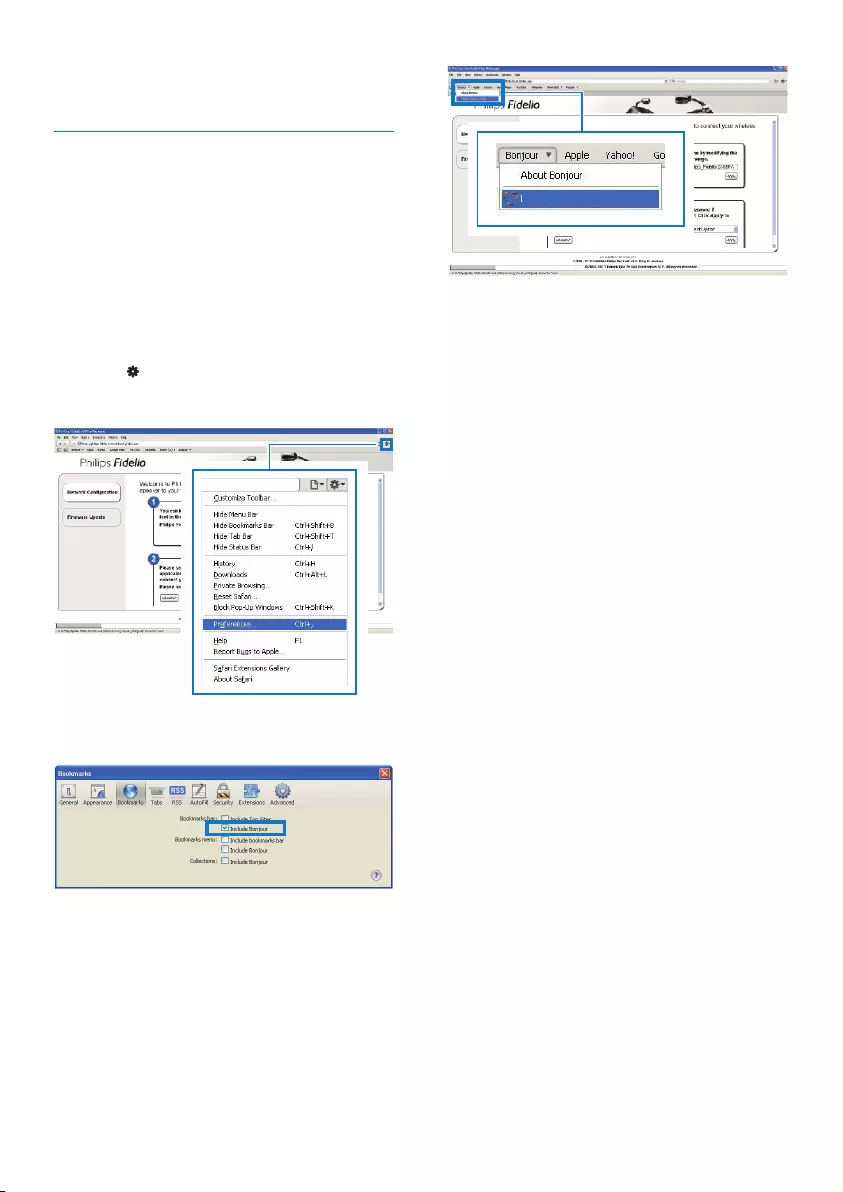
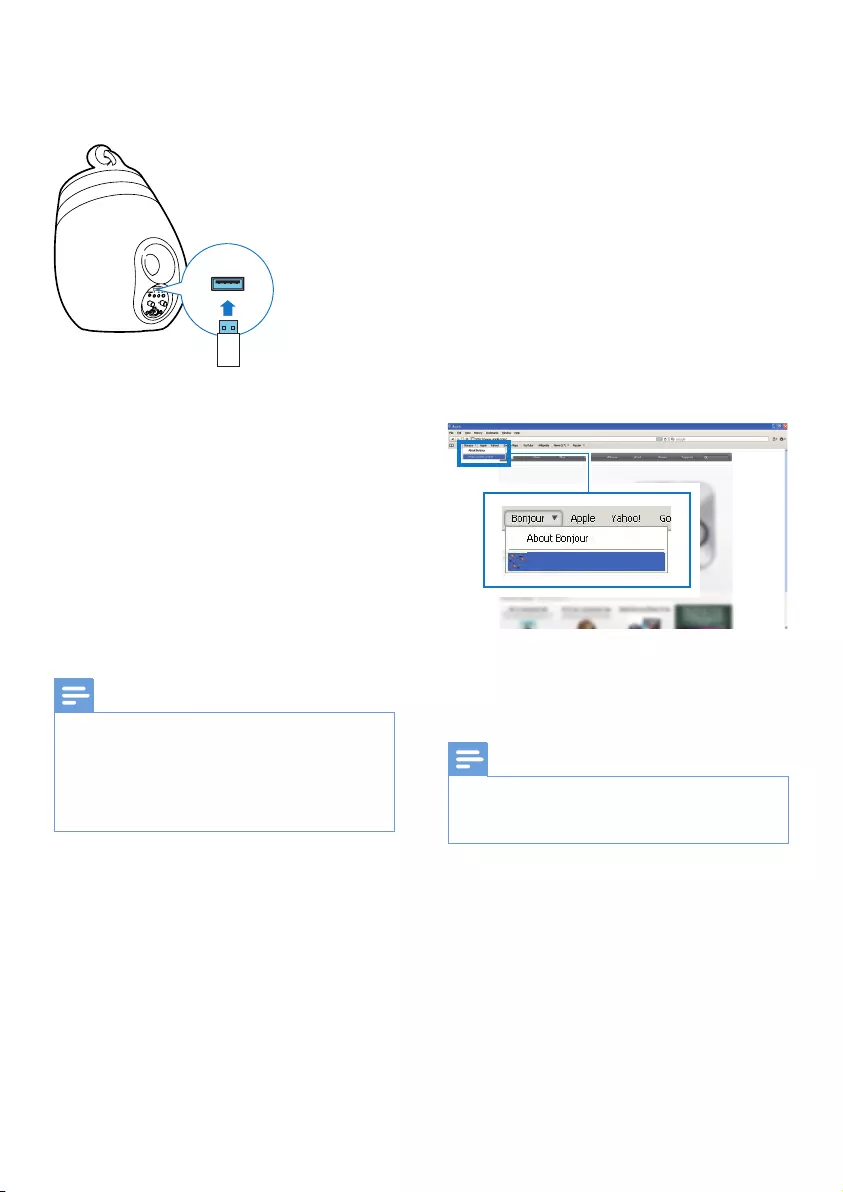
If you use Safari on your Wi-Fi enabled PC/
Mac,youcanalsoselect'Philips SoundSphere
XXXXXX' from the Bonjour pull-down list to
entertheDS9830Wcongurationwebpage
directly.Here,youcanchangetheinternalWi-Fi
settingsorrenameyourdeviceeasily.
1 Click -> Preferences.
» TheBookmarksmenuisdisplayed.
2 Tick Include Bonjour for Bookmarks bar.
3 Select Philips SoundSphere XXXXXX
from the Bonjour pull-down list shown at
thebookmarksbar.
» TheDS9830Wcongurationweb
pageisdisplayed.
4 Change the internal Wi-Fi settings or
renameyourdeviceonthewebpage.
Philips SoundSphere XXXXXX
18 EN
5 Play
Note
•The USB socket on the back of the main speaker does
notsupportmusicplay.Neverattempttoconnectany
devicetothissocketforsuchpurpose.
Stream audio from your
iTunes music library to
DS9830W
Note
•Make sure that your iTunes host device is connected
tothesameWi-FinetworkasDS9830W.YouriTunes
device can be an iPod touch/iPhone/iPad installed with
iOS4.3.3(orlater)oraWi-FienabledPC/Macinstalled
withiTunes10.2.2(orlater).
•For iPhone 4S users: To ensure optimal performance
ofAirPlaystreaming,upgradeyouriPhone4StoiOS
5.1orlater.
•Toplaymusicwirelessly,makesurethatyouriPod
touch/iPhone/iPad is disconnected from the USB socket
onthebackofthemainspeaker.
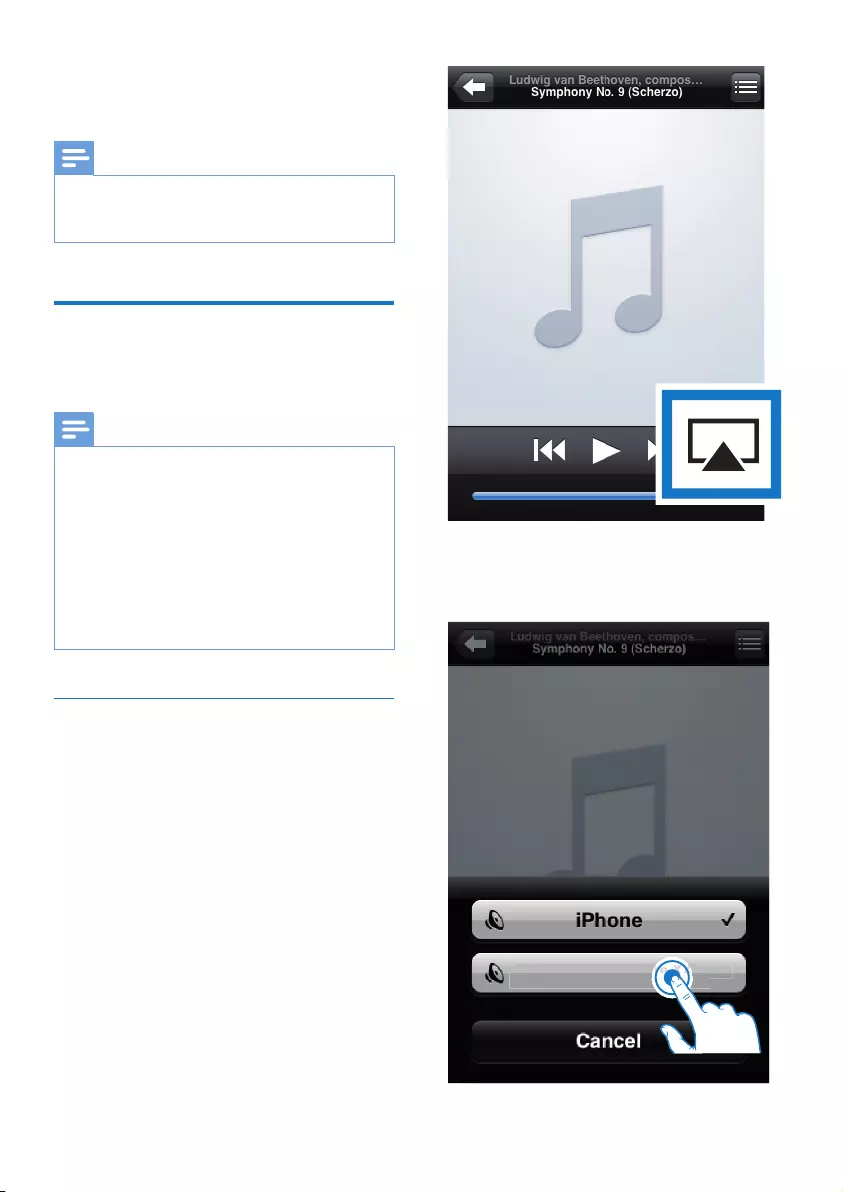
Stream from your iPod touch/iPhone/
iPad
1 LaunchtheiPod/Music application on your
iPodtouch/iPhone/iPad.
2 TaptheAirPlayicon.
3 Select Philips SoundSphere XXXXXX (or
user customized name) from the AirPlay
list.
Philips SoundSphere XXXXXX
ere XXX
ere XXX
19EN
4 Selectamedialeandstartplay.
» Afterawhile,youwillhearmusicfrom
DS9830W.
Note
•Ifyoufailtohearmusicaftersuccessfulsetup,dooneof
the following on your iPod touch/iPhone/iPad:
•(1) Disconnect and then re-connect to the same Wi-Fi
routeragain;
•(2)Closeallapplicationsrunningatthebackground;
•(3) Power off and then power on your iPod touch/
iPhone/iPadagain.
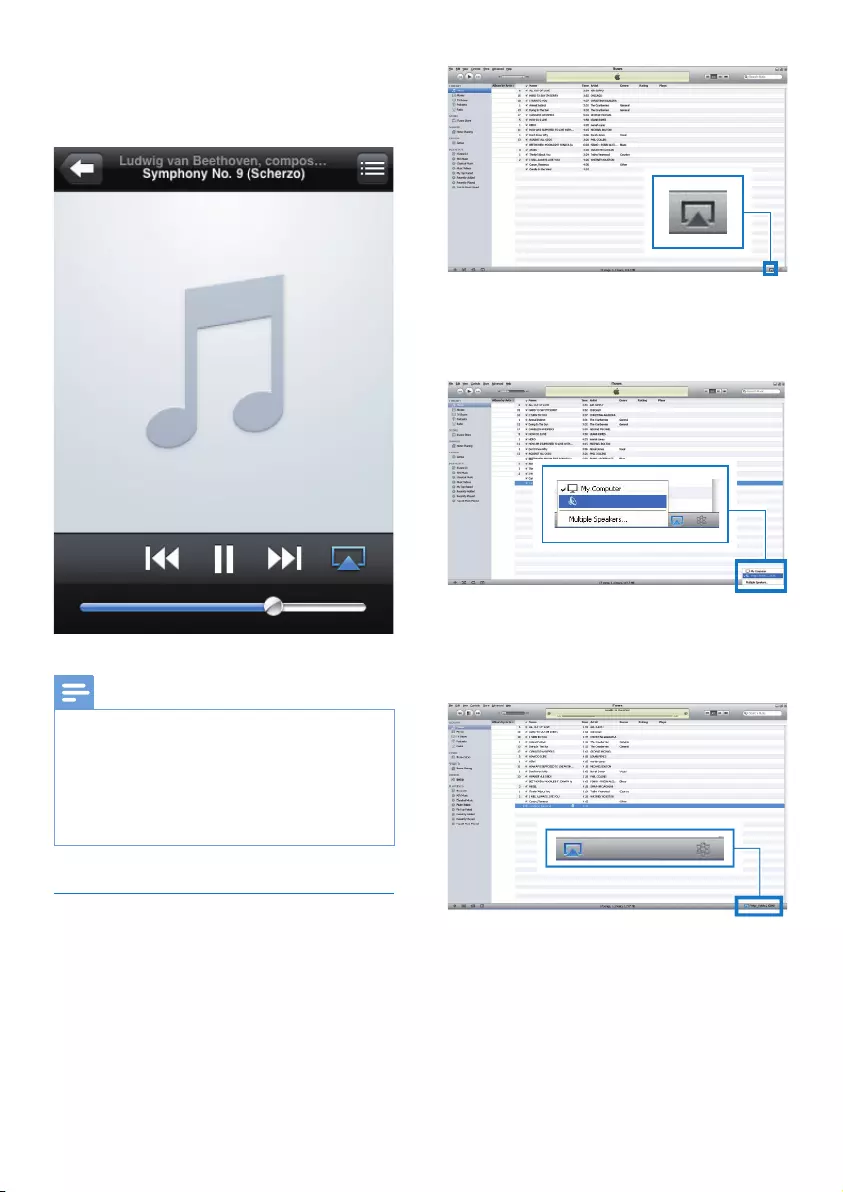
Stream from your PC/Mac
1 LaunchiTunes10.2.2(oralaterversion)
onyourPC/Mac.
2 ClicktheAirPlayicononthewindow.
3 Select Philips SoundSphere XXXXXX (or
user customized name) from the AirPlay
list.
4 Selectamedialeandstartplay.
» Afterawhile,youwillhearmusicfrom
DS9830W.
Philips SoundSphere XXXXXX
Philips SoundSphere XXXXXX

20 EN
Tip
•When you stream audio from your iTunes music library
onaPC/Mac,youcanselectmorethanoneAirPlay-
enabled devices (if available) at step 3 to stream music
toallofthematthesametime.
•IfyouareusinganearlierversionofiTunes,theAirPlay
icon may be instead of .
Control play
Youcanselectdifferentplayoptionsfromeither
youriTuneshostdeviceorDS9830W.
Note
•The operations below are based on the supplied
remotecontrolofDS9830W.
•Make sure that you have successfully streamed audio
fromyouriTunesmusiclibrarytoDS9830W.
• Tostartorpauseplay,press .
• Toskiptothepreviousornexttrack,press
/ .
• Toadjustvolume,press+/-repeatedly.
• Tomuteorrestorevolume,press .
• To switch to the MP3 link audio source (if
connected),press .
• ToswitchbacktotheAirPlayaudiosource,
press .
Tip
•IfyouarestreamingmusicfromaPC/Mac,tocontrol
musicplayfromDS9830W,launchiTunesandtick
Allow iTunes audio control from remote speakers
in Edit (for Windows) or iTunes (for Mac) ->
Preferences... -> Devices.
Use advanced sound settings
If your iTunes host device is an iPod touch/
iPhone/iPad:
For advanced sound settings and additional
features,youcanuseyouriPodtouch/iPhone/
iPad to download the Philips SoundStudio app
fromAppleAppStore.Itisafreeapplication
fromPhilips.
Tip
•Youcanalsoupgradethermwareofthedevice
through the Philips SoundStudio app directly (see
'Option 1: Update through Philips SoundStudio
(recommended)' on page 23).
If your iTunes host device is a Wi-Fi enabled
PC/Mac:
Foradvancedsoundsettings,youcanusethe
equalizeravailableoniTunesdirectly(View ->
Show Equalizer).
Tip
•SeetheiTuneshelpdocumentationformoredetails.
Play from an external device
Youcanalsolistentoanexternalaudioplayer
throughDS9830W.

21EN
1 Connect the supplied MP3 link cable to:
• the MP3-LINK socket on the back of
DS9830W.
• the headphone socket on an external
audioplayer.
2 Press toselecttheMP3linksource.
3 Startplayontheexternalaudioplayer.
MP3-LINK
22 EN
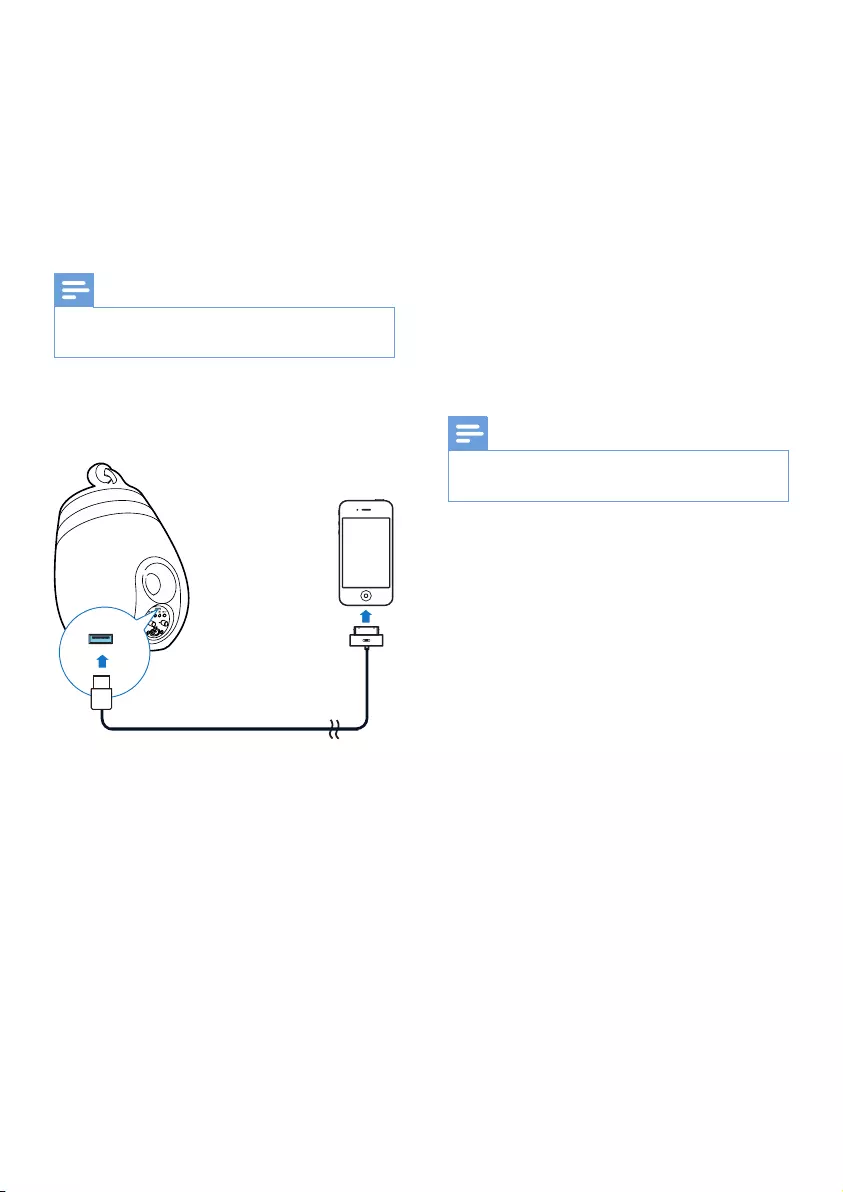
6 Charge your
iPod/iPhone/iPad
through USB
socket
Note
•The USB socket is only compatible with iPod/iPhone/
iPad.
YoucanchargeyouriPod/iPhone/iPadthrough
the USB socket with an Apple USB cable (not
supplied).
• Connect an Apple USB cable (not
supplied) to:
• the USB socket on the back of the
mainspeaker.
• the dock connector on your iPod/
iPhone/iPad.
Made for
• iPhone 5
• iPhone 4S
• iPhone 4
• iPhone 3GS
• iPhone 3G
• iPhone
• iPad (4th generation)
• iPad (3rd generation)
• iPad 2
• iPad
• iPod touch (5th generation)
• iPod touch (4th generation)
• iPod touch (3rd generation)
• iPod touch (2nd generation)
• iPod touch (1st generation)
• iPod nano (7th generation)
• iPod nano (6th generation)
• iPod nano (5th generation)
• iPod nano (4th generation)
• iPod nano (3rd generation)
• iPod nano (2nd generation)
• iPod nano (1st generation)
• iPod mini
Note
•iPodwithcolordisplay,iPodclassic,andiPodwithvideo
arenotcompatiblewithcharging.
23EN
7 Update
firmware
Warning
•Always connect your DS9830W to AC power for
rmwareupgrade.NeverpoweroffyourDS9830W
duringrmwareupgrade.
Youcanupdatethermwareeitherthrougha
USB mass storage device (recommended) or
fromaPC/Mac.
Option 1: Update through
Philips SoundStudio
(recommended)
1 Run the Philips SoundStudio app on your
iPod/iPhone/iPad.
2 Go to the Settingstaboftheapp.
3 Select About -> Check Upgrade.
4 Follow the on-screen instructions to
checkfornewrmwareandproceedwith
upgrade.
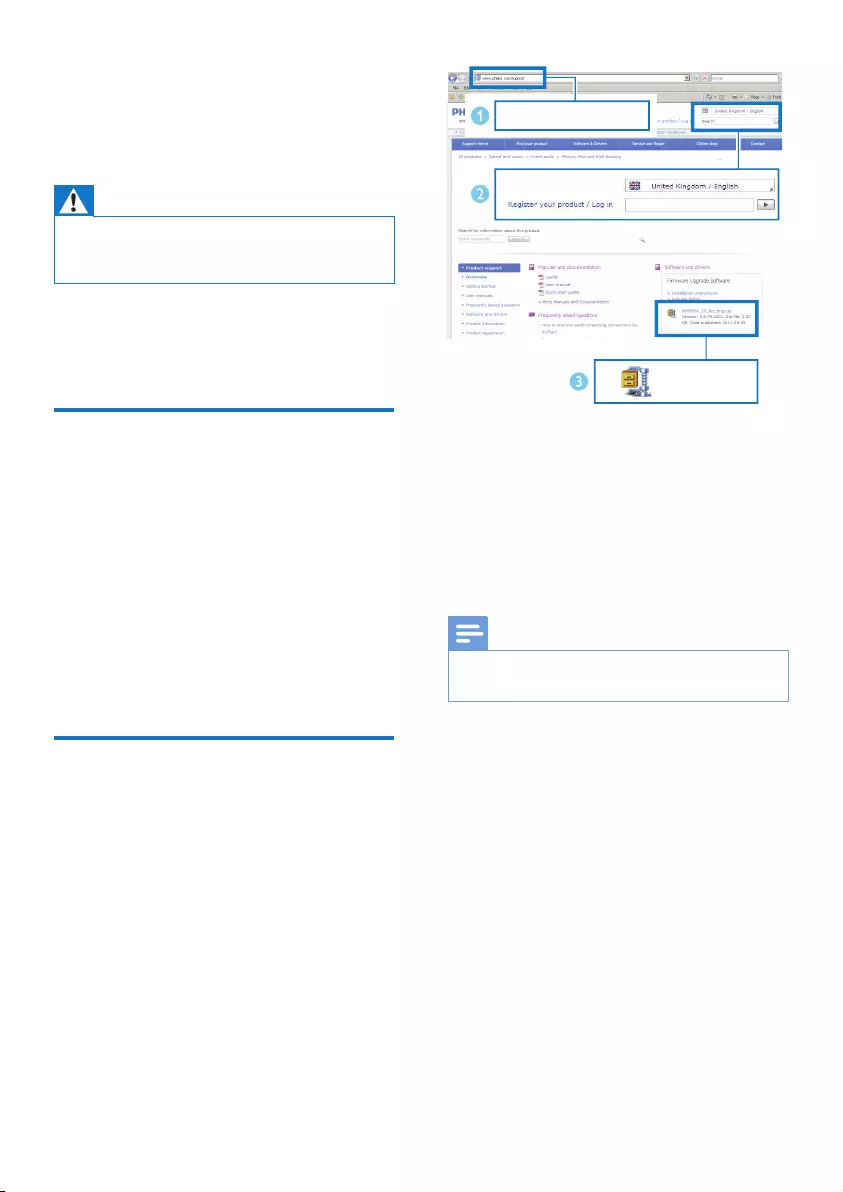
Option 2: Update through a
USB mass storage device or
PC/Mac
Downloadtheupdatele
1 OnyourPC/Mac,gotowww.philips.com/
support.
2 Enterthemodelnumbertondthelatest
rmwareupgradeleavailable.
3 Unzipandsavetheupgradeletoyour
harddrive.
Update through a USB mass storage device
Note
•Make sure that the USB mass storage device is
FAT16/32formatted.
1 Power on DS9830W (see 'Turn DS9830W
on' on page 8).
» It takes about 35 seconds for the unit
tobootup.Duringboot-up,theWI-FI
STATUS indicator on the back of the
mainspeakerblinksyellow.
» Afterboot-up,youcanhearabeep
and the WI-FI STATUS indicator turns
solidgreen.
» DS9830W is connected to the last
conguredWi-Finetworkautomatically.
2 Renamethedownloadedupgradeleto
'DS9830W.fw',andthensaveittotheroot
directoryofaUSBmassstoragedevice.
www.philips.com/support
XXXX
XXXX. zip
24 EN
3 Plug the USB mass storage device into
the USB socket on the back of the main
speaker.
4 Press and hold WI-FI SETUP for more
than10seconds.
» The WI-FI STATUSindicatorashes
red,andtheupgradeprocessstarts.
» Atcompletionofthermware
upgrade,theWI-FI STATUS indicator
ashesyellowandtheunitreboots.
Update from a PC/Mac
Note
•To use an Internet browser other than Apple Safari
onyourPC/Mac,remembertogototheWi-Firouter
congurationpageandwritedowntheIPaddressof
yourDS9830W.SeetheusermanualofyourWi-Fi
routerforhowtondtheIPaddressesofdevices
connectedtotheWi-Firouter.
1 Power on DS9830W (see 'Turn DS9830W
on' on page 8).
» It takes about 35 seconds for the unit
tobootup.Duringboot-up,theWI-FI
STATUSindicator on the back of the
mainspeakerblinksyellow.
» Afterboot-up,youcanhearabeep
and the WI-FI STATUS indicator turns
solidgreen.
» DS9830W is connected to the last
conguredWi-Finetworkautomatically.
2 Make sure that DS9830W and your PC/
Mac are connected to the same Wi-Fi
router.
3 Open Apple SafarionyourPC/Mac,then
select 'Philips SoundSphere XXXXXX'
fromtheBonjourpull-downlist.
• Or open any other Internet browser
onyourPC/Mac,thentypeintheIP
address of DS9830W (available on the
Wi-Firoutercongurationpage)atthe
addressbar.
» TheDS9830Wcongurationweb
pageisdisplayed.
4 Select the Firmware Update tab and
follow the on-screen instructions to
completetheupdateprocess.
Note
•Incasethermwareupdatefails,youcanupgrade
through a USB mass storage device or try the above
proceduresagain.
Aftersuccessfulrmwareupdate,ifthereis
anyproblemwiththeWi-Ficonnection,restart
DS9830W,andthentrytoset up the Wi-Fi
network for DS9830W again (see 'Connect to
your home Wi-Fi network for AirPlay' on page
10).
Philips SoundSphere XXXXXX

25EN
8 Product
information
Note
•Product information is subject to change without prior
notice.
Specications
Amplier
Rated Output Power 2X50WRMS
FrequencyResponse 20-20000Hz,
-3dB
Signal to Noise Ratio > 90 dB
Aux Input (MP3 link) 1VRMS20
kohm
Speakers
Speaker Impedance 8 ohm
Speaker Driver 130 mm woofer + 19
mm tweeter
Sensitivity > 85 dB/m/W
Wireless
Wireless
standard
802.11b/g
Wireless
security
WEP(64or128bit),
WPA/WPA2 (8-63 characters)
Frequency
range
2412 - 2462 MHz (CH1-CH11)
(for/79,/37,/55,/97)
2412 - 2472 MHz (CH1-CH13)
(for/12,/10,/05)
PBC (one
button push)
Ye s
General information
AC power Wireless
SoundSphere
speakers:
100-240V~,
50/60Hz
Operation Power
Consumption
22 W
Standby Power
Consumption
<0.5W
Dimensions
- Each speaker
265 in diameter x
410 mm
Weight
- With Packing
- Speakers
14.5kg
12 kg

26 EN
9 Troubleshooting
Warning
•Neverremovethecasingofthisapparatus.
Tokeepthewarrantyvalid,nevertrytorepair
thesystemyourself.
If you encounter problems when using this
apparatus,checkthefollowingpointsbefore
requestingservice.Iftheproblemremains
unsolved,gotothePhilipswebsite(www.
philips.com/welcome).Whenyoucontact
Philips,ensurethattheapparatusisnearby
and the model number and serial number are
available.
No power
•Make sure that the AC power plug of the
deviceisconnectedproperly.
•Make sure that there is power at the AC
outlet.
No sound
•Adjustthevolume.
•Checkthenetworkconnection.Set up the
network again if needed (see 'Connect to
your home Wi-Fi network for AirPlay' on
page 10).
•Check if you have selected the correct
audiosource.
No response from the unit
•Press and hold on DS9830W for more
than5secondstoresetthedevice.Then
set up the Wi-Fi network for DS9830W
again (see 'Connect to your home Wi-Fi
network for AirPlay' on page 10).
•Disconnect and reconnect the AC power
plug,andthenswitchonthedeviceagain.
Remote control does not work
•Beforeyoupressanyfunctionbutton,rst
select the correct source with the remote
controlinsteadofthemainunit.
•Reduce the distance between the remote
controlandtheunit.
•Insert the battery with its polarities (+/–
signs)alignedasindicated.
•Replacethebattery.
•Aim the remote control directly at the IR
sensoronthefrontofthemainspeaker.
Wi-Fi network connection failed
•Check if your Wi-Fi router is Wi-Fi
802.11b/gcertied.Thisdeviceisonly
compatiblewithWi-Fi802.11b/gcertied
routers.
•IfyourWi-FirouterisWi-Fi802.11n
certied,makesuretoenablethe
802.11b/gmode.DS9830Wdoesnot
support connection to routers with
802.11nonly.
•This device does not support the WPS-
PINmethod.
•If your Wi-Fi router supports WPS and
the WPS-PBC method but fails to connect
toDS9830W,try the manual Wi-Fi setup
method (see 'Method 3: Connect to a
non-WPS Wi-Fi router' on page 12).
•EnableSSIDbroadcastontheWi-Firouter.
•Keep away from potential sources of
interferencewhichmayaffectWi-Fisignal,
suchasmicrowaveovens.
•If you fail to use your PC for Wi-Fi network
setup,checkwhetheryourPCisusinga
Wi-Finetwork.YoucannotuseEthernet
connectionforAirPlaynetworksetup.
•Make sure that the SSID name of your
home router consists of alphanumeric
characters,withnospaceorspecial
characterslike%/#/*inserted.
•If you choose to rename the AirPlay device
'Philips_Install XXXXXX' in the setting
menu,donotusespecialcharactersor
symbols.

27EN
•ForsomenewtypesofWi-Firouters,a
network name (SSID) may be created
automatically when you use WPS for
connection.Alwayschangethedefault
network name (SSID) to a simple one that
consistsofalphanumericalcharacters,and
also change the Wi-Fi security mode to
secureyournetwork.
Occasional breaking of AirPlay music
streaming
Do one or all of the following:
•Move DS9830W closer to your Wi-Fi
router.
•Remove any obstacles between DS9830W
andyourWi-Firouter.
•Avoid using Wi-Fi channel which is
overlappedbythenearbyWi-Finetwork.
•Check if your network speed is fast enough
(in cases where multiple devices share the
samerouter,theAirPlayperformancemay
beaffected).Turnofftheotherdevices
connectedtoyourhomerouter.
•Enable the Quality of Service (QoS)
option(ifavailableontheWi-Firouter).
•TurnoffotherWi-Firouters.
No AirPlay icon on my iTunes host device
•Make sure that DS9830W is already
connectedtoyourhomeWi-Finetwork.
•BeforeyouopeniTunes,makesurethat
you have enabled Bonjour service in
yourPC.TakeWindowsXPforexample:
toenabletheservice,youcanclick
Start->Control Panel,anddouble-click
Administrative Tools-> Services->Bonjour
Service,thenclickStart followed by OK
onthepop-upmenu.
•Iftheproblemremains,trytorestart
DS9830W.
AirPlay connection failed with Mac or PC
•Temporarilydisabletherewalland
security software to see whether it blocks
the ports that AirPlay uses to stream
content.Seethehelpdocumentationof
yourrewallandsecuritysoftwareonhow
tounblocktheportsusedbyAirPlay.
•When you use iPod Touch/iPhone/iPad/
Mac/PCforAirPlay,ifthemusicplaybreaks
orstops,trytorestartyouriPodTouch/
iPhone/iPad,iTunesorDS9830W.
•VideostreamingorFTPdownloadsmay
overload your router and therefore may
cause interruptions during AirPlay music
play.Trytoreducetheloadofyourrouter.

2014 © WOOX Innovations Limited.
All rights reserved.
This product was brought to the market by WOOX Innovations
Limited or one of its affiliates, further referred to in this document
as WOOX Innovations, and is the manufacturer of the product.
WOOX Innovations is the warrantor in relation to the product
with which this booklet was packaged. Philips and the Philips Shield
Emblem are registered trademarks of Koninklijke Philips N.V. DS9830W_10_UM_V3.0