ASUS ROG Horus GK2000 RGB User Manual
Displayed below is the user manual for ROG Horus GK2000 RGB by ASUS which is a product in the Keyboards category. This manual has pages.
Related Manuals
GK2000 HORUS RGB
Mechanical Gaming Keyboard
Package Contents
Specications Summary
A
B
繁體中文 簡體中文
Français Deutsch
English
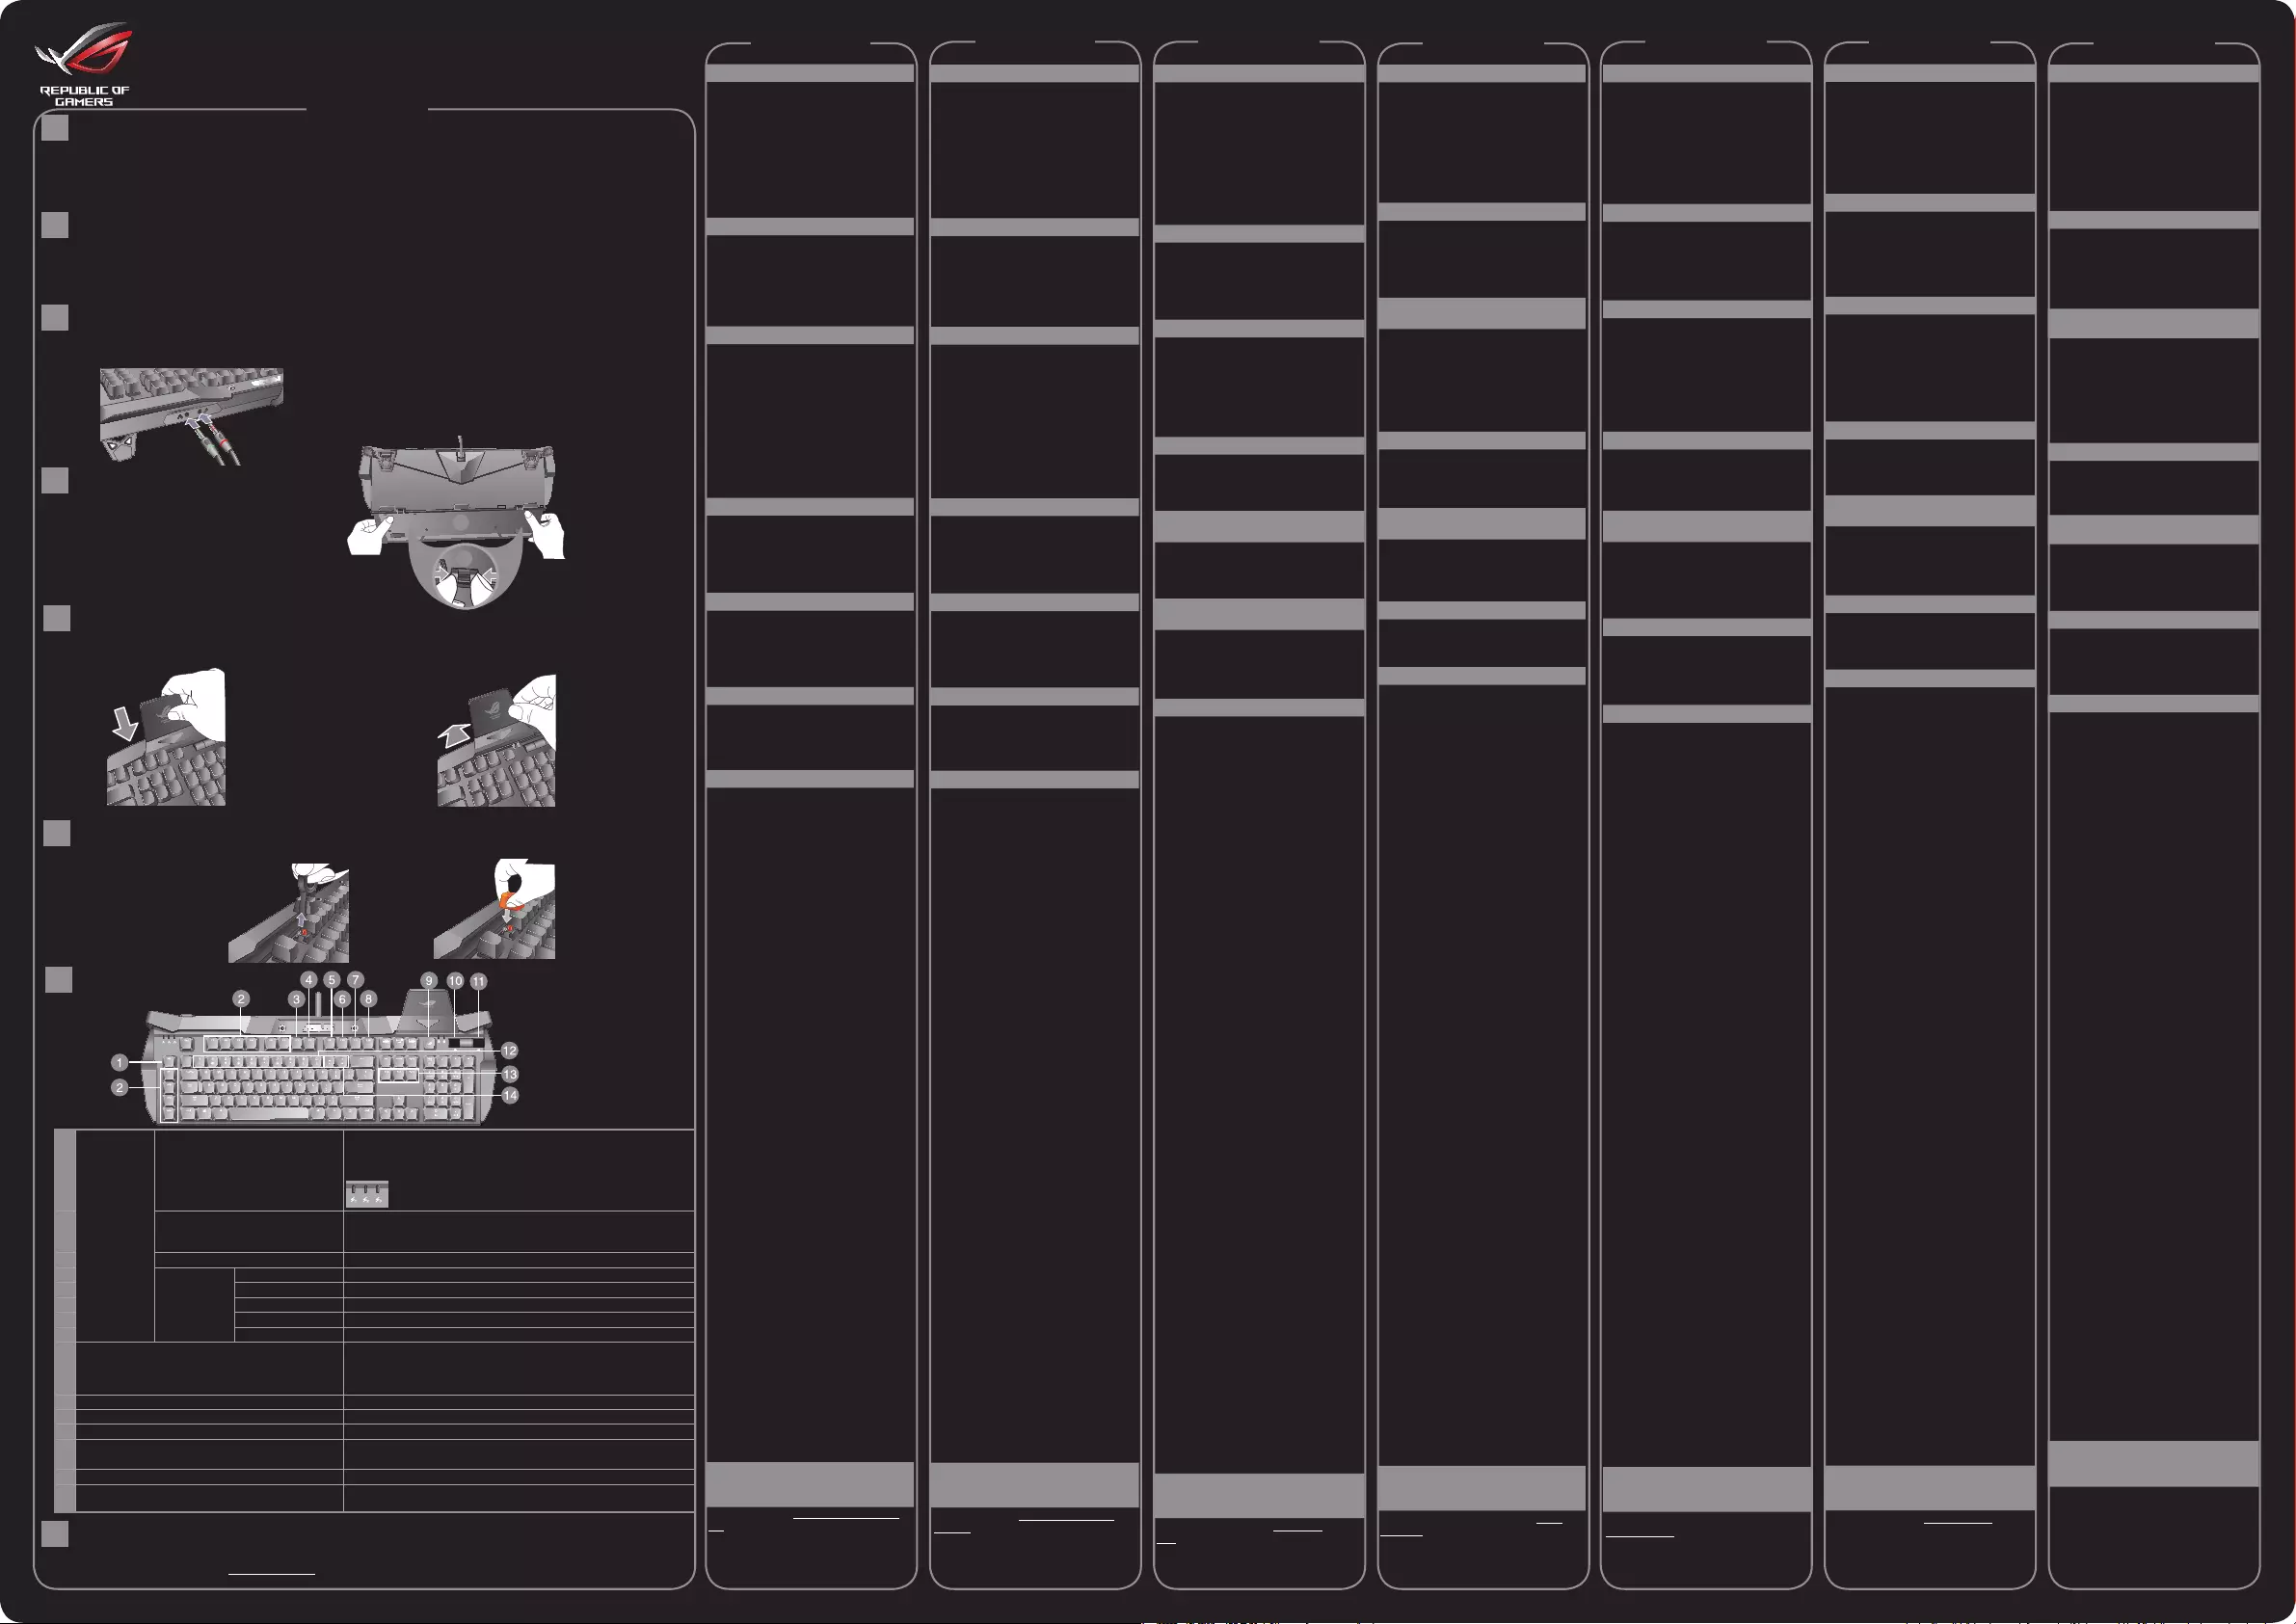
NOTE: We recommend that you connect an external HDD and
a mouse to the USB ports on your keyboard.
Installing your GK2000 RGB Keyboard
C
1. Connect your keyboard to the USB port on your computer.
2. Connect your microphone and headphone to the Mic and Headphone ports on your keyboard.
Go to the ASUS website at www.asus.com to download and install the latest keyboard driver to
customize your keyboard’s macro commands, button functions, lighting, and other functions.
Replacing the Key Caps
Installing the Mobile Device Stand
F
E
1. Use a key cap puller to take out the ML~M4 or
F7~F12 (M11~M16) keys.
1. Align the mobile device stand to the wing at
the upper right corner of your keyboard.
2. Replace with extra key caps.
2. Push the mobile device stand forward to
x it.
Hotkeys
Customizing your Keyboard (Macro commands, Button functions, Lighting
and others)
G
H
Installing the Wrist Rest
D
1. Align the wrist rest to the notches at
the back of your keyboard.
2. Press both sides inward to secure
the wrist rest in place.
1
2
• ASUSGK2000RGBkeyboardx1 • Wristrestx1
• Mobiledeviceholderx1 • Carrysleevex1
• QuickStartGuidex1 • Sparepartskit:keycappullerx1,extraML~M4key
caps, and extra F7~F12 (M11~M16) key caps.
• Productname:GK2000GamingKeyboard • Dimension51x22.5x4.5cm(LxWxH)
• Model:GK2000Keyboard • Weight:1.68Kg
• Rating:5V/500max2
1.
Programmable
keys: After the
keyboard driver
installation,
you can dene
functions for
these keys
through the
keyboard setup
program.
ML Default:MacroKeyLevelSwitch
Press this key to switch among Level 1 to Level 3. Each level provides
dierent programmable functions for M1~M4.
Macro Key Level indicator
2. M1~M4, M5(Fn+F1), M6(Fn+F2),
M7(Fn+F3), M8(Fn+F4), M9(Fn+F5),
M10(Fn+F6) Default: No function
3. M11(Fn+F7) or Fn+Arrow Left/Right Default: LED display mode switch
4.
Multimedia
controls
M12(Fn+F8) Default: Launches the default multimedia player.
5. M13(Fn+F9) Default: Play & Pause
6. M14(Fn+F10) Default: Stop
7. M15(Fn+F11) Default: Previous track
8. M16(Fn+F12) Default: Next track
9. ROG Key (Windows Key Lock/ Caps lock indicator) Pressthiskeytoenable/disabletheWindowsKey.TheWindowsKey
ashestwicetoindicatetheWindowsKeyisdisabled,anditashesthrice
toindicatetheWindowsKeyisenabled.
TheROGKeylightsuptoindicateCapslockisON.
10. Lighting knob Adjusts the brightness of the keyboard backlight.
11. Volume up/down/mute Push the knob leftward to mute the volume.
12. Fn+1/2/3/4/5/6/7/8/9/0 (Prole switch) Pressthesehotkeystoswitchamongthe10presetprolesfrom1to0.
13. Fn+DEL, END, PageDown Press these hotkeys to adjust the RGB lighting eect for Red (Fn+Del),
Green (Fn+End), Blue (Fn+PaDn) color depth (color spectrum) separately.
14. Fn + “+”, Fn+”-” Press these keys to speed up or down the display speed of lighting eect.
15. Fn + Esc Pressthesekeyssimultaneouslyfor10secondstorestoretothefactory
settings.
Flash 1: Level 1, Flash 2: Level 2, Flash 3: Level 3
Русский
Italiano Magyar
包裝內容物
• 華碩 GK2000 RGB 鍵盤 x1
• 腕托 x1
• 手機支架 x1
• 便攜收納袋 x1
• 快速使用指南 x1
• 配件包: 鍵帽移除工具 x1、附屬專用
ML~M4 鍵帽和 F7~F12(M11~M16)鍵
帽
規格概要
• 產品名稱: 鍵盤
• 型號: GK2000 KEYBOARD
• 額定功率: 5V/500ma x2
• 尺寸: 51 x 22.5 x 4.5 公分 (長 x 寬
x 高)
• 重量: 1.68kg
安裝 GK2000 RGB 鍵盤
1. 將鍵盤連接至電腦的 USB 連接埠。
2. 你可將麥克風和耳機連接至鍵盤的麥
克風和耳機連接埠。
注意:鍵盤后方的 USB 連接埠建議連接
使用一個滑鼠或一個外接硬碟。
安裝腕托
1. 將腕托的卡扣與鍵盤背面的凹槽對
齊。
2. 將兩側向內按壓,固定腕托。
安裝手機支架
1. 將手機支架與鍵盤右上角的缺口對
齊。
2. 將手機支架向前推入以固定。
更換鍵帽
1. 使用鍵帽移除工具取出 ML~M4 或
F7~F12(M11~M16) 鍵。
2. 用附屬專用鍵帽進行更換。
快速鍵
可編程鍵: 鍵盤驅動程式安裝後, 可以
透過鍵盤設定程式為按鍵自訂功能。
1. ML 預設: 巨集鍵級別切換
按下此鍵在 1 級至 3 級間切換。每級為
M1~M4 提供不同的編程功能。
巨集鍵級別指示燈
指示燈 1: 1 級, 指示燈 2: 2 級,
指示燈 3: 3 級
2. M1~M4、 M5(Fn+F1)、M6(Fn+F2)、
M7(Fn+F3)、 M8(Fn+F4)、 M9(Fn+F5)、
M10(Fn+F6) 預設: 無功能
3. M11(Fn+F7) 或 Fn+ 向左 / 向右方
向鍵 預設: 指示燈顯示模式切換
多媒體控制:
4. M12(Fn+F8) 預設: 開啟預設多媒
體播放器。
5. M13(Fn+F9) 預設:播放或暫停
6. M14(Fn+F10) 預設:停止
7. M15(Fn+F11) 預設:上一首
8. M16(Fn+F12) 預設:下一首
9. ROG 鍵 (Windows 鍵鎖定 / 大寫字
母鎖定指示燈) 按下此鍵開啟 / 關閉
Windows 鍵。 Windows 鍵閃爍兩下
表明 Windows 鍵關閉,閃爍三下表明
Windows 鍵開啟。
ROG 鍵燈亮表明大寫字母鎖定指示燈開
啟。
10. 燈光旋鈕 調節鍵盤背光亮度。
11. 音量增大 / 減小 / 靜音旋鈕 從
音量旋鈕側面向左側按壓為靜音功
能。
12. Fn+1/2/3/4/5/6/7/8/9/0 (設定檔切換)
按下這些快速鍵在從 1 到 0 的 10 個預
設檔間切換。
13. Fn+DEL、END、PageDown 按
下這些快速鍵分別調整 RGB 燈效紅
色(Fn+Del)、綠色(Fn+End)、藍色
(Fn+PaDn)的色深(色譜)。
14. Fn + “+”, Fn + “-” 按下這些按鍵
使燈效的顯示速度加快或減緩。
15. Fn + Esc 同時按下這兩個按鍵 10
秒回復為原廠設定。
客製化鍵盤(巨集命令 / 按鍵功能 ,
燈光和其他)
請造訪華碩網站 https://www.asus.com/
tw/ 下載和安裝最新鍵盤驅動程式,以
客製化您的鍵盤巨集命令、按鍵功能、
燈光和其他功能。
包裝內容物
• 華碩 GK2000 RGB 鍵盤 x1
• 腕托 x1
• 手機支架 x1
• 便攜收納袋 x1
• 快速使用指南 x1
• 配件包: 鍵帽移除工具 x1、附屬專用
ML~M4 鍵帽和 F7~F12(M11~M16)
鍵帽
規格概要
• 產品名稱: GK2000 游戲鍵盤
• 型號: GK2000 鍵盤
• 額定功率: 5V/500ma x2
• 尺寸:51 x 22.5 x 4.5 釐米 (長 x 寬
x 高)
• 重量: 1.68 千克
安裝 GK2000 RGB 鍵盤
1. 將鍵盤連接至電腦的 USB 接口。
2. 你可將麥克風和耳機連接至鍵盤的麥
克風和耳機接口。
注意:鍵盤后方的 USB 接口建議連接
使用一個鼠標或一個外接硬盤。
安裝腕托
1. 將腕托的卡扣與鍵盤背面的凹槽對
齊。
2. 將兩側向內按壓,固定腕托。
安裝手機支架
1. 將手機支架與鍵盤右上角的缺口對
齊。
2. 將手機支架向前推入以固定。
更換鍵帽
1. 使用鍵帽移除工具取出 ML~M4 或
F7~F12(M11~M16) 鍵。
2. 用附屬專用鍵帽進行更換。
快捷鍵
可編程鍵: 鍵盤驅動程序安裝後, 可以
通過鍵盤設置程序為按鍵自定義功能。
1. ML 默認: 宏鍵級別切換
按下此鍵在 1 級至 3 級間切換。每級
為 M1~M4 提供不同的編程功能。
宏鍵級別指示燈
指示燈 1: 1 級, 指示燈 2: 2 級,
指示燈 3: 3 級
2. M1~M4、 M5(Fn+F1)、M6
(Fn+F2)、 M7(Fn+F3)、 M8(Fn+F4)、
M9(Fn+F5)、M10(Fn+F6) 默認:
無功能
3. M11(Fn+F7) 或 Fn+ 向左 / 向右方
向鍵 默認: 指示燈顯示模式切換
多媒體控制:
4. M12(Fn+F8) 默認: 開啟默認多
媒體播放器。
5. M13(Fn+F9) 默認:播放或暫停
6. M14(Fn+F10) 默認:停止
7. M15(Fn+F11) 默認:上一首
8. M16(Fn+F12) 默認:下一首
9. ROG 鍵 (Windows 鍵鎖定 / 大寫字
母鎖定指示燈) 按下此鍵開啟 / 關閉
Windows 鍵。 Windows 鍵閃爍兩下
表明 Windows 鍵關閉,閃爍三下表明
Windows 鍵開啟。
ROG 鍵燈亮表明大寫字母鎖定指示燈開
啟。
10. 燈光旋鈕 調節鍵盤背光亮度。
11. 音量增大 / 減小 / 靜音旋鈕 從
音量旋鈕側面向左側按壓為靜音功
能。
12. Fn+1/2/3/4/5/6/7/8/9/0 (設置
文件切換)
按下這些快捷鍵在從 1 到 0 的 10 個默
認文件間切換。
13. Fn+DEL、END、PageDown 按
下這些快捷鍵分別調整 RGB 燈效紅
色(Fn+Del)、綠色(Fn+End)、藍色
(Fn+PaDn)的色深(色譜)。
14. Fn + “+”, Fn + “-” 按下這些按
鍵使燈效的顯示速度加快或減緩。
15. Fn + Esc 同時按下這兩個按鍵 10
秒恢復為出廠設置。
自定義鍵盤(宏命令 / 按鍵功能,
燈光和其他)
請訪問華碩網站 https://www.asus.
com.cn 下載和安裝最新鍵盤驅動程序,
以自定義您的鍵盤宏命令、按鍵功能、
燈光和其他功能。
Contenu de la boîte
•ClavierASUSGK2000RGBx1
•Repose-poignetx1
•Supportpourappareilmobilex1
•Pochettedetransportx1
•Guidededémarragerapidex1
•Kitdepiècesderechange:extracteur
de capuchons de touches x 1, capuchons
detouchessupplémentairesML~M4et
capuchonsdetouchessupplémentaires
F7~F12 (M11~M16).
Résumé des caractéristiques
•Nomduproduit:ClavierdejeuGK2000
•Modèle:ClavierGK2000
•Tensionnominale:5V/500max2
•Dimensions51x22,5x4,5cm(LxlxH)
•Poids:1,68Kg
Installer votre clavier GK2000 RGB
1. Connectez le clavier au port USB de votre
ordinateur.
2. Connectez votre micro et votre casque aux
ports micro et casque du clavier.
REMARQUE :Ilestrecommandéd'utiliser
les ports USB du clavier pour connecter un
disque dur externe ou une souris.
Installer le repose-poignet
1.Alignezlerepose-poignetsurlesencoches
situéesàl'arrièreduclavier.
2.Pressezsurlescôtéspoursécuriserle
repose-poignetauclavier.
Installer le support pour appareil
mobile
1. Alignez le support pour appareil mobile
surl'ailesituéeenhautàdroiteduclavier.
2.Poussezlesupportversl'avantpourle
xer.
Remplacer les capuchons de
touches
1. Utilisez un extracteur de capuchons de
touches pour retirer les touches ML~M4 ou
F7~F12 (M11~M16).
2.Remplacez-lespardescapuchonsde
touchessupplémentaires.
Raccourcis
Touches programmables :Après
l'installationdupiloteduclavier,vouspouvez
dénirdesfonctionspourcestouchesgrâce
au programme de conguration du clavier.
1. ML Pardéfaut:Commutateurdeniveau
de touche macro
Appuyez sur cette touche pour basculer
entrelesniveaux1à3.Chaqueniveaufournit
desfonctionsprogrammablesdiérentes
pourM1àM4.
Indicateur de niveau de touche macro
Clignotant 1 : Niveau 1, Clignotant 2 : Niveau
2, Clignotant 3 : Niveau 3
2. M1~M4, M5 (Fn+F1), M6 (Fn+F2), M7
(Fn+F3), M8 (Fn+F4), M9 (Fn+F5), M10
(Fn+F6)Pardéfaut:Aucunefonction
3. M11 (Fn+F7) ou Fn+Flèche gauche /
droite Pardéfaut:Commutateurmode
d'achageàLED
Commandes multimédia :
4. M12 (Fn+F8)
Pardéfaut:Ouvrele
lecteurmultimédiapardéfaut.
5. M13 (Fn+F9)
Pardéfaut:Lectureet
pause
6. M14 (Fn+F10)
Pardéfaut:Arrêt
7. M15 (Fn+F11)
Pardéfaut:Piste
précédente
8. M16 (Fn+F12)
Pardéfaut:Pistesuivante
9. Touche ROG (Indicateur de verrouillage
desmajuscules/verrouillagedetouche
Windows) Appuyez sur cette touche pour
activer/désactiverlatoucheWindows.
La touche Windows clignote deux fois
pour indiquer que la touche Windows est
désactivéeetelleclignotetroisfoispour
indiquerquelatoucheWindowsestactivée.
LatoucheROGs'allumepourindiquerquele
verrouillagedesmajusculesestactivé.
10. Bouton d'éclairage Règlelaluminosité
durétro-éclairageduclavier.
11. Bouton volume + / volume - Poussez le
bouton vers la gauche pour couper le son.
12. Fn+1/2/3/4/5/6/7/8/9/0 (Changement
de prol) Appuyez sur ces touches de
raccourcipourbasculerentreles10prols
prédénisde1à0.
13. Fn+Suppr., FIN, Pg.Suiv Appuyez sur
cesraccourcispourréglerl'eetlumineux
RGB pour la profondeur des couleurs (spectre
des couleurs) rouge (Fn+Suppr.), vert
(Fn+Fin),bleu(Fn+Pg.Suiv)séparément.
14. Fn+“+”, Fn+”-” Appuyez sur ces
touchespouraccélérerouralentirla
vitessed’achagedel’eetlumineux.
15. Fn+Échap Appuyezsimultanément
surcestouchespendant10secondes
pour restaurer la conguration d’usine.
Personnaliser votre clavier
(Commandes macro, fonctions des
boutons, éclairage et autres)
VisitezlesiteWebd'ASUSwww.asus.
compourtéléchargeretinstallerla
dernièreversiondupilotedevotreclavier
pour proter pleinement de toutes ses
fonctionnalités.
Verpackungsinhalt
•ASUSGK2000RGBTastaturx1
•Handgelenkauagex1
•Mobilgerätehalterungx1
•Tragetaschex1
•Schnellstartanleitungx1
•
Ersatzteilset:Tastenkappenabzieherx1,
zusätzlicheTastenkappenML~M4und
zusätzlicheTastenkappenF7~F12(M11~M16).
Spezikationsübersicht
•Produktname:GK2000GamingTastatur
•Modell:GK2000Tastatur
•Leistung:5V/500max2
•Abmessungen:51x22,5x4,5cm(LxBxH)
•Gewicht:1,68Kg
Anschließen Ihrer GK2000 RGB Tastatur
1.SchließenSieIhreTastaturandenUSB-
Anschluss Ihres Computers an.
2. Schließen Sie Ihr Mikrofon und Ihren
KopfhörerandieMikrofon-und
KopfhöreranschlüsseIhrerTastaturan.
HINWEIS: Es wird empfohlen, eine externe
Festplatte(HDD)undeineMausandieUSB-
AnschlüsseIhrerTastaturanzuschließen.
Installation der Handgelenkauage
1.
Richten Sie die Handgelenkauage an den
KerbenaufderUnterseiteIhrerTastaturaus.
2.
DrückenSiezurFixierungder
Handgelenkauage beide Seiten nach innen.
Installation der
Mobilgerätehalterung
1.RichtenSiedieMobilgerätehalterungan
derSeitenächeanderrechtenoberen
EckeIhrerTastaturaus.
2.DrückenSiedieMobilgerätehalterung
zum Fixieren nach vorn.
Austausch der Tastenkappen
1.NehmenSiedieTastenML~M4
oder F7~F12 (M11~M16) mit dem
Tastenkappenabzieherab.
2.ErsetzenSiesiedurchdiezusätzlichen
Tastenkappen.
Schnelltasten
Programmierbare Tasten: Nach
InstallationdesTastaturtreiberskönnen
SieFunktionenfürdieseTastenüberdas
Tastatureinrichtungsprogrammdenieren.
1. ML Standard: Umschalten der
Makrotastenstufe
DrückenSiedieseTastezumUmschalten
von Stufe 1 bis Stufe 3. Jede Stufe bietet
verschiedene programmierbare Funktionen
fürM1~M4.
Anzeige der Makrotastenstufe
Blitz 1: Stufe 1, Blitz 2: Stufe 2, Blitz 3: Stufe 3
2. M1~M4, M5 (Fn+F1), M6 (Fn+F2), M7
(Fn+F3), M8 (Fn+F4), M9 (Fn+F5), M10
(Fn+F6)Standard:KeineFunktion
3. M11 (Fn+F7) oder Fn+Pfeiltaste Links/
RechtsStandard:UmschaltendesLED-
Anzeigemodus
Multimedia-Steuerung:
4. M12 (Fn+F8)
Standard: Startet den
standardmäßigenMultimedia-Player.
5. M13 (Fn+F9)
Standard: Wiedergabe
und Pause
6. M14 (Fn+F10)
Standard: Stopp
7. M15 (Fn+F11)
Standard:VorherigerTitel
8. M16 (Fn+F12)
Standard:NächsterTitel
9. ROG-Taste(SperrungderWindows-Taste/
AnzeigederFeststelltaste)DrückenSie
dieseTastezumAktivieren/Deaktivieren
derWindows-Taste.DieWindows-Taste
zeigt durch zweimaliges Blinken an,
dassdieWindows-Tastedeaktiviertist,
und durch dreimaliges Blinken, dass die
Windows-Tasteaktiviertist.
DieROG-TastezeigtdurchAueuchtenan,
dass die Feststelltaste eingeschaltet ist.
10. Beleuchtungsregler Passt die Helligkeit
derTastaturhintergrundbeleuchtungan.
11. LautstärkereglerDrückenSieden
Regler zum Stummschalten nach links.
12. Fn+1/2/3/4/5/6/7/8/9/0 (Prolwechsel)
DrückenSiedieseSchnelltasten
zumUmschaltenzwischenden10
voreingestelltenProlenvon1bis0.
13.
Fn+Entf, Ende, Bild abDrücken
SiedieseSchnelltasten,umdenRGB-
LichteektfürdieFarbtiefe(Farbspektrum)
vonRot(Fn+Entf),Grün(Fn+Ende),Blau
(Fn+Bild ab) einzeln anzupassen.
14.
Fn+”+”, Fn+”-” DrückenSiediese
Tasten,umdieAnzeigegeschwindigkeit
derLichteektezuerhöhenoderzu
verringern.
15.
Fn+Esc DrückenSiedieseTasten
gleichzeitig10Sekundenlang,umauf
dieWerkseinstellungenzurückzusetzen.
Ihre Tastatur anpassen (Makrobefehle
/ Tasten- und Beleuchtungsfunktionen
und weiteres)
BesuchenSiedieASUS-Webseiteunter
www.asus.com, um den aktuellsten
Tastaturtreiberherunterzuladen,und
installieren Sie diesen, um die Makrobefehle,
Tasten-undBeleuchtungsfunktionenIhrer
Tastaturundvielesmehranzupassen.
Комплект поставки
•КлавиатураASUSGK2000RGB
•Подставкаподзапястьяx1
•Подставкадлямобильногоустройства
•Чехол
•Краткоеруководство
•Комплектзапасныхчастей:съемник,
дополнительныеклавишиML~M4и
F7~F12 (M11~M16).
Спецификация
•Названиепродукта:Игроваяклавиатура
GK2000
•Модель:КлавиатураGK2000
•Параметры:5В/500мА
•Размеры51х22,5х4,5см(ДхШхВ)
•Вес:1,68кг
Установка клавиатуры GK2000 RGB
1.ПодключитеклавиатурукразъемуUSB
компьютера.
2.Подключитемикрофонинаушникик
разъемамMICиPHONEнаклавиатуре.
ПРИМЕЧАНИЕ:Подключайтевнешний
жесткийилиоптическийдискUSB
непосредственнокUSB-порту
компьютера.
Установка подставки под запястья
1.Совместитеподставкуподзапястьяс
пазаминаклавиатуре.
2.Нажмитеобесторонывнутрьдля
закрепленияподставки.
Установка подставки для
мобильного устройства
1.Совместитеподставкудлямобильного
устройстванаверхнийправыйугол
клавиатуры.
2.Нажмитеподставкудлямобильного
устройствавпереддляеезакрепления.
Замена клавиш
1.ИзвлекитеклавишиML~M4илиF7~F12
(M11~M16)спомощьюсъемника.
2.Заменитеихдополнительными
клавишами.
Горячие клавиши
Программируемые клавиши:После
установкидрайвераклавиатурыможно
определитьфункциидляэтихклавишв
настройкахпрограммы.
1. ML Поумолчанию:переключательнабора
макросов
Нажмитеклавишудляпереключениямежду
наборами1и3.Каждыйнаборпредоставляет
различныепрограммируемыефункциидля
M1 ~ M4.
Индикатор набора макросов
Мигает1:набор1,мигает2:набор2,мигает3:
набор3
2. M1~M4, M5(Fn+F1), M6(Fn+F2),
M7(Fn+F3), M8(Fn+F4), M9(Fn+F5),
M10(Fn+F6)Поумолчанию:Нетфункции
3. M11(Fn+F7)Поумолчанию:Индикатор
переключениярежима
Управление мультимедиа:
4. M12(Fn+F8)
Поумолчанию:Запускает
мультимедийныйпроигрывательпо
умолчанию.
5. M13(Fn+F9)
Поумолчанию:
ВоспроизведениеиПауза
6. M14(Fn+F10)
Поумолчанию:Стоп
7. M15(Fn+F11)
Поумолчанию:
Предыдущаядорожка
8. M16(Fn+F12)
Поумолчанию:
Следующаядорожка
9. ROG Key (WКлавишаROG(индикатор
клавишиWindows/Capslock).Нажмите
этуклавишудлявключения/отключения
клавишиWindows.КлавишаWindows
мигаетдважды,указывая,чтоклавиша
Windowsотключена,имигаеттрижды,
указывая,чтоклавишаWindowsвключена.
КлавишаROGгорит,показывая,чторежим
Capslockвключен.
10. Регулятор освещения Настройка
яркостиклавиатуры.
11. Громкость Дляотключениязвука
повернитеручкувлево
12. Fn+1/2/3/4/5/6/7/8/9/0
(переключатель профилей) Используйте
этиклавишидляпереключениямежду10
предустановленнымипрофилямиот1до0.
13. Fn+DEL, END, PageDown
Используйтеэти«горячиеклавиши»для
настройкиRGB-подсветкидлякрасного(Fn
+Del),зеленого(Fn+End),синего(Fn+Pg
Dn)цветаотдельно.
14. Fn + Arrow Up, Arrow Down
Используйтеэтиклавишидля
ускоренияилизамедлениясветового
эффекта.
15. Fn + Esc Одновременнонажмите
иудерживайтеэтиклавишивтечение
10секунддлясбросакзаводским
настройкам.
Индивидуальная настройка
клавиатуры (макрокоманды, функции
кнопок, освещение и прочее)
ПосетитесайтASUSwww.asus.com
искачайтеиустановитедрайвер
клавиатуры,позволяющийиспользовать
макросы,кнопки,подсветкуидругие
функцииклавиатуры.
A csomag tartalma
•ASUSGK2000RGBbillentyűzetx1
•Csuklótámaszx1
•Mobileszköz-tartóx1
•Hordozótokx1
•Gyorsüzembehelyezésiútmutatóx1
•Pótalkatrész-készlet:billentyűborítást
eltávolítóeszközx1,pluszML-M4
billentyűborításokéspluszF7-F12
(M11-M16)billentyűborítások.
Műszaki adatok összefoglalása
•Termékneve:GK2000billentyűzet
játékokhoz
•Típus:GK2000RGBbillentyűzet
•Minősítés:5V/500max2
•Méret:51x22,5x4,5cm(HxSzxM)
•Tömeg:1,68kg
A GK2000 RGB billentyűzet
beüzemelése
1.Csatlakoztassaabillentyűzeteta
számítógépénlévőUSB-portba.
2.Csatlakoztassaamikrofontésafejhallgatót
abillentyűzetenlévőmikrofon-és
fejhallgatóportba.
MEGJEGYZÉS:Aztjavasoljuk,hogyakülső
HDD-tésazegeretabillentyűzetUSB-
portjaiba csatlakoztassa.
A csuklótámasz felszerelése
1.Igazítsaacsuklótámasztabillentyűzet
hátoldalánlévőhornyokhoz.
2.Nyomjamindkétoldaltbefeléa
csuklótámaszrögzítéséhez.
A mobileszköz-tartó állvány
felszerelése
1.Igazítsaamobileszköz-tartóállványt
abillentyűzetjobbfelsősarkábanlévő
szárnyhoz.
2.Toljaelőreamobileszköz-tartóállványta
rögzítéséhez.
A billentyűborítások lecserélése
1.TávolítsaelazML-M4vagyF7-F12
(M11~M16)billentyűketabillentyűborítást
eltávolítóeszközzel.
2.Tegyeahelyükreaplusz
billentyűborításokat.
Gyorsgombok
Programozható gombok:Abillentyűzet
illesztőprogramjánaktelepítéseutánfunkciókat
rendelhethozzáezekhezabillentyűkhöza
billentyűzetbeállítóprogramonkeresztül.
1. ML Alapértelmezett:Makróbillentyűk
szintkapcsolója
Abillentyűmegnyomásávalaz1.szintésa3.
szintközöttválthat.Mindegyikszintkülönböző
programozhatófunkciókatbiztosítazM1-M4
billentyűkhöz.
Makróbillentyűk szintjelzője
1.villogás:1.szint,2.villogás:2.szint,3.
villogás:3.szint
2. M1-M4, M5 (Fn+F1), M6 (Fn+F2), M7
(Fn+F3), M8 (Fn+F4), M9 (Fn+F5), M10
(Fn+F6)Alapértelmezett:Nincsfunkció
3. M11(Fn+F7) vagy Fn + bal/jobb nyílgomb
Alapértelmezett:LED-kijelzőmódkapcsolója
Multimédia-vezérlők:
4. M12(Fn+F8) Alapértelmezett:Elindítjaaz
alapértelmezettmultimédia-lejátszót
5. M13(Fn+F9) Alapértelmezett:Lejátszásés
szünet
6. M14(Fn+F10) Alapértelmezett:Leállítás
7. M15(Fn+F11) Alapértelmezett:Előző
zeneszám
8. M16(Fn+F12) Alapértelmezett:Következő
zeneszám
9. ROG billentyű (Windowsbillentyűzár/
CapsLockfunkciójelzőfénye)Abillentyű
megnyomásávalengedélyezhetivagyletilthatja
aWindowsbillentyűt.HaaWindowsbillentyű
kétszervillog,azaztjelzi,hogyaWindows
billentyűlevantiltva,haháromszorvillog,
azpedigaztjelzi,hogyaWindowsbillentyű
engedélyezve van.
AROGbillentyűvilágítanikezd,amiaztjelzi,
hogyaCapsLockfunkcióbevankapcsolva.
10.Világítógomb Beállítjaabillentyűzet
háttérvilágításánakfényerejét.
11. Hangerőnövelő/hangerőcsökkentő
gomb Nyomja balra a gombot a hang
elnémításához.
12. Fn+1/2/3/4/5/6/7/8/9/0 (prolváltó)
Ezekkelagyorsgombokkala10előrebeállított
prolközöttválthat(1-től0-ig).
13. Fn+DEL, END, PageDown Ezekkel a
gyorsgombokkalbeállíthatjaazRGBvilágítási
eektustegyenkéntapiros(Fn+Del),zöld
(Fn+End)éskék(Fn+PaDn)színmélységhez
(színspektrumhoz).
14 Fn + “+”, Fn+”-”Ezekkelabillentyűkkel
növelhetivagycsökkenthetiavilágításieektus
megjelenítésisebességét.
15.Fn+EscHa10másodpercigmegnyomva
tartjaeztakétbillentyűt,visszaállíthatjaagyári
beállításokat.
A billentyűzet (makróparancsok/
gombfunkciók, világítás és
egyebek) testreszabása
LátogassonelazASUSwebhelyére,amelya
www.asus.comcímenérhetőel,majdtöltsele
éstelepítseazbillentyűzet-illesztőprogramot,
amellyeltestreszabhatjaazbillentyűzet
makróparancsait,gombfunkcióit,világítását
ésegyébjellemzőit.
Contenuto della confezione
•TastieraASUSGK2000RGBx1
•Poggiapolsix1
•Supportoperdispositivomobilex1
•Custodiapertrasportox1
•Guidarapidax1
•Kitricambi:estrattoretastix1,tasti
aggiuntivi extra ML~M4 e tasti aggiuntivi
extra F7~F12 (M11~M16).
Indice delle speciche
•Nomeprodotto:TastieragamingGK2000
•Modello:TastieraGK2000
•Specicheelettriche:5V/500mAx2
•Dimensioni51x22.5x4.5cm(LxPxA)
•Peso:1.68kg
Installazione della tastiera GK2000
RGB
1. Collega la tastiera alla porta USB del
computer.
2.Collegatemicrofonoecuealleporte
relative sulla tastiera.
NOTA: Raccomandiamo di collegare un hard
disk esterno e un mouse alle porte USB della
vostra tastiera.
Installazione del poggiapolsi
1. Allineate il poggiapolsi agli incavi presenti
sul retro della tastiera.
2.Premeteentrambiilativersol'internoper
ssare il poggiapolsi.
Installazione del supporto per
dispositivo mobile
1. Allineate il supporto per dispositivo
mobileall'alanell'angolosuperioredestro
della tastiera.
2. Spingete in avanti il supporto per ssarlo.
Sostituzione dei tasti
1.Usatel'estrattoretastiperestrarreitasti
ML~M4 o F7~F12 (M11~M16).
2. Sostituite i tasti.
Tasti speciali
Tasti programmabili:Dopol'installazione
dei driver della tastiera potete denire le
funzioni di questi tasti tramite il programma
di congurazione.
1. ML Predenito:Tastomacrodiselezione
livello
Premete questo tasto per passare tra i livelli
1e3.Ognilivelloforniscediversefunzioni
programmabili per i tasti M1~M4.
Indicatore livello macro
LED 1: Livello 1, LED 2: Livello 2, LED 3:
Livello 3
2. M1~M4, M5(Fn+F1), M6(Fn+F2),
M7(Fn+F3), M8(Fn+F4), M9(Fn+F5),
M10(Fn+F6) Predenito: Nessuna
funzione
3. M11(Fn+F7) o Fn + Freccia Sinistra/
Destra Predenito: LED visualizzazione
modalità
Controlli multimediali
4. M12(Fn+F8)
Predenito: Avvia il lettore
multimediale predenito
5. M13(Fn+F9)
Predenito: Riproduci &
Pausa
6. M14(Fn+F10)
Predenito: Interrompi
7. M15(Fn+F11)
Predenito:Traccia
precedente
8. M16(Fn+F12)
Predenito:Traccia
successiva
9. Tasto ROG (TastoWindows/Tasto
blocco maiuscole) Premete questo tasto
perabilitare/disabilitareiltastoWindows.
Il tasto Windows lampeggia due volte per
indicarecheiltastoWindowsèdisabilitatoe
lampeggia tre volte per indicare che il tasto
Windowsèabilitato.
IlLEDdeltastoROGindicacheilblocco
maiuscoleèattivo.
10. Manopola illuminazione Regola la
luminositàdellaretroilluminazione.
11. Manopola volume +/- Spingete la
manopola verso sinistra per silenziare il
volume
12. Fn+1/2/3/4/5/6/7/8/9/0 (Cambio
prolo) Premete i tasti speciali per
selezionatetrai10prolipreimpostati,da1
a0.
13. Fn+Canc, Fine, PagGiù Premete questa
combinazioneditastiperregolarel'eetto
diilluminazioneelaprofonditàcoloredi
Rosso(Fn+Canc),Verde(Fn+Fine)eBlu
(Fn+PagGiù) separatamente.
14. Fn + “+”, Fn + ”-” Premete queste
combinazioni di tasti per aumentare
odiminuirelavelocitàdell’eettodi
illuminazione.
15. Fn + Esc Premete questa combinazione
ditastiper10secondiperripristinarele
impostazioni predenite di fabbrica.
Personalizzare la tastiera (Comandi
macro, pulsanti funzione,
illuminazione e altro)
VisitailsitowebASUSall'indirizzowww.
asus.com per scaricare e installare i driver
per la tastiera aggiornati e personalizzare i
comandi macro della tastiera, le funzioni dei
pulsanti,l'illuminazioneealtro.
Q13254 / Revised edition v2 / July 2017
Federal Communications Commission Statement
ThisdevicecomplieswithPart15oftheFCCRules.Operationissubjecttothefollowing
two conditions:
• Thisdevicemaynotcauseharmfulinterference,and
• Thisdevicemustacceptanyinterferencereceivedincludinginterferencethatmaycause
undesired operation.
ThisequipmenthasbeentestedandfoundtocomplywiththelimitsforaClassBdigitaldevice,
pursuanttoPart15oftheFCCRules.Theselimitsaredesignedtoprovidereasonableprotection
againstharmfulinterferenceinaresidentialinstallation.Thisequipmentgenerates,usesandcan
radiate radio frequency energy and, if not installed and used in accordance with manufacturer’s
instructions, may cause harmful interference to radio communications. However, there is no
guarantee that interference will not occur in a particular installation. If this equipment does cause
harmful interference to radio or television reception, which can be determined by turning the
equipment o and on, the user is encouraged to try to correct the interference by one or more of the
following measures:
• Reorientorrelocatethereceivingantenna.
• Increasetheseparationbetweentheequipmentandreceiver.
• Connecttheequipmenttoanoutletonacircuitdierentfromthattowhichthereceiveris
connected.
• Consultthedealeroranexperiencedradio/TVtechnicianforhelp.
CAUTION: Any changes or modications not expressly approved by the grantee of this device could
void the user’s authority to operate the equipment.
CE Mark Warning
ThisisaClassBproduct,inadomesticenvironment,thisproductmaycauseradiointerference,in
which case the user may be required to take adequate measures.
Canada, Industry Canada (IC) Notices
ThisdevicecomplieswithCanadalicence-exemptRSSstandard(s).
Operationissubjecttothefollowingtwoconditions:(1)thisdevicemaynotcauseinterference,
and (2) this device must accept any interference, including interference that may cause undesired
operation of the device.
Canada, avis d’Industry Canada (IC)
LeprésentappareilestconformeauxnormesCNRd’IndustrieCanadaapplicablesauxappareilsradio
exempts de licence.
Sonutilisationestsujetteauxdeuxconditionssuivantes:(1)cetappareilnedoitpascréer
d’interférenceset(2)cetappareildoittolérertouttyped’interférences,ycompriscellessusceptibles
deprovoquerunfonctionnementnonsouhaitédel’appareil.
ASUSTeKComputerInc.herebydeclaresthatthisdeviceisincompliancewiththeessential
requirements and other relevant provisions of related Directives. Full text of EU declaration of
conformityisavailableat:www.asus.com/support
Français AsusTekComputerInc.déclareparlaprésentequecetappareilestconformeauxcritères
essentielsetautresclausespertinentesdesdirectivesconcernées.Ladéclarationdeconformitéde
l’UEpeutêtretéléchargéeàpartirdusiteInternetsuivant:www.asus.com/support
DeutschASUSTeKComputerInc.erklärthiermit,dassdiesesGerätmitdenwesentlichen
AnforderungenundanderenrelevantenBestimmungenderzugehörigenRichtlinienübereinstimmt.
DergesamteTextderEU-Konformitätserklärungistverfügbarunter:www.asus.com/support
Italiano ASUSTeKComputerInc.conlapresentedichiarachequestodispositivoèconformeai
requisiti essenziali e alle altre disposizioni pertinenti con le direttive correlate. Il testo completo della
dichiarazionediconformitàUEèdisponibileall’indirizzo:www.asus.com/support
PolskiFirmaASUSTeKComputerInc.niniejszymoświadcza,żeurządzenietojestzgodnez
zasadniczymiwymogamiiinnymiwłaściwymipostanowieniamipowiązanychdyrektyw.Pełnytekst
deklaracjizgodnościUEjestdostępnypodadresem:www.asus.com/support
PortuguêsAASUSTeKComputerInc.declaraqueestedispositivoestáemconformidadecomos
requisitosessenciaiseoutrasdisposiçõesrelevantesdasDiretivasrelacionadas.Textointegralda
declaraçãodaUEdisponívelem:www.asus.com/support
RomânăPrinprezenta,ASUSTeKComputerInc.declarăcăacestdispozitivesteînconformitatecu
cerințele esențiale și cu alte prevederi relevante ale Directivelor aferente. Declarația de conformitate
UEcompletăestedisponibilălaadresa:www.asus.com/support
EspañolPorlapresente,ASUSTeKComputerInc.declaraqueestedispositivocumplelosrequisitos
básicosyotrasdisposicionespertinentesdelasdirectivasrelacionadas.Eltextocompletodela
declaracióndelaUEdeconformidadestádisponibleen:www.asus.com/support
TürkçeAsusTekComputerInc.,buaygıtıntemelgereksinimlerleveilişkiliYönergelerindiğerilgili
koşullarıylauyumluolduğunubeyaneder.ABuygunlukbildiriminintammetnişuadrestebulunabilir:
www.asus.com/support
Authorised representative in Europe
ASUS Computer GmbH
Address: HARKORTSTR.21-23,D-40880RATINGEN,DEUTSCHLAND
Manufacturer
ASUSTeK Computer Inc.
Tel: +886-2-2894-3447
Address: 4F,No.150,LI-TERD.,PEITOU,TAIPEI112,TAIWAN
華碩電腦股份有限公司
台北市北投區立德路 150 號 4F
Authorized Distributor in Turkey :
PENTA TEKNOLOJI URUNLERI DAGITIM TICARET A.S.
Address, City:DUDULLUORGANIZESANAYIBOLGESINATOYOLU4.CAD.NO:1
DUDULLUUMRANIYE34775ISTANBULTURKEY
Distributor Tel:02166458200
Country:TURKEY
Bilkom Bilişim Hizmetleri A.Ş.
Address:MahirİzCad.No:26K:2AltunizadeÜsküdarİstanbul-Turkiye
Distributor Tel:+902165549000
Country:TURKEY
C5 Elektronik Sanayi Ve Ticaret A.Ş.
Address:SahrayıceditMah.OmcaSok.GoldenPlazaNo:33EBlokKat:2
Kadıköy/İSTANBUL
Distributor Tel:+90(216)4114400
Country:TURKEY
AEEEYönetmeliğineUygundur.
Polski Português Español
Türkçe Svenska Bahasa Melayu
Română
單元
限用物質及其化學符號
鉛
(Pb)
汞
(Hg)
鎘
(Cd)
六價鉻
(Cr+6)
多溴聯苯
(PBB) 多溴二苯醚(PBDE)
印刷電路板及
電子組件
-
○ ○ ○ ○ ○
外殼 ○ ○ ○ ○ ○ ○
按鍵
-
○ ○ ○ ○ ○
其他及其配件
-
○ ○ ○ ○ ○
備考1.“○”係指該項限用物質之百分比含量未超出百分比含量基準值。
備考2.“-”係指該項限用物質為排除項目。
「產品之限用物質含有情況」之相關資訊,請參考下表:
電波障害自主規制について
この装置は、情報処理装置等電波障害自主規制協議会 (VCCI) の基準に基づくクラス B 情報技
術装置です。この装置は、家庭環境で使用することを目的としていますが、この装置がラジオ
やテレビジョン受信機に近接して使用されると、受信障害を引き起こすことがあります。取り
扱い説明書に従って正しい取り扱いをしてください。
Zawartość opakowania
•
KlawiaturaASUSGK2000RGBx1
•
Podparcie pod nadgarstki x1
•
Podstawkaurządzeniaprzenośnegox1
•
Rękawtransportowyx1
•
Instrukcja szybkiego uruchomienia x1
•
Zestawczęścizamiennych:ściągaczdo
przyciskówx1,dodatkoweprzyciskiML~M4i
dodatkowe przyciski M6~M12.
Podsumowanie specykacji
•
Nazwaproduktu:KlawiaturadogierGK2000
•
Model:KlawiaturaGK2000
•
Wymiary51x22,5x4,5cm(DxSxW)
•
Wartościznamionowe:5V/500mAx2
•
Masa:1,68kg
Instalacja klawiatury GK2000 RGB
1.PodłączklawiaturędogniazdaUSB
komputera.
2.Podłączmikrofonisłuchawkiodpowiednio
do gniazda Mic i Słuchawki na klawiaturze.
UWAGA: Zalecasiępodłączeniezewnętrznego
dyskutwardegoimyszydoportówUSB
klawiatury.
Instalacja podparcia pod nadgarstki
1.Wyrównajpodparciepodnadgarstkiz
zagłębieniamiztyłuklawiatury.
2.Naciśnijobiestronydośrodkawcelu
przymocowania podparcia pod nadgarstki
na miejscu.
Instalacja podstawki urządzenia
przenośnego
1.Wyrównajpodstawkęurządzenia
przenośnegozwystępemwgórnymprawym
narożnikuklawiatury.
2.Popchnijpodstawkęurządzenia
przenośnegodoprzodu,wcelu
przymocowania.
Wymiana przycisków
1.
DościągnięciaprzyciskówML~M4lub
M6~M12użyjściągaczadoprzycisków.
2.
Zastąpprzyciskamiwymiennymi.
Przycisk skrótów
Przyciski programowane: Po zainstalowaniu
sterownikaklawiaturymożeszokreślićfunkcjetych
przyciskówkorzystajączprogramukonguracji
klawiatury.
1. ML
Domyślne:Przełącznikpoziomuprzycisku
makro
Naciśnijtenprzyciskwceluprzełączeniamiędzy
Poziom1doPoziom3.Każdypoziomoferujeinne
funkcje programowane dla M1~M4.
Wskaźnik poziomu przycisku makro
Mignięcie1:Poziom1,Mignięcie2:Poziom2,
Mignięcie3:Poziom3
2. M1~M4, M5(Fn+F1), M6(Fn+F2), M7(Fn+F3),
M8(Fn+F4), M9(Fn+F5), M10(Fn+F6)
Domyślne:
Brak funkcji
3. M11(Fn+F7) lub Fn+strzałka w lewo/w
prawo
Domyślne:Przełączniktrybuwyświetlacza
LED
Sterowanie multimediam
:
4. M12(Fn+F8)
Domyślne:Służydouruchamiania
domyślnegoodtwarzaczamultimedialnego.
5. M13(Fn+F9)
Domyślne:Odtwarzanieipauza
6. M14(Fn+F10)
Domyślne:Stop
7. M15(Fn+F11)
Domyślne:Poprzedniutwór
8. M16(Fn+F12)
Domyślne:Następnyutwór
9.
Przycisk ROG (Wskaźnik blokady przycisku
Windows/ Caps lock)
Naciśnijtenprzycisk,aby
włączyć/wyłączyćprzyciskWindows.Przycisk
Windows mignie dwukrotnie w celu wskazania,
żeprzyciskWindowsjestwyłączonyimignie
trzyrazywskazując,żeprzyciskWindowsjest
włączony.
PrzyciskROGzapalasię,wskazującwłączenie
Caps lock.
10.
Pokrętło regulacji oświetlenia
Reguluje
jasnośćpodświetleniaklawiatury.
11.
Zwiększenie/zmniejszenie głośności/
wyciszenie
Popchnijdźwignięwlewowcelu
wyłączeniadźwięku.
12.
Fn+1/2/3/4/5/6/7/8/9/0 (przełącznik prolu)
Naciskającteprzyciskiskrótówmożeszprzełączać
między10zaprogramowanymiprolami,od1do0
.
13.Fn+DEL,END,PageDownNaciśnijteprzyciski
skrótuwceluoddzielnegodopasowaniaefektu
oświetleniaRGBdlagłębikolorówCzerwony
(Fn+Del),Zielony(Fn+End),Niebieski(Fn+PaDn)
(spektrumkolorów).
14.
Fn + “+”, Fn+”-”
Naciśnijteprzyciskiw
celuprzyspieszenialubzwolnieniaszybkości
wyświetlaniaefektuoświetlenia.
15.Fn+EscNaciśnijteprzyciskirównocześnie
przez10sekund,abyprzywrócićustawienia
fabryczne.
Dostosowanie klawiatury (polecenia
makro, funkcje przycisków,
oświetlenie i inne)
PrzejdźnastronęsieciowąASUS,podadreswww.
asus.com,abypobraćnajnowszysterownik
klawiaturyizainstalować,wceludostosowania
poleceńmakro,funkcjiprzycisku,oświetlenieoraz
innych funkcji klawiatury.
Conteúdo da embalagem
•
TecladoASUSGK2000RGBx1
•
Apoio para pulso x1
•
Suporteparadispositivomóvelx1
•
Bolsa de transporte x1
•
Guiadeconsultarápidax1
•
Kitdepeçasdesubstituição:ferramentade
remoção de teclas x1, teclas ML~M4 extra e
teclas M6~M12 extra.
Resumo das especicações
•
Nomedoproduto:Tecladoparajogos
GK2000
•
Modelo:TecladoGK2000
•
Dimensões:51x22,5x4,5cm(CxLxA)
•
Classicação:5V/500max2
•
Peso:1,68kg
Instalar o teclado GK2000 RGB
1.Ligue o teclado a uma porta USB no
computador.
2.Ligueomicrofoneeosauscultadoresàs
portas de Microfone e Auscultadores no
teclado.
NOTA: recomendamos que ligue um HDD
externoeumratoàsportasUSBdoseu
teclado.
Instalar o apoio para pulso
1. Alinhe o apoio para pulso com os entalhes
na parte traseira do teclado.
2.
Pressione ambas as extremidades para o
interior de maneira a xar o apoio para pulso
em posição
Instalar o suporte para dispositivo
móvel
1.Alinheosuporteparadispositivomóvel
com a aba no canto superior direito do
teclado.
2.Empurreosuporteparadispositivomóvel
para o xar.
Substituir as teclas
1.
Utilize uma ferramenta de remoção de teclas
para remover as teclas ML~M4 ou M6~M12.
2.
Substitua pelas teclas extra.
Teclas de atalho
Teclas programáveis: Depois de instalar o
controladordoteclado,poderádenirfunções
paraestasteclasatravésdoprogramade
conguração do teclado.
1. ML Padrão:Botãodeníveldateclamacro
PrimaestabotãoparaalternarentreoNível
1atéaoNível3.Cadaníveloferecediferentes
funçõesprogramáveisparaM1~M4.
Indicador de nível da tecla macro
Pisca1vez:Nível1,Pisca2vezes:Nível2,
Pisca3vezes:Nível3
2. M1~M4, M5(Fn+F1), M6(Fn+F2),
M7(Fn+F3), M8(Fn+F4), M9(Fn+F5),
M10(Fn+F6)
Padrão: Sem função
3. M11(Fn+F7) ou Fn+tecla direcional
para a esquerda/direita
Padrão: Mudança
do modo de exibição LED
Controlos multimédia
:
4. M12(Fn+F8)
Padrão: Abre o leitor
multimédiapredenido.
5. M13(Fn+F9)
Padrão: Reproduzir e Pausa
6. M14(Fn+F10)
Padrão: Parar
7. M15(Fn+F11)
Padrão: Faixa anterior
8. M16(Fn+F12)
Padrão: Faixa seguinte
9.
Tecla ROG (indicar de bloqueio da tecla
Windows / Caps lock)
Prima esta tecla para
ativar/desativarateclaWindows.Atecla
Windows pisca duas vezes para indicar que
ateclaWindowsestádesativada,episcatrês
vezesparaindicarqueateclaWindowsestá
ativada.
AteclaROGacendeparaindicarqueCapslock
estáativado.
10.
Controlo de iluminação
Ajusta o brilho
da luz de fundo do teclado
.
11.
Aumentar/diminuir/interromper
volume
Empurre o controlo para a esquerda
para interromper o volume.
12.
Fn+1/2/3/4/5/6/7/8/9/0 (Mudança de
perl)
Prima estas teclas de atalho para
alternarentreos10perspredenidosde1a0
.
13. Fn+DEL, END, PageDown Pressione
estas teclas de atalho para ajustar
separadamente o efeito de iluminação RGB
para a profundidade de cor (espetro de cor)
Vermelho(Fn+Del),Verde(Fn+End)eAzul
(Fn+PaDn).
14.
Fn + “+”, Fn+”-”
Pressione estas teclas
para aumentar ou diminuir a velocidade do
efeito de iluminação.
15.Fn+EscPressioneestasteclasem
simultâneodurante10segundospara
restaurar as predenições.
Personalizar o teclado (Comandos macro,
Botões de função, Iluminação e outros)
VisiteoWebsitedaASUSemwww.asus.
com para transferir e instalar o controlador
do teclado mais recente para personalizar os
comandos macro, as funções dos botões, a
iluminação e as restantes funções do teclado.
Paket İçeriği
•
1taneASUSGK2000RGBklavye
•
Bilekdesteğix1
•
Mobilaygıttutucux1
•
Taşımakolux1
•
HızlıBaşlatmaKılavuzux1
•
Yedekparçakiti:Tuşkafasısökücüx1,ek
ML~M4tuşkafalarıveekM6~M12tuşkafaları.
Özellikler Özeti
•
Ürünadı:GK2000OyunKlavyesi
•
•
Modelo:Model:GK2000Klavye
•
Boyut51x22,5x4,5cm(UxGxY)
•
Derecelendirme:5V/500max2
•
Ağırlık:1,68kg
GK2000 RGB Klavyenizi Kurma
1.KlavyenizibilgisayarınızınUSBbağlantı
noktasınabağlayın.
2.Mikrofonunuzuvekulaklığınızı,
klavyenizdekiMikrofonveKulaklıkbağlantı
noktalarınabağlayın.
NOT: KlavyenizdekiUSBbağlantınoktalarına
birharicisabitdiskvebirfarebağlamanızı
öneririz.
Bilek Desteğini Kurma
1.Bilekdesteğiniklavyenizinarkasındaki
çentiklerlehizalayın.
2.Bilekdesteğiniyerinesabitlemekiçinher
ikitarafıiçedoğrubastırın.
Mobil Aygıt Ayağını Kurma
1.Mobilaygıtayağınıklavyenizinsağüst
köşesindekikanatlahizalayın.
2.Sabitlemekiçinmobilaygıtayağınıileri
doğruitin.
Tuş Kafalarını Değiştirme
1.
ML~M4veyaM6~M12tuşlarınıçıkarmakiçin
birtuşkafasısökücükullanın.
2.
Ektuşkafalarıyladeğiştirin.
Kısayol Tuşları
Programlanabilir Tuşlar: Klavyesürücüsünü
yüklediktensonra,klavyeayarıprogramı
aracılığıylabutuşlarayönelikişlevleri
tanımlayabilirsiniz.
1. ML Varsayılan:MakroTuşuDüzeyi
Anahtarı
Düzey1ilaDüzey3arasındageçişyapmak
içinbutuşabasın.Herbirdüzey,M1~M4için
programlanabilirfarklıişlevlersağlar.
Makro Tuşu Düzeyi Göstergesi
YanıpSönme1:Düzey1,YanıpSönme2:
Düzey2,YanıpSönme3:Düzey3
2. M1~M4, M5(Fn+F1), M6(Fn+F2),
M7(Fn+F3), M8(Fn+F4), M9(Fn+F5),
M10(Fn+F6)
Varsayılan:İşlevyok
3. M11(Fn+F7) veya Fn+Sol/Sağ Ok
Varsayılan:LEDgösterimmoduanahtarı
Çoklu Ortam Kontrolleri
:
4. M12(Fn+F8)
Varsayılan:Varsayılançoklu
ortamoynatıcıyıbaşlatır.
5. M13(Fn+F9)
Varsayılan:OynatveDuraklat
6. M14(Fn+F10)
Varsayılan:Durdur
7. M15(Fn+F11)
Varsayılan:Öncekiparça
8. M16(Fn+F12)
Varsayılan:Sonrakiparça
9.
ROG Tuşu (Windows Tuş Kilidi/Büyük
Harf Kilidi Göstergesi)
WindowsTuşunu
etkinleştirmek/devredışıbırakmakiçin
butuşabasın.WindowsTuşu,devredışı
olduğunubelirtmekiçinikikez,etkin
olduğunubelirtmekiçindeüçkezyanıp
söner.
ROGTuşu,BüyükharfkilidininAÇIKolduğunu
belirtmek için yanar.
10.
Aydınlatma Düğmesi
Klavyearkaışığının
parlaklığınıayarlar.
11.
Ses Düzeyi Yukarı/Aşağı/Sessiz
Sesikapatmakiçindüğmeyisoltarafa
itin.
12.
Fn+1/2/3/4/5/6/7/8/9/0 (Prol anahtarı)
Önayarlı10prolarasında1'den0'ageçmek
içinbukısayoltuşlarınabasın.
13. Fn+DEL, END, PageDown RGB
aydınlatmaefektiniKırmızı(Fn+Del),Yeşil
(Fn+End),Mavi(Fn+PaDn)renkderinliği
(renkspektrumu)içinayrıayrıayarlamak
amacıylabukısayoltuşlarınabasın.
14.
Fn + “+”, Fn+”-”
Aydınlatmaefektinin
görüntülenmehızınıartırmakveyaazaltmak
içinbutuşlarabasın.
15.Fn+EscFabrikaayarlarınıgeriyüklemek
içinbutuşlarıaynıanda10saniyeboyunca
basılıtutun.
Klavyenizi Özelleştirme (Makro
Komutları, Düğme İşlevleri,
Aydınlatma ve Diğerleri)
Klavyenizinmakrokomutlarını,düğme
işlevlerini,aydınlatmasınıvediğerişlevlerini
özelleştirmekamacıylaensonklavye
sürücüsünüindiripyüklemekiçinwww.asus.
com adresindeki ASUS web sitesine gidin.
Conţinutul pachetului
•
1xtastaturăRGBASUSGK2000;
•
1xzonădesprijinpentruîncheietură;
•
1xsuportdispozitivmobil;
•
1xhusăpentrutransport;
•
1xghiddepornirerapidă;
•
kit de piese de schimb: 1 x dispozitiv de
extragereacapacelortastelor;capace
suplimentaretasteML~M4şicapace
suplimentare taste M6~M12.
Rezumatul specicaţiilor
•
Denumireprodus:Tastaturăpentrujocuri
GK2000
•
Model:TastaturăGK2000
•
Dimensiuni:51x22,5x4,5cm(LxlxÎ)
)
•
ntervaltensiunealimentare:2x5V/500ma
•
Greutate:1,68kg
Instalarea tastaturii GK2000 RGB
1. Conectaţi tastatura la portul USB de pe
computer.
2.Conectaţimicrofonulşicăştilelaporturile
pentrumicrofon,respectivpentrucăştidela
tastatură.
NOTĂ: vărecomandămsăconectaţiun
HDDexternşiunmouselaporturileUSBale
tastaturii.
Instalarea zonei de sprijin pentru
încheietură
1.Aliniaţizonadesprijinpentruîncheietură
la canelurile de pe spatele tastaturii.
2.Apăsaţipeambelepărţiînspreinterior
pentruaxaînpoziţiezonadesprijinpentru
încheietură.
Instalarea suportului pentru
dispozitivul mobil
1. Aliniaţi suportul dispozitivului mobil la
piuliţa din colţul din dreapta sus al tastaturii.
2.Împingeţiînaintesuportuldispozitivului
mobilpentrua-lxa.
Înlocuirea capacelor tastelor
1.
Utilizaţi un dispozitiv de extragere a
capacelor tastelor pentru a scoate tastele
ML~M4 sau M6~M12.
2.
Înlocuiţicucapacelesuplimentareale
tastelor.
Tastele de acces rapid
Tastele programabile: Dupăinstalarea
driveruluipentrutastatură,puteţiatribui
funcţii acestor taste cu ajutorul programului
de congurare a tastaturii.
1. ML Implicit:Comutatorniveltastă
macrocomandă
Apăsaţiaceastătastăpentruacomutaîntre
Nivelul1şiNivelul3.Fiecareniveloferăfuncţii
programabile diferite pentru tastele M1~M4.
Indicator nivel tastă macrocomandă
Flash 1: Nivelul 1, Flash 2:
Nivelul 2, Flash 3: Nivelul 3
2. M1~M4, M5(Fn+F1), M6(Fn+F2),
M7(Fn+F3), M8(Fn+F4), M9(Fn+F5),
M10(Fn+F6)
Implicit: Nicio funcţie
3. M11(Fn+F7) sau tasta Fn+tasta săgeată
stânga/dreapta
Implicit: Comutator mod
aşajcuLED
Comenzi multimedia
:
4. M12(Fn+F8)
Implicit:Lanseazăplayerul
multimedia implicit.
5. M13(Fn+F9)
Implicit: Play & Pause (Redare
şipauză)
6. M14(Fn+F10)
Implicit:Stop(Oprire)
7. M15(Fn+F11)
Implicit:Melodiaprecedentă
8. M16(Fn+F12)
Implicit:Melodiaurmătoare
9.
Tasta ROG (blocare tastă Windows/
indicator Caps lock)
Apăsaţiaceastătastă
pentruaactiva/dezactivatastaWindows.
TastaWindowslumineazăintermitentde
douăoripentruaindicafaptulcăeste
dezactivatăşidetreioripentruaindica
faptulcăesteactivată.
TastaROGseaprindepentruaindicafaptulcă
funcţiaCapslockesteactivată.
10.
Butonul de iluminare
Reglează
luminozitatearetroiluminăriitastaturii.
11.
Mărirea/micşorarea/dezactivarea
volumului
Apăsaţibutonulsprestânga
pentru a dezactiva sunetul.
12.
Fn+1/2/3/4/5/6/7/8/9/0 (comutare prol)
Apăsaţiacestetasterapidepentruacomuta
întrecele10proluripresetate,dela1la0
.
13.Fn+DEL,END,PageDownApăsaţiaceste
tastedecomandărapidăpentruaajusta
individual efectul de iluminare RGB pentru
Roşu(Fn+Del),Verde(Fn+End),Albastru
(Fn+PaDn)şiadâncimeaculorilor(spectrul
de culoare).
14.
Fn + “+”, Fn+”-”
Apăsaţiacestetaste
pentruaaccelerasauîncetinivitezade
aşareaefectuluideiluminare.
15.Fn+EscŢineţiapăsatsimultanpeaceste
tastetimpde10secundepentruarestaura
setăriledinfabrică.
Particularizarea tastaturii
(macrocomenzi, funcţii ale
butoanelor, iluminare şi altele)
Accesaţisite-ulwebASUSlaadresawww.
asus.compentruadescărcaşiinstalacel
mairecentdriverpentrutastaturăpentrua
văparticularizamacrocomenziletastaturii,
funcţiilebutoanelor,iluminareaşialtefuncţii.
Contenido del paquete
•
TecladoASUSGK2000RGBx1
•
Reposamuñecas x1
•
Soportededispositivomóvilx1
•
Funda de transporte x1
•
Guíadeiniciorápidox1
•
Kitdepiezasderepuesto:extractorde
cápsulasdeteclasx1,cápsulasdeteclas
ML~M4adicionalesycápsulasdetecla
M6~M12 adicionales.
Resumen de especicaciones
•
Nombredelproducto:Tecladoparajuegos
GK2000
•
Modelo:TecladoGK2000
•
Dimensiones51x22,5x4,5cm(LAxANxAL)
•
Valoresnominales:5V/500mAx2
•
Peso:1,68kg
Instalar el teclado GK2000 RGB
1.Conecte el teclado al puerto USB de su PC.
2.Conecteelmicrófonolosauricularesalos
puertos correspondientes del teclado.
NOTE: Le recomendamos que conecte una
unidaddediscoduroexternayunratónalos
puertos USB del teclado.
Instalar el reposamuñecas
1. Alinee el reposamuñecas con las ranuras
situadas en la parte posterior del teclado.
2. Presione ambos lados hacia adentro para
jar el reposamuñecas en su lugar.
Instalar el pedestal de dispositivo
móvil
1.Alineeelpedestaldedispositivomóvil
con el ala situada en la esquina superior
derecha del teclado.
2.Empujeelpedestaldedispositivomóvil
hacia adelante para jarlo.
Cambiar las cápsulas de las teclas
1.
Utiliceunextractordecápsulasdeteclapara
sacar las teclas ML~M4 o M6~M12.
2.
Realiceelcambioconlascápsulasdetecla
adicionales.
Métodos abreviados de teclado
Teclas programables: despuésdeinstalar
el controlador del teclado, puede denir
las funciones para estas teclas mediante el
programadeconguracióndelteclado.
1. ML Valorpredeterminado:conmutadorde
nivel de tecla de macro
Presione esta tecla para cambiar del nivel 1
al nivel 3. Cada nivel proporciona funciones
programadas diferentes para las teclas
M1~M4.
Indicador de nivel de tecla de macro
Parpadeo 1: Nivel 1, Parpadeo 2: Nivel 2,
Parpadeo 3: Nivel 3
2. M1~M4, M5(Fn+F1), M6(Fn+F2),
M7(Fn+F3), M8(Fn+F4), M9(Fn+F5),
M10(Fn+F6) Valorpredeterminado:sin
función
3. M11(Fn+F7) o Fn+Flecha izquierda/
derecha Valorpredeterminado:conmutador
demododevisualizacióndeLED
Controles multimedia:
4. M12(Fn+F8) Valorpredeterminado:iniciael
reproductor multimedia predeterminado.
5. M13(Fn+F9) Valorpredeterminado:
reproducir y pausar
6. M14(Fn+F10) Valorpredeterminado:
detener
7. M15(Fn+F11) Valorpredeterminado:pista
anterior
8. M16(Fn+F12) Valorpredeterminado:pista
siguiente
9. Tecla ROG (indicador de bloqueo de
mayúsculas y de bloqueo de la tecla
Windows) Presione esta tecla para habilitar
y deshabilitar la tecla Windows. La tecla
Windows parpadea dos o tres veces para
indicarqueestádeshabilitadaohabilitada,
respectivamente.
LateclaROGseiluminaparaindicarqueel
bloqueodemayúsculasestáACTIVADO.
10. Control de iluminación Permite ajustar el
brillo de la luz de fondo del teclado.
11. Subir volumen, bajar volumen y silencio
Empuje el control hacia la izquierda para
silenciar el volumen.
12. Fn+1/2/3/4/5/6/7/8/9/0 (cambio de
perl) Presioneestosmétodosabreviados
detecladoparacambiarentrelos10perles
predenidosde1a0.
13.Fn+SUPR,FIN,AvPág.Presioneestas
teclas de acceso directo para ajustar el efecto
deiluminaciónRGBparalaprofundidadde
color rojo (Fn+Supr), verde (Fn+Fin) y azul
(Fn+AvPág)(espectrodecolor)porseparado.
14.Fn + “+”, Fn+”-”. Presione estas teclas
para aumentar o disminuir la velocidad de
visualizacióndelefectodeiluminación.
15.Fn+Esc.Presioneestasteclas
simultáneamentedurante10segundospara
restaurarlaconguraciónpredeterminada.
Personalizar el teclado (comandos
de macro, funciones de los botones,
iluminación, etc.)
VayaalsitioWebdeASUS(www.asus.com) para
descargareinstalarelcontroladormásrecientedel
teclado para personalizar los comandos de macro,
lasfuncionesdelosbotones,lailuminaciónyotras
funciones del teclado.
Förpackningens innehåll
•ASUSGK2000RGB-tangentbordx1
•Handledsstödx1
•Hållareförmobilenhetx1
•Bärremx1
•Snabbstartguidex1
•Reservdelssats:tangentdragarex1,extra
ML~M4-tangenterochextraF7~F12-
tangenter (M11~M16).
Specikationer i sammanfattning
•Produktnamn:GK2000Speltangentbord
•Modell:GK2000tangentbord
•Klassicering:5V/500max2
•Mått51x22,5x4,5cm(LxBxH)
•Vikt:1,68kg
Installera ditt GK2000 RGB-
tangentbord
1.AnsluttangenbordettilldatornsUSB-port.
2.Anslutmikrofonenochhörlurarnatill
mikrofons-ochhörlursportarnapå
tangentbordet.
OBS! Virekommenderarattduansluteren
externHDDochenmustillUSB-portarnapå
tangentbordet.
Installera handledsstödet
1.Sättinhandledsstödetiskårornapå
tangentbordets baksida.
2.Tryckbådasidornainåtförattfästa
handledsstödetpåplats.
Montera stativet för mobilenheten
1.Passainstativetförmobilenhetenpå
vingenpåtangentbordetsövrehögra
hörn.
2.Tryckstativetförmobilenhetenframåtför
attfästadet.
Byta tangenter
1.Användtangentdragarenförattdra
ut tangenterna ML~M4 eller F7~F12
(M11~M16).
2.Ersättmedextratangenterna.
Snabbtangenter
Programmerbara tangenter:När
tangentbordets drivrutin har installerats
kandudenierafunktionerfördessa
tangenter genom tangentbordets
installationsprogram.
1. ML Standard:Nivåbrytareför
makrotangent
trycklättpåtangentenförattväxlamellan
nivå1ochnivå3.Varjenivåharolika
programmerbarafunktionerförM1~M4.
Indikator för makrotangent
Blixt1:Nivå1,Blixt2:Nivå2,Blixt3:Nivå3
2. M1~M4, M5(Fn+F1), M6(Fn+F2),
M7(Fn+F3), M8(Fn+F4), M9(Fn+F5),
M10(Fn+F6) Standard: Ingen funktion
3. M11(Fn+F7) eller Fn +vänster-/högerpil
Standard:VäxlingavLED-visningsläge
Multimediakontroller:
4. M12(Fn+F8)
Standard: Startar den
förinställdamultimediaspelaren.
5. M13(Fn+F9)
Standard: Spela & pausa
6. M14(Fn+F10)
Standard: Stopp
7. M15(Fn+F11)
Standard:Föregåendespår
8. M16(Fn+F12)
Standard:Nästaspår
9. ROG-tangent (Windowstangentlås-/
CapsLock-indikator)Tryckpåtangentenför
attaktivera/inaktiveraWindows-tangenten.
Windows-tangentenblinkartvågånger
förattindikeraattWindows-tangenten
ärinaktiverad,ochblinkartregångerför
attindikeraattWindows-tangentenär
aktiverad.
ROG-tangententändsförattindikeraatt
CapsLockärPÅ.
10. Belysningsknapp Justerar ljusstyrkan
påtangentbordetsbakgrundsljus.
11. Volymknapp upp/ner Tryckknappen
påvänsterförattstängaavljudet.
12. Fn+1/2/3/4/5/6/7/8/9/0 (Prolväxling)
Tryckpådessasnabbtangenterförattbyta
mellande10förinställdaprolernafrån1till
0.
13.Fn+DEL,END,PageDownTryckpå
dessasnabbtangenterförattjusteraRGB-
belysningseektenförrött(Fn+Del),
grönt(Fn+End),blått(Fn+PaDn)färgdjup
(färgspektrum)varförsig.
14.
Fn + “+”, Fn+”-”
Tryckpådessatangenter
förattökaellerminskabelysningseektens
visningshastighet.
15.Fn+EscTryckpådessatangenter
samtidigti10sekunderförattåterställatill
fabriksinställningarna.
Anpassa tangentbordet
(makrokommandon/
knappfunktioner, belysning osv.)
GåtillASUSwebbplatspåwww.asus.com
föratthämtaochinstalleradensenaste
tangentbordetdrivrutinenförattanpassa
tangentbordet makrokommandon,
knappfunktioner, belysning m.. funktioner.
Isi Paket
•1KeyboardASUSGK2000RGB
•1Dudukanpergelangantangan
•1Dudukanperangkatmobile
•1Taskeyboard
•1PanduanRingkas
•Kitsukucadang:1penariktombol
keyboard, tombol keyboard ML~M4
cadangan, dan tombol keyboard F7~F12
(M11~M16) cadangan.
Ringkasan Spesikasi
•NamaProduk:GK2000GamingKeyboard
•Tipe:GK2000RGBKeyboard
•Nilai:5V/500max2
•Dimensi51x22,5x4,5cm(PxLxT)
•Berat1,68Kg
Memasang keyboard GK2000 RGB
1. Sambungkan keyboard ke port USB di
komputer.
2. Sambungkan mikrofon dan headphone
ke port Mikrofon dan Headphone di
keyboard.
CATATAN: Sebaiknya sambungkan HDD
eksternal dan mouse ke port USB di
keyboard.
Memasang Dudukan Pergelangan
Tangan
1. Sejajarkan dudukan pergelangan tangan
ke kait di bagian belakang keyboard.
2.Tekankeduasisikearahdalamuntuk
mengunci dudukan pergelangan tangan
di tempatnya.
Memasang Dudukan Perangkat
Bergerak
1. Sejajarkan dudukan perangkat bergerak
ke dudukan di sudut kanan atas keyboard.
2.Tekandudukanperangkatbergerakke
depan untuk menguncinya.
Mengganti Tombol Keyboard
1. Gunakan penarik tombol keyboard untuk
melepas tombol ML~M4 atau F7~F12
(M11~M16).
2. Ganti dengan tombol keyboard cadangan.
Tombol pintas
Tombol terprogram: Setelah menginstal
driver keyboard, Anda dapat menentukan
fungsi untuk tombol tersebut dalam
program kongurasi keyboard.
1. Default ML:SwitchTingkatTombolMakro
Tekantomboliniuntukberalihantara
tingkat 1 hingga tingkat 3. Setiap tingkat
memiliki berbagai fungsi yang dapat
diprogram untuk M1~M4.
Indikator Tingkat Tombol Makro
Flash1:Tingkat1,Flash2:Tingkat2,Flash3:
Tingkat3
2. M1~M4, M5(Fn+F1), M6(Fn+F2),
M7(Fn+F3), M8(Fn+F4), M9(Fn+F5),
M10(Fn+F6)Default:Tidakadafungsi
3. M11(Fn+F7) atau Fn+Panah Kiri/Kanan
Default:TombolmodetampilanLED
Kontrol multimedia:
4. M12(Fn+F8)
Default: Mengaktifkan
pemutar multimedia default.
5. M13(Fn+F9)
Default: Putar & Jeda
6. M14(Fn+F10)
Default: Hentikan
7. M15(Fn+F11)
Default:Treksebelumnya
8. M16(Fn+F12)
Default:Trekberikutnya
9. Tombol ROG (Tombol Pengunci
Windows/indikatorCapslock)Tekantombol
iniuntukmengaktifkan/menonaktifkan
tombolWindows.TombolWindows
berkedip dua kali untuk mengindikasikan
menunjukkan bahwa tombol Windows
dinonaktifkan, dan akan berkedip tiga
kali untuk menunjukkan bahwa tombol
Windows diaktifkan.
TombolROGmenyalamenunjukkantombol
CapslockAKTIF.
10. Tombol cahaya Menyesuaikan tingkat
kecerahan lampu latar keyboard.
11. Tombol volume atas/bawah Tekan
tombol ke kiri untuk menonaktifkan
audio.
12. Fn+1/2/3/4/5/6/7/8/9/0 (Penggantian
prol) Tekantombolpintasaniniuntuk
beralihantara10prolstandardari1hingga
0.
13.Fn+DEL,END,PageDownTekantombol
pintas tersebut untuk menyesuaikan efek
pencahayaan RGB untuk kedalaman warna
(spektrum warna) Merah (Fn+Del), Hijau
(Fn+End), Biru (Fn+PaDn) secara terpisah.
14.
Fn + “+”, Fn+”-”
Tekantomboltersebut
untuk mempercepat atau memperlambat
kecepatan tampilan efek pencahayaan.
15.Fn+EscTekantomboltersebut
secarabersamaanselama10detikuntuk
mengembalikan ke pengaturan pabrik.
Menyesuaikan Keyboard (Perintah
makro/Fungsi tombol, Cahaya, dan
lainnya)
Buka situs web ASUS di www.asus.com
gunamen-downloaddanmenginstaldriver
Keyboardterbaruuntukmenyesuaikan
perintahmakropadaKeyboard,fungsi
tombol, fungsi cahaya, dan fungsi lainnya.
Kandungan Bungkusan
•PapankekunciRGBGK2000ASUSx1
•Tempatletakpergelangantanganx1
•Pemegangperantimudahalihx1
•Begsandangx1
•PanduanPermulaanRingkasx1
•Kitalatganti:penariktukupkekuncix1,
tukup kekunci tambahan ML~M4 dan tukup
kekunci tambahan F7~F12 (M11~M16).
Ringkasan Spesikasi
•Namaproduk:PapanKekunciPermainan
GK2000
•Model:PapanKekunciRGBGK2000
•Perkadaran:5V/500max2
•Dimensi51x22.5x4.5cm(PxLxT)
•Berat:1.68Kg
Pemasangan Papan Kekunci RGB
GK2000
1. Sambungkan papan kekunci ke port USB
pada komputer.
2. Sambungkan mikrofon dan fon kepala ke
portMikrofondanFonKepalapadapapan
kekunci.
NOTA:Kamimengesyorkan
menyambungkan HDD luaran dan tetikus ke
port USB pada papan kekunci.
Pemasangan Tempat Letak
Pergelangan Tangan
1. Sejajarkan tempat letak pergelangan
tangan ke takuk di belakang papan
kekunci anda.
2.Tekankedua-duasisikedalamuntuk
melindungi tempat letak pergelangan
tangan di tempatnya.
Pemasangan Kaki Peranti Mudah
Alih
1. Sejajarkan kaki peranti mudah alih ke
sayap di sudut kanan bahagian atas papan
kekunci anda.
2.Tolakkakiperantimudahalihkedepan
untuk membetulkannya.
Menggantikan Tukup Kekunci
1. Gunakan penarik tukup kekunci untuk
mengeluarkan kekunci ML~M4 atau
F7~F12 (M11~M16).
2. Gantikan dengan tukup kekunci
tambahan.
Kekunci pantas
Kekunci boleh diprogramkan: Selepas
pemasangan pemacu papan kekunci, anda
bolehmenentukanfungsiuntukkekunci-
kekunci ini menerusi program penyediaan
papan kekunci.
1. ML Lalai:PertukaranTahapKekunciMakro
TekankekunciiniuntukbertukarantaraTahap
1hinggaTahap3.Setiaptahapmenyediakan
fungsi boleh atur cara yang berbeza untuk
M1~M4.
Penunjuk Tahap Kekunci Makro
Berkelip1:Tahap1,Berkelip2:Tahap2,
Berkelip3:Tahap3
2. M1~M4, M5(Fn+F1), M6(Fn+F2),
M7(Fn+F3), M8(Fn+F4), M9(Fn+F5),
M10(Fn+F6)Lalai:Tiadafungsi
3. M11(Fn+F7) atau Fn+Anak Panah Kiri/
Kanan Lalai: Pertukaran mod paparan LED
Kawalan multimedia:
4. M12(Fn+F8) Lalai: Melancarkan pemain
multimedia lalai.
5. M13(Fn+F9) Lalai: Main & Jeda
6. M14(Fn+F10) Lalai: Berhenti
7. M15(Fn+F11) Lalai: Runut sebelumnya
8. M16(Fn+F12) Lalai: Runut seterusnya
9. Kekunci ROG (KunciKekunciWindows/
PenunjukCapslock)Tekankekunciiniuntuk
mendayakan/menyahdayakanKekunci
Windows.KekunciWindowsberkelipdua
kaliuntukmenunjukkanKekunciWindows
dinyahdayakan dan ia berkelip tiga kali
untukmenunjukkanKekunciWindowsKey
didayakan.
KekunciROGmenyalauntukmenunjukkan
Caps lock aktif.
10. Tombol pencahayaan Melaraskan
kecerahan lampu belakang papan kekunci.
11. Tombol kelantangan naik/turun Tolak
tombol ke kiri untuk membisukan kelantangan.
12. Fn+1/2/3/4/5/6/7/8/9/0 (Pertukaran
prol) Tekankekuncipantasuntukbertukar
antara10prolprasetdaripada1hingga0.
13.Fn+DEL,END,PageDownTekankekunci
pantas ini bagi melaraskan kesan pencahayaan
RGB untuk kedalaman warna (spektrum warna)
Merah (Fn+Del), Hijau (Fn+End), Biru (Fn+PaDn)
secara berasingan.
14. Fn + “+”, Fn+”-”Tekankekunciiniuntuk
melajukan atau memperlahankan kelajuan
paparan bagi kesan pencahayaan.
15.Fn+EscTekankekunciinisecaraserentak
selama10saatuntukmemulihkannyake
tetapan kilang.
Menyesuaikan Papan Kekunci anda
( Perintah makro / Fungsi butang ,
Pencahayaan dan lain-lain)
KunjungilamanwebASUSdiwww.asus.
com untuk memuat turun dan memasang
pemacuPapanKekunciterkinibagi
menyesuaikan perintah makro, fungsi
butang,pencahayaandanfungsi-fungsilain.
Bahasa Indonesia