Beko CHP6450W User Manual
Displayed below is the user manual for CHP6450W by Beko which is a product in the Electric Food Choppers category. This manual has pages.
Related Manuals

CHP6450W
Chopper
User Manual
01M-8832803200-4815-01
EN DE FR TR ES PL RO
Please read ths user manual frst!
Dear Customers,
Thank you for selecting an Beko product. We hope that you get the best results from
your product which has been manufactured with high quality and state-of-the-art
technology. Therefore, please read this entire user manual and all other accompanying
documents carefully before using the product and keep it as a reference for future use.
If you handover the product to someone else, give the user manual as well. Follow all
warnings and information in the user manual.
Meanngs of the symbols
Following symbols are used in the various section of this manual:
C
Important information and useful
hints about usage.
AWARNING:
Warnings for
dangerous situations concerning
the safety of life and property.
Materials are intended to be in
contact with food.
Do not immerse the appliance,
power cord or power plug in water or
in other liquids.
Potection class against electric
shock
Ths product has been produced n envronmentally-frendly, state-of-the-art facltes.
Comples wth the WEEE Drectve. It does not contan PCB.
Made n P.R.C.

3 / 61 EN
Chopper / User Manual
CONTENTS
1 Important instructions for
safety and environment 4
1.1 General safety . . . . . . . . . . . . . . . . . . . . . . . . . . . . . . 4
1.2 Compliance with the WEEE Directive and
disposal of waste products . . . . . . . . . . . . . . . . 5
1.3 Package information . . . . . . . . . . . . . . . . . . . . . . . 5
2 Chopper 6
2.1 Overview . . . . . . . . . . . . . . . . . . . . . . . . . . . . . . . . . . . 6
2.2 Technical data. . . . . . . . . . . . . . . . . . . . . . . . . . . . . . 6
3 Recipe idea 7
3.1 Recipe idea Salsa . . . . . . . . . . . . . . . . . . . . . . . . . . . .7
4 Operation 7
4.1 Preparation . . . . . . . . . . . . . . . . . . . . . . . . . . . . . . . . .7
4.2 Chopping . . . . . . . . . . . . . . . . . . . . . . . . . . . . . . . . . . .7
4.3 Maximum quantities and processing time . 8
5 Information 9
5.1 Cleaning and care. . . . . . . . . . . . . . . . . . . . . . . . . . . 9
5.2 Storage. . . . . . . . . . . . . . . . . . . . . . . . . . . . . . . . . . . . . 9
5.3 Handling and transportation . . . . . . . . . . . . . . . 9

4 / 61 EN Chopper / User Manual
This section contains safety
instructions that will help protect
from risk of personal injury or
property damage.
Failure to follow these instructions
invalidates the granted warranty.
1.1 General safety
• This appliance complies with the
international safety standards.
• This appliance can be used by
people who have limited physical,
sensory or mental capacity or
who do not have knowledge and
experience, provided that they are
supervised or they understand the
instructions with regard to safe
use of the product and potential
dangers.
• This appliance cannot be used by
children.
• Do not use it if the power cable,
blades or the appliance itself is
damaged. Contact an authorised
service.
• Unplug the appliance when left
unattended, while installing/
removing accessories or before
cleaning.
• Only use the original parts or
parts recommended by the
manufacturer.
• Do not attempt to dismantle the
appliance.
• Your mains power supply should
comply with the information
supplied on the rating plate of the
appliance.
• Do not use the appliance with an
extension cord.
• Do not pull the power cable when
unplugging the appliance.
• Unplug the appliance before
cleaning, disassembly, accessory
replacement and wait for it to stop
completely.
• Do not touch the plug of the
appliance with damp or wet hands.
• Do not use the device for hot food.
• Use the appliance only with the
supplied rubber base and glass
container.
• Do not operate the appliance
without the ingredients in the
bowl.
• Remove bones and stones from
food to prevent the blades and the
appliance from getting damaged.
1 Important nstructons for safety and
envronment

5 / 61 EN
Chopper / User Manual
• This appliance is not suitable for
dry or hard foods as this will quickly
cause the blades to become dull.
• To prevent overheating, do not use
the appliance continuously for more
than10 seconds. Leave to cool for 1
minute in between each 10 seconds
of operation.
• Follow all warnings to prevent
injuries due to incorrect use.
• When emptying the container,
during cleaning and grabbing
chopping blades with bare hands
serious injuries could result due to
incorrect use. Use caution and hold
the chopping blade only from its
plastic section.
• After cleaning, dry the appliance
and all parts before connecting it to
mains supply and before attaching
the parts.
• Do not immerse the appliance,
power cable, or power plug in water
or any other liquids.
• Do not operate or place any part of
this appliance or its parts on or near
hot surfaces.
• If you keep the packaging materials,
store them out of the reach of
children.
• Keep the appliance out of the
reach of children.
1.2 Compliance with the WEEE
Directive and disposal of
waste products
This product does not include harmful
and prohibited materials specified in the
“Regulation for Supervision of the Waste
Electric and Electronic Appliances” issued
by the Ministry of Environment and
Urban Planning. Complies with the WEEE
Regulation. This appliance has been manufactured
with high quality parts and materials which can be
reused and are suitable for recycling. Therefore,
do not dispose the appliance with normal
domestic waste at the end of its service life. Take
it to a collection point for the recycling of electrical
and electronic equipment. Ask the local authority
in your area for these collection points. Help
protect the environment and natural resources by
recycling used products.
1.3 Package information
Package of the product is made of
recyclable materials in accordance with
our national legislation. Do not dispose
of the packaging materials together
with the domestic or other wastes. Take them to
the packaging material collection points
designated by the local authorities.
1 Important nstructons for safety and
envronment

6 / 61 EN Chopper / User Manual
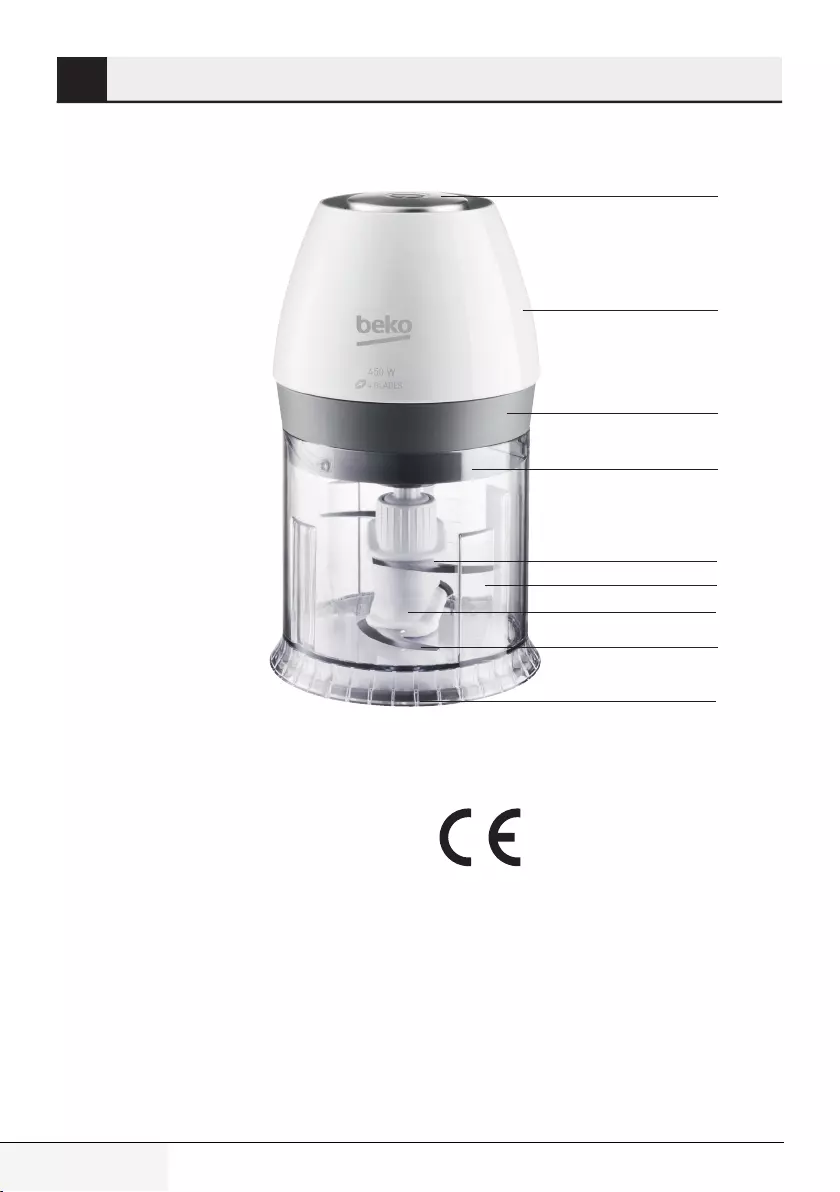
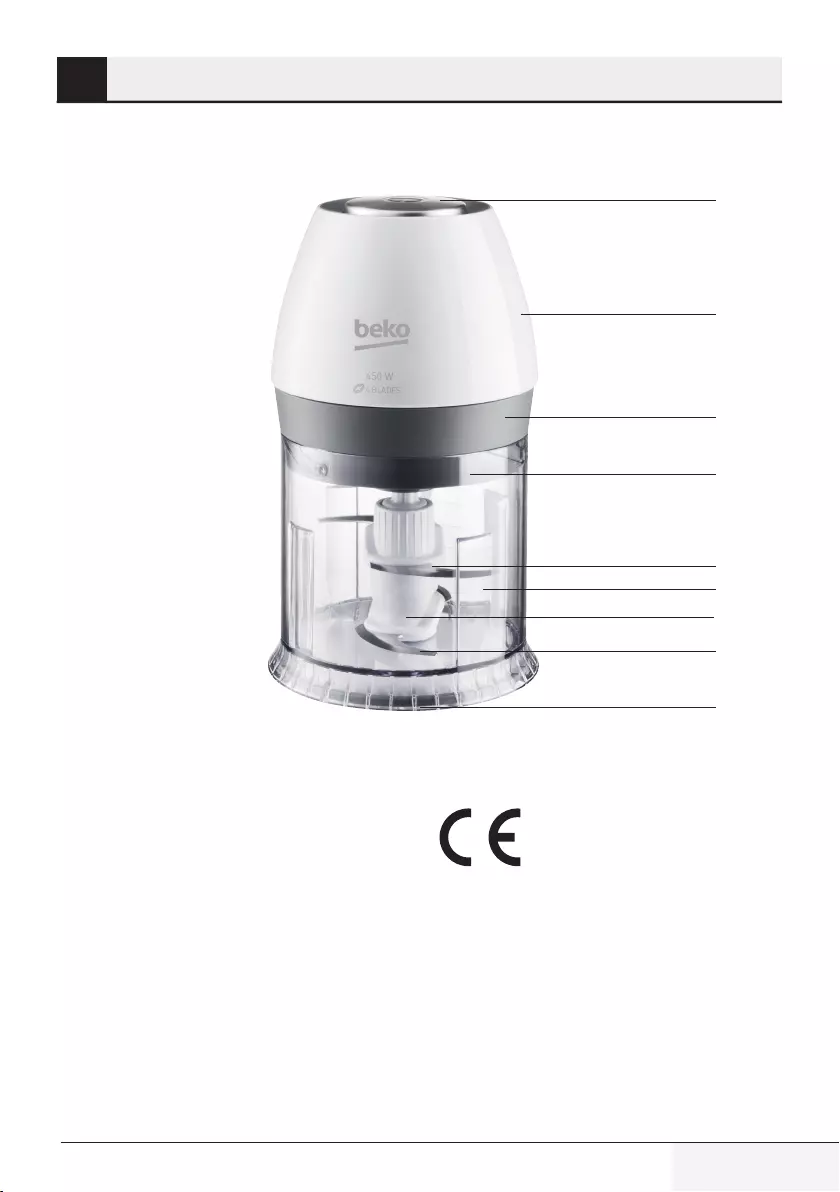
2 Chopper
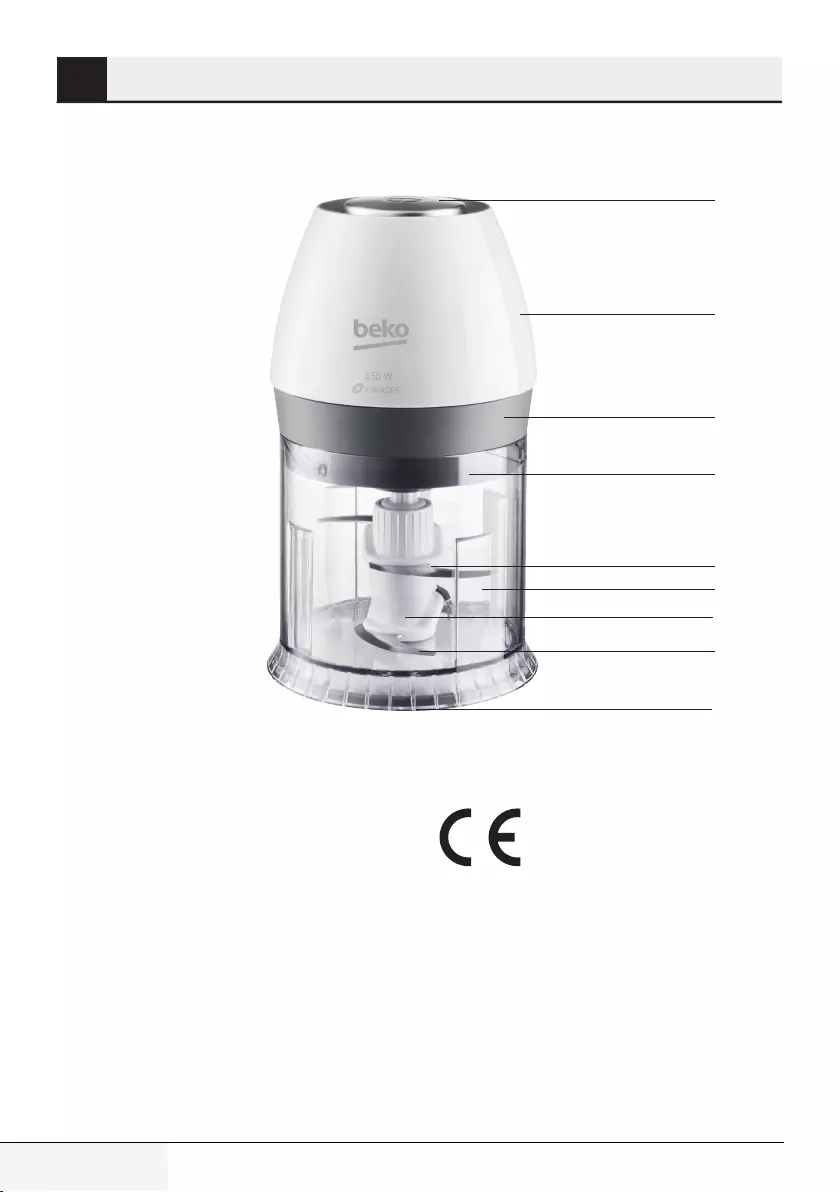
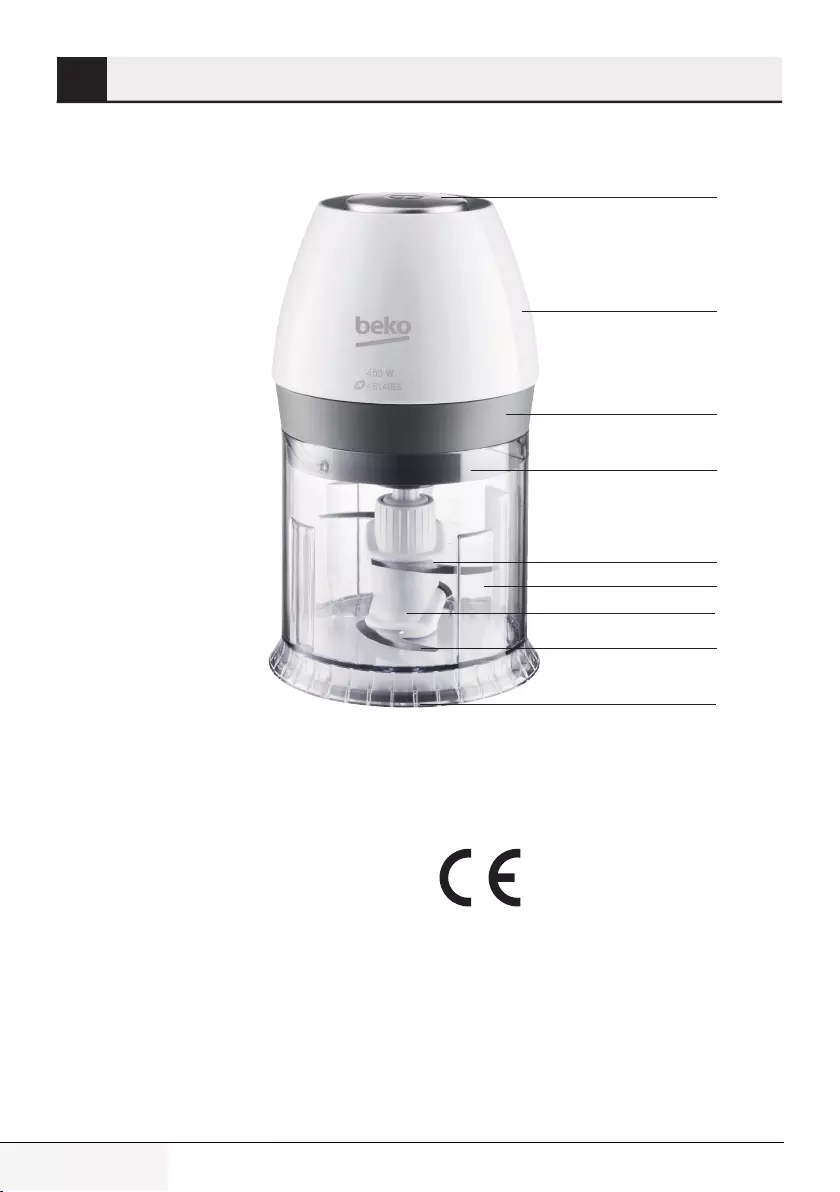
2.1 Overview
The values whch are declared n the markngs axed on your applance or the other prnted documents suppled wth t repre-
sent the values whch were obtaned n the laboratores pursuant to the pertnent standards. These values may vary accordng
to the usage of the applance and ambent condtons.
1. Operation switch
2. Base unit
3. Inner lid
4. Side placement section
5. Upper blade
6. Bowl
7. Fixed shaft
8. Lower blade
9. Anti-slip rubber pad
2.2 Technical data
This product conforms to the
European directives 2004/108/
EU, 2006/95/EU,2009/125/EU
and 2011/65/EU.
Power supply: 220-240 V~, 50/60 Hz
Power: 450 W
Technical and design modifications reserved.
1
2
3
4
8
9
7
6
5
7 / 61 EN
Chopper / User Manual
3 Recpe dea
3.1 Recipe idea Salsa
Ingredients:
•3 tomatoes, seeded
•1 red onion
•1 garlic clove
•1 red bell pepper
•1 jalapeño chilli pepper, seeded
•2 tablespoons fresh cilantro
•½ teaspoon salt
Preparation:
Peel the onion and place with the garlic, bell
pepper and chilli pepper into the bowl of the
appliance and pulse until the ingredients are
coarsely chopped. Gradually add the tomatoes,
cilantro and salt and pulse a few times until the
ingredients are thoroughly mixed.
4 Operation
C
Your chopper has been designed
for processing small quantities of
food and should not be used for
any other purpose.
C
Do not chop extremely hard
ingredients such as coffee beans,
nutmeg, grains, ice or bones.
Remove stalks from herbs, shells
from nuts and bones, tendons
and gristle from meat.
C
The appliance should be
unplugged when not in use.
4.1 Preparation
1. Remove all packaging and sticker materials
and dispose of them according to the
applicable local regulations.
2. Before using the appliance for the first time,
clean the appliance (See the “Cleaning and
care” section).
3. Cut the food into small pieces before using the
appliance.
4.2 Chopping
ACAUTION
: Do not touch the
chopping blade with your bare
hands.
1. Place the upper blade (5) to the lower blade (8)
and then on the fixed shaft (7) in the bowl (6).
2. Put the food that you would like to prepare in
the bowl (6).
3. Fit the inner lid (3) on the bowl (6). Turn the
inner lid (3) to the side placement section (4)
and fix it, otherwise the base unit (2) will not
be fit on the inner lid (3) and chopping process
can’t be operated.
4. Mount the base unit (2) on the inner lid (3) on
the bowl (6).
5. Insert the plug into the wall socket.
6. Press and hold the operation switch (1).
‒ The appliance starts operating.
8 / 61 EN Chopper / User Manual
4 Operation
4.3 Maximum quantities and processing time
Refer to the table for processing time and maximum quantities.
Ingredents
Maxmum quantty Processng tme
Meat (dced) 100 - 150 g 10 - 20 pulses
Cheese (cut nto small cubes) 100 - 150 g 5 - 10 pulses
Onons/Garlc
(peeled & cut nto 8 peces) 150 - 200 g 5 - 10 pulses
Tomato (cut nto 6 peces) 250 - 300 g 10 -20 pulses
Fruts/Vegetables
(cut nto 8 peces) 250 - 300 g 5 - 15 pulses
C
You can press the operation switch
(1) intermittently to activate the
“PULSE” function of the appliance.
You can obtain a better quality
of chopping with the “PULSE”
function.
7. Release the operation switch (1) to finish the
operation. Disconnect the plug from the wall
socket.
C
Do not operate the appliance
continuously for more than 10
seconds.
8. Remove the base unit (2) and the inner lid (3).
Take out chopping blade (4) carefully. Remove
food from the glass bowl (5).
ACAUTION
: Do not touch the blade
with your bare hands. The blade is
very sharp.

9 / 61 EN
Chopper / User Manual
5 Informaton
5.1 Cleaning and care
ACAUTION
: Never use petrol
solvents, abrasive cleaners, metal
objects or hard brushes to clean the
appliance.
ACAUTION
: Do not touch the
chopping blade with your bare
hands. The blades are very sharp.
Use a brush!
1. Turn the appliance off and disconnect it from
wall socket.
2. Let the appliance cool down completely.
3. Use a soft damp cloth to clean the exterior of
the base unit (2) and then wipe it dry.
4. The bowl (6), upper blade (5), lower blade
(8) and inner lid (3) can be washed in the
dishwasher on the upper shelf.
5. Before storing, clean and dry the upper blade
(5) and lower blade (8).
ACAUTION
: Never put the base
unit (2) or power cord in water or any
other liquids and never hold them
under running water.
C
Before using the appliance after
cleaning, dry all parts carefully using
a soft towel.
5.2 Storage
•If you do not plan to use the appliance for a long
period of time, please store it carefully.
•Make sure the appliance is unplugged, cooled
down and completely dry.
•Do not wrap the power cord around the
appliance.
•Store it in a cool, dry place.
•Make sure the appliance is always kept out of
the reach of children.
5.3 Handling and
transportation
•During handling and transportation, carry
the appliance in its original packaging. The
packaging of the appliance protects it against
physical damages.
•Do not place heavy loads on the appliance or the
packaging. The appliance may be damaged.
•Dropping the appliance will render it non-
operational or cause permanent damage.
Btte lesen Se zuerst dese Anletung!
Sehr geehrte Kundn, sehr geehrter Kunde,
Velen Dank, dass Se sch für en Beko-Produkt entscheden haben. Wr hoffen,
dass Se mt desem Produkt, das mt den höchsten Qualtätsanforderungen und der
modernsten Technologe hergestellt wurde, beste Ergebnsse erzelen. Btte lesen Se
de gesamte Bedenungsanletung und alle anderen Begletdokumente aufmerksam,
bevor Se das Produkt verwenden; bewahren Se se zum künftgen Nachschlagen
scher auf. Wenn Se das Produkt an enen Drtten wetergeben, händgen Se btte
auch dese Anletung aus. Befolgen Se alle Warnhnwese und Informatonen n deser
Anletung.
Symbole
Folgende Symbole werden n den verschedenen Abschntten deser Anletung
verwendet:
C
Wichtige Informationen und
nützliche Tipps in Bezug auf die
Verwendung.
AWARNUNG:
Warnhinweise zu
gefährlichen Situationen im Hinblick
auf die Sicherheit von Leib, Leben
und Eigentum.
Für den Kontakt mit Lebensmitteln
geeignet.
Gerät, Netzkabel sowie Netzstecker
nicht in Wasser oder andere Flüssig-
keiten tauchen.
Schutzklasse gegen Stromschlag
Deses Produkt wurde n umweltfreundlchen, hochmodernen Enrchtungen hergestellt
Das Gerät erfüllt de Vorgaben
der WEEE-Rchtlne. Es enthält ken PCB.
Hergestellt n: P.R.C.

11 / 61 DE
Zerkleinerer / Bedienungsanleitung
INHALT
1 Wichtige Anweisungen zu
Sicherheit und Umwelt 12
1.1 Allgemeine Sicherheit . . . . . . . . . . . . . . . . . . . . . 12
1.2 Konformität mit der WEEE-Richtlinie und
Entsorgung von Altprodukten . . . . . . . . . . 14
1.3 Informationen zur Verpackung . . . . . . . . . . . . 14
2 Chopper 15
2.1 Übersicht . . . . . . . . . . . . . . . . . . . . . . . . . . . . . . . . . . 15
2.2 Technische Daten . . . . . . . . . . . . . . . . . . . . . . . . . 15
3 Rezeptidee 16
3.1 Rezeptidee: Salsa. . . . . . . . . . . . . . . . . . . . . . . . . . 16
4 Betrieb 16
4.1 Vorbereitung . . . . . . . . . . . . . . . . . . . . . . . . . . . . . . 16
4.2 Zerkleinern . . . . . . . . . . . . . . . . . . . . . . . . . . . . . . . 16
4.3 Maximalmengen und Verarbeitungszeit . . 17
5 Informationen 18
5.1 Reinigung und Pflege . . . . . . . . . . . . . . . . . . . . . 18
5.2 Lagerung . . . . . . . . . . . . . . . . . . . . . . . . . . . . . . . . . . 18
5.3 Handhabung und Transport. . . . . . . . . . . . . . . 18

12 / 61 DE Zerkleinerer / Bedienungsanleitung
Dieser Abschnitt erklärt Sicher-
heitsanweisungen, die beim Schutz
vor Personen- und Sachschäden
helfen.
Bei Nichtbeachtung dieser Anwei-
sungen erlischt die gewährte Ga-
rantie.
1.1 Allgemene
Scherhet
• Dieses Gerät erfüllt die internatio-
nalen Sicherheitsstandards.
• Dieses Gerät kann von Personen
mit eingeschränkten körperlichen,
sensoriellen oder mentalen
Fähigkeiten oder ohne spezielles
Wissen oder Erfahrung verwendet
werden, sofern sie beaufsichtigt
werden oder die Anweisungen
zum sicheren Umgang mit dem
Produkt und dessen potenzielle
Gefahren verstehen. Kinder dürfen
nicht mit dem Gerät spielen.
• Dieses Gerät darf nicht von
Kindern benutzt werden.
• Verwenden Sie das Produkt nicht,
falls Netzkabel, Klingen oder
Gerät selbst beschädigt sind.
Wenden Sie sich dann an einen
autorisierten Serviceanbieter.
• Ziehen Sie den Netzstecker,
bevor Sie Zubehör installieren/
entfernen, das Produkt
reinigen oder unbeaufsichtigt
zurücklassen.
• Nur Originalteile und vom
Hersteller empfohlene Teile
verwenden.
• Nicht versuchen, das Gerät zu
demontieren.
• Die Stromversorgung muss mit
den Angaben am Typenschild des
Gerätes übereinstimmen.
• Das Gerät nicht mit einem
Verlängerungskabel verwenden.
• Beim Trennen des Gerätes nicht
am Netzkabel selbst ziehen.
• Ziehen Sie vor Reinigung,
Demontage und Auswechslung
von Zubehör den Netzstecker
und warten Sie, bis das Gerät
vollständig zum Stillstand
gekommen ist.
• Berühren Sie Stecker und Gerät
nicht mit feuchten oder nassen
Händen.
• Das Gerät nicht mit heißen
Lebensmitteln benutzen.
1 Wchtge Anwesungen zu Scherhet
und Umwelt

13 / 61 DE
Zerkleinerer / Bedienungsanleitung
1 Wchtge Anwesungen zu Scherhet
und Umwelt
• Verwenden Sie das Gerät nur mit
der mitgelieferten Gummibasis und
dem Glasbehälter.
• Das Gerät nicht ohne Zutaten in der
Schüssel betätigen.
• Knochen und Steine zur Vermeidung
von Schäden an Klingen und Gerät
aus Lebensmitteln entfernen.
• Dieses Gerät eignet sich nicht für
trockene oder harte Lebensmittel,
da diese die Klingen schnell stumpf
werden lassen können.
• Das Gerät zur Vermeidung einer
Überhitzung nicht länger als 10
Sekunden in Folge benutzen.
Zwischen 10-sekündigen Einsätzen
1 Minute abkühlen lassen.
• Zur Vermeidung von Verletzungen
aufgrund unsachgemäßer
Benutzung alle Warnungen
befolgen.
• Beim Leeren des Behälters,
während der Reinigung und bei
der Handhabung der Klingen mit
bloßen Händen können in Folge
unsachgemäßer Benutzung
ernsthafte Verletzungen auftreten.
Gehen Sie vorsichtig mit der
Klinge um, greifen Sie sie nur am
Kunststoffteil.
• Das Gerät und sämtliche
Zubehörteile nach der Reinigung
gründlich trocknen, bevor es mit
der Stromversorgung verbunden
wird und bevor Teile abgenommen
oder angebracht werden.
• Gerät, Netzkabel sowie
Netzstecker nicht in Wasser oder
andere Flüssigkeiten tauchen.
• Das Gerät und dessen Zubehör
nicht auf oder in der Nähe von hei-
ßen Oberflächen betreiben oder
platzieren.
• Falls Sie die Verpackungsmateria-
lien aufheben möchten, bewahren
Sie sie außerhalb der Reichweite
von Kindern auf.
• Halten Sie das Gerät von Kindern
fern.
14 / 61 DE Zerkleinerer / Bedienungsanleitung
1.2 Konformität mit der WEEE-
Richtlinie und Entsorgung von
Altprodukten
Dieses Produkt enthält keine der in der
vom Ministerium für Umwelt und Städte-
planung ausgestellten „Regulierung zur
Überwachung von elektrischen und elek-
tronischen Altgeräten“ angegebenen
gefährlichen und verbotenen Materialien. Das Ge-
rät erfüllt die Vorgaben der WEEE-Richtlinie. Die-
ses Gerät wurde aus hochwertigen Teilen und
Materialien hergestellt, die wiederverwendet
werden können und zum Recycling geeignet sind.
Deshalb darf das Gerät am Ende seiner Einsatzzeit
nicht mit dem normalen Hausmüll entsorgt wer-
den. Geben Sie das Gerät bei einer Sammelstelle
ab, die für das Recycling von elektrischen und
elektronischen Geräten zuständig ist. Erkundigen
Sie sich bei der örtlichen Behörde in Ihrer Region
nach diesen Sammelstellen. Durch das Recycling
von Altgeräten tragen Sie zum Schutz der Umwelt
und der natürlichen Rohstoffe bei.
1.3 Informationen zur
Verpackung
Die Verpackung des Produkts wurde ge-
mäß unserer nationalen Gesetzgebung
aus wiederverwertbaren Materialien
hergestellt. Entsorgen Sie die Verpa-
ckungsmaterialien nicht mit dem Hausmüll oder
anderem Müll. Bringen Sie sie zu einer von der
Stadtverwaltung bereitgestellten Sammelstelle
für Verpackungsmaterial.
1 Wchtge Anwesungen zu Scherhet
und Umwelt

15 / 61 DE
Zerkleinerer / Bedienungsanleitung
2 Chopper
2.1 Übersicht
De am Gerät oder n der Dokumentaton angegebenen Werte wurden nach maßgeblchen Standards unter Laborbedngungen
ermttelt. Dese Werte können je nach Ensatz- und Umgebungsbedngungen vareren.
1. Ein-/Ausschalter/Pulse-Taste
2. Basis
3. Innendeckel
4. Setlche Ansatzmarkerung
5. Obere Klnge
6. Schüssel
7. Schaft
8. Untere Klnge
9. Rutschfeste Gummmatte
2.2 Technische Daten
Dieses Gerät erfüllt die Vorgaben
der europäischen CE-Richtlinien
2004/108/EC, 2006/95/EC,
2009/125/EC und 2011/65/EU.
Spannung:
220-240 V~, 50 /60Hz
Leistung:
450 W
Technische und optische Änderungen vorbehal-
ten
1
2
3
4
8
7
6
5
9
16 / 61 DE Zerkleinerer / Bedienungsanleitung
3 Rezeptdee
3.1 Rezeptidee: Salsa
Zutaten:
•3 Tomaten, entkernt
•1 rote Zwebel
•1 Knoblauchzehe
•1 rote Paprkaschote
•1 Jalapeño-Chlschote, entkernt
•2 Esslöffel frscher Korander
•½ Teelöffel Salz
Zubereitung:
Zwiebel schälen und gemeinsam mit Knoblauch,
Paprikaschote und Chilischote in die Geräte-
schüssel geben und die Pulse-Taste bestätigen,
bis die Zutaten grob zerkleinert sind. Allmählich
Tomaten, Koriander und Salz hinzugeben und ei-
nige Male die Pulse-Taste bestätigen, bis Zutaten
gründlich vermischt sind.
4 Betreb
C
Der Zerkleinerer wurde zur Zu-
bereitung kleiner Speisemengen
entwickelt und sollte nicht zu an-
deren Zwecken eingesetzt wer-
den.
C
Keine extrem harten Zutaten,
wie Kaffeebohnen, Muskatnuss,
Getreide, Eis oder Knochen zer-
kleinern. Kräuter von Stängeln,
Nüsse von Schale und Fleisch von
Knochen, Sehnen und Knorpel
befreien.
C
Gerät sollte bei Nichtbenutzung
von der Stromversorgung ge-
trennt werden.
4.1 Vorbereitung
1. Alle Verpackungsmaterialien und Aufkleber
entfernen und diese entsprechend den
gesetzlichen Vorschriften entsorgen.
2. Rengen Se vor dem ersten Ensatz sämtlche
Tele sorgfältg (sehe Abschntt „Rengung
und Pflege“), de mt Lebensmtteln n
Berührung kommen.
3. Lebensmttel vor der Verarbetung mt dem
Gerät n klene Stücke schneden.
4.2 Zerkleinern
AWARNUNG:
Berühren Sie die
Klingen niemals mit bloßen Hän-
den.
1. Setzen Sie die obere Klinge (5) auf die untere
Klinge (8), anschließend auf den Schaft (7) in
der Schüssel (6).
2. Geben Se de Lebensmttel zur Zuberetung n
de Schüssel (6).
3. Setzen Se den Innendeckel (2) auf
de Schüssel (6) auf. Fxeren Se den
Innendeckel (3) durch Drehen bs zur setlchen
Ansatzmarkerung (4); andernfalls lässt sch
der Innendeckel (3) ncht komplett auf de Bass
(2) aufsetzen. In desem Fall lässt sch das Gerät
ncht enschalten.
4. Bass (2) am Innendeckel (3) an der
Schüssel (5) befestgen.
5. Netzstecker n de Steckdose stecken.

17 / 61 DE
Zerkleinerer / Bedienungsanleitung
4 Betreb
4.3 Maximalmengen und Verarbeitungszeit
Siehe Tabelle mit Maximalmengen und Verarbeitungszeit.
Zutaten
Maxmalmenge
Verarbetungszet
Fleisch (gewürfelt) 100 – 150 g 10 – 20 Pulse
Käse (in kleine Würfel
geschnitten) 100 – 150 g 5 – 10 Pulse
Zwiebeln/Knoblauch
(geschält & in 8 Stücke
geschnitten)
150 – 200 g 5 – 10 Pulse
Tomate (in 6 Stücke
geschnitten) 250 – 300 g 10 – 20 Pulse
Obst/Gemüse
(in 8 Stücke geschnitten) 250 – 300 g 5 – 15 Pulse
6. En-/Ausschalter (1) gedrückt halten.
‒ Das Gerät startet den Betrieb.
C
Zum Aktivieren der Pulse-Funktion
des Gerätes Ein-/Ausschalter (1)
periodisch drücken. Mit der „Pulse“-
Funktion lassen sich Lebensmittel
gewöhnlich noch besser zerkleinern.
7. En-/Ausschalter (1) abschleßend loslassen.
Netzstecker aus der Steckdose zehen.
C
Gerät nicht länger als 10 Sekunden
in Folge benutzen.
8. Bass (2) und Innendeckel (3) entfernen. Klnge
(4) vorschtg herausnehmen. Lebensmttel aus
der Glasschüssel (5) entfernen.
AWARNUNG:
Berühren Sie die
Klingen niemals mit bloßen Händen.
Die Klingen sind sehr scharf.
18 / 61 DE Zerkleinerer / Bedienungsanleitung
5 Informatonen
5.1 Reinigung und Pflege
AWARNUNG:
Zur Reinigung des
Gerätes niemals Benzin, Lösungs-
mittel, Scheuermittel oder harte
Bürsten verwenden.
AWARNUNG:
Klingen nicht mit
bloßen Händen berühren. Die Klin-
gen sind sehr scharf.
Eine Bürste verwenden!
1. Gerät ausschalten und Netzstecker aus der
Steckdose ziehen.
2. Das Gerät vollständg abkühlen lassen.
3. Außensete der Bass (2) mt enem wechen,
feuchten Tuch abwschen, dann trocken wschen.
4. Schüssel (6), obere Klnge (5), untere Klnge (8),
und Innendeckel (3) können Se m oberen Korb
der Spülmaschne rengen.
5. Rengen und trocknen Se obere Klnge (5) und
untere Klnge (8) vor dem Verstauen.
A
WARNUNG:
Basis (2) sowie
Netzkabel niemals in Wasser oder
andere Flüssigkeiten tauchen, nie-
mals unter fließendes Wasser hal-
ten.
C
Nach der Reinigung und vor der
Benutzung des Gerätes alle Teile
sorgfältig mit einem weichen Tuch
trocknen.
5.2 Lagerung
•Wenn das Gerät längere Zet ncht benutzt wrd,
sollte es sorgfältg aufbewahrt werden.
•Darauf achten, dass der Netzstecker gezogen
wrd und das Gerät komplett trocken st.
•Netzkabel ncht um das Gerät, sondern unter
de Bass wckeln.
•Kühl und trocken lagern.
•Das Gerät sollte sch mmer außerhalb der
Rechwete von Kndern befnden.
5.3 Handhabung und
Transport
•Transporteren Se das Gerät n sener
Orgnalverpackung. De Verpackung schützt
das Gerät vor Sachschäden.
•Legen Se kene schweren Gegenstände auf
dem Gerät oder der Verpackung ab. Andernfalls
könnte das Gerät beschädgt werden.
•Falls das Gerät herunterfällt, st es
möglcherwese ncht mehr funktonsfähg oder
west dauerhafte Schäden auf.

Avant toute chose, veullez lre ce manuel
d’utlsaton !
Chers clents,
Merc d’avor chos les produts Beko. Nous espérons que ce produt, fabrqué dans des
nstallatons modernes et soums à un processus de contrôle qualté rgoureux, vous
offre les melleures performances possbles. C’est pourquo nous vous recommandons,
avant d’utlser ce produt, de lre attentvement ce manuel et tous les autres documents
fourns et de les conserver sogneusement pour toute consultaton future. S vous
confez le produt à quelqu’un d’autre, n’oublez pas de lu remettre également le
manuel d’utlsaton. Vellez à ben respecter les consgnes et les nstructons fgurant
dans le manuel d’utlsaton.
Sgnfcaton des symboles
Les symboles suvants sont reprs tout au long de ce manuel :
C
Informations importantes et
conseils utiles sur l’utilisation de
l’appareil.
AATTENTION :
Avertissement
sur les situations dangereuses
concernant la sécurité des biens et
des personnes.
Ces substances sont supposées en-
trer en contact avec les aliments.
N’immergez pas l’appareil, le
câble d’alimentation ou la fiche
d’alimentation électrique dans de
l’eau ou tout autre liquide.
Classe de protection contre les
chocs électriques
Ce produt a été fabrqué dans des usnes écologques et modernes.
Conforme à la Drectve DEEE. Ne content pas de PCB.
Fabrqué en P.R.C.

20 / 61 FR Hachoir / Manuel d’utilisation
TABLE DES MATIÈRES
1 Sécurité et installation 21
1.1 Consignes générales de sécurité . . . . . . . . . . 21
1.2 Conformité avec la directive DEEE et mise au
rebut des produits usagés . . . . . . . . . . . . . . . . 23
1.3 Information sur l’emballage . . . . . . . . . . . . . . . 23
2 Hachoir 24
2.1 Vue d'ensemble. . . . . . . . . . . . . . . . . . . . . . . . . . . . 24
2.2 Données techniques . . . . . . . . . . . . . . . . . . . . . . 24
3 Idées de recettes 25
3.1 Idées de recettes : . . . . . . . . . . . . . . . . . . . . . . . . 25
4 Fonctionnement 25
4.1 Préparation. . . . . . . . . . . . . . . . . . . . . . . . . . . . . . . . 25
4.2 Hachage. . . . . . . . . . . . . . . . . . . . . . . . . . . . . . . . . . . 25
4.3 Quantités maximales et temps d’utilisation 26
5 Informations 27
5.1 Nettoyage et entretien. . . . . . . . . . . . . . . . . . . . 27
5.2 Rangement. . . . . . . . . . . . . . . . . . . . . . . . . . . . . . . . 27
5.3 Manipulation et transport. . . . . . . . . . . . . . . . . 27

21 / 61 FR
Hachoir / Manuel d’utilisation
1 Sécurté et nstallaton
Cette section contient les consignes
de sécurité qui aident à se prémunir
contre les risques de dommages
corporels ou de dégâts matériels.
Le non-respect de ces consignes
annule la garantie.
1.1 Consgnes
générales de
sécurté
• Cet appareil est conçu selon les
normes internationales de sécu-
rité.
• Cet appareil peut être utilisé par les
personnes à capacités physiques,
sensorielles ou mentales réduites
ou qui manquent d’expérience et
de connaissances concernant l’ap-
pareil, à condition qu’elles soient
supervisées ou qu’elles aient re-
çues les consignes concernant
l’utilisation sûre de l’appareil et as-
similées les dangers encourus. Les
enfants ne doivent pas jouer avec
l’appareil.
• Cet appareil ne peut pas être uti-
lisé par les enfants.
• N’utilisez pas l’appareil si le câble
d’alimentation, les lames ou l’ap-
pareil lui-même est endommagé.
Contactez un service agréé.
• Débranchez l’appareil lorsqu’il est
laissé sans surveillance, lorsque
vous installez/retirez les acces-
soires ou avant de le nettoyer.
• Utilisez uniquement des pièces
d’origine ou pièces recomman-
dées par le fabricant.
• N’essayez pas de démonter l’appa-
reil.
• Assurez-vous que votre source
d’alimentation électrique soit
conforme aux informations spéci-
fiées sur la plaque signalétique de
votre appareil.
• N’utilisez pas de cordon prolonga-
teur avec l’appareil.
• Ne tirez pas sur le câble d’alimen-
tation de l’appareil pour le débran-
cher de l’alimentation.
• Débranchez l’appareil avant le
nettoyage, le démontage ou le
remplacement des accessoires et
attendez qu’il soit à l’arrêt complet.
• Ne touchez jamais la prise élec-
trique avec les mains humides ou
mouillées.
• N’utilisez pas l’appareil pour traiter
des aliments chauds.
• Utilisez l’appareil uniquement
avec le socle en caoutchouc et le
broc en verre.

22 / 61 FR Hachoir / Manuel d’utilisation
1 Sécurité et installation
• Ne faites pas fonctionner l’appa-
reil sans ingrédients dans le bol.
• Retirez les os et les cailloux des
aliments pour éviter d’endomma-
ger les lames et l’appareil.
• Cet appareil n’est pas adapté pour
hacher des aliments secs ou durs
qui endommageraient rapidement
les lames.
• Pour éviter toute surchauffe, ne
faites pas fonctionner l’appareil de
manière continue pendant plus de
10 secondes. Laissez-le refroidir
pendant 1 minute entre chaque
utilisation de 10 secondes.
• Suivez toutes les instructions afin
d’éviter des blessures dues à un
mauvais usage de l’appareil.
• Lorsque vous videz le réservoir,
de sérieuses blessures résultant
d’un mauvais usage peuvent sur-
venir pendant le nettoyage si vous
attrapez les lames du hachoir à
mains nues. Soyez prudent et
tenez les lames du hachoir uni-
quement par la partie en plas-
tique.
• Après le nettoyage; séchez l’appa-
reil et tous ses composants avant
de le brancher sur le secteur et d’y
ajouter les accessoires.
• Ne plongez pas l’appareil, le câble
d’alimentation ou la prise d’alimen-
tation électrique dans de l’eau ou
tout autre liquide.
• Ne faites jamais fonctionner ou
n’installez aucun composant de cet
appareil au-dessus ou à proximité
de surfaces chaudes.
• Si vous conservez le matériel d’em-
ballage, tenez-le hors de la portée
des enfants.
• Tenez l’appareil hors de portée des
enfants.
23 / 61 FR
Hachoir / Manuel d’utilisation
1 Sécurité et installation
1.2 Conformité avec la
directive DEEE et mise au
rebut des produits usagés
Ce produit ne contient pas de substances
dangereuses et prohibées, telles que dé-
crites dans la « Directive réglementant
les déchets d’équipements électriques et
électroniques » émanant du Ministère de
l’Environnement et de l’Aménagement urbain.
Conforme à la Directive DEEE. Cet appareil a été
fabriqué avec des pièces et du matériel de qualité
supérieure, susceptibles d’être réutilisés aux fins
de recyclage. Par conséquent, à la fin de sa durée
de vie, il ne doit pas être mis au rebut aux côtés de
déchets domestiques ordinaires. Au contraire, il
doit être éliminé dans un point de collecte réservé
au recyclage d’appareils électriques et électro-
niques. Consultez les autorités locales de votre
région pour connaître les points de recyclage.
Participez à la protection de l’environnement et
des ressources naturelles grâce au recyclage des
produits usagés.
1.3 Information sur
l’emballage
L’emballage du produit est fait à partir
de matériaux recyclables, conformé-
ment à notre Règlementation nationale.
Ne jetez pas les éléments d’emballage
avec les déchets domestiques et autres déchets.
Déposez-les dans un des points de collecte d’élé-
ments d’emballage que vous indiquera l’autorité
locale dont vous dépendez.
24 / 61 FR Hachoir / Manuel d’utilisation
2 Hachor
Les valeurs ndquées sur les nscrptons apposées sur votre apparel ou les autres documents fourns avec le produt sont
des valeurs obtenues en condtons de laboratore, conformément aux normes en vgueur. Ces valeurs peuvent varer selon
l’utlsaton de l’apparel et les condtons envronnantes.
1. Bouton Marche/Arrêt
2. Bloc moteur
3. Couvercle intérieur
4. Section de placement latéral
5. Lame supérieure
6. Bol
7. Axe fixe
8. Lame inférieure
9. Pieds en caoutchouc antidérapant
2.2 Données techniques
Ce produit est conforme
aux Directives européennes
2004/108/EC, 2006/95/EC,
2009/125/EC et 2011/65/EU.
Alimentation :
220-240 V~, 50/60 Hz
Puissance :
450 W
Modifications relatives à la technique et à la
conception réservées.
2.1 Vue d'ensemble
1
2
3
4
8
7
6
5
9
25 / 61 FR
Hachoir / Manuel d’utilisation
3 Idées de recettes
3.1 Idées de recettes :
Salsa
Ingrédients :
•3 tomates épépinées
•1 oignon rouge
•1 gousse d‘ail
•1 poivron rouge
•1 piment jalapeño épépiné
•2 cuillères à soupe de coriandre fraîche
•½ cuillère à café de sel
Préparation :
Épluchez l‘oignon et mettez l‘ail, le poivron et le
piment dans le bol du hachoir et appuyez jusqu‘à
ce que les ingrédients soient hachés grossiè-
rement. Ajoutez progressivement les tomates,
la coriandre et le sel et appuyez sur le bouton
« Pulse » par intermittence pour mixer le tout.
C
Votre Mini-hachoir a été conçu pour
traiter de petites quantités d‘ali-
ments et ne devrait pas être utilisé
autrement.
C
Ne hachez pas de denrées trop
dures tels que des grains de café,
glaçons, noix de muscade, grains
ou os. Retirez la tige des herbes, la
coque des noix et les os, les tendons
et le cartilage de la viande.
C
L‘appareil doit être débranché lors-
qu‘il n‘est pas utilisé.
4.1 Préparation
1. Retirez les emballages et autocollants avant de
les jeter selon les lois en vigueur.
2. Avant la première utilisation de l’appareil,
nettoyez les éléments qui seront en contact
avec les aliments (reportez-vous à la rubrique «
Nettoyage et entretien »).
3. Coupez les aliments en petits morceaux avant
d’utiliser l’appareil.
4.2 Hachage
AATTENTION :
Évitez de toucher
les lames avec vos mains nues.
1. Placez la lame supérieure (5) sur la lame
inférieure (8), puis sur l’axe fixe (7) dans le bol
(6).
2. Mettez les aliments que vous voulez préparer
dans le bol (6).
3. Fixez le couvercle intérieur (3) sur le bol (6).
Tournez le couvercle intérieur (3) vers la section
de placement latéral (4) et fixez-le. Si vous ne le
faites pas, le bloc moteur (2) ne pourra pas être
fixé sur le couvercle intérieur (3) ce qui pourra
empêcher le processus de hachage.
4. Montez le bloc moteur (2) sur le couvercle
intérieur (3) du bol (5).
5. Branchez la prise de l’appareil à la prise
murale.
6. Appuyez sur le bouton Marche/Arrêt et
maintenez-le enfoncé (1).
‒ L‘appareil se met en marche.
4 Fonctonnement
26 / 61 FR Hachoir / Manuel d’utilisation
4 Fonctonnement
4.3 Quantités maximales et temps d’utilisation
Reportez-vous au tableau pour consulter les temps d‘utilisation et les quantités maximales.
Ingrédients Quantité maxmale Temps de traitement
Vande (en dés) 100 - 150 g 10 - 20 pressons sur le bouton
« PULSE »
Fromage (coupé en dés) 100 - 150 g 5 - 10 pressons sur le bouton
« PULSE »
Ognons/al
(épluchés et coupés en 8 morce-
aux)
150 - 200 g 5 - 10 pressons sur le bouton
« PULSE »
Tomates (coupées en 6 morceaux) 250 - 300 g 10 - 20 pressons sur le bouton
« PULSE »
Fruts/légumes
(épluchés et coupés en 8 morce-
aux)
250 - 300 g 5 - 15 pressons sur le bouton
« PULSE »
C
Vous pouvez appuyez sur l‘inter-
rupteur de fonctionnement (1) de
manière intermittente pour activer
la fonction « PULSE » de l‘appareil.
La fonction « PULSE » peut vous
permettre d‘obtenir un meilleur ha-
chage.
7. Relâchez le bouton Marche/Arrêt (1) lorsque
vous avez terminé. Débranchez la prise de la
prise murale.
C
N‘utilisez pas l‘appareil de manière
continue pendant plus de 10 se-
condes.
Retirez ensuite le bloc moteur (2) et le couvercle
intérieur (3). Enlevez soigneusement la lame su-
périeure (5) de la lame inférieure (8). Retirez les
aliments du bol (6).
AATTENTION :
Évitez de toucher
la lame avec vos mains nues. Elle est
très coupante.
27 / 61 FR
Hachoir / Manuel d’utilisation
5 Informatons
5.1 Nettoyage et entretien
A
ATTENTION :
N‘utilisez jamais
d‘essence, de solvants ou de net-
toyants abrasifs, d‘objets métal-
liques ou de brosses dures pour net-
toyer l‘appareil.
AATTENTION :
Évitez de tou-
cher la lame du hachoir avec vos
mains nues. Elle est très coupante.
Utilisez une brosse !
1. Éteignez l’appareil et débranchez le câble
d’alimentation de la prise murale.
2. Laissez l’appareil refroidir totalement.
3. Utilisez un chiffon humide et nettoyez la partie
externe du bloc moteur (2) avant de l’essuyer.
4. Le bol en verre (5), la lame du hachoir (4) et
le couvercle intérieur (3) sont lavables au
lave-vaisselle, dans la partie supérieure de la
machine.
5. Avant de ranger la lame supérieure (5) et la
lame inférieure (8), les nettoyer et les sécher.
A
ATTENTION :
N‘immergez ja-
mais le bloc moteur (2) ou le câble
d‘alimentation dans l‘eau ou d‘autres
liquides et ne les rincez jamais sous
l‘eau non plus.
C
Avant d‘utiliser l‘appareil après le
nettoyage, séchez soigneusement
tous ses éléments à l‘aide d‘une ser-
viette douce.
5.2 Rangement
1. Veuillez conserver soigneusement votre
appareil si vous ne comptez pas l‘utiliser
pendant une période prolongée.
2. Veillez également à ce qu‘il soit débranché et
entièrement sec.
3. Évitez d‘entourer le câble d‘alimentation autour
de l‘appareil.
4. Conservez-le dans un endroit frais et sec.
5. Assurez-vous de tenir l‘appareil hors de portée
des enfants.
5.3 Manipulation et transport
•Pendant la manipulation et le transport,
portez toujours l’appareil dans son emballage
d’origine. L’emballage de l’appareil le protège
des dommages physiques.
•Ne placez pas de charge lourde sur l’appareil ou
sur l’emballage. Cela pourrait l’endommager.
•Toute chute de l’appareil peut le rendre non
opérationnel ou l’endommager de façon
permanente.
Lütfen önce bu kılavuzu okuyun!
Değerl Müştermz,
Beko ürününü terch ettğnz çn teşekkür ederz. Yüksek kalte ve teknoloj le üretlmş
olan ürününüzün sze en y verm sunmasını styoruz. Bunun çn, bu kılavuzun
tamamını ve verlen dğer belgeler ürünü kullanmadan önce dkkatle okuyun ve br
başvuru kaynağı olarak saklayın. Ürünü başka brsne verrsenz, kullanma kılavuzunu
da brlkte vern. Kullanma kılavuzunda belrtlen tüm blg ve uyarıları dkkate alarak
talmatlara uyun.
Sembollern anlamları
Bu kullanma kılavuzunun çeştl kısımlarında aşağıdak semboller kullanılmıştır:
C
Chazın kullanımıyla lgl öneml
blgler ve faydalı tavsyeler.
AUYARI:
Can ve mal güvenliğiyle
ilgili tehlikeli durumlar konusunda
uyarılar.
Gıda ile temasa uygundur.
Cihazı, elektrik kablosunu veya
elektrik fişini suya ya da diğer
sıvılara batırmayın.
Elektrik çarpmasına karşı koruma
sınıfı.
Bu ürün, çevreye saygılı modern tesslerde doğaya zarar vermeden üretlmştr.
AEEE Yönetmelğne Uygundur. PCB çermez.
Menşe: P.R.C.

29 / 61 TR
Doğrayıcı / Kullanma Kılavuzu
İÇİNDEKİLER
1 Önemli güvenlik ve çevre
talimatları 30
1.1 Genel güvenlik . . . . . . . . . . . . . . . . . . . . . . . . . . . . . 30
1.2 AEEE yönetmeliğine uyum ve atık ürünün
elden çıkarılması . . . . . . . . . . . . . . . . . . . . . . . . . . . 31
1.3 Ambalaj bilgisi . . . . . . . . . . . . . . . . . . . . . . . . . . . . . 31
2 Doğrayıcı 32
2.1 Genel bakış . . . . . . . . . . . . . . . . . . . . . . . . . . . . . . . . 32
2.2 Teknik veriler . . . . . . . . . . . . . . . . . . . . . . . . . . . . . . 32
3 Tarif fikirleri 33
3.1 Tarif fikirleri: Salsa sos . . . . . . . . . . . . . . . . . . . . . 33
4 Kullanım 33
4.1 Hazırlık . . . . . . . . . . . . . . . . . . . . . . . . . . . . . . . . . . . . 33
4.2 Parçalama . . . . . . . . . . . . . . . . . . . . . . . . . . . . . . . . . 33
4.3 Maksimum miktarlar ve işlem süresi . . . . . . 34
5 Bilgiler 35
5.1 Temizleme ve bakım. . . . . . . . . . . . . . . . . . . . . . . 35
5.2 Saklama . . . . . . . . . . . . . . . . . . . . . . . . . . . . . . . . . . . 35
5.3 Taşıma ve nakliye. . . . . . . . . . . . . . . . . . . . . . . . . . 35

30 / 61 TR Doğrayıcı / Kullanma Kılavuzu
1 Önemli güvenlik ve çevre talimatları
Bu bölümde, yaralanma ya da
madd hasar tehlkelern önlemeye
yardımcı olacak güvenlk talmatları
yer almaktadır.
Bu talmatlara uyulmaması halnde
her türlü garant geçersz hale gelr.
1.1 Genel güvenlk
• Bu chaz, uluslararası güvenlk
standartlarına uygundur.
• Chaz, fzksel, algısal ve zhnsel
yetenekler azalmış veya tecrübe
ve blg eksklğ olan kşler
tarafından gözetm altında
veya chazın güvenl br şeklde
kullanımına ve karşılaşılan lgl
tehlkelern anlaşılmasına dar
talmat verlrse kullanılablr.
Çocuklar chazla oynamamalıdır.
• Bu chaz çocuklar tarafından
kullanılamaz.
• Elektrk kablosu, chaz veya chazın
bıçağı hasarlıysa kullanmayın.
Yetkl servse başvurun.
• Gözetmsz bırakıldığında,
aksesuar takma/çıkarma
şlemnde veya temzlkten önce
chazın fşn przden çekn.
• Sadece orjnal parçaları veya
üretc tarafından tavsye edlen
parçaları kullanın.
• Chazı parçalarına ayırmayın.
• Şebeke güç kaynağınız chazın
tp etketnde belrtlen blglere
uygun olmalıdır.
• Chazı uzatma kablosuyla
kullanmayın.
• Chazın fşn çıkartırken
kablosundan çekmeyn.
• Temzlk, sökme, aksesuar
yerleştrme şlemlernden önce
chazın fşn przden çekn ve
tamamen durmasını bekleyn.
• Ellernz neml veya ıslakken
chazın fşne dokunmayın.
• Sıcak yyecekler çn chazı
kullanmayın.
• Chazı sadece brlkte verlen lastk
altlığı ve cam kases le kullanın.
• Chazı, kases boş şeklde
çalıştırmayın.
• Bıçakların ve chazın zarar
görmesn önlemek çn gıdalardan
kemkler ve çekrdekler çıkarın.
• Chaz, bıçakların kısa sürede
körelmesne neden olablecek
kuru veya sert gıdalar çn uygun
değldr.
• Aşırı ısınmayı önlemek çn chazı
sürekl olarak 10 sanyeden uzun
süre kullanmayın. Her 10 sanyelk
çalıştırma arasında chazı 1 dakka
çn soğumaya bırakın.
31 / 61 TR
Doğrayıcı / Kullanma Kılavuzu
1 Öneml güvenlk ve çevre talmatları
• Hatalı kullanımdan ötürü
yaralanmaları önlemek çn tüm
uyarılara uyun.
• Kabı boşaltırken, temzlk
esnasında ve doğrayıcı bıçağına
çıplak el le dokunurken hatalı
kullanımdan ötürü cdd
yaralanmalar meydana geleblr.
Doğrayıcı bıçağını sadece plastk
kısmından tutmaya çalışarak
dkkatl tutun.
• Temzlk sonrasında, elektrğe
bağlamadan ve parçalarını
takmadan önce, chazı ve tüm
parçalarını kurutun.
• Chazı, elektrk kablosunu veya
elektrk fşn suya ya da dğer
sıvılara batırmayın.
• Chazı veya parçalarını sıcak
yüzeylern üzernde veya yanında
çalıştırmayın ya da bu yüzeylern
üstüne koymayın.
• Ambalaj malzemelern
saklıyorsanız çocukların
ulaşamayacağı br yerde
muhafaza edn.
• Chazı ve elektrk kablosunu,
çocukların ulaşamayacağı br
yerde muhafaza edn.
1.2 AEEE yönetmeliğine
uyum ve atık ürünün elden
çıkarılması
Bu ürün, T.C. Çevre ve Şehrclk Bakanlığı
tarafından yayımlanan “Atık Elektrkl ve
Elektronk Eşyaların Kontrolü
Yönetmelğ”nde belrtlen zararlı ve
yasaklı maddeler çermez. AEEE
Yönetmelğne uygundur. Bu ürün, ger dönüşümlü
ve tekrar kullanılablr ntelktek yüksek kaltel
parça ve malzemelerden üretlmştr. Bu nedenle,
ürünü, hzmet ömrünün sonunda evsel veya dğer
atıklarla brlkte atmayın. Elektrkl ve elektronk
chazların ger dönüşümü çn br toplama
noktasına götürün. Bu toplama noktalarını
bölgenzdek yerel yönetme sorun. Kullanılmış
ürünler ger kazanıma vererek çevrenn ve doğal
kaynakların korunmasına yardımcı olun.
1.3 Ambalaj bilgisi
Ürünün ambalajı, Ulusal Mevzuatımız
gereğ ger dönüştürüleblr
malzemelerden üretlmştr. Ambalaj
atığını evsel veya dğer atıklarla brlkte
atmayın, yerel otortenn belrttğ ambalaj
toplama noktalarına atın.
32 / 61 TR Doğrayıcı / Kullanma Kılavuzu
2 Doğrayıcı
2.1 Genel bakış
Ürününüz üzernde bulunan şaretlemelerde veya ürünle brlkte verlen dğer basılı dökümanlarda beyan edlen değerler, lgl
standartlara göre laboratuvar ortamında elde edlen değerlerdr. Bu değerler, ürünün kullanım ve ortam şartlarına göre değşeblr.
1. Çalıştırma düğmesi
2. Motor ünitesi
3. İç kapak
4. Yan yerleştirme bölümü
5. Üst bıçak
6. Plastik kap
7. Sabit mil
8. Alt bıçak
9. Kaymaz lastik ped
2.2 Teknik veriler
Bu ürün, 2004/108/EC, 2006/95/
EC, 2009/125/EC ve 2011/65/EU
Avrupa drektflerne uygundur.
Güç kaynağı:
220-240 V~, 50/60 Hz
Güç:
450 W
Teknk ve tasarım değşklkler yapma hakkı
saklıdır.
1
2
3
4
8
7
6
5
9

33 / 61 TR
Doğrayıcı / Kullanma Kılavuzu
3 Tarf fkrler
3.1 Tarif fikirleri: Salsa sos
Malzemeler:
•3 domates, çekirdekleri çıkarılmış
•1 kırmızı soğan
•1 diş sarımsak
•1 adet kırmızı biber
•1 Jalapeño acı biber, çekirdekleri çıkarılmış
•2 yemek kaşığı taze kişniş
•½ çay kaşığı tuz
Hazırlanışı:
Soğanı soyup sarımsak, kırmızı bber ve acı bberle
brlkte chazın kasesne koyun ve malzemeler rce
parçalanıncaya kadar „pulse“ şlevn kullanarak
chazı çalıştırın. Azar azar domates, kşnş ve tuz
ekleyp malzemeler tamamen karışana kadar
chazı brkaç kez daha „pulse“ şlevnde çalıştırın.
C
Parçalayıcınız, küçük mktarlardak
gıdaları şlemden geçrmek çn
tasarlanmıştır ve başka br amaç
çn kullanılmamalıdır.
C
Kahve çekrdeğ, hndstan cevz,
hububat, buz veya kemk gb
son derece sert malzemeler
parçalamak çn kullanmayın.
Btklern saplarını, cevzn
kabuğunu ve etn kemğn, snrn
ve kıkırdağını çıkarın.
C
Kullanılmadığı zaman chazın fş
çeklmeldr.
4.1 Hazırlık
1. Tüm ambalaj ve etiket malzemelerini çıkarın
ve yürürlükteki yasal düzenlemelere uygun
olarak atın.
2. Cihazı ilk kez kullanmadan önce gıdalarla temas
eden tüm parçaları dikkatli şekilde temizleyin
(“Temizlik ve bakım” bölümüne bakın).
3. Cihazı kullanmadan önce gıdaları küçük
parçalar halinde kesin.
4.2 Parçalama
AUYARI:
Bıçaklara çıplak elle
dokunmayın.
1. Üst bıçağı (5) alt bıçak (8) üzerine ve daha sonra
plastik kabı (6) mil üzerine (7) yerleştirin.
2. Hazırlamak istediğiniz yiyeceği plastik kabın (6)
içerisine yerleştirin.
3. İçteki kapağı (3) plastik kabın (6) üzerine
yerleştirin. İçteki kapağı (3) yan yerleştirme
bölümüne (4) doğru döndürüp sabitleyin,
aksi takdirde taban ünitesi (2) içteki kapağın
(3) üzerine uymaz ve doğrama işlemi
gerçekleştirilemez.
4. Motor ünitesini (2) plastik kabın üzerindeki (5) iç
kapağın (3) üzerine monte edin.
5. Elektrik kablosunun fişini prize takın.
6. Çalıştırma düğmesine (1) basın ve basılı tutun.
‒ Cihaz çalışmaya başlar.
4 Kullanım
34 / 61 TR Doğrayıcı / Kullanma Kılavuzu
4 Kullanım
4.3 Maksimum miktarlar ve işlem süresi
İşlem süreler ve maksmum mktarlar çn tabloya bakın.
Malzemeler Maksmum mktar İşlem süres
Et (küp) 100 - 150 g 10 - 20 pulse
Peynr (küçük küpler halnde
keslmş) 100 - 150 g 5 - 10 pulse
Soğan/Sarımsak
(soyulmuş ve 8 parçaya keslmş) 150 - 200 g 5 - 10 pulse
Domates (6 parçaya keslmş) 250 - 300 g 10 - 20 pulse
Meyve/Sebze
(8 parçaya keslmş) 250 - 300 g 5 - 15 pulse
C
Chazın „PULSE“ şlevn etknleştr-
mek çn çalıştırma düğmesne (1)
aralıklı olarak basablrsnz. “PULSE”
fonksyonunu kullanarak daha kal-
tel br parçalama elde edeblrsnz.
7. İşlemi bitirmek istediğinizde çalıştırma
düğmesini (1) bırakın. Cihazın fişini prizden
çekin.
C
Chazı sürekl olarak 10 sanyeden
daha uzun sürel çalıştırmayın.
8. Motor ünitesini (2) ve ardından iç kapağı (3)
çıkarın. Üstteki bıçağı (5) alttaki bıçaktan (8)
dikkatli şekilde çıkarın. Yiyeceği plastik kabtan
(6) alın.
AUYARI:
Bıçaklara çıplak elle do-
kunmayın. Bıçak oldukça keskndr.

35 / 61 TR
Doğrayıcı / Kullanma Kılavuzu
5 Blgler
5.1 Temizleme ve bakım
AUYARI:
Chazı temzlemek çn
kesnlkle benzn, solvent, aşındırıcı
temzleycler, metal nesneler veya
sert fırçalar kullanmayın.
AUYARI:
Parçalama bıçaklarına
çıplak elle dokunmayın. Bıçak
oldukça keskndr.Br fırça kullanın!
1. Cihazı kapatın ve fişini prizinden çekin.
2. Cihazın tamamen soğumasını bekleyin.
3. Motor ünitesinin (2) dışını nemli yumuşak bir
bezle temizleyin ve ardından silerek kurulayın.
4. Plastik kap (6), üst bıçak (5) alt bıçak (8) ve
iç kapak (3) bulaşık makinesinin üst rafında
yıkanabilir.
5. Kaldırmadan önce üst bıçağı (5) ve alt bıçağı (8)
yıkayıp kurulayın.
AUYARI:
Motor üntesn (2) veya
elektrk kablosunu suya ya da dğer
sıvıların çne koymayın ve asla akan
suyun altına tutmayın.
C
Temzlk sonrasında chazı kullan-
madan önce yumuşak br havlu le
tüm parçalarını kurulayın.
5.2 Saklama
•Cihazı uzun süre kullanmayı düşünmüyorsanız,
lütfen dikkatli bir şekilde saklayın.
•Cihazın fişinin çıkarıldığından ve tamamen kuru
olduğundan emin olun.
•Elektrik kablosunu cihazın etrafına sarmayın.
•Serin ve kuru bir yerde saklayın.
•Cihazın, daima çocukların ulaşamayacağı bir
yerde muhafaza edildiğinden emin olun.
5.3 Taşıma ve nakliye
•Taşıma ve nakliye sırasında cihazı orijinal
ambalajı ile birlikte taşıyın. Cihazın ambalajı,
cihazı fiziksel hasarlara karşı koruyacaktır.
•Cihazın veya ambalajının üzerine ağır cisimler
koymayın. Cihaz zarar görebilir.
•Cihazın düşürülmesi durumunda cihaz
çalışmayabilir veya kalıcı hasar oluşabilir.
Por favor, ¡lea este manual de usuaro prmero!
Estmados clentes,
Gracas por escoger un producto Beko. Esperamos que obtenga los mejores resultados
de nuestro producto, que ha sdo fabrcado con gran caldad y con tecnología de
vanguarda. Por tanto, le aconsejamos que lea este manual de usuaro con atencón y
todos los demás documentos adjuntos antes de utlzar el aparato y que lo guarde para
futuras consultas. S va a entregar este aparato a otra persona, proporcónele tambén
el manual del usuaro. Sga todas las advertencas e nstruccones ncludas en este
manual de usuaro.
Sgnfcado de los símbolos
Los símbolos sguentes se usan en las dversas seccones del presente manual:
C
Información importante y consejos
útiles sobre su uso.
AADVERTENCIA:
Advertencias
de situaciones peligrosas sobre
la seguridad de las personas y la
propiedad.
Los materiales están diseñados
para estar en contacto con la
comida.
No sumerja el aparato, el cable
eléctrico o el enchufe en agua ni en
ningún otro líquido.
Cristal de protección contra
descargas eléctricas.
Este aparato ha sdo fabrcado en unas nstalacones respetuosas con el medo ambente y en
nstalacones de vanguarda.
Cumple con la Drectva RAEE. No contene polclorobfenlos (PCV).
País de orgen: P.R.C.

37 / 61 ES
Nueva Picadora / Manual de usuario
CONTENIDO
1 Instrucciones importantes
para la seguridad y el medio
ambiente 38
1.1 Seguridad general . . . . . . . . . . . . . . . . . . . . . . . . . 38
1.2 Cumple con de la Directiva RAEE y
eliminación de residuos. . . . . . . . . . . . . . . . . . . 39
1.3 Información de embalaje . . . . . . . . . . . . . . . . . . 39
2 Nueva Picadora 40
2.1 Información general . . . . . . . . . . . . . . . . . . . . . . .40
2.2 Datos técnicos. . . . . . . . . . . . . . . . . . . . . . . . . . . . .40
3 Receta de ejemplo 41
3.1 Receta de ejemplo: Salsa. . . . . . . . . . . . . . . . . . 41
4 Funcionamiento 41
4.1 Preparación . . . . . . . . . . . . . . . . . . . . . . . . . . . . . . . 41
4.2 Picado . . . . . . . . . . . . . . . . . . . . . . . . . . . . . . . . . . . . . 41
4.3 Cantidades máximas y tiempo de
preparación . . . . . . . . . . . . . . . . . . . . . . . . . . . . . . . 42
5 Información 43
5.1 Limpieza y cuidados . . . . . . . . . . . . . . . . . . . . . . . 43
5.2 Almacenaje. . . . . . . . . . . . . . . . . . . . . . . . . . . . . . . . 43
5.3 Manejo y transporte. . . . . . . . . . . . . . . . . . . . . . . 43

38 / 61 ES Nueva Picadora / Manual de usuario
1 Instruccones mportantes para la
segurdad y el medo ambente
Esta sección contiene instrucciones
de seguridad que ayudarán a la
protección contra los riesgos de
lesiones personales o daño a la
propiedad.
El incumplimiento de estas
instrucciones causará la pérdida de la
garantía.
1.1 Segurdad general
• Este aparato cumple con los están-
dares internacionales sobre seguri-
dad.
• Las personas cuyas facultades físi-
cas, sensoriales o mentales estén
mermadas o que carezcan de la ex-
periencia o conocimientos necesa-
rios sobre el aparato pueden usar el
aparato, siempre y cuando lo hagan
bajo supervisión o reciban la infor-
mación pertinente sobre su uso se-
guro y los peligros asociados.
• Los niños no deben usar este apa-
rato.
• No use el aparato si el cable de ali-
mentación o el aparato mismo están
dañados. Contacte con un servicio
de atención al cliente autorizado.
• Desenchufe el aparato cuando lo
deje desatendido, mientras colo-
que/retire los accesorios o antes de
limpiarlo.
• Sólo use las piezas originales o las
piezas recomendadas por el fabri-
cante.
• No trate de desmontar el aparato.
• Su fuente de alimentación debe
ser conforme a la información que
se indica en la placa de datos del
aparato.
• No utilice este aparato con un cable
alargador.
• No tire del cable de alimentación
cuando desenchufe el aparato.
• Desenchufe el aparato antes de
limpiarlo, desmontarlo y recambiar
accesorios y espere hasta que se
detenga por completo.
• No toque el cable o el aparato con
las manos mojadas o húmedas.
• No utilice el aparato para comida
caliente.
• Utilice el aparato únicamente con la
base de goma y recipiente de vidrio
suministrados.
• No utilice el aparato sin haber de-
positado ingredientes en el vaso de
mezcla.
• Retire las pipas y los huesos de los
alimentos para evitar dañar las cu-
chillas y el propio aparato.
• Este aparato no es apto para triturar
alimentos secos o duros, ya que las
cuchillas se desafilarían con rapidez.

39 / 61 ES
Nueva Picadora / Manual de usuario
1 Instrucciones importantes para la
seguridad y el medio ambient
• No use el aparato de forma conti-
nua durante más de 10 segundos
con el fin de evitar su sobrecalen-
tamiento. Déjelo enfriar durante 1
minutos entre cada 10 segundos
de utilización.
• Siga todas las advertencias para
evitar lesiones debido a un uso in-
correcto.
• Cuando vacíe el recipiente, podría
sufrir graves heridas debido al uso
incorrecto de coger las cuchillas de
picado con las manos sin protección
durante la limpieza. Vaya con cui-
dado y coja la cuchilla de corte por
su sección de plástico.
• Después de limpiarlo, seque el apa-
rato y todas las piezas antes de co-
nectarlo a la red de alimentación y
antes de acoplarle las piezas.
• No sumerja el aparato, el cable eléc-
trico o el enchufe en agua ni en nin-
gún otro líquido.
• No utilice el aparato ni coloque nin-
guna parte de él o ninguno de sus
componentes en superficies calien-
tes o cerca de de ellas.
• Si guarda el material de embalaje,
manténgalo fuera del alcance de
los niños.
• Mantenga el aparato fuera del al-
cance de los niños.
1.2 Cumple con de la Directiva
RAEE y eliminación de residuos.
Este producto no incluye los materiales
nocivos y prohibidos especificados en la
normativa para la supervisión de los
residuos de aparatos eléctricos y
electrónicos de desecho (RAEE),
promulgada por el Ministerio de Medio Ambiente y
Planificación Urbanística. Cumple con la Directiva
RAEE. En la fabricación de este producto se han
empleado piezas y materiales de alta calidad, que
pueden reutilizarse y reciclarse. Por lo tanto, no
arroje este producto a la basura junto con sus
residuos domésticos normales al final de su vida útil.
Llévelo a un punto de recogida para el reciclado de
sus componentes eléctricos y electrónicos. Diríjase a
la autoridad local de su zona para obtener la dirección
de dichos puntos de recogida. Ayude a proteger el
medio ambiente reciclando los productos usados.
1.3 Información de embalaje
El embalaje del producto está fabricado
con material reciclable de acuerdo con las
normativas nacionales sobre medio
ambiente. No se deshaga del material de
embalaje ni de los desechos domésticos o de otro
tipo. Llévelos a los puntos de recogida de material de
embalaje designados por las autoridades locales.
40 / 61 ES Nueva Picadora / Manual de usuario
2 Nueva Pcadora
2.1 Información general
Los valores declarados en las etquetas adosadas al aparato o ndcados en los demás documentos mpresos sumnstrados
junto con él representan los valores obtendos en los laboratoros de acuerdo con los estándares pertnentes. Estos valores
pueden varar según el uso que se haga del aparato y de las condcones ambentales.
1. Interruptor de funcionamiento
2. Base
3. Tapa interior
4. Sección de colocación lateral
5. Cuchilla superior
6. Vaso
7. Eje fijo
8. Cuchilla inferior
9. Alfombrilla de goma antideslizante
2.2 Datos técnicos
Este producto cumple las
directivas europeas 2004/108/
EC, 2006/95/EC ,2009/125/EC y
2011/65/EU.
Voltaje:
220-240 V~, 50/60 Hz
Consumo de potencia:
450 W
Queda reservado el derecho a realizar
modificaciones técnicas y de diseño.
1
2
3
4
8
7
6
5
9
41 / 61 ES
Nueva Picadora / Manual de usuario
4 Funcionamiento
3 Receta de ejemplo
C
Su picadora se ha diseñado para
preparar cantidades pequeñas de
alimentos y no debe utilizarse para
ningún otro fin.
C
No pique ingredientes
excesivamente duros tales
como granos de café, hielo, nuez
moscada, cereales o huesos.
Retire los tallos de las hierbas,
las cáscaras de las nueces y los
huesos, tendones y cartílagos de
la carne.
C
Desconecte el aparato cuando no
lo esté utilizando.
4.1 Preparación
1. Retire todos los materiales de embalaje y las
etiquetas adhesivas, y deshágase de ellos
según la legislación vigente al respecto.
2. Antes de utilizar el aparato por primera vez,
limpie las piezas que entran en contacto con
los alimentos (vea la sección „Limpieza y
cuidados“).
3. Corte los alimentos en trozos pequeños antes
de procesarlos con el aparato.
4. Mantenga siempre el vaso de vidrio (5) sobre la
alfombrilla de goma antideslizante (7).
4.2 Picado
AATENCIÓN:
No toque la cuchilla
con las manos desnudas.
1. Coloque la cuchilla (4) en el eje fijo (6) de vaso
de vidrio (5).
2. Deposite los ingredientes que desee preparar
en el vaso de vidrio (5).
3. Coloque la tapa interior (3) en el vaso de
vidrio (5). Asegúrese de colocar la tapa interior
(3) correctamente; de lo contrario, la base (2)
puede no montarse adecuadamente sobre la
tapa interior (3) y no funcionará el aparato.
4. Monte la base (2) sobre la tapa interior (3) del
vaso (5).
5. Inserte el enchufe en la toma de pared.
3.1 Receta de ejemplo: Salsa
Ingredientes:
•3 tomates, sin semillas
•1 cebolla roja
•1 diente de ajo
•1 pimiento rojo
•1 jalapeño, sin semillas
•2 cucharadas de cilantro fresco
•½ cucharadita de sal
Preparación:
Pele la cebolla y póngala con el ajo, el pimiento
y el chile en el recipiente del aparato y presione
para picar los ingredientes. Añada gradualmente
los tomates, cilantro y sal y presione varias veces
hasta que los ingredientes se hayan mezclado
correctamente.
42 / 61 ES Nueva Picadora / Manual de usuario
4 Funcionamiento
4.3 Cantidades máximas y tiempo de preparación
Consulte la tabla para obtener información sobre los tiempos de preparación y las cantidades máximas.
Ingredentes Cantdad máxma Tempo de preparacón
Carne (en dados) 100 - 150 g 10 - 20 pulsacones
Queso (en dados) 100 - 150 g 5 - 10 pulsacones
Cebollas/ajo
(pelados y cortados en 8 trozos) 150 - 200 g 5 - 10 pulsacones
Tomates (pelados y cortados en 6
trozos) 250 - 300 g 10 - 20 pulsacones
Frutas/Verduras
(peladas y cortadas en 8 trozos) 250 - 300 g 5 - 15 pulsacones
6. Mantenga pulsado el interruptor de
funcionamiento (1).
‒ El aparato se pone en marcha.
C
Puede pulsar el interruptor
de funcionamiento (1)
intermitentemente para activar la
función “PULSE” del aparato, que le
proporcionará un picado de mayor
calidad.
7. Suelte el interruptor (1) para finalizar el
funcionamiento. Desconecte el enchufe de la
toma de corriente de la pared.
C
No use el aparato de forma continua
durante más de 10 segundos.
C
Si los ingredientes se adhieren a los
lados del vaso, sepárelos con una
espátula y continúe picando.
8. Retire la base (2) y la tapa interior (3). Retire la
cuchillas (4) con cuidado. Saque los alimentos
del vaso (5).
AATENCIÓN:
No toque la cuchilla
con las manos desnudas. La cuchilla
está muy afilada.
43 / 61 ES
Nueva Picadora / Manual de usuario
5 Información
5.1 Limpieza y cuidados
A
ATENCIÓN:
No utilice alcohol,
acetona, petróleo, disolventes,
limpiadores abrasivos, objetos
metálicos o cepillos duros para
limpiar el aparato.
AATENCIÓN:
No toque la
cuchilla con las manos desnudas,
La cuchilla está muy afilada.
Utilice un cepillo.
1. Apague el aparato y desconéctelo de la toma de
corriente de la pared.
2. Deje que el aparato se enfríe completamente.
3. Utilice un trapo húmedo para limpiar el exterior
de la base (2) y seque a continuación.
4. El vaso de vidrio (5), la cuchilla (4) y la tapa
interior (3) pueden lavarse en la cesta superior
del lavavajillas.
5. Antes de guardarla, limpie y seque la cuchilla
(4).
AATENCIÓN:
Nunca sumerja en
agua ni en ningún otro líquido la base
(2) o el cable de corriente, ni siquiera
bajo el chorro de agua corriente.
C
Antes de utilizar de nuevo el aparato
tras una limpieza, seque con cuidado
todas las piezas con una toalla suave.
5.2 Almacenaje
•Si no va a utilizar el aparato durante un
periodo prolongado de tiempo, guárdelo
cuidadosamente.
•Asegúrese de que el aparato esté desenchufado,
frío y completamente seco.
•No enrolle el cable de corriente alrededor del
aparato. Enrolle el cable de alimentación bajo
la base.
•Guarde el aparato en un lugar fresco y seco.
•Asegúrese de que el aparato quede en todo
momento fuera del alcance de los niños.
5.3 Manejo y transporte
•Durante el manejo y el transporte, lleve el
aparato en su embalaje original. El embalaje del
aparato lo protege de daños físicos.
•No coloque cargas pesadas en el aparato o en el
embalaje. El aparato podría dañarse.
•Dejar caer el aparato causará que éste no
funcione o causará un daño permanente.

Proszę najperw przeczytać nstrukcję obsług.
Szanown Klenc!
Dzękujemy za wybrane produktu frmy Beko. Mamy nadzeję, że wyrób ten,
wyprodukowany przy użycu najnowszych technolog wysokej jakośc, okaże sę
w najwyższym stopnu zadowalający. Przed użycem urządzena należy uważne
przeczytać całą nstrukcję obsług oraz towarzyszące jej dokumenty zachować ją do
wglądu na przyszłość. Przekazując wyrób nnemu użytkownkow, proszę oddać mu
równeż nnejszą nstrukcję. Proszę przestrzegać wszystkch ostrzeżeń nformacj w
tej nstrukcj obsług.
Znaczene symbol
W nnejszej nstrukcj stosuje sę następujące symbole:
C
Ważne informacje i przydatne
wskazówki dotyczące użytkowania.
AOSTRZEŻENIE:
Ostrzeżenia
dotyczące sytuacji zagrażających
bezpieczeństwu, życiu i mieniu.
Materiały te przeznaczone są do
kontaktu z żywnością.
Urządzenia ani przewodu zasilania
nie wolno zanurzać w wodzie lub w
innym płynie.
Klasa ochrony przed porażeniem
elektrycznym
Urządzene zostało wyprodukowane w bezpecznych dla środowska, nowoczesnych zakładach.
Wyrób zgodny z Dyrektywą WEEE. Ne zawera bfenyl polchlorowanych (PCB).
Kraj pochodzena: P.R.C.

45 / 61 PL
Chopper / Instrukcja obsługi
SPIS TREŚCI
1 Bezpieczeństwo i
Ustawienie 46
1.1 Ogólne zasady zachowania bezpieczeństwa 46
1.2 Zgodność z dyrektywą WEEE i pozbywanie się
zużytych wyrobów . . . . . . . . . . . . . . . . . . . . . . . .48
1.3 Informacje o opakowaniu . . . . . . . . . . . . . . . . .48
2 Chopper 49
2.1 Opis ogólny . . . . . . . . . . . . . . . . . . . . . . . . . . . . . . . .49
2.2 Dane techniczne . . . . . . . . . . . . . . . . . . . . . . . . . .49
3 Przepis 50
3.1 Przepis: Salsa . . . . . . . . . . . . . . . . . . . . . . . . . . . . . . 50
4 Obsługa 50
4.1 Przygotowanie . . . . . . . . . . . . . . . . . . . . . . . . . . . . 50
4.2 Siekanie . . . . . . . . . . . . . . . . . . . . . . . . . . . . . . . . . . . 50
4.3 Maksymalne ilości i czasy przyrządzania . . 51
5 Informacja 52
5.1 Czyszczenie i konserwacja. . . . . . . . . . . . . . . . . 52
5.2 Przechowywanie. . . . . . . . . . . . . . . . . . . . . . . . . . 52
5.3 Przenoszenie i transport . . . . . . . . . . . . . . . . . . 52

46 / 61 PL Chopper
/ Instrukcja obsługi
1 Bezpeczeństwo Ustawene
Rozdział ten zawiera instrukcje
dotyczące bezpieczeństwa, które
pomogą chronić się przed groźbą
obrażeń ciała i szkód dla mienia.
Nieprzestrzeganie tych instrukcji
powoduje unieważnienie udzielonej
gwarancji.
1.1 Ogólne zasady
zachowana
bezpeczeństwa
• Urządzenie jest zgodne z
międzynarodowymi normami
bezpieczeństwa.
• Urządzenie może być używane przez
osoby niepełnosprawne fizycznie,
psychicznie lub umysłowo, a także
osoby bez doświadczenia lub wiedzy
w zakresie obsługi urządzenia, o ile
znajdują się one pod nadzorem lub
zostały szczegółowo poinstruowane
o bezpiecznym korzystaniu
z urządzenia i potencjalnych
zagrożeniach.
• Urządzenie nie powinno być
obsługiwane przez dzieci.
• Nie należy używać uszkodzonego
urządzenia lub urządzenia z
uszkodzonym przewodem
zasilającym. Należy skontaktować
się z autoryzowanym punktem
serwisowym.
• Przed czyszczeniem, zmianą
akcesoriów lub przed odłożeniem
urządzenia należy odłączyć
zasilanie.
• Należy stosować wyłącznie
oryginalne lub zalecane przez
producenta części zamienne.
• Nie należy próbować rozkładać
tego urządzenia na części.
• Zasilanie z domowej sieci
elektrycznej powinno być zgodne
z informacjami podanymi na
tabliczce znamionowej tego
urządzenia.
• Nie należy używać przedłużaczy
razem z tym urządzeniem.
• Nie należy wyjmować wtyczki
z gniazdka, ciągnąc za przewód
zasilający.
• Przed czyszczeniem, zmianą
akcesoriów lub przed demontażem
urządzenia należy odczekać, aż
ruchome elementy przestaną się
obracać, a następnie odłączyć
zasilanie.
• Nie wolno dotykać wtyczki
urządzenia mokrymi lub
wilgotnymi dłońmi.
• Nie wolno używać urządzenia do
gorących potraw.

47 / 61 PL
Chopper / Instrukcja obsługi
1 Bezpieczeństwo i Ustawienie
• Urządzenia należy używać
wyłącznie z elementami
dołączonymi do zestawu: gumową
podstawą i szklanym pojemnikiem.
• Urządzenia nie należy używać bez
składników w misce siekania.
• Z owoców należy wyjmować
twarde części i pestki, aby nie
uszkodzić ostrzy lub urządzenia.
• W urządzeniu nie można
kruszyć lodu ani używać do
suchych i twardych produktów
spożywczych, ponieważ
spowoduje to szybkie stępienie
ostrzy.
• Aby uniknąć przegrzania, nie
należy nieprzerwanie używać
urządzenia dłużej niż przez
10 sekund. Pozostawiaj je, aby
ostygło, na 1 minutę po każdych
10 sekundach pracy.
• Aby uniknąć obrażeń
spowodowanych nieprawidłowym
użytkowaniem, należy
postępować zgodnie z
instrukcjami.
• Podczas opróżniania zbiornika,
czyszczenia lub chwytania ostrzy
należy zachować ostrożność,
aby uniknąć obrażeń. Element
z ostrzem należy chwytać za
plastikową część.
• Po czyszczeniu, a przed
podłączeniem tego urządzenia do
zasilania i założeniem akcesoriów,
należy osuszyć wszystkie
elementy.
•
Urządzenia, przewodu
zasilającego ani wtyczki nie wolno
zanurzać w wodzie ani w innym
płynie.
• Nie należy używać tego urządzenia
ani umieszczać żadnej jego części
na gorących powierzchniach, ani
w ich pobliżu.
• Opakowanie urządzenia należy
przechowywać poza zasięgiem
dzieci.
• Urządzenie należy chronić przed
dostępem dzieci.

48 / 61 PL Chopper
/ Instrukcja obsługi
1 Bezpieczeństwo i Ustawienie
1.2 Zgodność z dyrektywą
WEEE i pozbywanie się
zużytych wyrobów
Wyrób ten nie zawiera materiałów
szkodliwych ani zabronionych
określonych w „Rozporządzeniu dot.
nadzorowania odpadów urządzeń
elektrycznych i elektronicznych”
wydanym przez Ministerstwo Środowiska i
Urbanistyki. Wyrób zgodny z Rozporządzeniem
WEEE. Urządzenie wykonano z części i materiałów
wysokiej jakości, które mogą być odzyskane i
użyte jako surowce wtórne. W związku z tym po
zakończeniu użytkowania nie należy pozbywać się
go razem z innymi odpadami domowymi. Należy
przekazać wyrób do punktu zbiórki urządzeń
elektrycznych i elektronicznych na surowce
wtórne. Informacje o lokalizacji takich punktów
zbiórki można uzyskać od władz miejscowych.
Odzyskując surowce z używanych wyrobów,
pomagamy chronić środowisko naturalne.
1.3 Informacje o opakowaniu
Opakowanie urządzenia wykonano z
materiałów nadających się do recyklingu
zgodnie z przepisami krajowymi. Nie
wyrzucaj materiałów opakowaniowych
do śmieci wraz z innymi odpadkami domowymi.
Oddaj je w jednym z wyznaczonych przez władze
lokalne punktów zbiórki materiałów
opakowaniowych.
49 / 61 PL
Chopper / Instrukcja obsługi
2 Chopper
Wartośc podane w oznaczenach umeszczonych na tym urządzenu lub w nnych dostarczanych wraz z nm materałach druko-
wanych uzyskano w warunkach laboratoryjnych zgodne z obowązującym normam. Wartośc te mogą sę różnć w zależnośc
od użytkowana urządzena warunków w jego otoczenu.
1. Przełącznik pracy
2. Jednostka robocza
3. Wewnętrzna pokrywka
4. Część boczna
5. Górne ostrze
6. Miska
7. Stały trzpień
8. Dolne ostrze
9. Gumowa podkładka antypoślizgowa
2.2 Dane techniczne
Wyrób ten jest zgodny z
Dyrektywami Europejskimi
2004/108/WE, 2006/95/WE,
2009/125/WE oraz 2011/65/EU.
Zasilanie:
220-240 V~, 50/60 Hz
Moc:
450 W
Zastrzega się prawo do wprowadzania modyfikacji
konstrukcji i danych technicznych.
2.1 Opis ogólny
1
2
3
4
8
7
6
5
9

50 / 61 PL Chopper / Instrukcja obsługi
3 Przeps
3.1 Przepis: Salsa
Składniki:
•3 pomidory, oczyszczone z nasion
•1 czerwona cebula
•1 ząbek czosnku
•1 czerwona papryka
•1 papryka chili jalapeno, oczyszczona z nasion
•2 łyżki świeżej kolendry
•0,5 łyżeczki soli
Preparation:
Obierz cebulę i włóż ją razem z czosnkiem, papryką
i papryką chili do misy siekacza i siekaj je pulsująco,
aż składniki będą grubo posiekane. Dodawaj
stopniowo pomidory, kolendrę i sól pulsująco
załączaj siekacz, aż składniki Beda dokładnie
wymieszane.
4 Obsługa
C
Siekacz ten przeznaczony do obróbki
małych ilości żywności i nie wolno go
używać do innych celów.
C
Nie siekaj bardzo twardych
składników, np. ziaren kawy, kostek
lodu, gałki muszkatołowej, zboża
ani kości. Zioła obierz z łodyg, wyjmij
orzechy ze skorupek, mięso obierz z
kości, ścięgien i chrząstek.
C
Wyłącz siekacz z gniazdka, gdy go
nie używasz.
4.1 Przygotowanie
1. Zdjąć całe opakowanie oraz naklejki i wyrzucić
je zgodnie z obowiązującymi przepisami prawa.
2. Przed uruchomieniem tego urządzenia, oczyść
części mające kontakt z żywnością (patrz
rozdział „Czyszczenia i konserwacja”).
3. Przed włożeniem produktów do urządzenia
należy je pokroić na małe cząstki.
4.2 Siekanie
AOSTRZEŻENIE:
Nie dotykaj
ostrza siekającego gołymi dłońmi.
1. Wkładaj górne ostrze (5) do dolnego ostrza (8)
a następnie na stały trzpień (7) w misce (6).
2. Włóż składniki potrawy, którą chcesz
przygotować do miski (6).
3. Załóż wewnętrzną pokrywkę (3) na miskę (6).
Przykręć wewnętrzną pokrywkę (3) do bocznej
części (4) i dobrze zamocuj, aby podstawa (2)
pasowała do wewnętrznej pokrywki (3) i aby
siekanie przebiegało bez przeszkód.
4. Załóż podstawę (2) na wewnętrzną
pokrywkę (3) misy (5).
5. Wsadź wtyczkę zasilania do gniazdka w ścianie.
6. Naciśnij i przytrzymaj przycisk
wyłącznika (1).
‒ Urządzenie zaczyna działać.
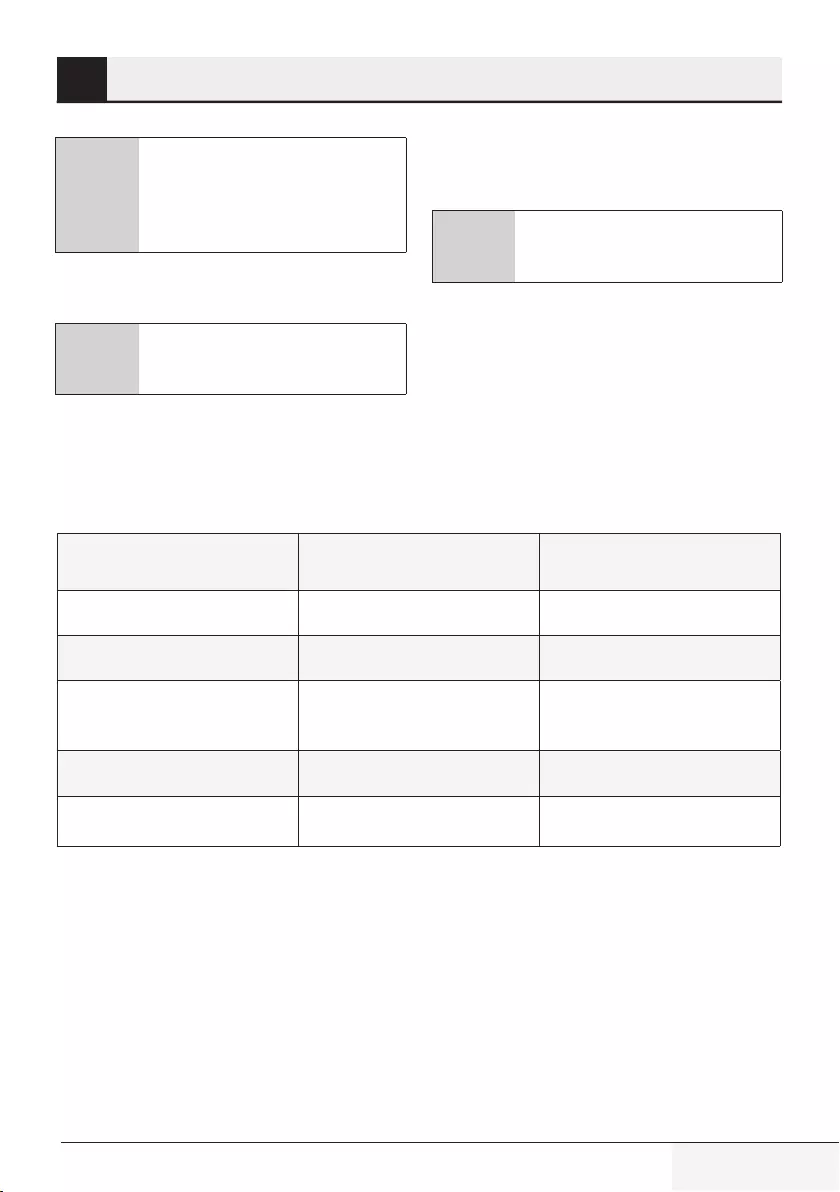
51 / 61 PL
Chopper / Instrukcja obsługi
4.3 Maksymalne ilości i czasy przyrządzania
Czasy przyrządzania i maksymalne ilości podano w tabeli.
Składniki Ilość maksymalna Czas obróbki
Męso (pokrojone w kostkę) 100 - 150 g 10 - 20 mpulsów
Ser (pokrojony na małe kostk) 100 - 150 g 5 - 10 mpulsów
Cebule/czosnek
(obrane pokrojone na 8
kawałków)
150 - 200 g 5 - 10 mpulsów
Pomdor (pocęty na 6 kawałków) 250 - 300 g 10 - 20 mpulsów
Owoce/warzywa
(pocęte na 8 kawałków) 250 - 300 g 5 - 15 mpulsów
C
Możesz naciskać przycisk wyłącz-
nika (1) raz po raz, aby uruchomić
funkcję “PULSE” urządzenia. Funkcja
IMPULSUJ zapewnia lepsze wyniki
siekania.
7. Aby zakończyć pracę (1) zwolnij przycisk. Wyjmij
wtyczkę zasilania z gniazdka w ścianie.
C
Nie używaj tego urządzenia
nieprzerwanie przez ponad 10
sekund.
4 Obsługa
8. Zdejmij jednostkę roboczą (2) i wewnętrzną
pokrywkę (3). Ostrożnie wyjmij górne ostrze (5)
z dolnego ostrza (8). Wyjmij potrawę z miski (6).
AOSTRZEŻENIE:
Nie dotykaj
ostrza gołymi dłońmi. Ostrze jest
bardzo ostre.

52 / 61 PL Chopper / Instrukcja obsługi
5 Informacja
5.1 Czyszczenie i konserwacja
A
OSTRZEŻENIE:
Do czyszczenia
urządzenia nigdy nie wolno używać
benzyny, rozpuszczalników ani
szorstkich proszków do czyszczenia,
przedmiotów metalowych ani
twardych szczotek.
AOSTRZEŻENIE:
Nie dotykaj
ostrza siekającego gołymi
dłońmi. Ostrze jest bardzo ostre.
Użyj szczoteczki!
1. Wyłącz czajnik i wyjmij wtyczkę z gniazdka.
2. Pozostawić czajnik do całkowitego ostygnięcia.
3. Podstawę czyść z zewnątrz miękką wilgotną
ściereczką (2) a potem wytrzyj ją do sucha.
4. Miskę (6), górne ostrze (5), dolne ostrze (8)
i wewnętrzną pokrywkę (3) można myć w
zmywarce, po ustawieniu ich na górnej półce.
5. Przed schowaniem oczyść i osusz górne ostrze
(5) i dolne ostrze (8).
A
OSTRZEŻENIE:
Nie wkładaj
podstawy (2) ani przewodu
zasilającego do wody ani żadnego
innego płynu, a także nie trzymaj ich
pod bieżącą wodą.
C
Przed użyciem tak oczyszczonego
urządzenia dokładnie wytrzyj do
sucha wszystkie jego części miękkim
ręcznikiem.
5.2 Przechowywanie
•Jeśli jest planowane nieużywanie tego
urządzenia przez dłuższy czas, należy starannie
je przechować.
•Upewnić się, czy urządzenie jest wypięte z sieci
i zupełnie suche.
•Nie owijać przewodu zasilania wokół urządzenia.
•Przechowywać je w chłodnym i suchym miejscu.
•Urządzenie musi sie zawsze znajdować poza
zasięgiem dzieci.
5.3 Przenoszenie i transport
•Urządzenie należy przenosić i transportować w
oryginalnym opakowaniu. Zabezpiecza ono
•urządzenie przed fizycznymi uszkodzeniami.
•Nie wolno umieszczać ciężkich ładunków
na urządzeniu lub opakowaniu. Może to
spowodować uszkodzenie żelazka parowego.
•Upuszczenie żelazka może spowodować jego
awarię lub trwałe uszkodzenie.
Vă rugăm să ctţ ma întâ acest manual de utlzare!
Stimate client,
Vă mulţumim pentru că aţi ales un produs Beko. Sperăm să obţineţi cele mai bune
rezultate de la produsul dumneavoastră, care a fost fabricat la o calitate înaltă şi cu
tehnologii performante. În acest scop, vă rugăm să citiţi cu grijă şi în întregime acest
manual de utilizare şi toate celelalte documente însoţitoare înainte de a utiliza produsul
şi să le păstraţi pentru consultări ulterioare. Dacă transmiteţi produsul altei persoane,
oferiţi-i şi manualul de utilizare. Respectaţi toate avertismentele şi informaţiile din
manualul de utilizare.
Semnfcaţa smbolurlor
Următoarele simboluri sunt utilizate în diverse părţi ale acestui manual de utilizare:
C
Informaţii importante sau sfaturi
utile privind utilizarea.
AAVERTISMENT:
Avertismente
pentru situaţii periculoase cu privire
la siguranţa vieţii și a proprietăţii.
Potrivit pentru contactul cu
alimentele.
Nu imersaţi produsul, cablul de
alimentare sau ștecherul în apă sau
alte lichide.
Clasă de protecţie pentru șoc electric.
Acest produs a fost produs în untăţ moderne care sunt pretenoase cu medu înconjurător.
Acest produs este conform cu
reglementarea WEEE. Nu conţne PCB.
Fabrcate în P.R.C

54 / 61 RO Tocător / Manual de utilizare
CONŢINUT
1 Instrucţiuni importante
de siguranţă și mediu
înconjurător 55
1.1 Siguranţă generală . . . . . . . . . . . . . . . . . . . . . . . . . . .55
1.2 Conform Directivei WEEE şi de eliminare a
produselor reziduale. . . . . . . . . . . . . . . . . . . . . . . . .57
1.3 Informaţii despre ambalaj . . . . . . . . . . . . . . . . . . . .57
2 Tocătorul dumneavoastră 58
2.1 Prezentare generală. . . . . . . . . . . . . . . . . . . . . . . . . .58
2.2 Date tehnice. . . . . . . . . . . . . . . . . . . . . . . . . . . . . . . . . .58
3 Reţetă de Salsa 59
3.1 Reţetă de Salsa . . . . . . . . . . . . . . . . . . . . . . . . . . . . . . .59
4 Utilizarea 59
4.1 Utilizare destinată. . . . . . . . . . . . . . . . . . . . . . . . . . . .59
4.2 Utilizarea . . . . . . . . . . . . . . . . . . . . . . . . . . . . . . . . . . . . .59
4.3 Cantităţile maxime și timpii de preparare . . . .60
5 Curăţarea și întreţinerea 61
5.1 Curăţarea . . . . . . . . . . . . . . . . . . . . . . . . . . . . . . . . . . . . .61
5.2 Depozitarea . . . . . . . . . . . . . . . . . . . . . . . . . . . . . . . . . .61
5.3 Manevrarea și transportul. . . . . . . . . . . . . . . . . . . .61

55 / 61 RO
Tocător / Manual de utilizare
Această secţiune conţine
instrucţiuni privind siguranţa, care
au rolul de a preveni vătămările
corporale şi pagubele materiale.
Nerespectarea acestor instrucţiuni
invalidează garanţia furnizată.
1.1 Sguranţă
generală
• Acest produs este conform cu
standardele internaţionale de
siguranţă.
• Acest produs poate fi utilizat
de către persoanele ale căror
capacităţi fizice, perceptive
sau mentale sunt diminuate
sau de persoanele care sunt
neexperimentate sau nu
cunosc informaţii despre produs
atâta timp cât aceștia sunt
supravegheaţi sau instruiţi cu
privire la utilizarea în siguranţă a
produsului și la pericolelor care le
întâlnesc.
• Acest produs nu poate fi utilizat de
către copii.
• Nu utilizaţi produsul atunci când
cablul de alimentare, lamele sau
produsul este avariat. Contactaţi
un service autorizat.
• Decuplaţi produsul în momentul
când acesta este lăsat
nesupravegheat, în timpul
montării/scoaterii accesoriilor sau
înaintea curăţării.
• Utilizaţi doar componente
originale sau componente
recomandate de către producător.
• Nu încercaţi să demontaţi
produsul.
• Tensiunea de alimentare ale
prizelor trebuie să corespundă cu
informaţiile furnizate pe eticheta
produsului.
• Nu utilizaţi produsul cu un
prelungitor.
• În momentul când scoateţi din
priză, nu trageţi de cablu.
• Decuplaţi produsul înainte de
curăţare, dezasamblare, înlocuire
accesorii și așteptaţi ca produsul
să se oprească complet.
• Nu atingeţi ştecherul aparatului
cu mâinile umede.
• Nu utilizaţi acest produs pentru
alimentele fierbinţi.
• Utilizaţi produsul doar cu baza
cauciucată furnizată și recipientul
din sticlă.
1 Instrucţun mportante de sguranţă
ș medu înconjurător

56 / 61 RO Tocător / Manual de utilizare
• Nu folosiţi aparatul fără
ingrediente în vas.
• Scoateţi oasele și pietrele din
alimente pentru a preveni avarierea
aparatului și a lamelor.
• Acest produs nu este potrivit
pentru alimentele uscate sau dure
deoarece acest lucru va cauza ca
lamelele să se tocească.
• Pentru prevenirea supraîncălzirii,
nu utilizaţi amestecarea cu spirale
continuu pentru mai mult de 10
secunde. La fiecare 10 secunde de
funcţionare, permiteţi-i aparatului
să se răcească pentru 1 minut.
• Respectaţi toate avertismentele
pentru a preveni vătămările
datorită utilizării incorecte.
• În momentul când descărcaţi
recipientul, în timpul curăţării și
prinderii lamelelor de tocare cu
mâinile goale pot rezulta vătămări
grave datorită unei utilizări
incorecte. Folosiţi cu atenţie și
menţineţi lamelele de tocare doar
de secţiunile sale din plastic.
• După curăţare, uscaţi produsul și
toate componentele înainte de a-l
conecta la priza principală și înainte
de a atașa componentele.
• Nu imersaţi produsul, cablul de
alimentare sau ştecherul în apă sau
alte lichide.
• Nu utilizaţi sau plasaţi orice
componentă al acestui produs sau
componentele sale pe sau lângă
suprafeţe fierbinţi.
• Dacă menţineţi materialele de
ambalare, depozitaţi-le departe
de copii.
• Menţineţi produsul departe de
copii.
1 Instrucţun mportante de sguranţă
ș medu înconjurător
57 / 61 RO
Tocător / Manual de utilizare
1.2 Conform Directivei WEEE
şi de eliminare a produselor
reziduale.
Acest produs nu conţine materiale
periculoase sau interzise specificate în
”Regulamentul pentru Supervizare a
Produselor Electrice și Electronice
Reziduale” eliberat de către Ministerul
Mediului și Planificării Urbane. Conform Directivei
WEEE. Acest produs a fost fabricat folosind
componente și materiale de înaltă calitate, care
pot fi refolosite și reciclate. Așadar, la sfârșitul
perioadei sale de utilizare, nu aruncaţi produsul
împreună cu gunoiul menajer. Duceţi-l la un centru
de colectare pentru reciclarea echipamentelor
electrice și electronice. Adresaţi-vă autorităţii
locale din zona dumneavoastră pentru aceste
puncte de colectare. Contribuiţi la protejarea
mediului și a resurselor naturale prin reciclarea
produselor uzate.
1.3 Informaţii despre ambalaj
Ambalajul produsului este fabricat din
materiale reciclabile conform Legislaţiei
Naţionale. Ambalajele nu trebuie aruncate
împreună cu gunoiul menajer sau alt tip.
Duceţi-le la punctele de colectare destinate
ambalajelor amenajate de către autorităţile locale.
1 Instrucţun mportante de sguranţă
ș medu înconjurător

58 / 61 RO Tocător / Manual de utilizare
2 Tocătorul dumneavoastră
2.1 Prezentare generală
Valorle care sunt declarate pe etcheta produsulu aplcată pe aparatul dumneavoastră sau alte documente mprmate furnzate
cu acesta reprezntă valorle care au fost obţnute în laborator conform standardelor corespunzătoare. Aceste valor pot vara în
funcţe de utlzarea produsulu ş condţle ambentale.
1. Recipient din sticlă
2. Arbore fix
3. Protecţie mijlocie
4. Unitate motor
5. Lamă superioară
6. Lamă tocător
7. Bază cauciucată aderentă
8. Lamă inferioară
9. Piciorușe antiderapante
2.2 Date tehnice
Acest produs este conform
Drectvelor Europene 2004/108/
CE, 2006/95/CE, 2009/125/CE ş
2011/65/UE.
Tensiune:
220-240 V~, 50/60 Hz
Putere:
450 W
Modificări tehnice și de proiectare rezervate.
1
2
3
4
8
9
7
6
5

59 / 61 RO
Tocător / Manual de utilizare
4 Utlzarea
4.1 Utilizare destinată
Acest produs este destinat doar uzului casnic; nu
este potrivit pentru uzul profesional.
Este proiectat doar pentru tocarea cantităţilor mici
de alimente.
Curăţaţi componentele produsului înainte de
utilizarea iniţială (consultaţi 4.1).
4.2 Utilizarea
1. Plasaţi aparatul pe o suprafaţă dură și dreaptă
utilizând baza cauciucată aderentă.
2. Scoateţi unitatea motor (4) și protecţia mijlocie
(3) din recipientul de sticlă.
3. Plasaţi lama tăietorului (6) pe arborele fix (2)
menţinând secţiunea din plastic.
4. Introduceţi ingredientele pe are dumneavoastră
le vreţi să le pregătiţi în recipientul din sticlă (1)
(consultaţi 3.4).
5. Plasaţi protecţia mijlocie (3) pe recipientul de
sticlă (1) (marginea din silicon pusă cu faţa în
jos) Apoi, montaţi unitatea motorului (4) în
partea superioară.
A
AVERTISMENT:
Plasaţi
protecţia mijlocie (3) pe recipientul
din sticlă. În caz contrar, unitatea
motorului (4) nu va fi prinsă în mod
securizat și produsul nu va porni.
6. Conectaţi produsul.
7. Utilizaţi viteza dorită prin apăsarea pe butonul
de utilizare (5) (consultaţi. 3.4).
8. Nu utilizaţi produsul continuu pentru mai mult
de 10 secunde. Opriţi dispozitivul atunci când
îl utilizaţi timp de mai mult de 10 secunde și
așteptaţi timp de 1 min. înainte de utilizarea
acestuia din nou.
A
AVERTISMENT:
În momentul când dumneavoastră
nu depășiţi 10 secunde în utilizări
intermitente, dumneavoastră puteţi
utiliza produsul până la finalizarea
procesului prin așteptarea câtorva
secunde.
3.1 Reţetă de Salsa
Ingrediente:
•3 roșii, cu seminţe
•o ceapă roșie
•un căţel de usturoi
•un ardei gras roșu
•un ardei chilli jalapeno, cu seminţe
•2 linguriţe de cilantro proaspăt
•½ linguriţă de sare
3 Reţetă de Salsa
Mod de preparare:
Decojiţi ceapa și amplasaţi-o împreună cu
usturoiul, ardeiul gras și ardeiul chilli într-un vas
și bateţi până când ingredientele sunt tăiate
în cuburi mari. Adăugaţi în mod gradual roșiile,
cilantro și sarea și bateţi de câteva ori până când
ingredientele sunt amestecate corespunzător.
60 / 61 RO Tocător / Manual de utilizare
C
Alimentele moi cum ar fi ceapa sau
pătrunjelul, 1-secundă, apăsări
scurte intermitente vor fi suficiente.
9. Eliberaţi butonul de utilizare în momentul când
utilizarea este finalizată. Decuplaţi produsul și
așteptaţi ca acesta să se oprească complet.
10. Scoateţi unitatea motorului (4) și apoi protecţia
mijlocie (3).
11. Scoateţi lama de tăiere (6) din recipientul de
sticlă (1) prin tragerea de secţiunea din plastic.
12. Scoateţ almentele procesate dn recpentul
dn stclă (1).
C
Partea interioară a lamei este
dotată cu arcuri. În momentul
când dumneavoastră așezaţi lama
pe arborele fix, dumneavoastră
veţi simţi o alunecare. Lama este
securizată în momentul când
dumneavoastră o rotiţi un sfert
de rotaţie spre stânga sau spre
dreapta.
13. În momentul când dumneavoastră dorţ să
scoateţ lama de pe arbore, rotţ la un sfert
de rotaţe lama în partea stângă sau în partea
dreaptă pentru a o elbera ș o scoate.
AAVERTISMENT:
Nu atingeţi
lamele cu mâinile goale.
4.3 Cantităţile maxime și timpii de preparare
Ingredente Canttate
maxmă Tmp de procesare
Carne (tocată) 100-150 g 10-20 s
Brânză (tăat în cubur mc) 100-150 g 5-10 s
Cepe/Usturo (decojt ș tăat în
8 bucăţ) 100-150 g 5-10 s
Roșe (tăată în 6 bucăţ) 250-300 g 10-20 s
Fructe/Legume (tăate în 8
bucăţ) 250-300 g 5-15 s
4 Utlzarea
61 / 61 RO
Tocător / Manual de utilizare
5 Curăţarea ș întreţnerea
5.1 Curăţarea
1. Înainte de curăţare decuplaţi produsul.
2. Așteptaţi ca lama de tăiere (6) să se oprească.
•Utilizaţi un material textil ușor umezit pentru a
curăţa partea exterioară a unităţii motorului (4).
AAVERTISMENT:
Nu utilizaţi
benzină, solvent, agenţi de curăţare
abraziv sau raclete dure pentru
curăţarea produsului.
AAVERTISMENT:
Fiţi atenţi în
momentul când curăţaţi lama de
tăiere (6). Este ascuţită.
C
Vasul din sticlă, lama de tăiere și
protecţia mijlocie pot fi spălate în
mașina de spălat vase fiind monta-
te pe raftul superior.
AAVERTISMENT:
Nu imersaţi
niciodată unitatea motorului sau
cablul de alimentare în apă sau în
alt lichid.
•După curăţare, uscaţi toate componentele
produsului.
5.2 Depozitarea
Dacă nu doriţi să utilizaţi produsul pentru o perioadă
lungă de timp, depozitaţi-l cu grijă.
•Înainte de depozitarea produsului, decuplaţi-l.
•Depozitaţi produsul într-o loc uscat şi răcoros.
•Menţineţi aparatul și cablul de alimentare
departe de copii.
5.3 Manevrarea și transportul
•În timpul manevrării și transportului,
transportaţi produsul în ambalajul său original.
Ambalajul produsului îl protejează împotriva
avariilor fizice.
•Nu plasaţi sarcini grele pe aparat sau pe ambalaj.
Produsul poate fi avariat.
•Aruncarea produsul îl poate face inoperaţional
sau cauza avarii permanente.


www.beko.com


5
5.1
1
26
4
A
:
A
6
:
C
A
:
5.2
5.3
8
C
13
A
:
4.3
100-15010-20
100-1505-10
8100-2005-10
6150-30010-20
8250-3005-15
4
7
3
3.1
3
1
1
1
1
2
420
4.1
4.2
1
234
326
41
5 1 3
4
A
3
:
4
4
6
75
810
10
A
10
C
1034
1116
121
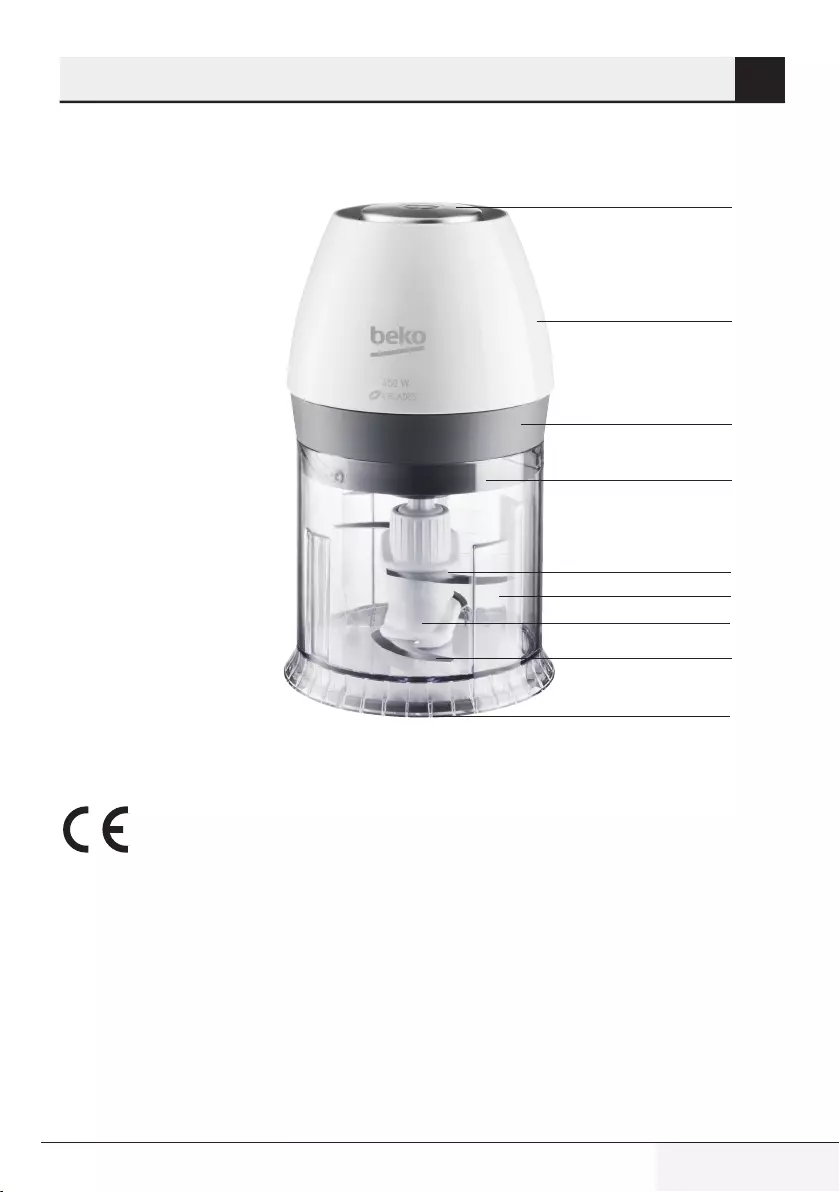
6
2
2.1
1
2
3
4
5
6
7
8
2.2
220-240
450
1
2
3
4
8
7
6
5

5
1
WEEE1.2
WEEE
1.3

4
1.1
10
10
1

3
41
4
5WEEE
5
6 2
6
6
7 3
7
7 4
7
7
8
9 5

Beko
C
A
WEEE PCB
www.beko.com
CHP6450W
AR
01M-8832803200-4815-01