Beko DFS04R11 User Manual
Displayed below is the user manual for DFS04R11 by Beko which is a product in the Dishwashers category. This manual has pages.
Related Manuals
www.beko.com.tr
DFS04010W
DFS04010S
DFS04010B
DFS04R11W
EN
Document Number :
15 9335 0100_AB_BEKO_A5_EN/ 04-05-18.(8:38)
Dishwasher
User’s Manual
www.beko.com.tr
DFS04010W
DFS04010S
DFS04010B
DFS04R11W
EN
Document Number :
15 9335 0100_AB_BEKO_A5_EN/ 04-05-18.(8:38)
Dishwasher
User’s Manual
Explanation of symbols
Throughout ths User Manual the followng symbols are used:
C
Important nformaton or useful
hnts about usage.
A
Warnng for hazardous
stuatons wth regard to lfe and
property.
B
Warnng for electrc shock.
Packagng materals of the
product are manufactured
from recyclable materals n
accordance wth our Natonal
Envronment Regulatons.
Do not dspose of the packagng materals together wth the domestc or other
wastes. Take them to the packagng materal collecton ponts desgnated by the local
authortes.
Please read these instructions first before using your appliance
Thank you for choosng a Beko applance.
Please take some tme to read ths user manual before usng your applance, to ensure
you know how to safely operate the controls and functons.
Carefully follow all unpackng and nstallaton nstructons to ensure the applance s
correctly connected and ftted pror to use.
Please wrte your product model and seral number on the last page of ths user manual,
and store n a safe locaton close to the applance for easy future reference.
Ths user manual may also be applcable for several other models. Dfferences between
models wll be lsted.
If you have any questons or concerns, please call our contact centre or fnd help and
nformaton onlne at www.beko.co.uk
This product was manufactured using the latest technology in environmentally friendly conditions.
Explanation of symbols
Throughout ths User Manual the followng symbols are used:
C
Important nformaton or useful
hnts about usage.
A
Warnng for hazardous
stuatons wth regard to lfe and
property.
B
Warnng for electrc shock.
Packagng materals of the
product are manufactured
from recyclable materals n
accordance wth our Natonal
Envronment Regulatons.
Do not dspose of the packagng materals together wth the domestc or other
wastes. Take them to the packagng materal collecton ponts desgnated by the local
authortes.
Please read these instructions first before using your appliance
Thank you for choosng a Beko applance.
Please take some tme to read ths user manual before usng your applance, to ensure
you know how to safely operate the controls and functons.
Carefully follow all unpackng and nstallaton nstructons to ensure the applance s
correctly connected and ftted pror to use.
Please wrte your product model and seral number on the last page of ths user manual,
and store n a safe locaton close to the applance for easy future reference.
Ths user manual may also be applcable for several other models. Dfferences between
models wll be lsted.
If you have any questons or concerns, please call our contact centre or fnd help and
nformaton onlne at www.beko.co.uk
CONTENTS
1 INSTRUCTIONS FOR SAFETY
AND ENVIRONMENT 4
General safety .......................................4
Intended use ..........................................4
Children’s safety .................................... 5
Disposing of packaging material ........5
Transportation of the product ............5
Compliance with WEEE Directive and
Disposing of the Waste Product .........6
Compliance with RoHS Directive ........6
Package information ............................6
2 DISHWASHER 7
Overview ................................................7
Fan drying system .................................8
Technical specications .......................8
3 INSTALLATION 9
Appropriate installation location .......9
Connecting water supply .....................9
Connection to the drain .................... 10
Adjusting the feet .............................. 10
Electrical connection ......................... 10
This appliance must be earthed .......11
Fitting a dierent plug .......................11
Initial use ..............................................11
4 PREPARATION 12
Tips for energy saving ........................12
Water softening system ....................12
Adjusting the water softening
system ..................................................12
Adding salt ...........................................14
Detergent .............................................15
Tablet detergents ...............................16
Rinse aid ...............................................17
Items not suitable for washing in the
dishwasher ...........................................17
Placing the dishes into the
dishwasher .......................................... 18
Cutlery basket .................................... 20
Upper basket rack .............................. 20
Collapsible lower basket tines ..........21
5 OPERATING THE PRODUCT 22
Keys ...................................................... 22
Preparing the machine...................... 22
Programme selection ........................ 22
Auxiliary functions ............................ 24
Starting the programme ................... 24
Programme follow-up ....................... 25
Cancelling the programme ............... 25
Salt indicator ....................................... 25
Rinse Aid indicator ............................. 25
Adjusting the amount of rinse aid ... 25
End of programme ............................. 26
6 MAINTENANCE AND
CLEANING 27
Cleaning the outer surface of the
product .................................................27
Cleaning the interior of the machine 27
Cleaning the lters .............................27
Cleaning the hose lter ..................... 28
Cleaning the impellers ...................... 29
Lower impeller .................................... 29
Upper impeller ................................... 29
7 TROUBLESHOOTING 30
8 GUARANTEE 35

4
Dshwasher / User’s Manual
/40 EN
Instructions for safety and envIronment
1
Ths secton contans safety
nstructons that wll help to
gve protecton from rsk of
personal njury or property
damage. Falure to follow
these nstructons shall vod all
warrantes.
General safety
•Never place the product
on a carpet-covered floor;
otherwse, lack of arflow
beneath the product wll
cause electrcal parts to
overheat. Ths wll cause
problems wth your product.
•Do not operate the product
f the power cable / plug s
damaged! Call the Authorsed
Servce Agent.
•Connect the product to a
grounded outlet protected
by a fuse complyng wth
the values n the “Techncal
specfcatons” table. Do
not neglect to have the
groundng nstallaton made
by a qualfed electrcan.
Our company shall not be
lable for any damages that
wll arse when the product
s used wthout groundng
n accordance wth the local
regulatons.
•The water supply and
dranng hoses must be
securely fastened and reman
undamaged.
•Unplug the product when not
n use.
•Never wash the product by
spreadng or pourng water
onto t! There s the rsk of
electrc shock!
•Never touch the plug wth
wet hands! Never unplug by
pullng on the cable, always
pull out by grabbng the plug.
•The product must
be unplugged durng
nstallaton, mantenance,
cleanng and reparng
procedures.
•Always have the repar
procedures carred out by the
Authorsed Servce Agent.
Manufacturer shall not be
held lable for damages that
may arse from procedures
carred out by unauthorsed
persons.
•Never use chemcal solvents
n the product. They brng
forth the rsk of exploson.
•When you pull the upper
and lower baskets out
completely, the door of the
product wll bear all the
weght of the baskets. Do not
put other loads on the door;
otherwse, the product may
tlt.
•Never leave the door of
the product open apart
from loadng and unloadng
procedures.
•Do not to open the door
of the product when t s
runnng unless necessary.
Be careful for the rush of
hot steam when you need to
open the door.
Intended use
•Ths product has been
desgned for domestc use.
Dshwasher / User’s Manual
5 / 40
EN
Instructions for safety and envIronment
•It must be used to do the
domestc type dshes only.
•Ths applance s ntended
to be used n household and
smlar applcatons such as:
- Staff ktchen areas n shops,
offces and other workng
envronments.
•Only dshwasher safe
detergents, rnse ads and
addtves must be used.
•The manufacturer waves
any responsblty arsen
from ncorrect usage or
transportaton.
•Ths applance can be used by
chldren aged from 8 years
and above and persons wth
reduced physcal,sensory
or mental capabltes or
lack of experence and
knowledge f they have
been gven supervson or
nstructon concernng use
of the applance n a safe
way and understand the
hazards nvolved. Chldren
shall not play wth the
applance. Cleanng and user
mantenance shall not be
made by chldren wthout
supervson.
Children’s safety
•Electrcal products are
dangerous for the chldren.
Keep chldren away from the
product when t s n use. Do
not let them to tamper wth
the product.
•Do not forget to close the
door of the product when
leavng the room where t s
located.
•Store all detergents and
addtves n a safe place
away from the reach of the
chldren.
Disposing of packaging
material
Packagng materals are
dangerous to chldren. Keep
packagng materals n a safe
place away from reach of the
chldren.
Packagng materals of the
product are manufactured from
recyclable materals. Dspose
of them properly and sort n
accordance wth recycled waste
nstructons. Do not dspose
of them wth normal domestc
waste.
Transportation of the
product
A
If you need to move the
product, do t n uprght
poston and hold from
the rear sde. Tltng the
product onto ts front
sde may cause the
electronc parts n t get
wet and damaged.
1. Unplug the product before
transportng t.
2. Remove water dranage and
water supply connectons.
3. Dran the remanng water n
the product completely.

6
Dshwasher / User’s Manual
/40 EN
Instructions for safety and envIronment
Compliance with WEEE
Directive and Disposing
of the Waste Product
Ths product comples wth
EU WEEE Drectve
(2012/19/EU). Ths product
bears a classfcaton
symbol for waste electrcal and
electronc equpment (WEEE).
Ths product has been
manufactured wth hgh qualty
parts and materals whch can be
reused and are sutable for
recyclng. Do not dspose of the
waste product wth normal
domestc and other wastes at the
end of ts servce lfe. Take t to
the collecton center for the
recyclng of electrcal and
electronc equpment. Please
consult your local authortes to
learn about these collecton
centers.
Compliance with RoHS
Directive
The product you have purchased
comples wth EU RoHS Drectve
(2011/65/EU). It does not contan
harmful and prohbted materals
specfed n the Drectve.
Package information
Packagng materals of the
product are manufactured
from recyclable materals n
accordance wth our Natonal
Envronment Regulatons. Do
not dspose of the packagng
materals together wth the
domestc or other wastes. Take
them to the packagng materal
collecton ponts desgnated by
the local authortes.
Dshwasher / User’s Manual
7 / 40
EN
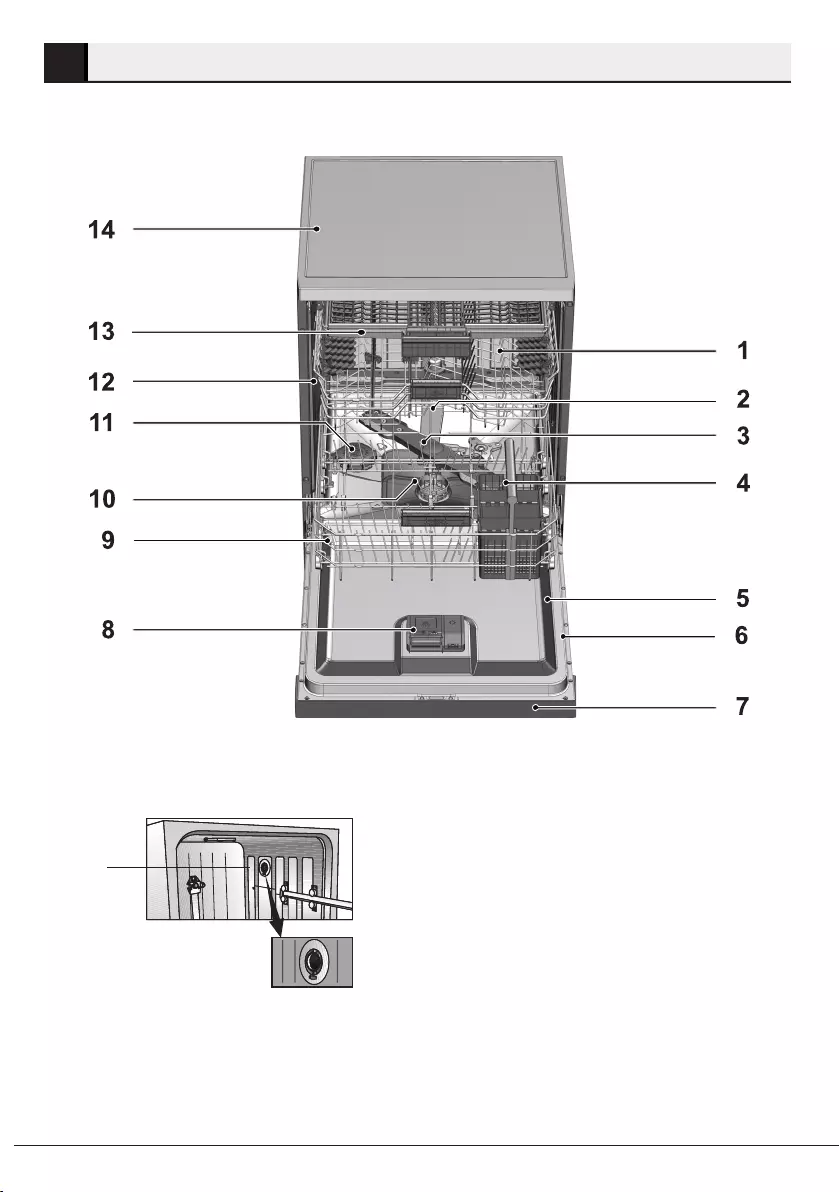
Dishwasher
2
Overview
1. Upper basket
2. Upper mpeller
3. Lower mpeller
4. Slverware basket
5. Door
6. Ratng Label
7. Control panel
8. Detergent dspenser
9. Lower basket
10. Flters
11. Salt reservor ld
12. Upper basket ral
13. Upper cutlery basket (depends on model)
14. Tabletop (depends on model)
15. Fan dryng system (depends on model)
15
8
Dshwasher / User’s Manual
/40 EN
Dishwasher
Technical specications
Compliance to standards and test data / EC declaration of conformity
Ths product comples wth the followng EU drectves;
Development, producton and sales stages of ths product comply wth the safety
rules ncluded n all pertanng European Communty regulatons.
2014/35/EU, 2014/30/EU, 93/68/EC, IEC 60436/DIN 44990, EN 50242
Power nput 220-240 V, 50 Hz (see ratng label)
Total power consumpton 1800-2100 W (see ratng label)
Heater power consumpton 1800 W (see ratng label)
Total current (depends on the model) 10 A (see ratng label)
Dran pump power consumpton 30 W (see ratng label)
Water pressure 0.3 –10 bar (= 3 – 100 N/cm = 0.01-1.0
Mpa)
C
Techncal specfcatons may be changed wthout pror notce to mprove the
qualty of the product.
C
Fgures n ths manual are schematc and may not match the product exactly.
C
Values stated on the markngs of the product or n the prnted documents
accompanyng the product are obtaned n the laboratory on bass of the
relevant standards. Dependng on operatonal and envronmental condtons of
the product, these values may vary.
Note for test institutions:
Data requred for performance tests shall be provded upon request. Requests can be
e-maled to the followng address:
dishwasher@standardloading.com
Do not forget to provde the code, stock and seral numbers of the product to be tested n
your request e-mal along wth your contact nformaton. Code, stock and seral numbers of
the product may be found on the type label attached to the sde wall of the door.
Fan drying system
(depends on model)
Fan dryng system ensures effcent dryng of your dshes.
It s normal to hear a dfferent sound than that of washng cycle durng fan operaton.

Dshwasher / User’s Manual
9 / 40
EN
3Installation
To make the product ready for use,
make sure that the electrcty, tap water
supply and water dranage systems are
approprate before callng the Authorsed
Servce Agent. If they are not, call a
qualfed techncan and plumber to have
any necessary arrangements carred out.
C
Preparaton of the locaton
and electrcal, tap water and
waste water nstallatons at the
place of nstallaton s under
customer's responsblty.
B
Manufacturer shall not be held
responsble for damages arsng
from processes carred out by
unauthorsed persons.
A
Pror to nstallaton, vsually
check f the product has any
defects on t. If so, do not have
t nstalled. Damaged products
cause rsks for your safety.
C
Make sure that the water nlet
and dscharge hoses are not
folded, pnched or crushed
whle pushng the product nto
ts place after nstallaton or
cleanng procedures.
When placng the product, pay attenton
not to damage the floor, walls, ppng, etc.
Do not hold the product from ts door or
panel to move t.
Appropriate installation
location
•Place the product on a sold and flat
floor that has suffcent load carryng
capacty! The product must be
nstalled on a flat surface n order for
the door to be closed comfortably and
securely.
•Do not nstall the product at places
where temperature may fall below
0ºC.
•Place the product on a rgd floor. Do
not place t on a long ple rug or smlar
surfaces.
B
Ensure the power cable does
not get trapped under the
product.
•Make sure that you select a locaton
that wll allow you to load and unload
the dshes n a fast and comfortable
manner.
•Install the product n a place close
to the tap and the dran. Select the
nstallaton locaton by consderng
that t wll not be changed after the
connectons are made.
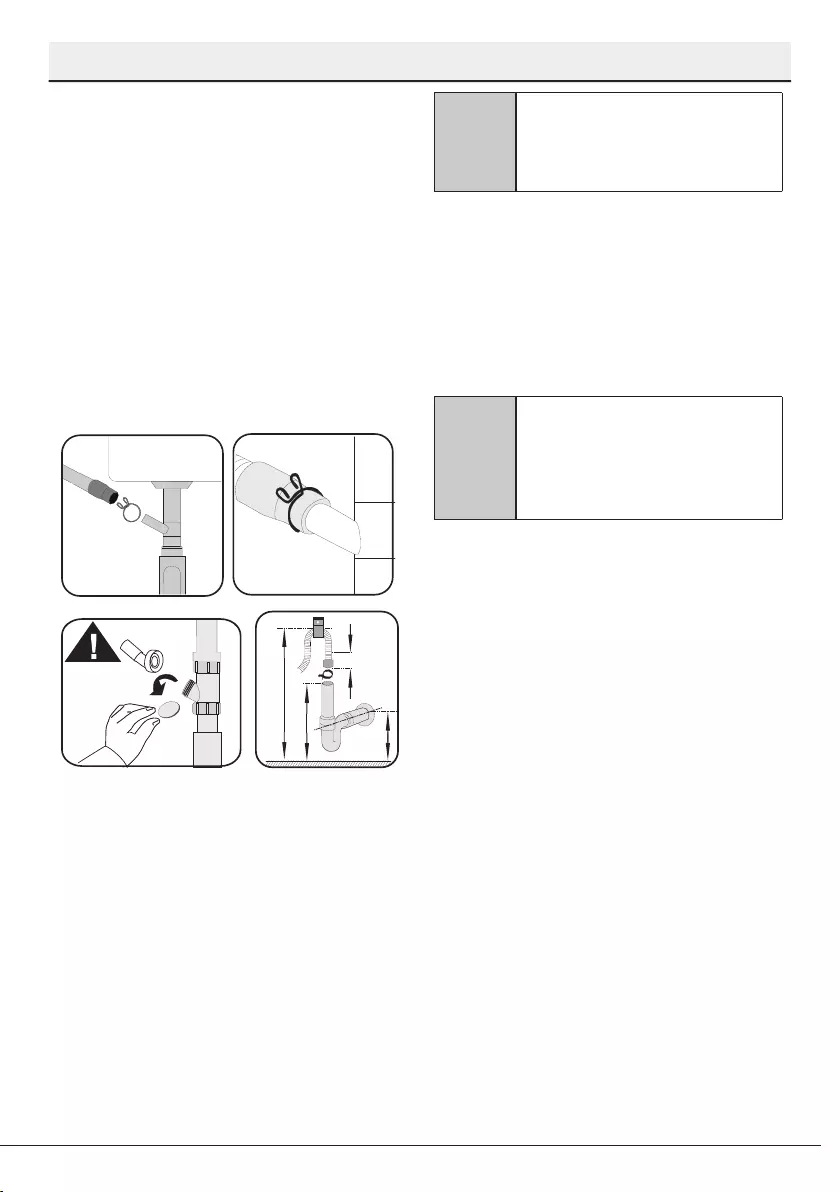
Connecting water supply
•Do not use old or used water nlet
hose on the new product. Use the new
water nlet hose suppled wth the
product.
•Connect the water nlet hose drectly
to the cold water tap. Permtted water
temperature up to 25°C. Pressure
comng from the tap should be
mnmum 0.3 and maxmum 10 bars.
If the water pressure exceeds 10
bars, a pressure relef valve should be
nstalled n between.
•Open the tap completely after makng
the connectons to check for water
leaks.
A
For your safety, close the water
nlet tap completely after the
washng programme s over.
10
Dshwasher / User’s Manual
/40 EN
Installation
Connection to the drain
Water dscharge hose can drectly be
connected to the dran hole or snk’s
dranage. The length of ths connecton
must be mn. 50 cm and max. 100 cm from
the floor. A dscharge hose longer than 4
meters wll cause washng performance
to be affected.Attach the water dscharge
hose to the dranppe wthout bendng
t. Tghtly fx the water dscharge hose
to the dranppe n order to prevent any
dslocaton of the water dscharge hose
durng operaton of the product.
min
300
min
120
max 1000
min 500
C
Dranppe must be connected
to the foul water system and t
should not be connected to any
surface water dran.
Adjusting the feet
If the door of the product cannot be closed
properly or f the product wobbles when
you push t slghtly, then you need to adjust
the feet of the product. Adjust the feet of
the product as llustrated n the relevant
secton.
A
Dswashers door must be
algned properly otherwse hot
steam can escape! Danger of
serous burns, other njury or
may damage furnture.
Electrical connection
Before you nsert the plug nto the wall
socket make sure that the voltage and
the frequency shown n the ratng label
corresponds to your electrcty supply.
We recommend that ths applance be
connected to the mans supply va a
sutable swtched and fused socket n a
readly accessble poston.
If the supply cord or the mans lead s
damaged please do not replace t yourself.
The supply cord or the mans lead must be
replaced by a Authorsed Servce Agent or a
smlarly qualfed person.
Dshwasher / User’s Manual
11 / 40
EN
Installation
Wth the alternatve plugs a 13A fuse must
be ftted ether n the plug or adaptor or
n the man fuse box. If n doubt contact a
qualfed electrcan.
Initial use
Before startng to use the product, make
sure that all preparatons are made n
accordance wth the nstructons n
sectons “Important safety nstructons”
and “Installaton”.
•Before usng the product, fll the salt
reservor wth 1 ltre of water, add salt
(see next page) and str to dssolve.
Run the Dshwasher wthout dshes
on a short programme wth a small
amount of detergent.
A
There mght be a small amount
of water left n the product
after factory qualty control
tests. Ths causes no harm to
the product.
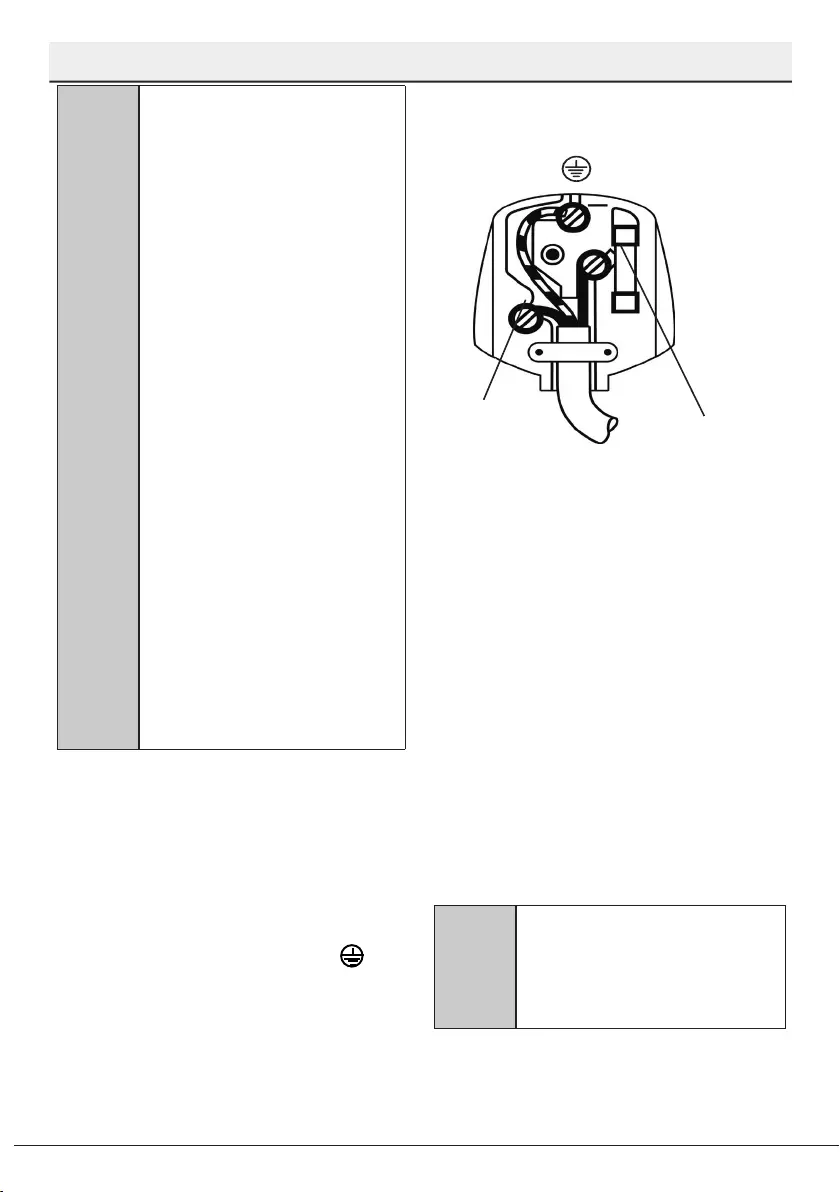
AThis appliance must
be earthed
If the ftted moulded plug s not
sutable for your socket, then
the plug should be cut off and
an approprate plug ftted.
Destroy the old plug, whch s
cut off as a plug wth a bared
cord could cause a shock
hazard f nserted nto a socket
elsewhere n the house.
The moulded plug on ths
applance ncorporates a 13A
fuse. Should the fuse need to
be replaced an ASTA approved
BS1362 fuse of the same ratng
must be used. Do not forget
to reft the fuse cover. In the
event of losng the fuse cover,
the plug must not be used
untl a replacement fuse cover
has been ftted. Colour of the
replacement fuse cover must
be the same colour as that
vsble on the pn face of the
plug. Fuse covers are avalable
from any good electrcal store.
Fitting a dierent plug
As the colours of the wres n the mans
lead of ths applance may not correspond
wth the coloured markngs dentfyng the
termnals on your plug, proceed as follows:
1. Connect the green - yellow or green
(earth) wre to the termnal n the plug
marked ‘E’ or wth the symbol or
coloured green and yellow or green.
2. Connect the blue (neutral) wre to
the termnal n the plug marked ‘N’ or
coloured black.
3. Connect the brown (lve) wre to the
termnal n the plug marked ‘L’ or
coloured red.

12
Dshwasher / User’s Manual
/40 EN
Preparation
4
Tips for energy saving
Followng nformaton wll help you use
the product n an ecologcal and energy-
effcent manner.
Wpe away any coarse food remnants on
the dshes before puttng them n the
product.
Operate the product after fllng t
completely.
When selectng a programme, consder
the table of "Programme data and average
consumpton values".
Do not put more detergent than suggested
on the detergent package.
Water softening system
The product s equpped wth a water
softenng system whch reduces the
hardness of ncomng water. Ths system
softens the supply water to a level that wll
allow washng the dshes wth the requred
qualty.
C
The mans water hardness must
be softened f t s over 7°dH.
Otherwse, hardness ons wll
accumulate on the dshes that
are washed and may affect the
washng, rnsng and dryng
performances of the machne.
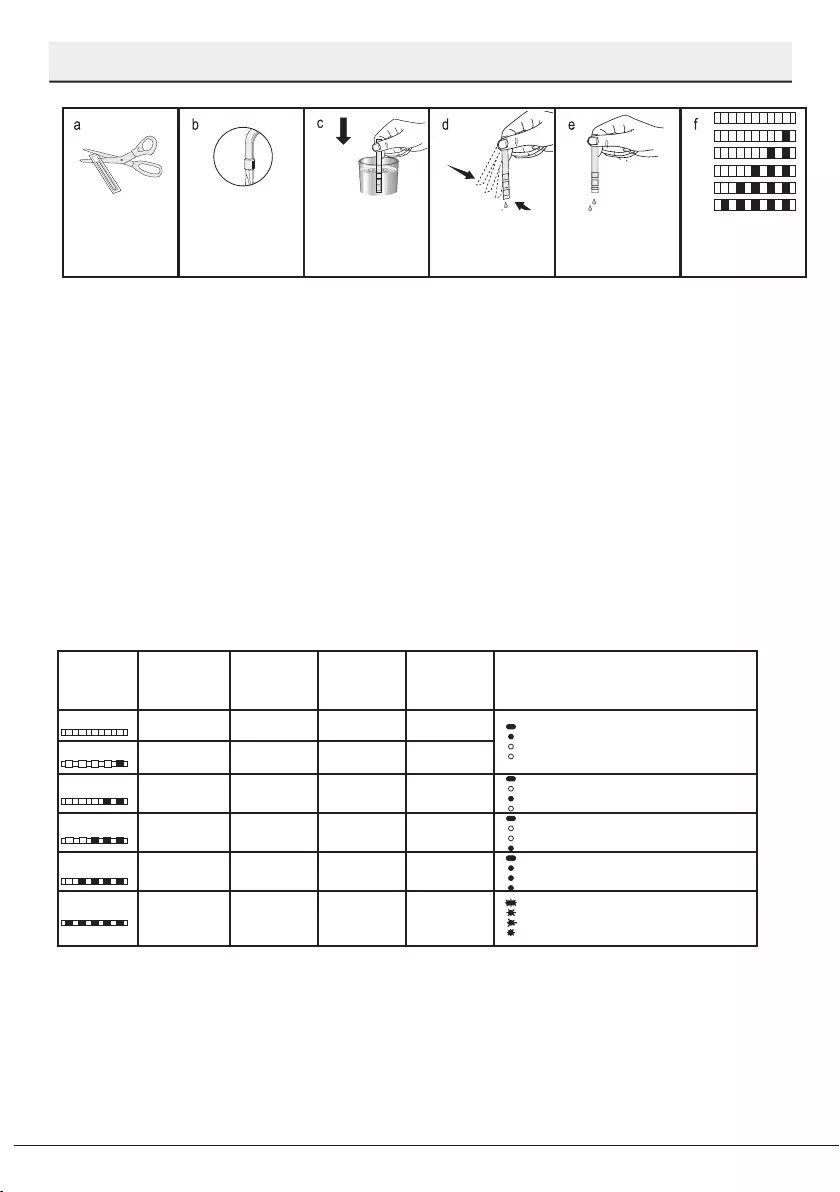
Adjusting the water
softening system
Cleanng, rnsng and dryng performance of
your dshwasher wll ncrease when water
softenng system s adjusted properly.
Adjust the new water hardness level
accordng to the Water hardness level
nstructon n ths booklet.
Use the test strp suppled wth the product
accordng to the steps gven below to
determne hardness level of your supply
water.
Dshwasher / User’s Manual
13 / 40
EN
Preparation
Remove the test
strip from the
packet.
Turn on the tap and
let the water run for
about a minute.
Hold the test strip in
the water for about
a second.
Remove the test
strip from the water
and shake it.
Wait for 1 minute. The test strip shows
you the hardness
level.
After determnng hardness level of the supply water:
1. When the Programme Selecton key s at “Off” poston, keep Start/Pause/Cancel key
pressed and turn the Programme Selecton key to poston “1” wthn 5 seconds. Machne wll
enter nto the regeneraton adjustment mode at the end of ths perod.
2. Regeneraton level n the memory wll be llumnated for 5 seconds when the regenerator
adjustment mode s actvated.
3. To adjust the new Water Hardness Level, move the Programme Selecton key to the
poston that s sutable for your supply water. (see, “Water Hardness Level Adjustment
Table”)
4. Press Start/Pause/Cancel key for once to store the level you have selected. Machne
returns to the normal operatng mode after the new settng s stored.
* Programme Selecton key rotates n 5 steps regardless of the number of the programmes
contaned on the machne.
5. Press “Start/Pause/Cancel” key for once to store the level you have selected.
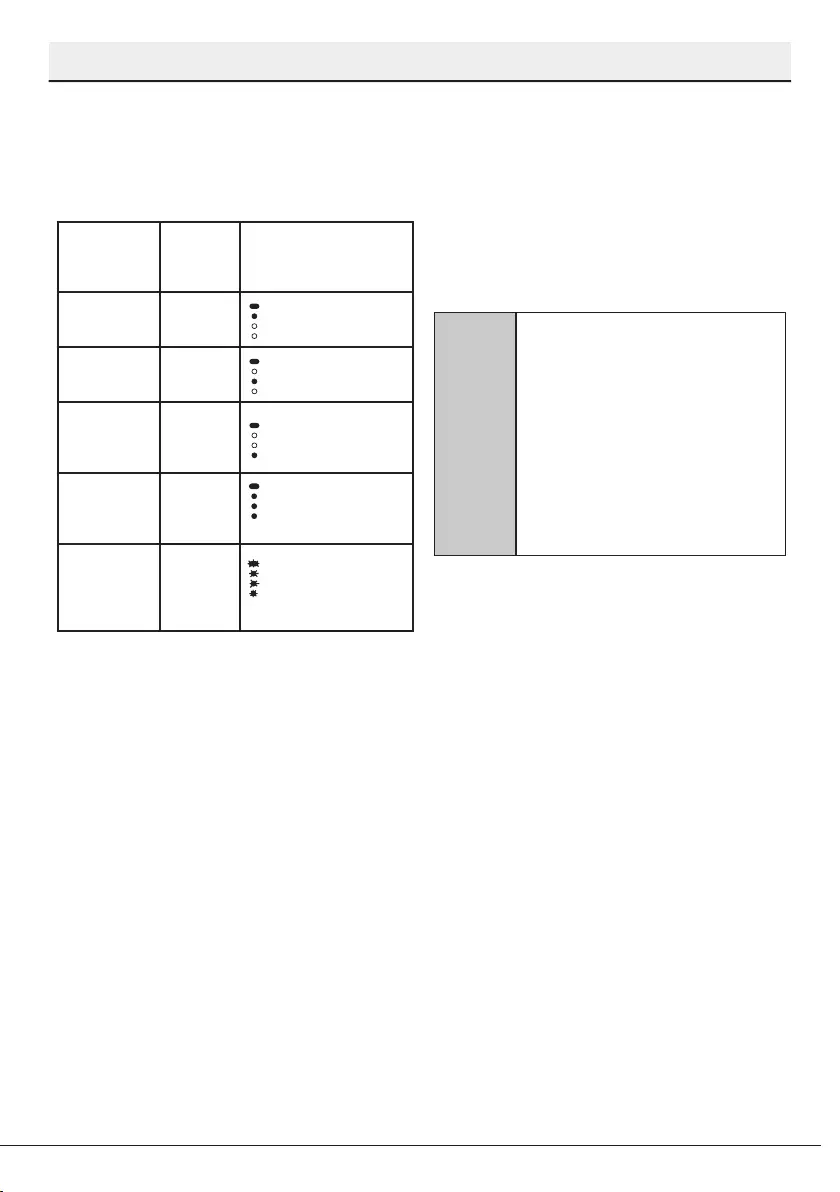
Water hardness level adjustment table
Hardness
Level
English Water
Hardness °dE
German Water
Hardness °dH
French Water
Hardness °dF
Position of
Program
Selection Key*
Water Hardness Level Indicator
0th Level 0-5 0-4 0-8 1 Washing lamp on the panel will
illuminate.
1st Level 6-9 5-7 9-13 1
2nd Level 10-15 8-12 14-22 2 Drying lamp on the panel will
illuminate.
3rd Level 16-19 13-15 23-27 3 End lamp on the panel will illuminate.
4th Level 20-24 16-19 28-34 4 Washing, Drying and End lamps on
the panel will illuminate.
5th Level 25-62 20-50 35-90 5
Washing, Drying and End lamps on
the panel will ash with an interval of
1 second.
If the hardness level of the supply water s above 90 °dF or f you are usng well water, then
t s recommended to use water purfcaton devces and specal flters.
If the hardness level of the supply water s below 13°dF, there s no need to use salt n your
dshwasher. If ths s the case, “No Salt Warnng Indcator” (f any) llumnates contnuously
on the panel of your machne.
14
Dshwasher / User’s Manual
/40 EN
Preparation
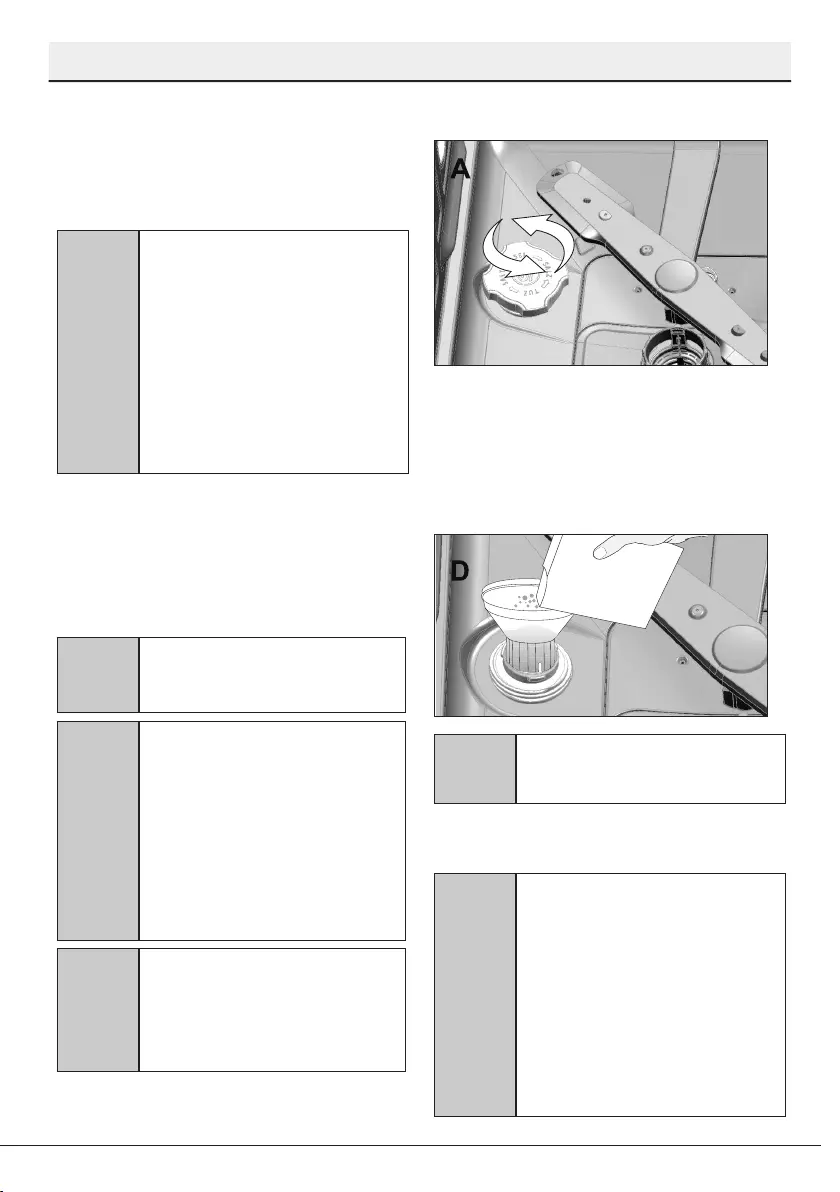
2. Turn the salt reservor ld counter-
clockwse to open t (A).
3. Add 1 ltre of water to salt reservor of
your machne only n ntal use.
4. Fll the salt reservor wth salt by
usng the salt funnel (D). To speed up
dssoluton rate of salt n water, str t
wth a spoon.
C
You can put about 2 kg of
softenng salt nto the salt
reservor.
5. Replace the ld and tghten t when the
reservor s full.
C
You need to add salt rght
before startng the machne.
Thus, the overflowng
salty water wll be flushed
mmedately, preventng the rsk
of corroson n machne. In cases
where you would not start
washng mmedately, run your
machne empty n the shortest
program.
If the water hardness level adjustment s set
to level 1, the “No salt warnng ndcator” wll
llumnate contnuously although t s not
necessary to use salt. If you use salt under
ths condton, salt wll not be consumed and
the Salt ndcator wll not llumnate.
C
If you move your house, t s
necessary to readjust water
hardness level of your machne
by consderng the nformaton
gven above accordng to the
hardness level of the supply
water n your new locaton.
Your machne wll dsplay the
most recently adjusted water
hardness level.
Adding salt
Water softenng system needs to be
regenerated n order for the product
operates wth the same performance
contnuously. Dshwasher salt s used for
ths purpose.
C
Use only specal softenng salts
produced partcularly for the
dshwashers n your machne.
C
It s recommended to use
granule- or powder-formed
softenng salts n the water
softenng system. Do not use
salts that do not completely
dssolve n water such as table
salt or rock salt. Otherwse the
performance of the system
may deterorate n tme.
C
Salt reservor wll be flled
wth water when you start
the product. For ths reason,
add salt before operatng the
machne.
1. Frstly, take the lower basket out to
add softenng salt.
Dshwasher / User’s Manual
15 / 40
EN
Preparation
C
Snce dfferent salt brands
n the market have dfferent
partcle szes and snce the
water hardness may vary,
dssoluton of the salt n water
may take a couple of hours.
Therefore, Salt Indcator
remans on for a whle after
addng salt nto the machne.
Detergent
You can use powder, lqud/gel or tablet
detergents n the machne.
A
Only use n the machne
the detergents produced
partcularly for use wth
dshwashers. We recommend
you not to use detergents that
contan chlorne and phosphate
as they are harmful for the
envronment.
Adding detergent
C
Pay attenton to the warnngs
on the detergent packagng
to get better washng and
dryng results. Contact the
manufacturer of the detergent
for further questons.
A
Do not put solvents nto the
detergent dspenser. There s
the rsk of exploson!
Put the detergent nto the detergent
dspenser just before operatng the
machne as llustrated below.
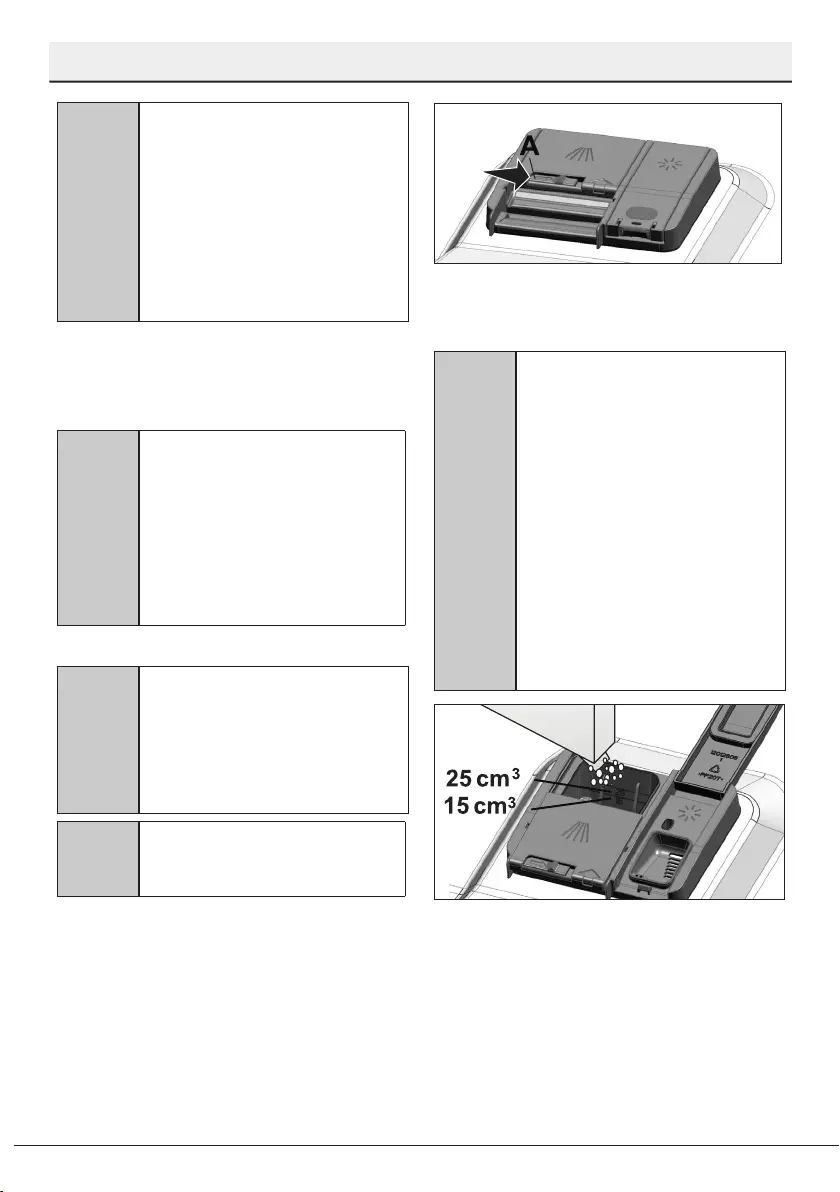
1. Push the latch to rght to open the
detergent dspenser ld (A).
2. Put suggested amount of powder,
lqud/gel or tablet detergent n the
reservor.
C
Insde the detergent dspenser
there are level markngs that
help you use approprate
amount of powder detergent.
When brmful, detergent
dspenser wll contan 45 cm
of detergent. Fll detergent up
to 15 cm or 25 cm level marks
n the detergent dspenser
accordng to fullness of the
machne and/or solng degree
of the dshes. One tablet
s enough f you are usng
detergent tablets.
3. Push the ld of the detergent dspenser
to close t. A "clck" wll be heard when
the ld s closed.

16
Dshwasher / User’s Manual
/40 EN
Preparation
C
The best washng performance
n dshwashers s obtaned
by usng detergent, rnse
ad and water softenng salt
ndvdually.
C
Observe the nstructons of the
detergent manufacturer on
the package when usng tablet
detergents.
C
Contact the detergent
manufacturer f your dshes
are wet and/or f you notce
lmescale spots partcularly on
your glasses after the washng
programme s over when usng
a tablet detergent.
When you switch to powder
detergent from tablet detergent:
1. Make sure that salt and rnse ad
reservors are full.
2. Set the water hardness to the hghest
level and perform an empty run.
3. After the empty washng cycle, revew
the user manual and readjust the
water hardness level so as to sut the
water supply.
4. Make the approprate rnse ad
settngs.
1
2
3
C
Use powder or lqud/gel
detergent n short programmes
wthout prewash snce
the solublty of the tablet
detergent changes dependng
on the temperature and tme.
Tablet detergents
In addton to the conventonal tablet
detergents, there are also commercally
avalable detergent tablets that show
water softenng salt and/or rnse ad
effect. Some types of these detergents
contan specal-purpose components such
as glass and stanless steel protectors.
These tablets show ther effects up to
a certan water hardness level (21°dH).
Water softenng salt and rnse ad must
also be used together wth the detergent
f the water hardness level s above the
mentoned level.
Dshwasher / User’s Manual
17 / 40
EN
Preparation
4. If there are stans on tableware tems
after washng, level must be ncreased
and f there s a blue trace after wpng
them by hand, t must be decreased.
Ths s set to poston 3 as factory
default.
C
The rnse ad adjustment s
descrbed under "Adjustng
the amount of rnse ad" n
the secton for operatng the
machne.
C
Wpe clean any splled rnse ad
outsde the reservor. Rnse
ad that splled accdentally
wll cause foamng and t wll
eventually decrease washng
performance.
Items not suitable for
washing in the dishwasher
•Never wash dshes soled by cgarette
ash, candle remnants, polsh, dyestuff,
chemcals, etc. n your dshwasher.
•Do not wash slverware and cutlery
wth wooden or bone stems, glued
peces, or peces that are not resstant
to heat, as well as copper and tn-
plated contaners n the dshwasher.
C
Decoratve prnts of chnaware
as well as alumnum and slver
tems may get dscoloured
or tarnshed after washng
n the dshwasher just as t
happens n handwashng as
well. Some delcate glass types
and crystals may become dull n
tme. We strongly recommend
you to check f the tableware
you are gong to purchase s
sutable for washng especally
n the dshwasher.
Rinse aid
C
The rnse ad used n
dshwashers s a specal
combnaton that ams to
ncrease dryng effcency and
prevent water or lme stans
on the washed tems. For ths
reason, care must be pad
to have rnse ad n the rnse
ad reservor and to use rnse
ads produced specally for
dshwashers only.
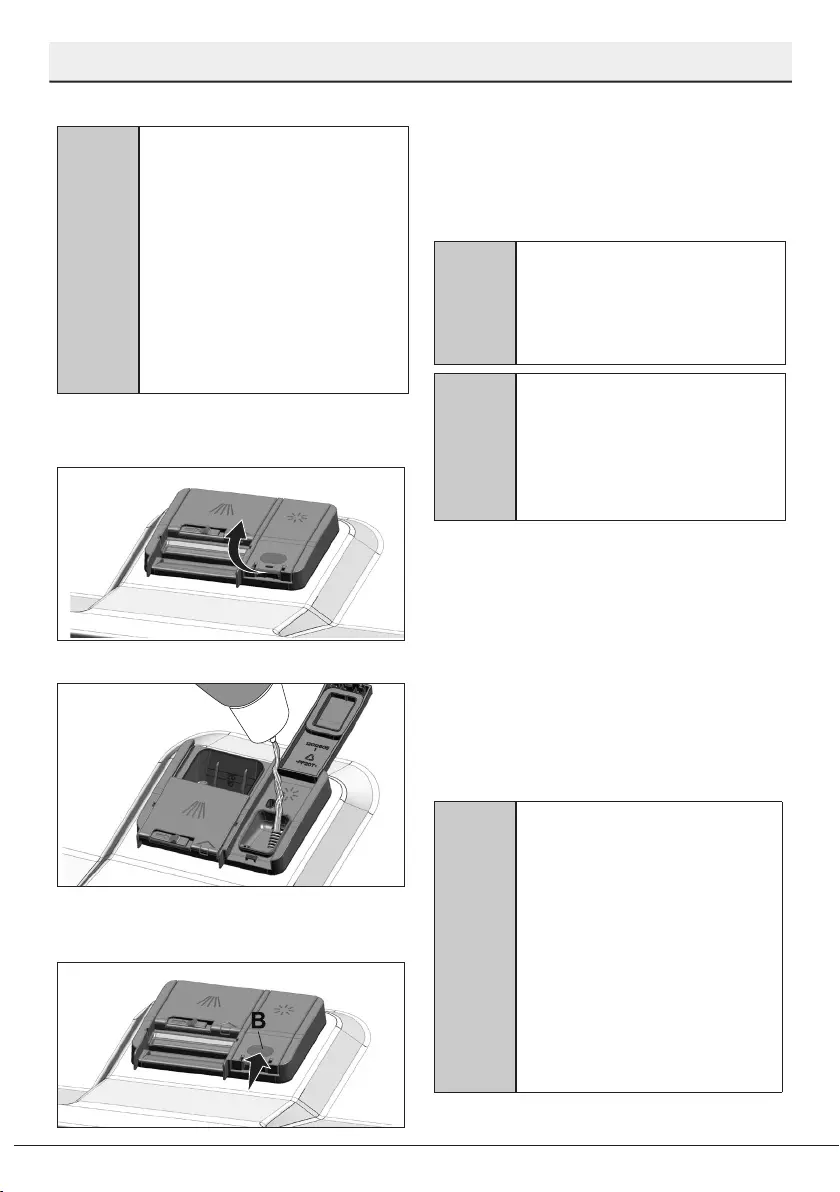
1. Open the ld of the rnse ad reservor
wth the help of the latch.
2. Fll the reservor untl “MAX” level.
3. Slghtly press the pont (B) of the
reservor ld to close t.
18
Dshwasher / User’s Manual
/40 EN
Preparation
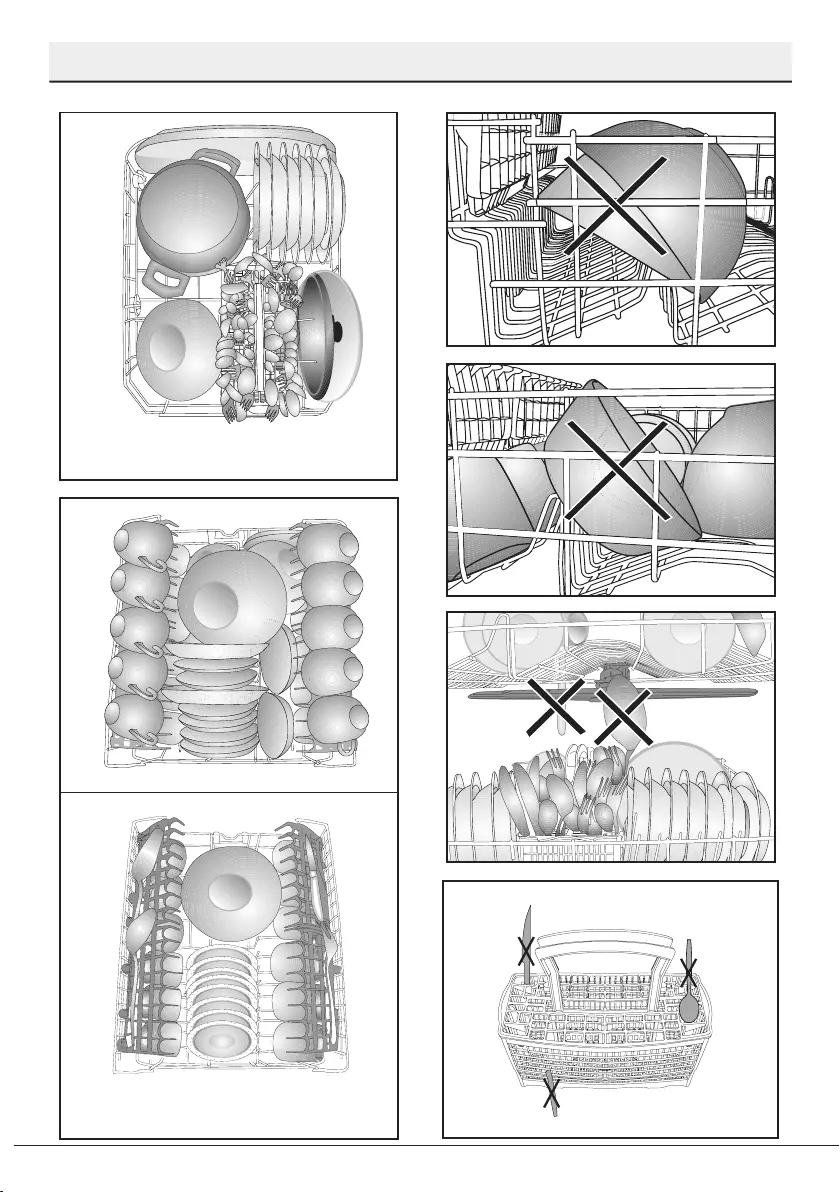
Placing the dishes into the
dishwasher
You can use your dshwasher n the
optmum way wth respect to energy
consumpton and washng and dryng
performance only f you place the dshes n
an orderly way.
•Wpe away any coarse food
remnants (bones, seeds, etc.) on the
dshes before placng them n the
dshwasher.
•Place thn, narrow peces n the mddle
sectons of baskets f possble.
•Place the heavly soled and bgger
tems n the lower basket and smaller,
delcate and lght tems n the upper
basket.
•Place the hollowed dshes such as
bowls, glasses and pans upsde down
n the dshwasher. Thus, accumulaton
of water n deep hollows s prevented.
A
To prevent possble njures,
always place the sharp and
ponted dshes such as servce
fork, bread knfe, etc. upsde
down so as ther ponted ends
wll face down or they wll le
horzontally n the dsh basket.
Unload dshes n the lower basket frst and
then the dshes n the upper basket.
Dshwasher / User’s Manual
19 / 40
EN
Preparation
Suggestions for loading the dishwasher
Lower basket
Upper basket
Improper Loading Of Dishware
20
Dshwasher / User’s Manual
/40 EN
Preparation
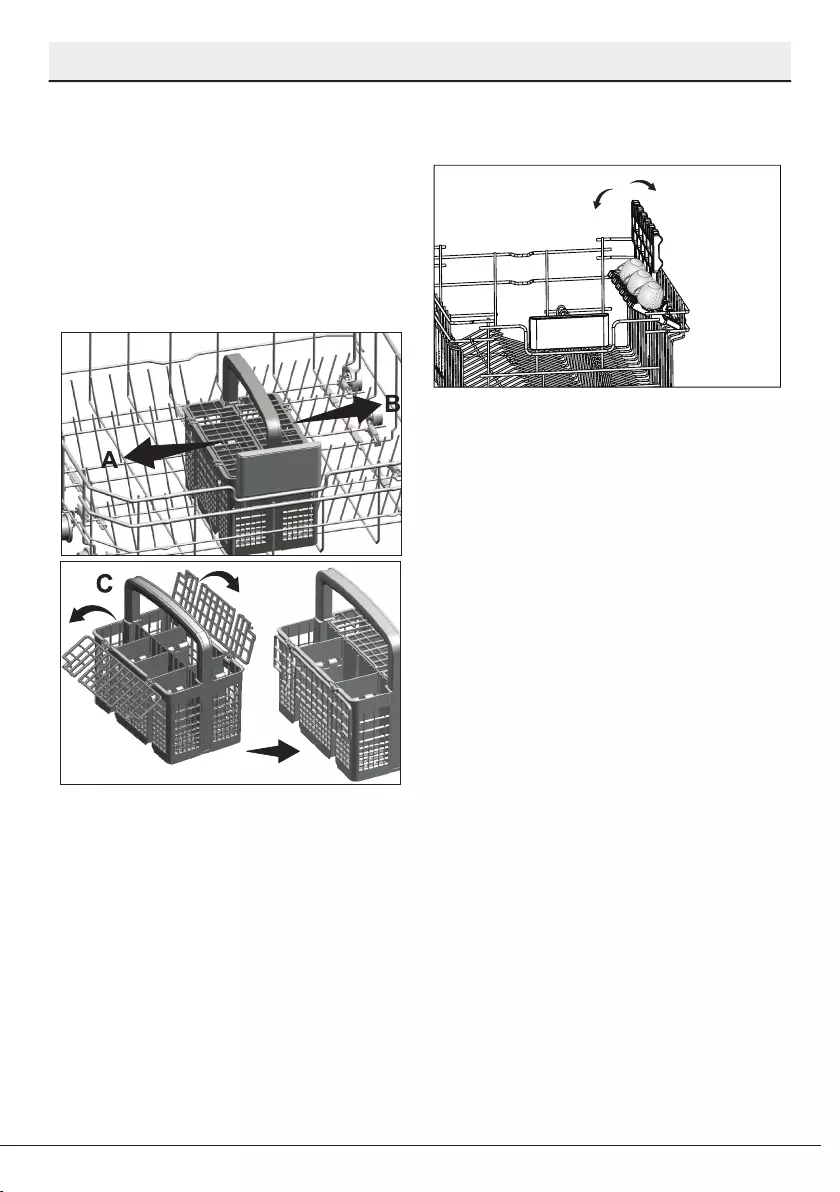
Cutlery basket
(depends on model)
Cutlery basket s desgned to wash your
dshes such as knfe, fork, spoon, etc. n an
effcent manner.
Snce the cutlery basket can be moved (A,
B), you can create more space whle placng
your dshes n the lower basket and free up
space for your dshes of dfferent szes.
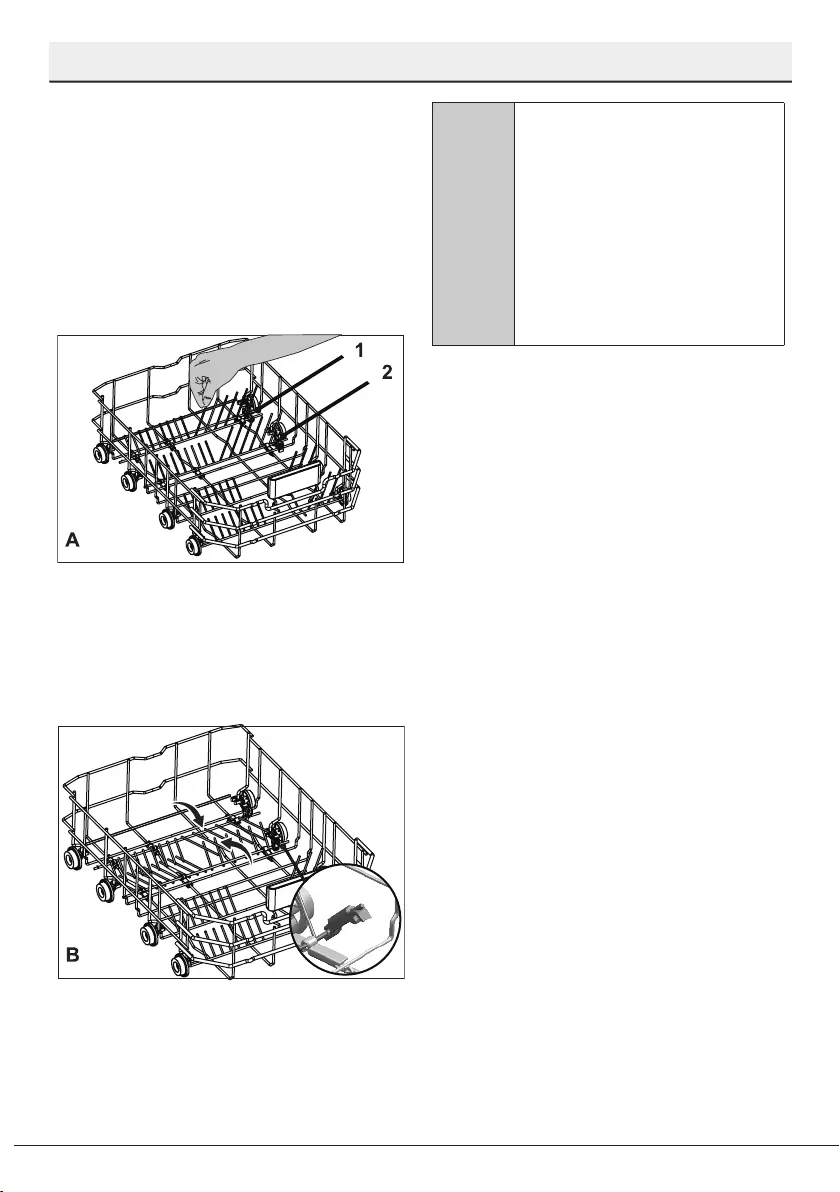
Upper basket rack
(depends on model)
Dshwasher / User’s Manual
21 / 40
EN
Preparation
Collapsible lower basket
tines
(depends on model)
Foldable tnes (A) located at the lower
basket of the machne are desgned for
an easer placement of large peces such
as pans, bowls, etc. You can create larger
spaces by foldng each tnes ndvdually or
all of them at once.
To brng the collapsble tnes nto horzontal
poston, grab the tnes from md poston
and push them n the drectons of arrows
(B). To brng the tnes back to vertcal
poston, just lft them up. Collapsble tnes
wll clck nto the latch agan (C).
C
Brngng the tnes to the
horzontal poston by holdng
them from the tps may cause
them to bend. Therefore, t
wll be approprate to brng the
tnes n the mddle to horzontal
or vertcal poston by holdng
them from ther stems and
pushng n the drecton of
arrow.

22
Dshwasher / User’s Manual
/40 EN
5
5
5
1-
2-
3-
4-
5-
6-
7-
8-
Salt ndcator
On/Off Control lght
Handle
On/Off/Programme Selecton key
Start/Pause/Cancel key
Programme Follow-up lghts
1 2 3
5678
4
Rnse Ad ndcator
Operating the product
Half Load functon
Keys
On/Off/Programme Selection key
When you use the On/Off/Programme
Selecton key to select a programme, the
On Warnng control lght wll become on,
and t wll go off when you swtch to the
Off poston.
Start/Pause/Cancel key
It s used to startup, pause or cancel the
selected program.
Preparing the machine
1. Open the door of the dshwasher.
2. Place the dshes n accordance wth the
nstructons n the user manual.
3. Make sure that the upper and lower
mpellers rotate freely.
4. Put adequate amount of detergent
nto the detergent compartment.
5. Check f the Salt and Rnse Ad
ndcators lght and add salt and/or
rnse ad f needed.
6. Close the door of the dshwasher.
Programme selection
1. Press On/Off/Programme Selecton key
to swtch on the product.
2. Refer to the table of "Programme data
and average consumpton values"
to determne a washng programme
sutable for your dshes.
3. Use the programme selecton key to
select the determned programme.
Dshwasher / User’s Manual
23 / 40
EN
Operating the product
1234
Eco * Intensive Clean&Shine Mini
50 ºC 70 ºC 65 ºC 35 ºC
Most economical washing
programme for the medium
soiled daily dishes that are
kept waiting.
Suitable for heavily soiled
dishes, pots and pans.
Daily washing programme
for normally soiled dishes.
Suitable for lightly soiled
daily dishes that are
scraped or pre-cleaned.
Medium High Medium Low
++ - -
++++
+++ -
205 115 120 30
10,5 14,8 15 10,4
0,83 1,28 1,18 0,77
Degree of Soiling
Energy (kWh)
Prewash
Wash
Dry
Duration (min)
Water (I)
Programme Table
The consumption values shown in the table were determined under standard conditions. Differences may therefore occur under practical conditions. * Reference
programme for testing institutes. The tests in accordance with EN 50242 must be carried out with a full water softener salt dispenser and a full rinse aid reservoir,
and using the test programme.
Programme number
Programme name
Cleaning temperature
#
Sensitivity: Public

24
Dshwasher / User’s Manual
/40 EN
Operating the product
Auxiliary functions
Washng programmes of your dshwasher
are desgned to obtan the best cleanng
effect, consderng the type of the solng,
solng degree and propertes of the dshes
to be washed.
Auxlary functons are provded n order
to enable you to save tme, water and
energy and to perform a more comfortable
washng wth condtons specfc to you.
C
Auxlary functons may cause
changes n the programme
duraton.
Starting the programme
To start your machne after selectng the
programme and auxlary functons, press
Start/Pause/Cancel key.
C
Your machne performs water
softenng dependng on the
hardness level of the mans
water. Due to water softenng
process the programme
duraton may change. The
programme duraton can also
change whle the programme
s runnng dependng on the
ambent temperature where
your machne s nstalled,
temperature of the supply
water and amount of the
dshes.
C
Pay attenton not to open the
door of the machne when t s
runnng. Stop the machne by
pressng Start/Pause/Cancel
key f you have to open the
door. Then, open the door of
the machne. There may be a
rush of vapour when you open
the door of your machne; be
careful. Close the door of your
machne and press Start/Pause/
Cancel key agan. Programme
wll resume runnng.
C
After the rnsng step, the
machne wll wat slent n pause
mode for some tme n order
to have the water remanng n
the machne and on the dshes
draned completely and to have
the water softener cleaned, and
then t wll resume runnng n
dryng mode.
Half Load function
It s used to operate the machne wthout
loadng t completely.
1. Load your dshes n the machne as you
lke.
2. Turn the machne on wth On/Off key.
3. Select the desred programme and
press the Half Load key.
Whle the functon s enabled, the Half Load
ndcator wll become on n the functon
selecton ndcator and on the dsplay.
4. Start the programme by pressng Start
/ Pause / Cancel key.
C
Wth the Half Load functon you
can save both water and power
whle usng the lower and upper
baskets of the machne.
Dshwasher / User’s Manual
25 / 40
EN
Operating the product
Salt indicator
Please check the salt ndcator to see
whether there s adequate amount of
softenng salt n the dshwasher or not.
You need to refll the salt reservor wth
salt whenever the no-salt warnng symbol
lghts.
C
Adjustng the water hardness
level s explaned n Water
Softenng System secton.
Rinse Aid indicator
Please check the rnse ad ndcator to see
whether there s adequate amount of rnse
ad n the dshwasher or not. You need to
refll the rnse ad dspenser wth rnse ad
whenever the no rnse ad warnng symbol
lghts.
Programme follow-up
You can track the current step of the
selected programme on the programme
step lghts located on the control panel.
C
If the dryng lght s on, the
machne wll perform slent
dryng for 30-60 mnutes. At
the end of ths perod, the
Dryng lght wll go off and the
End lght wll become on.
The End lght wll become on when the
selected washng programme ends.
Cancelling the programme
1. Press and hold the Start / Pause /
Cancel key for 3 seconds to cancel the
programme.
2. Release t when the Washng and
Dryng lghts start flashng. Water n
the machne wll be dscharged n 45
seconds. The programme wll have
been cancelled once the Washng and
Dryng lghts go off and the End lght
becomes on. Then, you can select and
operate a new programme.
C
There mght be resdues of
detergent or rnse ad left n the
machne and/or on the peces
beng washed dependng on the
step n whch the programme
has been cancelled.
C
When you set the Programme
Selecton Knob to “Off” poston,
the washng programme wll
end and the machne wll be
ready for a new programme
selecton. If you end the
washng cycle ths way, water
and detergent may reman n
the machne.
Adjusting the amount of
rinse aid
1. Whle the Programme Selecton Knob
s n “Off” poston, press and hold the
functon key and turn the Programme
Selecton Knob clockwse by one level,
keepng the functon key pressed for
2 seconds. At the end of ths tme,
the machne wll enter the rnse ad
adjustment mode.
2. Once the machne has entered the
rnse ad adjustment mode, the stored
rnse ad level wll be shown on the
programme follow-up LEDs for 5
seconds.
3. For the new Rnse Ad settng, set the
Programme Selecton Knob to the
relevant poston.
4. Press Start / Pause / Cancel key for
once to store the level you have
selected.
26
Dshwasher / User’s Manual
/40 EN
Operating the product
End of programme
End of Programme ndcator wll lght up
once the washng programme s over.
1. Press On/Off/Programme Selecton key
to swtch off the product.
2. Close the tap.
3. Unplug the machne from the socket.
C
Leave your dshes n the
machne for about 15 mnutes
after they are washed n order
to have them cooled. Your
dshes wll dry n a shorter tme
f you leave the door of your
machne ajar durng ths perod.
Ths process wll ncrease the
dryng effectveness of your
machne.
5. When you set the Programme
Selecton Knob to the “Off” poston
agan, the machne wll enter the
normal mode.
Rinse Aid
Amount
Position of
program
selection
knob
Rinse Aid Adjustment
Indicator
1 dose of
rinse aid is
dispensed.
1
Washing lamp
on the panel will
illuminate.
2 doses of
rinse aid are
dispensed.
2
Drying lamp on
the panel will
illuminate.
3 doses of
rinse aid are
dispensed. 3
End lamp on
the panel will
illuminate.
4 doses of
rinse aid are
dispensed. 4
Washing, Drying
and End lamps
on the panel will
illuminate.
No rinse aid
dispensed
in washing
programme.
5
Washing, Drying
and End lamps
on the panel will
ash at 1-second
intervals.
Dshwasher / User’s Manual
27 / 40
EN
Maintenance and cleaning
6
Servce lfe of the product extends and
frequently faced problems decrease f t s
cleaned at regular ntervals.
A
Unplug the product and turn off
the tap before attemptng any
cleanng procedures.
C
Do not use abrasve substances
for cleanng.
C
Clean the flter and mpellers
at least once a week n order
for the machne operates
effcently.
Cleaning the outer surface
of the product
Wpe the outer surface and door gaskets
of the product gently wth a mld cleanng
materal and damp cloth. Wpe the "Control
panel" only wth a slghtly damp cloth.
Cleaning the interior of the
machine
•Clean the nteror of the machne and
the tank by runnng a programme wth
or wthout detergent based on the
degree of sol.
•If water has remaned n the machne,
dran the water by performng the
procedures under the topc "Cancelng
a programme". If the water cannot
be dscharged, remove the flters
as specfed n the "Cleanng the
flters" secton and check f there
are any leftover deposts that have
accumulated at the bottom of the
machne, blockng the water path.
Clean f necessary.
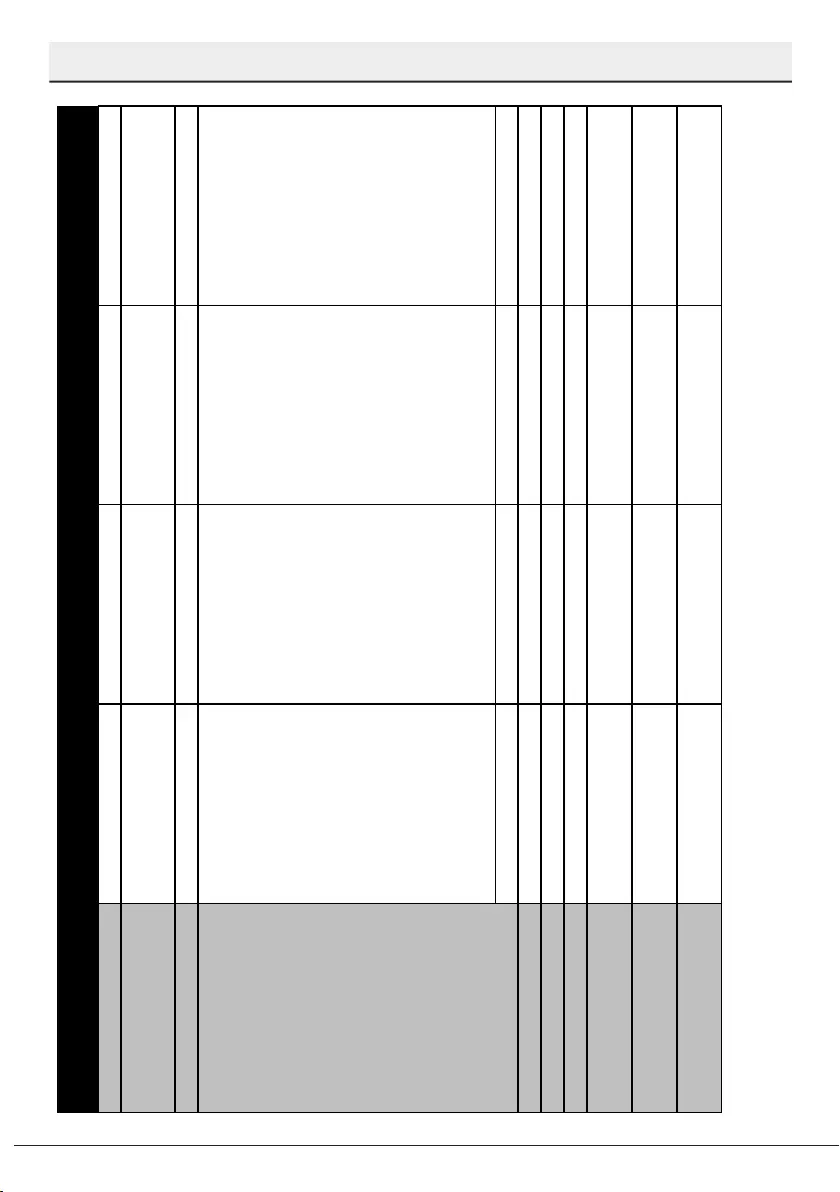
Cleaning the lters
Clean the flters at least once a week n
order for the machne operates effcently.
Check f food resdues are left on the flters.
If there are food resdues on flters, take
them out and clean well under runnng
water.
1. Turn the mcro flter (1) and coarse
flter (2) assembly counter clockwse
and pull t out from ts seatng.
2. Pull out the metal/plastc flter (3) from
the seatng.
3. Press the two pawls on the coarse
flter nwards and separate the coarse
flter from the assembly.

28
Dshwasher / User’s Manual
/40 EN
Maintenance and cleaning
4. Clean all three flters under tap water
by means of a brush.
5. Place the metal/plastc flter.
6. Place the coarse flter nto the mcro
flter. Make sure that t s properly
seated. Turn the coarse flter clockwse
untl a "clck" sound s heard.
C
Do not use the dshwasher
wthout flter.
C
Incorrect placement of the flters
wll reduce washng effcency.
Cleaning the hose lter
Damages on the machne that may be
caused by mpurtes comng from the
urban supply water or your own water
nstallaton (such as sand, drt, rust, etc.)
can be prevented by means of the flter
attached to the water nlet hose. Check the
flter and the hose regularly and clean them
f necessary.
1. Turn off the tap and remove the hose.
2. After takng out the flter, clean t
under runnng tap water.
3. Place the cleaned flter back to ts seat
n the hose.
4. Install the hose to tap.
(depends on model)
Dshwasher / User’s Manual
29 / 40
EN
Maintenance and cleaning
Cleaning the impellers
Clean the mpellers at least once a week n
order for the machne operates effcently.
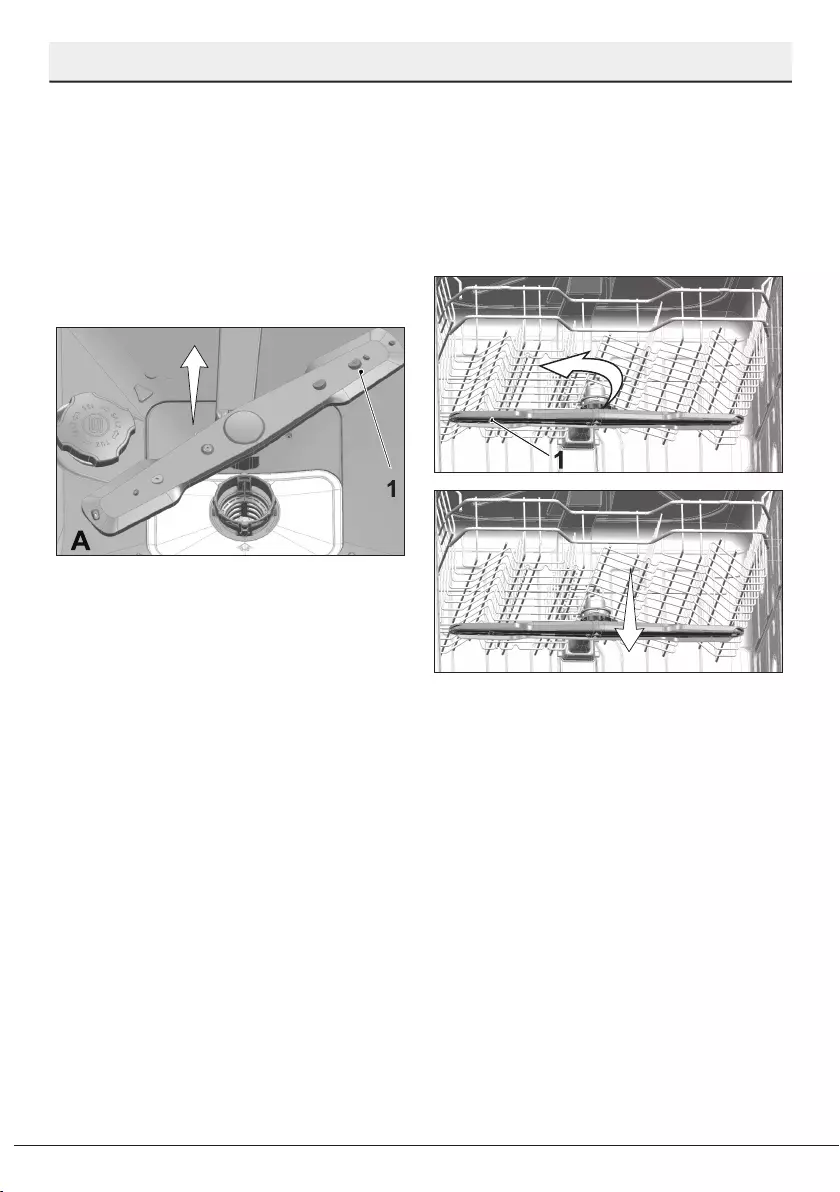
Lower impeller
Check f the holes on the lower mpeller (1)
are clogged. If they are clogged, remove
and clean the mpeller. You can pull the
lower mpeller up to remove t.
Upper impeller
Check f the holes on the upper mpeller (1)
are clogged. If they are clogged, remove
and clean the mpeller. Turn ts nut to left
to remove the upper mpeller.
Make sure that the nut s tghtened well
when nstallng the upper mpeller.

30
Dshwasher / User’s Manual
/40 EN
7Troubleshooting
Machine does not start.
• Power cable s unplugged. >>> Check f the power cable s plugged n.
• Fuse s blown. >>> Check the fuses n your house.
• Water s cut. >>> Make sure that the water nlet tap s open.
• Door of the machne s open. >>> Make sure that you have closed the door of the
machne.
• On / Off button s not pressed. >>> Make sure that you have turned on the machne by
pressng the On / Off button.
Dishes are not washed clean
• Dshes are not placed orderly n the machne. >>> Load the dshes as descrbed n the
user manual.
• Selected programme s unsutable. >>> Select a programme wth a hgher
temperature and cycle tme.
• Impellers are stuck. >>> Pror to startng the programme, turn the lower and upper
mpellers by hand to make sure that they rotate freely.
• Impeller holes are clogged. >>> Lower and upper mpeller holes mght be clogged
wth food remnants such as lemon pps. Clean the mpellers regularly as llustrated n
secton “Cleanng and Care”.
• Flters are clogged. >>> Check f the flter system s clean. Clean the flter system
regularly as llustrated n secton “Cleanng and Care”.
• Flters are nstalled ncorrectly. >>> Check the flter system and make sure that t s
nstalled correctly.
• Baskets are overloaded. >>> Do not overload the baskets n excess of ther capacty.
• Detergent s stored under unsutable condtons. >>> If you are usng powder
detergent, do not store the detergent package n humd places. Keep t n a closed
contaner f possble. For ease-of-storng, we recommend you to use tablet
detergents.
• Detergent s not suffcent. >>> If you are usng powder detergent, adjust the amount
of detergent accordng to the solng degree of your dshes and/or programme
defntons. We recommend you to use tablet detergents for optmum results.
• Rnse ad s not suffcent. >>> Check the rnse ad ndcator and add rnse ad f
necessary. Increase the rnse ad settng f there s enough amount of rnse ad n the
machne.
• Detergent dspenser ld s left open. >>> Make sure that the detergent dspenser ld s
closed tghtly after addng detergent.
Dishes are not dry at the end of cycle
• Dshes are not placed orderly n the machne. >>> Place your dshes n a way that no
water wll accumulate n them.

Dshwasher / User’s Manual
31 / 40
EN
Troubleshooting
• Rnse ad s not suffcent. >>> Check the rnse ad ndcator and add rnse ad f
necessary. Increase the rnse ad settng f there s enough amount of rnse ad n the
machne.
• Machne s unloaded rght after the programme s over. >>> Do not unload your
machne rght after washng process s completed. Slghtly open the door and wat for
evacuaton of the steam nsde for a whle. Unload the dshes after the peces cool down
to a touchable level. Start unloadng process from the lower basket. Thus, droppng of
water remaned on a pece at upper basket onto the peces at lower basket s prevented.
• Selected programme s unsutable. >>> Snce rnsng temperature s low at programmes
wth short duraton, dryng performance wll also be low. Select programmes wth longer
duraton for a hgher dryng performance.
• Surface qualty of the ktchen utensls s deterorated. >>> Desred washng
performance can not be obtaned on ktchen utensls wth deterorated surfaces and t
s not sutable to use such utensls n terms of hygene as well. Also, water can not flow
easly on deterorated surfaces. It s not recommended to wash such ktchen utensls n
dshwasher.
C
It s normal that dryng complants can be experenced wth Teflon ktchen
utensls. It s assocated wth the structure of Teflon. Snce the surface
tensons of Teflon and water are dfferent, water droplets wll reman as beads
on the Teflon surface.
Tea, cafe or lipstick stains remain on dishes.
• Selected programme s unsutable. >>> Select a programme wth a hgher temperature
and cycle tme.
• Surface qualty of the ktchen utensls s deterorated. >>> Tea and cafe stans or other
dye spots may not be cleaned n dshwasher when they have penetrated n deterorated
surfaces. Desred washng performance can not be obtaned on ktchen utensls wth
deterorated surfaces and t s not sutable to use such utensls n terms of hygene as
well. It s not recommended to wash such ktchen utensls n dshwasher.
• Detergent s stored under unsutable condtons. >>> If you are usng powder
detergent, do not store the detergent package n humd places. Keep t n a closed
contaner f possble. For ease-of-storng, we recommend you to use tablet detergents.
Lime traces remain on dishes and glassware gains a misty appearance
• Rnse ad s not suffcent. >>> Check the rnse ad ndcator and add rnse ad f
necessary. Increase the rnse ad settng f there s enough amount of rnse ad n the
machne.
• Water hardness settng s low or salt level s nsuffcent >>> Measure the hardness of
the supply water approprately and check the water hardness settng.
• Salt leakage exsts. >>> Pay attenton not to spll salt around the salt fllng hole whle
addng salt. Make sure that the salt reservor ld s tghtly closed after fnshng the
fllng process. Run the prewash programme to remove the salt that splled nsde the

32
Dshwasher / User’s Manual
/40 EN
Troubleshooting
machne. Snce the salt granules that wll reman under the ld wll dssolve durng
prewash, causng the ld loosen, check the ld once agan at the end of the programme.
There is a different odour in the machine
C
A new machne has a pecular odour. It wll fade out after a couple of washes.
• Flters are clogged. >>> Check f the flter system s clean. Clean the flter system
regularly as llustrated n secton “Cleanng and Care”.
• Drty dshes are kept n dshwasher for 2-3 days. >>> If you are not gong to start the
machne rght after you have put the dshes nto t, remove the remnants on the dshes
and run the Prewash programme wthout detergent every 2 days. In such cases, do not
close the door of the machne completely n order to avod odour buld up n machne.
You can also use commercally avalable odour removers or machne cleaners.
Rust, discoloration or surface deterioration occurs on dishes
• Salt leakage exsts. >>> Salt may cause deteroraton and oxdaton on metal surfaces.
Pay attenton not to spll salt around the salt fllng hole whle addng salt. Make sure
that the salt reservor ld s tghtly closed after fnshng the fllng process. Run the
prewash programme to remove the salt that splled nsde the machne. Snce the salt
granules that wll reman under the ld wll dssolve durng prewash, causng the ld
loosen, check the ld once agan at the end of the programme.
• Salty food remnants have remaned on dshes for a long tme. >>> If cutlery soled
wth such foods wll be kept watng n machne, drt must be removed by prewash or
dshes must be washed wthout beng kept watng.
• Electrc nstallaton s not grounded. >>>Check f your machne s connected to the
actual groundng lne. Otherwse, the statc electrc created n the product causes arcs
on the surfaces of metal tems creatng pores, removng the protectve cover on the
surface and causng dscoloraton.
• Intensve cleansers such as bleaches are used. >>> Protectve cover on metal surfaces
gets damaged and looses ts effcency n tme when t gets n contact wth cleansers
such as bleach. Do not wash your dshes wth bleach.
• Metal tems partcularly such as knves are used for purposes other then ther ntended
uses. >>> Protectve cover on the edges of knves may get damaged when they are
used for purposes such as openng cans. Do not use metal ktchen utensls out of ther
ntended uses.
• Cutlery are made of low qualty stanless steel. >>> Corroson on such tems s
nevtable; they should not be washed n dshwashers.
• Ktchen utensls that are already corroded are washed n dshwasher. >>> Rust on a
corroded tem can mgrate to other stanless steel surfaces and cause corroson on
those surfaces as well. Such tems should not be washed n dshwashers.

Dshwasher / User’s Manual
33 / 40
EN
Troubleshooting
Detergent remains in detergent dispenser.
• Detergent dspenser was damp when addng detergent. >>> Make sure that the
detergent dspenser s dred well pror to fllng t wth detergent.
• Detergent s added long before the washng process. >>> Pay attenton to add
detergent shortly before start-up of the washng.
• Openng of the detergent dspenser ld s prevented durng washng. >>> Place the
dshes n a way that wll not prevent the detergent dspenser ld from openng and the
water gong nto the machne from mpellers.
• Detergent s stored under unsutable condtons. >>> If you are usng powder
detergent, do not store the detergent package n humd places. Keep t n a closed
contaner f possble. For ease-of-storng, we recommend you to use tablet
detergents.
• Impeller holes are clogged. >>> Lower and upper mpeller holes mght be clogged
wth food remnants such as lemon pps. Clean the mpellers regularly as llustrated n
secton “Cleanng and Care”.
Decorations and ornaments on kitchen utensils are being erased.
C
Decorated glasses and decorated lustre porcelans are not sutable for washng
n the dshwasher. Manufacturers of some glassware and porcelan tableware
tems do not recommend washng such ktchen utensls n the dshwashers
ether.
Dishes are scratched.
C
Ktchen utensls that contans or are made of alumnum should not be washed
n dshwasher.
• Salt leakage exsts. >>> Pay attenton not to spll salt around the salt fllng hole
whle addng salt. Splled salt can cause scratches. Make sure that the salt reservor
ld s tghtly closed after fnshng the fllng process. Run the prewash programme to
remove the salt that splled nsde the machne. Snce the salt granules that wll reman
under the ld wll dssolve durng prewash, causng the ld loosen, check the ld once
agan at the end of the programme.
• Water hardness settng s low or salt level s nsuffcent >>> Measure the hardness of
the supply water approprately and check the water hardness settng.
• Dshes are not placed orderly n the machne. >>> When placng the glasses and other
glassware nto the basket lean them not aganst other dshes but the edges or racks of
the basket or the glass support tnes. Strkng of the glasses to each other or to other
dshes due to the mpact of water durng washng can cause breaks, or scratches on
ther surfaces.

34
Dshwasher / User’s Manual
/40 EN
Troubleshooting
A smear remains on glasses that resembles milk stain which can not be
removed when wiped by hand. A bluish / rainbow appearance occurs when
the glass is pointed to light.
• Excessve rnse ad s used. >>>Lower rnse ad settng. Clean the splled rnse ad
when addng rnse ad.
• Corroson has occurred on glass due to soft water. >>> Measure the hardness of the
supply water approprately and check the water hardness settng. If your supply water
s soft (<5 dH), do not use salt. Choose programmes that wash n hgher temperatures
(e.g. 60-65°C). You can also use glass protectve detergents that are commercally
avalable.
Foam forms in the machine.
• Dshes are washed wth hand-wash detergent by hand but not rnsed before placng
them nto the machne. >>> Hand-wash detergents do not contan antfoam. There s
no need to hand-wash the dshes before placng them nto the machne. Removng the
coarse sol on the dshes under tap water, wth a tssue paper or fork wll be suffcent.
• Rnse ad has splled nto the machne when addng rnse ad. >>> Take care that rnse
ad s not splled n the machne when you are fllng t. Clean any splled rnse at wth
the help of a tssue paper/towel.
• Ld of the rnse ad reservor s left open. >>> Make sure that the ld of the rnse ad
reservor s closed after addng rnse ad.
Kitchen utensils are broken.
• Dshes are not placed orderly n the machne. >>> Load the dshes as descrbed n the
user manual.
• Baskets are overloaded. >>> Do not overload the baskets n excess of ther capacty.
Water remains in the dishwasher at the end of the programme.
• Flters are clogged. >>> Check f the flter system s clean. Clean the flter system
regularly as llustrated n secton “Cleanng and Care”.
• Dscharge hose s clogged/blocked. >>> Check the dscharge hose. If necessary,
remove the dscharge hose, clear the blockage and nsert s as llustrated n the user
manual.
C
If you cannot elmnate the problem although you follow the nstructons n
ths secton, consult your dealer or the Authorsed Servce Agent. Never try to
repar a nonfunctonal product yourself.

Dshwasher / User’s Manual
35 / 40
EN
BEKO UK AND IRELAND STANDARD MANUFACTURER GUARANTEE
TERMS AND CONDITIONS
Your new Beko product s guaranteed aganst faulty materals, defectve components or
manufacturng defects.
The standard guarantee starts from the date of original purchase
of the product, and lasts for a period of twelve (12) months unless
Beko plc (the “Manufacturer”) agrees to extend the guarantee for the
product in writing.
If you have purchased an American style Fridge freezer, the standard
guarantee starts from the date of original purchase of the product,
and lasts for a period of twenty four (24) months unless Beko plc (the
“Manufacturer”) agrees to extend the guarantee for the product in
writing.
If you have any questons about the guarantee on your product (ncludng how long t
s vald), please contact your retaler or our contact centre on 0333 207 9710 (UK and
Northern Ireland) or 01 862 3411 (Republc of Ireland)
Ths guarantee does not n any way dmnsh or affect your statutory rghts n connecton
wth the product. Ths guarantee s n addton to your statutory rghts as a consumer. If
you have any questons about these rghts, please contact the retaler from whch you
purchased the product. In certan crcumstances, t s possble that your statutory rghts
may offer addtonal or hgher levels of protecton than those offered under the terms of
ths guarantee.
What is covered by this guarantee?
• Repars to the product requred as a result of faulty materals, defectve components
or manufacturng defects.
• Functonal replacement parts to repar a product.
• The costs of a Beko Approved Engneer to carry out the repar.
What is not covered?
• Transt and delvery damage.
• Cabnet or appearance parts, ncludng but not lmted to control knobs, flaps and
handles.
• Accessores and/or consumable tems ncludng but not lmted to ce trays, scrapers,
cutlery baskets, flters and lght bulbs.
• Repars necessary as a drect or ndrect result of:
Accdental damage, msuse or abuse of a product.
An attempted repar of a product by anyone other than a Beko Approved Engneer (the
“Engneer”).
Installaton or use of a product where such nstallaton or use fals to meet the
requrements contaned n ths guarantee or the User Instructons Booklet.
8Guarantee

36
Dshwasher / User’s Manual
/40 EN
Guarantee
• Repars to a product operated at any tme on commercal or non-resdental household
premses (unless we have prevously agreed to the nstallaton envronment).
Ths guarantee s lmted to the cost of reparng the product. To the extent permtted
by law, the Manufacturer does not accept and wll not be held lable for any fnancal loss
ncurred n connecton wth the falure of any product to operate n accordance wth the
expected standards. Such fnancal loss ncludes but s not lmted to loss arsng from:
• Tme taken off work.
• Damaged food, clothng or other tems.
• Meals taken at restaurants or from takeaways.
• General compensaton for nconvenence.
Important Notes
1. Your product s desgned and bult for domestc household use only.
2. The guarantee wll automatcally be vod f the product s nstalled or s used n
commercal or non-resdental domestc household premses, unless we have
prevously agreed to the nstallaton envronment.
3. The product must be correctly nstalled, located and operated n accordance wth the
nstructons contaned n the User Instructons Booklet provded wth your product.
4. Professonal nstallaton by a qualfed Electrcal Domestc Applance Installer s
recommended for all Washng Machnes, Dshwashers and Electrc Cookers (as
ncorrect nstallaton may result n you havng to pay for the cost of reparng the
product).
5. Gas Cookers must be professonally nstalled by a Gas Safe (or Gas Networks Ireland for
Republc of Ireland) regstered gas nstaller.
6. Ths guarantee s gven n respect of products purchased and used wthn the Unted
Kngdom and the Republc of Ireland.
7. Ths guarantee s effectve from the ntal date of purchase of a new product from an
authorsed retaler and wll be vod f the product s resold.
8. Ths guarantee does not apply to graded sales (where the product s purchased as a
“second”).
9. Possesson of a copy of these terms and condtons does not necessarly mean that a
product has the beneft of ths guarantee. If you have any questons, please call our
Call Centre on the number set out above.
10. The Manufacturer reserves the rght to termnate the guarantee f ts staff or
representatves are subjected to physcal or verbal abuse n the course of carryng out
ther dutes.
11. Optonal extras, where avalable (.e. extendable feet) are suppled on a chargeable
bass only.

Dshwasher / User’s Manual
37 / 40
EN
Guarantee
Does Beko offer replacements?
Ths s a repar-only guarantee. On occason, the Manufacturer may at ts sole dscreton,
replace your product wth a new product nstead of carryng out a repar. Where a
replacement s offered, ths would normally be an dentcal model but when ths s not
possble, a model of smlar specfcaton wll be provded. The Manufacturer wll cover the
costs and arrange for the delvery of the new product and for the return of the old product.
Any costs related to dsconnectng the faulty product and nstallng the replacement
product wll not be borne by the Manufacturer unless prevously agreed to n wrtng. The
orgnal guarantee wll contnue to apply to the replacement product; the new product wll
not come wth a new guarantee.
When will the repair take place?
Our Engneers work Monday to Frday 9.00am to 5.00pm. Appontments outsde
these hours may be possble at the sole dscreton of the Manufacturer but cannot be
guaranteed. Whlst our Engneers wll endeavour to mnmze nconvenence and to meet
requests for specfc tmed appontments, ths cannot be guaranteed. We wll not be lable
for delays or f t s unable to carry out a repar because a convenent appontment cannot
be arranged.
Will there be any charge for the repairs?
It s your responsblty to provde evdence to the Engneer that your product s covered by
ths guarantee wth a proof of purchase. The Manufacturer reserves the rght to charge for
the reasonable cost of any servce call f:
• You cannot provde evdence that your product s covered by ths guarantee.
• Where a servce call has been made and the engneer fnds that there s no fault wth
your product.
• That your product has not been nstalled or operated n accordance wth the User
Instructons Booklet.
• That the fault was caused by somethng other than faulty materals, defectve
components or manufacturng defects.
• For mssed appontments.
Payment of these costs are due mmedately upon the Engneer provdng you wth an
nvoce. The Manufacturer reserves the rght to termnate the guarantee f you fal to pay
the costs for the servce call n a tmely manner.
If you are a resdent of the Unted Kngdom, ths guarantee wll be governed by Englsh
law and subject to the Englsh Courts, save where you lve n another part of the Unted
Kngdom, n whch case the law and courts of that locaton wll apply.
If you are resdent n the Republc of Ireland, ths guarantee wll be governed by Irsh law
and the Irsh courts wll have jursdcton.
Ths guarantee s provded by Beko plc. Beko House, 1 Greenhll Crescent, Watford,
Hertfordshre. WD18 8QU.
Beko plc s regstered n England and Wales wth company regstraton number 02415578.
38
Dshwasher / User’s Manual
/40 EN
Guarantee
BEKO UK AND IRELAND BUILT-IN APPLIANCES GUARANTEE TERMS AND
CONDITIONS
If you have purchased a built-in or integrated appliance, and
registered it within 90 days of purchase by completing the online
registration form, then the standard 12 month guarantee will be
extended to 24 months, under the same terms and conditions as
detailed in our Standard Guarantee Terms and Conditions.
HOW TO OBTAIN SERVICE FOR YOUR APPLIANCE
Please keep your purchase recept or other proof of purchase detals n a safe place; you
wll need to have ths documentaton avalable should the product requre attenton under
guarantee.
Please take a few moments to complete the detals below, as you wll need ths
nformaton when you call us, or to use our onlne servces. When you call us you may be
requred to nput your seral number nto your telephone keypad. For help please vst
beko.co.uk/support/model-fnder
• The product model number s prnted on the Operatng Instructon Booklet / User gude
• The product model and seral number s prnted on the Ratng Label affxed to the
applance.
• The Retaler (Purchased from) and Date of purchase wll be prnted on your purchase
recept or other proof of purchase paperwork
Recordng of these detals alone wll not count as proof of purchase. A vald proof of
purchase s requred for requestng servce under guarantee.
Model number Seral number Purchased from Date of purchase
For service under guarantee or for product advice please call our
Contact centre
Before requestng servce please check the troubleshootng gude n the Operatng
Instructons booklet, as a charge may be leved where no fault s found, and even though
your product may stll be under guarantee.
After arrangng servce the area around the product must be easly accessble to the
Engneer, wthout the need for cabnets or furnture to be removed or moved.
It s your responsblty to ensure our Engneers have a clean and safe envronment to carry
out any repars.
Please have your Model number and Seral number avalable when you call us, as you may
be requred to nput your seral number nto your telephone keypad durng your call.

Dshwasher / User’s Manual
39 / 40
EN
Guarantee
UK Mainland & Northern Ireland:
0333 207 9710
Landlne or moble calls to 0333 numbers cost no more than calls to geographc numbers
01 or 02, and are charged at the basc rate. Calls from landlnes and mobles are ncluded
n free call packages but please check wth your telephone servce provder for exact call
charges.
Republic of Ireland:
01 862 3411
Service once the manufacturers guarantee has expired
If you have purchased an extended guarantee please refer to the nstructons contaned
wthn the extended guarantee agreement document, otherwse please call us usng the
approprate number above, where servce can be obtaned at a charge.
Should you experence any dffculty n obtanng servce please call us on 0333 207 9710
or 01 862 3411
Contact us though our website
Send us a secure message through our onlne contact us form. Please vst our webste,
clck Contact Us and choose a product support topc from the lst of optons. Complete the
requred detals and clck send message.
Product registrations
For UK regstratons please vst beko.co.uk/regster and for the Republc of Ireland vst
beko.e/regster.