Table of Contents
- Before Using the Product
- Preparations
- Connecting and Using a Source Device
- Using MDC
- Player feature
- Screen Adjustment
- OnScreen Display
- Network
- System
- Support
- Troubleshooting Guide
- Specifications
- Appendix
Samsung LH75OHFPLBC/ZA User Manual
Displayed below is the user manual for LH75OHFPLBC/ZA by Samsung which is a product in the Signage Displays category. This manual has pages.
Related Manuals

User Manual
The color and the appearance may differ depending on the product, and
performance.
OH75F

Table of contents
Before Using the Product
Copyright 6
Safety Precautions 7
Cleaning 7
Storage 8
Electricity and Safety 8
Installation 9
Operation 11
Preparations
Checking the Components 14
Components 14
Parts 15
Front 15
Remote Control 17
Before Installing the Product (Installation
Guide) 19
Ventilation 19
Wall Mount Specifications 20
Remote Control (RS232C) 21
Connecting and Using
Before Connecting 33
Pre-connection Checkpoints 33
Connecting to a PC 36
Connecting to a Video Device 37
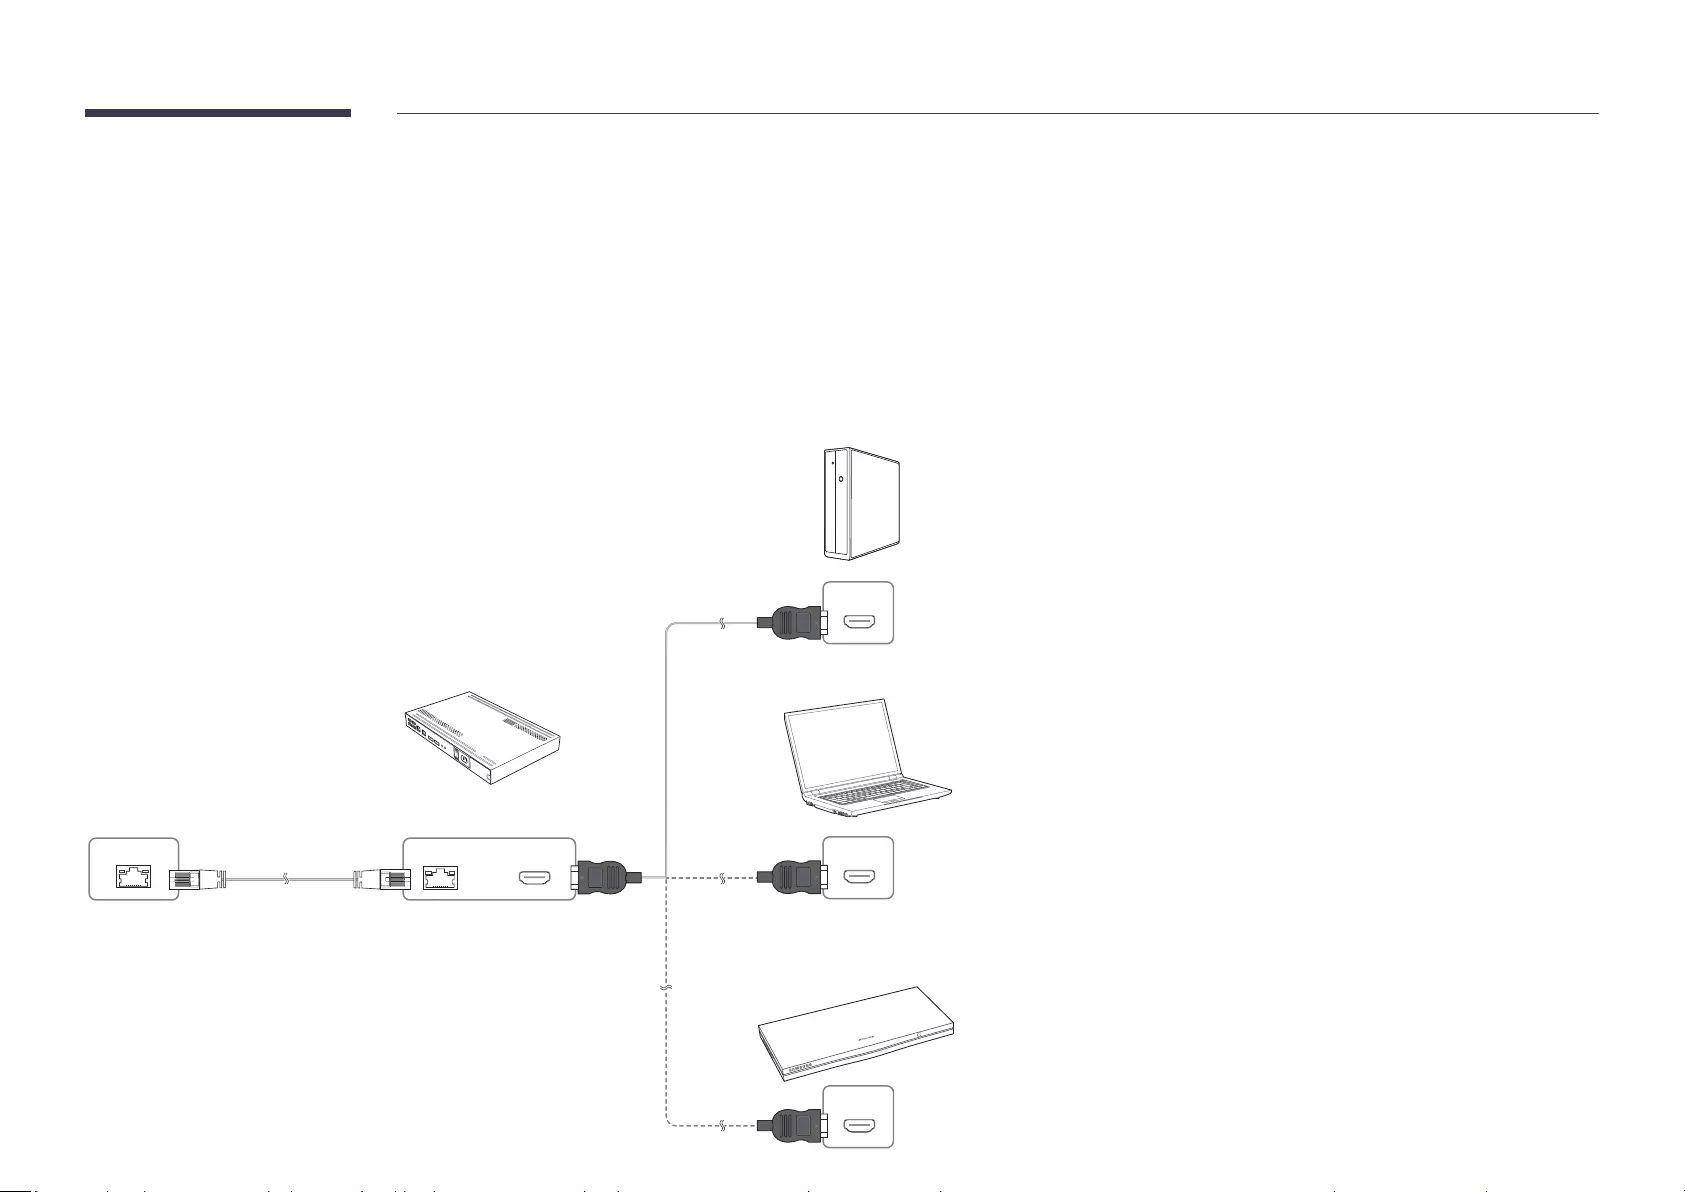
Connecting the HDBase-T 38
Connecting to an Audio System 39
Changing the Input source 40
Source 40
Web Browser 41
Settings 41
Refresh Options 43
Using MDC
MDC Program Installation/Uninstallation 44
Installation 44
Uninstallation 44
Connecting to MDC 45
communications standards) 45
Player feature
Player 47
When content is running 48
Player 49
Schedule 54
Clone Product 55
ID Settings 56
D ID
PC Connection C
Video Wall 57
Video Wall 57
Horizontal x Vertical 57
Screen Position 58
Format 58
Network Status 59

Table of contents
Picture Mode 60
On/Off Timer 61
On Timer
Off Timer
Holiday Management
Ticker 63
URL Launcher 64
URL Launcher Settings 65
Approving a connected device from
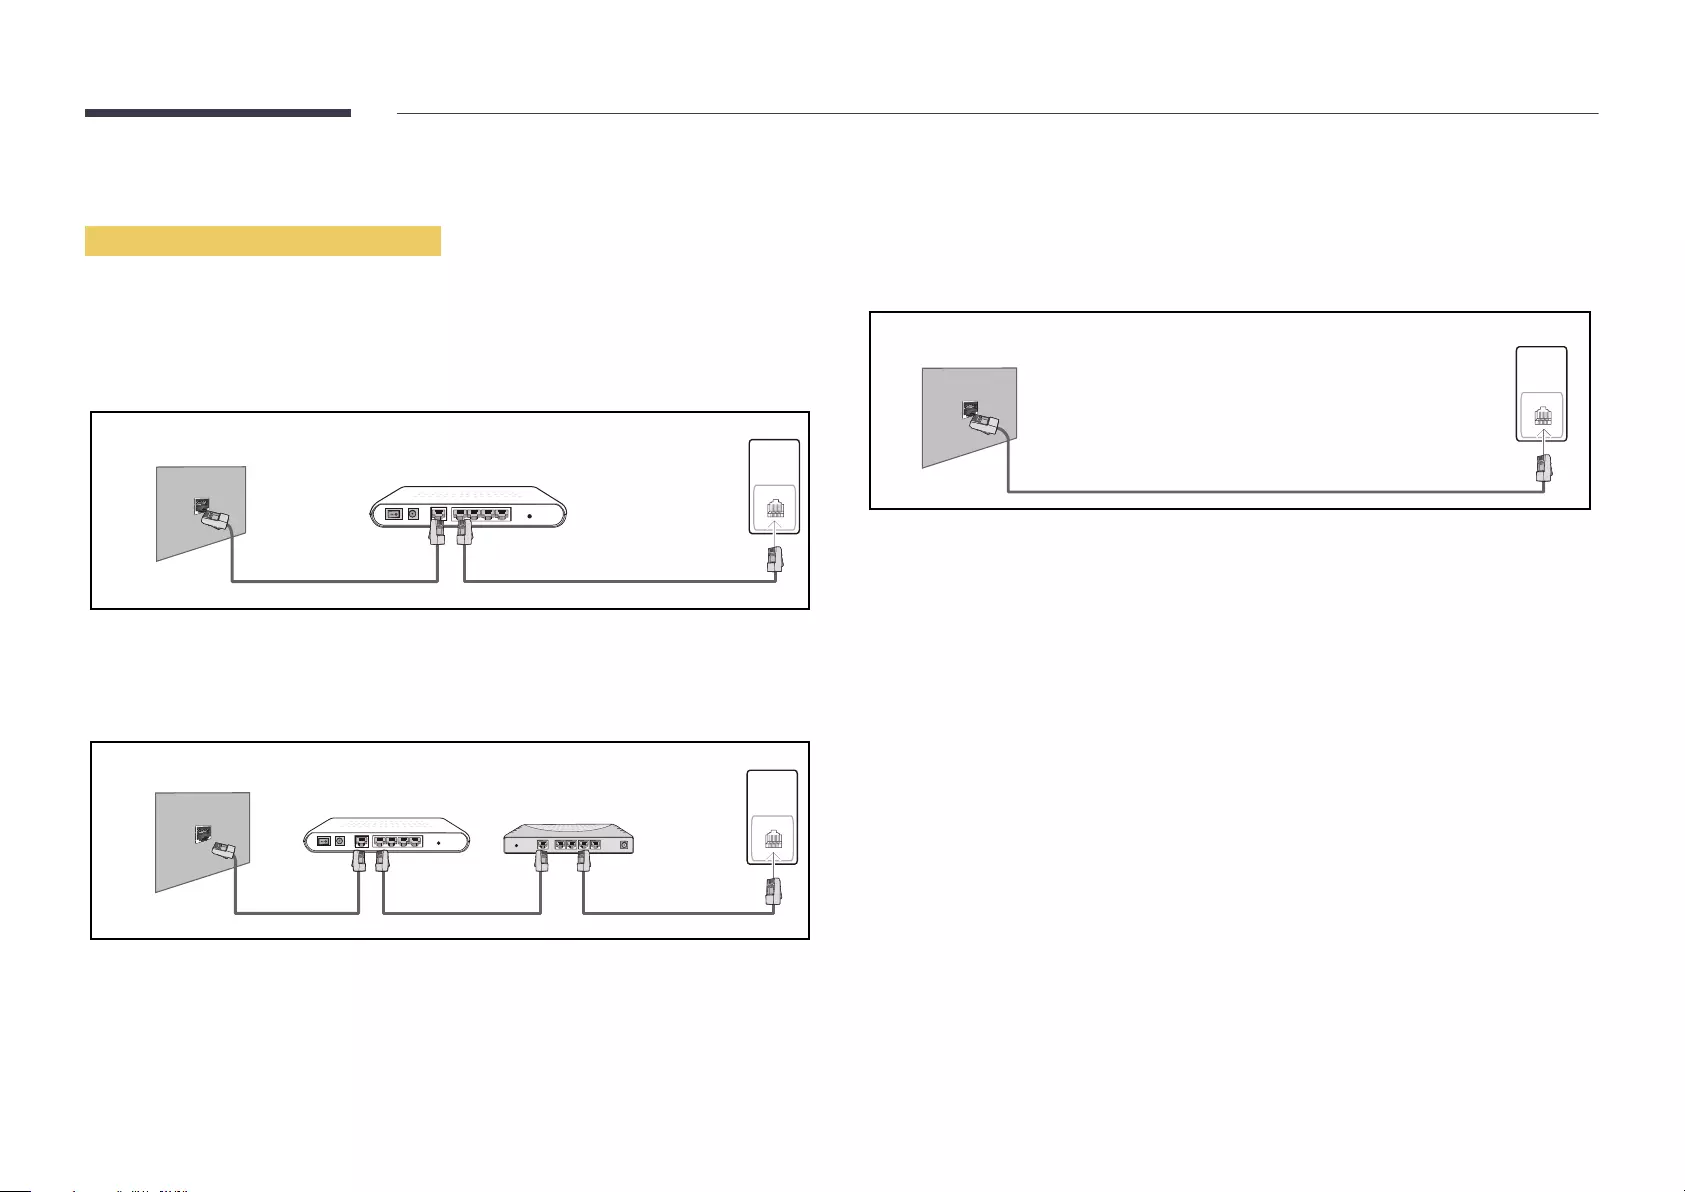
the server 66
Picture Mode 68
Backlight / Contrast / Brightness / Sharpness /
Color / Tint (G/R) 69
Color Temperature 70
White Balance 70
Point 70
10 Point 70
Gamma 71
Calibrated Value 71
Advanced Settings 72
Dynamic Contrast
Black Tone
Flesh Tone
RGB Only Mode
Color Space
HDMI UHD Color 73
Motion Lighting 73
Picture Options 74
Color Tone 74
Digital Clean V 74
HDMI Black L 75
Film Mode 75
Smart LED 75
Dynamic Backlight 75
Picture Size 76
Picture Size
Fit to Screen
Zoom/Position
Picture Off 77
Reset Picture 77
OnScreen Display
Display Orientation 78
Onscreen Menu Orientation 78
Source Content Orientation 78
Aspect Ratio 78
Screen Protection 79
Auto Protection Time 79
Screen Burn Protection 79
Message Display 82
Source Info
No Signal Message
MDC Message
D Status Message
Language 83
Reset OnScreen Display 83
N
Network Status 84
Open Network Settings 84
N type 84
Server Network Settings 87
Connect to S 87
MagicInfo Mode 87
S Access 87
FTP Mode 87
3

Table of contents
Proxy S 87
Device Name 87
System
Accessibility 88
Menu Transparency 88
High Contrast 88
Enlarge 88
Start Setup 89
Time 90
Clock Set 90
NTP Settings 90
DST 90
Sleep Timer 90
P On Delay 90
Auto Source Switching 91
Auto Source S 91
Primary Source R 91
Primary Source 91
Secondary Source 91
Power Control 92
Auto P On
Max. P S
S Control
N S 93
P Button 93
Eco Solution 94
Energy S Mode 94
Eco Sensor 94
Screen Lamp Schedule 95
No Signal P Off 95
Auto P Off 95
Fan & Temperature 96
Fan Control
Fan Speed Setting
Outdoor Mode
Temperature Control
Input Device Manager 97
K Language 97
K Type 97
Input Language Shortcut 97
Play via 97
Change PIN 98
Security 99
Safety Lock On 99
USB Auto Play Lock 99
Remote Management 99
General 100
Smart Security 100
AnynetHDMI-CEC) 101
HDMI Hot Plug 103
Custom Logo 103
Game Mode 104
Reset System 104
Support
Software Update 105
Update 105
Auto Update 105
Contact Samsung 105
Reset All 105
Requirements Before Contacting Samsung
Customer Service Center 106
Q & A 112
Specifications
General 114
Preset Timing Modes 116
4

Table of contents
Appendix
Responsibility for the Pay Service (Cost to
Customers) 119
Not a product defect 119
fault 119
Others 119
Optimum Picture Quality and
Afterimage Burn-in Prevention 120
License 122
Terminology 123
5

Before Using the Product
Copyright
©
VESA, DPM and DDC are registered trademarks of the Video Electronics Standards Association.
–
–
Chapter 01
7
Safety Precautions
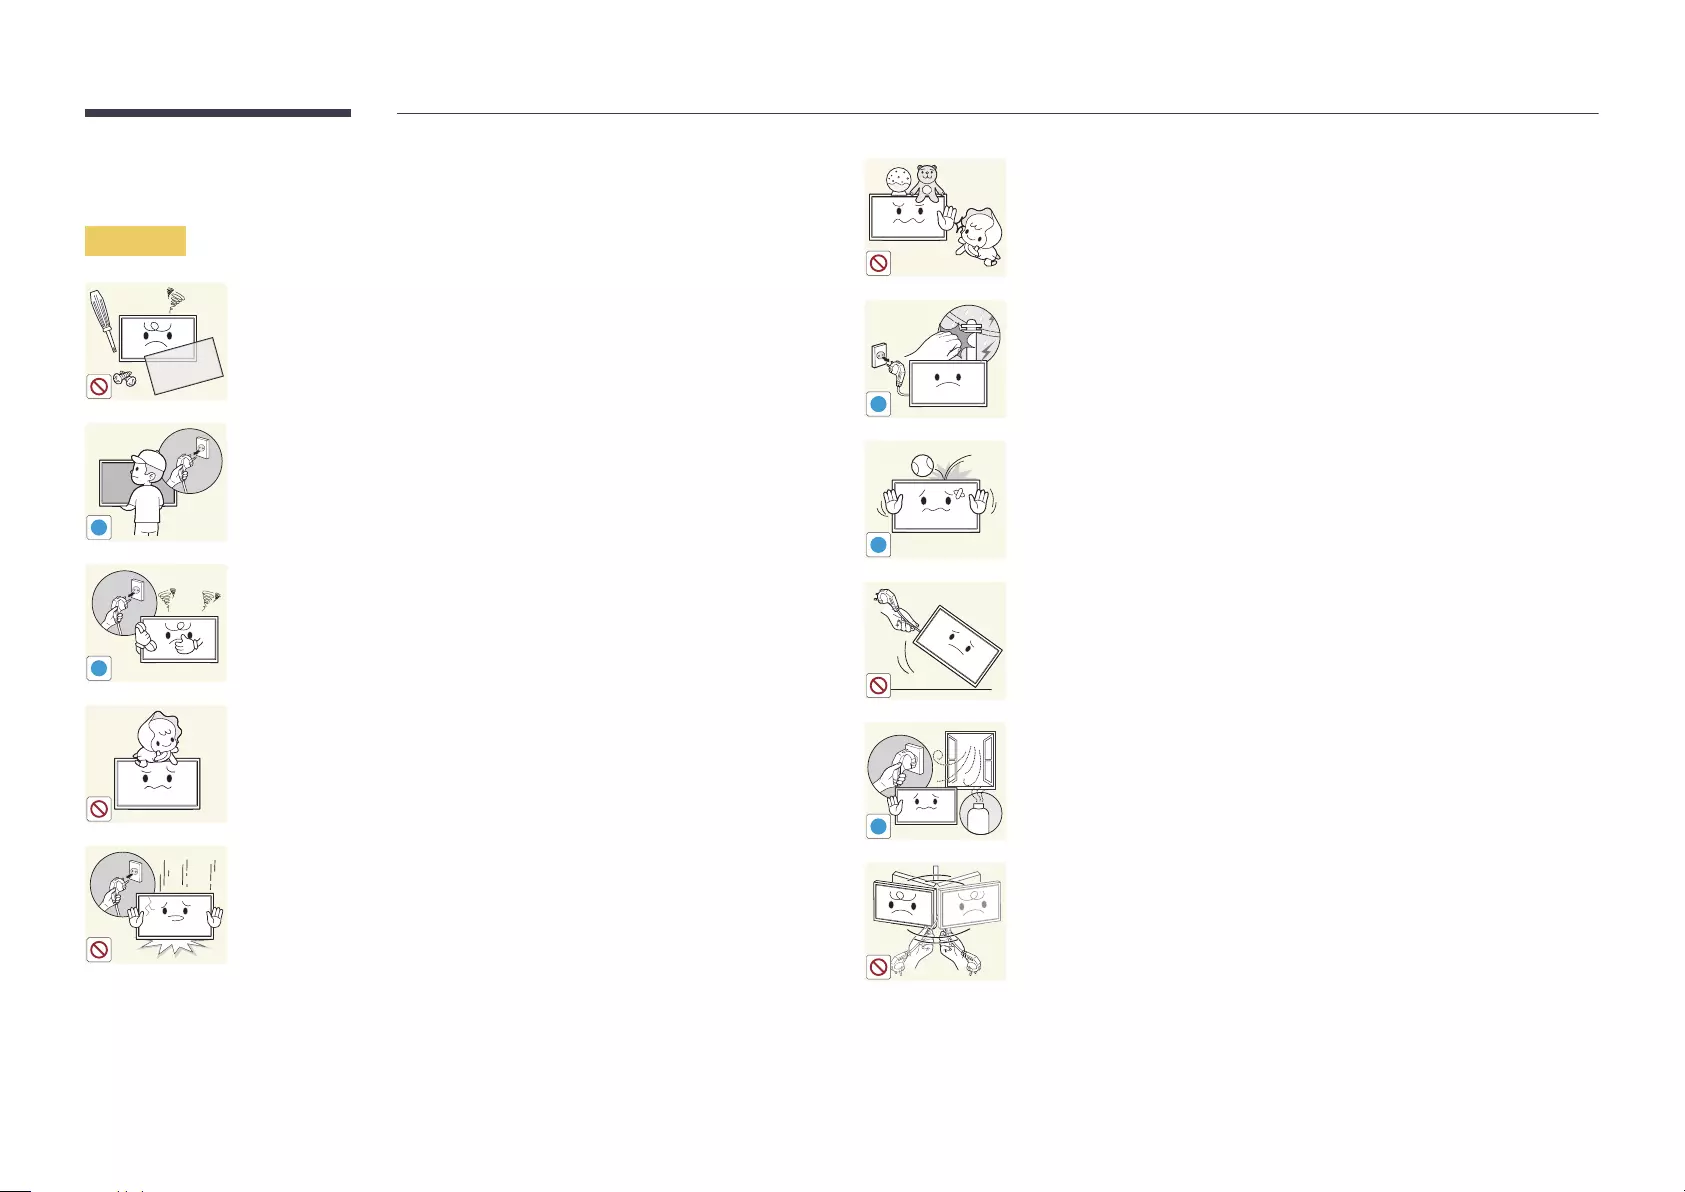
Warning
Caution
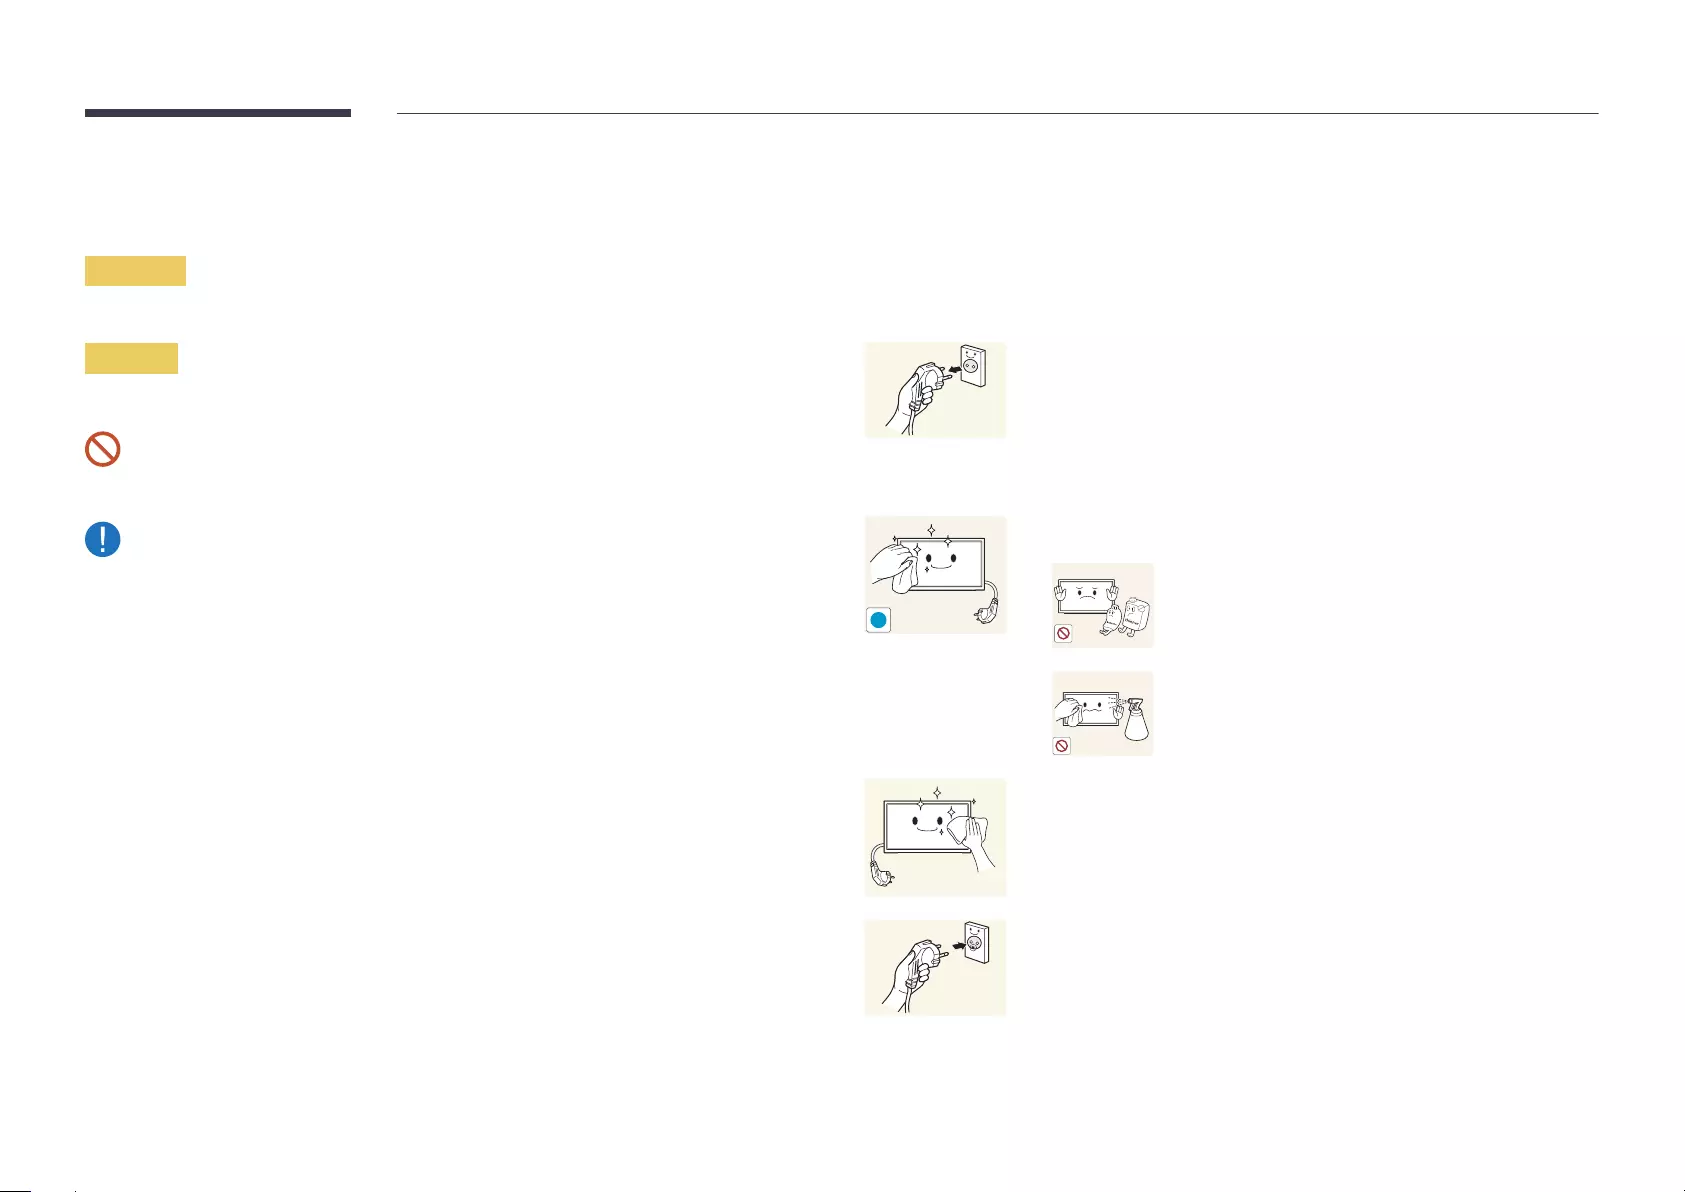
Cleaning
1
2
!
3
product.
4
the exterior of the product.
5
finished.
6
8
Storage
Electricity and Safety
Warning
An electric shock or fire may result.
shock may result.
!
An unsecure connection may cause a fire.
!
Damage to the cord may result in a fire or electric shock.
A fire or electric shock may result.
!
A fire may result.
9
Caution
!
A fire or electric shock may result.
!
!
socket.
An electric shock or fire may result.
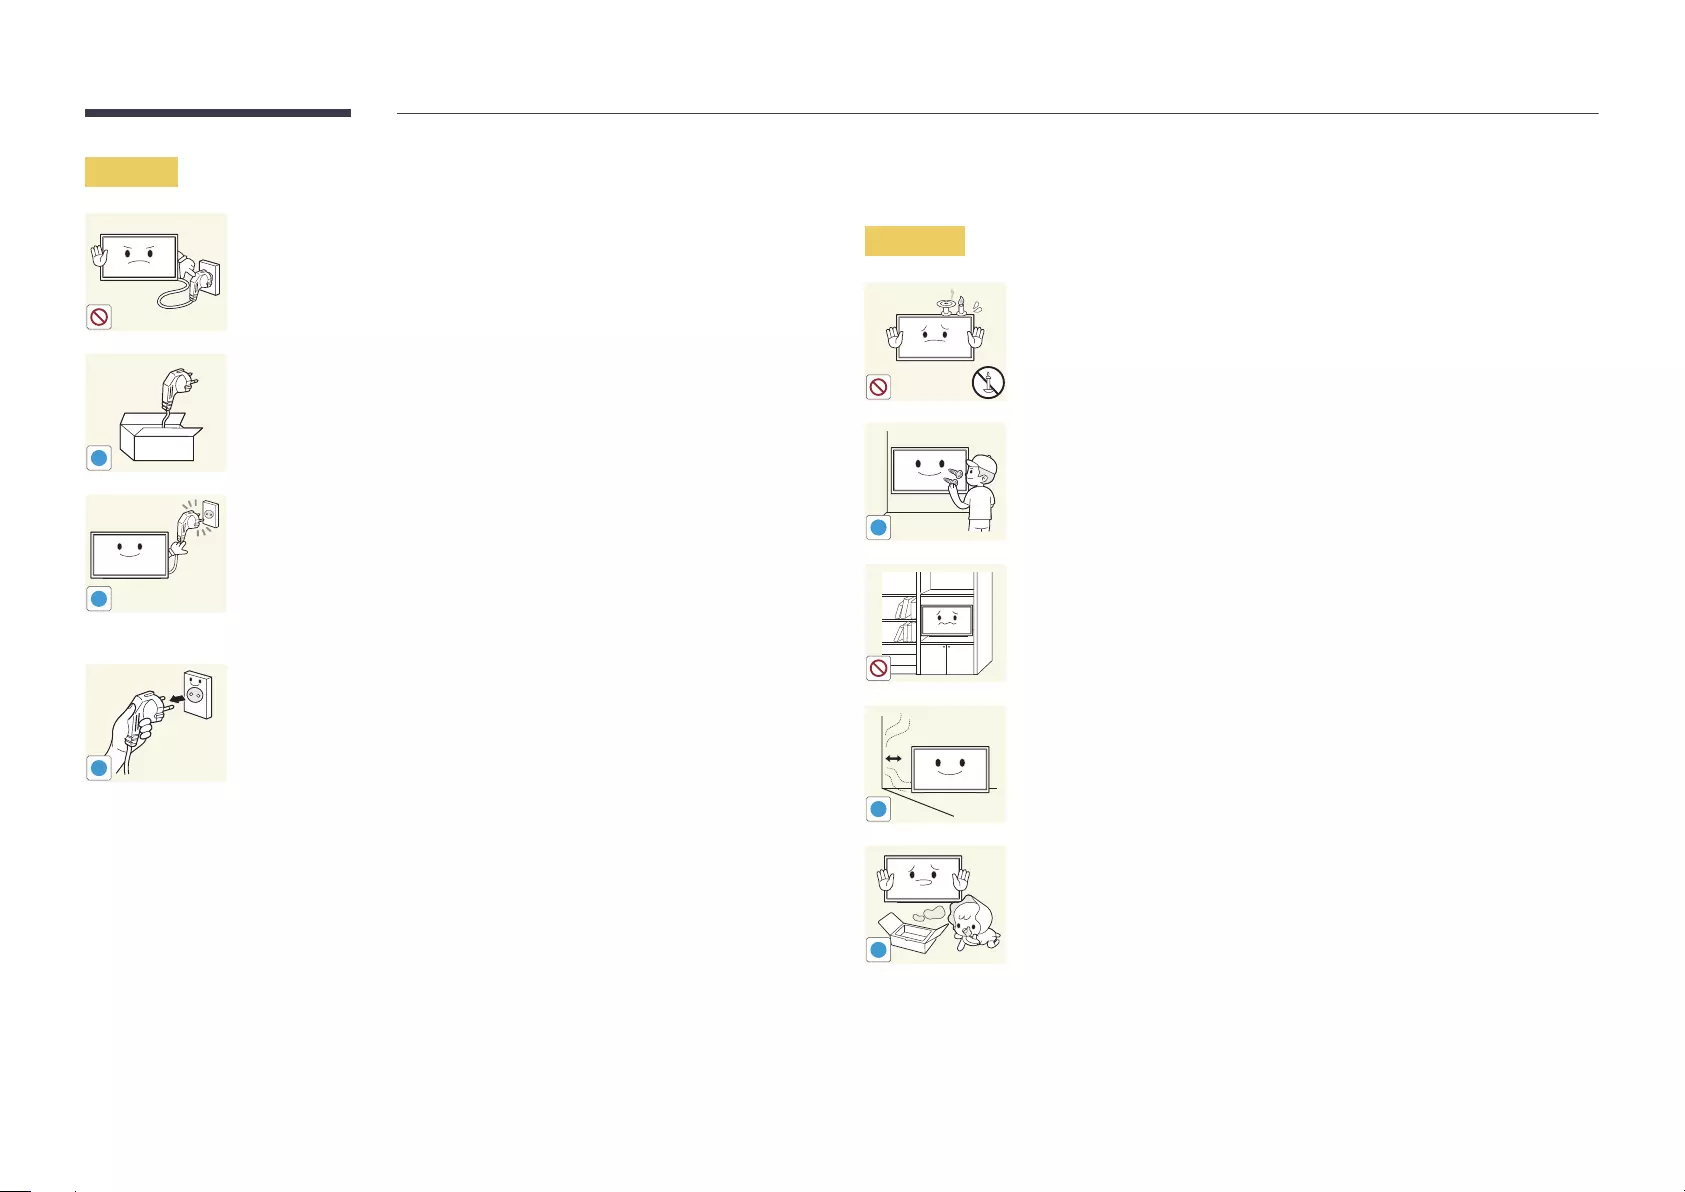
Installation
Warning
DO NOT PLACE CANDLES, INSECT REPELLANTS OR CIGARETTES ON
TOP OF THE PRODUCT. DO NOT INSTALL THE PRODUCT NEAR HEAT
SOURCES.
A fire may result.
!
An increased internal temperature may cause a fire.
!
An increased internal temperature may cause a fire.
!
Keep the plastic packaging out of the reach of children.
Children may suffocate.
10
the product or cause a fire.
!
A fire or electric shock may result.
surface.
not install the product in a kitchen or near a kitchen counter.
Precautions during installation and storage
P. 34)
Caution
!
!
SAMSUNG
!
continuously for an extended period of time) may seriously affect its
performance.
to install the product at such a place.
11
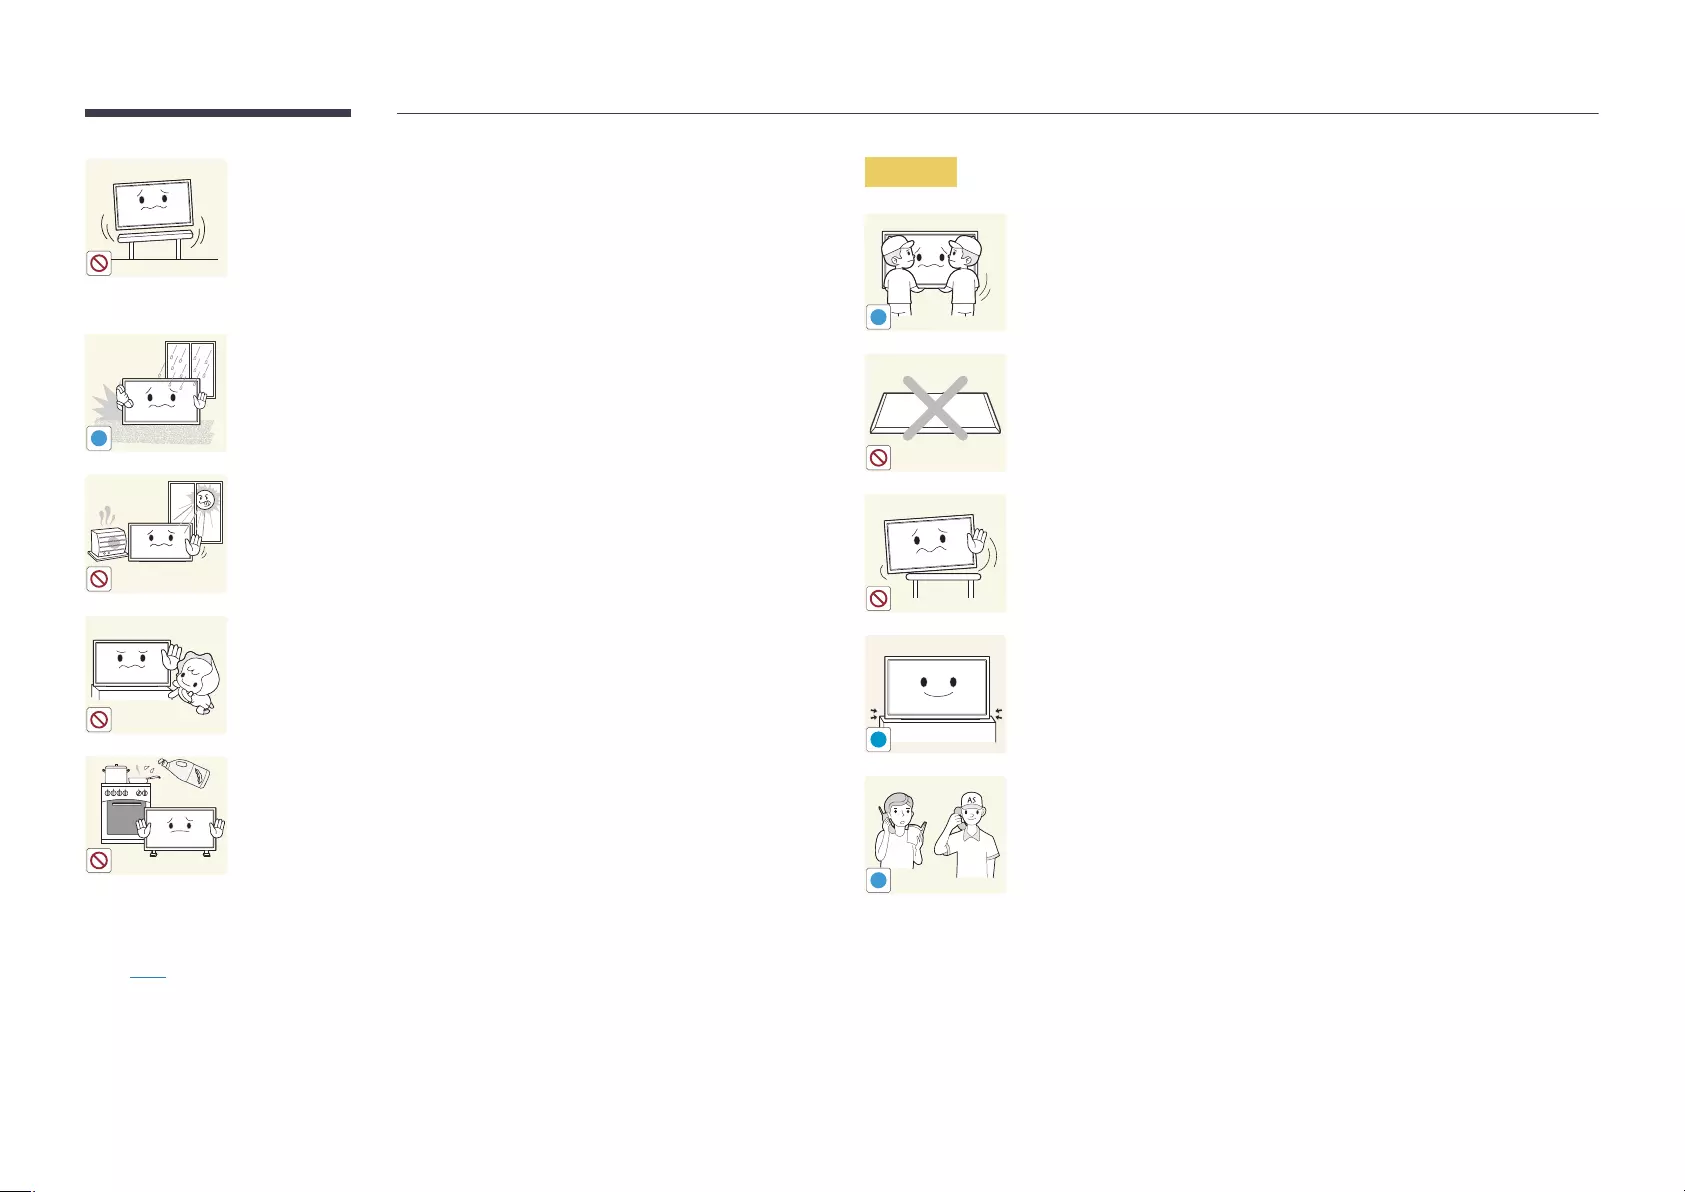
Operation
Warning
or modify the product yourself.
A fire or electric shock may result.
!
Damage to the cord may result in a fire or electric shock.
!
An electric shock or fire may result.
If the product is dropped or the outer case is damaged, turn off the
Continued use can result in a fire or electric shock.
etc.) on top of the product.
!
A fire or electric shock may result.
!
A fire or electric shock may result.
Product failure, an electric shock or fire may result from a
!GAS
Sparks can cause an explosion or fire.
Product failure, an electric shock or fire may result from a

!
near the product.
An explosion or fire may result.
An increased internal temperature may cause a fire.
100
Product failure, an electric shock or fire may result.
Product failure, an electric shock or fire may result.
Caution
!
-_-
!
shock or electric leakage.
!
Use the product at the recommended resolution and frequency.
Your eyesight may deteriorate.
!
Looking at the screen too close for an extended period of time can
deteriorate your eyesight.
A fire or electric shock may result.
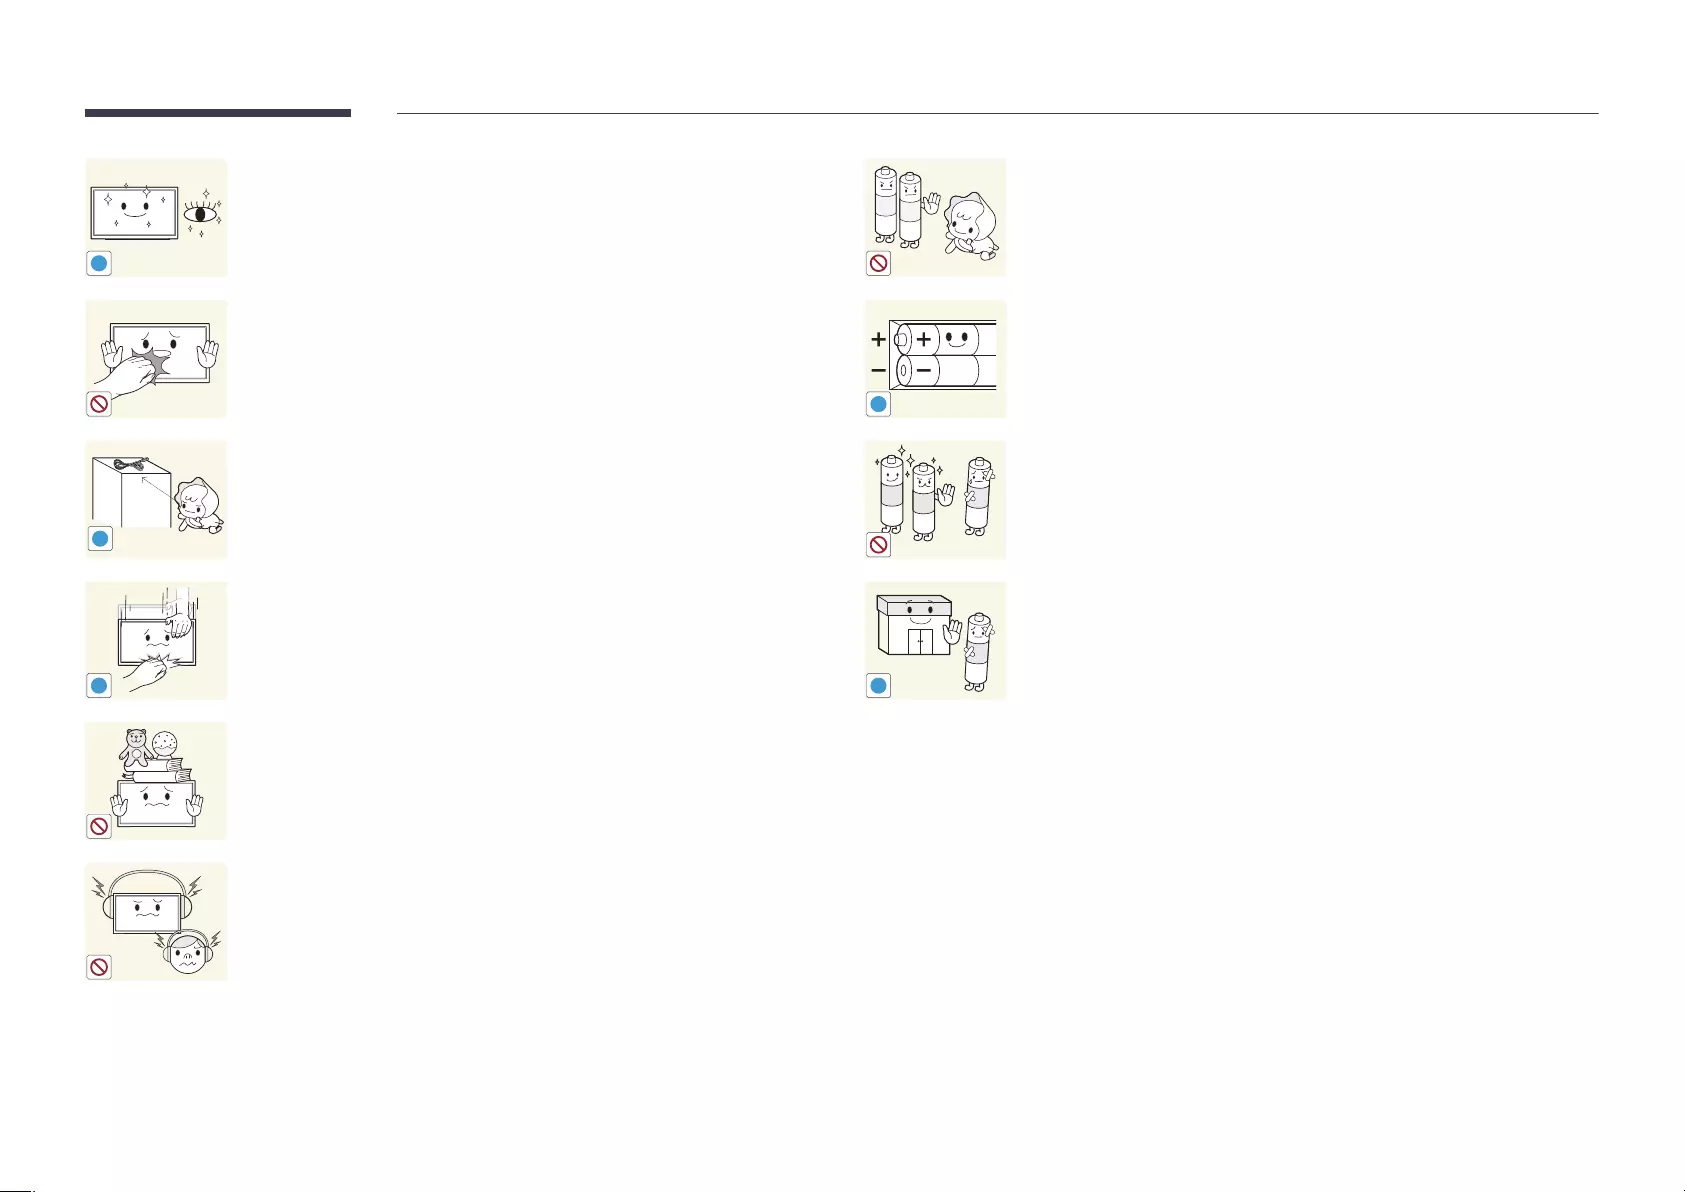
13
!
use.
!
Store small accessories out of the reach of children.
!
high.
location that children or infants cannot reach.
doctor immediately.
!
liquid.
!
recycling.

14
–
purchased the product if any
components are missing.
– The appearance of the components
–
product. To install a stand, you can
purchase one separately.
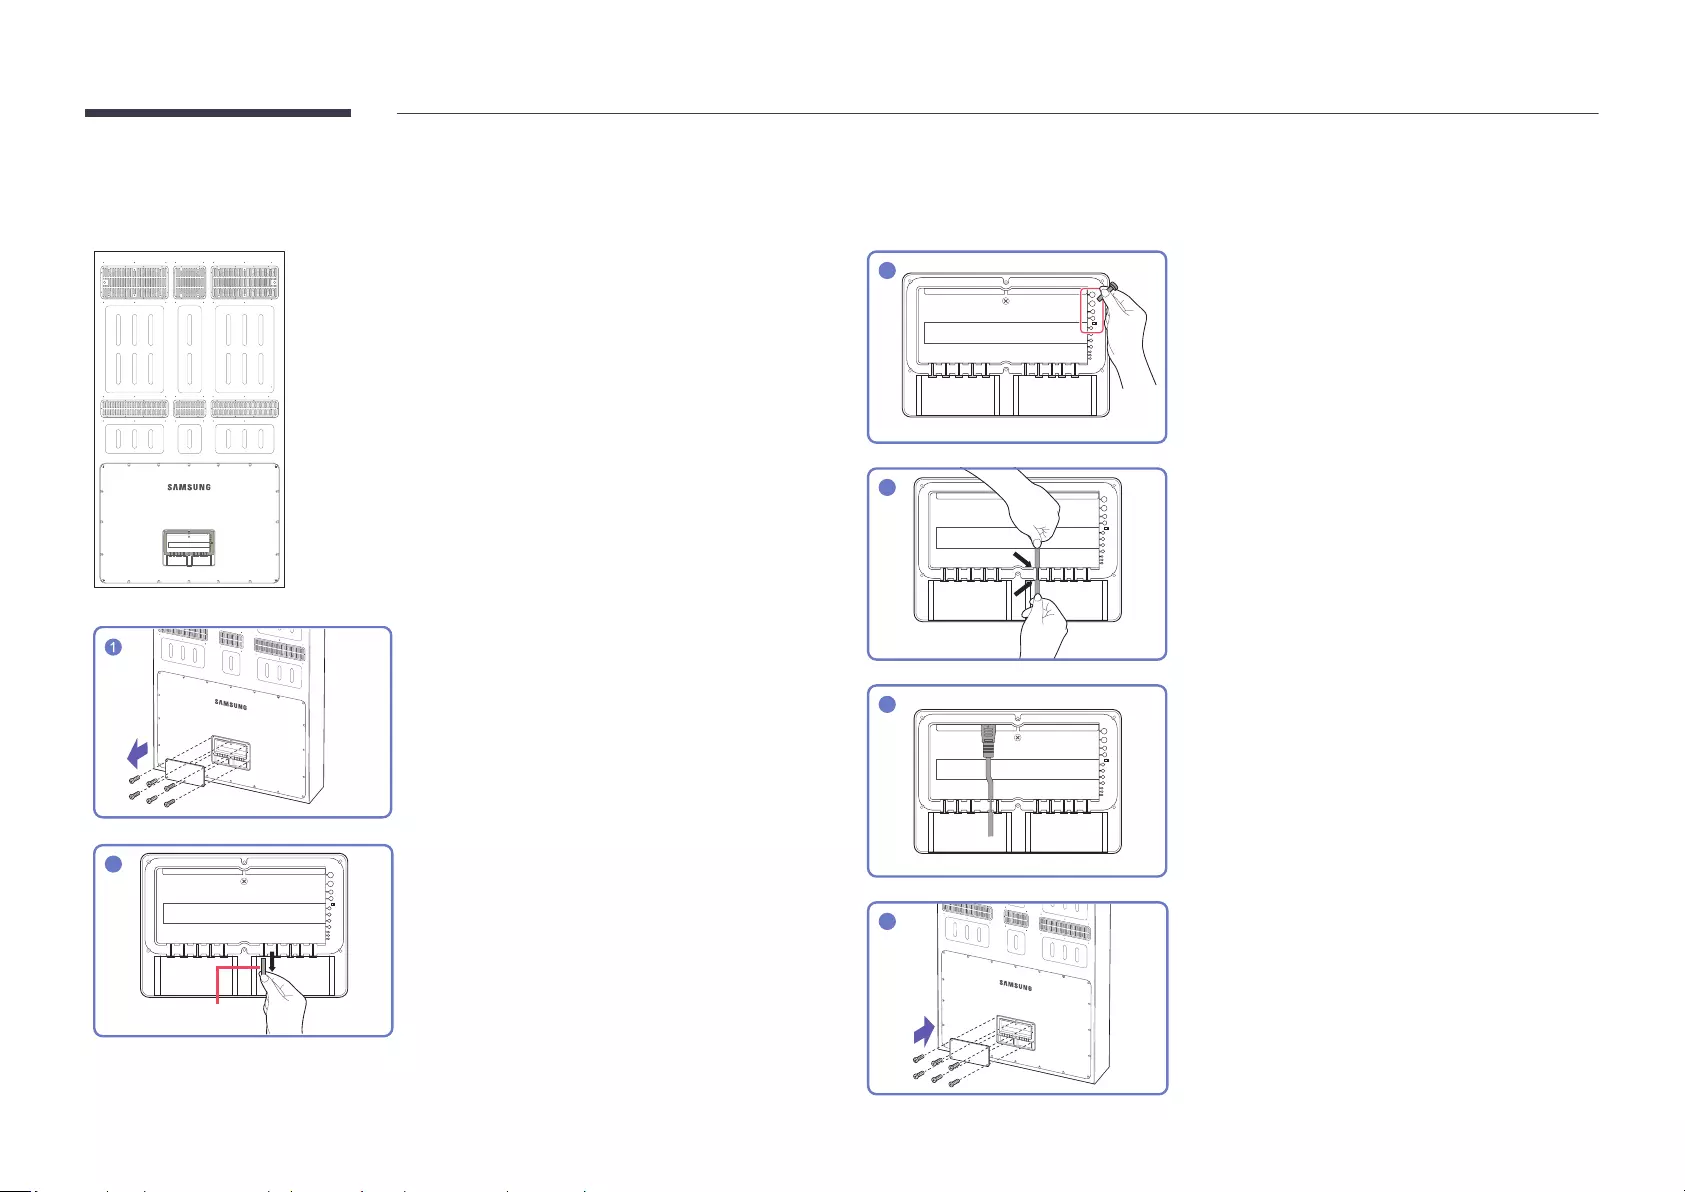
Checking the Components
Components
+
+
-
-
Quick setup guide Warranty card
Regulatory guide Batteries
Remote Control
Preparations
Chapter 02
15
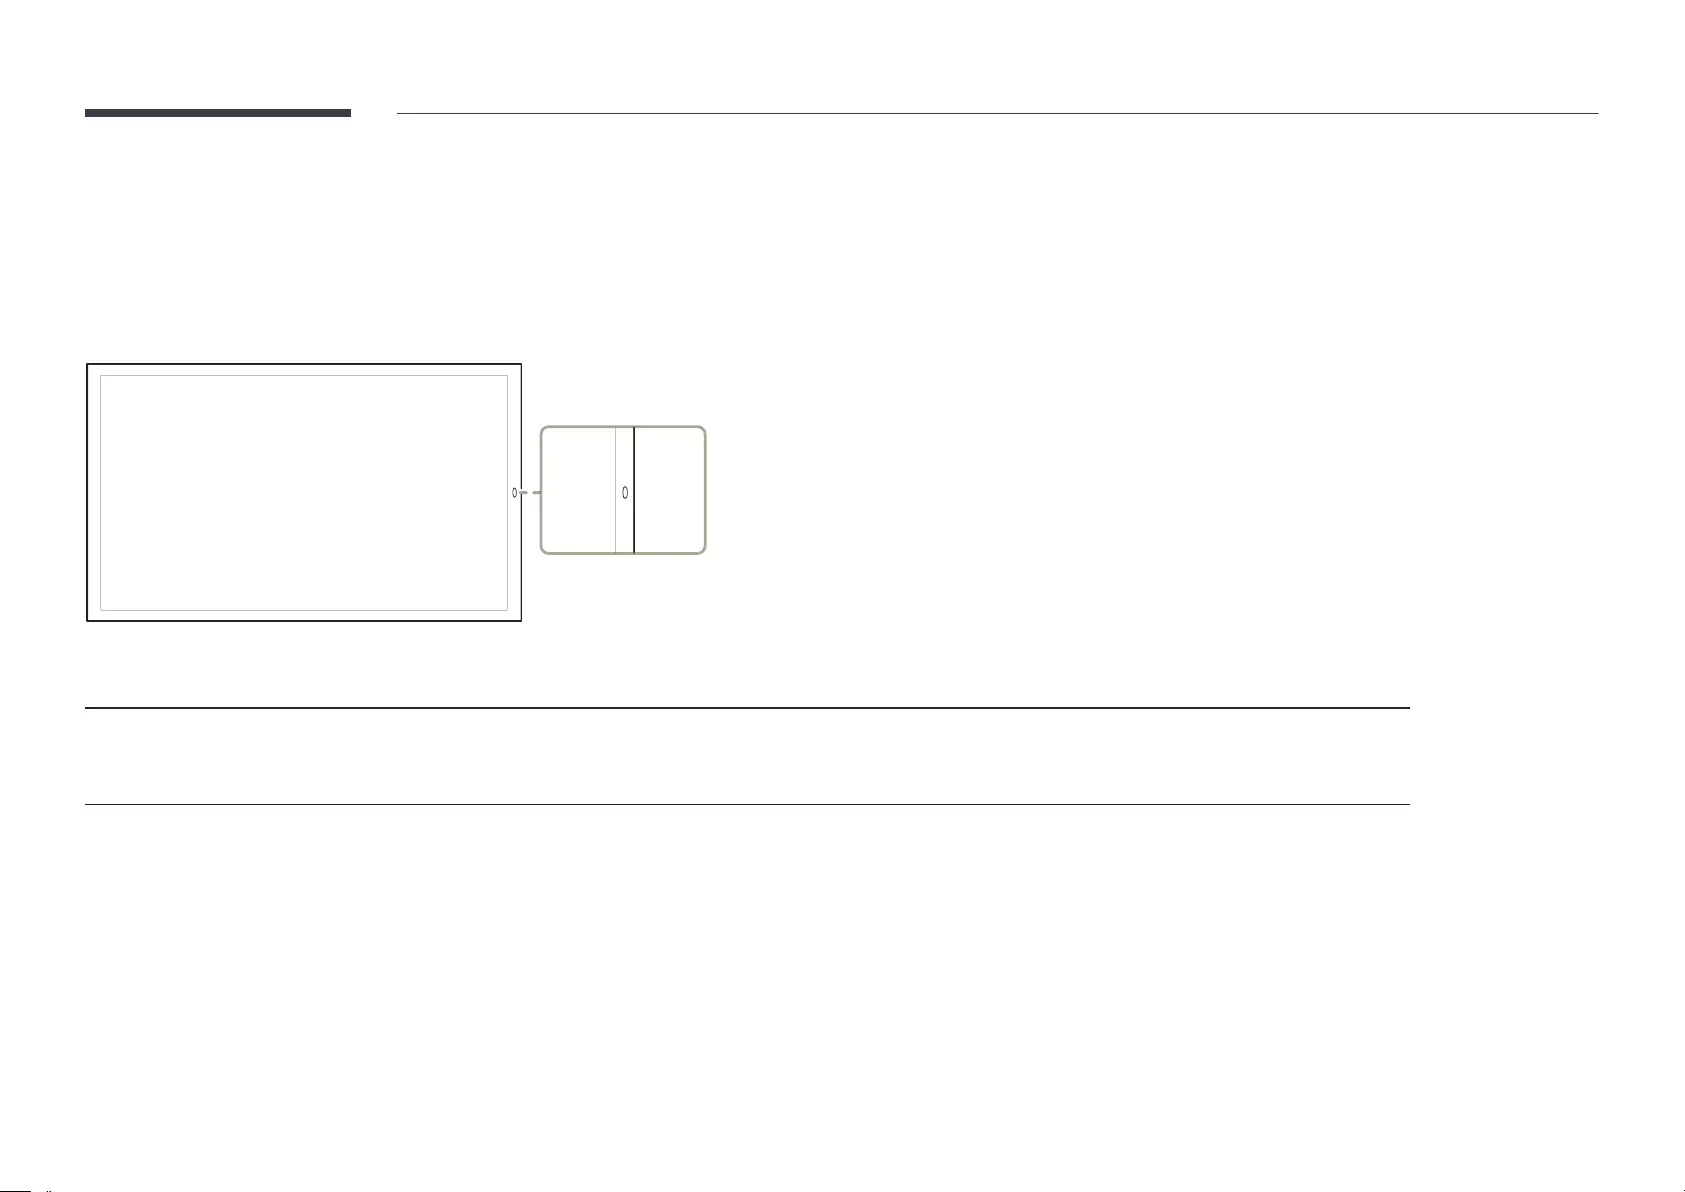
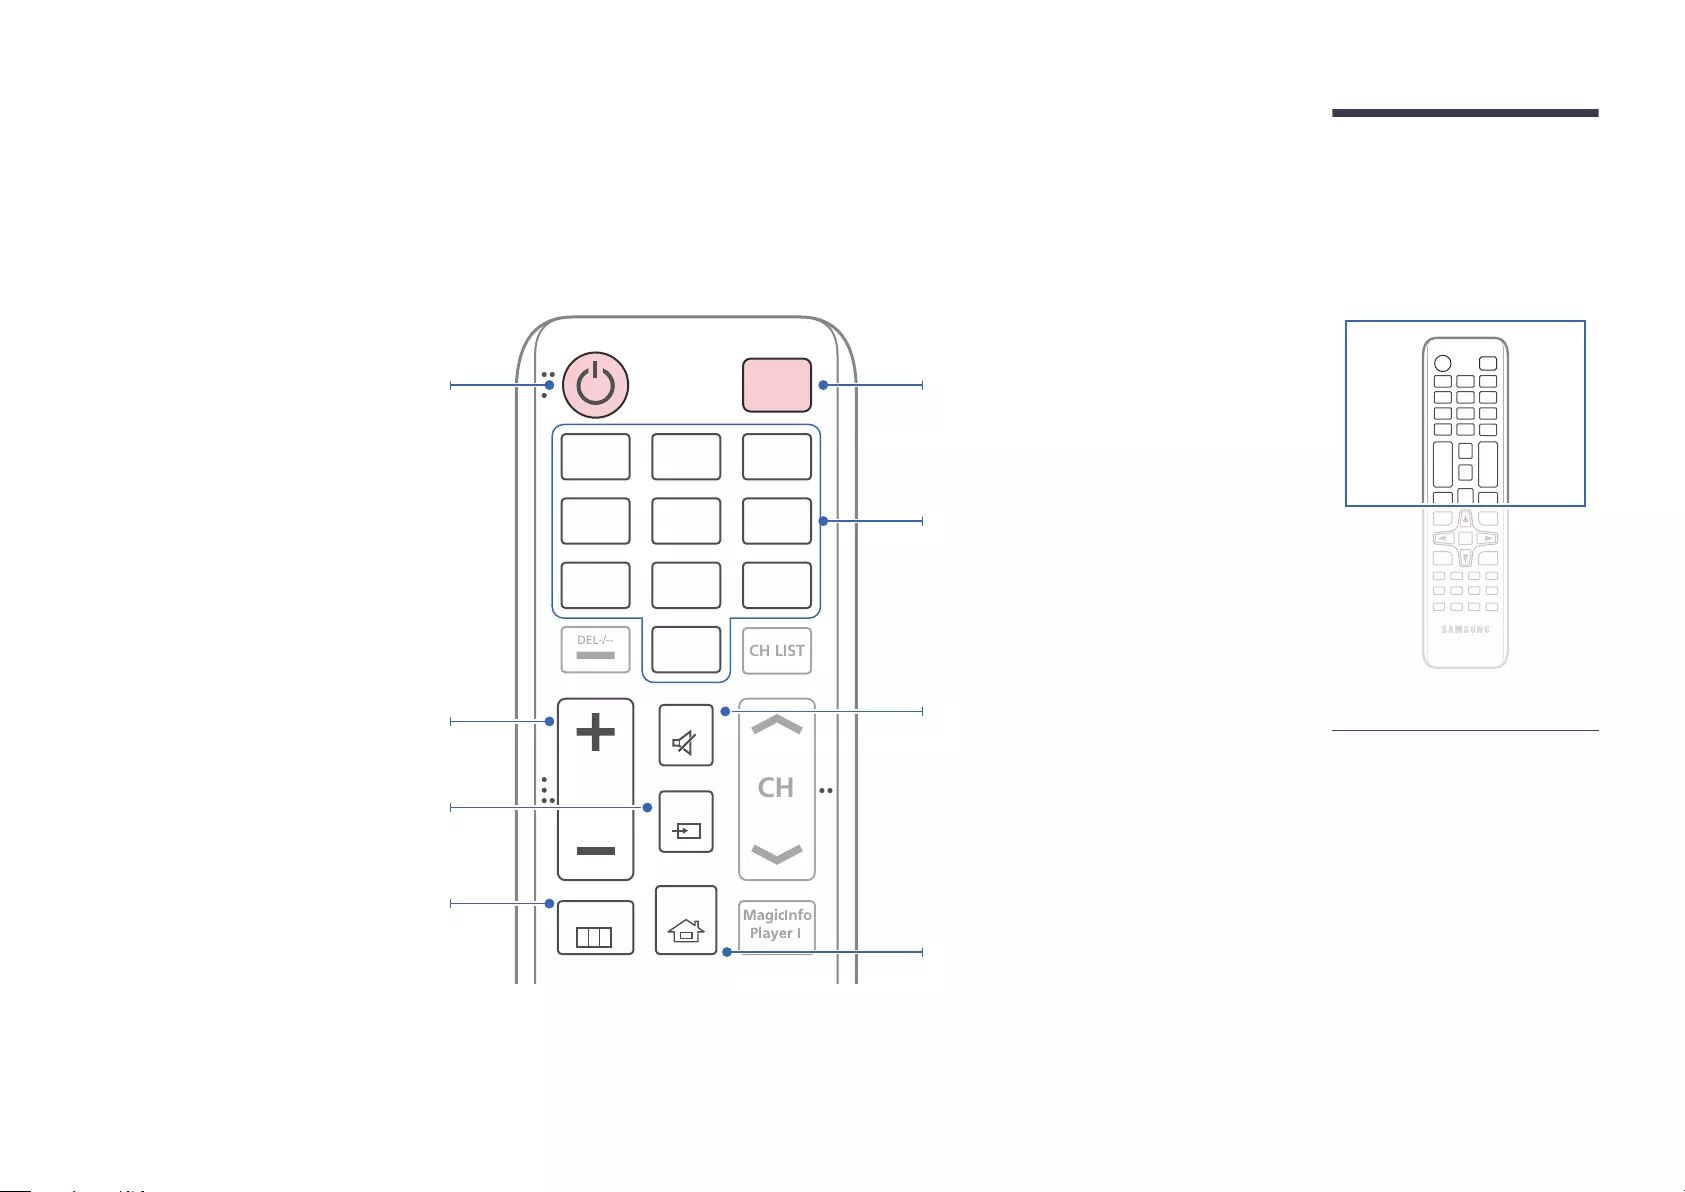
Parts
Front
Port Description
Remote sensor
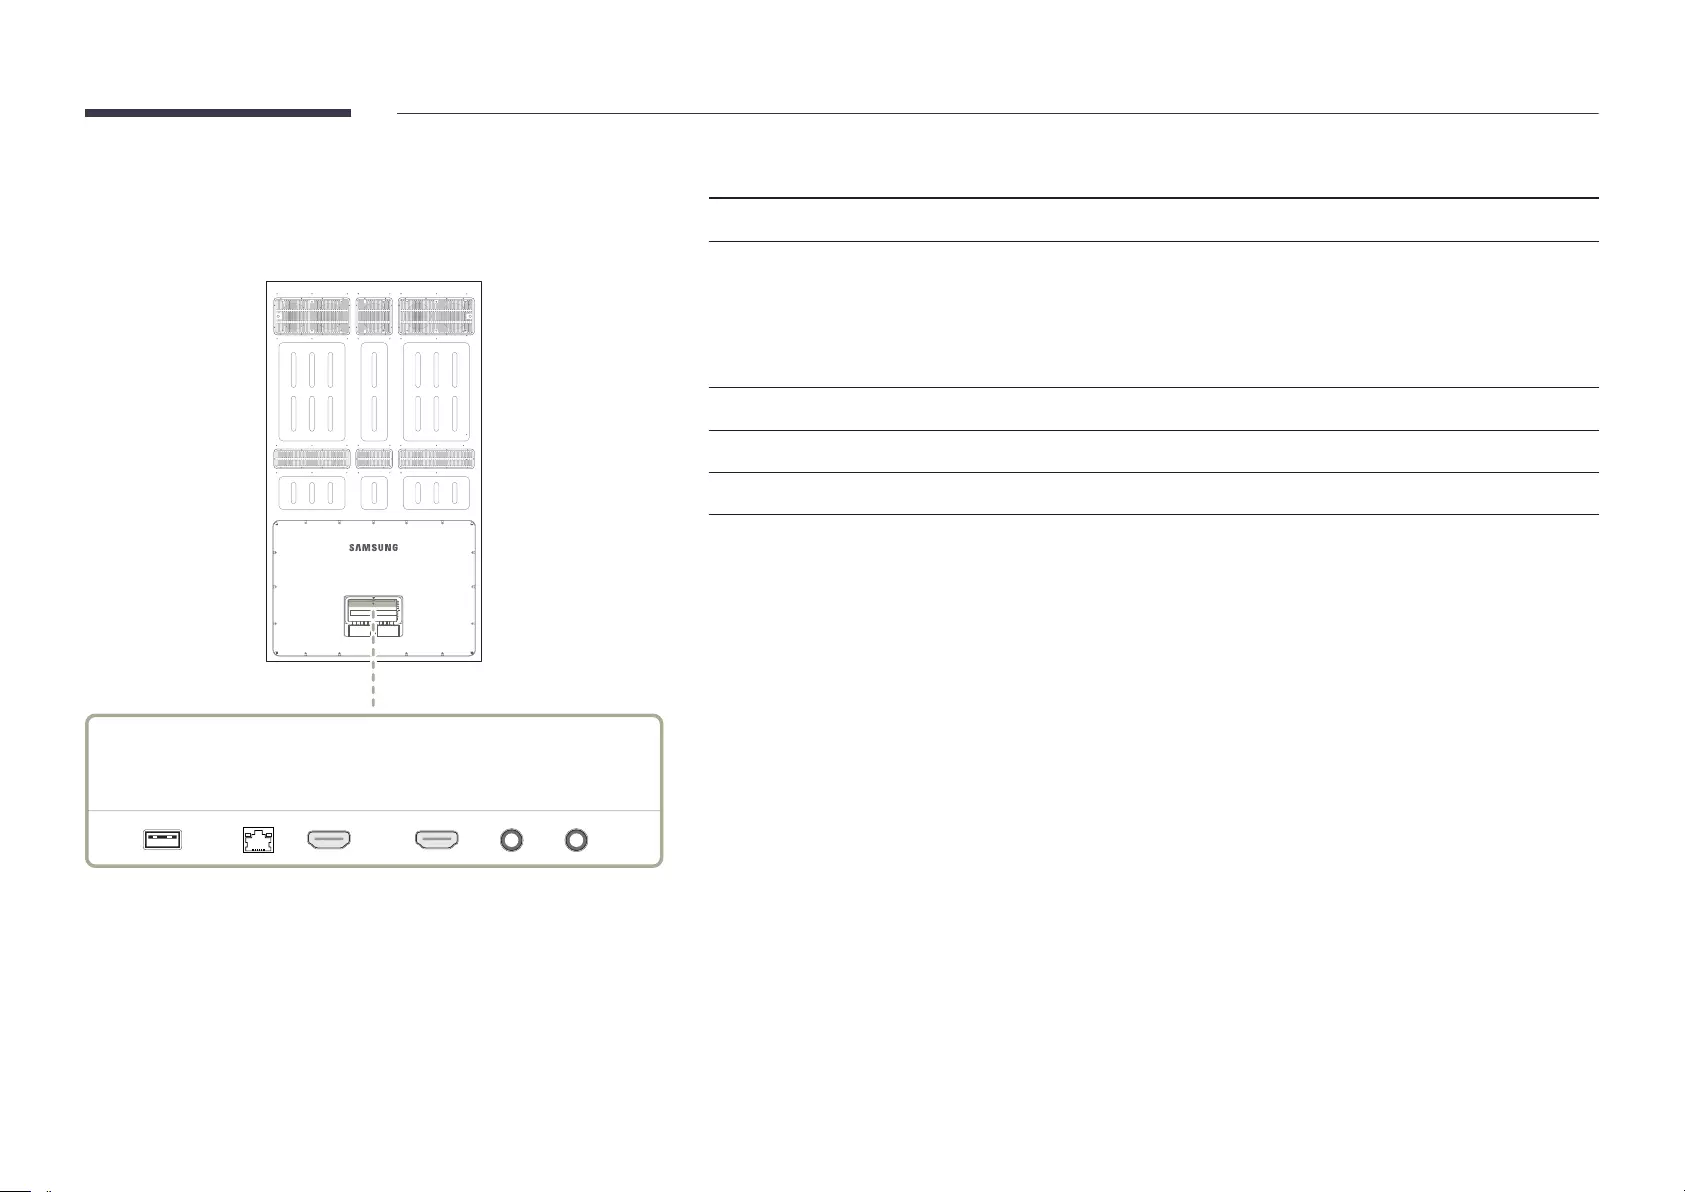
Reverse Side
USB
RS232C
IN
HDBT
(LAN IN) HDMI IN 1 HDMI IN 2 AUDIO
OUT
Port Description
USB
HDBT (LAN IN)
transmitter.
HDMI IN 1, HDMI IN 2
AUDIO OUT
RS232C IN
17
HOME
MENU
POWER
OFF
VOL
CH
.QZ
1
ABC
2
DEF
3
GHI
4
JKL
5
MNO
6
SYMBOL
0
PRS
7
TUV
8
WXY
9
MUTE
DEL-/--
SOURCE
CH LIST
Mute the sound.
Unmuting the sound: Press MUTE again or
+ VOL -
Player Launch Button.
Display or hide the onscreen display menu, or
Change the input source.
–
may differ for different products.
Remote Control
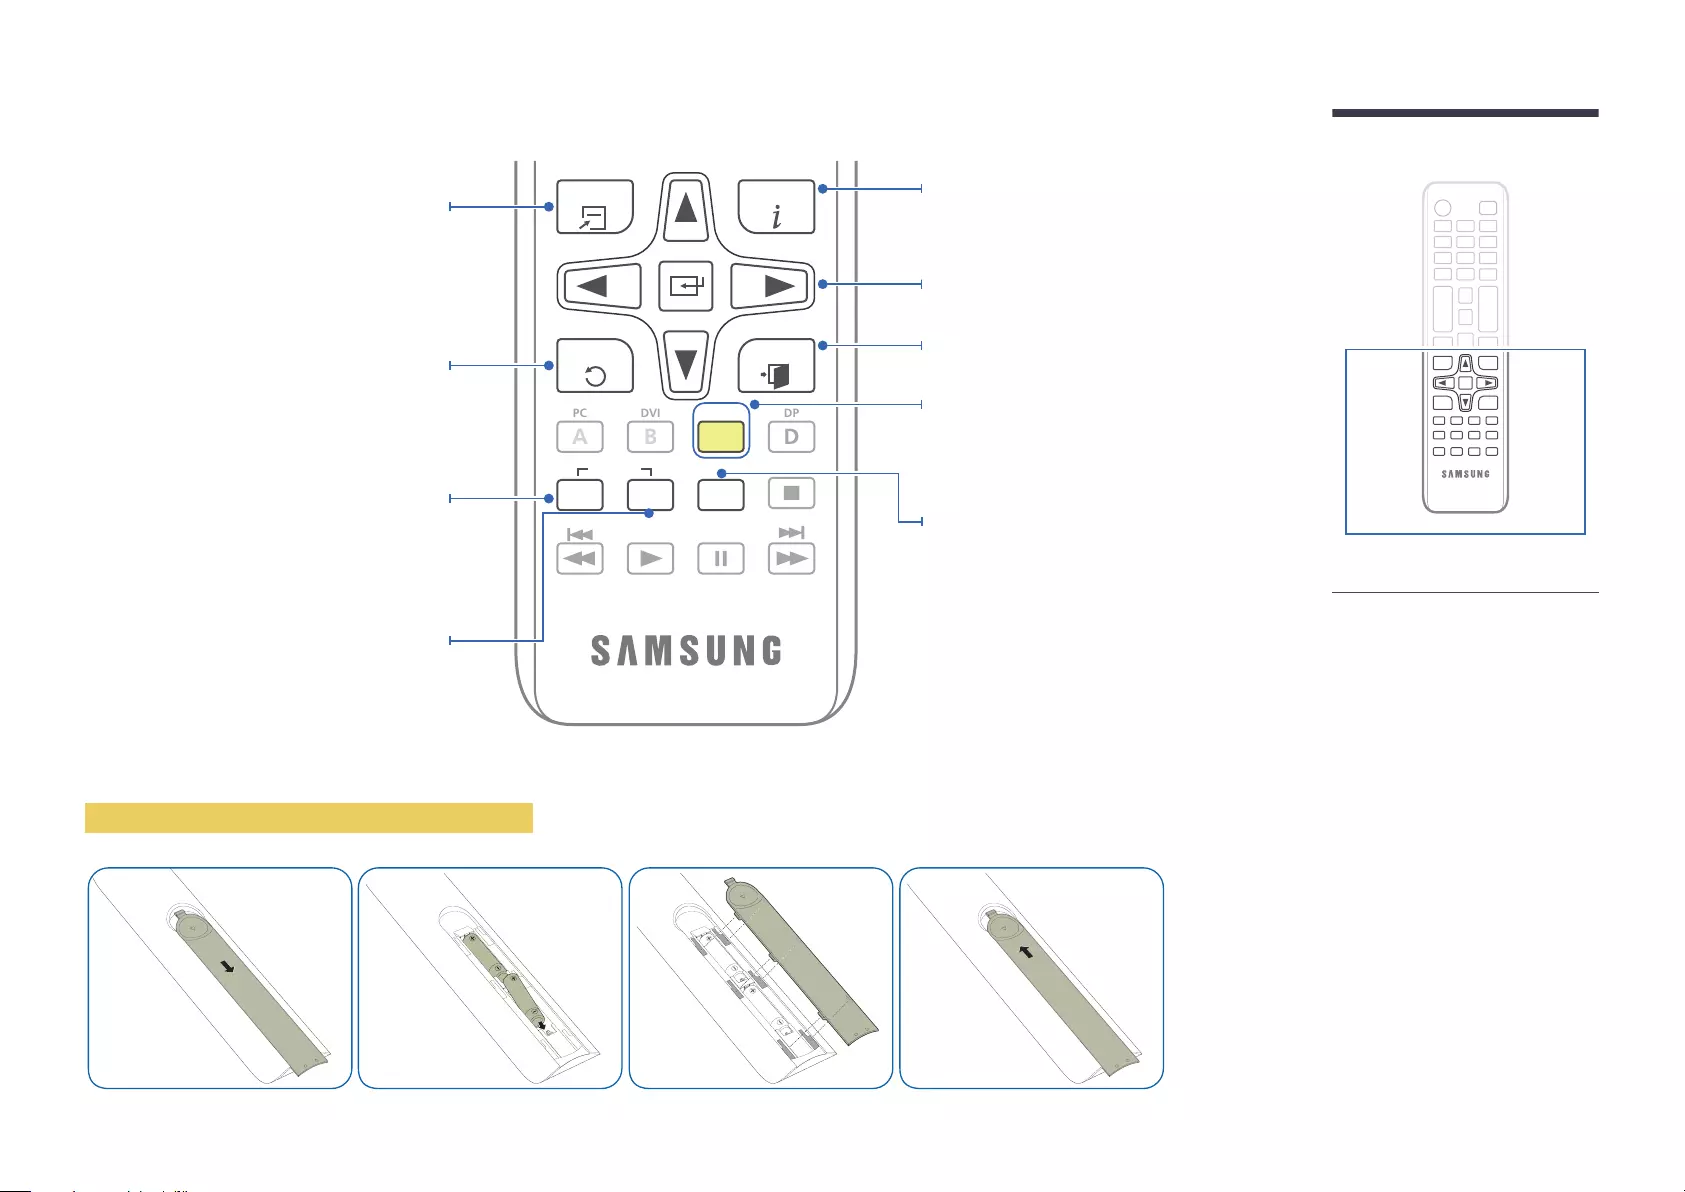
18
TOOLS INFO
SET
UNSET
LOCK
PC
A
DVI
B
HDMI
C
DP
D
EXITRETURN
IR control
source.
Confirm a menu selection.
Exit the current menu.
Manually select a connected input source
from HDMI 1, HDMI 2 or HDBT.
Quickly select frequently used functions.
If multiple products are connected through the
Video Wall feature, press the SET
Control the product using the remote control.
SET
using the remote control.
–
may differ for different products.
–
extended period of time.
To place batteries in the remote control
It sets safe lock function.
19
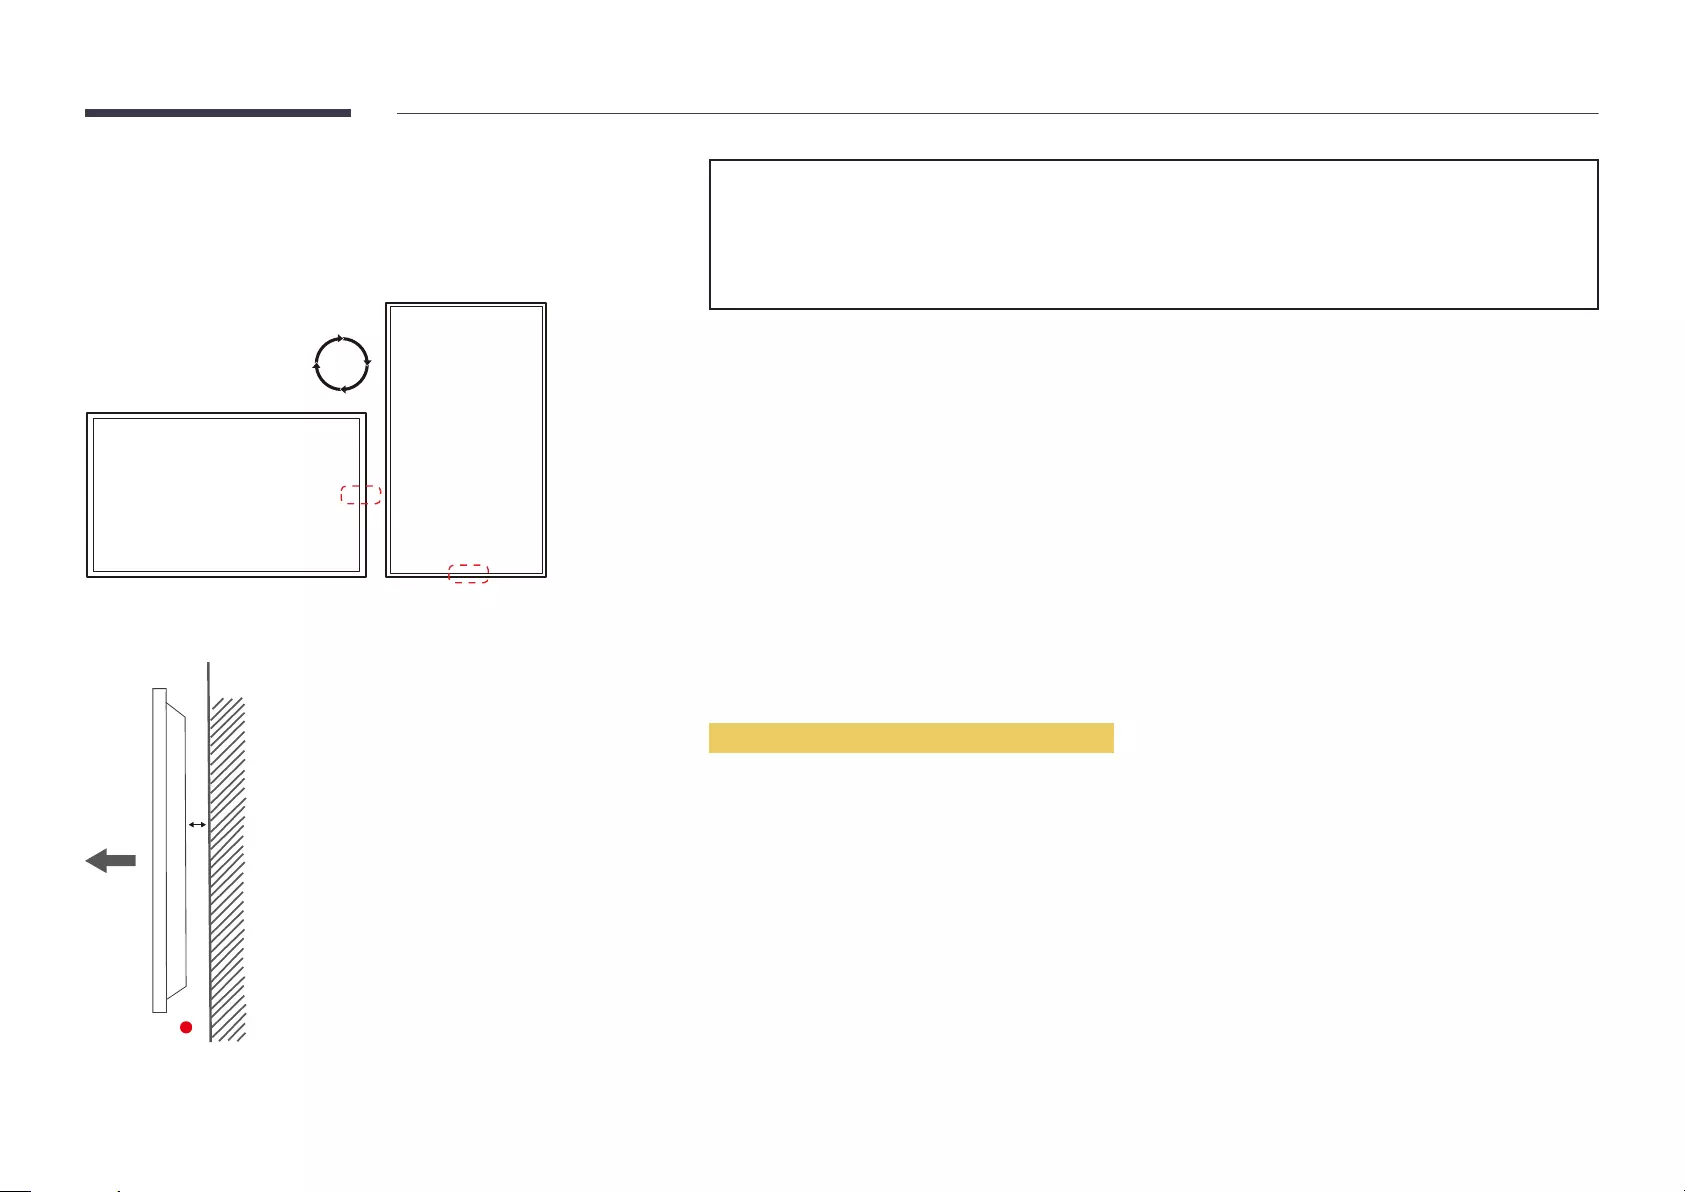
Before Installing the Product
(Installation Guide)
instructions.
Switching between portrait and landscape
A
B
Figure 1.1 Side view
Ventilation
Installation on a Perpendicular Wall
A
B
.
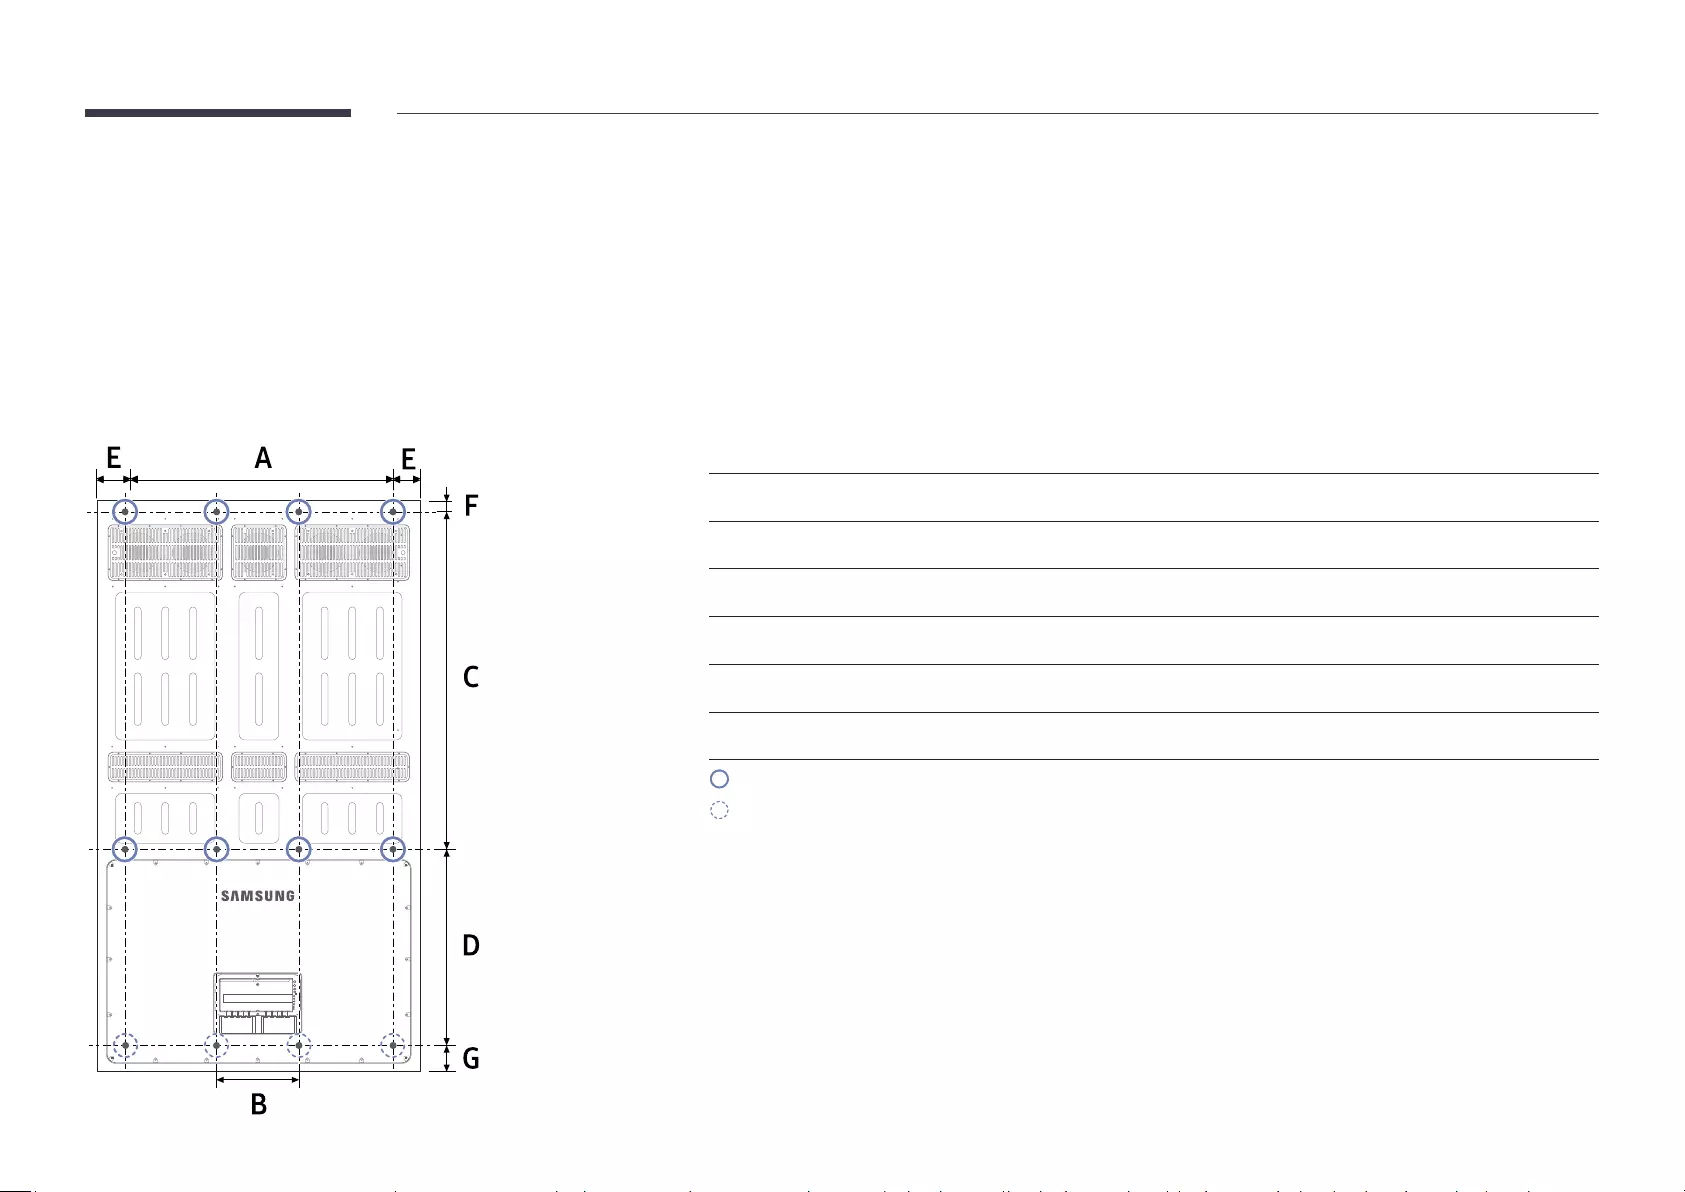
Wall Mount Specications
E
F
G
BOLT SIZE M8
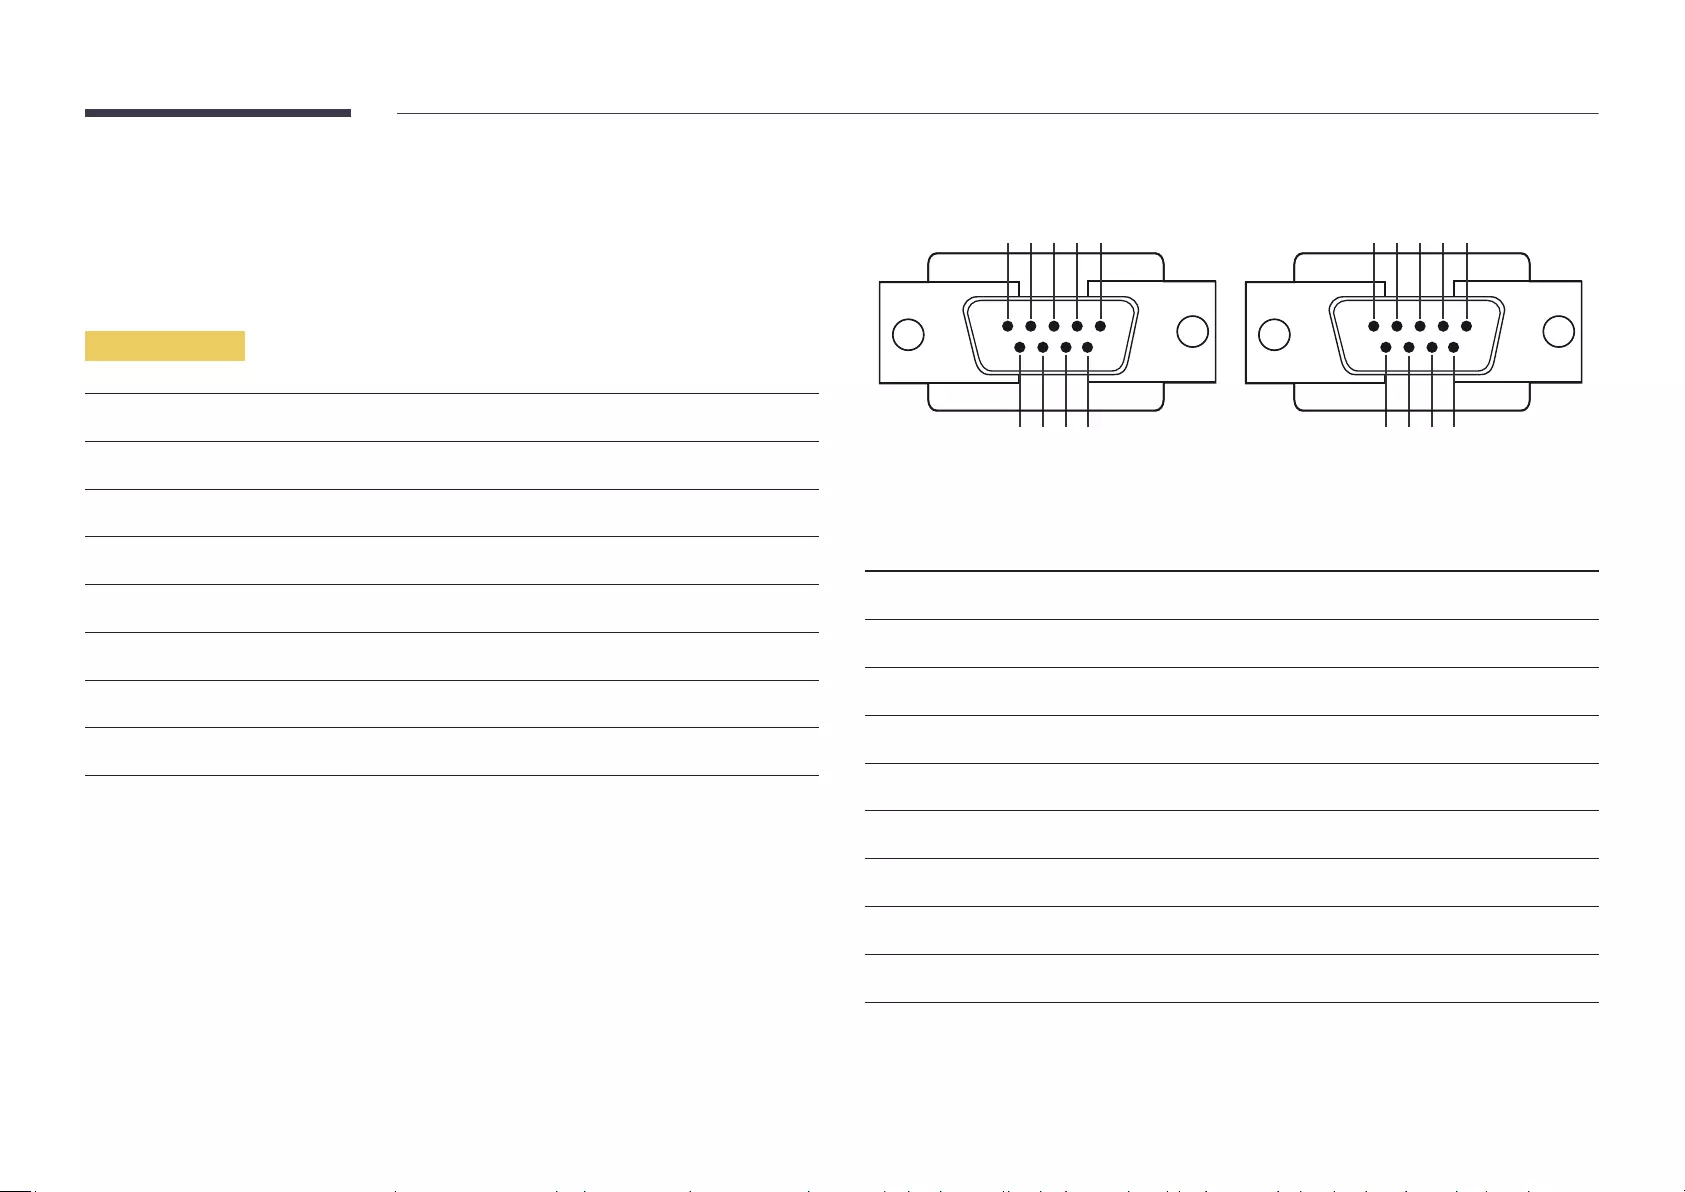
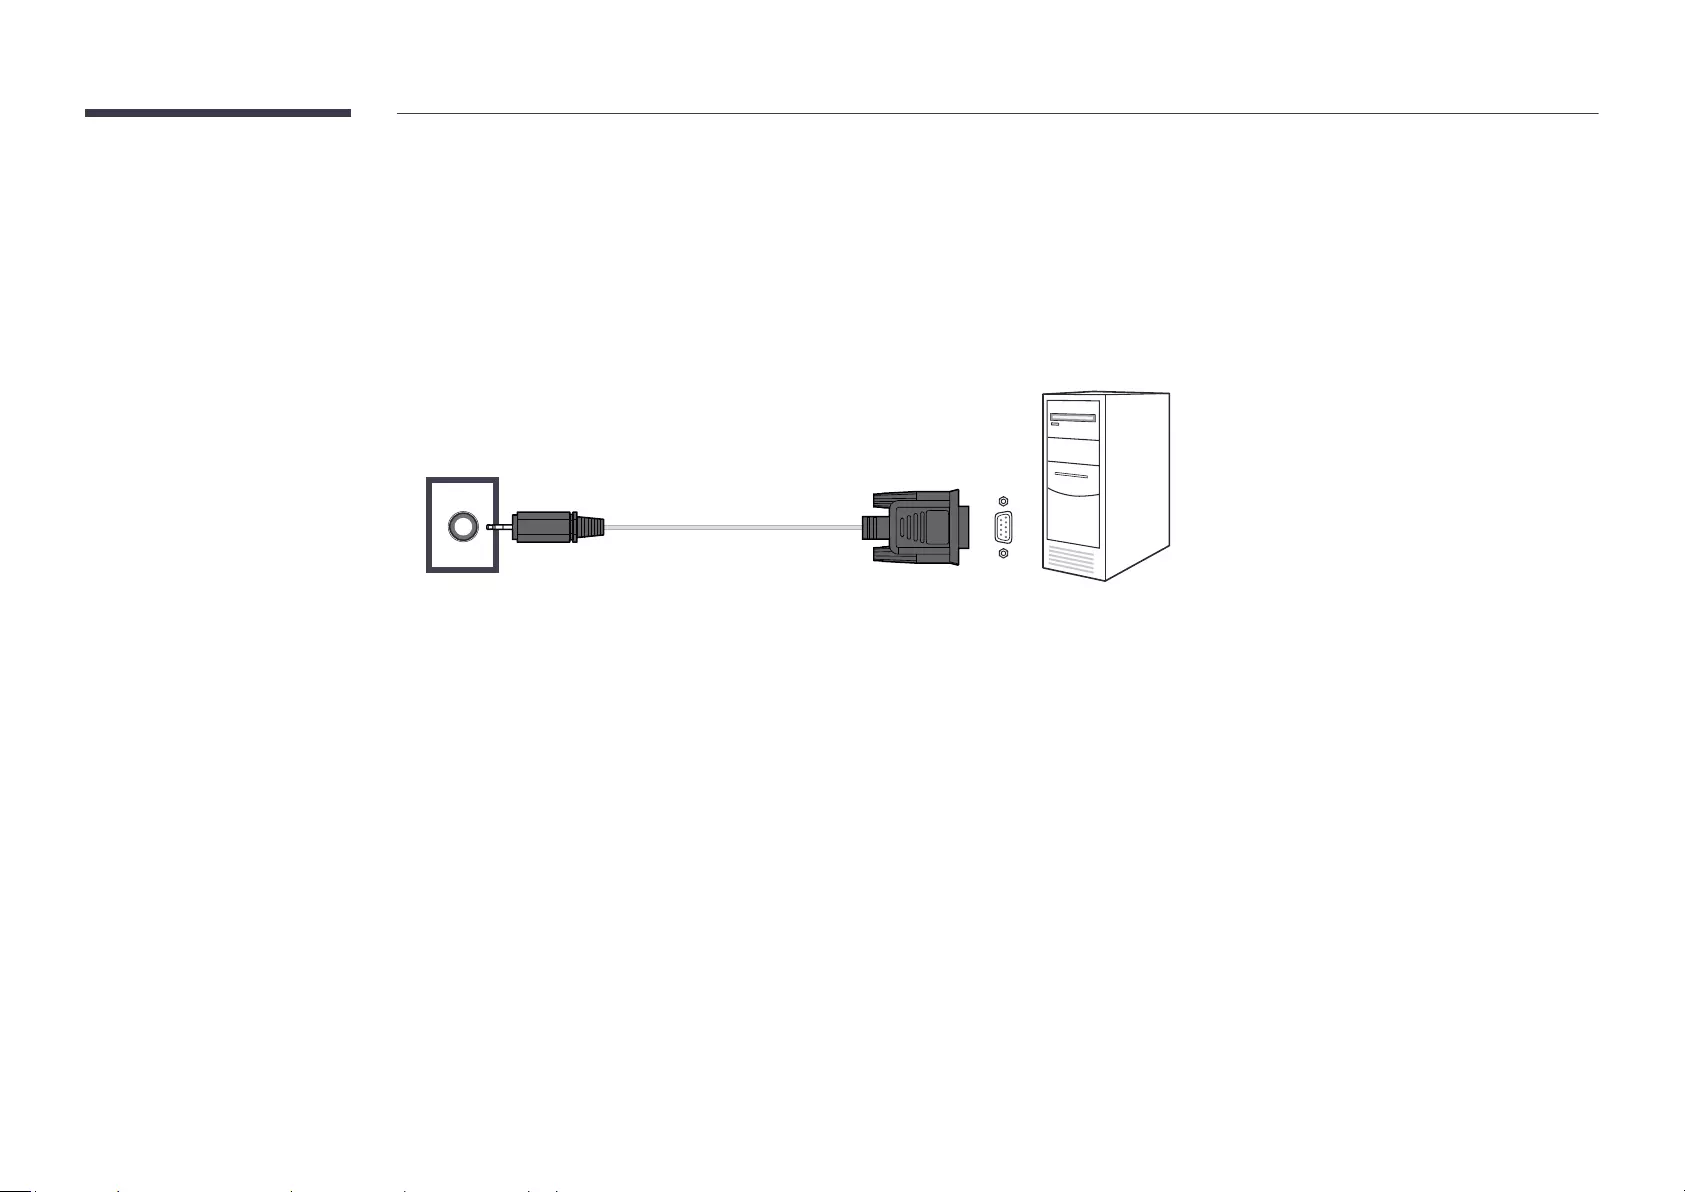
Remote Control (RS232C)
Cable Connection
RS232C Cable
Interface
Pin
Bit rate
Data bits
Parity
None
Stop bit
Flow control
None
Maximum length
Pin assignment
1 2 3 4 5
6 7 8 9
5 4 3 2 1
9 8 7 6
<Male type> <Female type>
Pin Signal
1
Detect data carrier
2
3
Transmitted data
4
Prepare data terminal
5
Signal ground
6
Prepare data set
7
Send request
8
Clear to send
9
Ring indicator
5
16
9
-P2-
1
2
3
-P1-
-P1- -P1- -P2- -P2-
Male type Rx
Tx
Gnd
3
2
5
----------
----------
----------
1
2
3
Tx
Rx
Gnd
STEREO
PLUG
(3.5ø)
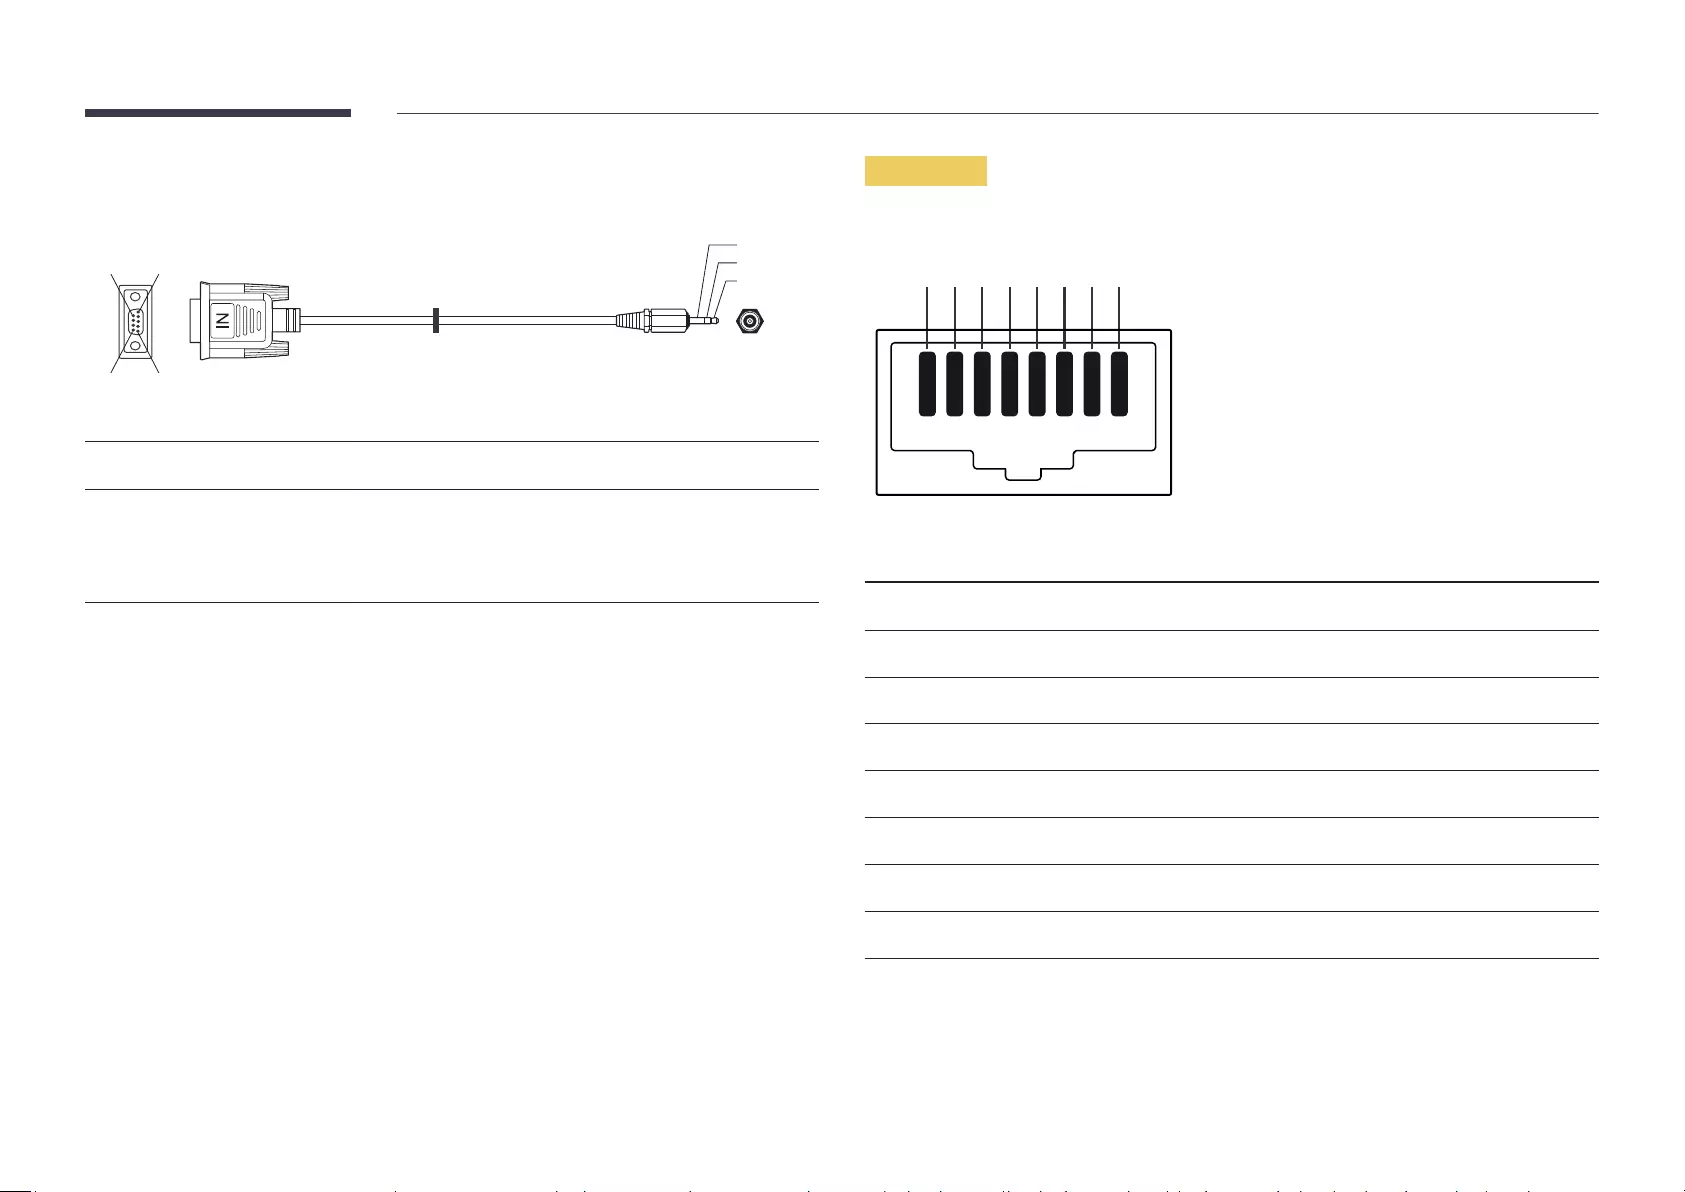
LAN Cable
Pin assignment
12345678
Pin No Standard Color Signal
1 White and orange TX+
Orange TX-
3 White and green RX+
4 Blue NC
5 NC
Green RX-
7 NC
8 NC
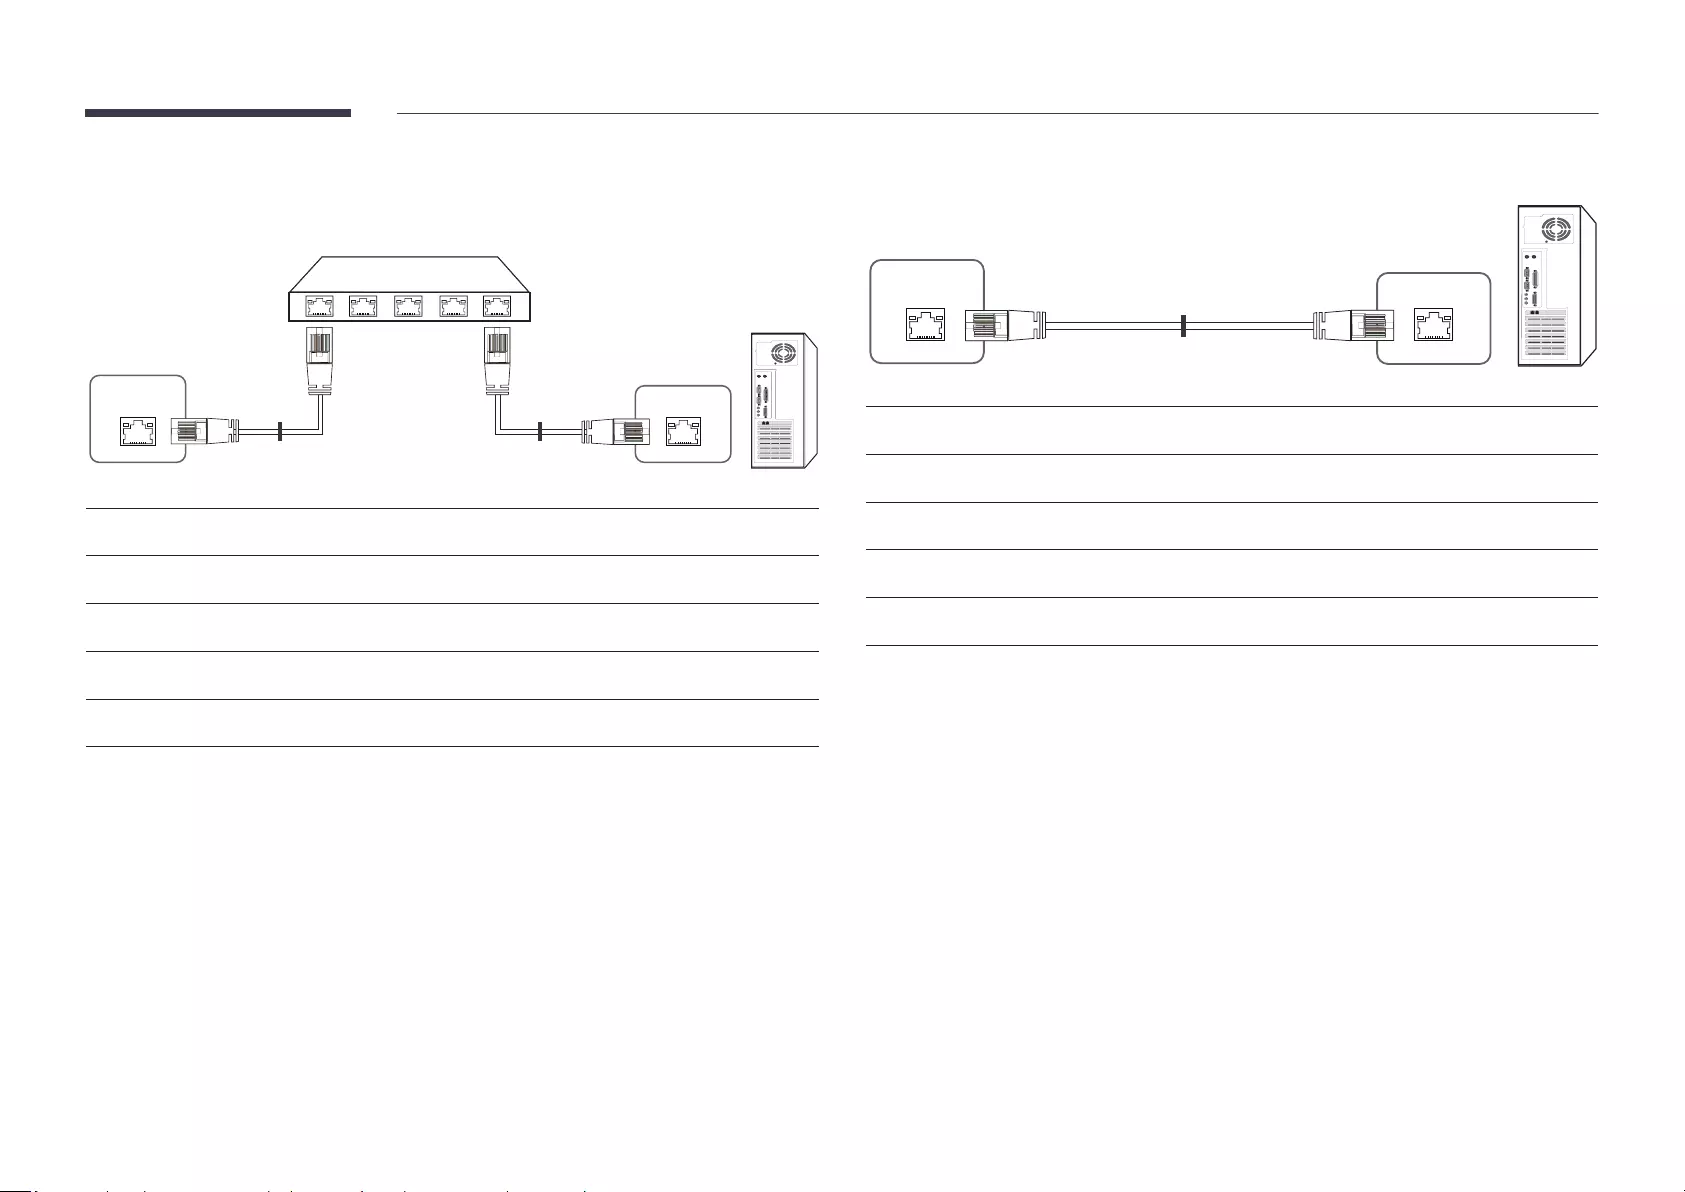
Direct LAN cable (PC to HUB)
HDBT
(LAN IN) RJ45 MDC
HUB
P1
P1P2
P2
Signal P1 Signal
TX+ 1↔1TX+
TX- ↔TX-
RX+ 3↔3RX+
RX- ↔RX-
Cross LAN cable (PC to PC)
HDBT
(LAN IN) P1 P2
Signal P1 Signal
TX+ 1↔3RX+
TX- ↔RX-
RX+ 3↔1TX+
RX- ↔TX-
Connection
Connection 1
RS232C IN
HDBT
(LAN IN)
HDBT
(LAN IN)

Control Codes
Viewing control state (Get control command)
Header Command ID Data length Checksum
0xAA Command
type
0
Controlling (Set control command)
Header Command ID Data length Data Checksum
0xAA Command
type
1 Value
Command
No. Command type Command Value range
1
0x11 0~1
2
Volume control 0~100
3
Input source control 0x14 -
4
Screen mode control 0x18 -
5
Screen size control 0x19
6
0x5C 0~1
7
Safety Lock 0x5D 0~1
8
Video Wall On 0x84 0~1
No. Command type Command Value range
9
Video Wall User Control 0x89 -
Header Command ID Data length Data 1 Checksum
0xAA 0x11 1
Header Command ID Data length Data 1
0xAA 0x11 1 1

Power control
Function
Header Command ID Data length Checksum
0xAA 0x11 0
Header Command ID Data length Data Checksum
0xAA 0x11 1
Ack
Header Command ID Data length Ack/Nak r-CMD Val1 Checksum
0xAA 0xFF 3 0x11
Nak
Header Command ID Data length Ack/Nak r-CMD Val1 Checksum
0xAA 0xFF 3 0x11 "ERR"
Volume control
Function
Header Command ID Data length Checksum
0xAA 0
Header Command ID Data length Data Checksum
0xAA 1 "Volume"
Ack
Header Command ID Data length Ack/Nak r-CMD Val1 Checksum
0xAA 0xFF 3 "Volume"
Nak
Header Command ID Data length Ack/Nak r-CMD Val1 Checksum
0xAA 0xFF 3 "ERR"

Input source control
Function
Header Command ID Data length Checksum
0xAA 0x14 0
Header Command ID Data length Data Checksum
0xAA 0x14 1 "Input Source"
0x0C Input source
MagicInfo
HDMI1
HDMI1_PC
0x55 HDBT
"Get" commands.
MagicInfoMagicInfo function.
Ack
Header Command ID Data length Ack/Nak r-CMD Val1 Checksum
0xAA 0xFF 3 0x14 "Input
Source"
Nak
Header Command ID Data length Ack/Nak r-CMD Val1 Checksum
0xAA 0xFF 3 0x14 "ERR"

Screen mode control
Function
Video Wall
Header Command ID Data length Checksum
0xAA 0x18 0
Header Command ID Data
length
Data Checksum
0xAA 0x18 1 "Screen
Mode"
"Screen Mode": A code that sets the product status
0x01
0x04 Zoom
0x31 Wide Zoom
0x0B 4 : 3
Ack
Header Command ID Data
length
Ack/Nak r-CMD Val1 Checksum
0xAA 0xFF 3 0x18 "Screen
Mode"
"Screen Mode": A code that sets the product status
Nak
Header Command ID Data
length
Ack/Nak r-CMD Val1 Checksum
0xAA 0xFF 3 0x18 "ERR"
Screen size control
Function
Header Command ID Data length Checksum
0xAA 0x19 0
Ack
Header Command ID Data
length
Ack/Nak r-CMD Val1 Checksum
0xAA 0xFF 3 0x19 "Screen
Size"
Nak
Header Command ID Data
length
Ack/Nak r-CMD Val1 Checksum
0xAA 0xFF 3 0x19 "ERR"

Video Wall Mode Control
Function
Video Wall
Video Wall
Header Command ID Data length Checksum
0xAA 0x5C 0
Header Command ID Data length Data Checksum
0xAA 0x5C 1 "Video Wall Mode"
Full
Natural
Ack
Header Command ID Data
length
Ack/Nak r-CMD Val1 Checksum
0xAA 0xFF 3 0x5C "Video Wall
Mode"
Nak
Header Command ID Data
length
Ack/Nak r-CMD Val1 Checksum
0xAA 0xFF 3 0x5C "ERR"
Safety Lock
Function
Safety Lock On function on or off on a product.
Header Command ID Data length Checksum
0xAA 0x5D 0
Header Command ID Data length Data Checksum
0xAA 0x5D 1 "Safety
Lock"
Ack
Header Command ID Data
length
Ack/Nak r-CMD Val1 Checksum
0xAA 0xFF 3 0x5D "Safety Lock"
Nak
Header Command ID Data
length
Ack/Nak r-CMD Val1 Checksum
0xAA 0xFF 3 0x5D "ERR"

30
Video Wall On
Function
Turn Video Wall on or off on the product from your computer.
Get Video Wall On/Off Status
Header Command ID Data length Checksum
0xAA 0x84 0
Set Video Wall On/Off
Header Command ID Data length Data Checksum
0xAA 0x84 1 V.Wall_On
Ack
Header Command ID Data length Ack/Nak r-CMD Val1 Checksum
0xAA 0xFF 3 0x84 V.Wall_On
Nak
Header Command ID Data
length
Ack/Nak r-CMD Val1 Checksum
0xAA 0xFF 3 0x84 ERR
Video Wall User Control
Function
Turn the Video Wall function on or off on the product from your computer.
Get Video Wall Status
Header Command ID Data length Checksum
0xAA 0x89 0
Set Video Wall
Header Command ID Data
length
Val1 Checksum
0xAA 0x89 Wall_SNo

31
10x10 Video Wall Model
1 2 3 4 5 6 7 8 9 10 11 12 13 14 15
Off
0x00 0x00 0x00 0x00 0x00 0x00 0x00 0x00 0x00 0x00 0x00 0x00 0x00 0x00 0x00
1
0x11 0x13 0x14 0x15 0x17 0x18 0x19 0x1A 0x1B 0x1C 0x1D 0x1E 0x1F
2
3
0x31 0x33 0x34 0x35 0x37 0x38 0x39 0x3A 0x3B 0x3C 0x3D 0x3E 0x3F
4
0x41 0x43 0x44 0x45 0x47 0x48 0x49 0x4A 0x4B 0x4C 0x4D 0x4E 0x4F
5
0x51 0x53 0x54 0x55 0x57 0x58 0x59 0x5A 0x5B 0x5C 0x5D 0x5E 0x5F
6
7
0x71 0x73 0x74 0x75 0x77 0x78 0x79 0x7A 0x7B 0x7C 0x7D 0x7E N/A
8
0x81 0x83 0x84 0x85 0x87 0x88 0x89 0x8A 0x8B 0x8C N/A N/A N/A
9
0x91 0x93 0x94 0x95 0x97 0x98 0x99 0x9A 0x9B N/A N/A N/A N/A
10
0xA1 0xA3 0xA4 0xA5 0xA7 0xA8 0xA9 0xAA N/A N/A N/A N/A N/A
11
0xB1 0xB3 0xB4 0xB5 0xB7 0xB8 0xB9 N/A N/A N/A N/A N/A N/A
12
0xC1 0xC3 0xC4 0xC5 0xC7 0xC8 N/A N/A N/A N/A N/A N/A N/A
13
0xD1 0xD3 0xD4 0xD5 0xD7 N/A N/A N/A N/A N/A N/A N/A N/A
14
0xE1 0xE3 0xE4 0xE5 0xE7 N/A N/A N/A N/A N/A N/A N/A N/A
15
0xF1 0xF3 0xF4 0xF5 N/A N/A N/A N/A N/A N/A N/A N/A N/A

10x10 Video Wall Model : ( 1 ~ 100)
Set Number
Data
1 0x01
... ...
99
100
Ack
Header Command ID Data length Ack/Nak r-CMD Val1 Checksum
0xAA 0xFF 4 0x89 Wall_
SNo
Nak
Header Command ID Data length Ack/Nak r-CMD Val1 Checksum
0xAA 0xFF 3 0x89 ERR

33
Connecting and Using a Source Device
Before Connecting
Pre-connection Checkpoints
Chapter 03
34
Before connecting cables
2
Silicone-Bar
thickness for each:
3
the marked area to ensure it is not lost.
4
5
6
35
Power cable connection guide
11
diameter is 8.5 mm for 15 A.
2
other. Solder and insulate the connected
part.
3
4
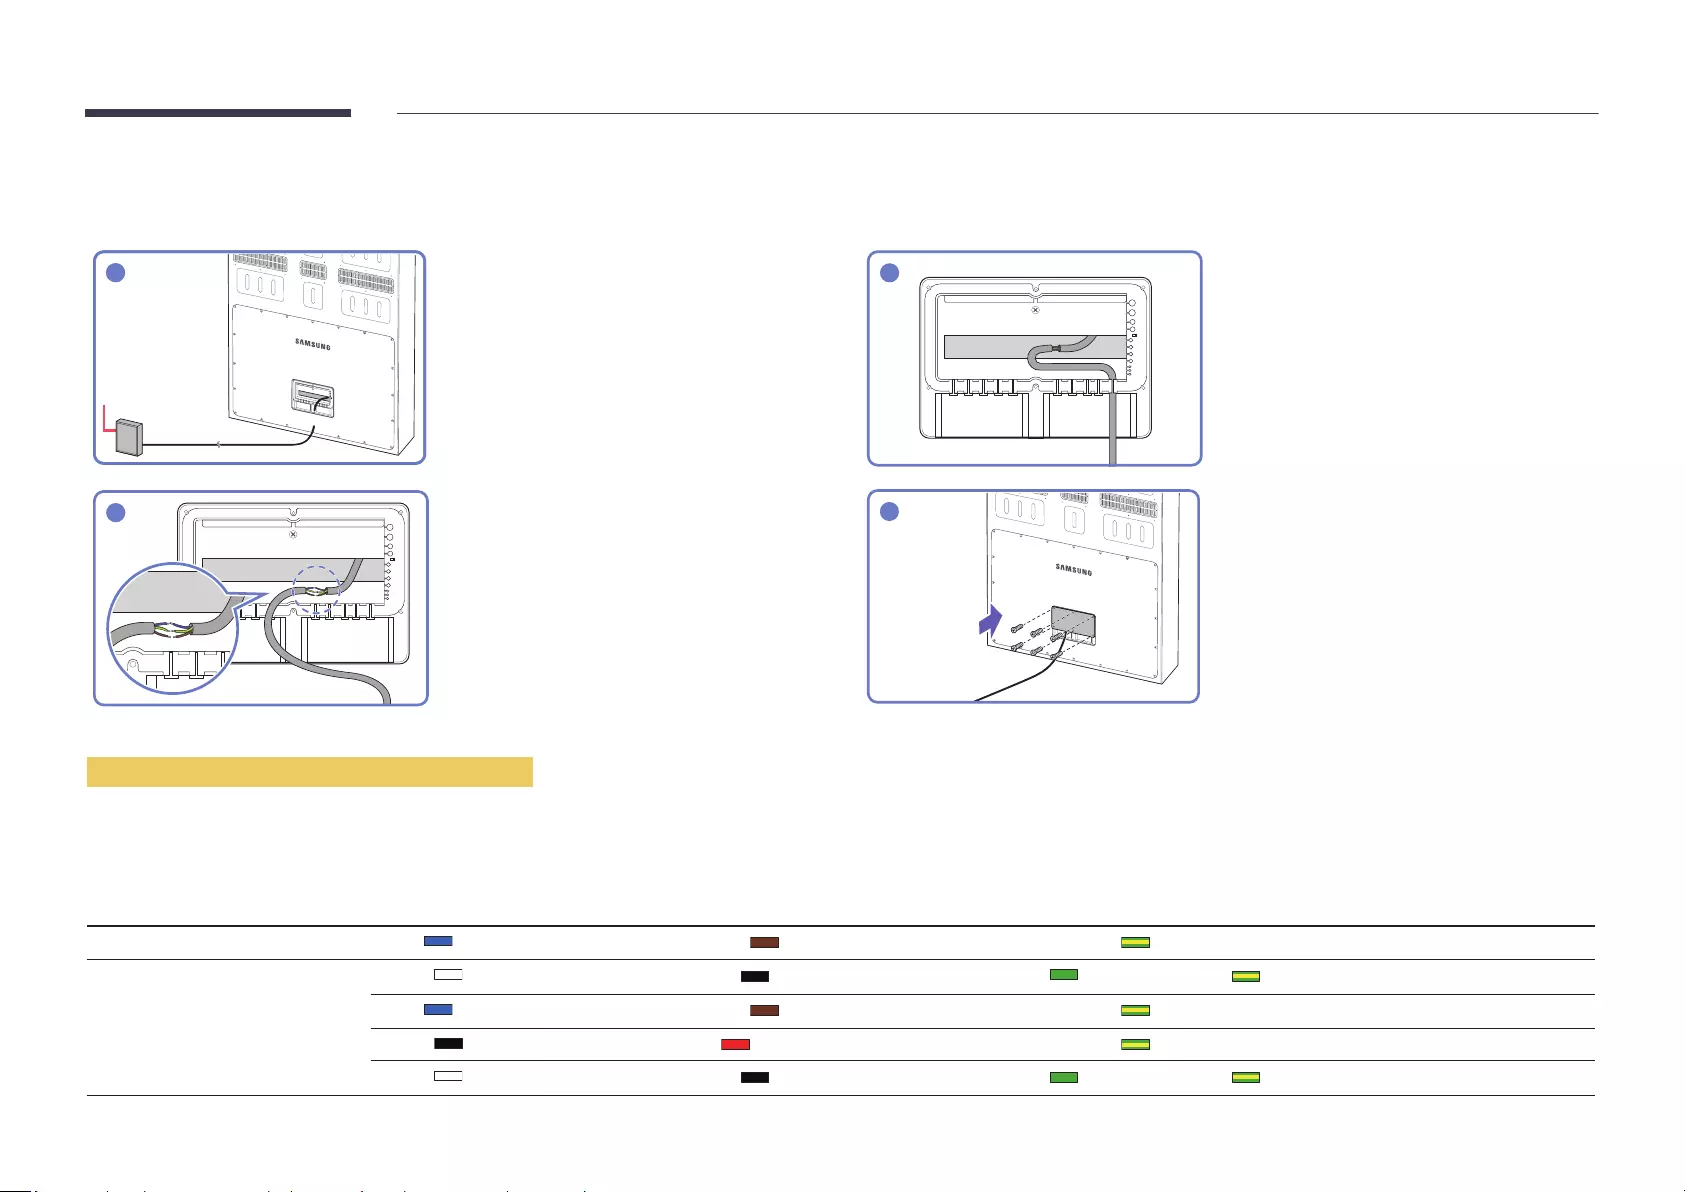
Different power cable colors by country
Model Name Neutral Live Ground Country
OH75F BLUE BROWN GREEN/YELLOW
WHITE BLACK GREEN or GREEN/YELLOW America
BLUE BROWN GREEN/YELLOW Europe
BLACK RED GREEN/YELLOW India
WHITE BLACK GREEN or GREEN/YELLOW
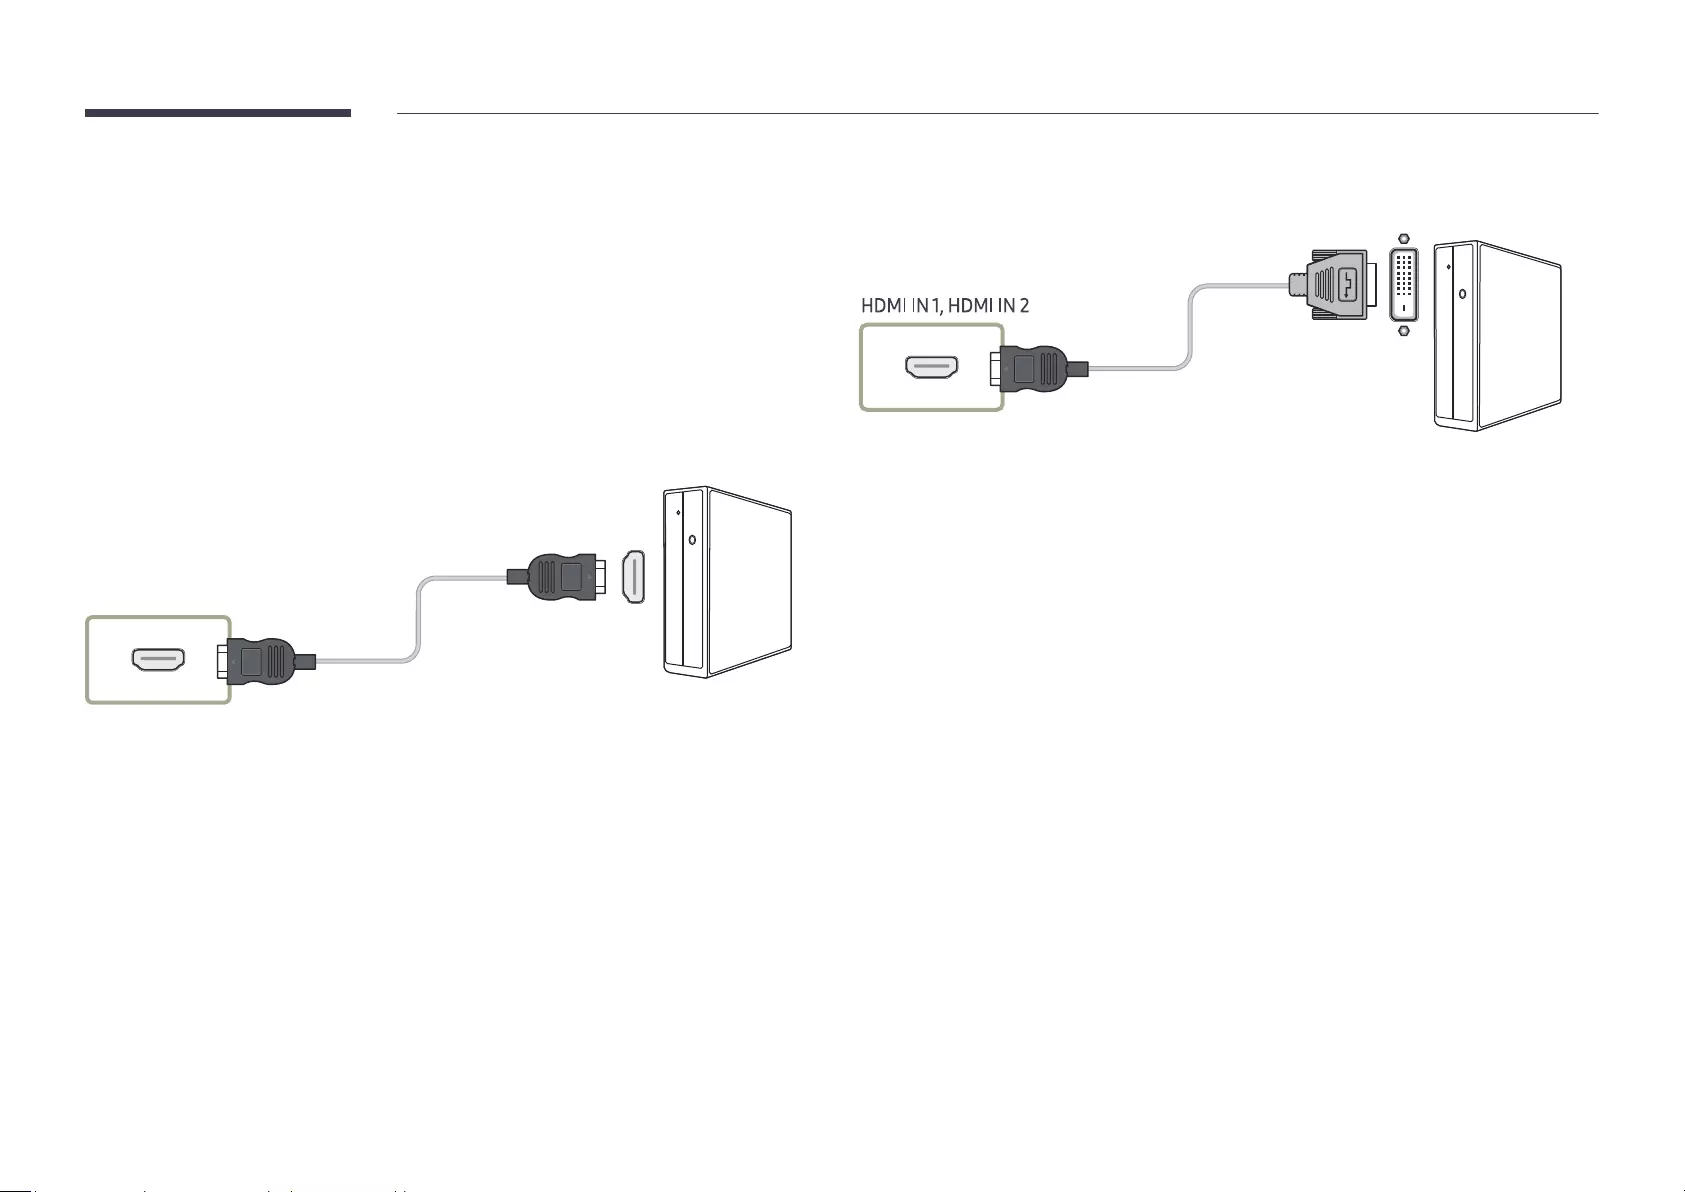
Connecting to a PC
Connecting parts may differ in different products.
Connection Using an HDMI Cable
HDMI IN 1, HDMI IN 2
Connection Using an HDMI-DVI Cable
37
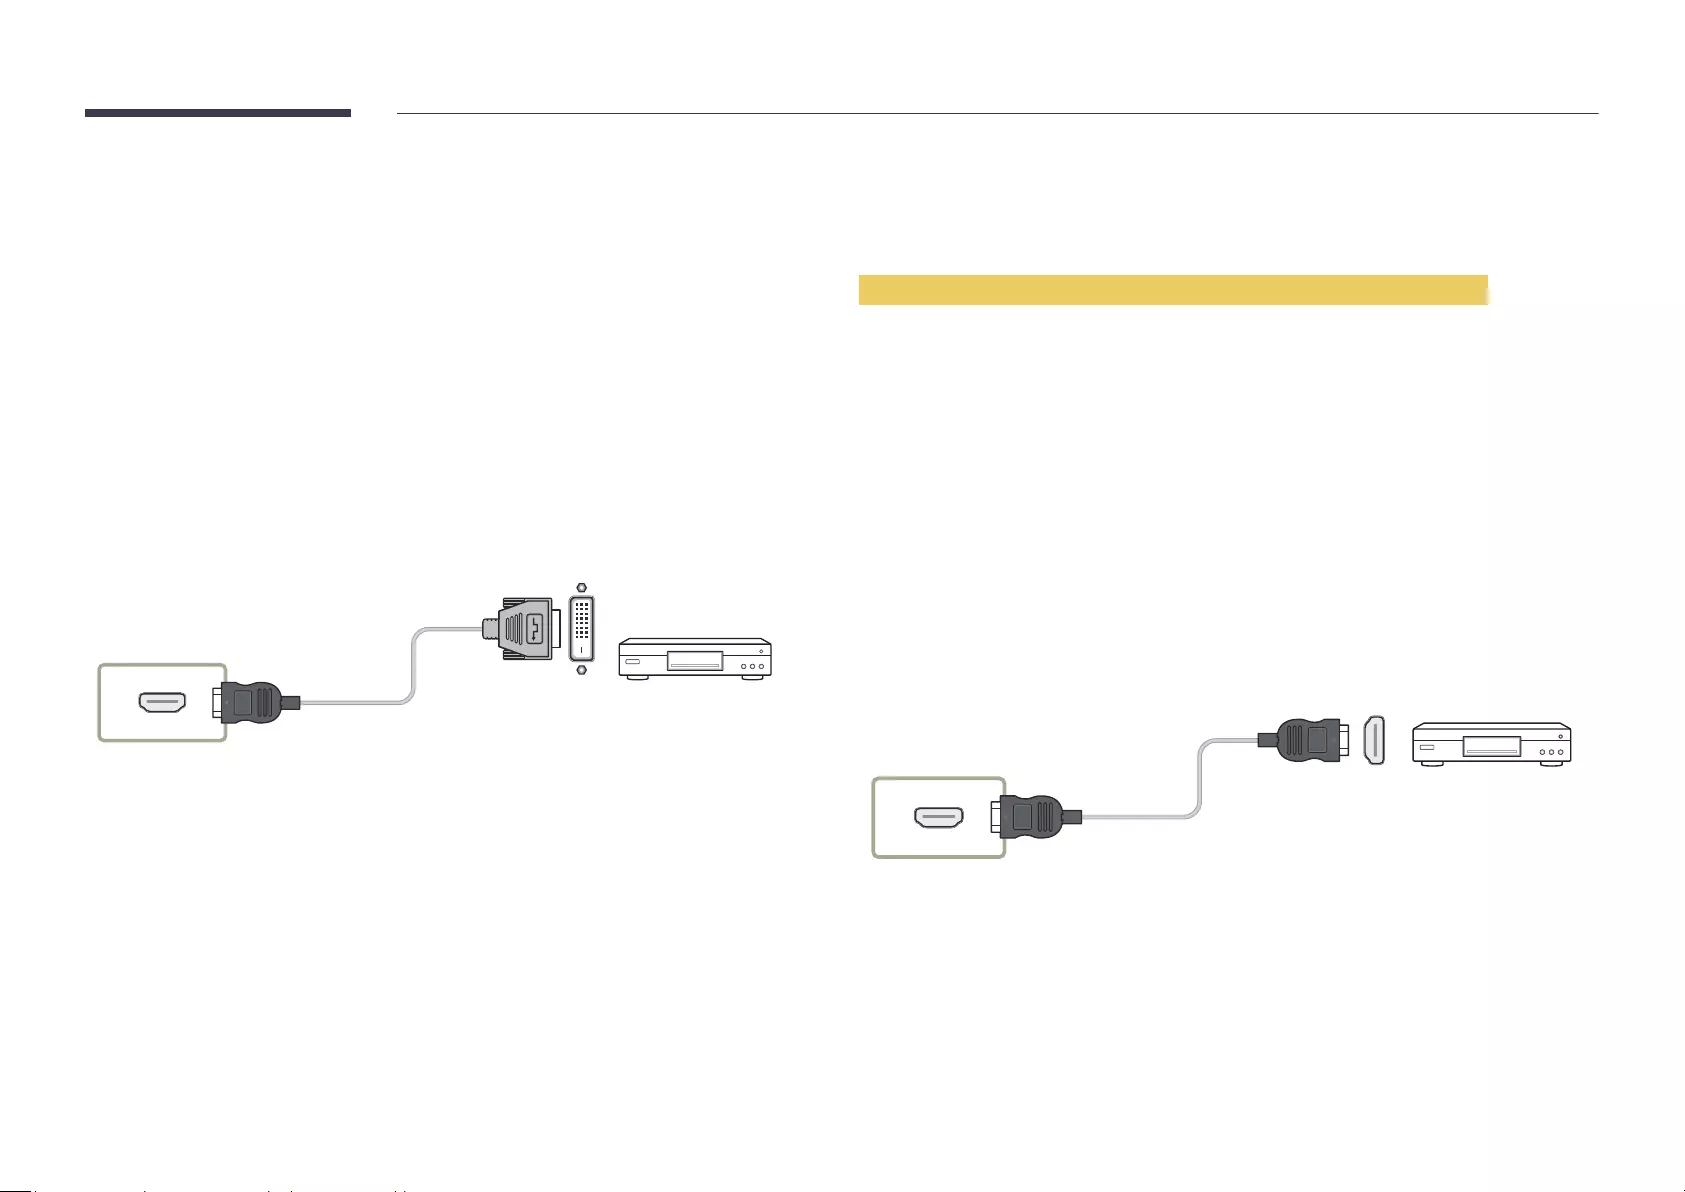
Connecting to a Video Device
Connecting parts may differ in different products.
Press the SOURCE
Connection Using an HDMI-DVI Cable
The appearance may differ depending on the product.
Connecting parts may differ in different products.
HDMI IN 1, HDMI IN 2
Connection Using an HDMI Cable
The appearance may differ depending on the product.
Connecting parts may differ in different products.
Using an HDMI cable or HDMI to DVI Cable (up to 1080p)
–
if out of date, request an upgrade.
connection error may occur.
HDMI IN 1, HDMI IN 2
38
Connecting the HDBase-T
The appearance may differ depending on the product.
Connecting parts may differ in different products.
HDMI IN
HDBT (LAN IN) LAN
HDBase-T (Tx)
HDMI OUT
HDMI OUT
HDMI OUT
39
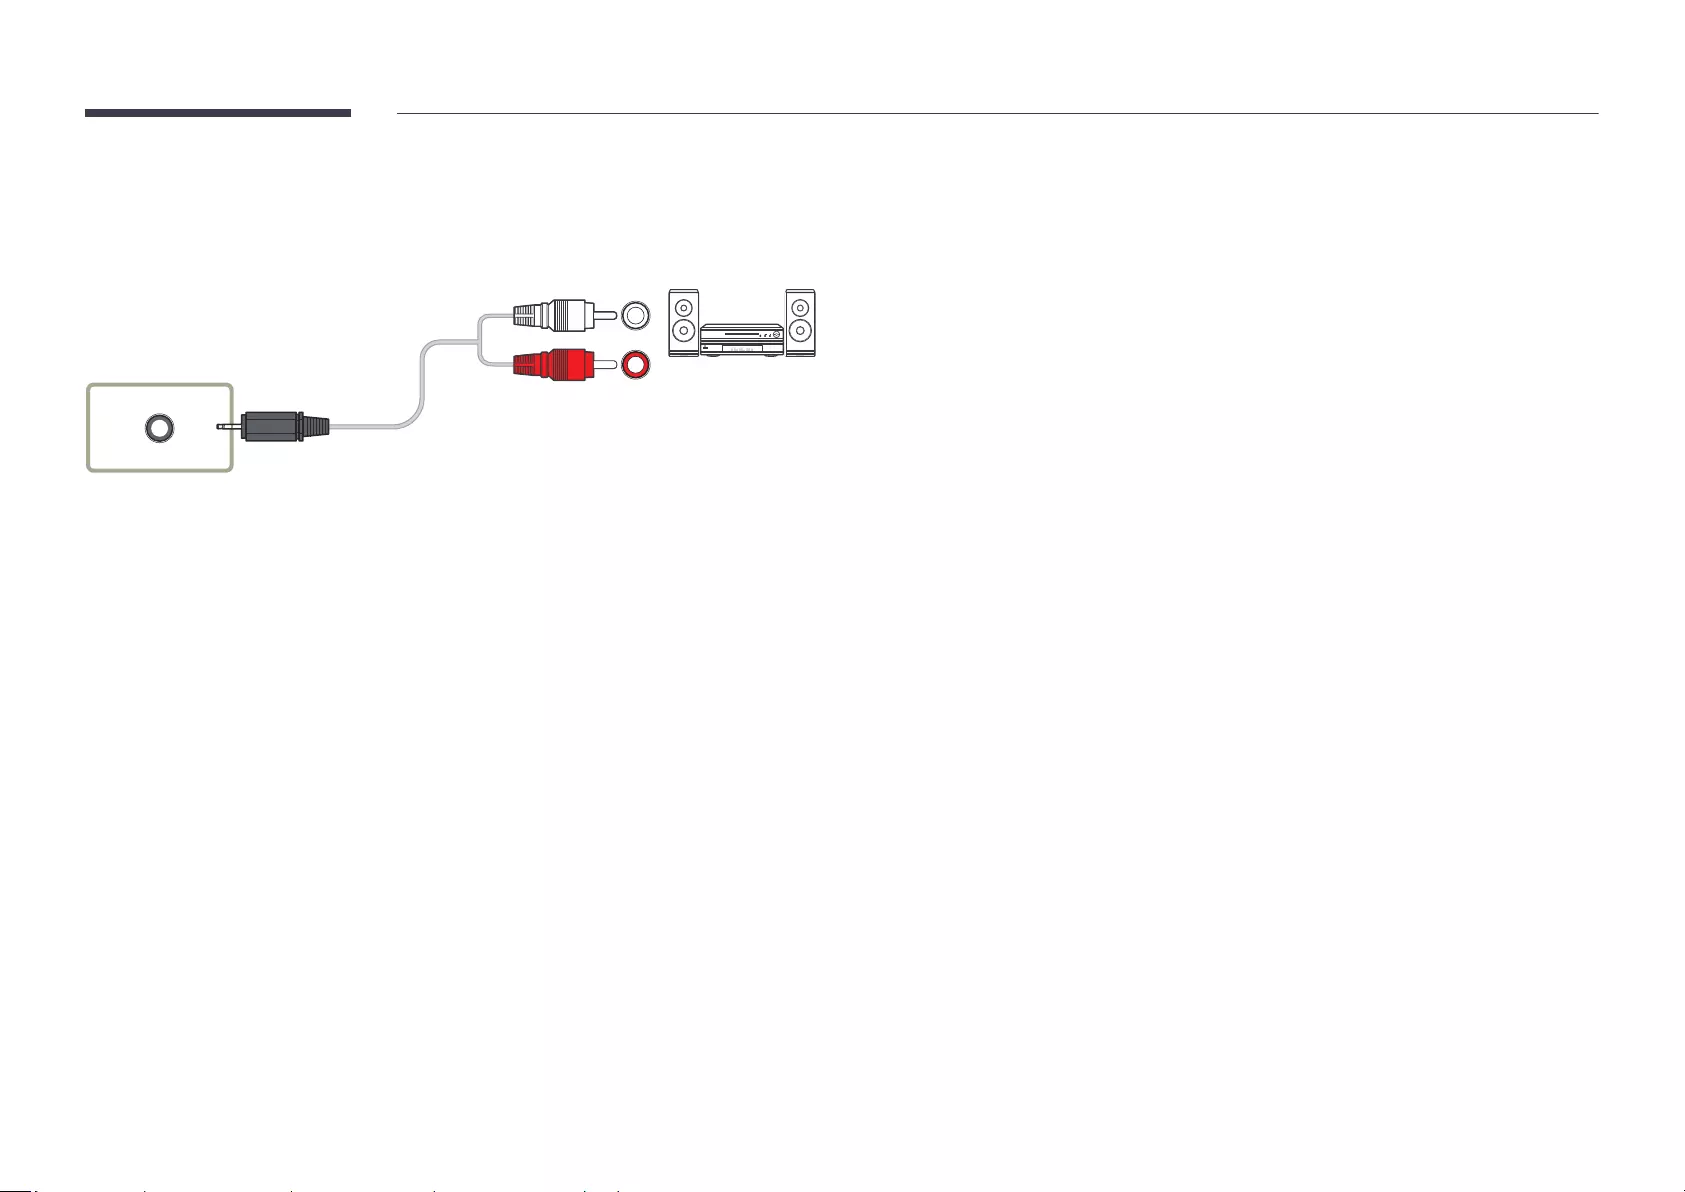
Connecting to an Audio System
Connecting parts may differ in different products.
AUDIO OUT

40
Changing the Input source
Source
SOURCESource
Source
HDMI 1
HDBT
MagicInfo S Web Browser
– The displayed image may differ depending on the model.
Source
the screen of the selected source.
SOURCE
to.
Edit
SOURCE SourceuEditENTER E
source.
HDMI 1 / HDMI 2 / HDBT / Cable Box / Game Console / PC / Blu-ray player
MagicInfo S / URL Launcher / Web Browser
Information
INFO
Screen Mirroring

41
Web Browser
SOURCE SourceWeb BrowserENTER E
Web Browser
– The displayed image may differ depending on the model.
–
Internet from a computer.
Settings
SOURCE Source Web BrowseruSettingsENTER E
General
Hide Tabs and Toolbar automatically
Use / Do not use
Pop-up Blocker
Use / Do not use
Reset Settings
affected.
Search Engine
Google / Bing

Privacy & Security
Security Mode
Use / Do not use
Private Browsing
Use / Do not use
Do Not Track
Use / Do not use
JavaScript
Use / Do not use
Clear History
Delete browsing data
Blocked pages
Blocked pages
Use / Do not use
Blocked Pages
Add
Approved pages
Approved pages
Use / Do not use
Password for Approved pages
Approved Pages
Add

43
Encoding
Encoding
About
Refresh Options
SOURCE Source Web Browseru Refresh OptionsENTER E
Refresh Interval
Off / 5 min / 10 min / 15 min / 30 min
Zoom
50% / 75% / 100% / 125% / 150% / 200% / 300%
Home Page
Samsung Display / Custom
Custom
Enter the URL to set as the home page.
Enter URL
Home Page is set to Custom.

44
After you press the Never expiredExpired
MDC Program Installation/Uninstallation
Installation
conditions.
1
Click the MDC Unified installation program.
2
Select a language for installation. Next, click "OK".
3
When the "Welcome to the InstallShield Wizard for MDC_Unified" screen appears, click
"Next".
4
In the "License AgreementI accept the terms in the license
agreement" and click "Next".
5
In the displayed "Customer Information
click "Next".
6
In the displayed "Destination Folder
install the program in and click "Next".
directory path.
7
In the displayed "Ready to Install the Program
install the program in and click "Install".
8
9
Click "Finish" in the displayed "InstallShield Wizard Complete
Select "Launch MDC Unified" and click "Finish" to run the MDC program immediately.
10
The MDC Unified
specifications.
Press F5 if the execution icon is not displayed.
Uninstallation
1
Select Settings > Control Panel on the StartAdd/Delete Program.
2
Select MDC Unified from the list and click Change/Remove.
Using MDC
Chapter 04
45
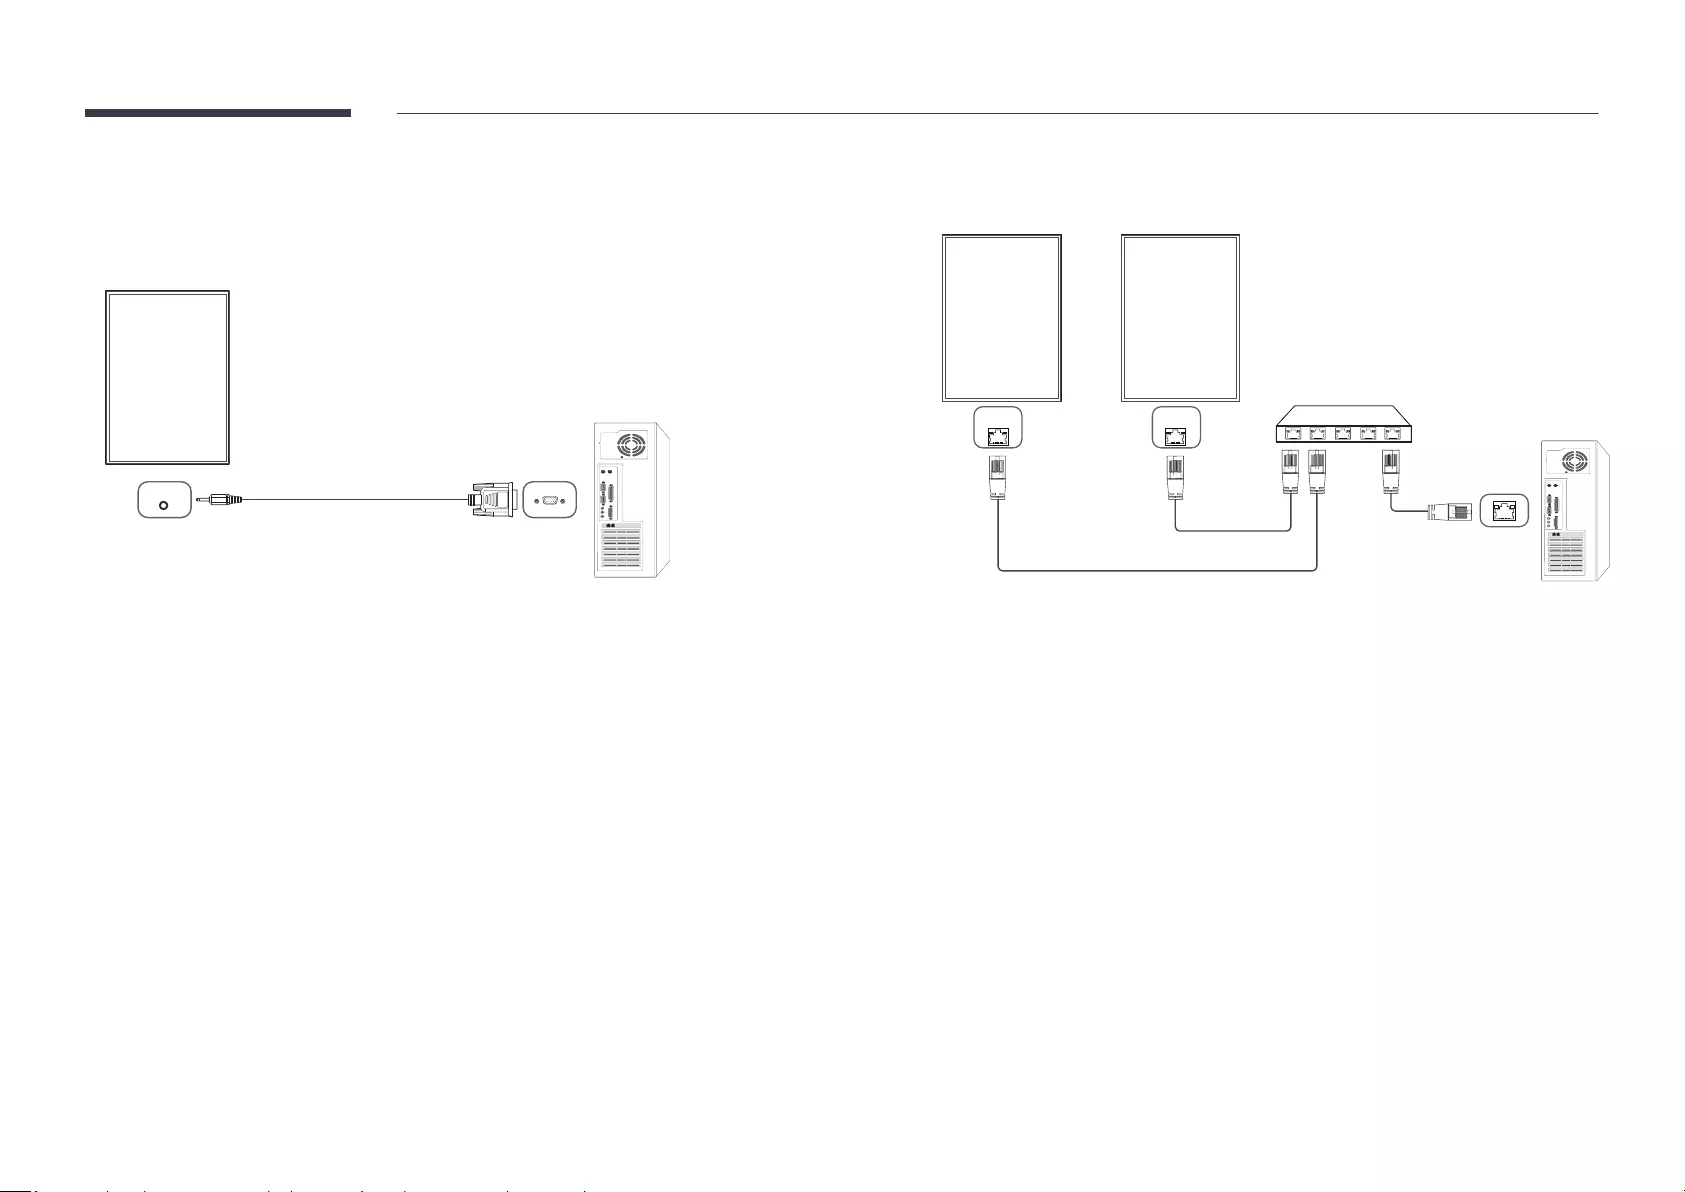
Connecting to MDC
Using MDC via RS-232C (serial data communications standards)
The appearance may differ depending on the product.
RS232C IN
Computer
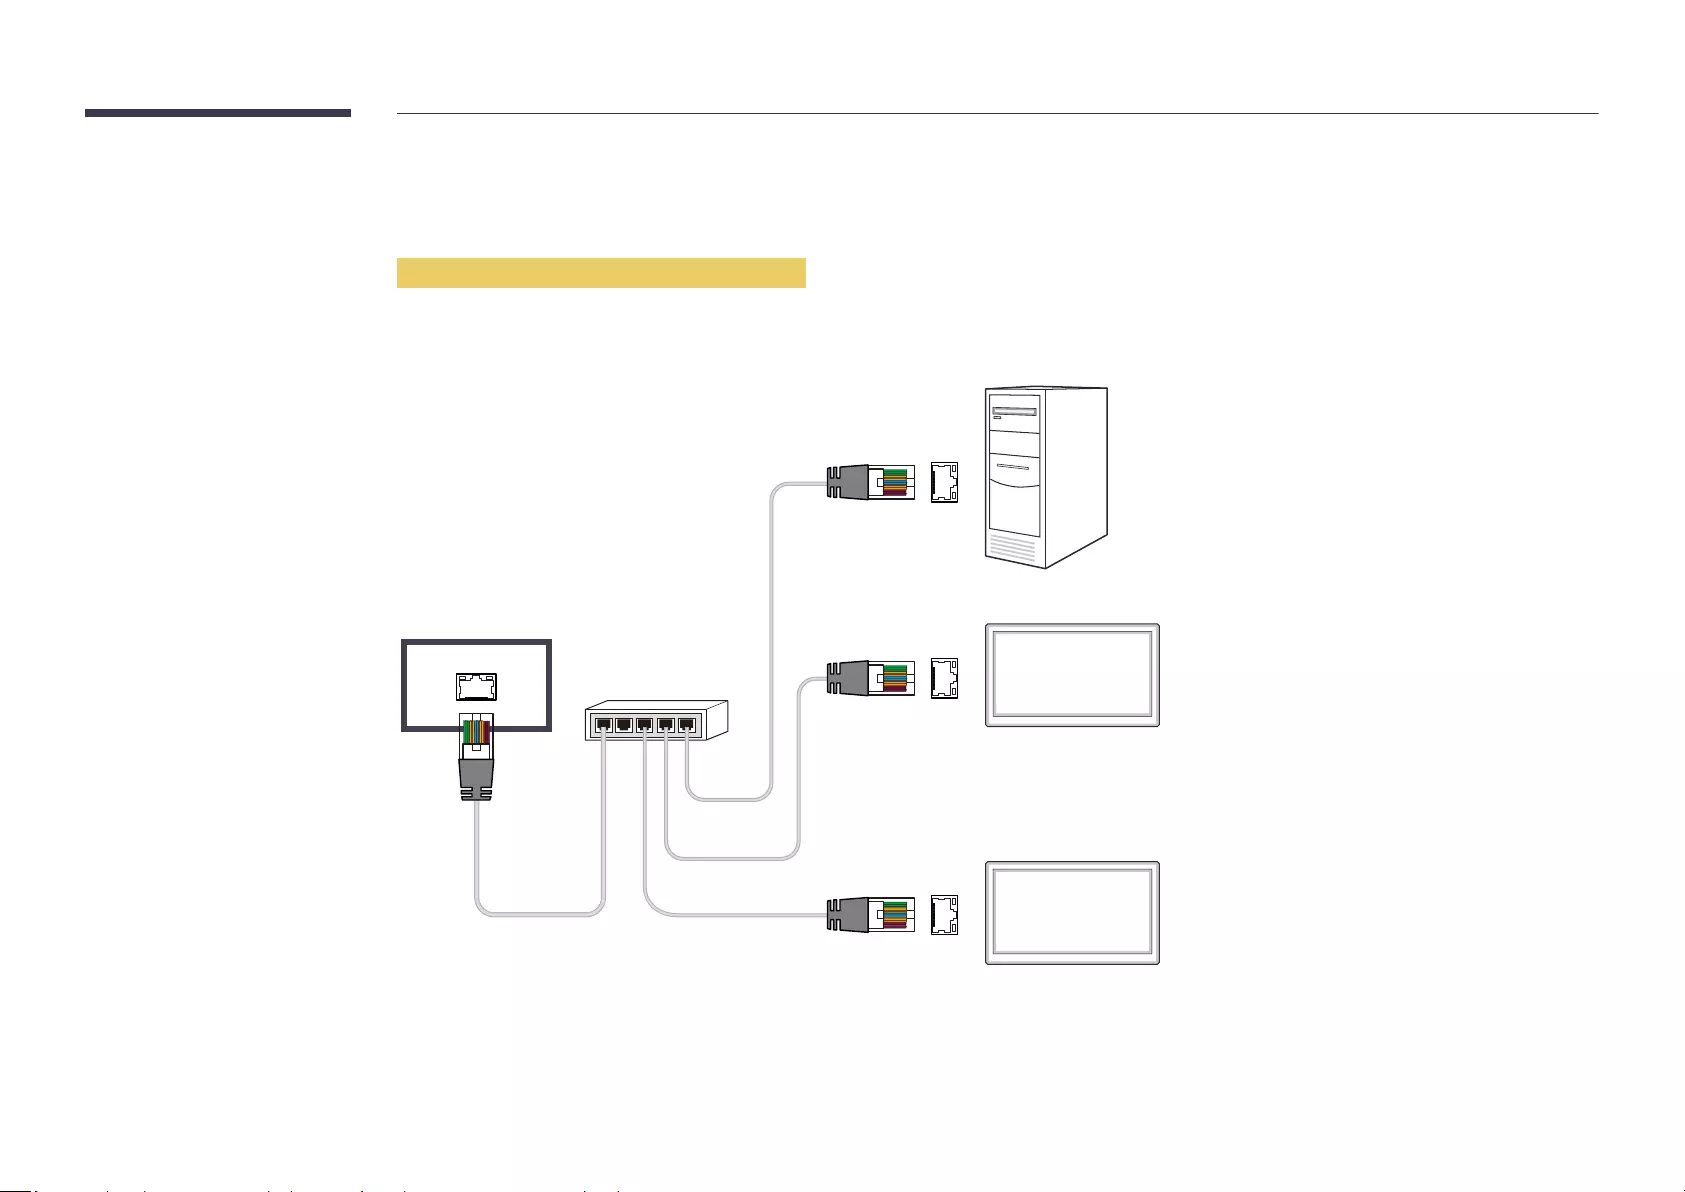
Using MDC via Ethernet
Connection using a direct LAN cable
The appearance may differ depending on the product.
HDBT (LAN IN) port on the product and the LAN ports on the HUB.
HDBT
(LAN IN)
HUB
Monitor 1
Computer
47
Player feature
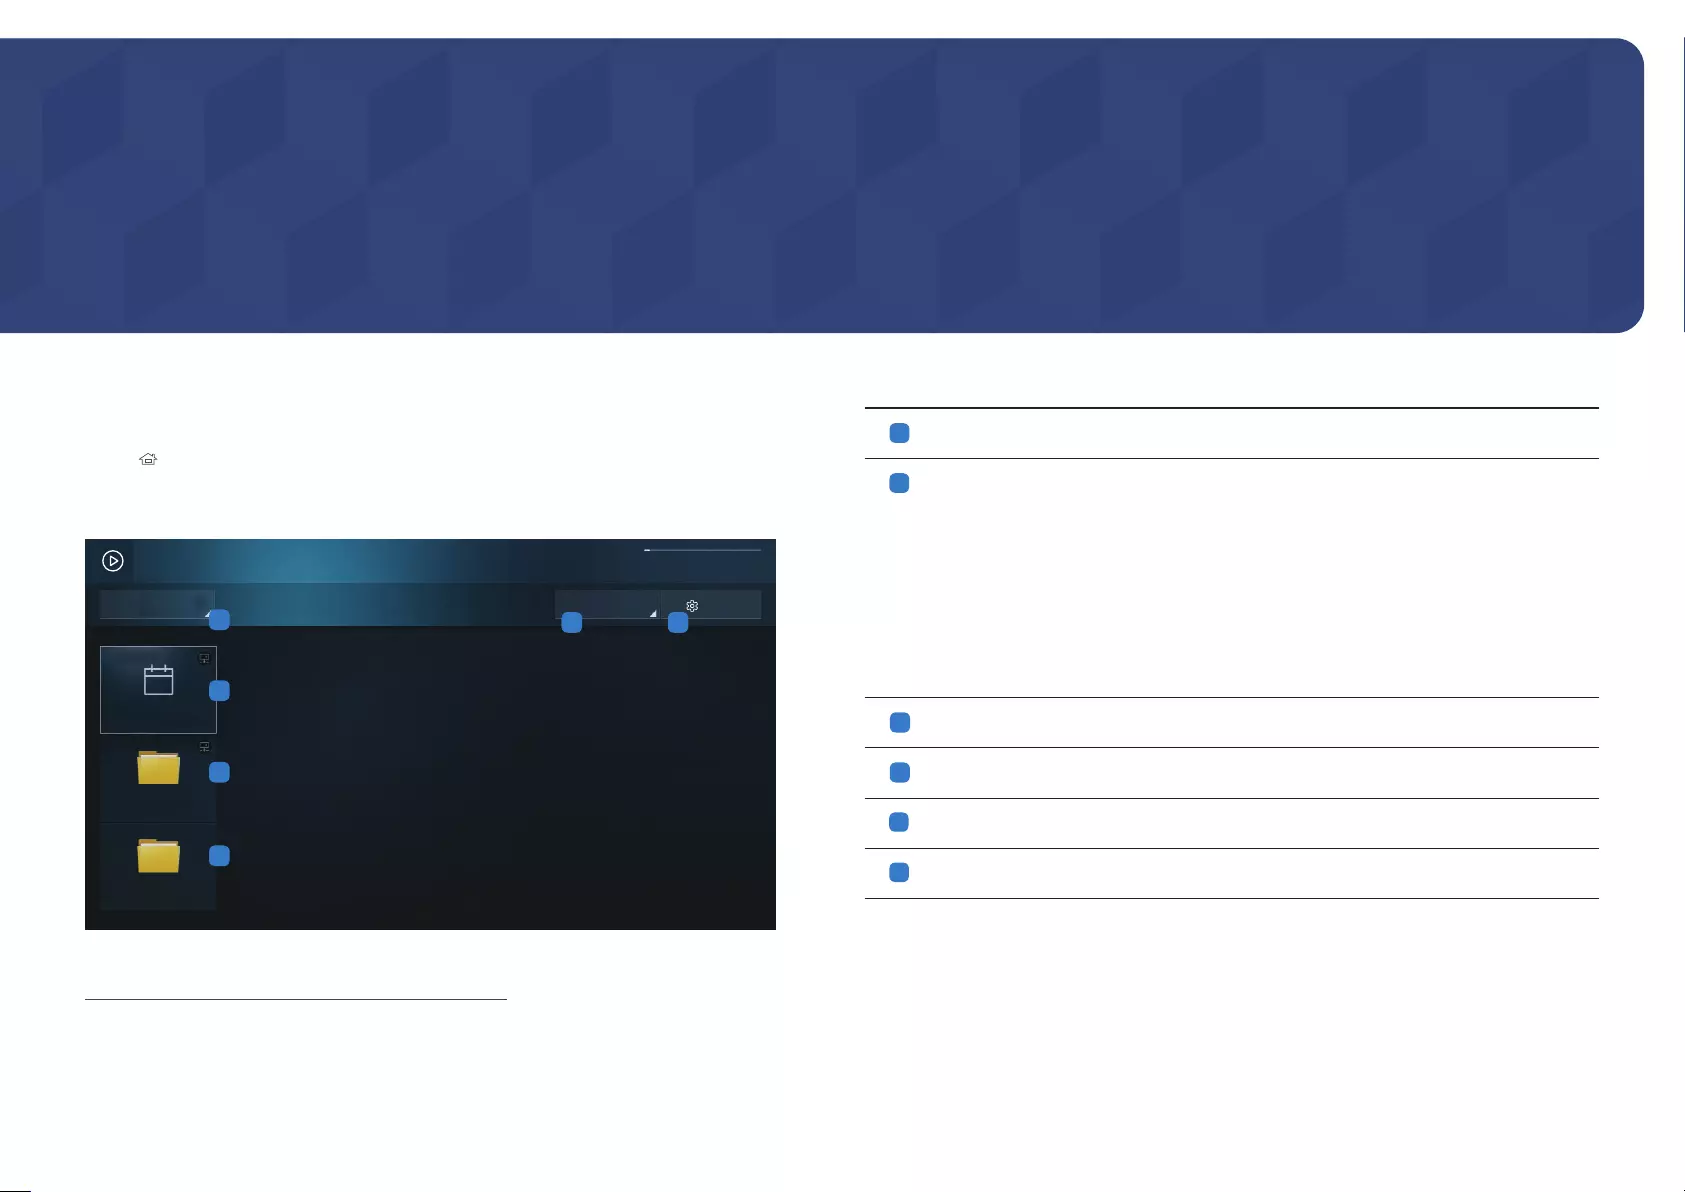
Player
HOME → Player → ENTER E
Used
199.33 MB
Available
4.26 GB(95%)
1
2
3
4
5 6
Player
Filter By: All Options
No channel.
Network Channel
Network File
My Templates
Internal Memory
– The displayed image may differ depending on the model.
– To use the Player feature, set Play via to MagicInfo in System.
No. Description
1
2
Player
Channel is running, press INFO on the remote.
1
Select Network Channel from the Player screen. The No channel.
Network Channel.
2
Network Channel
3
4
Play a template stored in the internal memory.
5
Select a content type as criterion to search for a desired content list.
6
Set different options for Player.
Viewing content
1
2
HOME
Chapter 05

48
When content is running
Control buttons on the remote
playlist.
Button Function
TOOLS
INFO Displays the information of the content.
►Goes to next file or page.
◄
E / ∆ / ³
´Stops displaying content and goes to the Player screen.
π
µ
Available menu
Press the TOOLS
Menu Description
Playlist
Picture Mode Customizes the screen settings for the content currently playing.
Repeat Set the repeat mode.
Background Music
Reset
Pause
Prev
Next
Reset, Pause, Prev, Next

49
File Formats Compatible with Player
–
Network Schedule Multiframe
Playback restrictions
Video
For OfficePDF files, only one file type is supported at a time.
Sound output restrictions
user
TOOLS
Player
Template files and LFD(.lfd) files
Restrictions
Internal Memory / USB memory.
Playback restrictions
Video
For OfficePDF files, only one file type is supported at a time.
Video
simultaneously.
Sound output restrictions
user

50
Contents
File Extension Container Video Codec Resolution Frame rate
(fps)
Bit rate
(Mbps)
Audio Codec
AVI
MKV
ASF
MP4
3GP
MOV
FLV
VRO
VOB
PS
TS
SVAF
40 AC3
LPCM
AAC
HE-AAC
WMA
DD+
80
30 80
MVC
MPEG4 SP/ASP
MPEG1
30
VP8 90
VP9
RMVB

51
Video Audio Image
is an error in the content or the container.
supported.
–
–
Supports only BD MVC Spec.
– ↔
– ↔
– The resolution is different from that of the monitor
– The frequency is different from that of the monitor
is an error in the content or the container.
Supports up to WMA 10 Pro 5.1 channel. WMA lossless
audio is not supported.
QCELP, AMR NB/WB are not supported.
Supported image effects : 9 effects
Fade1, Fade2, Blind, Spiral, Checker, Linear, Stairs, Wipe,
Random)

Power Point PDF WORD
– Extension : ppt, pptx
–
Functions not supported
– Animation effect
–
–
– Word Art
– Align
A group alignment error may occur
–
are supported.
–
–
– Letter spacing
– Charts
– Vertical text
– Slide notes and handout
– Extension : pdf
Functions not supported
–
performance degradation issue.
– Masked Image, Tiled Image content not supported.
–
–
– Some characters not supported
– Extension : .doc, .docx
–
Functions not supported
–
– Some paragraph styles
– Word Art
– Align
A group alignment error may occur
–
–
are supported.
– Charts
–
– Letter spacing
– Vertical text
– Slide notes and handout

53
Template les LFD
My
Templates.
Supported in Network Channel
– Extension : .lfd
54
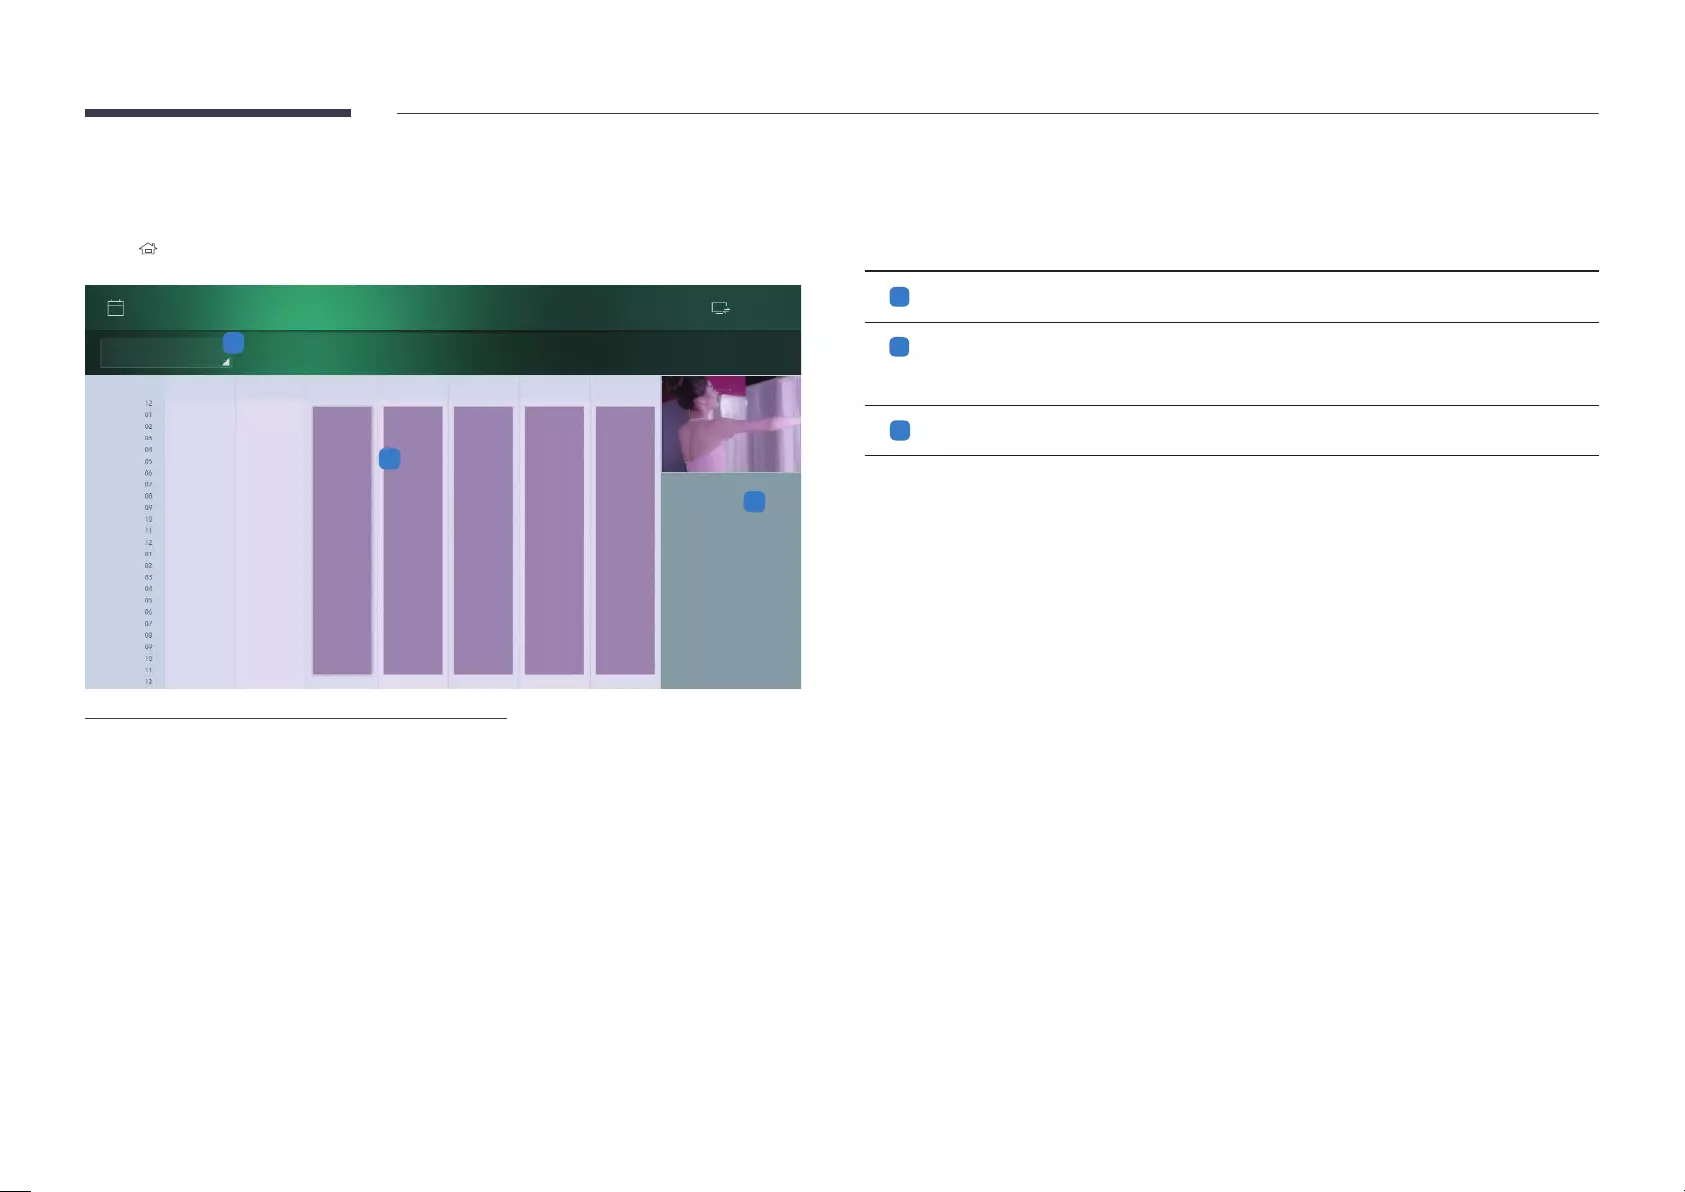
Schedule
HOME → Schedule → ENTER E
AM
PM
AM
Sun Mon Tue Wed Thu Fri Sat
1
2
3
Schedule
All day All day All day All day All day
Information
Location:
Internal Memory
Date:
Repeat:
Daily
Time:
All day
Connected
– The displayed image may differ depending on the model.
No. Description
1
2
3

55
Clone Product
HOME → Clone Product → ENTER E
Clone Product
– The displayed image may differ depending on the model.
MENU
When a duplicate le is not found on the external storage device
1
Clone Product function.
2
The No cloning file found on the external storage device. Export this device's settings to the external storage
device? message appears.
3
Select Export to export the settings.
When a duplicate le is found on the external storage device
1
Clone Product function.
2
The Cloning file found. Please select an option. message appears.
Run the Import from External Storage or Export to External Storage function.
– Import from External Storage
– Export to External Storage

ID Settings
HOME → ID Settings → ENTER E
ID Settings
– The displayed image may differ depending on the model.
Assign an ID to a set.
Device ID
Press u/dE.
PC Connection Cable
RS232C cable
RJ-45 (LAN)/Wi-Fi Network

57
Video Wall
HOME → Video Wall → ENTER E
Video Wall
– The displayed image may differ depending on the model.
To display multiple images, refer to MDC Help or the MagicInfo user guide. Some models may not support the
MagicInfo function.
Video Wall
Video Wall.
On.
Off / On
Horizontal x Vertical
The Horizontal x VerticalVideo Wall is set to On.

58
Screen Position
Screen Position feature.
Selecting Screen Position
E
Screen Position
The Screen PositionVideo Wall is set to On.
To use the function, make sure Horizontal x Vertical is configured.
Format
Full
Natural
The FormatVideo Wall is set to On.

59
Network Status
HOME → Network Status → ENTER E
Network Status
– The displayed image may differ depending on the model.

Picture Mode
HOME → Picture Mode → ENTER E
Picture Mode
– The displayed image may differ depending on the model.
Picture Mode
Video/ImageText
computer.
Shop & Mall
– Select either Video/Image or Text depending on the picture mode.
Office & School
– Select either Video/Image or Text depending on the picture mode.
Terminal & Station
– Select either Video/Image or Text depending on the picture mode.
Video Wall
– Select either Video/Image or Text depending on the picture mode.
Calibration
program Color Expert are applied.
– To apply the Calibration mode properly, make sure you configure the picture quality settings, such as
Color Expert.
– Color Expert

On/Off Timer
HOME → On/Off Timer → ENTER E
On/Off Timer
– The displayed image may differ depending on the model.
You must set Clock Set
On Timer
Set On Timer so that your product turns on automatically at a time and on a day of your choosing.
On Timer
first.
On Timer 1 ~ On Timer 7)
Setup: Select Off, Once, Everyday, Mon~Fri, Mon~Sat, Sat~Sun or Manual. If you select Manual, you can choose
On Timer to turn on your product.
–
Time
Volume
Source: Select the input source of your choice.
ContentSource is set to Internal/USB
does not operate correctly.
If there is only one photo file in the USB, the Slide Show
On Timer.
The On Timer

Off Timer
Off TimerOff Timer 1 ~ Off Timer 7)
Setup: Select Off, Once, Everyday, Mon~Fri, Mon~Sat, Sat~Sun or Manual. If you select Manual, you can choose
Off Timer to turn off your product.
–
Time
Holiday Management
Add Holiday
u/dDone
– Start: Set the start date of the holiday.
– End: Set the end date of the holiday.
Delete: Delete selected items from the list of holidays.
Edit: Select a holiday item and then change the date.
Set Applied Timer: Set the On Timer and Off Timer
– Press E to select the On Timer and Off Timer
– The selected On Timer and Off Timer

Ticker
HOME → Ticker → ENTER E
Ticker
– The displayed image may differ depending on the model.
Off / On
Message: Enter a message to display on the screen.
Time: Set the Start Time and End Time to display a Message.
Font Options: Specify the text font and color for the message.
Position: Select an orientation to display a Message.
Scroll: Specify the scroll Direction and Speed for the message.
Preview

URL Launcher
HOME → URL Launcher → ENTER E
URL Launcher
– The displayed image may differ depending on the model.
URL Launcher
URL Launcher
To use the URL Launcher feature, set Play via to URL Launcher in System.

URL Launcher Settings
HOME → URL Launcher Settings → ENTER E
URL Launcher
Settings
– The displayed image may differ depending on the model.
Install Web App
Install from USB Device
Uninstall
Timeout Setting: Set the timeout period for connecting to the URL.
Developer Mode
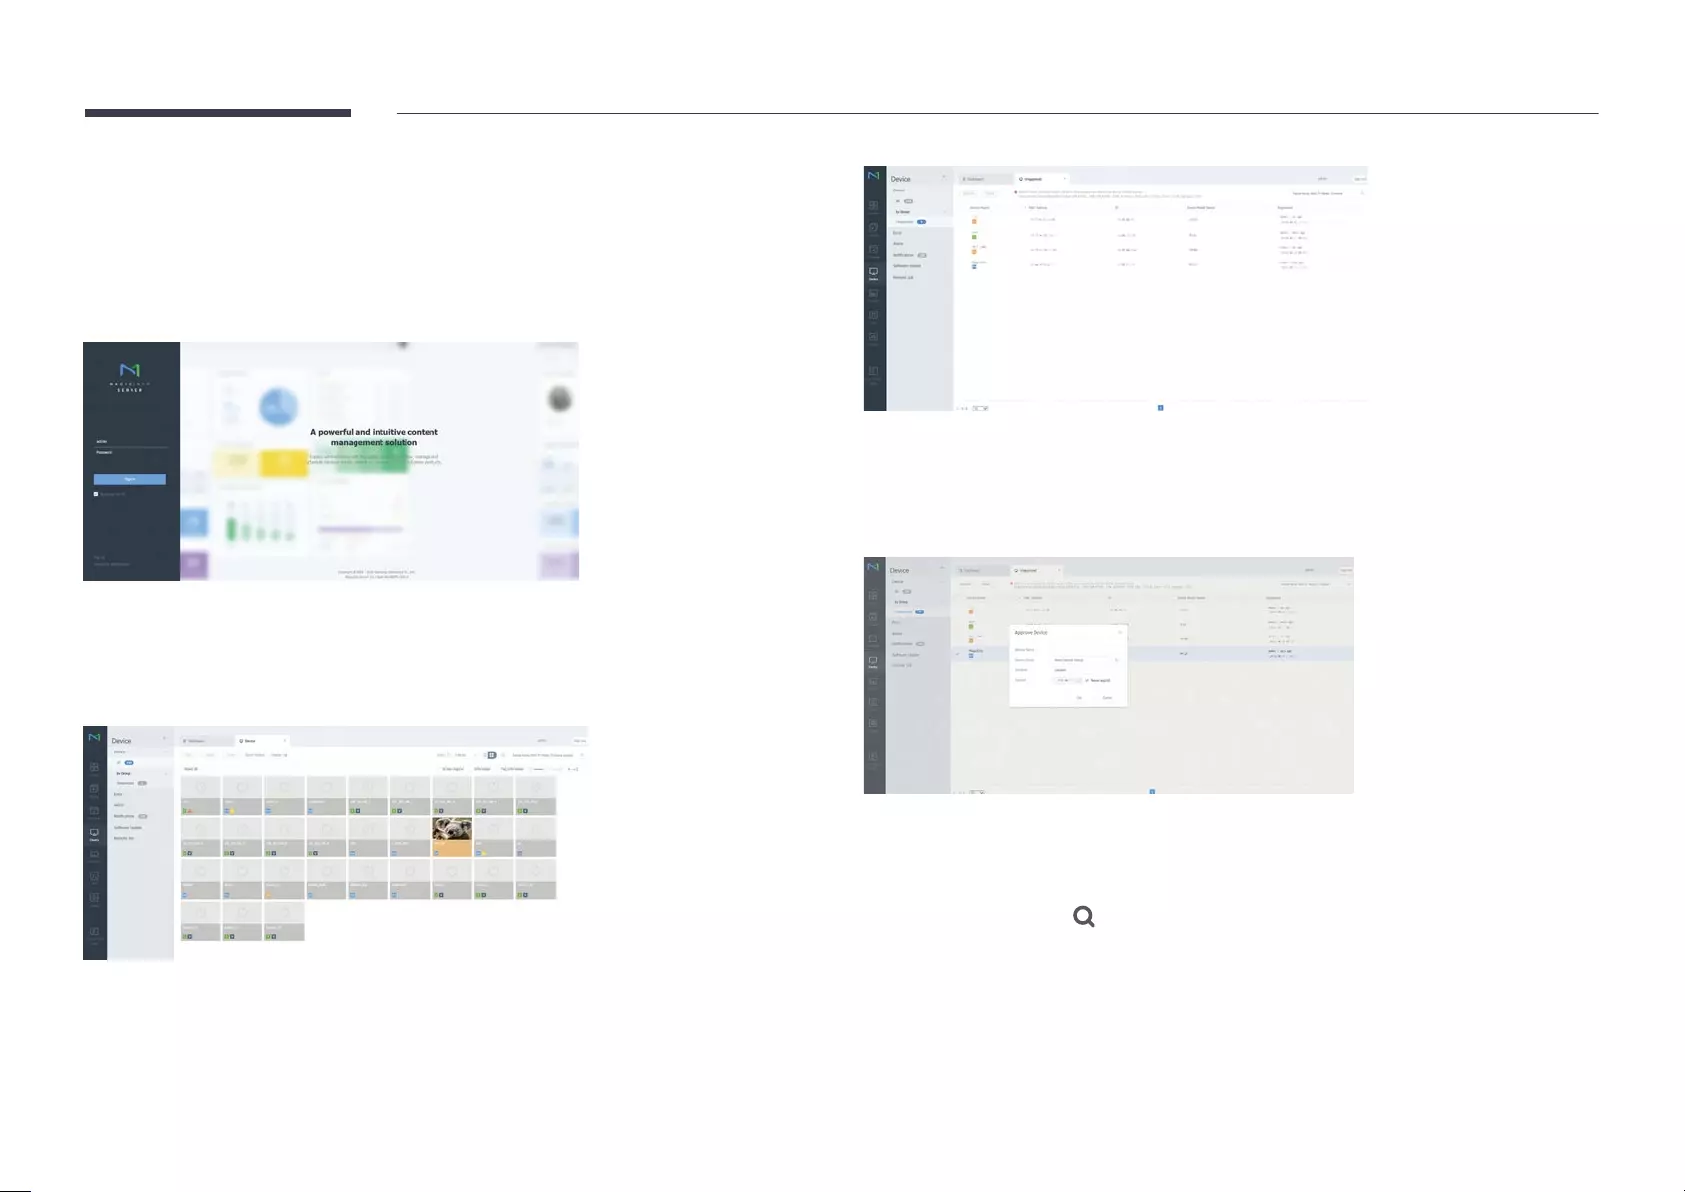
Approving a connected device from the
server
Server Network Settings
1
2
3
Select Device
4
Select Unapproved
5
Approve
6
Device Name
Device Group: Select to specify the group.
Location
Expired
date, select Never expired.
Pressing the INFO
7
Select the All
8
manual>.
to reset its settings.
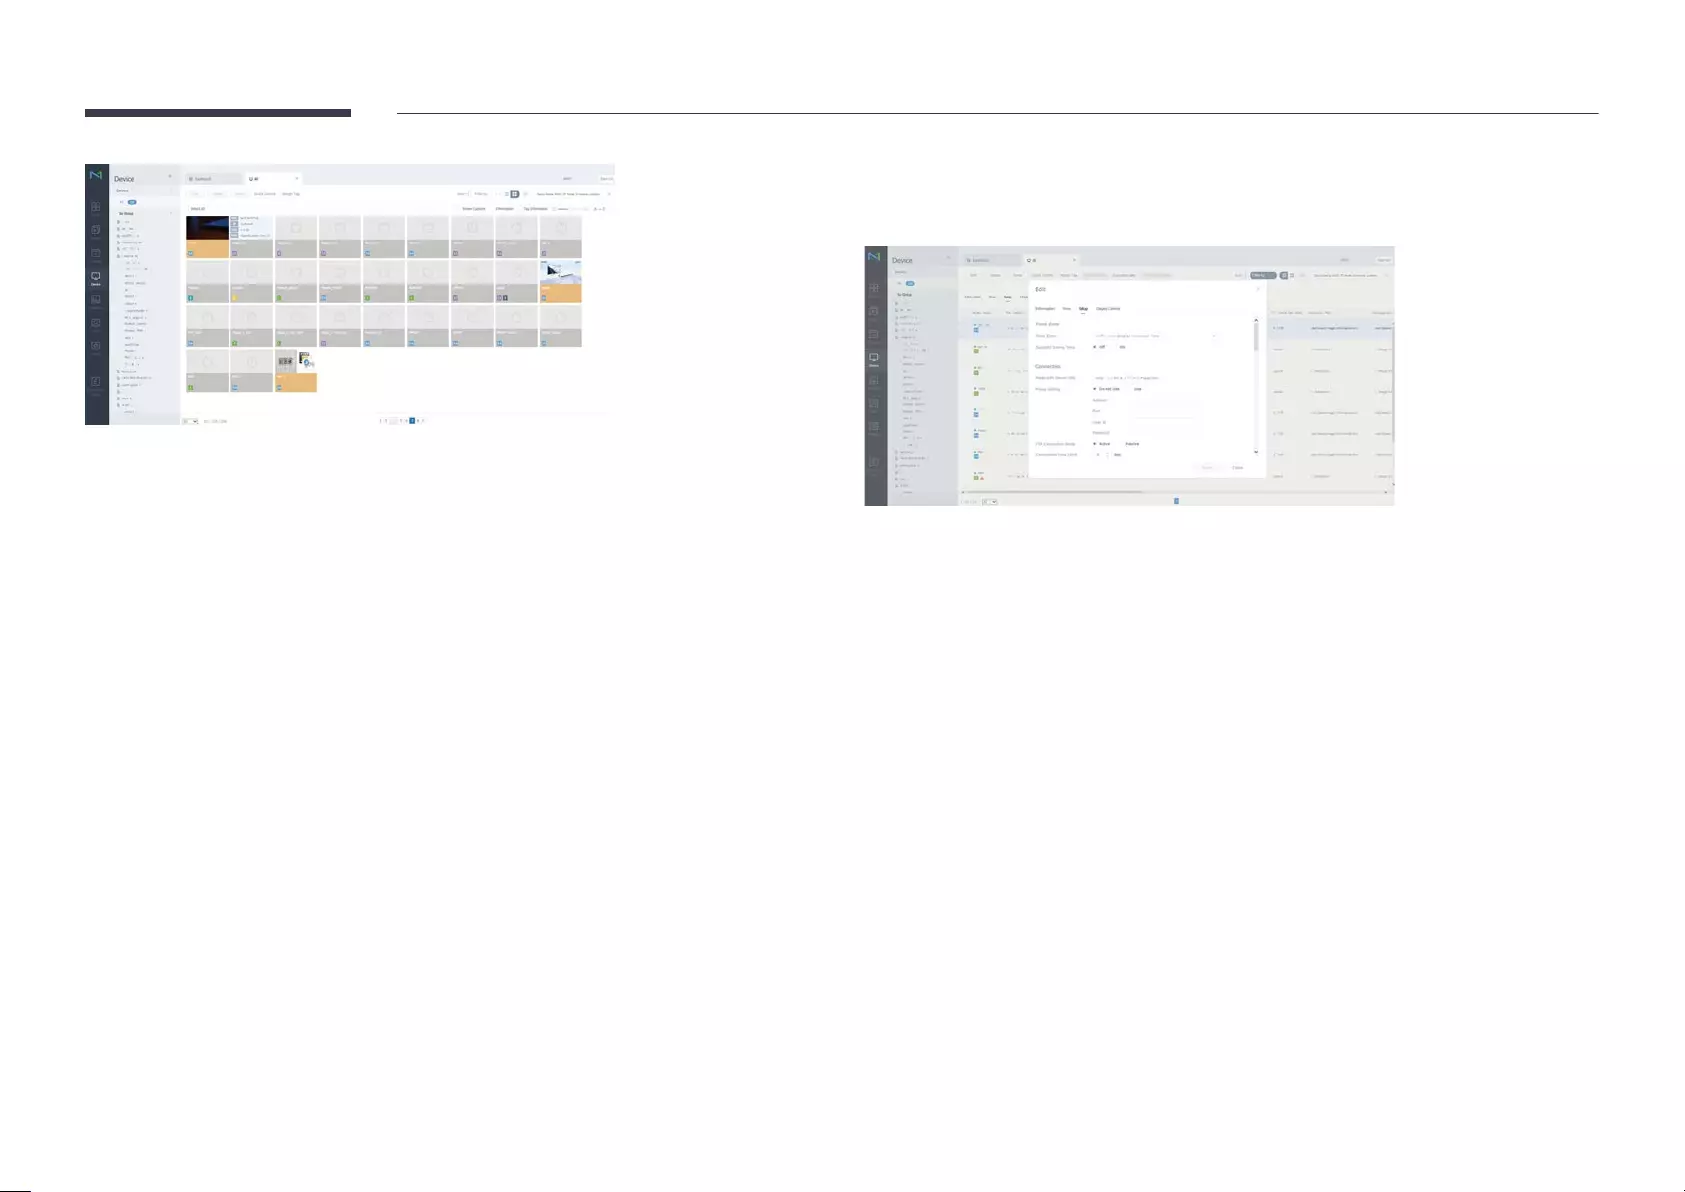
Setting the current time
1
Select Device
2
3
Select Edit → Setup.
4
Select Time Zone.

Screen Adjustment
Configure the PictureBacklight, Color Tone, etc.).
The layout of the Picture
Picture Mode
MENU mPicturePicture ModeENTER E
·
·
·
Picture
Picture Mode
Backlight
Contrast
Brightness
Sharpness
Color
100
70
45
50
G50 R50
– The displayed image may differ depending on the model.
Picture Mode
Video/ImageText
computer.
Shop & Mall
– Select either Video/Image or Text depending on the picture mode.
Office & School
– Select either Video/Image or Text depending on the picture mode.
Terminal & Station
– Select either Video/Image or Text depending on the picture mode.
Video Wall
– Select either Video/Image or Text depending on the picture mode.
Calibration
program Color Expert are applied.
– To apply the Calibration mode properly, make sure you configure the picture quality settings, such as
Color Expert.
– Color Expert
Chapter 06

Backlight / Contrast / Brightness
/ Sharpness / Color / Tint (G/R)
MENU mPictureENTER E
·
·
·
Picture
Picture Mode
Backlight
Contrast
Brightness
Sharpness
Color
100
70
45
50
G50 R50
– The displayed image may differ depending on the model.
When you make changes to Backlight, Contrast, Brightness, Sharpness, Color or Tint (G/R)
Color and Tint (G/R), set Picture Mode to Video/Image.

70
Color Temperature
MENU mPictureColor TemperatureENTER E
Picture
Color Temperature
– The displayed image may differ depending on the model.
Color Tone is set to Off.
If Picture Mode is set to Calibration, Color Temperature
White Balance
MENU mPictureWhite BalanceENTER E
Picture
White Balance
– The displayed image may differ depending on the model.
2 Point
R-Offset / G-Offset / B-Offset
R-Gain / G-Gain / B-Gain
Reset
10 Point
Off / On
Interval
Red
Green
Blue
Reset
Picture Mode is set to Office & SchoolVideo/Image).

71
Gamma
MENU mPictureGammaENTER E
Picture
Gamma 0
– The displayed image may differ depending on the model.
If Picture Mode is set to Calibration, Gamma
Calibrated Value
MENU mPictureCalibrated ValueENTER E
Picture
– The displayed image may differ depending on the model.
program Color Expert
Don't Apply / Apply
Color Expert
If Picture Mode is set to Calibration, Calibrated Value

Advanced Settings
MENU mPictureAdvanced SettingsENTER E
Dynamic Contrast
Black Tone
Flesh Tone
RGB Only Mode
Color Space
HDMI UHD Color
Motion Lighting
High
Darkest
0
Off
On
– The displayed image may differ depending on the model.
If Picture Mode is set to Calibration, Advanced Settings
Dynamic Contrast
Off / Low / Medium / High
Black Tone
Off / Dark / Darker / Darkest
Flesh Tone
Emphasize pink Flesh Tone.
Picture Mode is set to Video/Image.
RGB Only Mode
Displays the Red, Green and Blue
Off / Red / Green / Blue
Picture Mode is set to Video/Image.
Color Space
Auto / Native / Custom
Color, Red, Green, Blue and Reset, set Color Space to Custom.
Picture Mode is set to Video/Image.

73
Dynamic Contrast
Black Tone
Flesh Tone
RGB Only Mode
Color Space
HDMI UHD Color
Motion Lighting
High
Darkest
0
Off
On
– The displayed image may differ depending on the model.
HDMI UHD Color
HDMI1Off / On)
HDMI2Off / On)
Motion Lighting
Off / On
Picture Mode is set to Text.

74
Picture Options
MENU mPicturePicture OptionsENTER E
Picture Options
Color Tone
Film Mode
Smart LED
Dynamic Backlight
Off
Auto
Auto
Off
On
Off
– The displayed image may differ depending on the model.
Color Tone
If Picture Mode is set to Text
Off / Cool / Standard / Warm
If Picture Mode is set to Video/Image
Off / Cool / Standard / Warm1 / Warm2
If Picture Mode is set to Calibration, Color Tone
Digital Clean View
Off / Auto
If Picture Mode is set to Calibration, Digital Clean View

75
Picture Options
Color Tone
Film Mode
Smart LED
Dynamic Backlight
Off
Auto
Auto
Off
On
Off
– The displayed image may differ depending on the model.
HDMI Black Level
Auto / Low / Normal
HDMI 1 and HDMI 2
Film Mode
optimum quality.
Off / Auto1 / Auto2
Smart LED
Off / On
Dynamic Backlight
Off / On
Picture Mode is set to Video/Image.

Picture Size
MENU mPicturePicture SizeENTER E
·
·
Picture Size
Picture Size
Fit to Screen
Zoom/Position
– The displayed image may differ depending on the model.
choose size and aspect ratio picture displayed on screen.
Picture Size
16:9 Standard: Sets the picture to 16:9 Standard
Custom
4:34:3) mode.
Do not set your product to 4:3 format for a long time.
Fit to Screen
cut off.
Off / On / Auto
Zoom/Position
HDMI 1, HDMI 2
Picture SizeCustom
Reset in the Zoom/Position

77
Picture Off
MENU mPicturePicture OffENTER E
Picture
Picture Off
– The displayed image may differ depending on the model.
Selecting Picture Off
Reset Picture
MENU mPictureReset PictureENTER E
Picture
Reset Picture
– The displayed image may differ depending on the model.
Resets your current picture mode to its default settings.

78
OnScreen Display
Display Orientation
MENU m OnScreen DisplayDisplay OrientationENTER E
·
Display Orientation
Onscreen Menu Orientation
Source Content Orientation
Aspect Ratio
Landscape
Landscape
Full Screen
– The displayed image may differ depending on the model.
Onscreen Menu Orientation
Configure the menu screen.
Landscape
Portrait: Display the menu in portrait mode on the right side of the product screen.
Source Content Orientation
Rotate the product screen orientation.
Landscape
Portrait: Display the screen in portrait mode.
Aspect Ratio
Full Screen: Display the rotated screen in full screen.
Original Ratio: Display the rotated screen in the original aspect ratio.
Onscreen Menu Orientation is set to Portrait.
Source Content Orientation is set to Portrait.
Chapter 07

79
Screen Protection
MENU m OnScreen DisplayScreen ProtectionENTER E
Screen Protection
Auto Protection Time
Screen Burn Protection
Off
– The displayed image may differ depending on the model.
Auto Protection Time
Off / 2 hours / 4 hours / 8 hours / 10 hours
Screen Burn Protection
Screen Burn Protection
technology.
Screen Burn Protection
The Screen Burn Protection Time
minutes.
Pixel Shift
Pixel ShiftOff / On)
Horizontal, Vertical and TimePixel Shift is set to On.
Horizontal
Vertical
Time
Available Pixel Shift Settings and Optimum Settings.
Available Settings Optimum Settings
Horizontal 0 ~ 4 4
Vertical 0 ~ 4 4
Time 1 min. ~ 4 min. 4 min.
The Pixel Shift
Displaying a still image or a 4:3 output for an extended period of time may cause image retention. This is not a
defect in the product.

80
Screen Burn Protection
Pixel Shift
Timer
Immediate Display Off
– The displayed image may differ depending on the model.
Timer
You can set the timer for Screen Burn Protection.
The Screen Burn Protection feature stops automatically after a specified period of time.
Timer
Off
RepeatMode
IntervalModeStart Time
to End Time).
Mode, Period, Time, Start Time and End TimeTimer is set to Repeat or Interval.
Mode
– Pixel
– Rolling Bar
– Fading Screen
The Rolling Bar and Fading Screen patterns appear only once regardless of the specified repeat period or
time.
PeriodScreen Burn Protection function.
Repeat is selected for Timer.
Time: Specify the duration to keep the Screen Burn Protection function on.
Timer is set to Repeat and Mode is set to Pixel.
Start Time
Interval is selected for Timer.
End Time
Interval is selected for Timer.

81
Screen Burn Protection
Pixel Shift
Timer
Immediate Display Off
– The displayed image may differ depending on the model.
Immediate Display
Off / Pixel / Rolling Bar / Fading Screen

Message Display
MENU m OnScreen DisplayMessage DisplayENTER E
Message Display
Source Info
No Signal Message
MDC Message
On
On
On
Off
– The displayed image may differ depending on the model.
Source Info
Off / On
No Signal Message
Off / On
MDC Message
Off / On
Download Status Message
Off / On

83
Language
MENU mOnScreen Display LanguageENTER E
OnScreen Display
Language English
– The displayed image may differ depending on the model.
Set the menu language.
other functions on your PC.
Reset OnScreen Display
MENU mOnScreen DisplayReset OnScreen DisplayENTER E
OnScreen Display
Reset OnScreen Display
– The displayed image may differ depending on the model.
This option returns the current settings under OnScreen Display to the default factory settings.

84
Network
Network Status
MENU m NetworkNetwork StatusENTER E
Open Network Settings
MENU m NetworkOpen Network SettingsENTER E
Network type
Wired
Chapter 08
85
Network Settings (Wired)
Connecting to a Wired Network
RJ45
The Modem Port on the Wall External Modem
(ADSL / VDSL)
Modem Cable LAN Cable
LAN
The Modem Port on the Wall External Modem
(ADSL / VDSL) IP Sharer
(having DHCP server)
LAN
Modem Cable LAN Cable LAN Cable
RJ45
The LAN Port on the Wall
LAN
LAN Cable
RJ45
ADSL modems that support DHCP also let you use Static IP addresses.

Automatic Open Network Settings (Wired)
How to set up automatically
1
Set Network type to Wired from the Open Network Settings page.
2
Press the ConnectOpen Network Settings.
– The Connect
3
Wired network and Internet connection
completed.
If the connection process fails, check the LAN port connection.
Manual Open Network Settings (Wired)
Offices may use static IP addresses.
Getting the Network Connection Values
1
2
In the pop-up menu that appears, click Status.
3
On the dialog that appears, click the Support
4
On the SupportDetails
displayed.
How to set up manually
1
Set Network type to Wired from the Open Network Settings page.
2
Press the ConnectOpen Network Settings.
– The Connect
3
Stop. The
4
Select IP SettingsIP Settings screen appears.
5
Select the field at the top, press E, and then set IP Settings to Enter manually. Repeat
the entry process for each field in the IP Address.
Setting IP Settings to Enter manually automatically changes DNS Setting to Enter
manually.
6
When done, select OKE
7
Wired network and Internet connection
completed.

87
Server Network Settings
MENU m NetworkServer Network SettingsENTER E
Connect to Server
To run Player
Server Address / SSL / Port
If the SSLhttps and data transfer is
encrypted.
MagicInfo Mode
Select the appropriate MagicInfo Mode
product.
Lite / Premium
Server Access
Allow / Deny
FTP Mode
Specify the FTP operating mode.
Active / Passive
Proxy Server
Off / On
Address / Port / ID / Password
Address / Port / ID and PasswordProxy Server is set to On.
Device Name
MENU m NetworkDevice NameENTER E
[Signage]Display 1 ~ 6 / User Input

88
System
Accessibility
MENU mSystem AccessibilityENTER E
System
Start Setup
Time
Eco Solution
– The displayed image may differ depending on the model.
Menu Transparency
High / Low
High Contrast
option is selected.
Off / On
Enlarge
Off / On
Chapter 09

89
Start Setup
MENU mSystemStart SetupENTER E
System
Start Setup
Time
Eco Solution
– The displayed image may differ depending on the model.
Go through the initial setup steps like you did the first time you used this product.
Change PIN function.

90
Time
MENU mSystemTimeENTER E
Time
Clock Set
NTP Settings
DST
Sleep Timer
On
Off
0
– The displayed image may differ depending on the model.
You can configure Clock Set or Sleep Timer
Press the INFO
Clock Set
Select Clock Set. Select Date or Time, and then press E.
E
You can set the Date and Time
NTP Settings
DST
Off / On
Start Date
End Date
Time Offset: Select the correct time offset your timezone.
Start Date, End Date and Time OffsetDST is set to On.
Sleep Timer
Automatically shuts off the product after a preset period of time.
Off / 30 min. / 60 min. / 90 min. / 120 min. / 150 min. / 180 min.)
E. To cancel Sleep Timer, select Off.
Power On Delay
the range 0–50 seconds).

91
Auto Source Switching On
Auto Source Switching
When the Auto Source Switching is On
The Primary Source
Secondary Source
Primary Source Recovery
The Primary Source RecoveryPrimary Source is set to All.
Primary Source
Specify Primary Source for the automatic input source.
Secondary Source
Specify Secondary Source for the automatic input source.
The Secondary SourcePrimary Source is set to All.
Auto Source Switching
MENU mSystemAuto Source SwitchingENTER E
Primary Source
Secondary Source
Off
Off
All
HDMI 1
– The displayed image may differ depending on the model.

Power Control
MENU mSystemPower ControlENTER E
Off
On
On
Off
– The displayed image may differ depending on the model.
Auto Power On
Off / On
Max. Power Saving
Off / On
Standby Control
Auto
the display.
The message No Signal
Off
The message No Signal
If No Signal
If No Signal Message is set to Off, the No Signal message does not appear.
If this is the case, set No Signal Message to On.
On

93
Network Standby
Off / On
Power Button
Power On Only
Power On/Off
Off
On
On
Off
– The displayed image may differ depending on the model.

94
Eco Solution
MENU mSystemEco SolutionENTER E
Eco Solution
Eco Sensor
Screen Lamp Schedule
Off
Off
Off
Off
Off
– The displayed image may differ depending on the model.
Energy Saving Mode
Off / Low / Medium / High
Eco Sensor
Off / On
If the screen contrast is not sufficient, set the Eco Sensor to Off. If the Eco Sensor is Off
energy standards.
Min. Backlight
When Eco Sensor is OnMin. Backlight is the darkest
Min. BacklightBacklight setting.
If Eco Sensor is On
surrounding light intensity.

95
Screen Lamp Schedule
Screen Lamp Schedule
Off / On
Schedule1, Schedule2
Time
Lamp at a specified time.
Lamp
0 ~ 100
No Signal Power Off
Off / 15 min. / 30 min. / 60 min.
Auto Power Off
Off / 4 hours / 6 hours / 8 hours
Eco Solution
Eco Sensor
Screen Lamp Schedule
Off
Off
Off
Off
Off
– The displayed image may differ depending on the model.

Fan & Temperature
MENU mSystemFan & TemperatureENTER E
System
– The displayed image may differ depending on the model.
Fan Control
Selects auto or manual for the fan speed settings.
Auto / Manual
Fan Speed Setting
Fan Control is set to Manual.
Outdoor Mode
Outdoor Mode to "On."
Off / On
On."
On" rather than to "Off."
Temperature Control
This function detects the internal temperature of the product. You can specify the temperature range that is
The default temperature is set to 90 °C.

97
Keyboard Language
Keyboard Type
Input Language Shortcut
Input Device Manager
MENU mSystemInput Device ManagerENTER E
Input Language Shortcut
– The displayed image may differ depending on the model.
Select the appropriate Play via
MagicInfo / URL Launcher
Play via
MENU mSystemPlay viaENTER E
System
MagicInfo
– The displayed image may differ depending on the model.

98
The Change PIN
Choose any 4 digits for your PIN and enter it in Enter New PIN. Reenter the same 4 digits in Confirm New PIN.
Change PIN
MENU mSystemChange PINENTER E
System
Change PIN
– The displayed image may differ depending on the model.

99
Security
MENU mSystemSecurityENTER E
Security
Safety Lock On
USB Auto Play Lock
Remote Management
On
On
– The displayed image may differ depending on the model.
Safety Lock On
Change PIN function.
LOCK
Safety Lock On function.
LOCK
Power On Button
Safety Lock On is
Off / On
USB Auto Play Lock
MagicInfo
Off
Play MagicInfo
On
Do not play MagicInfo
MagicInfo content displays "USB Auto Play Lock : On
Remote Management
You can Allow or Deny
Allow / Deny

100
General
MENU m SystemGeneralENTER E
General
On
On
Off
Off
– The displayed image may differ depending on the model.
Smart Security
Scan
Isolated List
Real-Time Monitoring
Monitoring Results
Smart Security
HDMI Hot Plug
Custom Logo
Game Mode

101
General
On
On
Off
Off
Smart Security
HDMI Hot Plug
Custom Logo
Game Mode
– The displayed image may differ depending on the model.
Anynet+ (HDMI-CEC)
Off / On
You can only control Anynet+
Anynet+
Anynet+Anynet+
Anynet+

Troubleshooting for Anynet+
Problem Possible Solution
Anynet+ (HDMI-CEC) is set to On in the System menu.
product off and on again.
Anynet+ (HDMI-CEC) is set to On
in the System menu.
Press the SOURCE
Disconnecting
Anynet+ device ...
on the screen.
Anynet+.
play.
displayed.
Anynet+ (HDMI-CEC) is set to On in the System menu.

103
HDMI Hot Plug
Off / On
Custom Logo
Custom Logo
Logo Display Time
If the type of custom logo is Image, you can set the Logo Display Time.
Download Logo File
Custom logo file restrictions
General
Smart Security
HDMI Hot Plug
Custom Logo
Game Mode
On
On
Off
Off
– The displayed image may differ depending on the model.

104
Reset System
MENU mSystemReset SystemENTER E
System
Reset System
– The displayed image may differ depending on the model.
This option returns the current settings under system to the default factory settings.
– The displayed image may differ depending on the model.
Game Mode
Off / On
Precautions and limitations for Game Mode
Game Mode to Off in the setup menu.
General
Smart Security
HDMI Hot Plug
Custom Logo
Game Mode
On
On
Off
Off

105
Support
Software Update
MENU mSupportSoftware UpdateENTER E
The Software Update
after the upgrade.
Update now
Current version
Auto Update
Off / On
Contact Samsung
MENU mSupportContact SamsungENTER E
Contact Samsung and find the product Model Code and Software Version.
Reset All
MENU mSupportReset AllENTER E
This option returns all the current settings for a display to the default factory settings.
Chapter 10

Troubleshooting Guide
Requirements Before Contacting Samsung Customer Service Center
– Before calling Samsung Customer
Center.
Testing the Product
1
2
3
4
If No Signal is displayed, the product is operating normally.
Checking the Resolution and Frequency
Not Optimum Mode
–
Chapter 11

107
Check the followings.
Installation issue (PC mode)
The screen keeps switching on and off.
secure.
Blank spaces are found on all four sides of the screen when
an HDMI or HDMI-DVI cable is connected to the product
and PC.
Screen issue
The power LED is off. The screen will not switch on.
No Signal is displayed on the screen.
HDMI Hot Plug function turned On.
Not Optimum Mode is displayed.
maximum resolution and frequency.
according to the product specifications.
The images on the screen look distorted.

108
Screen issue
The screen is not clear. The screen is blurry.
The screen appears unstable and shaky.
There are shadows or ghost images left on the screen.
The screen is too bright. The screen is too dark.
Brightness and Contrast.
Screen color is inconsistent.
Go to PictureColor Space settings.
White does not really look white.
Go to PictureWhite Balance settings.
There is no image on the screen and the power LED blinks
every 0.5 to 1 second.
The product will turn off automatically.
Go to System and make sure Sleep Timer is set to Off.
after 10 to 15 minutes.
Picture quality of the product is different from the dealer
shop where it was purchased.
The screen display does not look normal.
products.

109
Screen issue
The brightness and color do not look normal.
Go to PicturePicture Mode, Color, Brightness and
Sharpness.
Go to SystemEnergy Saving Mode settings.
Reset the screen settings to the default settings.
Lines (red, green or blue) are displayed on the screen.
The display looks unstable and then freezes.
resolution.
The screen cannot be displayed in full screen.
Remote control issue
The remote control does not work.

110
Source device issue
A beeping sound is heard when my PC is booting.
Other issue
The product smells like plastic.
The monitor appears tilted.
Audio or video cuts out intermittently.
Small particles are found on the edges of the product.
When I try to change the PC resolution, a message "The
dened resolution is not currently supported." appears.
The message "The defined resolution is not currently supported." appears if the input source
resolution exceeds the maximum resolution of the display.
There is no sound from the speakers in HDMI mode when a
DVI-HDMI cable is connected.
HDMI Black Level is not functioning properly on an HDMI
device with YCbCr output.
There is no sound in HDMI mode.
to the product.
Some PC graphics cards may not automatically recognize HDMI signals that do not include
sound. In this case, manually select a sound input.

111
Other issue
HDMI-CEC does not work.
This product does not support the HDMI-CEC feature.
manufacturer for assistance.

Q & A
Question Answer
How can I change the frequency?
Set the frequency on your graphics card.
Control Panel Appearance and Themes Display Settings
Advanced MonitorMonitor Settings.
Control Panel Display Settings Advanced Monitor
Monitor Settings.
Control Panel Appearance and Personalization Personalize
Display Settings Advanced Settings MonitorMonitor
Settings.
Control Panel Appearance and Personalization Display Adjust
resolution Advanced Settings MonitorMonitor Settings.
Settings Control Panel Appearance and Personalization Display
Adjust resolution Advanced Settings MonitorMonitor
Settings.
Settings System Display Advanced display settings Display
adapter properties MonitorScreen refresh rate under Monitor settings.
How can I change the resolution?
Control Panel Appearance and Themes Display Settings and
Control Panel Display Settings
Control Panel Appearance and Personalization Personalize
Display Settings
Control Panel Appearance and Personalization Display Adjust
Resolution
Settings Control Panel Appearance and Personalization Display
Adjust Resolution
SettingsSystemDisplayAdvanced display settings
the resolution.
– Refer to the user manual for your
PC or graphics card for further

113
Question Answer
How do I set powersaving mode?
Control Panel Appearance and Themes
Display Screen Saver Settings or BIOS SETUP on the PC.
Control Panel Display Screen Saver
Settings or BIOS SETUP on the PC.
Control Panel Appearance and
Personalization Personalize Screen Saver Settings or BIOS SETUP on the PC.
Control Panel Appearance and Personalization
Personalize Screen Saver Settings or BIOS SETUP on the PC.
Settings Control Panel Appearance and
Personalization Personalize Screen Saver Settings or BIOS SETUP on the PC.
Settings Personalization Lock screen
Screen timeout settings Power & sleep or BIOS SETUP on the PC.

114
Specications
– Size
– Display area
H
V
General
Model Name OH75F
Panel Size
7574.5 inches / 189.3 cm)
Display area
Power Supply
Environmental
considerations
Operating
Temperature : °F – -3050
40
Storage
Temperature : -4 °F – °C – 50 °C)
Chapter 12

115
Plug-and-Play
not affect product performance.
measures.

Preset Timing Modes
specified for your product.
Model Name OH75F
Synchronization Horizontal Frequency
30 – 80 kHz
Vertical Frequency
Resolution Optimum resolution
Maximum resolution
– Horizontal Frequency
The time required to scan a single
line from the left to the right side of
the screen is called a horizontal cycle.
cycle is called horizontal frequency.
Horizontal frequency is measured in
kHz.
– Vertical Frequency
The product displays a single image
or refresh rate. Vertical frequency is
measured in Hz.

117
Resolution Horizontal Frequency
(kHz)
Vertical Frequency
(Hz)
Pixel Clock
(MHz)
Sync Polarity
(H/V)
70.087 -/+
35.000 -/-
74.551 -/-
100.000 -/-
59.940 -/-
31.500 -/-
37.500 75.000 31.500 -/-
+/+
37.879 40.000 +/+
48.077 50.000 +/+
75.000 49.500 +/+
-/-
75.000 -/-
78.750 +/+
75.000 108.000 +/+
45.000 +/+
59.810 83.500 -/+
108.000 +/+

118
Resolution Horizontal Frequency
(kHz)
Vertical Frequency
(Hz)
Pixel Clock
(MHz)
Sync Polarity
(H/V)
135.000 +/+
59.790 85.500 +/+
VESA, 1440 x 900 55.935 59.887 -/+
108.000 +/+
59.954 -/+
148.500 +/+

119
Appendix
Responsibility for the Pay Service (Cost to
Customers)
Not a product defect
etc.)
purchased product for the first time.
program.
If customer requests an installation additionally after purchasing a product through
home-shopping or online.
A Product damage caused by customer's fault
External impact or drop.
Samsung Electronics Co., Ltd.
Others
So please read User Manual first.
Chapter 13
Optimum Picture Quality and Afterimage
Burn-in Prevention
Optimum Picture Quality
Due to the nature of the manufacturing of this product, approximately 1 pixel per million
–
–
product for an extended period of time.
Prevention of Afterimage Burn-in
What is afterimage burn-in?
electrodes in pixels that control the liquid crystals.
Black Matrix
Source Drain
Data Bus-Line
TFT
Gate Pixel Electrode (ITO) Storage
Capaccitor (Cs)
Color-Filter
Common
Electrode (ITO)
Preventing afterimage burn-in
limited depending on instruction guide.
–
–
required.
–
Regular color Change
–
FLIGHT FLIGHT
TIME TIME
OZ348
UA102 21:10
20:30
OZ348
UA102 21:10
20:30
Type 1 Type 2
amount of light emitted.)
FLIGHT TIME
OZ348 20:30
:
:
FLIGHT TIME
OZ348 20:30
:
:
Regular Text color Change
–
FLIGHT TIME
OZ348 20:30
:
:
FLIGHT TIME
OZ348 20:30
:
:
FLIGHT TIME
OZ348 20:30
:
:
FLIGHT TIME
OZ348 20:30
:
:
–
FLIGHT TIME
OZ348 20:30
:
:
[ Step 3 ]
[ Step 2 ]
FLIGHT TIME
OZ348
:
:
[ Step 1 ]
20:30
–
hours.
License
For DTS patents, see http://patents.dts.com. Manufactured under
in the United States and/ or other countries. © DTS, Inc. All Rights
The terms HDMI and HDMI High-Definition Multimedia Interface, and
the HDMI Logo are trademarks or registered trademarks of HDMI
Licensing LLC in the United States and other countries.
®®
premium content.
®®
LLC and are used under license.
®®
®
Open Source Licence Notice
For information on the Open Source Licence Notice, contact the Samsung Customer Center

Terminology
480i / 480p / 720p / 1080i /
1080p____ Each of the scanning
the screen resolution. The scanning
scanning method.
- Scanning
Scanning refers to a process of
sending pixels that form an image
- Interlaced
other line of pixels is scanned from
not scanned) are scanned.
Non-interlace Mode and Interlace
Mode____ Non-interlace mode
horizontal line from the top to the
Interlace mode displays the odd
mode is mainly used in monitors
as it produces screen clarity and
interlace mode is mainly used in
TVs.
Dot Pitch____ The screen consist of
a higher resolution. Dot pitch refers
color. Dot pitch is measured in
millimeters.
Vertical Frequency____ The product
displays a single image many times
that flickers) to display an image for
frequency or refresh rate. Vertical
frequency is measured in Hz.
second.
Horizontal Frequency____ The
time required to scan a single line
from the left to the right side of
the screen is called a horizontal
horizontal cycle is called horizontal
frequency. Horizontal frequency is
measured in kHz.
Source____ Input source refers to
the product such as a camcorder or
Plug & Play
a monitor and PC to produce an
The product uses VESA DDC
Resolution____ Resolution is the
form a screen. It represents the
useful to perform multiple tasks
simultaneously.
DVD (Digital Versatile Disc)____
DVD refers to a CD-sized mass
compression technology.
HDMI (High Definition Multimedia
Interface)____ It is an interface that
Multiple Display Control (MDC)____
simultaneously using a PC.