Table of Contents
APC NBPD0175 User Manual
Displayed below is the user manual for NBPD0175 by APC which is a product in the Rack Accessories category. This manual has pages.
Related Manuals

Installation and Quick
Configuration Manual
NetBotz® Rack Access Pod 175
NBPD0125
NBPD1356
990-4231A-001
Publication Date: 4/2020

APC by Schneider Electric Legal Disclaimer
The information presented in this manual is not warranted by the APC by Schneider
Electric to be authoritative, error free, or complete. This publication is not meant to be
a substitute for a detailed operational and site specific development plan. Therefore,
APC by Schneider Electric assumes no liability for damages, violations of codes,
improper installation, system failures, or any other problems that could arise based
on the use of this Publication.
The information contained in this Publication is provided as is and has been prepared
solely for the purpose of evaluating data center design and construction. This
Publication has been compiled in good faith by APC by Schneider Electric. However,
no representation is made or warranty given, either express or implied, as to the
completeness or accuracy of the information this Publication contains.
IN NO EVENT SHALL APC BY SCHNEIDER ELECTRIC, OR ANY PARENT,
AFFILIATE OR SUBSIDIARY COMPANY OF APC BY SCHNEIDER ELECTRIC OR
THEIR RESPECTIVE OFFICERS, DIRECTORS, OR EMPLOYEES BE LIABLE
FOR ANY DIRECT, INDIRECT, CONSEQUENTIAL, PUNITIVE, SPECIAL, OR
INCIDENTAL DAMAGES (INCLUDING, WITHOUT LIMITATION, DAMAGES FOR
LOSS OF BUSINESS, CONTRACT, REVENUE, DATA, INFORMATION, OR
BUSINESS INTERRUPTION) RESULTING FROM, ARISING OUT, OR IN
CONNECTION WITH THE USE OF, OR INABILITY TO USE THIS PUBLICATION
OR THE CONTENT, EVEN IF APC BY SCHNEIDER ELECTRIC HAS BEEN
EXPRESSLY ADVISED OF THE POSSIBILITY OF SUCH DAMAGES. APC BY
SCHNEIDER ELECTRIC RESERVES THE RIGHT TO MAKE CHANGES OR
UPDATES WITH RESPECT TO OR IN THE CONTENT OF THE PUBLICATION OR
THE FORMAT THEREOF AT ANY TIME WITHOUT NOTICE.
Copyright, intellectual, and all other proprietary rights in the content (including but not
limited to software, audio, video, text, and photographs) rests with APC by Schneider
Electric or its licensors. All rights in the content not expressly granted herein are
reserved. No rights of any kind are licensed or assigned or shall otherwise pass to
persons accessing this information.
This Publication shall not be for resale in whole or in part.

Contents
NetBotz Rack Access Pod 175 Installation Guide i
Safety. . . . . . . . . . . . . . . . . . . . . . . . . . . . . . . . . . . . . . . . . . . . . 1
Safety Information for the Rack Access Pod 175 . . . . . . . 2
Introduction. . . . . . . . . . . . . . . . . . . . . . . . . . . . . . . . . . . . . . . . 2
Updates and Additional documentation . . . . . . . . . . . . . . 3
Additional options . . . . . . . . . . . . . . . . . . . . . . . . . . . . . . . 3
Inventory . . . . . . . . . . . . . . . . . . . . . . . . . . . . . . . . . . . . . . . . . . 4
Physical Description . . . . . . . . . . . . . . . . . . . . . . . . . . . . . . . . 6
The LED Identifier. . . . . . . . . . . . . . . . . . . . . . . . . . . . . . . . . . . 8
Reset the ID . . . . . . . . . . . . . . . . . . . . . . . . . . . . . . . . . . . 8
Install the Rack Access Pod . . . . . . . . . . . . . . . . . . . . . . . . . . 9
Rack-mount installation (with Sensor Pod 150) . . . . . . . . 9
Base-mount installation . . . . . . . . . . . . . . . . . . . . . . . . . 12
Toolless peg-mount installation . . . . . . . . . . . . . . . . . . . 13
Connect Sensors . . . . . . . . . . . . . . . . . . . . . . . . . . . . . . . . . . 14
Door Switch Sensors and Handles . . . . . . . . . . . . . . . . . 14
A-Link Cascades . . . . . . . . . . . . . . . . . . . . . . . . . . . . . . 14
Monitor Sensors . . . . . . . . . . . . . . . . . . . . . . . . . . . . . . . . . . . 14
Firmware Upgrades . . . . . . . . . . . . . . . . . . . . . . . . . . . . . . . . 15
Clean the Rack Access Pod . . . . . . . . . . . . . . . . . . . . . . . . . 15
Specifications . . . . . . . . . . . . . . . . . . . . . . . . . . . . . . . . . . . . 16
Two-Year Factory Warranty. . . . . . . . . . . . . . . . . . . . . . . . . . 17
Terms of warranty . . . . . . . . . . . . . . . . . . . . . . . . . . . . . 17
Non-transferable warranty . . . . . . . . . . . . . . . . . . . . . . . 17
Exclusions . . . . . . . . . . . . . . . . . . . . . . . . . . . . . . . . . . . 17
Warranty claims . . . . . . . . . . . . . . . . . . . . . . . . . . . . . . . 18

NetBotz Rack Access Pod 175 Installation Guide 1
Safety
Read the instructions carefully to become familiar with the equipment before
trying to assemble, operate, service, or maintain it. The following special
messages may appear throughout this manual or on the equipment to warn of
potential hazards or to call attention to information that clarifies or simplifies a
procedure.
The addition of this symbol to a Danger or Warning safety label
indicates that an electrical hazard exists which will result in personal
injury if the instructions are not followed.
This is the safety alert symbol. It is used to alert you to potential
personal injury hazards. Obey all safety messages that follow this
symbol to avoid possible injury or death.
DANGER
Indicates an imminently hazardous situation which, if not avoided, will result
in death or serious injury.
WARNING
Indicates a potentially hazardous situation which, if not avoided, can result in
death or serious injury.
CAUTION
Indicates a potentially hazardous situation which, if not avoided, can result in
moderate injury.
NOTICE
Addresses practices not related to physical injury including certain
environmental hazards, potential damage or loss of data.

2NetBotz Rack Access Pod 175 Installation Guide
Safety Information for the Rack Access Pod 175
Introduction
The APC by Schneider Electric® NetBotz® Rack Access Pod 175 (NBPD0175)
allows you to control access to a rack in your data center. You can connect the
Rack Access Pod to one of the following NetBotz host appliances with firmware
v5.2.3 or later:
• NetBotz Room Monitor 755 (NBWL0755)
• NetBotz Rack Monitor 750 (NBRK0750)
The Rack Access Pod includes two sets of sensor ports for APC by Schneider
Electric Door Switch Sensors and handles. Each set of sensors and ports allows
control of a single rack door. You can cascade multiple Rack Access Pods
together to monitor more than two (2) doors. The number of Rack Access Pods
you can cascade use depends on which host appliance they are connected to.
The NetBotz Rack Access Pod 175 Installation and Quick Configuration Manual
describes how to install the Rack Access Pod. Specific instructions on installing
Door Switch Sensors and handles are contained in the installation instructions
for each component.
DANGER
HAZARD OF ELECTRIC SHOCK, EXPLOSION, OR ARC FLASH
• No user serviceable parts inside. Refer servicing to qualified personnel.
• Use indoors in a dry location.
Failure to follow these instructions will result in death or serious injury.
NOTICE
EQUIPMENT DAMAGE RISK
• Connect A-Link terminators ONLY to A-Link ports.
• Do not connect A-Link cables or ports to the Door and Handle ports on the
Rack Access Pod.
• Only connect approved devices to ports on the Rack Access Pod as
directed in this manual.
Failure to follow these instructions will result in equipment damage.

NetBotz Rack Access Pod 175 Installation Guide 3
Updates and Additional documentation
You can find updates to this document and other documentation for your
NetBotz appliances on the applicable product page of www.apc.com.
To find a product page on www.apc.com, enter the product name or part
number in the Search field.
Additional options
The following products are compatible with the Rack Access Pod.
• NetBotz Door Switch Sensor for APC by Schneider Electric Racks
(NBES0303)
• NetBotz Door Switch Sensor for Rooms or Third Party Racks
(NBES0302)
• Power Supply 100-240 VAC/24 VDC (AP9505I)
4NetBotz Rack Access Pod 175 Installation Guide
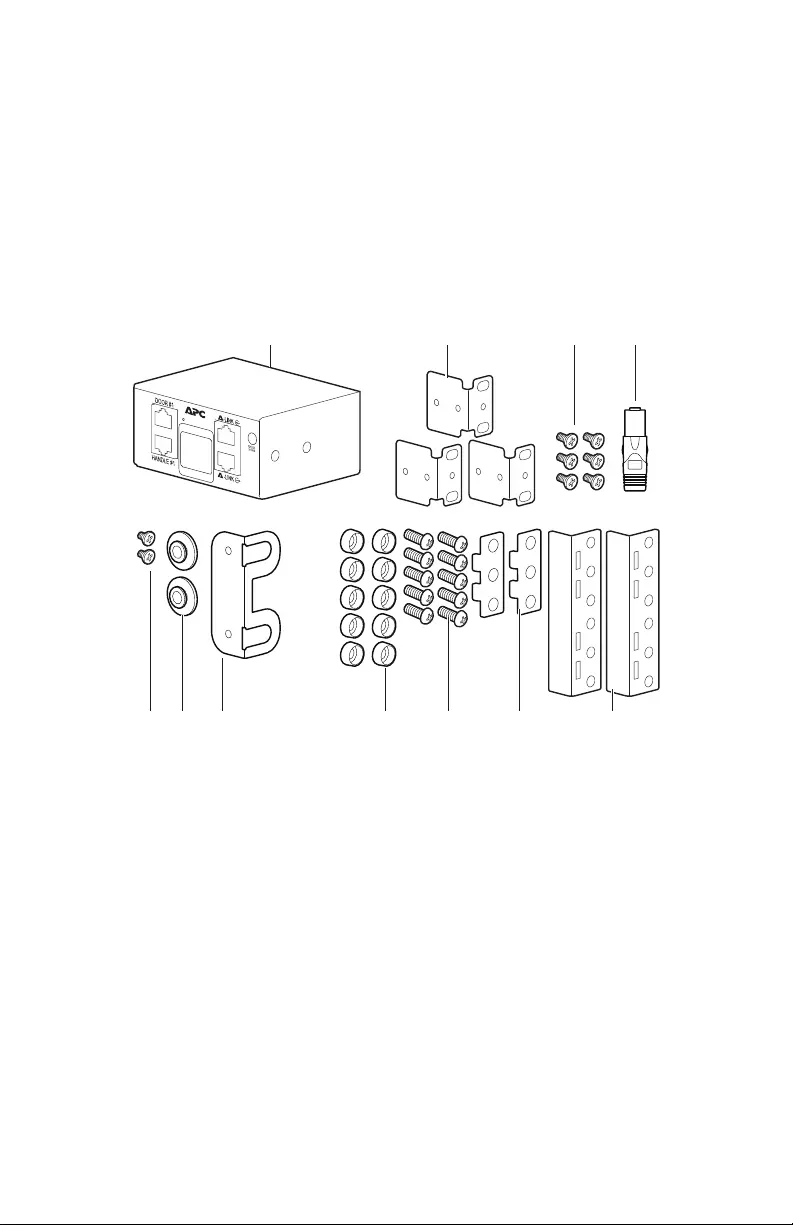
Inventory
Inspect the contents of the package to ensure that the parts included match
those shown below. Report missing or damaged contents to APC by Schneider
Electric or your reseller. If damage was due to shipping, immediately report the
damage to the shipping agent.
The shipping and packaging materials are recyclable. Please save them for later
use or dispose of them appropriately
aem0589a

NetBotz Rack Access Pod 175 Installation Guide 5
Item Description Item Description
Rack Access Pod 175
(NBPD0175) (1)
Toolless-mounting bracket kit
Brackets for a standard
19 in rack (3)
Toolless-mounting bracket (1)
8-32 x 1/4 in
Phillips-head screws (6)
Toolless-mounting pegs (2)
A-Link terminator (1) 8-32 x 3/8 in
Phillips-head screws (2)
Base-mount hardware kit
Not shown:
• Door switch sensors (NBES0303)
• 125 kHz Handle kit (NBHN125)
Included with NBPD0125 only.
• 13.56 MHz Handle kit (NBHN1356)
Included with NBPD1356 only.
Rail extenders (2)
Spacers for rail extender (2)
M6 x 16
Phillips-head screws (10)
M6 washers (10)
6NetBotz Rack Access Pod 175 Installation Guide
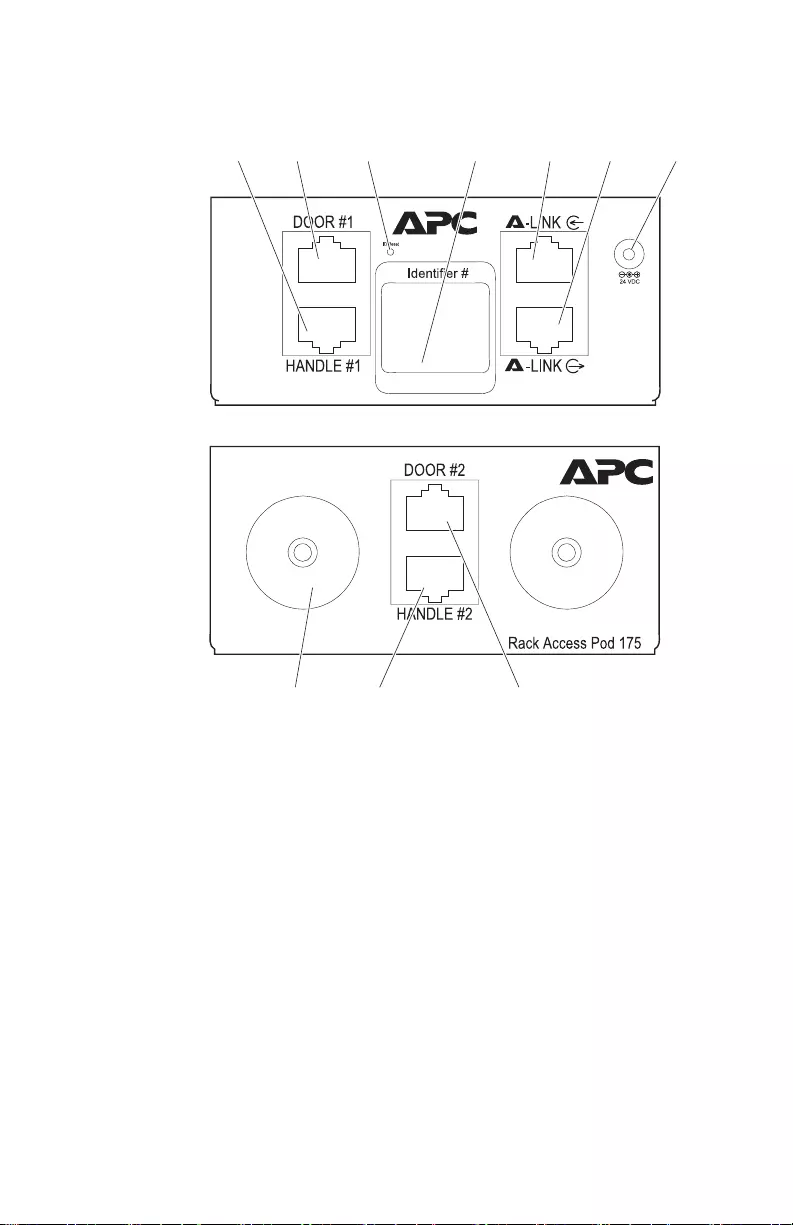
Physical Description
aem0588a
Front
Rear

NetBotz Rack Access Pod 175 Installation Guide 7
Item Description
Handle #1 Port Port for the Handle (NBHN125 or NBHN1356) on Door #1.
Door #1 Port Port for a Door Switch sensor (NBES0302 or NBES0303)
on Door #1.
ID Reset
button
Press for at least three (3) seconds to reset the LED
Identifier number. See “The LED Identifier” on page 8.
LED
Identifier #
Displays a unique number to identify the Rack Access
Pods in an A-Link cascade. Blinks when an alert occurs on
the Rack Access Pod. See “The LED Identifier” on page 8.
A-Link port (in) Used for connecting the Rack Access Pod to a compatible
appliance.
Use standard CAT-5 cabling with straight-through wiring.
A-Link port
(out)
Used to cascade Rack Access Pods on an A-Link bus.
Use standard CAT-5 cabling with straight-through wiring.
24 VDC Power
input
Connects to an external 24 V power supply (AP9505I).
See your appliance documentation for specific power
supply requirements.
Door #2 Port Port for a Door Switch sensor (NBES0302 or NBES0303)
on Door #2.
Handle #2 Port Port for the Handle (NBHN125 or NBHN1356) on Door #2.
Mounting pegs Fixtures for toolless peg mounting
(see “Toolless peg-mount installation” on page 13).
8NetBotz Rack Access Pod 175 Installation Guide
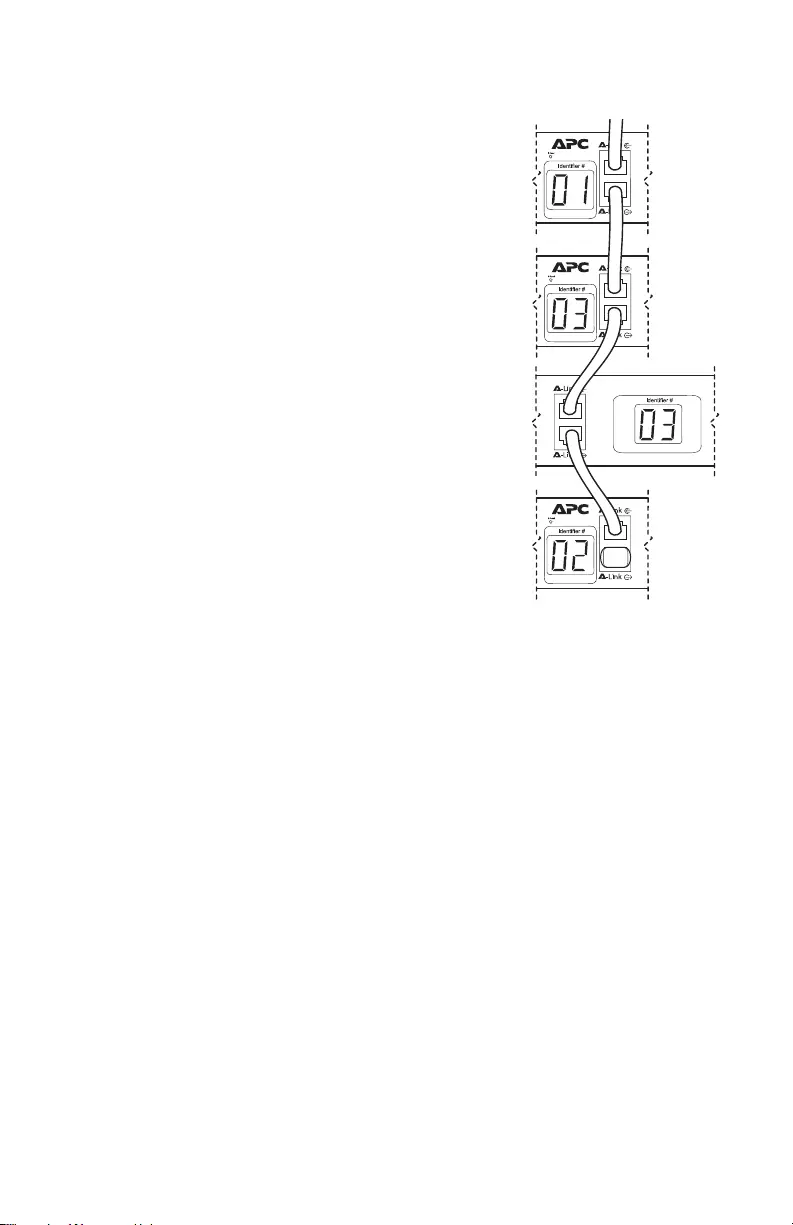
The LED Identifier
The ID is automatically assigned
based on the next available number
in the A-Link cascade. Available
numbers are determined by other
Rack Access Pods in the cascade.
The Rack Access Pod does not take
other sensors (such as Sensor Pod
150 units) into account when
configuring the ID.
For example, if you add an
unconfigured Rack Access pod to an
A-Link Cascade with Rack Access
Pods numbered 1 and 3, the
unconfigured Rack Access Pod will
be assigned an ID of 2.
NOTE: The Rack Monitor 750 has
an internal Rack Access Pod with an
ID of 1. All external Rack access
Pods connected to a Rack Monitor
750 will have IDs of 2 and higher.
Reset the ID
Press the ID Reset button for at least three (3) seconds. The ID is reset to
default, then the Rack Access Pod restarts and assigns a new ID based on the
first available ID in the A-Link cascade.
aem0594a
Rack Access
Pod 175
Rack Access
Pod 175
Rack Access
Pod 175
Sensor Pod
150
NetBotz Rack Access Pod 175 Installation Guide 9
Install the Rack Access Pod
You can mount the Rack Access Pod on the mounting rails with a Sensor Pod
150, or on the cable channel of an APC by Schneider Electric Rack using
Toolless peg-mount installation.
Rack-mount installation (with Sensor Pod 150)
The Rack Access Pod can be mounted in the same U-space as an existing
Sensor Pod 150.
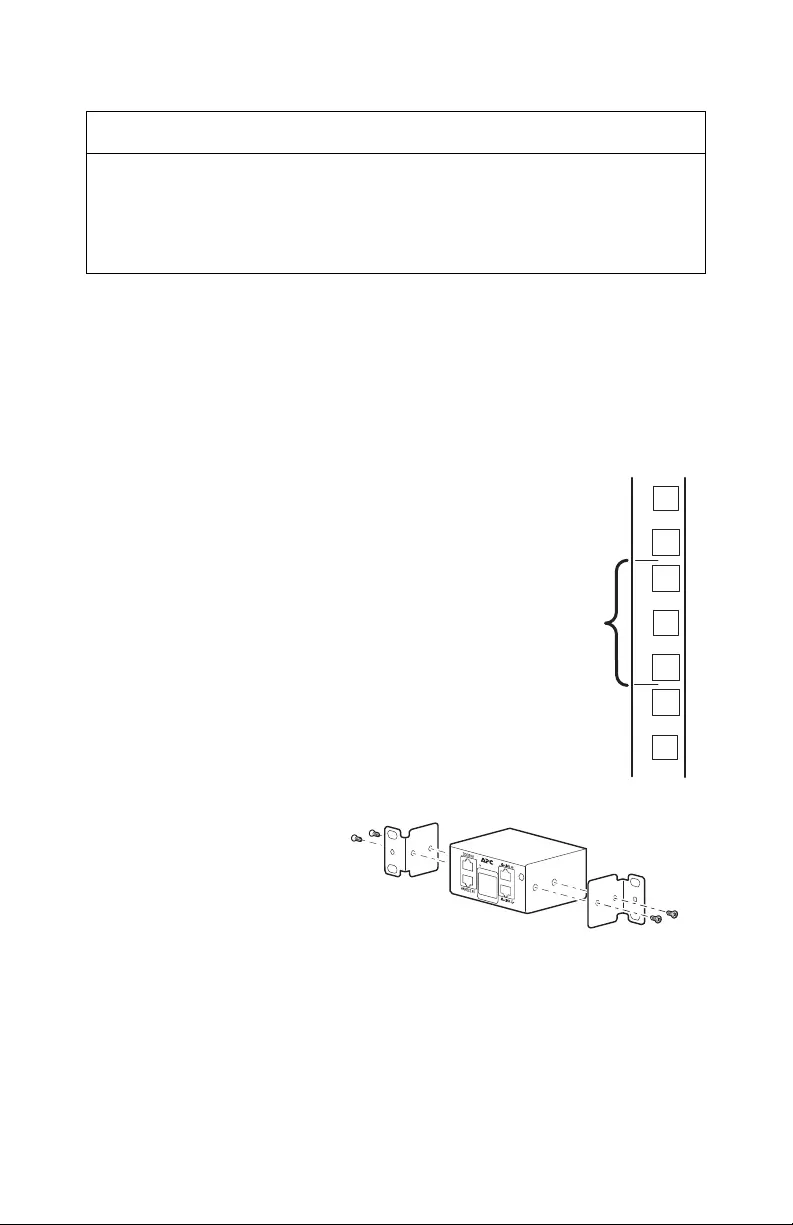
1. Choose a location for the Rack Access Pod.
The Rack Access Pod occupies one
U-space. A notched hole or a number on
the vertical rail of the rack denotes the
middle of a U-space.
2. Install the provided
brackets on each end
of the Rack Access
Pod.
NOTICE
• Do not create a hazardous condition due to uneven mechanical loading. For
example, do not use the Rack Access Pod as a shelf.
• Use only the provided hardware when installing the brackets.
• Install the Rack Access Pod in an environment compatible with the
environmental specifications on page 16.
1U
7
6
5
ns0014a
aem0590a
10 NetBotz Rack Access Pod 175 Installation Guide
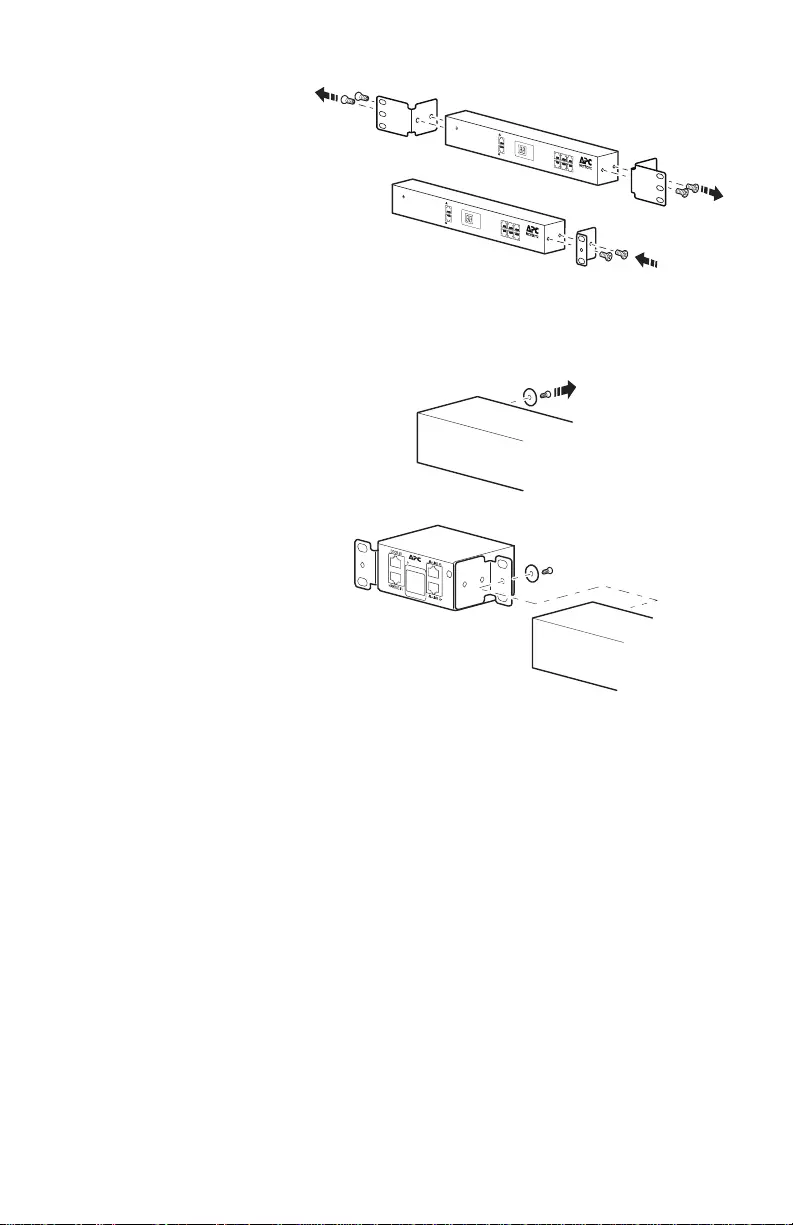
3. Remove the
existing brackets
from the Sensor
Pod 150. Install the
third mounting
bracket (provided).
4. Remove one peg
and screw from the
Sensor Pod 150.
Then use the peg
and screw to
secure the Rack
Access Pod to the
Sensor Pod 150.
-Link
-Link
Sensor
Pod 150
-Link
-Link
Sensor
Pod 150
aem0198c
aem0590b
aem0590c

NetBotz Rack Access Pod 175 Installation Guide 11
5. Secure the coupled
Rack Access Pod
and Sensor Pod to
the rack using cage
nuts and screws (not
provided).
aem0 90 a
-Link
-Link
Sensor
Pod 150
12 NetBotz Rack Access Pod 175 Installation Guide
Base-mount installation
1. Follow steps 1–4 of “Rack-mount installation (with Sensor Pod 150)” on
page 9.
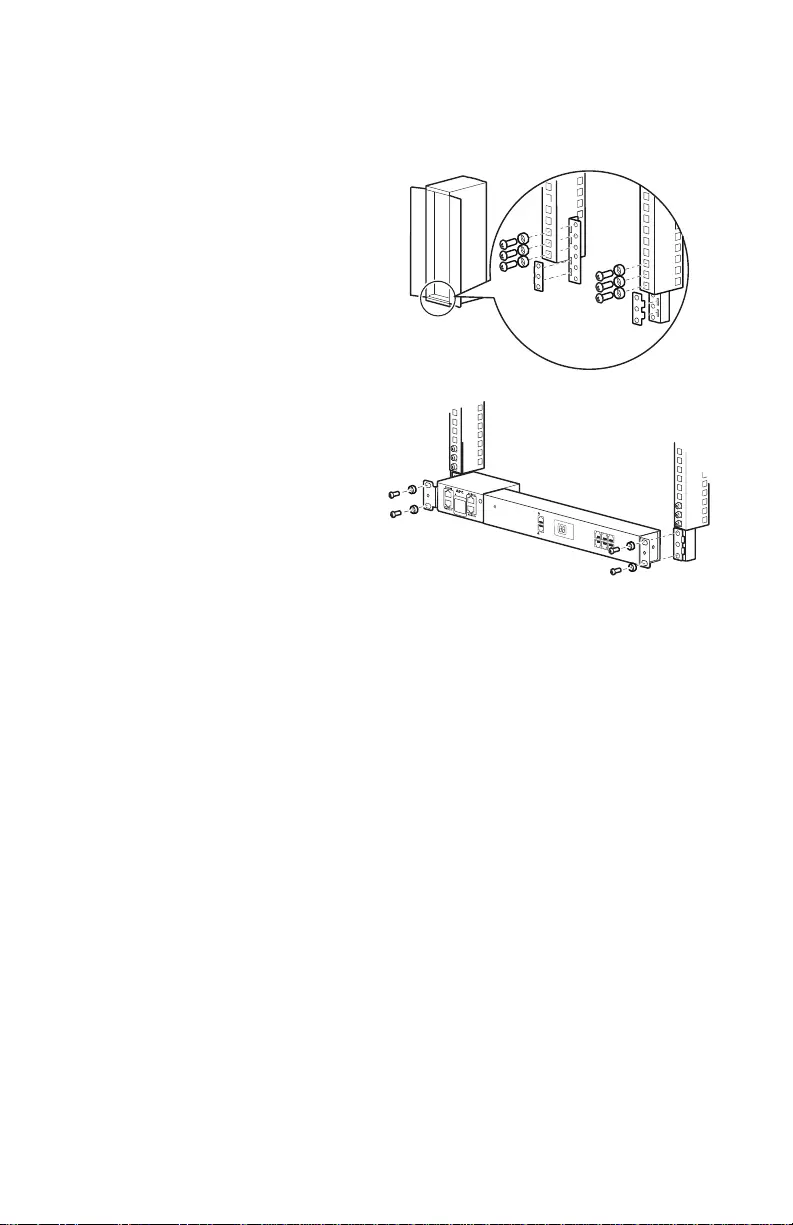
2. Use the provided M6
screws and washers to
install the base-mount
hardware kit on your rack.
3. Use the provided
M6 screws and washers to
secure the coupled Rack
access pod and sensor pod
to the rail extender.
aem0592a
aem0592b
-Link
-Link
NetBotz Rack Access Pod 175 Installation Guide 13
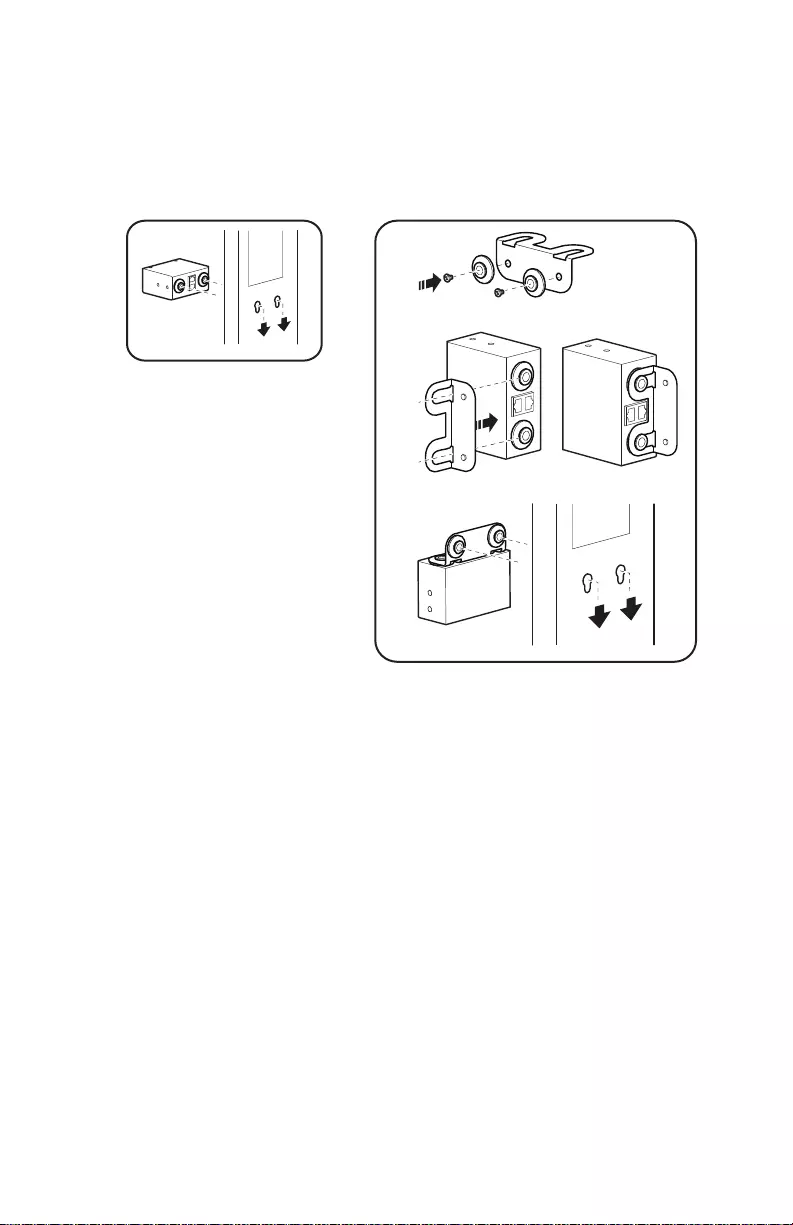
Toolless peg-mount installation
The toolless mounting pegs are compatible with accessory channels included in
NetShelter SX and VX racks.
You can install the Rack Access Pod in directly in an accessory channel (), or
use the toolless peg-mount bracket kit () to leave the rear ports open.
aem0593a
DE

14 NetBotz Rack Access Pod 175 Installation Guide
Connect Sensors
Door Switch Sensors and Handles
Each Rack Access Pod can monitor and control two sets of Door Switch
Sensors and handles. Each set corresponds to a single rack door. Connect
handles to the Handle #1 and Handle #2 ports. Connect Door Switch Sensors to
the Door #1 and Door #2 ports.
Use only handles included with a Rack Access Pod 175 (NBHN125 or
NBHN1356). The Rack Access Pod 175 does not support handles for the Rack
Access Pod 170 (NBHN0171).
A-Link Cascades
You can cascade additional sensors from the Rack Access Pod on an A-Link
bus. See your appliance Installation and Quick Configuration Manual for
compatible sensors and instructions to create an A-Link cascade.
You may need to attach one or more power supplies (AP9505I) to the Rack
Access Pod. The number of power supplies needed depends on your host
appliance and the number of Rack Access Pods in the cascade. See your
appliance documentation for the number of power supplies needed.
Monitor Sensors
Once your system is installed and receiving power, configure the sensors and
begin monitoring your system using the software interface of the appliance.
See your appliance documentation for instructions to connect to the appliance
and access its software interface.
NOTICE
EQUIPMENT DAMAGE RISK
• Connect A-Link terminators ONLY to A-Link ports.
• Do not connect A-Link cables or ports to the Door and Handle ports on the
Rack Access Pod.
• Only connect approved devices to ports on the Rack Access Pod as
directed in this manual.
Failure to follow these instructions will result in equipment damage.

NetBotz Rack Access Pod 175 Installation Guide 15
Firmware Upgrades
Firmware upgrades for Rack Access Pods are included with firmware upgrades
for compatible NetBotz appliances. See the appliance documentation for more
information.
NOTE: The Rack Access Pod Identifier # LED shows 88 during a firmware
upgrade. During the upgrade, data from sensors connected to the Rack Access
Pod will be invalid.
Clean the Rack Access Pod
To clean the device, gently wipe surfaces with a clean, dry cloth.

16 NetBotz Rack Access Pod 175 Installation Guide
Specifications
Electrical
Input voltage, nominal 24 VDC; 100-230 mA
Maximum total current draw 230 mA
Physical
Dimensions (H x W x D) 44.2 x 95.5 x 74.7 mm (1.7 x 3.8 x 2.9 in)
Shipping dimensions
(H x W x D)
81.0 x 237.5 x 144.5 mm (3.2 x 9.3 x 5.6)
Weight 0.4 kg (0.9 lb)
Shipping weight 0.7 kg (1.5 lb)
Environmental
Elevation (above MSL)
Operating
Storage
0 to 3000 m (0 to 10,000 ft)
0 to 15 000 m (0 to 50,000 ft)
Temperature
Operating
Storage
0 to 45°C (32 to 113°F)
–15 to 65°C (5 to 149°F)
Humidity
Operating
Storage
0 to 95%, non-condensing
0 to 95%, non-condensing
Compliance
EMC verification CE (EN55032, EN55035, EN55024), FCC,
ICES-003

NetBotz Rack Access Pod 175 Installation Guide 17
Two-Year Factory Warranty
This warranty applies only to the products you purchase for your use in accordance with
this manual.
Terms of warranty
APC by Schneider Electric warrants its products to be free from defects in materials and
workmanship for a period of two years from the date of purchase. APC by Schneider
Electric will repair or replace defective products covered by this warranty. This warranty
does not apply to equipment that has been damaged by accident, negligence or
misapplication or has been altered or modified in any way. Repair or replacement of a
defective product or part thereof does not extend the original warranty period. Any parts
furnished under this warranty may be new or factory-remanufactured.
Non-transferable warranty
This warranty extends only to the original purchaser who must have properly registered
the product. The product may be registered at the APC by Schneider Electric website,
www.apc.com.
Exclusions
APC by Schneider Electric shall not be liable under the warranty if its testing and
examination disclose that the alleged defect in the product does not exist or was caused
by end user’s or any third person’s misuse, negligence, improper installation or testing.
Further, APC by Schneider Electric shall not be liable under the warranty for unauthorized
attempts to repair or modify wrong or inadequate electrical voltage or connection,
inappropriate on-site operation conditions, corrosive atmosphere, repair, installation,
exposure to the elements, Acts of God, fire, theft, or installation contrary to APC by
Schneider Electric recommendations or specifications or in any event if the APC by
Schneider Electric serial number has been altered, defaced, or removed, or any other
cause beyond the range of the intended use.
THERE ARE NO WARRANTIES, EXPRESS OR IMPLIED, BY OPERATION OF LAW OR
OTHERWISE, OF PRODUCTS SOLD, SERVICED OR FURNISHED UNDER THIS
AGREEMENT OR IN CONNECTION HEREWITH. APC BY SCHNEIDER ELECTRIC
DISCLAIMS ALL IMPLIED WARRANTIES OF MERCHANTABILITY, SATISFACTION
AND FITNESS FOR A PARTICULAR PURPOSE. APC BY SCHNEIDER ELECTRIC
EXPRESS WARRANTIES WILL NOT BE ENLARGED, DIMINISHED, OR AFFECTED
BY AND NO OBLIGATION OR LIABILITY WILL ARISE OUT OF, APC BY SCHNEIDER
ELECTRIC RENDERING OF TECHNICAL OR OTHER ADVICE OR SERVICE IN
CONNECTION WITH THE PRODUCTS. THE FOREGOING WARRANTIES AND
REMEDIES ARE EXCLUSIVE AND IN LIEU OF ALL OTHER WARRANTIES AND
REMEDIES. THE WARRANTIES SET FORTH ABOVE CONSTITUTE APC BY
SCHNEIDER ELECTRIC’S SOLE LIABILITY AND PURCHASER’S EXCLUSIVE
REMEDY FOR ANY BREACH OF SUCH WARRANTIES. APC BY SCHNEIDER
ELECTRIC WARRANTIES EXTEND ONLY TO PURCHASER AND ARE NOT
EXTENDED TO ANY THIRD PARTIES.

18 NetBotz Rack Access Pod 175 Installation Guide
IN NO EVENT SHALL APC BY SCHNEIDER ELECTRIC, ITS OFFICERS, DIRECTORS,
AFFILIATES OR EMPLOYEES BE LIABLE FOR ANY FORM OF INDIRECT, SPECIAL,
CONSEQUENTIAL OR PUNITIVE DAMAGES, ARISING OUT OF THE USE, SERVICE
OR INSTALLATION, OF THE PRODUCTS, WHETHER SUCH DAMAGES ARISE IN
CONTRACT OR TORT, IRRESPECTIVE OF FAULT, NEGLIGENCE OR STRICT
LIABILITY OR WHETHER APC BY SCHNEIDER ELECTRIC HAS BEEN ADVISED IN
ADVANCE OF THE POSSIBILITY OF SUCH DAMAGES. SPECIFICALLY, APC BY
SCHNEIDER ELECTRIC IS NOT LIABLE FOR ANY COSTS, SUCH AS LOST PROFITS
OR REVENUE, LOSS OF EQUIPMENT, LOSS OF USE OF EQUIPMENT, LOSS OF
SOFTWARE, LOSS OF DATA, COSTS OF SUBSTITUENTS, CLAIMS BY THIRD
PARTIES, OR OTHERWISE.
NO SALESMAN, EMPLOYEE OR AGENT OF APC BY SCHNEIDER ELECTRIC IS
AUTHORIZED TO ADD TO OR VARY THE TERMS OF THIS WARRANTY. WARRANTY
TERMS MAY BE MODIFIED, IF AT ALL, ONLY IN WRITING SIGNED BY AN APC BY
SCHNEIDER ELECTRIC OFFICER AND LEGAL DEPARTMENT.
Warranty claims
Customers with warranty claims issues may access the APC by Schneider Electric
customer support network through the Support page of the APC by Schneider Electric
website, www.apc.com/support. Select your country from the country selection pull-down
menu at the top of the Web page. Select the Support tab to obtain contact information for
customer support in your region.

Radio Frequency Interference
Changes or modifications to this unit not expressly approved by the party responsible for
compliance could void the user’s authority to operate this equipment.
USA—FCC
This equipment has been tested and found to comply with the limits for a Class A digital
device, pursuant to part 15 of the FCC Rules. These limits are designed to provide
reasonable protection against harmful interference when the equipment is operated in a
commercial environment. This equipment generates, uses, and can radiate radio
frequency energy and, if not installed and used in accordance with this user manual, may
cause harmful interference to radio communications. Operation of this equipment in a
residential area is likely to cause harmful interference. The user will bear sole
responsibility for correcting such interference.
Canada—ICES
This Class A digital apparatus complies with Canadian ICES-003.
Cet appareil numérique de la classe A est conforme à la norme NMB-003 du Canada.
Australia and New Zealand
Attention: This is a Class A product. In a domestic environment this product may cause
radio interference in which case the user may be required to take adequate measures.
European Union
This product is in conformity with the protection requirements of EU Council Directive
2014/30/EU on the approximation of the laws of the Member States relating to
electromagnetic compatibility. APC by Schneider Electric cannot accept responsibility for
any failure to satisfy the protection requirements resulting from an unapproved
modification of the product.
This product has been tested and found to comply with the limits for Class A Information
Technology Equipment according to CISPR 32/European Standard EN 55032. The limits
for Class A equipment were derived for commercial and industrial environments to provide
a reasonable protection against interference with licensed communication equipment.
Attention: This is a Class A product. In a domestic environment this product may cause
radio interference in which case the user may be required to take adequate measures.

Worldwide Customer Support
Customer support for this product is available at www.apc.com/support.
© 2020 APC by Schneider Electric. All Rights Reserved.
NetBotz, APC, and the and the APC logo are trademarks owned by Schneider Electric SE
or its subsidiaries. All other brands may be trademarks of their respective owners.
4/2020
990-4231A-001