Table of Contents
- General Information
- Safety Messages
- Safety Information
- Inspect the package contents upon receipt. Notify the carrier and dealer if there is any damage.
- Deenergizing safety
- Battery safety
- General information
- Introduction
- Overview
- Inventory
- Hardware supplied
- Accessories
- Install accessories prior to connecting power to the UPS.
- Optional accessories
- Specifications
- Environmental Specifications
- Physical Specifications
- Installation
- Tower configuration
- Install stabilizer brackets
- Install and connect batteries
- Install bezel
- 2-post rack-mount configuration
- Position unit for mounting in rack
- Install rack-mount brackets
- Secure 2-post rack to floor
- Install units in rack
- Install and connect batteries
- Install bezel
- Connect XLBPs to UPS
- Tower configuration
- Configure UPS parameters
- Contact Information
- APC by Schneider Electric Worldwide Customer Support
- Maintenance, Transport, and Service
- Replace battery modules
- Service
- Two-Year Warranty
APC SRC96XLBP2S User Manual
Displayed below is the user manual for SRC96XLBP2S by APC which is a product in the UPS Batteries category. This manual has pages.
Related Manuals

990-3486B 2/2014
Smart-UPS™ RC
External Battery Pack
Tower/Rack-Mount 4U
SRC96XLBP
SRC96XLBP2S
English

SRC96XLBP / SRC96XLBP2S User Manual 3
General Information
Safety Messages
Read the i nstructions car ef ully to become familiar wit h the equipment be f o r e attempting to install,
operate , service or maintain the UPS. The following spe cial mess ages may appear thro ughout this manual
or on the equipment to warn of potential hazards or to ca ll attent ion to informat ion that clarifies or
simplif i es a procedu r e.
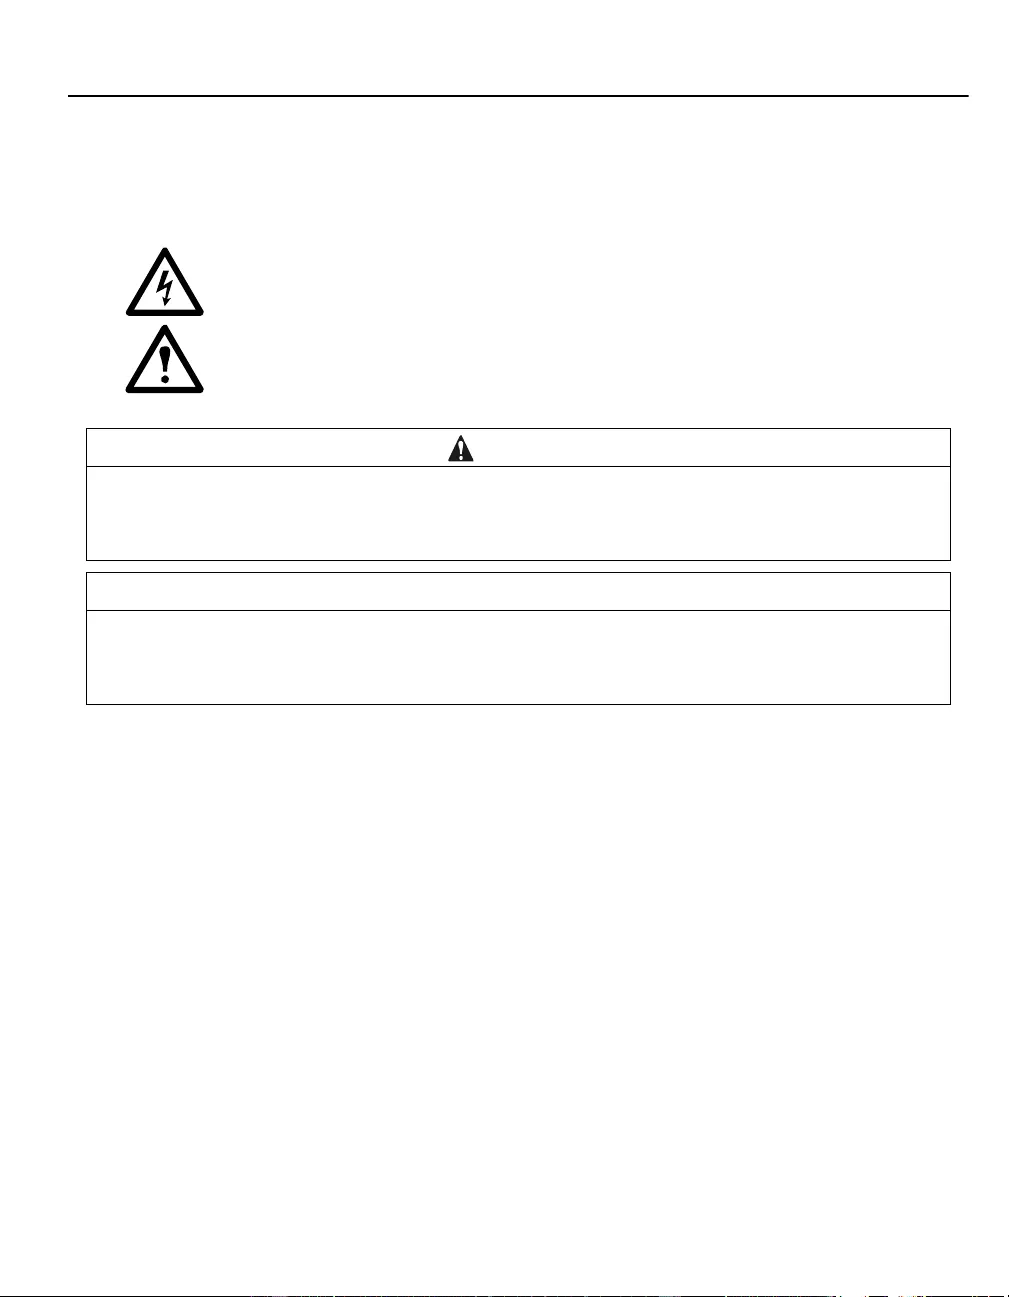
The addition of this symbol to a D anger or War ning safety l abel indicates that an electrical
hazard exists which will result in personal injury if the instructions are not followed.
The addition of this symbol to a Warning or Caution product safety label indicates that a
hazard exis ts that can resul t in injury and produc t damage if the instructio ns a re not followe d.
CAUTION
CAUTION indicates a potentially hazardous situation wh ich, if not avoided, can result in minor or moderate
injury.
CAUTION
CAUTION ad dresses pract ices not relate d to physical inj u ry incl uding cert ain environm ental hazards,
potential damage or loss of data.

SRC96XLBP / SRC96XLBP2S User Manual 4
Safety Information
Inspect the package contents upon receipt.
Notify the carrier and dealer if there is any dama ge.
• Adhere to all national and local electrical codes.
• All wiring must be performed by a qualified electricia n.
• Changes and modifications to t his unit not ex pressly approved by APC could v oid the warranty.
• This UPS is intended for ind oor use only.
• Do not operate this UPS in direct sunli ght, in contact with fluids, or where there is excessive dust
or humidity.
• Be sure the air ve nts on the UPS are not blocked. Allow ade quate space for proper ventilation.
• For a UPS with a factor y ins talled power cord, connect the UPS power cable dire ctly to a wall
outlet. Do not use surge protectors or extension cords.
• The batte ry typic ally l ast s for two to fi ve yea rs. Envi ronment al facto rs impact ba ttery li fe. Eleva ted
ambient tem peratures, poor qua lity utility power, and frequent short duration discharges will
sh or t e n batt ery li f e .
• The equipm ent is heavy. Always prac tice safe lift ing techniques adequate for the weight of the
equipment.
• Th e b atteries are heavy. Remov e the b atteries be f o re ins tall in g the UPS and external battery packs
(XL B Ps ) , in a rac k .
• Always install XLBPs at the bottom in rack-moun t configur ations. The UPS must be instal led
above the XLBPs.
• Always ins tall periphera l equipment abo ve the UPS in ra ck-mount configurati ons.
Deenergizing safety
The UPS conta ins internal batteries and may pres ent a shock hazard even when dis connected from the
branch circuit (mains ). Before install ing or serv icing the equipm ent che ck that the;
• in put circuit breaker is in the OFF pos ition
• XLBP batt ery m odules are disconnected
Battery safety
• Before ins talling or replac ing t he batteries, remo ve jewelry such as wristwatches and rings .
High short circuit curre nt through conductive materials could cause severe burns.
• Do not dispose of batteries by burning t hem . T he batteries may explode.
• Do not open o r mutilate b atteries. Released electro lyte is har mful t o the skin and eyes, and may be
toxic.

SRC96XLBP / SRC96XLBP2S User Manual 5
General information
• The UPS will recognize as many as 9 external battery pac ks conne cted to the UPS.
Note: For each XLBP added, increased recharge time will be required.
• The model and serial numbers are loc ated on a sm all, rear panel label. For some models , an
additional labe l is located on the cha s sis under the front bez el.
• Always re cycle u sed bat terie s.
• Recycle the package materials or save them for reuse.
SRC96XLBP / SRC96XLBP2S User Manual 6
Introduction
Overview
The Am erican Power Conversion (APC ™) SRC96XLBP external battery pack (XLBP) connects to an
APC Smart-UPS™ RC. Together thes e units provide extended protection for electronic equipment (load)
from uti lity power blac kouts, brownouts, sags and surges. The UPS and the XLBP together provide
continuous power from the batteries unt il ut ility power returns to safe levels or the batteries a r e fully
discharged.
Inventory
Read the Safety Guide before installing the unit.
Inspe ct the ba ttery pack upon receipt. Notify the ca rrier and dealer if there is damage.
The packa ging i s recyclable; save it for reuse or dispose of it prope rly.
Check the battery pack package contents:
NOTE: The model and serial numbers are located on a small, re ar panel label. For some models, an
additional label is located on the chassis under the front bezel.
Accessories
Insta ll accesso rie s prior to connec ting pow er to the UPS.
Ref er to the APC Web s ite, www.apc.com f o r availabl e accessories.
Optional acc essories
• Additional externa l battery packs (XLBP)
• Additional battery strings
• 4-post r ail kit
• Exter n al Battery Pa c k (X L B P )
•Front bezel
• Stabilizer/r ack-mount brac kets
• XLBP connector cable
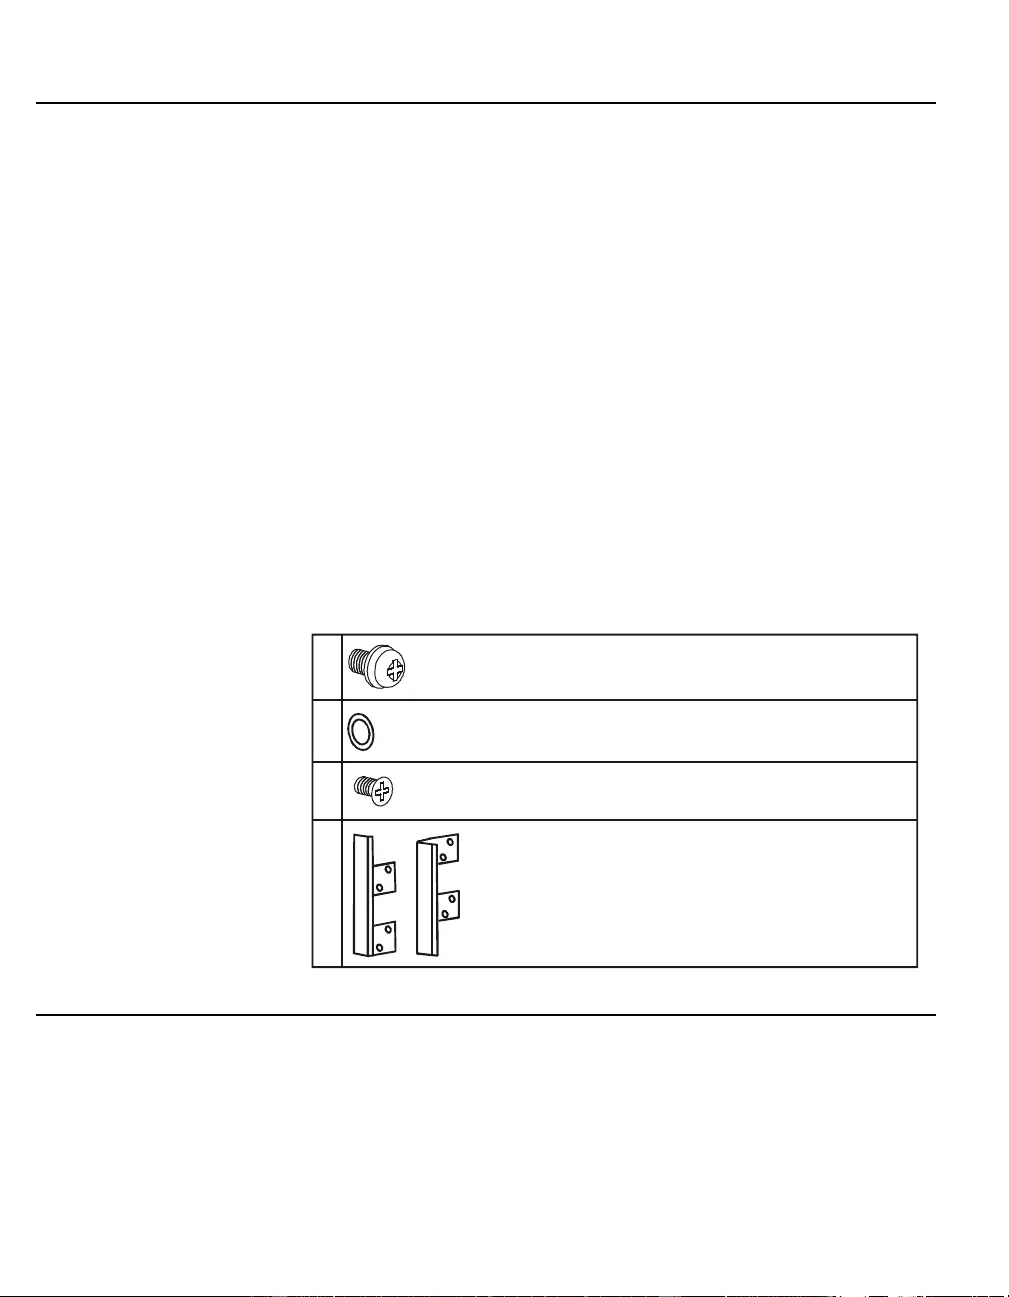
• H ardware supplied listed in table bel ow
• Literature kit containing:
– Product documentation
–Smart-UPS
™ RC User Manua ls CD
– Safety information
– Warranty information
8
2
2
su0211a
8
Hardware supplied Rack-mount co nfiguration:
Pan head screw s for securing rack-mount b rackets to unit
To w er configuration:
Flat head screws for securing stabili zer brackets unit
Rack-mount configur ation brackets
Tower configuration stabi lizer bracket s
Rack-mount configur ation:
Washers for securing rack-mount brackets to unit
SRC96XLBP / SRC96XLBP2S User Manual 7
Specifications
Environmental Specifications
Physical Specifications
Temperature Operating 0° to 40° C (32° to 104° F) This unit is intended for indoor use
only. Select a loca tion stur dy
enough to handle the weight.
Do not operate unit wher e there is
excessive dust or tem perature or
humi dity are outside specifi ed
limits.
Environmen tal fact ors impa ct
batt ery lif e. Hi gh te mper at ures, p oor
utility powe r, and frequ ent, shor t
duration dis charges will shorten
ba tte ry lif e .
Storage -1 5° to 30° C (5° t o 86° F)
charge UPS battery every six months
30° to 70° C (86° to 158° F)
charge UPS battery every three months
Maximum
Elevation Operating 3,000 m (10,000 ft)
Storage 15,000 m (50,000 ft)
Humidity 0 to 95% relative humidity,
non-condensing
Weight - Re fer to Safety Guide supplied with th is unit for lifting guidelines.
XLBP
model SRC96XLBP2S
• w ithout ba tterie s
• w ith two 48 V batt ery modu les 15 kg (3 2 lbs)
35 kg (7 6 lbs)
SRC96XLBP
• w ithout ba tterie s
• w ith six 48 V battery mod ules 15 kg (3 2 lbs)
75 kg (1 64 lbs)
each 48 V battery module 10 kg (22 lbs)
Each 96 V battery string consists of two
48 V battery modules.
Maximum number of external battery packs
(XLBPs) supported by Smart-UPS RC 10
Combine d weight s of UPS an d all XLB Ps ins tall ed in a
rack must not exceed rack weight limits.
Dimensions
Length x Width x Height: 48 cm (19 in) x 43 cm (17 in) x 18 cm (7 in)
su026
5a
SRC96XLBP / SRC96XLBP2S User Manual 8
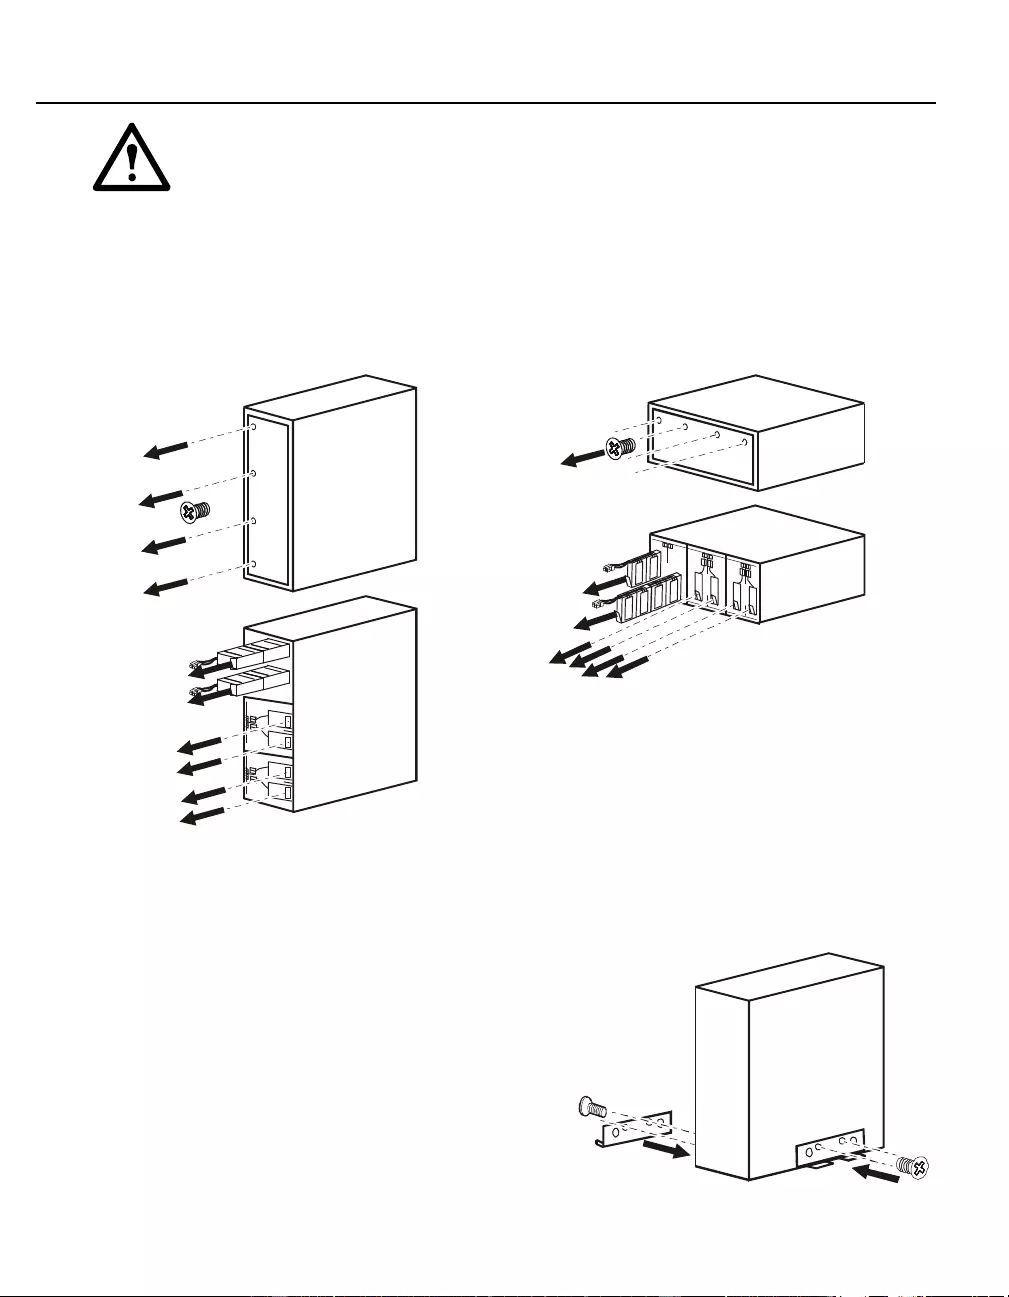
Installation
Units may var y in appe arance from those depic t ed in th is manu al.
Always place UPS above XLBPs in rack-mount configuration.
Connect all battery strings. Failure to do so may cause equipment damage.
Re f er t o Physical Sp ecificatio ns in this manual and the Safety Guide before installing unit.
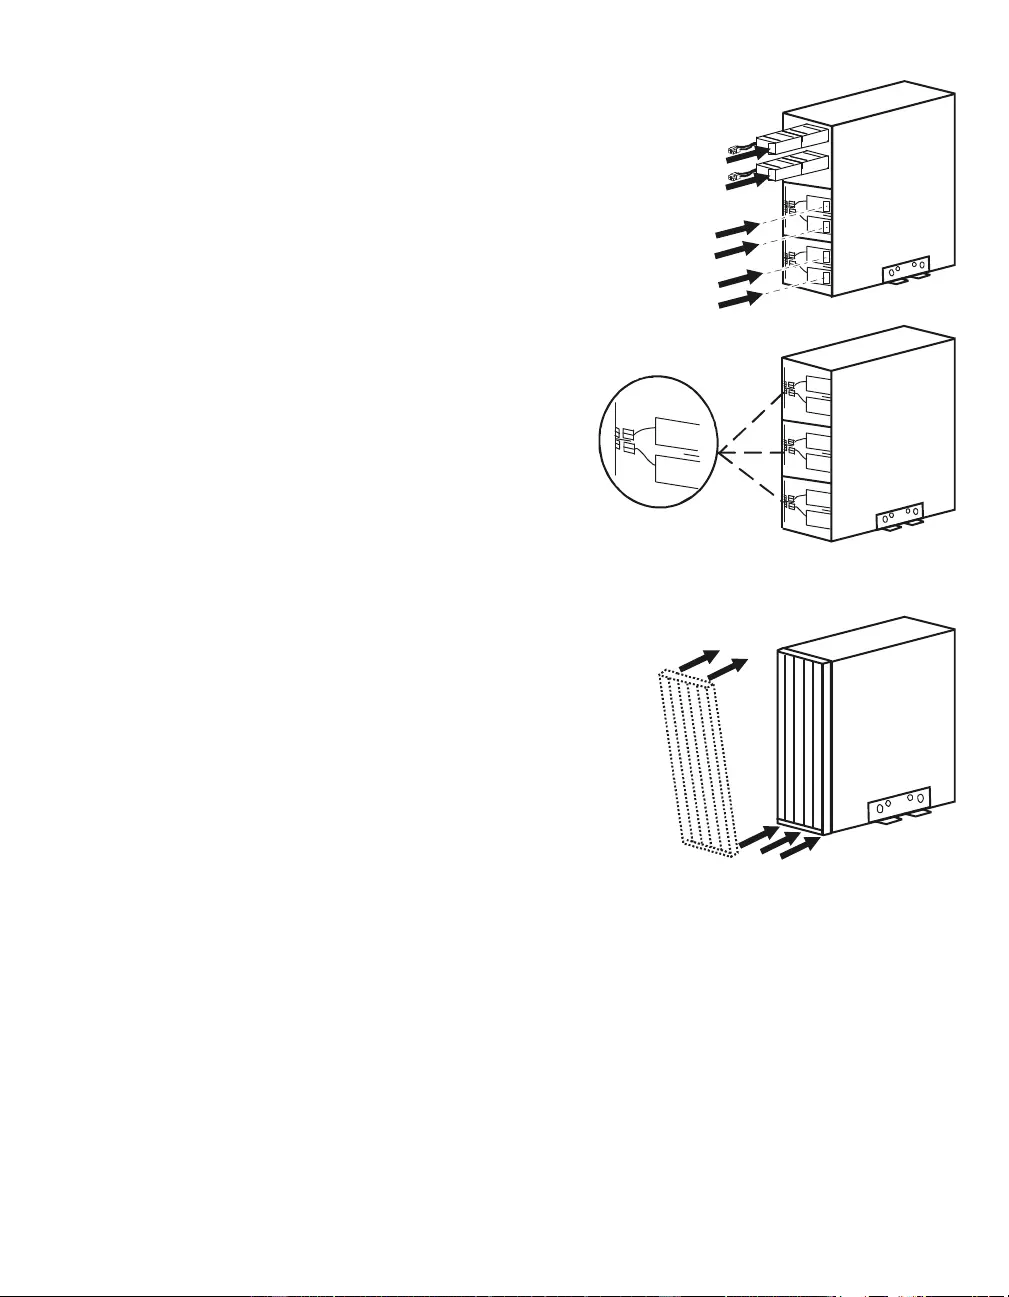
Unit is heavy. Batteries must be removed from unit prior to installa tion.
1. Remove screws securing battery compartment door. Rem ove door.
2. Grasp plastic flap att ached to batte r y and pull to remove battery module.
Units in tower configuration, remove batte r ies at top of unit first.
Tower configuratio n
Install st abilizer bracket s
1. Stabilizer brackets mus t be installe d on tower units.
2. Each bracket must be secured wit h two flat head screws
(supplied).
NOTE: Screws are pre-installed on left side of unit.
These screws must be removed fr om unit and used to
secure stabilizer bracket. Screws for securing
stabilizer bracket to right si de of unit are included in
hardware bag supplied with unit.
su0223a
su0224a
su212a
SRC96XLBP / SRC96XLBP2S User Manual 9
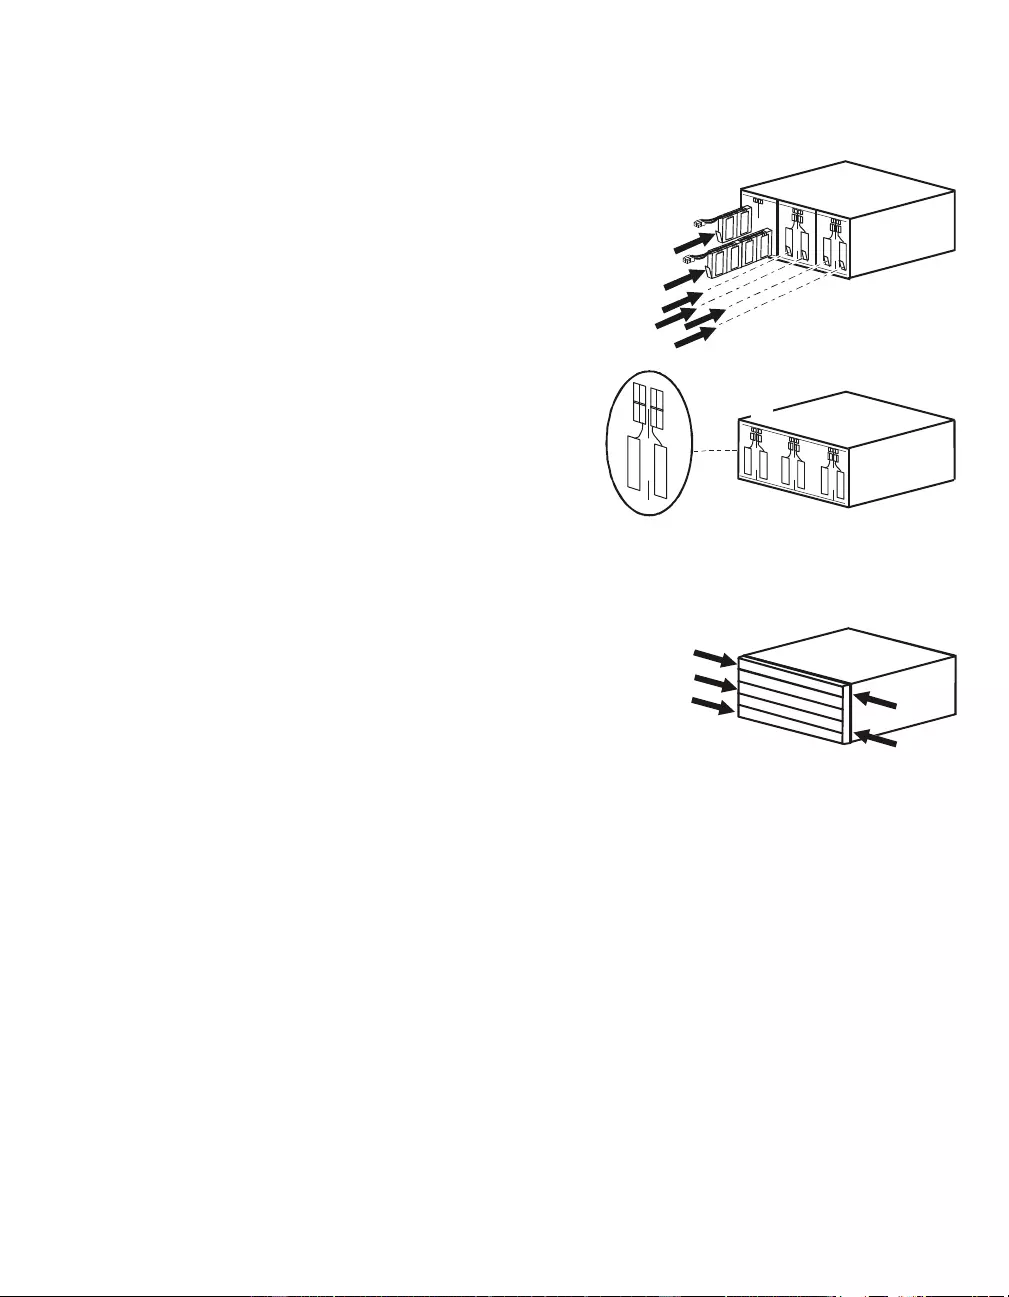
Instal l and connect batteries
This unit is equipp ed with b attery modules .
Insta ll batt eries into uni t begi nning with batt eries at the
bottom.
Each stri ng must be co nnected to ba tt ery conne ctors on
chassis.
1. Install batteries.
2. Connect batteries.
3. Repl ace battery compar tment door and se cure
door with screws previously removed .
Install bezel
1. Fit three tabs o n the bottom insid e edge of bezel into slots in
chassis.
2. Ti p bezel forward. Fit two t abs on t op insi de edge of bezel int o
slots in chassis and snap bezel into position.
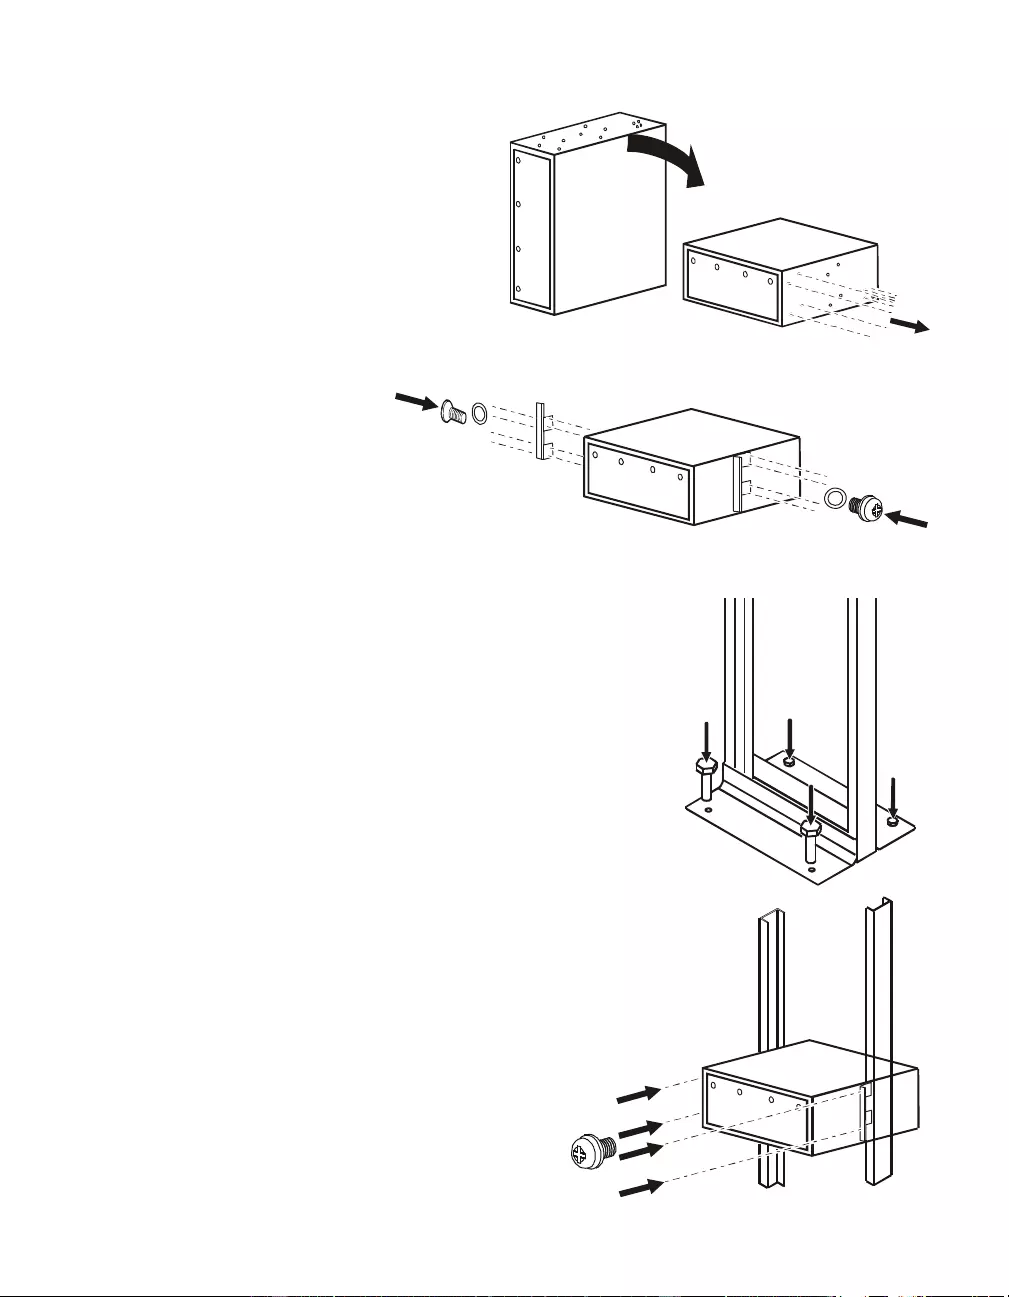
2-post rack-mount configuration
This un it is inten d ed f or installati on in a 19”, two- post or four - p ost rac k .
For details on 4-post rail and rack installation refer to instructions in rail kit.
Remov e stabili zer bracket s i f th ey are installed. Remove f o u r screws that secur e each bracket.
su0213a
x2
x2
x2
su0225a
su0216a
SRC96XLBP / SRC96XLBP2S User Manual 10
Position unit for mounting in rack
The uni t is heavy. Use caution when positioning
unit.
NOTE: The holes for securing rack-mount
brackets are plugged. Remove t he appropriate
plugs prior to installing brackets on the unit.
Install rack-mount brackets
Four pan head screws and four
wa shers mu st be used to sec ure
each rack -mount bracket to unit.
Secure 2-post rack to floor
Install units in rack
The UPS and XLBPs should be installed at or n ear
bottom of rack. Alwa ys p lace the UPS ab ove XLBPs.
Batteries must be removed from units prior to
installation in a rack.
Two screws (not supplie d), m us t be used to secure each
rack-mount bracket to rack.
su0214a
x8
su
0215a
x4
x4
su0248a
su0217a
SRC96XLBP / SRC96XLBP2S User Manual 11
Instal l and connect batteries
This UPS is equipped with batte r y mod ules. Each modul e must be connected to battery connectors on
chassis.
1. Install batterie s.
2. Co nnect internal b atter ies.
3. Repl ace bat tery co mpartmen t door and secure doo r
with s crews previously removed.
Install bezel
1. Fit three tabs on inside edge of bezel into slots in chassis.
2. Tip bezel towa rd chassis. Fit two tabs on inside edge of bezel into
slots in chassis and snap bezel into position.
su0218a
x2x2
x2
su0226a
su0220a
SRC96XLBP / SRC96XLBP2S User Manual 12
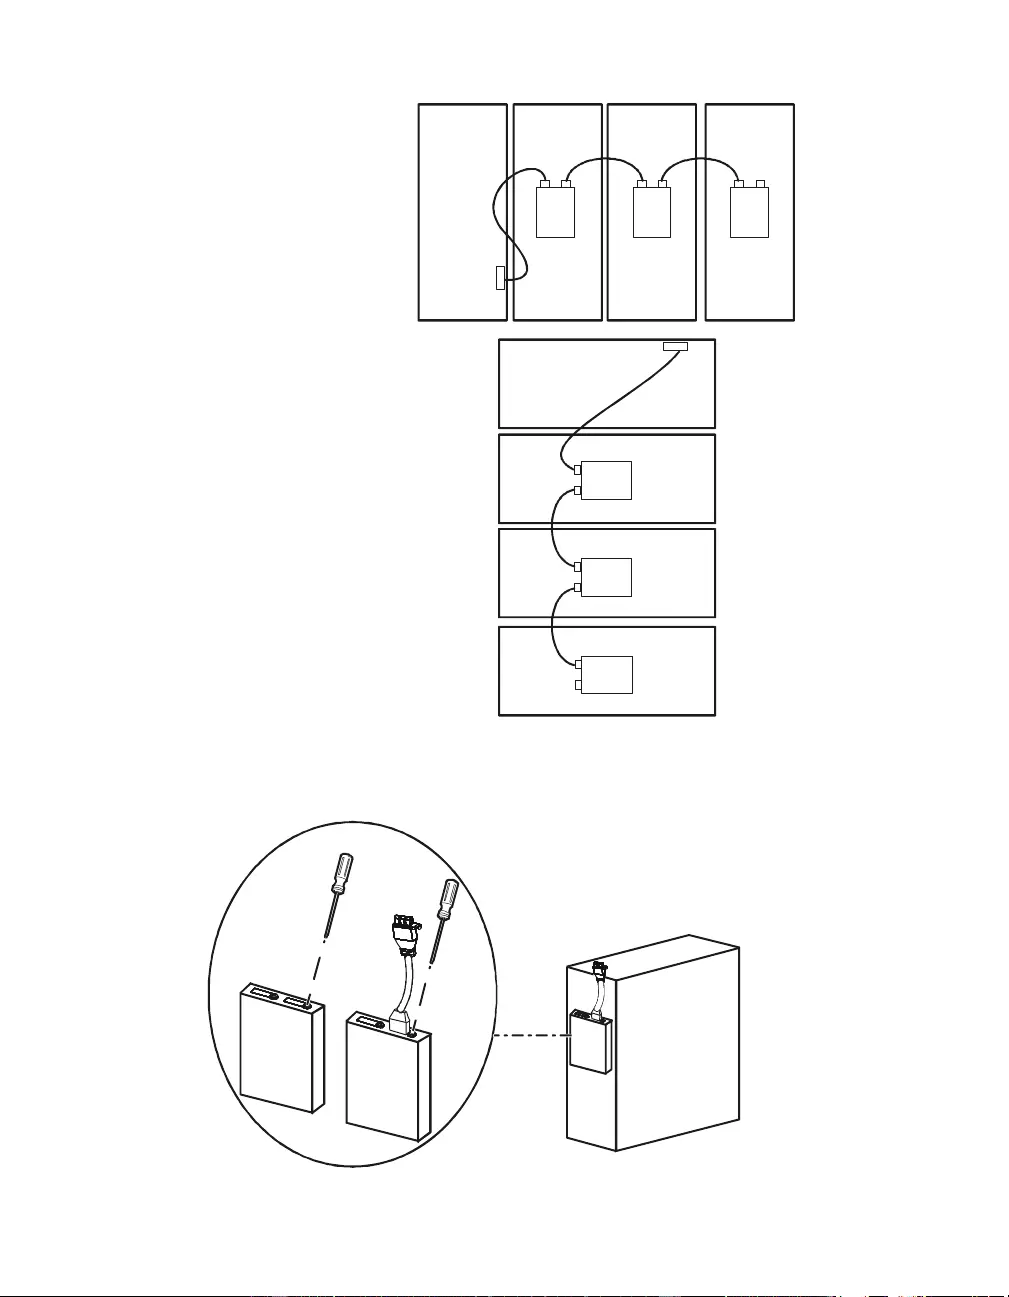
Connect XLBPs to UPS
su221a
UPS
XLBP
XLBP XLBP
su222a
UPS
XLBP
XLBP
XLBP
su264a
Tower configuration
Rack-mount conf iguration
There is small cover over each external battery pack connector on the UPS and XLBP . Remove the screw
that secures the cover and remove the cover

SRC96XLBP / SRC96XLBP2S User Manual 13
Configure UPS parame ters
This configuration affects the accuracy of the predicte d runtime calculations the UPS performs
while running on battery power.
Refer to the Battery S tring Configuration tables at the en d of t his section for d etail ed instructions.
Smart-UPS RC models must be programed to recognize the number of battery strings connected to the UPS.
There are f our options avail able for co nfiguring the UPS to recognize the number of ba ttery strings
1. PowerChute™ Business Edit ion: Refer to the ins tructions in cluded wit h the sof tware
2. N etwork Management Card (NMC) Web interface: Refer to the instructions included with NMC
3. Network Management Card (NMC) terminal mode: Refer to the instruct ions below
4. UPS termi nal mode
Configur e UPS connection settings using NMC terminal mode
Co n n ect th e serial cabl e to the ser ial com po r t on rear sid e o f U PS .
1. Open a terminal program, such as HyperTerminal.
From the Desktop, go to: Start, Programs, Accessories, Communication, HyperTerminal
2. Follow t he prompts to choose a name and select an icon. I f the mes sage, "... mu st ins tall a
modem," cl ick Cancel.
3. Go to File, Properties. Select the COM port that is connected to your UPS. The port settings a re:
–bits per second - 2400
–data - bits 8
–parity - none
–stop bit - 1
–flow control - none
4. Click OK in each of two windows
5. Press ENTER to initiate connection to UPS.

SRC96XLBP / SRC96XLBP2S User Manual 14
Configure th e number of battery strings using NMC terminal mode
1. Once the blank terminal window is open:
2. Press ENTER to initiate terminal mode. Press ENTER multiple times, until the prompt
User Name: is dis played. Fol low the pr omp ts. Type slowly, wai ting u ntil each character appears
on the screen prior to typing the next characte r.
Network Mana gement Card defaults:
•User Name: apc
• Password: apc
3. Pr ess 1 and ENTER to select Device Manager.
Select the model by entering the corre sponding number, then pr ess ENTER.
4. Pr ess 3 and ENTER to select Configuration.
5. Pr ess 1 and ENTER to select Battery.
6. Pr ess 2 and ENTER to change Battery Settings.
7. Type in the number of batter y s trings then press ENTER.
8. Pr ess 3 and ENTER to accept the change s.
9. Pr ess ESC five times to return to the main m enu.
10. Press 4 and ENTER to log out.

SRC96XLBP / SRC96XLBP2S User Manual 15
Configur e UPS connection setti ngs using UP S terminal mode
Connect the seri al cabl e to the serial por t on the back of the UPS. If usi ng USB commun ication to th e UPS,
dis connect USB cable prior to connecting serial cable.
1. Open a terminal program, such as HyperTerminal
From the Desktop, go to: Start, Programs, Accessories, Communication, HyperTerminal
2. Follow t he prompts to c hoose a name and select an ico n. Dis r egard the me ssage, "...must install a
modem," if it is dis p layed. Click Cancel
3. Go to File, Properties. Select the COM port that is connected to your UPS. The port settings a re:
–bits per second - 2400
–data - bits 8
–parity - none
–stop bit - 1
–flow control - none
4. Click OK in each of two windows
5. Press ENTER
Configure the number of battery str ings using UPS terminal mode
1. Once the blank t erm inal window i s open, follow these s teps to enter the nu mber of battery st rings:
NOTE: Letter key commands are case se nsitive. Use capital letters when using letter key comma nds.
2. Press Y. The UPS will respond with SM in the command box. If the UPS does not respond to t he
Y comman d, ensu re the se rial cable is securely connected to the serial port on the UPS. Use only
an AP C supplied serial cab le.
3. When SM appears in th e command box pres s the > key. The UPS will re spond wit h the number of
batte r y st rings connecte d to the UPS. I f the UPS has not been previously programmed to
recogniz e the number of battery strings this number will be zero.
4. Use the + or - keys to ch ange the number of battery strings. OK will appear in the command box.
5. Press > ke y. The number of battery strings will appear in the command box .
NOTE: Th e + or - keys and the > key mus t be used aga in to change the number of battery strings
from this point in the progra mming.
6. Press R. The UPS will respond with BYE in the command box.

SRC96XLBP / SRC96XLBP2S User Manual 16
Smart-UPS SRC XLI Models - Conf igure Number of Battery Strings
Each 96 V battery string consists of two 48 V battery modules . Cou nt the number of bat tery strings being used and
enter that number.
Configuration # of Battery
Strings
Factory Default
for all Models UPS inte rn al ba ttery strin g 1
SRC96XLBP2S UPS internal battery string + 1 SRC96X LBP2S 2
UPS internal ba ttery st ring + 1 SRC96XLBP2 S +
1 SRC004 (1 additi onal battery string) 3
UPS internal ba ttery st ring + 1 SRC96XLBP2 S +
2 SRC004 (2 additi onal batt ery strings) 4
SRC96XLBP The formul a for co n figu r in g SRC96XLBP units is as follows:
UPS in ternal bat tery str ing + 3 x the numb er of SRC96XLBP units # of ba tt e ry
strings to be
entered
UPS internal ba ttery st ring + 1 SRC96XLBP 4
UPS internal ba ttery st ring + 2 SRC96XLBP units 7
UPS internal ba ttery st ring + 3 SRC96XLBP units 10
Smart-UPS SRC UXI Models - Configure Number of Battery Strings
Each 96 V battery string consists of two 48 V battery modules . Cou nt the number of bat tery strings being used and
enter that number.
Configuration # of Battery
Strings
Factory Default
for all Models No UP S intern al ba ttery strin g 0
SRC96XLBP2S 1 SRC96XLBP2S 1
1 SRC96XLBP2S + 1 SRC004 (1 additional battery string) 2
1 SRC96XLBP2S + 2 SRC004 (2 additional battery strings) 3
SRC96XLBP The formul a for co n figu r in g SRC96XLBP units is as follows:
3 x the number of SRC96XLBP u nits # of ba tt e ry
strings to be
entered
1 SRC96XL BP 3
2 SRC96XLBP units 6
3 SRC96XLBP units 9

SRC96XLBP / SRC96XLBP2S User Manual 17
Contact Information
APC by Schneider Electric Worldwide Customer Support
Customer support for this or any other APC by Schneider Ele ctric product is availabl e at no charge in
any of the following ways:
• Visit the APC Web site to a ccess doc uments in the APC Knowledge Base and to subm it custom er
support requests.
–www.apc.com (Corporate Headquarters)
Connect to loc alized APC Web sites for specific countrie s, e ach of which provides customer
support information.
–www.apc.com/support/
Global support searching A PC Knowledge Base and using e-support.
• Contact the APC by Schneider Elect ric Customer Support Cent er by telepho ne or e-mail.
– Local, count ry specific center s: go to www.apc.com/support/contact for contac t information.
For informatio n on how to obtain lo cal customer suppor t, cont act the APC by Schnei der Electri c
representative or other distr ibutors from whom you purchased your APC by Schneider Electr ic
product.

SRC96XLBP / SRC96XLBP2S User Manual 18
Maintenance, Transp ort, and Servic e
Replace battery modules
This UPS has easy-to-replace, hot-swappable battery modules. Replace ment is a safe proce dure, isolated
from elect r ical hazard s. You may leave the UPS and connected equi pment on during the repl ac em ent
procedure.
Once the batteries are disconnected the connected equipment is not protected fr om power outages.
Refer to the appropriate replacement batte ry user manual for battery module insta llation ins tructions. See
your deal er or contact APC at www.apc.com for information on replacement battery mod ules.
Service
If the unit requires service, do not return i t to the dealer. Fol low these steps:
1. Review the Troubleshooting sec tion of the manual to eliminate comm on problems.
2. If the problem persists, contact APC by Schneider Electric Cus tomer Support through the APC
Web site, www.apc.com.
a. Note the model numbe r and serial number and the date of purchas e. The model and
serial numbers are located on the rear panel of the unit and are available through
the LCD display on select models.
b. Call APC Customer Support and a technician wil l attempt to solve the problem
over the phone. I f this is not possible, the technician will issue a Returne d Material
Authorization Number (RMA#).
c. If the unit is under warr anty, the repa irs are free.
d. Service p rocedur es and r eturns may va ry i ntern ationally. R efer to the APC Web site
for country specific instructions.
3. Pack the unit properly to avoid damage in transit. Nev er us e foa m beads for pac kaging. Damage
sustai ned in transit is not cove red under warranty.
a. Note: When shipping within the United States, or to the United States always
DISCONNECT ONE UPS BATTER Y before shipping in complian ce with U.S.
Department of Transpor tation (DOT) and IATA regulatio ns. The internal
batteries may remain in the UPS.
b. Batteries may remain connected in the XBP during shipment. Not all units utilize
XLBPs.
4. Write the RMA# provided by Cus tomer Support on the outside of the package.
5. Return the unit by insure d, prepaid carrie r to the address provide d by Customer Support.
Be sure to deliver the spent battery(s) to a recycling facility or ship it to APC in the
rep la c em en t ba t te ry p a cking ma t er ia l .

SRC96XLBP / SRC96XLBP2S User Manual 19
Two-Yea r Warra nty
Schneider El ectric IT Corporation ( SEIT), warrants its products to be free from defects i n materials and
workmanship for a per iod of two (2) years from the date of pur cha se. The SEIT obligation under this
warranty is limited to repair ing or replacing, at it s own sole option, any su ch defective products. Repair or
replacement of a defective product or parts thereof does not extend the original warranty per iod.
This warranty applies only to the original purc has er who must have properly registered the product within
10 days of purchase. Pr oducts may be registe red online at warranty.apc.c om .
SEIT shal l not b e liabl e under t he warranty if i ts te sting and exam inati on disc lose that th e alle ged defect in
the product does not exist or was caused by end user’s or any third person’s misuse, negligence, improper
inst allat ion, te sti ng, operati on or use of t he product contrar y to SEIT’s recommenda tions or specifi catio ns.
Further, SEIT shall not be liable for defe cts resulting from: 1) unauthorized at tempts to repair or mo dify
the product, 2) inco rrec t or inadequate el ectrical voltage or connection, 3) inappropriate on site o peration
conditions, 4) Acts of God, 5) exposure to the elements, or 6) thef t. In no event shall S EIT have any
liability under thi s warr ant y f or any product wher e the s erial nu mber has been al tered, defaced, or
removed.
EXCEPT AS SET FORTH ABOVE, THERE ARE NO WARRANTIES, EXPRESS OR IMPLIED, BY
OPERATION OF LAW OR OTHERWISE, APPLICABLE TO PRODUCTS SOLD, SERVICED OR
FURNISHED UNDER THIS AGREEMENT OR IN CONNECTION HEREWITH.
SEIT DIS CLAIMS ALL IM PLIED WARRAN TIES OF MERC HANTAB ILITY, SATISFACTIO N AN D
FITNESS FOR A PARTICULAR PURPOSE.
SEIT EXPRESS WARRANTI ES WILL NOT BE EN LARGED, DIMIN IS HE D, OR AFFECTED BY
AND NO OBLIGATION OR LIABILITY WILL ARISE OUT OF, SEIT’S RENDERING OF
TECHNICAL OR OTHER ADVICE OR SERVICE IN CONNECTION WITH THE PRODUCTS.
THE FORE GOING WARRANTIES AND REMEDIES ARE EXCLUSIVE AND IN LIEU OF ALL
OTHER WARRAN T IES AN D REM EDIE S. T HE WARR ANTI ES SE T FO RT H ABOV E CON STI TU TE
SEIT’S SOLE LIABILITY AND PURCHASER’S EXCLUSIVE REMEDY FOR ANY BREACH OF
SUCH WARRANTIES. SE IT WA RRANTIES EXTEND ONLY TO ORIGIN AL PURCHASER AN D
ARE NOT EXTENDED TO ANY THIRD PARTIES.
IN NO EVENT SH ALL SEIT, ITS OFFICERS, DIRE CTORS, AFFILIATES OR EMPLOYEES BE
L IABLE FOR ANY FORM OF INDIRECT, SPEC IAL, CONSEQUENTIA L OR PUNITIVE
DAMAG E S , ARI SING OUT OF TH E USE, SERVICE OR INSTALLATION OF T HE PRODUC TS,
WHETHER SUCH DAMAGES ARISE IN CONTRACT OR TORT, IRRESPECTIVE OF FAULT,
NEGLIGENCE OR STRICT LIABILITY OR WHETHER SEIT HAS BEEN ADVISED IN ADVANCE
OF THE POSS IBI LITY O F SUCH DAM AGE S. SPECIFI CALLY, SEIT IS NOT L IABLE FOR A NY
COSTS, SUCH AS LOST PROFITS OR REVENUE, WHETHER DIRECT OR INDIRECT, LOSS OF
EQ UI PMENT, LO SS OF USE OF EQ UI PM ENT, LOSS OF S OF TWAR E, L O S S OF DATA, C OS TS O F
SU BST ITUAN TS , CLAIMS BY THIRD PARTIES, OR OTHERWISE.
NOTHING IN THI S LIMITED WARRANTY S HALL SEEK TO EX CLUDE OR LIMI T SEIT’S
LIABILITY FOR DEA TH OR PERSONAL INJURY RESULTING FROM ITS NEGLIGENCE OR ITS
FRAU DULENT MIS R EP R ES E NTATIO N O F TO T HE EXTE NT TH AT IT CA NNOT BE EXCLUDED
OR LIM ITED B Y APPLI CABLE LAW.
To o btain s ervi ce unde r warrant y you must obta in a R eturned Materi al Autho rizat ion ( RMA) number from
customer support. Custom ers with warra nty claims iss ues may access the SEIT worldwide customer
support net wo rk through the SEIT Web site: www.apc.com. Select your country from the country
selection drop down menu. Open the Support tab at the top of the web page to obtain information for
customer support in your region. Pro ducts must be retur ned with transportation charges prepaid and must
be accompanied by a brief description of the prob lem encountered and pr oof of date and plac e of
purchase.

SRC96XLBP / SRC96XLBP2S User Manual 20
© 2014 APC by Schneider Electric. APC, the APC logo and APC, the AP C logo, and Smart-UPS are owned by Schneider Electric Industries
S.A.S . or thei r aff ilia ted com pan ies . All other trademarks are pr operty of their respective owners.