Table of Contents
ASUS VG278HV User Manual
Displayed below is the user manual for VG278HV by ASUS which is a product in the Computer Monitors category. This manual has pages.
Related Manuals
VG278 Series
LCD Monitor
User Guide

ii
Copyright © 2012 ASUSTeK COMPUTER INC. All Rights Reserved.
No part of this manual, including the products and software described in it, may be reproduced,
transmitted, transcribed, stored in a retrieval system, or translated into any language in any form or by any
means, except documentation kept by the purchaser for backup purposes, without the express written
permission of ASUSTeK COMPUTER INC. (“ASUS”).
Product warranty or service will not be extended if: (1) the product is repaired, modied or altered, unless
such repair, modication of alteration is authorized in writing by ASUS; or (2) the serial number of the
product is defaced or missing.
ASUS PROVIDES THIS MANUAL “AS IS” WITHOUT WARRANTY OF ANY KIND, EITHER EXPRESS
OR IMPLIED, INCLUDING BUT NOT LIMITED TO THE IMPLIED WARRANTIES OR CONDITIONS OF
MERCHANTABILITY OR FITNESS FOR A PARTICULAR PURPOSE. IN NO EVENT SHALL ASUS, ITS
DIRECTORS, OFFICERS, EMPLOYEES OR AGENTS BE LIABLE FOR ANY INDIRECT, SPECIAL,
INCIDENTAL, OR CONSEQUENTIAL DAMAGES (INCLUDING DAMAGES FOR LOSS OF PROFITS,
LOSS OF BUSINESS, LOSS OF USE OR DATA, INTERRUPTION OF BUSINESS AND THE LIKE),
EVEN IF ASUS HAS BEEN ADVISED OF THE POSSIBILITY OF SUCH DAMAGES ARISING FROM ANY
DEFECT OR ERROR IN THIS MANUAL OR PRODUCT.
SPECIFICATIONS AND INFORMATION CONTAINED IN THIS MANUAL ARE FURNISHED FOR
INFORMATIONAL USE ONLY, AND ARE SUBJECT TO CHANGE AT ANY TIME WITHOUT NOTICE,
AND SHOULD NOT BE CONSTRUED AS A COMMITMENT BY ASUS. ASUS ASSUMES NO
RESPONSIBILITY OR LIABILITY FOR ANY ERRORS OR INACCURACIES THAT MAY APPEAR IN THIS
MANUAL, INCLUDING THE PRODUCTS AND SOFTWARE DESCRIBED IN IT.
Products and corporate names appearing in this manual may or may not be registered trademarks or
copyrights of their respective companies, and are used only for identication or explanation and to the
owners’ benet, without intent to infringe.
Table of contents
Notices ..................................................................................................................................iii
Safety information .................................................................................................................iv
Care & Cleaning ......................................................................................................................v
1.1 Welcome! ...............................................................................................................1-1
1.2 Package contents .................................................................................................1-1
1.3 Monitor introduction.............................................................................................1-2
1.3.1 Front view ....................................................................... 1-2
1.3.2 Back view ........................................................................ 1-4
2.1 Assembling the monitor base .............................................................................2-1
2.2 Adjusting the monitor ..........................................................................................2-2
2.3 Detaching the arm (for VESA wall mount) .......................................................... 2-3
3.1 OSD (On-Screen Display) menu ..........................................................................3-1
3.1.1 Howtocongure ............................................................. 3-1
3.1.2 OSDFunctionIntroduction .............................................. 3-2
3.2 Specifications .......................................................................................................3-7
3.3 Troubleshooting (FAQ) .........................................................................................3-9
3.4 Supported Timing List ........................................................................................3-10

iii
Notices
Federal Communications Commission Statement
ThisdevicecomplieswithPart15oftheFCCRules.Operationissubject
tothefollowingtwoconditions:
• Thisdevicemaynotcauseharmfulinterference,and
• Thisdevicemustacceptanyinterferencereceivedincluding
interferencethatmaycauseundesiredoperation.
Thisequipmenthasbeentestedandfoundtocomplywiththelimitsfora
ClassBdigitaldevice,pursuanttoPart15oftheFCCRules.Theselimits
aredesignedtoprovidereasonableprotectionagainstharmfulinterference
inaresidentialinstallation.Thisequipmentgenerates,usesandcan
radiateradiofrequencyenergyand,ifnotinstalledandusedinaccordance
withmanufacturer’sinstructions,maycauseharmfulinterferencetoradio
communications.However,thereisnoguaranteethatinterferencewill
notoccurinaparticularinstallation.Ifthisequipmentdoescauseharmful
interferencetoradioortelevisionreception,whichcanbedeterminedby
turningtheequipmentoffandon,theuserisencouragedtotrytocorrect
theinterferencebyoneormoreofthefollowingmeasures:
• Reorientorrelocatethereceivingantenna.
• Increasetheseparationbetweentheequipmentandreceiver.
• Connecttheequipmenttoanoutletonacircuitdifferentfromthatto
whichthereceiverisconnected.
• Consultthedealeroranexperiencedradio/TVtechnicianforhelp.
Canadian Department of Communications Statement
ThisdigitalapparatusdoesnotexceedtheClassBlimitsforradio
noiseemissionsfromdigitalapparatussetoutintheRadioInterference
RegulationsoftheCanadianDepartmentofCommunications.
ThisclassBdigitalapparatuscomplieswithCanadianICES-003.

iv
Safety information
• Beforesettingupthemonitor,carefullyreadallthedocumentationthat
camewiththepackage.
• Topreventfireorshockhazard,neverexposethemonitortorainor
moisture.
• Nevertrytoopenthemonitorcabinet.Thedangeroushighvoltages
insidethemonitormayresultinseriousphysicalinjury.
• Ifthepowersupplyisbroken,donottrytofixitbyyourself.Contacta
qualifiedservicetechnicianoryourretailer.
• Beforeusingtheproduct,makesureallcablesarecorrectlyconnected
andthepowercablesarenotdamaged.Ifyoudetectanydamage,
contactyourdealerimmediately.
• Slotsandopeningsonthebackortopofthecabinetareprovidedfor
ventilation.Donotblocktheseslots.Neverplacethisproductnearor
overaradiatororheatsourceunlessproperventilationisprovided.
• Themonitorshouldbeoperatedonlyfromthetypeofpowersource
indicatedonthelabel.Ifyouarenotsureofthetypeofpowersupplyto
yourhome,consultyourdealerorlocalpowercompany.
• Usetheappropriatepowerplugwhichcomplieswithyourlocalpower
standard.
• Donotoverloadpowerstripsandextensioncords.Overloadingcan
resultinfireorelectricshock.
• Avoiddust,humidity,andtemperatureextremes.Donotplacethe
monitorinanyareawhereitmaybecomewet.Placethemonitorona
stablesurface.
• Unplugtheunitduringalightningstormorifitwillnotbeusedfora
longperiodoftime.Thiswillprotectthemonitorfromdamagedueto
powersurges.
• Neverpushobjectsorspillliquidofanykindintotheslotsonthe
monitorcabinet.
• Toensuresatisfactoryoperation,incaseuseataPCthenitshould
usethemonitoronlywithcomputerswhichhaveappropriate
configuredreceptaclesmarkedbetween100-240VAC.
• Ifyouencountertechnicalproblemswiththemonitor,contacta
qualifiedservicetechnicianoryourretailer.
• Thewallsocketshallbeinstalledneartheequipmentandshallbe
easilyaccessible.
v
Care & Cleaning
• Beforeyouliftorrepositionyourmonitor,itisbettertodisconnectthe
cablesandpowercord.Followthecorrectliftingtechniqueswhen
positioningthemonitor.Whenliftingorcarryingthemonitor,graspthe
edgesofthemonitor.Donotliftthedisplaybythestandorthecord.
• Cleaning.Turnyourmonitoroffandunplugthepowercord.Cleanthe
monitorsurfacewithalint-free,non-abrasivecloth.Stubbornstains
mayberemovedwithaclothdampenedwithmildcleaner.
• Avoidusingacleanercontainingalcoholoracetone.Useacleaner
intendedforusewiththeLCD.Neverspraycleanerdirectlyonthe
screen,asitmaydripinsidethemonitorandcauseanelectricshock.
The following symptoms are normal with the monitor:
• Thescreenmayflickerduringtheinitialuseduetothenatureofthe
fluorescentlight.TurnoffthePowerSwitchandturnitonagainto
makesurethattheflickerdisappears.
• Youmayfindslightlyunevenbrightnessonthescreendependingon
thedesktoppatternyouuse.
• Whenthesameimageisdisplayedforhours,anafterimageofthe
previousscreenmayremainafterswitchingtheimage.Thescreenwill
recoverslowlyoryoucanturnoffthePowerSwitchforhours.
• Whenthescreenbecomesblackorflashes,orcannotworkanymore,
contactyourdealerorservicecentertofixit.Donotrepairthescreen
byyourself!
Conventions used in this guide
WARNING:Informationtopreventinjurytoyourselfwhentryingto
completeatask.
CAUTION:Informationtopreventdamagetothecomponents
whentryingtocompleteatask.
IMPORTANT:InformationthatyouMUSTfollowtocompletea
task.
NOTE:Tipsandadditionalinformationtoaidincompletingatask.

vi
Where to find more information
Refertothefollowingsourcesforadditionalinformationandforproduct
andsoftwareupdates.
1. ASUS websites
TheASUSwebsitesworldwideprovideupdatedinformationonASUS
hardwareandsoftwareproducts.Refertohttp://www.asus.com
2. Optional documentation
Yourproductpackagemayincludeoptionaldocumentationthatmay
havebeenaddedbyyourdealer.Thesedocumentsarenotpartof
thestandardpackage.
1-1
ASUS VG278HV Series LCD Monitor
1.1 Welcome!
ThankyouforpurchasingtheASUS®LCDmonitor!
ThelatestwidescreenLCDmonitorfromASUSprovidesacrisper,
broader,andbrighterdisplay,plusahostoffeaturesthatenhanceyour
viewingexperience.
Withthesefeatures,youcanenjoytheconvenienceanddelightfulvisual
experiencethatthemonitorbringsyou!
1.2 Package contents
Checkyourpackageforthefollowingitems:
LCDMonitor
PowerCord
VGACable
DVI(Dual-Link)Cable
3.5mmAudioCable
QuickStartGuide
WarrantyCard
Ifanyoftheaboveitemsisdamagedormissing,contactyourretailerimmediately.

1-2 Chapter 1: Product Introduction
1.3 Monitor introduction
1.3.1 Front view
1 2 3 4 5 6 7
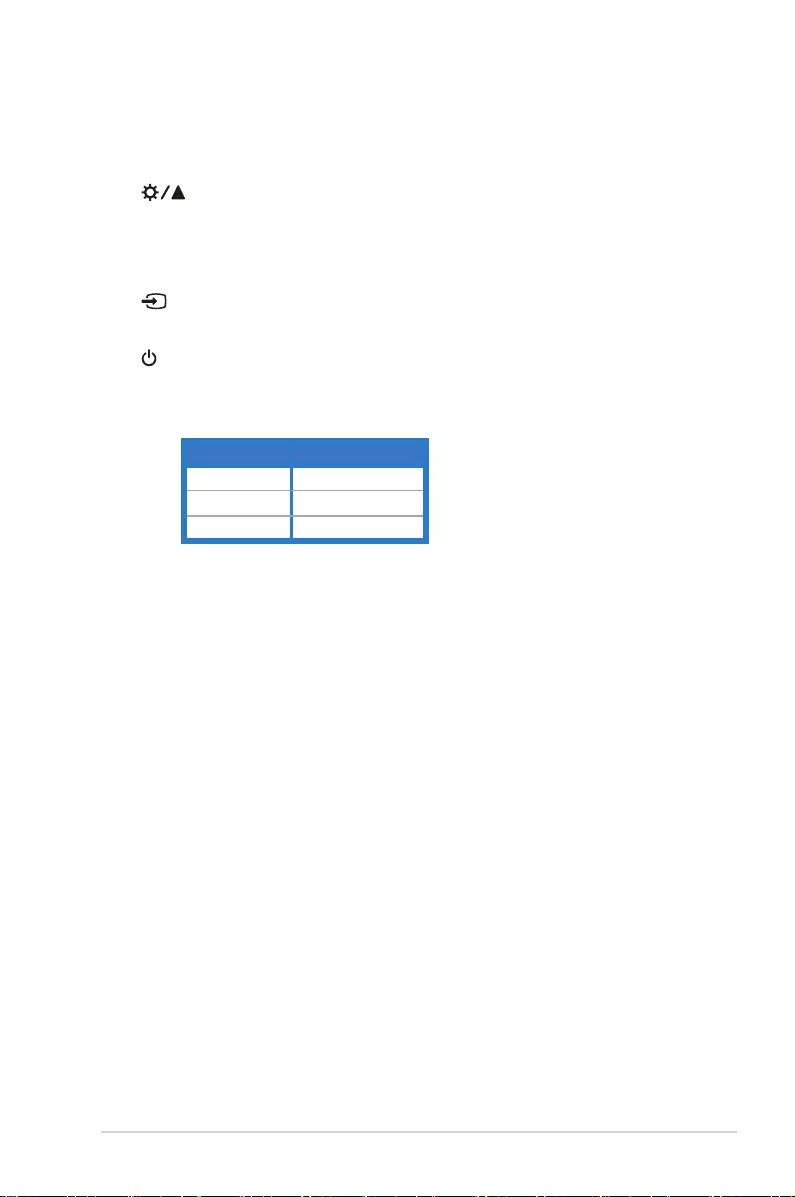
1. Button:
• Pressthishotkeytoswitchfromsixvideopresetmodes(Scenery
Mode,Standard Mode,Theater Mode,Game Mode,Night View Mode,
andsRGB)withSPLENDID™VideoIntelligenceTechnology.
• ExitstheOSDmenuorgoesbacktothepreviousmenuwhen
theOSDmenuisactive.
2. Button:
• Pressthisbuttontoautomaticallyadjusttheimagetoits
optimizedposition,clock,andphase(forVGAmodeonly).
3. Button:
• Pressthisbuttontodecreasethevalueofthefunctionselected
ormovetothenextfunctions.
• Volumehotkey
4. Button:
1-3
ASUS VG278HV Series LCD Monitor
• Pressthisbuttontoenter/selecttheicon(function)highlighted
whiletheOSDmenuisactivated.
• ExitsthehotkeyOSDmenu.
5. Button:
• Pressthisbuttontoincreasethevalueofthefunctionselected
ormovetothepreviousfunction.
• Brightnesshotkey
6. InputSelectButton:
• Pressthisbuttontoselectinputsource.
7. PowerButton/PowerIndicator:
• Pressthisbuttontoturnthemonitoron/off.
• Thecolordefinitionofthepowerindicatorisshownbelow.
Status Description
Blue ON
Amber Standbymode
OFF OFF
1-4 Chapter 1: Product Introduction
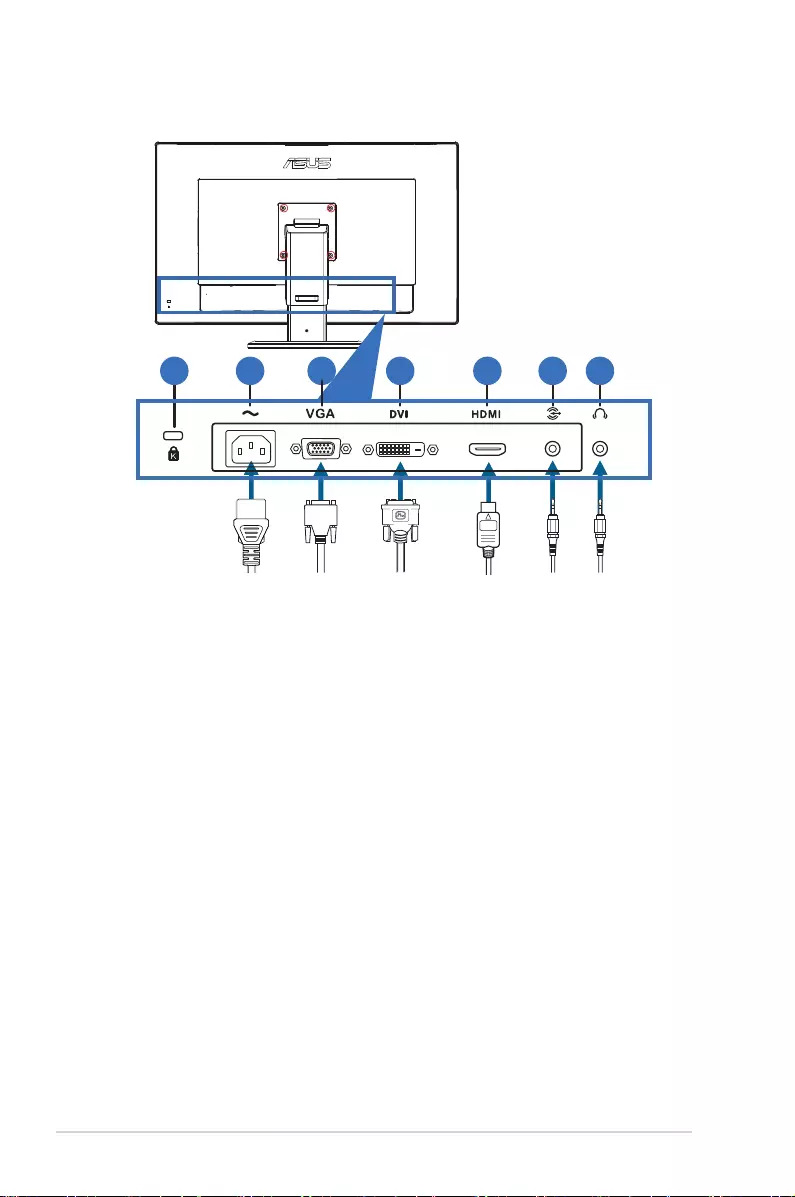
1.3.2 Back view
1 2 543 6 7
Rear connectors
1. Kensingtonlockslot.
2. AC-INport:Thisportconnectsthepowercord.
3. VGAport:This15-pinportisforPCVGAconnection.
4. DVIport:This24-pinportisforPC(PersonalComputer)DVI-Ddigital
signalconnection.
5. HDMI-INport:ThisportisforconnectionwithanHDMIcompatible
device.
6. PCAudio-InJack:This3.5mmstereojackisforPCaudioconnection.
7. Earphone-OutJack:This3.5mmstereojackisforearphoneaudio
connection.
2-1
ASUS VG278HV Series LCD Monitor
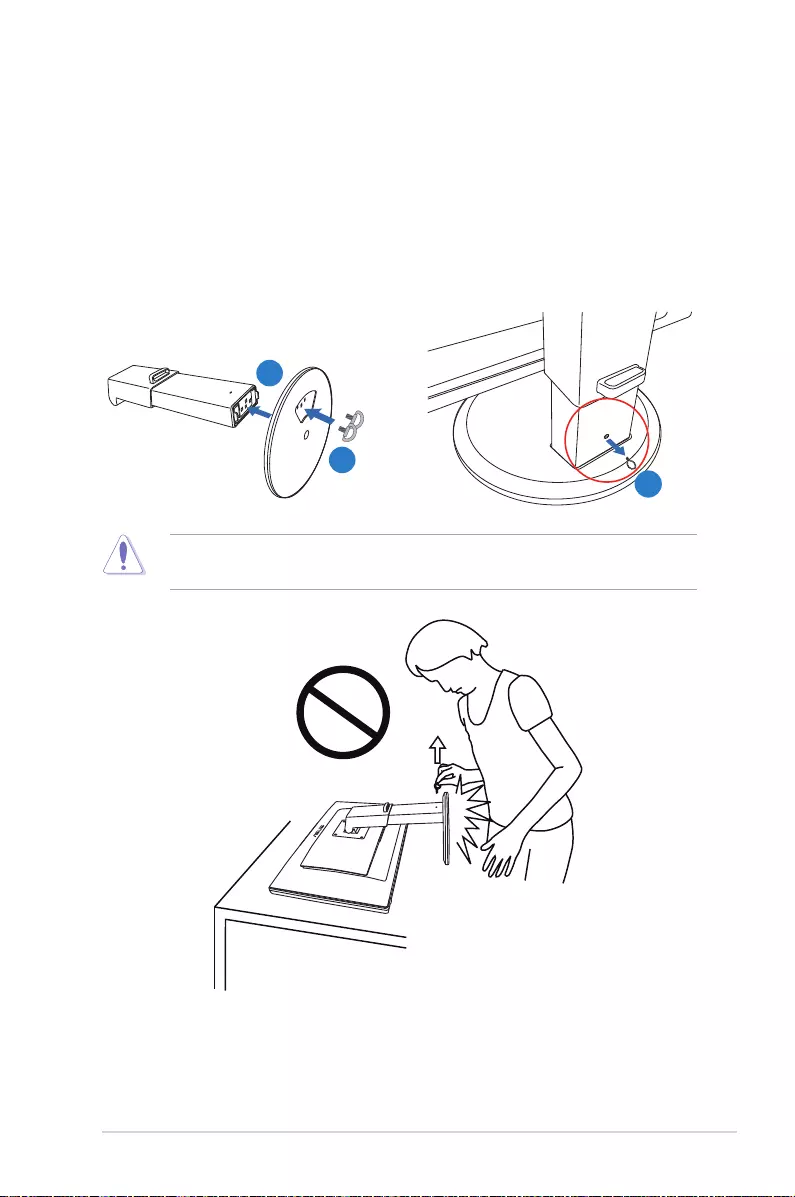
2.1 Assembling the monitor base
To assemble the monitor base:
1. Attachthebasetothearm.
2. Fixwiththescrewstojointthebasewiththearm.Youcaneasily
tightenthescrewsbyngers.
3. Removetheheightadjustmentlockfromthearm.
1
2
3
TheheightadjustmentlockshouldNEVERberemovedBEFOREyouplacethe
monitorVERTICALLYonaflatandcleantable.
2-2 Chapter 2: Setup
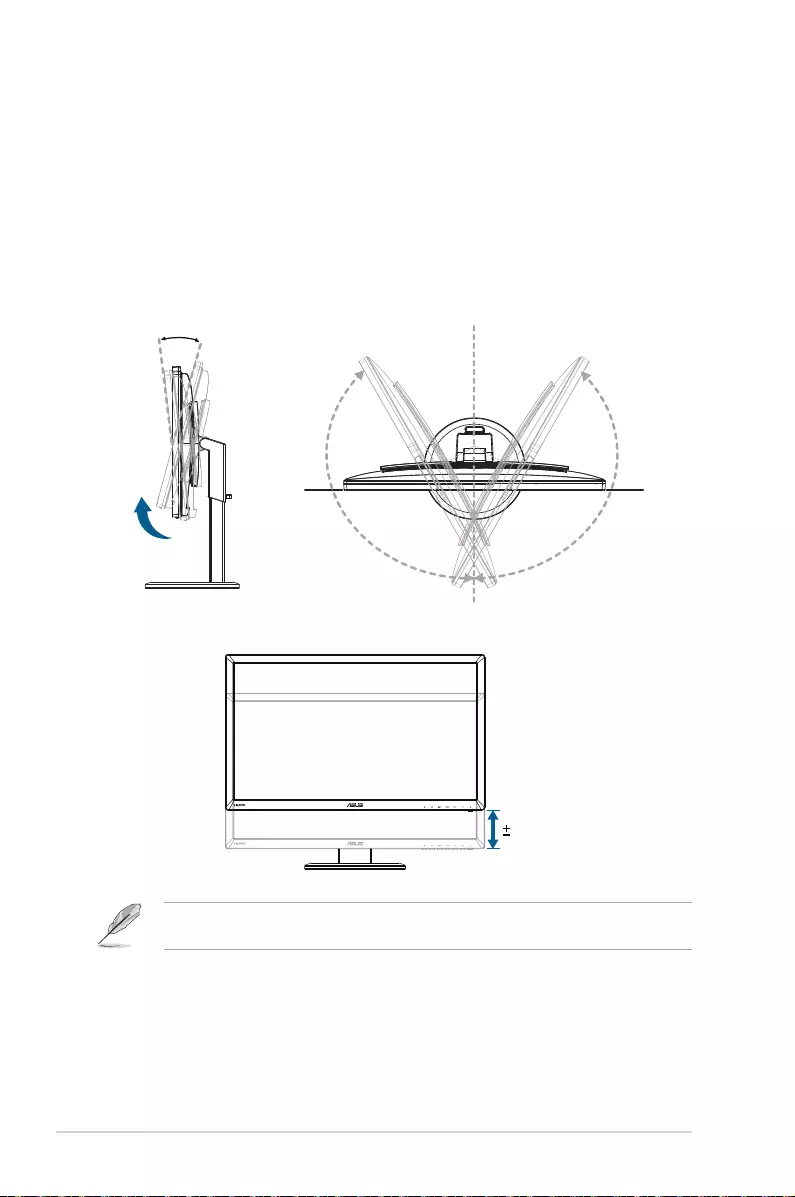
2.2 Adjusting the monitor
• Foroptimalviewing,werecommendthatyoulookatthefullfaceofthe
monitor,thenadjustthemonitortotheanglethatismostcomfortable
foryou.
• Holdthebasetopreventthemonitorfromfallingwhenyouchangeits
angle.
• Youcantiltthemonitor’sfrom-5˚to+15˚,swivelfromleft-to-rightfor
150˚,andliftthemonitor’sheightforabout100mm.
-5° ~ +15°
150°
0°
150°
100mm
Itisnormalthatthemonitorslightlyshakeswhileyouadjusttheviewingangle.
2-3
ASUS VG278HV Series LCD Monitor
2.3 Detaching the arm (for VESA wall
mount)
ThedetachablearmofthismonitorisspeciallydesignedforVESAwall
mount.
To detach the arm:
1. Disconnectpowerandsignalcables.
2. Lowerthemonitortoitslowestheight,andtheninserttheheight
adjustmentlock.
3. Carefullyputthefrontofthemonitorfacedownonaatandclean
table.
4. Useascrewdrivertoremovethefourscrewdriversonthearm,and
thendetachthearmfromthemonitor.
• Werecommendthatyoucoverthetablesurfacewithsoftclothtoprevent
damagetothemonitor.
• Holdthestandwhileremovingthescrews.
• TheVESAwallmountkit(100x100mm)ispurchasedseparately.
• UseonlytheULListedWallMountBracketwithminimumweight/load32.4kg
(Screwsize:M4x10mm).
3-1 Chapter 3: OSD (On-Screen Display) Menu
3.1 OSD (On-Screen Display) menu
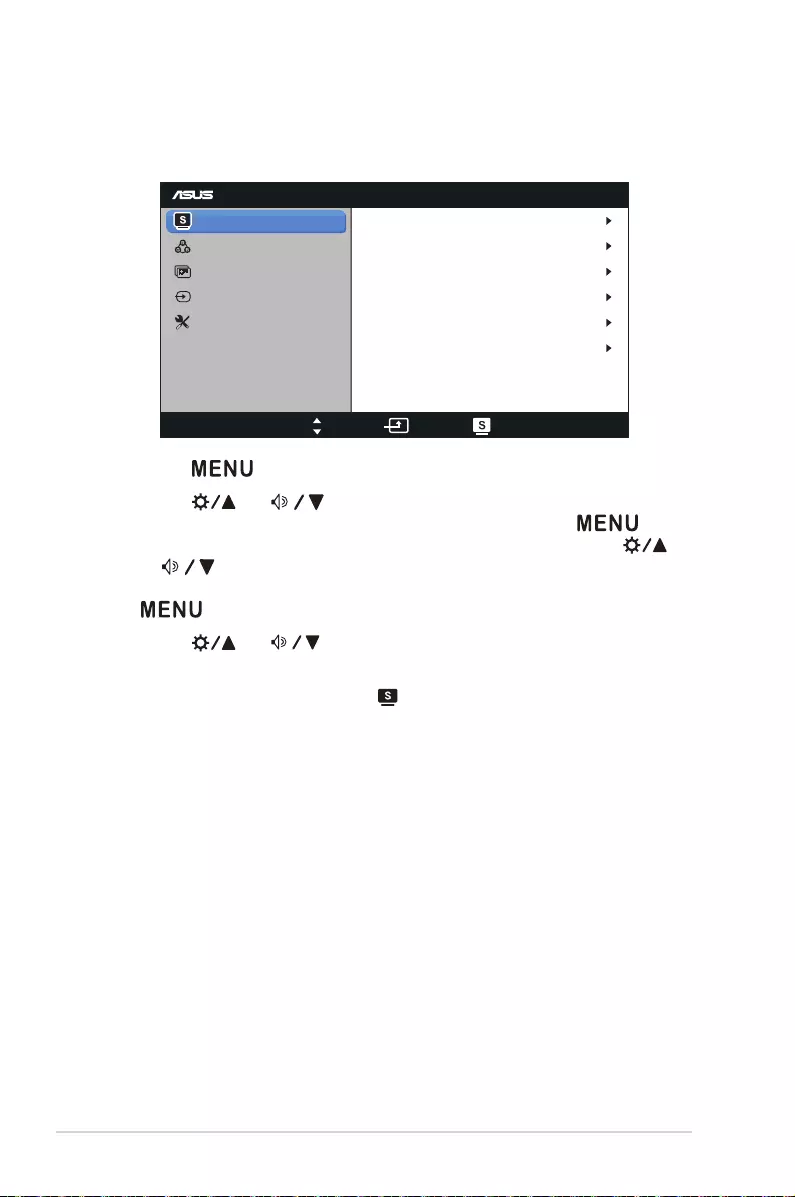
3.1.1 How to configure
VG278
Splendid
Color
Image
Input Select
Move Menu Exit
System Setup
Scenery Mode
Standard Mode
Theater Mode
Game Mode
Night View Mode
sRGB
1. Press[ ]buttontoactivatetheOSDmenu.
2. Press[ ]or[ ]buttontonavigatethroughthefunctions.
Highlightandactivatethedesiredfunctionbypressing[ ]
button.Ifthereisasub-menuinthefunctionselected,press[ ]
or[ ]buttonagaintonavigatethroughthesub-menufunctions.
Highlightandactivatethedesiredsub-menufunctionbypressing
[ ]button.
3. Press[ ]or[ ]buttontochangethesettingsoftheselected
function.
4. ToexittheOSDmenu,press[ ]button.Repeatstep2andstep3to
adjustanyotherfunction.
3-2
ASUS VG278HV Series LCD Monitor
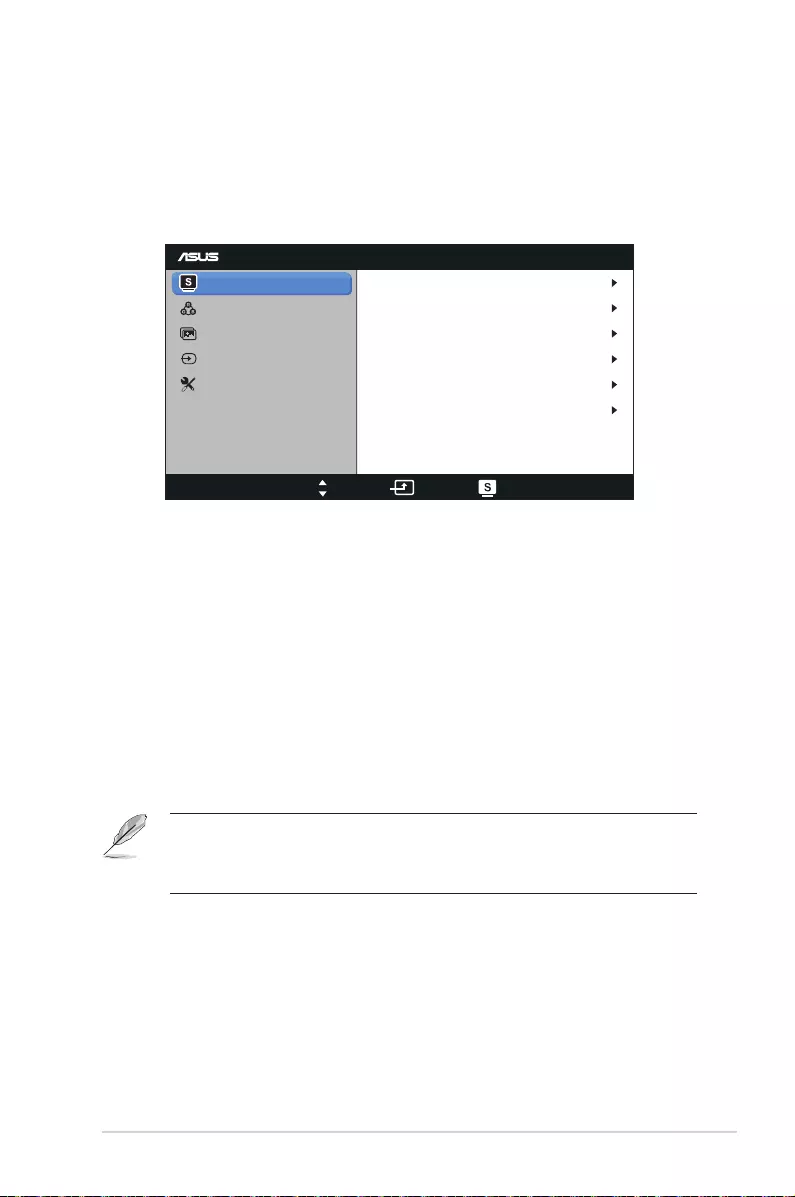
3.1.2 OSD Function Introduction
1. Splendid
Thisfunctioncontainssixsub-functionsyoucanselectforyour
preference.EachmodehastheResetselection,allowingyouto
maintainyoursettingorreturntothepresetmode.
VG278
Splendid
Color
Image
Input Select
Move Menu Exit
System Setup
Scenery Mode
Standard Mode
Theater Mode
Game Mode
Night View Mode
sRGB
• Scenery Mode:Thebestchoiceforsceneryphotodisplaywith
SPLENDID™VideoEnhancement.
• Standard Mode:Thebestchoicefordocumenteditingwith
SPLENDID™VideoEnhancement.
• Theater Mode:ThebestchoiceformoviewithSPLENDID™Video
Enhancement.
• Game Mode:ThebestchoiceforgameplayingwithSPLENDID™
VideoEnhancement.
• Night View Mode:Thebestchoicedark-scenegameormoviewith
SPLENDID™VideoEnhancement.
• sRGB Mode:CompatiblewithsRGBcolorspace.sRGBmodeis
thebestchoicefordocumentediting.
• IntheStandardMode,theSaturationandASCRfunctionsarenotuser-
configurable.
• Intheothermodes,thesRGBfunctionisnotuser-configurable.
3-3 Chapter 3: OSD (On-Screen Display) Menu
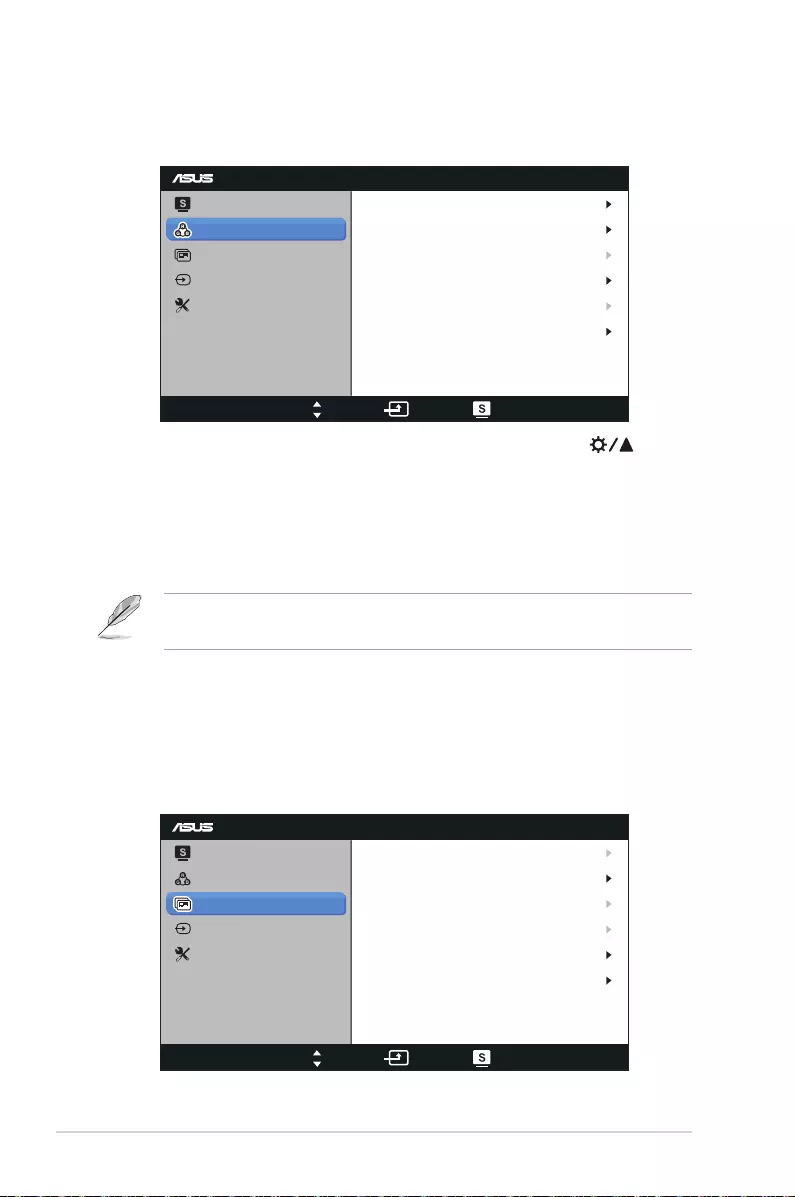
2. Color
Setadesiredcolorsettingfromthismenu.
VG278
Splendid
Color
Image
Input Select
Move Menu Exit
System Setup
Brightness
Contrast
Saturation
Color Temp.
90
80
User Mode
50
NaturalSkin Tone
Smart View OFF
• Brightness:Theadjustingrangeisfrom0 to 100. The button
isahotkeytoactivatethisfunction.
• Contrast:Theadjustingrangeisfrom0 to 100.
• Saturation:Theadjustingrangeisfrom0 to 100.
• Color Temp.:Containsfourcolormodes:“Cool”,“Normal”,“Warm”,
and“User Mode”.
IntheUsermodeforColorTemp.,thecolorsofR(Red),G(Green),andB(Blue)
areuser-configurable;theadjustingrangeisfrom0to100.
• Skin Tone:Containsthreecolormodesincluding“Reddish”,
“Natural”,and“Yellowish”.
• Smart View:Enableaclearervisibilityaftertiltedthescreen.
3. Image
Settheimagerelatedsettingfromthismenu.
VG278
Splendid
Color
Image
Input Select
Move Menu Exit
System Setup
Sharpness
Trace Free
Aspect Control
ASCR
50
60
Full
OFF
Position
Focus
3-4
ASUS VG278HV Series LCD Monitor
• Sharpness:Adjustthepicturesharpness.Theadjustingrangeis
from0 to 100.
• Trace Free:Speeduptheresponsetime.Theadjustingrangeis
from0 to 100.
• Aspect Control:Adjusttheaspectratioto“4:3”,“Full”,or
“OverScan”.
• ASCR:TurnonorofftheASCR(ASUSSmartContrastRatio)
function.(OnlyavailableatSceneryMode,TheaterMode,Game
Mode,andNight ViewMode.)
• Position:Adjustthehorizontalposition(H-Position)andthe
verticalposition(V-Position)oftheimage.Theadjustingrangeis
from0 to 100.(OnlyavailableforVGAinput.)
• Focus:ReduceHorizontal-linenoiseandVertical-linenoiseof
theimagebyadjusting(Phase)and(Clock)separately.The
adjustingrangeisfrom0 to 100.(OnlyavailableforVGAinput.)
• 4:3isonlyavailablewheninputsourceisin4:3format.OverScanisonly
availablefortheHDMIinputsource.
• Phaseadjuststhephaseofthepixelclocksignal.Withawrongphase
adjustment,thescreenshowshorizontaldisturbances.
• Clock(pixelfrequency)controlsthenumberofpixelsscannedbyone
horizontalsweep.Ifthefrequencyisnotcorrect,thescreenshowsvertical
stripesandtheimageisnotproportional.
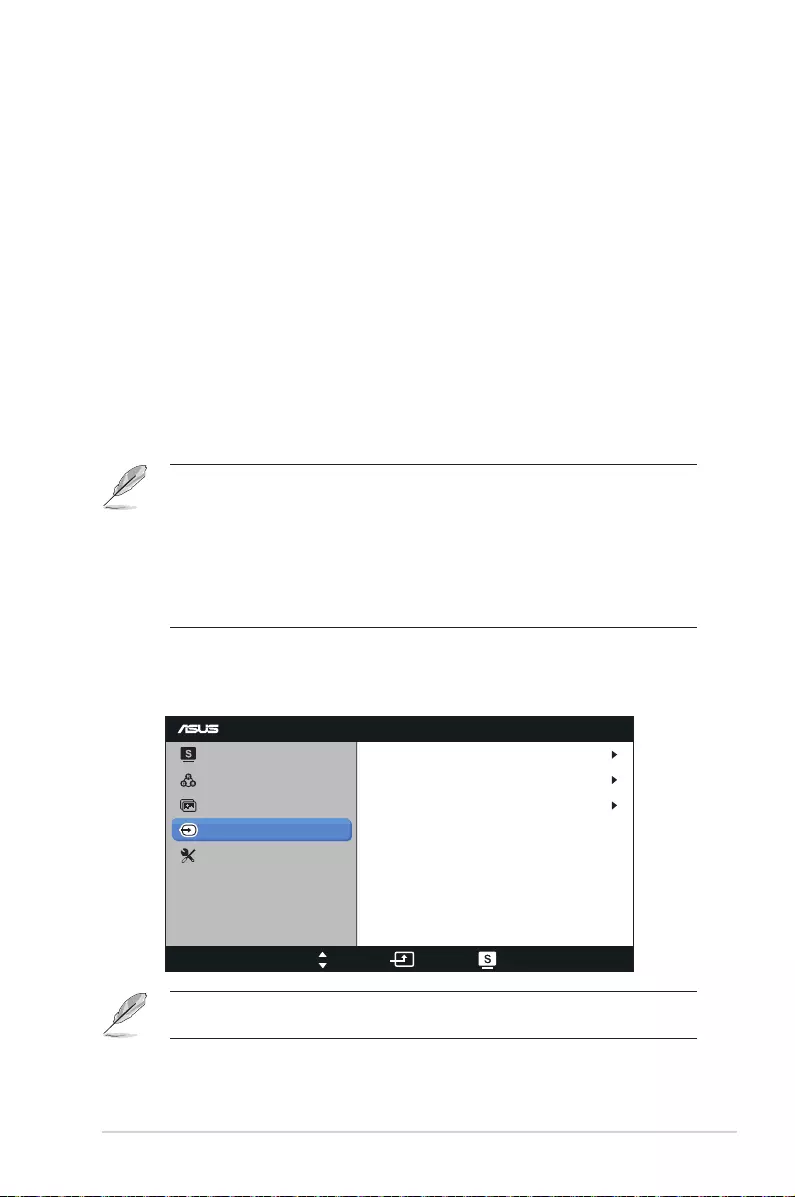
4. Input Select
Selecttheinputsourcefrom“VGA”,“DVI”,or“HDMI”.
VG278
Splendid
Color
Image
Input Select
Move Menu Exit
System Setup
VGA
DVI
HDMI
OnlytheVGAandDVIinputsupportsthe“Autoscan”function.
3-5 Chapter 3: OSD (On-Screen Display) Menu
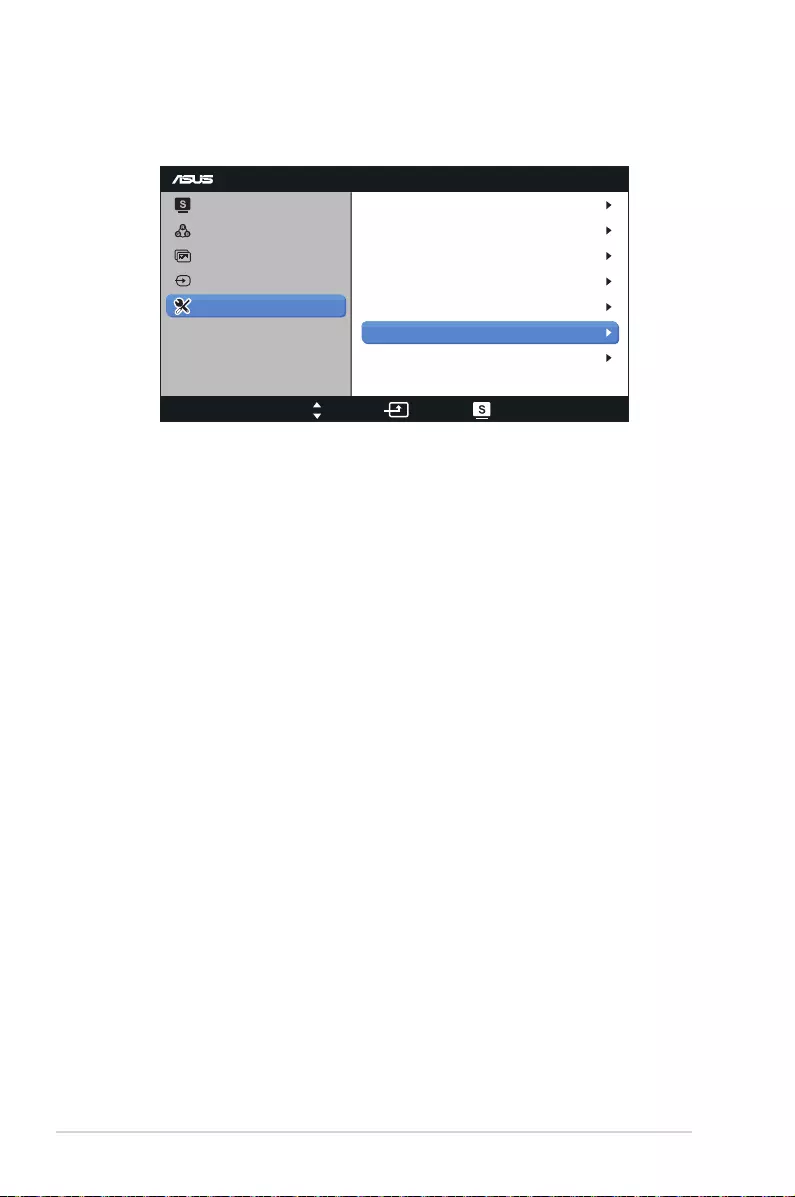
5. System Setup
Adjustthesystemconguration.
VG278
Splendid
Color
Image
Input Select
Move Menu Exit
System Setup
OSD Setup
Language
Splendid Demo Mode OFF
50
OFF
English
Volume
ECO Mode
Information
All Reset
• Splendid Demo Mode:SplitsthescreenintotwoforSplendid
modescomparison.(OnlyavailableatSceneryMode,Theater
Mode,GameMode,andNight ViewMode.)
• Volume:Adjuststhespeakerandearphoneoutputvolumelevel.
Theadjustingrangeisfrom0 to 100.
• ECO Mode: Activatetheecologymodeforpowersaving.(Some
graylevelsmaynotbedistinguishedifECOisON.Itsbrightness
islowerthanthatwhensettingtheContrastRatioto100.)
• OSD Setup:
• H-Position / V-Position:Adjuststhehorizontalposition
(H-Position)ortheverticalposition(V-Position)oftheOSD
from0 to 100.
• OSD Timeout:AdjuststheOSDtimeoutfrom10 to 120
seconds.
• DDC/CI:EnablesordisablestheDDC/CIfunction.
• Transparency:AdjuststheOSDbackgroundfromopaqueto
transparent.
• Language:Thereare10languagesforyourselection,including
“English”,“French”,“German”,“Spanish”,“Italian”,“Dutch”,“Russian”,
“Traditional Chinese”,“Simplified Chinese”,and“Japanese”.
• Information:Showsthemonitorinformation.
• All Reset:Select“Yes”torestorethedefaultsettings.
3-6
ASUS VG278HV Series LCD Monitor
3.2 Specications
Panel Type
TFTLCD
Panel Size
27”W(68.6cm)
Color Saturation(NTSC)
72%(sRGB)
True Resolution
1920x1080(upto144Hz)
Full HD 1080P
Yes
Pixel Pitch
0.311mm
Brightness (Typ.)
300cd/m2
Contrast Ratio (Typ.)
1000:1
ASUS Smart Contrast Ratio (ASCR)
50,000,000:1(withASCRon)
Viewing Angle (H/V) CR≧10
170°(H)/160°(V)
Display Colors
16.7M
Response Time
1ms(GraytoGray)
Trace Free Technology
Yes
SPLENDID™ Video Enhancement
Yes
SPLENDID™ Selection
6videopresetmodes(byhotkey)
Skin-Tone Selection
3modes
Color Temperature Selection
4modes
HDCP
Yes
Stereo Speaker
3Wx2stereo,RMS
Auto Adjustment Hotkey
Yes
Brightness Adjustment Hotkey
Yes
Volume Adjustment Hotkey
Yes
Input Selection Hotkey
Yes
PC Input
Dual-linkDVI-D,D-Sub
PC Audio Input
Yes(3.5mmMini-jack)
Video Input
HDMI
AV Audio Input
HDMI
Earphone Jack
Yes(3.5mmMini-jack)
Chassis Colors
Black
Power LED
Blue(On)/Amber(Standby)
Tilt
+15˚~-5˚
Swivel
+150˚~-150˚
Height Adjustment
100mm
VESA Wall Mounting
100x100mm

3-7 Chapter 3: OSD (On-Screen Display) Menu
Kensington Lock
Yes
AC Input Voltage
AC:100~240V
Power Consumption
PowerOn:<29.5 W*
Standby:<1W(Typ.)
PowerOff:<1W
Note
*BasedonEnergyStar6.0standard
Temperature (Operating)
0˚C~+35˚C
Temperature (Non-operating)
-20˚C~+60˚C
Dimension (W x H x D)
643x438x250mm(machine)
711x227x540mm(package)
Weight (Esti.)
8.1kg(Net);11.6kg(Gross)
Regulation approvals
ErP,UL/cUL,CB,CE,FCC,CCC,Gost-R,
C-Tick,VCCI,J-MOSS,PSB,RoHS,WEEE,
Windows7WHQL
3-8
ASUS VG278HV Series LCD Monitor
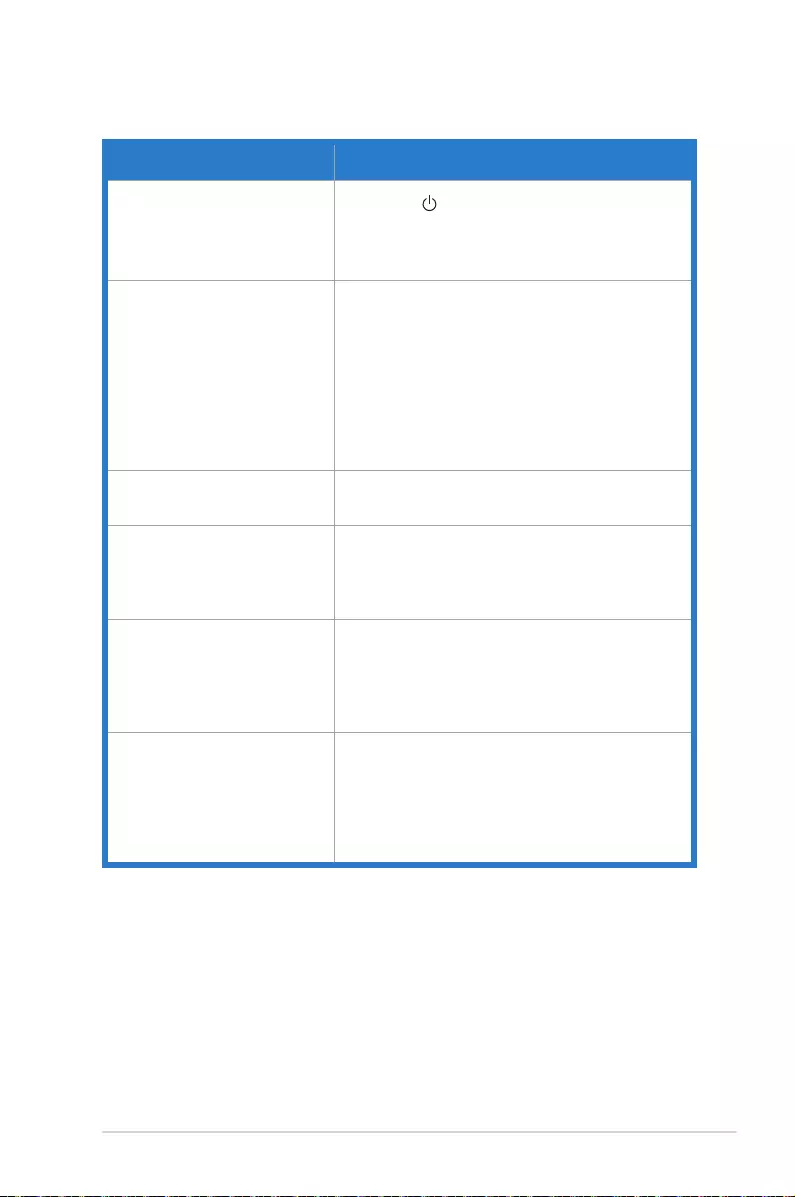
3.3 Troubleshooting (FAQ)
Problem Possible Solution
PowerLEDisnotON • Pressthe buttontocheckifthemonitorisinthe
ONmode.
• Checkifthepowercordisproperlyconnectedto
themonitorandthepoweroutlet.
ThepowerLEDlightsamberand
thereisnoscreenimage
• Checkifthemonitorandthecomputerareinthe
ONmode.
• Makesurethesignalcableisproperlyconnected
themonitorandthecomputer.
• Inspectthesignalcableandmakesurenoneofthe
pinsarebent.
• Connectthecomputerwithanotheravailable
monitortocheckifthecomputerisproperly
working.
Screenimageistoolightordark • AdjusttheContrastandBrightnesssettingsvia
OSD.
Screenimagebouncesorawave
patternispresentintheimage
• Makesurethesignalcableisproperlyconnectedto
themonitorandthecomputer.
• Moveawayelectricaldevicesthatmaycause
electricalinterference.
Screenimagehascolordefects
(whitedoesnotlookwhite)
• Inspectthesignalcableandmakesurethatnoneof
thepinsarebent.
• PerformAllResetviaOSD.
• AdjusttheR/G/BcolorsettingsorselecttheColor
TemperatureviaOSD.
Nosoundorsoundislow • Ensurethattheaudiocableisproperlyconnected
tothemonitorandthecomputer.
• Adjustthevolumesettingsofbothyourmonitorand
computer.
• Ensurethatthecomputersoundcarddriveris
properlyinstalledandactivated.

3-9 Chapter 3: OSD (On-Screen Display) Menu
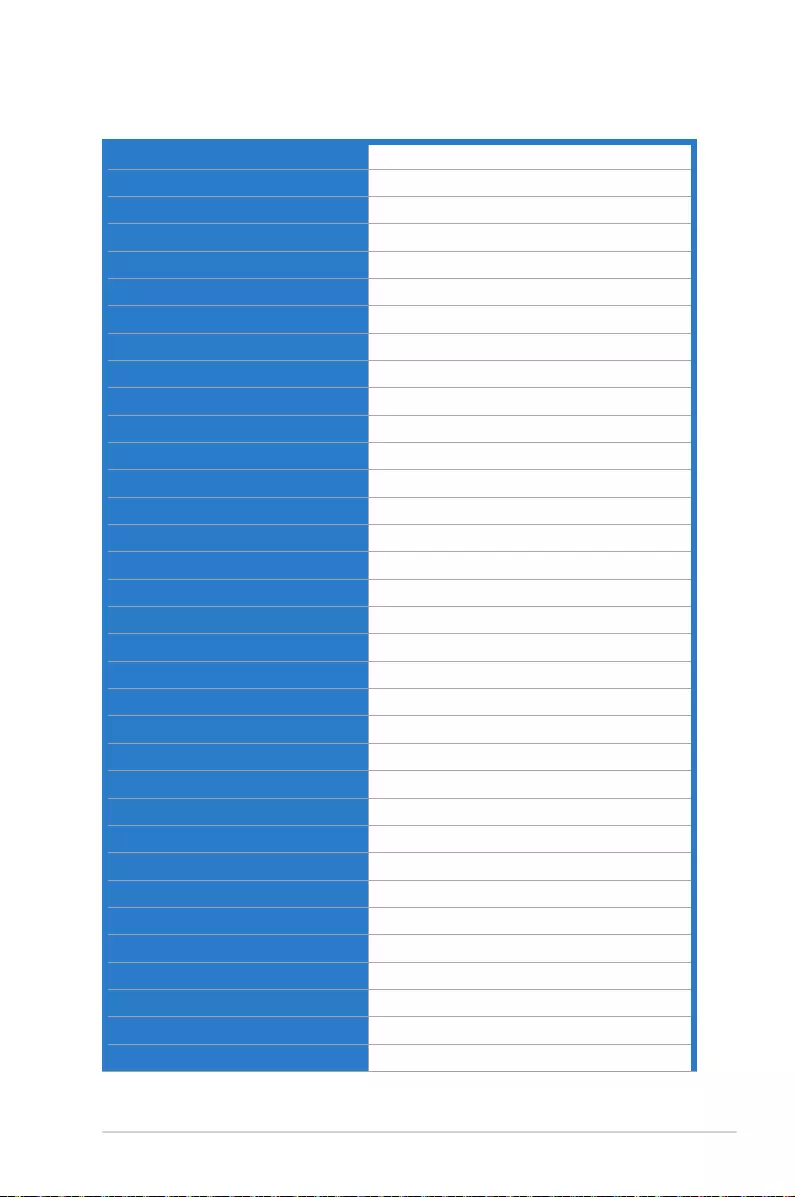
3.4 Supported Timing List
Resolution Refresh Rate Horizontal
640x480 60Hz 31.469KHz
640x480 67Hz 35KHz
640x480 75Hz 37.5KHz
720x400 70Hz 31.469KHz
720x400 85Hz 37.927KHz
800x600 56Hz 35.156KHz
800x600 60Hz 37.879KHz
800x600 72Hz 48.077KHz
800x600 75Hz 46.875KHz
832x624 75Hz 49.725KHz
848x480 60Hz 31.02KHz
1024x768 60Hz 48.363KHz
1024x768 70Hz 56.476KHz
1024x768 75Hz 60.023KHz
1152x864 75Hz 67.5KHz
1280x720 60Hz 44.444KHz
1280x720 60Hz 44.772KHz
1280x720 75Hz 56.456KHz
1280x768 60Hz 47.396KHz
1280x800 60Hz 49.306KHz
1280x800 60Hz 49.702KHz
1280x800 75Hz 62.795KHz
1280x960 60Hz 60KHz
1280x1024 60Hz 63.981KHz
1280x1024 75Hz 79.976KHz
1366x768 60Hz 47.712KHz
1440x900 60Hz 55.469KHz
1440x900 60Hz 55.935KHz
1440x900 75Hz 70.635KHz
1680x1050 60Hz 64.674KHz
1680x1050 60Hz 65.29KHz
1920x1080 60Hz 66.587KHz
1920x1080 60Hz 67.5KHz
3-10
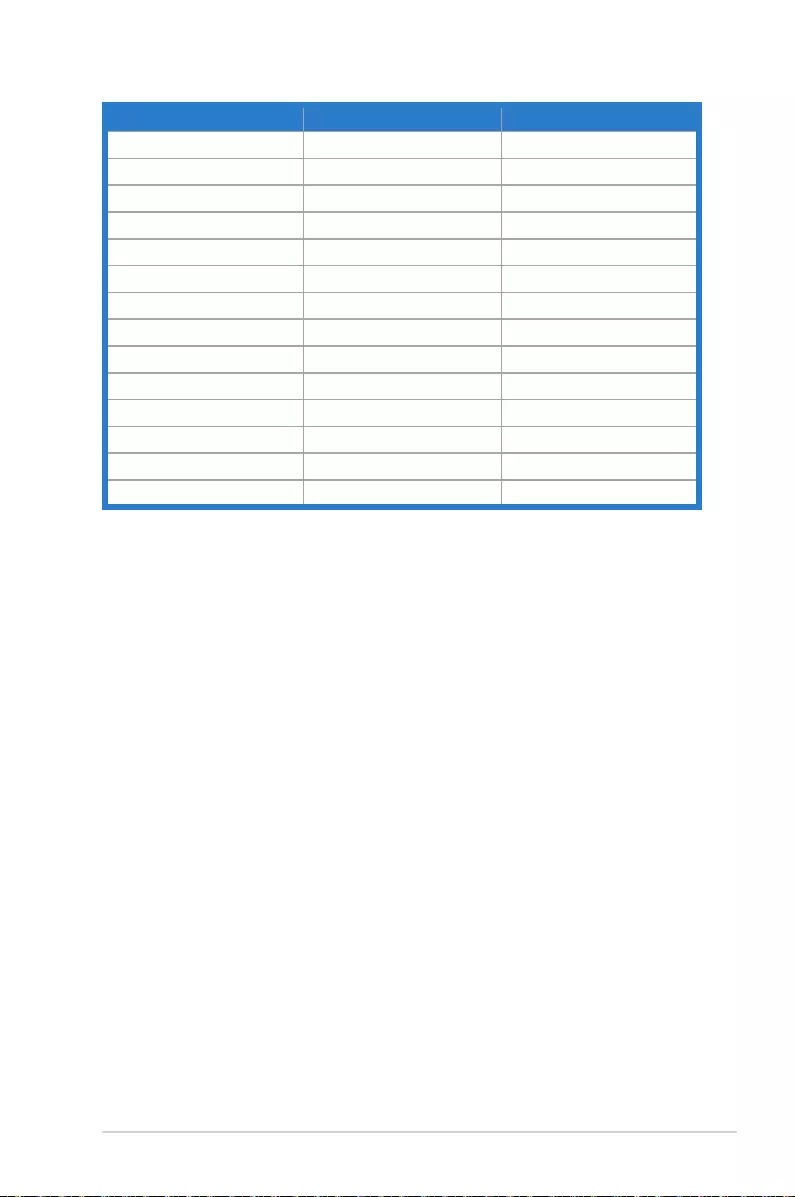
ASUS VG278HV Series LCD Monitor
Resolution Refresh Rate Horizontal
1920x1080(DVI) 144Hz 158.11KHz
1920x1080(DVI) 100Hz 113.3KHz
1920x1080(DVI) 120Hz 137.2KHz
640x480P(HDMI) 59.94/60Hz 31.469KHz/31.5KHz
720x480P(HDMI) 59.94/60Hz 31.469KHz/31.5KHz
720x576P(HDMI) 50Hz 31.25KHz
1280x720P(HDMI) 50Hz 37.5KHz
1280x720P(HDMI) 59.94/60Hz 44.955KHz/45KHz
1440x480P(HDMI) 59.94/60Hz 31.469KHz/31.5KHz
1440x576P(HDMI) 50Hz 31.25KHz
1920x1080i(HDMI) 50Hz 28.125KHz
1920x1080i(HDMI) 59.94/60Hz 33.716KHz/33.75KHz
1920x1080P(HDMI) 50Hz 56.25KHz
1920x1080P(HDMI) 59.94/60Hz 67.433KHz/67.5KHz