Huawei USG9520 AC User Manual
Displayed below is the user manual for USG9520 AC by Huawei which is a product in the Hardware Firewalls category. This manual has pages.
Related Manuals

HUAWEI USG9500 Series
Terabit-level Next-Generation Firewall
Hardware Guide
Issue
01
Date
2017-03-13
HUAWEI TECHNOLOGIES CO., LTD.

Issue 01 (2017-03-13)
Huawei Proprietary and Confidential
Copyright © Huawei Technologies Co., Ltd.
i
Copyright © Huawei Technologies Co., Ltd. 2017. All rights reserved.
No part of this document may be reproduced or transmitted in any form or by any means without prior
written consent of Huawei Technologies Co., Ltd.
Trademarks and Permissions
and other Huawei trademarks are trademarks of Huawei Technologies Co., Ltd.
All other trademarks and trade names mentioned in this document are the property of their respective
holders.
Notice
The purchased products, services and features are stipulated by the contract made between Huawei and
the customer. All or part of the products, services and features described in this document may not be
within the purchase scope or the usage scope. Unless otherwise specified in the contract, all statements,
information, and recommendations in this document are provided "AS IS" without warranties, guarantees or
representations of any kind, either express or implied.
The information in this document is subject to change without notice. Every effort has been made in the
preparation of this document to ensure accuracy of the contents, but all statements, information, and
recommendations in this document do not constitute a warranty of any kind, express or implied.
Huawei Technologies Co., Ltd.
Address:
Huawei Industrial Base
Bantian, Longgang
Shenzhen 518129
People's Republic of China
Website:
http://e.huawei.com

HUAWEI USG9500 Series Terabit-level Next-Generation Firewall
Hardware Guide
About This Document
Issue 01 (2017-03-13)
Huawei Proprietary and Confidential
Copyright © Huawei Technologies Co., Ltd.
ii
About This Document
Related Version
The following table lists the product version related to this document.
Product Name
Version
The USG9500 has the
following models:
USG9520
USG9560
USG9580
V500R001C50
Intended Audience
This document describes hardware structure, installation guide, and hardware maintenance.
The content of this document includes the appearance and specifications of the product, the
supported expansion cards, preparation before the installation, installation, cabling, and
hardware replacement.
This document is intended for installation personnel and administrators who install and
maintain USG. The installation personnel or administrators must have experience in the
installation and maintenance of networking devices.
Symbol Conventions
The symbols that may be found in this document are defined as follows.
Symbol
Description
Indicates an imminently hazardous situation which, if not
avoided, will result in death or serious injury.
Indicates a potentially hazardous situation which, if not
avoided, could result in death or serious injury.

HUAWEI USG9500 Series Terabit-level Next-Generation Firewall
Hardware Guide
About This Document
Issue 01 (2017-03-13)
Huawei Proprietary and Confidential
Copyright © Huawei Technologies Co., Ltd.
iii
Symbol
Description
Indicates a potentially hazardous situation which, if not
avoided, may result in minor or moderate injury.
Indicates a potentially hazardous situation which, if not
avoided, could result in equipment damage, data loss,
performance deterioration, or unanticipated results.
NOTICE is used to address practices not related to personal
injury.
Calls attention to important information, best practices and
tips.
NOTE is used to address information not related to
personal injury, equipment damage, and environment
deterioration.
Command Conventions
The command conventions that may be found in this document are defined as follows.
Convention
Description
Boldface
The keywords of a command line are in boldface.
Italic
Command arguments are in italics.
[ ]
Items (keywords or arguments) in brackets [ ] are optional.
{ x | y | ... }
Optional items are grouped in braces and separated by
vertical bars. One item is selected.
[ x | y | ... ]
Optional items are grouped in brackets and separated by
vertical bars. One item is selected or no item is selected.
{ x | y | ... } *
Optional items are grouped in braces and separated by
vertical bars. A minimum of one item or a maximum of all
items can be selected.
[ x | y | ... ] *
Optional items are grouped in brackets and separated by
vertical bars. Several items or no item can be selected.
&<1-n>
The parameter before the & sign can be repeated 1 to n
times.
#
A line starting with the # sign is comments.

HUAWEI USG9500 Series Terabit-level Next-Generation Firewall
Hardware Guide
About This Document
Issue 01 (2017-03-13)
Huawei Proprietary and Confidential
Copyright © Huawei Technologies Co., Ltd.
iv
GUI Conventions
The GUI conventions that may be found in this document are defined as follows.
Convention
Description
Boldface
Buttons, menus, parameters, tabs, window, and dialog titles
are in boldface. For example, click OK.
>
Multi-level menus are in boldface and separated by the ">"
signs. For example, choose File > Create > Folder.
Update History
Updates between document issues are cumulative. Therefore, the latest document issue
contains all updates made in previous issues.
Updates in Issue 01 (2017-03-13)
Initial commercial release.

HUAWEI USG9500 Series Terabit-level Next-Generation Firewall
Hardware Guide
Contents
Issue 01 (2017-03-13)
Huawei Proprietary and Confidential
Copyright © Huawei Technologies Co., Ltd.
v
Contents
About This Document .................................................................................................................... ii
1 Hardware Overview ..................................................................................................................... 1
1.1 USG9580 ...................................................................................................................................................................... 1
1.1.1 Device Overview ....................................................................................................................................................... 1
1.1.2 Components of the USG9580 .................................................................................................................................... 3
1.1.3 Slots Layout and Supported Boards ........................................................................................................................... 6
1.1.4 Power Supply System .............................................................................................................................................. 10
1.1.4.1 Features and Distributed Architecture of the Power Supply System .................................................................... 10
1.1.4.2 DC Power Supply System ..................................................................................................................................... 11
1.1.4.3 AC Power Supply System ..................................................................................................................................... 15
1.1.5 Heat Dissipation System .......................................................................................................................................... 19
1.1.5.1 System Air Channel .............................................................................................................................................. 19
1.1.5.2 Fan Module ........................................................................................................................................................... 20
1.1.5.3 Air Filter ............................................................................................................................................................... 22
1.1.6 Switch Fabric ........................................................................................................................................................... 23
1.1.7 Control Plane ........................................................................................................................................................... 24
1.1.8 Technical Specifications .......................................................................................................................................... 25
1.2 USG9560 .................................................................................................................................................................... 28
1.2.1 Device Overview ..................................................................................................................................................... 28
1.2.2 Components of the USG9560 .................................................................................................................................. 30
1.2.3 Slots Layout and Supported Boards ......................................................................................................................... 32
1.2.4 Power Supply System .............................................................................................................................................. 35
1.2.4.1 Features and Distributed Architecture of the Power Supply System .................................................................... 35
1.2.4.2 DC Power Supply System ..................................................................................................................................... 36
1.2.4.3 AC Power Supply System ..................................................................................................................................... 38
1.2.5 Heat Dissipation System .......................................................................................................................................... 42
1.2.5.1 System Air Channel .............................................................................................................................................. 42
1.2.5.2 Fan Module ........................................................................................................................................................... 43
1.2.5.3 Air Filter ............................................................................................................................................................... 45
1.2.6 Switch Frabric .......................................................................................................................................................... 45
1.2.7 Control Plane ........................................................................................................................................................... 47
1.2.8 Technical Specifications .......................................................................................................................................... 48

HUAWEI USG9500 Series Terabit-level Next-Generation Firewall
Hardware Guide
Contents
Issue 01 (2017-03-13)
Huawei Proprietary and Confidential
Copyright © Huawei Technologies Co., Ltd.
vi
1.3 USG9520 .................................................................................................................................................................... 50
1.3.1 Device Overview ..................................................................................................................................................... 50
1.3.2 Components of the USG9520 .................................................................................................................................. 51
1.3.3 Slots Layout and Supported Boards ......................................................................................................................... 54
1.3.4 Power Supply System .............................................................................................................................................. 57
1.3.4.1 Features of the Power Supply System................................................................................................................... 57
1.3.4.2 DC Power Supply System ..................................................................................................................................... 58
1.3.4.3 AC Power Supply System ..................................................................................................................................... 59
1.3.5 Heat Dissipation System .......................................................................................................................................... 63
1.3.5.1 System Air Channel .............................................................................................................................................. 63
1.3.5.2 Fan Module ........................................................................................................................................................... 64
1.3.5.3 Air Filter ............................................................................................................................................................... 66
1.3.6 Control Plane ........................................................................................................................................................... 67
1.3.7 Technical Specifications .......................................................................................................................................... 68
1.4 Boards ......................................................................................................................................................................... 70
1.4.1 Board Overview ....................................................................................................................................................... 70
1.4.1.1 Types and Mappings of Boards ............................................................................................................................. 70
1.4.1.2 Board Structure ..................................................................................................................................................... 88
1.4.1.3 Rules for Numbering Slots and Interfaces ............................................................................................................ 89
1.4.2 MPUs and SRUs ...................................................................................................................................................... 92
1.4.2.1 EKEX16-FWCD00MPUB00 ................................................................................................................................ 92
1.4.2.2 E8KE-X8-SRUA-200 ........................................................................................................................................... 95
1.4.2.3 E8KE-X3-MPU .................................................................................................................................................... 99
1.4.2.4 MPUD ................................................................................................................................................................. 102
1.4.3 SFUs ...................................................................................................................................................................... 105
1.4.3.1 E8KE-X16-SFUC-200SP ................................................................................................................................... 105
1.4.3.2 E8KE-X8-SFUC-200 .......................................................................................................................................... 107
1.4.4 SPUs and SPCs ...................................................................................................................................................... 108
1.4.4.1 X3 SPU (SPU-X3-B) .......................................................................................................................................... 108
1.4.4.2 X3 SPU (SPU-X3-B2) ........................................................................................................................................ 109
1.4.4.3 X8&X16 SPU (SPU-X8X16-B) ......................................................................................................................... 111
1.4.4.4 Firewall Service Processing Unit (SPU-X3-20-O-E8KE, for USG9520) ........................................................... 112
1.4.4.5 Firewall Service Processing Unit (SPUA-20-O-M, for USG9520) .................................................................... 114
1.4.4.6 Firewall Service Processing Unit (SPUB-20-O-M, for USG9520) .................................................................... 115
1.4.4.7 Firewall Service Processing Unit (SPU-X8X16-20-O-E8KE, for USG9560/USG9580) ................................... 117
1.4.4.8 Firewall Service Processing Unit (SPUA-20-O-H, for USG9560/USG9580) .................................................... 118
1.4.4.9 Firewall Service Processing Unit (SPUB-20-O-H, for USG9560/USG9580) .................................................... 120
1.4.4.10 Firewall Performance Expansion Card (SPC-20-O-E8KE) .............................................................................. 122
1.4.4.11 Firewall Performance Expansion Card (SPCA-20-O-H&M) ........................................................................... 123
1.4.4.12 Firewall Performance Expansion Card (SPCB-20-O-H&M) ............................................................................ 124
1.4.4.13 Application Security Service Processing Card (SPC-APPSEC-FW) ................................................................ 125
1.4.4.14 Application Security Service Processing Card (SPC-IPS-20) ........................................................................... 127

HUAWEI USG9500 Series Terabit-level Next-Generation Firewall
Hardware Guide
Contents
Issue 01 (2017-03-13)
Huawei Proprietary and Confidential
Copyright © Huawei Technologies Co., Ltd.
vii
1.4.5 LPUF-240 and FPICs ............................................................................................................................................ 128
1.4.5.1 LPUF-240 ........................................................................................................................................................... 128
1.4.5.2 20-Port 10/100/1000Base-RJ45 FPIC (FW-20X1G-RJ45) ................................................................................. 130
1.4.5.3 24-Port 100/1000 Base-X-SFP FPIC (E8KE-X-101-24XGE-SFP) .................................................................... 131
1.4.5.4 5-Port 10GBase LAN/WAN-SFP+ FPIC A (E8KE-X-101-5X10GE-SFP+) ...................................................... 133
1.4.5.5 6*10GE SFP+ Daughter Card (FW-6X10GE-SFP+) .......................................................................................... 134
1.4.5.6 12*10GE SFP+ Daughter Card (FW-12X10GE-SFP+) ...................................................................................... 135
1.4.5.7 3-Port 40GBase QSFP+ FPIC (FW-3X40G-QSFP+) ......................................................................................... 137
1.4.5.8 1-Port 40GBase LAN-CFP FPIC A (E8KE-X-101-1X40GE-CFP) .................................................................... 138
1.4.5.9 1*100GE CFP Daughter Card (FW-1X100GE-CFP) ......................................................................................... 140
1.4.6 LPUF-120 and FPICs ............................................................................................................................................ 141
1.4.6.1 LPUF-120 ........................................................................................................................................................... 141
1.4.6.2 20-Port 10/100/1000Base-RJ45 FPIC (FW-20X1G-RJ45) ................................................................................. 143
1.4.6.3 24-Port 100/1000 Base-X-SFP FPIC (E8KE-X-101-24XGE-SFP) .................................................................... 144
1.4.6.4 5-Port 10GBase LAN/WAN-SFP+ FPIC A (E8KE-X-101-5X10GE-SFP+) ...................................................... 146
1.4.6.5 6*10GE SFP+ Daughter Card (FW-6X10GE-SFP+) .......................................................................................... 147
1.4.6.6 12*10GE SFP+ Daughter Card (FW-12X10GE-SFP+) ...................................................................................... 148
1.4.6.7 3-Port 40GBase QSFP+ FPIC (FW-3X40G-QSFP+) ......................................................................................... 150
1.4.6.8 1-Port 40GBase LAN-CFP FPIC A (E8KE-X-101-1X40GE-CFP) .................................................................... 151
1.4.6.9 1*100GE CFP Daughter Card (FW-1X100GE-CFP) ......................................................................................... 153
1.4.7 LPUF-101 and FPICs ............................................................................................................................................ 154
1.4.7.1 LPUF-101 ........................................................................................................................................................... 154
1.4.7.2 24-Port 100/1000 Base-X-SFP FPIC (E8KE-X-101-24XGE-SFP) .................................................................... 156
1.4.7.3 4-Port 10G Base LAN -SFP+ FPIC (E8KE-X-101-4X10GE-SFP+) .................................................................. 157
1.4.7.4 5-Port 10GBase LAN/WAN-SFP+ FPIC A (E8KE-X-101-5X10GE-SFP+) ...................................................... 159
1.4.7.5 1-Port 40GBase LAN-CFP FPIC A (E8KE-X-101-1X40GE-CFP) .................................................................... 160
1.4.8 LPUF-40-A and FPIC ............................................................................................................................................ 162
1.4.8.1 LPUF-40-A ......................................................................................................................................................... 162
1.4.8.2 20-Port 100/1000Base-X-SFP Flexible Card (P40-20xGE/FE-SFP) .................................................................. 163
1.4.8.3 2-Port 10GBase LAN/WAN-XFP Flexible Card (P40-2x10GBase LAN/WAN-XFP) ....................................... 165
1.4.8.4 4-port 10GBase LAN/WAN-XFP FPIC (P40-4x10GBase LAN/WAN-XFP) .................................................... 166
1.4.9 LPUF-21 and FPIC ................................................................................................................................................ 168
1.4.9.1 LPUF-21 ............................................................................................................................................................. 168
1.4.9.2 12-port 10Base-T/100Base-TX/1000Base-T-RJ45 FPIC (12x10/100/1000Base-TX-RJ45) .............................. 169
1.4.9.3 12-port 100Base-FX/1000Base-X-SFP FPIC (12x100/1000Base-SFP) ............................................................. 171
1.4.9.4 1-port OC-192c/STM-64c POS-XFP FPIC (1 x OC-192c/STM-64c POS-XFP) ............................................... 172
1.4.9.5 1-port 10GBase LAN/WAN-XFP FPIC (1 x 10GBase LAN/WAN) .................................................................. 174
1.4.9.6 4-Port 10GBase WAN/LAN-XFP FPIC (4x10GBase LAN/WAN) .................................................................... 175
1.4.10 1-Port 100GBase-CFP Integrated Line Processing Unit (LPUI-101) .................................................................. 177
1.5 Optical/Electrical Module ......................................................................................................................................... 178
1.5.1 1 Gbit/s Electrical Transceiver ............................................................................................................................... 178
1.5.2 1.25 Gbit/s SFP/eSFP Optical Module................................................................................................................... 180

HUAWEI USG9500 Series Terabit-level Next-Generation Firewall
Hardware Guide
Contents
Issue 01 (2017-03-13)
Huawei Proprietary and Confidential
Copyright © Huawei Technologies Co., Ltd.
viii
1.5.3 10 Gbit/s XFP Optical Module .............................................................................................................................. 185
1.5.4 10 Gbit/s SFP+ Optical Module ............................................................................................................................. 191
1.5.5 40 Gbit/s CFP Optical Modules ............................................................................................................................. 196
1.5.6 40 Gbit/s QSFP+ Optical Module .......................................................................................................................... 199
1.5.7 100 Gbit/s CFP Optical Modules ........................................................................................................................... 203
2 Hardware Installation .............................................................................................................. 207
2.1 Installation Preparation ............................................................................................................................................. 207
2.1.1 Preparing Technical Documents ............................................................................................................................ 207
2.1.2 Preparing Tools and Meters ................................................................................................................................... 208
2.1.3 Checking the Installation Environment ................................................................................................................. 209
2.1.4 Unpacking and Checking the Products .................................................................................................................. 210
2.1.4.1 Checking the Package Container ........................................................................................................................ 210
2.1.4.2 Unpacking the Wooden Case .............................................................................................................................. 211
2.1.4.3 Unpacking the Carton ......................................................................................................................................... 215
2.1.4.4 Checking the Boards ........................................................................................................................................... 216
2.2 Installing USG9580 .................................................................................................................................................. 217
2.2.1 Preparing the Site ................................................................................................................................................... 217
2.2.2 Installing the Chassis into the Cabinet ................................................................................................................... 218
2.2.3 Installing the PGND Cable .................................................................................................................................... 222
2.2.4 Installing Boards and Subcards .............................................................................................................................. 223
2.2.5 Installing Chassis Components .............................................................................................................................. 226
2.2.6 Installing Power Cables-DC Power Distribution ................................................................................................... 228
2.2.7 Installing Power Cables-AC Power Distribution ................................................................................................... 231
2.2.8 Connecting Network Cables .................................................................................................................................. 234
2.2.9 Connecting Optical Fibers ..................................................................................................................................... 237
2.2.10 Checking After Installation .................................................................................................................................. 240
2.2.11 Powering On the USG9580-DC Power Distribution ........................................................................................... 241
2.2.12 Powering On the USG9580-AC Power Distribution ........................................................................................... 244
2.3 Installing USG9560 .................................................................................................................................................. 248
2.3.1 Preparing the Site ................................................................................................................................................... 248
2.3.2 Installing the Chassis into the Cabinet ................................................................................................................... 250
2.3.3 Installing the PGND Cable .................................................................................................................................... 254
2.3.4 Installing Boards and Subcards .............................................................................................................................. 255
2.3.5 Installing Chassis Components .............................................................................................................................. 257
2.3.6 Installing Power Cables-DC Power Distribution ................................................................................................... 259
2.3.7 Installing Power Cables-AC Power Distribution ................................................................................................... 262
2.3.8 Connecting Network Cables .................................................................................................................................. 265
2.3.9 Connecting Optical Fibers ..................................................................................................................................... 267
2.3.10 Checking After Installation .................................................................................................................................. 270
2.3.11 Powering On the USG9560-DC Power Distribution ........................................................................................... 271
2.3.12 Powering On the USG9560-AC Power Distribution ........................................................................................... 274

HUAWEI USG9500 Series Terabit-level Next-Generation Firewall
Hardware Guide
Contents
Issue 01 (2017-03-13)
Huawei Proprietary and Confidential
Copyright © Huawei Technologies Co., Ltd.
ix
2.4 Installing USG9520 .................................................................................................................................................. 277
2.4.1 Preparing the Site ................................................................................................................................................... 277
2.4.2 Installing Cable Racks and Mounting Ears ............................................................................................................ 279
2.4.3 Installing the Chassis into the Cabinet ................................................................................................................... 280
2.4.4 Installing the PGND Cable .................................................................................................................................... 282
2.4.5 Installing Boards and Subcards .............................................................................................................................. 283
2.4.6 Installing Power Cables-DC Power Distribution ................................................................................................... 285
2.4.7 Installing Power Cables-AC Power Distribution ................................................................................................... 288
2.4.8 Connecting Network Cables .................................................................................................................................. 291
2.4.9 Connecting Optical Fibers ..................................................................................................................................... 293
2.4.10 Checking After Installation .................................................................................................................................. 295
2.4.11 Powering On the USG9520-DC Power Distribution ........................................................................................... 297
2.4.12 Powering On the USG9520-AC Power Distribution ........................................................................................... 299
2.5 Guide to Power Distribution Design ......................................................................................................................... 302
2.5.1 Guide to Power Distribution Design of the USG9580 ........................................................................................... 302
2.5.1.1 Guide to the DC Power Distribution ................................................................................................................... 302
2.5.1.2 Guide to the AC Power Distribution ................................................................................................................... 304
2.5.2 Guide to Power Distribution Design of the USG9560 ........................................................................................... 306
2.5.2.1 Guide to the DC Power Distribution ................................................................................................................... 306
2.5.2.2 Guide to the AC Power Distribution ................................................................................................................... 309
2.5.3 Guide to Power Distribution Design of the USG9520 ........................................................................................... 310
2.5.3.1 Guide to the DC Power Distribution ................................................................................................................... 310
2.5.3.2 Guide to the AC Power Distribution ................................................................................................................... 312
3 Hardware Maintenance ............................................................................................................ 314
3.1 Replacing Boards ...................................................................................................................................................... 314
3.1.1 Replacing an MPU/SRU ........................................................................................................................................ 314
3.1.2 Replacing an SFU .................................................................................................................................................. 318
3.1.3 Replacing an LPU .................................................................................................................................................. 322
3.1.4 Replacing an FPIC of the LPU .............................................................................................................................. 326
3.1.5 Replacing an SPU .................................................................................................................................................. 329
3.1.6 Replacing the SPC of the SPU ............................................................................................................................... 333
3.2 Expanding SPU Capacities ....................................................................................................................................... 336
3.2.1 Expanding SPU Capacities for the Active and Standby FWs in Hot Standby Scenarios (for V500R001C50 and
Later Versions) ................................................................................................................................................................ 336
3.2.2 Expanding SPC Capacities for the Active and Standby FWs in Hot Standby Scenarios (for V500R001C50 and
Later Versions) ................................................................................................................................................................ 342
3.3 Replacing a Fan Frame ............................................................................................................................................. 348
3.3.1 Replacing the Fan Module of the USG9580 .......................................................................................................... 348
3.3.2 Replacing the Fan Module of the USG9560 .......................................................................................................... 350
3.3.3 Replacing the Fan Frame of the USG9520 ............................................................................................................ 353
3.4 Replacing a Power Module ....................................................................................................................................... 356
3.4.1 Replacing the DC PEM of the USG9580............................................................................................................... 356

HUAWEI USG9500 Series Terabit-level Next-Generation Firewall
Hardware Guide
Contents
Issue 01 (2017-03-13)
Huawei Proprietary and Confidential
Copyright © Huawei Technologies Co., Ltd.
x
3.4.2 Replacing the DC PEM of the USG9560............................................................................................................... 360
3.4.3 Replacing a DC Power Module of USG9520 ........................................................................................................ 363
3.4.4 Replacing an AC Power Module of USG9520 ...................................................................................................... 367
3.5 Replacing a CF Card ................................................................................................................................................. 372
3.5.1 Replacing CF Card 1 ............................................................................................................................................. 372
3.5.2 Replacing CF Card 2 ............................................................................................................................................. 374
3.6 Replacing an Optical Module ................................................................................................................................... 377
3.7 Replacing an Air Filter .............................................................................................................................................. 381
3.7.1 Replacing the Air Filter of the USG9580............................................................................................................... 381
3.7.2 Replacing the Air Filter of the USG9560............................................................................................................... 384
3.7.3 Replacing the Air Filter of the USG9520............................................................................................................... 386
3.8 Replacing Cables ...................................................................................................................................................... 388
3.8.1 Replacing a Power Cable ....................................................................................................................................... 388
3.8.2 Replacing a Network Cable ................................................................................................................................... 389
3.8.3 Replacing an Optical Cable ................................................................................................................................... 391
A Appendix ................................................................................................................................... 393
A.1 Cable ........................................................................................................................................................................ 393
A.1.1 DC Power Cable ................................................................................................................................................... 393
A.1.1.1 DC Power Cable of the USG9580 ..................................................................................................................... 393
A.1.1.2 DC Power Cable of the USG9560 ..................................................................................................................... 397
A.1.1.3 DC Power Cable of the USG9520 ..................................................................................................................... 401
A.1.2 AC Power Cable .................................................................................................................................................... 403
A.1.2.1 AC Power Cable of the USG9580 ...................................................................................................................... 403
A.1.2.2 AC Power Cable of the USG9560 ...................................................................................................................... 405
A.1.2.3 AC Power Cable of the USG9520 ...................................................................................................................... 406
A.1.3 PGND Cable ......................................................................................................................................................... 408
A.1.4 Console Cable ....................................................................................................................................................... 410
A.1.5 Auxiliary Port Cable ............................................................................................................................................. 411
A.1.6 Ethernet Cable....................................................................................................................................................... 413
A.1.7 Optical Fiber ......................................................................................................................................................... 418
A.2 On-site Cable Assembly and Installation ................................................................................................................. 421
A.2.1 Cable Assembling Precautions .............................................................................................................................. 421
A.2.2 Assembling Power Cables ..................................................................................................................................... 422
A.2.2.1 Assembling the OT Terminal and the Power Cable ........................................................................................... 422
A.2.2.2 Assembling the JG Terminal and the Power Cable ............................................................................................ 425
A.2.2.3 Assembling the Cord End Terminal and the Power Cable ................................................................................. 428
A.2.3 Assembling Ethernet Cables ................................................................................................................................. 431
A.2.3.1 Assembling the Shielded RJ45 Connector and the Ethernet Cable .................................................................... 431
A.2.3.2 Assembling the Unshielded RJ45 Connector and the Ethernet Cable ................................................................ 437
A.2.3.3 Checking the Appearance of Metal Contact Strips ............................................................................................ 439
A.2.3.4 Testing the Connection of Assembled Cables .................................................................................................... 442

HUAWEI USG9500 Series Terabit-level Next-Generation Firewall
Hardware Guide
Contents
Issue 01 (2017-03-13)
Huawei Proprietary and Confidential
Copyright © Huawei Technologies Co., Ltd.
xi
A.3 Environmental Requirements for Device Running .................................................................................................. 445
A.3.1 Requirements for Selecting a Site for an Equipment Room ................................................................................. 445
A.3.2 Equipment Room Layout ...................................................................................................................................... 446
A.3.3 Construction Requirements for the Equipment Room .......................................................................................... 446
A.3.4 Requirements for Temperature, Humidity, and Altitude ....................................................................................... 448
A.3.5 Requirements for Neatness ................................................................................................................................... 448
A.3.6 Requirements for Corrosive Gases ....................................................................................................................... 449
A.3.7 Requirements for ESD Prevention ........................................................................................................................ 450
A.3.8 Electromagnetism Requirements for the Equipment Room .................................................................................. 450
A.3.9 Requirements for Lightning Proof Grounding ...................................................................................................... 450
A.3.10 Requirements for Power Supply ......................................................................................................................... 452
A.4 Equipment Grounding Specifications ...................................................................................................................... 455
A.4.1 General Grounding Specifications ........................................................................................................................ 455
A.4.2 Grounding Specifications for an Equipment Room .............................................................................................. 455
A.4.3 Grounding Specifications for the Device .............................................................................................................. 456
A.4.4 Grounding Specifications for Communications Power Supply ............................................................................ 456
A.4.5 Grounding Specifications for Signal Cables ......................................................................................................... 457
A.4.6 Specifications for Laying Out Grounding Cables ................................................................................................. 458
A.5 Engineering Labels for Cables ................................................................................................................................. 458
A.5.1 Introduction to Labels ........................................................................................................................................... 459
A.5.1.1 Label Materials .................................................................................................................................................. 459
A.5.1.2 Type and Structure ............................................................................................................................................. 459
A.5.1.3 Label Printing .................................................................................................................................................... 461
A.5.1.4 Writing Labels .................................................................................................................................................... 463
A.5.1.5 Affixing Labels .................................................................................................................................................. 464
A.5.1.6 Contents of Engineering Labels ......................................................................................................................... 466
A.5.1.7 Precautions for Using Engineering Labels ......................................................................................................... 467
A.5.2 Engineering Labels for Optical Fibers .................................................................................................................. 467
A.5.2.1 Labels for the Optical Fibers Connecting Devices ............................................................................................. 467
A.5.2.2 Labels for the Optical Fibers Connecting the Device and an ODF .................................................................... 469
A.5.3 Engineering Labels for Network Cables ............................................................................................................... 470
A.5.4 Engineering Labels for Trunk Cables ................................................................................................................... 472
A.5.4.1 Engineering Labels for Trunk Cables Between Devices .................................................................................... 472
A.5.4.2 Engineering Labels for Trunk Cables Between the Device and a DDF ............................................................. 474
A.5.5 Engineering Labels for User Cables ..................................................................................................................... 475
A.5.6 Engineering Labels for Power Cables ................................................................................................................... 476
A.5.6.1 Engineering Labels for DC Power Cables ......................................................................................................... 476
A.5.6.2 Engineering Labels for AC Power Cables ......................................................................................................... 478
A.6 Requirements on Customers' Cabinets Purchased from Other Vendors ................................................................... 479

HUAWEI USG9500 Series Terabit-level Next-Generation Firewall
Hardware Guide
Contents
Issue 01 (2017-03-13)
Huawei Proprietary and Confidential
Copyright © Huawei Technologies Co., Ltd.
1
1 Hardware Overview
1.1 USG9580
The USG9580 is a 32 U device. It employs an integrated chassis and provides 16 LPU/SPU
slots. Its MPUs, SFUs, power modules, and fans work in redundancy mode.
1.1.1 Device Overview
This section describes the appearance and hardware system features of the USG9580.
Appearance
The USG9580 has an integrated chassis, and adopts a centralized routing engine and a
distributed forwarding architecture.
Figure 1-1 shows the chassis of the USG9580.

HUAWEI USG9500 Series Terabit-level Next-Generation Firewall
Hardware Guide
Contents
Issue 01 (2017-03-13)
Huawei Proprietary and Confidential
Copyright © Huawei Technologies Co., Ltd.
2
Figure 1-1 Appearance of the chassis
System Features
The USG9580 provides the following system features:
Unblocked switching network that can be upgraded, with switching capacity at the Tbit/s
level
Distributed hardware-based forwarding and fast service deployment
Compact structure to increase interface density
Normalized design of system components
Separation of the control channel, service channel, and monitoring channel to ensure
non-blacking control channels and monitoring channels
Carrier-class high reliability and manageability

HUAWEI USG9500 Series Terabit-level Next-Generation Firewall
Hardware Guide
Contents
Issue 01 (2017-03-13)
Huawei Proprietary and Confidential
Copyright © Huawei Technologies Co., Ltd.
3
Shielding at the modular level to meet Electro Magnetic Compatibility (EMC)
requirements
Hot-swappable boards, power modules, and fans
U-shaped air channels to improve system heat dissipation
Distributed power supply to enhance power supply capability for a single chassis
200-mm fans with a power filter module
MPUs in 1:1 backup mode
SFUs in load balancing mode
Backup for key components such as power modules, fan modules, clocks, and
management buses
Protection against incorrect of boards
Queries about alarm prompts, alarm indications, running status, and alarm status of the
voltage and ambient temperature
1.1.2 Components of the USG9580
The section describes main components on the front and rear panels of the USG9580.
The USG9580 has an integrated chassis, Figure 1-2 and Figure 1-3 show the architecture and
main components of the USG9580.

HUAWEI USG9500 Series Terabit-level Next-Generation Firewall
Hardware Guide
Contents
Issue 01 (2017-03-13)
Huawei Proprietary and Confidential
Copyright © Huawei Technologies Co., Ltd.
4
Front Panel
Figure 1-2 USG9580 Front Panel
No.
Name
Description
1
Air filter
The USG9580 has three air filters that are deployed on the air intake
vents of the upper and lower air channels and air intake vent at the left
side of the SFU area to protect the device against dust.
2
MPU
The Main Processing Unit (MPU) on the USG9580 is in charge of
system control and route information learning. It is the central control
unit of the device. The USG9580 MPU uses the 1:1 backup
mechanism. When the active MPU is faulty, the standby MPU
immediately takes over the work. The backup mechanism ensures the
proper running of services.
3
LPU/SPU
slot
It holds an LPU or SPU.
4
SFU
The SFUs of the USG9580 are responsible for data switching of the
entire system. The USG9580 has four SFUs that work in 3+1 backup

HUAWEI USG9500 Series Terabit-level Next-Generation Firewall
Hardware Guide
Contents
Issue 01 (2017-03-13)
Huawei Proprietary and Confidential
Copyright © Huawei Technologies Co., Ltd.
5
No.
Name
Description
mode for load balancing.
5
ESD jack
The equipment end of the wrist strap is inserted into the ESD jack. For
the wrist strap to be effective, ensure that the device is already
grounded.
6
Front
cable rack
It is used to deploy optical fibers and cables. The front cable rack is
divided into the upper and lower racks. The logo of the upper cable
rack is "HUAWEI", the logo of the lower cable rack is "USG9500
Series".
Rear Panel
Figure 1-3 USG9580 Rear Panel
No.
Name
Description
1
Fan
The USG9580 has four fan modules, each two arranged side by side.

HUAWEI USG9500 Series Terabit-level Next-Generation Firewall
Hardware Guide
Contents
Issue 01 (2017-03-13)
Huawei Proprietary and Confidential
Copyright © Huawei Technologies Co., Ltd.
6
No.
Name
Description
module
The fan modules are deployed on the air exhaust vents of the upper
and lower air channels respectively and work in 2+2 backup mode.
2
PEM
module
The USG9580 uses eight PEM power modules for DC power supply.
The USG9580 backplane is divided into four areas, each of which has
two PEM power inputs. These eight power inputs work in 4+4 backup
mode.
If the USG9580 uses the AC power supply, two additional external AC
power chassises are required.
3
Rear cable
rack
It is used to deploy optical fibers and cables. There are four rear cable
racks on the upper parts of the power modules.
4
Power
supply
areas
Power supply areas of the eight PEM power modules on the USG9580.
5
Protective
ground
terminal
The OT terminal of the ground cable is connected to the protective
ground terminal of the device, and the other terminal of the ground
cable is connected to the ground point of the cabinet or workbench or
the ground bar of the equipment room.
1.1.3 Slots Layout and Supported Boards
This section describes the layout of slots and supported boards on the USG9580.
Slots Layout
Figure 1-4shows the slot layout on the USG9580.

HUAWEI USG9500 Series Terabit-level Next-Generation Firewall
Hardware Guide
Contents
Issue 01 (2017-03-13)
Huawei Proprietary and Confidential
Copyright © Huawei Technologies Co., Ltd.
7
Figure 1-4 Slot layout on the USG9580
Table 1-1 describes the slot layout on the USG9580.
Table 1-1 Table 1 Board distribution in the board cage of the USG9580
Slot
Name
Slot
Number
Quant
ity
Slot Height
Remarks
LPU/SPU
1 to 16
16
41 mm (1.6
inches)
These slots are used to hold LPUs
or SPUs.
MPU
17 to 18
2
41 mm (1.6
inches)
These slots hold MPUs that work
in 1:1 backup mode.
SFU
19 to 22
4
41 mm (1.6
inches)
These slots are used to hold SFUs.
Supported Boards
Table 1-2 lists the specifications of boards supported by the USG9580.
Table 1-2 Supported boards by the USG9580
Type
BOM
Description
Hot
Swap
MPU
0305G06U
1.4.2.1 EKEX16-FWCD00MPUB00
Yes
SFU
0305G08Q
1.4.3.1 E8KE-X16-SFUC-200SP
Yes
SPUs and SPCs
03056638
1.4.4.3 X8&X16 SPU (SPU-X8X16-B)
Yes

HUAWEI USG9500 Series Terabit-level Next-Generation Firewall
Hardware Guide
Contents
Issue 01 (2017-03-13)
Huawei Proprietary and Confidential
Copyright © Huawei Technologies Co., Ltd.
8
Type
BOM
Description
Hot
Swap
0305G09U
1.4.4.7 Firewall Service Processing Unit
(SPU-X8X16-20-O-E8KE, for
USG9560/USG9580)
Yes
03057426
1.4.4.8 Firewall Service Processing Unit
(SPUA-20-O-H, for USG9560/USG9580)
Yes
03057520
1.4.4.9 Firewall Service Processing Unit
(SPUB-20-O-H, for USG9560/USG9580)
Yes
0305G09V
1.4.4.10 Firewall Performance Expansion
Card (SPC-20-O-E8KE)
Yes
03057429
1.4.4.11 Firewall Performance Expansion
Card (SPCA-20-O-H&M)
Yes
03057522
1.4.4.12 Firewall Performance Expansion
Card (SPCB-20-O-H&M)
Yes
03056688
1.4.4.13 Application Security Service
Processing Card (SPC-APPSEC-FW)
Yes
03056639
1.4.4.14 Application Security Service
Processing Card (SPC-IPS-20)
Yes
LPUF-240 and
FPIC
03056683
1.4.5.1 LPUF-240
Yes
03056890
1.4.5.2 20-Port 10/100/1000Base-RJ45
FPIC (FW-20X1G-RJ45)
No
03056633
1.4.5.3 24-Port 100/1000 Base-X-SFP
FPIC (E8KE-X-101-24XGE-SFP)
No
03056632
1.4.5.4 5-Port 10GBase LAN/WAN-SFP+
FPIC A (E8KE-X-101-5X10GE-SFP+)
No
03056684
1.4.5.5 6*10GE SFP+ Daughter Card
(FW-6X10GE-SFP+)
No
03056686
1.4.5.6 12*10GE SFP+ Daughter Card
(FW-12X10GE-SFP+)
No
03056848
1.4.5.7 3-Port 40GBase QSFP+ FPIC
(FW-3X40G-QSFP+)
No
03056631
1.4.5.8 1-Port 40GBase LAN-CFP FPIC A
(E8KE-X-101-1X40GE-CFP)
No
03056685
1.4.5.9 1*100GE CFP Daughter Card
(FW-1X100GE-CFP)
No
LPUF-120 and
FPIC
03056682
1.4.6.1 LPUF-120
Yes
03056890
1.4.6.2 20-Port 10/100/1000Base-RJ45
FPIC (FW-20X1G-RJ45)
No
03056633
1.4.6.3 24-Port 100/1000 Base-X-SFP
No

HUAWEI USG9500 Series Terabit-level Next-Generation Firewall
Hardware Guide
Contents
Issue 01 (2017-03-13)
Huawei Proprietary and Confidential
Copyright © Huawei Technologies Co., Ltd.
9
Type
BOM
Description
Hot
Swap
FPIC (E8KE-X-101-24XGE-SFP)
03056632
1.4.6.4 5-Port 10GBase LAN/WAN-SFP+
FPIC A (E8KE-X-101-5X10GE-SFP+)
No
03056684
1.4.6.5 6*10GE SFP+ Daughter Card
(FW-6X10GE-SFP+)
No
03056686
1.4.6.6 12*10GE SFP+ Daughter Card
(FW-12X10GE-SFP+)
No
03056848
1.4.6.7 3-Port 40GBase QSFP+ FPIC
(FW-3X40G-QSFP+)
No
03056631
1.4.6.8 1-Port 40GBase LAN-CFP FPIC A
(E8KE-X-101-1X40GE-CFP)
No
03056685
1.4.6.9 1*100GE CFP Daughter Card
(FW-1X100GE-CFP)
No
LPUF-101 and
FPIC
03056630
1.4.7.1 LPUF-101
Yes
03056633
1.4.7.2 24-Port 100/1000 Base-X-SFP
FPIC (E8KE-X-101-24XGE-SFP)
No
0305G09L
1.4.7.3 4-Port 10G Base LAN -SFP+ FPIC
(E8KE-X-101-4X10GE-SFP+)
No
03056632
1.4.7.4 5-Port 10GBase LAN/WAN-SFP+
FPIC A (E8KE-X-101-5X10GE-SFP+)
No
03056631
1.4.7.5 1-Port 40GBase LAN-CFP FPIC A
(E8KE-X-101-1X40GE-CFP)
No
LPUF-40-A and
FPIC
03056627
1.4.8.1 LPUF-40-A
Yes
03056629
1.4.8.2 20-Port 100/1000Base-X-SFP
Flexible Card (P40-20xGE/FE-SFP)
No
03056628
1.4.8.3 2-Port 10GBase LAN/WAN-XFP
Flexible Card (P40-2x10GBase
LAN/WAN-XFP)
No
0305G07X
1.4.8.4 4-port 10GBase LAN/WAN-XFP
FPIC (P40-4x10GBase LAN/WAN-XFP)
No
LPUF-21 and
FPIC
03056624
1.4.9.1 LPUF-21
Yes
0305G054
1.4.9.2 12-port
10Base-T/100Base-TX/1000Base-T-RJ45
FPIC (12x10/100/1000Base-TX-RJ45)
No
03056626
1.4.9.3 12-port
100Base-FX/1000Base-X-SFP FPIC
(12x100/1000Base-SFP)
No
0305G055
1.4.9.4 1-port OC-192c/STM-64c
No

HUAWEI USG9500 Series Terabit-level Next-Generation Firewall
Hardware Guide
Contents
Issue 01 (2017-03-13)
Huawei Proprietary and Confidential
Copyright © Huawei Technologies Co., Ltd.
10
Type
BOM
Description
Hot
Swap
POS-XFP FPIC (1 x OC-192c/STM-64c
POS-XFP)
03056625
1.4.9.5 1-port 10GBase LAN/WAN-XFP
FPIC (1 x 10GBase LAN/WAN)
No
0305G07W
1.4.9.6 4-Port 10GBase WAN/LAN-XFP
FPIC (4x10GBase LAN/WAN)
No
Integrated Line
Process Unit
03056637
1.4.10 1-Port 100GBase-CFP Integrated
Line Processing Unit (LPUI-101)
Yes
1.1.4 Power Supply System
This section describes the power supply system architecture, power supply area division, and
AC/DC power systems of the USG9580.
1.1.4.1 Features and Distributed Architecture of the Power Supply System
This section describes the power supply mode and power supply area division of the
USG9580.
The USG9580 supports either DC or AC power supply.
If DC power source is used, connect the DC power cables to the PEM input terminals.
If AC power source is used, use two suitable external AC-DC convertors. The number of
rectifier modules of the AC-DC convertors depends on the system power consumption.
The AC-DC convertor converts AC power to DC power and supplies DC power to the
PEMs.
As shown in Figure 1-5, the USG9580 backplane is divided into four areas, with each area
having two power inputs. These eight power inputs work in backup mode.

HUAWEI USG9500 Series Terabit-level Next-Generation Firewall
Hardware Guide
Contents
Issue 01 (2017-03-13)
Huawei Proprietary and Confidential
Copyright © Huawei Technologies Co., Ltd.
11
Figure 1-5 Distributed Architecture of the power supply for the USG9580
1.1.4.2 DC Power Supply System
This section describes the power supply architecture of the DC power system and the
appearance and technical specifications of the DC power modules of the USG9580.
The USG9580 uses eight 70 A PEM modules that work in 4+4 backup mode for DC power
supply. Table 1-3 describes the power supply solution.
Table 1-3 Power supply solution of the USG9580 DC power system
DC power
module
Powered Area
Powered Part
PEM-A1
PEM-B1
Zone1
Front panel: slots 5-7, 19-21.
Rear panel: fan modules (upper left side)
PEM-A2
Zone2
Front panel: slots 1-4, 17, and 18.

HUAWEI USG9500 Series Terabit-level Next-Generation Firewall
Hardware Guide
Contents
Issue 01 (2017-03-13)
Huawei Proprietary and Confidential
Copyright © Huawei Technologies Co., Ltd.
12
DC power
module
Powered Area
Powered Part
PEM-B2
Rear panel: fan modules (upper right side)
PEM-A3
PEM-B3
Zone3
Front panel: slots 13-16 and 22.
Rear panel: fan modules (lower left side)
PEM-A4
PEM-B4
Zone4
Front panel: slots 8-12.
Rear panel: fan modules (lower right side)
NOTE
PEMs A and B back up each other.
Figure 1-6 shows the relationships between the power modules and chassis parts. Each DC
power input contains one -48 V power input and one RTN input. Two separated RTN inputs
join on the board.

HUAWEI USG9500 Series Terabit-level Next-Generation Firewall
Hardware Guide
Contents
Issue 01 (2017-03-13)
Huawei Proprietary and Confidential
Copyright © Huawei Technologies Co., Ltd.
14
Figure 1-7 Appearance of the PEM
The LED indicators on the PEM are described in Table 1-4.
Table 1-4 Description of the indicators of the PEM
Indicator
Color
Description
RUN
Green
Indicates normal power output. If the indicator is steady on, it
implies the normal output.
ALM
Red
Power failure indicator. If the indicator is steady on, it
indicates the following:
The lightning protection link of the power module failed.
The power module does not have input power.
Table 1-5 lists the technical specifications of the PEM.
Table 1-5 Technical specifications of the DC PEM
Item
Technical Specification
Type
PEMB
Dimensions (Width x
Depth x Height)
58mm x 115mm x 220mm
Weight
1.1 kg
Number of power inputs
1
Input voltage range
-72 V DC to -38 V DC

HUAWEI USG9500 Series Terabit-level Next-Generation Firewall
Hardware Guide
Contents
Issue 01 (2017-03-13)
Huawei Proprietary and Confidential
Copyright © Huawei Technologies Co., Ltd.
15
Item
Technical Specification
Input rated voltage
-48 V DC/-60 V DC
Maximum input current
70 A
Output voltage
-72 V DC to -38 V DC
Output current
70 A
Rated current of the
air-break
70 A (Each PEM is controlled by an air switch).
1.1.4.3 AC Power Supply System
This section describes the power supply architecture of the AC power system and the
appearance and technical specifications of the AC power chassis of the USG9580.
Table 1-6 shows the power supply solution of the USG9580 AC power supply system. The
input AC power is output as steady DC power after being converted by the AC/DC module
and transmitted along external cables to the PEM to power all boards and fans.
Table 1-6 Power supply solution of the USG9580 AC power system
AC Power
Module
DC Power
Module
Powered
Area
Powered Part
AC power
chassis A
PEM-A1
PEM-B1
Zone1
Front panel: slots 5-7, 19-21.
Rear panel: fan modules (upper left
side)
PEM-A2
PEM-B2
Zone2
Front panel: slots 1-4, 17, and 18.
Rear panel: fan modules (upper right
side)
AC power
chassis B
PEM-A3
PEM-B3
Zone3
Front panel: slots 13-16 and 22.
Rear panel: fan modules (lower left
side)
PEM-A4
PEM-B4
Zone4
Front panel: slots 8-12.
Rear panel: fan modules (lower right
side)
NOTE
PEMs A and B back up each other.
Figure 1-8 shows the relationships between the AC power chassis, power modules, and
chassis parts. Each DC power input contains one -48 V power input and one RTN input. Two
separated RTN inputs join on the board.

HUAWEI USG9500 Series Terabit-level Next-Generation Firewall
Hardware Guide
Contents
Issue 01 (2017-03-13)
Huawei Proprietary and Confidential
Copyright © Huawei Technologies Co., Ltd.
16
Figure 1-8 Power supply architecture of the USG9580 AC power system
An AC power chassis is 2 U high. Installing the AC power chassis in the same cabinet as the
chassis is recommended. If the AC power chassis cannot be installed in the same cabinet as
the chassis, it should be placed near the cabinet and careful attention needs to be paid to the
cabling. Two AC power chassises work in 1+1 backup mode. Each AC power chassis
provides four circuit breakers and eight AC power inputs. Each circuit breaker is 20 A.
Figure 1-9 and Figure 1-10 show the appearance of the AC power chassis.

HUAWEI USG9500 Series Terabit-level Next-Generation Firewall
Hardware Guide
Contents
Issue 01 (2017-03-13)
Huawei Proprietary and Confidential
Copyright © Huawei Technologies Co., Ltd.
17
Figure 1-9 Front view of the AC power chassis
Figure 1-10 Rear view of the AC power chassis
As USG9580 do not support AC power chassis management, the DB9 interface on the rear of an AC
power chassis does not need to connect to the monitoring cable in the installation auxiliary material
package.
Table 1-7 shows the description of indicators on the panel of the AC power chassis.

HUAWEI USG9500 Series Terabit-level Next-Generation Firewall
Hardware Guide
Contents
Issue 01 (2017-03-13)
Huawei Proprietary and Confidential
Copyright © Huawei Technologies Co., Ltd.
18
Table 1-7 Indicator description
Indicator
Color
Normal
Abnormal
Cause
Power running
indicator
Green
On
Off
Power failure
(no AC input,
over-voltage
AC input, or
under-voltage
AC input) and
no output by the
power module
Protection
indicator
Yellow
Off
On
Temperature
alarm (When
the ambient
temperature
exceeds 65°C,
the device is
powered off.)
Dormant (When
the device is in
dormant state,
the protection
indicator of the
module is on,
but the module
does not report
alarms.)
Fault indicator
Red
Off
On
No output due
to the
over-voltage
output
power-off, fan
fault,
over-temperatur
e power-off, or
internal module
fault.
Table 1-8 lists the technical specifications of the AC power chassis.
Table 1-8 Technical specifications of the AC power supply module
Item
Technical Specification
Type
EPS200-4850A
Dimensions (Width x
Depth x Height)
442 mm x 650 mm x 88 mm
Number of power inputs
4
Maximum input voltage
90 V AC to 264 V AC; 50/60 Hz

HUAWEI USG9500 Series Terabit-level Next-Generation Firewall
Hardware Guide
Contents
Issue 01 (2017-03-13)
Huawei Proprietary and Confidential
Copyright © Huawei Technologies Co., Ltd.
19
Item
Technical Specification
range
Maximum input current
18.5 A/single module
Number of power outputs
4
Maximum output current
50 A/single module
Maximum output power
2900 W/single module
1.1.5 Heat Dissipation System
This section describes the components of the heat dissipation system and the appearance,
functions, and technical specifications of fan modules.
1.1.5.1 System Air Channel
This section describes the system air channels and air flows of the USG9580.
The USG9580 has three air channels.
The upper and lower chassis have separate air channels that draw air from the front and
exhausts air from the rear. The air filters are installed over the air intake vents. Each filter
has a curved face, large area, and small windage resistance. These features help to
improve heat dissipation efficiency. Air filters on the upper and lower chassis are
identical.
The air channel in the SFU slot area is located on the left of the chassis. The depth of the
air filter is the same as that of an SFU, and the height of the air filter is four times the
height of the SFU.
The air intake vent on the upper chassis is located above the board area on the front chassis;
the air exhaust vent is located above the board area on the rear chassis. The lower chassis and
the upper chassis are opposites. The upper chassis and the lower chassis also have separate
heat dissipation systems.
The middle area of the USG9580 is for SFU slots. The air intake vent of this area is located
on the left of the chassis. Two upper SFU slots in the area draw in air from the left. When
flowing to the right, the air joins the air from the upper chassis. Two lower SFU slots in the
area also draw in air from the left. When flowing to the right, the air joins the air from the
lower chassis.
Figure 1-11 shows the air flow in the USG9580.

HUAWEI USG9500 Series Terabit-level Next-Generation Firewall
Hardware Guide
Contents
Issue 01 (2017-03-13)
Huawei Proprietary and Confidential
Copyright © Huawei Technologies Co., Ltd.
20
Figure 1-11 Air flow in the USG9580
1.1.5.2 Fan Module
This section describes the appearance, technical specifications, and speed adjustment of fans.
Appearance and Technical Specifications of Fan Modules
The four fan modules of the USG9580 are located at the air exhaust vents side by side and
work in 2+2 backup mode. Each fan module is equipped with one fan. When one fan fails, the
heat dissipation system can still allow the device to work at the ambient temperature of 40°C
for a short period. Figure 1-12 shows the fan module appearance.
Short-term operation means that the continuous operation time does not exceed 96 hours and the
accumulated operation time per year does not exceed 15 days.
The fan module is hot swappable.

HUAWEI USG9500 Series Terabit-level Next-Generation Firewall
Hardware Guide
Contents
Issue 01 (2017-03-13)
Huawei Proprietary and Confidential
Copyright © Huawei Technologies Co., Ltd.
21
Figure 1-12 Appearance of a fan module
Table 1-9 describes the indicators on the fan module.
Table 1-9 Description of the indicators on the fan module
Indicator
Color
Description
STATUS
Green
If the indicator blinks once every two seconds (0.5 Hz), the fan
module is working normally.
Red
If the indicator blinks once every two seconds (0.5 Hz), the fan
module or PEM is faulty (including the case that not all PEMs
are powered on).
Table 1-10 lists the technical specifications of the fan module.
Table 1-10 Technical specifications of the fan module
Item
Technical Specification
Dimensions (Width x
Depth x Height)
210.4 mm x 100 mm x 243.7 mm
Weight
3.4 kg
Power consumption
(typical value)
30 W
Maximum noise
74 dB
Fan Speed Adjustment
When the system is fully configured, temperatures reported by the temperature sensors on the
LPUs, SPUs, SFUs and MPUs serve as the basis for fan speed adjustment. Table 1-11 lists
general principles.

HUAWEI USG9500 Series Terabit-level Next-Generation Firewall
Hardware Guide
Contents
Issue 01 (2017-03-13)
Huawei Proprietary and Confidential
Copyright © Huawei Technologies Co., Ltd.
22
Table 1-11 Fan Speed Adjustment Principles
Ambient
Temperat
ure
Rotationa
l Speed
Noise and Dissipation Standards
-5°C -
+27°C
(23°F -
80.6°F)
Low speed
(50%
rotational
speed)
When fans rotate at a constantly low speed, the noises meet the
NEBS standard and the fans meet heat dissipation
requirements of a fully configured system.
27°C -
50°C
(80.6°F -
122°F)
Linear
variation
The fan speed is adjusted smoothly in linear mode, without a
sharp increase in noises.
Over 45°C
(113°F)
High speed
(100%
rotational
speed)
Fans
Fans rotate at high speed to meet heat dissipation requirements.
1.1.5.3 Air Filter
This section describes the appearance and features of air filters.
The USG9580 draws in air from the front and exhausts air from the rear. The two air filters on
the upper and lower chassis are identical. To maximize air intake, the filters are fully
perforated. Air filters are fixed to the chassis by fasteners to facilitate filter removal and
replacement. Figure 1-13 shows the appearance of an air filter.
Figure 1-13 Air filter
The air channel in the SFU area is located on the left of the chassis. The air filter uses front
access. The depth of the air filter is the same as that of an SFU and the height of the air filter
is four times the width of an SFU as shown in Figure 1-14.

HUAWEI USG9500 Series Terabit-level Next-Generation Firewall
Hardware Guide
Contents
Issue 01 (2017-03-13)
Huawei Proprietary and Confidential
Copyright © Huawei Technologies Co., Ltd.
23
Figure 1-14 Air filter in the SFU area
Placing a black sponge air filter at the air intake vent helps to prevent dust from entering the system. It is
recommended that air filters be removed and cleaned at least once every three months.
1.1.6 Switch Fabric
This section describes the mechanism of the switch fabric on the USG9580.
The USG9580 has four independent switch fabric units (SFUs) that work in 3+1 backup mode
for load balancing. The four SFUs load balance services at the same time. When one SFU is
faulty or replaced, the other three SFUs automatically take over its tasks to ensure service
continuity. For details on USG9580 SFUs, see 1.4.3.1 E8KE-X16-SFUC-200SP.
The switching network responsible for switching data between LPUs/SPUs is a key
component of the USG9580. The USG9580 uses switching chips developed by Huawei and
Memory-Crossbar-Memory (M-C-M) to provide a three-level switching mode. Level-1 and
level-3 switching use a shared-memory model and are performed on LPUs/SPUs; level-2
switching uses a Crossbar model and is performed on SFUs. Figure 1-15 shows the switching
network of the USG9580. The following takes the LPU for example.

HUAWEI USG9500 Series Terabit-level Next-Generation Firewall
Hardware Guide
Contents
Issue 01 (2017-03-13)
Huawei Proprietary and Confidential
Copyright © Huawei Technologies Co., Ltd.
24
Figure 1-15 Switching network of the USG9580
The level-1 switching chip on one LPU is fully connected to the level-2 switching chips on
SFUs. The level-2 switching chips on the SFUs are also fully connected to the level-3
switching chip on another LPU. In addition, the level-2 crossbar switching chips work in load
balancing mode on multiple switching planes. The entire switching network is unblocked. The
following describes how data packets are transmitted across the switching network.
1. Data packets enter an LPU through physical interfaces and are fragmented into cells of a
fixed length. These cells are then sent to the level-1 switching chips. After being
buffered and scheduled, the cells enter the crossbar switching chips on the SFU. The
level-1 switching chip on an LPU is fully connected with all of the level-2 switching
chips. As a result, the same number of cells can be distributed to each level-2 switching
plane. This implements load balancing on switching planes and facilitates fault tolerance.
2. After the cells reach the crossbar switching chips, the crossbar switching chips schedule
the cells to the corresponding outbound interfaces according to the destination interfaces
of the data packets. The cells are then sent to the level-3 switching chips on another LPU.
At this point, the switching of the cells by the level-2 switching chips is completed.
3. After the cells reach the level-3 switching chips on another LPU, the system searches for
the destination interfaces. Once found, the cells are reassembled and sent out through
physical interfaces. At this point, switching of the data packets is completed.
1.1.7 Control Plane
This section describes the functions and features of the control plane.
USG9580 uses the MPU to implement the functions of the control plane. For MPU details,
see 1.4.2.1 EKEX16-FWCD00MPUB00. The functions of the MPU are described from the
following aspects:

HUAWEI USG9500 Series Terabit-level Next-Generation Firewall
Hardware Guide
Contents
Issue 01 (2017-03-13)
Huawei Proprietary and Confidential
Copyright © Huawei Technologies Co., Ltd.
25
System Control and Management Unit
As the system control and management unit, the MPU provides the following functions on the
system control panel:
Route calculation: All routing protocol packets are sent by the forwarding engine to the
MPU for processing. In addition, the MPU broadcasts and filters packets, and downloads
routing policies from the policy server.
Outband communication between boards: The LAN switch modules integrated on the
MPU provide outband communications between boards. In this manner, messages can be
controlled, maintained, and exchanged among the SFUs, LPUs and SPUs.
Device management and maintenance: Devices can be managed and maintained through
the management interfaces (serial interfaces) provided by the MPU.
Data configuration: The MPU stores configuration data, startup files, upgrade software,
and system logs.
Data storage: The MPU provides two interfaces for CF cards, which serve as mass
storage devices to store data files.
System Maintenance Unit
As the system maintenance unit, the MPU collects monitored information to test system units
locally or remotely, or implement in-service upgrading of system units.
The MPU periodically collects information about the operation of system units through the
Monitorbus. The MPU then generates related control information based on the collected
information, for example, the detection of board installations and adjustments to fan speed.
Through the joint test action group (JTAG) bus, the MPU remotely or locally tests system
units, or performs in-service upgrades of system units.
Reliability
The main control modules, clock modules, and LAN switch modules on the MPU work in 1:1
hot backup mode, thus improving system reliability.
The two MPUs work in 1:1 backup mode. Each MPU monitors the status of the other. If the
master MPU is faulty, the slave MPU automatically takes over as the master MPU.
1.1.8 Technical Specifications
This section describes the dimensions, weight, power, and environment specifications of the
USG9580.
Table 1-12 lists the technical specifications of the USG9580.
Table 1-12 USG9580 Technical Specifications
Item
Description
System specifications
Processing unit of the
MPU
Main frequency: 1.5 GHz
BootROM capacity of
the MPU
8 MB

HUAWEI USG9500 Series Terabit-level Next-Generation Firewall
Hardware Guide
Contents
Issue 01 (2017-03-13)
Huawei Proprietary and Confidential
Copyright © Huawei Technologies Co., Ltd.
26
Item
Description
SDRAM capacity of the
MPU
4 GB
NVRAM capacity of the
MPU
4 MB
Flash capacity of the
MPU
32 MB
CF card
2 x 2 GB
Number of slots
MPU
2 (slots 17 and 18)
SFU
4 (slots 19 to 22)
LPU/
SPU
16 (slots 1 to 16)
Dimensions and weight
Dimensions (Widtha x
Depth x Heightb)
442 mm x 650 mm x 1420 mm (32 U). The depth is 770 mm
covering the dust filter and cable rack.
Installation position
N68E cabinet or a standard 19-inch cabinet
Weight
Empt
y
chassi
s
94.4 kg
Full
config
uratio
n
(maxi
mal)
233.9 kg
Power specifications
Power supply
mode
DC
8 hot-swappable PEM modules
AC
8 PEM modules+2 external AC power chassises
Rated input
voltage
DC
-48 V
AC
175 V AC to 264 V AC; 50/60 Hz
Maximum input
voltage range
DC
-72 V to -38 V
AC
90 V AC to 264 V AC; 50/60 Hz (The output power reduces to
half of the maximum output when the input voltage is in the
range of 90 V AC to 175 V AC.)
Typical power
(six LPUF-240s
and nine SPUs
are configured.)
DC
7387 W
AC
7858 W

HUAWEI USG9500 Series Terabit-level Next-Generation Firewall
Hardware Guide
Contents
Issue 01 (2017-03-13)
Huawei Proprietary and Confidential
Copyright © Huawei Technologies Co., Ltd.
27
Item
Description
Maximum
Power (six
LPUF-240s and
nine SPUs are
configured.)
DC
8930 W
AC
9500 W
Heat dissipation
Fan module
4 hot-swappable fan modules, each of which has one fan
Air flow
Upper and lower air channels: draw air from the front and
discharge air from the back.
Middle air channels: draw air from the left side and discharge
air from the upper and lower back.
Air filter
3 air filters in the air intake vents of air channels
Environment specifications
System
reliability
MTB
F
(year)
25
MTT
R
(hour)
0.5
Ambient
temperaturec
Long-
termd
0°C to 45°C
Short-
term
-5°C to 50°C
Rema
rks
Limit of the temperature change rate: 30°C/hour
Storage temperature
-40°C to 70°C
Ambient
relative
humidity
Long-
term
5% RH to 85% RH, no coagulation
Short-
term
5% RH to 95% RH, no coagulation
Storage relative
humidity
0% RH to 95% RH
Long-term altitude
Lower than 3000 m
Storage altitude
Lower than 5000 m

HUAWEI USG9500 Series Terabit-level Next-Generation Firewall
Hardware Guide
Contents
Issue 01 (2017-03-13)
Huawei Proprietary and Confidential
Copyright © Huawei Technologies Co., Ltd.
28
Item
Description
NOTE
a. The width does not include the width of the mounting ear attached.
b. The height is 1 U (1 U = 1.75 inches, or about 44.45 mm), which is a height unit defined in
International Electrotechnical Commission (IEC) 60297 standards.
c. The measurement point of the temperature and humidity is 1.5 m over the floor and 0.4 m in front of
the cabinet without the front and the back doors.
d . Short-term operation means that the continuous operation time does not exceed 96 hours and the
accumulated operation time per year does not exceed 15 days. Otherwise, it is called long-term
operation.
1.2 USG9560
The USG9560 is a 14 U device. It employs an integrated chassis and provides 8 LPU/SPU
slots. Its SRUs, SFUs, power modules, and fans work in redundancy mode.
1.2.1 Device Overview
This section describes the appearance and hardware system features of the USG9560.
Appearance
The USG9560 has an integrated chassis, and adopts a centralized routing engine and a
distributed forwarding architecture.
Figure 1-16 shows the chassis of the USG9560.

HUAWEI USG9500 Series Terabit-level Next-Generation Firewall
Hardware Guide
Contents
Issue 01 (2017-03-13)
Huawei Proprietary and Confidential
Copyright © Huawei Technologies Co., Ltd.
29
Figure 1-16 Appearance of the chassis
System Features
The USG9560 provides the following system features:
Unblocked switching network that can be upgraded, with switching capacity at the Tbit/s
level
Distributed hardware-based forwarding and fast service deployment
Compact structure to increase interface density
Normalized design of system components
Separation of the control channel, service channel, and monitoring channel to ensure
non-blacking control channels and monitoring channels
Carrier-class high reliability and manageability
Shielding at the modular level to meet Electro Magnetic Compatibility (EMC)
requirements
Hot swappable boards, power modules, and fans
U-shaped air channels to improve system heat dissipation
Distributed power supply to enhance power supply capabilities for a single chassis
200-mm fans with a PFU
SRUAs in 1:1 backup mode
SFUs in load balancing mode

HUAWEI USG9500 Series Terabit-level Next-Generation Firewall
Hardware Guide
Contents
Issue 01 (2017-03-13)
Huawei Proprietary and Confidential
Copyright © Huawei Technologies Co., Ltd.
30
Backup for key components such as power modules, fan modules, clocks, and
management buses
Protection against incorrect insertion of boards
Queries about alarm prompts, alarm indications, running status, and alarm status of the
voltage and ambient temperature
1.2.2 Components of the USG9560
This section describes the main components of the USG9560.
The USG9560 has an integrated chassis, Figure 1-17 and Figure 1-18 show the architecture
and main components of the USG9560.
Front Panel
Figure 1-17 USG9560 Front Panel
No.
Name
Description
1
Air filter
The air filters of the USG9560 are deployed on the air intake vents of
chassis air channels to protect the device against dust.
2
SRU
The Switch Router Unit (SRU) on the USG9560 is in charge of system
control and route information learning. It is the central control unit of
the device. The USG9560 SRU uses the 1:1 backup mechanism. When
the active SRU is faulty, the standby SRU immediately takes over the
work. The backup mechanism ensures the proper running of services.
The USG9560 SRU is integrated with an SFU for data switching.

HUAWEI USG9500 Series Terabit-level Next-Generation Firewall
Hardware Guide
Contents
Issue 01 (2017-03-13)
Huawei Proprietary and Confidential
Copyright © Huawei Technologies Co., Ltd.
31
No.
Name
Description
3
SFU
The SFUs of the USG9560 are responsible for data switching of the
entire system. The USG9560 has one separate SFU. It works with the
SFUs integrated in two SRUs in 2+1 backup mode for load balancing.
4
LPU/SPU
slot
It holds an LPU or SPU.
5
Front
cable rack
It is used to deploy optical fibers and cables.
Rear Panel
Figure 1-18 USG9560 Rear Panel
No.
Name
Description
1
Fan
module
The USG9560 has two fan modules. They are deployed on the air
intake vents of chassis air channels and work in 1+1 backup mode.
2
ESD jack
The equipment end of the wrist strap is inserted into the ESD jack. For
the wrist strap to be effective, ensure that the device is already
grounded.
3
Protective
ground
terminal
The OT terminal of the ground cable is connected to the protective
ground terminal of the device, and the other terminal of the ground
cable is connected to the ground point of the cabinet or workbench or
the ground bar of the equipment room.

HUAWEI USG9500 Series Terabit-level Next-Generation Firewall
Hardware Guide
Contents
Issue 01 (2017-03-13)
Huawei Proprietary and Confidential
Copyright © Huawei Technologies Co., Ltd.
32
No.
Name
Description
4
Rear cable
rack
It is used to deploy optical fibers and cables. There are two rear cable
racks on the upper parts of the power modules.
5
Power
supply
areas
Power supply areas of the four PEM power modules on the USG9560.
6
PEM
module
The USG9560 uses four PEM power module for DC power supply.
The USG9560 backplane is divided into two areas, each of which has
two PEM power inputs. These eight power inputs work in 2+2 backup
mode.
If the USG9560 uses the AC power supply, one additional external AC
power chassis is required.
1.2.3 Slots Layout and Supported Boards
This section describes the layout of slots and supported boards on the USG9560.
Slots Layout
Figure 1-19shows the slot layout on the USG9560.
Figure 1-19 Slot layout on the USG9560
Table 1-13 describes the slot layout on the USG9560.
Table 1-13 Table 1 Board distribution in the board cage of the USG9560
Slot
Name
Slot
Number
Quant
ity
Slot Height
Remarks
LPU/SPU
1 to 8
8
41 mm (1.6
inches)
These slots are used to hold LPUs
or SPUs.
SRU
9 to 10
2
36 mm (1.4
inches)
These slots hold SRUs that work
in 1:1 backup mode.
SFU
11
1
36 mm (1.4
inches)
These slots are used to hold an
SFU.

HUAWEI USG9500 Series Terabit-level Next-Generation Firewall
Hardware Guide
Contents
Issue 01 (2017-03-13)
Huawei Proprietary and Confidential
Copyright © Huawei Technologies Co., Ltd.
33
Supported Boards
Table 1-14 lists the specifications of boards supported by the USG9560.
Table 1-14 Supported boards by the USG9560
Type
BOM
Description
Hot
Swap
SRU
0305G08N
1.4.2.2 E8KE-X8-SRUA-200
Yes
SFU
0305G08P
1.4.3.2 E8KE-X8-SFUC-200
Yes
SPUs and SPCs
03056638
1.4.4.3 X8&X16 SPU (SPU-X8X16-B)
Yes
0305G09U
1.4.4.7 Firewall Service Processing Unit
(SPU-X8X16-20-O-E8KE, for
USG9560/USG9580)
Yes
03057426
1.4.4.8 Firewall Service Processing Unit
(SPUA-20-O-H, for USG9560/USG9580)
Yes
03057520
1.4.4.9 Firewall Service Processing Unit
(SPUB-20-O-H, for USG9560/USG9580)
Yes
0305G09V
1.4.4.10 Firewall Performance Expansion
Card (SPC-20-O-E8KE)
Yes
03057429
1.4.4.11 Firewall Performance Expansion
Card (SPCA-20-O-H&M)
Yes
03057522
1.4.4.12 Firewall Performance Expansion
Card (SPCB-20-O-H&M)
Yes
03056688
1.4.4.13 Application Security Service
Processing Card (SPC-APPSEC-FW)
Yes
03056639
1.4.4.14 Application Security Service
Processing Card (SPC-IPS-20)
Yes
LPUF-240 and
FPIC
03056683
1.4.5.1 LPUF-240
Yes
03056890
1.4.5.2 20-Port 10/100/1000Base-RJ45
FPIC (FW-20X1G-RJ45)
No
03056633
1.4.5.3 24-Port 100/1000 Base-X-SFP
FPIC (E8KE-X-101-24XGE-SFP)
No
03056632
1.4.5.4 5-Port 10GBase LAN/WAN-SFP+
FPIC A (E8KE-X-101-5X10GE-SFP+)
No
03056684
1.4.5.5 6*10GE SFP+ Daughter Card
(FW-6X10GE-SFP+)
No
03056686
1.4.5.6 12*10GE SFP+ Daughter Card
(FW-12X10GE-SFP+)
No

HUAWEI USG9500 Series Terabit-level Next-Generation Firewall
Hardware Guide
Contents
Issue 01 (2017-03-13)
Huawei Proprietary and Confidential
Copyright © Huawei Technologies Co., Ltd.
34
Type
BOM
Description
Hot
Swap
03056848
1.4.5.7 3-Port 40GBase QSFP+ FPIC
(FW-3X40G-QSFP+)
No
03056631
1.4.5.8 1-Port 40GBase LAN-CFP FPIC A
(E8KE-X-101-1X40GE-CFP)
No
03056685
1.4.5.9 1*100GE CFP Daughter Card
(FW-1X100GE-CFP)
No
LPUF-120 and
FPIC
03056682
1.4.6.1 LPUF-120
Yes
03056890
1.4.6.2 20-Port 10/100/1000Base-RJ45
FPIC (FW-20X1G-RJ45)
No
03056633
1.4.6.3 24-Port 100/1000 Base-X-SFP
FPIC (E8KE-X-101-24XGE-SFP)
No
03056632
1.4.6.4 5-Port 10GBase LAN/WAN-SFP+
FPIC A (E8KE-X-101-5X10GE-SFP+)
No
03056684
1.4.6.5 6*10GE SFP+ Daughter Card
(FW-6X10GE-SFP+)
No
03056686
1.4.6.6 12*10GE SFP+ Daughter Card
(FW-12X10GE-SFP+)
No
03056848
1.4.6.7 3-Port 40GBase QSFP+ FPIC
(FW-3X40G-QSFP+)
No
03056631
1.4.6.8 1-Port 40GBase LAN-CFP FPIC A
(E8KE-X-101-1X40GE-CFP)
No
03056685
1.4.6.9 1*100GE CFP Daughter Card
(FW-1X100GE-CFP)
No
LPUF-101 and
FPIC
03056630
1.4.7.1 LPUF-101
Yes
03056633
1.4.7.2 24-Port 100/1000 Base-X-SFP
FPIC (E8KE-X-101-24XGE-SFP)
No
0305G09L
1.4.7.3 4-Port 10G Base LAN -SFP+ FPIC
(E8KE-X-101-4X10GE-SFP+)
No
03056632
1.4.7.4 5-Port 10GBase LAN/WAN-SFP+
FPIC A (E8KE-X-101-5X10GE-SFP+)
No
03056631
1.4.7.5 1-Port 40GBase LAN-CFP FPIC A
(E8KE-X-101-1X40GE-CFP)
No
LPUF-40-A and
FPIC
03056627
1.4.8.1 LPUF-40-A
Yes
03056629
1.4.8.2 20-Port 100/1000Base-X-SFP
Flexible Card (P40-20xGE/FE-SFP)
No
03056628
1.4.8.3 2-Port 10GBase LAN/WAN-XFP
Flexible Card (P40-2x10GBase
LAN/WAN-XFP)
No

HUAWEI USG9500 Series Terabit-level Next-Generation Firewall
Hardware Guide
Contents
Issue 01 (2017-03-13)
Huawei Proprietary and Confidential
Copyright © Huawei Technologies Co., Ltd.
35
Type
BOM
Description
Hot
Swap
0305G07X
1.4.8.4 4-port 10GBase LAN/WAN-XFP
FPIC (P40-4x10GBase LAN/WAN-XFP)
No
LPUF-21 and
FPIC
03056624
1.4.9.1 LPUF-21
Yes
0305G054
1.4.9.2 12-port
10Base-T/100Base-TX/1000Base-T-RJ45
FPIC (12x10/100/1000Base-TX-RJ45)
No
03056626
1.4.9.3 12-port
100Base-FX/1000Base-X-SFP FPIC
(12x100/1000Base-SFP)
No
0305G055
1.4.9.4 1-port OC-192c/STM-64c
POS-XFP FPIC (1 x OC-192c/STM-64c
POS-XFP)
No
03056625
1.4.9.5 1-port 10GBase LAN/WAN-XFP
FPIC (1 x 10GBase LAN/WAN)
No
0305G07W
1.4.9.6 4-Port 10GBase WAN/LAN-XFP
FPIC (4x10GBase LAN/WAN)
No
Integrated Line
Process Unit
03056637
1.4.10 1-Port 100GBase-CFP Integrated
Line Processing Unit (LPUI-101)
Yes
1.2.4 Power Supply System
This section describes the power supply system architecture, power supply area division, and
DC/AC power system of the USG9560.
1.2.4.1 Features and Distributed Architecture of the Power Supply System
This section describes the power supply mode and power supply area division of the
USG9560.
The USG9560 supports either DC or AC power supply.
If DC power source is used, connect the DC power cables to the PEM input terminals.
If AC power source is used, use two suitable external AC-DC convertors. The number of
rectifier modules of the AC-DC convertors depends on the system power consumption.
The AC-DC convertor converts AC power to DC power and supplies DC power to the
PEMs.
As shown in Figure 1-20, the USG9560 backplane is divided into two areas, with each area
having two power inputs. These four power inputs work in backup mode.

HUAWEI USG9500 Series Terabit-level Next-Generation Firewall
Hardware Guide
Contents
Issue 01 (2017-03-13)
Huawei Proprietary and Confidential
Copyright © Huawei Technologies Co., Ltd.
36
Figure 1-20 Distributed architecture of the power supply for the USG9560
1.2.4.2 DC Power Supply System
This section describes the power supply architecture of the DC power system and the
appearance and technical specifications of the DC power modules of the USG9560.
The USG9560 uses four 70 A PEM modules that work in 2+2 backup mode for DC power
supply. Figure 1-21 describes the power supply solution.
Table 1-15 Power supply solution of the USG9560 DC power system
DC Power
Module
Powered Area
Powered Part
PEM-A1
PEM-B1
Zone1
Front panel: slots 5-8 and 10.
Rear panel: fan modules (upper left side)
PEM-A2
PEM-B2
Zone2
Front panel: slots 1-4, 9, and 11.
Rear panel: fan modules (upper right side)
NOTE
PEMs A and B back up each other.
Figure 1-21 shows the relationships between the power modules and chassis parts. Each DC
power input contains one -48 V power input and one RTN input. Two separated RTN inputs
join on the board.

HUAWEI USG9500 Series Terabit-level Next-Generation Firewall
Hardware Guide
Contents
Issue 01 (2017-03-13)
Huawei Proprietary and Confidential
Copyright © Huawei Technologies Co., Ltd.
37
Figure 1-21 Power supply architecture of the USG9560 DC power system
Figure 1-22 shows the appearance of the PEM.
Figure 1-22 Appearance of the PEM
The LED indicators on the PEM are described in Table 1-16.
Table 1-16 Description of the indicators of the PEM
Indicator
Color
Description
RUN
Green
Indicates normal power output. If the indicator is steady on, it

HUAWEI USG9500 Series Terabit-level Next-Generation Firewall
Hardware Guide
Contents
Issue 01 (2017-03-13)
Huawei Proprietary and Confidential
Copyright © Huawei Technologies Co., Ltd.
38
Indicator
Color
Description
implies the normal output.
ALM
Red
Power failure indicator. If the indicator is steady on, it
indicates the following:
The lightning protection link of the power module failed.
The power module does not have input power.
Table 1-17 lists the technical specifications of the PEM.
Table 1-17 Technical specifications of the DC PEM
Item
Technical Specification
Type
PEMB
Dimensions (Width x
Depth x Height)
58mm x 115mm x 220mm
Weight
1.1 kg
Number of power inputs
1
Input voltage range
-72 V DC to -38 V DC
Input rated voltage
-48 V DC/-60 V DC
Maximum input current
70 A
Output voltage
-72 V DC to -38 V DC
Output current
70 A
Rated current of the
air-break
70 A (Each PEM is controlled by an air switch).
1.2.4.3 AC Power Supply System
This section describes the power supply architecture of the AC power system and the
appearance and technical specifications of the AC power chassis of the USG9560.
Figure 1-23 shows the power supply architecture of the USG9560 AC power supply system.
The input AC power is output as steady DC power after being converted by the AC/DC
module and transmitted along external cables to the PEM to power all boards and fans.
Table 1-18 Power supply solution of the USG9560 AC power system
AC Power
Module
DC Power
Module
Powered
Area
Powered Part
AC power
chassis
PEM-A1
PEM-B1
Zone1
Front panel: slots 5-8 and 10.
Rear panel: fan modules (upper left
side)

HUAWEI USG9500 Series Terabit-level Next-Generation Firewall
Hardware Guide
Contents
Issue 01 (2017-03-13)
Huawei Proprietary and Confidential
Copyright © Huawei Technologies Co., Ltd.
39
AC Power
Module
DC Power
Module
Powered
Area
Powered Part
PEM-A2
PEM-B2
Zone2
Front panel: slots 1-4, 9, and 11.
Rear panel: fan modules (upper right
side)
NOTE
PEMs A and B back up each other.
Figure 1-23 shows the relationships between the AC power chassis, power modules, and
chassis parts. Each DC power input contains one -48 V power input and one RTN input. Two
separated RTN inputs join on the board.
Figure 1-23 Power supply architecture of the USG9560 AC power system
An AC power chassis of the USG9560 is 2 U high, and you are advised to install the AC
power chassis in the same cabinet with the device. If they cannot be installed in the same
cabinet, deploy them as closely as possible and pay attention to cabling. The USG9560 uses
one AC power chassis. There are four air circuit breakers on the AC power chassis. The
current of each air circuit breaker is 20 A.
Figure 1-24 and Figure 1-25 show the appearance of the AC power chassis.

HUAWEI USG9500 Series Terabit-level Next-Generation Firewall
Hardware Guide
Contents
Issue 01 (2017-03-13)
Huawei Proprietary and Confidential
Copyright © Huawei Technologies Co., Ltd.
40
Figure 1-24 Front view of the AC power chassis
Figure 1-25 Rear view of the AC power chassis
As USG9580 do not support AC power chassis management, the DB9 interface on the rear of an AC
power chassis does not need to connect to the monitoring cable in the installation auxiliary material
package.
Table 1-19 shows the description of indicators on the panel of the AC power chassis.

HUAWEI USG9500 Series Terabit-level Next-Generation Firewall
Hardware Guide
Contents
Issue 01 (2017-03-13)
Huawei Proprietary and Confidential
Copyright © Huawei Technologies Co., Ltd.
41
Table 1-19 Indicator description
Indicator
Color
Normal
Abnormal
Cause
Power running
indicator
Green
On
Off
Power failure
(no AC input,
over-voltage
AC input, or
under-voltage
AC input) and
no output by the
power module
Protection
indicator
Yellow
Off
On
Temperature
alarm (When
the ambient
temperature
exceeds 65°C,
the device is
powered off.)
Dormant (When
the device is in
dormant state,
the protection
indicator of the
module is on,
but the module
does not report
alarms.)
Fault indicator
Red
Off
On
No output due
to the
over-voltage
output
power-off, fan
fault,
over-temperatur
e power-off, or
internal module
fault.
Table 1-20 lists the technical specifications of the AC power chassis.
Table 1-20 Technical specifications of the AC power supply module
Item
Technical Specification
Type
EPS200-4850A
Dimensions (Width x
Depth x Height)
442 mm x 650 mm x 88 mm
Number of power inputs
4
Maximum input voltage
90 V AC to 264 V AC; 50/60 Hz

HUAWEI USG9500 Series Terabit-level Next-Generation Firewall
Hardware Guide
Contents
Issue 01 (2017-03-13)
Huawei Proprietary and Confidential
Copyright © Huawei Technologies Co., Ltd.
42
Item
Technical Specification
range
Maximum input current
18.5 A/single module
Number of power outputs
4
Maximum output current
50 A/single module
Maximum output power
2900 W/single module
1.2.5 Heat Dissipation System
This section describes the air channel features of the heat dissipation system and the
appearance, functions, and technical specifications of fan modules.
1.2.5.1 System Air Channel
This section describes the system air channels and air flows of the USG9560.
The USG9560 draws in air from the front and exhausts air from the rear. The air intake vent is
located above the board area on the front chassis; the air exhaust vent is located above the
board area on the rear chassis. The air filter has a curved face, large area, and small windage
resistance. These features help to improve heat dissipation efficiency.
The entire system dissipates heat by drawing in air, as shown in USG9560.

HUAWEI USG9500 Series Terabit-level Next-Generation Firewall
Hardware Guide
Contents
Issue 01 (2017-03-13)
Huawei Proprietary and Confidential
Copyright © Huawei Technologies Co., Ltd.
43
Figure 1-26 Air flow in the USG9560
1.2.5.2 Fan Module
This section describes the appearance, technical specifications, and speed adjustment of fans.
Appearance and Technical Specifications of Fan Modules
The two fan modules of the USG9560 are located at the air exhaust vents side by side and
work in 1+1 backup mode. Each fan module is equipped with one fan. When one fan fails, the
heat dissipation system can still allow the device to work at the ambient temperature of 40°C
for a short period. Figure 1-27 shows the fan module appearance.
Short-term operation means that the continuous operation time does not exceed 96 hours and the
accumulated operation time per year does not exceed 15 days.
The fan module is hot swappable.

HUAWEI USG9500 Series Terabit-level Next-Generation Firewall
Hardware Guide
Contents
Issue 01 (2017-03-13)
Huawei Proprietary and Confidential
Copyright © Huawei Technologies Co., Ltd.
44
Figure 1-27 Appearance of a fan module
Table 1-21 describes the indicators on the fan module.
Table 1-21 Description of the indicators on the fan module
Indicator
Color
Description
STATUS
Green
If the indicator blinks once every two seconds (0.5 Hz), the fan
module is working normally.
Red
If the indicator blinks once every two seconds (0.5 Hz), the fan
module or PEM is faulty (including the case that not all PEMs
are powered on).
Table 1-22 lists the technical specifications of the fan module.
Table 1-22 Technical specifications of the fan module
Item
Technical Specification
Dimensions (Width x
Depth x Height)
210.4 mm x 100 mm x 243.7 mm
Weight
3.4 kg
Power consumption
(typical value)
30 W
Maximum noise
74 dB
Fan Speed Adjustment
When the system is fully configured, temperatures reported by the temperature sensors on the
LPUs, SPUs, SFUs and MPUs serve as the basis for fan speed adjustment. Table 1-23 lists
general principles.

HUAWEI USG9500 Series Terabit-level Next-Generation Firewall
Hardware Guide
Contents
Issue 01 (2017-03-13)
Huawei Proprietary and Confidential
Copyright © Huawei Technologies Co., Ltd.
45
Table 1-23 Fan Speed Adjustment Principles
Ambient
Temperat
ure
Rotationa
l Speed
Noise and Dissipation Standards
-5°C -
+27°C
(23°F -
80.6°F)
Low speed
(50%
rotational
speed)
When fans rotate at a constantly low speed, the noises meet the
NEBS standard and the fans meet heat dissipation
requirements of a fully configured system.
27°C -
50°C
(80.6°F -
122°F)
Linear
variation
The fan speed is adjusted smoothly in linear mode, without a
sharp increase in noises.
Over 45°C
(113°F)
High speed
(100%
rotational
speed)
Fans
Fans rotate at high speed to meet heat dissipation requirements.
1.2.5.3 Air Filter
This section describes the appearance and features of air filters.
The USG9560 draws in air from the front top and exhausts air from the rear top. There is a 3
U space in the upper part of the chassis and an air filter on the front of the chassis. To
maximize air intake, the filter is fully perforated. The air filter is fixed to the chassis by a
fastener to facilitate filter removal and replacement. Figure 1-28 shows the appearance of an
air filter.
Figure 1-28 An air filter
Placing a black sponge air filter at the air intake vent helps to prevent dust from entering the system. It is
recommended that the air filter be removed and cleaned once every three months.
1.2.6 Switch Frabric
This section describes the mechanism of the switch fabric on the USG9560.

HUAWEI USG9500 Series Terabit-level Next-Generation Firewall
Hardware Guide
Contents
Issue 01 (2017-03-13)
Huawei Proprietary and Confidential
Copyright © Huawei Technologies Co., Ltd.
46
The USG9560 has three SFUs, two of which integrated on two SRUs and another being
independent. Another SFU is an independent SFU. These three SFUs work in 2+1 backup
mode. The three SFUs load balance services at the same time. When one SFU is faulty or
replaced, the other two SFUs automatically take over its tasks to ensure normal running of
services. For details on USG9560 SFUs, see 1.4.3.2 E8KE-X8-SFUC-200.
The switching network responsible for switching data between LPUs/SPUs is a key
component of the USG9560. The USG9560 uses the switching chips developed by Huawei
and Memory-Crossbar-Memory (M-C-M) to provide a three-level switching mode. Level-1
and level-3 switching adopts the shared-memory model and is performed on LPUs/SPUs;
level-2 switching adopts the Crossbar model and is performed on an SFU. Figure 1-29 shows
the switching network of the USG9560. The following takes the LPU for example.
Figure 1-29 Switching network of the USG9560
The level-1 switching chip on one LPU is fully connected to all the level-2 switching chips on
the SFUs. The level-2 switching chips on the SFUs are also fully connected to the level-3
switching chip on another LPU. In addition, the level-2 crossbar switching chips work in load
balancing mode across multiple switching planes. The entire switching network is unblocked.
The following describes how data packets are transmitted across the switching network.
1. Data packets enter an LPU through physical interfaces and are fragmented into cells of a
fixed length. These cells are then sent to the level-1 switching chips. After being
buffered and scheduled, the cells enter the crossbar switching chips on the SFU. The
level-1 switching chip on an LPU is fully connected with all of the level-2 switching
chips on SFUs. As a result, the same number of cells can be distributed to each level-2
switching plane. This implements load balancing across switching planes and facilitates
fault tolerance.
2. After the cells reach the crossbar switching chips, the crossbar switching chips schedule
the cells to the corresponding outbound interfaces according to the destination interfaces

HUAWEI USG9500 Series Terabit-level Next-Generation Firewall
Hardware Guide
Contents
Issue 01 (2017-03-13)
Huawei Proprietary and Confidential
Copyright © Huawei Technologies Co., Ltd.
47
of the data packets. The cells are then sent to the level-3 switching chips on another LPU.
At this point, the switching of the cells by the level-2 switching chips is completed.
3. After the cells reach the level-3 switching chips on another LPU, the system searches for
the destination interfaces. Once found, the cells are reassembled and sent out through
physical interfaces. At this point, the switching of the data packets is completed.
1.2.7 Control Plane
This section describes the functions and features of the control plane.
USG9560 uses the SRU to implement the functions of the control plane. For SRU details, see
1.4.2.2 E8KE-X8-SRUA-200. The functions of the SRU are described from the following
aspects:
System Control and Management Unit
As the system control and management unit, the SRU provides the following functions on the
system control panel:
Route calculation: All routing protocol packets are sent by the forwarding engine to the
SRU for processing. In addition, the SRU broadcasts and filters packets, and downloads
routing policies from the policy server.
Outband communication between boards: The LAN switch modules integrated on the
SRU provide outband communications among the SFUs, LPUs and SPUs. In this manner,
messages can be controlled, maintained, and exchanged between the boards.
Device management and maintenance: Devices can be managed and maintained through
the management interfaces (serial interfaces) provided by the SRU.
Data configuration: The SRU stores configuration data, startup files, upgrade software,
and system logs.
Data storage: The SRU provides two interfaces for CF cards, which serve as mass
storage devices to store data files.
System Maintenance Unit
As the system maintenance unit, the SRU collects system monitoring information to test
system units locally or remotely, or implement in-service upgrading of system units.
The SRU periodically collects information about the operation of system units through the
Monitorbus. The SRU then generates related control information based on the collected
information, for example, the detection of board installations and adjustments to fan speed.
Through the joint test action group (JTAG) bus, the SRU remotely or locally tests system
units, or performs in-service upgrading of system units.
Reliability
The main control modules, clock modules, and LAN switch modules on the SRU work in 1:1
hot backup mode, thus improving system reliability.
The two SRUs work in 1:1 backup mode. Each SRU monitors the status of the other. If the
master SRU is faulty, the slave SRU automatically takes over as the master SRU.

HUAWEI USG9500 Series Terabit-level Next-Generation Firewall
Hardware Guide
Contents
Issue 01 (2017-03-13)
Huawei Proprietary and Confidential
Copyright © Huawei Technologies Co., Ltd.
48
1.2.8 Technical Specifications
This section describes the dimensions, weight, power, and environment specifications of the
USG9560.
Table 1-24 lists the technical specifications of the USG9560.
Table 1-24 USG9560 Technical Specifications
Item
Description
System specifications
Processing unit of the SRU
Main frequency: 1.5 GHz
BootROM capacity of the
SRU
8 MB
SDRAM capacity of the
SRU
4 GB
NVRAM capacity of the
SRU
4 MB
Flash capacity of the SRU
32 MB
CF card
2 x 2 GB
Number of
slots
SRU
2 (slots 9 and 10)
SFU
1 (slot 11)
LPU/SPU
8 (slots 1 to 8)
Dimensions and weight
Dimensions (Widtha x
Depth x Heightb)
442 mm x 650 mm x 620 mm (14 U). The depth is 770 mm
covering the dust filter and cable rack.
Installation position
N68E cabinet or a standard 19-inch cabinet
Weight
Empty
chassis
43.2 kg
Full
configuratio
n (maximal)
112.9 kg
Power specifications
Power
supply mode
DC
4 hot-swappable PEM modules
AC
4 PEM modules+1 external AC power chassis
Rated input
voltage
DC
-48 V
AC
175 V AC to 264 V AC; 50/60 Hz

HUAWEI USG9500 Series Terabit-level Next-Generation Firewall
Hardware Guide
Contents
Issue 01 (2017-03-13)
Huawei Proprietary and Confidential
Copyright © Huawei Technologies Co., Ltd.
49
Maximum
input
voltage
range
DC
-72 V to -38 V
AC
90 V AC to 264 V AC; 50/60 Hz (The output power reduces
to half of the maximum output when the input voltage is in
the range of 90 V AC to 175 V AC.)
Typical
power
(Three
LPUF-240s
and five
SPUs are
configured.)
DC
4025 W
AC
4282 W
Maximum
power
(Three
LPUF-240s
and five
SPUs are
configured.)
DC
4823 W
AC
5132 W
Heat dissipation
Fan module
2 hot-swappable fan modules, each having one fan
Air flow
Front-to-back airflow
Air filter
1 air filter in the air intake vent of the air channel
Environment specifications
System
reliability
MTBF
(year)
25
MTTR
(hour)
0.5
Ambient
temperaturec
Long-termd
0°C to 45°C
Short-term
-5°C to 50°C
Remarks
Limit of the temperature change rate: 30°C/hour
Storage temperature
-40°C to 70°C
Ambient
relative
humidity
Long-term
5% RH to 85% RH, no coagulation
Short-term
5% RH to 95% RH, no coagulation
Storage relative humidity
0% RH to 95% RH
Long-term altitude
Lower than 3000 m
Storage altitude
Lower than 5000 m

HUAWEI USG9500 Series Terabit-level Next-Generation Firewall
Hardware Guide
Contents
Issue 01 (2017-03-13)
Huawei Proprietary and Confidential
Copyright © Huawei Technologies Co., Ltd.
50
NOTE
a. The width does not include the width of the mounting ear attached.
b. The height is 1 U (1 U = 1.75 inches, or about 44.45 mm), which is a height unit defined in
International Electrotechnical Commission (IEC) 60297 standards.
c. The measurement point of the temperature and humidity is 1.5 m over the floor and 0.4 m in front of
the cabinet without the front and the back doors.
d . Short-term operation means that the continuous operation time does not exceed 96 hours and the
accumulated operation time per year does not exceed 15 days. Otherwise, it is called long-term
operation.
1.3 USG9520
The USG9520 has DC (4 U) and AC (5 U) chassis models. It employs an integrated chassis
and provides 3 LPU/SPU slots. Its MPUs, power modules, and fans work in redundancy
mode.
1.3.1 Device Overview
This section describes the appearance and hardware system features of the USG9520.
Appearance
The USG9520 has an integrated chassis, and adopts a centralized routing engine and a
distributed forwarding architecture.
The USG9520 chassis have both AC and DC models. Figure 1-30 shows the DC chassis, and
the Figure 1-31 shows the AC chassis.
Figure 1-30 Appearance of the DC chassis

HUAWEI USG9500 Series Terabit-level Next-Generation Firewall
Hardware Guide
Contents
Issue 01 (2017-03-13)
Huawei Proprietary and Confidential
Copyright © Huawei Technologies Co., Ltd.
51
Figure 1-31 Appearance of the AC chassis
System Features
The USG9520 provides the following system features:
Distributed hardware-based forwarding
Separation of control channels and service channels to ensure non-blocking control
channels
Carrier-class high reliability and manageability
Shielding at the modular level to meet Electro Magnetic Compatibility (EMC)
requirements
Hot swappable boards, power modules, and fans
MPUs in 1:1 backup mode
Backup for key components such as power modules, fan modules, clocks, and
management buses
Protection against incorrect insertion of boards
Queries about alarm prompts, alarm indications, running status, and alarm status of the
power supply
Queries about alarm prompts, alarm indications, running status, and alarm status of the
voltage and ambient temperature
1.3.2 Components of the USG9520
This section describes the main components of the USG9520.
The USG9520 has AC and DC chassis models. Figure 1-32 and Figure 1-33 shows the parts
in the DC chassis of the USG9520. Figure 1-34 and Figure 1-35 shows the part in the AC
chassis of the USG9520.

HUAWEI USG9500 Series Terabit-level Next-Generation Firewall
Hardware Guide
Contents
Issue 01 (2017-03-13)
Huawei Proprietary and Confidential
Copyright © Huawei Technologies Co., Ltd.
52
DC Chassis
Figure 1-32 Front panel of the USG9520 DC chassis
No.
Name
Description
1
MPU
The Main Processing Unit (MPU) on the USG9520 is in charge of
system control and route information learning. It is the central control
unit of the device. The USG9520 MPU uses the 1:1 backup
mechanism. When the active MPU is faulty, the standby MPU
immediately takes over the work. The backup mechanism ensures the
proper running of services.
2
LPU/SPU
slot
It holds an LPU or SPU.
3
ESD jack
The equipment end of the wrist strap is inserted into the ESD jack. For
the wrist strap to be effective, ensure that the device is already
grounded.
Figure 1-33 Rear panel of the USG9520 DC chassis
No.
Name
Description

HUAWEI USG9500 Series Terabit-level Next-Generation Firewall
Hardware Guide
Contents
Issue 01 (2017-03-13)
Huawei Proprietary and Confidential
Copyright © Huawei Technologies Co., Ltd.
53
No.
Name
Description
1
Fan
module
The USG9520 has one fan module that has two fans. The fans are
deployed on the air intake vents of chassis air channels and work in
1+1 backup mode.
2
Protective
ground
terminal
The OT terminal of the ground cable is connected to the protective
ground terminal of the device, and the other terminal of the ground
cable is connected to the ground point of the cabinet or workbench or
the ground bar of the equipment room.
3
Air filter
The air filters of the USG9520 are deployed on the air intake vents of
chassis air channels to protect the device against dust.
4
DC power
module
The DC power supply system of the USG9520 consists of two DC
power modules that are connected to an external direct current
distribution panel and work 1+1 backup mode.
5
ESD jack
The equipment end of the wrist strap is inserted into the ESD jack. For
the wrist strap to be effective, ensure that the device is already
grounded.
AC Chassis
Figure 1-34 Front panel of the USG9520 AC chassis
No.
Name
Description
1
MPU
The Main Processing Unit (MPU) on the USG9520 is in charge of
system control and route information learning. It is the central control
unit of the device. The USG9520 MPU uses the 1:1 backup
mechanism. When the active MPU is faulty, the standby MPU
immediately takes over the work. The backup mechanism ensures the
proper running of services.
2
LPU/SPU
slot
It holds an LPU or SPU.
3
ESD jack
The equipment end of the wrist strap is inserted into the ESD jack. For

HUAWEI USG9500 Series Terabit-level Next-Generation Firewall
Hardware Guide
Contents
Issue 01 (2017-03-13)
Huawei Proprietary and Confidential
Copyright © Huawei Technologies Co., Ltd.
54
No.
Name
Description
the wrist strap to be effective, ensure that the device is already
grounded.
4
AC power
module
The AC power supply system of the USG9520 consists of two DC
power modules that are connected to an external direct current
distribution panel and work 1+1 backup mode.
Figure 1-35 Rear panel of the USG9520 AC chassis
No.
Name
Description
1
Fan
module
The USG9520 has one fan module that has two fans. The fans are
deployed on the the air intake vents of chassis air channels and work in
1+1 backup mode.
2
Air filter
The air filters of the USG9520 are deployed on the air intake vents of
chassis air channels to protect the device against dust.
3
Protective
ground
terminal
The OT terminal of the ground cable is connected to the protective
ground terminal of the device, and the other terminal of the ground
cable is connected to the ground point of the cabinet or workbench or
the ground bar of the equipment room.
1.3.3 Slots Layout and Supported Boards
This section describes the layout of slots and supported boards on the USG9520.
Slots Layout
Figure 1-36 shows the slot layout on the USG9520.

HUAWEI USG9500 Series Terabit-level Next-Generation Firewall
Hardware Guide
Contents
Issue 01 (2017-03-13)
Huawei Proprietary and Confidential
Copyright © Huawei Technologies Co., Ltd.
55
Figure 1-36 Slot layout on the USG9520
Table 1-25 describes the slot layout on the USG9520.
Table 1-25 Table 1 Board distribution in the board cage of the USG9520
Slot
Name
Slot
Numbe
r
Quan
tity
Slot Height
Remarks
LPU/SP
U
1 to 3
3
41 mm (1.6
inches)
These slots are used to hold LPUs or
SPUs.
MPU
4 to 5
2
41 mm (1.6
inches)
These slots hold MPUs that work in
1:1 backup mode.
Supported Boards
Table 1-26 lists the specifications of boards supported by the USG9520.
Table 1-26 Supported boards by the USG9520
Type
BOM
Description
Hot
Swap
MPU
03056305
1.4.2.3 E8KE-X3-MPU
Yes
0305G06R
1.4.2.4 MPUD
Yes
SPUs and SPCs
03056640
1.4.4.1 X3 SPU (SPU-X3-B)
Yes
03056989
1.4.4.2 X3 SPU (SPU-X3-B2)
Yes
0305G09T
1.4.4.4 Firewall Service Processing Unit
(SPU-X3-20-O-E8KE, for USG9520)
Yes
03057427
1.4.4.5 Firewall Service Processing Unit
(SPUA-20-O-M, for USG9520)
Yes
03057518
1.4.4.6 Firewall Service Processing Unit
(SPUB-20-O-M, for USG9520)
Yes
0305G09V
1.4.4.10 Firewall Performance Expansion
Card (SPC-20-O-E8KE)
Yes
03056688
1.4.4.13 Application Security Service
Processing Card (SPC-APPSEC-FW)
Yes

HUAWEI USG9500 Series Terabit-level Next-Generation Firewall
Hardware Guide
Contents
Issue 01 (2017-03-13)
Huawei Proprietary and Confidential
Copyright © Huawei Technologies Co., Ltd.
56
Type
BOM
Description
Hot
Swap
03056639
1.4.4.14 Application Security Service
Processing Card (SPC-IPS-20)
Yes
LPUF-120 and
FPIC
03056682
1.4.6.1 LPUF-120
Yes
03056890
1.4.6.2 20-Port 10/100/1000Base-RJ45
FPIC (FW-20X1G-RJ45)
No
03056633
1.4.6.3 24-Port 100/1000 Base-X-SFP
FPIC (E8KE-X-101-24XGE-SFP)
No
03056632
1.4.6.4 5-Port 10GBase LAN/WAN-SFP+
FPIC A (E8KE-X-101-5X10GE-SFP+)
No
03056684
1.4.6.5 6*10GE SFP+ Daughter Card
(FW-6X10GE-SFP+)
No
03056686
1.4.6.6 12*10GE SFP+ Daughter Card
(FW-12X10GE-SFP+)
No
03056848
1.4.6.7 3-Port 40GBase QSFP+ FPIC
(FW-3X40G-QSFP+)
No
03056631
1.4.6.8 1-Port 40GBase LAN-CFP FPIC A
(E8KE-X-101-1X40GE-CFP)
No
03056685
1.4.6.9 1*100GE CFP Daughter Card
(FW-1X100GE-CFP)
No
LPUF-101 and
FPIC
03056630
1.4.7.1 LPUF-101
Yes
03056633
1.4.7.2 24-Port 100/1000 Base-X-SFP
FPIC (E8KE-X-101-24XGE-SFP)
No
0305G09L
1.4.7.3 4-Port 10G Base LAN -SFP+ FPIC
(E8KE-X-101-4X10GE-SFP+)
No
03056632
1.4.7.4 5-Port 10GBase LAN/WAN-SFP+
FPIC A (E8KE-X-101-5X10GE-SFP+)
No
03056631
1.4.7.5 1-Port 40GBase LAN-CFP FPIC A
(E8KE-X-101-1X40GE-CFP)
No
LPUF-40-A and
FPIC
03056627
1.4.8.1 LPUF-40-A
Yes
03056629
1.4.8.2 20-Port 100/1000Base-X-SFP
Flexible Card (P40-20xGE/FE-SFP)
No
03056628
1.4.8.3 2-Port 10GBase LAN/WAN-XFP
Flexible Card (P40-2x10GBase
LAN/WAN-XFP)
No
0305G07X
1.4.8.4 4-port 10GBase LAN/WAN-XFP
FPIC (P40-4x10GBase LAN/WAN-XFP)
No
LPUF-21 and
03056624
1.4.9.1 LPUF-21
Yes

HUAWEI USG9500 Series Terabit-level Next-Generation Firewall
Hardware Guide
Contents
Issue 01 (2017-03-13)
Huawei Proprietary and Confidential
Copyright © Huawei Technologies Co., Ltd.
57
Type
BOM
Description
Hot
Swap
FPIC
0305G054
1.4.9.2 12-port
10Base-T/100Base-TX/1000Base-T-RJ45
FPIC (12x10/100/1000Base-TX-RJ45)
No
03056626
1.4.9.3 12-port
100Base-FX/1000Base-X-SFP FPIC
(12x100/1000Base-SFP)
No
0305G055
1.4.9.4 1-port OC-192c/STM-64c
POS-XFP FPIC (1 x OC-192c/STM-64c
POS-XFP)
No
03056625
1.4.9.5 1-port 10GBase LAN/WAN-XFP
FPIC (1 x 10GBase LAN/WAN)
No
0305G07W
1.4.9.6 4-Port 10GBase WAN/LAN-XFP
FPIC (4x10GBase LAN/WAN)
No
Integrated Line
Process Unit
03056637
1.4.10 1-Port 100GBase-CFP Integrated
Line Processing Unit (LPUI-101)
Yes
1.3.4 Power Supply System
This section describes the power supply features, power supply area division, and AC/DC
power systems of the USG9520.
1.3.4.1 Features of the Power Supply System
This section describes the power supply modes of the USG9520.
The USG9520 supports either DC or AC power supply.
Power modules convert the input voltage into -48 V DC voltage to supply power for the entire
system. The power supply system has the following features:
The power supply system consists of two AC power modules or two DC power modules
working in 1+1 backup mode.
When AC 110 V input is used, the AC power module is half-load output, which cannot afford
the maximum system power consumption with the full configuration. Therefore, two AC
power modules are required, so that the device can work properly. If one AC power module
fails, the other cannot afford the maximum system power consumption. That is, 1+1
redundancy fails.
Both AC power modules and DC power modules support alarm functions.

HUAWEI USG9500 Series Terabit-level Next-Generation Firewall
Hardware Guide
Contents
Issue 01 (2017-03-13)
Huawei Proprietary and Confidential
Copyright © Huawei Technologies Co., Ltd.
58
1.3.4.2 DC Power Supply System
This section describes the appearance, functions, and technical specifications of the DC power
module.
The USG9520 DC power module is 1 U high, as shown in Figure 1-37.
The power modules are hot-swappable.
Figure 1-37 Appearance of the DC power module and panel
The indicators of the USG9520 DC power module are visible on the panel through light
emitting diode. Table 1-27 describes the indicators.
Table 1-27 Description of the indicators on the DC power module
Name
Color
Description
RUN
Green
Normal output indicator. If the indicator is steady green,
the PEM has normal output.
ALM
Red
Power failure indicator. If the indicator is steady red,
The lightning protection circuit of the PEM is faulty.
One of the power modules does not have input
power.
The DC power module has the following functions:
The USG9520 power module can output straight-through power and provide the following
functions:
Surge protection, filtering, and short circuit protection
Alarm function.
Table 1-28 lists the technical specifications of the DC power module.
Table 1-28 Technical specifications of the DC power module
Item
Parameter
Model
CR52PEMA

HUAWEI USG9500 Series Terabit-level Next-Generation Firewall
Hardware Guide
Contents
Issue 01 (2017-03-13)
Huawei Proprietary and Confidential
Copyright © Huawei Technologies Co., Ltd.
59
Item
Parameter
Dimensions (Height × Width ×
Depth)
40 mm × 100 mm × 190 mm
Weight
0.7 kg
Number of inputs
1
Input voltage range
-72 V DC to -38 V DC
Rated input voltage
-48V DC/-60V DC
Maximum input current
42 A
Output voltage
-72 V DC to -38 V DC
Outgoing current
42 A
Current of customer's air
breakers for power distribution
50 A (Each module corresponds to an air breaker.)
1.3.4.3 AC Power Supply System
This section describes the appearance, functions, and technical specifications of the AC power
module and AC power distribution box (PDB).
If a newly shipped USG9520 uses the 2200 W AC power module, which requires the 2200 W AC PDB
and power cable with the C19 straight connector. Early shipped USG9520 uses the 1600 W AC power
module, which requires the 1600 W AC PDB and power cable with the C13 straight connector.
2200 W AC Power System
The USG9520 2200 W AC PDB is in the 1 U standard modular structure. It contains the
R4850G2 AC power module. Both the 2200 W AC PDB and R4850G2 AC power module are
hot swappable. Figure 1-38 shows the appearance and panel of the AC PDB.

HUAWEI USG9500 Series Terabit-level Next-Generation Firewall
Hardware Guide
Contents
Issue 01 (2017-03-13)
Huawei Proprietary and Confidential
Copyright © Huawei Technologies Co., Ltd.
60
Figure 1-38 Appearance of the 2200 W AC PDB
Name
Description
Power cable clip
Binds and fix the power cable.
Power receptacle
Connects the C19 plug of the AC power cable.
Power switch
The power switch allows you to turn on or off the
power output.
RUN indicator (green)
Steady on: The power module works properly.
Off: The power input or power module is faulty.
Blink once every 2 seconds (0.5 Hz): The power
module is in manual query state. This is a normal
state, and no action is required.
Blink four times every second (4 Hz): The power
module is in program loading state. This is a
normal state, and no action is required. After the

HUAWEI USG9500 Series Terabit-level Next-Generation Firewall
Hardware Guide
Contents
Issue 01 (2017-03-13)
Huawei Proprietary and Confidential
Copyright © Huawei Technologies Co., Ltd.
61
Name
Description
program is loaded, the indicator blinks once every
2 seconds.
ALARM indicator (yellow)
Off: The power module does not have alarms.
Steady on: The power module has ever had a
fault, such as overvoltage, undervoltage, or
overcurrent.
Blink once every 2 seconds (0.5 Hz): The
communication of the power module is
interrupted.
FAULT indicator (red)
Steady on: The power module has an
unrecoverable fault, such as the fan fault, no
current output, or output current short circuit.
Off: The power module does not have faults.
Buckle and ejector lever
-
The R4850G2 AC power module provides the following protection functions:
Input overvoltage protection
Input undervoltage protection
Output overvoltage protection
Output current limiting protection
Output short circuit protection
Overtemperature protection
Table 1-29 lists the technical specifications of the 4850G2 AC power module.
Table 1-29 Technical specifications of R4850G2 AC power module
Item
Description
Model
R4850G2
Dimensions (Height × Width ×
Depth)
40.8 mm x 105 mm x 281 mm
Weight
1.8 kg
Number of inputs
1
Maximum input voltage range
90 V AC to 264 V AC; 50/60 Hz
Maximum input current
17 A
Output voltage
-53.3V DC
Maximum output current
-53.3 V DC/30 A
Maximum output power
2200 W (rated input voltage: 220 V AC)/1100 W
(rated input voltage: 110V AC)

HUAWEI USG9500 Series Terabit-level Next-Generation Firewall
Hardware Guide
Contents
Issue 01 (2017-03-13)
Huawei Proprietary and Confidential
Copyright © Huawei Technologies Co., Ltd.
62
1600 W AC Power System
The USG9520 1600 W AC PDB is in the 1 U standard modular structure. It contains the
EPW30B-48A AC power module. Both the 1600 W AC PDB and EPW30B-48A AC power
module are hot swappable. Figure 1-39 shows the appearance and panel of the AC PDB.
Figure 1-39 Appearance and panel of the EPW30B-48A AC power module
Name
Description
RUN indicator (green)
It indicates the running status. If it is steady on, the
power module is working normally.
ALARM indicator (yellow)
It indicates alarms. If it is on, a recoverable fault
occurs on the power module.
If it is blinking, the communication is interrupted.
If it is steady on, faults occur, such as overvoltage
or undervoltage of input power or overcurrent.
FAULT indicator (red)
It indicates a fault. If it is steady on, an unrecoverable
fault occurs in the power supply module, such as fan
failure, no output current, or short circuit of output
current.
The EPW30B-48A AC power module provides the following protection functions:
Protection against output overcurrent
Output overvoltage protection
Protection against short circuit
Alarm function
Table 1-30 lists the technical specifications of the EPW30B-48A AC power module.

HUAWEI USG9500 Series Terabit-level Next-Generation Firewall
Hardware Guide
Contents
Issue 01 (2017-03-13)
Huawei Proprietary and Confidential
Copyright © Huawei Technologies Co., Ltd.
63
Table 1-30 Technical specifications of EPW30B-48A AC power module
Item
Description
Model
EPW30B-48A
Dimensions (Height × Width ×
Depth)
40 mm x 116 mm x 208 mm
Weight
1.8 kg
Number of inputs
1
Maximum input voltage range
90 V AC to 264 V AC; 50/60 Hz
Maximum input current
10 A
Output voltage
-53.3V DC
Maximum output current
-53.3 V DC/30 A
Maximum output power
1600 W (rated input voltage: 220 V AC)/800 W
(rated input voltage: 110V AC)
1.3.5 Heat Dissipation System
This section describes the air channel features of the heat dissipation system and the
appearance, functions, and technical specifications of fan modules.
1.3.5.1 System Air Channel
This section describes the system air channels and air flows of the USG9520.
The USG9520 draws in air from the left and exhausts air from the rear. The air intake vent is
located at the left side of the chassis and the air exhaust vent is located at the rear of the
chassis. The air filter has a curved face, large area, and small windage resistance. These
features help to improve heat dissipation efficiency.
The system draws in air for heat dissipation, as shown in Figure 1-40 and Figure 1-41.

HUAWEI USG9500 Series Terabit-level Next-Generation Firewall
Hardware Guide
Contents
Issue 01 (2017-03-13)
Huawei Proprietary and Confidential
Copyright © Huawei Technologies Co., Ltd.
64
Figure 1-40 Air flow in the USG9520 DC chassis
Figure 1-41 Air flow in the USG9520 AC chassis
The heat dissipation system consists of the following components:
Two fan modules
An air intake vent and an air exhaust vent
An air filter
Fans on power modules
1.3.5.2 Fan Module
This section describes the appearance, technical specifications, and speed adjustment of fans.

HUAWEI USG9500 Series Terabit-level Next-Generation Firewall
Hardware Guide
Contents
Issue 01 (2017-03-13)
Huawei Proprietary and Confidential
Copyright © Huawei Technologies Co., Ltd.
65
Appearance and Technical Specifications of Fan Modules
The fan modules of the USG9520 is located at the back of the chassis. Each fan module has
two fans that work in 1+1 backup mode. When a single fan fails, the heat dissipation system
enables the system to work in a short period of time at ambient temperature of 40°C. Figure
1-42 shows the fan module appearance.
Short-term operation means that the continuous operation time does not exceed 96 hours and the
accumulated operation time per year does not exceed 15 days.
The fan module is hot swappable.
Figure 1-42 Appearance of a fan module
Table 1-31 describes the indicators on the fan module.
Table 1-31 Description of the indicators on the fan module
Indicator
Color
Description
STATUS
Green
If the indicator blinks once every two seconds (0.5 Hz), the fan
module is working normally.
Red
If the indicator blinks once every two seconds (0.5 Hz), the fan
module or power module is faulty (including the case that one
power module does not have input power).
Table 1-32 lists the technical specifications of the fan module.
Table 1-32 Technical specifications of the fan module
Item
Technical Specification
Dimensions (width x
depth x height)
160 mm x 108 mm x 213 mm
Weight
1.5 kg

HUAWEI USG9500 Series Terabit-level Next-Generation Firewall
Hardware Guide
Contents
Issue 01 (2017-03-13)
Huawei Proprietary and Confidential
Copyright © Huawei Technologies Co., Ltd.
66
Item
Technical Specification
Maximum wind pressure
700 Pa
Maximum wind rate
850 m3/h
Maximum noise
78 dB
Fan Speed Adjustment
When the system is fully configured, temperatures reported by the temperature sensors on the
LPUs, SPUs and MPUs serve as the basis for fan speed adjustment. Table 1-33 lists general
principles.
Table 1-33 Fan Speed Adjustment Principles
Ambient
Temperat
ure
Rotationa
l Speed
Noise and Dissipation Standards
-5°C-+27°
C (23°F -
80.6°F)
Low speed
(50%
rotational
speed)
When fans rotate at a constantly low speed, the noises meet the
ETSI standard and the fans meet heat dissipation requirements
of a fully configured system.
27°C-45°C
(80.6°F
-113°F)
Linear
variation
The fan speed is adjusted smoothly in linear mode, without a
sharp increase in noises.
Over 45°C
(113°F)
High speed
(100%
rotational
speed)
Fans rotate at high speed to meet heat dissipation requirements.
1.3.5.3 Air Filter
This section describes the appearance and features of air filters.
The air filter of the USG9520 is located on the left rear of the chassis, as shown in Figure
1-43.

HUAWEI USG9500 Series Terabit-level Next-Generation Firewall
Hardware Guide
Contents
Issue 01 (2017-03-13)
Huawei Proprietary and Confidential
Copyright © Huawei Technologies Co., Ltd.
67
Figure 1-43 Air filter on the USG9520 air intake frame
The air filter of the USG9520 can be bent, which facilitates the maintenance within a limited space in
the rear of the chassis.
Placing a black sponge air filter at the air intake vent helps to prevent dust from entering the system. It is
recommended that the air filter be removed and cleaned once every three months.
1.3.6 Control Plane
This section describes the functions and features of the control plane.
USG9520 uses the MPU to implement the functions of the control plane. The functions
include centralized control and management and data exchange. For MPU details, see 1.4.2.3
E8KE-X3-MPU. The functions of the MPU are described from the following aspects:
System Control and Management Unit
As the system control and management unit, the MPU provides the following functions on the
system control panel:
Route calculation: All routing protocol packets are sent by the forwarding engine to the
MPU for processing. In addition, the MPU broadcasts and filters packets, and downloads
routing policies from the policy server.
Outband communication between boards: The LAN switch modules integrated on the
MPU provide outband communications between boards. In this manner, communications
between the LPUs and SPUs are controlled and maintained, and messages can be
exchanged.
Device management and maintenance: Devices can be managed and maintained through
the management interfaces (serial interfaces) provided by the MPU.
Data configuration: The MPU stores configuration data, startup files, upgrade software,
and system logs.

HUAWEI USG9500 Series Terabit-level Next-Generation Firewall
Hardware Guide
Contents
Issue 01 (2017-03-13)
Huawei Proprietary and Confidential
Copyright © Huawei Technologies Co., Ltd.
68
Data storage: The MPU provides one USB card, which serve as mass storage devices to
store data files.
System Maintenance Unit
As the system maintenance unit, the MPU collects monitored information to test system units
locally or remotely, or implements in-service upgrading of system units.
The MPU periodically collects information about the operation of system units through the
Monitorbus. The MPU then generates related control information based on the collected
information, for example, the detection of board installations and adjustments to fan speed.
Through the joint test action group (JTAG) bus, the MPU remotely or locally tests system
units, or performs in-service upgrading of system units.
Reliability
The main control modules, clock modules, and LAN switch modules on the MPU work in 1:1
hot backup mode, thus improving system reliability.
The two MPUs work in 1:1 backup mode. Each MPU monitors the status of the other. If the
master MPU is faulty, the slave MPU automatically takes over as the master MPU.
1.3.7 Technical Specifications
This section describes the dimensions, weight, power, and environment specifications of the
USG9520.
Table 1-34 lists the technical specifications of the USG9520.
Table 1-34 USG9520 Technical Specifications
Item
Description
System specifications
Processing unit of the MPU
Main frequency: 1 GHz
BootROM capacity of the MPU
1 MB
SDRAM capacity of the MPU
2 GB
NVRAM capacity of the MPU
512 MB
Flash capacity of the MPU
32 MB
CF card
1 x 2 GB
Number of slots
MPU
2 (slots 4 and 5)
SFU
-
LPU/SPU
3 (slots 1, 2, and 3)
Dimensions and weight
Dimensions (Widtha x Depth x
Heightb)
DC chassis: 442 mm x 650 mm x 175 mm (4 U)
AC chassis: 442 mm x 650 mm x 220 mm (5 U)
The depth is 750 mm covering the dust filter and

HUAWEI USG9500 Series Terabit-level Next-Generation Firewall
Hardware Guide
Contents
Issue 01 (2017-03-13)
Huawei Proprietary and Confidential
Copyright © Huawei Technologies Co., Ltd.
69
Item
Description
cable rack.
Installation position
N68E cabinet or a standard 19-inch cabinet
Weight
Empty chassis
DC chassis: 15kg
AC chassis: 25kg
Full
configuration
(maximal)
DC chassis: 30.7 kg
AC chassis: 40.7 kg
Power specifications
Power supply
mode
DC
Double hot-swappable power modules
AC
Double hot-swappable power modules
Rated input
voltage
DC
-48 V
AC
175 V AC to 264 V AC; 50/60 Hz
Maximum input
voltage range
DC
-72 V to -38 V
AC
90 V AC to 264 V AC; 50/60 Hz (The output power
reduces to half of the maximum output when the
input voltage is in the range of 90 V AC to 175 V
AC.)
Typical power
(One LPUF-120
and two SPUs
are configured.)
DC
1066 W
AC
1185 W
Maximum
Power (One
LPUF-120 and
two SPUs are
configured.)
DC
1272 W
AC
1414 W
Heat dissipation
Fan module
1 hot-swappable fan module that has two fans
Air flow
Left-to-back airflow
Air filter
1 air filter in the air intake vent of the air channel
Environment specifications
System
reliability
MTBF (year)
25
MTTR (hour)
0.5
Ambient
temperaturec
Long-termd
0°C to 45°C
Short-term
-5°C to 50°C
Remarks
Limit of the temperature change rate: 30°C/hour

HUAWEI USG9500 Series Terabit-level Next-Generation Firewall
Hardware Guide
Contents
Issue 01 (2017-03-13)
Huawei Proprietary and Confidential
Copyright © Huawei Technologies Co., Ltd.
70
Item
Description
Storage temperature
-40°C to 70°C
Ambient
relative
humidity
Long-term
5% RH to 85% RH, no coagulation
Short-term
5% RH to 95% RH, no coagulation
Storage relative humidity
0% RH to 95% RH
Long-term altitude
Lower than 3000 m
Storage altitude
Lower than 5000 m
NOTE
a. The width does not include the width of the mounting ear attached.
b. The height is 1 U (1 U = 1.75 inches, or about 44.45 mm), which is a height unit defined in
International Electrotechnical Commission (IEC) 60297 standards.
c. The measurement point of the temperature and humidity is 1.5 m over the floor and 0.4 m in front of
the cabinet without the front and the back doors.
d . Short-term operation means that the continuous operation time does not exceed 96 hours and the
accumulated operation time per year does not exceed 15 days. Otherwise, it is called long-term
operation.
1.4 Boards
This section describes various supported boards and their specifications.
1.4.1 Board Overview
This section describes types, structures, and mappings of boards and the rules for numbering
board/subcard slots and interfaces.
1.4.1.1 Types and Mappings of Boards
This section describes the board types supported by the USG9500 and mappings between
boards and cards.
The USG9500 supports the following types of boards:
MPU/SRU
The USG9500 MPU/SRU adopts the integrated board structure. It controls the system in
the centralized manner and learns routing information. It is the controlling center of the
system.
SFU
The USG9500 SFU adopts the integrated board structure. It is responsible for data
switching between boards.
SPU
The USG9500 SPU adopts the flexible plug-in card (FPIC) structure. It is responsible for
processing security services in a centralized manner.

HUAWEI USG9500 Series Terabit-level Next-Generation Firewall
Hardware Guide
Contents
Issue 01 (2017-03-13)
Huawei Proprietary and Confidential
Copyright © Huawei Technologies Co., Ltd.
71
An FPIC SPU consists of two parts: mother board and FPIC. The USG9500 provides
multiple types of SPUs with different performance. An SPU mother board can hold one
or two Service Processing Cards (SPCs).
LPU
The USG9500 LPU adopts either the FPIC or integrated board structure and provides
network interfaces externally.
Table 1-35, Table 1-36, and Table 1-37 show USG9500 board mappings.
In this document, first supported software versions only refer to V300 and V500. For the support to
V200, see the related V200 product document.
Unless otherwise specified, the first supported software versions and their later versions support these
boards. For example, if the first version supporting a board is V500R001C00, V500R001C00 and later
versions also support this board.
Table 1-35 Board mappings
Typ
e
Board Name
BO
M
US
G9
520
US
G9
560
US
G95
80
First
Software
Version
Supporti
ng the
Board
Subcard
Hot
Sw
ap
MP
U/S
RU
1.4.2.1
EKEX16-FW
CD00MPUB0
0
030
5G
06
U
-
-
Yes
V300R00
1C01
-
Yes
1.4.2.2
E8KE-X8-SR
UA-200
030
5G
08
N
-
Yes
-
V300R00
1C01
-
Yes
1.4.2.3
E8KE-X3-MP
U
030
563
05
Yes
-
-
V500R00
1C00
-
Yes
1.4.2.4
MPUD
030
5G
06R
Yes
-
-
V300R00
1C01
-
Yes
SFU
1.4.3.1
E8KE-X16-S
FUC-200SP
030
5G
08
Q
-
-
Yes
V300R00
1C01
-
Yes
1.4.3.2
E8KE-X8-SF
UC-200
030
5G
08P
-
Yes
-
V300R00
1C01
-
Yes
SPU
1.4.4.1 X3
SPU
(SPU-X3-B)
030
566
40
Yes
-
-
V300R00
1C01
1.4.4.10
Firewall
Performance
Expansion
Card
Yes

HUAWEI USG9500 Series Terabit-level Next-Generation Firewall
Hardware Guide
Contents
Issue 01 (2017-03-13)
Huawei Proprietary and Confidential
Copyright © Huawei Technologies Co., Ltd.
72
Typ
e
Board Name
BO
M
US
G9
520
US
G9
560
US
G95
80
First
Software
Version
Supporti
ng the
Board
Subcard
Hot
Sw
ap
(SPC-20-O-E8
KE)
1.4.4.13
Application
Security
Service
Processing
Card
(SPC-APPSE
C-FW)
1.4.4.14
Application
Security
Service
Processing
Card
(SPC-IPS-20)
1.4.4.2 X3
SPU
(SPU-X3-B2)
030
569
89
Yes
-
-
V500R00
1C50
1.4.4.10
Firewall
Performance
Expansion
Card
(SPC-20-O-E8
KE)
1.4.4.13
Application
Security
Service
Processing
Card
(SPC-APPSE
C-FW)
1.4.4.14
Application
Security
Service
Processing
Card
(SPC-IPS-20)
1.4.4.11
Firewall
Performance
Expansion
Card
(SPCA-20-O-
Yes

HUAWEI USG9500 Series Terabit-level Next-Generation Firewall
Hardware Guide
Contents
Issue 01 (2017-03-13)
Huawei Proprietary and Confidential
Copyright © Huawei Technologies Co., Ltd.
73
Typ
e
Board Name
BO
M
US
G9
520
US
G9
560
US
G95
80
First
Software
Version
Supporti
ng the
Board
Subcard
Hot
Sw
ap
H&M)
1.4.4.12
Firewall
Performance
Expansion
Card
(SPCB-20-O-
H&M)
1.4.4.3
X8&X16 SPU
(SPU-X8X16-
B)
030
566
38
-
Yes
Yes
V300R00
1C01
1.4.4.10
Firewall
Performance
Expansion
Card
(SPC-20-O-E8
KE)
1.4.4.13
Application
Security
Service
Processing
Card
(SPC-APPSE
C-FW)
1.4.4.14
Application
Security
Service
Processing
Card
(SPC-IPS-20)
1.4.4.11
Firewall
Performance
Expansion
Card
(SPCA-20-O-
H&M)
1.4.4.12
Firewall
Performance
Expansion
Card
(SPCB-20-O-
H&M)
Yes
1.4.4.4
030
Yes
-
-
V300R00
1.4.4.10
Yes

HUAWEI USG9500 Series Terabit-level Next-Generation Firewall
Hardware Guide
Contents
Issue 01 (2017-03-13)
Huawei Proprietary and Confidential
Copyright © Huawei Technologies Co., Ltd.
74
Typ
e
Board Name
BO
M
US
G9
520
US
G9
560
US
G95
80
First
Software
Version
Supporti
ng the
Board
Subcard
Hot
Sw
ap
Firewall
Service
Processing
Unit
(SPU-X3-20-
O-E8KE, for
USG9520)
5G
09T
1C01
Firewall
Performance
Expansion
Card
(SPC-20-O-E8
KE)
1.4.4.13
Application
Security
Service
Processing
Card
(SPC-APPSE
C-FW)
1.4.4.14
Application
Security
Service
Processing
Card
(SPC-IPS-20)
1.4.4.5
Firewall
Service
Processing
Unit
(SPUA-20-O-
M, for
USG9520)
030
574
27
Yes
-
-
V500R00
1C50
-
Yes
1.4.4.6
Firewall
Service
Processing
Unit
(SPUB-20-O-
M, for
USG9520)
030
575
18
Yes
-
-
V500R00
1C50
-
Yes
1.4.4.7
Firewall
Service
Processing
Unit
(SPU-X8X16-
20-O-E8KE,
for
030
5G
09
U
-
Yes
Yes
V300R00
1C01
1.4.4.10
Firewall
Performance
Expansion
Card
(SPC-20-O-E8
KE)
1.4.4.13
Yes

HUAWEI USG9500 Series Terabit-level Next-Generation Firewall
Hardware Guide
Contents
Issue 01 (2017-03-13)
Huawei Proprietary and Confidential
Copyright © Huawei Technologies Co., Ltd.
75
Typ
e
Board Name
BO
M
US
G9
520
US
G9
560
US
G95
80
First
Software
Version
Supporti
ng the
Board
Subcard
Hot
Sw
ap
USG9560/US
G9580)
Application
Security
Service
Processing
Card
(SPC-APPSE
C-FW)
1.4.4.14
Application
Security
Service
Processing
Card
(SPC-IPS-20)
1.4.4.11
Firewall
Performance
Expansion
Card
(SPCA-20-O-
H&M)
1.4.4.12
Firewall
Performance
Expansion
Card
(SPCB-20-O-
H&M)
1.4.4.8
Firewall
Service
Processing
Unit
(SPUA-20-O-
H, for
USG9560/US
G9580)
030
574
26
-
Yes
Yes
V500R00
1C50
1.4.4.10
Firewall
Performance
Expansion
Card
(SPC-20-O-E8
KE)
1.4.4.13
Application
Security
Service
Processing
Card
(SPC-APPSE
C-FW)
1.4.4.14
Application
Security
Yes

HUAWEI USG9500 Series Terabit-level Next-Generation Firewall
Hardware Guide
Contents
Issue 01 (2017-03-13)
Huawei Proprietary and Confidential
Copyright © Huawei Technologies Co., Ltd.
76
Typ
e
Board Name
BO
M
US
G9
520
US
G9
560
US
G95
80
First
Software
Version
Supporti
ng the
Board
Subcard
Hot
Sw
ap
Service
Processing
Card
(SPC-IPS-20)
1.4.4.11
Firewall
Performance
Expansion
Card
(SPCA-20-O-
H&M)
1.4.4.12
Firewall
Performance
Expansion
Card
(SPCB-20-O-
H&M)
1.4.4.9
Firewall
Service
Processing
Unit
(SPUB-20-O-
H, for
USG9560/US
G9580)
030
575
20
-
Yes
Yes
V500R00
1C50
1.4.4.10
Firewall
Performance
Expansion
Card
(SPC-20-O-E8
KE)
1.4.4.13
Application
Security
Service
Processing
Card
(SPC-APPSE
C-FW)
1.4.4.14
Application
Security
Service
Processing
Card
(SPC-IPS-20)
1.4.4.11
Firewall
Performance
Expansion
Card
(SPCA-20-O-

HUAWEI USG9500 Series Terabit-level Next-Generation Firewall
Hardware Guide
Contents
Issue 01 (2017-03-13)
Huawei Proprietary and Confidential
Copyright © Huawei Technologies Co., Ltd.
77
Typ
e
Board Name
BO
M
US
G9
520
US
G9
560
US
G95
80
First
Software
Version
Supporti
ng the
Board
Subcard
Hot
Sw
ap
H&M)
1.4.4.12
Firewall
Performance
Expansion
Card
(SPCB-20-O-
H&M)
Flexi
ble
Card
LPU
1.4.5.1
LPUF-240
030
566
83
-
Yes
Yes
V500R00
1C00
1.4.5.2
20-Port
10/100/1000B
ase-RJ45
FPIC
(FW-20X1G-
RJ45)
1.4.5.3
24-Port
100/1000
Base-X-SFP
FPIC
(E8KE-X-101
-24XGE-SFP)
1.4.5.4 5-Port
10GBase
LAN/WAN-S
FP+ FPIC A
(E8KE-X-101
-5X10GE-SFP
+)
1.4.5.5
6*10GE SFP+
Daughter Card
(FW-6X10GE
-SFP+)
1.4.5.6
12*10GE
SFP+
Daughter Card
(FW-12X10G
E-SFP+)
1.4.5.7 3-Port
40GBase
QSFP+ FPIC
(FW-3X40G-
QSFP+)
Yes

HUAWEI USG9500 Series Terabit-level Next-Generation Firewall
Hardware Guide
Contents
Issue 01 (2017-03-13)
Huawei Proprietary and Confidential
Copyright © Huawei Technologies Co., Ltd.
78
Typ
e
Board Name
BO
M
US
G9
520
US
G9
560
US
G95
80
First
Software
Version
Supporti
ng the
Board
Subcard
Hot
Sw
ap
1.4.5.8 1-Port
40GBase
LAN-CFP
FPIC A
(E8KE-X-101
-1X40GE-CF
P)
1.4.5.9
1*100GE CFP
Daughter Card
(FW-1X100G
E-CFP)
1.4.6.1
LPUF-120
030
566
82
Yes
Yes
Yes
V500R00
1C00
1.4.6.2
20-Port
10/100/1000B
ase-RJ45
FPIC
(FW-20X1G-
RJ45)
1.4.6.3
24-Port
100/1000
Base-X-SFP
FPIC
(E8KE-X-101
-24XGE-SFP)
1.4.6.4 5-Port
10GBase
LAN/WAN-S
FP+ FPIC A
(E8KE-X-101
-5X10GE-SFP
+)
1.4.6.5
6*10GE SFP+
Daughter Card
(FW-6X10GE
-SFP+)
1.4.6.6
12*10GE
SFP+
Daughter Card
(FW-12X10G
E-SFP+)
1.4.6.7 3-Port
Yes

HUAWEI USG9500 Series Terabit-level Next-Generation Firewall
Hardware Guide
Contents
Issue 01 (2017-03-13)
Huawei Proprietary and Confidential
Copyright © Huawei Technologies Co., Ltd.
79
Typ
e
Board Name
BO
M
US
G9
520
US
G9
560
US
G95
80
First
Software
Version
Supporti
ng the
Board
Subcard
Hot
Sw
ap
40GBase
QSFP+ FPIC
(FW-3X40G-
QSFP+)
1.4.6.8 1-Port
40GBase
LAN-CFP
FPIC A
(E8KE-X-101
-1X40GE-CF
P)
1.4.6.9
1*100GE CFP
Daughter Card
(FW-1X100G
E-CFP)
1.4.7.1
LPUF-101
030
566
30
Yes
Yes
Yes
V300R00
1C01
1.4.7.2
24-Port
100/1000
Base-X-SFP
FPIC
(E8KE-X-101
-24XGE-SFP)
1.4.7.3 4-Port
10G Base
LAN -SFP+
FPIC
(E8KE-X-101
-4X10GE-SFP
+)
1.4.7.4 5-Port
10GBase
LAN/WAN-S
FP+ FPIC A
(E8KE-X-101
-5X10GE-SFP
+)
1.4.7.5 1-Port
40GBase
LAN-CFP
FPIC A
(E8KE-X-101
-1X40GE-CF
P)
Yes
1.4.8
030
Yes
Yes
Yes
V300R00
1.4.8.2
Yes

HUAWEI USG9500 Series Terabit-level Next-Generation Firewall
Hardware Guide
Contents
Issue 01 (2017-03-13)
Huawei Proprietary and Confidential
Copyright © Huawei Technologies Co., Ltd.
80
Typ
e
Board Name
BO
M
US
G9
520
US
G9
560
US
G95
80
First
Software
Version
Supporti
ng the
Board
Subcard
Hot
Sw
ap
LPUF-40-A
and FPIC
566
27
1C01
20-Port
100/1000Base
-X-SFP
Flexible Card
(P40-20xGE/F
E-SFP)
1.4.8.3 2-Port
10GBase
LAN/WAN-X
FP Flexible
Card
(P40-2x10GB
ase
LAN/WAN-X
FP)
1.4.8.4 4-port
10GBase
LAN/WAN-X
FP FPIC
(P40-4x10GB
ase
LAN/WAN-X
FP)
1.4.9
LPUF-21 and
FPIC
030
566
24
Yes
Yes
Yes
V300R00
1C01
1.4.9.2 12-port
10Base-T/100
Base-TX/1000
Base-T-RJ45
FPIC
(12x10/100/10
00Base-TX-R
J45)
1.4.9.3 12-port
100Base-FX/1
000Base-X-SF
P FPIC
(12x100/1000
Base-SFP)
1.4.9.4 1-port
OC-192c/ST
M-64c
POS-XFP
FPIC (1 x
OC-192c/ST
M-64c
POS-XFP)
1.4.9.5 1-port
Yes

HUAWEI USG9500 Series Terabit-level Next-Generation Firewall
Hardware Guide
Contents
Issue 01 (2017-03-13)
Huawei Proprietary and Confidential
Copyright © Huawei Technologies Co., Ltd.
81
Typ
e
Board Name
BO
M
US
G9
520
US
G9
560
US
G95
80
First
Software
Version
Supporti
ng the
Board
Subcard
Hot
Sw
ap
10GBase
LAN/WAN-X
FP FPIC (1 x
10GBase
LAN/WAN)
1.4.9.6 4-Port
10GBase
WAN/LAN-X
FP FPIC
(4x10GBase
LAN/WAN)
Integ
rated
LPU
1.4.10 1-Port
100GBase-CF
P Integrated
Line
Processing
Unit
(LPUI-101)
030
566
37
Yes
Yes
Yes
V300R00
1C01
-
Yes
Table 1-36 Mappings between SPUs and cards
SPU Card
B
SPU Mother Board
Fi
H

HUAWEI USG9500 Series Terabit-level Next-Generation Firewall
Hardware Guide
Contents
Issue 01 (2017-03-13)
Huawei Proprietary and Confidential
Copyright © Huawei Technologies Co., Ltd.
82
O
M
1.4.4.
4
Fire
wall
Serv
ice
Proc
essin
g
Unit
(SPU
-X3-2
0-O-
E8K
E,
for
USG
9520)
1.4.4.
7
Fire
wall
Serv
ice
Proc
essin
g
Unit
(SPU
-X8X
16-20
-O-E
8KE,
for
USG
9560/
USG
9580)
1.4.4
.1
X3
SPU
(SP
U-X
3-B)
1.4.4
.2
X3
SPU
(SP
U-X
3-B2
)
1.4
.4.
3
X8
&
X1
6
SP
U
(S
PU
-X
8X
16-
B)
1.4
.4.
5
Fir
ew
all
Se
rvi
ce
Pr
oc
ess
in
g
Un
it
(S
PU
A-
20-
O-
M,
for
US
G9
52
0)
1.4
.4.
8
Fir
ew
all
Se
rvi
ce
Pr
oc
ess
in
g
Un
it
(S
PU
A-
20-
O-
H,
for
US
G9
56
0/
US
G9
58
0)
1.4
.4.
6
Fir
ew
all
Se
rvi
ce
Pr
oc
ess
in
g
Un
it
(S
PU
B-
20-
O-
M,
for
US
G9
52
0)
1.4
.4.
9
Fir
ew
all
Se
rvi
ce
Pr
oc
ess
in
g
Un
it
(S
PU
B-
20-
O-
H,
for
US
G9
56
0/
US
G9
58
0)
rs
t
S
of
t
w
ar
e
V
er
si
o
n
S
u
p
p
or
ti
n
g
th
e
B
oa
rd
ot
S
w
ap
1.4.4.10
Firewall
Performanc
e
Expansion
Card
(SPC-20-O
-E8KE)
03
05
G0
9V
Yes
Yes
Yes
Yes
Ye
s
-
Ye
s
-
Ye
s
V
30
0
R
00
1
C
01
Y
es
1.4.4.13
Application
Security
Service
Processing
Card
(SPC-APP
SEC-FW)
03
05
66
88
Yes
Yes
Yes
Yes
Ye
s
-
Ye
s
-
Ye
s
V
50
0
R
00
1
C
00
Y
es
1.4.4.14
Application
Security
Service
03
05
G0
9V
Yes
Yes
Yes
Yes
Ye
s
-
Ye
s
-
Ye
s
V
30
0
R
Y
es

HUAWEI USG9500 Series Terabit-level Next-Generation Firewall
Hardware Guide
Contents
Issue 01 (2017-03-13)
Huawei Proprietary and Confidential
Copyright © Huawei Technologies Co., Ltd.
83
SPU Card
B
O
M
SPU Mother Board
Fi
rs
t
S
of
t
w
ar
e
V
er
si
o
n
S
u
p
p
or
ti
n
g
th
e
B
oa
rd
H
ot
S
w
ap
1.4.4.
4
Fire
wall
Serv
ice
Proc
essin
g
Unit
(SPU
-X3-2
0-O-
E8K
E,
for
USG
9520)
1.4.4.
7
Fire
wall
Serv
ice
Proc
essin
g
Unit
(SPU
-X8X
16-20
-O-E
8KE,
for
USG
9560/
USG
9580)
1.4.4
.1
X3
SPU
(SP
U-X
3-B)
1.4.4
.2
X3
SPU
(SP
U-X
3-B2
)
1.4
.4.
3
X8
&
X1
6
SP
U
(S
PU
-X
8X
16-
B)
1.4
.4.
5
Fir
ew
all
Se
rvi
ce
Pr
oc
ess
in
g
Un
it
(S
PU
A-
20-
O-
M,
for
US
G9
52
0)
1.4
.4.
8
Fir
ew
all
Se
rvi
ce
Pr
oc
ess
in
g
Un
it
(S
PU
A-
20-
O-
H,
for
US
G9
56
0/
US
G9
58
0)
1.4
.4.
6
Fir
ew
all
Se
rvi
ce
Pr
oc
ess
in
g
Un
it
(S
PU
B-
20-
O-
M,
for
US
G9
52
0)
1.4
.4.
9
Fir
ew
all
Se
rvi
ce
Pr
oc
ess
in
g
Un
it
(S
PU
B-
20-
O-
H,
for
US
G9
56
0/
US
G9
58
0)
Processing
Card
(SPC-IPS-2
0)
00
1
C
01
1.4.4.11
Firewall
Performanc
e
Expansion
Card
(SPCA-20-
O-H&M)
03
05
74
29
-
Yes
-
Yes
Ye
s
-
Ye
s
-
Ye
s
V
50
0
R
00
1
C
50
Y
es
1.4.4.12
Firewall
Performanc
e
Expansion
Card
(SPCB-20-
03
05
75
22
-
Yes
-
Yes
Ye
s
-
Ye
s
-
Ye
s
V
50
0
R
00
1
C
Y
es

HUAWEI USG9500 Series Terabit-level Next-Generation Firewall
Hardware Guide
Contents
Issue 01 (2017-03-13)
Huawei Proprietary and Confidential
Copyright © Huawei Technologies Co., Ltd.
84
SPU Card
B
O
M
SPU Mother Board
Fi
rs
t
S
of
t
w
ar
e
V
er
si
o
n
S
u
p
p
or
ti
n
g
th
e
B
oa
rd
H
ot
S
w
ap
1.4.4.
4
Fire
wall
Serv
ice
Proc
essin
g
Unit
(SPU
-X3-2
0-O-
E8K
E,
for
USG
9520)
1.4.4.
7
Fire
wall
Serv
ice
Proc
essin
g
Unit
(SPU
-X8X
16-20
-O-E
8KE,
for
USG
9560/
USG
9580)
1.4.4
.1
X3
SPU
(SP
U-X
3-B)
1.4.4
.2
X3
SPU
(SP
U-X
3-B2
)
1.4
.4.
3
X8
&
X1
6
SP
U
(S
PU
-X
8X
16-
B)
1.4
.4.
5
Fir
ew
all
Se
rvi
ce
Pr
oc
ess
in
g
Un
it
(S
PU
A-
20-
O-
M,
for
US
G9
52
0)
1.4
.4.
8
Fir
ew
all
Se
rvi
ce
Pr
oc
ess
in
g
Un
it
(S
PU
A-
20-
O-
H,
for
US
G9
56
0/
US
G9
58
0)
1.4
.4.
6
Fir
ew
all
Se
rvi
ce
Pr
oc
ess
in
g
Un
it
(S
PU
B-
20-
O-
M,
for
US
G9
52
0)
1.4
.4.
9
Fir
ew
all
Se
rvi
ce
Pr
oc
ess
in
g
Un
it
(S
PU
B-
20-
O-
H,
for
US
G9
56
0/
US
G9
58
0)
O-H&M)
50
Table 1-37 Mappings between FPIC LPUs and cards
FPIC LPU
Card
BOM
FPIC LPU Mother Board
First
Softw
are
Versi
on
Supp
orting
the
Board
Hot
Swap
1.4.5.1
LPUF
-240
1.4.6.1
LPUF
-120
1.4.7.1
LPUF
-101
1.4.8
LPUF
-40-A
and
FPIC
1.4.9
LPUF
-21
and
FPIC
1.4.9.2
12-port
10Base-T/10
0Base-TX/10
0305G0
54
-
-
-
-
Yes
V300
R001
C01
No

HUAWEI USG9500 Series Terabit-level Next-Generation Firewall
Hardware Guide
Contents
Issue 01 (2017-03-13)
Huawei Proprietary and Confidential
Copyright © Huawei Technologies Co., Ltd.
85
FPIC LPU
Card
BOM
FPIC LPU Mother Board
First
Softw
are
Versi
on
Supp
orting
the
Board
Hot
Swap
1.4.5.1
LPUF
-240
1.4.6.1
LPUF
-120
1.4.7.1
LPUF
-101
1.4.8
LPUF
-40-A
and
FPIC
1.4.9
LPUF
-21
and
FPIC
00Base-T-RJ
45 FPIC
(12x10/100/1
000Base-TX-
RJ45)
1.4.5.2
20-Port
10/100/1000
Base-RJ45
FPIC
(FW-20X1G-
RJ45)
030568
90
Yes
Yes
-
-
-
V500
R001
C50
No
1.4.9.3
12-port
100Base-FX/
1000Base-X-
SFP FPIC
(12x100/100
0Base-SFP)
030566
26
-
-
-
-
Yes
V300
R001
C01
No
1.4.8.2
20-Port
100/1000Bas
e-X-SFP
Flexible Card
(P40-20xGE/
FE-SFP)
030566
29
-
-
-
Yes
-
V300
R001
C01
No
1.4.7.2
24-Port
100/1000
Base-X-SFP
FPIC
(E8KE-X-10
1-24XGE-SF
P)
030566
33
Yes
Yes
Yes
-
-
V300
R001
C01
No
1.4.9.5 1-port
10GBase
LAN/WAN-
XFP FPIC (1
x 10GBase
LAN/WAN)
030566
25
-
-
-
-
Yes
V300
R001
C01
No

HUAWEI USG9500 Series Terabit-level Next-Generation Firewall
Hardware Guide
Contents
Issue 01 (2017-03-13)
Huawei Proprietary and Confidential
Copyright © Huawei Technologies Co., Ltd.
86
FPIC LPU
Card
BOM
FPIC LPU Mother Board
First
Softw
are
Versi
on
Supp
orting
the
Board
Hot
Swap
1.4.5.1
LPUF
-240
1.4.6.1
LPUF
-120
1.4.7.1
LPUF
-101
1.4.8
LPUF
-40-A
and
FPIC
1.4.9
LPUF
-21
and
FPIC
1.4.8.3 2-Port
10GBase
LAN/WAN-
XFP Flexible
Card
(P40-2x10G
Base
LAN/WAN-
XFP)
030566
28
-
-
-
Yes
-
V300
R001
C01
No
1.4.8.4 4-port
10GBase
LAN/WAN-
XFP FPIC
(P40-4x10G
Base
LAN/WAN-
XFP)
0305G0
7X
-
-
-
Yes
-
V300
R001
C01
No
1.4.9.6 4-Port
10GBase
WAN/LAN-
XFP FPIC
(4x10GBase
LAN/WAN)
0305G0
7W
-
-
-
-
Yes
V300
R001
C01
No
1.4.7.3 4-Port
10G Base
LAN -SFP+
FPIC
(E8KE-X-10
1-4X10GE-S
FP+)
0305G0
9L
-
-
Yes
-
-
V300
R001
C01
No
1.4.7.4 5-Port
10GBase
LAN/WAN-
SFP+ FPIC
A
(E8KE-X-10
1-5X10GE-S
FP+)
030566
32
Yes
Yes
Yes
-
-
V300
R001
C01
No
1.4.5.5
6*10GE
SFP+
030566
84
Yes
Yes
-
-
-
V500
R001
C00
No

HUAWEI USG9500 Series Terabit-level Next-Generation Firewall
Hardware Guide
Contents
Issue 01 (2017-03-13)
Huawei Proprietary and Confidential
Copyright © Huawei Technologies Co., Ltd.
87
FPIC LPU
Card
BOM
FPIC LPU Mother Board
First
Softw
are
Versi
on
Supp
orting
the
Board
Hot
Swap
1.4.5.1
LPUF
-240
1.4.6.1
LPUF
-120
1.4.7.1
LPUF
-101
1.4.8
LPUF
-40-A
and
FPIC
1.4.9
LPUF
-21
and
FPIC
Daughter
Card
(FW-6X10G
E-SFP+)
1.4.5.6
12*10GE
SFP+
Daughter
Card
(FW-12X10
GE-SFP+)
030566
86
Yes
Yes
-
-
-
V500
R001
C00
No
1.4.7.5 1-Port
40GBase
LAN-CFP
FPIC A
(E8KE-X-10
1-1X40GE-C
FP)
030566
31
Yes
Yes
Yes
-
-
V300
R001
C01
No
1.4.5.9
1*100GE
CFP
Daughter
Card
(FW-1X100
GE-CFP)
030566
85
Yes
Yes
-
-
-
V500
R001
C00
No
1.4.5.7 3-Port
40GBase
QSFP+ FPIC
(FW-3X40G-
QSFP+)
030568
48
Yes
Yes
-
-
-
V500
R001
C50
No
1.4.9.4 1-port
OC-192c/ST
M-64c
POS-XFP
FPIC (1 x
OC-192c/ST
M-64c
POS-XFP)
0305G0
55
-
-
-
-
Yes
V300
R001
C01
No

HUAWEI USG9500 Series Terabit-level Next-Generation Firewall
Hardware Guide
Contents
Issue 01 (2017-03-13)
Huawei Proprietary and Confidential
Copyright © Huawei Technologies Co., Ltd.
88
1.4.1.2 Board Structure
This section describes the appearance and structures of boards and cards.
Structure of the Integrated Board
The integrated board on the USG9500 is a plug-in board and consists of a circuit board,
connectors, upward and downward ejector levers, setscrews, and a bolt, as shown in Figure
1-44.
Figure 1-44 Structure of the integrated board
1. Ejector lever
2. Captive screw
3. Connector
4. Bolt
Structure of the flexible board
A flexible board consists of two parts:
Motherboard
Flexible subcard
The flexible board is a plug-in board and consists of the circuit board, connector, heat sinks,
ejector lever, and captive screws, as shown in Figure 1-45.

HUAWEI USG9500 Series Terabit-level Next-Generation Firewall
Hardware Guide
Contents
Issue 01 (2017-03-13)
Huawei Proprietary and Confidential
Copyright © Huawei Technologies Co., Ltd.
89
Figure 1-45 Structure of the flexible board
1. Ejector lever
2. Subcard slot 0
3. Subcard slot 1
4. Captive screw
5. Connector
The flexible subcard is a plug-in board and consists of the circuit board, connector, heat sinks,
ejector lever, and captive screws, as shown in Figure 1-46.
Figure 1-46 Structure of the flexible subcard
1. Circuit board
2. Captive screw
3. Connector
4. Heat sinks
1.4.1.3 Rules for Numbering Slots and Interfaces
The section describes the rule for numbering board slots, card slots, and interfaces.

HUAWEI USG9500 Series Terabit-level Next-Generation Firewall
Hardware Guide
Contents
Issue 01 (2017-03-13)
Huawei Proprietary and Confidential
Copyright © Huawei Technologies Co., Ltd.
90
Board Slot Numbering
Slots are numbered in left-right and top-down order. The slot number is marked on the slots.
Use the USG9560 as an example. Slot numbers start from 1 and range from 1 to 8, as shown
in Figure 1-47.
Figure 1-47 Slot layout on the USG9560
Card Numbering
The slot numbers start from 0. The numbering rules are as follows:
For the cards without subcards, the default subcard slot number is 0, as shown in Figure
1-48.
Figure 1-48 Subcard slot numbering for the cards without subcards
For the cards with subcards, if a card provides only half-width subcards, the subcard slot
numbers are 0 and 1, as shown in Figure 1-49.
Figure 1-49 Subcard slot numbering for the cards providing only half-width subcards
For the cards with subcards, if a card provides both half-width and one-quarter-width
subcards, such as LPUF-101, the subcard slot number is related to the type of inserted
subcards, as shown in Figure 1-50.

HUAWEI USG9500 Series Terabit-level Next-Generation Firewall
Hardware Guide
Contents
Issue 01 (2017-03-13)
Huawei Proprietary and Confidential
Copyright © Huawei Technologies Co., Ltd.
91
Figure 1-50 Subcard slot numbering for the cards providing half-width and
one-quarter-width subcards
Interface Numbering
Interfaces are named in the format of LPU slot/FPIC slot/interface number.
Interfaces are numbered from 0 in right-left and top-down order.
Interfaces are arranged in a single row or two rows. Figure 1-51 shows how interfaces are
numbered.
Figure 1-51 Interface numbers
Use the USG9560 as an example. As shown in Figure 7, the LPU slot number is 7, the FPIC
slot number is 1, and the interface number is 2. Therefore, the interface is named 7/1/2.

HUAWEI USG9500 Series Terabit-level Next-Generation Firewall
Hardware Guide
Contents
Issue 01 (2017-03-13)
Huawei Proprietary and Confidential
Copyright © Huawei Technologies Co., Ltd.
92
If the LPU is a fixed interface board, the FPIC slot number is considered 0.
1.4.2 MPUs and SRUs
The MPU/SRU controls the system in a centralized manner and learns routing information. It
is the controlling center of the system.
1.4.2.1 EKEX16-FWCD00MPUB00
EKEX16-FWCD00MPUB00 is the USG9580 MPU. It is hot-swappable.
Panel
Figure 1-52 shows the appearance of the EKEX16-FWCD00MPUB00.
Figure 1-52 Appearance of the EKEX16-FWCD00MPUB00
Name
Description
Buttons and indicators on the panel
OFL button
To remove a board, you must press and hold the button for six
seconds until the OFL indicator turns on.
NOTE
This button takes effect only on the slave MPU.
OFL indicator (red)
Steady on: You can remove the board.
RUN indicator (green)
Blinks every two seconds (0.5 Hz): The system is running
normally.
Blinks twice each second (2 Hz): The system is in the alarm
state.
ALM indicator (red)
Steady on: The system is in the alarm state.
Off: The system is running normally.
ACT active/standby
indicator (green)
Steady on: The MPU is in the active state.
Off: The MPU is in the standby state.

HUAWEI USG9500 Series Terabit-level Next-Generation Firewall
Hardware Guide
Contents
Issue 01 (2017-03-13)
Huawei Proprietary and Confidential
Copyright © Huawei Technologies Co., Ltd.
93
Name
Description
RESET button
The button is used for resetting the MPU. If you press the
RESET button, you can reset the MPU.
CF card slot, button, and indicator
CF SLOT2
MPUs of the USG9580 have two CF cards numbered CF card
1 and CF card 2.
CF card 1 lies on the circuit board of the MPU and is used to
store system files and configuration files. CF card 2 lies on the
panel of the MPU and is used to store logs and alarms.
CF ACT indicator
(green)
On: The CF is in position.
Blinking: Data is being read or written.
Off: The CF is not in position or can be removed.
CF OFL button
If you press the CF OFL button, all operations on the CF card
will be ended and the CF card will be powered off.
Interfaces and indicators
CTL-ETH-SFP interface
(1000MBase-X)
It is reserved for the use after capacity expansion.
SFP LINK/ACT
indicator (green)
Steady on: The link is normal.
Blinking: Data is being transmitted.
MGMT-ETH interface
(10M/100M/1000M
Base-TX auto-sensing)
It connects to the NMS workstation and has LINK and ACT
indicators.
MGMT-ETH LINK
indicator (green) (on
Ethernet network
interfaces)
Steady on: The link is normal.
Off: The link is Down.
MGMT-ETH ACT
indicator (amber) (on
Ethernet interfaces)
Blinking: Data is being transmitted.
Off: No data is being transmitted.
Console interface
It connects to the console for on-site configuration of the
system.
AUX interface
It connects to the Modem for remote maintenance through
dialing.
Others
USB interface
It is not used and reserved.
CLK/TOD0
They are reserved to input or output clock signals.
CLK/TOD1
CLK/1PPS
CLK/Serial

HUAWEI USG9500 Series Terabit-level Next-Generation Firewall
Hardware Guide
Contents
Issue 01 (2017-03-13)
Huawei Proprietary and Confidential
Copyright © Huawei Technologies Co., Ltd.
94
Interface Attributes
Table 1-38 lists the 1000MBase-X-SFP interface attributes.
Table 1-38 1000MBase-X-SFP interface attributes
Attribute
Description
Connector type
SFP
Operation mode
1000M fiber
Standard compliance
IEEE 802.3-2002
Cable specification
Single-mode or multi-mode fibers
Table 1-39 lists the attributes of the 10Base-T/100Base-TX/1000Base-T-RJ45 interfaces.
Table 1-39 10Base-T/100Base-TX/1000Base-T-RJ45 interface attributes
Attribute
Description
Connector type
RJ45
Operation mode
10M/100M/1000M auto-sensing interfaces, supporting
full-duplex mode
Standard compliance
IEEE 802.3-2002
Cable specification
Category 5 unshielded twisted pair (UTP) cables recommended
when the interface rate is 10 Mbit/s or 100 Mbit/s; super
category 5 Shielded Twisted Pair (STP) cables recommended
when the interface rate is 1000 Mbit/s
Table 1-40 lists the console interface attributes.
Table 1-40 Console interface attributes
Attribute
Description
Connector type
RJ45
Operation mode
Duplex Universal Asynchronous Receiver/Transmitter
(UART)
Electrical attribute
RS-232
Baud rate
9600 bit/s (default value), which can be changed as required
Data equipment type
Data Circuit-terminating Equipment (DCE)
Cable specification
8-core shielded cable

HUAWEI USG9500 Series Terabit-level Next-Generation Firewall
Hardware Guide
Contents
Issue 01 (2017-03-13)
Huawei Proprietary and Confidential
Copyright © Huawei Technologies Co., Ltd.
95
Table 1-41 lists the AUX interface attributes.
Table 1-41 AUX interface attributes
Attribute
Description
Connector Type
RJ45
Operation mode
Duplex UART
Electrical attribute
RS-232
Baud rate
9600 bit/s (default value), which can be changed as required
Data equipment type
Data Terminal Equipment (DTE)
Cable specification
8-core shielded cable
Technical Specifications
Table 1-42 shows the technical specifications of the EKEX16-FWCD00MPUB00.
Table 1-42 Technical specifications of the EKEX16-FWCD00MPUB00
Item
Description
Silkscreen of the board
name
MPUB
Dimensions (W x D x H)
398.5 mm x 554 mm x 40.5 mm
Power consumption
(typical value)
85 W
Heat dissipation
290.02 BTU/hour
Board weight
4.2 kg
1.4.2.2 E8KE-X8-SRUA-200
E8KE-X8-SRUA-200 is the USG9560 SRU. It is hot-swappable. E8KE-X8-SRUA-200
integrates not only a master control unit but also a switch fabric unit for data switching.
Panel
Figure 1-53 shows the appearance of the E8KE-X8-SRUA-200.

HUAWEI USG9500 Series Terabit-level Next-Generation Firewall
Hardware Guide
Contents
Issue 01 (2017-03-13)
Huawei Proprietary and Confidential
Copyright © Huawei Technologies Co., Ltd.
96
Figure 1-53 Appearance of the E8KE-X8-SRUA-200
Name
Description
Buttons and indicators on the panel
OFL button
To remove a board, you must press and hold the button for six
seconds until the OFL indicator turns on.
NOTE
This button takes effect only on the slave SRU.
OFL indicator (red)
Steady on: You can remove the board.
RUN indicator (green)
Blinks every two seconds (0.5 Hz): The system is running
normally.
Blinks twice each second (2 Hz): The system is in the alarm
state.
ALM indicator (red)
Steady on: The system is in the alarm state.
Off: The system is running normally.
ACT active/standby
indicator (green)
Steady on: The SRU is in the active state.
Off: The SRU is in the standby state.
RESET button
The button is used for resetting the SRU. If you press the
RESET button, you can reset the SRU.
CF card slot, button, and indicator
CF SLOT2
SRUs of the USG9560 have two CF cards numbered CF card 1
and CF card 2.
CF card 1 lies on the circuit board of the SRU and is used to
store system files and configuration files. CF card 2 lies on the
panel of the SRU and is used to store logs and alarms.
CF ACT indicator
(green)
On: The CF is in position.
Blinking: Data is being read or written.
Off: The CF is not in position or can be removed.

HUAWEI USG9500 Series Terabit-level Next-Generation Firewall
Hardware Guide
Contents
Issue 01 (2017-03-13)
Huawei Proprietary and Confidential
Copyright © Huawei Technologies Co., Ltd.
97
Name
Description
CF OFL button
If you press the CF OFL button, all operations on the CF card
will be ended and the CF card will be powered off.
Interfaces and indicators
CTL-ETH-SFP interface
(1000MBase-X)
It is reserved for the use after capacity expansion.
SFP LINK/ACT
indicator (green)
Steady on: The link is normal.
Blinking: Data is being transmitted.
MGMT-ETH interface
(10M/100M/1000M
Base-TX auto-sensing)
It connects to the NMS workstation and has LINK and ACT
indicators.
MGMT-ETH LINK
indicator (green) (on
Ethernet network
interfaces)
Steady on: The link is normal.
Off: The link is Down.
MGMT-ETH ACT
indicator (amber) (on
Ethernet interfaces)
Blinking: Data is being transmitted.
Off: No data is being transmitted.
Console interface
It connects to the console for on-site configuration of the
system.
AUX interface
It connects to the Modem for remote maintenance through
dialing.
Others
USB interface
It is not used and reserved.
CLK/TOD0
They are reserved to input or output clock signals.
CLK/TOD1
CLK/1PPS
CLK/Serial
Interface Attributes
Table 1-43 lists the 1000MBase-X-SFP interface attributes.
Table 1-43 1000MBase-X-SFP interface attributes
Attribute
Description
Connector type
SFP
Operation mode
1000M fiber
Standard compliance
IEEE 802.3-2002

HUAWEI USG9500 Series Terabit-level Next-Generation Firewall
Hardware Guide
Contents
Issue 01 (2017-03-13)
Huawei Proprietary and Confidential
Copyright © Huawei Technologies Co., Ltd.
98
Attribute
Description
Cable specification
Single-mode or multi-mode fibers
Table 1-44 lists the attributes of the 10Base-T/100Base-TX/1000Base-T-RJ45 interfaces.
Table 1-44 10Base-T/100Base-TX/1000Base-T-RJ45 interface attributes
Attribute
Description
Connector type
RJ45
Operation mode
10M/100M/1000M auto-sensing interfaces, supporting
full-duplex mode
Standard compliance
IEEE 802.3-2002
Cable specification
Category 5 unshielded twisted pair (UTP) cables recommended
when the interface rate is 10 Mbit/s or 100 Mbit/s; super
category 5 Shielded Twisted Pair (STP) cables recommended
when the interface rate is 1000 Mbit/s
Table 1-45 lists the console interface attributes.
Table 1-45 Console interface attributes
Attribute
Description
Connector type
RJ45
Operation mode
Duplex Universal Asynchronous Receiver/Transmitter
(UART)
Electrical attribute
RS-232
Baud rate
9600 bit/s (default value), which can be changed as required
Data equipment type
Data Circuit-terminating Equipment (DCE)
Cable specification
8-core shielded cable
Table 1-46 lists the AUX interface attributes.
Table 1-46 AUX interface attributes
Attribute
Description
Connector Type
RJ45
Operation mode
Duplex UART
Electrical attribute
RS-232

HUAWEI USG9500 Series Terabit-level Next-Generation Firewall
Hardware Guide
Contents
Issue 01 (2017-03-13)
Huawei Proprietary and Confidential
Copyright © Huawei Technologies Co., Ltd.
99
Attribute
Description
Baud rate
9600 bit/s (default value), which can be changed as required
Data equipment type
Data Terminal Equipment (DTE)
Cable specification
8-core shielded cable
Technical Specifications
Table 1-47 shows the technical specifications of the E8KE-X8-SRUA-200.
Table 1-47 Technical specifications of the E8KE-X8-SRUA-200
Item
Description
Silkscreen of the board
name
SRUA
Dimensions (W x D x H)
398.5 mm x 554 mm x 35 mm
Power consumption
(typical value)
149 W
Heat dissipation
508.39 BTU/hour
Board weight
4.8 kg
1.4.2.3 E8KE-X3-MPU
E8KE-X3-MPU is the USG9520 MPU. It is hot-swappable.
Panel
Figure 1-54 shows the appearance of the E8KE-X3-MPU.
Figure 1-54 Appearance of the E8KE-X3-MPU
This MPU uses a USB storage device. This USB storage device is installed on the PCB and is not
replaceable. To be compatible with the MPUs that use CF cards as storage devices, the USB storage
device is displayed as a CF card during a file operation, while is displayed as USB during an MPU
restart.
Name
Description

HUAWEI USG9500 Series Terabit-level Next-Generation Firewall
Hardware Guide
Contents
Issue 01 (2017-03-13)
Huawei Proprietary and Confidential
Copyright © Huawei Technologies Co., Ltd.
100
Name
Description
Buttons and indicators on the panel
OFL button
To remove a board, you must press and hold the button for six
seconds until the OFL indicator turns on.
NOTE
This button takes effect only on the slave MPU.
OFL indicator (red)
Steady on: You can remove the board.
RUN indicator (green)
Blinks every two seconds (0.5 Hz): The system is running
normally.
Blinks twice each second (2 Hz): The system is in the alarm
state.
ALM indicator (red)
Steady on: The system is in the alarm state.
Off: The system is running normally.
ACT active/standby
indicator (green)
Steady on: The MPU is in the active state.
Off: The MPU is in the standby state.
RESET button
The button is used for resetting the MPU. If you press the
RESET button, you can reset the MPU.
Interfaces and indicators
MGMT-ETH interface
(10M/100M/1000M
Base-TX auto-sensing)
It connects to the NMS workstation and has LINK and ACT
indicators.
MGMT-ETH LINK
indicator (green) (on
Ethernet network
interfaces)
Steady on: The link is normal.
Off: The link is Down.
MGMT-ETH ACT
indicator (amber) (on
Ethernet interfaces)
Blinking: Data is being transmitted.
Off: No data is being transmitted.
Console interface
It connects to the console for on-site configuration of the
system.
AUX interface
It connects to the Modem for remote maintenance through
dialing.
Others
CLK
They are reserved to input or output clock signals.
TOD
Interface Attributes
Table 1-48 lists the attributes of the 10Base-T/100Base-TX/1000Base-T-RJ45 interfaces.

HUAWEI USG9500 Series Terabit-level Next-Generation Firewall
Hardware Guide
Contents
Issue 01 (2017-03-13)
Huawei Proprietary and Confidential
Copyright © Huawei Technologies Co., Ltd.
101
Table 1-48 10Base-T/100Base-TX/1000Base-T-RJ45 interface attributes
Attribute
Description
Connector type
RJ45
Operation mode
10M/100M/1000M auto-sensing interfaces, supporting
full-duplex mode
Standard compliance
IEEE 802.3-2002
Cable specification
Category 5 unshielded twisted pair (UTP) cables recommended
when the interface rate is 10 Mbit/s or 100 Mbit/s; super
category 5 Shielded Twisted Pair (STP) cables recommended
when the interface rate is 1000 Mbit/s
Table 1-49 lists the console interface attributes.
Table 1-49 Console interface attributes
Attribute
Description
Connector type
RJ45
Operation mode
Duplex Universal Asynchronous Receiver/Transmitter
(UART)
Electrical attribute
RS-232
Baud rate
9600 bit/s (default value), which can be changed as required
Data equipment type
Data Circuit-terminating Equipment (DCE)
Cable specification
8-core shielded cable
Table 1-50 lists the AUX interface attributes.
Table 1-50 AUX interface attributes
Attribute
Description
Connector Type
RJ45
Operation mode
Duplex UART
Electrical attribute
RS-232
Baud rate
9600 bit/s (default value), which can be changed as required
Data equipment type
Data Terminal Equipment (DTE)
Cable specification
8-core shielded cable

HUAWEI USG9500 Series Terabit-level Next-Generation Firewall
Hardware Guide
Contents
Issue 01 (2017-03-13)
Huawei Proprietary and Confidential
Copyright © Huawei Technologies Co., Ltd.
102
Technical Specifications
Table 1-51 shows the technical specifications of the E8KE-X3-MPU.
Table 1-51 Technical specifications of the E8KE-X3-MPU
Item
Description
Silkscreen of the board
name
MPU
E8KE-X3-MPU
Dimensions (W x D x H)
198.5 mm x 551 mm x 40 mm
Power consumption
(typical value)
32 W
Heat dissipation
103.82 BTU/hour
Board weight
1.7 kg
1.4.2.4 MPUD
MPUD is the USG9520 MPU. It is hot-swappable.
MPUD Panel
Figure 1-55 shows the appearance of the panel.
The CF card is not hot swappable.
Figure 1-55 Appearance of the panel
1. Ejector
lever
2. BITS0 (not in
use currently)
3. BITS1 (not in use currently)
4. ETH0
5. CF OFL
button
6. CF indicator
7. CF card slot (the other CF card
slot is on the circuitry board)
8. Reset
button
9. OFL
button
10. OFL indicator
11. ACT indicator
12. ALM
indicator
13. RUN
14. Console
15. AUX interface
-

HUAWEI USG9500 Series Terabit-level Next-Generation Firewall
Hardware Guide
Contents
Issue 01 (2017-03-13)
Huawei Proprietary and Confidential
Copyright © Huawei Technologies Co., Ltd.
103
indicator
Table 1-52 describes the buttons and indicators on the MPUD panel.
Table 1-52 Buttons and indicators on the MPUD panel
Indicator/Button
Description
OFL button
To remove a board, you must press and hold the button for six
seconds until the OFL indicator turns on.
NOTE
This button takes effect only on the slave MPUD.
OFL indicator (red)
If the indicator is on, you can remove the board.
RUN indicator (green)
If the indicator blinks once every two seconds (0.5 Hz), the
system is in the normal state. If the indicator blinks twice each
second (2 Hz), the system is in the alarm state.
ALM indicator (red)
If the indicator is steady on, the system is in the alarm state.
If the indicator is steady off, the system is in the normal state.
ACT active/standby
indicator (green)
If the indicator is on, the MPUD is in the active state.
If the indicator is off, the MPUD is in the standby state.
RESET button
The button is used for resetting the MPUD. Press the RESET
button, and you can reset the MPUD.
CF ACT indicator
(green)
If the indicator is on, the CF is in position.
If the indicator is blinking, data is being read or written.
If the indicator is off, the CF is not in position or can be
removed.
LINK indicator (green)
(on the Ethernet
interface)
If the indicator is steady on, the link is normal.
If the indicator is off, the link is Down.
ACT indicator (amber)
(on Ethernet interfaces)
If the indicator is blinking, data is being transmitted.
If the indicator is off, no data is being transmitted.
Table 1-53 describes the interfaces on the MPUD and their uses.
Table 1-53 Interfaces on the MPUD and their uses
Interface Name
Connector
Type
Description
Eth0 (10M/100M/1000M
Base-TX auto-sensing)
RJ45
It connects to the NMS workstation and has
LINK and ACT indicators.
Console interface
RJ45
It connects to the console for on-site
configuration of the system.

HUAWEI USG9500 Series Terabit-level Next-Generation Firewall
Hardware Guide
Contents
Issue 01 (2017-03-13)
Huawei Proprietary and Confidential
Copyright © Huawei Technologies Co., Ltd.
104
Interface Name
Connector
Type
Description
AUX interface
RJ45
It connects to the Modem for remote
maintenance through dialing.
CF card interface
TYPE II
standard
(compatible
with TYPE I
standard)
It is used to hold a CF card to store data
files as a massive storage device.
Interface Attributes
Table 1-54 lists the attributes of the 10Base-T/100Base-TX/1000Base-T-RJ45 interfaces.
Table 1-54 10Base-T/100Base-TX/1000Base-T-RJ45 interface attributes
Attribute
Description
Connector type
RJ45
Operation mode
10M/100M/1000M auto-sensing interfaces, supporting
full-duplex mode
Standard compliance
IEEE 802.3-2002
Cable specification
Category 5 unshielded twisted pair (UTP) cables recommended
when the interface rate is 10 Mbit/s or 100 Mbit/s; super
category 5 Shielded Twisted Pair (STP) cables recommended
when the interface rate is 1000 Mbit/s
Table 1-55 lists the console interface attributes.
Table 1-55 Console interface attributes
Attribute
Description
Connector type
RJ45
Operation mode
Duplex Universal Asynchronous Receiver/Transmitter
(UART)
Electrical attribute
RS-232
Baud rate
9600 bit/s (default value), which can be changed as required
Data equipment type
Data Circuit-terminating Equipment (DCE)
Cable specification
8-core shielded cable
Table 1-56 lists the AUX interface attributes.

HUAWEI USG9500 Series Terabit-level Next-Generation Firewall
Hardware Guide
Contents
Issue 01 (2017-03-13)
Huawei Proprietary and Confidential
Copyright © Huawei Technologies Co., Ltd.
105
Table 1-56 AUX interface attributes
Attribute
Description
Connector type
RJ45
Operation mode
Duplex UART
Electrical attribute
RS-232
Baud rate
9600 bit/s (default value), which can be changed as required
Data equipment type
Data Terminal Equipments (DTE)
Cable specification
8-core shielded cable
Technical Specifications
Table 1-57 shows the technical specifications of the MPUD.
Table 1-57 Technical specifications of the MPUD
Item
Description
Silkscreen of the board
name
MPUD
Dimensions (W x D x H)
198.5 mm x 551 mm x 40 mm
Power consumption
(typical value)
41 W
Board weight
2 kg
1.4.3 SFUs
An SFU is responsible for data switching between boards. The USG9520 does not support the
SFU.
1.4.3.1 E8KE-X16-SFUC-200SP
E8KE-X16-SFUC-200SP is the USG9580 SFU. It uses the non-blocking switch fabric. It is
hot-swappable and responsible for data switching of the entire system.
Panel
Figure 1-56 shows the appearance of the E8KE-X16-SFUC-200SP.

HUAWEI USG9500 Series Terabit-level Next-Generation Firewall
Hardware Guide
Contents
Issue 01 (2017-03-13)
Huawei Proprietary and Confidential
Copyright © Huawei Technologies Co., Ltd.
106
Figure 1-56 Appearance of the E8KE-X16-SFUC-200SP
Name
Description
OFL button
To remove a board, you must press and hold the button for six
seconds until the OFL indicator turns on.
OFL indicator (red)
Steady on: You can remove the board.
RUN indicator (green)
Blinks every two seconds (0.5 Hz): The system is running
normally.
Blinks twice each second (2 Hz): The system is in the alarm
state.
ACT (green)
Steady on: The SFU is working normally.
Off: The SFU is faulty.
Interface Attributes
The E8KE-X16-SFUC-200SP does not provide interfaces externally.
Technical Specifications
Table 1-58 shows the technical specifications of the E8KE-X16-SFUC-200SP.
Table 1-58 Technical specifications of the E8KE-X16-SFUC-200SP
Item
Description
Silkscreen of the board
name
SFUI-200-B
Dimensions (W x D x H)
410 mm x 553.5 mm x 40.5 mm
Power consumption
(typical value)
90 W
Heat dissipation
307.08 BTU/hour
Board weight
4.26 kg

HUAWEI USG9500 Series Terabit-level Next-Generation Firewall
Hardware Guide
Contents
Issue 01 (2017-03-13)
Huawei Proprietary and Confidential
Copyright © Huawei Technologies Co., Ltd.
107
1.4.3.2 E8KE-X8-SFUC-200
E8KE-X8-SFUC-200 is the USG9560 SFU. It uses the non-blocking switch fabric. It is
hot-swappable and responsible for data switching of the entire system.
Panel
Figure 1-57 shows the appearance of the E8KE-X8-SFUC-200.
Figure 1-57 Appearance of the E8KE-X8-SFUC-200
Name
Description
OFL button
To remove a board, you must press and hold the button for six
seconds until the OFL indicator turns on.
OFL indicator (red)
Steady on: You can remove the board.
RUN indicator (green)
Blinks every two seconds (0.5 Hz): The system is running
normally.
Blinks twice each second (2 Hz): The system is in the alarm
state.
ACT (green)
Steady on: The SFU is working normally.
Off: The SFU is faulty.
Interface Attributes
The E8KE-X8-SFUC-200 does not provide interfaces externally.
Technical Specifications
Table 1-59 shows the technical specifications of the E8KE-X8-SFUC-200.
Table 1-59 Technical specifications of the E8KE-X8-SFUC-200
Item
Description
Silkscreen of the board
name
SFUI-200-C

HUAWEI USG9500 Series Terabit-level Next-Generation Firewall
Hardware Guide
Contents
Issue 01 (2017-03-13)
Huawei Proprietary and Confidential
Copyright © Huawei Technologies Co., Ltd.
108
Item
Description
Dimensions (W x D x H)
400 mm x 553.5 mm x 35 mm
Power consumption
(typical value)
77 W
Heat dissipation
262.72 BTU/hour
Board weight
3.82 kg
1.4.4 SPUs and SPCs
An SPU is a unit responsible for security service processing.
1.4.4.1 X3 SPU (SPU-X3-B)
The SPU-X3-B applies to the USG9520 platform and is a mother board. By default, this board
does not have any service processing capability and must be used together with subcards. This
board has two slots, and each slot can house a firewall SPC or application security SPC.
The SPU-X3-B is inserted into the LPU/SPU slot of the USG9520.
The board is hot swappable.
Panel
Figure 1-58 shows the appearance of the SPU-X3-B.
Figure 1-58 Appearance of the SPU-X3-B
Name
Description
OFL button
To remove a board, you must press and hold the button for six
seconds until the OFL indicator turns on.
OFL indicator (red)
Steady on: You can remove the board.
RUN indicator (green)
Blinks every two seconds (0.5 Hz): The board is running
normally.
Blinks four each second (4 Hz): The board is in the alarm
state or starting and not registered.

HUAWEI USG9500 Series Terabit-level Next-Generation Firewall
Hardware Guide
Contents
Issue 01 (2017-03-13)
Huawei Proprietary and Confidential
Copyright © Huawei Technologies Co., Ltd.
109
Interface Attributes
The SPU-X3-B does not provide interfaces externally.
Technical Specifications
Table 1-60 shows the technical specifications of the SPU-X3-B.
Table 1-60 Technical specifications of the SPU-X3-B
Item
Description
Silkscreen of the board
name
SPUC
SPU-X3-B
Dimensions (W x D x H)
400 mm x 520 mm x 41 mm
Power consumption
(typical value)
116 W
Heat dissipation
395.79 BTU/hour
Board weight
5.23 kg
Maximum input voltage
range (DC)
-72 V to -38 V
CPU
1.2 GHz
1.4.4.2 X3 SPU (SPU-X3-B2)
The SPU-X3-B2 applies to the USG9520 platform and is a mother board. By default, this
board does not have any service processing capability and must be used together with
subcards. This board has one available slot, and the slot can house a firewall SPC or
application security SPC.
The SPU-X3-B2 is inserted into the LPU/SPU slot of the USG9520.
The board is hot swappable.
Panel
Figure 1-59 shows the appearance of the SPU-X3-B2.

HUAWEI USG9500 Series Terabit-level Next-Generation Firewall
Hardware Guide
Contents
Issue 01 (2017-03-13)
Huawei Proprietary and Confidential
Copyright © Huawei Technologies Co., Ltd.
110
Figure 1-59 Appearance of the SPU-X3-B2
Name
Description
OFL button
To remove a board, you must press and hold the button for six
seconds until the OFL indicator turns on.
OFL indicator (red)
Steady on: You can remove the board.
RUN indicator (green)
Blinks every two seconds (0.5 Hz): The board is running
normally.
Blinks four each second (4 Hz): The board is in the alarm
state or starting and not registered.
Interface Attributes
The SPU-X3-B2 does not provide interfaces externally.
Technical Specifications
Table 1-61 shows the technical specifications of the SPU-X3-B2.
Table 1-61 Technical specifications of the SPU-X3-B2
Item
Description
Silkscreen of the board
name
SPUE
SPU-X3-B2
Dimensions (W x D x H)
400 mm x 520 mm x 41 mm
Power consumption
(typical value)
80 W
Heat dissipation
204.71 BTU/hour
Board weight
5.18 kg
Maximum input voltage
range (DC)
-72 V to -38 V
CPU
1.6 GHz

HUAWEI USG9500 Series Terabit-level Next-Generation Firewall
Hardware Guide
Contents
Issue 01 (2017-03-13)
Huawei Proprietary and Confidential
Copyright © Huawei Technologies Co., Ltd.
111
1.4.4.3 X8&X16 SPU (SPU-X8X16-B)
The SPU-X8X16-B applies to the USG9560 and USG9580 platforms and is a mother board.
By default, this board does not have any service processing capability and must be used
together with subcards. Each slot can house a firewall SPC or application security SPC.
The SPU-X8X16-B is inserted into the LPU/SPU slot of the USG9560 and USG9580.
The board is hot swappable.
Panel
Figure 1-60 shows the appearance of the SPU-X8X16-B.
Figure 1-60 Appearance of the SPU-X8X16-B
Name
Description
OFL button
To remove a board, you must press and hold the button for six
seconds until the OFL indicator turns on.
OFL indicator (red)
Steady on: You can remove the board.
RUN indicator (green)
Blinks every two seconds (0.5 Hz): The board is running
normally.
Blinks four each second (4 Hz): The board is in the alarm
state or starting and not registered.
Interface Attributes
The SPU-X8X16-B does not provide interfaces externally.
Technical Specifications
Table 1-62 shows the technical specifications of the SPU-X8X16-B.
Table 1-62 Technical specifications of the SPU-X8X16-B
Item
Description

HUAWEI USG9500 Series Terabit-level Next-Generation Firewall
Hardware Guide
Contents
Issue 01 (2017-03-13)
Huawei Proprietary and Confidential
Copyright © Huawei Technologies Co., Ltd.
112
Item
Description
Silkscreen of the board
name
SPUD
SPU-X8X16-B
Dimensions (W x D x H)
400 mm x 520 mm x 41 mm
Power consumption
(typical value)
125 W
Heat dissipation
426.5 BTU/hour
Board weight
5.34 kg
Maximum input voltage
range (DC)
-72 V to -38 V
CPU
1.2 GHz
1.4.4.4 Firewall Service Processing Unit (SPU-X3-20-O-E8KE, for USG9520)
The SPU-X3-20-O-E8KE is inserted into the LPU/SPU slot of the USG9520, provides an
expansion slot, and is hot swappable.
Panel
Figure 1-61 shows the appearance of the SPU-X3-20-O-E8KE.
Figure 1-61 Appearance of the SPU-X3-20-O-E8KE
Name
Description
SPU
OFL button
To remove an SPU, you must press and hold the OFL button
for six seconds until the OFL indicator turns on.
OFL indicator (red)
Steady on: You can remove the SPU.
RUN indicator (green)
Blinks every two seconds (0.5 Hz): The SPU is running
normally.
Blinks four times every second (4 Hz): The SPU is in the
alarm state or starting but not registered.

HUAWEI USG9500 Series Terabit-level Next-Generation Firewall
Hardware Guide
Contents
Issue 01 (2017-03-13)
Huawei Proprietary and Confidential
Copyright © Huawei Technologies Co., Ltd.
113
Name
Description
SPC
! NOT SWAP
The SPC and SPU in one slot share one sales code. Either the
SPC or SPU cannot be separately replaced.
OFL button
To remove an SPC, you must press and hold the OFL button
for six seconds until the OFL indicator turns red for one second
and then turns off.
OFL indicator
If the indicator is green and blinks once every second (1
Hz), the SPC is running normally.
If the indicator is green and blinks four times every second
(4 Hz), the SPC is in the alarm state or starting but not
registered.
If the indicator turns red for one second and then turns off,
you can remove the SPC securely.
Interface Attributes
The SPU-X3-20-O-E8KE does not provide interfaces externally.
Technical Specifications
Table 1-63 shows the technical specifications of the SPU-X3-20-O-E8KE.
Table 1-63 Technical specifications of the SPU-X3-20-O-E8KE
Item
Description
Silkscreen of the board
name
SPUC
SPU-X3-20-O-E8KE
Dimensions (W x D x H)
400 mm x 520 mm x 41 mm
Power consumption
(typical value)
255 W
Heat dissipation
870.06 BTU/hour
Board weight
6.85 kg
Maximum input voltage
range (DC)
-72 V to -38 V
CPU number
2
CPU
1.2 GHz
Memory
DDR3 16 GB/CPU

HUAWEI USG9500 Series Terabit-level Next-Generation Firewall
Hardware Guide
Contents
Issue 01 (2017-03-13)
Huawei Proprietary and Confidential
Copyright © Huawei Technologies Co., Ltd.
114
1.4.4.5 Firewall Service Processing Unit (SPUA-20-O-M, for USG9520)
The SPUA-20-O-M is inserted into the LPU/SPU slot of the USG9520, provides no
expansion slot, and is hot swappable.
Panel
Figure 1-62 shows the appearance of the SPUA-20-O-M.
Figure 1-62 Appearance of the SPUA-20-O-M
Name
Description
SPU
OFL button
To remove an SPU, you must press and hold the OFL button
for six seconds until the OFL indicator turns on.
OFL indicator (red)
Steady on: You can remove the SPU.
RUN indicator (green)
Blinks every two seconds (0.5 Hz): The SPU is running
normally.
Blinks four times every second (4 Hz): The SPU is in the
alarm state or starting but not registered.
SPC
! NOT SWAP
The SPC and SPU in one slot share one sales code. Either the
SPC or SPU cannot be separately replaced.
OFL button
To remove an SPC, you must press and hold the OFL button
for six seconds until the OFL indicator turns red for one second
and then turns off.
OFL indicator
If the indicator is green and blinks once every second (1
Hz), the SPC is running normally.
If the indicator is green and blinks four times every second
(4 Hz), the SPC is in the alarm state or starting but not
registered.
If the indicator turns red for one second and then turns off,
you can remove the SPC securely.

HUAWEI USG9500 Series Terabit-level Next-Generation Firewall
Hardware Guide
Contents
Issue 01 (2017-03-13)
Huawei Proprietary and Confidential
Copyright © Huawei Technologies Co., Ltd.
115
Interface Attributes
The SPUA-20-O-M does not provide interfaces externally.
Technical Specifications
Table 1-64 shows the technical specifications of the SPUA-20-O-M.
Table 1-64 Technical specifications of the SPUA-20-O-M
Item
Description
Silkscreen of the board
name
SPUE
SPUA-20-O-M
Dimensions (W x D x H)
400 mm x 520 mm x 41 mm
Power consumption
(typical value)
180 W
Heat dissipation
661.89 BTU/hour
Board weight
6.48 kg
Maximum input voltage
range (DC)
-72 V to -38 V
CPU number
1
CPU
1.6 GHz
Memory
DDR4 32GB
1.4.4.6 Firewall Service Processing Unit (SPUB-20-O-M, for USG9520)
The SPUB-20-O-M is inserted into the LPU/SPU slot of the USG9520, provides no expansion
slot, and is hot swappable.
Panel
Figure 1-63 shows the appearance of the SPUB-20-O-M.
Figure 1-63 Appearance of the SPUB-20-O-M

HUAWEI USG9500 Series Terabit-level Next-Generation Firewall
Hardware Guide
Contents
Issue 01 (2017-03-13)
Huawei Proprietary and Confidential
Copyright © Huawei Technologies Co., Ltd.
116
Name
Description
SPU
OFL button
To remove an SPU, you must press and hold the OFL button
for six seconds until the OFL indicator turns on.
OFL indicator (red)
Steady on: You can remove the SPU.
RUN indicator (green)
Blinks every two seconds (0.5 Hz): The SPU is running
normally.
Blinks four times every second (4 Hz): The SPU is in the
alarm state or starting but not registered.
SPC
! NOT SWAP
The SPC and SPU in one slot share one sales code. Either the
SPC or SPU cannot be separately replaced.
OFL button
To remove an SPC, you must press and hold the OFL button
for six seconds until the OFL indicator turns red for one second
and then turns off.
OFL indicator
If the indicator is green and blinks once every second (1
Hz), the SPC is running normally.
If the indicator is green and blinks four times every second
(4 Hz), the SPC is in the alarm state or starting but not
registered.
If the indicator turns red for one second and then turns off,
you can remove the SPC securely.
Interface Attributes
The SPUB-20-O-M does not provide interfaces externally.
Technical Specifications
Table 1-65 shows the technical specifications of the SPUB-20-O-M.
Table 1-65 Technical specifications of the SPUB-20-O-M
Item
Description
Silkscreen of the board
name
SPUE
SPUB-20-O-M
Dimensions (W x D x H)
400 mm x 520 mm x 41 mm
Power consumption
(typical value)
280 W
Heat dissipation
1003.08 BTU/hour
Board weight
6.6 kg

HUAWEI USG9500 Series Terabit-level Next-Generation Firewall
Hardware Guide
Contents
Issue 01 (2017-03-13)
Huawei Proprietary and Confidential
Copyright © Huawei Technologies Co., Ltd.
117
Item
Description
Maximum input voltage
range (DC)
-72 V to -38 V
CPU number
2
CPU
1.6 GHz
Memory
DDR4 32GB/CPU
1.4.4.7 Firewall Service Processing Unit (SPU-X8X16-20-O-E8KE, for
USG9560/USG9580)
The SPU-X8X16-20-O-E8KE is inserted into the LPU/SPU slot of the USG9560 and
USG9580, provides an expansion slot, and is hot swappable.
Panel
Figure 1-64 shows the appearance of the SPU-X8X16-20-O-E8KE.
Figure 1-64 Appearance of the SPU-X8X16-20-O-E8KE
Name
Description
SPU
OFL button
To remove an SPU, you must press and hold the OFL button
for six seconds until the OFL indicator turns on.
OFL indicator (red)
Steady on: You can remove the SPU.
RUN indicator (green)
Blinks every two seconds (0.5 Hz): The SPU is running
normally.
Blinks four times every second (4 Hz): The SPU is in the
alarm state or starting but not registered.
SPC
! NOT SWAP
The SPC and SPU in one slot share one sales code. Either the
SPC or SPU cannot be separately replaced.
OFL button
To remove an SPC, you must press and hold the OFL button

HUAWEI USG9500 Series Terabit-level Next-Generation Firewall
Hardware Guide
Contents
Issue 01 (2017-03-13)
Huawei Proprietary and Confidential
Copyright © Huawei Technologies Co., Ltd.
118
Name
Description
for six seconds until the OFL indicator turns red for one second
and then turns off.
OFL indicator
If the indicator is green and blinks once every second (1
Hz), the SPC is running normally.
If the indicator is green and blinks four times every second
(4 Hz), the SPC is in the alarm state or starting but not
registered.
If the indicator turns red for one second and then turns off,
you can remove the SPC securely.
Interface Attributes
The SPU-X8X16-20-O-E8KE does not provide interfaces externally.
Technical Specifications
Table 1-66 shows the technical specifications of the SPU-X8X16-20-O-E8KE.
Table 1-66 Technical specifications of the SPU-X8X16-20-O-E8KE
Item
Description
Silkscreen of the board
name
SPUD
SPU-X8X16-20-O-E8KE
Dimensions (W x D x H)
400 mm x 520 mm x 41 mm
Power consumption
(typical value)
284 W
Heat dissipation
969 BTU/hour
Board weight
6.96 kg
Maximum input voltage
range (DC)
-72 V to -38 V
CPU number
2
CPU
1.2 GHz
Memory
DDR3 16 GB/CPU
1.4.4.8 Firewall Service Processing Unit (SPUA-20-O-H, for
USG9560/USG9580)
The SPUA-20-O-H is inserted into the LPU/SPU slot of the USG9560 and USG9580,
provides an expansion slot, and is hot swappable.

HUAWEI USG9500 Series Terabit-level Next-Generation Firewall
Hardware Guide
Contents
Issue 01 (2017-03-13)
Huawei Proprietary and Confidential
Copyright © Huawei Technologies Co., Ltd.
119
Panel
Figure 1-65 shows the appearance of the SPUA-20-O-H.
Figure 1-65 Appearance of the SPUA-20-O-H
Name
Description
SPU
OFL button
To remove an SPU, you must press and hold the OFL button
for six seconds until the OFL indicator turns on.
OFL indicator (red)
Steady on: You can remove the SPU.
RUN indicator (green)
Blinks every two seconds (0.5 Hz): The SPU is running
normally.
Blinks four times every second (4 Hz): The SPU is in the
alarm state or starting but not registered.
SPC
! NOT SWAP
The SPC and SPU in one slot share one sales code. Either the
SPC or SPU cannot be separately replaced.
OFL button
To remove an SPC, you must press and hold the OFL button
for six seconds until the OFL indicator turns red for one second
and then turns off.
OFL indicator
If the indicator is green and blinks once every second (1
Hz), the SPC is running normally.
If the indicator is green and blinks four times every second
(4 Hz), the SPC is in the alarm state or starting but not
registered.
If the indicator turns red for one second and then turns off,
you can remove the SPC securely.
Interface Attributes
The SPUA-20-O-H does not provide interfaces externally.

HUAWEI USG9500 Series Terabit-level Next-Generation Firewall
Hardware Guide
Contents
Issue 01 (2017-03-13)
Huawei Proprietary and Confidential
Copyright © Huawei Technologies Co., Ltd.
120
Technical Specifications
Table 1-67 shows the technical specifications of the SPUA-20-O-H.
Table 1-67 Technical specifications of the SPUA-20-O-H
Item
Description
Silkscreen of the board
name
SPUD
SPUA-20-O-H
Dimensions (W x D x H)
400 mm x 520 mm x 41 mm
Power consumption
(typical value)
215 W
Heat dissipation
852.96 BTU/hour
Board weight
6.64 kg
Maximum input voltage
range (DC)
-72 V to -38 V
CPU number
1
CPU
1.6 GHz
Memory
DDR4 32GB
1.4.4.9 Firewall Service Processing Unit (SPUB-20-O-H, for
USG9560/USG9580)
The SPUB-20-O-H is inserted into the LPU/SPU slot of the USG9560 and USG9580,
provides an expansion slot, and is hot swappable.
Panel
Figure 1-66 shows the appearance of the SPUB-20-O-H.
Figure 1-66 Appearance of the SPUB-20-O-H
Name
Description

HUAWEI USG9500 Series Terabit-level Next-Generation Firewall
Hardware Guide
Contents
Issue 01 (2017-03-13)
Huawei Proprietary and Confidential
Copyright © Huawei Technologies Co., Ltd.
121
Name
Description
SPU
OFL button
To remove an SPU, you must press and hold the OFL button
for six seconds until the OFL indicator turns on.
OFL indicator (red)
Steady on: You can remove the SPU.
RUN indicator (green)
Blinks every two seconds (0.5 Hz): The SPU is running
normally.
Blinks four times every second (4 Hz): The SPU is in the
alarm state or starting but not registered.
SPC
! NOT SWAP
The SPC and SPU in one slot share one sales code. Either the
SPC or SPU cannot be separately replaced.
OFL button
To remove an SPC, you must press and hold the OFL button
for six seconds until the OFL indicator turns red for one second
and then turns off.
OFL indicator
If the indicator is green and blinks once every second (1
Hz), the SPC is running normally.
If the indicator is green and blinks four times every second
(4 Hz), the SPC is in the alarm state or starting but not
registered.
If the indicator turns red for one second and then turns off,
you can remove the SPC securely.
Interface Attributes
The SPUB-20-O-H does not provide interfaces externally.
Technical Specifications
Table 1-68 shows the technical specifications of the SPUB-20-O-H.
Table 1-68 Technical specifications of the SPUB-20-O-H
Item
Description
Silkscreen of the board
name
SPUD
SPUB-20-O-H
Dimensions (W x D x H)
400 mm x 520 mm x 41 mm
Power consumption
(typical value)
320 W
Heat dissipation
1194.14 BTU/hour
Board weight
6.76 kg

HUAWEI USG9500 Series Terabit-level Next-Generation Firewall
Hardware Guide
Contents
Issue 01 (2017-03-13)
Huawei Proprietary and Confidential
Copyright © Huawei Technologies Co., Ltd.
122
Item
Description
Maximum input voltage
range (DC)
-72 V to -38 V
CPU number
2
CPU
1.6 GHz
Memory
DDR4 32 GB/CPU
1.4.4.10 Firewall Performance Expansion Card (SPC-20-O-E8KE)
The SPC-20-O-E8KE is a dual-CPU service sub-card of the firewall service board, can be
inserted into a slot of the SPU, and is hot swappable.
Panel
Figure 1-67 shows the appearance of the SPC-20-O-E8KE.
Figure 1-67 Appearance of the SPC-20-O-E8KE
Name
Description
OFL button
To remove a board, you must press and hold the OFL button
for six seconds until the OFL indicator turns red for one second
and then turns off.
OFL indicator
If the indicator is green and blinks once every second (1
Hz), the board is running normally.
If the indicator is green and blinks four times every second
(4 Hz), the board is in the alarm state or starting but not
registered.
If the indicator turns red for one second and then turns off,
you can remove the board securely.
Interface Attributes
The SPC-20-O-E8KE does not provide interfaces externally.
Technical Specifications
Table 1-69 lists the technical specifications of the SPC-20-O-E8KE.

HUAWEI USG9500 Series Terabit-level Next-Generation Firewall
Hardware Guide
Contents
Issue 01 (2017-03-13)
Huawei Proprietary and Confidential
Copyright © Huawei Technologies Co., Ltd.
123
Table 1-69 Technical specifications of the SPC-20-O-E8KE
Item
Description
Silkscreen of the board
name
SPCB02
SPC-20-O-E8KE
Dimensions (W x D x H)
175 mm x 280 mm x 36 mm
Power consumption
(typical value)
159 W
Heat dissipation
542.51 BTU/hour
Board weight
1.62 kg
CPU number
2
CPU
1.2 GHz
Memory
DDR3 16 GB/CPU
1.4.4.11 Firewall Performance Expansion Card (SPCA-20-O-H&M)
The SPCA-20-O-H&M is a single-CPU service sub-card of the firewall service board, can be
inserted into a slot of the SPU, and is hot swappable.
Panel
Figure 1-68 shows the appearance of the SPCA-20-O-H&M.
Figure 1-68 Appearance of the SPCA-20-O-H&M
Name
Description
OFL button
To remove a board, you must press and hold the OFL button
for six seconds until the OFL indicator turns red for one second
and then turns off.
OFL indicator
If the indicator is green and blinks once every second (1
Hz), the board is running normally.
If the indicator is green and blinks four times every second
(4 Hz), the board is in the alarm state or starting but not
registered.
If the indicator turns red for one second and then turns off,
you can remove the board securely.

HUAWEI USG9500 Series Terabit-level Next-Generation Firewall
Hardware Guide
Contents
Issue 01 (2017-03-13)
Huawei Proprietary and Confidential
Copyright © Huawei Technologies Co., Ltd.
124
Interface Attributes
The SPCA-20-O-H&M does not provide interfaces externally.
Technical Specifications
Table 1-70 lists the technical specifications of the SPCA-20-O-H&M.
Table 1-70 Technical specifications of the SPCA-20-O-H&M
Item
Description
Silkscreen of the board
name
SPCF01
SPCA-20-O-H&M
Dimensions (W x D x H)
175 mm x 280 mm x 36 mm
Power consumption
(typical value)
90 W
Heat dissipation
477.66 BTU/hour
Board weight
1.30 kg
CPU number
1
CPU
1.6 GHz
Memory
DDR4 32 GB
1.4.4.12 Firewall Performance Expansion Card (SPCB-20-O-H&M)
The SPCB-20-O-H&M is a dual-CPU service sub-card of the firewall service board, can be
inserted into a slot of the SPU, and is hot swappable.
Panel
Figure 1-69 shows the appearance of the SPCB-20-O-H&M.
Figure 1-69 Appearance of the SPCB-20-O-H&M
Name
Description
OFL button
To remove a board, you must press and hold the OFL button

HUAWEI USG9500 Series Terabit-level Next-Generation Firewall
Hardware Guide
Contents
Issue 01 (2017-03-13)
Huawei Proprietary and Confidential
Copyright © Huawei Technologies Co., Ltd.
125
Name
Description
for six seconds until the OFL indicator turns red for one second
and then turns off.
OFL indicator
If the indicator is green and blinks once every second (1
Hz), the board is running normally.
If the indicator is green and blinks four times every second
(4 Hz), the board is in the alarm state or starting but not
registered.
If the indicator turns red for one second and then turns off,
you can remove the board securely.
Interface Attributes
The SPCB-20-O-H&M does not provide interfaces externally.
Technical Specifications
Table 1-71 lists the technical specifications of the SPCB-20-O-H&M.
Table 1-71 Technical specifications of the SPCB-20-O-H&M
Item
Description
Silkscreen of the board
name
SPCH01
SPCB-20-O-H&M
Dimensions (W x D x H)
175 mm x 280 mm x 36 mm
Power consumption
(typical value)
180 W
Heat dissipation
818.84 BTU/hour
Board weight
1.42 kg
CPU number
2
CPU
1.6 GHz
Memory
DDR4 32 GB/CPU
1.4.4.13 Application Security Service Processing Card (SPC-APPSEC-FW)
The SPC-APPSEC-FW is a dual-CPU subcard for processing application security services
and has an IAE to provide content security. This subcard takes up a slot on the mother board.
You can insert the SPC-APPSEC-FW independently in a slot on the mother board or use it
together with a firewall SPC on the mother board. This board is hot swappable.

HUAWEI USG9500 Series Terabit-level Next-Generation Firewall
Hardware Guide
Contents
Issue 01 (2017-03-13)
Huawei Proprietary and Confidential
Copyright © Huawei Technologies Co., Ltd.
126
Panel
Figure 1-70 shows the appearance of the SPC-APPSEC-FW.
Figure 1-70 Appearance of the SPC-APPSEC-FW
Name
Description
OFL button
To remove a board, you must press and hold the OFL button
for six seconds until the OFL indicator turns red for one second
and then turns off.
OFL indicator
If the indicator is green and blinks once every second (1
Hz), the board is running normally.
If the indicator is green and blinks four times every second
(4 Hz), the board is in the alarm state or starting but not
registered.
If the indicator turns red for one second and then turns off,
you can remove the board securely.
Interface Attributes
The SPC-APPSEC-FW does not provide interfaces externally.
Technical Specifications
Table 1-72 lists the technical specifications of the SPC-APPSEC-FW.
Table 1-72 Technical specifications of the SPC-20-O-E8KE
Item
Description
Silkscreen of the board
name
SPC-APPSEC-FW
Dimensions (W x D x H)
175 mm x 280 mm x 36 mm
Power consumption
(typical value)
159 W
Heat dissipation
542.51 BTU/hour
Board weight
1.62 kg
CPU number
2

HUAWEI USG9500 Series Terabit-level Next-Generation Firewall
Hardware Guide
Contents
Issue 01 (2017-03-13)
Huawei Proprietary and Confidential
Copyright © Huawei Technologies Co., Ltd.
127
Item
Description
CPU
1.2 GHz
Memory
DDR3 16 GB/CPU
1.4.4.14 Application Security Service Processing Card (SPC-IPS-20)
The SPC-IPS-20 is a dual-CPU subcard for processing application security services and has
an IAE to provide content security. This subcard takes up a slot on the mother board. You can
insert the SPC-IPS-20 independently in a slot on the mother board or use it together with a
firewall SPC on the mother board. This board is hot swappable.
When the product version is V300R001, the SPC-IPS-20 only processes the IPS services.
Panel
Figure 1-71 shows the appearance of the SPC-IPS-20.
Figure 1-71 Appearance of the SPC-IPS-20
Name
Description
OFL button
To remove a board, you must press and hold the OFL button
for six seconds until the OFL indicator turns red for one second
and then turns off.
OFL indicator
If the indicator is green and blinks once every second (1
Hz), the board is running normally.
If the indicator is green and blinks four times every second
(4 Hz), the board is in the alarm state or starting but not
registered.
If the indicator turns red for one second and then turns off,
you can remove the board securely.
Interface Attributes
The SPC-IPS-20 does not provide interfaces externally.
Technical Specifications
Table 1-73 lists the technical specifications of the SPC-IPS-20.

HUAWEI USG9500 Series Terabit-level Next-Generation Firewall
Hardware Guide
Contents
Issue 01 (2017-03-13)
Huawei Proprietary and Confidential
Copyright © Huawei Technologies Co., Ltd.
128
Table 1-73 Technical specifications of the SPC-IPS-20
Item
Description
Silkscreen of the board
name
IPSC01
SPC-IPS-20
Dimensions (W x D x H)
175 mm x 280 mm x 36 mm
Power consumption
(typical value)
159 W
Board weight
1.8 kg
CPU number
2
CPU
1.2 GHz
Memory
DDR3 16 GB/CPU
1.4.5 LPUF-240 and FPICs
The flexible LPU comprises the mother board (LPUF-240) and multiple flexible cards
(sub-cards), improving networking flexibility. The flexible LPU supports 240G full LR
forwarding, which reduces costs and provides personalized solutions for users.
1.4.5.1 LPUF-240
The LPUF-240 is hot swappable and provides two 1/2-width slots, each of which holds one
FPIC. It supports the following functions: 1. Forwards packets at the line speed of 240 Gbit/s.
2. Enhances networking flexibility and provides low-cost and customized solutions. 3.
Supports mixed insertion between different FPICs.
The LPUF-240 backplane does not support the hot swap of FPICs.
The LPUF-240 cannot be used on the USG9520 platform.
Panel
Figure 1-72 shows the appearance of the LPUF-240.

HUAWEI USG9500 Series Terabit-level Next-Generation Firewall
Hardware Guide
Contents
Issue 01 (2017-03-13)
Huawei Proprietary and Confidential
Copyright © Huawei Technologies Co., Ltd.
129
Figure 1-72 Appearance of the LPUF-240
Name
Description
OFL button
To remove a board, you must press and hold the button for five
seconds until the OFL indicator turns on.
OFL indicator (red)
Steady on: You can remove the board.
RUN indicator (green)
Blinks every two seconds (0.5 Hz): The system is running
normally.
Blinks twice each second (2 Hz): The system is in the alarm
state.
Interface Attributes
The LPUF-240 does not provide interfaces externally.
Technical Specifications
Table 1-74 shows the technical specifications of the LPUF-240.
Table 1-74 Technical specifications of the LPUF-240
Item
Description
Silkscreen of the board
name
LPUF-240
FW-LPUF-240
Dimensions (W x D x H)
399.2 mm x 555.2 mm x 40.1 mm
Power consumption
(typical value)
353 W
Heat dissipation
1145.28 BTU/hour
Board weight
9 kg

HUAWEI USG9500 Series Terabit-level Next-Generation Firewall
Hardware Guide
Contents
Issue 01 (2017-03-13)
Huawei Proprietary and Confidential
Copyright © Huawei Technologies Co., Ltd.
130
1.4.5.2 20-Port 10/100/1000Base-RJ45 FPIC (FW-20X1G-RJ45)
The FW-20X1G-RJ45 occupies one 1/2-width flexible card slot, applies to LPUF-240s and
LPUF-120s, but does not support hot swap.
Panel
Figure 1-73 shows the appearance of the FW-20X1G-RJ45.
Figure 1-73 Panel appearance of the 20-port 10/100/1000Base-RJ45 FPIC
Component
Description
STATUS (green)
Blinks every two seconds (0.5 Hz): The system is running
normally.
Blinks twice each second (2 Hz): The system is in the alarm
state.
LINK (green)/ACT
(yellow)
Steady on: The link is connected.
Blinking: There is data being transmitted or received.
Off: The link is disconnected.
Interface Attributes
Table 1-75 lists the attributes of interfaces on FW-20X1G-RJ45.
Table 1-75 FW-20X1G-RJ45 interface attributes
Attribute
Description
Connector type
RJ45
Working mode
10M/100M/1000M adaptive, supporting full duplex
Cable specifications
When the working mode is 10M or 100M, it is recommended
that Category 5 unshielded twisted pairs be used. When the
working mode is 1000M, it is recommended that super
Category 5 unshielded twisted pairs be used.
Frame format
Ethernet_II, Ethernet_SAP, and Ethernet_SNAP
Network protocol
IP

HUAWEI USG9500 Series Terabit-level Next-Generation Firewall
Hardware Guide
Contents
Issue 01 (2017-03-13)
Huawei Proprietary and Confidential
Copyright © Huawei Technologies Co., Ltd.
131
Technical Specifications
Table 1-76 shows the technical specifications of the FW-20X1G-RJ45.
Table 1-76 Technical specifications of the FW-20X1G-RJ45
Item
Description
Silk-screen board name
FW-20X1G-RJ45
Dimensions (W x D x H)
178 mm x 225 mm x 38 mm
Power consumption
(typical value)
31 W
Heat dissipation
105.77 BTU/hour
Board weight
0.8 kg
1.4.5.3 24-Port 100/1000 Base-X-SFP FPIC (E8KE-X-101-24XGE-SFP)
The E8KE-X-101-24XGE-SFP occupies one 1/2-width flexible card slot, applies to
LPUF-240s, LPUF-120s, and LPUF-101s, but does not support hot swap.
The 24-port 100/1000Base-X-SFP flexible card supports the following features:
GE optical module, supporting GE optical interface features.
FE optical module, supporting FE optical interface features.
Electrical SFP module, supporting 1000M electrical interface feature.
Mixed insertion among the above modules.
Only the interfaces indexed in odd numbers support the electrical interface module.
Panel
Figure 1-74 shows the appearance of the E8KE-X-101-24XGE-SFP.
Figure 1-74 Appearance of the E8KE-X-101-24XGE-SFP
Name
Description
STATUS (green)
Blinks every two seconds (0.5 Hz): The system is running
normally.
Blinks twice each second (2 Hz): The system is in the alarm
state.

HUAWEI USG9500 Series Terabit-level Next-Generation Firewall
Hardware Guide
Contents
Issue 01 (2017-03-13)
Huawei Proprietary and Confidential
Copyright © Huawei Technologies Co., Ltd.
132
Name
Description
Indicator below the
interface (green)
Steady on: The link is connected.
Blinking: There is data being transmitted or received.
Off: The link is disconnected.
Interface Attributes
Table 1-77 lists the attributes of interfaces on E8KE-X-101-24XGE-SFP.
Table 1-77 E8KE-X-101-24XGE-SFP interface attributes
Attribute
Description
Connector type
LC/PC
Optical interface attribute
Compliant with the selected SFP optical module. For the
optional attributes of the optical module, see
1.5.1 1 Gbit/s Electrical Transceiver
1.5.2 1.25 Gbit/s SFP/eSFP Optical Module
Working mode
Full duplex
Standard compliance
IEEE 802.3-2002
Frame format
Ethernet_II, Ethernet_SAP, Ethernet_SNAP, and 802.3
Network protocol
IP
Technical Specifications
Table 1-78 shows the technical specifications of the E8KE-X-101-24XGE-SFP.
Table 1-78 Technical specifications of the E8KE-X-101-24XGE-SFP
Item
Description
Silkscreen of the board
name
E8KE-X-101-24XGE-SFP
Dimensions (W x D x H)
178 mm x 225 mm x 38 mm
Power consumption
(typical value)
37 W
Heat dissipation
126.28 BTU/hour
Board weight
0.9 kg

HUAWEI USG9500 Series Terabit-level Next-Generation Firewall
Hardware Guide
Contents
Issue 01 (2017-03-13)
Huawei Proprietary and Confidential
Copyright © Huawei Technologies Co., Ltd.
133
1.4.5.4 5-Port 10GBase LAN/WAN-SFP+ FPIC A
(E8KE-X-101-5X10GE-SFP+)
The E8KE-X-101-5X10GE-SFP+ occupies one 1/2-width flexible card slot, applies to
LPUF-240s, LPUF-120s, and LPUF-101s, works in LAN or WAN mode, uses SFP+ optical
modules, but does not support hot swap.
Panel
Figure 1-75 shows the appearance of the E8KE-X-101-5X10GE-SFP+.
Figure 1-75 Appearance of the E8KE-X-101-5X10GE-SFP+
Name
Description
STATUS (green)
Blinks every two seconds (0.5 Hz): The system is running
normally.
Blinks twice each second (2 Hz): The system is in the alarm
state.
L/A (green)
Steady on: The link is connected.
Blinking: There is data being transmitted or received.
Off: The link is disconnected.
Interface Attributes
Table 1-79 lists the attributes of interfaces on E8KE-X-101-5X10GE-SFP+.
Table 1-79 E8KE-X-101-5X10GE-SFP+ interface attributes
Attribute
Description
Connector type
LC/PC
Optical interface attribute
Compliant with the selected SFP+ optical module. For the
optional attributes of the optical module, see 1.5.4 10 Gbit/s
SFP+ Optical Module.
Working mode
Full-duplex
Frame format
Ethernet_II, Ethernet_SAP, and Ethernet_SNAP
Network protocol
IP

HUAWEI USG9500 Series Terabit-level Next-Generation Firewall
Hardware Guide
Contents
Issue 01 (2017-03-13)
Huawei Proprietary and Confidential
Copyright © Huawei Technologies Co., Ltd.
134
Technical Specifications
Table 1-80 shows the technical specifications of the E8KE-X-101-5X10GE-SFP+.
Table 1-80 Technical specifications of the E8KE-X-101-5X10GE-SFP+
Attribute
Description
Silkscreen of the board
name
E8KE-X-101-5X10GE-SFP+
Dimensions (W x D x H)
203.3 mm x 178.65 mm x 37.2 mm
Power consumption
(typical value)
29 W
Heat dissipation
98.95 BTU/hour
Board weight
0.9 kg
1.4.5.5 6*10GE SFP+ Daughter Card (FW-6X10GE-SFP+)
The FW-6X10GE-SFP+ occupies one 1/2-width flexible card slot, applies to LPUF-240s and
LPUF-120s, works in LAN or WAN mode, uses SFP+ optical modules, but does not support
hot swap.
Panel
Figure 1-76 shows the appearance of the FW-6X10GE-SFP+.
Figure 1-76 Appearance of the FW-6X10GE-SFP+
Name
Description
STA (green)
Blinks every two seconds (0.5 Hz): The system is running
normally.
Blinks twice each second (2 Hz): The system is in the alarm
state.
Indicator below the
interface (green)
Steady on: The link is connected.
Blinking: There is data being transmitted or received.
Off: The link is disconnected.

HUAWEI USG9500 Series Terabit-level Next-Generation Firewall
Hardware Guide
Contents
Issue 01 (2017-03-13)
Huawei Proprietary and Confidential
Copyright © Huawei Technologies Co., Ltd.
135
Interface Attributes
Table 1-81 lists the attributes of interfaces on FW-6X10GE-SFP+.
Table 1-81 FW-6X10GE-SFP+ interface attributes
Attribute
Description
Connector type
LC/PC
Optical interface attribute
Compliant with the selected SFP+ optical module. For the
optional attributes of the optical module, see 1.5.4 10 Gbit/s
SFP+ Optical Module.
Working mode
Full-duplex
Frame format
Ethernet_II, Ethernet_SAP, and Ethernet_SNAP
Network protocol
IP
Technical Specifications
Table 1-82 shows the technical specifications of the FW-6X10GE-SFP+.
Table 1-82 Technical specifications of the FW-6X10GE-SFP+
Item
Description
Silkscreen of the board
name
FW-6X10GE-SFP+
Dimensions (W x D x H)
178 mm x 180 mm x 38 mm
Power consumption
(typical value)
34 W
Heat dissipation
110.31 BTU/hour
Board weight
0.65 kg
1.4.5.6 12*10GE SFP+ Daughter Card (FW-12X10GE-SFP+)
The FW-12X10GE-SFP+ occupies one 1/2-width flexible card slot, applies to LPUF-240s and
LPUF-120s, works in LAN or WAN mode, uses SFP+ optical modules, but does not support
hot swap.
Panel
Figure 1-77 shows the appearance of the FW-12X10GE-SFP+.

HUAWEI USG9500 Series Terabit-level Next-Generation Firewall
Hardware Guide
Contents
Issue 01 (2017-03-13)
Huawei Proprietary and Confidential
Copyright © Huawei Technologies Co., Ltd.
136
Figure 1-77 Appearance of the FW-12X10GE-SFP+
Name
Description
STA (green)
Blinks every two seconds (0.5 Hz): The system is running
normally.
Blinks twice each second (2 Hz): The system is in the alarm
state.
Indicator below the
interface (green)
Steady on: The link is connected.
Blinking: There is data being transmitted or received.
Off: The link is disconnected.
Interface Attributes
Table 1-83 lists the attributes of interfaces on FW-12X10GE-SFP+.
Table 1-83 FW-12X10GE-SFP+ interface attributes
Attribute
Description
Connector type
LC/PC
Optical interface attribute
Compliant with the selected SFP+ optical module. For the
optional attributes of the optical module, see 1.5.4 10 Gbit/s
SFP+ Optical Module.
Working mode
Full-duplex
Frame format
Ethernet_II, Ethernet_SAP, and Ethernet_SNAP
Network protocol
IP
Technical Specifications
Table 1-84 shows the technical specifications of the FW-12X10GE-SFP+.
Table 1-84 Technical specifications of the FW-12X10GE-SFP+
Item
Description
Silkscreen of the board
name
FW-12X10GE-SFP+

HUAWEI USG9500 Series Terabit-level Next-Generation Firewall
Hardware Guide
Contents
Issue 01 (2017-03-13)
Huawei Proprietary and Confidential
Copyright © Huawei Technologies Co., Ltd.
137
Item
Description
Dimensions (W x D x H)
193 mm x 178.65 mm x 37.2 mm
Power consumption
(typical value)
52 W
Heat dissipation
168.7 BTU/hour
Board weight
0.75 kg
1.4.5.7 3-Port 40GBase QSFP+ FPIC (FW-3X40G-QSFP+)
The FW-3X40G-QSFP+ occupies one 1/2-width flexible card slot, applies to LPUF-240s and
LPUF-120s, works in LAN mode, uses QSFP+ optical modules, but does not support hot
swap.
Panel
Figure 1-78 shows the appearance of the FW-3X40G-QSFP+.
Figure 1-78 Appearance of the FW-3X40G-QSFP+
Name
Description
STATUS (green)
Blinks every two seconds (0.5 Hz): The system is running
normally.
Blinks twice each second (2 Hz): The system is in the alarm
state.
L/A (green)
Steady on: The link is connected.
Blinking: There is data being transmitted or received.
Off: The link is disconnected.
Interface Attributes
Table 1-85 lists the attributes of interfaces on FW-3X40G-QSFP+.
Table 1-85 FW-3X40G-QSFP+ interface attributes
Attribute
Description

HUAWEI USG9500 Series Terabit-level Next-Generation Firewall
Hardware Guide
Contents
Issue 01 (2017-03-13)
Huawei Proprietary and Confidential
Copyright © Huawei Technologies Co., Ltd.
138
Attribute
Description
Connector type
LC/PC
Optical interface
attribute
Compliant with the selected SFP+ optical module. For the optional
attributes of the optical module, see 1.5.6 40 Gbit/s QSFP+ Optical
Module.
Working mode
Full-duplex
Standard
compliance
IEEE 802.3-2002
Frame format
Ethernet_II, Ethernet_SAP, and Ethernet_SNAP
Network protocol
IP
Technical Specifications
Table 1-86 shows the technical specifications of the FW-3X40G-QSFP+.
Table 1-86 Technical specifications of the FW-3X40G-QSFP+
Item
Description
Silkscreen of
the board
name
FW-3X40G-QSFP+
Dimensions
(W x D x H)
178 mm x 225 mm x 38 mm
Power
consumption
(typical value)
50 W
Heat
dissipation
170.59 BTU/hour
Board weight
0.685 kg
1.4.5.8 1-Port 40GBase LAN-CFP FPIC A (E8KE-X-101-1X40GE-CFP)
The E8KE-X-101-1X40GE-CFP occupies one 1/2-width flexible card slot, applies to
LPUF-240s, LPUF-120s and LPUF-101s, works in LAN mode, uses CFP optical modules, but
does not support hot swap.
Panel
Figure 1-79 shows the appearance of the E8KE-X-101-1X40GE-CFP.

HUAWEI USG9500 Series Terabit-level Next-Generation Firewall
Hardware Guide
Contents
Issue 01 (2017-03-13)
Huawei Proprietary and Confidential
Copyright © Huawei Technologies Co., Ltd.
139
Figure 1-79 Appearance of the E8KE-X-101-1X40GE-CFP
Name
Description
STATUS (green)
Blinks every two seconds (0.5 Hz): The system is running
normally.
Blinks twice each second (2 Hz): The system is in the alarm
state.
L/A (green)
Steady on: The link is connected.
Blinking: There is data being transmitted or received.
Off: The link is disconnected.
Interface Attributes
Table 1-87 lists the attributes of interfaces on E8KE-X-101-1X40GE-CFP.
Table 1-87 E8KE-X-101-1X40GE-CFP interface attributes
Attribute
Description
Connector type
LC/PC
Optical interface attribute
Compliant with the selected CFP optical module. For the
optional attributes of the optical module, see 1.5.5 40 Gbit/s
CFP Optical Modules.
Working mode
Full duplex
Frame format
Ethernet_II, Ethernet_SAP, and Ethernet_SNAP
Network protocol
IP
Technical Specifications
Table 1-88 shows the technical specifications of the E8KE-X-101-1X40GE-CFP.
Table 1-88 Technical specifications of the E8KE-X-101-1X40GE-CFP
Item
Description
Silkscreen of the board
name
E8KE-X-101-1X40GE-CFP

HUAWEI USG9500 Series Terabit-level Next-Generation Firewall
Hardware Guide
Contents
Issue 01 (2017-03-13)
Huawei Proprietary and Confidential
Copyright © Huawei Technologies Co., Ltd.
140
Item
Description
Dimensions (W x D x H)
178 mm x 225 mm x 38 mm
Power consumption
(typical value)
28 W
Heat dissipation
95.54 BTU/hour
Board weight
0.9 kg
1.4.5.9 1*100GE CFP Daughter Card (FW-1X100GE-CFP)
The FW-1X100GE-CFP occupies one 1/2-width flexible card slot, applies to LPUF-240s,
LPUF-120s and LPUF-101s, works in LAN mode, uses CFP optical modules, but does not
support hot swap.
Panel
Figure 1-80 shows the appearance of the FW-1X100GE-CFP.
Figure 1-80 Appearance of the FW-1X100GE-CFP
Name
Description
STATUS (green)
Blinks every two seconds (0.5 Hz): The system is running
normally.
Blinks twice each second (2 Hz): The system is in the alarm
state.
L/A (green)
Steady on: The link is connected.
Blinking: There is data being transmitted or received.
Off: The link is disconnected.
Interface Attributes
Table 1-89 lists the attributes of interfaces on FW-1X100GE-CFP.
Table 1-89 FW-1X100GE-CFP interface attributes
Attribute
Description
Connector type
LC/PC

HUAWEI USG9500 Series Terabit-level Next-Generation Firewall
Hardware Guide
Contents
Issue 01 (2017-03-13)
Huawei Proprietary and Confidential
Copyright © Huawei Technologies Co., Ltd.
141
Attribute
Description
Optical interface attribute
Compliant with the selected CFP optical module. For the
optional attributes of the optical module, see 1.5.7 100 Gbit/s
CFP Optical Modules.
Working mode
Full duplex
Frame format
Ethernet_II, Ethernet_SAP, and Ethernet_SNAP
Network protocol
IP
Technical Specifications
Table 1-90 shows the technical specifications of the FW-1X100GE-CFP.
Table 1-90 Technical specifications of the FW-1X100GE-CFP
Item
Description
Silkscreen of the board
name
FW-1X100GE-CFP
Dimensions (W x D x H)
178 mm x 130 mm x 35 mm
Power consumption
(typical value)
51 W
Heat dissipation
165.3 BTU/hour
Board weight
1.3 kg
1.4.6 LPUF-120 and FPICs
The flexible LPU comprises the mother board (LPUF-120) and multiple flexible cards
(sub-cards), improving networking flexibility. The flexible LPU supports 120G full LR
forwarding, which reduces costs and provides personalized solutions for users.
1.4.6.1 LPUF-120
The LPUF-120 is hot swappable and provides two 1/2-width slots, each of which holds one
FPIC. It supports the following functions: 1. Forwards packets at the line speed of 120 Gbit/s.
2. Enhances networking flexibility and provides low-cost and customized solutions. 3.
Supports mixed insertion between different FPICs.
The LPUF-120 backplane does not support the hot swap of FPICs.
The sum of LPUF-120 subcard performance cannot exceed 120G.

HUAWEI USG9500 Series Terabit-level Next-Generation Firewall
Hardware Guide
Contents
Issue 01 (2017-03-13)
Huawei Proprietary and Confidential
Copyright © Huawei Technologies Co., Ltd.
142
Panel
Figure 1-81 shows the appearance of the LPUF-120.
Figure 1-81 Appearance of the LPUF-120
Name
Description
OFL button
To remove a board, you must press and hold the button for five
seconds until the OFL indicator turns on.
OFL indicator (red)
Steady on: You can remove the board.
RUN indicator (green)
Blinks every two seconds (0.5 Hz): The system is running
normally.
Blinks twice each second (2 Hz): The system is in the alarm
state.
Interface Attributes
The LPUF-120 does not provide interfaces externally.
Technical Specifications
Table 1-91 shows the technical specifications of the LPUF-120.
Table 1-91 Technical specifications of the LPUF-120
Item
Description
Silkscreen of the board
name
LPUF-120
FW-LPUF-120
Dimensions (W x D x H)
400 mm x 530 mm x 41 mm
Power consumption
(typical value)
195 W
Heat dissipation
632.1 BTU/hour
Board weight
7.15 kg

HUAWEI USG9500 Series Terabit-level Next-Generation Firewall
Hardware Guide
Contents
Issue 01 (2017-03-13)
Huawei Proprietary and Confidential
Copyright © Huawei Technologies Co., Ltd.
143
1.4.6.2 20-Port 10/100/1000Base-RJ45 FPIC (FW-20X1G-RJ45)
The FW-20X1G-RJ45 occupies one 1/2-width flexible card slot, applies to LPUF-240s and
LPUF-120s, but does not support hot swap.
Panel
Figure 1-82 shows the appearance of the FW-20X1G-RJ45.
Figure 1-82 Panel appearance of the 20-port 10/100/1000Base-RJ45 FPIC
Component
Description
STATUS (green)
Blinks every two seconds (0.5 Hz): The system is running
normally.
Blinks twice each second (2 Hz): The system is in the alarm
state.
LINK (green)/ACT
(yellow)
Steady on: The link is connected.
Blinking: There is data being transmitted or received.
Off: The link is disconnected.
Interface Attributes
Table 1-92 lists the attributes of interfaces on FW-20X1G-RJ45.
Table 1-92 FW-20X1G-RJ45 interface attributes
Attribute
Description
Connector type
RJ45
Working mode
10M/100M/1000M adaptive, supporting full duplex
Cable specifications
When the working mode is 10M or 100M, it is recommended
that Category 5 unshielded twisted pairs be used. When the
working mode is 1000M, it is recommended that super
Category 5 unshielded twisted pairs be used.
Frame format
Ethernet_II, Ethernet_SAP, and Ethernet_SNAP
Network protocol
IP

HUAWEI USG9500 Series Terabit-level Next-Generation Firewall
Hardware Guide
Contents
Issue 01 (2017-03-13)
Huawei Proprietary and Confidential
Copyright © Huawei Technologies Co., Ltd.
144
Technical Specifications
Table 1-93 shows the technical specifications of the FW-20X1G-RJ45.
Table 1-93 Technical specifications of the FW-20X1G-RJ45
Item
Description
Silk-screen board name
FW-20X1G-RJ45
Dimensions (W x D x H)
178 mm x 225 mm x 38 mm
Power consumption
(typical value)
31 W
Heat dissipation
105.77 BTU/hour
Board weight
0.8 kg
1.4.6.3 24-Port 100/1000 Base-X-SFP FPIC (E8KE-X-101-24XGE-SFP)
The E8KE-X-101-24XGE-SFP occupies one 1/2-width flexible card slot, applies to
LPUF-240s, LPUF-120s, and LPUF-101s, but does not support hot swap.
The 24-port 100/1000Base-X-SFP flexible card supports the following features:
GE optical module, supporting GE optical interface features.
FE optical module, supporting FE optical interface features.
Electrical SFP module, supporting 1000M electrical interface feature.
Mixed insertion among the above modules.
Only the interfaces indexed in odd numbers support the electrical interface module.
Panel
Figure 1-83 shows the appearance of the E8KE-X-101-24XGE-SFP.
Figure 1-83 Appearance of the E8KE-X-101-24XGE-SFP
Name
Description
STATUS (green)
Blinks every two seconds (0.5 Hz): The system is running
normally.
Blinks twice each second (2 Hz): The system is in the alarm
state.

HUAWEI USG9500 Series Terabit-level Next-Generation Firewall
Hardware Guide
Contents
Issue 01 (2017-03-13)
Huawei Proprietary and Confidential
Copyright © Huawei Technologies Co., Ltd.
145
Name
Description
Indicator below the
interface (green)
Steady on: The link is connected.
Blinking: There is data being transmitted or received.
Off: The link is disconnected.
Interface Attributes
Table 1-94 lists the attributes of interfaces on E8KE-X-101-24XGE-SFP.
Table 1-94 E8KE-X-101-24XGE-SFP interface attributes
Attribute
Description
Connector type
LC/PC
Optical interface attribute
Compliant with the selected SFP optical module. For the
optional attributes of the optical module, see
1.5.1 1 Gbit/s Electrical Transceiver
1.5.2 1.25 Gbit/s SFP/eSFP Optical Module
Working mode
Full duplex
Standard compliance
IEEE 802.3-2002
Frame format
Ethernet_II, Ethernet_SAP, Ethernet_SNAP, and 802.3
Network protocol
IP
Technical Specifications
Table 1-95 shows the technical specifications of the E8KE-X-101-24XGE-SFP.
Table 1-95 Technical specifications of the E8KE-X-101-24XGE-SFP
Item
Description
Silkscreen of the board
name
E8KE-X-101-24XGE-SFP
Dimensions (W x D x H)
178 mm x 225 mm x 38 mm
Power consumption
(typical value)
37 W
Heat dissipation
126.28 BTU/hour
Board weight
0.9 kg

HUAWEI USG9500 Series Terabit-level Next-Generation Firewall
Hardware Guide
Contents
Issue 01 (2017-03-13)
Huawei Proprietary and Confidential
Copyright © Huawei Technologies Co., Ltd.
146
1.4.6.4 5-Port 10GBase LAN/WAN-SFP+ FPIC A
(E8KE-X-101-5X10GE-SFP+)
The E8KE-X-101-5X10GE-SFP+ occupies one 1/2-width flexible card slot, applies to
LPUF-240s, LPUF-120s, and LPUF-101s, works in LAN or WAN mode, uses SFP+ optical
modules, but does not support hot swap.
Panel
Figure 1-84 shows the appearance of the E8KE-X-101-5X10GE-SFP+.
Figure 1-84 Appearance of the E8KE-X-101-5X10GE-SFP+
Name
Description
STATUS (green)
Blinks every two seconds (0.5 Hz): The system is running
normally.
Blinks twice each second (2 Hz): The system is in the alarm
state.
L/A (green)
Steady on: The link is connected.
Blinking: There is data being transmitted or received.
Off: The link is disconnected.
Interface Attributes
Table 1-96 lists the attributes of interfaces on E8KE-X-101-5X10GE-SFP+.
Table 1-96 E8KE-X-101-5X10GE-SFP+ interface attributes
Attribute
Description
Connector type
LC/PC
Optical interface attribute
Compliant with the selected SFP+ optical module. For the
optional attributes of the optical module, see 1.5.4 10 Gbit/s
SFP+ Optical Module.
Working mode
Full-duplex
Frame format
Ethernet_II, Ethernet_SAP, and Ethernet_SNAP
Network protocol
IP

HUAWEI USG9500 Series Terabit-level Next-Generation Firewall
Hardware Guide
Contents
Issue 01 (2017-03-13)
Huawei Proprietary and Confidential
Copyright © Huawei Technologies Co., Ltd.
147
Technical Specifications
Table 1-97 shows the technical specifications of the E8KE-X-101-5X10GE-SFP+.
Table 1-97 Technical specifications of the E8KE-X-101-5X10GE-SFP+
Attribute
Description
Silkscreen of the board
name
E8KE-X-101-5X10GE-SFP+
Dimensions (W x D x H)
203.3 mm x 178.65 mm x 37.2 mm
Power consumption
(typical value)
29 W
Heat dissipation
98.95 BTU/hour
Board weight
0.9 kg
1.4.6.5 6*10GE SFP+ Daughter Card (FW-6X10GE-SFP+)
The FW-6X10GE-SFP+ occupies one 1/2-width flexible card slot, applies to LPUF-240s and
LPUF-120s, works in LAN or WAN mode, uses SFP+ optical modules, but does not support
hot swap.
Panel
Figure 1-85 shows the appearance of the FW-6X10GE-SFP+.
Figure 1-85 Appearance of the FW-6X10GE-SFP+
Name
Description
STA (green)
Blinks every two seconds (0.5 Hz): The system is running
normally.
Blinks twice each second (2 Hz): The system is in the alarm
state.
Indicator below the
interface (green)
Steady on: The link is connected.
Blinking: There is data being transmitted or received.
Off: The link is disconnected.

HUAWEI USG9500 Series Terabit-level Next-Generation Firewall
Hardware Guide
Contents
Issue 01 (2017-03-13)
Huawei Proprietary and Confidential
Copyright © Huawei Technologies Co., Ltd.
148
Interface Attributes
Table 1-98 lists the attributes of interfaces on FW-6X10GE-SFP+.
Table 1-98 FW-6X10GE-SFP+ interface attributes
Attribute
Description
Connector type
LC/PC
Optical interface attribute
Compliant with the selected SFP+ optical module. For the
optional attributes of the optical module, see 1.5.4 10 Gbit/s
SFP+ Optical Module.
Working mode
Full-duplex
Frame format
Ethernet_II, Ethernet_SAP, and Ethernet_SNAP
Network protocol
IP
Technical Specifications
Table 1-99 shows the technical specifications of the FW-6X10GE-SFP+.
Table 1-99 Technical specifications of the FW-6X10GE-SFP+
Item
Description
Silkscreen of the board
name
FW-6X10GE-SFP+
Dimensions (W x D x H)
178 mm x 180 mm x 38 mm
Power consumption
(typical value)
34 W
Heat dissipation
110.31 BTU/hour
Board weight
0.65 kg
1.4.6.6 12*10GE SFP+ Daughter Card (FW-12X10GE-SFP+)
The FW-12X10GE-SFP+ occupies one 1/2-width flexible card slot, applies to LPUF-240s and
LPUF-120s, works in LAN or WAN mode, uses SFP+ optical modules, but does not support
hot swap.
Panel
Figure 1-86 shows the appearance of the FW-12X10GE-SFP+.

HUAWEI USG9500 Series Terabit-level Next-Generation Firewall
Hardware Guide
Contents
Issue 01 (2017-03-13)
Huawei Proprietary and Confidential
Copyright © Huawei Technologies Co., Ltd.
149
Figure 1-86 Appearance of the FW-12X10GE-SFP+
Name
Description
STA (green)
Blinks every two seconds (0.5 Hz): The system is running
normally.
Blinks twice each second (2 Hz): The system is in the alarm
state.
Indicator below the
interface (green)
Steady on: The link is connected.
Blinking: There is data being transmitted or received.
Off: The link is disconnected.
Interface Attributes
Table 1-100 lists the attributes of interfaces on FW-12X10GE-SFP+.
Table 1-100 FW-12X10GE-SFP+ interface attributes
Attribute
Description
Connector type
LC/PC
Optical interface attribute
Compliant with the selected SFP+ optical module. For the
optional attributes of the optical module, see 1.5.4 10 Gbit/s
SFP+ Optical Module.
Working mode
Full-duplex
Frame format
Ethernet_II, Ethernet_SAP, and Ethernet_SNAP
Network protocol
IP
Technical Specifications
Table 1-101 shows the technical specifications of the FW-12X10GE-SFP+.
Table 1-101 Technical specifications of the FW-12X10GE-SFP+
Item
Description
Silkscreen of the board
name
FW-12X10GE-SFP+

HUAWEI USG9500 Series Terabit-level Next-Generation Firewall
Hardware Guide
Contents
Issue 01 (2017-03-13)
Huawei Proprietary and Confidential
Copyright © Huawei Technologies Co., Ltd.
150
Item
Description
Dimensions (W x D x H)
193 mm x 178.65 mm x 37.2 mm
Power consumption
(typical value)
52 W
Heat dissipation
168.7 BTU/hour
Board weight
0.75 kg
1.4.6.7 3-Port 40GBase QSFP+ FPIC (FW-3X40G-QSFP+)
The FW-3X40G-QSFP+ occupies one 1/2-width flexible card slot, applies to LPUF-240s and
LPUF-120s, works in LAN mode, uses QSFP+ optical modules, but does not support hot
swap.
Panel
Figure 1-87 shows the appearance of the FW-3X40G-QSFP+.
Figure 1-87 Appearance of the FW-3X40G-QSFP+
Name
Description
STATUS (green)
Blinks every two seconds (0.5 Hz): The system is running
normally.
Blinks twice each second (2 Hz): The system is in the alarm
state.
L/A (green)
Steady on: The link is connected.
Blinking: There is data being transmitted or received.
Off: The link is disconnected.
Interface Attributes
Table 1-102 lists the attributes of interfaces on FW-3X40G-QSFP+.
Table 1-102 FW-3X40G-QSFP+ interface attributes
Attribute
Description

HUAWEI USG9500 Series Terabit-level Next-Generation Firewall
Hardware Guide
Contents
Issue 01 (2017-03-13)
Huawei Proprietary and Confidential
Copyright © Huawei Technologies Co., Ltd.
151
Attribute
Description
Connector type
LC/PC
Optical interface
attribute
Compliant with the selected SFP+ optical module. For the optional
attributes of the optical module, see 1.5.6 40 Gbit/s QSFP+ Optical
Module.
Working mode
Full-duplex
Standard
compliance
IEEE 802.3-2002
Frame format
Ethernet_II, Ethernet_SAP, and Ethernet_SNAP
Network protocol
IP
Technical Specifications
Table 1-103 shows the technical specifications of the FW-3X40G-QSFP+.
Table 1-103 Technical specifications of the FW-3X40G-QSFP+
Item
Description
Silkscreen of
the board
name
FW-3X40G-QSFP+
Dimensions
(W x D x H)
178 mm x 225 mm x 38 mm
Power
consumption
(typical value)
50 W
Heat
dissipation
170.59 BTU/hour
Board weight
0.685 kg
1.4.6.8 1-Port 40GBase LAN-CFP FPIC A (E8KE-X-101-1X40GE-CFP)
The E8KE-X-101-1X40GE-CFP occupies one 1/2-width flexible card slot, applies to
LPUF-240s, LPUF-120s and LPUF-101s, works in LAN mode, uses CFP optical modules, but
does not support hot swap.
Panel
Figure 1-88 shows the appearance of the E8KE-X-101-1X40GE-CFP.

HUAWEI USG9500 Series Terabit-level Next-Generation Firewall
Hardware Guide
Contents
Issue 01 (2017-03-13)
Huawei Proprietary and Confidential
Copyright © Huawei Technologies Co., Ltd.
152
Figure 1-88 Appearance of the E8KE-X-101-1X40GE-CFP
Name
Description
STATUS (green)
Blinks every two seconds (0.5 Hz): The system is running
normally.
Blinks twice each second (2 Hz): The system is in the alarm
state.
L/A (green)
Steady on: The link is connected.
Blinking: There is data being transmitted or received.
Off: The link is disconnected.
Interface Attributes
Table 1-104 lists the attributes of interfaces on E8KE-X-101-1X40GE-CFP.
Table 1-104 E8KE-X-101-1X40GE-CFP interface attributes
Attribute
Description
Connector type
LC/PC
Optical interface attribute
Compliant with the selected CFP optical module. For the
optional attributes of the optical module, see 1.5.5 40 Gbit/s
CFP Optical Modules.
Working mode
Full duplex
Frame format
Ethernet_II, Ethernet_SAP, and Ethernet_SNAP
Network protocol
IP
Technical Specifications
Table 1-105 shows the technical specifications of the E8KE-X-101-1X40GE-CFP.
Table 1-105 Technical specifications of the E8KE-X-101-1X40GE-CFP
Item
Description
Silkscreen of the board
name
E8KE-X-101-1X40GE-CFP

HUAWEI USG9500 Series Terabit-level Next-Generation Firewall
Hardware Guide
Contents
Issue 01 (2017-03-13)
Huawei Proprietary and Confidential
Copyright © Huawei Technologies Co., Ltd.
153
Item
Description
Dimensions (W x D x H)
178 mm x 225 mm x 38 mm
Power consumption
(typical value)
28 W
Heat dissipation
95.54 BTU/hour
Board weight
0.9 kg
1.4.6.9 1*100GE CFP Daughter Card (FW-1X100GE-CFP)
The FW-1X100GE-CFP occupies one 1/2-width flexible card slot, applies to LPUF-240s,
LPUF-120s and LPUF-101s, works in LAN mode, uses CFP optical modules, but does not
support hot swap.
Panel
Figure 1-89 shows the appearance of the FW-1X100GE-CFP.
Figure 1-89 Appearance of the FW-1X100GE-CFP
Name
Description
STATUS (green)
Blinks every two seconds (0.5 Hz): The system is running
normally.
Blinks twice each second (2 Hz): The system is in the alarm
state.
L/A (green)
Steady on: The link is connected.
Blinking: There is data being transmitted or received.
Off: The link is disconnected.
Interface Attributes
Table 1-106 lists the attributes of interfaces on FW-1X100GE-CFP.
Table 1-106 FW-1X100GE-CFP interface attributes
Attribute
Description
Connector type
LC/PC

HUAWEI USG9500 Series Terabit-level Next-Generation Firewall
Hardware Guide
Contents
Issue 01 (2017-03-13)
Huawei Proprietary and Confidential
Copyright © Huawei Technologies Co., Ltd.
154
Attribute
Description
Optical interface attribute
Compliant with the selected CFP optical module. For the
optional attributes of the optical module, see 1.5.7 100 Gbit/s
CFP Optical Modules.
Working mode
Full duplex
Frame format
Ethernet_II, Ethernet_SAP, and Ethernet_SNAP
Network protocol
IP
Technical Specifications
Table 1-107 shows the technical specifications of the FW-1X100GE-CFP.
Table 1-107 Technical specifications of the FW-1X100GE-CFP
Item
Description
Silkscreen of the board
name
FW-1X100GE-CFP
Dimensions (W x D x H)
178 mm x 130 mm x 35 mm
Power consumption
(typical value)
51 W
Heat dissipation
165.3 BTU/hour
Board weight
1.3 kg
1.4.7 LPUF-101 and FPICs
The flexible LPU comprises the mother board (LPUF-101) and multiple flexible cards
(sub-cards), improving networking flexibility. The flexible LPU supports 100G full LR
forwarding, which reduces costs and provides personalized solutions for users.
1.4.7.1 LPUF-101
The LPUF-101 is hot swappable and provides four 1/4-width slots or two 1/2-width slots,
each of which holds one FPIC. It supports the following functions: 1. Forwards packets at the
line speed of 100 Gbit/s. 2. Enhances networking flexibility and provides low-cost and
customized solutions. 3. Supports mixed insertion of FPICs with different width. By default,
each LPUF-101 is delivered with two 1/2-width slots. To install 1/4-width flexible plug-in
cards, guide rails delivered with cards need to be installed.
The LPUF-101 backplane does not support the hot swap of FPICs.

HUAWEI USG9500 Series Terabit-level Next-Generation Firewall
Hardware Guide
Contents
Issue 01 (2017-03-13)
Huawei Proprietary and Confidential
Copyright © Huawei Technologies Co., Ltd.
155
Panel
Figure 1-90 shows the appearance of the LPUF-101.
Figure 1-90 Appearance of the LPUF-101
Name
Description
OFL button
To remove a board, you must press and hold the button for five
seconds until the OFL indicator turns on.
OFL indicator (red)
Steady on: You can remove the board.
RUN indicator (green)
Blinks every two seconds (0.5 Hz): The system is running
normally.
Blinks twice each second (2 Hz): The system is in the alarm
state.
Interface Attributes
Th LPUF-101 does not provide interfaces externally.
Technical Specifications
Table 1-108 shows the technical specifications of the LPUF-101.
Table 1-108 Technical specifications of the LPUF-101
Item
Description
Silkscreen of the board
name
LPUF-101
E8KE-X-LPUF-101
Dimensions (W x D x H)
399.2 mm x 532.6 mm x 40.1 mm
Power consumption
(typical value)
260 W
Heat dissipation
887.12 BTU/hour
Board weight
6.8 kg

HUAWEI USG9500 Series Terabit-level Next-Generation Firewall
Hardware Guide
Contents
Issue 01 (2017-03-13)
Huawei Proprietary and Confidential
Copyright © Huawei Technologies Co., Ltd.
156
1.4.7.2 24-Port 100/1000 Base-X-SFP FPIC (E8KE-X-101-24XGE-SFP)
The E8KE-X-101-24XGE-SFP occupies one 1/2-width flexible card slot, applies to
LPUF-240s, LPUF-120s and LPUF-101s, but does not support hot swap.
The 24-port 100/1000Base-X-SFP flexible card supports the following features:
GE optical module, supporting GE optical interface features.
FE optical module, supporting FE optical interface features.
Electrical SFP module, supporting 1000M electrical interface feature.
Mixed insertion among the above modules.
Only the interfaces indexed in odd numbers support the electrical interface module.
Panel
Figure 1-91 shows the appearance of the E8KE-X-101-24XGE-SFP.
Figure 1-91 Appearance of the E8KE-X-101-24XGE-SFP
Name
Description
STATUS (green)
Blinks every two seconds (0.5 Hz): The system is running
normally.
Blinks twice each second (2 Hz): The system is in the alarm
state.
Indicator below the
interface (green)
Steady on: The link is connected.
Blinking: There is data being transmitted or received.
Off: The link is disconnected.
Interface Attributes
Table 1-109 lists the attributes of interfaces on E8KE-X-101-24XGE-SFP.
Table 1-109 E8KE-X-101-24XGE-SFP interface attributes
Attribute
Description
Connector type
LC/PC
Optical interface attribute
Compliant with the selected SFP optical module. For the

HUAWEI USG9500 Series Terabit-level Next-Generation Firewall
Hardware Guide
Contents
Issue 01 (2017-03-13)
Huawei Proprietary and Confidential
Copyright © Huawei Technologies Co., Ltd.
157
Attribute
Description
optional attributes of the optical module, see
1.5.1 1 Gbit/s Electrical Transceiver
1.5.2 1.25 Gbit/s SFP/eSFP Optical Module
Working mode
Full duplex
Standard compliance
IEEE 802.3-2002
Frame format
Ethernet_II, Ethernet_SAP, Ethernet_SNAP, and 802.3
Network protocol
IP
Technical Specifications
Table 1-110 shows the technical specifications of the E8KE-X-101-24XGE-SFP.
Table 1-110 Technical specifications of the E8KE-X-101-24XGE-SFP
Item
Description
Silkscreen of the board
name
E8KE-X-101-24XGE-SFP
Dimensions (W x D x H)
178 mm x 225 mm x 38 mm
Power consumption
(typical value)
37 W
Heat dissipation
126.28 BTU/hour
Board weight
0.9 kg
1.4.7.3 4-Port 10G Base LAN -SFP+ FPIC (E8KE-X-101-4X10GE-SFP+)
The E8KE-X-101-4X10GE-SFP+ occupies one 1/4-width flexible card slot, applies to
LPUF-101s, but does not support hot swap.
The E8KE-X-101-4X10GE-SFP+ is a convergence sub-card. Each port can converge to 20G on average.
Panel
Figure 1-92 shows the appearance of the E8KE-X-101-4X10GE-SFP+.

HUAWEI USG9500 Series Terabit-level Next-Generation Firewall
Hardware Guide
Contents
Issue 01 (2017-03-13)
Huawei Proprietary and Confidential
Copyright © Huawei Technologies Co., Ltd.
158
Figure 1-92 Appearance of the E8KE-X-101-4X10GE-SFP+
Name
Description
STATUS (green)
Blinks every two seconds (0.5 Hz): The system is running
normally.
Blinks twice each second (2 Hz): The system is in the alarm
state.
L/A (green)
Steady on: The link is connected.
Blinking: There is data being transmitted or received.
Off: The link is disconnected.
Interface Attributes
Table 1-111 lists the attributes of interfaces on the E8KE-X-101-4X10GE-SFP+.
Table 1-111 E8KE-X-101-4X10GE-SFP+ interface attributes
Attribute
Description
Connector type
LC/PC
Optical interface attribute
Compliant with the selected SFP+ optical module. For the
optional attributes of the optical module, see 1.5.4 10 Gbit/s
SFP+ Optical Module.
Frame format
Ethernet_II, Ethernet_SAP, and Ethernet_SNAP
Network protocol
IP
Technical Specifications
Table 1-112 shows the technical specifications of the E8KE-X-101-4X10GE-SFP+.
Table 1-112 Technical specifications of the E8KE-X-101-4X10GE-SFP+
Parameter
Description
Silkscreen of the board
name
E8KE-X-101-4X10GE-SFP+

HUAWEI USG9500 Series Terabit-level Next-Generation Firewall
Hardware Guide
Contents
Issue 01 (2017-03-13)
Huawei Proprietary and Confidential
Copyright © Huawei Technologies Co., Ltd.
159
Parameter
Description
Dimensions (W x D x H)
89.1 mm x 203.3 mm x 37.2 mm
Power consumption
(typical value)
20 W
Heat dissipation
68.26 BTU/hour
Board weight
0.4 kg
1.4.7.4 5-Port 10GBase LAN/WAN-SFP+ FPIC A
(E8KE-X-101-5X10GE-SFP+)
The E8KE-X-101-5X10GE-SFP+ occupies one 1/2-width flexible card slot, applies to
LPUF-240s, LPUF-120s, and LPUF-101s, works in LAN or WAN mode, uses SFP+ optical
modules, but does not support hot swap.
Panel
Figure 1-93 shows the appearance of the E8KE-X-101-5X10GE-SFP+.
Figure 1-93 Appearance of the E8KE-X-101-5X10GE-SFP+
Name
Description
STATUS (green)
Blinks every two seconds (0.5 Hz): The system is running
normally.
Blinks twice each second (2 Hz): The system is in the alarm
state.
L/A (green)
Steady on: The link is connected.
Blinking: There is data being transmitted or received.
Off: The link is disconnected.
Interface Attributes
Table 1-113 lists the attributes of interfaces on E8KE-X-101-5X10GE-SFP+.
Table 1-113 E8KE-X-101-5X10GE-SFP+ interface attributes
Attribute
Description

HUAWEI USG9500 Series Terabit-level Next-Generation Firewall
Hardware Guide
Contents
Issue 01 (2017-03-13)
Huawei Proprietary and Confidential
Copyright © Huawei Technologies Co., Ltd.
160
Attribute
Description
Connector type
LC/PC
Optical interface attribute
Compliant with the selected SFP+ optical module. For the
optional attributes of the optical module, see 1.5.4 10 Gbit/s
SFP+ Optical Module.
Working mode
Full-duplex
Frame format
Ethernet_II, Ethernet_SAP, and Ethernet_SNAP
Network protocol
IP
Technical Specifications
Table 1-114 shows the technical specifications of the E8KE-X-101-5X10GE-SFP+.
Table 1-114 Technical specifications of the E8KE-X-101-5X10GE-SFP+
Attribute
Description
Silkscreen of the board
name
E8KE-X-101-5X10GE-SFP+
Dimensions (W x D x H)
203.3 mm x 178.65 mm x 37.2 mm
Power consumption
(typical value)
29 W
Heat dissipation
98.95 BTU/hour
Board weight
0.9 kg
1.4.7.5 1-Port 40GBase LAN-CFP FPIC A (E8KE-X-101-1X40GE-CFP)
The E8KE-X-101-1X40GE-CFP occupies one 1/2-width flexible card slot, applies to
LPUF-240s, LPUF-120s, and LPUF-101s, works in LAN mode, uses CFP optical modules,
but does not support hot swap.
Panel
Figure 1-94 shows the appearance of the E8KE-X-101-1X40GE-CFP.
Figure 1-94 Appearance of the E8KE-X-101-1X40GE-CFP

HUAWEI USG9500 Series Terabit-level Next-Generation Firewall
Hardware Guide
Contents
Issue 01 (2017-03-13)
Huawei Proprietary and Confidential
Copyright © Huawei Technologies Co., Ltd.
161
Name
Description
STATUS (green)
Blinks every two seconds (0.5 Hz): The system is running
normally.
Blinks twice each second (2 Hz): The system is in the alarm
state.
L/A (green)
Steady on: The link is connected.
Blinking: There is data being transmitted or received.
Off: The link is disconnected.
Interface Attributes
Table 1-115 lists the attributes of interfaces on E8KE-X-101-1X40GE-CFP.
Table 1-115 E8KE-X-101-1X40GE-CFP interface attributes
Attribute
Description
Connector type
LC/PC
Optical interface attribute
Compliant with the selected CFP optical module. For the
optional attributes of the optical module, see 1.5.5 40 Gbit/s
CFP Optical Modules.
Working mode
Full duplex
Frame format
Ethernet_II, Ethernet_SAP, and Ethernet_SNAP
Network protocol
IP
Technical Specifications
Table 1-116 shows the technical specifications of the E8KE-X-101-1X40GE-CFP.
Table 1-116 Technical specifications of the E8KE-X-101-1X40GE-CFP
Item
Description
Silkscreen of the board
name
E8KE-X-101-1X40GE-CFP
Dimensions (W x D x H)
178 mm x 225 mm x 38 mm
Power consumption
(typical value)
28 W
Heat dissipation
95.54 BTU/hour
Board weight
0.9 kg

HUAWEI USG9500 Series Terabit-level Next-Generation Firewall
Hardware Guide
Contents
Issue 01 (2017-03-13)
Huawei Proprietary and Confidential
Copyright © Huawei Technologies Co., Ltd.
162
1.4.8 LPUF-40-A and FPIC
This chapter describes the structure and specifications of the Flexible Card Line Processing
Unit (LPUF-40-A, 2 sub-slots) and FPIC.
1.4.8.1 LPUF-40-A
The LPUF-40-A is hot swappable and provides two 1/2-width slots, each of which holds one
FPIC. It supports the following functions: 1. Forwards packets at the line speed of 40 Gbit/s. 2.
Enhances networking flexibility and provides low-cost and customized solutions. 3. Supports
mixed insertion between different FPICs.
The LPUF-40-A backplane does not support the hot swap of FPICs.
The sum of the LPUF-40-A subcard performance cannot exceed 40G. Each slot supports a
maximum of 20-Gbit/s bandwidth.
Panel
Figure 1-95 shows the appearance of the LPUF-40-A.
Figure 1-95 Appearance of the LPUF-40-A
Name
Description
OFL button
To remove a board, you must press and hold the button for five
seconds until the OFL indicator turns on.
OFL indicator (red)
Steady on: You can remove the board.
RUN indicator (green)
Blinks every two seconds (0.5 Hz): The system is running
normally.
Blinks twice each second (2 Hz): The system is in the alarm
state.

HUAWEI USG9500 Series Terabit-level Next-Generation Firewall
Hardware Guide
Contents
Issue 01 (2017-03-13)
Huawei Proprietary and Confidential
Copyright © Huawei Technologies Co., Ltd.
163
Interface Attributes
Th LPUF-40-A does not provide interfaces externally.
Technical Specifications
Table 1-117 shows the technical specifications of the LPUF-40-A.
Table 1-117 Technical specifications of the LPUF-40-A
Item
Description
Silkscreen of the board
name
LPUF-40-A
E8KE-X-LPUF-40-A
Dimensions (W x D x H)
400 mm x 520 mm x 41 mm
Power consumption
(typical value)
280 W
Heat dissipation
955.36 BTU/hour
Board weight
6.6 kg
1.4.8.2 20-Port 100/1000Base-X-SFP Flexible Card (P40-20xGE/FE-SFP)
The P40-20xGE/FE-SFP occupies one 1/2-width flexible card slot, applies to LPUF-40-A, but
does not support hot swap.
The P40-20xGE/FE-SFP supports the following features:
GE optical module, supporting GE optical interface features.
FE optical module, supporting FE optical interface features.
Electrical SFP module, supporting features of the 10M/100M/1000M auto-sensing
electrical interfaces.
Mixed insertion among the above modules.
Panel
Figure 1-96 shows the appearance of the P40-20xGE/FE-SFP.
Figure 1-96 Appearance of the P40-20xGE/FE-SFP
Name
Description

HUAWEI USG9500 Series Terabit-level Next-Generation Firewall
Hardware Guide
Contents
Issue 01 (2017-03-13)
Huawei Proprietary and Confidential
Copyright © Huawei Technologies Co., Ltd.
164
Name
Description
STATUS (green)
Blinks every two seconds (0.5 Hz): The system is running
normally.
Blinks twice each second (2 Hz): The system is in the alarm
state.
Indicator below the
interface (green)
Steady on: The link is connected.
Blinking: There is data being transmitted or received.
Off: The link is disconnected.
Interface Attributes
Table 1-118 lists the attributes of interfaces on the P40-20xGE/FE-SFP.
Table 1-118 P40-20xGE/FE-SFP interface attributes
Attributes
Description
Connector type
LC/PC
Optical interface
attributes
Compliant with the selected SFP optical module. For the
optional attributes of the optical module, see
1.5.1 1 Gbit/s Electrical Transceiver
1.5.2 1.25 Gbit/s SFP/eSFP Optical Module
Working mode
Full-duplex
Frame format
Ethernet_II, Ethernet_SAP, and Ethernet_SNAP
Network protocol
IP
Technical Specifications
Table 1-119 lists the technical specifications of the P40-20xGE/FE-SFP.
Table 1-119 Technical specifications of the P40-20xGE/FE-SFP
Item
Specifications
Silkscreen of the board
name
P40-20xGE/FE-SFP
Dimensions (W x D x H)
180 mm x 145 mm x 40 mm
Power consumption
(typical value)
37 W
Heat dissipation
126.24 BTU/hour
Board weight
0.5 kg

HUAWEI USG9500 Series Terabit-level Next-Generation Firewall
Hardware Guide
Contents
Issue 01 (2017-03-13)
Huawei Proprietary and Confidential
Copyright © Huawei Technologies Co., Ltd.
165
1.4.8.3 2-Port 10GBase LAN/WAN-XFP Flexible Card (P40-2x10GBase
LAN/WAN-XFP)
The P40-2x10GBase LAN/WAN-XFP occupies one 1/2-width flexible card slot, applies to
LPUF-40-A, works in LAN or WAN mode, uses XFP optical modules, but does not support
hot swap.
Panel
Figure 1-97 shows the appearance of the P40-2x10GBase LAN/WAN-XFP.
Figure 1-97 Appearance of the P40-2x10GBase LAN/WAN-XFP
Name
Description
STATUS (green)
Blinks every two seconds (0.5 Hz): The system is running
normally.
Blinks twice each second (2 Hz): The system is in the alarm
state.
LINK/ACT (green)
Steady on: The link is connected.
Blinking: There is data being transmitted or received.
Off: The link is disconnected.
Interface Attributes
Table 1-120 lists the attributes of interfaces on the P40-2x10GBase LAN/WAN-XFP.
If you configure 10 GE interface to work in WAN mode, use single-mode optical fibers to
connect devices.
Table 1-120 P40-2x10GBase LAN/WAN-XFP interface attributes
Attributes
Description
Connector type
LC/PC

HUAWEI USG9500 Series Terabit-level Next-Generation Firewall
Hardware Guide
Contents
Issue 01 (2017-03-13)
Huawei Proprietary and Confidential
Copyright © Huawei Technologies Co., Ltd.
166
Attributes
Description
Optical interface
attributes
Compliant with the selected XFP optical module. For the
optional attributes of the optical module, see 1.5.3 10 Gbit/s
XFP Optical Module.
Working mode
Full-duplex
Frame format
Ethernet_II, Ethernet_SAP, and Ethernet_SNAP
Network protocol
IP
Technical Specifications
Table 1-121 lists the technical specifications of the P40-2x10GBase LAN/WAN-XFP.
Table 1-121 Technical specifications of the P40-2x10GBase LAN/WAN-XFP
Item
Specifications
Silkscreen of the board
name
P40-2x10GBase LAN/WAN-XFP
Dimensions (W x D x H)
180 mm x 145 mm x 40 mm
Power consumption
(typical value)
12 W
Heat dissipation
40.94 BTU/hour
Board weight
0.6 kg
1.4.8.4 4-port 10GBase LAN/WAN-XFP FPIC (P40-4x10GBase
LAN/WAN-XFP)
The P40-4x10GBase LAN/WAN-XFP occupies one 1/2-width flexible card slot, applies to
LPUF-40-A, works in LAN or WAN mode, uses XFP optical modules, but does not support
hot swap.
The P40-4x10GBase LAN/WAN-XFP is convergence. The left-most two ports can be converged to 10
Gbit/s in average. The right-most two ports can be converged to 10 Gbit/s in average.
Panel
Figure 1-98 shows the appearance of the P40-4x10GBase LAN/WAN-XFP.

HUAWEI USG9500 Series Terabit-level Next-Generation Firewall
Hardware Guide
Contents
Issue 01 (2017-03-13)
Huawei Proprietary and Confidential
Copyright © Huawei Technologies Co., Ltd.
167
Figure 1-98 Appearance of the P40-4x10GBase LAN/WAN-XFP
Name
Description
STATUS (green)
Blinks every two seconds (0.5 Hz): The system is running
normally.
Blinks twice each second (2 Hz): The system is in the alarm
state.
LA (green)
Steady on: The link is connected.
Blinking: There is data being transmitted or received.
Off: The link is disconnected.
Interface Attributes
Table 1-122 lists the attributes of interfaces on the P40-4x10GBase LAN/WAN-XFP.
If you configure 10 GE interface to work in WAN mode, use single-mode optical fibers to
connect devices.
Table 1-122 P40-4x10GBase LAN/WAN-XFP interface attributes
Attributes
Description
Connector type
LC/PC
Optical interface
attributes
Compliant with the selected XFP optical module. For the
optional attributes of the optical module, see 1.5.3 10 Gbit/s
XFP Optical Module.
Frame format
Ethernet_II, Ethernet_SAP, and Ethernet_SNAP
Network protocol
IP
Technical Specifications
Table 1-123 lists the technical specifications of the P40-4x10GBase LAN/WAN-XFP.

HUAWEI USG9500 Series Terabit-level Next-Generation Firewall
Hardware Guide
Contents
Issue 01 (2017-03-13)
Huawei Proprietary and Confidential
Copyright © Huawei Technologies Co., Ltd.
168
Table 1-123 Technical specifications of the P40-4x10GBase LAN/WAN-XFP
Item
Specifications
Silkscreen of the board
name
P40-4x10GBase LAN/WAN-XFP
Dimensions (W x D x H)
180 mm x 145 mm x 40 mm
Power consumption
(typical value)
12 W
Heat dissipation
39 BTU/hour
Board weight
0.5 kg
1.4.9 LPUF-21 and FPIC
This chapter describes the structure and specifications of the Flexible Card Line Processing
Unit (LPUF-21, 2 sub-slots) and FPIC.
1.4.9.1 LPUF-21
The LPUF-21 is hot swappable and provides two 1/2-width slots, each of which holds one
FPIC. It supports the following functions: 1. Forwards packets at the line speed of 20 Gbit/s. 2.
Enhances networking flexibility and provides low-cost and customized solutions. 3. Supports
mixed insertion between different FPICs.
The LPUF-21 backplane does not support the hot swap of FPICs.
Panel
Figure 1-99 shows the appearance of the LPUF-21.
Figure 1-99 Appearance of the LPUF-21
Name
Description

HUAWEI USG9500 Series Terabit-level Next-Generation Firewall
Hardware Guide
Contents
Issue 01 (2017-03-13)
Huawei Proprietary and Confidential
Copyright © Huawei Technologies Co., Ltd.
169
Name
Description
OFL button
To remove a board, you must press and hold the button for five
seconds until the OFL indicator turns on.
OFL indicator (red)
Steady on: You can remove the board.
RUN indicator (green)
Blinks every two seconds (0.5 Hz): The system is running
normally.
Blinks twice each second (2 Hz): The system is in the alarm
state.
Interface Attributes
Th LPUF-21 does not provide interfaces externally.
Technical Specifications
Table 1-124 shows the technical specifications of the LPUF-21.
Table 1-124 Technical specifications of the LPUF-21
Item
Description
Silkscreen of the board
name
LPUF-21
E8KE-X-LPUF-21
Dimensions (W x D x H)
400 mm x 520 mm x 41 mm
Power consumption
(typical value)
170 W
Heat dissipation value
580.04 BTU/hour
Board weight
5.0 kg
1.4.9.2 12-port 10Base-T/100Base-TX/1000Base-T-RJ45 FPIC
(12x10/100/1000Base-TX-RJ45)
The 12x10/100/1000Base-TX-RJ45 occupies one 1/2-width flexible card slot, applies to
LPUF-21, but does not support hot swap.
Panel
Figure 1-100 shows the appearance of the 12x10/100/1000Base-TX-RJ45.

HUAWEI USG9500 Series Terabit-level Next-Generation Firewall
Hardware Guide
Contents
Issue 01 (2017-03-13)
Huawei Proprietary and Confidential
Copyright © Huawei Technologies Co., Ltd.
170
Figure 1-100 Appearance of the 12x10/100/1000Base-TX-RJ45
Name
Description
STATUS (green)
Blinks every two seconds (0.5 Hz): The system is running
normally.
Blinks twice each second (2 Hz): The system is in the alarm
state.
LINK (green)/ACT
(yellow)
Steady on: The link is connected.
Blinking: There is data being transmitted or received.
Off: The link is disconnected.
Interface Attributes
Table 1-125 lists the attributes of interfaces on the 12x10/100/1000Base-TX-RJ45.
Table 1-125 12x10/100/1000Base-TX-RJ45 tnterface attributes
Attribute
Description
Connector type
RJ45
Working mode
10M/100M/1000M adaptive, supporting full duplex
Cable specifications
When the working mode is 10M or 100M, it is recommended
that Category 5 unshielded twisted pairs be used. When the
working mode is 1000M, it is recommended that super
Category 5 unshielded twisted pairs be used.
Compliance
IEEE802.3-2002
Frame format
Ethernet_II, Ethernet_SAP, and Ethernet_SNAP
Network protocol
IP
Technical Specifications
Table 1-126 shows the technical specifications of the 12x10/100/1000Base-TX-RJ45.
Table 1-126 Technical specifications of the 12x10/100/1000Base-TX-RJ45
Item
Description
Silk-screen board name
12x10/100/1000Base-TX-RJ45

HUAWEI USG9500 Series Terabit-level Next-Generation Firewall
Hardware Guide
Contents
Issue 01 (2017-03-13)
Huawei Proprietary and Confidential
Copyright © Huawei Technologies Co., Ltd.
171
Item
Description
Dimensions (W x D x H)
180 mm x 145 mm x 40 mm
Power consumption
(typical value)
10 W
Heat dissipation value
34.12 BTU/hour
Board weight
0.50 kg
1.4.9.3 12-port 100Base-FX/1000Base-X-SFP FPIC (12x100/1000Base-SFP)
The 12x100/1000Base-SFP occupies one 1/2-width flexible card slot, applies to LPUF-21, but
does not support hot swap.
The 12x100/1000Base-SFP supports the following features:
GE optical module, supporting GE optical interface features.
FE optical module, supporting FE optical interface features.
Electrical SFP module, supporting features of the 10M/100M/1000M auto-sensing
electrical interfaces.
Mixed insertion among the above modules.
Panel
Figure 1-101 shows the appearance of the 12x100/1000Base-SFP.
Figure 1-101 Appearance of the 12x100/1000Base-SFP
Name
Description
STATUS (green)
Blinks every two seconds (0.5 Hz): The system is running
normally.
Blinks twice each second (2 Hz): The system is in the alarm
state.
L/A (green)
Steady on: The link is connected.
Blinking: There is data being transmitted or received.
Off: The link is disconnected.

HUAWEI USG9500 Series Terabit-level Next-Generation Firewall
Hardware Guide
Contents
Issue 01 (2017-03-13)
Huawei Proprietary and Confidential
Copyright © Huawei Technologies Co., Ltd.
172
Interface Attributes
Table 1-127 lists the attributes of interfaces on the 12x100/1000Base-SFP.
Table 1-127 12x100/1000Base-SFP interface attributes
Attribute
Description
Connector type
LC/PC
Interface attributes
Compliant with the selected SFP optical module. For the
optional attributes of the optical module, see
1.5.1 1 Gbit/s Electrical Transceiver
1.5.2 1.25 Gbit/s SFP/eSFP Optical Module
Working mode
Full-duplex
Compliance
IEEE 802.3-2002
Frame format
Ethernet_II, Ethernet_SAP, and Ethernet_SNAP
Network protocol
IP
Technical Specifications
Table 1-128 shows the technical specifications of 12x100/1000Base-SFP.
Table 1-128 Technical specifications of 12x100/1000Base-SFP
Item
Description
Silk-screen board name
12x100/1000Base-SFP
Dimensions (W x D x H)
180 mm x 145mm x 40 mm
Power consumption
(typical value)
13 W
Heat dissipation value
44.36 BTU/hour
Board weight
0.50 kg
1.4.9.4 1-port OC-192c/STM-64c POS-XFP FPIC (1 x OC-192c/STM-64c
POS-XFP)
The 1 x OC-192c/STM-64c POS-XFP occupies one 1/2-width flexible card slot, applies to
LPUF-21, uses 10G XFP optical modules, provides one 10 GE POS interface, but does not
support hot swap.
Panel
Figure 1-102 shows the appearance of the 1 x OC-192c/STM-64c POS-XFP.

HUAWEI USG9500 Series Terabit-level Next-Generation Firewall
Hardware Guide
Contents
Issue 01 (2017-03-13)
Huawei Proprietary and Confidential
Copyright © Huawei Technologies Co., Ltd.
173
Figure 1-102 Appearance of the 1 x OC-192c/STM-64c POS-XFP
Name
Description
STATUS (green)
Blinks every two seconds (0.5 Hz): The system is running
normally.
Blinks twice each second (2 Hz): The system is in the alarm
state.
LINK/ACT (green)
Steady on: The link is connected.
Blinking: There is data being transmitted or received.
Off: The link is disconnected.
Interface Attributes
Table 1-129 lists the attributes of interfaces on the 1 x OC-192c/STM-64c POS-XFP.
Table 1-129 1 x OC-192c/STM-64c POS-XFP interface attributes
Attribute
Description
Connector type
LC/PC
Optical interface
attributes
Compliant with the selected XFP optical module. For the
optional attributes of the optical module, see 1.5.3 10 Gbit/s
XFP Optical Module.
Working mode
Full duplex
Compliance
STM-64c SDH/OC-192c SONET and RFC 2615 (1619)/1662
Link protocol
PPP and HDLC
Network protocol
IP
Technical Specifications
Table 1-130 shows the technical specifications of the 1-port OC-192c/STM-64c POS-XFP
FPIC.
Table 1-130 Technical specifications of the 1-port OC-192c/STM-64c POS-XFP FPIC
Item
Description

HUAWEI USG9500 Series Terabit-level Next-Generation Firewall
Hardware Guide
Contents
Issue 01 (2017-03-13)
Huawei Proprietary and Confidential
Copyright © Huawei Technologies Co., Ltd.
174
Item
Description
Silk-screen board name
1 x OC-192c/STM-64c POS-XFP
Dimensions (W x D x H)
180 mm x 145 mm x 40 mm
Power consumption
(typical value)
16 W
Heat dissipation value
54.59 BTU/hour
Board weight
0.50 kg
1.4.9.5 1-port 10GBase LAN/WAN-XFP FPIC (1 x 10GBase LAN/WAN)
The 1 x 10GBase LAN/WAN occupies one 1/2-width flexible card slot, applies to LPUF-21,
works in LAN or WAN mode, uses XFP optical modules, but does not support hot swap.
Panel
Figure 1-103 shows the appearance of the 1 x 10GBase LAN/WAN.
Figure 1-103 Appearance of the 1 x 10GBase LAN/WAN
Name
Description
STATUS (green)
Blinks every two seconds (0.5 Hz): The system is running
normally.
Blinks twice each second (2 Hz): The system is in the alarm
state.
L/A (green)
Steady on: The link is connected.
Blinking: There is data being transmitted or received.
Off: The link is disconnected.
Interface Attributes
Table 1-131 lists the attributes of interfaces on the 1 x 10GBase LAN/WAN.

HUAWEI USG9500 Series Terabit-level Next-Generation Firewall
Hardware Guide
Contents
Issue 01 (2017-03-13)
Huawei Proprietary and Confidential
Copyright © Huawei Technologies Co., Ltd.
175
If you configure 10 GE interface to work in WAN mode, use single-mode optical fibers to
connect devices.
Table 1-131 1 x 10GBase LAN/WAN interface attributes
Attribute
Description
Connector type
LC/PC
Optical interface
attributes
Compliant with the selected XFP optical module. For the
optional attributes of the optical module, see 1.5.3 10 Gbit/s
XFP Optical Module.
Compliance
IEEE 802.3ae
Frame format
Ethernet_II, Ethernet_SAP, and Ethernet_SNAP
Network protocol
IP
Technical Specifications
Table 1-132 shows the technical specifications of 1 x 10GBase LAN/WAN.
Table 1-132 Technical specifications of the 1 x 10GBase LAN/WAN
Item
Description
Silk-screen board name
1 x 10GBase LAN/WAN
Dimensions (W x D x H)
180 mm x 145 mm x 40 mm
Power consumption
(typical value)
16 W
Heat dissipation value
54.59 BTU/hour
Board weight
0.5 kg
1.4.9.6 4-Port 10GBase WAN/LAN-XFP FPIC (4x10GBase LAN/WAN)
The 4x10GBase LAN/WAN occupies two 1/2-width flexible card slots, applies to LPUF-21,
works in LAN or WAN mode, uses XFP optical modules, but does not support hot swap.
The 4x10GBase LAN/WAN is convergence. The left-most two ports can be converged to 10 Gbit/s in
average. The right-most two ports can be converged to 10 Gbit/s in average.
Panel
Figure 1-104 shows the appearance of the 4x10GBase LAN/WAN.

HUAWEI USG9500 Series Terabit-level Next-Generation Firewall
Hardware Guide
Contents
Issue 01 (2017-03-13)
Huawei Proprietary and Confidential
Copyright © Huawei Technologies Co., Ltd.
176
Figure 1-104 Appearance of the 4x10GBase LAN/WAN
Name
Description
STATUS (green)
Blinks every two seconds (0.5 Hz): The system is running
normally.
Blinks twice each second (2 Hz): The system is in the alarm
state.
LINK/ACT (green)
Steady on: The link is connected.
Blinking: There is data being transmitted or received.
Off: The link is disconnected.
Interface Attributes
Table 1-133 lists the attributes of interfaces on the 4x10GBase LAN/WAN.
Table 1-133 4x10GBase LAN/WAN interface attributes
Attributes
Description
Connector type
LC/PC
Optical interface
attributes
Compliant with the selected XFP optical module. For the
optional attributes of the optical module, see 1.5.3 10 Gbit/s
XFP Optical Module.
Working mode
Full-duplex
Frame format
Ethernet_II, Ethernet_SAP, and Ethernet_SNAP
Network protocol
IP
Technical Specifications
Table 1-134 lists the technical specifications of the 4x10GBase LAN/WAN.
Table 1-134 Technical specifications of the 4x10GBase LAN/WAN
Item
Specifications
Silkscreen of the board
name
4x10GBase LAN/WAN
Dimensions (W x D x H)
340 mm x 180 mm x 40 mm

HUAWEI USG9500 Series Terabit-level Next-Generation Firewall
Hardware Guide
Contents
Issue 01 (2017-03-13)
Huawei Proprietary and Confidential
Copyright © Huawei Technologies Co., Ltd.
177
Item
Specifications
Power consumption
(typical value)
31 W
Heat dissipation
105.77 BTU/hour
Board weight
1.2 kg
1.4.10 1-Port 100GBase-CFP Integrated Line Processing Unit
(LPUI-101)
The LPUI-101 is hot swappable and supports packet forwarding at the line speed of 100
Gbit/s on a single interface. The port can be only configured to work in LAN mode and uses
CFP optical module.
Panel
Figure 1-105 shows the appearance of the LPUI-101.
Figure 1-105 Appearance of the LPUI-101
Name
Description
OFL button
To remove a board, you must press and hold the button for five
seconds until the OFL indicator turns on.
OFL indicator (red)
Steady on: You can remove the board.
RUN indicator (green)
Blinks every two seconds (0.5 Hz): The system is running
normally.
Blinks twice each second (2 Hz): The system is in the alarm
state.
LINK/ACT (green)
Steady on: The link is connected.
Blinking: There is data being transmitted or received.
Off: The link is disconnected.

HUAWEI USG9500 Series Terabit-level Next-Generation Firewall
Hardware Guide
Contents
Issue 01 (2017-03-13)
Huawei Proprietary and Confidential
Copyright © Huawei Technologies Co., Ltd.
178
Interface Attributes
Table 1-135 lists the attributes of interfaces on LPUI-101.
Table 1-135 LPUI-101 Interface attributes
Attribute
Description
Connector type
LC/PC
Optical interface attribute
Compliant with the selected CFP optical module. For the
optional attributes of the optical module, see 1.5.7 100 Gbit/s
CFP Optical Modules.
Working mode
Full duplex
Standard compliance
IEEE 802.3-2002
Frame format
Ethernet_II, Ethernet_SAP, and Ethernet_SNAP
Network protocol
IP
Technical Specifications
Table 1-136 shows the technical specifications of the LPUI-101.
Table 1-136 Technical specifications of the LPUI-101
Item
Description
Silkscreen of the board
name
LPUI-101
1x100GBase LAN-CFP
E8KE-X-101-1X100GE-CFP
Dimensions (W x D x H)
399.2 mm x 532.6 mm x 40.1 mm
Power consumption
(typical value)
339 W
Heat dissipation
1157 BTU/hour
Board weight
8.28 kg
1.5 Optical/Electrical Module
This section describes supported optical/electrical modules.
1.5.1 1 Gbit/s Electrical Transceiver
The 1 Gbit/s electrical transceiver can be applied to the GE electrical interfaces.

HUAWEI USG9500 Series Terabit-level Next-Generation Firewall
Hardware Guide
Contents
Issue 01 (2017-03-13)
Huawei Proprietary and Confidential
Copyright © Huawei Technologies Co., Ltd.
179
Figure 1-106 1 Gbit/s Electrical Transceiver
Table 1-137 lists the currently available 1 Gbit/s electrical transceivers.
Table 1-137 1 Gbit/s electrical transceivers
Product
Model
BOM
Number
Interface
Standard
Transmis
sion
Distance
Transmis
sion
medium
Auto-neg
otiation
Remarks
SFP/RJ45-
GE-100m
02314171
1000BAS
E-T
100 m
(328.08 ft)
RJ-45
Supported
To meet
NEBS
standards,
shielded
cables
must be
available
for this
type of
optical
module
used at
sites in
North
America.
Table 1-138 lists the basic features of 1 Gbit/s electrical transceivers and the compliant
standards.
Table 1-138 Basic features of 1 Gbit/s electrical transceivers and the compliant standards
Item
Description
Interface standard
IEEE Std 802.3z, IEEE Std 802.3ab
SFP MSA
Temperature
0-75°C (32°F - 167°F)
Digital diagnosis
N/A

HUAWEI USG9500 Series Terabit-level Next-Generation Firewall
Hardware Guide
Contents
Issue 01 (2017-03-13)
Huawei Proprietary and Confidential
Copyright © Huawei Technologies Co., Ltd.
180
Item
Description
Environment standard
RoHS(exempted)
Security standard
FCC class B, IEC 61000-4-3
ESD
> 500 V (Human body model)
Table 1-139 lists the specifications of 1 Gbit/s electrical transceivers.
Table 1-139 Specifications of 1 Gbit/s electrical transceivers
Item
Description
Remarks
Interface standard
1000BASE-T
-
Transmission rate
10-1000 Mbit/s
Complying with IEEE802.3
Interface type
RJ-45
-
Transmission distance
100m (328.08 ft)
Category 5 UTP, BER <
10-12, (SFP/RJ45-GE-100)
1.5.2 1.25 Gbit/s SFP/eSFP Optical Module
The 1.25 Gbit/s SFP/eSFP optical modules of different levels can be applied to the GE
interface. The wavelength of the common 1.25 Gbit/s SFP/eSFP optical modules can be 850
nm, 1310 nm, or 1550 nm and the transmission distance ranges from 0.5 km (0.31 mi) to 80
km (49.71 mi).
Figure 1-107 1.25 Gbit/s SFP/eSFP Optical Module
Table 1-140 lists the currently available 1.25 Gbit/s SFP/eSFP optical modules.

HUAWEI USG9500 Series Terabit-level Next-Generation Firewall
Hardware Guide
Contents
Issue 01 (2017-03-13)
Huawei Proprietary and Confidential
Copyright © Huawei Technologies Co., Ltd.
181
Table 1-140 1.25 Gbit/s SFP/eSFP optical modules
Product
Model
BOM
Number
Interface
Standard
Transmis
sion
Distance
(km) (mi)
Transmis
sion
medium
Wavelen
gth (nm)
Remarks
eSFP-GE-
MM850-5
00m
02315204
1000BAS
E-SX
0.5 (0.31)
Multi-mod
e
850
Preferred
eSFP-GE-
SM1310-1
0Km
02315200
1000BAS
E-LX
10 (6.21)
Single-mo
de
1310
Preferred
eSFP-GE-
SM1310-4
0Km
02317346
1000BAS
E-LX
40 (24.86)
Single-mo
de
1310
Preferred
When
performin
g a
self-loop
test, use
an optical
attenuator
eSFP-GE-
SM1550-8
0Km
02317348
1000BAS
E-ZX
80 (49.71)
Single-mo
de
1550
Preferred
When
performin
g a
self-loop
test, use
an optical
attenuator
Table 1-141 lists the basic features of 1.25 Gbit/s SFP/eSFP optical modules and the
compliant standards.
Table 1-141 Basic features of 1.25 Gbit/s SFP/eSFP optical modules and the compliant standards
Item
Description
Interface standard
IEEE802.3, SFP MSA
Bit Error Ratio (BER)
< 1 x 10E -12
Temperature
0°C -70°C (32°F -158°F)
Digital diagnosis
SFF-8472(exclude SFP optical modules)
Environment standard
RoHS (exempted)
Security standard
FCC class B, IEC 60825-1 Class 1
ESD
> 500 V (Human body model)

HUAWEI USG9500 Series Terabit-level Next-Generation Firewall
Hardware Guide
Contents
Issue 01 (2017-03-13)
Huawei Proprietary and Confidential
Copyright © Huawei Technologies Co., Ltd.
182
Table 1-142 lists the specifications of the eSFP-GE-MM850-500 optical module.
Table 1-142 Specifications of the eSFP-GE-MM850-500 optical module
Item
Description
Interface standard
1000BASE-SX
Transmission rate
1.25 Gbit/s
Interface type
LC/PC
Transmission distance
500m (310.7 ft.) (50/125 um MMF)
200m (124.28 ft.) (62.5/125 um MMF)
Optical transmitter
Optical source type
VCSEL
Center wavelength
850 nm
Operating wavelength range
830 nm-860 nm
Spectral characteristics
Maximum root mean square (RMS)
Spectral Width
0.85 nm
Maximum spectral width (-20 dB)
N/A
Minimum side mode suppression ratio
(SMSR)
N/A
Average transmit optical power
Maximum transmit optical power
-3dBm
Minimum transmit optical power
-9dBm
Minimum extinction ratio
9.0dB
Optical receiver
Operating wavelength range
770nm-860nm
Maximum receiver sensitivity
-17dBm
Overload power
0dBm
Maximum optical channel cost
N/A
Maximum reflection factor
N/A
Table 1-143 lists the specifications of the eSFP-GE-SM1310-10K optical module.
Table 1-143 Specifications of the eSFP-GE-SM1310-10K optical module
Parameter
Description

HUAWEI USG9500 Series Terabit-level Next-Generation Firewall
Hardware Guide
Contents
Issue 01 (2017-03-13)
Huawei Proprietary and Confidential
Copyright © Huawei Technologies Co., Ltd.
183
Parameter
Description
Interface standard
1000BASE-LX
Transmission rate
1.25 Gbit/s
Interface type
LC
Transmission distance
10 km(6.21 mi)
Optical transmitter
Optical source type
FP
Center wavelength
1310 nm
Operating wavelength range
1270-1355 nm
Spectral characteristics
Maximum root mean square (RMS)
Spectral Width
4 nm
Maximum spectral width (-20 dB)
N/A
Minimum side mode suppression ratio
(SMSR)
N/A
Average transmit optical power
Maximum transmit optical power
-3 dBm
Minimum transmit optical power
-9 dBm
Minimum extinction ratio
9.5 dB
Optical receiver
Operating wavelength range
1260-1580 nm
Minimum receiver sensitivity
-20 dBm
Overload power
-3 dBm
Maximum optical channel cost
N/A
Maximum reflection factor
N/A
Table 1-144 lists the specifications of the SFP-STM1-MM1310-40K optical module.
Table 1-144 Specifications of the SFP-STM1-MM1310-40K optical module
Parameter
Description
Interface standard
1000BASE-ZX
Transmission rate
1.25 Gbit/s
Interface type
LC/PC

HUAWEI USG9500 Series Terabit-level Next-Generation Firewall
Hardware Guide
Contents
Issue 01 (2017-03-13)
Huawei Proprietary and Confidential
Copyright © Huawei Technologies Co., Ltd.
184
Parameter
Description
Transmission distance
40 km (25 mi)
Optical transmitter
Optical source type
DFB
Center wavelength
1310 nm
Operating wavelength range
1275 nm-1335 nm
Spectral characteristics
Maximum root mean square (RMS)
Spectral Width
N/A
Maximum spectral width (-20 dB)
1.0 nm
Minimum side mode suppression ratio
(SMSR)
30 dB
Average transmit optical power
Maximum transmit optical power
0 (34060298)dBm
Minimum transmit optical power
-5 (34060298)dBm
Minimum extinction ratio
9dB
Optical receiver
Operating wavelength range
1260 nm-1580 nm
Receiver sensitivity
-23 dBm
Overload power
-3 dBm
Maximum optical channel cost
N/A
Maximum reflection factor
N/A
Table 1-145 lists the specifications of the eSFP-GE-SM1550-80K optical module.
Table 1-145 Specifications of the eSFP-GE-SM1550-80K optical module
Parameter
Description
Interface standard
1000BASE-ZX
Transmission rate
1.25 Gbit/s
Interface type
LC/PC
Transmission distance
80 km (50 mi)
Optical transmitter
Optical source type
DFB

HUAWEI USG9500 Series Terabit-level Next-Generation Firewall
Hardware Guide
Contents
Issue 01 (2017-03-13)
Huawei Proprietary and Confidential
Copyright © Huawei Technologies Co., Ltd.
185
Parameter
Description
Center wavelength
1550 nm
Operating wavelength range
1540 nm-1570 nm
Spectral characteristics
Maximum root mean square (RMS)
Spectral Width
N/A
Maximum spectral width (-20 dB)
1.0 nm
Minimum side mode suppression ratio
(SMSR)
30 dB
Average transmit optical power
Maximum transmit optical power
3 dBm
Minimum transmit optical power
-2 dBm
Minimum extinction ratio
9 dB
Optical receiver
Operating wavelength range
1270 nm-1570 nm
Minimum receiver sensitivity
-22 dBm
Overload power
-3 dBm
Maximum optical channel cost
N/A
Maximum reflection factor
N/A
1.5.3 10 Gbit/s XFP Optical Module
The 10 Gbit/s XFP optical modules of different levels can be applied to the OC-192/STM-64
POS interface and 10 GE interface. The wavelength of these 10 Gbit/s XFP optical modules
can be 850 nm, 1310 nm, or 1550 nm and the transmission distance ranges from 0.3 km (0.19
mi.) to 80 km (49.71 mi.).

HUAWEI USG9500 Series Terabit-level Next-Generation Firewall
Hardware Guide
Contents
Issue 01 (2017-03-13)
Huawei Proprietary and Confidential
Copyright © Huawei Technologies Co., Ltd.
186
Figure 1-108 10 Gbit/s XFP Optical Module
Table 1-146 lists the currently available 10 Gbit/s XFP optical modules.
Table 1-146 10 Gbit/s XFP optical modules
Product
Model
BOM
Number
Interface
Standard
Transmis
sion
Distance
(km)
Transmis
sion
medium
Wavelen
gth (nm)
Remarks
XFP-10G-
MM850-3
00m
02315176
10GBASE
-SR/SW
0.3 (0.19
mi.)
Multi-mod
e
850
-
XFP-10G-
SM1310-1
0Km
02315208
10GBASE
-LR/LW
STM-64/
OC-192
10 (6.21
mi.)
Single-mo
de
1310
-
XFP-10G-
SM1550-4
0Km
02315209
10GBASE
-ER/EW
STM-64/
OC-192
40 (24.86
mi.)
Single-mo
de
1550
When
performin
g a
self-loop
test, use
an optical
attenuator
XFP-10G-
SM1550-8
0Km
02315143
10GBASE
-ZR/ZW
STM-64/
OC-192
80 (49.71
mi.)
Single-mo
de
1550
When
performin
g a
self-loop
test, use
an optical
attenuator

HUAWEI USG9500 Series Terabit-level Next-Generation Firewall
Hardware Guide
Contents
Issue 01 (2017-03-13)
Huawei Proprietary and Confidential
Copyright © Huawei Technologies Co., Ltd.
187
Table 1-147 lists the basic features of 10 Gbit/s XFP optical modules and the compliant
standards.
Table 1-147 Basic features of 10 Gbit/s XFP optical modules and the compliant standards
Item
Description
Interface standard
IEEE802.3ae 10GE, SONET OC-192/SDH
STM-64, XFP MSA
XFP-10G-MM850-300 do not support
SONET OC-192/SDH STM-64
Bit Error Ratio (BER)
< 1 x 10E -12
Temperature
0-70°C (32°F to 158°F)
Digital diagnosis
XFP MSA INF8077i
Environment standard
RoHS (exempted)
Security standard
FCC class B, IEC 60825-1 Class 1 laser eye
safe
ESD
> 500 V (Human body model)
Table 1-148 lists the specifications of the XFP-10G-MM850-300 optical module.
Table 1-148 Specifications of the XFP-10G-MM850-300 optical module
Item
Description
Interface standard
10GBASE-SR/SW
Transmission rate
10.3125 Gbit/s (10GBASE-SR/SW)
9.95328 Gbit/s (10GBASE-SW)
Interface type
LC
Transmission distance
300m (984.24 ft) (50/125um MMF, OM3)
33m (108.27 ft) (62.5/125um MMF, OM1)
Optical transmitter
Optical source type
VCSEL
Center wavelength
850 nm
Operating wavelength range
840-860 nm
Spectral characteristics
Maximum root mean square (RMS)
Spectral Width
0.45 nm
Maximum spectral width (-20 dB)
N/A
Minimum side mode suppression ratio
N/A

HUAWEI USG9500 Series Terabit-level Next-Generation Firewall
Hardware Guide
Contents
Issue 01 (2017-03-13)
Huawei Proprietary and Confidential
Copyright © Huawei Technologies Co., Ltd.
188
Item
Description
(SMSR)
Average transmit optical power
Maximum transmit optical power
-1.3 dBm
Minimum transmit optical power
-7.3 dBm
Minimum extinction ratio
3.0 dB
Optical receiver
Operating wavelength range
840-860 nm
Receiver sensitivity
-9.9 dBm
Overload power
-1 dBm
Maximum optical channel cost
N/A
Maximum reflection factor
-12 dB
Table 1-149 lists the specifications of the XFP-10G-SM1310-10K optical module.
Table 1-149 Specifications of the XFP-10G-SM1310-10K optical module
Item
Description
Interface standard
10GBASE-LR/LW, STM-64/OC-192
Transmission rate
9.95328 Gbit/s
(STM-64/OC-192/10GBASE-LW)
10.3125 Gbit/s (10GBASE-LR/LW)
Interface type
LC
Transmission distance
10km (6.21 mi.)
Optical transmitter
Optical source type
DFB
Center wavelength
1310 nm
Operating wavelength range
1290-1330 nm
Spectral characteristics
Maximum root mean square (RMS)
Spectral Width
N/A
Maximum spectral width (-20 dB)
1.0 nm
Minimum side mode suppression ratio
(SMSR)
30 dB
Average transmit optical power

HUAWEI USG9500 Series Terabit-level Next-Generation Firewall
Hardware Guide
Contents
Issue 01 (2017-03-13)
Huawei Proprietary and Confidential
Copyright © Huawei Technologies Co., Ltd.
189
Item
Description
Maximum transmit optical power
-1 dBm
Minimum transmit optical power
-6 dBm
Minimum extinction ratio
6 dB
Optical receiver
Operating wavelength range
1270-1565 nm
Receiver sensitivity
-14.4 dBm
Overload power
0.5 dBm
Maximum optical channel cost
1 dB
Maximum reflection factor
-14 dB
Table 1-150 lists the specifications of the XFP-10G-SM1550-40K optical module.
Table 1-150 Specifications of the XFP-10G-SM1550-40K optical module
Item
Description
Interface standard
10GBASE-ER/EW, STM-64/OC-192
Transmission rate
9.95328 Gbit/s (STM-64/OC-192/EW)
10.3125 Gbit/s (10GBASE-ER)
Interface type
LC
Transmission distance
40km (24.86 mi.)
Optical transmitter
Optical source type
EML
Center wavelength
1550 nm
Operating wavelength range
1530-1565 nm
Spectral characteristics
Maximum root mean square (RMS)
Spectral Width
N/A
Maximum spectral width (-20 dB)
1.0 nm
Minimum side mode suppression ratio
(SMSR)
30 dB
Average transmit optical power
Maximum transmit optical power
2 dBm
Minimum transmit optical power
-1 dBm

HUAWEI USG9500 Series Terabit-level Next-Generation Firewall
Hardware Guide
Contents
Issue 01 (2017-03-13)
Huawei Proprietary and Confidential
Copyright © Huawei Technologies Co., Ltd.
190
Item
Description
Minimum extinction ratio
8.2 dB
Optical receiver
Operating wavelength range
1270-1565 nm
Receiver sensitivity
-15.8 dBm
Overload power
-1 dBm
Maximum optical channel cost
2 dB
Maximum reflection factor
-26 dB
Table 1-151 lists the specifications of the XFP-10G-SM1550-80K optical module.
Table 1-151 Specifications of the XFP-10G-SM1550-80K optical module
Item
Description
Interface standard
10GBASE-ZR/ZW, STM-64/OC-192
Transmission rate
9.95328 Gbit/s (STM-64/OC-192/ZW)
10.3125 Gbit/s (10GBASE-ZR)
Interface type
LC/PC
Transmission distance
80 km (49.71 mi.)
Optical transmitter
Optical source type
EML
Center wavelength
1550 nm
Operating wavelength range
1530-1565 nm
Spectral characteristics
Maximum root mean square (RMS)
Spectral Width
N/A
Maximum spectral width (-20 dB)
1.0 nm
Minimum side mode suppression ratio
(SMSR)
30 dB
Average transmit optical power
Maximum transmit optical power
4 dBm
Minimum transmit optical power
0 dBm
Minimum extinction ratio
9 dB
Optical receiver

HUAWEI USG9500 Series Terabit-level Next-Generation Firewall
Hardware Guide
Contents
Issue 01 (2017-03-13)
Huawei Proprietary and Confidential
Copyright © Huawei Technologies Co., Ltd.
191
Item
Description
Operating wavelength range
1270-1600 nm
Receiver sensitivity
-24 dBm
Overload power
-7 dBm
Maximum optical channel cost
2 dB
Maximum reflection factor
-27 dB
1.5.4 10 Gbit/s SFP+ Optical Module
The 10 Gbit/s SFP+ optical modules can only be used on 10 GE interfaces. The wavelength of
these 10 Gbit/s SFP+ optical modules can be 850 nm, 1310 nm, or 1550 nm. The transmission
distance ranges from 0.3 km (0.19 mi.) to 80 km (49.71 mi.).
Figure 1-109 10 Gbit/s SFP+ Optical Module
Table 1-152 lists the currently available 10 Gbit/s SFP+ optical modules.
Table 1-152 10 Gbit/s SFP+ optical modules
Product
Model
BOM
Number
Interface
Standard
Transmis
sion
Distance
(km)
Mode
Wavelen
gth (nm)
Remarks
SFP+-10
G-MM85
0-300m
02318169
10GBASE
-SR
0.3 (0.19
mi.)
Multi-mod
e
850
-
SFP+-10
G-SM131
0-10Km
02318170
10GBASE
-LR
10 (6.21
mi.)
Single-mo
de
1310
-
SFP+-10
G-SM155
02310CN
10GBASE
40 (24.86
Single-mo
1550
The
optical

HUAWEI USG9500 Series Terabit-level Next-Generation Firewall
Hardware Guide
Contents
Issue 01 (2017-03-13)
Huawei Proprietary and Confidential
Copyright © Huawei Technologies Co., Ltd.
192
Product
Model
BOM
Number
Interface
Standard
Transmis
sion
Distance
(km)
Mode
Wavelen
gth (nm)
Remarks
0-40Km
F
-ER
mi.)
de
modules
produced
by
FINISAR
are of the
cooled
type, and
the
initializati
on time
does not
exceed
90s. When
performin
g a
self-loop
test, use an
optical
attenuator.
SFP+-10
G-SM155
0-80Km
34060672
02310SN
N
10GBASE
-ZR
80 (49.71
mi.)
Single-mo
de
1550
When
performin
g a
self-loop
test, use an
optical
attenuator
Table 1-153 lists the basic features of 10 Gbit/s SFP+ optical modules and the compliant
standards.
Table 1-153 Basic features of 10 Gbit/s SFP+ optical modules and the compliant standards
Item
Description
Interface standard
IEEE802.3ae 10GE, SFP+ MSA,SFF-8472
SONET OC-192/SDH STM-64 is not
supported.
Bit Error Ratio (BER)
<1x10E-12
Temperature
0°C to 70°C (32°F to 158°F)
Digital diagnosis
SFF-8472
Environment standard
RoHS-6 (lead free)
Security standard
IEC 60825-1 Class 1 laser eye safe
ESD
>500 V (Human body model)

HUAWEI USG9500 Series Terabit-level Next-Generation Firewall
Hardware Guide
Contents
Issue 01 (2017-03-13)
Huawei Proprietary and Confidential
Copyright © Huawei Technologies Co., Ltd.
193
Table 1-154 lists the specifications of the SFP+-10G-MM850-300 optical modules.
Table 1-154 Specifications of the SFP+-10G-MM850-300 optical modules
Item
Description
Interface standard
10GBASE-SR
Transmission rate
10.3125 Gbit/s (10GBASE-SR)
Interface type
LC
Transmission distance
300 m (984.24 ft) (50/125um MMF, OM3)
33 m (108.27 ft) (62.5/125um MMF, OM1)
Optical transmitter
Optical source type
VCSEL
Center wavelength
850 nm
Operating wavelength range
840-860 nm
Spectral characteristics
Maximum root mean square (RMS)
spectral width
0.45 nm
Maximum spectral width (-20 dB)
N/A
Minimum side mode suppression ratio
(SMSR)
N/A
Average transmit optical power
Maximum transmit optical power
-1 dBm
Minimum transmit optical power
-7.3 dBm
Minimum extinction ratio
3.0 dB
Optical receiver
Operating wavelength range
840-860 nm
Receiver sensitivity
-9.9 dBm
Overload power
-1 dBm
Maximum optical channel cost
N/A
Maximum reflection factor
-12 dB
Table 1-155 lists the specifications of the SFP+-10G-SM1310-10Km optical modules.

HUAWEI USG9500 Series Terabit-level Next-Generation Firewall
Hardware Guide
Contents
Issue 01 (2017-03-13)
Huawei Proprietary and Confidential
Copyright © Huawei Technologies Co., Ltd.
194
Table 1-155 Specifications of the SFP+-10G-SM1310-10Km optical modules
Item
Description
Interface standard
10GBASE-LR
Transmission rate
10.3125 Gbit/s (10GBASE-LR)
Interface type
LC
Transmission distance
10 km (6.21 mi.)
Optical transmitter
Optical source type
DFB
Center wavelength
1310 nm
Operating wavelength range
1260-1355 nm
Spectral characteristics
Maximum root mean square (RMS)
spectral width
N/A
Maximum spectral width (-20dB)
N/A
Minimum side mode suppression ratio
(SMSR)
30 dB
Average transmit optical power
Maximum transmit optical power
0.5 dBm
Minimum transmit optical power
-8.2 dBm
Minimum extinction ratio
3.5 dB
Optical receiver
Operating wavelength range
1260-1355 nm
Receiver sensitivity
-14.4 dBm
Overload power
0.5 dBm
Maximum optical channel cost
N/A
Maximum reflection factor
-12 dB
Table 1-156 lists the specifications of the SFP+-10G-SM1550-40Km optical modules.
Table 1-156 Specifications of the SFP+-10G-SM1550-40Km optical modules
Item
Description
Interface standard
10GBASE-ER
Transmission rate
10.3125 Gbit/s (10GBASE-ER)

HUAWEI USG9500 Series Terabit-level Next-Generation Firewall
Hardware Guide
Contents
Issue 01 (2017-03-13)
Huawei Proprietary and Confidential
Copyright © Huawei Technologies Co., Ltd.
195
Item
Description
Interface type
LC
Transmission distance
40 km (24.86 mi.)
Optical transmitter
Optical source type
EML
Center wavelength
1550 nm
Operating wavelength range
1530-1565 nm
Spectral characteristics
Maximum root mean square (RMS)
spectral width
N/A
Maximum spectral width (-20dB)
1nm
Minimum side mode suppression ratio
(SMSR)
30 dB
Average transmit optical power
Maximum transmit optical power
4 dBm
Minimum transmit optical power
-4.7 dBm
Minimum extinction ratio
3 dB
Optical receiver
Operating wavelength range
1530-1565 nm
Receiver sensitivity
-15.8 dBm
Overload power
0.5 dBm
Maximum optical channel cost
N/A
Maximum reflection factor
-26 dB
Table 1-157 lists the specifications of the SFP+-10G-SM1550-80Km optical modules.
Table 1-157 Specifications of the SFP+-10G-SM1550-80Km optical modules
Item
Description
Interface standard
10GBASE-ER
Transmission rate
10.3125 (10GBASE-ER)
9.953 (10GBASE-WAN)
Interface type
LC
Transmission distance
80 km (49.72 mi.)

HUAWEI USG9500 Series Terabit-level Next-Generation Firewall
Hardware Guide
Contents
Issue 01 (2017-03-13)
Huawei Proprietary and Confidential
Copyright © Huawei Technologies Co., Ltd.
196
Item
Description
Optical transmitter
Optical source type
EML
Center wavelength
1550 nm
Operating wavelength range
1530-1565 nm
Spectral characteristics
Maximum root mean square (RMS)
spectral width
N/A
Maximum spectral width (-20dB)
1 nm
Minimum side mode suppression ratio
(SMSR)
30 dB
Average transmit optical power
Maximum transmit optical power
4 dBm
Minimum transmit optical power
0 dBm
Minimum extinction ratio
9 dB
Optical receiver
Operating wavelength range
1530-1565 nm
Receiver sensitivity
-24 dBm
Overload power
-7 dBm
Maximum optical channel cost
N/A
Maximum reflection factor
-27 dB
1.5.5 40 Gbit/s CFP Optical Modules
The 40 Gbit/s CFP Optical Modules can only be used on 40 GE interfaces. They provide
multiple wavelength ranges. The transmission distance is 10 km (6.21 mi).

HUAWEI USG9500 Series Terabit-level Next-Generation Firewall
Hardware Guide
Contents
Issue 01 (2017-03-13)
Huawei Proprietary and Confidential
Copyright © Huawei Technologies Co., Ltd.
197
Figure 1-110 40 Gbit/s CFP Optical Modules
Table 1-158 lists the available 40 Gbit/s CFP optical modules.
Table 1-158 40 Gbit/s CFP optical modules
Model
BOM
Number
Interface
Standard
Transmis
sion
Distance
(km) (mi)
Transmis
sion
medium
Wavelen
gth (nm)
Remarks
CFP-40G-
SM-10k
02310TM
D
40GBASE
-LR4
10(6.21)
Single
mode
1271
1291
1311
1331
-
Table 1-159 lists the attributes and standards of 40 Gbit/s CFP optical modules.
Table 1-159 Attributes and standards of 40 Gbit/s CFP optical modules
Attribute and standard
Description
Interface standard
40GBASE-LR4, ITU-T G.959.1 4I1-9D1F
Bit error rate (BER)
< 1 x 10E -12
Operating temperature
0-70°C (32°F to 158°F)
Digital diagnosis
Environment standard
RoHS (exempted)
Safety standard
FCC class B, IEC 60825-1 Class 1 laser eye
safe
ESD
>500V (Human Body Model (HBM))
Table 1-160 lists the CFP-40G-SM1310-10k optical module specifications.

HUAWEI USG9500 Series Terabit-level Next-Generation Firewall
Hardware Guide
Contents
Issue 01 (2017-03-13)
Huawei Proprietary and Confidential
Copyright © Huawei Technologies Co., Ltd.
198
Table 1-160 CFP-40G-SM1310-10k optical module specifications
Item
Description
Interface standard
40GBASE-LR4
Transmission rate
41.25 Gbit/s
Interface type
LC
Transmission distance
10 km (6.21 mi)
Optical transmitter
Optical source type
Semi-cooled EA-DFB
Center wavelength
1271 nm
1291 nm
1311 nm
1331 nm
Working wavelength
1264.5-1277.5 nm
1284.5-1297.5 nm
1304.5-1317.5 nm
1324.5-1337.5 nm
Spectrum attributes
Maximum root-mean-square (RMS)
spectral width
N/A
Maximum spectrum width (-20 dB)
N/A
Minimum Side Mode Suppression Ratio
(SMSR)
30 dB
Average transmit optical power
Maximum transmit optical power
3.5 dBm
Minimum transmit optical power
-4 dBm
Minimum extinction ratio
4.0 dB
Optical receiver
Working wavelength
1264.5-1277.5 nm
1284.5-1297.5 nm
1304.5-1317.5 nm
1324.5-1337.5 nm
Minimum receiver sensitivity
-13.7 dBm
Overload optical power
3.5 dBm
Minimum optical channel overhead
1.5 dB
Maximum reflection coefficient
-26 dB

HUAWEI USG9500 Series Terabit-level Next-Generation Firewall
Hardware Guide
Contents
Issue 01 (2017-03-13)
Huawei Proprietary and Confidential
Copyright © Huawei Technologies Co., Ltd.
199
1.5.6 40 Gbit/s QSFP+ Optical Module
The 40 Gbit/s QSFP+ optical modules can only be used on 40 GE interfaces. The wavelength
of these 40 Gbit/s QSFP+ optical modules can be 850 nm, or 1310 nm-center multiple
wavelength ranges. The transmission distance is 0.15 km (0.09 mi.), 0.3 km (0.18 mi.), or 10
km (6.21 mi.).
Figure 1-111 40 Gbit/s QSFP+ Optical Module
Table 1-161 lists the currently available 40 Gbit/s QSFP+ optical modules.
Table 1-161 40 Gbit/s QSFP+ optical modules
Product
Model
BOM
Number
Interface
Standard
Transmis
sion
Distance
(km)
Mode
Wavelen
gth (nm)
Remarks
QSFP+-4
0G-SM-1
0km
02310MH
S
40GBASE
-LR4
10 (6.21
mi.)
Single-mo
de
1271
1291
1311
1331
-
QSFP+-4
0G-MM-
0.15km
02310MH
R
40GBASE
-SR4
0.15 (0.09
mi.)
Multi-mod
e
850
-
QSFP+-4
0G-MM-
0.3km
02310RM
B
40GBase-
eSR4
0.3 (0.18
mi.)
Multi-mod
e
850
-
Table 1-162 lists the basic features of 40 Gbit/s QSFP+ optical modules and the compliant
standards.

HUAWEI USG9500 Series Terabit-level Next-Generation Firewall
Hardware Guide
Contents
Issue 01 (2017-03-13)
Huawei Proprietary and Confidential
Copyright © Huawei Technologies Co., Ltd.
200
Table 1-162 Basic features of 40 Gbit/s QSFP+ optical modules and the compliant standards
Item
Description
Interface standard
IEEE 802.3ba
Bit Error Ratio (BER)
<1x10E-12
Temperature
0°C to 70°C (32°F to 158°F)
Digital diagnosis
QSFP MSA
Environment standard
RoHS-6 (lead free)
Security standard
-
ESD
>500 V (Human body model)
Table 1-163 lists the specifications of the QSFP+-40G-SM-10km optical modules.
Table 1-163 Specifications of the QSFP+-40G-SM-10km optical modules
Item
Description
Interface standard
40GBASE-LR4
Transmission rate
41.25 Gbit/s
Interface type
LC
Transmission distance
10 km (6.21 mi.)
Optical transmitter
Optical source type
DFB
Center wavelength
1310 nm
Operating wavelength range
1264.5 nm-1277.5 nm
1284.5 nm-1297.5 nm
1304.5 nm-1317.5 nm
1324.5 nm-1337.5 nm
Spectral characteristics
Maximum root mean square (RMS)
spectral width
N/A
Maximum spectral width (-20 dB)
N/A
Minimum side mode suppression ratio
(SMSR)
N/A
Average transmit optical power
Maximum transmit optical power
2.3 dBm
Minimum transmit optical power
–7 dBm

HUAWEI USG9500 Series Terabit-level Next-Generation Firewall
Hardware Guide
Contents
Issue 01 (2017-03-13)
Huawei Proprietary and Confidential
Copyright © Huawei Technologies Co., Ltd.
201
Item
Description
Minimum extinction ratio
3.5 dB
Optical receiver
Operating wavelength range
1264.5 nm-1277.5 nm
1284.5 nm-1297.5 nm
1304.5 nm-1317.5 nm
1324.5 nm-1337.5 nm
Receiver sensitivity
–11.5 dBm
Overload power
2.3 dBm
Maximum optical channel cost
1.9 dB
Maximum reflection factor
N/A
Table 1-164 lists the specifications of the QSFP+-40G-MM-0.15km optical modules.
Table 1-164 Specifications of the QSFP+-40G-MM-0.15km optical modules
Item
Description
Interface standard
40GBASE-SR4
Transmission rate
41.25Gbit/s
Interface type
MPO
Transmission distance
0.15 km (0.09 mi.)
Optical transmitter
Optical source type
VCSEL
Center wavelength
850 nm
Operating wavelength range
840 nm-860 nm
Spectral characteristics
Maximum root mean square (RMS)
spectral width
N/A
Maximum spectral width (-20dB)
N/A
Minimum side mode suppression ratio
(SMSR)
N/A
Average transmit optical power
Maximum transmit optical power
-1 dBm
Minimum transmit optical power
-7.6 dBm
Minimum extinction ratio
3 dB

HUAWEI USG9500 Series Terabit-level Next-Generation Firewall
Hardware Guide
Contents
Issue 01 (2017-03-13)
Huawei Proprietary and Confidential
Copyright © Huawei Technologies Co., Ltd.
202
Item
Description
Optical receiver
Operating wavelength range
840 nm-860 nm
Receiver sensitivity
-9.5 dBm
Overload power
2.4 dBm
Maximum optical channel cost
N/A
Maximum reflection factor
N/A
Table 1-164 lists the specifications of the QSFP+-40G-MM-0.3km optical modules.
Table 1-165 Specifications of the QSFP+-40G-MM-0.3km optical modules
Item
Description
Interface standard
40GBase-eSR4
Transmission rate
41.25 Gbit/s
Interface type
MPO
Transmission distance
0.3 km (0.18 mi.)
Optical transmitter
Optical source type
VCSEL
Center wavelength
850 nm
Operating wavelength range
840 nm-860 nm
Spectral characteristics
Maximum root mean square (RMS)
spectral width
N/A
Maximum spectral width (-20dB)
N/A
Minimum side mode suppression ratio
(SMSR)
N/A
Average transmit optical power
Maximum transmit optical power
-1 dBm
Minimum transmit optical power
-7.6 dBm
Minimum extinction ratio
3 dB
Optical receiver
Operating wavelength range
840 nm-860 nm
Receiver sensitivity
-9.9 dBm

HUAWEI USG9500 Series Terabit-level Next-Generation Firewall
Hardware Guide
Contents
Issue 01 (2017-03-13)
Huawei Proprietary and Confidential
Copyright © Huawei Technologies Co., Ltd.
203
Item
Description
Overload power
2.4 dBm
Maximum optical channel cost
N/A
Maximum reflection factor
N/A
1.5.7 100 Gbit/s CFP Optical Modules
The 100 Gbit/s CFP Optical Modules can only be used on 100 GE interfaces. They provide
multiple wavelength ranges. The transmission distance ranges from 0.1 km (0.06 mi.) to 10
km (6.21 mi.).
Figure 1-112 100 Gbit/s CFP Optical Modules
Table 1-166 lists the available 100 Gbit/s CFP optical modules.
Table 1-166 100 Gbit/s CFP optical modules
Model
BOM
Number
Interface
Standard
Transmissi
on
Distance
(km) (mi)
Transmissi
on medium
Wavelengt
h (nm)
CFP-100G-S
M-10km
(4x25G)
02310YTD
100GBASE-
LR4
10(6.21)
Single mode
1295
1300
1304
1309
CFP-100G-
MM-0.1Km(
10x10G)
02310YNE
100GBASE-
SR10
0.1(0.06)
Multi-mode
850
Table 1-167 lists the attributes and standards of 100 Gbit/s CFP optical modules.

HUAWEI USG9500 Series Terabit-level Next-Generation Firewall
Hardware Guide
Contents
Issue 01 (2017-03-13)
Huawei Proprietary and Confidential
Copyright © Huawei Technologies Co., Ltd.
204
Table 1-167 Attributes and standards of 100 Gbit/s CFP optical modules
Item
Description
Interface standard
100GBASE-LR4
100GBASE-SR10
Bit error rate (BER)
< 1 x 10E -12
Operating temperature
0-70°C (32°F to 158°F)
Digital diagnosis
-
Environment standard
RoHS (exempted)
Safety standard
FCC class B, IEC 60825-1 Class 1 laser eye
safe
ESD
>500V
Table 1-168 lists the CFP-100G-SM-10km (4x25G) optical module specifications.
Table 1-168 CFP-100G-SM-10km (4x25G) optical module specifications
Item
Description
Interface standard
100GBASE-LR4
Transmission rate
103.125 Gbit/s
Interface type
LC/PC
Transmission distance
10 km (6.21 mi)
Optical transmitter
Optical source type
EML
Center wavelength
1295 nm
1300 nm
1304 nm
1309 nm
Working wavelength
1294.53-1296.59 nm
1299.02-1301.09 nm
1303.54-1305.63 nm
1308.09-1310.19 nm
Spectrum attributes
Maximum root-mean-square (RMS)
spectral width
N/A
Maximum spectrum width (-20 dB)
N/A
Minimum Side Mode Suppression Ratio
30 dB

HUAWEI USG9500 Series Terabit-level Next-Generation Firewall
Hardware Guide
Contents
Issue 01 (2017-03-13)
Huawei Proprietary and Confidential
Copyright © Huawei Technologies Co., Ltd.
205
Item
Description
(SMSR)
Average transmit optical power
Maximum transmit optical power
4.5 dBm
Minimum transmit optical power
-4.3 dBm
Minimum extinction ratio
4.0 dB
Optical receiver
Working wavelength
1294.53-1296.59 nm
1299.02-1301.09 nm
1303.54-1305.63 nm
1308.09-1310.19 nm
Receiver sensitivity
-10.6 dBm
Overload optical power
4.5 dBm
Minimum optical channel overhead
1.5 dB
Maximum reflection coefficient
-26 dB
Table 1-169 lists theCFP-100G-MM-0.1Km(10x10G) optical module specifications.
Table 1-169 CFP-100G-MM-0.1Km(10x10G) optical module specifications
Item
Description
Interface standard
100GBASE-SR10
Transmission rate
103.125 Gbit/s
Interface type
MPO
Transmission distance
0.1 km
Optical transmitter
Optical source type
DFB
Center wavelength
850 nm
Working wavelength
840-860 nm
Spectrum attributes
Maximum root-mean-square (RMS)
spectral width
-
Maximum spectrum width (-20 dB)
-
Minimum Side Mode Suppression Ratio
(SMSR)
-

HUAWEI USG9500 Series Terabit-level Next-Generation Firewall
Hardware Guide
Contents
Issue 01 (2017-03-13)
Huawei Proprietary and Confidential
Copyright © Huawei Technologies Co., Ltd.
206
Item
Description
Average transmit optical power
Maximum transmit optical power
-2.4 dBm
Minimum transmit optical power
-7.6 dBm
Minimum extinction ratio
3 dB
Optical receiver
Working wavelength
840-860 nm
Receiver sensitivity
-9.5 dBm
Overload optical power
2.5 dBm
Minimum optical channel overhead
3.5 dB
Maximum reflection coefficient
-

HUAWEI USG9500 Series Terabit-level Next-Generation Firewall
Hardware Guide
2 Hardware Installation
Issue 01 (2017-03-13)
Huawei Proprietary and Confidential
Copyright © Huawei Technologies Co., Ltd.
207
2 Hardware Installation
2.1 Installation Preparation
Before installing the USG9500, learn installation preparations and requirements, prepare
technical files, tools, and instruments, and unpack and check the device.
2.1.1 Preparing Technical Documents
Technical documents are a vital prerequisite for installing a cabinet successfully. They are also
the important information to be referred to during the installation.
Before installation, read the technical documents listed in Table 2-1 carefully to master the
information on the project.
Table 2-1 Technical documents related to hardware installation
Document
Category
Document Name
Description
Installation
guide
Equipment Room Design
Construction Diagram
Cable Route Diagram
Prepared by the customer.
The user or Huawei site survey engineer
should provide the duplicates before
delivery.
Machine room site survey
report
Produced by Huawei site survey engineer
after site survey.
Engineering design,
including network
functions, networking
diagrams and network
addresses planning
Compiled by Huawei Engineering
Design Department according to the
equipment configuration of the sites.
Delivered at the installation site along
with the equipment.
Product manual
Attached disk
Quick Installation Guide
They are provided by Huawei and
shipped together with the equipment.
Installers can refer to these manuals to
install and maintain the equipment.
Related
document
Contract
Configuration Table
Provided by Huawei during delivery.

HUAWEI USG9500 Series Terabit-level Next-Generation Firewall
Hardware Guide
2 Hardware Installation
Issue 01 (2017-03-13)
Huawei Proprietary and Confidential
Copyright © Huawei Technologies Co., Ltd.
208
Document
Category
Document Name
Description
Packing List
2.1.2 Preparing Tools and Meters
The owner of installation needs to arrange the tools and meters for hardware installation.
Table 2-2 lists the required tools and meters for USG9500 installation.
Table 2-2 Required instruments and meters
Category
Instrument/Meter
Measuring and
lineation instruments
Ruler: used to measure length.
Marker: used to indicate specific lengths with drawn lines.
Fastening tools
Flat-head screwdriver: used to fasten small screws and bolts.
Phillips screwdriver: used to fasten small screws and bolts.
Drilling tools
Hammer drill: used to drill mounting holes during
wall-mounting.
Vacuum cleaner: used to remove dust and debris produced
while drilling holes.
Hammer: used to drive the hollow wall anchors into mounting
holes.
Pliers
Needle-nose pliers: used to hold small fittings and twist fine
wires in a narrow workplace.
Diagonal cutting pliers: used to cut insulated sleeves and tie
wraps.
Auxiliary tools
Knife: used to peel the insulated sleeve from the cable.
Ladder: used to access overhead cabling.
Special tools
Wire stripper: used to peel the insulated sleeve of the
communication cable.
RJ-45 crimping tool: used to crimp RJ-45 cables for telephony
and Ethernet applications.
Crimping tool: used to crimp the metal sleeve at the ends of
coaxial cables.
ESD gloves: used to protect the device from being damaged by
static electricity.
ESD wrist strip: used to protect the device from being damaged
by static electricity.
Protective gloves: used to shield hands from being injury by
sharp objects.
Meters
Network cable tester: used to test whether a network cable is
connected and check the connection sequence in a network

HUAWEI USG9500 Series Terabit-level Next-Generation Firewall
Hardware Guide
2 Hardware Installation
Issue 01 (2017-03-13)
Huawei Proprietary and Confidential
Copyright © Huawei Technologies Co., Ltd.
209
Category
Instrument/Meter
cable.
Optical power meter: used to test the optical power.
Optical attenuator: used to measure optical attenuation.
Multimeter: used to test insulation within the cabinet, cable
connections, and electric performance specifications of the
device, such as the voltage, current, and resistance.
Ground resistance tester: used to measure the ground
resistance.
Configuration terminal (A common PC is also applicable).
2.1.3 Checking the Installation Environment
Before you install a USG9500, verify that the installation environment meets requirements to
ensure the normal running and extended life time of the USG9500.
Table 2-3 lists installation environment check items.
Table 2-3 Installation environment checklist
Check Item
Requirement
Compliance
Site for the Equipment
Room
Complies with requirements
in A.3.1 Requirements for
Selecting a Site for an
Equipment Room.
□ Y □ N □ N/A
Construction for the
equipment room
Complies with requirements
in A.3.3 Construction
Requirements for the
Equipment Room.
□ Y □ N □ N/A
Temperature
Complies with requirements
in A.3.4 Requirements for
Temperature, Humidity, and
Altitude.
□ Y □ N □ N/A
Relative humidity
□ Y □ N □ N/A
Altitude
□ Y □ N □ N/A
Neatness
Complies with requirements
in A.3.5 Requirements for
Neatness.
□ Y □ N □ N/A
Corrosive Gases
Complies with requirements
in A.3.6 Requirements for
Corrosive Gases.
□ Y □ N □ N/A
Electrostatic discharging
Complies with requirements
in A.3.7 Requirements for
ESD Prevention.
□ Y □ N □ N/A
Electromagnetic shielding
Complies with requirements
in A.3.8 Electromagnetism
Requirements for the
□ Y □ N □ N/A

HUAWEI USG9500 Series Terabit-level Next-Generation Firewall
Hardware Guide
2 Hardware Installation
Issue 01 (2017-03-13)
Huawei Proprietary and Confidential
Copyright © Huawei Technologies Co., Ltd.
210
Check Item
Requirement
Compliance
Equipment Room.
Surge protection
Complies with requirements
in A.3.9 Requirements for
Lightning Proof Grounding.
□ Y □ N □ N/A
Power supply facility
Complies with requirements
in A.3.10 Requirements for
Power Supply.
□ Y □ N □ N/A
2.1.4 Unpacking and Checking the Products
The section describes procedures and precautions for unpacking and checking the device prior
to installation.
2.1.4.1 Checking the Package Container
Before unpacking and checking the products, check whether the package container is intact.
Procedure
Step 1 Unload the products.
When unloading the products, place the package containers in order. Make sure that the
product labels on the package containers are in the same direction. This facilitates the
checking.
Step 2 After unloading the products, check whether the total number of the products are the same as
the number indicated on the Packing List. Check whether the destination of delivery is the
same as the actual site for installation.
Condition
Action
The total number of products are the same
as the number indicated on the Packing List,
and the products are delivered to the correct
destination.
Perform step 4.
The total number of products are different
from the number indicated on the Packing
List, or the products are delivered to the
wrong destination.
Perform step 3.
Step 3 The engineering supervisor must send the Cargo Inspection Feedback Form that is confirmed
and signed by the customer to the order management engineer in the local Huawei
representative office within three days. At the same time, stop unpacking the products.

HUAWEI USG9500 Series Terabit-level Next-Generation Firewall
Hardware Guide
2 Hardware Installation
Issue 01 (2017-03-13)
Huawei Proprietary and Confidential
Copyright © Huawei Technologies Co., Ltd.
211
Step 4 Check whether the exterior of the package container is intact. Check whether the package
container is placed correctly during transportation.
Condition
Action
The external package is intact.
Unpack and check the products.
The exterior of the package container is
seriously damaged or shows signs of water
penetration.
Perform step 5.
Step 5 Stop unpacking the products, trace the cause, report the problem to the order management
engineer of the local Huawei representative office, and wait for further assistance.
To protect the device and trace the cause, transfer the unpacked device indoors to ensure
proper storage. Take photographs of the storage site, the device that is rusted or corroded, the
related package container, and the package materials. Collect the photos and file them.
Preserve the package container and package materials that are unpacked.
----End
2.1.4.2 Unpacking the Wooden Case
In general, wooden cases are used to pack heavy goods such as racks, cabinets and batteries.
The package for a cabinet consists of wooden panels, steel edges, tongues, and foam plates. If
possible, move the wooden case into or near the equipment room, and then unpack the cabinet
to avoid damaging the cabinet during transportation.
Prerequisites
When carrying the cabinet, always hold the stronger part of the cabinet, such as the
support or the rack. Do not exert force on the parts that are relatively weak, such as the
cable support or the cable fixing beam. Otherwise, the cabinet may get damaged or
accidents may occur. Remove the backing blocks from the rack only after the cabinet is
carried to the installation site. The same is to avoid damaging signal cables and boards
when carrying the cabinet.
The wooden case must be positioned correctly. Do not place the wooden case upside down.
Otherwise, the device can get damaged severely.
Procedure
Step 1 Wear protective gloves.

HUAWEI USG9500 Series Terabit-level Next-Generation Firewall
Hardware Guide
2 Hardware Installation
Issue 01 (2017-03-13)
Huawei Proprietary and Confidential
Copyright © Huawei Technologies Co., Ltd.
212
Step 2 Place the wooden case in an even manner on the ground, and make sure that the side with the
pallet faces downwards.
Step 3 Insert one end of the spanner into the hole of the tongue on the cover of the wooden case. Lift
the spanner to straighten the tongue, as shown in Figure 2-1. You can also use a screwdriver
or a claw hammer to straighten the tongue.
Figure 2-1 Straightening the tongue
1 Steel edge
2 Wooden panel
3 Tongue
4 Spanner
The edges of tongues are sharp and may injure your hand.
Step 4 After straightening all the tongues on the cover, remove the cover as shown in Figure 2-2.

HUAWEI USG9500 Series Terabit-level Next-Generation Firewall
Hardware Guide
2 Hardware Installation
Issue 01 (2017-03-13)
Huawei Proprietary and Confidential
Copyright © Huawei Technologies Co., Ltd.
213
Figure 2-2 Removing the cover
Step 5 Straighten all the tongues that join the side wooden panels and remove the wooden panels, as
shown in Figure 2-3.

HUAWEI USG9500 Series Terabit-level Next-Generation Firewall
Hardware Guide
2 Hardware Installation
Issue 01 (2017-03-13)
Huawei Proprietary and Confidential
Copyright © Huawei Technologies Co., Ltd.
214
Figure 2-3 Removing the side wooden panels
Step 6 Stand the cabinet. Remove the pallet, foam plates, and package bag.
Three to five persons are required to stand the cabinet. When standing the cabinet, prevent the
cabinet from tipping over, as this may cause injury to the personnel who are handling it.

HUAWEI USG9500 Series Terabit-level Next-Generation Firewall
Hardware Guide
2 Hardware Installation
Issue 01 (2017-03-13)
Huawei Proprietary and Confidential
Copyright © Huawei Technologies Co., Ltd.
215
Step 7 Check the cabinet according to the following requirements:
Check the appearance of the cabinet. Ensure that the exterior (especially the bottom) of
the cabinet is intact, free from water penetration, distortion, and rust.
Check the cabinet door. Ensure that the cabinet door can be opened and closed normally.
Check the surface of the cabinet. Ensure that the surface of the cabinet is clean, neat and
completely painted.
Check the labels on the cabinet. Ensure that the labels on the cabinet are correct, legible
and complete.
----End
2.1.4.3 Unpacking the Carton
In general, cartons are used to pack cables, boards, and terminal devices.
Procedure
Step 1 Read the carton label carefully to know the types and quantities of the boards in the carton.
Step 2 Use diagonal pliers to cut the packing straps.
Step 3 Use a paper knife to cut the tapes along the seams of the carton cover. Do not insert the paper
knife to extra depths; otherwise, the contents inside the carton may get damaged.
Step 4 Open the carton and take out the foam plates.
Step 5 Check the label of the box that contains the board, and see whether the board quantity is
consistent with the quantity indicated on the carton label. Then, take out the boxes.
Step 6 Wear an ESD wrist strap and ground it correctly. Unpack the ESD bag that contains the board.
Check whether the board has any obvious damages.
Step 7 Check the types and quantity of the boards in the carton according to the Packing List. The
Packing List must be confirmed and signed on site by the customer.
Figure 2-4 shows the procedure for unpacking the carton.

HUAWEI USG9500 Series Terabit-level Next-Generation Firewall
Hardware Guide
2 Hardware Installation
Issue 01 (2017-03-13)
Huawei Proprietary and Confidential
Copyright © Huawei Technologies Co., Ltd.
216
Figure 2-4 Unpacking the carton
1 Pressure-sensitive adhesive tape
2 Packing strap
3 Carton label
4 Carton
5 Foam plate
6 Label of the board box
7 Board box
8 ESD bag
9 Board
Do not throw away a carton that still contains boards. It is recommended that one person
unpacks one carton. After unpacking a carton, check it carefully and make sure that it is
empty before unpacking the next carton.
----End
2.1.4.4 Checking the Boards
This section describes the criteria for checking boards.
Clean the chassis and cabinet before installing the boards. Wear an antistatic wrist strap and
remove the board from the antistatic package. Check whether the board name is consistent
with the identifier on the package box, and whether any device is damaged or any component
is missing.
Check pins on the backplane of the chassis. The pins should be kept straight, orderly, and
clean. For the pins bent in the board slots on the backplane, repair them.
The boards are sensitive to Electrostatic Discharge (ESD). When handling boards, observe the
following rules:
Check whether the device is securely grounded against requirements.
Wear an antistatic wrist strap during the installation.
Ensure good contact of the metal tab of the wrist strap with your bare skin. Insert the
other end of the wrist strap into the grounding point on the device.

HUAWEI USG9500 Series Terabit-level Next-Generation Firewall
Hardware Guide
2 Hardware Installation
Issue 01 (2017-03-13)
Huawei Proprietary and Confidential
Copyright © Huawei Technologies Co., Ltd.
217
Ensure that the wrist strap works in the normal state. Its resistance value must be
between 0.75 megohm and 10 megohm. If the service life (usually two years) of the
wrist strap expires or the resistance value fails to meet requirements, replace it with
another one.
Avoid touching the board with your clothes, because the touch generates static electricity
that is beyond the protection scope of the wrist strap.
Wear antistatic gloves and place the board on an antistatic pad when replacing the chip of
the board. Use antistatic tweezers or extraction tools to replace chips. Do not tough chips,
circuits, or pins with your bare hands.
Keep the board and other ESD sensitive parts to be installed in antistatic bags. Place the
removed boards and components on an antistatic pad or other antistatic materials. Do not
use non-antistatic materials such as white foams, common plastic bags, or paper bags to
pack boards or let them touch boards.
Wear an antistatic wrist strap when operating the ports of boards because they are also
ESD-sensitive. Discharge the static electricity of cables and protective sleeves before
connecting them to the ports.
It is recommended that you reserve some materials that can hold boards such as vacuum
formed boxes and antistatic bags in the equipment room for later use.
2.2 Installing USG9580
This section describes how to install the USG9580.
2.2.1 Preparing the Site
Prior to device installation, deploy the cabinet and device according to the following
requirements to ensure that the device can operate properly.
Power Supply System
If you use DC power, ensure that the outputs of the DC power distribution box fall
within the range of -72 V DC to -38 V DC. Two power modules are needed, and each
power module must be connected to two different power sources for redundancy.
If you use AC power, ensure that the outputs of the AC power distribution box fall within
the range of 90V AC to 264 V AC. Two power modules are needed, and each power
module must be connected to two different power sources for redundancy. Meanwhile,
two AC power chassis must be installed on the device.
Cabinet Requirements
You are advised to use Huawei standard NE68E cabinet. The self-purchased cabinet must
meet A.6 Requirements on Customers' Cabinets Purchased from Other Vendors.
Cabinet Clearance Requirements
The N68E-22 cabinet is used as an example. As shown in Figure 2-5, cabinet clearance must
meet the following requirements:
Aisles in the equipment room ≥ 1000 mm; aisles between cabinet rows ≥ 1000 mm
Spacing between cabinet sides and wall ≥800 mm
Spacing between cabinet row and wall ≥ 1000 mm

HUAWEI USG9500 Series Terabit-level Next-Generation Firewall
Hardware Guide
2 Hardware Installation
Issue 01 (2017-03-13)
Huawei Proprietary and Confidential
Copyright © Huawei Technologies Co., Ltd.
218
Figure 2-5 Diagram for cabinet deployment
Device Clearance Requirements
The USG9580 chassis is 32 U high and requires front and back maintenance mode. Device
clearance must meet the following requirements:
Airflow clearance
− Maintain a minimum of 750 mm spacing between the device and the equipment
room wall and between two neighboring devices to prevent hot air recirculation.
− Maintain a minimum spacing of 2 U between devices installed in the same cabinet,
between the top-most device and the cabinet top, and between the bottom-most
device and the cabinet bottom.
Maintenance clearance
Maintain a minimum of 700 mm spacing between devices and between a device and
wall.
The height of three holes on the mounting rails is 1 U, which is equivalent to 44.45 mm.
2.2.2 Installing the Chassis into the Cabinet
The USG9580 can be mounted into a 19-inch standard cabinet through guide rails.
Context

HUAWEI USG9500 Series Terabit-level Next-Generation Firewall
Hardware Guide
2 Hardware Installation
Issue 01 (2017-03-13)
Huawei Proprietary and Confidential
Copyright © Huawei Technologies Co., Ltd.
219
The USG9580 is heavy and requires four people to lift and move.
Use the handles on the chassis sides when moving the device. Do not use the handles of
modules to avoid damages to the device.
Do not step on the air filter at the bottom of the cabinet.
Procedure
Step 1 Install floating nuts and guide rails
1. Determine where to install floating nuts and mark the positions using a marker, as shown
in Figure 2-6.
2. Fix the floating nuts at the positions.
3. Use M6 screws to fix the guide rails at the positions.
Figure 2-6 Installing floating nuts and guide rails
Step 2 Install mounting ears on the USG9580.
Use a Phillips screwdriver to fix the mounting ears to both sides of the chassis with M4
screws, as shown in Figure 2-7.

HUAWEI USG9500 Series Terabit-level Next-Generation Firewall
Hardware Guide
2 Hardware Installation
Issue 01 (2017-03-13)
Huawei Proprietary and Confidential
Copyright © Huawei Technologies Co., Ltd.
220
Figure 2-7 Installing mounting ears
Step 3 Mount the USG9580 in the cabinet.
1. Lift the USG9580, move it to the cabinet, place it onto the guide rails, and push it into
the cabinet.
2. Use M6 screws to fix the mounting ears of the USG9580 to the mounting rack, as shown
in Figure 2-8.

HUAWEI USG9500 Series Terabit-level Next-Generation Firewall
Hardware Guide
2 Hardware Installation
Issue 01 (2017-03-13)
Huawei Proprietary and Confidential
Copyright © Huawei Technologies Co., Ltd.
221
Figure 2-8 Mounting the USG9580 in the cabinet
Step 4 Mount the AC power chassises in the cabinet. (Mandatory in case of AC power supply)
When the equipment room uses the AC power supply, one USG9580 requires two AC power
chassises, as shown in Figure 2-9.
Figure 2-9 Mounting the AC power chassises in the cabinet
----End

HUAWEI USG9500 Series Terabit-level Next-Generation Firewall
Hardware Guide
2 Hardware Installation
Issue 01 (2017-03-13)
Huawei Proprietary and Confidential
Copyright © Huawei Technologies Co., Ltd.
222
Follow-up Procedure
Perform the following checks after the installation:
Ensure that the USG9580 is placed securely inside the cabinet.
Ensure that the exhaust of the USG9580 is not blocked by other objects.
2.2.3 Installing the PGND Cable
Connecting the PGND cable of the USG9580 correctly is a key measure of surge protection
and resistance to interference. Before using the USG9580, correctly connect the PGND cable.
Prerequisites
Before installing the PGND cable of the device, ensure that the PGND cable of the cabinet is
correctly connected and the ground resistance is zero ohm.
Context
If the chassis is near the ground bar in the equipment room, connect the PGND cable of the
chassis directly to the ground bar. If the chassis is distant from the ground bar, connect the
PGND cable to the ground point on the cabinet.
In this section, connecting the PGND cable to the ground point on the cabinet is used as an
example.
Procedure
Step 1 Install the chassis ground cable, as shown in Figure 2-10.
Step 2 Install the ground cable of the AC power chassis (mandatory for AC power supply), as shown
in Figure 2-10.

HUAWEI USG9500 Series Terabit-level Next-Generation Firewall
Hardware Guide
2 Hardware Installation
Issue 01 (2017-03-13)
Huawei Proprietary and Confidential
Copyright © Huawei Technologies Co., Ltd.
223
Figure 2-10 Connecting the PGND cable
----End
Follow-up Procedure
Verify the following after the cabling is complete:
The PGND cable is securely connected to the ground terminal.
The electrical resistance between the ground terminal and ground point is less than 10
ohm on a multimeter.
2.2.4 Installing Boards and Subcards
This section describes how to install boards and subcards to avoid any damage.
Context

HUAWEI USG9500 Series Terabit-level Next-Generation Firewall
Hardware Guide
2 Hardware Installation
Issue 01 (2017-03-13)
Huawei Proprietary and Confidential
Copyright © Huawei Technologies Co., Ltd.
224
Ensure that no water is on the device or board before you insert the board into the device.
Before installing boards, wear the ESD wrist strap and that the strap is well grounded to
prevent any electrostatic discharge of the human body from damaging the sensitive
components.
The boards in the lower chassis need to be inversely installed. The installation method is the
same as that of the boards in the upper chassis.
Procedure
Step 1 Select the slots based on the slot distribution.
You can determine whether it is a correct slot for a board by checking whether the color on
both ends of the board panel is the same as the color on the slot.
Figure 2-11 Slot layout
Step 2 Install a board.
1. Determine the slot for the board to be installed based on hardware planning and remove
the filler panel from the slot.
2. Extend the ejector levels of the board, insert the board fully into slot, and rotate the
ejector level to the front of the board so that the board is fully inserted in the slot.
3. Use a Phillips screwdriver to tighten the captive screws to the board.

HUAWEI USG9500 Series Terabit-level Next-Generation Firewall
Hardware Guide
2 Hardware Installation
Issue 01 (2017-03-13)
Huawei Proprietary and Confidential
Copyright © Huawei Technologies Co., Ltd.
225
Figure 2-12 Installing a board
Step 3 Install a subcard.
Before you install a subcard, remove redundant guide rails from the board and store them properly for
future use.
1. Remove the filler panel from the board.
2. Smoothly insert the subcard into the board along the guide rail.
3. Use a Phillips screwdriver to tighten the captive screws to the board.
Figure 2-13 Installing a subcard
----End
Follow-up Procedure
Check the following items after the installation is complete:
Check whether the boards and subcards are installed in position and the captive screws
are fastened.
Filler panels are inserted in vacant slots. You must insert filler panels in the vacant slots
on the USG9580 to prevent dust and ensure heat dissipation.

HUAWEI USG9500 Series Terabit-level Next-Generation Firewall
Hardware Guide
2 Hardware Installation
Issue 01 (2017-03-13)
Huawei Proprietary and Confidential
Copyright © Huawei Technologies Co., Ltd.
226
2.2.5 Installing Chassis Components
Air filters are used to protect devices against dust, and cable racks are used to route optical
fibers and cables.
Procedure
Install air filters to the upper and lower air intake frames.
The air intake vent has two air filters on the upper and lower ends of the front panel of the chassis
respectively.Point the pin on the air filter to the hole that prevents reverse installation. Otherwise, the air
filter cannot be installed.
Figure 2-14 Install air filters to the upper and lower air intake frames
Install the front cable rack.
The front cable rack is classified into upper and lower cable racks. The logo of the upper cable rack is
"HUAWEI", the logo of the lower cable rack is "USG9500 Series"
a. Align the studs of the cable rack with the holes on the front panel of the device and
insert the rack.
b. (For the upper rack) Push the rack upward to click it into place.
c. (For the lower rack) Push the rack downward to click it into place.

HUAWEI USG9500 Series Terabit-level Next-Generation Firewall
Hardware Guide
2 Hardware Installation
Issue 01 (2017-03-13)
Huawei Proprietary and Confidential
Copyright © Huawei Technologies Co., Ltd.
227
d. Use M4 x 10 screws to fix the cable rack.
Figure 2-15 Install the front cable rack
Install the rear cable rack.
There are four rear cable racks on the rear panel of the chassis.
a. Align the studs of the cable rack with the holes on the rear panel of the device and
insert the rack.
b. Push the rack to the left or right to click it into place.
c. Tighten the captive screws.

HUAWEI USG9500 Series Terabit-level Next-Generation Firewall
Hardware Guide
2 Hardware Installation
Issue 01 (2017-03-13)
Huawei Proprietary and Confidential
Copyright © Huawei Technologies Co., Ltd.
228
Figure 2-16 Install the rear cable rack
----End
2.2.6 Installing Power Cables-DC Power Distribution
In standard configuration, the USG9580 has eight PEM modules. Each PEM module requires
an NEG DC power cable and an RTN DC power cable. This section describes how to connect
power cables to the two DC supply modules.
Context
Never install power cables when the power is on.
Before installing the power cables, ensure that the device is adequately grounded.
Inside the cable should be an entire piece of copper core. Any connection of the core is
not allowed.
Cables of DC power distribution.

HUAWEI USG9500 Series Terabit-level Next-Generation Firewall
Hardware Guide
2 Hardware Installation
Issue 01 (2017-03-13)
Huawei Proprietary and Confidential
Copyright © Huawei Technologies Co., Ltd.
229
Cable
Image
NEG cable
RTN cable
The terminals on DC cables.
Terminal
Image
OT bare crimping
terminal (M8)
JG2 double-hole
bare crimping
terminal (M6)
For details, see 2.5.1.1 Guide to the DC Power Distribution.
Procedure
Step 1 Make temporary marks on both ends of each power cable using a marker.
Step 2 Connect the M6 JG2 terminals of the DC power cable to the PEM modules on USG9580.
Connect the M8 OT terminals of the DC power cable to the output terminals on the power
supply device.

HUAWEI USG9500 Series Terabit-level Next-Generation Firewall
Hardware Guide
2 Hardware Installation
Issue 01 (2017-03-13)
Huawei Proprietary and Confidential
Copyright © Huawei Technologies Co., Ltd.
230
Step 3 Use tie wraps to bind the cables every 100 mm upwards from the bottom end, and fix the
cables to the cabling rack.
Step 4 Affix permanent labels 20 mm from both ends of each power cable.
Figure 2-17 Affix permanent labels
----End

HUAWEI USG9500 Series Terabit-level Next-Generation Firewall
Hardware Guide
2 Hardware Installation
Issue 01 (2017-03-13)
Huawei Proprietary and Confidential
Copyright © Huawei Technologies Co., Ltd.
231
Follow-up Procedure
Note that the power cable has polarity. After the device is powered on, if the PEM indicator
blinks red, check whether the anode and cathode of the power cable for the PEM are
connected without error. If they are connected mistakenly, switch off the previous-stage power
immediately and connect the power cable w ithout error.
1. After installing power cables, install the plastic cover to each power module.
2. The power cables are fixed securely and in reliable and good contact with the terminals.
3. In the corner, the cables should be smooth.
4. Labels for the power cables must be filled in and attached to the cables as required. All
labels are neat and face the same direction for easy viewing.
5. The power cable, grounding cable and the signal cable should be bound separately. The
distance between them must be more than 3 cm.
2.2.7 Installing Power Cables-AC Power Distribution
When the USG9580 uses AC power supply, two external AC power chassises are added to the
DC power supply system to constitute an AC power supply system. Four AC power cables are
used to connect each AC power chassis to the AC PDF.
Context
Never install power cables when the power is on.
Before installing the power cables, ensure that the device is adequately grounded.
With the 110 V AC power supply, the USG9580 must use 110 V dual-live-wire AC input to
meet the maximum system power consumption with the full configuration. This is because
AC power modules are half-load output with 110 V AC input, which cannot meet the system
power consumption.
Inside the cable should be an entire piece of copper core. Any connection of the core is
not allowed.
Cables of AC power distribution.
Cable
Image

HUAWEI USG9500 Series Terabit-level Next-Generation Firewall
Hardware Guide
2 Hardware Installation
Issue 01 (2017-03-13)
Huawei Proprietary and Confidential
Copyright © Huawei Technologies Co., Ltd.
232
Cable
Image
DC cables
from the
device to
the AC
power
chassis
NEG cable
RTN cable
Terminals
on DC
cables from
the device
to the AC
power
chassis
JG2 double-hole
bare crimping
terminal (M6)
AC cables from the AC power
chassis to the AC power supply
device
For details, see 2.5.1.2 Guide to the AC Power Distribution.
Procedure
Step 1 Make temporary marks on both ends of each power cable using a marker.
Step 2 Connect one end of the AC power cables to the input terminals of the AC power chassis.
Connect the other end of the AC power cables to the AC power supply device.

HUAWEI USG9500 Series Terabit-level Next-Generation Firewall
Hardware Guide
2 Hardware Installation
Issue 01 (2017-03-13)
Huawei Proprietary and Confidential
Copyright © Huawei Technologies Co., Ltd.
233
Step 3 Connect one end of the DC power cables to the PEM modules on USG9580. Connect the
other end of the DC power cables to the output terminals of the AC power chassis.
Step 4 Use tie wraps to bind the cables every 100 mm upwards from the bottom end, and fix the
cables to the cable rack.
Step 5 Affix permanent labels 20 mm from both ends of each power cable.
Figure 2-18 Affix permanent labels
----End

HUAWEI USG9500 Series Terabit-level Next-Generation Firewall
Hardware Guide
2 Hardware Installation
Issue 01 (2017-03-13)
Huawei Proprietary and Confidential
Copyright © Huawei Technologies Co., Ltd.
234
Follow-up Procedure
Note that the power cable has polarity. After the device is powered on, if the PEM indicator
blinks red, check whether the anode and cathode of the power cable for the PEM are
connected without error. If they are connected mistakenly, switch off the previous-stage power
immediately and connect the power cable without error.
1. After installing power cables, install the plastic cover to each power module.
2. The power cables are fixed securely and in reliable and good contact with the terminals.
3. In the corner, the cables should be smooth.
4. Labels for the power cables must be filled in and attached to the cables as required. All
labels are neat and face the same direction for easy viewing.
5. The power cable, grounding cable and the signal cable should be bound separately. The
distance between them must be more than 3 cm.
2.2.8 Connecting Network Cables
This section describes how to install electrical transceivers on the ports and connect them to
the ports of the peer device using network cables according to the network plan.
Context
Before connecting the network cable, perform the following operations:
Check construction conditions.
The peer device has been installed in the equipment room, and the port to which the
network cable is to be connected has been determined.
Check the cabling route.
The engineering document should specify the cabling route from the cabinet to the peer
device in the equipment room, and the length of the cable is calculated based on the
cabling path.
Label the cable.
The cable must be labeled before being connected to the devices.
network cables fall into crossover and straight through cables. Currently, Ethernet ports on
most devices can dynamically adapt to both types of cables. Use proper cables for devices that
do not support dynamic adaptation.
By electromagnetic compatibility, network cables can be classified into ordinary and shielded
cables. The shielded cables are preferred due to their better electromagnetic compatibility.
Before connecting a cable, note the label on the port and make sure that the cable is inserted
into the correct port. Otherwise, the port module or the device might be damaged.

HUAWEI USG9500 Series Terabit-level Next-Generation Firewall
Hardware Guide
2 Hardware Installation
Issue 01 (2017-03-13)
Huawei Proprietary and Confidential
Copyright © Huawei Technologies Co., Ltd.
235
Before bundling network cables, use a network cable tester to test cable connectivity. Bind the
network cables to form a rectangle inside the cabinet. Each bundle contains a maximum of 20
network cables. The tie wraps must be tidy and in the same direction.
The clearance between the power cable, PGND cable, and signal cable must be more than 30
mm.
Procedure
Step 1 If multiple network cables need to be connected, attach temporary labels to both ends of each
cable for identification.
Step 2 Remove the dust-proof caps from a board interface and insert the electrical module into the
interface.
The electrical module can be inserted only in the interface with an odd number on the 24-port
100/1000Base-X-SFP flexible interface card.
Step 3 Connect one end of a network cable to the electrical transceiver of the USG9580 and the other
end to the Ethernet port of the peer device based on the network plan.

HUAWEI USG9500 Series Terabit-level Next-Generation Firewall
Hardware Guide
2 Hardware Installation
Issue 01 (2017-03-13)
Huawei Proprietary and Confidential
Copyright © Huawei Technologies Co., Ltd.
236
Figure 2-19 Connecting a network cable
Step 4 Lay out the network cable along a cabinet and route the cable through the cable hole for the
signal cables at the top (overhead cabling) or bottom (underfloor cabling) of the cabinet.
Step 5 Remove the temporary labels and attach labels (20 mm away from the connectors) at both
ends of the network cable.
----End
Follow-up Procedure
Verify the following after the installation:
The labels at both ends of the cable are correct, clear, neat, and facing the same direction.
The cables and connectors are free of any damage or breakage and are connected
properly and reliably.

HUAWEI USG9500 Series Terabit-level Next-Generation Firewall
Hardware Guide
2 Hardware Installation
Issue 01 (2017-03-13)
Huawei Proprietary and Confidential
Copyright © Huawei Technologies Co., Ltd.
237
2.2.9 Connecting Optical Fibers
This section describes how to install optical transceivers on the ports and connect them to the
ports of the peer device using optical fibers according to the network plan.
Installing Fiber Spools
You are advised to wind excess optical fibers around fiber spools for convenient cable routing and
device maintenance.
Determine the locations of the fiber spools based on the device arrangement in the cabinet. The fiber
spools cannot be too close to device operation area to avoid hampering board insertion or removal or
cabling, and the fiber spools cannot be too far away from the device to facilitate fiber spool operation.
Figure 2-20 Installing fiber spools
Installing Optical Transceivers and Connecting Optical Fibers

HUAWEI USG9500 Series Terabit-level Next-Generation Firewall
Hardware Guide
2 Hardware Installation
Issue 01 (2017-03-13)
Huawei Proprietary and Confidential
Copyright © Huawei Technologies Co., Ltd.
238
Do not look into the optical interface of the optical module or the optical fiber connector
without eye protection.
Wear an ESD wrist strap or ESD gloves before installing optical modules.
Before connecting optical fiber cables, read the following precautions:
Do not overbend optical fibers, and the radius should not be shorter than 40 mm.
Do not bundle the optical fibers too tight. Otherwise, the transmission performance of
the optical fibers and the communication between devices might be adversely affected.
Step 1 Before connecting an optical fiber, attach temporary labels to both ends of the optical fiber for
identification.
Step 2 Remove the dust cap from an optical interface and insert an optical module in the optical
interface.
Step 3 Remove the dust cap from the optical transceiver.
Set aside the dust cap properly for future use. After optical fiber are disconnected for maintenance, use
the dust cap to prevent the optical transceiver from dust.
Step 4 Remove protective caps from optical fiber connectors, insert optical fibers into the optical
transceiver, and connect the fiber to the peer device.
Ensure that the Tx and Rx ports are correctly connected.
Ensure that the TX and RX ports on one end of the optical fiber cable are connected to the RX
and TX ports (respectively) on the other end.

HUAWEI USG9500 Series Terabit-level Next-Generation Firewall
Hardware Guide
2 Hardware Installation
Issue 01 (2017-03-13)
Huawei Proprietary and Confidential
Copyright © Huawei Technologies Co., Ltd.
239
Figure 2-21 Figure 1 Installing optical transceivers and connecting optical fibers
Step 5 Repeat Step 1 to Step 4 to install all optical transceivers and connect all optical fibers.
Step 6 Coil up the redundant optical fibers around a fiber management tray.
Step 7 Bind optical fibers every 200 mm with binding tapes and use tie wraps to fix the bundle of the
optical fibers to the cabling rack.
Step 8 Affix permanent labels 20 mm from both ends of the optical fiber.
----End

HUAWEI USG9500 Series Terabit-level Next-Generation Firewall
Hardware Guide
2 Hardware Installation
Issue 01 (2017-03-13)
Huawei Proprietary and Confidential
Copyright © Huawei Technologies Co., Ltd.
240
Follow-up Procedure
After you power on the USG9500, check the connection by observing the optical port
indicator. If the indicator is on or blinks, the link is connected or data is being transmitted. If
the indicator is off, the link is disconnected. Possible causes for the disconnection are as
follows:
The optical fiber is improperly inserted. Pull out the optical fiber and re-insert it.
The RX and TX optical ports are inserted reversely. Pull out the optical fibers, change
their position, and re-insert them.
The optical module is damaged or the optical fiber is broken. Replace the optical module
or the optical fiber.
2.2.10 Checking After Installation
After you install the device in a cabinet, you need to verify the cables and NE40E have been
installed correctly before powering up the device.
Cabinet Installation Checklist
No.
Item
1
Verify that the cabinet is placed according to the engineering
design document.
2
Verify that the deviation of the cabinet is less than 3 mm
horizontally and not more than 3 mm vertically.
3
Verify that all the bolts are firmly fastened, especially those for
electrical connections. Flat washers and spring washers are
used, and spring washers are placed on top of flat washers.
4
Verify that the cabinet is neat and clean.
5
Verify that the doors can be opened and closed smoothly.
6
Verify that all labels, tags, and nameplates are correct, legible,
and complete.
Installation Environment Checklist
No.
Item
1
Verify that no fingerprints or other smears exist on the
equipment.
2
Verify that no excessive electrical tapes or cable ties exist on
the cables.
3
Verify that no tapes, cable ties, wastepaper, or packaging bags
are left around the equipment.
4
Verify that all the items around the equipment are neat, clean,
and intact.

HUAWEI USG9500 Series Terabit-level Next-Generation Firewall
Hardware Guide
2 Hardware Installation
Issue 01 (2017-03-13)
Huawei Proprietary and Confidential
Copyright © Huawei Technologies Co., Ltd.
241
Cable Installation Checklist
No.
Item
1
Verify that all the self-made ground cables are copper-based
with proper wire diameters. There is no switch, fuse, or
disconnection on the cable.
2
Verify that ground cables, AC input power cables, cables in the
cabinet are connected correctly according to the wiring diagram
of the power system, and the screws are tightened. Ensure that
the output and input cables are not short-circuited.
3
Verify that the redundant part of the power cable or ground
cable is stripped off rather than being coiled.
4
Verify that the lugs at both ends of each power cable or ground
cable are crimped securely.
5
Verify that bare wires and lug handles at the wiring terminals
are wrapped tightly by using insulation tapes or heat shrink
tubes.
6
Verify that the flat washer and spring washer are mounted
securely to all the wiring terminals.
7
Verify that the connectors of all cables are securely linked,
especially those at the bottom of the cabinet.
8
Verify that the cables are properly bound. Cable ties are
installed at equal spacing and in the same direction
9
Verify that the power cable and ground cable are routed
separately from other cables.
10
Verify that the cable layout facilitates maintenance and
expansion in the future.
11
Verify that the labels at both ends of each cable are legible.
12
Verify that the excess of cable ties is trimmed off without
remaining rough edges.
2.2.11 Powering On the USG9580-DC Power Distribution
Check whether the USG9580 is operating properly in the DC power supply environment.
Power on the USG9580 according to the following requirements to ensure device security.
Context

HUAWEI USG9500 Series Terabit-level Next-Generation Firewall
Hardware Guide
2 Hardware Installation
Issue 01 (2017-03-13)
Huawei Proprietary and Confidential
Copyright © Huawei Technologies Co., Ltd.
242
Before power-on check, switch all circuit breakers to the OFF position.
Before you power on the USG9580, ensure that:
The power cable and PGND cable are properly connected.
The power switch in the equipment room is easy to locate so that you can power off
devices in the case of accidents.
Procedure
Step 1 Turn on the circuit breakers of external DC power supplies A and B.
Step 2 Measure the input voltage of the device with a multimeter and ensure that the voltage falls
within the range of -72 V DC to -38 V DC.
Step 3 Turn on the DC power switch of the device.
Step 4 Wait for three minutes and then check the status of the indicators.
Figure 2-22 shows the indicator status of main parts when the device is operating properly.
Table 2-4 describes all indicators.
If all power modules do not have eight inputs, the STATUS indicator of the fan module is steady red.

HUAWEI USG9500 Series Terabit-level Next-Generation Firewall
Hardware Guide
2 Hardware Installation
Issue 01 (2017-03-13)
Huawei Proprietary and Confidential
Copyright © Huawei Technologies Co., Ltd.
243
Figure 2-22 Indicator status when the USG9580 is operating properly
----End
Result
Table 2-4 Device indicators
Item
Indicator
Color
Status Description
PEM
RUN
Green
If the indicator is steady green, the
PEM has normal output.
ALM
Red
Alarm indicator. If the indicator is
steady red,
Lightning protection circuit of the
PEM is faulty.
No power is input.
FAN
STATUS
Green
If the indicator blinks once every two
seconds (0.5 Hz), the FAN is working
properly.
Red
If the indicator blinks once every two

HUAWEI USG9500 Series Terabit-level Next-Generation Firewall
Hardware Guide
2 Hardware Installation
Issue 01 (2017-03-13)
Huawei Proprietary and Confidential
Copyright © Huawei Technologies Co., Ltd.
244
Item
Indicator
Color
Status Description
seconds (0.5 Hz), the fan module or
PEM is faulty (including the case that
not all PEMs are powered on).
MPU/SRU
RUN
Green
From the MPU/SRU being powered on
until it is registered, the indicator status
changes in the sequence of off-blinks
once every 250 ms (4 Hz)-off-steady
on-blinks once every two seconds (0.5
Hz).
After the MPU/SRU is registered, the
MPU/SRU is working properly if the
indicator blinks at 0.5 Hz.
NOTE
Possible causes for the indicator being off
are:
The BootROM is damaged.
The MPU cannot be powered on.
Possible causes for the indicator blinking
quickly are:
The CF card is faulty.
The other control chips on the
MPU/SRU are faulty, causing the
MPU/SRU not to be able to initialize.
ALM
Red
If the indicator is steady off, the
MPU/SRU is in the normal state. If the
indicator is steady red, an alarm is
generated.
SFU
RUN
Green
From the SFU being powered on until it
is registered, the indicator status
changes in the sequence of off-blinks
once every 250 ms (4 Hz)-off-steady
on-blinks once every two seconds (0.5
Hz).
After the SFU is registered, the SFU is
working properly if the indicator blinks
at 0.5 Hz.
ACT
Green
If the indicator is steady green, the SFU
is working properly; if the indicator is
off, the SFU is faulty.
2.2.12 Powering On the USG9580-AC Power Distribution
Check whether the USG9580 is operating properly in the DC power supply environment.
Power on the USG9580 according to the following requirements to ensure device security.

HUAWEI USG9500 Series Terabit-level Next-Generation Firewall
Hardware Guide
2 Hardware Installation
Issue 01 (2017-03-13)
Huawei Proprietary and Confidential
Copyright © Huawei Technologies Co., Ltd.
245
Context
Before power-on check, switch all circuit breakers to the OFF position.
Before you power on the USG9580, ensure that:
The power cable and PGND cable are properly connected.
The power switch in the equipment room is easy to locate so that you can power off
devices in the case of accidents.
Procedure
Step 1 Turn on the external AC power supplies A and B.
Step 2 Measure the input voltage of the AC power chassis with a multimeter and ensure that the
voltage falls within the range of 90 V AC to 264 V AC.
Step 3 Turn on the circuit breakers of external AC power supplies A and B and check the status of
the indicators on the AC power chassis.
Step 4 Measure the input voltage of the device with a multimeter and ensure that the voltage falls
within the range of -72 V DC to -38 V DC.
Step 5 Measure the input voltage of the device with a multimeter and ensure that the voltage falls
within the range of -72 V DC to -38 V DC.
Step 6 Wait for three minutes and then check the status of the indicators.
Figure 2-23 and Figure 2-24 show the indicator status of main parts when the device is
operating properly. Table 2-6 describes all indicators.
Figure 2-23 Indicator status when the AC power chassis is working properly

HUAWEI USG9500 Series Terabit-level Next-Generation Firewall
Hardware Guide
2 Hardware Installation
Issue 01 (2017-03-13)
Huawei Proprietary and Confidential
Copyright © Huawei Technologies Co., Ltd.
246
Figure 2-24 Indicator status when the USG9580 is operating properly
----End
Result
Table 2-5 Indicators on the AC power chassis
Item
Color
Status Description
Cause of the Abnormality
Operation
indicator
Green
If the indicator is
steady green, the AC
power chassis is
running properly. If
the indicator is off, an
exception occurs.
No main AC power is input, the
AC input voltage is higher or
lower than the normal range, or
the AC power chassis has no
output.
Protection
indicator
Yellow
If the indicator is off,
the AC power chassis
is running properly. If
the indicator is on, an
exception occurs.
A temperature alarm is
generated (if the temperature
exceeds 65°C, the AC power
chassis will be powered off), or
the AC power chassis is in the
dormant state (the indicator is
on and no alarm is generated).

HUAWEI USG9500 Series Terabit-level Next-Generation Firewall
Hardware Guide
2 Hardware Installation
Issue 01 (2017-03-13)
Huawei Proprietary and Confidential
Copyright © Huawei Technologies Co., Ltd.
247
Item
Color
Status Description
Cause of the Abnormality
Fault
indicator
Red
If the indicator is off,
the AC power chassis
is running properly. If
the indicator is on, an
exception occurs.
The AC power chassis is
powered off due to over-voltage
or over-temperature, or fans are
faulty, or the AC power chassis
has no output due to its internal
faults.
DC output
voltage
-
The normal voltage
ranges from -43.2 V
DC to -57 V DC
-
Table 2-6 Device indicators
Item
Indicator
Color
Status Description
PEM
RUN
Green
If the indicator is steady green, the
PEM has normal output.
ALM
Red
Alarm indicator. If the indicator is
steady red,
Lightning protection circuit of the
PEM is faulty.
No power is input.
FAN
STATUS
Green
If the indicator blinks once every two
seconds (0.5 Hz), the FAN is working
properly.
Red
If the indicator blinks once every two
seconds (0.5 Hz), the fan module or
PEM is faulty (including the case that
not all PEMs are powered on).
MPU/SRU
RUN
Green
From the MPU/SRU being powered on
until it is registered, the indicator status
changes in the sequence of off-blinks
once every 250 ms (4 Hz)-off-steady
on-blinks once every two seconds (0.5
Hz).
After the MPU/SRU is registered, the
MPU/SRU is working properly if the
indicator blinks at 0.5 Hz.
NOTE
Possible causes for the indicator being off
are:
The BootROM is damaged.
The MPU cannot be powered on.
Possible causes for the indicator blinking
quickly are:
The CF card is faulty.

HUAWEI USG9500 Series Terabit-level Next-Generation Firewall
Hardware Guide
2 Hardware Installation
Issue 01 (2017-03-13)
Huawei Proprietary and Confidential
Copyright © Huawei Technologies Co., Ltd.
248
Item
Indicator
Color
Status Description
The other control chips on the
MPU/SRU are faulty, causing the
MPU/SRU not to be able to initialize.
ALM
Red
If the indicator is steady off, the
MPU/SRU is in the normal state. If the
indicator is steady red, an alarm is
generated.
SFU
RUN
Green
From the SFU being powered on until it
is registered, the indicator status
changes in the sequence of off-blinks
once every 250 ms (4 Hz)-off-steady
on-blinks once every two seconds (0.5
Hz).
After the SFU is registered, the SFU is
working properly if the indicator blinks
at 0.5 Hz.
ACT
Green
If the indicator is steady green, the SFU
is working properly; if the indicator is
off, the SFU is faulty.
2.3 Installing USG9560
This section describes how to install the USG9560.
2.3.1 Preparing the Site
Prior to device installation, deploy the cabinet and device according to the following
requirements to ensure that the device can operate properly.
Power Supply System
If you use DC power, ensure that the outputs of the DC power distribution box fall
within the range of -72 V DC to -38 V DC. Two power modules are needed, and each
power module must be connected to two different power sources for redundancy.
If you use AC power, ensure that the outputs of the AC power distribution box fall within
the range of 90V AC to 264 V AC. Two power modules are needed, and each power
module must be connected to two different power sources for redundancy. Meanwhile,
one AC power chassis must be installed on the device.
Cabinet Requirements
You are advised to use Huawei standard NE68E cabinet. The self-purchased cabinet must
meet A.6 Requirements on Customers' Cabinets Purchased from Other Vendors.

HUAWEI USG9500 Series Terabit-level Next-Generation Firewall
Hardware Guide
2 Hardware Installation
Issue 01 (2017-03-13)
Huawei Proprietary and Confidential
Copyright © Huawei Technologies Co., Ltd.
249
Cabinet Clearance Requirements
The N68E-22 cabinet is used as an example. As shown in Figure 2-25, cabinet clearance must
meet the following requirements:
Aisles in the equipment room ≥ 1000 mm; aisles between cabinet rows ≥ 1000 mm
Spacing between cabinet sides and wall ≥800 mm
Spacing between cabinet row and wall ≥ 1000 mm
Figure 2-25 Diagram for cabinet deployment
Device Clearance Requirements
The USG9560 chassis is 14 U high and requires front and back maintenance mode. Device
clearance must meet the following requirements:
Airflow clearance
− Maintain a minimum of 750 mm spacing between the device and the equipment
room wall and between two neighboring devices to prevent hot air recirculation.
− Maintain a minimum spacing of 2 U between devices installed in the same cabinet,
between the top-most device and the cabinet top, and between the bottom-most
device and the cabinet bottom.
Maintenance clearance
Maintain a minimum of 700 mm spacing between devices and between a device and
wall.
The height of three holes on the mounting rails is 1 U, which is equivalent to 44.45 mm.

HUAWEI USG9500 Series Terabit-level Next-Generation Firewall
Hardware Guide
2 Hardware Installation
Issue 01 (2017-03-13)
Huawei Proprietary and Confidential
Copyright © Huawei Technologies Co., Ltd.
250
2.3.2 Installing the Chassis into the Cabinet
The USG9560 can be mounted into a 19-inch standard cabinet through guide rails.
Context
The USG9560 is heavy and requires four people to lift and move.
Use the handles on the chassis sides when moving the device. Do not use the handles of
modules to avoid damages to the device.
Do not step on the air filter at the bottom of the cabinet.
Procedure
Step 1 Install floating nuts and guide rails
1. Determine where to install floating nuts and mark the positions using a marker, as shown
in Figure 2-26.
2. Fix the floating nuts at the positions.
3. Use M6 screws to fix the guide rails at the positions.

HUAWEI USG9500 Series Terabit-level Next-Generation Firewall
Hardware Guide
2 Hardware Installation
Issue 01 (2017-03-13)
Huawei Proprietary and Confidential
Copyright © Huawei Technologies Co., Ltd.
251
Figure 2-26 Installing floating nuts and guide rails
Step 2 Install mounting ears on the USG9560.
Use a Phillips screwdriver to fix the mounting ears to both sides of the chassis with M4
screws, as shown in Figure 2-27.

HUAWEI USG9500 Series Terabit-level Next-Generation Firewall
Hardware Guide
2 Hardware Installation
Issue 01 (2017-03-13)
Huawei Proprietary and Confidential
Copyright © Huawei Technologies Co., Ltd.
252
Figure 2-27 Installing Mounting Ears
Step 3 Mount the USG9560 in the cabinet.
1. Lift the USG9560, move it to the cabinet, place it onto the guide rails, and push it into
the cabinet.
2. Use M6 screws to fix the mounting ears of the USG9560 to the mounting rack, as shown
in Figure 2-28.

HUAWEI USG9500 Series Terabit-level Next-Generation Firewall
Hardware Guide
2 Hardware Installation
Issue 01 (2017-03-13)
Huawei Proprietary and Confidential
Copyright © Huawei Technologies Co., Ltd.
253
Figure 2-28 Mounting the USG9560 in the cabinet
Step 4 Mount the AC power chassises in the cabinet. (Mandatory in case of AC power supply)
When the equipment room uses the AC power supply, one USG9560 requires one AC power
chassis, as shown in Figure 2-29.
Figure 2-29 Mounting the AC power chassis in the cabine
----End

HUAWEI USG9500 Series Terabit-level Next-Generation Firewall
Hardware Guide
2 Hardware Installation
Issue 01 (2017-03-13)
Huawei Proprietary and Confidential
Copyright © Huawei Technologies Co., Ltd.
254
Follow-up Procedure
Perform the following checks after the installation:
Ensure that the USG9560 is placed securely inside the cabinet.
Ensure that the exhaust of the USG9560 is not blocked by other objects.
2.3.3 Installing the PGND Cable
Connecting the PGND cable of the USG9560 correctly is a key measure of surge protection
and resistance to interference. Before using the USG9560, correctly connect the PGND cable.
Prerequisites
Before installing the PGND cable of the device, ensure that the PGND cable of the cabinet is
correctly connected and the ground resistance is zero ohm.
Context
If the chassis is near the ground bar in the equipment room, connect the PGND cable of the
chassis directly to the ground bar. If the chassis is distant from the ground bar, connect the
PGND cable to the ground point on the cabinet.
In this section, connecting the PGND cable to the ground point on the cabinet is used as an
example.
Procedure
Step 1 Install the chassis ground cable, as shown in Figure 2-30.
Step 2 Install the ground cable of the AC power chassis (mandatory for AC power supply), as shown
in Figure 2-30.

HUAWEI USG9500 Series Terabit-level Next-Generation Firewall
Hardware Guide
2 Hardware Installation
Issue 01 (2017-03-13)
Huawei Proprietary and Confidential
Copyright © Huawei Technologies Co., Ltd.
255
Figure 2-30 Connecting the PGND cable
----End
Follow-up Procedure
Verify the following after the cabling is complete:
The PGND cable is securely connected to the ground terminal.
The electrical resistance between the ground terminal and ground point is less than 10
ohm on a multimeter.
2.3.4 Installing Boards and Subcards
This section describes how to install boards and subcards to avoid any damage.
Context

HUAWEI USG9500 Series Terabit-level Next-Generation Firewall
Hardware Guide
2 Hardware Installation
Issue 01 (2017-03-13)
Huawei Proprietary and Confidential
Copyright © Huawei Technologies Co., Ltd.
256
Ensure that no water is on the device or board before you insert the board into the device.
Before installing boards, wear the ESD wrist strap and that the strap is well grounded to
prevent any electrostatic discharge of the human body from damaging the sensitive
components.
Procedure
Step 1 Select the slots based on the slot distribution.
You can determine whether it is a correct slot for a board by checking whether the color on
both ends of the board panel is the same as the color on the slot.
Figure 2-31 Slot layout
Step 2 Install a board.
1. Determine the slot for the board to be installed based on hardware planning and remove
the filler panel from the slot.
2. Extend the ejector levels of the board, insert the board fully into slot, and rotate the
ejector level to the front of the board so that the board is fully inserted in the slot.
3. Use a Phillips screwdriver to tighten the captive screws to the board.
Figure 2-32 Installing a board
Step 3 Install a subcard.

HUAWEI USG9500 Series Terabit-level Next-Generation Firewall
Hardware Guide
2 Hardware Installation
Issue 01 (2017-03-13)
Huawei Proprietary and Confidential
Copyright © Huawei Technologies Co., Ltd.
257
Before you install a subcard, remove redundant guide rails from the board and store them properly for
future use.
1. Remove the filler panel from the board.
2. Smoothly insert the subcard into the board along the guide rail.
3. Use a Phillips screwdriver to tighten the captive screws to the board.
Figure 2-33 Installing a subcard
----End
Follow-up Procedure
Check the following items after the installation is complete:
Check whether the boards and subcards are installed in position and the captive screws
are fastened.
Filler panels are inserted in vacant slots. You must insert filler panels in the vacant slots
on the USG9560 to prevent dust and ensure heat dissipation.
2.3.5 Installing Chassis Components
Air filters are used to protect devices against dust, and cable racks are used to route optical
fibers and cables.
Procedure
Install air filters to the air intake frame.
Point the pin on the air filter to the hole that prevents reverse installation. Otherwise, the air filter cannot
be installed.

HUAWEI USG9500 Series Terabit-level Next-Generation Firewall
Hardware Guide
2 Hardware Installation
Issue 01 (2017-03-13)
Huawei Proprietary and Confidential
Copyright © Huawei Technologies Co., Ltd.
258
Figure 2-34 Install air filters to the air intake frame
Install the cable rack.
a. Install the front cable rack.
b. Slide the rack to the right to click it into place.
c. Use two M4 x 10 screws to fix the cable rack.
Figure 2-35 Install the cable rack
----End

HUAWEI USG9500 Series Terabit-level Next-Generation Firewall
Hardware Guide
2 Hardware Installation
Issue 01 (2017-03-13)
Huawei Proprietary and Confidential
Copyright © Huawei Technologies Co., Ltd.
259
2.3.6 Installing Power Cables-DC Power Distribution
In standard configuration, the USG9560 has four PEM modules. Each PEM module requires
an NEG DC power cable and an RTN DC power cable. This section describes how to connect
power cables to the two DC supply modules.
Context
Never install power cables when the power is on.
Before installing the power cables, ensure that the device is adequately grounded.
Inside the cable should be an entire piece of copper core. Any connection of the core is
not allowed.
Cables of DC power distribution.
Cable
Image
NEG cable
RTN cable
The terminals on DC cables.
Terminal
Image

HUAWEI USG9500 Series Terabit-level Next-Generation Firewall
Hardware Guide
2 Hardware Installation
Issue 01 (2017-03-13)
Huawei Proprietary and Confidential
Copyright © Huawei Technologies Co., Ltd.
260
Terminal
Image
OT bare crimping
terminal
JG2 double-hole
bare crimping
terminal
For details, see 2.5.2.1 Guide to the DC Power Distribution.
Procedure
Step 1 Make temporary marks on both ends of each power cable using a marker.
Step 2 Connect the M6 JG2 terminals of the DC power cable to the PEM modules on USG9560.
Connect the M8 OT terminals of the DC power cable to the output terminals on the power
supply device.
Step 3 Use tie wraps to bind the cables every 100 mm upwards from the bottom end, and fix the
cables to the cabling rack.
Step 4 Affix permanent labels 20 mm from both ends of each power cable.

HUAWEI USG9500 Series Terabit-level Next-Generation Firewall
Hardware Guide
2 Hardware Installation
Issue 01 (2017-03-13)
Huawei Proprietary and Confidential
Copyright © Huawei Technologies Co., Ltd.
261
Figure 2-36 Affix permanent labels
----End
Follow-up Procedure
Note that the power cable has polarity. After the device is powered on, if the PEM indicator
blinks red, check whether the anode and cathode of the power cable for the PEM are
connected without error. If they are connected mistakenly, switch off the previous-stage power
immediately and connect the power cable without error.
1. After installing power cables, install the plastic cover to each power module.
2. The power cables are fixed securely and in reliable and good contact with the terminals.
3. In the corner, the cables should be smooth.

HUAWEI USG9500 Series Terabit-level Next-Generation Firewall
Hardware Guide
2 Hardware Installation
Issue 01 (2017-03-13)
Huawei Proprietary and Confidential
Copyright © Huawei Technologies Co., Ltd.
262
4. Labels for the power cables must be filled in and attached to the cables as required. All
labels are neat and face the same direction for easy viewing.
5. The power cable, grounding cable and the signal cable should be bound separately. The
distance between them must be more than 3 cm.
2.3.7 Installing Power Cables-AC Power Distribution
When the USG9560 uses AC power supply, one external AC power chassis is added to the DC
power supply system to constitute an AC power supply system. Four AC power cables are
used to connect each AC power chassis to the AC PDF.
Context
Never install power cables when the power is on.
Before installing the power cables, ensure that the device is adequately grounded.
With the 110 V AC power supply, the USG9560 must use 110 V dual-live-wire AC input
to meet the maximum system power consumption with the full configuration. This is
because AC power modules are half-load output with 110 V AC input, which cannot meet
the system power consumption.
As USG9560 do not support AC power chassis management, the DB9 interface on the rear
of an AC power chassis does not need to connect to the monitoring cable in the installation
auxiliary material package.
Inside the cable should be an entire piece of copper core. Any connection of the core is
not allowed.
Cables of AC power distribution.
Cable
Image
DC cables
from the
device to
the AC
power
chassis
NEG cable
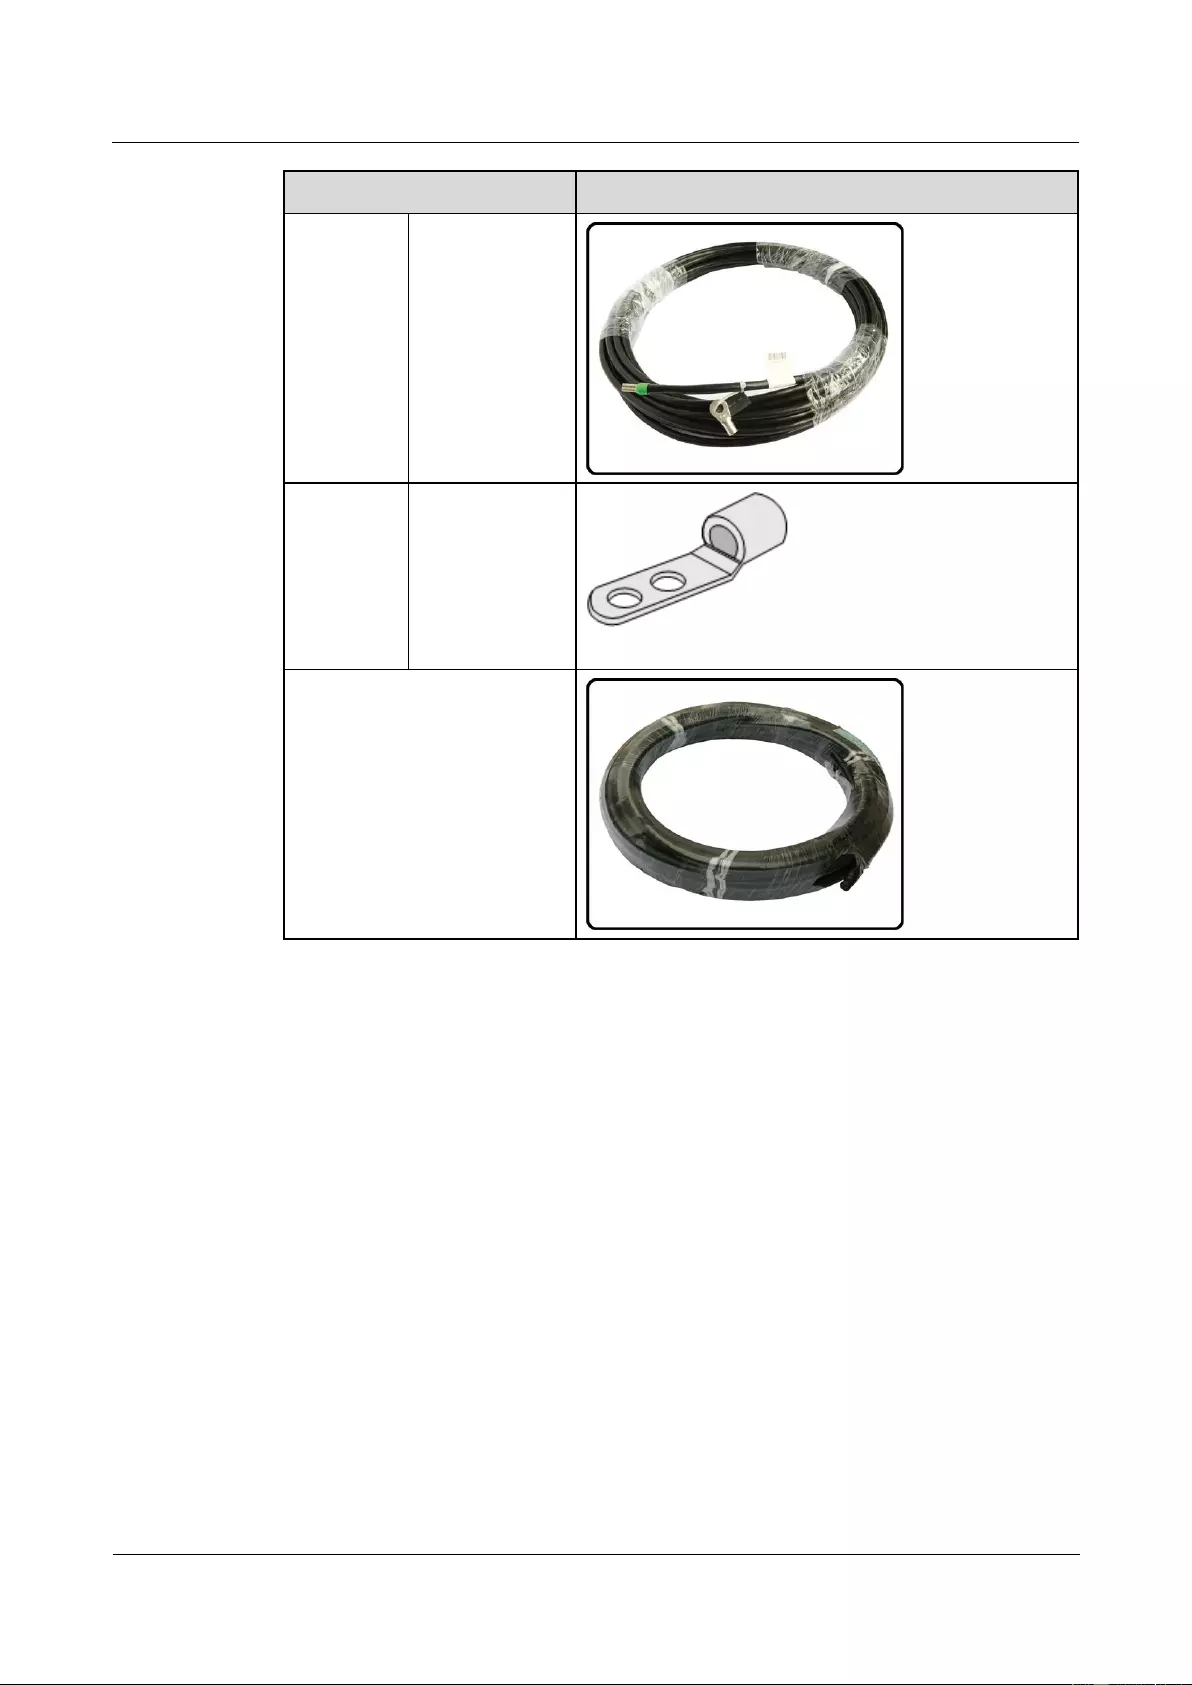
HUAWEI USG9500 Series Terabit-level Next-Generation Firewall
Hardware Guide
2 Hardware Installation
Issue 01 (2017-03-13)
Huawei Proprietary and Confidential
Copyright © Huawei Technologies Co., Ltd.
263
Cable
Image
RTN cable
Terminals
on DC
cables from
the device
to the AC
power
chassis
JG2 double-hole
bare crimping
terminal (M6)
AC cables from the AC power
chassis to the AC power supply
device
For details, see 2.5.2.2 Guide to the AC Power Distribution.
Procedure
Step 1 Make temporary marks on both ends of each power cable using a marker.
Step 2 Connect one end of the AC power cables to the input terminals of the AC power chassis.
Connect the other end of the AC power cables to the AC power supply device.
Step 3 Connect one end of the DC power cables to the PEM modules on USG9560. Connect the
other end of the DC power cables to the output terminals of the AC power chassis.
Step 4 Use tie wraps to bind the cables every 100 mm upwards from the bottom end, and fix the
cables to the cable rack.
Step 5 Affix permanent labels 20 mm from both ends of each power cable.

HUAWEI USG9500 Series Terabit-level Next-Generation Firewall
Hardware Guide
2 Hardware Installation
Issue 01 (2017-03-13)
Huawei Proprietary and Confidential
Copyright © Huawei Technologies Co., Ltd.
264
Figure 2-37 Affix permanent labels
----End
Follow-up Procedure
Note that the power cable has polarity. After the device is powered on, if the PEM indicator
blinks red, check whether the anode and cathode of the power cable for the PEM are
connected without error. If they are connected mistakenly, switch off the previous-stage power
immediately and connect the power cable without error.
1. After installing power cables, install the plastic cover to each power module.
2. The power cables are fixed securely and in reliable and good contact with the terminals.
3. In the corner, the cables should be smooth.

HUAWEI USG9500 Series Terabit-level Next-Generation Firewall
Hardware Guide
2 Hardware Installation
Issue 01 (2017-03-13)
Huawei Proprietary and Confidential
Copyright © Huawei Technologies Co., Ltd.
265
4. Labels for the power cables must be filled in and attached to the cables as required. All
labels are neat and face the same direction for easy viewing.
5. The power cable, grounding cable and the signal cable should be bound separately. The
distance between them must be more than 3 cm.
2.3.8 Connecting Network Cables
This section describes how to install electrical transceivers on the ports and connect them to
the ports of the peer device using network cables according to the network plan.
Context
Before connecting the network cable, perform the following operations:
Check construction conditions.
The peer device has been installed in the equipment room, and the port to which the
network cable is to be connected has been determined.
Check the cabling route.
The engineering document should specify the cabling route from the cabinet to the peer
device in the equipment room, and the length of the cable is calculated based on the
cabling path.
Label the cable.
The cable must be labeled before being connected to the devices.
network cables fall into crossover and straight through cables. Currently, Ethernet ports on
most devices can dynamically adapt to both types of cables. Use proper cables for devices that
do not support dynamic adaptation.
By electromagnetic compatibility, network cables can be classified into ordinary and shielded
cables. The shielded cables are preferred due to their better electromagnetic compatibility.
Before connecting a cable, note the label on the port and make sure that the cable is inserted
into the correct port. Otherwise, the port module or the device might be damaged.
Before bundling network cables, use a network cable tester to test cable connectivity. Bind the
network cables to form a rectangle inside the cabinet. Each bundle contains a maximum of 20
network cables. The tie wraps must be tidy and in the same direction.
The clearance between the power cable, PGND cable, and signal cable must be more than 30
mm.
Procedure
Step 1 If multiple network cables need to be connected, attach temporary labels to both ends of each
cable for identification.
Step 2 Remove the dust-proof caps from a board interface and insert the electrical module into the
interface.
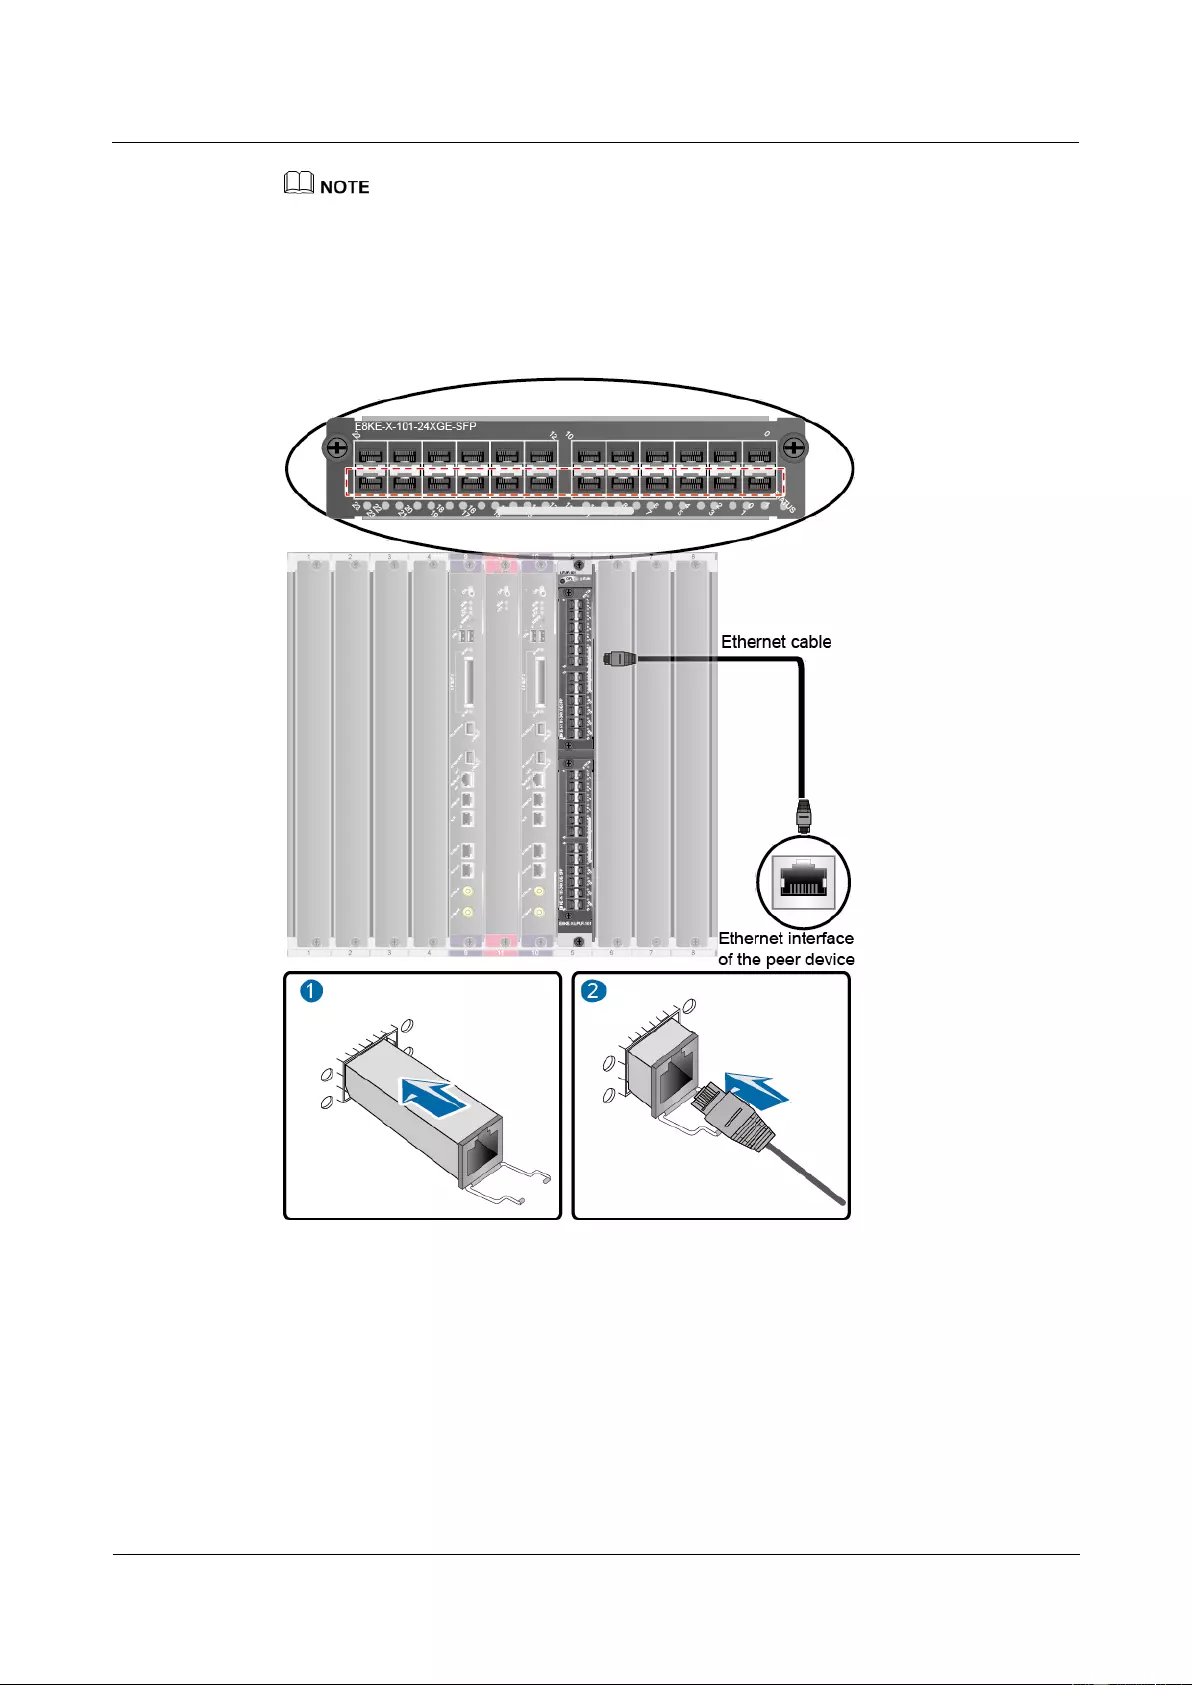
HUAWEI USG9500 Series Terabit-level Next-Generation Firewall
Hardware Guide
2 Hardware Installation
Issue 01 (2017-03-13)
Huawei Proprietary and Confidential
Copyright © Huawei Technologies Co., Ltd.
266
The electrical module can be inserted only in the interface with an odd number on the 24-port
100/1000Base-X-SFP flexible interface card.
Step 3 Connect one end of a network cable to the electrical transceiver of the USG9560 and the other
end to the Ethernet port of the peer device based on the network plan.
Figure 2-38 Connecting a network cable
Step 4 Lay out the network cable along a cabinet and route the cable through the cable hole for the
signal cables at the top (overhead cabling) or bottom (underfloor cabling) of the cabinet.
Step 5 Remove the temporary labels and attach labels (20 mm away from the connectors) at both
ends of the network cable.
----End
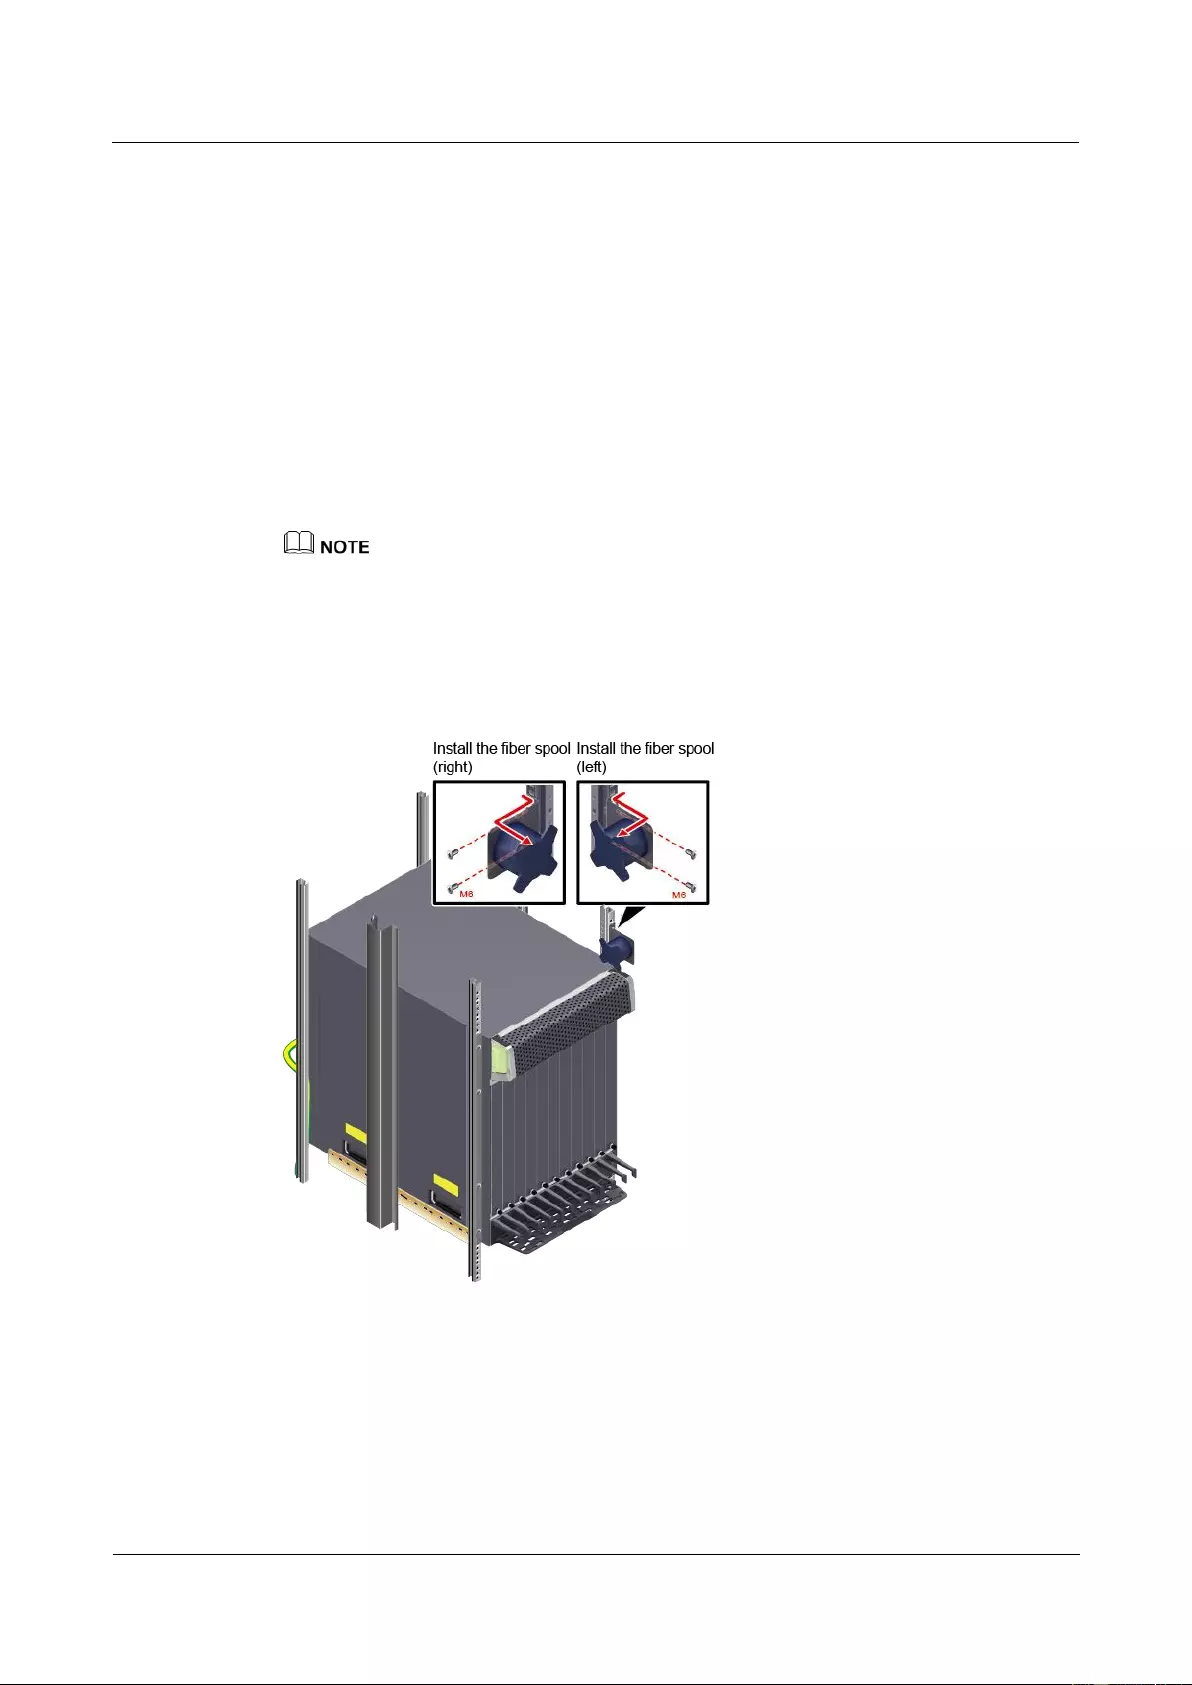
HUAWEI USG9500 Series Terabit-level Next-Generation Firewall
Hardware Guide
2 Hardware Installation
Issue 01 (2017-03-13)
Huawei Proprietary and Confidential
Copyright © Huawei Technologies Co., Ltd.
267
Follow-up Procedure
Verify the following after the installation:
The labels at both ends of the cable are correct, clear, neat, and facing the same direction.
The cables and connectors are free of any damage or breakage and are connected
properly and reliably.
2.3.9 Connecting Optical Fibers
This section describes how to install optical transceivers on the ports and connect them to the
ports of the peer device using optical fibers according to the network plan.
Installing Fiber Spools
You are advised to wind excess optical fibers around fiber spools for convenient cable routing and
device maintenance.
Determine the locations of the fiber spools based on the device arrangement in the cabinet. The fiber
spools cannot be too close to device operation area to avoid hampering board insertion or removal or
cabling, and the fiber spools cannot be too far away from the device to facilitate fiber spool operation.
Figure 2-39 Installing fiber spools
Installing Optical Transceivers and Connecting Optical Fibers

HUAWEI USG9500 Series Terabit-level Next-Generation Firewall
Hardware Guide
2 Hardware Installation
Issue 01 (2017-03-13)
Huawei Proprietary and Confidential
Copyright © Huawei Technologies Co., Ltd.
268
Do not look into the optical interface of the optical module or the optical fiber connector
without eye protection.
Wear an ESD wrist strap or ESD gloves before installing optical modules.
Before connecting optical fiber cables, read the following precautions:
Do not overbend optical fibers, and the radius should not be shorter than 40 mm.
Do not bundle the optical fibers too tight. Otherwise, the transmission performance of
the optical fibers and the communication between devices might be adversely affected.
Step 1 Before connecting an optical fiber, attach temporary labels to both ends of the optical fiber for
identification.
Step 2 Remove the dust cap from an optical interface and insert an optical module in the optical
interface.
Step 3 Remove the dust cap from the optical transceiver.
Set aside the dust cap properly for future use. After optical fiber are disconnected for maintenance, use
the dust cap to prevent the optical transceiver from dust.
Step 4 Remove protective caps from optical fiber connectors, insert optical fibers into the optical
transceiver, and connect the fiber to the peer device.
Ensure that the Tx and Rx ports are correctly connected.
Ensure that the TX and RX ports on one end of the optical fiber cable are connected to the RX
and TX ports (respectively) on the other end.
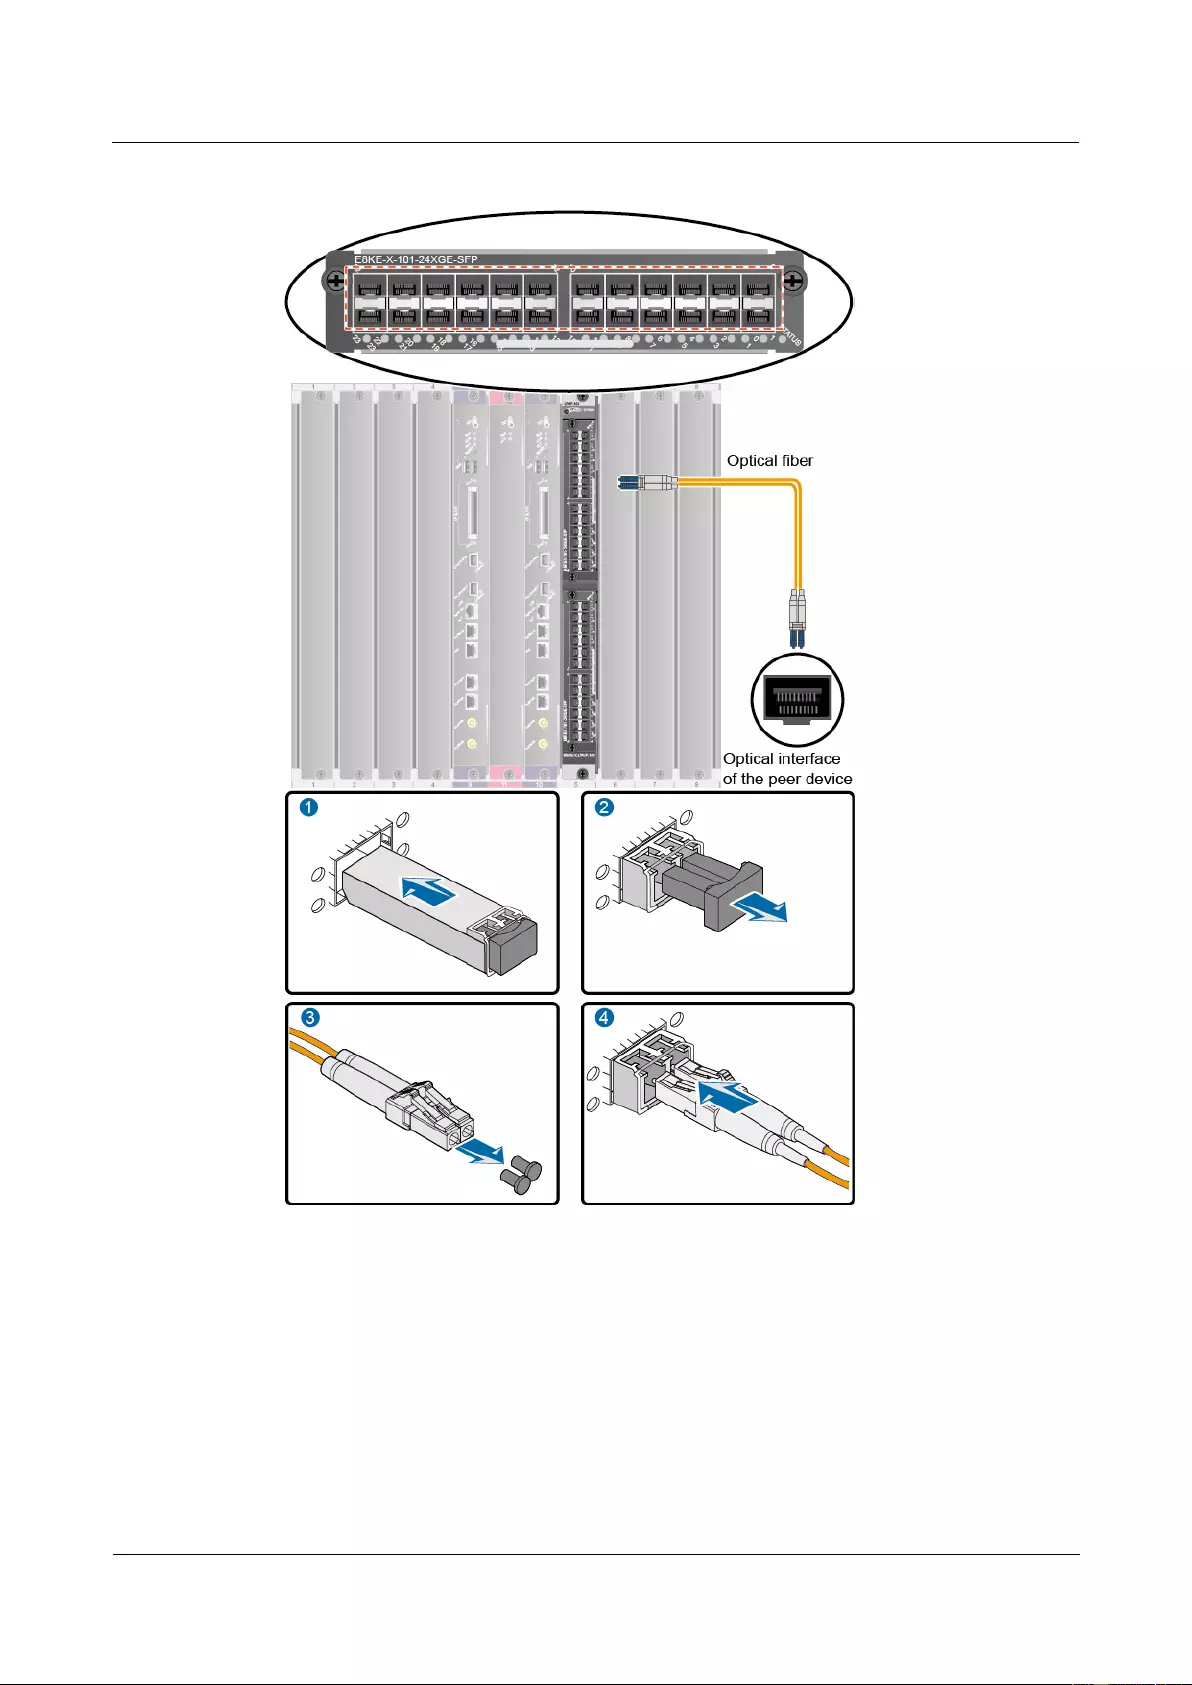
HUAWEI USG9500 Series Terabit-level Next-Generation Firewall
Hardware Guide
2 Hardware Installation
Issue 01 (2017-03-13)
Huawei Proprietary and Confidential
Copyright © Huawei Technologies Co., Ltd.
269
Figure 2-40 Figure 1 Installing optical transceivers and connecting optical fibers
Step 5 Repeat Step 1 to Step 4 to install all optical transceivers and connect all optical fibers.
Step 6 Coil up the redundant optical fibers around a fiber management tray.
Step 7 Bind optical fibers every 200 mm with binding tapes and use tie wraps to fix the bundle of the
optical fibers to the cabling rack.
Step 8 Affix permanent labels 20 mm from both ends of the optical fiber.
----End

HUAWEI USG9500 Series Terabit-level Next-Generation Firewall
Hardware Guide
2 Hardware Installation
Issue 01 (2017-03-13)
Huawei Proprietary and Confidential
Copyright © Huawei Technologies Co., Ltd.
270
Follow-up Procedure
After you power on the USG9500, check the connection by observing the optical port
indicator. If the indicator is on or blinks, the link is connected or data is being transmitted. If
the indicator is off, the link is disconnected. Possible causes for the disconnection are as
follows:
The optical fiber is improperly inserted. Pull out the optical fiber and re-insert it.
The RX and TX optical ports are inserted reversely. Pull out the optical fibers, change
their position, and re-insert them.
The optical module is damaged or the optical fiber is broken. Replace the optical module
or the optical fiber.
2.3.10 Checking After Installation
After you install the device in a cabinet, you need to verify the cables and NE40E have been
installed correctly before powering up the device.
Cabinet Installation Checklist
No.
Item
1
Verify that the cabinet is placed according to the engineering
design document.
2
Verify that the deviation of the cabinet is less than 3 mm
horizontally and not more than 3 mm vertically.
3
Verify that all the bolts are firmly fastened, especially those for
electrical connections. Flat washers and spring washers are
used, and spring washers are placed on top of flat washers.
4
Verify that the cabinet is neat and clean.
5
Verify that the doors can be opened and closed smoothly.
6
Verify that all labels, tags, and nameplates are correct, legible,
and complete.
Installation Environment Checklist
No.
Item
1
Verify that no fingerprints or other smears exist on the
equipment.
2
Verify that no excessive electrical tapes or cable ties exist on
the cables.
3
Verify that no tapes, cable ties, wastepaper, or packaging bags
are left around the equipment.
4
Verify that all the items around the equipment are neat, clean,
and intact.

HUAWEI USG9500 Series Terabit-level Next-Generation Firewall
Hardware Guide
2 Hardware Installation
Issue 01 (2017-03-13)
Huawei Proprietary and Confidential
Copyright © Huawei Technologies Co., Ltd.
271
Cable Installation Checklist
No.
Item
1
Verify that all the self-made ground cables are copper-based
with proper wire diameters. There is no switch, fuse, or
disconnection on the cable.
2
Verify that ground cables, AC input power cables, cables in the
cabinet are connected correctly according to the wiring diagram
of the power system, and the screws are tightened. Ensure that
the output and input cables are not short-circuited.
3
Verify that the redundant part of the power cable or ground
cable is stripped off rather than being coiled.
4
Verify that the lugs at both ends of each power cable or ground
cable are crimped securely.
5
Verify that bare wires and lug handles at the wiring terminals
are wrapped tightly by using insulation tapes or heat shrink
tubes.
6
Verify that the flat washer and spring washer are mounted
securely to all the wiring terminals.
7
Verify that the connectors of all cables are securely linked,
especially those at the bottom of the cabinet.
8
Verify that the cables are properly bound. Cable ties are
installed at equal spacing and in the same direction
9
Verify that the power cable and ground cable are routed
separately from other cables.
10
Verify that the cable layout facilitates maintenance and
expansion in the future.
11
Verify that the labels at both ends of each cable are legible.
12
Verify that the excess of cable ties is trimmed off without
remaining rough edges.
2.3.11 Powering On the USG9560-DC Power Distribution
Check whether the USG9560 is operating properly in the DC power supply environment.
Power on the USG9560 according to the following requirements to ensure device security.
Context
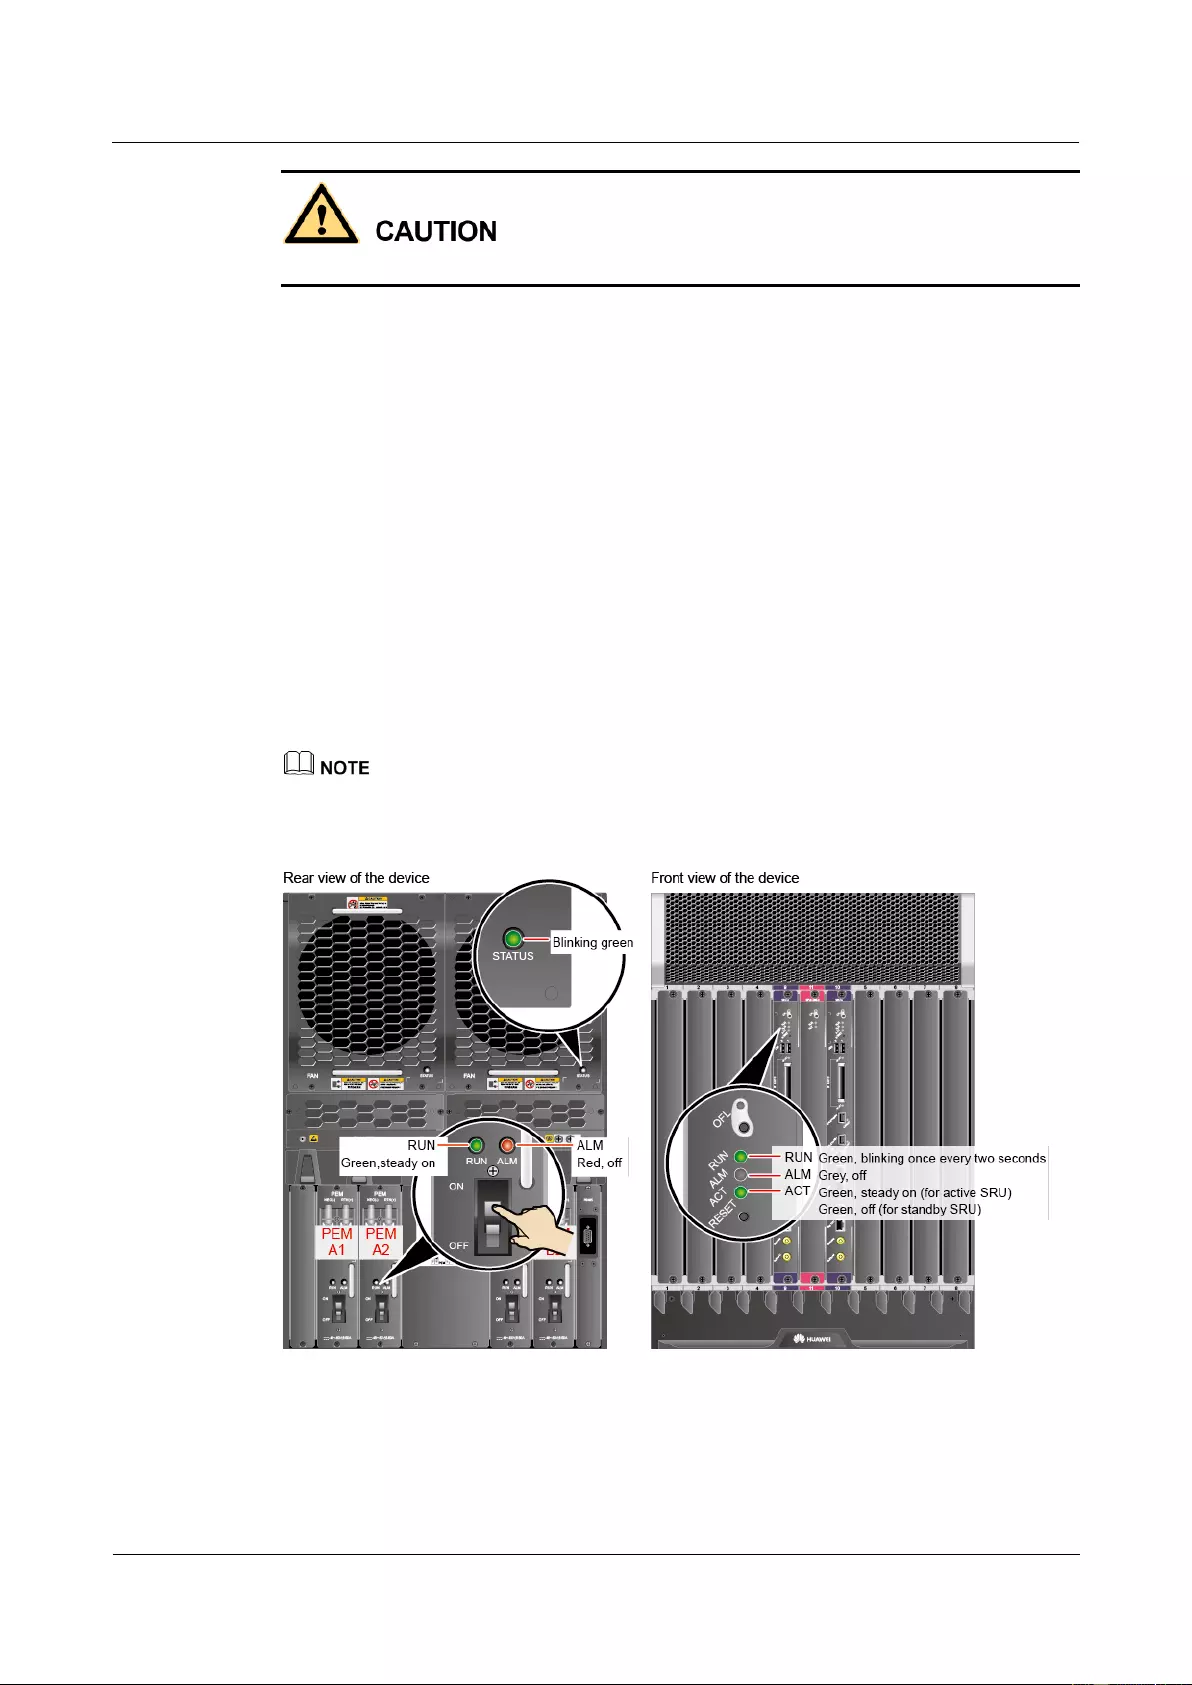
HUAWEI USG9500 Series Terabit-level Next-Generation Firewall
Hardware Guide
2 Hardware Installation
Issue 01 (2017-03-13)
Huawei Proprietary and Confidential
Copyright © Huawei Technologies Co., Ltd.
272
Before power-on check, switch all circuit breakers to the OFF position.
Before you power on the USG9580, ensure that:
The power cable and PGND cable are properly connected.
The power switch in the equipment room is easy to locate so that you can power off
devices in the case of accidents.
Procedure
Step 1 Turn on the circuit breakers of external DC power supplies A and B.
Step 2 Measure the input voltage of the device with a multimeter and ensure that the voltage falls
within the range of -72 V DC to -38 V DC.
Step 3 Turn on the DC power switch of the device.
Step 4 Wait for three minutes and then check the status of the indicators.
Figure 2-41 shows the indicator status of main parts when the device is operating properly.
Table 2-7 describes all indicators.
If all power modules do not have four inputs, the STATUS indicator of the fan module is steady red.
Figure 2-41 Indicator status when the USG9560 is operating properly
----End

HUAWEI USG9500 Series Terabit-level Next-Generation Firewall
Hardware Guide
2 Hardware Installation
Issue 01 (2017-03-13)
Huawei Proprietary and Confidential
Copyright © Huawei Technologies Co., Ltd.
273
Result
Table 2-7 Device indicators
Item
Indicator
Color
Status Description
PEM
RUN
Green
If the indicator is steady green, the
PEM has normal output.
ALM
Red
Alarm indicator. If the indicator is
steady red,
Lightning protection circuit of the
PEM is faulty.
No power is input.
FAN
STATUS
Green
If the indicator blinks once every two
seconds (0.5 Hz), the FAN is working
properly.
Red
If the indicator blinks once every two
seconds (0.5 Hz), the fan module or
PEM is faulty (including the case that
not all PEMs are powered on).
MPU/SRU
RUN
Green
From the MPU/SRU being powered on
until it is registered, the indicator status
changes in the sequence of off-blinks
once every 250 ms (4 Hz)-off-steady
on-blinks once every two seconds (0.5
Hz).
After the MPU/SRU is registered, the
MPU/SRU is working properly if the
indicator blinks at 0.5 Hz.
NOTE
Possible causes for the indicator being off
are:
The BootROM is damaged.
The MPU cannot be powered on.
Possible causes for the indicator blinking
quickly are:
The CF card is faulty.
The other control chips on the
MPU/SRU are faulty, causing the
MPU/SRU not to be able to initialize.
ALM
Red
If the indicator is steady off, the
MPU/SRU is in the normal state. If the
indicator is steady red, an alarm is
generated.
SFU
RUN
Green
From the SFU being powered on until it
is registered, the indicator status
changes in the sequence of off-blinks
once every 250 ms (4 Hz)-off-steady
on-blinks once every two seconds (0.5

HUAWEI USG9500 Series Terabit-level Next-Generation Firewall
Hardware Guide
2 Hardware Installation
Issue 01 (2017-03-13)
Huawei Proprietary and Confidential
Copyright © Huawei Technologies Co., Ltd.
274
Item
Indicator
Color
Status Description
Hz).
After the SFU is registered, the SFU is
working properly if the indicator blinks
at 0.5 Hz.
ACT
Green
If the indicator is steady green, the SFU
is working properly; if the indicator is
off, the SFU is faulty.
2.3.12 Powering On the USG9560-AC Power Distribution
Check whether the USG9560 is operating properly in the AC power supply environment.
Power on the USG9560 according to the following requirements to ensure device security.
Context
Before power-on check, switch all circuit breakers to the OFF position.
Before you power on the USG9580, ensure that:
The power cable and PGND cable are properly connected.
The power switch in the equipment room is easy to locate so that you can power off
devices in the case of accidents.
Procedure
Step 1 Turn on the external AC power supplies A and B.
Step 2 Measure the input voltage of the AC power chassis with a multimeter and ensure that the
voltage falls within the range of 90 V AC to 264 V AC.
Step 3 Turn on the circuit breakers of external AC power supplies A and B and check the status of
the indicators on the AC power chassis.
Step 4 Measure the input voltage of the device with a multimeter and ensure that the voltage falls
within the range of -72 V DC to -38 V DC.
Step 5 Measure the input voltage of the device with a multimeter and ensure that the voltage falls
within the range of -72 V DC to -38 V DC.
Step 6 Wait for three minutes and then check the status of the indicators.
Figure 2-42 and Figure 2-43 show the indicator status of main parts when the device is
operating properly. Table 2-9 and Table 2-8 describe all indicators.
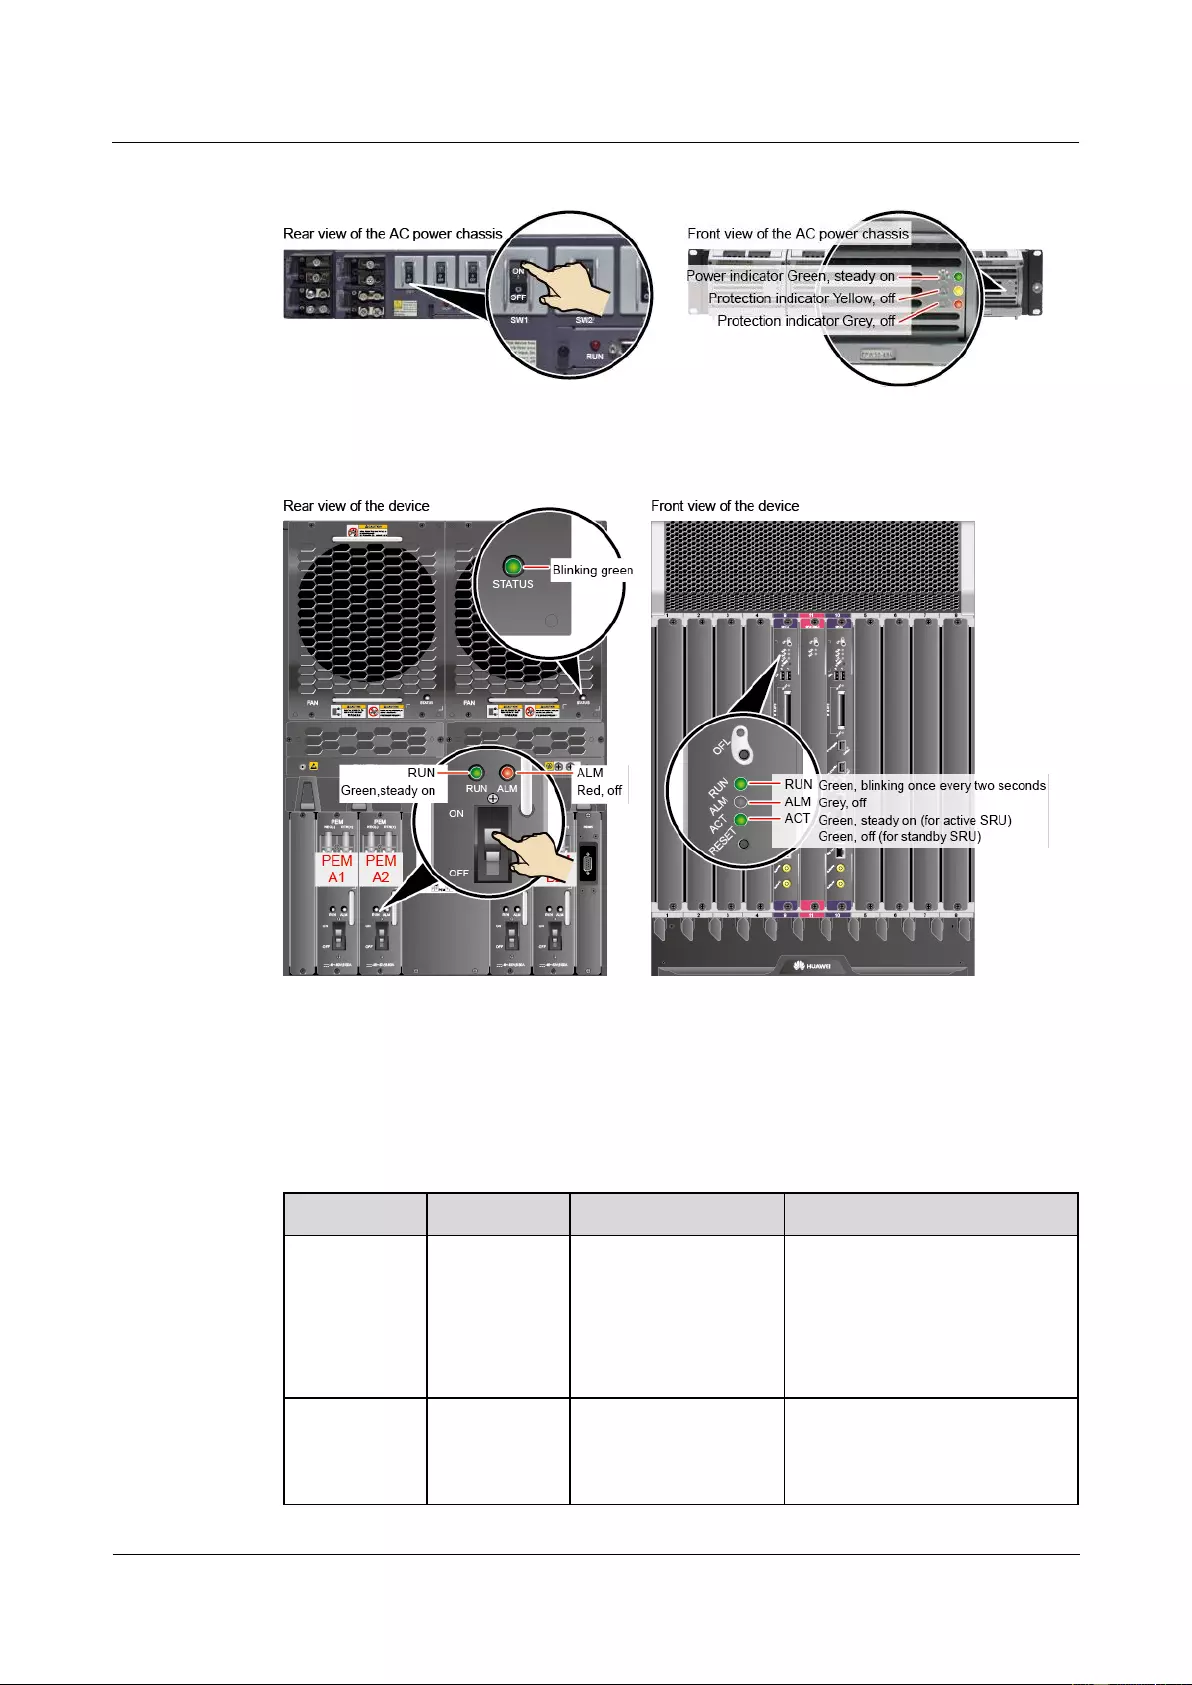
HUAWEI USG9500 Series Terabit-level Next-Generation Firewall
Hardware Guide
2 Hardware Installation
Issue 01 (2017-03-13)
Huawei Proprietary and Confidential
Copyright © Huawei Technologies Co., Ltd.
275
Figure 2-42 Indicator status when the AC power chassis is working properly
Figure 2-43 Indicator status when the USG9560 is operating properly
----End
Result
Table 2-8 Indicators on the AC power chassis
Item
Color
Status Description
Cause of the Abnormality
Operation
indicator
Green
If the indicator is
steady green, the AC
power chassis is
running properly. If
the indicator is off, an
exception occurs.
No main AC power is input, the
AC input voltage is higher or
lower than the normal range, or
the AC power chassis has no
output.
Protection
indicator
Yellow
If the indicator is off,
the AC power chassis
is running properly. If
the indicator is on, an
A temperature alarm is
generated (if the temperature
exceeds 65°C, the AC power
chassis will be powered off), or

HUAWEI USG9500 Series Terabit-level Next-Generation Firewall
Hardware Guide
2 Hardware Installation
Issue 01 (2017-03-13)
Huawei Proprietary and Confidential
Copyright © Huawei Technologies Co., Ltd.
276
Item
Color
Status Description
Cause of the Abnormality
exception occurs.
the AC power chassis is in the
dormant state (the indicator is
on and no alarm is generated).
Fault
indicator
Red
If the indicator is off,
the AC power chassis
is running properly. If
the indicator is on, an
exception occurs.
The AC power chassis is
powered off due to over-voltage
or over-temperature, or fans are
faulty, or the AC power chassis
has no output due to its internal
faults.
DC output
voltage
-
The normal voltage
ranges from -43.2 V
DC to -57 V DC
-
Table 2-9 Device indicators
Item
Indicator
Color
Status Description
PEM
RUN
Green
If the indicator is steady green, the
PEM has normal output.
ALM
Red
Alarm indicator. If the indicator is
steady red,
Lightning protection circuit of the
PEM is faulty.
No power is input.
FAN
STATUS
Green
If the indicator blinks once every two
seconds (0.5 Hz), the FAN is working
properly.
Red
If the indicator blinks once every two
seconds (0.5 Hz), the fan module or
PEM is faulty (including the case that
not all PEMs are powered on).
MPU/SRU
RUN
Green
From the MPU/SRU being powered on
until it is registered, the indicator status
changes in the sequence of off-blinks
once every 250 ms (4 Hz)-off-steady
on-blinks once every two seconds (0.5
Hz).
After the MPU/SRU is registered, the
MPU/SRU is working properly if the
indicator blinks at 0.5 Hz.
NOTE
Possible causes for the indicator being off
are:
The BootROM is damaged.
The MPU cannot be powered on.

HUAWEI USG9500 Series Terabit-level Next-Generation Firewall
Hardware Guide
2 Hardware Installation
Issue 01 (2017-03-13)
Huawei Proprietary and Confidential
Copyright © Huawei Technologies Co., Ltd.
277
Item
Indicator
Color
Status Description
Possible causes for the indicator blinking
quickly are:
The CF card is faulty.
The other control chips on the
MPU/SRU are faulty, causing the
MPU/SRU not to be able to initialize.
ALM
Red
If the indicator is steady off, the
MPU/SRU is in the normal state. If the
indicator is steady red, an alarm is
generated.
SFU
RUN
Green
From the SFU being powered on until it
is registered, the indicator status
changes in the sequence of off-blinks
once every 250 ms (4 Hz)-off-steady
on-blinks once every two seconds (0.5
Hz).
After the SFU is registered, the SFU is
working properly if the indicator blinks
at 0.5 Hz.
ACT
Green
If the indicator is steady green, the SFU
is working properly; if the indicator is
off, the SFU is faulty.
2.4 Installing USG9520
This section describes how to install the USG9520.
2.4.1 Preparing the Site
Prior to device installation, deploy the cabinet and device according to the following
requirements to ensure that the device can operate properly.
Power Supply System
If you use a DC cabinet, ensure that the outputs of the DC power distribution box fall
within the range of -72 V DC to -38 V DC. Two different power sources are required for
redundancy.
If you use an AC cabinet, ensure that the outputs of the AC power distribution box fall
within the range of 90 V AC to 264 V AC. Two different power sources are required for
redundancy.
Cabinet Requirements
You are advised to use Huawei standard NE68E cabinet. The self-purchased cabinet must
meet A.6 Requirements on Customers' Cabinets Purchased from Other Vendors.
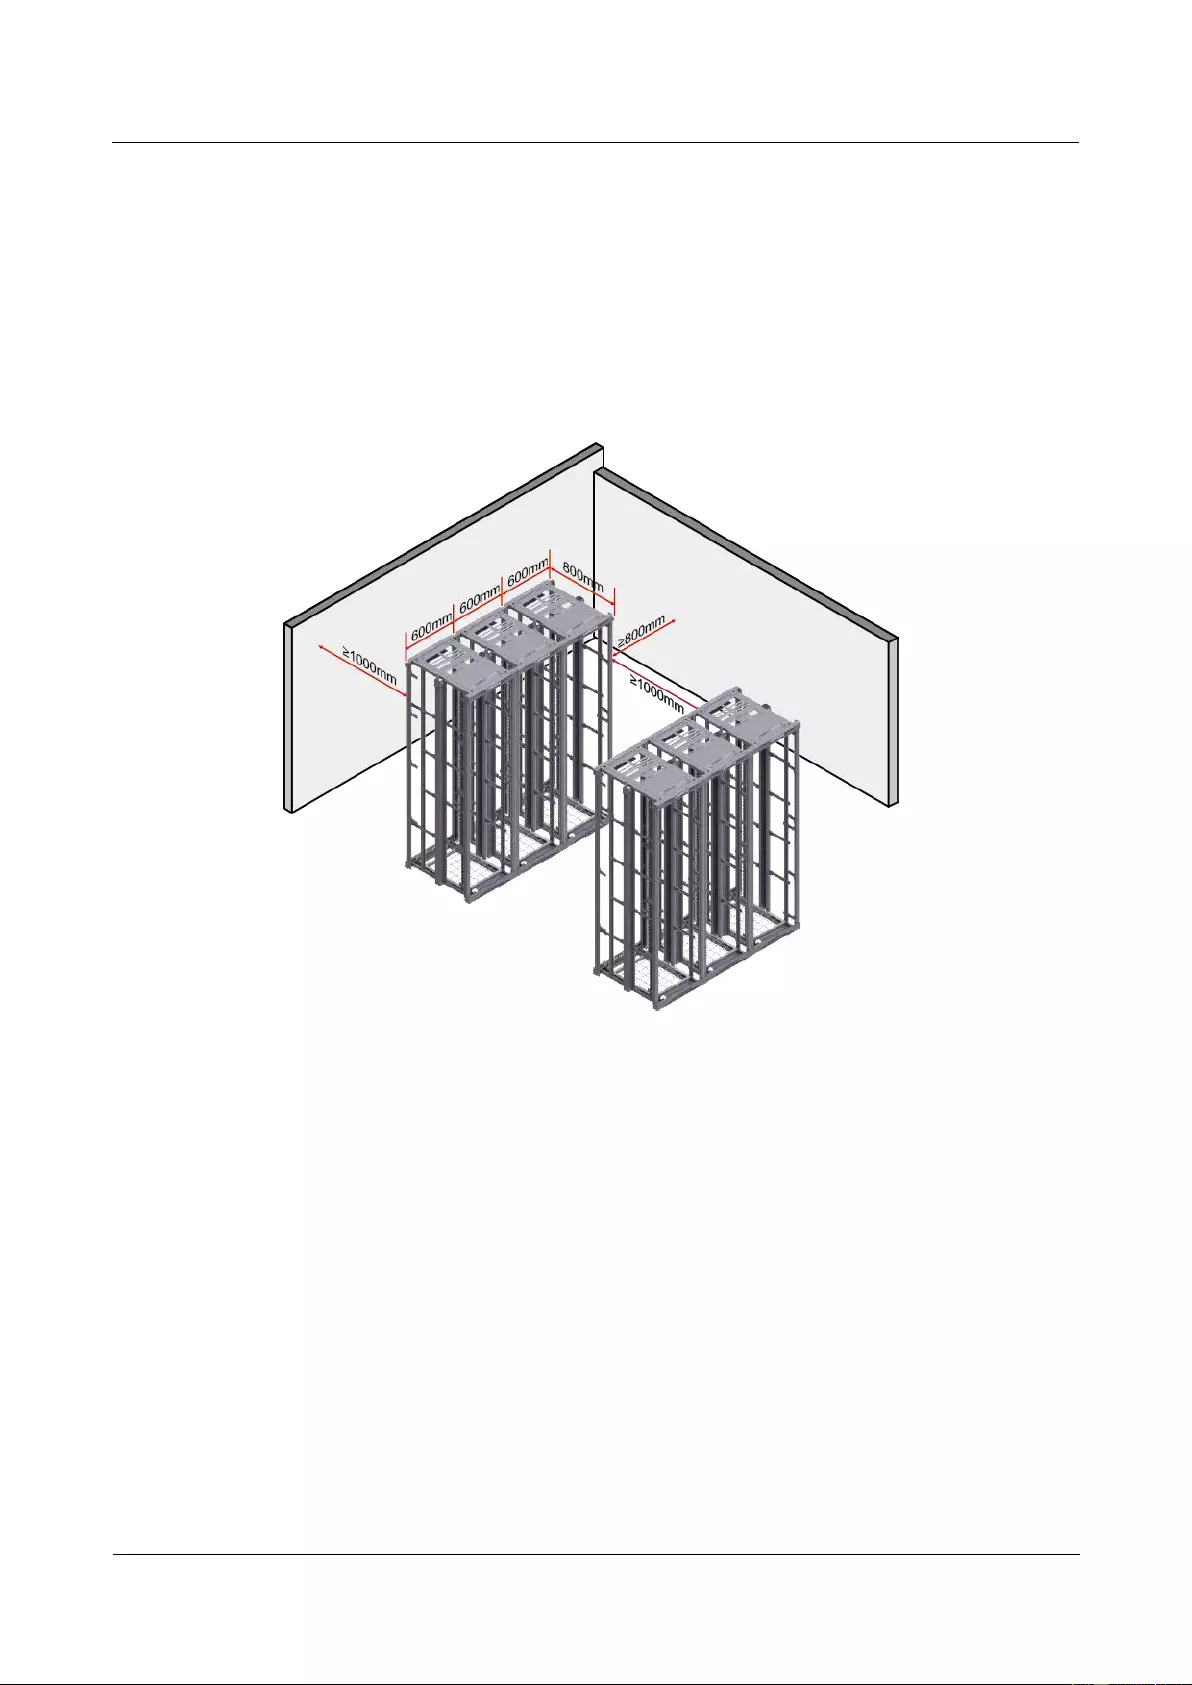
HUAWEI USG9500 Series Terabit-level Next-Generation Firewall
Hardware Guide
2 Hardware Installation
Issue 01 (2017-03-13)
Huawei Proprietary and Confidential
Copyright © Huawei Technologies Co., Ltd.
278
Cabinet Clearance Requirements
The N68E-22 cabinet is used as an example. As shown in Figure 2-44, cabinet clearance must
meet the following requirements:
Aisles in the equipment room ≥ 1000 mm; aisles between cabinet rows ≥ 1000 mm
Spacing between cabinet sides and wall ≥800 mm
Spacing between cabinet row and wall ≥ 1000 mm
Figure 2-44 Diagram for cabinet deployment
Device Clearance Requirements
The USG9520 DC chassis is 4 U high, and the USG9520 AC chassis is 5 U. The USG9520
requires front and back maintenance mode. Device clearance must meet the following
requirements:
Airflow clearance
− The spacing between the air intake of the cabinet and neighboring objects must
exceed 75 mm. If the air intake of the cabinet is next to another communication
device, the spacing must exceed 150 mm.
− Maintain a minimum spacing of 2 U between devices installed in the same cabinet,
between the top-most device and the cabinet top, and between the bottom-most
device and the cabinet bottom.
Maintenance clearance
The spacing between the rear of the cabinet and neighboring objects must exceed 350
mm for maintenance.

HUAWEI USG9500 Series Terabit-level Next-Generation Firewall
Hardware Guide
2 Hardware Installation
Issue 01 (2017-03-13)
Huawei Proprietary and Confidential
Copyright © Huawei Technologies Co., Ltd.
279
The height of three holes on the mounting rails is 1 U, which is equivalent to 44.45 mm.
2.4.2 Installing Cable Racks and Mounting Ears
Mounting ears are used to fix a device to the cabinet, and cable racks are used to route optical
fibers and cables.
Procedure
Install the cable racks
Figure 2-45 Install the cable racks
Install the mounting ears
Before installing the mounting ears, measure the distance (L) between mounting bar and the front door.
The way the mounting ear is installed depends on distance L, as shown in the following figures.
Figure 2-46 Space between the surface of the mounting ear and the inside of the front door
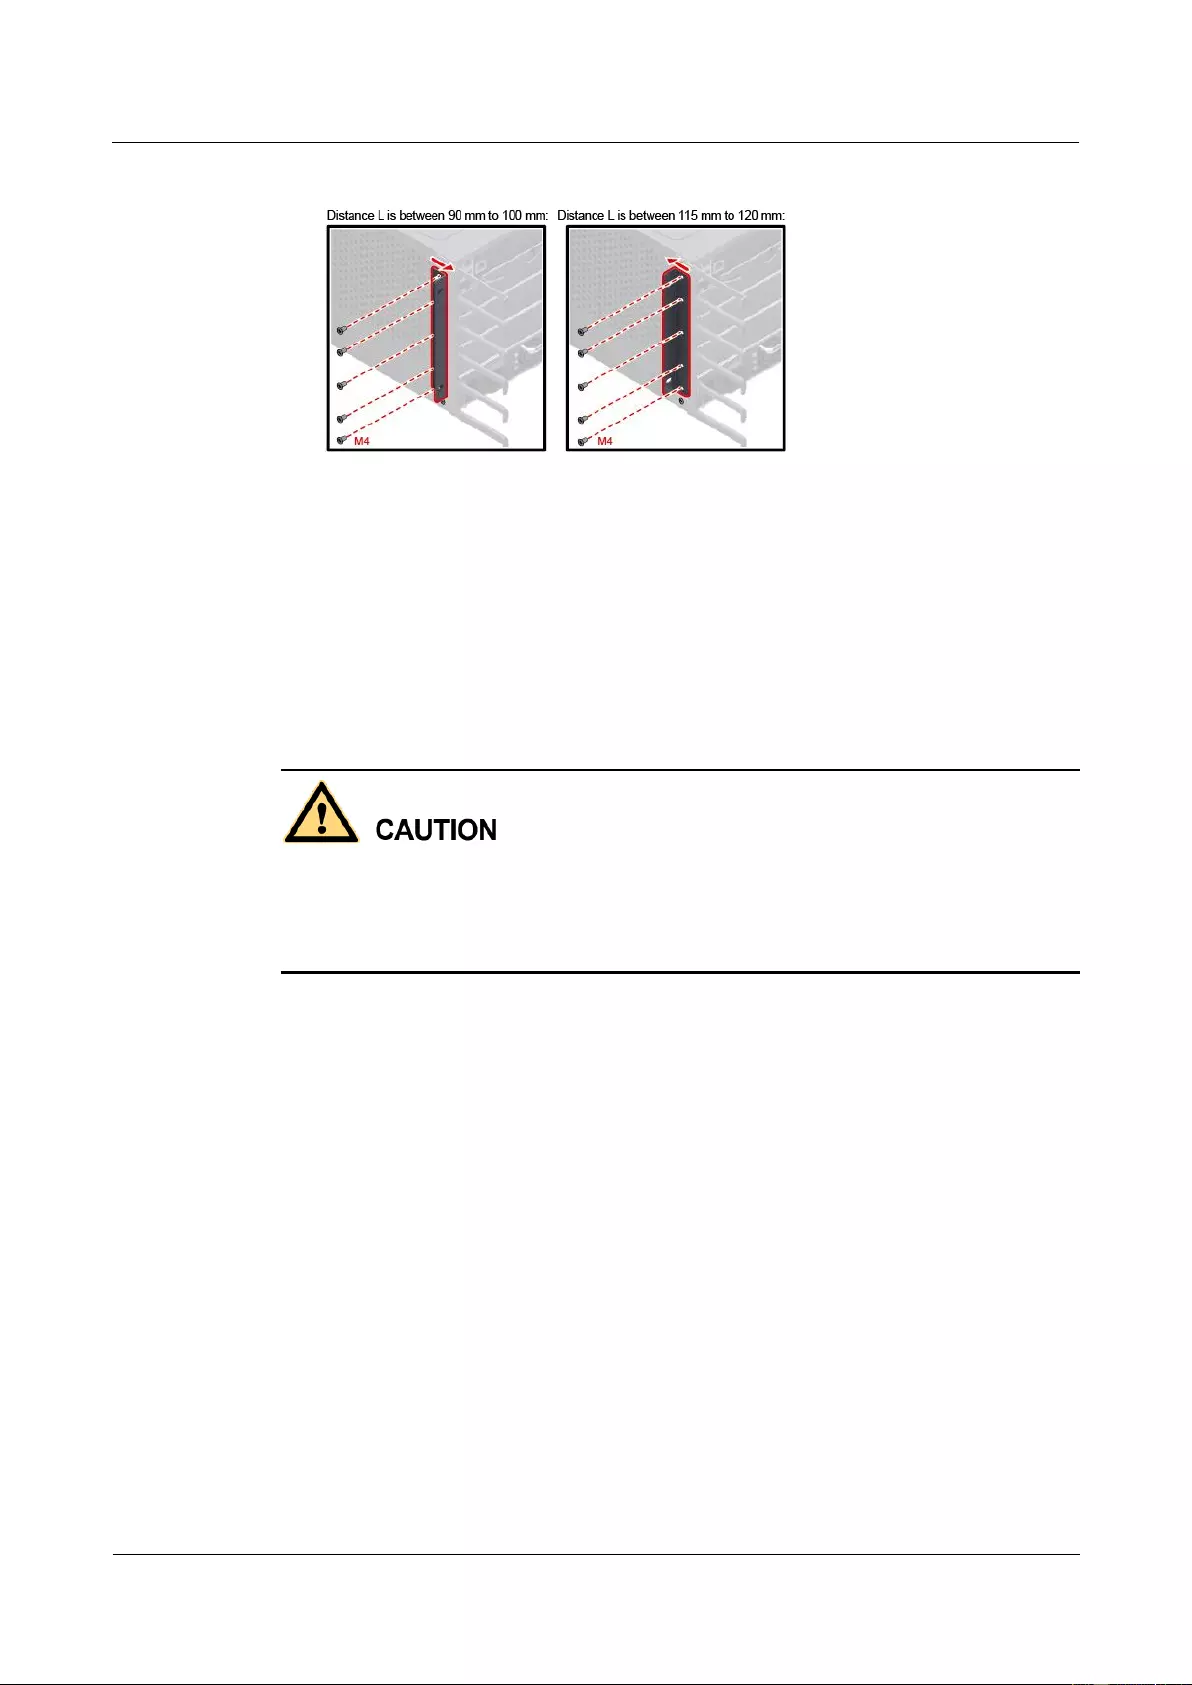
HUAWEI USG9500 Series Terabit-level Next-Generation Firewall
Hardware Guide
2 Hardware Installation
Issue 01 (2017-03-13)
Huawei Proprietary and Confidential
Copyright © Huawei Technologies Co., Ltd.
280
Figure 2-47 Mounting ears can be installed either normally or reversely
----End
2.4.3 Installing the Chassis into the Cabinet
The USG9520 can be mounted into a 19-inch standard cabinet through guide rails.
Context
The USG9520 is heavy and requires two people to lift and move.
Use the handles on the chassis sides when moving the device. Do not use the handles of
modules to avoid damages to the device.
Do not step on the air filter at the bottom of the cabinet.
Procedure
Step 1 Install floating nuts and guide rails
1. Determine where to install floating nuts and mark the positions using a marker, as shown
in Figure 2-48.
2. Fix the floating nuts at the positions.
3. Use M6 screws to fix the guide rails at the positions.
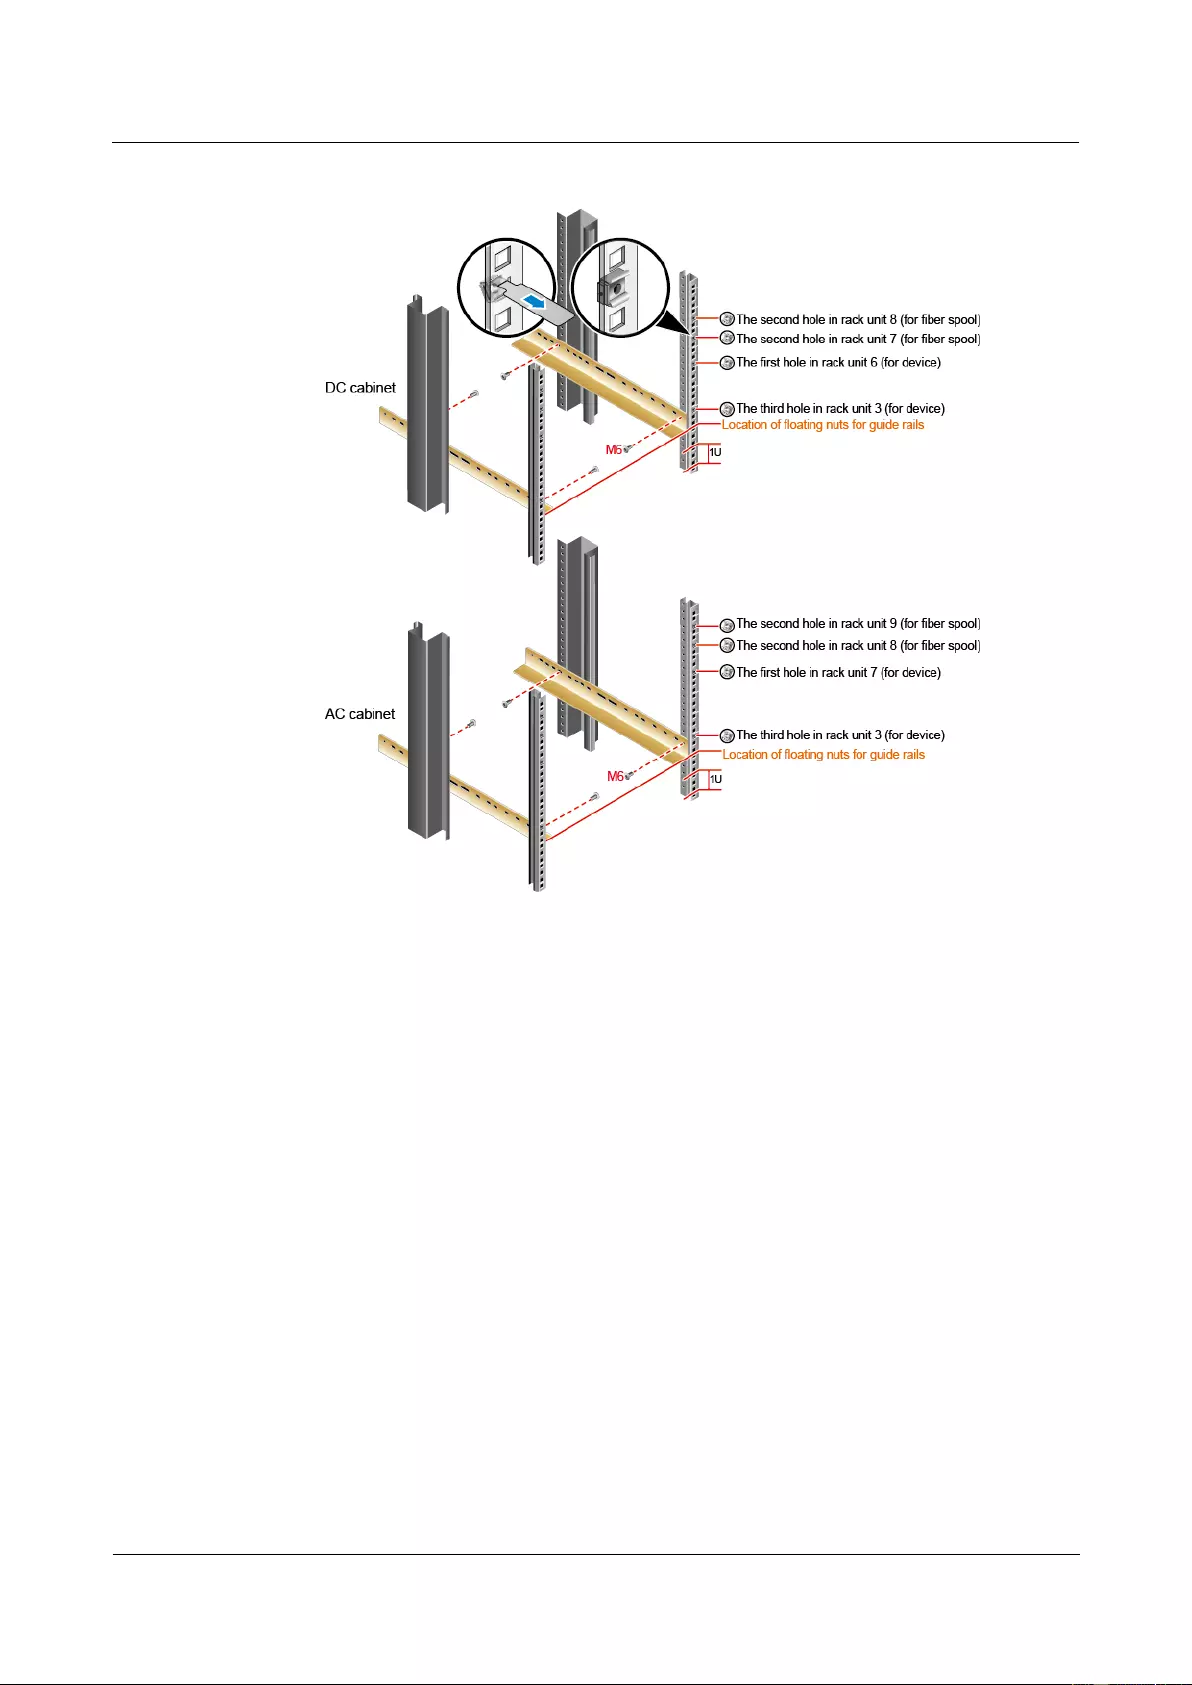
HUAWEI USG9500 Series Terabit-level Next-Generation Firewall
Hardware Guide
2 Hardware Installation
Issue 01 (2017-03-13)
Huawei Proprietary and Confidential
Copyright © Huawei Technologies Co., Ltd.
281
Figure 2-48 Installing floating nuts and guide rails
Step 2 Mount the USG9520 in the cabinet.
1. Lift the USG9520, move it to the cabinet, place it onto the guide rails, and push it into
the cabinet.
2. Use M6 screws to fix the mounting ears of the USG9520 to the mounting rack, as shown
in Figure 2-49.
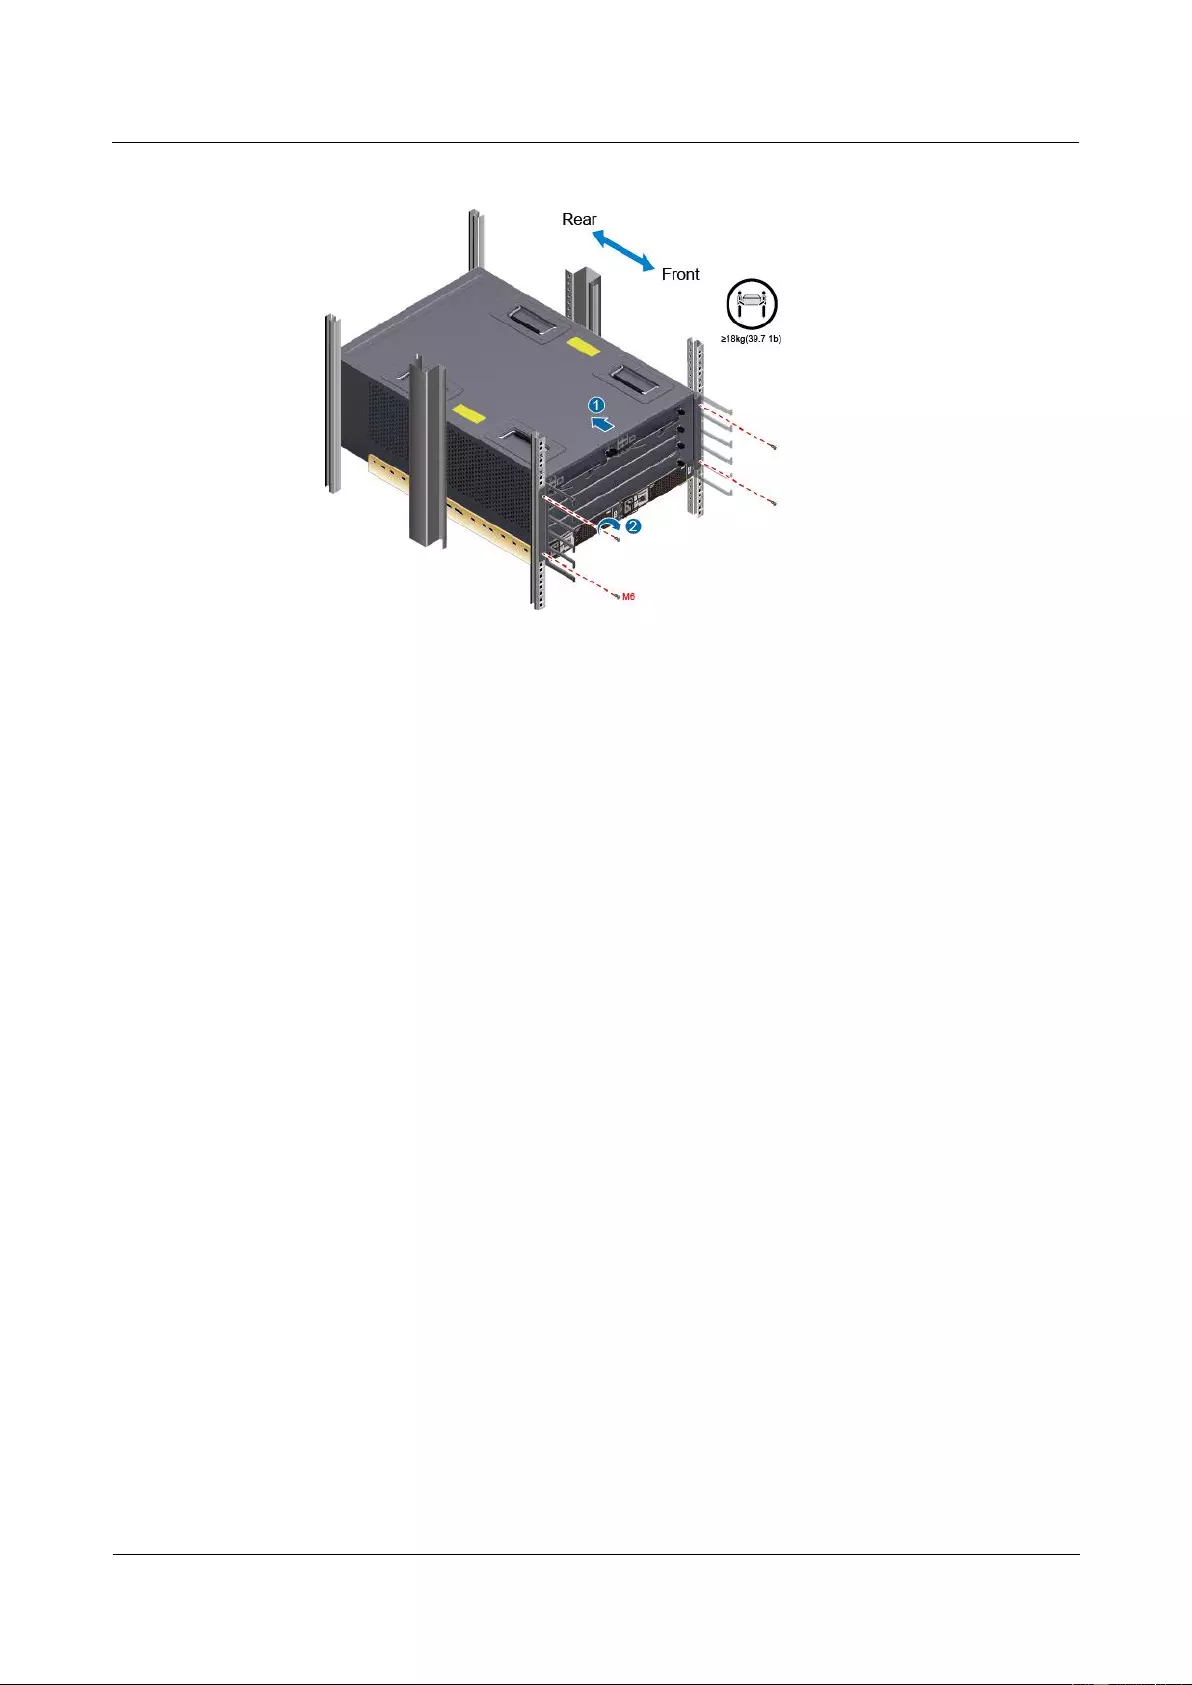
HUAWEI USG9500 Series Terabit-level Next-Generation Firewall
Hardware Guide
2 Hardware Installation
Issue 01 (2017-03-13)
Huawei Proprietary and Confidential
Copyright © Huawei Technologies Co., Ltd.
282
Figure 2-49 Mounting the USG9520 in the cabinet
----End
Follow-up Procedure
Perform the following checks after the installation:
Ensure that the USG9520 is placed securely inside the cabinet.
Ensure that the exhaust of the USG9520 is not blocked by other objects.
2.4.4 Installing the PGND Cable
Connecting the PGND cable of the USG9520 correctly is a key measure of surge protection
and resistance to interference. Before using the USG9520, correctly connect the PGND cable.
Prerequisites
Before installing the PGND cable of the device, ensure that the PGND cable of the cabinet is
correctly connected and the ground resistance is zero ohm.
Context
If the chassis is near the ground bar in the equipment room, connect the PGND cable of the
chassis directly to the ground bar. If the chassis is distant from the ground bar, connect the
PGND cable to the ground point on the cabinet.
In this section, connecting the PGND cable to the ground point on the cabinet is used as an
example.
Procedure
Step 1 Install the chassis ground cable. The AC chassis is used as an example, as shown in Figure
2-50.
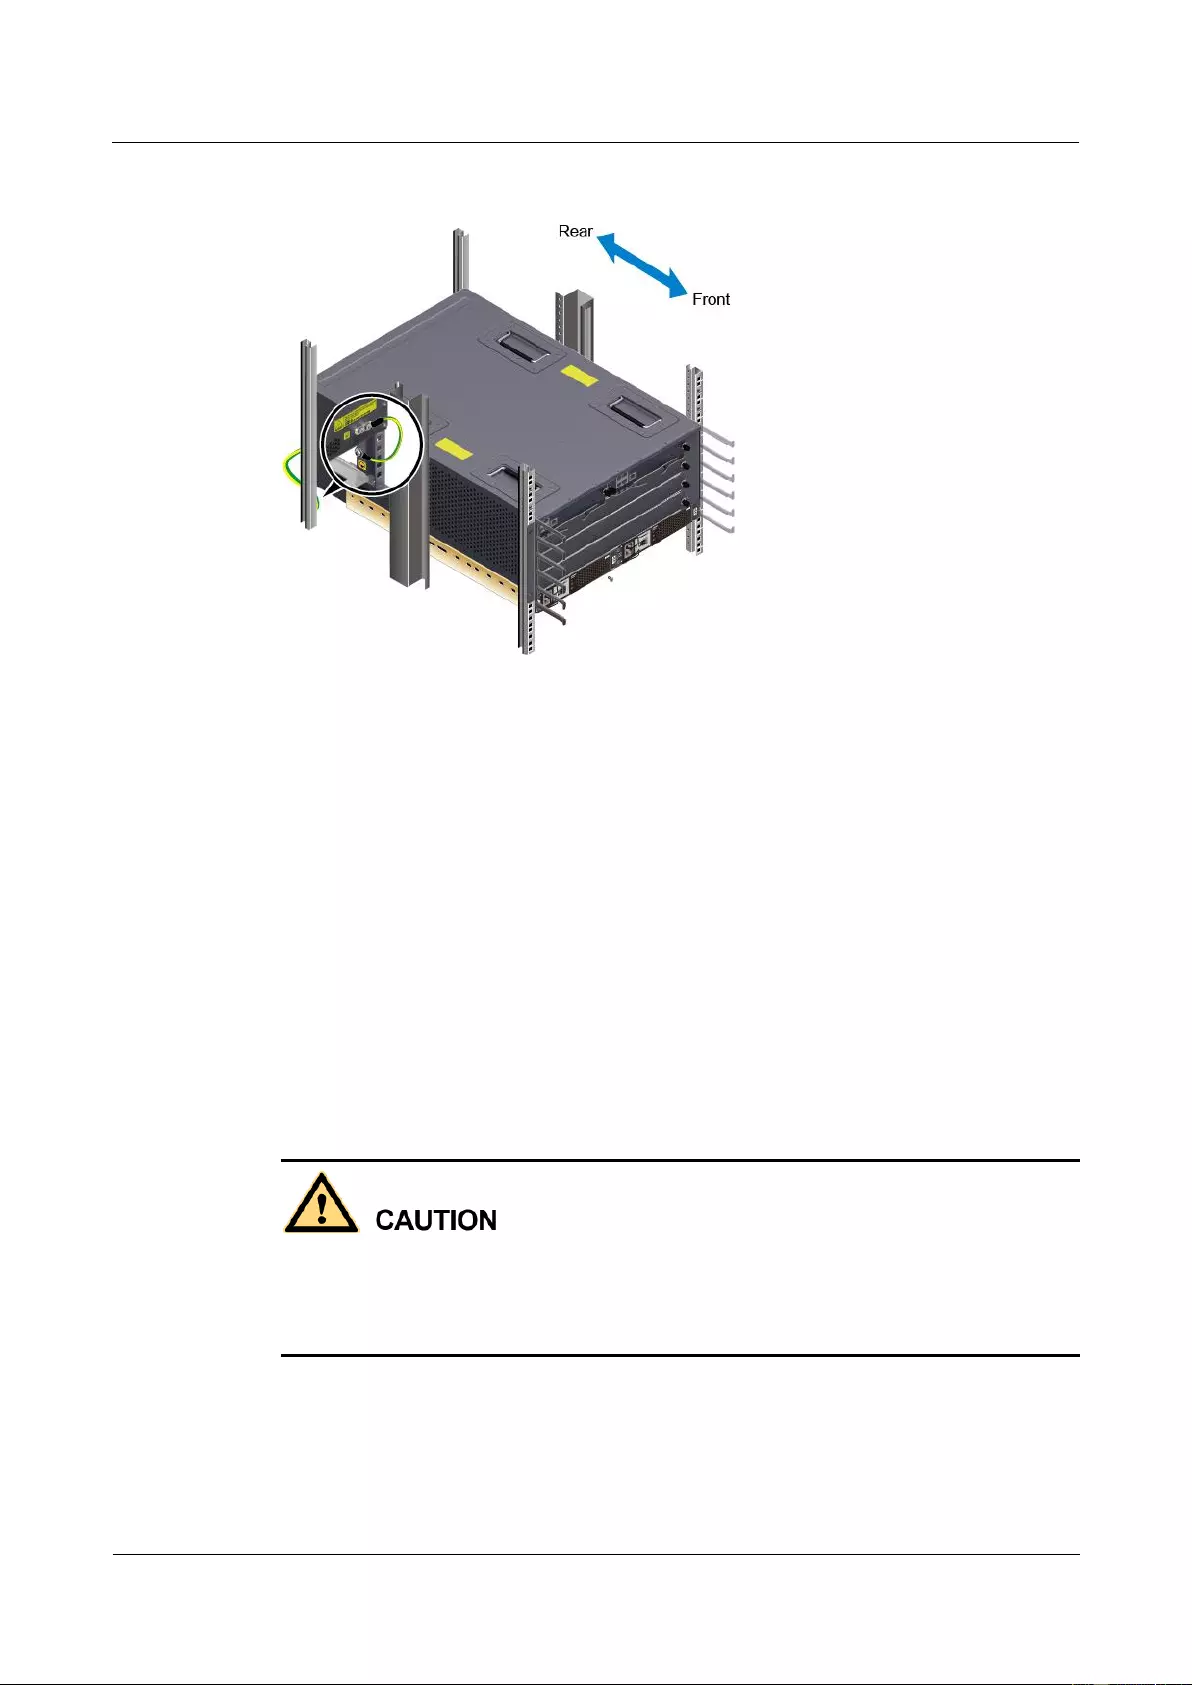
HUAWEI USG9500 Series Terabit-level Next-Generation Firewall
Hardware Guide
2 Hardware Installation
Issue 01 (2017-03-13)
Huawei Proprietary and Confidential
Copyright © Huawei Technologies Co., Ltd.
283
Figure 2-50 Connecting the PGND cable
----End
Follow-up Procedure
Verify the following after the cabling is complete:
The PGND cable is securely connected to the ground terminal.
The electrical resistance between the ground terminal and ground point is less than 10
ohm on a multimeter.
2.4.5 Installing Boards and Subcards
This section describes how to install boards and subcards to avoid any damage.
Context
Ensure that no water is on the device or board before you insert the board into the device.
Before installing boards, wear the ESD wrist strap and that the strap is well grounded to
prevent any electrostatic discharge of the human body from damaging the sensitive
components.
Procedure
Step 1 Select the slots based on the slot distribution.
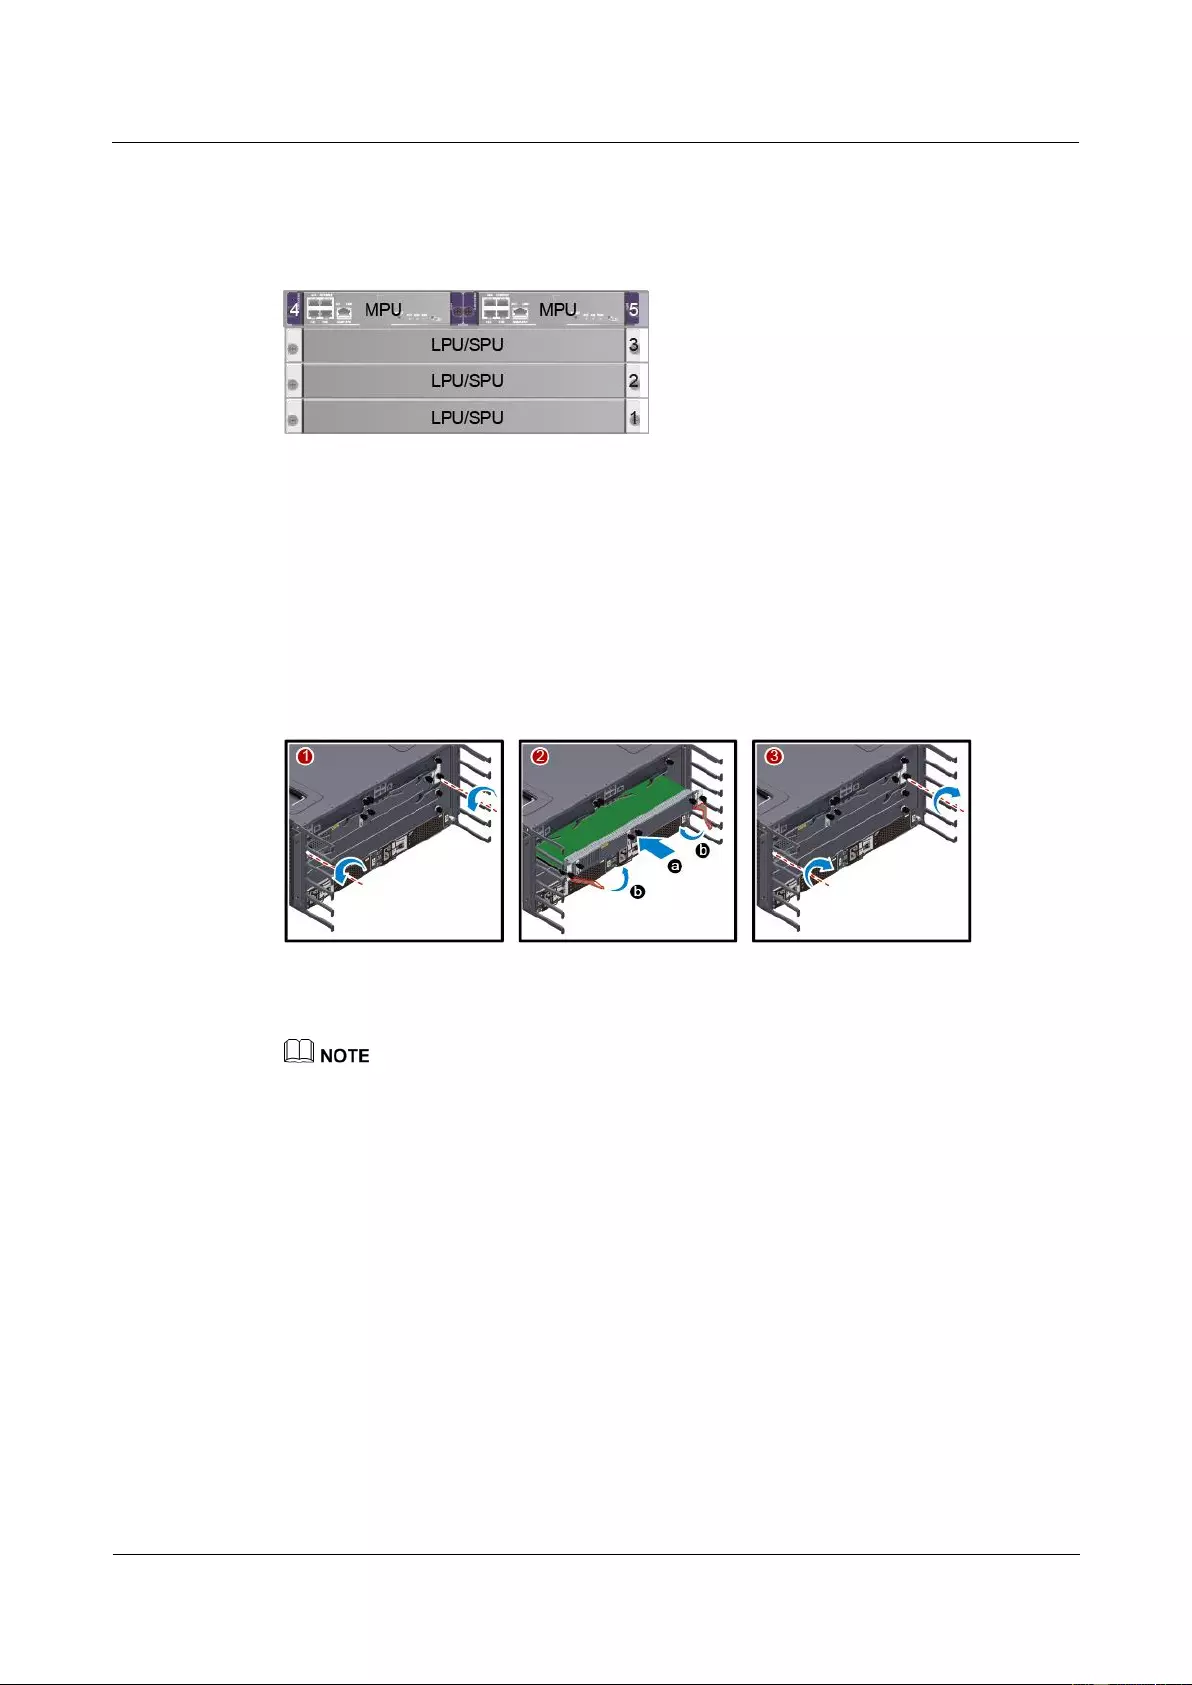
HUAWEI USG9500 Series Terabit-level Next-Generation Firewall
Hardware Guide
2 Hardware Installation
Issue 01 (2017-03-13)
Huawei Proprietary and Confidential
Copyright © Huawei Technologies Co., Ltd.
284
You can determine whether it is a correct slot for a board by checking whether the color on
both ends of the board panel is the same as the color on the slot.
Figure 2-51 Slot layout
Step 2 Install a board.
1. Determine the slot for the board to be installed based on hardware planning and remove
the filler panel from the slot.
2. Extend the ejector levels of the board, insert the board fully into slot, and rotate the
ejector level to the front of the board so that the board is fully inserted in the slot.
3. Use a Phillips screwdriver to tighten the captive screws to the board.
Figure 2-52 Installing a board
Step 3 Install a subcard.
Before you install a subcard, remove redundant guide rails from the board and store them properly for
future use.
1. Remove the filler panel from the board.
2. Smoothly insert the subcard into the board along the guide rail.
3. Use a Phillips screwdriver to tighten the captive screws to the board.
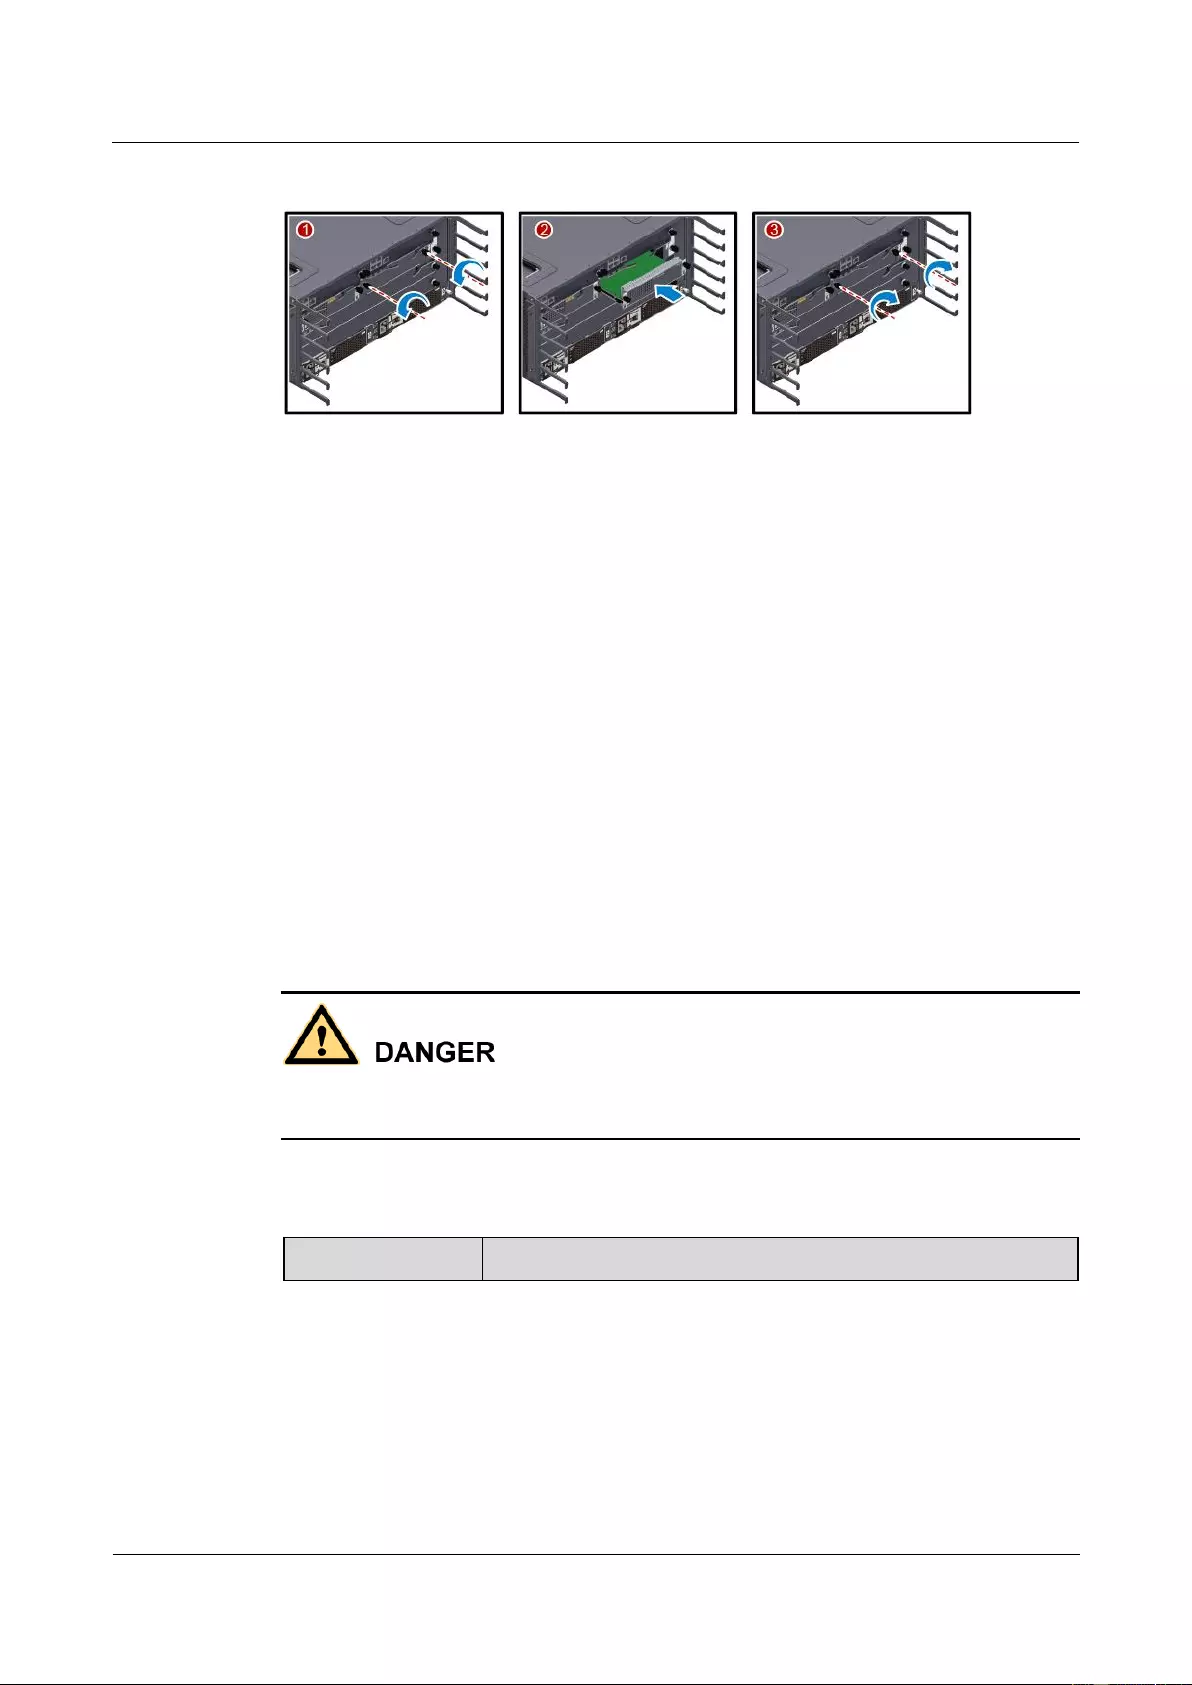
HUAWEI USG9500 Series Terabit-level Next-Generation Firewall
Hardware Guide
2 Hardware Installation
Issue 01 (2017-03-13)
Huawei Proprietary and Confidential
Copyright © Huawei Technologies Co., Ltd.
285
Figure 2-53 Installing a subcard
----End
Follow-up Procedure
Check the following items after the installation is complete:
Check whether the boards and subcards are installed in position and the captive screws
are fastened.
Filler panels are inserted in vacant slots. You must insert filler panels in the vacant slots
on the USG9520 to prevent dust and ensure heat dissipation.
2.4.6 Installing Power Cables-DC Power Distribution
In standard configuration, the USG9520 has two DC power supply modules. Each module
requires an NEG DC power cable and an RTN DC power cable. This section describes how to
connect power cables to the two DC supply modules.
Context
Never install power cables when the power is on.
Before installing the power cables, ensure that the device is adequately grounded.
Inside the cable should be an entire piece of copper core. Any connection of the core is
not allowed.
Cables of DC power distribution.
Cable
Image
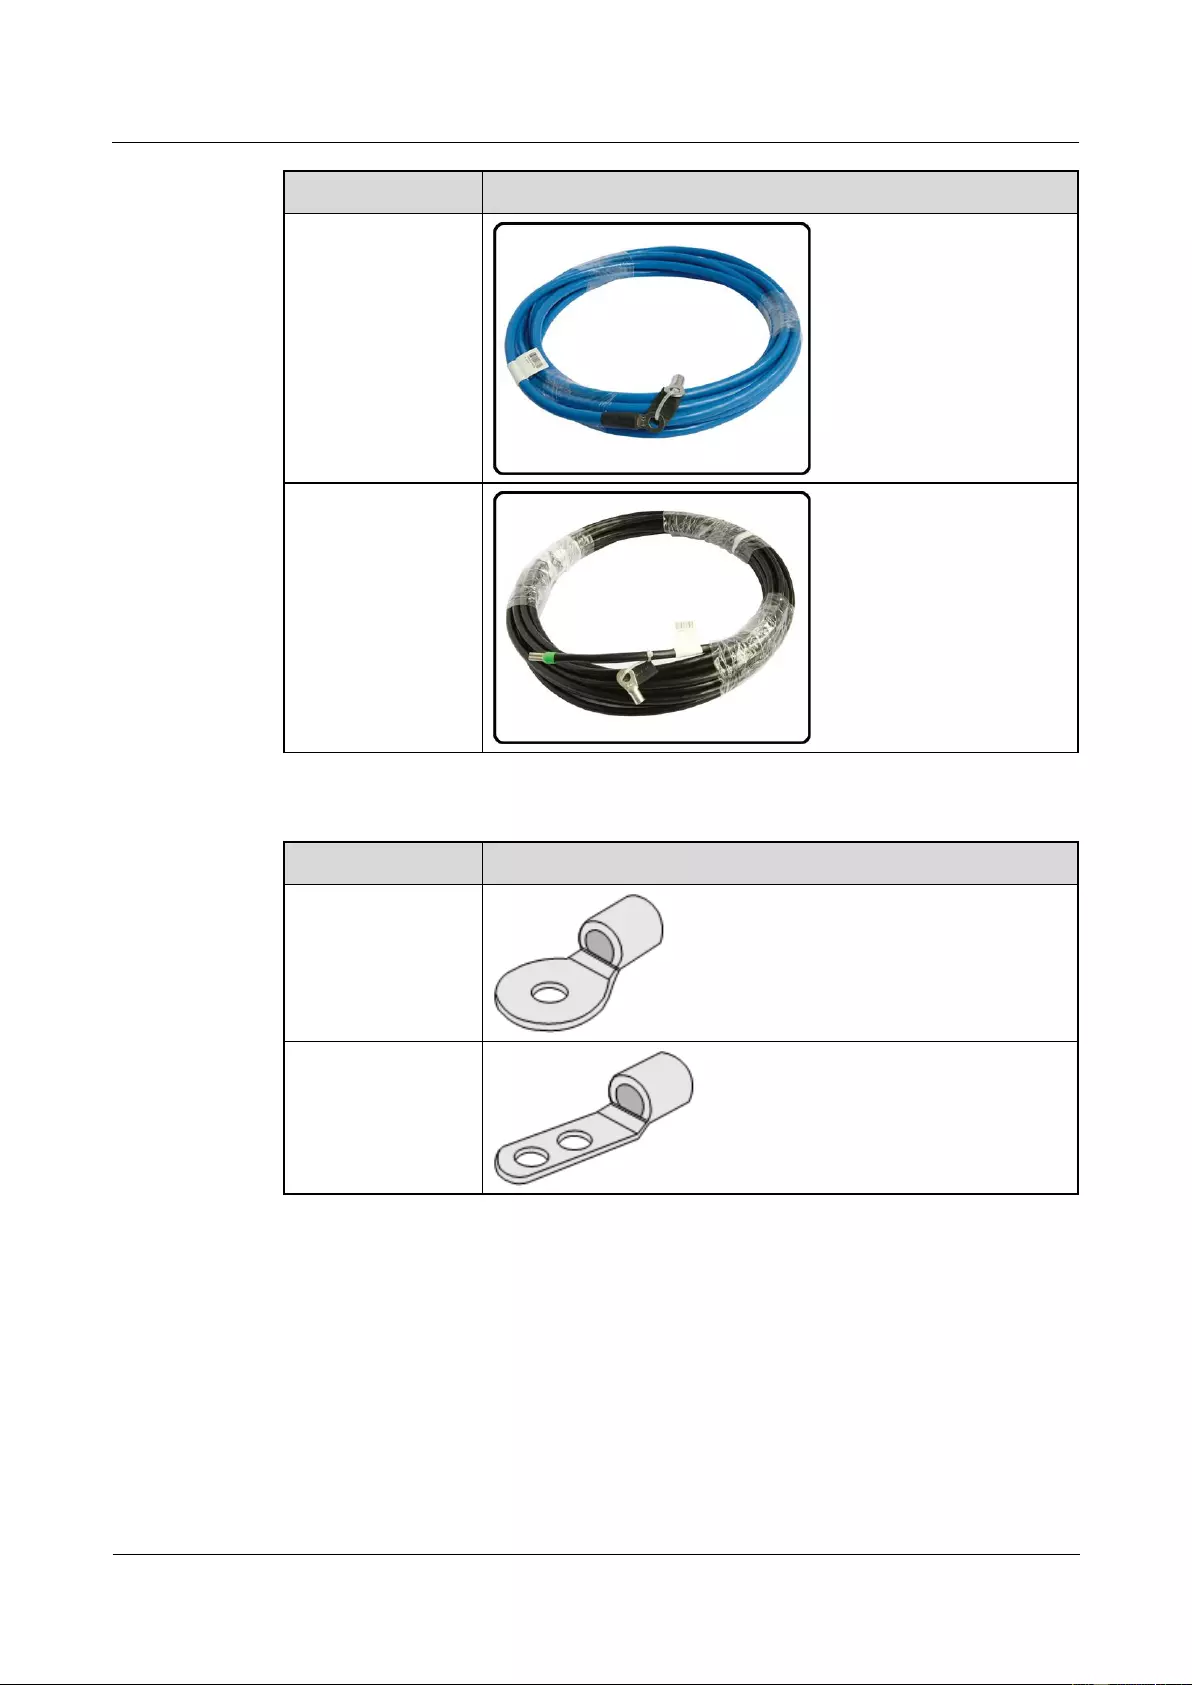
HUAWEI USG9500 Series Terabit-level Next-Generation Firewall
Hardware Guide
2 Hardware Installation
Issue 01 (2017-03-13)
Huawei Proprietary and Confidential
Copyright © Huawei Technologies Co., Ltd.
286
Cable
Image
NEG cable
RTN cable
The terminals on DC cables.
Terminal
Image
OT bare crimping
terminal
JG2 double-hole
bare crimping
terminal
For details, see 2.5.3.1 Guide to the DC Power Distribution.
Procedure
Step 1 Make temporary marks on both ends of each power cable using a marker.
Step 2 Connect the M6 JG2 terminals of the DC power cable to the DC power modules on USG9520.
Connect the M8 OT terminals of the DC power cable to the output terminals on the power
supply device.
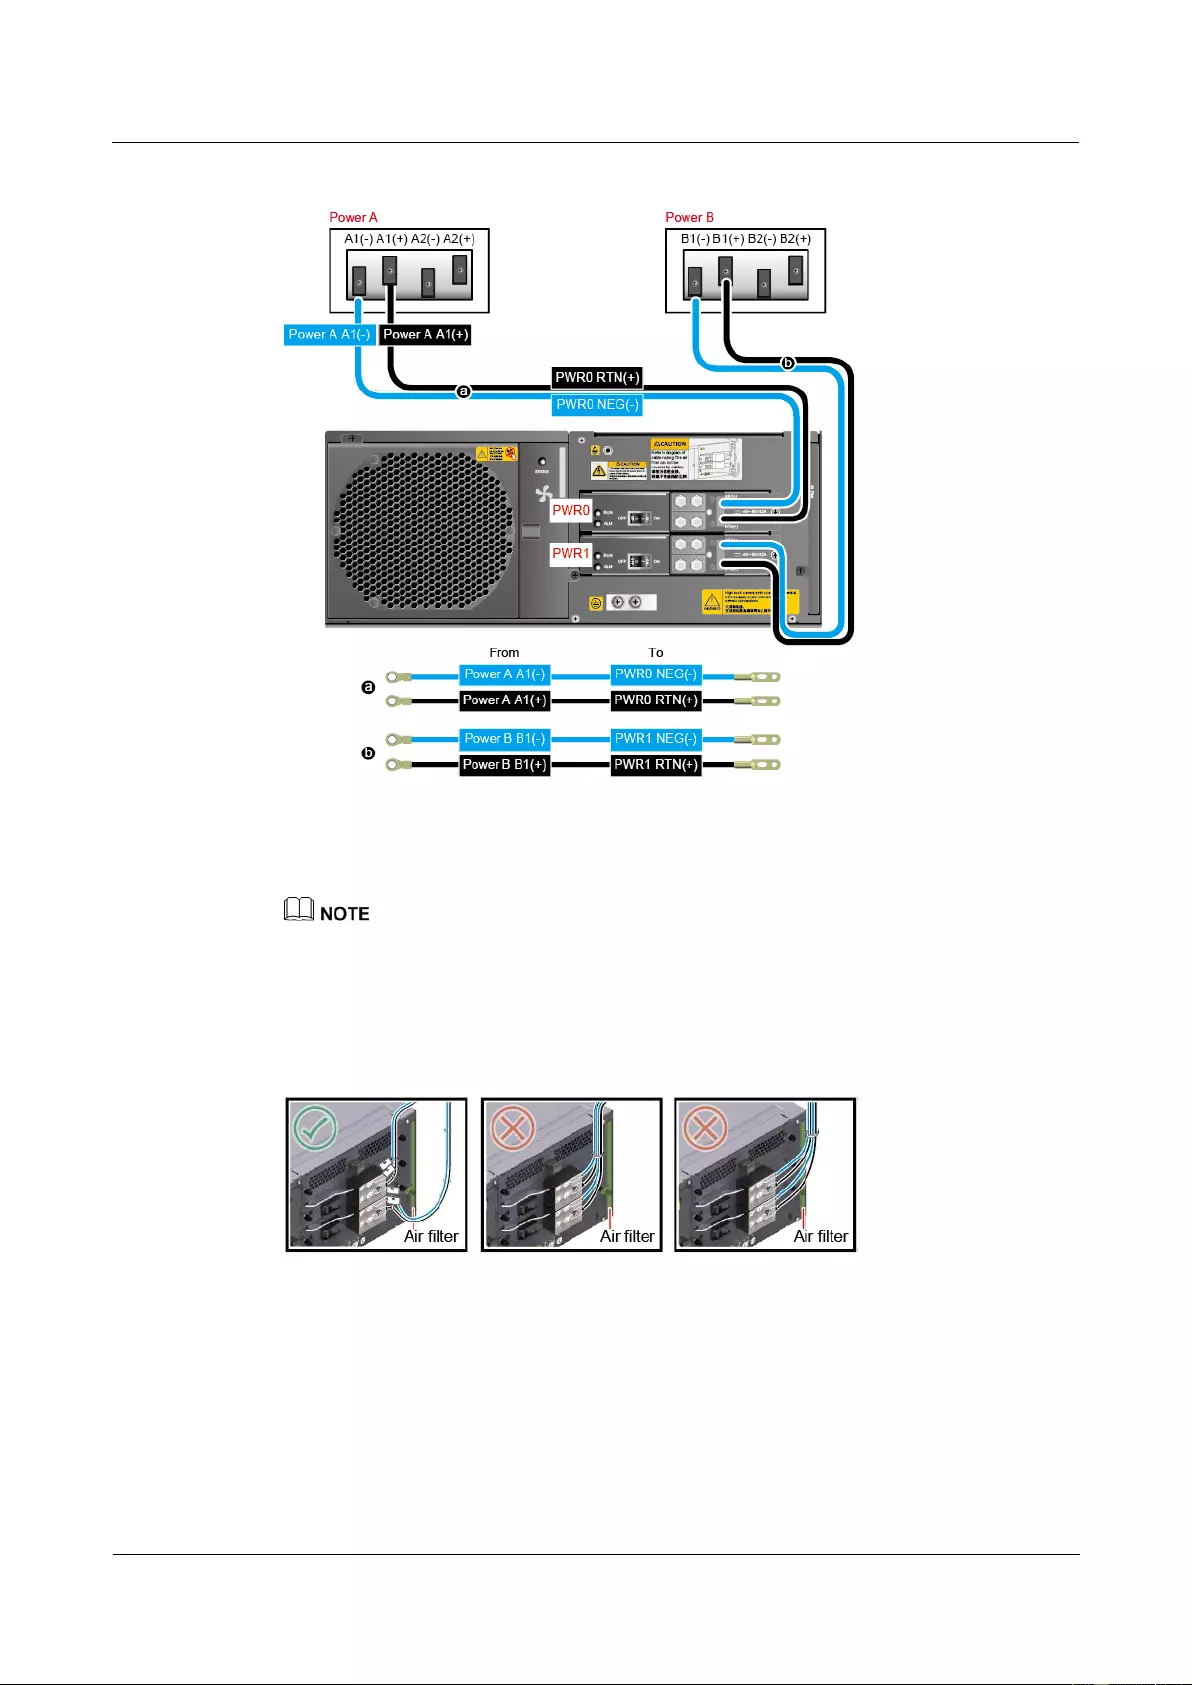
HUAWEI USG9500 Series Terabit-level Next-Generation Firewall
Hardware Guide
2 Hardware Installation
Issue 01 (2017-03-13)
Huawei Proprietary and Confidential
Copyright © Huawei Technologies Co., Ltd.
287
Figure 2-54 Installing power cables
Step 3 Use tie wraps to bind the cables every 100 mm upwards from the bottom end, and fix the
cables to the cabling rack.
To facilitate future maintenance, observe the following cabling requirements:
Cables of the power modules must be tied separately to facilitate the removal of individual modules.
Ensure that the power cables do not block the air filter and that the cables of one power module do
not block the access to the cables of the other module.
Figure 2-55 Requirements for installing power cables
Step 4 Affix permanent labels 20 mm from both ends of each power cable.
----End
Follow-up Procedure

HUAWEI USG9500 Series Terabit-level Next-Generation Firewall
Hardware Guide
2 Hardware Installation
Issue 01 (2017-03-13)
Huawei Proprietary and Confidential
Copyright © Huawei Technologies Co., Ltd.
288
Note that the power cable has polarity. After the device is powered on, if the power module
indicator blinks red, check whether the anode and cathode of the power cable for the power
module are connected without error. If they are connected mistakenly, switch off the
previous-stage power immediately and connect the power cable without error.
1. After installing power cables, install the plastic cover to each power module.
2. The power cables are fixed securely and in reliable and good contact with the terminals.
3. In the corner, the cables should be smooth.
4. Labels for the power cables must be filled in and attached to the cables as required. All
labels are neat and face the same direction for easy viewing.
5. The power cable, grounding cable and the signal cable should be bound separately. The
distance between them must be more than 3 cm.
2.4.7 Installing Power Cables-AC Power Distribution
In standard configuration, the USG9520 has two AC power supply modules. Each module
requires a power cable. This section describes how to connect power cables to the two AC
supply modules.
Context
Never install power cables when the power is on.
Before installing the power cables, ensure that the device is adequately grounded.
When AC 110 V input is used, the AC power module is half-load output, which cannot afford
the maximum system power consumption with the full configuration. Therefore, two AC
power modules are required, so that the device can work properly. If one AC power module
fails, the other cannot afford the maximum system power consumption. That is, 1+1
redundancy fails.
Inside the cable should be an entire piece of copper core. Any connection of the core is
not allowed.
Cables of AC power distribution.
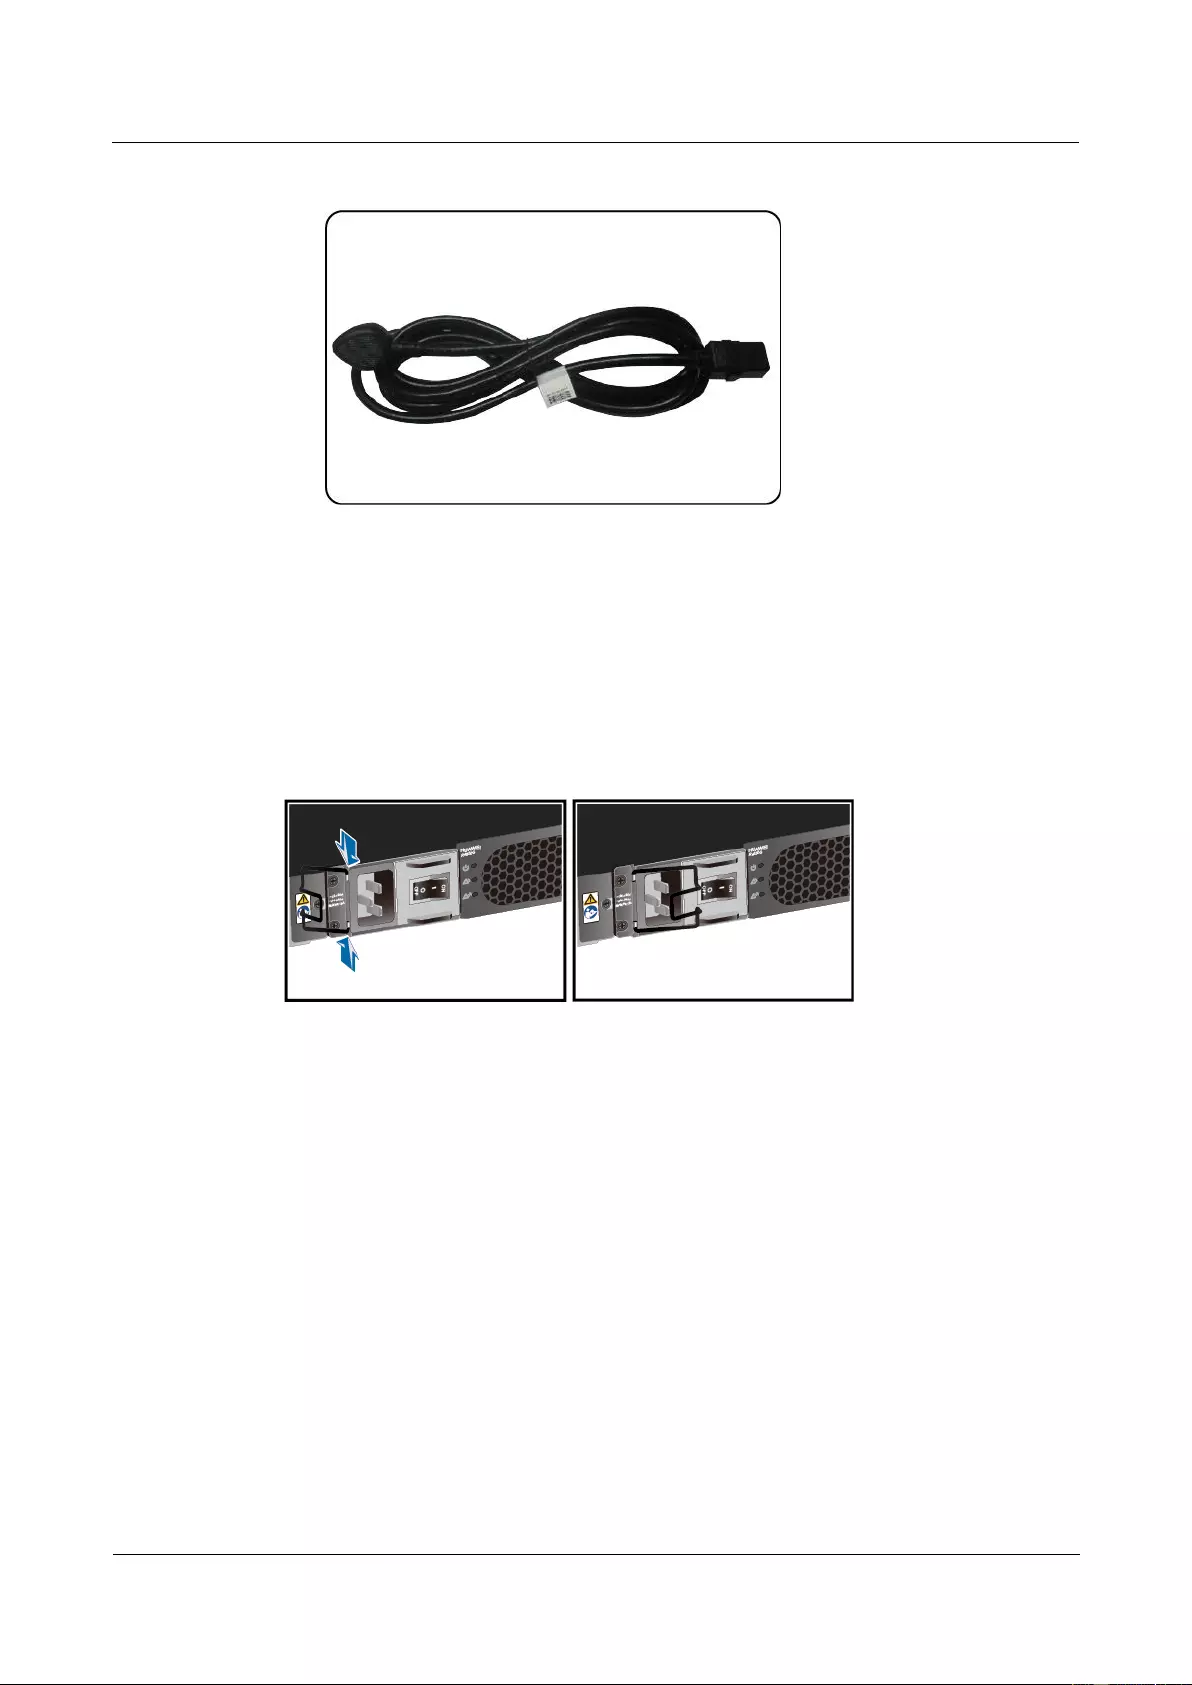
HUAWEI USG9500 Series Terabit-level Next-Generation Firewall
Hardware Guide
2 Hardware Installation
Issue 01 (2017-03-13)
Huawei Proprietary and Confidential
Copyright © Huawei Technologies Co., Ltd.
289
Figure 2-56 Cables of AC power distribution
For details, see 2.5.3.2 Guide to the AC Power Distribution.
Procedure
Step 1 Make temporary marks on both ends of each power cable using a marker.
Step 2 Install an AC power cable clip.
Figure 2-57 Install an AC power cable clip
Step 3 Insert the AC power cable in the receptacle on the AC power module and close the cable clip
around the plug. Insert the other end of the AC power cable to a socket or a power supply
device in the top of the cabinet.
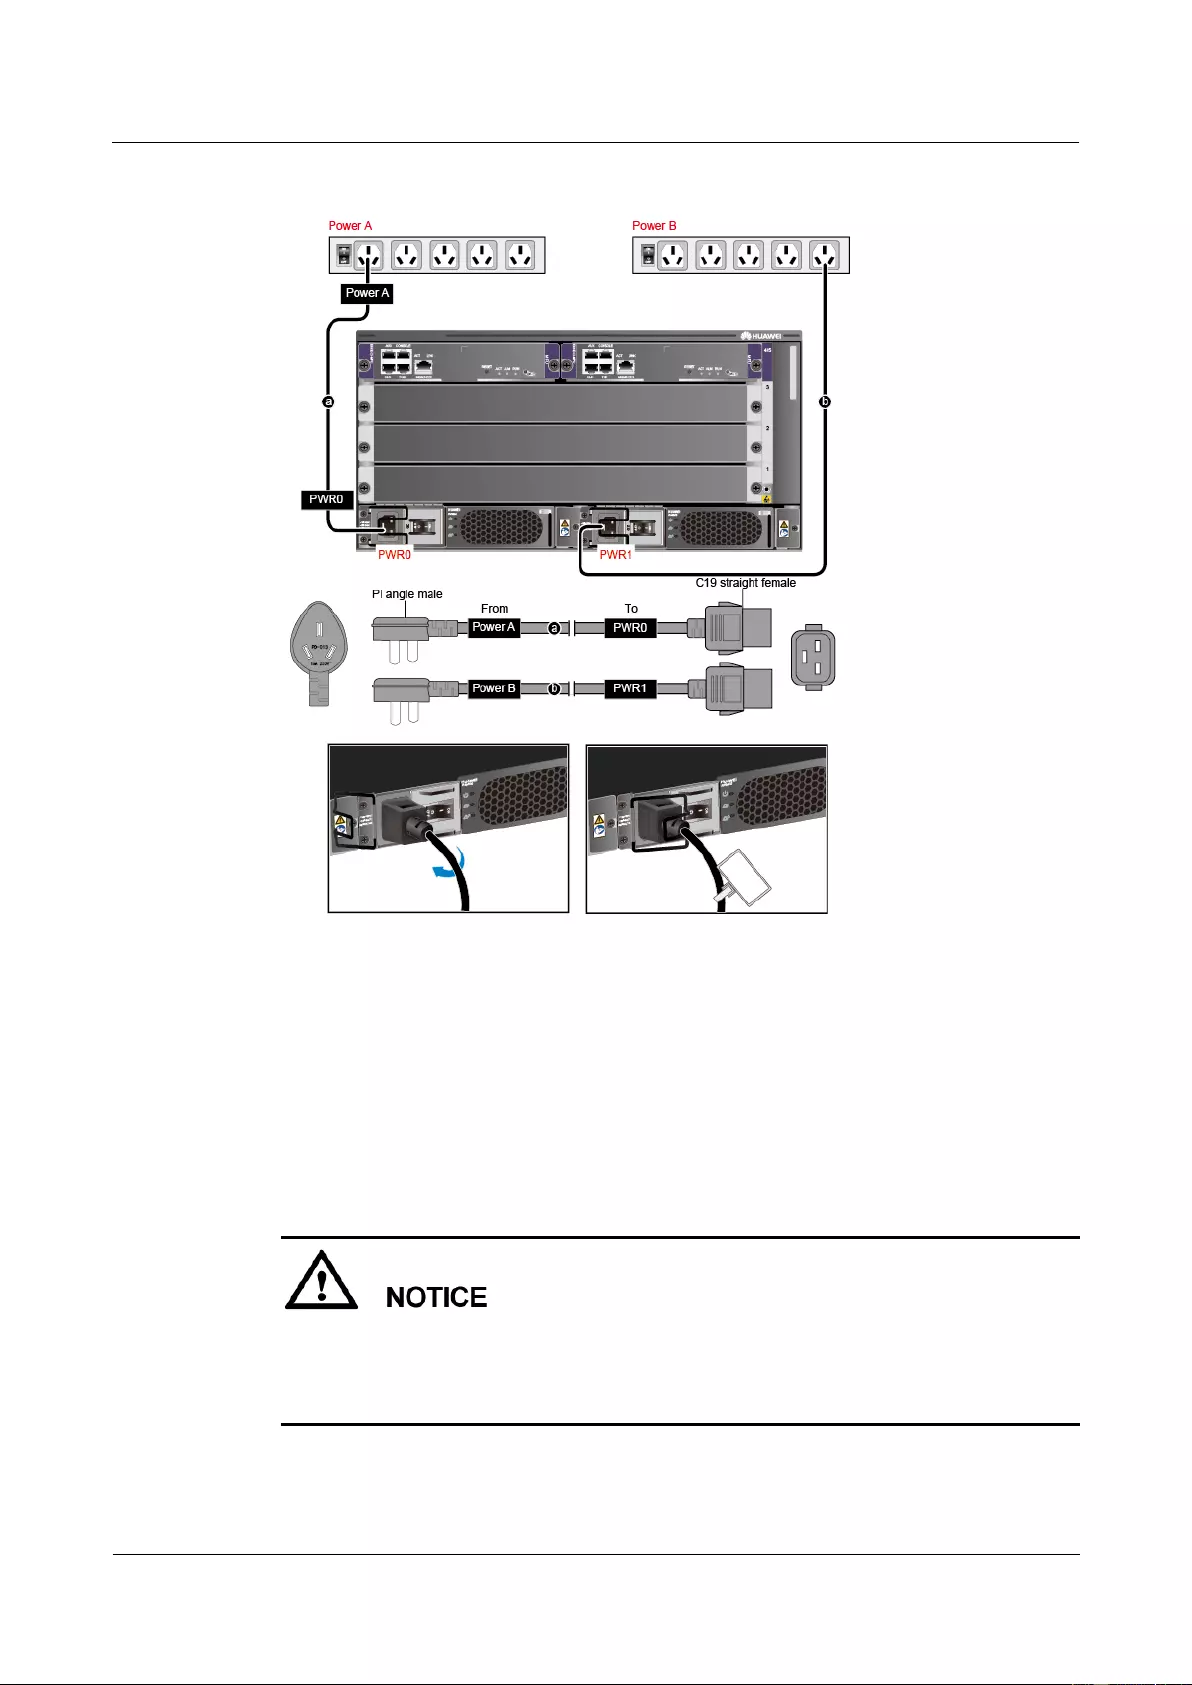
HUAWEI USG9500 Series Terabit-level Next-Generation Firewall
Hardware Guide
2 Hardware Installation
Issue 01 (2017-03-13)
Huawei Proprietary and Confidential
Copyright © Huawei Technologies Co., Ltd.
290
Figure 2-58 Installing AC Power Cables
Step 4 Use tie wraps to bind the cables every 100 mm upwards from the bottom end, and fix the
cables to the cabling rack.
Step 5 Affix permanent labels 20 mm from both ends of each power cable.
----End
Follow-up Procedure
Note that the power cable has polarity. After the device is powered on, if the power module
indicator blinks red, check whether the anode and cathode of the power cable for the power
module are connected without error. If they are connected mistakenly, switch off the
previous-stage power immediately and connect the power cable without error.
1. The power cables are fixed securely and in reliable and good contact with the terminals.
2. In the corner, the cables should be smooth.

HUAWEI USG9500 Series Terabit-level Next-Generation Firewall
Hardware Guide
2 Hardware Installation
Issue 01 (2017-03-13)
Huawei Proprietary and Confidential
Copyright © Huawei Technologies Co., Ltd.
291
3. Labels for the power cables must be filled in and attached to the cables as required. All
labels are neat and face the same direction for easy viewing.
4. The power cable, grounding cable and the signal cable should be bound separately. The
distance between them must be more than 3 cm.
2.4.8 Connecting Network Cables
This section describes how to install electrical transceivers on the ports and connect them to
the ports of the peer device using network cables according to the network plan.
Context
Before connecting the network cable, perform the following operations:
Check construction conditions.
The peer device has been installed in the equipment room, and the port to which the
network cable is to be connected has been determined.
Check the cabling route.
The engineering document should specify the cabling route from the cabinet to the peer
device in the equipment room, and the length of the cable is calculated based on the
cabling path.
Label the cable.
The cable must be labeled before being connected to the devices.
network cables fall into crossover and straight through cables. Currently, Ethernet ports on
most devices can dynamically adapt to both types of cables. Use proper cables for devices that
do not support dynamic adaptation.
By electromagnetic compatibility, network cables can be classified into ordinary and shielded
cables. The shielded cables are preferred due to their better electromagnetic compatibility.
Before connecting a cable, note the label on the port and make sure that the cable is inserted
into the correct port. Otherwise, the port module or the device might be damaged.
Before bundling network cables, use a network cable tester to test cable connectivity. Bind the
network cables to form a rectangle inside the cabinet. Each bundle contains a maximum of 20
network cables. The tie wraps must be tidy and in the same direction.
The clearance between the power cable, PGND cable, and signal cable must be more than 30
mm.
Procedure
Step 1 If multiple network cables need to be connected, attach temporary labels to both ends of each
cable for identification.
Step 2 Remove the dust-proof caps from a board interface and insert the electrical module into the
interface.
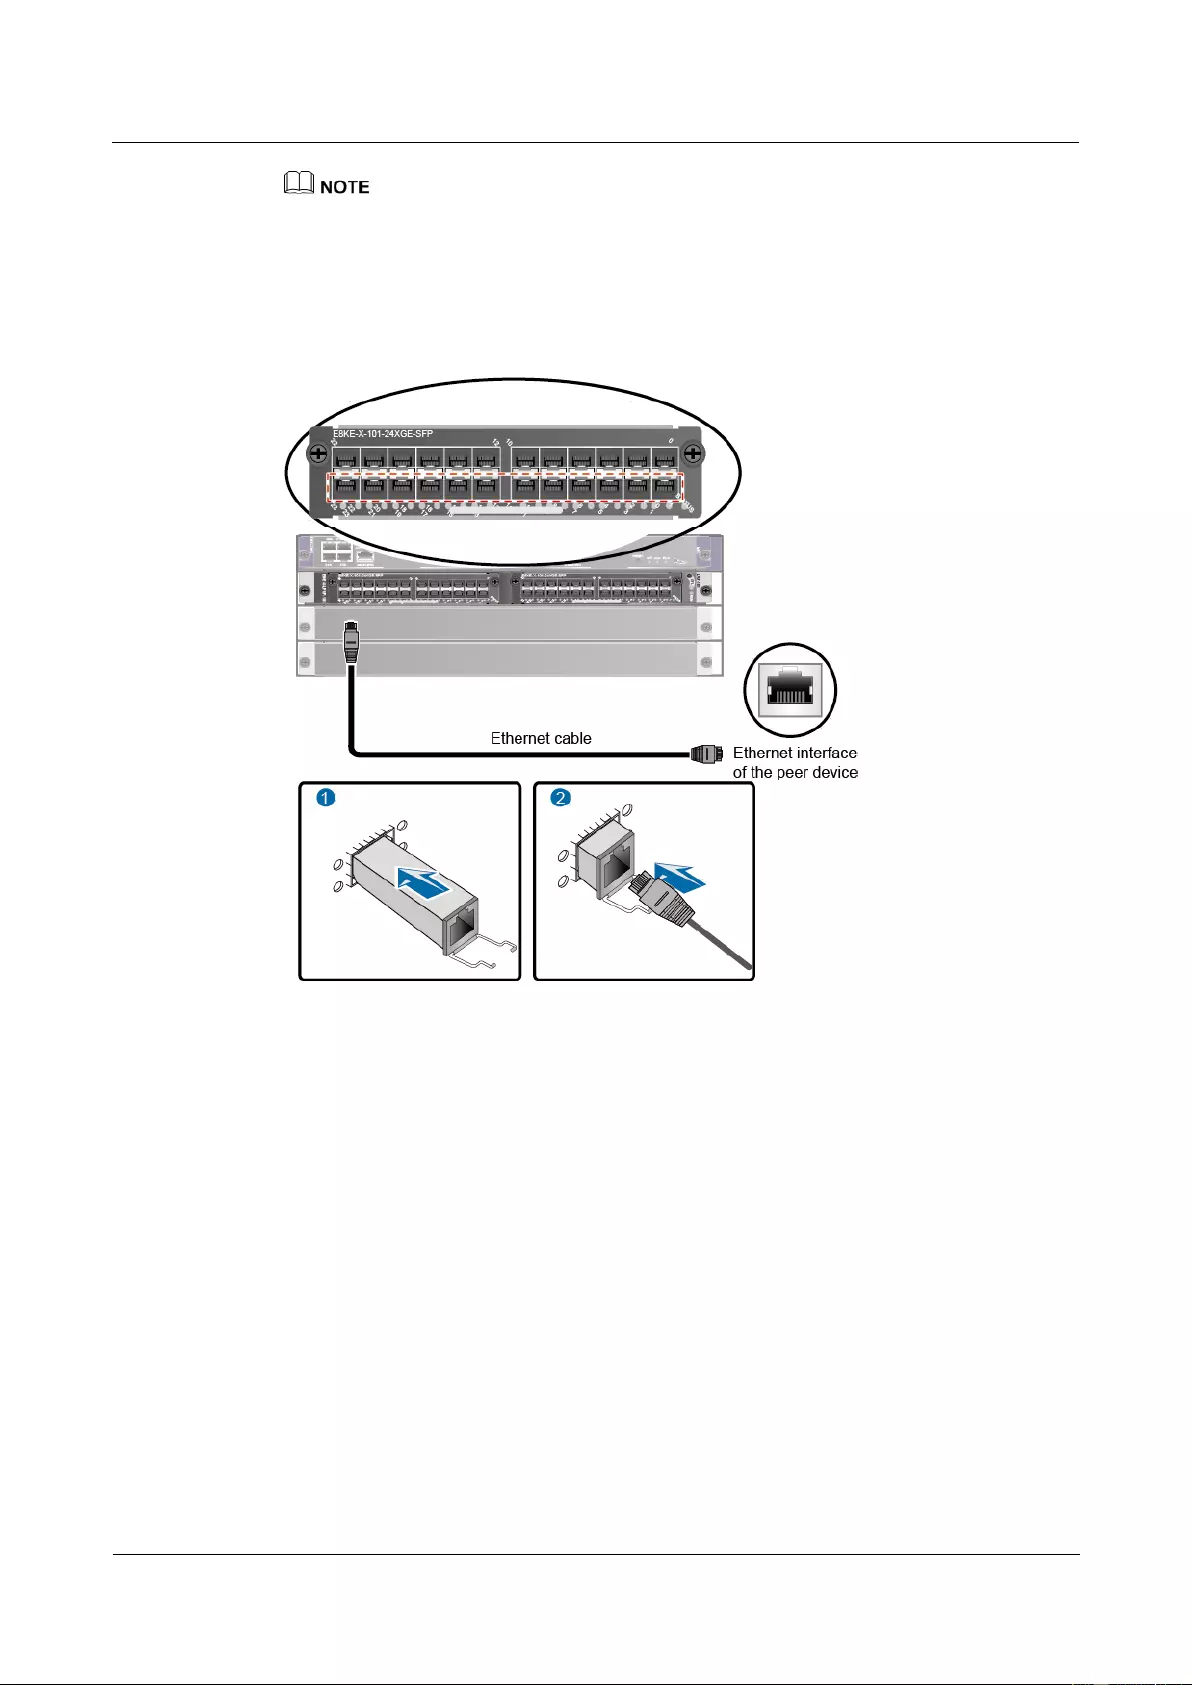
HUAWEI USG9500 Series Terabit-level Next-Generation Firewall
Hardware Guide
2 Hardware Installation
Issue 01 (2017-03-13)
Huawei Proprietary and Confidential
Copyright © Huawei Technologies Co., Ltd.
292
The electrical module can be inserted only in the interface with an odd number on the 24-port
100/1000Base-X-SFP flexible interface card.
Step 3 Connect one end of a network cable to the electrical transceiver of the USG9520 and the other
end to the Ethernet port of the peer device based on the network plan.
Figure 2-59 Connecting a network cable
Step 4 Lay out the network cable along a cabinet and route the cable through the cable hole for the
signal cables at the top (overhead cabling) or bottom (underfloor cabling) of the cabinet.
Step 5 Remove the temporary labels and attach labels (20 mm away from the connectors) at both
ends of the network cable.
----End
Follow-up Procedure
Verify the following after the installation:
The labels at both ends of the cable are correct, clear, neat, and facing the same direction.
The cables and connectors are free of any damage or breakage and are connected
properly and reliably.
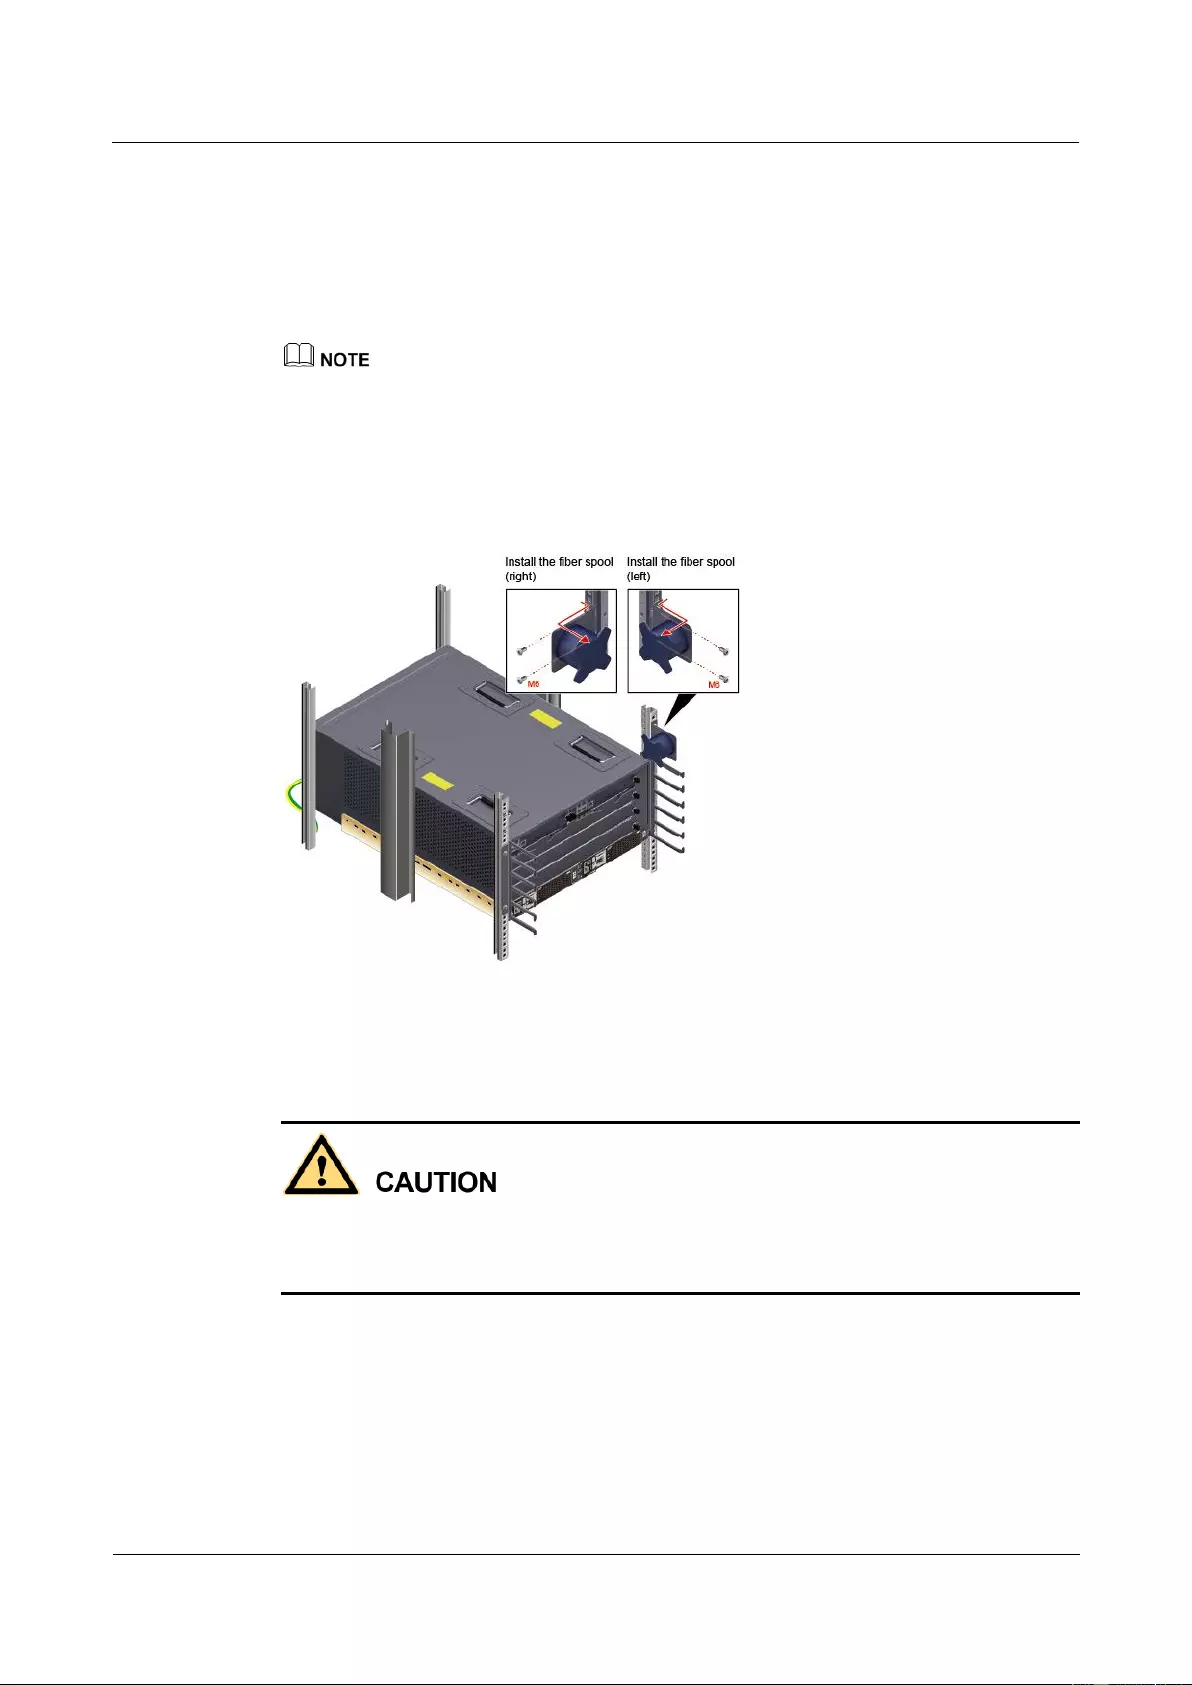
HUAWEI USG9500 Series Terabit-level Next-Generation Firewall
Hardware Guide
2 Hardware Installation
Issue 01 (2017-03-13)
Huawei Proprietary and Confidential
Copyright © Huawei Technologies Co., Ltd.
293
2.4.9 Connecting Optical Fibers
This section describes how to install optical transceivers on the ports and connect them to the
ports of the peer device using optical fibers according to the network plan.
Installing Fiber Spools
You are advised to wind excess optical fibers around fiber spools for convenient cable routing and
device maintenance.
Determine the locations of the fiber spools based on the device arrangement in the cabinet. The fiber
spools cannot be too close to device operation area to avoid hampering board insertion or removal or
cabling, and the fiber spools cannot be too far away from the device to facilitate fiber spool operation.
Figure 2-60 Installing fiber spools
Installing Optical Transceivers and Connecting Optical Fibers
Do not look into the optical interface of the optical module or the optical fiber connector
without eye protection.
Wear an ESD wrist strap or ESD gloves before installing optical modules.
Before connecting optical fiber cables, read the following precautions:
Do not overbend optical fibers, and the radius should not be shorter than 40 mm.
Do not bundle the optical fibers too tight. Otherwise, the transmission performance of
the optical fibers and the communication between devices might be adversely affected.
Step 1 Before connecting an optical fiber, attach temporary labels to both ends of the optical fiber for
identification.
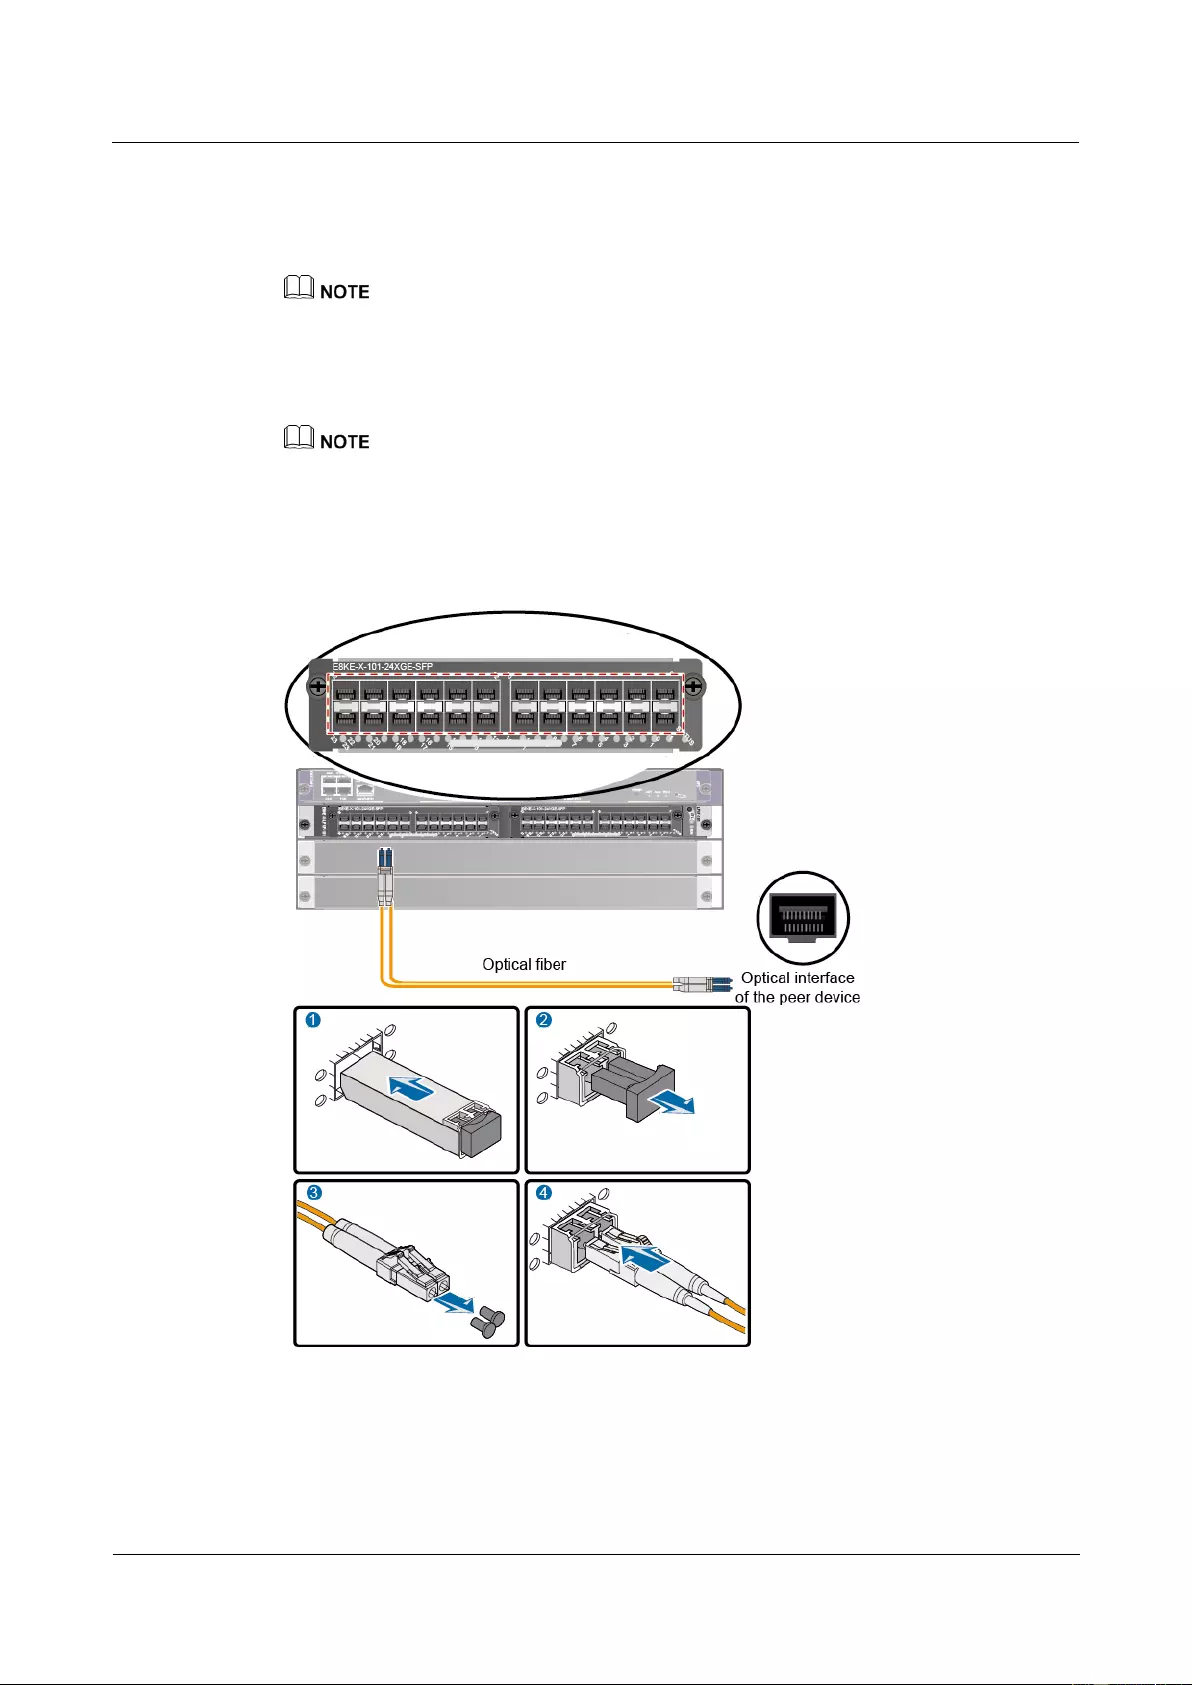
HUAWEI USG9500 Series Terabit-level Next-Generation Firewall
Hardware Guide
2 Hardware Installation
Issue 01 (2017-03-13)
Huawei Proprietary and Confidential
Copyright © Huawei Technologies Co., Ltd.
294
Step 2 Remove the dust cap from an optical interface and insert an optical module in the optical
interface.
Step 3 Remove the dust cap from the optical transceiver.
Set aside the dust cap properly for future use. After optical fiber are disconnected for maintenance, use
the dust cap to prevent the optical transceiver from dust.
Step 4 Remove protective caps from optical fiber connectors, insert optical fibers into the optical
transceiver, and connect the fiber to the peer device.
Ensure that the Tx and Rx ports are correctly connected.
Ensure that the TX and RX ports on one end of the optical fiber cable are connected to the RX
and TX ports (respectively) on the other end.
Figure 2-61 Figure 1 Installing optical transceivers and connecting optical fibers
Step 5 Repeat Step 1 to Step 4 to install all optical transceivers and connect all optical fibers.
Step 6 Coil up the redundant optical fibers around a fiber management tray.

HUAWEI USG9500 Series Terabit-level Next-Generation Firewall
Hardware Guide
2 Hardware Installation
Issue 01 (2017-03-13)
Huawei Proprietary and Confidential
Copyright © Huawei Technologies Co., Ltd.
295
Step 7 Bind optical fibers every 200 mm with binding tapes and use tie wraps to fix the bundle of the
optical fibers to the cabling rack.
Step 8 Affix permanent labels 20 mm from both ends of the optical fiber.
----End
Follow-up Procedure
After you power on the USG9500, check the connection by observing the optical port
indicator. If the indicator is on or blinks, the link is connected or data is being transmitted. If
the indicator is off, the link is disconnected. Possible causes for the disconnection are as
follows:
The optical fiber is improperly inserted. Pull out the optical fiber and re-insert it.
The RX and TX optical ports are inserted reversely. Pull out the optical fibers, change
their position, and re-insert them.
The optical module is damaged or the optical fiber is broken. Replace the optical module
or the optical fiber.
2.4.10 Checking After Installation
After you install the device in a cabinet, you need to verify the cables and NE40E have been
installed correctly before powering up the device.
Cabinet Installation Checklist
No.
Item
1
Verify that the cabinet is placed according to the engineering
design document.
2
Verify that the deviation of the cabinet is less than 3 mm
horizontally and not more than 3 mm vertically.
3
Verify that all the bolts are firmly fastened, especially those for
electrical connections. Flat washers and spring washers are
used, and spring washers are placed on top of flat washers.
4
Verify that the cabinet is neat and clean.
5
Verify that the doors can be opened and closed smoothly.
6
Verify that all labels, tags, and nameplates are correct, legible,
and complete.
Installation Environment Checklist
No.
Item
1
Verify that no fingerprints or other smears exist on the
equipment.
2
Verify that no excessive electrical tapes or cable ties exist on

HUAWEI USG9500 Series Terabit-level Next-Generation Firewall
Hardware Guide
2 Hardware Installation
Issue 01 (2017-03-13)
Huawei Proprietary and Confidential
Copyright © Huawei Technologies Co., Ltd.
296
No.
Item
the cables.
3
Verify that no tapes, cable ties, wastepaper, or packaging bags
are left around the equipment.
4
Verify that all the items around the equipment are neat, clean,
and intact.
Cable Installation Checklist
No.
Item
1
Verify that all the self-made ground cables are copper-based
with proper wire diameters. There is no switch, fuse, or
disconnection on the cable.
2
Verify that ground cables, AC input power cables, cables in the
cabinet are connected correctly according to the wiring diagram
of the power system, and the screws are tightened. Ensure that
the output and input cables are not short-circuited.
3
Verify that the redundant part of the power cable or ground
cable is stripped off rather than being coiled.
4
Verify that the lugs at both ends of each power cable or ground
cable are crimped securely.
5
Verify that bare wires and lug handles at the wiring terminals
are wrapped tightly by using insulation tapes or heat shrink
tubes.
6
Verify that the flat washer and spring washer are mounted
securely to all the wiring terminals.
7
Verify that the connectors of all cables are securely linked,
especially those at the bottom of the cabinet.
8
Verify that the cables are properly bound. Cable ties are
installed at equal spacing and in the same direction
9
Verify that the power cable and ground cable are routed
separately from other cables.
10
Verify that the cable layout facilitates maintenance and
expansion in the future.
11
Verify that the labels at both ends of each cable are legible.
12
Verify that the excess of cable ties is trimmed off without
remaining rough edges.

HUAWEI USG9500 Series Terabit-level Next-Generation Firewall
Hardware Guide
2 Hardware Installation
Issue 01 (2017-03-13)
Huawei Proprietary and Confidential
Copyright © Huawei Technologies Co., Ltd.
297
2.4.11 Powering On the USG9520-DC Power Distribution
Check whether the USG9520 is operating properly in the DC power supply environment.
Power on the USG9520 according to the following requirements to ensure device security.
Context
Before power-on check, switch all circuit breakers to the OFF position.
Before you power on the USG9580, ensure that:
The power cable and PGND cable are properly connected.
The power switch in the equipment room is easy to locate so that you can power off
devices in the case of accidents.
Procedure
Step 1 Turn on the circuit breakers of external DC power supplies A and B.
Step 2 Measure the input voltage of the device with a multimeter and ensure that the voltage falls
within the range of -72 V DC to -38 V DC.
Step 3 Turn on the DC power switch of the device.
Step 4 Wait for three minutes and then check the status of the indicators.
Figure 2-62 shows the indicator status of main parts when the device is operating properly.
Table 2-10 describes all indicators.
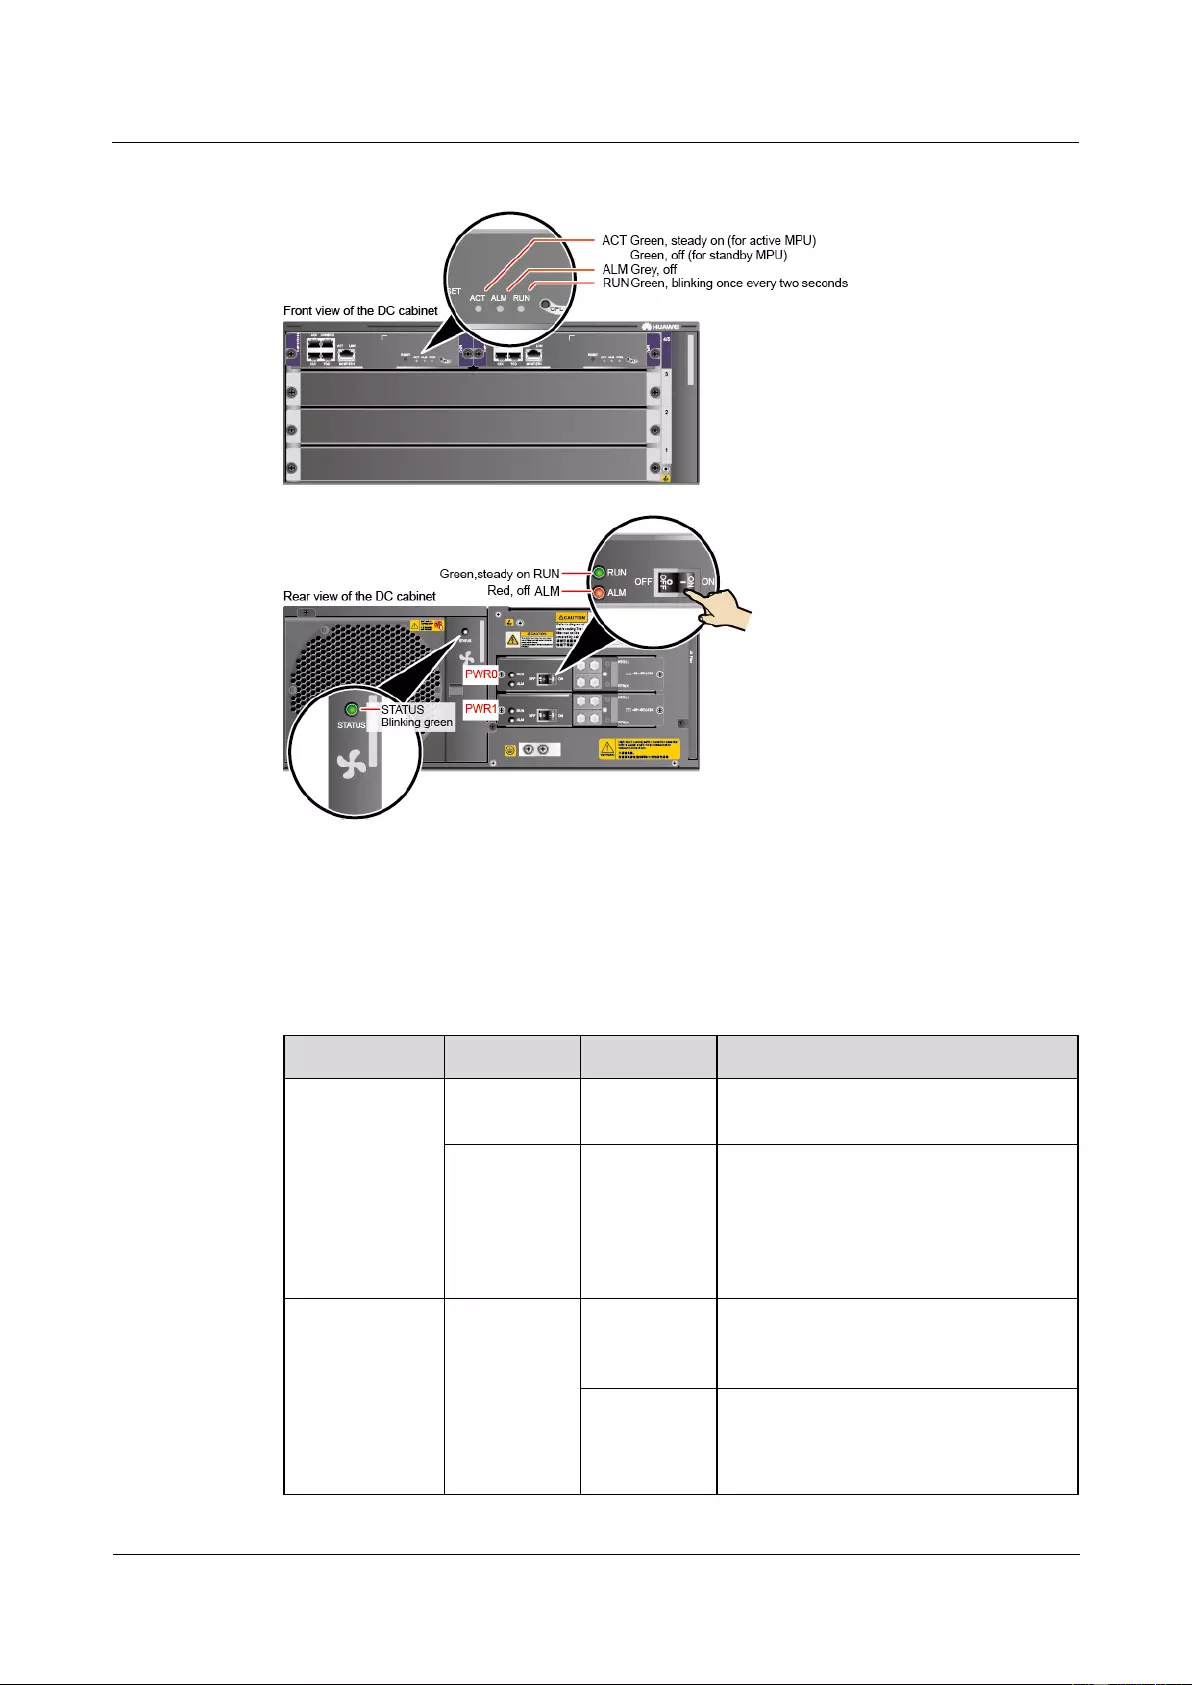
HUAWEI USG9500 Series Terabit-level Next-Generation Firewall
Hardware Guide
2 Hardware Installation
Issue 01 (2017-03-13)
Huawei Proprietary and Confidential
Copyright © Huawei Technologies Co., Ltd.
298
Figure 2-62 Indicator status when the USG9520 is operating properly
----End
Result
Table 2-10 Device indicators
Item
Indicator
Color
Status Description
DC power
module
RUN
Green
If this indicator is steady on, the power
module is running properly.
ALM
Red
Alarm indicator. If the indicator is
steady red,
Lightning protection circuit of the
power module is faulty.
No power is input.
FAN
STATUS
Green
If the indicator blinks once every two
seconds (0.5 Hz), the FAN is working
properly.
Red
If the indicator blinks once every two
seconds (0.5 Hz), the fan module or
power module is faulty (including the
case that one power module does not
HUAWEI USG9500 Series Terabit-level Next-Generation Firewall
Hardware Guide
2 Hardware Installation
Issue 01 (2017-03-13)
Huawei Proprietary and Confidential
Copyright © Huawei Technologies Co., Ltd.
299
Item
Indicator
Color
Status Description
have input power).
MPU
RUN
Green
From the MPU being powered on until
it is registered, the indicator status
changes in the sequence of off-blinks
once every 250 ms (4 Hz)-off-steady
on-blinks once every two seconds (0.5
Hz).
After the MPU is registered, the MPU
is working properly if the indicator
blinks at 0.5 Hz.
NOTE
Possible causes for the indicator being off
are:
The BootROM is damaged.
The MPU cannot be powered on.
Possible causes for the indicator blinking
quickly are:
The CF card is faulty.
The other control chips on the MPU are
faulty, causing the MPU not to be able
to initialize.
ALM
Red
If the indicator is steady off, the MPU is
in the normal state. If the indicator is
steady red, an alarm is generated.
2.4.12 Powering On the USG9520-AC Power Distribution
Check whether the USG9520 is operating properly in the AC power supply environment.
Power on the USG9520 according to the following requirements to ensure device security.
Context
Before power-on check, switch all circuit breakers to the OFF position.
Before you power on the USG9580, ensure that:
The power cable and PGND cable are properly connected.
The power switch in the equipment room is easy to locate so that you can power off
devices in the case of accidents.
Procedure
Step 1 Turn on the external AC power supplies A and B.
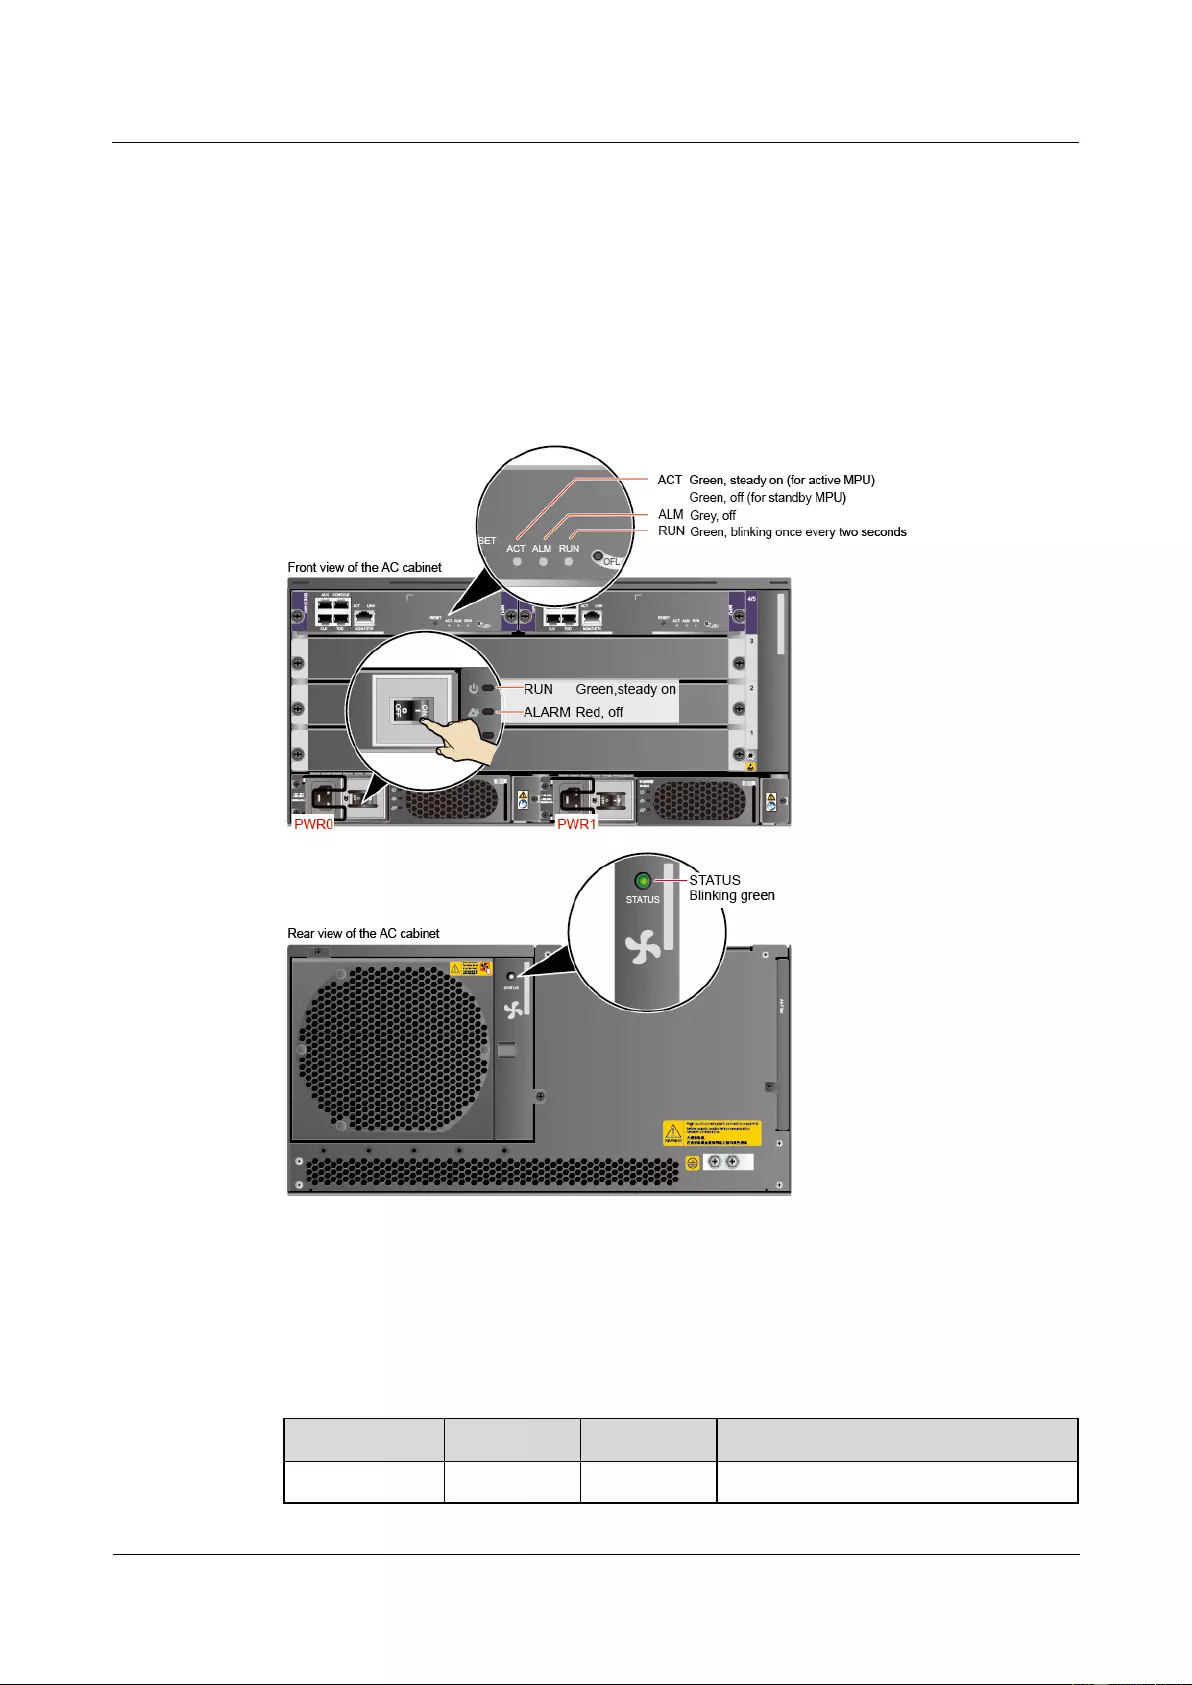
HUAWEI USG9500 Series Terabit-level Next-Generation Firewall
Hardware Guide
2 Hardware Installation
Issue 01 (2017-03-13)
Huawei Proprietary and Confidential
Copyright © Huawei Technologies Co., Ltd.
300
Step 2 Measure the input voltage of the device with a multimeter and ensure that the voltage falls
within the range of 90 V AC to 264V AC.
Step 3 Turn on the AC power switch of the device.
Step 4 Wait for three minutes and then check the status of the indicators.
Figure 2-63 shows the indicator status of main parts when the device is operating properly.
Table 2-11 describes all indicators.
Figure 2-63 Indicator status when the USG9520 is operating properly
----End
Result
Table 2-11 Device indicators
Item
Indicator
Color
Status Description
AC power
RUN
Green
Operation indicator. If this indicator is

HUAWEI USG9500 Series Terabit-level Next-Generation Firewall
Hardware Guide
2 Hardware Installation
Issue 01 (2017-03-13)
Huawei Proprietary and Confidential
Copyright © Huawei Technologies Co., Ltd.
301
Item
Indicator
Color
Status Description
module
steady on, the power module is running
properly.
ALARM
Yellow
Alarm indicator.
If this indicator is blinking, the
communication is interrupted.
If this indicator is steady on, a fault
such as input overvoltage,
undervoltage, or overcurrent, has
occurred.
FAULT
Red
Fault indicator. If this indicator is
steady on, an unrecoverable fault, such
as a fan failure, no output, or short
circuit, has occurred.
FAN
STATUS
Green
If the indicator blinks once every two
seconds (0.5 Hz), the FAN is working
properly.
Red
If the indicator blinks once every two
seconds (0.5 Hz), the fan module or
power module is faulty (including the
case that one power module does not
have input power).
MPU
RUN
Green
From the MPU being powered on until
it is registered, the indicator status
changes in the sequence of off-blinks
once every 250 ms (4 Hz)-off-steady
on-blinks once every two seconds (0.5
Hz).
After the MPU is registered, the MPU
is working properly if the indicator
blinks at 0.5 Hz.
NOTE
Possible causes for the indicator being off
are:
The BootROM is damaged.
The MPU cannot be powered on.
Possible causes for the indicator blinking
quickly are:
The CF card is faulty.
The other control chips on the MPU are
faulty, causing the MPU not to be able
to initialize.
ALM
Red
If the indicator is steady off, the MPU is
in the normal state. If the indicator is
steady red, an alarm is generated.
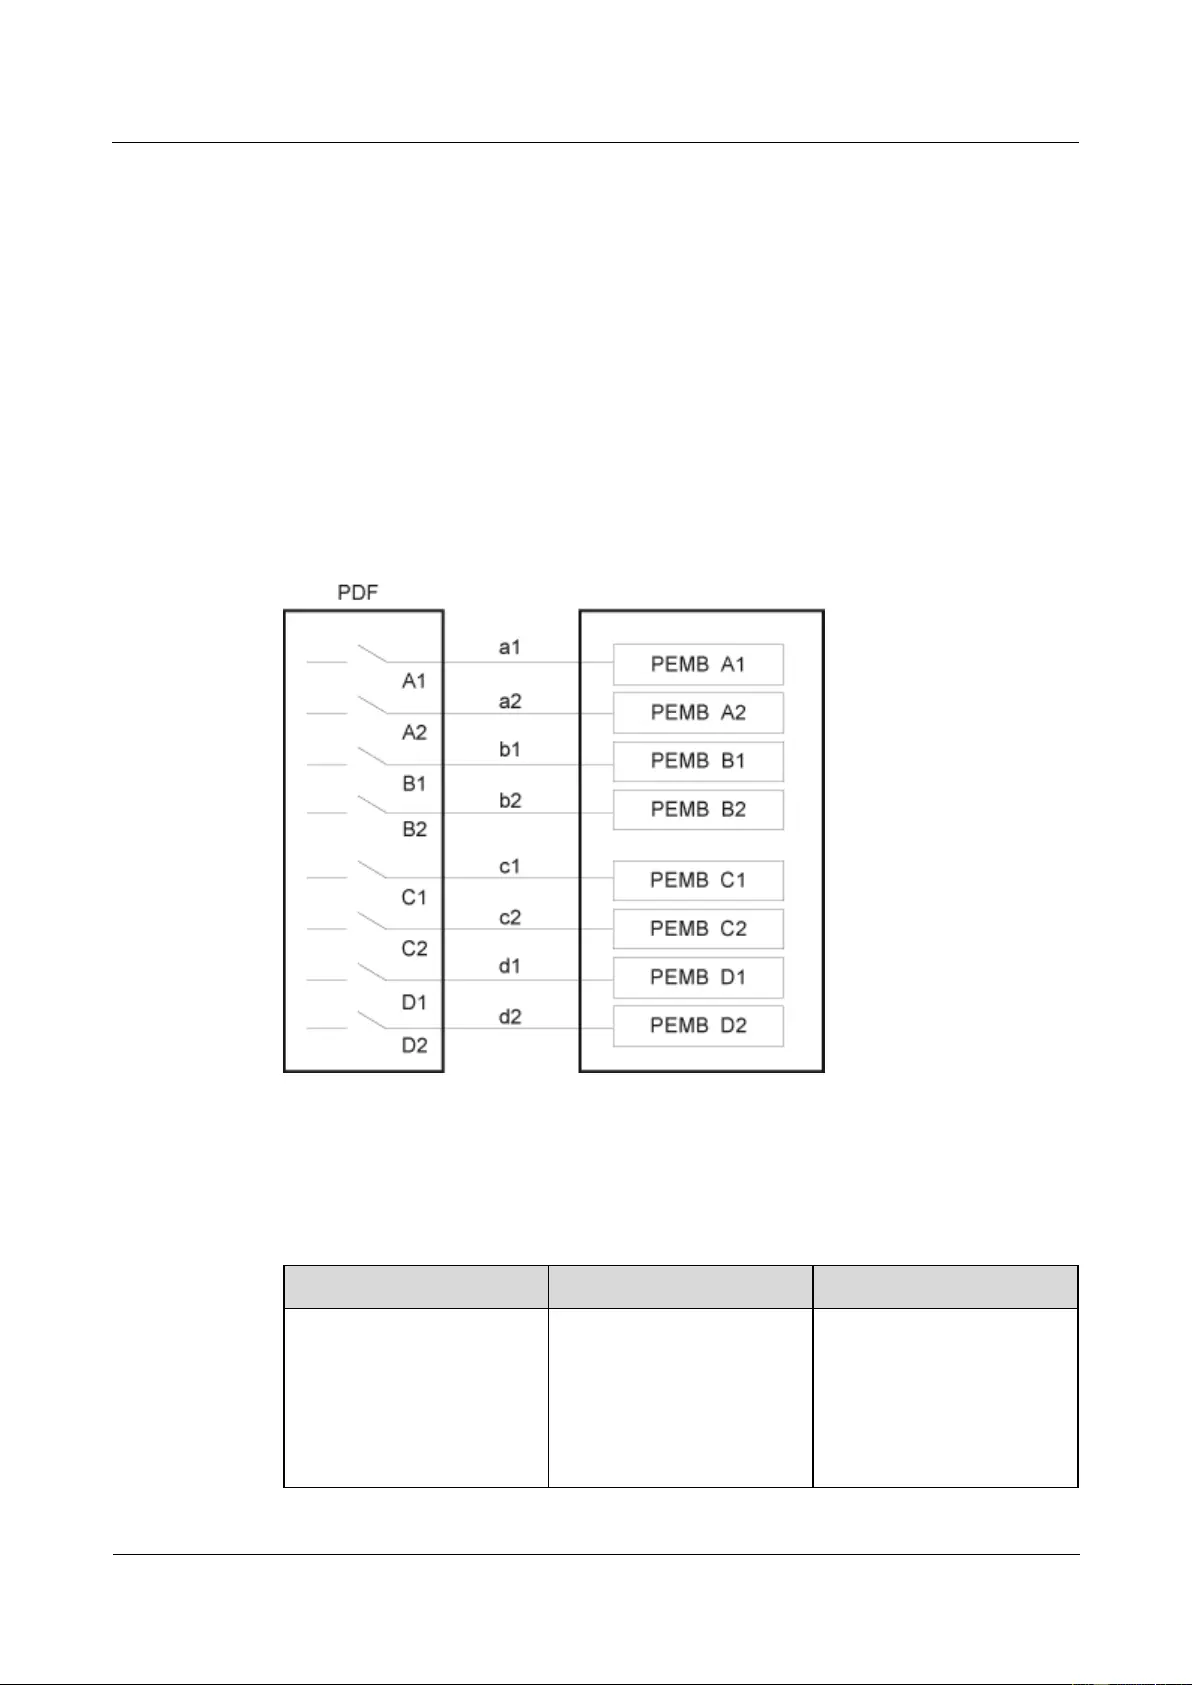
HUAWEI USG9500 Series Terabit-level Next-Generation Firewall
Hardware Guide
2 Hardware Installation
Issue 01 (2017-03-13)
Huawei Proprietary and Confidential
Copyright © Huawei Technologies Co., Ltd.
302
2.5 Guide to Power Distribution Design
This section describes how to configure power distribution.
2.5.1 Guide to Power Distribution Design of the USG9580
This section describes how to configure power distribution for the USG9580.
2.5.1.1 Guide to the DC Power Distribution
This section describes how to select DC power distribution cables and circuit breakers of the
DC PDF.
Figure 2-64 shows the schematic diagram of the DC PEMB.
Figure 2-64 Schematic diagram of the DC PEMB
Table 2-12 shows the current parameters of each circuit breaker and each power line for the
PDF
Table 2-12 Current parameters of each circuit breaker and each power line for the PDF (DC
PEMB)
Item
Specification
Note
Each circuit breaker
(A1,A2,B1,B2,C1,C2,D1,D
2)
≥ 60 A
To protect power supplies of
different levels, it is
recommended that the
current of the circuit breaker
on the user side should be
greater than or equal to that
of the circuit breaker of the

HUAWEI USG9500 Series Terabit-level Next-Generation Firewall
Hardware Guide
2 Hardware Installation
Issue 01 (2017-03-13)
Huawei Proprietary and Confidential
Copyright © Huawei Technologies Co., Ltd.
303
Item
Specification
Note
power module (70 A).
Each power supply
(A1,A2,B1,B2,C1,C2,D1,D
2)
≥60 A @ -48 V
To support the maximum
configuration, it is
recommended that each DC
power line should provide a
minimum of 55 A @ -48 V
current.
If the PDF cannot provide 70 A circuit breakers and the full configuration is unnecessary,
you can select the circuit breaker of each DC line by using the following formula
(A1,A2,B1,B2,C1,C2,D1,D2).
I = P / (Vin * D * 4)
I: indicates the rated current of the circuit breaker of each line on the PDF, in Ampere (A).
P: indicates the total power of each device.
Vin: indicates the input voltage of the power supply. (38 < Vin < 72)
D: indicates the derating coefficient. The recommended coefficient is 0.8.
4: indicates the number of the input lines of the power module.
Table 2-13 shows the selection of power cables (a1,a2,b1,b2,c1,c2,d1,d2)
Table 2-13 Cables for the PEMB
Distance from the PDF to
the Device
Selection of Power Cables a and b
Equal to or shorter than 15
m
Wire,450/750V,227 IEC
02(RV)16mm2,blue,85A
Each power module should
be equipped with one cable
of this type. The cable
length is determined by the
project survey on site.
Wire,450/750V,227 IEC
02(RV)16mm2,black,85A
Each power module should
be equipped with one cable
of this type. The cable
length is determined by the
project survey on site.
Naked Crimping
Terminal,JG2,16mm2,M6,95
A,Tin Plated,for OEM
Each cable should be
equipped with one terminal
of this type.
Naked Crimping
Terminal,OT,16mm2,M8,Ti
n Plating,Naked Ring
Terminal
Each cable should be
equipped with one terminal
of this type.
Longer than 15 m and equal
to or shorter than 25 m
Wire,450/750V,227 IEC
02(RV)25mm2,blue,110A
Each power module should
be equipped with one cable
of this type. The cable
length is determined by the

HUAWEI USG9500 Series Terabit-level Next-Generation Firewall
Hardware Guide
2 Hardware Installation
Issue 01 (2017-03-13)
Huawei Proprietary and Confidential
Copyright © Huawei Technologies Co., Ltd.
304
Distance from the PDF to
the Device
Selection of Power Cables a and b
project survey on site.
Wire,450/750V,227 IEC
02(RV)25mm2,black,110A
Each power module should
be equipped with one cable
of this type. The cable
length is determined by the
project survey on site.
Naked Crimping
Connector,JG2,25mm2,M6,1
50A,Tin Plating,For OEM
Each cable should be
equipped with one terminal
of this type.
Naked Crimping
Terminal,OT,25mm2,M8,Ti
n Plating,Naked Ring
Terminal
Each cable should be
equipped with one terminal
of this type.
Longer than 25 m and equal
to or shorter than 35 m
Wire,450/750V,227 IEC
02(RV)35mm2,Blue,135A
Each power module should
be equipped with one cable
of this type. The cable
length is determined by the
project survey on site.
Wire,450/750V,227 IEC
02(RV)35mm2,black,135A
Each power module should
be equipped with one cable
of this type. The cable
length is determined by the
project survey on site.
Naked Crimping
Connector,JG2,34.3mm2,M6
(1/4"),134A,Tin
Plated,2AWG,Hole Center
Distance
15.875mm(5/8"),Short
Tube,for North American
Each cable should be
equipped with one terminal
of this type.
Naked Crimping
Terminal,OT,35mm2,M8,Ti
n Plating,Naked Ring
Terminal
Each cable should be
equipped with one terminal
of this type.
Longer than 35 m
A PDF should be placed near the device.
Formula calculating cable
cross-sectional area
S = ( I * L ) / 74
S: indicates cross-sectional area.
I: indicates the current flowing through the cable.
L: indicates distance from the PDF to the device.
2.5.1.2 Guide to the AC Power Distribution
This section describes AC power distribution and matching AC cables.
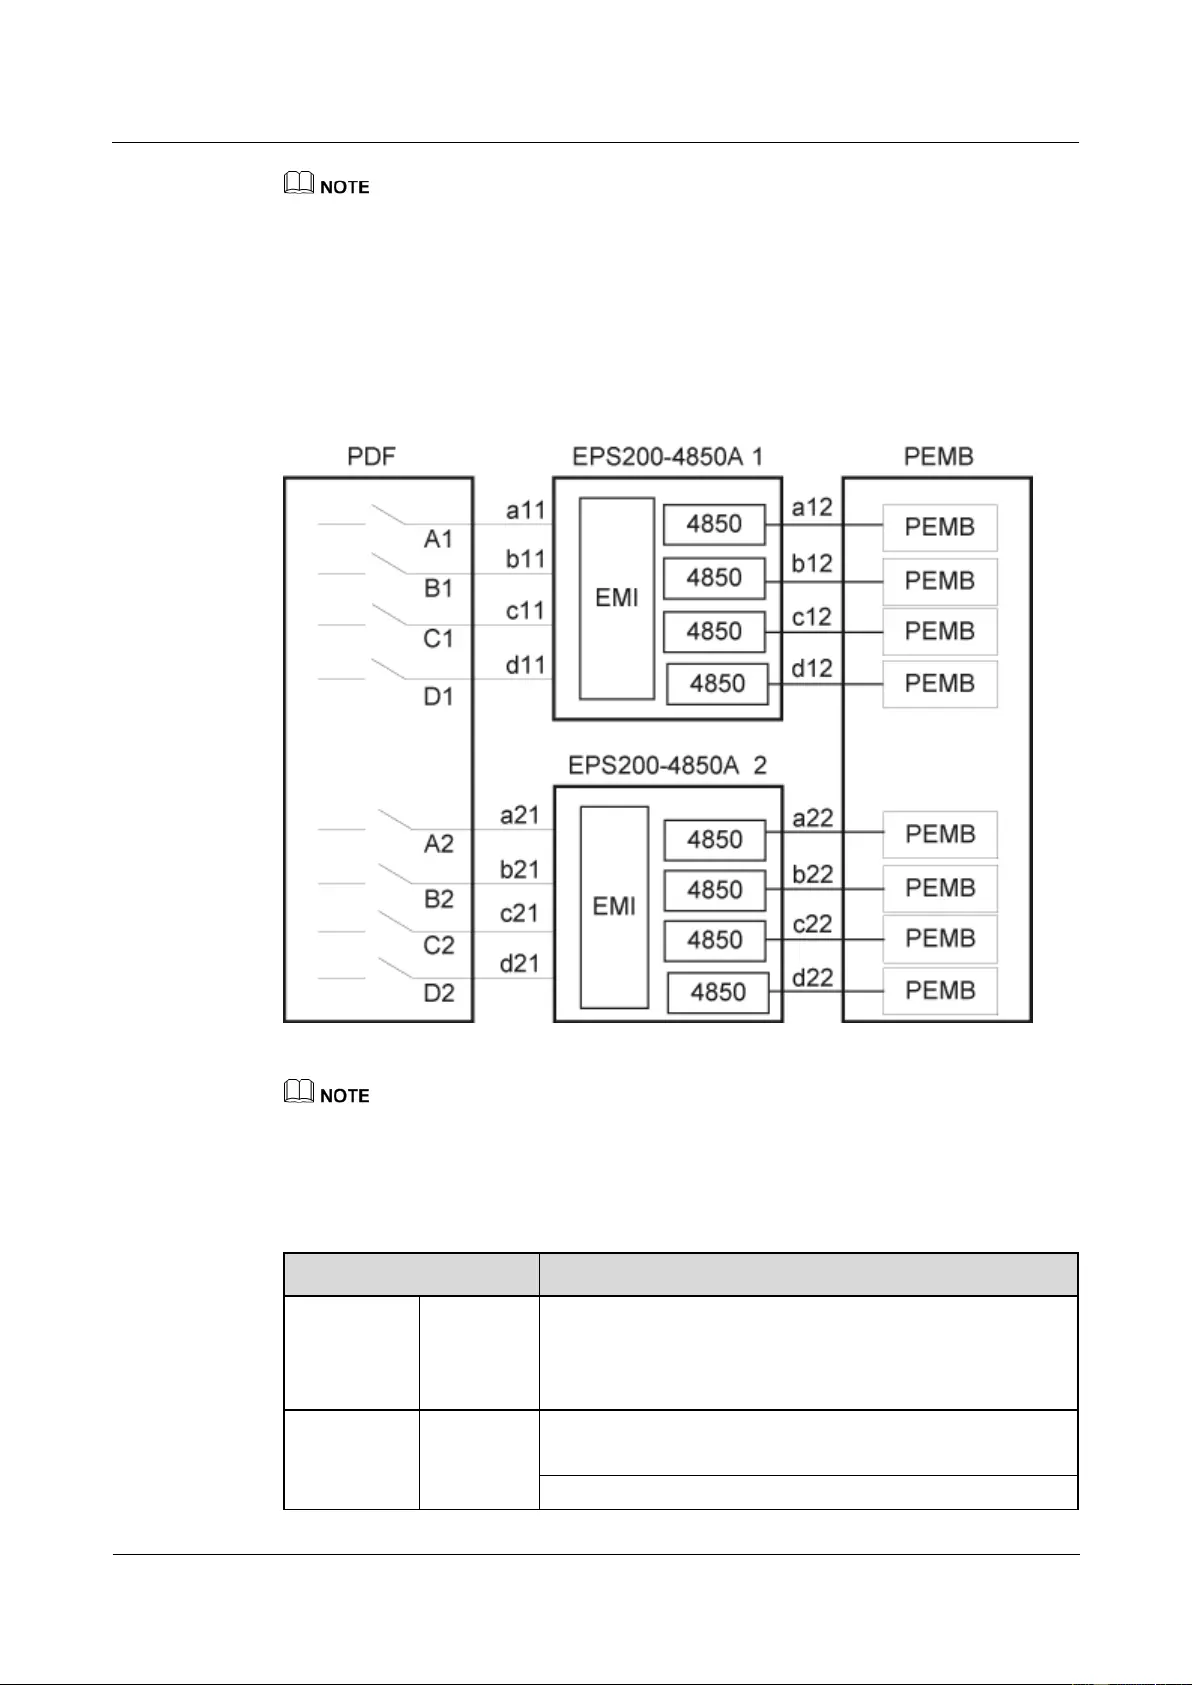
HUAWEI USG9500 Series Terabit-level Next-Generation Firewall
Hardware Guide
2 Hardware Installation
Issue 01 (2017-03-13)
Huawei Proprietary and Confidential
Copyright © Huawei Technologies Co., Ltd.
305
If the customer uses a purchased three-core cable, the ground core does not need to be connected to the
ground terminal on the device. This is because the ground terminal on the device has already been
connected to a separate ground cable, ensuring that the device is properly grounded.
Figure 2-65 shows the appearance of the AC power module EPS200-4850A. AC power input
is converted into regulated DC power by an AC/DC converter. The resulting DC power output
is connected to the PEMs through external cables to supply power for all boards and fan
modules.
Figure 2-65 Schematic diagram of the AC EPS200-4850A power distribution
It is recommended that the current specifications of the circuit breakers on the PDF or distribution box
should be no less than 16 A
Table 2-14 lists the cables and terminals for the AC power module EPS200-4850A.
Table 2-14 Cables and terminals for the EPS200-4850A
Item
Description
a11,b11,c11,
d11,
a21,b21,c21,
d21
Power
cable
Power Cable,300/500V,60227IEC10(BVV),6mm2,Black
Jacket(Cores:Blue,Brown),43A,2 Equivalent Cores
Terminal
Naked Crimping Terminal,OT,6mm2,M6,Tin
Plating,Insulated Ring Terminal,12~10AWG,yellow
Naked Crimping Terminal,OT,6mm2,M8,Tin
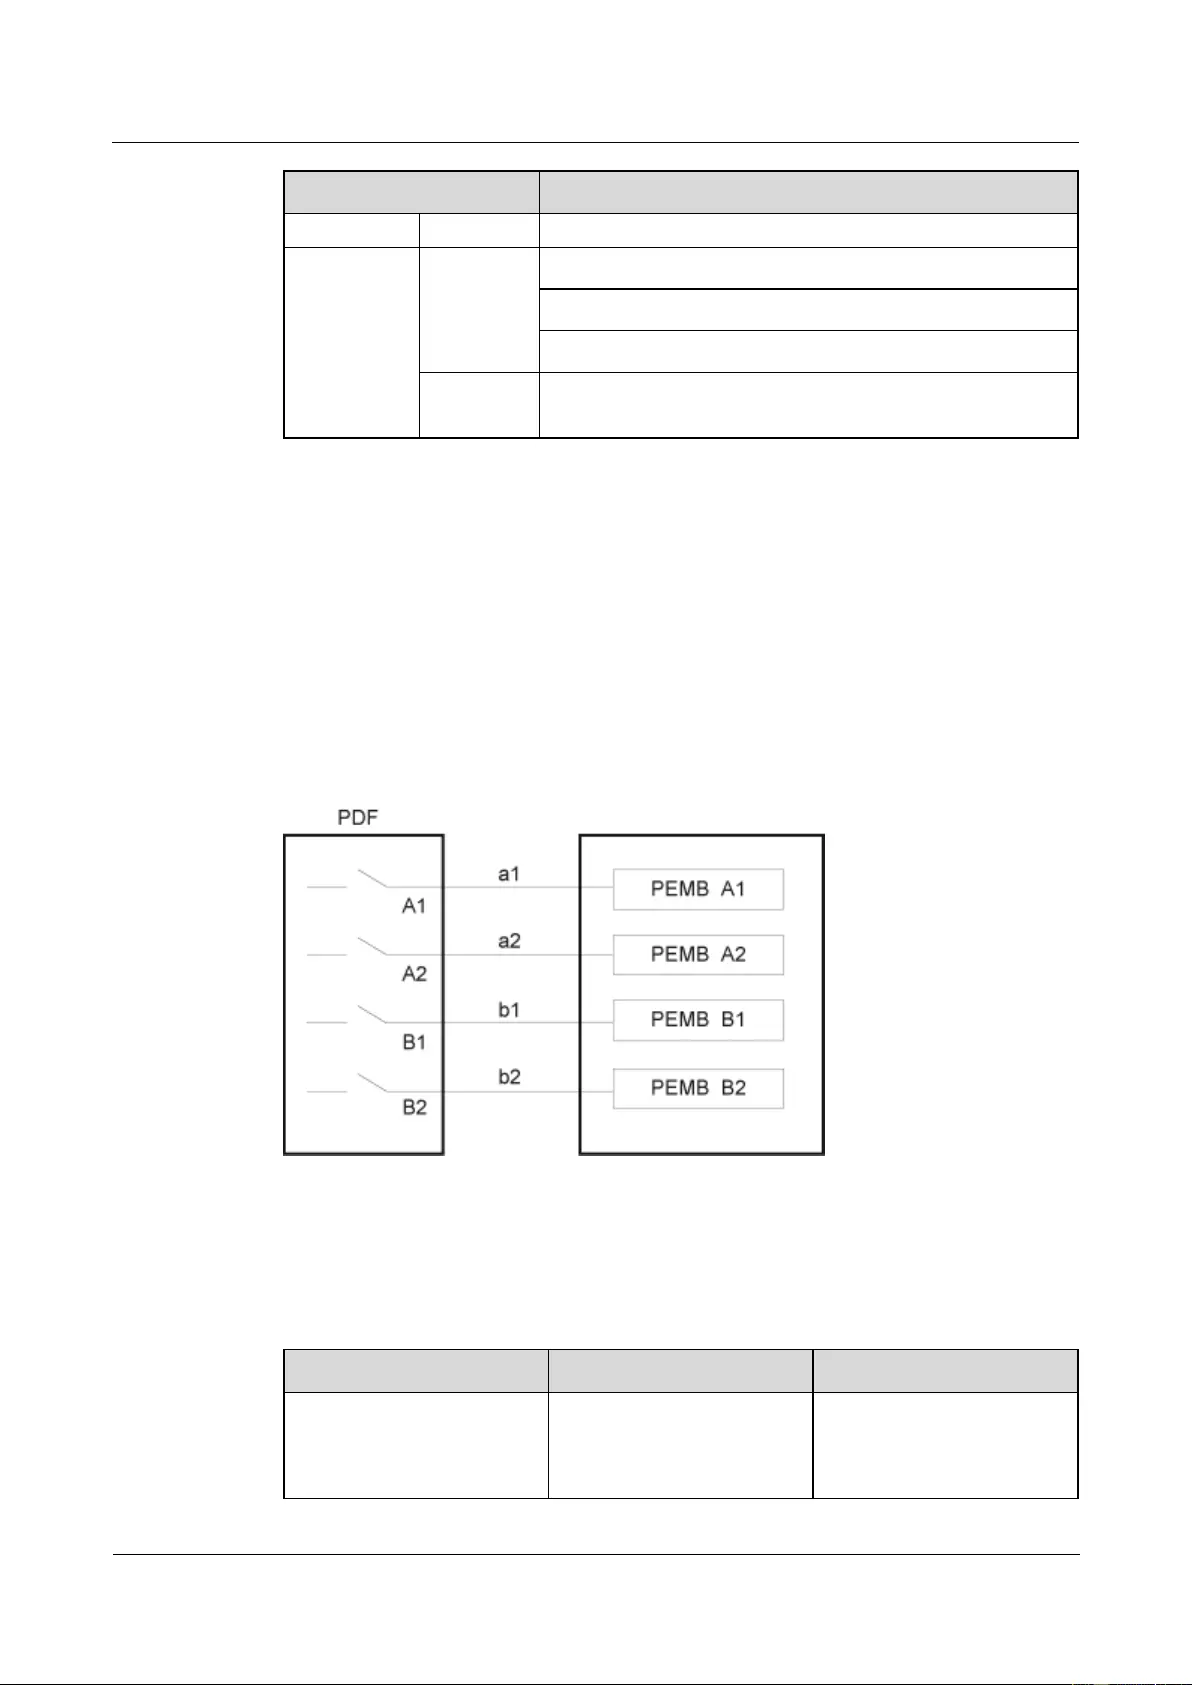
HUAWEI USG9500 Series Terabit-level Next-Generation Firewall
Hardware Guide
2 Hardware Installation
Issue 01 (2017-03-13)
Huawei Proprietary and Confidential
Copyright © Huawei Technologies Co., Ltd.
306
Item
Description
Plating,Insulated Ring Terminal,12~10AWG,yellow
a12,b12,c12,
d12,
a22,b22,c22,
d22
Cables
Monitor and Alarm Cable,3m,D9M,CC4P0.48B(S),D9M
Wire,450/750V,227 IEC 02(RV)16mm2,blue,85A
Wire,450/750V,227 IEC 02(RV)16mm2,black,85A
Terminal
Naked Crimping Terminal,JG2,16mm2,M6,95A,Tin
Plated,for OEM
2.5.2 Guide to Power Distribution Design of the USG9560
This section describes how to configure power distribution for the USG9560.
2.5.2.1 Guide to the DC Power Distribution
This section describes how to select DC power distribution cables and circuit breakers of the
DC PDF.
Figure 2-66 shows the schematic diagram of the DC PEMB.
Figure 2-66 Schematic diagram of the DC PEMB
Table 2-15 shows the current parameters of each circuit breaker and each power line for the
PDF
Table 2-15 Current parameters of each circuit breaker and each power line for the PDF (DC
PEMB)
Item
Specification
Note
Each circuit breaker
(A1,A2,B1,B2)
≥ 60 A
To protect power supplies of
different levels, it is
recommended that the
current of the circuit breaker

HUAWEI USG9500 Series Terabit-level Next-Generation Firewall
Hardware Guide
2 Hardware Installation
Issue 01 (2017-03-13)
Huawei Proprietary and Confidential
Copyright © Huawei Technologies Co., Ltd.
307
Item
Specification
Note
on the user side should be
greater than or equal to that
of the circuit breaker of the
power module (70 A).
Each power supply
(A1,A2,B1,B2)
≥60 A @ -48 V
To support the maximum
configuration, it is
recommended that each DC
power line should provide a
minimum of 60 A @ -48 V
current.
If the PDF cannot provide 70 A circuit breakers and the full configuration is unnecessary,
you can select the circuit breaker of each DC line by using the following formula
(A1,A2,B1,B2).
I = P / (Vin * D * 2)
I: indicates the rated current of the circuit breaker of each line on the PDF, in Ampere (A).
P: indicates the total power of each device.
Vin: indicates the input voltage of the power supply. (38 < Vin < 72)
D: indicates the derating coefficient. The recommended coefficient is 0.8.
2: indicates the number of the input lines of the power module.
Table 2-16 shows the selection of power cables (a1,a2,b1,b2)
Table 2-16 Cables for the PEMB
Distance from the PDF to
the Device
Selection of Power Cables a and b
Equal to or shorter than 15
m
Wire,450/750V,227 IEC
02(RV)16mm2,blue,85A
Each power module should
be equipped with one cable
of this type. The cable
length is determined by the
project survey on site.
Wire,450/750V,227 IEC
02(RV)16mm2,black,85A
Each power module should
be equipped with one cable
of this type. The cable
length is determined by the
project survey on site.
Naked Crimping
Terminal,JG2,16mm2,M6,95
A,Tin Plated,for OEM
Each cable should be
equipped with one terminal
of this type.
Naked Crimping
Terminal,OT,16mm2,M8,Ti
n Plating,Naked Ring
Terminal
Each cable should be
equipped with one terminal
of this type.
Longer than 15 m and equal
Wire,450/750V,227 IEC
Each power module should

HUAWEI USG9500 Series Terabit-level Next-Generation Firewall
Hardware Guide
2 Hardware Installation
Issue 01 (2017-03-13)
Huawei Proprietary and Confidential
Copyright © Huawei Technologies Co., Ltd.
308
Distance from the PDF to
the Device
Selection of Power Cables a and b
to or shorter than 25 m
02(RV)25mm2,blue,110A
be equipped with one cable
of this type. The cable
length is determined by the
project survey on site.
Wire,450/750V,227 IEC
02(RV)25mm2,black,110A
Each power module should
be equipped with one cable
of this type. The cable
length is determined by the
project survey on site.
Naked Crimping
Connector,JG2,25mm2,M6,1
50A,Tin Plating,For OEM
Each cable should be
equipped with one terminal
of this type.
Naked Crimping
Terminal,OT,25mm2,M8,Ti
n Plating,Naked Ring
Terminal
Each cable should be
equipped with one terminal
of this type.
Longer than 25 m and equal
to or shorter than 35 m
Wire,450/750V,227 IEC
02(RV)35mm2,Blue,135A
Each power module should
be equipped with one cable
of this type. The cable
length is determined by the
project survey on site.
Wire,450/750V,227 IEC
02(RV)35mm2,black,135A
Each power module should
be equipped with one cable
of this type. The cable
length is determined by the
project survey on site.
Naked Crimping
Connector,JG2,34.3mm2,M6
(1/4"),134A,Tin
Plated,2AWG,Hole Center
Distance
15.875mm(5/8"),Short
Tube,for North American
Each cable should be
equipped with one terminal
of this type.
Naked Crimping
Terminal,OT,35mm2,M8,Ti
n Plating,Naked Ring
Terminal
Each cable should be
equipped with one terminal
of this type.
Longer than 35 m
A PDF should be placed near the device.
Formula calculating cable
cross-sectional area
S = ( I * L ) / 74
S: indicates cross-sectional area.
I: indicates the current flowing through the cable.
L: indicates distance from the PDF to the device.
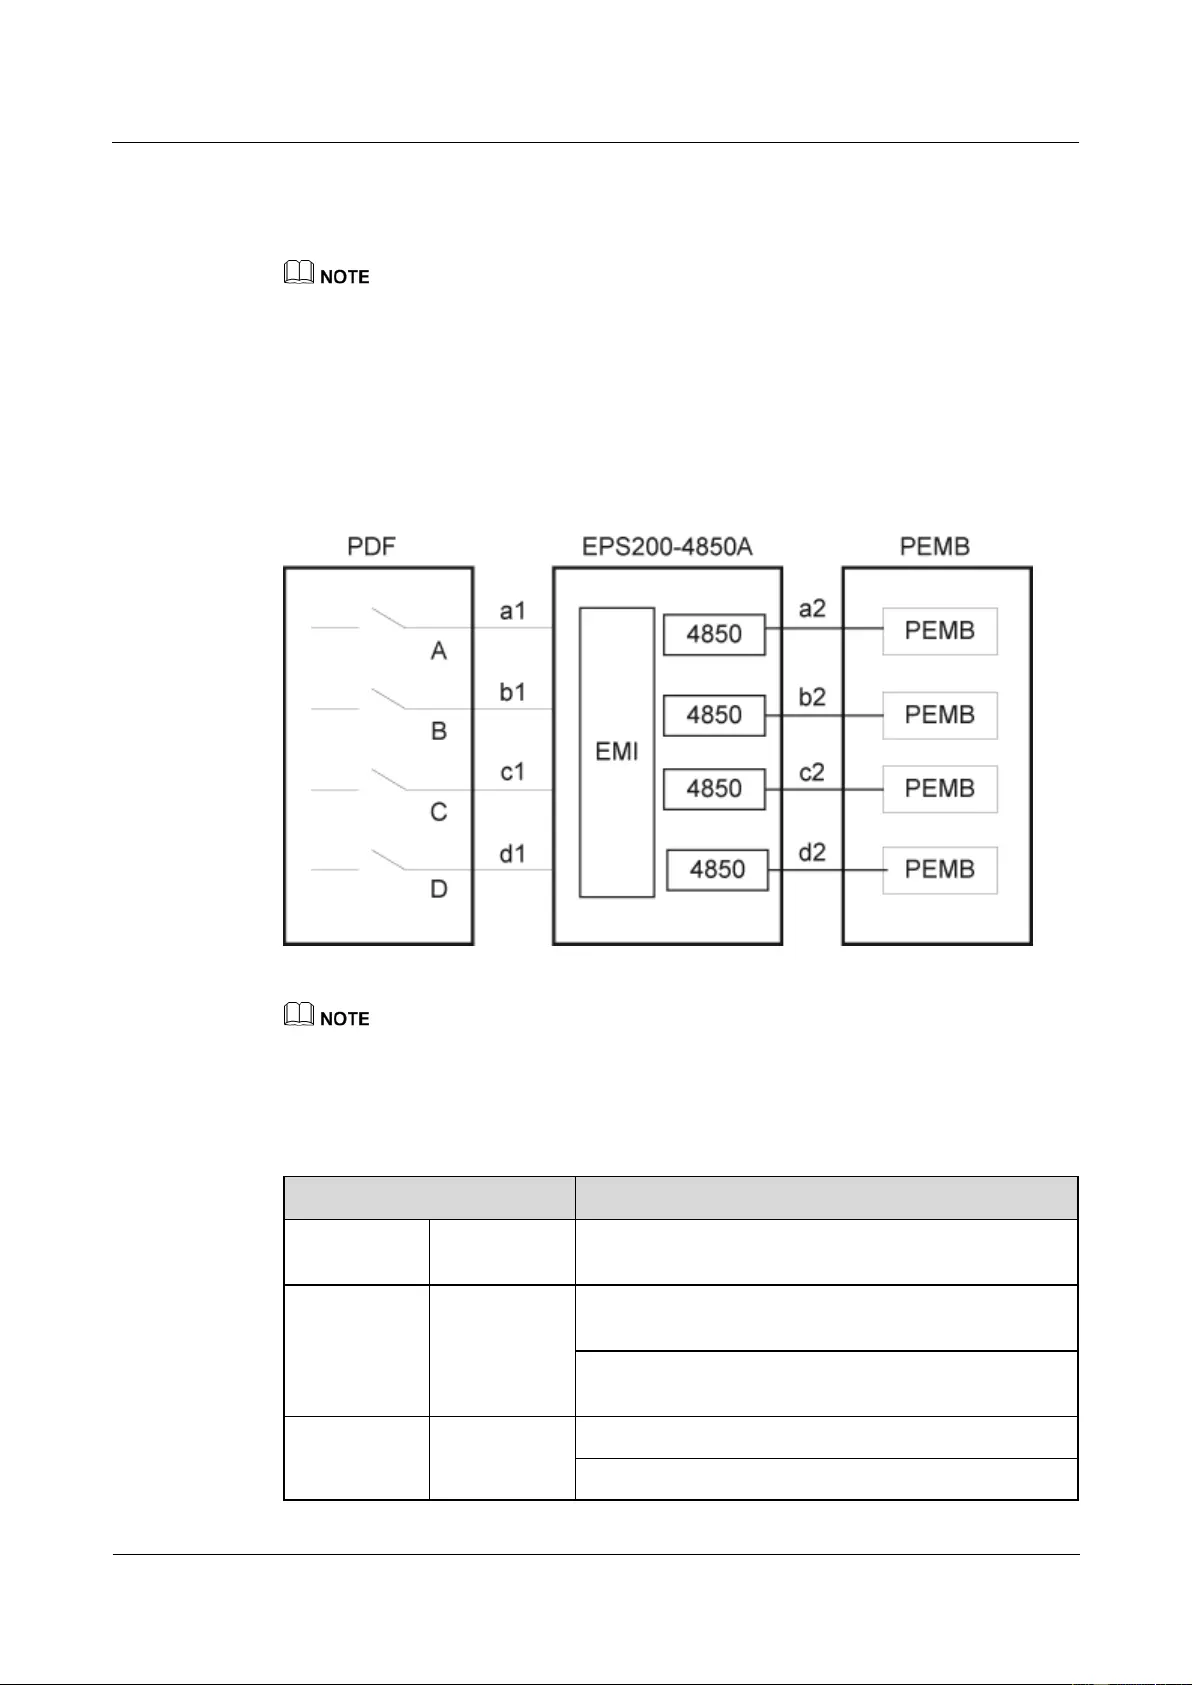
HUAWEI USG9500 Series Terabit-level Next-Generation Firewall
Hardware Guide
2 Hardware Installation
Issue 01 (2017-03-13)
Huawei Proprietary and Confidential
Copyright © Huawei Technologies Co., Ltd.
309
2.5.2.2 Guide to the AC Power Distribution
This section describes AC power distribution and matching AC cables.
If the customer uses a purchased three-core cable, the ground core does not need to be connected to the
ground terminal on the device. This is because the ground terminal on the device has already been
connected to a separate ground cable, ensuring that the device is properly grounded.
Figure 2-67 shows the schematic diagram of the AC power module EPS200-4850A. AC
power input is converted into regulated DC power by an AC/DC converter. The resulting DC
power output is connected to the PEMs through external cables to supply power for all boards
and fan modules.
Figure 2-67 Schematic diagram of the AC EPS200-4850A power distribution
It is recommended that the current specifications of the circuit breakers on the PDF or distribution box
should be no less than 16 A
Table 2-17 lists the cables and terminals for the AC power module EPS200-4850A.
Table 2-17 Cables and terminals for the EPS200-4850A
Item
Description
a1,b1,c1,d1
Power cable
Power Cable,300/500V,60227IEC10(BVV),6mm2,Black
Jacket(Cores:Blue,Brown),43A,2 Equivalent Cores
Terminal
Naked Crimping Terminal,OT,6mm2,M6,Tin
Plating,Insulated Ring Terminal,12~10AWG,yellow
Naked Crimping Terminal,OT,6mm2,M8,Tin
Plating,Insulated Ring Terminal,12~10AWG,yellow
a2,b2,c2,d2
Cables
Monitor and Alarm Cable,3m,D9M,CC4P0.48B(S),D9M
Wire,450/750V,227 IEC 02(RV)16mm2,blue,85A
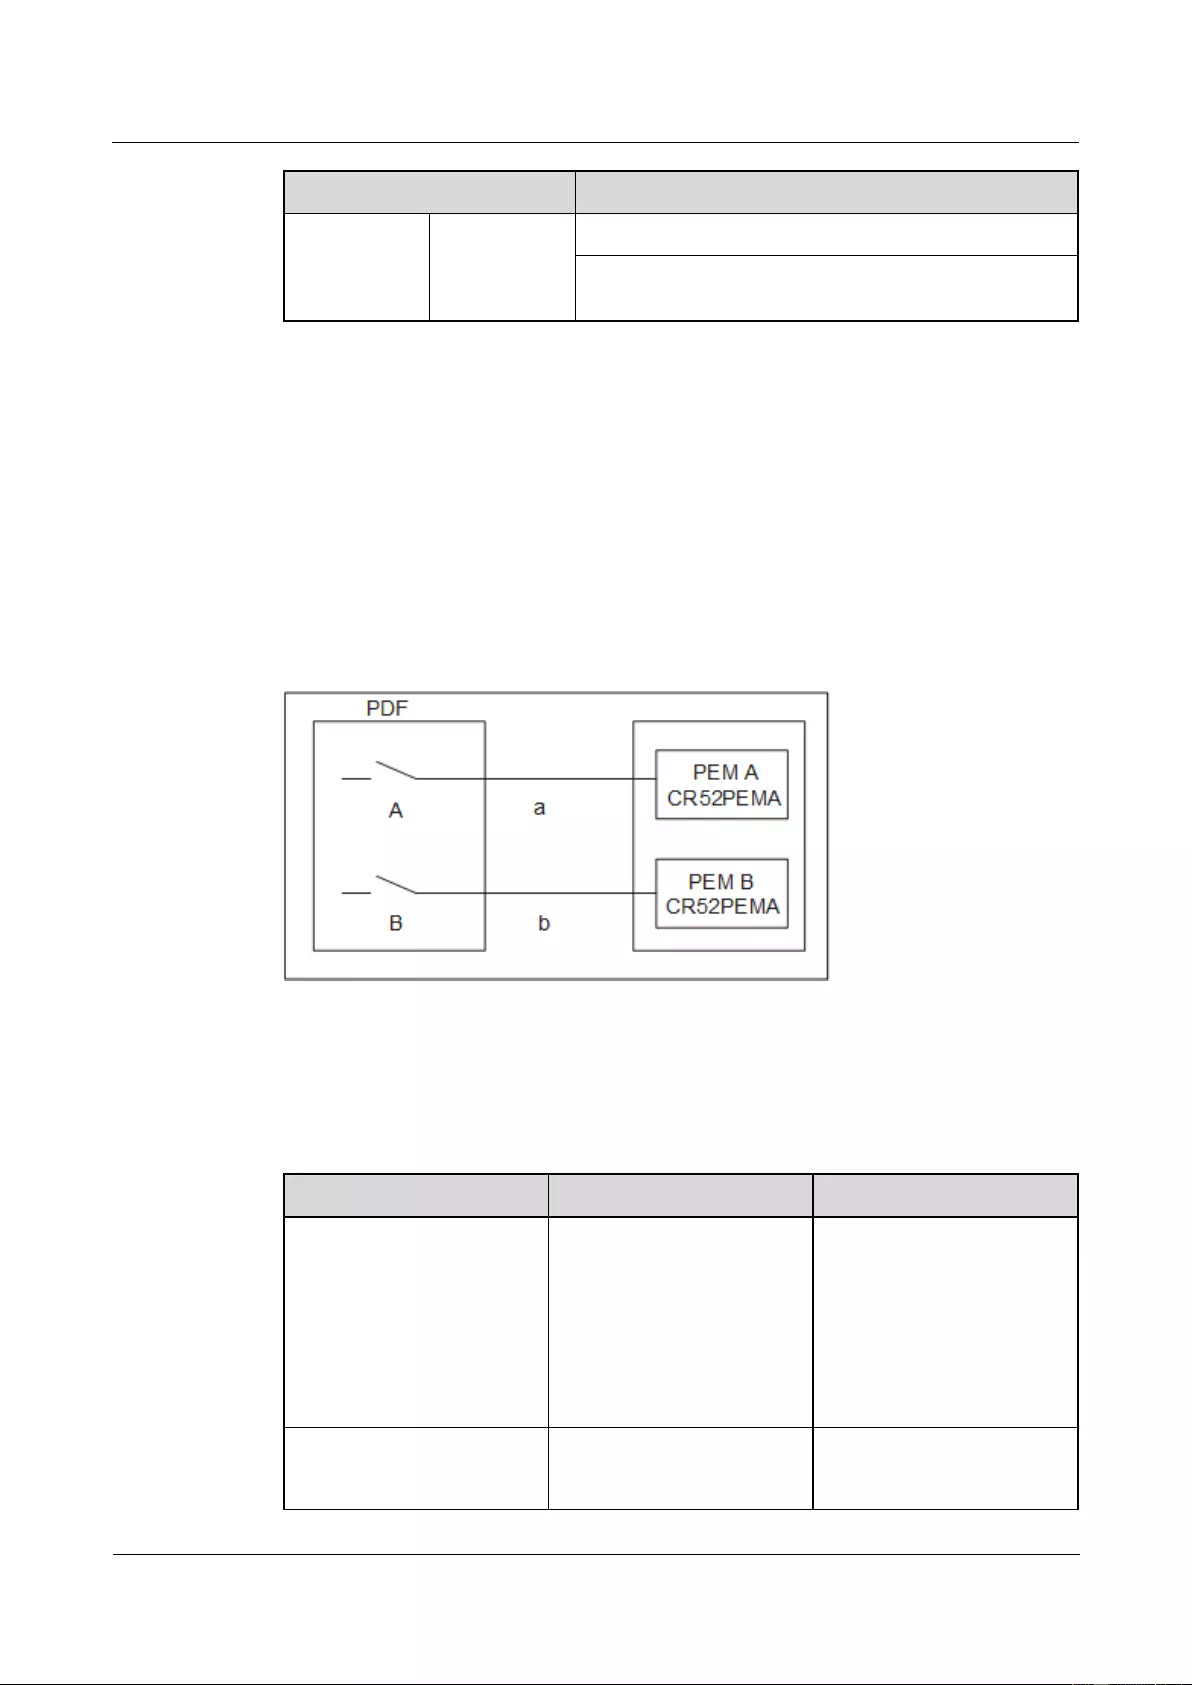
HUAWEI USG9500 Series Terabit-level Next-Generation Firewall
Hardware Guide
2 Hardware Installation
Issue 01 (2017-03-13)
Huawei Proprietary and Confidential
Copyright © Huawei Technologies Co., Ltd.
310
Item
Description
Terminal
Wire,450/750V,227 IEC 02(RV)16mm2,black,85A
Naked Crimping Terminal,JG2,16mm2,M6,95A,Tin
Plated,for OEM
2.5.3 Guide to Power Distribution Design of the USG9520
This section describes how to configure power distribution for the USG9520.
2.5.3.1 Guide to the DC Power Distribution
This section describes how to select DC power distribution cables and circuit breakers of the
DC PDF.
Figure 2-68 shows the schematic diagram of the DC power distribution.
Figure 2-68 Schematic diagram of the DC power distribution
Table 2-18 shows the current parameters of each circuit breaker and each power line for the
PDF.
Table 2-18 Current parameters of each circuit breaker and each power line for the PDF (DC
PEMA)
Item
Specification
Note
Each circuit breaker (A and
B)
≥ 50 A
To protect power supplies of
different levels, it is
recommended that the
current of the circuit breaker
on the user side should be
greater than or equal to that
of the circuit breaker of the
power module (50 A).
Each power supply (A and
B)
≥33 A @ -48 V
To support the maximum
configuration, it is
recommended that each DC

HUAWEI USG9500 Series Terabit-level Next-Generation Firewall
Hardware Guide
2 Hardware Installation
Issue 01 (2017-03-13)
Huawei Proprietary and Confidential
Copyright © Huawei Technologies Co., Ltd.
311
Item
Specification
Note
power line should provide a
minimum of 33 A @ -48 V
current.
If the PDF cannot provide 50 A circuit breakers and the full configuration is unnecessary,
you can select the circuit breaker of each DC line by using the following formula.
I = P / (Vin * D * 1)
I: indicates the rated current of the circuit breaker of each line on the PDF, in Ampere (A).
P: indicates the total power of each device.
Vin: indicates the input voltage of the power supply. (38 < Vin < 72)
D: indicates the derating coefficient. The recommended coefficient is 0.8.
1: indicates the number of the input lines of the power module.
Table 2-19 shows the selection of power cables a and b.
Table 2-19 Cables for the PEMA
Distance from the PDF to
the Device
Selection of Power Cables a and b
Equal to or shorter than 15
m
Wire,450/750V,227 IEC
02(RV)16mm2,blue,85A
Each power module should
be equipped with one cable
of this type. The cable
length is determined by the
project survey on site.
Wire,450/750V,227 IEC
02(RV)16mm2,black,85A
Each power module should
be equipped with one cable
of this type. The cable
length is determined by the
project survey on site.
Naked Crimping
Terminal,JG2,16mm2,M6,95
A,Tin Plated,for OEM
Each cable should be
equipped with one terminal
of this type.
Naked Crimping
Terminal,OT,16mm2,M8,Ti
n Plating,Naked Ring
Terminal
Each cable should be
equipped with one terminal
of this type.
Longer than 15 m and equal
to or shorter than 35 m
Wire,450/750V,227 IEC
02(RV)25mm2,blue,110A
Each power module should
be equipped with one cable
of this type. The cable
length is determined by the
project survey on site.
Wire,450/750V,227 IEC
02(RV)25mm2,black,110A
Each power module should
be equipped with one cable
of this type. The cable
length is determined by the
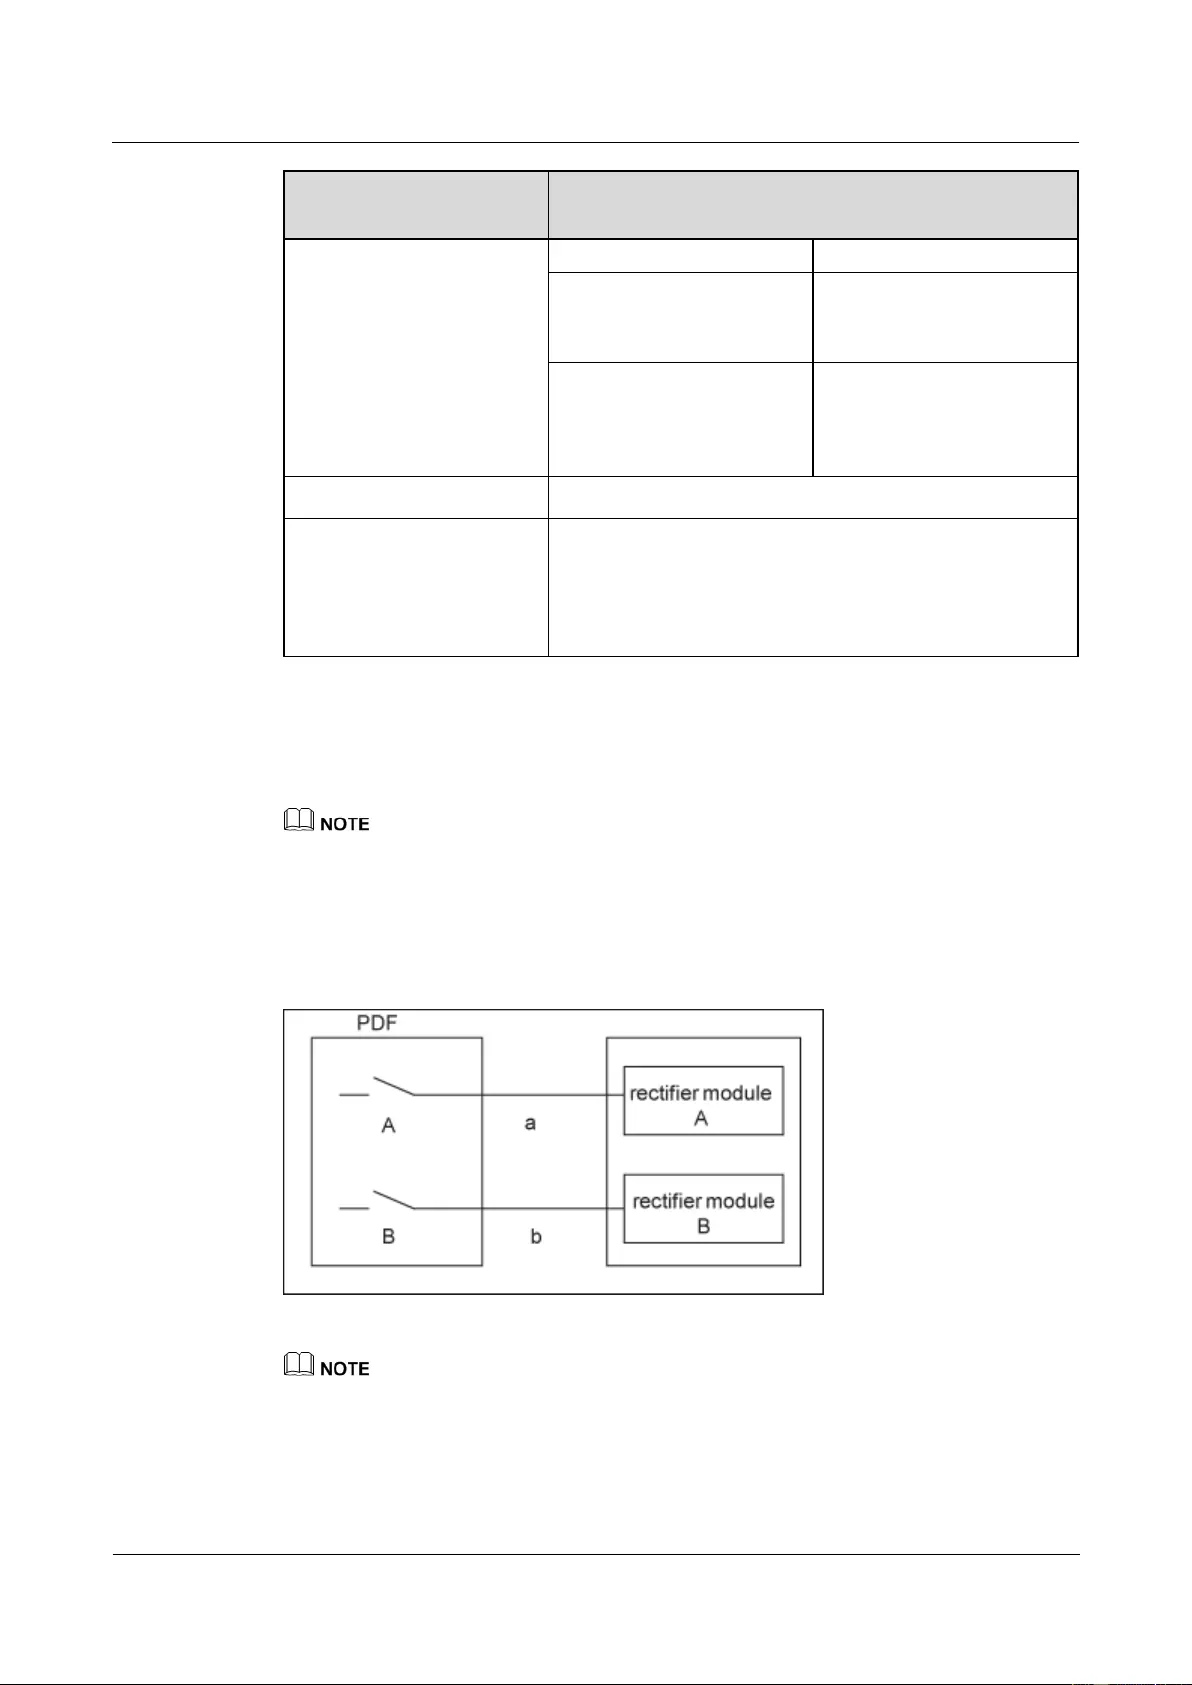
HUAWEI USG9500 Series Terabit-level Next-Generation Firewall
Hardware Guide
2 Hardware Installation
Issue 01 (2017-03-13)
Huawei Proprietary and Confidential
Copyright © Huawei Technologies Co., Ltd.
312
Distance from the PDF to
the Device
Selection of Power Cables a and b
project survey on site.
Naked Crimping
Connector,JG2,25mm2,M6,1
50A,Tin Plating,For OEM
Each cable should be
equipped with one terminal
of this type.
Naked Crimping
Terminal,OT,25mm2,M8,Ti
n Plating,Naked Ring
Terminal
Each cable should be
equipped with one terminal
of this type.
Longer than 35 m
A PDF should be placed near the device.
Formula calculating cable
cross-sectional area
S = ( I * L ) / 74
S: indicates cross-sectional area.
I: indicates the current flowing through the cable.
L: indicates distance from the PDF to the device.
2.5.3.2 Guide to the AC Power Distribution
This section describes AC power distribution and matching AC cables.
If the customer uses a purchased three-core cable, the ground core does not need to be connected to the
ground terminal on the device. This is because the ground terminal on the device has already been
connected to a separate ground cable, ensuring that the device is properly grounded.
Figure 2-69 shows the appearance of the AC power module.
Figure 2-69 Schematic diagram of the AC power distribution
AC power modules A and B are connected to two AC PDF or AC distribution box through cables a and
b.
It is recommended that the current specifications of the circuit breakers (A and B) on the PDF or
distribution box should be no less than 20 A (because the current specifications of the circuit breaker of
the R4850G2 power module is 20 A).

HUAWEI USG9500 Series Terabit-level Next-Generation Firewall
Hardware Guide
2 Hardware Installation
Issue 01 (2017-03-13)
Huawei Proprietary and Confidential
Copyright © Huawei Technologies Co., Ltd.
313
It is recommended that the current specifications of the circuit breakers (A and B) on the PDF or
distribution box should be no less than 10 A (because the current specifications of the circuit breaker of
the EPW30B-48A power module is 10 A).
Table 2-20 lists the cables and terminals for the AC power module.
Table 2-20 Cables and terminals for the AC power module
Type
Description
Quantity
R4850G2
External Suite, Power Cords All
Over The World, Class I Equipment
With Connector C19, External
Cable Set
Each power module should be
equipped with one cable of this
type. The cable length is
determined by the project survey on
site.
EPW30B-48
A
External Suite, Power Cords All
Over The World, Class I Equipment
With Connector C13, External
Cable Set
Each power module should be
equipped with one cable of this
type. The cable length is
determined by the project survey on
site.

HUAWEI USG9500 Series Terabit-level Next-Generation Firewall
Hardware Guide
3 Hardware Maintenance
Issue 01 (2017-03-13)
Huawei Proprietary and Confidential
Copyright © Huawei Technologies Co., Ltd.
314
3 Hardware Maintenance
3.1 Replacing Boards
This section describes the precaution and procedure for replacing MPU/SRU, SFU, FPIC of
the LPU, and SPC of the SPU.
3.1.1 Replacing an MPU/SRU
This section describes the precaution and procedure for replacing an MPU/SRU.
Context
Before replacing a Main Processing Unit (MPU)/Switch and Route Processing Unit (SRU),
you need to note the following points:
When the system is running, you can replace only the slave MPU/SRU.
If you need to replace the master MPU/SRU, you must first perform the master/slave
switchover to enable the master MPU/SRU to become the slave one.
The system software package and configuration file in the new MPU/SRU must be
consistent with those in the MPU/SRU to be replaced.
Tool
Before replacing an MPU/SRU, you need the following tools:
ESD wrist strap or ESD glove
Phillips screwdriver
ESD bag
Procedure
Step 1 Check the version of the running software package.
Run the display_version command to check the version of the running software package.
Step 2 Prepare a new MPU/SRU and check whether there is any bent pin in the connector. After
determining that there is no bent pin, copy the software package and configuration file
checked in Step 1 to the root directory of CF card 1 of the new MPU/SRU.
Step 3 Save the current configuration.

HUAWEI USG9500 Series Terabit-level Next-Generation Firewall
Hardware Guide
3 Hardware Maintenance
Issue 01 (2017-03-13)
Huawei Proprietary and Confidential
Copyright © Huawei Technologies Co., Ltd.
315
Run the save command to save the current configuration.
Run the compare configuration command to compare the saved configuration file and the
current configuration file.
Step 4 Check the location of the MPU/SRU to be replaced.
Before pulling out an MPU/SRU that is to be replaced, you should first determine the location
of the MPU/SRU, for example, the cabinet, chassis, and slot where the MPU/SRU resides.
The USG have two MPUs/SRUs.
The MPUs of the USG9520 reside in slots 4 and 5.
The SRUs of the USG9560 reside in slots 9 and 10.
The MPUs of the USG9580 reside in slots 17 and 18.
Locate the MPU/SRU to be replaced in the chassis and attach a label to identify the
MPU/SRU.
Step 5 Check whether the MPU/SRU to be replaced is the master MPU/SRU.
Run the display device command to check the slot number of the current MPU/SRU. If the
MPU/SRU to be replaced is the master one, you must run the slave switchover command on
the console interface to forcibly perform the master/slave switchover. If the output is
displayed as follows on the console interface, it indicates that the switchover is successful.
Then, run the display device command to check the slot number of the MPU/SRU after the
master/slave switchover.
[sysname] slave switchover enable
[sysname] slave switchover
Caution!!! Confirm switch slave to master[Y/N]? y
Switching........................................................................
[sysname]
Step 6 Remove the cables from the MPU/SRU and label the cables.
Step 7 Power off the MPU/SRU to be replaced.
Press and hold the OFL button on the panel of the MPU/SRU for six seconds till the OFL
indicator is on. It means that the MPU/SRU is powered off.
Step 8 Pull out the MPU/SRU to be replaced from the chassis.
1. Wear the ESD wrist strap and connect the grounding terminal to the ESD jack on the
rack.
2. Turn the Phillips screwdriver counter-clockwise to loosen the two captive screws on the
board, as (1) shown in Figure 3-1.
3. Turn the ejector levers on the panel of the MPU/SRU outward and upward. When the
ejector levers and the panel form a 45-degree angle, the MPU/SRU is removed from the
backplane, as (2) shown in Figure 3-1.
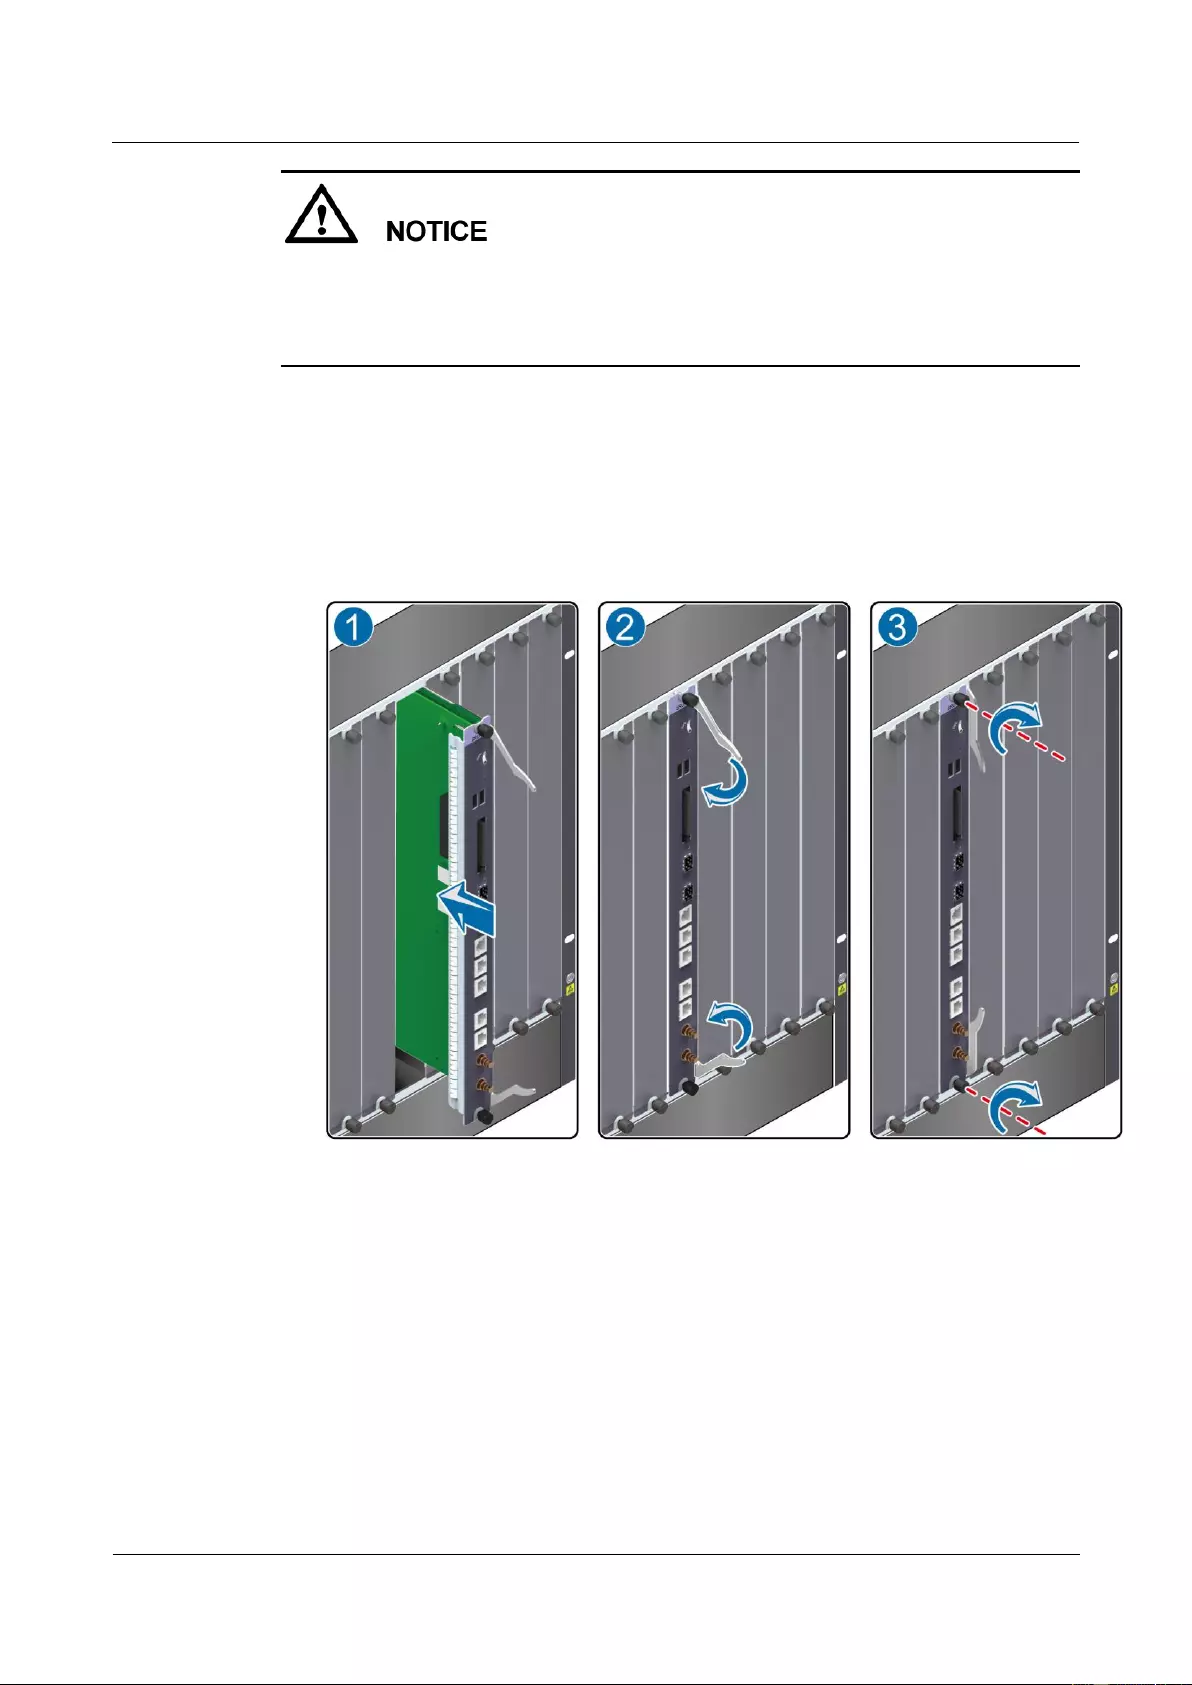
HUAWEI USG9500 Series Terabit-level Next-Generation Firewall
Hardware Guide
3 Hardware Maintenance
Issue 01 (2017-03-13)
Huawei Proprietary and Confidential
Copyright © Huawei Technologies Co., Ltd.
316
During the operation, pull out the MPU/SRU slowly and smoothly to prevent it from
colliding with the neighboring boards and from causing the failure of the running boards.
When swapping an MPU/SRU, do not touch the parts on the MPU/SRU. This is to prevent
it from being damaged.
4. Hold the ejector levers on the panel of the MPU/SRU and pull out the MPU/SRU
smoothly from the chassis along the guide rail of the slot. When the MPU/SRU is 40 cm
out of the chassis, support the lower edge of the MPU/SRU with one hand and hold the
panel of the MPU/SRU with the other hand. Then, pull out the MPU/SRU smoothly from
the slot, as (3) shown in Figure 3-1.
5. Place the MPU/SRU that is removed in the ESD bag.
Figure 3-1 Schematic diagram of removing an MPU/SRU
Step 9 Insert the new MPU/SRU into the chassis.
1. Take out the new MPU/SRU from the ESD bag.
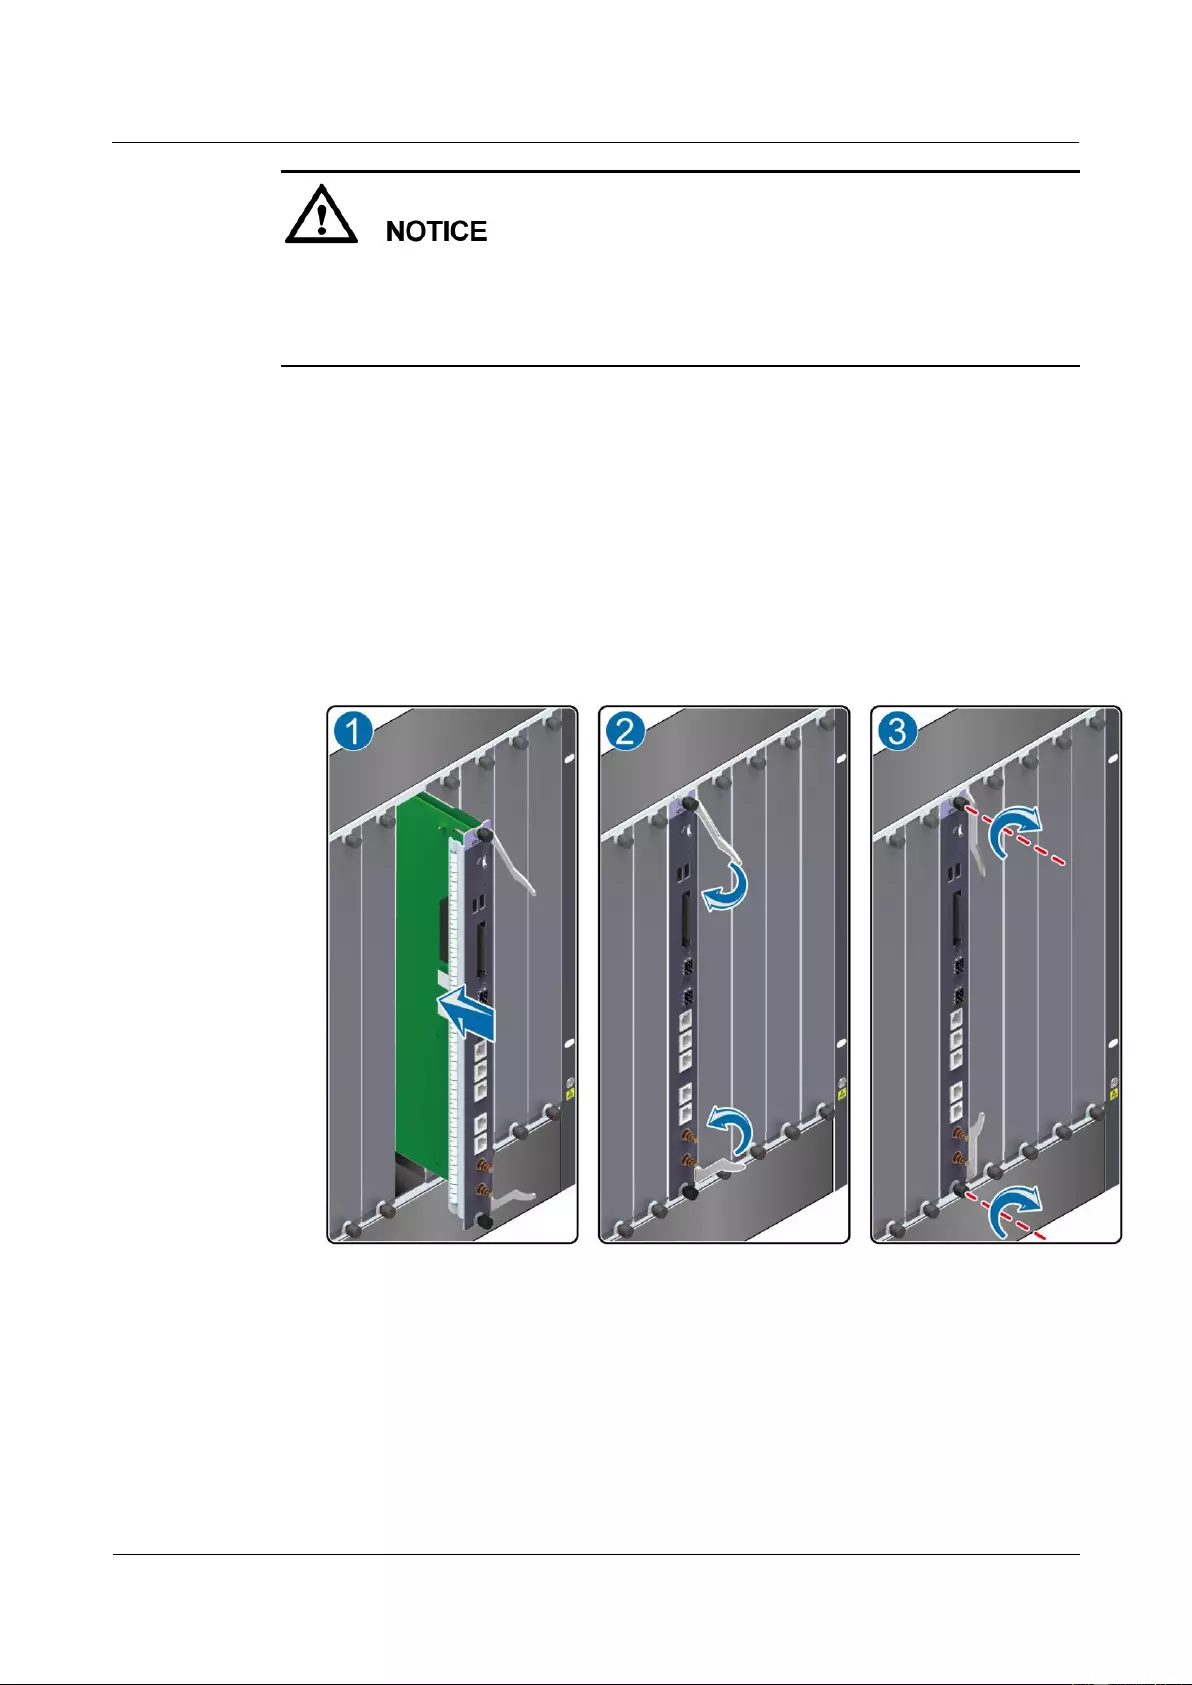
HUAWEI USG9500 Series Terabit-level Next-Generation Firewall
Hardware Guide
3 Hardware Maintenance
Issue 01 (2017-03-13)
Huawei Proprietary and Confidential
Copyright © Huawei Technologies Co., Ltd.
317
During the operation, pull out the MPU/SRU slowly and smoothly to prevent it from
colliding with the neighboring boards and from causing the failure of the running boards.
When swapping an MPU/SRU, do not touch the parts on the MPU/SRU. This is to prevent
it from being damaged.
2. Support the lower edge of the new MPU/SRU with one hand and hold the panel with the
other hand. Then, insert the new MPU/SRU smoothly into the chassis along the guide
rail of the slot. Stop sliding the MPU/SRU forward when the ejector levers on the front
panel of the MPU/SRU reaches the chassis, as (1) shown in Figure 3-2.
3. Turn the ejector levers on the MPU/SRU outward and upward to form a 45-degree angle,
and at the same time push the MPU/SRU into the slot. Then, turn the ejector levers
inward and downward till the panel of the MPU/SRU touches the slot, as (2) shown in
Figure 3-2.
4. Turn the Phillips screwdriver clockwise to tighten the two captive screws, as (3) shown
in Figure 3-2.
Figure 3-2 Schematic diagram of inserting an MPU/SRU
Step 10 Check the running status of the new MPU/SRU.
In normal situations, after the new MPU/SRU is inserted into the chassis, the MPU/SRU
automatically communicates with the boards in the chassis. In this case, you can check the
running status of the new MPU/SRU in the following ways:
If the RUN indicator on the panel of the MPU/SRU is on (green), it indicates that the
MPU/SRU is running normally.

HUAWEI USG9500 Series Terabit-level Next-Generation Firewall
Hardware Guide
3 Hardware Maintenance
Issue 01 (2017-03-13)
Huawei Proprietary and Confidential
Copyright © Huawei Technologies Co., Ltd.
318
Check the alarms. In normal situations, the system does not generate any alarm related to
the new MPU/SRU.
Run the display device command on the console interface to view the running status of
the new MPU/SRU. If the output is displayed as follows, it indicates that the MPU/SRU
is running normally.
<sysname> display device
USG9560's Device status:
Slot # Type Online Register Status Primary
- - - - - - - - - - - - - - - - - - - - - - - - - - - - - - - - - - - - - -
1 SPU Present Registered Normal NA
2 SPU Present Registered Normal NA
3 SPU Present Registered Normal NA
4 SPU Present Registered Normal NA
5 SPU Present Registered Normal NA
6 LPU Present Registered Normal NA
7 LPU Present Registered Normal NA
8 LPU Present Registered Normal NA
9 MPU Present NA Normal Master
10 MPU Present Registered Normal Slave
11 SFU Present Registered Normal NA
12 SFU Present Registered Normal NA
13 SFU Present Registered Normal NA
14 CLK Present Registered Normal Master
15 CLK Present Registered Normal Slave
16 PWR Present Registered Normal NA
17 PWR Present Registered Normal NA
18 FAN Present Registered Normal NA
19 FAN Present Registered Normal NA
- - - - - - - - - - - - - - - - - - - - - - - - - - - - - - - - - - - - - -
----End
Follow-up Procedure
After replacing an MPU/SRU, collect the tools.
If an MPU/SRU that is replaced is confirmed to be faulty, you should fill in the Faulty
Card for Repair, and send the card and the faulty MPU/SRU to a Huawei local office for
timely maintenance.
3.1.2 Replacing an SFU
This section describes the precaution and procedure for replacing an SFU.
Context
Before replacing a Switch Fabric Unit (SFU), you need to note the following points:
The USG9560 has three SFUs . Only one SFU among the three can be separately
replaced.
The USG9580 has four SFUs. All four SFUs can be separately replaced. However, only
one SFU can be replaced at a time when the device is operating. To replace multiple
SFUs, replace one SFU at first, wait till the inserted one operates normally, then replace
the rest one by one.

HUAWEI USG9500 Series Terabit-level Next-Generation Firewall
Hardware Guide
3 Hardware Maintenance
Issue 01 (2017-03-13)
Huawei Proprietary and Confidential
Copyright © Huawei Technologies Co., Ltd.
319
USG9520 does not have independent SFU.
Tool
Before replacing an SFU, you need the following tools:
ESD wrist strap or ESD glove
Phillips screwdriver
ESD bag
Procedure
Step 1 Check the location of the SFU to be replaced.
Before pulling out an SFU that is to be replaced, you should first determine the location of the
SFU, for example, the cabinet, chassis, and slot where the SFU resides.
The USG9560 has one SFU, which resides in slot 11.
The USG9580 has four SFUs in slots 19, 20, 21, and 22 separately.
Locate the SFU to be replaced in the chassis and attach a label to identify the SFU.
Step 2 Prepare a new SFU and check whether there is any bent pin in the connector.
Step 3 Power off the SFU to be replaced.
You can use either of the following methods.
Press and hold the OFL button on the panel of the SFU for six seconds until the OFL
indicator is on. It means that the SFU is powered off.
In the user view, run the power off slot slot-id command.
Step 4 Pull out the SFU to be replaced from the chassis.
1. Wear the ESD wrist strap and connect the grounding terminal to the ESD jack on the
rack.
2. Loosen the two captive screws counter-clockwise with a Phillips screwdriver, as (1)
shown in Figure 3-3.
3. Turn the ejector levers on the panel of the SFU outward and upward. When the ejector
levers and the panel form a 45-degree angle, the SFU is removed from the backplane, as
(2) shown in Figure 3-3.
During the operation, pull out the SFU slowly and smoothly to prevent it from colliding
with the neighboring boards and from causing the failure of the running boards.
When swapping an SFU, do not touch the parts on the SFU. This is to prevent it from
being damaged.
4. Hold the ejector levers on the panel of the SFU and pull out the SFU smoothly from the
chassis along the guide rail of the slot. When the SFU is 30 cm to 40 cm out of the
chassis, support the lower edge of the SFU with one hand and hold the panel of the SFU
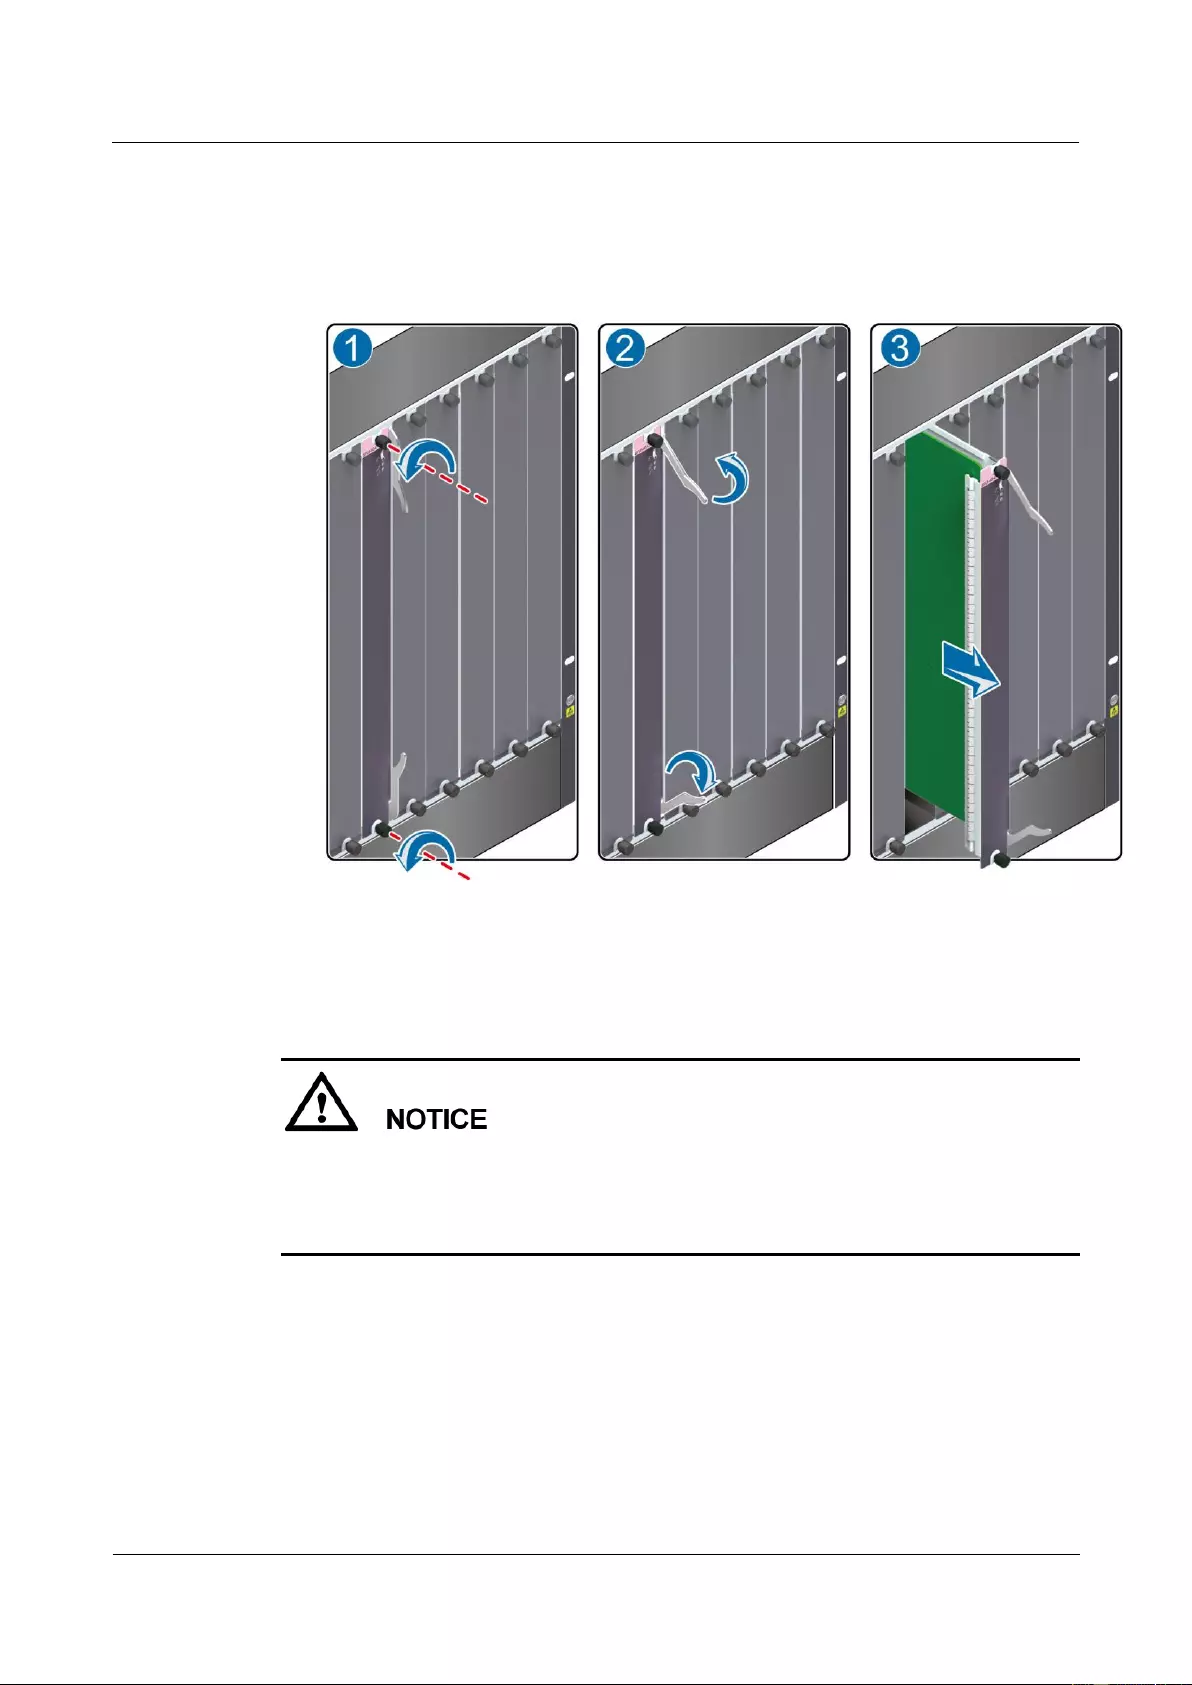
HUAWEI USG9500 Series Terabit-level Next-Generation Firewall
Hardware Guide
3 Hardware Maintenance
Issue 01 (2017-03-13)
Huawei Proprietary and Confidential
Copyright © Huawei Technologies Co., Ltd.
320
with the other hand. Then, pull out the SFU smoothly from the slot, as (3) shown in
Figure 3-3.
5. Place the SFU that is pulled out in the ESD-preventative bag.
Figure 3-3 Schematic diagram of removing an SFU
Step 5 Insert the new SFU into the chassis.
1. Take out the new SFU from the ESD bag.
During the operation, pull out the SFU slowly and smoothly to prevent it from colliding
with the neighboring boards and from causing the failure of the running boards.
When swapping an SFU, do not touch the parts on the SFU. This is to prevent it from
being damaged.
2. Support the lower edge of the new SFU with one hand and hold the panel with the other
hand. Then, insert the new SFU smoothly into the chassis along the guide rail of the slot,
as (1) shown in Figure 3-4. Stop sliding the SFU forward when the ejector levers on the
front panel of the SFU reaches the chassis.
3. Turn the ejector levers on the SFU outward and upward to form a 45-degree angle, and
at the same time push the SFU into the slot. Then, turn the ejector levers inward and
downward till the panel of the SFU touches the slot, as (2) shown in Figure 3-4.
4. Turn the Phillips screwdriver clockwise to tighten the two captive screws, as (3) shown
in Figure 3-4.
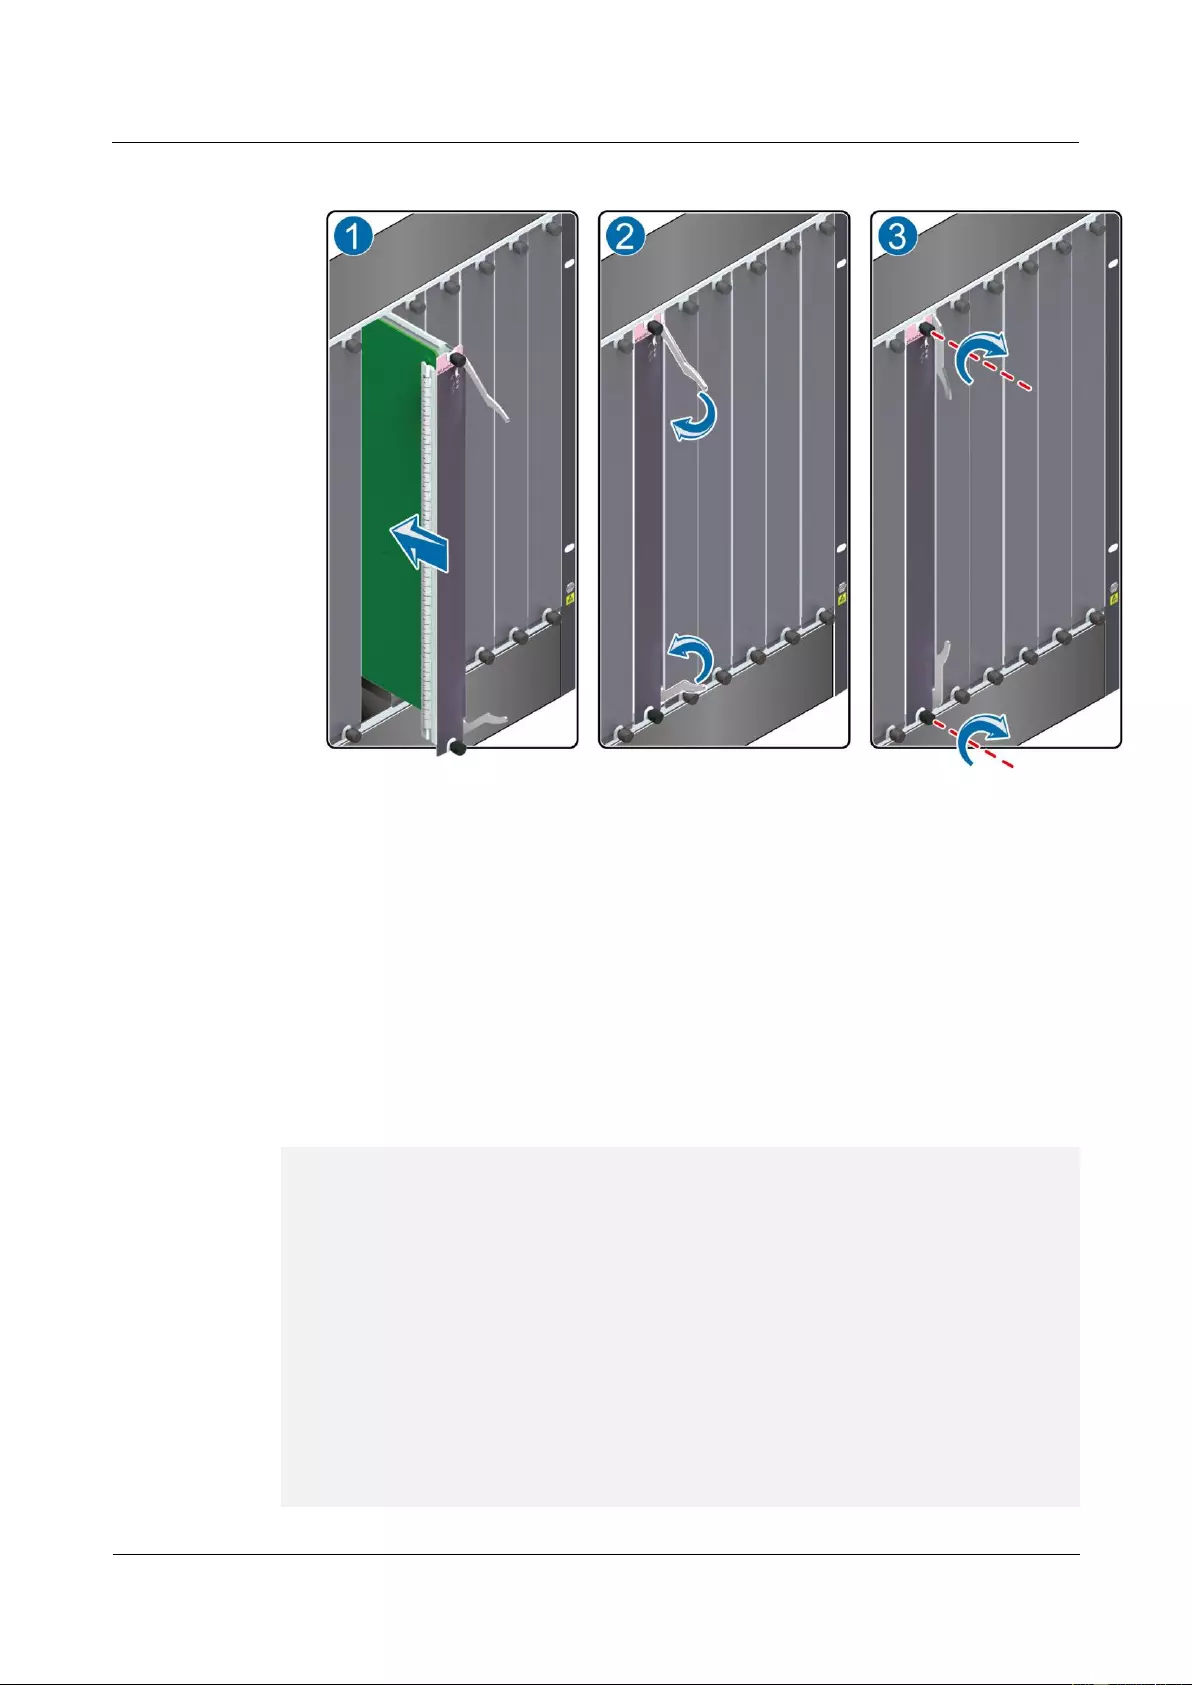
HUAWEI USG9500 Series Terabit-level Next-Generation Firewall
Hardware Guide
3 Hardware Maintenance
Issue 01 (2017-03-13)
Huawei Proprietary and Confidential
Copyright © Huawei Technologies Co., Ltd.
321
Figure 3-4 Schematic diagram of inserting the new SFU into the chassis
Step 6 Check the running status of the new SFU.
In normal situations, after the new SFU is inserted into the chassis, the SFU automatically
communicates with the boards in the chassis. In this case, you can check the running status of
the new SFU in the following ways:
If the RUN indicator on the panel of the SFU is on (green), it indicates that the SFU is
running normally.
Check the alarms. In normal situations, the system does not generate any alarm related to
the new SFU.
Run the display device command on the console interface to view the running status of
the new SFU. If the output is displayed as follows, it indicates that the SFUs are running
normally.
<sysname> display device
USG9560's Device status:
Slot # Type Online Register Status Primary
- - - - - - - - - - - - - - - - - - - - - - - - - - - - - - - - - - - - - -
1 SPU Present Registered Normal NA
2 SPU Present Registered Normal NA
3 SPU Present Registered Normal NA
4 SPU Present Registered Normal NA
5 SPU Present Registered Normal NA
6 LPU Present Registered Normal NA
7 LPU Present Registered Normal NA
8 LPU Present Registered Normal NA
9 MPU Present NA Normal Master
10 MPU Present Registered Normal Slave
11 SFU Present Registered Normal NA

HUAWEI USG9500 Series Terabit-level Next-Generation Firewall
Hardware Guide
3 Hardware Maintenance
Issue 01 (2017-03-13)
Huawei Proprietary and Confidential
Copyright © Huawei Technologies Co., Ltd.
322
12 SFU Present Registered Normal NA
13 SFU Present Registered Normal NA
14 CLK Present Registered Normal Master
15 CLK Present Registered Normal Slave
16 PWR Present Registered Normal NA
17 PWR Present Registered Normal NA
18 FAN Present Registered Normal NA
19 FAN Present Registered Normal NA
- - - - - - - - - - - - - - - - - - - - - - - - - - - - - - - - - - - - - -
----End
Follow-up Procedure
After replacing an SFU, collect the tools.
If an SFU that is replaced is confirmed to be faulty, you should fill in the Faulty Card for
Repair, and send the card and the faulty SFU to a Huawei local office for timely
maintenance.
3.1.3 Replacing an LPU
This section describes the precaution and procedure for replacing an LPU.
Context
Before replacing an LPU, you need to note the following points:
Before replacing an LPU, prepare a new LPU.
When replacing boards the USG9580 device, note the boards in the lower chassis need to
be inversely installed.
Tool
Before replacing an LPU, you need the following tools:
ESD-preventive wrist strap or ESD-preventive glove
Phillips screwdriver
ESD-preventive bag
Procedure
Step 1 Check the location of the LPU to be replaced.
Before pulling out an LPU that is to be replaced, you should first check the location of
the LPU, for example, the cabinet, chassis, and slot where the LPU resides.
USG9580 has 16 LPU slots numbered from 1 to 16.
USG9560 has 8 LPU slots numbered from 1 to 8.
USG9520 has 3 LPU slots numbered from 1 to 3.
Locate the LPU to be replaced in the chassis and attach a label to identify the LPU.
Step 2 Check whether there is any bent pin in the connector of the new LPU.
Step 3 Power off the LPU to be replaced.

HUAWEI USG9500 Series Terabit-level Next-Generation Firewall
Hardware Guide
3 Hardware Maintenance
Issue 01 (2017-03-13)
Huawei Proprietary and Confidential
Copyright © Huawei Technologies Co., Ltd.
323
You can use either of the following methods.
Press and hold the OFL button on the panel of the LPU for five seconds until the OFL
indicator is on. It means that the LPU is powered off.
In the user view, run the power off slot slot-id command.
Step 4 Remove the cables from the LPU and label the cables to mark the corresponding interface
numbers.
Step 5 Pull out the LPU to be replaced from the chassis.
1. Wear the ESD-preventive wrist strap and connect the grounding terminal to the ESD
jack on the rack.
2. Loosen the two captive screws counter-clockwise with a Phillips screwdriver, as (1)
shown in Figure 3-5.
3. Turn the ejector levers on the panel of the LPU outward and upward. When the ejector
levers and the panel form a 45-degree angle, the LPU is removed from the backplane, as
(2) shown in Figure 3-5.
During the operation, pull out the LPU slowly and smoothly to prevent it from colliding
with the neighboring boards and from causing the failure of the running boards.
When swapping an LPU, do not touch the parts on the LPU. This is to prevent it from
being damaged.
4. Hold the ejector levers on the panel of the LPU and pull out the LPU smoothly from the
chassis along the guide rail of the slot. When the LPU is 40 cm out of the chassis,
support the lower edge of the LPU with one hand and hold the panel of the LPU with the
other hand. Then, pull out the LPU smoothly from the slot, as shown (3) in Figure 3-5.
5. Place the LPU that is pulled out in the ESD-preventive bag.
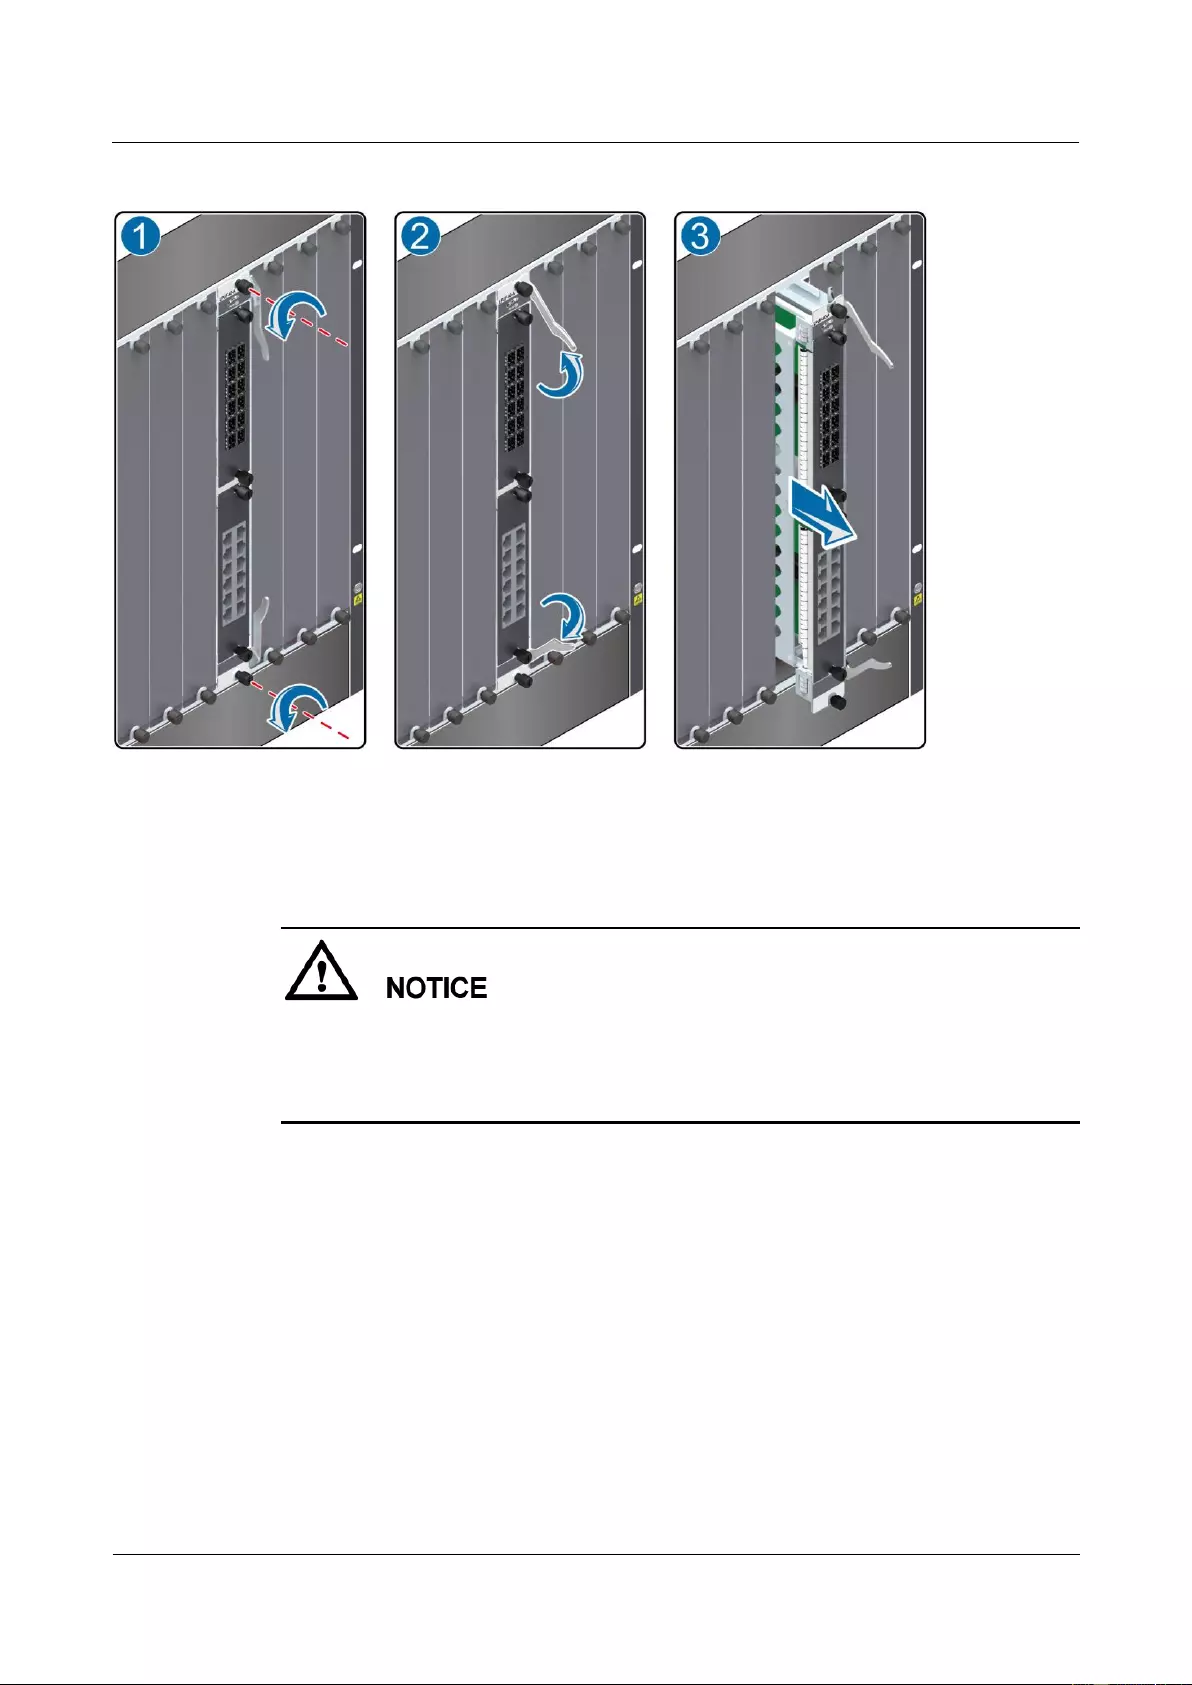
HUAWEI USG9500 Series Terabit-level Next-Generation Firewall
Hardware Guide
3 Hardware Maintenance
Issue 01 (2017-03-13)
Huawei Proprietary and Confidential
Copyright © Huawei Technologies Co., Ltd.
324
Figure 3-5 Pulling out an LPU from a chassis
Step 6 Insert the new LPU into the chassis.
1. Take out the new LPU from the ESD-preventive bag.
During the operation, pull out the LPU slowly and smoothly to prevent it from colliding
with the neighboring boards and from causing the failure of the running boards.
When swapping an LPU, do not touch the parts on the LPU. This is to prevent it from
being damaged.
2. Support the lower edge of the new LPU with one hand and hold the panel with the other
hand. Then, insert the new LPU smoothly into the chassis along the guide rail of the slot.
Stop sliding the LPU forward when the ejector lever on the front panel of the LPU
reaches the chassis, as (1) shown in Figure 3-6.
3. Turn the ejector levers on the LPU outward and upward to form a 45-degree angle, and
at the same time push the LPU into the slot. Then, turn the ejector levers inward and
downward till the panel of the LPU touches the frame, as (2) shown in Figure 3-6.
4. Turn the Phillips screwdriver clockwise to tighten the two captive screws, as (3) shown
in Figure 3-6.
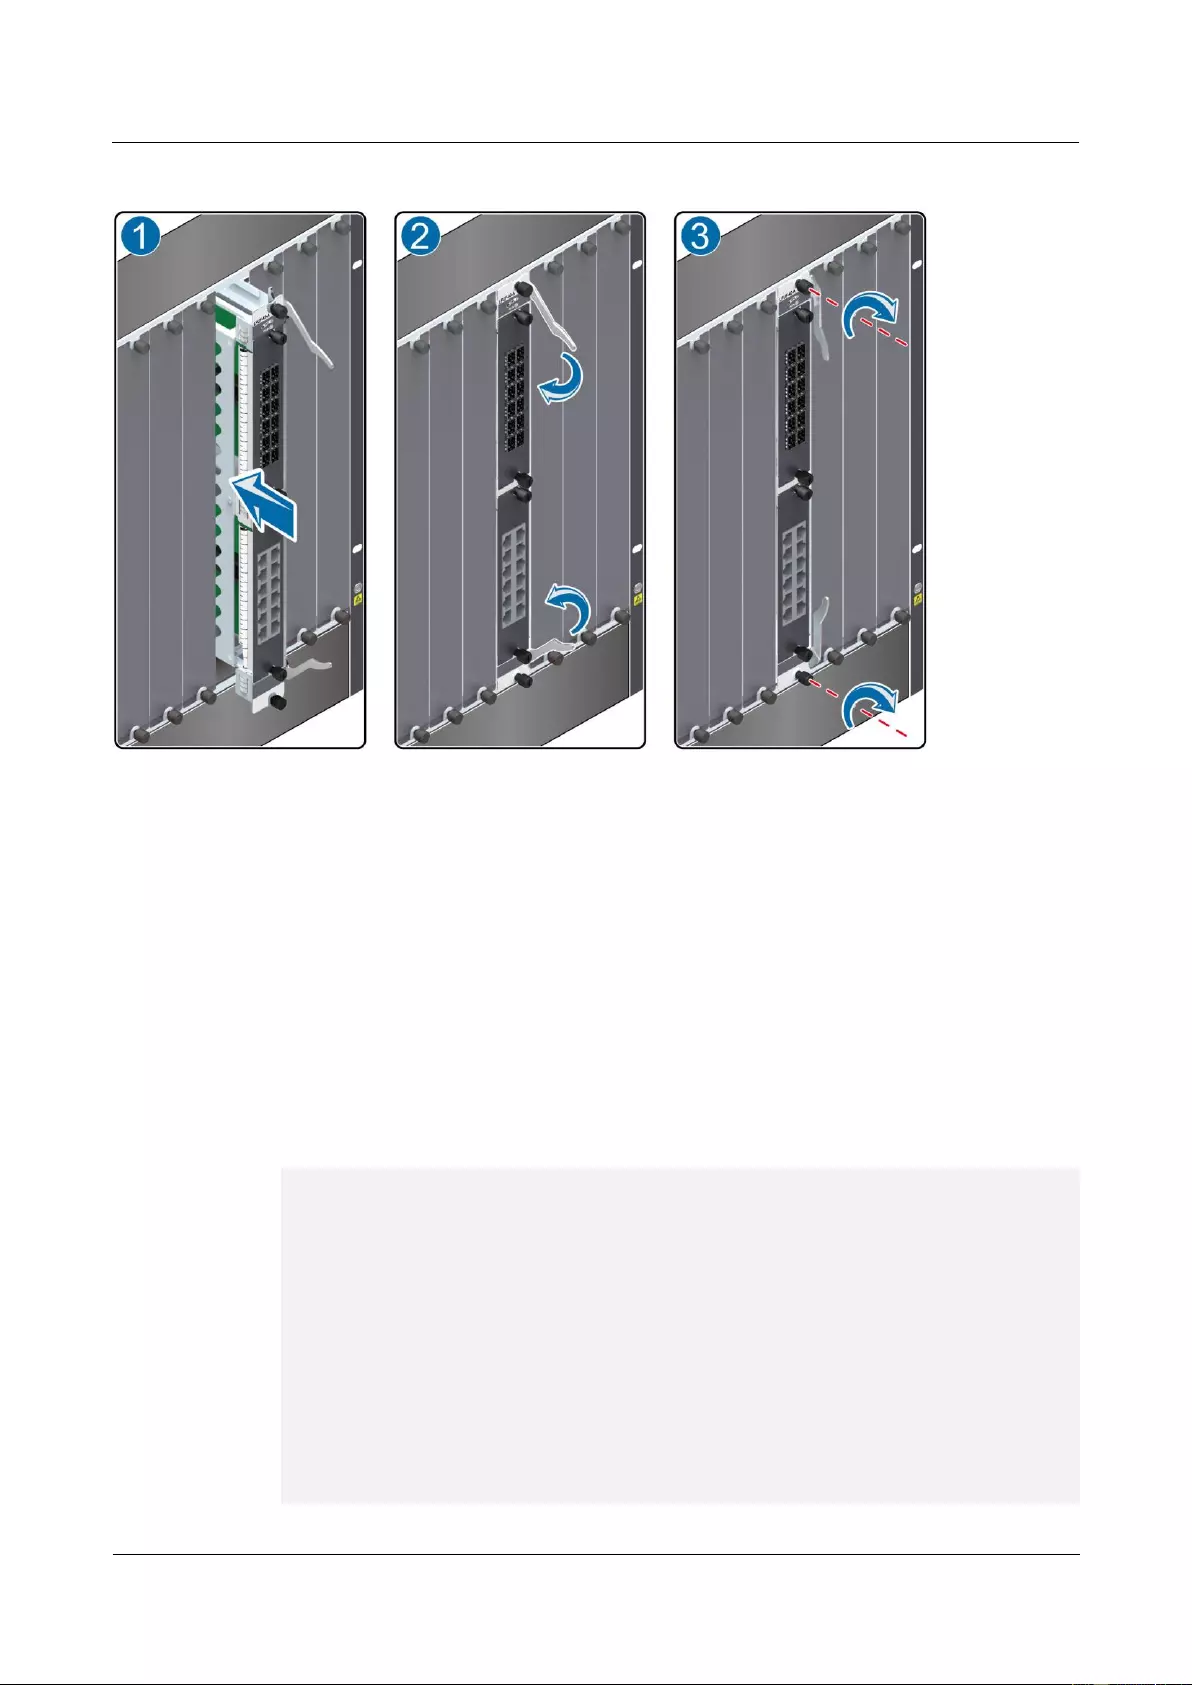
HUAWEI USG9500 Series Terabit-level Next-Generation Firewall
Hardware Guide
3 Hardware Maintenance
Issue 01 (2017-03-13)
Huawei Proprietary and Confidential
Copyright © Huawei Technologies Co., Ltd.
325
Figure 3-6 Insert an LPU into a chassis
Step 7 Connect the cables to the corresponding interfaces in the original sequence.
Step 8 Check the running status of the new LPU.
In normal situations, after the new LPU is inserted into the chassis, the LPU automatically
communicates with the MPU. In this case, you can check the running status of the new LPU
in the following ways:
If the RUN indicator on the panel of the LPU is on (green), it indicates that the LPU is
running normally.
Check the alarms. In normal situations, the system does not generate any alarm related to
the new LPU.
Run the display device command on the console interface to view the running status of
the new LPU. If the output is displayed as follows, it indicates that the LPUs in the
corresponding slots are running normally.
<sysname> display device
USG9560's Device status:
Slot # Type Online Register Status Primary
- - - - - - - - - - - - - - - - - - - - - - - - - - - - - - - - - - - - - -
1 SPU Present Registered Normal NA
2 SPU Present Registered Normal NA
3 SPU Present Registered Normal NA
4 SPU Present Registered Normal NA
5 SPU Present Registered Normal NA
6 LPU Present Registered Normal NA
7 LPU Present Registered Normal NA
8 LPU Present Registered Normal NA
9 MPU Present NA Normal Master
10 MPU Present Registered Normal Slave

HUAWEI USG9500 Series Terabit-level Next-Generation Firewall
Hardware Guide
3 Hardware Maintenance
Issue 01 (2017-03-13)
Huawei Proprietary and Confidential
Copyright © Huawei Technologies Co., Ltd.
326
11 SFU Present Registered Normal NA
12 SFU Present Registered Normal NA
13 SFU Present Registered Normal NA
14 CLK Present Registered Normal Master
15 CLK Present Registered Normal Slave
16 PWR Present Registered Normal NA
17 PWR Present Registered Normal NA
18 FAN Present Registered Normal NA
19 FAN Present Registered Normal NA
- - - - - - - - - - - - - - - - - - - - - - - - - - - - - - - - - - - - - -
Step 9 Check service operations.
----End
Follow-up Procedure
After replacing an LPU, collect the tools.
If the LPU that is replaced is confirmed to be faulty, you should fill in the Faulty Card
for Repair, and send the card and the faulty LPU to a Huawei local office for timely
maintenance.
3.1.4 Replacing an FPIC of the LPU
This section describes the precautions and procedures for replacing an FPIC.
Context
Flexible Plug-in Card (FPIC) Line Processing Unit (LPU) boards include the LPUF-240,
LPUF-120, LPUF-101, LPUF-40-A, and LPUF-21.
Before replacing an FPIC, you need to note the following points:
Prepare a same FPIC as the one to be replaced.
Power off the LPU where an FPIC to be replaced resides because all FPICs do not
support hot swap.
Tool
Before replacing an FPIC, you need the following tools:
ESD wrist strap or ESD gloves
Phillips screwdriver
ESD bag
Procedure
Step 1 Check the location of the FPIC to be replaced.
Before pulling out an FPIC to be replaced, you should first check the location of the FPIC, for
example, the cabinet, chassis, and slot where the FPIC resides. Then, locate the FPIC to be
replaced in the chassis and attach a label to identify the FPIC.
Step 2 Check whether there is any bent pin in the connector of the new FPIC.
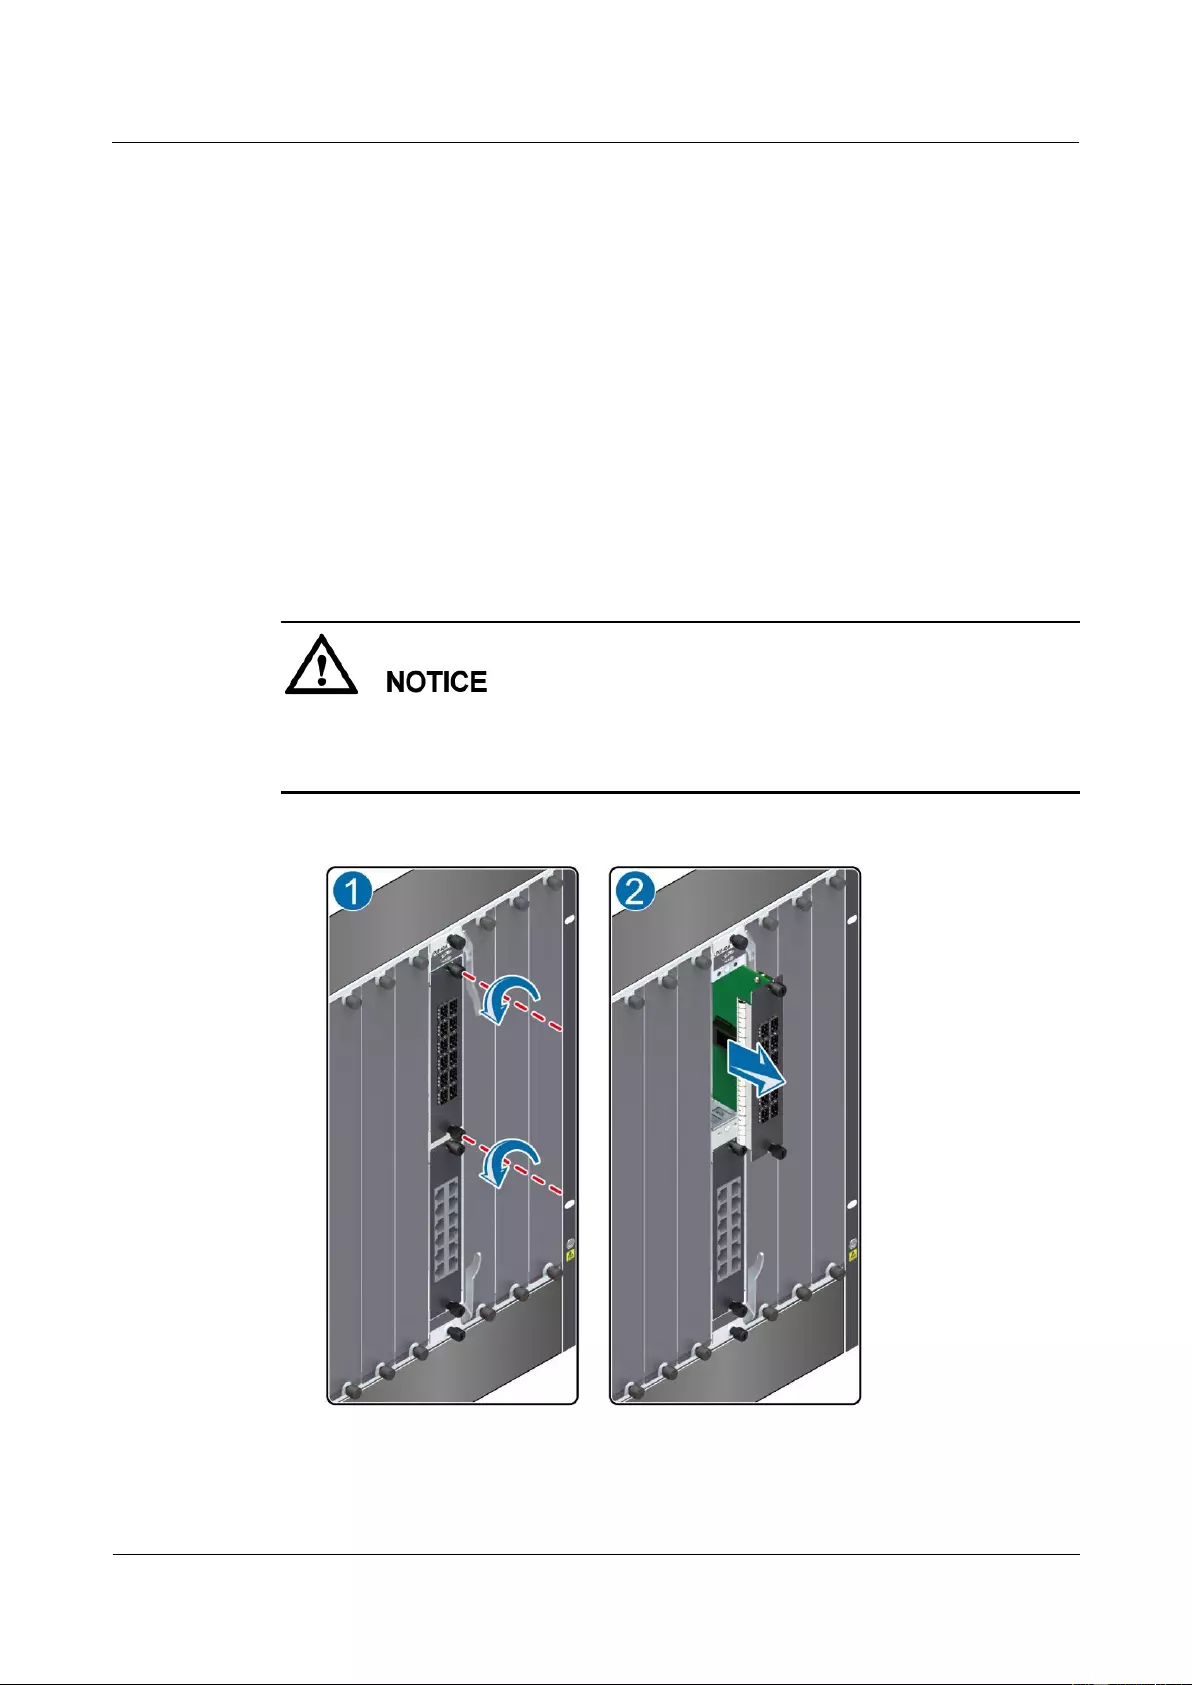
HUAWEI USG9500 Series Terabit-level Next-Generation Firewall
Hardware Guide
3 Hardware Maintenance
Issue 01 (2017-03-13)
Huawei Proprietary and Confidential
Copyright © Huawei Technologies Co., Ltd.
327
Step 3 Pull out the cables from the FPIC and label the cables to mark the corresponding interface
numbers.
Step 4 Power off the LPU to be replaced.
You can use either of the following methods.
Press and hold the OFL button on the panel of the LPU for five seconds until the OFL
indicator is on. It means that the LPU is powered off.
In the user view, run the power off slot slot-id command.
Step 5 Pull out the FPIC to be replaced from the LPU.
1. Wear the ESD wrist strap and connect the ground terminal to the ESD jack on the rack.
2. Turn the Phillips screwdriver counter-clockwise to loosen the two captive screws, as (1)
shown in Figure 3-7.
3. Hold the captive screws of the FPIC and pull out the FPIC, as (2) shown in Figure 3-7.
During the operation, pull out the LPU slowly and smoothly to prevent it from colliding
with the neighboring boards and from interrupting other running boards.
When removing an LPU, do not touch the parts on it to avoid damages to the LPU.
Figure 3-7 Pulling out an FPIC from the LPU
4. Place the removed FPIC into the ESD bag.
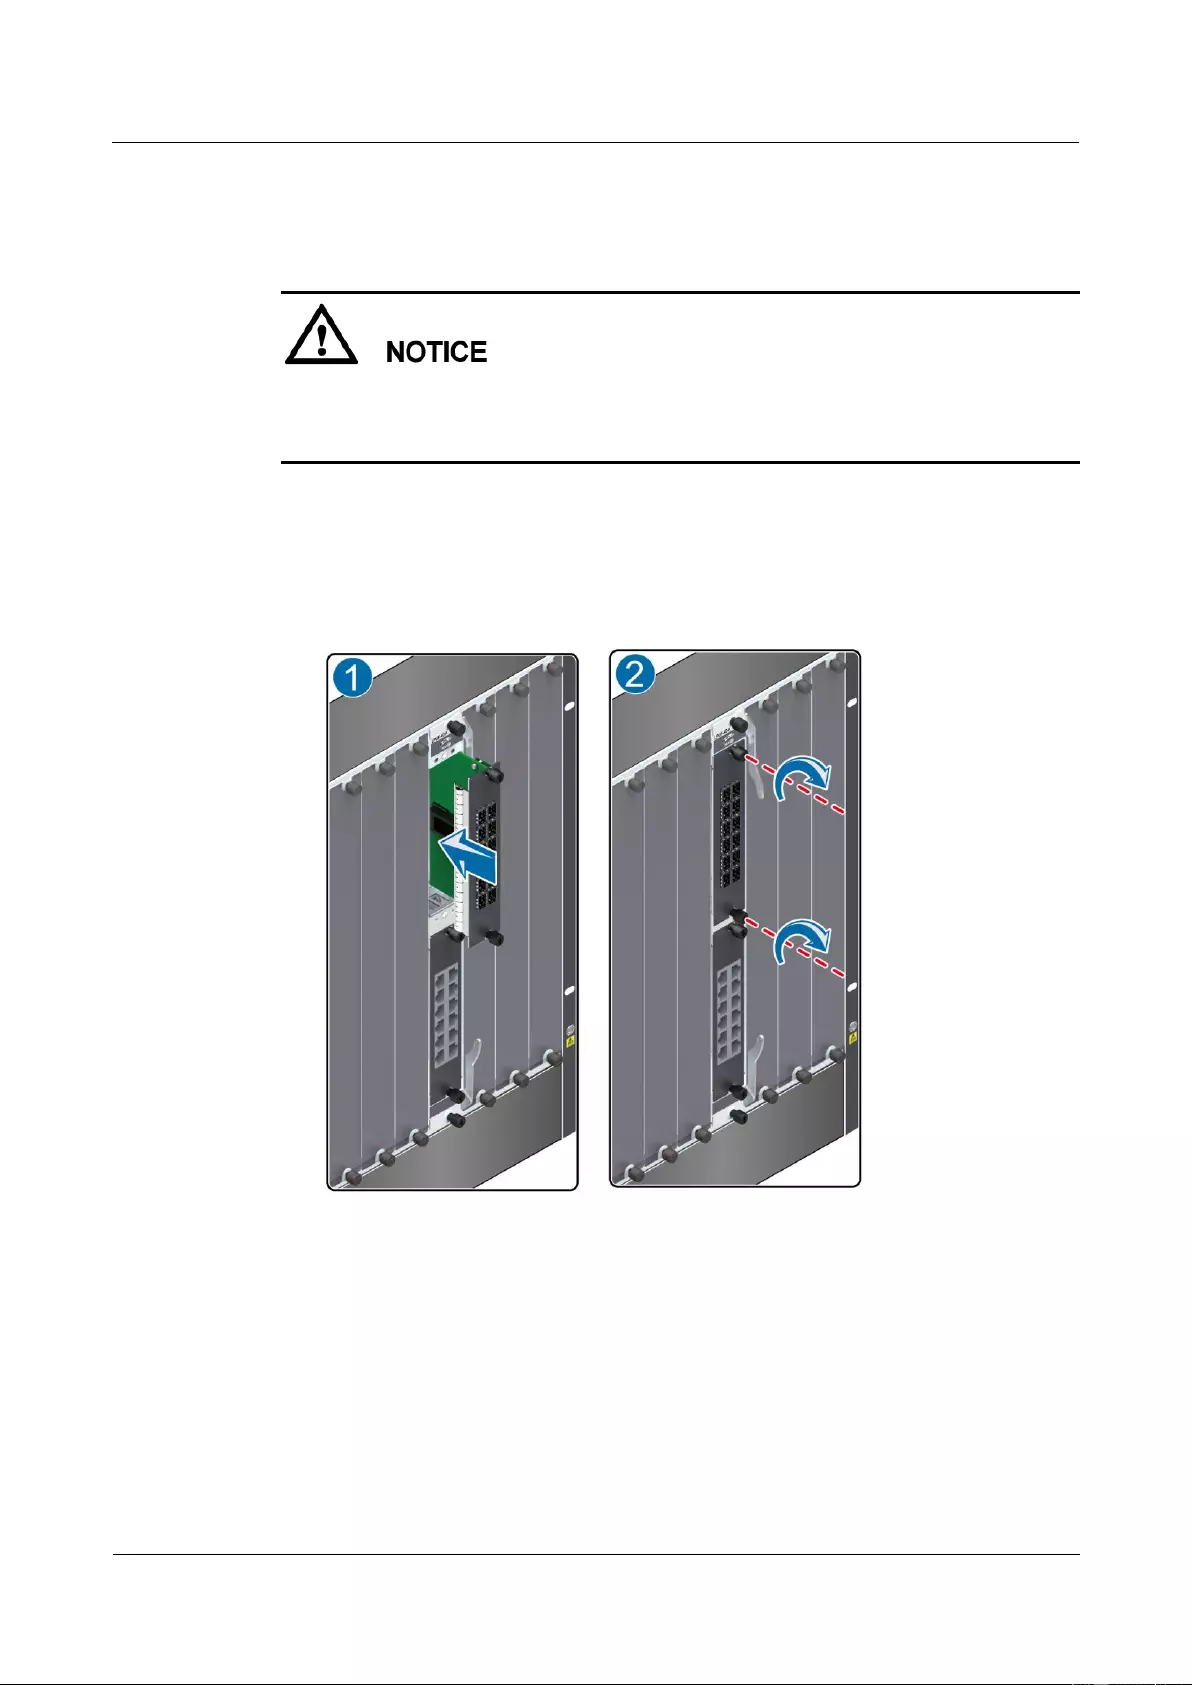
HUAWEI USG9500 Series Terabit-level Next-Generation Firewall
Hardware Guide
3 Hardware Maintenance
Issue 01 (2017-03-13)
Huawei Proprietary and Confidential
Copyright © Huawei Technologies Co., Ltd.
328
Step 6 Insert a new FPIC into the LPU.
1. Take out the new FPIC from the ESD bag.
During the operation, pull out the LPU slowly and smoothly to prevent it from colliding
with the neighboring boards and from interrupting other running boards.
When removing an LPU, do not touch the parts on it to avoid damages to the LPU.
2. Hold the captive screws of the FPIC, and insert the FPIC smoothly along the guide rails
of the slot till the FPIC is completely seated in the slot, as (1) shown in Figure 3-8.
3. Turn the Phillips screwdriver clockwise to tighten the two captive screws, as (2) shown
in Figure 3-8.
Figure 3-8 Inserting an FPIC into the LPU
Step 7 Connect the cables to the corresponding interfaces in the original sequence.
Step 8 Log in to the device and run the power on slotslot-id command to power on the LPU
backplane whose FPIC has been replaced.
Step 9 Check the running status of the new FPIC.
Check the running status of the new FPIC in the following ways:
If the STATUS indicator on the panel of the FPIC is on (green), it indicates that the FPIC
is running normally.

HUAWEI USG9500 Series Terabit-level Next-Generation Firewall
Hardware Guide
3 Hardware Maintenance
Issue 01 (2017-03-13)
Huawei Proprietary and Confidential
Copyright © Huawei Technologies Co., Ltd.
329
Check the alarms. In normal situations, the system does not generate any alarm related to
the new FPIC.
Run the display device command on the console interface to view the running status of
LPUs. If the output is displayed as follows, it indicates that the LPUs in the
corresponding slots are running normally.
<sysname> display device
USG9520's Device status:
Slot # Type Online Register Status Primary
- - - - - - - - - - - - - - - - - - - - - - - - - - - - - - - - - - - - - -
1 SPU Present Registered Normal NA
2 LPU Present Registered Normal NA
4 MPU Present NA Normal Master
5 MPU Present Registered Normal Slave
6 CLK Present Registered Normal Master
7 CLK Present Registered Normal Slave
8 PWR Present Registered Normal NA
9 PWR Present Registered Normal NA
10 FAN Present Registered Normal NA
Run the display device pic-status command on the console interface to view the running
status of FPICs. If the output is displayed as follows, it indicates that the FPICs on the
corresponding LPUs are running normally.
<sysname> display device pic-status
Pic-status information in Chassis 1:
- - - - - - - - - - - - - - - - - - - - - - - - - - - - - - - - - - - - - - - -
SLOT PIC Status Type Port_count Init_result Logic down
Registered Cpu
1 1 Registered SPU_CARD_TYPE_SPCC 0 SUCCESS SUCCESS
CPU3
2 1 Registered ETH_12XGE_CARD 12 SUCCESS SUCCESS
- - - - - - - - - - - - - - - - - - - - - - - - - - - - - - - - - - - - - - - -
Step 10 Check whether services are normal.
----End
Follow-up Procedure
After replacing an FPIC, collect the tools.
After an LPUF has been upgraded from version B to version A, attach a label that
records the upgrade time to the upgraded LPUF. If an FPIC that is replaced is confirmed
to be faulty, you should fill in the Faulty Card for Repair and send the faulty FPIC
together with the card to the Huawei local office for timely repair.
3.1.5 Replacing an SPU
This section describes the precautions and procedures for replacing an SPU.
Context
Prepare a same SPU as the one to be replaced.

HUAWEI USG9500 Series Terabit-level Next-Generation Firewall
Hardware Guide
3 Hardware Maintenance
Issue 01 (2017-03-13)
Huawei Proprietary and Confidential
Copyright © Huawei Technologies Co., Ltd.
330
Tool
Before replacing the SPU, you need the following tools:
ESD wrist strap or ESD gloves
Phillips screwdriver
ESD bag
Procedure
Step 1 Check the location of the SPU to be replaced.
Before pulling out the SPU to be replaced, you should first check the location of the SPU, for
example, the cabinet and chassis. Then, locate the SPU to be replaced in the chassis and attach
a label to identify the SPU.
Step 2 Check whether there is any bent pin in the connector of the new SPU.
Step 3 Power off the SPU to be replaced.
Before replacing an SPU, power off it. If you remove a working SPU and then insert it, the SPU and
its SPC may not work properly.
After powering off the SPU, the number of CPUs of the device changes. In this case, sessions
reselect CPUs based on the hash algorithm. If the selected CPU is different from the previous one,
the session will be interrupted, and the service will re-initiate a connection.
You can use either of the following methods.
Press and hold the OFL button on the panel of the SPU for six seconds until the OFL
indicator is on. It means that the SPU is powered off.
In the user view, run the power off slot slot-id command.
Step 4 Pull out the SPU.
1. Wear the ESD wrist strap and connect the ground terminal to the ESD jack on the rack.
2. Turn the Phillips screwdriver counter-clockwise to loosen the two captive screws, as (1)
shown in Figure 3-9.
3. Turn the ejector levers on the panel of the SPU outward and upward. When the ejector
levers and the panel form a 45-degree angle, the SPU is removed from the backplane, as
(2) shown in Figure 3-9.
4. Hold the captive screws of the SPU and pull out the SPU, as (3) shown in Figure 3-9.
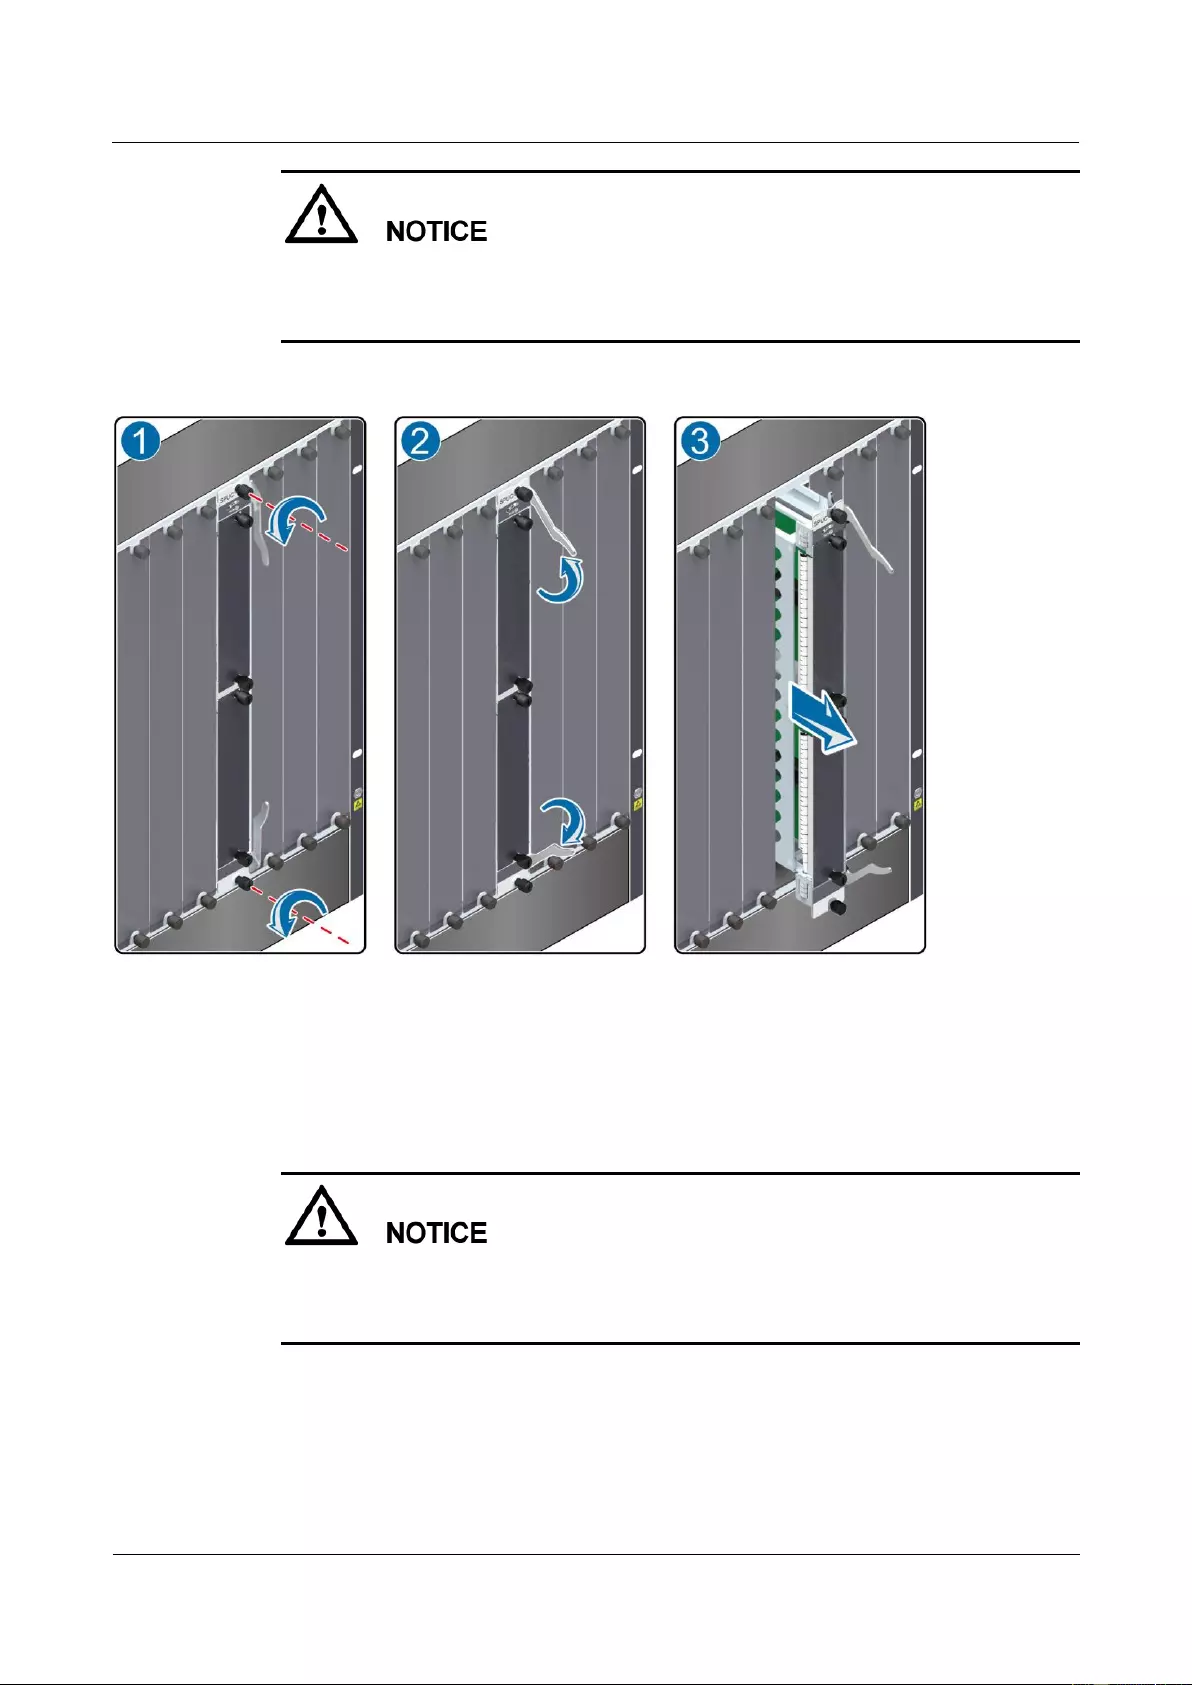
HUAWEI USG9500 Series Terabit-level Next-Generation Firewall
Hardware Guide
3 Hardware Maintenance
Issue 01 (2017-03-13)
Huawei Proprietary and Confidential
Copyright © Huawei Technologies Co., Ltd.
331
During the operation, pull out the SPU slowly and smoothly to prevent it from colliding
with the neighboring boards and from interrupting other running boards.
When removing an SPU, do not touch the parts on it to avoid damages to the SPU.
Figure 3-9 Pulling out an SPU
5. Place the removed SPU into the ESD bag.
Step 5 Insert a new SPU.
1. Take out the new SPU from the ESD bag.
During the operation, pull out the SPU slowly and smoothly to prevent it from colliding
with the neighboring boards and from interrupting other running boards.
When inserting an SPU, do not touch the parts on it to avoid damages to the SPU.
2. Hold the captive screws of the SPU, and insert the SPU smoothly along the guide rails of
the slot till the SPU is completely seated in the slot, as (1) shown in Figure 3-10.
3. Turn the ejector levers on the SPU outward and upward to form a 45-degree angle, and
at the same time push the SPU into the slot. Then, turn the ejector levers inward and
downward till the panel of the SPU touches the slot, as (2) shown in Figure 3-10.
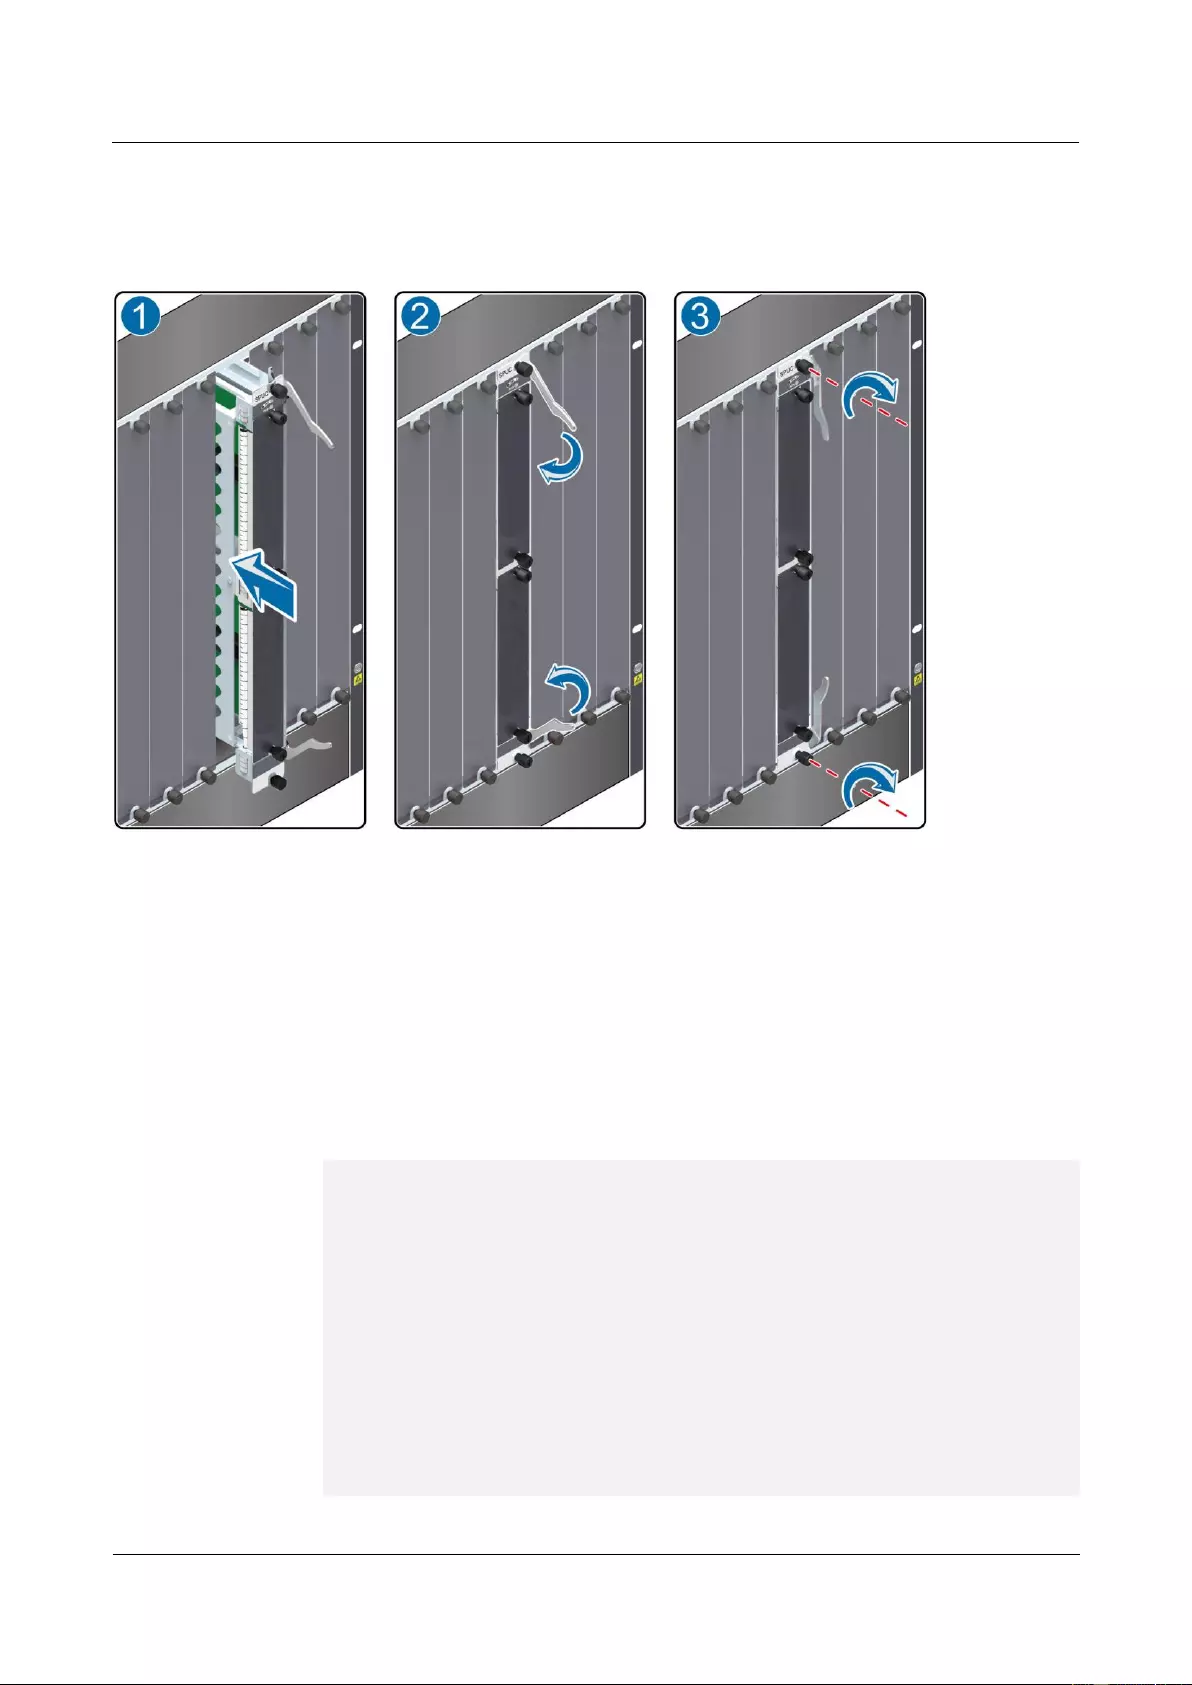
HUAWEI USG9500 Series Terabit-level Next-Generation Firewall
Hardware Guide
3 Hardware Maintenance
Issue 01 (2017-03-13)
Huawei Proprietary and Confidential
Copyright © Huawei Technologies Co., Ltd.
332
4. Turn the Phillips screwdriver clockwise to tighten the two captive screws, as (3) shown
in Figure 3-10.
Figure 3-10 Inserting an SPU
Step 6 Check the running status of the new SPU.
Check the running status of the new SPU in the following ways:
If the RUN indicator on the panel of the SPU is on (green), it indicates that the SPU is
running normally.
Check the alarms. In normal situations, the system does not generate any alarm related to
the new SPU.
Run the display device command on the console interface to view the running status of
SPUs. If the output is displayed as follows, it indicates that the SPUs in the
corresponding slots are running normally.
<sysname> display device
USG9560's Device status:
Slot # Type Online Register Status Primary
- - - - - - - - - - - - - - - - - - - - - - - - - - - - - - - - - - - - - -
1 SPU Present Registered Normal NA
2 SPU Present Registered Normal NA
3 SPU Present Registered Normal NA
4 SPU Present Registered Normal NA
5 SPU Present Registered Normal NA
6 LPU Present Registered Normal NA
7 LPU Present Registered Normal NA
8 LPU Present Registered Normal NA
9 MPU Present NA Normal Master
10 MPU Present Registered Normal Slave

HUAWEI USG9500 Series Terabit-level Next-Generation Firewall
Hardware Guide
3 Hardware Maintenance
Issue 01 (2017-03-13)
Huawei Proprietary and Confidential
Copyright © Huawei Technologies Co., Ltd.
333
11 SFU Present Registered Normal NA
12 SFU Present Registered Normal NA
13 SFU Present Registered Normal NA
14 CLK Present Registered Normal Master
15 CLK Present Registered Normal Slave
16 PWR Present Registered Normal NA
17 PWR Present Registered Normal NA
18 FAN Present Registered Normal NA
19 FAN Present Registered Normal NA
- - - - - - - - - - - - - - - - - - - - - - - - - - - - - - - - - - - - - -
Step 7 Check whether services are normal.
----End
Follow-up Procedure
After replacing an SPU, collect the tools.
If the SPU that is replaced is confirmed to be faulty, you should fill in the Faulty Card
for Repair and send the faulty SPU together with the card to the Huawei local office for
timely repair.
3.1.6 Replacing the SPC of the SPU
This section describes the precautions and procedures for replacing the SPC of the SPU.
Context
Prepare a same SPC as the one to be replaced.
Tool
Before replacing the SPC, you need the following tools:
ESD wrist strap or ESD gloves
Phillips screwdriver
ESD bag
Procedure
Step 1 Check the location of the SPC to be replaced.
Before pulling out the SPC to be replaced, you should first check the location of the SPC, for
example, the cabinet, chassis, and SPU where the SPC resides. Then, locate the SPC to be
replaced in the chassis and attach a label to identify the SPC.
Step 2 Check whether there is any bent pin in the connector of the new SPC.
Step 3 Power off the SPC to be replaced.
Before replacing an SPC, power off it. If you remove a working SPC and then insert it, it and its
SPU may not work properly.
After powering off the SPC, the number of CPUs of the device changes. In this case, sessions
reselect CPUs based on the hash algorithm. If the selected CPU is different from the previous one,
the session will be interrupted, and the service will re-initiate a connection.
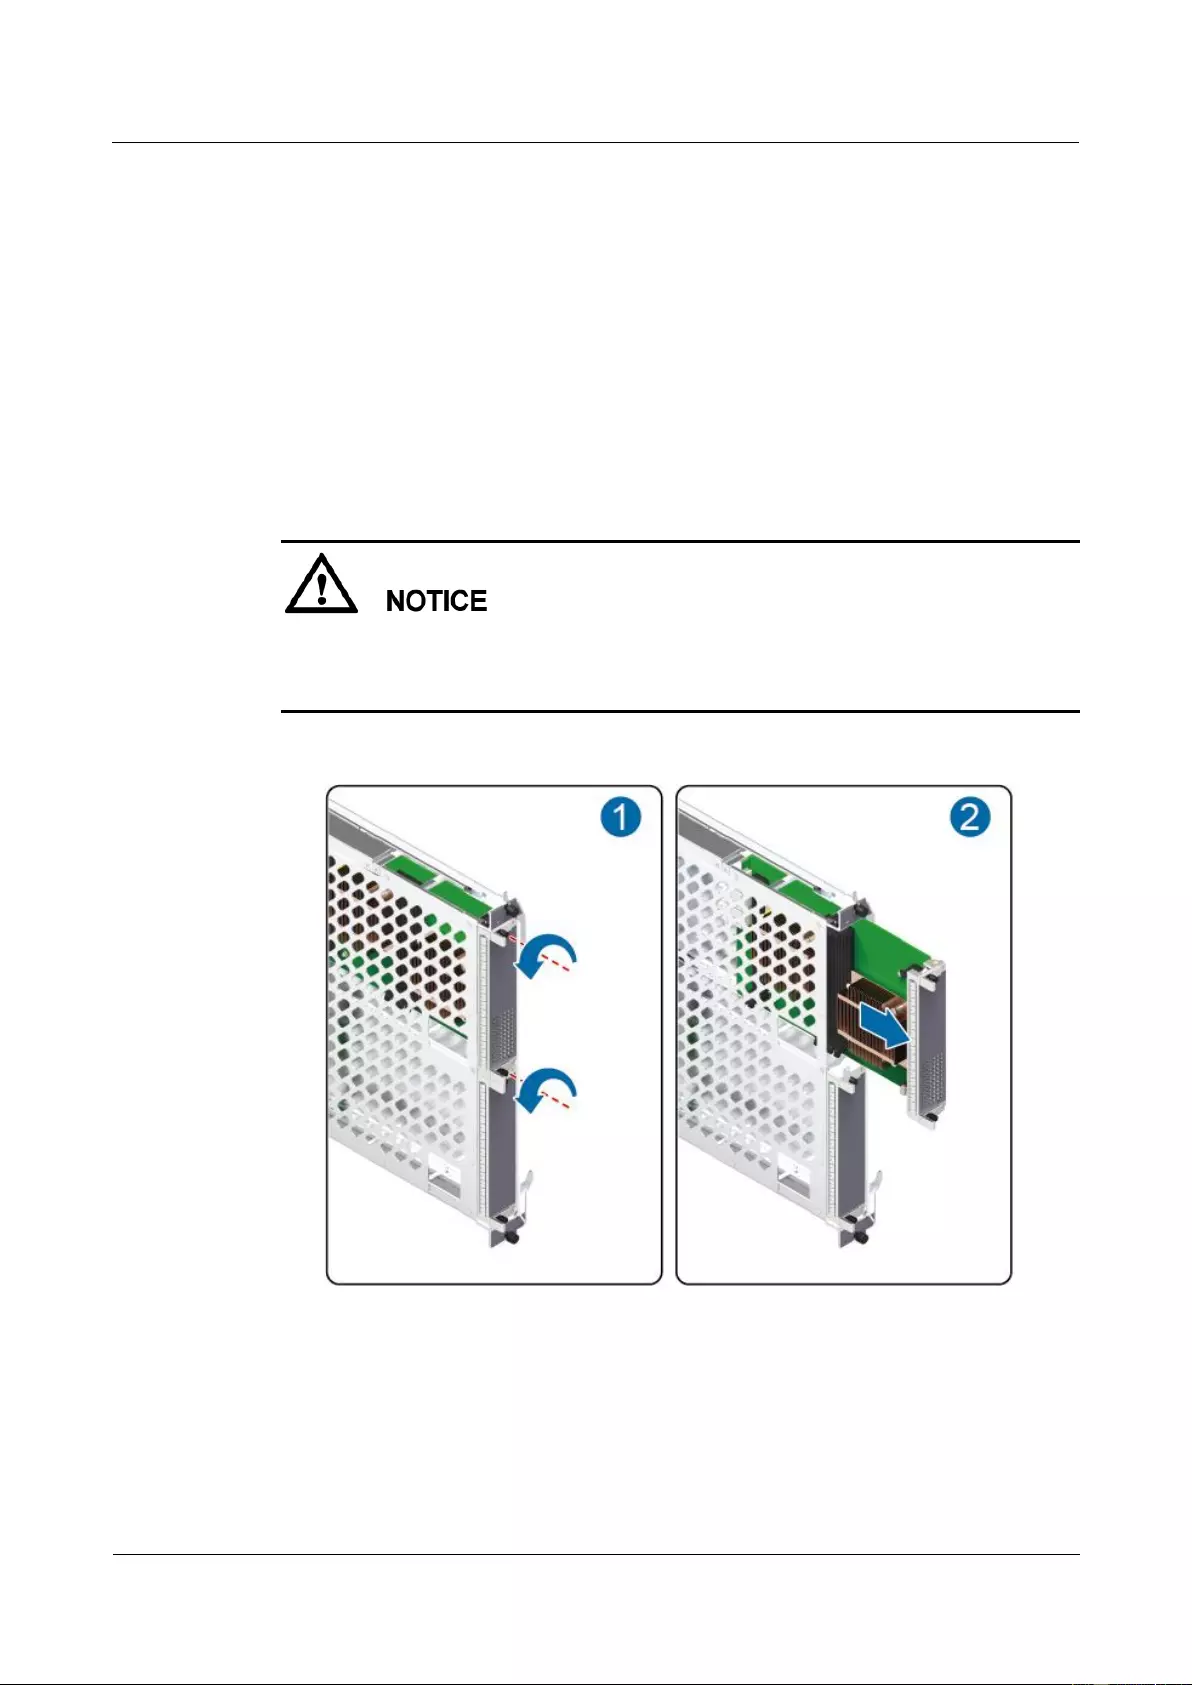
HUAWEI USG9500 Series Terabit-level Next-Generation Firewall
Hardware Guide
3 Hardware Maintenance
Issue 01 (2017-03-13)
Huawei Proprietary and Confidential
Copyright © Huawei Technologies Co., Ltd.
334
You can use either of the following methods.
Press and hold the OFL button on the panel of the SPC for six seconds until the OFL
indicator turns red for one second and then turns off. It means that the SPC is powered
off.
In the user view, run the power off slot slot-id card card-id command.
Step 4 Pull out the SPC to be replaced from the SPU.
1. Wear the ESD wrist strap and connect the ground terminal to the ESD jack on the rack.
2. Turn the Phillips screwdriver counter-clockwise to loosen the two captive screws, as (1)
shown in Figure 3-11.
3. Hold the captive screws of the SPC and pull out the SPC, as (2) shown in Figure 3-11.
During the operation, pull out the SPC slowly and smoothly to prevent it from colliding
with the neighboring boards and from interrupting other running boards.
When removing an SPC, do not touch the parts on it to avoid damages to the SPC.
Figure 3-11 Pulling out an SPC from the SPU
4. Place the removed SPC into the ESD bag.
Step 5 Insert a new SPC into the SPU.
1. Take out the new SPC from the ESD bag.
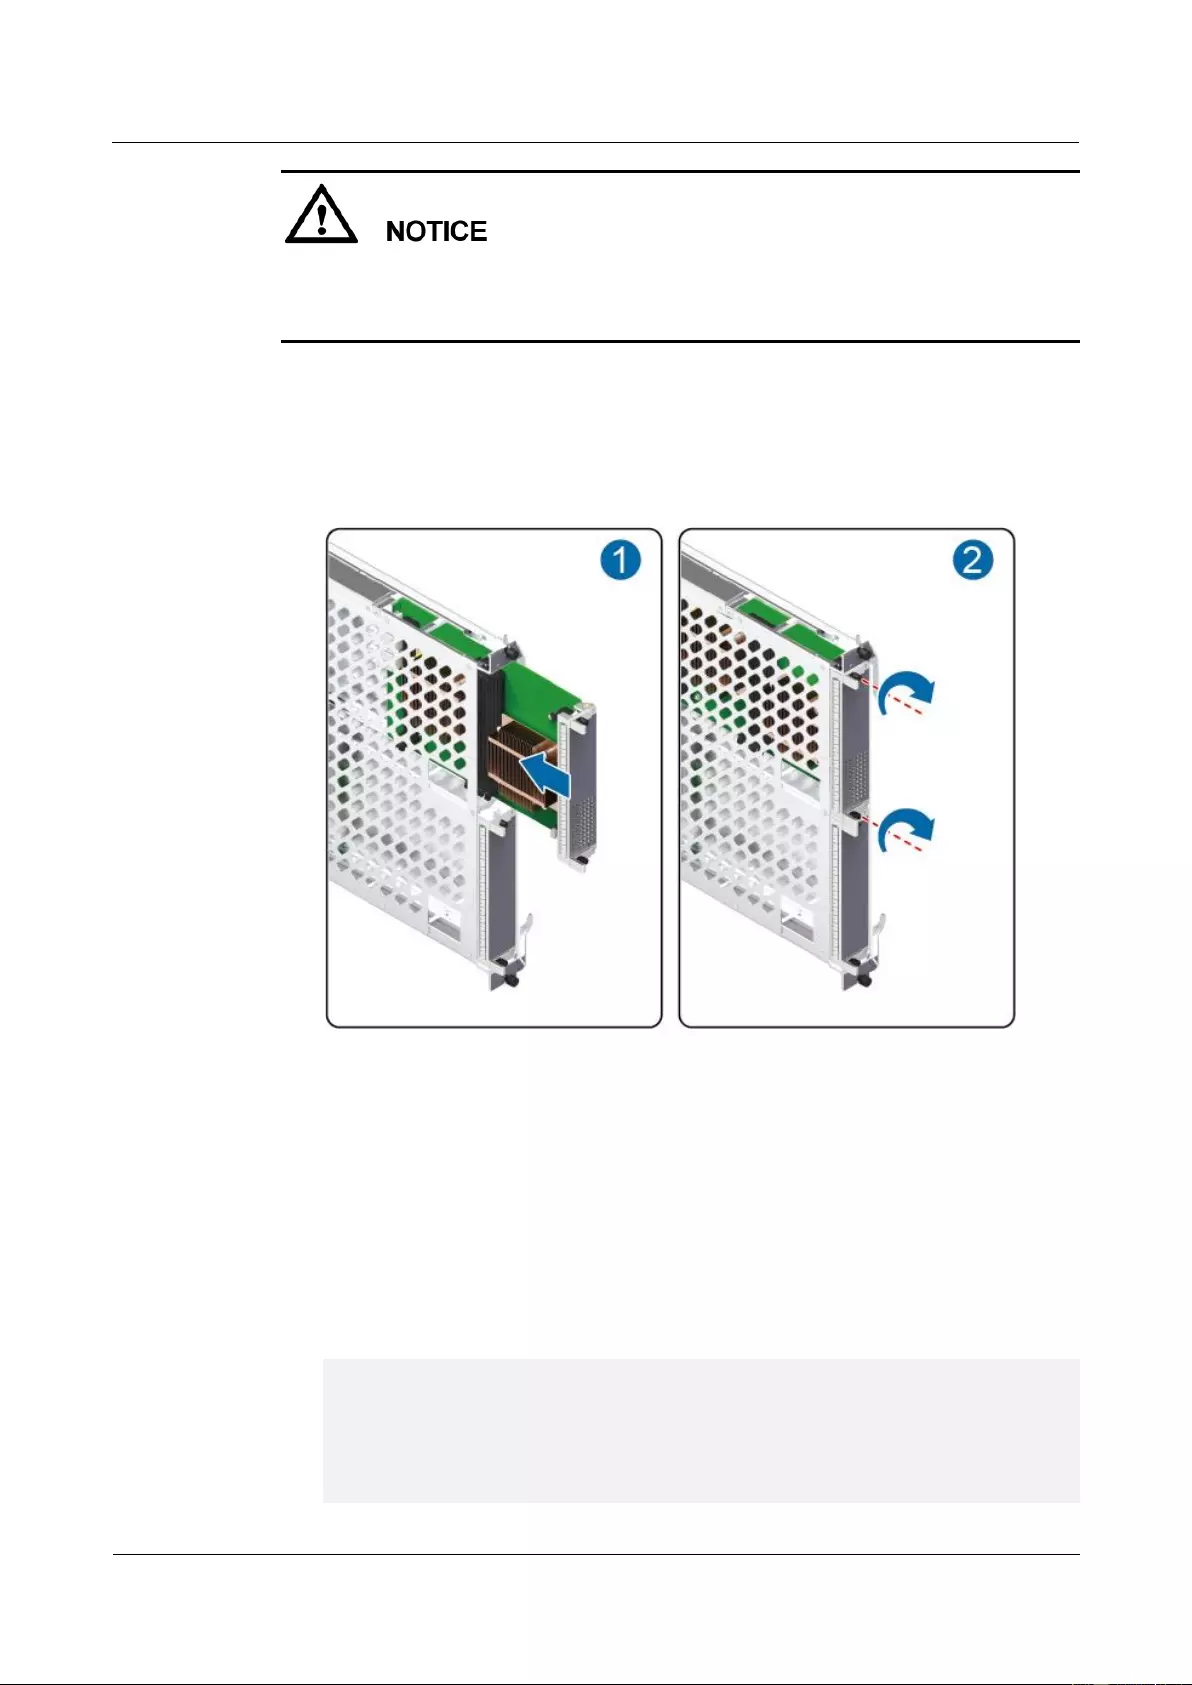
HUAWEI USG9500 Series Terabit-level Next-Generation Firewall
Hardware Guide
3 Hardware Maintenance
Issue 01 (2017-03-13)
Huawei Proprietary and Confidential
Copyright © Huawei Technologies Co., Ltd.
335
During the operation, pull out the SPC slowly and smoothly to prevent it from colliding
with the neighboring boards and from interrupting other running boards.
When inserting an SPC, do not touch the parts on it to avoid damages to the SPC.
2. Hold the captive screws of the SPC, and insert the SPC smoothly along the guide rails of
the slot till the SPC is completely seated in the slot, as (1) shown in Figure 3-12.
3. Turn the Phillips screwdriver clockwise to tighten the two captive screws, as (2) shown
in Figure 3-12.
Figure 3-12 Inserting an SPC into the SPU
Step 6 Check the running status of the new SPC.
Check the running status of the new SPC in the following ways:
If the STATUS indicator on the panel of the SPC is on (green), it indicates that the SPC
is running normally.
Check the alarms. In normal situations, the system does not generate any alarm related to
the new SPC.
Run the display device command on the console interface to view the running status of
SPUs. If the output is displayed as follows, it indicates that the SPUs in the
corresponding slots are running normally.
<sysname> display device
USG9520's Device status:
Slot # Type Online Register Status Primary
- - - - - - - - - - - - - - - - - - - - - - - - - - - - - - - - - - - - - -
1 SPU Present Registered Normal NA
2 LPU Present Registered Normal NA

HUAWEI USG9500 Series Terabit-level Next-Generation Firewall
Hardware Guide
3 Hardware Maintenance
Issue 01 (2017-03-13)
Huawei Proprietary and Confidential
Copyright © Huawei Technologies Co., Ltd.
336
4 MPU Present NA Normal Master
5 MPU Present Registered Normal Slave
6 CLK Present Registered Normal Master
7 CLK Present Registered Normal Slave
8 PWR Present Registered Normal NA
9 PWR Present Registered Normal NA
10 FAN Present Registered Normal NA
Run the display device pic-status command on the console interface to view the running
status of SPCs. If the output is displayed as follows, it indicates that the SPCs on the
corresponding SPUs are running normally.
<sysname> display device pic-status
Pic-status information in Chassis 1:
- - - - - - - - - - - - - - - - - - - - - - - - - - - - - - - - - - - - - - - -
SLOT PIC Status Type Port_count Init_result Logic down
Registered Cpu
1 1 Registered SPU_CARD_TYPE_SPCC 0 SUCCESS SUCCESS
CPU3
2 1 Registered ETH_12XGE_CARD 12 SUCCESS SUCCESS
- - - - - - - - - - - - - - - - - - - - - - - - - - - - - - - - - - - - - - - -
Step 7 Check whether services are normal.
----End
Follow-up Procedure
After replacing an SPC, collect the tools.
If an SPC that is replaced is confirmed to be faulty, you should fill in the Faulty Card for
Repair and send the faulty SPC together with the card to the Huawei local office for
timely repair.
3.2 Expanding SPU Capacities
This section describes how to expand SPU capacities.
3.2.1 Expanding SPU Capacities for the Active and Standby FWs
in Hot Standby Scenarios (for V500R001C50 and Later Versions)
This section describes how to expand SPU capacities for the active and standby FWs in hot
standby scenarios.
Precautions
Expand SPU capacities as follows only when software of V500R001C50 or a later version
operates on the FW.
Before expanding SPU capacities, prepare new SPUs. The SPUs to be installed on the active
and standby FWs for capacity expansion must be of the same model. In addition, they must be
installed in the same slot on the active and standby FWs.

HUAWEI USG9500 Series Terabit-level Next-Generation Firewall
Hardware Guide
3 Hardware Maintenance
Issue 01 (2017-03-13)
Huawei Proprietary and Confidential
Copyright © Huawei Technologies Co., Ltd.
337
If two FWs work in active/standby mode, you must expand the SPU capacity for the standby
FW first and then for the active FW. If two FWs work in load balancing mode, run the hrp
switch active command on one FW to switch the operating mode to the active/standby mode
and then expand SPU capacities.
The following table lists service damage when an SPU is hot swapped.
Item
Description
IPv4 session
Not affected
IPv6 session
Not affected
Source NAT (PAT or
easy-IP mode)
Not affected
Source NAT (No-PAT
mode or triplet NAT)
Affected
Port pre-allocation
Affected
PCP
Affected
NAT Server
Not affected
Destination NAT
Not affected
IPSec SA
Not affected
Preparations
Tools:
ESD wrist strap or ESD gloves
Phillips screwdriver
ESD bag
Record card tables of the two FWs before capacity expansion so that you can compare them
with those after capacity expansion to check whether capacity expansion succeeds.
HRP_M<sysname> system-view
HRP_M[sysname] diagnose
HRP_M[sysname-diagnose] display firewall cpu-table
MainBrd Cpu-table .
Slot = 1, Cpu = 1, Tptb =80, Count = 342.
Slot = 2, Cpu = 1, Tptb =84, Count = 341.
Slot = 2, Cpu = 3, Tptb =85, Count = 341.
80 84 85 80 84 85 80 84 85 80 84 85 80 84 85 80
84 85 80 84 85 80 84 85 80 84 85 80 84 85 80 84
85 80 84 85 80 84 85 80 84 85 80 84 85 80 84 85
80 84 85 80 84 85 80 84 85 80 84 85 80 84 85 80
84 85 80 84 85 80 84 85 80 84 85 80 84 85 80 84
85 80 84 85 80 84 85 80 84 85 80 84 85 80 84 85

HUAWEI USG9500 Series Terabit-level Next-Generation Firewall
Hardware Guide
3 Hardware Maintenance
Issue 01 (2017-03-13)
Huawei Proprietary and Confidential
Copyright © Huawei Technologies Co., Ltd.
338
80 84 85 80 84 85 80 84 85 80 84 85 80 84 85 80
84 85 80 84 85 80 84 85 80 84 85 80 84 85 80 84
85 80 84 85 80 84 85 80 84 85 80 84 85 80 84 85
80 84 85 80 84 85 80 84 85 80 84 85 80 84 85 80
84 85 80 84 85 80 84 85 80 84 85 80 84 85 80 84
85 80 84 85 80 84 85 80 84 85 80 84 85 80 84 85
80 84 85 80 84 85 80 84 85 80 84 85 80 84 85 80
84 85 80 84 85 80 84 85 80 84 85 80 84 85 80 84
85 80 84 85 80 84 85 80 84 85 80 84 85 80 84 85
80 84 85 80 84 85 80 84 85 80 84 85 80 84 85 80
84 85 80 84 85 80 84 85 80 84 85 80 84 85 80 84
85 80 84 85 80 84 85 80 84 85 80 84 85 80 84 85
80 84 85 80 84 85 80 84 85 80 84 85 80 84 85 80
84 85 80 84 85 80 84 85 80 84 85 80 84 85 80 84
85 80 84 85 80 84 85 80 84 85 80 84 85 80 84 85
80 84 85 80 84 85 80 84 85 80 84 85 80 84 85 80
84 85 80 84 85 80 84 85 80 84 85 80 84 85 80 84
85 80 84 85 80 84 85 80 84 85 80 84 85 80 84 85
80 84 85 80 84 85 80 84 85 80 84 85 80 84 85 80
84 85 80 84 85 80 84 85 80 84 85 80 84 85 80 84
85 80 84 85 80 84 85 80 84 85 80 84 85 80 84 85
80 84 85 80 84 85 80 84 85 80 84 85 80 84 85 80
84 85 80 84 85 80 84 85 80 84 85 80 84 85 80 84
85 80 84 85 80 84 85 80 84 85 80 84 85 80 84 85
80 84 85 80 84 85 80 84 85 80 84 85 80 84 85 80
84 85 80 84 85 80 84 85 80 84 85 80 84 85 80 84
85 80 84 85 80 84 85 80 84 85 80 84 85 80 84 85
80 84 85 80 84 85 80 84 85 80 84 85 80 84 85 80
84 85 80 84 85 80 84 85 80 84 85 80 84 85 80 84
85 80 84 85 80 84 85 80 84 85 80 84 85 80 84 85
80 84 85 80 84 85 80 84 85 80 84 85 80 84 85 80
84 85 80 84 85 80 84 85 80 84 85 80 84 85 80 84
85 80 84 85 80 84 85 80 84 85 80 84 85 80 84 85
80 84 85 80 84 85 80 84 85 80 84 85 80 84 85 80
84 85 80 84 85 80 84 85 80 84 85 80 84 85 80 84
85 80 84 85 80 84 85 80 84 85 80 84 85 80 84 85
80 84 85 80 84 85 80 84 85 80 84 85 80 84 85 80
84 85 80 84 85 80 84 85 80 84 85 80 84 85 80 84
85 80 84 85 80 84 85 80 84 85 80 84 85 80 84 85
80 84 85 80 84 85 80 84 85 80 84 85 80 84 85 80
84 85 80 84 85 80 84 85 80 84 85 80 84 85 80 84
85 80 84 85 80 84 85 80 84 85 80 84 85 80 84 85
80 84 85 80 84 85 80 84 85 80 84 85 80 84 85 80
84 85 80 84 85 80 84 85 80 84 85 80 84 85 80 84
85 80 84 85 80 84 85 80 84 85 80 84 85 80 84 85
80 84 85 80 84 85 80 84 85 80 84 85 80 84 85 80
84 85 80 84 85 80 84 85 80 84 85 80 84 85 80 84
85 80 84 85 80 84 85 80 84 85 80 84 85 80 84 85
80 84 85 80 84 85 80 84 85 80 84 85 80 84 85 80
84 85 80 84 85 80 84 85 80 84 85 80 84 85 80 84
85 80 84 85 80 84 85 80 84 85 80 84 85 80 84 85
80 84 85 80 84 85 80 84 85 80 84 85 80 84 85 80
84 85 80 84 85 80 84 85 80 84 85 80 84 85 80 84
85 80 84 85 80 84 85 80 84 85 80 84 85 80 84 85
80 84 85 80 84 85 80 84 85 80 84 85 80 84 85 80

HUAWEI USG9500 Series Terabit-level Next-Generation Firewall
Hardware Guide
3 Hardware Maintenance
Issue 01 (2017-03-13)
Huawei Proprietary and Confidential
Copyright © Huawei Technologies Co., Ltd.
339
84 85 80 84 85 80 84 85 80 84 85 80 84 85 80 84
85 80 84 85 80 84 85 80 84 85 80 84 85 80 84 85
80 84 85 80 84 85 80 84 85 80 84 85 80 84 85 80
Procedure
Step 1 Confirm where the SPUs are to be installed.
Before expanding SPU capacities, first confirm where the SPUs are to be installed, including
the cabinets, chassis, and slots. Ensure that the SPUs are installed in the same slot on the
active and standby FWs.
Step 2 Check whether the connectors of the SPUs to be installed are damaged.
Step 3 Optional: If two FWs work in load balancing mode, switch the operating mode to the
active/standby mode. Run the hrp switch active command on either FW to switch the
operating mode.
If the two FWs work in active/standby mode, skip this step.
HRP_M<sysname> system-view
HRP_M[sysname] hrp switch active
The FW on which the hrp switch active command is executed has its VGMP group priority
increased by 1 to be higher than that of the other FW and therefore becomes the active FW.
The other FW become the standby FW. Services on the standby FW are switched to the active
FW. Service switchover takes a certain period of time. For service continuity, run the hrp
switch active command, wait for one minute, and then perform subsequent operations.
Step 4 Run the undo hrp track spu enable command on the standby FW to disable the VGMP
group from monitoring the SPU.
HRP_S<sysname> system-view
HRP_S[sysname] undo hrp track spu enable
After the SPU is inserted into the standby FW, its VGMP group priority increases and
becomes higher than that of the active FW, triggering active/standby switchover. In addition,
session tables on the standby FW are deleted after the SPU is inserted. If active/standby
switchover occurs at this time, service traffic is discarded by the standby FW due to a failure
in matching session tables after being diverted to the standby FW. Therefore, before the SPU
is inserted into the standby FW, run the undo hrp track spu enable command on the standby
FW to disable the VGMP group from monitoring the SPU. In this way, after the SPU is
inserted into the standby FW, its VGMP group priority does not increase, active/standby
switchover is not triggered, and service traffic is still forwarded by the active FW.
Step 5 Insert the SPU into the slot of the standby FW.
1. Take out the new SPU from the ESD bag.
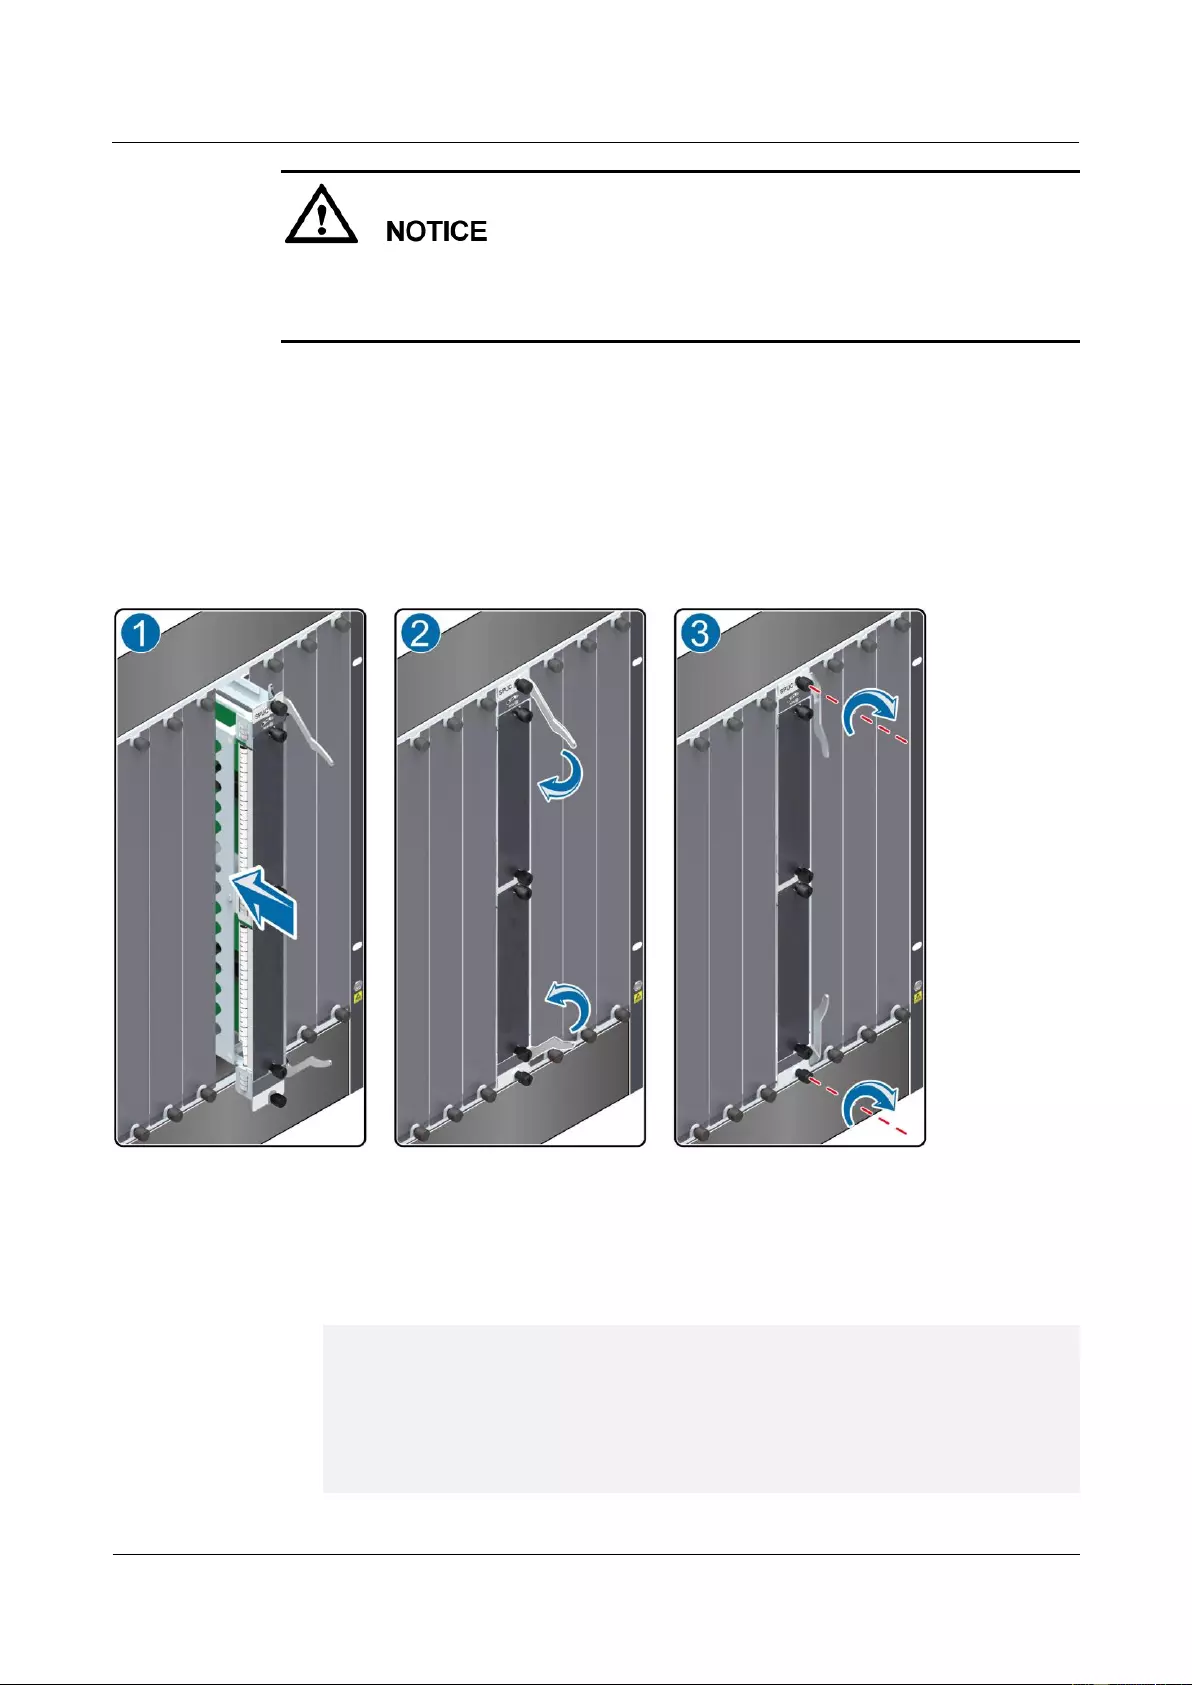
HUAWEI USG9500 Series Terabit-level Next-Generation Firewall
Hardware Guide
3 Hardware Maintenance
Issue 01 (2017-03-13)
Huawei Proprietary and Confidential
Copyright © Huawei Technologies Co., Ltd.
340
During the operation, pull out the SPU slowly and smoothly to prevent it from colliding
with the neighboring boards and from interrupting other running boards.
When inserting an SPU, do not touch the parts on it to avoid damages to the SPU.
2. Hold the captive screws of the SPU, and insert the SPU smoothly along the guide rails of
the slot till the SPU is completely seated in the slot, as (1) shown in Figure 3-13.
3. Turn the ejector levers on the SPU outward and upward to form a 45-degree angle, and
at the same time push the SPU into the slot. Then, turn the ejector levers inward and
downward till the panel of the SPU touches the slot, as (2) shown in Figure 3-13.
4. Turn the Phillips screwdriver clockwise to tighten the two captive screws, as (3) shown
in Figure 3-13.
Figure 3-13 Inserting an SPU
Step 6 Check the operating status of the inserted SPU.
1. Run the display device command on the standby FW to query the operating status of the
SPU motherboard. If all items of the SPU motherboard in the corresponding slot are
displayed as follows, the SPU motherboard runs properly.
HRP_S<sysname> display device
USG9520's Device status:
Slot # Type Online Register Status Primary
- - - - - - - - - - - - - - - - - - - - - - - - - - - - - - - - - - - - - -
1 SPU Present Registered Normal NA
2 SPU Present Registered Normal NA
3 LPU Present Registered Normal NA

HUAWEI USG9500 Series Terabit-level Next-Generation Firewall
Hardware Guide
3 Hardware Maintenance
Issue 01 (2017-03-13)
Huawei Proprietary and Confidential
Copyright © Huawei Technologies Co., Ltd.
341
4 MPU Present NA Normal Master
6 CLK Present Registered Normal Master
8 PWR Present Registered Normal NA
9 PWR Present Registered Abnormal NA
10 FAN Present Registered Normal NA
2. Run the display device pic-status command on the standby FW to query the operating
status of the subcard. If all items of the corresponding subcard are displayed as follows,
the subcard runs properly.
HRP_S<sysname> display device pic-status
Pic-status information in Chassis 1:
- - - - - - - - - - - - - - - - - - - - - - - - - - - - - - - - - - - - - - - -
SLOT PIC Status Type Port_count Init_result Logic down
Registered Cpu
1 0 Registered SPU_CARD_TYPE_IPS 0 SUCCESS SUCCESS CPU1
1 1 Registered SPU_CARD_TYPE_SPCC 0 SUCCESS SUCCESS CPU3
2 1 Registered SPU_CARD_TYPE_SPCH 0 SUCCESS SUCCESS
CPU2,CPU3
3 0 Registered LAN_WAN_5x10GF_B_CARD 5 SUCCESS SUCCESS
3 2 Registered ETH_24xGF_B_CARD 24 SUCCESS SUCCESS
3. Run the display firewall cpu-table command on the standby FW to view the card table.
Compare it with that before capacity expansion to confirm whether the card table is
updated. If the card tables before and after capacity expansion are different, the card
table has been updated.
HRP_S<sysname> system-view
HRP_S[sysname] diagnose
HRP_S[sysname-diagnose] display firewall cpu-table
The FW allocates sessions to various CPUs for processing based on the card table. After
the card table of the standby FW is updated, the standby FW sends the updated card table
to the active FW. After receiving the new card table from the standby FW, the active FW
synchronizes session tables to the standby FW. During session backup, the active FW
allocates sessions to CPUs for processing based on the card table of the standby FW. In
this way, the standby FW can properly identify and process sessions after they are
backed up to the standby FW.
SPU registration and card table update on the standby FW take around 20 minutes.
Session backup between the active and standby FWs takes around 2 minutes. Therefore,
after confirming that the card table is updated, wait for 2 minutes and perform
subsequent operations.
Step 7 Run the hrp track spu enable command on the standby FW to enable the VGMP group to
monitor the SPU.
HRP_S<sysname> system-view
HRP_S[sysname] hrp track spu enable
After the VGMP group is enabled to monitor the SPU, the VGMP group priority of the
standby FW becomes higher than that of the active FW, triggering active/standby switchover.
The standby FW assumes the active role and processes service traffic, and the active FW
enters the standby status.
Service switchover takes a certain period of time. For service continuity, run the hrp track
spu enable command, wait for one minute, and then perform subsequent operations.
Step 8 Optional: If two FWs work in load balancing mode, perform as described in step Step 3 to
switch the operating mode to the active/standby mode. After operations in step Step 7 are
complete, run the undo hrp switch active command on the FW on which the hrp switch

HUAWEI USG9500 Series Terabit-level Next-Generation Firewall
Hardware Guide
3 Hardware Maintenance
Issue 01 (2017-03-13)
Huawei Proprietary and Confidential
Copyright © Huawei Technologies Co., Ltd.
342
active command is executed (namely, the FW in standby status) to cancel operations in step
Step 3.
If two FWs work in active/standby mode, and operations in step Step 3 are not performed,
skip this step.
HRP_S<sysname> system-view
HRP_S[sysname] undo hrp switch active
Step 9 Repeat steps Step 4 to Step 7 on the original active (existing standby) FW to expand its SPU
capacity.
Step 10 Check whether the service properly operates.
----End
3.2.2 Expanding SPC Capacities for the Active and Standby FWs
in Hot Standby Scenarios (for V500R001C50 and Later Versions)
This section describes how to expand SPC capacities for the active and standby FWs in hot
standby scenarios.
Precautions
Expand SPC capacities as follows only when the software is of V500R001C50 or a later
version.
Before expanding SPC capacities, prepare new SPCs. The SPCs to be installed on the active
and standby FWs for capacity expansion must be of the same model. In addition, they must be
installed in the same slot on the active and standby FWs.
If two FWs work in active/standby mode, you must expand the SPC capacity for the standby
FW first and then for the active FW. If two FWs work in load balancing mode, run the hrp
switch active command on one FW to switch the operating mode to the active/standby mode
and then expand SPC capacities.
The following table lists service damage when an SPC is hot swapped.
Item
Description
IPv4 session
Not affected
IPv6 session
Not affected
Source NAT (PAT or
easy-IP mode)
Not affected
Source NAT (No-PAT
mode or triplet NAT)
Affected
Port pre-allocation
Affected
PCP
Affected
NAT Server
Not affected
Destination NAT
Not affected

HUAWEI USG9500 Series Terabit-level Next-Generation Firewall
Hardware Guide
3 Hardware Maintenance
Issue 01 (2017-03-13)
Huawei Proprietary and Confidential
Copyright © Huawei Technologies Co., Ltd.
343
Item
Description
IPSec SA
Not affected
Preparations
Tools:
ESD wrist strap or ESD gloves
Phillips screwdriver
ESD bag
Record card tables of the two FWs before capacity expansion so that you can compare them
with those after capacity expansion to check whether capacity expansion succeeds.
HRP_M<sysname> system-view
HRP_M[sysname] diagnose
HRP_M[sysname-diagnose] display firewall cpu-table
MainBrd Cpu-table .
Slot = 1, Cpu = 1, Tptb =80, Count = 342.
Slot = 2, Cpu = 1, Tptb =84, Count = 341.
Slot = 2, Cpu = 3, Tptb =85, Count = 341.
80 84 85 80 84 85 80 84 85 80 84 85 80 84 85 80
84 85 80 84 85 80 84 85 80 84 85 80 84 85 80 84
85 80 84 85 80 84 85 80 84 85 80 84 85 80 84 85
80 84 85 80 84 85 80 84 85 80 84 85 80 84 85 80
84 85 80 84 85 80 84 85 80 84 85 80 84 85 80 84
85 80 84 85 80 84 85 80 84 85 80 84 85 80 84 85
80 84 85 80 84 85 80 84 85 80 84 85 80 84 85 80
84 85 80 84 85 80 84 85 80 84 85 80 84 85 80 84
85 80 84 85 80 84 85 80 84 85 80 84 85 80 84 85
80 84 85 80 84 85 80 84 85 80 84 85 80 84 85 80
84 85 80 84 85 80 84 85 80 84 85 80 84 85 80 84
85 80 84 85 80 84 85 80 84 85 80 84 85 80 84 85
80 84 85 80 84 85 80 84 85 80 84 85 80 84 85 80
84 85 80 84 85 80 84 85 80 84 85 80 84 85 80 84
85 80 84 85 80 84 85 80 84 85 80 84 85 80 84 85
80 84 85 80 84 85 80 84 85 80 84 85 80 84 85 80
84 85 80 84 85 80 84 85 80 84 85 80 84 85 80 84
85 80 84 85 80 84 85 80 84 85 80 84 85 80 84 85
80 84 85 80 84 85 80 84 85 80 84 85 80 84 85 80
84 85 80 84 85 80 84 85 80 84 85 80 84 85 80 84
85 80 84 85 80 84 85 80 84 85 80 84 85 80 84 85
80 84 85 80 84 85 80 84 85 80 84 85 80 84 85 80
84 85 80 84 85 80 84 85 80 84 85 80 84 85 80 84
85 80 84 85 80 84 85 80 84 85 80 84 85 80 84 85
80 84 85 80 84 85 80 84 85 80 84 85 80 84 85 80
84 85 80 84 85 80 84 85 80 84 85 80 84 85 80 84
85 80 84 85 80 84 85 80 84 85 80 84 85 80 84 85
80 84 85 80 84 85 80 84 85 80 84 85 80 84 85 80

HUAWEI USG9500 Series Terabit-level Next-Generation Firewall
Hardware Guide
3 Hardware Maintenance
Issue 01 (2017-03-13)
Huawei Proprietary and Confidential
Copyright © Huawei Technologies Co., Ltd.
344
84 85 80 84 85 80 84 85 80 84 85 80 84 85 80 84
85 80 84 85 80 84 85 80 84 85 80 84 85 80 84 85
80 84 85 80 84 85 80 84 85 80 84 85 80 84 85 80
84 85 80 84 85 80 84 85 80 84 85 80 84 85 80 84
85 80 84 85 80 84 85 80 84 85 80 84 85 80 84 85
80 84 85 80 84 85 80 84 85 80 84 85 80 84 85 80
84 85 80 84 85 80 84 85 80 84 85 80 84 85 80 84
85 80 84 85 80 84 85 80 84 85 80 84 85 80 84 85
80 84 85 80 84 85 80 84 85 80 84 85 80 84 85 80
84 85 80 84 85 80 84 85 80 84 85 80 84 85 80 84
85 80 84 85 80 84 85 80 84 85 80 84 85 80 84 85
80 84 85 80 84 85 80 84 85 80 84 85 80 84 85 80
84 85 80 84 85 80 84 85 80 84 85 80 84 85 80 84
85 80 84 85 80 84 85 80 84 85 80 84 85 80 84 85
80 84 85 80 84 85 80 84 85 80 84 85 80 84 85 80
84 85 80 84 85 80 84 85 80 84 85 80 84 85 80 84
85 80 84 85 80 84 85 80 84 85 80 84 85 80 84 85
80 84 85 80 84 85 80 84 85 80 84 85 80 84 85 80
84 85 80 84 85 80 84 85 80 84 85 80 84 85 80 84
85 80 84 85 80 84 85 80 84 85 80 84 85 80 84 85
80 84 85 80 84 85 80 84 85 80 84 85 80 84 85 80
84 85 80 84 85 80 84 85 80 84 85 80 84 85 80 84
85 80 84 85 80 84 85 80 84 85 80 84 85 80 84 85
80 84 85 80 84 85 80 84 85 80 84 85 80 84 85 80
84 85 80 84 85 80 84 85 80 84 85 80 84 85 80 84
85 80 84 85 80 84 85 80 84 85 80 84 85 80 84 85
80 84 85 80 84 85 80 84 85 80 84 85 80 84 85 80
84 85 80 84 85 80 84 85 80 84 85 80 84 85 80 84
85 80 84 85 80 84 85 80 84 85 80 84 85 80 84 85
80 84 85 80 84 85 80 84 85 80 84 85 80 84 85 80
84 85 80 84 85 80 84 85 80 84 85 80 84 85 80 84
85 80 84 85 80 84 85 80 84 85 80 84 85 80 84 85
80 84 85 80 84 85 80 84 85 80 84 85 80 84 85 80
84 85 80 84 85 80 84 85 80 84 85 80 84 85 80 84
85 80 84 85 80 84 85 80 84 85 80 84 85 80 84 85
80 84 85 80 84 85 80 84 85 80 84 85 80 84 85 80
Procedure
Step 1 Confirm where the SPCs are to be installed.
Before expanding SPC capacities, first confirm where the SPCs are to be installed, including
the cabinets, chassis, and slots. Ensure that the SPCs are installed in the same slot on the
active and standby FWs.
Step 2 Check whether the connectors of the SPCs to be installed are damaged.
Step 3 Optional: If two FWs work in load balancing mode, switch the operating mode to the
active/standby mode. Run the hrp switch active command on either FW to switch the
operating mode.
If the two FWs work in active/standby mode, skip this step.
HRP_M<sysname> system-view
HRP_M[sysname] hrp switch active

HUAWEI USG9500 Series Terabit-level Next-Generation Firewall
Hardware Guide
3 Hardware Maintenance
Issue 01 (2017-03-13)
Huawei Proprietary and Confidential
Copyright © Huawei Technologies Co., Ltd.
345
The FW on which the hrp switch active command is executed has its VGMP group priority
increased by 1 to be higher than that of the other FW and therefore becomes the active FW.
The other FW become the standby FW. Services on the standby FW are switched to the active
FW. Service switchover takes a certain period of time. For service continuity, run the hrp
switch active command, wait for one minute, and then perform subsequent operations.
Step 4 Run the undo hrp track spu enable command on the standby FW to disable the VGMP
group from monitoring the SPU.
HRP_S<sysname> system-view
HRP_S[sysname] undo hrp track spu enable
After the SPC is inserted into the standby FW, its VGMP group priority increases and
becomes higher than that of the active FW, triggering active/standby switchover. In addition,
session tables on the standby FW are deleted after the SPC is inserted. If active/standby
switchover occurs at this time, service traffic is discarded by the standby FW due to a failure
in matching session tables after being diverted to the standby FW. Therefore, before the SPC
is inserted into the standby FW, run the undo hrp track spu enable command on the standby
FW to disable the VGMP group from monitoring the SPU. In this way, after the SPC is
inserted into the standby FW, its VGMP group priority does not increase, active/standby
switchover is not triggered, and service traffic is still forwarded by the active FW.
Step 5 Insert the SPC into the SPU motherboard of the standby FW.
1. Take out the new SPC from the ESD bag.
During the operation, pull out the SPC slowly and smoothly to prevent it from colliding
with the neighboring boards and from interrupting other running boards.
When inserting an SPC, do not touch the parts on it to avoid damages to the SPC.
2. Hold the captive screws of the SPC, and insert the SPC smoothly along the guide rails of
the slot till the SPC is completely seated in the slot, as (1) shown in Figure 3-14.
3. Turn the Phillips screwdriver clockwise to tighten the two captive screws, as (2) shown
in Figure 3-14.
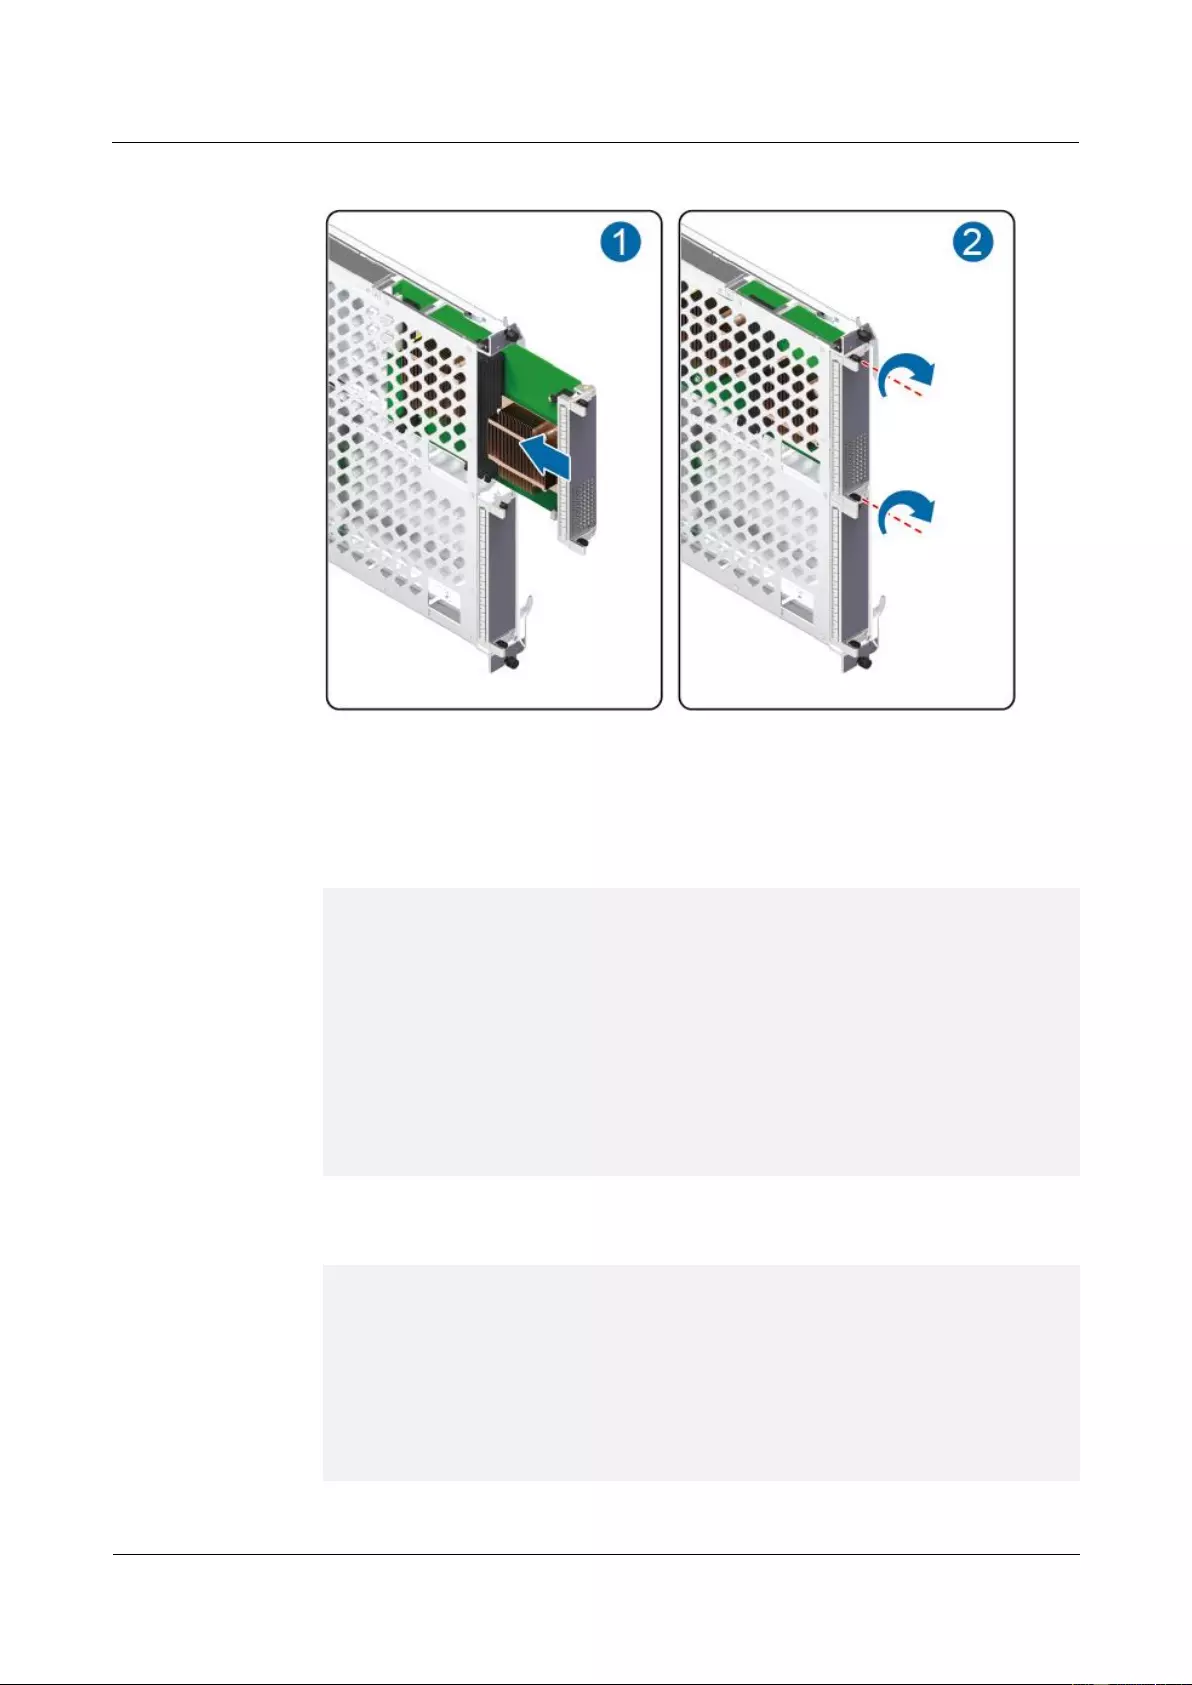
HUAWEI USG9500 Series Terabit-level Next-Generation Firewall
Hardware Guide
3 Hardware Maintenance
Issue 01 (2017-03-13)
Huawei Proprietary and Confidential
Copyright © Huawei Technologies Co., Ltd.
346
Figure 3-14 Inserting an SPC into the SPU
Step 6 Check the operating status of the inserted SPC.
1. Run the display device command on the standby FW to query the operating status of the
SPU motherboard. If all items of the SPU motherboard in the corresponding slot are
displayed as follows, the SPU motherboard runs properly.
HRP_S<sysname> display device
USG9520's Device status:
Slot # Type Online Register Status Primary
- - - - - - - - - - - - - - - - - - - - - - - - - - - - - - - - - - - - - -
1 SPU Present Registered Normal NA
2 SPU Present Registered Normal NA
3 LPU Present Registered Normal NA
4 MPU Present NA Normal Master
6 CLK Present Registered Normal Master
8 PWR Present Registered Normal NA
9 PWR Present Registered Abnormal NA
10 FAN Present Registered Normal NA
2. Run the display device pic-status command on the standby FW to query the operating
status of the subcard. If all items of the corresponding subcard are displayed as follows,
the subcard runs properly.
HRP_S<sysname> display device pic-status
Pic-status information in Chassis 1:
- - - - - - - - - - - - - - - - - - - - - - - - - - - - - - - - - - - - - - - -
SLOT PIC Status Type Port_count Init_result Logic down
Registered Cpu
1 0 Registered SPU_CARD_TYPE_IPS 0 SUCCESS SUCCESS CPU1
1 1 Registered SPU_CARD_TYPE_SPCC 0 SUCCESS SUCCESS CPU3
2 1 Registered SPU_CARD_TYPE_SPCH 0 SUCCESS SUCCESS
CPU2,CPU3

HUAWEI USG9500 Series Terabit-level Next-Generation Firewall
Hardware Guide
3 Hardware Maintenance
Issue 01 (2017-03-13)
Huawei Proprietary and Confidential
Copyright © Huawei Technologies Co., Ltd.
347
3 0 Registered LAN_WAN_5x10GF_B_CARD 5 SUCCESS SUCCESS
3 2 Registered ETH_24xGF_B_CARD 24 SUCCESS SUCCESS
3. Run the display firewall cpu-table command on the standby FW to view the card table.
Compare it with that before capacity expansion to confirm whether the card table is
updated. If the card tables before and after capacity expansion are different, the card
table has been updated.
HRP_S<sysname> system-view
HRP_S[sysname] diagnose
HRP_S[sysname-diagnose] display firewall cpu-table
The FW allocates sessions to various CPUs for processing based on the card table. After
the card table of the standby FW is updated, the standby FW sends the updated card table
to the active FW. After receiving the new card table from the standby FW, the active FW
synchronizes session tables to the standby FW. During session backup, the active FW
allocates sessions to CPUs for processing based on the card table of the standby FW. In
this way, the standby FW can properly identify and process sessions after they are
backed up to the standby FW.
SPC registration and card table update on the standby FW take around 20 minutes.
Session backup between the active and standby FWs takes around 2 minutes. Therefore,
after confirming that the card table is updated, wait for 2 minutes and perform
subsequent operations.
Step 7 Run the hrp track spu enable command on the standby FW to enable the VGMP group to
monitor the SPU.
HRP_S<sysname> system-view
HRP_S[sysname] hrp track spu enable
After the VGMP group is enabled to monitor the SPU, the VGMP group priority of the
standby FW becomes higher than that of the active FW, triggering active/standby switchover.
The standby FW assumes the active role and processes service traffic, and the active FW
enters the standby status.
Service switchover takes a certain period of time. For service continuity, run the hrp track
spu enable command, wait for one minute, and then perform subsequent operations.
Step 8 Optional: If two FWs work in load balancing mode, perform as described in step Step 3 to
switch the operating mode to the active/standby mode. After operations in step Step 7 are
complete, run the undo hrp switch active command on the FW on which the hrp switch
active command is executed (namely, the FW in standby status) to cancel operations in step
Step 3.
If two FWs work in active/standby mode, and operations in step Step 3 are not performed,
skip this step.
HRP_S<sysname> system-view
HRP_S[sysname] undo hrp switch active
Step 9 Repeat steps Step 4 to Step 7 on the original active (existing standby) FW to expand its SPC
capacity.
Step 10 Check whether the service properly operates.
----End
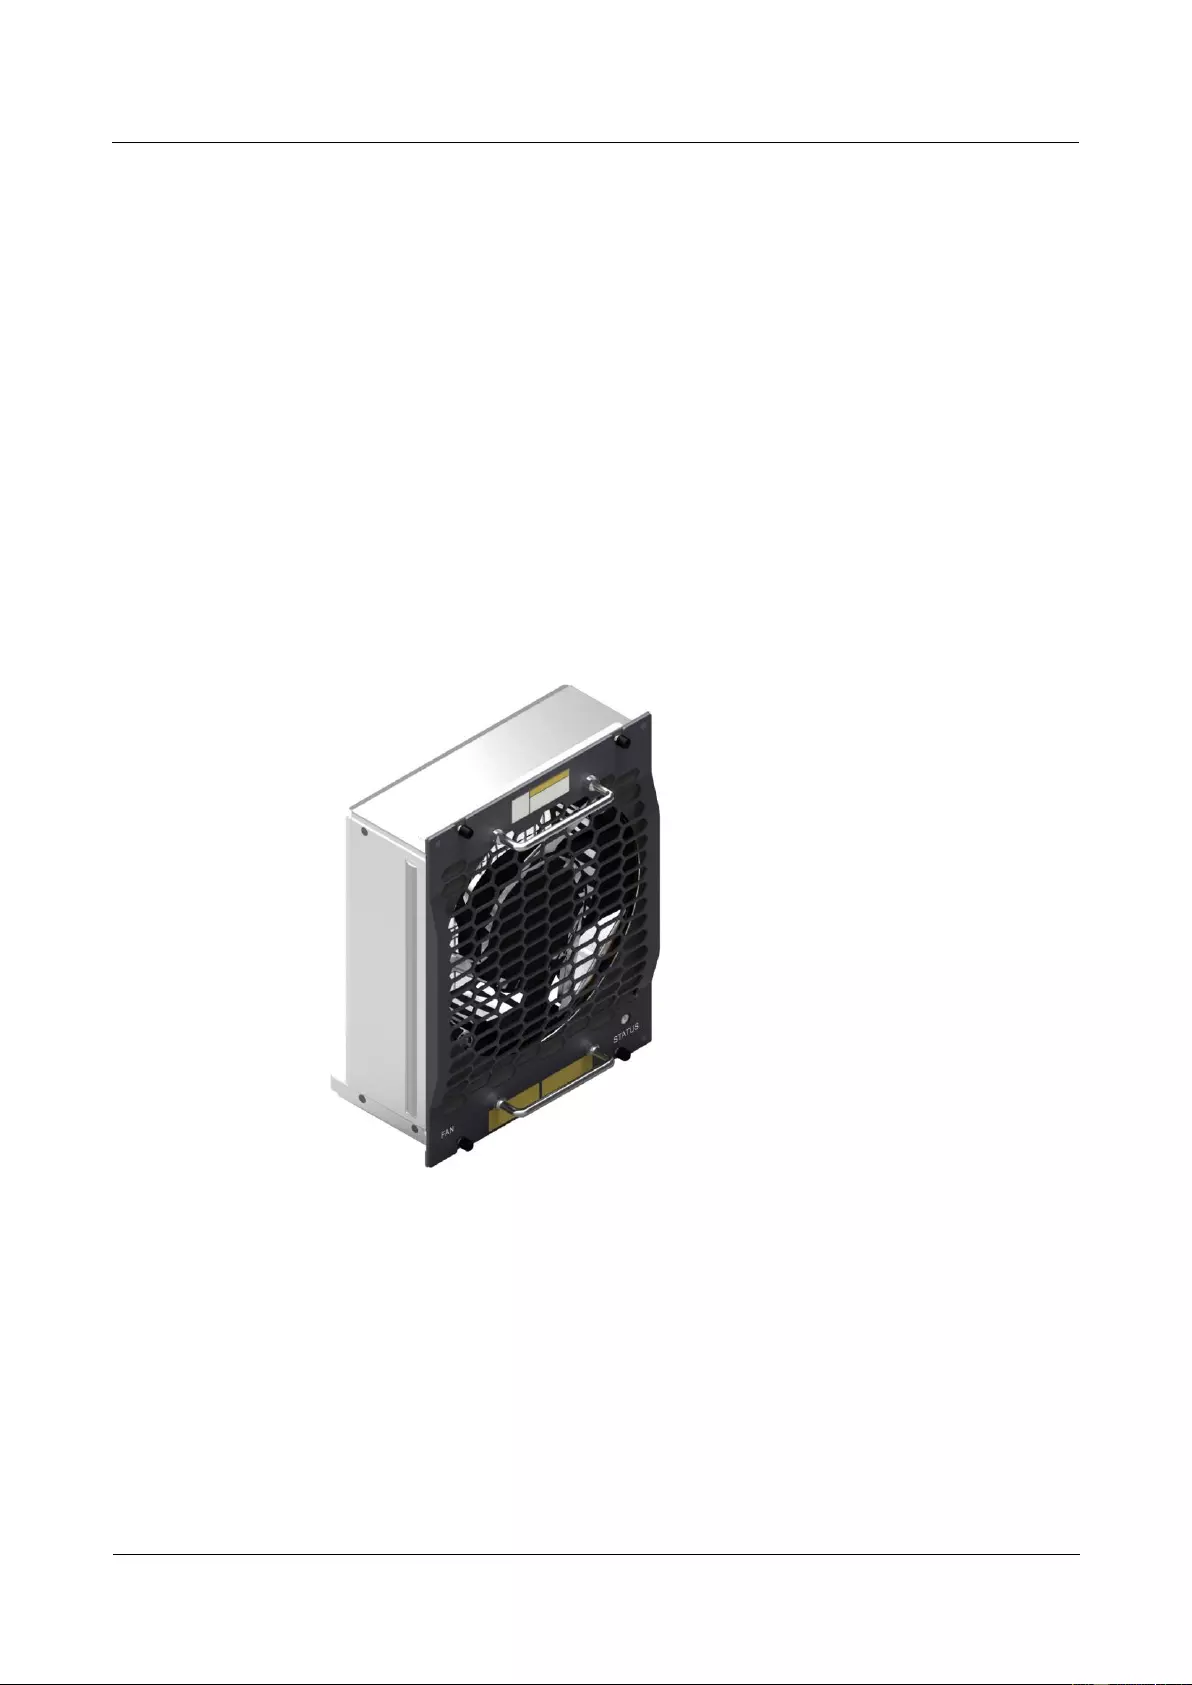
HUAWEI USG9500 Series Terabit-level Next-Generation Firewall
Hardware Guide
3 Hardware Maintenance
Issue 01 (2017-03-13)
Huawei Proprietary and Confidential
Copyright © Huawei Technologies Co., Ltd.
348
3.3 Replacing a Fan Frame
This section describes the fan frame of the device and the procedure for replacing the fan
frame.
3.3.1 Replacing the Fan Module of the USG9580
This section describes the fan frame of the USG9580 and the procedure for replacing the fan
frame.
Precautions
In the process of removing an old fan module, you need to pull it out about 5 cm first.
After the fans stop rotating, you can pull out the complete module.
The USG9580 has four fans. You can replace only one fan at a time.
The fan module of the USG9580 is located at the rear of the chassis. Figure 3-15 shows
the appearance of the fan module.
Figure 3-15 Appearance of the fan module
Tools
ESD wrist strap or ESD gloves
Phillips screwdriver
Procedure
Step 1 Check the location of the fan module to be replaced.
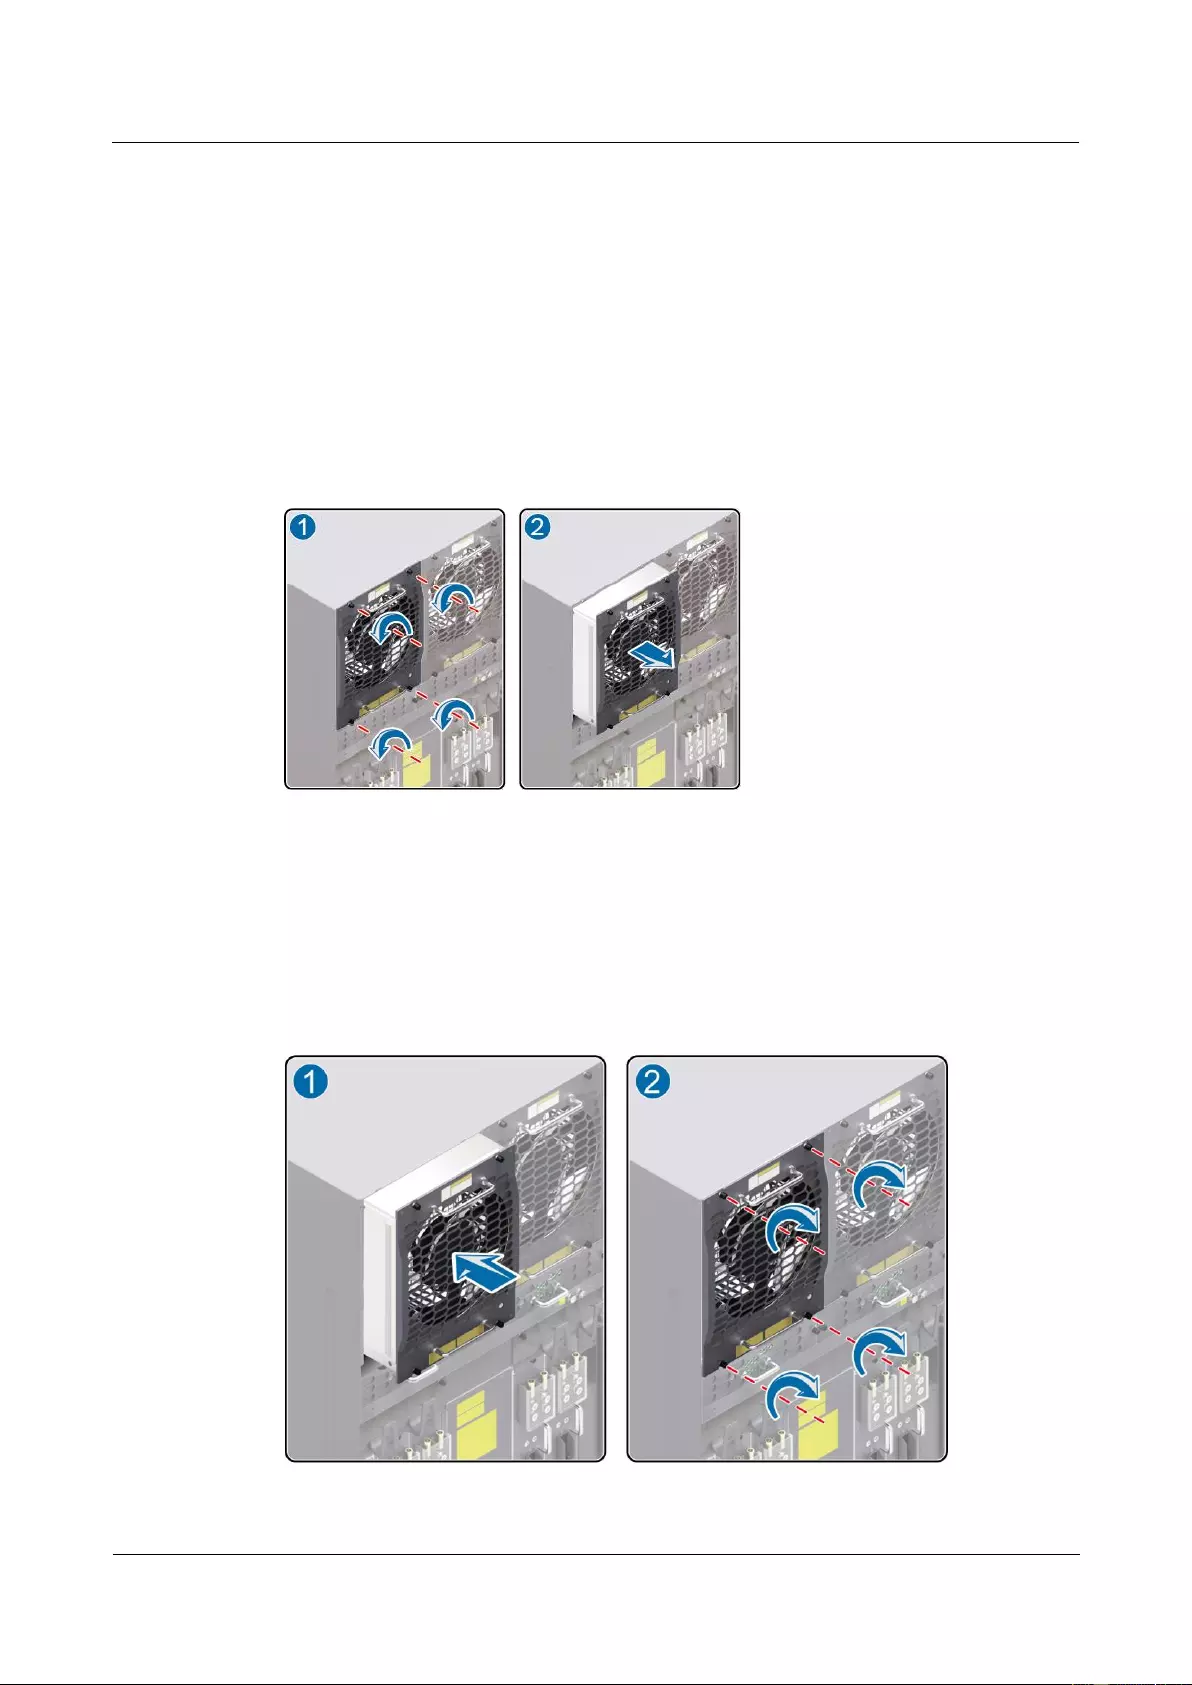
HUAWEI USG9500 Series Terabit-level Next-Generation Firewall
Hardware Guide
3 Hardware Maintenance
Issue 01 (2017-03-13)
Huawei Proprietary and Confidential
Copyright © Huawei Technologies Co., Ltd.
349
Before removing the old fan module, check its location, for example, the cabinet and chassis
where the fan module resides. Then, find the fan module to be replaced in the chassis and
attach a label to the panel to identify the fan module to avoid misoperation.
Step 2 Wear the ESD wrist strap and connect the ground terminal to the ESD jack on the chassis.
Step 3 Turn the Phillips screwdriver to loosen the captive screws on the fan frame, as shown in
Figure 3-16.
Step 4 Pull the upper handle upward and the lower handle downward to draw the fan module about 5
cm out of the slot. When the fans stop rotating, pull out the fan module completely, as shown
in Figure 3-16.
Figure 3-16 Diagram of removing the fan module from the USG9580
Step 5 Insert a new fan module into the chassis.
Hold the upper and lower handles of the fan module, and slowly and horizontally insert the
fan module along the guide rails in the slot until the back of the fan module properly connects
to the backplane. Turn the Phillips screwdriver to fasten the fan frame to the chassis by
tightening the captive screws, as shown in Figure 3-17.
Figure 3-17 Diagram of installing the fan module on the USG9580

HUAWEI USG9500 Series Terabit-level Next-Generation Firewall
Hardware Guide
3 Hardware Maintenance
Issue 01 (2017-03-13)
Huawei Proprietary and Confidential
Copyright © Huawei Technologies Co., Ltd.
350
Step 6 Verify the function of the new fan module.
In normal situations, after the new fan module is inserted into the chassis, the fans inside it
immediately start to operate to draw air from the chassis. In this case, you can check whether
the new fan module functions normally in the following manners:
If the FAN indicator on the panel of the fan module is on and green, it indicates that the
fan module runs normally. If the indicator is red, it indicates that the fan module fails to
run normally.
Run the display fan command on the console interface to view the running status of the
fan module. If the command output is displayed as follows, it indicates that the fan
module runs normally.
<sysname> display fan
Slotid : 27
Present : YES
Registered: YES
Status : AUTO
FanSpeed : [No.]Speed
[1]40%
Slotid : 28
Present : YES
Registered: YES
Status : AUTO
FanSpeed : [No.]Speed
[1]40%
Slotid : 29
Present : YES
Registered: YES
Status : AUTO
FanSpeed : [No.]Speed
[1]40%
Slotid : 30
Present : YES
Registered: YES
Status : AUTO
FanSpeed : [No.]Speed
[1]40%
The preceding command output indicates that the new fan module is normal. If the new fan
module fails to return to the normal state, contact Huawei technical personnel.
----End
Follow-up Procedure
After finishing the replacement, collect the tools.
If a fan module that is replaced is confirmed to be faulty, you need to fill in the Faulty
Card for Repair and send the faulty fan module together with the card to the Huawei
local office for timely repair.
3.3.2 Replacing the Fan Module of the USG9560
This section describes the fan frame of the USG9560 and the procedure for replacing the fan
frame.
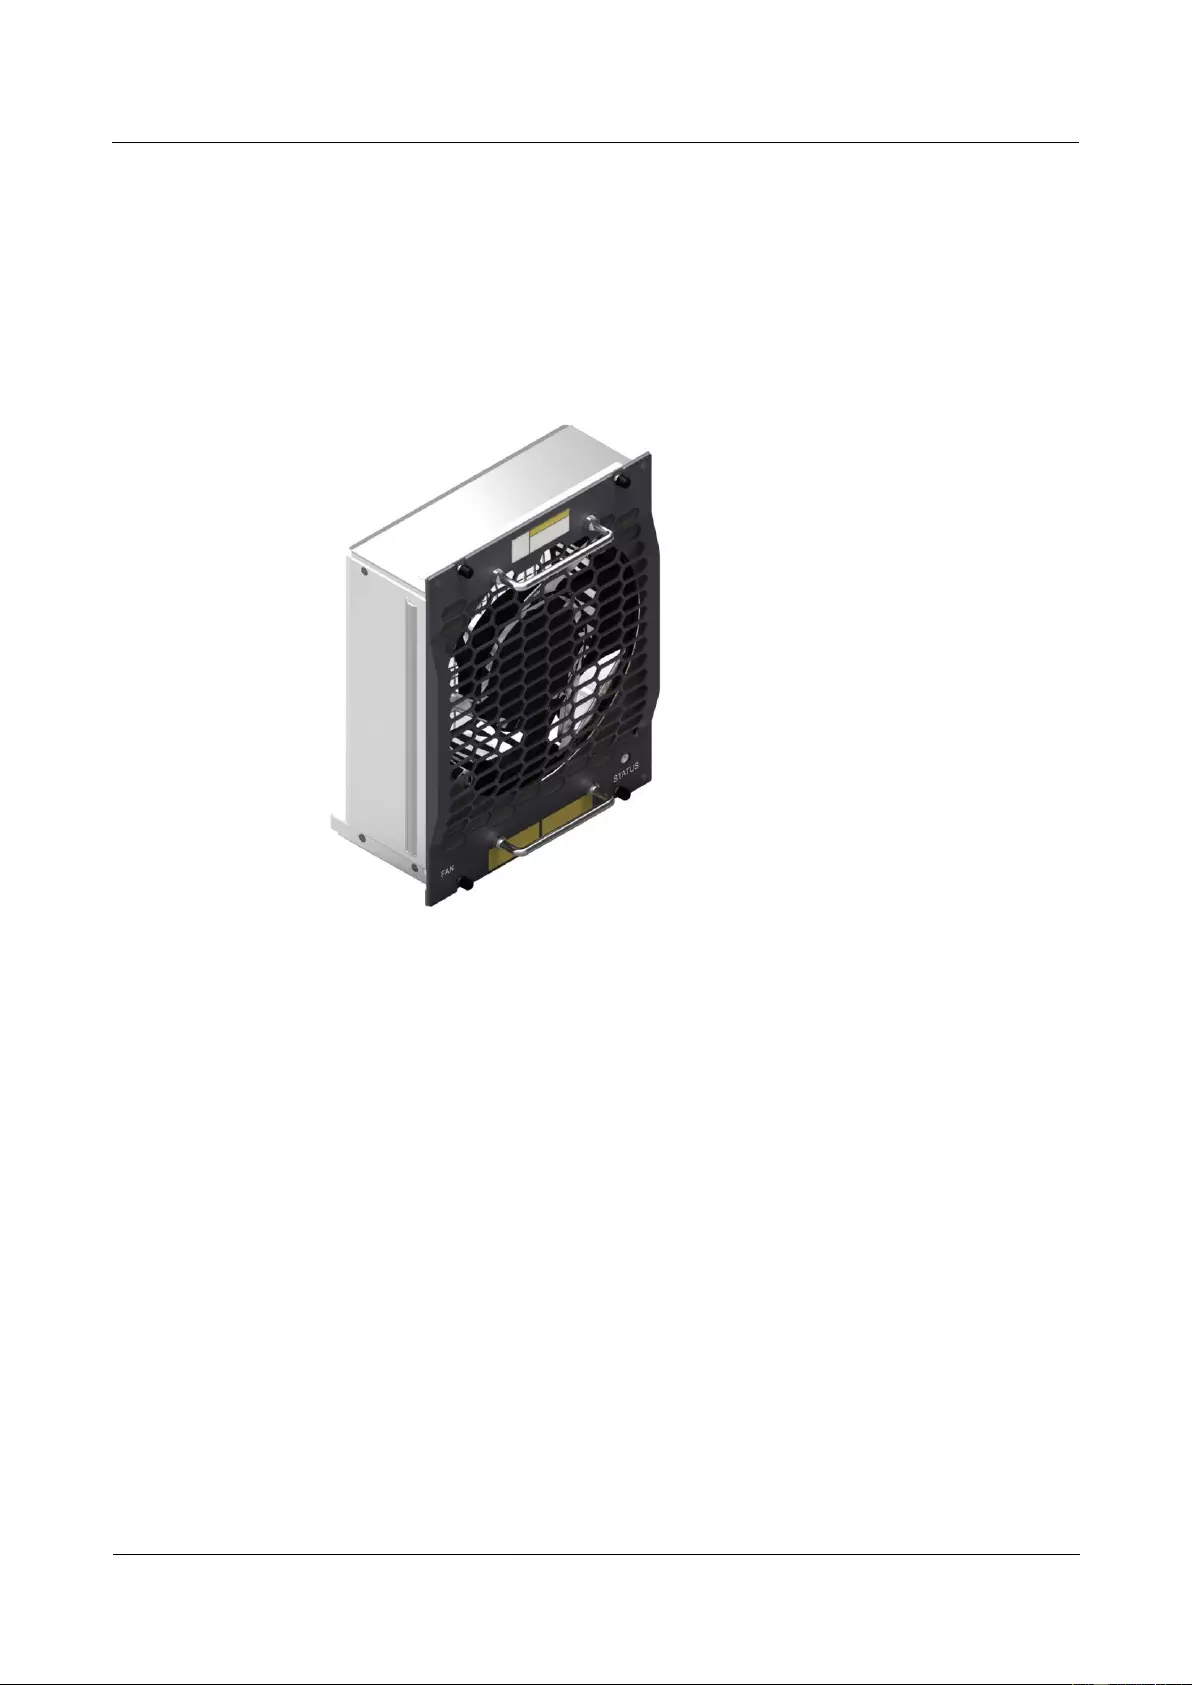
HUAWEI USG9500 Series Terabit-level Next-Generation Firewall
Hardware Guide
3 Hardware Maintenance
Issue 01 (2017-03-13)
Huawei Proprietary and Confidential
Copyright © Huawei Technologies Co., Ltd.
351
Precautions
In the process of removing an old fan module, you need to pull it out about 5 cm first.
After the fans stop rotating, you can pull out the complete module.
The USG9560 has two fan modules. You can replace only one fan at a time.
The fan module of the USG9560 is located at the rear of the chassis. Figure 3-18 shows
the appearance of the fan module.
Figure 3-18 Appearance of the fan module
Tools
ESD wrist strap or ESD gloves
Phillips screwdriver
Procedure
Step 1 Check the location of the fan module to be replaced.
Before removing the old fan module, check its location, for example, the cabinet and chassis
where the fan module resides. Then, find the fan module to be replaced in the chassis and
attach a label to the panel to identify the fan module and avoid misoperation.
Step 2 Wear the ESD wrist strap and connect the grounding terminal to the ESD jack on the chassis.
Step 3 Turn the Phillips screwdriver to loosen the captive screws on the fan frame, as shown in
Figure 3-19.
Step 4 Pull the upper handle upward and the lower handle downward and then draw the fan module
about 5 cm out of the slot. When the fan blades stop rotating, pull out the fan module
completely, as shown in Figure 3-19.
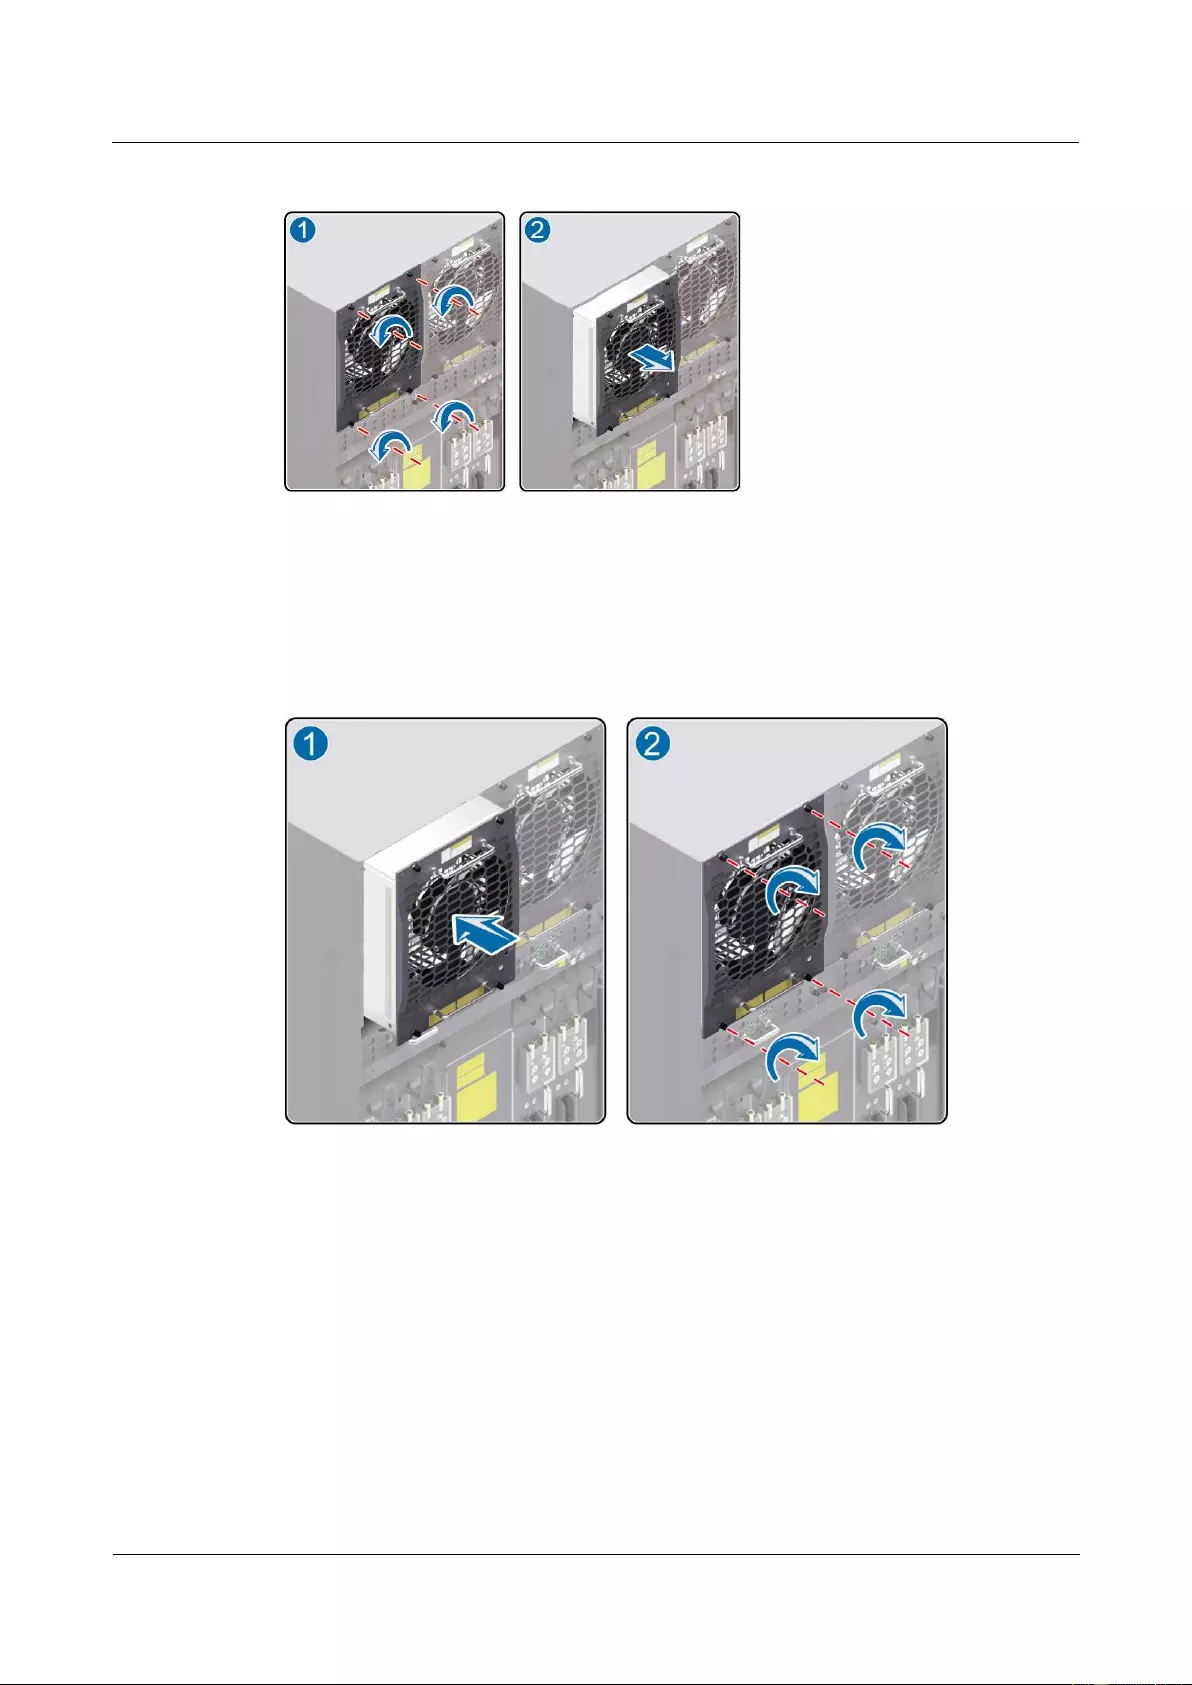
HUAWEI USG9500 Series Terabit-level Next-Generation Firewall
Hardware Guide
3 Hardware Maintenance
Issue 01 (2017-03-13)
Huawei Proprietary and Confidential
Copyright © Huawei Technologies Co., Ltd.
352
Figure 3-19 Diagram of removing the fan module from the USG9560
Step 5 Hold the upper and lower handles of the fan module, and slowly and horizontally insert the
fan module along the guide rails in the slot until the back of the fan module properly connects
to the backplane. Turn the Phillips screwdriver to fasten the fan frame to the chassis by
tightening the captive screws, as shown in Figure 3-20.
Figure 3-20 Diagram of installing the fan module on the USG9560
Step 6 Verify the function of the new fan module.
In normal situations, after the new fan module is inserted into the chassis, the fans inside it
immediately start to operate to draw air from the chassis. In this case, you can check whether
the new fan module functions normally in the following manners:
If the FAN indicator on the panel of the fan module is on and green, it indicates that the
fan module runs normally. If the indicator is red, it indicates that the fan module fails to
run normally.
Run the display fan command on the console interface to view the running status of the
fan module. If the command output is displayed as follows, it indicates that the fan
module runs normally.

HUAWEI USG9500 Series Terabit-level Next-Generation Firewall
Hardware Guide
3 Hardware Maintenance
Issue 01 (2017-03-13)
Huawei Proprietary and Confidential
Copyright © Huawei Technologies Co., Ltd.
353
<sysname> display fan
Slotid : 18
Present : YES
Registered: YES
Status : AUTO
FanSpeed : [No.]Speed
[1]46%
Slotid : 19
Present : YES
Registered: YES
Status : AUTO
FanSpeed : [No.]Speed
[1]45%
The preceding command output indicates that the new fan module is normal. If the new fan
module fails to return to the normal state, contact Huawei technical personnel.
----End
Follow-up Procedure
After finishing the replacement, put all the tools away.
If a fan module is replaced and confirmed to be faulty, you need to fill in the Faulty Card
for Repair and send the card with the faulty fan module to the Huawei local office for
timely maintenance.
3.3.3 Replacing the Fan Frame of the USG9520
This section describes the fan frame of the USG9520 and the procedure for replacing the fan
frame.
Context
Before replacing a fan frame, you need to note the following points:
You must spend not more than five minutes to replace a fan frame. Otherwise, the
security and stability of the device is severely affected.
During the process of pulling out the old fan frame, you should first pull out part of the
fan frame. After the fans stop rotating, pull out the fan frame completely.
The USG9520 has one fan module. The fan module is located at the rear of the chassis.
Figure 3-21 shows the appearance of the fan module.
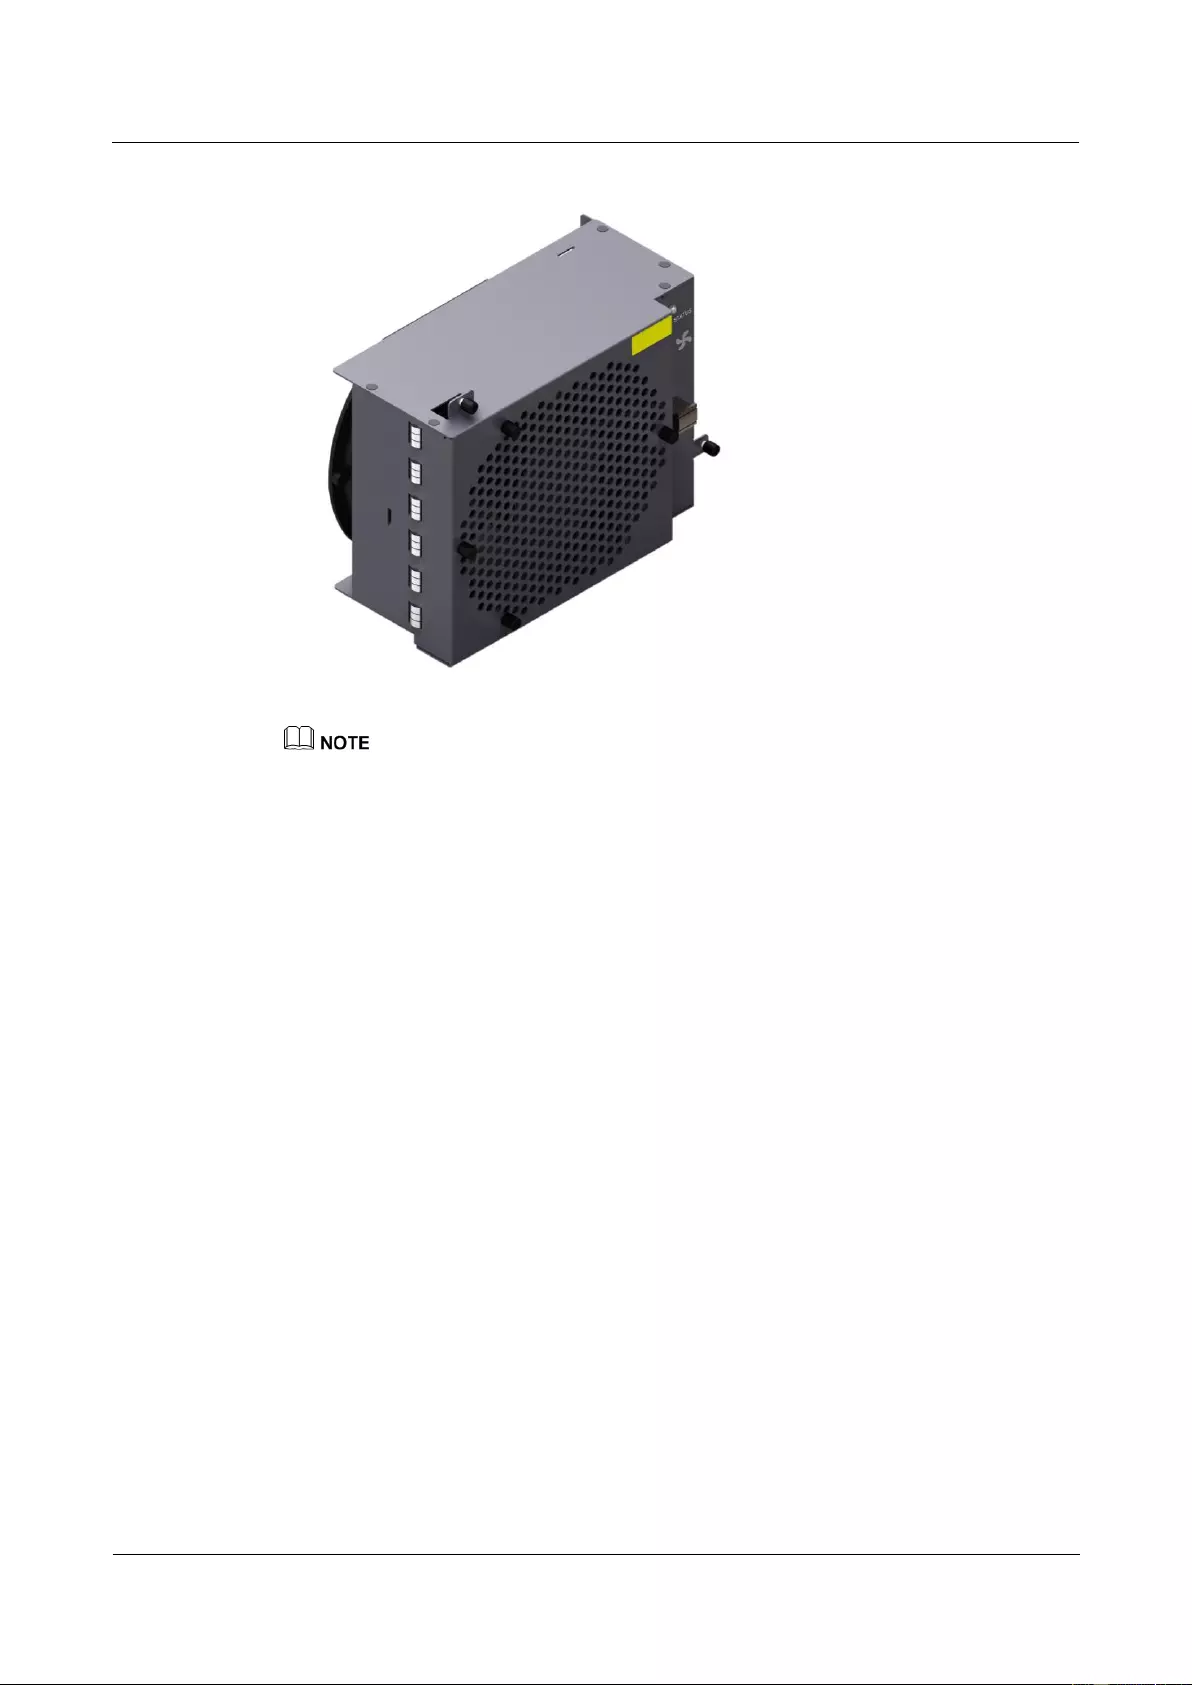
HUAWEI USG9500 Series Terabit-level Next-Generation Firewall
Hardware Guide
3 Hardware Maintenance
Issue 01 (2017-03-13)
Huawei Proprietary and Confidential
Copyright © Huawei Technologies Co., Ltd.
354
Figure 3-21 Appearance of the fan module
The method to replace the fan frame of the USG9520 chassis that is configured with DC power supply
module is similar to that of the chassis which is configured with AC power supply module. Take the fan
frame of the chassis that is configured with DC power supply module as an example.
Tool
Before replacing a fan frame, you need the following tools:
ESD wrist strap or ESD glove
Phillips screwdriver
Procedure
Step 1 Check the location of the fan frame to be replaced.
Before pulling out a fan frame that is to be replaced, you should first check the location of the
fan frame, for example, the cabinet and chassis where the fan frame resides. Then, find the fan
frame to be replaced in the chassis and attach a label to the panel to identify the fan frame.
Step 2 Wear the ESD wrist strap and connect the grounding terminal to the ESD jack on the rack.
Step 3 Turn the Phillips screwdriver to loosen the captive screws on both ends of the fan frame, as (1)
shown in Figure 3-22.
Step 4 Hold the handle on the fan frame and draw out the fan frame by 5 cm. When the fans stop
rotating, pull out the fan frame completely, as (2) shown in Figure 3-22.
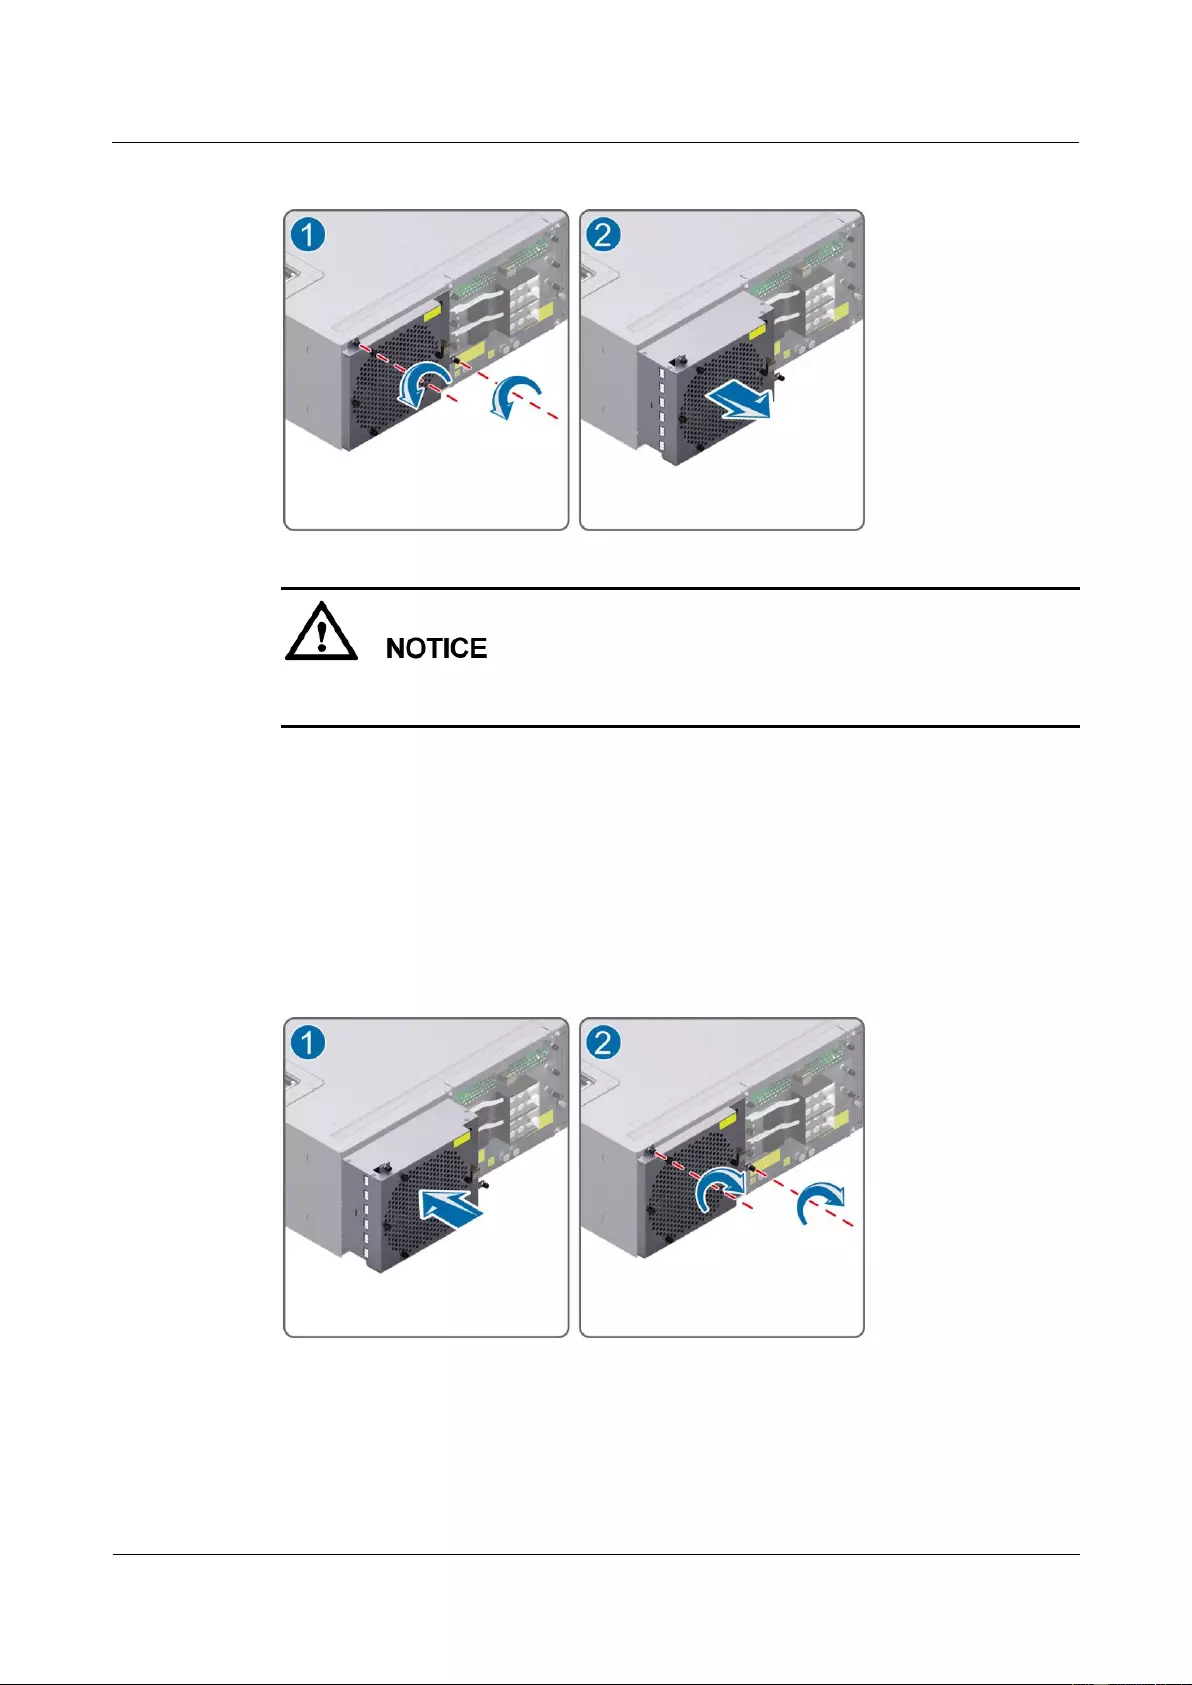
HUAWEI USG9500 Series Terabit-level Next-Generation Firewall
Hardware Guide
3 Hardware Maintenance
Issue 01 (2017-03-13)
Huawei Proprietary and Confidential
Copyright © Huawei Technologies Co., Ltd.
355
Figure 3-22 Pulling out the fan frame of the USG9520
You must spend not more than five minutes to replace a fan frame. Otherwise, the security
and stability of the device is severely affected.
Step 5 Insert the backup fan frame into the chassis.
Hold the handle of the fan frame with one hand and support the bottom of the fan frame with
the other hand. Then, insert the fan frame smoothly and slowly along the guide rail of the slot
till the back of the fan frame is connected properly to the backplane of the chassis, as (1)
shown in Figure 3-23.
Step 6 Turn the cross driver to fasten the fan frame to the chassis by tightening the captive screws, as
(2) shown in Figure 3-23.
Figure 3-23 Inserting a fan frame of the USG9520
Step 7 Verify the functions of the new fan frame.
In normal situations, after the new fan frame is inserted into the chassis, the fans start to
operate and meet the ventilation and heat dissipation requirements of the chassis. In this case,
you can check whether the fan frame functions normally in the following ways:

HUAWEI USG9500 Series Terabit-level Next-Generation Firewall
Hardware Guide
3 Hardware Maintenance
Issue 01 (2017-03-13)
Huawei Proprietary and Confidential
Copyright © Huawei Technologies Co., Ltd.
356
If the Status indicator on the panel of the fan frame is on and is green (blinks at a rate of
0.5 Hz), it indicates that the fan frame runs normally.
If the Status indicator on the panel of the fan frame is on and is green(blinks at a rate of 4
Hz)/yellow/red,it indicates that the fan frame fails to run normally
Run the display fan command on the console interface to view the running status of the
fan frame. If the output is displayed as follows, it indicates that the fan frame runs
normally.
<sysname> display fan
Slotid : 10
Present : YES
Registered: YES
Status : AUTO
FanSpeed : [No.]Speed
[1]75% [2]75%
The preceding output also indicates that the fan frame has returned to the normal state. If the
fan frame fails to return to the normal state, you should contact Huawei local office for timely
technical support.
----End
Follow-up Procedure
After replacing a fan frame, collect the tools.
If a fan frame that is replaced is confirmed to be faulty, you should fill in the Faulty Card
for Repair, and send the card and the faulty fan frame to a Huawei local office for timely
maintenance.
3.4 Replacing a Power Module
This section describes the power module of the device and the procedure for replacing the
power module.
3.4.1 Replacing the DC PEM of the USG9580
This section describes the DC power module of the USG9580 and the procedure for replacing
the power module.
Precautions
Before replacing a PEM, you need to power it off by turning off the corresponding air
circuit breaker on the power distribution cabinet. Thus, the PEM to be replaced is
powered off. In addition, you need to switch off the PEM.
Before replacing a PEM, ensure that its backup PEM works properly.
The USG9580 has eight PEMs working in 4+4 backup mode. You can power off one
PEM during replacement. Figure 3-24 shows the appearance of the PEM.
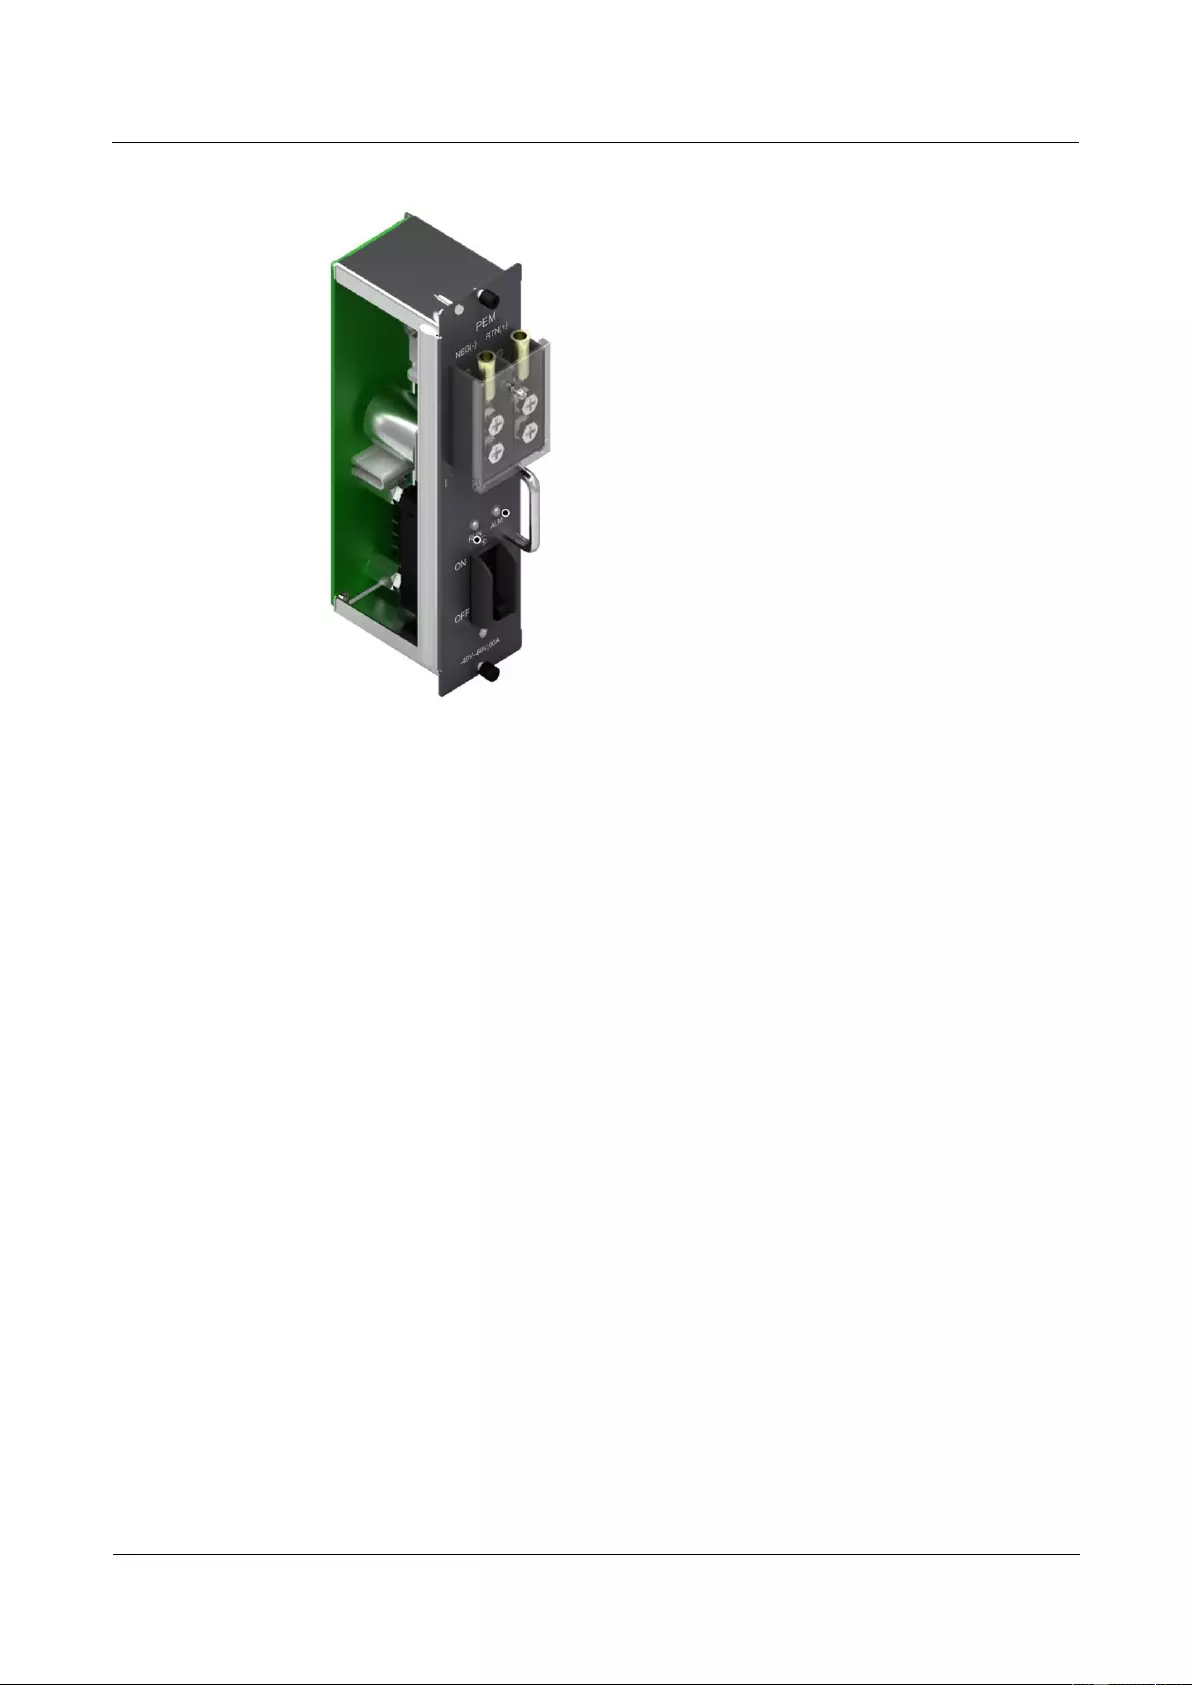
HUAWEI USG9500 Series Terabit-level Next-Generation Firewall
Hardware Guide
3 Hardware Maintenance
Issue 01 (2017-03-13)
Huawei Proprietary and Confidential
Copyright © Huawei Technologies Co., Ltd.
357
Figure 3-24 Appearance of the PEM
Tools
ESD wrist strap or ESD gloves
Phillips screwdriver
Procedure
Step 1 Check the location of the PEM to be replaced.
Before removing the old PEM, check its location, for example, the cabinet and chassis where
the PEM resides. Then, find the PEM to be replaced in the chassis and attach a label to the
panel to identify the PEM and avoid misoperation.
Step 2 Wear the ESD wrist strap and connect the grounding terminal to the ESD jack on the chassis.
Step 3 Turn off the corresponding air circuit breaker on the power distribution cabinet. Thus, the
PEM to be replaced is powered off. In addition, switch off the PEM.
Step 4 Remove the cables from the power module to be replaced.
Step 5 Turn the Phillips screwdriver to loosen the captive screws on the PEM, as shown in Figure
3-25.
Step 6 Hold the handle on the PEM with one hand and hold the PEM with the other hand. Then, pull
the PEM horizontally and slowly out of the chassis, as shown in Figure 3-25.
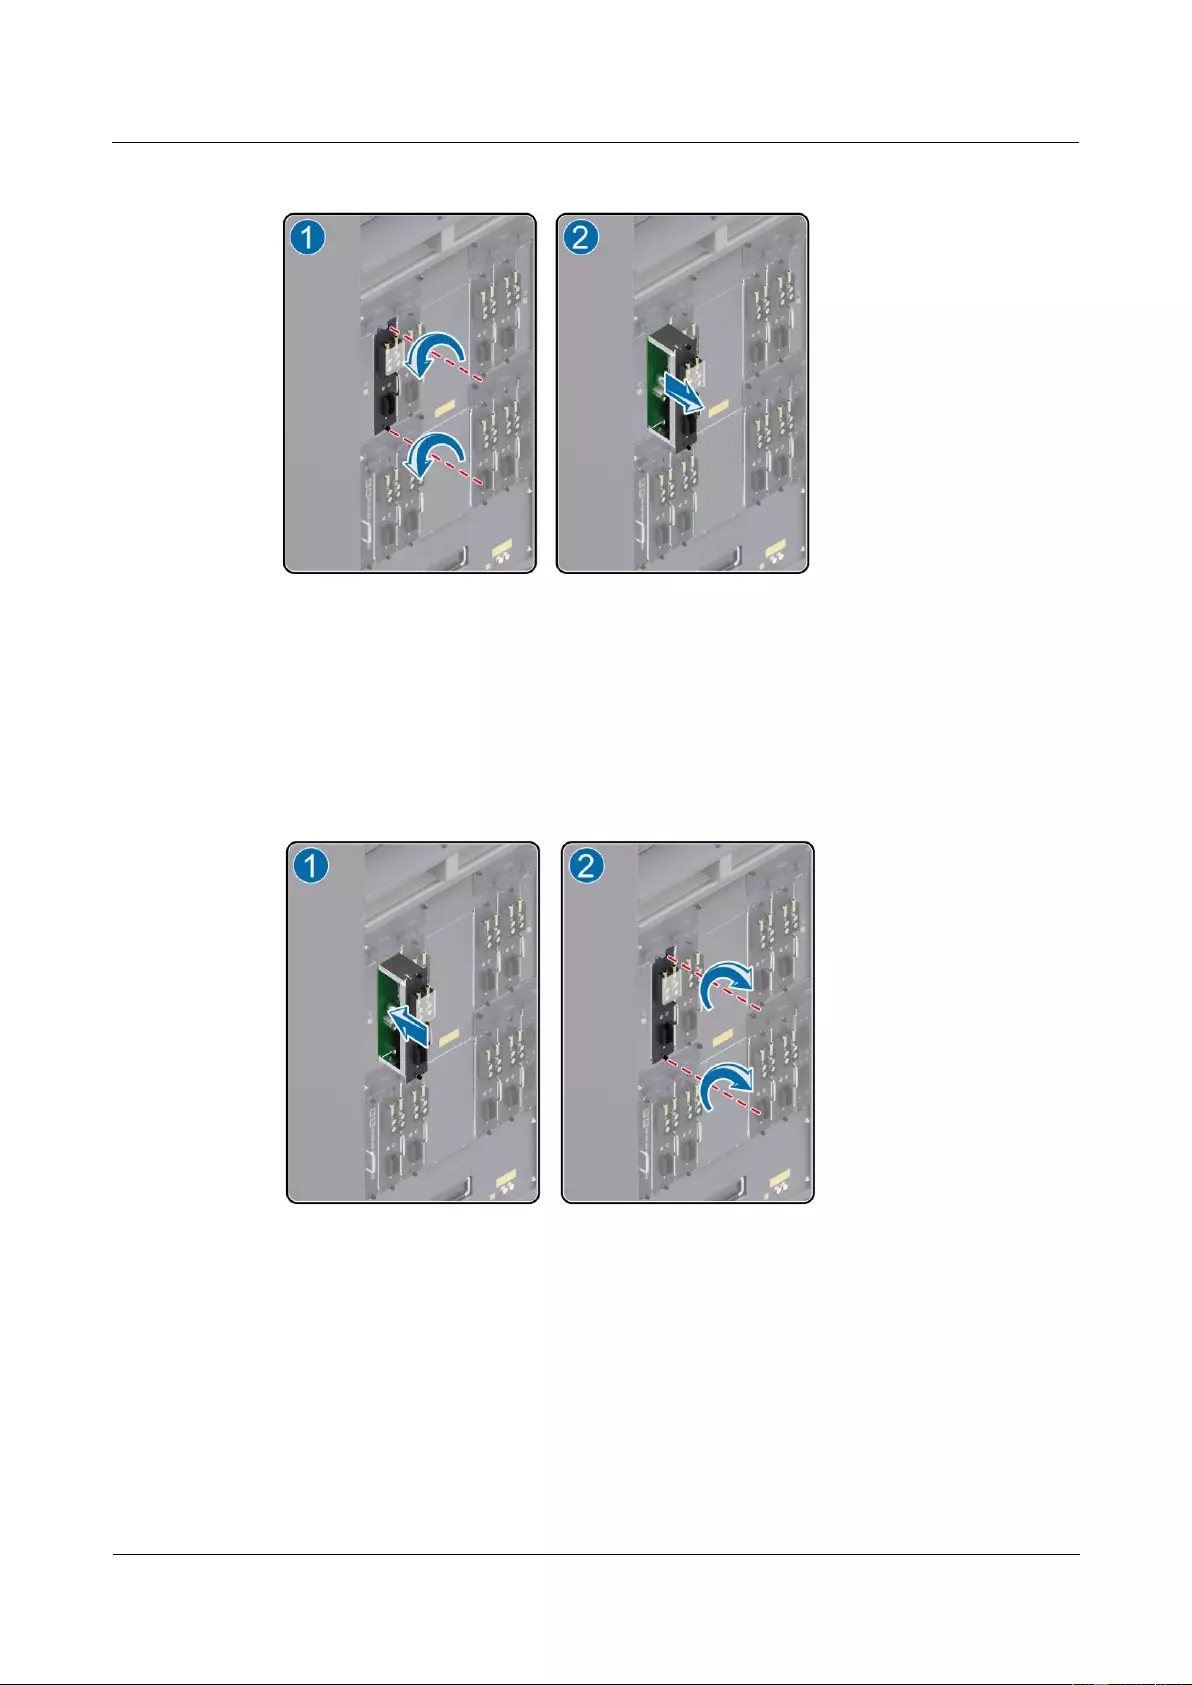
HUAWEI USG9500 Series Terabit-level Next-Generation Firewall
Hardware Guide
3 Hardware Maintenance
Issue 01 (2017-03-13)
Huawei Proprietary and Confidential
Copyright © Huawei Technologies Co., Ltd.
358
Figure 3-25 Diagram of removing the PEM from the USG9580
Step 7 Insert the new PEM into the chassis.
Hold the handle on the PEM with one hand and the PEM with the other hand. Then, insert the
PEM horizontally and slowly along the guide rails in the slot until the back of the PEM
properly connects to the backplane, Turn the Phillips screwdriver to fasten the PEM to the
chassis by tightening the captive screws, as shown in Figure 3-26.
Figure 3-26 Diagram of installing the PEM on the USG9580
Step 8 Connect the cables to the power module in original sequence.
Step 9 Verify the function of the new PEM.
If the RUN indicator on the PEM panel is on and green, it indicates that the PEM runs
normally.
If the ALM indicator on the PEM panel is on and red, it indicates that the PEM fails to
run normally.

HUAWEI USG9500 Series Terabit-level Next-Generation Firewall
Hardware Guide
3 Hardware Maintenance
Issue 01 (2017-03-13)
Huawei Proprietary and Confidential
Copyright © Huawei Technologies Co., Ltd.
359
Run the display device slot id command on the console interface to check the running
status of the new PEM. If the PEM statuses are displayed as the following bold
characters, it indicates that the PEM runs normally.
<sysname> display device
USG9580's Device status:
Slot # Type Online Register Status Primary
- - - - - - - - - - - - - - - - - - - - - - - - - - - - - - - - - - - - - -
1 SPU Present Registered Normal NA
2 SPU Present Registered Normal NA
3 SPU Present Registered Normal NA
4 SPU Present Registered Normal NA
5 SPU Present Registered Normal NA
6 SPU Present Registered Normal NA
7 SPU Present Registered Normal NA
8 SPU Present Registered Normal NA
9 SPU Present Registered Normal NA
10 SPU Present Registered Normal NA
11 LPU Present Registered Normal NA
12 LPU Present Registered Normal NA
13 LPU Present Registered Normal NA
14 LPU Present Registered Normal NA
15 LPU Present Registered Normal NA
16 LPU Present Registered Normal NA
17 MPU Present NA Normal Master
18 MPU Present Registered Normal Slave
19 SFU Present Registered Normal NA
20 SFU Present Registered Normal NA
21 SFU Present Registered Normal NA
22 SFU Present Registered Normal NA
23 CLK Present Registered Normal Master
24 CLK Present Registered Normal Slave
25 PWR Present Registered Normal NA
26 PWR Present Registered Normal NA
27 FAN Present Registered Normal NA
28 FAN Present Registered Normal NA
29 FAN Present Registered Normal NA
30 FAN Present Registered Normal NA
- - - - - - - - - - - - - - - - - - - - - - - - - - - - - - - - - - - - - -
<sysname> display device 25
Type :NEPS2250-D
Present :PRESENT
Status :NORMAL
Cable :PLUG
Mode :DC
PowerNum :2
TotalPower:842
Module : 0[B2]
Present :PRESENT
CpuStatus :NORMAL
InputVoltage:53.13
InputCurrent:9.33
InputPower :495
Module : 1[A1]

HUAWEI USG9500 Series Terabit-level Next-Generation Firewall
Hardware Guide
3 Hardware Maintenance
Issue 01 (2017-03-13)
Huawei Proprietary and Confidential
Copyright © Huawei Technologies Co., Ltd.
360
Present :PRESENT
CpuStatus :NORMAL
InputVoltage:53.13
InputCurrent:8.42
InputPower :447
The preceding command output indicates that the new PEM is normal. If the new PEM fails
to return to the normal state, you should contact a Huawei local office for timely technical
support.
----End
Follow-up Procedure
After finishing the replacement, put all the tools away.
If a PEM is replaced and confirmed to be faulty, you need to fill in the Faulty Card for
Repair and send the card with the faulty PEM to the Huawei local office for timely
maintenance.
3.4.2 Replacing the DC PEM of the USG9560
This section describes the DC power module of the USG9560 and the procedure for replacing
the power module.
Precautions
Before replacing a PEM, you need to power it off by turning off the corresponding air
circuit breaker on the power distribution cabinet. Thus, the PEM to be replaced is
powered off. In addition, you need to switch off the PEM.
The USG9560 has four PEMs, You can power off one PEM during replacement. Figure
3-27 shows the appearance of the PEM.
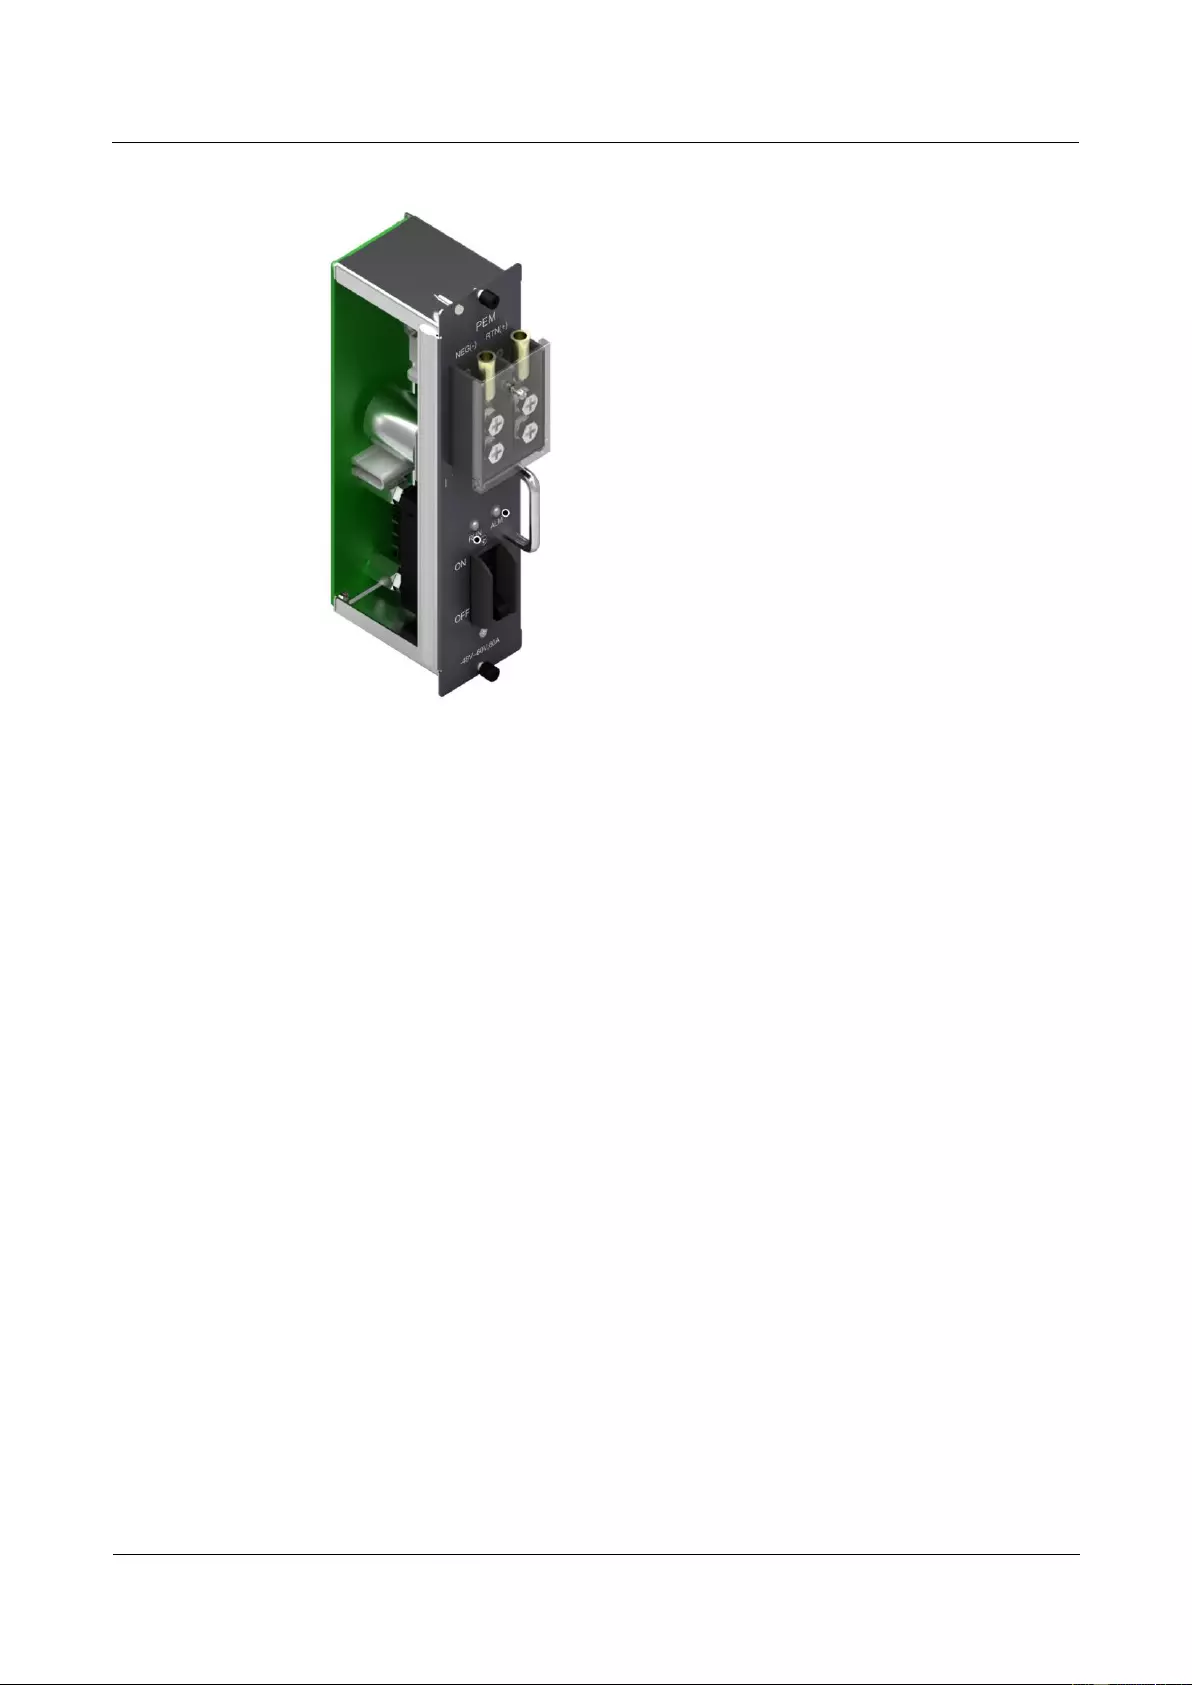
HUAWEI USG9500 Series Terabit-level Next-Generation Firewall
Hardware Guide
3 Hardware Maintenance
Issue 01 (2017-03-13)
Huawei Proprietary and Confidential
Copyright © Huawei Technologies Co., Ltd.
361
Figure 3-27 Appearance of the PEM
Tools
ESD wrist strap or ESD gloves
Phillips screwdriver
Procedure
Step 1 Check the location of the PEM to be replaced.
Before removing the old PEM, check its location, for example, the cabinet and chassis where
the PEM resides. Then, find the PEM to be replaced in the chassis and attach a label to the
panel to identify the PEM and avoid misoperation.
Step 2 Wear the ESD wrist strap and connect the grounding terminal to the ESD jack on the chassis.
Step 3 Turn off the corresponding air circuit breaker on the power distribution cabinet. Thus, the
PEM to be replaced is powered off. In addition, switch off the PEM.
Step 4 Remove the cables from the power module to be replaced.
Step 5 Turn the Phillips screwdriver to loosen the captive screws on the PEM, as shown in Figure
3-28.
Step 6 Hold the handle on the PEM with one hand and hold the PEM with the other hand. Then, pull
the PEM horizontally and slowly out of the chassis, as shown in Figure 3-28.
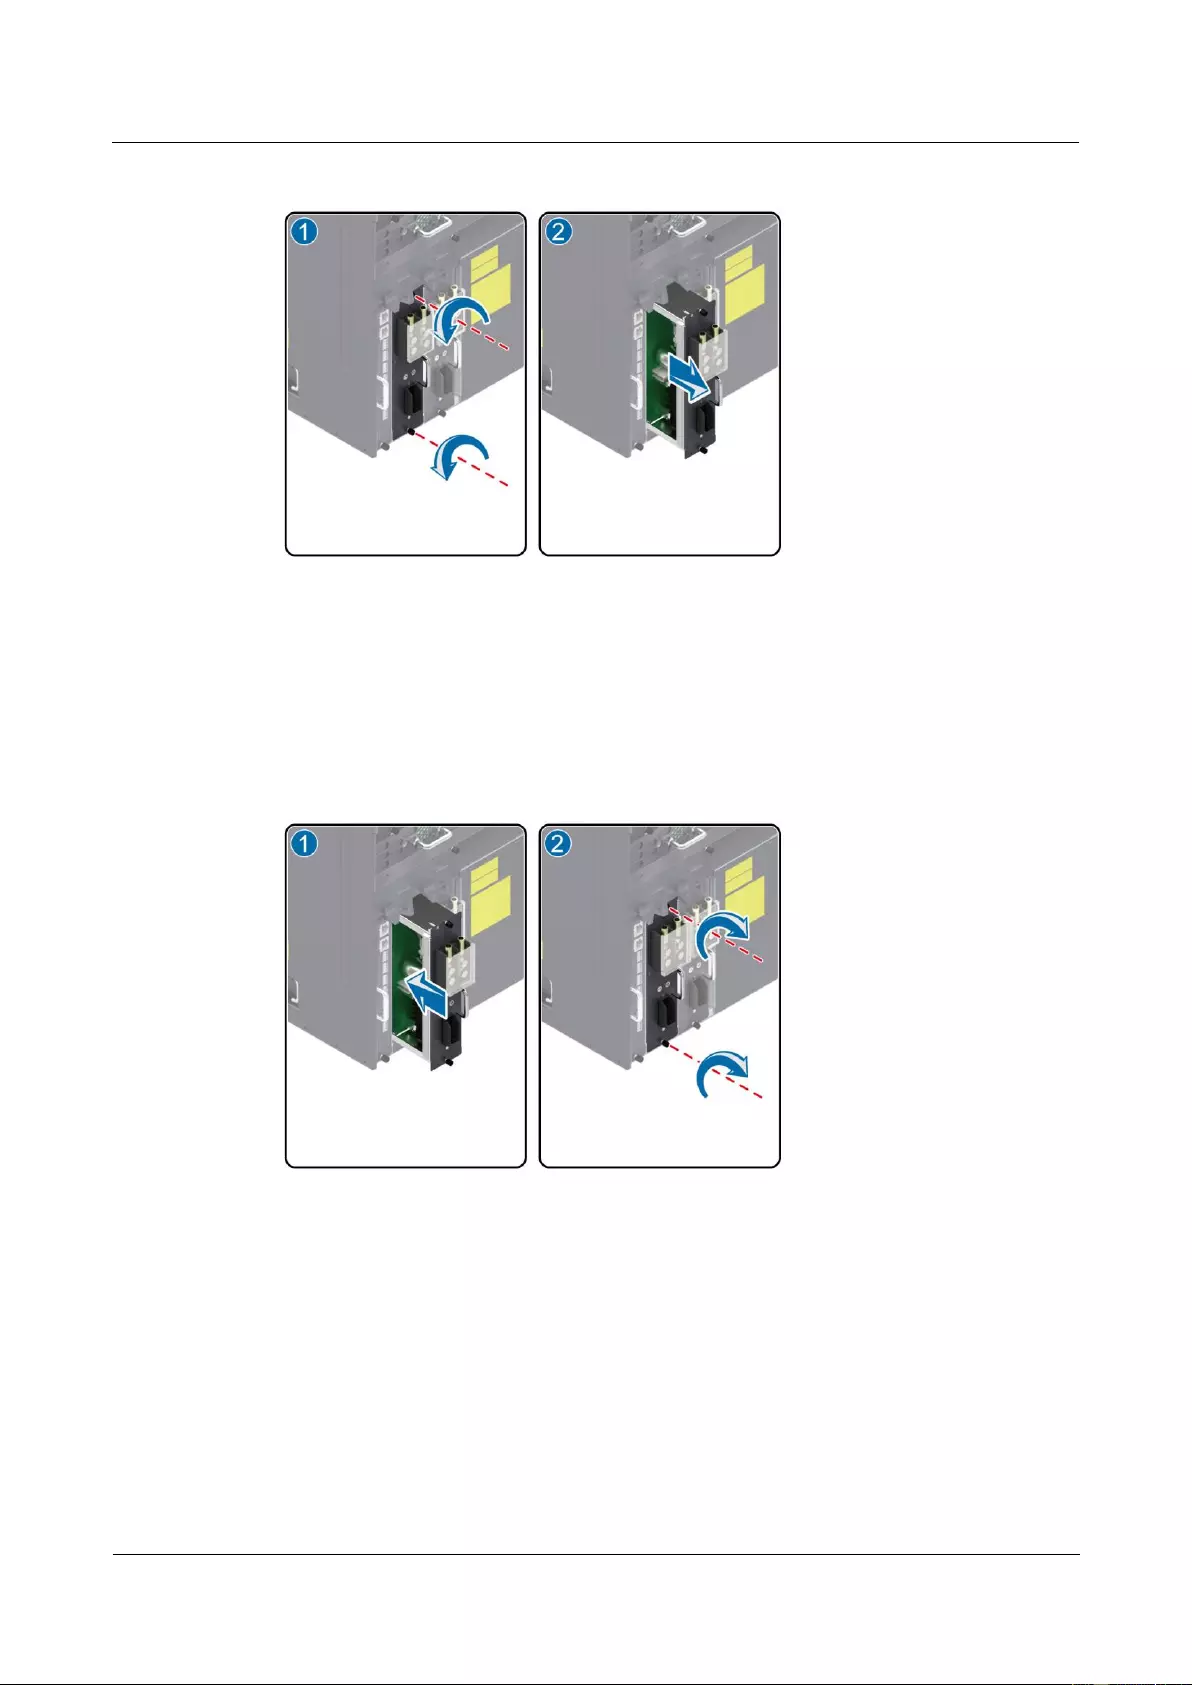
HUAWEI USG9500 Series Terabit-level Next-Generation Firewall
Hardware Guide
3 Hardware Maintenance
Issue 01 (2017-03-13)
Huawei Proprietary and Confidential
Copyright © Huawei Technologies Co., Ltd.
362
Figure 3-28 Diagram of removing the PEM from the USG9560
Step 7 Insert the new PEM into the chassis.
Hold the handle on the PEM with one hand and the PEM with the other hand. Then, insert the
PEM horizontally and slowly along the guide rails in the slot until the back of the PEM
properly connects to the backplane, Turn the Phillips screwdriver to fasten the PEM to the
chassis by tightening the captive screws, as shown in Figure 3-29.
Figure 3-29 Diagram of installing the PEM on the USG9560
Step 8 Connect the cables to the power module in original sequence.
Step 9 Verify the function of the new PEM.
If the RUN indicator on the PEM panel is on and green, it indicates that the PEM runs
normally.
If the ALM indicator on the PEM panel is on and red, it indicates that the PEM fails to
run normally.
Run the display device command on the console interface to check the running status of
the new PEM. If the PEM statuses are displayed as the following bold characters, it
indicates that the PEM runs normally.

HUAWEI USG9500 Series Terabit-level Next-Generation Firewall
Hardware Guide
3 Hardware Maintenance
Issue 01 (2017-03-13)
Huawei Proprietary and Confidential
Copyright © Huawei Technologies Co., Ltd.
363
<sysname> display device
USG9560's Device status:
Slot # Type Online Register Status Primary
- - - - - - - - - - - - - - - - - - - - - - - - - - - - - - - - - - - - - -
1 SPU Present Registered Normal NA
2 SPU Present Registered Normal NA
3 SPU Present Registered Normal NA
4 SPU Present Registered Normal NA
5 SPU Present Registered Normal NA
6 LPU Present Registered Normal NA
7 LPU Present Registered Normal NA
8 LPU Present Registered Normal NA
9 MPU Present NA Normal Master
10 MPU Present Registered Normal Slave
11 SFU Present Registered Normal NA
12 SFU Present Registered Normal NA
13 SFU Present Registered Normal NA
14 CLK Present Registered Normal Master
15 CLK Present Registered Normal Slave
16 PWR Present Registered Normal NA
17 PWR Present Registered Normal NA
18 FAN Present Registered Normal NA
19 FAN Present Registered Normal NA
- - - - - - - - - - - - - - - - - - - - - - - - - - - - - - - - - - - - - -
The preceding command output indicates that the new PEM is normal. If the new PEM fails
to return to the normal state, you should contact a Huawei local office for timely technical
support.
----End
Follow-up Procedure
After finishing the replacement, put all the tools away.
If a PEM is replaced and confirmed to be faulty, you need to fill in the Faulty Card for
Repair and send the card with the faulty PEM to the Huawei local office for timely
maintenance.
3.4.3 Replacing a DC Power Module of USG9520
This section describes the DC power module of the USG9520 and the procedure for replacing
the power module.
Context
Before replacing a power module, you must switch off the corresponding air circuit
breaker on the power distribution cabinet. Thus, the power module to be replaced is
powered off. In addition, the power module to be replaced must be switched off.
The USG9520 has two power modules. Do not power off the other during the process of
removing one power module. Figure 3-30 shows the appearance of the PEM.
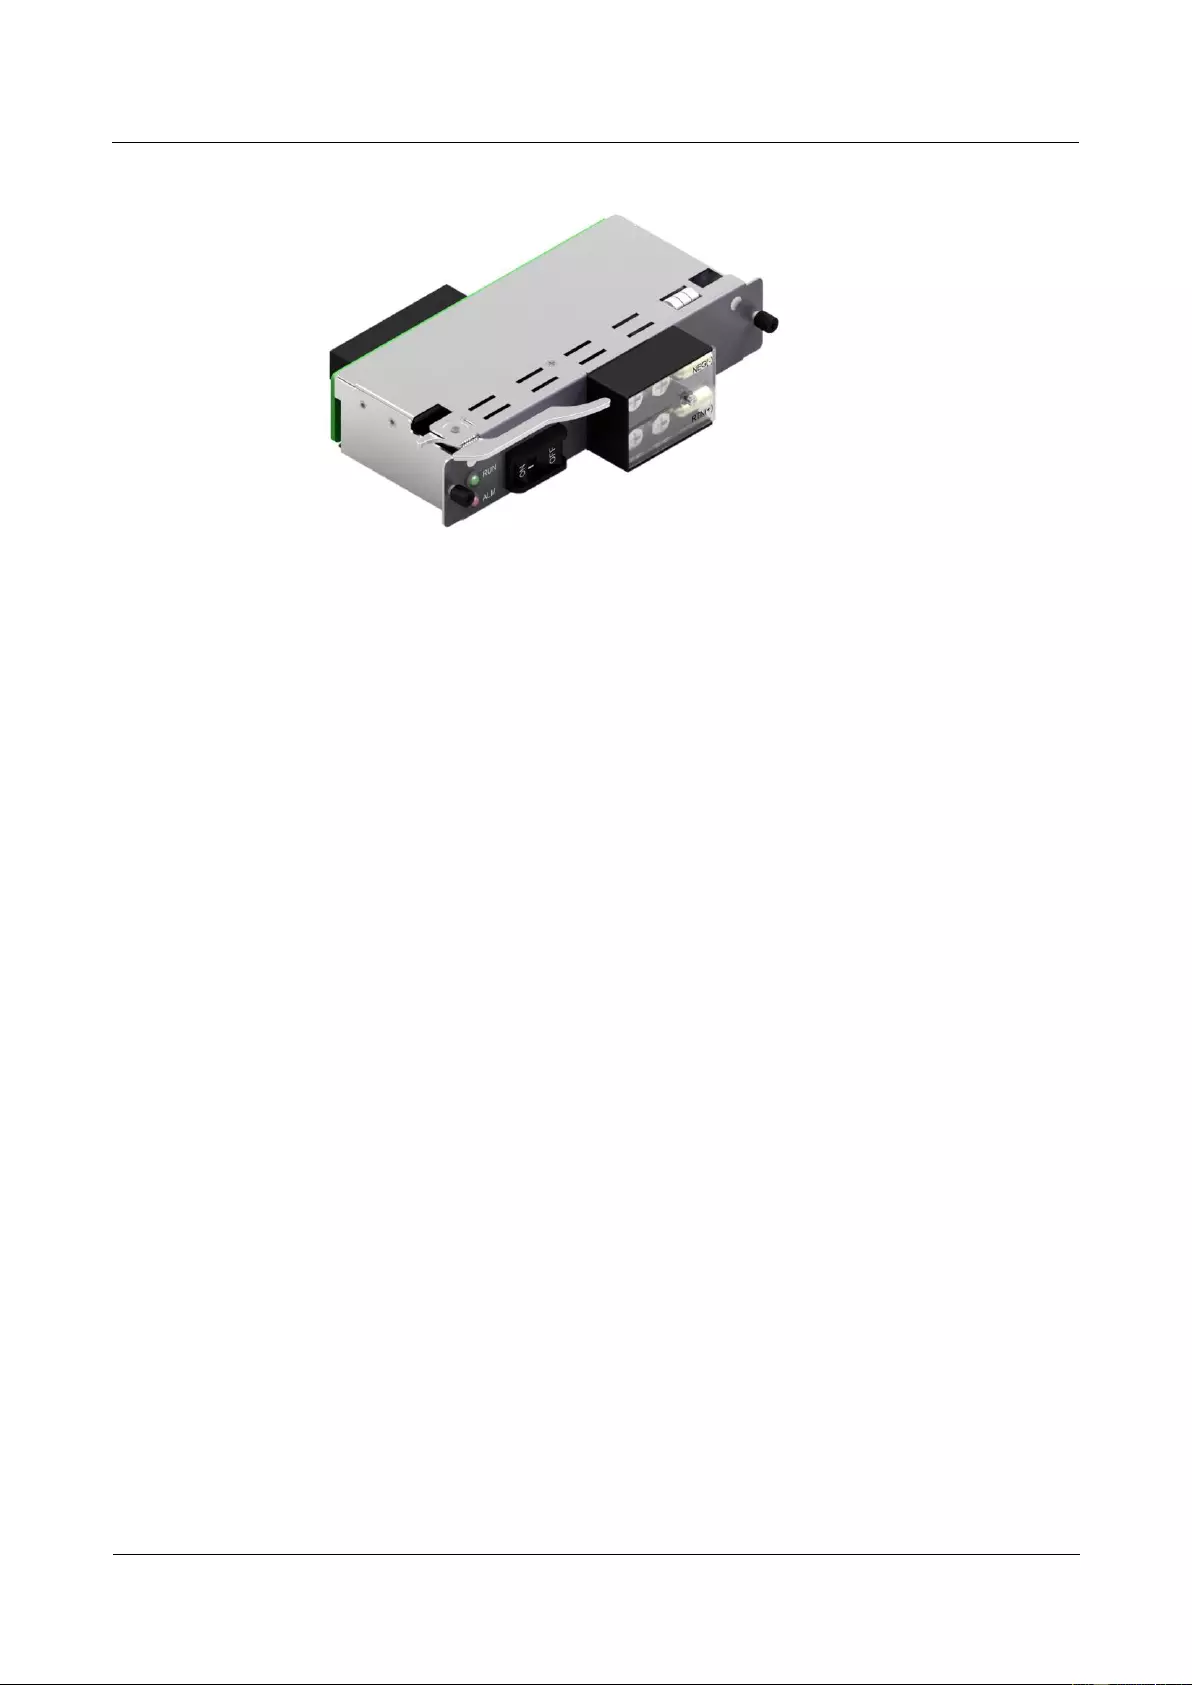
HUAWEI USG9500 Series Terabit-level Next-Generation Firewall
Hardware Guide
3 Hardware Maintenance
Issue 01 (2017-03-13)
Huawei Proprietary and Confidential
Copyright © Huawei Technologies Co., Ltd.
364
Figure 3-30 Appearance of the DC power module
Tool
ESD wrist strap or ESD glove
Phillips screwdriver
Procedure
Step 1 Check the location of the power module to be replaced.
Before pulling out a power module that is to be replaced, you should first check the location
of the module, for example, the cabinet and chassis where the power module resides. Then,
locate the power module to be replaced in the chassis and attach a label to the panel to
identify the power module.
Step 2 Switch off the corresponding air circuit breaker on the power distribution cabinet. Thus, the
power module to be replaced is powered off. In addition, the power module to be replaced
must be switched off.
Step 3 Wear the ESD wrist strap and connect the grounding terminal to the ESD jack on the rack.
Step 4 Remove the cables from the power module to be replaced, as (1) shown in Figure 3-31.
Step 5 Loosen the captive screws on both sides of the power module with a Phillips screwdriver, as
(2) shown in Figure 3-31.
Step 6 Turn the ejector levers on the panel of the power module outward and upward. When the
ejector levers and the panel form a 45-degree angle, the power module is removed from the
backplane, as (3) shown in Figure 3-31.
Step 7 Hold both sides of the power module and pull the power module out of the chassis, as (4)
shown in Figure 3-31.
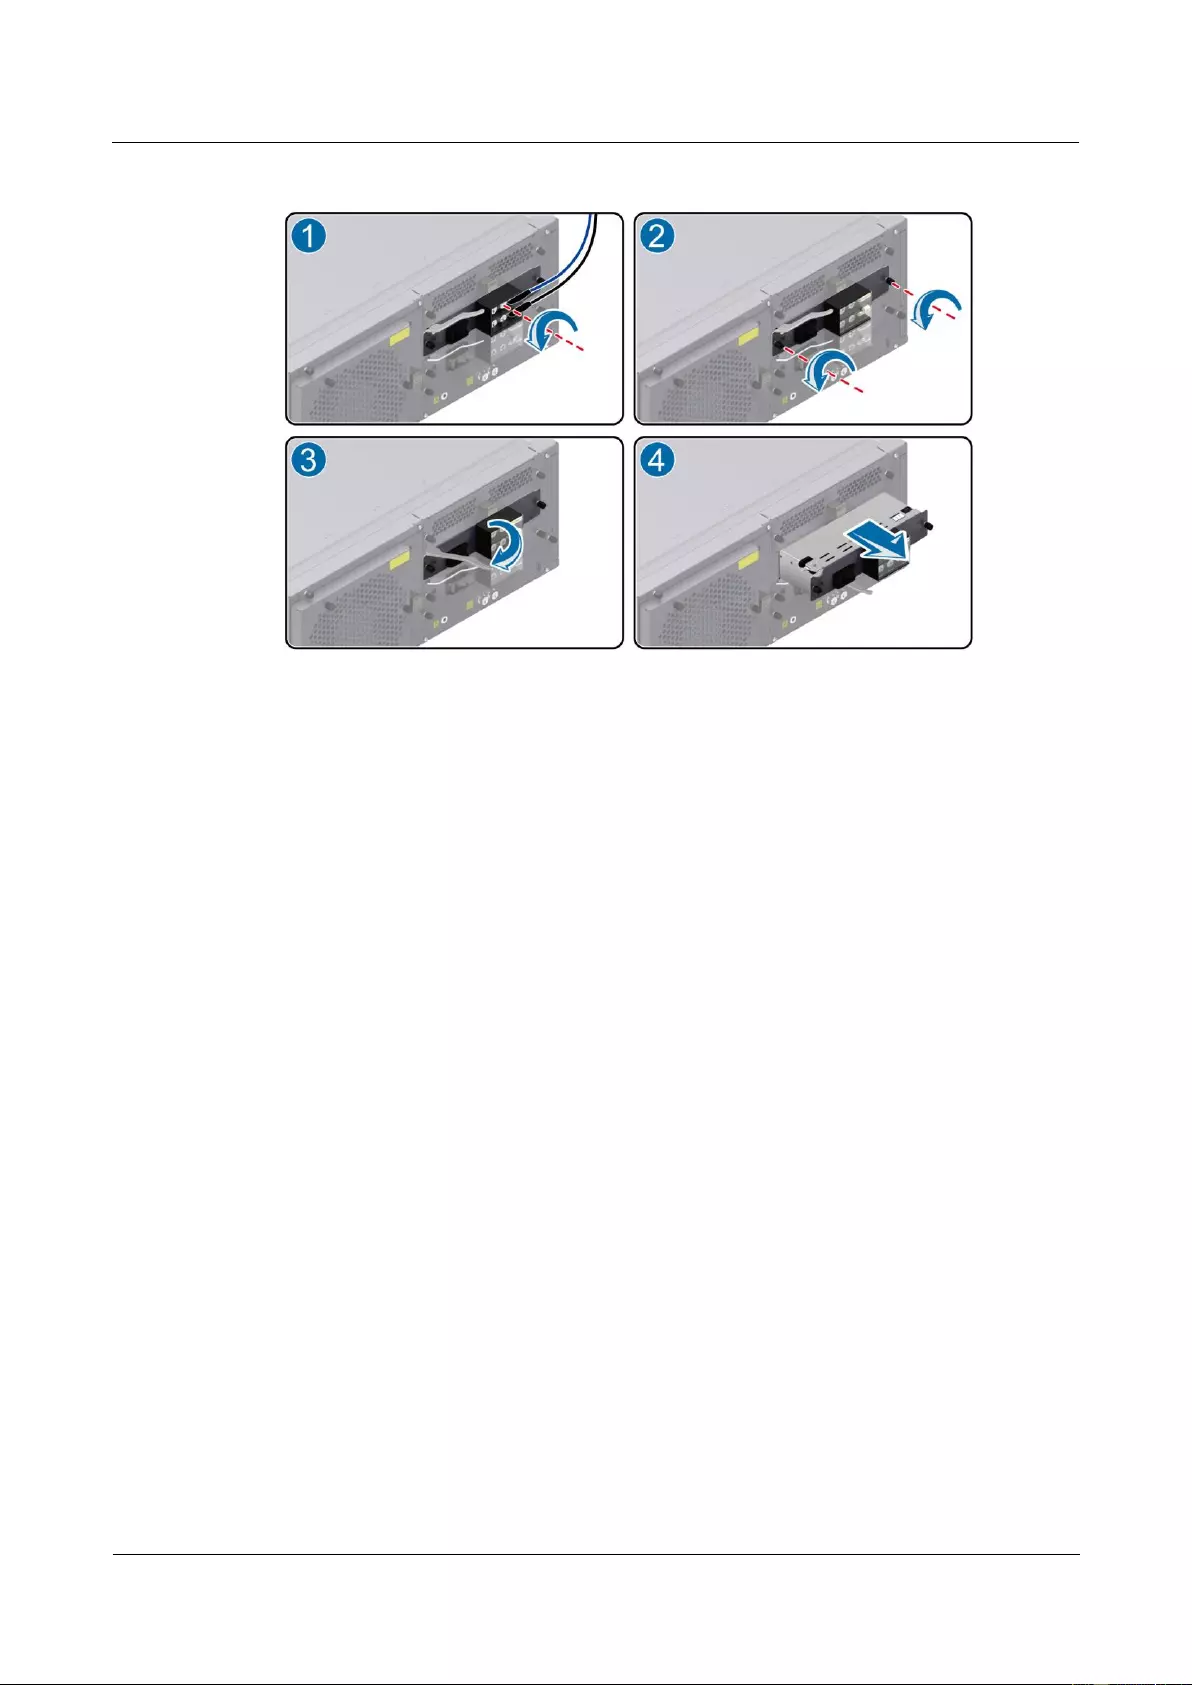
HUAWEI USG9500 Series Terabit-level Next-Generation Firewall
Hardware Guide
3 Hardware Maintenance
Issue 01 (2017-03-13)
Huawei Proprietary and Confidential
Copyright © Huawei Technologies Co., Ltd.
365
Figure 3-31 Schematic diagram of removing the power module on the USG9520
Step 8 Insert the backup power module into the chassis.
Hold both sides of the power module and insert the module into the guide rail of the slot, as (1)
shown in Figure 3-32. Ensure that the power module is in good contact with the backplane of
the chassis.
Step 9 Turn the ejector levers inward and downward with both hands till the power module touches
the slot, as (2) shown in Figure 3-32.
Step 10 Fasten the power module to the chassis by screwing the captive screws with a Phillips
screwdriver, as (3) shown in Figure 3-32.
Step 11 At last, connect the cables to the power module in original sequence, as (4) shown in Figure
3-32.
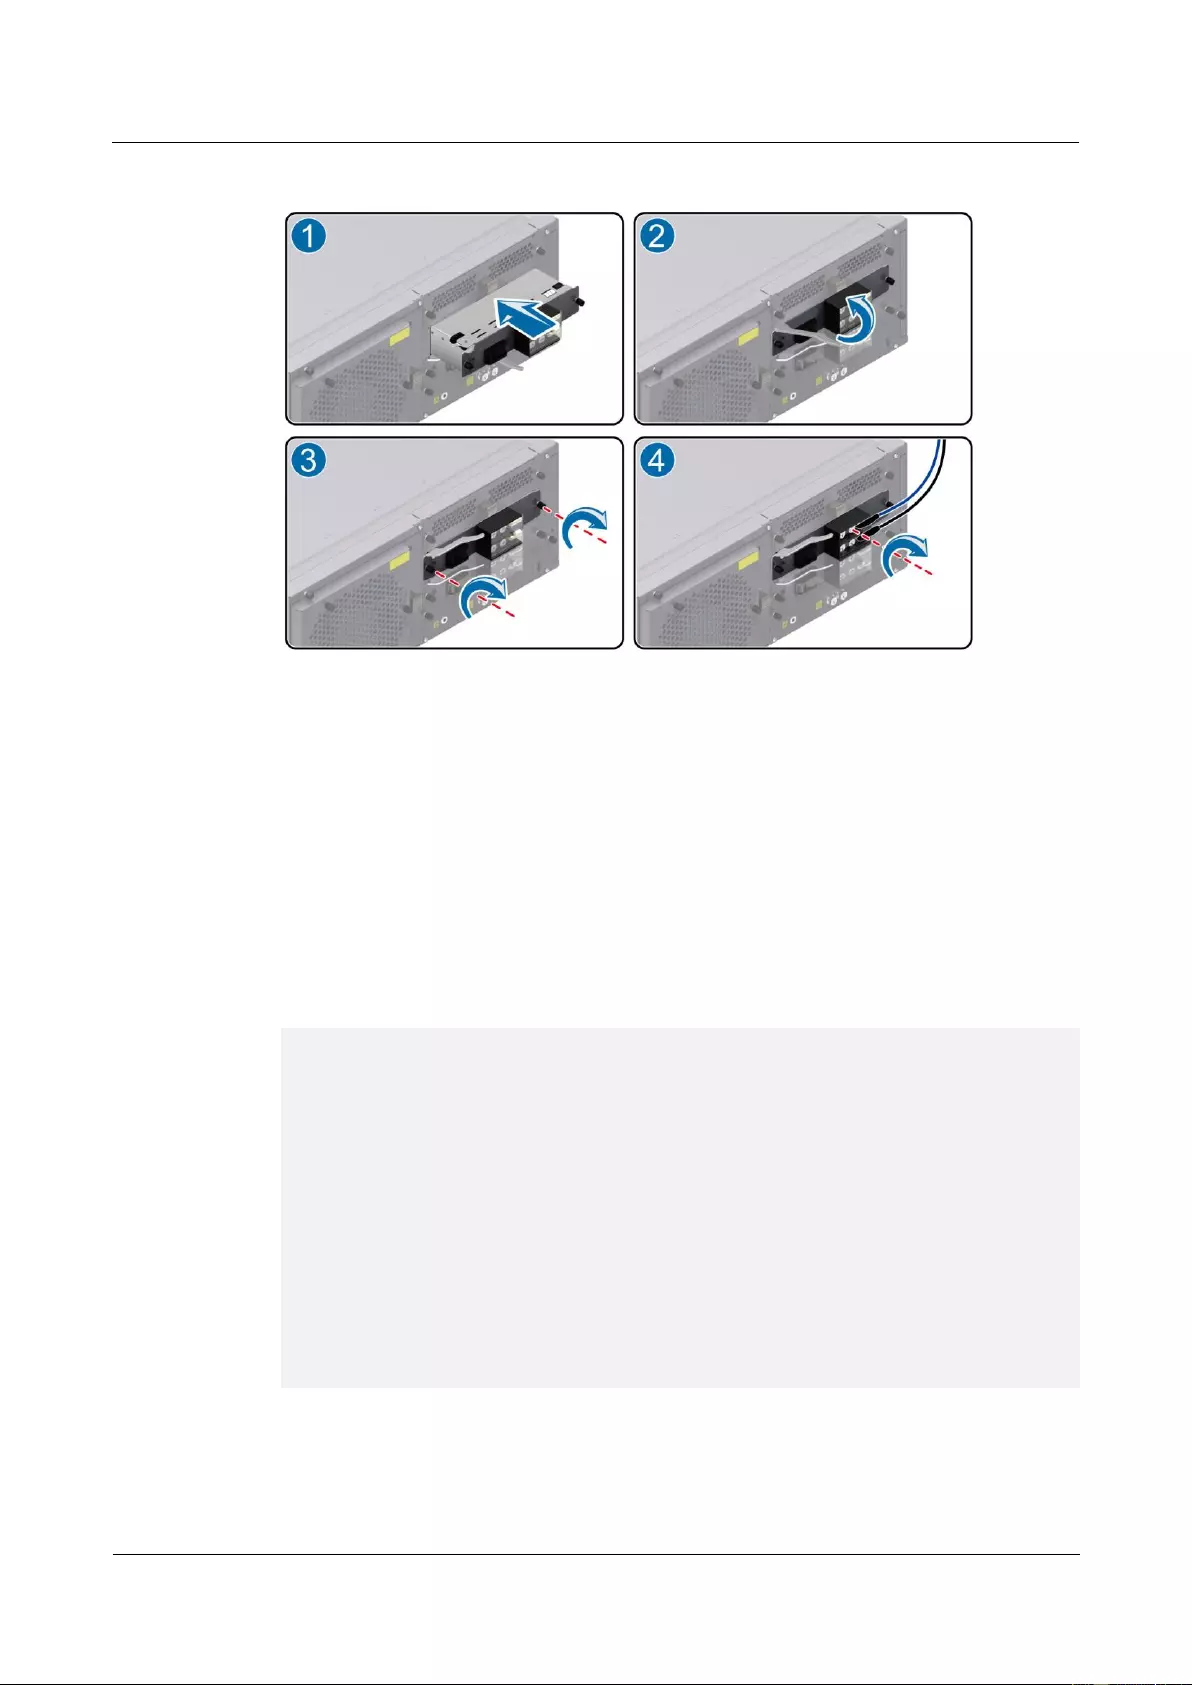
HUAWEI USG9500 Series Terabit-level Next-Generation Firewall
Hardware Guide
3 Hardware Maintenance
Issue 01 (2017-03-13)
Huawei Proprietary and Confidential
Copyright © Huawei Technologies Co., Ltd.
366
Figure 3-32 Schematic diagram of installing the power module on the USG9520
Step 12 Verify the functions of the new power module.
After inserting the power module into the chassis, switch on the air circuit breaker on the
power distribution cabinet and then switch on the power module. Then, you can verify the
functions of the new power module in the following ways:
If the RUN indicator on the panel of the power module is on and is green, it indicates
that the power module runs normally.
If the ALM indicator on the panel of the power module is on and is red, it indicates that
the power module fails to run normally.
Run the display device command on the console interface to check the running status of
the new power module. If the output is displayed as follows, it indicates that the power
module runs normally.
<sysname> display device
USG9520's Device status:
Slot # Type Online Register Status Primary
- - - - - - - - - - - - - - - - - - - - - - - - - - - - - - - - - - - - - -
1 SPU Present Registered Normal NA
2 SPU Present Registered Normal NA
3 LPU Present Registered Normal NA
4 MPU Present NA Normal Master
5 MPU Present Registered Normal Slave
6 CLK Present Registered Normal Master
7 CLK Present Registered Normal Slave
8 PWR Present Registered Normal NA
9 PWR Present Registered Normal NA
10 FAN Present Registered Normal NA
- - - - - - - - - - - - - - - - - - - - - - - - - - - - - - - - - - - - - -
The preceding output also indicates that the power module has returned to the normal state. If
the fan frame fails to return to the normal state, you should contact a Huawei local office for
timely technical support.
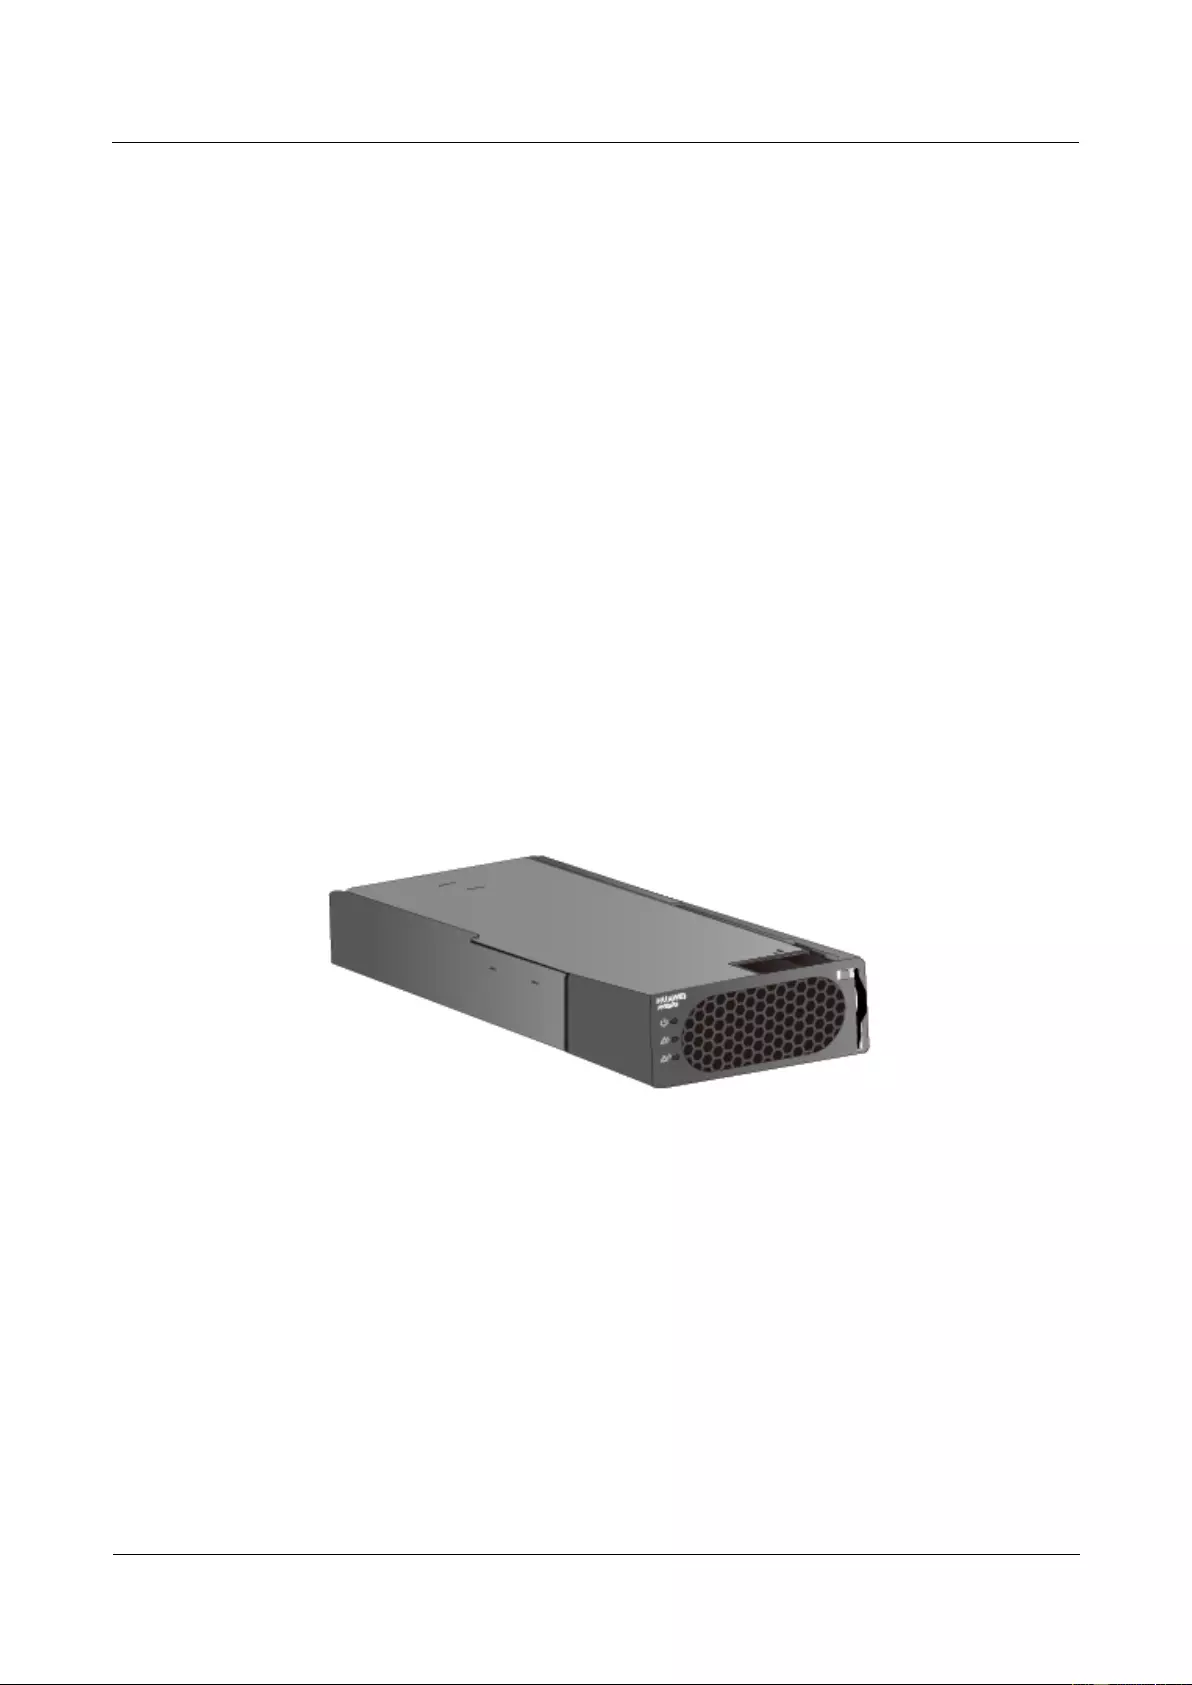
HUAWEI USG9500 Series Terabit-level Next-Generation Firewall
Hardware Guide
3 Hardware Maintenance
Issue 01 (2017-03-13)
Huawei Proprietary and Confidential
Copyright © Huawei Technologies Co., Ltd.
367
----End
Follow-up Procedure
After replacing the power module, collect the tools.
If a power module that is replaced is confirmed to be faulty, you should fill in the Faulty
Card for Repair, and send the card and the faulty power module to a Huawei local office
for timely maintenance.
3.4.4 Replacing an AC Power Module of USG9520
This section describes the AC power module of the USG9520 and the procedure for replacing
the power module.
Context
Before replacing a power module, you must switch off the corresponding circuit breaker
on the power distribution cabinet. In this manner, the power module to be replaced is
powered off. In addition, the power module to be replaced must be switched off.
The USG9520 has two power modules. Do not power off the other during the process of
removing one power module.
The USG9520 has two types of AC power modules: 1600 W and 2200 W. Figure 3-33
and Figure 3-34 show the appearance of the power modules. These two types of power
modules cannot be inserted on the same device.
Figure 3-33 Appearance of the R4850G2 AC power module (2200 W)
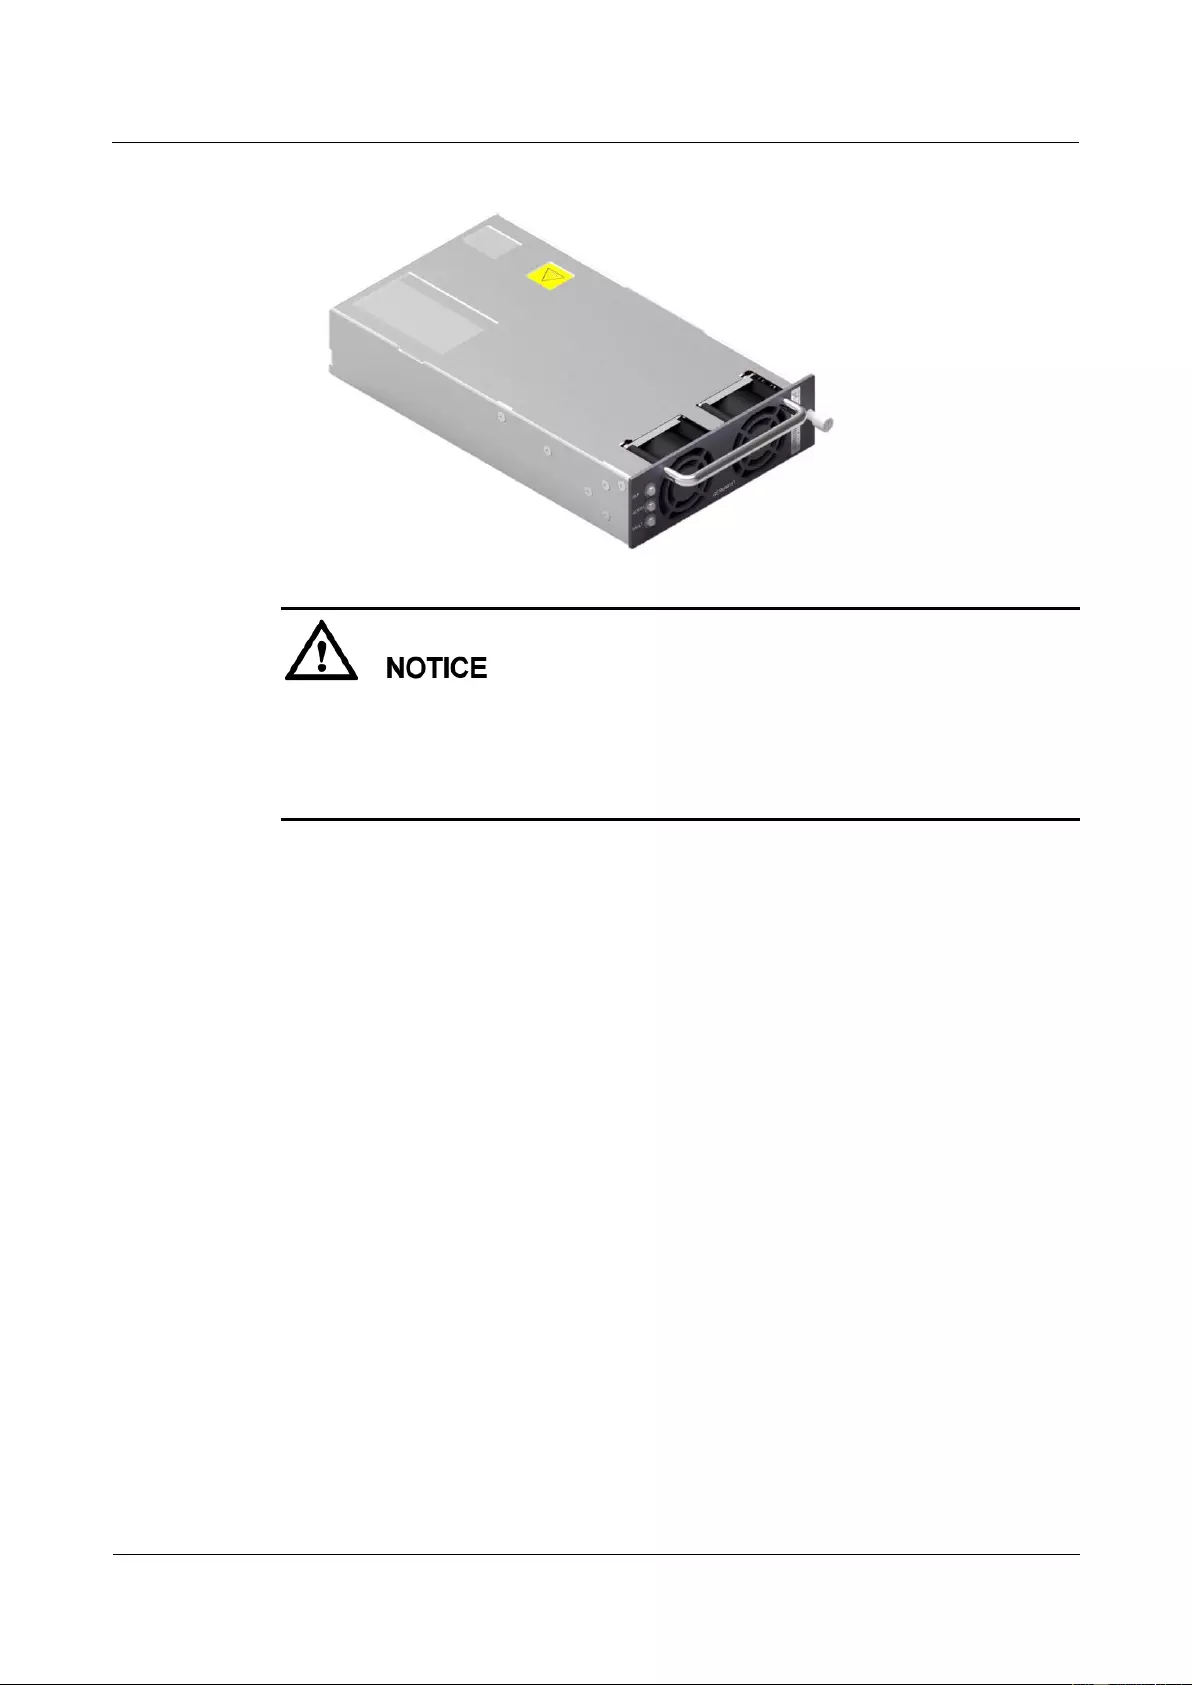
HUAWEI USG9500 Series Terabit-level Next-Generation Firewall
Hardware Guide
3 Hardware Maintenance
Issue 01 (2017-03-13)
Huawei Proprietary and Confidential
Copyright © Huawei Technologies Co., Ltd.
368
Figure 3-34 Appearance of the EPW30B-48A AC power module (1600 W)
When AC 110 V input is used, the AC power module is half-load output, which cannot afford
the maximum system power consumption with the full configuration. Therefore, two AC
power modules are required, so that the device can work properly. If one AC power module
fails, the other cannot afford the maximum system power consumption. That is, 1+1
redundancy fails.
Tool
ESD wrist strap or ESD glove
Phillips screwdriver
Procedure
Step 1 Check the location of the power module to be replaced.
Before pulling out a power module that is to be replaced, you should first check the location
of the module, for example, the cabinet and chassis where the power module resides. Then,
locate the power module to be replaced in the chassis and attach a label to the panel to
identify the power module.
Step 2 Switch off the corresponding circuit breaker on the power distribution cabinet. In this manner,
the power module to be replaced is powered off. In addition, the power module to be replaced
must be switched off.
Step 3 Wear the ESD wrist strap and connect the grounding terminal to the ESD jack on the rack.
Step 4 Remove the cables from the power module to be replaced, as (1) shown in Figure 3-35 or
Figure 3-37.
Step 5 Replace the power module as follows:
Replace the R4850G2 power module.
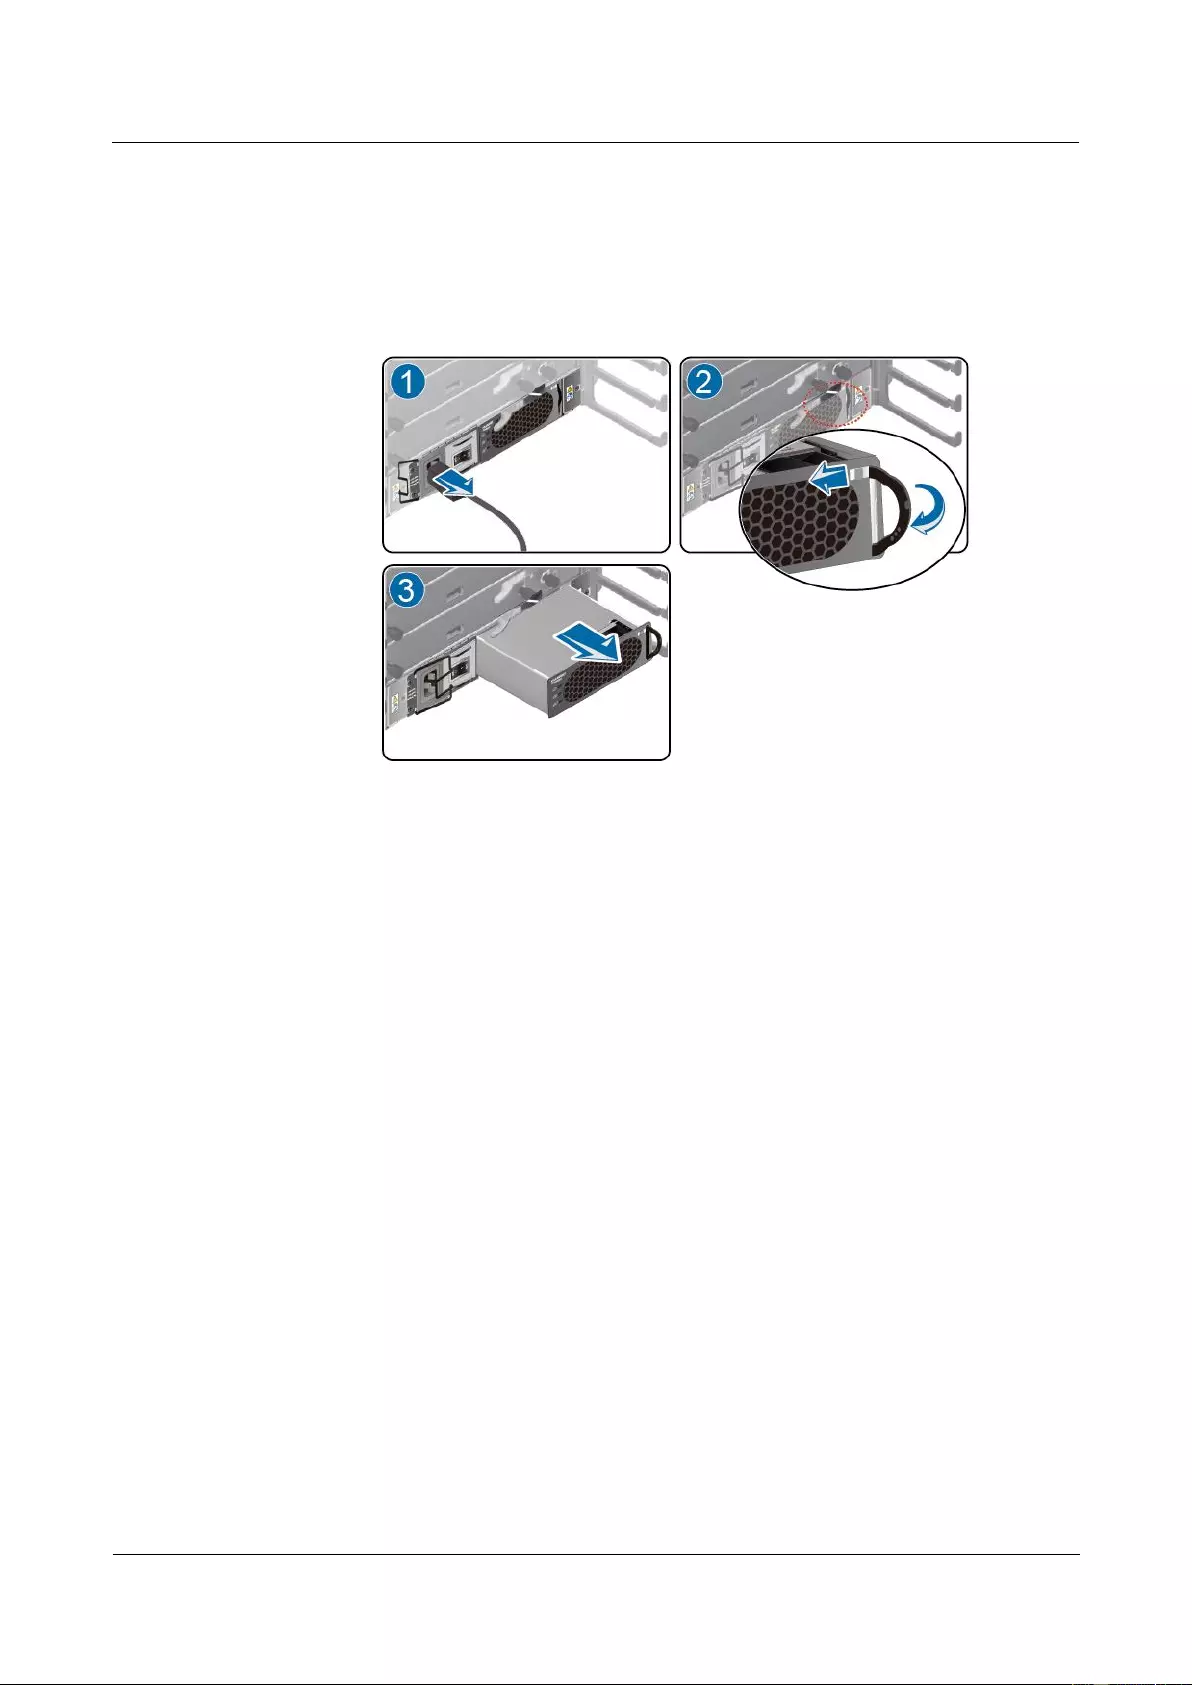
HUAWEI USG9500 Series Terabit-level Next-Generation Firewall
Hardware Guide
3 Hardware Maintenance
Issue 01 (2017-03-13)
Huawei Proprietary and Confidential
Copyright © Huawei Technologies Co., Ltd.
369
a. Disconnect the buckle in the upper right of the power module and lower the ejector
lever on the right. Hold the ejector lever and remove the power module from the
slot.
Figure 3-35 Schematic diagram of removing the R4850G2 power module on the
USG9520
b. Place the new power module on the slot, disconnect the buckle in the upper right,
lower the ejector lever on the right, push the power module slowly along the guide
rails until it is in position, push the ejector lever back, and fasten the buckle. Install
the power cable on the new power module.
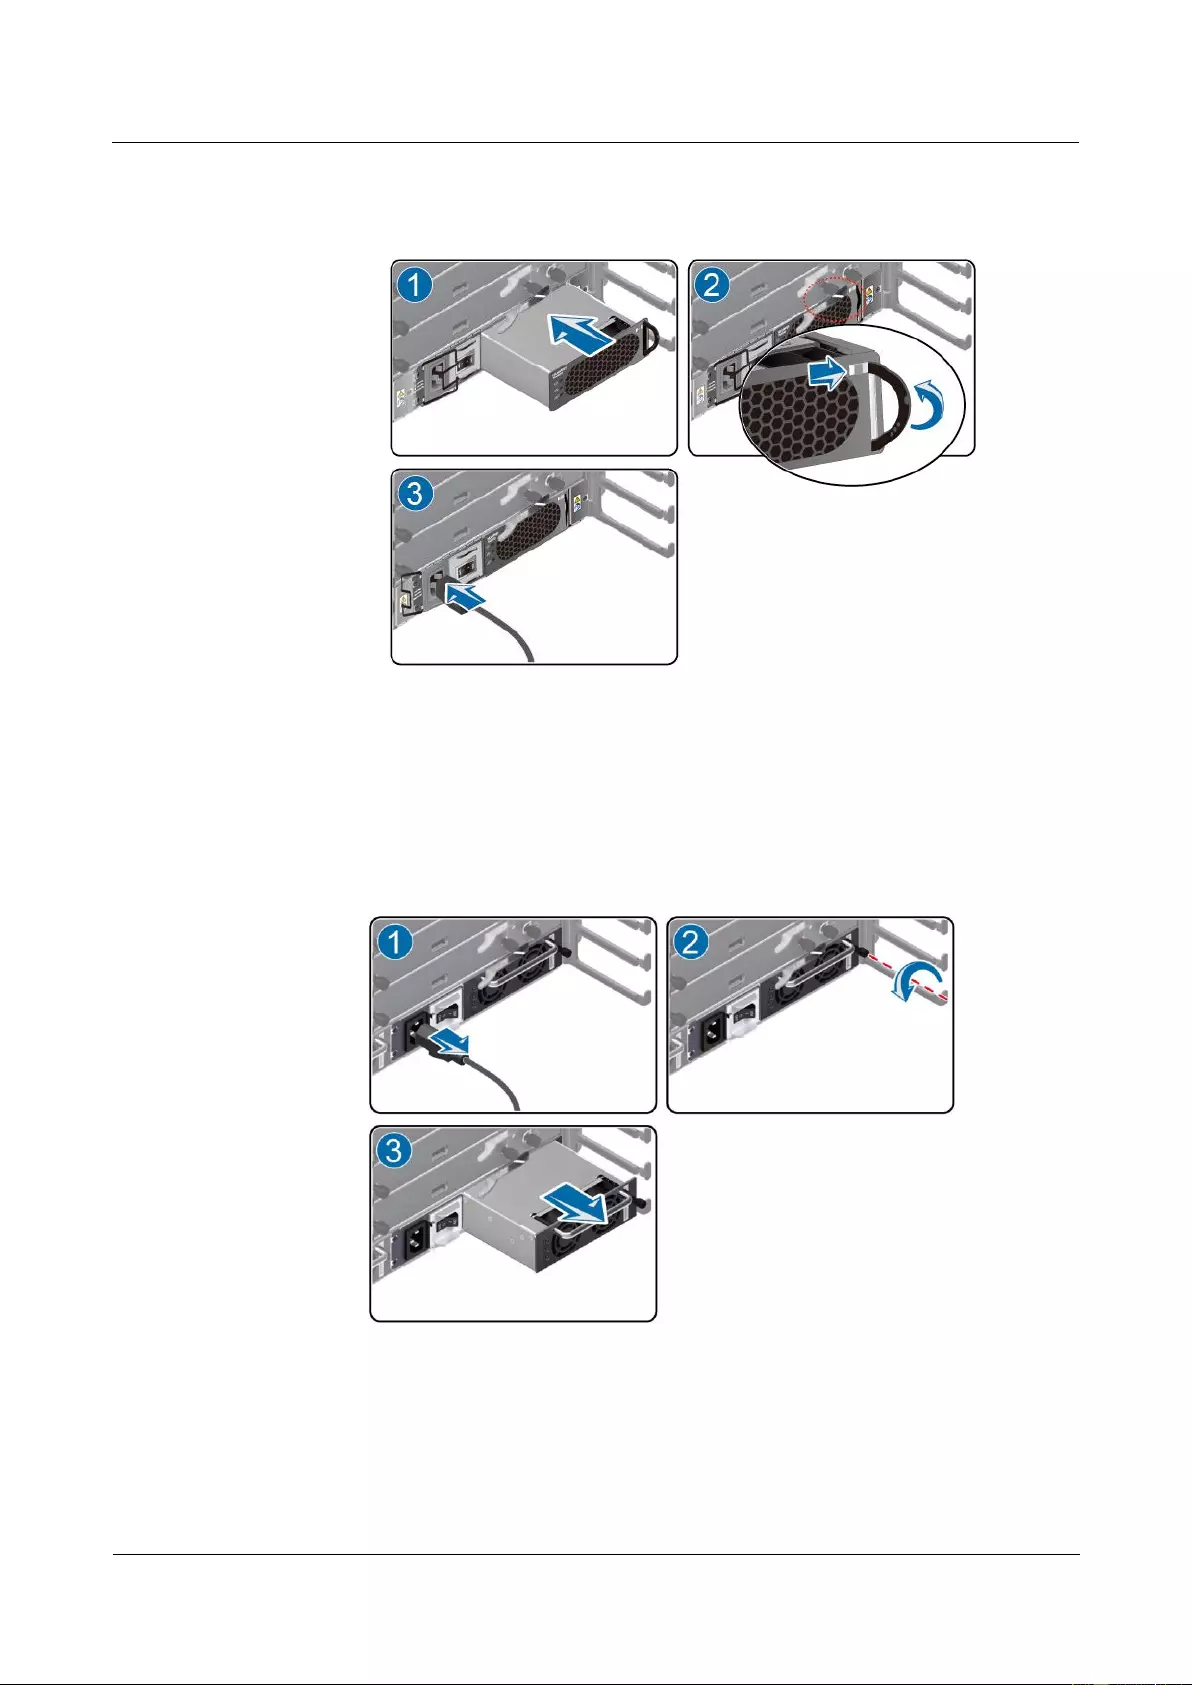
HUAWEI USG9500 Series Terabit-level Next-Generation Firewall
Hardware Guide
3 Hardware Maintenance
Issue 01 (2017-03-13)
Huawei Proprietary and Confidential
Copyright © Huawei Technologies Co., Ltd.
370
Figure 3-36 Schematic diagram of installing the R4850G2 power module on the
USG9520
Replace the EPW30B-48A power module.
a. Use the Phillips screwdriver to loosen the captive screw on the right of the power
module. Hold the handle and pull out the power module horizontally and slowly.
Figure 3-37 Schematic diagram of removing the EPW30B-48A power module on the
USG9520
b. Place the new power module on the slot, hold the handle with one hand, hold the
bottom of the power module with the other hand, and push the power module along
the guide rails horizontally and slowly until the power module properly connects to
the backplane. Fasten the captive screw with the Phillips screwdriver and install the
power cable on the new power module.
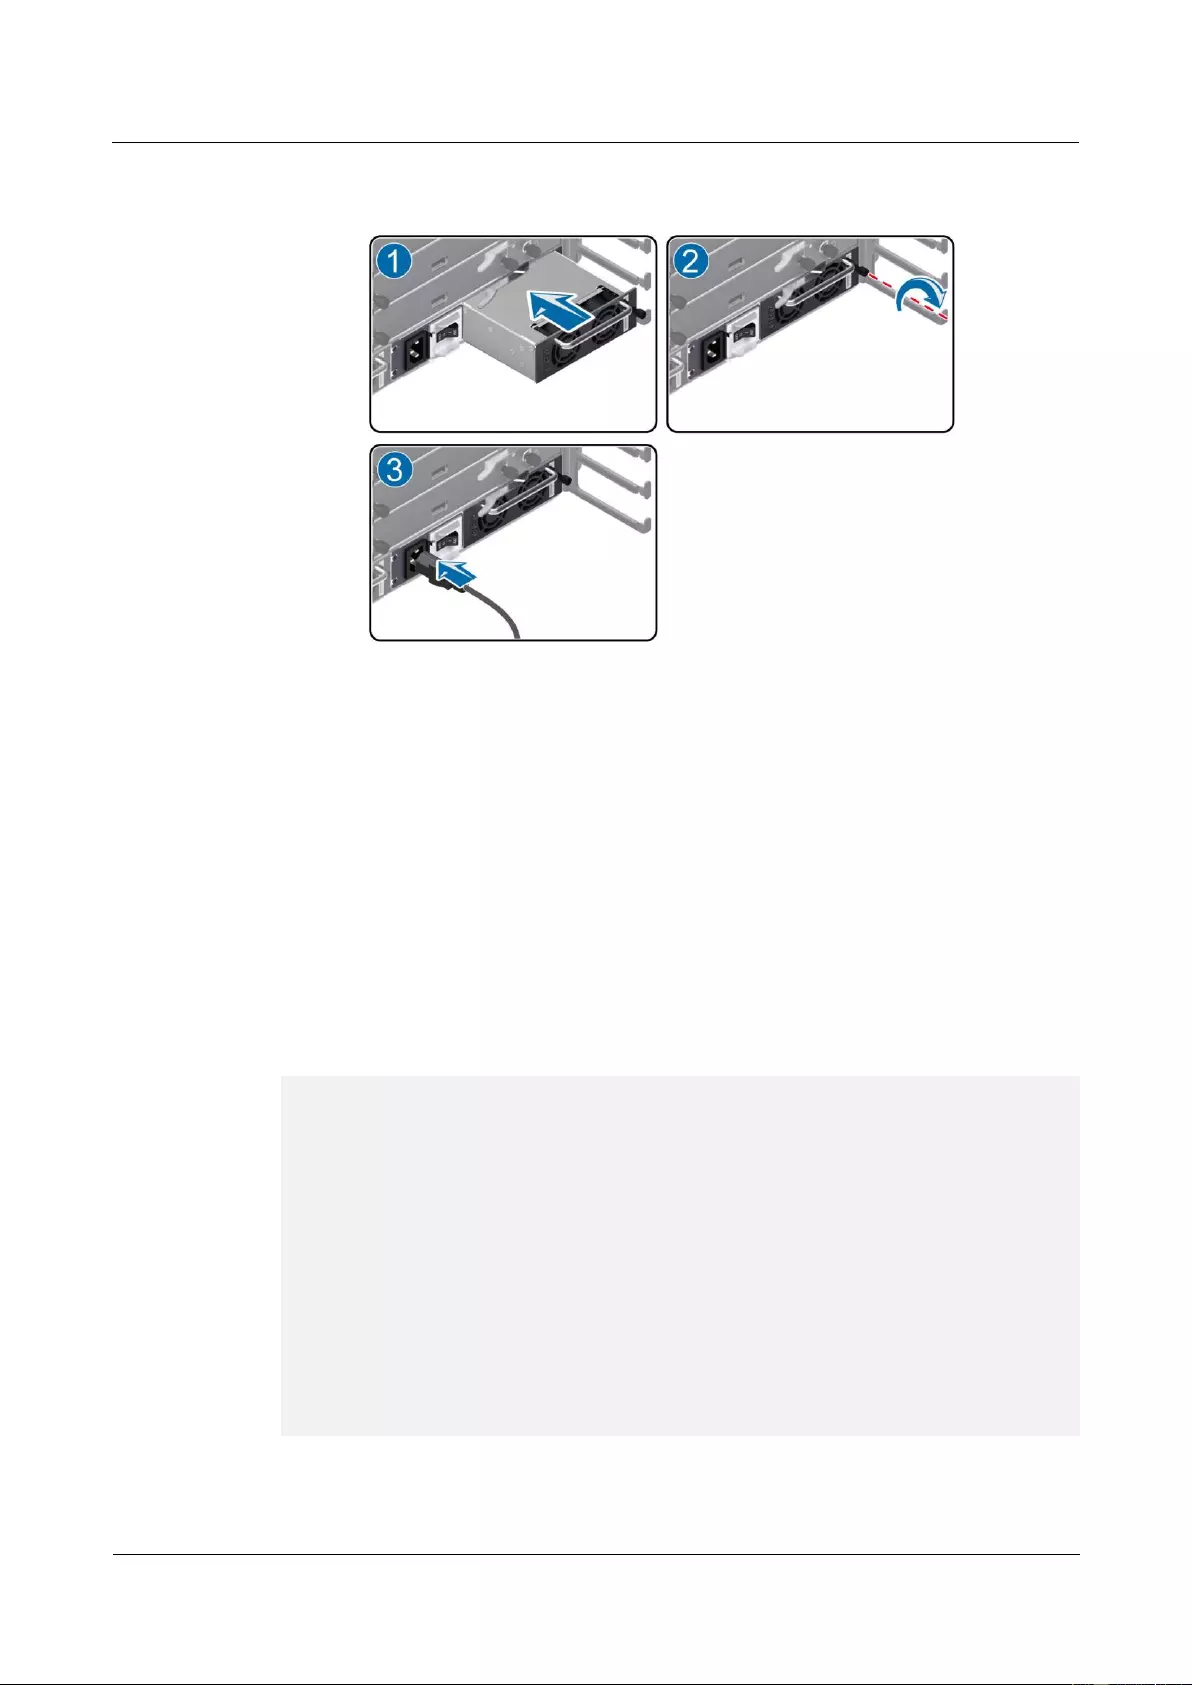
HUAWEI USG9500 Series Terabit-level Next-Generation Firewall
Hardware Guide
3 Hardware Maintenance
Issue 01 (2017-03-13)
Huawei Proprietary and Confidential
Copyright © Huawei Technologies Co., Ltd.
371
Figure 3-38 Schematic diagram of installing the EPW30B-48A power module on the
USG9520
Step 6 Verify the functions of the new power module.
After inserting the power module into the chassis, switch on the circuit breaker on the power
distribution cabinet and then switch on the power module. Then, you can verify the functions
of the new power module in the following ways:
If the RUN indicator on the panel of the power module is on and is green, it indicates
that the power supply module functions normally.
If the ALARM indicator on the panel of the power module is on and is yellow, it
indicates that a recoverable fault occurs in the power supply module.
If the FAULT indicator on the panel of the power module is on and is red, it indicates
that an unrecoverable fault occurs in the power supply module.
Run the display device command on the console interface to check the running status of
the new power module. If the output is displayed as follows, it indicates that the power
module runs normally.
<sysname> display device
USG9520's Device status:
Slot # Type Online Register Status Primary
- - - - - - - - - - - - - - - - - - - - - - - - - - - - - - - - - - - - - -
1 SPU Present Registered Normal NA
2 SPU Present Registered Normal NA
3 LPU Present Registered Normal NA
4 MPU Present NA Normal Master
5 MPU Present Registered Normal Slave
6 CLK Present Registered Normal Master
7 CLK Present Registered Normal Slave
8 PWR Present Registered Normal NA
9 PWR Present Registered Normal NA
10 FAN Present Registered Normal NA
- - - - - - - - - - - - - - - - - - - - - - - - - - - - - - - - - - - - - -

HUAWEI USG9500 Series Terabit-level Next-Generation Firewall
Hardware Guide
3 Hardware Maintenance
Issue 01 (2017-03-13)
Huawei Proprietary and Confidential
Copyright © Huawei Technologies Co., Ltd.
372
The preceding output also indicates that the power module has returned to the normal state. If
the fan frame fails to return to the normal state, you should contact a Huawei local office for
timely technical support.
----End
Follow-up Procedure
After replacing the power module, collect the tools.
If a power module that is replaced is confirmed to be faulty, you should fill in the Faulty
Card for Repair, and send the card and the faulty power module to a Huawei local office
for timely maintenance.
3.5 Replacing a CF Card
This section describes the CF card of the device and the procedure for replacing the CF card.
3.5.1 Replacing CF Card 1
This section describes the CF card 1 of the device and the procedure for replacing the CF card
1.
Context
Before replacing CF card 1, you need to note the following points:
CF card 1 lies on the circuit board of the MPU/SRU, so you must pull out the MPU/SRU
before replacing CF card 1.
Contents on the new CF card must be consistent with the contents on CF card 1.
Tool
Before replacing CF card 1, you need the following tools:
ESD wrist strap or ESD glove
ESD bag
Procedure
Step 1 Check the location of the CF card to be replaced.
Before pulling out the CF card that is to be replaced, you should first check the location of the
CF card, for example, the cabinet and chassis where the CF card resides. Then, locate the
MPU/SRU on which the CF card needs to be replaced and attach a label to the panel to
identify the MPU/SRU.
Step 2 Check whether the MPU/SRU on which the CF card needs to be replaced is the master
MPU/SRU.
You can view the ACT indicator on the MPU/SRU to check whether the MPU/SRU is the
master one. If the ACT indicator is on, it means that the MPU/SRU is the master one;
otherwise, the MPU/SRU is the slave one.
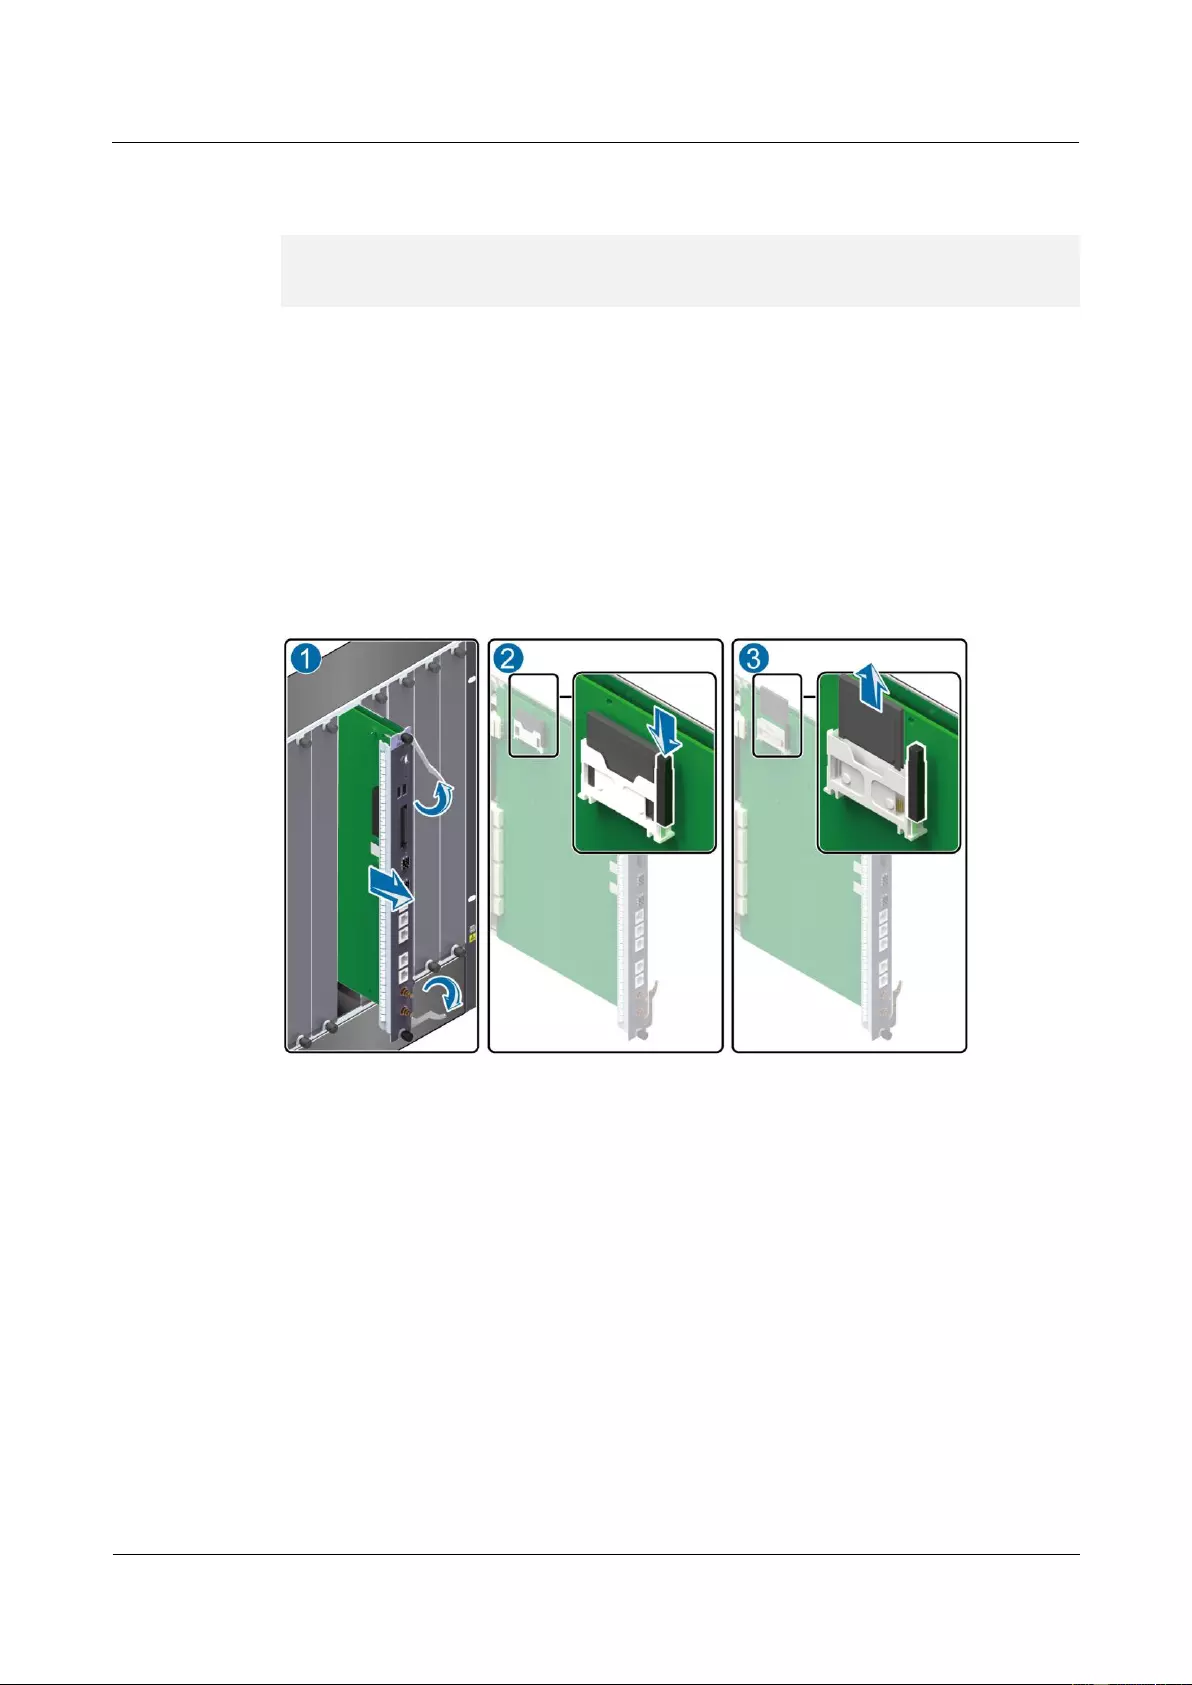
HUAWEI USG9500 Series Terabit-level Next-Generation Firewall
Hardware Guide
3 Hardware Maintenance
Issue 01 (2017-03-13)
Huawei Proprietary and Confidential
Copyright © Huawei Technologies Co., Ltd.
373
Step 3 If the MPU/SRU on which the CF card needs to be replaced is the master one, run the
following commands to perform the master/slave switchover.
<sysname> system-view
[sysname] slave switchover enable
[sysname] slave switchover
Step 4 Power off the MPU/SRU on which the CF card needs to be replaced.
Press and hold the OFL button on the panel of the MPU/SRU for six seconds till the OFL
indicator is on. It means that the MPU/SRU is powered off.
Step 5 Pull out the MPU/SRU on which the CF card needs to be replaced and place the MPU/SRU
horizontally on the worktable, as (1) shown in Figure 3-39. For details, see "3.1.1 Replacing
an MPU/SRU."
Step 6 Press the button on the jack of CF card 1, as (2) shown in Figure 3-39. The CF card then
automatically comes out. Remove the CF card horizontally, as (3) shown in Figure 3-39.
Figure 3-39 Schematic diagram of pulling out CF card 1
Step 7 Place the removed CF card in the ESD bag.
Step 8 Insert the new CF card into the slot of CF card 1 of the MPU/SRU and push the CF card in
the proper position, as (1) shown in Figure 3-40.
Step 9 Insert the MPU/SRU into the chassis, as (2) shown in Figure 3-40. For detailed procedure, see
"3.1.1 Replacing an MPU/SRU."
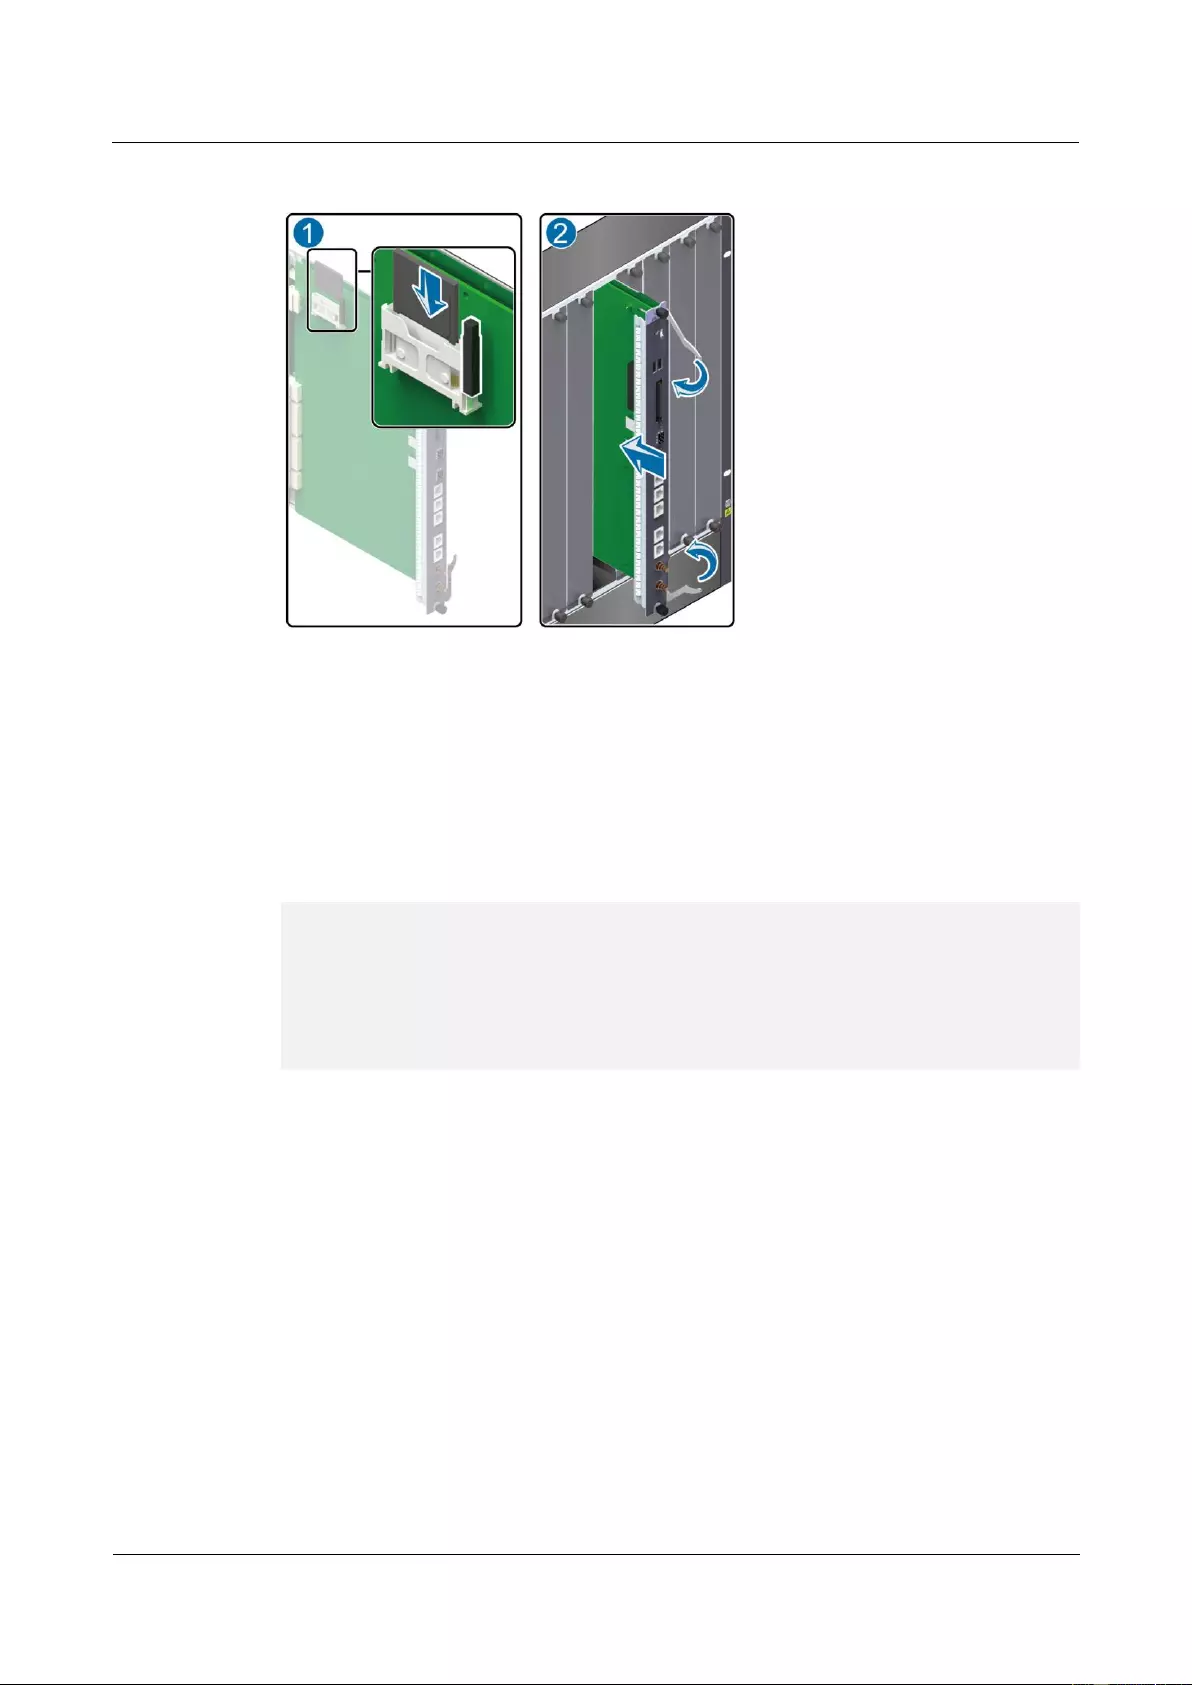
HUAWEI USG9500 Series Terabit-level Next-Generation Firewall
Hardware Guide
3 Hardware Maintenance
Issue 01 (2017-03-13)
Huawei Proprietary and Confidential
Copyright © Huawei Technologies Co., Ltd.
374
Figure 3-40 Schematic diagram of inserting CF card 1
Step 10 Check the running status of the new CF card.
You can check the running status of the new CF card in the following ways:
You can check the alarms. In normal situations, the system does not generate any alarm
related to the new MPU/SRU.
Run the dir command on the console interface to check whether the new CF card can be
displayed. If the output is displayed as follows, it indicates that the new CF card runs
normally.
<sysname> dir ?
/all List all files
STRING<1-64> [drive][path][file name]
cfcard2: Device name
cfcard: Device name
slave#cfcard2: Device name
slave#cfcard: Device name
The preceding output also indicates that the new CF card has returned to the normal state. If
the new CF card fails to return to the normal state, you should contact a Huawei local office
for timely technical support.
----End
Follow-up Procedure
After replacing a CF card, collect the tools.
If a CF card that is replaced is confirmed to be faulty, you should fill in the Faulty Card
for Repair, and send the card and the faulty CF card to a Huawei local office for timely
maintenance.
3.5.2 Replacing CF Card 2
This section describes the CF card 2 of the device and the procedure for replacing the CF card
2.

HUAWEI USG9500 Series Terabit-level Next-Generation Firewall
Hardware Guide
3 Hardware Maintenance
Issue 01 (2017-03-13)
Huawei Proprietary and Confidential
Copyright © Huawei Technologies Co., Ltd.
375
Context
Before replacing CF card 2, you need to note the following points:
CF card 2 of a USG device supports hot swap. Therefore, before replacing CF card 2 of a
USG device, press the CF OFL button on the panel of the MPU/SRU.
CF card 2 lies on the panel of the MPU/SRU, you need not pull out the MPU/SRU
before replacing CF card 2.
During the replacement of CF card 2, the device log and alarm information cannot be
stored.
Tool
Before replacing CF card 2, you need the following tools:
ESD wrist strap or ESD glove
ESD bag
Procedure
Step 1 Check the location of the CF card to be replaced.
Before pulling out the CF card that is to be replaced, you should first check the location of the
CF card, for example, the cabinet and chassis where the CF card resides. Then, locate the
MPU/SRU on which the CF card needs to be replaced in the chassis and attach a label to the
panel to identify the MPU/SRU.
Step 2 Press the CF OFL button on the panel of the MPU/SRU for about 6 seconds till the CF ACT
indicator turns off.
Step 3 Open the shielding can on the CF card, as (1) shown in Figure 3-41. Press the button the jack
of CF card 2, as (2) shown in Figure 3-41. The CF card then automatically comes out.
Remove the CF card horizontally, as (3) shown in Figure 3-41.
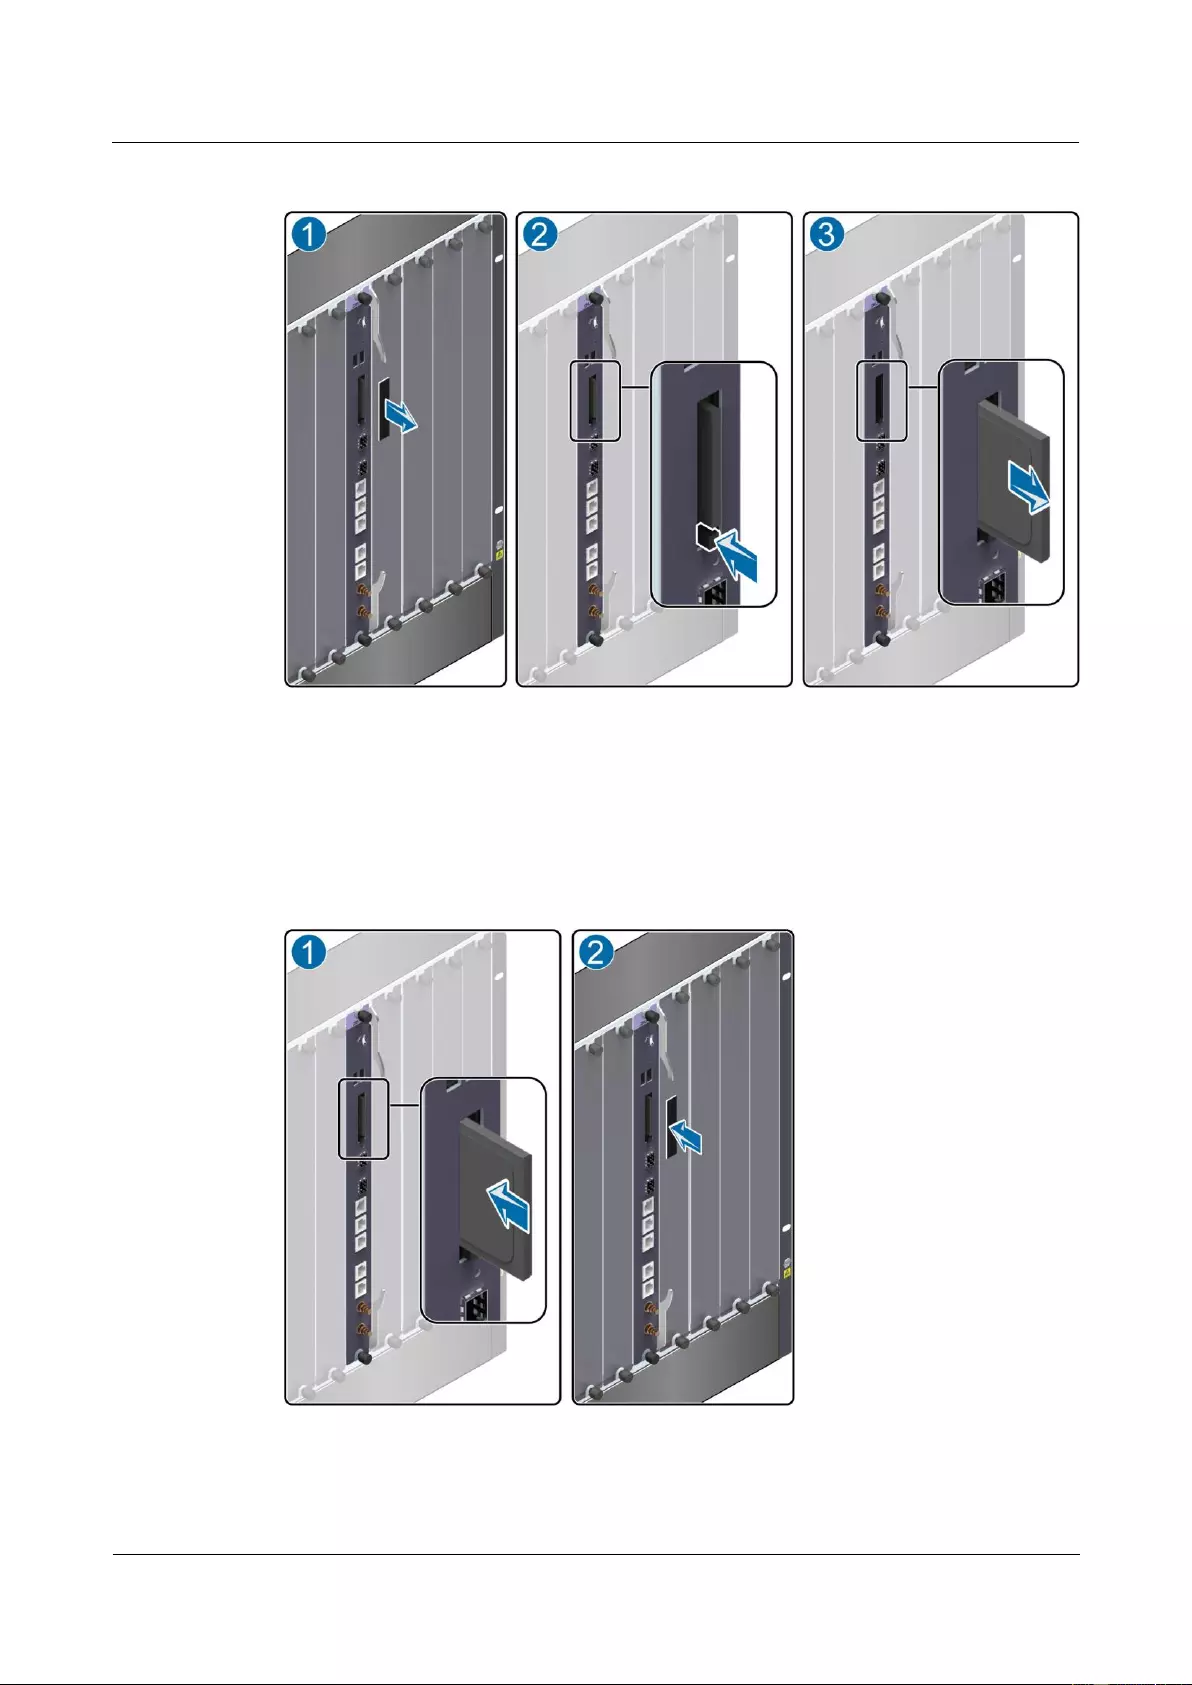
HUAWEI USG9500 Series Terabit-level Next-Generation Firewall
Hardware Guide
3 Hardware Maintenance
Issue 01 (2017-03-13)
Huawei Proprietary and Confidential
Copyright © Huawei Technologies Co., Ltd.
376
Figure 3-41 Schematic diagram of pulling out CF card 2
Step 4 Place the removed CF card in the ESD bag.
Step 5 Insert the new CF card into the slot of CF card 2 of the MPU/SRU and push the CF card in
the proper position, as (1) shown in Figure 3-42. Pinch the shielding can properly, as (2)
shown in Figure 3-42
Figure 3-42 Schematic diagram of inserting CF card 2
Step 6 Check the running status of the new CF card.

HUAWEI USG9500 Series Terabit-level Next-Generation Firewall
Hardware Guide
3 Hardware Maintenance
Issue 01 (2017-03-13)
Huawei Proprietary and Confidential
Copyright © Huawei Technologies Co., Ltd.
377
You can check the running status of the new CF card in the following ways:
Check whether the CF ACT indicator (green) on the panel of the MPU/SRU is steady on
or blinks, which means that the new CF card runs properly.
Check the alarms. In normal situations, the system does not generate any alarm related to
the new MPU/SRU.
Run the dir command on the console interface to check whether the new CF card can be
displayed. If the output is displayed as follows, it indicates that the new CF card runs
properly.
<sysname> dir ?
/all List all files
STRING<1-64> [drive][path][file name]
cfcard2: Device name
cfcard: Device name
slave#cfcard2: Device name
slave#cfcard: Device name
<cr>
The preceding output also indicates that the new CF card has returned to the normal state. If
the new CF card fails to return to the normal state, you should contact a Huawei local office
for timely technical support.
----End
Follow-up Procedure
After replacing a CF card, collect the tools.
If a CF card that is replaced is confirmed to be faulty, you should fill in the Faulty Card
for Repair, and send the card and the faulty CF card to a Huawei local office for timely
maintenance.
3.6 Replacing an Optical Module
This section describes the optical module of the device and the procedure for replacing the
optical module.
Context
Before replacing an optical module, you need to note the following points:
Replacing an optical module interrupts services. Therefore, make sure that the optical
module is faulty before replacing it.
Only an external optical module can be replaced. The internal optical module can not be
replaced.
You need to take antistatic measures before replacing an optical module.
You need not swap a board when replacing an optical module.
Be careful when you remove or insert an optical cable in case the connector of an optical
cable is damaged.
When replacing an optical module, do not look directly into the fiber connector as the
laser radiation may harm your eyes.

HUAWEI USG9500 Series Terabit-level Next-Generation Firewall
Hardware Guide
3 Hardware Maintenance
Issue 01 (2017-03-13)
Huawei Proprietary and Confidential
Copyright © Huawei Technologies Co., Ltd.
378
An optical module is an electrostatic sensitive device. Therefore, you must take antistatic
measures during the whole process of replacing an optical module to prevent the optical
module from being damaged.
Currently, the USG supports SFP and XFP optical modules. Here, take the maintenance of the SFP
optical module as an example. The maintenance of the XFP optical module is similar, and is not
mentioned here.
Tool
Before replacing an optical module, you need the following tools:
ESD wrist strap or ESD glove
ESD bag
Procedure
Step 1 Check the location of the optical module to be replaced.
Before pulling out an optical module that is to be replaced, you should first check the location
of the module, for example, the cabinet and chassis where the optical module resides. Then,
locate the optical module to be replaced in the chassis and attach a label to the panel to
identify the optical module.
Step 2 Run the display interface interface-type interface-number command to view and record the
type of the optical module to be replaced, as the following output in bold displays:
<sysname> display interface gigabitethernet2/0/1
GigabitEthernet2/0/1 current state : DOWN
Line protocol current state : DOWN
Description : Huawei, GigabitEthernet2/0/1 Interface, Route Port
The Maximum Transmit Unit is 1500 bytes
Internet Address is 172.16.1.1/24
IP Sending Frames' Format is PKTFMT_ETHNT_2, Hardware address is 00e0-fcd4-7aad
The Vendor PN is SCP6F86-GL-CWH
Port BW: 1G, Transceiver max BW: 1G, Transceiver Mode: MultiMode
WaveLength: 850nm, Transmission Distance: 300m
Loopback:none, full-duplex mode, negotiation: disable, Pause Flowcontrol:Send and
Receive Enable
Statistics last cleared: never
Last 30 seconds input rate: 0 bits/sec, 0 packets/sec
Last 30 seconds output rate: 0 bits/sec, 0 packets/sec
Input: 0 bytes, 0 packets
Output: 0 bytes, 0 packets
Input:
Unicast: 0, Multicast: 0
Broadcast: 0, Jumbo: 0
CRC: 0, Symbol: 0
Overrun: 0 , InRangeLength: 0
LongPacket: 0 , Jabber: 0, Alignment: 0
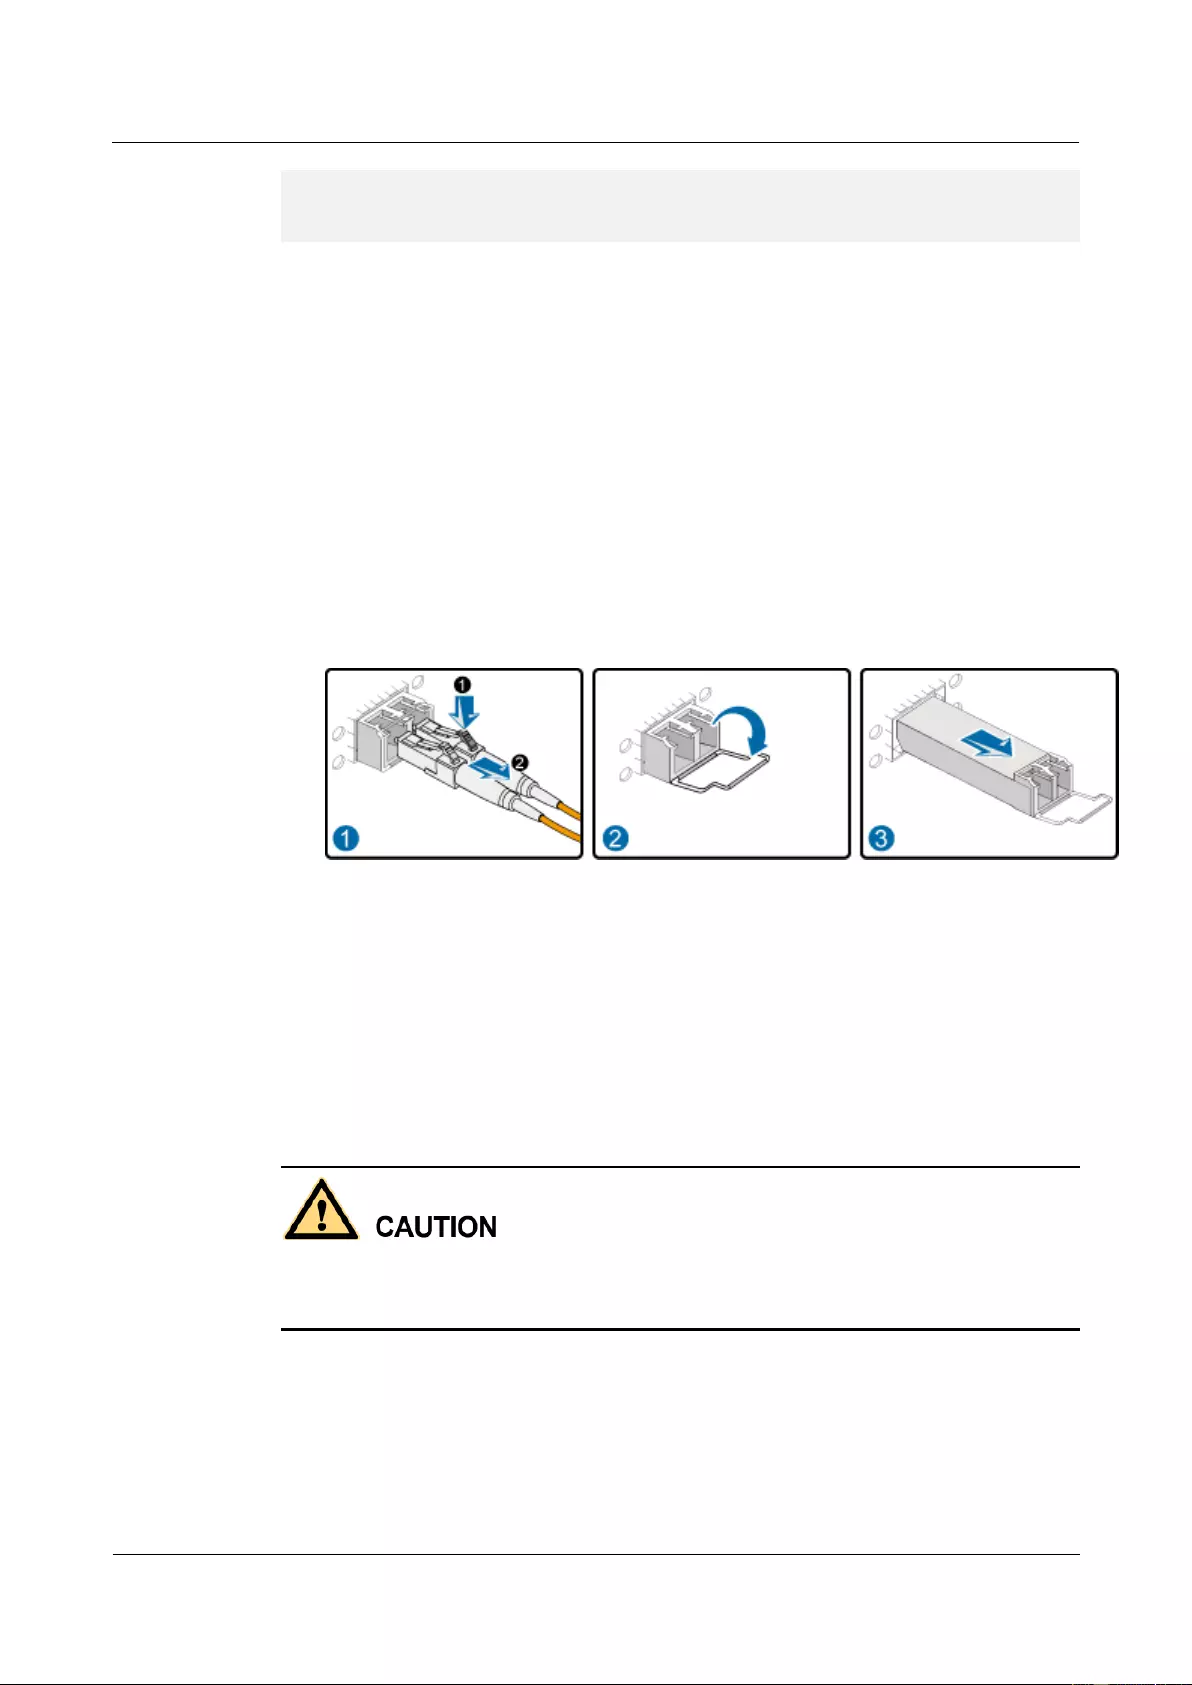
HUAWEI USG9500 Series Terabit-level Next-Generation Firewall
Hardware Guide
3 Hardware Maintenance
Issue 01 (2017-03-13)
Huawei Proprietary and Confidential
Copyright © Huawei Technologies Co., Ltd.
379
Fragment: 0, Undersized Frame: 0
RxPause: 0
---- More ----
Step 3 Record the location of the cables and check whether the labels on the cables are correct and
clear. If the labels are hard to identify, re-make labels and re-label the cables in case the
cables are not connected properly.
Step 4 Wear the ESD gloves or wrist strap and connect the grounding terminal to the ESD jack on
the rack.
Step 5 Pull out the optical module to be replaced.
1. Remove the optical cables from the connector and cover the connector with a dust cap.
2. Turn the pulled handle of the optical module downward, as shown in Figure 3-43.
3. Hold the handle to pull out the optical module carefully from the optical interface, as
shown in Figure 3-43.
4. Place the removed optical module in the ESD bag.
Figure 3-43 Schematic diagram of pulling out an optical module
Step 6 Insert the new optical module into the optical interface.
1. Take out the new optical module from the ESD bag and check whether there is any
damage or component missing. Check whether the new optical module is of the same
type as the optical module to be replaced.
2. Insert the new optical module into the optical interface, as shown in Figure 3-44. When
the click of the reed in the optical module is heard, it indicates that the optical module is
correctly inserted.
An optical module must not be inserted inversely. If you cannot completely insert an optical
module into the interface, do not push it. Instead, you should reverse it and insert it into the
interface again.
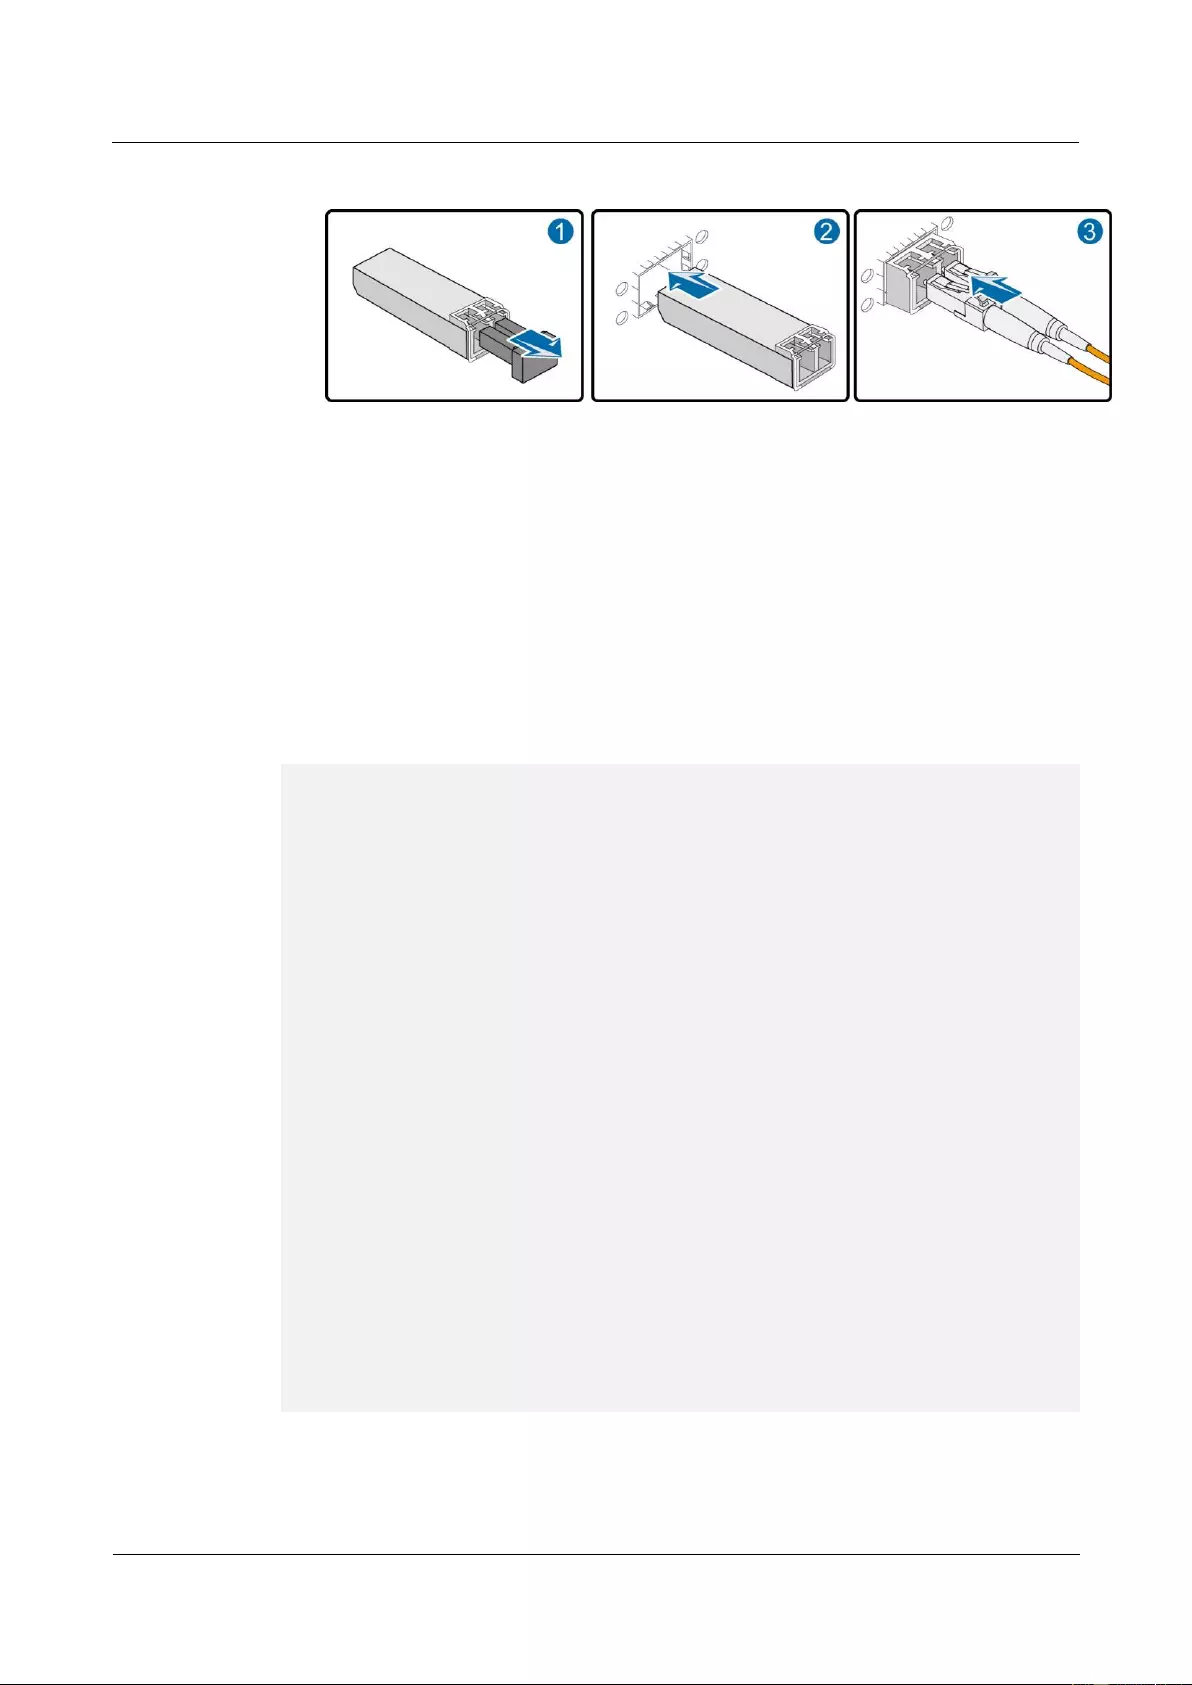
HUAWEI USG9500 Series Terabit-level Next-Generation Firewall
Hardware Guide
3 Hardware Maintenance
Issue 01 (2017-03-13)
Huawei Proprietary and Confidential
Copyright © Huawei Technologies Co., Ltd.
380
Figure 3-44 Schematic diagram of inserting an optical module
3. Remove the dust cap from the connector and insert the optical cables in the original
sequence.
Step 7 Verify the functions of the new optical module.
Then, you can verify the functions of the new optical module in the following ways:
Check whether the LINK indicator on the optical interface works normally. If the
indicator is green, it indicates that the links connected to the interface are Up.
Run the display interface interface-type interface-number command on the console
interface to view the type and running status of the new optical module. Check whether
the type of the new optical module corresponds to that of the original optical module, as
the following output in bold displays:
<sysname> display interface gigabitethernet2/0/1
GigabitEthernet2/0/1 current state : UP
Line protocol current state : UP
Description : Huawei, GigabitEthernet2/0/1 Interface, Route Port
The Maximum Transmit Unit is 1500 bytes
Internet Address is 172.16.1.1/24
IP Sending Frames' Format is PKTFMT_ETHNT_2, Hardware address is 00e0-fcd4-7aad
The Vendor PN is SCP6F86-GL-CWH
Port BW: 1G, Transceiver max BW: 1G, Transceiver Mode: MultiMode
WaveLength: 850nm, Transmission Distance: 300m
Loopback:none, full-duplex mode, negotiation: disable, Pause Flowcontrol:Send an
d Receive Enable
Statistics last cleared: never
Last 30 seconds input rate: 0 bits/sec, 0 packets/sec
Last 30 seconds output rate: 0 bits/sec, 0 packets/sec
Input: 0 bytes, 0 packets
Output: 0 bytes, 0 packets
Input:
Unicast: 0, Multicast: 0
Broadcast: 0, Jumbo: 0
CRC: 0, Symbol: 0
Overrun: 0 , InRangeLength: 0
LongPacket: 0 , Jabber: 0, Alignment: 0
Fragment: 0, Undersized Frame: 0
RxPause: 0
---- More ----
Check whether there is any new alarm or performance event.
Check whether the services are normal on the new optical module. If the services are
normal, it indicates that replacing an optical module is successful.

HUAWEI USG9500 Series Terabit-level Next-Generation Firewall
Hardware Guide
3 Hardware Maintenance
Issue 01 (2017-03-13)
Huawei Proprietary and Confidential
Copyright © Huawei Technologies Co., Ltd.
381
If the new optical module fails to return to the normal state, you should contact a Huawei
local office for timely technical support.
----End
Follow-up Procedure
After replacing an optical module, collect the tools.
If an optical module that is replaced and is confirmed to be faulty, you should fill in the
Faulty Card for Repair, and send the card and the faulty optical module to a Huawei local
office for timely maintenance.
3.7 Replacing an Air Filter
This section describes the air filter of the device and the procedure for replacing the air filter.
3.7.1 Replacing the Air Filter of the USG9580
This section describes the air filter of the USG9580 and the procedure for replacing the air
filter.
Precautions
To ensure good heat dissipation and ventilation for the system and to prevent the
accumulation of dust on an air filter, you need to clean the air filter regularly. It is
recommended that an air filter be cleaned at least once every three months and be replaced
once every year. When an air filter is placed in the dusty environment, it needs to be cleaned
more frequently.
Configuring a Cleaning Cycle for the Air Filter
Using the command dustproof check-timer day days in the system view, you can configure a
cleaning cycle for the air filter on the chassis.
When the air filter has been running for a period of time, the system generates an alarm to
remind you of the air filter cleaning. Then, the reset dustproof run-time command is used to
clear the alarm and re-count the runtime of the air filter. The default cleaning cycle is 90 days.
The value 0 indicates that the monitoring of the air filter is stopped.
The air filter is a component without memory. All the monitored information is saved on the MPU,
which may be inserted, removed, switched, or replaced during usage. Therefore, the monitoring cycle
may differ from the set cycle, but this does not affect the monitoring function.
Tools
ESD wrist strap or ESD gloves
Procedure
Step 1 Check the location of the air filter to be replaced.
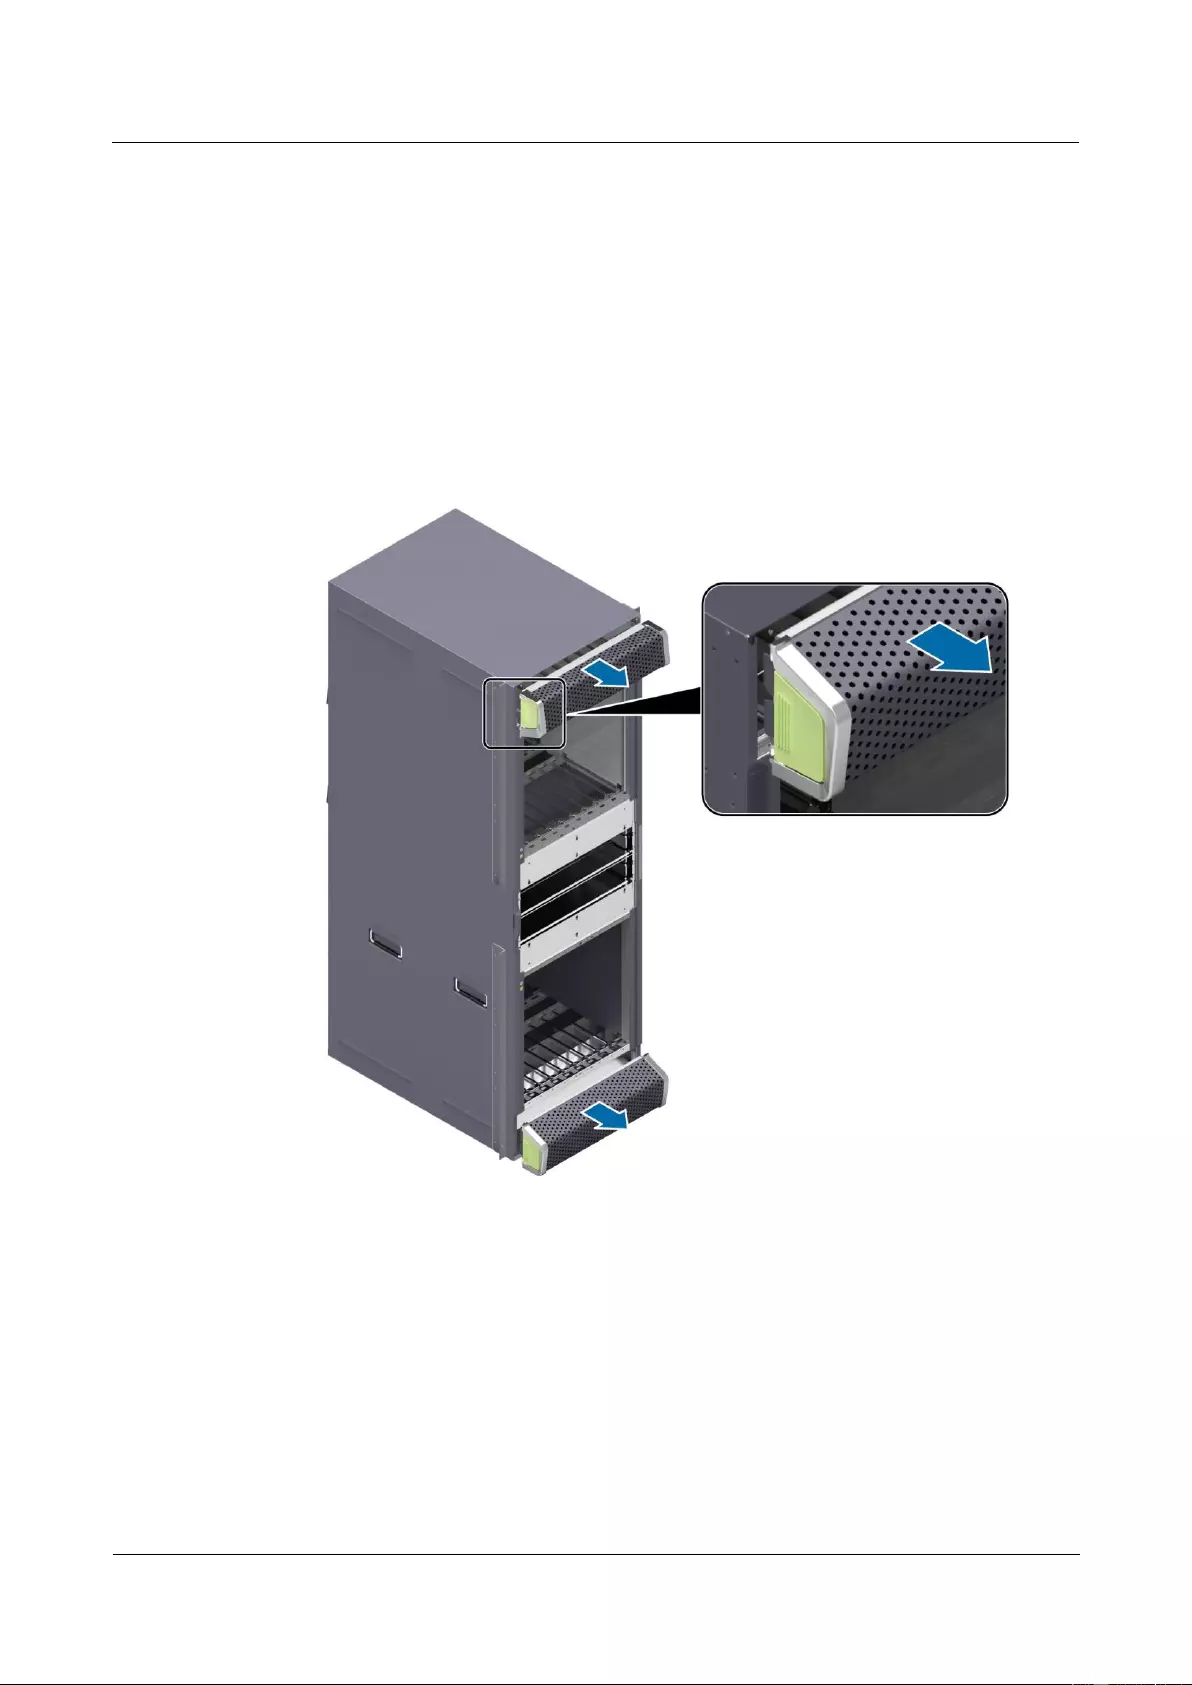
HUAWEI USG9500 Series Terabit-level Next-Generation Firewall
Hardware Guide
3 Hardware Maintenance
Issue 01 (2017-03-13)
Huawei Proprietary and Confidential
Copyright © Huawei Technologies Co., Ltd.
382
Before removing the old air filter, check its location, for example, the cabinet and chassis
where the air filter resides. Then, find the air filter to be replaced in the chassis and attach a
label to the panel to identify the air filter and avoid misoperation.
Step 2 Wear the ESD wrist strap and connect the grounding terminal to the ESD jack on the chassis.
Step 3 Remove the air filter from the air intake frame.
1. There is an air intake frame on the upper and lower chassis. Place fingers in the holes on
both sides of the panel to pull it out of the air intake frame horizontally. In this manner,
the panel is removed, Remove the air filter from the panel of the air intake frame, as
shown Figure 3-45.
Figure 3-45 Diagram of removing the air filter from the air intake frame on the USG9580
Step 4 Remove the air filter from the SFU area.
1. The air filter is located on the left in the middle of the device. When removing the air
filter, hold the upper handle of the air filter with one hand and pull the air filter out
horizontally, as shown in Figure 3-46.
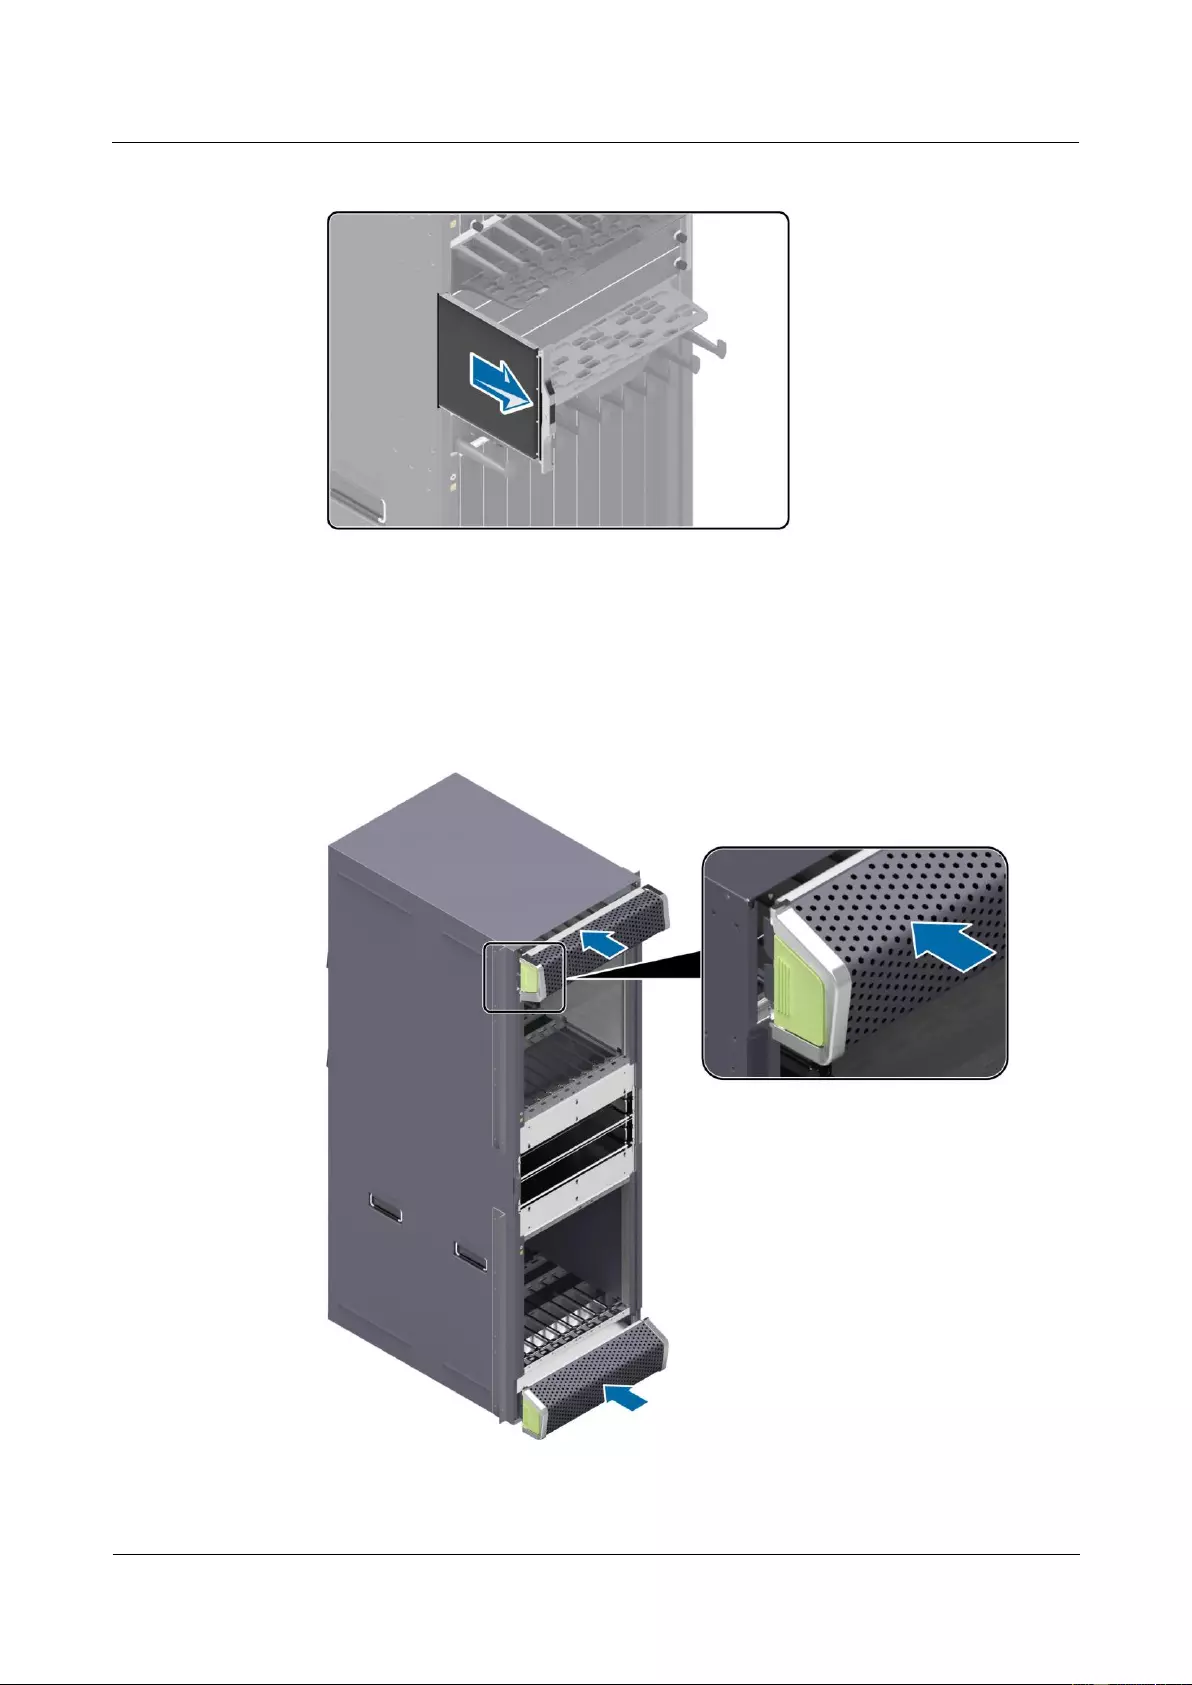
HUAWEI USG9500 Series Terabit-level Next-Generation Firewall
Hardware Guide
3 Hardware Maintenance
Issue 01 (2017-03-13)
Huawei Proprietary and Confidential
Copyright © Huawei Technologies Co., Ltd.
383
Figure 3-46 Diagram of removing the air filter from the SFU area on the USG9580
Step 5 Install an air filter on the air intake frame.
1. Place the clean and dry air filter onto the panel of the air intake frame, Place fingers in
the holes on both sides of the panel to install the panel back to the original place, as
shown in Figure 3-47.
Figure 3-47 Diagram of installing the air filter on the air intake frame of the USG9580
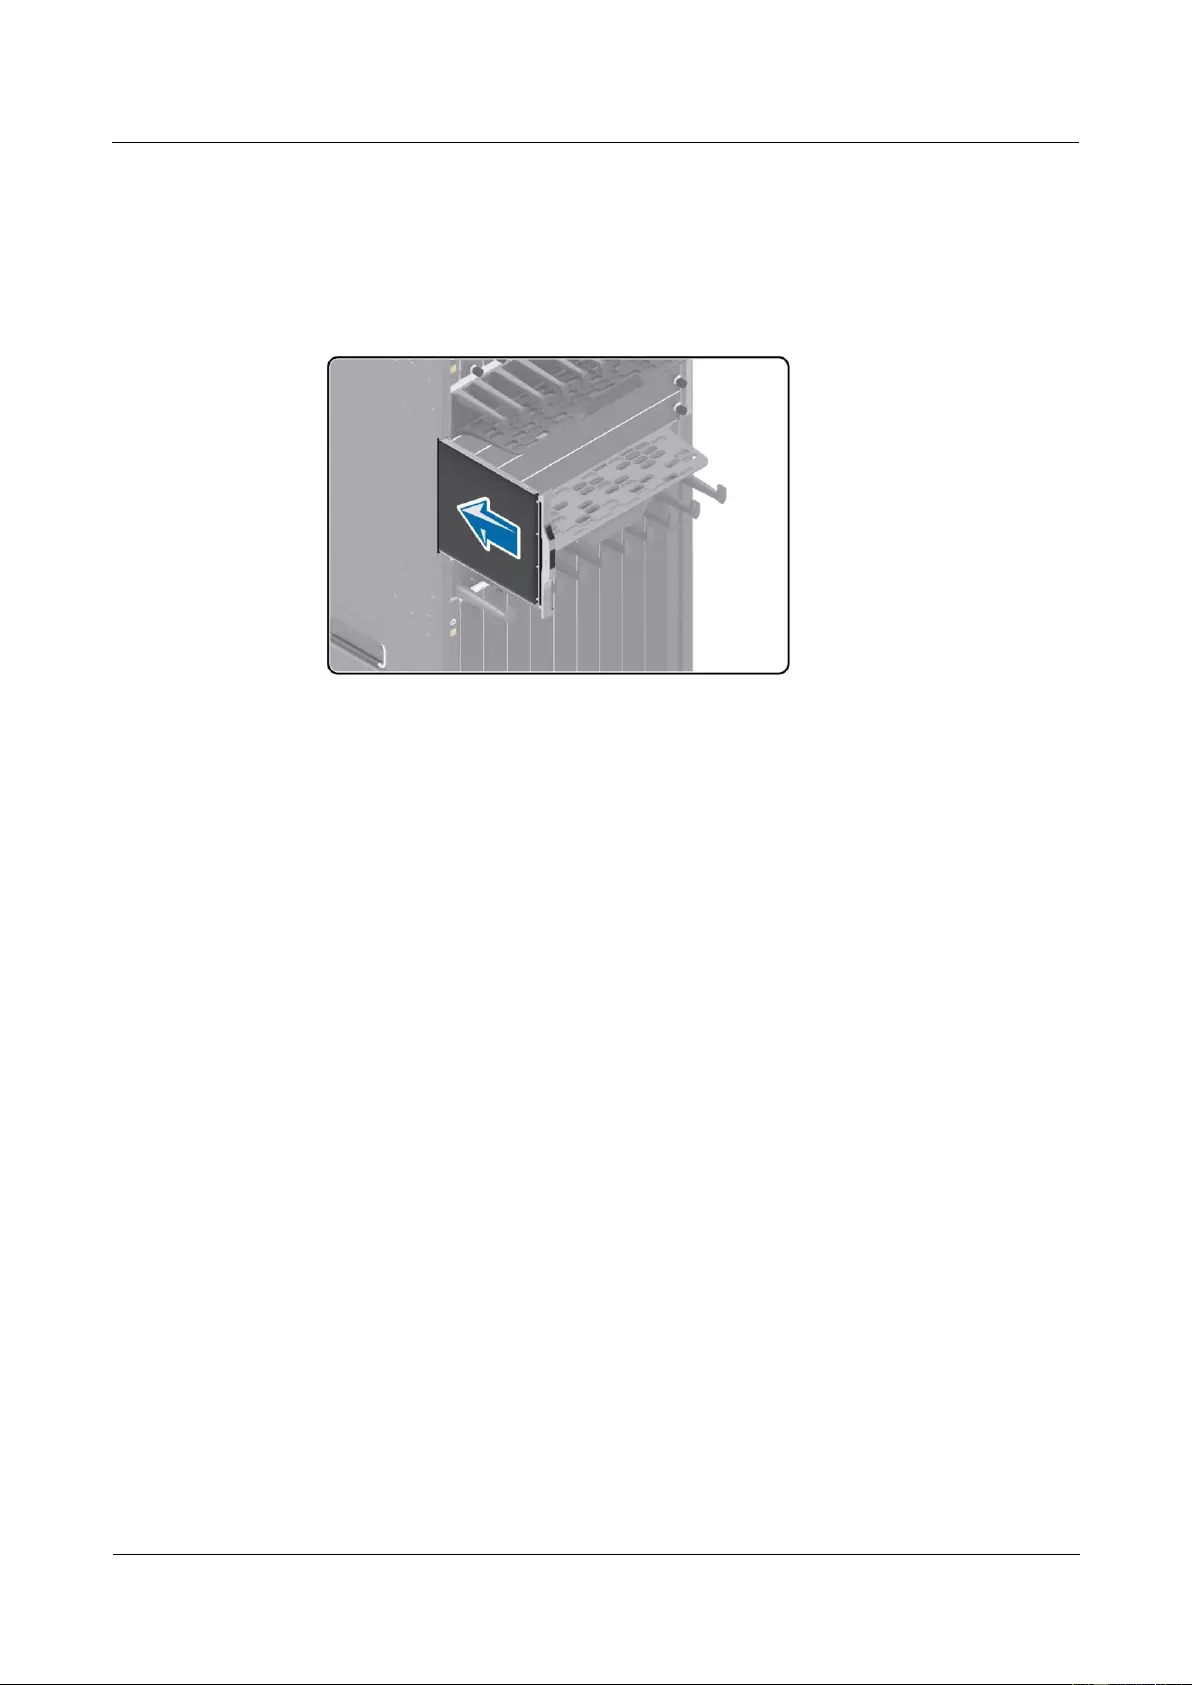
HUAWEI USG9500 Series Terabit-level Next-Generation Firewall
Hardware Guide
3 Hardware Maintenance
Issue 01 (2017-03-13)
Huawei Proprietary and Confidential
Copyright © Huawei Technologies Co., Ltd.
384
Step 6 Install an air filter in the SFU area.
1. Support the bottom of the air filter with one hand and hold the handle on the air filter
with the other hand. Then, insert the clean and dry air filter in the chassis horizontally, as
shown in Figure 3-48.
Figure 3-48 Diagram of installing the air filter in the SFU area on the USG9580
----End
Follow-up Procedure
After finishing the replacement, put all the tools away.
Dispose of an air filter that is replaced according to the compliance and safety standards.
3.7.2 Replacing the Air Filter of the USG9560
This section describes the air filter of the USG9560 and the procedure for replacing the air
filter.
Precautions
To ensure good heat dissipation and ventilation for the system and to prevent the
accumulation of dust on an air filter, you need to clean the air filter regularly. It is
recommended that an air filter be cleaned at least once every three months and be replaced
once every year. When an air filter is placed in the dusty environment, it needs to be cleaned
more frequently.
Configuring a Cleaning Cycle for the Air Filter
Using the command dustproof check-timer day days in the system view, you can configure a
cleaning cycle for the air filter on the chassis.
When the air filter has been running for a period of time, the system generates an alarm to
remind you of the air filter cleaning. Then, the reset dustproof run-time command is used to
clear the alarm and re-count the runtime of the air filter. The default cleaning cycle is 90 days.
The value 0 indicates that the monitoring of the air filter is stopped.
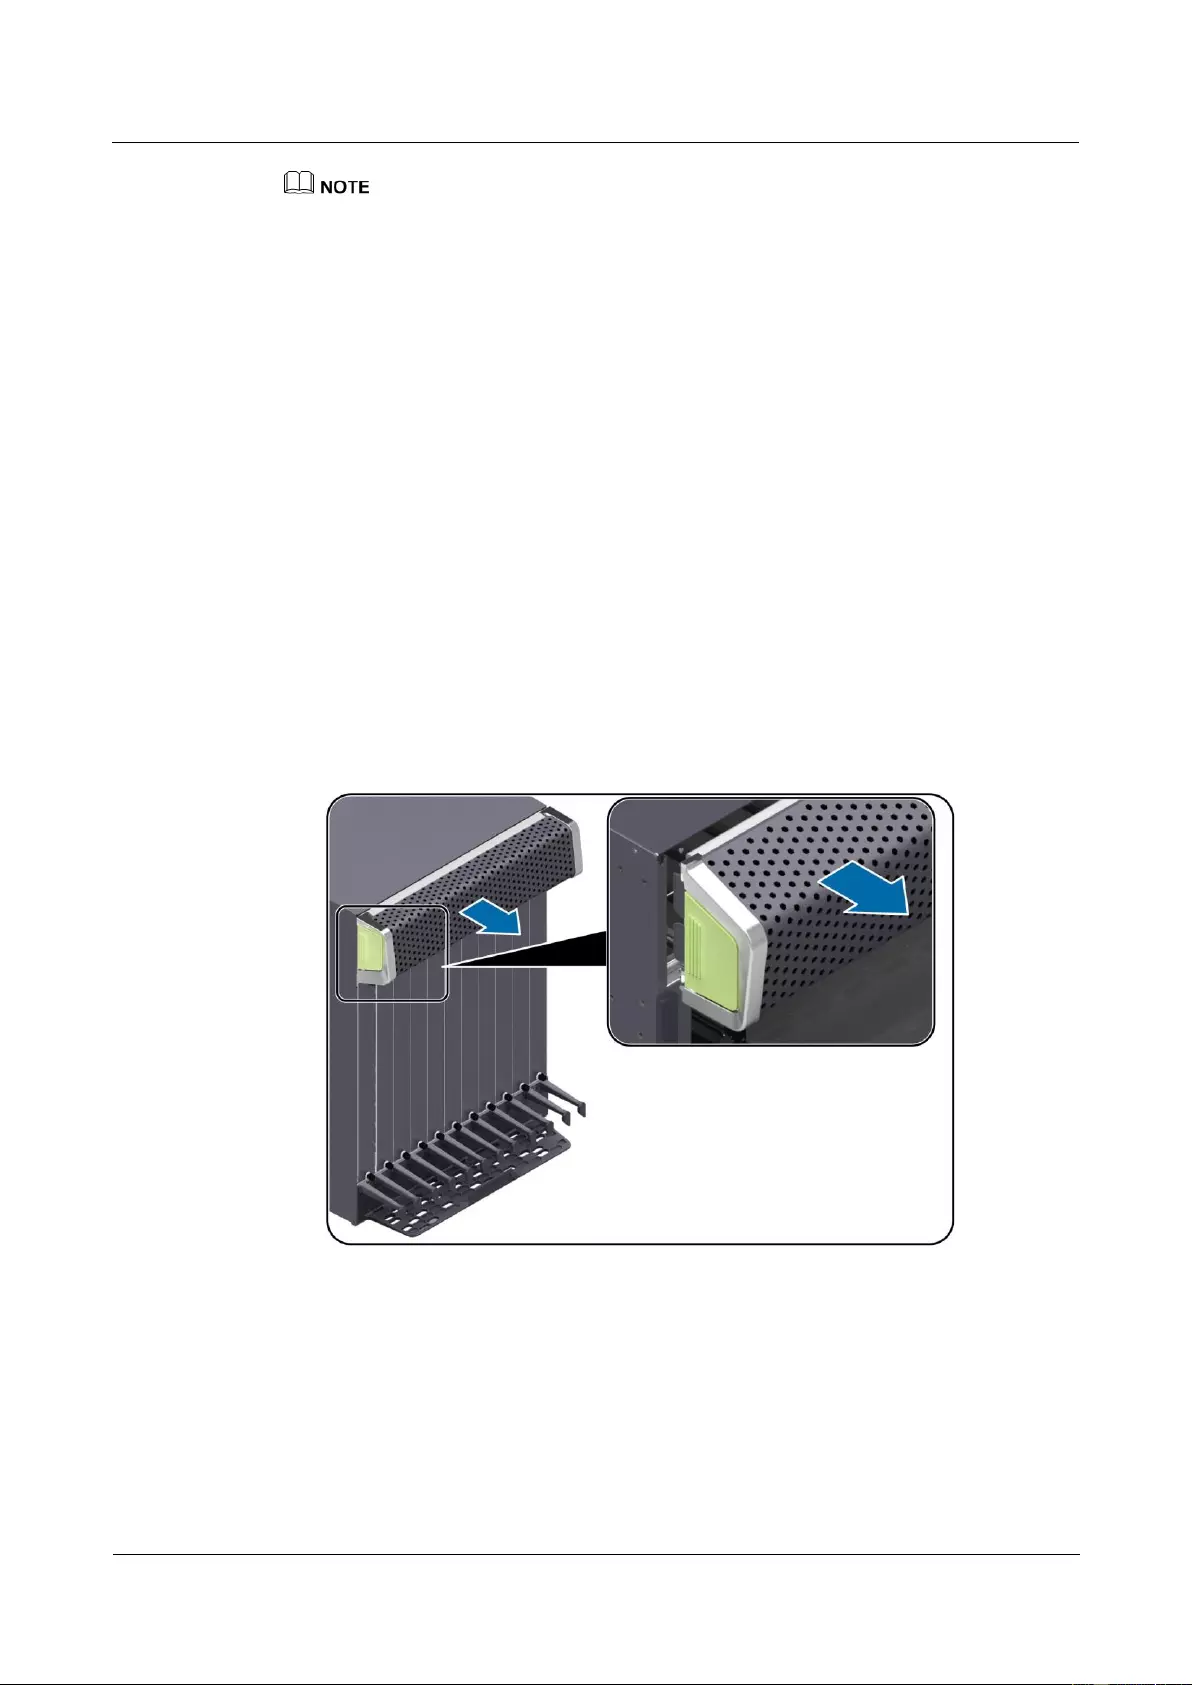
HUAWEI USG9500 Series Terabit-level Next-Generation Firewall
Hardware Guide
3 Hardware Maintenance
Issue 01 (2017-03-13)
Huawei Proprietary and Confidential
Copyright © Huawei Technologies Co., Ltd.
385
The air filter is a component without memory. All the monitored information is saved on the MPU,
which may be inserted, removed, switched, or replaced during usage. Therefore, the monitoring cycle
may differ from the set cycle, but this does not affect the monitoring function.
Tools
ESD wrist strap or ESD gloves
Procedure
Step 1 Check the location of the air filter to be replaced.
Before removing the old air filter, check its location, for example, the cabinet and chassis
where the air filter resides. Then, find the air filter to be replaced in the chassis and attach a
label to the panel to identify the air filter and avoid misoperation.
Step 2 Wear the ESD wrist strap and connect the grounding terminal to the ESD jack on the chassis.
Step 3 Remove the air filter from the air intake frame.
1. Place fingers in the holes on both sides of the panel to pull it out of the air intake frame
horizontally. In this manner, the panel is removed, Remove the air filter from the panel
of the air intake frame, as shown in Figure 3-49.
Figure 3-49 Diagram of removing the air filter from the air intake frame on the USG9560
Step 4 Install an air filter on the air intake frame.
1. Place a clean and dry air filter onto the air intake frame and press the air filter, Install the
panel of the air intake frame back to its original position in the chassis, as shown in
Figure 3-50.
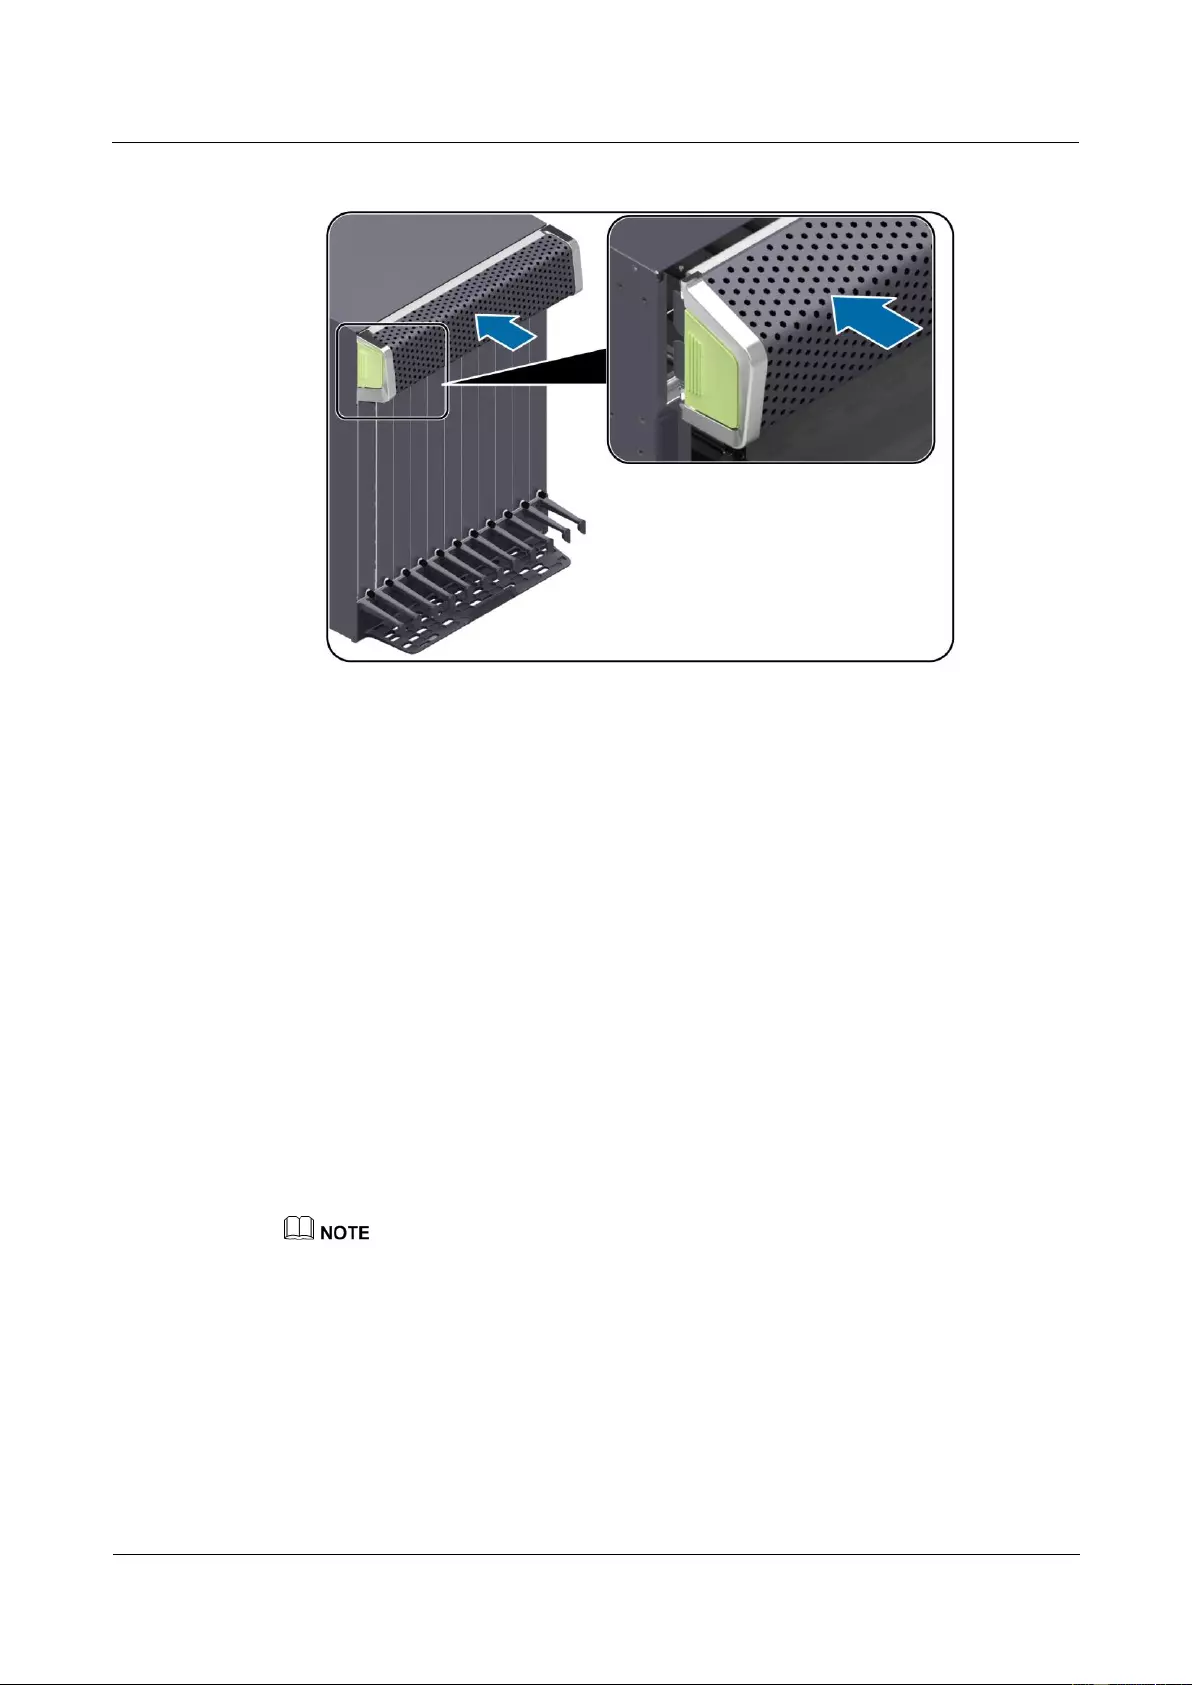
HUAWEI USG9500 Series Terabit-level Next-Generation Firewall
Hardware Guide
3 Hardware Maintenance
Issue 01 (2017-03-13)
Huawei Proprietary and Confidential
Copyright © Huawei Technologies Co., Ltd.
386
Figure 3-50 Diagram of installing the air filter onto the air intake frame of the USG9560
----End
Follow-up Procedure
After finishing the replacement, put all the tools away.
Dispose of an air filter that is replaced according to the compliance and safety standards.
3.7.3 Replacing the Air Filter of the USG9520
This section describes the air filter of the USG9520 and the procedure for replacing the air
filter.
Context
To ensure proper heat dissipation and ventilation for the system, and to prevent the
accumulation of dust on the air filter, you need to clean the air filter regularly. It is
recommended that an air filter be cleaned once at least every three months and be replaced
once every year. When an air filter is placed in the dusty environment such as an equipment
room, the air filter should be cleaned more frequently.
The method to replace the air filter of the USG9520 chassis that is configured with DC power supply
module is similar to that of the chassis which is configured with AC power supply module. Take the air
filter of the chassis that is configured with DC power supply module as an example.
Configuring a Cleaning Cycle for the Air Filter
Using the command dustproof check-timer day days in the system view, you can configure a
cleaning cycle for the air filter on the chassis.
When the air filter has been running for a period of time, the system generates an alarm to
remind you of the air filter cleaning. Then, the reset dustproof run-time command is used to
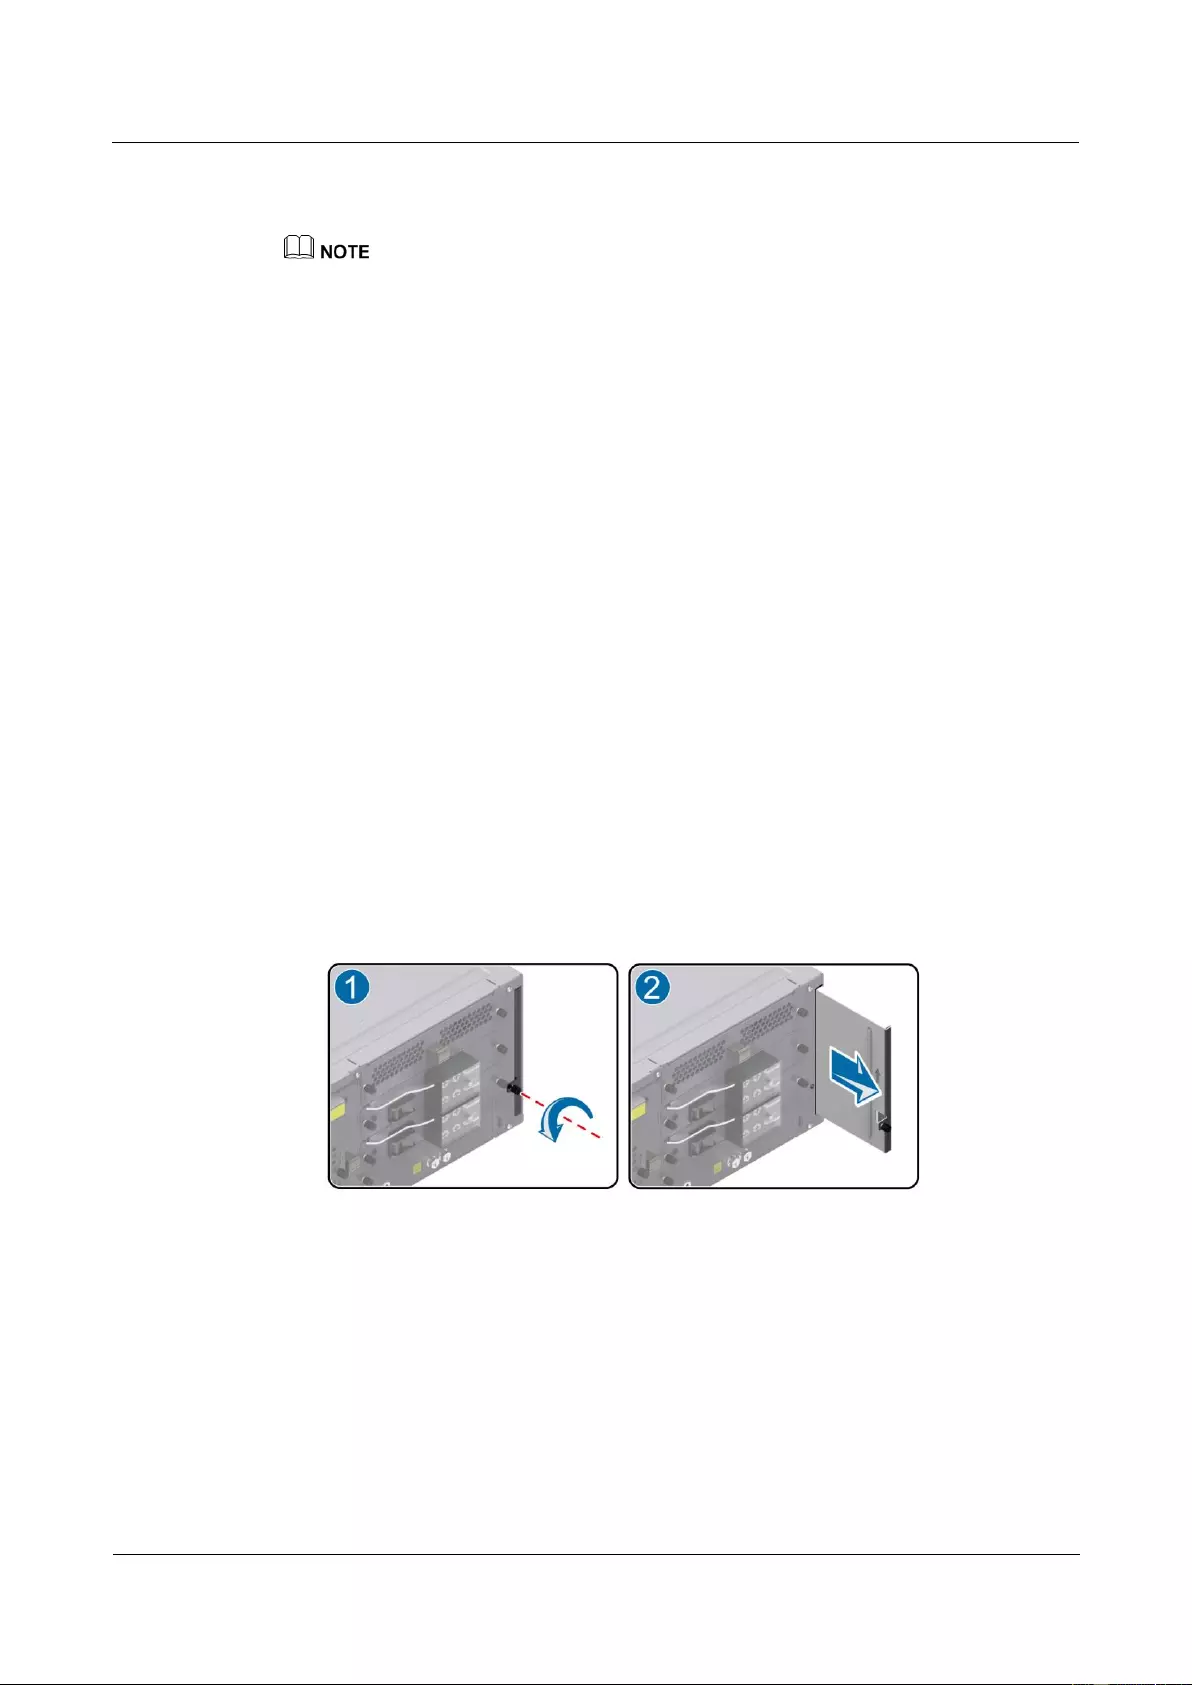
HUAWEI USG9500 Series Terabit-level Next-Generation Firewall
Hardware Guide
3 Hardware Maintenance
Issue 01 (2017-03-13)
Huawei Proprietary and Confidential
Copyright © Huawei Technologies Co., Ltd.
387
clear the alarm and re-count the runtime of the air filter. The default cleaning cycle is 90 days.
The value 0 indicates that the monitoring of the air filter is stopped.
The air filter is a component without memory. All the monitored information is saved on the MPU,
which may be inserted, removed, switched, or replaced during usage. Therefore, the monitoring cycle
may differ from the set cycle, but this does not affect the monitoring function.
Tool
Before replacing an air filter, you need the following tools:
ESD wrist strap or ESD glove
Phillips screwdriver
Procedure
Step 1 Check the location of the air filter to be replaced.
Before pulling out an air filter that is to be replaced, you should first check the location of the
air filter, for example, the cabinet and chassis where the air filter resides. Then, locate the air
filter to be replaced in the chassis and attach a label to the panel to identify the air filter.
Step 2 Wear the ESD wrist strap and connect the grounding terminal to the ESD jack on the rack.
Step 3 Remove the air filter from the air intake frame.
1. The air filter is located behind the device. Loosen the captive screws on the panel, as (1)
shown in Figure 3-51.
2. Hold the panel of the air filter and slowly pull the air filter out until it leaves the chassis,
as (2) shown in Figure 3-51.
Figure 3-51 Removing the air filter from the air intake frame of the USG9520
Step 4 Install the clean and dry air filter of the air intake frame.
1. Insert the clean and dry air filter into the chassis, as (1) shown in Figure 3-52.
2. Secure the captive screws on the panel of the air filter, as (2) shown in Figure 3-52.
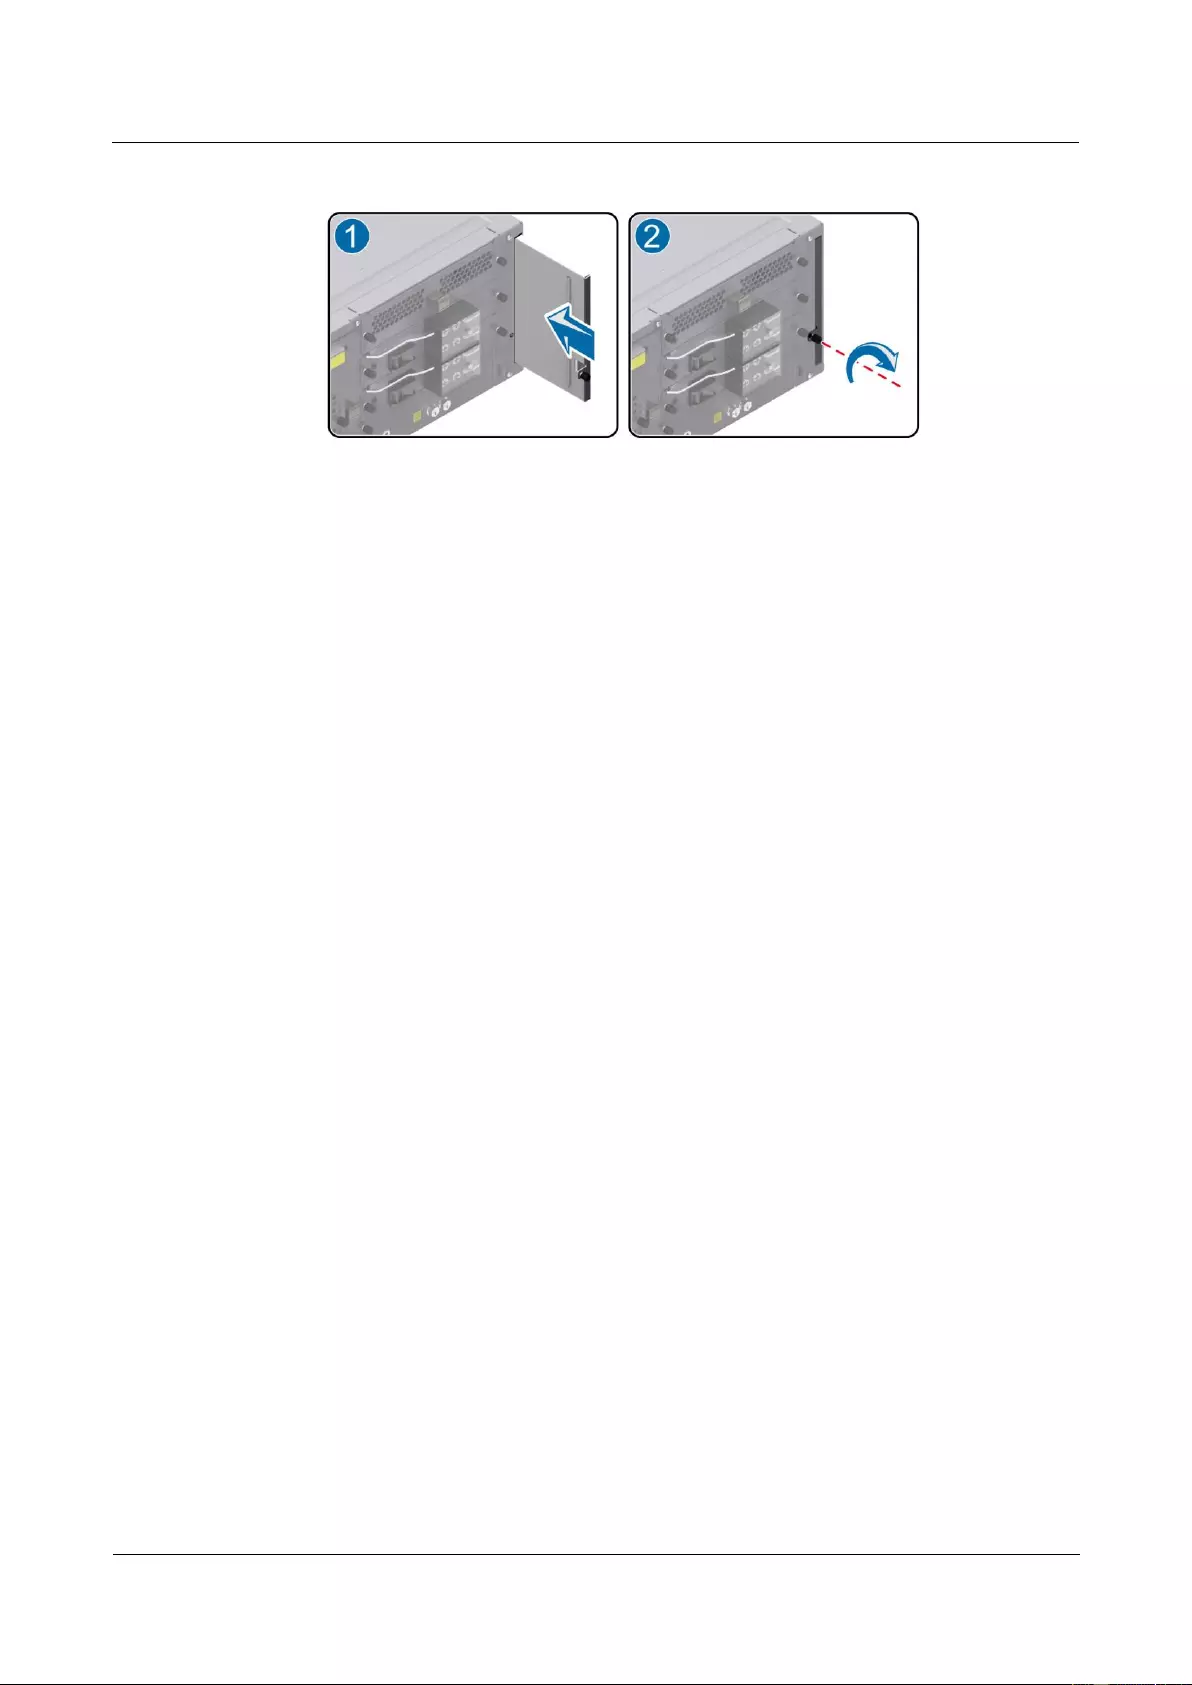
HUAWEI USG9500 Series Terabit-level Next-Generation Firewall
Hardware Guide
3 Hardware Maintenance
Issue 01 (2017-03-13)
Huawei Proprietary and Confidential
Copyright © Huawei Technologies Co., Ltd.
388
Figure 3-52 Installing the air filter of the air intake frame of the USG9520
----End
Follow-up Procedure
After replacing an air filter, collect the tools.
Handle an air filter that is replaced according to the compliance and safety standards.
3.8 Replacing Cables
This section describes the precaution and procedure for replacing power cable, network cable,
trunk cable, and optical cable.
3.8.1 Replacing a Power Cable
This section describes the power cable of the device and the procedure for replacing the
power cable.
Context
Before replacing a power cable, you need to note the following points:
Make sure that service data is backed up before replacing a power cable.
Before operation, make sure to cut off all input power supplies in the power distribution
cabinet, and attach an label to the switch to be used.
The terminals of a DC power cable and other exposed surfaces must be fully insulated.
Tool
Before replacing a power cable, you need the following tools:
Terminal of the power module
Power cable
ESD wrist strap
Phillips screwdriver

HUAWEI USG9500 Series Terabit-level Next-Generation Firewall
Hardware Guide
3 Hardware Maintenance
Issue 01 (2017-03-13)
Huawei Proprietary and Confidential
Copyright © Huawei Technologies Co., Ltd.
389
Procedure
Step 1 Record the location of both ends of the power cable to be replaced and the cabling mode in
case of misoperation.
Step 2 Make a new power cable. For details, refer to the A.2 On-site Cable Assembly and
Installation.
Step 3 Loosen the screws on the terminal of the power module with a wrench. Then, remove the
terminal. Pull out the power cable from the guide-in hole on the cabinet.
Step 4 Install the power cable. Pass the new power cable through the guide-in hole on the cabinet,
and connect the terminal of the power module to the input terminal of the power module in
the power distribution cabinet. Then, tighten the setscrews with a wrench.
Step 5 Make new labels according to the contents of the labels on the old power cable. For label
regulations, refer to the A.5 Engineering Labels for Cables.
----End
Follow-up Procedure
After replacing a power cable, collect the tools and the replaced cable.
Do not place the old and the new cables together to avoid confusions.
3.8.2 Replacing a Network Cable
This section describes the network cable of the device and the procedure for replacing the
network cable.
Context
Before replacing a network cable, you need to note the following points:
During the process of replacing a network cable, the services are interrupted temporarily.
It is recommended that you replace a network cable during the hours when the network
is not busy, for example, from 00:00 am to 06:00 am.
Tool
Before replacing a network cable, you need the following tools:
Cutter
Cable tie
ESD wrist strap or ESD glove
Cable tester
Crimper
Procedure
Step 1 Check the location and cabling of the network cable to be replaced.
Step 2 Prepare a new network cable. The type of the new network cable must be consistent with that
of the old network cable. When a network cable is made, test its connectivity with a cable
tester.
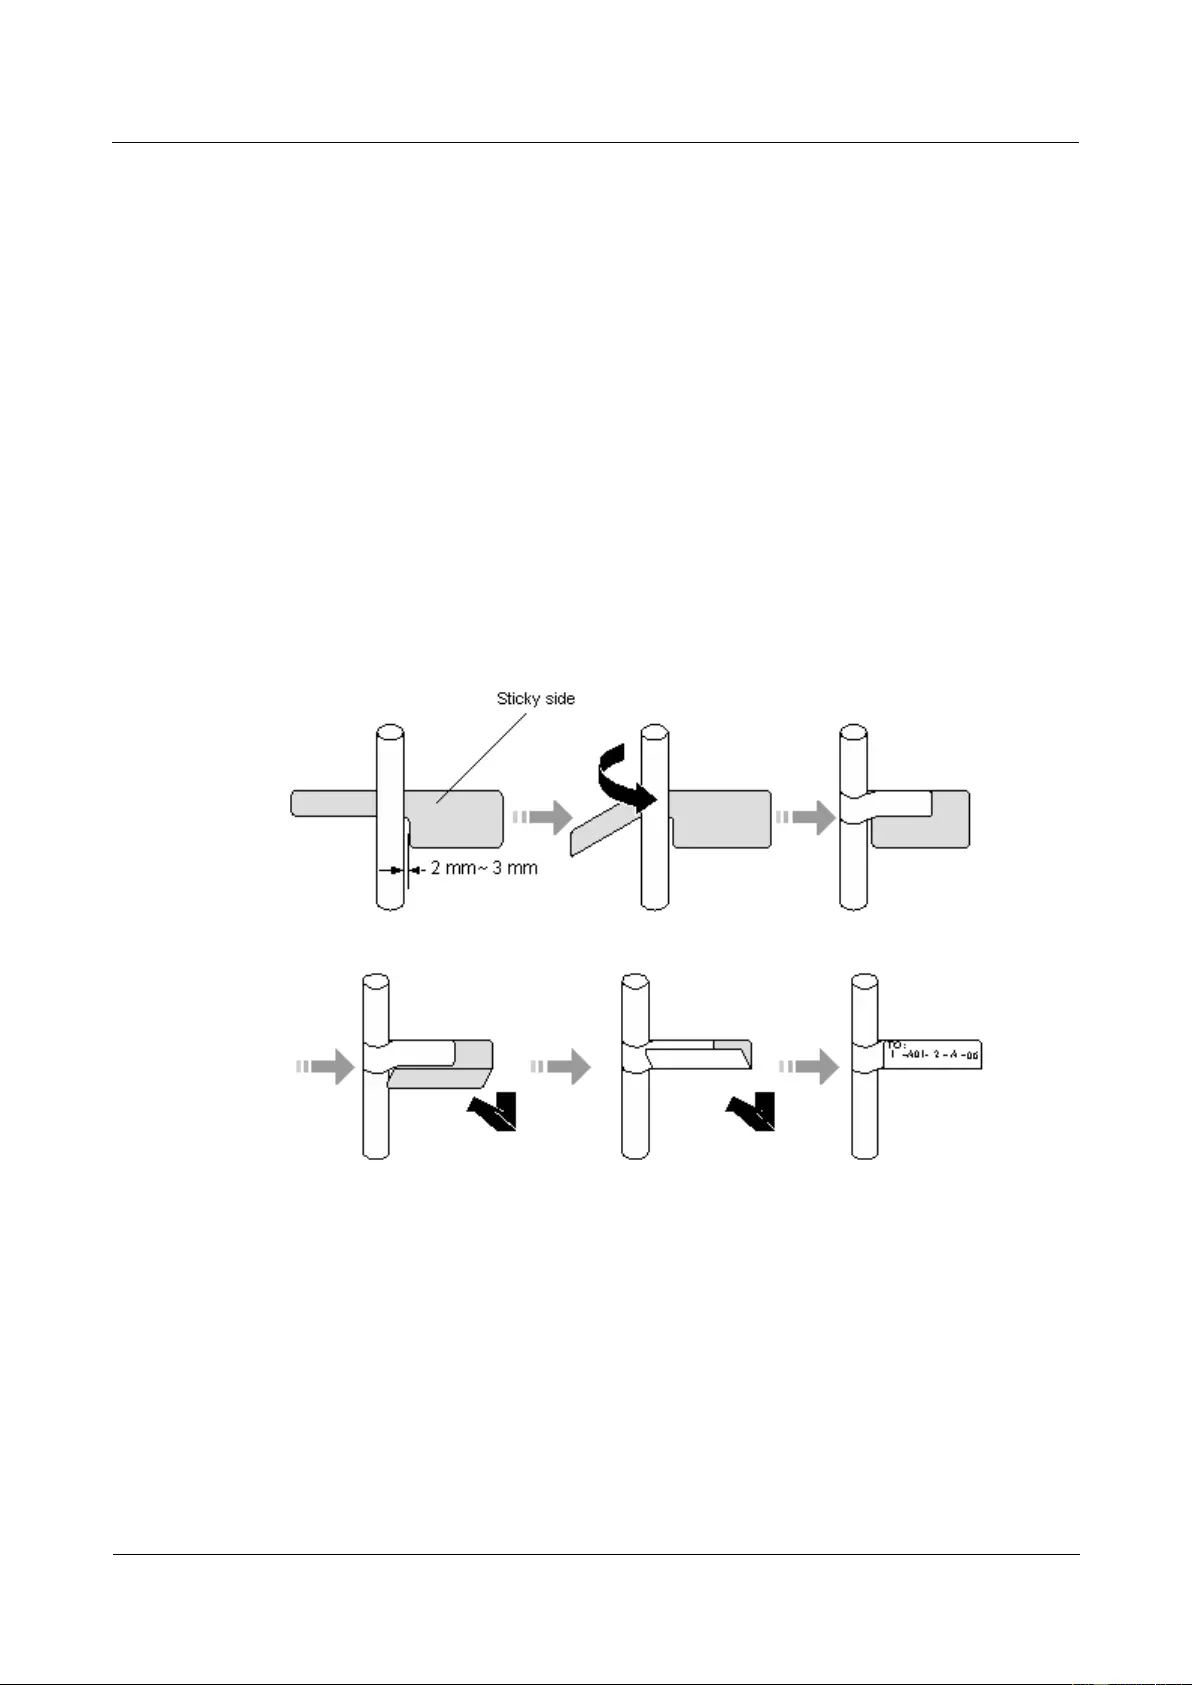
HUAWEI USG9500 Series Terabit-level Next-Generation Firewall
Hardware Guide
3 Hardware Maintenance
Issue 01 (2017-03-13)
Huawei Proprietary and Confidential
Copyright © Huawei Technologies Co., Ltd.
390
Step 3 Wear the ESD gloves or wrist strap and connect the grounding terminal to the ESD jack on
the rack.
Step 4 Lay out the new network cable according to the original cabling mode.
If you need to replace more than one network cable at a time, you should attach temporary
labels to the new network cables to identify the cables. The new network cables must be
numbered consistently with the network cables to be replaced.
Step 5 Remove the old network cable and record the location where the old network cable is
installed.
1. Remove the connectors of the network cable.
2. Cut the cable tie with a cutter and remove the network cable.
Step 6 Insert the new network cable connector into the network interface of which the location is
recorded. If a click is heard, it indicates that the insertion is successful. The indicator of the
network interface being constantly on and green indicates that the link is Up.
Step 7 Attach a label to the new network cable, as shown in Figure 3-53.
Figure 3-53 Schematic diagram of attaching a label to a new network cable
Step 8 Bind the cable with a cable tie and cut the redundancies of the tie.
Step 9 Run the ping command to check the connection between both ends of the new network cable.
If both ends fail to communicate normally, check whether the network cable is damaged or
whether the connectors are secured.
----End
Follow-up Procedure
After replacing a network cable, collect the tools and the replaced cable.
Do not place the old and the new cables together to avoid confusions.

HUAWEI USG9500 Series Terabit-level Next-Generation Firewall
Hardware Guide
3 Hardware Maintenance
Issue 01 (2017-03-13)
Huawei Proprietary and Confidential
Copyright © Huawei Technologies Co., Ltd.
391
3.8.3 Replacing an Optical Cable
This section describes the optical cable of the device and the procedure for replacing the
optical cable.
Context
Before replacing an optical cable, you need to note the flowing points:
During the process of replacing an optical cable, the services are interrupted temporarily.
Be careful when you remove or insert an optical cable in case that the connector of the
optical cable is damaged.
When installing or maintaining an optical interface board or an optical cable, do not
observe an optical interface or connectors of an optical cable.
The curvature radius of an optical cable should be 20 times greater than its diameter.
Generally, the curvature radius should be greater than 40 mm.
Connectors of optical cables are divided into the LC type and the SC type. You must
select an optical cable according to the interface type.
Tool
Before replacing an optical cable, you need the following tools:
Cutter
Binding strap
ESD wrist strap or ESD glove
Procedure
Step 1 Record the location of both ends of the optical cable to be replaced and the cabling mode.
Step 2 Take out the new optical cable and check whether the type of the new optical cable is
consistent with that of the old one. The multi-mode optical cable is orange and the
single-mode optical cable is yellow.
Step 3 Make a new label according to the contents of the label on the old optical cable.
Step 4 Lay out the new optical cable in the original place.
Step 5 Remove the old optical cable.
1. Put on the ESD gloves or wrist strap and connect the grounding terminal to the ESD jack
on the rack.
2. Hold the connectors and remove them. Then, cover the connectors with dust caps.
If a connector is dusty, clean it with dust-free cloth or fiber cleaning paper.
3. Remove the old optical cable from the corrugated pipe.
Step 6 Insert the new optical cable.
Before inserting the new optical cable, remove the dust caps and keep them properly for
future use. Then, connect both ends of the new optical cable to the optical interfaces and
secure the optical cables.
Step 7 Attach a label to the new optical cable, as shown in Figure 3-54.
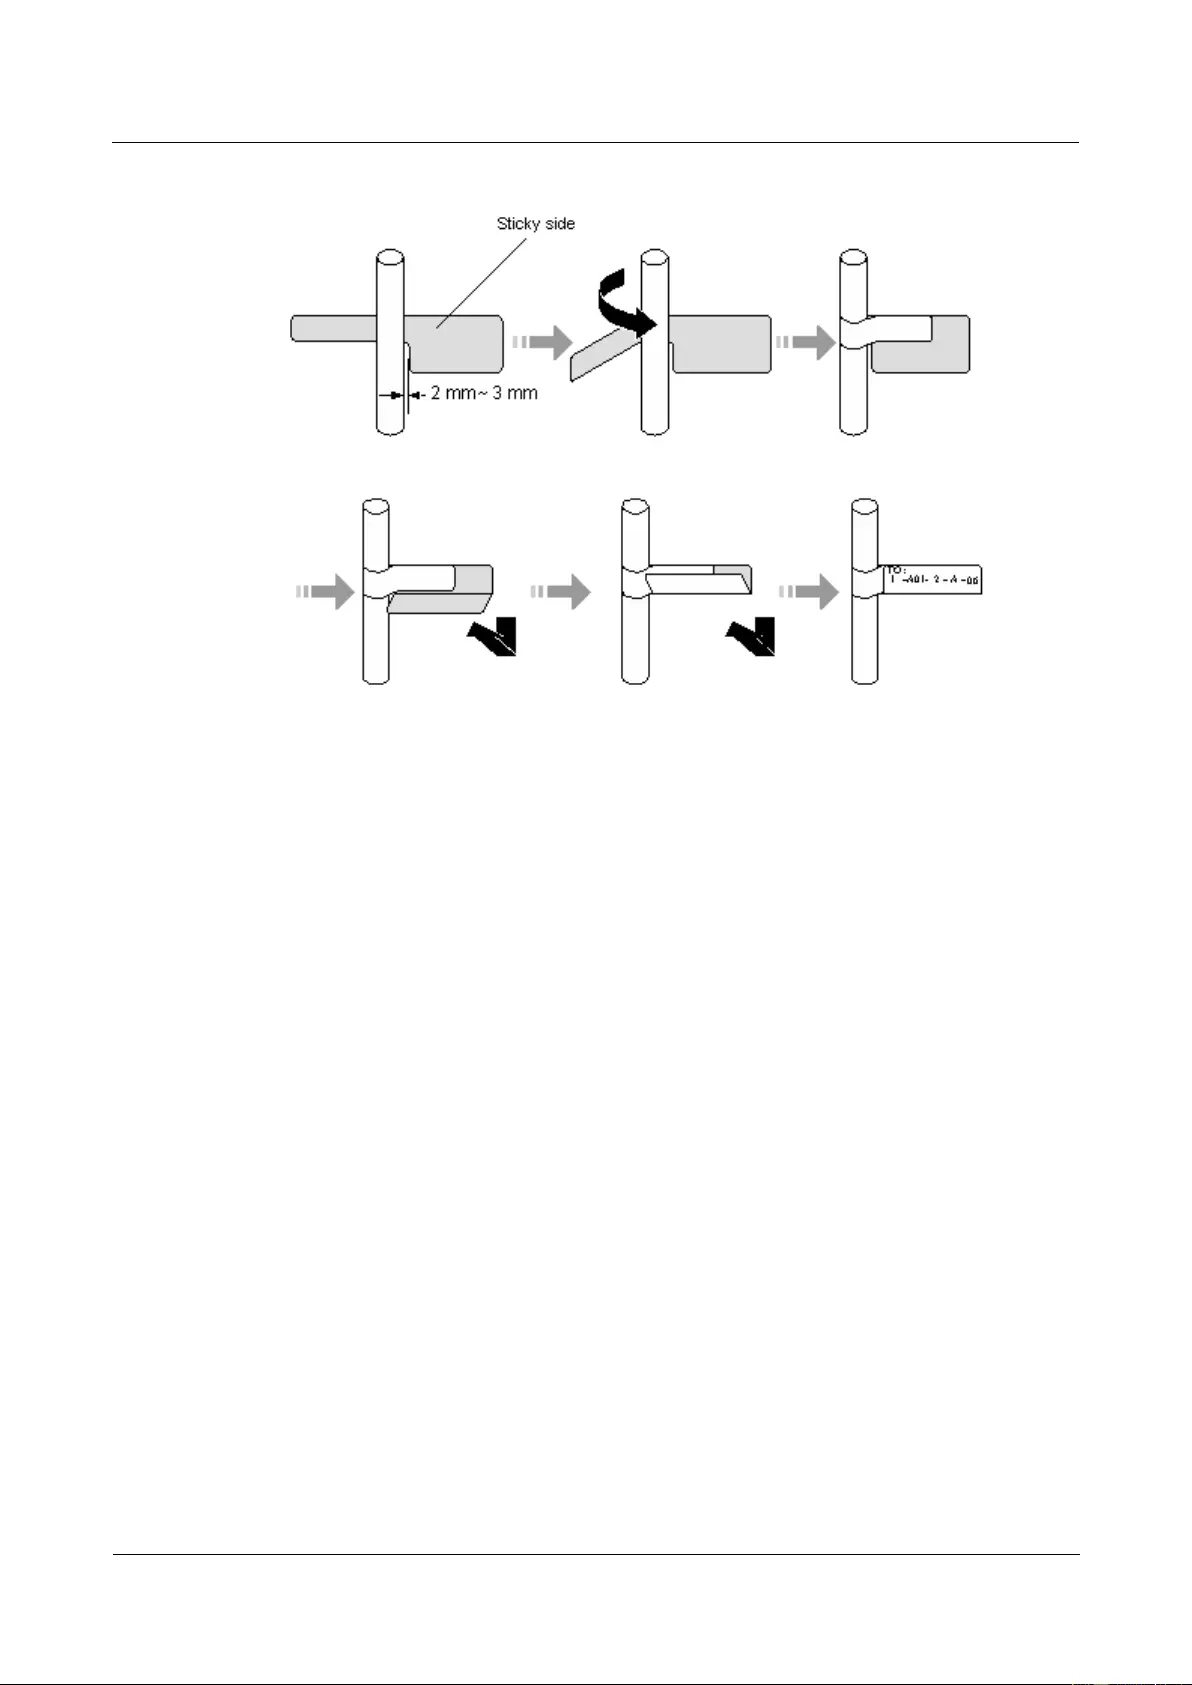
HUAWEI USG9500 Series Terabit-level Next-Generation Firewall
Hardware Guide
3 Hardware Maintenance
Issue 01 (2017-03-13)
Huawei Proprietary and Confidential
Copyright © Huawei Technologies Co., Ltd.
392
Figure 3-54 Schematic diagram of attaching a label to a new optical cable
Step 8 Lay out the new optical cable in a tidy manner in the cabinet and bind the optical cable with a
binding strap. Note that the optical cable should be bound with proper strength and with even
space in between. Bind the redundancies of the optical cable at the ODF side.
Step 9 Check whether the new optical cable works normally.
Check the LINK indicator at the optical interface. If the indicator is constantly on and
green, it indicates that the link is Up.
Check whether the service on the board where the new optical cable connects is normal.
If the services are normal, it indicates that the optical cable is replaced successfully.
Check whether there is any new alarm or performance event.
----End
Follow-up Procedure
After replacing an optical cable, collect the tools and the replaced optical cable.
Do not place the old and the new optical cables together to avoid confusions.

HUAWEI USG9500 Series Terabit-level Next-Generation Firewall
Hardware Guide
A Appendix
Issue 01 (2017-03-13)
Huawei Proprietary and Confidential
Copyright © Huawei Technologies Co., Ltd.
393
A Appendix
A.1 Cable
This section describes the PGND cable, power cable, configuration cable, Ethernet cable, and
optical fiber of the USG9500.
A.1.1 DC Power Cable
This section describes the DC power cables of the USG9500 that uses the DC power supply.
Learn about the structure and specifications of the DC power cable before you make or
purchase any for the USG9500.
A.1.1.1 DC Power Cable of the USG9580
This section describes the DC power cable of the USG9580.
DC Power Cable uses in two situation:
DC-input power cable.
The cable between the AC power chassis and the device.
Structure and Appearance
The DC power cable consists of a -48 V power cable NEG(-), and a cable RTN (+). The
power cable transfers -48 V DC from the DC distribution equipment to the terminal block of
the USG9500 power module, supplying power for the USG9500.
The DC power cables of the USG9500 are delivered in an integrated way. Cut the cables and
make the power cables according to the actual requirements on the site. Figure A-1 and Figure
A-2 show the power cables.
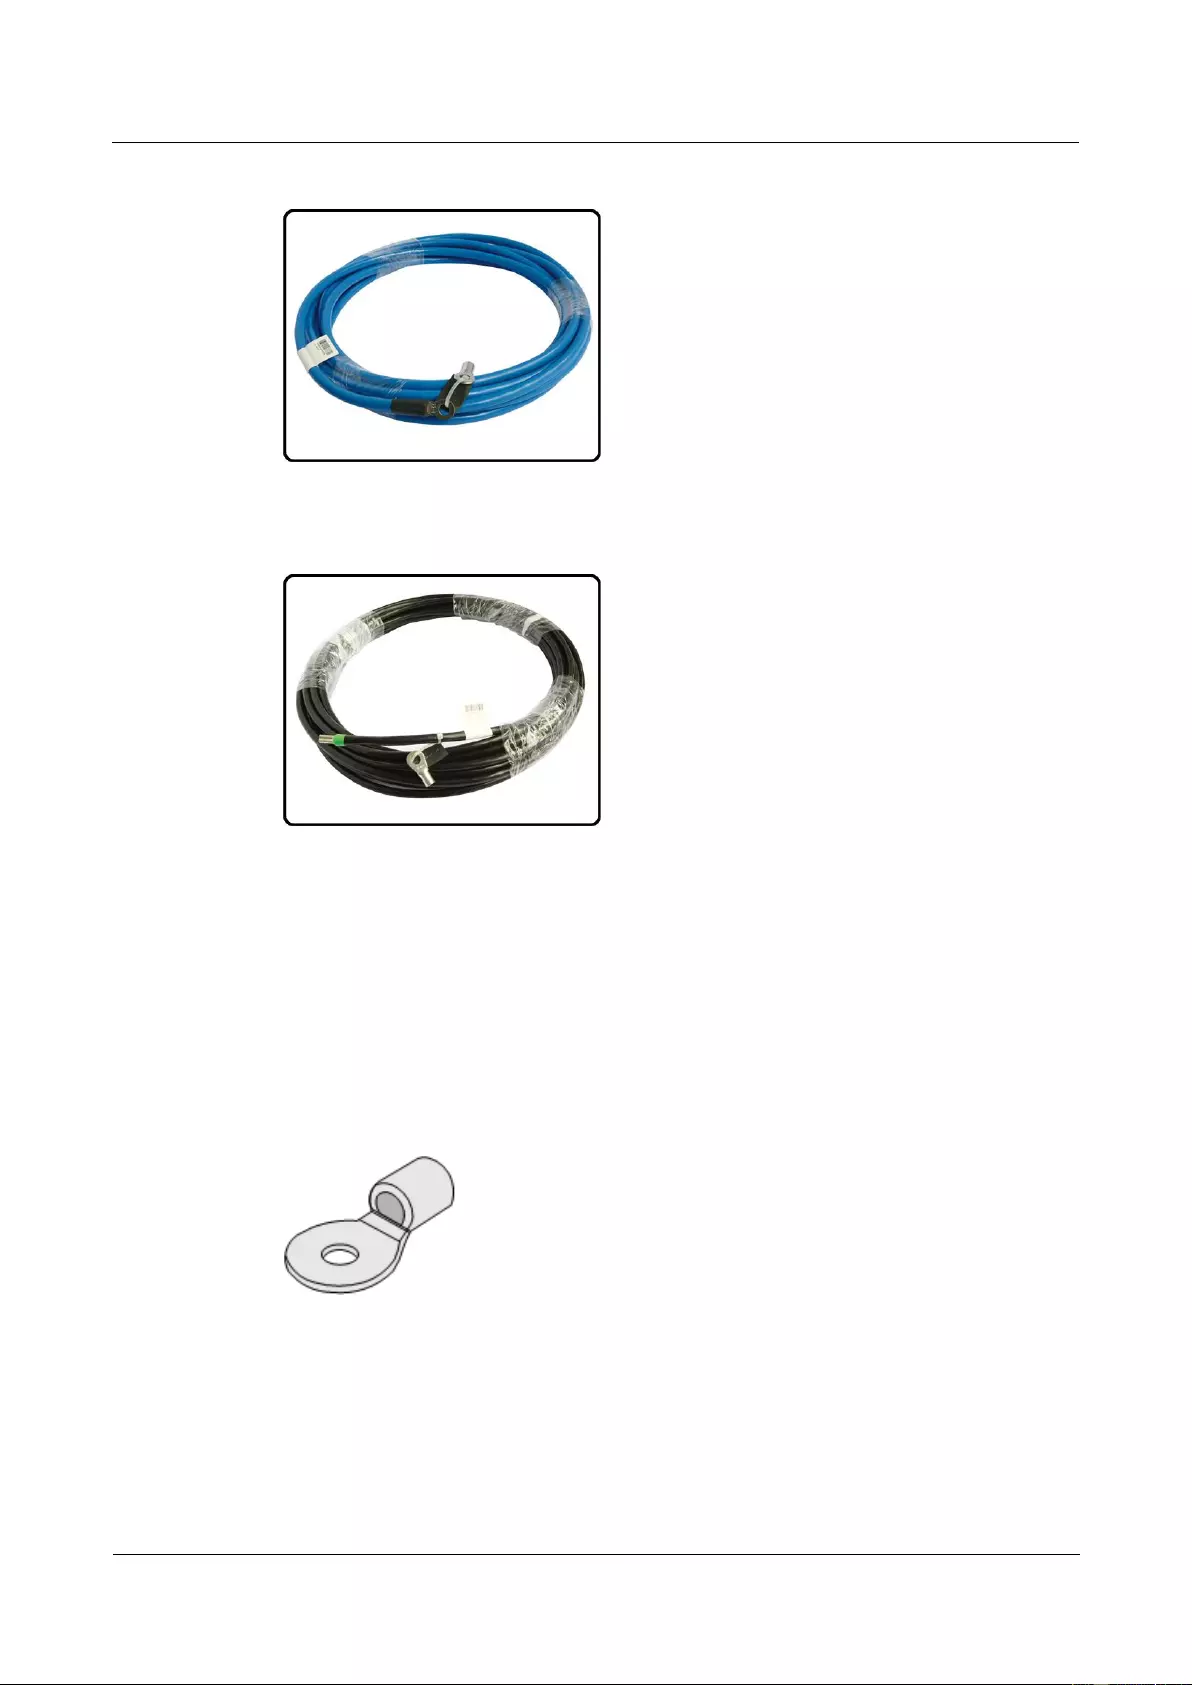
HUAWEI USG9500 Series Terabit-level Next-Generation Firewall
Hardware Guide
A Appendix
Issue 01 (2017-03-13)
Huawei Proprietary and Confidential
Copyright © Huawei Technologies Co., Ltd.
394
Figure A-1 NEG(-)
Figure A-2 RTN (+)
The terminals on DC cables vary with the devices to which the cables are connected. Two
commonly used terminals are OT bare crimping terminal and JG2 double-hole bare crimping
terminal.
Bare crimping terminals need to be crimped on both ends of the power cable. Terminals vary
according to different devices. The OT bare crimping terminals and JG2 double-hole bare
crimping terminals are usually adopted.
Figure A-3 shows the appearance of the OT bare crimping terminal without a cable.
Figure A-3 Appearance of the OT bare crimping terminal
Figure A-4 shows the appearance of the JG2 double-hole bare crimping terminal without a
cable.
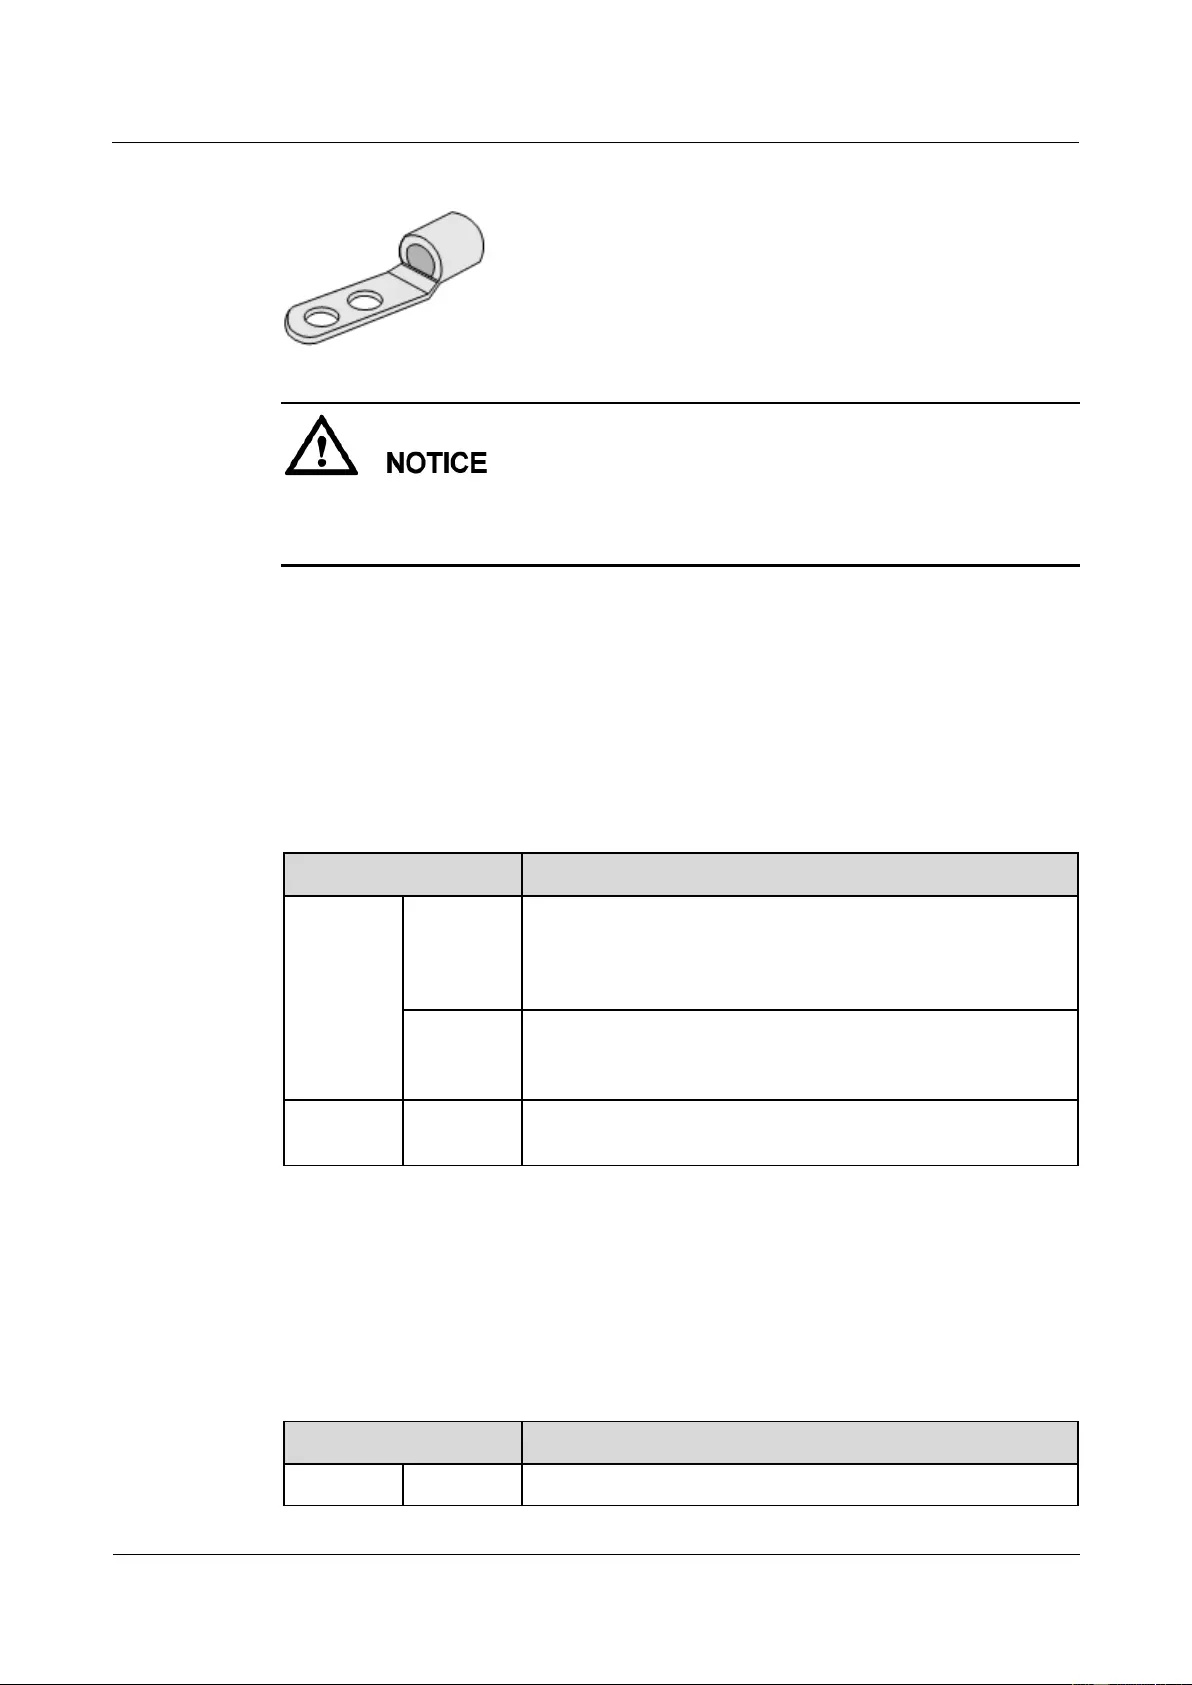
HUAWEI USG9500 Series Terabit-level Next-Generation Firewall
Hardware Guide
A Appendix
Issue 01 (2017-03-13)
Huawei Proprietary and Confidential
Copyright © Huawei Technologies Co., Ltd.
395
Figure A-4 Appearance of the JG2 double-hole bare crimping terminal
If the power supply distance is longer than 35 m, you need to place the DC power distribution
cabinet near the USG9500. For cables to be selected, see Power Supply Distance Shorter
Than or Equal to 15 m.
You need to prepare suitable cables according to the surveyed power supply distance between
the USG9500 and the power distribution cabinet.
Power Supply Distance Shorter Than 3 m (Cables Between the AC power chassis
and the USG9580)
Place the AC power chassis as near to the device as possible. If the distance is shorter than
and equal to 3 m, the cabling scheme is shown in Table A-1.
Table A-1 Cable types and cable terminals of the AC-input power cable
Item
Description
Cable Type
NEG
power
cable (-48
V)
Wire,450/750V,60227 IEC 02(RV)16mm2,blue,85A
RTN
power
cable
Wire,450/750V,60227 IEC 02(RV)16mm2,black,85A
Terminal
USG9580
Naked Crimping Terminal,JG2,16mm2,M6,95A,Tin Plated,for
OEM
Power Supply Distance Shorter Than or Equal to 15 m
If the power supply distance is shorter than or equal to 15 m, use the 16 mm2 power cable to
connect the USG9580 and the power distribution cabinet. Table A-2 lists the cable terminals
and cable types.
Table A-2 Cables used when the power supply distance is shorter than or equal to 15 m
Item
Description
Cable type
NEG
Wire,450/750V,60227 IEC 02(RV)16mm2,blue,85A

HUAWEI USG9500 Series Terabit-level Next-Generation Firewall
Hardware Guide
A Appendix
Issue 01 (2017-03-13)
Huawei Proprietary and Confidential
Copyright © Huawei Technologies Co., Ltd.
396
Item
Description
power
cable (-48
V)
RTN
power
cable
Wire,450/750V,60227 IEC 02(RV)16mm2,black,85A
Terminal
USG9580
Naked Crimping Terminal,JG2,16mm2,M6,95A,Tin Plated,for
OEM
DC Power
distribution
cabinet
Naked Crimping Terminal,OT,16mm2,M8,Tin Plating,Naked
Ring Terminal
Power Supply Distance Longer Than 15 m and Shorter Than or Equal to 25 m
If the power supply distance is longer than 15 m and shorter than or equal to 25 m, use the 25
mm2 power cable to connect the USG9580 to the power distribution cabinet. Table A-3 lists
the cable terminals and cable types..
Table A-3 Cables used when the power supply distance is longer than 15 m and shorter than or
equal to 25 m
Item
Description
Cable type
NEG
power
cable (-48
V)
Wire,450/750V,227 IEC 02(RV)25mm2,blue,110A
RTN
power
cable
Wire,450/750V,227 IEC 02(RV)25mm2,black,110A
Terminal
USG9580
Naked Crimping Connector,JG2,25mm2,M6,150A,Tin
Plating,For OEM
DC Power
distribution
cabinet
Naked Crimping Terminal,OT,25mm2,M8,Tin Plating,Naked
Ring Terminal
Power Supply Distance Longer Than 25 m and Shorter Than or Equal to 35 m
If the power supply distance is longer than 25 m and shorter than or equal to 35 m, use the 35
mm2 power cable to connect the USG9580 and the power distribution cabinet. Table A-4 lists
the cable terminals and cable types..
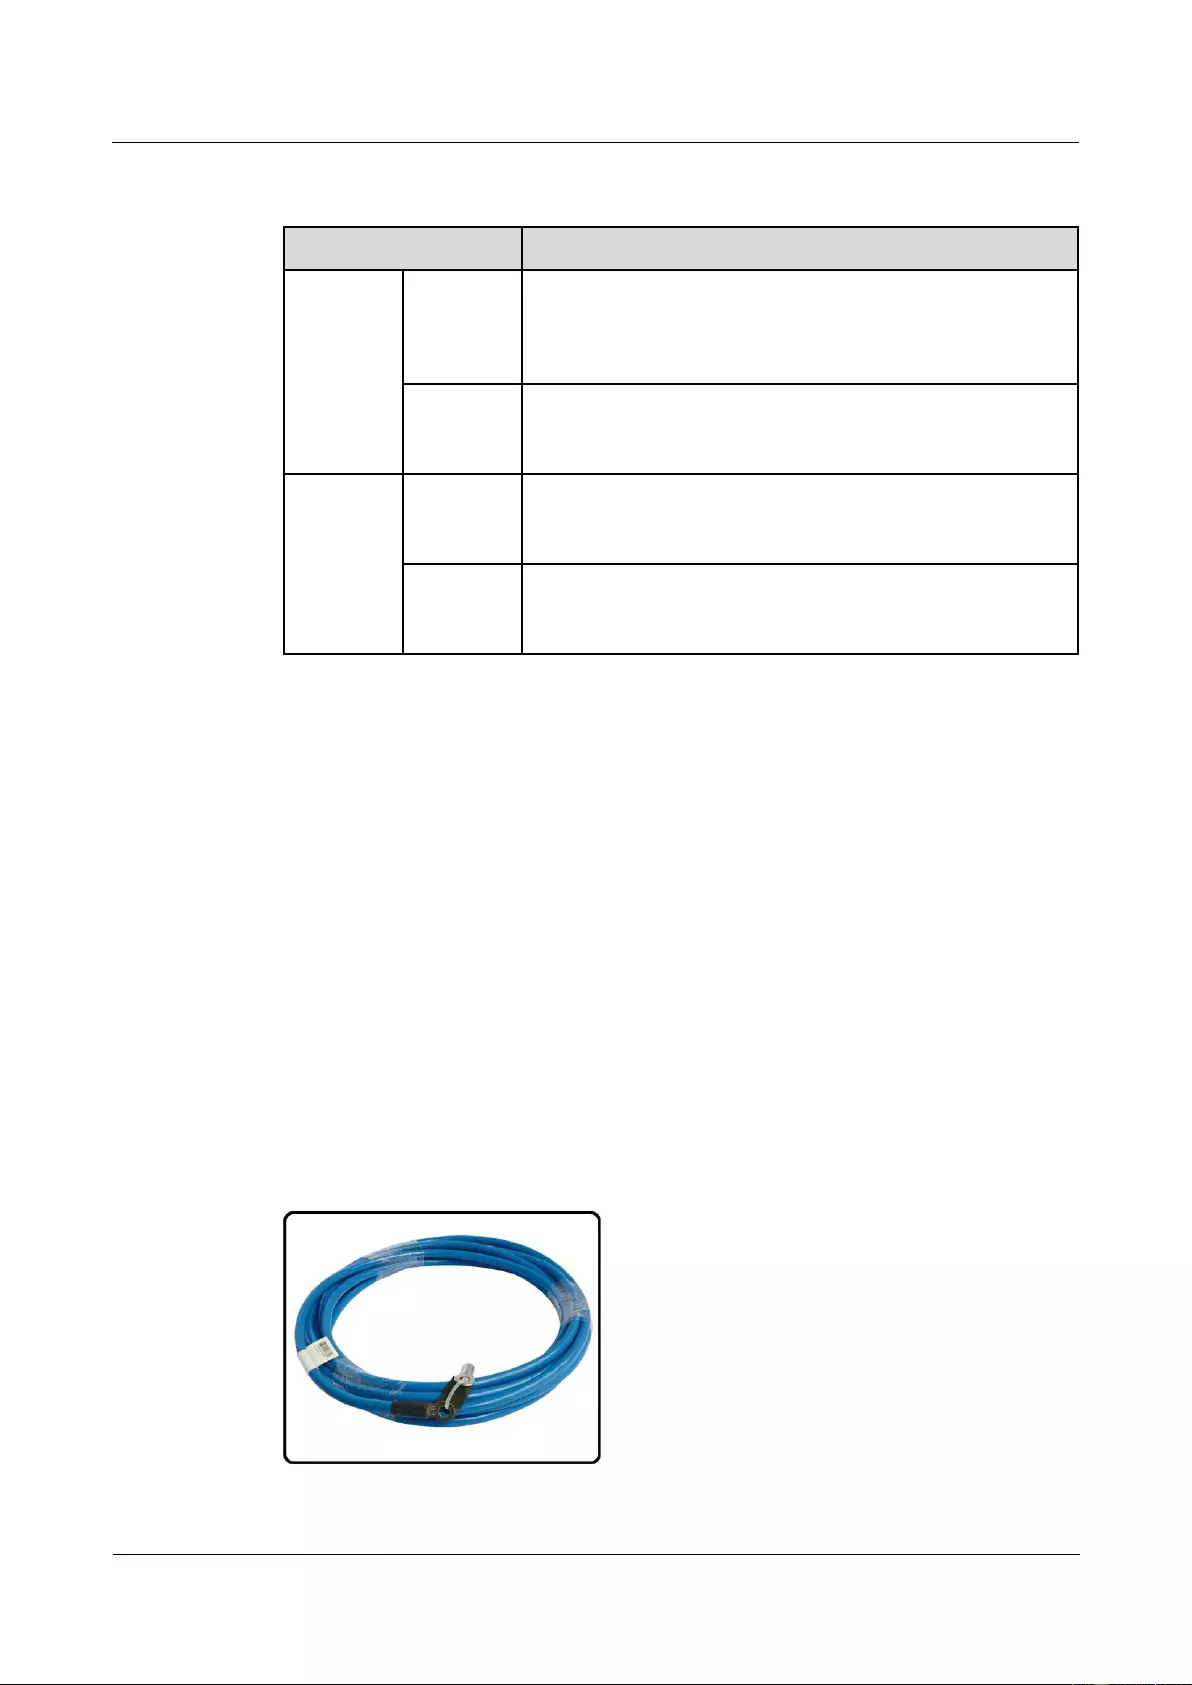
HUAWEI USG9500 Series Terabit-level Next-Generation Firewall
Hardware Guide
A Appendix
Issue 01 (2017-03-13)
Huawei Proprietary and Confidential
Copyright © Huawei Technologies Co., Ltd.
397
Table A-4 Cables used when the power supply distance is longer than 25 m and shorter than or
equal to 35 m
Item
Description
Cable type
NEG
power
cable (-48
V)
Wire,450/750V,60227 IEC 02(RV)35mm2,Blue,135A
RTN
power
cable
Wire,450/750V,60227 IEC 02(RV)35mm2,black,135A
Terminal
USG9580
Naked Crimping Connector,JG2,34.3mm2,M6(1/4"),134A,Tin
Plated,2AWG,Hole Center Distance 15.875mm(5/8"),Short
Tube,for North American
DC Power
distribution
cabinet
Naked Crimping Terminal,OT,35mm2,M8,Tin Plating,Naked
Ring Terminal
A.1.1.2 DC Power Cable of the USG9560
This section describes the DC power cable of the USG9560.
DC power cable uses in two situation:
DC-input power cable.
The cable between the AC power chassis and the device.
Structure and Appearance
The DC power cable consists of a -48 V power cable NEG(-), and a cable RTN (+). The
power cable transfers -48 V DC from the DC distribution equipment to the terminal block of
the USG9500 power module, supplying power for the USG9500.
The DC power cables of the USG9500 are delivered in an integrated way. Cut the cables and
make the power cables according to the actual requirements on the site. Figure A-5 and Figure
A-6 show the power cables.
Figure A-5 NEG(-)
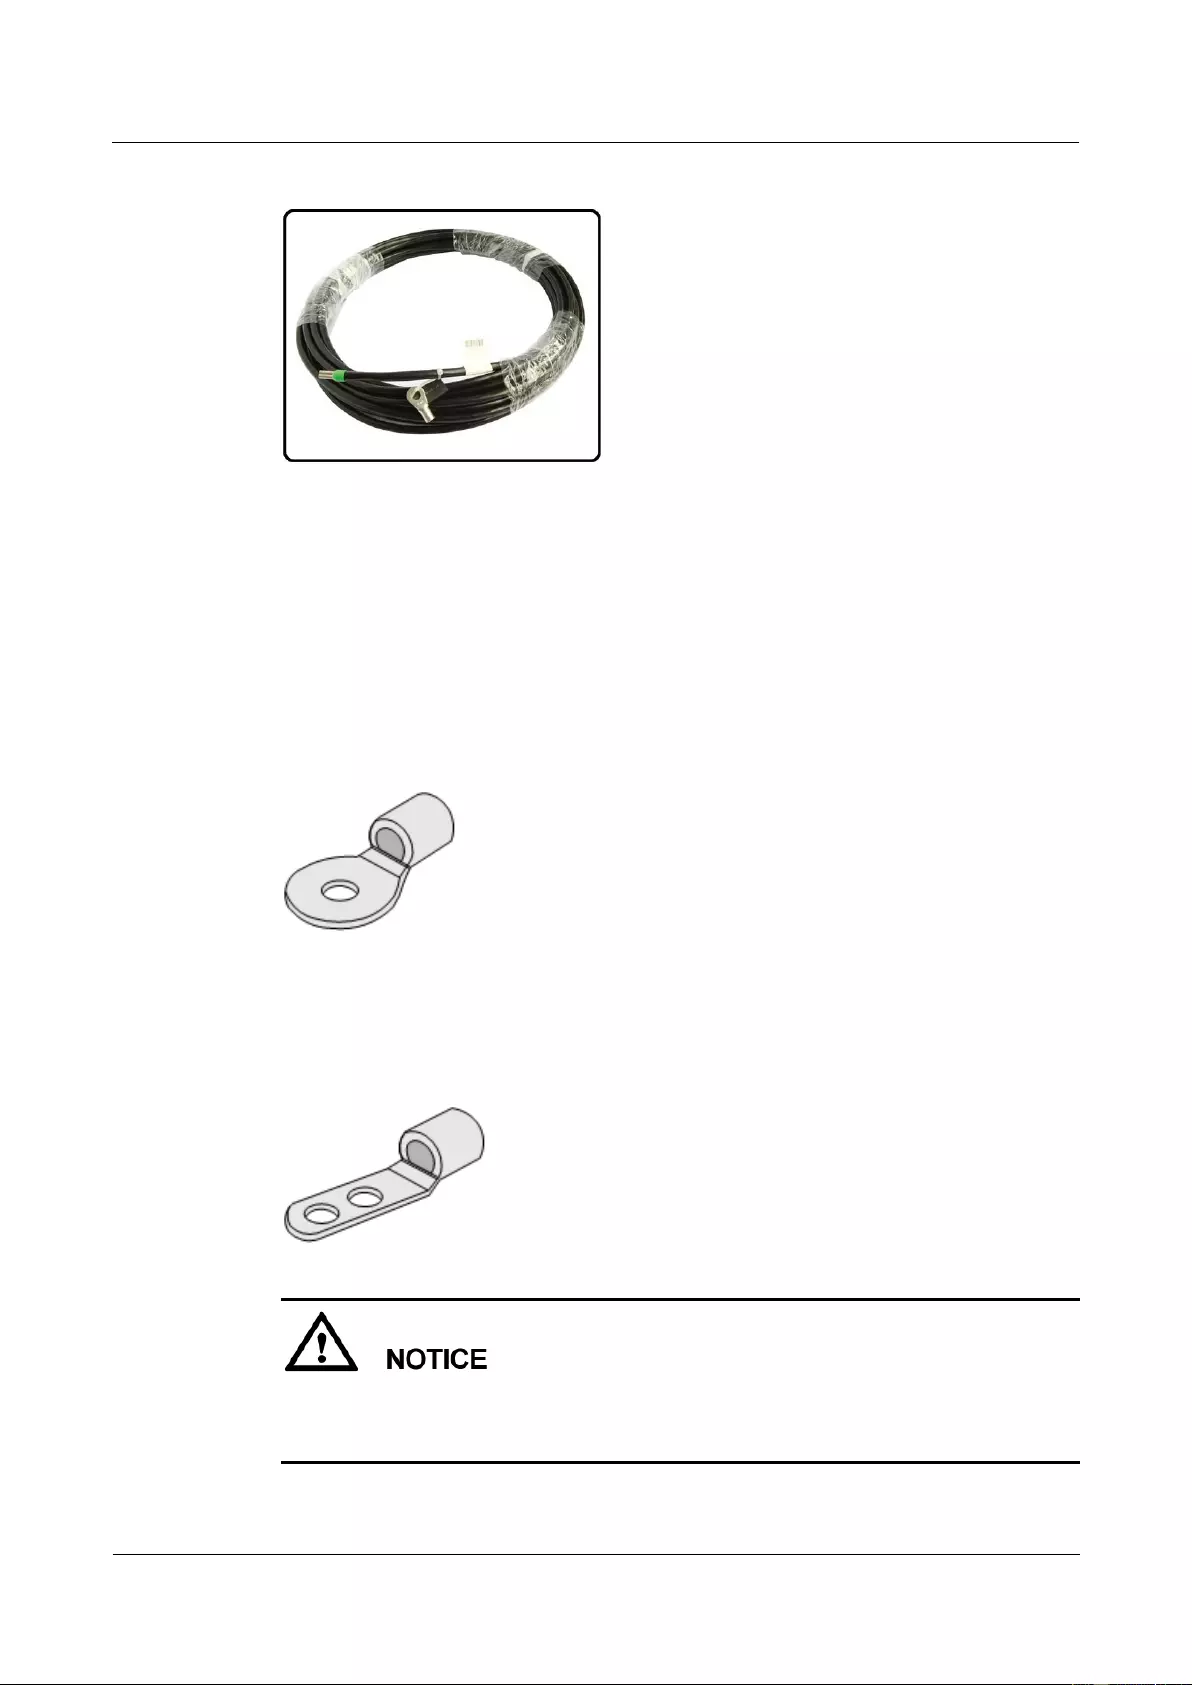
HUAWEI USG9500 Series Terabit-level Next-Generation Firewall
Hardware Guide
A Appendix
Issue 01 (2017-03-13)
Huawei Proprietary and Confidential
Copyright © Huawei Technologies Co., Ltd.
398
Figure A-6 RTN (+)
The terminals on DC cables vary with the devices to which the cables are connected. Two
commonly used terminals are OT bare crimping terminal and JG2 double-hole bare crimping
terminal.
Bare crimping terminals need to be crimped on both ends of the power cable. Terminals vary
according to different devices. The OT bare crimping terminals and JG2 double-hole bare
crimping terminals are usually adopted.
Figure A-7 shows the appearance of the OT bare crimping terminal without a cable.
Figure A-7 Appearance of the OT bare crimping terminal
Figure A-8 shows the appearance of the JG2 double-hole bare crimping terminal without a
cable.
Figure A-8 Appearance of the JG2 double-hole bare crimping terminal
If the power supply distance is longer than 35 m, you need to place the DC power distribution
cabinet near the USG9500. For cables to be selected, see Power Supply Distance Shorter
Than or Equal to 15 m.

HUAWEI USG9500 Series Terabit-level Next-Generation Firewall
Hardware Guide
A Appendix
Issue 01 (2017-03-13)
Huawei Proprietary and Confidential
Copyright © Huawei Technologies Co., Ltd.
399
You need to prepare suitable cables according to the surveyed power supply distance between
the USG9500 and the power distribution cabinet.
Power Supply Distance Shorter Than 3 m (Cables Between the AC power chassis
and the USG9560)
Place the AC power chassis as near to the device as possible. If the distance is shorter than
and equal to 3 m, the cabling scheme is shown in Table A-5.
Table A-5 Cable types and cable terminals of the AC-input power cable
Item
Description
Cable Type
NEG
power
cable (-48
V)
Wire,450/750V,60227 IEC 02(RV)16mm2,blue,85A
RTN
power
cable
Wire,450/750V,60227 IEC 02(RV)16mm2,black,85A
Terminal
USG9560
Naked Crimping Terminal,JG2,16mm2,M6,95A,Tin Plated,for
OEM
Power Supply Distance Shorter Than or Equal to 15 m
If the power supply distance is shorter than or equal to 15 m, use the 16 mm2 power cable to
connect the USG9560 and the power distribution cabinet. Table A-6 lists the cable terminals
and cable types.
Table A-6 Cables used when the power supply distance is shorter than or equal to 15 m
Item
Description
Cable type
NEG
power
cable (-48
V)
Wire,450/750V,60227 IEC 02(RV)16mm2,blue,85A
RTN
power
cable
Wire,450/750V,60227 IEC 02(RV)16mm2,black,85A
Terminal
USG9560
Naked Crimping Terminal,JG2,16mm2,M6,95A,Tin Plated,for
OEM
DC Power
distribution
cabinet
Naked Crimping Terminal,OT,16mm2,M8,Tin Plating,Naked
Ring Terminal

HUAWEI USG9500 Series Terabit-level Next-Generation Firewall
Hardware Guide
A Appendix
Issue 01 (2017-03-13)
Huawei Proprietary and Confidential
Copyright © Huawei Technologies Co., Ltd.
400
Power Supply Distance Longer Than 15 m and Shorter Than or Equal to 25 m
If the power supply distance is longer than 15 m and shorter than or equal to 25 m, use the 25
mm2 power cable to connect the USG9560 to the power distribution cabinet. Table A-7 lists
the cable terminals and cable types..
Table A-7 Cables used when the power supply distance is longer than 15 m and shorter than or
equal to 25 m
Item
Description
Cable type
NEG
power
cable (-48
V)
Wire,450/750V,227 IEC 02(RV)25mm2,blue,110A
RTN
power
cable
Wire,450/750V,227 IEC 02(RV)25mm2,black,110A
Terminal
USG9560
Naked Crimping Connector,JG2,25mm2,M6,150A,Tin
Plating,For OEM
DC Power
distribution
cabinet
Naked Crimping Terminal,OT,25mm2,M8,Tin Plating,Naked
Ring Terminal
Power Supply Distance Longer Than 25 m and Shorter Than or Equal to 35 m
If the power supply distance is longer than 25 m and shorter than or equal to 35 m, use the 35
mm2 power cable to connect the USG9560 and the power distribution cabinet. Table A-8 lists
the cable terminals and cable types..
Table A-8 Cables used when the power supply distance is longer than 25 m and shorter than or
equal to 35 m
Item
Description
Cable type
NEG
power
cable (-48
V)
Wire,450/750V,60227 IEC 02(RV)35mm2,Blue,135A
RTN
power
cable
Wire,450/750V,60227 IEC 02(RV)35mm2,black,135A
Terminal
USG9560
Naked Crimping Connector,JG2,34.3mm2,M6(1/4"),134A,Tin
Plated,2AWG,Hole Center Distance 15.875mm(5/8"),Short
Tube,for North American
DC Power
distribution
cabinet
Naked Crimping Terminal,OT,35mm2,M8,Tin Plating,Naked
Ring Terminal
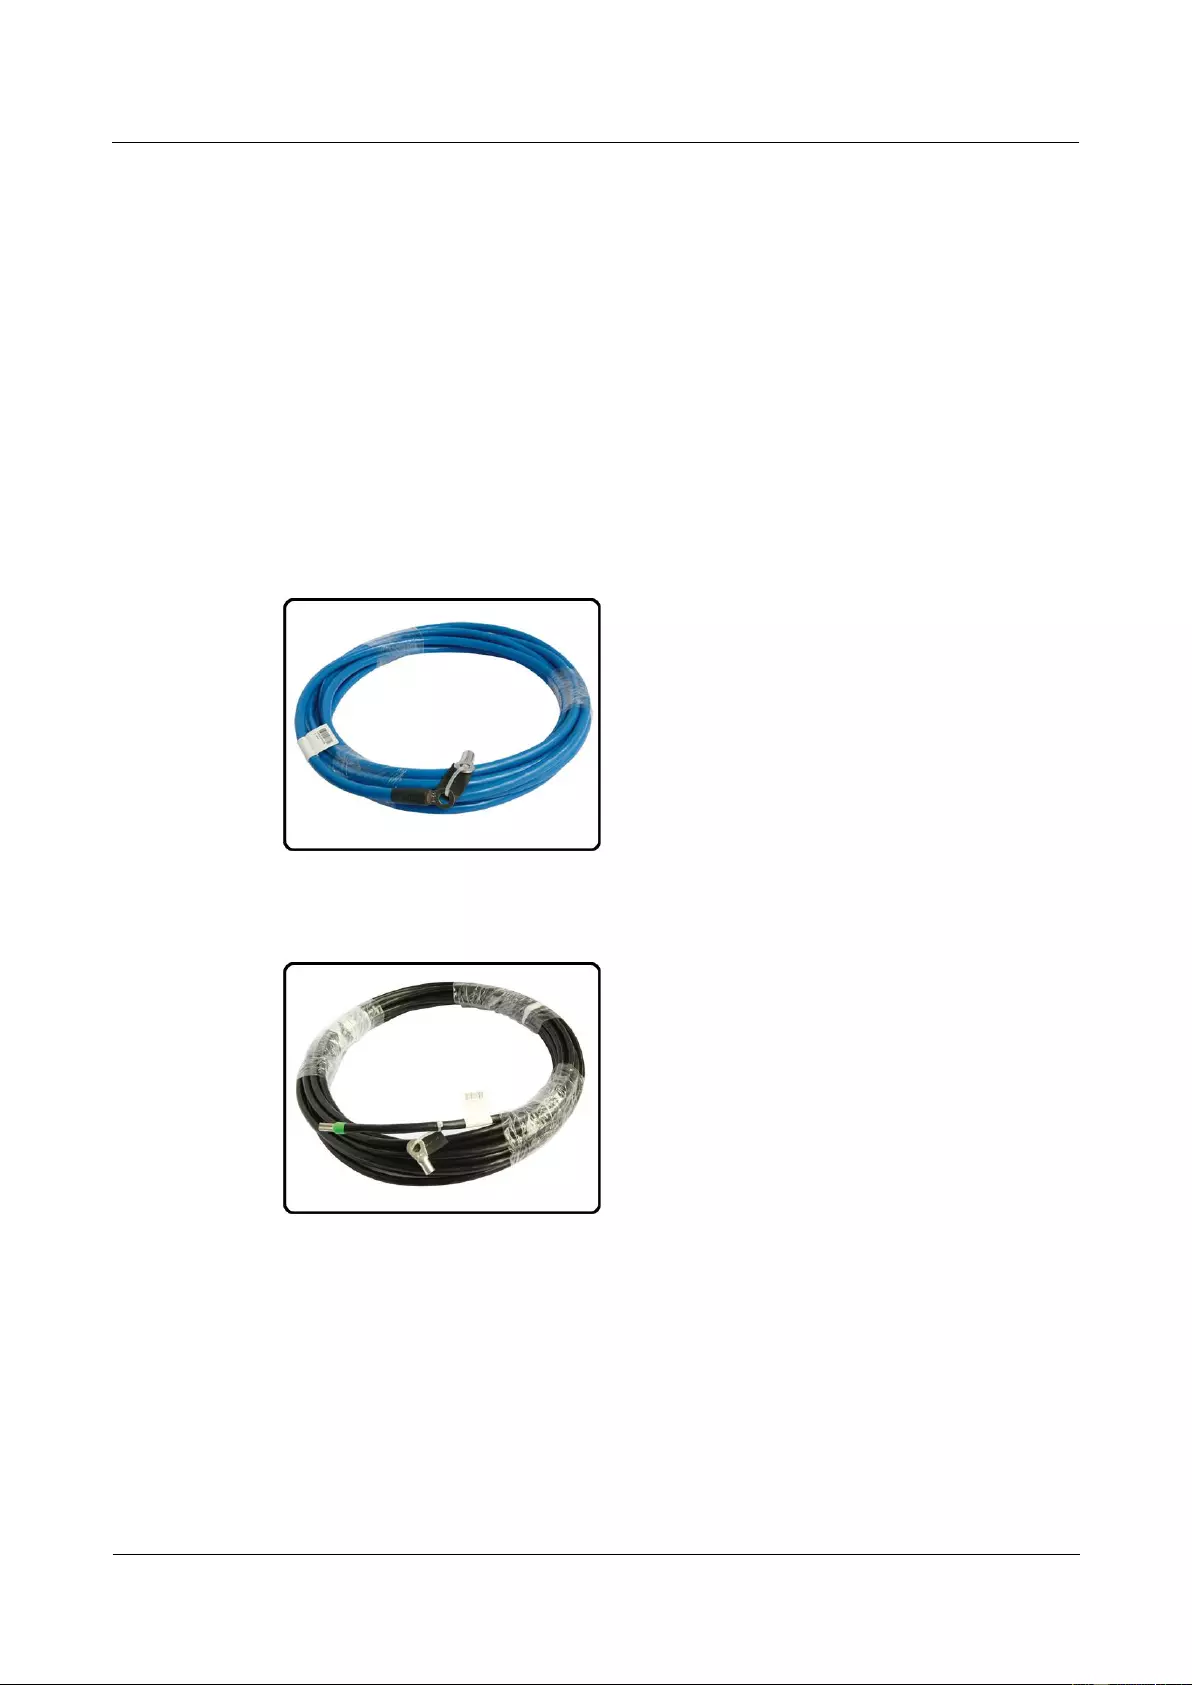
HUAWEI USG9500 Series Terabit-level Next-Generation Firewall
Hardware Guide
A Appendix
Issue 01 (2017-03-13)
Huawei Proprietary and Confidential
Copyright © Huawei Technologies Co., Ltd.
401
A.1.1.3 DC Power Cable of the USG9520
This section describes the DC power cable of the USG9520.
Structure and Appearance
The DC power cable consists of a -48 V power cable NEG(-), and a cable RTN (+). The
power cable transfers -48 V DC from the DC distribution equipment to the terminal block of
the USG9500 power module, supplying power for the USG9500.
The DC power cables of the USG9500 are delivered in an integrated way. Cut the cables and
make the power cables according to the actual requirements on the site. Figure A-9 and Figure
A-10 show the power cables.
Figure A-9 NEG(-)
Figure A-10 RTN (+)
The terminals on DC cables vary with the devices to which the cables are connected. Two
commonly used terminals are OT bare crimping terminal and JG2 double-hole bare crimping
terminal.
Bare crimping terminals need to be crimped on both ends of the power cable. Terminals vary
according to different devices. The OT bare crimping terminals and JG2 double-hole bare
crimping terminals are usually adopted.
Figure A-11 shows the appearance of the OT bare crimping terminal without a cable.
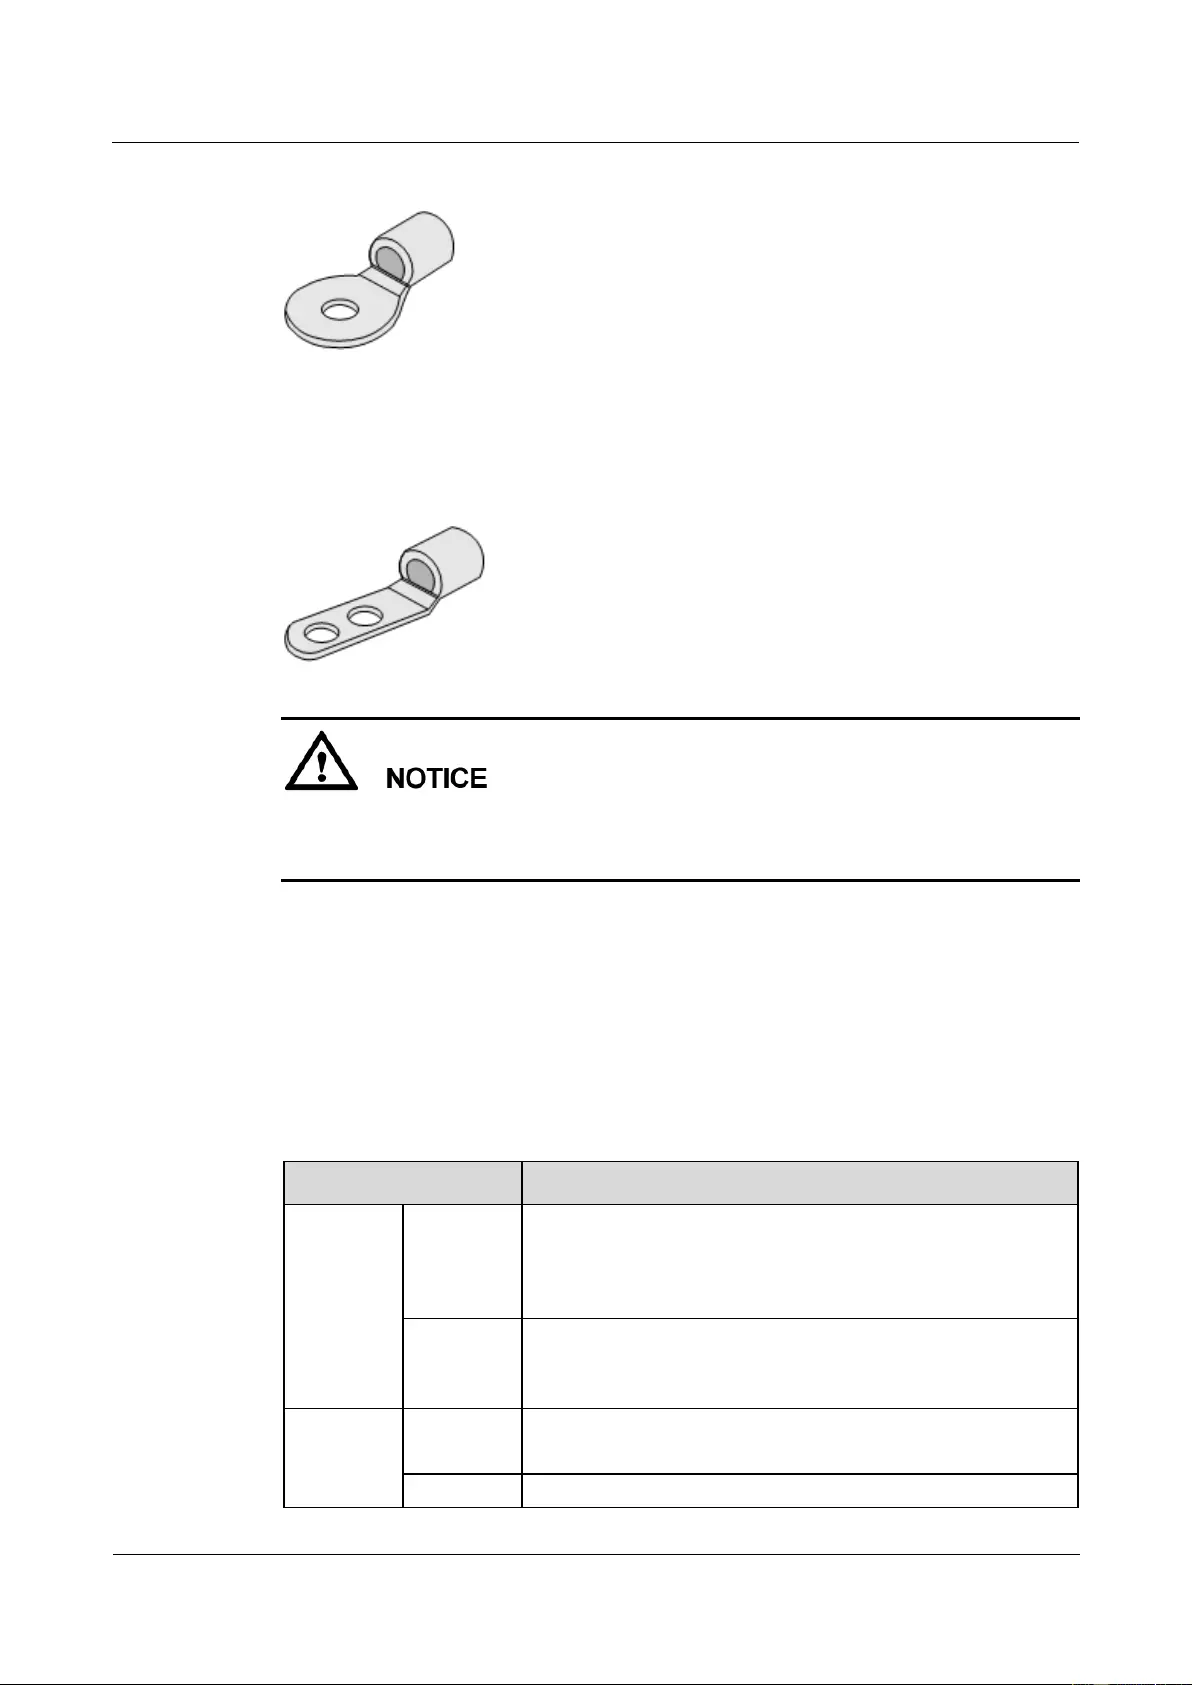
HUAWEI USG9500 Series Terabit-level Next-Generation Firewall
Hardware Guide
A Appendix
Issue 01 (2017-03-13)
Huawei Proprietary and Confidential
Copyright © Huawei Technologies Co., Ltd.
402
Figure A-11 Appearance of the OT bare crimping terminal
Figure A-12 shows the appearance of the JG2 double-hole bare crimping terminal without a
cable.
Figure A-12 Appearance of the JG2 double-hole bare crimping terminal
If the power supply distance is longer than 35 m, you need to place the DC power distribution
cabinet near the USG9500. For cables to be selected, see Power Supply Distance Shorter
Than or Equal to 15 m.
You need to prepare suitable cables according to the surveyed power supply distance between
the USG9500 and the power distribution cabinet.
Power Supply Distance Shorter Than or Equal to 15 m
If the power supply distance is shorter than or equal to 15 m, use the 16 mm2 power cable to
connect the USG and the DC power distribution cabinet.Table A-9 lists the cable terminals
and cable types.
Table A-9 Cable used when the power supply distance is shorter than or equal to 15 m
Item
Description
Cable type
NEG
power
cable (-48
V)
Wire,450/750V,60227 IEC 02(RV)16mm2,blue,85A
RTN
power
cable
Wire,450/750V,60227 IEC 02(RV)16mm2,black,85A
Terminal
USG9520
Naked Crimping Terminal,JG2,16mm2,M6,95A,Tin Plated,for
OEM
DC Power
Naked Crimping Terminal,OT,16mm2,M8,Tin Plating,Naked

HUAWEI USG9500 Series Terabit-level Next-Generation Firewall
Hardware Guide
A Appendix
Issue 01 (2017-03-13)
Huawei Proprietary and Confidential
Copyright © Huawei Technologies Co., Ltd.
403
Item
Description
distribution
cabinet
Ring Terminal
Power Supply Distance Longer Than 15 m and Shorter Than or Equal to 35 m
If the power supply distance is longer than 15 m and shorter than or equal to 35 m, use the 25
mm2 power cable to connect in the USG9520 and the DC power distribution cabinet. Table
A-10 lists the cable terminals and cable types.
Table A-10 Cables used when the power supply distance is longer than 15 m and shorter than or
equal to 35m
Item
Description
Cable type
NEG
power
cable (-48
V)
Wire,450/750V,227 IEC 02(RV)25mm2,blue,110A
RTN
power
cable
Wire,450/750V,227 IEC 02(RV)25mm2,black,110A
Terminal
USG9520
Naked Crimping Connector,JG2,25mm2,M6,150A,Tin
Plating,For OEM
DC Power
distribution
cabinet
Naked Crimping Terminal,OT,25mm2,M8,Tin Plating,Naked
Ring Terminal
A.1.2 AC Power Cable
This section describes the AC power cables of the USG9500 that uses the AC power supply.
Learn about the structure and specifications of the AC power cable before you make or
purchase any for the USG9500.
A.1.2.1 AC Power Cable of the USG9580
This section describes the AC power cable of the USG9580.
USG9580 AC Power Cable includes two parts:
Cable between the AC power chassis and the USG9580
Between the AC power chassis and the AC Power Distribution cabinet
When the AC power passes through the AC power chassis, the convertor converts the AC power into the
DC power. Therefore, the DC power cable needs to be used between the AC power chassis and the
USG9580. For detailed information, please check Cables Between the AC power chassis and the
USG9580.
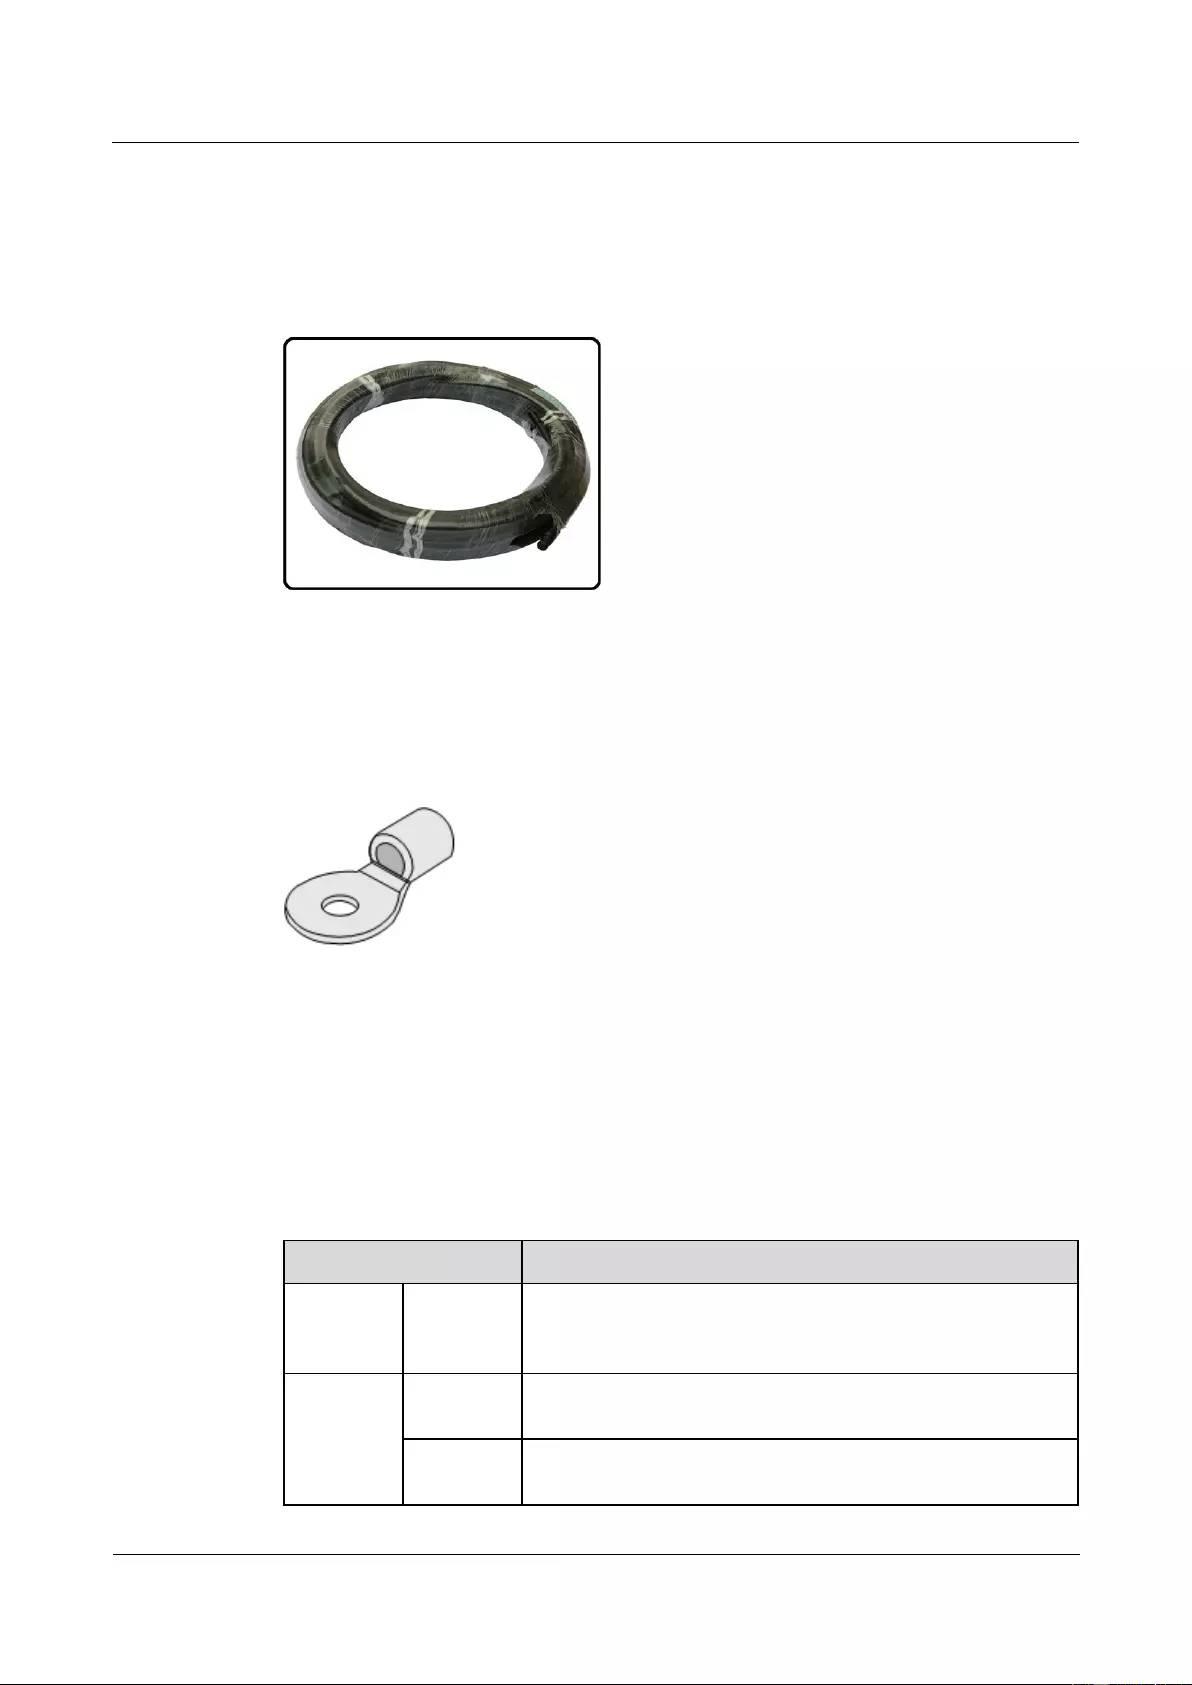
HUAWEI USG9500 Series Terabit-level Next-Generation Firewall
Hardware Guide
A Appendix
Issue 01 (2017-03-13)
Huawei Proprietary and Confidential
Copyright © Huawei Technologies Co., Ltd.
404
Structure and Appearance
The USG9580 uses electric and electronic cables as AC power cables, as shown in Figure
A-13.
Figure A-13 Appearance of the fixed-length electric and electronic cable
An electric and electronic cable consists of a cable and two terminals. The terminals are
mainly OT bare crimp terminals.
Figure A-14 shows the appearance of the OT bare crimping terminal without a cable.
Figure A-14 Appearance of the OT bare crimping terminal
Cables Between the AC power chassis and the AC Power Distribution cabinet
If the power supply distance is longer than 50 m, you need to place the power distribution
cabinet near the AC power chassis.
If the distance between an AC power chassis and the power distribution cabinet is shorter than
50 m, use the AC power cable shown in Table A-11.
Table A-11 Cable types and cable terminals of the AC-input power cable
Item
Description
Cable Type
Two-wire
AC power
cable
Power Cable,300/500V,60227 IEC 10(BVV),6mm2,Black
Jacket(Cores:Blue,Brown),43A,2 Equivalent Cores
Terminal
AC power
chassis
Naked Crimping Terminal,OT,6mm2,M6,Tin Plating,Insulated
Ring Terminal,12~10AWG,yellow
DC power
distribution
Naked Crimping Terminal,OT,6mm2,M8,Tin Plating,Insulated
Ring Terminal,12~10AWG,yellow
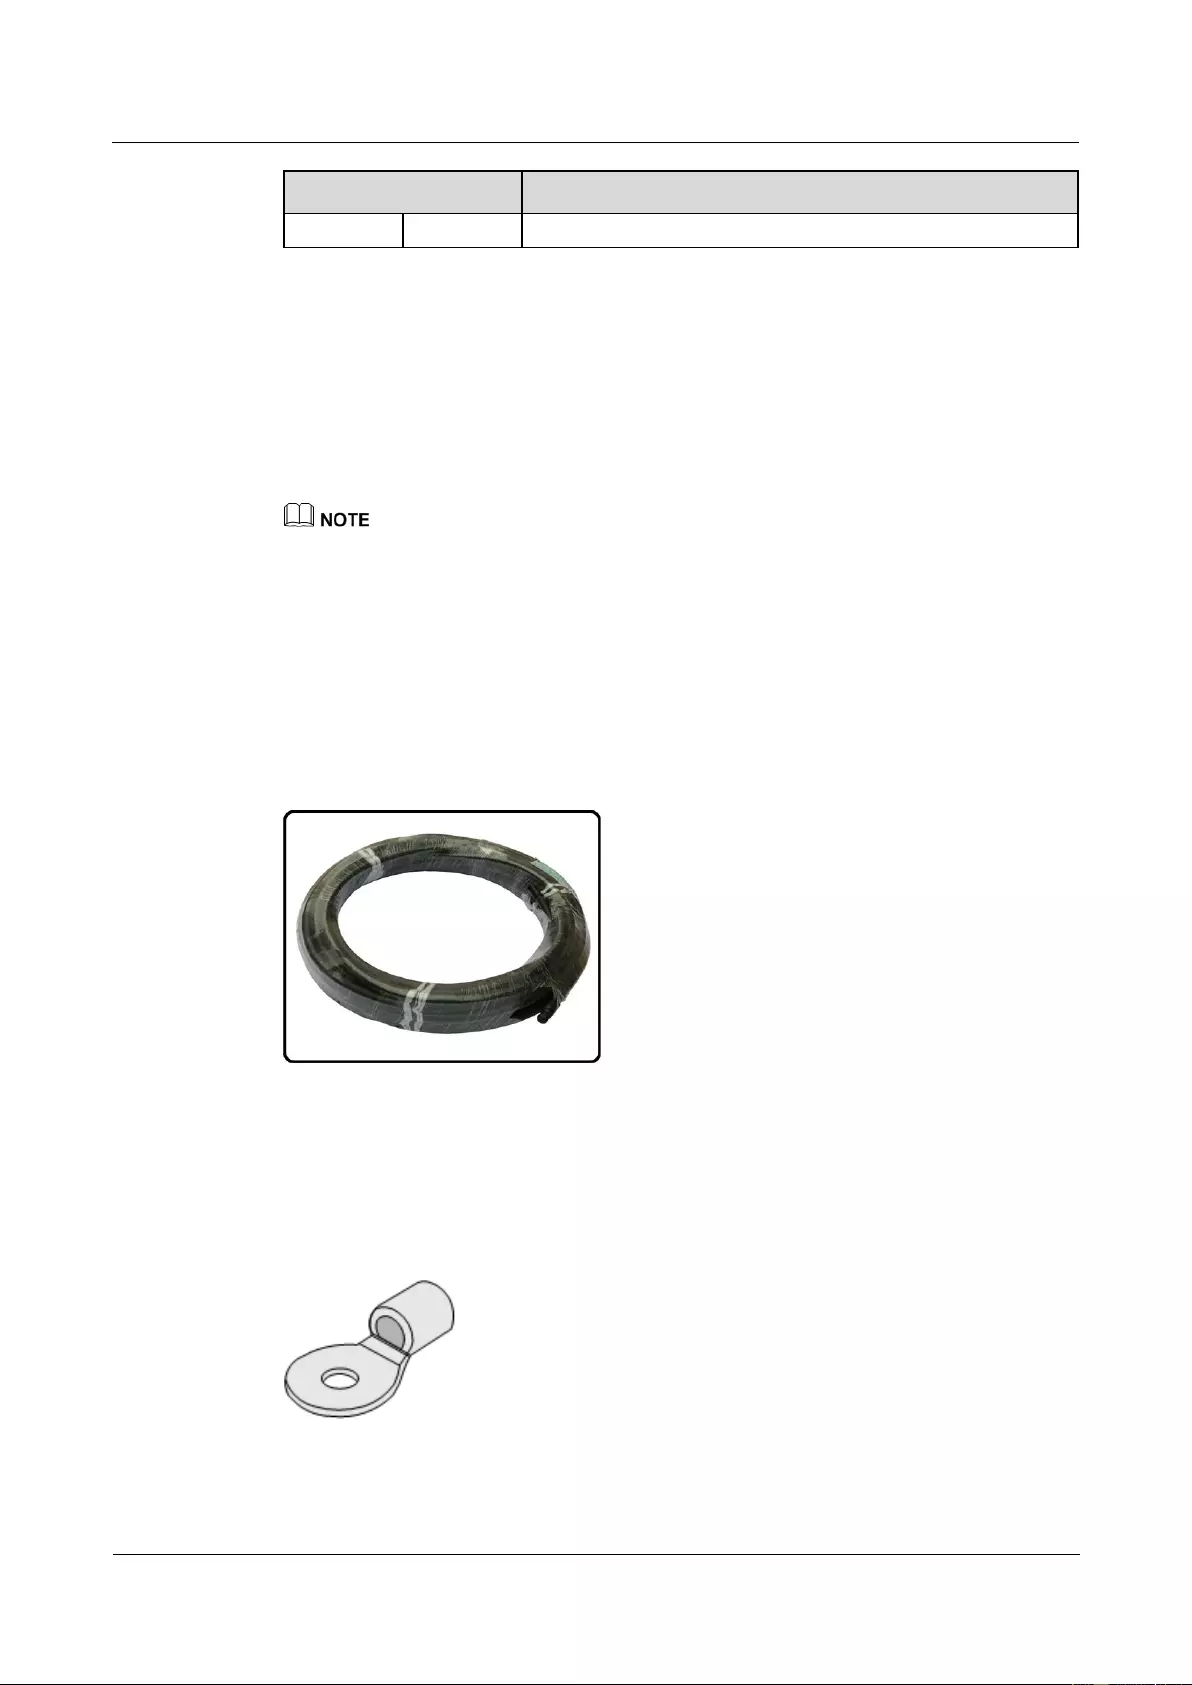
HUAWEI USG9500 Series Terabit-level Next-Generation Firewall
Hardware Guide
A Appendix
Issue 01 (2017-03-13)
Huawei Proprietary and Confidential
Copyright © Huawei Technologies Co., Ltd.
405
Item
Description
cabinet
A.1.2.2 AC Power Cable of the USG9560
This section describes the AC power cable of the USG9560.
USG9560 AC Power Cable includes two parts:
Cable between the AC power chassis and the USG9560
Between the AC power chassis and the AC Power Distribution cabinet
When the AC power passes through the AC power chassis, the convertor converts the AC power into the
DC power. Therefore, the DC power cable needs to be used between the AC power chassis and the
USG9580. For detailed information, please check Cables Between the AC power chassis and the
USG9560.
Structure and Appearance
The USG9560 uses electric and electronic cables as AC power cables, as shown in Figure
A-15.
Figure A-15 Appearance of the fixed-length electric and electronic cable
An electric and electronic cable consists of a cable and two terminals. The terminals are
mainly OT bare crimp terminals.
Figure A-16 shows the appearance of the OT bare crimping terminal without a cable.
Figure A-16 Appearance of the OT bare crimping terminal
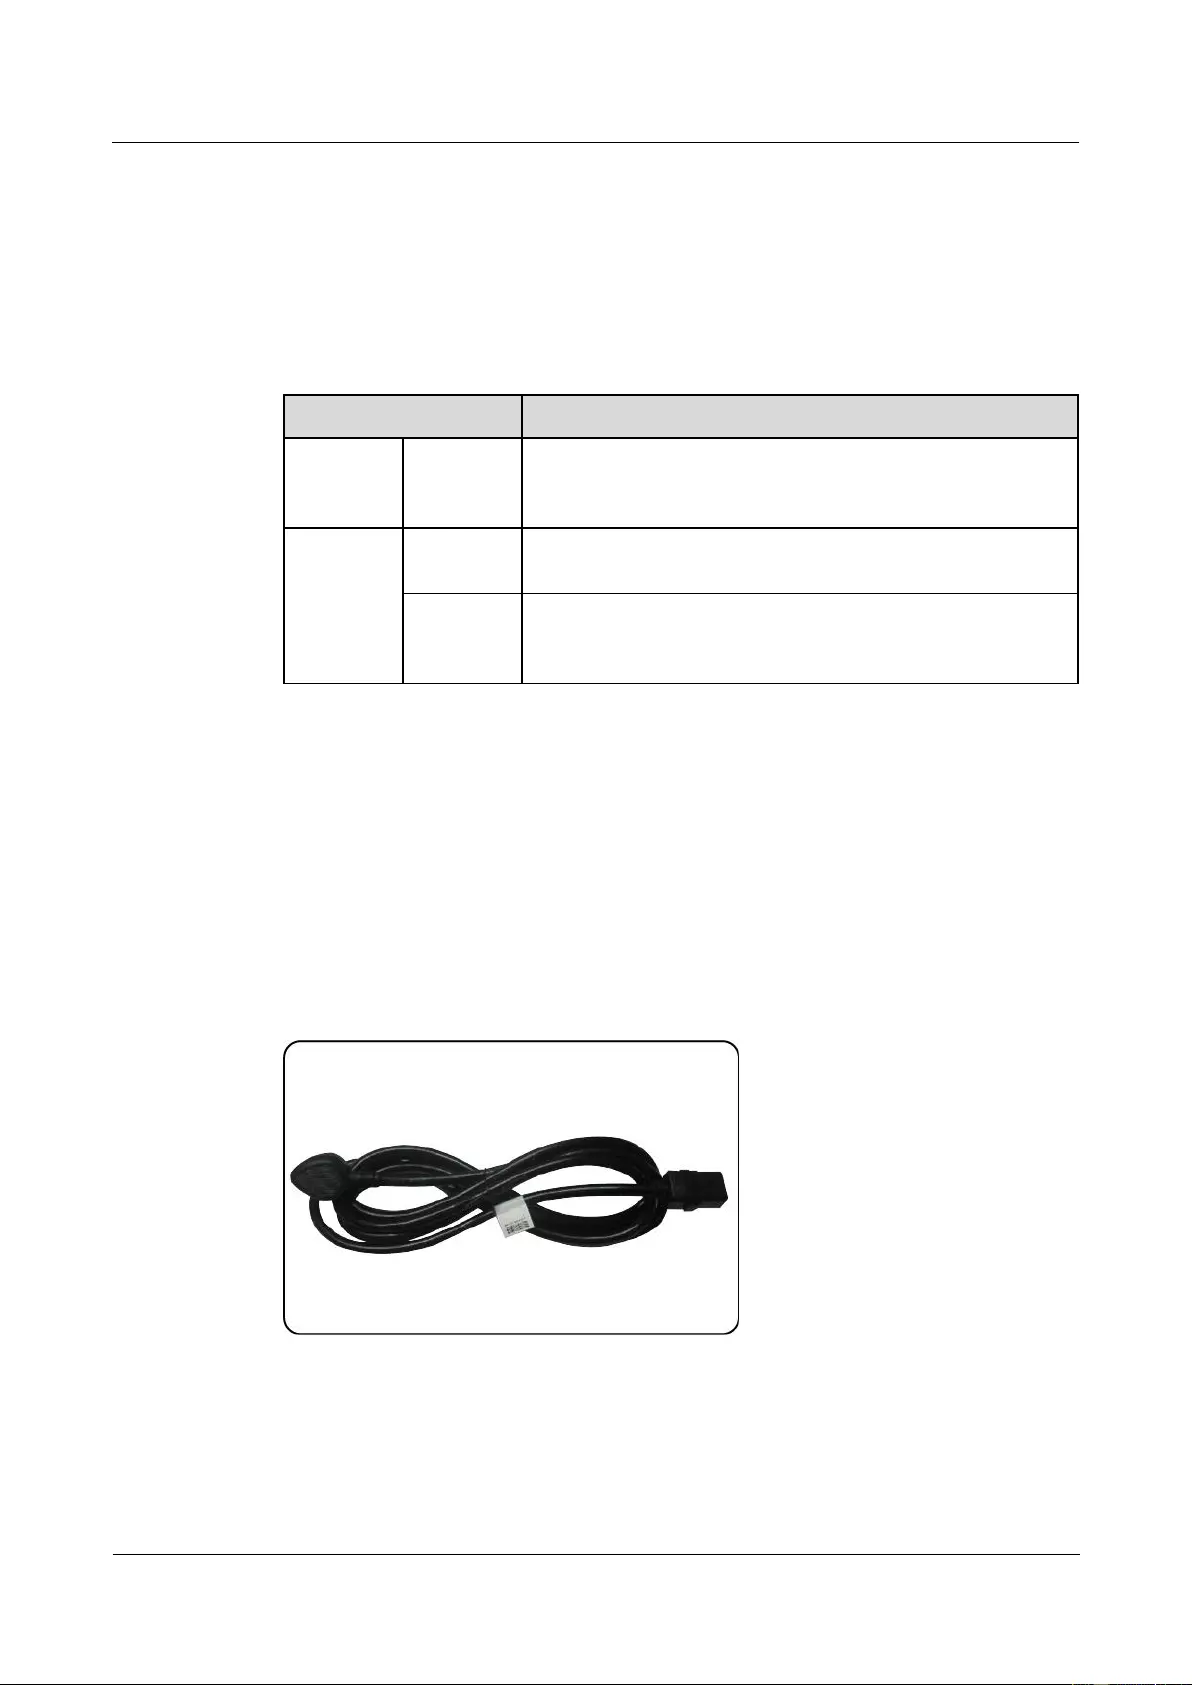
HUAWEI USG9500 Series Terabit-level Next-Generation Firewall
Hardware Guide
A Appendix
Issue 01 (2017-03-13)
Huawei Proprietary and Confidential
Copyright © Huawei Technologies Co., Ltd.
406
Cables Between the AC power chassis and the AC Power Distribution cabinet
If the power supply distance is longer than 50 m, you need to place the power distribution
cabinet near the AC power chassis.
If the distance between an AC power chassis and the power distribution cabinet is shorter than
50 m, use the AC power cable shown in Table A-12.
Table A-12 Cable types and cable terminals of the AC-input power cable
Item
Description
Cable Type
Two-wire
AC power
cable
Power Cable,300/500V,60227 IEC 10(BVV),6mm2,Black
Jacket(Cores:Blue,Brown),43A,2 Equivalent Cores
Terminal
AC power
chassis
Naked Crimping Terminal,OT,6mm2,M6,Tin Plating,Insulated
Ring Terminal,12~10AWG,yellow
DC power
distribution
cabinet
Naked Crimping Terminal,OT,6mm2,M8,Tin Plating,Insulated
Ring Terminal,12~10AWG,yellow
A.1.2.3 AC Power Cable of the USG9520
This section describes the AC power cable of the USG9520.
Structure and Appearance
The USG9520 uses an external AC cable suite. In addition to Chinese standard AC power
cables, there are local-standard AC power cables for Europe and North America. Figure A-17
and Figure A-18 are for reference. Select power cables as required.
Figure A-17 Chinese standard AC power cable (for the R4850G2 AC power module)
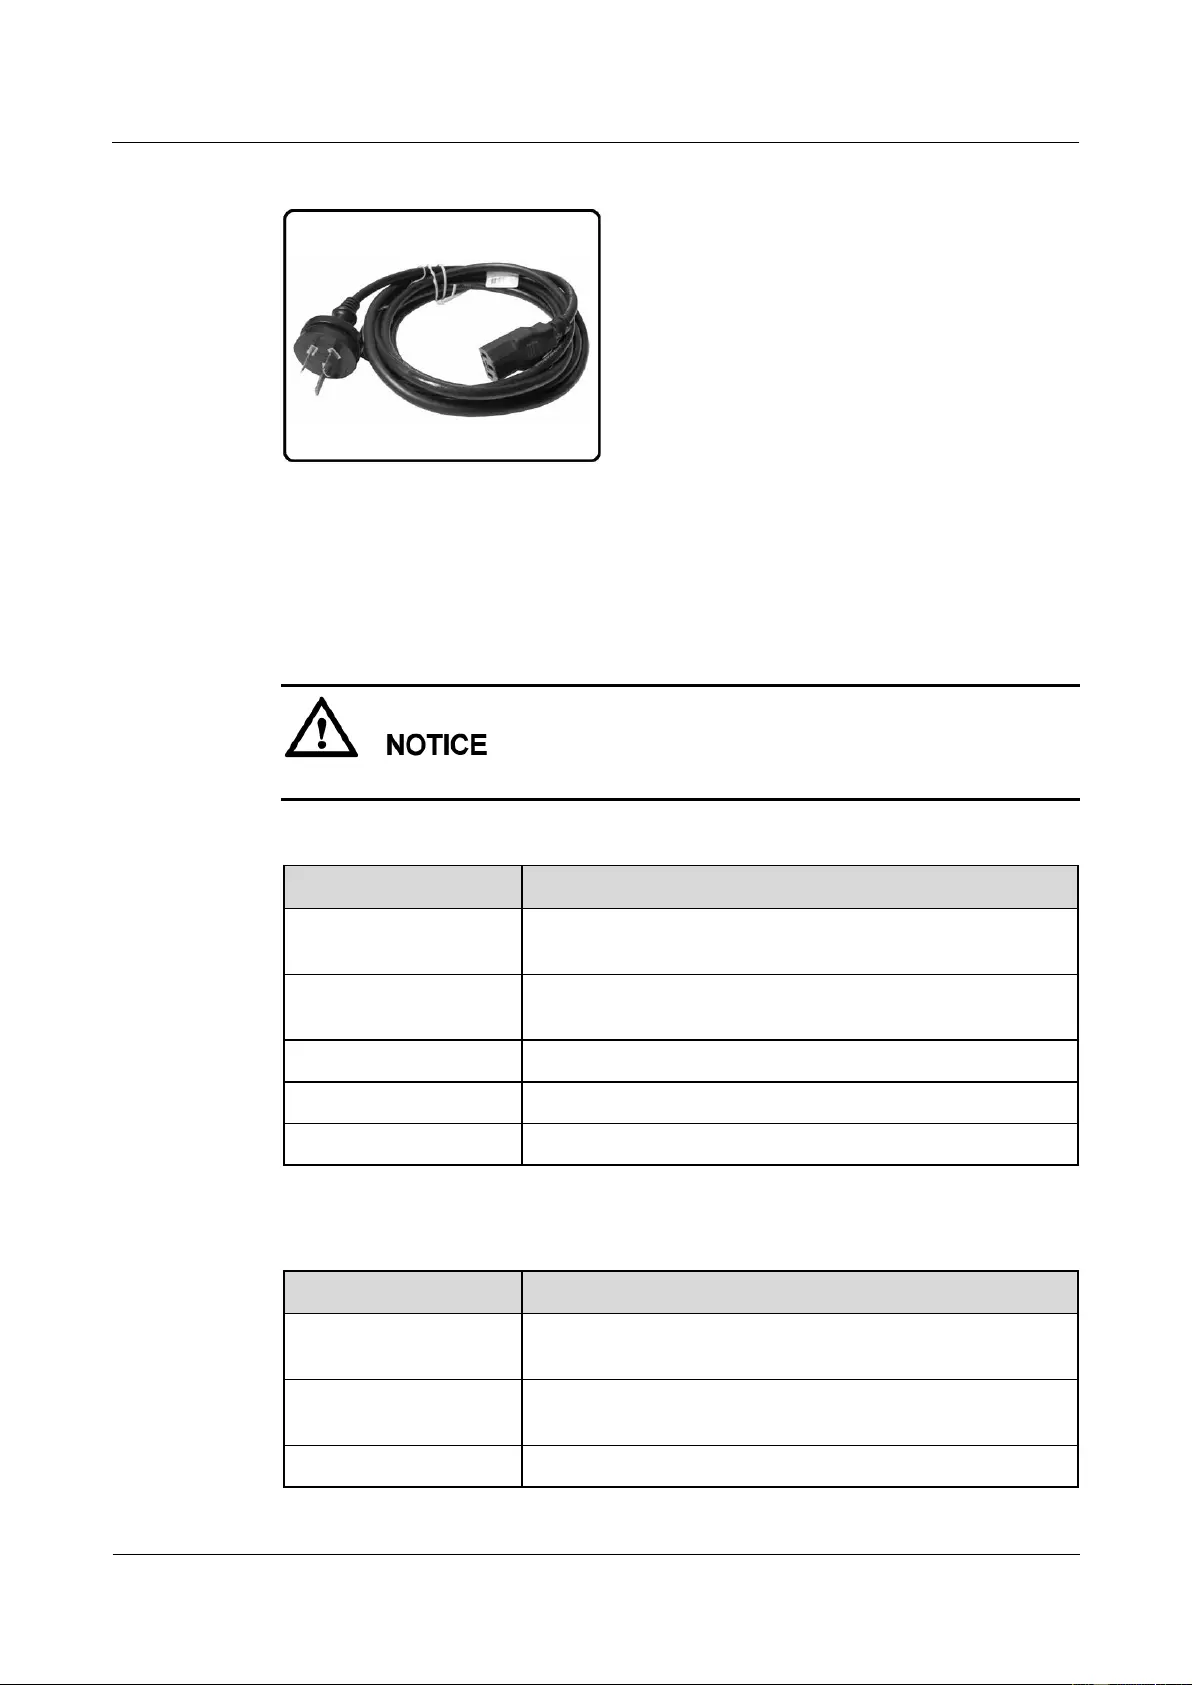
HUAWEI USG9500 Series Terabit-level Next-Generation Firewall
Hardware Guide
A Appendix
Issue 01 (2017-03-13)
Huawei Proprietary and Confidential
Copyright © Huawei Technologies Co., Ltd.
407
Figure A-18 Chinese standard AC power cable (for the EPW30B-48A AC power module)
Technical Specifications
Table A-13 and Table A-14 show the technical specifications for the R4850G2 and
EPW30B-48A AC power cables, respectively.
You must connect the AC cable in compliance with local standards and requirements.
Table A-13 Technical specifications of the R4850G2 AC cable
Item
Description
Type of connector on the
device
C19 straight female
Type of connector on the
peer end
PI straight male, PI angle male, PF angle male, and PG angle
male based on countries and regions
Cable length
3 m
Maximum voltage
125 V/250 V
Maximum current
16 A
Table A-14 Technical specifications of the EPW30B-48A AC cable
Item
Description
Type of connector on the
device
C13 straight female
Type of connector on the
peer end
PI straight male, PB straight male, PF straight male, and PG
angle male based on countries and regions
Cable length
3 m

HUAWEI USG9500 Series Terabit-level Next-Generation Firewall
Hardware Guide
A Appendix
Issue 01 (2017-03-13)
Huawei Proprietary and Confidential
Copyright © Huawei Technologies Co., Ltd.
408
Item
Description
Maximum voltage
125 V/250 V
Maximum current
10 A
A.1.3 PGND Cable
This section describes the structure and specifications of the protection ground (PGND) cable
for you to ground the USG9500. Read this section before you make or purchase any PGND
cables for the USG9500.
The PGND cable is used in the following situations:
The USG9500 is installed inside the cabinet.
If the cabinet has been properly grounded, connect one end of the PGND cable to the
ground terminal of the USG9500 and the other end to the ground port of the cabinet.
The USG9500 is installed outside the cabinet.
Connect one end of the PGND cable to the ground terminal of the USG9500 and the
other end to the ground bar in the equipment room.
Unreliable grounding may damage the USG9500. Therefore, ensure that the USG9500 is
reliably grounded during operation.
Structure and Appearance
A PGND cable has two OT bare crimp terminals and a copper cable with yellow/green plastic
encapsulation. Figure A-19 shows the appearance of a type of PGND cables.
The figure is for reference only.
Figure A-19 PGND cable
Figure A-20 shows the appearance of the OT bare crimp terminal.
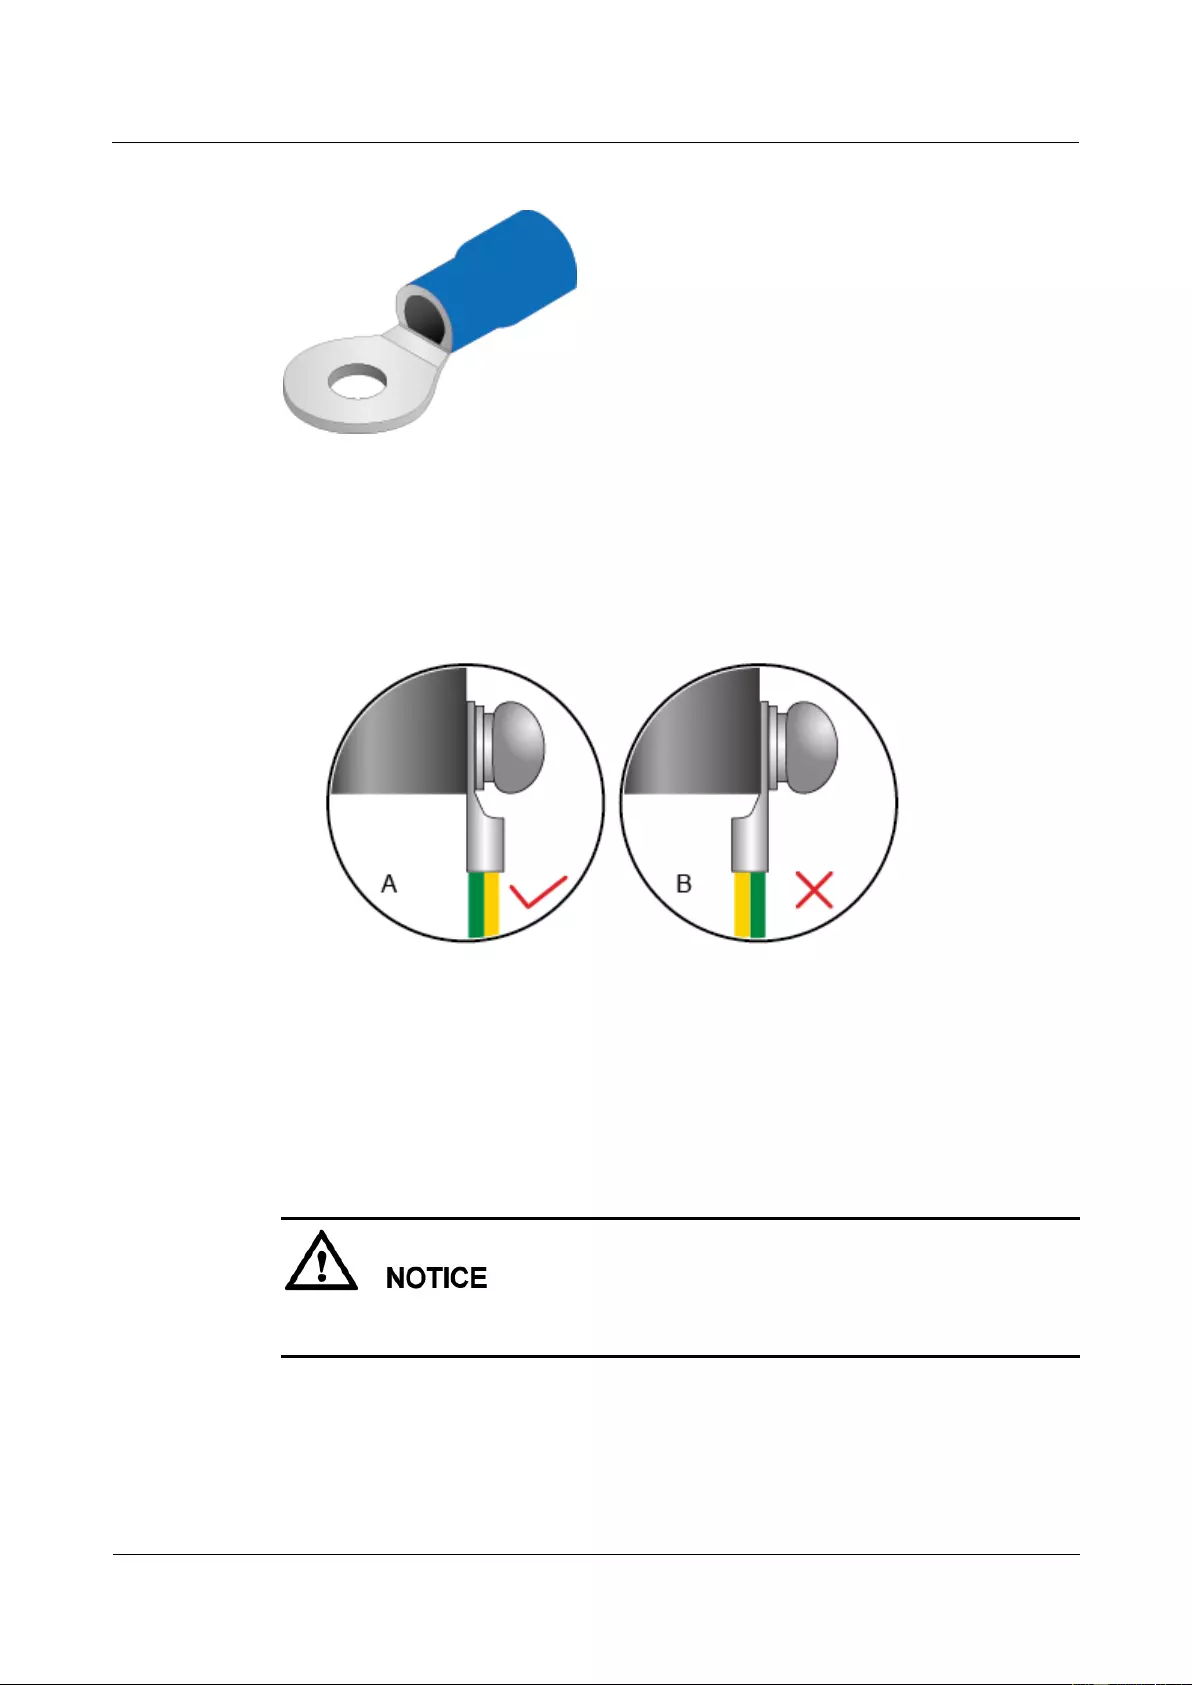
HUAWEI USG9500 Series Terabit-level Next-Generation Firewall
Hardware Guide
A Appendix
Issue 01 (2017-03-13)
Huawei Proprietary and Confidential
Copyright © Huawei Technologies Co., Ltd.
409
Figure A-20 OT bare crimp terminal
Installation
1. Connect the OT bare crimp terminal at one end of the PGND cable to the connection
hole of the USG9500, with the conducting wire upward, as shown in A of Figure A-21.
Figure A-21 Installing the OT bare crimp terminal
2. Select a matching screw for the screw jack and turn the screw in clockwise direction to
fasten it. For reliable connection, make sure that at least two full threads match each
other.
3. Pull the power cable gently to verify that it is well connected.
4. Connect the other end of the PGND cable to the ground port of the equipment room or
cabinet.
The OT terminal may rotate and result in device damage. Make sure that it is independent of
the adjacent metal mechanical part or other terminals.
Technical Specifications
Table A-15 shows the technical specifications of the PGND cable.
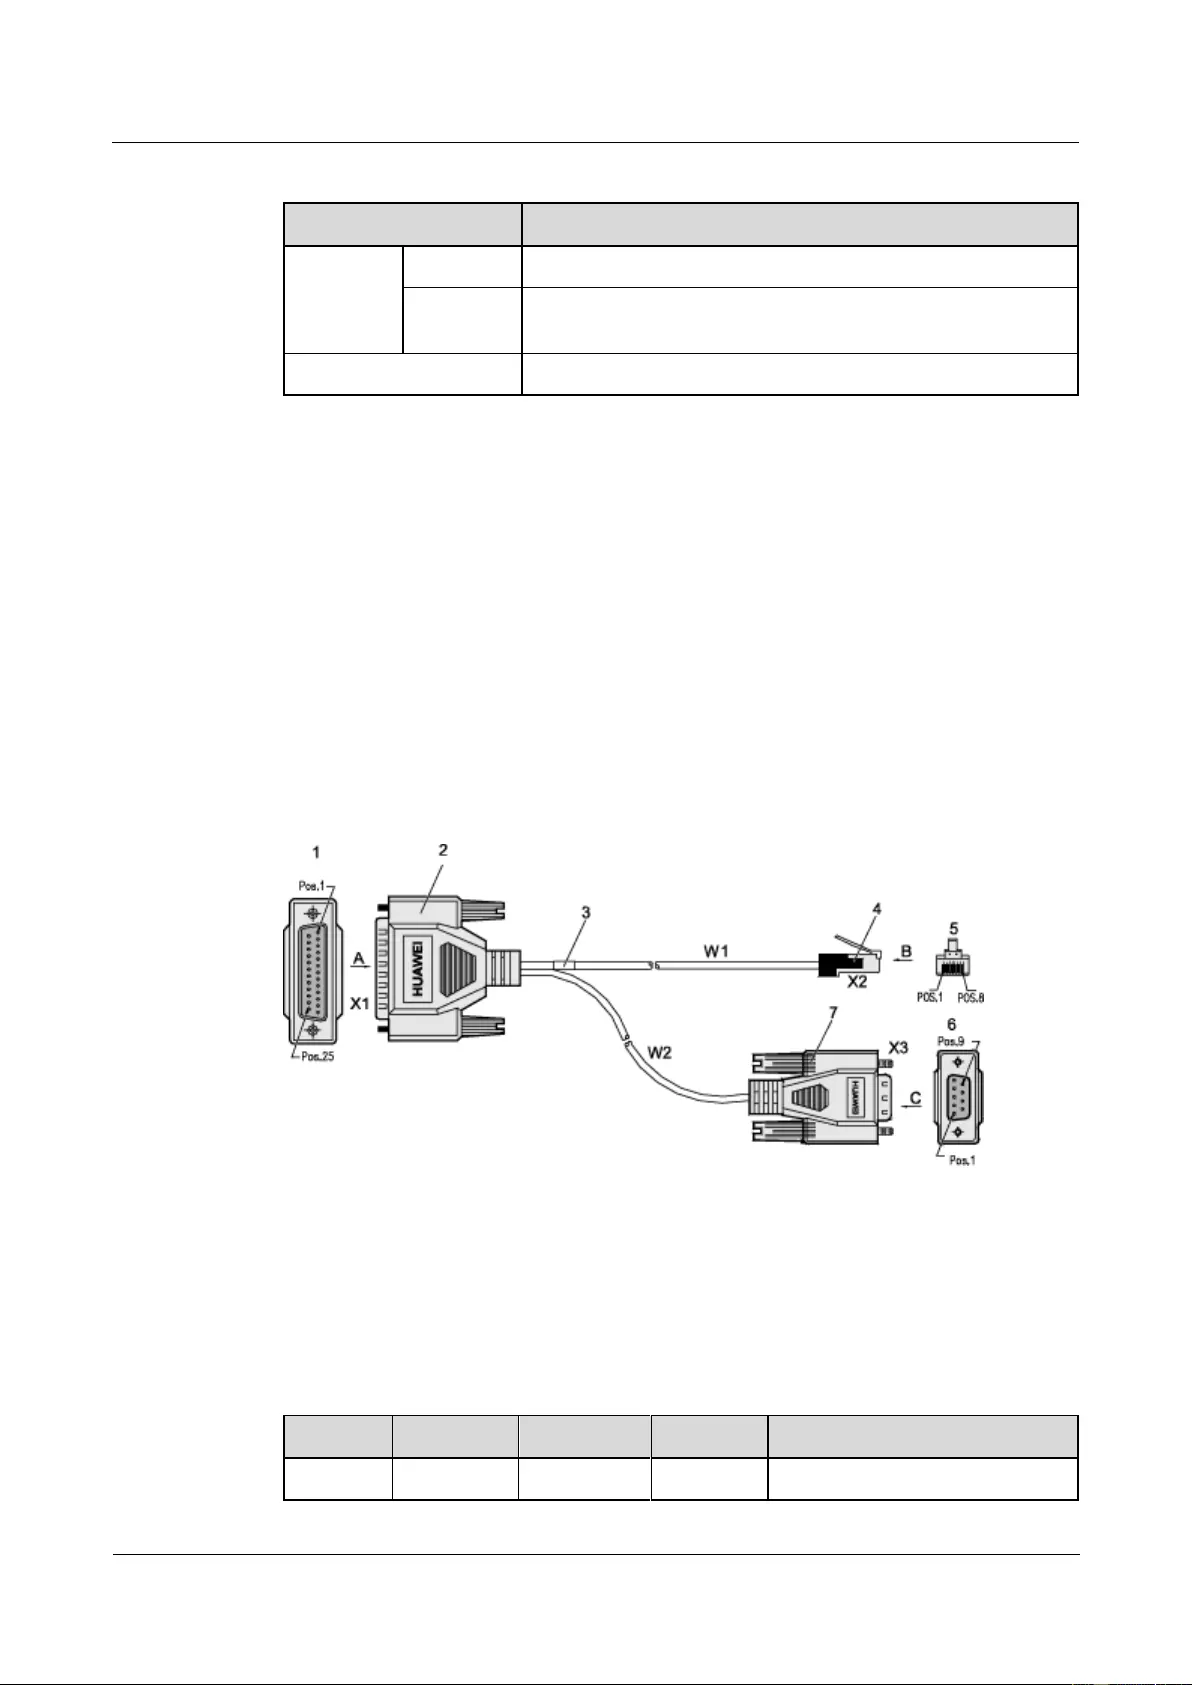
HUAWEI USG9500 Series Terabit-level Next-Generation Firewall
Hardware Guide
A Appendix
Issue 01 (2017-03-13)
Huawei Proprietary and Confidential
Copyright © Huawei Technologies Co., Ltd.
410
Table A-15 Technical specifications of the PGND cable
Item
Description
PGND
cable
Cable type
Wire,450/750V,227 IEC 02(RV)25mm2,yellow green,110A
Terminal
Naked Crimping Terminal,OT,25mm2,M8,Tin Plating,Naked
Ring Terminal
Fireproof class
CM
A.1.4 Console Cable
The console interface cable is used to connect the console interface on the Eudemon8000E to
the serial interface of the console to transmit configuration data of the USG9500.
The console interface cable is an 8-core shielded cable. One end of the cable is an RJ45
connector connected to the console interface on the MPU. The other end has DB9 and DB25
connectors, either of which is connected to the serial interface on a computer.
Structure and Appearance
Figure A-22 shows the structure of a console interface cable. Table A-16 shows the pin
assignment on the console interface cable.
Figure A-22 Console interface cable
1. Direction
A
2. DB25 male
connector
3. Label
4. RJ45 connector
5. Direction
B
6. Direction C
7. DB9 male
connector
W1 and W2 communication
cable
Table A-16 Pin assignment on the console interface cable
RJ45
Direction
DB25
DB9
Signal
1
->
5
8
CTS (Clear to Send)

HUAWEI USG9500 Series Terabit-level Next-Generation Firewall
Hardware Guide
A Appendix
Issue 01 (2017-03-13)
Huawei Proprietary and Confidential
Copyright © Huawei Technologies Co., Ltd.
411
RJ45
Direction
DB25
DB9
Signal
2
->
6
6
DSR (Data Set Ready)
3
->
3
2
RXD (Receive Data)
4
—
7
5
GND
5
—
8
1
GND
6
<-
2
3
TXD (Transmit Data)
7
<-
20
4
DTR (Data Terminal Ready)
8
<-
4
7
RTS (Request to Send)
Technical Specifications
Table A-17 lists the technical specifications of the console interface cable.
Table A-17 Technical specifications of the console interface cable
Item
Description
Connector X1
Network interface connector-crystal connector
-8PIN-8bit-shielded plug
Connector X2
Cable connector-D style-25PIN-male
Connector X3
Cable connector-D style-9PIN-male
Cable type
Symmetrical twisted
cable-120-ohm-SEYVPV-0.5mm-24AWG-8core-PANTON
E 430U
Symmetrical twisted
cable-100-ohm-SEYVP-0.48mm-26AWG-8core-black
Number of cores
8
Fireproof class
CM
Available length
15 m for the 120-ohm cable
3 m for the 100-ohm cable
A.1.5 Auxiliary Port Cable
The AUX interface cable is used to connect the AUX interface on the USG9500 to a modem
to remotely transmit the configuration data of the USG9500.
The AUX interface cable is an 8-core shielded cable. One end of the cable is an RJ45
connector connected to the AUX interface on the MPU. The other end has DB9 and DB25
connectors, either of which is connected to the serial interface on a computer.
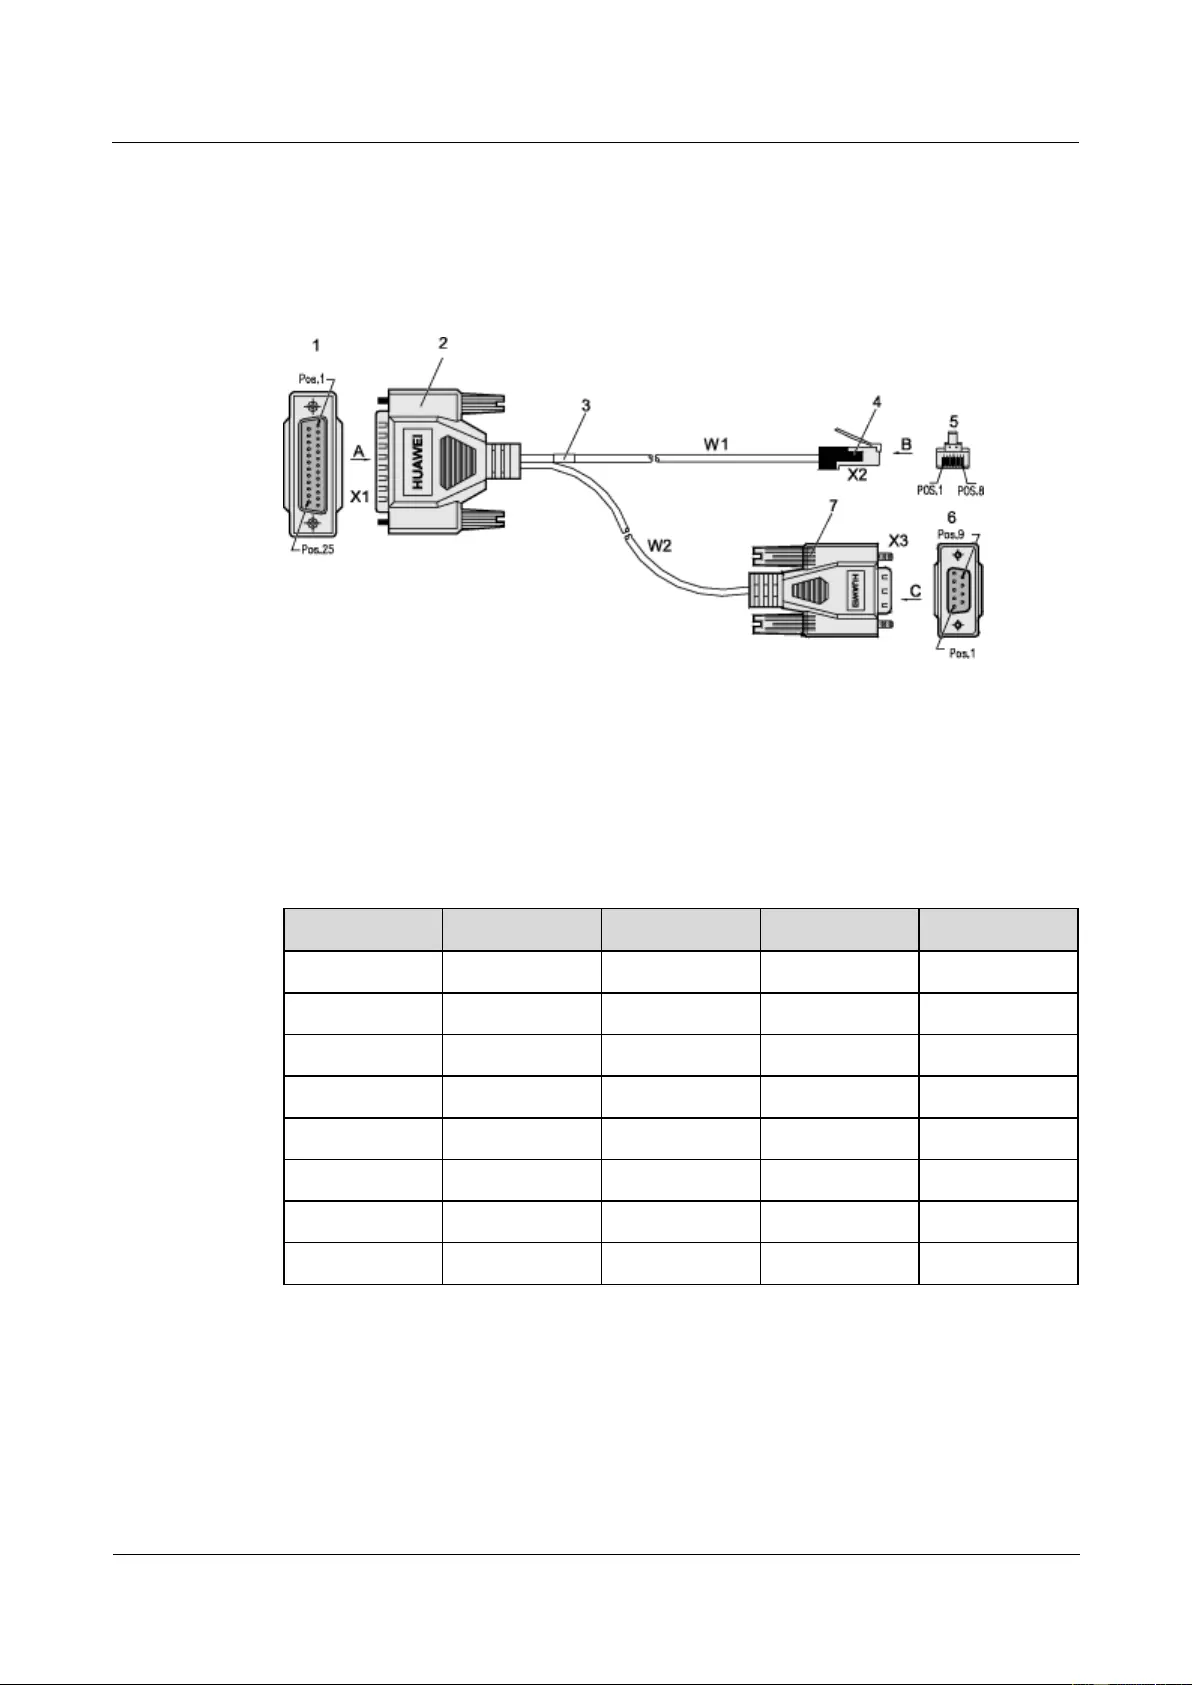
HUAWEI USG9500 Series Terabit-level Next-Generation Firewall
Hardware Guide
A Appendix
Issue 01 (2017-03-13)
Huawei Proprietary and Confidential
Copyright © Huawei Technologies Co., Ltd.
412
Structure and Appearance
As shown in Figure A-23 the structure of the AUX interface cable is the same as that of the
console interface cable. Table A-18 shows the pin assignment on the AUX interface cable.
Figure A-23 AUX interface cable
1. Direction
A
2. DB25 male
connector
3. Label
4. RJ45 connector
5. Direction
B
6. Direction C
7. DB9 male
connector
W1 and W2 communication
cable
Table A-18 Pin assignment on the AUX interface cable
RJ45
Direction
DB25
DB9
Signal
1
->
4
7
RTS
2
->
20
4
DTR
3
->
2
3
TXD
4
—
8
1
GND
5
—
7
5
GND
6
<-
3
2
RXD
7
<-
6
6
DSR
8
<-
5
8
CTS
Technical Specifications
Table A-19 lists the technical specifications of the AUX interface cable.
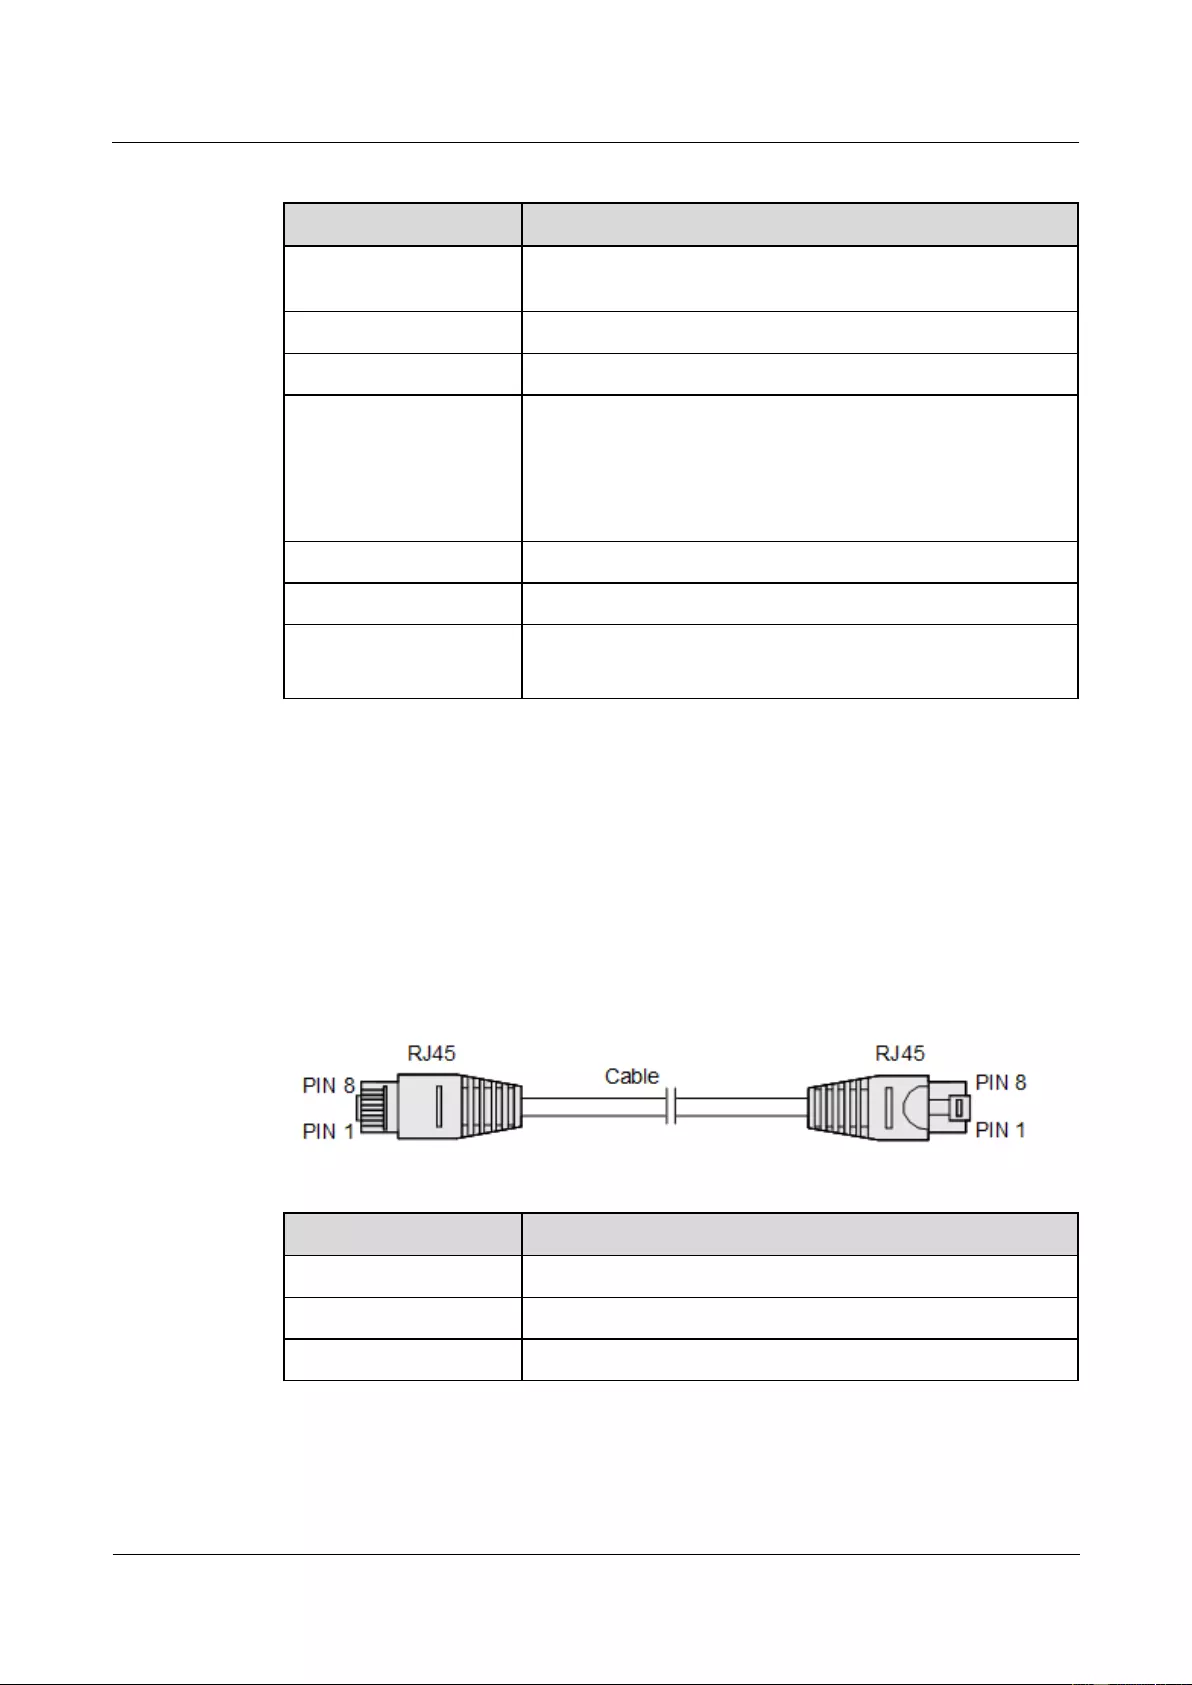
HUAWEI USG9500 Series Terabit-level Next-Generation Firewall
Hardware Guide
A Appendix
Issue 01 (2017-03-13)
Huawei Proprietary and Confidential
Copyright © Huawei Technologies Co., Ltd.
413
Table A-19 Technical specifications of the AUX interface cable
Item
Description
Connector X1
Network interface connector-crystal
connector-8PIN-8bit-shielded plug
Connector X2
Cable connector-D type-25PIN-male
Connector X3
Cable connector-D type-9PIN-male
Cable type
Symmetrical twisted
cable-120-ohm-SEYVPV-0.5mm-24AWG-8core-PANTONE
430U
Symmetrical twisted
cable-100-ohm-SEYVP-0.48mm-26AWG-8core-black
Number of cores
8
Fireproof class
CM
Available length
15 m for the 120-ohm cable
3 m for the 100-ohm cable
A.1.6 Ethernet Cable
The Ethernet cable, also called the network cable, is used for carrying signals on Gigabit
networks or networks with a lower packet rate.
Structure and Appearance
An Ethernet cable consists of twisted pairs and RJ45 connectors, as shown in Figure A-24.
Figure A-24 Cable structure
Name
Description
RJ45
RJ45 connector
Cable
Category 5 or higher twisted pair network cable
PIN1 to PIN8
8 pins. Each pin has an ID ranging from 1 to 8.
The twisted pair network cable has eight wires. The connection between wires and RJ45
connector pins complies with wiring scheme EIA/TIA 568A or EIA/TIA 568B, as shown in
Figure A-25.
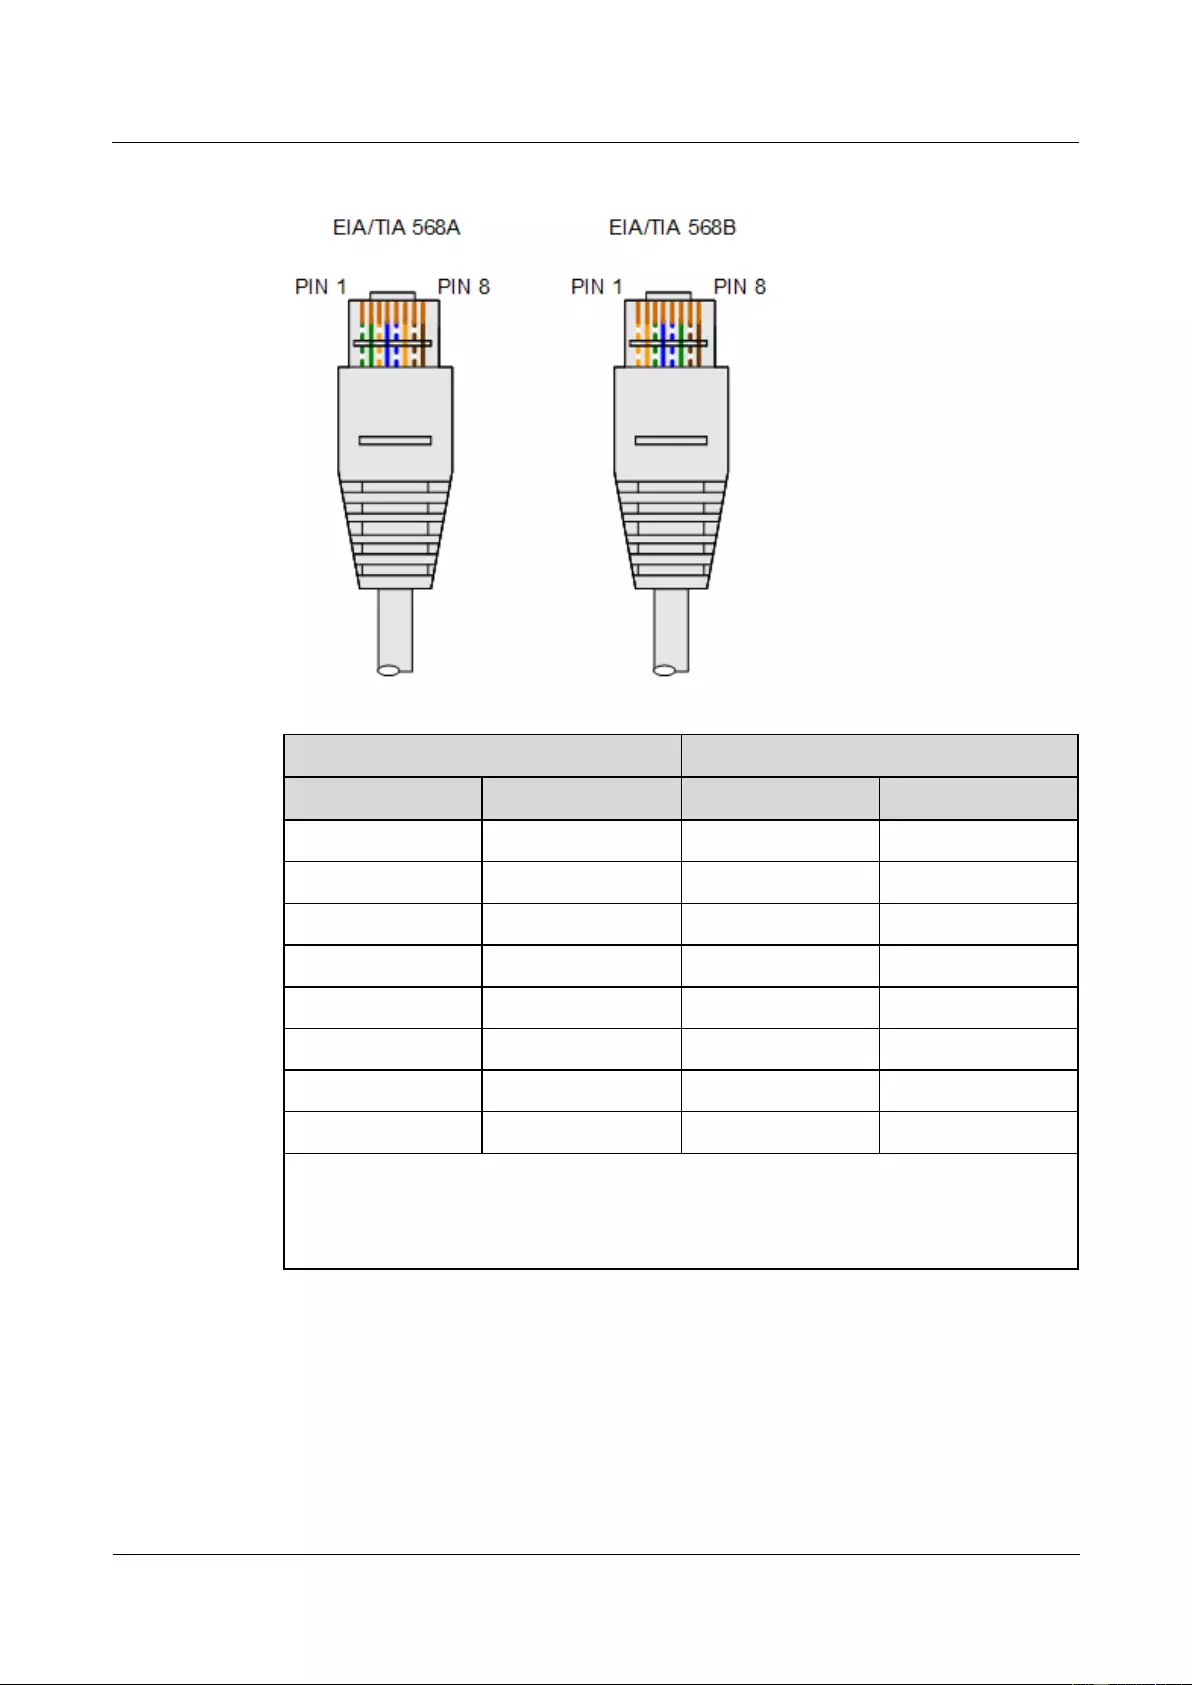
HUAWEI USG9500 Series Terabit-level Next-Generation Firewall
Hardware Guide
A Appendix
Issue 01 (2017-03-13)
Huawei Proprietary and Confidential
Copyright © Huawei Technologies Co., Ltd.
414
Figure A-25 Wiring scheme EIA/TIA 568A or EIA/TIA 568B
EIA/TIA 568A
EIA/TIA 568B
PINa
Core Wireb
PIN
Core Wire
1
Green-white
1
Orange-white
2
Green
2
Orange
3
Orange-white
3
Green-white
4
Blue
4
Blue
5
Blue-white
5
Blue-white
6
Orange
6
Green
7
Brown-white
7
Brown-white
8
Brown
8
Brown
NOTE
a. An RJ45 connector has eight pins.
b. The wire of a twisted pair connects to the RJ45 connector pin. The color of the plastic jacket is
considered as the name of the wire.
Straight-Through and Crossover Cables
Ethernet cables are classified into straight-through and crossover cables according to the
wiring scheme used at the two ends of the cables. The interfaces of most devices can
dynamically adapt to straight-through cables and crossover cables. For interfaces that cannot
dynamically adapt to the two types of cables, connect interfaces at the same layer using the
crossover cables and interfaces at different layers using the straight-through cables.
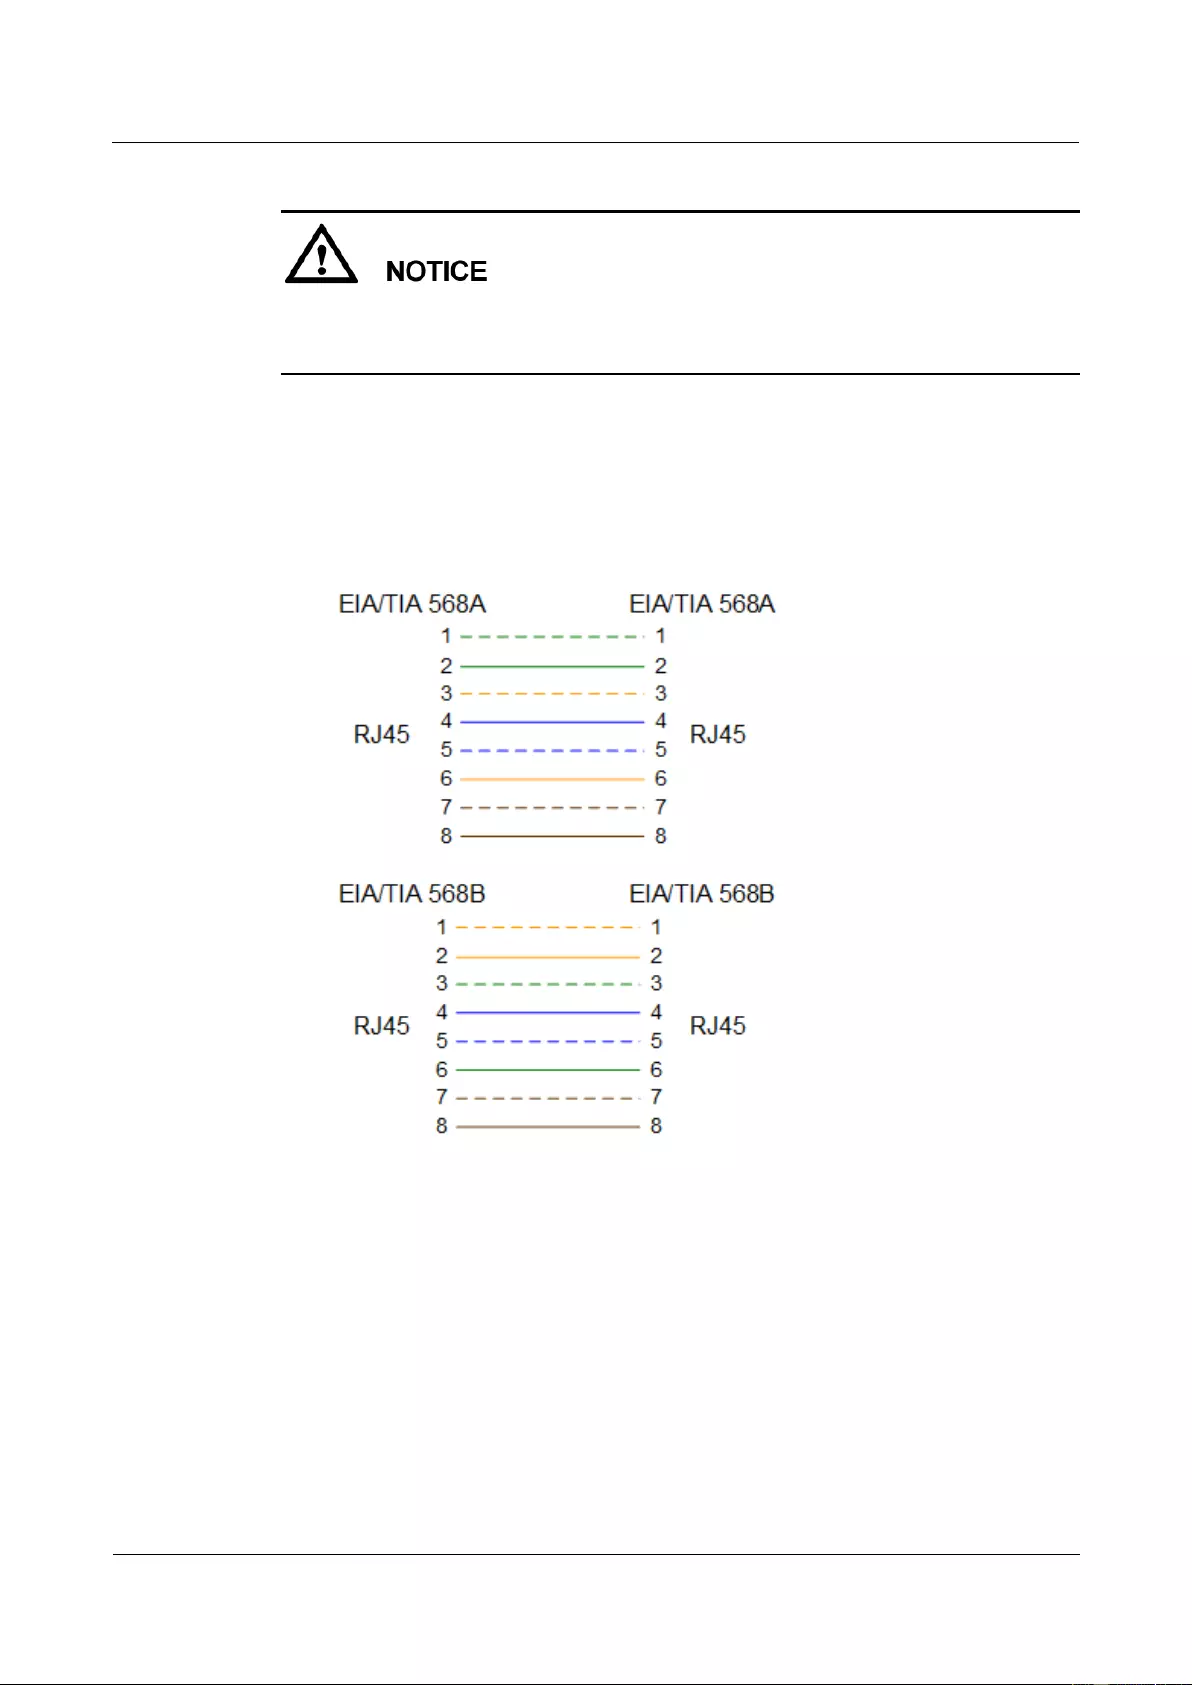
HUAWEI USG9500 Series Terabit-level Next-Generation Firewall
Hardware Guide
A Appendix
Issue 01 (2017-03-13)
Huawei Proprietary and Confidential
Copyright © Huawei Technologies Co., Ltd.
415
Figure A-26 and Figure A-27 show how to distinguish and make straight-through cables and
crossover cables. You need to strictly observe the wiring scheme to ensure the quality of
services.
Straight-through cable
The straight-through cable is also called the standard cable. Both ends of the cable use
wiring scheme EIA/TIA T568A or EIA/TIA T568B. You are advised to use wiring
scheme EIA/TIA T568B when you make straight-through cables. Figure A-26 shows the
detail.
Figure A-26 Schematic diagram of the connection scheme of straight-through cables
You can use the straight-through cables in the following scenarios:
− Connecting a switch or hub to an USG9500
− Connecting computers (including servers and workstations) to USG9500s or hubs
− Connecting two switches through the uplink interface
Crossover cable
The crossover cable uses wiring scheme EIA/TIA T568A for one end and EIA/TIA
T568B for the other, as shown in Figure A-27.
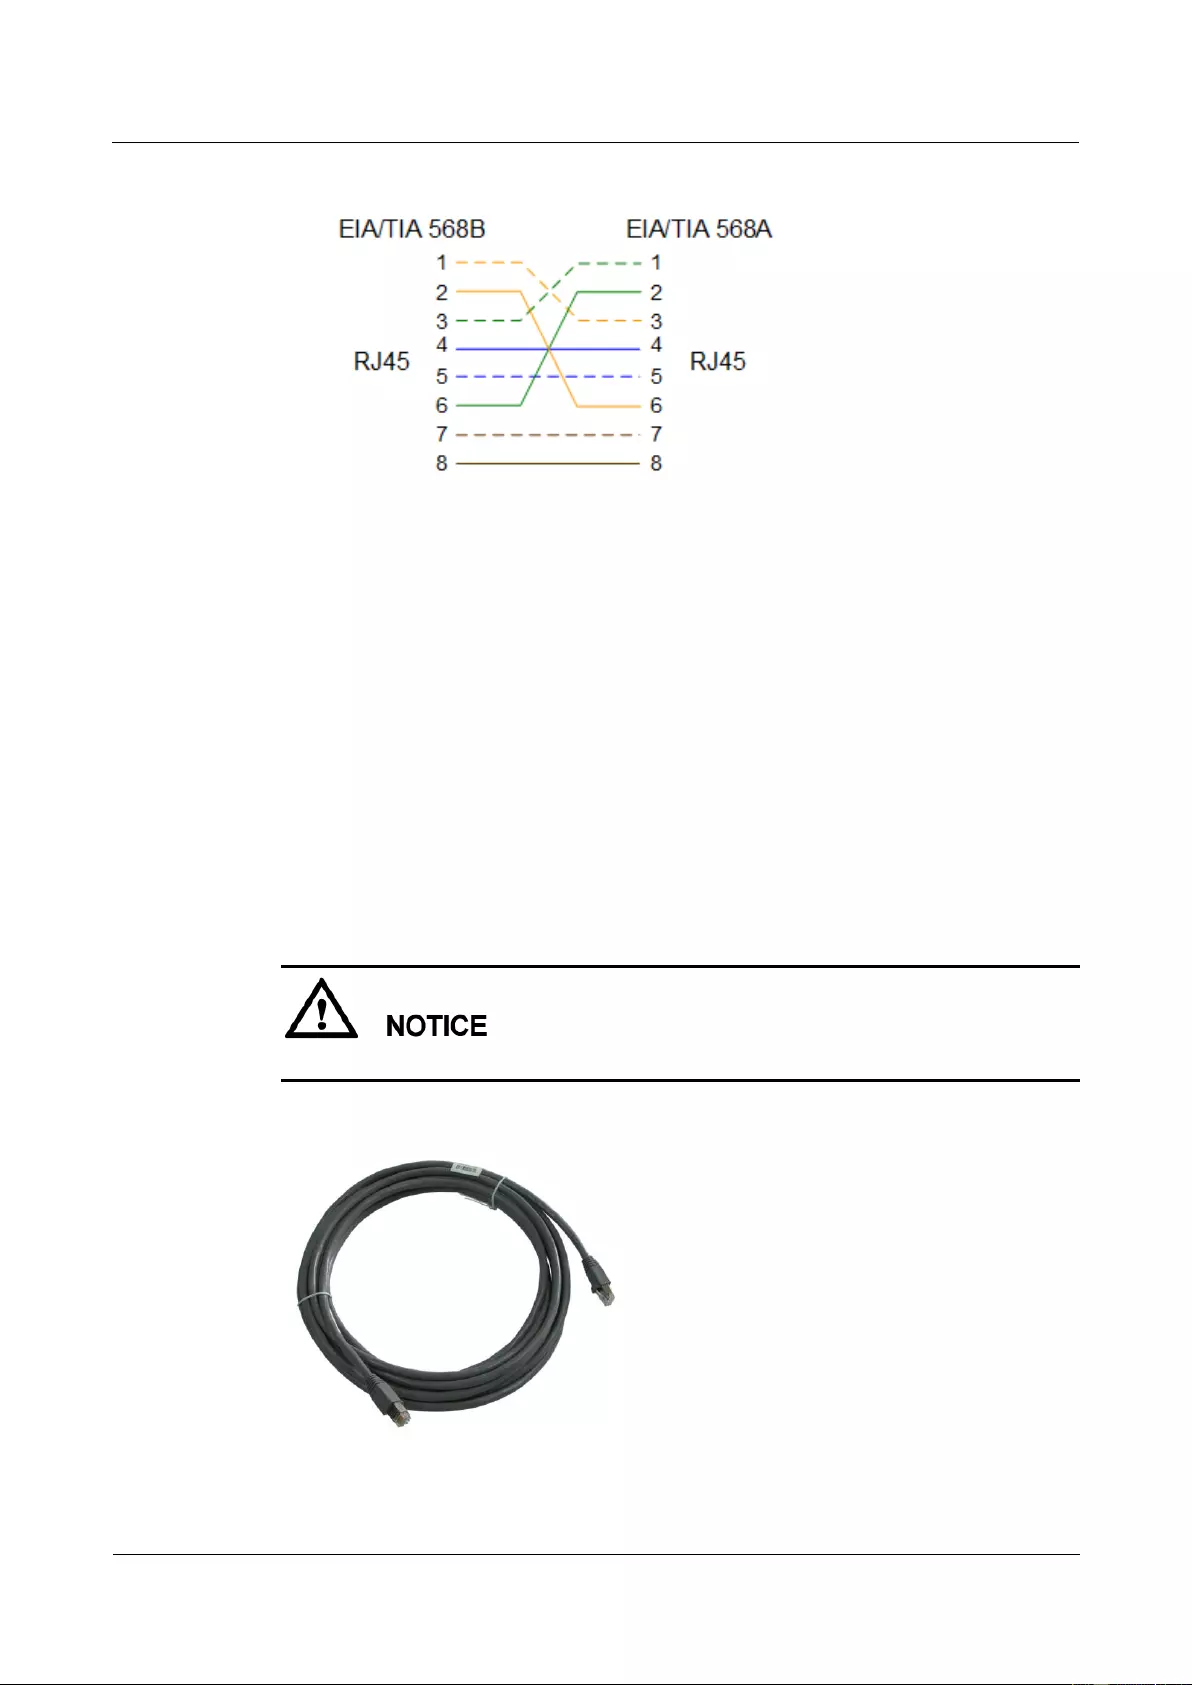
HUAWEI USG9500 Series Terabit-level Next-Generation Firewall
Hardware Guide
A Appendix
Issue 01 (2017-03-13)
Huawei Proprietary and Confidential
Copyright © Huawei Technologies Co., Ltd.
416
Figure A-27 Schematic diagram of the connection scheme of crossover cables
You can use the crossover cables in the following scenarios:
− Connecting a computer and a router
− Connecting two switches
− Connecting two hubs
− Connecting two computers
− Connecting interfaces on different routers
− Connecting Ethernet interfaces on an ADSL modem and the network adapter on a
computer
Shielded Cable and Unshielded Cable
Network cables are classified into shielded and unshielded ones based on whether the twisted
pair and RJ45 connector are shielded, as shown in Figure A-28 and Figure A-29.
Only shielded cables are supported on the USG9500.
Figure A-28 Appearance of a shielded cable

HUAWEI USG9500 Series Terabit-level Next-Generation Firewall
Hardware Guide
A Appendix
Issue 01 (2017-03-13)
Huawei Proprietary and Confidential
Copyright © Huawei Technologies Co., Ltd.
417
Figure A-29 Appearance of an unshielded cable
The figure is for reference only.
Technical Specifications
Table A-20 and Table A-21 show the technical specifications of the straight-through cable and
crossover cable respectively.
Table A-20 Technical specifications of the straight-through cable
Item
Description
Connector X1/X2
Network port connector-crystal
connector-8PIN-8bit-shield-plug-24-26AWG-CAT 6/SFTP
network cable
Cable type
Communication cable-100±15ohm-shielded enhanced 5
types-CAT5E SFTP 24AWG-8 core PANTONE 445U
Number of cores
8
Fireproof class
CM
Available length
5 m, 10 m, 20 m, and 30 m
Table A-21 Technical specifications of the crossover cable
Item
Description
Connector X1/X2
Network port connector-crystal
connector-8PIN-8bit-shield-plug-24~26AWG-CAT 6/SFTP
network cable
Cable type
Communication cable-100±15ohm-shielded enhanced 5
types-CAT5E SFTP 24AWG-8 core PANTONE 646U
Number of cores
8
Fireproof class
CM
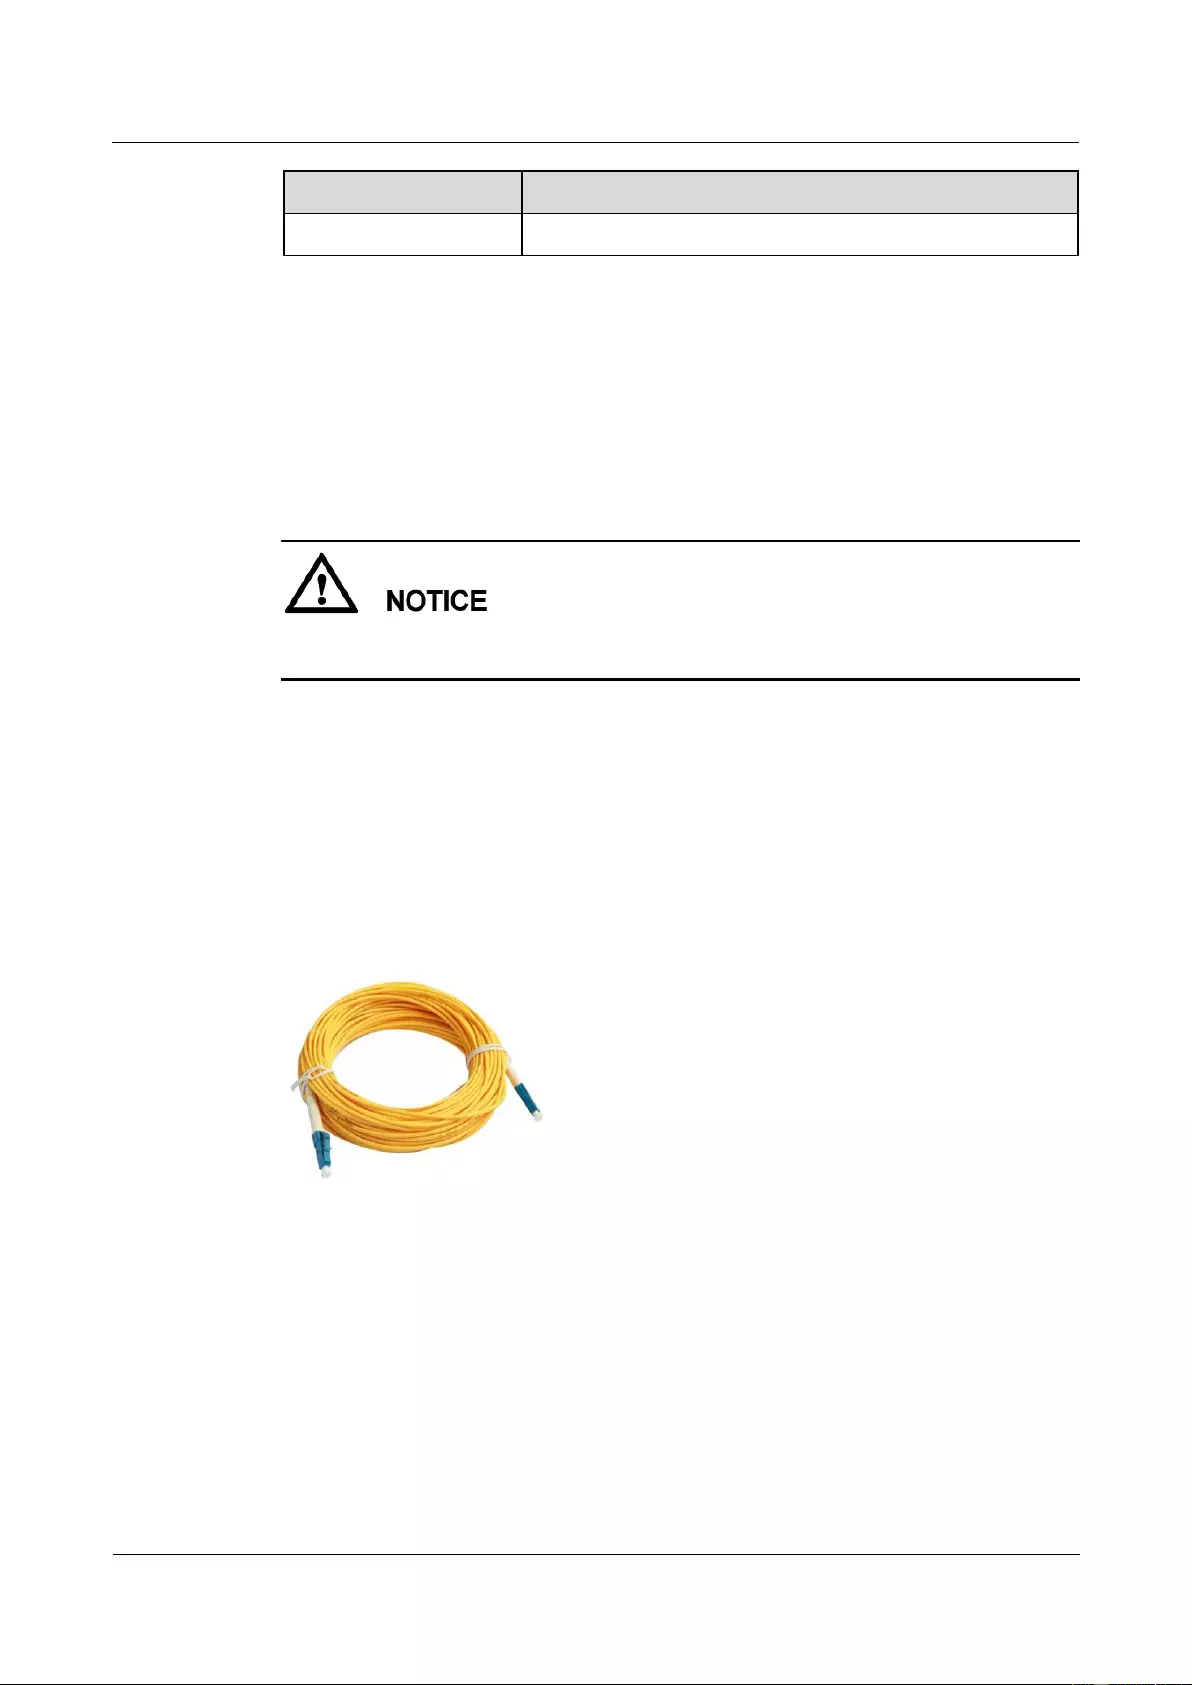
HUAWEI USG9500 Series Terabit-level Next-Generation Firewall
Hardware Guide
A Appendix
Issue 01 (2017-03-13)
Huawei Proprietary and Confidential
Copyright © Huawei Technologies Co., Ltd.
418
Item
Description
Available length
5 m and 30 m
A.1.7 Optical Fiber
The optical fiber is used for carrying signals on Gigabit networks or networks with a higher
packet rate.
The optical fiber connects to the interface on the USG9500 through an optical module. You
can select optical modules and fibers based on the interfaces of the peer device.
Huawei optical modules are recommended. The optical modules of other vendors may have
incompatibility issues and cause faults on the USG9500.
Structure and Appearance
Optical fibers are classified into single-mode and multi-mode optical fibers. Single-mode
optical fibers are used for long-distance transmission whereas multi-mode optical fibers are
used for short-distance transmission. For indoor optical fibers, the cover of single-mode
optical fibers is usually yellow, as shown in Figure A-30; whereas the cover of multi-mode
optical fibers is usually orange, as shown in Figure A-31. Optical fibers are not delivered with
the USG9500. Therefore, you need to purchase optical fibers as required.
Figure A-30 LC/PC-LC/PC single-mode optical fiber
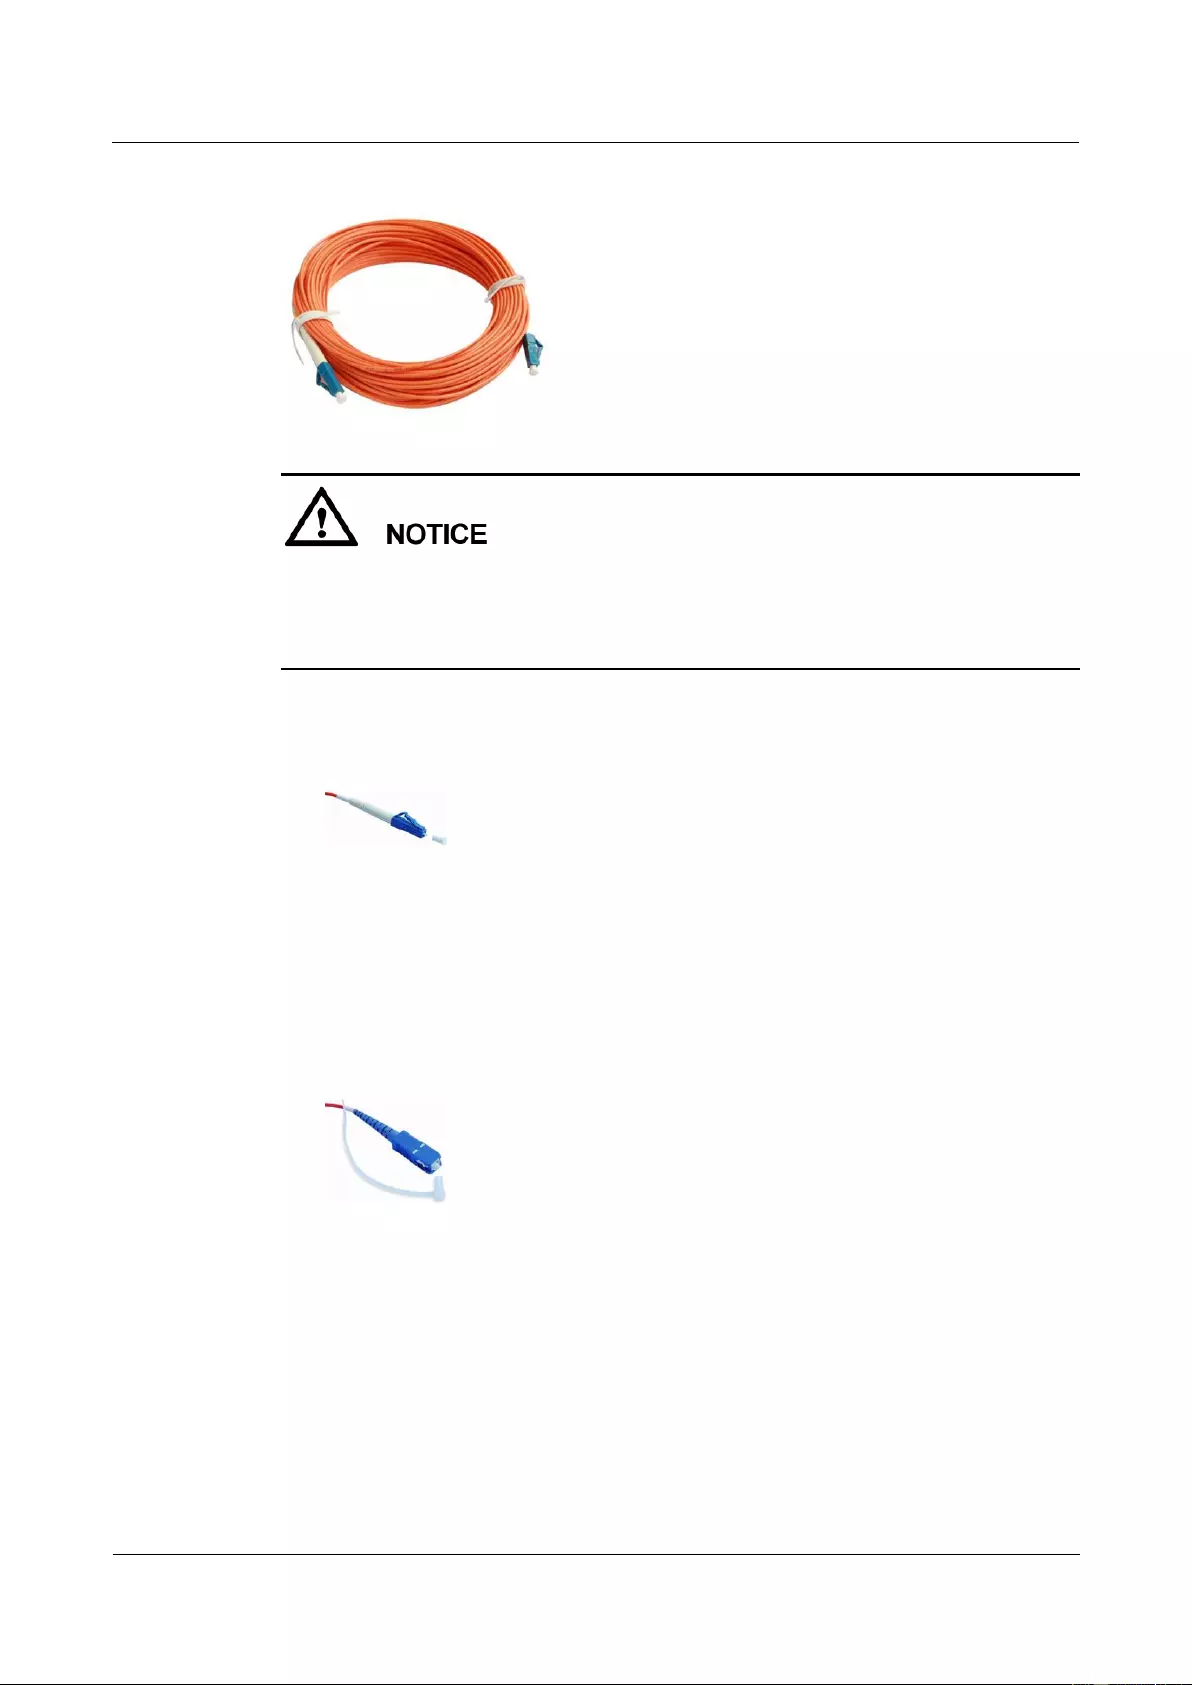
HUAWEI USG9500 Series Terabit-level Next-Generation Firewall
Hardware Guide
A Appendix
Issue 01 (2017-03-13)
Huawei Proprietary and Confidential
Copyright © Huawei Technologies Co., Ltd.
419
Figure A-31 LC/PC-LC/PC multi-mode optical fiber
To ensure the normal transmission of optical signals, do not use single-mode optical fibers
to connect multi-mode optical modules or multi-mode optical fibers to connect
single-mode optical modules.
To connect extension optical fibers, purchase LC/PC-LC/PC adapters.
Optical fibers have multiple types of connectors. Common connectors are LC/PC, SC/PC, and
FC/PC.
LC/PC connector
The procedure and precautions for inserting and removing LC/PC connectors are as
follows:
− Insert and remove the connector along the axis without rotating the connector.
− When you insert the fiber, carefully insert the fiber head to the optical interface on
the interface board.
− To remove the optical fiber, press the pinch on the fiber connector, slightly push the
fiber connector and then pull it out.
SC/PC connector
The procedure and precautions for inserting and removing SC/PC connectors are as
follows:
− Insert and remove the connector along the axis without rotating the connector.
− When you insert the fiber, carefully insert the fiber head to the optical interface on
the interface board.
− To remove the optical fiber, slightly push the fiber connector, and pull out the
connector.
FC/PC connector
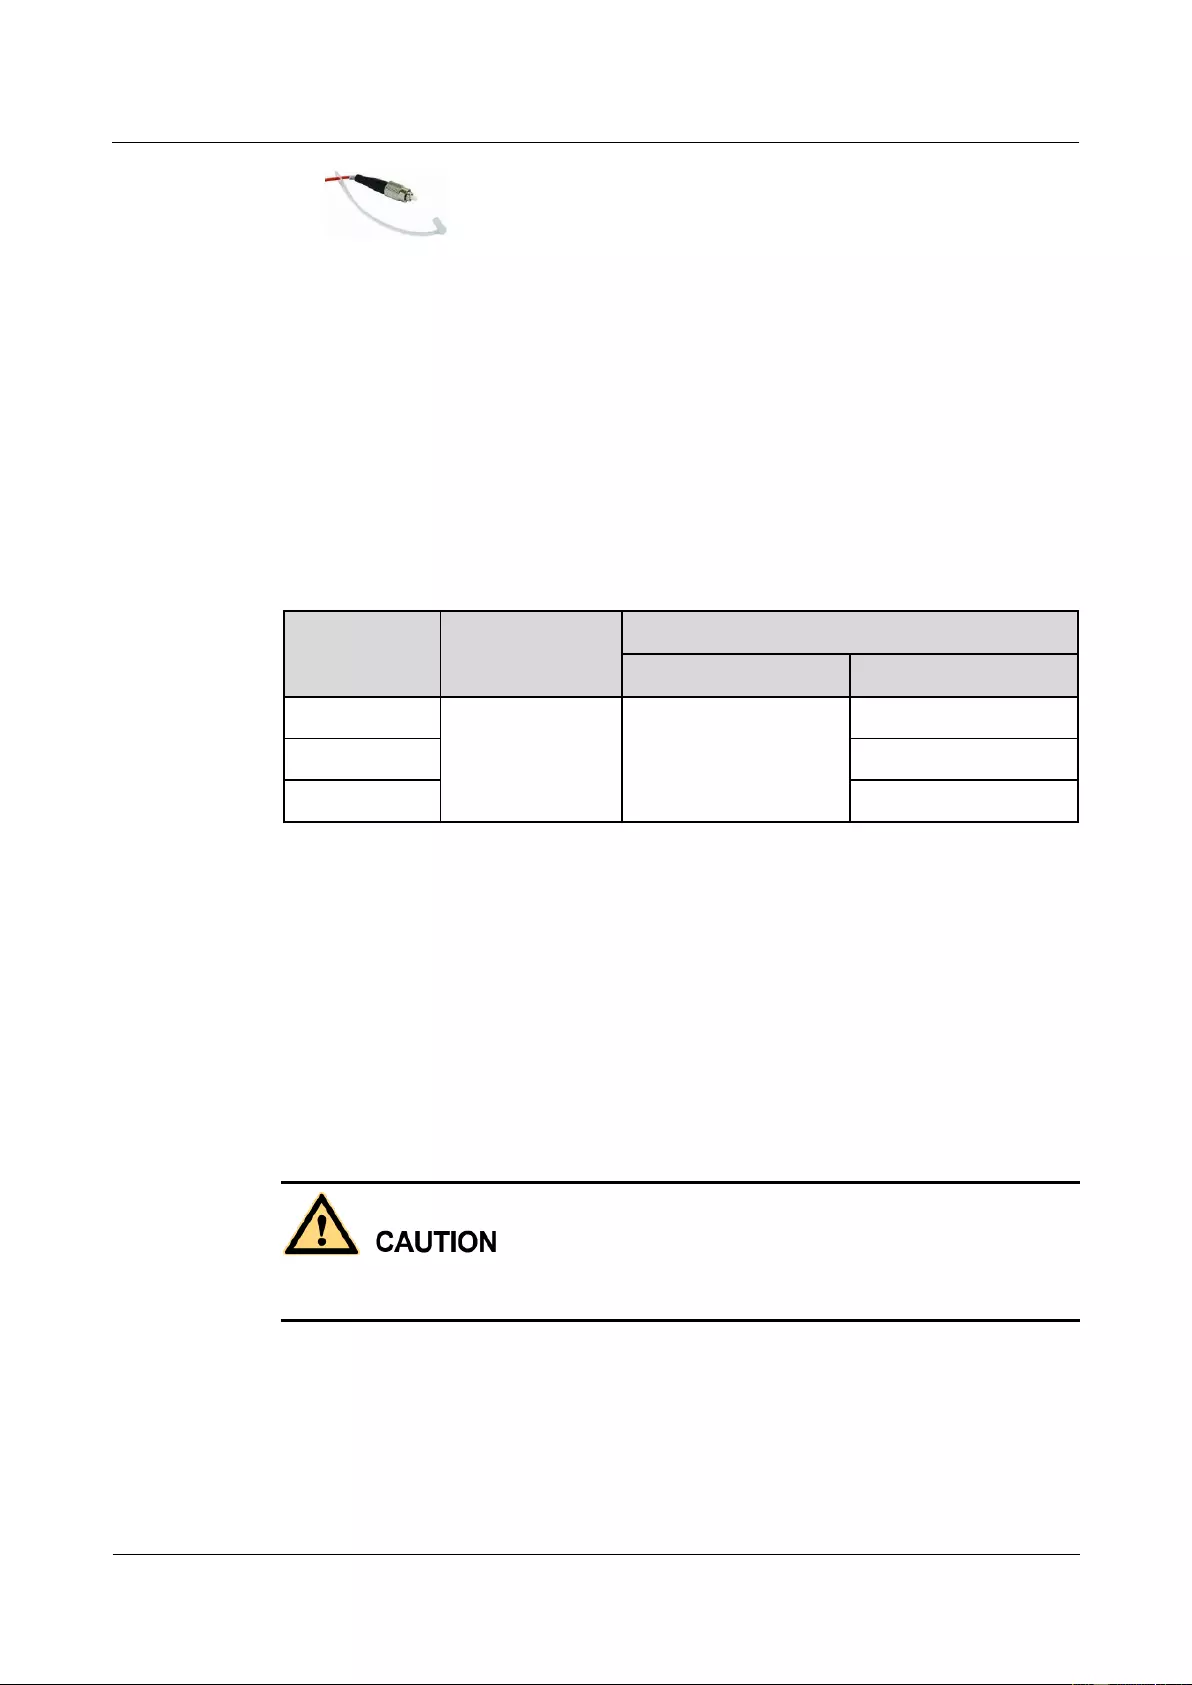
HUAWEI USG9500 Series Terabit-level Next-Generation Firewall
Hardware Guide
A Appendix
Issue 01 (2017-03-13)
Huawei Proprietary and Confidential
Copyright © Huawei Technologies Co., Ltd.
420
The procedure and precautions for inserting and removing FC/PC connectors are as
follows:
− When you insert an optical fiber, aim the FC/PC connector at the optical interface
on the interface board to avoid damaging the inner layer of the optical interface.
Then insert the fiber into the optical interface, rotate the outer screw jacket in
clockwise direction, and then fasten the optical connector.
− To remove an optical fiber, rotate the outer screw jacket counter-clockwise on the
optical interface until the screw is loose. Then slightly pull out the optical fiber.
The optical fibers of the USG9500 are classified into three categories, LC/PC-LC/PC,
LC/PC-SC/PC, and LC/PC-FC/PC, based on the types of connectors on both ends, as shown
in Table A-22.
Table A-22 Common optical fiber
Type
Transmission
Mode
Connector
On the USG9500
On the peer device
LC/PC-LC/PC
Single-mode/Multi
-mode
LC/PC
LC/PC
LC/PC-SC/PC
SC/PC
LC/PC-FC/PC
FC/PC
Precautions
When using optical modules and optical fibers, pay attention to the following to ensure proper
communication between devices:
Use single-mode and multi-mode optical fibers as required.
Tx (sending) of the local device corresponds to Rx (receiving) of the peer device.
The wavelengths of the optical modules on both ends must be the same.
Do not overbend optical fibers, and the bend radius must not be shorter than 40 mm.
To avoid eye injuries, do not look straight at the optical transmit interface of the laser or the
optical connector.
Technical Specifications
Table A-23 lists the technical specifications of the optical fiber for reference only. Select
optical fibers as required.

HUAWEI USG9500 Series Terabit-level Next-Generation Firewall
Hardware Guide
A Appendix
Issue 01 (2017-03-13)
Huawei Proprietary and Confidential
Copyright © Huawei Technologies Co., Ltd.
421
Table A-23 Technical specifications of the optical fiber
Item
Description
Transmission mode
Single-mode/Multi-mode
Connector
On the USG9500: LC/PC
On the peer device: LC/PC, SC/PC, or FC/PC
Outer diameter
2 mm
Length
5 m, 10 m, or 20 m
A.2 On-site Cable Assembly and Installation
This section describes how to assemble power cables, Ethernet cables, and other cables.
A.2.1 Cable Assembling Precautions
You must check the cables and connector components, choose the appropriate cables and
connector components, and assemble them properly according to the cable assembling
precautions.
Checking the Appearance of Cables
If the jacket or insulation layer of a cable is visibly dirty, clean it before assembly.
If the jacket or insulation layer of a cable has visible damage, irreparable scuffing, or
defect, do not use the cable.
If the shielding layer of a cable is damaged, do not use the cable.
If the jacket or insulation layer of a cable cracks after the cable is bent or twisted, check
whether other cables have the same problem. If other cables are good, do not choose this
cable. If other cables have the same problem, do not assemble these cables until they are
replaced.
Checking the Appearance of Connectors
Do not use the connectors with visible defect, damage, rust or scuffing.
Do not use the connectors if the pins or shells of the connectors are damaged.
Do not use the connectors if there is dirt on the pins or in the jacks of the connectors or if
there are conductors between pins or between pins and the shell.
Precautions for Assembly
Use dedicated tools or tools delivered by Huawei and follow the correct methods during
assembly.
Hold terminals of cables instead of pulling the cables when installing or removing cable
components.
Take the following precautions when cutting or peeling cables:
− Keep extra lengths when cutting cables.
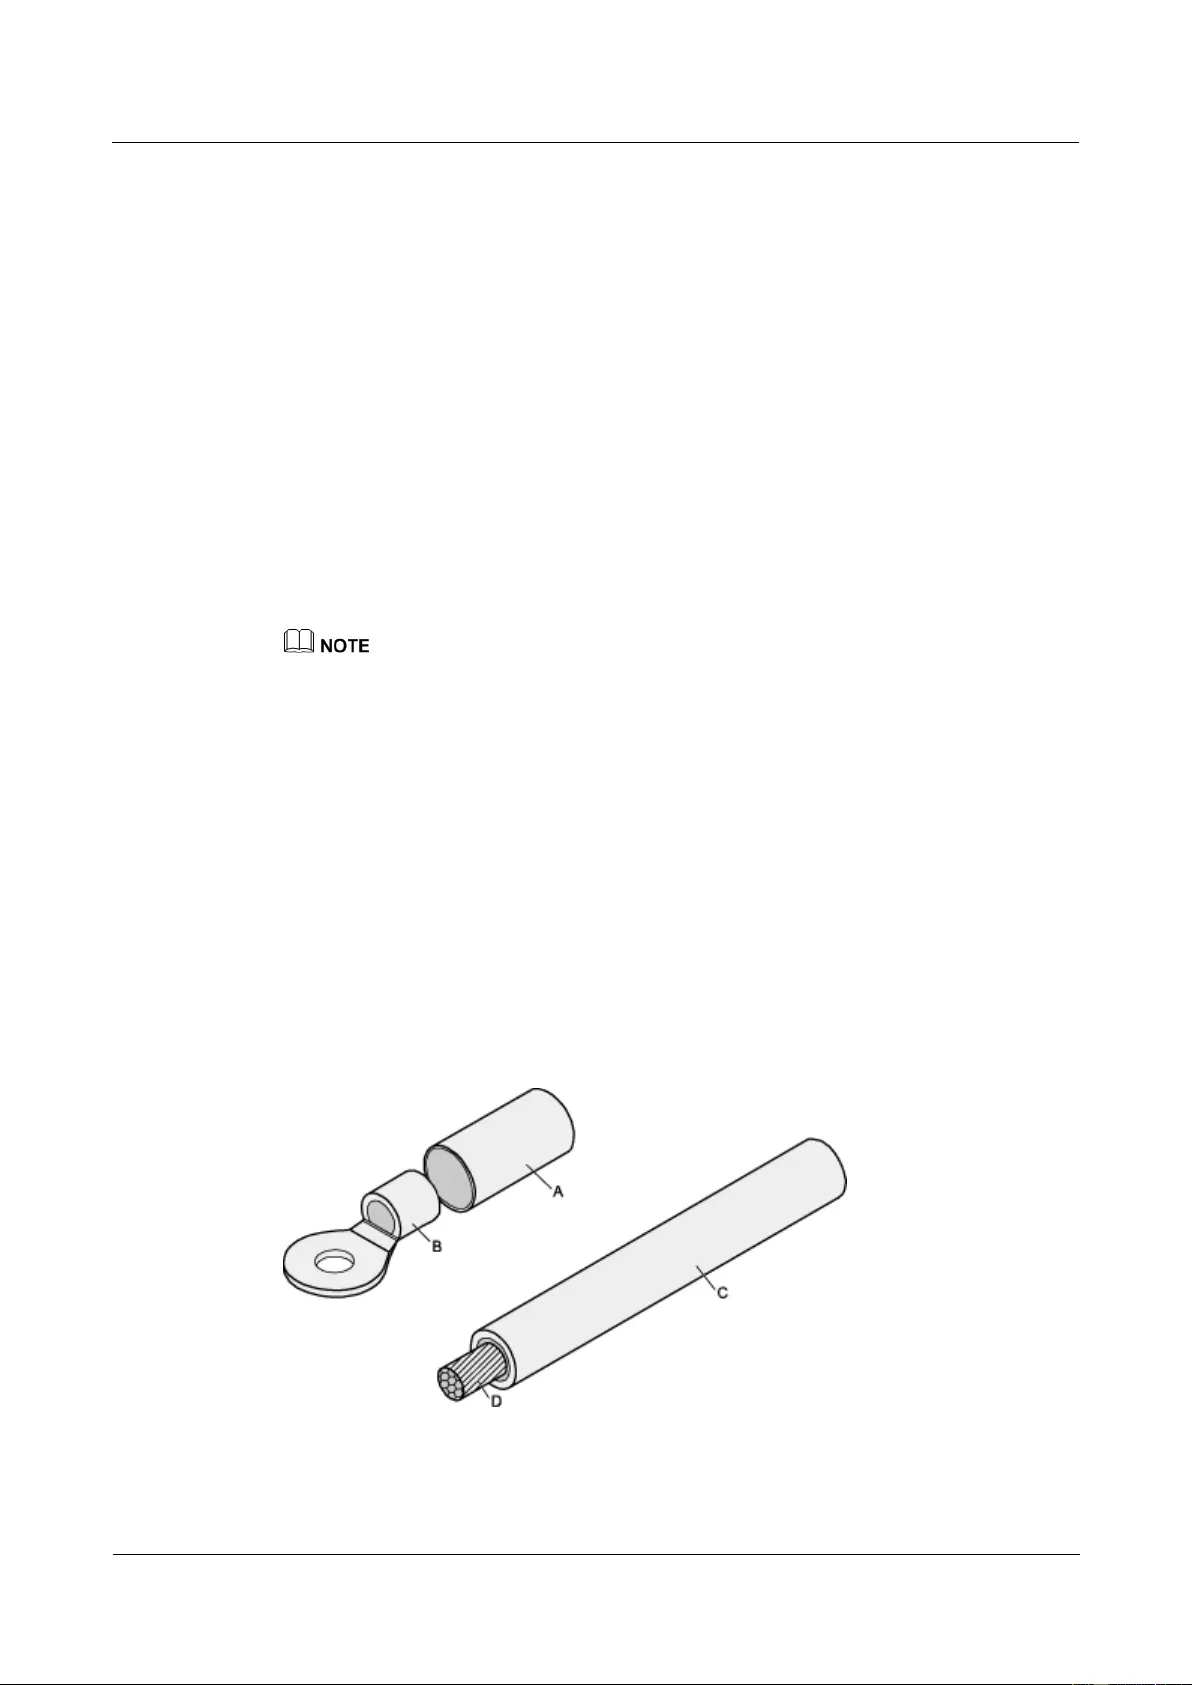
HUAWEI USG9500 Series Terabit-level Next-Generation Firewall
Hardware Guide
A Appendix
Issue 01 (2017-03-13)
Huawei Proprietary and Confidential
Copyright © Huawei Technologies Co., Ltd.
422
− Coil the cables that are longer than 2 m after cutting. Bind and fasten the coils using
bundling ropes. The inner diameters of the coils should be larger than 20 times the
outer diameters of the cables.
− When peeling the jackets of cables, avoid damaging the shielding layers (braid or
aluminum foil), insulation layers, core conductors, and other jackets that need not
be peeled.
− Clean the exposed jackets section (for example, the dead ends of power cables). Cut
all cables flush.
− Do not touch the core conductors of cables with your hands. Process the conductor
peeled from cables in time so that the surface of the conductor need not be oxidized.
Take the following precautions when crimping and connecting cables or connectors:
− The terminals and conductors should be connected tightly after they are crimped.
They should not be moved or turned.
− Cut all the exposed copper wires.
− Try to avoid a second crimping of sleeves.
− Keep all the conductors clean and aligned.
The connectors, cables, and tools provided by different vendors may be different. The figures in this
document are only for your reference.
A.2.2 Assembling Power Cables
This topic describes how to assemble power cables by using OT terminals, JG terminals, cord
end terminals, and power cables.
A.2.2.1 Assembling the OT Terminal and the Power Cable
This topic describes how to assemble an OT terminal and a power cable.
Context
Figure A-32shows the components of an OT terminal and a power cable.
Figure A-32 Components of an OT terminal and a power cable
A Heat-shrinkable
tube
B. Bare crimping
terminal
C. Insulation layer of a
power cable
D. Conductor of a
power cable
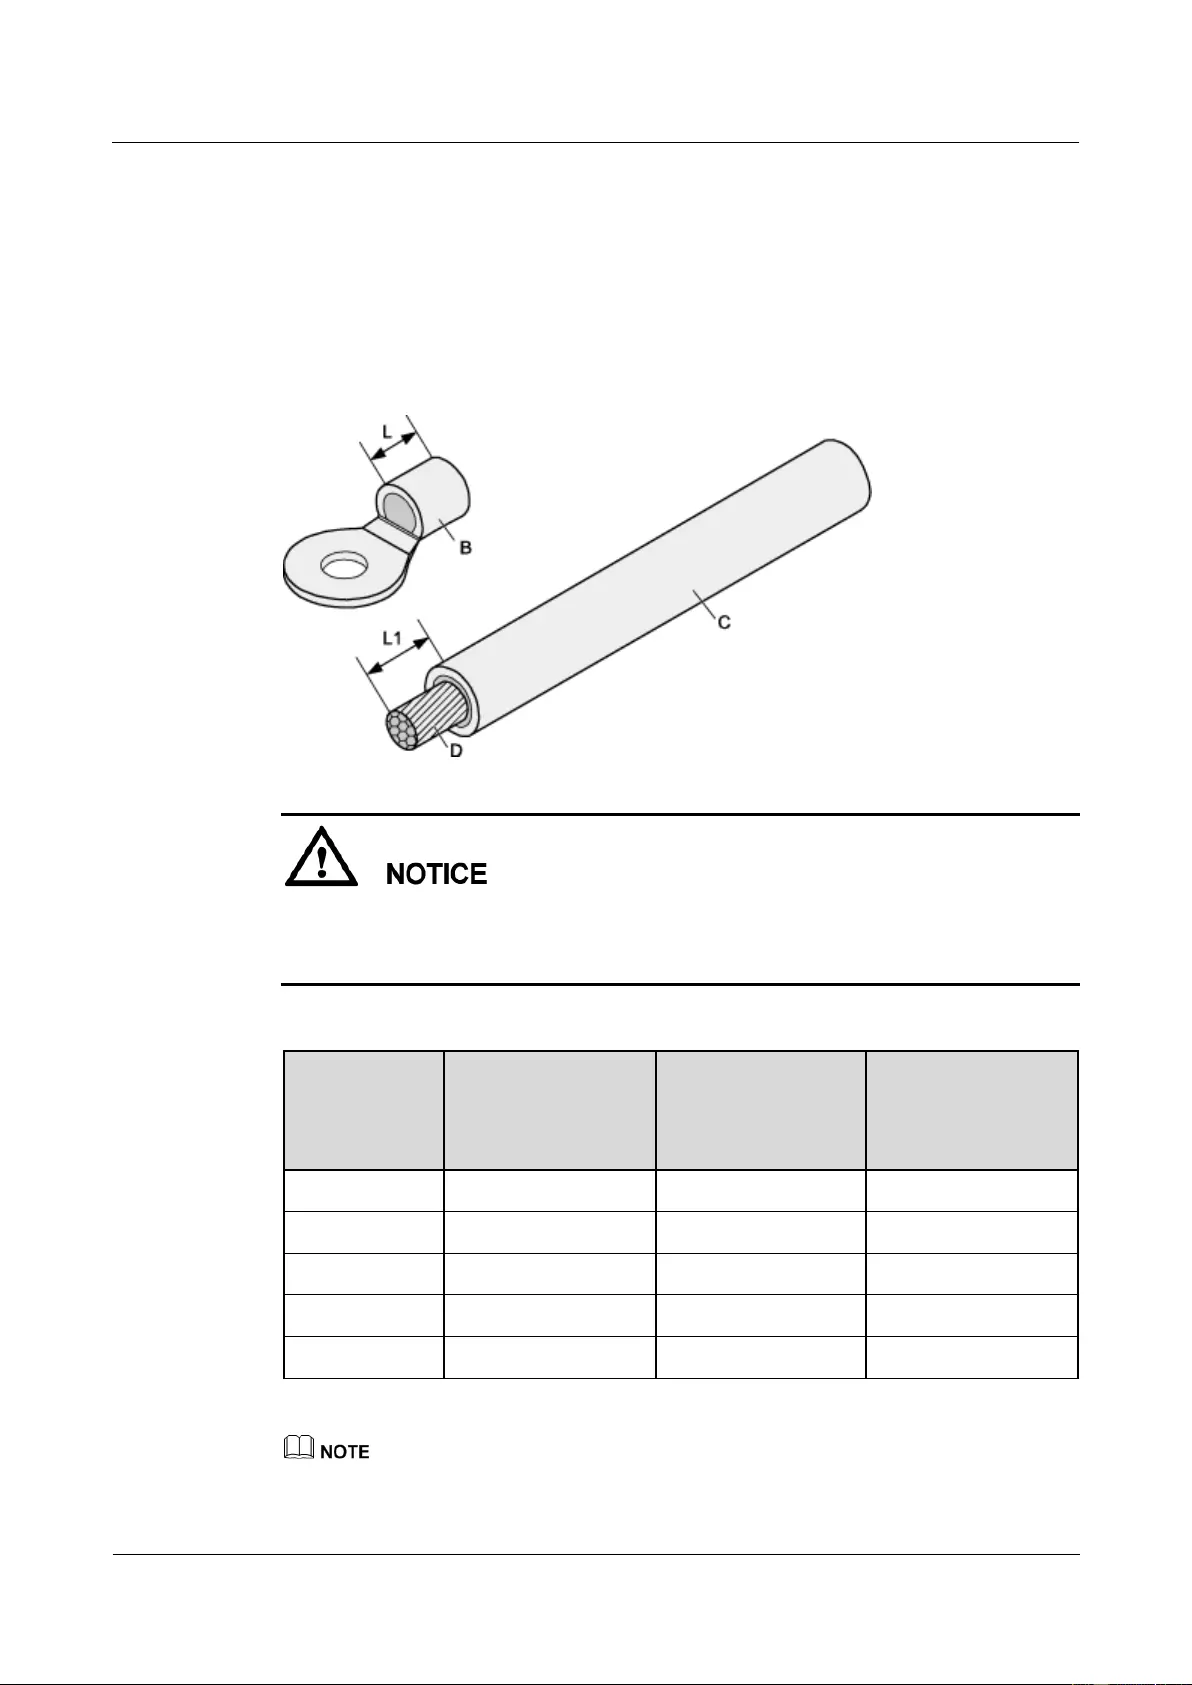
HUAWEI USG9500 Series Terabit-level Next-Generation Firewall
Hardware Guide
A Appendix
Issue 01 (2017-03-13)
Huawei Proprietary and Confidential
Copyright © Huawei Technologies Co., Ltd.
423
Procedure
Step 1 Based on the cross-sectional area of the cable conductor, strip a part of the insulation layer.
The L1-long conductor is exposed, as shown in Figure A-33. The recommended values of L1
are listed in Table A-24.
Figure A-33 Stripping a power cable (OT terminal)
When you strip a power cable, do not damage the conductor of the cable.
If the bare crimping terminal is not provided by Huawei, the value of L1 is 1 mm to 2 mm
greater than the value of L.
Table A-24 Mapping between the cross-sectional area of the conductor and the value of L1
Cross-Section
al Area of
Conductor
(mm2)
Value of L1 (mm)
Cross-Sectional
Area of Conductor
(mm2)
Value of L1 (mm)
1
7
10
11
1.5
7
16
13
2.5
7
25
14
4
8
35
16
6
9
50
16
If you are proficient in assembling OT terminals and power cables, you can obtain the value of L1 by
comparing the part to be crimped with the power cable.
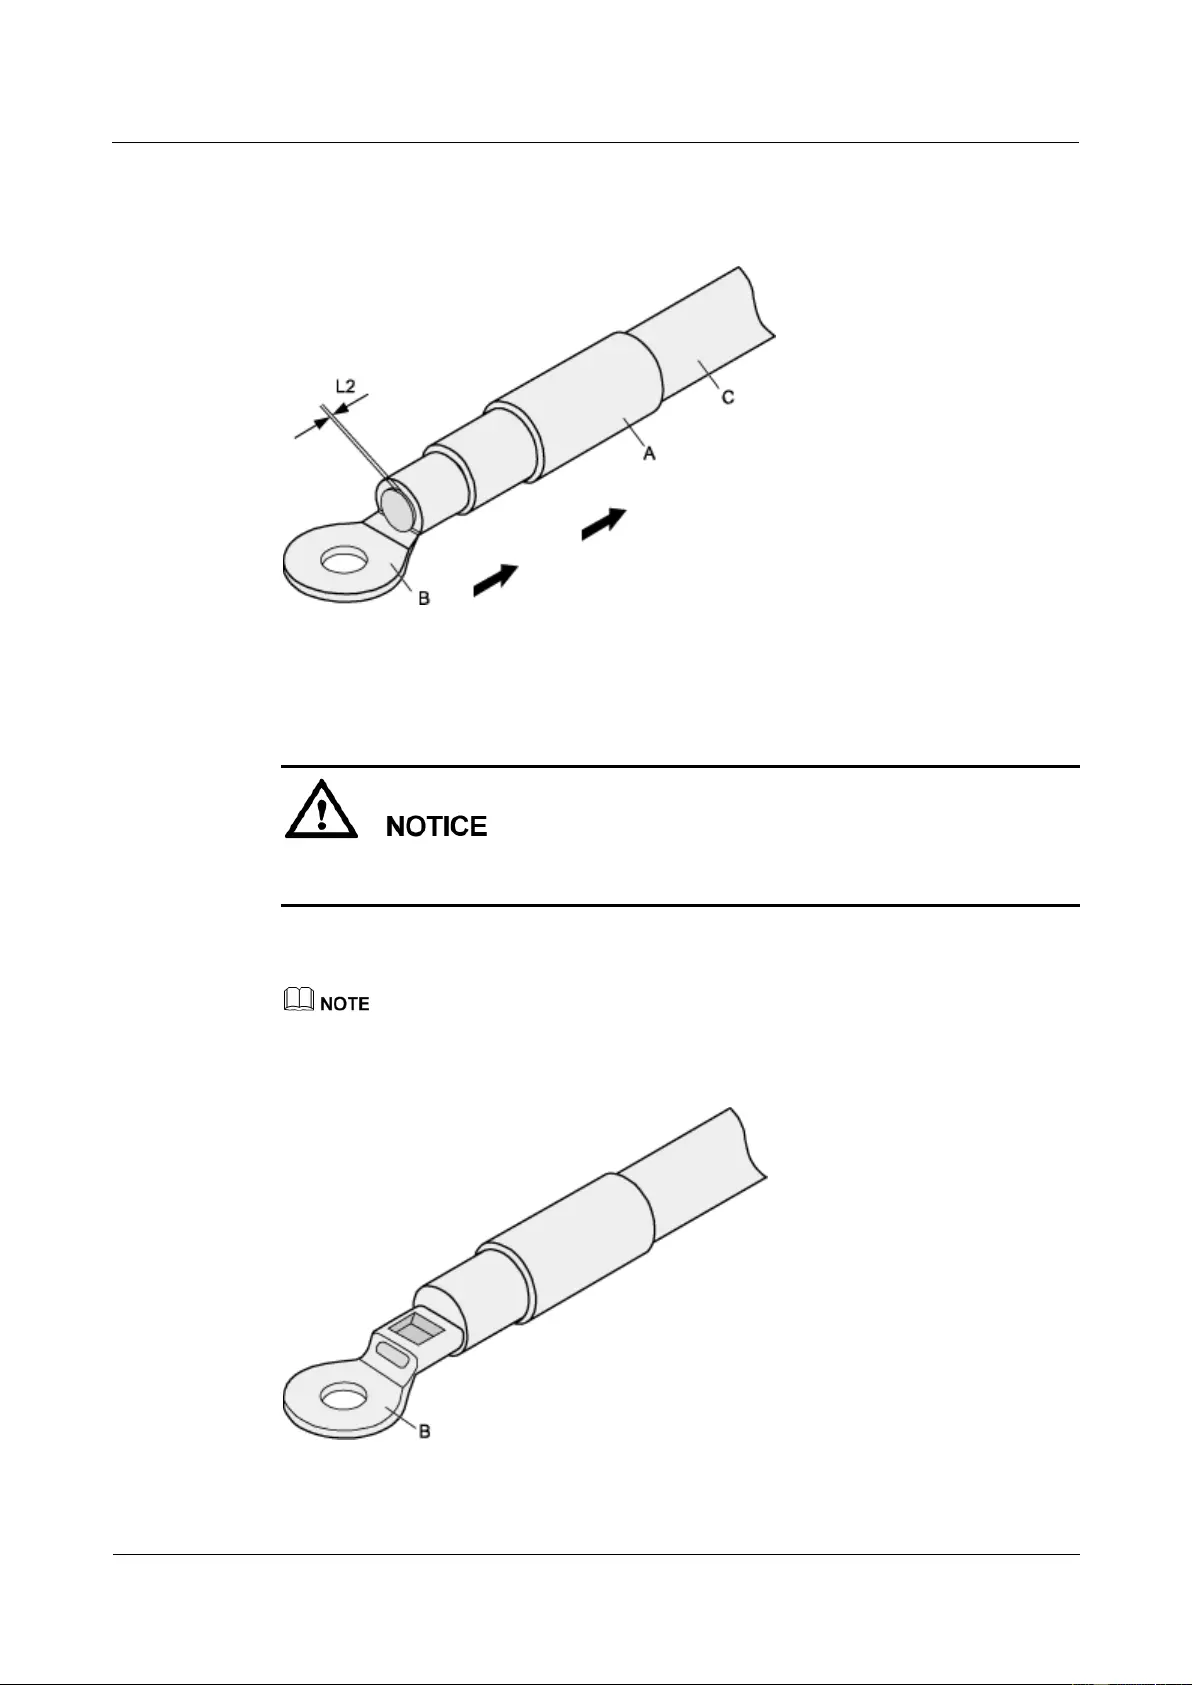
HUAWEI USG9500 Series Terabit-level Next-Generation Firewall
Hardware Guide
A Appendix
Issue 01 (2017-03-13)
Huawei Proprietary and Confidential
Copyright © Huawei Technologies Co., Ltd.
424
Step 2 Put the heat-shrinkable (A) tube onto the bare crimping terminal, as shown in Figure A-34.
Figure A-34 Putting the heat-shrinkable tube onto the bare crimping terminal
Step 3 Put the OT terminal onto the exposed conductor, and ensure that the OT terminal is in good
contact with the insulation layer of the power cable, as shown in Figure A-34.
After the conductor is fed into the OT terminal, the protruding part of the conductor, or L2 in
Figure A-34, must not be longer than 2 mm.
Step 4 Crimp the joint parts of the bare crimping terminal and the conductor, as shown in Figure
A-35.
The shapes of crimped parts may vary with the crimping dies.
Figure A-35 Crimping the joint parts of the bare crimping terminal and the conductor
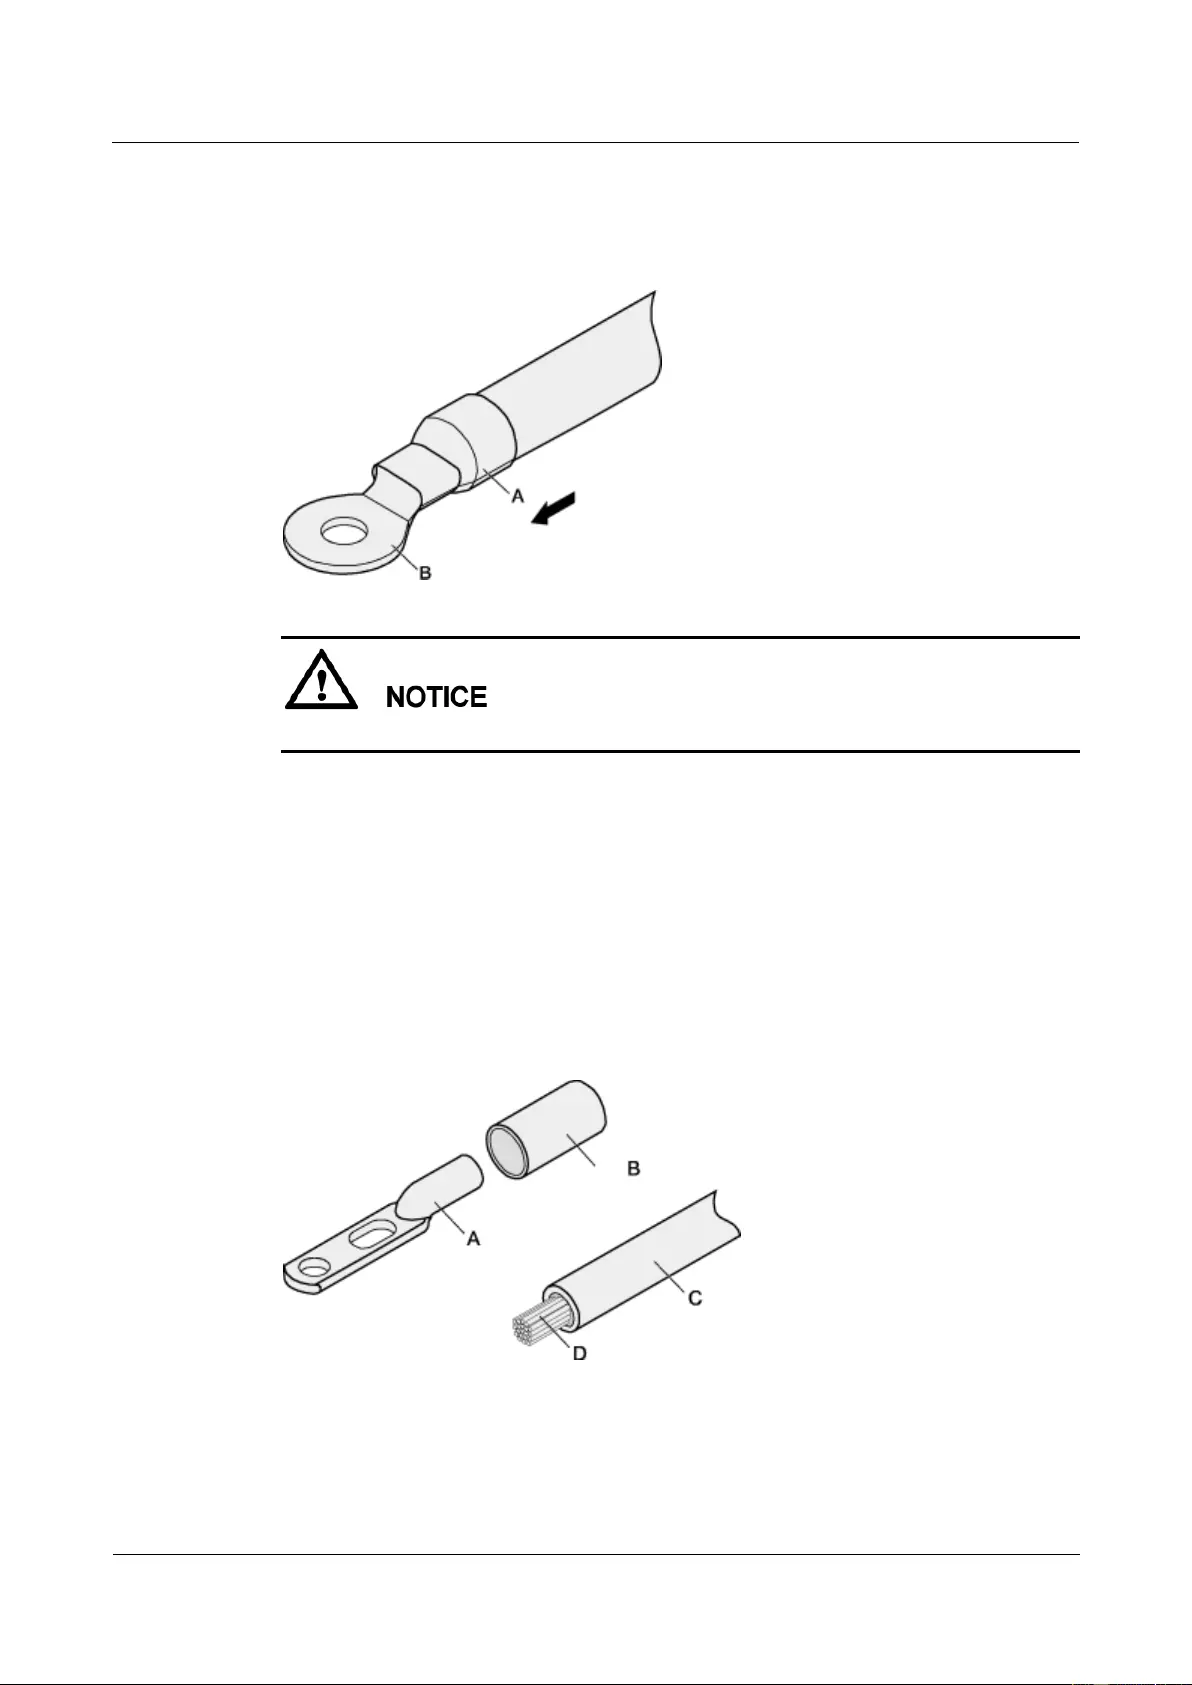
HUAWEI USG9500 Series Terabit-level Next-Generation Firewall
Hardware Guide
A Appendix
Issue 01 (2017-03-13)
Huawei Proprietary and Confidential
Copyright © Huawei Technologies Co., Ltd.
425
Step 5 Push the heat-shrinkable tube (A) towards the connector until the tube covers the crimped part,
and then heat the tube by using a heat gun, as shown in Figure A-36.
Figure A-36 Heating the heat-shrinkable tube
When you heat the heat-shrinkable tube, do not heat it with too much time.
----End
A.2.2.2 Assembling the JG Terminal and the Power Cable
This topic describes how to assemble a JG terminal and a power cable.
Context
Figure A-37 shows the components of a JG terminal and a power cable.
Figure A-37 Components of a JG terminal and a power cable
A. JG
terminal
B. Heat-shrinkable
tube
C. Insulation layer of a
power cable
D. Conductor of a
power cable
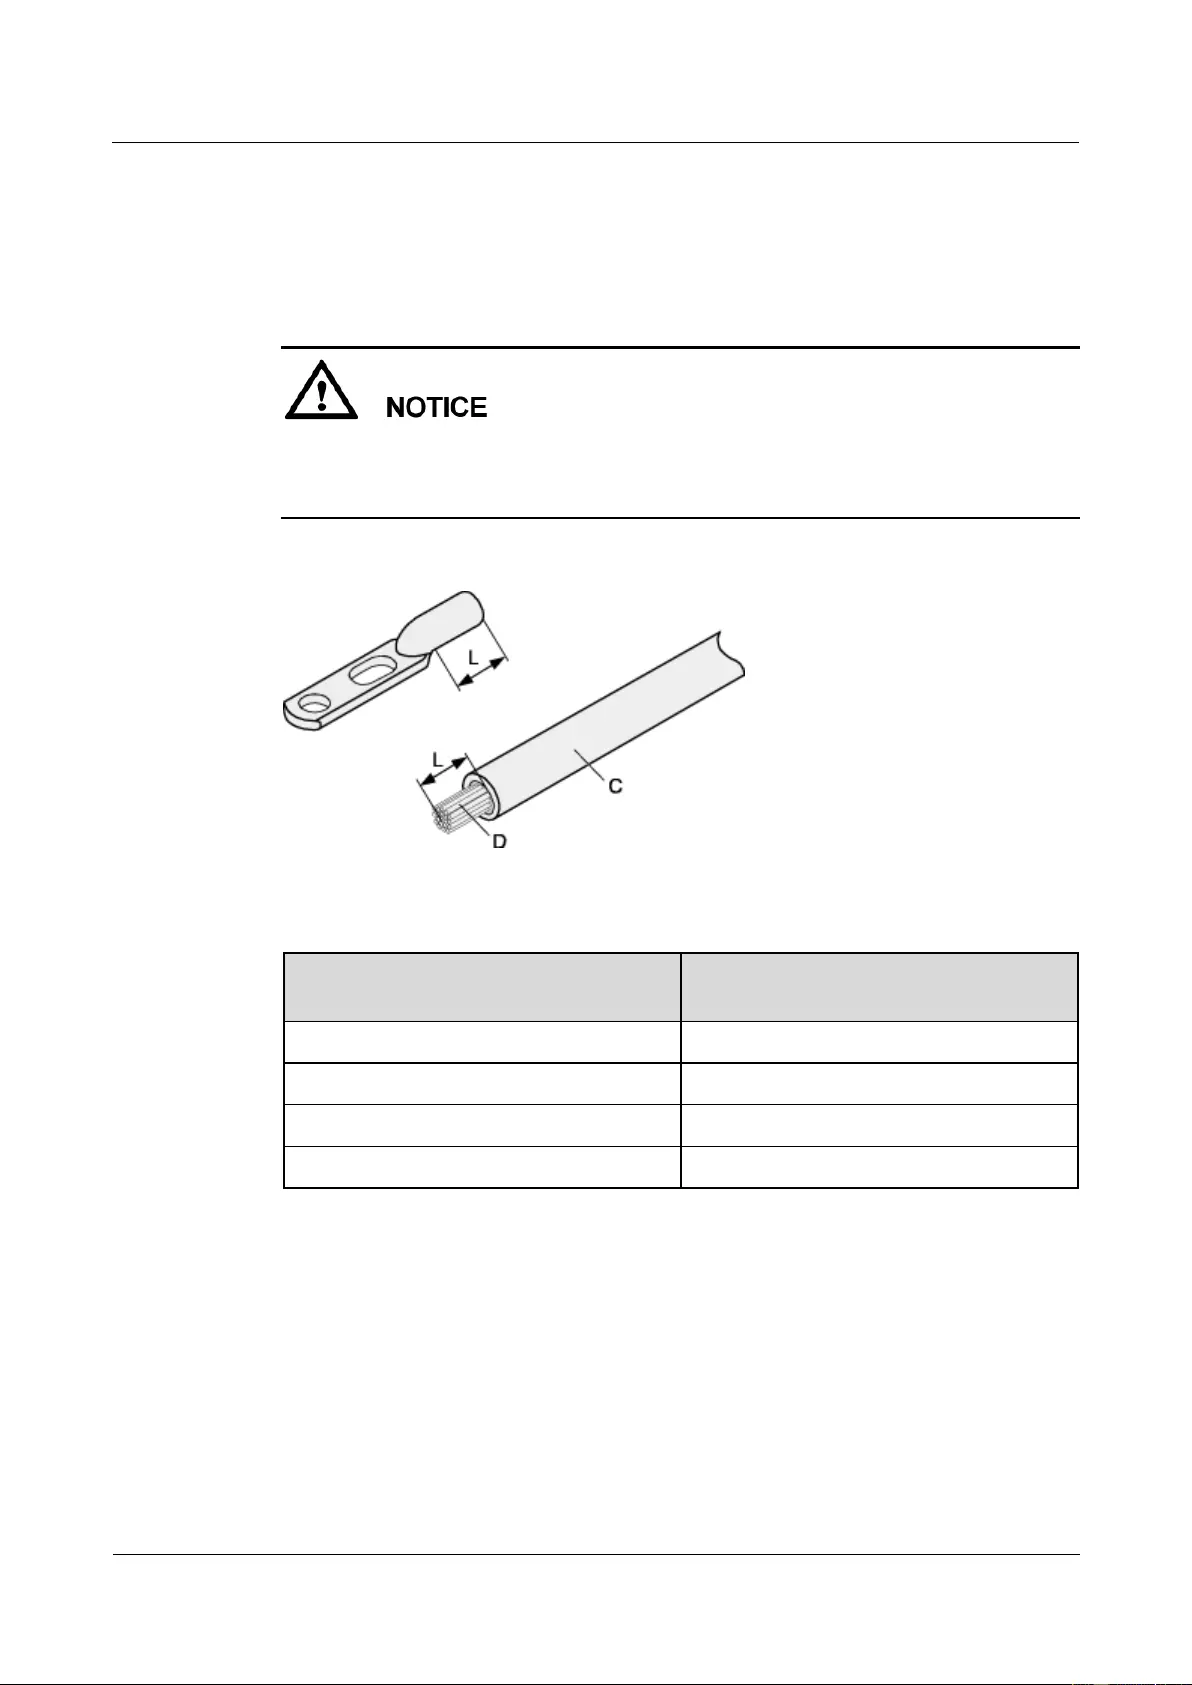
HUAWEI USG9500 Series Terabit-level Next-Generation Firewall
Hardware Guide
A Appendix
Issue 01 (2017-03-13)
Huawei Proprietary and Confidential
Copyright © Huawei Technologies Co., Ltd.
426
Procedure
Step 1 Based on the cross-sectional area of the cable conductor, strip a part of the cable. The L-long
conductor is exposed, as shown in Figure A-38. The recommended values of L1 are listed in
Table A-25.
When you strip a power cable, do not damage the conductor of the cable.
If the bare crimping terminal is not provided by Huawei, you can adjust the value of L as
required.
Figure A-38 Stripping a power cable (JG terminal)
Table A-25 Mapping between the cross-sectional area of the conductor and the value of L
Cross-Sectional Area of Conductor
(mm2)
Value of L (mm)
16
13
25
14
35
16
50
16
Step 2 Put the heat-shrinkable tube onto the bare crimping terminal, as shown in Figure A-39.
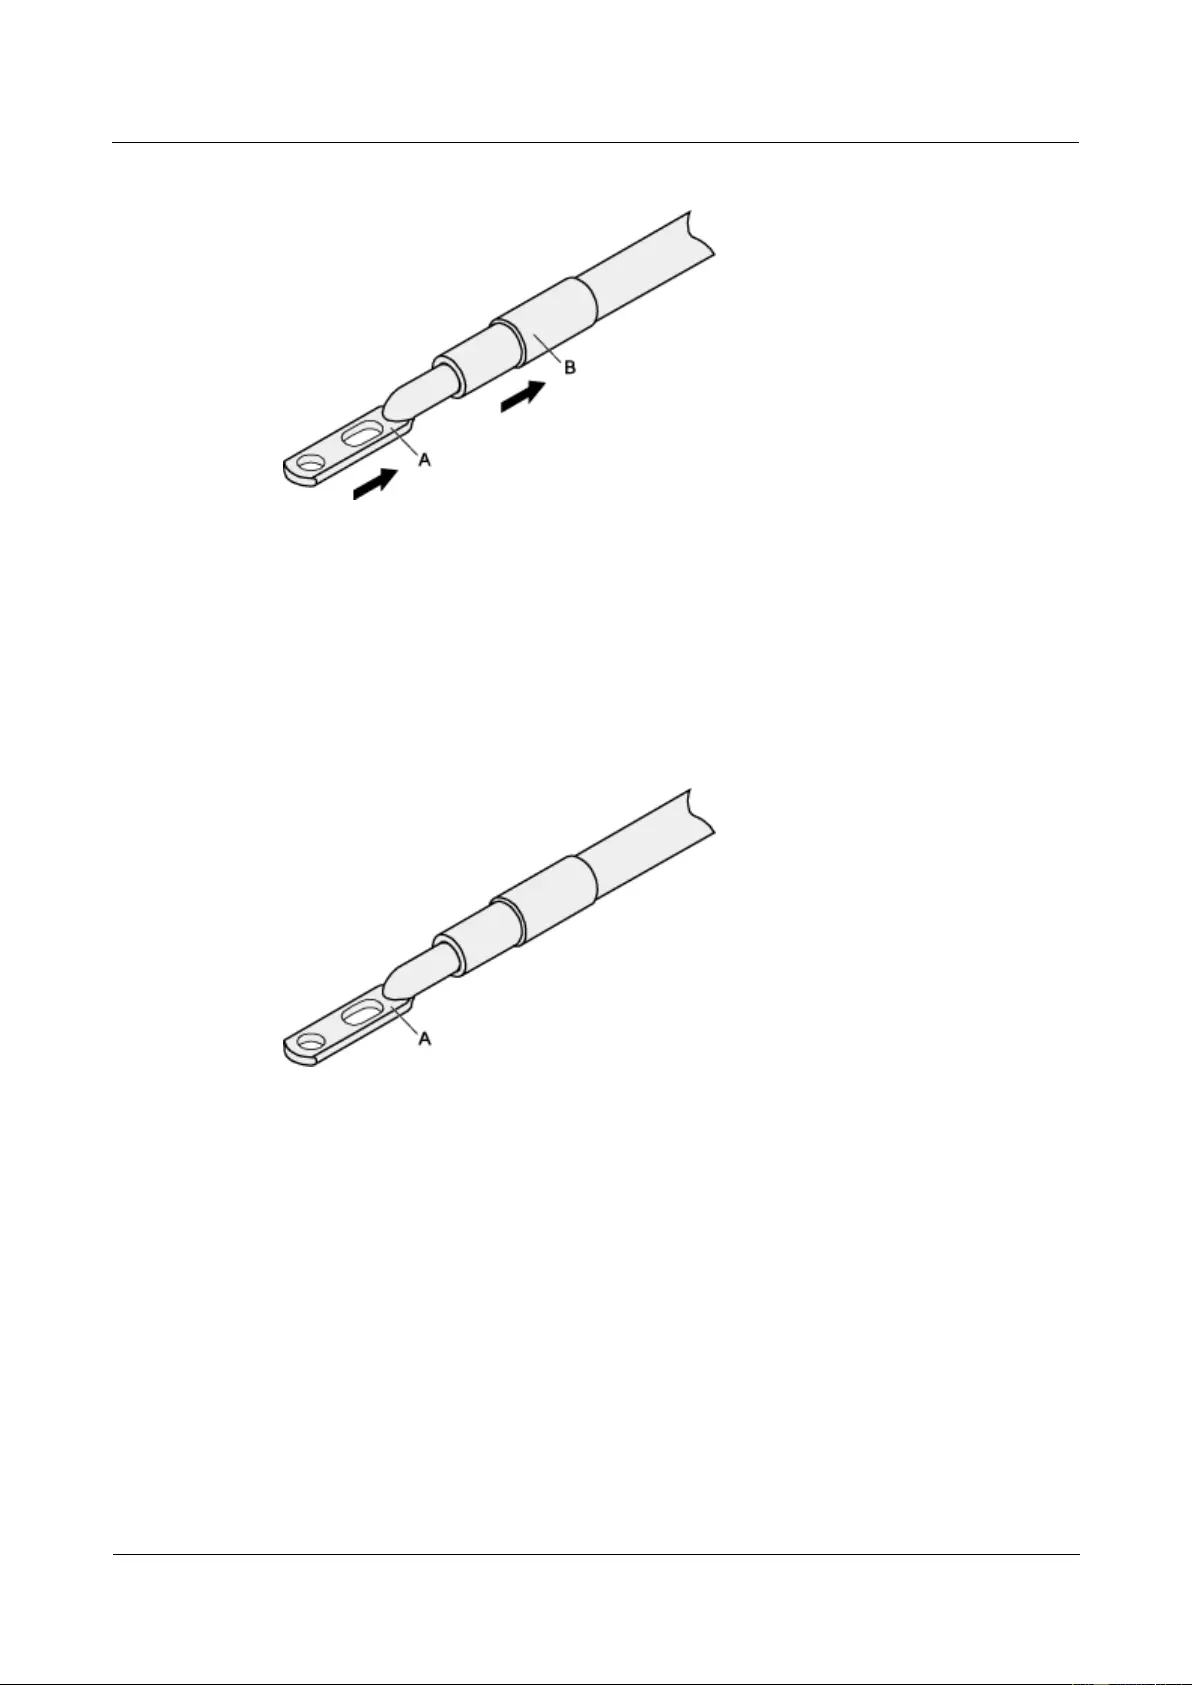
HUAWEI USG9500 Series Terabit-level Next-Generation Firewall
Hardware Guide
A Appendix
Issue 01 (2017-03-13)
Huawei Proprietary and Confidential
Copyright © Huawei Technologies Co., Ltd.
427
Figure A-39 Putting the heat-shrinkable tube onto the bare crimping terminal
Step 3 Put the bare crimping terminal onto the exposed conductor, and ensure that the bare crimping
terminal is in good contact with the insulation layer of the power cable, as shown in Figure
A-39.
Step 4 Crimp the joint parts of the bare crimping terminal and the conductor, as shown in Figure
A-40.
Figure A-40 Crimping the joint parts of the bare crimping terminal and the conductor (JG
terminal)
Step 5 Push the heat-shrinkable tube towards the connector until the tube covers the crimped part,
and then heat the tube by using a heat gun, as shown in Figure A-41.
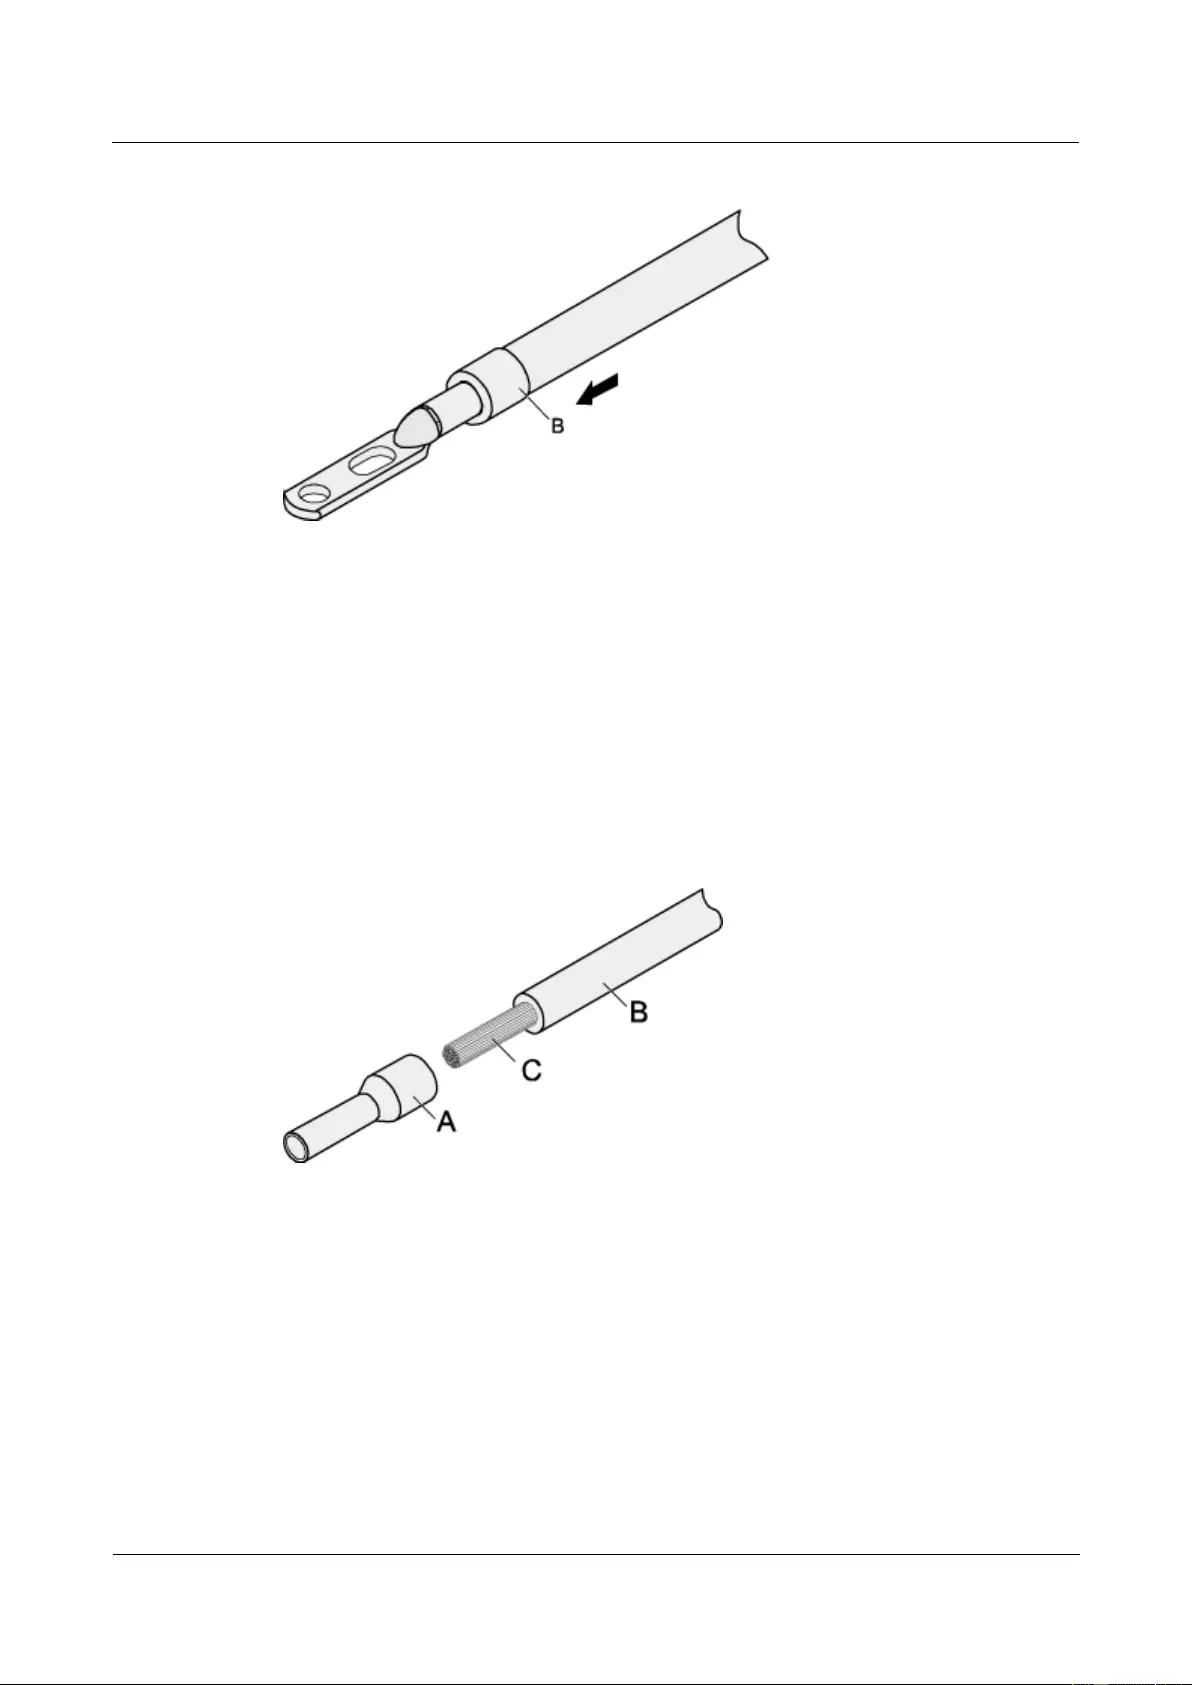
HUAWEI USG9500 Series Terabit-level Next-Generation Firewall
Hardware Guide
A Appendix
Issue 01 (2017-03-13)
Huawei Proprietary and Confidential
Copyright © Huawei Technologies Co., Ltd.
428
Figure A-41 Heating the heat-shrinkable tube (JG terminal)
----End
A.2.2.3 Assembling the Cord End Terminal and the Power Cable
This topic describes how to assemble a cord end terminal and a power cable.
Context
Figure A-42 shows the components of a cord end terminal and a power cable.
Figure A-42 Components of a cord end terminal and a power cable
A. Cord end
terminal
B. Insulation layer of a power
cable
C. Conductor of a power
cable
Procedure
Step 1 Based on the cross-sectional area of the cable conductor, strip a part of the insulation layer.
The L1-long conductor is exposed, as shown in Figure A-43. The recommended values of L1
are listed in Table A-26.
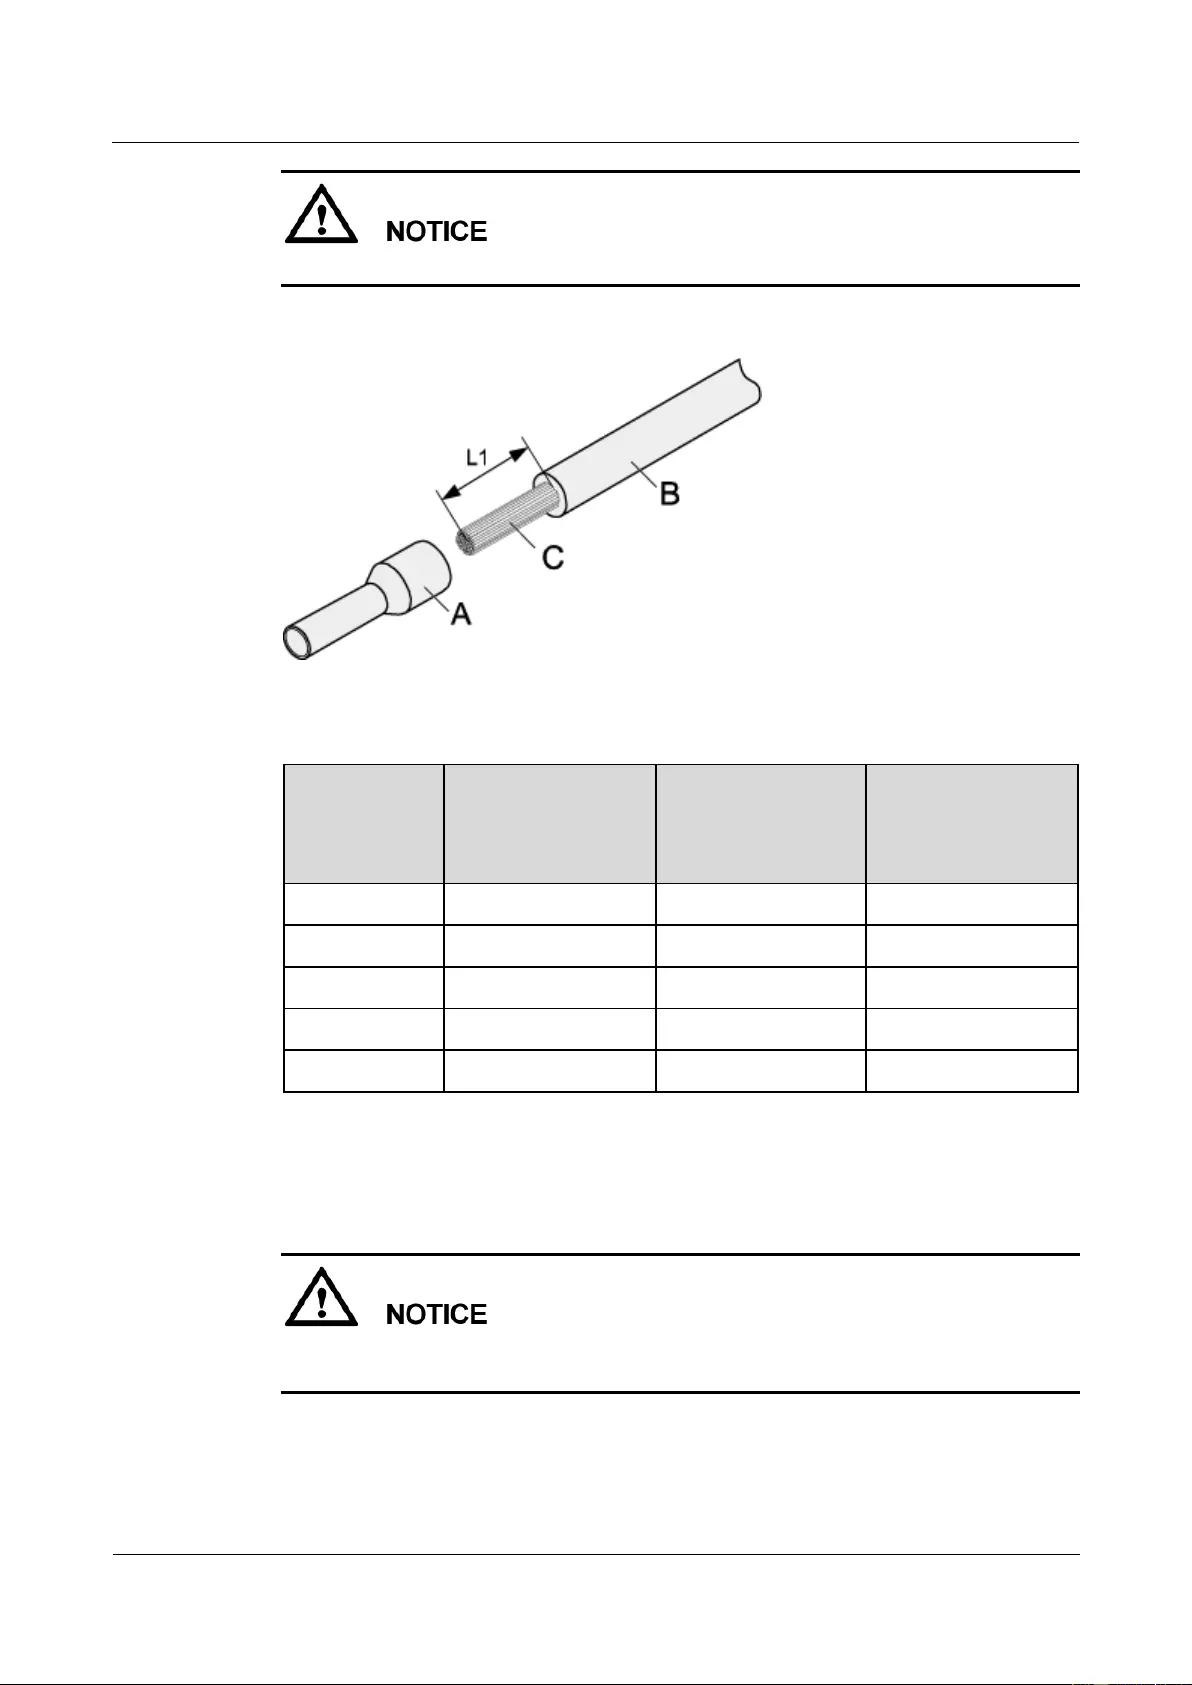
HUAWEI USG9500 Series Terabit-level Next-Generation Firewall
Hardware Guide
A Appendix
Issue 01 (2017-03-13)
Huawei Proprietary and Confidential
Copyright © Huawei Technologies Co., Ltd.
429
When you strip a power cable, do not damage the conductor of the cable.
Figure A-43 Stripping a power cable (cord end terminal)
Table A-26 Mapping between the cross-sectional area of the conductor and the value of L1
Cross-Section
al Area of
Conductor
(mm2)
Value of L1 (mm)
Cross-Sectional
Area of Conductor
(mm2)
Value of L1 (mm)
1
8
10
15
1.5
10
16
15
2.5
10
25
18
4
12
35
19
6
14
50
26
Step 2 Putting the cord end terminal onto the conductor, and ensure that the conductor is aligned
with the edge of the cord end terminal, as shown in Figure A-44.
After the conductor is fed into the cord end terminal, the protruding part of the conductor
must not be longer than 1mm.
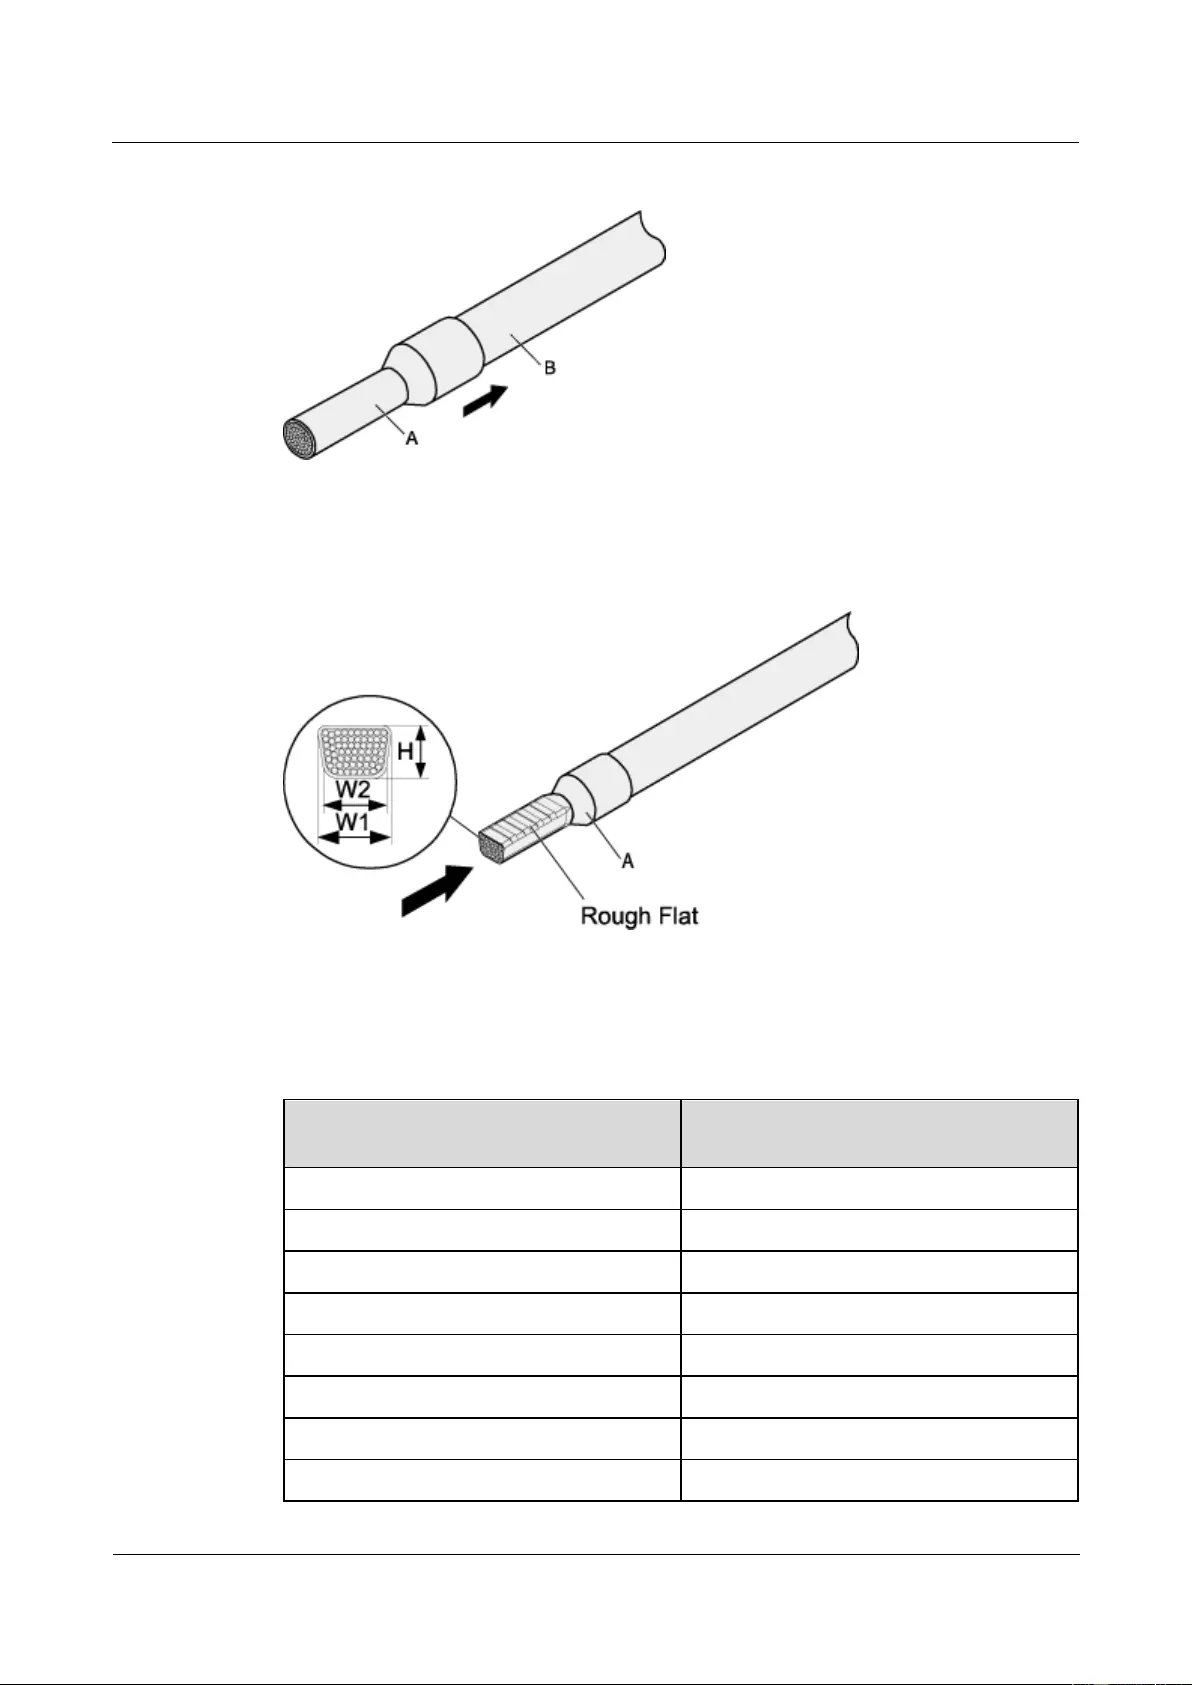
HUAWEI USG9500 Series Terabit-level Next-Generation Firewall
Hardware Guide
A Appendix
Issue 01 (2017-03-13)
Huawei Proprietary and Confidential
Copyright © Huawei Technologies Co., Ltd.
430
Figure A-44 Put the cord end terminal onto the conductor
Step 3 Crimp the joint parts of the cord end terminal and the conductor, as shown in Figure A-45.
Figure A-45 Crimping the cord end terminal and the conductor
Step 4 Check the maximum width of the tubular crimped terminal. The maximum width of a tubular
crimped terminal is listed in Table A-27.
Table A-27 Maximum width of a tubular crimped terminal
Cross-Sectional Area of Tubular
Terminal (mm2)
Maximum Width of Crimped Terminal
W1 (mm)
0.25
1
0.5
1
1.0
1.5
1.5
1.5
2.5
2.4
4
3.1
6
4
10
5.3
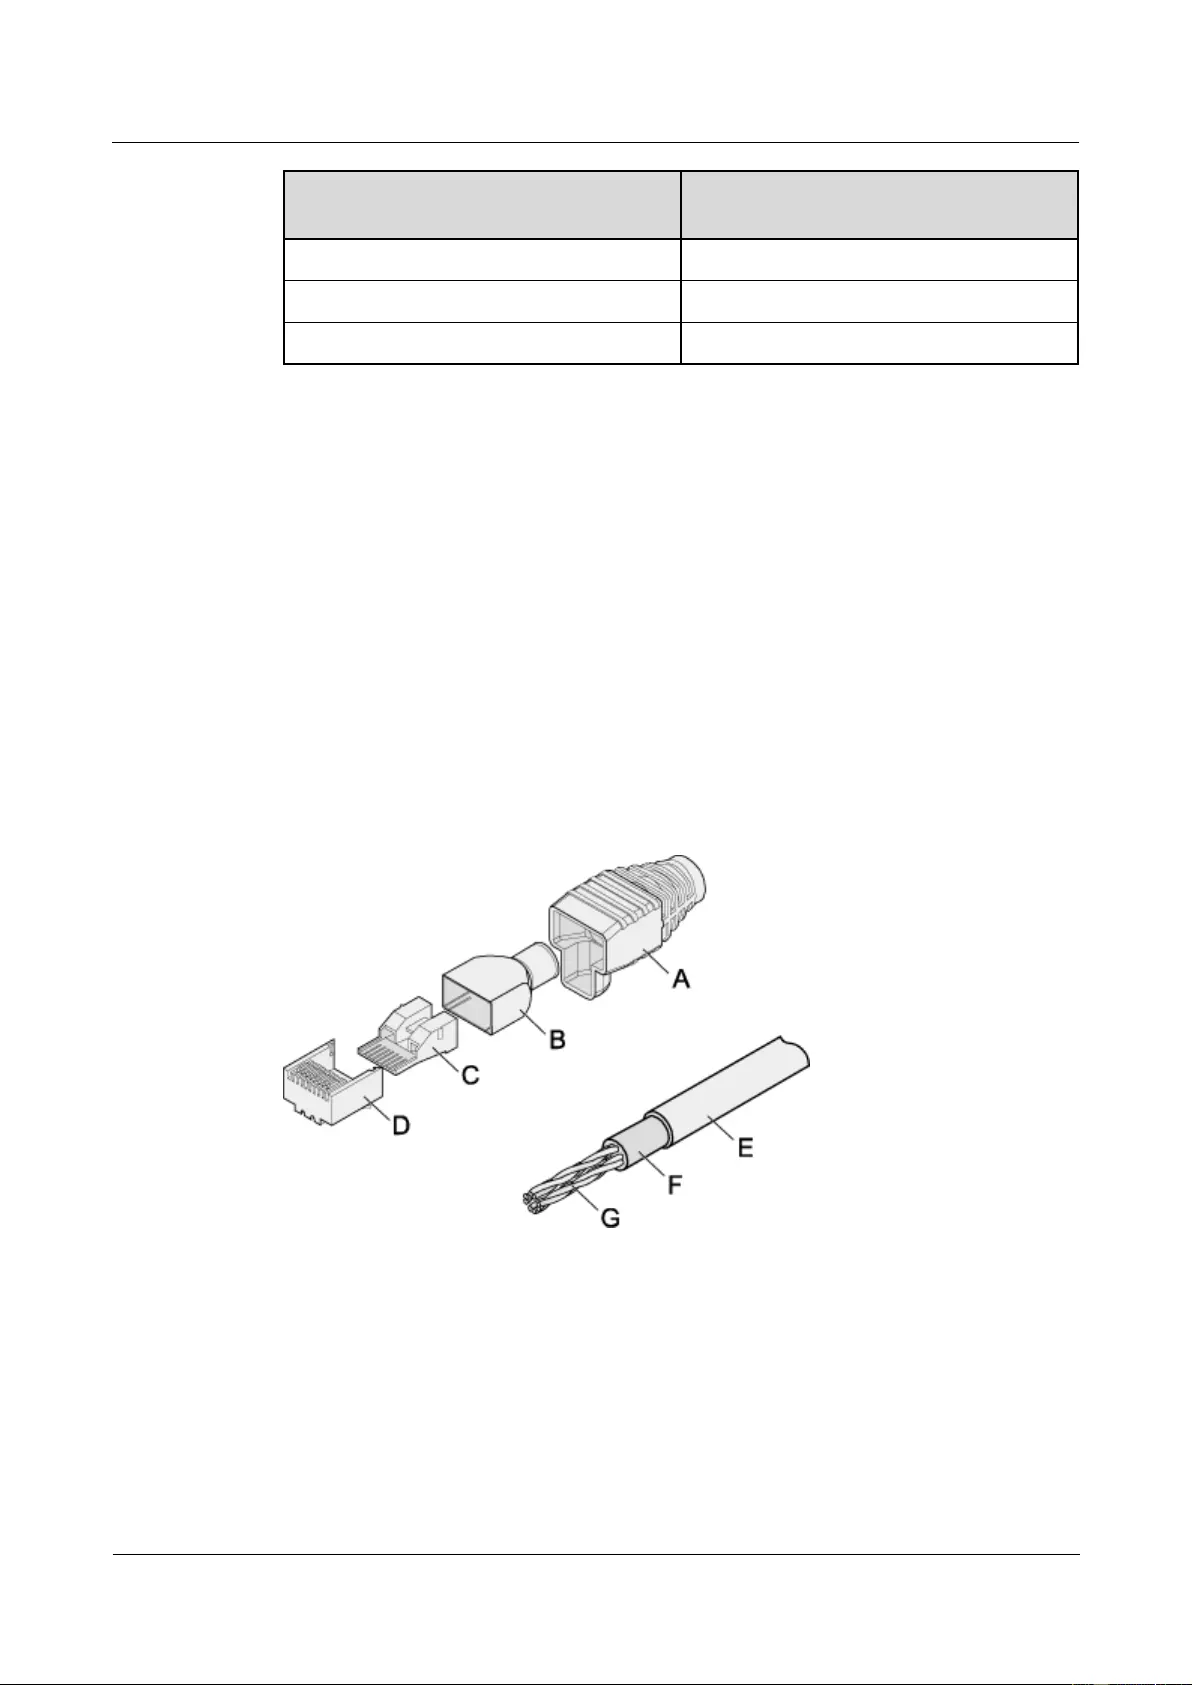
HUAWEI USG9500 Series Terabit-level Next-Generation Firewall
Hardware Guide
A Appendix
Issue 01 (2017-03-13)
Huawei Proprietary and Confidential
Copyright © Huawei Technologies Co., Ltd.
431
Cross-Sectional Area of Tubular
Terminal (mm2)
Maximum Width of Crimped Terminal
W1 (mm)
16
6
25
8.7
35
10
----End
A.2.3 Assembling Ethernet Cables
This topic describes how to assemble RJ45 connectors and Ethernet cables.
A.2.3.1 Assembling the Shielded RJ45 Connector and the Ethernet Cable
This topic describes how to assemble a shielded RJ45 connector and an Ethernet cable, or
specifically, a straight-through Ethernet cable.
Context
Figure A-46 shows the components of an RJ45 connector and a shielded Ethernet cable.
Figure A-46 Shielded RJ45 connector
A. Jacket of
connector
B. Metal shell of
connector
C. Wire holder of
connector
D. Plug of
connector
E. Jacket of
Ethernet cable
F. Shielding layer of
Ethernet cable
G. Twisted-pair cable
-
Procedure
Step 1 Fit the jacket of the connector onto the Ethernet cable, as shown in Figure A-47.
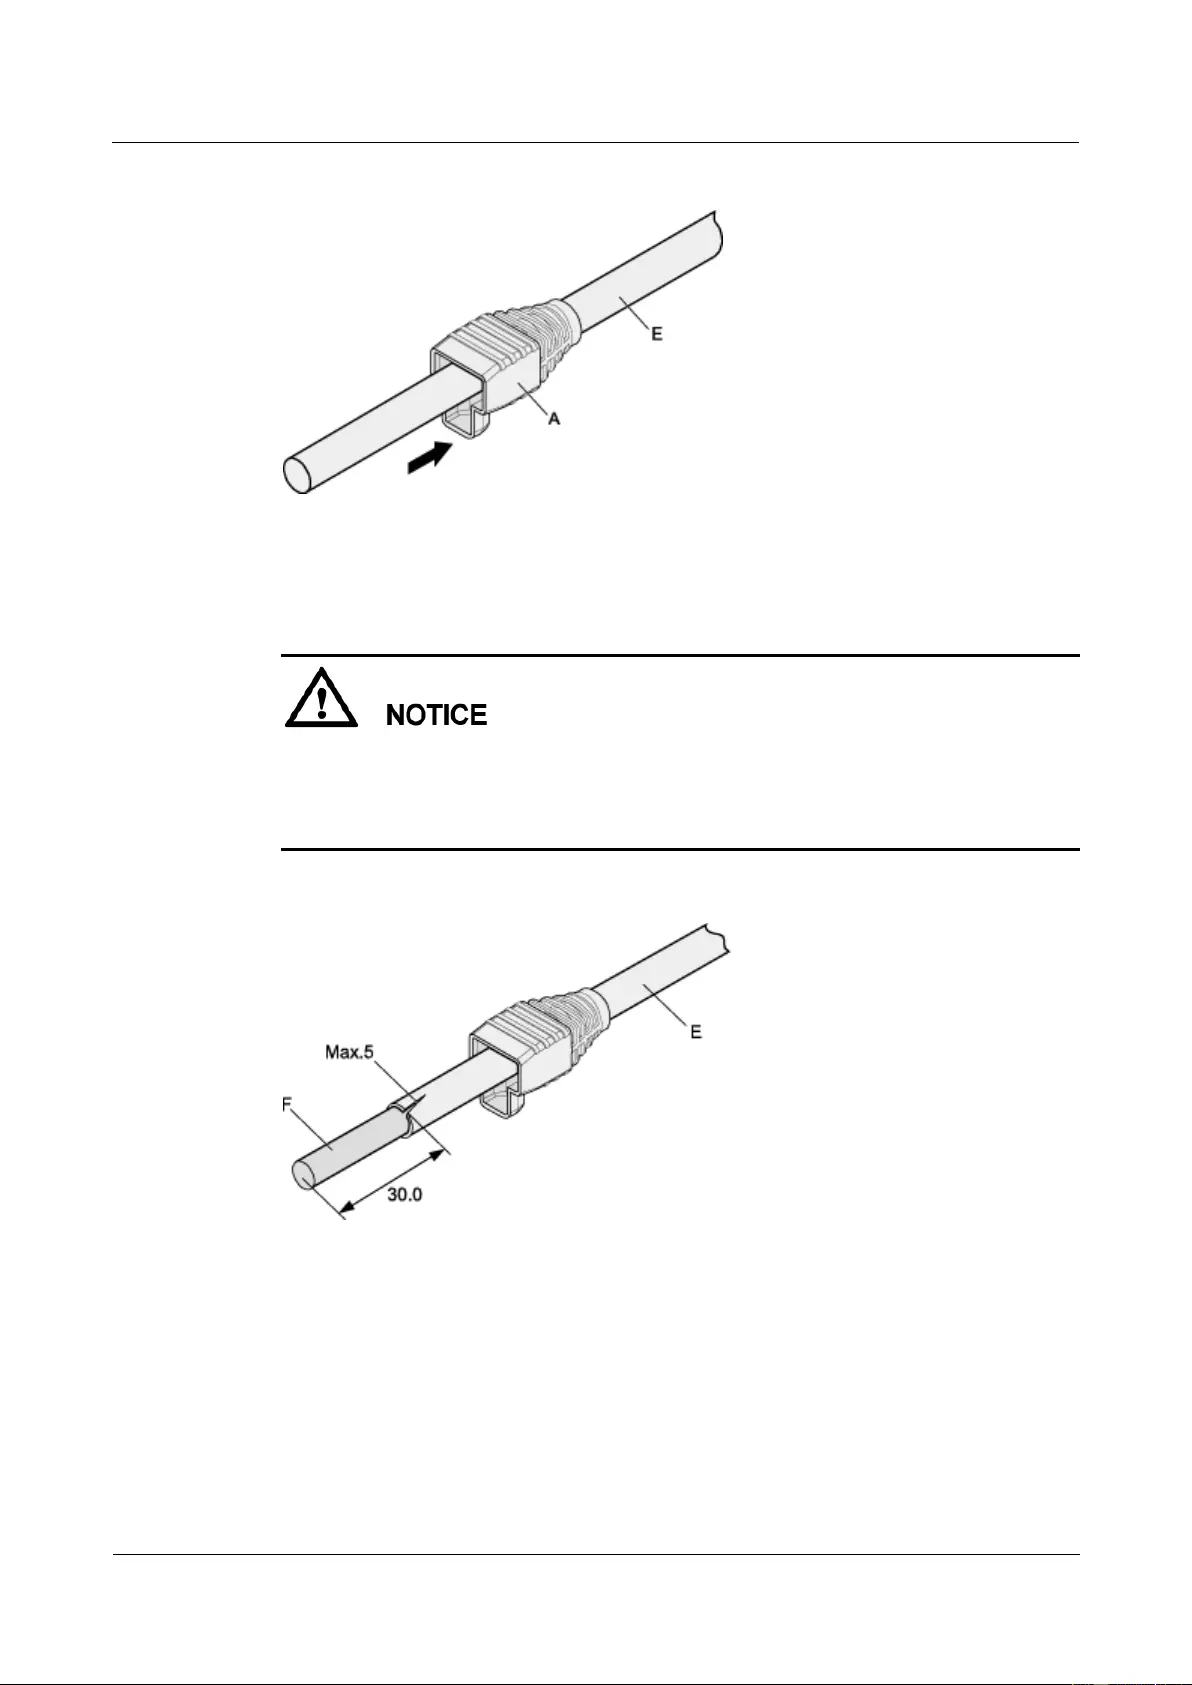
HUAWEI USG9500 Series Terabit-level Next-Generation Firewall
Hardware Guide
A Appendix
Issue 01 (2017-03-13)
Huawei Proprietary and Confidential
Copyright © Huawei Technologies Co., Ltd.
432
Figure A-47 Fit the jacket of the connector onto the Ethernet cable
Step 2 Remove a 30-mm long section of the jacket, cut off the nylon twine inside the jacket, and cut
a 5-mm cleft in the cable jacket, as shown Figure A-48.
When you remove a section of the jacket, do not damage the shielding layer of the
twisted-pair cable.
When you remove the shielding layer, do not damage the insulation layer of the
twisted-pair cable.
Figure A-48 Removing the jacket of a twisted-pair cable (unit: mm)
Step 3 Fit the metal shell onto the twisted-pair cable. The shielding layer is covered by the metal
shell, as shown in Figure A-49.
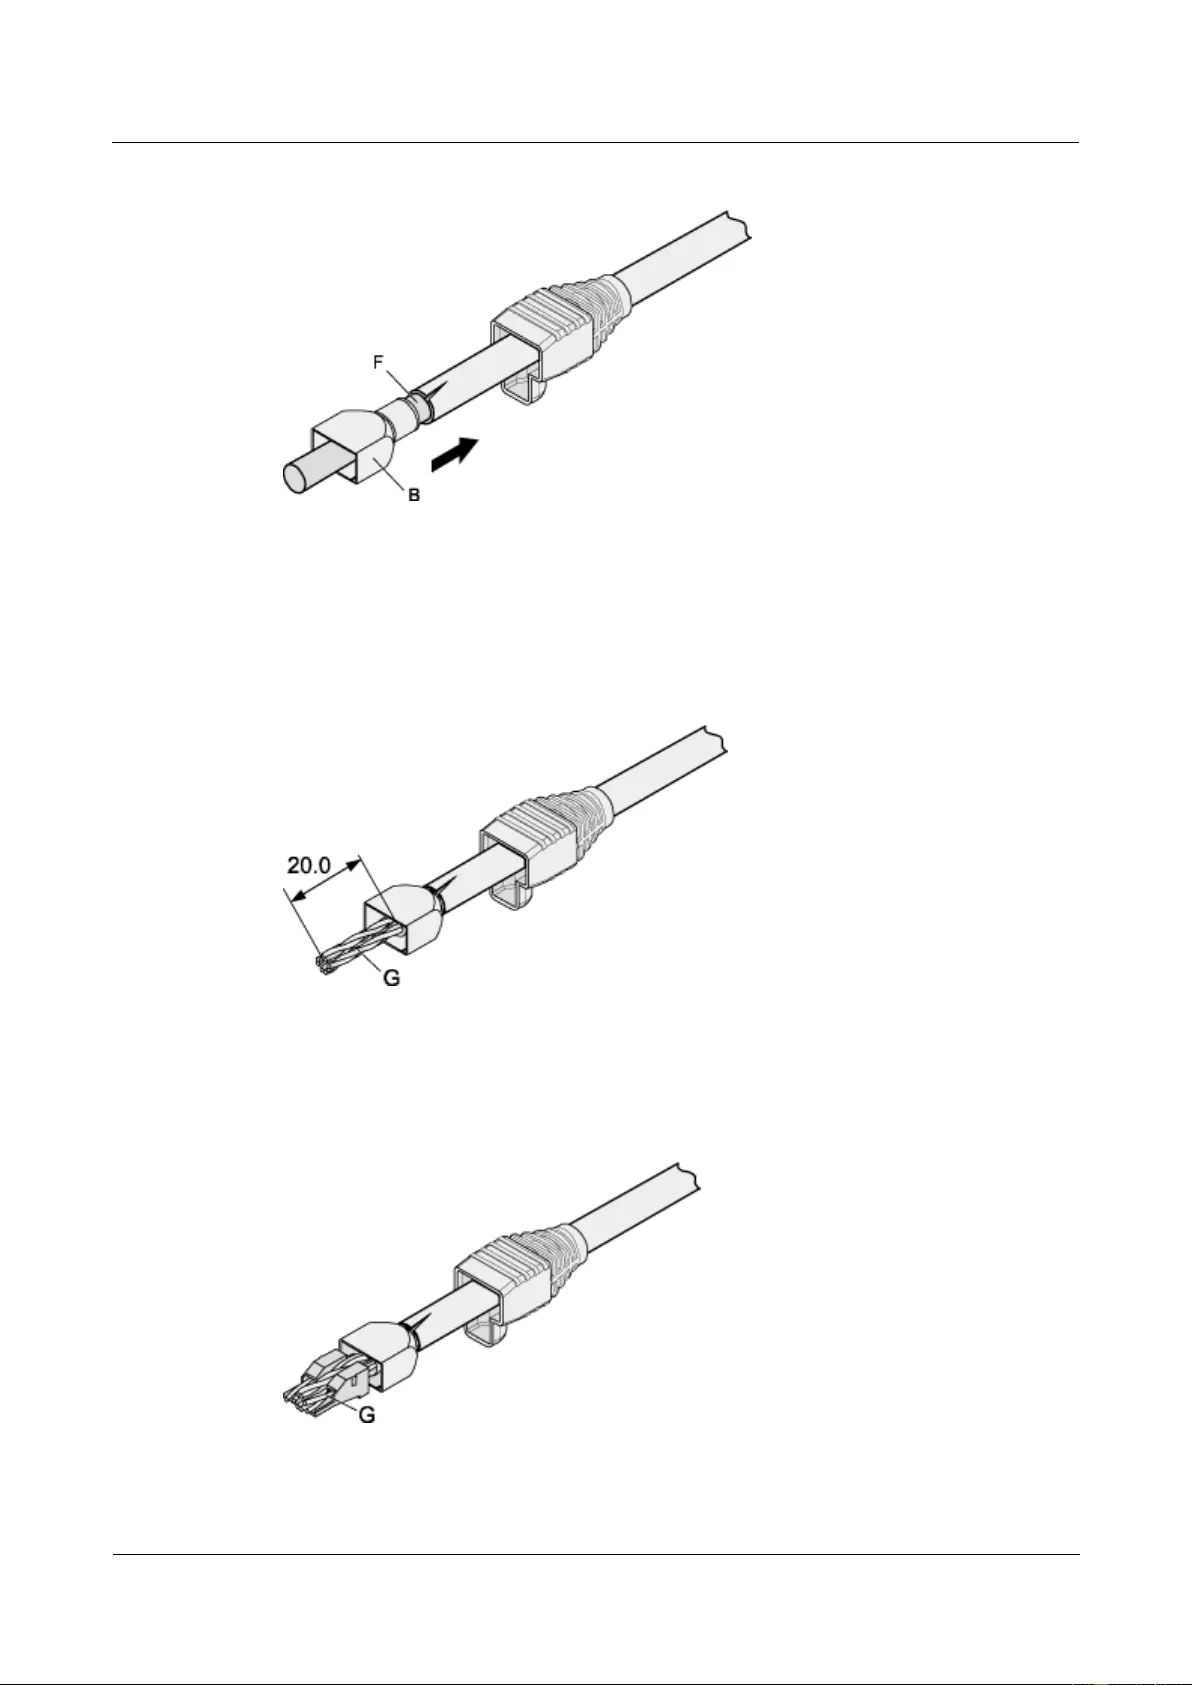
HUAWEI USG9500 Series Terabit-level Next-Generation Firewall
Hardware Guide
A Appendix
Issue 01 (2017-03-13)
Huawei Proprietary and Confidential
Copyright © Huawei Technologies Co., Ltd.
433
Figure A-49 Fit the metal shell onto the twisted-pair cable
Step 4 Fit the metal shell onto the twisted-pair cable until the shielding layer is covered completely.
Along the edge of the metal shell, cut off the shielding layer with aluminum foil and ensure
that there is no surplus copper wire. The exposed twisted-pair cable is about 20 mm long, as
shown in Figure A-50.
Figure A-50 Removing the shielding layer of a twisted-pair cable (unit: mm)
Step 5 Based on the colors, lead the four pairs of twisted-pair cables through the wire holder, as
shown in Figure A-51 and Figure A-52.
Figure A-51 Leading cables through the wire holder
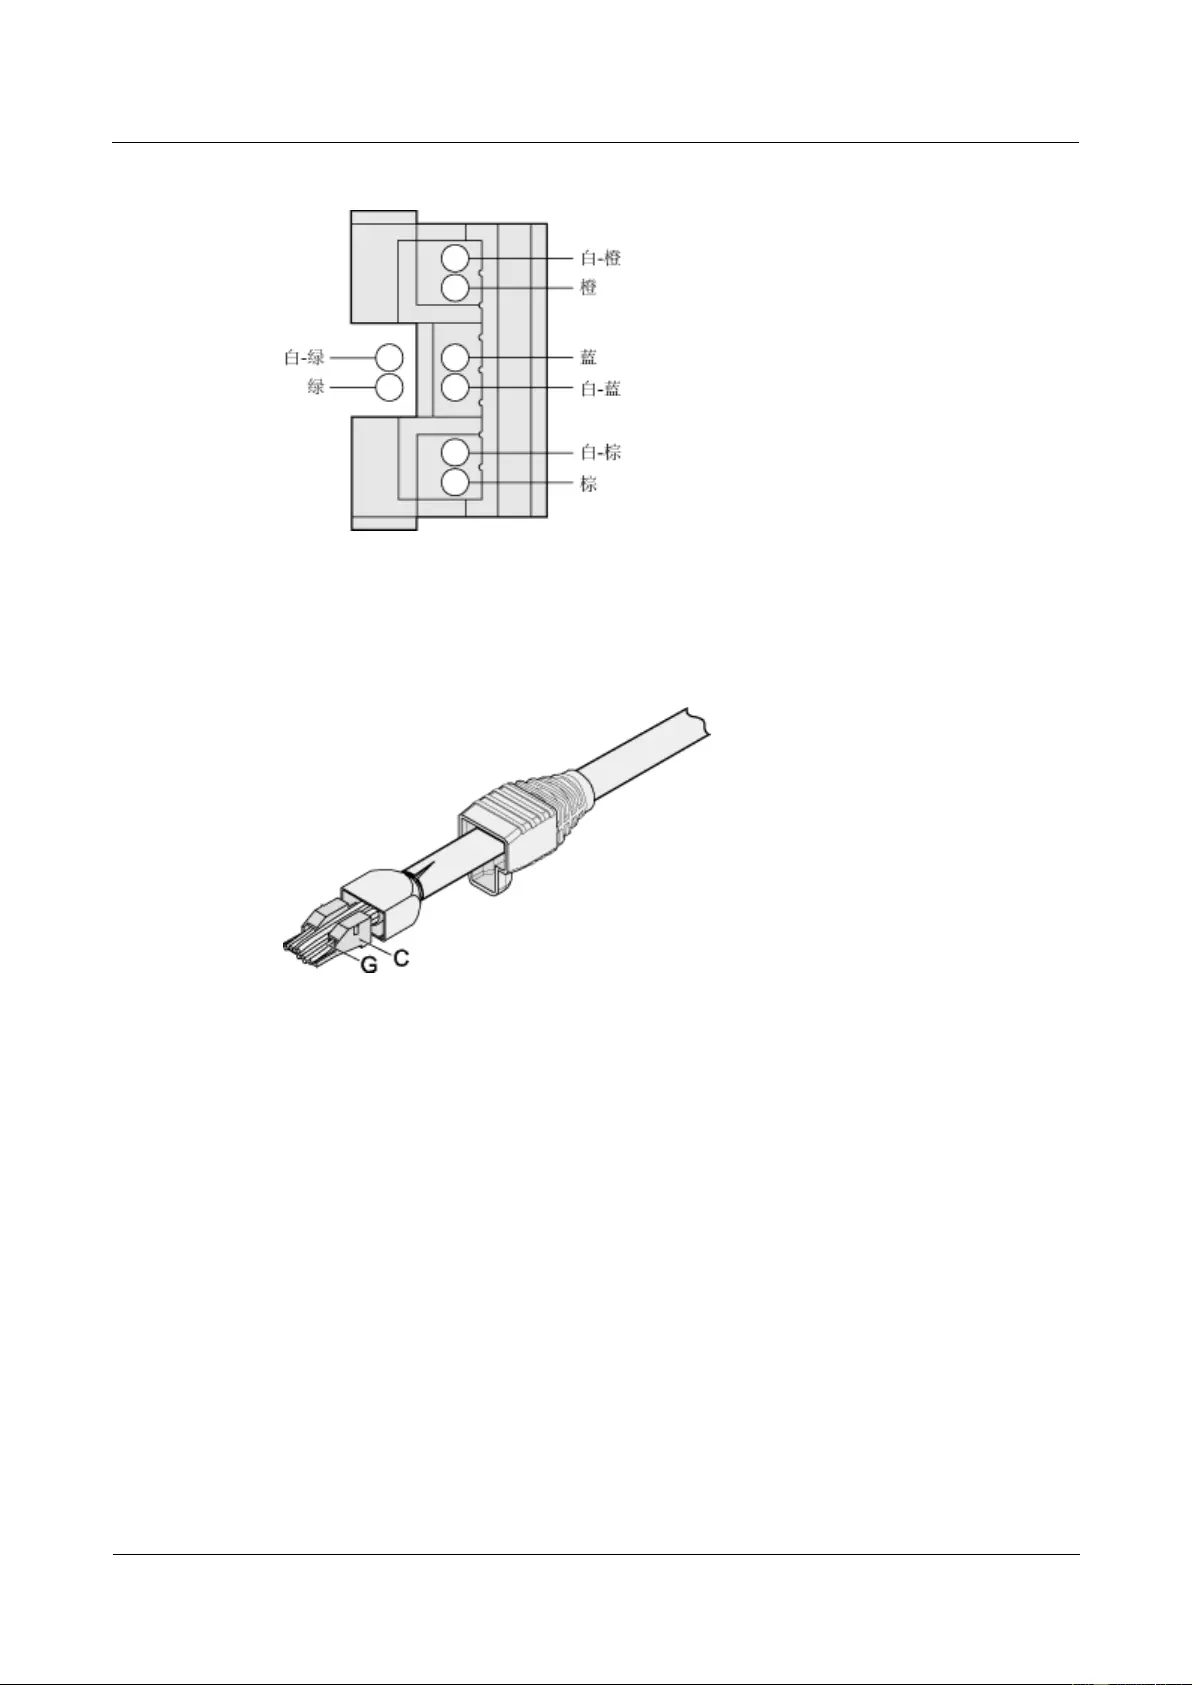
HUAWEI USG9500 Series Terabit-level Next-Generation Firewall
Hardware Guide
A Appendix
Issue 01 (2017-03-13)
Huawei Proprietary and Confidential
Copyright © Huawei Technologies Co., Ltd.
434
Figure A-52 Cable locations in a wire holder
Step 6 Align the four pairs of cables on the holder, as shown in Figure A-53. The connections
between the core wires and the pins are shown in Figure A-54 and listed in Table A-28.
Figure A-53 Aligning four pairs of cables on a wire holder
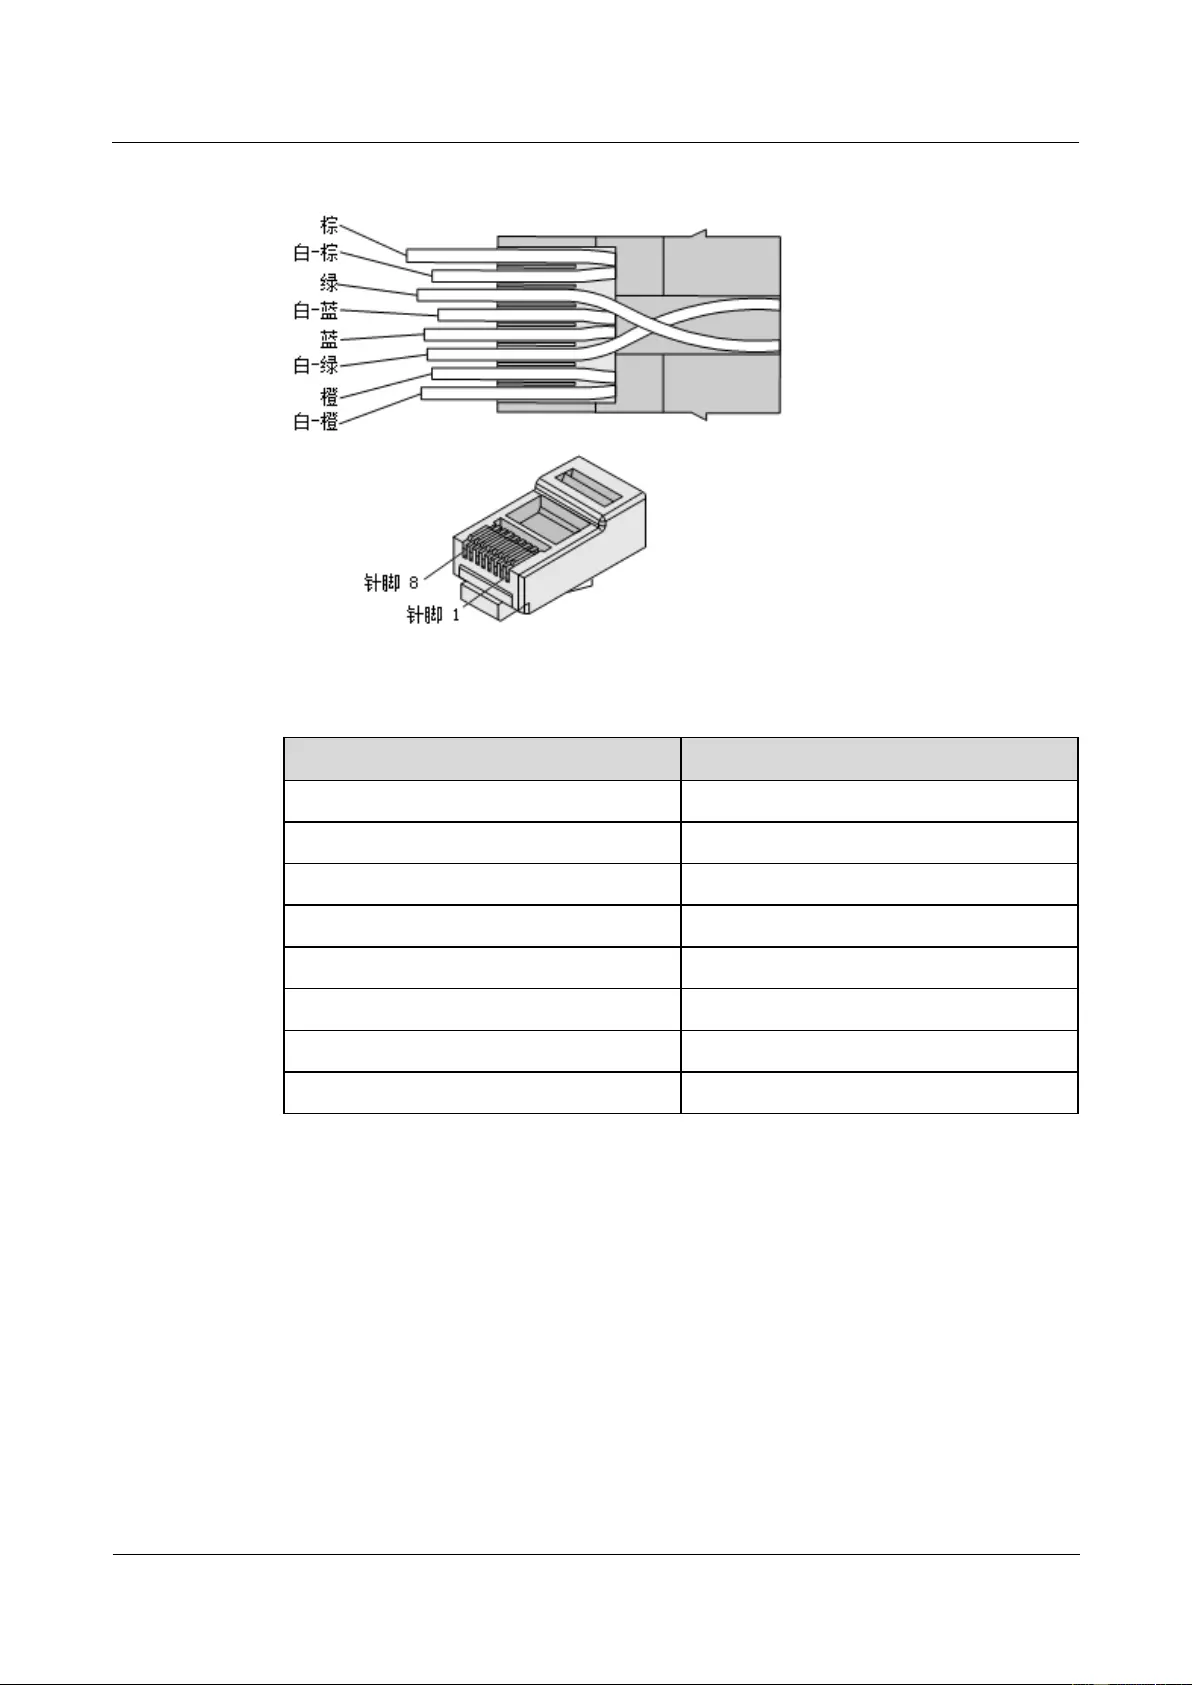
HUAWEI USG9500 Series Terabit-level Next-Generation Firewall
Hardware Guide
A Appendix
Issue 01 (2017-03-13)
Huawei Proprietary and Confidential
Copyright © Huawei Technologies Co., Ltd.
435
Figure A-54 Connections between core wires and pins
Table A-28 Connections between core wires and pins
Matching Pins of Wires
Core Wire Color
1
White-Orange
2
Orange
3
White-Green
4
Blue
5
White-Blue
6
Green
7
White-Brown
8
Brown
Step 7 Cut off the surplus cables along the lower edge of the wire holder, as shown in Figure A-55.
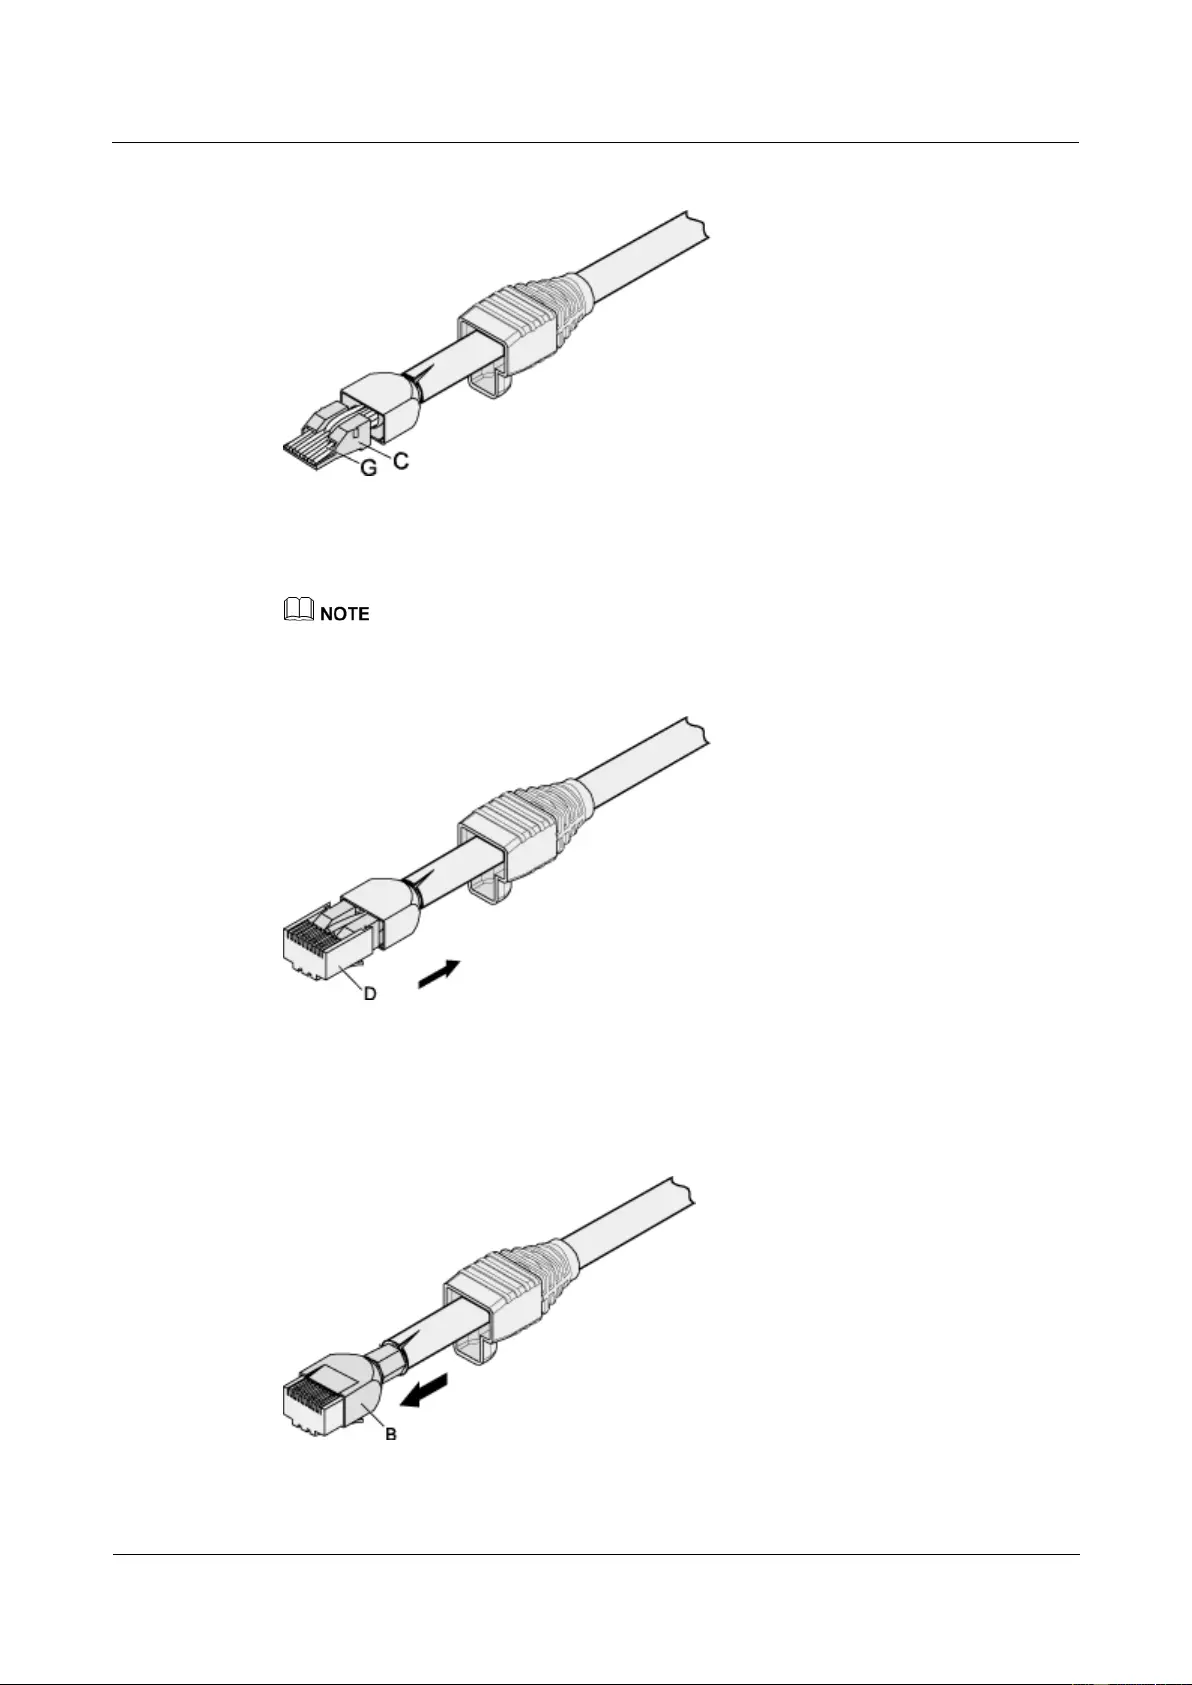
HUAWEI USG9500 Series Terabit-level Next-Generation Firewall
Hardware Guide
A Appendix
Issue 01 (2017-03-13)
Huawei Proprietary and Confidential
Copyright © Huawei Technologies Co., Ltd.
436
Figure A-55 Cutting off surplus cables
Step 8 Putting the connector body onto the wire holder and turn the metal shell by 90°, as shown in
Figure A-56.
Ensure that the wire holder is in good contact with the connector body.
Figure A-56 Put the connector body onto the wire holder
Step 9 Push the metal shell towards the connector body until the wire holder and the connector body
are wrapped completely. Crimp the connector, as shown in Figure A-57.
Figure A-57 Crimping the connector
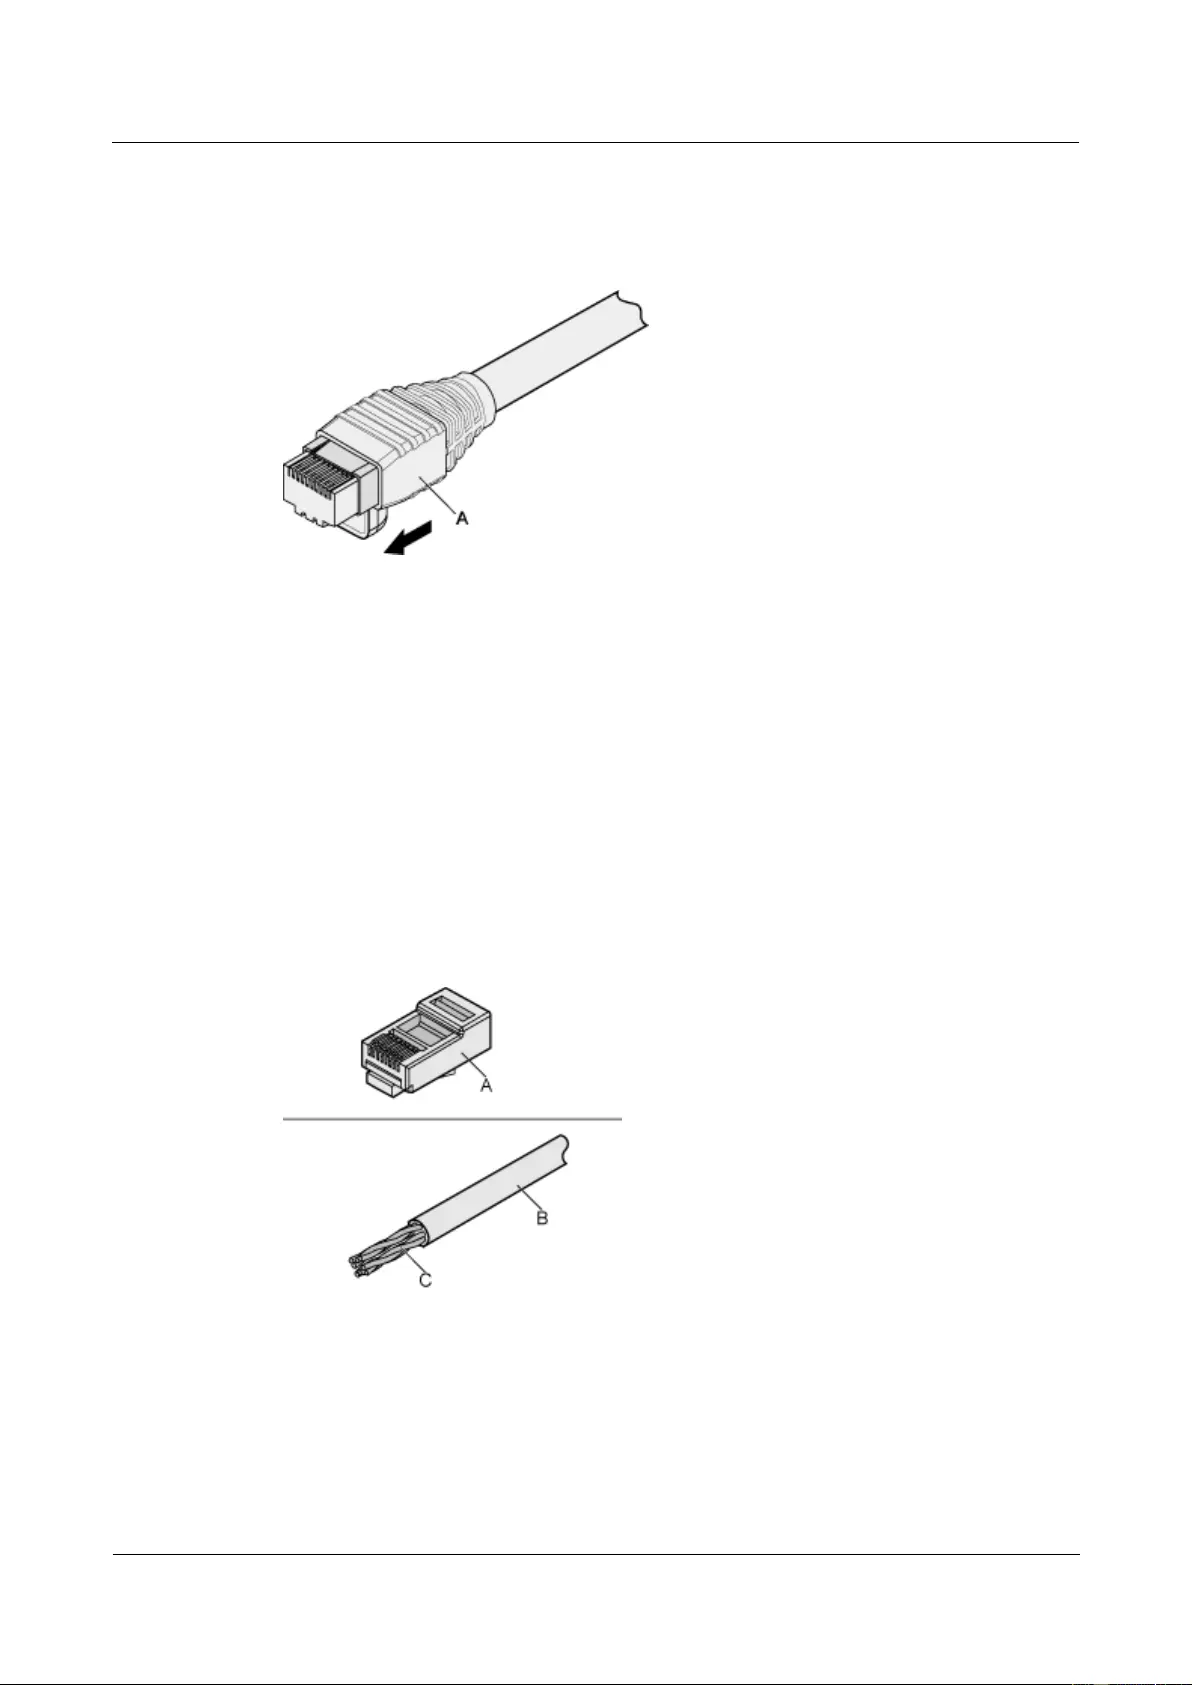
HUAWEI USG9500 Series Terabit-level Next-Generation Firewall
Hardware Guide
A Appendix
Issue 01 (2017-03-13)
Huawei Proprietary and Confidential
Copyright © Huawei Technologies Co., Ltd.
437
Step 10 Push the jacket towards the metal shell until the metal shell is wrapped. One end of the cable
is completely assembled, as shown in Figure A-58.
Figure A-58 Wrapping the metal shell
Step 11 To complete the assembly of the other end, repeat Step 1 through Step 10.
----End
A.2.3.2 Assembling the Unshielded RJ45 Connector and the Ethernet Cable
This topic describes how to assemble an unshielded RJ45 connector and an Ethernet cable, or
specifically, a straight-through Ethernet cable.
Context
Figure A-59 shows the components of an unshielded RJ45 connector.
Figure A-59 Components of an unshielded RJ45 connector
A. Plug of connector
B. Jacket of connector
C. Twisted-pair cable
Procedure
Step 1 Remove a 30-mm long section of the jacket, as shown in Figure A-60.
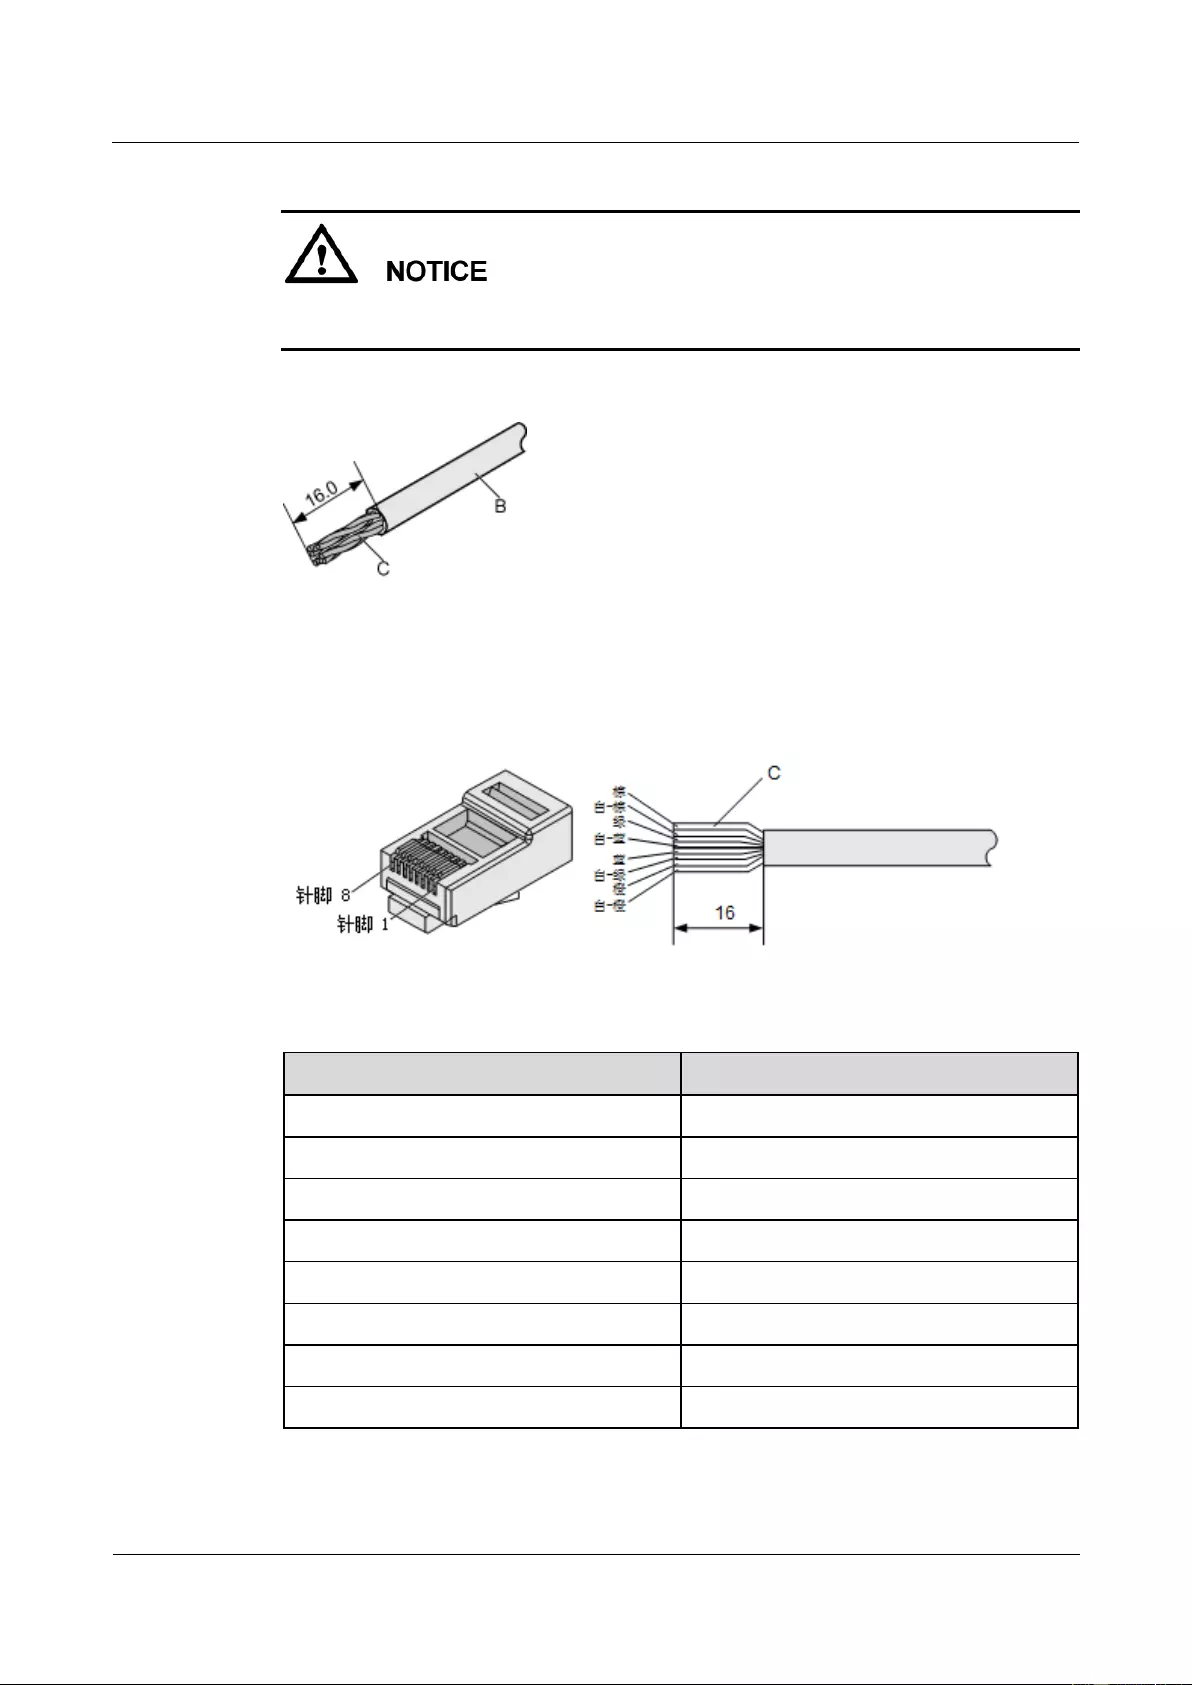
HUAWEI USG9500 Series Terabit-level Next-Generation Firewall
Hardware Guide
A Appendix
Issue 01 (2017-03-13)
Huawei Proprietary and Confidential
Copyright © Huawei Technologies Co., Ltd.
438
When you remove the shielding layer, do not damage the insulation layer of the twisted-pair
cable.
Figure A-60 Removing the jacket of a twisted-pair cable (unit: mm)
Step 2 Align the four pairs of cables and cut the ends neatly, as shown in Figure A-61. The
connections between the core wires and the pins are listed in Table A-29.
Figure A-61 Connections between core wires and pins (unit: mm)
Table A-29 Connections between core wires and pins
Matching Pins of Wires
Core Wire Color
1
White-Orange
2
Orange
3
White-Green
4
Blue
5
White-Blue
6
Green
7
White-Brown
8
Brown
Step 3 Feed the cable into the plug, and crimp the connector, as shown in Figure A-62.
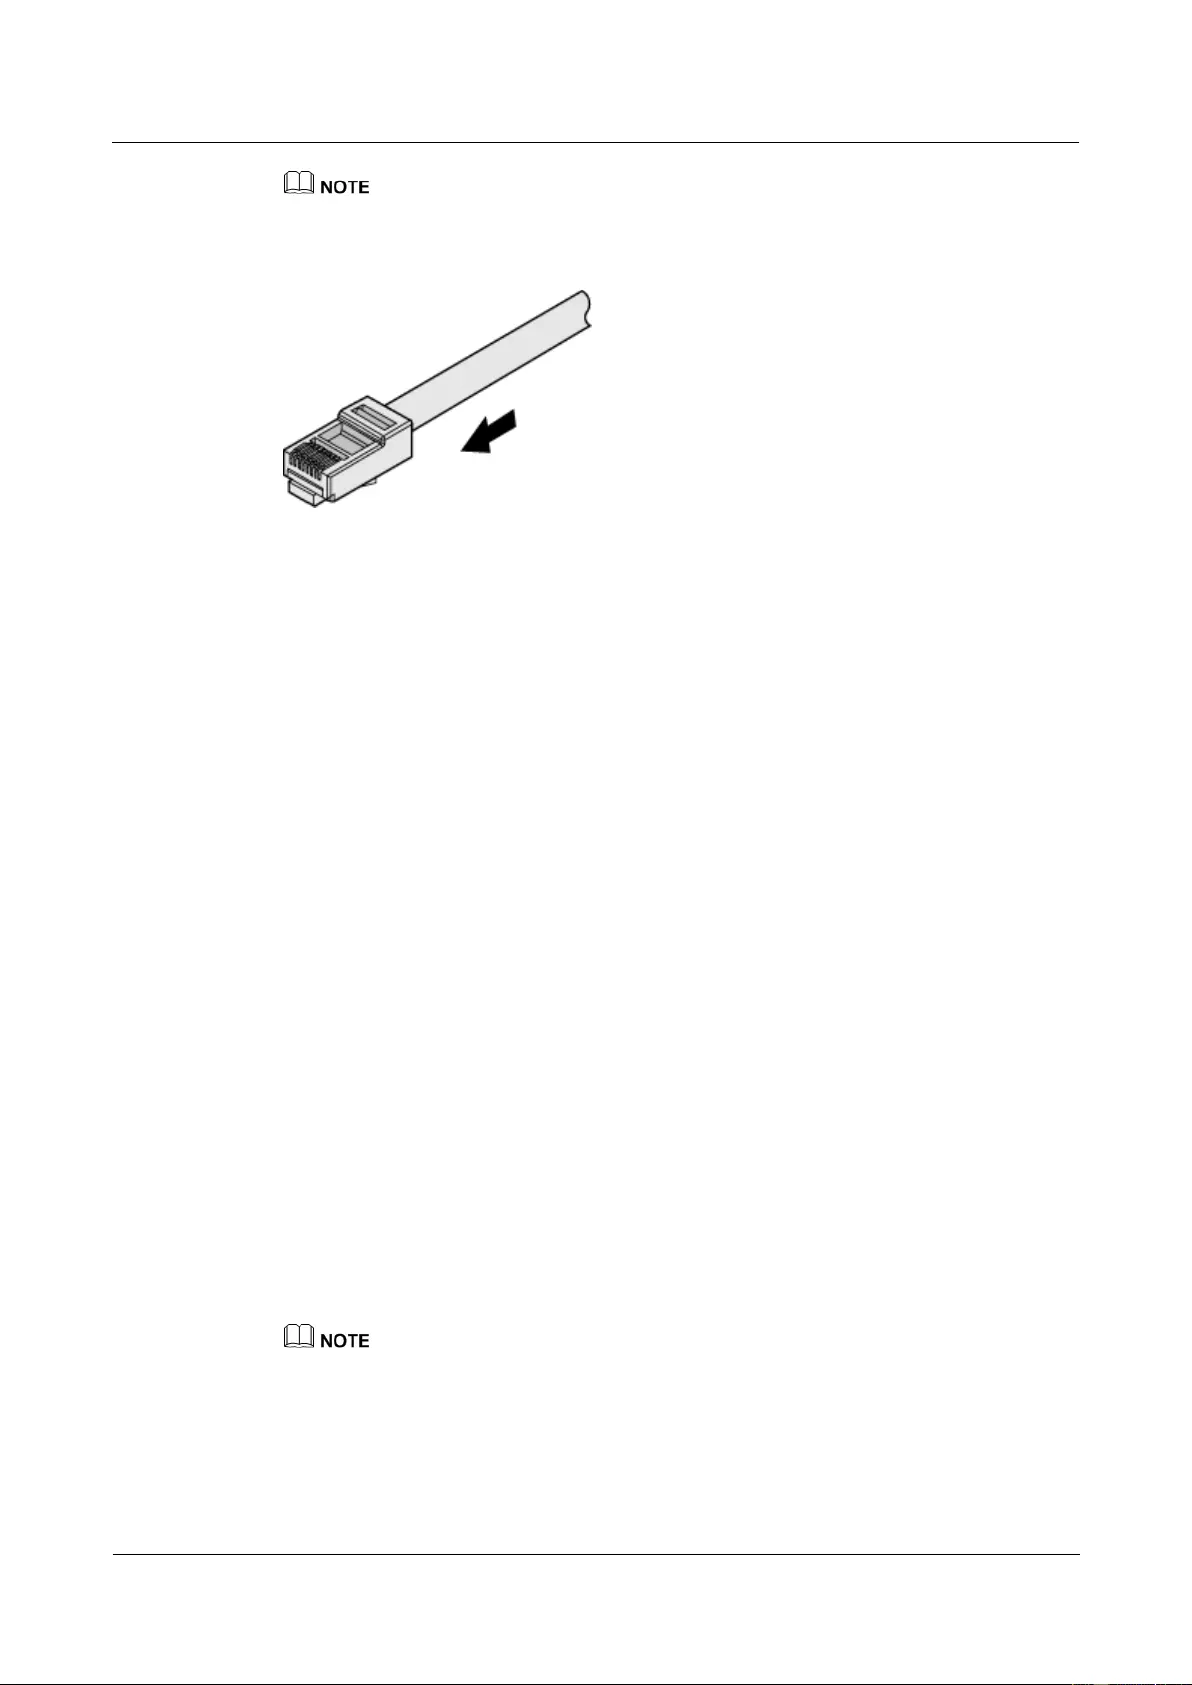
HUAWEI USG9500 Series Terabit-level Next-Generation Firewall
Hardware Guide
A Appendix
Issue 01 (2017-03-13)
Huawei Proprietary and Confidential
Copyright © Huawei Technologies Co., Ltd.
439
Ensure that the cable is in good contact with the plug.
Figure A-62 Crimping the connector
Step 4 To complete the assembly of the other end, repeat Step 1 through Step 3.
----End
A.2.3.3 Checking the Appearance of Metal Contact Strips
This topic describes how to check the metal contact strips and how to check whether an
assembled RJ45 connector is qualified.
Context
To ensure proper contact between the crimped parts and the core wires, the heights and
sizes of the metal contact strips must be uniform and standard.
The metal contact strips must be parallel to each other, with an offset less than 5°. The
top margin of a strip must be parallel to the axis of the connector, with an offset less than
10°.
To ensure expedite conduction, the surface of the metal contact strips must be clean.
The metal contact strips must be in good contact with the RJ45 socket. The plastic
septa must remain intact and must be aligned properly.
The soldering edge of a metal contact strip must surpass the ends of the core wires. The
ends of the core wires must be in contact with the edge of the RJ45 trough. In principle,
the distance between them must be less than 0.5 mm.
Procedure
Step 1 Hold the crimped connector, with the front side facing you, and check whether the metal
contact strips are of the same height. In principle, the height is 6.02 ± 0.13 mm. If a measuring
tool is not available, you can compare the connector with a standard connector. Figure A-63
shows an unqualified piece, and Figure A-64 shows a qualified piece.
All unqualified pieces must be crimped again.
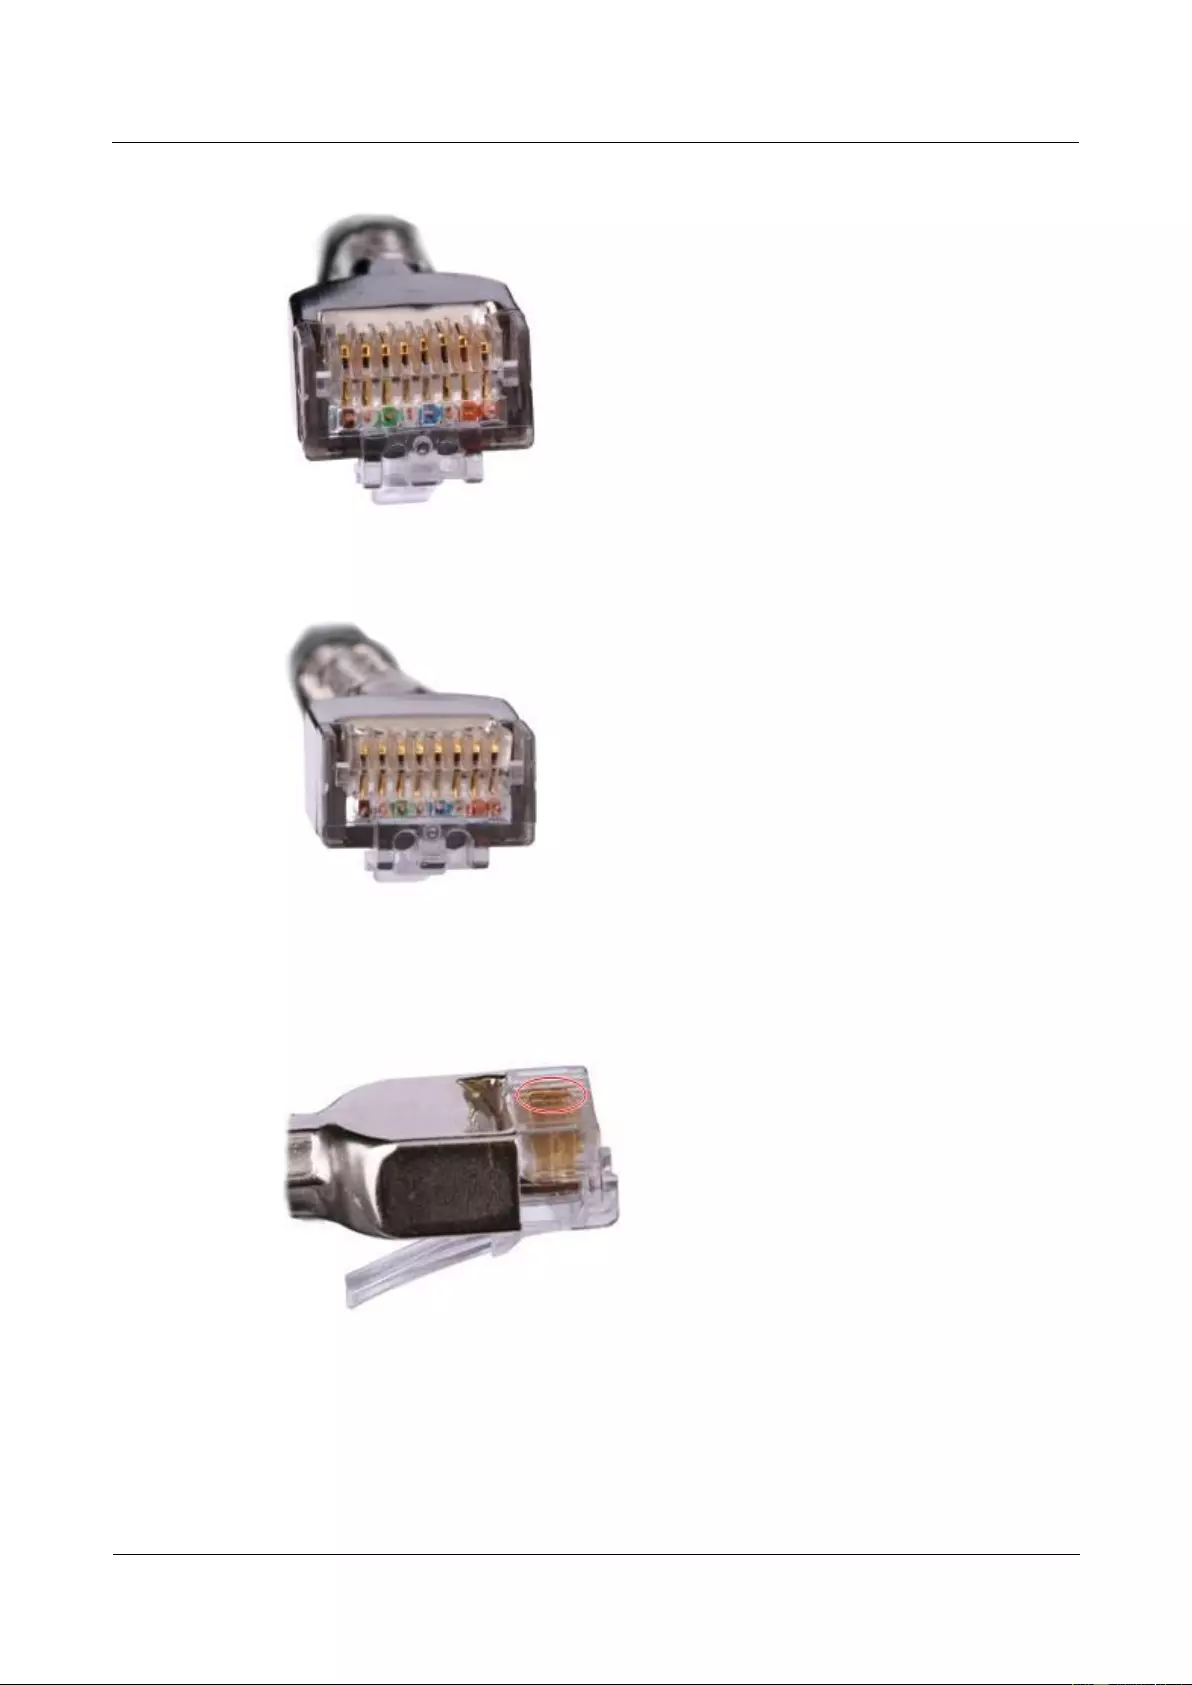
HUAWEI USG9500 Series Terabit-level Next-Generation Firewall
Hardware Guide
A Appendix
Issue 01 (2017-03-13)
Huawei Proprietary and Confidential
Copyright © Huawei Technologies Co., Ltd.
440
Figure A-63 Metal contact strips of different heights
Figure A-64 Metal contact strips of the same height
Step 2 Hold an RJ45 connector and turn it by 45°. Observe the top edges of the metal contact strips.
Figure A-65 shows an unqualified piece.
Figure A-65 Unparallel metal contact strips of different heights
Step 3 Check whether the metal contact strips are clean. If they are not clean and the dirt cannot be
removed, replace it with a new RJ45 connector. Figure A-66 shows an unqualified piece.
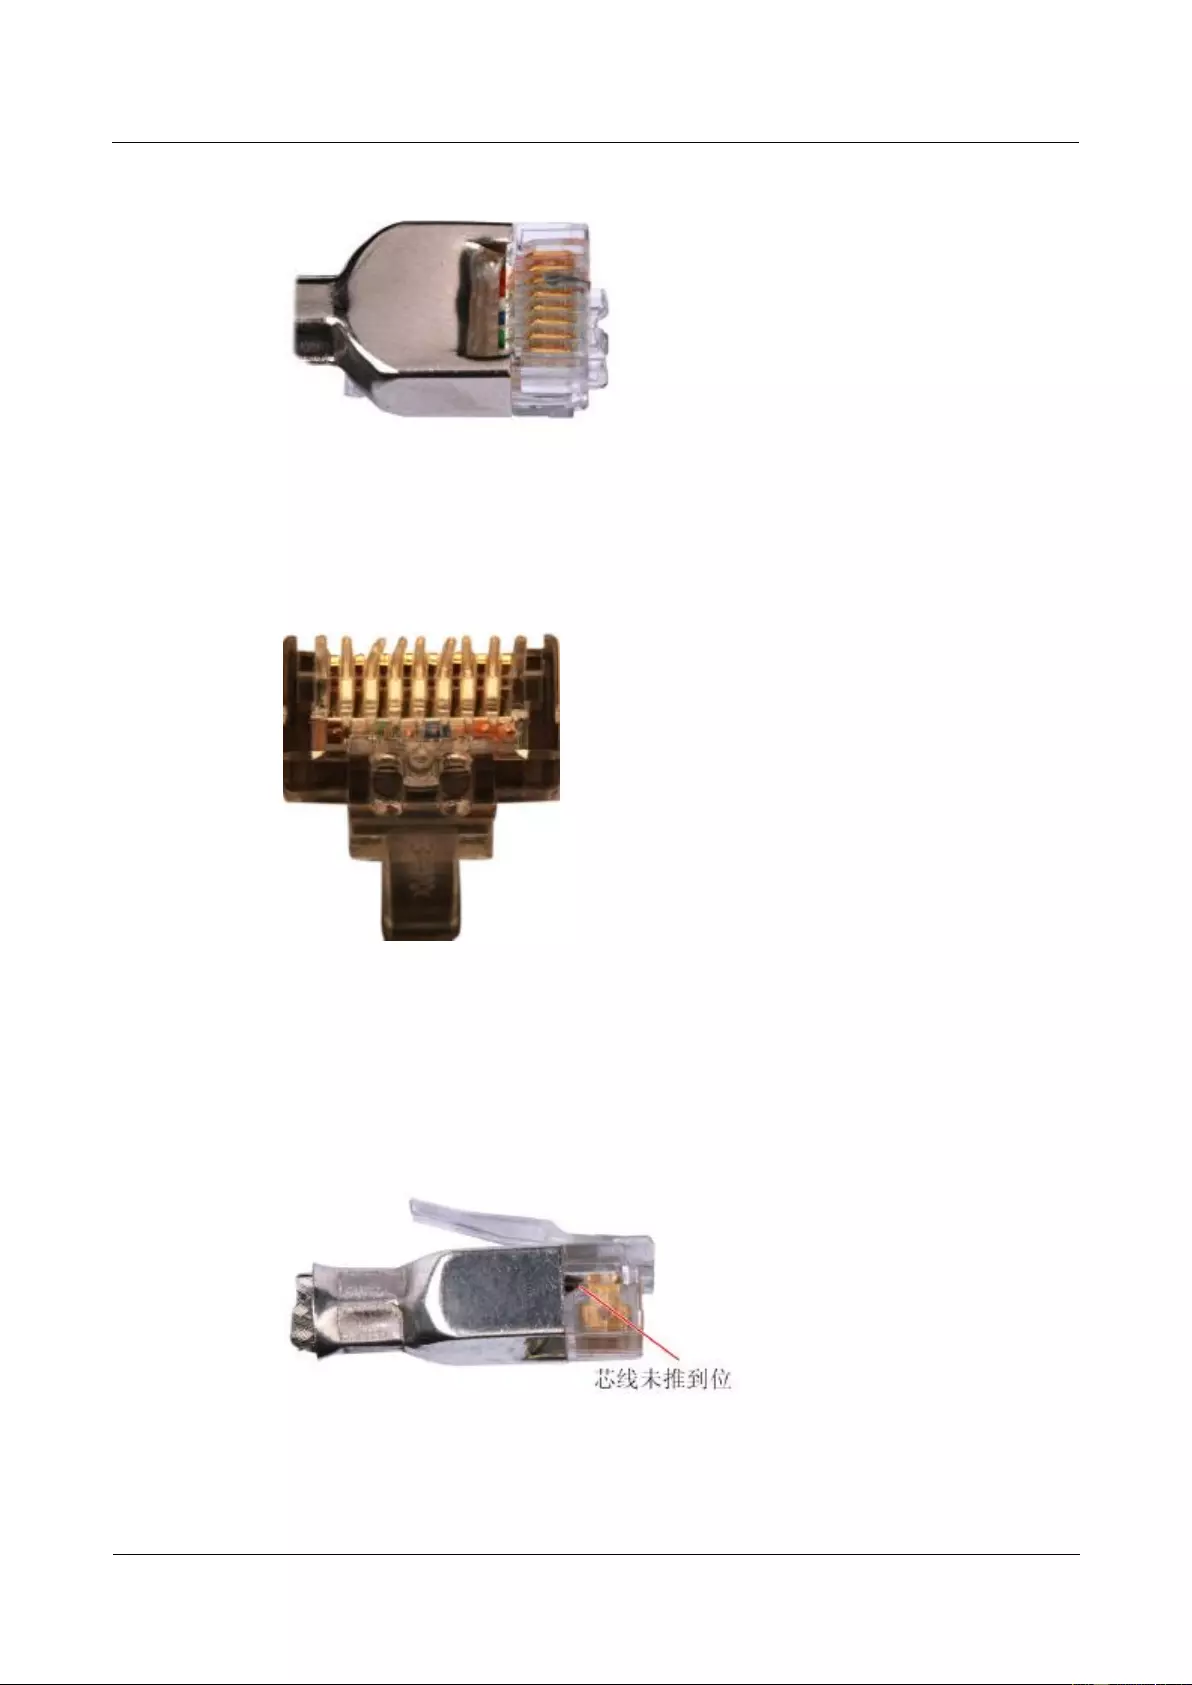
HUAWEI USG9500 Series Terabit-level Next-Generation Firewall
Hardware Guide
A Appendix
Issue 01 (2017-03-13)
Huawei Proprietary and Confidential
Copyright © Huawei Technologies Co., Ltd.
441
Figure A-66 Dirt on a metal contract strip
Step 4 Check whether the metal contact strips and the plastic septa are well aligned and intact. If a
part is skewed and it cannot be fixed, replace it with a new RJ45 connector. Figure A-67
shows an unqualified piece.
Figure A-67 Skew plastic septa
Step 5 Hold the connector, with the side facing towards you, and check whether you can see the
cross-sections of the core wires. Ensure that the ends of the core wires are in good contact
with the edge of the RJ45 trough, and that the soldering edge of a metal contact strip
surpasses the ends of the core wires and is reliably crimped with the core wires. If not, replace
it with a new RJ45 connector. Figure A-68 shows an unqualified piece.
Figure A-68 Core wires not in good contact with the edge of the RJ45 trough
----End

HUAWEI USG9500 Series Terabit-level Next-Generation Firewall
Hardware Guide
A Appendix
Issue 01 (2017-03-13)
Huawei Proprietary and Confidential
Copyright © Huawei Technologies Co., Ltd.
442
A.2.3.4 Testing the Connection of Assembled Cables
This topic describes how to test an assembled Ethernet cable, thus ensuring that the
connectors and wires at both ends are correctly connected. This topic illustrates how to test a
straight-through Ethernet cable.
Context
Huawei provides two types of Ethernet cables: straight-through cables and crossover cables.
Straight-through cables are connected in a one-to-one manner. They are used to connect
network adapters to equipment such as switches or hubs. Table A-30 lists the connections
of core wires in a straight-through cable.
Table A-30 Connections of core wires in a straight-through cable
RJ45 Connector 1
RJ45 Connector 2
Core Wire Color
Twisted or Not
2
2
Orange
Twisted
1
1
Orange-White
6
6
Green
Twisted
3
3
Green-White
4
4
Blue
Twisted
5
5
Blue-White
8
8
Brown
Twisted
7
7
Brown-White
Crossover cables are connected in a crossover manner. They are used to connect network
adapters to equipment such as switches or hubs. Table A-31 lists the connections of core
wires in a crossover cable.
Table A-31 Connections of core wires in a straight crossover cable
RJ45 Connector 1
RJ45 Connector 2
Core Wire Color
Twisted or Not
6
2
Orange
Twisted
3
1
Orange-White
2
6
Green
Twisted
1
3
Green-White
4
4
Blue
Twisted
5
5
Blue-White
8
8
Brown
Twisted
7
7
Brown-White
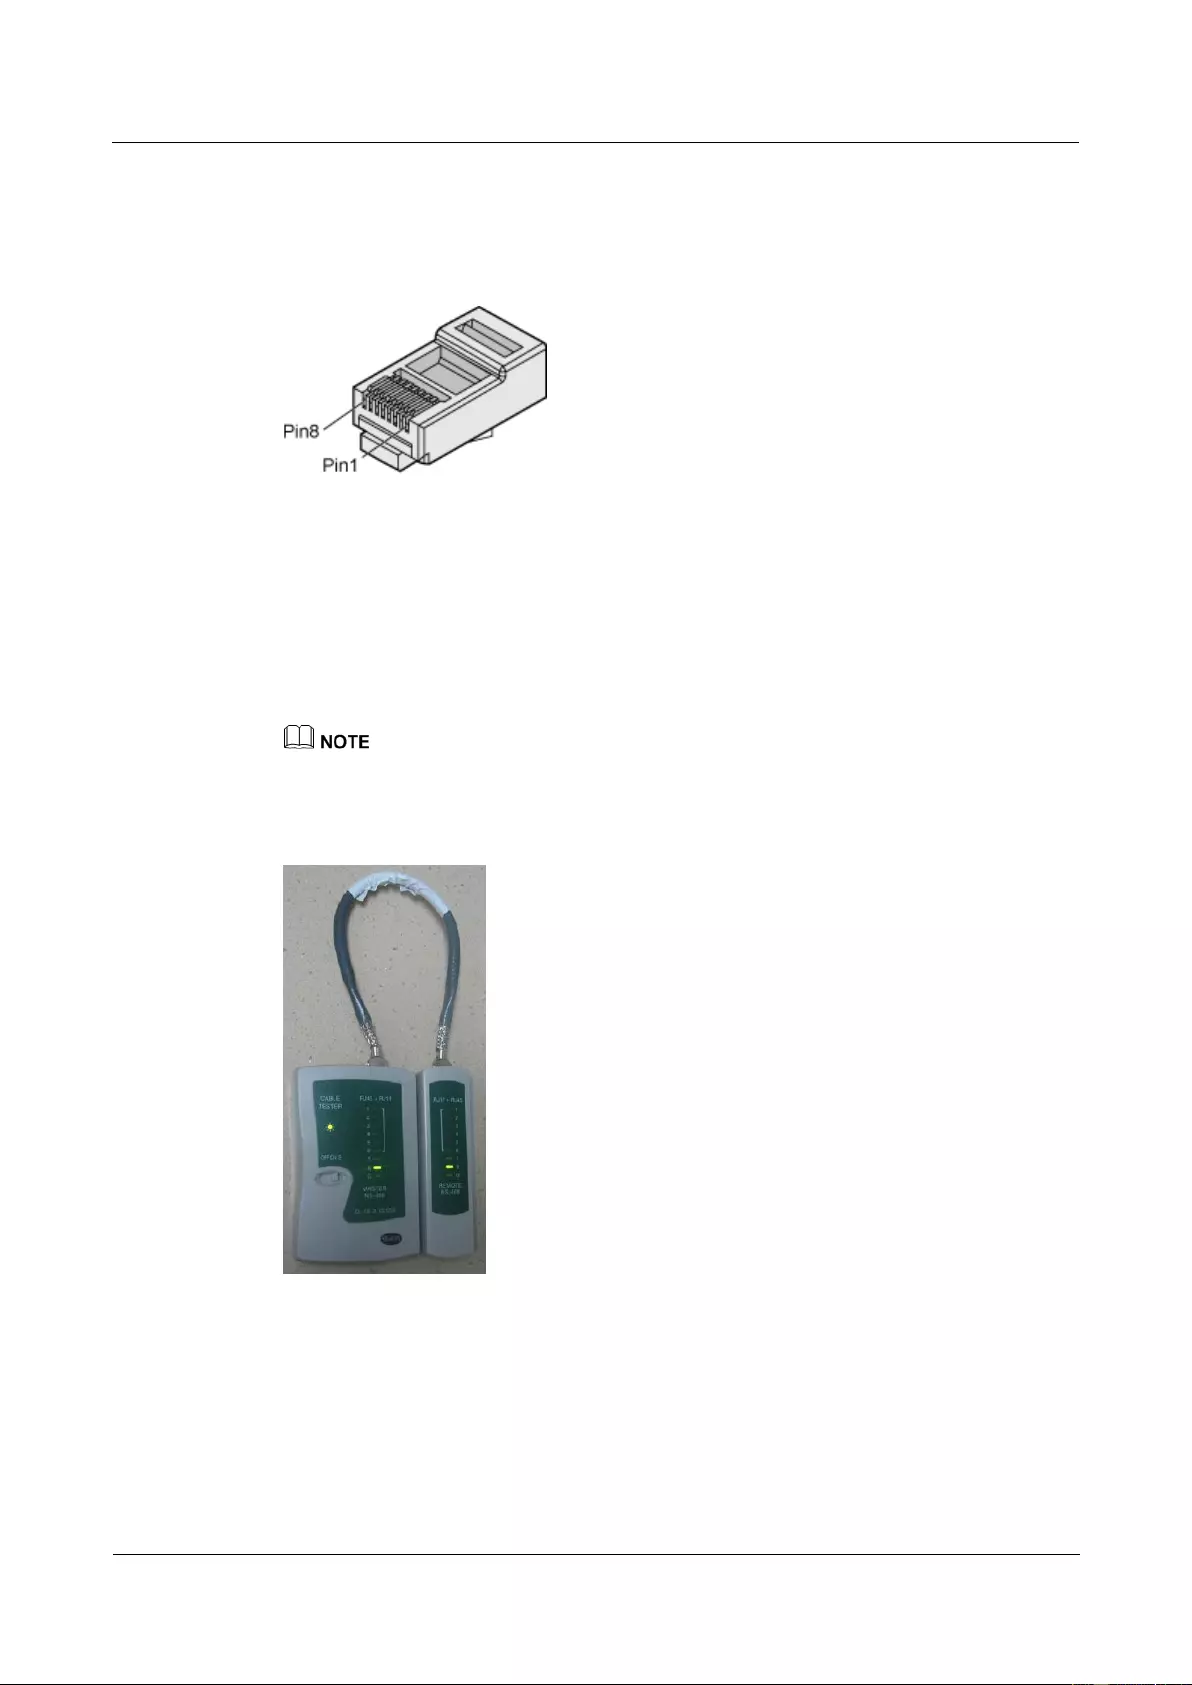
HUAWEI USG9500 Series Terabit-level Next-Generation Firewall
Hardware Guide
A Appendix
Issue 01 (2017-03-13)
Huawei Proprietary and Confidential
Copyright © Huawei Technologies Co., Ltd.
443
Figure A-69 shows the pins of an RJ45 connector.
Figure A-69 Pins of an RJ45 connector
Procedure
Step 1 Feed both connectors of the cable into the ports of the cable tester.
Step 2 After the connectors are properly inserted, turn on the tester. If the indicators from 1 to G turn
on simultaneously, you can infer that the pins work normally and the wires are correctly
connected.
Turn the switch to the S position and check whether the indicators turn on simultaneously, as shown in
Figure A-70.
Figure A-70 Testing the conduction and connections of wires
Step 3 Gently shake the connector and repeat 错误!未找到引用源。 to check whether the metal
contact strips are in good contact with the core wires and Ethernet ports, as shown in Figure
A-71.
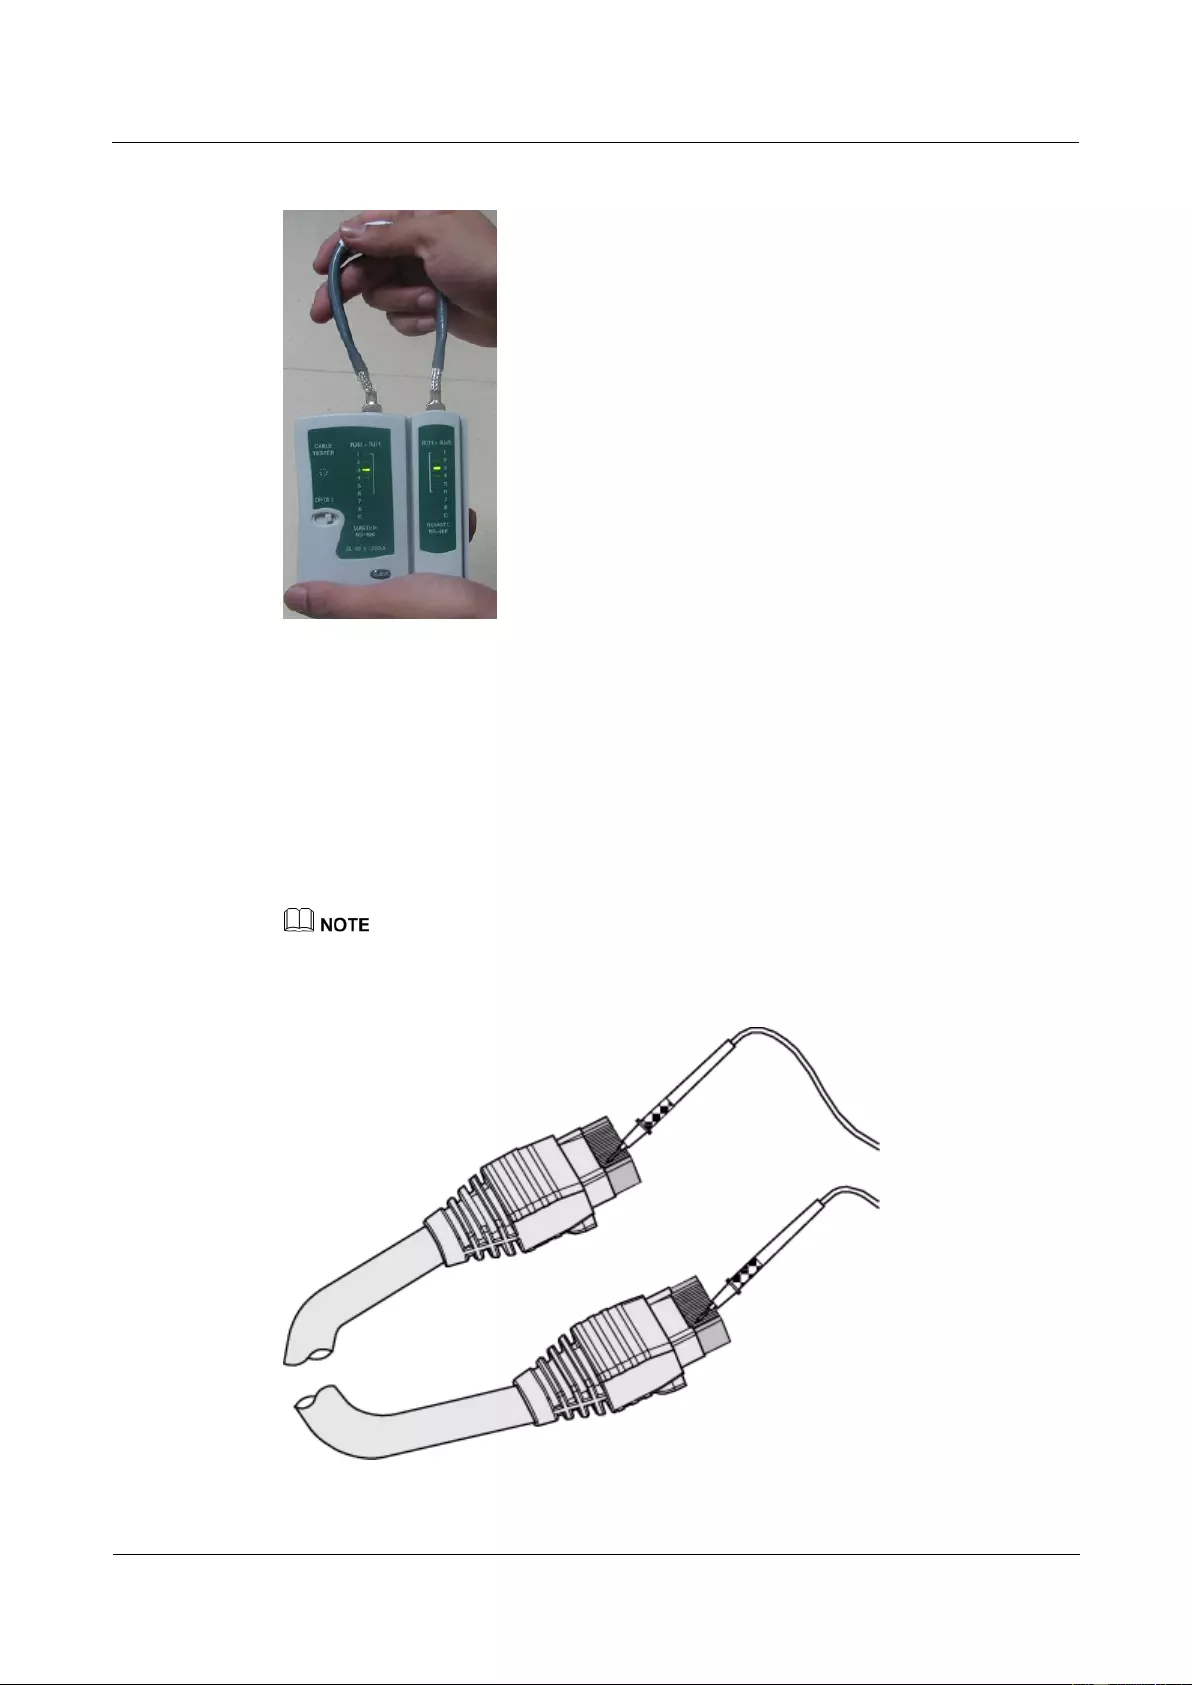
HUAWEI USG9500 Series Terabit-level Next-Generation Firewall
Hardware Guide
A Appendix
Issue 01 (2017-03-13)
Huawei Proprietary and Confidential
Copyright © Huawei Technologies Co., Ltd.
444
Figure A-71 Checking the reliability
The procedure for testing a crossover cable is the same as that for testing a straight-through
cable except for the sequence in which the indicators turn on. You need to refer to the wire
connections of a crossover cable.
The Ethernet cable is qualified if the indicators turn on in the following sequence:
At the master (left) section of the tester, the indicators turn on in the sequence of 1-8-G. At the
slave (right) section of the tester, the indicators turn on in the sequence of 3-6-1-4-5-2-7-8-G.
Otherwise, the Ethernet cable is unqualified.
If a tester is not available, you can use a multimeter to perform a simple test, as shown in Figure A-72.
Figure A-72 Testing the connection of an Ethernet cable

HUAWEI USG9500 Series Terabit-level Next-Generation Firewall
Hardware Guide
A Appendix
Issue 01 (2017-03-13)
Huawei Proprietary and Confidential
Copyright © Huawei Technologies Co., Ltd.
445
----End
A.3 Environmental Requirements for Device Running
This section describes the environment requirements for device running, including the
requirements for the environment of an equipment room and power supply conditions.
A.3.1 Requirements for Selecting a Site for an Equipment Room
Telecom equipment should run in a favorable environment. When designing a project, you
should consider the communication network planning and the technical requirements of the
equipment. You should also consider hydrographic, geological, seismic, power supply, and
transportation factors.
Construction, structure, heating and ventilation, power supply, lighting and fire fighting of the
equipment room should be designed by specialized construction designers according to the
environment requirements of devices. The equipment room should also follow the relevant
regulation concerning the industrial, environment protection, fire fighting, and civil air
defense. It should conform to the state standards, regulations, and other requirements in this
regard.
The equipment room should be located at a place free from high temperature, dust, toxic gases,
explosive materials, or instable voltage. Keep the equipment room away from great vibrations,
strong noises , or power transformer stations.
The specific requirements for selecting a site for an equipment room are as follows:
The room should be located at a distance of at least 5 km from heavy pollution sources
such as smelteries and coal mines. It should be located at a distance of at least 3.7 km
from medium pollution sources such as chemical, rubber, and galvanization industrials.
It should be located at a distance of at least 2 km from light pollution sources such as
packinghouses and tanyards. If these pollution sources cannot be avoided, ensure that the
equipment room is situated in the opposite direction of the pollution sources. In addition,
adopt a high-quality equipment room or protection products.
The room should be located away from livestock farms, or in the upwind direction of the
livestock farms. Do not use the old livestock room or the fertilizer warehouse as the
equipment room.
The air vent of the room should be far from the exhaust of city waste pipes, big cesspools
and sewage treatment tanks. The room should be in the positive pressure state lest the
corrosive gases enter the equipment room and erode components and circuit boards.
The room should be located farther away from industrial and heating boilers.
You are recommended to locate the room in or above the second floor. If this
requirement cannot be met, the ground for equipment installation in the room should be
at least 600 mm above the maximum flood level in the local record. The room should be
at an altitude of lower than 3000 m.
The room should be at least 3.7 km away from the seaside or salt lake. Otherwise, the
equipment room should be airtight with cooling facilities. In addition, the alkalized soil
cannot be used as the construction material. Otherwise, the equipment suitable for wet
conditions must be used.
The equipment room should be strong enough to resist winds and downpours.
The room should be located away from dusty roads or sand fields. If this is unavoidable,
the doors and windows of the equipment room must not face pollution sources.
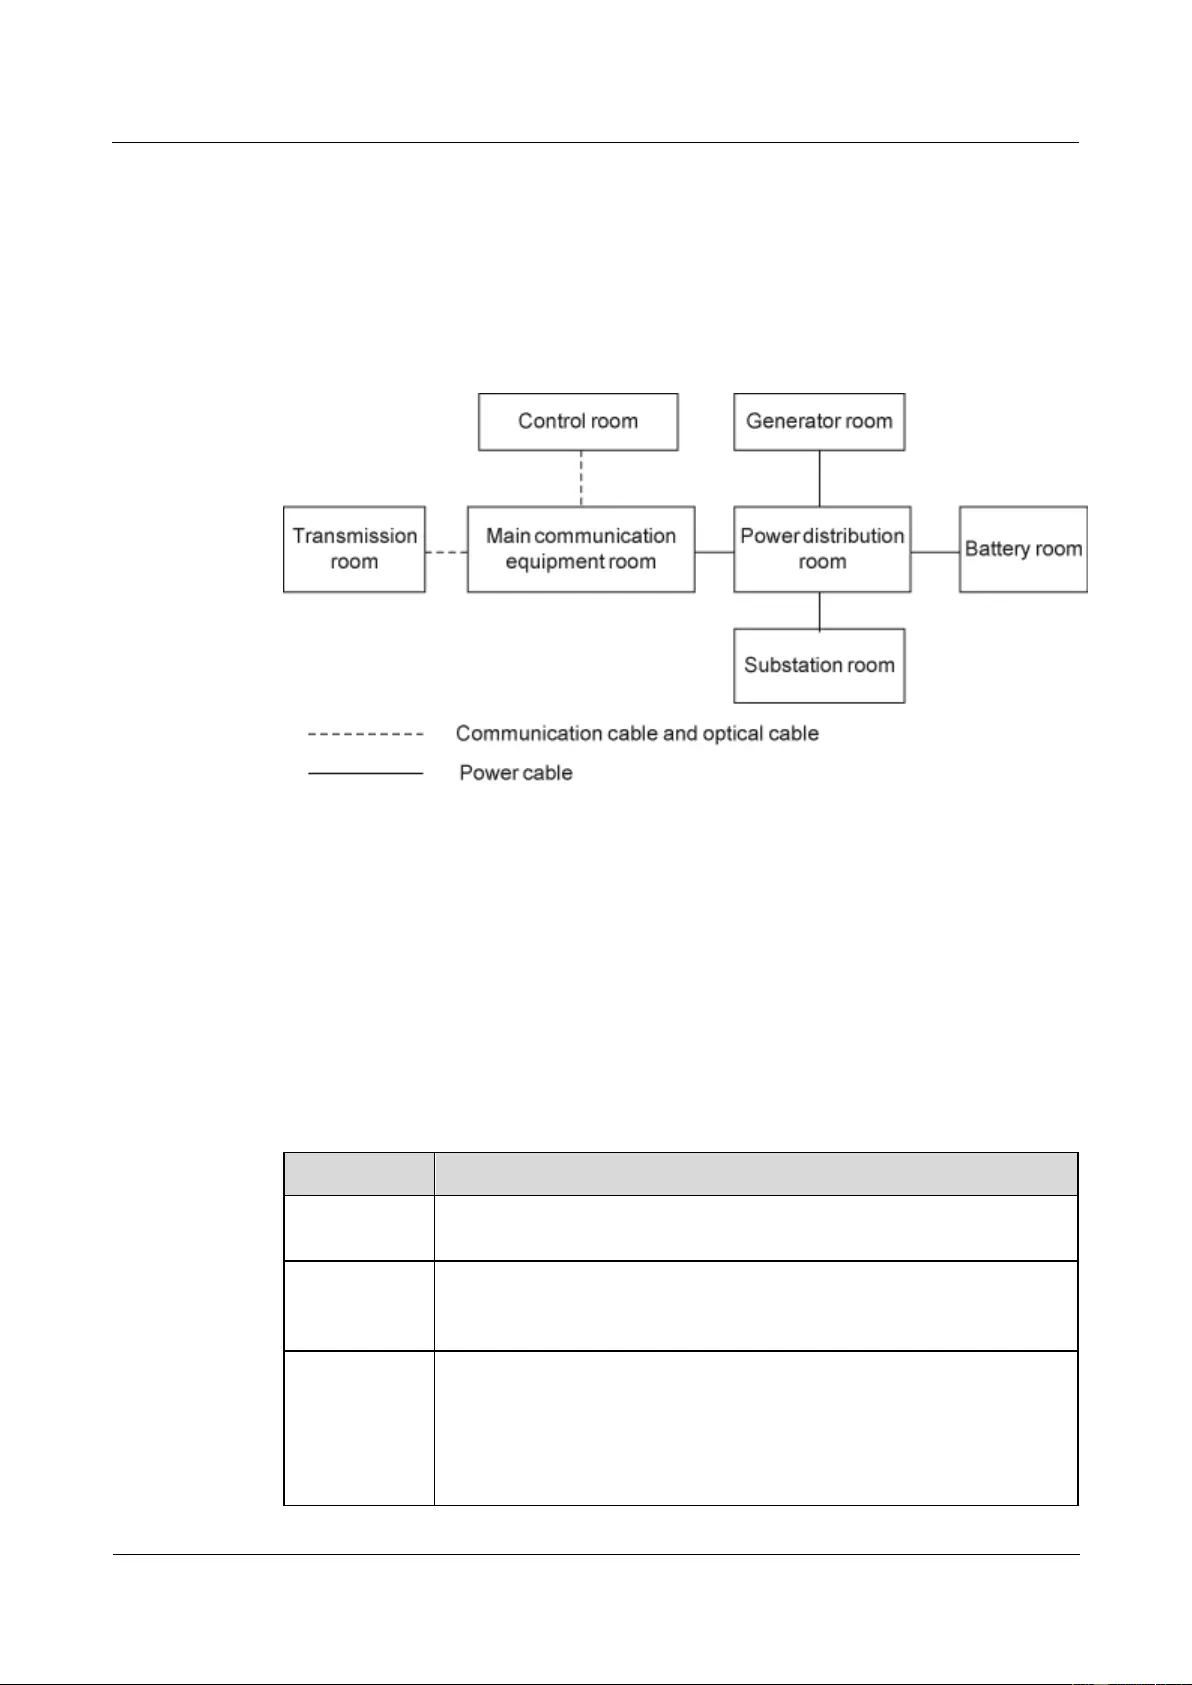
HUAWEI USG9500 Series Terabit-level Next-Generation Firewall
Hardware Guide
A Appendix
Issue 01 (2017-03-13)
Huawei Proprietary and Confidential
Copyright © Huawei Technologies Co., Ltd.
446
A.3.2 Equipment Room Layout
The equipment room is usually used to install mobile switching equipment, telecom
transmission equipment and power supply equipment as well as other auxiliary equipment. To
ensure easy maintenance and management, place the telecom equipment in different rooms.
Figure A-73 shows the plane layout of the equipment room.
Figure A-73 Layout of the equipment room
The general layout principles of the equipment room are as follows:
It should meet the requirements for laying out and maintaining communication cables
and power cables.
It should reduce the cabling distance, which eases cable maintenance, reduces the
potential communication faults, and raises efficiency.
A.3.3 Construction Requirements for the Equipment Room
Table A-32 shows the construction requirements for the equipment room.
Table A-32 Construction requirements for the equipment room
Item
Requirements
Area
The smallest area of the equipment room can accommodate the
equipment with the largest capacity.
Net height
The minimum height of the equipment room indicates the net height
below the beam or the ventilation pipe. The minimum height of the
equipment room should not be less than 3 m.
Floor
The floor in the equipment room should be semi-conductive and
dustproof. The raised floor with an ESD-preventive function is
recommended. Pave the raised floor tightly and solidly. The horizontal
tolerance of each square meter should be less than 2 mm. If raised floors
are unavailable, use the static electricity conductive floor material, with
the volume resistivity of 1.0 x 10⁷ ohms to 1.0 x 10¹⁰ ohms. Ground the

HUAWEI USG9500 Series Terabit-level Next-Generation Firewall
Hardware Guide
A Appendix
Issue 01 (2017-03-13)
Huawei Proprietary and Confidential
Copyright © Huawei Technologies Co., Ltd.
447
Item
Requirements
static electricity conductive floor material or raise floor so that the static
electricity can be conducted. You can connect them with the grounding
unit by using the current limiting resistor and connection line. The
resistance of the current limiting resistor is one megohm.
Load-bearing
capacity
Be larger than 150 kg/m2.
Door and
windows
The door of the equipment room should be 2 m high and 1 m wide. One
door is enough. Install the doors and windows with dustproof plastic
tapes for seal. Install the windows with double-layer glass and seal them
firmly.
Wall surface
treatment
Paste wallpapers to the wall surface or apply flat paint to the wall surface,
except pulverized paint.
Grooves
Use grooves to arrange cables. The inner faces of the grooves must be
smooth. The reserved length and width of the grooves, and the number,
position and dimensions of the holes must comply with the requirements
of the arrangement of devices.
Water pipe
Do not pass the service pipes, drainpipes, and storm sewers through the
equipment room. Do not set the fire hydrant in the equipment room, but
in the corridor or near the staircase.
Internal
partition wall
Separate the area where the equipment is installed from the equipment
room door. The partition wall can hold back some dusts.
Installation
position of the
air conditioner
Install the air conditioner in a proper place so that its airflow does not
directly blow the device.
Other
requirements
Avoid the proliferation of fungi mildew, and prohibit rodents (like mice).
Figure A-74 Internal partition wall inside the equipment room

HUAWEI USG9500 Series Terabit-level Next-Generation Firewall
Hardware Guide
A Appendix
Issue 01 (2017-03-13)
Huawei Proprietary and Confidential
Copyright © Huawei Technologies Co., Ltd.
448
A.3.4 Requirements for Temperature, Humidity, and Altitude
Ensure proper temperature and humidity in the equipment room. Ensure the altitude of the
equipment room in the regulated range. Table A-33 gives the specific requirements.
Table A-33 Requirements for temperature, humidity, and altitude
Item
Requirements
Environmental
temperaturea
Long-term
operationb
0°C to 45°C
Short-term
operation
-5°C to 50°C
Storage temperature
-40°C to 70°C
Environmental
relative
humidity
Long-term
operation
5% RH to 85% RH, no coagulation
Short-term
operation
5% RH to 95% RH, no coagulation
Storage relative humidity
0% to 95%
Long-term altitude
Less than 3,000 m
Storage altitude
Less than 5,000 m
a. The measurement point of the temperature and humidity is 1.5 m over the floor and 0.4 m at the
front of the cabinet. There should be no protection board at the front or back of the cabinet.
b. Short-term operation means that the continuous working time does not exceed 96 hours and the
accumulated time per year not exceed 15 days. Otherwise, it is called long-term operation.
Take the following measures to meet the preceding requirements:
Use a perennial temperature-control device no matter what the local climate is.
Mop the ground regularly or use a humidifier to maintain proper humidity in the
equipment room in dry areas.
Use the dehumidifier in the place where the humidity is high.
A.3.5 Requirements for Neatness
The dust accumulated on the device may cause electrostatic force, thus result in poor contact
for metal connectors or metal connection points. It not only affects the life span of the device,
but also easily causes faults on the device.
The equipment room is free from explosive, conductive, magnetism-permeable, and corrosive
dust. Table A-34 shows the requirement for dust concentration in the equipment room.
Table A-34 Requirements for dust particles in the equipment room
Mechanical active
material
Unit
Concentration

HUAWEI USG9500 Series Terabit-level Next-Generation Firewall
Hardware Guide
A Appendix
Issue 01 (2017-03-13)
Huawei Proprietary and Confidential
Copyright © Huawei Technologies Co., Ltd.
449
Mechanical active
material
Unit
Concentration
Dust particle
Particle /m3
≤3×10⁴
(no visible dust accumulated
on the workbench in three
days)
Description
Dust particle diameter ≥ 5 µm
Suspending dust
mg/m3
≤0.2
Precipitable dust
mg/m2·h
≤1.5
Sand
mg/m3
-
Description
Suspending dust diameter ≤ 75 µm
75 µm ≤ precipitable dust diameter ≤ 150 µm
150 µm ≤ sand diameter ≤ 1000 µm
Take the following measures to meet the preceding requirements:
Apply dustproof materials for ground, wall, and ceiling construction.
Equip screens for the door and windows facing outside. The outer windows should be
dust-proof.
Clean the equipment room regularly and clean the air filter monthly.
Wear shoe covers and ESD-preventive clothes before entering the equipment room.
A.3.6 Requirements for Corrosive Gases
The room should be free from dusts and corrosive gases, such as SO2, H2S, and NH3. Table
A-35 shows the requirements for the corrosive gas concentration.
Table A-35 Requirements for corrosive gas concentration
Chemical active
material
Unit
Concentration
SO2
mg/m3
≤0.20
H2S
mg/m3
≤0.006
NH3
mg/m3
≤0.05
Cl2
mg/m3
≤0.01
Take the following measures to meet the preceding requirements:
Avoid constructing the room near a place where the corrosive gas concentration is high,
such as a chemical plant.

HUAWEI USG9500 Series Terabit-level Next-Generation Firewall
Hardware Guide
A Appendix
Issue 01 (2017-03-13)
Huawei Proprietary and Confidential
Copyright © Huawei Technologies Co., Ltd.
450
Ensure the air intake vent of the room is in the perennial upwind direction of the
pollution source.
The batteries should be placed separately and it is best to install them in different rooms.
A professional institute should monitor the corrosive gas conditions regularly.
A.3.7 Requirements for ESD Prevention
The absolute value of electrostatic voltage is less than 1000 V.
Take the following measures to meet the preceding requirements:
Train operators on ESD prevention.
Keep proper humidity in the equipment room to reduce the impact of static electricity.
Lay out antistatic floor on equipment rooms.
Wear antistatic shoes and clothing before entering an equipment room.
Use ESD-preventive tools, such as wrist straps, tweezers, and pullers.
Ground all conductive materials in the room, including computer terminals. Use
antistatic worktables.
Keep non-antistatic materials (such as common bags, foams, and rubbers) at least 30 cm
away from boards and ESD-sensitive components.
A.3.8 Electromagnetism Requirements for the Equipment Room
All interference sources, no matter from the outside of the equipment or the application
system, or from the inside, will influence the equipment negatively in the conduction patterns
of capacitance coupling, inductance coupling, electromagnetic wave radiation, and common
impedance (including grounding system) coupling. To prevent the interference, you should:
Take effective measures against electricity net interference with the power supply
system.
Do not use the working ground of the equipment together with the grounding or
lightning protection grounding device of the power equipment. Separate them as far as
possible.
Keep the equipment far away from strong power wireless launchers, radar launchers, and
high frequency and high-current equipment.
Use electromagnetic shielding if necessary.
A.3.9 Requirements for Lightning Proof Grounding
Table A-36 shows the requirements for lightning proof grounding.
Table A-36 Requirements for lightning proof grounding
Item
Requirements
Capital
construction
Use the reinforced concrete structure for the construction of the
equipment room.
Install the lightning proof device like a lighting rod in the room.
The lightning proof ground shares the same grounding body with the
protection ground of the room.
A TN-S power
Use a special power transformer for the telecommunication site. Use

HUAWEI USG9500 Series Terabit-level Next-Generation Firewall
Hardware Guide
A Appendix
Issue 01 (2017-03-13)
Huawei Proprietary and Confidential
Copyright © Huawei Technologies Co., Ltd.
451
Item
Requirements
system shall be
adopted.
the metal jacket or steel tube to cover the power cables before burying
them under the ground. Ground both ends of the metal jacket or steel
tube nearby and properly with the buried length less than 15 m.
Install a gapless zinc oxide arrester to each of the three phase lines at
the low-voltage side of the AC power transformer. Ground nearby and
correctly the enclosure of the transformer, the neutral lines at the
low-voltage side, and the metal steel tubes of the power cables that are
connected to the enclosure of the transformer.
Power cables
leading in the
communications
site need to be
equipped with a
lightning
arrester.
Do not lead the AC/DC power cables in/out the communications site in
aerial mode.
After the low-voltage power cables are led into the room, install the
lightning arrester for the power cables in the AC voltage stabilizer and
the AC power distribution panel (box). Ground the arrester nearby and
correctly.
For the equipment room in the city, install the power supply arrester
with the nominal discharging current no less than 20 kA. For the
equipment room built in the suburbs subject to lightning strike, install
the power supply arrester with the nominal discharging current larger
than 60 kA. For the equipment room in the mountain areas easily
subject to lightning strike, or in the separate high-rise buildings in the
city, install the power supply arrester with the nominal discharging
current larger than 100 kA.
The PGND cable of the lightning arrester should be a maximum of one
meter long.
Grounding of
DC power
distribution
Connect the DC working ground (positive pole of the -48 V DC power
supply or the negative pole of the 24 V DC power supply) with the
indoor collective PGND cable nearby. The total PGND cable should
meet the maximum load of the equipment.
The power equipment must have the DC working PGND cable, which
can connect the power equipment to the collective PGND cable of the
telecommunication site (or the protection grounding bar of the
equipment room).
Equipotential
connection
Ground the devices and auxiliary devices in the room such as mobile
base station, transmission, switching equipment, power supply
equipment, and cable distribution frame properly. Connect all
protection PGND cables to the collective protection grounding bar.
Connect all protection PGND cables in one equipment room to one
protection grounding bar.
Apply joint grounding to the working ground and protection ground of
devices, which means the two share one grounding network.
The cabling rack, rack or shell, metal ventilation pipe, metal door or
window of the equipment should be grounded for protection.
General
requirements for
grounding
Do not connect the neutral line of the AC power cable with the
protection ground of any telecom equipment in the equipment room.
Do not install the fuse or switch on the PGND cable.
All PGND cables should be as short as possible, and arranged directly.

HUAWEI USG9500 Series Terabit-level Next-Generation Firewall
Hardware Guide
A Appendix
Issue 01 (2017-03-13)
Huawei Proprietary and Confidential
Copyright © Huawei Technologies Co., Ltd.
452
Item
Requirements
Grounding
resistance
The grounding resistance must be lower than 1 ohm.
The upper end of the grounding body should be at least 0.7 m over the
ground. In cold areas, bury the grounding body below the frozen
ground.
Measure the grounding resistance periodically to ensure effective
grounding.
Routing of
signal cable
Do not arrange the signal cables overhead in the equipment room. All
signal cables must be led into the site underground.
Use the cables with metal jacket or place them into the metal pipe if
they come out/in the equipment room.
Keep the PGND cable of the lightning arrester as short as possible.
Ground the idle lines inside the cable in the equipment room.
Collective
grounding cable
Use the grounding ring or grounding bar for the collective grounding
cable.
Do not use aluminum cables as grounding cables. Adopt measures to
prevent electrification corrosion when connecting different metal parts
together.
Use the copper busbar as the collective grounding cable with the
cross-sectional area not less than 120 mm2, or use the galvanized flat
steel of he same resistance. Insulate the collective grounding cable from
the reinforcing steel bars of the building.
Grounding
lead-in
The grounding lead-in should be a maximum of 30 m long. Use the
galvanized flat steel with cross-sectional area of 40mm x 4 mm or
50mm x 5 mm.
A.3.10 Requirements for Power Supply
This describes the requirements for power supply conditions.
Requirements for DC Power Supply
The telecommunication site should receive stable and reliable DC power supply. Deploy the
power equipment near the telecom equipment to make the DC feeder as short as possible. To
reduce the power consumption and installation cost, the loop voltage drop from the battery
port to the equipment port should be less than 3.2 V.
For a communication site with heavy traffic or with more than two switching systems, two or
more independent power supply systems are adopted.
For a large-scale communication site, multiple power supply systems are configured in
different floors to supply power to different equipment rooms. For a common communication
site with medium traffic, a centralized power room or battery room is configured. You can
also adopt the distributed power supply mode. Use the integrated power supply for an office
with small traffic. Prevent the corrosive gas released by the battery from eroding the circuit
board.
Table A-37 shows the specifications for the DC power supply.

HUAWEI USG9500 Series Terabit-level Next-Generation Firewall
Hardware Guide
A Appendix
Issue 01 (2017-03-13)
Huawei Proprietary and Confidential
Copyright © Huawei Technologies Co., Ltd.
453
Table A-37 Specifications for the DC power supply
Item
Requirements
Range of the -48
V input voltage
-38 V to -72 V
DC power
capacity to
support the surge
current
Greater than 1.5 times the rated current at least
Regulated
voltage precision
If the AC input voltage is in the range of 85% to 110% of the rated
value, and the load current is in the range of 5% to 100% of the rated
value, the output voltage of the rectifier is an integer in the range of
-46.0 V to 56.4 V, with the regulated voltage precision equal to or
lower than 1%.
Overshoot
amplitude of
switch on/off
Integral value of the DC output voltage ±5%
Peak-to-peak
noise voltage
≤200 mV
Dynamic
response
The recovery time is less than 200 ms. The overshoot is in the range of
the integral value of the DC output voltage ±5%.
Recommendations for DC Power Supply
The following shows several recommendations for DC power supply.
Adopt the dispersed power supply mode. Use multiple DC power supply systems and set
power equipment in multiple positions.
Adopt the standard DC power supply system, and set the output voltage of the
communications equipment to be within the required range.
Improve the reliability of the AC power supply system, and reduce the capacity of
storage batteries. For the small offices, add the capacity of storage batteries if it is
difficult to enhance the reliability of the AC power supply system.
The total capacity of the high-frequency switch rectifier must satisfy the power of the
communication loading and battery charging. Configure the backup rectifier modules. If
there are 10 or fewer active modules, configure one backup module. If there are more
than 10 active modules, configure one backup module for every 10 active modules.
Install the storage batteries in two or more groups. The capacity is determined by the
duration when the storage batteries supply power to the load. For most offices, the
batteries should be able to supply power for one hour at least.
Requirements for AC Power Supply
AC power supply that consists of mains, Uninterrupted Power Supply (UPS), and
self-supplied electric generator set is fit for integrated power supply. On meeting the
requirements of server load, AC power supply has the features such as simple connection line,
safe operation, flexible scheduling, and easy maintenance.

HUAWEI USG9500 Series Terabit-level Next-Generation Firewall
Hardware Guide
A Appendix
Issue 01 (2017-03-13)
Huawei Proprietary and Confidential
Copyright © Huawei Technologies Co., Ltd.
454
Low voltage power supply should adopt three-phase five-wire mode or monophase three-wire
mode. Low voltage of AC power supply should be 110 V/127 V/220 V/380 V, and the
frequency is 50 Hz.
UPS is required to be the AC potential power which should be the same phase as mains. The
switching time of UPS and mains should be less than 10 ms; otherwise, the device will reboot
or reset.
For power distribution capacity in the equipment room, working current and fault current of
the device should be accounted. Ensure that independent AC power supply protects the
independent device. Configure the current capacity of the protection switch of the equipment
room more than that of the device.
Table A-38 shows the voltage range of AC power supply for the device.
Table A-38 Voltage range of AC power supply
Item
Requirements
AC power capacity to
support the device
-10% to +5% of the rated voltage
AC power capacity to
support the power modules
and important buildings
-15% to +10% of the rated voltage
Frequency of alternating
current
-4% to +4% of the rated voltage
Voltage wave shape sine
distortion rate
Within 5% of the rated current
As an automated generator set, the self-supplied electric generator set of telecommunication
server with the standard interface supports telecommunication protocol, remote
telecommunication, monitoring, and control by adopting automatic input, removal, and
supply.
AC power cables should accord with the following specifications:
AC neutral should adopt the conductor with the same cross section as the phase line.
AC wires should adopt non-flammable wires. The layout of AC wires should comply
with local regulations. Low-voltage power distribution rooms should comply with local
regulations.
Recommendations for AC Power Supply
The following shows several recommendations for AC power supply.
If the power voltage of the mains, which supplies power for the device directly, exceeds
the rated voltage by -10% to 5%, or exceeds the voltage range that the device can
support, a voltage regulating device or voltage stabilizing device is required.
If the mains does not supply power for the device directly, the mains voltage exceeds the
rated voltage by -15% to 10%, or exceeds the voltage range that the DC power supply
device allows AC to input, a voltage regulating device or voltage stabilizing device is
required.

HUAWEI USG9500 Series Terabit-level Next-Generation Firewall
Hardware Guide
A Appendix
Issue 01 (2017-03-13)
Huawei Proprietary and Confidential
Copyright © Huawei Technologies Co., Ltd.
455
UPS power supply system or inverter power supply system is required for uninterrupted
or non-transient telecommunication load of AC.
When abnormality occurs on mains, telecommunication server should be equipped with
self-supplied electric generator set as power supply to ensure the key telecommunication
load and force load. The capacity should be not less than 150% to 200% of the total
uninterrupted AC power device.
Storage batteries are usually installed in parallel connection of two groups. UPS storage
batteries are generally installed in one group. Redundancy required for UPS can adopt
concatenation or parallel connection. When an inverter or a UPS is used, the active
inverter is determined by the maximum power and a backup inverter is required.
A.4 Equipment Grounding Specifications
This section describes grounding specifications, including general grounding specifications,
the grounding specifications for equipment rooms, devices, communication power modules,
signal cables, signal cables, and the specification for laying out grounding cables.
A.4.1 General Grounding Specifications
This describes the requirements of general grounding specifications in details.
Table A-39 shows the general grounding specifications.
Table A-39 General Grounding Specifications
No.
Description
1
The design for grounding should follow the principles of equal voltage and equal
potential. That is, the working grounding and protection grounding, including the
shielded grounding and the lightning-proof grounding of the cable distribution
frame are jointly grounded at the same group of grounding body.
2
The cabling racks, racks or shells, metal ventilation pipes, metal doors and
windows in the equipment room should be grounded for protection.
3
The metal parts of the equipment which are neutral in normal conditions should be
grounded for protection.
4
The grounding cable must be connected properly to the protection grounding bar
of the equipment room.
5
Do not take other equipment as the component part of the grounding cable or
electrical connection.
A.4.2 Grounding Specifications for an Equipment Room
This describes the requirements for the grounding of the equipment room in details.
The grounding resistance of a comprehensive communication building should be less than or
equal to one ohm. The grounding resistance of an ordinary communication office should be
less than five ohms. The grounding resistance in the area where earth resistance rate is high
should be less than 10 ohms.

HUAWEI USG9500 Series Terabit-level Next-Generation Firewall
Hardware Guide
A Appendix
Issue 01 (2017-03-13)
Huawei Proprietary and Confidential
Copyright © Huawei Technologies Co., Ltd.
456
A.4.3 Grounding Specifications for the Device
This describes the requirements for the grounding of the device in details.
Table A-40 shows the equipment grounding specifications.
Table A-40 Equipment Grounding Specifications
No.
Description
1
All communication devices and auxiliary devices (such as mobile base stations,
transmission and switching devices, power supply devices) in the equipment room
should be grounded for protection. Connect all protection grounding for various
devices jointly to a general grounding bar, and then to the same protection
grounding bar in the room together with the protection ground (PGND) of the
device.
2
The PGND of the equipment is shorted to the copper protection grounding bar
provided by the user. The short-circuiting cable used should be an alternating
yellow and green plastic insulating one with copper core, with cross-sectional area
greater than 35 sq. mm.
3
There are grounding terminals and grounding flags at the lower part of the front
door, rear door and side panel of the cabinet, connected to the grounding terminals
of the cabinet framework through connection cables with cross-sectional area no
less than 1.6 sq. mm.
4
Keep all metal components of the cabinet in good conductibility. No insulating
coating should be sprayed on the connection part of the metal components.
5
Connect the cabinets in the same row closely by fastening captive screws and
gaskets on the top of the cabinets. Do not spray coating into a rectangle area of 30
mm x 50 mm around the connection hole for captive bolt. Measures to prevent rust
and corrosion must be taken for this area. Zinc electroplating with iridescent
yellow chromate conversion coating should be applied to the gasket and nut to
ensure sufficient electric contact.
6
When combining cabinets of the same type, short-circuiting cables are required to
connect the grounding busbars (if any) of the cabinets. The cross-sectional area of
the short-circuiting cable is 6 sq. mm and is less than 300 mm long. Connect the
two ends of the short-circuiting cable respectively to the grounding busbar
terminals of the neighboring cabinets and fix them firmly.
A.4.4 Grounding Specifications for Communications Power
Supply
This describes the requirements for the grounding of communications power modules in
details.
Table A-41 shows the grounding specifications for communication power supply.
Table A-41 Grounding Specifications for Communication Power Supply
No.
Description

HUAWEI USG9500 Series Terabit-level Next-Generation Firewall
Hardware Guide
A Appendix
Issue 01 (2017-03-13)
Huawei Proprietary and Confidential
Copyright © Huawei Technologies Co., Ltd.
457
No.
Description
1
The AC power supply system of the communication equipment room should adopt
the TN-S power supply mode.
2
The inlet for the AC power cable at the equipment room should be equipped with a
lightning protection device (C-level) with a nominal discharging current no less
than 20 kA.
3
The protection ground for the power supply and that for communication equipment
share the same group of grounding body. If the power supply and the equipment
sare in the same equipment room, try to use the same protection grounding bar for
them.
4
Add lightning protection circuit for the AC power interface.
5
The anode of the -48 V DC power supply or negative pole of the 24 V DC power
supply should be grounded at the output of the DC power supply.
6
The working ground and protection ground of the DC power supply equipment
should use the same group of grounding body with the protection ground of the
switching equipment. If the power supply and equipment are in the same
equipment room, try to use the same protection grounding bar for them.
7
Add surge protection for the DC power interface.
A.4.5 Grounding Specifications for Signal Cables
This describes the requirements for the grounding of signal cables in details.
Grounding specifications for signal cables are shown in Table A-42.
Table A-42 Grounding Specifications for Signal Cables
No.
Description
1
If there are digital trunks that connect the transmission equipment directly or
indirectly to the wireless communication equipment in the station, install an E1
lightning protection device for the relative interface of the transmission equipment.
2
Equip the cable laid out outdoors with metal jacket, and well ground its two ends,
or connect them to the protection grounding bar of the equipment room. For cables
inside the equipment room, install lightning protection devices at the
corresponding interface of the equipment. The protection grounding cable for the
lightning protection devices should be as short as possible.
3
Both ends of the external conductor of the coaxial cable and those of the shielding
layer of the shielded cable should have good electric contact with the metal shell of
the equipment they connect to.
4
The incoming and outgoing signal cables to and from the office and the idle line
pair inside the cable should be grounded for protection.
5
The Tone & Data Access (TDA) cable must pass the Main Distribution Frame
(MDF) with security unit when going out the office. Its shielding layer should be
connected to the protection ground of the MDF. The MDF should use the same

HUAWEI USG9500 Series Terabit-level Next-Generation Firewall
Hardware Guide
A Appendix
Issue 01 (2017-03-13)
Huawei Proprietary and Confidential
Copyright © Huawei Technologies Co., Ltd.
458
No.
Description
group of grounding body with the cabinet.
6
The signal cables within the area of the communication office and mobile station
should not be arranged aerially.
A.4.6 Specifications for Laying Out Grounding Cables
This describes the requirements for laying out grounding cables in details.
Table A-43 shows the cabling specifications for the grounding cable.
Table A-43 Specifications for laying out grounding cables
No.
Description
1
The grounding leading should not parallel or twist with the signal cable.
2
The grounding cable cannot be led in aerially, but should be buried in the earth
globally or arranged indoor.
3
Do not connect to extend the protection grounding cable, or add any switch or
fuse.
4
The protection grounding cable used should be an alternating yellow and green
plastic insulating one with copper core.
5
The neutral line of the AC power cable cannot be connected with the protection
ground of various transmission and communication equipment in the equipment
room.
6
The length of the protection grounding cable should not exceed 45 m. The
protection grounding cable should be as short as possible. When it is longer than
45 m, you can advise the user to replace the grounding bar nearby.
A.5 Engineering Labels for Cables
This section gives you an overview of engineering labels and describes the engineering labels
for optical fibers, Ethernet cables, and power cables.
An engineering label serves as an identifier for on-site installation and maintenance after the
installation. Labels on the cables facilitate correct and orderly connection of cables, and easy
maintenance after installation.
Specialized for power cables and signal cables, the types of engineering labels are as follows:
The signal cables include network cables, optical fibers, trunk cables, and user cables
(excluding antenna feeders).
The power cables include the AC power cables and DC power cables (excluding the
power bus cable).

HUAWEI USG9500 Series Terabit-level Next-Generation Firewall
Hardware Guide
A Appendix
Issue 01 (2017-03-13)
Huawei Proprietary and Confidential
Copyright © Huawei Technologies Co., Ltd.
459
Fill in the label according to the user's requirements if the user needs an integrated description of the
label. Make a relevant statement in the self-check report.
A.5.1 Introduction to Labels
This describes the material, types, structure, and contents of engineering labels, and how to
print, fill in, and paste engineering labels, and the precautions for using engineering labels.
A.5.1.1 Label Materials
Features:
Thickness: 0.09 mm
Color: chalk white
Material: polyester (PET)
Ambient temperature: -29°C to +149°C
Compatible with laser printing and handwriting with oiliness markers
Pass the UL and CSA authentication
A.5.1.2 Type and Structure
Label for Signal Cables
The label for signal cables is L-shaped with fixed dimensions, as shown in Figure A-75.
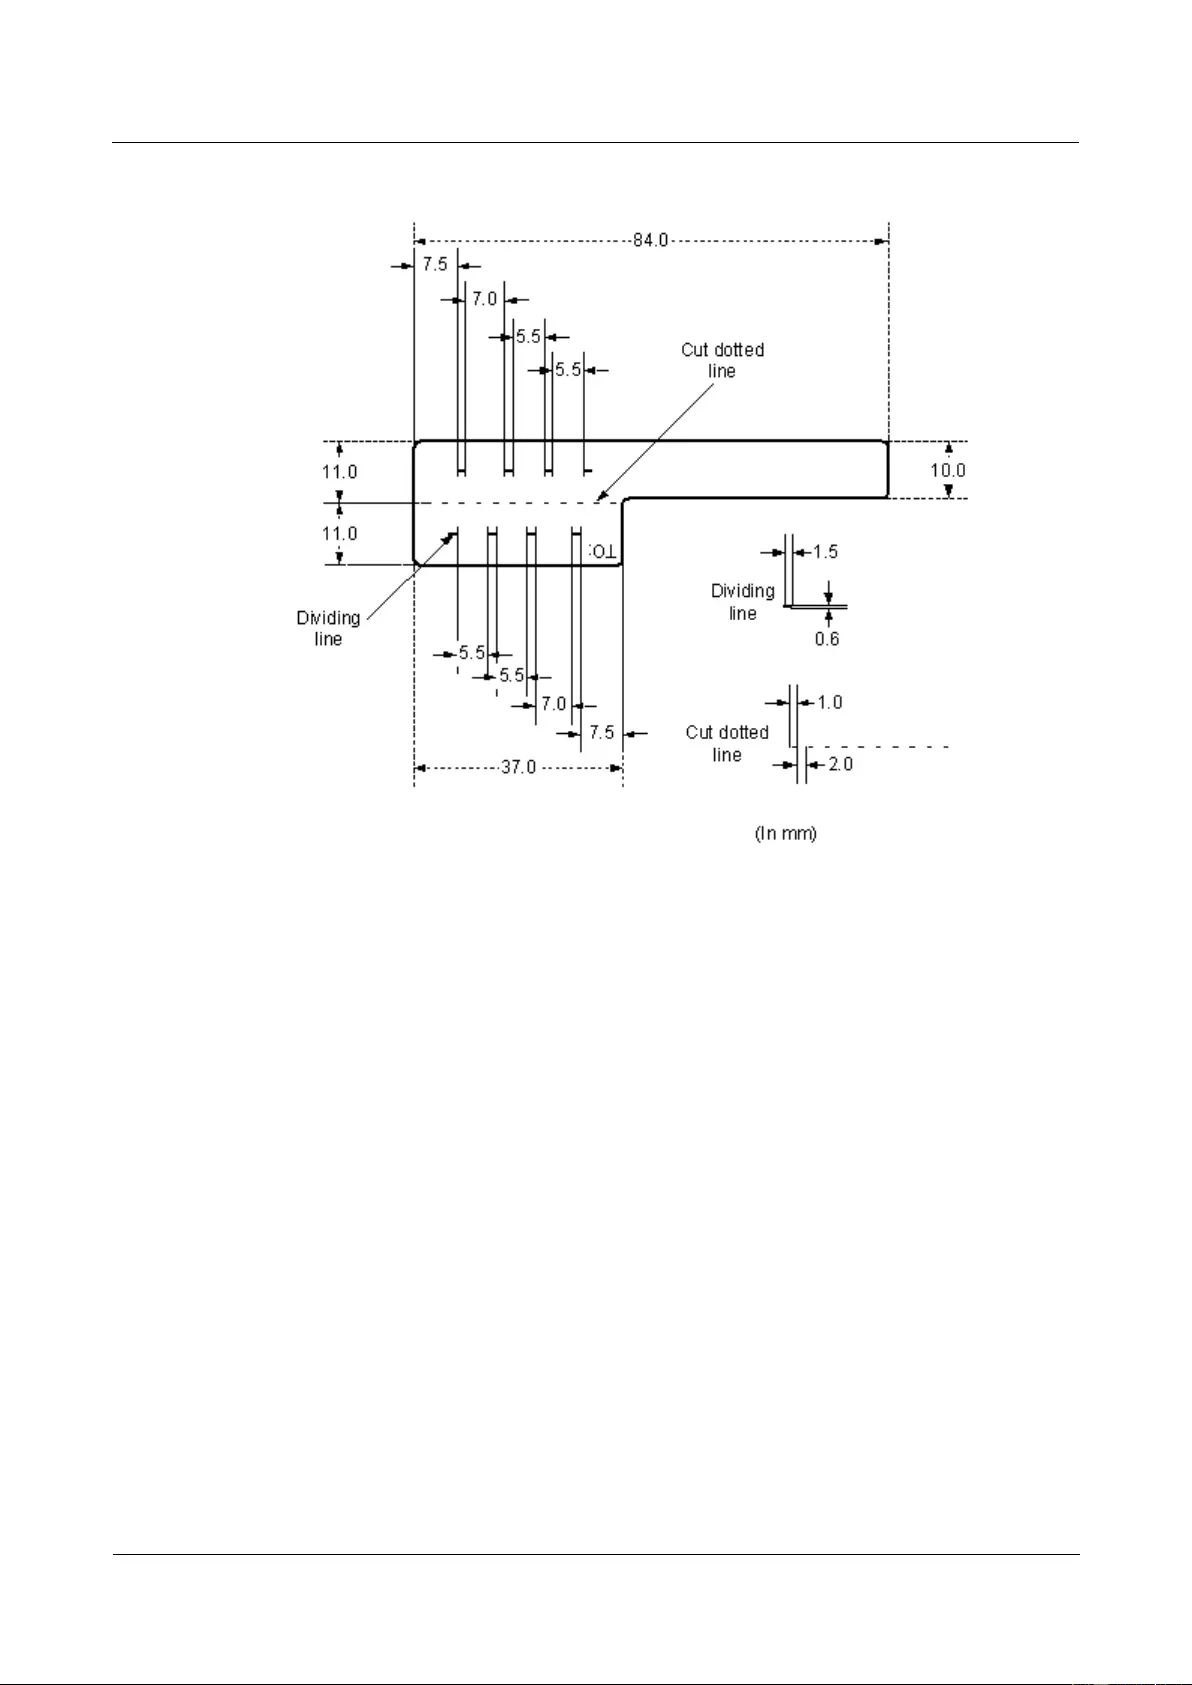
HUAWEI USG9500 Series Terabit-level Next-Generation Firewall
Hardware Guide
A Appendix
Issue 01 (2017-03-13)
Huawei Proprietary and Confidential
Copyright © Huawei Technologies Co., Ltd.
460
Figure A-75 Label for signal cables
To specify more clearly the position of a cable, use the dividing lines on the label. For
example, there is a dividing line between the cabinet number and the chassis number, and
another one between the chassis number and the slot number. The dividing line is 1.5 mm x
0.6 mm in size with the color of PONTONE 656c (light blue).
The cut dotted line helps to fold the label when affixed to the cable, and its size is 1 mm x 2
mm.
There is a mark "TO:" (upside down in the figure) at the lower right corner of the label. The
mark is used to identify the opposite end of the cable on which the label is affixed.
Power Cable Label
The label for power cables should be attached to the identification plate on the cable ties that
are bundled to the cable. The identification plate has an embossment of 0.2 mm x 0.6 mm
around (symmetric on both sides), and the area in the middle is for affixing the label, as
shown in Figure A-76.
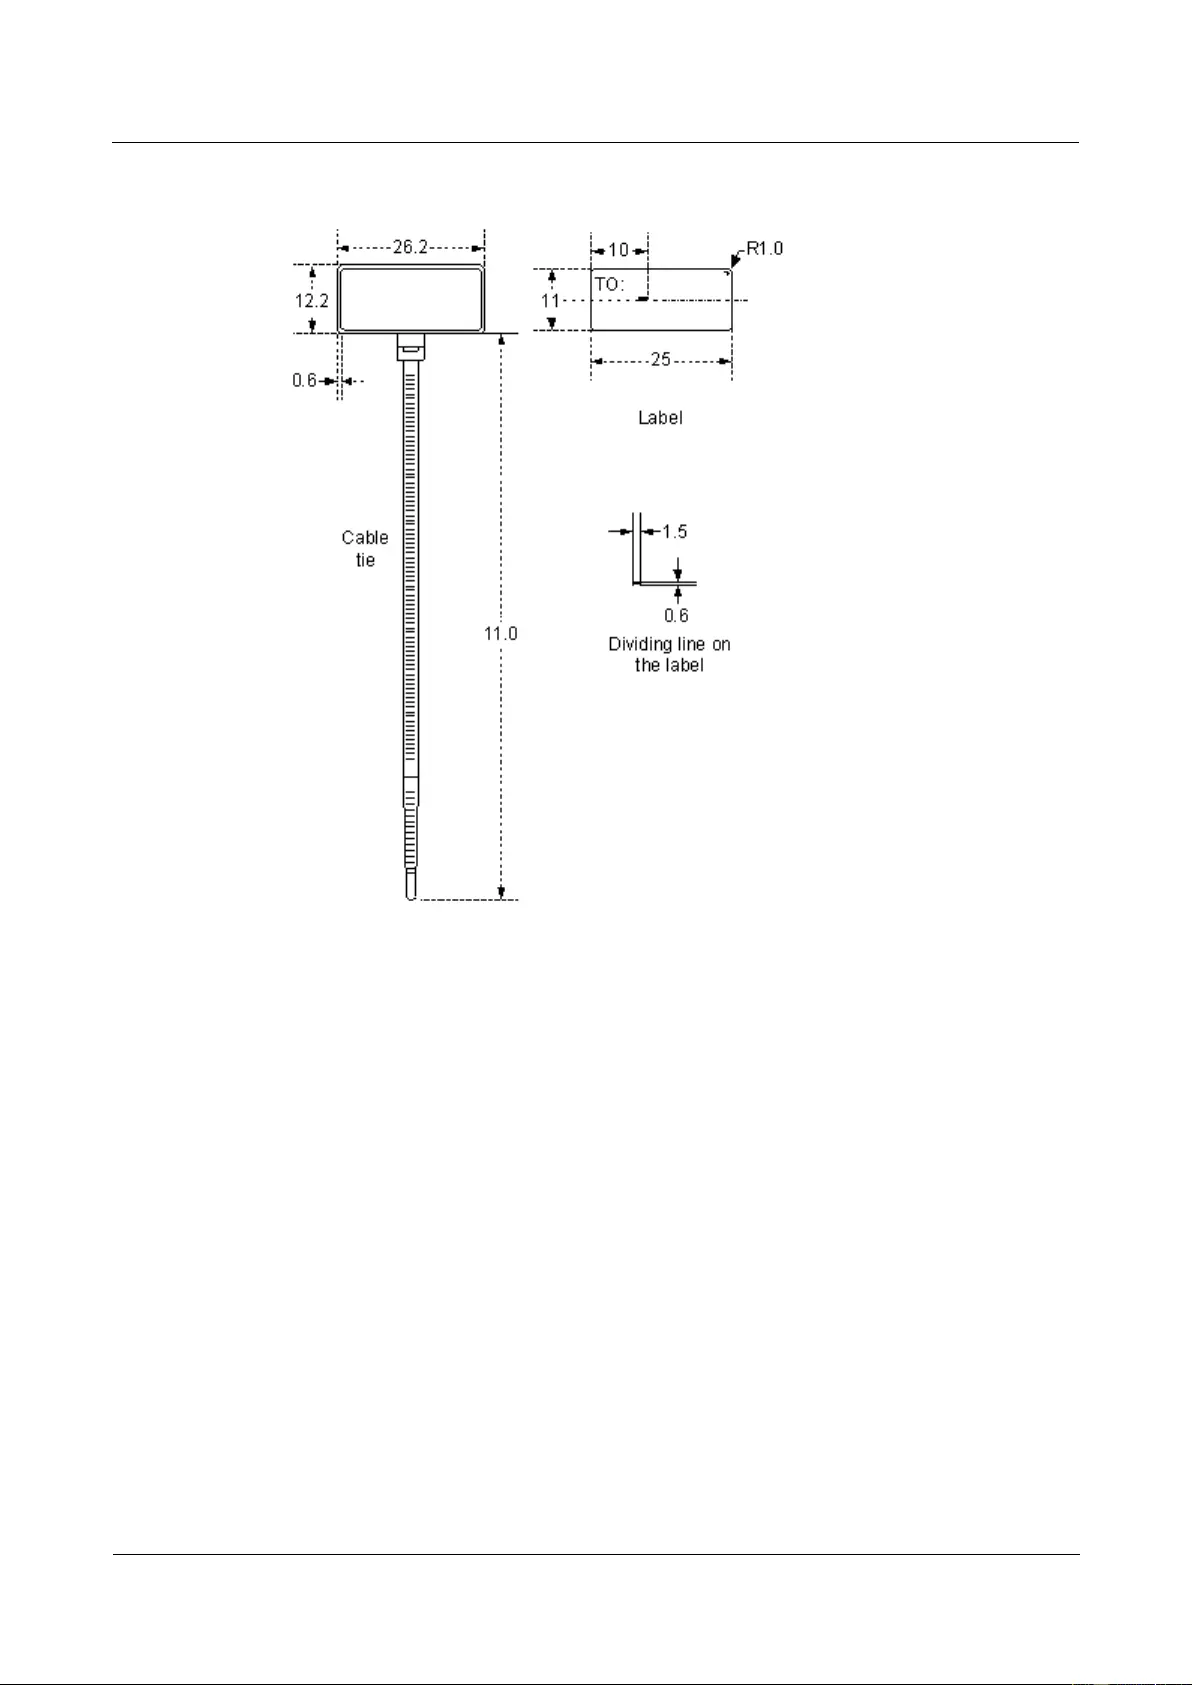
HUAWEI USG9500 Series Terabit-level Next-Generation Firewall
Hardware Guide
A Appendix
Issue 01 (2017-03-13)
Huawei Proprietary and Confidential
Copyright © Huawei Technologies Co., Ltd.
461
Figure A-76 Power Cable Label
A.5.1.3 Label Printing
The contents can be printed or written on the labels. Printing is recommended for the sake of
high efficiency and eye-pleasant layout.
Template for the Printing
You must use a template to print labels. You can obtain the template through the following
methods:
Download the template from http://support.huawei.com/enterprise.
Obtain the template from the Huawei local office.
The templates are made in Microsoft Word and the following requirements should be met:
When using the template, you can directly modify the contents on the template. The
settings of centered characters, direction, and fonts should not be changed.
When there are too many characters to be filled in, zoom out the characters, but make
sure that the printouts are clear and legible.
HUAWEI USG9500 Series Terabit-level Next-Generation Firewall
Hardware Guide
A Appendix
Issue 01 (2017-03-13)
Huawei Proprietary and Confidential
Copyright © Huawei Technologies Co., Ltd.
462
Merging Cells in the Template
To merge two or more cells, do as follows:
1. Select Edit/Select All.
2. Select Format/Borders and Shading/Borders. Select Box tab and click OK.
3. Drag the mouse to select cells to be merged and select the Table/Merge Cells.
Requirements on the Printer
To print the labels, laser jet printer must be used, although there is no restriction on the model
of the printer. Before printing the label, set up the page and try the printing.
1. Try the printing on ordinary paper with both blank sides. Cover the blank paper onto the
whole page of label paper, and check whether the page setup conforms to the
requirement.
2. Make sure the printer properties, such as "paper size" and "direction", have been set
correctly.
− If the printout conforms to the requirement, print it to label paper.
− If the printout does not conform, adjust the page setup and try the printing again,
until the correct printout is produced.
The method of adjusting the page setup is as follows.
1. Select File/Page Setup.
2. Select Layout and set Header and Footer as 0.
3. Select the Margins tab page. Select Left for Gutter Position and adjust the values of Top,
Bottom, Left, and Right.
If the warning prompt as shown in Figure A-77 appears before printing, click Ignore to continue the
printing.
Figure A-77 Warning prompt before printing
After the page setup has been made correctly, save it for future use. This page setup is only
necessary for the first time you use the template to print the labels.
Requirements on Feeding the Printer
Different from the ordinary paper, the label paper is composed of two pages. No matter which
model of the printer you are using, feed in the labels one after another by hand. Never use the
auto-feed mode in order to avoid jamming the labels. Different models of printers may have
different feeding modes, make sure to feed in the labels correctly.

HUAWEI USG9500 Series Terabit-level Next-Generation Firewall
Hardware Guide
A Appendix
Issue 01 (2017-03-13)
Huawei Proprietary and Confidential
Copyright © Huawei Technologies Co., Ltd.
463
Different models of printers may have different feeding modes, make sure to feed in the labels
correctly.
Requirements on the Printed Label
Make sure that the printed labels satisfy the following requirements:
All the printouts must be on the label, and nothing should be printed on the bottom page
of the label.
Contents in the cells should be aligned in the center. In a single-line printout, the
dividing lines and the mark "To:" should not be covered by the printed characters.
When the cells are merged and the printouts are made in multiple lines, avoid covering
the mark "TO:" when printing the texts the space bar to move the printing contents to the
next line.
A.5.1.4 Writing Labels
Writing Tools
To make sure the printouts are clear and legible, use the black oiliness markers instead of
ball-pens to write the labels.
In special cases, black ball-pens are allowed, although not recommended. Compared with
ball-pens, oiliness markers are better. When writing with the ball-pen, take care not to leave
the oil on the label, which may contaminate the label and blur the words.
The delivered marker has two nibs. Make sure to use the smaller nib to write the labels.
Font
For the sake of easy recognition and good looking, the font in handwriting should be close to
the standard typeface (Times New Roman) as much as possible. Table A-44 shows the
standard typeface.
Table A-44 Standard Typeface for Handwriting
0
1
2
3
4
5
6
7
8
9
A
B
C
D
E
F
G
H
I
J
K
L
M
N
O
P
Q
R
S
T
U
V
W
X
Y
Z
Write the characters in proper size. The characters should be clear, distinct, and tidy.
Writing direction: The direction is as shown in Figure A-78:
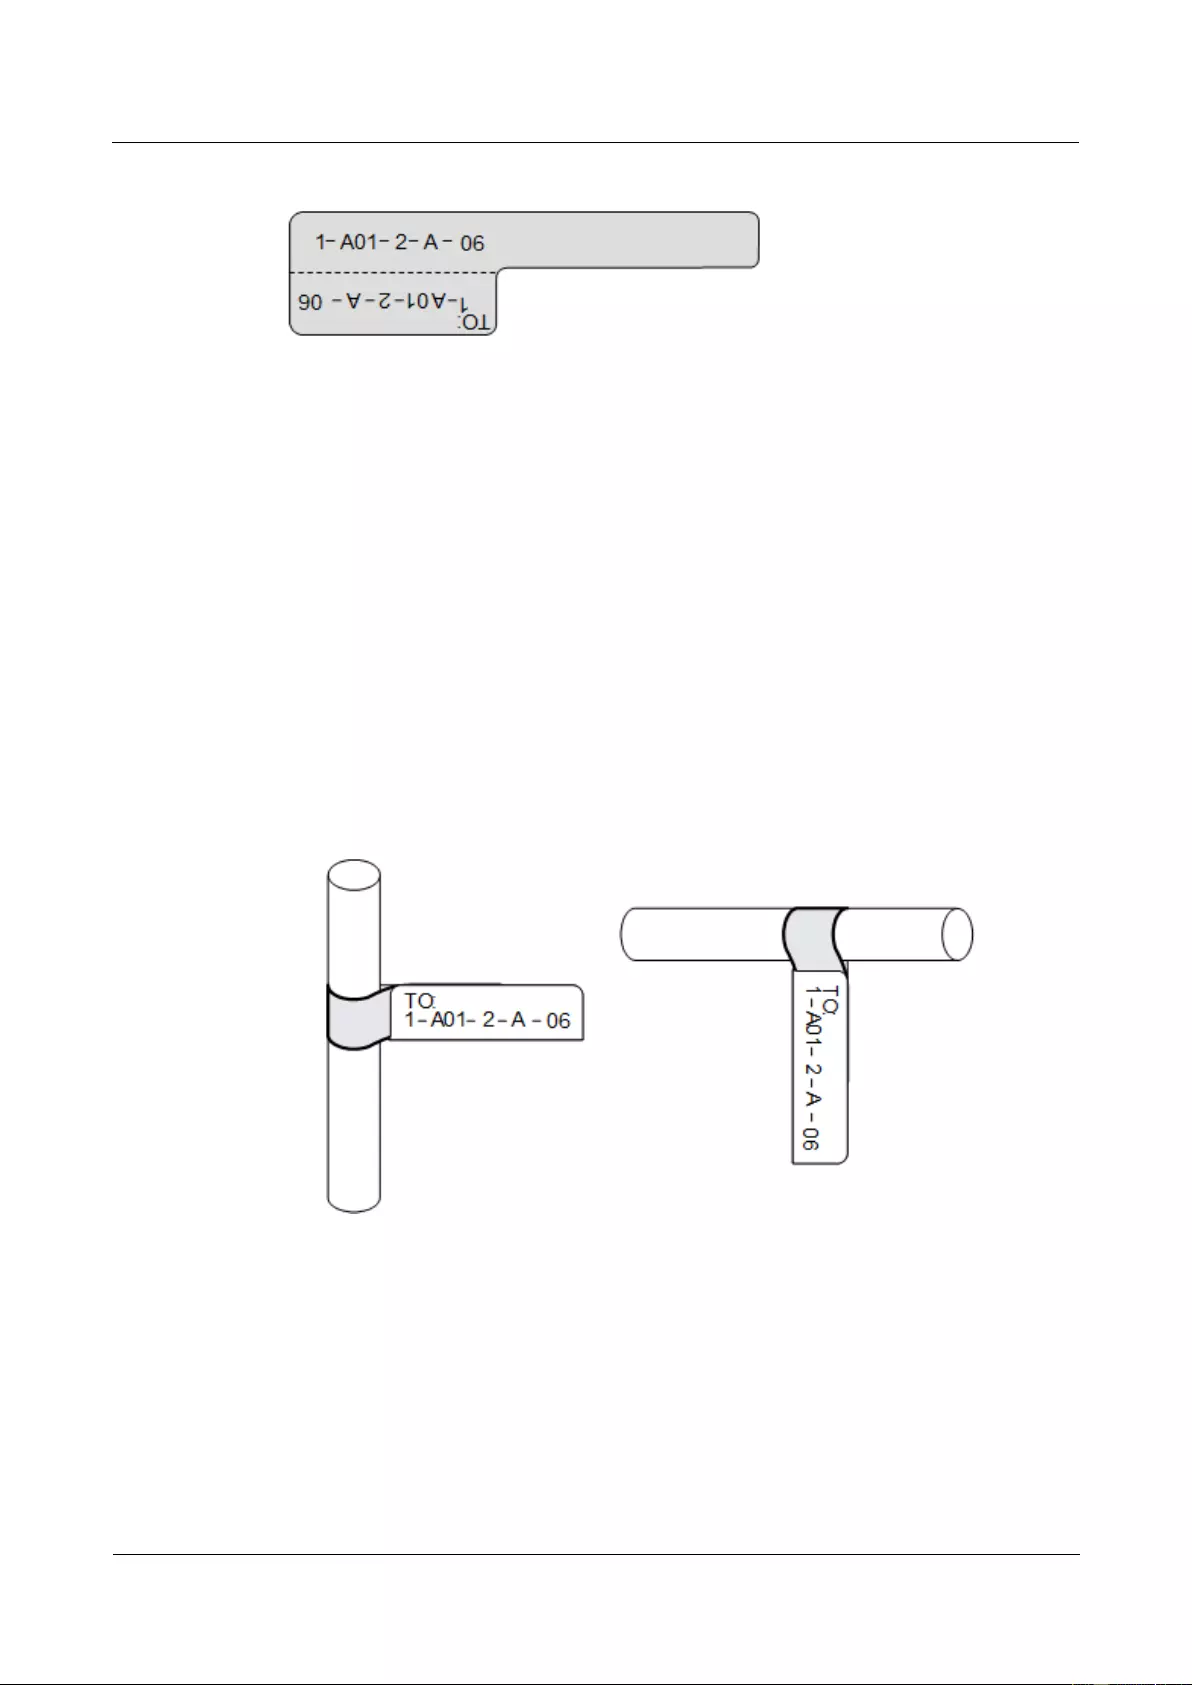
HUAWEI USG9500 Series Terabit-level Next-Generation Firewall
Hardware Guide
A Appendix
Issue 01 (2017-03-13)
Huawei Proprietary and Confidential
Copyright © Huawei Technologies Co., Ltd.
464
Figure A-78 Writing direction of the characters on the label
A.5.1.5 Affixing Labels
After printing or writing the label, remove the label from the bottom page and affix it to the
signal cable, or the identification plate of the power cable. Method of affixing Labels:
Label for Signal Cables
Choose the place to affix labels.
The label is affixed 2 cm from the connector on the signal cable. In special cases, for
example, to avoid cable bent or affecting other cables, other positions are allowed to
affix the labels. The rectangle part with characters is attached rightward or downward, as
shown in Figure A-79. The details are as follows:
− The identification card is to the right of the cable in vertical cabling.
− The identification card should be downward when you lay out the cable
horizontally.
Figure A-79 Text Area of the Label
Procedure for affixing labels
Figure A-80 shows the methods and procedures for affixing labels.
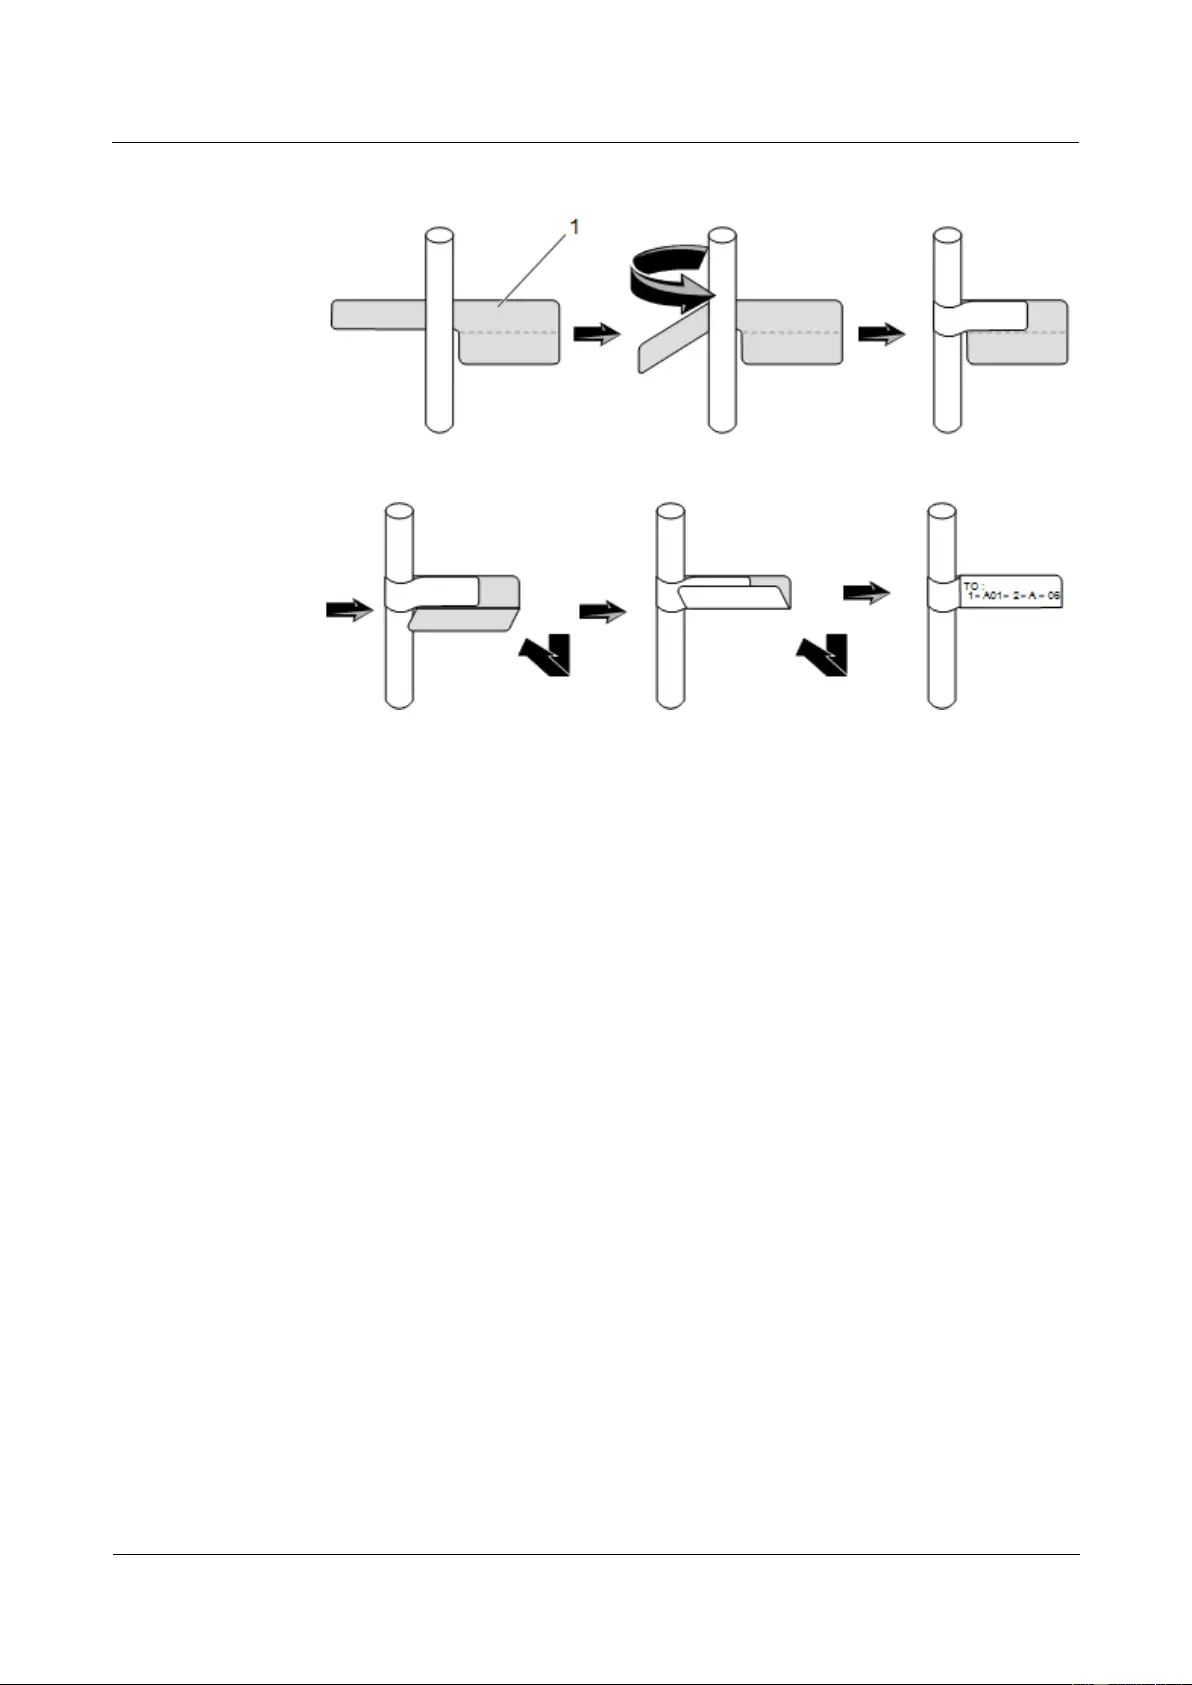
HUAWEI USG9500 Series Terabit-level Next-Generation Firewall
Hardware Guide
A Appendix
Issue 01 (2017-03-13)
Huawei Proprietary and Confidential
Copyright © Huawei Technologies Co., Ltd.
465
Figure A-80 Label for Signal Cables
Power Cable Label
Remove the label from the bottom page, and then affix it to the identification plate on the
cable tie. Remove the label from the bottom page, and then affix it to the identification plate
on the cable tie. The label should be stuck to the rectangular flute, and should be stuck to only
one side of the identification plate. The cable ties are bundled at 2 cm from the connectors,
and other positions are allowed in special circumstances.
Cable ties should be bound on both ends of a cable. After the bundling, the finished
identification plate should be on top of the cable in horizontal cabling, or on the right side of
the cable in vertical cabling, as shown in Figure A-81. The details are as follows:
The identification card is to the right of the cable in vertical cabling.
The identification card is on the top of the cable in horizontal cabling. Make sure the
label is facing out.
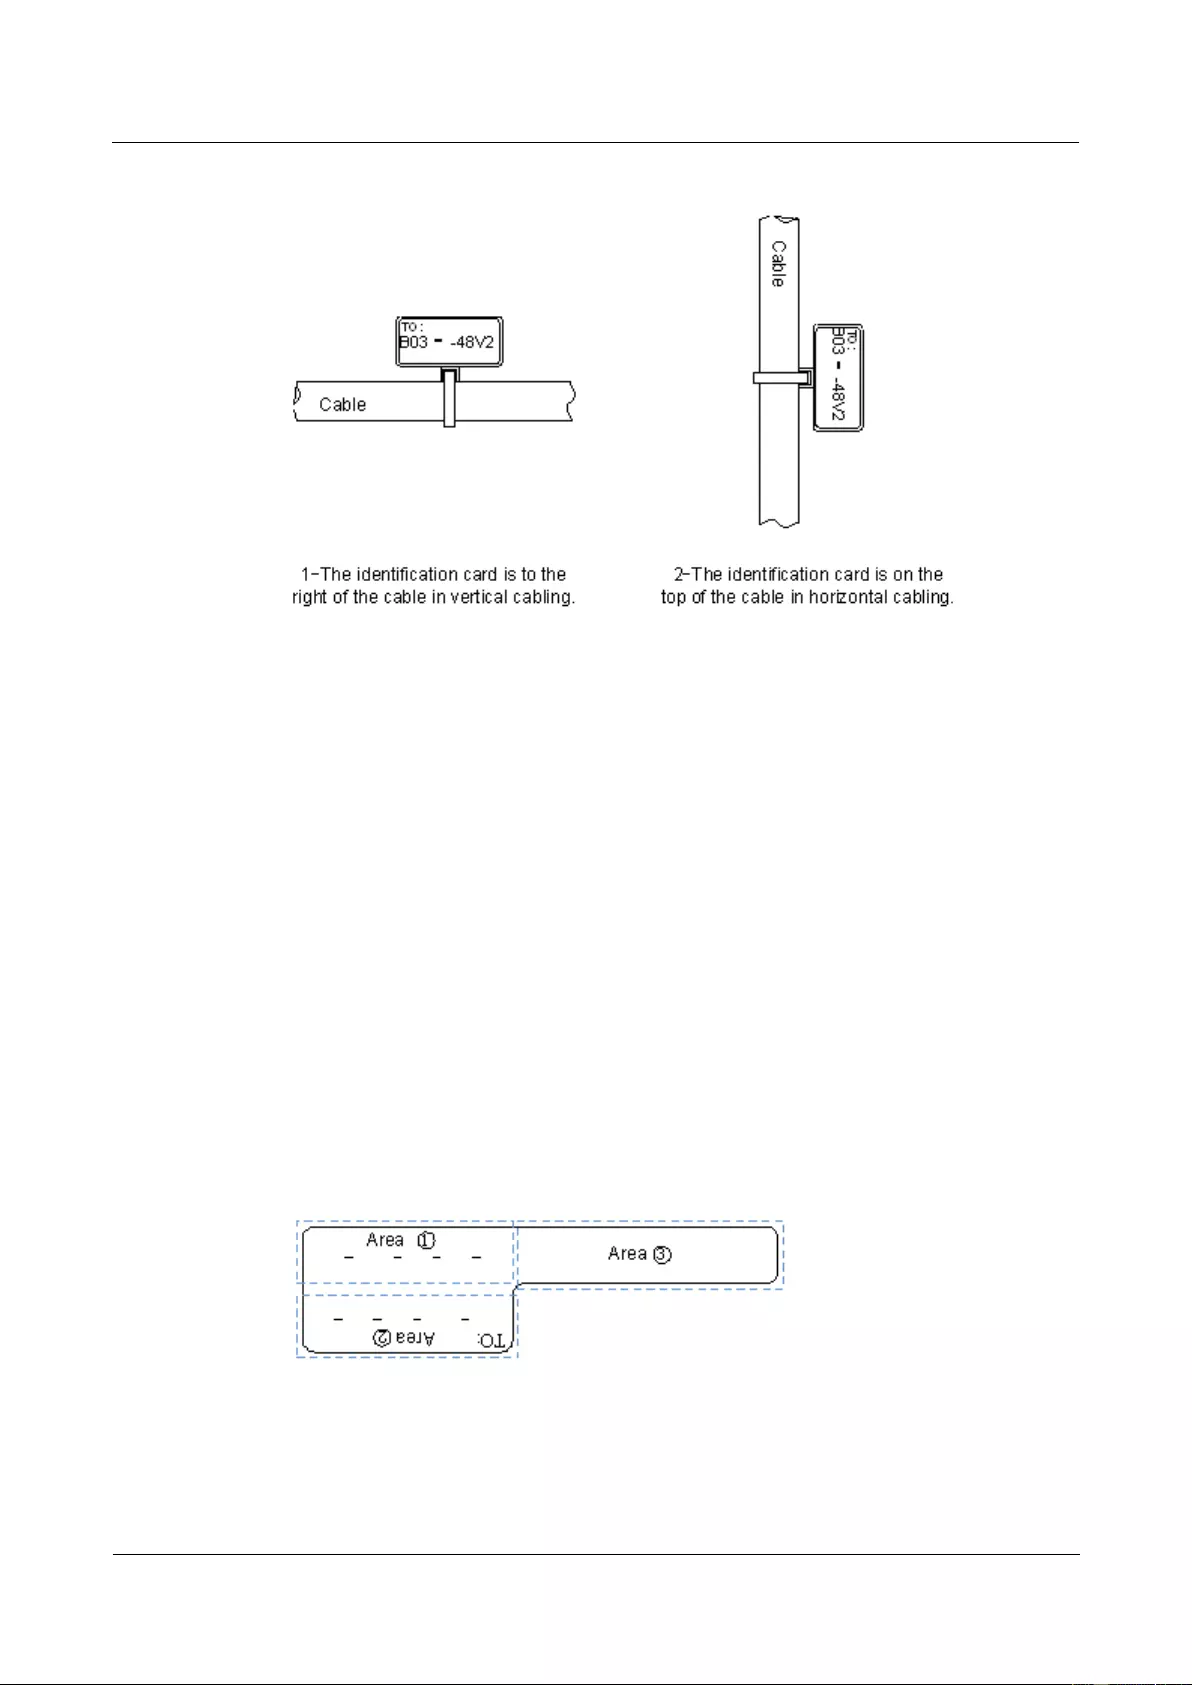
HUAWEI USG9500 Series Terabit-level Next-Generation Firewall
Hardware Guide
A Appendix
Issue 01 (2017-03-13)
Huawei Proprietary and Confidential
Copyright © Huawei Technologies Co., Ltd.
466
Figure A-81 Binding the Label for the Power Cable
A.5.1.6 Contents of Engineering Labels
Contents of Labels for Power Cables
Labels for power cables are only affixed on one side of the identification plates. On the labels,
there is information (the part after the mark "TO:") about the location of the device on the
other end of the cable, like the location of control cabinet, distribution box or power socket.
Contents of Labels for Signal Cables
The two sides of the label affixed on the signal cable carry information about the location of
the ports connected to both ends of the cable. Figure A-82 shows the information on both
sides of the labels affixed to the signal cables.
Area 1 contains the location information of the local end of the cable.
Area 2 (with the mark "TO:") contains the location information of the opposite end of the
cable.
Area 3 has been folded up inside the label.
Figure A-82 Printed parts on the label for signal cables
Seen from the cabling end of the equipment, the text part of the label is on the right side of the
cable. The side with "TO:" that is facing outside carries the location information of the
opposite end; and the other side carries the location information of the local end.

HUAWEI USG9500 Series Terabit-level Next-Generation Firewall
Hardware Guide
A Appendix
Issue 01 (2017-03-13)
Huawei Proprietary and Confidential
Copyright © Huawei Technologies Co., Ltd.
467
Therefore, the information in Area 1 at one end is the same as the information in Area 2 at the
other end of the cable. In other words, the local information at one end is called the opposite
information at the other end.
A.5.1.7 Precautions for Using Engineering Labels
When using labels, note the following:
When printing, writing, or affixing labels, you should keep the labels clean.
Since the label paper is made of moistureproof and waterproof material, ink-jet printers
and ink pens are forbidden for printing and writing labels.
Labels should be affixed tidily and gracefully. New-type labels are strip-shaped. If they
are pasted at incorrect locations or in wrong directions, the appearance of the device is
affected.
Power cable ties should be bundled in the same position of power cables, with
identification plates on the same side.
The positions of "up", "down", "left" or "right" are all based on the viewpoint of the
engineering person who works on the label.
A.5.2 Engineering Labels for Optical Fibers
This describes the engineering labels for optical fibers, including the labels for the optical
fibers between devices and the labels for the optical fibers between a device and an ODF.
These labels are affixed to the optical fibers that connect the optical interfaces on the boards
in a chassis, or on the device boxes. There are two types of labels for optical cables:
One is for the fiber that connects the optical interfaces on two devices.
The other is for the fiber that connects the device and the ODF.
A.5.2.1 Labels for the Optical Fibers Connecting Devices
Meaning of the Label
Table A-45 lists information on both sides of the labels affixed to the optical fibers that
connect two devices.
Table A-45 Information on labels affixed to the fiber between two devices
Content
Meaning
Example
MN-B-C-D-R
/T
MN: cabinet
number
M: The cabinet rows from front to back are numbered
from A to Z.
N: The cabinet columns from left to right are numbered
from 01 to 99.
For example, A01 is the cabinet in Row A and Column
01.
B: chassis
number
Numbered in bottom-up order with two digits, for
example, 01.
C: physical slot
number
Numbered in the top-bottom and left-right order
starting from 01. For example, A01 is the slot with
number 1.

HUAWEI USG9500 Series Terabit-level Next-Generation Firewall
Hardware Guide
A Appendix
Issue 01 (2017-03-13)
Huawei Proprietary and Confidential
Copyright © Huawei Technologies Co., Ltd.
468
Content
Meaning
Example
D: optical
interface
number.
Numbered with two digits in up-bottom and left-right
order. For example, 1 is the second optical interface.
R: Receiving
interface
T: optical
transmitting
interface
-
MN-B-C-D-R
/T
MN: Cabinet
number
M: The cabinet rows from front to back are numbered
from A to Z.
N: The cabinet columns from left to right are numbered
from 01 to 99.
For example, A01 is the cabinet in Row A and Column
01.
Numbered in bottom-up order with two digits, for
example, 01.
B: chassis
number
-
C: physical slot
number
Numbered in up-bottom and left-right order with two
digits starting from 01. For example, A01 is the slot
with number 1.
D: optical
interface
number.
Numbered with two digits in up-bottom and left-right
order. For example, 01 is the number 1 optical
interface.
R: Optical
receiving
interface
T: optical
transmitting
interface
-
Example of the Label
Figure A-83 shows the label on the cable.
Figure A-83 Example of the label on the optical fiber between two devices

HUAWEI USG9500 Series Terabit-level Next-Generation Firewall
Hardware Guide
A Appendix
Issue 01 (2017-03-13)
Huawei Proprietary and Confidential
Copyright © Huawei Technologies Co., Ltd.
469
The meaning of the labels is listed in Figure A-83.
"A0-01-05-01-R" indicates that the local end of the optical fiber is connected with the
optical receiving interface 01 on slot 5, chassis 01 in the cabinet on row A, column 01 in
the machine room.
"G01-01-01-01-T" indicates that the opposite end of the optical fiber is connected with
Optical Transmitting Interface 01 on Slot 01, Chassis 01 in the cabinet on Row G,
Column 01 in the machine room.
A.5.2.2 Labels for the Optical Fibers Connecting the Device and an ODF
Meaning of the Labels
Table A-46 shows the information on both sides of the labels affixed to the optical fiber that
connects the device and the ODF.
Table A-46 Information on labels affixed to the fiber between the device and the ODF
Content
Meaning
Example
MN-B-C-D-R
/T
MN: cabinet
number
For example, A01.
B: chassis
number
Numbered in bottom-up order with two digits, for
example, 01.
C: physical slot
number
Numbered in bottom-up order with two digits, for
example, 01.
D: optical
interface
number.
Numbered with two digits in up-bottom and left-right
order. For example, 01.
R: Optical
receiving
interface
T: optical
transmitting
interface
-
ODF-MN-B-
C-R/T
MN: row
number and
column number
of an ODF
M: The cabinet rows from front to back are numbered
from A to Z.
N: The cabinet columns from left to right are
numbered from 01 to 99.
For example, G01 is the ODF of Row G and Column
01.
B: row number
of the terminal
device
Range from 01 to 99, for example, 01-01.
C: row number
of the terminal
device
R: Optical
-
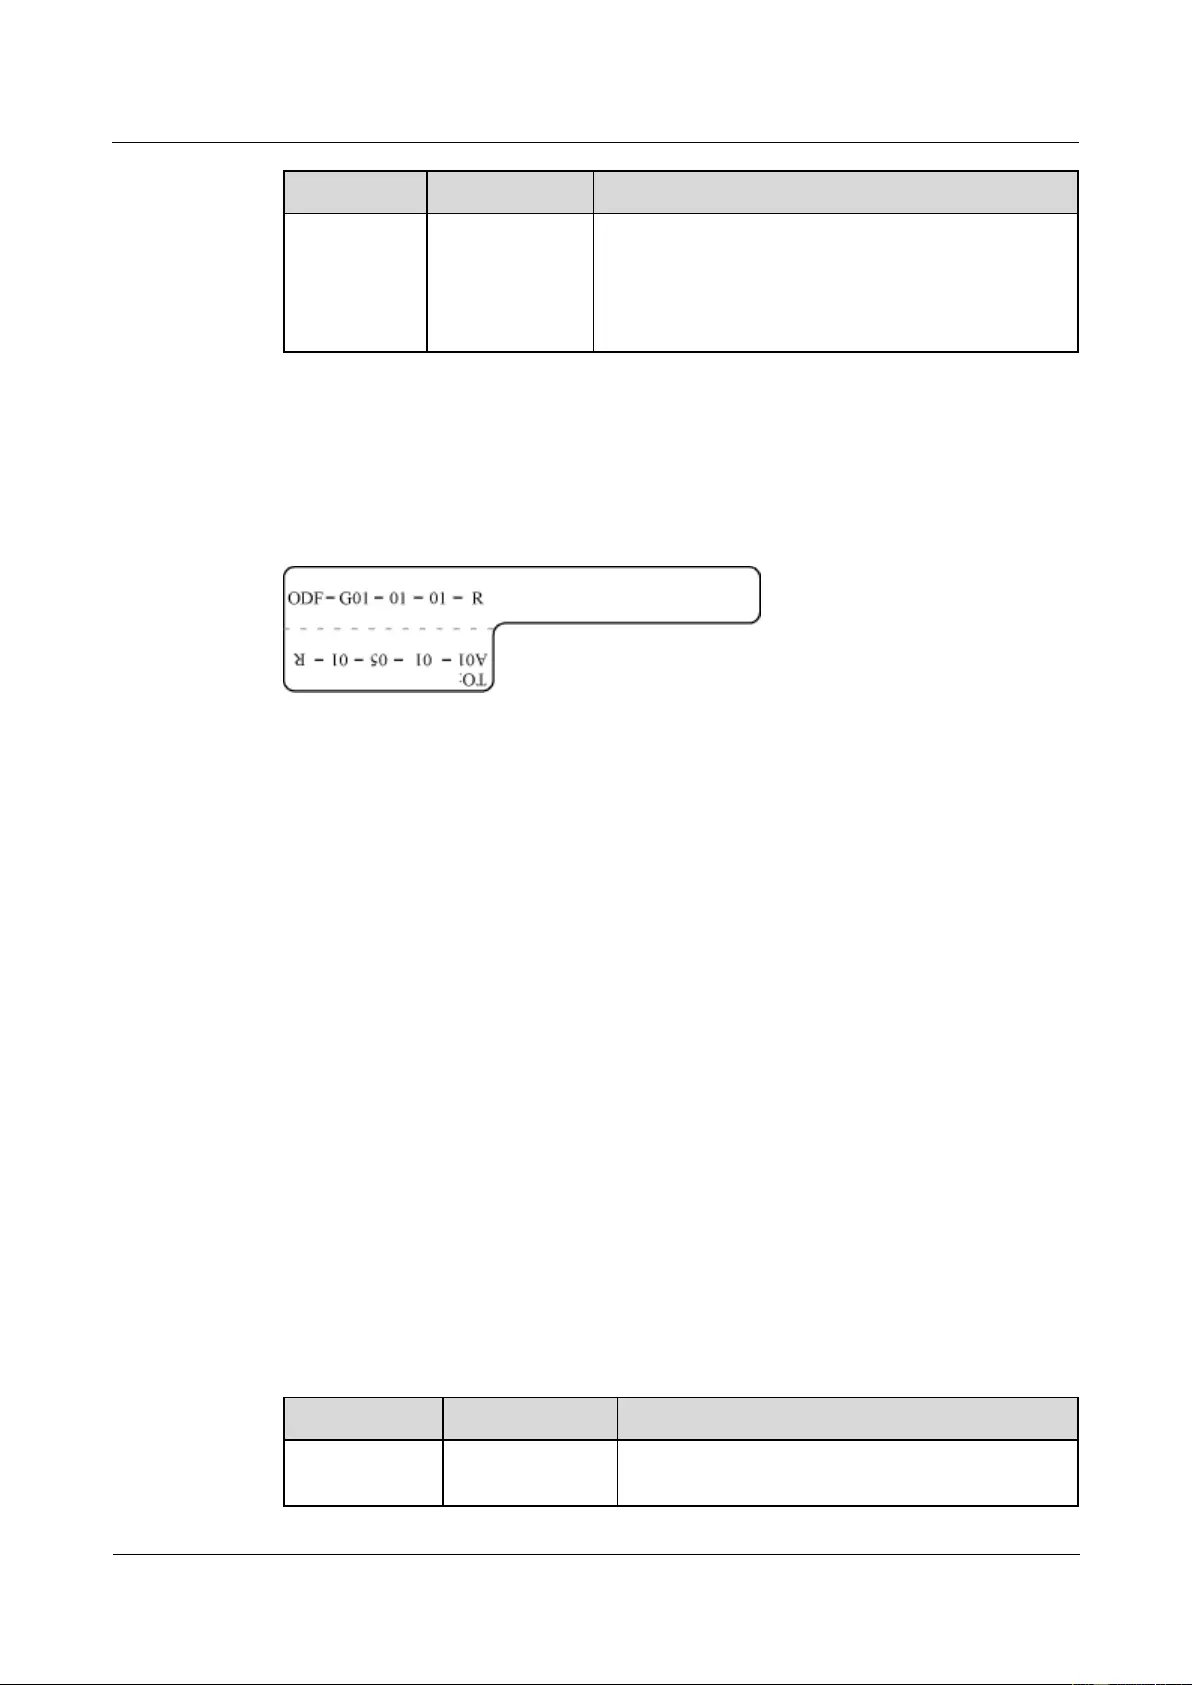
HUAWEI USG9500 Series Terabit-level Next-Generation Firewall
Hardware Guide
A Appendix
Issue 01 (2017-03-13)
Huawei Proprietary and Confidential
Copyright © Huawei Technologies Co., Ltd.
470
Content
Meaning
Example
receiving
interface
T: optical
transmitting
interface
Example of the Label
Figure A-84 shows the label on the cable.
Figure A-84 Example of the label on the optical fiber between the device and the ODF
Meaning of the label in Figure A-84
"ODF-G01-01-01-R" indicates that the local end of the optical fiber is connected with
the optical receiving terminal on row 01, column 01 of the ODF in row G, column 01 in
the machine room.
"A01-01-05-01-R" indicates that the opposite end of the optical fiber is connected with
Optical Receiving Interface 1 on Slot 01, chassis 01 in the cabinet on Row A, Column 01
in the machine room.
A.5.3 Engineering Labels for Network Cables
This describes the applicable ranges and contents of the engineering labels for network cables
and gives instances.
Applicable Ranges
The labels can be applied to Ethernet cables.
Label Content
Table A-47 shows the information on both sides of the labels affixed to the Ethernet cables.
You can also decide the label content according to the actual environment. If the device is not
installed in the cabinet, you can remove the cabinet number.
Table A-47 Information on the Ethernet cables
Content
Meaning
Example
MN-B-C-D
MN: cabinet
number
For example, A01 is the first cabinet in row A.

HUAWEI USG9500 Series Terabit-level Next-Generation Firewall
Hardware Guide
A Appendix
Issue 01 (2017-03-13)
Huawei Proprietary and Confidential
Copyright © Huawei Technologies Co., Ltd.
471
Content
Meaning
Example
B: chassis
number
Numbered in the bottom-up order with two digits,
for example, 01.
C: physical slot
number
Numbered with two digits in bottom-up and
left-right order. For example, 01.
D: network port
number
Numbered in the up-bottom and left-right orders.
For example, 01.
MN-Z
MN: cabinet
number
For example, B02 is the second cabinet in Row B.
Z: Location
number
Fill in the valid location number of the terminal
device on site. If the cable is connected to a router
in a cabinet, the serial numbers of the cabinet, the
chassis, and the Ethernet interface of the router
should be specified. For example, B02-03-12. If the
cable is connected to the Network Management
Station (NMS), specific location of the NMS should
be given.
The contents of the labels for the network cables connecting hubs and routers or agents and
the network cables for other purposes should be specified according to actual connections.
The details are as follows:
For the network cable connecting a hub and router, the label on the hub end should
indicate the numbers of the chassis and cabinet where the hub resides, and the serial
number on the hub. The label on the router end should indicate the number of the chassis
and cabinet where the router l ocates. In case it is a stand-alone router, specific position of
the router should be provided.
For the network cable connecting a hub and an agent or a terminal, the label on the agent
or terminal end should contain the serial number of the network interface. The
definitions of the cabinet number and chassis number are the same as those described in
Table D-4.
If it is a stand-alone hub without any cabinet or chassis, the label should contain specific
location information that identifies the hub.
The serial number on the hub, the network interface number of the agent or terminal, and the
location of the stand-alone router should be specified according to actual connections.
Label Example
Figure A-85 shows the label on the cable.

HUAWEI USG9500 Series Terabit-level Next-Generation Firewall
Hardware Guide
A Appendix
Issue 01 (2017-03-13)
Huawei Proprietary and Confidential
Copyright © Huawei Technologies Co., Ltd.
472
Figure A-85 Example of the label on network cables
Meaning of the label in Figure A-85.
"A01-03-01-01" indicates that one end of the network cable is connected to network
interface 01 of slot 01, chassis 03 of the cabinet on row A, column 01 in the equipment
room.
"B02-03-01" indicates that another end of the network cable is connected to network
interface 01, chassis 03 of the cabinet on row B, column 02 in the equipment room. No
slot number.
A.5.4 Engineering Labels for Trunk Cables
This describes the engineering labels for trunk cables, including the labels for the cables
between devices and the labels for the cables between a device and an MDF.
There are two types of labels for trunk cables:
Labels for the cables between devices. For example, the label for the cable between a
trunk board and a built-in transmission device and the label for the cable between two
trunk boards. Attach labels to both ends of the cable to indicate the locations of the cable
on both devices or on both trunk boards of a device.
Labels for the cables between the device and a DDF. Attach labels to both ends of the
cable to indicate the locations of the cable on the device and DDF.
The trunk cables are 75Ω/120Ω E1 cable, 100Ω T1 cable, 34M, 45M, 140M, and 155M
cables, and 120Ω to 75Ω trunk cables.
A.5.4.1 Engineering Labels for Trunk Cables Between Devices
Meaning of Engineering Labels for Trunk Cables Between Devices
Table A-48 shows the engineering labels for trunk cables between devices.
Table A-48 Contents of engineering labels for trunk cables between devices
Content
Meaning
Example
MN-B-C-D-R
/T
MN: cabinet
number
For example, A01.
B: chassis
number
Numbered in the bottom-up order with two digits, for
example, 01.
C: physical slot
number
Numbered in the left-right and top-bottom order with
two digits, for example, 01.
D: interface
number
Numbered with two digits in the top-bottom and
left-right order. For example, 01.

HUAWEI USG9500 Series Terabit-level Next-Generation Firewall
Hardware Guide
A Appendix
Issue 01 (2017-03-13)
Huawei Proprietary and Confidential
Copyright © Huawei Technologies Co., Ltd.
473
Content
Meaning
Example
R: optical
receiving
interface, T:
optical transmit
interface.
-
MN-B-C-D-R
/T
MN: cabinet
number
For example, A01.
B: chassis
number
Numbered in the bottom-top order with two digits, for
example, 01.
C: physical slot
number
Numbered in the left-right and top-bottom order with
two digits, for example, 01.
D: interface
number.
Numbered with two digits in the top-bottom and
left-right order. For example, 01.
R: optical
receiving
interface, T:
optical transmit
interface.
-
Example of the Label
Figure A-86 shows the label on the cable.
Figure A-86 Engineering labels for trunk cables between devices
Meaning of the label in Figure A-86 is as follows:
"G01-01-05-01-T" indicates that the local end of the trunk cable is connected to
transmitting interface 01 on slot 05, chassis 01 in the cabinet on row G, column 01 in the
equipment room.
"D02-01-01-01-R" indicates that the opposite end of the trunk cable is connected to
receiving interface 01 on slot 01, chassis 01 in the cabinet on row D, column 02 in the
equipment room.

HUAWEI USG9500 Series Terabit-level Next-Generation Firewall
Hardware Guide
A Appendix
Issue 01 (2017-03-13)
Huawei Proprietary and Confidential
Copyright © Huawei Technologies Co., Ltd.
474
A.5.4.2 Engineering Labels for Trunk Cables Between the Device and a
DDF
Meaning of the Engineering Labels for Trunk Cables Between the Device and a
DDF
Table A-49 shows the engineering labels for trunk cables between the device and a DDF.
Table A-49 Contents of the labels for trunk cables between the device and a DDF
Content
Meaning
Example
MN-B-C-D-R
/T
MN: cabinet
number
For example, A01.
B: chassis
number
Numbered in the bottom-top order with two digits, for
example, 03.
C: physical slot
number
Numbered in the left-right and top-bottom order with
two digits, for example, 01.
D: interface
number
For example, 01.
R: optical
receiving
interface, T:
optical transmit
interface.
-
DDF-MN-B-
C-D/R/T
MN: row
number and
column number
of a DDF
M: The rows of cabinets from front to back are
numbered from A to Z. N: The columns of cabinets
from left to right are numbered from 01 to 99. For
example, G01 is the DDF of row G and column 01.
B: row number
of the terminal
device
Range: 01 to 99 For example, 01-01.
C: row number
of the terminal
device
DDF-MN-B-
C-D/R/T
R: optical
receiving
interface, T:
optical transmit
interface.
Usually, a DDF is marked with "A", which indicates
that the DDF terminal is connected to an optical
network device or "B", which indicates that the DDF
terminal is connected to a switching device.
Example of the Label
Figure A-87 shows an example of the label.

HUAWEI USG9500 Series Terabit-level Next-Generation Firewall
Hardware Guide
A Appendix
Issue 01 (2017-03-13)
Huawei Proprietary and Confidential
Copyright © Huawei Technologies Co., Ltd.
475
Figure A-87 Engineering labels for trunk cables between the device and a DDF
Meaning of the label in Figure A-87 is as follows:
"A01-03-01-01-R" indicates that the local end of the trunk cable is connected to
receiving interface 01 on slot 01, chassis 03 in the cabinet on row A, column 01 in the
equipment room.
"DDF-G01-01-01-AR" indicates that the opposite end of the trunk cable is connected to
the receiving interface on row 01, column 01 of the DDF in row G, column 01 in the
equipment room.
A.5.5 Engineering Labels for User Cables
This describes the applicable ranges and contents of the engineering labels for user cables and
provides examples.
Attach labels to both ends of the cable to indicate the locations of the cable on the device and
MDF.
Meaning of the Engineering Labels for User Cables
Table A-50 shows the contents of the labels.
Table A-50 Contents of the engineering labels for user cables
Content
Meaning
Example
MN-B-C-D
MN: cabinet
number
For example, A01 is the first cabinet in row A.
B: frame number
Numbered in the bottom-top order with two digits,
for example, 03.
C: physical slot
number
Numbered with two digits in the top-bottom and
left-right order. For example, 01.
D: cable number
Numbered with two digits in the top-bottom and
left-right order. For example, 01.
MDF-MN-B-C
MN: row number
and column
number of the
MDF
M: The rows of cabinets from front to back are
numbered from A to Z. N: The columns of cabinets
from left to right are numbered from 01 to 99. For
example, G01 is the MDF of row G and column 01.
B: row number of
the terminal
device
Ranges from 01 to 99, for example, 01.
C: column number
of the terminal
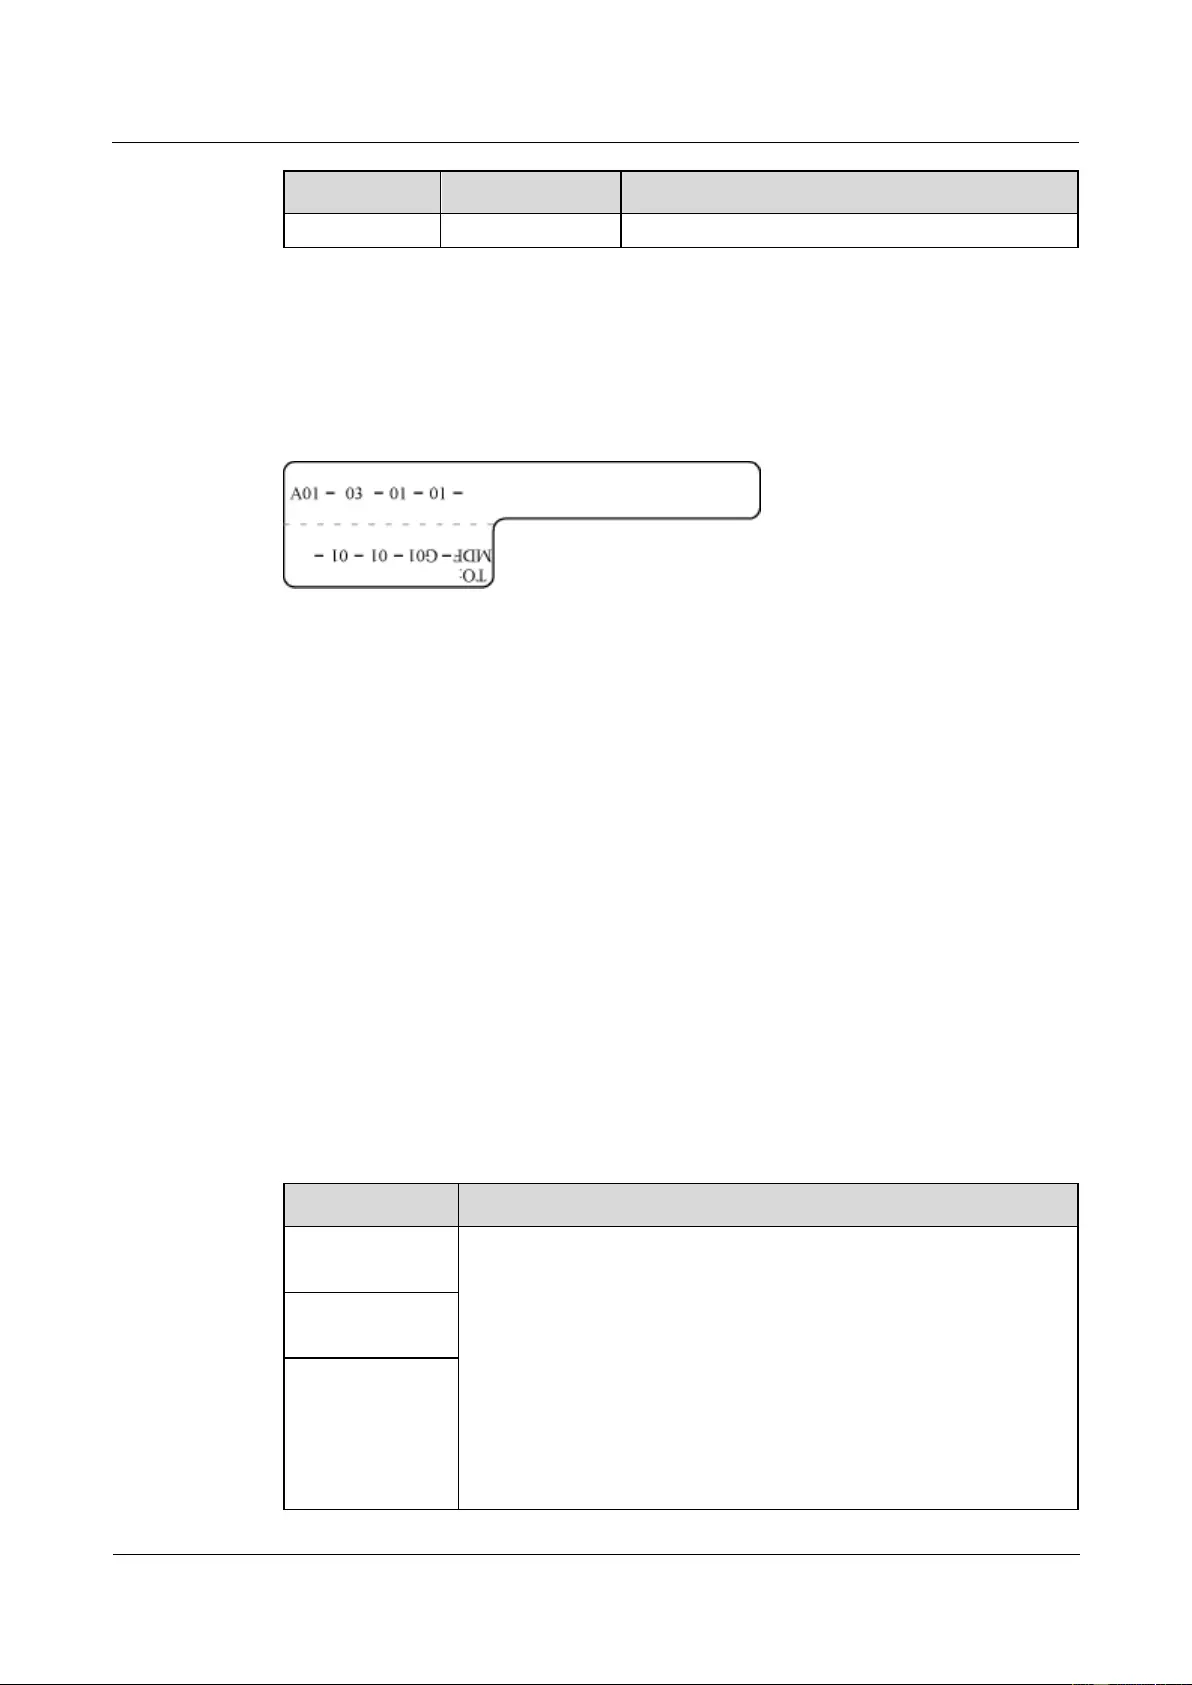
HUAWEI USG9500 Series Terabit-level Next-Generation Firewall
Hardware Guide
A Appendix
Issue 01 (2017-03-13)
Huawei Proprietary and Confidential
Copyright © Huawei Technologies Co., Ltd.
476
Content
Meaning
Example
device
Example of the Label
Figure A-88 shows an example.
Figure A-88 Example of labels for user cables
The meaning of the label in Figure A-88 is as follows:
"A01-03-01-01" indicates that the local end of the user cable is connected to port 1 of on
slot 1, chassis 03 of the cabinet on row A, column 01 in the equipment room.
"MDF-G01-01-01-AR" indicates that the opposite end of the user cable is connected to
the terminal on row 01, column 01 of the MDF in row G, column 01 in the equipment
room.
A.5.6 Engineering Labels for Power Cables
This describes the engineering labels for power cables, including DC and AC power cables.
A.5.6.1 Engineering Labels for DC Power Cables
The labels are affixed to the DC power cables that provide power supply for cabinets,
including the -48 V, PGND, and BGND cables. Here, the DC power cables also include power
cables and protection grounding cables.
The labels for DC power cables are affixed to one side of the identification plates on cable ties.
For details of the labels, see Table A-51.
Table A-51 Contents of the label
Content
Meaning
MN(BC)-B--48V
n
MN(BC): BC is written right under MN.
B: chassis number, numbered in the bottom-top order with two digits,
for example, 01.
N: power socket number , numbered as 1 to 3 in the bottom-top and
left-right orders.
On the loaded cabinet side, only MN is used to identify the cabinet.
On the power cabinet side, MN identifies the row and column number
of the power distribution equipment like a control cabinet and
distribution box, and BC identifies the row and column number of the
-48 V connector. If there is no row number or column number, or the
MN(BC)-B-BGN
D
MN(BC)-B-PGN
D
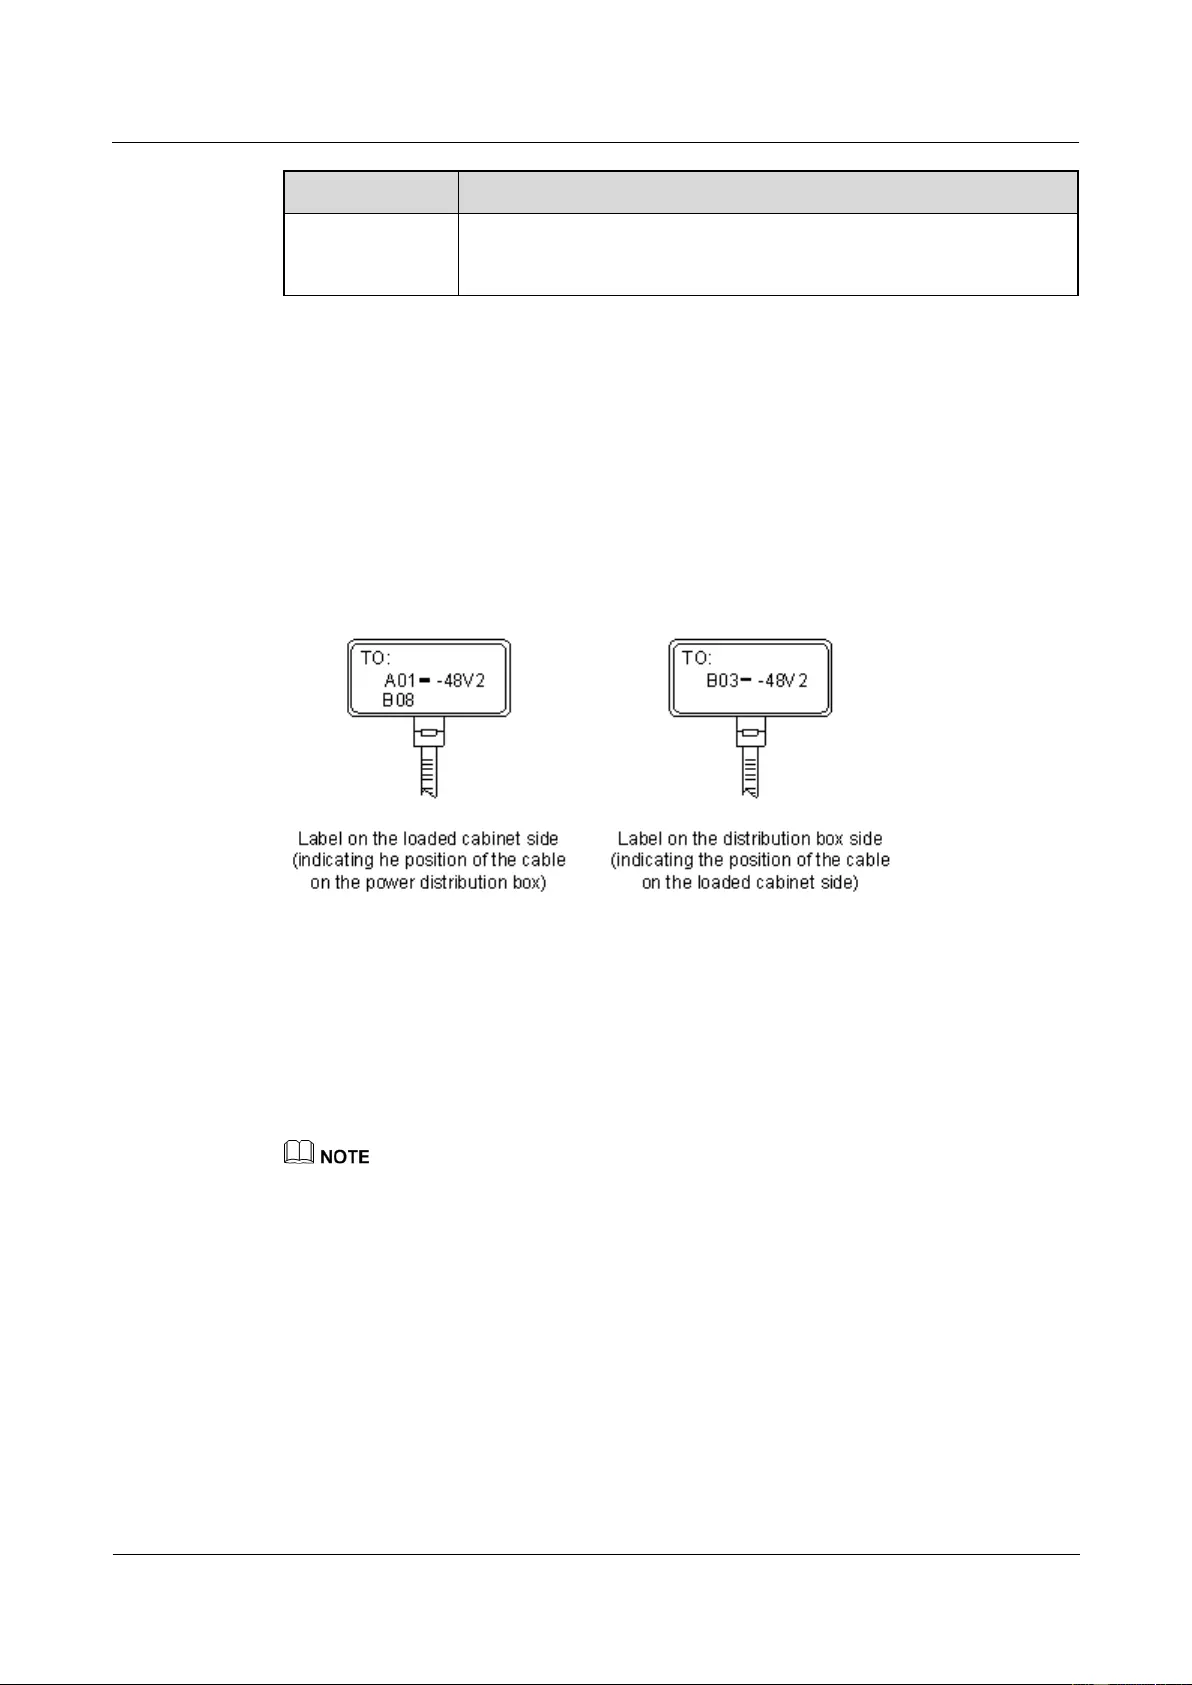
HUAWEI USG9500 Series Terabit-level Next-Generation Firewall
Hardware Guide
A Appendix
Issue 01 (2017-03-13)
Huawei Proprietary and Confidential
Copyright © Huawei Technologies Co., Ltd.
477
Content
Meaning
connector can be identified without them, BC can be omitted. It is
unnecessary for BGND and PGND to identify the row and column
number.
The label only carries location information about the destination direction of the power cable
while information of the local end is not necessary. That is, the label only carries location
information about the opposite equipment, the control cabinet, or the distribution box. Table
D-8 lists the information on two -48 V power supplies on the label. The information on other
DC voltages, such as 24 V and 60 V should be given in similar methods.
Make sure that labels are affixed in the correction direction. That is, after the cable ties are
bundled onto the cable, the identification plates with the labels should face up, and the text on
the labels in the same cabinet should be in the same direction. For details, see Figure A-89.
Figure A-89 Example of the labels for DC power cables
The meaning of the label in Figure A-89 is as follows:
On the loaded cabinet side, the label "A01/B08--48V2" on the cable indicates that the
cable is -48 V DC supply, which is from the eighth connector on row B of -48 V bus bar
in the cabinet on row A, and column 1 in the equipment room.
On the distribution box side, the label "B03--48V2" indicates that the cable is -48 V DC
supply, connected to DC power socket 2 on row B, column 03 in the equipment room.
In the power distribution box or the first power cabinet of a row in a transmission equipment room,
every terminal block on the -48 V connector bar has a numeric identification. For example, in the above
label of "A01/B08--48V2", "08" (or sometimes "8") is the numeric identification of the terminal block.
PGND and BGND are two copper bars, on which the terminal blocks are short-circuited,
therefore which terminal is connected makes no difference. It is only necessary to give the
row and column of the power distribution box, instead of giving the specific serial number of
the terminal block on the copper bar. For example, if the label on the loaded cabinet side is
"A01-BGND", it means that the power cable is a BGND that connects BGND copper bar in
the power distribution box on Row A, Column 01 in the machine room. Information on the
labels for PGND cables should be given in a similar way.
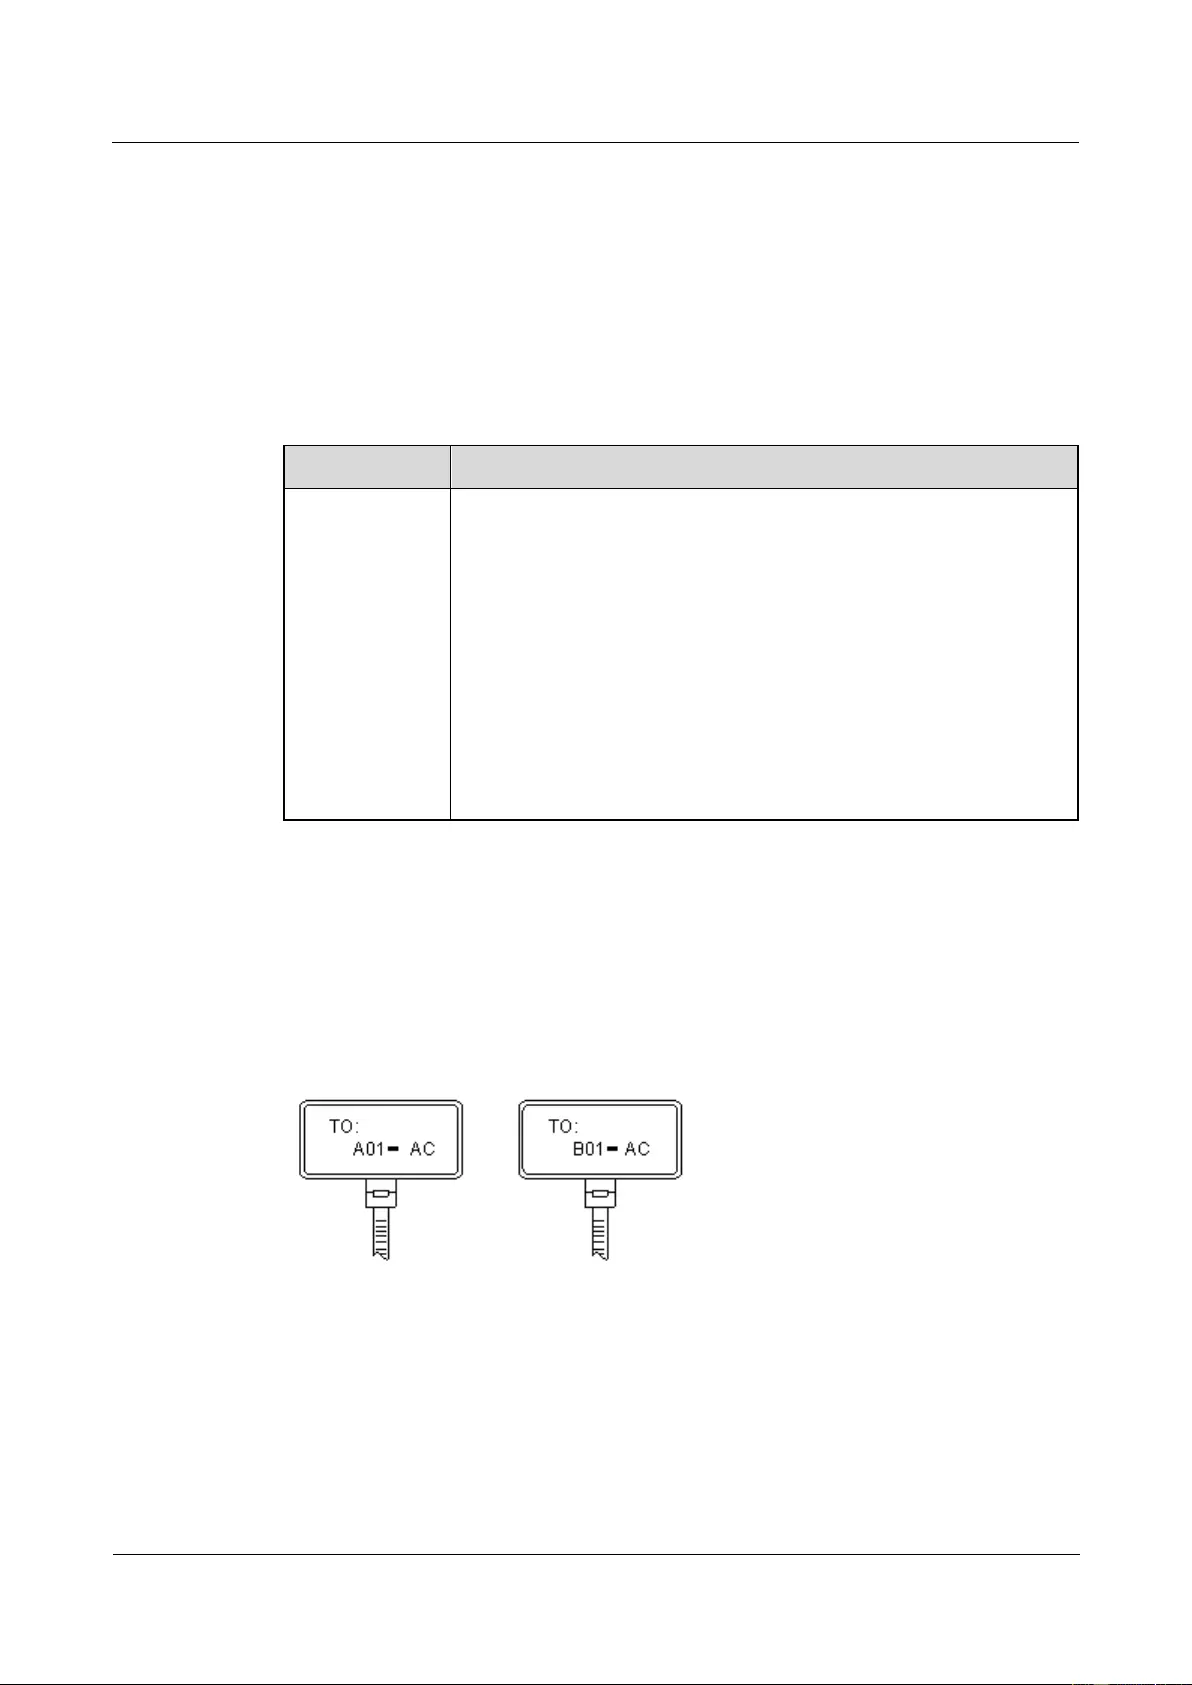
HUAWEI USG9500 Series Terabit-level Next-Generation Firewall
Hardware Guide
A Appendix
Issue 01 (2017-03-13)
Huawei Proprietary and Confidential
Copyright © Huawei Technologies Co., Ltd.
478
A.5.6.2 Engineering Labels for AC Power Cables
The labels are affixed to both ends of an AC power cable that provides AC power supply to
cabinets, including 220 V, PGND, and BGND cables. The 220 V AC cables and related
PGND and BGND cables are covered with insulating sheath, so the labels need to contain
only the words of "AC" and the cabinet numbers.
The labels for AC power cables are affixed to one side of the identification plates on cable ties.
For details, see Table A-52.
Table A-52 Label content
Content
Meaning
MN-(B)-ACn
MN: serial number of the cabinet or the socket where the power is led
in
B: chassis number, numbered in the bottom-top order with two digits,
for example, 01.
n: power port number, numbered as 1 to 3 in bottom-top and left-right
order.
Serial number of the socket where the power is led in: the location of
the socket is marked out according to the actual situation. If the sockets
can be identified by row numbers and column numbers, they can be
numbered following the same rule for the cabinets. If the sockets
cannot be identified by rows and columns, specify the detailed
locations to avoid confusing with other sockets.
The label only carries location information about the opposite equipment and the power
socket, while information about the local end is not necessary.
Make sure that labels are affixed in correct direction. That is, after the cable ties are bundled
onto the cable, the identification plates with the labels should face up, and the text on the
labels in the same cabinet should be in the same direction, as shown in Figure A-90.
Figure A-90 Labels for AC power cables
Meaning of the label in Figure A-90.
On the loaded cabinet side, the label "A01-AC" indicates that the power cable is
connected to the socket of Row A and Column 01 in the machine room.
On the power socket side, the label marked with "B01-AC1" indicates that the power
cable is connected to AC power socket on Row B, Column 01 in the machine room.
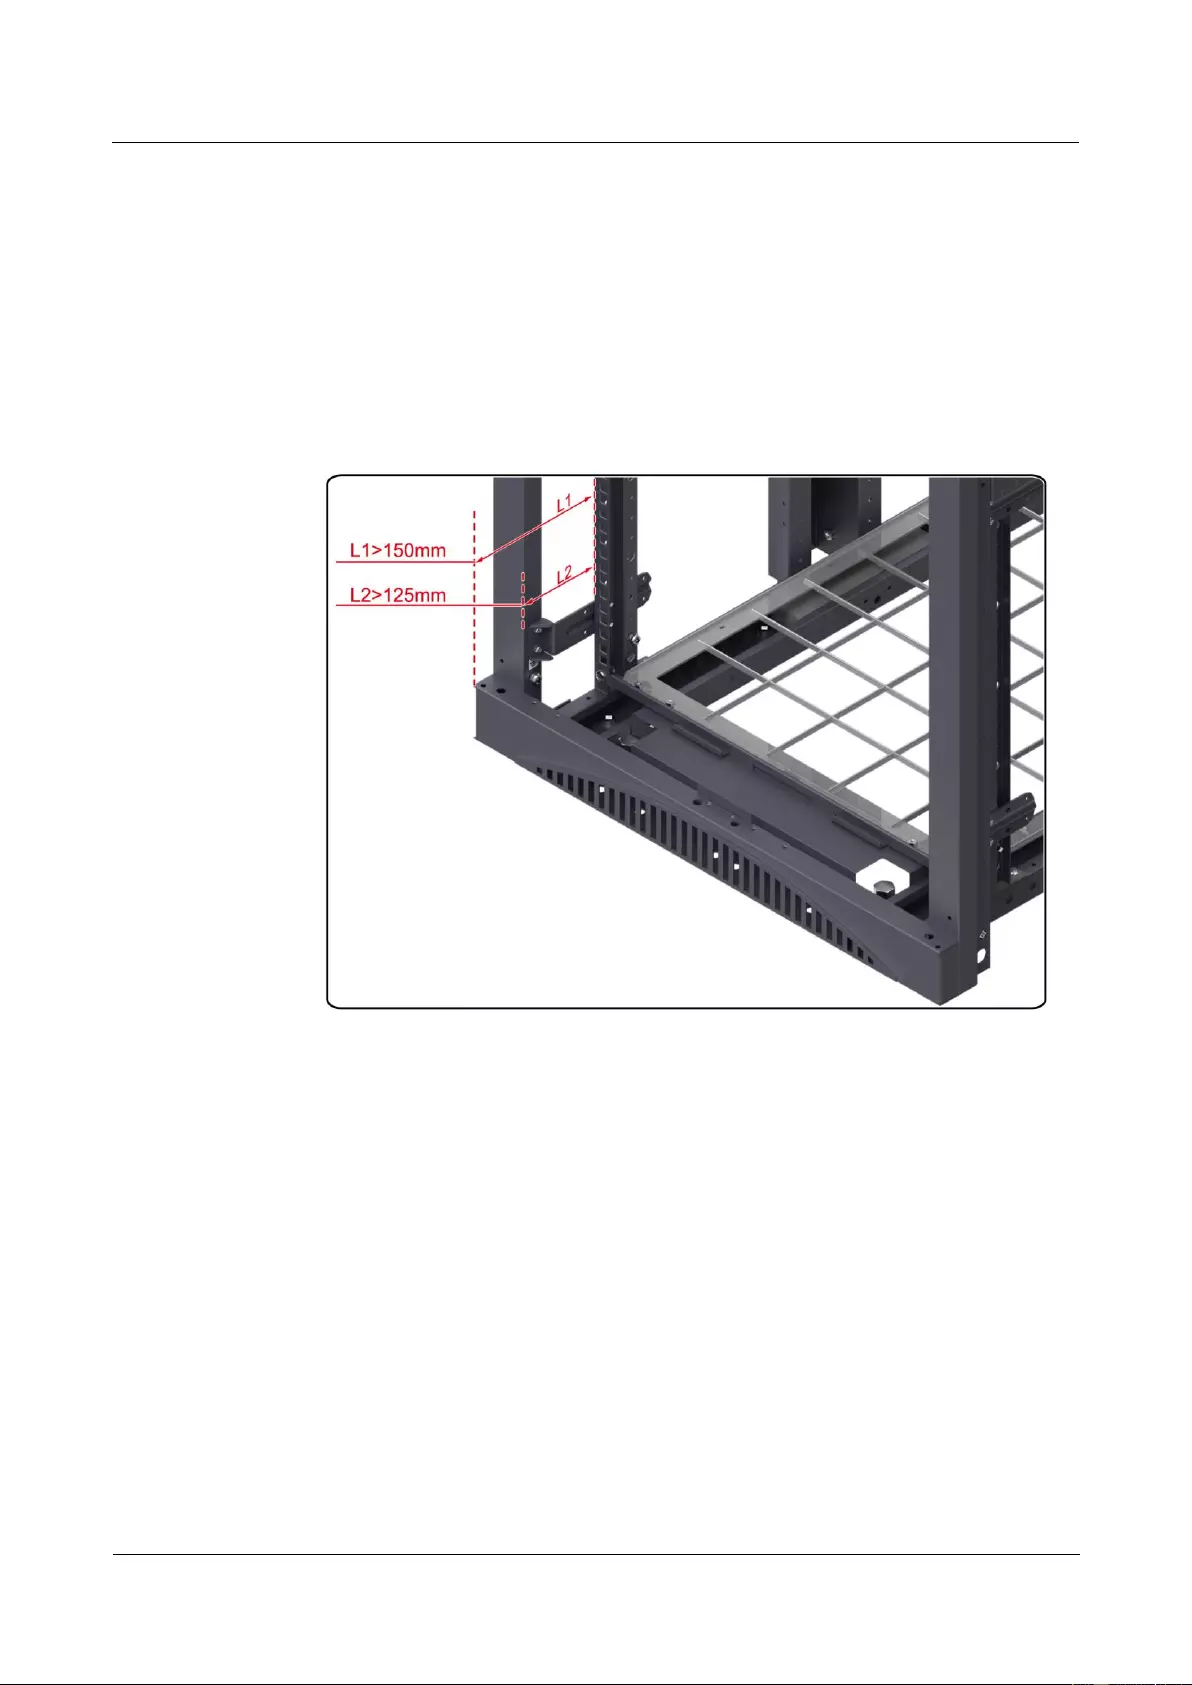
HUAWEI USG9500 Series Terabit-level Next-Generation Firewall
Hardware Guide
A Appendix
Issue 01 (2017-03-13)
Huawei Proprietary and Confidential
Copyright © Huawei Technologies Co., Ltd.
479
A.6 Requirements on Customers' Cabinets Purchased from
Other Vendors
This section describes the requirements on customers' cabinets purchased from other vendors.
Cabinets purchased from other vendors must meet the following requirements:
The rack mounting rail is more than 150 mm from the front door of the cabinet, and the
front door is less than 25 mm thick, ensuring that the available space is over 125 mm.
Figure A-91 Requirements on the rack mounting rail
The cabinet customized by the customer should be a 19-inch standard cabinet, the depth
of the cabinet is greater than 800 mm, and the space between the installation holes on the
two rack mounting rails is 465 mm.
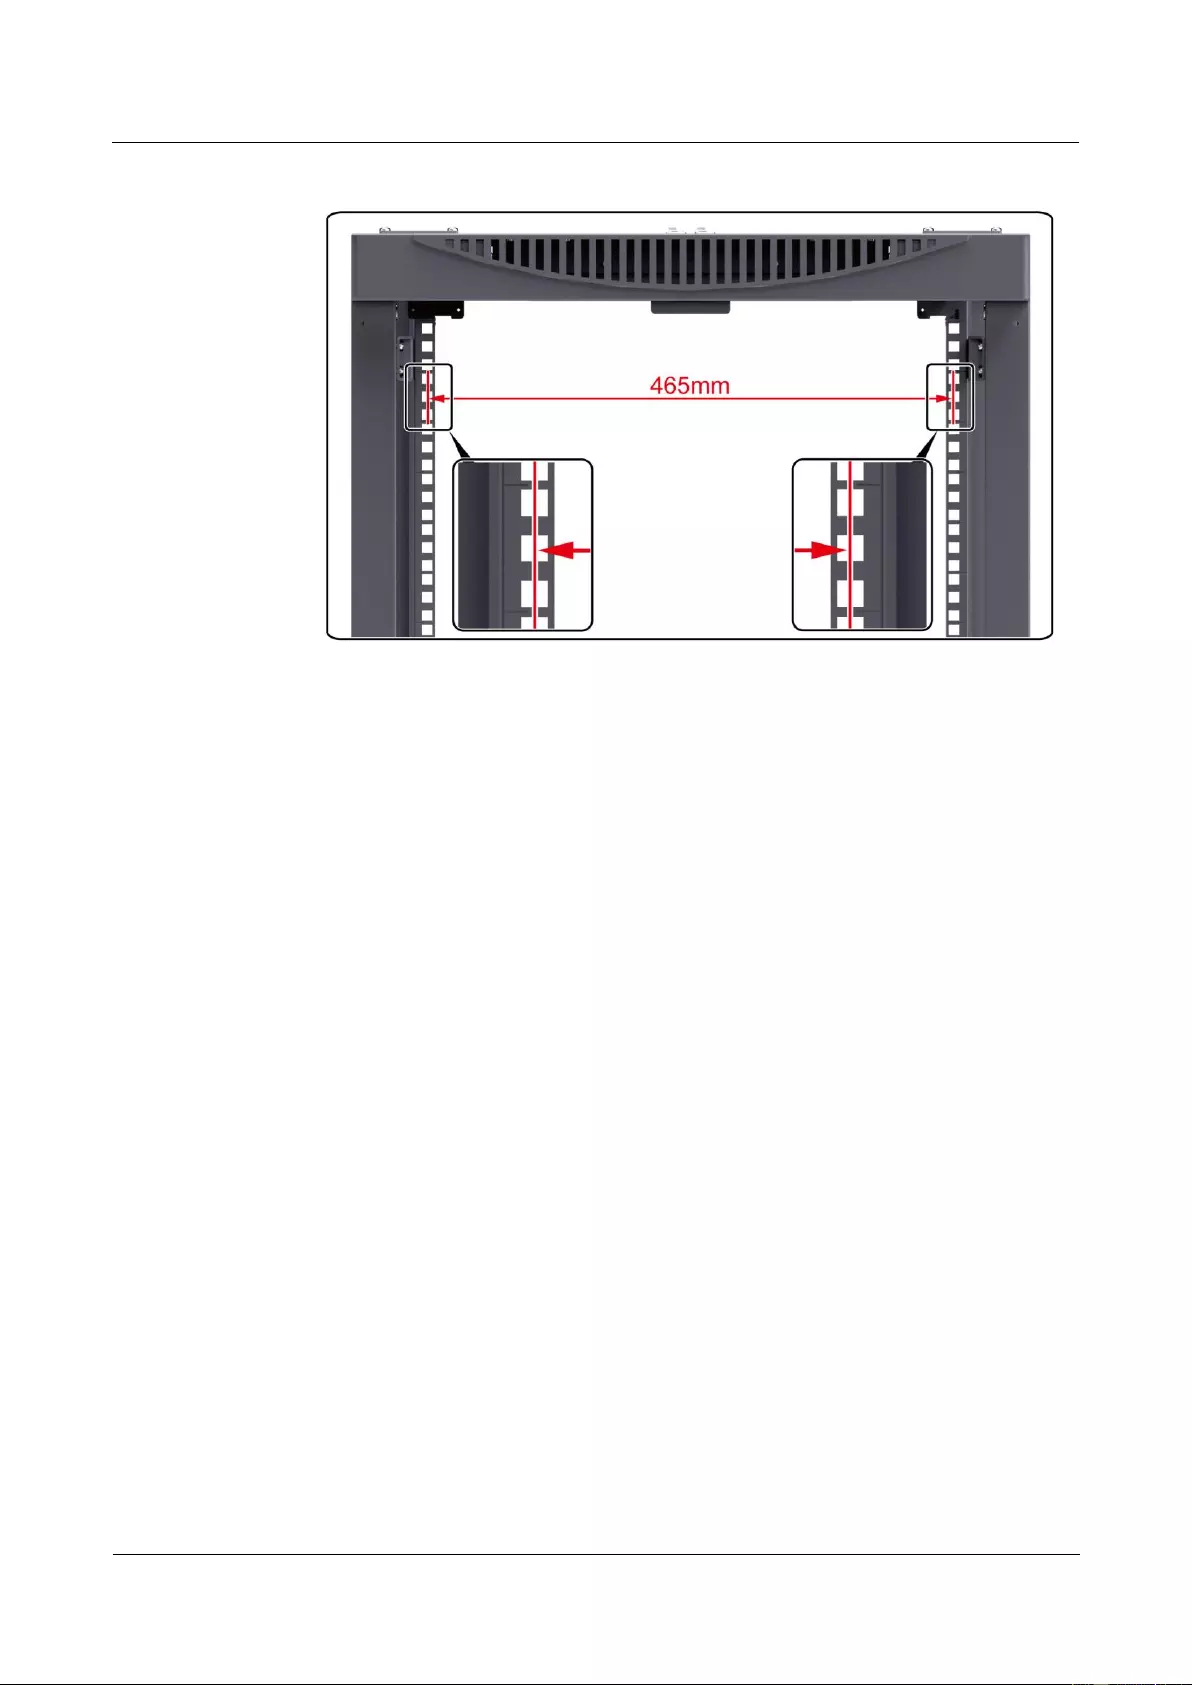
HUAWEI USG9500 Series Terabit-level Next-Generation Firewall
Hardware Guide
A Appendix
Issue 01 (2017-03-13)
Huawei Proprietary and Confidential
Copyright © Huawei Technologies Co., Ltd.
480
Figure A-92 Requirements on the cabinet customized by the customer
If the overhead cabling mode is adopted, a cable outlet must be reserved on the top of the
cabinet; if the underfloor cabling mode is adopted, a cable outlet must be reserved in the
bottom of the cabinet.
A cabinet should contain installation accessories such as slide rails, captive nuts, and
screws.
Check whether there is a ground point on the cabinet. If the ground point is reserved,
connect the device to the ground point and connect the ground point to the ground busbar.
If the ground point is not reserved, connect the device to the ground busbar directly.
On a customized cabinet of the customer, the porosity must be larger than 50% on the
front and rear doors.
If a device adopts the front access and rear access mode, it cannot be installed against a
wall. This is to ensure that the available space for maintenance is more than 760 mm.
