iggual PSIES243 User Manual
Displayed below is the user manual for PSIES243 by iggual which is a product in the Projection Screens category. This manual has pages.
Related Manuals
Guía de usuario • User guide
Pantalla
Proyección
• Pantalla Motorizada / Motorized screen
• Pantalla Manual de pared / Wall-mounted manual screen
• Pantalla Trípode / Tripod screen
Projection
Screen
PSIMS200
PSITS180
PSITS200
PSIMS180
PSIPS203
PSIES300
PSIPS184
PSIES200
PSIES240
PSIPS265
PSIPS234
CONNECT & ENJOY
®
Gracias por elegir nuestras pantallas.
Todas las pantallas han pasado una estricta inspección de calidad antes de su comercialización. Lea detenidamente este manual para asegurarse un uso apropiado del
producto. Así mismo, use este manual como guía para resolver cualquier duda que tenga sobre la instalación y especificaciones del producto.
Atención, no intente manipular los componentes eléctricos y mecánicos usted mismo, sólo debe hacerlo un técnico cualificado y autorizado.
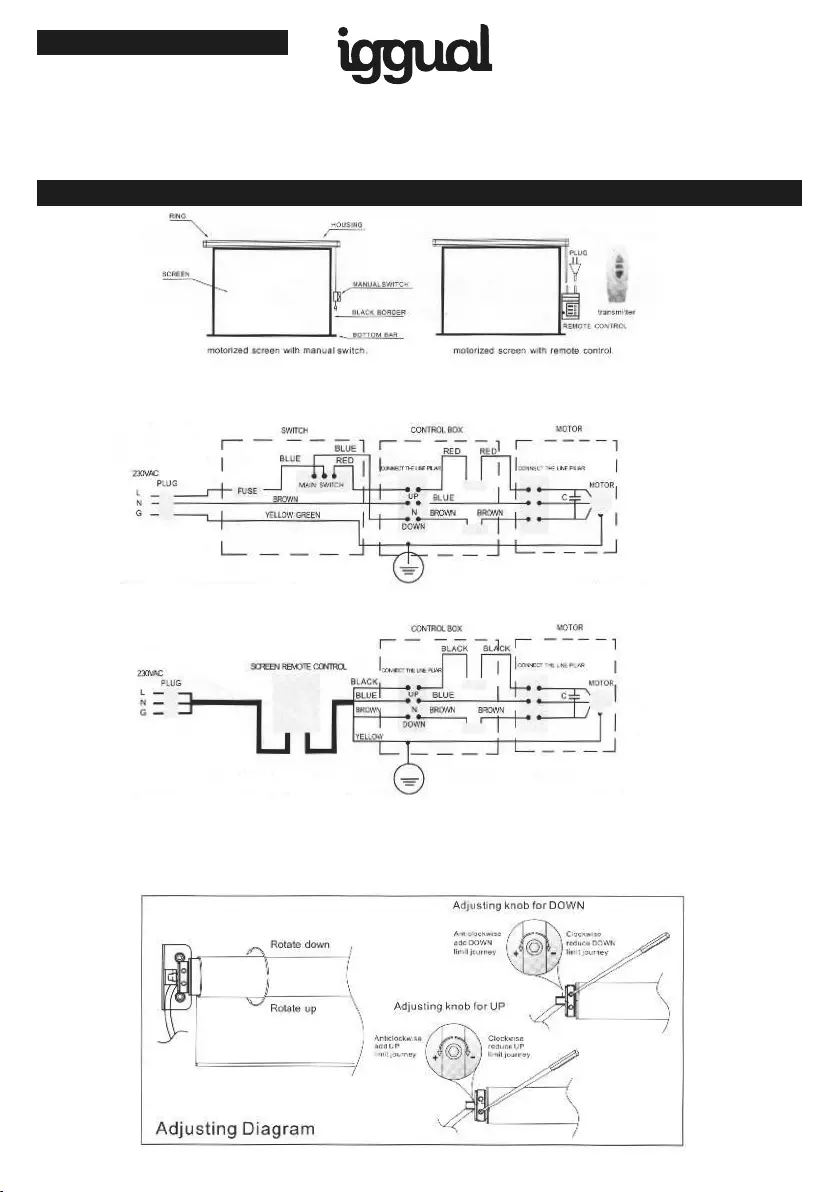
Si la pantalla motorizada funciona con interruptor manual, consulte la figura siguiente para la conexión eléctrica.
Si la pantalla motorizada funciona con control remoto, consulte la figura siguiente para la conexión eléctrica.
1. Esquemas de circuitos
2. Ajuste de límites de recorrido
Ajuste la posición para los límites de recorrido, consulte la imagen de abajo:
Si el control remoto no funciona bien, compruebe la batería y reemplace por una nueva en caso necesario.
Español Pantalla Proyección. Manual de Usuario
PANTALLA MOTORIZADA
a. Las pantallas motorizadas deben conectarse directamente a la red eléctrica. Puede ser indistintamente 220V / 50HZ, 230V / 50HZ, o 110V / 60HZ, 120V / 60HZ.
En caso de disponer de selector de entrada de alimentación, asegúrese seleccionar la posición adecuada según el suministro local.
b. La pantalla se puede utilizar con o sin el mando a distancia. El sistema de control remoto puede ser de tipo radio o infrarrojo, normalmente si se necesita un sistema
de control remoto, se suministra un mando a distancia de radio, pero también hay un controlador de tipo infrarrojo disponible para un requisito especial, estas dos
funciones de control diferentes no pueden combinarse en un sistema de control.
c. Normalmente se instala un motor sincronizado dentro de la carcasa, pero también está disponible un motor tubular para un requerimiento especial.
d. Si su modelo no dispone de mando a distancia, o no dispone de él en el momento de su uso, la pantalla puede ser controlada directamente desde la caja de control,
simplemente presione el botón ARRIBA / ABAJO / PARADA en la caja de control y haga funcionar el mecanismo de la misma.
e. La pantalla se detendrá automáticamente cuando el tejido de la pantalla suba y regrese a la carcasa o cuando el borde negro superior salga totalmente. La pantalla
también puede detenerse en cualquier posición que desee mediante el pulsador.
3. Instrucciones de uso
a. Mantenga la pantalla en posición horizontal y desempaquétela cuidadosamente, asegúrese de que la pantalla esté en buenas condiciones. Compruebe que todos
los accesorios están incluidos dentro del paquete.
b. Compruebe que el voltaje y la frecuencia marcados en la pantalla están de acuerdo con el suministro de alimentación local. Se sugiere utilizar las pantallas sólo en
interiores bajo temperatura y humedad normales.
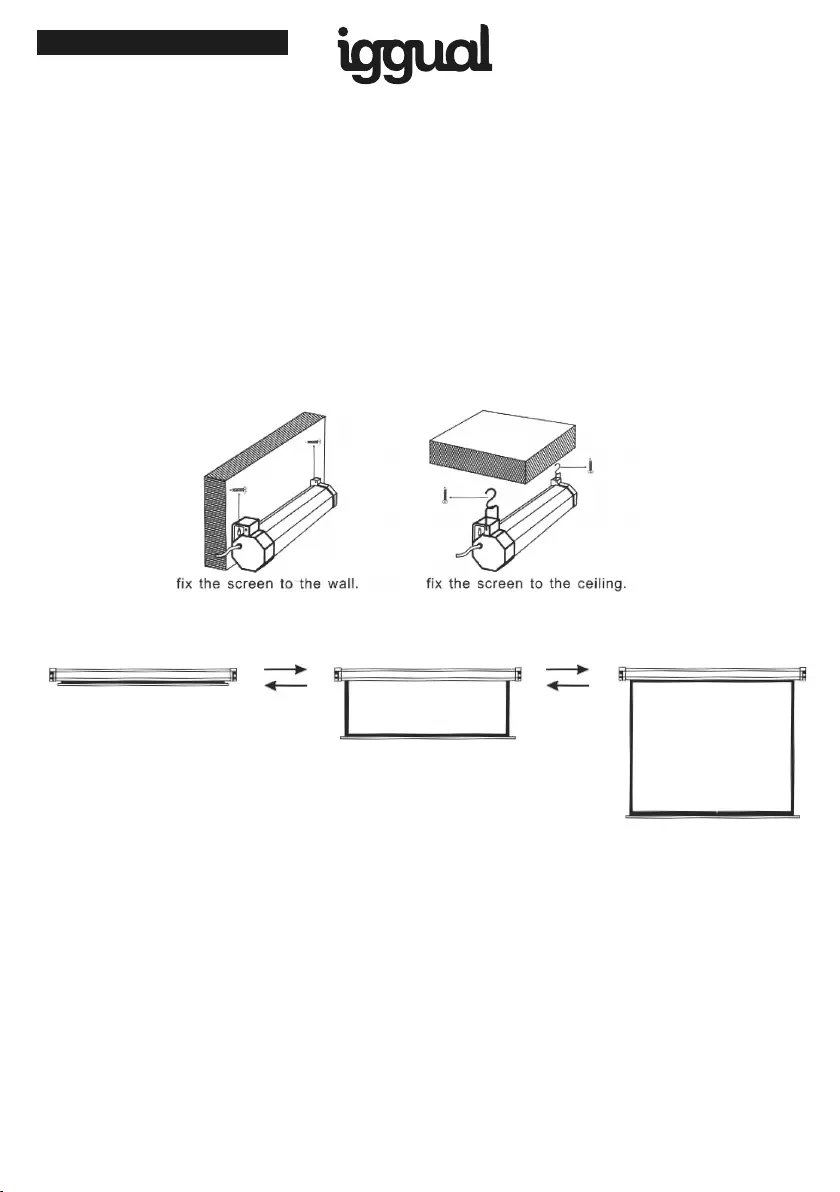
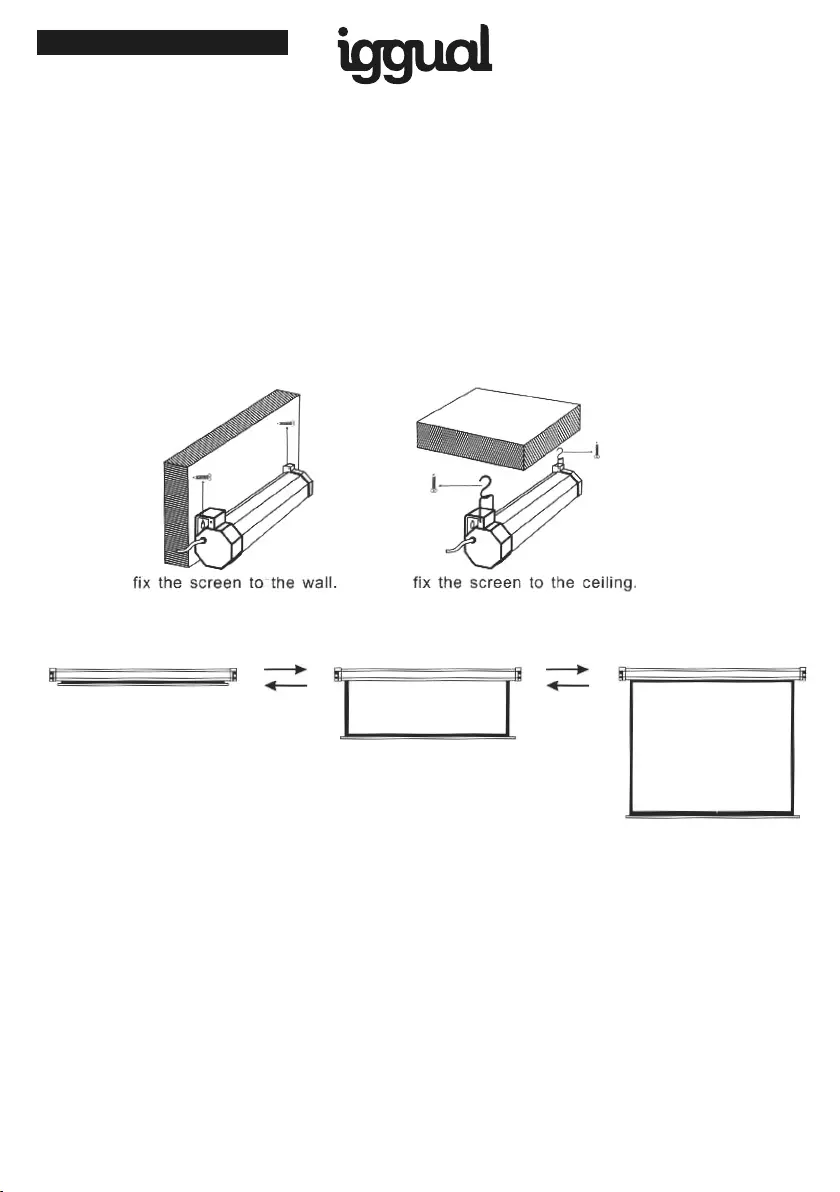
c. Consulte la figura siguiente y fije la pantalla a la pared o al techo, según su necesidad.
d. Conecte la fuente de alimentación. Presione el botón hacia abajo del interruptor manual o el transmisor, la pantalla bajará suavemente. Presione el botón de parada
cuando la pantalla descienda a la posición deseada, de lo contrario la pantalla se detendrá automáticamente en la posición limitada más baja.
e. Presione el botón “arriba” del interruptor manual o del transmisor, la pantalla subirá suavemente. Presione el botón de
parada cuando la pantalla suba a la posición deseada, de lo contrario la pantalla volverá a la carcasa. En caso de no utilizar
la pantalla durante mucho tiempo desconecte la fuente de alimentación.
f. A la hora de instalar la pantalla tenga en cuenta la altura de colocación de la misma, dejando espacio suficiente hasta el
suelo.
a. La pantalla no se puede plegar ni doblar. No toque con los dedos, ni utilice objetos duros o punzantes para tocar la superficie de la pantalla. No salpique con líquidos
la superficie de la pantalla. Mantenga la pantalla lejos de objetos a alta temperatura o del fuego.
b. Si la pantalla está sucia, límpiela suavemente con un paño ligeramente húmedo o con una bola de algodón, no use disolventes orgánicos ni alcohol, para limpiar la
superficie de la pantalla, luego seque con otro paño u algodón seco la pantalla antes de recogerla.
c. En caso de tirar de la pantalla manualmente hacia abajo, debe ser lenta y verticalmente. No tire de ella fuertemente. Por favor, pare de tirar tan pronto compruebe
que el borde negro esté hacia fuera. Si la pantalla estuviera atascada o dañada, póngase en contacto con su distribuidor y/o envíe la pantalla al servicio técnico
autorizado del fabricante.
d. Después de usarla, vuelva a colocar la pantalla en la carcasa, para evitar que absorba polvo y suciedad ambiental. Si no usa la pantalla durante mucho tiempo, es
conveniente desinstalarla y guardarla en un lugar protegido.
e. Si el cable de alimentación se rompiera, desconecte la pantalla de la red inmediatamente, no intente manipularlo usted mismo, póngase en contacto con personal
técnico autorizado y cualificado.
WARNINGS Important safety instructions. It is important for the safety of persons to Follow these instructions. Save these instructions.
— No permita que los niños jueguen con los controles de alimentación. Mantenga los controles remotos alejados de los niños.
— Examinar con frecuencia la instalación en busca de desperfectos y señales de desgaste o daños en los cables y mecanismos.
No utilice la pantalla si es necesario realizar reparaciones o ajustes.
Si el cable de alimentación está dañado, debe ser reemplazado por el fabricante.
Este aparato no está diseñado para ser usado por personas (incluyendo niños) con capacidades físicas, sensoriales o mentales reducidas, o por falta de experiencia
y conocimiento. A menos que se les haya dado supervisión o instrucciones sobre el uso del aparato por una persona responsable de su seguridad.
Los niños deben ser supervisados por un adulto, para asegurarse de que no juegan con el aparato.
4. Instalación
5. Advertencias
CONNECT & ENJOY
®
Español Pantalla Proyección. Manual de Usuario

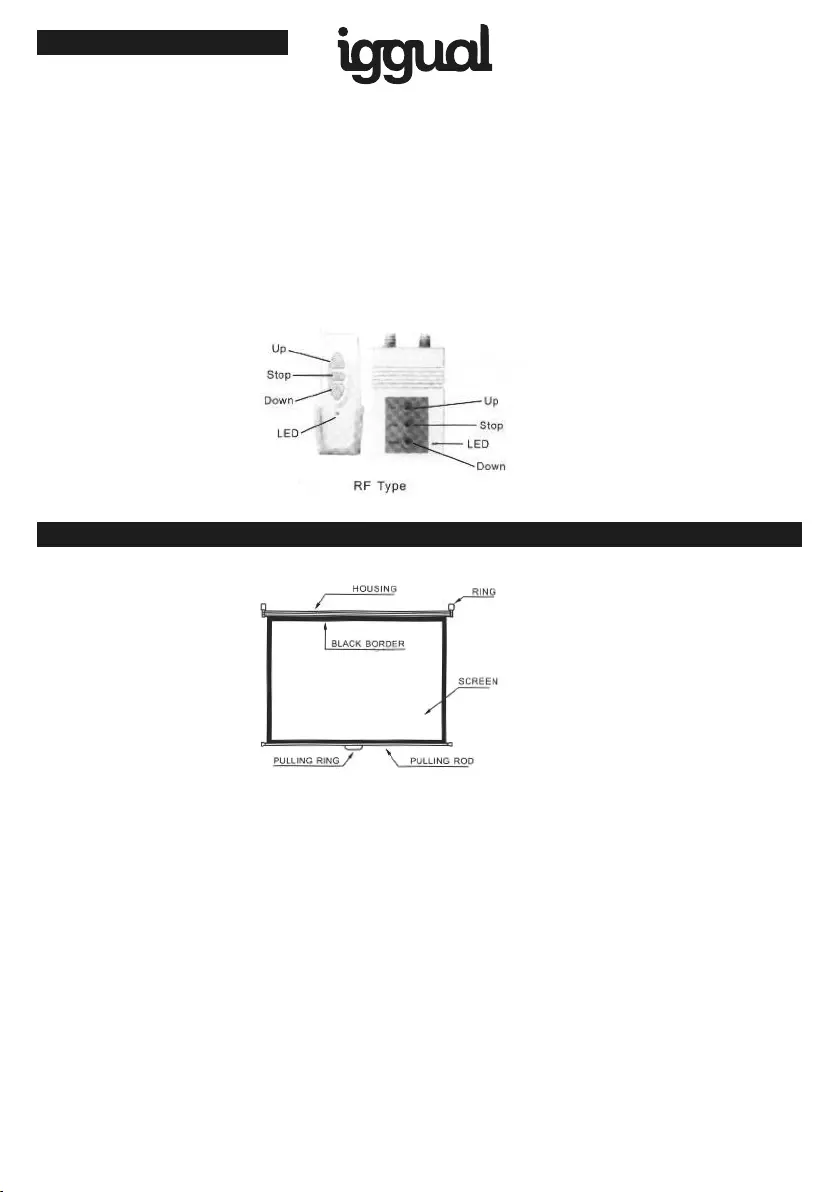
1. El mando a distancia puede ser del tipo IR o del RF.
2. (Tipo IR) Conecte el cable de alimentación del controlador. El indicador de fuente de alimentación parpadeará. Después de presionar el botón de parada del mando
a distancia y pulsar de nuevo el botón de subir o bajar, el relé de potencia del controlador comenzará a funcionar. Pulse el botón de parada después de ocho segundos,
el indicador de fuente de alimentación dejará de parpadear. Esto es evidencia de que el controlador ha terminado el aprendizaje automático con éxito.
(Tipo RF). Pulse el botón hacia abajo, a continuación, el indicador de fuente de alimentación parpadeará. Después pulse el botón de parada del mando a distancia, de
nuevo pulse el botón hacia abajo, el relé de potencia del controlador comenzará a funcionar. Pulse el botón de parada después de ocho segundos. El indicador de
fuente de alimentación dejará de parpadear. Esto es evidencia de que el controlador ha terminado el proceso de automatización satisfactoriamente.
3. Cuando se presionan los botones arriba y abajo al mismo tiempo, el mando a distancia se bloquea. Se detendrá el funcionamiento. El sistema se desbloqueará si
se pulsa de nuevo el botón de parada.
4. La fuente de alimentación cortará automáticamente el suministro eléctrico si la operación del motor ha pasado el límite de tiempo preestablecido. A continuación,
el motor dejará de funcionar.
5. El motor realizará funciones si se presiona el botón de arriba del controlador. Si se pulsa el botón de parada o el botón de bajada, el motor dejará de funcionar.
Cuando se vuelve a pulsar el botón de bajada, el motor realizará las funciones de bajada. En caso de que se presione el botón Stop o Up, el motor dejará de funcionar.
6. Sistema de control remoto
1. Estructura
2. Instalación
Las partes móviles del accionamiento deben instalarse a una altura suficiente por encima del nivel del suelo u otro nivel que pueda proporcionar acceso a él.
Elija un lugar adecuado para la instalación (plano y nivelado) y coloque dos tornillos que sean bastante fuertes para cargar pesos de más de 25kg.
3. Instrucciones útiles
Sostenga el asa de tracción firmemente y tire lentamente hacia abajo de la pantalla, deténgase cuando salga el borde negro (o deje de tirar donde desee parar), la
pantalla se puede auto-fijar. Si no puede fijarla, por favor, realice la misma operación de la misma manera. Después de usarla, libere la pantalla, subirá y volverá a
enrollarse en la carcasa.
4. Advertencias
a. La pantalla no se puede plegar ni doblar. No toque con los dedos, ni utilice objetos duros o punzantes para tocar la superficie de la pantalla. No salpique con líquidos
la superficie de la pantalla. Mantenga la pantalla lejos de objetos a alta temperatura o del fuego.
b. Si la pantalla está sucia, límpiela suavemente con un paño ligeramente húmedo o con una bola de algodón, no use disolventes orgánicos ni alcohol, para limpiar la
superficie de la pantalla, luego seque con otro paño u algodón seco la pantalla antes de recogerla.
c. En caso de tirar de la pantalla manualmente hacia abajo, debe ser lenta y verticalmente. No tire de ella fuertemente. Por favor pare de tirar tan pronto compruebe
que el borde negro esté hacia fuera o la pantalla está atascada o dañada, entonces póngase en contacto con su distribuidor y/o envíe la pantalla al servicio técnico
autorizado del fabricante.
d. Después de usarla, vuelva a colocar la pantalla en la carcasa, para evitar que absorba polvo y suciedad ambiental. Si no la usa durante mucho tiempo, por favor,
mejor desinstale la pantalla y guárdela en un lugar protegido.
PANTALLA MANUAL INSTALADA EN PARED
CONNECT & ENJOY
®
Español Pantalla Proyección. Manual de Usuario
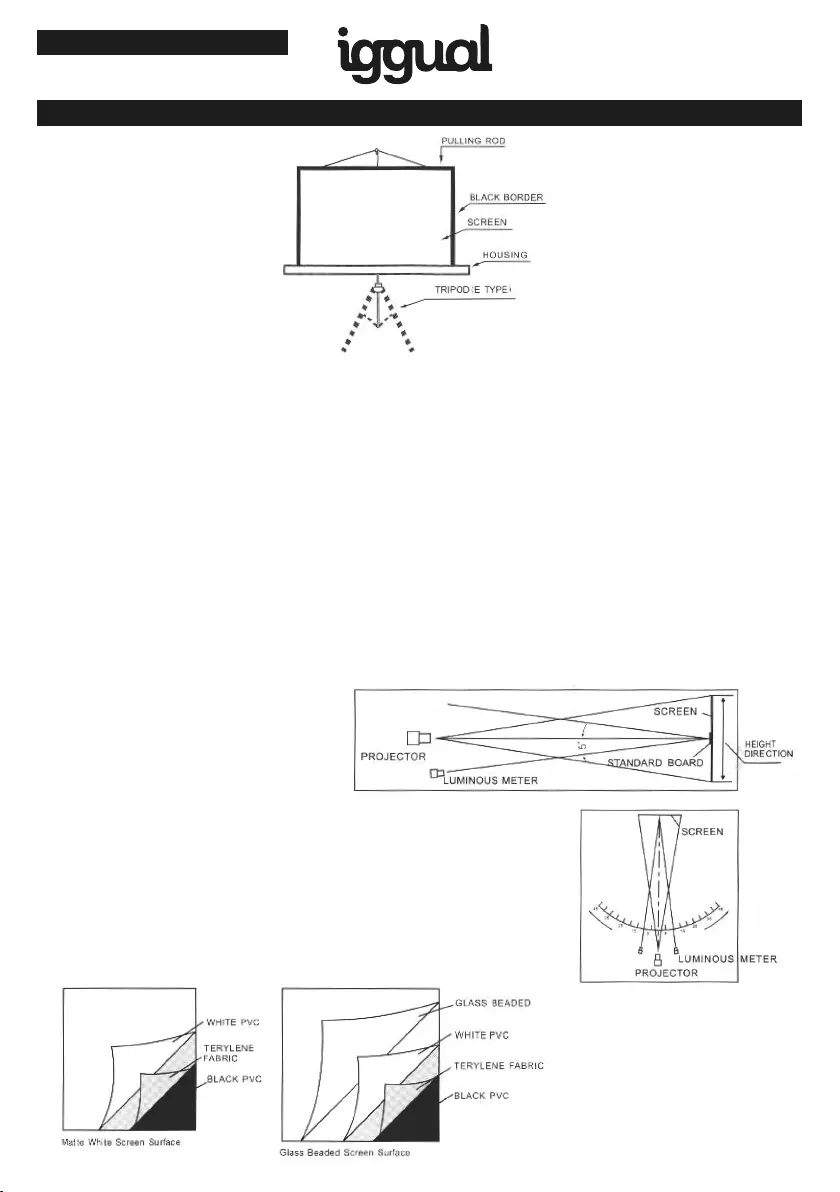
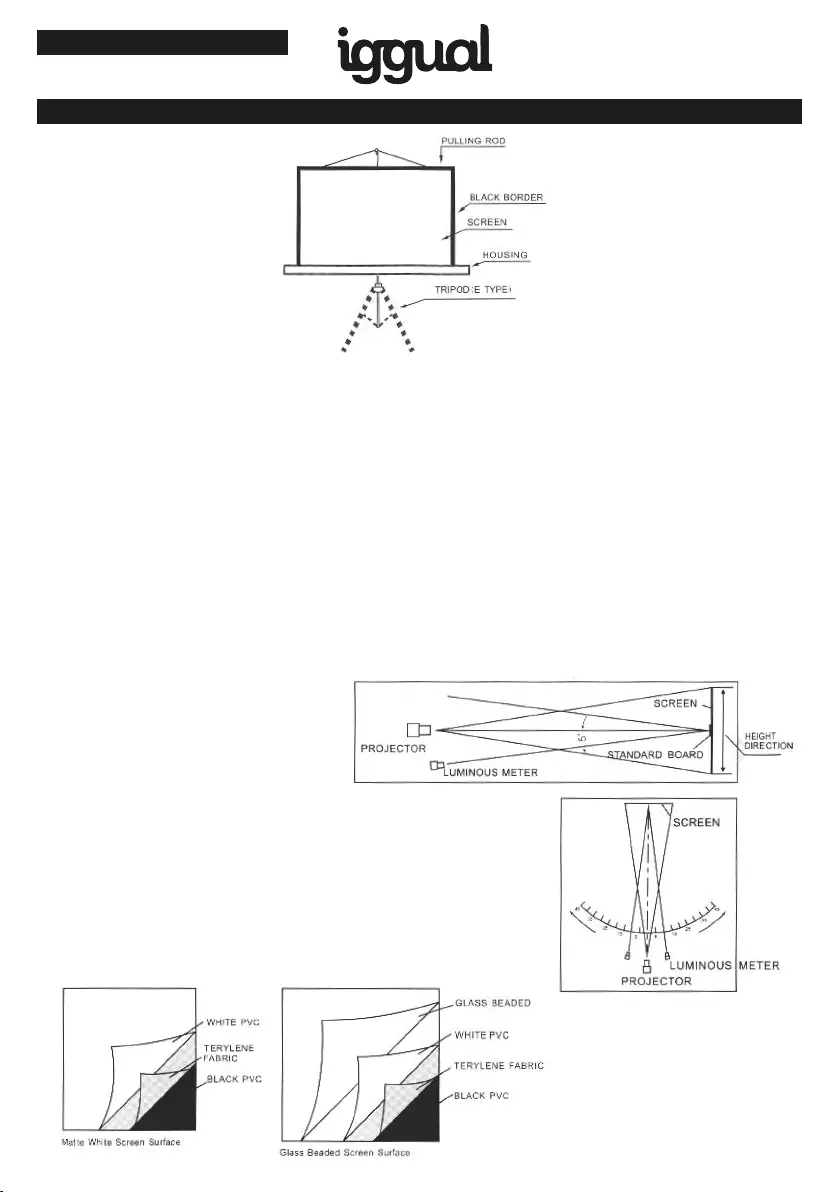
PANTALLA TRÍPODE
DATOS TÉCNICOS
ACABADO DE LAS PANTALLAS
1. Estructura
2. Instalación
Elija un lugar adecuado para la instalación, en primer lugar abra los pies del trípode, extraiga la barra superior a una altura adecuada y bloquéela, ajuste la altura de la
pantalla a la posición que desee. Después de usarla, suelte la pantalla y vuelva a colocarla en la carcasa.
3. Instrucciones útiles
a. Las patas del trípode deben colocarse de forma que la pantalla quede estable.
b. Al ajustar la altura de la pantalla se debe mover la barra superior lenta y cuidadosamente.
4. Advertencias
a. La pantalla no se puede plegar ni doblar. No toque con los dedos, ni utilice objetos duros o punzantes para tocar la superficie de la pantalla. No salpique con líquidos
la superficie de la pantalla. Mantenga la pantalla lejos de objetos a alta temperatura o del fuego.
b. Si la pantalla está sucia, límpiela suavemente con un paño ligeramente húmedo o con una bola de algodón, no use disolventes orgánicos ni alcohol, para limpiar la
superficie de la pantalla, luego seque con otro paño u algodón seco la pantalla antes de recogerla.
c. En caso de tirar de la pantalla manualmente hacia abajo, debe ser lenta y verticalmente. No tire de ella fuertemente. Por favor pare de tirar tan pronto compruebe
que el borde negro esté hacia fuera o la pantalla está atascada o dañada, entonces póngase en contacto con su distribuidor y/o envíe la pantalla al servicio técnico
autorizado del fabricante.
d. Después de usarla, vuelva a colocar la pantalla en la carcasa, para evitar que absorba polvo y suciedad ambiental. Si no la usa durante mucho tiempo, por favor,
mejor desinstale la pantalla y guárdela en un lugar protegido.
a. Pantalla blanca mate
Ganancia: 1,1
Ángulo de visión: 160º
Alta representación de color, alta resolución.
b. Pantalla con capa de fibras de vidrio
Ganancia: 2,5
Ángulo de visión: 60º
Alta representación de color, alta resolución.
c. El motor de alta calidad síncrono o tubular, está instalado
en el extremo izquierdo de la carcasa de la pantalla.
d. Medida de ganancia: consulte la figura siguiente
Estándar: JB T8389
e. Medición del ángulo de visión: consulte la figura siguiente
Estándar: JB T8389
CONNECT & ENJOY
®
Español Pantalla Proyección. Manual de Usuario

Thank you for choosing our screens.
All the screens have passed the strict quality inspection before delivery Read this manual carefully to ensure proper usage. You may also find the solution if you have
problems.
Attention the installation of the screen is important, the electric connections, the setting of the limit switches, must be made from skilled engineer only.
If the motorized screen work with manual switch ,please refer to the below fig for electric connection.
If the motorized screen work with remote control, please refer to the below fig for electric connection.
1. Circuit diagrams
2. Adjust limit switch
Adjust position for the two limit journey, refer to below picture:
If the remote control does not work well, please check the battery and replace new one.
English Projection Screen. User Manual
MOTORIZED SCREEN
CONNECT & ENJOY
®
a. The screen should be switched to a suitable power supply. it can be 220V/ 50HZ,230V/ 50HZ,or 110V/ 60HZ,120V/ 60HZ,but the motor's power must be same
as the local voltage and frequency.
b. The screen can be used with or without the remote controller. The remote control system can be radio type or infrared type, normally if a remote control system
needed, a radio remote controller is supplied but an infrared type controller is also available for a special requirement these two different controlling functions can not
combined in one control system.
c. Normally a synchronized motor is installed inside the housing but a tubular motor is also available for a special requirement.
d. lf the remote control system is not accompanied, the screen can Operated by the control box directly, just push the UP/ DOWN / STOP button on the control box
and operate the screen.Or the screen can be operated by the remote controller.
e. The screen will automatically stops when the screen fabric goes up and back to the housing or when the top black border comes out totally. The screen can also
stop at any position which you want.
3.Useful instructions
a. Unpack the screen carefully, be sure the screen is in good condition. check all the accessories are packed inside the carton.
b. Check the voltage and frequency marked on the screen is in accordance with the local power supply. It is suggested only to use the screens indoor under normal
temperature and humidity.
c. Refer to the below fig and fix the screen to the wall or to the ceiling.
d. Plug in the power supply. Press the down button of the manual switch or the transmitter,the screen will go down smoothly.Press the stop button when the screen
goes down to the expected position,otherwise the screen will stop at the lower limited position automatically.
e. Press the up button of the manual switch or the transmitter, the screen will go up Smoothly. Press the stop button when
the screen goes up to the expected position, otherwise the screen will roll back to the housing.
The screen won't be used for a long time when you cut off the power supply.
Don not pull the control wires to avoid disconnection and it's dangerous.
f. Moving Parts of the drive must be installed higher than 2,5 mm above the floor or other level that could provide access
to it.
a. The screen can not be folded. Do not use fingers or hard objects to touch the screen surface Do not splash the milk fruit juice or other chemical doses to the screen
surface. Keep the screen far away from the high temperature objects or fire.
b. lf the screen is dirty. wash the screen gently by a broom or a cotton ball,do not use the organic solvents to clean the screen surface.
c. When pulling the screen down, must be slowly and vertical .Do not pull it roughly. please stop pulling as soon as the black border is out or the screen is jammed or
injured then send the screen to the maintenance center.
d. After using put the screen back to the housing in order to avoid being polluted. If not using it for a long time, please take the screen from the wall and pack it in a
carton.
e. If the power soft cable was broken, you have to replace it by technical people from the manufacturer or service department ensure safety. WARNINGS Important
safety instructions. It is important for the safety of persons to Follow these instructions. Save these instructions.
— do not allow children to play with fixed controls. Keep remote controls away from children;
— Frequently examine the installation for imbalance and signs of wear or damage to cables and springs.
Do not use if repair or adjustment is necessary;
If the supply cord is damaged, it must be replaced by the manufacturer, its service agent or similarly qualified persons in order to avoid a hazard.
This appliance is not intended for use by persons (including children) with reduced physical, sensory or mental capabilities, or lack of experience and knowledge.
unless they have been given supervision or instruction concerning use of the appliance by a person responsible for their safety.
Children should be supervised to ensure that they do not play with the appliance.
4. Installing
5. Warnings
English Projection Screen. User Manual
CONNECT & ENJOY
®
1. The remote control can be IR Type or RF Type.
2. (A-IR Type) Plug in the power cable for the controller. the power source indicator will flash. After the stop button of the remote control is pressed and either the up
or down button is pressed again, the power relay of the controller will start to operate. Press the stop button after eight seconds, the power source indicator will stop
flashing. This is evidence that the controller has finished automatic learning successfully. Above operation is normally completed in eight seconds.
(B-RF Type). Press the down button, then plug in the power source indicator will flash . After the stop button of the remote control is pressed. The down button is
pressed again,the power relay of the controller will start to operate. Press the stop button, after eight seconds. the power source indicator will stop flashing. This is
evidence that the controller has finished automaticlearningsuccessfully,Above operation is normally completed in eight seconds.
3. When the up and down buttons are pressed in the same time, the remote control is locked. Operation will be stopped. The system will be unlocked if the stop button
is pressed again.
4. The power source will be cut off automatically if the motor operation has passed the preset time limit. Then the motor will stop operation .
5. The motor will perform up functions if the up button of the controller is pressed. If the stop button or down button is pressed, the motor will stop operation. When
down button is pressed again, the motor will perform down functions. ln case stop or up button is pressed, the motor will stop operation.
6. Remote control system
1. Structure
2. Installing
Moving Parts of the drive must be installed higher than 2,5 mm above above the floor or other level that could provide access to it Choose a suitable place for
installing.it is best to install two screws on the wall, the distance of the screwsust be equal to that of the two rings and they should be at the same level, the rings
must be strong enough to loading more than 25kg weights.
3. Useful instructions
Hold the pulling ring tightly and pull down the screen slowly, then stop when the black border comes out(or stop pulling where you want to stop), the screen can be
auto-fixed. if it can not be fixed, please operate it once again according to the same method. After using.release the screen and it will go up and back to the housing.
4. Warnings
a. The screen can not be folded.Do not use fingers or hard objects to touch the screen surface.Do not splash the milk, fruit juice or other chemical doses to the screen
surface. Keep the screen far away from the high temperature objects or fire.
b. If the screen is dirty wash the screen gently by a broom or a cotton ball do not use the organic solvents to clean the screen surface.
c. When pulling the screen down, must be slowly and vertical. Do not pull it roughly, please stop pulling as soon as the black border is out or the screen is jammed or
injured, then send the screen to the maintenance center.
d. After using, put the screen back to the housing in order to avoid being polluted, If not using it for a long time,please take the screen from the wall and pack it in a
carton.
WALL-MOUNTED MANUAL SCREEN
English Projection Screen. User Manual
CONNECT & ENJOY
®
TRIPOD SCREEN
TECHNICAL DATA
SCREEN FABRIC
1. Structure
2. Installing
Choose a suitable place for installing, open the tripod feet first, pull out the upper bar to a suitable height and lock it, hang the pulling rod above to the goose neck
and adjust the screen height, then finally fix/lock it at a satisfied position which you want. After using, release the screen and put it back to the housing.
3. Useful instructions
a. The tripod legs should be placed steady.
b. When adjusting the height of screen should be move the upper bar slowly and carefully.
4. Warnings
a. The screen can not be folded. Do not use fingers or hard objects to touch the screen surface. Do not splash the milk, fruit juice or other chemical doses to the
screen surface. Keep the screen far away from the high temperature objects or fire.
b. If the screen is dirty wash the screen gently by a broom or a cotton ball, do not use the organic solvents to clean the screen surface.
c. When pulling the screen down, must be slowly and vertical. Do not pull it roughly. Please stop pulling as soon as the black border is out or the screen is jammed or
injured, then send the screen to the maintenance center.
d. After using, put the screen back to the housing in order to avoid being polluted. lf not using it for a long time, please take the screen from the wall and pack it in a
carton.
a. Matte White Screen
Gain: 1.1
Viewing Angle: 160
High color rendering, high resolution.
b. Glass Beaded Screen
Gain: 2.5
Viewing Angle: 60
High color rendering, high resolution.
c. High quality synchronous or tubular motor is equipped in the left
end of the screen housing.
d. Gain Measurement: refer the fig below
Standard: JB T8389
e. Viewing Angle Measurement: refer the fig below
Standard: JB.. T8389
English Projection Screen. User Manual
CONNECT & ENJOY
®
CONNECT & ENJOY
®
EC DECLARATION
OF CONFORMITY
Manager Quality
Juan José Alfonso Infortisa, sl
C/ del Pozo, 1
46115, Alfara del Patriarca
Valencia, Spain
www.infortisa.com
Brand name: iggual
Models:
iggual Pantalla Mural (200x200 cm y 180x180 cm)
iggual Pantalla Mural (180x180 cm y 200 x 200 cm) con Trípode+bolsa
iggual Pantalla Elec. Pano.92" (203x114 cm) ContRem
iggual Pantalla Elec. Pano.80" (184x104 cm) ContRem
iggual Pantalla Elec. Pano.110" (265x149 cm) ContRem
iggual Pantalla Elec. Pano.106" (234x131 cm) ContRem
iggual Pantalla Elec. (300x300 cm, 200x200 cm y 240x240 cm)
Product description:
PROJECTION SCREEN
Procedures:
- LVD DIRECTIVE: 2014/35/EU
European norms and standards:
- EN 55014-1: 2006+A1: 2009+A2:2011
- EN 61000-3-2: 2014
- EN 61000-3-3: 2013
- EN 55014-2: 1997+A1: 2001+A2: 2008
- EN 62233: 2008
- EN 60335-1: 2012+A11: 2014
- EN 60335-2-97: 2006+A11: 2008+A2: 2010+A12:2015


MADE IN PCR
El contenido puede estar sujeto a errores tipográficos / The content is subject to typographical errors
Importado por / Imported by:
INFORTISA, SL
CIF: B46466421
TLF: +34 902 53 99 66
info@iggual.com
www.iggual.com
La marca iggual es propiedad de Planet Solutions, S.L.