Grundig GEKW32400B User Manual
Displayed below is the user manual for GEKW32400B by Grundig which is a product in the Ovens category. This manual has pages.
Related Manuals
GRUMNDIG
Built-in
Oven
User
Manual
iM
GEKW32400B
EN
385.4413.73/R.AB/28.09.2021
7758286352
Dear
Customer,
Please
read
this
manual
before
using
the
product.
Grundig
thank
you
for
choosing
the
product.
We
want
your
product,
manufactured
with high
quality
and
technology,
to
offer
you
the
best
efficiency.
To
do
this,
carefully
read
this
manual
and
any
other
documentation
provided
before
using
the
product
and
Keep
it
as
a
reference.
If
you
give
the
product
to
someone
else,
give
the
manual
with
it.
Follow
the
instructions,
taking
into
account
all
the
information
and
warnings
stated
In
the
user
manual.
Heed
all
information
and
warnings
in
the
user
manual.
This
way,
you
will
protect
yourself
and
your
product
against
the
dangers
that
may
occur.
Keep
the
user
manual.
If
you
give
the
product
to
someone
else,
give
the
manual
with
It.
The
user
manual
contains
the
following
symbols:
=
Hazard
that
may
result
in
death
or
injury.
NOTICE
Hazard
that
may
result
in
material
damage
to
the
product
or
its
environment.
Hazard
that
may
result
in
burns
due
to
contact
with
hot
surfaces.
Important
information
or
useful
usage
tips.
0
o>
Read
the
user
manual.
Arcelik
A.S.
Karaagac
caddesi
No:2-6
34445
Siiliice/Istanbul/TURKEY
Cé
Made
in
TURKEY
fl
Safety
instructions
4
PUrPOSE
Of
USAGE
.......cccceeseceeeeeeeeeeeeeaee
eens
4
Child,
vulnerable
person
and
pet
safety.....
4
Electrical
Safety
.........cccccccceeseceeseseeeeseeeeees
5
MiICrOWAVE
Safely
.......ccccceceeceeeeeeeeeeeeeeees
4
Transportation
Safety
.......:cccccceeseeeeeeee
sees
12
Installation
Safety
........ccccccccceeeeee
eens
seen
ees
12
Safety
Of
USC.....ccccccecsccceeeeseeeeeeeeseeeneeaes
13
Temperature
WarningS
........cccceecseeeeeeeeees
13
ACCESSOLY
USEC
....cecceceeeceeeeeaeeeseeeeseeeeeees
14
COOKING
SAPELY
......
cc
eecceceeeseeeeeeeeeeeeeeeeees
14
Maintenance
and
cleaning
safety............
15
A
Environmental
Instructions16
Waste
regulation
........:ccccccecceeeeeeeeeeeeeees
16
Compliance
with
the
WEEE
Directive
and
Disposing
of
the
Waste
Product........
16
Package
INfOrMAtION.........cccccceeeeceeeeee
sees
16
Recommendations
for
energy
saving
......
16
3
Your
product
17
Product
intrOdUuCTION..........0cccceeseeeeeeee
eens
17
Product
control
panel
introduction
and
usage
eee
18
OVEN
CONTIOL
....
ccc
ceec
eee
eeee
eee eee
eee
eaeeneees
18
Oven
operating
TUNCTIONS
..........ccceeeeeee
ees
20
Product
ACCESSOMES
.......ccccceeeeeeeeeeeeeeeees
22
Use
of
product
ACCESSOTIES..........cceceee
ees
23
Technical
SpeCIICATIONS
.........ccceeeeeeeeeees
25
A
First
use
26
FirSt
time
S@ttING.........ccccceceeseeeeeeeeeeeee
eens
26
FirSt
CICANING.......cccccceeeecceeeseeeeeeeeeeeeeneees
26
A
How
to
operate
the
oven
28
General
information
on
oven
USageé.........
28
Operation
of
the
oven
control
unit...........
29
Operating
in
microwave
MOdE..........:0068
32
Operating
in
combi
mode
(oven
and
MICrOWAVE
TOGEtNEL).......cccceeeseeeeeeeees
33
SOUtINGS
0...
cece
ccc
cec
eee
eee eee
eeeeeeeeeeeeeeeeeeens
34
A
General
information
about
cooking
37
General
information
on
microwave
cooking
eee
eee
eee
nese
eee
eee
eeeeeeeeeeeeaeenaesaeensnsaneaes
37
General
warnings
about
cooking
in
the
oven
eee
eee
eee
nese
eee
eee
eeeeeeeeeeeeaeenaesaeensnsaneaes
43
PastrieS
ANd
OVEN
TOO
1.0...
cceceeceeeeeeeeeees
43
Meat,
Fish
and
Poultry
............cccccceeeeeeees
46
GY.
ce ccc
eee
eeceeeeeeeeeeeeeeeeaeeeeeeeereeraeeaees
47
MICTOWAVE
os
cceeceeseceeceeseeeeeeeaeeneeeeneaeeaeees
48
T@St
fOOdS.......cccccceeceeceeeeeeeeeeeeeeeeeeneenees
49
7’
Maintenance
and
care
50
General
cleaning
information
.........::60c08
50
Cleaning
the
ACCESSOMIES
.......ccceeceeeeee
eens
o1
Cleaning
the
control
panel..........cccceee
o1
Cleaning
the
inside
of
the
oven
(cooking
area)
eee
eee
eee
nese
eee
eee
eeeeeeeeeeeeaeenaesaeensnsaneaes
on
Cleaning
the
OVEN
IAMP........:cccceeeeeeeee
eens
52
FE
Troubleshooting
04
E
Guarantee
Details
95
S/EN
e
This
section
contains
safety
instructions
that
will
helo
prevent
any
risks
of
personal
injuries
or
material
damage.
e If
the
product
is
transferred
to
another
person
or
used
second
hand,
the
operating
manual,
product
labels,
other
relevant
documents
and
accessories
should
be
delivered
with
the
product.
e
Our
company
shall
not
be
held
responsible
for
any
damage
that
may
occur
as
a
result
of
failure
to
comply
with
these
instructions.
e
Failure
to
comply
with
these
instructions
shall
render
any
warranty
void.
e
AAlways
have
the
installation
and
repair
work
performed
by
the
manufacturer,
the
authorized
service
or
a
person
specified
by
the
importer.
e
A.Use
genuine
spare
parts
and
accessories
only.
¢
£.Do
not
attempt
to
repair
or
replace
any
part
of
the
product
unless
it
is
clearly
specified
in
the
operating
manual.
A/EN
4,Do
not
perform
technical
modifications
on
the
product.
Ad
purpose
of
usage
e
This
product
is
designed
for
home
use.
It
is
not
suitable
for
commercial
use.
e
Do
not
use
the
product
in
gardens,
balconies
or
other
outdoor
environments.
The
appliance
is
intended
to
be
used
in
household
and
staff
kitchen
areas
in
shops,
offices
and
other
working
environments.
e
WARNING:
This
product
should
be
used
for
cooking
purposes
only.
It
should
not
be
used
for
different
Ourposes,
such
as
heating
the
room.
e
The
oven
can
be
used
to
defrost,
bake,
fry
and
grill
food.
e
This
product;
should
not
be
used
for
heating,
plate
heating,
hanging
towels
or
clothes
on
the
handle
for
drying.
Ad
chita,
vulnerable
person
and
pet
safety
e
This
product
can
be
used
by
children
8
years
of
age
and

older,
and
people
who
are
underdeveloped
in
physical,
sensory
or
mental
skills,
or
lack
of
experience
and
knowledge,
as
long
as
they
are
supervised
or
trained
about
the
safe
use
and
hazards
of
the
product.
e
Children
should
not
play
with
the
product.
Cleaning
and
user
maintenance
should
not
be
performed
by
children
unless
there
is
Someone
overseeing
them.
e
This
product
should
not
be
used
by
people
with
limited
physical,
sensory
or
mental
capacity
(including
children),
unless
they
are
keot
under
supervision
or
receive
the
necessary
instructions.
e
Children
should
be
supervised
to
ensure
that
they
do
not
play
with
the
oroduct.
e
Electrical
products
are
dangerous
for
children
and
pets.
Children
and
pets
must
not
play
with,
climb
on,
or
enter
the
product.
e
Do
not
put
objects
that
children
may
reach
on
the
oroduct.
e
WARNING:
During
use,
the
accessible
surfaces
of
the
product
are
hot.
Keep
children
away
from
the
product.
e
Keep
the
packaging
materials
out
of
the
reach
of
children.
There
is
a
hazard
of
injury
and
suffocation.
e
When
the
door
is
open,
do
not
put
any
heavy
objects
on
it
or
allow
children
to
sit
on
it.
You
may
cause
the
oven
to
tio
over
or
damage
the
door
hinges.
e
(Not
all
products
are
supplied
with
a
plug,
so
if
your
product
DOES
have
a
plug)
For
the
safety
of
children,
disconnect
the
power
plug
and
make
the
oroduct
inoperable
before
disposing
of
the
product.
A
Electrical
safety
e
Connect
the
product
into
a
grounded
outlet
protected
by
a
fuse
that
matches
the
current
ratings
indicated
on
the
type
label.
Have
the
grounding
installation
made
by
a
qualified
electrician.
Do
not
use
the
product
without
grounding
in
accordance
with
local
/
national
regulations.
e
The
plug
or
the
electrical
connection
of
the
product
5/EN
should
be
in
an
easily
accessible
place
(where
it
will
not
be
affected
by
the
flame
of
the
stove).
If
this
is
not
possible,
there
should
be
a
mechanism
(fuse,
switch,
switch,
etc.)
on
the
electrical
installation
to
which
the
oroduct
is
connected,
in
compliance
with
the
electrical
regulations
and
separating
all
poles
from
the
network.
The
product
must
not
be
connected
into
the
outlet
during
installation,
repair,
and
transportation.
Connect
the
product
into
an
outlet
that
meets
the
voltage
and
frequency
values
specified
on
the
type
label.
(Not
all
products
are
supplied
with
a
supply
cord,
so
if
your
product
DOES
NOT
have
a
supply
cord)
Use
only
the
connecting
cable
specified
in
the
"Technical
specifications"
section.
Do
not
jam
the
power
cord
under
and
behind
the
product.
Do
not
put
a
heavy
object
on
the
power
cord.
The
power
cord
should
not
be
bent,
crushed,
and
come
6/EN
into
contact
with
any
heat
SOUICe.
e
While
the
oven
is
operating,
its
back
surface
also
gets
hot.
Power
cords
must
not
touch
the
back
surface,
connections
may
be
damaged.
Do
not
jam
the
electric
cables
into
the
oven
door
and
pass
them
over
hot
surfaces.
You
may
cause
the
oven
to
short
circuit
and
catch
fire
as
a
result
of
the
cable
melting.
Use
original
cable
only.
Do
not
use
cut
or
damaged
cables
or
extension
leads.
If
the
power
cord
is
damaged,
it
must
be
replaced
by
a
manufacturer,
an
authorized
service
or
a
person
to
be
specified
by
the
importer
company
in
order
to
prevent
possible
dangers.
e
WARNING:
Before
replacing
the
oven
lamp,
be
sure
to
disconnect
the
product
from
the
mains
supply
to
avoid
the
risk
of
electric
shock.
Switch
off
the
product
or
turn
off
the
fuse
from
the
fuse
box.
(Not
all
products
are
supplied
with
a
plug,
so
if
your
product
DOES
have
a
plug)
e
Do
not
plug
the
product
into
an
outlet
that
is
loose,
has
come
out
of
its
socket,
is
broken,
dirty,
oily,
with
risk
of
water
contact
(for
example,
water
that
may
leak
from
the
counter).
e
Never
touch
the
plug
with
wet
hands!
To
unplug,
do
not
hold
the
cord,
always
hold
the
plug.
e
Make
sure
that
the
product
plug
is
securely
plugged
into
the
outlet
to
avoid
arcing.
Ad
Microwave
safety
e
The
appliance
is
intended
to
be
used
in
household
and
similar
applications
as:
e
staff
kitchen
areas
in
shops,
offices
and
other
working
environments;
e
farm
houses;
e
by
clients
in
hotels,
motels
and
other
residentinal
environments;
e
bed
and
breakfast
type
environments.
e
Only
allow
children
to
use
the
oven
without
supervision
when
adequate
instructions
have
been
given
so
that
the
child
is
able
to
use
the
microwave
oven
in
a
safe
way
and
understands
the
hazards
of
improper
use.
When
the
appliance
is
operated
in
the
combination
mode,
children
should
only
use
the
oven
under
adult
supervision
due
to
the
temperature
generated.
The
exposed
parts
of
the
product
will
become
hot
while
and
after
the
product
is
iN
use.
Check
the
oven
for
any
damage,
such
as
misaligned
or
bent
door,
damaged
door
seals
and
sealing
surface,
broken
or
loose
door
hinges
and
latches
and
dents
inside
the
cavity
or
on
the
door.
If
there
is
any
damage,
do
not
operate
the
oven
and
contact
by
the
Authorised
service
Agent.
If
the
door
or
door
seals
are
damaged,
the
oven
must
not
be
operated
until
it
has
been
repaired
by
a
competent
person
or
Authorised
Service
Agent.
7/EN
Before
operating
your
oven
ensure
that
the
door
has
been
closed
properly.
A
safety
mechanism
in
the
door
lock
prevents
your
appliance
from
operating
when
the
door
is
open,
halting
the
cooking
operation
if
you
open
the
door.
You
should
not
interfere
with
the
door
locking
system
or
attempt
to
override
this
system.
If
the
door
locking
system
is
overridden,
risk
of
exposure
to
microwaves
arises
if
the
appliance
is
operated
with
an
open
door.
Do
not
place
any
kind
of
object
between
the
front
of
the
oven
and
the
door.
You
should
not
operate
your
oven
if
objects
such
as
paper
towels
or
napkins
prevent
it
from
being
closed
properly.
Radio
Interference
Place
the
oven
no
less
than
2
metres
from
IVs,
radios,
wireless
modems,
access
points
and
aerials.
Otherwise
it
may
cause
Interference.
8/EN
Do
not
cook
your
meals
with
the
cooking
time
and
microwave
power
set
excessively
high.
Excessive
cooking
may
desiccate,
burn
or
inflame
some
parts
of
the
meal.
Never
use
aluminum
folio
or
aluminum
utensils
for
microwave
cooking.
Sparks
will
damage
the
appliance.
Do
not
use
metal
objects
closer
than
3
cm
to
the
oven
door
while
cooking
with
microwave.
Do
not
place
corrosive
chemicals
or
materials
containing
corrosive
vapor
into
the
oven.
When
there
is
interference,
it
may
be
reduced
or
eliminated
by
taking
the
following
measures:
Clean
door
and
sealing
Surface
of
the
oven.
Reorient
the
receiving
antenna
of
radio
or
television.
Relocate
the
microwave
oven
with
respect
to
the
receiver.
Move
the
microwave
oven
away
from
the
receiver.
Wire
the
microwave
oven
into
a
different
outlet
so that
microwave
oven
and
receiver
are
on
different
branch
circuits.
Place
the
oven
away
from
other
heating
appliances
and
avoid
using
in
damp
or
steamy
environments.
It
is
hazardous
for
anyone
other
than
a
competent
person
or
the
Authorised
service
Agent
to
carry
out
any
service
or
repair
operation
that
involves
the
removal
of
a
cover
which
gives
protection
against
exposure
to
microwave
energy.
This
product
is
a
Group
2
Class
B
ISM
equipment.
The
definition
of
Group
2
which
contains
all
ISM
(Industrial,
Scientific
and
Medical)
equipment
in
which
radio-frequency
energy
is
intentionally
generated
and/or
used
in
the
form
of
electromagnetic
radiation
for
the
treatment
of
material,
and
spark
erosion
equipment.
For
Class
B
equipment
is
equipment
suitable
for
use
in
domestic
establishments
and
in
establishments
directly
connected
to
a
low
voltage
power
supply
network
which
supplies
buildings
used
for
domestic
purpose.
The
microwave
oven
is
intended
for
heating
food
and
beverages.
Drying
of
food
or
clothing
and
heating
or
warming
pads,
slippers,
sponges,
damp
cloth
and
similar
may
lead
to
risk
of
injury,
ignition
or
fire.
Your
oven
has
not
been
designed
for
drying
any
living
beings.
Do
not
operate
your
oven
when
it
is
empty.
This
may
damage
the
oven.
Should
you
wish
to
test
the
oven,
place
a
glass
of
water
inside.
The
water
will
absorb
the
microwave
energy
and
the
oven
will
suffer
no
damage.
Only
use
utensils
that are
Suitable
for
use
In
microwave
ovens.
Do
not
use
earthenware
containers
for
microwave
cooking.
Moisture
in
the
earthenware
may
expand
9/EN

and
cause
cracking
of
your
container.
To
reduce
the
risk
of
fire
in
the
oven
cavity:
When
heating
food
in
plastic
or
paper
containers,
keep
an
eye
on
the
oven
due
to
the
possibility
of
ignition.
If
smoke
is
observed,
switch
off
or
unwire
the
appliance
and
Keep
the
door
closed
in
order
to
stifle
any
flames.
Remove
wire
twist-ties
from
paper
or
plastic
bags
before
placing
bag
in
oven.
Do
not
use
the
cavity
for
storage
purposes
.
Do
not
leave
paper
products,
cooking
utensils
or
food
in
the
cavity
when
not
in
use.
The
minimum
height
of
free
space
necessary
above
the
top
surface
of
the
oven.
If
you
use
materials
like
paper,
wood
or
plastic
for
cooking
in
your
microwave,
do
not
leave
the
oven
unattended.
Paper,
wood
and
similar
materials
may
ignite,
while
plastic
materials
may
melt.
Do
not
use
containers
made
of
such
materials
for
fan
oven,
10/EN
grilling
and
mixed
cooking
operations.
The
contents
of
feeding
bottles
and
baby
food
jars
shall
be
stirred
or
shaken
and
the
temperature
checked
before
consumption,
in
order
to
avoid
burns.
Liquids
and
other
foods
must
not
be
heated
in
sealed
containers
since
they
are
liable
to
explode.
Microwave
heating
of
beverages
can
result
in
delayed
eruptive
boiling,
therefore
care
must
be
taken
when
handling
the
container.
Eggs
in
their
shell
and
whole
hard-boiled
eggs
should
not
be
heated
in
microwave
ovens
since
they
may
exploed,
even
after
microwave
heating
has
ended.
Do
not
use
your
oven
to
heat
carbonated
drinks
or
foods
stored
in
airtight
containers
like
tin
cans.
This
will
cause
pressure
to
build
Up
Inside
the
oven
that
may
result
in
damage
or

explosion
when
the
door
is
opened.
Do
not
use
your
microwave
oven
for
cooking
or
reheating
unwhisked
eggs,
whether
shelled
or
not.
Ensure
that
you
pierce
the
skins
of
potatoes,
apples,
chesnut
or
similar
fruits
and
vegetables
before
cooking.
Do
not
use
porcelain
containing
metal
(silver,
gold,
etc.).
Ensure
that
you
remove
all
metal
twist-ties
from
food
packages.
Pieces
of
metal
inside
the
oven
can
Cause
arcing
that
may
result
in
serious
damage.
Do
not
use
your
oven
for
frying
with
oil
since
you
will
be
unable
to
regulate
the
temperature
of
the
oil.
Do
not
use
the
microwave
to
warm
cooking
oil
or
drinks
with
high
alcohol
volume
only.
Do
not
place
the
oven
where
heat,
moisture,
or
high
humidity
are
generated,
or
near
combustible
materials.
Do
not
use
the
interior
of
your
oven
for
storage
purposes.
should
the
contents
of
the
oven
catch
fire
or
should
you
notice
any
smoke,
keep
the
oven
door
closed.
Switch
off
the
oven
and
remove
the
wire
from
the
socket,
or
else
remove
or
switch
off
the
fuses
for
your
home.
Do
not
lean
on
the
oven
door
when
it
is
open,
or
let
children
swing
on
It.
This
will
warp
the
oven door
and
prevent
it
from
closing
properly.
Put
a
metal
teaspoon
or
glass
rod
in
the
container
when
heating
up
liquids.
This
will
prevent
delay
of
boiling
of
the
liquid,
thus
prevent
sudden
overflowing
when
the
container
is
moved.
Do
not
use
the
oven,
if:
-
The
door
is
not
closed
properly;
-
The
door
hinges
are
damaged:
-
The
contact
surfaces
between
the
door
and
the
front
side
of
the
oven
are
damaged:
-
The
door
window
is
damaged;
11/EN
-
An
electrical
arch
occurs
within
the
oven
although
there
are
no
metal
object
in
the
cooking
segment.
e
tis
very
important
not
to
select
long
durations
or
extremely
high
power
levels
while
cooking
a
small
amount
of
food
in
order
to
avoid
overheating
or
burning
the
meal.
For
example,
a
slice
of
bread
may
burn
after
3
minutes
if
a
very
high
power
level
is
selected.
e
Do
not
use
the
oven
for
frying
as
it
is
not
possible
to
control
the
temperature
of
oil
heated
in
microwave.
e
Contact
surfaces
of
the
door
(front
side
of
the
inner
segment
and
inner
side
of
the
doors),
must
be
kept
clean
to
ensure
proper
operation
of
the
oven.
Ad
Transportation
safety
e
Disconnect
the
product
from
the
mains
before
transporting
the
product.
e
The
product
is
heavy,
carry
the
product
with
at
least
two
people.
12/EN
e
Do
not
use
the
door
and
/
or
handle
to
transport
or
move
the
product.
e
Do
not
put
other
items
on
the
oroduct
and
carry
the
product
upright.
e
When
you
need
to
transport
the
product,
wrap
it
with
bubble
wrap
packaging
material
or
thick
cardboard
and
tape
it
tightly.
Secure
the
product
tightly
with
tape
to
prevent
the
removable
or
moving
parts
of
the
product
and
the
product
from
damage.
e
Check
the
overall
appearance
of
the
product
for
any
damage
that
may
have
occurred
during
transportation.
Ad
installation
safety
e
Before
the
product
is
installed,
check
the
product
for
any
damage.
If
the
product
is
damaged,
do
not
install
it.
e
Do
not
install
the
product
near
heat
sources
(radiators,
stoves,
etc.).
e
Keep
all
ventilation
ducts
open
around
the
product.
e
To
prevent
overheating,
the
product
should
not
be
installed
behind
decorative
doors.
e
Make
sure
that
the
product
Is
turned
off
after
each
use.
e If
you
do
not
use
the
product
for
a
long
time,
disconnect
it
or
turn
off
the
fuse
from
the
fuse
box.
e
Do
not
operate
defective
or
damaged
product.
If
any,
disconnect
the
electricity
/
gas
connections
of
the
product
and
call
the
authorized
service.
e
Do
not
use
the
product
with
the
front
door
glass
removed
or
broken.
e
Do
not
climb
on
the
product
to
reach
anything
or
for
any
other
reason.
e
Do
not
use
the
product
in
situations
that
may
affect
your
judgment,
such
as
drug
intake
and
/
or
alcohol
use.
e
Flammable
objects
kept
in
the
cooking
area
may
catch
fire.
Never
store
flammable
objects
in
the
cooking
area.
e
The
oven
handle
is
not
a
towel
dryer.
When
using
the
product,
do
not
hang
towels,
gloves
or
similar
textiles.
e
The
hinges
of
the
product
door
move
and
tighten
when
opening
and
closing
the
door.
When
opening
/
closing
the
door,
do
not
hold
the
part
with
the
hinges.
Ad
temperature
warnings
e
WARNING:
While
the
product
is
operating,
exposed
parts
will
be
hot.
Do
not
touch
the
product
and
heating
elements.
Children
under
the
age
of
8
should
not
be
brought
close
to
the
oroduct
without
an adult.
e
Do
not
place
flammable
/
explosive
materials
near
the
product,
as
the
edges
will
be
hot
while
it
is
operating.
e
As
steam
may
be
exhaled,
keep
away
while
opening
the
oven
door.
The
steam
may
burn
your
hand,
face
and
/
or
eyes.
e
The
product
may
be
hot
during
use.
Do
not
touch
the
hot
compartments,
the
interior
parts
of
the
oven,
the
heating
elements,
etc.
e
When
placing
food
in
the
hot
oven,
removing
the
food,
etc.
always
use
heat
resistant
oven
gloves.
13/EN
Ad
accessory
use
e
It
is
important
that
the
wire
grill
and
tray
are
placed
properly
on
the
wire
shelves.
For
detailed
information,
refer
to
the
section
“Usage
of
accessories’.
e
Accessories
can
damage
the
door
glass
when
closing
the
oroduct
door.
Always
push
the
accessories
to
the
end
of
the
cooking
area.
Ad
cooking
safety
e
Be
careful
when
using
alcohol
in
your
food.
Alcohol
evaporates
at
high
temperatures
and
may
catch
fire
when
exposed
to
hot
Surfaces,
Causing
a
fire.
¢«
Food
waste,
oil,
etc.
in
the
cooking
area
may
catch
fire.
Before
cooking,
remove
such
coarse
dirt.
e
Food
Poisoning
Hazard:
Do
not
keep
food
in
the
oven
for
more
than
an
hour
before
and
after
cooking.
Otherwise
it
may
cause
food
poisoning
or
diseases.
e
Do
not
heat
closed
tin
cans
and
glass
jars.
Built
up
oressure
may
cause
the
jar
to
burst.
14/EN
e
Place
the
greaseproof
paper
in
a
cookware
or
on
the
oven
accessory
(tray,
wire
grill,
etc.)
with
food
and
place
it
in
the
preheated
oven.
Remove
any
excessive
pieces
of
greaseproof
paper
hanging
from
the
accessory
or
container
to
avoid
the
risk
of
touching
the
oven
heating
elements.
Never
use
greaseproof
paper
at
an
oven
temperature
higher than
the
maximum
use
temperature
specified
on
the
greaseproof
paper
you
are
using.
Never
place
greaseproof
paper
on
the
oven
base.
¢
Do
not
place
baking
trays,
plates
or
aluminum
foil
directly
on
the
bottom
of
the
oven.
The
accumulated
heat
can
damage
the
base
of
the
oven.
e
Close
the
oven door
during
grilling.
Hot
surfaces
may
cause
burns!
e
Food
not
suitable
for
grilling
carries
a
fire
hazard.
Grill
only
food
that
Is
suitable
for
heavy
grill
fire.
Also,
do
not
place
the
food
too
far
in
the
back
of
the
grill.
This
is
the
hottest
area
and
fatty
foods
may
catch
fire.
AX
Maintenance
and
cleaning
safety
e
VWWait
for
the
product
to
cool
before
cleaning
the
product.
Hot
surfaces
may
cause
burns!
e
Never
wash
the
product
by
spraying
or
pouring
water
on
it!
There
is
an
electric
shock
hazard!
e
Do
not
clean
the
product
with
steam
cleaners
as
this
may
cause
electric
shock.
e
Do
not
use
harsh
abrasive
cleaners,
metal
scrapers,
wire
wool
or
bleach
materials
to
clean
the
oven
front
door
glass
/
(if
present)
oven
upper
door
glass.
These
materials
can
cause
glass
surfaces
to
be
scratched
and
broken.
e
Always
keep
the
control
panel
clean
and
dry.
A
damp
and
dirty
surface
may
cause
problems
in
operating
the
functions.
15/EN
Waste
regulation
Compliance
with
the
WEEE
Directive
and
Disposing
of
the
Waste
Product
This
product
complies
with
EU
WEEE
Directive
=
(2012/19/EU).
This
product
bears
a
classification
symbol
for
waste
electrical
and
electronic
equipment
(WEEE).
This
product
has
been
manufactured
with high
quality
parts
and
materials
which
can
be
reused
and
are
suitable
for
recycling.
Do
not
dispose
of
the
waste
product
with
normal
domestic
and
other
wastes
at
the
end
of
its
service
life.
Take
it
to
the
collection
center
for
the
recycling
of
electrical
and
electronic
equipment.
Please
consult
your
local
authorities
to
learn
about
these
collection
centers.
Appropriate
disposal
of
used
appliance
helos
prevent
potential
negative
consequences
for
the
environment
and
human
health.
Compliance
with
RoHS
Directive:
The
product
you
have
purchased
complies
with
EU
RoHS
Directive
(2011/65/EU).
It
does
not
contain
harmful
and
prohibited
materials
specified
in
the
Directive.
Package
information
e
Packaging
materials
of
the
product
are
manufactured
from
recyclable
materials
in
accordance
with
our
National
Environment
Regulations.
Do
not
dispose
of
the
packaging
materials
together
with
the
domestic
or
other
16/EN
wastes.
Take
them
to
the
packaging
material
collection
points
designated
by
the
local
authorities.
Recommendations
for
energy
saving
Information
on
energy
efficiency
according
to
EU
66/2014
can
be
found
on
the
product
fiche
given
with
the
product.
The
following
suggestions
will
help
you
use
your
product
in
an
ecological
and
energy-efficient
way:
e
Defrost
frozen
food
before
cooking.
e
|n
the
oven,
use
dark
or
enamelled
containers
that
transmit
heat
better.
e
Turn
off
the
product
5
to
10
minutes
before
the
end
time
of
cooking
for
prolonged
cooking.
Now
you
can
save
up
to
20%
electricity
by
using
heat.
e
If
specified
in
the
recipe
or
user
manual,
always
preheat.
Do
not
open
the
oven door
frequently
during
cooking.
e
Do
not
open
the
oven
door
when
cooking
In
the
"Eco
fan
heating"
operating
function.
If
the
door
is
not
opened,
the
internal
temperature
is
optimized
to
save
energy
in
the
"Eco
fan
heating"
operating
function,
and
this
temperature
may
differ
from
what
is
shown
on the
screen.
e
Try
to
cook
more
than
one
dish
at
a
time
in
the
oven.
You
can
cook
at
the
same
time
by
placing
two
cooking
containers
on
the
wire
shelf.
In
addition,
if
you
cook
your
meals
one
after
the
other,
it
will
save
energy
because
the
oven
will
not
lose
its
heat.
“
3
=
=
=
=
=
=
=
=
=
=
=
=
=
=
=
=
=
=
=
=
=
=
=
=
=
=
=
=
=
=
=
=
=
=
=
=
=
°
=
=
=
=
=
=
=
=
=
=
=
=
=
=
=
=
o
=
=
=
=
=
=
=
=
=
=
=
=
=
=
=
=
=
=
=
=
=
=
=
=
=
=
=
=
=
=
=
=
=
=
=
=
=
=
=
=
=
=
=
=
=
=
=
=
=
=
=
=
=
+
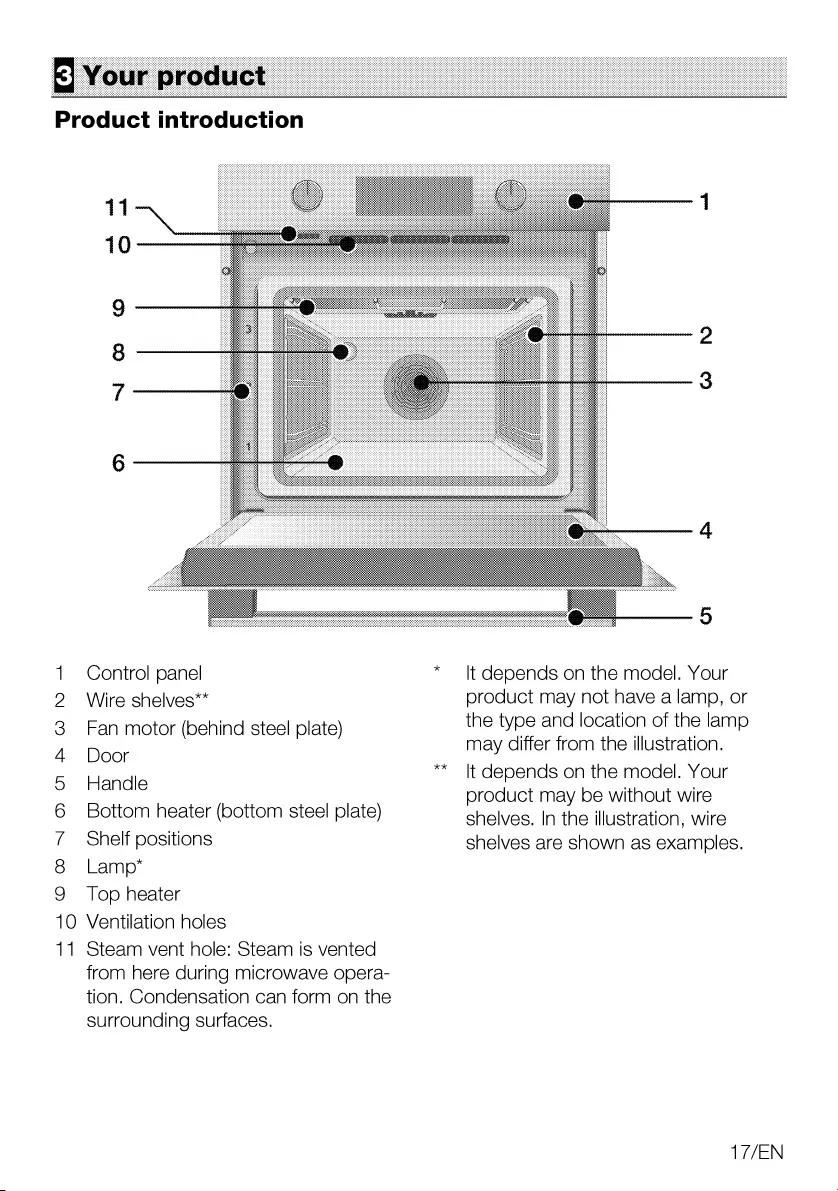
ontrol
panel
It
depends
on
the
model.
Your
2
ire
shelves**
product
may
not
have
a
lamp,
or
the
type
and
location
of
the
lam
may
differ
from
the
illustration.
It
depends
on
the
model.
Your
product
may
be
without
wire
shelves.
In
the
illustration,
wire
/
Shelf
positions
shelves
are
shown
as
examples.
8
Lamp”
9
Top
heater
10
Ventilation
holes
11
Steam
vent
hole:
Steam
is
vented
from
here
during
microwave
opera-
tion.
Condensation
can
form
on
the
surrounding
surfaces.
3
Fan
motor
(behind
steel
plate
4
Door
©
Handle
6
Bottom
heater
(bottom
steel
plate
xk
17/EN
Product
control
panel
introduction
and
usage
In
this
section,
you
can
find
the
overview
and
basic
uses
of
the
product's
control
panel.
There
may
be
differences
in
images
and
some
features
depending
on
the
type
of
product.
Oven
control
fegye
$2
O900;27
GBOb1.
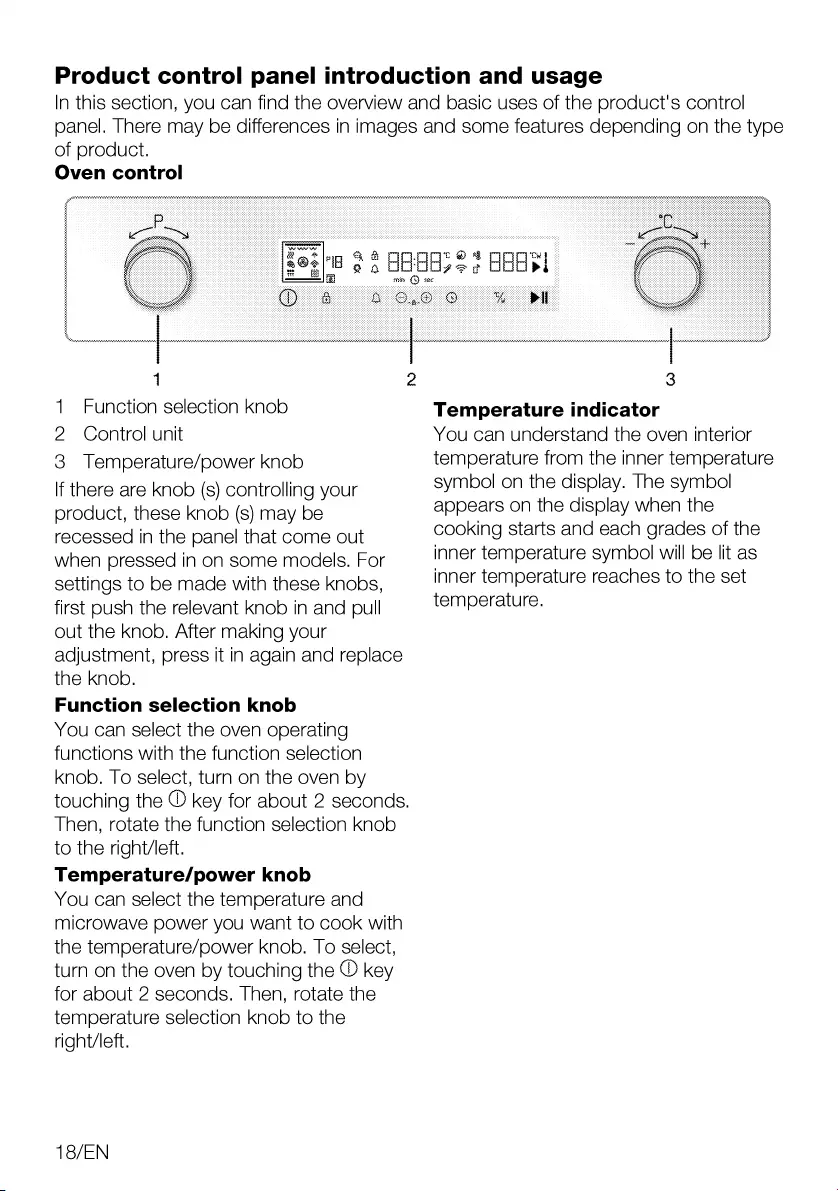
1
Function
selection
knob
2
Control
unit
3
Temperature/power
knob
If
there
are
knob
(s)
controlling
your
product,
these
knob
(s)
may
be
recessed
in
the
panel
that
come
out
when
pressed
in
on
some
models.
For
settings
to
be
made
with
these
knobs,
first
push
the
relevant
knob
in
and
pull
out
the
knob.
After
making
your
adjustment,
press
it
in
again
and
replace
the
knob.
Function
selection
knob
You
can
select
the
oven
operating
functions
with
the
function selection
Knob.
To
select,
turn
on
the
oven
by
touching
the
©
key
for
about
2
seconds.
Then,
rotate
the
function
selection
knob
to
the
right/left.
Temperature/power
knob
You
can
select
the
temperature
and
microwave
power
you
want
to
cook
with
the
temperature/power
knob.
To
select,
turn on
the
oven
by
touching
the
©
key
for
about
2
seconds.
Then,
rotate
the
temperature
selection
knob
to
the
right/left.
18/EN
Temperature
indicator
You
can
understand
the
oven
interior
temperature
from
the
inner
temperature
symbol
on
the
display.
The
symbol
appears
on
the
display
when
the
cooking
starts
and
each
grades
of
the
inner
temperature
symbol
will
be
lit
as
inner
temperature
reaches
to
the
set
temperature.

Control
unit
Sa
oooor®
*
ooo
ao
OO0OOseer
OOO
7
2
3
4 5 6
f 8
Keys:
»
:
Cooking
symbol
1
On/Off
key
i
:
Oven
inner
temperature
symbol
2
Key
lock
key
ah:
Quick
heating
(booster)
symbol
3
Alarm
key
S)
:
Settings
symbol
&
:
Key
lock
symbol
4
Decrease
and
progress
key
eit):
Function
number
©
Increase
and
progress
key
3%,
+
Defrost
symbol
6
Time
and
settings
key
2?
:
Warm
keeping
symbol
7
Temperature/microwave
key
f’
:
Remote
control
symbol"
8
Cooking
start/stop
key
;
Microwave
symbol
_
Indicator
fields:
“=~
:
Wireless
network
(wifi)
symbol”
oO
#
:
Low
level
steam
symbol*
9
Temperature
indication
field
&
+
High
level
steam
symbol"
10
Time/duration
indicator
field
=:
Self
cleaning
(pyro)
symbol
11
Function
display
fai
:
Door
lock
symbol*
Display
symbols
~
:Meat
probe
symbol”
*
It
varies
depending
on the
product
model.
It
may
not
be
available
on
your
oroduct.
@)
:
Cooking
time
symbol
min
:
Minute
symbol
sec:
Second
symbol
f£.
—:
Alarm
symbol
19/EN
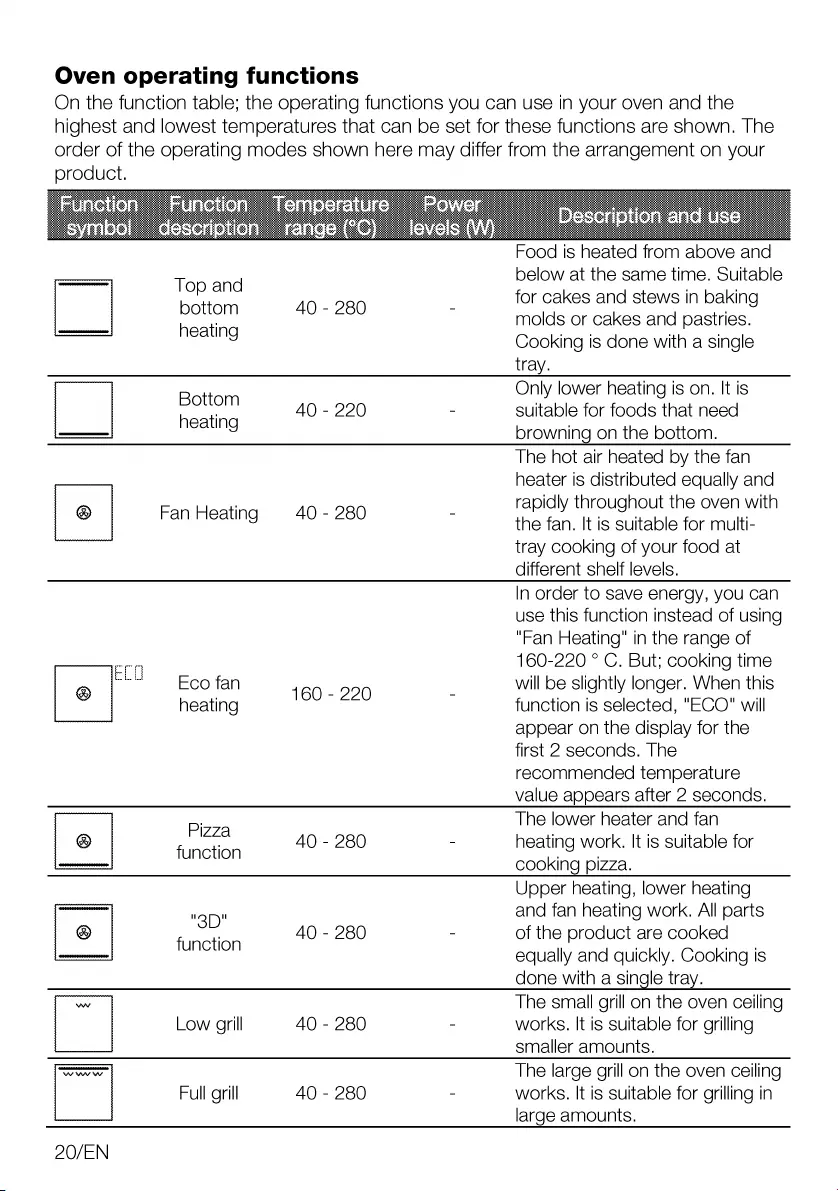
Oven
operating
functions
On
the
function
table;
the
operating
functions
you
can
use
In
your
oven
and
the
highest
and
lowest
temperatures
that
can
be
set
for
these
functions
are
shown.
The
order
of
the
operating
modes
shown
here
may
differ
from
the
arrangement
on
your
oroduct.
below
at
the
same
time.
Suitable
for
cakes
and
stews
in
baking
molds
or
cakes
and
pastries.
Cooking
is
done
with
a
single
tray.
Only
lower
heating
is
on.
It
is
heating
40
-
220
-
suitable
for
foods
that
need
————|
browning
on
the
bottom.
The
hot
air
heated
by
the
fan
heater
is
distributed
equally
and
rapidly
throughout
the
oven
with
the
fan.
It
is
suitable
for
multi-
tray
cooking
of
your
food
at
different
shelf
levels.
In
order
to
save
energy,
you
can
use
this
function
instead
of
using
“Fan
Heating"
in
the
range
of
160-220
°
C.
But;
cooking
time
Eco
fan
will
be
slightly
longer.
When
this
6
heating
160
-
220
:
function
is
selected,
"ECO"
wil
appear
on
the
display
for
the
first
2
seconds.
The
recommended
temperature
value
appears
after
2
seconds.
Pizza
The
lower
heater
and
fan
@
functi
AO
-
280
-
heating
work.
It
is
suitable
for
unction
.
seen
cooking
pizza.
Upper
heating,
lower
heating
en
"9p"
and
fan
heating
work.
All
parts
®
AO
-
280
-
of
the
product
are
cooked
Top
and
bottom
AO
-
280
-
|
heating
@
Fan
Heating
4O
-
280
-
nnn
function
equally
and
quickly.
Cooking
is
done
with
a
single
tray.
ow
The
small
grill
on
the
oven
ceiling
Low
grill
40
-
280
-
works.
It
is
suitable
for
grilling
smaller
amounts.
Sea
The
large
grill
on
the
oven
ceiling
Full
grill
40
-
280
-
works.
It
is
suitable
for
grilling
in
large
amounts.
20/EN

The
hot
air
heated
by
the
large
Soe
Fan
st:
a
.
2
assisted
full
AO
-
280
;
grill
is
quickly
distributed
into
the
‘il
oven
with
the
fan.
It
is
suitable
g
for
grilling
in
large
amounts.
»
Keepin
It
is
used
to
keep
the
food
at
a
pINg
40
-
100
-
temperature
ready
for
service
for
warm
a
long
time.
100
.
200
Only
the
microwave
operates.
It
.
may
be
used
to
warm
meals
and
Microwave
-
300
.
600
drinks,
as
well
as
cooking.
Meals
800
are
cooked
without
roasting.
Microwave
100
Microwave
and
the
grill
on
the
3
+
Fan
AO
-
280
200
ceiling
of
the
oven
operate.
It
is
=
assisted
full
300
suitable
for
grilling
large
amount
grill
600
of
meat.
Microwave
and
only
the
fan
(on
.
100
the
rear
wall)
operate.
It
is
Microwave
3
+
Defrost
;
200
suitable
for
thawing
frozen
*
ey
300
grained
food
at
room
600
temperature
slowly
and
cooling
down
the
cooked
food.
Oven’s
rear
heater
also
operates
together
with
the
microwave.
Microwave
100
Hot
air
heated
by
the
rear
heater
200
is
evenly
distributed
throughout
®
+
40
-
280
.
Fan
Heating
300
the
oven
rapidly
by
means
of
the
600
fan.
You
can
cook
your
meals
in
a
short
time
and
roast
at
the
same
time.
Food
is
heated
from
above
and
Microwave
100
below
at
the
same
time
with
the
+
Top
and
AO
-
280 200
microwave.
Suitable
for
cakes
bottom
300
and
stews
in
baking
molds
or
heating
600
cakes
and
pastries.
Cooking
Is
done
with
a
single
tray.
Microwave
100
The
lower
heater
and
fan
.
200
heating
work
with
the
+
Pizza
40
-
280 300
microwave.
It
is
suitable
for
function
600
cooking
pizza.
21/EN

Product
accessories
There
are
various
accessories
in
your
product.
In
this
section,
the
description
of
the
accessories
and
the
descriptions
of
the
correct
usage
are
available.
Depending
on
the
product
model,
the
supplied
accessory
varies.
All
accessories
described
in
the
user
guide
may
not
be
available
in
your
product.
NOTICE
:
The
trays
in
your
product
may
be
deformed
by
the
effect
of
the
temperature.
This
has
no
effect
on
the
function.
Deformation
disappears
when
the
tray
cools
down.
Standard
tray
It
is
used
for
pastries,
frozen
foods
and
frying
large
pieces.
Models
with
wire
shelves:
Wire
grill
It
is
used
for
frying
or
placing
the
food
to
be
baked,
fried
and
stewed
on
the
desired
shelf.
Wire
grill
in
tray
By
placing
It
in
the
tray
(if
provided),
it
is
ensured
that
the
oils
flowing
while
grilling
are
collected
in
the
tray
and
thus
the
contamination
of
the
oven
is
prevented.
Wire
grill
in
tray
is
not
suitable
to
use
with
deep
tray.
22/EN

Use
of
product
accessories
Cooking
shelves
There
are
3
levels
of
shelf
position
in
the
cooking
area.
You
can
also
see
the
order
of
the
shelves
in
the
numbers
on
the
front
frame
of
the
oven
@
Shelf
position
0”
is
the
base
of
the
oven.
Do
not
use
It
other
than
Microwave
function.
Placing
the
wire
grill
on
the
cooking
shelves
It
is
crucial
to
place
the
wire
grill
on the
wire
side
shelves
properly.
While
placing
the
wire
grill
on the
desired
shelf,
the
open
section
must
be
on
the
front.
For
better
cooking,
the
wire
grill
must
be
secured
with
the
stopper
on
the
wire
shelf.
It
must
not
pass
over
the
stopper
lo
contact
with
the rear
wall
of
the
oven.
Placing
the
tra
y
on
the
cooking
shelves
It
is
also
crucial
to
place
the
trays
on
the
wire
side
shelves
properly.
While
placing
the
tray
on
the
desired
shelf,
its
side
designed
for
holding
must
be
on
the
front.
For
better
cooking,
the
tray
must
be
secured
with
the
stopper
on
the
wire
shelf.
It
must
not
pass
over
the
stopper
to
contact
with
the rear
wall
of
the
oven.
Stopper
function
of
the
wire
grill
There
is
a
stopper
function
to
prevent
the
wire
grill
from
tipping
out
of
the
wire
shelf.
With
this
function,
you
can
easily
and
safely
take
out
your
food.
While
removing
the
wire
grill,
you
can
pull
it
forward
until
itt
reaches
the
stopper.
You
must
pass
over
the
stopper
to
remove
It
completely.
23/EN

Stopper
function
of
the
wire
grill
tray
There
is
also
a
stopper
function
to
prevent
the
tray
from
tipping
out
of
the
wire
shelf.
While
removing
the
tray,
release
it
from
the
rear
lock
and
pull
it
towards
yourself
until
it
reaches
the
stopper.
You
must
pass
over
the
stopper
to
remove
it
completely.
Ee
2A/EN
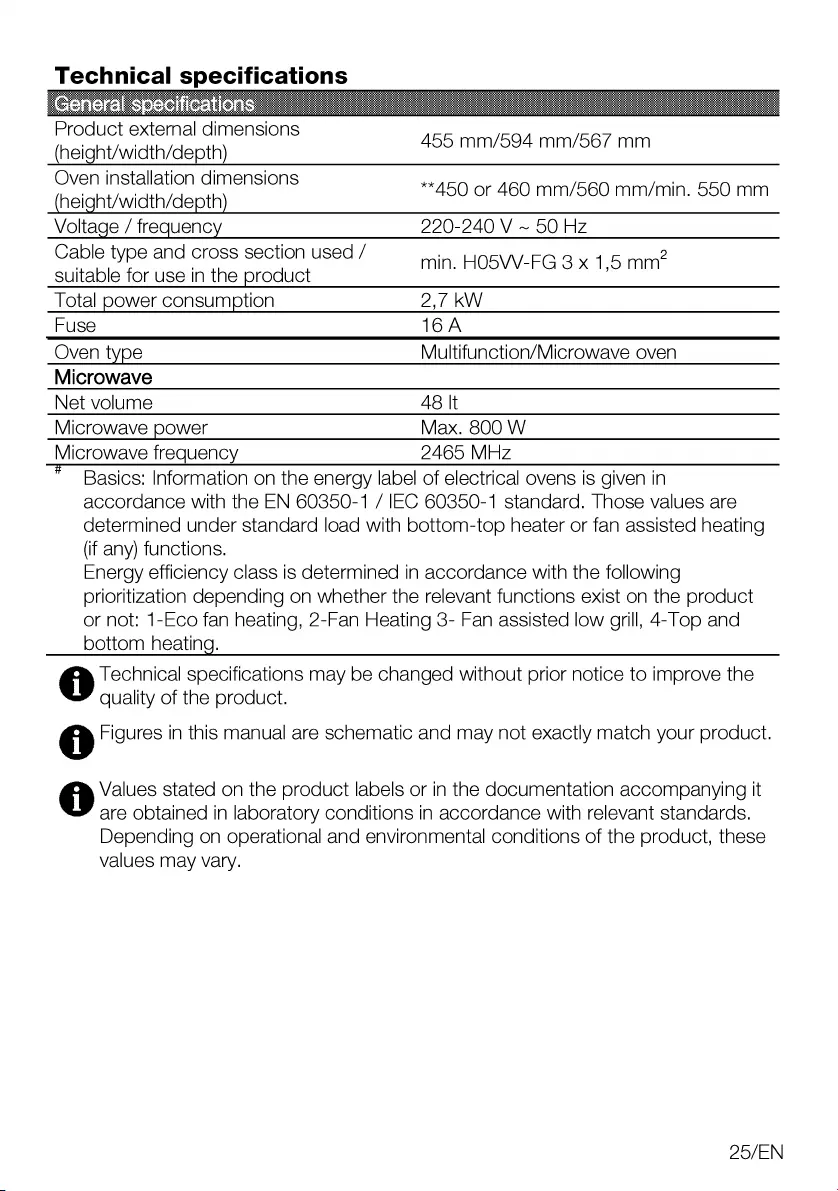
Technical
specifications
A455
mm/594
mm/567
mm
(height/width/depth)
Oven
installation
dimensions
ee
.
(height/width/depth)
450
or
460
mm/560
mm/min.
550
mm
Voltage
/
frequency
220-240
V
~
50
Hz
Cable
type
and
cross
section
used
/
|
2
suitable
for
use
in
the
product
min.
HOSVV-FG
3 x
1,5
mm
Total
power
consumption
2,/
KW
Fuse
16A
Oven
type
Multiftunction/Microwave
oven
Microwave
Net
volume
48
It
Microwave
power
Max.
800
W
Microwave
frequency
2465
MHz
Basics:
Information
on
the
energy
label
of
electrical
ovens
is
given
in
accordance
with
the
EN
60350-1
/
IEC
60350-1
standard.
Those
values
are
determined
under
standard
load
with
bottom-top
heater
or
fan
assisted
heating
(if
any)
functions.
Energy
efficiency
class
is
determined
in
accordance
with
the
following
prioritization
depending
on
whether
the
relevant
functions
exist
on the
product
or
not:
1-Eco
fan
heating,
2-Fan
Heating
3-
Fan
assisted
low
grill,
4-Top
and
bottom
heating.
Technical
specifications
may
be
changed
without
prior
notice
to
improve
the
P
quality
of
the
product.
@
Figures
in
this
manual
are
schematic
and
may
not
exactly
match
your
product.
Values
stated
on
the
product
labels
or
in
the
documentation
accompanying
It
P
are
obtained
tn
laboratory
conditions
in
accordance
with
relevant
standards.
Depending
on
operational
and
environmental
conditions
of
the
product,
these
values
may
vary.
25/EN
Before
you
start
using
your
product,
It
Is
recommended
to
do
the
following
in
the
following
sections.
First
time
setting
Always
set
the
time
of
day
before
using
your
oven.
If
you
do
not
set
it,
you
Cannot
cook
in
some
oven
models.
1.When
after
the
oven
is
energized
for
the
first
time,
the
time
of
day
set
for
oven
will
appear
on
the
display.
2.While
your
oven
is
turned
off
(when
the
time
of
day
Is
displayed
on
the
display),
activate
the
settings
menu
by
touching
©
key
for
about
3
seconds.
3.
Touch
@/©
keys
until
&
is
displayed
on
the
display
4.Touch
©
key
to
activate
the
hour
field.
»
Hour
field
and
&
symbol
flashes
on
the
display.
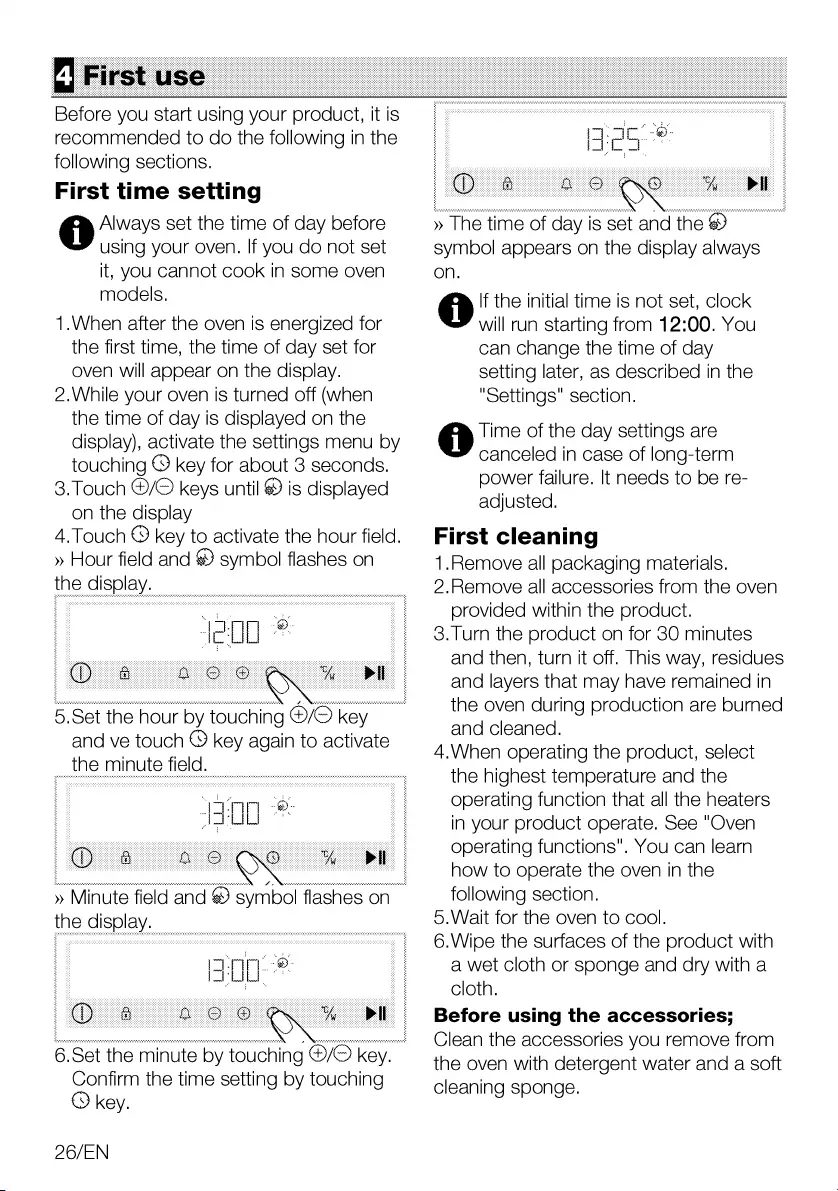
Je
rn
©:
5.Set
the
hour
by
touching
©/©
key
and
ve
touch
©
key
again
to
activate
the
minute
field.
»
Minute
field
and
symbol
flashes
on
the
display.
mann
®
FE
6.Set
the
minute
by
touching
@/©@
key.
Confirm
the
time
setting
by
touching
©
key.
26/EN
»
The
time
of
day
is
set
and
the
#)
symbol
appears
on the
display
always
on.
®
If
the
initial
time
is
not
set,
clock
u
will
run
starting
from
12:00.
You
can
change
the
time
of
day
setting
later,
as
described
in
the
"Settings"
section.
®
Time
of
the
day
settings
are
u
canceled
in
case
of
long-term
power
failure.
It
needs
to
be
re-
adjusted.
First
cleaning
1.Remove
all
packaging
materials.
2.Remove
all
accessories
from
the
oven
provided
within
the
product.
3.
Turn
the
product
on
for
30
minutes
and
then,
turn
It
off.
This
way,
residues
and
layers
that
may
have
remained
in
the
oven
during
production
are
burned
and
cleaned.
4.When
operating
the
product,
select
the
highest
temperature
and
the
operating
function
that
all
the
heaters
in
your
product
operate.
See
"Oven
operating
functions".
You
can
learn
how
to
operate
the
oven
in
the
following
section.
©.Wait
for
the
oven
to
cool.
6.Wipe
the
surfaces
of
the
product
with
a
wet
cloth
or
sponge
and
dry
with
a
cloth.
Before
using
the
accessories;
Clean
the
accessories
you
remove
from
the
oven
with
detergent
water
and
a
soft
cleaning
sponge.

NOTICE
The
surface
might
get
NOTICE
damaged
by
some
detergents
or
cleaning
materials.
Do
not
use
aggressive
detergents,
cleaning
powders/creams
or
any
sharp
objects
during
cleaning.
Smoke
and
smell
may
emit
for
a
couple
of
hours
during
the
initial
operation.
This
is
quite
normal.
Ensure
that
the
room
Is
well
ventilated
to
remove
the
smoke
and
smell.
Avoid
directly
inhaling
the
smoke
and
the
smell
that
emits.
27/EN
General
information
on
oven
usage
Cooling
fan
(It
may
not
exist
on
your
product.)
Your
product
has
a
cooling
fan.
The
cooling
fan
is
activated
automatically
when
necessary
and
cools
both
the
front
of
the
product
and
the
furniture.
It
is
automatically
deactivated
when
the
cooling
process
Is
finished.
Hot
air
comes
out
over
the
oven
door.
Do
not
cover
these
ventilation
openings
with
anything.
Otherwise,
the
oven
may
overheat.
The
cooling
fan
continues
to
operate
during
oven
operation
or
after
the
oven
is
turned
off
(approximately
20-30
minutes).
If
you
cook
by
programming
the
oven
timer,
at
the
end
of
the
cooking
time,
the
cooling
fan
turns
off
with
all
functions.
The
cooling
fan
running
time
cannot
be
determined
by
the
user.
It
turns
on
and
off
automatically.
This
is
not
an
error.
Oven
lighting
The
oven
lamp
is
turned
on
when
the
oven
starts
cooking.
In
some
models,
the
lamp
Is
on
during
cooking,
while
in
some
models
it
turns
off
after
a
certain
time.
If
the
product
door
is
opened
while
the
oven
Is
operating
or
in
the
closed
position,
the
oven
lamp
turns
on
automatically.
In
some
operating
functions,
the
lamp
does
not
light
due
to
energy
savings.
28/EN
Oven
Operating
Modes
Your
microwave
oven
operates
in
3
different
principles,
namely,
only
microwave,
only
oven
function,
and
combined
mode.
Microwave
When
the
oven
operates
In
microwave
mode
only,
It
creates
heat
directly
inside
the
meal.
You
may
use
the
microwave
for
warming
meals
or
drinks,
thawing
or
cooking.
In
microwave,
meals
are
cooked
but not
roasted.
Oven
function
Only
the
oven
heaters
cooks
the
meal
by
heating
it
up.
You
may
use
the
oven
for
all
kinds
of
cooking
and
also
for
thawing.
Meals
are
both
cooked
and
roasted
in
the
oven
function.
Combined
mode
In
the
combined
mode,
both
the
oven
heaters
and
the
microwave
operate
concurrently.
Meals
are
cooked
and
roasted
ina
shorter
time
in
the
combined
mode.
Operation
of
the
oven
control
unit
General
warnings
for
the
oven
control
unit
The
maximum
time
that
can
be
set
for
the
end
of
the
time
Is
5:59
hours.
In
warn
keeping
function,
this
time
is
23:59
hours.
In
the
event
of
a
power
failure,
the
cooking
and
cooking
time
set
will
be
canceled.
While making
any
adjustments,
=
the
relevant
symbols
flash
on the
display.
A
short
time
should
be
waited
for
the
settings
to
be
saved.
I
I
I
If
any
cooking
setting
has
been
made,
the
time
of
the
day
cannot
be
adjusted.
If
cooking
time
is
set
when
cooking
starts,
the
remaining
time
is
displayed
on the
display.
If
the
quick
preheat
(booster)
setting
is
enabled
on
your
control
unit,
the
*8
symbol
appears
on
the
display
when
you
start
cooking
and
the
oven
reaches
the
temperature
you
set
for
cooking
quickly.
For
the
quick
preheat
(booster)
setting,
please
see
"Settings"
section.
29/EN

1
2 3
4
Keys:
On/Off
key
Key
lock
key
Alarm
key
Decrease
and
progress
key
Increase
and
progress
key
Time
and
settings
key
Temperature/microwave
key
Cooking
start/stop
key
Indicator
fields:
9
Temperature
indication
field
10
Time/duration
indicator
field
11
Function
display
Display
symbols
€
:
Cooking
time
symbol
min
:
Minute
symbol
sec:
Second
symbol
CONDO
BWNDMY
—
fs
Alarm
symbol
>»
:
Cooking
symbol
i
:
Oven
inner
temperature
symbol
a}:
Quick
heating
(booster)
symbol
&)
:
Settings
symbol
@
:
Key
lock
symbol
PIT:
Function
number
%,
:
Defrost
symbol
2
:
Warm
keeping
symbol
ff
:
Remote
control
symbol*
:
Microwave
symbol
“=x:
Wireless
network
(wifi)
symbol*
¢
:
Low
level
steam
symbol”
OO
©
<
oi
Z
Aa
ooootc®
%
ood
9
a
ULtULgeg
UU
min
sec
5
6
7
8
@
:
High
level
steam
symbo!l*
tes:
oelf
cleaning
(pyro)
symbol
fai
:
Door
lock
symbol”
#
:
Meat
probe
symbol”
*
It
varies
depending
on the
product
model.
It
may
not
be
available
on
your
oroduct.
Turning
on
the
oven
1.Turn
on
the
oven
by
touching
the
Key.
»
After
the
oven
Is
turned
on,
the
first
operating
function
is
displayed
on the
display.
On
this
display,
the
operating
function,
temperature,
cooking
time
and
cooking
end
time
can
be
set.
®
If
no
settings
are
made
on
this
J
display,
the
oven
will
turn
off
in
about
3
minutes
and
the
time
of
day
will
appear
on
the
display.
Turning
off
the
oven
Turn
off
the
oven
by
touching
the
©
key.
The
time
of
day
appears
on
the
display.
Manual
cooking
to
select
temperature
and
oven
operating
function
You
can
cook
by
making
a
manual
control
(at
your
own
control)
without
setting
the
cooking
time
by
selecting
the
temperature
and
operating
function
specific
to
your
food.
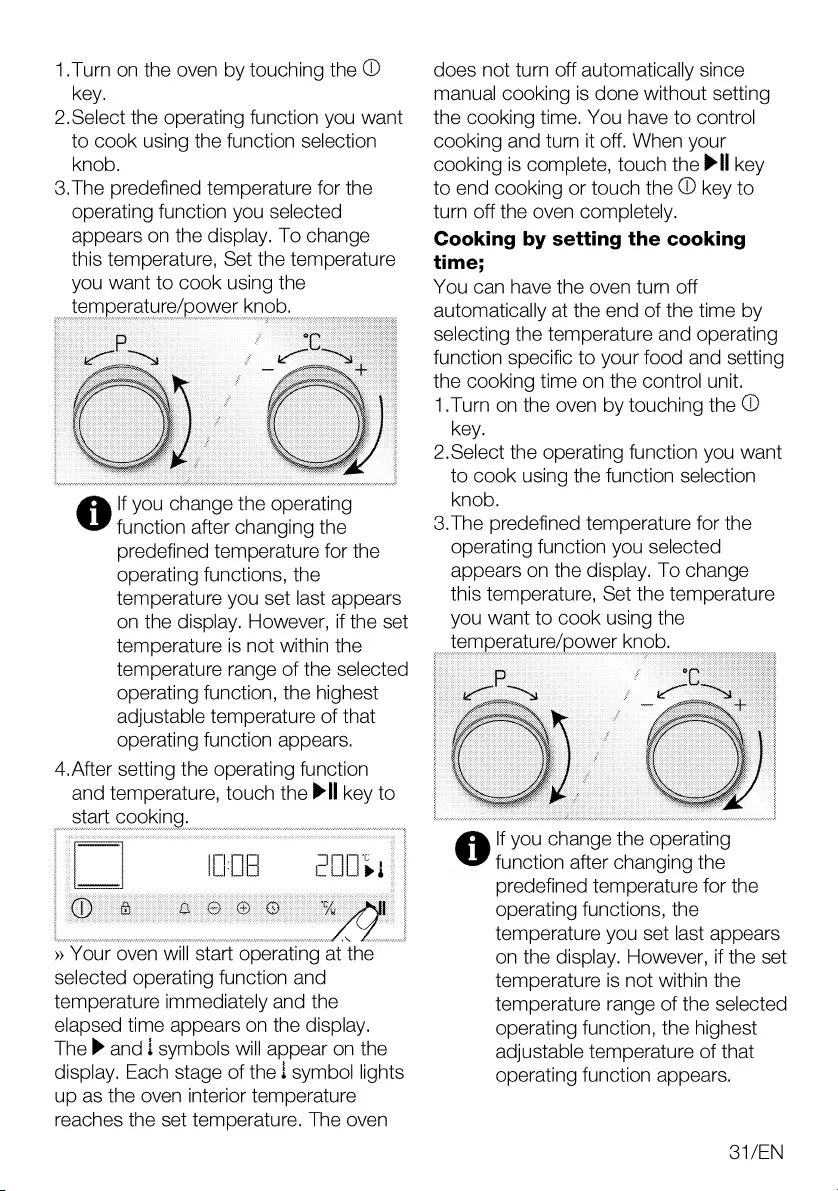
1.Turn
on
the
oven
by
touching
the
©
Key.
2.9elect
the
operating
function
you
want
to
cook
using
the
function
selection
Knob.
3.
The
predefined
temperature
for
the
operating
function
you
selected
appears
on
the
display.
To
change
this
temperature,
Set
the
temperature
you
want
to
cook
using
the
temperature/power
kno
®
If
you
change
the
operating
function
after
changing
the
predefined
temperature
for
the
operating
functions,
the
temperature
you
set
last
appears
on
the
display.
However,
if
the
set
temperature
Is
not
within
the
temperature
range
of
the
selected
operating
function,
the
highest
adjustable
temperature
of
that
operating
function
appears.
4.After
setting
the
operating
function
and
temperature,
touch
the
Pll
key
to
start
cooking.
LEB
2008
»
Your
oven
will
start
operating
at
the
selected
operating
function
and
temperature
immediately
and
the
elapsed
time
appears
on
the
display.
The
®
andi
symbols
will
appear
on the
display.
Each
stage
of
the
i
symbol
lights
up
as
the
oven
interior
temperature
reaches
the
set
temperature.
The
oven
does
not
turn
off
automatically
since
manual
cooking
is
done
without
setting
the
cooking
time.
You
have
to
control
cooking
and
turn
it
off.
When
your
cooking
is
complete,
touch
the
Pll
key
to
end
cooking
or
touch
the
©
key
to
turn
off
the
oven
completely.
Cooking
by
setting
the
cooking
time;
You
can
have
the
oven
turn
off
automatically
at
the
end
of
the
time
by
selecting
the
temperature
and
operating
function
specific
to
your food
and
setting
the
cooking
time
on
the
control
unit.
1.Turn
on
the
oven
by
touching
the
Key.
2.9elect
the
operating
function
you
want
to
cook
using
the
function
selection
Knob.
3.
The
predefined
temperature
for
the
operating
function you
selected
appears
on
the
display.
To
change
this
temperature,
Set
the
temperature
you
want
to
cook
using
the
I
If
you
change
the
operating
function
after
changing
the
predefined
temperature
for
the
operating
functions,
the
temperature
you
set
last
appears
on
the
display.
However,
if
the
set
temperature
Is
not
within
the
temperature
range
of
the
selected
operating
function,
the
highest
adjustable
temperature
of
that
operating
function
appears.
31/EN

4.Touch
the
©
key
once
for
cooking
time.
»
The
©
symbol
appears
on the
display.
_
no0g
IPP
TS
I
LILI
After
setting
the
operation
=
function
and
temperature,
you
can
set
the
cooking
time
for
30
minutes
by
touching
the
©
key
directly
for
quick
setting
of
the
cooking
time
and
change
the
time
with
the
@/©
keys.
5.Set
the
cooking
time
with
the
®/O
Keys.
The
cooking
time
increases
by
1
minute
in
the
first
15
minutes,
after
15
minutes
it
increases
by
5
minutes.
6.After
setting
the
operating
function,
temperature
and
cooking
time,
touch
the
Pll
key
to
start
cooking.
»
Your
oven
will
start
operating
immediately
at
the
selected
function
and
temperature.
The
set
cooking
time
starts
to
count
down.
The
P
and
i
symbols
will
appear
on
the
display.
Each
stage
of
the
i
symbol
lights
up
as
the
oven
interior
temperature
reaches
the
set
temperature.
After
the
set
cooking
time
is
completed,
"End"
appears
on
the
display,
an
audio
warning
sounds
and
cooking
stops.
7.
The
audio
warning
sounds
for
two
minutes.
If
the
Pll
key
is
touched
while
the
audio
warning
sounds
and
"End"
appears
on
the
display,
the
oven
327EN
continues
to
operate
indefinitely.
If
©
key
Is
touched,
the
oven
turns
off.
If
any
key
other
than
these
keys
Is
touched,
the
audible
warning
will
be
Interrupted.
Operating
in
microwave
mode
1.Turn
on
the
oven
by
touching
the
Key.
2.9elect
the
“Microwave”
function
with
using
the
function
selection
knob.
B00
*
PP
LP]
Ld
Pio
mins
Gy
nae
3.Rotate
the
temperature/power
knob
to
right/left
to
change
the
microwave
DOwer.
4.Touch
the
@
key
once
for
cooking
time.
»
The
©
symbol
blinks
on
the
display.
6.
Confirm
the
cooking
time
by
touching
©
key.
®
Maximum
microwave
power
Is
J
limited
to
GOOW
when
the
cooking
time
selected
exceeds
12
minutes
In
microwave
mode.
The
microwave
power
is
automatically
set
to
BOOW
when
selected
cooking
times
exceeding
12
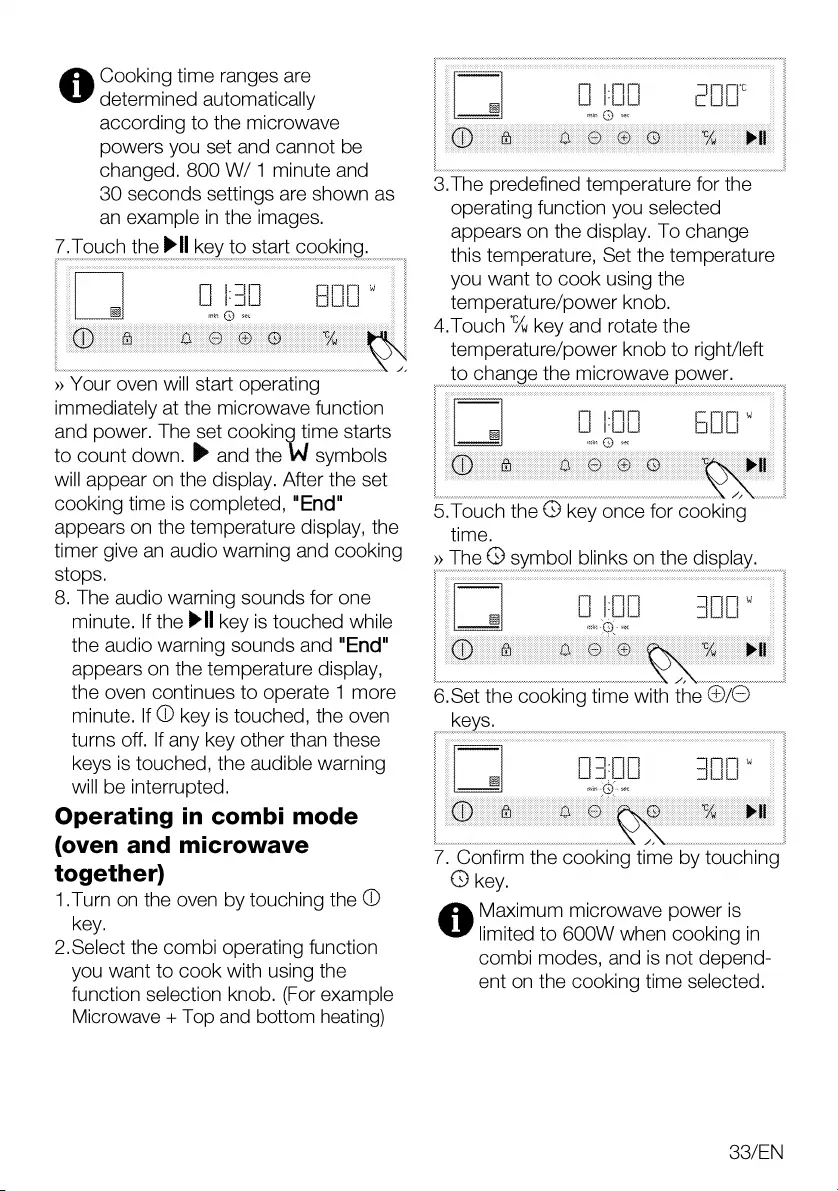
Cooking
time
ranges
are
‘determined
automatically
according
to
the
microwave
powers
you
set
and
cannot
be
changed.
800
W/
1
minute
and
30
seconds
settings
are
shown
as
an
example
in
the
images.
LPP
EL
min
tap
gee
LJ
CUL
7.Touch
the
Pll
key
to
start
cooking.
»
Your
oven
will
start
operating
immediately
at
the
microwave
function
and
power.
The
set
cooking
time
starts
to
count
down.
® and
the
W
symbols
will
appear
on
the
display.
After
the
set
cooking
time
is
completed,
"End"
appears
on
the
temperature
display,
the
timer
give
an
audio
warning
and
cooking
Stops.
8.
The
audio
warming
sounds
for
one
minute.
If
the
Pll
key
is
touched
while
the
audio
warning
sounds
and
"End"
appears
on
the
temperature
display,
the
oven
continues
to
operate
1
more
minute.
If
©
key
is
touched,
the
oven
turns
off.
If
any
key other
than
these
keys
is
touched,
the
audible
warning
will
be
interrupted.
Operating
in
combi
mode
(oven
and
microwave
together)
1.Turn
on
the
oven
by
touching
the
©
Key.
2.9elect
the
combi
operating
function
you
want
to
cook
with
using
the
function
selection
knob.
(For
example
Microwave
+
Top
and
bottom
heating)
3.
The
predefined
temperature
for
the
operating
function you
selected
appears
on
the
display.
To
change
this
temperature,
Set
the
temperature
you
want
to
cook
using
the
temperature/power
knob.
4.Touch
‘&
key
and
rotate
the
temperature/power
knob
to
right/left
to
change
the
microwave
power.
BLL
*
5.
Touch
the
&
key
once
for
cooking
time.
»
The
©
symbol
blinks
on
the
display.
ta
er
penny
Tannennne
WSU
edt
~
Sen
=
7.
Confirm
the
cooking
time
by
touching
©
key.
Se
Maximum
microwave
power
Is
J
limited
to
GOOW
when
cooking
in
combi
modes,
and
Is
not
depend-
ent
on the
cooking
time
selected.
33/EN

Cooking
time
ranges
are
‘determined
automatically
according
to
the
microwave
powers
you
set
and
cannot
be
changed.
300
W/
3
minute
settings
are
shown
as
an
example
in
the
images.
7.Touch
the
Pll
key
to
start
cooking.
»
Your
oven
will
start
operating
immediately
at
the
selected
kombi
function,
temperature
and
microwave
power.
The
set
cooking
time
starts
to
count
down
®
and
the
|
symbols
wil
appear
on
the
temperature
display.
After
the
set
cooking
time
is
completed,
"End"
appears
on
the
display,
the
timer
give
an
audio
warning
and
cooking
Stops.
8.
The
audio
warning
sounds
for
one
minute.
If
the
Pll
key
is
touched
while
the
audio
warning
sounds
and
"End"
appears
on
the
temperature
display,
the
oven
continues
to
operate
1
more
minute.
If
©
key
is
touched,
the
oven
turns
off.
If
any
key other
than
these
keys
is
touched,
the
audible
warning
will
be
interrupted.
Settings
The
3-
2-
1
count
down
Is
‘displayed
on
the
menus
or
settings
that
shall
be
activated
by
touching
for
a
long
period.
When
the
count
down
expires,
the
relevant
menu
or
setting
is
activated.
Activating
key
lock
By
using
the
key
lock
feature,
you
can
safeguard
the
control
unit
from
interference.
B4/EN
appears
on
the
display.
i200
»
The
&
symbol
appears
on the
display
and
the
key
lock
is
activated.
When
any
key
is
touched
when
the
key
lock
is
set,
an
audible
signal
sounds
and
the
&
symbol
flashes.
f
Control
unit
keys
cannot
be
used
when
key
lock
is
on.
The
key
lock
will
not
be
cancelled
in
case
of
power
failure.
Deactivating
the
key
lock
1.Touch
the
f
key
until
the
&
symbol!
disappears
from
the
display.
»
The
&
symbol
disappears
and
the
key
lock
is
disabled
on
the
display.
Setting
the
alarm
You
can
also
use
the
control
unit
of
the
product
for
any
warning
or
reminder
other
than
cooking.
The
alarm
clock
has
no
effect
on the
oven
operating
functions.
Used
for
warning
purposes.
For
example,
you
can
use
the
alarm
clock
when
you
want
to
turn the
food
in
the
oven
at
a
certain
time.
As
soon
as
the
time
you
set
has
expired,
the
clock
gives
you
an
audible
warning.
Sm
Maximum
alarm
time
can
be
23
J
hours
and
59
minutes.
1.Touch
the
&
key
to
set
the
alarm
period.
»
The
&
symbol
starts
to
flash
on
the
display.
ce
UU

2.Set
the
alarm
time
with
the
@/©
keys.
Touch
the
& key
again
to
confirm
the
setting.
»
The
&
symbol
illuminates
continuously
and
the
alarm
time
starts
to
count
down
on
the
display.
If
the
alarm
time
and
cooking
time
are
set
at
the
same
time,
the
shorter
time
is
displayed
on the
display.
3.After
the
alarm
time
is
completed,
the
f\symbol
starts
flashing
and
gives
you
an
audible
warning.
Turning
off
the
alarm
1.At
the
end
of
the
alarm
period,
the
warning
sounds
for
two
minutes.
Touch
any
key
to
stop
the
audible
warning.
»
The
audible
warning
is
stopped.
If
you
want
to
cancel
the
alarm;
1.Touch
the
&
key
to
reset
the
alarm
period.
Wait
until
"00:00"
is
displayed
on
the
display
while
touching
the
©
Key.
2.
You
can
also
cancel
the
alarm
by
touching
the
&
key
for
a
long
time.
Setting
the
volume
You
may
set
the
volume
of
the
control
unit.
Your
oven
shall
be
off
to
perform
this
operation.
1.While
your
oven
is
turned
off
(when
the
time
of
day
Is
displayed
on
the
display),
activate
the
settings
menu
by
touching
the
©
key
for
about
3
seconds.
2.Touch
the
©/©
keys
until
the
b-1
or
b-2
appears
on the
display.
3.
Activate
the
volume
setting
by
touching
the
©
key
again.
(b-1,
b-2
)
4.Use
®/©
keys
to
set
the
desired
volume.
»
Selected
volume
setting
is
confirmed
immediately.
Touch
the
©
key
to
return
to
the
settings
menu.
Setting
the
display
brightness
You
may
set
the
brightness
of
the
control
unit
display.
Your
oven
shall
be
off
to
perform
this
operation.
1.While
your
oven
is
turned
off
(when
the
time
of
day
Is
displayed
on
the
display),
activate
the
settings
menu
by
touching
the
©
key
for
about
3
seconds.
2.Touch
the
&/©
keys
until
the
d-1,
d-2
or
d-3
symbol
appears
on
the
display.
3.
Activate
the
brightness
setting
by
touching
the
©
key
again.
4.Set
the
desired
brightness
with
the
/O©
keys.
(d-1,
d-2,
d-3
)
»
Selected
brightness
setting
is
confirmed
immediately.
Touch
the
©
key
to
return
to
the
settings
menu.
Setting
the
Quick
pre-heating
(Booster)
function
You
may
operate
the
cooking
automatically
with
the
quick
pre-heating
function
on
your
product.
For
this
oburpose,
you
shall
activate
the
quick
pre-heating
setting.
Your
oven
shall
be
off
to
perform
this
operation.
1.While
your
oven
is
turned
off
(when
the
time
of
day
Is
displayed
on
the
display),
activate
the
settings
menu
by
touching
the
©
key
for
about
3
seconds.
2.Touch
the
&/©
keys
until
the
*8
symbol
appears
on the
display.
3.
Activate
the
quick
pre-heating
(booster)
setting
by
touching
the
©
key
again.
4.Use
©/©
keys
to
change
the
“OFF”
setting
displayed
on
the
display
to
the
“ON”
setting.
35/EN
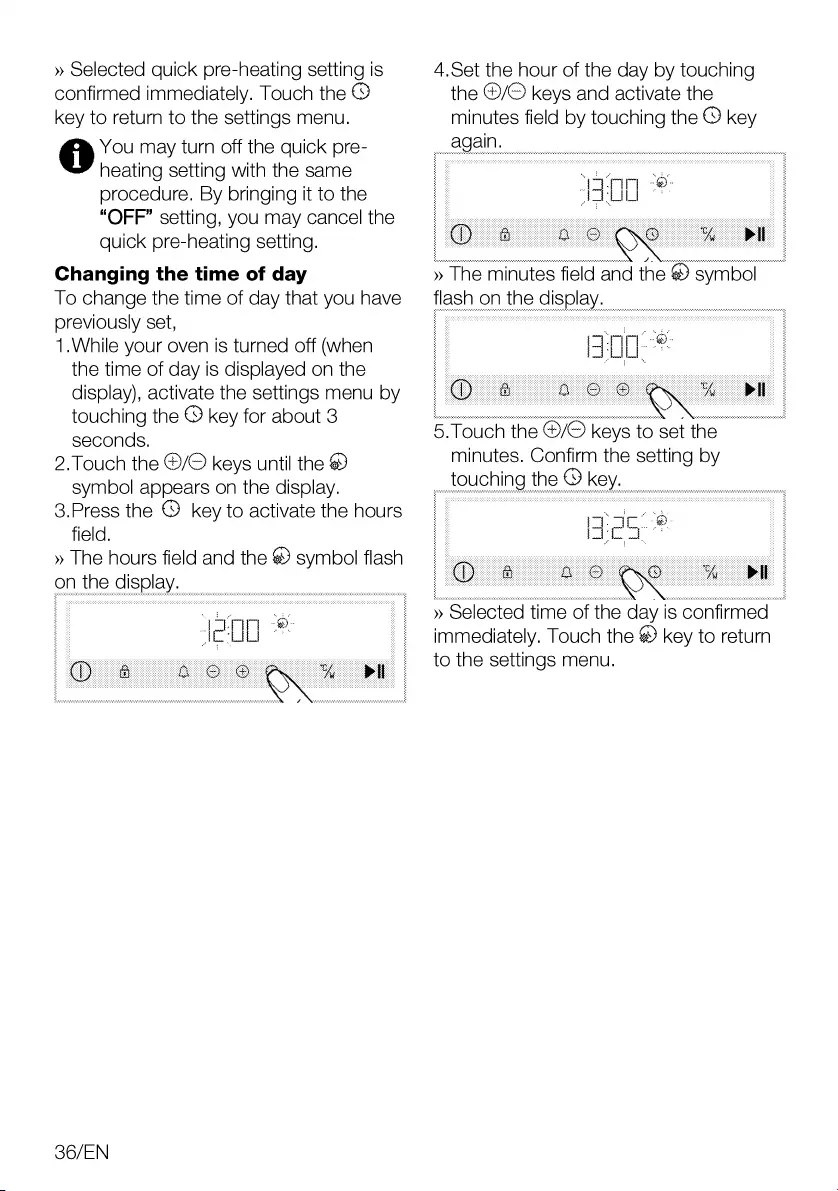
»
Selected
quick
pre-heating
setting
is
confirmed
immediately.
Touch
the
©
key
to
return
to
the
settings
menu.
You
may
turn
off
the
quick
pre-
heating
setting
with
the
same
procedure.
By
bringing
It
to
the
“OFF”
setting,
you
may
cancel
the
quick
pre-heating
setting.
Changing
the
time
of
day
To
change
the
time
of
day
that
you
have
previously
set,
1.While
your
oven
is
turned
off
(when
the
time
of
day
Is
displayed
on
the
display),
activate
the
settings
menu
by
touching
the
©
key
for
about
3
seconds.
2.Touch
the
©/©
keys
until
the
#
symbol
appears
on the
display.
3.Press
the
©
key
to
activate
the
hours
field.
»
The
hours
field
and
the
#9
symbol
flash
on
the
display.
lego
*
S6/EN
4.Set
the
hour
of
the
day
by
touching
the
©/©
keys
and
activate
the
minutes
field
by
touching
the
©
key
again.
»
The
minutes
field
and
the
&
symbol
flash
on
the
display.
nn
“8:
UU
a
5.
Touch
the
@/©
keys
to
set
the
minutes.
Confirm
the
setting
by
touching
the
©
key.
qe:
*
»
Selected
time
of
the
day
is
confirmed
immediately.
Touch
the
#
key
to
return
to
the
settings
menu.
This
section
describes
tips
on
preparing
and
cooking
your
food.
In
addition,
you
can
also
find
some
of
the
foods
tested
as
producers
and
the
most
appropriate
settings
for
these
foods.
Appropriate
oven
settings
and
accessories
for
these
foods
are
also
indicated.
General
information
on
microwave
cooking
To
prevent
overflowing
when
heating
water
and
other
liquids
in
your
microwave
oven:
e
Do
not
use
closed
containers,
or
containers
with
narrow
openings.
e
Do
not
overheat.
e
Before
placing
the
container
in
the
microwave,
stir
the
contents
with
a
teaspoon
and
then
open
the
door
and
restir
when
It
is
half
done. Do
not
leave
the
teaspoon
inside
while
the
oven
is
operating.
e
When
heating
liquids
such
as
soups
and
sauces,
these
may
unexpectedly
bubble
up
and
overflow
before
they
even
come
to
the
boil.
Do
not
leave
your
oven
unattended
when
heating
such
liquids.
e
After
warming
baby
food
or
drink
inside
a
feeding
bottle,
shake
and
test
the
temperature
before
giving
to
your
baby.
Before
heating,
remove
the
cap
and
mouthpiece
from
the
bottle.
e
Remove
food
trom
any
plastic
packaging
before
cooking
or
defrosting.
Under
certain
exceptional
circumstances,
you
may
be
required
to
cover
food
with
a
special
nylon
clinging
film.
e
Do
not
use
your
product
for
making
popcorn
unless
you
have
specially
designed
bags
for
use
In
microwave
ovens.
e
Chocolate
sweets
with
low
liquid
content
and
flour-based
foods
should
be
heated
with
caution.
e
Eggs
in
their
shell
and
whole
hardboiled
eggs
should
not
be
heated
in
microwave
ovens
since
they
may
explode
even
after
microwave
heating
has
ended.
The
advantages
of
microwaving
e
In
conventional
ovens,
the
heat
emitted
by
electrical
heaters
or
gas
burners
penetrate
into
the
food
item
from
outside.
Therefore,
a
huge
amount
of
energy
is
consumed
In
order
to
heat
the
air
inside,
oven
components
and
the
cooking
utensils.
e
In
amicrowave
oven,
heat
is
generated
by
food
item
itself
and
heat
flow
is
from
inside
to
outside.
There
is
no
heat
loss
in
the
medium,
on
the
oven
inner
walls
or
utensils
(if
they
are
microwave
compatible).
In
other
words,
only
the
food
Is
heated.
e
Microwave
ovens
considerably
reduce
cooking
times.
Time
needed
In
microwave
cooking
Is
almost
half
or
a
third
less
than
the
conventional
ovens.
A
lot
depends
on
the
density,
heat
and
amount
of
the
ingredients
to
be
cooked.
e
You
can
preserve
the
natural
taste
of
foods
by
cooking
them
in
their
own
juices
without
adding
a
lot
of
spices,
or
with
no
spices
at
all.
e
Microwave
ovens
save
energy.
Energy
is
only
used
when
you
are
cooking.
There
is
no
wasted
energy
with
a
microwave.
377EN
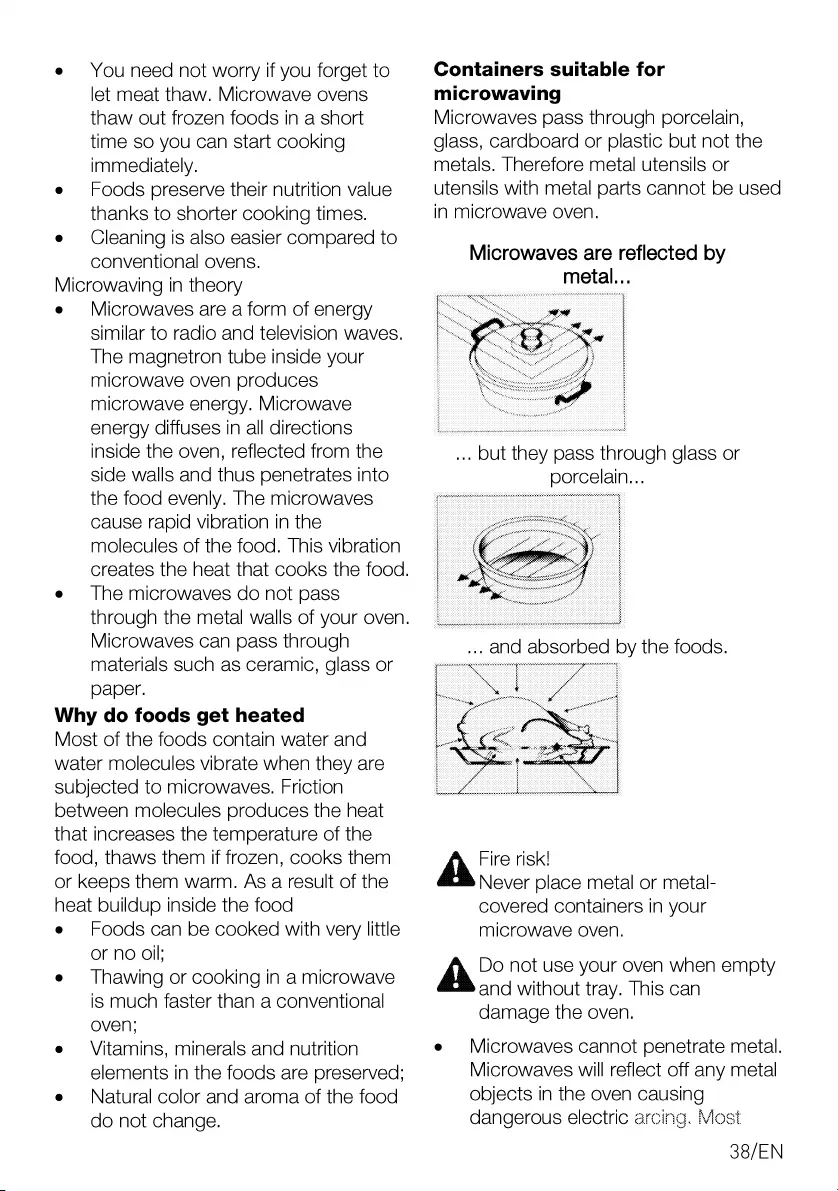
e
You
need
not
worry
if
you
forget
to
let
meat
thaw.
Microwave
ovens
thaw
out
frozen
foods
in
a
short
time
so
you
can
start
cooking
immediately.
e
Foods
preserve
their
nutrition
value
thanks
to
shorter
cooking
times.
e
Cleaning
is
also
easier
compared
to
conventional
ovens.
Microwaving
in
theory
e
Microwaves
are
a
form
of
energy
similar
to
radio
and
television
waves.
The
magnetron
tube
inside
your
microwave
oven
produces
microwave
energy.
Microwave
energy
diffuses
in
all
directions
inside
the
oven,
reflected
from
the
side
walls
and
thus
penetrates
into
the
food
evenly.
The
microwaves
cause
rapid
vibration
in
the
molecules
of
the
food.
This
vibration
creates
the
heat
that
cooks
the
food.
e
The
microwaves
do
not
pass
through
the
metal
walls
of
your
oven.
Microwaves
can
pass
through
materials
such
as
ceramic,
glass
or
paper.
Why
do
foods
get
heated
Most
of
the
foods
contain
water
and
water
molecules
vibrate
when
they
are
subjected
to
microwaves.
Friction
between
molecules
produces
the
heat
that
increases
the
temperature
of
the
food,
thaws
them
if
frozen,
cooks
them
or
keeps
them
warm.
As
a
result
of
the
heat
buildup
inside
the
food
e
Foods
can
be
cooked
with
very
little
or
no
oll;
e
Thawing
or
cooking
in
a
microwave
is
much
faster
than
a
conventional
oven;
e
Vitamins,
minerals
and
nutrition
elements
in
the
foods
are
preserved;
e
Natural
color
and
aroma
of
the
food
do
not
change.
Containers
suitable
for
microwaving
Microwaves
pass
through
porcelain,
glass,
cardboard
or
plastic
but not
the
metals.
Therefore
metal
utensils
or
utensils
with
metal
parts
cannot
be
used
In
microwave
oven.
Microwaves
are
reflected
by
..
but
they
pass
through
glass
or
porcelain...
Fire
risk!
Never
place metal
or
metal-
covered
containers
in
your
microwave
oven.
Do
not
use
your
oven
when
empty
and
without
tray.
This
can
damage
the
oven.
e
Microwaves
cannot
penetrate
metal.
Microwaves
will
reflect
off
any
metal
objects
in
the
oven
causing
dangerous
electric
arcing.
Most
38/EN
heatproof
non-metallic
containers
are
suitable
for
use
in
a
microwave
oven.
However,
certain
containers
may
contain
materials
that
are
unsuitable
for
microwaving.
You
can
apply
the
following
test
to
determine
whether
a
container
Is
suitable
for
microwaving
or
not:
e
Place
the
container
you wish
to
test
empty
in
the
oven
along
with
another
container
filled
with
water.
e
Operate
the
oven
at
high
power
for
one
minute.
If
the
water
has
been
heated
and
the
container
you
are
testing
is
cold,
then
it
is
suitable
for
microwaving.
e
On
the
other
hand,
if
the
water
remains
cold
and
the
neighboring
container
heats
up,
this
means
that
the
microwaves
have
been
absorbed
by
the
container
and
therefore
subject
container
is
unsuitable
for
microwaving.
Glass
containers
e
Avoid
using
containers
made
of
very
thin
glass
or
lead
crystal.
Heatoroof
glass
containers
are
suitable
for
use
in
microwave
ovens.
On
the
other
hand,
in
the
microwave
oven
avoid
using
brittle
glass
containers
such
as
water
and wine
glasses
that
may
break
as
their
contents
heat
up.
Plastic
containers
e
Do
not
use
pots
and
dishes
made
of
plastic
or
melamine
for
long
duration
microwaving;
the
same
applies
for
bags
used
for
storing
frozen
food.
This
is
because
very
hot
food
will
sooner
or
later
cause
the
plastic
containers
to
melt
or
distort.
Use
such
containers
only
for
short
duration
microwaving.
Cooking
bags
e
Cooking
bags
are
suitable
for
use
in
microwave
ovens,
provided
that
these
are
designed
for
cooking.
Do
not
forget
to
pierce
them
to
enable
the
steam
inside
to
escape.
Never
use
normal
plastic
bags
for
cooking
purposes
since they
will
melt
and
break
up.
Paper
e
You
should
not
use
any
kind
of
paper
for
long-duration
cooking.
This
will
cause
the
paper
to
catch
fire.
Paper
dishes
are
suitable
for
oily
and
dry
foods
that
require
short-
duration
cooking.
Do
not
use
recycled
paper.
Such
paper
may
contain
fragments
that
can
Cause
arcing.
Wooden
and
wicker
containers
e
As
microwave
causes
drying
of
wooden
structure
and
crisp
it,
large
wooden
containers
should
not
be
used.
Porcelain
containers
e
Generally
speaking,
containers
made
of
such
materials
are
suitable
for
use
In
a
microwave
oven,
but
you
should
test
them
to
be
sure.
Metal
containers
e
Metal
containers
reflect
the
microwaves
away
from
the
food.
Therefore,
avoid
using
such
containers.
Certain
cookware
containing
high
levels
of
iron
or
lead
are
unsuitable
for
use
as
cooking
containers.
Make
sure
that
you
test
your
cookware
In
terms
of
suitability
for
microwaving.
39/EN
Heat—Resistant
Glass
Yes Yes Yes Yes
Non
Heat—Resistant
Glass No
No No
No
Heat—Resistant
Ceramics
Yes Yes Yes Yes
Microwave—Safe
Plastic
Yes
No No
No
Plate
Kitchen
Paper
Yes
No No
No
Metal
Tray
Yes”
Yes Yes
Yes”
Metal
Rack
No
Yes Yes
No
Aluminum
Foil
&
Foil
No
Yes Yes
No
Container
*
Only
use
metal
tray
given
with
oven.
Positioning
food
for
this
purpose
than
wide,
shallow
e
You
will
obtain
optimal
results
by
ones.
Containers
should
be
no
more
arranging
the
food
evenly
in
the
than
two
thirds
full
when
You
heat
container.
This
method
can
be
gravy,
SAUCES
OF
SOUPS.
applied
in
many
ways
for
e
|f
you
are
cooking
fish
whole,
pierce
satisfactory
results.
them
so
that
their
skins
do
not
burst.
e
Youcan
cook
a
large
number
of
e
When
using
clinging
film,
bags
or
identical
pieces
(for
example
baking
paper,
pierce
or
leave
an
potatoes).
If
you
arrange
them
in
an
opening
to
enable
steam
to
escape.
evenly
spaced
circle
around
the
e
small
pieces
of
food
will
cook
oven
they
will
cook
better.
Avoid
quicker
than
large
pieces,
and
placing
one
piece
on
another.
evenly
shaped
pieces
will
cook
e
Since
the
microwaves
act
more
quicker
than
other
pieces.
For
the
powerfully
on
the
outer
layers
of
best
results
cut
food
evenly
into
food,
when
cooking
pieces
of
food
pieces
of
equal
size.
with different
shapes
and
Food
height
thicknesses,
place
the
thick
parts
In
the
centre
of
the
tray.
This
will
ensure
that
these
parts
are
cooked
first.
e
Place
fish
and
other
food
that
Is
not
flat
with
their
tails
at
the
edge
of
the
tray.
e
You
can
place
very
finely
carved
pieces
of
meat
on
top
of
each
other.
Thicker
items
such
as
Sausages
and
meat
slices
should
be
placed
close
together.
e
Heat
gravy
and
sauces
in
a
separate
dish.
Narrow,
deep
dishes
are
better
With
food
that
is
quite
thick
(generally
roasts),
the
lower
part
will
cook
faster.
This
means
that
it
is
sometimes
necessary
to
turn
such
items
over
several
times.
Thick
or
dense
Items
can
be
placed
in
a
higher
position,
enabling
the
microwaves
to
act
on the
bottom
and
middle
parts
of
the
ttem.
Cooking
suggestions
Factors
affecting
microwaving
time
:
Microwaving
time
depends
on
a
number
of
factors.
The
temperature
of
the
ingredients
used
in
a
recipe
40/EN
can
considerably
affect
the
amount
of
cooking
time
required.
Thus,
a
cake
made
with
ice-cold
butter,
milk
and
eggs
will
take
considerably
longer
to
cook
than
one
made
with
ingredients
at
room
temperature.
e
Particularly
when
it
comes
to
bread,
cakes
and
cream
sauces,
you
are
recommended
with
certain
recipes
to
remove
the
food
from
the
oven
before
it
is
fully
cooked. Such
foods
if
left
covered
outside
the
oven
will
continue
to
cook
as
heat
flows
from
the
outer
to
the
inner
layers
of
the
food.
If
you
leave
Items
on
the
oven
until
they
are
fully
done,
you
risk
burning
the
outer
layer.
With
time
you
will
become
a
better
judge
of
how
long
items
require
to
be
cooked
and
left
to
stand.
e
Do
not
leave
items
to
cook
unattended.
Your
microwave
oven
Is
automatically
lit
up
when
it
Is in
operation,
enabling
you
to
keep
an
eye
on
the
condition
of
the
items
being
cooked.
Defrosting:
e
The
defrosting
time
may
depend
on
the
shape
of
the
packet.
Shallow,
rectangular
packets
defrost
more
quickly
than
deep
containers.
e
Separate
the
items
as
they
start
to
defrost.
They
will
then
defrost
more
readily.
e
The
more
food
you
cook,
the
longer
it
will
take.
Twice
the
amount
of
food
will
take
roughly
twice
as
long.
If
it
takes
four
minutes
to
cook
one
potato,
it
will
take
on
average
seven
minutes
to
cook
two
potatoes.
The
amount
of
microwaves
that
your
oven
produces
remains
constant
however
much
food
you place
inside
it.
This
means
that
the
more
food
you
place
inside,
the
longer
tt
will
take
to
do.
Liquid
content
e
Liquid
content
affects
cooking
time
because
microwaves
are
sensitive
to
moisture.
Foods
with
natural
liquid
content
(Such
as
vegetables,
fish,
and
poultry)
will
cook
quickly
and
easily.
When
cooking
dry
items
such
as
rice
and
pulses
you
are
recommended
to
add
water.
e
Remember
that
moisture
Is
eliminated
in
a
microwave
oven,
SO
that
when
cooking
drier
items
such
as
certain
vegetables
you
should
first
wet
them
with
a
little
water
or
cover
them
so
that
they
retain
their
moisture.
e
When
cooking
foods
with
very
little
water
content
(thawing
bread,
making
pop-corns)
evaporation
takes
place
rapidly.
In
such
cases
oven
operates
as
If
it
is
empty
and
foods
can
get
burnt.
And
oven
or
the
utensils
can
get
damaged.
Therefore,
make
sure
that
you
just
set
the
required
cooking
time
and
never
leave
the
oven
unattended
during
cooking.
Steam
e
The
moisture
within
the
food
may
sometimes
cause
the
oven
to
steam
up
when
it
is
operating.
This
Is
normal.
Sugar
e
When
making
foods
with
very
high
sugar
content
like
puddings
and
tarts,
follow
the
recommendations
in
your
microwave
recipe
books.
If
you
exceed
the
recommended
cooking
time,
this
may
result
in
the
food
burning
or
damage
to
your
oven.
A1/EN
Food
density
Light,
porous
Items
such
as
bread
and
cakes
will
take
less
time
than
heavy,
dense
items
such
as
roasts
and
stews.
Exercise
caution
when
microwaving
porous
items
since
they
do
not
have
hard,
dry
surfaces.
Bones
and
fat
content
Bones
conduct
heat
and
fat
cooks
faster
than
meat.
When
cooking
pieces
of
meat
containing
bones
or
fat,
ensure
that
they
are
cooked
evenly and
not
overcooked.
Food
colour
Meat
or
poultry
that
has
been
cooked
for
fifteen
minutes
or
more
will
brown
gently
in
its
own
fat.
To
give
food
that
has
been
prepared
quickly
a
more
appetizing
and
roast
complexion,
you
can
cover
tt
with
barbecue
or
soy
sauce.
If
you
only
use
a
little
of
this
sauce
It
will
not
affect
the
essential
flavor
of
the
food.
Reducing
the
internal
pressure
in
food
Many
kinds
of
foods
are
covered
in
skins.
Steam
builds
up
inside
as
they
are
cooked
which
may
cause
them
to
burst.
To
avoid
this,
the
skin
should
be
pierced
with
a
fork
or
Knife.
You
should
apply
this
procedure
with
potatoes,
chicken
livers,
mussels,
egg
yolks,
sausages
and
certain
kinds
of
fruit
and
vegetable.
Turning
and
stirring
items
while
cooking
It
is
important
to
stir
ttems
when
you
are
microwaving
them.
In
conventional
cooking
food
Is
stirred
to
mix
it.
In
microwave
cooking,
however,
food
Is
stirred
to
achieve
equal
heat
distribution.
Always
stir
from
the
outside
towards
the
middle
because
the
outside
heats
up
before
the
middle.
A27EN
e
With
bulky
and
elongated
items
like
roasts
and
whole
poultry,
you
should
turn
them
over
to
ensure
that
the
top
and
bottom
are
equally
cooked.
Indeed,
you
may
have
to
turn
sliced
meat
and
chicken
over.
e
Turning
items
over
and
stirring
whilst
cooking
are
important
to
ensure
that
all
sides
are
equally
well
done.
Different
cooking
times
e
lo
begin
with,
always
try
out
the
minimum
cooking
time
and
check
whether
the
item
is
done.
The
cooking
times
given
In
this
manual
are
approximate
values.
Cooking
times
may
vary
according
to
the
dimensions
and
types
of
the
food
and
containers.
standing
time
e
Leave
the
food
to
stand
for
a
while
after
removing
from
the
oven.
When
defrosting,
cooking
and
reheating,
leaving
the
items
to
stand
for
a
while
invariably
produces
better
results.
This
is
because
the
heat
will
spread
evenly
around
the
food.
Inside
the
microwave
oven,
food
will
continue
to
cook
even
after
the
oven
has
been
turned
off.
The
standing
period
will
raise
the
heat
of
the
food
by
between
3°C
and
8°C.
This
process
is
maintained
not
by
the
microwave
oven
but
by
the
heat
within
the
food.
The
standing
time
may
vary
according
to
the
kind
of
food.
Sometimes
this
period
is
as
short
as
the
time
taken
to
remove
the
food
from
the
oven
and
serve
it.
This
period
may
extend
to
as
long
as
ten
minutes
with
large
items.
e
Remove
food
trom
its
plastic
packaging
before
cooking
or
defrosting.
Under
certain
exceptional
circumstances
it
may
be
necessary
to
cover
you
food
with
a
special
clinging,
nylon
film.
e
Itis
especially
recommended
with
items
like
meat,
chicken,
bread,
cakes
and
cream
sauce
to
remove
them
from
the
oven
before
they
are
fully
cooked
and
leave
them
to
stand
until
fully
cooked.
General
warnings
about
cooking
in
the
oven
e
While
opening
the
oven door
during
or
after
cooking,
hot-burning
steam
may
emerge.
The
steam
may
burn
your
hand,
face
and
/
or
eyes.
When
opening
the
oven
door,
stay
away.
e
Intense
steam
generated
during
cooking
may
form
condensed
water
drops
on
the
interior
and
exterior
of
the
oven
and
on
the
upper
parts
of
the
furniture
due
to
the
temperature
difference.
This
is
anormal
and
physical
occurrence.
e
The
cooking
temperature
and
time
values
given
for
foods
may
vary
depending
on
the
recipe
and
amount.
For
this
reason,
these values
are
given
as
ranges.
e
Always
remove
unused
accessories
from
the
oven
before
you
start
cooking.
Accessories
that
will
remain
in
the
oven
may
prevent
your
food
from
being
cooked
at
the
correct
values.
e
For
foods
that
you
will
cook
according
to
your
own
recipe,
you
can
reference
similar
foods
given
in
the
cooking
tables.
e
Using
the
supplied
accessories
ensures
you
get
the
best
cooking
performance.
Always
observe
the
warnings
and
information
provided
by
the
manufacturer
for
the
external
cookware
you
will
use.
e
Cut
the
greaseproof
paper
you
will
use
in
your
cooking
in
suitable
sizes
to
the
container
you
will
cook.
Greaseproof
papers
that
are
overflowing
from
the
container
can
create
a
risk
of
burns
and
affect
the
quality
of
your
cooking.
Use
the
greaseproof
paper
you
will
use
In
the
temperature
range
specified.
e
For
good
cooking
performance,
place
your food
on
the
recommended
correct
shelf.
Do
not
change
the
shelf
position
during
cooking.
Pastries
and
oven
food
General
Information
e
We
recommend
using
the
accessories
of
the
product
for
a
good
cooking
performance.
If
you
are
going
to
use
an
external
cookware,
prefer
dark,
non-sticking
and
heat
resistant
ware.
e
If
preheating
is
recommended
in
the
cooking
table,
be
sure
to
put
your
food
in
the
oven
after
preheating.
e
If
you
are
going
to
cook
using
cookware
on
the
wire
grill,
place
it
in
the
middle
of
the
wire
grill,
not
near
the
back
wall.
e
All
materials
used
in
making
pastry
should
be
fresh
and
at
room
temperature.
e
The
cooking
status
of
the
products
may
vary
depending
on
the
amount
of
food
and
the
size
of
the
cookware.
e
Metal,
ceramic
and
glass
molds
extend
the
cooking
time
and
the
bottom
surface
of
pastry
foods
do
not
brown
evenly.
e
If
you
use
cooking
paper
during
cooking,
a
little
browning
may
be
observed
on
the
bottom
surface
of
the
food.
In
this
case,
you
may
need
to
extend
your
cooking
time
about
10
minutes.
e
The
values
specified
in
the
cooking
tables
are
determined
as
a
result
of
the
tests
carried
out
in
our
laboratories.
Values
suitable
for
you
may
differ
from
these
values.
A3/EN
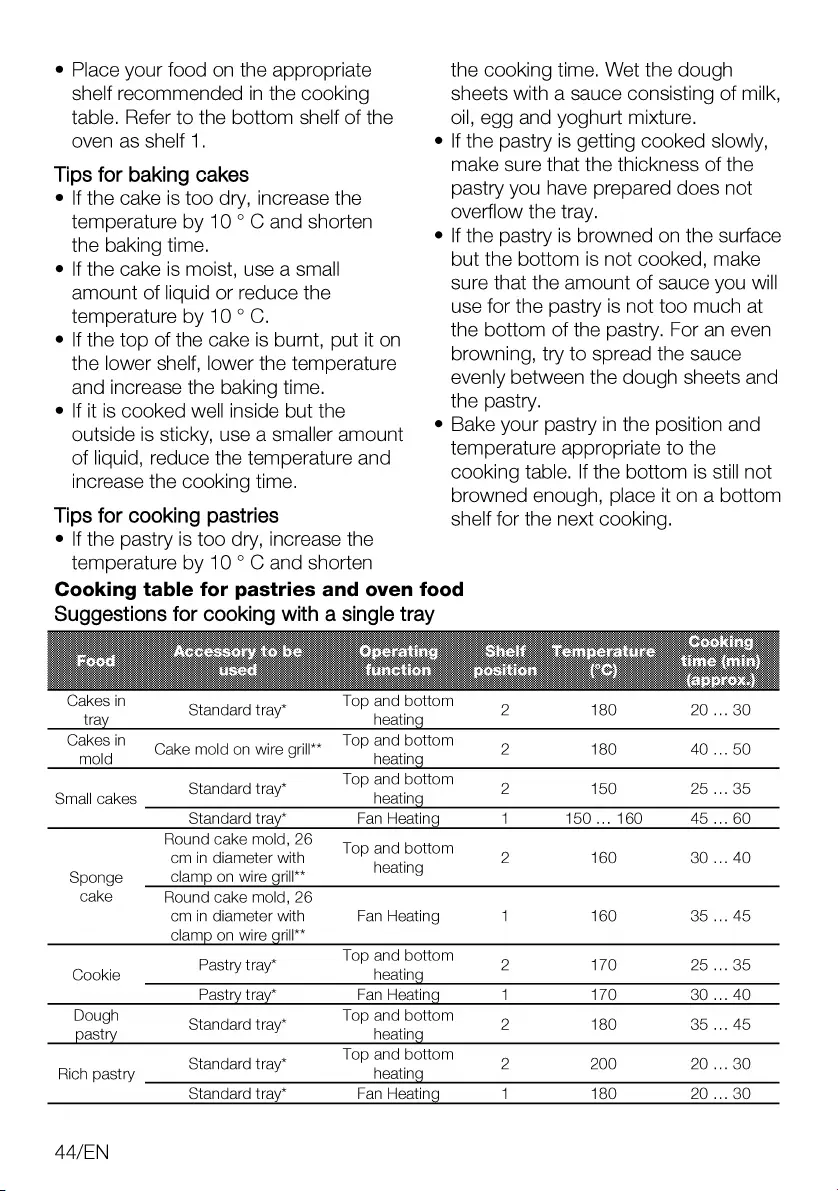
e
Place
your food
on the
appropriate
shelf
recommended
in
the
cooking
table.
Refer
to
the
bottom
shelf
of
the
oven
as
shelf
1.
Tips
for
baking
cakes
e
lf
the
cake
Is
too
dry,
increase
the
temperature
by
10
°
C
and
shorten
the
baking
time.
e
If
the
cake
Is
moist,
use
a
small
amount
of
liquid
or
reduce
the
temperature
by
10°
C.
e
If
the
top
of
the
cake
Is
burnt,
put
It
on
the
lower
shelf,
lower
the
temperature
and
increase
the
baking
time.
e
If
it
is
cooked
well
inside
but
the
outside
Is
sticky,
use
a
smaller
amount
of
liquid,
reduce
the
temperature
and
Increase
the
cooking
time.
Tips
for
cooking
pastries
e
lf
the
pastry
Is
too
dry,
increase
the
temperature
by
10
°
C
and
shorten
Cooking
table
for
pastries
and
oven
food
the
cooking
time.
Wet
the
dough
sheets
with
a
sauce
consisting
of
milk,
oil,
egg
and
yoghurt
mixture.
If
the
pastry
is
getting
cooked
slowly,
make
sure
that
the
thickness
of
the
pastry
you
have
prepared
does
not
overflow
the
tray.
If
the
pastry
is
browned
on
the
surface
but
the
bottom
is
not
cooked,
make
sure
that
the
amount
of
sauce
you
will
use
for
the
pastry
Is
not
too
much
at
the
bottom
of
the
pastry.
For
an
even
browning,
try
to
spread
the
sauce
evenly
between
the
dough
sheets
and
the
pastry.
Bake
your
pastry
In
the
position
and
temperature
appropriate
to
the
cooking
table.
If
the
bottom
Is
still
not
browned
enough,
place
it
on
a
bottom
shelf
for
the
next
cooking.
Suggestions
for
cooking
with
a
single
tray
Cakes
in
Standard
tray*
Top
and
bottom
2
180
20
...
30
tray
heating
Cakes
IN
Cake
mold
on
wire
grill
[OP
and
bottom
2
180
40
...
50
mold
heating
Standard
tray*
Top
and
bottom
2
150
25...
35
Small
cakes
heating
standard
tray*
Fan
Heating
1
150
...
160
AS
...
60
Round
cake
mold,
26
Top
and
bottom
cm
in
diameter
with
P
2
160
30
...
40
ses
heating
Sponge
clamp
on
wire
grill
cake
Round
cake
mold,
26
cm
in
diameter
with
Fan
Heating
|
160
35
...
45
clamp
on
wire
grill**
‘
Top
and
bottom
Cookie
Pastry
tray
heating
2
170
20...
35
Pastry
tray“
Fan
Heating
1
170
30
...
40
Dough
Standard
tray*
Top
and
bottom
2
180
35
...
45
pastry
heating
‘
Top
and
bottom
Rich
pastry
Standard
tray
heating
2
200
20
...
30
standard
tray*
Fan
Heating
1
180
20
...
30
AA/EN
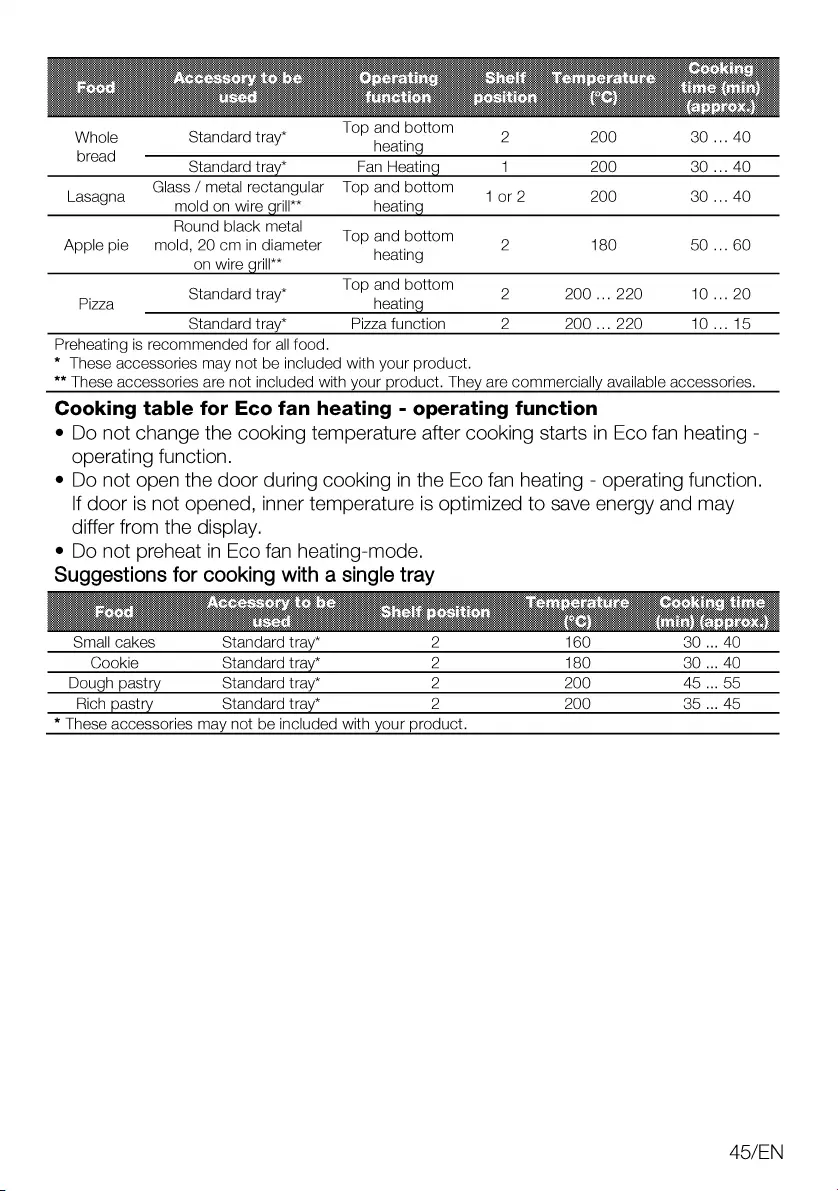
Top
and
bottom
Whole
Standard
tray*
heat
2
200
30
...
40
bread
eating
Standard
tray”
Fan
Heating
1
200
30
...
40
Lasagna
Glass
/
metal
rectangular
Top
and
bottom
4
or2
200
30...
40
mold
on
wire
grill
heating
Round
black
metal
Top
and
bottom
Apple
pie
=mold,
20
cm
in
diameter
P
.
2
180
90
...
60
,
soe
heating
on
wire
grill
|
Standard
tray’
Top
and
bottom
200
...
220
10...
20
Pizza
heating
standard
tray*
Pizza
function
2
200...
220
10...
15
Preheating
is
recommended
for
all
food.
*
These
accessories
may
not
be
included
with
your
product.
**
These
accessories
are not
included
with
your
product.
They
are
commercially
available
accessories.
Cooking
table
for
Eco
fan
heating
-
operating
function
e
Do
not
change
the
cooking
temperature
after
cooking
starts
in
Eco
fan
heating
-
operating
function.
e
Do
not
open
the
door
during
cooking
In
the
Eco
fan
heating
-
operating
function.
If
door
is
not
opened,
inner
temperature
is
optimized
to
save
energy
and
may
differ
from
the
display.
e
Do
not
preheat
in
Eco
fan
heating-mode.
Suggestions
for
cooking
with
a
single
tray
Small
cakes
Standard
tray
2
160
30
...
40
Cookie
Standard
tray”
2
180
30
...
40
Dough
pastry
Standard
tray”
2
200
45
...
55
Rich
pastry
standard
tray”
2
200
30
...
45
*
These
accessories
may
not
be
included
with
your
product.
AS/EN

Meat,
Fish
and
Poultry
The
key
points
on
roasting
e
Seasoning
it
with
lemon
juice
and
e
After
the
cooking
time
Is
over,
leave
the
meat
in
the
oven
for
about
10
minutes.
The
juice
of
the
meat
is
pepper
before
cooking
all
chicken,
better
distributed
to
the
fried
meat
and
turkey
and
large
pieces
of
meat
will
does
not
come
out
when
the
meat
is
Increase
cooking
performance.
Cut.
e
It
takes
15
to
30
minutes
more
to
e
Fish
should
be
placed
on
a
medium
or
cook
boned
meat
than
fillet
by
low
level
shelf
in
a
heat
resistant
plate.
roasting.
e
Cook
the
foods
recommended
in
the
e
You
should
calculate
about
4
to
5
cooking
table
with
a
single
tray.
minutes
of
cooking
time
per
centimeter
of
the
meat
thickness.
Cooking
table
for
meat,
fish
and
poultry
Steak
Monn
15
mins.
(whole)/
Single
tray
aye
‘uneton
250/max,
then
60...
80
Roast
(1
kg)
180
...
190
Lamb's
Monn
shank
(1.5-
Single
tray
ay
sunowon
170
85
...
110
9.0
ka)
Roasted
Hon
15
mins.
chicken
Single
tray
ay
sunowon
250/max,
then
70... 90
(1.5-2
kg)
190
Horn
25
mins.
Ko)
Key
(5.5
Single
tray
erancer
sunowon
250/max,
then
150...
210
y
180
...
190
Fish
Single
tray
ay
sunowon
200
20
...
30
Preheating
is
recommended
for
all
food.
*
These
accessories
may
not
be
included
with
your
product.
**
These
accessories
are not
included
with
your
product.
They
are
commercially
available
accessories.
A6/EN
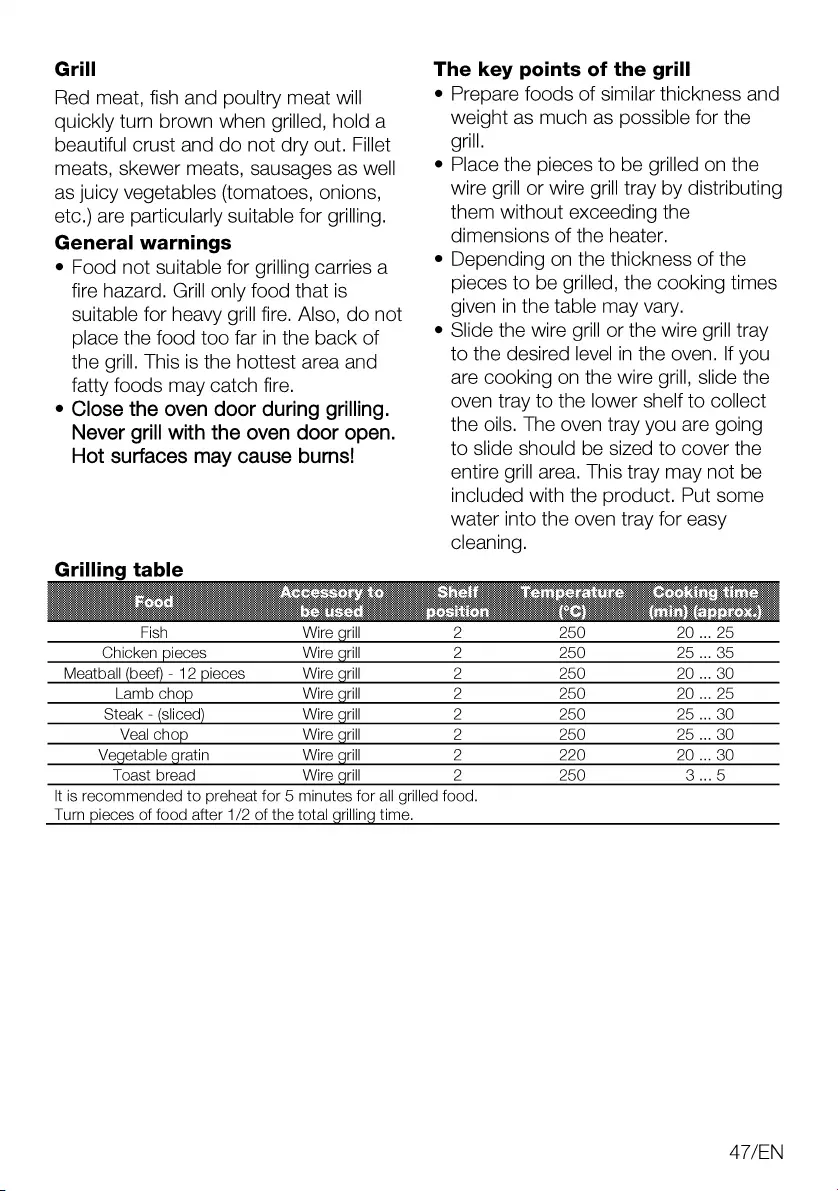
Grill
Red
meat,
fish
and
poultry
meat
will
quickly
turn
brown
when
grilled,
hold
a
beautiful
crust
and
do
not
dry
out.
Fillet
meats,
skewer
meats,
Sausages
as
well
as
juicy
vegetables
(tomatoes,
onions,
etc.)
are
particularly
suitable
for
grilling.
General
warnings
e
Food
not
suitable
for
grilling
carries
a
fire
hazard.
Grill
only
food
that
is
suitable
for
heavy
grill
fire.
Also,
do
not
place
the
food
too
far
in
the
back
of
the
grill.
This
is
the
hottest
area
and
fatty
foods
may
catch
fire.
e
Close
the
oven
door
during
grilling.
Never
grill
with
the
oven
door
open.
Hot
surfaces
may
cause
burns!
Grilling
table
The
key
points
of
the
grill
e
Prepare
foods
of
similar
thickness
and
weight
as
much
as
possible
for
the
grill.
e
Place
the
pieces
to
be
grilled
on
the
wire
grill
or
wire
grill
tray
by
distributing
them
without
exceeding
the
dimensions
of
the
heater.
e
Depending
on
the
thickness
of
the
pieces
to
be
grilled,
the
cooking
times
given
in
the
table
may
vary.
e
Slide
the
wire
grill
or
the
wire
grill
tray
to
the
desired
level
in
the
oven.
If
you
are
cooking
on
the
wire
grill,
slide
the
oven
tray
to
the
lower
shelf
to
collect
the
oils.
The
oven
tray
you
are
going
to
slide
should
be
sized
to
cover
the
entire
grill
area.
This
tray
may
not
be
included
with
the
product.
Put
some
water
into
the
oven
tray
for
easy
cleaning.
Fish
Wire
grill
2
200
20...
25
Chicken
pieces
Wire
grill
2
200
20
...
8D
Meatball
(beef)
-
12
pieces
Wire
grill
2
200
20
...
30
Lamb
chop
Wire
grill
2
200
20...
25
steak
-
(sliced)
Wire
grill
2
200
20
...
30
Veal
chop
Wire
grill
2
200
20
...
30
Vegetable
gratin
Wire
grill
2
220
20
...
30
Toast
bread
Wire
grill
2
200
3.20
It
is
recommended
to
preheat
for
5
minutes
for
all
grilled
food.
Turn
pieces
of
food
after
1/2
of
the
total
grilling
time.
A7/EN
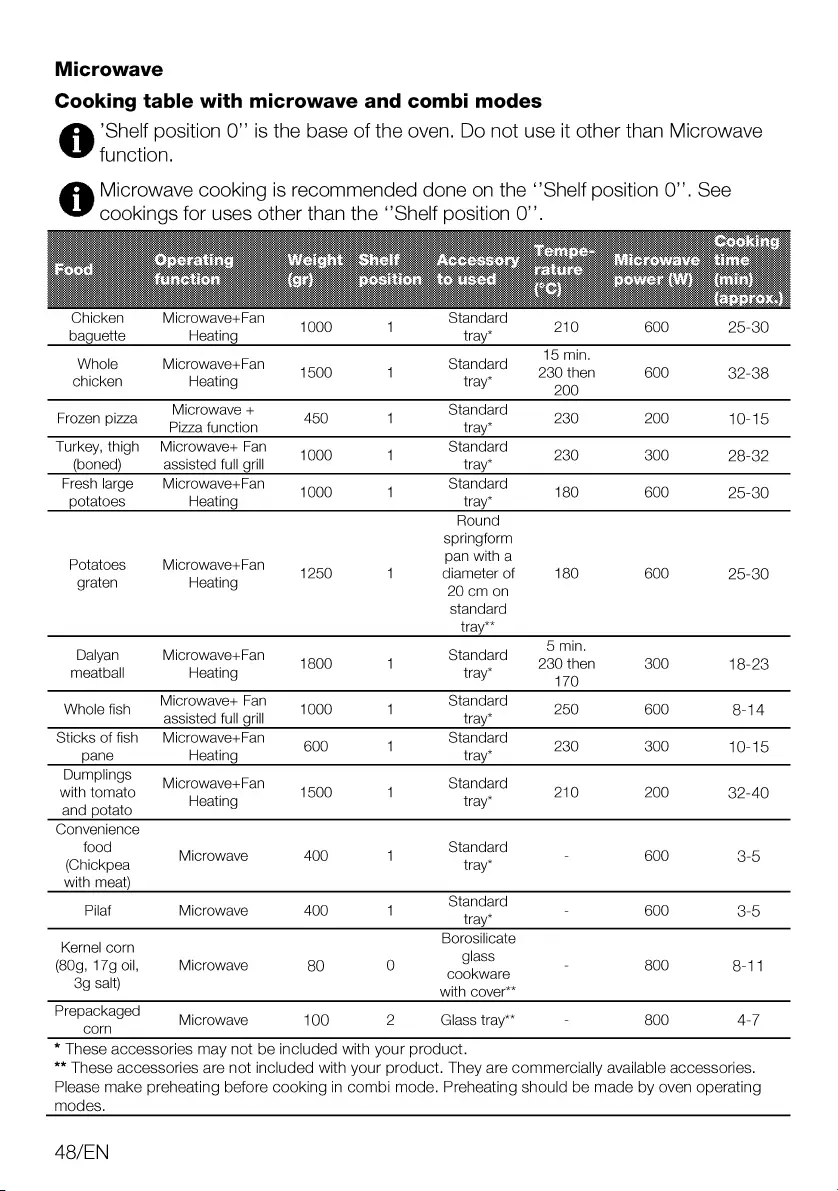
Microwave
Cooking
table
with
microwave
and
combi
modes
@
‘Shelf
position
O”’
is
the
base
of
the
oven.
Do
not
use
it
other
than
Microwave
=
function.
Microwave
cooking
is
recommended
done
on the
‘Shelf
position
0”.
See
cookings
for
uses
other
than
the
“Shelf
position
O’’.
Chicken
Microwave+Fan
4000
{
Standard
10
600
95-30
baguette
Heating
tray
Whole
Microwave+Fan
Standard
15
min,
no
et
1500
{
°
230
then
600
32-38
chicken
Heating
tray
500
Frozen
pizza
—
Microwave
+
450
1
Standard
280 200
10-15
Pizza
function
tray
Turkey,
thigh
Microwave+
Fan
Standard
;
(boned)
assisted
full
grill
1000
'
tray*
230 300
28-32
Fresh
large
Microwave+Fan
4000
{
Standard
480
600
95-30
potatoes
Heating
tray
Round
springform
.
pan
with
a
Potatoes
MicrowavetFan
4950
1
diameter
of
180
600
25-30
graten
Heating
20
cm
on
standard
tray*™*
Dalyan
Micr
Fan
Standard
©
min.
aya
ICrOWaNET
1800
{
c
230
then
300
18-23
meatball
Heating
tray
470
Whole
fish
Microwave
Fan
4099
1
Standard
250
600
8-14
assisted
full
grill
tray
Sticks
of
fish
Microwave+Fan
600
{
Standard
930 300
40-15
pane
Heating
tray
Dumplings
.
with
tomato
MIcrowavesFan
509
1
Standard
210
200
32-40
Heating
tray
and
potato
Convenience
food
;
Standard
(Chickpea
Microwave
400
|
tray"
-
600
3-5
with
meat)
Pilaf
Microwave
400
{
ve
-
600
3-5
Borosilicate
Kernel
corn
glass
(80g,
17g
oil,
Microwave
80
0
cookware
800
8-11
3g
salt)
,
sek
with
cover
repackaged
Microwave
100
2
Glass
tray**
-
800
4-/
*
These
accessories
may
not
be
included
with
your
product.
**
These
accessories
are not
included
with
your
product.
They
are
commercially
available
accessories.
Please
make
preheating
before
cooking
in
combi mode.
Preheating
should
be
made
by
oven
operating
modes.
A8/EN
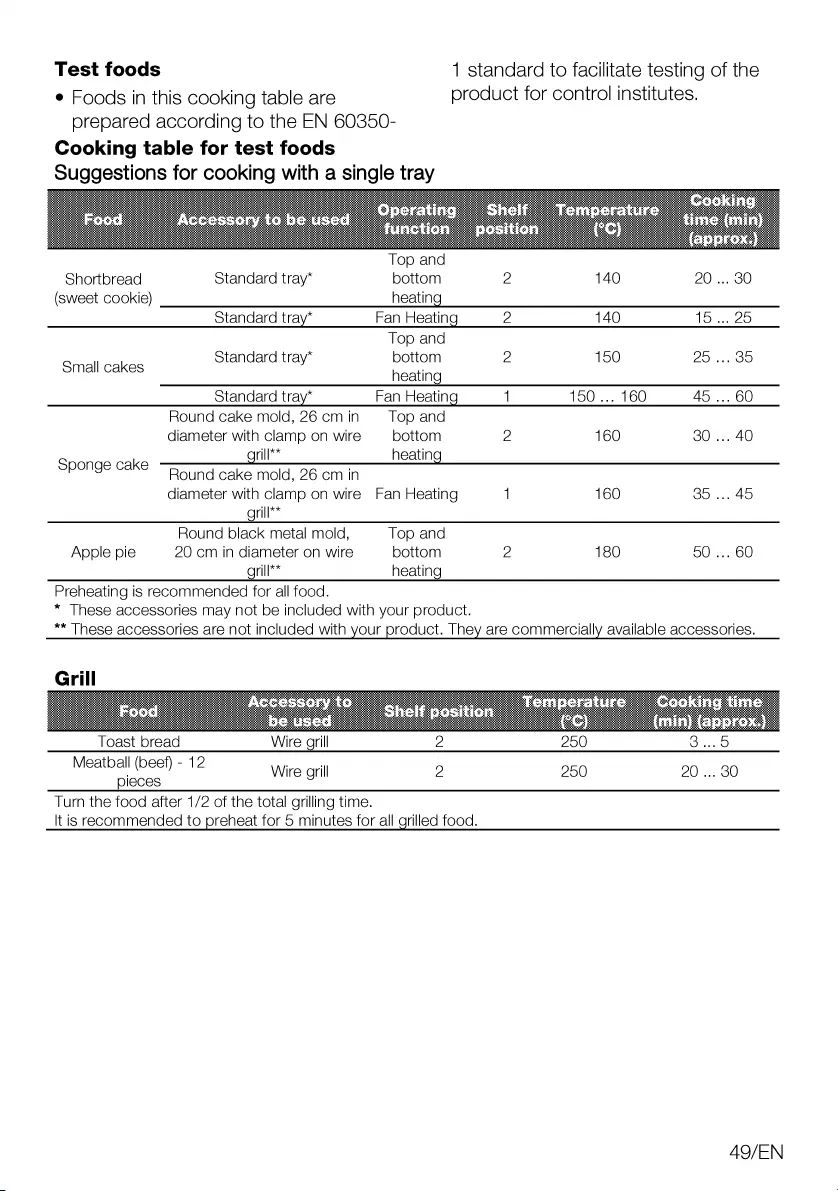
Test
foods
1
standard
to
facilitate
testing
of
the
e
Foods
in
this
cooking
table
are
product
for
control
institutes.
prepared
according
to
the
EN
60350-
Cooking
table
for
test
foods
Suggestions
for
cooking
with
a
single
tray
Top
and
Shortbread
Standard
tray*
bottom
2
140
20
...
30
(sweet
cookie)
heating
Standard
tray”
Fan
Heating
2
140
15...
25
Top
and
Small
cakes
Standard
tray*
bottom
2
150
25...
35
heating
Standard
tray”
Fan
Heating
1
150
...
160
A5
...
60
Round
cake
mold,
26
cm
in
Top
and
diameter
with
clamp
on
wire
bottom
2
160
30
...
40
grill**
heating
Sponge
cake
Round
cake
mold,
26
cm
in
diameter
with
clamp
on
wire
Fan
Heating
|
160
35
...
45
grill**
Round
black
metal
mold,
Top
and
Apple
pie
20
cm
in
diameter
on
wire
bottom
2
180
90
...
60
grill**
heating
Preheating
is
recommended
for
all
food.
*
These
accessories
may
not
be
included
with
your
product.
**
These
accessories
are not
included
with
your
product.
They
are
commercially
available
accessories.
Grill
Toast
bread
Wire
grill
2
200
3.4.90
Meatball
(beef)
-
12
pieces
Turn
the
food
after
1/2
of
the
total
grilling
time.
It
is
recommended
to
preheat
for
5
minutes
for
all
grilled
food.
Wire
grill
2
200
20
...
30
AQ/EN

General
cleaning
information
44
General
warnings
e
Wait
for
the
product
to
cool
before
cleaning
the
product.
Hot
surfaces
may
cause
burns!
e
Do
not
apply
the
detergents
directly
on
the
hot
surfaces.
This
may
cause
a
permanent
stains.
e
The
appliance
shall
be
thoroughly
cleaned
and
dried
after
each
operation.
Thus,
food
residues
shall
be
easily
cleaned
and these
residues
shall
be
prevented
from
burning
when
the
appliance
is
used
again
later.
Thus,
the
service
life
of
the
appliance
extends
and
frequently
faced
problems
are
decreased.
e
Do
not
use
steam
cleaning
products
for
cleaning.
e
Some
detergents
or
cleaning
agents
may
damage
the
surface.
Do
not
use
abrasive
detergents,
cleaning
powders,
cleaning
creams,
descalers
or
sharp
objects
during
cleaning.
e
There
is
no
need
for
a
special
cleaning
agent
for
cleaning
after
each
use.
Clean
the
appliance
using
dish
soap,
warm
water
and
a
soft
cloth
or
sponge
and
dry
with
a
dry
microfiber
cloth.
e
Be
sure
to
completely
wipe
off
any
remaining
liquid
after
cleaning
and
immediately
clean
any
food
splashing
around
during
cooking.
e
Do
not
wash
any
component
of
your
appliance
in
a
dishwasher.
Inox
and
stainless
surfaces
e
Do
not
use
acid
or
chlorine-containing
cleaning
agents
to
clean
stainless
or
Inox
surfaces
and
handles.
5SO/EN
e
Stainless
or
inox
surface
may
change
colour
in
time.
This
is
normal.
After
each
operation,
clean
with
a
detergent
Suitable
for
the
stainless
or
Inox
surface.
e
Clean
with
a
soft
soapy
cloth
and
liquid
(non-scratching)
detergent
suitable
for
inox
surfaces,
taking
care
to
wipe
In
one
direction.
e
Remove
lime,
oil,
starch,
milk
and
protein
stains
on
the
inox-stainless
and
glass
surfaces
immediately
without
waiting.
Stains
may
rust
under
long
periods
of
time.
Enamelled
surfaces
e
After
each
use,
clean
the
enamel
surfaces
using
dishwashing
detergent,
warm
water
and
a
soft
cloth
or
sponge
and
dry
them
with
a
dry
cloth.
e
For
persistent
stains,
the
oven
and
grill
cleaner
recommended
on
the
website
of
your
product
brand
and
a
non-
scratching
scouring
pad
can
be
used.
Do
not
use
an
external
oven
cleaner.
e
The
oven
must
coo!
down
for
cleaning
in
the
cooking
area.
Cleaning
on
hot
surfaces
shall
create
both
fire
hazard
and
damage
with
enamel
surface.
Catalytic
surfaces
e
The
side
walls
in
the
cooking
area
can
only
be
covered
with
enamel
or
catalytic
walls.
It
varies
by
model.
e
The
catalytic
walls
have
a
light
matte
and
porous
surface.
The
catalytic
walls
of
the
oven
should
not
be
cleaned.
e
Catalytic
surfaces
absorb
oil
thanks
to
its
porous
structure
and
start
to
shine
when
the
surface
Is
saturated
with
oll,
in
this
case
It
Is
recommended
to
replace
the
parts.
Glass
surfaces
e
When
cleaning
glass
surfaces,
do
not
use
hard
metal
scrapers
and
abrasive
cleaning
materials.
They
can
damage
the
glass
surface.
e
Clean
the
appliance
using
dishwashing
detergent,
warm
water
and
a
microfiber
cloth
specific
for
glass
surfaces
and
dry
it
with
a
dry
microfiber
cloth.
e
lf
there
is
residual
detergent
after
cleaning,
wipe
It
with
cold
water
and
dry
with
a
clean
and
dry
microfiber
cloth.
Residual
detergent
residue
may
damage
the
glass
surface
next
time.
e
Under
no
circumstances
should
the
dried-up
residue
on the
glass
surface
be
cleaned
off
with
serrated
knives,
wire
wool
or
similar
scratching
tools.
e
You
can
remove
the
calcium
stains
(yellow
stains)
on the
glass
surface
with
the
commercially
available
descaling
agent,
with
a
descaling
agent
such
as
vinegar
or
lemon
juice.
e
lf
the
surface
is
heavily
soiled,
apply
the
cleaning
agent
on
the
stain
with
a
sponge
and
wait
a
long
time
for
it
to
work
properly.
Then
clean
the
glass
surface
with
a
wet
cloth.
e
Discolorations
and
stains
on
the
glass
surface
are
normal
and
not
defects.
Plastic
parts
and
painted
surfaces
e
Clean
plastic
parts
and
painted
surfaces
using
dishwashing
detergent,
warm
water
and
a
soft
cloth
or
sponge
and
dry
them
with
a
dry
cloth.
e
Do
not
use
hard
metal
scrapers
and
abrasive
cleaners.
It
may
damage
the
surfaces.
e
Ensure
that
the
joints
of
the
components
of
the
appliance
are
not
left
as
damp
and
with
detergent.
Otherwise,
corrosion
may
occur
on
these
joints.
Cleaning
the
accessories
Unless
otherwise
stated
in
the
user
manual,
do
not
wash
the
product
accessories
in
the
dishwasher.
Cleaning
the
control
panel
e
When
cleaning
the
panels
with
knob
control,
wipe
the
panel
and
knobss
with
a
damp
soft
cloth
and
dry
with
a
dry
cloth.
Do
not
remove
the
knobs
and
gaskets
underneath
to
clean
the
control
panel.
The
control
panel
and
knobs
may
be
damaged.
e
While
cleaning
the
inox
panels
with
Knob
control,
do
not
use
Inox
cleaning
agents
around
the
knobs.
The
indicators
around
the
knobs
may
be
deleted.
e
Clean
the
touch
control
panels
with
a
damp
soft
cloth
and
dry
with
a
dry
cloth.
If
your
product
has
a
key
lock
feature,
set
the
key
lock
before
performing
control
panel
cleaning.
Otherwise,
incorrect
detection
may
occur
on
the
keys.
Cleaning
the
inside
of
the
oven
(cooking
area)
Follow
the
cleaning
steps
described
in
the
"General
cleaning
information”
section
according
to
the
surface
types
in
your
oven.
Cleaning
the
side
walls
of
the
oven
The
side
walls
in
the
cooking
area
can
only
be
covered
with
enamel
or
catalytic
walls.
It
varies
by
model.
If
there
is
a
catalytic
wall,
refer
to
the
"Catalytic
walls"
section
for
information.
If
your
product
Is
a
side
rack
model,
remove
the
side
racks
before
cleaning
your
side
walls.
Then
complete
the
cleaning
as
described
in
the
"General
cleaning
information"
section
according
to
the
side
wall
surface
type.
51/EN
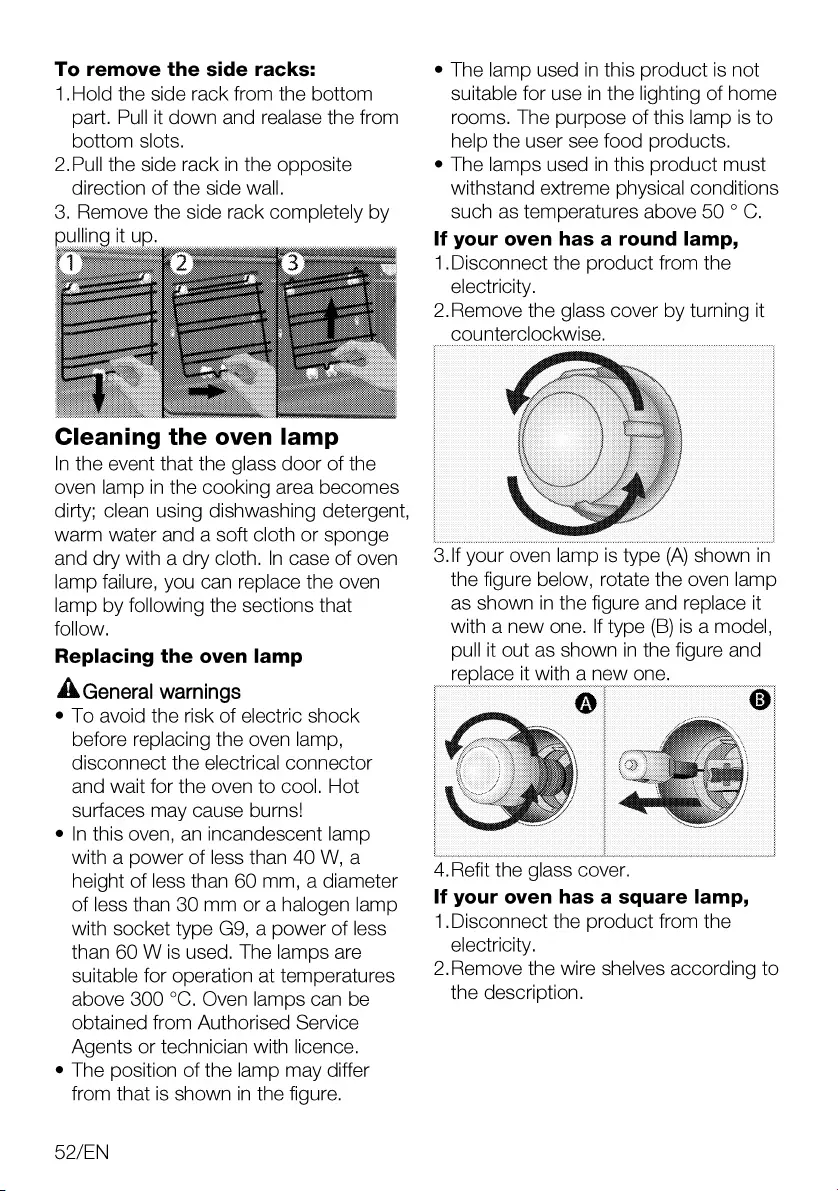
To
remove
the
side
racks:
1.Hold
the
side
rack
from
the
bottom
part.
Pull
it
down
and
realase
the
from
bottom
slots.
2.Pull
the
side
rack
in
the
opposite
direction
of
the
side
wall.
3.
Remove
the
side
rack
completely
by
Cleaning
the
oven
lamp
In
the
event
that
the
glass
door
of
the
oven
lamp
in
the
cooking
area
becomes
dirty;
clean
using
dishwashing
detergent,
warm
water
and
a
soft
cloth
or
sponge
and
dry
with
a
dry
cloth.
In
case
of
oven
lamp
failure,
you
can
replace
the
oven
lamp
by
following
the
sections
that
follow.
Replacing
the
oven
lamp
4x
General
warnings
e
To
avoid
the
risk
of
electric
shock
before
replacing
the
oven
lamp,
disconnect
the
electrical
connector
and
wait
for
the
oven
to
cool.
Hot
surfaces
may
cause
burns!
e
In
this
oven,
an
incandescent
lamp
with
a
power
of
less
than
40
W,
a
height
of
less
than
60
mm,
a
diameter
of
less
than
30
mm
or
a
halogen
lamp
with
socket
type
GY,
a
power
of
less
than
60
W
is
used.
The
lamps
are
suitable
for
operation
at
temperatures
above
300
°C.
Oven
lamps
can
be
obtained
from
Authorised
Service
Agents
or
technician
with
licence.
e
The
position
of
the
lamp
may
differ
from
that
is
shown
in
the
figure.
52/EN
e
The
lamp
used
in
this
product
is
not
suitable
for
use
in
the
lighting
of
home
rooms.
The
purpose
of
this
lamp
is
to
help
the
user
see
food
products.
e
The
lamps
used
in
this
product
must
withstand
extreme
physical
conditions
such
as
temperatures
above
50
°
C.
If
your
oven
has
a
round
lamp,
1.Disconnect
the
product
from
the
electricity.
2.Remove
the
glass
cover
by
turning
It
|
counterclockwise,
3
If
your
oven
lamp
is
type
(A)
shown
in
the
figure
below,
rotate
the
oven
lamp
as
shown
in
the
figure
and
replace
it
with
a
new
one.
If
type
(B)
is
a
model,
pull
it
out
as
shown
in
the
figure
and
replace
it
with
a
new
one.
4
Refit
the
glass
cover.
If
your
oven
has
a
square
lamp,
1.Disconnect
the
product
from
the
electricity.
2.Remove
the
wire
shelves
according
to
the
description.
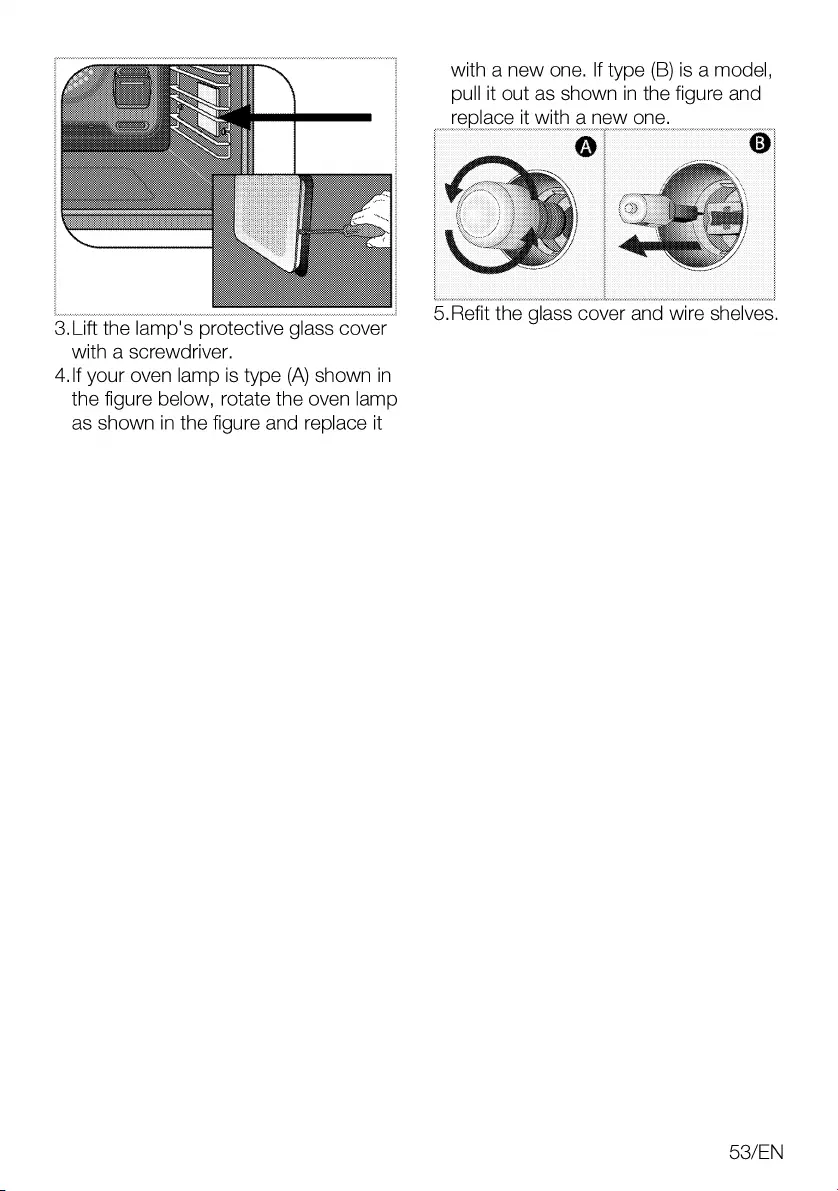
3.Lift
the
lamp's
protective
glass
cover
with
a
screwdriver.
4.lf
your
oven
lamp
is
type
(A)
shown
in
the
figure
below,
rotate
the
oven
lamp
as
shown
in
the
figure
and
replace
it
with
a
new
one.
If
type
(B)
is
a
model,
pull
tt
out
as
shown
in
the
figure
and
5.Refit
the
glass
cover
and
wire
shelves.
53/EN

Consult
the
Authorised
Service
Agent
or
technician
with
license
or
the
dealer
where
you
have
purchased
the
product
If
you
cannot
remedy
the
trouble
although
you
have
implemented
the
instructions
in
this
section.
Never
attempt
to
repair
a
oroduct
yourself
defective
°
It
is
normal
that
steam
escapes
during
operation.
>>>
This
is
not
a
fault
“e
The
vapour
that
arises
during
cooking
can
condense
and
form
water
droplets
when
It
hits
cold
surfaces
of
the
product.
>>>
[his
is
not
a
fault.
e
The
mains
fuse
is
defective
or
has
tripped.
>>>
Check
fuses
in
the
fuse
box.
If
necessary,
replace
or
reset
them.
e
Product
is
not
plugged
into
the
(grounded)
socket.
>>>
Check
the
plug
connection.
e
Buttons/knobs/keys
on the
control
panel
do
not
function.
>>>
/f
your
product
equipped
with
key
lock
function,
keylock
may
be
enabled.
Please
disable
it.
e
Oven
lamp
is
defective.
>>>
Replace
oven
lamp.
e
Power
is
cut.
>>>
Check
if
there
is
power.
Check
the
fuses
in
the
fuse
box.
If
necessary,
reolace
or
reset
the
fuses
e
Might
not
be
set
to
a
certain
cooking
function
and/or
temperature.
>>>
Set
the
oven
to
a
certain
cooking
function
and/or
temperature.
e
In
models
equipped
with
a
timer,
the
timer
is
not
adjusted.
>>>
Adjust
the
time.
e
Power
is
cut.
>>>
Check
if
there
is
power.
Check
the
fuses
in
the
fuse
box.
If
necessary,
replace
or
reset
the
fuses.
e
The
oven door
might
be
open.
>>>
Make
sure
the
oven
door
is
closed.
If
the
oven
door
remains
open
for
more
than
approx.
5
minutes,
the
cooking
time
settings
will
be
canceled
and
the
heaters
will
not
work.
e
A
previous
power
outage
has
occurred.
>>>
Adjust
the
time
/
Switch
of
the
product
and
switch
it
on
again
e
The
oven door
may
be
open.
>>>
Make
sure
the
oven
door
is
completely
closed.
[f
the
error
persists,
contact
the
authorized
service.
S4/EN
GRUNDIG
UK
AND
IRELAND
STANDARD
MANUFACTURER
GUARANTEE
TERMS
AND
CONDITIONS
Your
new
Grundig
product
is
guaranteed
against
faulty
materials,
defective
components
or
manufacturing
defects.
The
standard
guarantee
starts
from
the
date
of
original
purchase
of
the
product,
and
lasts
for
a
period
of
thirty
six
(86)
months
unless
Beko
plc
(the
“Manufacturer”)
agrees
to
extend
the
guarantee
for
the
product
in
writing.
If
you
have
registered
the
product
within
90
days
of
purchase
by
completing
the
online
registration
form,
then
the
standard
36
month
guarantee
will
be
extended
to
60
months,
under
the
same
terms
and
conditions
as
detailed
below
If
you
have
any
questions
about
the
guarantee
on
your
product
(including
how
long
it
is
valid),
please
contact
your
retailer
or
our
contact
centre
on
03833
207
9920
(UK
and
Northern
lreland)
or
01
691
0203
(Republic
of
Ireland)
This
guarantee
does
not
in
any
way
diminish
or
affect
your
statutory
rights
in
connection
with
the
product.
This
guarantee
is
in
addition
to
your
statutory
rights
as
a
consumer.
If
you
have
any
questions
about
these
rights,
please
contact
the
retailer
from
which
you
purchased
the
product.
In
certain
circumstances,
It
is
possible
that
your
statutory
rights
may
offer
additional
or
higher
levels
of
protection
than
those
offered
under
the
terms
of
this
guarantee.
What
is
covered
by
this
guarantee?
e
Repairs
to
the
product
required
as
a
result
of
faulty
materials,
defective
components
or
manufacturing
defects.
e
Functional
replacement
parts
to
repair
a
product.
e
The
costs
of
a
Grundig
Approved
Engineer
to
carry
out the
repair.
What
is
not
covered?
e
Transit
and
delivery
damage.
e
Cabinet
or
appearance
parts,
including
but
not
limited
to
control
knobs,
flaps
and
handles.
e
Accessories
and/or
consumable
items
including
but
not
limited
to
ice
trays,
scrapers,
cutlery
baskets,
filters
and
light
bulbs.
e
Repairs
necessary
as
a
direct
or
indirect
result
of:
-
Accidental
damage,
misuse
or
abuse
of
a
product.
-
An
attempted
repair
of
a
product
by
anyone
other
than
a
Grundig
Approved
Engineer
(the
“Engineer”).
-
Installation
or
use
of
a
product
where
such
installation
or
use
fails
to
meet
the
requirements
contained
in
this
guarantee
or
the
User
Instructions
Booklet.
e
Repairs
to
a
product
operated
at
any
time
on
commercial
or
non-residential
hold
premises
(unless
we
have
previously
agreed
to
the
installation
environment).
55/EN
This
guarantee
is
limited
to
the
cost
of
repairing
the
product.
To
the
extent
permitted
by
law,
the
Manufacturer
does
not
accept
and
will
not
be
held
liable
for
any
financial
loss
incurred
in
connection
with
the
failure
of
any
product
to
operate
in
accordance
with
the
expected
standards.
Such
financial
loss
includes
but
is
not limited
to
loss
arising
from:
Time
taken
off
work.
Damaged
food,
clothing
or
other
items.
Meals
taken
at
restaurants
or
from
takeaways.
General
compensation
for
inconvenience.
Important
Notes
—k
Your
product
is
designed
and
built
for
domestic
household
use
only.
The
guarantee
will
automatically
be
void
if
the
product
is
installed
or
is
used
in
commercial
or
non-residential
domestic
household
premises,
unless
we
have
previously
agreed
to
the
installation
environment.
The
product
must
be
correctly
installed,
located
and
operated
in
accordance
with
the
instructions
contained
in
the
User
Instructions
Booklet
provided
with
your
product.
Professional
installation
by
a
qualified
Electrical
Domestic
Appliance
Installer
is
recommended
for
all
Washing
Machines,
Dishwashers
and
Electric
Cookers
(as
incorrect
installation
may
result
in
you
having
to
pay
for
the
cost
of
repairing
the
GesdUodkers
must
be
professionally
installed
by
a
Gas
Safe
(or
Gas
Networks
lreland
for
Republic
of
Ireland)
registered
gas
installer.
This
guarantee
is
given
in
respect
of
products
purchased
and
used
within
the
United
Kingdom
and
the
Republic
of
Ireland.
This
guarantee
is
effective
from
the
initial
date
of
purchase
of
a
new
product
from
an
authorised
retailer
and
will
be
void
if
the
product
is
resold.
This
guarantee
does
not
apply
to
graded
sales
(where
the
product
is
purchased
as
a
“second”).
Possession
of
a
copy
of
these
terms
and
conditions
does
not
necessarily
mean
that
a
product
has
the
benefit
of
this
guarantee.
If
you
have
any
questions,
please
call
our
Call
Centre
on
the
number
set
out
above.
10.
The
Manufacturer
reserves
the
right
to
terminate
the
guarantee
if
its
staff
or
11.
56/EN
representatives
are
subjected
to
physical
or
verbal
abuse
in
the
course
of
carrying
out
their
duties.
Optional
extras,
where
available
(i.e.
extendable
feet)
are
supplied
on
a
chargeable
basis
only.

Does
Grundig
offer
replacements?
This
is
a
repair-only
guarantee.
On
occasion,
the
Manufacturer
may
at
its
sole
discretion,
replace
your
product
with
a
new
product
instead
of
carrying
out
a
repair.
Where
a
replacement
is
offered,
this
would
normally
be
an
identical
model
but
when
this
is
not
possible,
a
model
of
similar
specification
will
be
provided.
The
Manufacturer
will
cover
the
costs
and
arrange
for
the
delivery
of
the
new
product
and
for
the
return
of
the
old
product.
Any
costs
related
to
disconnecting
the
faulty
product
and
installing
the
replacement
product
will
not
be
borne
by
the
Manufacturer
unless
previously
agreed
to
in
writing.
The
original
guarantee
will
continue
to
apply
to
the
replacement
product;
the
new
product
will
not
come
with
a
new
guarantee.
When
will
the
repair
take
place?
Our
Engineers
work
Monday
to
Friday
9.00am
to
5.00pm.
Appointments
outside these
hours
may
be
possible
at
the
sole
discretion
of
the
Manufacturer
but
cannot
be
guaranteed.
Whilst
our
Engineers
will
endeavour
to
minimize
inconvenience
and
to
meet
requests
for
specific
timed
appointments,
this
cannot
be
guaranteed.
We
will
not
be
liable
for
delays
or
if
it
is
unable
to
carry
out
a
repair
because
a
convenient
appointment
cannot
be
arranged.
Will
there
be
any
charge
for
the
repairs?
It
is
your
responsibility
to
provide
evidence
to
the
Engineer
that
your
product
is
covered
by
this
guarantee
with
a
proof
of
purchase.
The
Manufacturer
reserves
the
right
to
charge
for
the
reasonable
cost
of
any
service
call
tf:
e
You
cannot
provide
evidence
that
your
product
is
covered
by
this
guarantee.
e
Where
a
service
call
has
been
made
and
the
engineer
finds
that
there
is
no
fault
with
your
product.
e
That
your
product
has
not
been
installed
or
operated
in
accordance
with
the
User
Instructions
Booklet.
e
That
the
fault
was
caused
by
something
other
than
faulty
materials,
defective
components
or
manufacturing
defects.
e
For
missed
appointments.
Payment
of
these
costs
are
due
immediately
upon
the
Engineer
providing
you
with
an
invoice.
The
Manufacturer
reserves
the
right
to
terminate
the
guarantee
if
you
fail
to
pay
the
costs
for
the
service
call
in
a
timely
manner.
If
you
are
a
resident
of
the
United
Kingdom,
this
guarantee
will
be
governed
by
English
law
and
subject
to
the
English
Courts,
save
where
you
live
in
another
part
of
the
United
Kingdom,
in
which
case
the
law
and
courts
of
that
location
will
apply.
If
you
are
resident
in
the
Republic
of
Ireland,
this
guarantee
will
be
governed
by
Irish
law
and
the
Irish
courts
will
have
jurisdiction.
This
guarantee
is
provided
by
Beko
plc.
Beko
House,
1
Greenhill
Crescent,
Watford,
Hertfordshire.
WD18
8QU.
Beko
plc
is
registered
in
England
and
Wales
with
company
registration
number
02415578.
5S7/EN

GRUNDIG
UK
AND
IRELAND
ECO
INVERTER
MOTOR
GUARANTEE
TERMS
AND
CONDITIONS
This
10
year
guarantee
relates
to
Grundig
products
that
feature
the
Eco
Inverter
Motor.
The
Eco
Inverter
Motor
guarantee
terms
and
conditions
are
in
addition
to
our
Standard
guarantee
terms
and
conditions
detailed
in
the
previous
section.
In
order
to
activate
the
10
year
guarantee
you
MUST
register
the
appliance
within
90
days
of
the
original
purchase
date.
You
can
register
by
first
visiting
grundig.co.uk/register
and
by
following
the
online
instructions.
Grundig
Free
standing
and
Built-in
appliances
come
with
a
36
month
parts
and
labour
guarantee
as
standard,
which
can
be
extended
to
a
60
months
parts
and
labour
guarantee
by
registering
within
90
days
of
the
original
purchase
date.
To
make
a
claim
against
your
Grundig
Eco
Inverter
Motor
Guarantee
(the
“Guarantee”),
all
customer
and
product
details
must
be
registered
with
Beko
plc
using
the
procedure
outlined
below.
1.
This
extra
7
years
(or
5
years
for
appliances
registered
within
90
days
of
the
original
purchase
date)
Guarantee
is
only
effective
after
the
expiration
of
the
standard
manufacturer's
guarantee.
2.
It
is
only
valid
for
the
Eco
Inverter
motors
of
selected
washing
machines,
washer-
dryers,
tumble
dryers
and
dishwashers.
It
does
not
cover
any
labour
charge
or
any
other
components
of
the
product.
In
addition,
It
is
only
valid
for
one
replacement
of
the
Eco
Inverter
motor
during
the
extra
7
years
(or
5
years
for
appliances
registered
within
90
days
of
the
original
purchase
date)
guarantee
period.
3.
To
activate
your
guarantee,
you
MUST
register
your
appliance
within
90
days
of
the
original
purchase
date,
by
visiting
Grundig.co.uk/register.
4.
Customers
will
receive
a
unique
reference
code
as
proof
of
guarantee
validation
by
email
or
post,
which
must
be
quoted
at
the
time
of
a
claim
being
made.
5.
Any
repair/replacement
of
the
Eco
Inverter
motor
must
only
be
carried
out
by
an
authorised
Grundig
Service
Agent
(the
“Service
Agent”).
6.
Labour
for
the
repair/replacement
of
the
Eco
Inverter
motor
is
not
included
in
this
guarantee
and
is
chargeable
directly
by
the
Service
Agent.
/.
Any
additional
components
fitted
to
the
product
at
any
time
will
not
be
covered
by
this
guarantee
and
will
be
chargeable
directly
by the
Service
Agent.
8.
The
guarantee
is
not
transferable
and
cannot
be
exchanged
for
cash.
9.
There
are
no
alternative
or
additional
offers
to
this
Guarantee.

10.
11.
12.
13.
The
guarantee
is
exclusive
of
the
manufacturer’s
standard
guarantee
The
Terms
and
Conditions
shown
above
are
in
addition
to
the
standard
terms
and
conditions
of
your
product
guarantee.
Please
read
and
refer
to
such
Terms
and
Conditions
when
making
any
claim.
We
may
use
the
information
you
provide
for
marketing
purposes
and
to
analyse
your
purchasing
preferences.
We
may
keep
your
information
for
a
reasonable
period
for
these
purposes
in
accordance
with
the
applicable
Data
Protection
Laws
and
General
Data
Protection
Regulations
(GDPR).
You
can
opt
into
this
service
during
the
registration
process.
Further
details
are
available
at
http://www.
Grundig.co.uk/cookie-and-privacy.
These
Terms
and
Conditions
are
governed
by
the
laws
of
England
and
Wales;
manufacturer:
Beko
plc,
Beko
House,
1
Greenhill
Crescent,
Watford
WD18
8QU.
Company
Registration
Number:
02415578.
59/EN

HOW
TO
OBTAIN
SERVICE
FOR
YOUR
APPLIANCE
Please
keep
your
purchase
receipt
or
other
proof
of
purchase
details
in
a
safe
place;
you
will
need
to
have
this
documentation
available
should
the
product
require
attention
under
guarantee.
Please
take
a
few
moments
to
complete
the
details
below,
as
you
will
need
this
information
when
you
Call
us, or
to
use
our
online
services.
When
you
call
us
you
may
be
required
to
input
your
serial
number
into
your
telephone
keypad.
For
help
please
visit
grundig.co.uk/support/model-finder
e
The
product
model
number
is
printed
on
the
Operating
Instruction
Booklet
/
User
guide
e
The
product
model
and
serial
number
is
printed
on
the
Rating
Label
affixed
to
the
appliance.
e
The
Retailer
(Purchased
from)
and
Date
of
purchase
will
be
printed
on
your
purchase
receipt
or
other
proof
of
purchase
paperwork
Recording
of
these
details
alone
will
not
count
as
proof
of
purchase.
A
valid
proof
of
purchase
is
required
for
requesting
service
under
guarantee.
For
service
under
guarantee
or
for
product
advice please
call
our
Contact
centre
Before
requesting
service
please
check
the
troubleshooting
guide
in
the
Operating
Instructions
booklet,
as
a
charge
may
be
levied
where
no
fault
is
found,
and
even
though
your
product
may
still
be
under
guarantee.
After
arranging
service
the
area
around
the
product
must
be
easily
accessible
to
the
Engineer,
without
the
need
for
cabinets
or
furniture
to
be
removed
or
moved.
It
is
your
responsibility
to
ensure
our
Engineers
have
a
clean
and
safe
environment
to
carry
out
any
repairs.
Please
have
your
Model
number
and
Serial
number
available
when
you
call
us,
aS
you
may
be
required
to
input
your
serial
number
into
your
telephone
keypad
during
your
call.
UK
Mainland
&
Northern
Ireland:
0333
207
9920
Landline
or
mobile
calls
to
O3383
numbers
cost
no
more
than
calls
to
geographic
numbers
O1
or
02,
and
are
charged
at
the
basic
rate.
Calls
from
landlines
and
mobiles
are
included
in
free
call
packages
but
please
check
with
your
telephone
service
provider
for
exact
call
charges.
6O0/EN
Republic
of
lreland:
01
691
0203
Service
once
the
manufacturers
guarantee
has
expired
lf
you
have
purchased
an
extended
guarantee
please
refer
to
the
instructions
contained
within
the
extended
guarantee
agreement
document,
otherwise
please
call
us
using
the
appropriate
number
above,
where
service
can
be
obtained
at
a
charge.
Should
you
experience
any
difficulty
in
obtaining
service
please
call
us
on
0333
207
9920
or
01
691
0203
Contact
us
though
our
website
send
us
a
secure
message
through
our
online
contact
us
form.
Please
visit
our
website,
click
Contact
Us
and
choose
a
product
support
topic
from
the
list
of
options.
Complete
the
required
details
and
click
send
message.
Product
registrations
For
UK
and
Republic
of
Ireland
product
registrations
please
visit
grundig.co.uk/register.
61/EN